

Page 1

User Guide
Wireless 3D Connected Blu-ray Disc Player
NS-WBRDVD3
Page 2

Contents
Important safety instructions . . . . . . . . . . . . . . . . . . . . . . . . . . . . . . . . . . . . .1
Warnings . . . . . . . . . . . . . . . . . . . . . . . . . . . . . . . . . . . . . . . . . . . . . . . . . . . . . . . . 2
Introduction . . . . . . . . . . . . . . . . . . . . . . . . . . . . . . . . . . . . . . . . . . . . . . . . . . . . .3
Features . . . . . . . . . . . . . . . . . . . . . . . . . . . . . . . . . . . . . . . . . . . . . . . . . . . . . . . . .3
Package contents . . . . . . . . . . . . . . . . . . . . . . . . . . . . . . . . . . . . . . . . . . . . . . . . 3
Front . . . . . . . . . . . . . . . . . . . . . . . . . . . . . . . . . . . . . . . . . . . . . . . . . . . . . . . . . . . . 4
Back . . . . . . . . . . . . . . . . . . . . . . . . . . . . . . . . . . . . . . . . . . . . . . . . . . . . . . . . . . . . . 4
Remote control . . . . . . . . . . . . . . . . . . . . . . . . . . . . . . . . . . . . . . . . . . . . . . . . . . 5
Setting up your player . . . . . . . . . . . . . . . . . . . . . . . . . . . . . . . . . . . . . . . . . . . .6
Installing the remote control batteries . . . . . . . . . . . . . . . . . . . . . . . . . . . . 6
Connecting a TV using an HDMI cable (best) . . . . . . . . . . . . . . . . . . . . . . 6
Connecting a TV using an AV cable (good) . . . . . . . . . . . . . . . . . . . . . . . . 6
Connecting an amplifier with digital optical audio . . . . . . . . . . . . . . . . 7
Connecting an amplifier using digital coaxial audio . . . . . . . . . . . . . . . 7
Connecting to the Internet . . . . . . . . . . . . . . . . . . . . . . . . . . . . . . . . . . . . . . . 7
Turning on your player for the first time . . . . . . . . . . . . . . . . . . . . . . . . . . 8
Using your player . . . . . . . . . . . . . . . . . . . . . . . . . . . . . . . . . . . . . . . . . . . . . . . .9
Using connected applications . . . . . . . . . . . . . . . . . . . . . . . . . . . . . . . . . . . . 9
Activating an online service . . . . . . . . . . . . . . . . . . . . . . . . . . . . . . . . . . . . . . 9
Playable discs . . . . . . . . . . . . . . . . . . . . . . . . . . . . . . . . . . . . . . . . . . . . . . . . . . . 10
About Blu-ray Discs . . . . . . . . . . . . . . . . . . . . . . . . . . . . . . . . . . . . . . . . . . . . . 10
About BD-Live . . . . . . . . . . . . . . . . . . . . . . . . . . . . . . . . . . . . . . . . . . . . . . . . . . 11
Playing a Blu-ray Disc or DVD . . . . . . . . . . . . . . . . . . . . . . . . . . . . . . . . . . . . 11
Controlling Blu-ray Disc or DVD playback . . . . . . . . . . . . . . . . . . . . . . . . 11
Playing an audio CD . . . . . . . . . . . . . . . . . . . . . . . . . . . . . . . . . . . . . . . . . . . . 12
Controlling audio CD playback . . . . . . . . . . . . . . . . . . . . . . . . . . . . . . . . . . 12
Viewing photos and playing music and video files . . . . . . . . . . . . . . . 12
Searching for a title, chapter, or elapsed time . . . . . . . . . . . . . . . . . . . . 14
Repeating a title, chapter, or CD track . . . . . . . . . . . . . . . . . . . . . . . . . . . 14
Creating a playback loop on a DVD or audio CD . . . . . . . . . . . . . . . . . . 15
Using PIP (picture-in-picture) mode . . . . . . . . . . . . . . . . . . . . . . . . . . . . . 15
Using a disc popup menu . . . . . . . . . . . . . . . . . . . . . . . . . . . . . . . . . . . . . . . 15
Selecting the audio channel with the remote control . . . . . . . . . . . . 15
Selecting a viewing angle . . . . . . . . . . . . . . . . . . . . . . . . . . . . . . . . . . . . . . . 15
Selecting the TV aspect ratio . . . . . . . . . . . . . . . . . . . . . . . . . . . . . . . . . . . . 16
Selecting the video output resolution . . . . . . . . . . . . . . . . . . . . . . . . . . . 16
Adjusting the HDMI image including 3D mode . . . . . . . . . . . . . . . . . . 17
Selecting the digital audio output mode . . . . . . . . . . . . . . . . . . . . . . . . . 17
Selecting the HDMI digital audio output mode . . . . . . . . . . . . . . . . . . 18
Selecting the PCM downsampling rate . . . . . . . . . . . . . . . . . . . . . . . . . . 18
Turning dynamic range control on or off . . . . . . . . . . . . . . . . . . . . . . . . . 19
Selecting the on-screen menu language . . . . . . . . . . . . . . . . . . . . . . . . . 19
Selecting the disc menu language . . . . . . . . . . . . . . . . . . . . . . . . . . . . . . . 19
Selecting the disc audio language . . . . . . . . . . . . . . . . . . . . . . . . . . . . . . . 20
Selecting the subtitle language . . . . . . . . . . . . . . . . . . . . . . . . . . . . . . . . . 20
Configuring a wired Internet connection . . . . . . . . . . . . . . . . . . . . . . . . 21
Configuring a wireless Internet connection . . . . . . . . . . . . . . . . . . . . . . 21
Viewing Internet connection information . . . . . . . . . . . . . . . . . . . . . . . . 22
ii
www.insigniaproducts.com
Page 3

Contents
Testing your Internet connection . . . . . . . . . . . . . . . . . . . . . . . . . . . . . . . . 22
Setting the IP address . . . . . . . . . . . . . . . . . . . . . . . . . . . . . . . . . . . . . . . . . . . 23
Setting the BD-Live Internet access level . . . . . . . . . . . . . . . . . . . . . . . . . 24
Setting the screen saver activation time . . . . . . . . . . . . . . . . . . . . . . . . . 24
Setting automatic disc playback mode . . . . . . . . . . . . . . . . . . . . . . . . . . 25
Turning InLink on or off . . . . . . . . . . . . . . . . . . . . . . . . . . . . . . . . . . . . . . . . . 25
Upgrading your player’s firmware . . . . . . . . . . . . . . . . . . . . . . . . . . . . . . . 26
Displaying system information . . . . . . . . . . . . . . . . . . . . . . . . . . . . . . . . . . 26
Viewing the Open Source Software information . . . . . . . . . . . . . . . . . 27
Viewing BD-Live information . . . . . . . . . . . . . . . . . . . . . . . . . . . . . . . . . . . . 27
Erasing BD-Live storage . . . . . . . . . . . . . . . . . . . . . . . . . . . . . . . . . . . . . . . . . 28
Setting the parental control password . . . . . . . . . . . . . . . . . . . . . . . . . . . 28
Setting the parental control level . . . . . . . . . . . . . . . . . . . . . . . . . . . . . . . . 29
Maintaining . . . . . . . . . . . . . . . . . . . . . . . . . . . . . . . . . . . . . . . . . . . . . . . . . . . . 29
General guidelines . . . . . . . . . . . . . . . . . . . . . . . . . . . . . . . . . . . . . . . . . . . . . . 29
Electrical disturbance . . . . . . . . . . . . . . . . . . . . . . . . . . . . . . . . . . . . . . . . . . . 29
Condensation . . . . . . . . . . . . . . . . . . . . . . . . . . . . . . . . . . . . . . . . . . . . . . . . . . 29
Storing discs . . . . . . . . . . . . . . . . . . . . . . . . . . . . . . . . . . . . . . . . . . . . . . . . . . . . 29
Handling discs . . . . . . . . . . . . . . . . . . . . . . . . . . . . . . . . . . . . . . . . . . . . . . . . . . 30
Cleaning discs . . . . . . . . . . . . . . . . . . . . . . . . . . . . . . . . . . . . . . . . . . . . . . . . . . 30
Troubleshooting . . . . . . . . . . . . . . . . . . . . . . . . . . . . . . . . . . . . . . . . . . . . . . . 30
Loading default settings . . . . . . . . . . . . . . . . . . . . . . . . . . . . . . . . . . . . . . . . 30
Deactivating individual online applications . . . . . . . . . . . . . . . . . . . . . . 31
Power . . . . . . . . . . . . . . . . . . . . . . . . . . . . . . . . . . . . . . . . . . . . . . . . . . . . . . . . . . 31
Operation . . . . . . . . . . . . . . . . . . . . . . . . . . . . . . . . . . . . . . . . . . . . . . . . . . . . . . 31
TV screen, video, and HDMI connections . . . . . . . . . . . . . . . . . . . . . . . . . 32
BD-Live and USB connections . . . . . . . . . . . . . . . . . . . . . . . . . . . . . . . . . . . 32
Wireless Internet connections . . . . . . . . . . . . . . . . . . . . . . . . . . . . . . . . . . . 32
Other playback problems . . . . . . . . . . . . . . . . . . . . . . . . . . . . . . . . . . . . . . . 32
Specifications . . . . . . . . . . . . . . . . . . . . . . . . . . . . . . . . . . . . . . . . . . . . . . . . . . 33
Video file requirement (USB/DISC) . . . . . . . . . . . . . . . . . . . . . . . . . . . . . . . 33
MP3/WMA audio file requirement (USB/DISC) . . . . . . . . . . . . . . . . . . . . 34
Photo file requirement (USB/DISC) . . . . . . . . . . . . . . . . . . . . . . . . . . . . . . 34
Legal notices . . . . . . . . . . . . . . . . . . . . . . . . . . . . . . . . . . . . . . . . . . . . . . . . . . . 34
One-year limited warranty . . . . . . . . . . . . . . . . . . . . . . . . . . . . . . . . . . . . . . 36
www.insigniaproducts.com
iii
Page 4
CAUTION
RISK OF ELECTRIC SHOCK
DO NOT OPEN
This symbol indicates that dangerous voltage constituting a risk
of electric shock is present within your player. This label is
located on the back of your player.
This symbol indicates that there are important operating and
maintenance instructions in the literature accompanying your
player.
This symbol is the symbol for CLASS II (Double Insulation).
Warning
Your player employs a laser system.
Use of controls, adjustments, or the
performance of procedures other than those
specified may result in hazardous radiation
exposure.
Visible laser radiation is present when open and interlocks
defeated. Do not stare into the beam.
Disposal of your old appliance
1. When this crossed-out wheeled bin symbol is
attached to a product, it means the product is
covered by the European Directive 2002/96/EC.
2. All electrical and electronic products should be
disposed of separately from the municipal waste
stream via designated collection facilities appointed
by the government or the local authorities.
3. The correct disposal of your old appliance will
help prevent potential negative consequences for
the environment and human health.
4. For more detailed information about disposal of
your old appliance, please contact your city office,
waste disposal service, or the shop where you
purchased the product.
Important safety instructions
1 Read these instructions.
2 Keep these instructions.
3 Heed all warnings.
4 Follow all instructions.
5 Do not use this apparatus near water.
6 Clean only with dry cloth.
7 Do not block any ventilation openings. Install in
accordance with the manufacturer's
instructions.
8 Do not install near any heat sources such as
radiators, heat registers, stoves, or other
apparatus (including amplifiers) that produce
heat.
9 Do not defeat the safety purpose of the
polarized or grounding-type plug. A polarized
plug has two blades with one wider than the
other. A grounding type plug has two blades
and a third grounding prong. The wide blade or
the third prong are provided for your safety. If
the provided plug does not fit into your outlet,
consult an electrician for replacement of the
obsolete outlet.
10 Protect the power cord from being walked on or
pinched particularly at plugs, convenience
receptacles, and the point where they exit from
the apparatus.
11 Only use attachments/accessories specified by
the manufacturer.
12 Use only with the cart, stand,
tripod, bracket, or table specified
by the manufacturer, or sold with
the apparatus. When a cart is used,
use caution when moving the
cart/apparatus combination to
avoid injury from tip-over.
13 Unplug this apparatus during lightning storms
or when unused for long periods of time.
14 Refer all servicing to qualified service personnel.
Servicing is required when the apparatus has
been damaged in any way, such as
power-supply cord or plug is damaged, liquid
has been spilled or objects have fallen into the
apparatus, the apparatus has been exposed to
rain or moisture, does not operate normally, or
has been dropped.
15 The wall plug is the disconnecting device. The
plug must remain readily operable.
16 An apparatus with a three-prong,
grounding-type plug is a Class I apparatus,
which needs to be grounded to prevent
possible electric shock. Make sure that you
connect this Class I Wireless 3D Connected
Blu-ray Disc Player to a grounding-type,
three-prong outlet.
17 Remote control batteries should not be exposed
to excessive heat such as sunshine, fire, or the
like.
18 The apparatus should not be exposed to
dripping or splashing, and no objects filled with
liquids, such as vases, should be placed on the
apparatus.
www.insigniaproducts.com
1
Page 5

Warnings
Warning
The laser radiation warning label is on the bottom of
the player.
Electric shock hazard
To reduce the risk of fire or electric shock, do not
remove any cover or expose the device to rain or
moisture. No user-serviceable parts are inside. Refer
servicing to qualified service technicians.
Lightning
For added protection during a lightning storm, or
when it is left unattended and unused for long
periods of time, unplug it from the power outlet.
This helps prevent property damage and personal
injury from lightning and power line surges.
Replacement parts
When replacement parts are required, make sure
that the service technician uses replacement parts
specified by the manufacturer that have the same
characteristics as the original part. Unauthorized
substitutions may result in fire, electric shock,
personal injury, or other hazards.
Safety check
After completing any service or repair to this device,
ask the service technician to perform routine safety
checks to determine that your Wireless 3D
Connected Blu-ray Disc Player is in correct
operating condition.
Power source
Operate your Wireless 3D Connected Blu-ray Disc
Player only from the type of power source indicated
on the marking label. If you are not sure of the type
of power supplied to your home, consult an
electrician or your local power company.
www.insigniaproducts.com
2
Page 6

Wireless 3D Connected Blu-ray Disc Player
Wireless 3D Connected Blu-ray Disc Player
Introduction
Congratulations on your purchase of a high-quality
Insignia product. Your NS-WBRDVD3 represents the
state of the art in Wireless 3D Connected Blu-ray
Disc Player design and is designed for reliable and
trouble-free performance.
Features
• Compatible with 3D devices, such as an AV
receiver or TV, that lets you watch 3D programs
using 3D glasses (see “Adjusting the HDMI image
including 3D mode” on page 17).
• WiFi wireless connectivity for ease of connection.
• Internet access lets you download BD Live
content and stream movies and music.
• Full high-definition video playback at up to 1080p
resolution for an amazing viewing experience.
• Easy and simple HDTV connection using a single
HDMI cable (cable not included).
• Upconversion of standard definition DVDs for
enhanced picture quality at up to 1080p over an
HDMI connection.
• Rich multi-channel surround sound.
• Multiple outputs for connecting your home
theater system or amplifier.
• PIP functionality that lets you display primary and
secondary video at the same time (if available on
the Blu-ray Disc).
• Pop-up menu display without interrupting
playback (if available on the Blu-ray Disc).
• HDMI 1080p 24fps which is the frame speed for
movies. When your player is connected to a TV
that supports 24fps and this feature is turned on,
DVD and Blu-ray Discs play movies at the original
recorded frame rate and provide a cinema-like
experience.
Package contents
• Wireless 3D Connected Blu-ray Disc Player
• Remote control with two AAA batteries
• Important Information Document
• Quick Setup Guide
www.insigniaproducts.com
3
Page 7
Wireless 3D Connected Blu-ray Disc Player
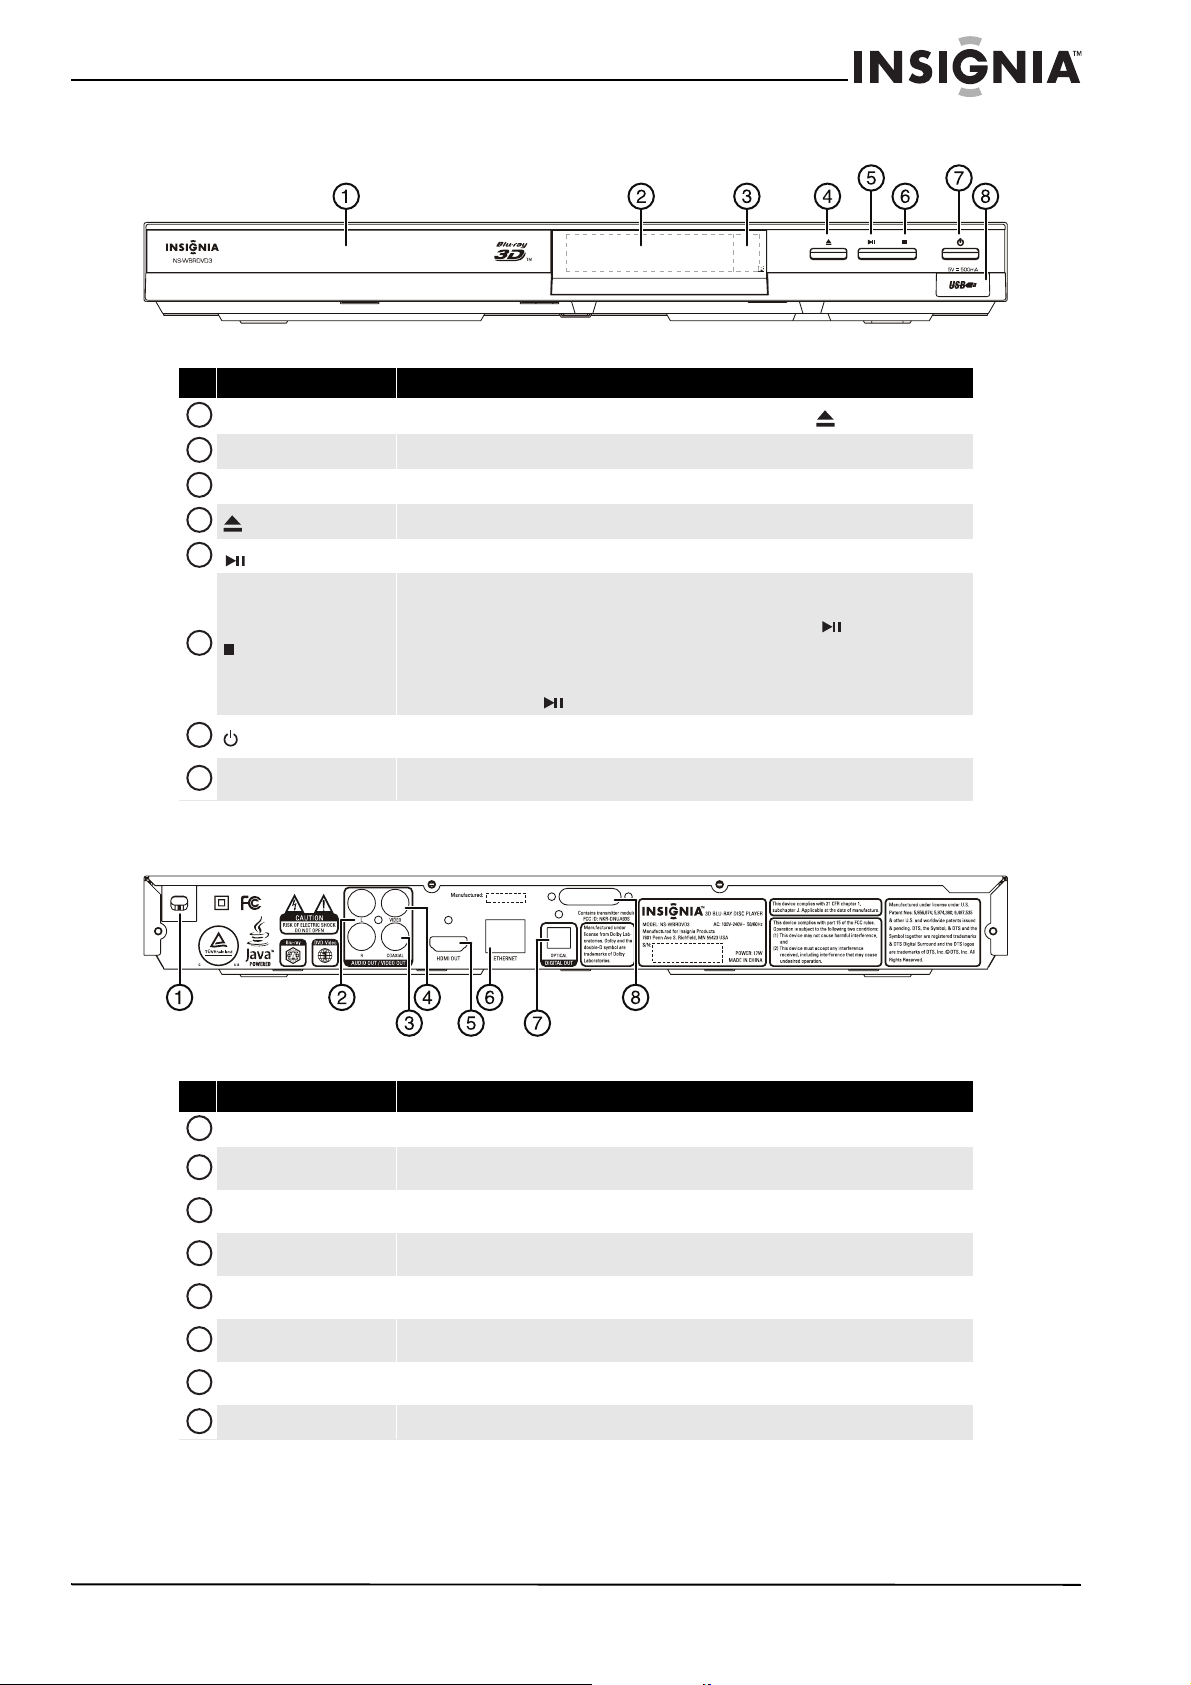
Front
# Item Description
1
Disc tray Insert a disc with label side up into this tray. To open or close the tray, press (open/close).
2
LED screen Displays status information.
3
Remote control sensor Receives signals from the remote control. Do not block.
4
(open/close) button Press to open or close the disc tray.
5
(play/pause) button Press to start or pause disc playback.
Press to stop playback. The HOME menu appears on the screen.
To resume playback, on the HOME menu press
ENTER. Press S or T to highlight DVD-Video or Blu-ray Disc, then press (play/pause) or
6
7
8
(stop) button
(power) button
USB port
ENTER. Depending on the disc, playback starts where it stopped or at the beginning of the disc.
Press twice to completely stop playback. Depending on the disc, when you press
HOME menu, highlight My Media, then press ENTER. Press S or T to highlight DVD-Video or
Blu-ray Disc, then press (play/pause) or ENTER, playback starts at the beginning of the disc.
Press to turn on your player or put your player in standby mode. When your player is in standby mode,
power is still entering your player. To disconnect power, unplug the power cord.
Insert a USB flash drive into this port to play multi-media files using the Media Center. See “Viewing
photos and playing music and video files” on page 12.
S T W or X to highlight My Media, then press
S T W or X on the
Back
# Item Description
1
Power cord Plug the power cord into a power outlet.
2
L/R AUDIO OUT
3
COAXIAL AUD IO OUT
4
VIDEO OUT
5
HDMI OUT
6
ETHERNET
7
OPTICAL DIGITAL OUT
8
WiFi antenna Sends and receives signals from a wireless access point or router.
Connect these jacks to the analog audio input jacks on a TV or receiver using an analog audio cable. See
“Connecting a TV using an AV cable (good)” on page 6.
Connect this jack to the coaxial digital input jack on a receiver to play sound through the receiver’s
speakers. See “Connecting an amplifier using digital coaxial audio” on page 7.
Connect this jack to the video in jack on a TV or receiver using a composite video cable. See “Connecting
a TV using an AV cable (good)” on page 6.
Connect a TV to this jack using an HDMI cable. An HDMI cable carries both video and audio. You do not
need to make a separate audio connection. See “Connecting a TV using an HDMI cable (best)” on page 6.
Connect an Ethernet cable to this jack and to a broadband Internet jack to stream movies and music and
download BD-Live information.
Connect this jack to the optical digital input jack on a receiver to play the sound from the receiver’s
speakers. See “Connecting an amplifier with digital optical audio” on page 7.
www.insigniaproducts.com
4
Page 8
Wireless 3D Connected Blu-ray Disc Player
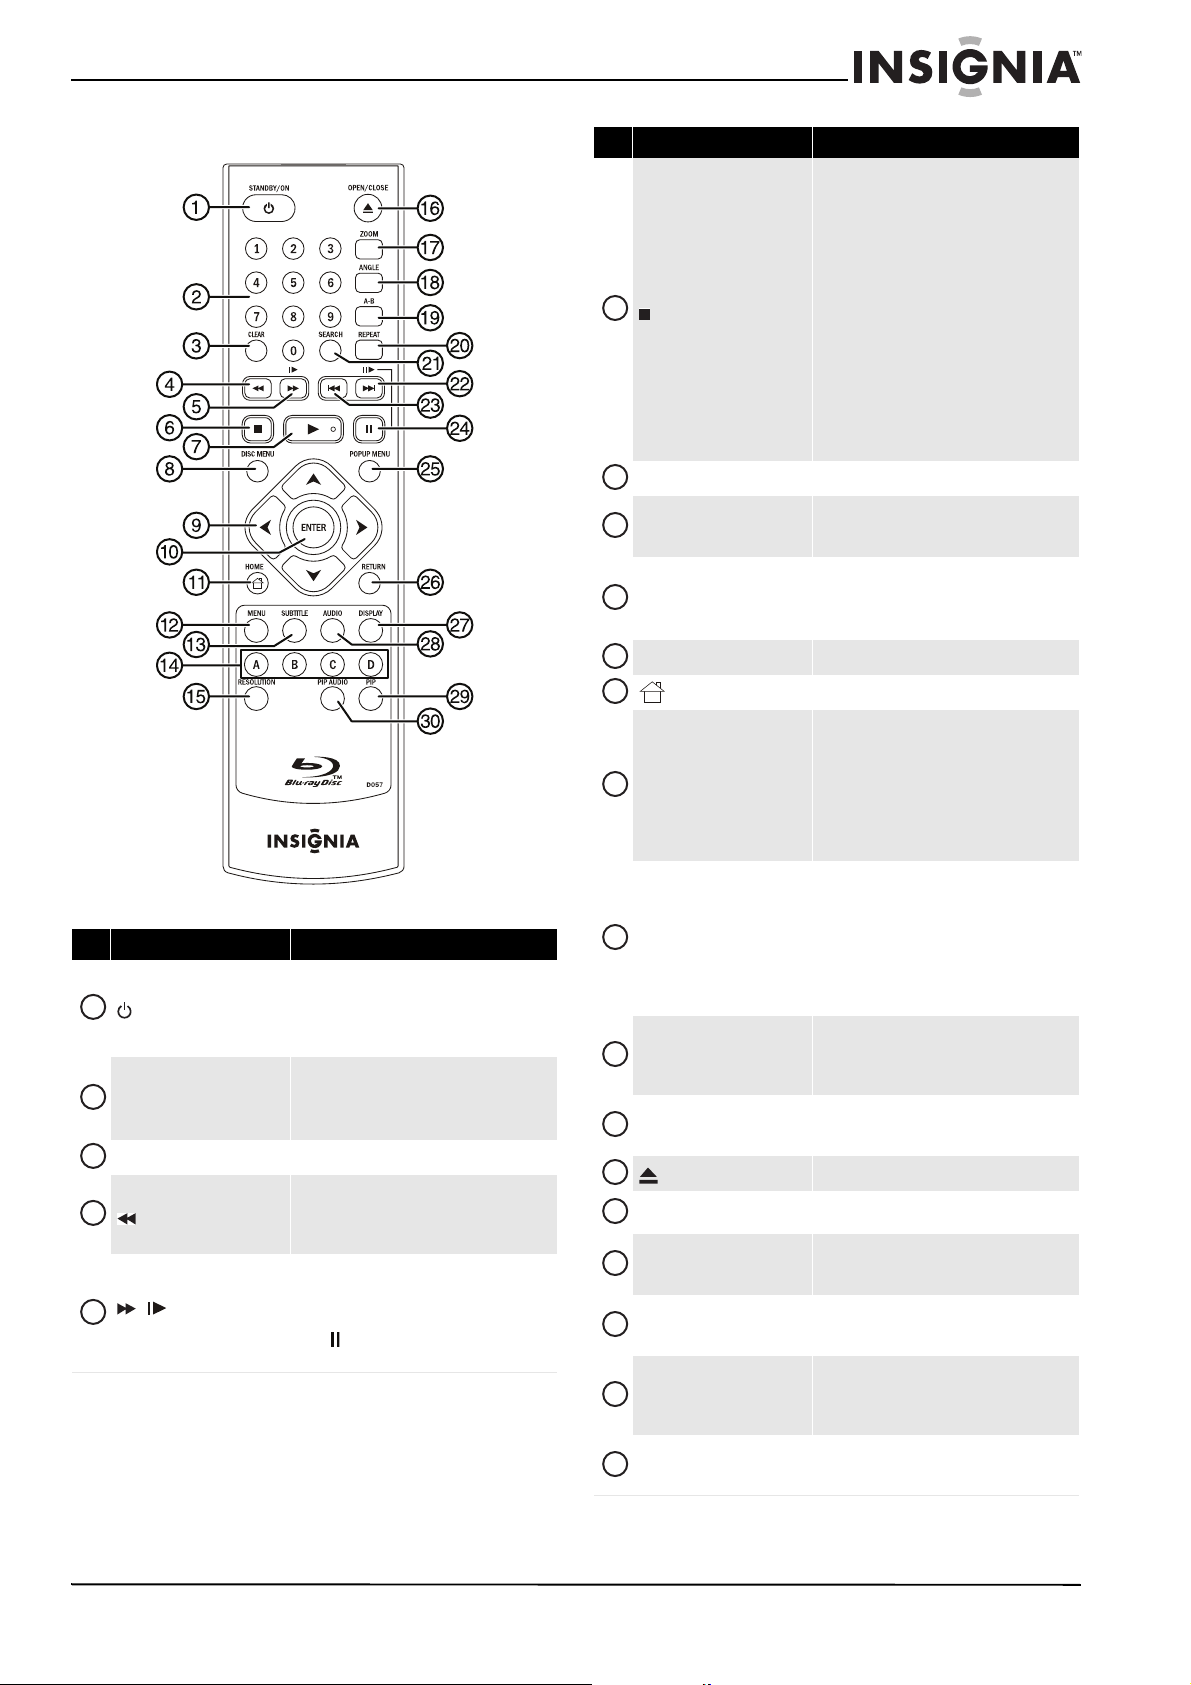
Remote control
# Item Description
Press to turn on your player or put your player
1
STANDBY/ON
2
Numbers
3
CLEAR Press to clear an input error.
4
(fast reverse)
/ (fast forward/
5
slow fast forward)
in standby mode. When your player is in
standby mode, power is still entering your
player. To disconnect power, unplug the power
cord.
In playback mode, press SEARCH, then press
the number buttons to enter a title, chapter,
track, or time.
In menu mode, press to enter numbers.
Press to fast reverse. Each time you press this
button, the fast-reverse speed increases from
WW 1, WW 2, WW 3, WW 4, to WW 5.
Press X (play) to resume normal playback.
Press to fast forward. Each time you press this
button, the fast-forward speed increases from
XX 1, XX 2, XX 3, XX 4, to XX 5.
Press X (play) to resume normal playback.
Press (pause), then press this button to play
forward slowly.
# Item Description
Press to stop playback. The HOME menu
appears on the screen.
To resume playback, on the HOME menu press
S T W or X to highlight My Media, then
press ENTER. Press S or T to highlight
DVD-Video or Blu-ray Disc, then press X
(play) or ENTER. Depending on the disc,
6
(stop)
7
X (play) Press to start playback.
8
DISC MENU
9
S T W X
10
ENTER Press to confirm selections.
11
12
13
14
15
16
17
18
19
20
21
HOME Press to open the HOME menu.
MENU
SUBTITLE
A (red), B (green), C (yellow),
D(blue)
RESOLUTION
OPEN/CLOSE Press to open or close the disc tray.
ZOOM
ANGLE
A-B
REPEAT
SEARCH
playback starts where it stopped or at the
beginning of the disc.
Press twice to completely stop playback.
Depending on the disc, when you press
W or X on the HOME menu, highlight My
Media, then press ENTER. Press S or T to
highlight DVD-Video or Blu-ray Disc, then
press X (play) or ENTER, playback starts at the
beginning of the disc.
During Blu-ray Disc or DVD playback, press to
open the Blu-ray Disc or DVD root menu where
you can select playback options.
When a menu is open, press to highlight an
item, then press ENTER.
When viewing a picture (JPEG file), press to
rotate the picture.
Press to display and change the media player
settings, such as current title and chapter,
elapsed or remaining playing time, play mode,
audio mode, viewing angle, subtitle language,
and bitrate. Press ENTER, then press S or T
to select the item you want to change. Change
the item, then press ENTER. Press MENU again
to hide the menu.
Press to select a subtitle language or to turn
subtitles off.
When you press this button, “ X/X XXX” appears
on the screen. The first “X” indicates the
number of the current language. The second
“X” indicates the total number of available
languages. The “XXX” indicates the language’s
country.
When playing a Blu-ray Disc that has a Java™
application, press to control playback. For more
information, see the documentation that came
with the Blu-ray Disc.
Press to select the video resolution. See
“Selecting the video output resolution” on
page 16.
Press to zoom i n on a vi deo. Each time you press
this button, the magnification level changes.
Press to select a viewing angle if multiple
angles are available on the disc. See “Selecting
a viewing angle” on page 15.
Press to create a playback loop. See “Creating a
playback loop on a DVD or audio CD” on
page 15,
Press to repeat the current title, chapter, or
track, to repeat all, or to turn off repeat mode.
See “Repeating a title, chapter, or CD track” on
page 14.
Press to search for a title, chapter, or specific
time on a disc. See “Searching for a title,
chapter, or elapsed time” on page 14.
S T
www.insigniaproducts.com
5
Page 9
Wireless 3D Connected Blu-ray Disc Player
# Item Description
Press to go to the next title, chapter, or track.
22
/ (next/step forward)
23
(previous)
24
(pause)
25
POPUP MENU
26
RETURN
27
DISPLAY
28
AUDIO
29
PIP
30
PIP AUDIO
Press (pause), then press this button to play
forward one video frame at a time.
Press to go to the previous title, chapter, or
track.
Press to pause playback. Press again to resume
playback.
During Blu-ray Disc playback, press to open a
menu that lets you control Blu-ray Disc
playback.
In the Media Center, press to open the Edit
menu where you can select files for playback.
When the HOME menu is open, press to return
to the previous menu.
Press to display disc information. Press again to
hide the information.
Press to select the audio mode. See “Selecting
the audio channel with the remote control” on
page 15.
Press to turn PIP (picture-in-picture) mode on
or off. See “Using PIP (picture-in-picture)
mode” on page 15.
In PIP mode, press to turn the audio for the
secondary video on or off. See “Using PIP
(picture-in-picture) mode” on page 15.
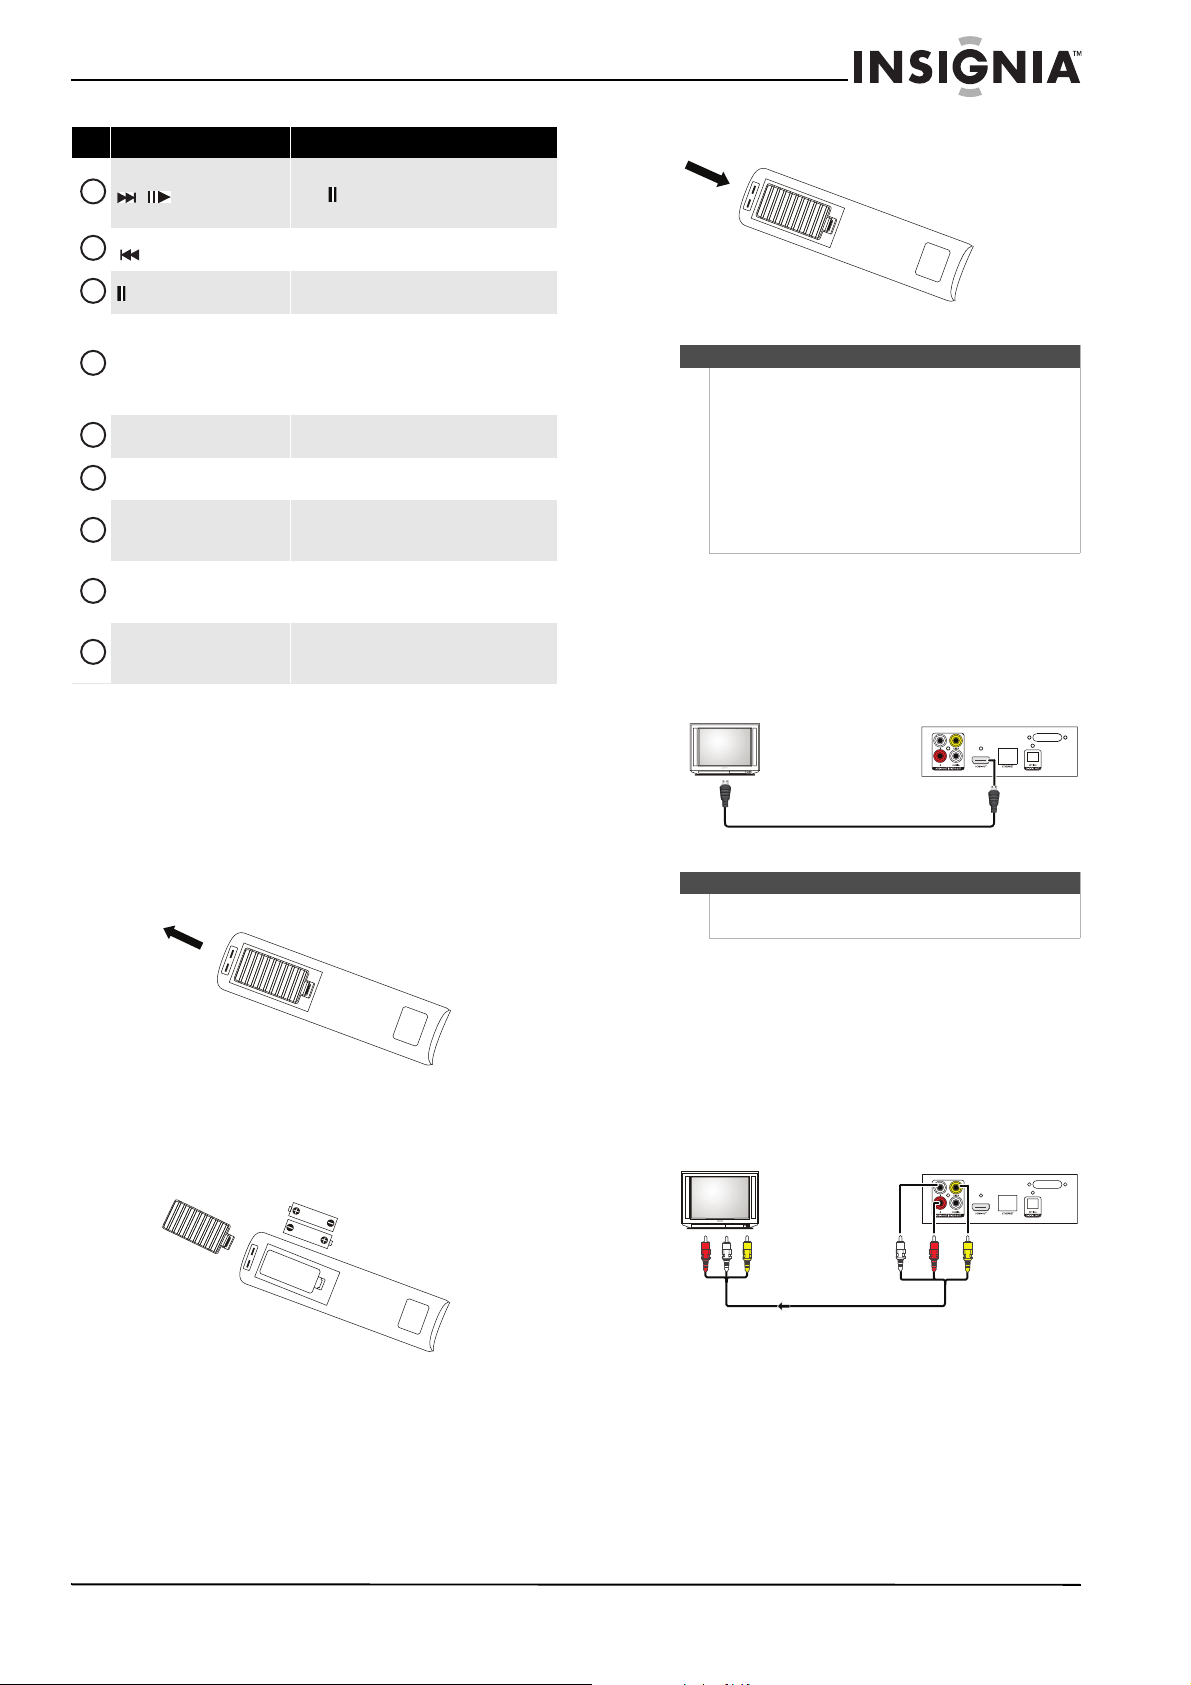
3 Replace the cover.
Cautions
• Make sure that you insert the batteries correctly.
• Do not heat, open, or short-circuit batteries.
• Do not throw batteries into a fire.
• Do not mix different types of batteries or mix
old and new batteries.
• Do not try to recharge non-rechargable
batteries.
• If the remote control does not function correctly
or if the operating range becomes reduced,
replace the batteries.
Connecting a TV using an HDMI cable (best)
To connect a TV using an HDMI cable (best):
• Connect an HDMI cable (not included) to the
HDMI OUT jack on the back of your player and
to the HDMI IN jack on the TV.
TV
Back of player
Setting up your player
Installing the remote control batteries
To install the remote control batteries:
1 Press down on the battery compartment cover
latch, then slide the cover off the remote
control.
2 Insert two AAA batteries into the battery
compartment. Make sure that the + and –
symbols on the batteries match the + and –
symbols in the battery compartment.
HDMI cable
Note
An HDMI cable carries both video and audio. You do
not need to make an audio connection.
Connecting a TV using an AV cable (good)
To connect a TV using an AV cable (good):
• Connect an A/V cable (not included) to the
VIDEO OUT and L/R AUDIO OUT jacks on the
back of your player and to the VIDEO IN and
AUDIO IN L/R jack on the TV. Jacks and cable
connectors are usually color-coded. Make sure
that you match the colors.
TV
AV c abl e
Back of player
www.insigniaproducts.com
6
Page 10
Wireless 3D Connected Blu-ray Disc Player
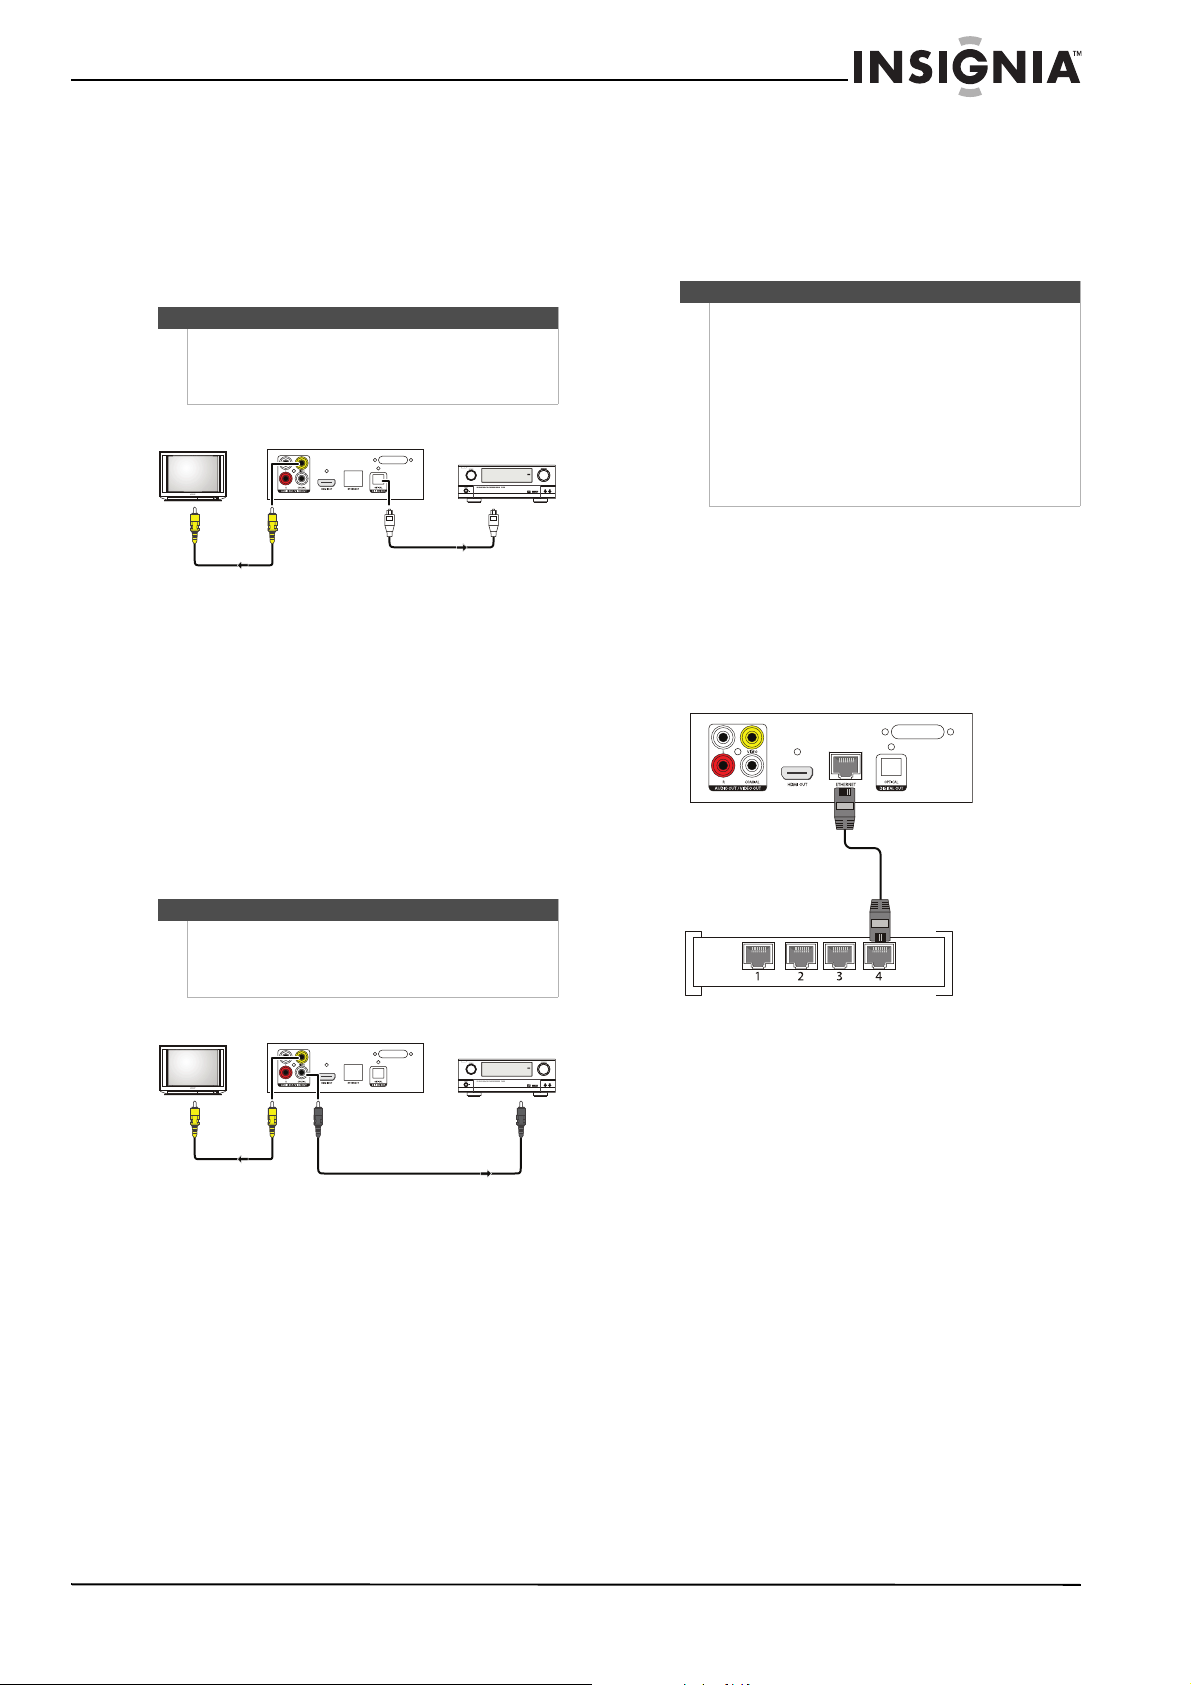
Connecting an amplifier with digital optical audio
To connect an amplifier with digital optical
audio:
1 Connect a video cable (not included) to the
VIDEO OUT jack on the back of your player and
to the VIDEO IN jack on the TV.
Note
You can connect an HDMI cable (not included) to the
HDMI OUT jack on the back of your player and to the
HDMI IN jack on the TV instead of using the VIDEO
OUT jack.
TV Back of player
Digital optical
Video cable
audio cable
2 Connect a digital optical audio cable (not
included) to the OPTICAL DIGITAL OUT jack on
the back of your player and to the OPTICAL
DIGITAL IN jack on the amplifier.
Amplifier
Connecting to the Internet
Wired connection
Using a wired network provides the best
performance because the attached devices connect
directly to the network and are not subject to radio
frequency interference.
Notes
• When plugging or unplugging the Ethernet
cable, hold the plug portion of the cable.
• When unplugging, do not pull on the Ethernet
cable. While pressing down on the cable lock on
the plug, pull the plug out of the jack.
• Do not connect a modular phone cable to the
ETHERNET jack.
• Connection configurations vary based on the
specifications of your Internet service provider.
Contact your provider for specific instructions
about setting up your wired connection.
To connect to the Internet using a wired
connection:
1 Make sure that your player is turned off and the
power cord is unplugged.
2 Connect a network cable to the ETHERNET jack
on the back of your player and into a wired
router using a commercially available LAN or
Ethernet cable.
Connecting an amplifier using digital coaxial audio
To connect an amplifier using digital coaxial
audio:
1 Connect a video cable (not included) to the
VIDEO OUT jack on the back of your player and
to the VIDEO IN jack on the TV.
Note
You can connect an HDMI cable (not included) to the
HDMI OUT jack on the back of your player and to the
HDMI IN jack on the TV instead of using the VIDEO
OUT jack.
TV Back of player
Video cable
Digital coaxial audio cable
2 Connect a digital coaxial audio cable (not
included) to the COAXIAL AUDIO OUT jack on
the back of your player and to the COAXIAL
AUDIO IN jack on the amplifier.
Amplifier
For instructions on configuring a wired Internet
connection, see “Configuring a wired Internet
connection” on page 21.
www.insigniaproducts.com
7
Page 11
Wireless 3D Connected Blu-ray Disc Player
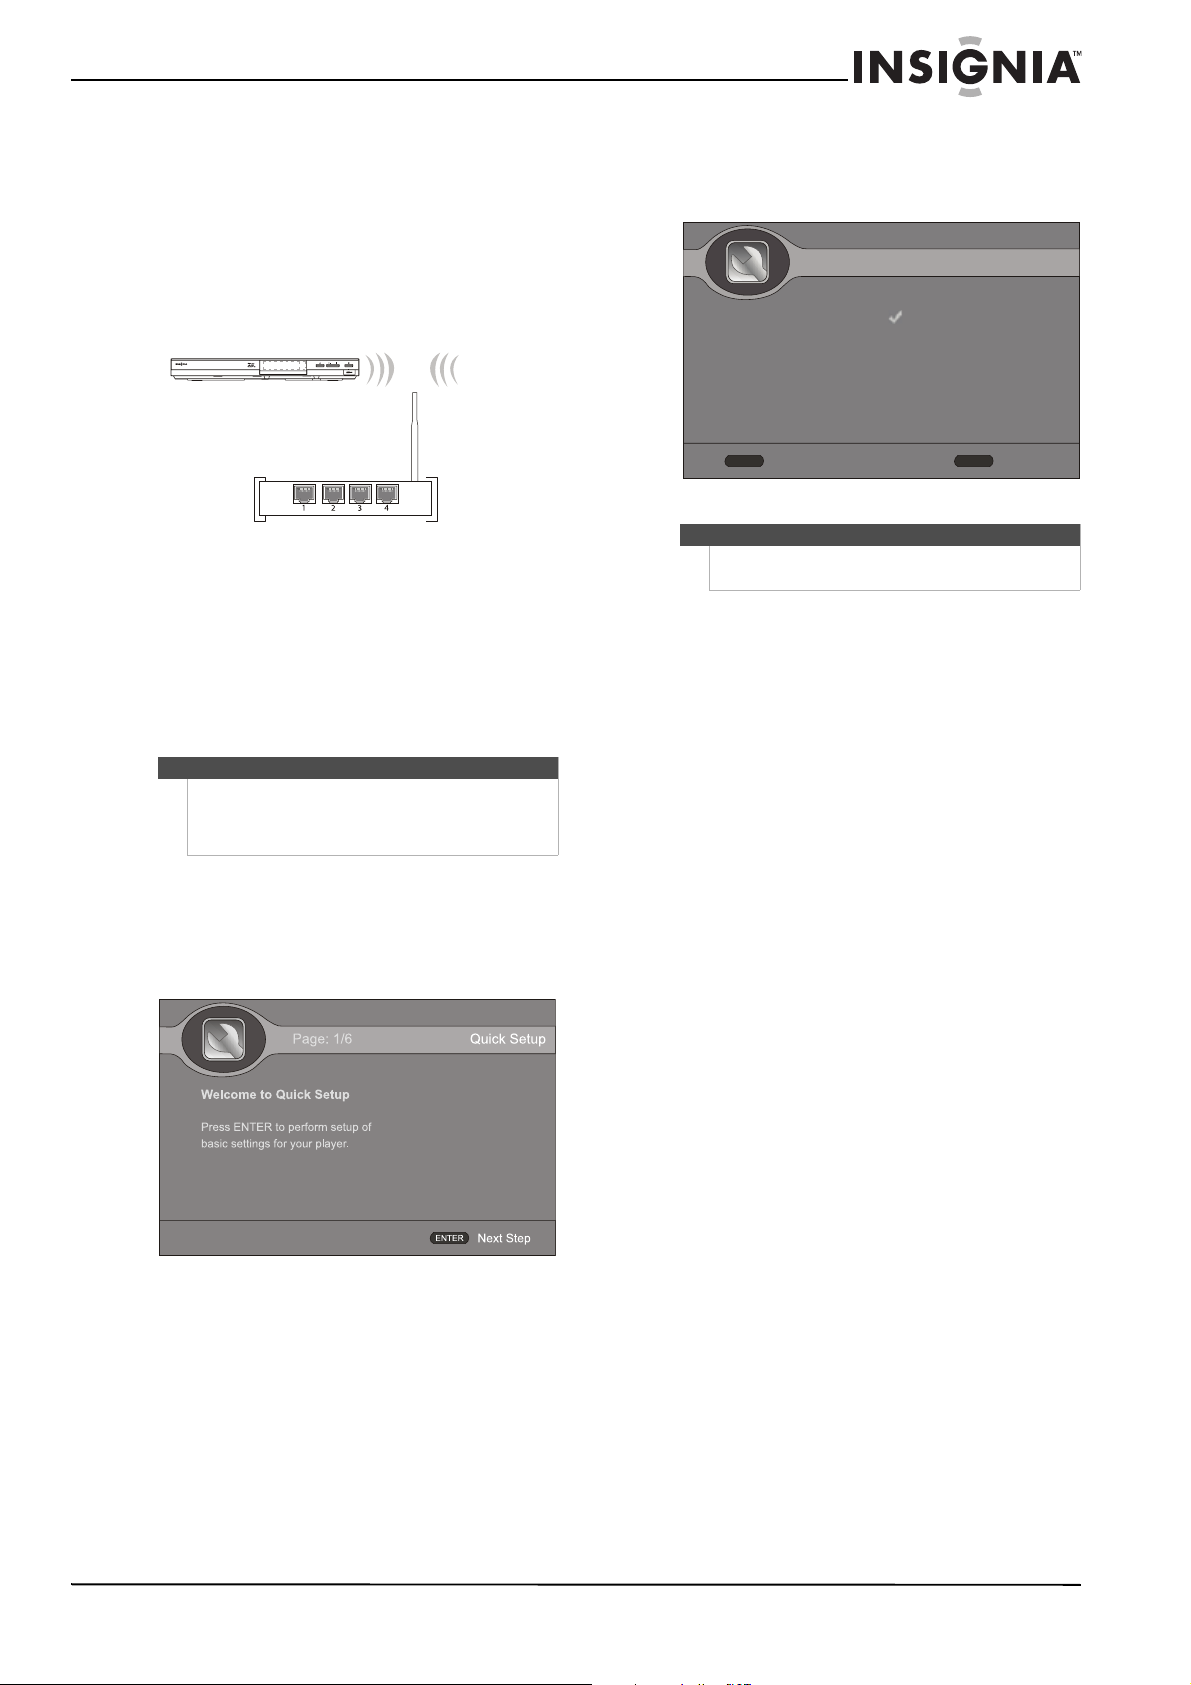
Wireless connection
Your player is equipped with a built-in IEEE 802.11n
wireless module, which also supports the
IEEE 802.11b/g standards. For the best wireless
performance, we recommend using an IEEE
802.11n certified Wi-Fi network (access point or
wireless router).
The network configuration and connection method
may vary depending on the equipment in use and
the network environment.
NS-WBRDVD3
5V 500mA
For instructions on configuring a wireless
connection, see “Configuring a wireless Internet
connection” on page 21.
Turning on your player for the first time
The first time you turn on your player, the Quick
Setup wizard opens automatically. You can use the
wizard to select initial settings for your player, such
as the menu language and video resolution.
Note
The Quick Setup wizard automatically selects the
most commonly used settings. If you are unsure
about a setting, use the setting selected by the Quick
Setup wizard.
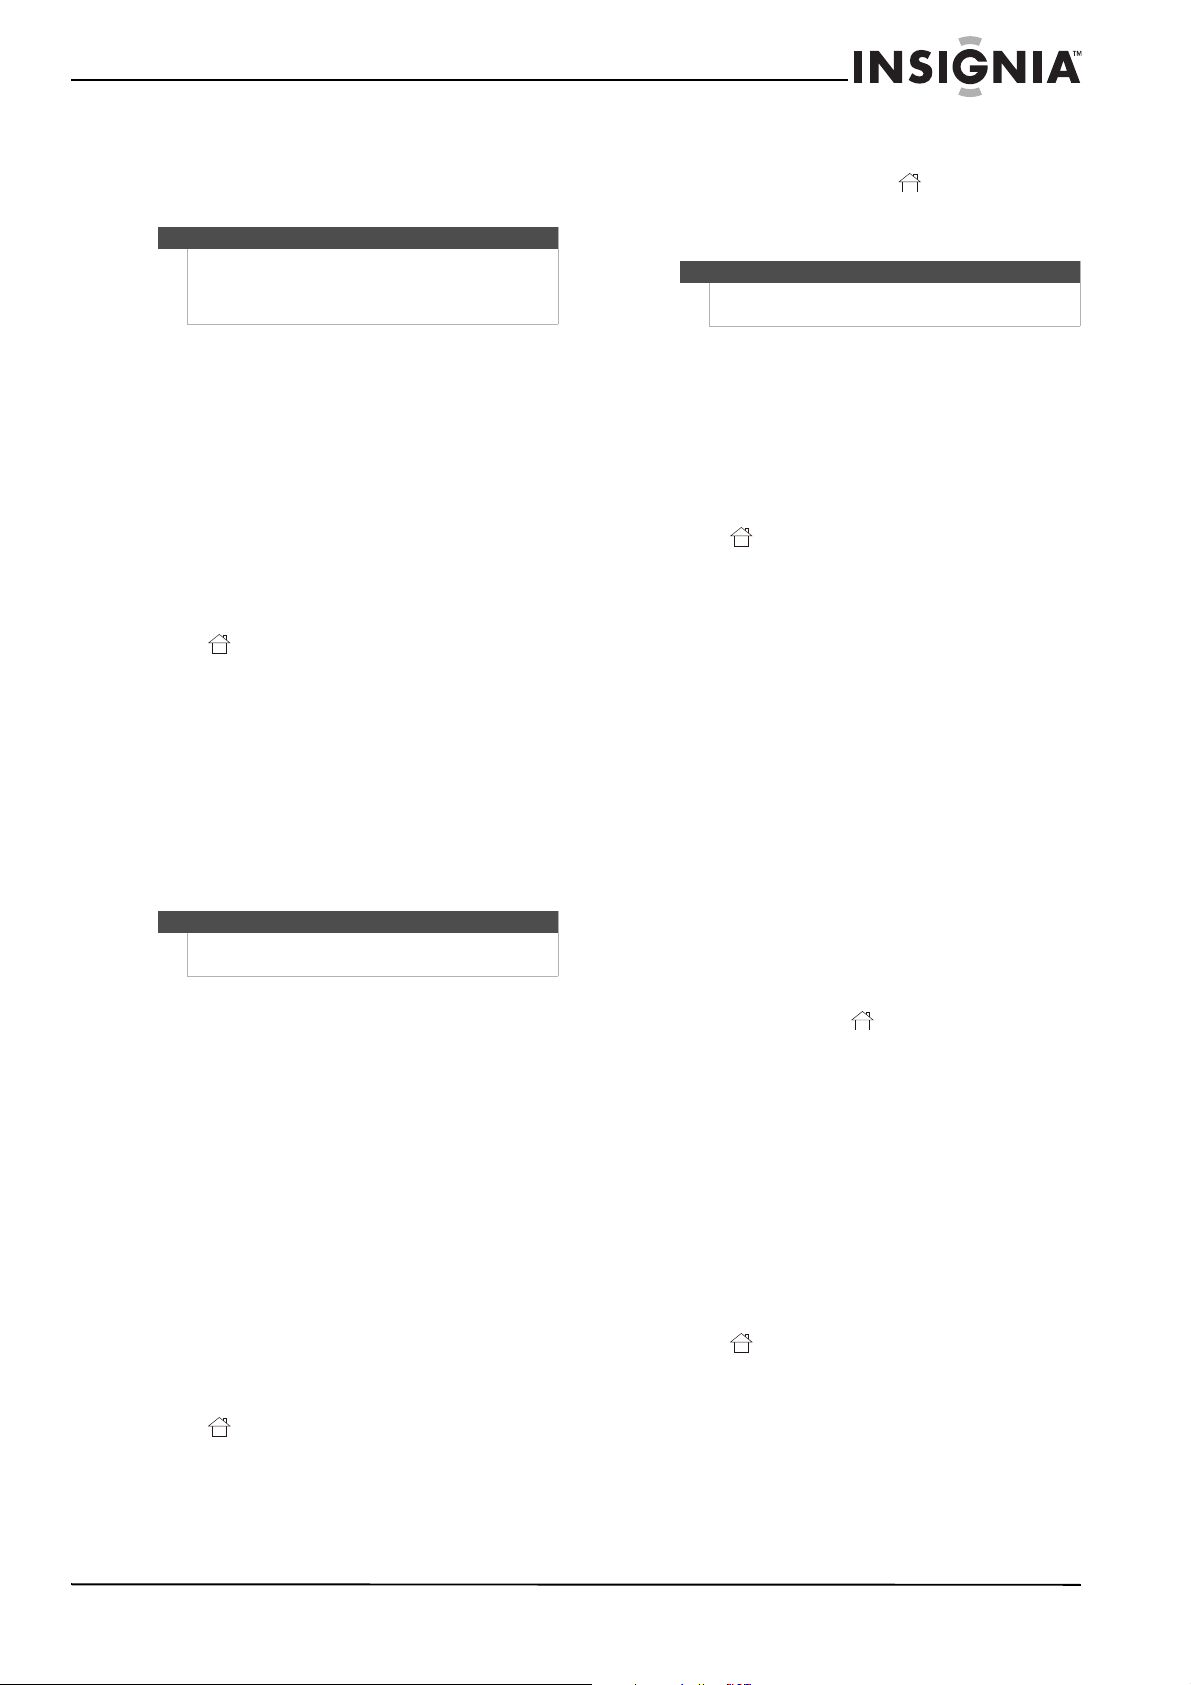
3 Press ENTER, then follow the on-screen
instructions to complete the wizard. When the
wizard is complete, the following screen is
displayed.
Page: 6/6
Quick Setup is completed!
Press ENTER to confirm your
settings a
n
d enjoy your player.
Any of these settings can be
adjusted later using the SETTINGS
menu.
RETURN
Previous
Note
You can run the Quick Setup wizard again by selecting
QUICK SETUP on the HOME menu.
ENTER
Quick Setup
Confirm Settings
To complete the Quick Setup wizard:
1 Make sure that the TV is connected to your
player.
2 Turn on the TV and your player. The Quick Setup
wizard opens.
www.insigniaproducts.com
8
Page 12
Wireless 3D Connected Blu-ray Disc Player
Using your player
Using connected applications
Note
Online services frequently update their sites. They
may change how you log on or how you use the sites.
If you experience problems when you try to use a
service, contact the service, not Insignia.
You can watch movies over the Internet (for
example, from Netflix or CinemaNow), listen to
Pandora Internet radio, or watch the latest personal
video on YouTube. Before you can use these
Internet services, you must first:
• Have connected your player to the Internet.
• Have a valid account to these services.
• Follow on screen instructions to activate
accounts. You may need a computer.
Activating an online service
To activate an online service:
1 After you successfully connect to the Internet,
press HOME. The HOME menu is displayed.
2 Press S T W or X to highlight the service you
want to access, then press ENTER.
3 Follow the on-screen instructions to activate
and set up an account. You may need a
computer.
For instructions on how to deactivate an online
service, see “Deactivating individual online
applications” on page 31
Watching movies with CinemaNow (application
available in US only)
Note
CinemaNow is coming to the Canada market in a
future release.
With CinemaNow on your player, you can rent some
of your favorite movies from the comfort of your
couch. All you need is your Insignia remote.
Once you have a CinemaNow account, grab some
popcorn and enjoy the show.
To set up your CinemaNow account:
1 Set up your CinemaNow account through your
computer. Go to
www.cinemanow.com/ activate
to get an activation PIN.
2 Click Activate a New Device, then sign in again
with your user name and password.
3 Enter any name in the Name Your Device
section, then click Continue. You assigned a
valid activation number to enter into the
activation field within the Cinemanow
application on your player.
4 After you successfully connect to the Internet,
press HOME. The HOME menu is displayed.
5 Press S T W or X to CinemaNow, then press
ENTER.
6 Select the Settings tab at the bottom of the
screen, then press ENTER.
7 Select Activate, then enter your activation code.
You can now rent movies using Cinemanow.
8 To exit CinemaNow, press HOME.
Watching movies with Netflix (application available in
US and Canada markets)
Note
You must have a valid Netflix account in order to
stream Netflix movies to your player.
With Netflix on your player, if you have a Netflix
unlimited plan, you can instantly watch thousands
movies and TV episodes streamed from Netflix to
your player.
Just add shows to your Netflix Instant Queue, and
start watching.
To watch movies with Netflix:
1 After you successfully connect to the Internet,
press HOME. The HOME menu is displayed.
2
Press S T W or X to Netflix, then press ENTER.
3 Follow the directions on the screen to register
your player. You are assigned an activation code.
4 If you already have an existing Netflix account,
log in to your account on your computer. Click
the Your Account & Help link in the upper right
corner of the screen.
In the WATCHING INSTANTLY ON YOUR TV OR
COMPUTER section, click Activate a Netflix
Ready Device, then enter the activation code
from Step 1.
OR
If you do not have an existing Netflix account,
go to http://www.netflix.com/Insignia (US) or
http://www.netflix.ca/Insignia (Canada) to start
your free trial and enter the activationcode from
Step 1 into the Insignia code field on screen.
5 After setting up your account and activating
your player, browse to Instant under the Yo u r
Queue tab and add movies to queue.
6 To exit Netflix, press HOME.
Listening to music with Pandora (application available in
US only)
Pandora on your player lets you choose exactly the
music you want to hear and creates personal
Internet radio stations that play it for you. Just enter
a song title or band name that represents the kind
of music you want to hear, and Pandora starts a
unique Pandora station that plays music similar to
it. Add variety by entering other titles and bands to
your station, and even more variety by creating
multiple Pandora stations (up to 100!).
For existing Pandora customers:
1 After you successfully connect to the Internet,
press HOME. The HOME menu is displayed.
2 Press S T W or X to Pandora, then press
ENTER. The Welcome to Pandora screen opens.
3 Press ENTER to activate Pandora. A message
asks “Do you already have a Pandora account?”.
4 Choose Ye s , then press ENTER to confirm.
www.insigniaproducts.com
9
Page 13

Wireless 3D Connected Blu-ray Disc Player
5 When a message tells you “Sign in to your
Pandora account,” input the correct E-mail
address and password with the small keyboard
on the screen, then press ENTER.
After you enter a station list, it plays
automatically. You can choose another chapters,
then press ENTER to play.
For new Pandora customers:
1 After you successfully connect to the Internet,
press HOME. The HOME menu is displayed.
2 Press S T W or X to Pandora, then press
ENTER. The Welcome to Pandora screen opens.
3 Press ENTER to activate Pandora. A message
asks “Do you already have a Pandora account?”.
4 Choose No, then press ENTER to confirm.
Information like the activation code appears on
the screen.
5 On your computer, go to
www.pandora.com/Insignia
and enter the activation code from Step 4, then
click Activate.
Click Create a Pandora Account, then follow the
on-screen instructions.
To exit Pandora, press HOME.
To create a new Pandora account using a
computer:
• Go to http://www.pandora.com/ to create a new
account.
Contact the partner company (not Insignia) if you
experience an issue using one of these applications.
Note
Support numbers for the connected applications
apply to the US market only.
Netflix:
www.netflix.com/help
1-866-579-7113
CinemaNow:
www.cinemanow.com/support
Pandora:
http://blog.pandora.com/faq/
You Tube :
http://www.google.com/support/youtube/
Note
A particular connected service may not be available
in the country in which you live. Consult the
streaming services support page to see if service is
currently available in your country. To stay up-to-date
on future connected service options for your player,
visit www.insigniaproducts.com.
Playable discs
Disc type Logo Disc type Logo
3D Blu-ray Disc DVD-RW
Blu-ray Disc Audio CDs (CDDA)
DVD-video
(DVD-ROM)
DVD+R CD-RW
DVD+RW MPEG4
DVD-R MP3/WMA/
Notes
• Writeable DVD discs (DVD+RW/+R, DVD-RW/-R)
must be finalized, VR-mode only.
• Playback may not work for some types of discs,
or when specific operations, such as an angle
change and aspect ratio adjustment, are being
performed. Information about the discs is
written in detail on the box.
• Do not allow the disc to become dirty or
scratched. Fingerprints, dirt, dust, scratches, or
deposits of cigarette smoke on the recording
surface may make it impossible to use the disc
for playback.
• CD-R/-RW, DVD-RW/-R recorded with UDF or
ISO9660 format can be played back.
• Windows Media Audio (WMA) files must be
written to the disc with a .wma file extension in
order to be recognized and played back
correctly.
• JPEG picture files must be written to the disc
with a .jpeg or .jpg file extension in order to be
recognized and played back correctly.
CD-R
JPEG/Data CD
About Blu-ray Discs
The massive storage capacity of a Blu-ray Disc
allows a higher standard of picture and audio
quality and a wealth of special effects and
enhanced features not available on DVDs.
Java
Your player features Java support so you can get the
most out of the latest Blu-ray Discs. When a Blu-ray
Disc loads, explore the title menu to enjoy these
extra features.
Color buttons
The red, green, yellow, and blue buttons on the
remote control are used with interactive menus
when operating a Blu-ray Disc that includes Java
applications. For more information about using this
kind of disc, see the instructions that came with the
disc.
HDMI
HDMI is the only connection type capable of
transmitting the huge volumes of data required by
the high picture resolutions and advanced digital
audio codecs that make Blu-ray such an exciting
medium.
www.insigniaproducts.com
10
Page 14

Wireless 3D Connected Blu-ray Disc Player
Playing Blu-ray Discs
Playing Blu-ray Discs are a lot like playing DVDs,
except Blu-ray Discs have a higher level of
interactivity.
Most of the standard features of DVD playback work
the same with Blu-ray Disc playback. The two most
common exceptions are:
• Resume play—Not available on some Blu-ray
Java discs
• A-B repeat (playback loop)—Not available on
some Blu-ray Discs
About BD-Live
Some Blu-ray Discs contain additional features that
require an Internet connection, such as:
• Downloadable movie trailers
• Commentaries by actors and directors
• Multi-person games and chat
To access these features you need to:
• Insert a USB flash drive with at least 1 GB of
available space into the USB port on the front
of your player
• Set up your player’s Internet connection
Playing a Blu-ray Disc or DVD
To play a Blu-ray Disc or DVD:
1 Press STANDBY/ON.
2 Turn on the TV, then select the input setting on
the TV that matches the connection method
you used to connect your player.
3 Press OPEN/CLOSE to open the disc tray.
4 Place a disc on the disc tray with the label facing
up, then press OPEN/CLOSE to close the disc
tray. It may take a few seconds for the disc to
load.
5 If a Blu-ray Disc or DVD menu opens, press
STWor X to highlight PLAY, then press
ENTER.
6 To eject the disc, press OPEN/CLOSE.
Controlling Blu-ray Disc or DVD playback
When a Blu-ray Disc or DVD is playing, press the
DISPLAY button on the remote control to see the
following information.
Playback cmod
Disc type
Video output format
Current title
number/Total
number of titles
Current chapter/Total chapte rs
Current playback
time
To control Blu-ray Disc or DVD playback:
• To start playback, press X (play).
• To pause playback, press (pause). To resume
playback, press (pause) or X (play).
• To stop playback, press (stop). The startup
logo appears on the screen.To resume
playback, on the HOME menu press S T W or
X to highlight My Media, then press ENTER.
Press S or T to highlight DVD-Video or
Blu-ray Disc, then press X (play) or ENTER.
Depending on the disc, playback starts where
it stopped or at the beginning of the disc.
Press (stop) twice to completely stop
playback. Depending on the disc, when you
press S T W or X on the HOME menu,
highlight My Media, then press ENTER. Press
S or T to highlight DVD-Video or Blu-ray
Disc, then press X (play) or ENTER, playback
starts at the beginning of the disc.
• To fast forward or fast reverse, press (fast
forward) or (fast reverse). Each time you
press one of these buttons, the fast forward or
fast reverse speed changes. The speeds are 1,
2, 3, 4, and 5. To resume normal playback,
press X (play).
• To go to the next chapter, press
/ (next/step). To go to the start of the
current chapter, press (previous). To go the
previous chapter, press (previous) twice.
• To play slowly forward, press (pause), then
press / (fast forward/slow forward). To
resume playback, press X (play). Each time
you press this button, the speed changes. The
speeds are 1/16, 1/8, 1/4, and 1/2.
• To play forward one video frame at a time,
press (pause), then press / (next/step).
Each time you press this button, the video
advances one frame. To resume playback,
press X (play).
If you press MENU during playback, information
about the disc is displayed.
Blu-ray Disc information:
Disc type
Audio aoutput format
Note
If appears on the screen, the current action is not
permitted by the disc or your player. For example,
many discs do not let you fast-forward through the
warning information at the beginning of the disc.
Current subtitle
www.insigniaproducts.com
11
Page 15

Wireless 3D Connected Blu-ray Disc Player
DVD video disc information:
Playing an audio CD
1 Press STANDBY/ON.
2 Turn on the TV, then select the input setting on
the TV that matches the connection method
you used to connect your player.
3 Press OPEN/CLOSE to open the disc tray.
4 Place a CD on the disc tray with the label facing
up, then press OPEN/CLOSE to close the disc
tray. It may take a few seconds for the CD to
load.
5 If the CD does not start playing automatically,
press X (play.)
6 To eject the CD, press OPEN/CLOSE.
Disc type
Viewing photos and playing music and video files
Media Center lets you browse and play multimedia
files on a data disc or USB device, such as a flash
drive.
Notes
• A file name can be up to 255 characters.
• The folder name can be up to 1152 characters.
• When playing a video disc, you must stop playback, then
switch to the USB device.
To play files on a data disc or USB device:
1 Insert a data disc into the disc tray or plug a USB
device into the USB jack on the front of your
player.
2 After the files load, press HOME. The HOME
menu opens.
Controlling audio CD playback
When a CD is playing, the following information
appears automatically.
Disc type
Playback
mode
To control audio CD playback:
• To pause playback, press (pause). To resume
playback, press (pause) or X (play).
• To stop playback, press (stop). To resume
playback, press X (play). Playback starts at the
beginning of the CD.
• To press (stop) twice to completely stop
playback. On the HOME menu, press S T W
or X to highlight My Media, then press
ENTER. Press S or T to highlight CDDA, then
press ENTER.
• To fast forward or fast reverse, press (fast
forward) or (fast reverse). To resume normal
playback, press X (play).
• To go to the next track, press
/ (next/step). To go to the start of the
current track, press (previous). To go the
previous track, press (previous) twice.
Current track/
total trac ks
Current playback time
3 Press S T W or X to highlight My Media, then
press ENTER. The Media Center menu opens.
The following illustration is for a data disc.
Data Disc
..
Photo
Music
Video
Type Folder
POPUP
SETUP
Edit Menu
Exit
The Media Center has three folders:
• Photo—Contains the photo files on the
data disc or USB flash drive. You can view
individual photos in this folder or create a
slideshow of photos. See “Viewing a
photo” on page 13 and “Creating a
slideshow of photos” on page 13.
Supported file types are files with .jpg,
.jpeg, .png, or .gif file extensions.
• Music—Contains the music files on the
data disc or USB flash drive. You can listen
to individual music files in this folder or
create a playlist of music files. See
“Listening to a music file” on page 13 and
“Creating a music playlist of music files” on
page 14. Supported file types are files with
.wma or .mp3 file extensions.
www.insigniaproducts.com
12
Page 16

Wireless 3D Connected Blu-ray Disc Player
• Video—Contains the video files on the
data disc or USB flash drive. You can view a
video in this folder. See “Playing a video”
on page 14. Supported file types are files
with .mpeg4 or .avi file extentions.
4 Press S or T to highlight a folder name, then
press ENTER.
During playback, if you press MENU information
about the disc is displayed.
Photo disc:
Disc type
Viewing a photo
To a view photo:
1 In Media Center, open the Photo folder.
2 Press
Creating a slideshow of photos
To create a slideshow of photos:
1 In Media Center, open the Photo folder.
2 Press POPUP MENU. The Edit menu opens.
S or T to highlight the photo you want
to view, then press ENTER. The photo is
displayed.
Notes
When you highlight a JPEG file, a thumbnail view of the JPEG is
displayed on the bottom right of the screen. This lets you preview
a photo before you display it full-screen.
The file type, size, and resolution are displayed on the preview
area.
You can:
• Press
• Press (stop) to return to Media Center.
S T W or X to rotate the photo.
3 Press S or T to highlight an option, then press
ENTER. You can select:
• Add to Playlist—Adds the currently selected
file to the playlist.
• Select All—Adds all the files and folders in the
current folder to the playlist. A check mark
appears next to each file or folder. This option
can select 100 files or folders. If the current
folder has more than 100 files or folders, the
first 100 are selected.
• Clear All—Removes all selected files and
folders from the playlist. The check marks next
to the files and folders disappear.
• Cancel—Closes the Edit menu.
To control slideshow playback:
• Press W or RETURN to go back to
Data Disc/Photo screen, select the playlist you
want to control, then press ENTER.
• Press
• Press (pause) to pause playback. Press
• Press (stop) to stop the slideshow and return
• Press REPEAT once to repeat the currently
• Press (fast reverse) or (fast forward) to
• Press DISPLAY to view information about the
Listening to a music file
To listen to a music file:
1 In Media Center, open the Music folder.
2 Press
want to listen to, then press ENTER. The file
plays.
You can :
X (play) to start playback.
(pause) or
to the file list.
displayed photo, press twice to repeat all the
photos in the slideshow, press a third time to
cancel the repeat function and resume normal
playback.
change the playback speed from fast, to
middle, to slow.
currently displayed photo.
S or T to highlight the music file you
• Press (pause) to pause playback. Press
(pause) or
• Press (stop) twice to stop playback and
return to the file list.
X (play) to resume playback.
X (play) to resume playback.
www.insigniaproducts.com
13
Page 17

Wireless 3D Connected Blu-ray Disc Player
Creating a music playlist of music files
To create a music playlist:
1 In Media Center, open the Music folder.
2 Press POPUP MENU. The Edit menu opens.
3 Press S or T to highlight an option, then press
ENTER. You can select:
• Add to Playlist—Adds the currently selected
file to the playlist.
• Select All—Adds all the files and folders in the
current folder to the playlist. A check mark
appears next to each file or folder. This option
can select 100 files or folders. If the current
folder has more than 100 files or folders, the
first 100 are selected.
• Clear All—Removes all selected files and
folders from the playlist. The check marks next
to the files and folders disappear.
• Cancel—Closes the Edit menu.
To control playlist playback:
• Press W or RETURN to go back to
Data Disc/Music screen, select the playlist you
want to control, then press ENTER.
• Press
• Press (pause) to pause playback. Press
• Press (stop) twice to stop the playlist and
• Press REPEAT once to repeat the currently
• While a file is playing, press A-B to mark a
X (play) to start playback.
(pause) or
return to the file list.
playing file, press twice to repeat all the files in
the playlist, press a third time to cancel the
repeat function and resume normal playback.
starting point for a playback loop. The file
continues to play. When you reach the point
where you want to playback loop to end, press
A-B again. The playback loop plays. Press A-B
again to cancel the playback loop and return
to normal playback.
X (play) to resume playback.
Playing a video
To play a v i d e o:
1 In Media Center, open the Video folder.
2 Press
3 To control video playback:
S or T to highlight the video file you
want to watch, then press ENTER. The file plays.
• Press (pause) to pause playback. Press
(pause) or
• Press (stop) to stop the video and return to
the file list.
• While a video is playing, press A-B to mark a
starting point for a playback loop. The video
continues to play. When you reach the point
where you want to playback loop to end, press
A-B again. The playback loop plays. Press A-B
again to cancel the playback loop and return
to normal viewing.
• Press DISPLAY to view information about the
currently playing video.
X (play) to resume playback.
Searching for a title, chapter, or elapsed time
Note
Some discs do not let you search for a title.
To search for a title, chapter, or elapsed time:
1 During playback, press SEARCH, then press
ENTER.
2 Press S T W or X to highlight a search mode,
then press ENTER. You can select Title, Chapter,
or Time.
3 Press the number buttons to enter a title
number, chapter number, or time, then press
ENTER. Your player goes to the title, chapter, or
time you entered.
4 Press DISPLAY to exit search mode.
Repeating a title, chapter, or CD track
Notes
• Repeat does not work with Blu-ray JAVA discs.
• Some Blu-ray Discs do not let you repeat all.
To repeat a title or chapter or CD track:
• To repeat a title or chapter, press REPEAT one
or more times to select a repeat mode. You can
select Repeat Title, Repeat Chapter, Repeat
track, Repeat all, or Off.
• To repeat a CD track, press REPEAT one or
more times to select a repeat mode. You can
select Repeat Track, Repeat All, or Off.
www.insigniaproducts.com
14
Page 18

Wireless 3D Connected Blu-ray Disc Player
Creating a playback loop on a DVD or audio CD
Note
Blu-ray Discs do not normally support playback
loops.
To create a playback loop:
1 Play the disc until you reach the point where
you want the loop to start, then press A-B.
2 Play the disc until you reach the point where
you want the loop to stop, then press A-B. Your
player plays the loop you created repeatedly.
3 Press A-B to cancel the loop and return to
normal playback.
Using PIP (picture-in-picture) mode
Some Blu-ray Discs are compatible with
picture-in-picture (PIP) mode. In PIP mode, the
primary video is displayed on the full screen, and
the secondary video is displayed in a small window.
Primary video
Using a disc popup menu
To use a disc popup menu:
1 During Blu-ray Disc playback, press
POPUP MENU. The Blu-ray Disc popup menu
opens.
2 Press S T W or X to highlight an option, then
press ENTER.
Selecting the audio channel with the remote control
To select the audio channel with the remote
control:
• Press AUDI O one or more times. Your player
displays audio channel information, such as
“1/2 English Dolby Digital stereo.” “1” indicates
the currently selected audio channel. “2”
indicates the total number of audio channels.
“English” indicates the audio language. “Dolby
Digital” describes the currently selected audio
format. “Stereo” indicates the current audio
mode.
Selecting a viewing angle
Note
Not all discs are recorded with multiple viewing
angles and not all scenes on a disc have multiple
viewing angles.
Secondary video
See the documentation that came with the disc for
playback instructions.
To use PIP m o de:
1 Press PIP to turn PIP mode on or off.
2 If PIP mode is on, press PIP AUDIO to turn the
audio for the video in the PIP window on or off.
Note
In search mode or frame-by-frame playback mode,
only the primary video plays.
To select a viewing angle:
• During playback, press ANGLE. Your player
displays “Angle: X of X.” “The first “X” indicates
the current viewing angle, and the second “X”
indicates the total number of viewing angles.
www.insigniaproducts.com
15
Page 19

Wireless 3D Connected Blu-ray Disc Player
Selecting the TV aspect ratio
To select the TV aspect ratio:
1 Turn on your player.
If no disc is in the disc tray, the HOME menu is
displayed.
Or
If a disc is in the tray, press HOME. The
HOME menu is displayed.
2 Press S T W or X to highlight SETTINGS, then
press ENTER. The SETTINGS menu opens with
Display highlighted.
Display
Audio
Language
Network
System
Security
Use cursor ke ys to highlight menu and
ENTER key to select
TV Aspe ct Rati o
Resolution
HDMI Color Space
HDMI Deep Color
HDMI 1080p 24Hz
HDMI 3D
RETURN
16:9 Normal
Auto
Auto
Auto
Off
Auto
HOME
Selecting the video output resolution
Notes
• Selecting a resolution the TV does not support
could result in an unstable picture or loss of the
picture. See the documentation that came with
the TV to find the resolutions the TV supports.
• Only the HDMI output on your player supports
1080p video output at any frame rate.
• The AV (analog) jack only support the 480i or
480p resolution. If the TV is connected to these
jacks and no picture is displayed, press
RESOLUTION one or more times until you see a
picture.
To select the video output resolution using the
remote control:
• Press RESOLUTION one or more times to
select a resolution. You can select Auto,
1080p, 1080i, 720p, 480p, or 480i.
Note
Auto selects the best resolution based on the video
input.
To select the video output resolution using the
SETTINGS menu:
1 Turn on your player.
If no disc is in the disc tray, the HOME menu is
displayed.
Or
If a disc is in the tray, press HOME. The
HOME menu is displayed.
Exit
3 Press ENTER. TV Aspect Ratio is highlighted.
4 Press ENTER.
5 Press S or T to highlight an aspect ratio, then
press ENTER.
You can select: 16:9 Normal, 16:9 Full,
4:3 Pan & Scan, or 4:3 Letterbox.
Note
• If your TV has a rectangular (16:9) aspect ratio,
choose one of the 16:9 aspect ratios. If your TV
has a square (4:3) aspect ratio, choose one of the
4:3 aspect ratios.
• Setting your player for one of the 16:9 settings
when connected to a 4:3 TV may produce a
picture that does not correctly fit on the screen.
2 Press S T W or X to highlight SETTINGS, then
press ENTER. The SETTINGS menu opens with
Display highlighted.
Display
Audio
Language
Network
System
Security
Use cursor ke ys to highlight menu and
ENTER key to select
TV Aspe ct Rati o
Resolution
HDMI Color Space
HDMI Deep Color
HDMI 1080p 24Hz
HDMI 3D
RETURN
16:9 Normal
Auto
Auto
Auto
Off
Auto
HOME
Exit
3 Press ENTER, press S or T to highlight
Resolution, then press ENTER.
4 Press S or T to highlight a resolution, then
press ENTER. You can select Auto, 1080p,
1080i, 720p, 480p, or 480i.
Note
Auto selects the best resolution based on the video
input.
www.insigniaproducts.com
16
Page 20

Wireless 3D Connected Blu-ray Disc Player
Adjusting the HDMI image including 3D mode
To adjust the HDMI image:
1 Turn on your player.
If no disc is in the disc tray, the HOME menu is
displayed.
Or
If a disc is in the tray, press HOME. The
HOME menu is displayed.
2 Press S T W or X to highlight SETTINGS, then
press ENTER. The SETTINGS menu opens with
Display highlighted.
Display
Audio
Language
Network
System
Security
Use cursor ke ys to highlight menu and
ENTER key to select
TV Aspe ct Rati o
Resolution
HDMI Color Space
HDMI Deep Color
HDMI 1080p 24Hz
HDMI 3D
RETURN
16:9 Normal
Auto
Auto
Auto
Off
Auto
HOME
Exit
Selecting the digital audio output mode
To select the digital audio output mode:
1 Turn on your player.
If no disc is in the disc tray, the HOME menu is
displayed.
Or
If a disc is in the tray, press HOME. The
HOME menu is displayed.
2 Press S T W or X to highlight SETTINGS, then
press ENTER. The SETTINGS menu opens.
3 Press S or T to highlight Audio.
Display
Audio
Language
Network
System
Security
Use cursor keys to highlight menu and
ENTER key to select
Digital Out
HDMI Out
Down Sampling
Dynami c Range
RETURN
PCM
PCM
48kHz
Off
HOME
Exit
3 Press ENTER, press S or T to highlight an
HDMI option, then press ENTER. You can select:
• HDMI Color Space—You can select Auto,
YCb Cr, YCbCr422, Full RGB, or RGB. “Color
Space” refers to the number of individual
colors that can be displayed on the screen. If
you know the Color Space capability for the
connected TV, you can select one of these
options to match the TV’s color display
capability. We recommend that you select
Auto.
• HDMI Deep color—You can select Auto or
Off. If this option is set to Auto and your TV
supports Deep color, the screen displays
colors more accurately. See the
documentation that came with your TV to see
if your TV supports Deep color.
• HDMI 1080p 24HZ—Movies are recorded on
film at a rate of 24 pictures (frames) per
second. Many of the movies on Blu-ray Discs
are placed on the discs at this frame rate. If
your TV supports 24 frames per second, but
you would prefer viewing the video at a higher
frame rate, you should turn off HDMI 1080p
24Hz. You can select Auto or Off.
• HDMI 3D—Turns the 3D feature on or off. You
can select Auto or Off.
4 Press ENTER. Digital Out is highlighted.
5 Press ENTER.
6 Press S or T to highlight a mode, then press
ENTER. You can select:
• PCM—Outputs the signal as processed audio
ready for any receiver. Use this when your
receiver cannot decode the movie soundtrack
on the disc.
• Bitstream—Outputs the movie soundtrack
without any processing. This option requires a
receiver that supports the movie soundtrack
format.
• Bitstream Re-encode—Combines all audio
signals and outputs as DTS, Dolby, or PCM
depending on the audio stream on the disc.
www.insigniaproducts.com
17
Page 21

Wireless 3D Connected Blu-ray Disc Player
Selecting the HDMI digital audio output mode
To select the HDMI digital audio output mode:
1 Turn on your player.
If no disc is in the disc tray, the HOME menu is
displayed.
Or
If a disc is in the tray, press HOME. The
HOME menu is displayed.
2 Press S T W or X to highlight SETTINGS, then
press ENTER. The SETTINGS menu opens.
3 Press S or T to highlight Audio.
Display
Audio
Language
Network
System
Security
Use cursor keys to highlight menu and
ENTER key to select
4 Press ENTER.
5 Press S or T to highlight HDMI OUT, then
press ENTER.
6 Press S or T to highlight a mode, then press
ENTER. You can select:
• PCM—Outputs the signal as processed audio
ready for any receiver. Use this when your
receiver cannot decode the movie soundtrack
on the disc.
• Bitstream—Outputs the movie sound track
without any processing. This option requires a
receiver that supports the movie soundtrack
format.
• Bitstream Re-encode—Automatically selects
the HDMI digital signal type according to the
audio stream on the disc.
Digital Out
HDMI Out
Down Sampling
Dynami c Range
RETURN
PCM
PCM
48kHz
Off
HOME
Exit
Selecting the PCM downsampling rate
If your player is connected to an audio receiver or
TV with an optical or coaxial cable, you need to
select the highest PCM sampling rate the amplifier
supports.
To select the PCM downsampling rate:
1 Turn on your player.
If no disc is in the disc tray, the HOME menu is
displayed.
Or
If a disc is in the tray, press HOME. The
HOME menu is displayed.
2 Press S T W or X to highlight SETTINGS, then
press ENTER. The SETTINGS menu opens.
3 Press S or T to highlight Audio.
Display
Audio
Language
Network
System
Security
Use cursor keys to highlight menu and
ENTER key to select
4 Press ENTER.
5 Press S or T to highlight Down Sampling,
then press ENTER.
6 Press S or T to highlight a rate, then press
ENTER. You can select:
• 48kHz—Select this option if the TV speakers,
amplifier, or home theater is not capable of
handling signals over 48kHz sampling rate.
If you do not have an audio receiver or TV
connected to your player through one of the
digital audio jacks (optical or coaxial), select
48kHz. See the documentation that came with
the receiver or TV.
• 96kHz—Select this option if the TV speakers,
amplifier, or home theater is capable of
handling a digital sampling rate of 96kHz.
• 192kHz—Select this option if the TV speakers,
amplifier, or home theater is capable of
handling a digital sampling rate of 192kHz.
Digital Out
HDMI Out
Down Sampling
Dynami c Range
RETURN
HOME
PCM
PCM
48kHz
Off
Exit
www.insigniaproducts.com
18
Page 22

Wireless 3D Connected Blu-ray Disc Player
Turning dynamic range control on or off
When Dynamic Range Control is set to Off, movie
soundtracks are played with the standard dynamic
range.
When movie soundtracks are played at low volume
or from smaller speakers, you can set Dynamic
Range Control to On. Your player applies
appropriate compression to make low-level content
more intelligible and prevent dramatic passages
from getting too loud.
To turn dynamic range control on or off:
1 Turn on your player.
If no disc is in the disc tray, the HOME menu is
displayed.
Or
If a disc is in the tray, press HOME. The
HOME menu is displayed.
Selecting the on-screen menu language
To select the on-screen menu language:
1 Turn on your player.
If no disc is in the disc tray, the HOME menu is
displayed.
Or
If a disc is in the tray, press HOME. The
HOME menu is displayed.
2 Press S T W or X to highlight SETTINGS, then
press ENTER. The SETTINGS menu opens.
3 Press Sor T to highlight Language.
2 Press S T W or X to highlight SETTINGS, then
press ENTER. The SETTINGS menu opens.
3 Press S or T to highlight Audio.
Display
Audio
Language
Network
System
Security
Use cursor keys to highlight menu and
ENTER key to select
Digital Out
HDMI Out
Down Sampling
Dynami c Range
RETURN
HOME
PCM
PCM
48kHz
Off
Exit
4 Press ENTER.
5 Press S or T to highlight Dynamic Range,
then press ENTER.
6 Press S or T to highlight On or Off, then press
ENTER.
Display
Audio
Language
Network
Syste m
Security
Use cursor ke ys to highlight menu and
ENTER key to select
OSD
Disc Menu
Disc Audio
Disc Subtitle
RETURN
4 Press ENTER. OSD is highlighted.
5 Press ENTER, press S or T to highlight a
language, then press ENTER. You can select
English or Spanish.
Selecting the disc menu language
To select the disc menu language:
1 Turn on your player.
If no disc is in the disc tray, the HOME menu is
displayed.
Or
If a disc is in the tray, press HOME. The
HOME menu is displayed.
HOME
English
Auto
Auto
None
Exit
2 Press S T W or X to highlight SETTINGS, then
www.insigniaproducts.com
press ENTER. The SETTINGS menu opens.
19
Page 23

Wireless 3D Connected Blu-ray Disc Player
3 Press S or T to highlight Language.
Display
Audio
Language
Network
Syste m
Security
Use cursor ke ys to highlight menu and
ENTER key to select
OSD
Disc Menu
Disc Audio
Disc Subtitle
RETURN
4 Press ENTER.
5 Press Sor T to highlight Disc Menu, then press
ENTER.
6 Press Sor T to highlight a language, then press
ENTER. The available languages depend on the
disc.
Selecting the disc audio language
To select the disc audio language:
1 Turn on your player.
If no disc is in the disc tray, the HOME menu is
displayed.
Or
If a disc is in the tray, press HOME. The
HOME menu is displayed.
HOME
English
Auto
Auto
None
Exit
Selecting the subtitle language
To select the subtitle language:
1 Turn on your player.
If no disc is in the disc tray, the HOME menu is
displayed.
Or
If a disc is in the tray, press HOME. The
HOME menu is displayed.
2 Press S T W or X to highlight SETTINGS, then
press ENTER. The SETTINGS menu opens.
3 Press S or T to highlight Language.
Display
Audio
Language
Network
Syste m
Security
Use cursor ke ys to highlight menu and
ENTER key to select
OSD
Disc Menu
Disc Audio
Disc Subtitle
RETURN
HOME
English
Auto
Auto
None
Exit
4 Press ENTER.
5 Press Sor T to highlight Disc Audio, then
press ENTER.
6 Press Sor T to highlight a language, then press
ENTER. The available languages depend on the
disc.
4 Press ENTER.
5 Press Sor T to highlight Disc Subtitle, then
press ENTER.
6 Press Sor T to highlight a language, then press
ENTER. The available languages depend on the
disc.
www.insigniaproducts.com
20
Page 24

Wireless 3D Connected Blu-ray Disc Player
Configuring a wired Internet connection
To configure a wired Internet connection:
1 Turn on your player.
If no disc is in the disc tray, the HOME menu is
displayed.
Or
If a disc is in the tray, press HOME. The
HOME menu is displayed.
Note
If this is the first time you have turned on your player,
the Quick Setup wizard opens. For instructions on
completing the wizard, see “Turning on your player
for the first time” on page 8.
Configuring a wireless Internet connection
To configure a wireless Internet connection:
1 Set up your access point or wireless router (if not
already set up).
2 Turn on your player.
If no disc is in the disc tray, the HOME menu is
displayed.
Or
If a disc is in the tray, press HOME. The
HOME menu is displayed.
Note
If this is the first time you have turned on your player,
the Quick Setup wizard opens. For instructions on
completing the wizard, see “Turning on your player
for the first time” on page 8.
2 Press S T W or X on the remote control to
highlight SETTINGS, then press ENTER. The
SETTINGS menu opens.
3 Press S or T to highlight Network.
Display
Audio
Language
Network
System
Security
Use cursor keys to highlight menu and
ENTER key to select
Connecti on Type
Information
Connecti on Test
IP Setting
BD-Live Connection
RETURN
Wired
More...
More...
Auto
Permitted
HOME
Exit
4 Press ENTER. Connection Type is highlighted.
5 Press ENTER, press S or T to select Wired,
then press ENTER.
3 Press S T W or X on the remote control to
highlight SETTINGS, then press ENTER. The
SETTINGS menu opens.
4 Press S or T to highlight Network.
Display
Audio
Language
Network
System
Security
Use cursor keys to highlight menu and
ENTER key to select
Connecti on Type
Information
Connecti on Test
IP Setting
BD-Live Connection
RETURN
Wired
More...
More...
Auto
Permitted
HOME
Exit
5 Press ENTER. Connection Type is highlighted.
6 Press ENTER, press S or T to highlight
Wireless, then press ENTER. If the current
Connection Type is set to Wired, the Wireless
Setting screen opens. If the current Connection
Typ e is set to Wireless, the following screen is
displayed.
Display
Audio
Language
Network
System
Security
Use cursor ke ys to highlight menu and
ENTER key to select
Doing this will disconnet you from the
current network. Do you wish to
continue?
RETURN
No
HOME
Yes
Exit
www.insigniaproducts.com
21
Page 25

Wireless 3D Connected Blu-ray Disc Player
7 Select Ye s , then press ENTER. The Wireless
Setting screen opens.
8 Press S or T to highlight a connection type,
then press ENTER. You can select:
• Scan—Automatically searches for any
networks within range.
• Manual—Lets you enter a router’s name or
SSID.
• WPS—Connects your player to a WPS
protected Wi-Fi router.
9 Follow the on-screen instructions to complete
the network setup.
Notes
Use a LAN cable or router that supports
10BASE-T/100BASE-TX.
Insignia cannot guarantee that all brands of
broadband routers are compatible with your player.
You need a router to use xDSL service. Your Internet
service provider may have restrictions on the use of a
router. Contact your Internet service provider.
Cordless phones, Bluetooth devices, microwave
ovens, and similar devices may interfere with wireless
connections that operate on the 2.4GHz frequency.
Internet access can be limited based on:
• Internet traffic
• The type of connection you have
• The bandwidth provided by your Internet service
provider
• Access restrictions set by your Internet service
provider
• Problems with the site or your Internet service
provider
If your player cannot access Internet sites or services,
make sure that:
• Power has not failed.
• Your Internet service provider is not experiencing
problems.
• Your player is configured correctly.
See “Troubleshooting” on page 30.
3 Press S or T to highlight Network.
Display
Audio
Language
Network
System
Security
Use cursor keys to highlight menu and
ENTER key to select
Connecti on Type
Information
Connecti on Test
IP Setting
BD-Live Connection
RETURN
4 Press ENTER.
5 Press S or T to highlight Information, then
press ENTER. Information such as Address Type,
IP Address, and Subnet Mask is displayed.
Testing your Internet connection
When your player tests your Internet connection, it
sends (pings) an IP address.
To test your Internet connection:
1 Turn on your player.
If no disc is in the disc tray, the HOME menu is
displayed.
Or
If a disc is in the tray, press HOME. The
HOME menu is displayed.
Wired
More...
More...
Auto
Permitted
HOME
Exit
Viewing Internet connection information
To view Internet connection information:
1 Turn on your player.
If no disc is in the disc tray, the HOME menu is
displayed.
Or
If a disc is in the tray, press HOME. The
HOME menu is displayed.
2 Press S T W or X on the remote control to
highlight SETTINGS, then press ENTER. The
SETTINGS menu opens.
2 Press S T W or X on the remote control to
highlight SETTINGS, then press ENTER. The
SETTINGS menu opens.
3 Press S or T to highlight Network.
Display
Audio
Language
Network
System
Security
Use cursor keys to highlight menu and
ENTER key to select
Connecti on Type
Information
Connecti on Test
IP Setting
BD-Live Connection
RETURN
Wired
More...
More...
Auto
Permitted
HOME
Exit
4 Press ENTER.
www.insigniaproducts.com
22
Page 26

Wireless 3D Connected Blu-ray Disc Player
5 Press S or T to highlight Connection Test,
then press ENTER. If the test is successful,
“Connection Success” appears on the screen.
If this test fails, check the connection to your
home network.
•If you have a wired connection:
• Make sure your network cable is securely
attached to your router and your player.
• Make sure your router is connected to your
cable or DSL modem correctly.
• If you have a wireless connection:
• Make sure your router is connected to your
cable or DSL modem correctly.
• Make sure your player is within the range
of your router.
• Make sure the WIFI network you want to
use is selected.
• If you have a security password, be sure
you have entered the password correctly.
• If further help is need for setting up
security and obtaining your security
password, contact your router
manufacturer and/or cable or DSL modem
manufacturer.
If the Connection Test fails, there may be an
issue with your router or Internet service
provider.
• Make sure that you router is connected
correctly to your cable or DSL modem.
• Contact your Internet service provider for
more help.
3 Press S or T to highlight Network.
Display
Audio
Language
Network
System
Security
Use cursor keys to highlight menu and
ENTER key to select
Connecti on Type
Information
Connecti on Test
IP Setting
BD-Live Connection
RETURN
Wired
More...
More...
Auto
Permitted
HOME
Exit
4 Press ENTER.
5 Press S or T to highlight IP Setting, then press
ENTER.
6 Press S or T to highlight Auto or Manual, then
press ENTER.
If you selected Manual, the Network Information
screen opens with the IP Address row
highlighted. Press a number button to enter the
first digit of the IP address, then press X to
move to the next digit. Continue using the
number buttons and the W or X buttons to
enter the rest of the IP address. When you have
finished, press ENTER. If you need to remove a
number you entered, press T.
Setting the IP address
You can set your player to automatically obtain an
IP address when it connects to your Internet service
provider (ISP). Some providers require that you
enter a fixed IP address that does not change.
To set the IP address:
1 Turn on your player.
If no disc is in the disc tray, the HOME menu is
displayed.
Or
If a disc is in the tray, press HOME. The
HOME menu is displayed.
2 Press S T W or X on the remote control to
highlight SETTINGS, then press ENTER. The
SETTINGS menu opens.
www.insigniaproducts.com
23
Page 27

Wireless 3D Connected Blu-ray Disc Player
Setting the BD-Live Internet access level
1 Turn on your player.
If no disc is in the disc tray, the HOME menu is
displayed.
Or
If a disc is in the tray, press HOME. The
HOME menu is displayed.
2 Press S T W or X on the remote control to
highlight SETTINGS, then press ENTER. The
SETTINGS menu opens.
3 Press S or T to highlight Network.
Display
Audio
Language
Network
System
Security
Use cursor keys to highlight menu and
ENTER key to select
4 Press ENTER.
5 Press S or T to highlight BD-Live connection,
then press ENTER.
6 Press S or T to highlight an access level, then
press ENTER. You can select:
• Permitted—Always allows Internet access.
• Partial Permitted—Allows internet access to
BD-Live content with valid certificates only.
• Prohibited—Never allows Internet access.
Connecti on Type
Information
Connecti on Test
IP Setting
BD-Live Connection
RETURN
Wired
More...
More...
Auto
Permitted
HOME
Exit
Setting the screen saver activation time
Your player has a screen saver feature that turns the
the displays the Insignia logo when your player is
inactive. The logo moves around the screen to
prevent screen burn-in. You can set the amount of
time you want your player to wait before activating
the screen saver.
To set screen saver activation time:
1 Turn on your player.
If no disc is in the disc tray, the HOME menu is
displayed.
Or
If a disc is in the tray, press HOME. The
HOME menu is displayed.
2 Press S T W or X on the remote control to
highlight SETTINGS, then press ENTER. The
SETTINGS menu opens.
3 Press S or T to highlight System.
Display
Audio
Language
Network
System
Security
Use cursor ke ys to highlight menu and
ENTER key to select
Screen Saver
Disc Auto P layback
InLink
Firmware Update
Load De faults
Deactivate Online Serv...
RETURN
4 Press ENTER. Screen Saver is highlighted.
5 Press ENTER, then press S or T to highlight the
amount on time your player is inactive before it
displays the screen saver. You can select 5
minutes, 10 minutes, 15 minutes, or 20 minutes.
6 Press ENTER.
5 Minutes
On
Off
More...
More...
HOME
Exit
www.insigniaproducts.com
24
Page 28

Wireless 3D Connected Blu-ray Disc Player
Setting automatic disc playback mode
You can set your player to automatically start
playback when you load a disc and close the disc
tray.
To set automatic disc playback mode:
1 Turn on your player.
If no disc is in the disc tray, the HOME menu is
displayed.
Or
If a disc is in the tray, press HOME. The
HOME menu is displayed.
2 Press S T W or X on the remote control to
highlight SETTINGS, then press ENTER. The
SETTINGS menu opens.
3 Press S or T to highlight System.
Turning InLink on or off
This option is used to allow the TV remote control
to control certain functions of the Blu-ray
player; and for the Blu-ray player to control certain
functions of the TV. InLink control is only
available when you are using an HDMI connection
to your TV.
Note
Not all TVs are compatible with your Blu-ray player.
To turn InLink on or off:
1 Turn on your player.
If no disc is in the disc tray, the HOME menu is
displayed.
Or
If a disc is in the tray, press HOME. The
HOME menu is displayed.
Display
Audio
Language
Network
System
Security
Use cursor ke ys to highlight menu and
ENTER key to select
Screen Saver
Disc Auto P layback
InLink
Firmware Update
Load De faults
Deactivate Online Serv...
RETURN
5 Minutes
On
Off
More...
More...
HOME
Exit
4 Press ENTER.
5 Press S or T to highlight Disc Auto Playback,
then press ENTER.
6 Press S or T to highlight On or Off, then press
ENTER.
2 Press S T W or X on the remote control to
highlight SETTINGS, then press ENTER. The
SETTINGS menu opens.
3 Press S or T to highlight System.
Display
Audio
Language
Network
System
Security
Use cursor ke ys to highlight menu and
ENTER key to select
Screen Saver
Disc Auto P layback
InLink
Firmware Update
Load De faults
Deactivate Online Serv...
RETURN
5 Minutes
On
Off
More...
More...
HOME
Exit
4 Press ENTER.
5 Press S or T to highlight InLink, then press
ENTER.
6 Press S or T to highlight On or Off, then press
ENTER.
www.insigniaproducts.com
25
Page 29

Wireless 3D Connected Blu-ray Disc Player
Upgrading your player’s firmware
You can upgrade your player’s firmware by:
• Connecting your player to the Internet and
letting your player tell you when a firmware
upgrade is available
• Downloading a firmware upgrade to a disc or
USB flash drive, then installing the firmware
upgrade from the disc or flash drive
• Manually installing an upgrade directly from
the Internet.
To let your player tell you when a firware
upgrade is available:
1 Connect your player to the Internet. When your
player is connected to the Internet, it
automatically detects available firmware
upgrads and displays a message on the screen.
2 Follow the on-screen instructions to install the
firmware upgrade.
To upgrade your player’s firmware from a disc or
flash drive:
1 Insert the disc or flash drive into a computer.
2 Go to www.insigniaproducts.com, type
“NS-WBRDVD3” in the search box, then press
ENTER.
3 Click the CURRENT Firmware link, then save the
firware update to the disc or flash drive.
4 Insert the disc or flash drive into your player.
Your player automatically detects the upgrade
software and installs it on your player.
5 Follow the on-screen instructions to complete
the firmware upgrade. A message tells your
when the upgrade is complete.
6 Press ENTER.
To upgrade your player’s firmware directly from
the Internet:
1 Turn on your player.
If no disc is in the disc tray, the HOME menu is
displayed.
Or
If a disc is in the tray, press HOME. The
HOME menu is displayed.
3 Press S or T to highlight System.
Display
Audio
Language
Network
System
Security
Use cursor ke ys to highlight menu and
ENTER key to select
Screen Saver
Disc Auto P layback
InLink
Firmware Update
Load De faults
Deactivate Online Serv...
4 Press ENTER.
5 Press S or T to highlight Firmware Update,
then press ENTER.
6 Press ENTER to highlight Network, then press
ENTER
again.
7 Follow the on-screen instructions to complete
the firmware upgrade. A message tells you
when the upgrade is complete. If an error
message appears, make sure that you are not
trying to install an older version of the firmware.
To view the installed firmware version, see
“Displaying system information” on page 26.
8 Press ENTER.
Displaying system information
To display system information:
1 Turn on your player.
If no disc is in the disc tray, the HOME menu is
displayed.
Or
If a disc is in the tray, press HOME. The
HOME menu is displayed.
RETURN
5 Minutes
On
Off
More...
More...
HOME
Exit
2 Press S T W or X on the remote control to
highlight SETTINGS, then press ENTER. The
SETTINGS menu opens.
www.insigniaproducts.com
2 Press S T W or X on the remote control to
highlight SETTINGS, then press ENTER. The
SETTINGS menu opens.
3 Press S or T to highlight System.
Display
Audio
Language
Network
System
Security
Use cursor ke ys to highlight menu and
ENTER key to select
Screen Saver
Disc Auto P layback
InLink
Firmware Update
Load De faults
Deactivate Online Serv...
RETURN
5 Minutes
On
Off
More...
More...
HOME
Exit
4 Press ENTER.
26
Page 30

Wireless 3D Connected Blu-ray Disc Player
5 Press S or T to highlight System Information,
then press ENTER. Information about your
player, such as the serial number, software
version, and Netflix ESN, is displayed.
Viewing the Open Source Software information
To view the Open Source Software information:
1 Turn on your player.
If no disc is in the disc tray, the HOME menu is
displayed.
Or
If a disc is in the tray, press HOME. The
HOME menu is displayed.
Viewing BD-Live information
To view BD-Live information:
1 Turn on your player.
If no disc is in the disc tray, the HOME menu is
displayed.
Or
If a disc is in the tray, press HOME. The
HOME menu is displayed.
2 Press S T W or X on the remote control to
highlight SETTINGS, then press ENTER. The
SETTINGS menu opens.
3 Press S or T to highlight System.
2 Press S T W or X on the remote control to
highlight SETTINGS, then press ENTER. The
SETTINGS menu opens.
3 Press S or T to highlight System.
Display
Audio
Language
Network
System
Security
Use cursor ke ys to highlight menu and
ENTER key to select
Screen Saver
Disc Auto P layback
InLink
Firmware Update
Load De faults
Deactivate Online Serv...
RETURN
5 Minutes
On
Off
More...
More...
HOME
Exit
4 Press ENTER.
Press S or T to highlight Legal, then press
ENTER. The Open Source Software information is
displayed.
Display
Audio
Language
Network
System
Security
Use cursor ke ys to highlight menu and
ENTER key to select
Screen Saver
Disc Auto P layback
InLink
Firmware Update
Load De faults
Deactivate Online Serv...
RETURN
5 Minutes
On
Off
More...
More...
HOME
Exit
4 Press ENTER.
5 Press T to highlight BD-Live Storage, then
press ENTER.
6 Press T to highlight Information, then press
ENTER. Information, including how much
storage space is available, is displayed.
www.insigniaproducts.com
27
Page 31

Wireless 3D Connected Blu-ray Disc Player
Erasing BD-Live storage
To erase BD-Live storage:
1 Turn on your player.
If no disc is in the disc tray, the HOME menu is
displayed.
Or
If a disc is in the tray, press HOME. The
HOME menu is displayed.
2 Press S T W or X on the remote control to
highlight SETTINGS, then press ENTER. The
SETTINGS menu opens.
3 Press S or T to highlight System.
Display
Audio
Language
Network
System
Security
Use cursor ke ys to highlight menu and
ENTER key to select
4 Press ENTER.
5 Press T to highlight BD-Live Storage, then
press ENTER.
6 Press T to highlight Erase BD-Live data, then
press ENTER.
7 Follow the on-screen instruction to erase
storage data.
Screen Saver
Disc Auto P layback
InLink
Firmware Update
Load De faults
Deactivate Online Serv...
RETURN
5 Minutes
On
Off
More...
More...
HOME
Exit
Setting the parental control password
You must set a password before you can set
parental controls.
To set the parental control password:
1 Turn on your player.
If no disc is in the disc tray, the HOME menu is
displayed.
Or
If a disc is in the tray, press HOME. The
HOME menu is displayed.
2 Press S T W or X on the remote control to
highlight SETTINGS, then press ENTER. The
SETTINGS menu opens.
3 Press S or T to highlight Security.
Display
Audio
Language
Network
System
Se curity
Use cursor ke ys to highlight menu and
ENTER key to select
4 Press ENTER. Change Password is highlighted.
5 Press ENTER. The Change Password screen
opens.
Display
Audio
Language
Network
System
Security
Use cursor ke ys to highlight menu and
ENTER key to select
Change Password
Pare ntal Control
RETURN
Change Password
Plea se enter current P assword:
RETURN
HOME
HOME
More...
Off
Exit
Exit
6 Press the number buttons to enter the current
7 Press the number buttons to enter your new
www.insigniaproducts.com
password (the default password is 0000), then
press ENTER. Another screen opens.
password, then press ENTER. Enter your new
password again to confirm, then press ENTER.
28
Page 32

Wireless 3D Connected Blu-ray Disc Player
Setting the parental control level
To set the parental control level:
1 Turn on your player.
If no disc is in the disc tray, the HOME menu is
displayed.
Or
If a disc is in the tray, press HOME. The
HOME menu is displayed.
2 Press S T W or X on the remote control to
highlight SETTINGS, then press ENTER. The
SETTINGS menu opens.
3 Press S or T to highlight Security.
Display
Audio
Language
Network
System
Security
Use cursor ke ys to highlight menu and
ENTER key to select
4 Press ENTER, press S or T to highlight
Parental Control, then press ENTER. You are
prompted to enter the password.
5 Press the number buttons to enter the
password, then press ENTER.
6 Press S or T to select the parental control level
you want, then press ENTER.
Parental control levels
Off—Turns off parental controls.
KID SAFE—Safe for kids
G—All children and general guidance
PG—Parental guidance
PG-13—Parental guidance for children under 13
PGR—Parental guidance recommended.
R—Restricted viewing
NC-17— No one 17 and under allowed
ADULT— Adult only
Note
• If you set the parental control level and try to
play a disc with level higher than current
parental control level, a password box opens.
Use the number buttons to enter the password,
then press ENTER. After you stop playback, the
parental control is reset.
• If you try to change the parental control level, a
password box opens. Use the number buttons
to enter the password, then press ENTER.
Change Password
Pare ntal Control
RETURN
HOME
More...
Off
Exit
Maintaining
General guidelines
• The top and back panels of your player may
become hot after a long period of use. This is not a
malfunction.
• When your are not using your player, make sure
that you remove the disc and put your player into
standby mode.
• If you do not use your player for a long period of
time, it may not function correctly. Turn on and
use your player occasionally.
• Do not place objects on the disc tray.
• Do not locate your player:
• Near heating devices or in an enclosed vehicle.
• In an area with a temperature over
104°F (40°C) or humidity over 90%.
•Dirty places.
• In an area with direct exposure to sunlight.
• Do not install this equipment in a confined
space such as a book case or similar unit. The
ventilation should not be impeded by
covering the ventilation openings with items
such as newspapers, table-cloths, or curtains.
• Make sure that you leave a minimum of 4 inches
(10 cm) around your player for sufficient
ventilation.
Electrical disturbance
If you place your player next to a radio, TV, or VCR,
the image may be poor and the sound may be
distorted. In this case, move your player away from
the radio, TV, or VCR.
Condensation
Condensation may form inside your player when:
• You move your player from a cold area to a warm
area
• You use it in a cold room where you have just
turned on a heater
• Air conditioning is blowing directly on your player
• Your player is in a damp place
If condensation forms inside your player, your
player may not work correctly. Turn on your player,
remove the disc and leave the tray open, then leave
your player on for two to three hours.
To minimize condensation problems, keep the
power cord connected to a power outlet.
Storing discs
• Do not store discs in a place that is exposed to
direct sunlight or heat.
• Do not store discs in a place that is exposed to
moisture and dust, such as a bathroom or near a
humidifier.
• Store discs vertically in their cases. Stacking discs
or placing objects on discs when not in their cases
may cause warping.
www.insigniaproducts.com
29
Page 33

Wireless 3D Connected Blu-ray Disc Player
Handling discs
• To keep a disc clean, do not touch the play side
(non-label side) of the disc.
• Do not attach paper or tape to the disc.
Cleaning discs
• Before playback, wipe the disc outwards from the
center (not in a circle) with a clean cloth.
• If you cannot clean the disc with a dry cloth, wipe
the disc with a slightly moistened, soft cloth, then
dry with a soft cloth.
• Do not use any solvents, such as paint thinner,
benzine, or commercially available cleaners, or
anti-static spray designed for vinyl records.
Troubleshooting
Check the following information for the possible
cause and solution for a problem before contacting
the nearest service center or dealer for repairs.
The following do not indicate a problem with your
player:
• Regular disc rotation sounds.
• Image disturbance during search.
Loading default settings
Caution
• To load default values on your player returns all
settings, including parental control settings, to
the factory default.
• After you reset your player, you must set up your
network and online applications again.
To load default settings:
1 Press HOME to open the Home menu.
2 Press
3 Press S or T to highlight System.
S T W or X to highlight SETTINGS, then
press ENTER.
Display
Audio
Language
Network
System
Security
Use cursor ke ys to highlight menu and
ENTER key to select
Screen Saver
Disc Auto P layback
InLink
Firmware Update
Load De faults
Deactivate Online Serv...
RETURN
5 Minutes
On
Off
More...
More...
HOME
Exit
4 Press ENTER, then press S or T to highlight
Load Defaults.
HOME
More...
Exit
Display
Audio
Language
Network
System
Security
Use cursor keys to highlight menu and
ENTER key to select
Screen Saver
Disc Auto Playback
InLink
Firmware Update
Load Defaults
Deactivate Online Ser...
RETURN
5 Press ENTER. A message asks “Do you want to
load default settings?”.
6 Select Yes , then press ENTER. Your player
resets to the default settings and the Quick
Setup menu opens.
7 Follow the on-screen instructions to select initial
settings, such as the menu language and the
screen resolution.
www.insigniaproducts.com
30
Page 34

Wireless 3D Connected Blu-ray Disc Player
Deactivating individual online applications
To deactivate individual online applications:
1 Press HOME to open the Home menu.
2 Press
S T W or X to highlight SETTINGS, then
press ENTER.
3 Press
S or T to highlight System.
Display
Audio
Language
Network
System
Security
Use cursor ke ys to highlight menu and
ENTER key to select
Screen Saver
Disc Auto P layback
InLink
Firmware Update
Load De faults
Deactivate Online Serv...
RETURN
5 Minutes
On
Off
More...
More...
HOME
Exit
4 Press ENTER, then press S or T to highlight
Deactivate Online Service.
HOME
All
Netflix
CinemaNow
Pandora
Napster
Exit
Display
Audio
Language
Network
System
Security
Use cursor keys to highlight menu and
ENTER key to select
Screen Saver
Disc Auto Playback
InLink
Firmware Update
Load Defaults
Deactivate Online Servi
RETURN
5 Press ENTER.
6 Press
S T W or X to highlight the application
you want to deactivate, then press ENTER. The
next time you try to open the application, you
have to activate it again.
Power
Problem Solution
No power
The player switches to
standby mode
• Make sure that the power cord is plugged
into a power outlet and that the outlet is
supplying power.
• After a period of inactivity, your player
switches to standby mode automatically.
This is a power saving feature.
• When InLink is turned activated on your
player, CEC is turned activated on your TV,
and you use your TV's remote control to turn
off your TV, your player switches to standby
mode. Use your player's remote control to
turn on your player. Your TV also turns on.
• If your player switches to standby mode
unexpectedly, a safety protection may have
been activated. Press STANDBY/ON on
the front of your player.
Operation
Problem Solution
Remote control does not
work
Some or all functions do
not work
Playback fails to start or
starts then stops even
X (play) is
when
pressed
Start up is slow and
audio and video output
takes a long time
When reading a disc, the
disc tray opens
Audio or video pause
during playback
• Make sure that you are pointing the remote
control at the remote control sensor on the
front of your player.
• Make sure that there are no obstructions
between the remote control and the remote
control sensor on the front of your player.
• Make sure that there is no colored glass
between the remote control and the remote
control sensor on the front of your player.
Colored glass, such as the glass door of an
entertainment center, can interfere with
signal reception.
• Make sure that the remote control sensor is
not exposed to direct sunlight or bright light.
These can interfere with signal reception.
• If the batteries came wrapped in clear
plastic, make sure the plastic has been
removed.
• Replace the batteries.
• Some functions are not allowed by the disc,
for example, fast-forwarding through the
warning information at the beginning of the
disc.
• Condensation may have formed inside your
player. Turn off your player and wait one to
two hours for the condensation to
evaporate.
• Reset your player. For instructions, see
“Loading default settings” on page 30.
• Make sure that the disc is inserted face up in
the disc tray.
• Make sure that the disc is not dirty. For
instructions, see “Cleaning discs” on
page 30.
• The disc may be blank or incompatible with
your player. Try another disc.
• If power has been interrupted or the power
cord has just been connected, startup is
slow. This is not a defect.
• If your player is connected to the TV with an
HDMI cable, startup is slow. This is not a
defect.
• Make sure that the disc is not dirty. For
instructions, see “Cleaning discs” on
page 30.
• The disc may be incompatible with your
player. Try another disc.
• Reset your player. For instructions, see
“Loading default settings” on page 30.
• Make sure that the disc is not dirty. For
instructions, see “Cleaning discs” on
page 30.
• Reset your player. For instructions, see
“Loading default settings” on page 30.
www.insigniaproducts.com
31
Page 35

Wireless 3D Connected Blu-ray Disc Player
Problem Solution
The player is on and the
logo and menu appear,
but there is no image
from the disc
The player freezes when
reading a disc
• Make sure that the disc is not dirty. For
instructions on cl eaning a disc, see “Cleaning
discs” on page 30.
• Reset your player. For instructions, see
“Loading default settings” on page 30.
• Reset your player. For instructions, see
“Loading default settings” on page 30.
• When you see “loading” on the screen, press
(open/close) to open the disc tray and
remove the disc. Clean the disc. (For
instructions, see “Cleaning discs” on
page 30, then try the disc again.
• If your player freezes again, the disc may
contain some content that is not compatible
with your player. Do no tr y playing the disc
with your player.
• Make sure the firmware is up to date. See
“Upgrading your player’s firmware” on
page 26.
TV screen, video, and HDMI connections
Problem Solution
Video does not appear
on the TV screen or the
picture is distorted
Video is not output in
high definition
The 4:3 aspect ratio
picture expands left and
right, the picture size is
incorrect, or the image
of my 16:9 TV appears
stretched or distorted
There is no apparent
change in the picture
quality when the picture
settings are changed in
the Setup menu
When playing a BD-Live
disc, the screen is black
• Make sure that the TV is connected to the
correct jacks on the back of your player.
• Make sure that the TV is set to the correct
video input source.
• The TV may be in screen saver mode. Check
the documentation that came with the TV
for instructions about “waking” your TV.
• Reset your player. For instructions, see
“Loading default settings” on page 30.
• High definition video cannot be output
through the VIDEO OUT jack. You must
connect the TV to your player using the
HDMI jack.
• Make sure that the correct HDMI resolution
has been selected in the Setup menu. See
“Selecting the video output resolution” on
page 16.
• Use the TV to change the aspect ratio. See
the documentation that came with the TV.
• Change aspect ratio setting to match the size
of your TV screen. If your TV has a 4:3 screen,
change the aspect ratio to 4:3 Letterbox. If
your TV has a 16:9 screen, change the aspect
ratio to 16:9 Normal. See “Selecting the TV
aspect ratio” on page 16.
• Depending on the video type, changes may
not be apparent.
• Erase BD Storage. See “Erasing BD-Live
storage” on page 28.
• Make sure that your Internet connection is
working.
• Make sure that the Internet cable is
connected securely and correctly to your
player and the Internet jack.
BD-Live and USB connections
Problem Solution
Cannot connect access
BD-Live content
After connecting to the
Internet, cannot
download a file
File was downloaded,
but playback from file
pauses
• Make sure that the BD-Live Disc you are
using is a legal copy.
• Make sure that the USB flash drive is
connected correctly and securely, and has at
least 1 GB capacity.
• Make sure that the network connection is
working.
• Erase BD Storage. See “Erasing BD-Live
storage” on page 28.
• Make sure that the Internet connection is
working.
• Try a different USB flash drive.
• Make sure that the USB flash drive is a USB
2.0 device. Using a USB 1.1 device may cause
pausing.
• Try a different USB flash drive.
Wireless Internet connections
Problem Solution
Cannot perform
automatic setup with my
wireless router
Cannot connect to my
wireless router
Cannot connect to the
Internet (wireless
connection)
• Only WPS automatic setup is supported by
the player.
• Make sure that the router automatically
allows new devices to connect to it.
• The 802.11n specification is not finalized, so
not all 802.11n devices are compatible.
• Your player may be experiencing
interference from other devices that
operate on the same frequency. Try
turning off unused network equipment
and wireless devices, such as cordless
phones or Bluetooth devices.
• Your wireless router or access point may
be too far from your player. Move your
wireless router or access point closer to
your player.
• Move your wireless router or access point
to a higher position in the area.
Sometimes elevating your router or access
point one or two feet improves reception.
Other playback problems
Problem Solution
Audio and video pause
momentarily
Blu-ray Disc or DVD does
not play
Picture In Picture (PIP)
does not work on a
Blu-ray Disc
• This happens when your player is changing
chapters in a playlist.
• When playing a disc that is recorded on both
layers, audio and video may pause when
your player is changing layers.
• Make sure that the disc has the correct
region code. Your player plays discs with
region code 1 or All.
• Check the rating on the disc. You may have
set parental controls to block that rating.
•Check the System option in the Settings
menu to see if Disc Auto Play is set to On or
Off. If Disc Auto Play is set to Off, the disc
does not play automatically when you close
the disc tray. Press X (play) to start
playback.
• Make sure that the disc supports PIP mode.
www.insigniaproducts.com
32
Page 36

Wireless 3D Connected Blu-ray Disc Player
Problem Solution
No subtitles
Cannot change the
viewing angle
Resume function does
not work
• Turn on subtitles. See “Selecting the subtitle
language” on page .20.
• Make sure that the disc was recorded with
subtitles. If the disc has subtitles, a subtitle
option should appear on the disc’s menu.
• Some discs are not recorded with multiple
viewing angles. Check the documentation
that came with the disc.
• Not all scenes on a disc have multiple
viewing angles. Check the documentation
that came with the disc.
• If you press (stop) twice, the resume
information is erased.
• Some discs do not support the resume
function.
BD-Live technical notes
• The Insignia player only supports the connection
of USB memory in order to fulfill the Blu-ray Disc
Profile 2.0 or “BD-Live” requirement for 1 GB of
free, available storage. An externally connected
drive will become the default storage for BD-Live
content and the internal storage will be ignored.
• You must have a BD-Live disc in the player to play
any related (already downloaded) content.
• Some BD-Live content may expire and will not
play.
• You will occasionally need to delete the contents
in storage in order to free up space. This can be
done from your player’s main setup menu, in the
System submenu (select Erase BD-Live data).
The Insignia player currently only allows deleting
the entire BD storage.
• No clock is used to manage the expiration of
downloaded BD-live content. Instead, time and
expiration of content is managed by the BD-Live
server on the Internet.
Specifications
Specifications are subject to change without notice.
System and outputs
TV signal system NTSC
Video output Electric level output: 1.0 Vp-p
Resistance: 75 ohms
Output connector: Pin jack (1 system)
Audio output (analog) Output level: 2 Vrms (1 kHz, 0 dB)
Output connector: Pin jack
Number of connectors: 2-channel (1)
Audio output (digital) Coaxial digital output (pin jack) (1)
Audio performance
(frequency response)
HDMI output Output format: 480i, 480p, 720p,1080i, 1080p, Auto
General
Power 100V-240V ~ 50/60Hz
Power cons umptio n 17 W
Dimensions
H×W×D
Weight 3.3 lbs. (1.5 kg)
Operating temperature 41°F to 95°F (5°C to 35°C)
Operating humidity 10% to 80%
Video file requirement (USB/DISC)
• Video file compatibility with your player is limited
as follows:
• Maximum resolution size: 1920x1080 (W x H)
• File extensions: .wmv, .avi, .mp4, .mpeg, .mpg,
• Playable Audio format: Dolby Digital, DTS,
• Sampling frequency: within 32 to 48kHz
• Bit rate: within 32-192kbps (WMA), within
• CD-R/RW, DVD R/RW, BD-R/RE Format: ISO
9660+JOLIET, UDF and UDF Bridge format
• Maximum Files/Folder: Less than 1000. The movie
file name and subtitle are limited to 180
characters.
• Not all of the WMA and AAC Audio formats are
compatible with your player.
• HD WMA movie files contained on a USB 1.0/1.1
flash drive may not play correctly. Blu-ray, DVD, or
USB 2.0 are recommended to play back HD WMA
movie files.
• Your player does not support files that are
recorded with GMC (Global Motion
Compensation) or Qpel (Quarter pixel). Those are
video encoding techniques in MPEG4 standard,
like DivX.
Audio: 20 Hz to 20 kHz
S/N ratio: 90 dB
Dynamic range: 80 dB
Total harmonic distortion: 0.004%
1.6 × 14.2 × 8.3 inches
(41 × 360 × 212 mm)
pixels
.vob, .mkv (Note: Files encoded by Divx
cannot be played on this player)
MP3, WMA, AAC, AC3
(WMA), within 8-48kHz (Mp3)
32-320kbps (Mp3)
www.insigniaproducts.com
33
Page 37

Wireless 3D Connected Blu-ray Disc Player
MP3/WMA audio file requirement (USB/DISC)
• File extensions: .mp3, .wma
• Sampling frequency: Within 32 to 48kHz (WMA),
within 8 to 48kHz (Mp3)
• Bit rate: Within 32-192kbps (WMA) 32320kbps (MP3)
• CD-R/RW, DVD R/RW, BD-R/RE Format:
ISO 9660+JOLIET, UDF and UDF Bridge format
• Maximum Files/Folder: Less than 2000 (total
number of files and folders)
• Depending on the size and number of the
MP3/WMA files, it may take several minutes to
read the contents of the media.
• HD WMA movie files contained on a USB 1.0/1.1
flash drive may not play correctly. Blu-ray, DVD, or
USB 2.0 are recommended to play back HD WMA
movie files.
Photo file requirement (USB/DISC)
• File extensions: .jpg, .jpeg, .png, .gif
• Recommended size:
• PNG: 5120 × 5120 pixels
• GIF: 10000 × 10000 pixels
• JPEG/JPG: 8192 × 8192 pixels, 32MB
• CD-R/RW, DVD R/RW, BD-R/RE Format:
ISO 9660+JOLIET, UDF, and UDF Bridge format
• Maximum Files/Folder: Less than 1000 (total
number of files and folders)
• Progressive and lossless compression photo
image files are not supported.
• Depending on the size and number of the photo
files, it may take several minutes to read the
contents of the media.
Legal notices
FCC Part 15
This device complies with Part 15 of the FCC Rules. Operation is
subject to the following two conditions: (1) this device may not
cause harmful interference, and (2) this device must accept any
interference received, including interference that may cause
undesired operation.
You are cautioned that changes or modifications not expressly
approved by the part responsible for compliance could void the
user's authority to operate the equipment.
Note: This equipment has been tested and found to comply
with the limits for a Class B digital device, pursuant to part 15 of
the FCC Rules. These limits are designed to provide reasonable
protection against harmful interference in a residential
installation.
This equipment generates, uses and can radiate radio frequency
energy and, if not installed and used in accordance with the
instructions, may cause harmful interference to radio
communications. However, there is no guarantee that
interference will not occur in a particular installation. If this
equipment does cause harmful interference to radio or
television reception, which can be determined by turning the
equipment off and on, the user is encouraged to try to correct
the interference by one or more of the following measures:
• Reorient or relocate the receiving antenna.
• Increase the separation between the equipment and
receiver.
• Connect the equipment into an outlet on a circuit
different from that to which the receiver is connected.
• Consult the dealer or an experienced radio/ TV
technician for help.
DHHS and FDA safety certification
This product is made and tested to meet safety standards of the
FCC, requirements and compliance with safety performance of
the U.S. Department of Health and Human Services, and also
with FDA Radiation Performance Standards 21 CFR Subchapter J.
Canada ICES-003 statement
This Class B digital apparatus complies with Canadian ICES-003.
1. Under Industry Canada regulations, this radio transmitter
may only operate using an antenna of a type and maximum (or
lesser) gain approved for the transmitter by Industry Canada. To
reduce potential radio interference to other users, the antenna
type and its gain should be so chosen that the equivalent
isotropic ally radiated power (e.i.r.p.) is not more than that
necessary for successful communication.
Conformément à la réglementation d'Industrie Canada, le
présent émetteur radio peut fonctionner avec une antenne d'un
type et d'un gain maximal (ou inférieur) approuvé pour
l'émetteur par Industrie Canada. Dans le but de réduire les
risques de brouillage radioélectrique à l'intention des autres
utilisateurs, il faut choisir le type d'antenne et son gain de sorte
que la puissance isotrope rayonnée équivalente (p.i.r.e.) ne
dépasse pas l'intensité nécessaire à l'établissement d'une
communication satisfaisante.
2. This equipment complies with IC radiation exposure limits
set forth for an uncontrolled environment. This equipment
should be installed and operated with minimum distance 20cm
between the radiator and your body.
"Cet équipement est conforme à l'exposition aux rayonnements
IC limites établies pour un environnement non contrôlé. Cet
équipement doit être installé et utilisé avec un minimum de 20
cm de distance entre le radiateur et votre corps."
3. "This device complies with Industry license-exempt RSS
standard(s). Operation is subject to the following two conditions:
(1) this device may not cause interference, and (2) this device
must accept any interference, including interference that may
cause undesired operation of the device."
"Ce dispositif est conforme à la norme de l'industrie RSS exempts
de licence (s). Son fonctionnement est soumis aux deux
conditions suivantes: (1) cet appareil ne peut pas provoquer
d'interférences et (2) cet appareil doit accepter toute
interférence, y compris les interférences qui peuvent causer un
mauvais fonctionnement du dispositif."
www.insigniaproducts.com
34
Page 38

Wireless 3D Connected Blu-ray Disc Player
About copyright
This item incorporates copyright protection technology that is
protected by U.S. patents and other intellectual property rights.
Use of this copyright protection technology must be authorized
by Rovi Corporation, and is intended for home and other limited
viewing uses only unless other wise authorized by Rovi
Corporation. Reverse engineering or disassembly is prohibited.
HDMI®
HDMI Logo and High-Definition Multimedia Interface are
trademarks or registered trademarks of HDMI Licensing LLC.
Your TV incorporates HDMI® technology. HDMI, the
Energy Star
Products that have earned ENERGY STAR® are designed to
protect the environment through superior energy efficiency.
Your player is Energy Star compliant.
Sun Microsystems, Inc.
Java and all other Java trademarks and logos are trademarks or
registered trademarks of Sun Microsystems, Inc. in the United
States and/or other countries.
Dolby Laboratories
Manufactured under license from Dolby Laboratories. Dolby
and the double-D symbol are trademarks of Dolby
Laboratories.
DTS, Inc.
Manufactured under license under U.S.
Patent #’s: 5,956,674; 5,974,380; 6,487,535 &
other U.S. and worldwide patents issued &
pending. DTS, the Symbol, & DTS and the
Symbol together are registered trademarks
& DTS Digital Surround and the DTS logos
are trademarks of DTS, Inc. Product includes
software. ©DTS, Inc. All Rights Reserved.
OPEN SOURCE SOFTWARE
For OPEN SOURCE SOFTWARE information, refer to the System
section in the on-screen display (OSD) on the Blu-ray player. If
you require additional information or you wish to receive the
complete corresponding GPL or LGPL licensed source code,
please call the Insignia support line at 1-877-467-4289. This
source code is available for a period of three (3) years from the
date of the distribution of this product by Insignia.
www.insigniaproducts.com
35
Page 39

Wireless 3D Connected Blu-ray Disc Player
One-year limited warranty
Insignia Products (“Insignia”) warrants to you, the original
purchaser of this new product (“Product”), that the Product shall
be free of defects in the original manufacture of the material or
workmanship for a period of one (1) year from the date of your
purchase of the Product (“Warranty Period”). This Product must
be purchased from an authorized dealer of Insignia brand
products and packaged with this warranty statement. This
warranty does not cover refurbished Product. If you notify
Insignia during the Warranty Period of a defect covered by this
warranty that requires service, terms of this warranty apply.
How long does the coverage last?
The Warranty Period lasts for 1 year (365 days) from the date you
purchased the Product. The purchase date is printed on the
receipt you received with the Product.
What does this warranty cover?
During the Warranty Period, if the original manufacture of the
material or workmanship of the Product is determined to be
defective by an authorized Insignia repair center or store
personnel, Insignia will (at its sole option): (1) repair the Product
with new or rebuilt parts; or (2) replace the Product at no charge
with new or rebuilt comparable products or parts. Products and
parts replaced under this warranty become the property of
Insignia and are not returned to you. If service of Products or
parts are required after the Warranty Period expires, you must
pay all labor and parts charges. This warranty lasts as long as you
own your Insignia Product during the Warranty Period. Warranty
coverage terminates if you sell or otherwise transfer the Product.
How to obtain warranty service?
If you purchased the Product at a retail store location, take your
original receipt and the Product to the store you purchased it
from. Make sure that you place the Product in its original
packaging or packaging that provides the same amount of
protection as the original packaging. If you purchased the
Product from an online web site, mail your original receipt and
the Product to the address listed on the web site. Make sure that
you put the Product in its original packaging or packaging that
provides the same amount of protection as the original
packaging.
To obtain in-home warranty service for a television with a screen
30 inches or larger, call 1-888-BESTBUY. Call agents will diagnose
and correct the issue over the phone or will have an
Insignia-approved repair person dispatched to your home.
Should the Insignia-approved repair person not correct the issue
on the first call, an Insignia television (size and features to be
determined by Insignia) will be loaned to you until your TV is
repaired and returned, at no charge to you. This feature is only
available to Insignia television consumers residing in the United
States.
Where is the warranty valid?
This warranty is valid only to the original purchaser of the
product in the United States, Canada, and Mexico.
What does the warranty not cover?
This warranty does not cover:
• Customer instruction
•Installation
•Set up adjustments
•Cosmetic damage
• Damage due to acts of God, such as lightning strikes
•Accident
•Misuse
•Abuse
•Negligence
•Commercial use
• Modification of any part of the Product, including the
antenna
• Plasma display panel damaged by static (non-moving)
images applied for lengthy periods (burn-in).
This warranty also does not cover:
• Damage due to incorrect operation or maintenance
• Connection to an incorrect voltage supply
• Attempted repair by anyone other than a facility
authorized by Insignia to service the Product
• Products sold as is or with all faults
• Consumables, such as fuses or batteries
• Products where the factory applied serial number has been
altered or removed
REPAIR REPLACEMENT AS PROVIDED UNDER THIS WARRANTY IS
YOUR EXCLUSIVE REMEDY. INSIGNIA SHALL NOT BE LIABLE FOR
ANY INCIDENTAL OR CONSEQUENTIAL DAMAGES FOR THE
BREACH OF ANY EXPRESS OR IMPLIED WARRANTY ON THIS
PRODUCT, INCLUDING, BUT NOT LIMITED TO, LOST DATA, LOSS
OF USE OF YOUR PRODUCT, LOST BUSINESS OR LOST PROFITS.
INSIGNIA PRODUCTS MAKES NO OTHER EXPRESS WARRANTIES
WITH RESPECT TO THE PRODUCT, ALL EXPRESS AND IMPLIED
WARRANTIES FOR THE PRODUCT, INCLUDING, BUT NOT LIMITED
TO, ANY IMPLIED WARRANTIES OF AND CONDITIONS OF
MERCHANTABILITY AND FITNESS FOR A PARTICULAR PURPOSE,
ARE LIMITED IN DURATION TO THE WARRANTY PERIOD SET
FORTH ABOVE AND NO WARRANTIES, WHETHER EXPRESS OR
IMPLIED, WILL APPLY AFTER THE WARRANTY PERIOD. SOME
STATES, PROVINCES AND JURISDICTIONS DO NOT ALLOW
LIMITATIONS ON HOW LONG AN IMPLIED WARRANTY LASTS, SO
THE ABOVE LIMITATION MAY NOT APPLY TO YOU. THIS
WARRANTY GIVES YOU SPECIFIC LEGAL RIGHTS, AND YOU MAY
ALSO HAVE OTHER RIGHTS, WHICH VARY FROM STATE TO STATE
OR PROVINCE TO PROVINCE.
Contact Insignia:
For customer service please call 1-877-467-4289
www.insigniaproducts.com
Distributed by Best Buy Purchasing, LLC
7601 Penn Avenue South, Richfield, Minnesota, U.S.A.
55423-3645
© 2011 BBY Solutions, Inc.
All rights reserved. INSIGNIA is a trademark of BBY Solutions, Inc.
Registered in some countries. All other products and brand
names are trademarks of their respective owners.
www.insigniaproducts.com
36
Page 40

www.insigniaproducts.com (877) 467-4289
Distributed by Best Buy Purchasing, LLC
7601 Penn Avenue South, Richfield, MN 55423-3645 USA
© 2011 BBY Solutions, Inc.
All rights reserved. INSIGNIA is a trademark of BBY Solutions, Inc. Registered in some countries.
All other products and brand names are trademarks of their respective owners.
ENGLISH
11-1144
 Loading...