

QUICK SETUP GUIDE
Compact Outdoor
Antenna
NS-ANT20DA
PACKAGE CONTENTS
• Outdoor antenna • Antenna base • Metal stand
• Coaxial cable • Power inserter • Rubber boot
• AC adapter • Zip tie • Quick Setup Guide
• Wall and pole installation kit
MOUNTING TOOLS
Note: You don’t need any tools to set on a at surface. If mounting to a wall, roof, or another surface,
you’ll need a:
• Drill with 3/32", 7/32" and 1/4" drill bits • Hammer
• Phillips screwdriver • Pencil
FEATURES
• 40-mile range for superior reception, even in dicult locations
• Amplier included to boost weak signals from far away
• Designed for indoor and outdoor use
• Resistant to summer and winter elements
• Water-proof and anti-UV housing with a lightweight, compact, and stylish design
• Full kit of installation parts included for mounting to exterior walls, roofs, attics, poles, or
other surfaces
• Works with 4K TVs
WARNING: Installation of this product near powerlines is dangerous.
For your safety, follow the enclosed installation directions.
Before using your new product, please read these instructions to prevent any damage.
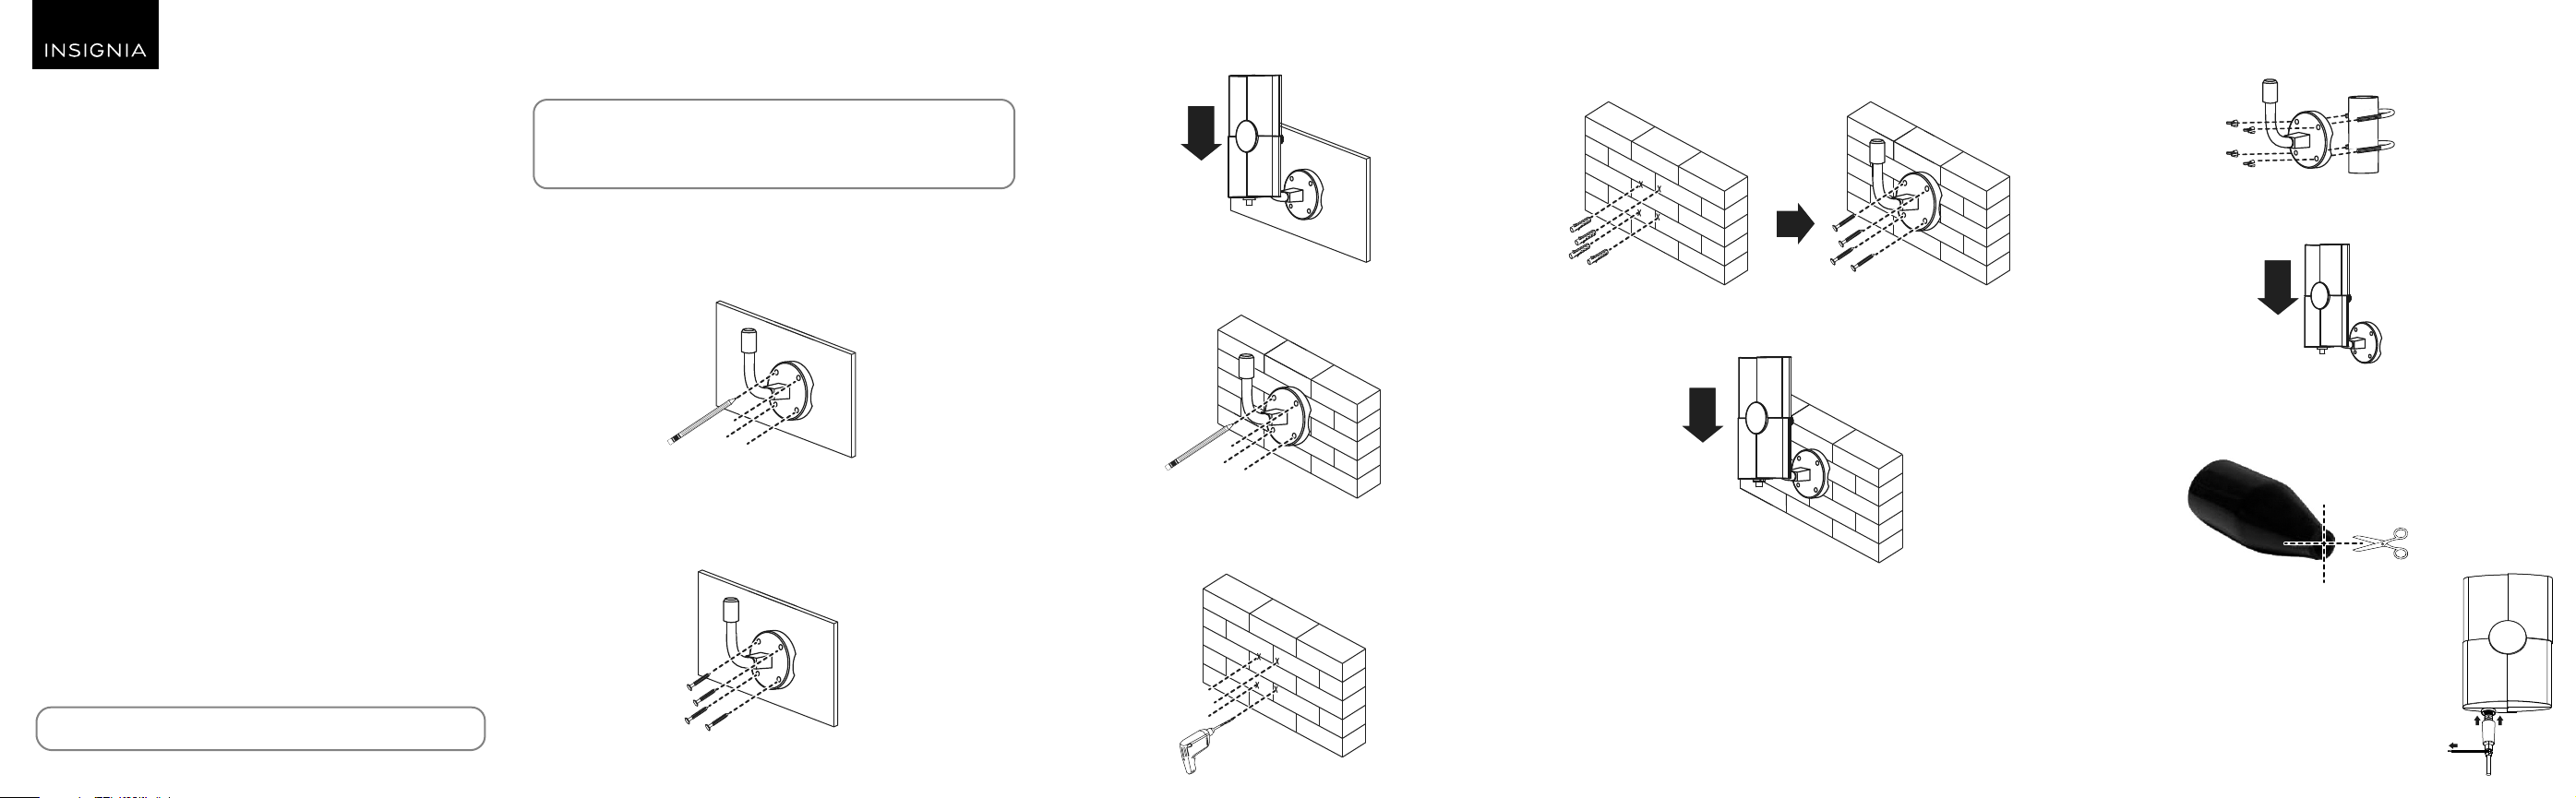
MOUNTING YOUR ANTENNA
Note: When using an electric drill, you should wear protective eye goggles and make sure that the drill bit is
installed correctly to avoid injury.
WARNING: Do NOT bend the exible antenna base with the antenna attached. This can crack
the antenna’s plastic housing. To bend the exible antenna base, remove the antenna and
bend the antenna base. Then, reinstall the antenna.
Wall mount
Wooden wall
1 Use the antenna base to mark the screw locations.
Wall
2 Attach the antenna base to a wall with the included screws (×4).
Notes:
• You may choose to pre-drill the holes using a 3/32" drill bit.
• Make sure that the antenna base’s arm is upturned.
Wall
3 Unscrew the black knob on the back of the antenna, then insert the antenna onto the
antenna base and screw the black knob back on until it is snug.
Wall
Concrete or masonry wall
1 Use the antenna base to mark the drilling positions.
Wall
2 Use an electric drill with a 7/32" drill bit to drill four holes that are 1.38 in. (35 mm) deep,
then clean the holes.
Note: Start with a 7/32" drill bit. If the hole is not large enough to t the wall anchors, increase the drill
bit size to 1/4".
Wall
3 Use a hammer to insert the wall anchors (×4) into the holes, then attach the antenna base to
the wall with screws (×4).
Note: Make sure that the antenna base’s arm is upturned.
Wall Wall
4 Unscrew the black knob on the back of the antenna, then insert the antenna onto the antenna
base and screw the black knob back on until it is snug.
Wall
Pole mount
1 Select a pole that is rmly inser ted into the ground or attached to a building to install the
antenna on.
Note: The pole must have a diameter of 1.4 in. (35.6 mm) or less.
2 Attach the antenna base to the pole with U-bolts (×2) and wing nuts (×4).
Note: Make sure the antenna base’s arm is upturned.
Pole
3 Unscrew the black knob on the back of the antenna, then insert the antenna onto the
antenna base and screw the black knob back on until it is snug.
USING THE RUBBER BOOT
• Use the included rubber boot to help protect the coaxial connection to the antenna from
environmental elements.
1 Cut four, evenly-spaced slits into the narrow end of the rubber boot.
2 Run the coaxial cable through the narrow end of the rubber boot,
then connect the coaxial cable to the antenna’s coaxial jack.
3 Slide the rubber boot into the round channel on the antenna.
4 Wrap the included zip tie around the four slits on the narrow end
of the rubber boot, then pull the tie tight.
• Leave enough slack in the coaxial cable to create a drip loop. This will
prevent unwanted moisture from entering your house.
• Seal the coaxial cable’s entry point into your house with exterior caulk.
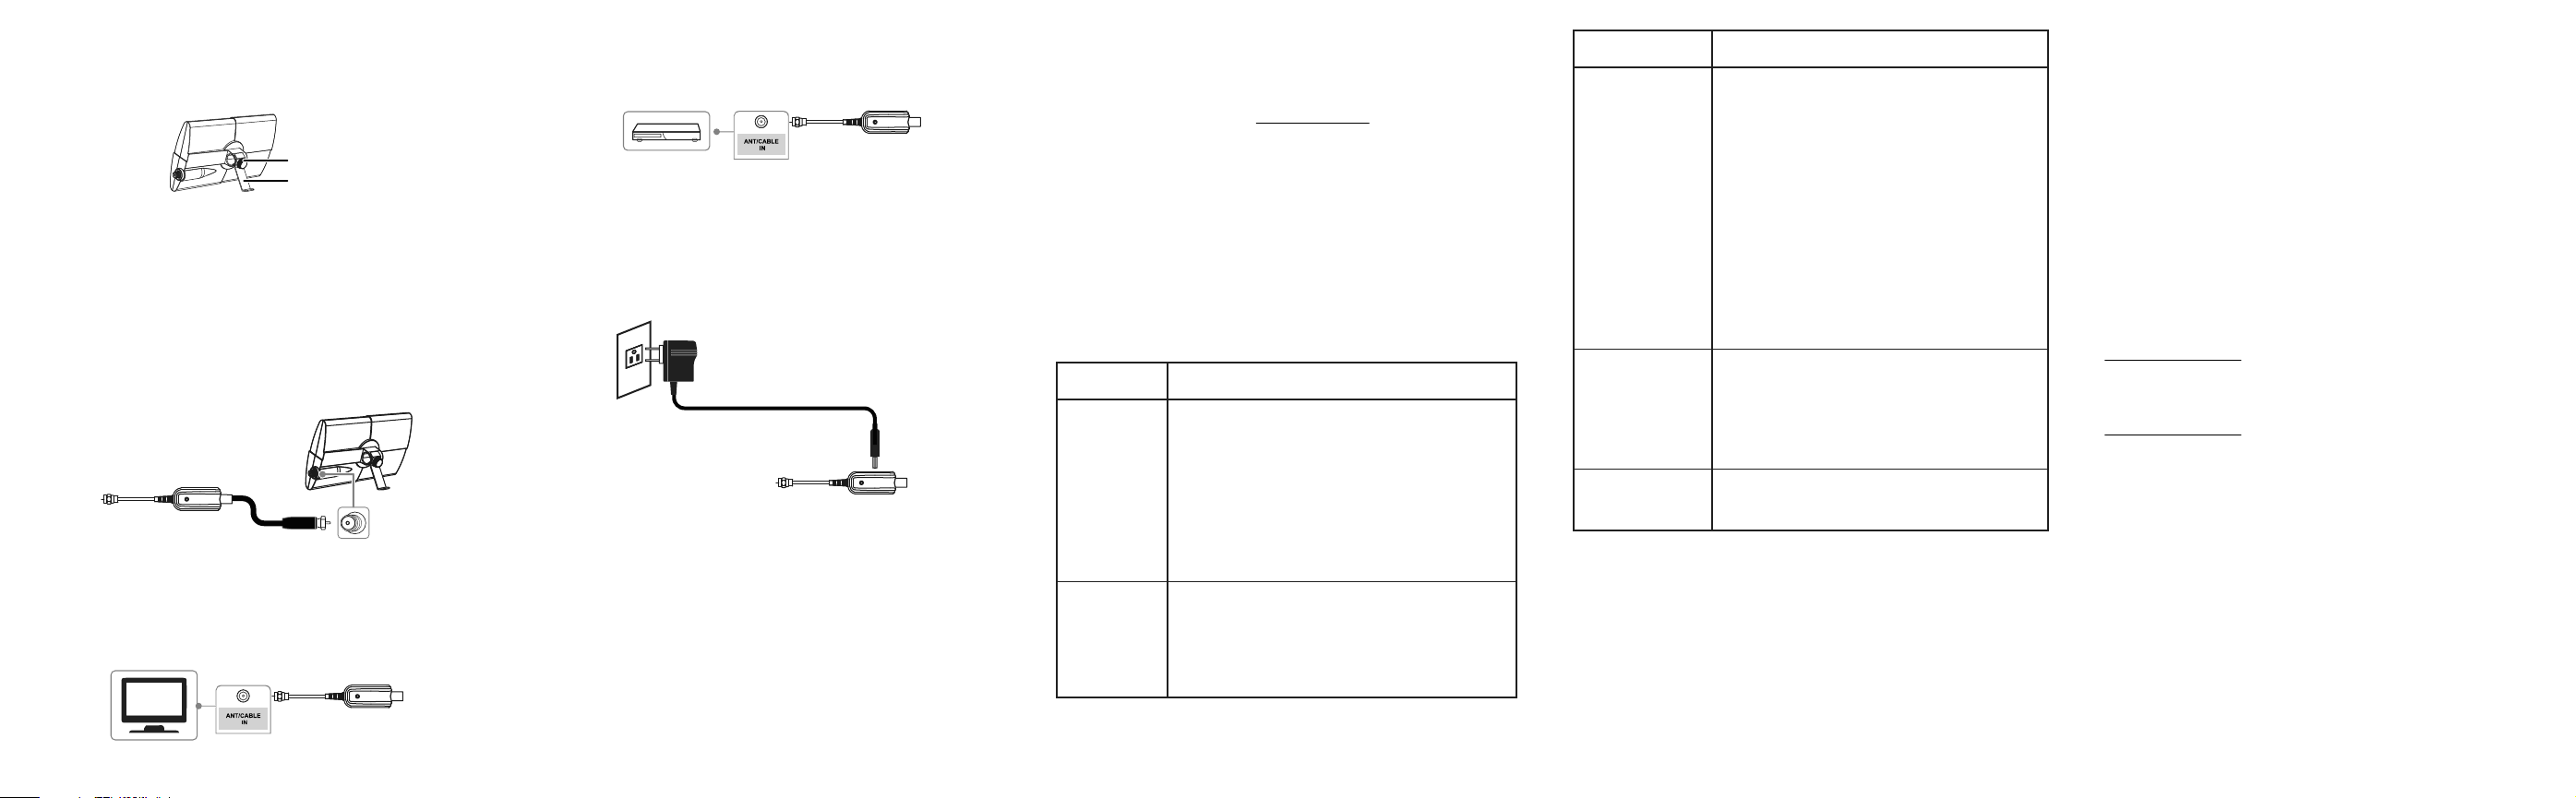
PLACING YOUR ANTENNA INDOORS
1 Unscrew the black knob on the back of the antenna.
2 Place the metal stand over the thumbscrew hole, with the stand pointing away from the
antenna body.
Black knob
Metal stand
3 Screw the black knob on until it is snug.
Notes:
• This method is not intended for outdoor use, as wind and other factors can easily move the antenna.
• Perform a channel scan whenever the antenna is moved, as available channels might change.
CONNECTING YOUR ANTENNA
Note: For the antenna to properly function, the power inserter must be installed and powered on.
1 Connect the included coaxial cable to the power inserter, then connect it to the antenna.
Note: A longer coaxial cable may need to be purchased if the included cable is not long enough for your
mounting position.
Power inserter
Coaxial cable (included)
2 Choose which device (HDTV, digital converter box, or set-top box) to connect the power
inserter to.
HDTV
Connect the power inserter’s coaxial connection to the coaxial jack on the back of your TV.
OR
HDTV
Antenna
DC IN
Power inserter
Digital converter box or Set-top box
1 Connect the power inserter’s coaxial connection to the coaxial jack on your digital converter box
or set-top box (both are not included).
DC IN
Power inserter
Digital converter box
or set-top box
2 Connect a video/audio cable (such as an HDMI, a coaxial cable, or a composite cable) from your
converter box or set-top box to your TV.
CONNECTING THE AC ADAPTER
Plug the AC adapter into a wall outlet, then plug the other end into the power inserter.
Wall outlet
AC adapter
Power inserter
SCANNING FOR CHANNELS
1 Turn on your TV, then press input or source to select the input your antenna is connected to.
Note: Turn on your digital converter box or set-top box if your antenna is connected to either device.
2 Open your device’s setup menu, then select the “scan” or “channel scan” option. Your device
automatically searches for available channels in your area.
Note: See your device’s manual for detailed instructions.
TIPS FOR BETTER RECEPTION
• Install the antenna as high as possible to avoid possible obstacles between the antenna and
transmission tower. Obstacles may cause signal loss.
• When installing indoors, place the antenna near a window. If the window has a metal screen,
place the antenna near a window that does not have a metal screen.
• Keep the antenna away from sources of interference, such as air conditioners, hair dryers, or
microwave ovens.
• Run a channel scan every time you move your antenna.
• If possible, position your antenna toward the transmission tower. To determine which
channels are available in your area, visit www.antennaweb.org. Type in your zip code to get
help with antenna placement.
• Test the antenna in multiple locations to nd the strongest signal.
• Run a channel scan monthly to make sure you are receiving all possible channels.
• Some TVs have a signal strength indicator that can help with antenna placement. See your TV
manual to see if your TV has this feature.
• This antenna works with any TV or device with an ATSC tuner. Refer to the device manual to
check compatibility.
• The antenna’s range will vary depending on a wide range of environmental and geographic
factors—the mile range provided is only for reference.
TROUBLESHOOTING
PROBLEM:
Cannot nd any
channels.
Not all channels
are available after
performing a
channel scan.
SOLUTION:
• Make sure that the power inserter is properly installed and is
powered on.
• Make sure that you have selected the correct input on your TV.
• Go to the menu on your TV or set-top box and rescan the
channels.
• Make sure that all your connections are correct and secure.
• Adjust your antenna, then rescan for available channels on your
TV or set-top box.
• Adjust your antenna, then scan for available channels on your TV
or set-top box.
• Make sure that the signal strength from the antenna is
adequate. Some TVs have a signal strength indicator. See your
TV manual to see if your TV has this feature.
PROBLEM:
Picture quality is good
on some channels and
poor or no reception on
others.
SOLUTION:
• Adjust your antenna, then scan for available channels on your
TV or set-top box.
• Keep the antenna away from sources of interference, such as
air conditioners, hair dryers, and microwave ovens.
• Your antenna may be too far from the broadcast antenna to
receive an adequate signal. The signal may also be aected by
obstructions between the broadcast antenna and your
antenna.
• Make sure that the signal strength from the antenna is
adequate. Some TVs have a signal strength indicator. See your
TV manual to see if your TV has this feature.
• Your digital antenna’s performance may vary based on the
weather conditions.
I am not receiving cable
and streaming
channels after a
channel scan.
• Your digital antenna is capable of receiving local channels that
are dependent on the broadcasters in your area. You can use
the antenna alongside cable boxes and streaming devices, but
it will not provide all of the same content oered by those
devices.
I want HD channels, but
I do not have an HDTV.
• Your digital antenna will not upscale to HD if the TV is not HD.
You will need to purchase an HDTV.
SPECIFICATIONS
• Dimensions (H×W×D): 8.2 × 4.8 × 2.4 in. (20.8 × 12.2 × 6.1 cm) (antenna body only)
• Net weight: .6 lbs (.3 kg)(antenna and mounting bracket)
• Range: 40 miles (approximate, for guidance only)
• VHF Range: 174-230 MHz
• UHF Range: 470-862 MHz
• Amplier Gain: 20dB (average)
LEGAL NOTICES
This equipment has been tested and found to comply with the limits for a Class B digital device,
pursuant to part 15 of the FCC Rules. These limits are designed to provide reasonable protection against
harmful interference in a residential installation. This equipment generates, uses, and can radiate radio
frequency energy and, if not installed and used in accordance with the instructions, may cause harmful
interference to radio communications. However, there is no guarantee that interference will not occur in
a particular installation. If this equipment does cause harmful interference to radio or television
reception, which can be determined by turning the equipment o and on, the user is encouraged to try
to correct the interference by one or more of the following measures:
• Reorient or relocate the receiving antenna.
• Increase the separation between the equipment and receiver.
• Connect the equipment into an outlet on a circuit dierent from that to which the receiver is
connected.
• Consult the dealer or an experienced radio/TV technician for help.
ONE-YEAR LIMITED WARRANTY
Visit www.insigniaproducts.com for details.
CONTACT INSIGNIA:
Visit www.insigniaproducts.com for details.
INSIGNIA is a trademark of Best Buy and its aliated companies
Distributed by Best Buy Purchasing, LLC
7601 Penn Ave South, Richeld, MN 55423 U.S.A.
©2017 Best Buy. All rights reserved.
Made in China
V2 ENGLISH 17-0840
 Loading...