

Portable
Air Conditioner
USER GUIDE
NS-AC10PWH9 / NS-AC12PWH9 / NS-AC10PWH9-C / NS-AC12PWH9-C
Before using your new product, please read these instructions to prevent any damage.

Contents
Introduction . . . . . . . . . . . . . . . . . . . . . . . . . . . . . . . . . . . . . . . . . . . . . . . . . . . . . . . . . . . . . . . . . . . . . . . . . . . . . . . . . . . . . . . . . . 3
IMPORTANT SAFETY INSTRUCTIONS . . . . . . . . . . . . . . . . . . . . . . . . . . . . . . . . . . . . . . . . . . . . . . . . . . . . . . . . . . . . . . . . . . . 3
Features . . . . . . . . . . . . . . . . . . . . . . . . . . . . . . . . . . . . . . . . . . . . . . . . . . . . . . . . . . . . . . . . . . . . . . . . . . . . . . . . . . . . . . . . . . . . . . 5
Package contents . . . . . . . . . . . . . . . . . . . . . . . . . . . . . . . . . . . . . . . . . . . . . . . . . . . . . . . . . . . . . . . . . . . . . . . . . . . . . . . . . . . . . . . . . . . . . . . . . 6
Main components . . . . . . . . . . . . . . . . . . . . . . . . . . . . . . . . . . . . . . . . . . . . . . . . . . . . . . . . . . . . . . . . . . . . . . . . . . . . . . . . . . . . . . . . . . . . . . . . 6
Remote control . . . . . . . . . . . . . . . . . . . . . . . . . . . . . . . . . . . . . . . . . . . . . . . . . . . . . . . . . . . . . . . . . . . . . . . . . . . . . . . . . . . . . . . . . . . . . . . . . . . 9
Setting up your portable air conditioner . . . . . . . . . . . . . . . . . . . . . . . . . . . . . . . . . . . . . . . . . . . . . . . . . . . . . . . . . . . . . . 10
Placing your air conditioner . . . . . . . . . . . . . . . . . . . . . . . . . . . . . . . . . . . . . . . . . . . . . . . . . . . . . . . . . . . . . . . . . . . . . . . . . . . . . . . . . . . . . . 10
Installing your air conditioner . . . . . . . . . . . . . . . . . . . . . . . . . . . . . . . . . . . . . . . . . . . . . . . . . . . . . . . . . . . . . . . . . . . . . . . . . . . . . . . . . . . . 10
Using your portable air conditioner. . . . . . . . . . . . . . . . . . . . . . . . . . . . . . . . . . . . . . . . . . . . . . . . . . . . . . . . . . . . . . . . . . . 13
Inserting the batteries in the remote control . . . . . . . . . . . . . . . . . . . . . . . . . . . . . . . . . . . . . . . . . . . . . . . . . . . . . . . . . . . . . . . . . . . . . . 13
Using the air conditioner . . . . . . . . . . . . . . . . . . . . . . . . . . . . . . . . . . . . . . . . . . . . . . . . . . . . . . . . . . . . . . . . . . . . . . . . . . . . . . . . . . . . . . . . . 14
Cleaning and maintaining your air conditioner . . . . . . . . . . . . . . . . . . . . . . . . . . . . . . . . . . . . . . . . . . . . . . . . . . . . . . . 15
Cleaning the case . . . . . . . . . . . . . . . . . . . . . . . . . . . . . . . . . . . . . . . . . . . . . . . . . . . . . . . . . . . . . . . . . . . . . . . . . . . . . . . . . . . . . . . . . . . . . . . . 15
Cleaning the air filter. . . . . . . . . . . . . . . . . . . . . . . . . . . . . . . . . . . . . . . . . . . . . . . . . . . . . . . . . . . . . . . . . . . . . . . . . . . . . . . . . . . . . . . . . . . . . 15
Emptying the water collection tank. . . . . . . . . . . . . . . . . . . . . . . . . . . . . . . . . . . . . . . . . . . . . . . . . . . . . . . . . . . . . . . . . . . . . . . . . . . . . . . 16
Storing your air conditioner . . . . . . . . . . . . . . . . . . . . . . . . . . . . . . . . . . . . . . . . . . . . . . . . . . . . . . . . . . . . . . . . . . . . . . . . . . . . . . . . . . . . . . 17
Restarting your air conditioner after storage . . . . . . . . . . . . . . . . . . . . . . . . . . . . . . . . . . . . . . . . . . . . . . . . . . . . . . . . . . . . . . . . . . . . . . 17
Troubleshooting. . . . . . . . . . . . . . . . . . . . . . . . . . . . . . . . . . . . . . . . . . . . . . . . . . . . . . . . . . . . . . . . . . . . . . . . . . . . . . . . . . . . . 18
Intelligent error indication . . . . . . . . . . . . . . . . . . . . . . . . . . . . . . . . . . . . . . . . . . . . . . . . . . . . . . . . . . . . . . . . . . . . . . . . . . . . . . . . . . . . . . . 19
Understanding your air conditioner’s automatic protection . . . . . . . . . . . . . . . . . . . . . . . . . . . . . . . . . . . . . . . . . . . . . . . . . . . . . . . 19
Specifications. . . . . . . . . . . . . . . . . . . . . . . . . . . . . . . . . . . . . . . . . . . . . . . . . . . . . . . . . . . . . . . . . . . . . . . . . . . . . . . . . . . . . . . . 19
NS-AC10PWH9/NS-AC10PWH9-C. . . . . . . . . . . . . . . . . . . . . . . . . . . . . . . . . . . . . . . . . . . . . . . . . . . . . . . . . . . . . . . . . . . . . . . . . . . . . . . . . 19
NS-AC12PWH9/NS-AC12PWH9-C. . . . . . . . . . . . . . . . . . . . . . . . . . . . . . . . . . . . . . . . . . . . . . . . . . . . . . . . . . . . . . . . . . . . . . . . . . . . . . . . . 19
ONE-YEAR LIMITED WARRANTY . . . . . . . . . . . . . . . . . . . . . . . . . . . . . . . . . . . . . . . . . . . . . . . . . . . . . . . . . . . . . . . . . . . . . . 20
2
www.insigniaproducts.com
NS-AC10PWH9 / NS-AC12PWH9 / NS-AC10PWH9-C / NS-AC12PWH9-C
Portable Air Conditioner
Introduction
Congratulations on your purchase of a high-quality Insignia product. Your NS-AC10PWH9 / NS-AC12PWH9 /
NS-AC10PWH9-C / NS-AC12PWH9-C represents state of the art design in portable air conditioning, designed for
reliable and trouble-free performance.
IMPORTANT SAFETY INSTRUCTIONS
CAUTION
RISK OF ELECTRIC
SHOCK
DO NOT OPEN
This symbol indicates that dangerous voltage
constituting a risk of electric shock is present
within your portable air conditioner.
This symbol indicates that there are important
operating and maintenance instructions in the
literature accompanying your portable air
conditioner.
WARNING
1 Read these instructions.
2 Keep these instructions.
3 Heed all warnings.
4 Follow all instructions.
5 Do not use this machine near water.
6 Clean only with a damp cloth.
7 Do not block any ventilation openings. Install in accordance with the manufacturer's instructions.
8 Do not install near any heat sources such as radiators, heat registers, stoves, or other apparatus (including amplifiers)
that produce heat.
9 Do not defeat the safety purpose of the polarized or grounding-type plug. A polarized plug has two blades with one
wider than the other. A grounding-type plug has two blades and a third grounding prong. The wide blade or the third
prong are provided for your safety. If the provided plug does not fit into your outlet, consult an electrician for
replacement of the obsolete outlet.
10 Protect the power cord from being walked on or pinched particularly at plugs, convenience receptacles, and the point
where they exit from the machine.
11 Do not attempt to modify or extend the power cord of this machine.
12 Unplug this machine during lightning storms or when it will not be used for long periods of time.
13 Make sure that the available AC power matches the voltage requirements of this machine.
14 Do not handle the plug with wet hands. This could result in an electric shock.
15 Unplug the power cord by holding the plug, never by pulling the cord.
16 Do not turn the machine on or off by plugging or unplugging the power cord.
17 Turn off the machine before unplugging it.
18 Refer all servicing to qualified service personnel. Servicing is required when the machine has been damaged in any
way, such as power-supply cord or plug is damaged, liquid has been spilled or objects have fallen into the machine, the
machine has been exposed to rain or moisture, does not operate normally, or has been dropped.
19 To reduce the risk of fire or electric shock, do not expose this machine to rain, moisture, dripping, or splashing, and no
objects filled with liquids should be placed on top of it.
20 Batteries should not be exposed to excessive heat such as sunshine, fire, or the like.
Caution: Danger of explosion if batteries are incorrectly replaced. Replace only with the same or equivalent type.
Additional precautions
• This machine is intended for household use. Do not use for any other purpose.
• Use this machine indoors in a dry location only. Do not use it outdoors.
• Do not place heavy objects on the machine, as this could damage the machine.
www.insigniaproducts.com
3

Portable Air Conditioner
TEST button
RESET button
• Wipe the machine with a soft cloth to clean it. Do not use wax, thinner, or irritating detergents.
• Do not allow children or pets to drink the water discharged by the machine.
• Do not disassemble or attempt to repair the machine yourself.
• Do not plug this machine into an outlet with several other high electrical usage appliances.
• Keep the machine away from heat sources and avoid direct sunlight.
• If the machine is making a loud noise or producing an odor or smoke, switch it off, disconnect the plug, and
immediately try to determine the cause.
• Do not place heavy objects on the power cord to avoid it being crushed and causing an electric shock.
• Do not put your fingers or hard objects into the outlet air guide bars.
• Turn the machine off and unplug it if there is water inside the machine, then contact qualified service personnel for
servicing.
• Turn the machine off and unplug it before cleaning, moving, or servicing it.
• To avoid injury, do not allow children or other individuals with special needs to touch or operate the machine. The
machine should only be used with adult supervision.
• Place the air conditioner on a flat surface and upright to ensure the normal operation of the compressor.
• Do not use the machine near gasoline or other flammable liquids.
• Do not use aerosol sprays or other solvents near the machine. This may cause plastic deformation or possibly damage
the electrical components of the machine.
WARNING
Electric Shock Hazard
Failure to follow these instructions can result in electric shock, fire, or death.
• This unit must be properly grounded.
• Do not, under any circumstances, cut or remove the grounding plug.
• If you do not have a properly grounded AC outlet, or if there is any doubt that the outlet is not properly
grounded, a qualified electrician should check the outlet and circuit and, if necessary, install a properly
grounded outlet.
• This air conditioner must be plugged into a grounded 115V, 60 Hz AC outlet, protected by a 15 amp time-delay
fuse or circuit breaker.
• This air conditioner must be installed in accordance with national wiring codes.
• Do not alter or modify the plug or cord of this air conditioner. If the power cord becomes worn or damaged, the
cord should only be replaced by a qualified service technician using genuine replacement parts.
• Do not use an extension cord.
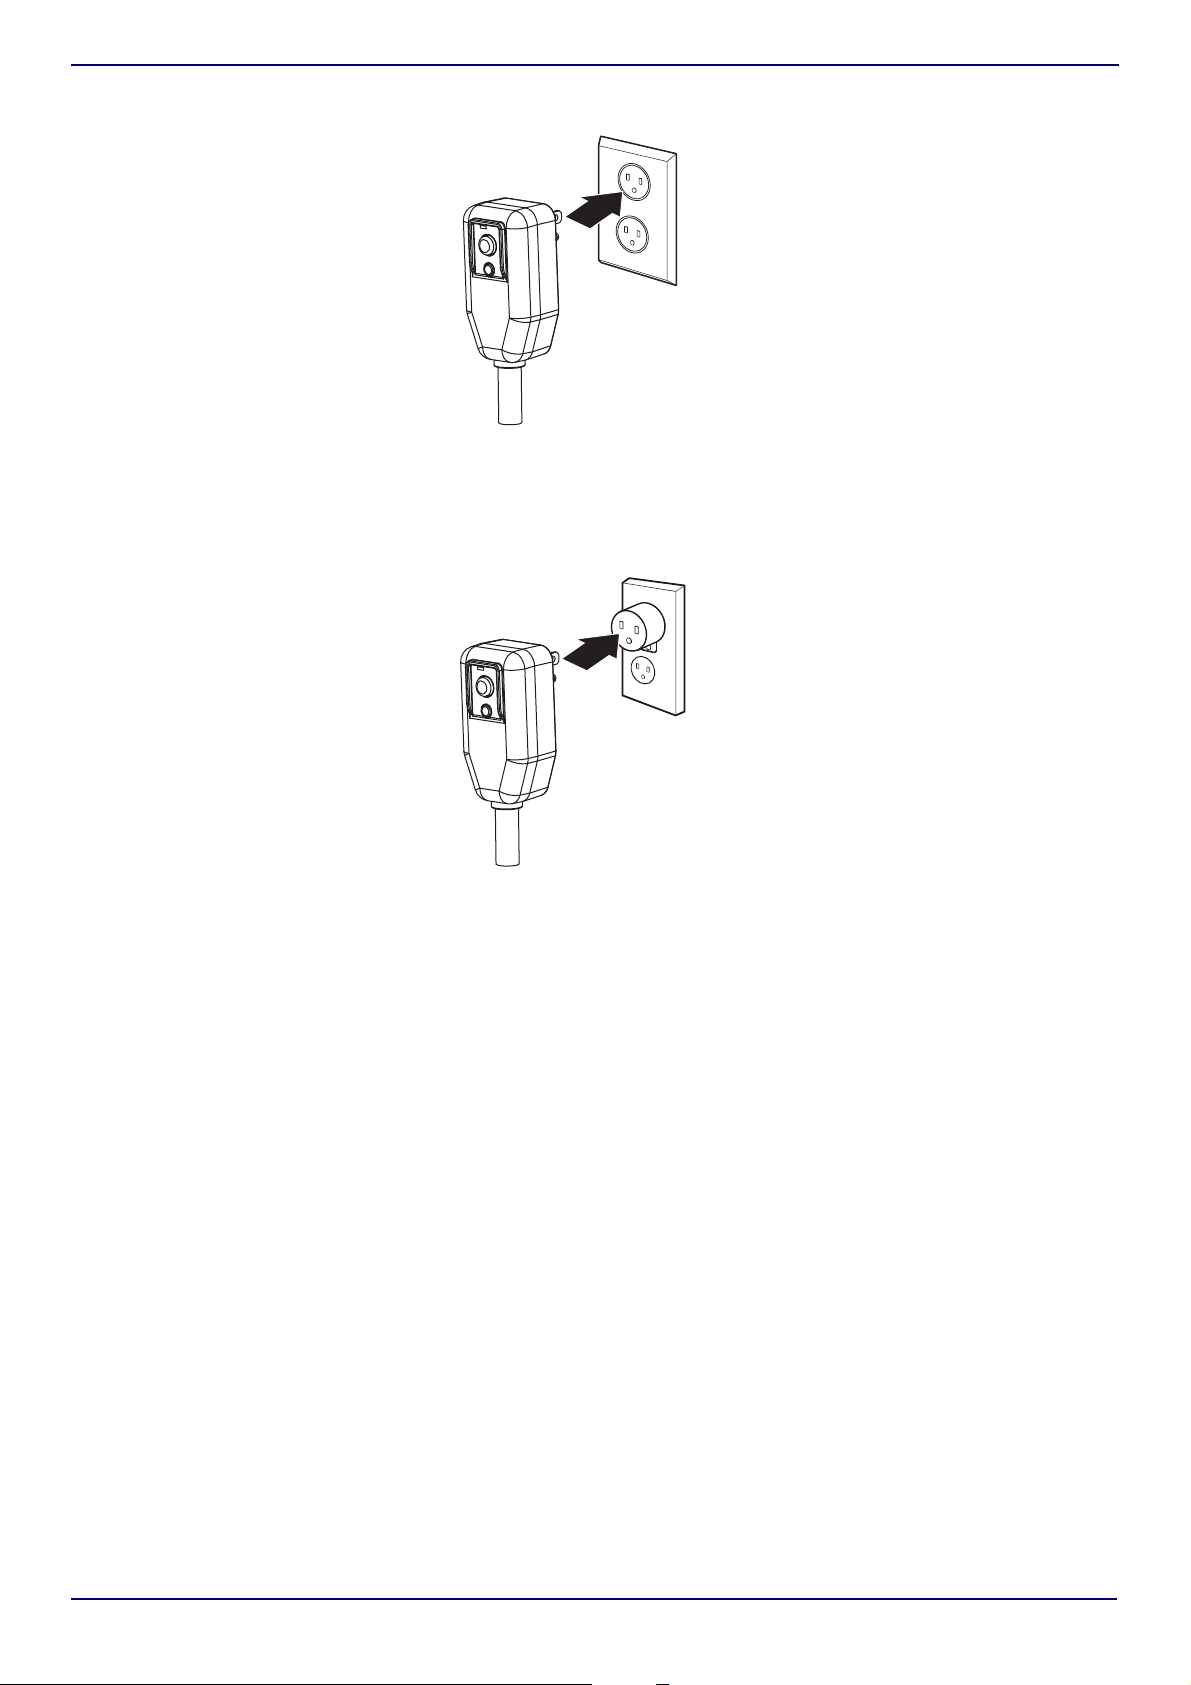
Electrical Safety
Integrated circuit breaker
For additional safety, the power cord on this air conditioner features an integrated circuit breaker. You can test and reset
the circuit breaker using the buttons provided on the plug case.
The circuit breaker should be tested periodically by pressing the TEST button then the RESET button. If the TEST button
does not cause the circuit breaker to trip, or if the RESET button will not stay engaged, unplug the air conditioner
immediately and contact an Insignia technician.
4
www.insigniaproducts.com
NS-AC10PWH9 / NS-AC12PWH9 / NS-AC10PWH9-C / NS-AC12PWH9-C
Make sure that a
proper ground
exists before use.
Make sure that a
proper ground
exists before use.
Preferred grounding method
Temporary grounding
Due to potential safety hazards, we strongly discourage the use of an adapter plug. If an adapter plug must be used
for a temporary connection, use only a UL-listed adapter with a minimum capacity of 120V~60Hz, 13A, and 1560W. Make
sure that the large slot of the adapter is aligned with the large slot in the outlet.
To prevent damage to the adapter’s ground terminal, hold the adapter in place while plugging or unplugging the air
conditioner.
Attaching the adapter ground terminal to the wall receptacle cover screw does not ground the appliance unless the cover
screw is metal and not insulated and the wall receptacle is grounded through the house wiring.
Frequent connection and disconnection can damage the ground terminal on the adapter. Never use a broken or damaged
adapter.
Features
• 3-in-1 design (air conditioner, fan, and dehumidifier)
• Digital controls with LED display
• Multiple fan speeds with auto-control
• Programmable timer and remote control
• Auto On/Off
www.insigniaproducts.com
5
Portable Air Conditioner
A
B
C
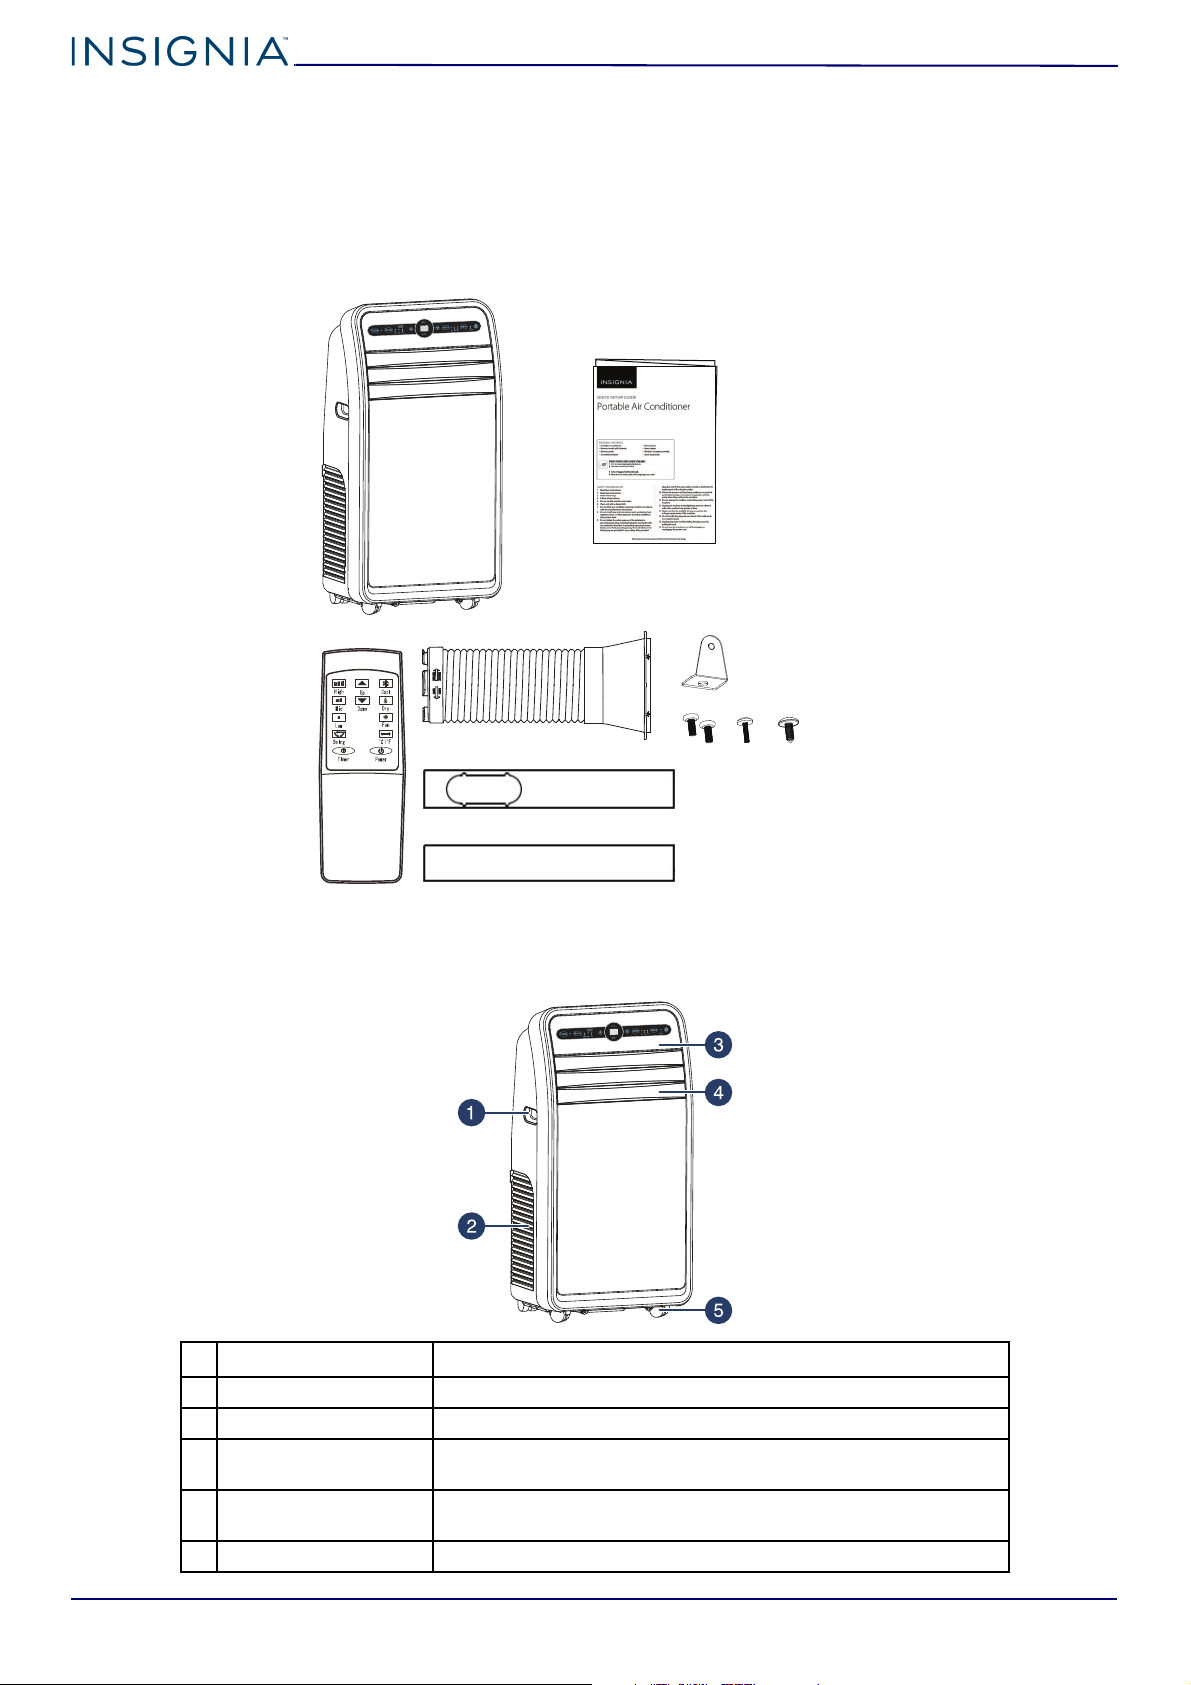
Package contents
• Portable air conditioner
• Exhaust hose with adapter
• Window sealing plate assembly (window sealing plates [2], security bracket, and four screws [two type A, one type B,
and one type C])
• Remote control (with two AAA batteries)
•Quick Setup Guide
Main components
Front
#ITEM DESCRIPTION
1 Handle Provides a convenient grip when moving your air conditioner.
2 Air inlet Allows air to enter the air conditioner. Do not block.
Control panel and
3
display
Adjustable louvered air
4
discharge
5 Swiveling casters Allows you to move the air conditioner easily on most surfaces.
Displays air conditioner settings. Press the buttons to change
settings.
Opens automatically when the air conditioner is turned on. Can also
be set to oscillate.
6
www.insigniaproducts.com
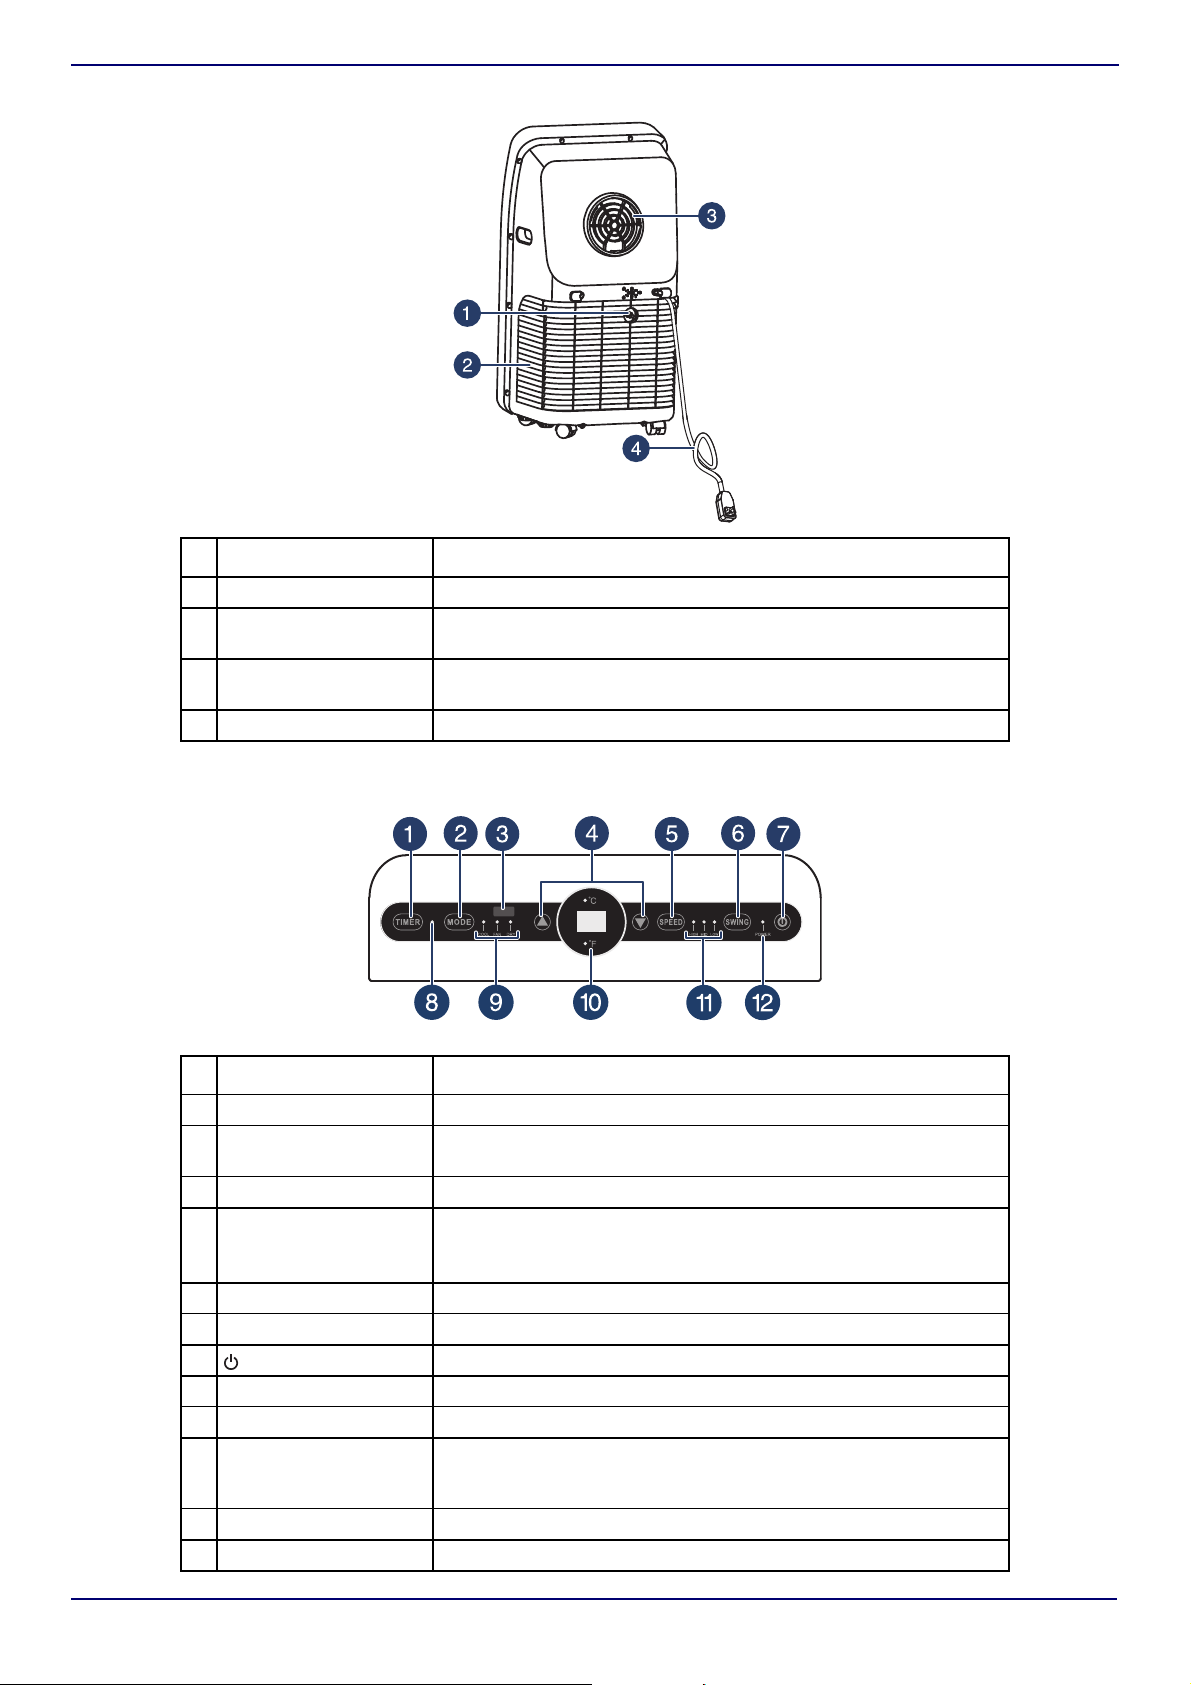
Back
NS-AC10PWH9 / NS-AC12PWH9 / NS-AC10PWH9-C / NS-AC12PWH9-C
#ITEM DESCRIPTION
1 Drain outlet Use to drain the condensation from the air conditioner.
2Filter and filter case
3Exhaust outlet
4 Power cord Plug this in to a 120V 60 Hz AC outlet to power your air conditioner.
Remove the filter from this case to clean it at least every two weeks.
See “Cleaning the air filter” on p age 15.
Allows warm air to exit the back of the air conditioner into the
exhaust hose. Do not block.
Control panel
#ITEM DESCRIPTION
1 TIMER button Press to set the air conditioner to turn on or off automatically.
2MODE button
3 Remote control receiver Receives signals from the remote control. Do not block.
(TEMP/TIMER)
4
buttons
5 SPEED button Press to select high, mid, or low speed.
6 SWING button Press to turn oscillation on or off.
7 Power button Press to turn the air conditioner on or off.
8 Timer indicator Lights when the timer is turned on.
9 Mode indicators Light to show the air conditioner mode.
LED display
10
Tem pe rat ur e/ Ti me
display
11 Fan speed indicators Light to show the fan’s speed.
12 Power indicator Lights when the air conditioner is turned on.
Press to cycle the air conditioner through the available modes.
Options include COOL, FAN, and DRY.
COOLING mode: Press to raise or lower the temperature setting.
Press at the same time to change from Fahrenheit to Celsius.
TIMER mode: Press to increase or decrease the time.
Shows the temperature and time left on the timer.
www.insigniaproducts.com
7
 Loading...