

Page 1

User Guide | Guide de l’utilisateur | Guía del Usuario
25-Watt DVD Executive Shelf System
Minichaîne de luxe avec lecteur DVD de 25 W
Sistema audio tipo ejecutivo con reproductor de DVD de 25 vatios
NS-A3111
Page 2

Page 3
Insignia NS-A3111
DVD Executive Shelf
System
Contents
Important safeguards. . . . . . . . . . . . . . . . . . . . . . .3
About the symbol . . . . . . . . . . . . . . . . . . . . . . . . .5
Features. . . . . . . . . . . . . . . . . . . . . . . . . . . . . . . . .5
Setting up your DVD shelf system . . . . . . . . . . . . .8
Using your DVD shelf system. . . . . . . . . . . . . . . .10
Troubleshooting . . . . . . . . . . . . . . . . . . . . . . . . . .17
Maintaining. . . . . . . . . . . . . . . . . . . . . . . . . . . . . .18
Legal notices . . . . . . . . . . . . . . . . . . . . . . . . . . . .18
90-Day Limited Warranty . . . . . . . . . . . . . . . . . . .19
Français. . . . . . . . . . . . . . . . . . . . . . . . 21
Español . . . . . . . . . . . . . . . . . . . . . . . . 41
Welcome
Congratulations on your purchase of this
high-quality Insignia product. Your NS-A3111
DVD executive shelf system represents the state
of the art in DVD players and is designed for
reliable and trouble-free performance.
Warning:
To reduce the risk of fire or electric shock, do not
expose your shelf system to rain or moisture.
CAUTION:
ELECTRIC
COVER
PARTS INSIDE. REFER SERVICING
QUALIFIED SERVICE PERSONNEL.
The lightning flash with arrowhead symbol, within an
equilateral triangle is intended to alert the user to the
presence of uninsulated dangerous voltage within the
product’s enclosure that may be of sufficient magnitude
to constitute a risk of electric shock.
The exclamation point within an equilateral triangle is
intended to alert the user to the presence of important
operating and maintenance (servicing) instructions in the
literature accompanying the appliance.
TO REDUCE THE RISK OF
SHOCK, DO NOT REMOVE
(OR BACK). NO USER-SERVICEABLE
TO
Changing controls, making adjustments, or
carrying out procedures other than those
specified herein may result in hazardous
radiation exposure.
To prevent direct exposure to the laser beam, do
not try to open the enclosure. There is visible
laser radiation when open.
DO NOT STARE INTO THE BEAM.
Laser Type: Dual semiconductor laser GaAIAs
Wavelength: 650 nm and 780 nm
Output Power: 7 mW
Beam Divergence: 60 degree
CAUTION: Visible and invisible laser radiation is
present when your shelf system is open and
interlocks are defeated.
Caution:
Your shelf system should not be exposed to
water (dripping or splashing) and no objects
filled with liquids, such as vases, should be
placed on your shelf system.
Caution:
Class 3B visible and invisible laser radiation
when open and interlocks defeated. Do not stare
into the beam or view directly with optical
instruments.
Cautions - Power cord
• Most player manufacturers recommend their
players be placed upon a dedicated circuit.
That is, a single outlet circuit which powers only
that player and has no additional outlets or
branch circuits.
• Do not overload wall outlets. Overloaded wall
outlets, loose or damaged wall outlets,
overloaded extension cords, frayed power
cords, or damaged or cracked wire insulation
are dangerous. Any of these conditions could
result in electric shock or fire. Periodically
examine the cord of your shelf system, and if its
appearance indicates damage or deterioration,
unplug it, discontinue use of your shelf system,
and have the cord replaced with an exact
replacement part by an authorized servicer.
• Protect the power cord from physical or
mechanical abuse, such as being twisted,
kinked, pinched, closed in a door, or walked
upon. Pay particular attention to plugs, wall
outlets, and the point where the cord exits your
shelf system.
• To disconnect power from the power outlet, pull
out the power cord plug. When installing your
shelf system, make sure that the plug is easily
accessible.
Important safeguards
Laser warning
WARNING: This shelf system uses a laser
system.
To ensure correct use of this shelf system , read
this user guide carefully and retain it for future
reference. Should your shelf system require
maintenance, contact an authorized service
center.
• Read instructions– Read all the safety and
operating instructions before operating your
shelf system.
• Retain instructions–Retain the safety and
operating instructions for future reference.
• Follow warnings–Follow all warnings on
your shelf system and in the operating
instructions.
• Follow instructions–Follow all operating
and use instructions.
• Cleaning–Unplug your shelf system from the
wall outlet before cleaning. Do not use liquid
cleaners or aerosol cleaners. Use a damp
cloth for cleaning.
www.insignia-products.com
3
Page 4

Insignia NS-A3111 DVD Executive Shelf System
• Attachments–Do not use attachments not
recommended by your shelf system
manufacturer because they may cause
hazards.
• Water and moisture–Do not use your shelf
system near water, for example, near a bath
tub, wash bowl, kitchen sink, or laundry tub,
in a wet basement, or near a swimming pool.
• Accessories–Do not place your shelf system
on an unstable cart, stand, tripod, bracket, or
table. Your shelf system may fall, causing
serious injury to someone and serious
damage to your shelf system. Use only with a
cart, stand, tripod, bracket, or table
recommended by the manufacturer, or sold
with your shelf system.
If you mount your shelf system,
follow the manufacturer's
instructions and use a mounting
accessory recommended by the
manufacturer. Move a shelf
system and cart combination
with care. Quick stops, excessive force, and
uneven surfaces may cause your shelf
system and cart combination to overturn.
• Ventilation–Slots and openings in the
cabinet and the back or bottom are provided
for ventilation, to ensure reliable operation of
your shelf system and to protect it from
overheating. Do not block openings. Do not
place your shelf system on a bed, sofa, rug,
or other similar surface. Your shelf system
should never be placed near or over a
radiator or heat register. Do not place your
shelf system in a built-in installation such as a
bookcase or rack unless correct ventilation is
provided or the manufacturer’s instructions
have been adhered to.
• Power sources–Use only the type of power
source indicated on the marking label. If you
are not sure of the type of power supply to
your home, consult your shelf system dealer
or local power company. For shelf systems
intended to operate from battery power, or
other sources, refer to the operating
instructions.
• Grounding or polarization–Your shelf
system is equipped with a polarized
alternating-current line plug (a plug having
one blade wider than the other). This plug will
fit into the power outlet only one way. This is
a safety feature. If you are unable to insert
the plug fully into the outlet, try reversing the
plug. If the plug should still fail to fit, contact
your electrician to replace your obsolete
outlet. Do not defeat the safety purpose of
the polarized plug.
• Power cord protection–Route power-supply
cords so that they are not likely to be walked
on or pinched by items placed upon or
against them, paying particular attention to
cords at plugs, convenience receptacles, and
the point where they exit from your shelf
system.
• Lightning–For added protection for your
shelf system during a lightning storm, or
when it is left unattended and unused for long
periods of time, unplug it from the wall outlet
and disconnect the antenna or cable system.
This will prevent damage to your shelf system
due to lightning and power-line surges.
• Power lines–An outside antenna system
should not be located in the vicinity of
overhead power lines or other electric light or
power circuits, or where it can fall into such
power lines or circuits. When installing an
outside antenna system, do not touch power
lines or circuits because contact with them
might be fatal.
• Overloading–Do not overload wall outlets
and extension cords because this can result
in a risk of fire or electric shock.
• Object and liquid entry–Never push objects
of any kind into your shelf system through
openings because they may touch dangerous
voltage points or short out parts that could
result in a fire or electric shock. Never spill
liquid of any kind on your shelf system.
• Servicing–Do not attempt to service your
shelf system yourself because opening or
removing covers may expose you to
dangerous voltage or other hazards. Refer all
servicing to qualified service personnel.
• Damage requiring service–Unplug your
shelf system from the wall outlet and refer
servicing to qualified service personnel under
the following conditions:
• When the power supply cord or plug is
damaged or frayed.
• If liquid has been spilled, or objects have
fallen into your shelf system.
• If your shelf system has been exposed to
rain or water.
• If your shelf system does not operate
normally by following the operating
instructions. Adjust only those controls
that are covered by the operating
instructions, because incorrect
adjustment of other controls may result in
damage and often requires extensive
work by a qualified technician to restore
your shelf system to its normal operation.
• If your shelf system has been dropped or
damaged in any way.
• When your shelf system exhibits a distinct
change in performance, this indicates a
need for service.
• Replacement parts–When replacement
parts are required, make sure that the
service technician uses replacement parts
specified by the manufacturer that have the
same characteristics as the original part.
Unauthorized substitutions may result in fire,
electric shock, injury to persons, or other
hazards.
• Safety check–Upon completion of any
service or repairs to your shelf system, ask
the service technician to perform routine
safety checks to determine that your shelf
system is in correct operating condition.
4
www.insignia-products.com
Page 5
Insignia NS-A3111 DVD Executive Shelf System
• Heat–Place your shelf system away from
heat sources such as radiators, heat
registers, stoves, or other products (including
amplifiers) that produce heat.
Caution
Batteries should never be thrown away or
incinerated but disposed of in accordance with
your local regulations concerning chemical
wastes.
Warning
To prevent electric shock, match the wide blade of
plug to the wide slot in the power outlet and fully
insert the plug.
•End-of-life disposal–This symbol
on the product or in the instructions
means that your electrical and
electronic equipment should be
disposed at the end of its life
separately from your household waste. There
are separate collection systems for recycling
in the EU. For more information, please
contact the local authority or your retailer
where you purchased the product.
• USA and Canada versions
comply with ETL requirements.
About the symbol
The symbol may appear on your TV display
during operation and indicates that the function
is not permitted by your shelf system or specific
media.
Copyright
Your shelf system incorporates copyright
protection technology that is protected by
method claims of certain U.S. patents and other
intellectual property rights owned by Macrovision
Corporation and other rights owners. Use of this
copyright protection technology must be
authorized by Macrovision Corporation and is
intended for home and other limited viewing
uses only, unless otherwise authorized by
Macrovision corporation. Reverse engineering or
disassembly is prohibited.
Manufactured under license from Dolby
Laboratories. Dolby and the symbol are
registered trademarks of DOLBY
LABORATORIES. Confidential Unpublished
works.1992-1997 Dolby Laboratories, Inc. All
rights reserved.
Features
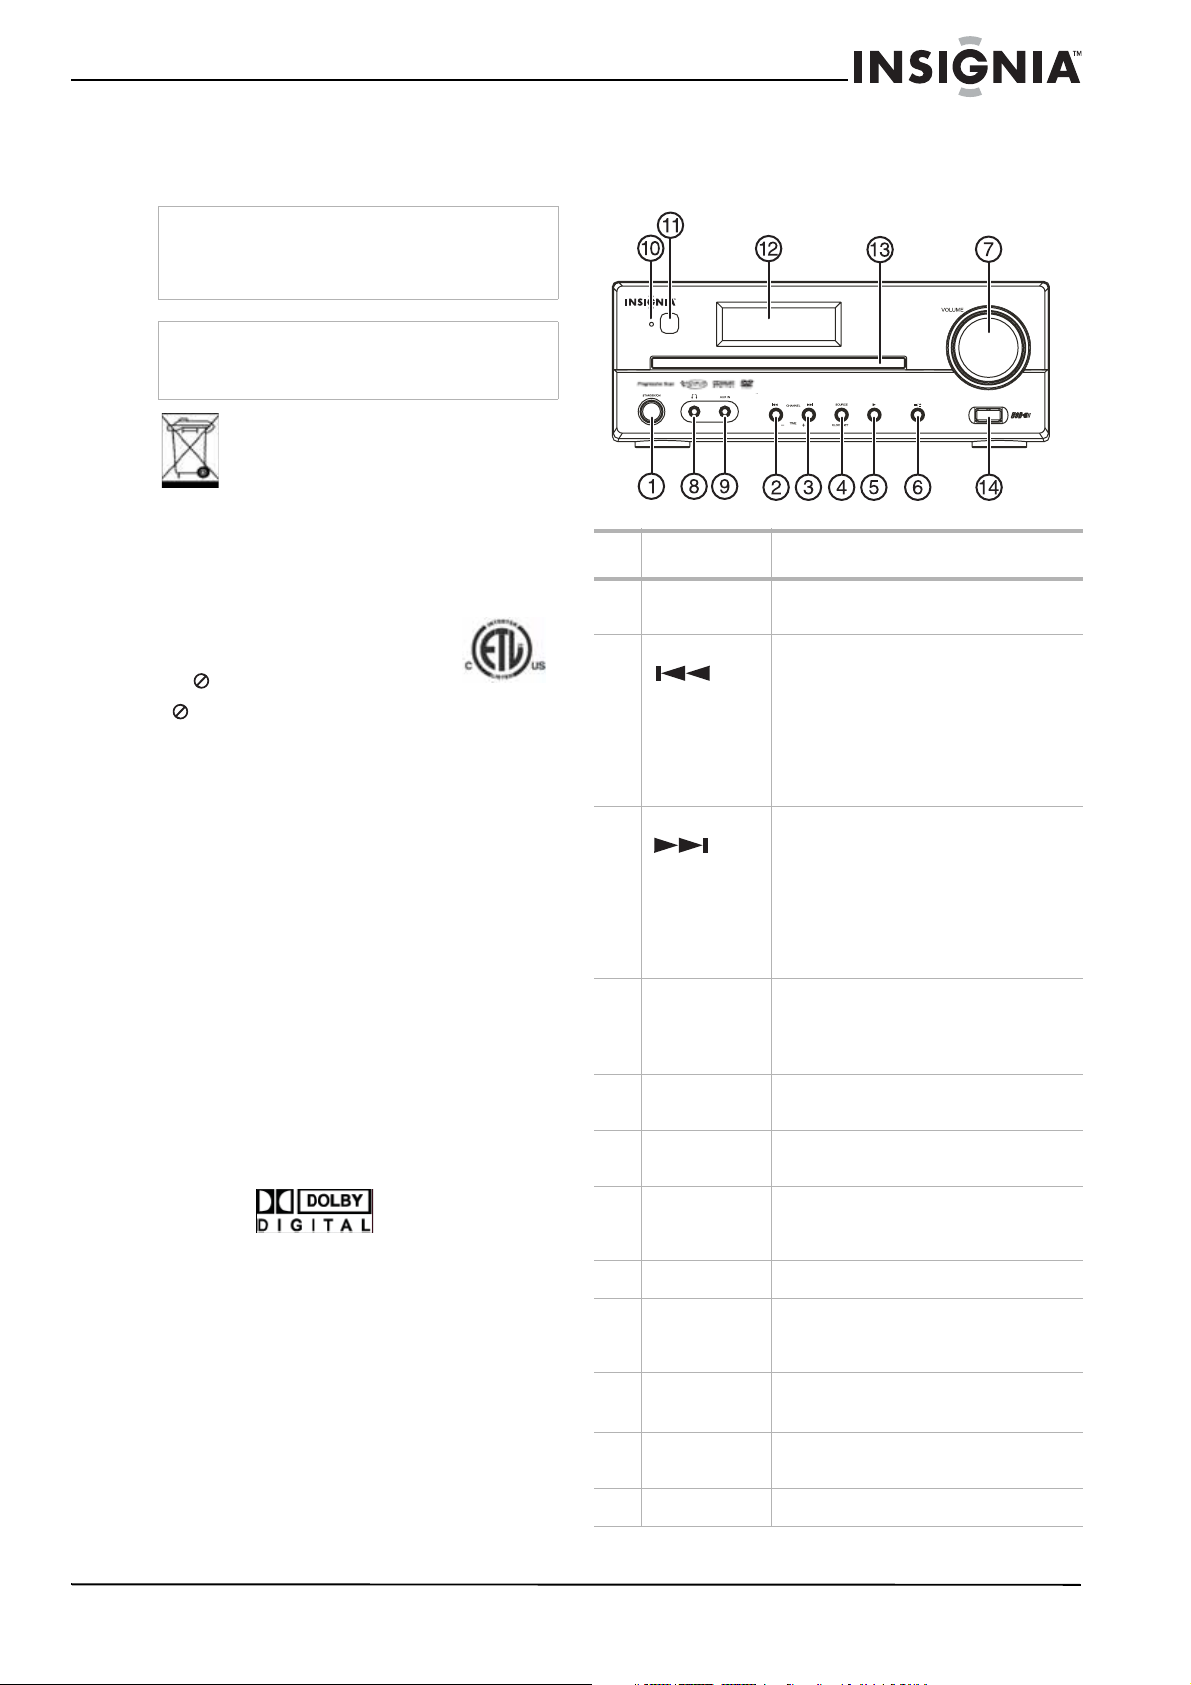
Front panel
DVD EXECUTIVE SHELF SYSTEM
# Description Function
1 Standby/On Press to turn your shelf system on or to
standby mode.
2 Channel In Disc/USB mode, press to skip to the
previous chapter or track. Press and
hold to fast backward.
In Radio mode, press to tune to previous
radio channel in memory.
In Standby mode, press to decrease an
hour/minute when adjusting the clock
setting.
3 Channel In Disc/USB mode, press to skip to the
next chapter or track. Press and hold to
fast forward.
In Radio mode, press to tune to the next
radio channel in memory.
In Standby mode, press to increase an
hour/minute when adjusting the clock
setting.
4 Source/Clock Press to cycle between Disc/USB, FM,
AM, AUX, modes.
In Standby mode, press and hold to set
up the real time clock.
5 Play In Disc/USB mode, press to play/select
tracks or songs.
6 Open/Stop In Disc/USB mode, press to stop
playback and to eject a disc..
Using progressive scan
Consumers should note that not all
high-definition televisions are fully compatible
with your shelf system and may cause artifacts
to be displayed in the picture.
In case of progressive scan picture problems, we
recommend that you switch the connection to
the standard definition output. If there are
questions regarding your television’s
compatibility with your shelf system, contact our
customer service center.
7 VOLUME Turn clockwise to increase volume and
8 Phones Plug standard headphones into this jack.
9 AUX IN Plug an external audio device into this
10 Standby
indicator
11 Infrared
receiver
12 LCD Display Displays status messages.
www.insignia-products.com
counter-clockwise to decrease the
volume.
jack to play its sound through this
player.
Power on/off mode - no light
Standby mode - Red LED
Receives the signal from the remote
control.
5
Page 6
Insignia NS-A3111 DVD Executive Shelf System
# Description Function
13 Disc Tray Place a DVD or CD, label side up, into
14 USB jack Plug an external USB device into this
this tray.
jack.
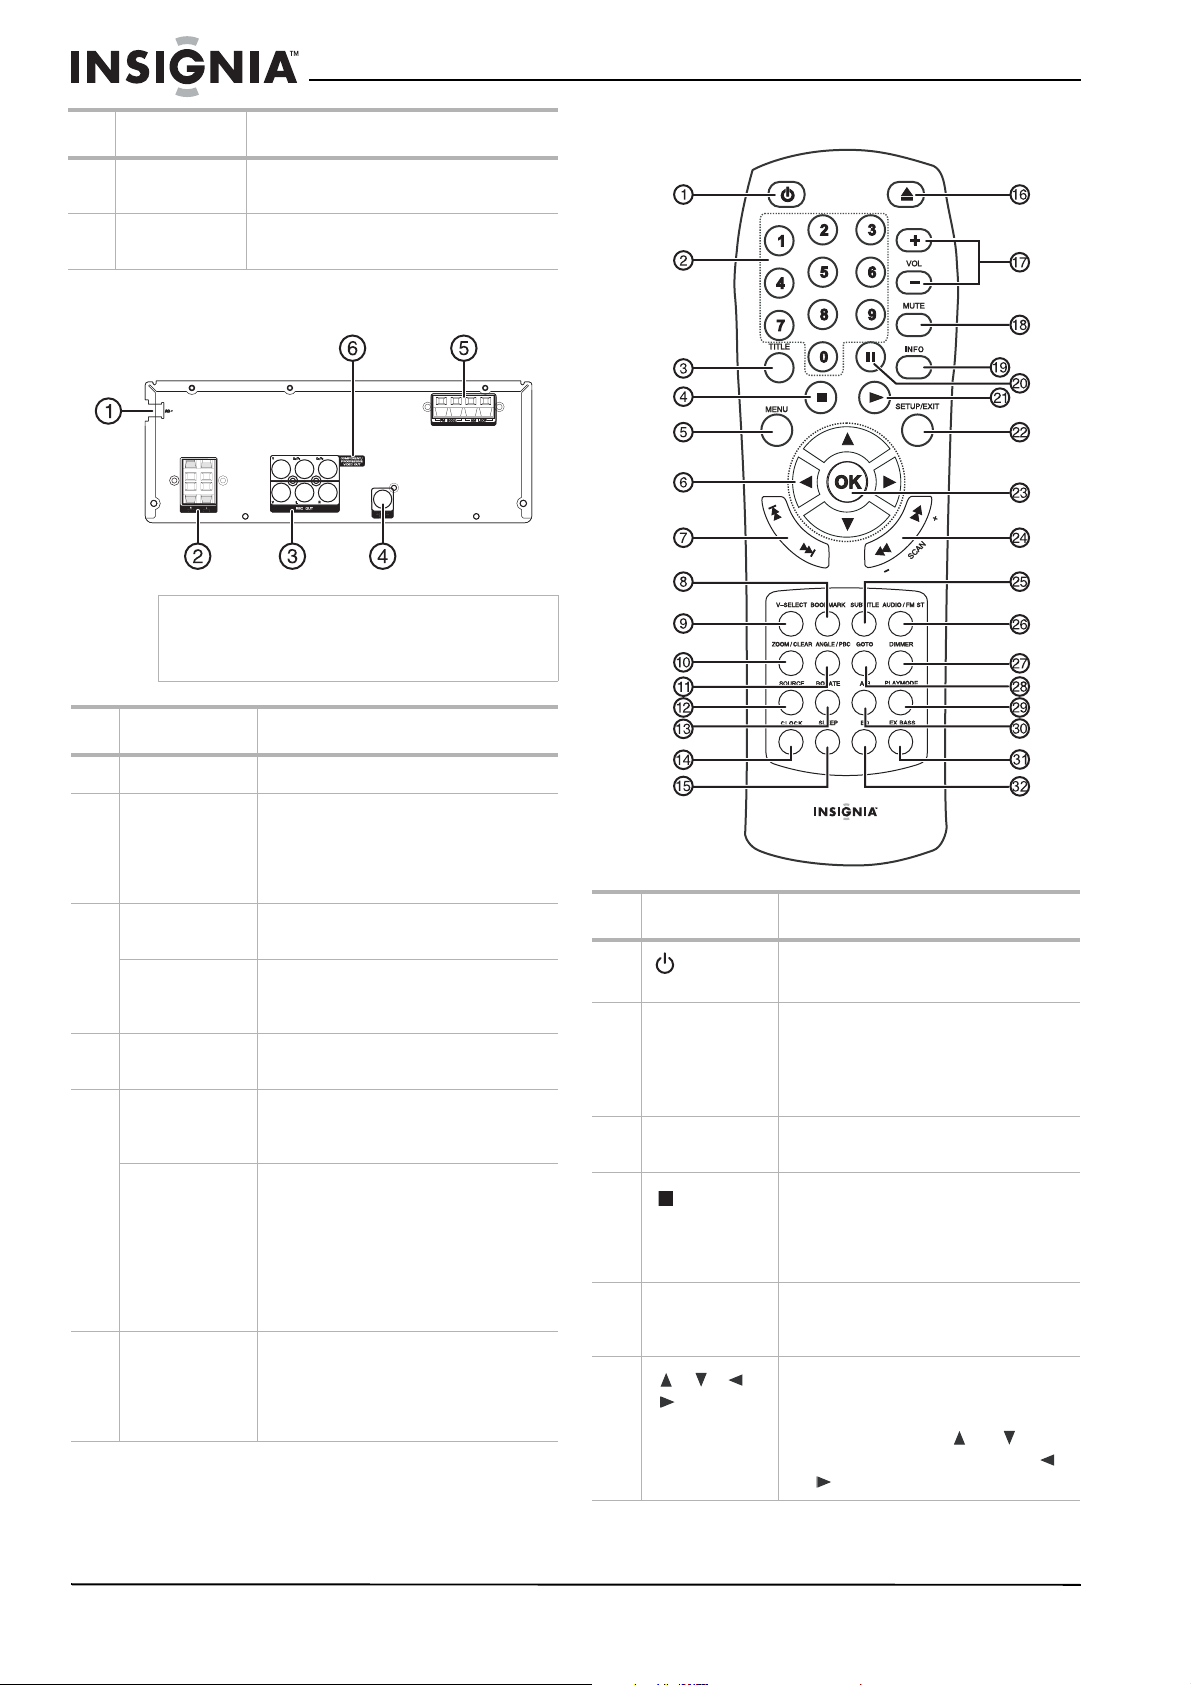
Back panel
Note
Connect the AC cord only after the speakers, antennas,
and all optional equipment have been connected. Never
make or change any connections with the power switched
on. The rating plan is located on the back of the system.
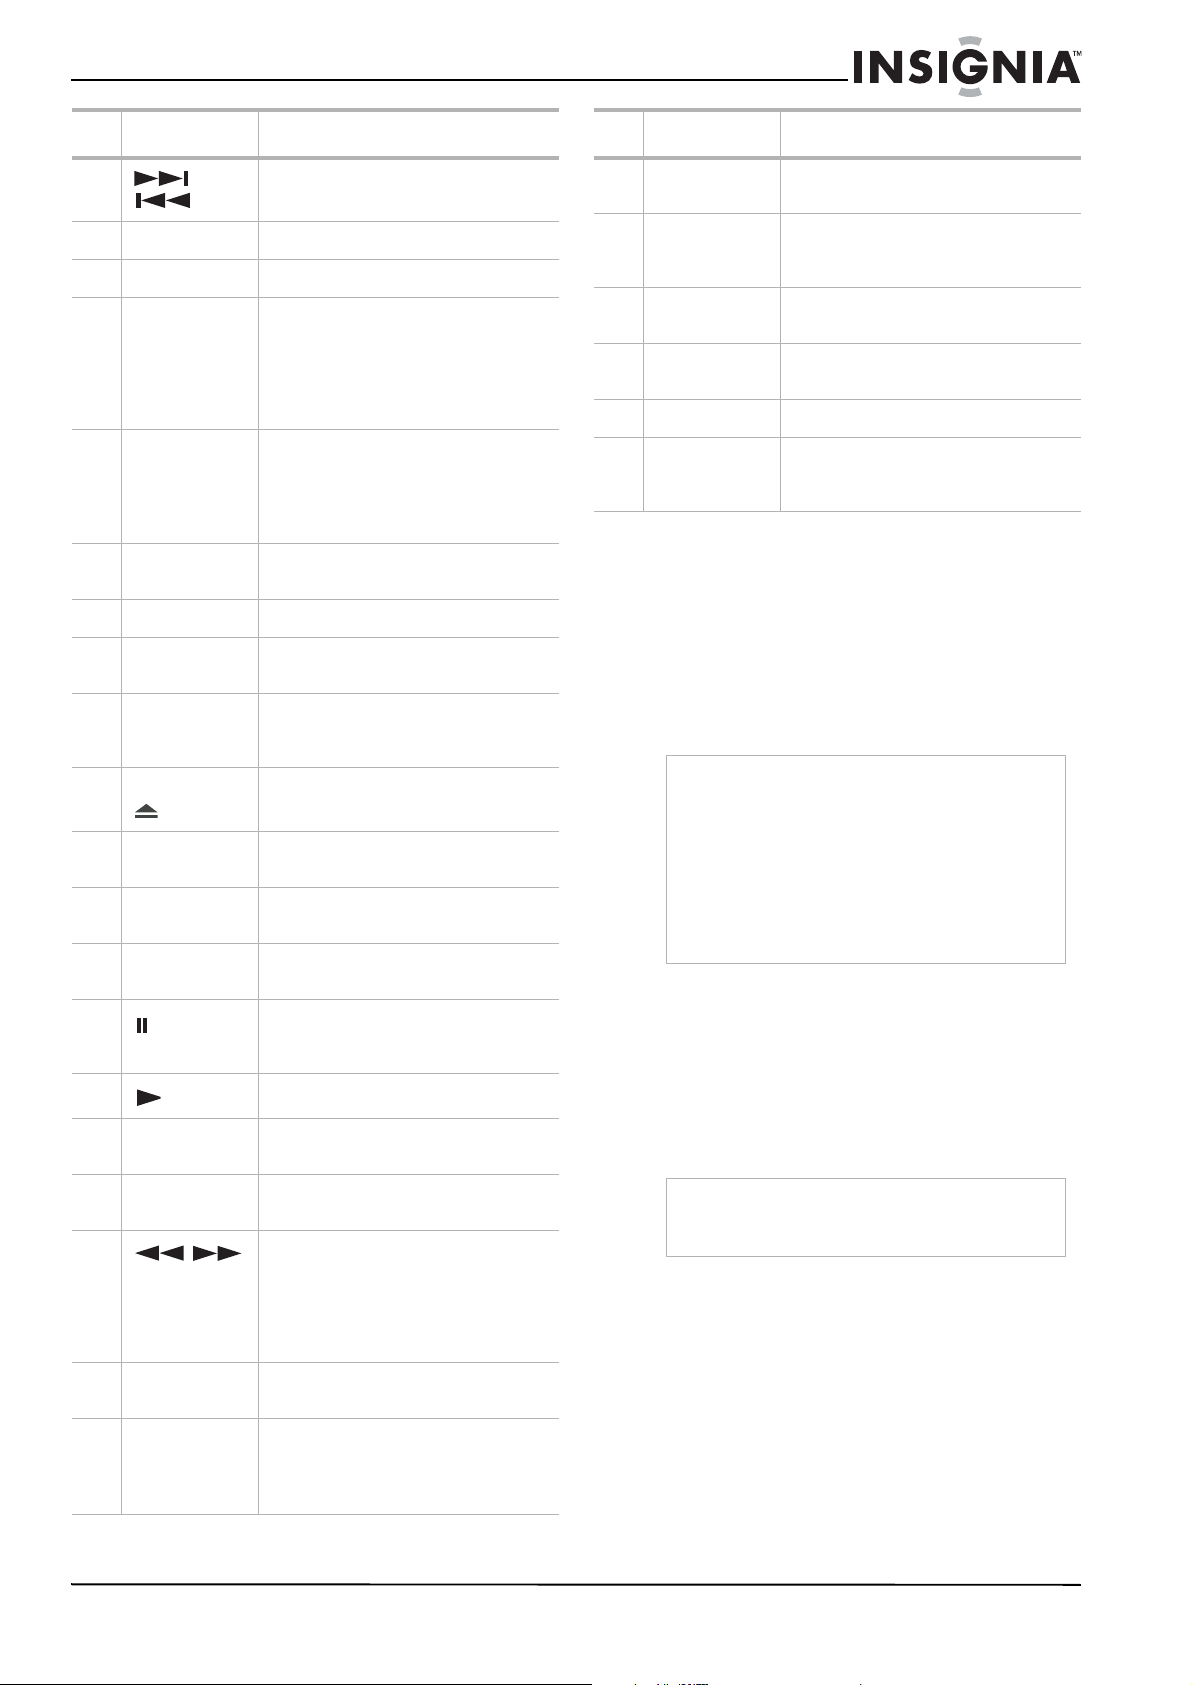
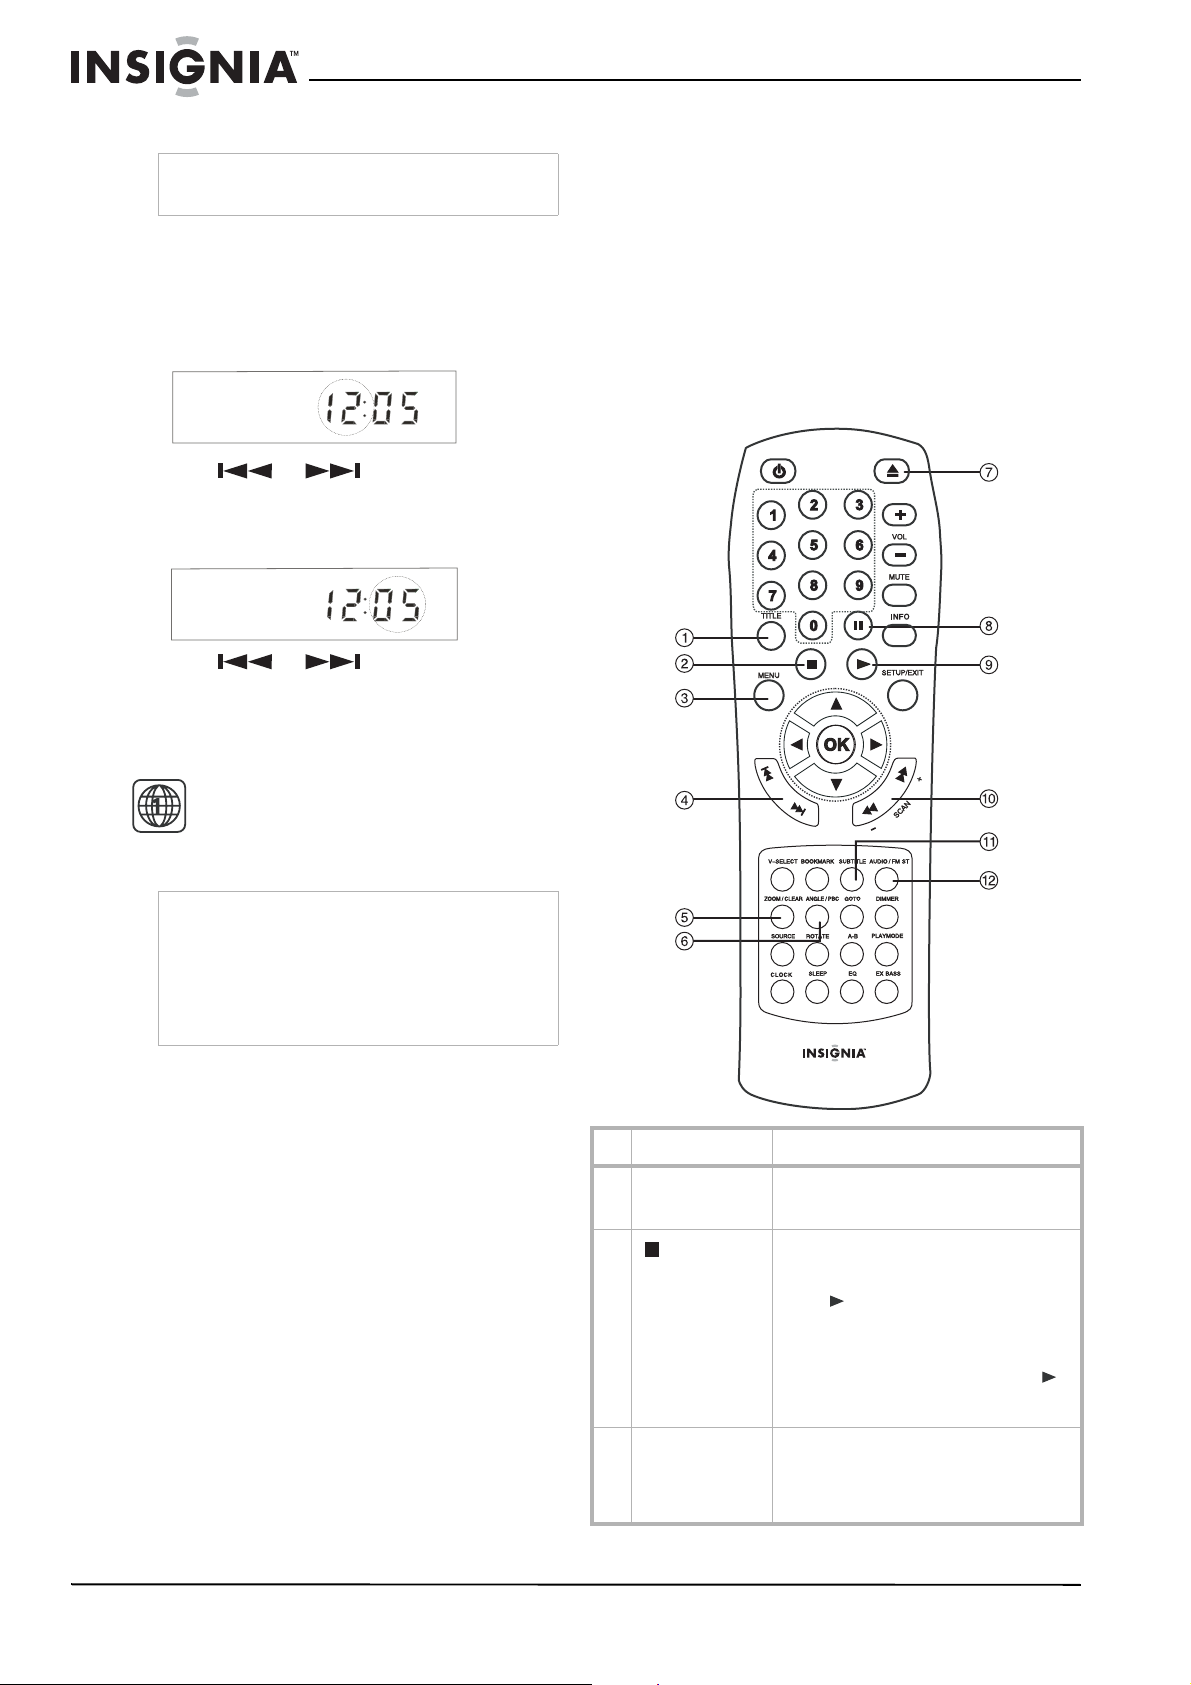
Remote control
# Description Function
1 Power cord Plug into an electrical outlet
2 Speakers Connect the left speaker to the L
3 Video Output For connecting VCRs or other
Audio Outputs For connecting the audio (L/R) signals
4 Coaxial output Connect to an external device that has
5 FM antenna
input
connections
AM loop
antenna
connections
6 Component and
progressive
video outputs
terminals and right speaker to the R
terminals. Connect the colored wire to
the color terminal and black wire to the
black terminal.
recording devices.
to external recording devices, such as
VCRs.
a digital audio input jack.
For FM reception connect the FM
antenna to the FM jack. Adjust until the
clearest signal is received.
For AM reception, connect the AM loop
antenna to the AM jack. Adjust until the
clearest signal is received. Insert the
stripped portion of the antenna into the
terminal fully.
Note: Position the antenna as far as
possible from TV, VCR, or other
radiation source.
Connect to a television that has
component video input . Use
component video cables. This type of
connection provides the best picture
quality.
DAV8611
# Button Function
1
2 0 - 9 numeric
3 TITLE Press to display the title menu, if
4
5 MENU In DVD mode, press to enter the Disc
6
(Standby/on)
keys
(Stop)
, , ,
(Arrow
keys)
Press to toggle between Operating and
Standby modes.
In DVD mode, press to enter title,
chapter, track, and time search
selections.
In Radio mode, press to enter a preset
station.
present on the disc.
Press STOP to stop playback. Playback
begins from this point when you press
PLAY. Press STOP twice, then press
PLAY to begin playback from the
beginning.
Contents menu. In PBC ON mode,
press to view a VCD disc menu.
In Menu mode, press to navigate in the
indicated directions for making
selections in menus.
In Radio mode, press or to
change the radio frequency. Press
or to change the radio memory.
6
www.insignia-products.com
Page 7
Insignia NS-A3111 DVD Executive Shelf System
# Button Function
7
8 BOOKMARK Press to open the Bookmark menu.
9 V-SELECT Press to switch between video outputs.
10 ZOOM/CLEAR In playback mode, press to select a diff
11 ANGLE/PBC In playback mode, press to toggle
12 SOURCE Press to cycle between Disc/USB, FM,
13 ROTATE Press to rotate the picture.
14 CLOCK In Standby mode, press and hold to
15 SLEEP Press to activate a sleep timer for your
16 OPEN/CLOSE Press to open and close the disc tray.
17 VOL +/VOL – Press to increase or decrease the
18 MUTE Press to mute the sound. Press again
19 INFO Press to display current information
20
21
22 SETUP/EXIT Press to enter or exit the System Setup
or
(Pause)
(Play)
Press to skip backward or forward to
the previous or next chapter or track.
erent zooming size while playing a
video.
In menu mode, press to clear the
information you entered in a setup
menu.
between different angles to view (if
available on the disc).
Press to turn PBC on or off on a VCD
disc.
AM, and AUX modes.
start real time clock setup.
DVD shelf system to go into standby
mode automatically.
volume.
to restore the sound.
about a disc during playback.
Press once to pause playback or
recording. Press repeatedly to advance
frame by frame.
Press to start playback.
menu.
# Button Function
27 DIMMER Press to dim or brighten the front panel
display light.
28 GOTO Press to start playback at a specific
point on a DVD, CD, VCD, or SVCD
disc.
29 PLAYMODE Press to display the playmode menu to
select a different play mode.
30 A-B Press to set up repeat playback or to
clear repeat playback.
31 EX BASS Press to turn Ex Bass on or off.
32 EQ Press to select a preset EQ mode.
Selections include FLAT, ROCK, POP,
CLASSIC, and JAZZ.
Installing remote control batteries
To install the remote control batteries:
1 Remove the battery cover.
2 Insert two AAA batteries into the battery
compartment. Make sure that you match the
+ and – symbols on the batteries with the +
and – symbols in the battery compartment.
3 Replace the cover.
Notes
• Do not mix batteries of different types.
• Do not mix old and new batteries.
• Remove batteries when the charge is depleted.
• Battery chemicals can cause a rash. If the
batteries leak, clean the battery compartment
with a cloth. If chemicals touch your skin, wash
immediately.
• If the remote control is not going to be used for
an extended period of time, remove the
batteries.
Using the remote control
To use the remote control:
• Point the remote control directly at your shelf
system, within a 60° angle horizontally (30°
to either side), and within 30° vertically of the
remote control sensor on the front of your
shelf system and within approximately 20 feet
(6 m) of your shelf system.
23 OK Press to enter or select a value in a
24
25 SUBTITLE Press to select a subtitle language, if
26 AUDIO/FM ST In playback mode, press to change to a
/
menu and setup navigation.
In playback mode, press to fast reverse
or fast forward the DVD or CD. Press
repeatedly to step through the fast
reverse or fast forward speeds.
In Radio mode, press to start autoscan
up or down.
available.
different audio stream.
In radio mode, press to select Mono or
Stereo.
www.insignia-products.com
Caution
Do not expose the remote control to liquids, direct
sunlight, or shock. Do not mix batteries of different
types.
7
Page 8
Insignia NS-A3111 DVD Executive Shelf System
-
Setting up your DVD shelf system
Unpacking and setting up
Your carton should contain:
• DVD shelf system
•User Guide
• Remote control with 2 batteries
•AV cable
• FM and AM antennas
• Speakers (2) with speaker wire
If you need to replace any of these items, call
our help line mentioned in the Warranty section
of this guide.
Carefully remove all the components from the
carton and make sure that you have all the
necessary components before you dispose of
the carton.
• Remove all packing materials from the
individual components.
• Do not remove any labels or stickers on the
back panel of your shelf system.
• Place your shelf system in the location you
want. Your shelf system is designed to be
used on a level, stable, flat surface, such as a
table, desk, shelf, or stand convenient to a
power outlet, out of direct sunlight, and away
from sources of excess heat, dust, moisture,
or vibration.
• Unwind the AC power cord and extend the
cord to its full length, then plug it into the back
of your shelf system.
Power source
Use the polarized AC line cord provided for
operation on AC power. Insert the AC cord plug
into a standard 120 V 60 Hz polarized AC outlet.
If you cause a static discharge when touching
your shelf system and your shelf system fails to
function, unplug it from the AC outlet and plug it
back in. Your shelf system should return to
normal operation.
Making connections
Notes
• Make sure that your shelf system is connected
directly to the TV, then tune the TV to the
correct video input channel.
• Do not connect your shelf system’s AUDIO
OUTPUT jack to the PHONO IN jack (record
deck) of your audio system.
• Do not connect your shelf system through
another VCR. The DVD image could be
distorted by the copy protection system.
• The picture and sound of a nearby TV, VCR, or
radio may be distorted during playback.
Position the units away from each other or turn
off your shelf system after removing the disc.
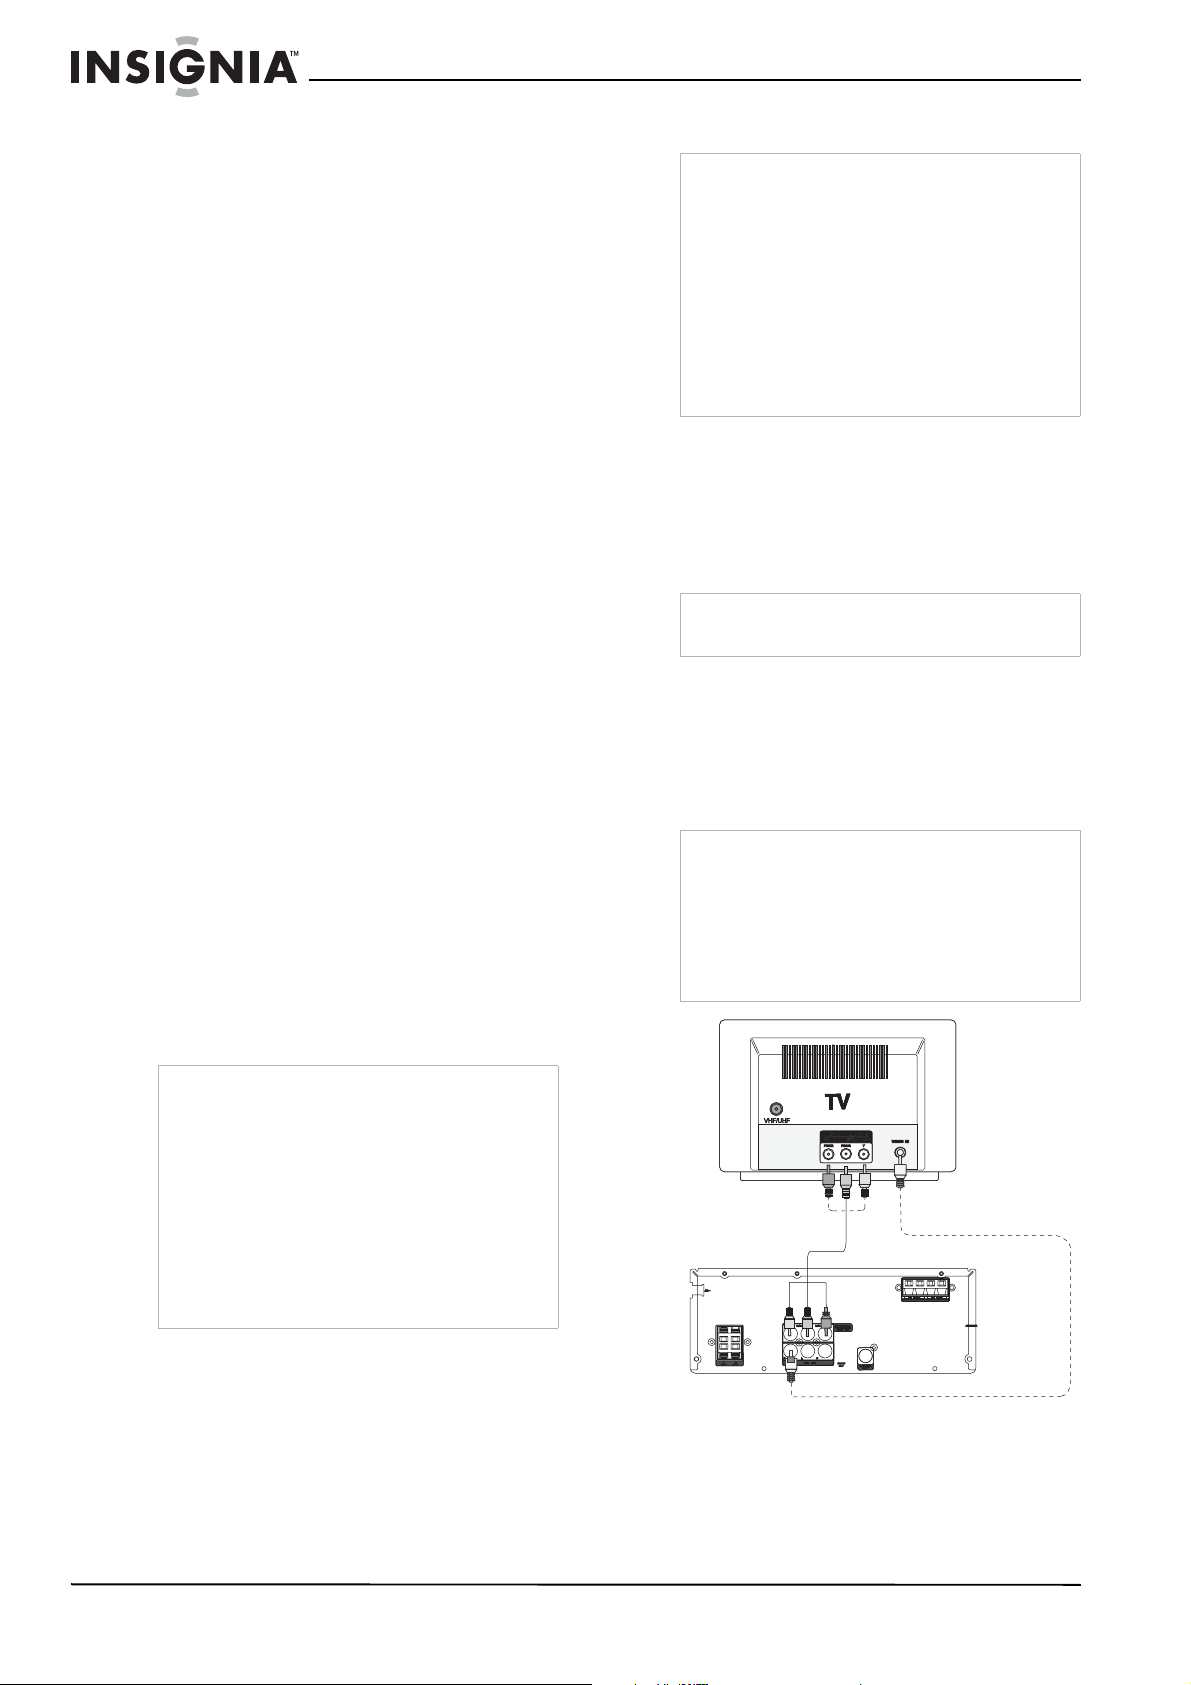
Connecting a TV
If your television is a high-definition or “digital
ready” television, you can take advantage of
your shelf system’s component/progressive scan
output for the highest quality video possible. You
only need to make one of the following
connections.
Caution
Do not plug in the AC power plug until you have
finished making the system connections.
To connect to your TV with component or
composite video cable:
• Connect the COMPONENT/PROGRESSIVE
OUT jacks (for best picture), or the VIDEO
OUT jack (for good picture) on your shelf
system to the corresponding in jacks on the
TV using the included cables.
Notes
• Progressive scan video quality requires a
progressive scan TV and is possible only when
using Y Pb Pr connections.
• Once connected, select Progressive Scan as
Video Output in the Setup menu to activate the
feature.
• Your TV may need adjustment to accept
progressive scan feeds.
Warnings
• The system uses a polarized AC plug with one
wide blade and one narrow blade. The plug will
only fit into matching polarized power outlets.
This is a safety feature to reduce the possibility
of electric shock. If the plug will not fit in your
power outlets, you probably have outdated,
non-polarized outlets which should be changed
by a qualified, licensed electrician. Do not file
the wide blade on the plug or use an adapter to
make the plug fit into your outlet.
• Never connect the AC cord plug to other than
the specified voltage (120 V 60 Hz). Use the
attached power cord only.
Back of shelf
system
Component video cable (not
included) for Best picture
Composite video cable (yellow
included) for Good picture
Audio connection
To connect to your TV with audio source:
• Connect the left and right AUDIO OUT jacks
on the back of your shelf system to the audio
left and right in jacks on the TV using the
supplied audio cables.
8
www.insignia-products.com
Page 9
Insignia NS-A3111 DVD Executive Shelf System
TV TV
To connect a two-channel digital stereo or
A/V receiver with multi-channel decoder:
1 Connect your shelf system’s COAXIAL OUT
jack to the corresponding in jack on your
amplifier. Use an optional digital coaxial
audio cable.
2 Activate your shelf system’s digital output.
(See “AUDIO SETUP” on page 11).
Connecting a VCR or tape recorder
To record DVD playback:
1 To record the audio track of your DVD,
connect the left/right audio output jacks on
this shelf system to the left/right audio input
jacks on your VCR or tape recorder.
2 To record the video track of your DVD,
connect the video output jack on this shelf
system to the video input jack on your VCR
or tape recorder.
5.1/6.1 CH home theater
Digital coaxial audio
cable (not included)
Back of shelf
system
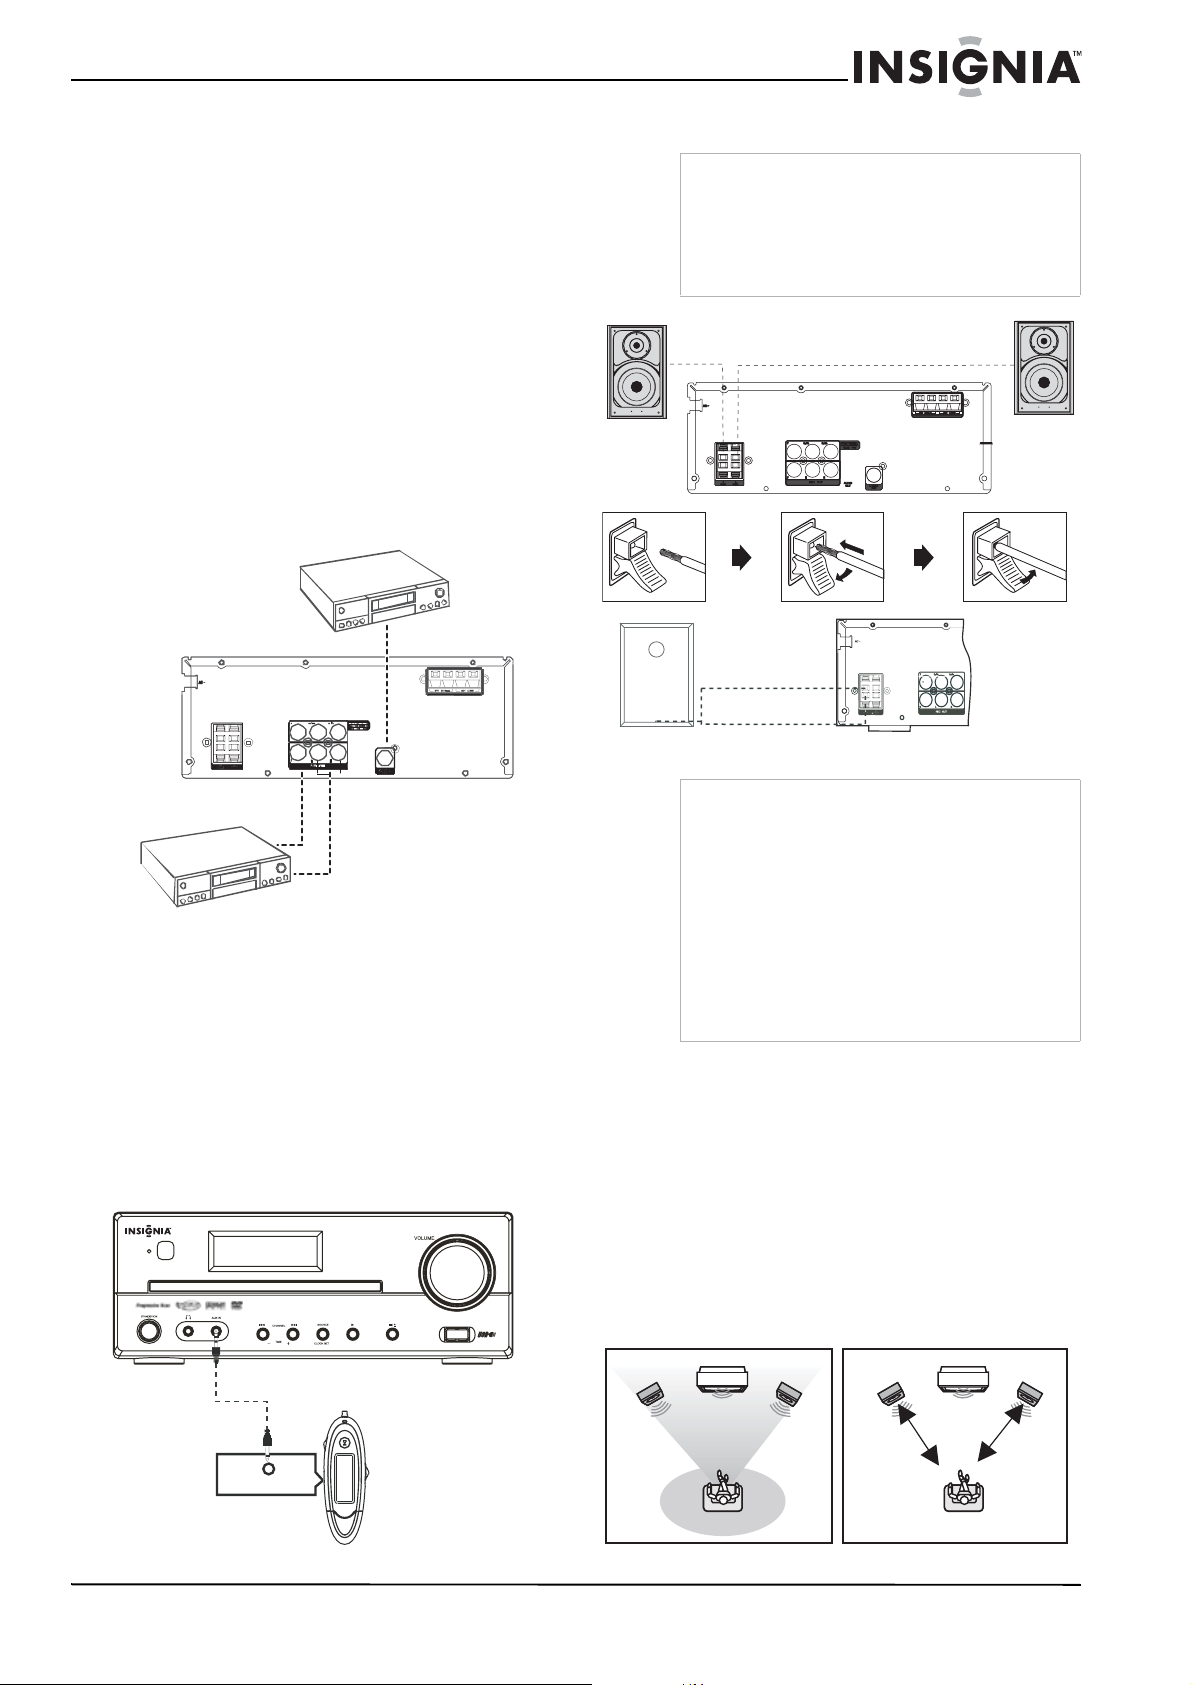
Connecting speakers
Note
This shelf system is designed to reproduce
optimum sound quality when the supplied
speakers are used. If you want to connect other
speakers to the system instead of the supplied
speakers, they should have 4 ohms impedance.
Ensure correct polarity when connecting speakers
(colored wire for matched colored terminal clip).
Right
speaker
Colored wire
Black wire
Left
speaker
VCR or tape
recorder
Video cable
Audio cable
3 If you have an external Dolby Digital or DTS
decoder and want to play your DVD through
external Dolby Digital or DTS decoder,
connect the digital coaxial output jack only to
the digital coaxial input jack of your decoder.
A digital coaxial audio cable is not included.
Making audio connections
To listen to the sound from an external music
device, such as an MP3, CD, or MD player,
through the speakers of this unit, connect the
AUX IN jack of this unit to the headphone output
of your music device with an audio cable, then
press SOURCE to select AUX.
DVD EXECUTIVE SHELF SYSTEM
Connect all speakers in the same manner.
Cautions
• To prevent damage to circuits, never
short-circuit the speaker output terminals.
• Do not remove too much insulation from the
wire cables to avoid the stripped
• portions from touching each other. The optimal
length for the stripped part should be around
1/3 inch (or 1cm).
• Do not push the stripped part too far into the
speaker connectors.
• Do not connect more than one speaker to any
one pair of speker terminals.
• Do not connect speakers with ampedance
lower than the speakers supplied.
Positioning the speakers
Where you place speakers plays an important
role in the reproduction of the surround sound
effect. Pay particular attention when planning
speaker layout. For the best surround effects, all
speakers should be installed.
To place the speakers:
• Place the front left and right speakers to the
left hand and right hand sides of your TV.
All speakers should be approximately the
same distance from your listening position
and must be visible.
Front of shelf system
Audio cable
Headphone output
External
audio
device
Front speaker
(left)
www.insignia-products.com
Viewing area
Front speaker
(right)
Front speaker
(left)
DIM L
Front speaker
(right)
DIM R
9
Page 10
Insignia NS-A3111 DVD Executive Shelf System
Installing your shelf system
Install your shelf system on a stable flat surface.
There must be sufficient room in front of your
shelf system for the disc tray to open. Positon
your shelf system so that it can have a direct line
of sight to the remote control.
Caution
• Do not install this shelf system in a confined
space such as a bookcase.
• Do not expose your shelf system to extremes of
temperature or humidity.
• Avoid placing your shelf system on a hot
surface such as on top of other hot running
equipment.
• Make sure that there is adequate ventilation to
your shelf system.
Notes
• Connect the AV cord only after the speakers,
antenna, and all optional equipment have been
connected.
• Never make or change any connections with
power turned on.
Using your DVD shelf system
Getting started
To get started:
1 Finish the connection for the shelf system as
shown in the previous section.
2 Connect power to your shelf system.
3 Turn on the TV and set to the correct video-in
channel.
To turn your shelf system on:
1 Plug in your shelf system. The standby
indicator on the front panel lights up.
2 Press
the display shows “NO DISC.”
3 Turn on your television and select the AV
input that your shelf system is connected to.
Standby/On. After a few seconds
Basic setup
To use the basic setup menus:
1 Press SETUP/EXIT on the remote control to
enter the
To exit the
SETUP/EXIT again.
2 Press
menus:
Video Setup, or Audio Setup.
3 When a menu is highlighted, press
to select options within the menu.
Available options for each setting appear on
the right side of the screen.
4 Press
5 Press
press OK to confirm the changed setting.
6 Repeat Steps 3 to 5 to change the other
settings. For more information, refer to
appropriate sections in this guide.
7 When you have finished making changes,
highlight EXIT/SETUP, then press OK, or
press SETUP/EXIT again to exit the
Setup
System Setup
System Setup
or to navigate to one of these
System Setup, Language Setup
or OK to move to the right column.
or to select a new setting, then
menu.
menu in stop mode.
menu, press
,
or
System
To start playback:
1 Press (OPEN/CLOSE). The disc tray
opens.
2 Place a DVD in the disc tray, then press
(OPEN/CLOSE). The player reads the disc
and starts playback. Before the movie starts
to play, a menu appears.
3 Select PLAY MOVIE, then press OK. The
movie starts.
4 Although you can watch a movie immediately,
to get the best results from your shelf system,
press STOP, then complete the following
system setup options. You only need to do
this when you first set up your shelf system.
10
www.insignia-products.com
Page 11

Insignia NS-A3111 DVD Executive Shelf System
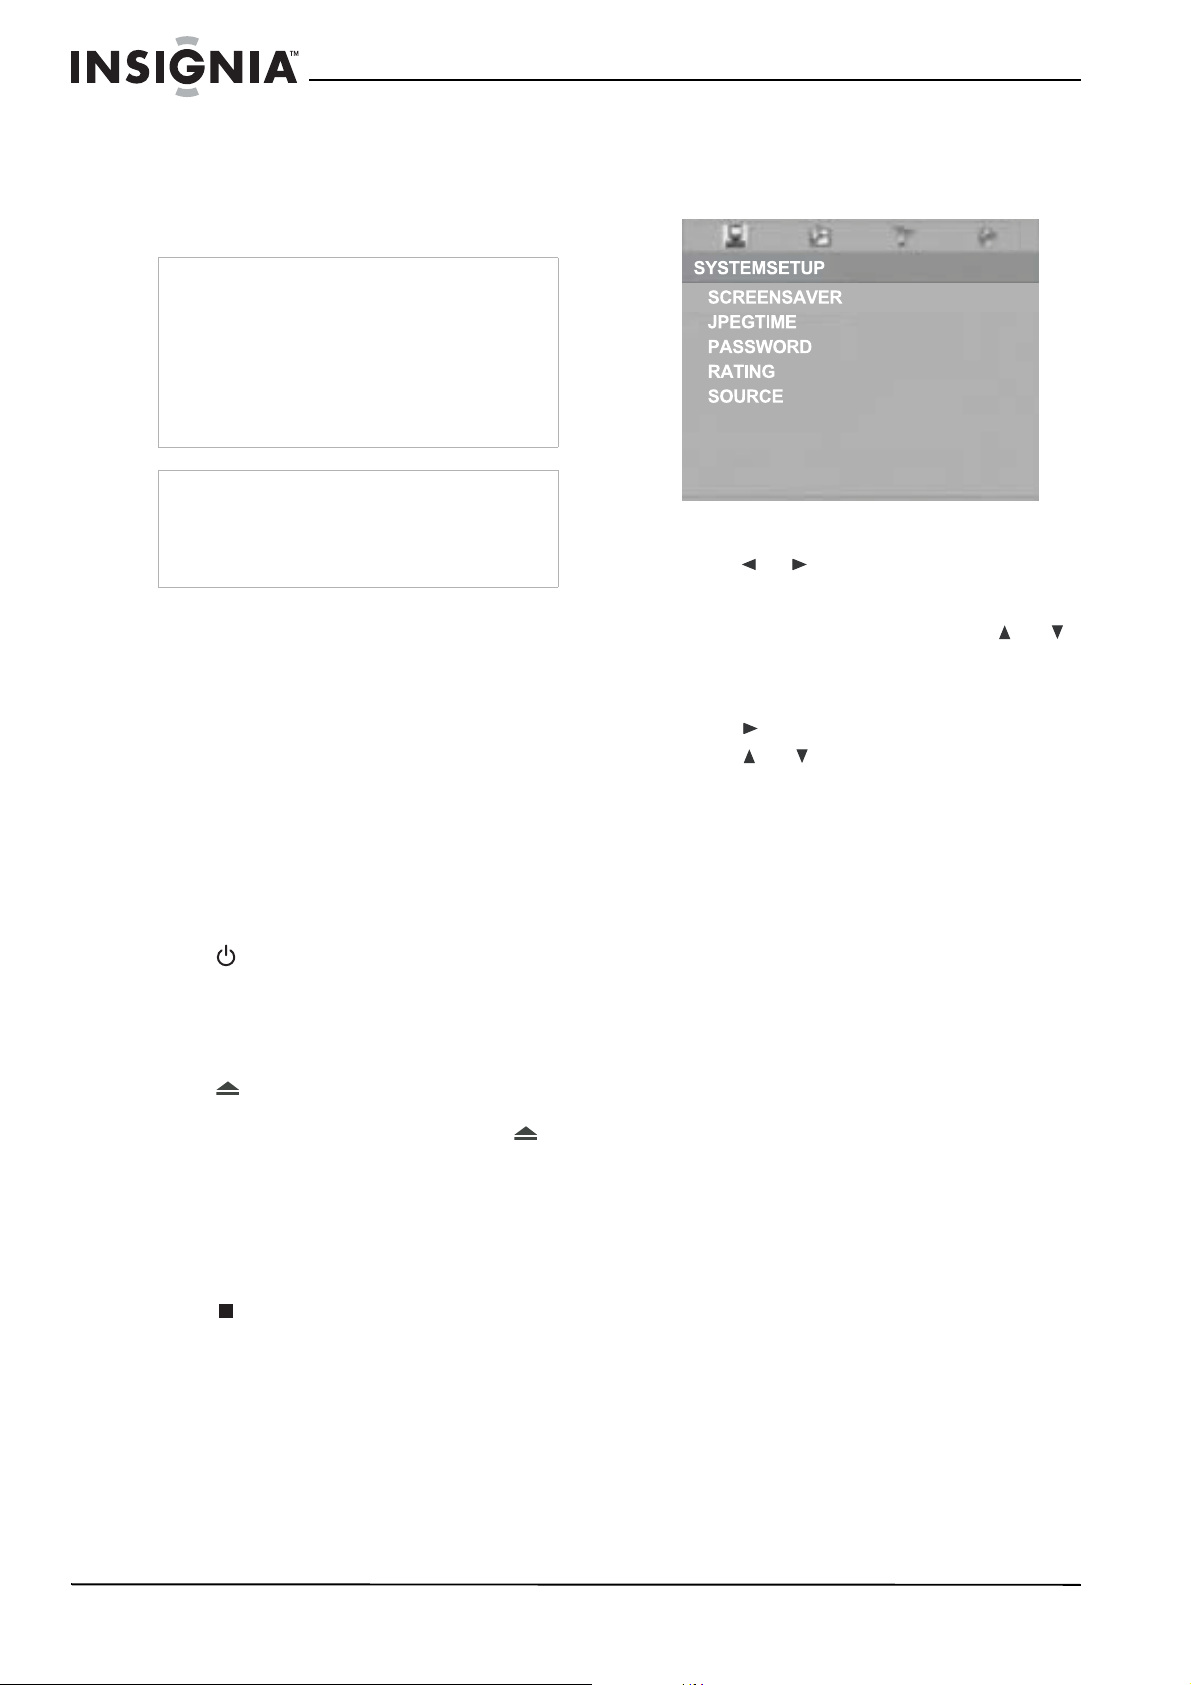
Changing your player’s settings
Menu Available options
SCREEN SAVER–Turn screen saver On or Off.
JPEG TIME–Select the JPEG slide show
interval while playing a picture CD. Each
picture will display for the duration specified
before showing the next one automatically.
Choices include 5SEC, 10SEC, and 15SEC.
PASSWORD–Many DVD movie discs contain
MPAA rating codes. This shelf system
recognizes the codes on these DVDs. This
provides a method for you to prevent children
from viewing films which are not suitable or
that you find objectionable. To unlock the
RATING feature or change the password, press
the numeric buttons to input the existing
password (the factory-set password is "1234"),
then press ENTER. You can then change the
RATING setting as shown below, or input a
new password and press ENTER. An open lock
icon indicates that parental lock is NOT active.
A closed lock icon indicates that parental lock
is active.
RATING–After entering the password (as
shown above), Select the highest rating you
want anyone to view, then lock the password.
To play a disc with a higher rating, the
password must be entered. Ratings include:
• KID SAFE–Content is safe for children.
• G–Recommended as acceptable for all
ages.
• PG–Parental Guidance is suggested.
• PG-13–Material may not be suitable for
SYSTEM
SETUP
children under age 13.
• PG-R–Parental guidance recommended
- very brief mature language or
situations.
• R–Restricted - violence, adult language
and situations unsuitable for young
viewers.
• NC-17–Not recommended viewing for
children under age 17.
• ADULT–Should be viewed only by
adults due to graphic sexual material,
violence, or language.
To set the rating when the password is
unlocked:
•In the
• Press or to highlight a rating level
• Press or to highlight Password,
SOURCE–Select the source files that you want
to play between Disc and USB. To access files
in a USB device, make sure your USB device is
connected to the USB jack on the front panel.
Note: This system does not support NTFS format. If
the USB flash drive does not work, check the USB
flash drive file system and format it with FAT or
FAT32.
System Setup
to highlight Rating, then press .
for the disc inserted, then press OK.
then press OK. Use the numeric keys
(0-9) to enter a four-digit password. If
you make a mistake before pressing
OK, press CLEAR and enter your
four-digit security code again. DVD
discs that are rated above the level you
selected will not play unless you enter
correct the four-digit password.
menu, press or
Menu Available options
OSD LANGUAGE–Select the language for the
on-screen display (menus).
AUDIO LANG–Select the DVD audio language
LANG(UAGE)
SETUP
VIDEO SETUP
AUDIO SETUP
you want.
SUBTITLE LANG–Select the DVD subtitle
language you want.
MENU LANG–Select the DVD menu language
you want.
TV TYPE–Sets the aspect ratio of the picture.
Choices include:
• 4:3 PS–Select this when your system is
connected to a normal TV. Wide-screen
images are shown on the screen, but
with some parts cut automatically.
• 4:3 LB–Select this when your system is
connected to a normal TV. Wide-screen
images are shown on the screen, with
black bands on the top and bottom
• 16:9–Select this when your system is
connected to a wide-screen TV.
Note: Some discs may not be able to play according
to your selection due to the format that has been
recorded on the disc. For example, a disc recorded
in 4:3 mode can only be played in 4:3. The TV TYPE
should correspond to the TV screen.
VIDEO–Choose video output that matches the
video connection between your system and TV.
Choices include:
• 480i YPBPR–Select this if you have
connected unit to your TV using Y, Cb,
Cr video cable.
• P-SCAN YPBPR–Select this if you have
connected the unit to your TV using the
Y, Pb, Pr video jacks and are using the
progressive scan feature.
Note: You also can press V-SELECT to select this
directly.
DIGITAL OUTPUT–Select the digital audio
format:
• SPDIF/RAW–Digital audio output is in
the original format, such as AC3 or
DTS.
• SPDIF/PCM–Digital audio output is
converted to PCM.
DYNAMIC RANGE– Lets you control the
dynamic range so as to achieve a suitable
sound for your equipment.
• ON–Loud sounds such as explosions
are toned down slightly.
• OFF–The system plays back at the
recording level on the disc.
SAMPLING–Selects the decode sampling
between 96 KHz and 48 KHz.
• 48 KHz–Audio is down sampled at
48 KHz if the disc is recorded in
96 KHz.
• 96 KHz–Outputs with original audio
format.
Note: This function is only available for digital audio
output of a disc recorded in 96 KHz.
www.insignia-products.com
11
Page 12
Insignia NS-A3111 DVD Executive Shelf System
Setting the clock
Note
You will need to reset the clock every time you
unplug the unit.
Press STANDBY/ON on the front panel to put
the unit into standby mode.
To set up the clock:
1 Press and hold the SOURCE button on the
front panel until the hour display is flashing.
2 Press or on the front panel to
adjust the hour.
3 Press the SOURCE button again until the
minute display is flashing.
4 Press or on the front panel to
adjust the minute.
or higher, MP3 files can be played. Some
files may not play depending on condition or
formats.
• WMA Files on CD-R
If the sampling frequency is 32KHz, and the
fixed bit rate is 128Kbps or higher, WMA files
can be played. Some files may not play,
depending on condition or formats.
• JPEG Files on CD-R or CD-RW
This player can play JPEG files with a
resolution of up to five million pixels. Certain
JPEG files cannot be read by this player.
Using the remote control to play a DVD, CD, or VCD
Playing a DVD, CD, or VCD
Regional code
Your shelf system has a regional code
(1) printed on the back of the case. Your
1
shelf system can play only DVDs
or ALL.
Playable discs
You can play the following discs on your shelf
system:
• DVD-Video
• DVD-R, DVD-RW, DVD+R and DVD+RW
• Video CD (VCD)
• Super Video CD (SVCD)
• Audio CDs
• CD-R and CD-RW
• MP3 Files on CD-R or CD-RW
labeled with the same regional code (1)
Notes
• Most DVDs have a globe with one or more
numbers in it clearly visible on the cover. This
number must match your shelf system’s
regional code or the DVD cannot play.
• If you try to play a DVD with a different regional
code than your shelf system, an error message
appears on the TV screen.
DVD-R and DVD-RW discs must be made in
Video DVD mode. DVD+RW disc must be
made in accordance with the specifications
for DVD+RW disc with a 4.7 GB capacity.
This player can play most CD-R and CD-RW
discs. Depending on the recording
conditions, however, you may find that not all
discs play successfully.
MP3 files should be ISO 9660 or JOLIET
format. If the sampling frequency is 44.1 or
48.1 KHz, and the fixed bit rate is 128 Kbps
DAV8611
# Button Function
1 TITLE Press to display the Title menu, if present
2
3 MENU Press to display the disc menu.
(Stop)
on the disc. This feature works for DVD
playback only.
Press once to stop the current playback
instantly and enter the Resume Play
mode.
Press (Play) to resume playback from
the point at which you last stopped the
disc.
Press twice to stop playback completely.
You cannot resume playback. Press
(Play) to start playback from the
beginning of the disc.
Note: Playback stops to display the menu. The
button does not work for CD playback. For
VCD, this button is only available when PBC is
set to on.
12
www.insignia-products.com
Page 13

Insignia NS-A3111 DVD Executive Shelf System
# Button Function
4
(Skip
forward)
or (Skip
back)
5 ZOOM/CLEAR Press to zoom in on the image. You can
6 ANGLE/PBC You can select different angles of viewing
7
8
(Open/ Close)
(Pause)
9 (Play) Press to start playback.
10
/
When a disc is playing, you can skip
backward or forward a chapter or track.
Press to skip to the beginning of
the previous chapter or track.
Press to skip to the beginning of
the next chapter or track.
Note: For audio CD discs, use the numeric
buttons (0 - 9 ) to directly jump to a track
number. When operating a VCD with the PBC
function, the PBC should be set to OFF.
magnify pictures during playback.
Each time ZOOM /CLEAR is pressed,
zoom settings are changed as follows:
ZOOM x 2 ----> ZOOM x 3 ----> ZOOM x 4
----> ZOOM x 3/4 ----> ZOOM x 2/3 ---->
ZOOM x 1/2 ----> ZOOM : OFF
While an image is magnified, you can
press , , , or to move within
the image.
To return to the original normal view,
press ZOOM until the ZOOM:OFF symbol
is shown. The screen returns to normal.
when playing a DVD video disc that
contains scenes recorded from multiple
angles.
Press ANGLE repeatedly to select different
angles of viewing if available on the disc.
Note: This function is only available when the
scenes shot from multiple angles have been
recorded on the DVD. If multi-angle viewing is
not available, OFF is displayed.
Press to open the disc tray.
Note: Load the disc on the disc tray with disc
label facing upward.
Press again to close the disc tray. The
shelf system starts playback
automatically.
You can freeze the image and advance
frame-by-frame.
CD: Press to pause the playback. Press
again or press to resume normal
playback.
DVD/VCD: Press to pause the playback.
Press again to go to Step mode.
Each time you press , the video
advances one frame. Press to resume
playback.
Press to search backward or forward.
Press to resume playback. Each time
or is pressed, the speed
of back or forward searches changes
accordingly.
In Pause mode, press to start
forward slow motion play.
Each time is pressed, the speed of
slow-motion playback changes
accordingly. Press to resume normal
playback.
Note: Slow motion step-by-step does not work
with CD Playback. Backward slow motion does
not work with VCD playback.
# Button Function
11 SUBTITLE During playback, you can change to a
12 AUDIO/FM ST Press to change to a different audio
different subtitle language or disable
subtitles.
When a DVD disc is playing, press
SUBTITLE to show the current playback
language subtitle.
Press repeatedly to select the desired
subtitle language.
Note: This function can only be used for disc
on which different subtitle languages have been
recorded. The number of languages recorded
may be different depending on the disc.
language on the disc during playback. You
can change audio language or audio
output.
When a disc is playing, press AUDIO/FM
ST to show the current playback audio
track number.
Press repeatedly to select the desired
audio track.
Note: If there is only one audio track available
on the disc, the number does not change.
Advanced playback functions
To playback using the Display function:
• While the disc is playing, press INFO to
display playback information present on the
disc.
For DVDs:
• Press INFO to display DVD playback
information.
Disc format
Title
Current title
Total titles
• Press INFO twice to display additional
playback information.
Audio
• Press INFO three times to check the
playing time of current title.
• Press INFO four times to check the
remaining time of current title.
• Press INFO five times to display more
playback information.
The following information is shown,
depending on the type of disc being played:
• TT (title info) - Displays the title number
being played and the total number of titles
recorded on the disc.
• CH (chapter info) - Displays the chapter
number being played and the total
number of chapters recorded on the disc.
• Elapsed Time - Displays the elapsed time
from the beginning of the
title/chapter/disc/track being played.
Current chapter
Total chapters
Chapter
Elapsed time
Subtitle
---
Angle
www.insignia-products.com
Note
If there is a “-” displayed at the front of the time,
the number indicates remaining time of current
title/ chapter/disc/track.
13
Page 14
Insignia NS-A3111 DVD Executive Shelf System
• Audio - Displays the audio track currently
selected.
• Subtitle language - Displays the
language (subtitle) number currently
selected.
• Angle - Displays the viewing angle
currently selected. When a disc without
multiple angles is played back, “OFF” is
displayed.
• TRK (track info) - Displays the track
number being played and the total
number of tracks recorded on the disc.
• Repeat Mode - Displays any repeat mode
that is set.
Note
After checking the settings, press INFO again to
turn off the display.
Using the GOTO function
This function lets you directly select any point of
the disc from which to start playback.
DVD
TT
Current title
7 /36
CH
1/41
Chapter
To select a specific title, chapter, or track:
1 Press GOTO. The
2 Press
or to highlight a title, chapter, or
GOTO
menu opens.
track, then press the corresponding number
key (0 - 9).
3 Press OK to confirm. Your shelf system starts
playback from the position you have selected.
Note
Press ZOOM/CLEAR to reset the highlighted title,
chapter, or track.
00:03:12
Time
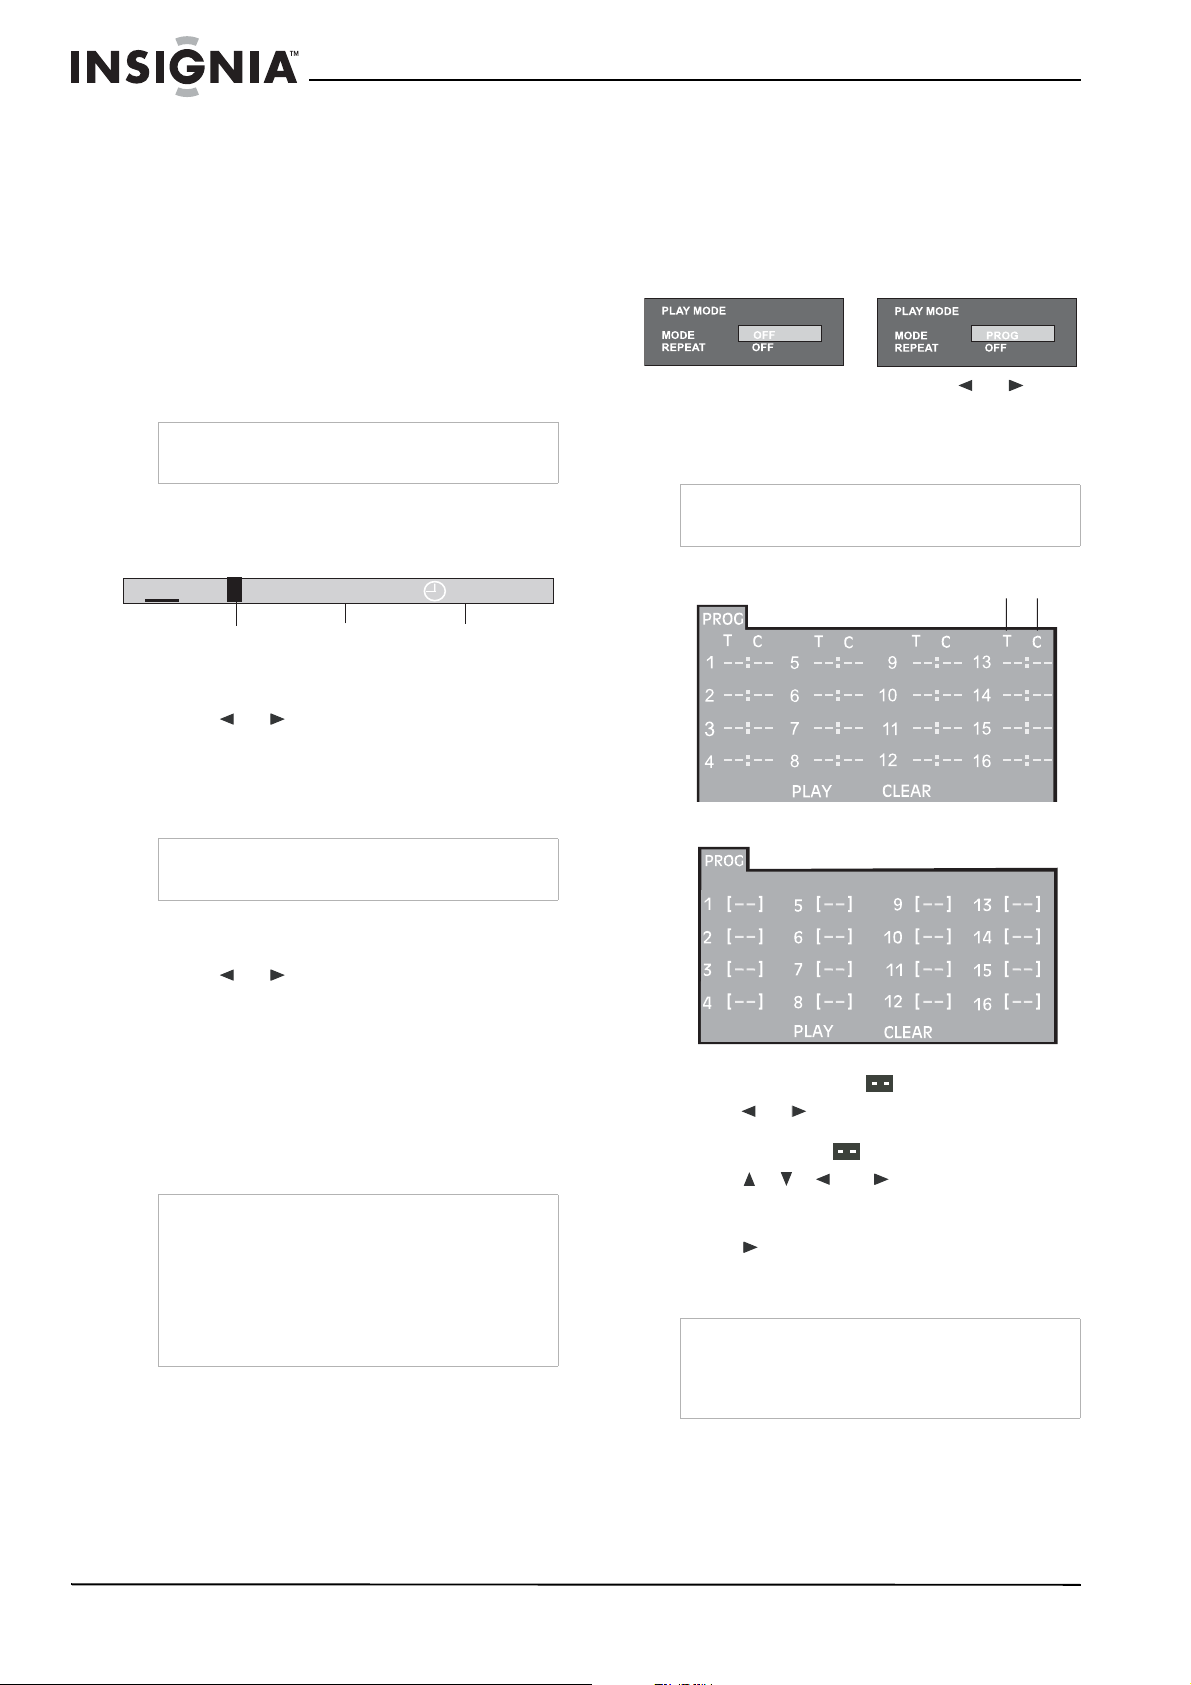
Using program playback
Program playback lets you enter the order in
which a disc will play chapters or tracks.
To play a DVD, CD, VCD, or SVCD disc using
program play:
1 With a disc in the shelf system, press
PLAYMODE. The
Playmode
menu opens.
PLAY MODE
PLAY MODE
MODE PROG
MODE PROG
REPEAT OFF
REPEAT OFF
2 With MODE highlighted, press
select PROG.
3 Press OK to confirm. The
PROG
opens.
Note
During VCD and SVCD playback, the function is
only available when PBC is off.
DVD PROG menu
CD, VCD, or SVCD PROG menu
or to
menu
Chapter
Title
To locating a specific time:
1 Press GOTO. The
2 Press
or to highlight time.
GOTO
menu opens.
3 Directly key in the time to start playback
using the number keys (0 - 9).
• The first two digits are the hours.
• The next two digits are the minutes.
• The last two digits are the seconds.
4 After entering the time, press OK to confirm.
Your shelf system starts playback from the
time you select.
Notes
• Some discs may not let you use this function.
• Some scenes may not be located as precisely
as you specify.
• This method for accessing a specific location is
available only within the current title of the DVD
disc.
• Press ZOOM/CLEAR to reset the time when
the time is highlighted.
4 Enter the title (DVD) or track (CD) numbers in
the blanks provided (
5 Press
or to highlight chapter and enter
).
the chapter numbers (DVDs only) in the
blanks provided ( ).
6 Press , , , or to move to another
field, then repeat the above steps for more
inputs.
7 Press
or highlight PLAY on the screen,
then press OK to start the programmed
playback.
Notes
• Highlight CLEAR on the
press OK to delete all inputs.
• During VCD/SVCD playback, the function is
only available when PBC is turned off.
PROG
menu, then
14
www.insignia-products.com
Page 15
Insignia NS-A3111 DVD Executive Shelf System
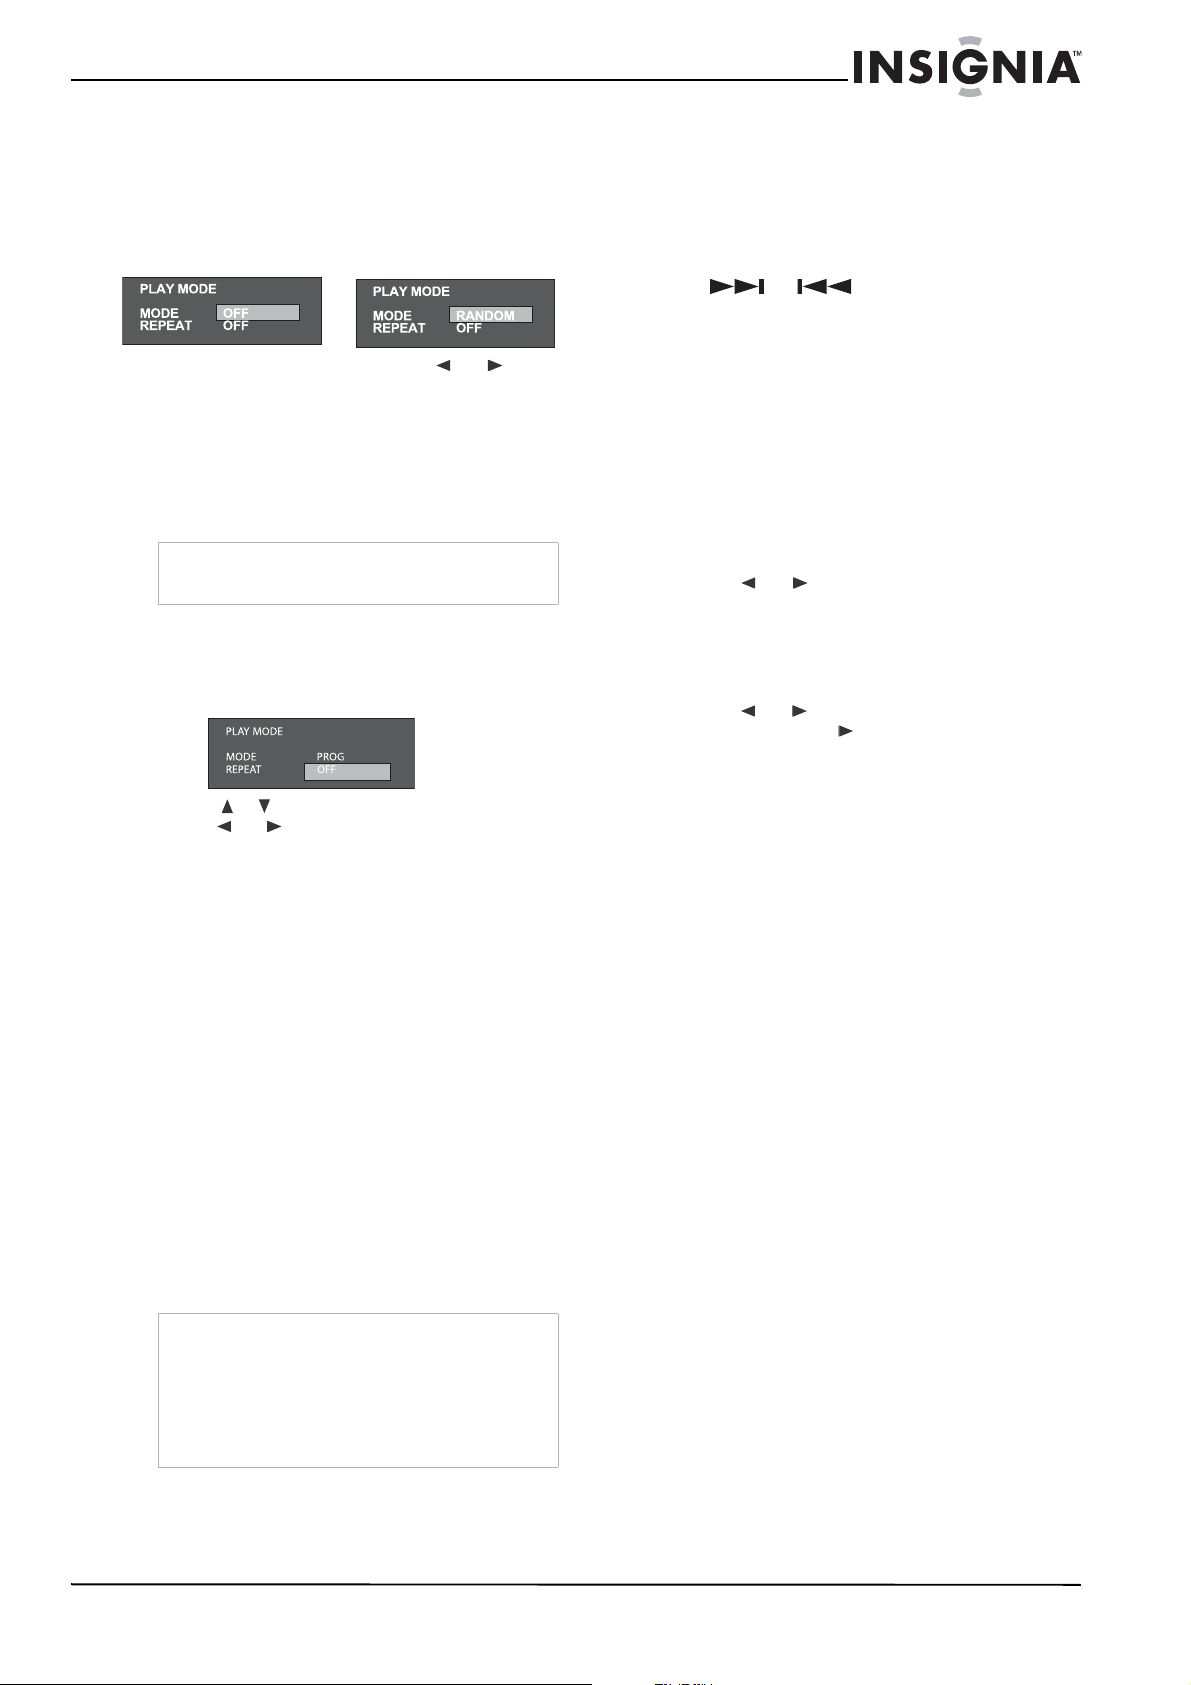
Using random playback
The chapters on a DVD and the tracks on a CD
can be played in random order.
To use random playback:
1 With a disc in the shelf system, press
PLAYMODE. The
Playmode
menu opens.
2 With MODE highlighted, press
select RANDOM.
3 Press OK to confirm. The disc plays in
random order.
Using repeat playback
You can play a specific title, chapter, or track
repeatedly.
Note
During VCD/SVCD playback, the function is only
available when PBC is turned off.
To repeat a title, chapter, track, or the entire
disc:
1 With a disc in the shelf system, press
PLAYMODE. The
Playmode
menu opens.
2 Press , to highlight REPEAT, then
press
or to select the repeat mode you
want.
• For DVDs—Off > Chapter > Title
• For CDs, VCDs, or SVCDs—Off > REP 1
> REP ALL
• For MP3, JPEG, or WMA discs—Off >
REP DIR > REP 1 > REP ALL
3 Press OK to confirm. The selected mode is
highlighted on the screen and the selected
portion of the disc is repeated.
To repeat a specific section of a disc:
1 While the disc is playing, press A-B to set the
beginning of the section you want to play
repeatedly.
2 When playback reaches the end of the
section you want repeated, press A-B again.
Your shelf system immediately starts
replaying the section you have chosen.
3 Press A-B again to clear the programmed
repeat playback and return to normal
playback.
Notes
• The A-B repeat function can only be used
within the same title. If the start and end of the
section to be repeated are in different titles, it
will not work.
• The A-B repeat function does not operate in
scenes where different camera angles are
recorded.
or to
Using PBC (VCD/SVCD playback control)
To use PBC :
1 When a VCD or SVCD is playing, press
ANGLE/PBC repeatedly to switch between
PBC (Playback Control) ON and OFF.
• If you select PBC ON, the disc menu (if
available) will appear on the TV. Press
or the number keys (0-9) to
select a play operation.
• If you select PBC OFF, the unit will skip
the disc menu and playback directly.
Playmode is available when playing a
VCD.
Using the bookmark feature
The bookmark feature lets you mark a point in
the DVD that you want to watch again.
To create a bookmark:
1 During DVD or CD playback, press
BOOKMARK to access the bookmark menu.
2 Press or to navigate, then press OK to
bookmark the point point you want.
To recall a bookmarked scene:
1 During playback, press BOOKMARK to
access the bookmark menu.
2 Press or to highlight the bookmark you
want, then press to play from the
bookmarked point.
3 Press CLEAR to reset the highlighted
bookmark.
Selecting different EQ modes and EX BASS Control
To set the EQ mode:
• Press EQ repeatedly to cycle the five EQ
modes: FLAT, ROCK, POP, CLASSIC, or
JAZZ.
To set the EX Bass control:
• Press EXBASS to switch the EXBASS sound
effect on or off .
Using the sleep timer function
This feature lets you select a time for your shelf
system to switch to standby mode automatically.
To set the sleep timer:
• Press SLEEP repeatedly to cycle through the
following sleep timer options:
• 90 MINUTES, 80 MINUTES, 70
MINUTES, 60 MINUTES, 50 MINUTES,
40 MINUTES, 30 MINUTES, 20
MINUTES, 10 MINUTES, OFF
To check the remaining sleep time:
• Press SLEEP once and the remaining time is
displayed.
To cancel the sleep timer:
• Press SLEEP repeatedly until “SLEEP OFF”
is displayed.
www.insignia-products.com
15
Page 16
Insignia NS-A3111 DVD Executive Shelf System
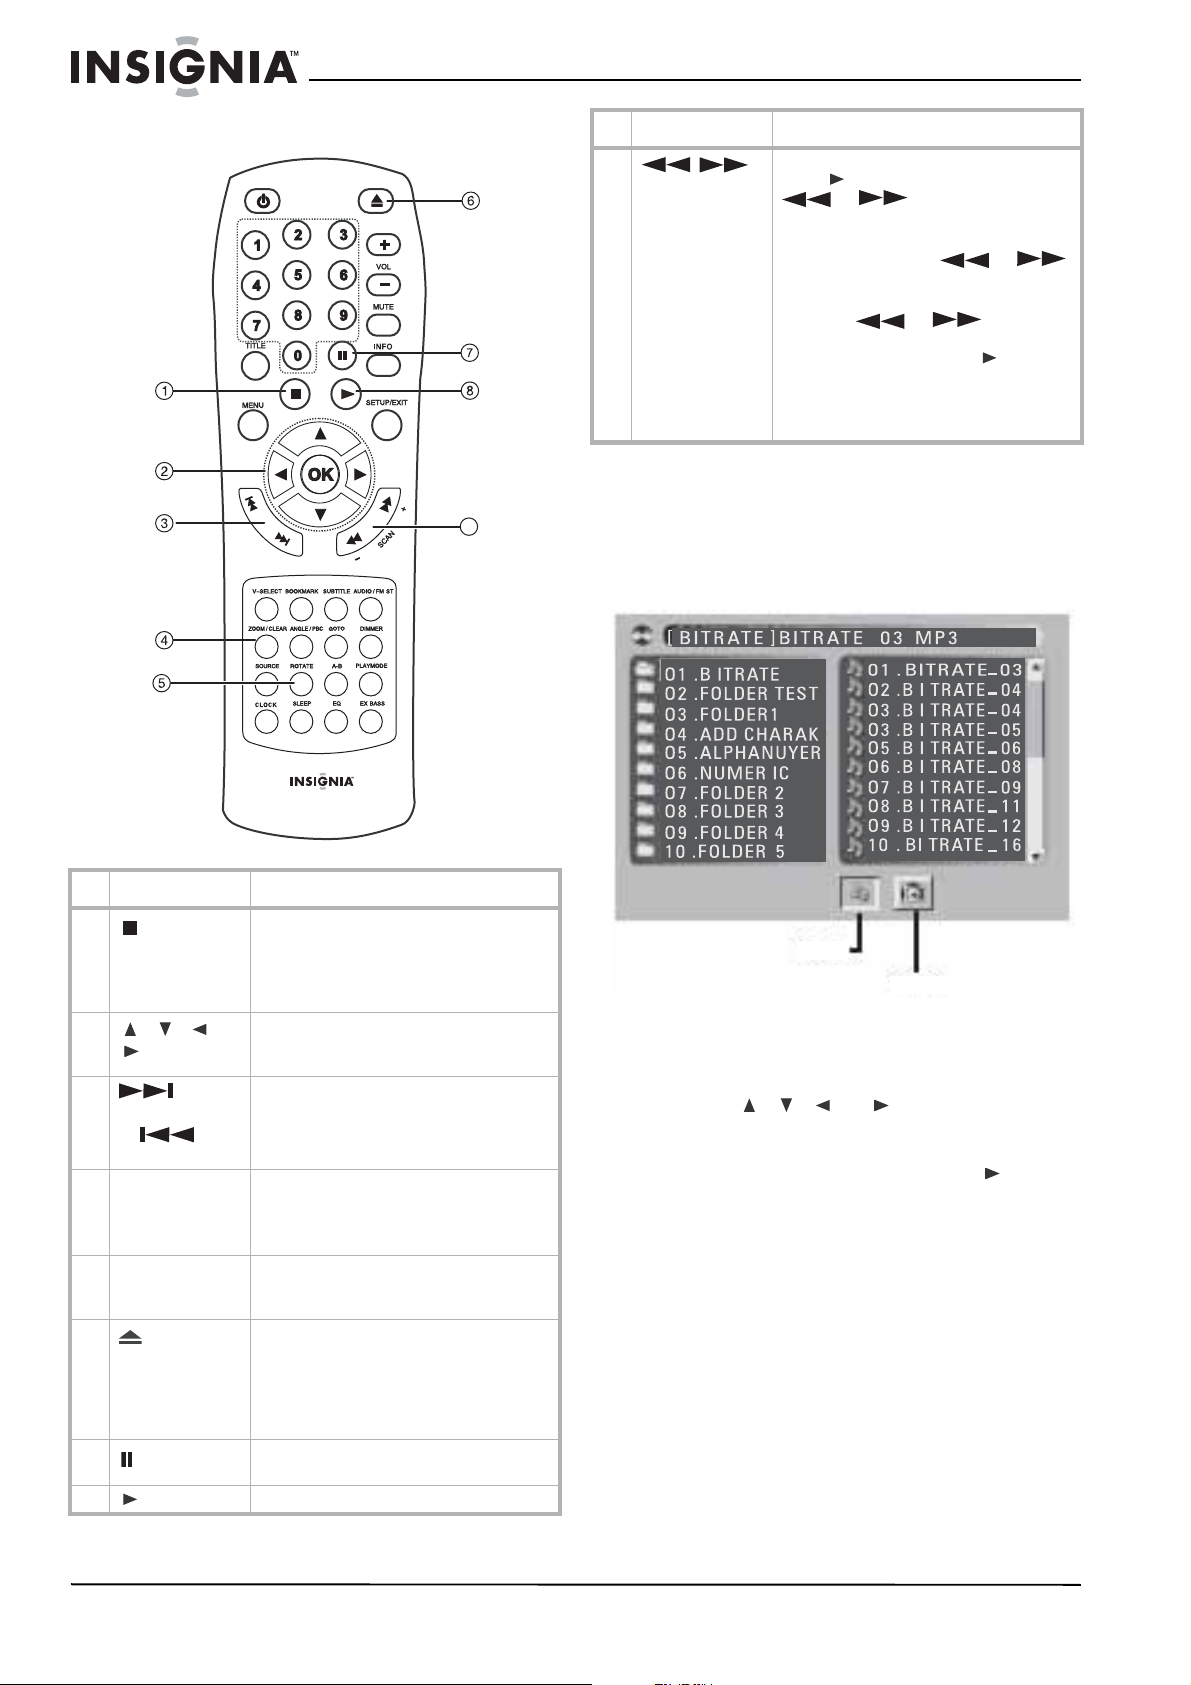
Playing MP3, WMA, and JPEG files
# Button Function
9
/
Press to search backward or forward.
Press to resume playback. Each time
or is pressed, the speed
of back or forward searches changes
accordingly.
In Pause mode, press or
to start forward or backward slow motion
play.
Each time or is pressed,
the speed of slow-motion playback
changes accordingly. Press to resume
normal playback.
Note: Slow motion step-by-step does not work
with CD Playback. Backward slow motion does
not work with VCD playback.
Using the Selection menu
To use the selection menu:
9
1 Place the MP3, WMA, or JPEG disc in the
shelf system disc tray. The
Selection
menu
opens. Folders appear in the left pane and
are numbered in ascending order.
DAV8611
# Button Function
1
2
3
4 ZOOM/CLEAR Press to zoom in on a picture during JPEG
5 ROTATE (for JPEGs only) During the playback of a
6
7
8 (Play) Press to start playback.
(Stop)
, , , or
and OK
(Skip
forward)
or (Skip
back)
(Open/ Close)
(Pause)
Press once to stop the current playback
instantly and enter the Resume Play
mode.
Press to display the selection menu
during playback (JPEG and MPEG4 only).
Active navigation - Press direction keys to
select a file, then press OK to start
playback.
When a disc is playing, you can skip
backward or forward a track or picture.
file slideshow playback.
Press CLEAR to delete information you
input.
JPEG file, press ROTATE to rotate the
picture.
Press to open the disc tray.
Note: Load the disc on the disc tray with disc
label facing upward.
Press again to close the disc tray. The
shelf system starts playback
automatically.
Press to pause playback. Press again to
resume normal playback.
Music
Picture
2 When one of the folders is highlighted, the
contents of the folder are displayed on the
right side. Music/picture files can be selected
individually for desired playback.
3 Press , , , or to highlight the
Music or Picture icon at the bottom of the
selection menu, then press OK to confirm.
4 Select the files, then press OK or to start
playback.
• Music (MP3 or WMA files)—Your shelf
system begins playing all of the MP3 or
WMA files currently selected. It then plays
all the files in the subfolders contained
within the same folder. After that, the unit
plays the remaining folders on the disc.
• Picture (JPEG files)—The unit starts the
slideshow for the JPEG file currently
selected. It then displays all other
remaining JPEG files in the same folder.
Afterwards, the unit plays JPEG files in
the subfolders contained in the same
folder.
16
www.insignia-products.com
Page 17
Insignia NS-A3111 DVD Executive Shelf System
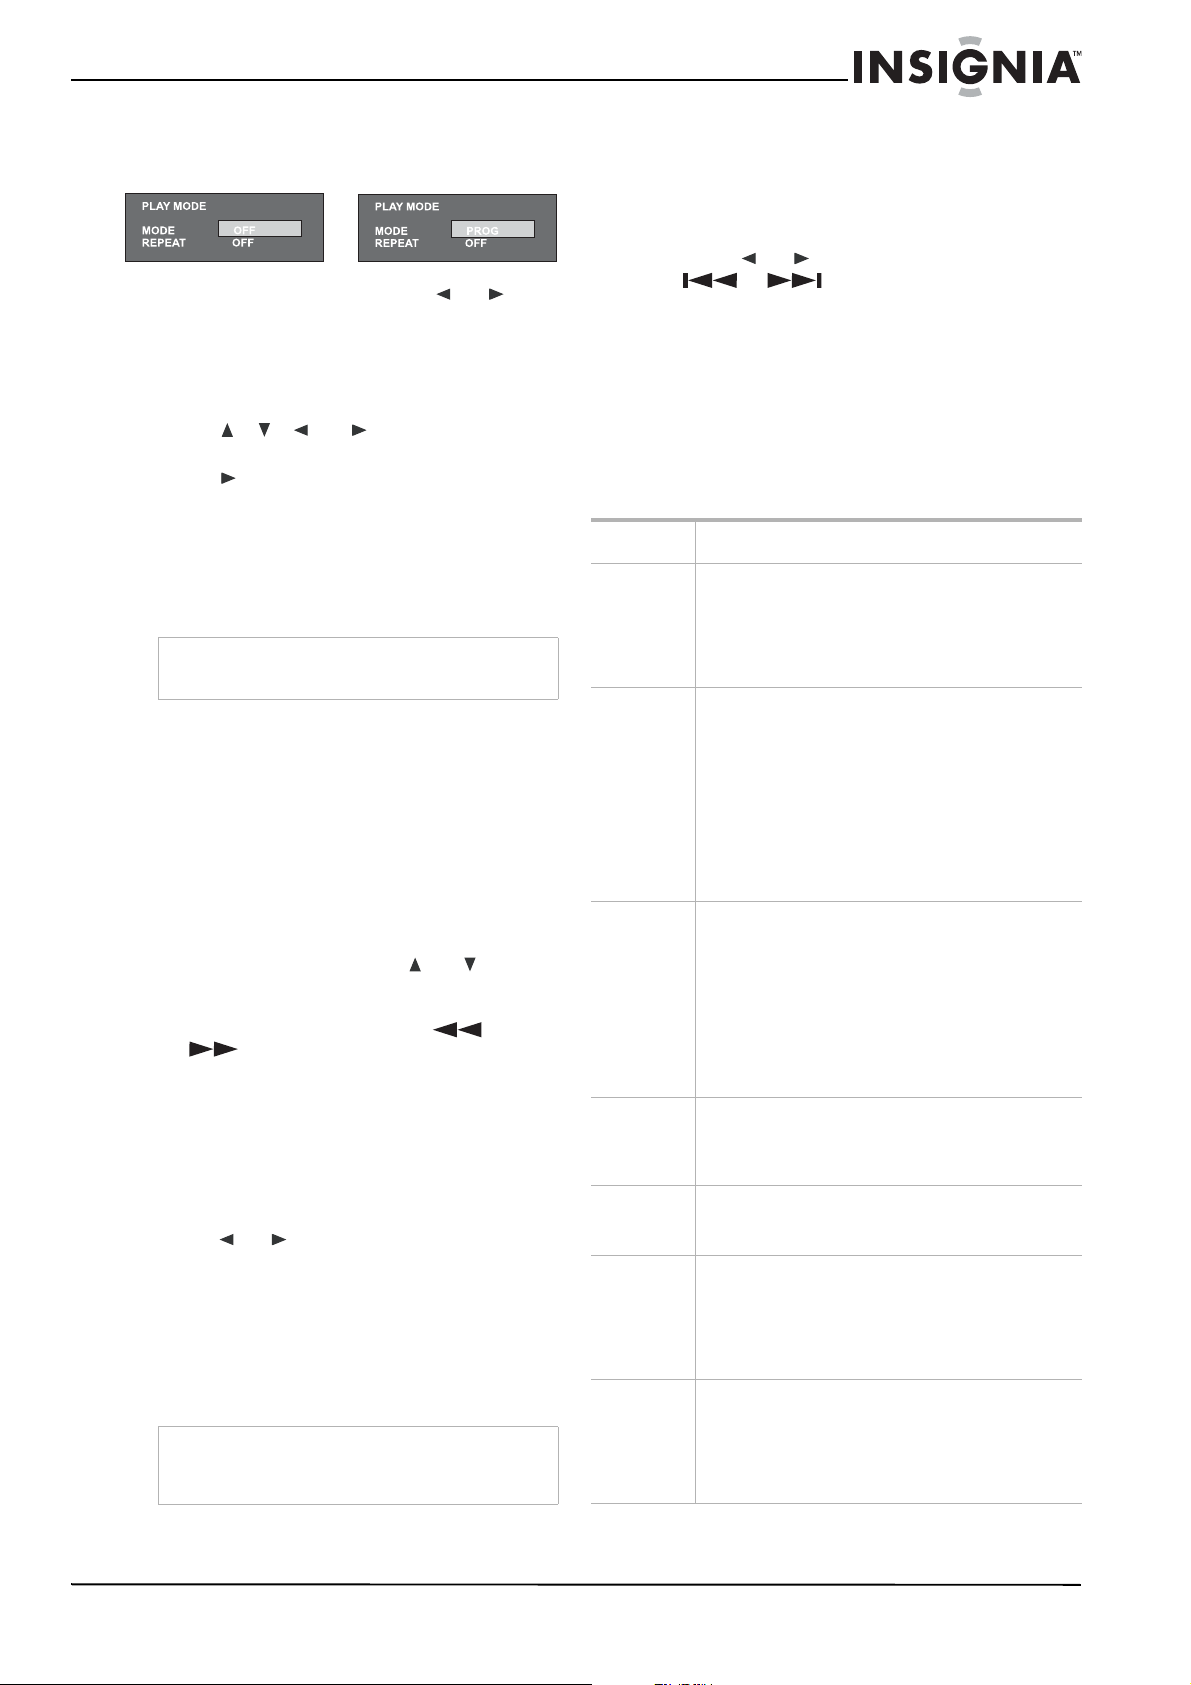
To program MP3 songs:
1 Press PLAYMODE. The
Play Mode
opens.
PLAY MODE
PLAY MODE
MODE PROG
MODE PROG
REPEAT OFF
REPEAT OFF
2 With MODE highlighted, press or to
select PROG, then press OK to enter the
MP3 program menu. In this menu, the letter F
means Folder, T means Track.
3 Using two-digit numbers, input the folder
number below F and track number below T.
4 Press , , , or to move to another
field and repeat Step 3 for the next song.
5 Press or highlight PLAY on the screen,
then press OK to start program playback.
6 Highlight CLEAR on the PROG screen, then
press OK to delete all inputs. You can
program up to 16 songs.
Listening to the radio
Note
Make sure the FM and AM antennas are
connected correctly.
You can program up to 20 FM and 20 AM radio
channels.
To search for a radio station:
1 Press STANDBY/ON to turn your shelf
system on.
2 Press SOURCE repeatedly until the Radio
mode is selected. Press again to switch
between AM and FM bands, if necessary.
3 Tune to a radio station by one of the following
methods:
• Manual Tuning—Press or
repeatedly on the remote control until the
desired frequency appears on the display.
• Automatic Tuning—Press or
on the remote control to start the
AUTO SCAN function. It stops on any
radio station found. Repeat this process
until it stops on the station you want.
To save a radio station:
1 When you locate a radio station you want to
save, press OK to save it. The memory
number will start blinking.
2 Press or to select the channel number
that you want the unit to memorize.
3 Press OK again to store the channel into the
selected memory number. The memory
number will stop blinking to confirm that the
channel has been saved.
4 Repeat the above steps to save as many as
20 FM and AM radio channels.
Note
When you tune a weak FM station manually, press
AUDIO/FM ST to switch from Stereo mode to
Mono mode to reduce background noise.
menu
To recall a memorized channel:
1 Press STANDBY/ON to turn your shelf
system on.
2 Press SOURCE repeatedly until Radio mode
is selected. Press again to switch between
AM and FM bands if necessary.
3 Press or on the remote control or
or on the front panel to change
to a different memorized radio channel.
4 Use the numeric keys (0-9) to directly recall
the first 10 memorized channels.
Troubleshooting
Under no circumstances should you try to repair
your shelf system yourself, as this will invalidate
the warranty. Only qualified service personnel
can remove the cover or service this player.
Problem Solution
No power • Make sure that the Standby/On button on the
No picture • Make sure that the TV is turned on.
Distorted
picture
No color in
the picture
Picture
swings
Does not
return to
start-up
screen
when a disc
is removed
The system
does not
respond to
the remote
control
front of your shelf system is set to on.
• Make sure that the power cord plug is
correctly connected.
• Make sure that there is power at the AC outlet
by plugging in another appliance.
• Select the correct AV input on the TV.
• Check the video connection.
• Make sure that the channel selector is set to
AV on the TV (See your TV manual for
instructions).
• When Progressive Scan is on, composite
video output is disabled. Press V-SELECT to
select the correct video output mode,
otherwise, you will have no picture or a
distorted picture.
• Check the disc for fingerprints and clean with
a soft cloth, wiping from the center to the
edge.
• Sometimes a small amount of picture
distortion may appear. This is not a
malfunction.
• The disc format does not match the TV being
used (PAL/NTSC).
• Make sure that only one video output is
connected.
• The disc format is not the same as that of the
TV being used (PAL/NTSC).
• Make sure that the DVD player is not
connected through a VCR.
Move your shelf system further away from possible
interference or emission sources (for example a
radio, power amplifier, or radiator).
• Check to see if the program requires another
disc to be loaded.
• Reset your system by unplugging the power
cord, then connect the power again.
• Aim the remote control directly at the sensor
on the front of the system.
• Avoid all obstacles that may interfere with the
signal path.
• Inspect or replace the batteries in the remote
control.
www.insignia-products.com
17
Page 18
Insignia NS-A3111 DVD Executive Shelf System
No sound • Check the audio connections.
No audio at
the digital
output
A disc
cannot be
played
You have
forgotten
the
password
Function
disturbed
• If using a Hi-Fi amplifier, try another sound
source.
• Clean the disc.
• Make sure the disc is not defective by trying
another disc.
• Check the digital connections.
• Check the Digital Out menu to make sure that
the digital output is correctly set.
• Make sure that the audio format of the
selected audio language matches your shelf
system capabilities.
Make sure that the disc is placed into the disc tray
correctly.
While in NO DISC mode, enter 76418.
• The normal function of your shelf system
may be disturbed by external interference.
• Reset your shelf system by disconnecting
and reconnecting the power cord.
Maintaining
Care and handling of discs
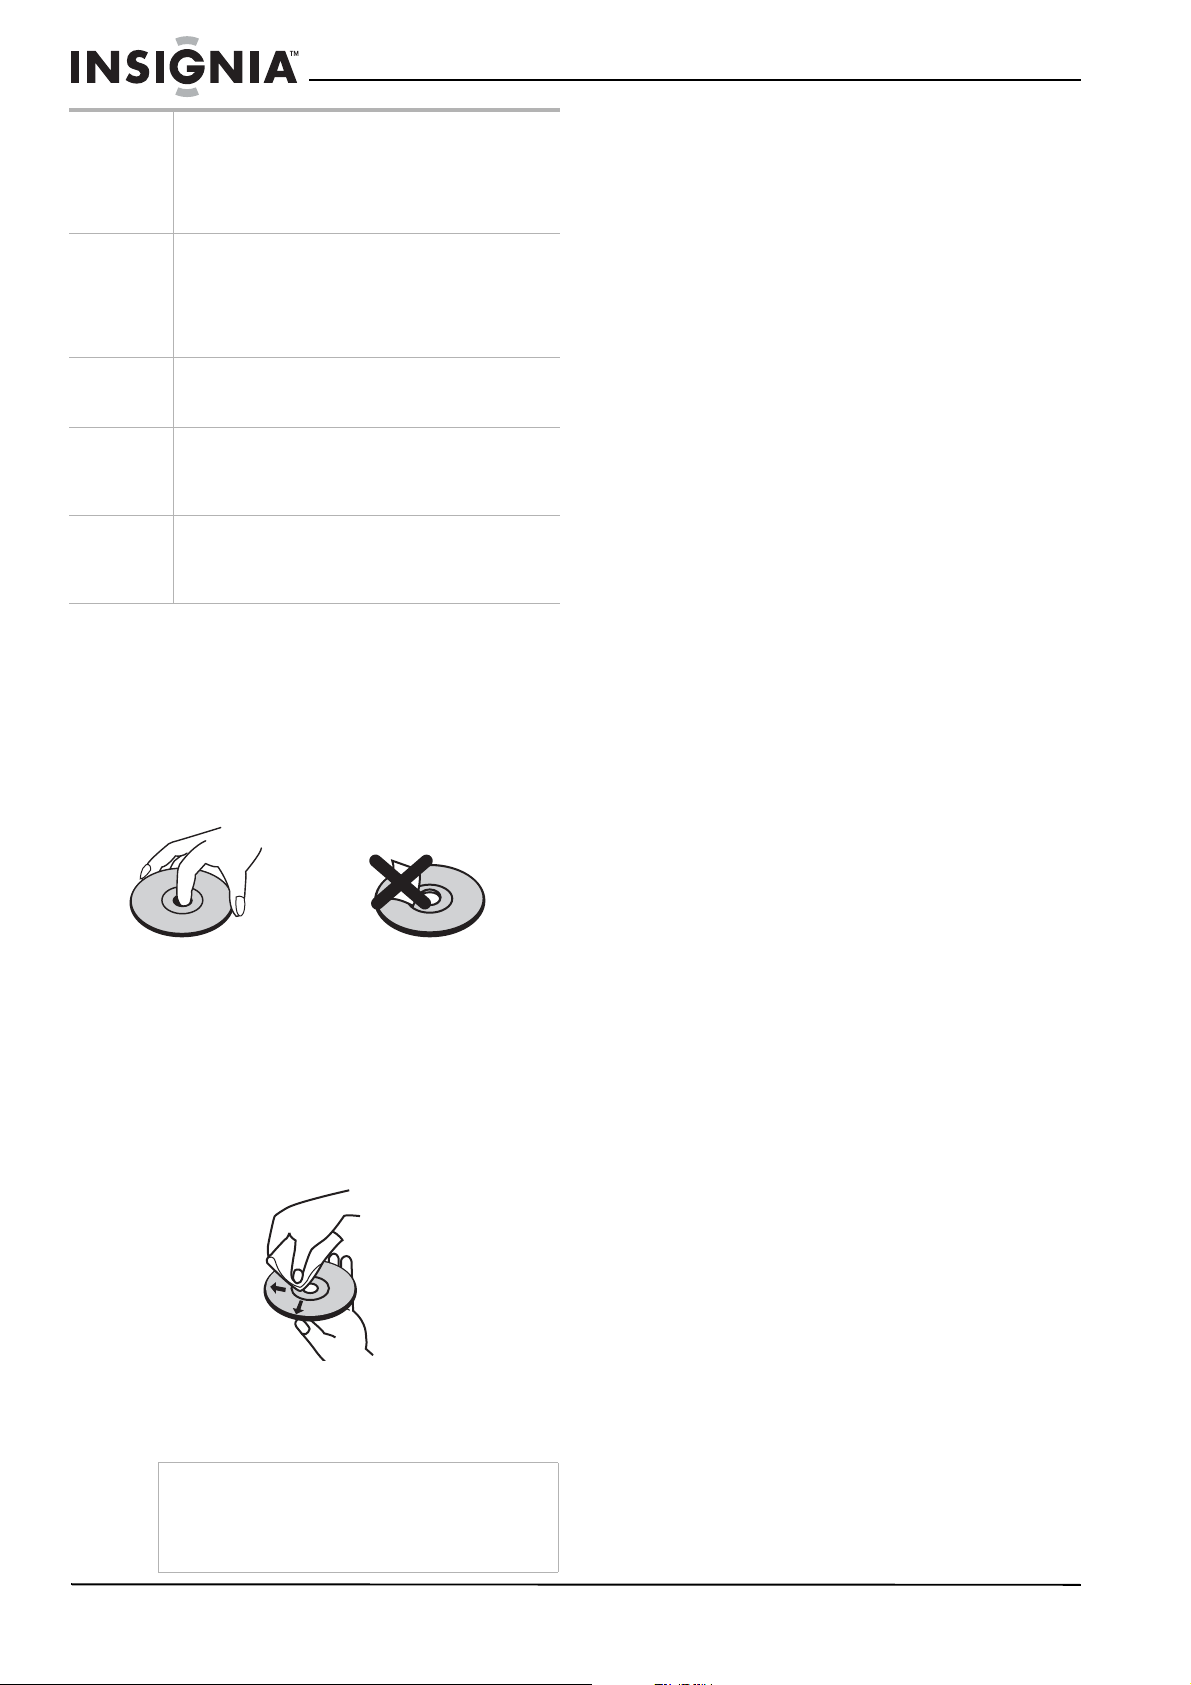
Handling discs
Do not touch the playback side of the disc. Hold
the disc by the edges so that fingerprints do not
get on the surface. Never stick paper or tape on
the disc.
Storing discs
After playing, store the disc in its case. Do not
expose the disc to direct sunlight or sources of
heat and never leave it in a parked car exposed
to direct sunlight.
Cleaning discs
Fingerprints and dust on the disc can cause
poor picture quality and sound distortion. Before
playing, clean the disc with a clean cloth. Wipe
the disc from the center out.
Legal notices
FCC compliance statement
This equipment has been tested and found to
comply with the limits for a Class B digital
device, pursuant to Part 15 of the FCC Rules.
These limits are designed to provide reasonable
protection against harmful interference when the
product is operated in a residential
installation.This equipment generates, uses, and
can radiate radio frequency energy and, if not
installed and used in accordance with the
instructions, may cause harmful interference to
radio communications. However, there is no
guarantee that interference will not occur in a
particular installation. Changes or modifications
to this equipment may cause harmful
interference unless the modifications are
expressly approved in the owner’s manual. The
user could lose the authority to operate this
equipment if an unauthorized change or
modification is made. If this equipment does
cause harmful interference to radio or television
reception, which can be determined by turning
the equipment off and on, the user is
encouraged to try to correct the interference by
one or more of the following measures:
• Reorient or relocate the receiving antenna.
• Increase the separation between the
equipment and receiver.
• Connect the equipment into an outlet on a
circuit different from that to which the receiver
is connected.
• Consult the dealer or an experienced
radio/TV technician for help.
This device complies with Part 15 of the FCC
Rules. Operation is subject to the following two
conditions:
• This device may not cause harmful
interference, and
• This device must accept any interference
received, including interference that may
cause undesired operation.
Copyright
© 2008 Insignia. Insignia and the Insignia logo are
trademarks of Best Buy Enterprise Services, Inc. Other
brands and product names are trademarks or
registered trademarks of their respective holders.
Specifications and features are subject to change
without notice or obligation.
Do not use strong solvents such as alcohol,
benzine, thinner, commercially available
cleaners, or anti-static spray intended for older
vinyl records.
Note
Never operate this product immediately after
moving it from a cold location to a warm location.
Leave it for two or three hours without operating it.
If you use this product in such a situation, it may
damage discs or internal parts.
18
www.insignia-products.com
Page 19

Insignia NS-A3111 DVD Executive Shelf System
90-Day Limited Warranty
Insignia Products (“Insignia”) warrants to you, the
original purchaser of this new NS-A3111 (“Product”),
that the Product shall be free of defects in the original
manufacture of the material or workmanship for a period
of 90 days from the date of your purchase of the Product
(“Warranty Period”). This Product must be purchased
from an authorized dealer of Insignia brand products and
packaged with this warranty statement. This warranty
does not cover refurbished Product. If you notify Insignia
during the Warranty Period of a defect covered by this
warranty that requires service, terms of this warranty
apply.
How long does the coverage last?
The Warranty Period lasts for 90 days from the date you
purchased the Product. The purchase date is printed on
the receipt you received with the Product.
What does this warranty cover?
During the Warranty Period, if the original manufacture of
the material or workmanship of the Product is
determined to be defective by an authorized Insignia
repair center or store personnel, Insignia will (at its sole
option): (1) repair the Product with new or rebuilt parts;
or (2) replace the Product at no charge with new or
rebuilt comparable products or parts. Products and parts
replaced under this warranty become the property of
Insignia and are not returned to you. If service of
Products or parts are required after the Warranty Period
expires, you must pay all labor and parts charges. This
warranty lasts as long as you own your Insignia Product
during the Warranty Period. Warranty coverage
terminates if you sell or otherwise transfer the Product.
How to obtain warranty service?
If you purchased the Product at a retail store location,
take your original receipt and the Product to the store
you purchased it from. Make sure that you place the
Product in its original packaging or packaging that
provides the same amount of protection as the original
packaging. If you purchased the Product from an online
web site, mail your original receipt and the Product to the
address listed on the web site. Make sure that you put
the Product in its original packaging or packaging that
provides the same amount of protection as the original
packaging.
To obtain in-home warranty service for a television with a
screen 25 inches or larger, call 1-888-BESTBUY. Call
agents will diagnose and correct the issue over the
phone or will have an Insignia-approved repair person
dispatched to your home.
• Connection to an incorrect voltage supply
• Attempted repair by anyone other than a facility
authorized by Insignia to service the Product
• Products sold as is or with all faults
• Consumables, such as fuses or batteries
• Products where the factory applied serial number
has been altered or removed
REPAIR REPLACEMENT AS PROVIDED UNDER THIS
WARRANTY IS YOUR EXCLUSIVE REMEDY.
INSIGNIA SHALL NOT BE LIABLE FOR ANY
INCIDENTAL OR CONSEQUENTIAL DAMAGES FOR
THE BREACH OF ANY EXPRESS OR IMPLIED
WARRANTY ON THIS PRODUCT, INCLUDING, BUT
NOT LIMITED TO, LOST DATA, LOSS OF USE OF
YOUR PRODUCT, LOST BUSINESS OR LOST
PROFITS. INSIGNIA PRODUCTS MAKES NO OTHER
EXPRESS WARRANTIES WITH RESPECT TO THE
PRODUCT, ALL EXPRESS AND IMPLIED
WARRANTIES FOR THE PRODUCT, INCLUDING, BUT
NOT LIMITED TO, ANY IMPLIED WARRANTIES OF
AND CONDITIONS OF MERCHANTABILITY AND
FITNESS FOR A PARTICULAR PURPOSE, ARE
LIMITED IN DURATION TO THE WARRANTY PERIOD
SET FORTH ABOVE AND NO WARRANTIES,
WHETHER EXPRESS OR IMPLIED, WILL APPLY
AFTER THE WARRANTY PERIOD. SOME STATES,
PROVINCES AND JURISDICTIONS DO NOT ALLOW
LIMITATIONS ON HOW LONG AN IMPLIED
WARRANTY LASTS, SO THE ABOVE LIMITATION MAY
NOT APPLY TO YOU. THIS WARRANTY GIVES YOU
SPECIFIC LEGAL RIGHTS, AND YOU MAY ALSO
HAVE OTHER RIGHTS, WHICH VARY FROM STATE
TO STATE OR PROVINCE TO PROVINCE.
Contact Insignia:
For customer service please call 1-877-467-4289
www.insignia-products.com
Distributed by Best Buy Purchasing, LLC
7601 Penn Avenue South, Richfield, Minnesota, U.S.A.
55423-3645
© 2008 Best Buy Enterprise Services, Inc.
All rights reserved. INSIGNIA is a trademark of Best Buy
Enterprise Services, Inc. Registered in some countries.
All other products and brand names are trademarks of
their respective owners.
Where is the warranty valid?
This warranty is valid only to the original purchaser of the
product in the United States and Canada.
What does the warranty not cover?
This warranty does not cover:
• Customer instruction
• Installation
• Set up adjustments
• Cosmetic damage
• Damage due to acts of God, such as lightning
strikes
• Accident
• Misuse
• Abuse
• Negligence
• Commercial use
• Modification of any part of the Product, including
the antenna
• Plasma display panel damaged by static
(non-moving) images applied for lengthy periods
(burn-in).
This warranty also does not cover:
• Damage due to incorrect operation or maintenance
www.insignia-products.com
19
Page 20

Insignia NS-A3111 DVD Executive Shelf System
20
www.insignia-products.com
Page 21
Minichaîne de luxe avec lecteur DVD NS-A3111 de Insignia
Minichaîne de luxe
avec lecteur DVD
NS-A3111 de Insignia
Table des matières
Importantes mesures de sécurité . . . . . . . . . . . .21
Fonctionnalités. . . . . . . . . . . . . . . . . . . . . . . . . . .24
Installation de la minichaîne avec lecteur DVD . .26
Utilisation de la minichaîne avec lecteur DVD . . .29
Problèmes et solutions. . . . . . . . . . . . . . . . . . . . .37
Entretien. . . . . . . . . . . . . . . . . . . . . . . . . . . . . . . .38
Avis juridiques . . . . . . . . . . . . . . . . . . . . . . . . . . .38
Garantía limitada de 90 días . . . . . . . . . . . . . . . .61
Bienvenue
Félicitations d’avoir acheté ce produit Insignia de
haute qualité. Le modèle NS-A3111 représente
la dernière avancée technologique dans la
conception de minichaînes de luxe avec lecteur
DVD et a été conçu pour des performances et
une fiabilité exceptionnelles.
Avertissement :
Afin de réduire le risque d’incendie et de choc
électrique, ne pas exposer cet appareil à la pluie
ou l’humidité.
ATTENTION
RISQUE DE CHOC ÉLECTRIQUE
NE PAS OUVRIR
ATTENTION
RISQUES DE CHOC ÉLECTRIQUE, NE RETIREZ
PAS LE COUVERCLE (OU LE PANNEAU ARRIÈRE)
AUCUNE PIÈCE NE PEUT ÊTRE RÉPARÉE PAR
L'UTILISATEUR. CONFIEZ L'APPAREIL À UN
TECHNICIEN QUALIFIÉ.
Le symbole représentant un éclair dans un
triangle équilatéral a pour but d'avertir l'utilisateur
du danger présenté par des pièces
non isolées à l'intérieur de l'appareil et dont la
tension est suffisante pour provoquer des
décharges électriques dangereuses.
:
AFIN DE RÉDUIRE LES
Le point d'exclamation dans un triangle équilatéral
a pour but d'avertir l'utilisateur que des instructions
importantes relatives à l'utilisation et à l'entretien se
trouvent dans le manuel accompagnant l'appareil.
Le recours à des commandes, réglages ou
procédures autres que celles spécifiées dans ce
guide, présente des dangers d'exposition aux
rayonnements.
Pour éviter toute exposition directe aux rayons
laser, ne pas essayer d’ouvrir le boîtier.
Radiation au laser visible en cas d'ouverture.
NE PAS REGARDER LE FAISCEAU LASER.
Type de laser : Laser double à semi-conducteur
GaAIAs
Longueur d’onde : 650 nm et 780 nm
Puissance de sortie : 7 mW
Divergence du faisceau : 60°
ATTENT ION : Un rayonnement laser visible et
invisible est émis quand le boîtier de l’appareil
est ouvert ou que le dispositif de verrouillage est
contourné.
Attention :
Cet appareil ne doit pas être exposé à des
éclaboussures ou à des gouttes d’eau et aucun
objet rempli de liquide, tel qu’un vase, ne doit
être posé sur l’appareil.
Attention :
Émission de rayon laser visible et invisible de
classe 3B en cas d’ouverture ou de
neutralisation du dispositif de verrouillage. Ne
pas fixer des yeux l’axe du faisceau laser ni le
regarder directement avec des instruments
optiques.
Précautions - Cordon d’alimentation
• La plupart des fabricants recommandent que
leurs lecteurs soient branchés sur un circuit
dédié. À savoir, un circuit à prise unique qui
n’alimente que l’appareil sur lequel aucune
autre prise ou autre circuit ne sont branchés.
• Ne pas surcharger les prises secteur. Les
prises secteur surchargées, desserrées ou
endommagées, les rallonges surchargées, les
cordons d'alimentation effilochés, l’isolement
des fils fissuré ou endommagé sont
dangereux. N’importe quelle situation de ce
type peut être la cause d’un choc électrique ou
d’un incendie. Examiner régulièrement le
cordon d'alimentation de l’appareil, et en
présence de signes de dommage ou de
détérioration, débrancher l’appareil et ne plus
l'utiliser tant qu’un réparateur agréé n’a pas
remplacé le cordon par une pièce neuve
identique.
• Protéger le cordon d’alimentation des
détériorations résultant de torsions,
déformations, pincements, coincements dans
une porte qui se ferme ou piétinement. Prêter
particulièrement attention au point de
branchement du cordon à la prise, à la prise
secteur et à l’endroit où il est raccordé à
l’appareil.
• Pour débrancher l'appareil de la prise murale,
tirer sur la prise du cordon d'alimentation.
Installer l’appareil afin que la prise soit
facilement accessible.
Avertissement relatif au laser
AVERTISSEMENT : Cet appareil est équipé
d’un système au laser.
Pour garantir une utilisation appropriée de cet
appareil, lire ce guide de l’utilisateur avec
attention et le conserver à titre de référence
ultérieure. Si l'appareil nécessite un entretien,
contacter un service de réparation agréé.
Importantes mesures de sécurité
• Lire les instructions – Lire toutes les
instructions de sécurité et de fonctionnement
avant d’utiliser cet appareil.
www.insignia-products.com
21
Page 22

Minichaîne de luxe avec lecteur DVD NS-A3111 de Insignia
• Conserver les instructions – Conserver les
instructions de sécurité et de fonctionnement
pour toute référence ultérieure.
• Respecter les avertissements – Observer
tous les avertissements figurant sur cet
appareil ainsi que dans les instructions
d’utilisation.
• Suivre les instructions – Toutes les
instructions d’utilisation doivent être
observées.
• Nettoyage – Débrancher l’appareil de la
prise secteur avant tout nettoyage. Ne pas
utiliser de nettoyants liquides ou en aérosol.
Utiliser un chiffon humide pour le nettoyage.
• Périphériques – Ne pas utiliser de
périphériques qui ne sont pas recommandés
par le fabricant de la minichaîne et qui
pourraient être dangereux.
• Eau et humidité – Ne pas utiliser cette
minichaîne à proximité de l’eau, par exemple,
à côté d’une baignoire, d'un lavabo, d'un
évier, d’un bac à laver, dans une cave humide
ou à côté d’une piscine.
• Accessoires – Ne pas placer cet appareil
sur une table roulante, un pied, un trépied, un
support ou une table. L’appareil risque de
tomber et, dans sa chute, de provoquer des
blessures graves et de subir des dommages
importants. N’utiliser qu’avec la table
roulante, le pied, le trépied, le support ou la
table recommandés par le fabricant ou
vendus avec l’appareil.
Pour installer l’appareil sur un
support, observer les
instructions du fabricant et
utiliser un accessoire de
montage recommandé par le
fabricant. Déplacer cet appareil
sur un meuble à roulettes avec précaution.
Un arrêt brusque, l’utilisation d’une force
excessive et des surfaces irrégulières
risquent de déstabiliser l’ensemble et de le
renverser.
• Ventilation – Les fentes et ouvertures au dos
et au bas du boîtier sont prévues pour la
ventilation, pour assurer un fonctionnement
fiable de l’appareil et le protéger contre toute
surchauffe. Ne pas obstruer les ouvertures.
Ne pas placer l’appareil sur un lit, un sofa,
une moquette ou toute autre surface
semblable. L’appareil ne doit jamais être
positionné à proximité ou sur un radiateur ou
une bouche de chauffage. Ne pas installer
l’appareil dans un meuble encastré comme
une bibliothèque ou sur une étagère, sauf si
une ventilation adéquate a été prévue ou si
les instructions du fabricant ont été
respectées.
• Sources d’alimentation – Utiliser
uniquement le type d’alimentation électrique
indiqué sur la plaque signalétique. En cas
d’incertitude sur la tension d'alimentation
électrique de la maison, consulter le
revendeur ou la compagnie d'électricité. Pour
les appareils fonctionnant sur piles ou
d’autres sources d’alimentation électrique,
consulter les instructions d’utilisation.
• Mise à la terre ou polarisation – Cet
appareil est équipé d'une prise CA polarisée
(à deux plots, un plus large que l'autre). Cette
fiche ne s'insère dans une prise secteur que
d'une seule façon. Il s'agit d'un dispositif de
sécurité. S’il est impossible d’introduire à
fond la fiche dans la prise secteur, essayer
de retourner la prise. Si la fiche ne s'adapte
toujours pas à la prise secteur, contacter un
électricien afin qu'il remplace la prise
inadéquate. Ne pas chercher à modifier le
dispositif de sécurité de la prise polarisée.
• Protection du cordon d’alimentation –
Acheminer le cordon d'alimentation de telle
manière qu'on ne puisse pas marcher dessus
ou qu'il ne soit pas pincé par des objets
placés dessus ou tout contre; prêter
particulièrement attention au point de
raccordement du cordon à la prise murale, à
la plaque multiprises et au connecteur de
l’appareil sur lequel il est branché.
• Foudre – Pour protéger l’appareil pendant un
orage ou s’il se trouve inutilisé et sans
surveillance pendant une période prolongée,
le débrancher de la prise secteur et
débrancher l'antenne ou la connexion au
réseau câblé. Ceci évitera d’endommager
l’appareil en cas de foudre et de variations de
tension du secteur.
• Lignes électriques – L'antenne externe ne
doit pas être située près de lignes électriques
aériennes ou d'autres circuits d'alimentation
et électriques, ni à un emplacement où elle
pourrait tomber sur de tels circuits ou lignes
électriques. Lors de l'installation d'une
antenne externe, ne pas toucher les lignes
ou circuits électriques car tout contact peut
être mortel.
• Surcharge – Les prises secteur et les
rallonges ne doivent pas être surchargées,
cela pourrait provoquer des risques
d'incendie ou de choc électrique.
• Pénétration de liquides et d'objets divers
– Ne jamais enfoncer un objet quelconque
dans les ouvertures de l’appareil, car il
pourrait entrer en contact avec des tensions
dangereuses ou provoquer un court-circuit à
l'origine d'un incendie ou d'un choc
électrique. Ne jamais répandre un liquide sur
l’appareil.
• Réparation – L’utilisateur ne doit pas essayer
de réparer cet appareil lui-même; en effet
son ouverture ou le démontage du boîtier
peut l’exposer à des tensions dangereuses
ou à d'autres dangers. Toutes les réparations
doivent être réalisées par un personnel
qualifié.
• Dommages requérant des réparations –
Débrancher l’appareil de la prise secteur et
utiliser les services d’un technicien qualifié
dans les conditions suivantes :
• Lorsque le cordon d’alimentation est
effiloché ou la prise endommagée.
• Si un liquide a été répandu ou des objets
sont tombés dans l’appareil.
• Si l’appareil a été exposé à la pluie ou à
l’eau.
• Si l’appareil fonctionne anormalement en
appliquant les instructions d’utilisation. Ne
régler que les commandes décrites dans
22
www.insignia-products.com
Page 23

Minichaîne de luxe avec lecteur DVD NS-A3111 de Insignia
les instructions d’utilisation; en effet, un
réglage incorrect d’autres commandes
pourrait provoquer des détériorations
entraînant souvent d'importantes
réparations par un technicien qualifié afin
de rétablir un fonctionnement normal.
• Si l’appareil est tombé ou s’il est
endommagé de quelque façon que ce
soit.
• Lorsque l’appareil présente d’importantes
modifications de ses performances, il doit
être réparé.
• Pièces de remplacement – Si des pièces
doivent être remplacées, vérifier que le
technicien a utilisé des pièces de rechange
spécifiées par le fabricant qui ont les mêmes
caractéristiques que les pièces d’origine.
Toute substitution par des pièces non
autorisées risque de provoquer un incendie,
un choc électrique, des blessures ou d'autres
dangers.
• Contrôle de sécurité – Les réparations ou la
maintenance ayant été effectuées, demander
au technicien de réaliser les contrôles de
sécurité de routine afin de déterminer que
l’appareil est en bon état de fonctionnement.
• Chaleur – Installer l’appareil à l’écart de
sources de chaleur, telles que radiateurs,
bouches de chaleur, fours ou autres
appareils (y compris les amplificateurs) qui
produisent de la chaleur.
Attention
Les piles ne doivent jamais être mises au rebut ni
incinérées, mais éliminées de façon conforme aux
réglementations locales relatives aux déchets
chimiques.
Droits d’auteurs
Cet appareil incorpore une technologie de
protection de droits d’auteurs protégée par des
revendications de procédé de certains brevets
américains et d’autres droits de propriété
intellectuelle de Macrovision Corporation et
d’autres propriétaires de droits. L’utilisation de
cette technologie de protection des droits
d’auteur doit être autorisée par Macrovision
Corporation et doit se limiter à des fins de
divertissement privé à moins d’une autorisation
préalable et explicite de Macrovision
Corporation. La rétro-ingénierie ou le
démontage sont interdits.
Fabriqué sous licence de Dolby Laboratories.
Dolby et le symbole sont des marques de
commerce déposées de DOLBY
LABORATORIES. Travaux confidentiels non
publiés. 1992-1997 Dolby Laboratories, Inc.
Tous droits réservés.
Balayage progressif
Les consommateurs doivent savoir que les
téléviseurs à haute définition ne sont pas tous
entièrement compatibles avec ce produit ce qui
peut être source de défauts sur l’image.
En cas de balayage progressif de l’image, nous
recommandons d'établir la connexion à la sortie
de définition standard. Pour toute question
relative à la compatibilité d'un téléviseur avec
cette minichaîne, contacter le centre de service
à la clientèle.
Avertissement
Pour éviter les chocs électriques, introduire la
lame la plus large de la fiche dans la fente
correspondante de la prise et pousser à fond.
•Recyclage de l’appareil – Ce
symbole sur l’appareil ou dans les
instructions indique que
l'équipement électrique et
électronique ne doit pas être mis au
rebut avec les déchets ménagers habituels
lorsqu'il n'est plus en état de service. Il existe
des services de mise au rebut pour le
recyclage dans l’UE. Pour plus
d'informations, contacter le bureau concerné
de la municipalité locale ou le magasin où a
été acheté le produit.
• Les versions destinées aux
États-Unis et au Canada sont
conformes aux exigences ETL.
À propos du symbole
Le symbole peut s’afficher sur l’écran du
téléviseur en cours d’opération et indique que la
fonction n’est pas autorisée par l’appareil ou le
média particulier.
www.insignia-products.com
23
Page 24

Minichaîne de luxe avec lecteur DVD NS-A3111 de Insignia
Fonctionnalités
Panneau avant
DVD EXECUTIVE SHELF SYSTEM
# Description Fonction
1 Attente/Marche Permet de mettre l’appareil sous
2
Canal
3
Canal
tension ou en mode attente.
En mode disque/USB, permet de passer
à la piste ou au chapitre précédent.
Maintenir cette touche appuyée pour un
retour rapide.
En mode radio, permet de syntoniser la
station radio précédente mémorisée.
En mode attente, permet de régler
l’heure/les minutes de façon
décroissante lors de la configuration de
l’horloge.
En mode disque/USB, permet de passer
à la piste ou au chapitre suivant.
Maintenir cette touche appuyée pour
une avance rapide.
En mode radio, permet de syntoniser la
station radio suivante mémorisée.
En mode attente, permet de régler
l’heure/les minutes de façon croissante
lors de la configuration de l’horloge.
# Description Fonction
11 Récepteur
infrarouge
12 Affichage LCD Affiche les messages d’état.
13 Plateau à
disque
14 Prise USB Brancher un périphérique USB sur cette
Reçoit les signaux de la télécommande.
Placer un DVD ou un CD sur le plateau
avec l’étiquette tournée vers le haut.
prise.
Panneau arrière
Remarque
Connecter le cordon CA uniquement après avoir
connecté les haut-parleurs, les antennes et tous les
périphériques optionnels. Ne jamais effectuer ni modifier
de connexions alors que l’appareil est sous tension. La
plaque signalétique se trouve au dos de l’appareil.
# Description Fonction
1 Cordon
d’alimentation
2 Haut-parleurs Connecter le haut-parleur gauche aux
Le brancher sur une prise secteur
bornes L et le haut-parleur droit aux
bornes R. Connecter le fil de couleur à
la borne en couleur et le fil noir à la
borne noire.
4 Source/Horloge Permet de naviguer parmi les modes
5 Lecture En mode disque/USB, permet de
6 Ouvrir/Arrêt En mode disque/USB, permet d’arrêter
7 VOLUME Tourner dans le sens horaire pour
8 Téléphones Brancher un casque d’écoute standard
9ENTRÉE
AUXILIAIRE
10 Témoin de mise
en attente
24
Disque/USB, FM, AM, AUX.
En mode attente, maintenir cette touche
appuyée pour configurer l’horloge en
temps réel.
lire/sélectionner les pistes ou les
chansons.
la lecture et d’éjecter le disque.
augmenter le volume et dans le sens
antihoraire pour le diminuer.
sur cette prise.
Brancher un périphérique audio sur
cette prise pour diffuser le son émis à
travers cette minichaîne.
Mode sous/hors tension - Éteint
Mode attente - DEL rouge
www.insignia-products.com
3 Sortie vidéo Pour la connexion des magnétoscopes
Sorties audio Pour la connexion des signaux audio
4 Sortie coaxiale Pour la connexion à un périphérique
5 Connexions en
entrée de
l’antenne FM
Connexions
d’une antenne
cadre AM
ou autres périphériques
d’enregistrement.
(G/D) aux périphériques
d’enregistrement, tels que les
magnétoscopes.
doté d’une prise d’entrée audio
numérique.
Pour la réception FM, connecter
l’antenne FM à la prise FM. Régler
jusqu'à obtention d'un signal clair.
Pour la réception AM, connecter
l’antenne cadre AM à la prise AM.
Régler jusqu'à obtention d'un signal
clair. Insérer entièrement la partie
dénudée de l’antenne dans la borne.
Remarque : Placer l’antenne le plus
loin possible du téléviseur, du
magnétoscope ou autres sources
d’interférence.
Page 25
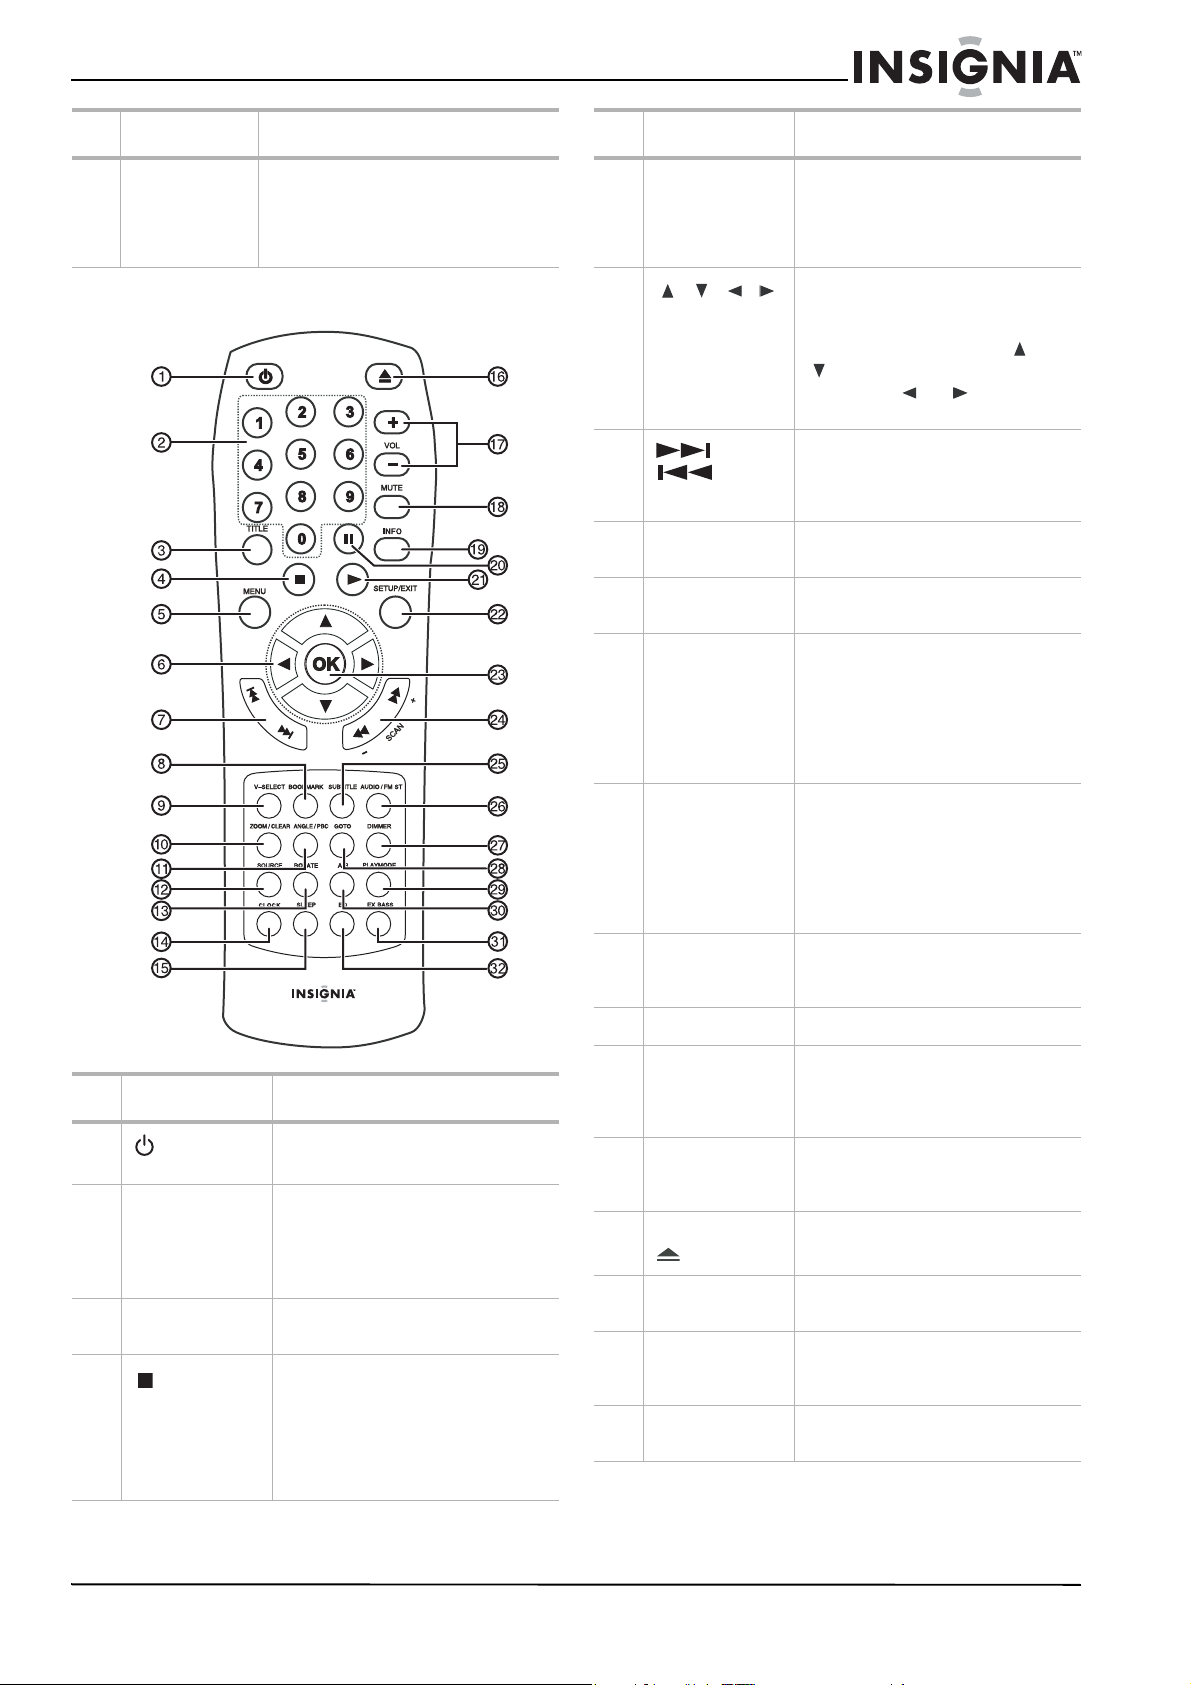
Minichaîne de luxe avec lecteur DVD NS-A3111 de Insignia
# Description Fonction
6 Sorties vidéo à
balayage
progressif et à
composantes
Connecter à un téléviseur doté d’une
entrée vidéo à composantes. Utiliser
des câbles vidéo à composantes. Ce
type de connexion fournit une qualité
d’image supérieure.
Télécommande
# Touche Fonction
5 MENU En mode DVD, permet d’accéder au
6
7
8 SIGNETS Permet d’accéder au menu des
9 SÉLECTION
10 ZOOM/EFFACER En mode lecture, permet de
, , ,
(Touches
directionnelles)
ou
VIDÉO
menu du contenu du disque (Disc
Contents). En mode PBC (Contrôle
de la lecture) activé, permet de
visualiser le menu d’un disque VCD.
En mode menu, permettent de
parcourir les options du menu pour
les sélectionner.
En mode radio, appuyer sur ou
pour changer de fréquence.
Appuyer sur ou pour
modifier la station radio mémorisée.
Appuyer sur ces touches pour
effectuer une recherche arrière ou
avant pour aller à la piste ou chapitre
suivant ou précédent.
signets (Bookmark).
Permet de basculer entre les sorties
vidéo.
sélectionner différentes taille
d’agrandissement de l’image lors de
la visualisation d’une vidéo.
En mode menu, permet de supprimer
l’information saisie dans un menu de
configuration.
DAV8611
# Touche Fonction
1
2Touches
3 TITRE Permet d'afficher le menu du titre s'il
4
(Attente/Marche)
numériques 0 à 9
(Arrêt)
Permet de basculer entre les modes
fonctionnement et attente.
En mode DVD, permet la sélection du
titre, du chapitre, de la piste et de la
recherche en fonction de la durée.
En mode radio, permet la saisie
d’une station préréglée.
en existe sur le disque.
Appuyer sur STOP (Arrêt) pour
arrêter la lecture. La lecture reprend
à partir de ce point quand PLAY
(Lecture) est appuyée. Appuyer deux
fois sur STOP, puis une fois sur PLAY
pour lancer la lecture à partir du
début.
11 ANGLE/PBC En mode lecture, permet de
sélectionner différents angles de
prise de vues s’ils sont disponibles
sur le disque.
Permet d’activer et de désactiver le
contrôle de la lecture (PBC) d’un
disque VCD.
12 SOURCE Permet de naviguer parmi les modes
Disc/USB (Disque/USB), FM, AM et
AUX.
13 PIVOTER Permet de faire pivoter l’image.
14 HORLOGE En mode attente, maintenir cette
touche appuyée pour lancer la
configuration de l'horloge en temps
réel.
15 ARRÊT DIFFÉRÉ Permet d’activer l’arrêt différé pour
que l’appareil se mette
automatiquement en mode attente.
16 OUVRIR/FERMER Permet d’ouvrir ou de fermer le
plateau à disque.
17 VOL +/VOL – Permettent d’augmenter ou de
diminuer le volume.
18 SOURDINE Permet de mettre le son en sourdine.
Appuyer de nouveau sur cette touche
pour rétablir le son.
19 INFO Permet d’afficher les informations
sur le disque en cours de lecture.
www.insignia-products.com
25
Page 26
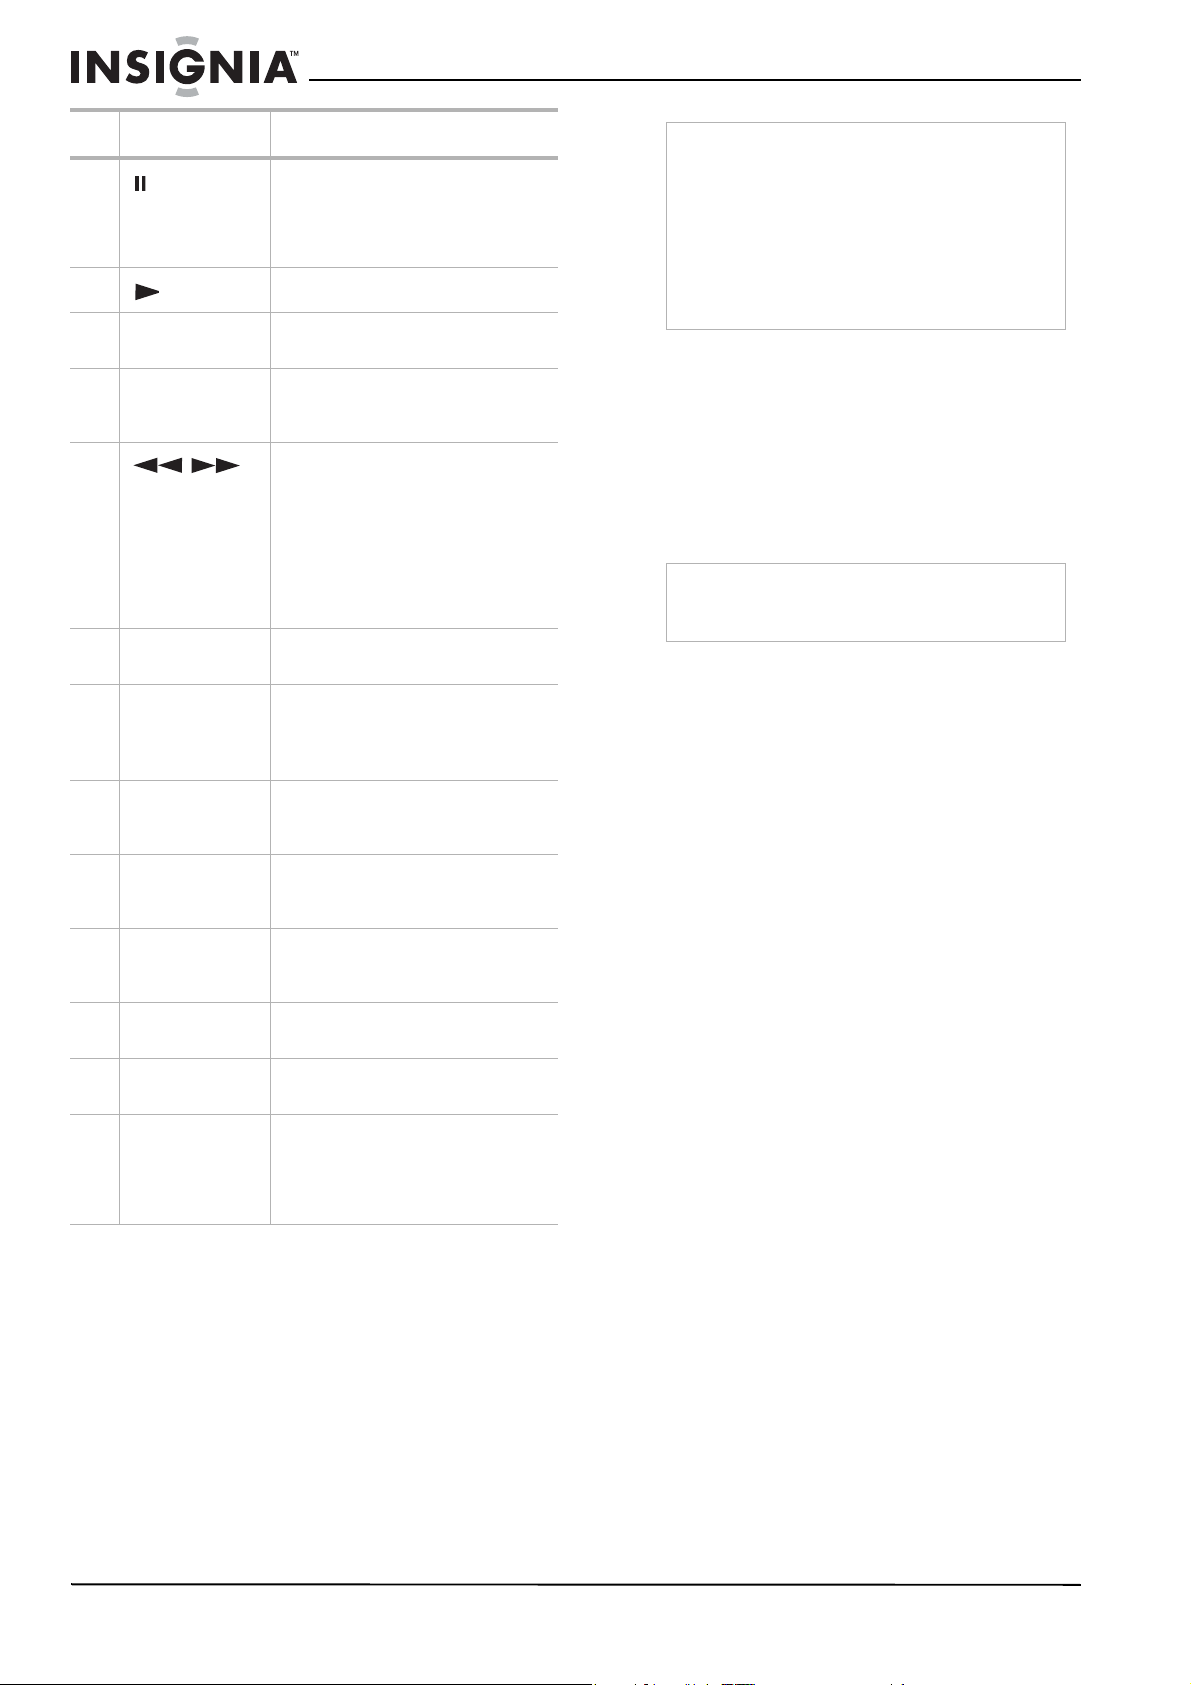
Minichaîne de luxe avec lecteur DVD NS-A3111 de Insignia
# Touche Fonction
20
21
22 CONFIGURATION
23 OK Permet de confirmer ou sélectionner
24
25 SOUS-TITRES Permet de sélectionner la langue des
26 AUDIO/FM ST En mode lecture, permet de passer à
27 GRADATEUR Permet d’atténuer ou d’augmenter
28 ALLER À Permet de commencer la lecture
29 MODE DE
30 A-B Permet de configurer la lecture
31 EXTRÊMES
32 ÉGALISATION Permet de sélectionner un mode
(Pause)
(Lecture)
/QUITTER
/
LECTURE
GRAVES
Appuyer une fois sur cette touche
pour arrêter momentanément la
lecture ou l'enregistrement. Appuyer
plusieurs fois sur cette touche pour
une lecture image par image.
Permet de commencer la lecture.
Permet d’accéder ou de quitter le
menu de configuration du système.
une valeur dans un menu et lors de la
configuration.
En mode lecture, maintenir ces
touches appuyées pour une avance
ou un retour rapide d’un DVD ou
d’un CD. Appuyer de façon répétée
pour faire varier les vitesses
d'avance ou de retour rapide.
En mode radio, permet de lancer le
balayage automatique croissant ou
décroissant.
sous-titres, si disponible.
lecture audio en continu différente.
En mode radio, permet de
sélectionner Mono ou Stéréo.
l’intensité le l'éclairage de l’affichage
du panneau avant.
d’un DVD, CD, VCD ou SVCD à partir
d’un endroit spécifique.
Permet d'afficher le menu Playmode
(Mode de lecture) pour sélectionner
un mode de lecture différent.
répétée ou de l’annuler.
Permet d'activer ou de désactiver les
extrêmes graves (Ex Bass).
d'égalisation prédéfinie. Il est
possible de sélectionner FLAT
(Normal), ROCK, POP, CLASSIC
(Classique) et JAZZ.
Installation des piles de la télécommande
Pour installer les piles de la télécommande :
1 Retirer le couvercle du compartiment des
piles.
2 Insérer deux piles AAA dans le
compartiment. Veiller à ce que les pôles + et
– des piles coïncident avec les repères + et –
figurant à l'intérieur du compartiment.
3 Remettre le couvercle en place.
Remarques
• Ne pas mélanger différents types de piles.
• Ne pas mélanger des piles neuves et usagées.
• Retirer les piles quand elles sont déchargées.
• Les produits chimiques des piles peuvent
provoquer des démangeaisons. Si les piles
fuient, nettoyer le compartiment avec un
chiffon. Si les produits chimiques sont au
contact de la peau, nettoyer immédiatement.
• Retirer les piles si la télécommande n’est pas
utilisée pendant une période prolongée.
Utilisation de la télécommande
Pour utiliser la télécommande :
• Pointer directement la télécommande vers la
minichaîne, avec un angle horizontal inférieur
à 60° (30° de chaque côté) et avec un angle
vertical inférieur à 30° par rapport au capteur
infrarouge sur le devant de l’appareil, à une
distance maximale de 20 pieds (6 m) de la
minichaîne.
Attention
Ne pas exposer la télécommande à des liquides,
au soleil ou à des chocs. Ne pas mélanger
différents types de piles.
Installation de la minichaîne avec lecteur DVD
Déballage et installation
Le carton doit contenir :
• Minichaîne avec lecteur DVD
• Guide de l'utilisateur
• Télécommande avec 2 piles
•Câble AV
• Antennes FM et AM
• 2 haut-parleurs avec leur câble
Si l’un ou plusieurs de ces articles doivent être
remplacés, appeler le numéro d’assistance à la
clientèle mentionné dans ce guide à la section
relative à la garantie.
Enlever soigneusement tous les articles du
carton. Avant de jeter l’emballage, vérifier que
tous les articles nécessaires sont au complet.
• Enlever les matériaux d’emballage des
éléments individuels.
• Ne pas retirer d’étiquettes ou d’autocollants
du panneau arrière de la minichaîne.
• Placer l’appareil à l’emplacement souhaité.
Cet appareil a été conçu pour être utilisé sur
une surface à niveau, stable, plane, telle
qu’une table, un bureau, une étagère ou un
support, située près d’une prise
d’alimentation, à l’écart de la lumière directe
du soleil et des sources de chaleur
excessive, de la poussière, de l’humidité ou
des vibrations.
• Dérouler le cordon d'alimentation CA pour le
déployer entièrement, puis le brancher à
l'arrière de la minichaîne.
26
www.insignia-products.com
Page 27

Minichaîne de luxe avec lecteur DVD NS-A3111 de Insignia
Source d’alimentation
Utiliser le cordon CA polarisé fourni pour le
fonctionnement sur courant secteur CA. Insérer
la prise du cordon d’alimentation CA dans une
prise secteur CA polarisée standard de 120 V
60 Hz.
Si une décharge d’électricité statique se produit
quand l’appareil est touché et que celui-ci cesse
de fonctionner, débrancher l’appareil de la prise
secteur CA, puis le rebrancher. Il devrait alors
fonctionner normalement.
Avertissements
• Le système est doté d’une fiche CA polarisée
avec un plot large et un plot étroit. Cette fiche
ne pourra fonctionner qu’avec des prises
polarisées adaptées. Cette mesure de sécurité
permet de réduire le risque de choc électrique.
Si la fiche ne rentre pas dans la prise
d’alimentation, il s’agit certainement d’une
prise ancienne non-polarisée, qui doit être
remplacée par un électricien agréé. Ne pas
limer le plot large sur la fiche ou utiliser un
adaptateur pour que la fiche puisse être
branchée dans la prise.
• Ne jamais connecter la prise du cordon CA à
une tension autre que celle spécifiée (120 V
60 Hz). N'utiliser que le cordon d'alimentation
fourni.
Pour connecter au téléviseur à l’aide d’un
câble vidéo à composantes ou composite :
• Connecter les prises de sortie
composantes/balayage progressif
(COMPONENT/PROGRESSIVE OUT) [pour
la meilleure image] ou la prise de sortie vidéo
(VIDEO OUT) [pour une bonne image] de
l’appareil aux prises correspondantes du
téléviseur à l’aide des câbles fournis.
Remarques
• La qualité vidéo obtenue avec le balayage
progressif nécessite un téléviseur à balayage
progressif et n’est possible qu'en utilisant les
connexions Y Pb Pr.
• Une fois connecté, régler la sortie vidéo sur
Progressive Scan (Balayage progressif) dans
le menu de configuration pour activer la
fonction.
• Il sera peut-être nécessaire de configurer le
téléviseur pour la réception de signaux à
balayage progressif.
Connexions
Remarques
• Vérifier que l'appareil est branché directement
sur le téléviseur et régler ce dernier sur le
canal d'entrée vidéo correct.
• Ne pas connecter la prise de sortie audio
(AUDIO OUTPUT) de l'appareil à la prise
d’entrée phono [PHONO IN] (platine du
graveur) du système audio.
• Ne pas brancher l’appareil par l’intermédiaire
d’un autre magnétoscope. L’image DVD
pourrait être déformée par le système de
protection contre la copie.
• L’image et le son d’un téléviseur, d’un
magnétoscope ou d’une radio à proximité
risquent d’être déformés lors de la lecture.
Écarter les appareils les uns des autres ou
mettre la minichaîne hors tension après avoir
éjecté le disque.
Connexion à un téléviseur
Si le téléviseur est du type haute-définition ou
compatible avec le signal numérique, il est
possible d’utiliser la sortie
composantes/balayage progressif de l’appareil
pour obtenir la plus haute qualité vidéo possible.
L'utilisateur n'a besoin d'utiliser qu'une seule des
connexions illustrées.
Attention
Ne pas brancher le cordon d’alimentation CA
avant de terminer d’effectuer les connexions du
système.
Câble vidéo composite (jaune Câble vidéo à composantes (non
fourni) pour une meilleure image
Panneau arrière
de l’appareil
fourni) pour une bonne image
Connexion audio
Pour connecter au téléviseur avec une
source audio :
• Connecter les prises de sortie audio (AUDIO
OUT) gauche et droite au dos de l’appareil
aux prises audio gauche et droite du
téléviseur à l’aide des câbles audio fournis.
Pour connecter à un système stéréo
numérique à deux canaux ou à un récepteur
A/V avec décodeur multicanal :
1 Connecter la prise de sortie coaxiale
(COAXIAL OUT) de l’appareil sur la prise
d’entrée correspondante de l’amplificateur.
Utiliser un câble audio numérique coaxial en
option.
2 Activer la sortie numérique de l’appareil. (voir
“AUDIO SETUP (Configuration de l’audio)”
on page 30).
www.insignia-products.com
27
Page 28
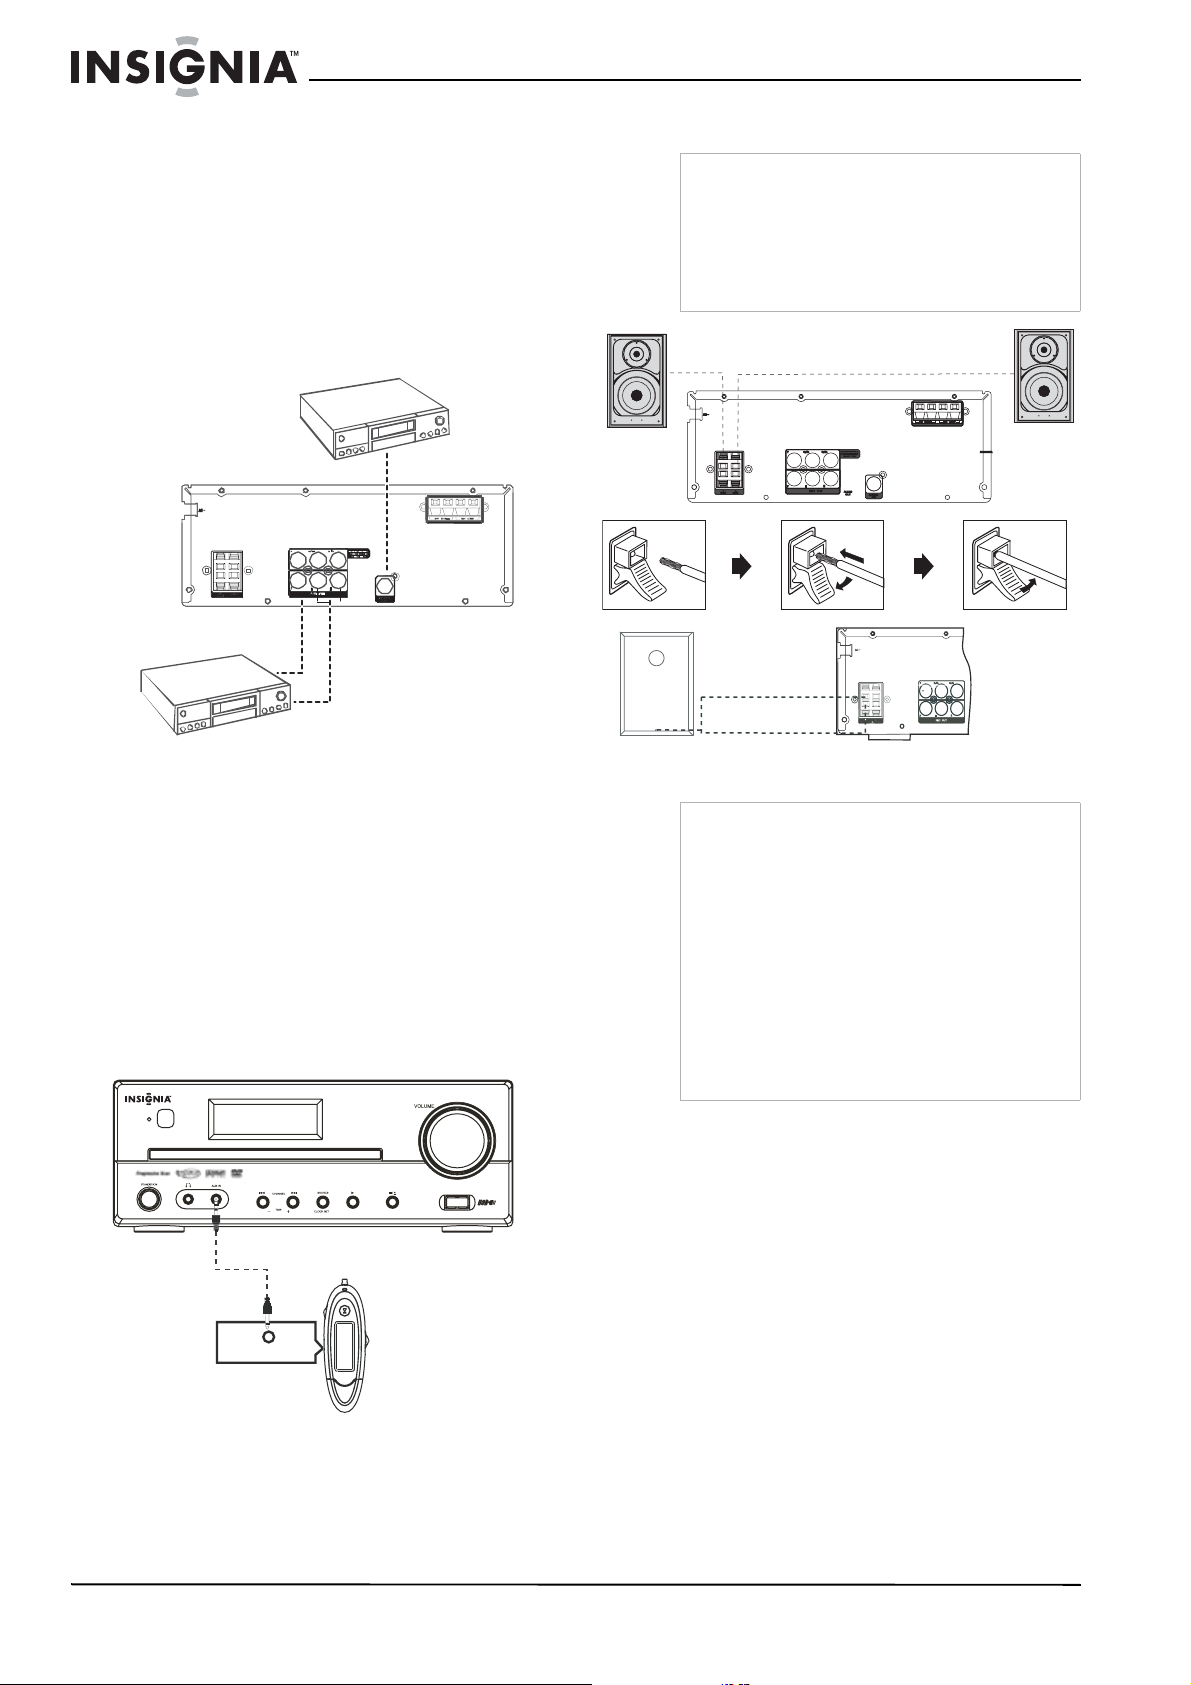
Minichaîne de luxe avec lecteur DVD NS-A3111 de Insignia
e
Connexion d'un magnétoscope ou magnétophone
Pour enregistrer la lecture d'un DVD :
1 Pour enregistrer la piste audio d’un DVD,
connecter les prises de sortie audio
gauche/droit de la minichaîne aux prises
d’entrée audio gauche/droit du
magnétoscope ou magnétophone.
2 Pour enregistrer la piste vidéo d’un DVD,
connecter la prise de sortie vidéo de la
minichaîne à la prise d’entrée vidéo du
magnétoscope ou magnétophone.
Cinéma maison avec
5.1/6.1 canaux
Câble audio numériqu
coaxial (non fourni)
Panneau arrière
de l’appareil
Magnétoscope ou
magnétophone
Câble vidéo
Câble audio
Connexion des haut-parleurs
Remarque
Cet appareil est conçu pour reproduire une qualité
de son optimale grâce à l'utilisation des
haut-parleurs fournis. En cas de connexion de
haut-parleurs autres que ceux fournis, ils doivent
être d'une impédance de 4 ohms. Lors de la
connexion des haut-parleurs, respecter les
polarités (le fil de couleur se connecte à la borne
de la même couleur).
Haut-parleur
droit
Fil de couleur
Haut-parleur
gauche
3 Pour lire un DVD en utilisant un décodeur
externe Dolby Digital ou DTS, connecter la
prise de sortie numérique coaxiale
uniquement à la prise d’entrée numérique
coaxiale du décodeur. Le câble audio
numérique coaxial n’est pas fourni.
Pour effectuer des connexions audio
Pour écouter de la musique à partir d’un
périphérique, tel qu’un lecteur MP3, CD ou MD,
à travers les haut-parleurs de cette minichaîne,
connecter la prise d’entrée auxiliaire (AUX IN)
de celle-ci à la sortie casque d’écoute du
périphérique de musique à l’aide d’un câble
audio, puis appuyer sur SOURCE pour
sélectionner AUX.
DVD EXECUTIVE SHELF SYSTEM
Panneau avant de l’appareil
Câble audio
Périphériq
Headphone output
ue audio
Fil noir
Connecter tous les haut-parleurs de la même
façon.
Avertissements
• Pour éviter d'endommager les circuits, prendre
soin de ne jamais court-circuiter les bornes de
sortie des haut-parleurs.
• Ne pas enlever trop d'isolant des câbles afin
que
• les parties dénudées ne se touchent pas. La
longueur idéale du fil dénudé devrait être
d'environ 1 cm (1/3 de pouce).
• Ne pas pousser la partie dénudée trop loin
dans les connecteurs des haut-parleurs.
• Ne pas connecter plus d’un haut-parleur par
paires de bornes de haut-parleur.
• Ne pas connecter des haut-parleurs dont
l’impédance est inférieure à celle des
haut-parleurs fournis.
Emplacement des haut-parleurs
Le positionnement des haut-parleurs joue un
rôle important dans la reproduction d'un son
ambiophonique. Prêter une attention toute
particulière à la disposition des haut-parleurs.
Pour garantir les meilleurs effets
ambiophoniques, installer tous les haut-parleurs.
28
www.insignia-products.com
Page 29
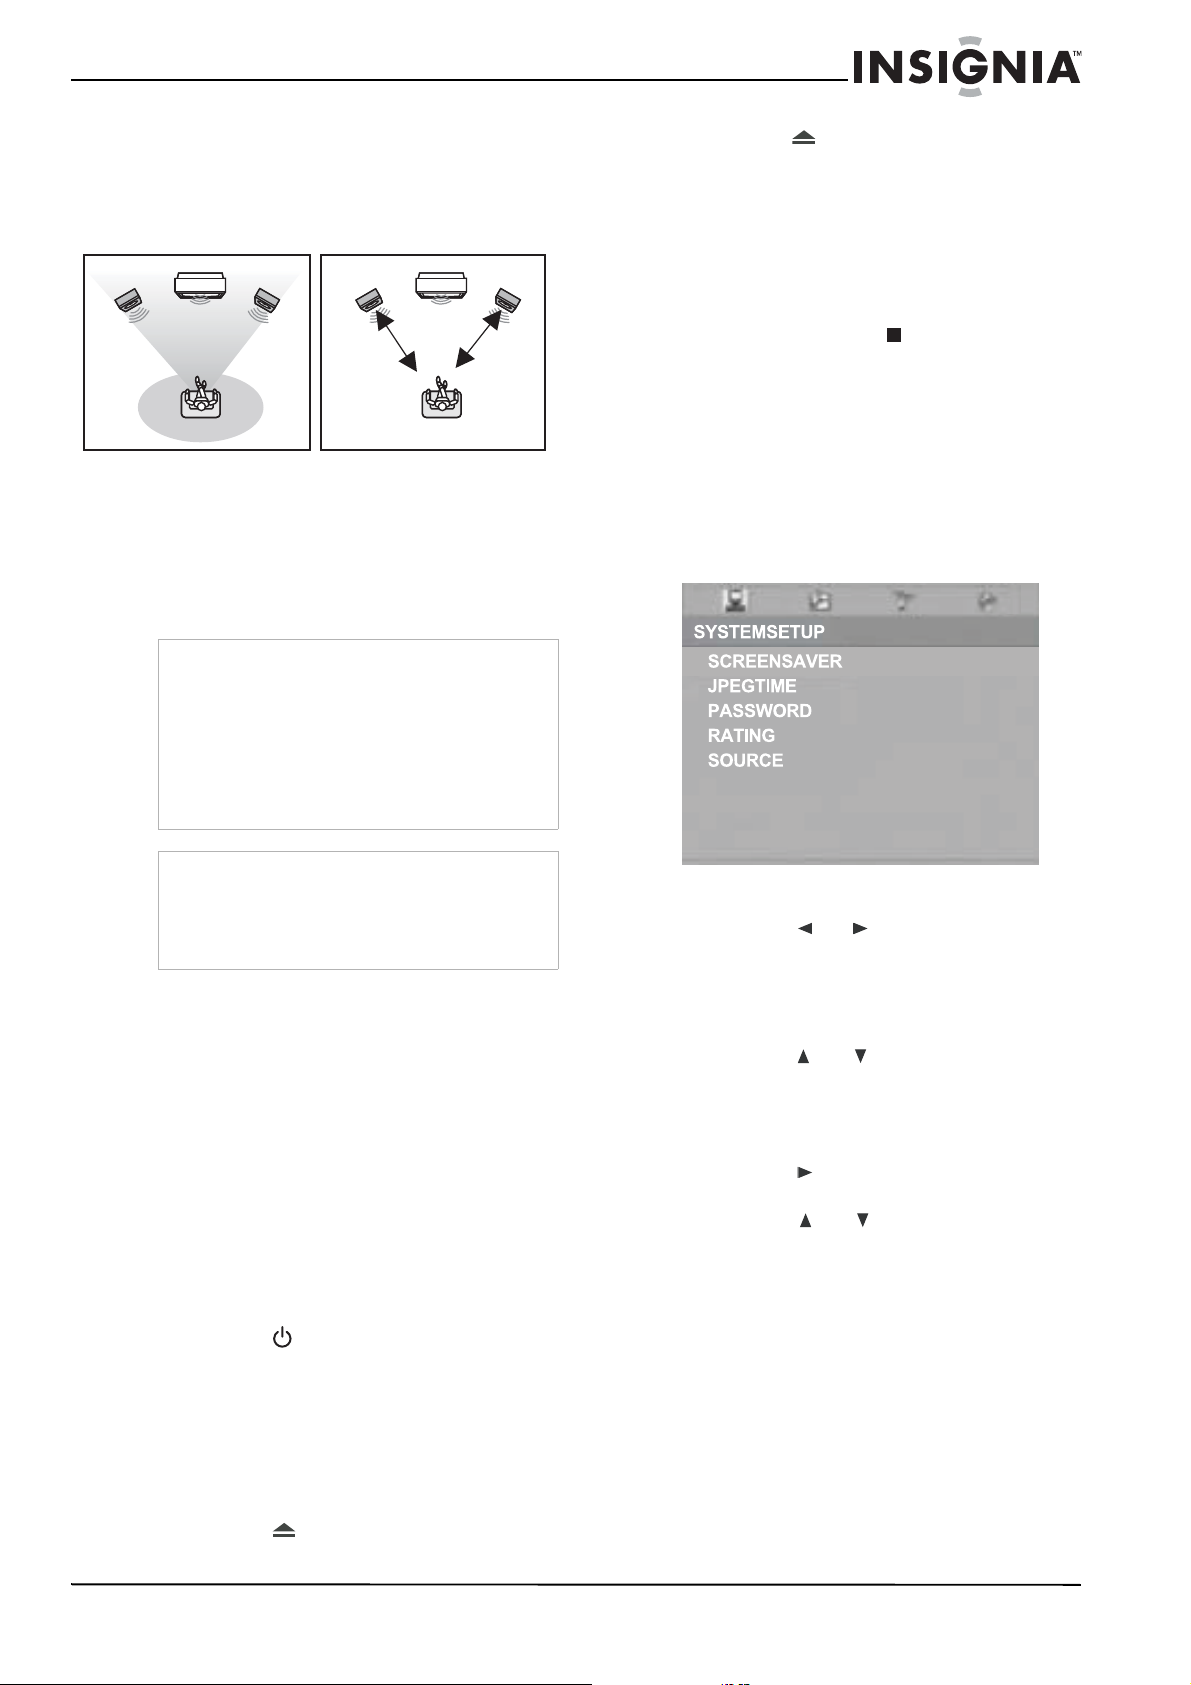
Minichaîne de luxe avec lecteur DVD NS-A3111 de Insignia
TV TV
Pour positionner les haut-parleurs :
• Placer les haut-parleurs avant gauche et droit
sur les côtés gauche et droit du téléviseur.
Tous les haut-parleurs doivent être environ à
la même distance de la zone d’écoute et
doivent être visibles.
Front speaker
(left)
Front speaker
Viewing area
(right)
Front speaker
(left)
DIM L
Installation de la minichaîne
Installer l’appareil sur une surface plane et
stable. L’espace devant l’appareil doit être
suffisant pour que le plateau à disque puisse
s’ouvrir. Positionner l’appareil afin qu’il soit
directement dans la ligne de mire de la
télécommande.
Attention
• Ne pas installer l’appareil dans un espace
dépourvu d’aération tel qu’une bibliothèque.
• Ne pas exposer l’appareil à des températures
extrêmes ou à l’humidité.
• Éviter de placer l’appareil sur une surface
chaude, telle qu’un autre appareil dégageant
de la chaleur pendant son fonctionnement.
• Vérifier que la ventilation de l’appareil est
suffisante.
Front speaker
(right)
DIM R
2 Placer un DVD sur le plateau à disque, puis
appuyer sur (OUVRIR/FERMER). Le
lecteur identifie le disque et commence la
lecture. Avant que le film ne commence, un
menu peut s’afficher.
3 Sélectionner PLAY MOVIE (Commencer le
film), puis appuyer sur OK. Le film
commence.
4 Bien que le film puisse être visualisé
immédiatement, pour obtenir le meilleur de
l’appareil, appuyer sur STOP (Arrêt), puis
configurer les options du système de la façon
suivante. Cette étape n’est nécessaire qu'au
moment de l'installation initiale de l’appareil.
Configuration de base
Pour utiliser les menus de configuration de
base :
1 Appuyer sur SETUP/EXIT
(Configuration/Quitter) de la télécommande
pour accéder au menu
(Configuration du système) en mode arrêt.
System Setup
Remarques
• Connecter le cordon AV uniquement après
avoir connecté les haut-parleurs, l’antenne et
tous les périphériques.
• Ne jamais effectuer ni modifier de connexions
alors que l’appareil est sous tension.
Utilisation de la minichaîne avec lecteur DVD
Informations générales
Pour commencer :
1 Effectuer la connexion de l’appareil tel
qu’illustré dans la section précédente.
2 Connecter l’alimentation à l’appareil.
3 Mettre le téléviseur sous tension et le régler
sur le canal d'entrée vidéo correct.
Pour mettre la minichaîne sous tension :
1 Brancher la minichaîne. Le témoin de veille
s’allume sur l'affichage du panneau avant.
2 Appuyer sur
(Attente/Marche). Après quelques instants,
l’affichage indique « NO DISC » (Pas de
disque).
3 Mettre le téléviseur en marche et
sélectionner l’entrée AV à laquelle l’appareil
est connecté.
Pour commencer la lecture :
1 Appuyer sur (OUVRIR/FERMER). Le
plateau à disque s’ouvre.
Standby/On
Pour quitter le menu
System Setup
, appuyer
de nouveau sur SETUP/EXIT.
2 Appuyer sur
menus suivants :
Setup
(Configuration de la langue), Video
ou pour aller sur l’un des
System Setup, Language
Setup (Configuration de la vidéo) ou Audio
Setup (Configuration de l’audio).
3 Lorsqu'un menu est mis en surbrillance,
appuyer sur
ou pour sélectionner les
options dans le menu.
Les options disponibles pour chaque
paramètre s’affichent sur le côté droit de
l’écran.
4 Appuyer sur
ou OK pour aller à la colonne
de droite.
5 Appuyer sur
ou pour sélectionner un
nouveau paramètre, puis appuyer sur OK
pour confirmer la modification du paramètre.
6 Répéter les étapes 3 à 5 pour modifier
d’autres paramètres. Pour plus
d’informations, se référer aux sections
appropriées de ce guide.
7 Quand les modifications ont été effectuées,
mettre en surbrillance EXIT/SETUP
(Configuration/Quitter), puis appuyer sur OK
ou de nouveau sur SETUP/EXIT pour quitter
le menu
System Setup
(Configuration du
système).
www.insignia-products.com
29
Page 30

Minichaîne de luxe avec lecteur DVD NS-A3111 de Insignia
Modifications des paramètres du lecteur
Menu Options disponibles
SCREEN SAVER (Économiseur d’écran) – Permet
d’activer (On) ou de désactiver (Off) l'économiseur
d'écran.
JPEG TIME (Intervalle entre JPEG) – Permet de
sélectionner l'intervalle de la présentation des
fichiers JPEG lors de la lecture d’un CD image.
Chaque image s’affiche pour la durée spécifiée
avant de sauter à la prochaine automatiquement.
Les choix incluent 5SEC (5 s), 10SEC (10 s) et
15SEC (15 s).
PASSWORD (Mot de passe) – De nombreux DVD
de films contiennent des codes de la classification
MPAA. Cet appareil peut identifier les codes sur
ces DVD. Ceci permet à l’utilisateur d’éviter que les
enfants ne puissent visualiser des films qui sont
considérés comme inappropriés ou inacceptables.
Pour déverrouiller la fonction de classification ou
changer le mot de passe, appuyer sur les touches
numériques pour saisir le mot de passe existant (le
mot de passe d’origine est « 1234 »), puis appuyer
sur ENTER (Entrée). Il est ensuite possible de
modifier le paramètre de la CLASSIFICATION tel
qu’illustré ci-après ou de saisir un nouveau mot de
passe, puis appuyer sur ENTER. Une icône de
déverrouillage indique que le contrôle parental
N’EST PAS activé. Une icône de verrouillage
indique que le contrôle parental est activé.
RATING (Classification) – Après avoir saisi le mot
de passe (tel qu’illustré ci-dessus), sélectionner la
classification supérieure pour tous publics, puis
verrouiller le mot de passe. Pour lire un disque
avec une classification supérieure, le mot de passe
doit être saisi. Classifications incluses :
• KID SAFE (Tous les enfants) – Approprié
pour les enfants de tous âges.
SYSTEM
SETUP
(Configuration
du système)
• G – Recommandé pour tous les publics.
• PG – Contrôle parental suggéré.
• PG-13 – Déconseillé au moins de 13 ans.
• PG-R – Surveillance parentale
recommandée – vulgarités ou scènes
inappropriées assez brèves.
• R – Interdit - violence, vulgarités et scènes
inappropriées pour les jeunes.
• NC-17 – Interdit aux moins de 17 ans.
• ADULT (Adultes) – Réservé aux adultes en
raison de scènes à caractère sexuel, de
violence ou de vulgarités explicites.
Pour régler la classification quand le mot de passe
est déverrouillé :
• Dans le menu
du système), appuyer sur ou pour
sélectionner Rating (Classification), puis
appuyer sur .
• Appuyer sur ou pour sélectionner le
niveau de classification pour le disque
inséré, puis appuyer sur OK.
• Appuyer sur ou pour sélectionner
Password (Mot de passe), puis appuyer
sur OK. Utiliser les touches numériques (0
à 9) pour saisir un mot de passe à quatre
chiffres. En cas d’erreur avant d’appuyer
sur OK, appuyer sur CLEAR (Effacer) et
saisir de nouveau un code de sécurité à
quatre chiffres. Les disques DVD dont la
classification est supérieure à celle
sélectionnée ne pourront être lus, sauf si
un mot de passe à quatre chiffres correct
est saisi.
SOURCE – Sélectionner la source du fichier à lire
entre Disc (Disque) et USB. Pour accéder aux
fichiers d’un périphérique USB, vérifier qu’il est
connecté à la prise USB sur le panneau avant.
Remarque : Cet appareil n’est pas compatible avec le
format NTFS. Si le lecteur USB à mémoire flash ne
fonctionne pas, vérifier le système de fichiers de ce
dernier et le formater au système FAT ou FAT32.
System Setup
(Configuration
Menu Options disponibles
OSD LANGUAGE (Langue de l’OSD) – Permet de
sélectionner la langue d'affichage des menus
d'écrans.
LANG(UAGE)
SETUP
(Configuration
de la langue)
VIDEO SETUP
(Configuration
de la vidéo)
AUDIO SETUP
(Configuration
de l’audio)
AUDIO LANG (Langue audio) – Permet de
sélectionner la langue audio du DVD.
SUBTITLE LANG (Langue des sous-titres) –
Permet de sélectionner la langue des sous-titres
du DVD.
MENU LANG (Langue du menu) – Permet de
sélectionner la langue du menu du DVD.
TV TYPE (Format TV) – Permet de sélectionner
le format d'image. Les choix sont les suivants :
• 4:3 PS – Sélectionner cette option
lorsque l’appareil est connecté à un
téléviseur classique. L’écran est
compatible avec des images
panoramiques mais elles sont rognées
automatiquement.
• Normal/LB (Normal/Format boîte aux
lettres) – Sélectionner cette option
lorsque l’appareil est connecté à un
téléviseur classique. L’écran est
compatible avec des images
panoramiques mais comprend une bande
noire en haut et en bas de l’écran.
• 16:9 – Sélectionner cette option lorsque
l’appareil est connecté à un téléviseur
grand écran.
Remarque : En raison du format sur lequel ils ont été
enregistrés, certains disques peuvent ne pas être lus
selon la sélection choisie. Par exemple, si le disque est
enregistré au format 4:3, il ne pourra être lu qu’au
format 4:3. Le format TV doit correspondre à l’écran
du téléviseur.
VIDEO (Vidéo) – Sélectionner le type de sortie
vidéo qui correspond à la connexion entre
l’appareil et le téléviseur. Les choix sont les
suivants :
• 480i YPBPR – Sélectionner ce paramètre
si l’appareil est connecté au téléviseur
avec un câble vidéo Y, Cb, Cr.
• P-SCAN YPBPR (Balayage progressif Y,
Pb, Pr) – Sélectionner ce paramètre si
l’appareil est connecté aux prises vidéo Y,
Pb, Pr du téléviseur et que la fonction
balayage progressif est activée.
Remarque : Il est aussi possible d’appuyer sur
V-SELECT (Sélection des sorties vidéo) pour effectuer
directement la sélection.
DIGITAL OUTPUT (Sortie numérique) – Pour
sélectionner le format audio numérique :
• SPDIF/RAW (SPDIF/Brut) – La sortie
audio numérique est au format original,
tel que AC3 ou DTS.
• SPDIF/PCM – La sortie audio numérique
est converti en un signal PCM.
DYNAMIC RANGE (Portée dynamique) – Permet
de contrôler la portée dynamique afin d’obtenir
un son acceptable pour l’équipement.
• ON (Activé) – Un son puissant tel qu’une
explosion est légèrement assourdi.
• OFF (Désactivé) – La lecture se fait en
accord avec le niveau d’enregistrement
du disque.
SAMPLING (Échantillonnage) – Permet de
sélectionner la fréquence d’échantillonnage entre
96 kHz et 48 kHz.
• 48 KHz – L'audio est sous-échantillonné
à 48 kHz si le disque est enregistré à une
fréquence de 96 kHz.
• 96 KHz – La sortie se fait au format audio
original.
Remarque : Cette fonction n’est disponible que pour la
sortie audio numérique d'un disque enregistré à une
fréquence de 96 kHz.
30
www.insignia-products.com
Page 31
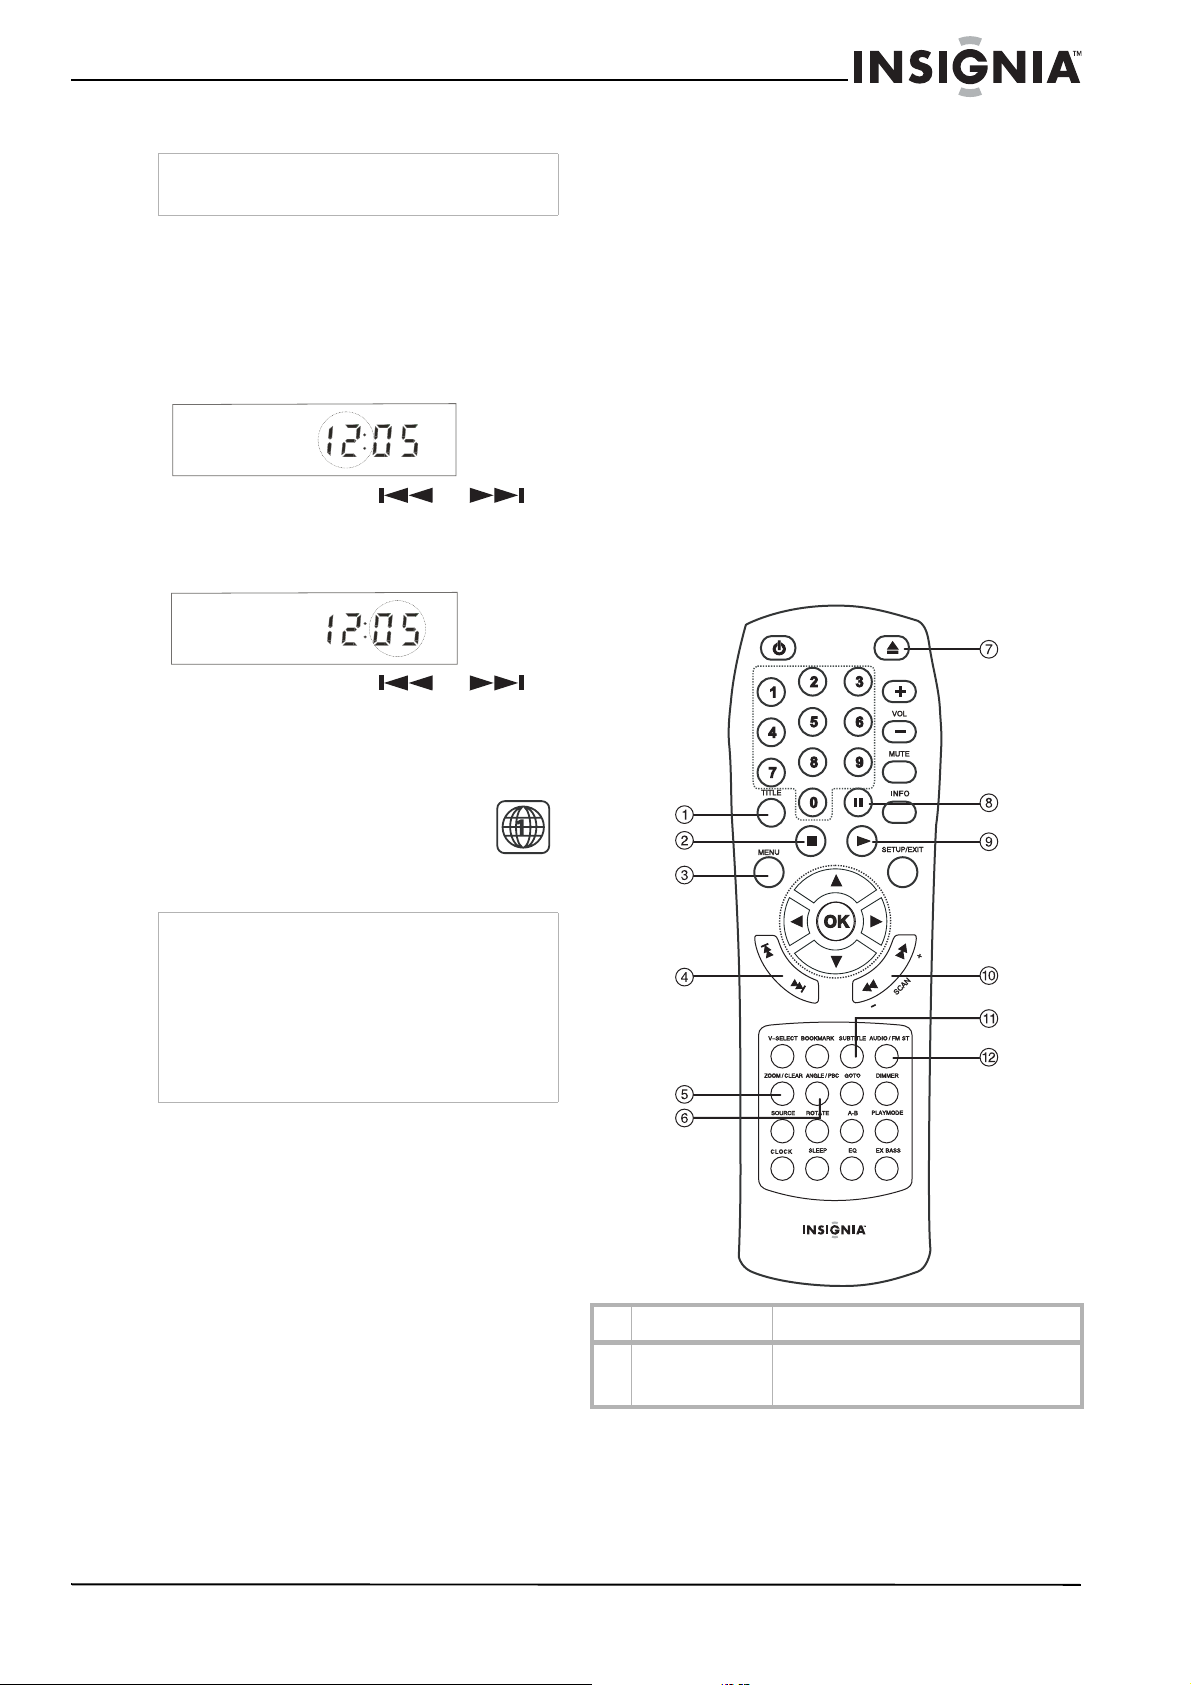
Minichaîne de luxe avec lecteur DVD NS-A3111 de Insignia
Réglage de l’horloge
Remarque
Il faudra de nouveau régler l'heure chaque fois
que l’appareil est débranché.
Appuyer sur la touche STANDBY/ON
(Attente/Marche) du panneau avant pour mettre
l’appareil en mode attente.
Pour régler l’horloge :
1 Maintenir appuyée la touche SOURCE du
panneau avant jusqu’à ce que l’affichage de
l’heure clignote.
2 Appuyer sur les touches ou du
panneau avant pour régler l’heure.
3 Appuyer de nouveau sur SOURCE jusqu’à
ce que l'affichage des minutes clignote.
4 Appuyer sur les touches ou du
panneau avant pour régler les minutes.
Les fichiers MP3 doivent être au format ISO
9660 ou JOLIET. Si la fréquence
d’échantillonnage est de 44,1 ou 48,1 kHz et
le débit binaire fixé à 128 Kbps ou plus, la
lecture des fichiers MP3 peut se faire.
Toutefois, la lecture de certains d’entre eux
ne pourra se faire suivant leur état ou leur
format.
• Fichiers WMA sur CD-R
Si la fréquence d’échantillonnage est de 32
kHz et le débit binaire fixé à 128 Kbps ou
plus, la lecture des fichiers WMA peut se
faire. Toutefois, la lecture de certains d’entre
eux ne pourra se faire suivant leur état ou
leur format.
• Fichiers JPEG sur CD-R ou CD-RW
Cet appareil peut lire les fichiers JPEG d’une
résolution allant jusqu’à cinq millions de
pixels. La lecture de certains fichiers JPEG
ne peut se faire avec cet appareil.
Utilisation de la télécommande pour lire un DVD, CD ou VCD
Lecture d’un DVD, CD ou VCD
Codes régionaux
Un code régional (1) est imprimé audos
du boîtier de l’appareil. L’appareil ne
peut lire que les DVD étiquetés avec le
même code régional (1) ou la mention
ALL (Tous).
Remarques
• La plupart des disques DVD comportent un
globe avec un ou plusieurs numéros imprimés
qui sont clairement visibles sur la boîte. Ce
numéro doit correspondre au code régional de
l’appareil, sinon celui-ci ne peut pas lire le DVD.
• En cas de tentative de lecture d’un DVD avec
code régional différent de celui de l’appareil, un
message d’erreur s’affiche sur l’écran du
téléviseur.
Disques compatibles
L’appareil peut lire les disques suivant :
• DVD-Vidéo
• Les disques DVD-R, DVD-RW, DVD+R et
DVD+RW, DVD-R et DVD-RW doivent être
enregistrés en mode DVD vidéo. Les
DVD+RW doivent être enregistrés selon les
spécifications pour disques DVD+RW avec
une capacité de 4,7 Go.
• CD vidéo (VCD)
• Super CD vidéo (SVCD)
• CD audio
• CD-R et CD-RW
Ce lecteur peut lire la plupart des disques
CD-R et CD-RW. Toutefois, en fonction des
conditions d’enregistrement, il se peut que la
lecture de certains disques ne puisse se
faire.
• Fichiers MP3 sur CD-R ou CD-RW
1
DAV8611
# Touche Fonction
1 TITRE Permet d’afficher le menu du Titre s’il en
existe sur le disque. Cette fonction n’est
disponible que pour la lecture des DVD.
www.insignia-products.com
31
Page 32

Minichaîne de luxe avec lecteur DVD NS-A3111 de Insignia
# Touche Fonction
2
(Arrêt)
3 MENU Permet d’afficher le menu du disque.
4
(Avance
rapide)
ou
(Retour rapide)
5 ZOOM/EFFACER Permet d'effectuer un zoom avant de
6 ANGLE/PBC Permet de choisir l'angle de prise de vues
7
(Ouvrir/Fermer)
Appuyer une fois pour arrêter la lecture en
cours immédiatement et entrer en mode
reprise de lecture.
Appuyer sur (Lecture) pour reprendre
la lecture à partir du point où elle s’était
interrompue.
Appuyer deux fois pour arrêter totalement
la lecture. La reprise de la lecture n’est
pas possible. Appuyer sur (Lecture)
pour reprendre la lecture à partir du début
du disque.
Remarque : La lecture s’arrête pour afficher le
menu. Cette touche est inopérante pour la
lecture d’un CD. Pour un VCD, cette touche ne
fonctionne que si PBC (contrôle de la lecture)
est activé (ON).
Quand un disque est en cours de lecture,
il est possible de faire un saut au chapitre
ou à la piste précédente ou suivante.
Appuyer sur pour revenir au
début du chapitre ou de la piste
précédente.
Appuyer sur pour aller au début
du chapitre ou de la piste suivante.
Remarque : Pour des CD audio, utiliser les
touches numériques (0 à 9) pour aller
directement à un numéro de piste. Lors de la
lecture d’un VCD avec la fonction PBC (contrôle
de la lecture), PBC doit être régler sur OFF
(Désactivé).
l'image. Permet d’agrandir l’image
pendant la lecture.
Chaque fois que la touche ZOOM /CLEAR
(Zoom/Effacer) est appuyée,
l’agrandissement de l’image se fait
comme suit :
ZOOM x 2 ----> ZOOM x 3 ----> ZOOM x 4
----> ZOOM x 3/4 ----> ZOOM x 2/3 ---->
ZOOM x 1/2 ----> ZOOM : OFF (Désactivé)
Quand une image a été agrandie, les
touches , , ou permettent
de se déplacer dans l’image.
Pour revenir à la taille originale de l’image,
appuyer sur ZOOM jusqu’à l’affichage du
symbole ZOOM : OFF (Désactivé). L’écran
revient alors au mode normal.
si le DVD vidéo en lecture contient des
scènes enregistrées sous différents
angles.
Appuyer de façon répétée sur ANGLE pour
sélectionner différents angles de prise de
vues s’ils sont disponibles sur le disque.
Remarque : Cette fonction n’est disponible que
si des scènes avec des angles de prise de vues
différents ont été enregistrés sur le DVD. Si la
visualisation d’angles multiples n’est pas
disponible, OFF (Désactivé) est affiché.
Appuyer sur cette touche pour ouvrir le
plateau à disque.
Remarque : Charger le disque sur le plateau
avec l’étiquette vers le haut.
Appuyer de nouveau sur cette touche
pour fermer le plateau. La lecture du
disque commencera automatiquement.
# Touche Fonction
8
(Pause)
9 (Lecture) Permet de commencer la lecture.
10
/
11 SOUS-TITRES Pendant la lecture, il est possible de
12 AUDIO/FM ST Permet de modifier la langue audio du
Il est possible de faire un arrêt sur image
et de lire image par image.
CD : Appuyer sur pour interrompre
momentanément la lecture. Appuyer de
nouveau sur ou sur pour reprendre
la lecture normale.
DVD/VCD : Appuyer sur pour
interrompre momentanément la lecture.
Appuyer de nouveau sur pour aller au
mode image par image (Step).
Chaque fois que la touche est appuyée,
la vidéo avance d'une image. Appuyer sur
pour reprendre la lecture.
Permet la recherche arrière ou avant.
Appuyer sur pour reprendre la lecture.
Chaque fois que ou est
appuyée, la vitesse de recherche arrière
ou avant est modifiée.
En mode pause, appuyer sur pour
commencer la lecture en mode ralenti
avant.
Chaque fois que la touche est
appuyée, la vitesse de lecture au ralenti
est modifiée. Appuyer sur pour revenir
au mode de lecture normal.
Remarque : Le ralenti en mode image par
image est inopérant pendant la lecture d’un CD.
Le ralenti arrière ne s’applique pas à la lecture
de VCD.
modifier la langue des sous-titres ou de
désactiver les sous-titres.
Pendant la lecture d’un disque DVD,
appuyer sur SUBTITLE (Sous-titres) pour
afficher la langue des sous-titres en
cours.
Appuyer de façon répétée sur cette touche
pour sélectionner la langue souhaitée
pour les sous-titres.
Remarque : Cette fonction ne peut être utilisée
que si des sous-titres dans des langues
différentes ont été enregistrés sur le disque. Le
nombre de langues enregistrées diffère en
fonction des disques.
disque pendant la lecture. Pendant la
lecture, il est possible de modifier la
langue ou la sortie audio.
Pendant la lecture d’un disque, appuyer
sur AUDIO/FM ST pour afficher le
numéro de piste audio de la lecture en
cours.
Appuyer de façon répétée sur cette touche
pour sélectionner la piste audio souhaitée.
Remarque : Si une seule piste audio est
disponible sur le disque, le numéro ne change
pas.
32
www.insignia-products.com
Page 33

Minichaîne de luxe avec lecteur DVD NS-A3111 de Insignia
Fonctions de lecture avancées
Pour lire un disque avec la fonction
d’affichage :
• Pendant la lecture du disque, appuyer sur
INFO pour afficher l’information disponible
sur le disque.
Pour les DVD :
• Appuyer sur INFO pour afficher
l’information sur le DVD.
Format de disque
Titre en cours de lecture
• Appuyer deux fois sur INFO pour afficher
plus d’informations sur le disque.
• Appuyer trois fois sur INFO pour vérifier la
durée de lecture du titre en cours.
• Appuyer quatre fois sur INFO pour vérifier
la durée restante du titre en cours.
• Appuyer cinq fois sur INFO pour afficher
plus d’informations sur le disque.
L’information suivante est affichée, selon le
type de disque en cours de lecture :
• TT (information sur le titre) – Affiche le
numéro du titre en cours de lecture et le
nombre total de titres enregistrés sur le
disque.
• CH (information sur le chapitre) – Affiche
le numéro du chapitre en cours de lecture
et le nombre de chapitres enregistrés sur
le disque.
• Elapsed Time (Durée écoulée) – Affiche
la durée écoulée depuis le
commencement de la lecture du
titre/chapitre/disque/piste.
Remarque
Si « - » est affiché devant l’heure, le numéro
indique la durée restante du
titre/chapitre/disque/piste en cours de lecture.
• Audio – Affiche la piste audio
sélectionnée.
• Subtitle language (Langue des
sous-titres) – Le numéro de la langue des
sous-titres qui a été sélectionnée est
affiché.
• Angle – Affiche l’angle de prise de vue
actuellement sélectionné. Si le disque en
cours de lecture n’a pas d’angles
multiples, OFF (Désactivé) s’affiche.
• TRK (information sur la piste) – Affiche le
numéro de la piste en cours de lecture et
le nombre total de pistes enregistrées sur
le disque.
• Repeat Mode (Mode répétition) – Affiche
tout mode répétition configuré.
Remarque
Quand les paramètres ont été vérifiés, appuyer de
nouveau sur INFO pour éteindre l’affichage.
Titre
Nombre de titres
Audio
Chapitre en cours de lecture
Nombre de chapitres
Chapitre
Sous-titres
---
Durée écoulée
Angle
Utilisation de la fonction GOTO (Aller à)
Cette fonction permet de sélectionner
directement une position quelconque sur le
disque pour commencer la lecture.
DVD
TT
7 /36
Titre en cours de
CH
1/41
Chapitre
Pour sélectionner un titre, chapitre ou piste
spécifique :
1 Appuyer sur GOTO (Aller à). Le menu
s’affiche.
2 Appuyer sur
ou pour mettre en
surbrillance un titre, chapitre ou piste, puis
sur la touche numérique correspondante (0 à
9).
3 Appuyer sur OK pour confirmer. L’appareil
commence alors la lecture à partir de la
position sélectionnée.
Remarque
Appuyer sur ZOOM/CLEAR (Zoom/Effacer) pour
réinitialiser le titre, chapitre ou piste en
surbrillance.
Pour localiser un point particulier :
1 Appuyer sur GOTO (Aller à). Le menu
s’affiche.
2 Appuyer sur
ou pour sélectionner le
point de départ.
3 Saisir directement le point de départ de la
lecture à l’aide des touches numériques (0 à
9).
• D’abord les deux chiffres des heures.
• Puis les deux chiffres des minutes.
• Enfin, les deux chiffres pour les secondes.
4 Après avoir saisi le point de départ, appuyer
sur OK pour confirmer. L’appareil commence
alors la lecture à partir de la position
sélectionnée.
Remarques
• Pour certains disques cette fonction peut être
inopérante.
• Certaines scènes peuvent ne pas être situées
à la position précise spécifiée.
• Cette méthode d’accès à une position
spécifique n’est disponible que pour le titre du
DVD en cours de lecture.
• Appuyer sur ZOOM/CLEAR (Zoom/Effacer)
pour réinitialiser l'heure quand celle-ci est en
surbrillance.
Utilisation de la lecture programmée
La lecture programmée permet à l’utilisateur de
saisir l’ordre de lecture des chapitres ou des
titres sur le disque.
Pour lire un disque DVD, CD, VCD ou SVCD
en utilisant la lecture programmée :
1 Après avoir inséré un disque, appuyer sur
PLAYMODE (Mode de lecture). Le menu
Playmode
s’affiche.
PLAY MODE
PLAY MODE
MODE PROG
MODE PROG
REPEAT OFF
REPEAT OFF
00:03:12
Heure
GOTO
GOTO
www.insignia-products.com
33
Page 34
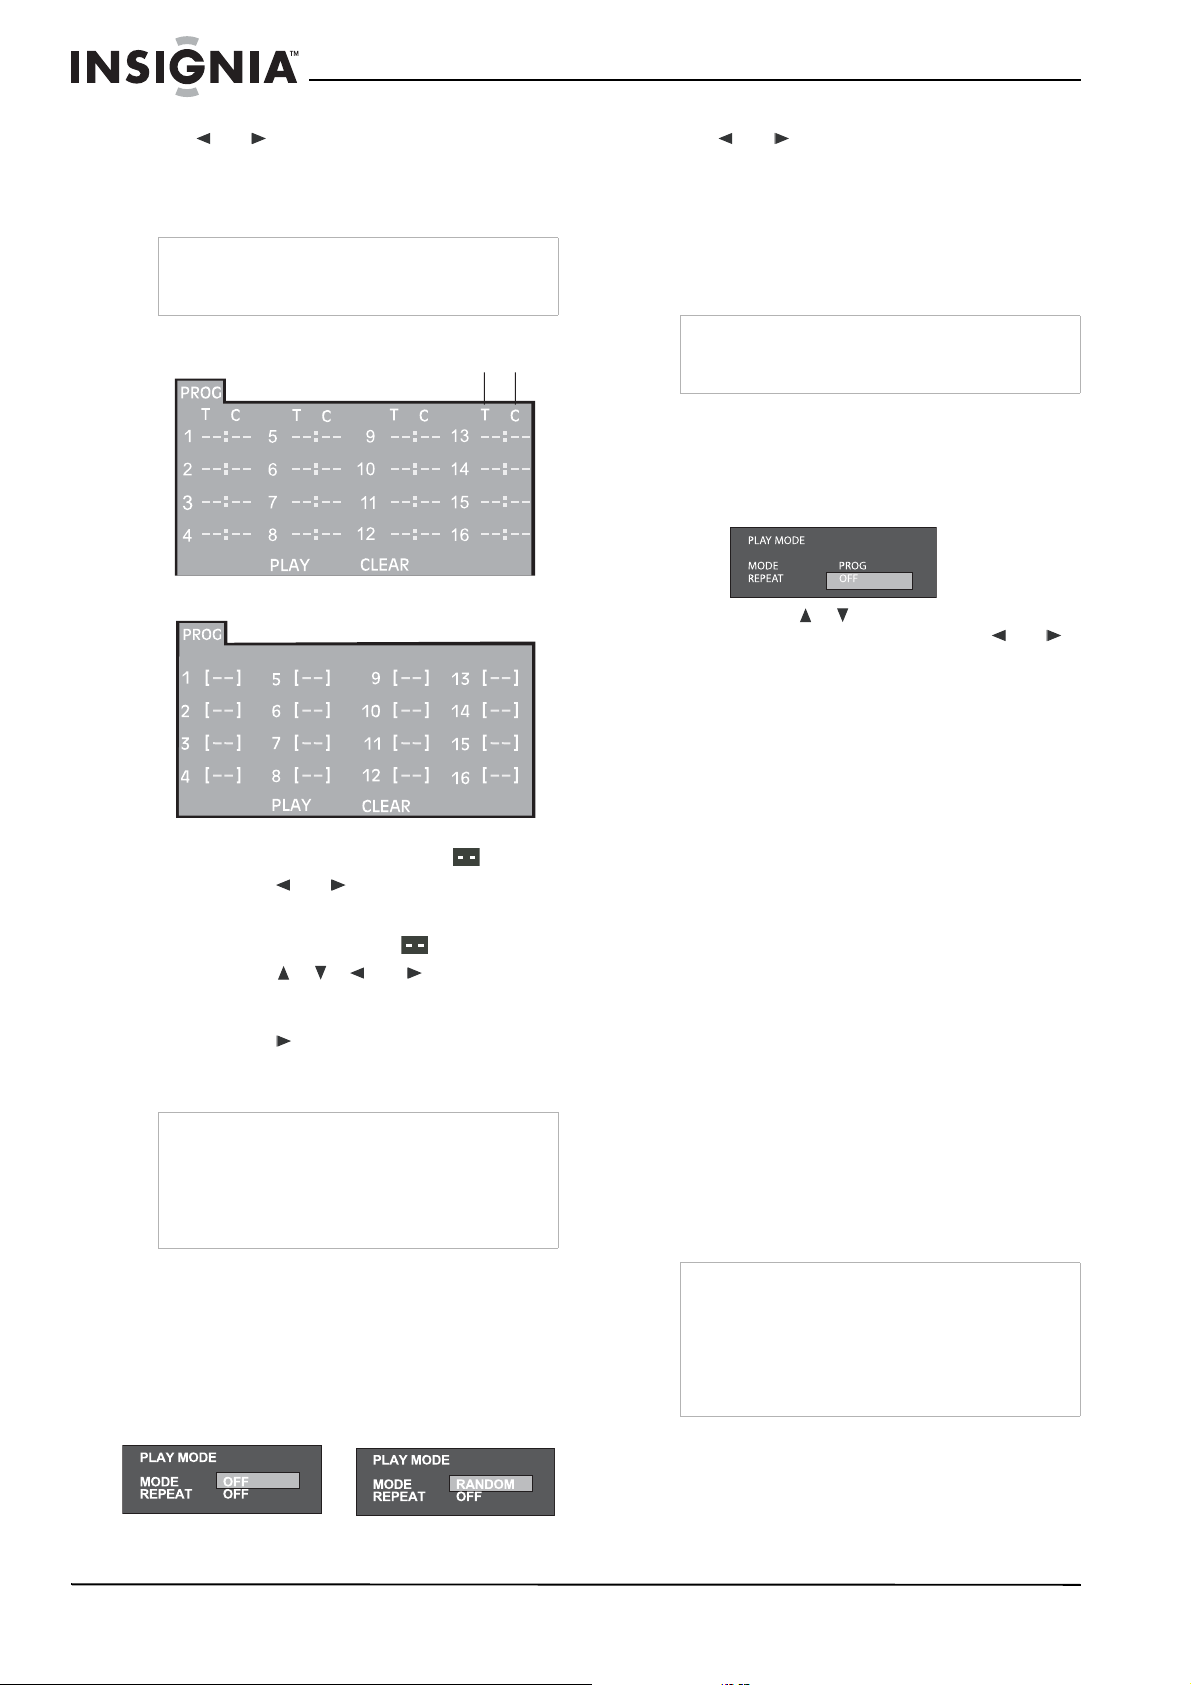
Minichaîne de luxe avec lecteur DVD NS-A3111 de Insignia
2 Mettre MODE en surbrillance, puis appuyer
ou pour sélectionner PROG
sur
(Programme).
3 Appuyer sur OK pour confirmer. Le menu
PROG
s’affiche.
Remarque
Pendant la lecture d’un VCD et SVCD, cette
fonction n’est disponible que si PBC est off
(Désactivé).
Menu de programmation d’un DVD
Menu de programmation d’un CD, VCD, SVCD
Titre
Chapitre
4 Saisir les numéros du titre (DVD) ou de la
piste (CD) dans le champ fourni (
5 Appuyer sur
ou pour mettre chapter
).
(chapitre) en surbrillance et saisir les
numéros du chapitre (DVD uniquement) dans
le champ prévu à cet effet (
).
6 Appuyer sur , , ou pour aller sur
un autre champ, puis répéter les étapes
précédentes pour saisir d’autres numéros.
7 Appuyer sur
ou mettre PLAY (Lecture) en
surbrillance sur l’écran, puis appuyer sur OK
pour lancer la lecture programmée.
Remarques
• Mettre CLEAR (Effacer) en surbrillance dans le
menu
PROG
pour supprimer toutes les saisies.
• Pendant la lecture d’un VCD ou SVCD, cette
fonction n’est disponible que si PBC est off
(Désactivé).
(Programme) et appuyer sur OK
2 Mettre MODE en surbrillance, puis appuyer
ou pour sélectionner RANDOM
sur
(Aléatoire).
3 Appuyer sur OK pour confirmer. La lecture du
disque se fait dans un ordre aléatoire.
Utilisation de la lecture répétée
Il est possible de lire en boucle un titre, un
chapitre ou une piste spécifique.
Remarque
Pendant la lecture d’un VCD ou SVCD, cette
fonction n’est disponible que si PBC est off
(Désactivé).
Pour répéter un titre, un chapitre, une piste
ou tout le disque :
1 Après avoir inséré un disque, appuyer sur
PLAYMODE (Mode de lecture). Le menu
Playmode
s’affiche.
2 Appuyer sur , pour mettre REPEAT
(Répéter) en surbrillance, puis sur
pour sélectionner le mode de répétition
souhaité.
• Pour les DVD – Off (Désactivé) > Chapter
(Chapitre) > Title (Titre)
• Pour les CD, VCD ou SVCD – Off
(Désactivé) > REP 1 (Répéter 1) > REP
ALL (Répéter tout)
• Pour les disques MP3, JPEG ou WMA –
Off (Désactivé) > REP DIR (Répéter le
répertoire) > REP 1 (Répéter 1) > REP
ALL (Répéter tout)
3 Appuyer sur OK pour confirmer. Le mode
sélectionné est mis en surbrillance à l’écran
et la partie sélectionnée du disque est
répétée.
Pour répéter une section spécifique d’un
disque :
1 Pendant la lecture du disque, appuyer sur
A-B pour fixer le début de la section à lire en
boucle.
2 Quand la lecture atteint la fin de la section à
lire en boucle, appuyer de nouveau sur A-B.
L’appareil recommence immédiatement la
lecture en boucle de la section sélectionnée.
3 Appuyer de nouveau sur A-B pour effacer la
lecture en boucle programmée et revenir à la
lecture normale.
ou
Utilisation de la lecture aléatoire
Les chapitres d’un DVD et les pistes d’un CD
peuvent être lus en ordre aléatoire.
Pour utiliser le mode de lecture aléatoire :
1 Après avoir inséré un disque, appuyer sur
PLAYMODE (Mode de lecture). Le menu
Playmode
s’affiche.
34
Remarques
www.insignia-products.com
• La fonction de répétition A-B ne peut être
utilisée qu’avec le même titre. Si le début et la
fin de la section à lire en boucle sont dans des
titres différents, la fonction sera réinitialisée.
• La fonction de répétition A-B est inopérante
pour les scènes qui ont plusieurs angles de
prise de vues enregistrés.
Page 35

Minichaîne de luxe avec lecteur DVD NS-A3111 de Insignia
Utilisation de la fonction PBC (Contrôle de la lecture de VCD et SVCD)
Pour utiliser la fonction PBC :
1 Pendant la lecture d’un VCD ou SVCD,
appuyer plusieurs fois sur ANGLE/PBC pour
passer de PBC (Contrôle de la lecture) ON
(Activé) à OFF (Désactivé).
•Si PBC ON (Contrôle de la lecture activé)
est sélectionné, le menu du disque (s’il
est disponible) s’affiche sur l’écran du
téléviseur. Appuyer sur ou
ou utiliser les touches numériques (0 à 9)
pour sélectionner un mode de lecture.
•Si PBC OFF (Contrôle de la lecture
désactivé) est sélectionné, l’appareil
commence la lecture directement sans
passer par le menu du disque. Le mode
de lecture est disponible lors de la lecture
d’un VCD.
Utilisation de la fonction signets
La fonction signets permet de marquer une
partie d’un DVD pour pouvoir la visualiser de
nouveau.
Pour créer un signet :
1 Pendant la lecture d’un DVD ou CD, appuyer
sur BOOKMARK (Signets) pour accéder au
menu des signets.
2 Appuyer sur ou pour parcourir les
options, puis sur OK pour affecter un signet à
la partie souhaitée.
• 90 MINUTES, 80 MINUTES, 70
MINUTES, 60 MINUTES, 50 MINUTES,
40 MINUTES, 30 MINUTES, 20
MINUTES, 10 MINUTES, OFF
(Désactivé)
Pour vérifier la durée restante de l’arrêt
différé :
• Appuyer une fois sur SLEEP et la durée
restante s’affiche.
Pour annuler l’arrêt différé :
• Appuyer plusieurs fois sur SLEEP jusqu’à ce
que l’écran affiche « SLEEP OFF » (Arrêt
différé désactivé).
Lecture de fichiers MP3, WMA et JPEG
Pour rappeler une scène marquée d’un
signet :
1 Pendant la lecture, appuyer sur BOOKMARK
pour accéder au menu des signets.
2 Appuyer sur ou pour mettre en
surbrillance le signet souhaité et appuyer sur
pour commencer la lecture à partir du
signet.
3 Appuyer sur CLEAR (Effacer) pour
réinitialiser le signet mis en surbrillance.
Sélection des différents modes d'égalisation (EQ) et commande d’extrêmes graves (EX BASS)
Pour régler le mode d’égalisation (EQ) :
• Appuyer plusieurs fois sur EQ pour parcourir
les cinq modes d’égalisation : FLAT
(Normal), ROCK, POP, CLASSIC
(Classique) ou JAZZ.
Pour régler la commande d’extrêmes graves
(EX Bass) :
• Appuyer sur EXBASS (Extrêmes graves)
pour activer (On) ou désactiver (Off) l’effet
sonore d’extrêmes graves.
Utilisation de la fonction d’arrêt différé
Cette fonction permet de sélectionner une heure
à laquelle le système passe automatiquement
en mode de mise en attente.
Pour régler l'arrêt différé :
• Appuyer plusieurs fois sur SLEEP (Arrêt
différé) pour parcourir les options d’arrêt
différé suivantes :
DAV8611
# Touche Fonction
1
2
3
(Arrêt)
, , ou
et OK
(Saut
avant)
ou (Saut
arrière)
Appuyer une fois pour arrêter la lecture en
cours immédiatement et entrer en mode
reprise de lecture.
Permet d’afficher le menu de sélection
pendant la lecture (pour les fichiers JPEG
et MPEG4 uniquement).
Touches directionnelles – Permettent de
sélectionner un fichier, puis de
commencer la lecture en appuyant sur
OK.
Quand un disque est en cours de lecture,
il est possible de faire un saut à la piste ou
à l’image précédente ou suivante.
9
www.insignia-products.com
35
Page 36

Minichaîne de luxe avec lecteur DVD NS-A3111 de Insignia
# Touche Fonction
4 ZOOM/CLEAR
(Effacer)
5 PIVOTER (pour les fichiers JPEG uniquement)
6
7
8 (Lecture) Permet de commencer la lecture.
9
(Ouvrir/Fermer)
(Pause)
/
Permet d’agrandir l’image pendant une
présentation de fichiers JPEG.
Appuyer sur CLEAR (Effacer) pour
supprimer l’information saisie.
Pendant la lecture de fichiers JPEG,
appuyer sur ROTATE (Pivoter) pour faire
pivoter l’image.
Appuyer sur cette touche pour ouvrir le
plateau à disque.
Remarque : Charger le disque sur le plateau
avec l’étiquette vers le haut.
Appuyer de nouveau sur cette touche
pour fermer le plateau. La lecture du
disque commencera automatiquement.
Permet d’interrompre la lecture
momentanément. Appuyer de nouveau
sur cette touche pour revenir à la lecture
normale.
Permet la recherche arrière ou avant.
Appuyer sur pour reprendre la lecture.
Chaque fois que la touche ou
est appuyée, la vitesse de
recherche arrière ou avant est modifiée.
En mode pause, appuyer sur
ou pour commencer la
lecture en mode ralenti avant ou arrière.
Chaque fois que la touche ou
est appuyée, la vitesse de lecture
au ralenti est modifiée. Appuyer sur
pour revenir au mode de lecture normal.
Remarque : Le ralenti en mode image par
image est inopérant pendant la lecture d’un CD.
Le ralenti arrière ne s’applique pas à la lecture
de VCD.
Utilisation du menu de sélection
Pour utiliser le menu de sélection :
1 Mettre un disque MP3, WMA ou JPEG dans
le plateau à disque de l’appareil. Le menu
Selection
(Sélection) s’affiche. Les dossiers
s’affichent dans le volet gauche et sont
numérotés par ordre croissant.
2 Quand un des dossiers est mis en
surbrillance, tout le contenu de ce dossier
s’affiche dans le volet droit. Les fichiers de
musique/image peuvent être sélectionnés
individuellement pour la lecture souhaitée.
3 Appuyer sur , , ou pour mettre en
surbrillance l’icône Music (Musique) ou
Picture (Image) en bas du menu de
sélection, puis appuyer sur OK pour
confirmer.
4 Sélectionner les fichiers, puis appuyer sur
OK ou pour lancer la lecture.
• Music [Musique] (fichiers MP3 ou WMA)
– L’appareil commence la lecture de tous
les fichiers MP3 et WMA sélectionnés.
Puis il continue avec tous les fichiers des
sous-dossiers du dossier racine. Par la
suite, l’appareil lit les dossiers restants du
disque.
• Picture [Image] (fichiers JPEG) –
L’appareil commence la présentation des
fichiers JPEG sélectionnés. Puis il affiche
tous les autres fichiers JPEG du même
dossier. Il passe ensuite aux fichiers
JPEG dans les sous-dossiers contenus
dans le même dossier.
Pour programmer des chansons MP3 :
1 Appuyer sur PLAYMODE (Mode de lecture).
Le menu
Play Mode
s'affiche.
PLAY MODE
PLAY MODE
MODE PROG
MODE PROG
REPEAT OFF
REPEAT OFF
2 Mettre MODE en surbrillance, appuyer sur
ou pour sélectionner PROG
(Programme), puis sur OK pour accéder au
menu du programme MP3. Dans ce menu, la
lettre F signifie Dossier et T Piste.
3 Saisir le numéro de dossier sous le F et le
numéro de piste sous le T au format deux
chiffres.
4 Appuyer sur , , ou pour aller sur
un autre champ et répéter l’étape 3 pour la
chanson suivante.
5 Appuyer sur ou mettre PLAY (Lecture) en
surbrillance sur l’écran, puis appuyer sur OK
pour commencer la lecture programmée.
6 Mettre CLEAR (Effacer) en surbrillance dans
l’écran PROG (Programme) et appuyer sur
OK pour supprimer toutes les saisies. Il est
possible de programmer jusqu’à 16
chansons au total.
36
Musique
Image
Écoute de la radio
Remarque
Vérifier que les antennes FM et AM sont
correctement connectées.
Il est possible de programmer jusqu'à 20
stations radio FM et 20 stations radio AM.
Pour rechercher une station radio :
1 Appuyer sur STANDBY/ON (Attente/Marche)
pour mettre l’appareil sous tension.
www.insignia-products.com
Page 37

Minichaîne de luxe avec lecteur DVD NS-A3111 de Insignia
2 Appuyer plusieurs fois sur SOURCE jusqu’à
ce que le mode radio soit sélectionné.
Appuyer de nouveau pour basculer entre les
bandes AM et FM si nécessaire.
3 Syntoniser la station radio à l’aide d’une des
méthodes suivantes :
• Manual Tuning (Syntonisation manuelle)
– Appuyer plusieurs fois sur ou de
la télécommande jusqu’à l’affichage de la
fréquence recherchée.
• Automatic Tuning (Syntonisation
automatique) – Appuyée sur ou
de la télécommande pour activer la
fonction AUTO SCAN (Balayage
automatique). L’appareil s’arrête sur
chaque station trouvée. Répéter cette
étape jusqu’à l’arrêt sur la station
recherchée.
Pour mémoriser une station radio :
1 Quand la station souhaitée a été détectée,
appuyer sur OK pour la mémoriser. Le
numéro programmé commence à clignoter.
2 Appuyer sur ou pour sélectionner le
numéro de la station que l’appareil doit
mémoriser.
3 Appuyer de nouveau sur OK pour enregistrer
le numéro de la station. Le numéro
programmé s’arrête de clignoter pour
confirmer que la station est mémorisée.
4 Répéter les étapes précédentes pour
mémoriser jusqu’à 20 stations de radio FM et
AM.
Remarque
Lors de la syntonisation manuelle d’une station
FM à réception faible, appuyer sur AUDIO/FM ST
pour basculer du mode stéréo au mode mono afin
de réduire le bruit de fond.
Pour rappeler une station radio mémorisée :
1 Appuyer sur STANDBY/ON (Attente/Marche)
pour mettre l’appareil sous tension.
2 Appuyer plusieurs fois sur SOURCE jusqu’à
ce que le mode radio soit sélectionné.
Appuyer de nouveau pour basculer entre les
bandes AM et FM si nécessaire.
3 Appuyer sur ou de la télécommande
ou sur ou du panneau avant
pour accéder à une station de radio
mémorisée différente.
4 Utiliser les touches numériques (0 à 9) pour
rappeler directement les 10 premières
stations mémorisées.
Problèmes et solutions
L’utilisateur ne doit en aucun cas essayer de
réparer lui-même l’appareil sous peine
d’annulation de la garantie. Seul un personnel
de service qualifié est en droit d’enlever le
couvercle ou de réparer ce lecteur.
Problème Solution
Pas
d’alimentation
Absence
d’image
Image déformée • Essuyer toutes éventuelles empreintes
Image en noir et
blanc
Oscillation
d’image
Quand un
disque est
enlevé, le
système ne
revient pas à
l’écran de
démarrage
• Vérifier que la touche Standby/On
(Attente/Marche) à l’avant de la
minichaîne est bien placée en position
marche (on).
• Vérifier que le cordon d'alimentation est
correctement branché.
• Vérifier que la prise secteur CA est
alimentée en y branchant un autre
appareil.
• Vérifier que le téléviseur est allumé.
• Sélectionner l'entrée AV appropriée sur
le téléviseur.
• Vérifier la connexion vidéo.
• Vérifier que le commutateur de canal du
téléviseur est réglé sur AV (se référer aux
instructions du manuel du téléviseur).
• En mode balayage progressif, la sortie
vidéo composite est désactivée. Appuyer
sur V-SELECT (Sélection des sorties
vidéo) pour sélectionner le mode de
sortie vidéo correct, sinon l'image ne
s'affichera pas où sera déformée.
digitales sur le disque à l’aide d'un
chiffon doux en partant du centre vers la
périphérie.
• Parfois, une légère déformation de
l’image peut se produire. Ceci est
normal.
• Le format du disque ne correspond pas
au téléviseur utilisé (PAL/NTSC).
• Vérifier qu'une seule sortie vidéo est
connectée.
• Le format du disque est différent de celui
du téléviseur (PAL/NTSC).
• Vérifier que le lecteur DVD n’est pas
connecté à travers un magnétoscope.
Repositionner l’appareil le plus loin possible des
sources d’interférence ou d’émission (par
exemple radio, amplificateur de puissance ou
radiateur).
• Vérifier si le programme nécessite le
chargement d’un autre disque.
• Réinitialiser l'appareil en le débranchant
de la prise secteur et en le rebranchant.
Le système ne
réagit pas à la
télécommande
Pas de son • Vérifier les connexions audio.
www.insignia-products.com
• Diriger la télécommande vers le capteur
se trouvant à l'avant de l’appareil.
• Éviter tous les obstacles qui pourraient
créer des interférences sur le chemin du
signal.
• Vérifier ou remplacer les piles de la
télécommande.
• Avec un amplificateur Hi-Fi, essayer une
autre source sonore.
• Nettoyer le disque.
• Vérifier si le disque est défectueux en
essayant un autre disque.
37
Page 38

Minichaîne de luxe avec lecteur DVD NS-A3111 de Insignia
Absence de son
sur la sortie
numérique
Le disque ne
peut pas être lu
Le mot de passe
à été omis
Fonctionnement
perturbé
• Vérifier les connexions numériques.
• Vérifier dans le menu de la sortie
numérique que celle-ci a été
correctement réglée.
• Vérifier que le format audio de la langue
sélectionnée est compatible avec
l’appareil.
Vérifier que le disque est placé correctement sur
le plateau à disque.
En mode NO DISC (Pas de disque), saisir
76418.
• Le fonctionnement normal de l'appareil
peut être perturbé par des interférences
externes.
• Réinitialiser l’appareil en débranchant et
en rebranchant le cordon d’alimentation.
Entretien
Soins et manipulation des disques
Manipulation des disques
Ne pas toucher le côté lecture du disque. Saisir
le disque par les bords afin de ne pas maculer la
surface du disque d'empreintes digitales. Ne
jamais coller du papier ou du ruban sur le
disque.
Rangement des disques
Après lecture, ranger le disque dans son boîtier.
Ne pas exposer le disque à la lumière directe du
soleil ou d’autres sources de chaleur et ne
jamais le laisser dans une voiture garée en plein
soleil.
Nettoyage des disques
Des empreintes digitales et de la poussière sur
un disque sont sources d’image médiocre et de
son déformé. Nettoyer le disque avec un chiffon
propre avant de l’utiliser. Essuyer le disque en
partant du centre vers l’extérieur.
Avis juridiques
Déclaration de conformité FCC
Cet équipement a été testé et déclaré conforme
aux limitations prévues dans le cadre de la
catégorie B des appareils numériques, définies
par l’article 15 du règlement de la FCC. Ces
limites ont été établies afin de fournir une
protection raisonnable contre toute interférence
nuisible en cas d’exploitation de l’appareil dans
un environnement résidentiel. Cet équipement
génère, utilise et diffuse des ondes radio et, s’il
n’est pas installé et utilisé conformément aux
instructions dont il fait l’objet, il peut provoquer
des interférences préjudiciables aux
communications radio. Cependant, il n'est pas
possible de garantir qu’aucune interférence ne
se produira pour une installation particulière. Les
changements ou modifications apportés à cet
appareil peuvent donner lieu à des interférences
indésirables, à moins que les modifications ne
soient expressément approuvées dans le
manuel d'instruction. L'utilisateur pourrait perdre
le droit d’utiliser cet appareil s'il a subi un
changement ou une modification non autorisée.
Si cet équipement produit des interférences
préjudiciables lors de réceptions radio ou
télévisées, qui peuvent être détectées en
éteignant puis en rallumant l’appareil, essayer
de corriger l’interférence au moyen de l’une ou
de plusieurs des mesures suivantes :
• Réorienter ou déplacer l’antenne réceptrice.
• Augmenter la distance entre l’équipement et
le récepteur.
• Brancher l’équipement sur la prise électrique
d’un circuit différent de celui auquel le
récepteur est relié.
• Contacter le revendeur ou un technicien
radio/télévision qualifié pour toute
assistance.
Cet appareil est conforme à l’article 15 du
règlement de la FCC. Son fonctionnement est
soumis aux deux conditions suivantes :
• Ce périphérique ne doit pas émettre
d’interférences préjudiciables, et
• Ce périphérique doit accepter toutes les
interférences reçues, y compris celles
pouvant provoquer un fonctionnement
indésirable.
Ne pas utiliser des solvants puissants comme
l’alcool, le benzène, les diluants, les nettoyants
disponibles dans le commerce ou les
vaporisateurs antistatiques destinés aux anciens
disques en vinyle.
Remarque
Ne jamais utiliser cet appareil immédiatement
après l’avoir transféré d’un lieu froid à un lieu
tiède. Ne pas le faire fonctionner pendant deux ou
trois heures. L’utilisation immédiate de l’appareil
risque d’endommager les disques ou les
composants internes.
38
Droits d’auteurs
© 2008 Insignia. Insignia et le logo Insignia sont des
marques de commerce de Best Buy Enterprise
Services, Inc. Les autres noms de marques et de
produits mentionnés sont des marques de commerce
ou des marques déposées de leurs propriétaires
respectifs. Les spécifications et caractéristiques sont
susceptibles d’être modifiées sans préavis.
www.insignia-products.com
Page 39

Minichaîne de luxe avec lecteur DVD NS-A3111 de Insignia
Garantie limitée de 90 jours
Insignia Products (« Insignia ») garantit au premier
acheteur de ce NS-A3111 neuf (« Produit »), qu’il est
exempt de vices de fabrication et de main-d’œuvre à
l’origine, pour une période de 90 jours à partir de la date
d’achat du Produit (« Période de garantie »). Ce Produit
doit avoir été acheté chez un revendeur agréé des
produits de la marque Insignia et emballé avec cette
déclaration de garantie. Cette garantie ne couvre pas les
Produits remis à neuf. Les conditions de la présente
garantie s’appliquent à tout Produit pour lequel Insignia
est notifié pendant la Période de garantie, d’un vice
couvert par cette garantie qui nécessite une réparation.
Quelle est la durée de la couverture?
La Période de garantie dure 90 jours à compter de la
date d’achat de ce Produit. La date d’achat est imprimée
sur le reçu fourni avec le Produit.
Que couvre cette garantie?
Pendant la Période de garantie, si un vice de matériau
ou de main-d’œuvre d'origine est détecté sur le Produit
par un service de réparation agréé par Insignia ou le
personnel du magasin, Insignia (à sa seule discrétion) :
(1) réparera le Produit en utilisant des pièces détachées
neuves ou remises à neuf; ou (2) remplacera le Produit
par un produit ou des pièces neuves ou remises à neuf
de qualité comparable. Les produits et pièces remplacés
au titre de cette garantie deviennent la propriété
d’Insignia et ne sont pas retournés à l’acheteur. Si les
Produits ou pièces nécessitent une réparation après
l’expiration de la Période de garantie, l’acheteur devra
payer tous les frais de main-d’œuvre et les pièces. Cette
garantie reste en vigueur tant que l’acheteur reste
propriétaire du Produit Insignia pendant la Période de
garantie. La garantie prend fin si le Produit est revendu
ou transféré d’une quelconque façon que ce soit à tout
autre propriétaire.
Comment obtenir une réparation sous garantie?
Si le Produit a été acheté chez un détaillant, le rapporter
accompagné du reçu original chez ce détaillant. Prendre
soin de remettre le Produit dans son emballage d’origine
ou dans un emballage qui procure la même qualité de
protection que celui d’origine. Si le Produit a été acheté
en ligne, l’expédier accompagné du reçu original à
l’adresse indiquée sur le site Web. Prendre soin de
remettre le Produit dans son emballage d’origine ou
dans un emballage qui procure la même qualité de
protection que celui d’origine.
Pour obtenir le service de la garantie à domicile pour un
téléviseur avec écran de 25 po ou plus, appeler le
1-888-BESTBUY. L’assistance technique établira un
diagnostic et corrigera le problème au téléphone ou
enverra un technicien agréé par Insignia pour la
réparation à domicile.
Où cette garantie s’applique-t-elle?
Cette garantie ne s’applique qu’à l’acheteur original du
produit aux États-Unis et au Canada.
• la modification de tout ou partie du Produit, y
compris l’antenne;
• un écran plasma endommagé par les images fixes
(sans mouvement) qui restent affichées pendant de
longues périodes (rémanentes).
La présente garantie ne couvre pas non plus :
• les dommages ayant pour origine une utilisation ou
une maintenance défectueuse;
• la connexion à une source électrique dont la
tension est inadéquate;
• toute réparation effectuée par quiconque autre
qu’un service de réparation agréé par Insignia pour
la réparation du Produit;
• les produits vendus en l’état ou hors service;
• les consommables tels que les fusibles ou les piles;
• les produits dont le numéro de série usine a été
altéré ou enlevé.
LA RÉPARATION OU LE REMPLACEMENT, TELS
QU’OFFERTS PAR LA PRÉSENTE GARANTIE,
CONSTITUENT LE SEUL RECOURS DE L’ACHETEUR.
INSIGNIA NE SAURAIT ÊTRE TENU POUR
RESPONSABLE DE DOMMAGES ACCESSOIRES OU
CONSÉCUTIFS, RÉSULTANT DE L’INEXÉCUTION
D'UNE GARANTIE EXPRESSE OU IMPLICITE SUR CE
PRODUIT, Y COMPRIS, SANS S’Y LIMITER, LA
PERTE DE DONNÉES, L’IMPOSSIBILITÉ D’UTILISER
LE PRODUIT, L’INTERRUPTION D’ACTIVITÉ OU LA
PERTE DE PROFITS. INSIGNIA PRODUCTS
N’OCTROIE AUCUNE AUTRE GARANTIE EXPRESSE
RELATIVE À CE PRODUIT; TOUTES LES GARANTIES
EXPRESSES OU IMPLICITES POUR CE PRODUIT, Y
COMPRIS MAIS SANS LIMITATION, TOUTE
GARANTIE DE QUALITÉ MARCHANDE,
D'ADÉQUATION À UN BUT PARTICULIER, SONT
LIMITÉES À LA PÉRIODE DE GARANTIE
APPLICABLE TELLE QUE DÉCRITE CI-DESSUS ET
AUCUNE GARANTIE EXPRESSE OU IMPLICITE NE
S’APPLIQUERA APRÈS LA PÉRIODE DE GARANTIE.
CERTAINS ÉTATS ET PROVINCES NE
RECONNAISSENT PAS LES LIMITATIONS DE LA
DURÉE DE VALIDITÉ DES GARANTIES IMPLICITES.
PAR CONSÉQUENT, LES LIMITATIONS
SUSMENTIONNÉES PEUVENT NE PAS S'APPLIQUER
À L’ACHETEUR ORIGINAL. LA PRÉSENTE GARANTIE
DONNE À L'ACHETEUR DES GARANTIES
JURIDIQUES SPÉCIFIQUES; IL PEUT AUSSI
BÉNÉFICIER D'AUTRES GARANTIES QUI VARIENT
D'UN ÉTAT OU D'UNE PROVINCE À L'AUTRE.
Pour contacter Insignia :
Pour le service à la clientèle, appeler le 1-877-467-4289
www.insignia-products.com
Distribué par Best Buy Purchasing, LLC
Dynex, 7601 Penn Avenue South, Richfield, Minnesota,
É.-U. 55423-3645
© 2008 Best Buy Enterprise Services, Inc.
Tous droits réservés. INSIGNIA est une marque de
commerce de Best Buy Enterprise Services, Inc.
déposée dans certains pays. Tous les autres produits et
noms de marques sont des marques de commerce
appartenant à leurs propriétaires respectifs.
Ce qui n’est pas couvert par cette garantie limitée
La présente garantie ne couvre pas :
• la formation du client;
• l’installation;
• les réglages de configuration;
• les dommages esthétiques;
• les dommages résultants de catastrophes
naturelles telles que la foudre;
• les accidents;
• une utilisation inadaptée;
• une manipulation abusive;
• la négligence;
• une utilisation commerciale;
www.insignia-products.com
39
Page 40

Minichaîne de luxe avec lecteur DVD NS-A3111 de Insignia
40
www.insignia-products.com
Page 41
Sistema de audio tipo ejecutivo con reproductor de DVD Insignia NS-A3111
Sistema de audio
tipo ejecutivo con
reproductor de DVD
Insignia NS-A3111
Contenido
Medidas de seguridad importantes . . . . . . . . . . .42
Características . . . . . . . . . . . . . . . . . . . . . . . . . . .44
Configuración de su sistema de audio con
reproductor de DVD. . . . . . . . . . . . . . . . . . . . . .47
Uso de su sistema de audio con reproductor de DVD
49
Localización y corrección de fallas . . . . . . . . . . .58
Mantenimiento . . . . . . . . . . . . . . . . . . . . . . . . . . .59
Avisos legales . . . . . . . . . . . . . . . . . . . . . . . . . . .59
Garantía limitada de 90 días . . . . . . . . . . . . . . . .61
Bienvenido
Felicitaciones por su compra de este producto
de alta calidad de Insignia. Su NS-A3111
representa el más moderno diseño de sistemas
de audio tipo ejecutivo con reproductor de DVD,
y está concebido para brindar un rendimiento
confiable y sin problemas.
Advertencia:
Para reducir el riesgo de incendio o choque
eléctrico, no exponga su sistema de audio tipo
ejecutivo a la lluvia o humedad.
AVI SO :
Advertencia sobre el láser
ADVERTENCIA: Este sistema de audio utiliza
un sistema láser.
PARA REDUCIR EL RIESGO DE DESCARGA
ELÉCTRICA, NO RETIRE LA CUBIERTA (O SECCIÓN
POSTERIOR). EN EL INTERIOR DEL APARATO NO
HAY COMPONENTES QUE REQUIERAN SERVICIO
DE MANTENIMIENTO POR EL USUARIO. SOLICITE
CUALQUIER OPERACIÓN DE MANTENIMIENTO A
PERSONAL DE SERVICIO CALIFICADO.
El símbolo del rayo dentro de un triángulo
equilátero tiene por finalidad alertar al usuario
de la presencia de tensión peligrosa (sin
aislamiento) en el interior del producto, que
puede tener la intensidad suficiente como para
constituir un riesgo de descarga eléctrica.
El signo de exclamación dentro de un triángulo
equilátero tiene por finalidad alertar al usuario
de importantes instrucciones de operación y
mantenimiento (servicio) en la literatura que
acompaña a este aparato.
Para asegurar el uso adecuado de este sistema
de audio, lea cuidadosamente la guía del
usuario, y consérvela para referencia futura. Si
su sistema de audio requiere mantenimiento,
comuníquese con un centro de servicio
autorizado.
Cambiar controles, hacer ajustes o llevar acabo
procedimientos que no estén especificados en
este manual pueden resultar en una exposición
peligrosa a la radiación.
Para evitar la exposición directa al rayo láser, no
trate de abrir la caja del equipo. Cuando se
encuentra abierta, existe radiación láser visible.
NO MIRE DIRECTAMENTE EL HAZ DE LUZ.
Tipo de láser: Láser GaAlA con semiconductor
doble
Longitud de onda: 650 nm y 780 nm
Potencia de salida: 7 mW
Divergencia del rayo: 60 grados
CUIDADO: Radiación láser visible e invisible se
encuentra presente cuando su sistema audio en
casa está abierto y cuando se ha vencido el
seguro.
Cuidado:
Su sistema de audio no debe de ser expuesto al
agua (goteo o salpicaduras), y ningún objeto
lleno de líquido, como por ejemplo vasijas,
deberá ser colocado sobre la unidad.
Cuidado:
Radiación de láser visible e invisible de clase 3B
cuando está abierto y se han invalidado los
seguros. No mire directamente al haz de luz ni
mire directamente con instrumentos ópticos.
Precauciones - Cable de alimentación
• La mayoría de los fabricantes de reproductores
recomiendan que sus equipos se conecten en
un circuito eléctrico dedicado. Esto es, un
circuito de un solo tomacorriente que
suministre alimentación sólo al reproductor y
no tenga tomacorrientes ni circuitos de
bifurcación adicionales.
• No sobrecargue los tomacorrientes de pared.
Los tomacorriente sobrecargados, flojos o
defectuosos, los cables de extensión
sobrecargados, los cables de alimentación
pelados o los aislamientos de cables dañados
o agrietados son peligrosos. Cualquiera de
estas condiciones puede causar un choque
eléctrico o un incendio. Examine
periódicamente el cable de su sistema de
audio y si su aspecto indica que ha sufrido
daño o deterioro, desenchúfelo, deje de usar
su sistema de audio y solicite a un centro de
servicio autorizado que cambien el cable por
una pieza de repuesto exacta.
• Proteja el cable de alimentación de abusos
físicos o mecánicos como cuando se retuerce,
se enrosca, se pellizca, se aplasta al cerrar
una puerta o se le pisa. Preste especial
atención a los enchufes, tomacorrientes y al
lugar por donde el cable sale de su sistema de
audio.
• Para desconectar la alimentación del
tomacorriente, saque el enchufe del cable de
alimentación. Cuando instale su sistema de
audio, verifique que el enchufe se puede
acceder fácilmente.
www.insignia-products.com
41
Page 42

Sistema de audio tipo ejecutivo con reproductor de DVD Insignia NS-A3111
Medidas de seguridad importantes
• Lea las instrucciones – Lea todas las
instrucciones de seguridad y operación antes
de usar su sistema de audio.
• Guarde las instrucciones – Guarde las
instrucciones de seguridad y operación para
referencia futura.
• Siga las advertencias – Preste atención a
todas las advertencias sobre su sistema de
audio y en las instrucciones de operación.
• Siga las instrucciones – Siga todas las
instrucciones de operación y uso.
• Limpieza – Desconecte su sistema de audio
del tomacorriente antes de limpiarlo. No use
productos de limpieza líquidos o en aerosol.
Use un paño húmedo para limpiar la unidad.
• Aditamentos – No use aditamentos que no
hayan sido recomendados por el fabricante
del sistema de audio ya que podrían causar
peligrosos.
• Agua y humedad – No use su sistema de
audio cerca del agua; por ejemplo, cerca de
una bañera, lavabo, fregadero de cocina, o
lavadero; en un sótano mojado o cerca de
una piscina.
• Accesorios – No coloque su sistema de
audio en un carro, base, trípode, soporte, o
mesa inestable. Su sistema de audio puede
caerse y causar lesiones graves a alguien y
daño grave al sistema. Usar solamente con
carros, bases, trípodes, soportes, o mesas
especificadas por el fabricante o que se
vendan con el sistema de audio.
Si va a montar su sistema de
audio, siga las instrucciones del
fabricante y use un accesorio
de montaje recomendado por el
fabricante. Mueva el conjunto
del sistema de audio y el carro
con cuidado. Las paradas repentinas, la
fuerza excesiva y las superficies irregulares
pueden causar que su sistema de audio y el
carro se volteen de lado.
• Ventilación – Las ranuras y aberturas en el
gabinete en y en la parte posterior o inferior
se proveen por ventilación, para asegurar la
operación confiable de su sistema de audio y
para protegerlo contra el
sobrecalentamiento. No bloquee las
aberturas. No coloque su sistema de audio
sobre una cama, un sofá, una alfombra u otra
superficie similar. Su sistema de audio nunca
se debe colocar cerca o sobre un radiador o
calefactor. No coloque su sistema de audio
en una instalación empotrada, tal como un
librero o estantería a menos que se
proporcione la correcta ventilación o se
hayan seguido las instrucciones del
fabricante.
• Fuentes de alimentación – Use sólo el tipo
de alimentación eléctrica indicado en la
etiqueta de marca. Si no está seguro del tipo
de fuente de alimentación en su casa,
consulte con el vendedor del sistema de
audio o la compañía local de energía. Para
sistemas de audio diseñados para funcionar
con pilas, u otras fuentes, refiérase a las
instrucciones de operación respectivas.
• Conexión a tierra o polarización – Su
sistema de audio está equipado con un
enchufe polarizado de corriente alterna (un
enchufe que tiene una espiga más ancha
que la otra). Este enchufe se conecta en el
tomacorriente de una sola forma. Ésta es
una característica de seguridad. Si no puede
insertar completamente el enchufe en el
tomacorriente, intente voltearlo. Si el enchufe
todavía no entra, contacte a su electricista
para que reemplace el tomacorriente
obsoleto. No anule el propósito de seguridad
del enchufe polarizado.
• Protección del cable de alimentación –
Coloque los cables de alimentación eléctrica
de tal forma que no se pisen o queden
aplastados por objetos colocados contra
ellos; preste atención especial a los cables
conectados a tomacorrientes y al lugar de
donde salen de su sistema de audio.
• Relámpagos – Para protección adicional de
su sistema de audio durante una tormenta de
rayos, o cuando se deje sin usar por un
periodo de tiempo extensivo, desconéctelo
del tomacorriente de pared y desconecte la
antena o el sistema de cable. Esto evitará
daños a su sistema de audio debido a
relámpagos o sobretensión en la línea de
energía.
• Líneas de alimentación – Un sistema de
antena externa no debe de ubicarse en las
inmediaciones de líneas de corriente aéreas
u otros circuitos de luz eléctrica o de energía,
o donde pueda caer sobre dichos circuitos o
líneas de corriente. Cuando instale un
sistema de antena exterior, no toque los
circuitos o las líneas de alimentación ya que
el contacto con ellos puede ser fatal.
• Sobrecarga – No sobrecargue los
tomacorrientes ni los cables de extensión ya
que esto podría resultar en peligro de
incendio o choque eléctrico.
• Ingreso de objetos y líquidos – Nunca
inserte objetos de ningún tipo en su sistema
de audio a través de las aberturas, ya que
podrían tocar puntos de voltaje peligrosos o
hacer corto circuito con otros componentes
que podrían resultar en incendio o choque
eléctrico. Nunca derrame líquidos de ninguna
clase sobre su sistema de audio.
• Reparación – No trate de reparar su sistema
de audio usted mismo, ya que abrir o quitar
las cubiertas puede exponerlo a voltajes
peligrosos u otros peligros. Remita todas las
reparaciones a personal de servicio
calificado.
• Daños que requieren reparación –
Desconecte el sistema de audio del
tomacorriente de pared y refiera la
reparación a personal calificado bajo las
siguientes condiciones:
• Cuando el cable de alimentación o el
enchufe esté dañado o expuesto.
• Si líquido ha sido derramado u objetos
han caído dentro del sistema de audio.
• Si el sistema de audio ha sido expuesto a
la lluvia o al agua.
42
www.insignia-products.com
Page 43
Sistema de audio tipo ejecutivo con reproductor de DVD Insignia NS-A3111
• Si el sistema de audio no funciona
normalmente aún siguiendo las
instrucciones de operación siguientes.
Ajuste únicamente los controles que
están cubiertos en las instrucciones de
operación, ya que el ajuste incorrecto de
otros controles puede resultar en daño y
frecuentemente requerirá trabajo
intensivo de un técnico calificado para
restaurar la operación normal de su
sistema de audio.
• Si su sistema de audio se ha caído o
dañado de cualquier forma.
• Cuando su sistema de audio muestra un
cambio evidente en el funcionamiento,
esto indica que se necesita reparación.
• Piezas de repuesto – Cuando se necesiten
repuestos, asegúrese de que el técnico de
reparación use repuestos especificados por
el fabricante o que tengan las mismas
características que la parte original. Las
sustituciones no autorizadas pueden resultar
en incendio, choque eléctrico, lesiones a
personas u otros peligros.
• Verificación de seguridad – Después de
completar la reparación de su sistema de
audio, pídale al técnico de servicio que
realice verificaciones de seguridad rutinarias
para determinar que su sistema de audio se
encuentra en buena condición de operación.
• Calor – No instale su sistema de audio cerca
de fuentes de calor tales cómo radiadores,
calefactores, estufas u otros productos
(incluyendo amplificadores) que produzcan
calor.
Cuidado
Las pilas no deben tirarse o incinerarse, sino
descartarse de acuerdo con las normativas
locales concernientes a desechos químicos.
Derechos de reproducción
Su sistema de audio incorpora tecnología de
protección de derechos de reproducción que
está protegida por demandas de método de
ciertas patentes de los Estados Unidos y otros
derechos de propiedad intelectual poseídos por
Macrovision Corporation y otros dueños de los
derechos. El uso de esta tecnología con
protección de derechos de reproducción debe
ser autorizada por Macrovision Corporation, y
está destinada únicamente para visualización en
casa y otros usos limitados de visualización a
menos que sea autorizada por Macrovision
Corporation. Se prohíbe la ingeniería inversa y
el desensamblaje.
Fabricado bajo licencia de Dolby Laboratories.
Dolby y el símbolo son marcas registradas de
DOLBY LABORATORIES. Obras confidenciales
no publicadas. 992-1997 Dolby Laboratories,
Inc. Todos los derechos reservados.
Uso de barrido progresivo
El consumidor debe tener en cuenta que no
todos los televisores de alta definición son
totalmente compatibles con su sistema de audio
por lo que puede que se muestren algunos
artefactos en la imagen.
En caso de problemas con la imagen usando
barrido progresivo, recomendamos que cambie
la conexión a la salida de definición estándar. Si
tiene preguntas relacionadas con la
compatibilidad de su sistema de audio, póngase
en contacto con nuestro centro de servicio al
cliente.
Advertencia
Para evitar un choque eléctrico haga
corresponder la clavija ancha del enchufe con la
ranura ancha del tomacorriente e inserte el
enchufe completamente.
•Desecho al final de vida útil –
Este símbolo en el producto o en
las instrucciones significa que su
equipo eléctrico y electrónico debe
ser desechado al final de su vida útil
por separado de sus desperdicios caseros.
Existen distintos sistemas de recolección
para el reciclaje en la UE. Para obtener más
información, favor póngase en contacto con
la autoridad local o el distribuidor donde
compró el producto.
• Las versiones de EE.UU. y
Canadá cumplen con los
requisitos ETL.
Acerca del símbolo
El símbolo puede aparecer en la pantalla de
su televisor durante la operación e indica que la
función no está permitida por su sistema de
audio o por medio de grabación específico.
www.insignia-products.com
43
Page 44

Sistema de audio tipo ejecutivo con reproductor de DVD Insignia NS-A3111
Características
Panel frontal
DVD EXECUTIVE SHELF SYSTEM
# Descripción Función
1 Suspensión/
Encendido
2
Canal
Permite activar su sistema de audio o
ponerlo en el modo de suspensión.
En el modo de disco/USB, permite saltar
al capítulo o la pista anterior. Mantenga
presionado para buscar hacia atrás.
En el modo de radio, permite sintonizar
el canal de radio anterior en la memoria.
En el modo de suspensión, permite
reducir una hora o un minuto mientras
se ajusta el reloj.
# Descripción Función
12 Pantalla de
LCD
13 Bandeja de
discos
14 Toma de USB Conecte un equipo de USB externo en
Muestra mensajes de estado.
Coloque un DVD o CD con la etiqueta
hacia arriba en esta bandeja.
esta toma.
Panel posterior
Nota
Conecte el cable de alimentación CA únicamente
después de haber conectado los altavoces, las antenas y
todos los demás equipos opcionales. Nunca haga ni
cambie conexiones con el equipo conectado a la
electricidad. La placa de clasificación se encuentra en la
parte posterior del sistema.
3
Canal
4 Salida coaxial Conecte un equipo externo que cuente
5 Reproducir En el modo de disco/USB, permite
6 Abrir/Detener En el modo de disco/USB, permite
7 VOLUMEN Girar en el sentido horario para subir el
8 Auriculares Enchufe auriculares estándar en esta
9Entrada
AUXILIAR.
10 Indicador de
suspensión
En el modo de disco/USB, permite saltar
al siguiente capítulo o pista. Mantenga
presionado para avanzar rápidamente.
En el modo de radio, permite sintonizar
el siguiente canal de radio en la
memoria.
En el modo de suspensión, permite
aumentar una hora o un minuto
mientras se ajusta el reloj.
con una toma de entrada de audio
digital.
reproducir o seleccionar pistas o
canciones.
detener la reproducción y expulsar un
disco.
volumen y en sentido antihorario para
bajarlo.
toma.
Conecte un equipo de audio externo en
esta toma para reproducir su sonido a
través de este reproductor.
Modo encendido/apagado - El indicador
está apagado
Modo de suspensión - El indicador rojo
se enciende
# Descripción Función
1Cable de
alimentación
2 Altavoces Conecte el altavoz izquierdo a los
3 Salida de video Para conectar VCRs u otros equipos de
Salidas de
audio
4 Conecte un
equipo externo
que cuente con
una toma de
entrada de
audio digital.
5 Conexiones de
entrada de
antena FM
Conexiones
para el bucle de
antena AM
Enchufe en un tomacorriente eléctrico
terminales L y el altavoz derecho a los
terminales R. Conecte el cable de color
al terminal de color y el cable negro al
terminal negro.
grabación.
Para conectar las señales de audio
(izq./der.) a equipos de grabación
externos, tal como VCRs.
Conecte un equipo externo que cuente
con una toma de entrada de audio
digital.
Para la recepción de FM, conecte la
antena de FM a la toma de FM. Ajuste
hasta que se reciba la señal más clara.
Para la recepción de AM, conecte la
antena de AM al conector de AM.
Ajuste hasta que se reciba la señal más
clara. Inserte completamente la parte
pelada de la antena en el terminal.
Nota: Coloque la antena lo más lejos
posible de un televisor, VCR u otra
fuente de radiación.
11 Receptor
Infrarrojo
44
Recibe la señal del control remoto.
www.insignia-products.com
Page 45

Sistema de audio tipo ejecutivo con reproductor de DVD Insignia NS-A3111
# Descripción Función
6 Salidas de video
de
componentes y
de barrido
progresivo
Conecte un televisor que cuenta con
una entrada de video de componentes.
Utilice cables de video de
componentes. Este tipo de conexión
ofrecerá la mejor calidad de imagen.
Control remoto
# Botón Función
5 MENÚ En el modo de DVD, permite ingresar
6
7
8 MARCADOR Presione para abrir el menú de
9 SELECCIÓN DE
10 AMPLIAR/
, , ,
(Botones
direccionales)
o
VIDEO
BORRAR
al menú de contenido del disco. En el
modo de PBC ON (Activado), permite
ver el menú de un disco VCD.
En el modo de menú, permite
navegar en la direcciones indicadas
para hacer selecciones en los menús.
En el modo de radio, presione o
para cambiar la frecuencia de
radio. Presione o para
cambiar la memoria de radio.
Permite saltar hacia atrás o hacia
adelante al capítulo o pista anterior o
siguiente.
marcador.
Permite cambiar entre las salidas de
video.
En el modo de reproducción, permite
seleccionar un tamaño de ampliación
diferente mientras reproduce un
video.
En el modo de menú, permite borrar
la información que ingresó en un
menú de configuración.
DAV8611
# Botón Función
1
2 Teclas numéricas
3 TÍTULO Permite mostrar el menú del título si
(Suspensión/
Encendido)
0 - 9
Presione para alternar entre el modo
de operación y el de suspensión.
En el modo de DVD, permite ingresar
las selecciones de búsqueda de título,
capítulo, pista y por tiempo.
En el modo de radio, permite ingresar
una estación predefinida.
se encuentra en el disco.
11 ÁNGULO/PBC En el modo de reproducción, permite
12 FUENTE Permite alternar entre los modos de
13 GIRAR Permite girar la imagen.
14 RELOJ En el modo de suspensión, mantenga
15 APAGADO
AUTOMÁTICO
16 ABRIR/CERRAR Permite abrir y cerrar la bandeja de
17 VOL +/VOL – Permiten subir o bajar el volumen.
18 SILENCIAR Permite silenciar el sonido. Presione
alternar entre los distintos ángulos de
cámara (si están disponibles en el
disco).
Permite activar o desactivar el control
de reproducción (PBC) en un disco
VCD.
Disco/USB, FM, AM y AUX.
presionado para comenzar a ajustar
el reloj de tiempo real.
Permite activar el temporizador de
apagado automático para que su
sistema de audio con reproductor de
DVD o ingrese automáticamente al
modo de suspensión.
discos.
el botón de nuevo para restaurar el
sonido.
4
(Detener)
Presione el botón de detener (STOP)
para detener la reproducción. La
reproducción comenzará desde este
punto cuando presione el botón de
reproducir (PLAY). Presione dos
veces el botón de detener (STOP) y
presione el botón de reproducir
(PLAY) para comenzar a reproducir
desde el comienzo.
www.insignia-products.com
19 INFO Permite mostrar información actual
20
21
(Pausar)
(Reproducir)
acerca del disco mientras se
reproduce.
Presione una vez para detener la
reproducción o la grabación.
Presione repetidamente para avanzar
cuadro por cuadro.
Permite empezar la reproducción.
45
Page 46
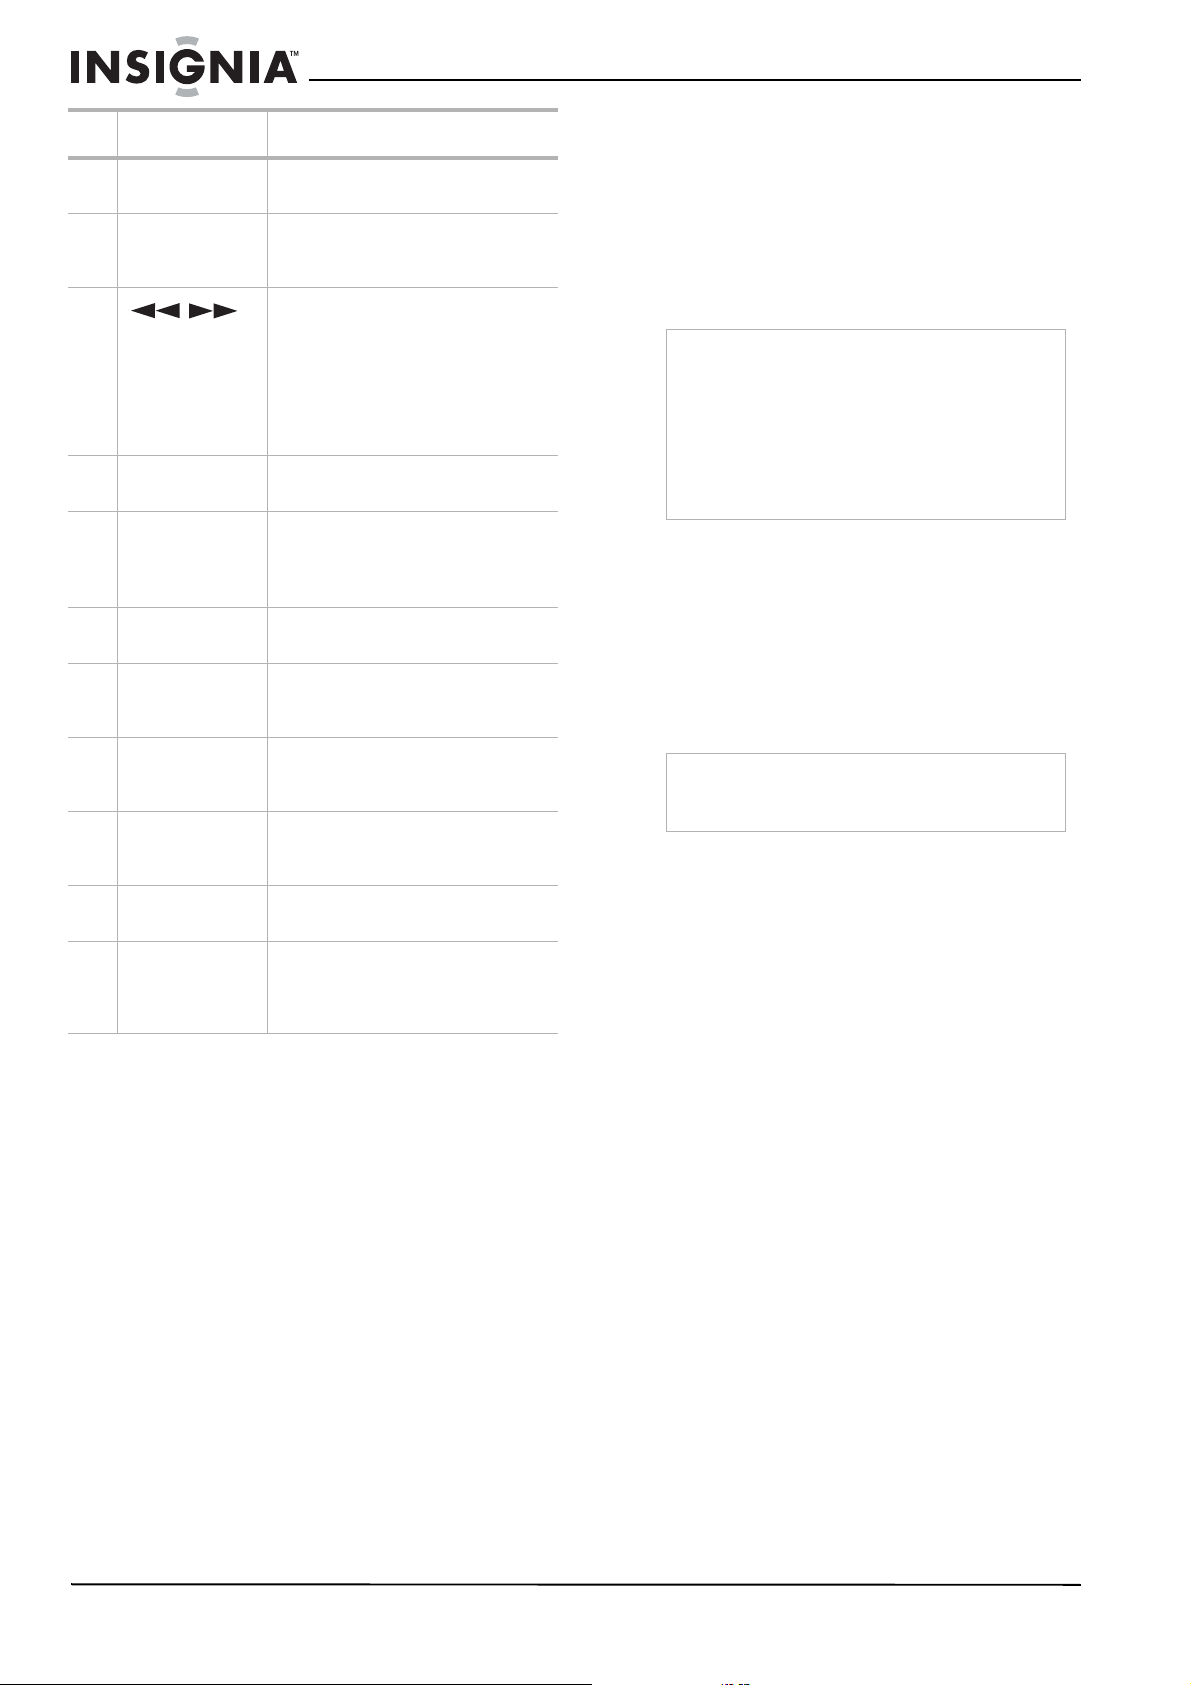
Sistema de audio tipo ejecutivo con reproductor de DVD Insignia NS-A3111
# Botón Función
22 CONFIGURAR/
SALIR
23 Aceptar Presione para ingresar o seleccionar
24
25 SUBTÍTULOS Permite seleccionar un idioma de los
26 AUDIO/FM
27 ATENUADOR Permite atenuar o iluminar la luz de la
28 IR A Permite comenzar a reproducir a
29 MODO DE
30 A-B Presione para configurar la
/
ESTÉREO
REPRODUCCIÓN
Permite ingresar o salir del menú de
configuración de sistema.
un valor en un menú y en la
navegación de configuración.
En el modo de reproducción, permite
retroceder o avanzar rápidamente un
DVD o CD. Presione repetidamente el
botón para cambiar la velocidad de
retroceso y avance rápido.
En el modo de radio, permite
comenzar el escaneo automático
hacia arriba o abajo.
subtítulos, si está disponible.
En el modo de reproducción, permite
cambiar a otro canal de audio.
En el modo de radio, permite
seleccionar Monofónico o Estéreo.
pantalla del panel frontal.
partir de un punto determinado en un
disco DVD, CD, VCD o SVCD.
Permite mostrar el menú de los
modos de reproducción y seleccionar
otro modo diferente.
reproducción repetida o para
cancelarla.
Instalación de las pilas del control remoto
Para instalar las pilas del control remoto:
1 Remueva la cubierta de las pilas.
2 Inserte dos pilas AAA en el compartimiento
de pilas. Verifique que los símbolos + y – en
las pilas correspondan con los símbolos + y –
en el compartimiento de las pilas.
3 Reinstale la cubierta.
Notas
• No combine pilas de diferentes tipos.
• No combine pilas gastadas y nuevas.
• Retire las pilas cuando se les acabe la carga.
• Los químicos de las pila pueden causar
sarpullido. Si las pilas se derraman, limpie el
compartimiento de pilas con un paño. Si los
químicos tocan su piel, lávese inmediatamente.
• Retire las pilas si el control remoto no se va a
usar por un período de tiempo extendido.
Uso del control remoto
Para usar el control remoto:
• Apunte el control remoto directamente a su
sistema de audio, dentro de un ángulo de 60°
horizontalmente (30° a cada lado) y dentro
de 30° verticalmente con respecto al sensor
del control remoto al frente de su sistema de
audio y dentro de 20 pies (6 m) de su
sistema de audio.
Cuidado
No exponga el control remoto a líquidos, a luz del
sol directa o a impactos. No combine pilas de
diferentes tipos.
31 GRAVES EX Presione para activar o desactivar los
32 ECUALIZADOR Permite seleccionar un modo de
Graves Ex (Ex Bass).
ecualizador predefinido. Se puede
seleccionar FLAT (Normal), ROCK,
POP, CLASSIC (Clásica) y JAZZ.
46
www.insignia-products.com
Page 47
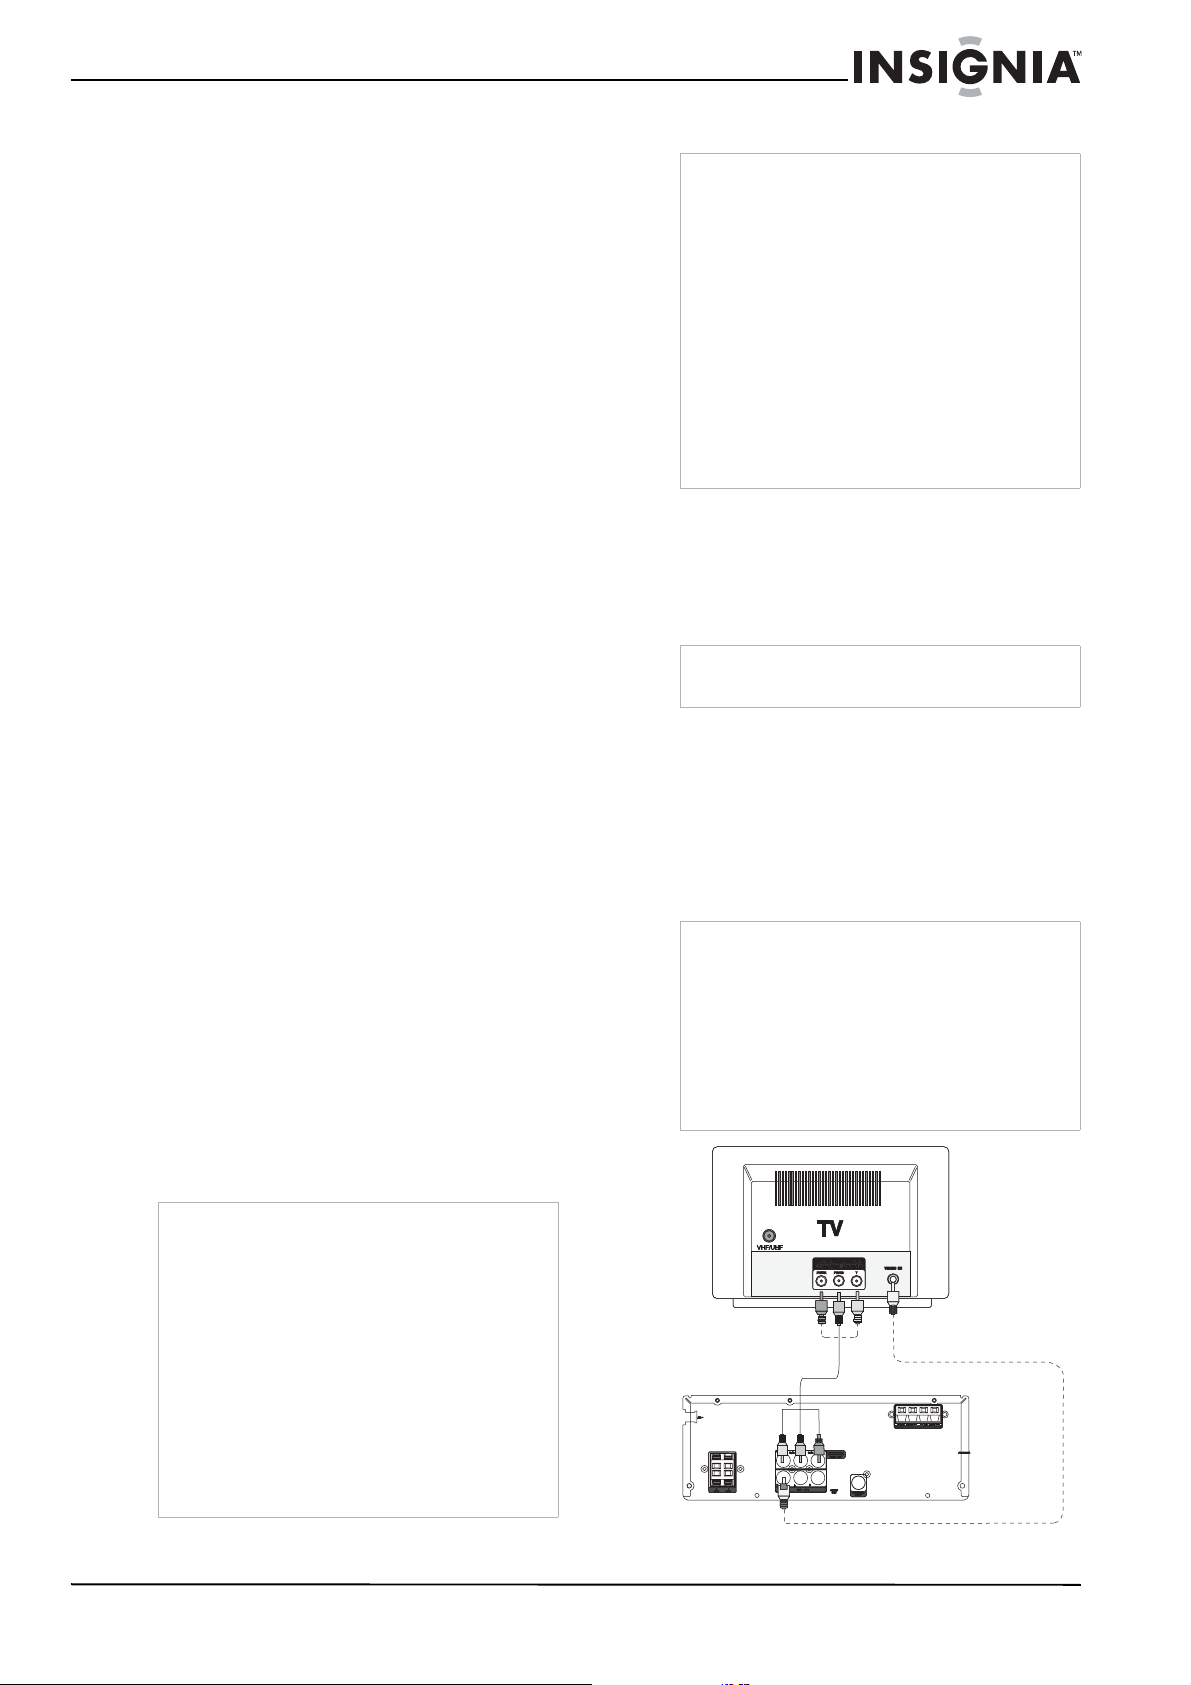
Sistema de audio tipo ejecutivo con reproductor de DVD Insignia NS-A3111
Configuración de su sistema de audio con reproductor de DVD
Desempaque y preparación
Su caja debe contener:
• Sistema de audio con reproductor de DVD
• Guía del usuario
• Control remoto con 2 pilas
• Cable de AV
• Antenas FM y AM
• Altavoces (2) con cable de altavoces
Si necesita reemplazar cualquiera de estos
componentes, llame a nuestra línea de ayuda
mencionada en la sección de Garantía de esta
guía.
Remueva cuidadosamente todos los
componentes de la caja y asegúrese de que
tiene todos los componentes necesarios antes
de desechar la caja.
• Remueva todos los materiales de empaque
de los componentes individuales.
• No remueva ninguna etiqueta o pegatina en
el panel posterior del su sistema de audio.
• Coloque su sistema de audio donde usted
prefiera. Su sistema de audio está diseñado
para ser usado en una superficie nivelada,
plana y estable como una mesa, escritorio,
estante o pedestal, cerca de un
tomacorriente de pared, lejos de la luz solar
directa, y lejos de fuentes de excesivo calor,
polvo, humedad o vibración.
• Desenrolle el cable de alimentación de CA y
extienda completamente el cable, luego
conéctelo en la parte posterior de su sistema
de audio.
Fuente de alimentación
Use el cable de alimentación de CA polarizado
proporcionado para la operación con
alimentación de CA. Inserte el cable de CA en
un tomacorriente CA estándar polarizado de 120
V, 6 0 Hz .
Si usted causa una descarga de estática al tocar
el sistema de audio y éste deja de funcionar,
desenchúfelo del tomacorriente CA y
reconéctelo. Su sistema de audio deberá
regresar a su funcionamiento normal.
Haciendo las conexiones
Notas
• Asegúrese de que su sistema de audio esté
conectado directamente al televisor y sintonice
el televisor al canal de entrada de video
correcto.
• No conecte la toma AUDIO OUTPUT (Salida
de audio) de su sistema de audio a la toma
PHONO IN (entrada de fonógrafo) de su
sistema de sonido.
• No conecte su sistema de audio a través de
otro VCR. La imagen de DVD podría verse
distorsionada por el sistema de protección
contra copia.
• La imagen o el sonido de un televisor, VCR o
radio cercano podría verse distorsionado
durante la reproducción. Coloque las unidades
alejadas unas de otras o apague su sistema de
audio después de extraer el disco.
Conexión de un televisor
Si su televisor es de alta definición o “listo para
digital”, puede aprovecharse de la salida de
barrido progresivo de su sistema de audio para
obtener la máxima calidad de video posible.
Sólo necesita realizar una de estas conexiones.
Cuidado
No enchufe el cable de alimentación de CA hasta
que haya realizado las conexiones del sistema.
Para conectar a su televisor con un cable de
video compuesto o de componentes:
• Conecte las tomas de componentes/salida
progresiva [COMPONENT/PROGRESSIVE
OUT] (para la mejor imagen), o la toma de
salida de video [VIDEO OUT] (para una
buena imagen) en su sistema de audio a las
tomas correspondientes en el televisor
usando los cables incluidos.
Notas
• La calidad del video con barrido progresivo
requiere un televisor con barrido progresivo y
es posible sólo cuando se usan las conexiones
Y Pb Pr.
• Una vez conectado, seleccione barrido
progresivo (Progressive Scan) como la salida
de video (Video Output) en el menú de
configuración (Setup) para activar la función.
• Su televisor puede necesitar se ajustado para
aceptar señales de barrido progresivo.
Advertencias
• El sistema tiene un enchufe de CA polarizado
con una espiga ancha y una estrecha. El
enchufe entrará únicamente en tomacorrientes
de CA polarizados. Éste es un mecanismo de
seguridad para reducir la posibilidad de
choque eléctrico. Si el enchufe no entra en el
tomacorriente de CA, probablemente es un
tomacorriente antiguo sin polarización que
debe ser reemplazado por un electricista
calificado y con licencia. No lime la espiga
ancha del enchufe, ni use un adaptador para
hacer que el enchufe entre en el tomacorriente.
• Nunca conecte el enchufe de un cable de CA a
otro voltaje que no sea el especificado (120 V,
60 Hz). Utilice solamente el cable de
alimentación suministrado.
www.insignia-products.com
Cable de video de componentes (no
incluido) para la mejor imagen
Parte posterior
del sistema de
audio
Cable de video compuesto
(amarillo - incluido) para buena
imagen
47
Page 48
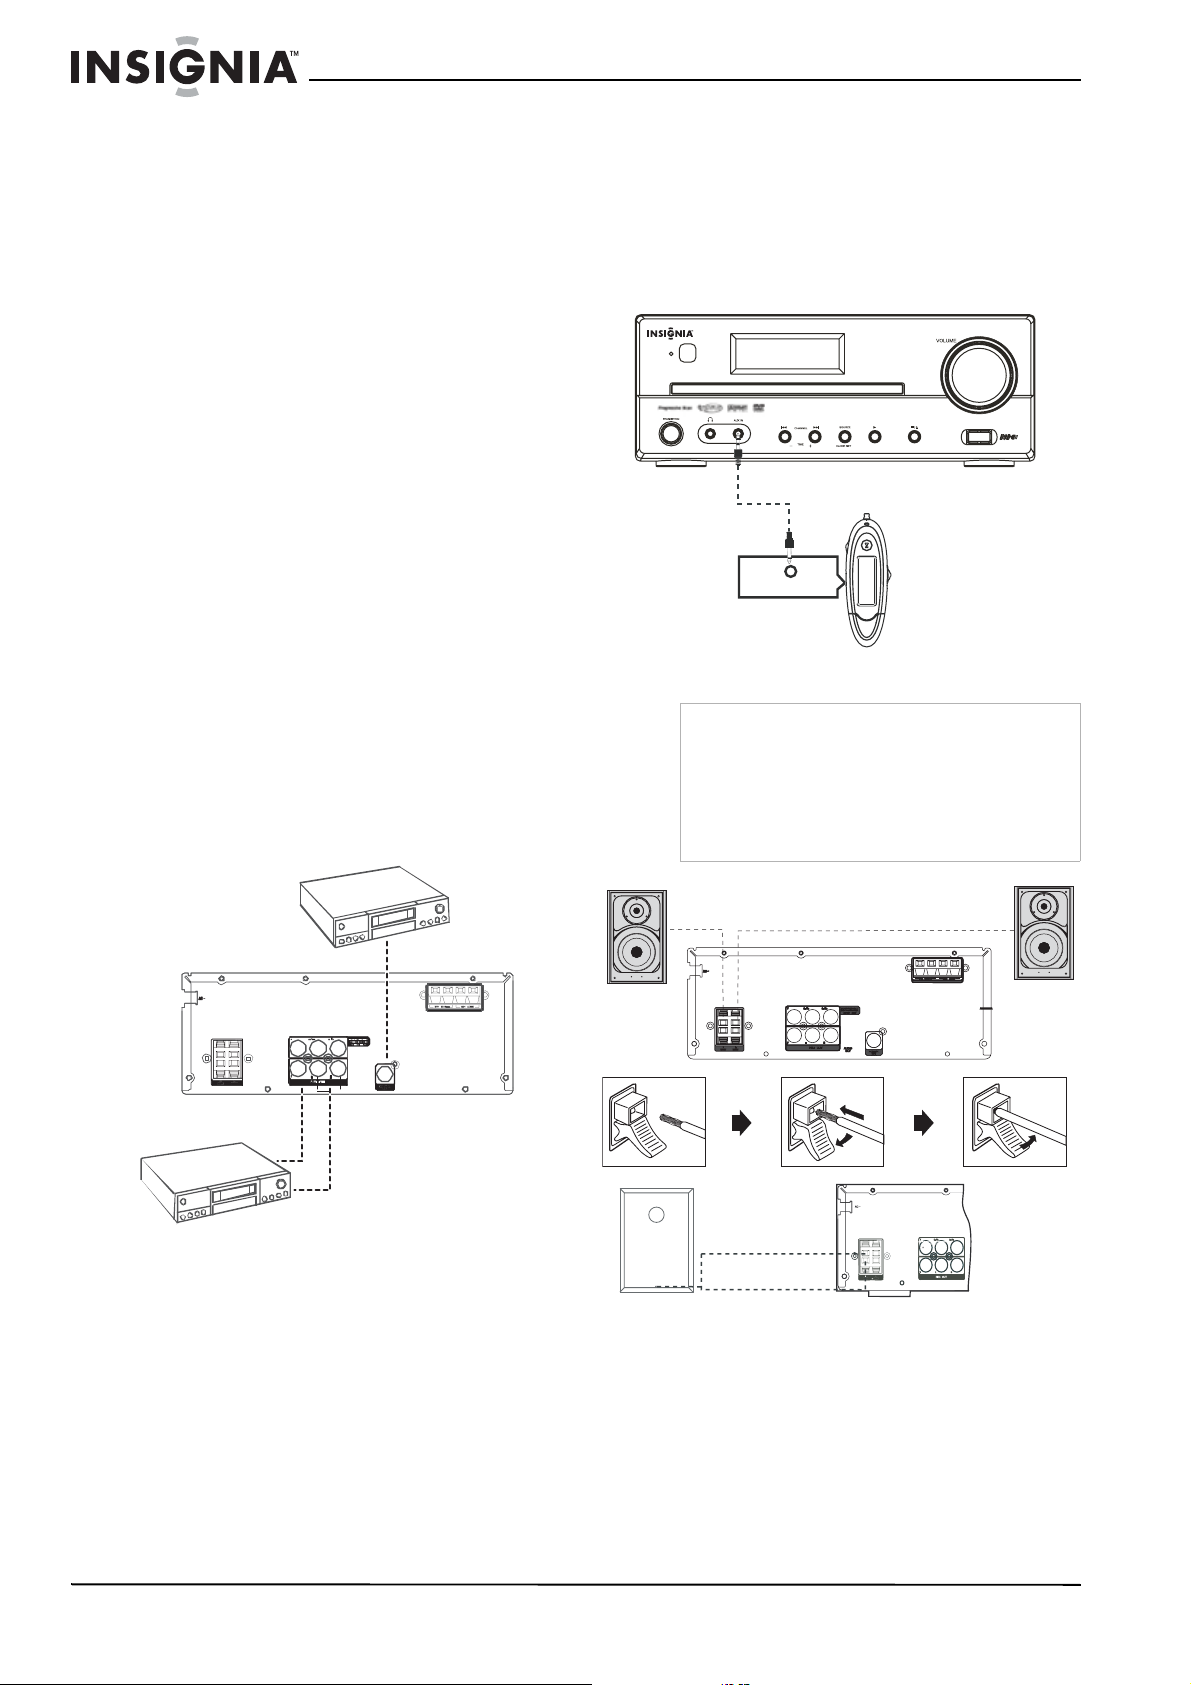
Sistema de audio tipo ejecutivo con reproductor de DVD Insignia NS-A3111
Conexión de audio
Para conectar a su televisor con una fuente
de audio:
• Conecte las tomas izquierda y derecha de la
salida de audio (AUDIO OUT) en la parte
posterior de su sistema de audio a las tomas
de entrada de audio izquierda y derecha en
el televisor usando los cables de audio
suministrados.
Para conectar un sistema estéreo digital o
receptor A/V de dos canales con
decodificador de multicanales:
1 Conecte la toma de salida coaxial (DIGITAL
AUDIO OUT) de su sistema de audio a la
toma de entrada correspondiente en su
amplificador. Utilice un cable coaxial de
audio digital (opcional).
2 Active la salida digital de su sistema de
audio. (Refiérase a AUDIO SETUP
(Configuración de audio) en la página 51).
Conexión de un VCR o grabadora de cinta
Para grabar la reproducción de DVD:
1 Para grabar la pista de audio de su DVD,
conecte las tomas de salida de audio
izquierdo/derecho en este sistema de audio
a las tomas de entrada de audio
izquierdo/derecho en su VCR o grabadora de
cinta.
2 Para grabar la pista de video de su DVD,
conecte las tomas de salida de video en este
sistema de audio a las tomas de entrada de
video en su VCR o grabadora de cinta.
Haciendo las conexiones de audio
Para escuchar el sonido de un equipo de música
externo, tal como un reproductor de MP3, CD o
MD, a través de los altavoces de esta unidad,
conecte la toma de entrada auxiliar (AUX IN) de
esta unidad a la salida de auriculares de su
equipo de música con un cable de audio y
presione el botón de fuente (SOURCE) para
seleccionar AUX.
DVD EXECUTIVE SHELF SYSTEM
Parte frontal del sistema de audio
Cable de audio
Equipo de
audio
Headphone output
externo
Conexión de los altavoces
Nota
El sistema de audio está diseñado para reproducir
una calidad óptima de sonido cuando se utilizan
los altavoces suministrados. Si desea conectar
otros altavoces al sistema en lugar de los
suministrados, deben tener una impedancia de 4
ohmios. Verifique la polaridad correcta cuando
conecte los altavoces (el cable de color coincide
con la terminal de color).
Cine en casa de 5.1/6.1
canales
Cable coaxial de audio
digital (no incluido)
Parte posterior del
sistema de audio
VCR o
grabadora de
cinta
Cable de video
Cable de audio
3 Si tiene un decodificador externo de Dolby
Digital o DTS y quiere reproducir su DVD a
través de un decodificador externo de Dolby
Digital o DTS, conecte la toma coaxial de
salida digital sólo a la toma coaxial de
entrada digital de su decodificador. No se ha
incluido un cable coaxial de audio digital.
Altavoz
derecho
Alambre de color
Alambre negro
Altavoz
izquierdo
48
www.insignia-products.com
Page 49

Sistema de audio tipo ejecutivo con reproductor de DVD Insignia NS-A3111
TV TV
Conecte todos los altavoces de la misma forma.
Cuidados
• Para prevenir daño a los circuitos, nunca haga
cortocircuito en los terminales de salida de los
altavoces.
• No remueva demasiado aislamiento de los
cables para evitar que
• las porciones expuestas se toquen entre ellas.
La longitud óptima de la parte desforrada debe
ser alrededor de 1/3 de pulgada (o 1 cm)
• No inserte la parte expuesta demasiado en las
terminales de los altavoces.
• No conecte más de un altavoz a cualquier par
de terminales de altavoz.
• No conecte altavoces con una impedancia
inferior que la de los altavoces suministrados.
Ubicación de los altavoces
La ubicación de los altavoces juega un papel
importante en la reproducción del efecto de
sonido envolvente. Preste atención en particular
cuando diseñe la distribución de los altavoces.
Para los mejores efectos envolventes, se deben
instalar todos los altavoces.
Para colocar los altavoces:
• Coloque los altavoces frontales izquierdo y
derecho al lado izquierdo y derecho de su
televisor.
Todos los altavoces deben estar
aproximadamente a la misma distancia de su
posición de escucha y deben estar visibles.
Front speaker
(left)
Front speaker
Viewing area
(right)
Front speaker
(left)
DIM L
Instalación de su sistema de audio
Instale su sistema de audio sobre una superficie
plana estable. Debe haber suficiente espacio
frente a su sistema de audio para que se abra la
bandeja de discos. Ubique su sistema de audio
de forma que exista una línea de visión directa
al control remoto.
Cuidado
• No instale este sistema de audio en un espacio
encerrado tal como un librero.
• No exponga su sistema de audio a
temperaturas o humedad extremas.
• Evite colocar su sistema de audio sobre una
superficie caliente tal como sobre otro equipo
que se calienta cuando se utiliza.
• Asegúrese de que exista una ventilación
adecuada para su sistema de audio.
Front speaker
(right)
DIM R
Uso de su sistema de audio con reproductor de DVD
Primeros pasos
Para comenzar:
1 Finalice la conexión del sistema de audio
como se muestra en la sección anterior.
2 Conecte la alimentación de su sistema de
audio.
3 Encienda su televisor y seleccione el canal
de entrada de video correcto.
Para encender su sistema de audio:
1 Enchufe su sistema de audio. El indicador de
suspensión se ilumina en la pantalla del
panel frontal.
2 Presione el botón de suspensión/encendido
(
Standby/On). Después de algunos
segundos, la pantalla mostrará el mensaje
“NO DISC” (No hay disco).
3 Encienda su televisor y seleccione la entrada
de AV a la que está conectado el sistema de
audio.
Para comenzar la reproducción:
1 Presione el botón de abrir/cerrar . La
bandeja de discos se abrirá.
2 Coloque un DVD en la bandeja de discos y
presione el botón de abrir/cerrar . El
reproductor leerá el disco y comenzará a
reproducirlo. Antes de comenzar a reproducir
la película, aparecerá un menú.
3 Seleccione PLAY MOVIE (Reproducir
película), luego presione el botón de aceptar
(OK). La película comenzará.
4 Aunque puede ver una película
inmediatamente, para obtener los mejores
resultados de su sistema de audio, presione
el botón de detener ( STOP). Solamente
necesita hacer esto cuando instale por
primera vez su sistema de audio.
Configuración básica
Para usar los menús de configuración
básica:
1 Presione el botón de configuración/salir
(SETUP/EXIT) del control remoto para
ingresar al menú de configuración del
sistema (
detenido.
System Setup
) en el modo
Notas
• Conecte el cable de AV únicamente después
de haber conectado los altavoces, la antena y
todos los demás equipos opcionales.
• Nunca realice ni cambie conexiones con la
unidad encendida.
www.insignia-products.com
49
Page 50

Sistema de audio tipo ejecutivo con reproductor de DVD Insignia NS-A3111
Para salir del menú de configuración del
sistema (
System Setup
) y presione
nuevamente el botón de configuración/salir
(SETUP/EXIT).
2 Presione el botón
uno de los siguientes menús:
(Configuración del sistema),
o para navegar a
System Setup
Language Setup
(Configuración de idioma), Video Setup
(Configuración de video) o Audio Setup
(Configuración de audio).
3 Cuando un menú está resaltado, presione
o para seleccionar opciones dentro del
menú.
Las opciones disponibles para cada ajuste
aparecen en el lado derecho de la pantalla.
4 Presione el botón
u OK (Aceptar) para
moverse a la columna derecha.
5 Presione el botón
o para seleccionar
un ajuste nuevo y presione el botón OK
(Aceptar) para confirmar el ajuste cambiado.
6 Repita los pasos 3 al 5 para cambiar los
otros ajustes. Para obtener más información,
refiérase a las secciones apropiadas en esta
guía.
7 Cuando haya terminado con los cambios,
resalte la selección EXIT/SETUP
(Salir/Configuración) y presione OK
(Aceptar) o presione SETUP/EXIT
(Configuración/Salir) nuevamente para salir
de
System Setup
(Configuración del
sistema).
Cambio de los ajustes de su reproductor
Menú Opciones disponibles
SYSTEM
SETUP
(Configuración
del sistema)
SCREEN SAVER (Salvapantallas) – Active (On) o
desactive (Off) el salvapantallas.
JPEG TIME (Tiempo de JPEG) – Seleccione el
intervalo de la presentación de JPEG mientras se
reproduce un CD de imágenes. Cada imagen se
mostrará por la duración especificada antes de
mostrar la siguiente imagen automáticamente. Las
opciones incluyen 5SEC (5 seg.) 10SEC (10 seg.) y
15SEC (15 seg.)
PASSWORD (Contraseña) – Muchos discos DVD de
películas contienen códigos de clasificación de la
MPAA. Este sistema de audio reconoce los códigos
incluidos en estos DVDs. Esto proporciona un
método para evitar que los niños vean películas no
recomendadas o que usted no considera
apropiadas. Para desbloquear la función de
clasificación (RATING) o cambiar la contraseña,
presione los botones numéricos para ingresar la
contraseña actual (la contraseña establecida de
fábrica es “1234”), y presione el botón de ingresar
(ENTER). Luego puede cambiar el ajuste de la
clasificación (RATING) como se muestra a
continuación, o ingrese una contraseña nueva y
presione el botón de entrar (ENTER). Un icono de
candado abierto indica que el bloqueo de los padres
NO está activado. Un icono de candado cerrado
indica que el bloqueo de los padres está activado.
RATING (Clasificación) – Después de ingresar la
contraseña (como se muestra anteriormente),
seleccione la clasificación más alta que quiera que
se pueda ver y bloquee la contraseña. Para
reproducir un disco con una clasificación superior,
se debe ingresar la contraseña. Las clasificaciones
incluyen:
• KID SAFE (Seguro para niños) – El contenido es
seguro para niños.
• G – Recomendado como aceptable para todas
las edades.
• PG – Guía de los padres recomendada.
• PG-13 – Puede ser que el material no sea
apropiado para niños menores de 13 años.
• PG-R – Guía de los padres recomendada – muy
poco lenguaje o situaciones maduras.
• R – Restringido - violencia, lenguaje adulto y
situaciones no aptas para televidentes jóvenes.
• NC-17 – No se recomienda para niños menores
de 17 años.
• ADULT (Adultos) – Debe ser visto sólo por
adultos debido a contenido de material sexual
explícito, violencia o lenguaje.
Para establecer la clasificación cuando la contraseña
esté desbloqueada:
• En el menú de configuración del sistema
System Setup
(
Rating (Clasificación) y presione .
• Presione o para resaltar un nivel de
clasificación, luego presione el botón de aceptar
(OK).
• Presione el botón o para seleccionar
Password (Contraseña), luego presione el botón
de aceptar (OK). Use los botones numéricos
(0-9) para ingresar una contraseña de cuatro
dígitos. Si comete un error antes de presionar el
botón de aceptar (OK), presione el botón de
borrar (CLEAR) e ingrese nuevamente su código
de seguridad de 4 dígitos. Los discos DVD con
clasificación arriba del nivel seleccionado no se
reproducirán a menos que usted ingrese la
contraseña correcta de cuatro dígitos.
SOURCE (Fuente) – Seleccione los archivos de
origen que usted desea reproducir entre Disco y
USB. Para acceder a archivos en un dispositivo
USB, asegúrese de que su dispositivo USB está
conectado a la toma USB en el panel frontal.
Nota: Este sistema no soporta el formato NTFS. Si la
unidad de flash USB no funciona, revise el sistema de
archivos de la unidad de flash USB y formatéelo con el
sistema FAT o FAT32.
), presione o para resaltar
50
www.insignia-products.com
Page 51
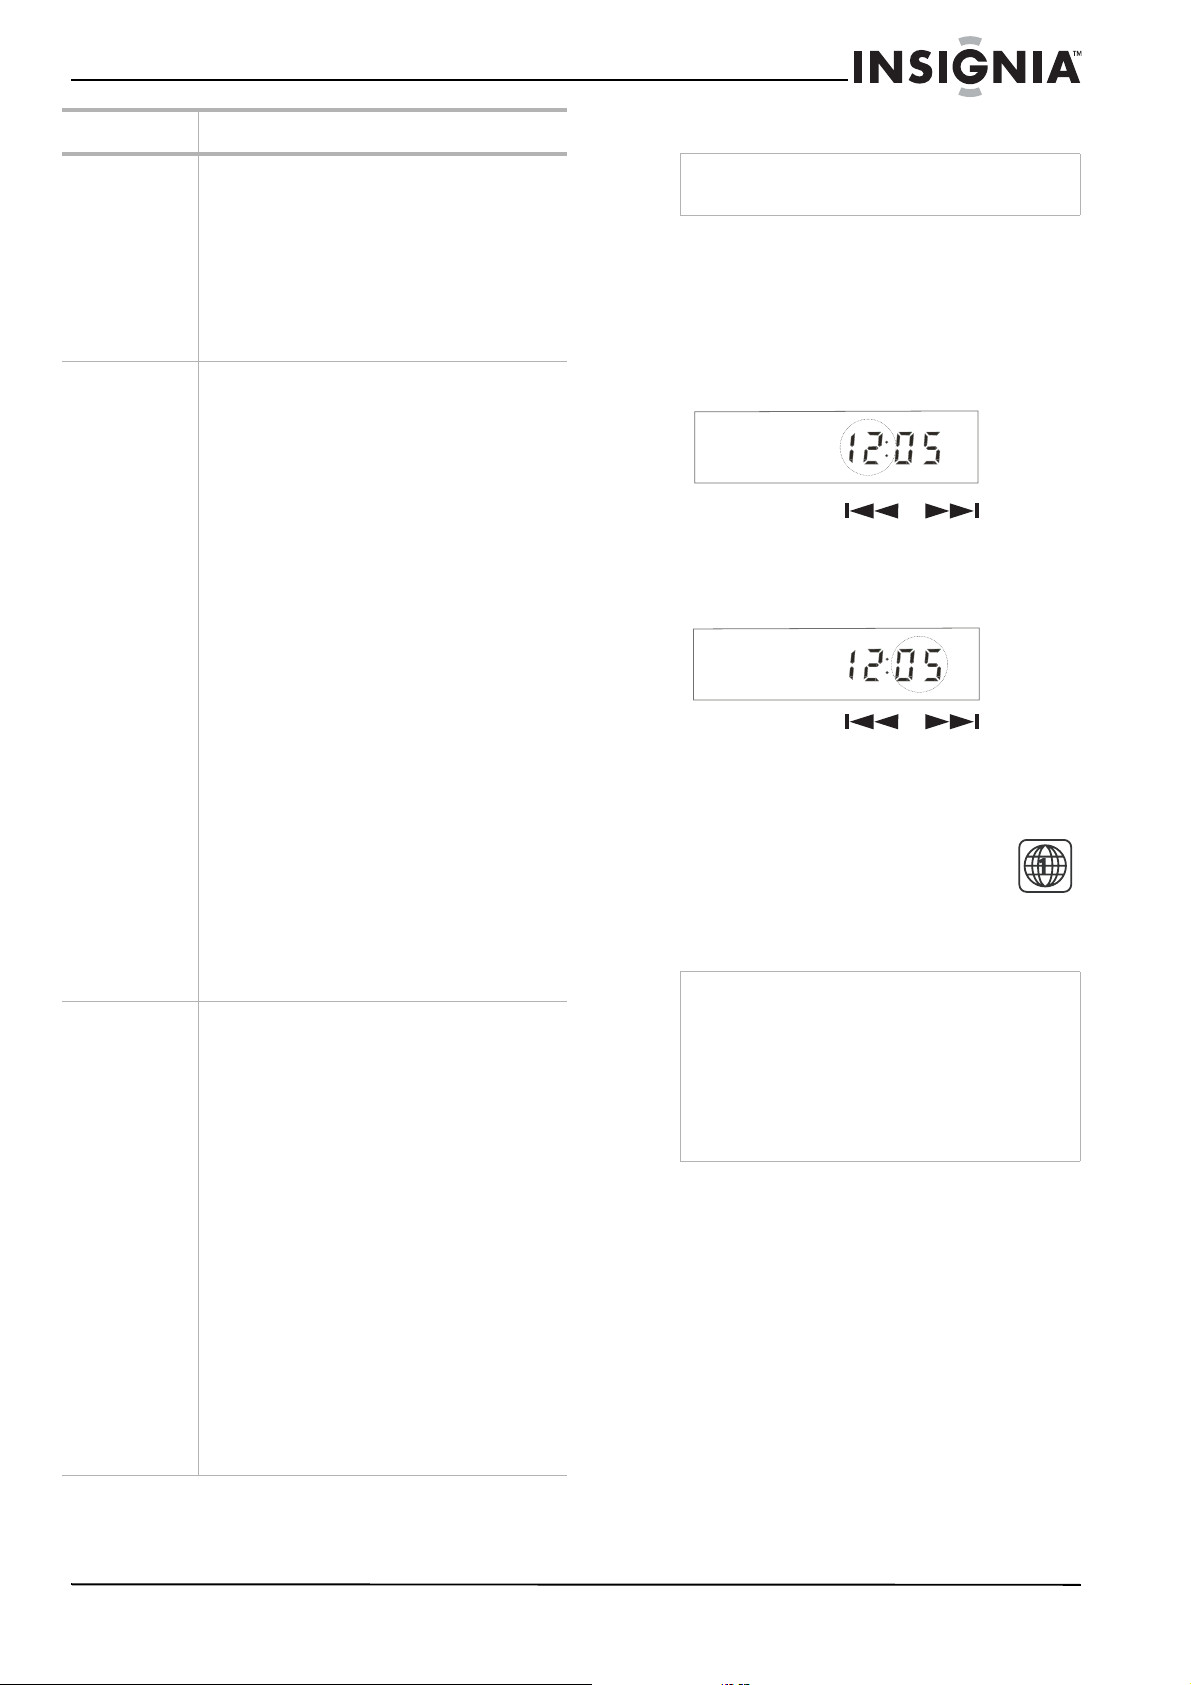
Sistema de audio tipo ejecutivo con reproductor de DVD Insignia NS-A3111
Menú Opciones disponibles
OSD LANGUAGE (Idioma del OSD) – Permite
seleccionar el idioma para los menús de pantalla.
LANG(UAGE)
SETUP
(Configuración
de idioma)
VIDEO SETUP
(Configuración
de video)
AUDIO SETUP
(Configuración
de audio)
AUDIO LANG (Idioma de audio) – Permite
seleccionar el idioma del audio del DVD que
guste.
SUBTITLE LANG (Idioma de subtítulos) – Permite
seleccionar el idioma de los subtítulos que guste.
MENU LANG (Idioma del menú) – Permite
seleccionar el idioma del menú del DVD que
guste.
TV TYPE (Tipo de televisor) – Permite seleccionar
la relación de aspecto de la imagen. Las opciones
incluyen:
• 4:3 PS – Se selecciona cuando su sistema
está conectado a un televisor normal.
Imágenes panorámicas se muestran en la
pantalla, pero con algunas partes cortadas
automáticamente.
• 4:3 LB (4:3 Buzón) – Seleccione esta
opción cuando su sistema esté conectado
a un televisor normal. Imágenes
panorámicas se muestran en la pantalla
con bandas negras arriba y abajo de la
pantalla.
• 16:9 – Se selecciona cuando su sistema se
conecta a un televisor panorámico.
Nota: Algunos discos no se pueden reproducir de
acuerdo a su selección debido a que el formato ha sido
grabado en el disco. Por ejemplo, un disco grabado en
el modo 4:3 sólo puede ser reproducido en 4:3. El tipo
de televisor (TV TYPE) debe corresponder con la
pantalla del televisor.
VIDEO – Elija la salida de video que coincida con
la conexión de video entre su sistema y su
televisor. Las opciones incluyen:
• 480i YPBPR – Seleccione esta opción si ha
conectado la unidad a su televisor usando
el cable de video Y, Cb, Cr.
• P-SCAN YPBPR (Barrido Progresivo Y Pb
Pr) – Seleccione esta opción si ha
conectado la unidad a su televisor usando
las tomas de video Y, Pb, Pr y está usando
la función de barrido progresivo.
Nota: También puede presionar V-SELECT (Seleccionar
video) para seleccionar esto directamente.
DIGITAL OUTPUT (Salida digital) – Permite
seleccionar el formato de audio digital:
• SPDIF/RAW (SPDIF/En bruto) – La salida
de audio digital se encuentra en el formato
original, tal como AC3 o DTS.
• SPDIF/PCM – La salida de audio digital se
convierte a PCM.
DYNAMIC RANGE (Rango dinámico) – Le permite
controlar el rango dinámico a fin de lograr un
sonido apropiado para su equipo.
• ON (Activado) – Los sonidos fuertes,
como explosiones, se reducen
ligeramente.
• OFF (Desactivado) – El sistema reproduce
al nivel de grabación en el disco.
SAMPLING (Muestreo) – Permite seleccionar el
muestreo de decodificación entre 96 kHz y 48
kHz.
• 48 KHz – El muestreo del audio se reduce
a 48 kHz si el disco está grabado con
96 kHz.
• 96 KHz – Salida con el formato de audio
original.
Nota: Esta función sólo está disponible para la salida de
audio digital de un disco grabado con 96 kHz.
Ajuste del reloj
Nota
Necesitará reconfigurar el reloj cada vez que
desenchufe la unidad.
Presione el botón de suspensión/encendido
(STANDBY/ON) en el panel frontal para poner la
unidad en el modo de suspensión.
Para ajustar el reloj:
1 Mantenga presionado el botón de fuente
(SOURCE) hasta que la hora parpadee en la
pantalla.
2 Presione el botón o en el
panel frontal para ajustar la hora.
3 Presione el botón de fuente (SOURCE)
nuevamente hasta que los minutos
parpadeen en la pantalla.
4 Presione el botón o en el
panel frontal para ajustar los minutos.
Reproducción de un DVD, CD o VCD
Código regional
Su sistema de audio tiene un código
regional (1) impreso en la parte
posterior de la caja. Su receptor sólo
puede reproducir DVDs que tengan una
etiqueta con el mismo código regional (1) o con
el código ALL (Todos).
Notas
• La mayoría de los DVDs tienen un globo que
contiene uno o más números claramente
visible en la cubierta. Este número debe
coincidir con el código regional de su sistema
de audio o el DVD no podrá reproducirse.
• Si intenta reproducir un DVD cuyo código
regional sea diferente al de su sistema de
audio, aparecerá un mensaje de error en la
pantalla del televisor.
Discos compatibles
Se pueden reproducir los siguientes discos en
su sistema de audio:
• DVD-Video
• Los discos DVD-R, DVD-RW, DVD+R y
DVD+RW. Los discos DVD-R y DVD-RW
deben grabarse en el modo de DVD Video.
Los discos DVD+RW deben grabarse de
acuerdo con las especificaciones para los
discos DVD+RW con una capacidad de 4.7
GB.
• Video CD (VCD)
• Super Video CD (SVCD)
• CDs de audio
• CD-R y CD-RW
1
www.insignia-products.com
51
Page 52

Sistema de audio tipo ejecutivo con reproductor de DVD Insignia NS-A3111
Este reproductor puede reproducir la mayoría
de discos CD-R y CD-RW. Dependiendo de
las condiciones de grabación, es posible que
no todos los discos se reproduzcan sin
problemas.
• Archivos MP3 en CD-R o CD-RW
Los archivos MP3 deben tener el formato
ISO 9660 o JOLIET. Si la frecuencia de
muestreo es de 44.1 ó 48.1 kHz, y la
velocidad de bits fija es 128 kbps o superior,
se podrán reproducir los archivos MP3.
Quizás algunos archivos no puedan
reproducirse, dependiendo de la condición o
los formatos.
• Archivos WMA en CD-R
Si la frecuencia de muestreo es 32 kHz y la
velocidad de bits fija es 128 kbps o superior,
se podrán reproducir los archivos WMA.
Quizás algunos archivos no puedan
reproducirse, dependiendo de la condición o
los formatos.
• Archivos JPEG en CD-R o CD-RW
Este reproductor puede reproducir archivos
JPEG con una resolución de hasta cinco
millones de píxeles. Algunos archivos JPEG
no pueden ser leídos por este reproductor.
Uso del control remoto para reproducir un DVD, CD o VCD
DAV8611
# Botón Función
1 TÍTULO Permite mostrar el menú de títulos si está
presente en el disco. Esta función sólo
funciona para la reproducción de DVD.
# Botón Función
2
3 MENÚ Presione para visualizar el menú del
4
5AMPLIAR/
6 ÁNGULO/
7
(Detener)
(Saltar
hacia adelante)
o (Saltar
hacia atrás)
BORRAR
PBC
(Abrir/Cerrar)
Presione una vez para detener
instantáneamente la reproducción actual e
ingresar al modo de reanudar
reproducción (Resume Play).
Presione (Reproducir) para reanudar
la reproducción desde el punto en el que
se detuvo el disco.
Presione el botón dos veces para detener
la reproducción completamente. No se
podrá reanudar la reproducción. Presione
(Reproducir) para comenzar la
reproducción desde el comienzo del
disco.
disco.
Nota: La reproducción se detiene para mostrar
el menú. El botón no funciona para la
reproducción de CD. Para VCD, solo está
disponible cuando PBC (Control de
Reproducción) se activa.
Cuando se está reproduciendo un disco,
usted puede saltar hacia atrás o hacia
adelante un capítulo o pista.
Presione el botón para saltar al
comienzo del capítulo o pista previa.
Presione el botón para saltar al
comienzo del siguiente capítulo o pista.
Nota: En el caso de un disco de CD, use los
botones numéricos (0 -9) para saltar
directamente a un número de pista. Cuando se
usa un VCD con la función PBC, ésta debe estar
desactivada (OFF).
Permite ampliar la imagen. Usted puede
ampliar el tamaño de la imagen durante la
reproducción.
Cada vez que se presiona el botón de
ampliar/borrar (ZOOM /CLEAR), los
niveles de aumento cambiarán de la
siguiente manera:
ZOOM x 2 ----> ZOOM x 3 ----> ZOOM x 4
----> ZOOM x 3/4 ----> ZOOM x 2/3 ---->
ZOOM x 1/2 ----> ZOOM : OFF
(Desactivado)
Mientras una imagen está ampliada, usted
puede usar las teclas , , o
para moverse dentro de la imagen.
Para cambiar a la visualización normal
original, presione el botón de ampliar
(ZOOM) hasta que aparezca el símbolo
ZOOM:OFF (Ampliación: Desactivada). La
pantalla regresará a la visualización
normal.
Usted puede seleccionar ángulos
diferentes de cámara diferentes al
reproducir un disco de video DVD que
contienen escenas grabadas desde
múltiples ángulos.
Presione el botón de ángulo (ANGLE)
repetidamente para seleccionar diferentes
ángulos de cámara, si están disponibles
en el disco.
Nota: Esta función sólo está disponible cuando
las escenas filmadas desde ángulos múltiples
ha sido grabadas en el DVD. Si la visualización
ángulos múltiples no está disponible, se
muestra el indicador OFF (Desactivado).
Permite abrir la bandeja de discos.
Nota: Coloque el disco en la bandeja de discos
con el lado de la etiqueta hacia arriba.
Presione de nuevo para cerrarla. El
sistema de audio comenzará a reproducir
automáticamente.
52
www.insignia-products.com
Page 53

Sistema de audio tipo ejecutivo con reproductor de DVD Insignia NS-A3111
# Botón Función
8
(Pausar)
9 (Reproducir) Permite empezar la reproducción.
10
11 SUBTITLE
12 AUDIO/FM
/
(Subtítulos)
ESTÉREO
Puede congelar la imagen y avanzar
imagen por imagen.
CD: Presione el botón para pausar la
reproducción. Presione el botón
nuevamente, o presione el botón para
reanudar la reproducción normal.
DVD/VCD: Presione el botón para
pausar la reproducción. Presione el botón
nuevamente para ir al modo de paso
(Step).
Cada vez que presione el botón , el
video avanza de un cuadro. Presione el
botón para reanudar la reproducción.
Permite buscar hacia atrás o hacia
adelante. Presione el botón para
reanudar la reproducción. Cada vez que se
presiona el botón o , la
velocidad de búsqueda hacia atrás o hacia
adelante cambia apropiadamente.
En el modo de pausa, presione
para comenzar la reproducción en cámara
lenta hacia adelante.
Cada vez que se presiona el botón
, la velocidad de reproducción en
cámara lenta cambia apropiadamente.
Presione el botón para reanudar la
reproducción normal.
Nota: La cámara lenta paso a paso no funciona
con la reproducción de CD. La cámara lenta
hacia atrás no funciona con la reproducción de
VCD.
Durante la reproducción, usted puede
cambiar entre los diferentes idiomas de
los subtítulos o desactivar los subtítulos.
Cuando se está reproduciendo un DVD,
presione el botón de subtítulos
(SUBTITLE) para mostrar los subtítulos
en el idioma de reproducción actual.
Presione repetidamente para seleccionar
el idioma deseado para los subtítulos.
Nota: Esta función sólo puede usarse con
discos en los cuales se han grabado subtítulos
en diferentes idiomas. El número de idiomas
grabados puede ser diferente, dependiendo del
disco.
Presione para cambiar a un idioma de
audio diferente en el disco durante la
reproducción. Usted puede cambiar entre
diferentes idiomas de audio o salidas de
audio.
Cuando se está reproduciendo un disco,
presione el botón AUDIO/FM ST para
mostrar el número de pista de audio de
reproducción actual.
Presione repetidamente el botón para
seleccionar la pista de audio deseada.
Nota: Si solo hay una pista de audio disponible
en el disco, el número no cambiará.
Funciones de reproducción avanzadas
Para reproducir usando la función de
visualización (Display):
• Cuando el disco se está reproduciendo,
presione el botón INFO para mostrar la
información de reproducción presente en el
disco.
En el caso de DVDs:
• Presione el botón INFO vez para mostrar
la información de reproducción del DVD.
Formato de disco
Título actual
Título
Número de Títulos
Capítulo actual
Número de capítulos
Capítulo
Tiempo transcurrido
• Presione el botón INFO dos veces para
mostrar información de reproducción
adicional del DVD.
Audio
Subtítulos
---
Ángulo
• Presione el botón INFO tres veces para
verificar el tiempo de reproducción del
título en curso.
• Presione el botón INFO cuatro veces para
verificar el tiempo restante del título en
curso.
• Presione el botón INFO cinco veces para
mostrar más información sobre la
reproducción.
La siguiente información se muestra,
dependiendo en el tipo de disco que se
reproduce:
• TT (Información del título) – Muestra el
número de título que se reproduce y el
número total de títulos grabados en el
disco.
• CH (Información de capítulo) – Muestra el
número de capítulo que se reproduce y el
número total de capítulos grabados en el
disco.
• Elapsed Time (Tiempo transcurrido) –
Muestra el tiempo transcurrido desde el
comienzo del título/capítulo/disco/pista
que se reproduce.
Nota
Si se muestra un "-" enfrente del tiempo, el
número muestra el tiempo restante del
título/capítulo/disco/pista.
• Audio - Muestra la pista de audio
seleccionada actualmente.
• Subtitle language (Idioma de subtítulos)
- Muestra el número del idioma
(subtítulos) seleccionado actualmente.
• Angle (Ángulo) – Muestra el ángulo de
cámara seleccionado actualmente.
Cuando se reproduce un disco sin
ángulos múltiples, aparece OFF
(Desactivado).
• TRK (Información de pista) – Muestra el
número de pista que se reproduce en
este momento y el número total de pistas
grabadas en el disco.
• Repeat Mode (Modo de repetición) –
Muestra cualquier modo de repetición que
esté establecido.
Nota
Después de verificar los ajustes, presione
nuevamente el botón INFOpara apagar la
pantalla.
www.insignia-products.com
53
Page 54

Sistema de audio tipo ejecutivo con reproductor de DVD Insignia NS-A3111
Menú d
DVD (DVD PROG)
Uso de la función “Ir a” (GOTO)
Esta función le permite seleccionar
directamente cualquier punto del disco para
comenzar la reproducción.
DVD
TT
Título actual
7 /36
CH
1/41
Capítulo
Para seleccionar un título, capítulo o pista
específica:
1 Presione el botón GOTO (Ir a). Se abre el
menú de “Ir a” (
2 Presione el botón
GOTO
).
o para resaltar un
título, capítulo o pista y presione el botón
numérico (0 - 9) correspondiente.
3 Presione el botón de aceptar (OK) para
confirmar. Su sistema de audio comenzará la
reproducción desde la posición que
seleccionó.
Nota
Presione el botón de ampliar/borrar
(ZOOM/CLEAR) para reiniciar el título, capítulo o
pista resaltado.
Para ubicar un tiempo específico:
1 Presione el botón GOTO (Ir a). Se abre el
menú de “Ir a” (
2 Presione el botón
GOTO
).
o para resaltar el
tiempo.
3 Teclee directamente el tiempo a donde
comenzará la reproducción usando los
botones numéricos (0 – 9).
• Los primeros dos dígitos son las horas.
• Los siguientes dos dígitos son los
minutos.
• Los últimos dos dígitos son los segundos.
4 Después de ingresar el tiempo, presione el
botón de aceptar (OK) para confirmar. Su
sistema de audio comenzará a reproducir
desde el tiempo que seleccionó.
00:03:12
Tiempo
Uso de la reproducción programada
La reproducción programada le permite ingresar
el orden en el que el disco reproducirá los
capítulos o pistas.
Para reproducir un disco DVD, CD, VCD, o
SVCD usando la reproducción programada:
1 Con un disco en el sistema de audio,
presione el botón de modo de reproducción
(PLAYMODE). Se abrirá el menú de modo
de reproducción (
Playmode
PLAY MODE
PLAY MODE
MODE PROG
MODE PROG
REPEAT OFF
REPEAT OFF
).
2 Con la opción de modo (MODE) resaltada,
presione
o para seleccionar PROG.
3 Presione el botón de aceptar (OK) para
confirmar. Se abre el menú de programación
(
PROG
).
Nota
Durante la reproducción de VCD y SVCD, la
función sólo está disponible cuando PBC (Control
de reproducción) está desactivado.
e programación de
Menú de programación de CD, VCD o SVCD (PROG)
Título
Capítulo
54
Notas
• Algunos discos quizás no permitan usar esta
función.
• Algunas escenas quizás no pueden ubicarse
de la manera precisa que usted especifique.
• Este método de acceder a una ubicación
específica está disponible sólo dentro del título
actual del disco DVD.
• Presione el botón de ampliar/borrar
(ZOOM/CLEAR) para reiniciar el tiempo
cuando el tiempo está resaltado.
4 Ingrese los números de título (DVD) o pista
(CD) en los campos suministrados (
5 Presione el botón
capítulo e ingrese los números de capítulo
(sólo para DVD) en los campos
suministrados (
6 Presione el botón , , , o para
moverse a otro campo y luego repita los
pasos anteriores para otras entradas.
www.insignia-products.com
).
o para resaltar el
).
Page 55

Sistema de audio tipo ejecutivo con reproductor de DVD Insignia NS-A3111
7 Presione o resalte reproducir (PLAY) en
la pantalla y luego presione el botón de
aceptar (OK) para comenzar la reproducción
programada.
Notas
• Resalte CLEAR (Borrar) en el menú de
programación (
aceptar (OK) para borrar todas las entradas.
• Durante la reproducción de VCD/SVCD, la
función sólo está disponible cuando PBC
(Control de reproducción) está desactivado.
PROG
) y presione el botón de
Uso de la reproducción aleatoria
Los capítulos en un DVD y las pistas en el CD
pueden ser reproducidos en orden aleatorio.
Para usar la reproducción aleatoria:
1 Con un disco en el sistema de audio,
presione el botón de modo de reproducción
(PLAYMODE). Se abrirá el menú de modo
de reproducción (
Playmode
).
2 Con la opción de modo (MODE) resaltada,
presione
o para seleccionar RANDOM
(Aleatorio).
3 Presione el botón de aceptar (OK) para
confirmar. El disco se reproduce en orden
aleatorio.
Uso de la reproducción repetida
Usted puede reproducir repetidamente un título,
capítulo o una pista determinada.
Nota
Durante la reproducción de VCD/SVCD, la función
sólo está disponible cuando PBC (Control de
reproducción) está desactivado.
Para repetir un título, capítulo, una pista o
todo el disco:
1 Con un disco en el sistema de audio,
presione el botón de modo de reproducción
(PLAYMODE). Se abrirá el menú de modo
de reproducción (
Playmode
).
Para repetir una sección determinada de un
disco:
1 Mientras se está reproduciendo el disco,
presione el botón A-B para establecer el
comienzo de la sección que desea reproducir
repetidamente.
2 Cuando la reproducción alcanza el final de la
sección que quiere repetir y presione A-B de
nuevo. Inmediatamente, su sistema de audio
comienza a repetir la sección que
seleccionó.
3 Presione el botón A-B de nuevo para borrar
la reproducción repetida programada y
regresar a la reproducción normal.
Notas
• La función de repetición A-B solo puede usarse
dentro del mismo título. Si el inicio y el fin de la
sección que se va a repetir están en títulos
diferentes, no funcionará.
• La función Repetir A-B no funciona en escenas
donde se han grabado ángulos de cámara
diferentes.
Uso de PBC (Control de reproducción de VCD/SVCD)
Para usar PBC (Control de reproducción):
1 Cuando se está reproduciendo un VCD o
SVCD, presione el botón de ángulo/PBC
(ANGLE/PBC) repetidamente para cambiar
entre PBC (control de reproducción) activado
(ON) y desactivado (OFF).
• Si usted selecciona PBC ON (PBC
activado), el menú de disco (si está
disponible) aparecerá en el televisor. Use
el botón o los botones
numéricos (0-9) para seleccionar una
operación de reproducción.
• Si selecciona PBC OFF (PBC
desactivado), la unidad se saltará el menú
del disco y reproducirá directamente.
Playmode (Modo de reproducción) está
disponible cuando se reproduce un VCD.
Uso de la función de marcador
La función de marcador (Bookmark) le permite
marcar un punto en el DVD que usted desea ver
nuevamente.
2 Presione , para resaltar REPEAT
(Repetir) y presione
o para seleccionar
el modo de repetición que guste.
• En el caso de DVDs — Off (Desactivado)
> Chapter (Capítulo) > Title (Título)
• En el caso de CDs, VCDs, o SVCDs —
Off (Desactivado) > REP 1 (Repetir 1) >
REP ALL (Repetir todo)
• En el caso de discos con MP3, JPEG, o
WMA — Off (Desactivado) > REP DIR
(Repetir directorio) > REP 1 (Repetir 1) >
REP ALL (Repetir todo)
3 Presione el botón de aceptar (OK) para
confirmar. El modo seleccionado se resaltará
en la pantalla y se repetirá la porción
seleccionada del disco.
www.insignia-products.com
Para crear un marcador:
1 Durante la reproducción de un DVD o CD,
presione el botón BOOKMARK (Marcador)
para acceder al menú de marcador.
2 Presione el botón o para navegar y
presione aceptar (OK) para marcar el punto
deseado.
Para recuperar una escena marcada:
1 Durante la reproducción, presione el botón
de marcador (BOOKMARK) para acceder al
menú del marcador.
2 Use el botón o para resaltar el
marcador deseado y presione para
reproducir desde el punto marcado.
3 Presione el botón de borrar (CLEAR) para
reiniciar el marcador resaltado.
55
Page 56

Sistema de audio tipo ejecutivo con reproductor de DVD Insignia NS-A3111
Selección de diferentes modos de ecualizador y control de graves EX (EX BASS)
Para ajustar el modo de ecualizador:
• Presione repetidamente el botón de
ecualizador (EQ) para alternar entre los
cinco modos de ecualizador: FLAT (Normal),
ROCK, POP, CLASSIC (Clásica) o JAZZ.
Para ajustar el control de Graves EX (EX
Bass):
• Presione EXBASS (Graves EX) para activar
o desactivar el efecto de sonido EXBASS.
Uso de la función de temporizador de apagado automático
Esta función le permite seleccionar un tiempo
para que su sistema de audio cambie
automáticamente al modo de suspensión.
Para configurar el temporizador de apagado
automático:
• Presione repetidamente el botón de apagado
automático (SLEEP) para alternar entre las
siguientes opciones de temporizador de
apagado automático:
• 90 MINUTOS, 80 MINUTOS, 70
MINUTOS, 60 MINUTOS, 50 MINUTOS,
40 MINUTOS, 30 MINUTOS, 20
MINUTOS, 10 MINUTOS, OFF
(Desactivado)
Reproducción de archivos MP3, WMA y JPEG
9
Para verificar el tiempo restante de apagado
automático:
• Presione el botón de apagado automático
(SLEEP) una vez y se mostrará el tiempo
restante.
Para cancelar el temporizador de apagado
automático:
• Presione repetidamente el botón de apagado
automático (SLEEP) hasta que se muestre el
mensaje “SLEEP OFF” (Apagado automático
cancelado).
DAV8611
# Botón Función
1
2
3
4AMPLIAR/
5 GIRAR (Sólo para JPEGs) Durante la
6
(Detener)
, , , o
y OK
(Aceptar)
(Saltar
hacia adelante)
o (Saltar
hacia atrás)
BORRAR
(Abrir/Cerrar)
Presione una vez para detener
instantáneamente la reproducción actual e
ingresar al modo de reanudar
reproducción (Resume Play).
Permite mostrar el menú de selección
durante la reproducción (sólo para
archivos JPEG y MPEG4).
Navegación activa – Presione los botones
direccionales para seleccionar un archivo
y presione el botón de aceptar (OK) para
comenzar la reproducción.
Cuando se está reproduciendo un disco,
usted puede saltar hacia atrás o hacia
adelante una pista o imagen.
Permite ampliar una imagen durante una
presentación de archivos JPEG.
Presione el botón de borrar (CLEAR) para
borrar la información ingresada.
reproducción de un archivo JPEG,
presione el botón de girar (ROTATE) para
girar la imagen.
Permite abrir la bandeja de discos.
Nota: Coloque el disco en la bandeja de discos
con el lado de la etiqueta hacia arriba.
Presione de nuevo para cerrar la bandeja.
El sistema de audio comenzará a
reproducir automáticamente.
56
www.insignia-products.com
Page 57

Sistema de audio tipo ejecutivo con reproductor de DVD Insignia NS-A3111
# Botón Función
7
(Pausar)
8 (Reproducir) Permite empezar la reproducción.
9
/
Permite pausar la reproducción. Presionar
de nuevo para reanudar la reproducción
normal.
Permite buscar hacia atrás o hacia
adelante. Presione el botón para
reanudar la reproducción. Cada vez que se
presiona el botón o , la
velocidad de búsqueda hacia atrás o hacia
adelante cambia apropiadamente.
En el modo de pausa, presione o
para comenzar la reproducción
en cámara lenta hacia adelante o hacia
atrás.
Cada vez que se presiona el botón
o , la velocidad de reproducción en
cámara lenta cambia apropiadamente.
Presione el botón para reanudar la
reproducción normal.
Nota: La cámara lenta paso a paso no funciona
con la reproducción de CD. La cámara lenta
hacia atrás no funciona con la reproducción de
VCD.
Uso del menú de selección
Para usar el menú de selección:
1 Coloque el disco con MP3, WMA o JPEG en
la bandeja de discos del sistema de audio.
Se abre el menú de selección (
Selection
Aparecen carpetas en el panel izquierdo y
están enumeradas en orden ascendiente.
Música
Imagen
2 Cuando usted resalta una de las carpetas,
todo el contenido de esta carpeta se
mostrará en el lado derecho. Los archivos de
música/imágenes pueden ser seleccionados
individualmente para la reproducción
deseada.
3 Presione , , , o para resaltar el
icono de música (Music) o imagen (Picture)
en la parte inferior del menú de selección y
presione el botón de aceptar (OK) para
confirmar.
4 Seleccione los archivos y presione el botón
de aceptar (OK) o para comenzar la
reproducción.
).
• Music [Música] (Archivos MP3 o WMA)
— Su sistema de audio comienza a
reproducir todos los archivos de MP3 o
WMA que se seleccionaron. Luego
reproduce todos los archivos en las
subcarpetas contenidas dentro de la
misma carpeta. Después, la unidad
reproduce el resto de las carpetas en el
disco.
• Picture [Imagen] (Archivos JPEG) — La
unidad comienza la presentación de
archivos JPEG que se seleccionaron.
Luego muestra todos los otros archivos
JPEG restantes que se encuentran en la
misma carpeta. Después, la unidad
reproduce los archivos JPEG de las
subcarpetas que están contenidas en la
misma carpeta
Para programar las canciones MP3:
1 Presione el botón de modo de reproducción
(PLAYMODE). Se abre el menú de modo de
reproducción (
Play Mode
).
PLAY MODE
PLAY MODE
MODE PROG
MODE PROG
REPEAT OFF
REPEAT OFF
2 Con la opción de modo (MODE) resaltada,
presione o para seleccionar PROG y
presione el botón de aceptar (OK) para
ingresar al menú de programación de MP3.
En este menú, la letra F (de Folder) significa
carpeta, y T (de Track) significa pista.
3 Usando números de dos dígitos, ingrese el
número de la carpeta debajo de la F y el
número de pista debajo de la T.
4 Presione , , , o para moverse a
otro campo y repita el paso 3 para la
siguiente canción.
5 Presione o resalte PLAY (Reproducir) en
la pantalla y luego presione el botón de
aceptar (OK) para comenzar la reproducción
programada.
6 Resalte CLEAR (Borrar) en el menú de
programación (PROG) y presione el botón de
aceptar (OK) para borrar todas las entradas.
Puede programar hasta 16 canciones.
Escuchando la radio
Nota
Verifique que las antenas FM y AM estén
conectadas correctamente.
Puede programar hasta 20 estaciones de radio
FM y 20 de radio AM.
Para buscar una estación de radio:
1 Presione el botón de suspensión/encendido
(STANDBY/ON) para encender su sistema
de audio.
2 Presione el botón de fuente (SOURCE)
repetidamente hasta que se seleccione el
modo de radio. Presione nuevamente el
botón para cambiar entre las bandas AM y
FM, si es necesario.
3 Sintonice una estación de radio con uno de
los siguientes métodos:
www.insignia-products.com
57
Page 58
Sistema de audio tipo ejecutivo con reproductor de DVD Insignia NS-A3111
• Sintonización manual — Presione el
botón o repetidamente en el
control remoto hasta que aparezca la
frecuencia deseada en la pantalla.
• Sintonización automática — Presione el
botón o en el control remoto
para activar la función de escaneo
automático (AUTO SCAN). Se detendrá
en cualquier estación de radio que se
encuentre. Repita este proceso hasta que
se detenga en la estación deseada.
Para guardar una estación de radio:
1 Cuando ubique una estación de radio que
quiera guardar, presione el botón de aceptar
(OK) para guardarla. El número de memoria
comenzará a parpadear.
2 Presione el botón o para seleccionar
el número de canal que quiere que la unidad
memorice.
3 Presione nuevamente el botón de aceptar
(OK) para guardar el canal en el número de
memoria seleccionado. El número de
memoria dejará de parpadear para confirmar
que el canal ha sido guardado.
4 Repita los pasos anteriores para guardar
hasta 20 canales de radio FM y AM.
Nota
Cuando sintonice manualmente una estación de
FM débil, presione el botón AUDIO/FM ST para
cambiar del modo estéreo (Stereo) al modo
monofónico (Mono) para reducir el ruido de fondo.
Para regresar a un canal memorizado:
1 Presione el botón de suspensión/encendido
(STANDBY/ON) para encender su sistema
de audio.
2 Presione el botón de fuente (SOURCE)
repetidamente hasta que se seleccione el
modo de radio. Presione nuevamente para
cambiar entre las bandas AM y FM si es
necesario.
3 Presione el botón o en el control
remoto o el botón o en el panel
frontal para cambiar a otro canal de radio
memorizado.
4 Use los botones numéricos (0-9) para
sintonizar directamente los primeros 10
canales memorizados.
Localización y corrección de fallas
Bajo ninguna circunstancia trate de reparar su
sistema de audio por su cuenta, ya que esto
anulará la garantía. Únicamente el personal de
servicio calificado podrá remover la cubierta o
reparar este reproductor.
Problema Solución
La unidad no
enciende
No hay
imagen
Imagen
distorsionada
La imagen no
tiene color
Imagen
oscilante
La unidad no
regresa a la
pantalla de
arranque
cuando se
retira un
disco
• Verifique que el botón de
suspensión/encendido (Standby/On) al frente
de su sistema de audio se encuentra en la
posición de encendido (on).
• Verifique que el cable de alimentación esté
enchufado correctamente.
• Verifique que hay corriente en el
tomacorriente CA mediante enchufar otro
aparato.
• Verifique que el televisor esté encendido.
• Seleccione la entrada de AV correcta en el
televisor.
• Revise la conexión de video.
• Verifique que el selector de canales esté en
AV en el televisor (Refiérase al manual de su
televisor para obtener instrucciones).
• Cuando el Barrido progresivo se encuentra
activado, se desactiva la salida de video
compuesto. Presione el botón de selección
de video (V-SELECT) para seleccionar el
modo de salida video correcto, de lo
contrario no habrá imagen o ésta se
encontrará distorsionada.
• Revise el disco para asegurarse que no hay
huellas digitales y límpielo con un paño
suave, del centro hacia la orilla.
• A veces puede aparecer un pequeño nivel de
distorsión de imagen. Esto no es un mal
funcionamiento.
• El formato del disco no corresponde al
equipo de televisión usado (PAL/NTSC).
• Verifique que solamente una salida de video
esté conectada.
• El formato del disco no corresponde al
equipo de televisión usado (PAL/NTSC).
• Verifique que el reproductor de DVD no está
conectado a través de un VCR.
Aleje su sistema de audio de posibles fuentes de
interferencia o emisión (por ejemplo, el radio, un
amplificador de potencia o un radiador).
• Revise si el programa requiere que se cargue
otro disco.
• Reinicie su sistema al desconectar el cable de
alimentación y reconectarlo.
58
El sistema no
responde al
control
remoto
No hay
sonido
www.insignia-products.com
• Apunte el control remoto directamente al
sensor al frente del sistema.
• Evite todos los obstáculos que puedan
interferir con la trayectoria de la señal.
• Revise o reemplace las pilas en el control
remoto.
• Revise las conexiones de audio.
• Si está usando un amplificador de alta
fidelidad (Hi-Fi) , pruebe con otra fuente de
sonido.
• Limpie el disco.
• Verifique que el disco no está defectuoso
probando con otro disco.
Page 59
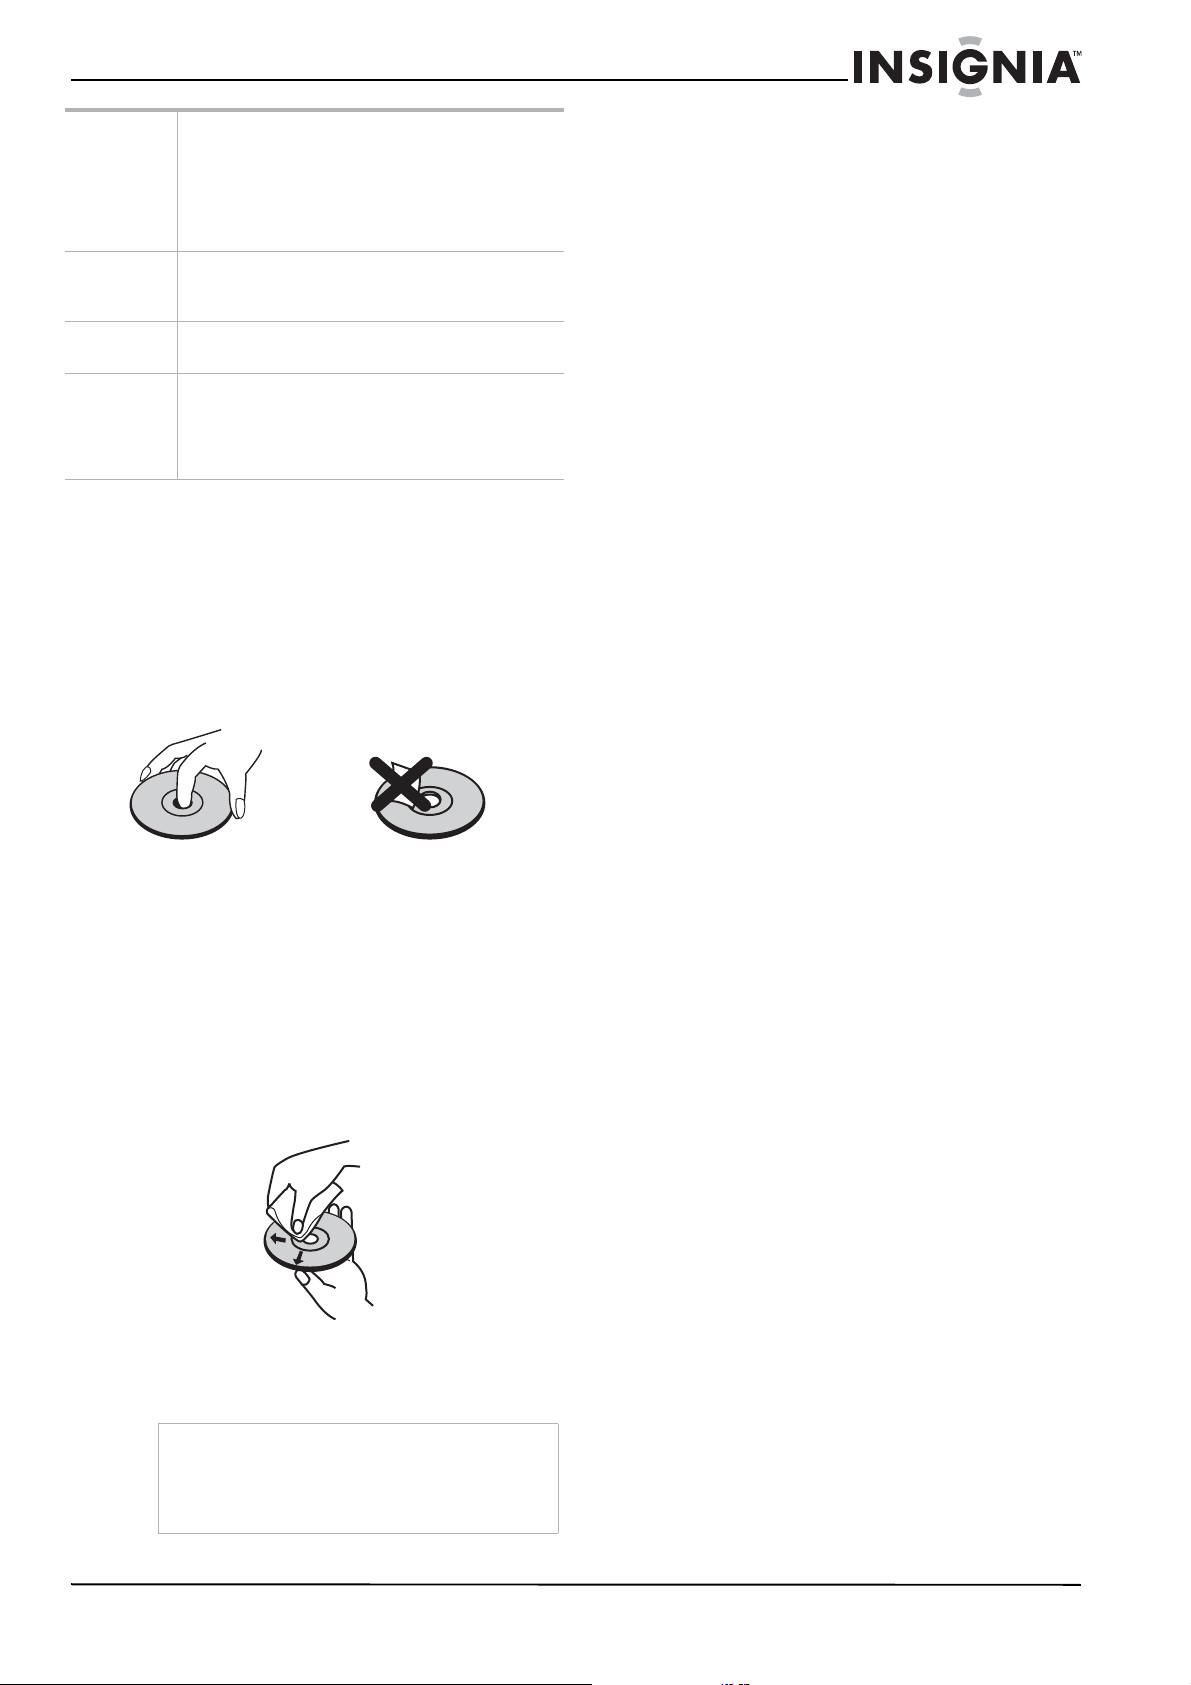
Sistema de audio tipo ejecutivo con reproductor de DVD Insignia NS-A3111
No hay audio
en la salida
digital
Un disco no
se puede
reproducir
Olvidó la
contraseña
Funcionamie
nto anormal
• Revise las conexiones digitales.
• Revise el menú de salida digital para
asegurarse que la salida digital esté
correctamente configurada.
• Verifique que el formato de sonido del idioma
de sonido seleccionado corresponde a la
capacidad del sistema de audio.
Verifique que el disco se ha colocado correctamente
en la bandeja de discos.
Sin un disco en la bandeja, ingrese 76418.
• El funcionamiento normal del sistema de
audio puede ser alterado por interferencia
externa.
• Reinicie su sistema de audio desconectando
y reconectando el cable de alimentación.
Mantenimiento
Cuidado y manejo de los discos
Manejo de los discos
No toque el lado de reproducción del disco.
Sujete el disco por el borde para no ensuciar la
superficie con sus huellas digitales. Nunca
pegue papeles o adhesivos en la superficie del
disco.
Almacenamiento de los discos
Después de reproducir un disco, guárdelo en su
estuche. No exponga el disco a la luz directa del
sol ni a fuentes de calor y nunca lo deje dentro
de un automóvil aparcado a la luz directa del sol.
Limpieza de los discos
Las huellas digitales y el polvo en el disco
pueden producir imágenes de calidad deficiente
y sonido distorsionado. Antes de utilizar un
disco, límpielo con un paño limpio. Pase el paño
desde el centro hacia fuera (hacia el borde del
disco).
Avisos legales
Declaración de cumplimiento con FCC
Este equipo ha sido sometido a pruebas y se ha
determinado que satisface los límites
establecidos para clasificarlo cómo dispositivo
digital de Clase B de acuerdo con la Parte 15 del
reglamento FCC. Estos límites están diseñados
para proporcionar una protección razonable
contra interferencias dañinas cuando el equipo
se opera en una instalación residencial. Este
equipo genera, usa y puede emitir energía de
radiofrecuencia, y si no se instala y usa de
acuerdo con el manual de instrucciones, este
aparato puede causar interferencias
perjudiciales a las comunicaciones de radio. Sin
embargo, no se garantiza que no ocurrirá
interferencia en una instalación particular. Los
cambios o modificaciones que se realicen a este
equipo podrían causar interferencia perjudicial a
menos que las modificaciones estén
expresamente autorizadas en el manual de
instrucciones. El usuario podría perder la
autoridad de operar este equipo si se realiza un
cambio o modificación no autorizado. Si este
equipo causa interferencias perjudiciales en la
recepción de la señal de radio o televisión, lo
cual puede comprobarse encendiendo y
apagando el reproductor alternativamente, se
recomienda al usuario corregir la interferencia
mediante uno de los siguientes procedimientos:
• Cambie la orientación o la ubicación de la
antena receptora.
• Aumente la distancia entre el equipo y el
receptor.
• Conecte el equipo a un tomacorriente de un
circuito distinto de aquel al que está
conectado el receptor.
• Solicite consejo al distribuidor o a un técnico
experto en radio/TV para obtener ayuda.
Este dispositivo satisface la parte 15 del
reglamento FCC. Su utilización está sujeta a las
siguientes dos condiciones:
• Este dispositivo no puede causar
interferencia dañina, y
• Este dispositivo debe aceptar cualquier
interferencia recibida, incluyendo
interferencias que puedan causar una
operación no deseada.
No utilice solventes fuertes como alcohol,
benceno, diluyente, limpiadores de venta en
comercios o pulverizador antiestático para uso
con los antiguos discos de vinilo.
Nota
No encienda nunca este producto nada más
trasladarlo de un lugar frío a uno caliente. Deje
pasar dos o tres horas antes de usarlo. Si lo utiliza
en una situación como la descrita, los discos o las
partes internas podrían resultar dañados.
www.insignia-products.com
Derechos de reproducción
© 2008 Insignia. Insignia y el logotipo de Insignia son
marcas comerciales de Best Buy Enterprise Services,
Inc. Otras marcas y nombres de productos son marcas
comerciales o marcas registradas de sus dueños
respectivos. Las especificaciones y características
están sujetas a cambio sin aviso previo u obligación.
59
Page 60

Sistema de audio tipo ejecutivo con reproductor de DVD Insignia NS-A3111
60
www.insignia-products.com
Page 61

Sistema de audio tipo ejecutivo con reproductor de DVD Insignia NS-A3111
Garantía limitada de 90 días
Insignia Products (“Insignia”) le garantiza a usted, el
comprador original de este nuevo NS-A3111
(“Producto”), que éste se encontrará libre de defectos de
material o de mano de obra en su fabricación original
por un período de 90 (noventa) días a partir de la fecha
de compra del Producto (“Período de Garantía”). Este
Producto debe ser comprado en un distribuidor
autorizado de productos Insignia y empacado con esta
declaración de garantía. Esta garantía no cubre
Productos reacondicionados. Si notifica a Insignia
durante el Período de Garantía sobre un defecto
cubierto por esta garantía que requiere reparación, los
términos de esta garantía se aplican.
¿Cuánto dura la garantía?
El Período de Garantía dura por 90 (noventa) días a
partir de la fecha en que compró el Producto. La fecha
de compra se encuentra impresa en el recibo que recibió
con el Producto.
¿Qué es lo que cubre esta garantía?
Durante el Período de Garantía, si un centro de
reparación autorizado de Insignia concluye que la
fabricación original del material o la mano de obra del
Producto se encuentran defectuosos Insignia (cómo su
opción exclusiva): (1) reparará el Producto con
repuestos nuevos o reacondicionados; o (2)
reemplazará el Producto con uno nuevo o con uno
reacondicionado con repuestos equivalentes. Los
Productos y repuestos reemplazados bajo esta garantía
se volverán propiedad de Insignia y no se le regresarán
a usted. Si se requiere la reparación de Productos o
partes después de que se vence el Período de Garantía,
usted deberá pagar todos los costos de mano de obra y
de repuestos. Esta garantía estará vigente con tal que
usted sea el dueño de su producto Insignia durante el
periodo de garantía. El alcance de la garantía se termina
si usted vende o transfiere el producto.
¿Cómo se obtiene la reparación de garantía?
Si ha comprado el Producto en una tienda de ventas,
lleve su recibo original y el Producto a la tienda en
donde lo compró. Asegúrese de que vuelva a colocar el
Producto en su empaque original o en un empaque que
provea la misma protección que el original. Si compró el
Producto en un sitio Web, envíe por correo su recibo
original y el Producto a la dirección postal listada en el
sitio Web. Asegúrese de colocar el Producto en su
empaque original o en un empaque que provea la
misma protección que el original.
Para obtener servicio de garantía a domicilio para un
televisor con una pantalla de 25 pulgadas o más, llame
al 1-888-BESTBUY. El soporte técnico diagnosticará y
corregirá el problema por teléfono o enviará un técnico
certificado por Insignia a su casa.
• Un panel de pantalla de plasma dañado por la
persistencia de imágenes estáticas (sin
movimiento), mostradas por periodos de tiempo
extendido (efecto “burn-in”).
Esta garantía tampoco cubre:
• Daño debido al uso o mantenimiento incorrecto
• La conexión a una fuente de voltaje incorrecta
• El intento de reparación por alguien que no sea una
compañía autorizada por Insignia para reparar el
Producto
• Productos vendidos tal cual (en el estado en que se
encuentran) o con todas sus fallas
• Productos consumibles, tal como fusibles o
baterías
• Productos en los cuales el número de serie
asignado en la fábrica ha sido alterado o removido
EL REEMPLAZO DE REPARACIÓN SEGÚN
PROVISTO BAJO ESTA GARANTÍA ES SU ÚNICO
RECURSO. INSIGNIA NO SERÁ RESPONSABLE POR
DAÑOS INCIDENTALES O CONSECUENTES DEBIDO
AL INCUMPLIMIENTO DE CUALQUIER GARANTÍA
EXPRESA O IMPLÍCITA RELACIONADA CON ESTE
PRODUCTO, INCLUYENDO PERO SIN LIMITARSE A
LA PÉRDIDA DE INFORMACIÓN, LA PÉRDIDA DE
NEGOCIOS O DE GANANCIAS. INSIGNIA PRODUCTS
NO HACE NINGUNA OTRA GARANTÍA EXPRESA E
IMPLÍCITA RELACIONADA A ESTE PRODUCTO,
INCLUYENDO PERO SIN LIMITARSE A, CUALQUIER
GARANTÍA IMPLÍCITA Y CONDICIONES DE
COMERCIALIZACIÓN Y IDONEIDAD PARA UN USO
PARTICULAR, ESTÁN LIMITADAS EN DURACIÓN AL
PERÍODO DE GARANTÍA DECLARADO
ANTERIORMENTE Y NINGUNA GARANTÍA YA SEA
EXPRESA O IMPLÍCITA SE APLICARÁ DESPUÉS DEL
PERÍODO DE GARANTÍA. ALGUNOS ESTADOS,
PROVINCIAS Y JURISDICCIONES NO PERMITEN
RESTRICCIONES EN CUANTO A LA DURACIÓN DE
UNA GARANTÍA IMPLÍCITA, ASÍ QUE LA
RESTRICCIÓN ANTERIOR PUEDE NO APLICARSE
EN SU CASO. ESTA GARANTÍA LE DA DERECHOS
LEGALES ESPECÍFICOS, Y USTED PUEDE POSEER
OTROS DERECHOS QUE VARÍAN DE ESTADO A
ESTADO, O DE PROVINCIA A PROVINCIA.
Comuníquese con Insignia:
Para servicio al cliente favor llamar al 1-877-467-4289
www.insignia-products.com
Distribuido por Best Buy Purchasing, LLC
Dynex, 7601 Penn Avenue South, Richfield, Minnesota,
E.U.A. 55423-3645
© 2008 Best Buy Enterprise Services, Inc.Todos los
derechos reservados. INSIGNIA es una marca
comercial de Best Buy Enterprise Services, Inc.
registrada en ciertos países. Todos los otros productos y
los nombres de marca son marcas comerciales de sus
respectivos dueños.
¿En dónde es válida la garantía?
Esta garantía sólo es válida al comprador original del
producto en los Estados Unidos y en Canadá.
¿Qué es lo que no cubre la garantía?
Esta garantía no cubre:
• Capacitación del cliente
• Instalación
• Ajuste de configuración
• Daños cosméticos
• Daños debido a actos de la naturaleza, tal como
rayos
• Accidentes
• Mal uso
• Abuso
• Negligencia
• Uso comercial
• Modificación de alguna parte del Producto,
incluyendo la antena
www.insignia-products.com
61
Page 62

Sistema de audio tipo ejecutivo con reproductor de DVD Insignia NS-A3111
62
www.insignia-products.com
Page 63

Sistema de audio tipo ejecutivo con reproductor de DVD Insignia NS-A3111
www.insignia-products.com
63
Page 64

www.insignia-products.com (877) 467-4289
Distributed by Best Buy Purchasing, LLC
7601 Penn Avenue South, Richfield, MN USA 55423-3645
All rights reserved. INSIGNIA is a trademark of Best Buy Enterprise Services, Inc. Registered in some countries.
Tous droits réservés. INSIGNIA est une marque de Best Buy Enterprise Services, Inc. Déposée dans certains pays.
Tous les autres produits ou noms de marques sont des marques de commerce qui appartiennent à leurs propriétaires respectifs.
Todos los derechos reservados. INSIGNIA es una marca de Best Buy Enterprise Services, Inc. Registrada en ciertos países.
All other products and brand names are trademarks of their respective owners.
Todos los demás productos y marcas son marcas comerciales de sus respectivos dueños.
© 2008 Best Buy Enterprise Services, Inc.
Distribué par Best Buy Purchasing, LLC
7601 Penn Avenue South, Richfield, MN USA 55423-3645
© 2008 Best Buy Enterprise Services, Inc.
Distribuido por Best Buy Purchasing, LLC
7601 Penn Avenue South, Richfield, MN USA 55423-3645
© 2008 Best Buy Enterprise Services, Inc.
08-1088
 Loading...