

Page 1

User Guide | Guide de l’utilisateur | Guía del Usuario
Mini-Shelf System with 3-CD Changer and AM/FM Tuner
Minisystème audio avec changeur de CD 3 disques et syntoniseur
AM/FM | Mini Sistema de audio con Cambiador de 3 CDs y
sintonizador de AM/FM
NS-A2113
Page 2

Page 3
Insignia NS-A2113
Mini-Shelf System
Contents
Welcome. . . . . . . . . . . . . . . . . . . . . . . . . . . . . . . . . . . . . . . . . .3
Safety information. . . . . . . . . . . . . . . . . . . . . . . . . . . . . . . . . . .3
Features . . . . . . . . . . . . . . . . . . . . . . . . . . . . . . . . . . . . . . . . . . 7
Setting up your shelf system. . . . . . . . . . . . . . . . . . . . . . . . . .10
Using your mini-shelf system . . . . . . . . . . . . . . . . . . . . . . . . .11
Troubleshooting. . . . . . . . . . . . . . . . . . . . . . . . . . . . . . . . . . . .16
Maintaining your shelf system. . . . . . . . . . . . . . . . . . . . . . . . .17
Legal notices. . . . . . . . . . . . . . . . . . . . . . . . . . . . . . . . . . . . . . 18
Warranty . . . . . . . . . . . . . . . . . . . . . . . . . . . . . . . . . . . . . . . . .19
Français . . . . . . . . . . . . . . . . . . . . . . . . . . . . . . . . 21
Español. . . . . . . . . . . . . . . . . . . . . . . . . . . . . . . . . 41
Welcome
Congratulations on your purchase of a high-quality Ins ig nia produ ct .
Your NS-A2113 represents the state of the art in mini-shelf systems
and is designed for reliable and trouble-free performance.
Safety information
To prevent fire or shock hazard, do not plug the power cord into an
extension cord, receptacle, or other outlet unless the blades can be
fully inserted to prevent blade exposure. To prevent fire or shock
hazard do not expose this appliance to rain or moisture.
CAUTION: To reduce the risk of electric
shock, do not remo ve co v er (or back ). No
user-serviceable parts inside. Refer
servicing to qualified service personnel.
www.insignia-products.com
3
Page 4
Insignia NS-A2113 Mini-Shelf S
The lightning flash with arrowhead symbol within a
triangle is intended to alert you to the presence of
uninsulated dangerous voltage within your shelf
system's enclosure that may be of sufficient magnitude
to constitute risk of electric shock to persons.
The exclamation point within a triangle is intended to
alert you to the presence of important operating and
maintenance (servicing) instructions in the literature
accompanying your shelf system.
Warning
Your shelf system uses a laser system. Follow all operating
instructions in this guide, and save this guide for future
reference. If your shelf system requires servicing, contact
the seller or our service center.
To prevent direct exposure to the laser radiation, do not
open the case. Invisible laser radiation is present when the
case is opened or the interlocks are defeated. Do not stare
into the laser beams.
Use of any controls, adjustments, or procedures other than
those specified herein may result in hazardous radiation
exposure.
Caution
Any change or modification to your shelf system not
expressly approved by the manufacturer or its authorized
parties could void your authority to operate your shelf
system.
ystem
Caution:
Your shelf system should not be exposed to water (dripping or
splashing) and no objects filled with liquids, such as vases, should be
placed on it.
Important safeguards
• Read instructions—Read all the safety and operating
instructions before operating your shelf system.
• Retain instructions—Retain the safety and operating
instructions for future reference.
• Follow warnings—Follow all warnings on your shelf system
and in the operating instructions.
• Follow instructions—Follow all operating and use
instructions.
4
www.insignia-products.com
Page 5

Insignia NS-A2113 Mini-Shelf S
ystem
• Cleaning—Unplug your shelf system from the power outlet
before cleaning. Do not use liquid cleaners or aerosol cleaners.
Use a damp cloth for cleaning.
• Attachments—Do not use attachments not recommended by
Insignia because they may cause hazards.
• Water and moisture—Do not use your shelf system near
water, f or e xample, near a bath tub, in a wet basement, or near
a swimming pool.
• Ventilation—To ensure reliable operation of your shelf system
and to protect it from overheating, ventilation slots and
openings are provided in the cabinet back or bottom. Do not
block these openings. Do not place your shelf system on a bed,
sofa, rug, or other similar surface. Your shelf system should
never be placed near or over a radiator or heat register. Do not
place your shelf system in a built-in installation such as a
bookcase or rack unless correct ventilation is provided or the
manufacturer’s instructions have been adhered to.
• Power sources—Use only the type of power source ind icate d
on the marking label. If you are not sure of the type of power
supply to your home, consult your shelf system dealer or local
power company. For shelf systems intended to operate from
battery power or other sources, refer to the operating
instructions.
• Grounding or polarization—Your shelf system is equipped
with a polarized alternating-current line plug (a plug having one
blade wider than the other). This plug will fit into the power
outlet only one way. This is a safety feature. If you are unable to
insert the plug fully into the outlet, try reversing the plug. If the
plug should still fail to fit, contact your electrician to replace
your obsolete outlet. Do not defeat the safety purpose of the
polarized plug.
• Power cord protection—Route power supply cords so that
they are not likely to be walked on or pinched by items placed
upon or against them, paying particular attention to cords at
plugs, convenience receptacles, and the point where they exit
from your shelf system.
• Lightning—For added protection for your shelf system during
a lightning storm, or when it is left unattended and unused for
long periods of time, unplug it from the power outlet and
disconnect the antenna or cable system. This will prevent
damage to your shelf system due to lightning and power line
surges.
• Overloading—Do not overload power outlets and extension
cords because this can result in a r is k of fire or ele ctr i c shock.
www.insignia-products.com
5
Page 6
Insignia NS-A2113 Mini-Shelf S
ystem
• Object and liquid entry—Never push objects of any kind into
your shelf system through openings, because they may touch
dangerous voltage points or short out parts that could result in
a fire or electric shock. Never spill liquid of any kind on your
shelf system.
• Servicing—Do not attempt to service your shelf system
yourself, because opening or removing covers may expose you
to dangerous voltage or other hazards. Refer all servicing to
qualified service personnel.
• Damage requiring service—Unplug your shelf system from
the power outlet and refer servicing to qualified service
personnel under the following conditions:
• When the power supply cord or plug is damaged or frayed.
• If liquid has been spilled, or objects have fallen into your
shelf system.
• If your shelf system has been exposed to rain or water.
• If your shelf system does not operate normally by following
the operating instructions. Adjust only those controls that
are covered by the operating instructions, because incorrect
adjustment of other controls may result in damage and
often requires extensive work by a qualified technician to
restore your shelf system to its normal operation.
• If your shelf system has been dropped or damaged in any
way.
• When your shelf system exhibits a distinct change in
performance.
• Replacement parts—When replacement parts are required,
make sure that the service technician uses replacement parts
specified by the manufacturer that have the same
characteristics as the or ig in al part. Unauthor ized subs ti tutions
may result in fire, electric shock, injury to persons, or other
hazards.
• Safety check—Upon completion of any service or repairs to
your shelf system, ask the service technician to perform
routine safety checks to determine that your shelf system is in
correct operating condition.
• Heat—Place your shelf system away from heat sources such
as radiators, heat registers, stoves, or other products (including
amplifiers) that produce heat.
Caution
To prevent electric shock, match the wide blade of plug to
the wide slot in the power outlet and fully insert the plug.
6
www.insignia-products.com
Page 7
Insignia NS-A2113 Mini-Shelf S
Features
Front
ystem
2
31
8 9
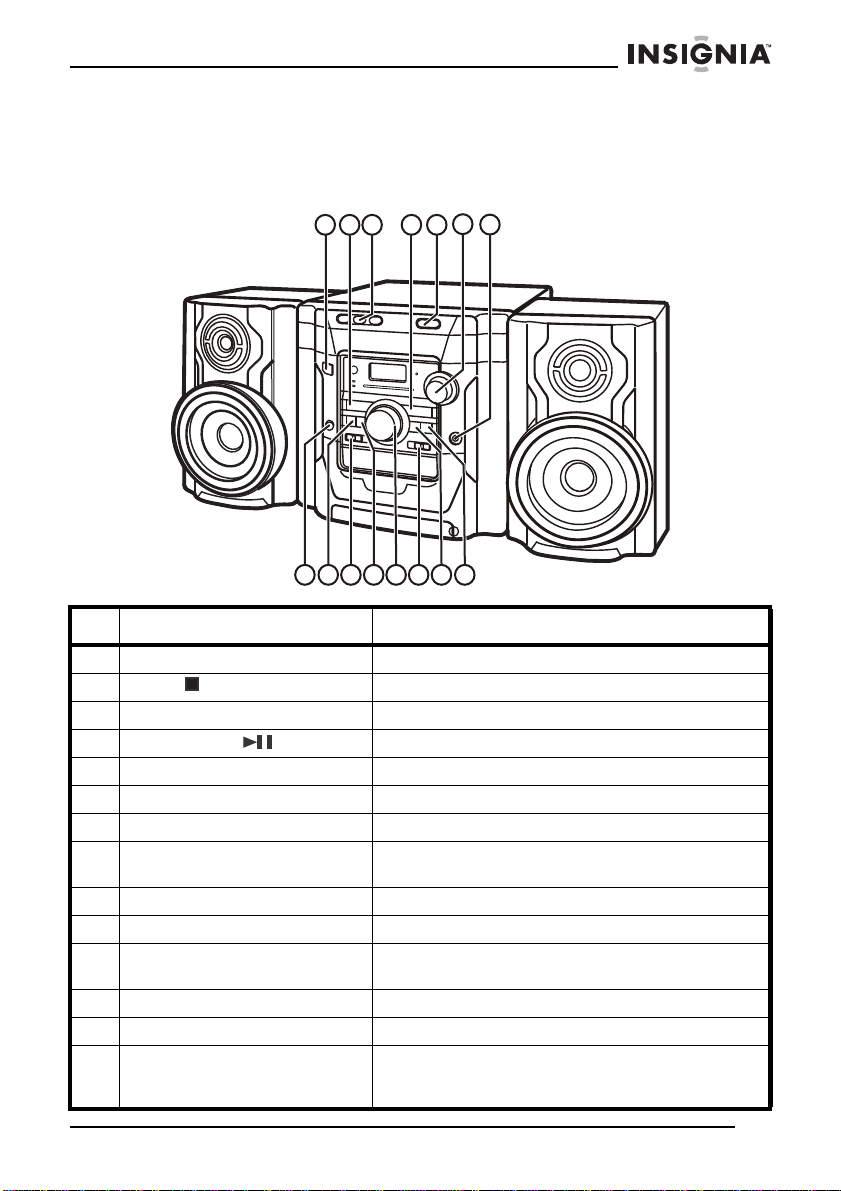
# Description Function
1 POWER button Press to turn the system on or off.
2STOP button Press to stop disc playback.
3 DISC1/DISC2/DISC3 buttons Press to select the disc to play.
4 PLAY/PAUSE
5 OPEN/CLOSE button Press to open and close the disc tray.
6 TUNING knob Turn to tune to a different radio frequency.
7 Headphone jack Connect stereo headphones here.
8 DBBS button Press to increase the bass response of the
9 PROGRAM button Press to program CD playback.
10 FUNCTION switch Switch to select CD or Radio.
11 REPEAT button Press to repeat tracks on the CD or the entire
12 VOLUME knob Turn to raise or lower the volume.
13 BAND switch Switch to select AM, FM, or FM Stereo.
14 SKIP/SEARCH DN button In radio mode, press to tune the radio to a lower
button Press to play or pause the disc.
12
10
11
player.
CD.
frequency. In playback mode, press to select a
previous track or chapter.
4
13 14
6
5
7
15
www.insignia-products.com
7
Page 8
Insignia NS-A2113 Mini-Shelf S
ystem
# Description Function
15 SKIP/SEARCH UP button In radio mode, press to tune the radio to a higher
frequency. In playback m ode, press to select the
next track or chapter.
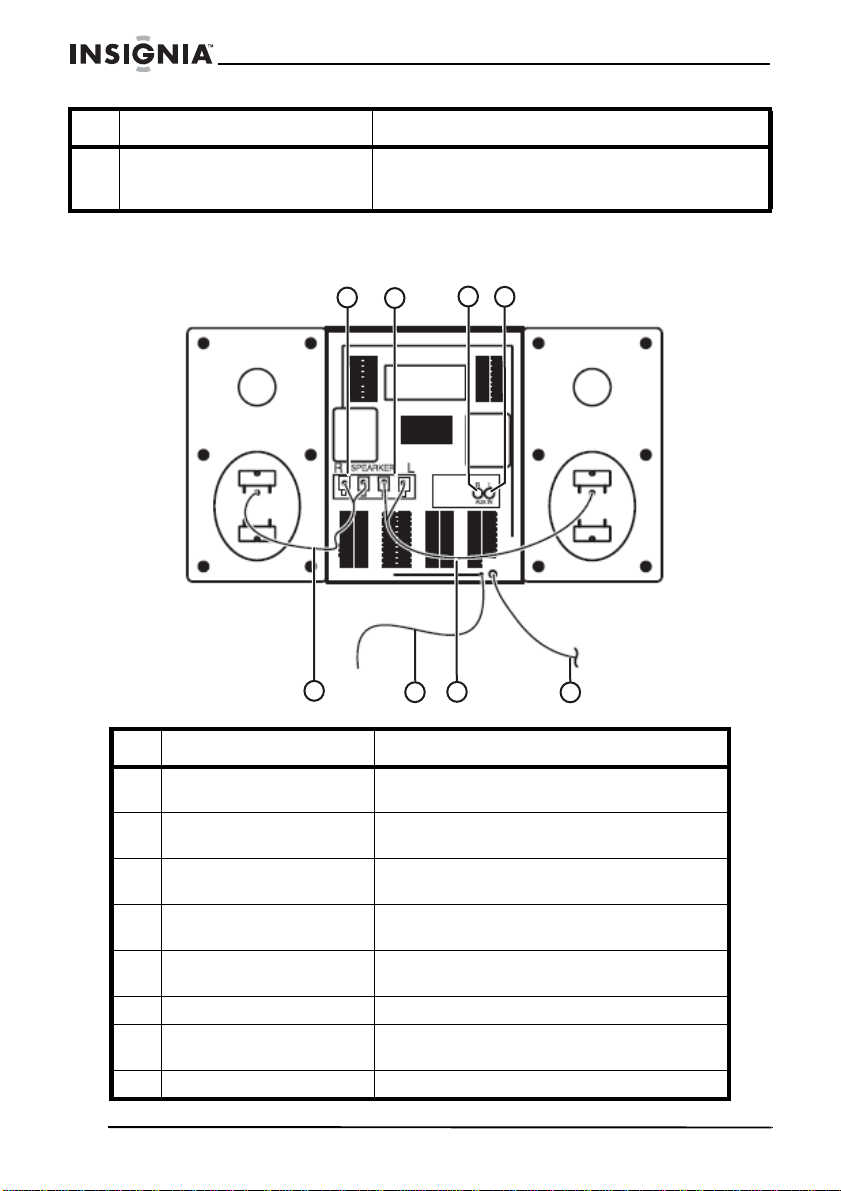
Back
3
1
2
4
# Description Function
1 Right speaker jacks Connect the wires from the right s peak er to
2 Left speaker jacks Connect the wires from the left speaker to
3 Right AUX In jack Connect the right output from an external
4 Left AUX In jack Connect the left output from an external
5 Right speaker wires Connect these wires to the right speaker
6 FM antenna Use to improve FM reception.
7 Left speaker wires Connect these wires to the left speaker
8 AC power cord Plug this cord into a power outlet.
8
5
6
7
these jacks.
these jacks.
audio source to this jack.
audio source to this jack.
jacks.
jacks.
www.insignia-products.com
8
Page 9
Insignia NS-A2113 Mini-Shelf S
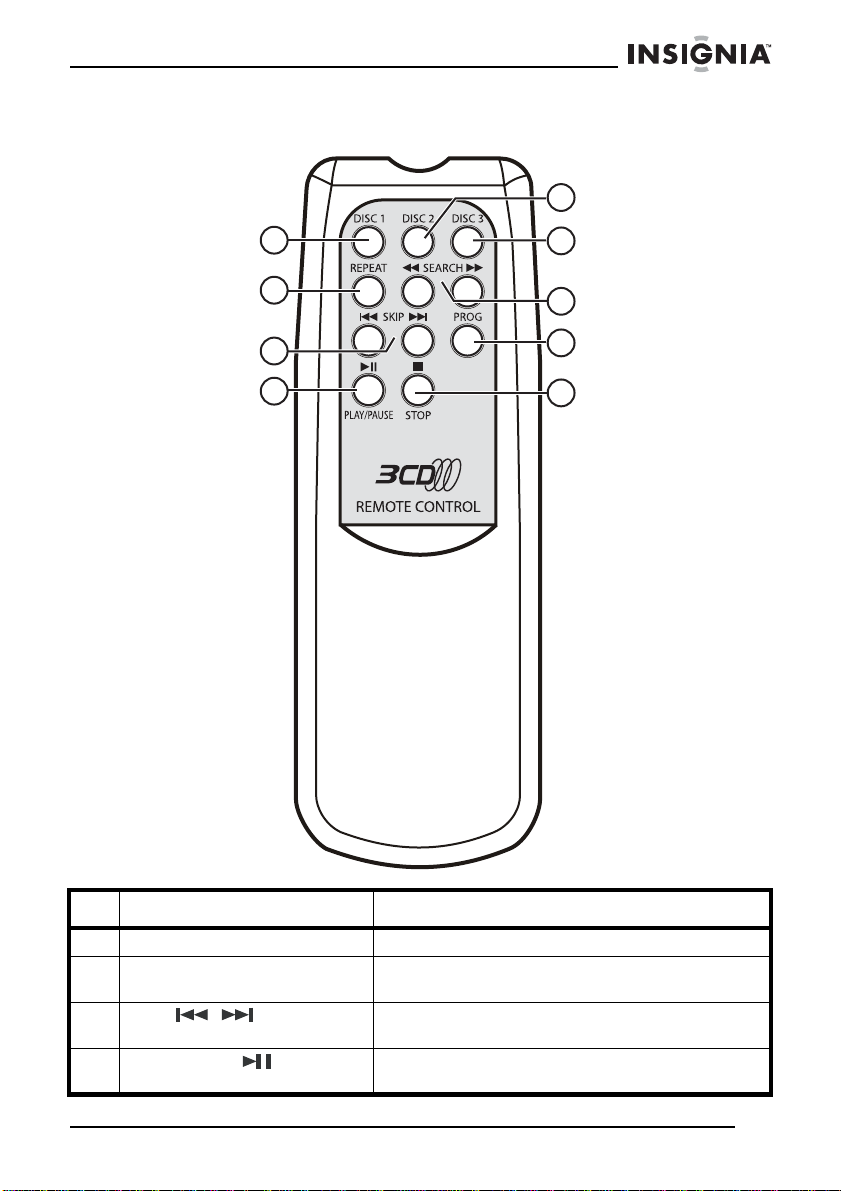
Remote
ystem
5
1
2
3
4
6
7
8
9
# Description Function
1 DISC 1 button Press to play disc 1 in the CD changer.
2 REPEAT button Press to repeat tracks on the CD or the entire
3 SKIP
4 PLAY/PAUSE
/ Press to select a previous track or chapter or the
CD.
next track or chapter.
button Press begin playback, press again to pause,
press again to resume playback.
www.insignia-products.com
9
Page 10
Insignia NS-A2113 Mini-Shelf S
# Description Function
5 DISC 2 button Press to play disc 2 in the CD changer.
6 DISC 3 button Press to play disc 3 in the CD changer.
7 SEARCH / buttons Press to fast reverse or fast forward a disc to
8 PROG button Press to program CD playback.
9STOP
button Press to st op playback of a dis c.
search for a selection .
Setting up your shelf system
Connecting the power cord
To use AC power:
1 Make sure that your local AC power source matches the voltage
shown on the plate located on the back of the system. If it does
not, consult your dealer or service center.
2 Connect the power cord to the AC connector on the shelf system,
then plug it into the AC wall outlet.
3 To switch the shelf system off completely, unplug the power cord
from the AC wall outlet.
ystem
Caution
Unplug the power cord from the AC wall out let during heavy
thunderstorms to protect your shelf system.
10
www.insignia-products.com
Page 11
Insignia NS-A2113 Mini-Shelf S
ystem
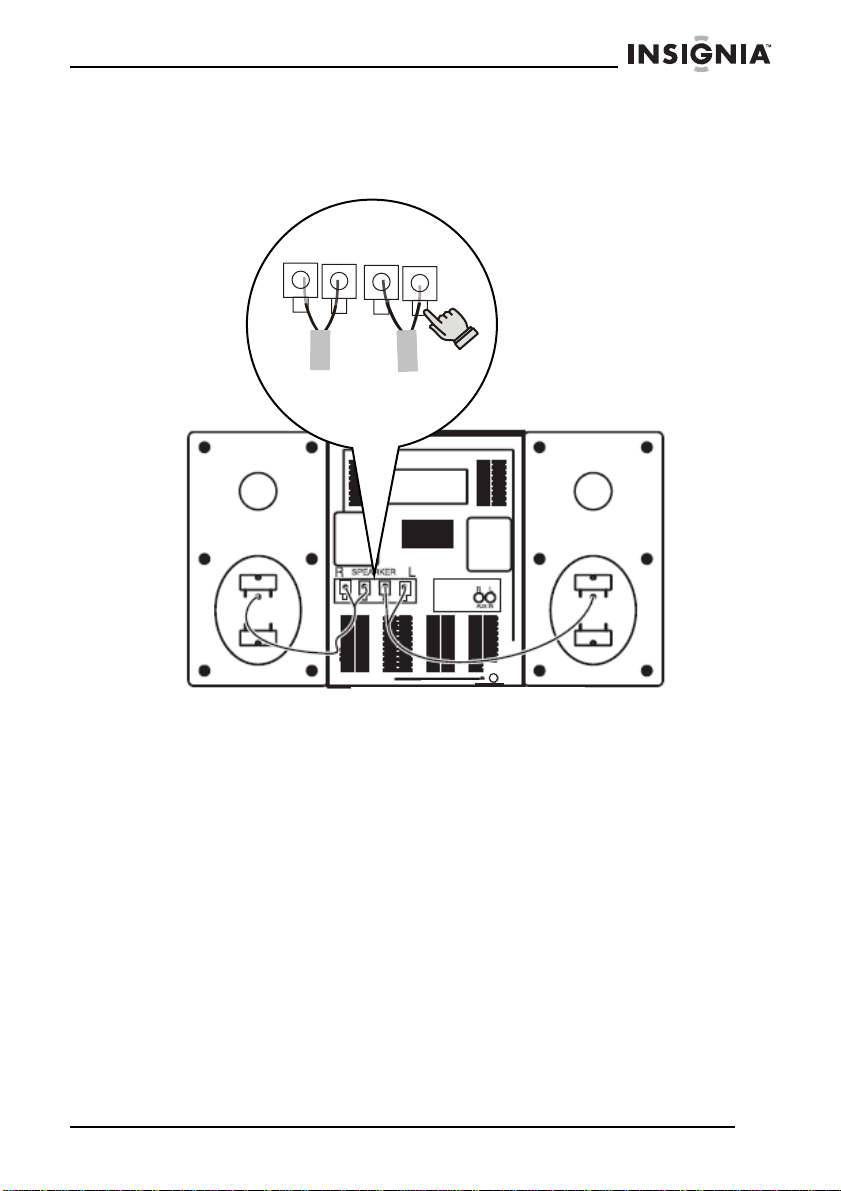
Connecting the speakers
Connect the speaker wires to the back of the player, as shown in the
following illustration.
Red
Right
speaker
Black
Red
Press
Left
speaker
Using your mini-shelf system
Using the radio
To use the radio:
1 Press the POWER button to turn on the shelf system.
2 Slide the function selector to RADIO.
3 Slide the band selector to AM, FM, or FM ST. (stereo).
4 Rotate the TUNING knob to the station you want.
• For FM listening, pull out the antenna and adjust it for the best
signal.
• For AM listening, rotate the player for the best signal (it has a
built-in antenna).
www.insignia-products.com
11
Page 12
Insignia NS-A2113 Mini-Shelf S
Note
The FM Stereo indicator LED lights when you tune to an FM
stereo station, if the BAND selector is set to FM ST.
5 Adjust the sound level with the VOLUME control.
6 Press the DBBS button to boost the bass (if desired).
7 For private listening, plug your stereo headphones into the stereo
headphone jack on top of the player. The speakers mute
automatically.
Warning
To avoid damaging your hearing, set the volume to a low
level before putting on the headphones, then adjust the
volume up to a comfortable level.
8 To turn the radio off, press the POWER button.
Using the CD player
The CD player can play audio discs, including CD-R and CD-RW
discs. The CD player is not compatible with CD-ROM, CDI, VCD,
DVD, or computer CDs.
Note
CD-R and CD-RW discs must be finalized to play in this CD
player.
ystem
To use the CD player:
1 Press the POWER button to turn the shelf system on.
2 Slide the function selector to CD.
3 Open the CD tray by pressing the OPEN/CLOSE button.
4 Insert as many as 3 discs with the printed side up, then press the
OPEN/CLOSE button again to close the tray.
5 Press the DISC1, DISC2, or DISC3 button to select the disc you
want to play.
6 Press the PLAY/PAUSE button to start playback.
• To pause playback, press the PLAY/PAUSE button.
• To resume playback, press the PLAY/PAUSE button
again.
7 Adjust the sound level with the VOLUME control.
8 Press the DBBS button to boost the bass during playback (if
desired).
12
www.insignia-products.com
Page 13

Insignia NS-A2113 Mini-Shelf S
9 For private listening, plug your stereo headphones into the stereo
headphone jack on top of the player. The speakers mute
automatically.
Warning
To avoid damaging your hearing, set the volume to a low
level before putting on the headphones, then adjust the
volume up to a comfortable level.
10 Press the STOP button to stop the CD playback.
Note
Playback also stops when:
• You open the CD tray
• You select the RADIO sound source
• The CD is finished
Selecting a different track
To select a different track on a CD:
1 Press the SKIP/SEARCH UP button once for the next track , or
press repeatedly until the track you want appears on the display.
2 Press the SKIP/SEARCH DN button once to return to the
beginning of the current track, or press repeatedly to go to a
previous track until the track you want appears on the display.
3 If you selected a track while the CD is stopped or paused, press
PLAY/PAUSE to begin playback.
ystem
Locating a specific passage
To locate a specific passage within a track:
1 Press and hold the SKIP/SEARCH UP button or the
SKIP/SEARCH DN button.
2 When you reach the passage you want, release the button.
Normal pla yback resumes.
Repeating portions of a CD
To use Repeat mode:
• To repeat the current track, press the REPEAT button once
(REPEAT and the disc number appear on the display).
• To repeat the entire CD, press the REPEAT button again
(REPEAT and 1 DISC appear on the display) .
• To repeat all the CDs in the player, press the REPEAT button
again (REPEAT and ALL DISC appear on the display).
• To cancel Repeat mode and return to normal playback, press
the REPEAT button again.
www.insignia-products.com
13
Page 14
Insignia NS-A2113 Mini-Shelf S
Programming playback
You can program as many as 30 tracks to play in the order you
specify, and repeat any track more than once. An existing program
can be edit ed in the same way.
To program playback:
1 In STOP mode, press PROG.
2 Press SKIP/SEARCH UP or SKIP/SEARCH DN to select the
track you want.
3 When the track you want appears on the display, press the
PROGRAM button to store the track in memory.
4 Repeat steps 2 and 3 to select additional tracks.
5 Press PLAY/PAUSE to play your program.
6 Press the STOP button to cancel the program.
To erase a program:
• Open the CD tray
- Or -
• Select the RADIO source with the function selector
To repeat portions of a program:
1 Press REPEAT once to repeat the current track of the program
playing. Press REPEAT three times to cancel.
2 Press REPEAT twice to repeat the entire chapter of the program
currentl y playing. Press REPEAT twice to cancel.
3 Press REPEAT three times to repeat the entire program currently
playing. Press REPEAT once to cancel.
PROGRAM
ystem
appears on the display.
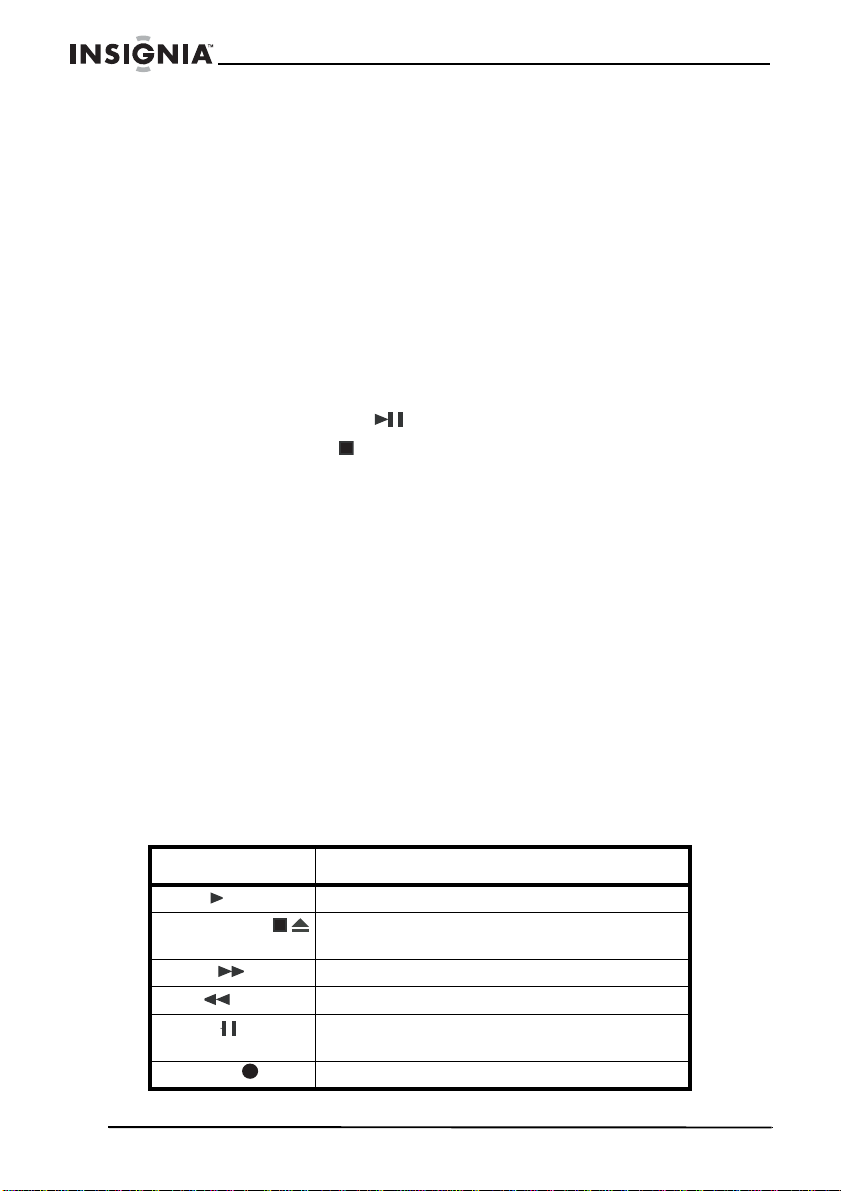
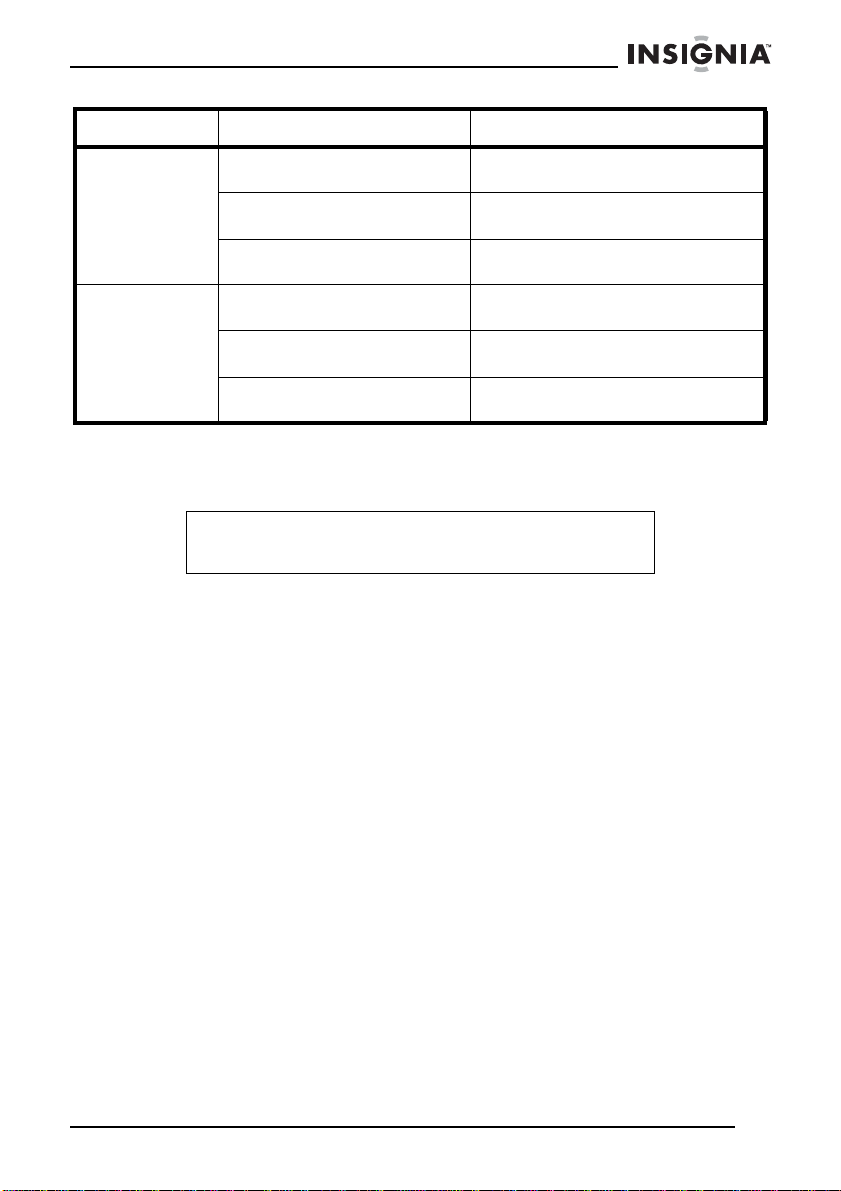
Using the cassette player
Button Function
PLAY Press to play the cassette tape.
STOP/EJECT Press to stop playback. Press again to eject
F.FWD Press to fast forward the tape.
REW Press to rewind the tape.
PAUSE Press to pause the tape. Press again to
RECORD Press to begin recording to the tape.
14
the tape.
resume playback.
www.insignia-products.com
Page 15
Insignia NS-A2113 Mini-Shelf S
ystem
To use the cassette player:
1 Press the POWER button to turn the shelf system on.
2 Slide the function selector to TAPE.
3 Open the cassette door by pressing the STOP/EJECT button at
the bottom of the door.
4 Insert a cassette tape, open side down, then press the door
closed.
5 Press the PLAY button to begin playback.
6 Adjust the sound level with the VOLUME control.
7 Press the DBBS button to boost the bass during playback (if
desired).
8 For private listening, plug your stereo headphones into the stereo
headphone jack on top of the player. The speakers mute
automatically.
Warning
To avoid damaging your hearing, set the volume to a low
level before putting on the headphones, then adjust the
volume up to a comfortable level.
9 Press the STOP button to stop the cassette playback.
To record with the cassette player:
1 Press the POWER button to turn the shelf system on.
2 Slide the function selector to RADIO.
3 Open the cassette door by pressing the STOP/EJECT button at
the bottom of the door.
4 Insert a blank cassette tape, open side down, then press the door
closed.
5 Tune the radio to the station you want to record, then press the
RECORD button.
6 Press the STOP button to stop recording.
Using your player to listen to another sound source
To use your player to listen to another sound source:
1 Make sure that the power is turned off, then connect a cable from
the audio out jacks on the device to the AUX-IN jacks on the back
of the player.
2 Press POWER to turn on the player, then slide the function switch
to select AUX.
3 Adjust the sound level with the VOLUME control.
www.insignia-products.com
15
Page 16
Insignia NS-A2113 Mini-Shelf S
4 Press the DBBS button to boost the bass.
5 For private listening, plug your stereo headphones into the stereo
headphone jack on top of the player. The speakers mute
automatically.
Warning
To avoid damaging your hearing, set the volume to a low
level before putting on the headphones, then adjust the
volume up to a comfortable level.
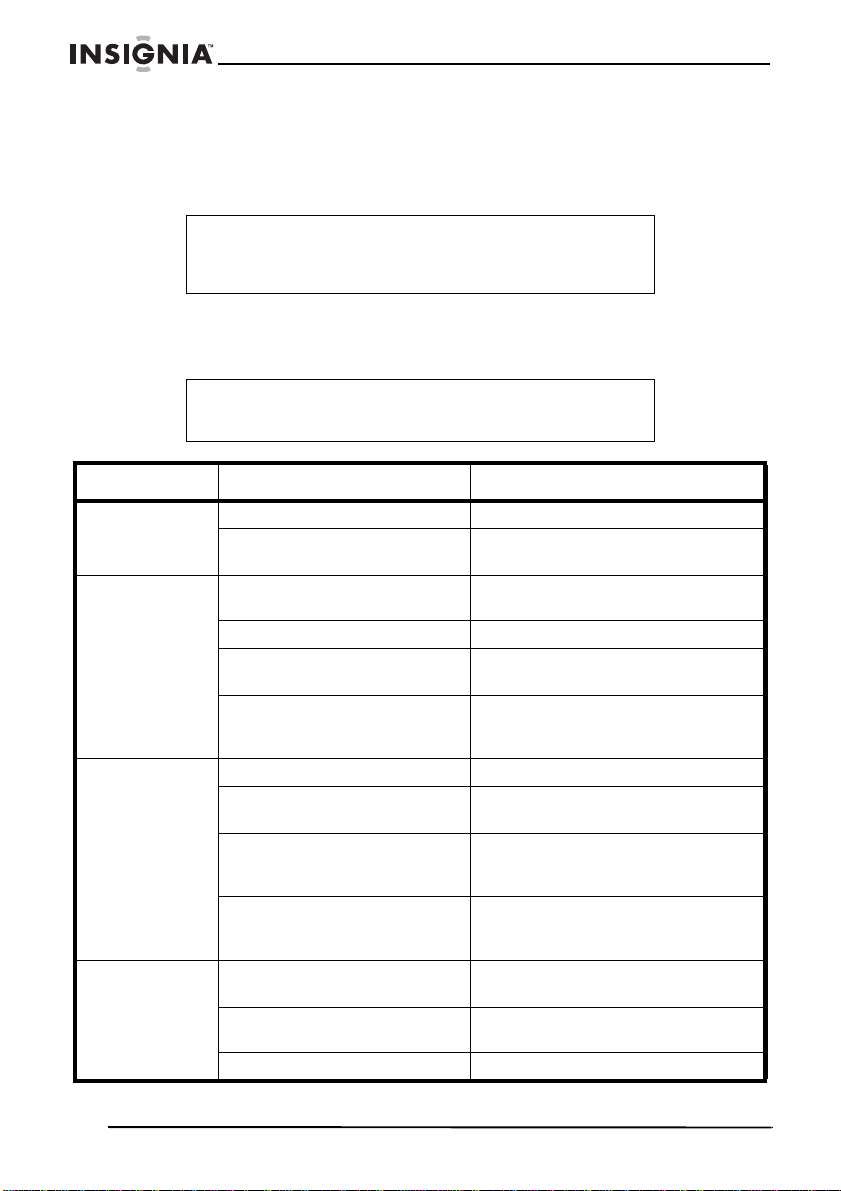
Troubleshooting
Caution
Do not try to repair the shelf system yourself. Doing so will
invalidate your warranty.
Problem Possible cause Solution
No sound or
power
The CD does
not play
No disc
indicated on the
display
No sound in the
headphones
Volume too low. Turn up the volume.
AC power cord not securely
connected.
The CD was incorrectly
inserted.
The CD is defective. Try another CD.
The CD compartment is not
closed.
There is condensation in the
CD compartment.
No CD inserted. Insert a CD, CD-R, or CD-RW d isc.
The CD is badly scratched or
dirty.
There is condensation in the
CD compartment.
You are using a CD-R or
CD-RW that is blank or the
disc has not been finalized.
The headphone jack is not
correctly inserted.
The volume control is turned
down.
The CD or tape is defective. Try another CD or tape.
Connect the AC power cord.
Reinsert the CD, label side up.
Close the CD door .
Remove the CD and leave the
cover open for about an hour in a
dry environment.
Clean the CD if it’s dirty. Replace
the CD if it’s defective.
Remove the CD and leave the
cover open for about an hour in a
dry environment.
Use a finalized CD-R or CD-RW.
Reinsert the headphone plug into
the jack.
Increase the volume.
ystem
16
www.insignia-products.com
Page 17
Insignia NS-A2113 Mini-Shelf S
ystem
Problem Possible cause Solution
The CD skips
during play
No sound or
poor sound on
the radio
The CD or lens is dirty. Clean or replace the CD, or clean
Strong shaking or vibrations Place the shelf system on a flat and
The CD play er is progr ammed
to skip a track.
The station is not tuned in
correctly.
FM—The antenna is not
correctly adjusted.
AM—The player is not
positioned for goo d rece pti on.
the lens.
stable surf ac e wi tho ut vib ra t io n.
Quit the Pro gram mode.
Retune the station.
Adjust the FM antenna for better
reception.
Rotate the player for better
reception.
Maintaining your shelf system
Note
The mechanical part of this shelf system contains
self-lubricating bearings and must not be oiled or lubricated.
Cleaning the case
Wipe with a soft cloth. If the case is very dirty, moisten the cloth with a
weak solution of non-caustic detergent and water.
Cleaning the lens
A dirty lens can cause skipping and can even stop the CD player from
working.
To clean dry particles and dust from the lens:
1 Open the CD cover.
2 Use a camera lens puffer-brush to blow repeatedly on the lens,
then wipe with the brush to remove dust.
3 Blow again to remove loose particles. To clean fingerprints from the lens:
• If the lens does not come clean with the puffer-brush, wipe it
with a soft cotton cloth.
www.insignia-products.com
17
Page 18

Insignia NS-A2113 Mini-Shelf S
Cleaning CDs
Using a soft cleaning cloth, wipe the CD from the center outwards.
Caution
Do not use solvents such as benzene, thinners, commercial
cleaning fluids, or anti-static sprays designed for vinyl
records.
Legal notices
© 2007 Insignia. Insignia and the Insignia logo are trademarks of Best Buy Enterprise
Services, Inc. Other brands and product names are trademarks or registered
trademarks of their respective holders. Specifications and features are subject to
change without notice or obligation.
For service and support call (877) 467-4289.
ystem
18
www.insignia-products.com
Page 19

Insignia NS-A2113 Mini-Shelf S
ystem
Warranty
90-day limited warranty
Insignia Products (“Insignia”) warrants to you, the original purchaser of this new shelf
system (“Product”), that the Product shall be free of defects in the original manufacture
of the material or workmanship for a period of 90 days from the date of your purchase
of the Product (“Warranty P eriod”). This Product must be purchased from an authorized
dealer of Insignia brand products and packaged with this warranty statement. This
warranty does not cover refurbished Product. If you notify Insignia during the Warranty
Period of a defect covered by this warranty that requires service, terms of this warranty
apply.
How long does the coverage last?
The Warranty Period lasts for 90 days from the date you purchased the Product. The
purchase date is printed on the receipt you received with the Product.
What does this warranty cover?
During the Warranty Period, if the original manuf act ure of the material or workmanship
of the Product is determined to be defective by an authorized Insignia repair center or
store personnel, Insignia will (at its sole option): (1) repair the Product with new or
rebuilt parts; or (2) replace the Product at no charge with new or rebuilt comparable
products or parts. Products and parts replaced under this warranty become the
property of Insignia and are not returned to you. If service of Products or parts are
required after the Warranty Period expires, you must pay all labor and parts charges.
This warranty lasts as long as you own your Insignia Product during the Warranty
Period. Warranty coverage terminates if you sell or otherwise transfer the Product.
How to obtain warranty service?
If you purchased the Product at a retail store location, take y our original receipt and the
Product to the store you purchased it from. Make sure that you place the Product in its
original packaging or packaging that provides the same amount of protection as the
original packaging. If you purchased the Product from an online web site, mail your
original receipt and the Product to the address listed on the web site. Make sure that
you put the Product in its original packaging or packaging that provides the same
amount of protection as the original packaging.
Where is the warranty valid?
This warranty is valid only to the original purchaser of the product in the United States
and Canada.
What does the warranty not cover?
This warranty does not cover:
• Customer instruction
• Installation
• Set up adjustments
• Cosmetic damage
• Damage due to acts of God, such as lightning strikes
• Accident
•Misuse
•Abuse
• Negligence
• Commercial use
www.insignia-products.com
19
Page 20

Insignia NS-A2113 Mini-Shelf S
ystem
• Modification of any part of the Product, including the antenna
This warranty also does not cover:
• Damage due to incorrect operation or maintenance
• Connection to an incorrect voltage supply
• Attempted repair by anyone other than a facility authorized by Insignia to service
the Product
• Products sold as is or with all faults
• Consumables, such as fuses or batteries
• Products where the factory applied serial number has been altered or removed
REPAIR REPLACEMENT AS PROVIDED UNDER THIS WARRANTY IS YOUR
EXCLUSIVE REMEDY. INSIGNIA SHALL NOT BE LIABLE FOR ANY INCIDENTAL
OR CONSEQUENTIAL DAMAGE S FOR THE BREA CH OF ANY EXPRESS OR
IMPLIED WARRANTY ON THIS PRODUCT, INCLUDING, BUT NOT LIMITED TO,
LOST DATA, LOSS OF USE OF YOUR PRODUCT, LOST BUSINESS OR LOST
PROFITS. INSIGNIA PRODUCTS MAKES NO OTHER EXPRESS WARRANTIES
WITH RESPECT TO THE PRODUCT, ALL EXPRESS AND IMPLIED WARRANTIES
FOR THE PRODUCT, INCLUDING, BUT NOT LIMITED TO, ANY IMPLIED
WARRANTIES OF AND CONDITIONS OF MERCHANTABILITY AND FITNESS FOR
A PARTICULAR PURPOSE, ARE LIMITED IN DURATION TO THE WARRANTY
PERIOD SET FORTH ABOVE AND NO WARRANTIE S, WH ET HER EXPRESS OR
IMPLIED, WILL APPLY AFTER THE WARRANTY PERIOD. SOME STATES,
PROVI NCES AND JURISDICTIONS DO NOT ALLOW LIMITA TIONS ON HOW LONG
AN IMPLIED WARRANTY LASTS, SO THE ABOVE LIMITATION MAY NOT APPLY TO
YOU. THIS WARRANTY GIVES YOU SPECIFIC LEGAL RIGHTS, AND YOU MAY
ALSO HAVE OTHER RIGHTS, WHICH VARY FROM STATE T O STATE OR
PROVINCE TO PROVINCE.
20
www.insignia-products.com
Page 21

Insignia NS-A2113 Mini
système audio
Insignia NS-A2113
Minisystème audio
Table des matières
Bienvenue. . . . . . . . . . . . . . . . . . . . . . . . . . . . . . . . . . . . . . . .21
Informations sur la sécurité. . . . . . . . . . . . . . . . . . . . . . . . . . .21
Fonctionnalités . . . . . . . . . . . . . . . . . . . . . . . . . . . . . . . . . . . .25
Installation de l'appareil. . . . . . . . . . . . . . . . . . . . . . . . . . . . . .29
Utilisation de l'appareil . . . . . . . . . . . . . . . . . . . . . . . . . . . . . . 30
Problèmes et solutions . . . . . . . . . . . . . . . . . . . . . . . . . . . . . .36
Entretien de l'appareil . . . . . . . . . . . . . . . . . . . . . . . . . . . . . . .37
Avis juridiques. . . . . . . . . . . . . . . . . . . . . . . . . . . . . . . . . . . . . 38
Garantie . . . . . . . . . . . . . . . . . . . . . . . . . . . . . . . . . . . . . . . . .39
Bienvenue
Félicitations d’avoir acheté ce produit Ins ign ia de haute quali té. Le
modèle NS-A2113 représente la dernière avancée technologique
dans la conception de minisystèmes audio et a été conçu pour des
performances et une fiabilité exceptionnelles.
Informations sur la sécurité
Afin de réduire les risques d’incendie et de choc électrique, ne pas
utiliser cette prise avec une rallonge ou autres prises d’alimentation,
sauf si les plots peuvent s’y enfoncer entièrement sans être exposés.
Afin de réduire les risques d’incendie et de choc électrique, ne pas
exposer cet appareil à la pluie ou l’humidité.
PRÉCAUTIONS: Afin de réduire le risque de
choc électrique, ne pas enlever le couvercle
(ou le panneau arrière). Ne contient aucune
pièce réparable par l'utilisateur. Confier
l’entretien à du personnel qualifié.
www.insignia-products.com
21
Page 22

Insignia NS-A2113 Mini
L'éclair fléché au centre d'un triangle équilatéral prévient
l'utilisateur de la présence de tensions élevées non
isolées dans l’appareil, pouvant constituer un risque de
choc électrique pour les personnes.
Le point d’exclamation au centre d’un triangle équilatéral
prévient l’utilisateur de la présence d’instructions
importantes dans le manuel de l’utilisateur livré avec
l'appareil concernant son utilisation et son entretien.
Avertissement
Cet appareil est équipé d’un système au laser. Observer
toutes les instructions d’utilisation dans ce guide et le
conserver pour toute référence ultérieure. Si l'appareil a
besoin d’être réparé, contacter le vendeur ou le centre de
réparation agréé.
Pour éviter toute exposition à des radiations lasers, ne pas
ouvrir le boîtier. Un rayonnement laser invisible est émis
quand le boîtier est ouvert ou que le dispositif de
verrouillage est défectueux. Ne pas regarder directement le
faisceau laser.
L'utilisation de commandes, de réglages ou l'exécution de
procédures autres que celles indiquées ici peuvent aboutir à
une irradiation dangereuse.
Précautions
Tout changement ou modification de l’appareil non
expressément approuvé par le fabricant ou ses
représentants autorisés pourrait annuler l’autorisation pour
l’utilisateur de faire fonctionner cet appareil.
système audio
Attention :
Cet appareil ne doit pas être exposé à des éclaboussures ou à des
gouttes d’eau et aucun objet rempli de liquide, tel qu’un vase, ne doit
être posé sur l’appareil.
Importantes mesures de sécurité
• Lire les instructions — Lire toutes les instructions de sécurité
• Conserver les instructions — Conserver les instructions de
• Respecter les avertissements — Observer tous les
22
et de fonctionnement avant d’utiliser cet appareil.
sécurité et de fonctionnement pour toute référence ultérieure.
avertissements figurant sur cet appareil ainsi que dans les
instructions d’utilisation.
www.insignia-products.com
Page 23

Insignia NS-A2113 Mini
système audio
• Suivre les instructions — Toutes les instructions d’utilisation
doivent être appliquées.
• Nettoyage — Débrancher l’appareil de la prise secteur avant
tout nettoyage. Ne pas utiliser de nettoyants liquides ou en
aérosol. Utiliser un chiffon humide pour le nettoyage.
• Périphériques — Ne pas utiliser de périphériques qui ne sont
pas recommandés par Insignia, lesquels pourraient être
source de dangers.
• Eau et humidité — Ne pas utiliser cet appareil à proximité de
l’eau, par exemple, à côté d’une baignoire, d'un lavabo, d'un
évier, d’un bac à laver, dans une cave humide ou à côté d’une
piscine.
• Ventilation — Les fentes et ouvertures au dos et au bas du
boîtier sont prévues pour la ventilation, afin d’assurer un
fonctionnement fiable de l’appareil et de le protéger contre
toute surchauffe. Ne pas obstruer les ouvertures. Ne pas
placer l’appareil sur un lit, un sofa, une moquette ou toute autre
surface semblable. L’appareil ne doit jamais être positionné à
proximité ou sur un radiateur, ou une bouche de chauffage. Ne
pas installer l’appareil dans un meuble encastré comme une
bibliothèque ou sur une étagère, sauf si une ventilation
adéquate a été prévue ou si les instructions du fabricant ont
été respectées.
• Sources d’alimentation — Utiliser uniquement le type
d’alimentation électrique indiqué sur la plaque signalétique. En
cas d’incertitude sur la tension d'alimentation électrique de la
maison, consulter le revendeur ou la compagnie d'électricité.
Pour les appareils fonctionnant sur piles ou d’autres sources
d’alimentation électrique, consulter les instructions d’utilisation.
• Mise à la terre ou polarisation — Cet appareil est équipé
d'une prise de courant CA polarisée (à deux plots, un plus
large que l'autre). Cette fiche ne s'insère dans une prise
secteur que d'une seule façon. Il s'agit d'un dispositif de
sécurité. S’il est impossible d’introduire à fond la fiche dans la
prise secteur, essayer de retourner la prise. Si la fiche ne
s'adapte toujours pas à la prise secteur, contacter un
électricien afin qu’il remplace la prise inadéquate. Ne pas
chercher à modifier le dispositif de sécurité de la prise
polarisée.
• Protection du cordon d’alimentation — Acheminer le cordon
d'alimentation de telle manière qu'on ne puisse marcher
dessus ou qu'il ne soit pas pincé par des objets placés dessus
ou tout contre; prêter particulièrement attention au point de
raccordement du cordon à la prise murale, à la plaque
multiprises et au connecteur de l’appareil dans lequel il est
branché.
www.insignia-products.com
23
Page 24

Insignia NS-A2113 Mini
système audio
• Foudre — Pour protéger l’appareil pendant un orage ou s’il se
trouve inutilisé et sans surveillance pendant de longues
périodes, le débrancher de la prise secteur et débrancher
l'antenne ou la connexion au réseau câblé. Ceci évitera
d’endommager l’appareil en cas de foudre et de variations de
tension du secteur.
• Surcharge — Les prises murales et les rallonges ne doivent
pas être surchargées, ce qui pourrait provoquer des risques
d'incendie ou de choc électrique.
• Pénétration de liquides et d'objets divers — Ne jamais
enfoncer un objet quelconque dans les ouvertures de
l’appareil, car il pourrait entrer en contact avec des tensions
dangereuses ou provoquer un court-circuit à l'origine d'un
incendie ou d'un choc électrique. Ne jamais répandre un
liquide sur l’appareil .
• Réparation — L’utilisateur ne doit pas essayer de réparer cet
appareil lui-même; en effet son ouverture ou le démontage du
boîtier peut l’exposer à des tensions dangereuses ou à
d'autres dangers. Toutes les réparations doivent être réalisées
par du personnel qualifié.
• Dommages requérant des réparations — Débrancher
l’appareil de la prise secteur et utiliser les services d’un
technicien qualifié dans les conditions suivantes :
• Lorsque le cordon d’alimentation est effiloché ou la prise
endommagée.
• Si un liquide a été répandu ou des objets sont tombés dans
l’appareil.
• Si l’appareil a été exposé à la pluie ou à l’eau.
• Si l’appareil fonctionne anormalement en appliquant les
instructions d’utilisation. Ne régler que les commandes
décrites dans les instructions d’utilisation; en effet, un
réglage incorrect d’autres commandes pourrait provoquer
des détériorations entraînant souvent d'importantes
réparations par un technicien qualifié afin de rétablir un
fonctionnement normal.
• Si l’appareil est tombé ou s’il est endommagé de quelque
façon que ce soit.
• Détérioration marquée des performances de l’appareil.
• Pièces de remplacement — Si des pièces doivent être
remplacées, vérifier que le technicien a utilisé des pièces
spécifiées par le fabricant ayant les mêmes caractéristiques
que celles d’origine. Toute substitution par des pièces non
autorisées risque de provoquer un incendie, un choc
électrique, des blessures ou d'autres dangers.
• Contrôle de sécurité — Les réparations ou la maintenance
ayant été effectuées, demander au technicien de réaliser les
contrôles de sécurité de routine afin de déterminer que
l’appareil est en bon état de fonctionnement.
24
www.insignia-products.com
Page 25

Insignia NS-A2113 Mini
système audio
• Chaleur — Installer l’appareil à l’écart de sources de chaleur,
telles que radiateurs, bouches de chaleur, fours ou autres
appareils (y compris les amplificateurs) qui produisent de la
chaleur.
Précautions
Pour éviter les chocs électriques, introduire la lame la plus
large de la fiche dans la fente correspondante de la prise et
pousser à fond.
Fonctionnalités
Avant
2
31
8 9
# Description Fonction
1 Touche MARCHE/ARRÊT Permet de mettre le système sous ou hors
2 Touche ARRÊT
3 Touches DISQUE 1/DISQUE
2/DISQUE 3
4 Touche LECTURE/PAUSE Permet la lecture ou l’arrêt momentané d’un
5 Tou che OUVRIR/FERM ER Pe rmet d’ouvrir ou de fermer le plateau à disqu e.
6 Bouton SYNTONISATION Permet de syntoniser une fréquence radio
Permet d’arrêter la lecture du disque.
12
10
11
tension.
Permettent de sélectionner le disque à lire.
disque.
différente.
4
13 14
6
5
7
15
www.insignia-products.com
25
Page 26

Insignia NS-A2113 Mini
système audio
# Description Fonction
7 Prise de casque d'écoute Brancher le casque d'écoute stéréo ici.
8 Touche DBBS Permet d'amplifier les graves du lecteur.
9 Touche PROGRAMMATION Permet de programmer l a lecture d'un CD.
10 Sélecteur de FONCTION Faire glisser pour sélectionner CD ou Radio.
11 Touche RÉPÉTITION Permet de répéter la lecture des pistes d'un CD
12 Bouton du VOLUME Permet d’augmenter ou de diminuer le volume.
13 Sélecteur de BANDE Le faire glisser pour sélectionner la radio AM,
14 Touche SAUT ARRIÈRE/
RECHERCHE
DÉCROISSANTE
15 Touche SAUT AVANT/
RECHERCHE CROISSANTE
ou le CD tout entier.
FM ou FM stéréo.
En mode radio, permet de syntoniser les
stations radio à fréquence inférieure. En mode
lecture de CD , pe rmet de sélectionn er la piste ou
le chapitre précédent.
En mode radio, permet de syntoniser les
stations radio à fréquence supérieure. En mode
lecture de CD , pe rmet de sélectionn er la piste ou
le chapitre suivant.
26
www.insignia-products.com
Page 27

Insignia NS-A2113 Mini
Partie arrière
système audio
1
2
3
4
5
6
7
8
# Description Fonction
1 Connecteurs du
haut-parleur droit
2 Connecteurs du
haut-parleur gauche
3 Prise AUX In (Entrée
auxiliaire) droite
4 Prise AUX In (Entrée
auxiliaire) gauche
5 Câbles du haut-parleur
droit
6 Antenne FM L'utiliser pour améliorer la réception FM.
7 Câbles du haut-parleur
gauche
8 Cordon d’alimentation CABrancher le cordon d’alimentation sur une
Brancher les câbles du haut-parleur droit
sur ces connecteurs.
Brancher les câbles du haut-parleur
gauche sur ces connecteurs.
Brancher le câble de sortie audio droite
d’un périphérique sur cette prise.
Brancher le câble de sortie audio gauche
d'un périphérique sur cette prise.
Brancher ces câbles aux connecteurs du
haut-parleur droit.
Brancher ces câbles aux connecteurs du
haut-parleur gauche.
prise secteur.
www.insignia-products.com
27
Page 28

Insignia NS-A2113 Mini
Télécommande
système audio
5
1
2
3
4
6
7
8
9
# Description Fonction
1 Touche DISQUE 1 Permet la lecture du disque 1 du changeur de
2 To uc he RÉPÉTITION Permet de répéter la lecture des pistes d'un CD
3SAUT
28
CD.
ou le CD tout entier.
/ Permet de sélectionner la piste ou le chapitre
précédent , ou la piste ou le chapitre suivant.
www.insignia-products.com
Page 29

Insignia NS-A2113 Mini
système audio
# Description Fonction
4 To uc he LECTU RE/PAUSE
5 Touche DISQUE 2 Permet la lecture du disque 2 du changeur de
6 Touche DISQUE 3 Permet la lecture du disque 3 du changeur de
7 Touches de RECHERCHE
/
8 T o uc he de
PROGRAMMATION
9 To uc he ARRÊ T Pour arrêter momentanément la lecture d’un
Permet de commen cer la lec ture, appuyer de
nouveau pour l'interrompre momentanément,
puis de nouveau pour la reprendre.
CD.
CD.
Permettent le retour ou l'avance rapide d'un
disque pour rechercher une sélection.
Permet de programmer la lecture d'un CD.
DVD.
Installation de l'appareil
Connexion du cordon d’alimentation
Pour utiliser l’alimentation CA :
1 Vérifier que la source d'alimentation CA locale correspond à la
tension indiquée sur la plaque signalétique à l'arrière de l'appareil.
Si elle ne correspond pas, contacter le détaillant ou un centre de
réparation.
2 Brancher le cordon d’alimentation au connecteur CA sur
l’appareil, puis l’autre extrémité sur une prise secteur CA.
3 Pour éteindre l’appareil complètement, débrancher le cordon
d’alimentation de la prise secteur CA.
Précautions
Afin de protéger l’appareil pendant les gros orages,
débrancher le cordon d’alimentation de la prise secteur CA.
www.insignia-products.com
29
Page 30

Insignia NS-A2113 Mini
Connexion des haut-parleurs
Connecter les câbles des haut-parleurs à l’arrière de l’appareil tel
qu’illustré sur le schéma suivant.
système audio
Rouge
Haut-parleur
droit
Noir
Haut-parleur
gauche
Rouge
Utilisation de l'appareil
Fonctionnement de la radio
Appuyer
Pour utiliser la radio :
1 Appuyer sur POWER (Marche/Arrêt) pour mettre l’appareil sous
tension.
2 Faire glisser le sélecteur de fonctions sur RADIO.
3 Faire glisser le sélecteur de bande sur AM, FM, ou FM ST. (FM
stéréo).
4 Tourne r le bou ton TUN ING (Syntonisation) sur la station d’écoute
souhaitée.
• Pour l’écoute FM, déployer l’antenne puis la réorienter pour
30
obtenir la meilleure réceptio n.
www.insignia-products.com
Page 31

Insignia NS-A2113 Mini
système audio
• Pour l’écoute AM, réorienter l’appareil pour obtenir la meilleure
réception (il est équipé d’une antenne intégrée).
Remarque
Si le sélecteur de BANDE est réglé sur FM ST, le témoin à
DEL stéréo FM s’allume quand une station stéréo FM est
syntonisée.
5 Régler le niveau sonore avec la commande du VOLUME.
6 Appuyer sur DBBS pour amplifier les graves (si souhaité).
7 Pour l’écoute individuelle, brancher le casque d’écoute stéréo sur
la prise de l’appareil prévue à cet effet. Les haut-parleurs sont
automatiquement mis en sourdine.
Avertissement
Pour éviter d'affecter l'ouïe, conserver le volume au niveau
le plus bas avant de mettre le casque d'écoute, puis le
régler ensuite à un niveau acceptable.
8 Appuyer sur POWER (Marche/Arrêt) pour éteindre la radio.
Utilisation du lecteur de CD
Ce lecteur de CD peut lire des disques audio tels que les CD-R et
CD-RW. Il n’est pas compatible avec les CD-ROM, CDI, VCD, DVD
ou CD d’ordinateurs.
Pour utiliser le lecteur de CD :
1 Appuyer sur POWER (Marche/Arrêt) pour mettre l’appareil sous
tension.
2 Faire glisser le sélecteur de fonctions sur CD.
3 Ouvrir le plateau à disque en appuyant sur OPEN/CLOSE
(Ouvrir/Fermer).
4 Insérer jusqu'à 3 disques avec le côté imprimé tourné vers le haut,
puis appuyer de nouveau sur OPEN/CLOSE pour refermer le
plateau à disque.
5 Appuyer sur DISC1, DISC2, ou DISC3 pour sélectionner le
disque souhaité.
6 Appuyer sur PLAY/PAUSE (Lecture/Pause) pour commencer
la lecture.
• Pour arrêter momentanément la lecture, appuyer sur PLAY/
Remarque
Ce lecteur de CD ne peut pas lire les disques CD-R et
CD-RW s’ils ne sont pas finalisés.
PAUSE .
www.insignia-products.com
31
Page 32

Insignia NS-A2113 Mini
• Pour reprendre la lecture normale, appuyer de nouveau sur
PLAY/PAUSE .
7 Régler le niveau sonore avec la commande du VOLUME.
8 Appuyer sur DBBS pour amplifier les graves pendant la lecture (si
souhaité).
9 Pour l’écoute individuelle, brancher le casque d’écoute stéréo sur
la prise de l’appareil prévue à cet effet. Les haut-parleurs sont
automatiquement mis en sourdine.
Avertissement
Pour éviter d'affecter l'ouïe, conserver le volume au niveau
le plus bas avant de mettre le casque d'écoute, puis le
régler ensuite à un niveau acceptable.
10 Appuyer sur STOP (Arrêt) pour arrêter la lecture du CD.
Remarque
La lecture est aussi interrompue lorsque :
• Le plateau à disque est ouvert
• La source audio RADIO est sélectionnée
• La lecture du CD est terminée
Sélection d'une piste particulière
Pour sélectionner une autre piste sur un CD :
1 Appuyer une fois sur SKIP/SEARCH UP (Saut avant/Recherche
croissante) pour aller à la piste suivante, ou plusieurs fois jusqu'à
ce que la piste souhaitée s'affiche à l'écran.
2 Appuyer une fois sur SKIP/SEARCH DN (Saut arrière/Recherche
décroissante) pour revenir au début de la piste en cours, ou
plusieurs fois jusqu’à ce que la piste précédente souhaitée
s'affiche à l'écran.
3 Si une piste est sélectionnée pendant l’arrêt complet ou
momentané d’un CD, appuyer sur PLAY/PAUSE (Lecture/
Pause) pour commencer la lecture.
système audio
Localisation d’un point particulier
Pour localiser un point particulier sur une piste :
1 Maintenir appuyé SKIP/SEARCH UP (Saut avant/Recherche
croissant e) ou
SKIP/SEARCH DN (Saut arrière/Recherche décroissante).
2 Relâcher la touche lorsque le point voulu de la sélection est
atteint. La lecture normale reprend.
32
www.insignia-products.com
Page 33

Insignia NS-A2113 Mini
système audio
Répétition des parties d’un CD
Pour utiliser le mode Repeat (Répétition) :
• Pour répéter la piste en cours, appuyer une fois sur REPEAT
(REPEAT et le numéro du disque s'affichent à l’écran).
• Pour répéter tout le CD, appuyer de nouveau sur REPEAT
(REPEAT et 1 DISC s’affichent à l’écran).
• Pour répéter tous les CD dans le lecteur, appuyer de nouveau
sur REPEAT (REPEAT et ALL DISC [Tous les disques]
s’affichent à l’écran).
• Pour annuler le mode Répétition, appuyer de nouveau sur
REPEAT.
Programmation de la lecture
Il est possible de programmer la lecture de 30 pistes au maximum
dans l’ordre souhaité et de répéter une piste plus d’une fois. Un
programme existant peut être modifié de la même façon.
Pour programmer la lecture :
1 En mode ARRÊT, appuyer sur PROG (Programmation).
PROGRAM
2 Appuyer sur SKIP/SEARCH UP (Saut avant/Recherche
croissante) ou sur SKIP/SEARCH DN (Saut arrière/Recherche
décroissante) pour sélectionner la piste souhaitée.
3 Quand la piste souhaitée s’affiche à l’écran, appuyer sur
PROGRAM (Programmation) pour enregistrer la piste en
mémoire.
4 Répéter les étapes 2 à 3 pour sélectionner des pistes
supplémentaires.
5 Appuyer sur PLAY/PAUSE (Lecture/Pause) pour commencer
la lecture du programme.
6 Appuyer sur la touche STOP (Arrêt) pour annuler le
programme.
(Programmation) s’affiche à l’écran.
Pour annuler un programme :
• Ouvrir le plateau à CD.
- Ou -
• Choisir la source RADIO avec le sélecteur de fonctions
Pour répéter des parties d’un programme :
1 Appuyer une fois sur REPEAT pour répéter la piste actuelle du
programme en cours de lecture. Appuyer trois fois sur REPEAT
pour annuler.
www.insignia-products.com
33
Page 34

Insignia NS-A2113 Mini
2 Appuyer deux fois sur REPEAT pour répéter tout le chapi tre du
programme en cours de lecture. Appuyer deux fois sur REPEAT
pour annuler.
3 Appuyer trois fois sur REPEAT pour répéter tout le programme en
cours de lecture. Appuyer une fois sur REPEAT pour annuler.
Fonctionnement du lecteur de cassettes
Touche Fonction
PLAY (Lecture) Permet de lire la cassette.
STOP/EJECT
(Arrêt/Éjecter)
F.FWD (Avance
rapide)
REW
(Rembobiner)
PAUSE Permet une d'interrompre momenta nément l a
RECORD
(Enregistrer)
Permet d’arrêter la lecture. Appuyer de
nouveau sur cette touche pour éjecter la
cassette.
Permet l'avance rapide de la cassette.
Permet de rembobiner la cassette.
lecture. Appuy e r de n ouv eau sur cette touche
pour reprendre la lecture.
Permet de lancer l'enregistrement d'une
cassette.
système audio
Pour utiliser le lecteur de cassettes :
1 Appuyer sur POWER (Marche/Arrêt) pour mettre l’appareil sous
tension.
2 Faire glisser le sélecteur de fonctions sur TAPE (Cassette).
3 Ouvrir le compartiment de la cassette en appuyant sur STOP/
EJECT (Arrêt/Éjecter) sur la partie inférieure du compartiment.
4 Insérer une cassette, le côté ouvert vers le bas, puis refermer le
compartiment.
5 Appuyer sur PLAY (Lecture) pour commencer la lecture.
6 Régler le niveau sonore avec la commande du VOLUME.
7 Appuyer sur DBBS pour amplifier les graves pendant la lecture (si
souhaité).
34
www.insignia-products.com
Page 35

Insignia NS-A2113 Mini
système audio
8 Pour l’écoute individuelle, brancher le casque d’écoute stéréo sur
la prise de l’appareil prévue à cet effet. Les haut-parleurs sont
automatiquement mis en sourdine.
Avertissement
Pour éviter d'affecter l'ouïe, conserver le volume au niveau
le plus bas avant de mettre le casque d'écoute, puis le
régler ensuite à un niveau acceptable.
9 Appuyer sur STOP pour arrêter la lecture de la cassette.
Pour enregistrer avec le lecteur de cassettes :
1 Appuyer sur POWER (Marche/Arrêt) pour mettre l’appareil sous
tension.
2 Faire glisser le sélecteur de fonctions sur RADIO.
3 Ouvrir le compartiment de la cassette en appuyant sur STOP/
EJECT (Arrêt/Éjecter) sur la partie inférieure du compartiment.
4 Insérer une cassette vierge, le côté ouvert vers le bas, puis
refermer le compartiment.
5 Syntoniser la radio sur la station à enregistrer, puis appuyer sur
RECORD (Enregistrer).
6 Appuyer sur STOP pour arrêter l'enregistrement.
Utilisation du lecteur pour écouter une autre source sonore
Pour utiliser le lecteur afin d'écouter une autre source sonore :
1 Vérifier que l'appareil est hors tension, puis connecter un câble à
partir des prises de sortie audio du périphérique sur les prises
d'entrée auxiliaire (AUX-IN) à l'arrière du lecteur.
2 Appuyer sur POWER (Marche/Arrêt) pour mettre le lecteur sous
tension, puis faire glisser le sélecteur de fonctions sur AUX.
3 Régler le niveau sonore avec la commande du VOLUME.
4 Appuyer sur DBBS pour amplifier les graves.
5 Pour l’écoute individuelle, brancher le casque d’écoute stéréo sur
la prise de l’appareil prévue à cet effet. Les haut-parleurs sont
automatiquement mis en sourdine.
Avertissement
Pour éviter d'affecter l'ouïe, conserver le volume au niveau
le plus bas avant de mettre le casque d'écoute, puis le
régler ensuite à un niveau acceptable.
www.insignia-products.com
35
Page 36

Insignia NS-A2113 Mini
Problèmes et solutions
Précautions
L’utilisateur ne doit pas essayer de réparer cet appareil
lui-même. Cela annulerait la garantie.
Problème Cause éventuelle Solution
Absence de son
ou
d’alimentation
Le CD n’est pas luLe CD n’a pas été inséré
Le disque ne
s'affiche pas à
l'écran
Pas de so n dans
le casque
d’écoute
Le volume est trop bas. Augmenter le volume.
Le cordon d’alimentation CA
n’est pas fermement
connecté.
correctement.
Le CD est défectueux. Essayer un autre CD.
Le couvercle du compartiment
du CD n’est pas fermé.
De la condensation s’est
formée dans le compartiment
du CD.
Aucun disque n'a été inséré. Insérer un disque CD, CD-R ou
Le disque est sale ou rayé . Si le disque est sale, le nettoye r. Si
De la condensation s’est
formée dans le compartiment
du CD.
Le disque CD-R ou CD-RW
utilisé est vierge ou n’a pas
été finali sé.
La fiche du casque d’écoute
n’est pas branchée
correctement.
La commande du volume est
au minimum.
Le CD ou la cassette sont
défectueux.
Connecter le cordon d’alimentation
CA.
Réinsérer le CD, étiquette tournée
vers le haut.
Fermer le couvercle du
compartiment du CD.
Enlever le CD et laisser le
couvercle ouvert dans un endroit
sec pendant une heure environ.
CD-RW.
le disque est défectueux, le
remplacer.
Enlever le CD et laisser le
couvercle ouvert dans un endroit
sec pendant une heure environ.
Utiliser un disque CD-R ou CD-RW
finalisé.
Rebrancher la fiche du casque
d’écoute dans la prise.
Augmenter le volume.
Essayer un autre CD ou une autre
cassette.
système audio
36
www.insignia-products.com
Page 37

Insignia NS-A2113 Mini
système audio
Problème Cause éventuelle Solution
Des sautes de
CD se
produisent en
cours de lecture
Pas de son ou
son médiocre
sur la radio
Le CD ou la lentille optique
est sale.
Fortes secousses ou
vibrations.
Le lecteur de CD est
programmé pour sa uter d’un e
piste à l’autre.
La station n’est pas
syntonisée correctement.
FM — L’antenne n’est pas
réglée correctement.
AM — L’appareil est mal
positionné pour obtenir une
bonne réception.
Nettoyer ou remplacer le CD ou
nettoyer la lentille de lecture.
Placer le lecteur de CD sur une
surface plane et stable sans
vibration.
Quitter le mode de programmation.
Syntoniser de nouveau la station.
Réorienter l’antenne FM pour
obtenir une meilleure réception.
Réorienter l’appareil pour obtenir
une meilleure réception.
Entretien de l'appareil
Remarque
La partie mécanique de cet appareil contient des
roulements autolubrifiants et ne doit pas être huilée ou
lubrifiée.
Nettoy age du boîtier
Essuyer avec un chiffon propre. Si le boîtier est très sale, humidifier le
chiffon avec une solution diluée de détergent non caustique et d’eau.
Nettoy age de la lentille optique
Une lentille optique sale provoque des sautes de son et même l'arrêt
du lecteur de CD.
Pour nettoyer la lentille de particules sèches et de poussières éventuelles :
1 Ouvrir le couvercle du CD.
2 En utilisant une brosse pneumatique pour lentille d'appareil de
photo, souffler plusieurs fois sur la lentille, puis essuyer
délicatement avec la brosse pour enlever la poussière.
3 Souffler de nouveau pour éliminer les particules en suspension.
www.insignia-products.com
37
Page 38

Insignia NS-A2113 Mini
Pour nettoyer les empreintes digitales sur la lentille optique :
• Si la lentille n'est toujours pas propre après le traitement à la
brosse pneumatique, l'essuyer avec un chiffon en coton propre
et doux.
Nettoyage d’un CD
Essuyer le CD, du centre vers la périphérie à l’aide d’un chiffon
propre et doux.
Précautions
Ne pas utiliser des solvants comme le benzène, les diluants,
les liquides de nettoyage commerciaux ou les vaporisateurs
antistatiques conçus pour les disques en vinyle.
système audio
Avis juridiques
© 2007 Insignia. Insignia et le logo Insignia sont des marques de commerce de Best
Buy Enterprise Services, Inc. Les autres noms de marques et de produits mentionnés
sont des marques de commerce ou des marques déposées de leurs propriétaires
respectifs. Les spécifications et caractéristiques sont susceptibles d’être modifiées
sans préavis.
Pour l’assistance technique, appeler le (877) 467-4289.
38
www.insignia-products.com
Page 39

Insignia NS-A2113 Mini
système audio
Garantie
Garantie limitée de 90 jours
Insignia Products (“Insignia”) garantit au premier acheteur de ce Insignia NS-A2113
Minisystème audio neuf (“Produit”), qu’il est exempt de vices de fabrication et de
main-d’œuvre à l’origine, pour une période de 90 jours à partir de la date d’achat du
Produit (“Période de garantie”). Ce produit doit avoir été acheté chez un revendeur
agréé des produits de la marque Insignia et emballé avec cette déclaration de garantie.
Cette garantie ne couvre pas les Produits remis à neuf. Les conditions de la présente
garantie s’appliquent à tout Produit pour lequel Insignia est notifié, pendant la Période
de garantie, d’un vice couvert par cette garantie qui nécessite une réparation.
Quelle est la durée de la couverture ?
La Période de garantie dure 90 jours à compter de la date d’achat de ce Produit. La
date d’achat est imprimée sur le reçu fourni avec le Produit.
Que couvre cette garantie ?
Pendant la Période de garantie, si un vice de matériau ou de main-d’œuvre d'origine
est détecté sur le Produit par un service de réparation agréé par Insignia ou le
personnel du magasin, Insignia (à sa seule discrétion) : (1) réparera le Produit en
utilisant des pièces détachées neuves ou remises à neuf ; ou (2) remplacera le Produit
par un produit ou des pièces neuves ou remises à neuf de qualité comparable. Les
produits et pièces remplacés au titre de cette garantie deviennent la propriété
d’Insignia et ne sont pas retournés à l’acheteur. Si les Produits ou pièces nécessitent
une réparation après l’expiration de la Période de garantie, l’acheteur devra payer tous
les frais de main d’œuvre et les pièces. Cette garantie reste en vigueur tant que
l’acheteur reste propriétaire du Produit Insignia pendant la Période de garantie. La
garantie prend fin si le Produit est revendu ou transféré d’une quelconque façon que ce
soit à tout autre propriétaire.
Comment obtenir une réparation sous garantie ?
Si le Produit a été acheté chez un détaillant, le rapporter accompagné du reçu original
chez ce détaillant. S’assurer de remettre le Produit dans son emballage d’origine ou
dans un emballage qui procure la même qualité de protection que celui d’origine. Si le
Produit a été acheté en ligne, l’expédier accompagné du reçu original à l’adresse
indiquée sur le site Web . S’assurer de remettre le Produit dans son emballage d’origine
ou dans un emballage qui procure la même qualité de protection que celui d’origine.
Où cette garantie s’applique-t-elle ?
Cette garantie ne s’applique qu’à l’acheteur original du Produit aux États-Unis et au
Canada.
Ce qui n’est pas couvert par cette garantie limitée
La présente garantie ne couvre pas :
• la formation du client ;
• l'installation ;
• les réglages de configuration ;
• les dommages esthétiques ;
• les dommages résultants de catastrophes naturelles telles que la foudre ;
• les accidents ;
• une utilisation inadaptée ;
• une manipulation abusive ;
www.insignia-products.com
39
Page 40

Insignia NS-A2113 Mini
système audio
• la négligence ;
• une utilisation commerciale ;
• la modification de tout ou partie du Produit, y compris l’antenne.
La présente garantie ne couvre pas non plus :
• les dommages ayant pour origine une utilisation ou une maintenance
défectueuse ;
• la connexion à une source électrique dont la tension est inadéquate ;
• Toute réparation effectuée par quiconque autre qu’un service de réparation agréé
par Insignia pour la réparation du Produit
• les Produits vendus en l’état ou hors service ;
• les consommables tels que les fusibles ou les piles ;
• les produits dont le numéro de série usine a été altéré ou enlevé du Produit.
LA RÉPARATION OU LE REMPLACEMENT, TELS QU’OFFERTS PAR LA
PRÉSENTE GARANTIE, CONSTITUENT LE SEUL RECOURS DE L’ACHETEUR.
INSIGNIA NE SAURAIT ÊTRE TENU POUR RESPONSABLE DE DOMMAGES
ACCESSOIRES OU CONSÉCUTIFS, RÉSULTANT DE L’INEXÉCUTION D'UNE
GARANTIE EXPRESSE OU IMPLICITE SUR CE PRODUIT, Y COMPRIS, SANS S’Y
LIMITER, LA PERTE DE DONNÉES, L’IMPOSSIBILITÉ D’UTILISER LE PRODUIT,
L’INTERRUPTION D’ACTIVITÉ OU LA PERTE DE PROFITS. INS IGNIA PRODUCTS
N’OCTROIE AUCUNE AUTRE GARANTIE EXPRESSE RELATIVE À CE PRODUIT ;
TOUTES LE S GARANTIES EXPRESSE S OU IMPLICITES POUR CE PRODUIT, Y
COMPRIS MAIS SANS LIMITATION, TOUTE GARANTIE DE QUALITÉ
MARCHANDE, D'ADÉQUATION À UN BUT PARTICULIER, SONT LIMITÉES À LA
PÉRIODE DE GARANTIE APPLICABLE TELLE QUE DÉCRITE CI-DESSUS ET
AUCUNE GARANTIE EXPRESSE OU IMPLICITE, NE S’APPLIQUE RONT APRÈS LA
PÉRIODE DE GARANTIE. CERTAINS ÉTATS ET PROVINCES NE
RECONNAISSENT PAS LES LIMITATI ONS DE LA DURÉE DE VALIDITÉ DES
GARANTIES IMPLICITES. PAR CONSÉQUENT, LES LIMITATIONS
SUSMENTIONNÉES PEUVENT NE PAS S'APPLIQUER À L’ACHETEUR ORIGINAL.
LA PRÉSENTE GARANTIE DONNE À L'ACHETEUR DES GARANTIES JURIDIQUES
SPÉCIFIQUES ; IL PEUT AUSSI BÉNÉFICIER D'AUTRES GARANTIES QUI
VARIENT D'UN ÉTAT OU D'UNE PROVINCE À L'AUTRE.
40
www.insignia-products.com
Page 41

Insignia NS-A2113 Mini si
Contenido
Bienvenido . . . . . . . . . . . . . . . . . . . . . . . . . . . . . . . . . . . . . . .41
Información de seguridad . . . . . . . . . . . . . . . . . . . . . . . . . . . . 41
Características . . . . . . . . . . . . . . . . . . . . . . . . . . . . . . . . . . . .45
Configuración de su sistema de audio . . . . . . . . . . . . . . . . . .49
Uso de su mini sistema de audio . . . . . . . . . . . . . . . . . . . . . .50
Localización y corrección de fallas . . . . . . . . . . . . . . . . . . . . .56
Mantenimiento de su sistema de audio . . . . . . . . . . . . . . . . . 57
Avisos legales. . . . . . . . . . . . . . . . . . . . . . . . . . . . . . . . . . . . .58
Garantía . . . . . . . . . . . . . . . . . . . . . . . . . . . . . . . . . . . . . . . . .59
Bienvenido
Felicitaciones por su compra de un producto de alta calidad de
Insignia. Su NS-A2113 representa el más moderno diseño de mini
sistemas de audio y está concebido para brindar un rendimiento
confiable y sin problemas.
stema de audio
Insignia NS-A2113
Mini sistema de audio
Información de seguridad
Para evitar el peligro de incendio o choque eléctrico, no conecte este
cable de alimentación en un cable de extensión, receptáculo, ni con
otro tipo de tomacorriente, ya que las clavijas deben quedar
completamente insertadas para evitar su exposición. Para reducir el
riesgo de incendio o choque eléctrico, no exponga este equipo a la
lluvia o la humedad.
CUIDADO: Para evitar el riesgo de choque
eléctrico, no retire la cubierta (o parte
posterior). En su interior hay piezas que no
debe manipular el usuario. Para realizar
reparaciones, acuda al personal de servicio
calificado.
www.insignia-products.com
41
Page 42

Insignia NS-A2113 Mini si
La figura de relámpago que termina en punta de flecha
dentro de un triángulo tiene por finalidad alertarle de la
presencia de voltaje peligroso sin aislamiento en el
interior de su sistema de audio que podría tener
potencia suficiente para constituir riesgo de choque
eléctrico para las personas.
El signo de admiración dentro de un triángulo tiene por
finalidad alertarle de la presencia de instrucciones
importantes de operación y mantenimiento (servicio) en
la literatura que se incluye con su sistema de audio.
Advertencia:
Su sistema de audio utiliza un sistema láser. Siga todas las
instrucciones de operación contenidas en esta guía y
guarde la guía para su consulta posterior. Si su sistema de
audio requiere reparación, contacte al vendedor o a nuestro
centro de servicio.
Para prevenir la exposición directa a la radiación láser, no
abra la caja. Existe radiación de láser invisible cuando la
caja está abierta o los seguros estén desactivados. No mire
directamente a los rayos láser.
El uso de cualquier otro control, ajuste o procedimiento que
no sea especificado en este manual puede resultar en una
exposición peligrosa a la radiación.
stema de audio
Precaución
Cuidado:
Su sistema de audio no debe de ser expuesto al agua (goteo o
salpicaduras), y ningún objeto lleno de líquido, como por ejemplo
vasijas, deberá ser colocado sobre la unidad.
Medidas de seguridad importantes
• Lea las instrucciones — Lea todas las instruccione s de
• Guarde las instrucciones — Guarde las instrucciones de
• Siga las advertencias — Preste atención a todas las
42
Cualquier cambio o modificación a su sistema de audio, que
no este aprobado expresamente por el fabricante o sus
centros autorizados, pueden cancelar su autoridad para
operar su sistema de audio.
seguridad y operación antes de usar su sistema de audio.
seguridad y operación para referencia futura.
advertencias sobre su sistema de audio y en las instrucciones
de operación.
www.insignia-products.com
Page 43

Insignia NS-A2113 Mini si
stema de audio
• Siga las instrucciones — Siga todas las instrucciones de
operación y uso.
• Limpieza — Desconecte su sistema de audio del
tomacorriente antes de limpiarlo. No use productos de
limpieza líquidos o en aerosol. Use un paño húmedo para
limpiarla.
• Aditamentos — No use accesorios que no hayan sido
recomendados por Insignia ya que podrían causar problemas
peligrosos.
• Agua y humedad — No use su sistema de audio cerca del
agua; por ejemplo, cerca de una bañera, en un sótano mojado
o cerca de una piscina.
• Ventilación — Para asegurar la operación co nfiable de su
sistema de audio y para protegerlo contra el
sobrecalentamiento, se proveen ranuras y aberturas en la
parte posterior o inferior del gabinete ventilación. No bloquee
estas aberturas. No coloque su sistema de audio sobre una
cama, un sofá, una alfombra u otra superficie similar. Su
sistema de audio nunca se debe colocar cerca o sobre un
radiador o calefactor. No coloque su sistema de audio en una
instalación empotrada, tal como un librero o estantería a
menos que se proporcione la correcta ventilación o se hayan
seguido las instruc cion es del fabrica nte.
• Fuentes de alimentación — Use sólo el tipo de alimentación
eléctrica indicado en la etiqueta de marca. Si no está seguro
del tipo de fuente de alimentación en su casa, consulte con el
vendedor del sistema de audio o la compañía local de energía.
Para sistemas de audio diseñados para funcionar con
baterías, u otras fuentes, refiérase a las instrucciones de
operación respectivas.
• Conexión a tierra o polarización — Su sistema de audio está
equipado con un enchufe polarizado de corriente alterna (un
enchufe que tiene una espiga más ancha que la otra). Este
enchufe se conecta en el tomacorriente de una sola forma.
Ésta es una característica de seguridad. Si no puede insertar
completamente el enchufe en el tomacorriente, intente
voltearlo. Si el enchufe todavía no entra, contacte a su
electricista para que reemp lace el toma co rriente obsoleto. No
anule el propósito de seguridad del enchufe polarizado.
• Protección del cable de alimentación — Coloque los cables
de alimentación eléctrica de tal forma que no se pisen o
queden aplastados por objetos colocados contra ellos; preste
atención especial a los cables conectados a tomacorrientes y
al lugar de donde salen de su sistema de audio.
www.insignia-products.com
43
Page 44

Insignia NS-A2113 Mini si
stema de audio
• Relámpagos — Para protección adicional de su sistema de
audio durante una tormenta de rayos, o cuando se deje sin
usar por un periodo de tiempo extensivo, desconéctelo del
tomacorriente y desconecte la antena o el sistema de cable.
Esto evitará daños a su sistema de audio debido a relámpagos
o sobretensión en la línea de energía.
• Sobrecarga — No sobrecargue los tomacorrientes ni los
cables de extensión ya que esto podría resultar en riesgo de
incendio o choque eléctrico.
• Ingreso de objetos y líquidos — Nunca inserte objetos de
ningún tipo en su sistema de audio a través de las aberturas,
ya que podrían tocar puntos de voltaje peligrosos o hacer corto
circuito con otros componentes que podrían resultar en
incendio o choque eléctrico. Nunca derrame líquidos de
ninguna clase sobre su sistema de audio.
• Reparación — No trate de reparar su sistema de audio usted
mismo, ya que abrir o quitar las cubiertas puede exponerlo a
voltajes peligrosos u otros peligros. Encomiende todas las
reparaciones al personal de servicio calificado.
• Daños que requieren reparación — Desconecte el sistema
de audio del tomacorriente y refiera la reparación a personal
calificado bajo las siguientes condiciones:
• Cuando el cable de alimentación o el enchufe se dañe o se
pele.
• Si líquido ha sido derramado u objetos han caído dentro del
sistema de audio.
• Si el sistema de audio ha sido expuesto a la lluvia o al
agua.
• Si el sistema de audio no funciona normalmente aún
siguiendo las instrucciones de operación siguientes. Ajuste
únicamente los controles que están cubiertos en las
instrucciones de operación, ya que el ajuste incorrecto de
otros controles puede resultar en daño y frecuentemente
requerirá trabajo intensivo de un técnico calificado para
restaurar la operación normal de su sistema de audio.
• Si su sistema de audio se ha caído o dañado de cualquier
forma.
• Si su sistema de audio exhibe un cambio marcado en el
rendimiento.
• Piezas de repuesto — Cuando se necesiten repuestos,
asegúrese de que el técnico de reparación use repuestos
especificados por el fabricante o que tengan las mismas
características que la parte original. Las substituciones no
autorizadas pueden resultar en incendio, choque eléctrico,
lesiones a personas u otros peligros.
44
www.insignia-products.com
Page 45

Insignia NS-A2113 Mini si
• Verificación de segur idad — Después de completar la
reparación de su sistema de audio, pídale al técnico de
servicio que realice verificaciones de seguridad rutinarias para
determinar que su sistema de audio se encuentra en buena
condición de operación.
• Calor — No instale su sistema de audio cerca de fuentes de
calor tales cómo radiadores, calefactores, estufas u otros
productos (incluyendo amplificadores) que produzcan calor.
Precaución
Para evitar un choque eléctrico haga corresponder la clavija
ancha del enchufe con la ranura ancha del tomacorriente e
inserte el enchufe completamente.
Características
Vista Frontal
stema de audio
2
31
8 9
# Descripción Función
1 Botón ENCENDIDO Presione para encender o apagar el sistema.
2 Botón DETENER
3 Botones DISC1/DISC2/DISC3 Permite seleccionar el disco que se reproducirá.
4 Botón REPRODUCIR/
PAUSAR
5 Botón ABRIR/CERRAR Permite abrir y cerrar la bandeja de discos.
Permite detener la reproducción del disco.
12
10
11
Permite reproducir o pausar el disco.
4
13 14
6
5
7
15
www.insignia-products.com
45
Page 46

Insignia NS-A2113 Mini si
stema de audio
# Descripción Función
6 Perilla de SINTONIZACIÓN Gire para sintonizar otra frecuencia de radio
7 Toma de auriculares Conecte auriculares estéreo aquí.
8 Botón DBBS Permite amplificar los graves del reproductor.
9 Botón PROGRAMAR Permite programar la reproducción del CD.
10 Selector de FUNCIÓN Permite seleccionar entre CD o Radio.
11 Botón REPETIR Permite repetir pistas del CD o todo el CD.
12 Perilla de VOLUMEN Gire para subir o bajar el volumen.
13 Selector de BANDA Permite seleccionar AM, FM o FM Estéreo.
14 Botón SALTAR HACIA
ATRÁS/RETROCEDER
15 Botón SALTAR HACIA
ADELANTE/AVANZAR
En el modo de radio, permite sintonizar una
frecuencia más baja. En el modo de
reproducción, permite seleccionar una pista o
capitulo anterior.
En el modo de radio, permite sintonizar una
frecuencia más alta. En el modo de
reproducción, permite seleccionar la siguiente
pista o capitulo .
46
www.insignia-products.com
Page 47

Insignia NS-A2113 Mini si
Vista Posterior
stema de audio
1
2
3
4
5
6
7
8
# Descripción Función
1 Tomas del altavoz
derecho
2 Tomas del altavoz
izquierdo
3 Toma derecho de la
Entrada AUX
4 Toma izquierdo de la
Entrada AUX
5 Alambres del altavoz
derecho
6 Antena de FM Úsela para mejorar la recepción de FM
7 Alambres del altavoz
izquierdo
8 Cable de alimentación
de CA
Conecte los alambres del altavoz derecho
en estos tomas.
Conecte los alambre s del alt av oz iz quierdo
en estos tomas.
Conecte la salida derecha de una fuente
de audio externa en este toma.
Conecte la salida izquierda de una fuente
de audio externa en este toma
Conecte estos alambres a los tomas del
altavoz derecho.
Conecte estos alambres a los tomas del
altavoz izquierdo.
Conecte este cable en un tomacorriente.
www.insignia-products.com
47
Page 48

Insignia NS-A2113 Mini si
Control Remoto
stema de audio
5
1
2
3
4
6
7
8
9
# Descripción Función
1 Botón DISC 1 (Disco 1) Permite reproducir el disco 1 e n el cambia dor de
2 Botón REPETIR Permite repetir pistas del CD o todo el CD.
3 SALTAR
4 Botón REPRODUCIR/
PAUSAR
48
CDs.
/ Permite seleccionar una pista o un capitulo
anterior o la siguiente pista o capítulo.
Permite comenzar la reproducción, presiónelo
de nuevo para pausar y otra vez para reanudar
la reproducción.
www.insignia-products.com
Page 49

Insignia NS-A2113 Mini si
stema de audio
# Descripción Función
5 Botón DISC 2 (Disco 2) Permite reproducir el disco 2 e n el cambia dor de
6 Botón DISC 3 (Disco 3) Permite reproducir el disco 3 e n el cambia dor de
7 Botónes BUSCAR / Permite retroceder o avanzar rápidamente un
8 Botón PROG Permite programar la reproducción del CD.
9 Botón DETENER
Presione para detener la reproducción de un
CDs.
CDs.
disco para bus car una sele cción.
disco.
Configuración de su sistema de audio
Conexión del cable de alimentación
Para usar la alimentación de CA:
1 Asegúrese de que el voltaje de su fuente de alimentación de CA
local sea el mismo que el indicado en la placa situada en ka parte
posterior del sistema. Si no lo es, consulte con su vendedor o
centro de servicio.
2 Conecte el cable de alimentación al toma de CA en el sistema de
audio y enchúfelo en el tomacorriente de CA.
3 Para apagar completamente el sistema de audio, desenchufe el
cable de alimentación del tomacorriente de CA.
Cuidado
Desenchufe el cable de alimentación del tomacorriente de
CA durante tormentas de rayos fuertes para proteger su
sistema.
www.insignia-products.com
49
Page 50

Insignia NS-A2113 Mini si
Conexión de los altavoces
Conecte los alambres de los altavoces en la parte posterior del
reproductor según se muestra en la siguiente figura.
stema de audio
Rojo
Altavoz
derecho
Negro
Rojo
Presione
Altavoz
izquierdo
Uso de su mini sistema de audio
Uso de la radio
Para usar la radio:
1 Presione POWER (Encendido) para encender el sistema de
audio.
2 Deslice el interruptor de función a la posición RADIO.
3 Deslice el selector de banda a la posición AM, FM, o FM ST. (FM
Estéreo).
4 Gire la perilla de SINTONIZACIÓN hasta seleccionar la emisora
deseada.
• Para escuchar FM, extienda la antena y ajústela hasta obtener
50
la mejor señal.
www.insignia-products.com
Page 51

Insignia NS-A2113 Mini si
stema de audio
• Para escuchar AM, gire el sistema de audio hasta encontrar la
mejor señal (tiene una antena integrada).
Nota
El indicador LED de FM Estéreo se ilumina cuando se
sintoniza una emisora FM estéreo, si el selector de banda
se encuentra la posición FM ST.
5 Ajuste el nivel de sonido con el control de VOLUMEN.
6 Presione DBBS para amplificar los graves (si gusta).
7 Para escuchar de forma privada, conecte sus auriculares estéreo
en el toma en la parte superior del sistema de audio. Los
altavoces se silenciarán automáticamente.
Advertencia:
Para evi tar dañar su oído , ajuste del vol umen a un nivel bajo
antes de colocarse los auriculares, luego ajuste del
volumen a un nivel cómodo.
8 Para pagar el sistema de audio, presione POWER (Encend id o) .
Uso del reproductor de CD
El reproductor de CD puede reproducir discos de audio, tal cómo
discos CD-R y CD-RW. El reproductor de CD no es compatible con
CD-ROM, CDI, VCD, DVD o discos para computadora.
Nota
Para usar el reproductor de CD:
1 Presione POWER (Encendido) para encender el sistema de
audio.
2 Deslice el interruptor de función a la posición CD.
3 Abra la bandeja de discos presionando OPEN/CLOSE (Abrir/
Cerrar).
4 Inserte hasta 3 discos con el lado impreso hacia arriba, y presione
OPEN/CLOSE de nuevo para cerrar la bandeja.
5 Presione DISC1, DISC2, o DISC3 para seleccionar el disco que
desea reproducir.
6 Presione REPRODUCIR/PAUSAR para comenzar a
reproducir.
• Para pausar la reproducción, presione REPRODUCIR/
• Para reanudar la reproducción, presione REPRODUCIR/
Los discos CD-R y CD-RW se tienen que finalizar para
poder ser reproducidos en este reproductor de CD.
PAUSAR .
PAUSAR de nuevo.
www.insignia-products.com
51
Page 52

Insignia NS-A2113 Mini si
7 Ajuste el nivel de sonido con el control de VOLUMEN.
8 Presione DBBS para amplificar los graves durante la
reproducción (si gusta).
9 Para escuchar de forma privada, conecte sus auriculares estéreo
en el toma en la parte superior del sistema de audio. Los
altavoces se silenciarán automáticamente.
Advertencia:
Para evi tar dañar su oído , ajuste del vol umen a un nivel bajo
antes de colocarse los auriculares, luego ajuste del
volumen a un nivel cómodo.
10 Presione DETENER para detener la reproducción del CD.
Notas
La reproducción se detiene cuando:
• Se abre la bandeja del CD.
• Se selecciona la fuente de sonido de la RADIO
• Se llega al final del CD.
Selección de una pista diferente
Para seleccionar una pista diferente en un CD:
1 Presione una vez SKIP/SEARCH UP (Saltar hacia delante/
Avanzar) para saltar a la siguiente pista o presione repetidamente
hasta que la pista deseada aparezca en la pantalla.
2 Presione una vez SKIP/SEARCH DN (Saltar hacia atrás/
Retroceder) para regresar al principio de la pista actual o presione
repetidamente para saltar a una pista anterior hasta que la pista
deseada aparezca en la pantalla.
3 Si seleccionó una pista mientras el CD se encuentra detenido o
pausado, presione REPRODUCIR/PAUSAR para comenzar
la reproducción.
stema de audio
Localización de un pasaje específico
Para localizar un pasaje específico en una pista:
1 Mantenga presionado SKIP/SEARCH UP (Saltar hacia adelante/
Avanzar) o el botón
SKIP/SEARCH DN (Saltar hacia atrás/Retroceder).
2 Cuando alcance la parte que desea, suelte el botón. La
reproducción normal se reanudará.
52
www.insignia-products.com
Page 53

Insignia NS-A2113 Mini si
stema de audio
Repetición de porciones de un CD
Para usar el modo de repetición:
• Para repetir la pista actual, presione REPEAT (Repeti r) una
vez (el indicador REPEAT [Repetir] aparece en la pantalla).
• Para repetir todo el CD, presione REPEAT (Repetir) de nuevo
(los indicadores REPEAT [Repetir] y 1 DISC [1 Disco]
aparecen en la pantalla).
• Para repetir todos los CDs dentro del reproductor, presione
REPEAT (Repetir) de nuevo (los indicadores REPEAT
[Repetir] y ALL DISC [Todos los discos] aparecen en la
pantalla).
• Para cancelar el modo de repetición y retornar a la
reproducción normal, presione REPEAT (Repetir) de nuevo.
Programación de la reproducción
Puede programar hasta 30 pistas para reproducirlas en el orden que
especifique, y repetir cualquier pista más de una vez. Un programa
existente puede ser editado de la misma forma.
Para programar la reproducción:
1 En el modo detenido, presione PROG. El indicador
(Programar) aparecerá en la pantalla.
2 Presione SKIP/SEARCH UP (Saltar hacia delante/Avanzar) o
SKIP/SEARCH DN (Saltar hacia atrás/Retroceder) para
seleccionar la pista deseada.
3 Cuando la pista deseada aparezca en la pantalla, presione
PROGRAM (Programar) para almacena r la pista en la memoria.
4 Repita los pasos 2 y 3 para seleccionar más pistas.
5 Presione REPRODUCIR/PAUSAR para reproducir su
programa.
6 Presione DETENER para cancelar el programa.
PROGRAM
Para eliminar un programa:
• Abra la bandeja del CD
- O -
• Seleccione la fuente RADIO con el selector de función
Para repetir porciones de un programa:
1 Presione REPEAT (Repetir) una vez para repetir la pista actual
del programa que se reproduce. Presione REPEAT (Repetir) tres
veces para cancelar.
www.insignia-products.com
53
Page 54

Insignia NS-A2113 Mini si
2 Presione REPEAT (Repetir) dos veces para repetir todo el
capítulo del programa que se reproduce actualmente. Presione
REPEAT (Repetir) dos veces para cancelar.
3 Presione REPEAT (Repetir) tres veces para repetir todo el
programa que se reproduce actualmente. Presione REPEAT
(Repetir) una vez para cancelar.
Uso del reproductor de cintas
Botón Función
REPRODUCIR Permite reproducir la cinta.
DETENER/
EXPULSAR
F.FWD (Avance
rápido)
REW (Retroceder) Permite retroceder la cinta.
Permite detener la reproducci ón. Presione de
nuevo para expulsar la cinta.
Permite avanzar la cinta rápidamente.
stema de audio
PAUSAR Permite pausar la cinta. Presione de nuevo
GRABAR Permite comenzar a grabar la cinta.
para reanudar la reproducción.
Para usar el reproductor de cintas:
1 Presione POWER (Encendido) para encender el sistema de
audio.
2 Deslice el selector de función a la posición TAPE (Cinta).
3 Abra la puerta de la cinta presionando STOP/EJECT (Detener/
Expulsar) en la parte inferior de la puerta.
4 Inserte una cinta, con el lado abierto hacia abajo y cierre la
puerta.
5 Presione REPRODUCIR para comenzar la reproducción.
6 Ajuste el nivel de sonido con el control de VOLUMEN.
7 Presione DBBS para amplificar los graves durante la
reproducción (si gusta).
8 Para escuchar de forma privada, conecte sus auriculares estéreo
en el toma en la parte superior del sistema de audio. Los
altavoces se silenciarán automáticamente.
Advertencia
Para evi tar dañar su oído , ajuste del vol umen a un nivel bajo
antes de colocarse los auriculares, luego ajuste del
volumen a un nivel cómodo.
9 Presione DETENER para detener la reproducción de la cinta.
54
www.insignia-products.com
Page 55

Insignia NS-A2113 Mini si
stema de audio
Para grabar con el reproductor de cintas:
1 Presione POWER (Encendido) para encender el sistema de
audio.
2 Deslice el selector de función a la posición RADIO.
3 Abra la puerta de la cinta presionando STOP/EJECT (Detener/
Expulsar) en la parte inferior de la puerta.
4 Inserte una cinta en blanco, con el lado abierto hacia abajo y
cierre la puerta.
5 Sintonice el radio a la emisora que desea grabar y presione
RECORD (Grabar).
6 Presione STOP (Detener) para detener la grabación .
Uso de su reproductor para escuchar otra fuente de sonido
Para usar su reproductor para escuchar otra fuente de sonido:
1 Asegúrese de que la unidad esté encendida y conecte un cable
desde los tomas de salida de audio del equipo a los tomas
AUX-IN (Entrada auxiliar) en la parte posterior del reproductor.
2 Presione POWER (Encendido) en el reproductor y deslice el
interruptor de función a la posición AUX.
3 Ajuste el nivel de sonido con el control de VOLUMEN.
4 Presione DBBS para amplificar los graves.
5 Para escuchar de forma privada, conecte sus auriculares estéreo
en el toma en la parte superior del sistema de audio. Los
altavoces se silenciarán automáticamente.
Advertencia
Para evi tar dañar su oído , ajuste del vol umen a un nivel bajo
antes de colocarse los auriculares, luego ajuste del
volumen a un nivel cómodo.
www.insignia-products.com
55
Page 56

Insignia NS-A2113 Mini si
Localización y corrección de fallas
Cuidado
No intente reparar el sistema de audio usted mismo.
Hacerlo anulará su garantía.
Problema Causa probable Solución
No hay soni do o
alimentación
No se puede
reproducir el CD
El indicador "No
disc" (No hay
disco) se
muestra en la
pantalla
No se escucha
sonido por los
auriculares
El volumen está demasiado
bajo.
El cable de alimentación de
CA no está bien conectado.
El CD se ha insertado
incorrectamente.
El CD está defectuoso. Pruebe con otro CD.
No está cerrado el
compartimiento del CD.
Hay condensación en el
compartimiento del CD.
No se ha insertado un CD. Inserte un disco CD, CD-R o
El CD se encuentra muy
raya do o suc io.
Hay condensación en el
compartimiento del CD.
Está usando un d is co CD -R o
CD-RW que no se ha g rabado
o el disco no ha sido
finalizado.
Los auriculares no están
insertados correctament e en
el toma de los auriculares.
El control d e volumen está
bajo.
El CD o la cinta están
defectuosos.
Suba el volumen.
Conecte el cable de alimentación
de CA.
Vuelva a insertar el CD con la
etiqueta hacia arriba.
Cierre la puerta del CD.
Saque el CD y deje la cubierta
abierta por cerca de una hora en
un ambiente seco.
CD-RW.
Limpie el CD si está sucio.
Reemplace el CD si está
defectuoso.
Saque el CD y deje la cubierta
abierta por cerca de una hora en
un ambiente seco.
Use un disco CD-R o CD-RW
finalizado.
Reinserte el enchufe de los
auriculares en el toma.
Suba el volumen.
Pruebe con otro CD u otra cinta.
stema de audio
56
www.insignia-products.com
Page 57

Insignia NS-A2113 Mini si
stema de audio
Problema Causa probable Solución
El sonido del
CD se salta
segmentos
durante la
reproducción
No hay soni do o
el sonido es
malo en la radio
El CD o el lente están sucios. Limpie o reemplace el CD o limpie
Vibraciones o sacudi das
fuertes
El reproductor de CD está
programado p ara salta rse una
pista.
No se ha sintonizado la
estación co rrectament e.
FM — La antena no está
ajustada correctamente.
AM — El sistema de au dio no
está orientado de man era que
se consiga una buena
recepción.
el lente.
Colocar el sistema de audio sobre
una superficie plana, dura y
estable.
Salga del modo de programación.
Vuelva a sintonizar la estación.
Ajuste la antena de FM para
mejorar la recepción.
Gire el reproductor para mejorar la
recepción.
Mantenimiento de su sistema de audio
Nota
La sección mecánica de este sistema de audio contiene
engranajes autolubricantes y no se debe aceitar o lubricar.
Limpieza de la caja
Limpie la caja con un paño suave. Si está muy sucia, humedezca el
paño con una solución muy diluida de detergente no cáustico y agua.
Limpieza del lente
Un lente sucio puede provocar saltos e incluso hacer que el
reproductor de CD deje de funcionar.
Para limpiar las partículas secas y polvo del lente:
1 Abra la cubierta del CD.
2 Usando una brocha y sopladora para lentes de cámara, sople
sobre el lente varias veces y luego límpielo cuidadosamente con
la brocha para remover el polvo.
3 Sople de nuevo para remover partículas sueltas. Para limpiar huellas digitales del lente:
• Si el lente no se puede limpiar con la brocha y el soplador,
límpielo con un paño suave de algodón.
www.insignia-products.com
57
Page 58

Insignia NS-A2113 Mini si
Limpieza de los CDs
Usando un paño suave de limpieza, limpie el CD del centro hacia
afuera.
Cuidado
No utilice solventes tal como benceno, diluyentes,
limpiadores comerciales o aerosoles antiestáticos
diseñados para discos de vinilo.
Avisos legales
© 2007 Insignia. Insignia y el logotipo de Insignia son marcas de comercio de Best Buy
Enterprise Services, Inc. Otras marcas y nombres de productos son marcas
comerciales o marcas registradas de sus dueños respectivos. Las especificaciones y
características están sujetas a cambio sin aviso previo u obligación.
Para reparación y soporte llamar al (877) 467-4289.
stema de audio
58
www.insignia-products.com
Page 59

Insignia NS-A2113 Mini si
stema de audio
Garantía
Garantía limitada de 90 días
Insignia Products (“Insignia”) le garantiza a usted, el comprador original de este nuevo
Insignia NS-A2113 Mini sistema de audio (“Producto”), que éste se encontrará libre de
defectos de material o de mano de obra en su fabricación original por un período de 90
(noventa) días a partir de la fecha de compra del Producto (“Período de Garantía”).
Este producto debe ser comprado en un distribuidor autorizado de productos de la
marca Insignia y empacado con esta declaración de garantía. Esta garantía no cubre
Productos reacondicionados. Si notifica a Insignia durante el Período de Garantía
sobre un defecto cubierto por esta garantía que requiere reparación, los términos de
esta garantía se aplican.
¿Cuánto dura la garantía?
El Período de Garantía dura por 90 (noventa) días a partir de la fecha en que compró
el Producto. La fecha de compra se encuentra impresa en el recibo que recibió con el
Producto.
¿Qué es lo que cubre esta garantía?
Durante el Período de Garantía, si un centro de reparación autorizado de Insignia
concluye que la fabricación original del material o la mano de obra del Producto se
encuentran defectuosos, Insignia (cómo su opción exclusiva): (1) reparará el Producto
con repuestos nuevos o reacondicionados; o (2) reemplazará el Producto sin cargo
con uno nuevo o con uno reacondicionado con repuestos equivalentes. Los Productos
y repuestos reemplazados bajo esta garantía se volverán propiedad de Insignia y no
se le regresarán a usted. Si se requiere la reparación de Productos o partes después
de que se vence el Período de Garantía, usted deberá pagar todos los costos de mano
de obra y de repuestos. Esta garantía estará vigente con tal que usted sea el dueño de
su Producto Insignia durante el periodo de garantía. El alcance de la garantía se
termina si usted vende o transfiere el Producto.
¿Cómo se obtiene la reparación de garantía?
Si ha comprado el Producto en una tienda de ventas, lleve su recibo original y el
Producto a la tienda en donde lo compró. Asegúrese de que vuelva a colocar el
Producto en su empaque original o en un empaque que provea la misma protección
que el original. Si compró el Producto en un sitio Web, envíe por correo su recibo
original y el Producto a la dirección postal listada en el sitio Web . Asegúrese de colocar
el Producto en su empaque original o en un empaque que provea la misma protección
que el original.
¿En dónde es válida la garantía?
Esta garantía sólo es válida al comprador original del Producto en los Estados Unidos
y en Canadá.
¿Qué es lo que no cubre la garantía?
Esta garantía no cubre:
• Formación del cliente
• Instalación
• Ajuste de configuración
• Daños cosméticos
• Daños debido a actos de la naturaleza, tal cómo rayos
• Accidentes
www.insignia-products.com
59
Page 60

Insignia NS-A2113 Mini si
stema de audio
• Mal uso
•Abuso
• Negligencia
• Uso comercial
• Modificación de alguna parte del Producto, incluyendo la antena
Esta garantía tampoco cubre:
• Daño debido al uso o mantenimiento incorrecto
• La conexión a una fuente de voltaje incorrecta
• El intento de reparación por alguien que no sea una compañía autorizada por
Insignia para reparar el Producto
• Productos vendidos tal cual (en el estado en que se encuentran) o con todas sus
fallas
• Productos consumibles, tal cómo fusibles o baterías
• Productos en los cuales el número de serie asignado en la fábrica ha sido
alterado o removido.
LA REPARACIÓN O REEMPLAZO SEGÚN LO PROVISTO BAJO ESTA GARANTÍA
ES SU ÚNICO RECURSO. INSIGNIA NO SERÁ RESPONSABLE POR DAÑOS
INCIDENTALES O CONSECUENTES DEBIDO AL INCUMPLIMIENTO DE
CUALQUIER GARANTÍA EXPRESA O IMPLÍCITA RELACIONADA CON ESTE
PRODUCTO, INCLUYENDO, PERO SIN LIMITARSE A ELLO, PÉRDIDA DE DATOS,
IMPOSIBILIDAD DE USO DE SU PRODUCT O, PÉRDIDA DE NEGOCIO O LUCRO
CESANTE. INSIGNIA NO CONCEDE NINGUNA OTRA GARANTÍA EXPRESA CON
RESPECTO AL PRODUCTO; TODAS LAS GARANTÍAS EXPRESAS E IMPLÍCITAS
DE ESTE PRODUCTO, INCLUY ENDO PER O SIN LIMITARSE A, CUALQUIER
GARANTÍA IMPLÍCITA DE O CONDICIONES DE COMERCIALIZACIÓN O
IDONEIDAD PARA UN USO PARTICULAR, ESTÁN LIMITADAS EN DURACIÓN AL
PERÍODO DE GARANTÍA DECLARADO ANTERIORMENTE Y NINGUNA GARANTÍA
YA SEA EXPRESA O IMPLÍCITA SE APLICARÁ DESPUÉS DEL PERÍODO DE
GARANTÍA. ALGUNOS ESTADOS, PROVINCIAS Y JURISDICCIONES NO
PERMITEN RESTRICCIONES EN CUANTO A LA DURACIÓN DE UNA GARANTÍA
IMPLÍCITA, ASÍ QUE LA RESTRICCIÓN ANTERIOR PUEDE NO APLICARSE EN SU
CASO. ESTA GARANTÍA LE DA DERECHOS LEGALES ESPECÍFICOS, Y USTED
PUEDE POSEER OTROS DERECH O S QU E VARÍAN DE ESTADO A ESTADO, O
PRO VINCIA A PROVINCIA.
60
www.insignia-products.com
Page 61

Insignia NS-A2113 Mini si
stema de audio
www.insignia-products.com
61
Page 62

Distributed by Insignia™ Products
Distribué par Insignia™ Products
Distribuido por Insignia™ Products
7601 Penn Avenue South
Richfield, MN USA 55423-3645
www.Insignia-Products.com
R1
All rights reserved. All other products and brand names are trademarks of their respective owners.
Tous droits réservés. Tous les autres produits ou noms de marques sont des marques de commerce qui appartiennent à
Todos los derechos reservados. Todos los demás productos y marcas son marcas comerciales de sus respectivos dueños.
© 2007 Insignia™ Products
© 2007 produits Insignia™
leurs propriétaires respectifs.
© 2007 productos Insignia™
 Loading...