

Page 1

User Guide | Guide de l’utilisateur | Guía del Usuario
Executive shelf system with tuner
Lecteur de CD de salon haut de gamme avec syntoniseur
Sistema de audio tipo ejecutivo con sintonizador
NS-A1112
Page 2

Page 3
Insignia NS-A1112
Executive Shelf
System with Tuner
Contents
Introduction . . . . . . . . . . . . . . . . . . . . . . . . . . . . . .3
Safety information . . . . . . . . . . . . . . . . . . . . . . . . 3
Features. . . . . . . . . . . . . . . . . . . . . . . . . . . . . . . . 4
Setting up your executive shelf system . . . . . . . . .5
Using the executive shelf system. . . . . . . . . . . . . 5
Maintaining the executive shelf system . . . . . . . . 7
Specifications . . . . . . . . . . . . . . . . . . . . . . . . . . . .8
Warranty information . . . . . . . . . . . . . . . . . . . . . . 8
Français. . . . . . . . . . . . . . . . . . . . . . . . . 9
Español . . . . . . . . . . . . . . . . . . . . . . . . 16
Introduction
Congratulations on your purchase of a
high-quality Insignia product. Your NS-A1112
executive shelf system with tuner represents the
state of the art in stereo design, and is designed
for reliable and trouble-free performance.
Safety information
Read the instructions carefully before oper ating
your executive shelf system.
Warning
Risk of electric shock. Do not open. Do
not attempt to service your executive shelf
system yourself because opening or
removing covers may expose you to
dangerous electrical voltage or other
hazards. Refer all servicing to qualified
service personnel.
Important
Note
Since the CD circuitry may cause
interference to other radio tuners nearby,
turn this executive shelf system off when
not in use or move it away from the
affected radio tuner.
This executive shelf system complies with
Part 15 of the FCC Rules. Operation is
subject to the following two conditions:
(1) This device may not cause harmful
interference, and (2) this device must
accept any interference received,
including interference that may cause
undesirable operation.
This equipment has been tested and found
to comply within the limits for a class B
digital device, pursuant to Part 15 of the
FCC Rules. These limits are designed to
provide reasonable protection against
harmful interference in a residential
installation. This equipment generates,
uses, and can radiate radio frequency
energy and, if not installed and used in
accordance with the instructions, may
cause harmful interference to radio
communications. However, there is no
guarantee that interference will not occur
in a particular installation. If this
equipment does cause harmful
interference to radio or television
reception, which can be determined by
turning the equipment off and on, the user
is encouraged to try to correct the
interference by one or more of the
following measures:
• Reorient or relocate the receiving
antenna.
• Increase the separation between
the equipment and receiver.
• Connect the equipment into an
outlet on a circuit different from
that to which the receiver is
connected.
• Consult the dealer or an
experienced radio / TV technician
for help.
Warning
Warning
Warning
Warning
T o reduce the risk of fire or elect ric shock,
do not expose your executive shelf system
to rain or moisture. Do not expose your
executive shelf system to dripping or
splashing liquids. Do not set objects filled
with liquids, such as vases, on your
executive shelf system.
To avoid fire, do not place an open flame
source, such as a lighted candle, on or
near your executive shelf system.
Leave at least 4 inches (10 cm) of space
around your executive shelf system for
sufficient ventilation.
Do not block the ventilation openings with
items, such as newspapers, tablecloths,
or curtains.
In case of smoke, strange noises, or
strange smells from your executive shelf
system, turn it off, unplug it from the
power outlet, and contact your dealer or
service center.
Safety certification
This executive shelf system is made and tested
to meet safety standards of the FCC,
requirements and compliance with saf ety
performance of the U.S. Department of Health
and Human Services, and also with FDA
Radiation Performance Standards 21 CFR
Subchapter J.
Laser safety
This executive shelf system
employs an optical laser beam
Invisible laser
radiation when open
and interlock failed
or defeated. Avoid
direct exposure to
laser beam.
system in the CD mechanism,
designed with built-in
safeguards. Do not attempt to
disassemble. Refer to qualified
service personnel. Exposure to
this invisible laser light beam
may be harmful to the human
eye.
This is a Class-1 laser product.
Use of controls, adjustments,
or procedures other than those
specified herein, may result in
hazardous laser light beam
exposure.
www.insignia-products.com
3
Page 4
Insignia NS-A1112 Executive Shelf System with Tuner
Safety precautions
• Do not open the cabinet. Refer servicing to
qualified personnel only.
• Do not expose to excessive heat, direct
sunlight, dust, moisture, vibration, or shock.
• Use only the AC adapter specified. Other
types may damage your executive shelf
system.
• Disconnect the AC adapter from the power
outlet when the executive shelf system is not
going to be used for an extended period of
time.
• When cleaning your executive shelf system,
use a soft dry cloth. Do not use solvents or
commercially available cleaners because
they may damage or discolor the finish.
• Protect the power cord from being walked on
or pinched, particularly at plugs, convenience
receptacles, and the point where the power
cord exits from the executive shelf system.
• Use only attachments and accessories
specified by the manufacturer.
• Use the executive shelf system only with a
cart, stand, tr ip od , bracket, or table specified
by Insignia or sold with the executive shelf
system. When using a cart, use caution when
moving the cart and executive shelf system
combination to avoid injury from it tipping
over.
• This is classified as Class II equipment,
which means that the stereo has a
double-insulation system.
Number Control
9 CD Play/Pause button
10 Volume + / - button
11 Push Open button
12 Skip Forward/Tuning + button
13 Skip Backward/Tuning - button
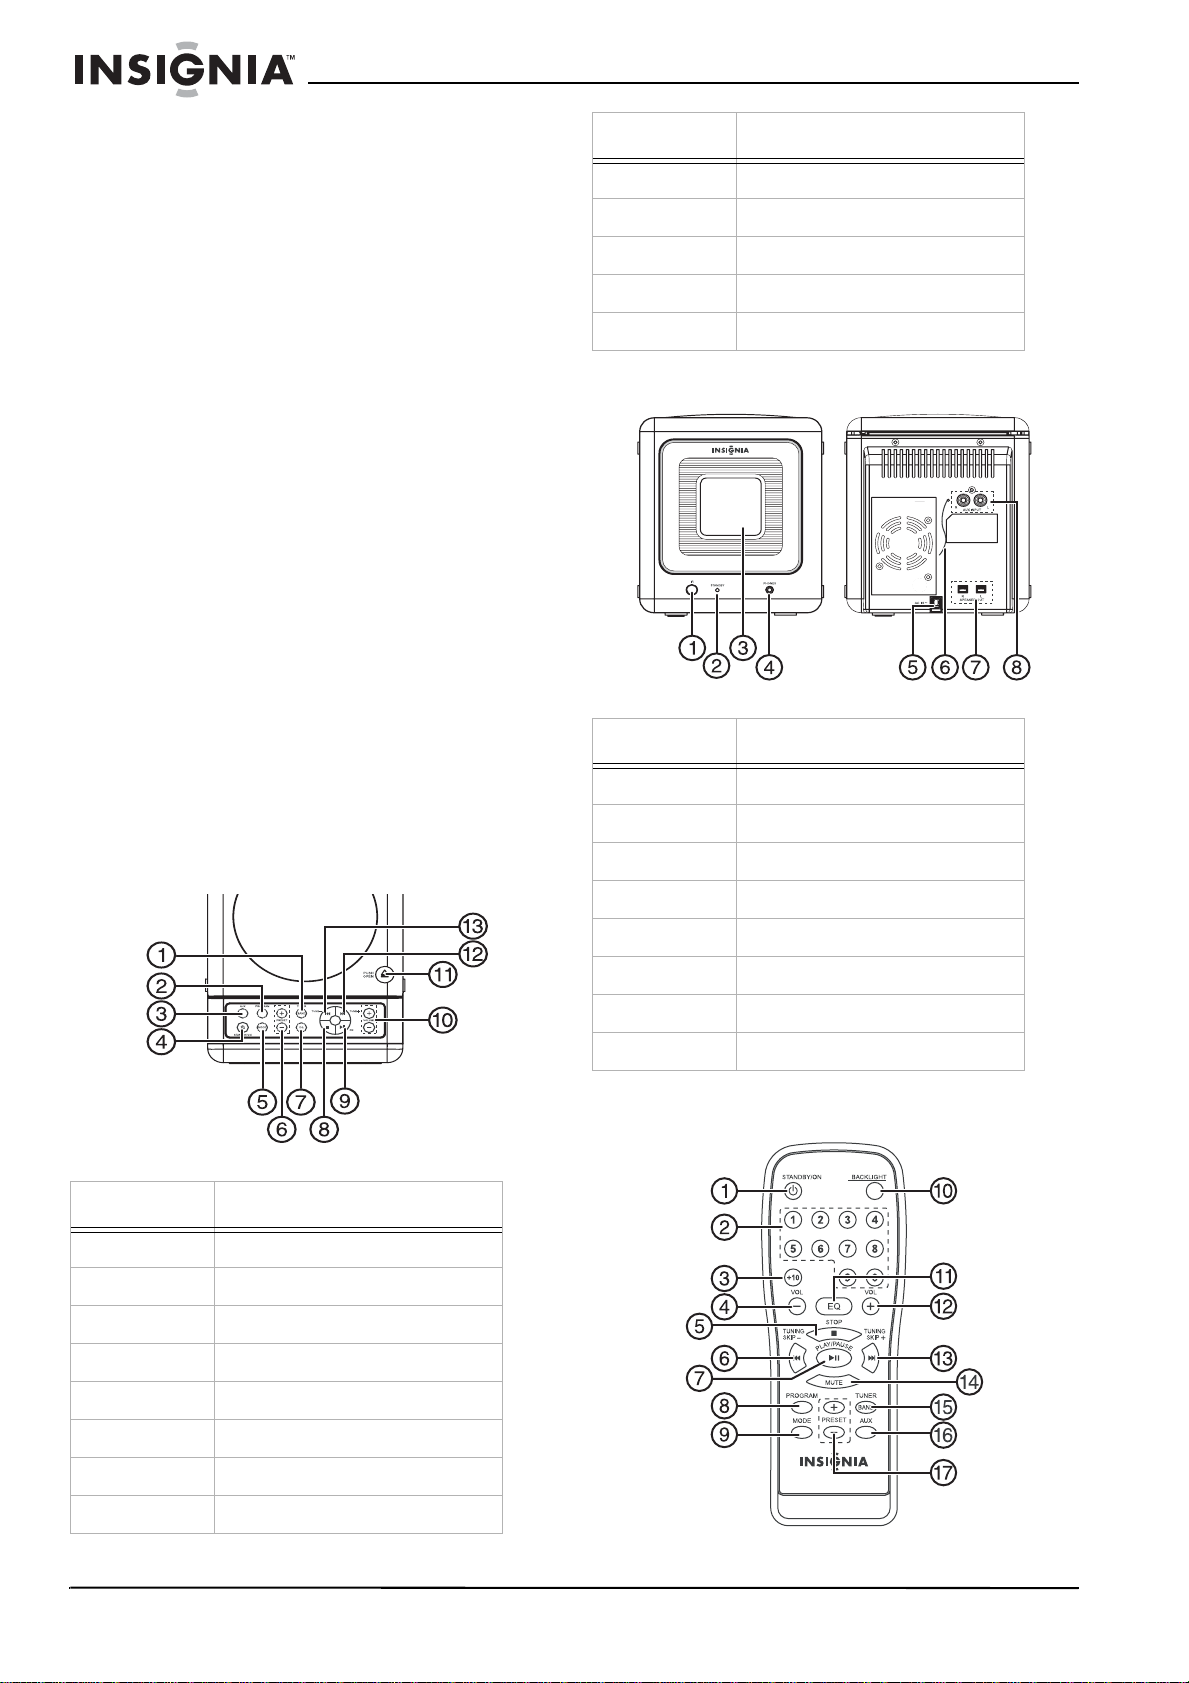
Front and Back Controls
Number Control
1 Remote sensor
Features
Top controls
Number Control
1 Tuner/Band button
2 Memory/Program button
3 Aux button
4 Standby/On button
5 Mode button
2 Standby indicator
3 LCD display
4 Headphone jack
5AC In jack
6 FM wire antenna
7 Speaker connections
8Aux In jack
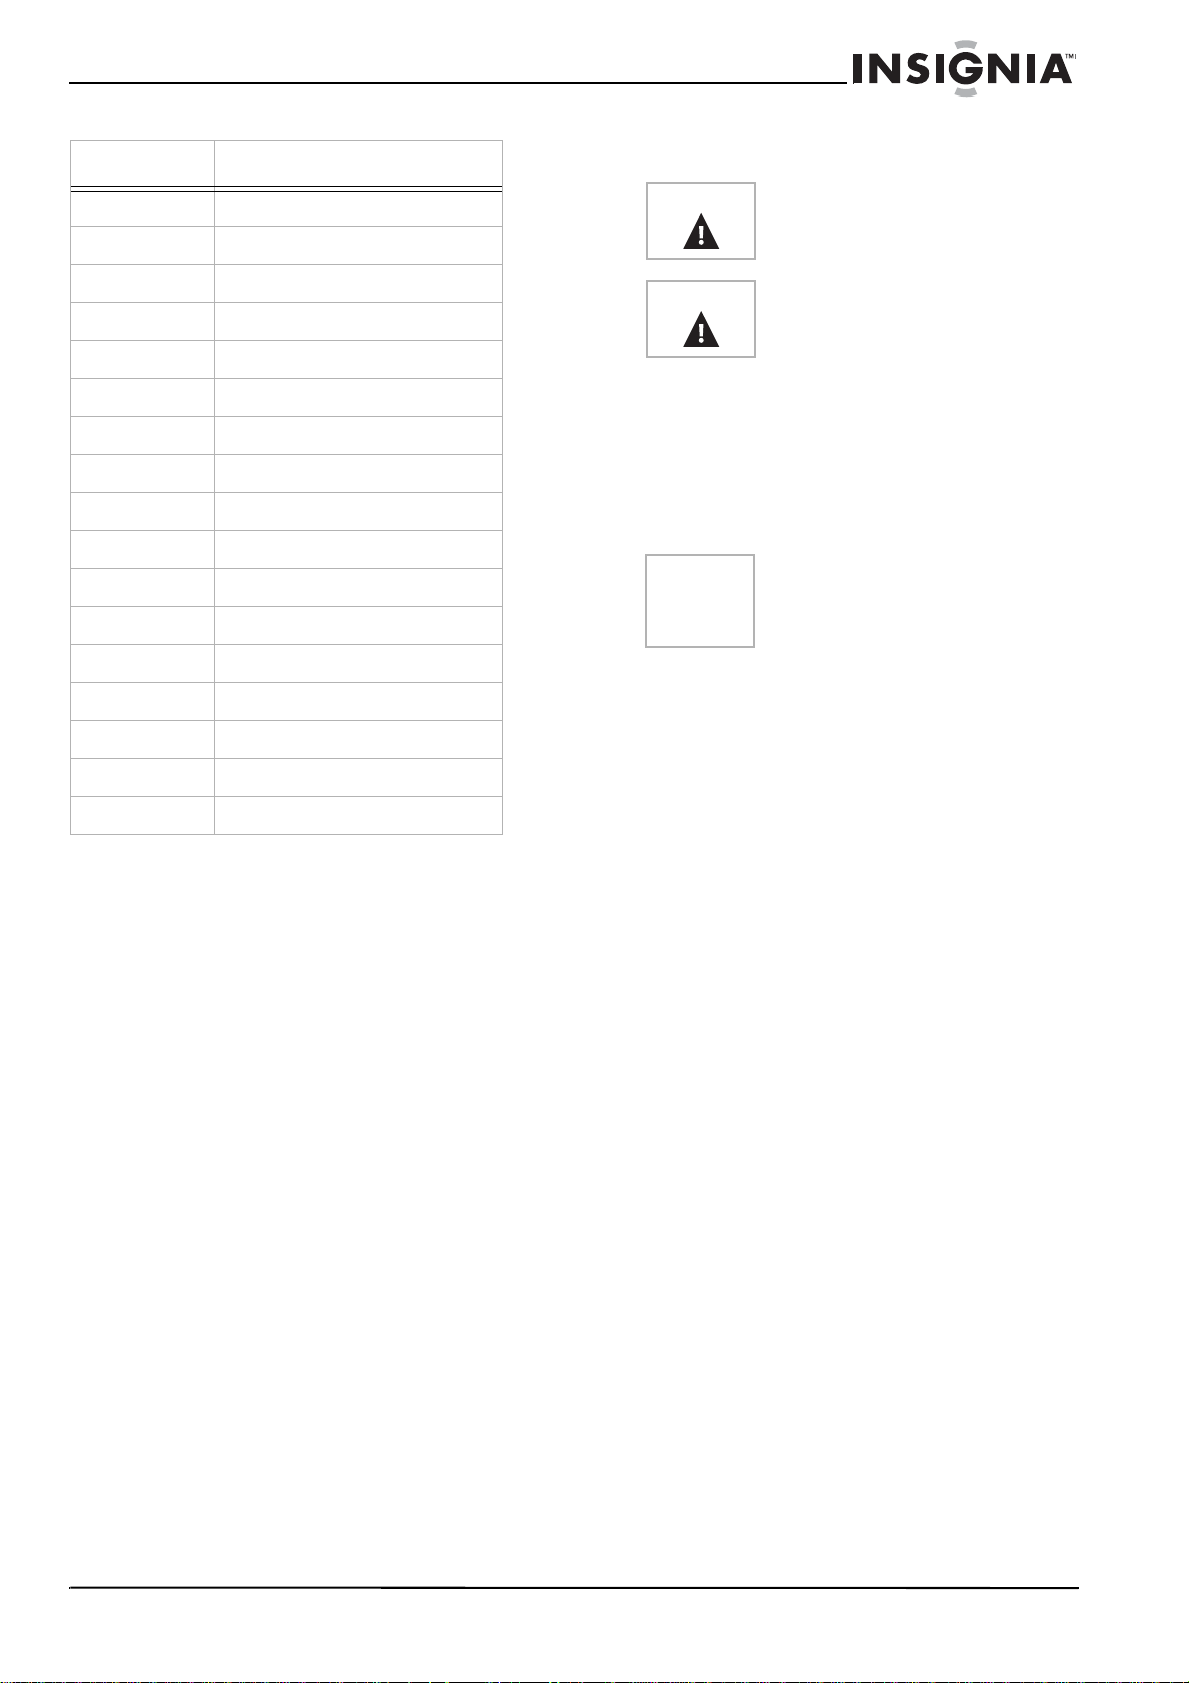
Remote control
6 Preset + / - button
7 EQ button
8 Stop button
4
www.insignia-products.com
Page 5
Insignia NS-A1112 Executive Shelf System with Tuner
Number Control
Preparing the remote control
Installing remote control batteries
1 Standby button
2 Numeric keypad
3 +10 button
4 Volume - button
5 Stop button
6 Skip – / Tuning button
7 CD Play / Pause button
8 Program button
9 Mode button
10 Backlight button
11 EQ button
12 Volume + button
13 Skip + / Tuning + button
14 Mute button
15 Tuner / Band button
16 AUX button
17 Preset + / – button
Setting up your executive
shelf system
Unpacking the executive shelf system
How to unpack the executive shelf system:
1 Carefully unpack the stereo and speakers,
then remove all pac king material from around
the stereo.
2 Position the stereo horizontally on a
heavy-duty stand or firm, level surface away
from the speaker system to avoid acoustic
feedback.
Connecting the executive shelf system
How to connect the executive shelf system:
1 Connect the wires from the speaker box to
the speaker connections on the back of the
stereo.
2 Connect the AC power cord to an AC outlet.
NOTE:
Before operating the stereo in a new area for the first time,
you must check that the operating voltage of your stereo is
identical to the voltage of your local power supply. This
stereo is to be operated only at the power source voltage
printed on the back panel. Disconnect from the power outlet
when not in use for a long period of time.
Warning
Caution
Do not throw the batteries into fire.
Dispose of used batteries as hazardous
waste.
Do not drop or disassemble the remote
control. Do not get the remote control wet.
To install batteries in the remote control:
1 Remove the battery cover.
2 Insert two AAA batteries into the battery
compartment. Make sure that the +/–
symbols on the battery match the +/– marks
inside the battery compartment.
3 Replace the battery cover.
Note
When the remote control will not be used
for a long period of time or when the
batteries are worn out, remove the
batteries to prevent leakage.
Using the executive shelf
system
Turning the stereo off and on
There are several ways to turn on the
executive shelf system:
1 Press Standby/On o nce to turn on the stereo
and light the backlight.
Note:
When the power is off, pressing Backlight on the remote
control will turn the backlight on or off. After turning off the
stereo, the backlight will be off.
2 Press Play/Pause once to turn on the stereo,
which will read the TOC and start playback
automatically.
3 Press Tuner/Band once to turn on the stereo
and restore the band and frequency playing
when the stereo was turned off.
4 Press AUX once to turn on the stereo and
select AUX input.
Using the remote control
To change modes for the executive shelf
system:
1 Press Standby/On on the remote control to
turn the power on.
2 After the remote control is turned on, press
• Press Tuner/Band to select the tuner.
• Press CD Play/Pause to select the CD.
• Press AUX to select an auxiliary source
component.
NOTE:
When using the remote control and you are required to move
closer to the stereo for the remote control to operate, replace
both batteries. The remote control may not operate correctly
if direct sunlight or the light of a high-frequency fluorescent
lamp enters the remote control light sensor. In this case,
change the system installation position to prevent the
problem.
www.insignia-products.com
5
Page 6

Insignia NS-A1112 Executive Shelf System with Tuner
Using the clock
When the stereo is turned off, the real-time clock
shows in the LCD display.
To adjust the time:
1 Press Mode once to enter the clock setting
mode. The time flashes in the LCD display.
2 Press Skip Backward/Tuning - once to
decrease the hour.
3 Press Skip Forward/Tuning + once to
increase the hour.
4 Press Volume - once to decrease the minute.
5 Press Volume + once to increase the minute.
6 Press and hold any of these but tons for more
than 1 second to enter the fast setting mode.
After the time is changed, the seconds reset
to “00” and the clock stops running.
7 To confirm the time and exit clock setting
mode, press Mode. The clock starts.
Note:
If there is no button operation for 10 seconds, the stereo
automatically exits the clock setting mode.
Adjusting the sound
Volume
To adjust the volume:
1 Press Volume + as necessary to increase
the volume.
2 Press Volume - as necessary to decrease
the volume.
Preset equalizer
The preset equalizer provi des five ranges of
control (NORMAL, ROCK, JAZZ, POP, AND
CLASSIC) for the audio frequency spectrum in
narrow and distinct sections.
Press EQ to select the best response that suits
your type of music and individual taste.
Using the radio
After pressing a button while using the r adio, the
LCD display shows the operation. Five seconds
after any operation is completed, the LCD will
re-display the clock.
Tuner mode
1 Press Tuner/Band once to turn on the stereo
and restore the band and frequency playing
when the stereo was turned off.
2 In Tuner mode, Press Tuner/Band to toggle
between AM and FM bands.
3 With the radio set to FM band, press Mode to
toggle between FM stereo or mono mode. If
the FM stereo mode is selected, the Stereo
indicator on the LCD will be lit.
AUX IN mode
1 Press Aux to select the auxiliary mode. The
RCA jacks at the back of the stereo can be
used for connecting external audio sources.
2 Make sure the correct color of the RCA plug
is paired with the correct color of RCA jack.
Reception
To adjust FM reception:
• Raise and extend the FM antenna, then
adjust the position for the best reception . The
Stereo indicator appears on the LCD only if
an actual stereo broadcast station is being
received.
To adjust AM reception:
• Because the built-in ferrite bar antenna is
directional, rotate the stereo horizontally or
relocate the stereo for best reception.
Tuning
To tune the stereo manually:
1 In Tuner mode, press Skip Forward/Tuning
+ to move to a higher radio frequency one
frequency step at a time.
2 In Tuner mode, press Skip Backward/
Tuning - to move to a lower radio frequency
one frequency step at a time.
To tune the stereo automatically:
1 Press and hold Skip Forward/Tuning + or
Skip Backward/Tuning - to auto search in
the desired direction at the speed of four
frequency steps per second.
2 Hold the button down to bypass all stations
until the button is released. After the button is
released, the radio stops at the next station
frequency . When the tuning rea ches the band
edge, the tuner will wrap around to the
opposite end and keep searching.
3 While auto-tuning, no other functions are
available. To use another function while
auto-tuning, press Standby/On, Play/Pause,
or Aux to abort the auto tuning. You then can
perform another function.
Channel save and recall
You can program (save) 20 preset FM stations
and 12 preset AM stations.
To save station settings:
1 In Tuner mode, se lect the station to be sa ved,
then press Memory/Program once to enter
the Channel Save mode.
2
Press Memory/Program again to save the
channel in memory, then press Preset + / –
to confirm the operation.
3 Repeat Steps 1 and 2 to enter more stations
(up to 20 FM stations and 12 AM stations.)
4 Press any other button to abort or exit the
channel save operation.
To find saved stations:
1 Press Preset + / – to find a saved channel.
2 Press Preset + / – again to move to the next
saved channel. Repeat the process as
necessary to reach the channel you want.
Using the CD
This executive shelf system can pla y audio discs
such as CD-R or CD-RW discs. Do not try to
play a CD-ROM, CDi, VCD, DVD, or computer
data CD.
6
www.insignia-products.com
Page 7

Insignia NS-A1112 Executive Shelf System with Tuner
Use a CD with the logo at left in this
stereo. The executive shelf system can
play 3" (8 cm) single CDs without an
adapter (not included). Do not use a CD
single adapter for these CDs.
Note
Always store discs in their cases. Do not
expose discs to direct sunlight, high
temperature, high humidity, or dust. When
removing the disc from its case,
• Do not touch the recorded surface
opposite the side of the CD with
the label
• Do not stick paper on label surface
• Do not bend the CD.
Operating the CD player
When using the CD player, after pressing a
button the LCD display will show the operation.
Five seconds after any operation is completed,
the LCD will re-display the clock.
Basic CD play
1 Press Push Open to open the CD
compartment lid.
2 Adjust the Volume +/- to minimum.
3 Remove the CD from its storage case, then
insert the CD with the label side facing up.
4 Close the lid securely until you hear a click.
5 Press Play/Pause to start playing.
Play/Pause function
This CD player has no ON/OFF switch.
Program mode
Program mode allows you to play up to 20
tracks in the order you choose.
To use the program mode:
1 In CD Stop mode, press Memory/Program
once to enter the Program mode.
2 Press Skip Forward/Tuning + or Skip
Backward/Tuning - to select the desired
track.
3 Press Memory/Program again to save the
track in memory .
4 Repeat Steps 2 and 3 to enter more tracks
(up to 20 tracks).
5 Press Play/Pause to start the program
playback.
6 Press Stop twice or open the CD door to
clear program memories.
Search/Skip Forward and Backward
1 Press Skip Forward/Tuning + or Skip
Backward/Tuning - to skip the track forward
(+) or backward (-).
2 Press and hold Skip Forward/Tuning + or
Skip Backward/Tuning - to search over
more than one track forward (+) or backward
(-).
3 Release the button to resume normal
playback.
Maintaining the executive
shelf system
To turn the player on and off:
1 In power off mode, press Standby/On or
Play/Pause once to turn on the executive
shelf system in CD mode. The executive shelf
system will start playback automatically.
2 Turn off the CD player by pressing the Stop
button.
3 While in CD mode:
• Open and close the CD door to start
playback automatically.
• When the CD stops, press Play/Pause
once to start the CD playback.
• When the CD is playing, press Play/
Pause once to pause th e CD playback.
Play mode
1 In CD mode, press Mode to select play mode
using the following seq uence:
NORMAL → REPEAT 1 → REPEAT ALL →
RANDOM → REPEAT ALL RANDOM →
• Activating REPEAT 1 causes the REPEAT
icon to flash.
• Activating REPEAT ALL turns on the
REPEAT icon.
• Activating RANDOM turns on the
RANDOM icon.
• Activating REPEAT ALL RANDOM turns
on the RANDOM and REPEAT icons.
2 To clear the pla y mode, press Stop or
change to mode to Tuner.
3 If Program mode is activated, random mode
will not be activated.
Cleaning the player
• Wipe with a soft cloth. If the player is very
dirty, dampen the cloth with a weak solution
of neutral detergent and w ater , and then wipe
clean.
Cleaning the lens
A dirty lens causes sound skipping, and if the
lens is very dirty, the CD may not work at all.
To clean the lens:
1 Open the CD cover.
2 To remove dust or dry particles, use a
camera lens blower/brush to blow on the lens
several times .
• Wipe the lens lightly with the brush to
remove dust.
• Blow on the lens one more time to make
sure that all particles are gone.
3 If the lens cannot be cleaned by using a
brush/blower, use a dry cotton swab starting
from the middle and working to the outside
edge to remove dirt or marks.
www.insignia-products.com
7
Page 8
Insignia NS-A1112 Executive Shelf System with Tuner
Cleaning CDs
• Fingerprints and dust should be carefully
wiped from the surface of the CD with a soft
cloth. Wipe in a straight motion from the
center to the edge.
• Never use thinner, benzine, record cleaner,
or anti-static spray on a CD, because they
can damage its plastic surface.
Specifications
Design and specifications are subject to change
without notice.
General
System executive shelf system with Tuner
Output terminal Terminal speaker sockets
Maximum total
output power
Dimensions 15.35 × 6.7 × 8.7 inches
Weight 7.7 lbs.
Audio
Radio:
Frequency FM: 87.5 - 108 MHz
CD:
Sampling
frequency
Radio frequency 20-20,000 Hz
Number of
Channels
Power sources
Power supply 120 V AC
Remote control
batteries
Power
consumption
> 1.8 W x 2
(389.9 × 170.18 ×221 mm)
(3.496 kg)
AM: 520 - 1710 MHz
44.1 Khz
Below measurable limits
2 channels (stereo)
60 Hz
1.5 V (2)
14 W
Warranty information
Limited warranty
Insignia Products warrants to you, the original
purchaser of this Product, that this product shall
be free of defects in m aterial or w orkmanship f or
a period of ninety (90) days from the date of
purchase as follows:
1 LABOR: During the Warranty Period if this
Product is determined to be defective,
Insignia will repair or replace the Product, at
its option at no charge, or pay the labor
charges to any Insignia authorized service
facility. After the Warranty Period, you must
pay for all labor charges.
2 PARTS: In addition, Insignia will supply, at no
charge, new or rebuilt replacement parts in
exchange fo r defective parts for the W arrant y
Period. After the Warranty Period, you must
pay all parts costs.
To obtain warranty service, you must take the
Product with your original receipt or other proof
of purchase, either in its original packaging or
packaging affording an equal degree of
protection, to your ne arest reta il store locatio n of
the store or online web site from which you
purchased the Product.
This warranty does not cover cosmetic damage
or damage due to acts of God, lightning strikes,
accident, misuse, abuse, negligence,
commercial use, or modificati on of, or to any part
of the Product, including the antenna. This
warranty does not cover damage due to
improper operation or maintenance, connection
to improper voltage supply, or attempted repair
by anyone other than a f acility authorized by
Insignia to service the Product. This warranty
does not cover Products sold AS IS or WITH
ALL FAULTS, or consumables (such as fuses or
batteries). This warranty is valid only in the
United States and Canada.
This warranty is invalid if the factory applied
serial number has been altered or remo v ed from
the Product.
REPAIR REPLACEMENT AS PROVIDED UNDER
THIS WARRANTY IS THE EXCLUSIVE REMEDY
OF THE CONSUMER. INSIGNIA SHALL NOT BE
LIABLE FOR ANY INCIDENTAL OR
CONSEQUENTIAL DAMAGES FOR BREACH OF
ANY EXPRESS OR IMPLIED WARRANTY ON
THIS PRODUCT. EXCEPT TO THE EXTENT
PROHIBITED BY APPLICABLE LAW, ANY
IMPLIED WARRANTY, REPRESENTATION OR
CONDITION OF MERCHANTABILITY OR
FITNESS FOR A PARTICULAR PURPOSE ON
THIS PRODUCT IS LIMITED IN DURATION TO
THE DURATION OF THIS WARRANTY.
Some states or provinces do not allow the
exclusion or limitation of incidental or
consequential damages, or allow limitations on
how long an implied warranty lasts , so the abov e
limitations or exclusions may not apply to you.
This warranty gives y ou specific leg al rights, and
you may have other rights which vary from state
to state, or province to province.
For customer service, please call
1-877-467-4289.
www.insignia-products.com
Insignia Products, Richfield, Minnesota, U.S.A.
8
www.insignia-products.com
Page 9

Lecteur de CD de salon haut de gamme avec syntoniseur NS-A1112 Insignia
Lecteur de CD de
salon haut de
gamme avec
syntoniseur
NS-A1112 Insignia
Table des matières
Introduction . . . . . . . . . . . . . . . . . . . . . . . . . . . . . 9
Information sur la sécurité . . . . . . . . . . . . . . . . . . 9
Fonctionnalités. . . . . . . . . . . . . . . . . . . . . . . . . . 10
Installation du lecteur de CD de salon haut de
gamme . . . . . . . . . . . . . . . . . . . . . . . . . . . . . . 11
Fonctionnement du lecteur de CD de salon haut de
gamme . . . . . . . . . . . . . . . . . . . . . . . . . . . . . . 12
Entretien de l’appareil . . . . . . . . . . . . . . . . . . . . 14
Spécifications . . . . . . . . . . . . . . . . . . . . . . . . . . .14
Informations sur la garantie . . . . . . . . . . . . . . . . 15
Droits d’auteurs . . . . . . . . . . . . . . . . . . . . . . . . . .15
Avertissement
Avertissement
Important
Laisser un espace d’environ 4 po (10 cm)
autour de l’appareil pour une bonne
ventilation.
Ne pas bloquer les ouvertures de
ventilation avec des articles tels que des
journaux, des nappes ou des rideaux.
En cas de fumée, bruits ou odeurs
étranges émanant de l’appareil, le mettre
hors tension, le débrancher de la prise
murale et contacter le détaillant ou le
centre de réparation.
Les composants d’un lecteur de CD
pouvant provoquer des interférences avec
d’autres syntoniseurs radio à proximité,
mettre l’appareil hors tension quand il
n’est pas utilisé ou l’écarter du
syntoniseur radio affecté.
Cet appareil est conforme à l'article 15 du
règlement de la FCC. Son fonctionnement
est soumis aux deux conditions suivantes
: (1) Ce dispositif ne doit pas provoquer
d’interférences nuisibles et (2) il doit
accepter toute interférence reçue,
notamment les interférences qui
pourraient entraîner un fonctionnement
indésirable de l’appareil.
Introduction
Félicitations d’avoir achet é ce produit Insignia de
haute qualité. Le lecteur de CD de salon haut de
gamme avec syntoniseur NS-A1112 représente
la dernière avancée technologique dans la
conception de systèmes stéréo et a été conçu
pour des performances et une fiabilité hors pair.
Information sur la sécurité
Lire les instructions avec attention avant
d’utiliser ce lecteur de CD de salon haut de
gamme.
Avertissement
Avertissement
Risque de choc électrique Ne pas ouvrir.
L ’utilisateur ne doit pas essayer de réparer
cet appareil lui-même, en effet son
ouverture ou le démontage des couvercles
peut l’exposer à des tensions dangereuses
et à d'autres dangers. Toutes les
réparations doivent être réalisées par du
personnel qualifié.
Afin de réduire le risque d’incendie et de
choc électrique, ne pas exposer cet
appareil à la pluie ou l’humidité. Ne pas
exposer cet appareil aux gouttes d’eau ou
aux éclaboussures. Ne pas placer d’objets
tels qu'un vase rempli de liquide sur
l'appareil.
Remarque
Cet équipement a été mis à l’essai et
déclaré conforme aux limites prévues
pour un appareil numérique de classe B,
définies dans la section 15 de la
réglementation FCC. Ces limites ont été
établies pour fournir une protection
raisonnable contre les interférences
nuisibles lors d’une installation
résidentielle. Cet équipement génère,
utilise et diffuse des ondes radio et, s’il
n’est pas installé et utilisé conformément
aux instructions dont il fait l’objet, il peut
provoquer des interférences indésirables
avec les communications radio.
Cependant, il n’est pas possible de
garantir qu’aucune interférence ne se
produira dans une installation particulière.
Si cet équipement cause des interférences
gênant la réception d'ondes radio ou
télévisées (déterminé en éteignant et en
rallumant l’équipement), il est
recommandé que l’utilisateur tente de
corriger le problème en appliquant au
moins l'une des mesures suivantes :
• Réorienter ou déplacer l’antenne
réceptrice.
• Augmenter la distance entre
l’équipement et le récepteur.
• Brancher l’équipement sur la prise
électrique d’un circuit différent de
celui auquel le récepteur est relié.
• Contacter le revendeur ou un
technicien radio/télévision qualifié
pour toute assistance.
Avertissement
Pour éviter un incendie, ne pas mettre une
source de lumière telle qu’une chandelle
allumée sur ou à proximité de l’appareil.
www.insignia-products.com
Certification de sécurité
Ce lecteur de CD de salon haut de gamme a été
fabriqué et testé pour satisfaire aux normes de
sécurité de la FCC, aux exigences et règles de
conformité du Ministère de la santé des
États-Unis (U.S. Département of Health and
Human Services), ainsi qu’aux normes
d’irradiation 21 CFR, section de chapitre J de la
FDA.
9
Page 10

Lecteur de CD de salon haut de gamme avec syntoniseur NS-A1112 Insignia
Sécurité du laser
Le mécanisme CD de cet
appareil utilise une technologie
Radiation au laser
invisible en cas
d'ouverture et
lorsque le système
de sécurité est
défectueux ou
neutralisé. Éviter
toute exposition
directe aux rayons
laser.
de faisceau laser optique,
conçue pour intégrer des
dispositifs de sécurité. Ne pas
essayer de démonter cet
appareil. Confier l’entretien à
du personnel qualifié. Une
exposition à la lumière du
faisceau laser invisible peut
être dangereuse pour la vue.
Appareil au laser de classe 1.
L'utilisation de commandes,
de réglages ou l'exécution de
procédures autres que celles
indiquées ici peuvent aboutir à
une irradiation dangereuse.
Mesures de sécurité
• Ne pas ouvrir le boîtier. Confier la réparation
à un technicien spécialisé.
• Ne pas exposer l'appareil à une chaleur
excessive, la lumière solaire directe, la
poussière, l’humidité, les vibrations ou les
chocs.
• Utiliser uniquement l’adaptateur CA
spécifié. D’autres types peuvent
endommager l’appareil.
• Déconnecter l’adaptateur CA de la prise
secteur quand l’appareil ne doit pas être
utilisé pendant une longue période.
• Pour le nettoyage de l’appareil, utiliser un
chiffon doux et sec. Éviter totalement l’usage
de solvants ou produits de nett oyage du
commerce, car ils pourraient endommager
ou décolorer la finition de l’appareil.
• Protéger le cordon d’alimentation afin d’éviter
qu’on marche dessus ou qu’il soit pincé, en
particulier au niveau des prises murales,
plaques multiprises et à l’endroit où il est
rattaché à l’appareil.
• N'utiliser que des accessoires et des outils
spécifiés par le fabricant.
• N’utiliser qu’avec la table roulante, le pied, le
trépied, le support ou la table spécifiés par
Insignia ou vendus avec le produit.
Lorsqu’une table roulante est utilisée,
déplacer l’ensemble appareil/table roulante
avec précaution pour éviter les blessures
provoquées par une éventuelle chute de
l’appareil.
• Cet appareil est un produit de classe II, ce
qui signifie que la stéréo est dotée d’un
double système d’isolation.
Fonctionnalités
Commandes sur le dessus
Légende Commande
1 Touche Syntoniseur/Fréquence
2 Touche Mémoire/Programmation
3 Touche Aux
4 Touche Attente/Mise sous tension
5 Touche Mode
6 Touche Préréglage + / 7 Touche EQ
8 Touche Arrêt
9 Touche Lecture/Pause du CD
10 Touche Volume + / 11 Touche Ouvrir
12 Touche Saut en avant/Syntonisation
+
13 Touche Saut arrière/Syntonisation -
Commandes panneau avant et arrière
10
Légende Commande
1 Capteur de la télécommande
2 Témoin de mise en attente
3Écran ACL
www.insignia-products.com
Page 11

Lecteur de CD de salon haut de gamme avec syntoniseur NS-A1112 Insignia
Légende Commande
4Prise de casque d'écoute
5 Prise d’entrée CA
6 Antenne filaire FM
7 Connexions des haut-parleurs
8 Prise d’entrée Aux
Télécommande
Installation du lecteur de CD
de salon haut de gamme
Déballage de l’appareil
Comment déballer l’appareil:
1 Déballer avec soin la stéréo et les
haut-parleurs, puis enlever l’emballage de la
stéréo.
2 Placer la stéréo horizontalement sur un
support robuste ou une surface plane solide
à l’écart des haut-parleurs pour éviter le
retour acoustique.
Connexion de l’appareil
Comment connecter l’appareil:
1 Connecter les fils des haut-parleurs aux
connecteurs correspondants à l’arrière de la
stéréo.
2 Brancher le cordon d’alimentation CA dans
une prise de courant CA.
REMARQUE:
Avant d’utiliser la stéréo dans un nouvel emplacement pour
la première fois, vérifier que la tension de fonctionnement de
la stéréo est identique à la tension d'alimentation locale.
Cette stéréo doit fonctionner seulement à la tension de la
source d’alimentation indiquée sur le panneau arrière.
Débrancher l’appareil de la prise secteur s'il n'est pas utilisé
pendant une longue période.
Mise en service de la télécommande
Installation des piles de la téléco mmande
Légende Commande
1 Touche Attente
2 Pavé numérique
3 Touche +10
4 Touche Volume 5 Touche Arrêt
6 Touche Saut – / Syntonisation
7 Touche Lecture/Pause du CD
8 Touche Programmation
9 Touche Mode
10 Touche de rétro-éclairage
11 Touche EQ
12 Touche Volume +
13 Touche Saut + / Syntonisation +
14 Touche Sourdine
Avertissement
Précaution
Ne pas jeter les piles dans le feu. Se
débarrasser des piles usagées en suivant
les normes relatives aux déchets
dangereux.
Ne pas faire tomber ni démonter la
télécommande. Ne pas mouiller la
télécommande.
Pour installer les piles dans la
télécommande:
1 Retirer le couvercle du compartiment des
piles.
2 Insérer deux piles AAA dans le
compartiment. Vérifier que les symboles +/–
sur la pile concordent avec les repères +/– à
l’intérieur du compartiment des piles.
3 Remettre le couvercle du compartiment des
piles.
Remarque
Retirer les piles si la télécommande ne va
pas être utilisée pendant une période
prolongée ou si elles sont mortes, pour
éviter qu‘elles ne fuient.
15 Touche Syntoniseur/Fréquence
16 Touche AUX
17 Touche Préréglage + / -
www.insignia-products.com
11
Page 12

Lecteur de CD de salon haut de gamme avec syntoniseur NS-A1112 Insignia
Fonctionnement du lecteur
de CD de salon haut de
gamme
Mettre l’appareil hors puis sous tension
Il peut être mis sous tension de différentes
façons:
1 Appuyer une fois sur Attente/Mise sous
tension pour mettre l’appareil en marche et
allumer le rétro-éclairage.
Remarque :
Quand l’appareil est hors tension, l’appui sur
Rétro-éclairage de la télécommande activera ou
désactivera le rétro-éclairage. Quand l’appareil est hors
tension, le rétro-éclairage est désactivé.
2 Appuyer une fois sur Lecture/Pause pour
mettre l’appareil sous tension, la Table des
matières sera alors lue et la lecture
commencera automatiquement.
3 Appuyer une fois sur Syntoniseur/
Fréquence pour mettre l’appareil sous
tension et reprendre l’écoute avec la même
gamme d’ondes et fréquence utilisée avant la
mise hors tension de l’appareil.
4 Appuyer une fois sur AUX pour mettre
l’appareil sous tension et sélectionner
l’entrée AUX.
Utilisation de la télécommande
Pour changer les modes de l’appareil:
1 Appuyer sur la touche Attente/Mise sous
tension de la télécommande pour mettre
l’appareil sous tension.
2 Quand la télécommande est mise sous
tension :
• Appuyer sur Syntoniseur/Fréquence
pour sélectionner le syntoniseur.
• Appuyer sur Lecture/Pause du CD pour
sélectionner le CD.
• Appuyer sur AUX pour sélectionner la
source auxiliaire de l’appareil.
REMARQUE :
S’il est nécessaire de se rapprocher de l’appareil pour le bon
fonctionnement de la télécommande, remplacer les deux
piles. La télécommande ne fonctionnera pas correctement si
la lumière solaire directe ou d’une lampe incandescente à
haute fréquence interfère avec le capteur de la
télécommande. Dans ce cas, réorienter l’appareil pour éviter
le problème.
Fonctionnement de l’horloge
Quand l’appareil est hors tension, l’heure
actuelle s’affiche sur l’écran ACL.
Pour régler l’heure:
1 Appuyer une fois sur Mode pour accéder au
réglage de l’horloge. L’heure clignote sur
l’affichage ACL.
2 Appuyer une fois sur Saut arrière/
Syntonisation - pour diminuer les heures.
3 Appuyer une fois sur Saut en avant/
Syntonisation + pour augmenter le nombre
d’heures.
4 Appuyer une f ois sur Volume - pour diminuer
le nombre de minutes.
5 Appuyer une fois sur Volume + pour
augmenter le nombre de minutes.
6 Maintenir l’une de ces touches appuyée
pendant plus d’une seconde pour accéder au
mode de réglage rapide. Quand l’heure est
modifiée, les secondes sont réinitialisées à «
00 » et l’horloge s’arrête.
7 Pour confirmer l’heure et quitter le réglag e de
l’horloge, appuyer sur Mode. L’horloge se
met en marche.
Remarque :
Si aucune touche n’est appuyée pendant 10 secondes,
l’appareil quitte automatiquement le mode réglage de
l’horloge.
Réglage du son
Volume
Pour régler le volume:
1 Appuyer sur Volume + pour augmenter le
volume.
2 Appuyer sur Volume - pour diminuer le
volume.
Mode d’égalisation préréglé
L’égalisation préréglée fournit cinq modes
différents de commande (NORMAL, ROCK,
JAZZ, POP ET CLASSIQUE) pour répartir le
spectre de fréquence audio en sections
distinctes.
Appuyer sur EQ pour sélectionner ce qui
correspond à votre type de musique préféré.
Fonctionnement de la radio
Quand la radio est en fonctionnement, si une
touche est appuyée, l’écran ACL affiche la
commande. Cinq secondes après l’exécution de
la commande, l’écran ACL affiche de nouveau
l’horloge.
Mode syntoniseur
1 Appuyer une fois sur Syntoniseur/
Fréquence pour mettre l’appareil sous
tension et reprendre l’écoute avec la même
gamme d’ondes et fréquence utilisée avant la
mise hors tension de l’appareil.
2 En mode syntoniseur, appuyer sur
Syntoniseur/Fréquence pour basculer entre
les fréquences AM et FM.
3 Quand la radio est réglée sur la fréquence
FM, appuyer sur Mode pour basculer entre
les modes stéréo ou mono FM. Si le mode
stéréo FM est sélectionné, l’indicateur
Stéréo sur l’écran ACL s’allume.
Mode entrée AUX
1 Appuyer sur Aux pour sélectionner le mode
auxiliaire. Les prises RCA sur le panneau
arrière de l’appareil permettent la connexion
de sources audio externes.
2 Vérifier que les couleurs du câble RCA
correspondent à celles de la prise RCA.
Réception
Pour régler la réception FM:
• Relever et déployer l’antenne FM, puis la
réorienter pour obtenir la meilleure réception.
L’indicateur Stéréo s’affiche sur l’écran ACL
seulement si la station reçue est émise en
stéréo.
12
www.insignia-products.com
Page 13

Lecteur de CD de salon haut de gamme avec syntoniseur NS-A1112 Insignia
Pour régler la réception AM:
• Comme l’antenne barre à ferrite intégrée est
directionnelle, faire pivoter l’appareil
horizontalement ou le déplacer pour obtenir
la meilleure réception.
Syntonisation
Pour syntoniser l'appareil manuellement:
1 En mode Syntoniseur, appuyer sur Saut en
avant/Syntonisa tion + pour syntoniser une
par une les fréquences plus élevées.
2 En mode Syntoniseur, appuyer sur Saut
arrière/Syntonisation - pour syntoniser une
par une les fréquences moins élevées.
Pour syntoniser l'appareil automatiquement:
1 Maintenir appuyé Saut en avant/
Syntonisation + ou Saut arrière/
Syntonisation - pour faire une recherche
automatique dans la direction souhaitée à la
vitesse de quatre fréquences par seconde.
2 Maintenir la touche appuyée pour f aire défiler
les stations en continu jusqu’à ce que la
touche soit relâchée. Quand la touche est
relâchée, la radio s’arrête à la fréquence de
la station suivante. Quand le syntoniseur
atteint l'extrémité de la gamme d’ondes, il
retourne au début pour continuer la
recherche.
3 Pendant la syntonisation automatique,
aucune autre fonction n’est disponible. Pour
utiliser une autre fonction pendant la
syntonisation automatique, appuyer sur
Attente/Mise sous tension, Lecture/Pause
ou Aux pour l’annuler. Il est alors possible
d’utiliser une autre fonction.
Enregistrement et accès aux stations
Il est possible de programmer (enregistrer) et de
prérégler 20 stations FM et 12 stations AM.
Pour enregistrer la configuration des
stations:
1 En mode Syntoniseur, sélectionner la station
à enregistrer, puis appuyer une fois sur
Mémoire/Programmation pour accéder au
mode Enregistrer la station.
2 Appuyer de nouveau sur Mémoire/
Programmation pour mémoriser la station,
puis appuyer sur Préréglage + / – pour
confirmer.
3 Répéter les étapes 1 et 2 pour mémoriser
plus de stations (jusqu’à 20 stations FM et 12
stations AM).
4 Appuyer sur n’importe quelle touche pour
annuler ou quitter la mémorisation d’au tr es
stations.
Pour trouver les stations mémorisées:
1 Appuyer sur Préréglage + / – pour trouver
une station mémorisée.
2 Appuyer de nouveau sur Préréglage + / –
pour aller à la station mémorisée suivante .
Répéter ces étapes jusqu’à atteindre la
station souhaitée.
Fonctionnement du lecteur de CD
Cet appareil peut lire des disques audio te ls que
les CD-R ou CD-RW. Ne pas essay er de lire un
CD-ROM, CDi, VCD , DVD ou un CD de données
pour PC.
Utiliser un CD revêtu du logo ci-contre.
Cet appareil peut lire des CD deux titres de
3 po (8 cm) sans adaptateur (non inclus).
Ne pas utiliser d’adaptateur pour CD deux
titres avec ces disques.
Remarque
Toujours ranger les disques dans leur
boîtier. Ne pas exposer les disques à la
lumière directe du soleil, de hautes
températures, une humidité élevée ou la
poussière. Quand le disque est retiré de
son boîtier :
• Ne pas toucher la surface
enregistrée du côté opposé à
l’étiquette du CD
• Ne pas coller de papier sur
l'étiquette
• Ne pas plier le CD.
Fonctionnement du lecteur de CD
Quand le lecteur de CD est utilisé, l’appui sur
une touche permet l’affichage sur l’écran A CL de
la commande. Cinq secondes après l’exécution
d’une commande, l’écran ACL affiche de
nouveau l'horloge.
Lecture de base d’un CD
1 Appuyer sur Ouvrir pour ouvrir le couvercle
du compartiment du CD.
2 Régler le Volume +/- au minimum.
3 Retirer le CD de son boîtier, puis l’insérer
avec l’étiquette tournée vers le haut.
4 Bien fermer le couvercle jusqu'au déclic.
5 Appuyer sur Lecture/Pause pour
commencer la lecture.
Fonction Lecture/Pause
Cet appareil n’a pas de touche ON/OFF (Mise
sous ou hors tension).
Pour mettre l’appareil sous et hors tension:
1 En mode hors tension, appuyer une fois sur
Attente/Mise sous tension ou Lecture/
Pause pour mettre en marche le lecteur de
CD. La lecture commencera
automatiquement.
2 Mettre l’appareil hors tension en appuyant
sur la touche Arrêt.
3 En mode CD :
• Ouvrir et fermer le couvercle du
compartiment du CD et la lecture
commence automatiquement.
• Quand le CD s'arrête, appuyer une fois
sur Lecture/Pause pour commencer la
lecture.
• Quand le CD est en cours de lecture,
appuyer une f ois sur Lecture/Pause pour
arrêter momentanément la lecture.
Mode de lecture
1 En mode CD, appuyer sur Mode pour
sélectionner le mode de lecture dans l’ordre
suivant :
www.insignia-products.com
13
Page 14

Lecteur de CD de salon haut de gamme avec syntoniseur NS-A1112 Insignia
NORMAL → REPEAT 1 (Répéter 1) → REPEAT ALL (Répéter tout)→
RANDOM (Aléatoire) → REPEAT ALL RANDOM (Répéter tout en mode
aléatoire)
• Quand REPEAT 1 (Répéter 1) est activé,
l’icône REPEAT clignote.
• Quand REPEAT ALL (Répéter tout) est
activé, l’icône REPEAT s’affiche.
• Quand RANDOM (Aléatoire) est activé,
l’icône RANDOM s’affiche.
• Quand REPEAT ALL RANDOM (Répéter
tout en mode aléatoire) est activé, les
icônes RANDOM et REPEAT s’affichent.
2 Pour ann uler le mode de lectu re, appuy er sur
Arrêt ou passer au mode Syntoniseur.
3 Si le mode Programmation est activé, le
mode aléatoire ne sera pas disponible.
Mode de programmation
Le mode Programmation permet de lire jusqu’à
20 pistes dans l’ordre choisi.
Pour utiliser le mode de programmation:
1 En mode CD Arrêt, appuyer une fois sur
Mémoire/Programmation pour passer au
mode de Programmation.
2 Appuyer sur Saut en av ant/Syntonisation +
ou Saut arrière/Syntonisation - pour
sélectionner la piste souhaitée.
3 Appuyer de nouveau sur Mémoire/
Programmation pour mémoriser la piste.
4 Répéter les étapes 2 et 3 pour programmer
des pistes supplémentaires (jusqu’à 20
pistes).
5 Appuyer sur la touche Lecture/Pause pour
commencer la lecture.
6 Appuyer deux fois sur Arrêt ou ouvrir le
compartiment du CD pour annuler les
programmations mémorisées.
Recherche/Saut en avant et en arrière
1 Appuyer sur Saut en av ant/Syntonisation +
ou Saut arrière/Syntonisation - pour aller à
la piste suivante (+) ou précéde nte (-).
2 Maintenir appuyé Saut en avant/
Syntonisation + ou Saut arrière/
Syntonisation - pour rechercher plus d’une
piste en avant (+) ou en arrière (-).
3 Relâcher la touche pour revenir au mode de
lecture normal.
→
2 Pour enlever la poussière ou les particules
sèches, utiliser une brosse pneumatique
pour lentille d’appareil photo et souffler sur la
lentille plusieurs fois.
• Brosser délicatement la lentille pour
enlever la poussière.
• Souffler une fois de plus sur la lentille
pour être sûr que toutes les particules ont
été éliminées.
3 Si l’utilisation de la brosse pneumatique n’est
pas suffisante, passer un coton-tige sec en
partant du centre vers la périphérie pour
enlever la saleté et les empreintes.
Nettoyage d’un CD
• Les empreintes digitales et la poussière sur
la surface enregistrée doivent être essuyées
délicatement avec un chiffon doux. Les
essuyer d’un mouvement régulier en partant
du centre vers la périphérie.
• Ne jamais utiliser de diluant, benzène,
nettoyant pour disques conventionnels ou
vaporisateur antistatique sur un CD, cela
pourrait endommager la surface en plastique.
Spécifications
La conception et les spécifications sont sujettes
à modifications sans avis préalable.
Spécifications
générales
Système Lecteur de CD de salon haut de
Bornes de sortie Connecteurs pour les haut-parleurs
Puissance de
sortie totale
maximale
Dimensions 15,35 × 6,7 × 8,7 pouces
gamme avec syntoniseur
> 1,8 W x 2
(389,9 × 170,18 × 221 mm)
Entretien de l’appareil
Nettoyage du lecteur
• Essuyer avec un chiffon propre. Si l’appareil
est très sale, humidifier le chiffon avec une
solution diluée de détergent neutre et d’eau
et le nettoyer.
Nettoyage de la lentille
Une lentille sale provoquera une lecture
défectueuse (son irrégulier) et si elle est très
sale le CD peut ne pas être lu.
Pour nettoyer la lentille:
1 Ouvrir le couvercle du CD.
14
Poids 7,7 lb
(3,496 kg)
Audio
Radio :
Fréquence FM : 87.5 à 108 MHz
AM : 520 à 1 710 MHz
CD :
www.insignia-products.com
Page 15

Lecteur de CD de salon haut de gamme avec syntoniseur NS-A1112 Insignia
Audio
Fréquence
d’échantillonnag
e
Fréquence radio 20 à 20 000 Hz
Nombre de
canaux
Sources
d’alimentation
Alimentation 120 V CA
Piles de la
télécommande
Consommation
électrique
44,1 kHz
Inférieur aux limites mesurables
2 canaux (stéréo)
60 Hz
1,5 V (2)
14 W
Informations sur la garantie
IGarantie limitée
Insignia Products garantit au premier acheteur
de ce produit qu’il sera exempt de défauts de
fabrication et de main-d’œuvre po ur une période
de quatre vingt dix (90) jours à partir de la date
d’achat, conformément aux détails ci-dessous :
1 MAIN-D’ŒUVRE : Pendant la période de
garantie, si ce produit est considéré comme
étant défectueux, Insignia le réparera ou le
remplacera, à sa convenance, gratuitement,
ou paiera les frais de main-d’œuvre à tout
service de réparation agréé par Insignia.
Au-delà de la période de garantie, l’utilisateur
sera redev able de tous les frais afférents à la
main-d’œuvre.
2 PIÈCES DÉTACHÉES : En outre, Insignia
fournira gratuitem ent les pièces détachées
neuves ou remises à neuf, en échange des
pièces défectueuses pendant la durée de la
garantie. À l’e xpiration de la période de
garantie le coût de toute pièce détachée ser a
à la charge de l’utilisateur.
Pour obteni r le service de la garantie, le produit
devra être présenté accompagné du reçu
original ou de toute autre preuve d’achat, soit
dans son emballage original, soit dans un
emballage procurant des conditions identiques
de protection, au détaillant le plus proche du
magasin ou du site Web où le produit a été
acheté.
Cette garantie ne couvre pas les dommages
esthétiques, ou ceux résultants de cata strophes
naturelles, de la foudre, d’un accident, d’une
mauvaise utilisation, de manipulations abusives,
de négligence, d’une utilisation commerciale ou
d’une modification de tout ou partie du produit, y
compris l’antenne. Cette garantie ne couvre
aucun dommage ayant pour origine une
utilisation ou une maintenance défectueuse, la
connexion à une source électrique dont la
tension est inadéquate, ou encore toute
réparation réalisée par quiconque autre qu’un
service de réparation agréé par Insignia. Cette
garantie ne couvre pas les produits vendus « EN
L’ÉTAT » ou « HORS SERVICE », ou les
consommables (tels que les fusibles ou les
piles). Cette garantie n’est applicable qu’aux
États-Unis et au Canada.
La garantie est annulée si le numéro de série
usine a été altéré ou enlevé du produit.
LA RÉPARATION OU LE REMPLACEMENT,
TELS QU’OFFERTS PAR CETTE GARANTIE
CONSTITUENT LE SEUL RECOURS DU
CONSOMMATEUR. INSIGNIA NE POURRA
PAS ÊTRE TENU POUR RESPONSABLE DE
DOMMAGES ACCESSOIRES OU
CONSÉCUTIFS, OU DE L’INEXÉCUTION
D'UNE GARANTIE EXPRESSE OU IMPLICITE
SUR CE PRODUIT. SAUF POUR LES
DISPOSITIONS PROHIBÉES PAR LES LOIS
APPLICABLES, TOUTE GARANTIE IMPLICITE
DE QUALITÉ MARCHANDE OU
D’ADAPTATION À UN USAGE PARTICULIER
RELATIVE À CE PRODUIT EST LIMITÉE À LA
PÉRIODE DE GARANTIE APPLICABLE TELLE
QUE DÉCRITE CI-DESSUS.
Certains états ou provinces ne permettent ni
l'exclusion ni la limitation des dommages
accessoires ou consécutifs, ni les limitations
implicites de durée d'une garantie, de sorte que
les limitations ou exclusions énoncées ci-dessus
peuvent être nulles da ns le cas du premier
acheteur. La présente garantie donne au
premier acheteur des garanties juridiques
spécifiques ; il peut aussi bénéficier d'autres
garanties qui varient d'un état ou d'une province
à l'autre.
Pour le service à la clientèle, appeler le
1-877-467-4289
www.insignia-products.com
Insignia Products, Richfield, Minnesota, U.S.A.
Droits d’auteurs
© 2006 Insignia. Insignia et le logo Insignia sont des
marques de commerce de Best Buy Enterprise
Services, Inc. Les autres noms de marques et de
produits mentionnés sont des marques de commerce
ou des marques déposées de leurs propriétaires
respectifs. Les spécifications et caractéristiques sont
susceptibles d’être modifiées sans préavis.
Assistance technique : (877) 467-4289
Adresse Web : www.insignia-products.com
www.insignia-products.com
15
Page 16

Sistema de audio tipo ejecutivo con sintonizador NS-A1112 de Insignia
Sistema de audio
tipo ejecutivo con
sintonizador
NS-A1112 de Insignia
Contenido
Introducción . . . . . . . . . . . . . . . . . . . . . . . . . . . .16
Información de seguridad . . . . . . . . . . . . . . . . . .16
Características . . . . . . . . . . . . . . . . . . . . . . . . . .17
Instalación de su sistema de audio tipo
ejecutivo . . . . . . . . . . . . . . . . . . . . . . . . . . . . . .18
Uso del sistema de audio tipo ejecutivo . . . . . . .19
Mantenimiento del sistema de audio tipo
ejecutivo . . . . . . . . . . . . . . . . . . . . . . . . . . . . . .21
Especificaciones . . . . . . . . . . . . . . . . . . . . . . . . .22
Informations sur la garantie . . . . . . . . . . . . . . . .22
Derechos de reproducción . . . . . . . . . . . . . . . . .23
Introducción
Felicitaciones por su compra de un producto de
alta calidad de Insignia. Su sistema de audio
tipo ejecutivo con sintonizador NS-A1112
representa el más moderno diseño de sistema
estéreo, y está concebido para brindar un
rendimiento confiable y sin problemas.
Información de seguridad
Lea las instrucciones detalladamente antes de
hacer funcionar su sistema de audio tipo
ejecutivo.
Advertencia
Advertencia
Advertencia
Riesgo de choque eléctrico. No abra la
unidad. No trate de reparar este sistema
de audio tipo ejecutivo usted mismo, ya
que abrir o quitar las cubiertas puede
exponerlo a voltajes peligrosos u otros
peligros. Encomiende todas las
reparaciones al personal de servicio
calificado.
Para reducir el riesgo de incendio o
choque eléctrico, no exponga su sistema
de audio tipo ejecutivo a la lluvia o
humedad. No exponga su sistema de
audio tipo ejecutivo a líquidos que gotean
o salpican. No coloque objetos llenos de
líquidos, tal como vasijas, sobre el
sistema de audio tipo ejecutivo.
Para evitar un incendio, no coloque una
fuente de llama expuesta, tal como una
vela encendida, sobre o cerca de su
sistema de audio tipo ejecutivo.
Advertencia
Advertencia
Importante
Nota
Deje por lo menos 4 pulgadas (10 cm) de
espacio alrededor de su sistema de audio
tipo ejecutivo para tener suficiente
ventilación.
No se debe bloquear las aberturas de
ventilación con periódicos, manteles de
mesa o cortinas.
En caso de humo, ruidos u olores
extraños que salgan de su sistema de
audio tipo ejecutivo, apáguelo,
desconéctelo del tomacorriente y póngase
en contacto con su distribuidor o centro
de servicio.
Ya que la cir cuitería del reproductor de CD
puede causar interferencia con otros
sintonizadores de radio a su alrededor,
apague este sistema de audio tipo
ejecutivo cuando no se use, o aléjelo del
sintonizador de radio afectado.
Este sistema de audio tipo ejecutivo
satisface la parte 15 del reglamento FCC.
Su operación está sujeta a las dos
condiciones siguientes: (1) Este
dispositivo no puede causar interferencia
dañina, y (2) Este dispositivo debe aceptar
cualquier interferencia recibida incluyendo
interferencias que puedan causar una
operación no deseada.
Este equipo ha sido sometido a prueba y
se ha determinado que satisface los
límites establecidos para ser clasificado
como dispositivo digital de la Clase B de
acuerdo con la Parte 15 del reglamento
FCC. Estos límites se han establecido para
proporcionar una protección razonable
contra interferencias perjudiciales en una
instalación residencial. Este equipo
genera, usa y puede emitir energía de
radiofrecuencia. Sí no se instala y usa de
acuerdo con las instrucciones, este
aparato puede causar interferencias
perjudiciales a las comunicaciones de
radio. Sin embargo, no se garantiza que
no ocurrirá interferencia en una
instalación particular. Si el equipo causa
interferencias perjudiciales en la
recepción de la señal de radio o televisión,
lo cual puede comprobarse encendiéndolo
y apagándolo alternativamente, se
recomienda al usuario corregir la
interferencia mediante uno de los
siguientes procedimientos:
• Cambie la orientación o la
ubicación de la antena receptora.
• Aumente la distancia entre el
equipo y el receptor.
• Conecte el equipo a un
tomacorriente de un circuito
distinto de aquel al que esta
conectado el receptor.
• Solicite consejo al distribuidor o a
un técnico experto en radio/TV
para obtener ayuda.
16
www.insignia-products.com
Page 17

Sistema de audio tipo ejecutivo con sintonizador NS-A1112 de Insignia
Certificación de seguridad
Este sistema de audio tipo ejecutivo está hecho
y probado para cumplir con los estándares de
seguridad de los requisitos del FCC y con el
rendimiento de seguridad del Departamento
Estadounidense de Salud y Servicios Humanos,
y también con los estándares de rendimient o 21
CFR, subcapítulo J de la radiación del FDA.
Seguridad del láser
Este sistema de audio tipo
ejecutivo emplea un sistema
Radiación de láser
invisible y peligrosa
cuando está abierto
y han fallado o se
vencieron los
seguros. Evite la
exposición directa al
rayo láser.
de rayo láser óptico en el
mecanismo del CD, el cual
esta diseñado con medidas de
seguridad integradas. No
intente desensamblarlo. Acuda
al personal de servicio
calificado. La exposición a este
rayo de luz láser invisible
puede ser dañina para el ojo
humano.
Este es un producto láser de
Clase 1. El uso de cualquier
otro control, ajuste o
procedimiento que no sea
especificado en este manual
puede resultar en una
exposición peligrosa al rayo de
luz láser.
Precauciones de seguridad
• No abra el gabinete. Encomiende la
reparación únicamente a personal calificado.
• No exponga al calor excesivo, luz solar
directa, polvo, humedad, vibración o
choques.
• Use únicamente el adaptador de CA
especificado. Si usa otros tipos puede dañar
su sistema de audio tipo ejecutivo.
• Desconecte el adaptador de CA del
tomacorriente cuando el sistema de audio
tipo ejecutivo no se vaya a usar por periodo
de tiempo extendido.
• Cuando limpie su sistema de audio tipo
ejecutivo, utilice un paño sua ve seco. No se
debe usar solventes o limpiadores
disponibles comercialmente ya que estos
pueden dañar o decolorar el acabado.
• Evite caminar sobre el cable de alimentación
o que este sea aplastado especialmente en
los enchufes, los receptáculos y el punto
donde éste sale del sistema de audio tipo
ejecutivo.
• Use solamente los dispositivos/accesorios
especificados por el fabricante.
• Use el sistema de audio tipo ejecutivo
solamente con un carro, plataforma, trípode,
consola o mesa especificados por Insignia o
que se venda con el sistema de audio tipo
ejecutivo. Cuando use un carro, tenga
cuidado al mover el carro con el sistema de
audio tipo ejecutivo para evitar lesiones si el
sistema de voltea de lado.
• Este sistema está clasificado como equip o
Clase II, lo cual significa que el sistema de
estéreo tiene doble aislamiento.
Características
Controles superiores
Número Control
1 Botón de sintonizador/banda
2 Botón de memoria/programación
3 Botón aux.
4 Botón de Standby/encendido
5 Botón de modo
6 Botón de predefinir +/7 Botón EQ
8 Botón de detener
9 Botón de reproducir CD/pausa
10 Botón de volumen + / 11 Botón presionar para abrir
12 Botón de saltar hacia delante/
sintonización +
13 Botón de saltar hacia atrás/
sintonización -
Controles frontales y posteriores
Número Control
1 Sensor del control remoto
2 Indicador de Standby
www.insignia-products.com
17
Page 18

Sistema de audio tipo ejecutivo con sintonizador NS-A1112 de Insignia
Número Control
3 Pantalla LCD
4 Conector de audífonos
5 Conector de entrada de CA
6 Antena de cable FM
7 Conexiones de los altavoces
8 Conector de entrada aux.
Control remoto
Número Control
1 Botón de Standby
Instalación de su sistema
de audio tipo ejecutivo
Desempaque del sistema de audio tipo
ejecutivo
Cómo desempacar el sistema de audio tipo
ejecutivo:
1 Desempaque cuidadosamente el sistema
estéreo y los altavoces, luego retire todo el
material de embalaje situado alrededor del
sistema estéreo.
2 Coloque el sistema estéreo horizontalmente
sobre una base resistente o una superficie
nivelada y firme lejos del sistema de
altavoces par a evitar la retroalimentación
acústica.
Conexión del sistema de audio tipo
ejecutivo
Cómo conectar el sistema de audio tipo
ejecutivo:
1 Conecte los cables de la caja de los
altavoces a las conexiones de los altavoces
situadas en la parte post erior del sistema
estéreo.
2 Conecte el cable de alimentaci ón de CA a un
tomacorriente de CA.
NOTA:
Antes de hacer funcionar por primera vez el sistema estéreo
en una área nueva, verifique que el voltaje de operación del
sistema estéreo sea idéntico al voltaje de su fuente de
alimentación local. Este sistema estéreo debe funcionar
solamente con el voltaje de fuente de alimentación impreso
en el panel posterior. Desconéctelo del tomacorriente
cuando no se vaya a usar por un largo período de tiempo.
Preparación del control remoto
Instalación de las pilas del control remoto
2 Teclado numérico
3 Botón +10
4 Botón de volumen 5 Botón de detener
6 Botón de saltar - / sintonización
7 Botón de reproducir CD/pausa
8 Botón de programación
9 Botón de modo
10 Botón de luz de retroiluminación
11 Botón EQ
12 Botón de volumen +
13 Botón de saltar + / sintonización +
14 Botón de silenciamiento
15 Botón de sintonizador / banda
16 Botón AUX
17 Botón de predefinir + / -
Advertencia
Cuidado
No tire las pilas al fuego. Deseche las pilas
usadas como si fuera desperdicios
dañinos.
No deje caer ni desarme el control remoto.
No moje el control remoto.
Para instalar las pilas en el control remoto:
1 Extraiga la cubierta de las pilas.
2 Inserte dos pilas AAA en el compartimiento
de pilas. Asegúrese de que los símbolos +/en la pila hagan juego con las marcas +/- en
el compartimiento de las pilas.
3 Vuelva a colocar la cubierta de las pilas.
Nota
Si el control remoto no se va a usar por un
período de tiempo extendido, o si las pilas
están agotadas, extraiga las pilas para
prevenir derrames.
18
www.insignia-products.com
Page 19

Sistema de audio tipo ejecutivo con sintonizador NS-A1112 de Insignia
Uso del sistema de audio
tipo ejecutivo
Cómo apagar y encender el sistema
estéreo
Hay varias maneras de encender el sistema
de audio tipo ejecutivo:
1 Presione Standby/On (Standby/encendido)
una vez para en cender el sistema de es téreo
y encender la luz de retroiluminación.
Nota:
Cuando la alimentación eléctrica está desconectada,
presionar Backlight (Luz de retroiluminación) en el control
remoto encenderá o apagará la luz de retroiluminación. La
luz de retroiluminación se apagará después de apagar el
sistema de estéreo.
2 Presione Play/Pause (Reproducir/pausa)
una vez en el sistema d e estéreo par a le er la
tabla de contenido y comenzar la
reproducción automáticamente.
3 Presione Tuner/Band (Sintonizador/banda)
una vez para encender el siste ma estéreo y
restaurar la reproducción de banda y la
frecuencia sintonizada cuando se apagó el
sistema estéreo.
4 Presione AUX una vez para encender el
sistema estéreo y seleccionar la entrada
AUX.
Uso del control remoto
Para cambiar los modos del sistema de
audio tipo ejecutivo:
1 Presione Standby/On (Standby/encendido)
en el control remoto para encender la unid ad.
2 Cuando el control remoto esté activado,
presione
• Presione Tuner/Band (Sintonizador/
banda) para seleccionar el sintonizador
• Presione CD Play/Pause (Reproducción
de CD/pausa) para seleccionar el CD.
• Presione AUX para seleccionar un
componente de fuente auxiliar.
NOTA:
Cuando use el control remoto y necesite moverse más cerca
al sistema de estéreo para que el control remoto funcione,
reemplace las dos pilas. El control remoto puede no
funcionar correctamente si la luz directa del sol o la luz de
una bombilla fluorescente de alta frecuencia ingresa al
sensor de luz del control remoto. En este caso, cambie la
posición de instalación del sistema para evitar el problema.
Uso del reloj
Cuando el estéreo está apagado, aparece el
reloj en tiempo real en la pantalla LCD.
Para ajustar la hora:
1 Presione Mode (Modo) una vez para entrar
al modo de ajuste del reloj. La hor a parpadea
en la pantalla LCD.
2 Presione Skip Backward/Tuning - (Saltar
hacia atrás/sintonización -) una vez para
disminuir la hora.
3 Presione Skip Backward/Tuning + (Saltar
hacia atrás/sintonización +) una vez para
aumentar la hora.
4 Presione Volume - (V olumen -) un a vez para
disminuir los minutos.
5 Presione Volume + (Volumen +) una vez
para aumentar los minutos.
6 Mantenga presionado cualquiera de estos
botones durante más de 1 segundo para
entrar al modo de ajuste rápido. Después de
cambiar la hora, los segundos se restablecen
a “00” y el reloj deja de funcionar.
7 Para confirmar la hora y salir del mo do de
ajuste del reloj, presione Mode (Modo). El
reloj comienza a funcionar.
Nota:
Si no hay operación de botón durante 10 segundos, el
sistema estéreo automáticamente sale del modo de ajuste
del reloj.
Ajuste del sonido
Volumen
Para ajustar el volumen:
1 Presione Volume + (Volumen +) según sea
necesario para aumentar el volumen.
2 Presione Volume - (Volumen -) según sea
necesario para disminuir el volumen.
Ecualizador predefinido
El ecualizador predefinido proporciona cinco
rangos de control (NORMAL, ROCK, JAZZ,
POP, Y CLÁSICO) para el espectro de
frecuencia de audio en secciones angostas y
diferentes.
Presione EQ para seleccionar la respuesta más
apropiada para su tipo de música y gusto
individual.
Uso de la radio
Después de presionar un botón mientras usa la
radio, la pantalla LCD muestra la operación.
Cinco segundos después de concluir cualquier
operación, la pantalla LCD volverá a mostrar el
reloj.
Modo de sintonizador
1 Presione Tuner/Band (Sintonizador/banda)
una vez para encender el sistema estéreo y
restaurar la reproducción de banda y la
frecuencia sintonizada cuando se apagó el
sistema estéreo.
2 En el modo de sintonizador, presione Tuner/
Band (Sintonizador/banda) para alternar
entre las bandas de AM y FM.
3 Con la radio establecida en banda de FM,
presione Mode (Modo) para alt ernar entre el
modo de estéreo FM o monofónico. Si el
modo de estéreo FM está seleccionado, se
encenderá el indicador Stereo (Estéreo) en
la pantalla LCD.
Modo de entrada AUX
1 Presione Aux para seleccionar el modo
auxiliar. Los conectores RCA situados en la
parte posterior del sistema estéreo pueden
usarse para conectar fuentes de audio
externas.
2 Asegúrese de emparejar el color corre cto del
enchufe RCA con el color correcto del
conector RCA.
www.insignia-products.com
19
Page 20

Sistema de audio tipo ejecutivo con sintonizador NS-A1112 de Insignia
Recepción
Para ajustar la recepción de FM:
• Eleve y extienda la antena FM, luego ajuste
la posición para la mejor recepción. El
indicador Stereo (Estéreo) aparece en la
pantalla LCD sólo si la estación de difusión
de estéreo actual está siendo recibida.
Para ajustar la recepción de AM:
• Puesto que la antena de barra de ferrito
incorporada es direccional, gire el sistema
estéreo horizontalmente o reubique el
sistema para lograr una mejor recepción.
Sintonización
Para sintonizar el sistema estéreo
manualmente:
1 En el modo sintonizador, presione Skip
Forward/Tuning + (Saltar hacia delante/
Sintonización +) para ir a una frecuencia de
radio superior un paso de frecuencia a la v ez.
2 En el modo sintonizador, presione Skip
Backwar d /Tuning - (Saltar hacia atrás/
Sintonización -) para ir a una frecuencia de
radio inferior un paso de frecuencia a la vez.
Para sintonizar el sistema estéreo
automáticamente:
1 Mantenga presionado Skip Forward/Tuning
+ (Saltar hacia delante/sintonizació n +) o
Skip Backward/Tuning - (Saltar hacia atrás/
sintonización -) para hacer una búsqueda
automática en la dirección deseada a la
velocidad de cuatro pasos de frecuencia por
segundo.
2 Mantenga presionado el botón para sa ltar
todas las estaciones hasta que suelte el
botón. Al soltar el botón, la radio se detien e
en la siguiente frecuencia de estación.
Cuando la sintonización llega al borde de la
banda, el sintonizador regresa al extremo
opuesto y continúa buscando.
3 Durante la sintonización automática las
demás funciones no están disponibles. Para
usar otra función durante la sintonización
automática, presione Standby/On (Standby/
encendido) Play/Pause (Reproducir/pa usa)
o Aux para cancelar la sintonización
automática. A continuación podrá ejecutar
otra función.
Guardar y acceder a canales
Puede programar (guardar) 20 estaciones FM
predefinidas y 12 estacones AM predefinidas.
Para guarda los ajustes de estación:
1 En el modo sintonizador, seleccione la
estación que va a guardar, luego presione
Memory/Program (Memoria/programación)
una vez para entrar al modo Channel Save
(Guardar canal).
2 Presione Memory/Program (Memoria/
programación) nuevamente para guardar el
canal en la memoria, luego presione Preset
+ / – (Predefinido +/-) para confirmar la
operación.
3 Repita los pasos 1 y 2 para introducir más
estaciones (hasta 20 estaciones FM y 12
estaciones AM).
4 Presione cualquier otro botón para cancelar
o salir de la operación de guardar canal.
Para encontrar las estaci ones guardadas:
1 Presione Preset + / – (Predefinido +/-) para
encontrar un canal guardado.
2 Presione Preset + / –
(Predefinido +/-)
nuevamente para ir al siguiente canal
guardado. Repi ta el proceso según sea
necesario para llegar al canal deseado.
Uso del CD
Este sistema de audio tipo ejecutivo puede
reproducir discos de audio tales como CD-R o
CD-RW. No intente reproducir discos CD-ROM,
CDi, VCD, DVD o CD de datos para
computadora.
Use un CD con el logotipo a la izquierda
en este sistema de estéreo. El sistema de
audio tipo ejecutivo puede reproducir CD
sencillos de 3" (8 cm) sin un adaptador
(no incluido). No se debe usar un
adaptador para CD sencillos con estos CD.
Nota
Siempre guarde los discos en sus
estuches. No exponga los discos a la luz
solar directa, humedad alta, temperatura
alta o polvo. Cuando extraiga el disco de
su estuche,
• No toque la superficie grabada
opuesta al lado de la etiqueta del
CD
• No pegue papel en la superficie de
la etiqueta
• No doble el CD.
Operación del reproductor de CD
Cuando use el reproductor de CD, la pantalla
LCD mostrará la operación después de
presionar un botón. Cinco segundos después de
concluir cualquier operación, la pantalla LCD
volverá a mostrar el reloj.
Reproducción básica de CD
1 Presione el botón Push Open (Presionar
para abrir) para abrir la cubierta del
compartimiento del CD.
2 Ajuste Volume +/- (Volumen +/-) al mínimo.
3 Extraiga el CD de su estuche de
almacenamiento, luego inserte el CD con el
lado de la etiqueta hacia arriba.
4 Cierre la cubierta seguramente hasta que
escuche un clic.
5 Presione Play/Pause (Reproducir/pausa)
para empezar a reproducir.
Función Reproducir/pausa
Este reproductor de CD no tiene un interruptor
de ON/OFF (Encendido/apagado).
20
www.insignia-products.com
Page 21

Sistema de audio tipo ejecutivo con sintonizador NS-A1112 de Insignia
Para encender y apagar el reproductor:
1 En el modo de apagado, presione Standby/
On (Standby/encendido) o Play/Pause
(Reproducir/pausa) una vez par a encender el
sistema de audio tipo ejecutivo en el modo
CD. El sistema de audio tipo ejecutivo
comenzará a reproducir automáticamente.
2 Apague el reproductor de CD presionando el
botón Stop (Detener).
3 Mientras está en el modo CD:
• Abra y cierre la puerta del CD para
comenzar la reproducción
automáticamente.
• Cuando el CD se detenga, presione Play/
Pause (Reproducir/pausa) una vez para
comenzar la reproducción del CD.
• Cuando el CD se está reproduciendo,
presione Play/Pause (Reproducir/pausa)
una vez para pausar la reproducción del
CD.
Modo de reproducción
1 En el modo CD, presione Mode (Modo) para
seleccionar el modo de reproducción usando
la siguiente secuencia:
NORMAL → REPEAT 1 (REPETIR 1)→ REPEAT ALL (REPETIR
→
TODOS)
RANDOM (ALEATORIO) → REPEAT ALL RANDOM (REPETIR TODOS EN
MODO ALEATORIO)
• Cuando se activa REPEAT 1 (REPETIR
1) el icono REPEAT (REPETIR)
parpadea.
• Cuando se activa REPEAT ALL
(REPETIR TODOS), el icono REPEAT
(REPETIR) se enciende.
• Cuando se activa RANDOM
(ALEATORIO), el icono RANDOM
(ALEATORIO) se enciende.
• Cuando se activa REPEAT ALL RANDOM
(REPETIR TODOS EN MODO
ALEATORIO), los iconos RANDOM
(ALEATORIO) y REPEAT (REPETIR) se
encienden.
2 Para bor rar el modo de reproducción,
presione Stop (Detener), o cambie el modo
al modo Tuner (Sintonizador).
3 Si el modo Program (Programación) está
activado, el modo al azar no estará activado.
Modo de programación
El modoProgram (Programación) le permite
reproducir hasta 20 pistas en el orden que usted
elija.
Para usar el modo de program ación:
1 En el modo Stop (Detener) de CD, Presione
Memory/Program (Memoria/programación)
una vez para entrar al modo Program
(Programación).
2 Presione Skip Forward/Tuning + (Saltar
hacia delante/sintonización +) o Skip
Backwar d /Tuning - (Saltar hacia atrás/
sintonización -) para seleccionar la pista
deseada.
3 Presione Memory/Program (Memoria/
programación) nuevamente para guardar la
pista en la memoria.
→
4 Repita los pasos 2 y 3 para introducir más
pistas (hasta 20 pistas).
5 Presione Play/Pause (Reproducir/pausa)
para programar la reproducción.
6 Presione Stop (Detener) dos veces o abra la
puerta del CD para borrar las memorias de
programación.
Buscar/saltar hacia delante o hacia atrás
1 Presione Skip Forward/Tuning + (Saltar
hacia delante/sintonización +) o Skip
Backward/Tuning - (Saltar hacia atrás/
sintonización -) para saltar la pista hacia
delante (+) o hacia atrás (-).
2 Mantenga presionado Skip Forward/Tuning
+ (Saltar hacia delante/sintonización +) o
Skip Backward/Tuning - (Saltar hacia atrás/
sintonización -) para buscar sobre más de
una pista hacia delante (+) o hacia atrás (-).
3 Suelte el botón para continuar la
reproducción normal.
Mantenimiento del sistema
de audio tipo ejecutivo
Limpieza del reproductor
• Limpie la unidad con un paño suave. Si el
reproductor está muy sucio, humedezca un
paño con una solución suave de detergente
neutral y agua, y luego límpielo.
Limpieza de la lente
Una lente sucia causa saltos de sonido y si está
muy sucia, puede que el CD deje de funcionar
completamente.
Para limpiar la lente:
1 Abra la cubierta del CD.
2 Para limpiar el polvo o las partículas secas,
use un soplador/brocha para lente y sople la
lente varias veces.
• Limpie la lente suavemente con la brocha
para eliminar el polvo.
• Sople la lente una vez más para
asegurarse de que todas las partículas
han desaparecido.
3 Si la lente no se puede limpiar usando una
brocha/soplador, se puede usar un algodón
seco, comenzando desde el centro y
limpiando hacia la orilla de afuera para
eliminar la suciedad o marcas.
Limpieza de CD
• Las huellas digitales y el polvo deben
eliminarse cuidadosamente de la superficie
grabada del CD con un paño sua v e . Se debe
limpiar con un movimiento recto desde el
centro hacia la orilla.
www.insignia-products.com
21
Page 22

Sistema de audio tipo ejecutivo con sintonizador NS-A1112 de Insignia
• Nunca utilice diluyente, benceno , limpiadores
de discos, o aerosoles antiestáticos en un
CD ya que dichos productos pueden dañar
su superficie plástica.
Especificaciones
El diseño y las especificaciones están sujetos a
cambio sin aviso previo.
Generales
Sistema Sistema de audio tipo ejecutivo con
Terminal de
salida
Potencia de
salida total
máxima
Dimensiones 15.35 × 6.7 × 8.7 pulgadas
Peso 7.7 lbs.
Audio
Radio:
Frecuencia FM: 87.5 - 108 MHz
CD:
Frecuencia de
muestreo
Frecuencia de
radio
Número de
canales
Fuentes de
alimentación
Fuente de
alimentación
Pilas del control
remoto
Consumo de
potencia
sintonizador
Conectores de altavoces terminales
> 1.8 W x 2
(389.9 × 170.18 ×221 mm)
(3.496 kg)
AM: 520 - 1710 MHz
44.1 Khz
20-20,000 Hz
Debajo de los límites de medición
2 canales (estéreo)
120 V CA
60 Hz
1.5 V (2)
14 W
Informations sur la garantie
Garantía limitada
Insignia Products le garantiza a usted, el
comprador original de este Producto, que éste
estará libre de defectos de material o mano de
obra por un período de noventa (90) días
contados a partir de la fecha de compr a como se
indica a continuación:
1 MANO DE OBRA: Durante el Periodo de
Garantía, si se encuentra que este producto
esta defectuoso, Insignia reparará o
reemplazará el Producto, a su discreción sin
costo alguno, o pagará los cargos de
reparación a un centro autorizado de servicio
de Insignia. Después del período de
garantía, usted deberá cubrir todos los
gastos de mano de obra.
2 REPUESTOS: Además, Insignia proveerá,
sin costo alguno, repue stos ya sean nue vo s o
como nuevos como reemplazo de los
componentes que se encuentren
defectuosos durante el Período de Garantía.
Después del período de garantía, usted
deberá cubrir todos los gastos de repuestos.
Para obtener servicio de garantía, usted deberá
llevar el Producto junto con su recibo original u
otra prueba de compra, ya sea en su empaque
original o en un empaque que proporcione el
mismo grado de protección, al centro de ventas
más cercano de la tienda o sitio Web dónde
usted compró el Producto. Esta garantía no
abarca daños cosméticos, o daños por fuerzas
de la naturaleza, rayos, accidentes, uso
indebido, abuso, negligencia, uso comercial o
modificación de alguna parte del Producto,
incluyendo la antena. Esta gar antía no abarca
daño debido a operación o mantenimiento
inadecuado, conexión a una fuente de voltaje
inadecuada, o el intento de repar ación por parte
de cualquier persona excepto un representante
autorizado por Insignia para llevar a cabo dicha
reparación del Producto. Esta garantía no
abarca Productos vendidos que no mantengan
las condiciones originales o con falla, o
consumibles (tales como fusibles o baterías.)
Esta garantía es valida únicament e en Los
Estados Unidos de América y Canadá. Esta
garantía es inválida si el número de serie
aplicado en la fábrica ha sido alterado o
removido del Producto. REEMPLAZO O
REPARACIÓN PROVEÍDOS MEDIANTE ESTA
GARANTÍA SON LA UNÍCA SOLUCIÓN
OFRECIDA AL CLIENTE. INSIGNIA NO SERÁ
RESPONSABLE POR CUALQUIER DAÑOS
INCIDENTALES O DIRECTOS CAUSADOS
POR LA VIOLACIÓN DE CUALQUIER
GARANTÍA EXPRESA O IMPLÍCITA PARA
CON ESTE PRODUCTO. CON EXCEPCIÓN
DEL ALCANCÉ PERMITIDO POR LA LEY,
CUALQUIER GARANTÍA IMPLÍCITA,
REPRESENTACIÓN O CONDICIÓN DE
COMERCIALIZACIÓN O ADECUACIÓN PARA
UN FIN DETERMINADO ESTÁ LIMITADA POR
LA DURACIÓN DE LA GARANTÍA. Dado que
algunos estados o provincias no permiten la
exclusión o imposición de limitaciones sobre
daños y perjuicios incidentales o directos en
22
www.insignia-products.com
Page 23

Sistema de audio tipo ejecutivo con sintonizador NS-A1112 de Insignia
cuanto al tiempo que una garantía implícita
durará, es posible que la limitación o exclusión
anteriormente indicada no se aplique en su
caso. Esta garantía le da derechos legales
específicos, y usted puede poseer otros
derechos que varían de estado a estado, o
provincia a provincia. Para servicio al cliente
favor llamar al 1-877-467-4289
www.insignia-products.com Insignia Products,
Richfield, Minnesota, U.S.A.
Derechos de reproducción
© 2006 Insignia. Insignia y el logotipo de Insignia son
marcas de comercio de Best Buy Enterprise Services,
Inc. Otras marcas y nombres de productos son
marcas de comercio o marcas registradas de sus
dueños respectivos. Las especificaciones y
características están sujetas a cambio sin aviso previo
u obligación.
Número de asistencia : (877) 467-4289
URL: www.insignia-products.com
www.insignia-products.com
23
Page 24

R1
 Loading...