

Page 1
NS-A1111_final_translationDTP.fm Page 1 Friday, February 17, 2006 12:09 PM
5-CD Shelf System |
Lecteur de CD de salon à 5 disques
audio tipo ejecutivo con 5 CD
NS-A1111
|
Sistema de
Page 2
NS-A1111_final_translationDTP.fm Page 2 Friday, February 17, 2006 12:09 PM
Page 3
NS-A1111_final_translationDTP.fm Page 3 Friday, February 17, 2006 12:09 PM
Insignia NS-A1111
5-CD Shelf System
Contents
Introduction . . . . . . . . . . . . . . . . . . . . . . . . . . . . . 3
Safety information . . . . . . . . . . . . . . . . . . . . . . . . 3
Features. . . . . . . . . . . . . . . . . . . . . . . . . . . . . . . . 5
Setting up your shelf system . . . . . . . . . . . . . . . . 6
Using your shelf system. . . . . . . . . . . . . . . . . . . . 7
Maintaining your shelf system . . . . . . . . . . . . . . 11
Troubleshooting . . . . . . . . . . . . . . . . . . . . . . . . . 12
Specifications. . . . . . . . . . . . . . . . . . . . . . . . . . . 12
Warranty information . . . . . . . . . . . . . . . . . . . . . 12
Copyright . . . . . . . . . . . . . . . . . . . . . . . . . . . . . . 13
Français. . . . . . . . . . . . . . . . . . . . . . . . 14
Español . . . . . . . . . . . . . . . . . . . . . . . . 26
Introduction
Congratulations on your purchase of a
high-quality Insignia product. Your NS-A1111
5-CD shelf system represents the state of th e art
in stereos, designed for reliable and trouble-free
performance.
Safety information
I
Warning
To reduce the risk of fire or electric shock, do not
expose your shelf system to rain or moisture.
I
Warning
To reduce the risk of electric shock, do not remove the
cover (or back). No user serviceable parts inside.
Refer servicing to qualified service personnel.
Read instructions
Read all safety and operating instructions before
operating your shelf system.
Retain instructions
Keep the safety and operating instructions for
future reference.
Heed warnings
Follow to all w arnings on your shelf system and
in the operating instructions.
Follow instructions
Follow all operating and use instructions.
Water and moisture
Do not use your shelf system near water. For
example, avoid using near a bathtub, washbowl,
kitchen sink, laundry tub, in a wet basement, or
near a swimming pool.
Wall or ceiling mounting
Do not mount your shelf system to a wall or
ceiling.
Accessories
Use only attachments and accessories
specified. Use the shelf system only with a cart,
stand, tripod, bracket, or table specified by
Insignia or sold with the shelf system. When
using a cart, use caution when moving the cart
and shelf system combination to avoid injury
from it tipping over.
Ventilation
Slots and openings in the cabinet back or botto m
are provided for ventilation, to ensure reliable
operation of your shelf system, and to protect it
from overheating. These openings must not be
blocked or covered. Do not place the unit on a
bed, sofa, rug, or other similar surface. Do not
place the unit near or over a radiator or heat
source. Do not place your shelf system in a
built-in installation such as a bookcase or rack
unless you provide correct ventilation or follow
the manufacturer's instructions.
Power source
Operate your shelf system only from the type of
power source indicated on the rating plate
(located on the back of the shelf system).
If you are not sure of the type of power supply to
your home, consult your shelf system dealer or
local power company.
Grounding and polarization
Your shelf system is equipped with a polarized
alternating-current line plug (a plug having one
blade wider than the other). This plug will fit into
the power outlet only one way. This is a safety
feature. If you are unable to insert the plug fully
into the outlet, try reversing the plug. If the plug
still won’t fit, contact your electrician to replace
your obsolete outlet.
Instead of the polarized alternating-current line
plug, your shelf system may be equipped with a
3-wire grounding-type plug (a plug having a third
(grounding) pin). This plug will only fit into a
grounding-type power outlet. This, too, is a
safety f eature. If y ou are unab le to insert the plug
into the outlet, contact your ele ctrician to replace
your obsolete outlet. Do not defeat the safety
purpose of the grounding-type plug.
Power cord protection
Route power supply cords so they are not likely
to be walked on or pinched b y items placed on or
against them. Pa y particular attention to cords at
plugs, power outlets, and the point where they
exit from your shelf system.
Headphones
When you use headphones, keep the volume at
a moderate level. Using headphones
continuously at high volume may cause hearing
damage.
Lightning
To protect your shelf system from a lightning
storm, or when it is left unattended and unused
for long periods of time, unplug it from the po wer
outlet and disconnect the antenna or cab le
system. This will prevent damage to your shelf
system from lightning and power line surges.
Overloading
Do not overload power outlets and extension
cords because this can result in a risk of fire or
electric shock.
www.insignia-products.com
3
Page 4
NS-A1111_final_translationDTP.fm Page 4 Friday, February 17, 2006 12:09 PM
Insignia NS-A1111 5-CD Shelf System
Object and liquid entry
Do not push objects through any openings in
your shelf system because they may touch
dangerous voltage points or short out parts that
could result in fire or electric shock. Never spill or
spray any type of liquid into your shelf system.
Damage requiring service
Do not try to service your shelf system yourself.
Opening or removing covers may expose you to
dangerous voltage or other hazards. Unplug
your shelf system from the power outlet and
refer servicing to qualified service personnel
under the following conditions:
• When the power supply cord or plug is
damaged.
• If liquid has been spilled, or objects have
fallen, into your shelf system.
• If your shelf system has been exposed to rain
or water.
• If your shelf system does not operate
normally by following the operating
instructions. Adjust only those controls that
are covered by the operating instructions
because an incorrect adjustment of other
controls may result in damage and will often
require extensive work by a qualified
technician to restore your shelf system to its
normal operation.
• If your shelf system has been dropped or the
cabinet has been damaged.
• If your shelf system e xhibits a distinct change
in performance.
Replacement parts
When replacement parts are required, make
sure that the service technician uses
replacement parts specified by Insignia or those
that have the same characteristics as the
original par t. Un au th orized substitutions may
result in fire, electric shock, or other hazards.
Safety check
Upon completion of any service or repairs to
your shelf system, ask the service technician to
perform safety checks to determine that your
shelf system is in correct operating condition.
Heat
Locate your shelf system away from heat
sources such as radiators, heat registers,
stoves, or other products (including amplifiers)
that produce heat.
Disc slot
Keep your fingers clear of the disc slot as it is
closing. You may injure yourself.
Disc
Do not use a cracked, deformed, or repaired
disc. These discs are easily broken and may
cause serious personal injury and product
malfunction.
Equipment classificati o n
This is classified as Class II equipment, which
means that the shelf system has a
double-insulation system.
F
Invisible laser
radiation
possible when
open and
interlock failed or
defeated. Avoid
direct exposure
to laser beam.
Laser safety
This shelf system employs an optical
laser beam system in the CD
mechanism designed with built-in
safeguards. Do not try to disassemble.
Refer to qualified service personnel.
Exposure to this invisible laser light
beam may be harmful to the human
eye.
This is a Class-1 laser product. Using
controls, adjustments, or procedures
other than those specified herein may
result in hazardous laser light beam
exposure.
4
www.insignia-products.com
Page 5

NS-A1111_final_translationDTP.fm Page 5 Friday, February 17, 2006 12:09 PM
Insignia NS-A1111 5-CD Shelf System
Features
Shelf system
CD door
Volume control
ON/OFF button
Headphone jack
Function button
Open and close button
TIMER button
Memory button
Display window
Remote control sensor
Tuner control
Aux in indicator
Aux in jack
Band button
Disc skip button
Skip/search/preset button
Play/pause/clock set button
CD storage
Stop button
Control Symbol Description
CD door Press to open and close to
load and unload discs.
Volume control Rotate to adjust the volume.
ON/OFF button Press to turn the shelf
system on and off. Also
places system in standby
mode.
Headphone jack Connects headphones with a
3.5 mm stereo mini plug to
the shelf system.
Function button Press to switch between CD,
tuner, and aux in.
Open and close button Press to open and close the
CD door.
TIMER button Press to set a timer alarm.
Memory button Press to program tracks for
storage in memory.
Stop button Press to stop playing a disc.
Display window Shows whether the shelf
system is on or off and
displays the time. Indicators
also show system settings.
Remote control sensor Receives the remote control
signal.
Tuner control Rotate to adjust the radio
frequency.
Aux in indicator Lights when an external
(auxiliary) audio source is
plugged in.
Aux in jack Connects external (auxiliary)
audio sources.
Band button Press to switch between AM
and FM radio bands.
Disc skip button Press to skip playing an
entire disc loaded in the CD
changer.
Control Symbol Description
Skip/search/preset
button
Play, pause, and clock
set button
CD storage Stores CDs when not in the
Press to skip or search for a
/
CD track, or to recall a track
stored in memory.
Press to start, pause or
resume playing a disc.
Also sets the time on the
clock.
CD changer.
Remote
Standby/On button
Stop button
Skip/preset- button
Memory button
Tuning (down)
button
TIMER button
Volume +/-
button
Control Symbol Description
Standby/On button Press to turn the shelf
Stop button Press to stop playing a disc.
Skip backward/preset-
button
Memory button Press to program tracks for
system on and off. Also
places system in standby
mode.
Press to skip a CD track or to
recall a track stored in
memory.
storage in memory.
Disc skip button
Tuning (up)
button
Play/pause button
Skip/preset+ button
Repeat button
BAND button
FUNCTION button
www.insignia-products.com
5
Page 6
NS-A1111_final_translationDTP.fm Page 6 Friday, February 17, 2006 12:09 PM
Insignia NS-A1111 5-CD Shelf System
Control Symbol Description
Tuning (down) button Press to adjust radio setting
TIMER button Press to set a timer alarm.
Volume +/- buttons Press to adjust the volume.
Disc skip button Press to skip playing an
Tuning (up) button Press to adjust radio setting
Play/pause button Press to start or resume
Skip forward/preset+
button
Repeat button Press to replay a track.
Band button Press to switch between AM
Function button Press to switch between CD,
from a higher to lower
frequency.
entire disc loaded in the CD
changer.
from a lower to higher
frequency.
playing a disc.
Press to pause playback of
disc.
Press to start, pause, or
resume playing a disc.
and FM radio bands
tuner, and aux in.
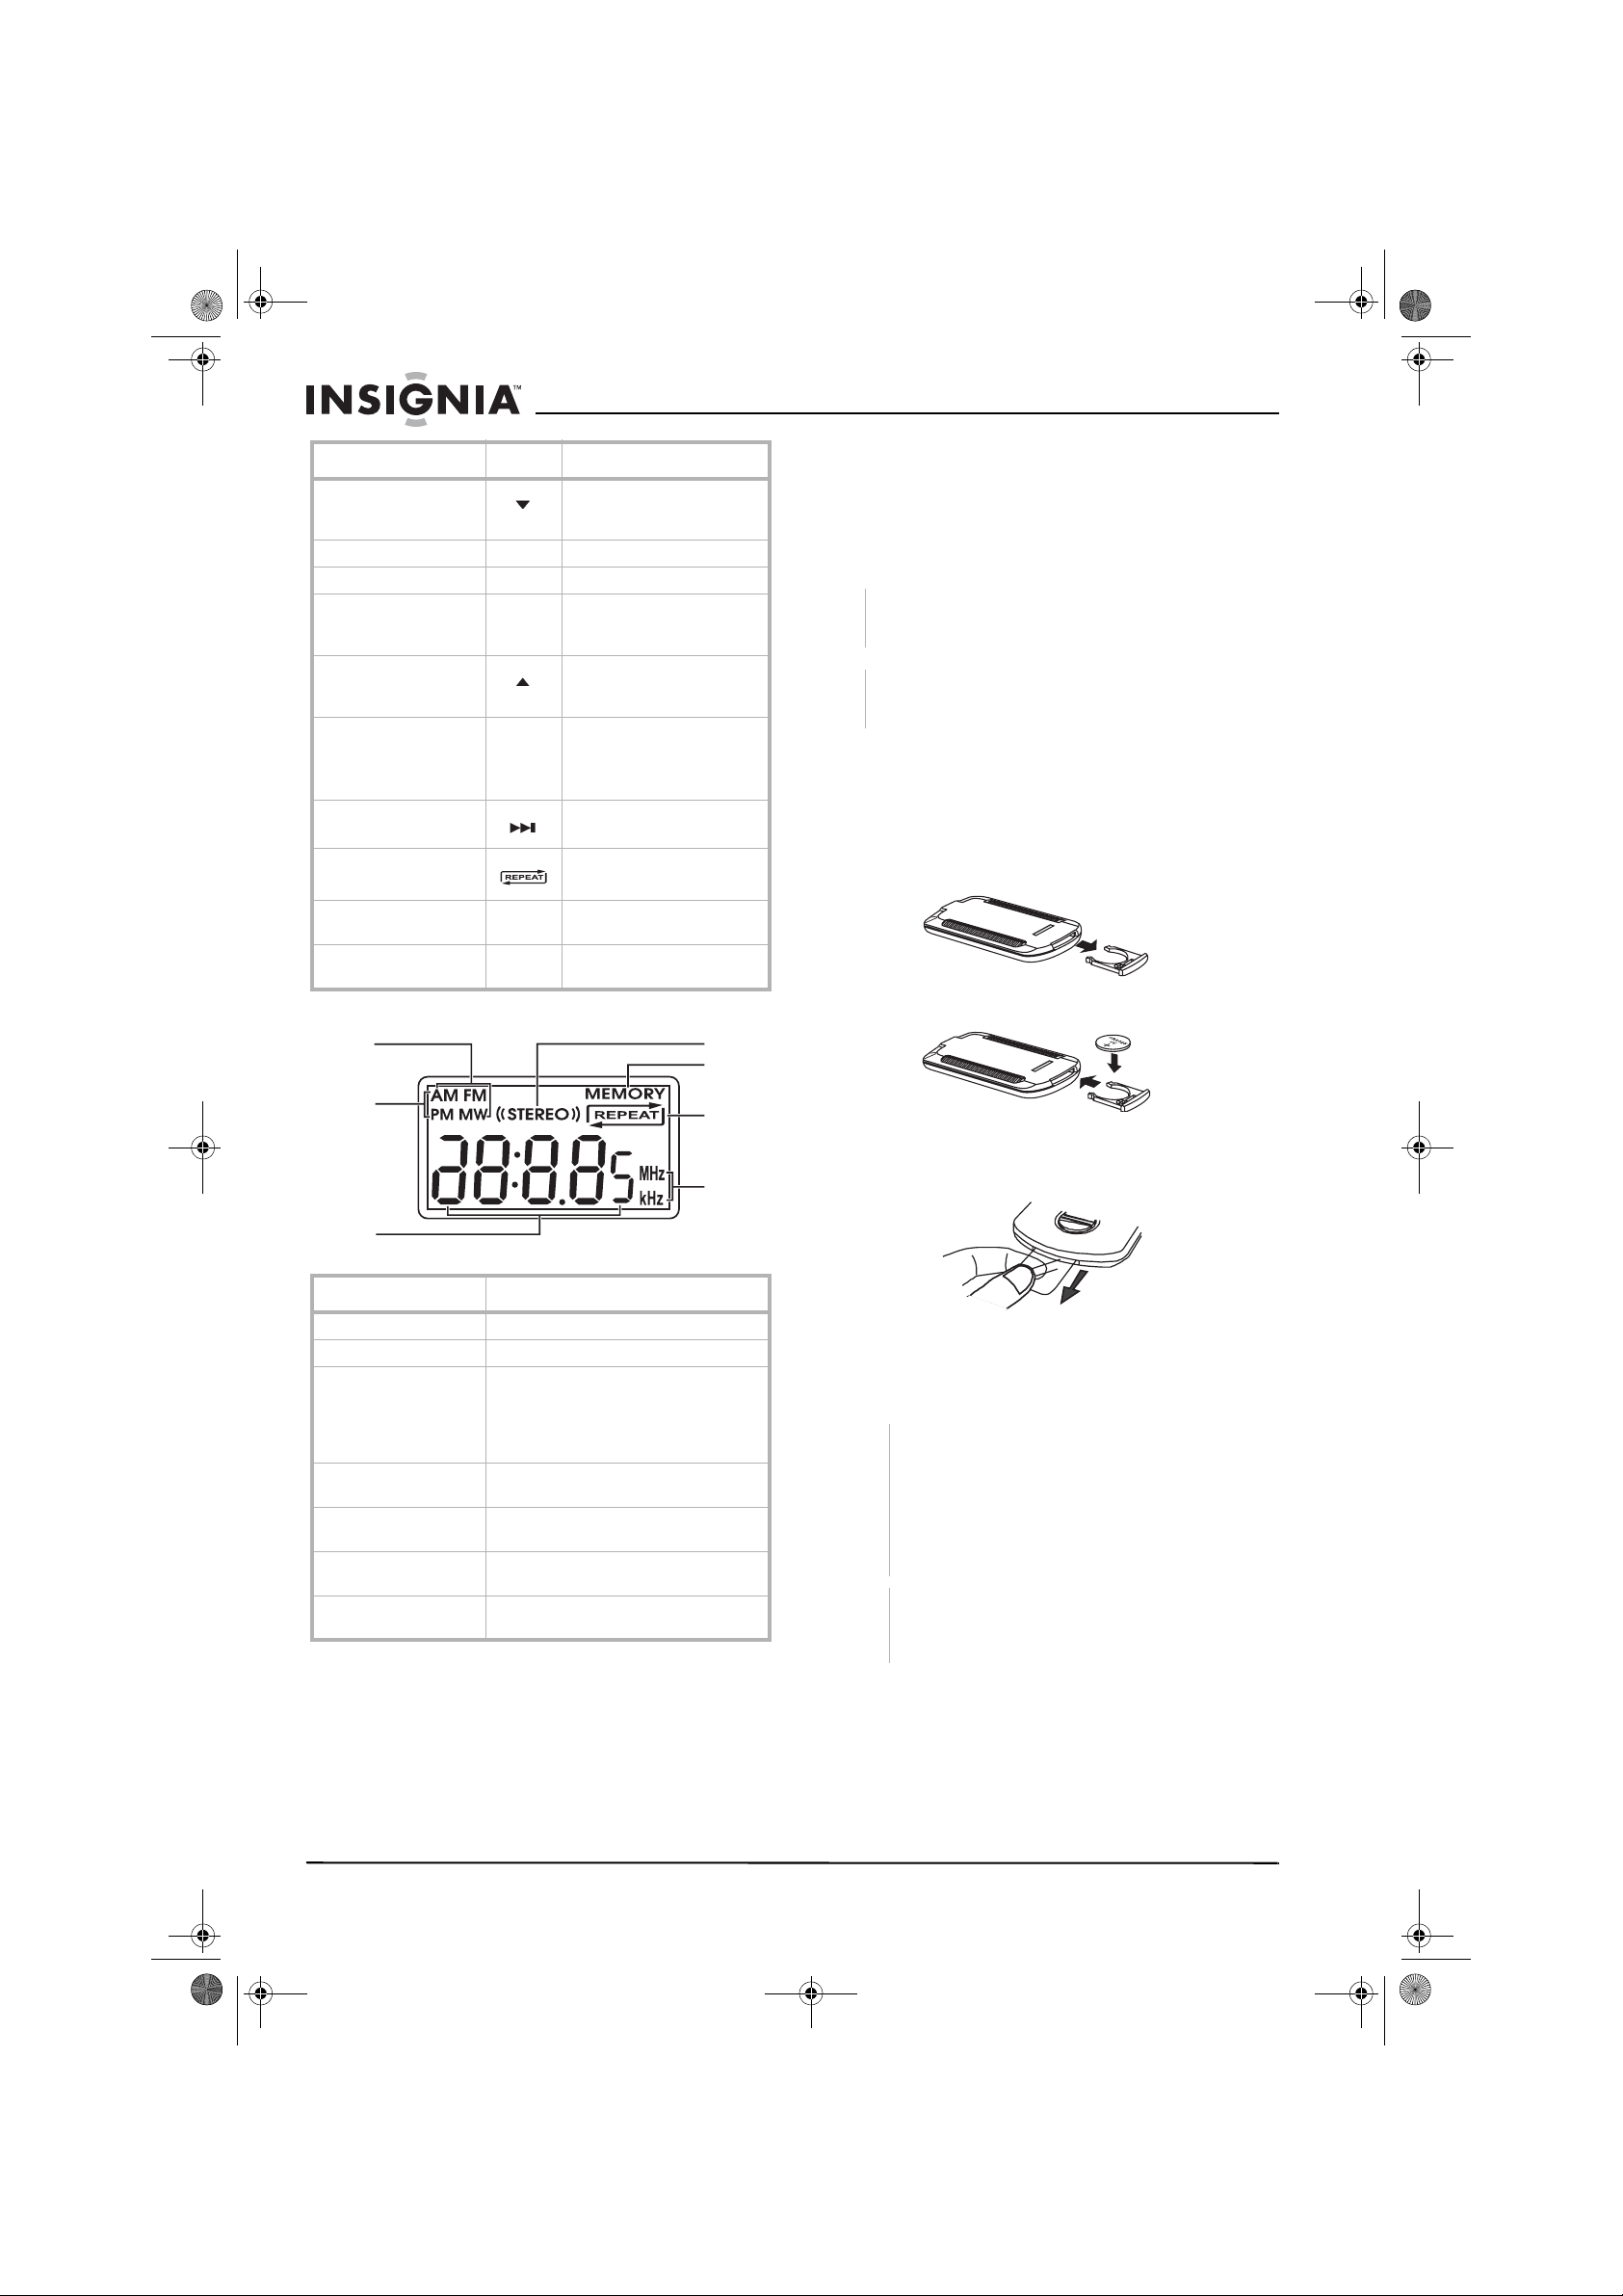
Display
Setting up your shelf
system
Preparing the remote control
Installing remote control batteries
I
Warning
Do not throw the batteries into fire. Dispose of used
batteries as hazardous waste.
I
Caution
Do not drop or disassemble the remote control. Do not
get the remote control wet.
To install batteries in the remote control:
1 Remove the battery cover.
2 Insert one CR2025 (3-volt) battery into the
battery compartment. Make sure that the +/–
symbols on the battery match the +/– marks
inside the battery compartment.
Band
Clock
AM/PM
Clock/CD
track/
broadcast
station
STEREO
MEMORY
Repeat
mode
Radio
frequency
Indicator Description
Band Displays FM or AM radio band.
Clock AM/PM Indicates that the time is AM or PM.
Clock/CD track/
broadcast station
MEMORY Displays when the track being played is
STEREO Indicates that the FM signal is playing in
REPEAT mode Displays when the repeat feature is in
Radio frequency Shows whether the radio frequency is
• In clock mode, displays the time.
• In CD mode, displays the track
number.
• In broadcast station mode,
displays the station number.
stored in memory.
stereo.
use.
megahertz or kilohertz.
3 Replace the battery cover.
4 Remove the plastic tab covering the remote
control sensor.
5 P oint the remo te control at the r emote sensor
on the shelf system. The effective distance
for remote oper ation is about 16 feet (5
meters).
Note
When using the remote control and you are
required to move closer to the stereo for the
remote control to operate, replace the battery. The
remote control may not operate correctly if direct
sunlight or the light of a high-frequency fluorescent
lamp enters the remote control light sensor. In this
case, change the system installation position to
prevent the problem.
Note
When the remote control will not be used for a long
period of time or when the batteries are worn out,
remove the batteries to prevent leakage.
6
www.insignia-products.com
Page 7
NS-A1111_final_translationDTP.fm Page 7 Friday, February 17, 2006 12:09 PM
Insignia NS-A1111 5-CD Shelf System
Connecting speakers to the shelf system
Right
speaker
box
Left
speaker
box
Amplifier
speaker
conectors
AC power
cord
To connect the speakers:
1 Position the speakers supplied with the shelf
system to the right and left of the shelf
system.
Caution
Connecting speakers other than the speakers
provided with the shelf system may damage the
shelf system.
2 Connect the wires fr om the speakers to the
amplifier speaker connectors.
Connecting power to the shelf system
Note
Before operating the shelf system in a new area for the
first time, you must check that the operating voltage of
your shelf system is identical to the voltage of your
local power supply . This shelf system is to be operated
only at the power source voltage printed on the back
panel. Disconnect from the power outlet when not in
use for a long period of time.
Connecting external equipment
You can connect external audio systems to the
shelf system.
To connect external equipment:
1 Make sure t hat the pow er on the shelf system
is off.
2 Plug the jack from the external equipment
into the aux in jack (with the music note
symbol) on the front panel.
Connecting headphones
To connect the headphones:
1 Turn down the volume on the shelf system.
2 Plug headphones with a 3.5 mm stereo mini
plug into the headphone jack.
Note
When the headphones are connected, the
speakers on the shelf system are automatically
disabled.
Using your shelf system
Turning the shelf system on and off
The display changes according to the button
pressed or feature selected.
To turn the shelf system on and off:
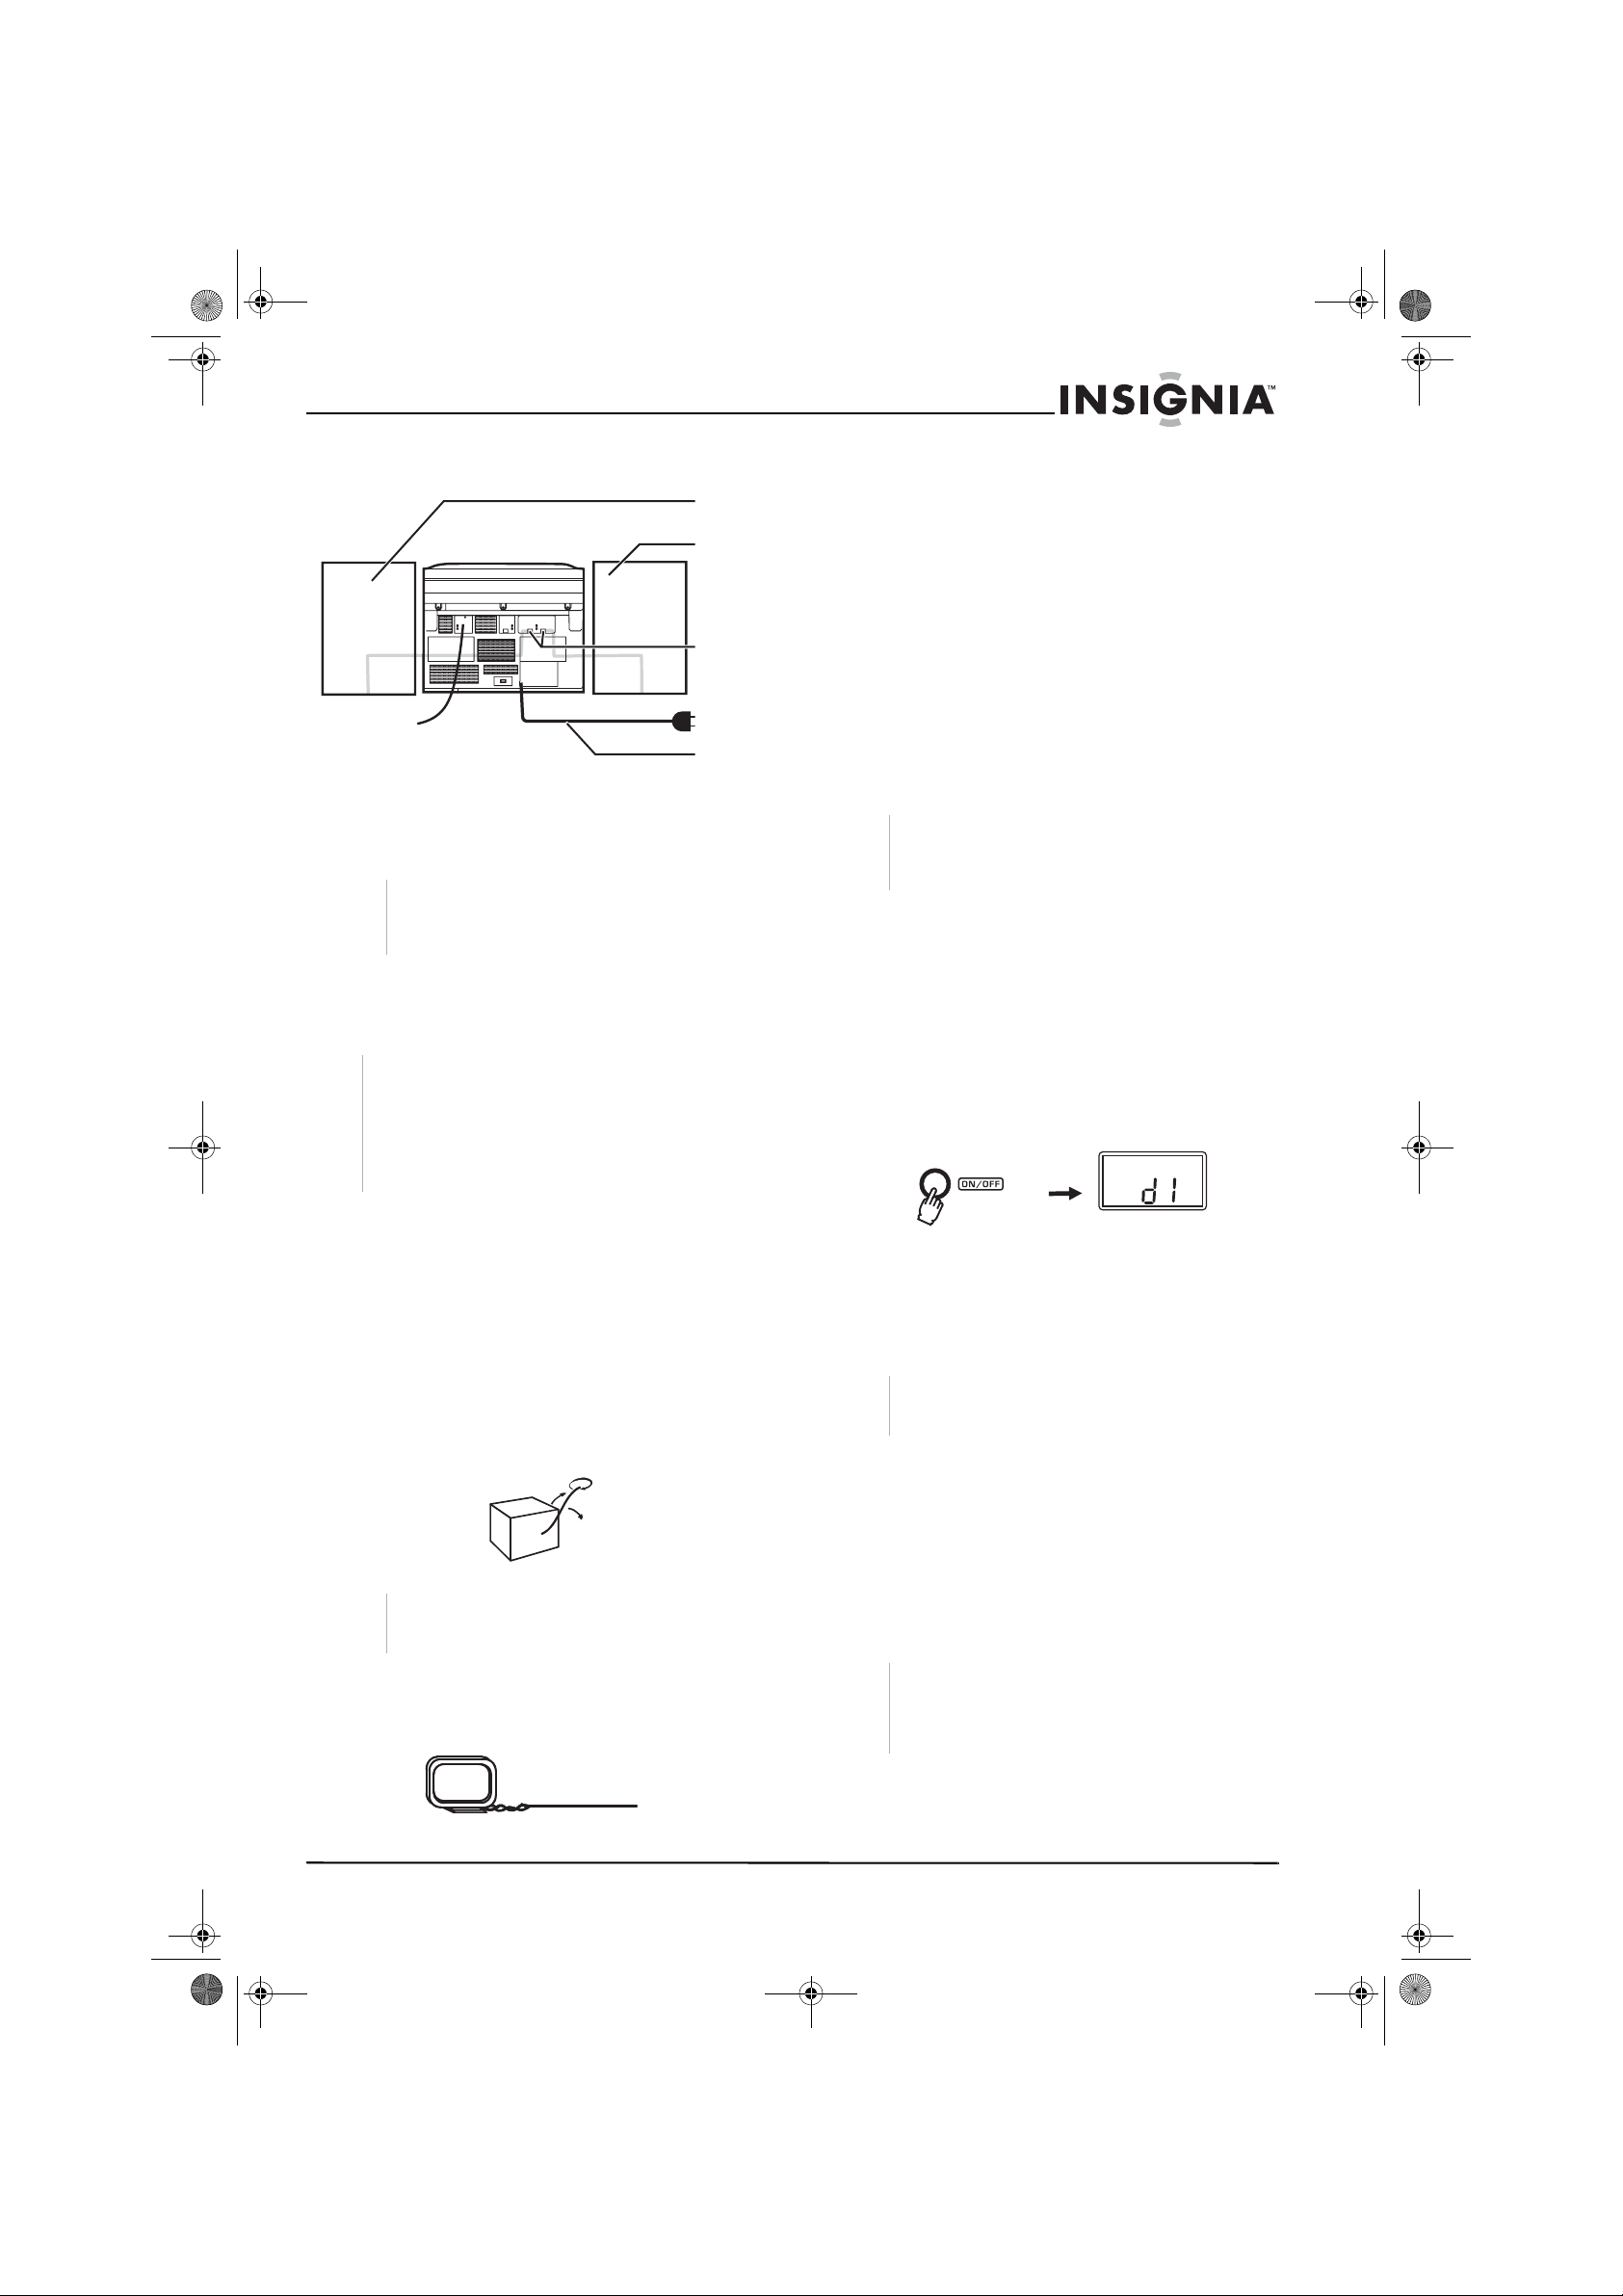
1 When the shelf system is off, press the ON/
OFF button on the shelf system on ce to turn
it on. The display shows d1 and turns on the
display backlight.
To connect the power cord:
1 Make sure that the speakers are properly
connected and that the ON/OFF button is set
to OFF.
2 Connect the AC power cord to an AC outlet.
Connecting the antenna
To connect the antenna:
1 Fully unwind the FM wire antenna. Extend
the antenna and move it to determine the
best sound reception.
Note
Do not connect the shelf system’s FM antenna to
an outside antenna.
2 Connect the pro vided AM loop antenna to the
AM LOOP ANTENNA snap terminals on the
back of the shelf system, then move it to
determine the best sound reception.
2 When the shelf system is on, press the ON/
OFF button on the shelf system on ce to turn
it off. The display backlight goes out.
When the shelf system is turned off, the clock
still shows on the display without a backlight.
This is called the standby mode.
Note
Disconnect the power cord when the unit is not
going to be used for a long time.
Listening to external equipment
To listen to external equi pment:
1 Press the ON/OFF button on the shelf
system once to turn it on.
2 Press the Function button on the front panel
to Aux, indicated by a music note symbol on
the display.
3 Turn on the external equipment.
Note
If the external equipment is a television and this
shelf system is close to the TV, you may
experience interference if the tuner function is
selected while the TV is on.
www.insignia-products.com
7
Page 8

N
N
N
N
NS-A1111_final_translationDTP.fm Page 8 Friday, February 17, 2006 12:09 PM
Insignia NS-A1111 5-CD Shelf System
Adjusting the sound
To adjust the sound:
1 Tur n th e volume control knob to ob ta in th e
desired volume level.
2 For personal listening, connect headphones
to the shelf system.
Note
When the headphones are connected, the
speakers on the shelf system are automatically
disabled.
Setting the clock
To set the clock:
1 When the shelf system is on, press the ON/
OFF bu tton on the shelf system to turn off the
shelf system and enter the standby mod e.
The clock will show on the display without a
backlight.
2 Press the PLAY/PAUSE button until the hour
flashes on the display, then press the search/
skip button repeatedly to set the cu rren t h ou r.
/
Note
Make sure that the time setting is correct before
setting the timer alarm.
3 Press the PLAY/PAUSE button until the hour
flashes on the display, then press the search/
skip button repeatedly to set the desired
hour.
/
4 Press the PLAY/PAUSE button until the
minute flashes on the display, then press the
search/skip button repeatedly to set the
desired minute.
/
5 Press the PLAY/PAUSE button to confirm the
time setting. An alarm sounds when the time
reaches the preset time.
/
3 Press the PLAY/PAUSE button until the
minute flashes on the display, then press the
search/skip button repeatedly to set the
current minute.
/
4 Press the PLAY/PAUSE button until 12H or
24H flashes on the display, then press the
search/skip button to select either a 12-hour
or 24-hour time format.
/
5 Press the PLAY/PAUSE button to confirm the
time setting.
/
Setting the timer alarm
6 Press the TIMER button a second time to
cancel the alarm after setting the timer alarm.
Tuning the radio
Manual tuning
To manually tune the radio:
1 Press the ON/OFF button on the shelf
system once to turn it on.
2 Press the FUNCTION butt on to tuner mode,
which is shown by the radio frequency
indicator on the display.
3 Press the BAND button to select the band
(AM or FM), which is shown by the band
indicator on the display, then tune a station.
Note
In FM mode, the stereo indicator lights when
reception is good.
Note
After changing the band or turning the radio off and
on again, the last station selected will be recalled.
FUNCTIO
FUNCTIO
FUNCTIO
FUNCTIO
To set the timer alarm:
1 When the shelf system is on, press the ON/
OFF bu tton on the shelf system to turn off the
shelf system and enter the standby mod e.
The clock will show on the display without a
backlight.
2 Press the TIMER button once.
8
4 To search for a station quickly, hold the tuning
(up) or tuning (down) button on the remote
control. Station searching starts
automatically and stops automatically when a
station is found.
www.insignia-products.com
Page 9
N
N
N
N
NS-A1111_final_translationDTP.fm Page 9 Friday, February 17, 2006 12:09 PM
Insignia NS-A1111 5-CD Shelf System
Preset tuning
The system stores a total of 40 stations. (Each
band has a maximum of 20 available preset
stations.) Presetting allows you to tune into a
station directly. Stations are assign e d pr es et
numbers, beginning from 1 in consecutive order
for each band (AM and FM).
To program preset radio stations:
1 Manually select a radio station (see page 8).
2 Press the memory button to store the station
in memory.
3 Repeat steps 1 and 2 to preset up to 20 AM
and 20 FM stations.
Recalling a preset station
To recall a preset radio station:
1 Press the ON/OFF button on the shelf
system once to turn it on.
2 Press the FUNCTION button to tuner mode,
which is shown by the radio frequency
indicator on the display.
3 Press the BAND button to select the band
(AM or FM), which is shown by the band
indicator on the display, then tune a station.
Note
In FM mode, the stereo indicator lights when
reception is good.
Note
After changing the band or turning the radio off and
on again, the last station selected is recalled.
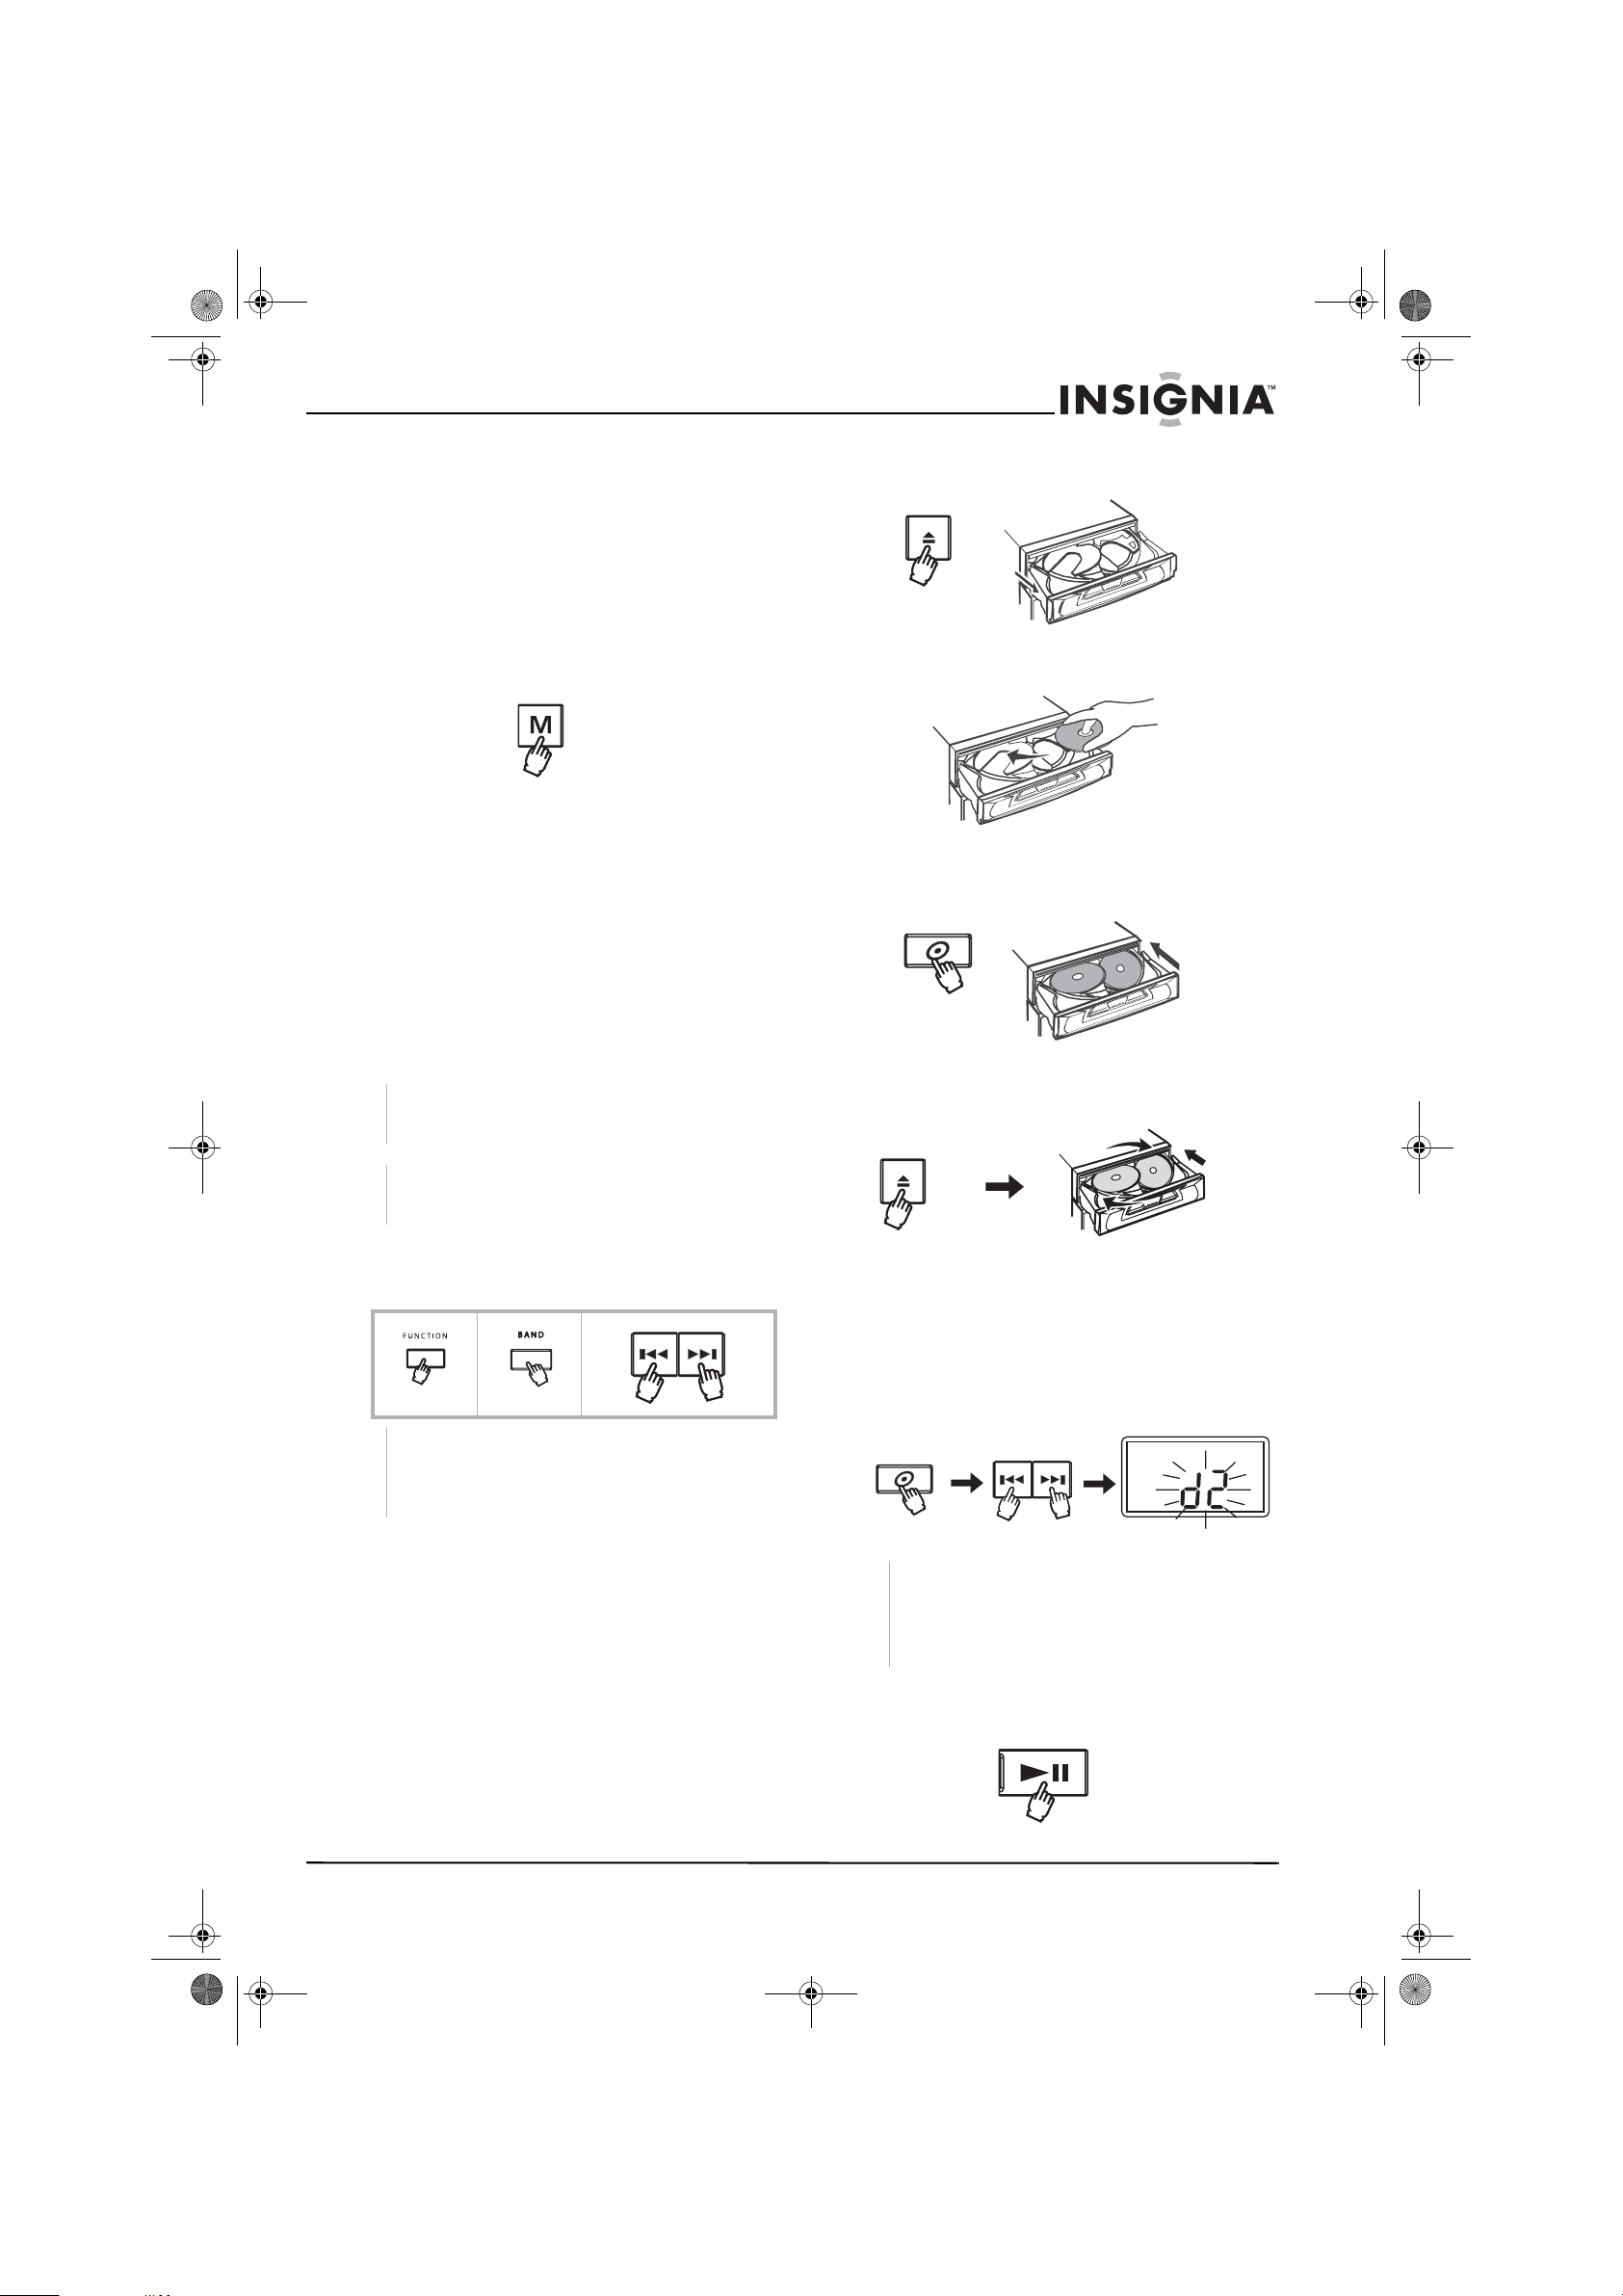
3 Press the open/close button to open the disc
tray.
4 Load the first disc into the disc tr a y, label side
up.
5 Press the disc skip button to revolve the disc
tray cloc kwise. Repe at to load up to fiv e discs
in the CD changer.
6 Press the open/close b utt on to close th e disc
tray. There will be a slight delay while the CD
changer checks the discs.
4 Press the skip/search/preset button until the
desired number for the preset station shows
on the display.
FUNCTIO
FUNCTIO
FUNCTIO
FUNCTIO
Note
The memory entry (channel number, frequency
band, and frequency) that have been stored
appear on the display in numerical order,
regardless of the frequency band.
Using the CD changer
Loading CDs
To load CDs in the changer:
1 Press the ON/OFF button on the shelf
system once to turn it on.
2 Press the FUNCTION button to CD mode,
which is shown on the display.
Playing CDs
To play CDs:
1 Press the disc skip button to select the
desired disc, then press either of the skip/
search/preset buttons to select a track on the
selected disc. The selected disc flashes on
the display.
Note
The disc tray can be opened during playback to
change or add a disc not in play. While the tray is
open, the selected disc will not stop playing, but
the disc skip button will not work to select another
disc.
2 Press the PLAY/PAUSE button to start
playback. Press during play to pause play,
then press again to resume playing.
www.insignia-products.com
9
Page 10
NS-A1111_final_translationDTP.fm Page 10 Friday, February 17, 2006 12:09 PM
Insignia NS-A1111 5-CD Shelf System
3 Press the stop button to stop playback.
Note
Before transporting the unit, remove any disc from
the disc compartment.
Locating tracks
Note
Searching and skipping can be done during playback
or pause, but can only be done for the CD currently
playing.
To skip to a track in sequence:
1 To go to the beginning of the current or the
preceding track, press the skip/search/ preset
reverse button once.
2 To go to the beginning of the next track on the
CD, press the skip/search/preset forward
button once.
Reverse skip
Forward skip
To search for a point in a track:
1 Press and hold the skip/search/preset
reverse button to move backward at high
speed. Release the button at the desired
point.
2 Press and hold the skip/search/preset
forward button to move forward at high
speed. Release the button at the desired
point.
Reverse search Forward search
Repeating a track or disc
Repeat playbac k allows you to repea t the current
track, an entire disc, or all discs in the CD
changer.
You can use repeat playback during normal
playback (playback mode), stop mode, or pause
mode.
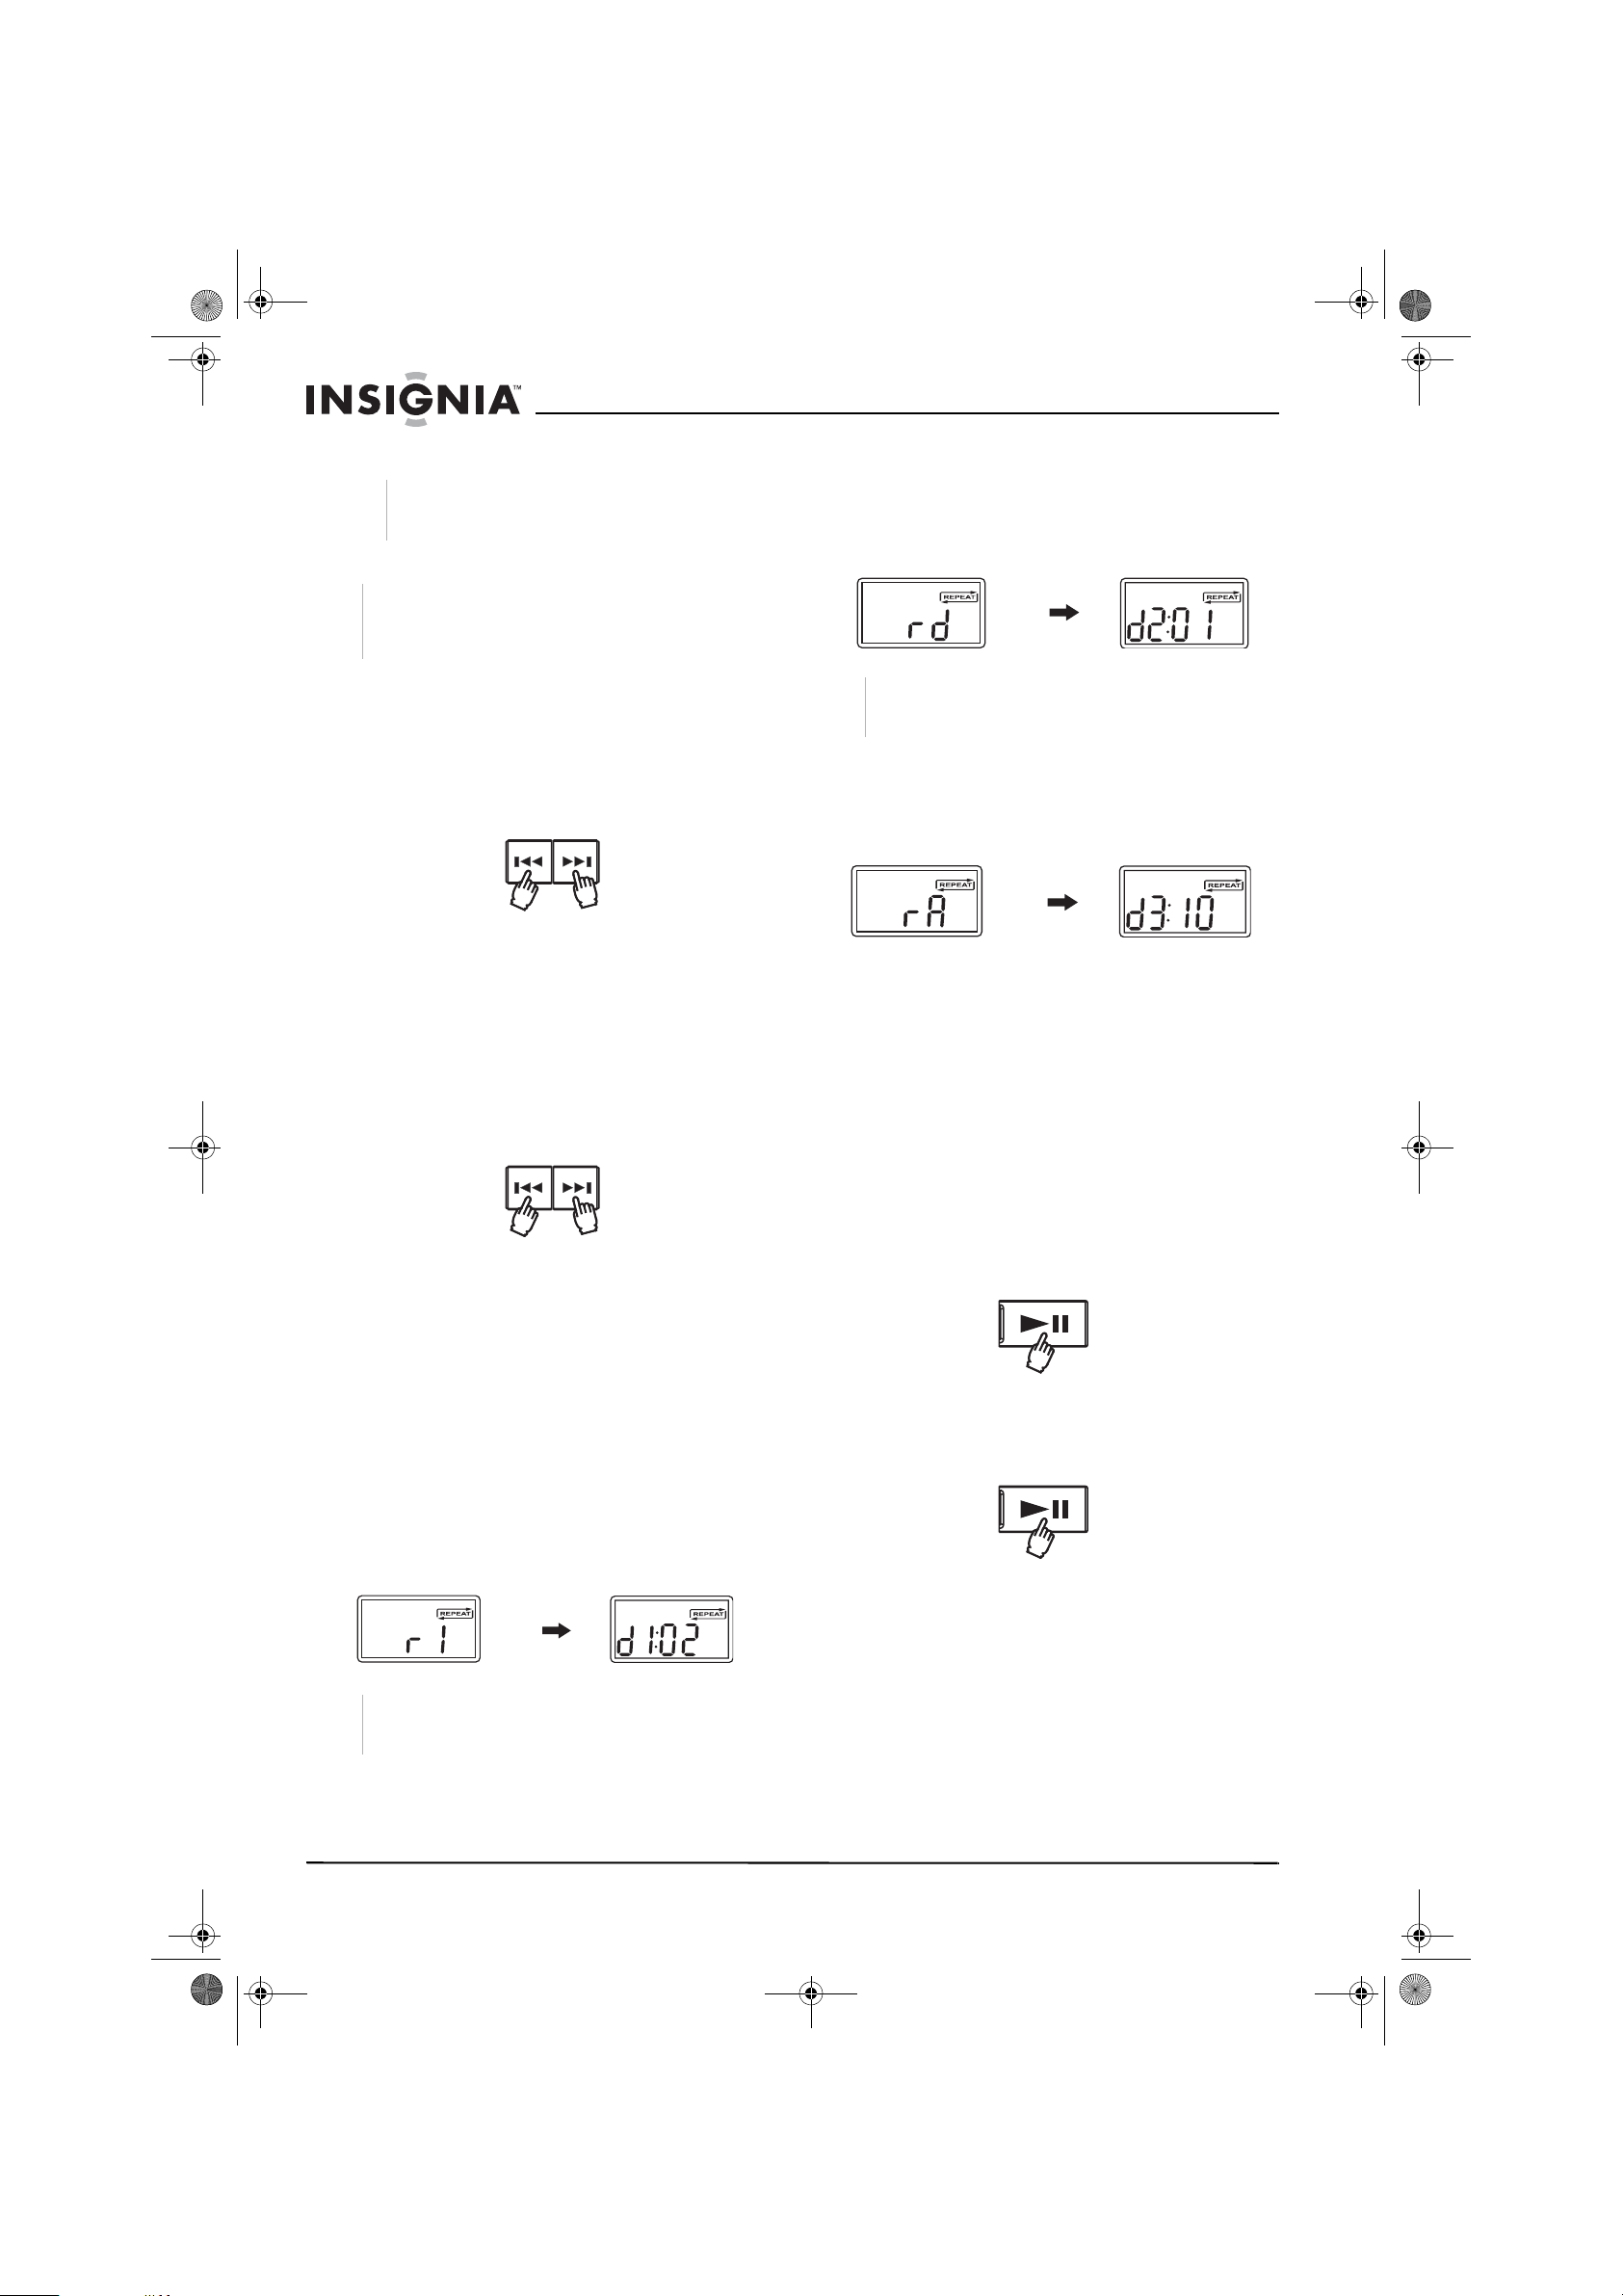
To repeat play during playback mode:
1 To repeat a track that is playing, press
Repeat on the remote control until the
display shows REPEAT and r1 (indicating a
track repeat). The currently playing track will
play repeatedly until you press the STOP
button.
2 To repeat the entire disc that is pla ying, press
Repeat on the remote control until the
display shows REPEAT and rd (indicating a
disc repeat). The currently playing disc will
play repeatedly fro m the current playing
point.
Note
The skip/search buttons can be used during this
function but operate in the search mode only.
3 To repeat all discs in the CD changer, press
Repeat on the remote control until the
display shows REPEAT and rA (indicating a
all-disc repeat). The discs will play repeatedly
from the current playing point.
4 Press the search/skip buttons to use select
another track on the se lected disc , or u se the
disc skip button to play the first track of the
newly selected disc.
5 To cancel repeat play, press Repeat on the
remote control until REPEAT disappears
from the display.
To repeat play during stop or pause modes:
1 While the CD player is stopped or paused,
program the repeat play function as if the CD
were in playback mode.
2 From stop mode, press the PLAY/PAUSE
button to begin repeat play. The currently
playing disc will play from the beginning of
the first track.
3 From pause mode, press the PLAY/PAUSE
button to begin repeat play. The currently
playing disc will play from the point at which
play was paused.
Programming CD tracks
The system stores a total of 20 tracks from all
available discs in the disc tray. These tracks can
be played in a preset order.
10
Note
The skip/search buttons can be used during this
function and operate normally.
www.insignia-products.com
Page 11
N
N
N
N
NS-A1111_final_translationDTP.fm Page 11 Friday, February 17, 2006 12:09 PM
Insignia NS-A1111 5-CD Shelf System
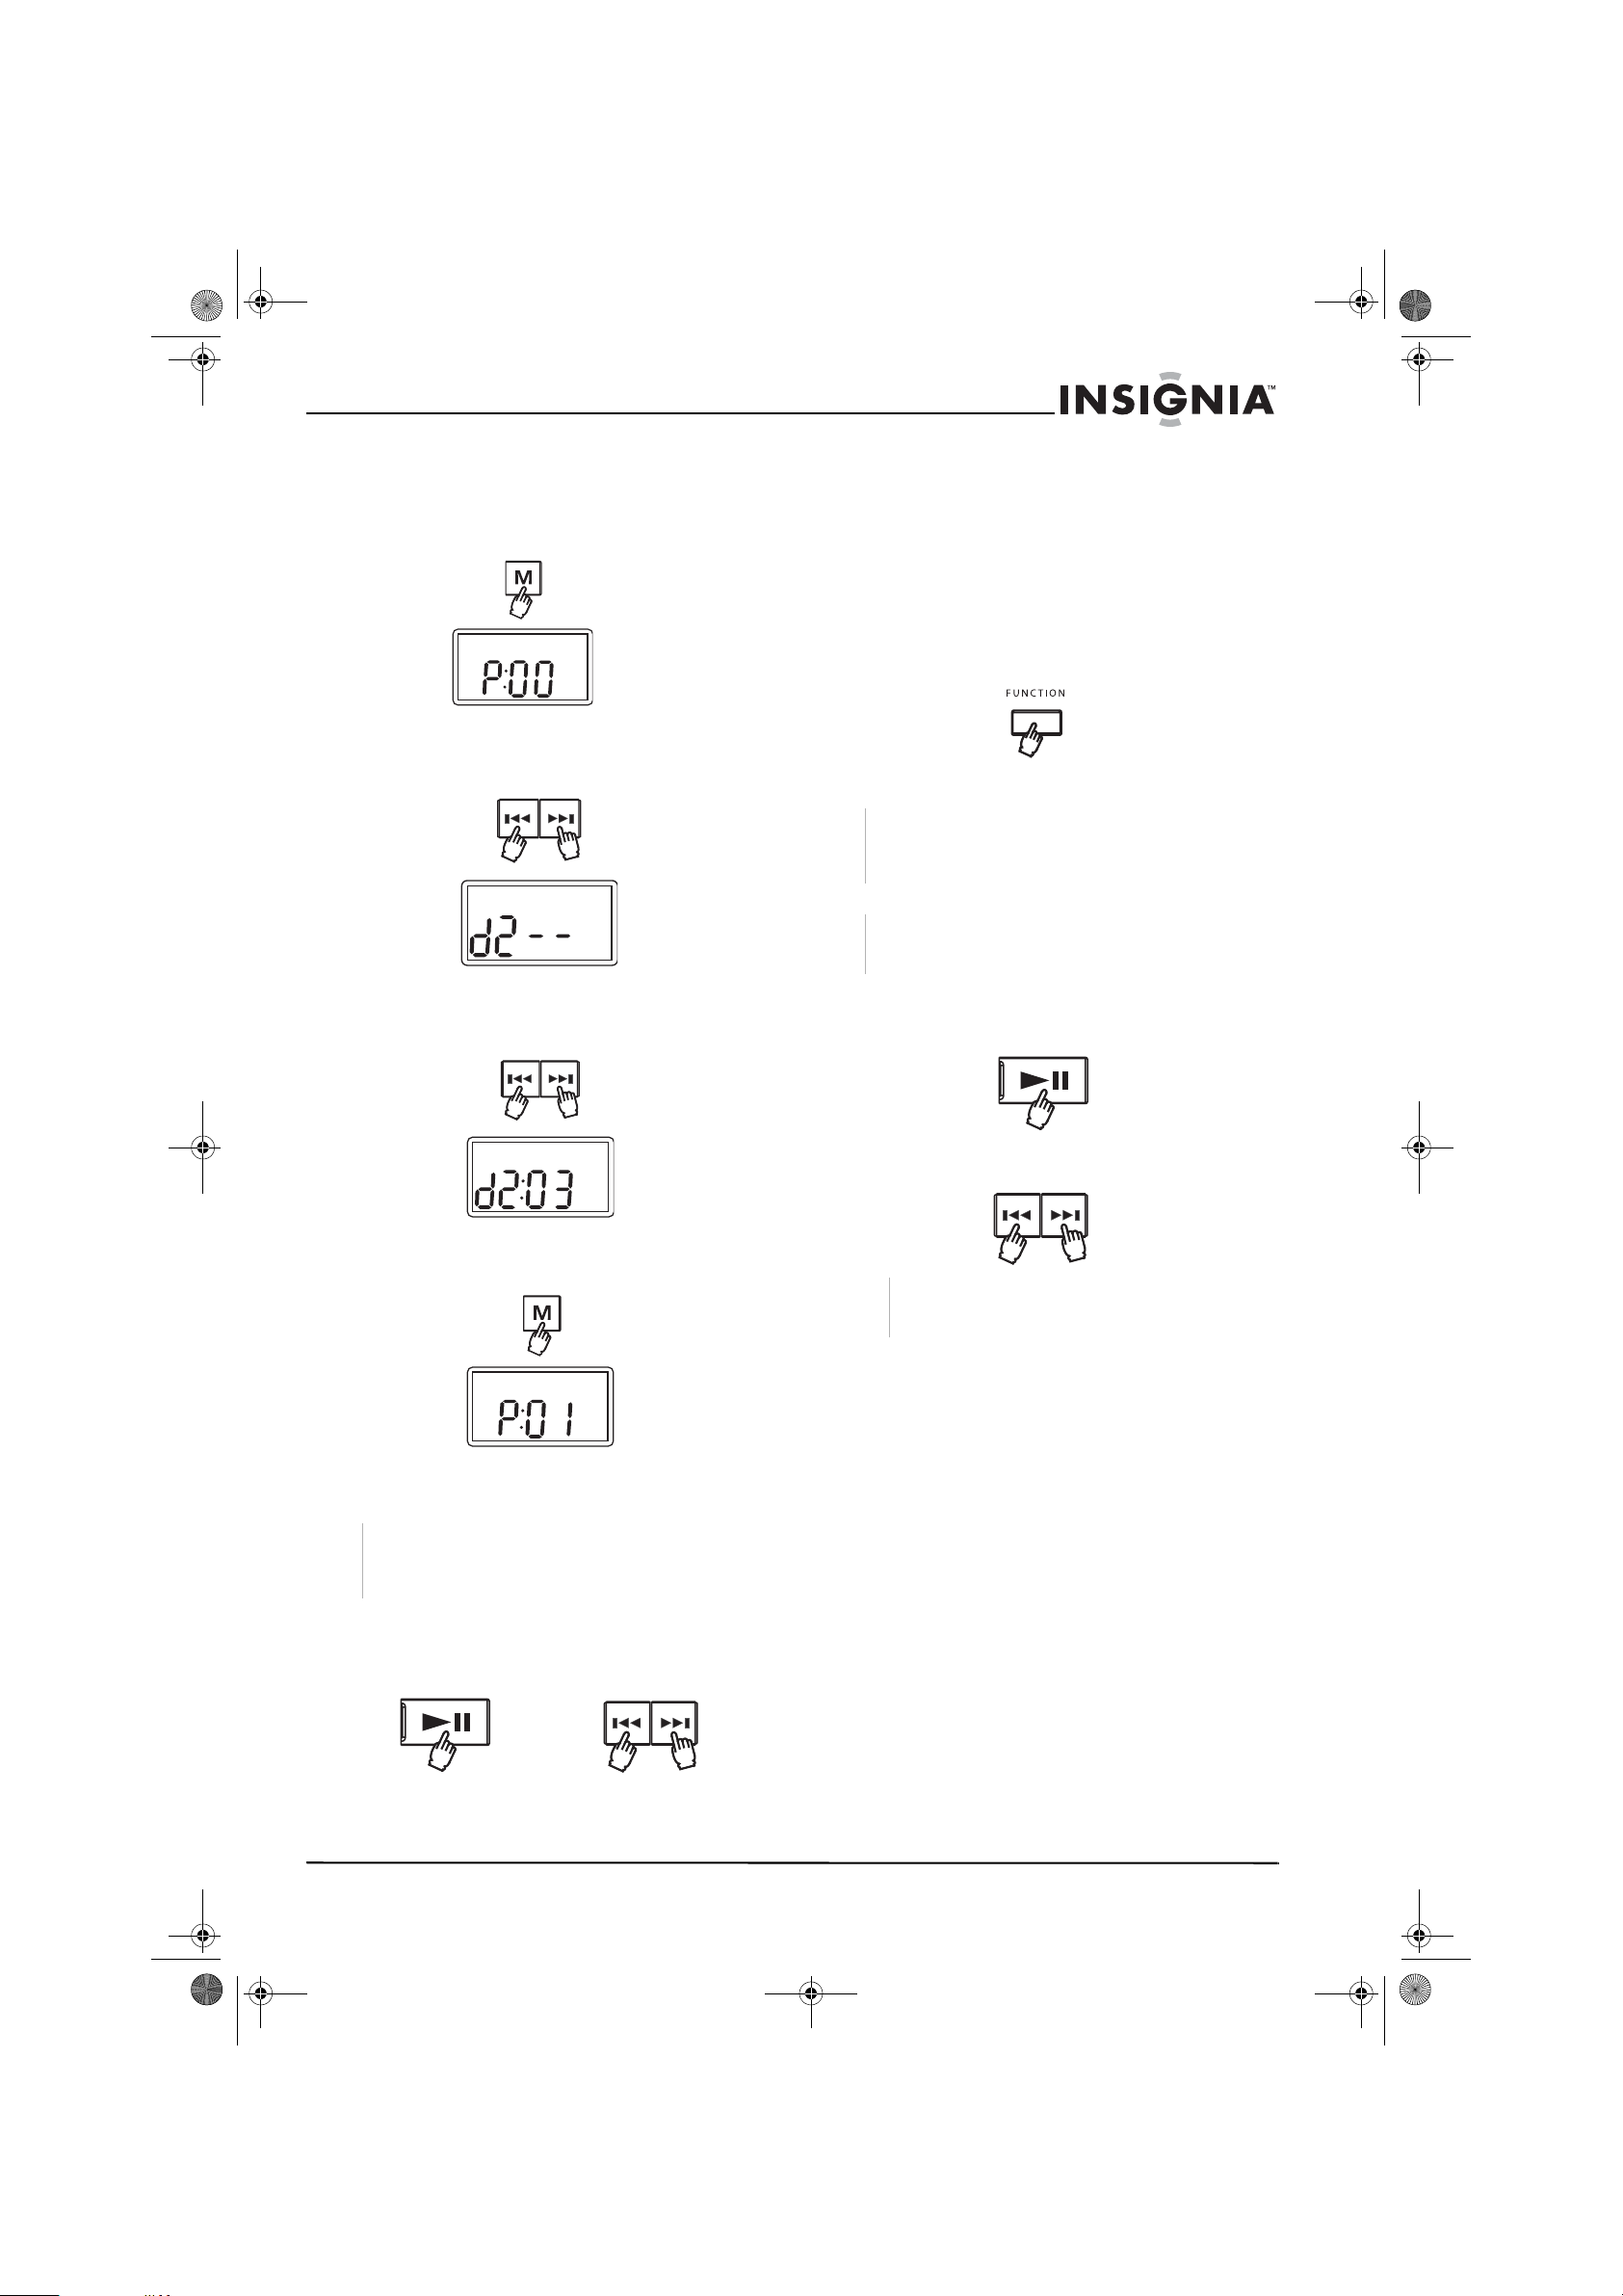
To program CD playback:
1 With the CD pla yer in stop mode, press the M
(memory) button. P:00 shows on the display
indicating that no tracks have been
programmed.
2 Press the search/skip button to select the
desired disc. The disc number shows in the
display.
3 Press the search/skip button again to select
the desired track. The track number shows
after the disc number in the display.
To erase a CD program:
1 Press the stop button until MEMORY
disappears from the display. The display
shows the information for the current disc in
the CD changer.
OR
2 Open the disc tray by pressing the OPEN/
CLOSE button.
OR
3 Press FUNCTION to select another function.
FUNCTIO
FUNCTIO
FUNCTIO
FUNCTIO
Playing programmed tracks
Note
While playing programmed tracks, the search/skip
button can only be used to select tracks that have
been programmed.
Note
While playing programmed tracks, repeat play will not
work for all discs.
1 Press the PLAY/PAUSE button to start
playback. Press during play to pause play,
then press again to resume playing.
4 Press the M (memory) button again to store
the disc and track in memory.
5 Repeat steps 2 through 4 to p rogram up to 19
additional tracks in memory.
Note
The same track can be selected more than once in the
same program. (For example , you could set a program
to play the same track 20 times.)
6 To check the program, press the PLAY/
PAUSE button to start play, then press a
search/skip button to mak e sur e that t he ne xt
programmed track plays.
2 Press a search/skip button to move to
another programmed track.
Note
The memory entry (disc and track) that have been
stored appear on the display in numerical order.
Maintaining your shelf
system
Cleaning the player
• Wipe with a soft cloth. If the player is very
dirty, dampen the cloth with a weak solution
of neutral detergent and w ater , and then wipe
clean. Do not use compressed air to remove
dust.
Caring for CDs
• Do not touch the surface of the unlabeled
side of the disc.
• Do not attach paper or tape to the surface of
the disc.
• Do not expose the disc to direct sunlight or
excessive heat.
• Do not use irregularly shaped discs (for
example: heart shaped or octagonal discs).
They may cause malfunctions.
www.insignia-products.com
11
Page 12
NS-A1111_final_translationDTP.fm Page 12 Friday, February 17, 2006 12:09 PM
Insignia NS-A1111 5-CD Shelf System
Cleaning CDs
A dirty disc causes sound skipping, and if the
disc is very dirty, the CD may not work at all.
Handle the disc by holding its inner and outer
edges.
• Fingerprints and dust should be carefully
wiped from the surface of the CD with a soft
cloth. Wipe in a straight motion from the
center to the edge.
• Never use thinner, benzine, record cleaner,
or anti-static spray on a CD, because they
can damage its plastic surface.
Note
Before transporting the unit, remove any disc from
the disc compartment.
Troubleshooting
Problem Solution
No sound. • Turn the volume knob up.
No or
unbalanced
sound from a
speaker.
Reversed left
and right
sound.
Severe hum or
noise.
The FM stereo
indicator
flashes.
CD door does
not close due to
power off or
other functions
are selected
without first
closing the
door
The disc does
not play
Distorted
playback or
sound loss
during CD
playback
• The headphones are connected.
Disconnect them.
• Reset the unit by pressing the ON/OFF
button.
Check the speaker connections of the
inoperative speaker.
Check the speaker cord connection and
speaker location.
• A TV or VCR is too close to the shelf
system. Separate the shelf system
from the TV or VCR.
• The plugs and jacks are dirty. Wipe
them with a cloth slightly moistened
with alcohol.
• Clean the disc.
• Adjust the antenna wire.
Reception is poor. Adjust the antenna wire.
• Press the ON/OFF button to turn on
the shelf system.
•Press the Function button to select CD
mode.
• Press the Open/Close button to close
the CD door.
• The disc is not inserted correctly or is
upside down. Insert the disc correctly.
• Clean the disc.
• The CD system is in the pause mode.
Press the Play button to leave pause
mode.
• Condensation may have formed inside
the unit because of a sudden change
in temperature. Wait about an hour for
the condensation to evaporate and try
again.
• CD disc is dirty or scratched. Clean
the disc.
Specifications
Design and specifications are subject to change
without notice.
Power sources
Power supply 120 V AC
60 Hz
Remote control
batteries
Power
consumption
3V (1)
15 W
FCC compliance
This equipment has been tested and found to
comply within the limits for a class B digital
device, pursuant to Part 15 of the FCC Rules.
These limits are designed to provide reasonab le
protection against harmful interference in a
residential installation. This equipment
generates, uses, and can radiate radio
frequency energy and, if not installed and used
in accordance with the instructions, may cause
harmful interference to radio communications.
Howev e r, there is no guarantee that interf erence
will not occur in a particular installation. If this
equipment does cause harmful interference to
radio or television reception, which can be
determined by turning the equipment off and on,
the user is encouraged to try to correct the
interference by one or more of the following
measures:
• Reorient or relocate the receiving antenna.
• Increase the separation between the
equipment and receiver.
• Connect the equipment into an outlet on a
circuit different fr om that to which the receiv er
is connected.
• Consult the dealer or an experienced
technician for help.
Safety certification
This shelf system is made and tested to meet
safety standards of the FCC, requirements and
compliance with safety performance of the U.S.
Department of Health and Human Services, and
also with FDA Radiation P erf ormance Standards
21 CFR Subchapter J.
Warranty information
Limited warranty
Insignia Products warrants to you, the original
purchaser of this Product, that this product shall
be free of defects in m aterial or w orkmanship f or
a period of ninety (90) days from the date of
purchase as follows:
1 LABOR: During the Warranty Period if this
Product is determined to be defective,
Insignia will repair or replace the Product, at
its option at no charge, or pay the labor
charges to any Insignia authorized service
facility. After the Warranty Period, you must
pay for all labor charges.
12
www.insignia-products.com
Page 13

NS-A1111_final_translationDTP.fm Page 13 Friday, February 17, 2006 12:09 PM
Insignia NS-A1111 5-CD Shelf System
2 PARTS: In addition, Insignia will supply , at no
charge, new or rebuilt replacement parts in
exchange f or defective parts for the Warr anty
Period. After the Warranty P eriod, you must
pay all parts costs.
To obtain warranty service, you must take the
Product with your original receipt or other proof
of purchase, either in its original packaging or
packaging affording an equal degree of
protection, to your nearest reta il store locatio n of
the store or online web site from which you
purchased the Product.
This warranty does not cover cosmetic damage
or damage due to acts of God, lightning strikes,
accident, misuse, abuse, negligence,
commercial use, or modification of , or to any pa rt
of the Product, including the antenna. This
warranty does not co ver damage due to
improper operation or maintenance, connection
to improper voltage supply , or attempted repair
by anyone other than a facility authorized by
Insignia to service the Product. This warranty
does not cover Products sold AS IS or WITH
ALL FAULTS, or consumables (such as fuses or
batteries). This warranty is valid only in the
United States and Canada.
This warranty is invalid if the factory applied
serial number has been altered or rem ov ed f rom
the Product.
REPAIR REPLACEMENT AS PROVIDED
UNDER THIS WARRANTY IS THE EXCLUSIVE
REMEDY OF THE CONSUMER. INSIGNIA
SHALL NOT BE LIABLE FOR ANY
INCIDENTAL OR CONSEQUENTIAL
DAMAGES FOR BREACH OF ANY EXPRESS
OR IMPLIED WARRANTY ON THIS PRODUCT.
EXCEPT TO THE EXTENT PROHIBITED BY
APPLICABLE LAW, ANY IMPLIED WARRANTY,
REPRESENTATION OR CONDITION OF
MERCHANTABILITY OR FITNESS FOR A
PARTICULAR PURPOSE ON THIS PRODUCT
IS LIMITED IN DURATION TO THE DURATION
OF THIS WARRANTY.
Some states or provinces do not allow the
exclusion or limitation of incidental or
consequential damages, or allow limitations on
how long an implied warranty lasts, so the abov e
limitations or exclusions may not apply to you.
This warranty gives y ou specific legal rights, and
you may have other rights which vary from state
to state, or province to province.
For customer service, please call
1-877-467-4289.
www.insignia-products.com
Insignia Products, Richfield, Minnesota, U.S.A.
Copyright
© 2006 Insignia. Insignia and the Insignia logo are
trademarks of Best Buy Enterprise Services, Inc. Other
brands and product names are tr ademarks or
registered trademarks of their respective holders.
Specifications and features are subject to change
without notice or obligation.
www.insignia-products.com
13
Page 14

NS-A1111_final_translationDTP.fm Page 14 Friday, February 17, 2006 12:09 PM
Lecteur de CD de salon à 5 disques NS-A1111 de Insignia
Lecteur de CD de
salon à 5 disques
NS-A1111 de Insignia
Table des matières
Introduction . . . . . . . . . . . . . . . . . . . . . . . . . . . . .14
Information sur la sécurité . . . . . . . . . . . . . . . . . .14
Fonctionnalités. . . . . . . . . . . . . . . . . . . . . . . . . . .16
Installation du lecteur de CD de salon. . . . . . . . 17
Utilisation du lecteur de CD de salon. . . . . . . . . 18
Entretien du lecteur de CD de salon . . . . . . . . . 23
Problèmes et solutions. . . . . . . . . . . . . . . . . . . . 23
Spécifications . . . . . . . . . . . . . . . . . . . . . . . . . . .24
Informations sur la garantie . . . . . . . . . . . . . . . . 24
Droits d’auteur . . . . . . . . . . . . . . . . . . . . . . . . . . .25
Introduction
Félicitations d’avoir achet é ce produit Insignia de
haute qualité. Le lecteur de CD de salon à 5
disques NS-A1111 représente la dernière
avancée technologique dans la conception de
systèmes stéréo et a été conçu pour des
performances et une fiabilité exceptionnelles.
Informations sur la sécurité
I
Avertissement
Afin de réduire le risque d’incendie et de choc
électrique, ne pas exposer cet appareil à la pluie ou
l’humidité.
I
Avertissement
Afin de réduire le risque de choc électrique, ne pas
enlever le couvercle (ou l'arrière). Ne contient aucune
pièce réparable par l'utilisateur. Confier l’entretien à du
personnel qualifié.
Lire les instructions
Lire toutes les instructions de sécurité et de
fonctionnement avant d’utiliser cet appareil.
Conserver les instructions
Conserver les instructions de sécurité et de
fonctionnement pour toute référence ultérieure.
Respecter les avertissements
Respecter tous les avertissements sur cet
appareil ainsi que dans les instructions
d’utilisation.
Observer les instructions
Toutes les instructions d’utilisation et de
fonctionnement doivent être observées.
Eau et humidité
Ne pas utiliser cet appareil près de l’eau. Par
exe mple: baignoire, bac à linge, évier, cuve à
lessive, dans un sous-sol humide ou à proximité
d'une piscine.
Montage mural ou suspension au plafond
Ne pas effectuer un montage mural ou au
plafond de cet appareil.
Accessoires
N'utiliser que les périphériques et accessoires
spécifiés. N’utiliser qu’avec la table roulante, le
pied, le trépied, le support ou la table spécifiés
par Insignia ou vendus avec le produit.
Lorsqu’une table roulante est utilisée, déplacer
l’ensemble appareil/table roulante avec
précaution pour éviter les blessures pro voquées
par une éventuelle chute de l’appareil.
Ventilation
Les fentes et ouvertures au dos et au bas du
boîtier sont prévues pour la ve ntilation, afin
d’assurer un fonctionnement fiable de l’appareil
et de le protéger contre toute surchauffe. Ces
ouvertures ne doivent être ni bloquées ni
obstruées. Ne pas placer l'appareil sur un lit, un
sofa, un tapis ou toute autre surface similaire.
Ne pas placer l’appareil à proximité ou
au-dessus d’un radiateur ou d’une source de
chaleur. Ne pas installer l’appareil dans un
meuble encastré tel qu’une bibliothèque ou sur
une étagère, sauf si une ventilation adéquate a
été prévue ou si les instructions du fabricant ont
été respectées.
Source d’alimentation
Ne brancher cet appareil que sur la source
d’alimentation indiquée sur la plaque
signalétique de l’appareil (située au dos du
lecteur de CD de salon).
En cas d’incertitude sur la tension d'alimentation
électrique de la maison, consulter le revendeur
ou la compagnie d'électricité.
Mise à la terre ou polarisation
Cet appareil est équipé d'une prise de courant
CA polarisée (à deux plots, un plus large que
l'autre). Cette fiche ne s'insère dans une prise
murale que d'une seule façon. Il s'agit d'une
caractéristique de sécurité. S’il est impossible
d’introduire à fond la fiche dans la prise murale,
essayer de retourner la prise. Si la fiche ne
s'adapte toujours pas à la prise murale,
contacter un électricien afin qu’il remplace la
prise inadéquate.
Au lieu d'une prise de courant al ternatif
polarisée, cet appareil peut être équipé d’une
fiche à trois câbles dont un pour la ter re (il s’agit
donc d’une fiche avec une troisième broche de
mise à la terre). Cette prise ne pourra
fonctionner qu’avec une prise murale équipée
d'une connexion à la masse. Il s'agit également
d'un dispositif de sécurité. S’il s’avère impossible
d’introduire la fiche dans la prise murale,
contacter un électricien afin qu’il remplace la
prise inadéquate. Ne pas chercher à modifier le
dispositif de sécurité de la prise polarisée ou de
type mise à la terre.
Protection du cordon d’alimentation
Les cordons d’alimentation électrique doivent
être acheminés afin que personne ne puisse
marcher dessus et qu’aucun objet posé dessus
ne vienne les entraver. Prêter particulièrement
attention aux points de branchement du cordon
à la prise secteur et à l’endroit d’où le cordon
sort de l’appareil.
14
www.insignia-products.com
Page 15

NS-A1111_final_translationDTP.fm Page 15 Friday, February 17, 2006 12:09 PM
Lecteur de CD de salon à 5 disques NS-A1111 de Insignia
Casque d’écoute
Conserver le volume à un niveau modéré lors de
l’utilisation du casque d’écoute. L’utilisation
continue du casque d’écoute à un niveau sonore
élevé peut endommager l’ouïe.
Foudre
Pour protéger l'appareil pendant un or age ou s’il
est inutilisé et sans surveillance pendant une
durée prolongée, le débrancher de la prise
secteur et débrancher l'antenne ou la conne xion
au réseau câblé. Ceci évitera d’endommager
l’appareil en cas de foudre et de variations de
tension du secteur.
Surcharge
Les prises secteur et les rallonges ne doivent
pas être surchargées, cela pourrait provoquer
des risques d'incendie ou de choc électrique.
Pénétration d’objets ou de liquides
Ne jamais enfoncer un objet quelconque dans
les ouvertures du boîtier de l’appareil, il pourrait
entrer en contact avec des tensions
dangereuses ou provoquer un court-circuit à
l'origine d'un incendie ou d'un choc électrique.
Ne jamais renverser ou pulvériser un liquide
quelconque sur l’appareil.
Dégâts nécessitant un entretien
L’utilisateur ne doit pas essayer de réparer cet
appareil lui-même. L’ouverture ou le démontage
des couvercles peut exposer l’utilisateur à des
tensions dangereuses et à d'autres dangers.
Débrancher cet appareil de la prise secteur et
utiliser les services d’un technicien qualifié dans
les conditions suivantes:
• Lorsque le cordon d’alimentation ou la fiche
sont endommagés.
• Si un liquide a été répandu ou des objets
sont tombés dans l’appareil.
• Si l’appareil a été exposé à la pluie ou à
l’eau.
• Si l’appareil fonctionne anormalement en
appliquant les instructions d’utilisation. Ne
régler que les commandes décrites dans les
instructions d’utilisation ; en effet, le réglage
incorrect d’autres commandes pourrait
provoquer des a nomalies, entr aînant souv ent
d'importantes réparations par un technicien
qualifié pour rétablir le fonctionnement
normal de l’appareil.
• Si l’appareil est tombé ou si le boîtier a été
endommagé.
• Détérioration marquée des performances de
l’appareil.
Pièces de rechange
Si des pièces doivent être remplacées , s’assurer
que le technicien a utilisé des pièces spécifiées
par Insignia ayant les mêmes caractéristiques
que celles des pièces d’origine. Toute
substitution par des pièces non autorisées peut
provoquer un incendie, un choc électrique ou
d'autres dangers.
Contrôle de sécurité
Les réparations ou la maintenance ayant été
effectuées, demander au technicien de réaliser
les contrôles de sécurité de routine afin de
déterminer que l’appareil est en bon état de
fonctionnement.
Chaleur
Installer l’appareil à l’écart de sources de
chaleur, telles que radiateurs, bouches de
chaleur, fours ou autres appareils (y compris les
amplificateurs) qui produisent de la chaleur.
Tiroir du CD
Tenir les doigts à l’écart du tiroir du CD lorsqu'il
se ferme, afin d’éviter de se bl esser.
Disque
Ne pas utiliser de disques fissurés, déformés ou
réparés. Ces disques se cassent facilement et
peuvent entraîner des blessures graves et
endommager l’appareil.
Classification d'équipement
Cet appareil est un produit de classe II, ce qui
signifie que ce lecteur de CD de salon est doté
d’un double système d’isolation.
F
Sécurité du laser
Le mécanisme CD de cet appareil
utilise une technologie de faisceau
laser optique, conçue pour intégrer des
Radiation au
laser invisible en
cas d'ouverture
et lorsque le
système de
sécurité est
défectueux ou
neutralisé. Éviter
toute exposition
directe aux
rayons laser.
dispositifs de sécurité. Ne pas essayer
de démonter cet appareil. Confier
l’entretien à du personnel qualifié. Une
exposition à la lumière du faisceau
laser invisible peut être dangereuse
pour la vue.
Appareil au laser de classe 1.
L'utilisation de commandes, de
réglages ou l'exécution de procédures
autres que celles indiquées ici peuvent
aboutir à une irradiation dangereuse.
www.insignia-products.com
15
Page 16

NS-A1111_final_translationDTP.fm Page 16 Friday, February 17, 2006 12:09 PM
Fonctionnalités
Lecteur de CD de salon
Compartiment du CD
Commande du volume
Touche Marche/Arrêt
Prise de casque d'écoute
Touche de fonction
Touche Ouvrir/Fermer
Touche du temporisateur
Touche Mémoire
Lecteur de CD de salon à 5 disques NS-A1111 de Insignia
Fenêtre d'affichage
Capteur de télécommande
Commande de syntonisation
Témoin d’entrée Aux
Prise d’entrée Auxiliaire
Touche Bande
Touche Saut de disque
Touche Saut de disque/Recherche/Préréglage
Touche Lecture/Pause/Réglage de l’horloge
Rangement pour CD
Touche Arrêt
Commande Symbole Description
Compartiment du CD Pour ouvrir et refermer le
Commande du volume Tourner le bouton pour
Touche Marche/Arrêt Pour mettre l’appareil sous
Prise de casque
d'écoute
Touche de fonction Pour basculer entre le
Touche Ouvrir/Fermer Pour ouvrir et refermer le
Touche du
temporisateur
Touch e Mémoire Pour programmer des pistes
Touche Arrêt Pour arrêter la lecture d’un
Fenêtre d'affichage Indique quand l’appareil est
Capteur de
télécommande
Commande de
syntonisation
Témoin d’entrée Aux S’allume quand une source
Prise d’entrée Aux Pour la connexion de
plateau à disque.
régler le volume.
et hors tension. Permet
aussi de mettre l’appareil en
mode d’attente.
Pour brancher le casque
d’écoute avec une mini-fiche
stéréo de 3,5 mm à
l’appareil.
lecteur de CD, le syntoniseur
et l’entrée Aux.
compartiment du CD.
Pour programmer une
alarme.
en mémoire.
disque.
sous ou hors tension et
affiche l’heure. Les témoins
affichent aussi la
configuration du système.
Reçoit les signaux de la
télécommande.
Tourner le bouton pour
régler la fréquence radio.
audio (auxiliaire) externe est
branchée.
sources audio (auxiliaires)
externes.
Commande Symbole Description
Touche Bande Pour basculer entre les
Touche Saut de disque Pour sauter la lecture de la
Touche Saut de disque/
Recherche/Préréglage
Touche Lecture/Pause/
Réglage de l’horloge
Rangement pour CD Permet de ranger les
fréquences radio AM et FM.
totalité du disque chargé
dans le changeur de CD.
Pour sauter ou rechercher
/
une piste sur un CD, ou pour
rappeler une piste
mémorisée.
Pour démarrer , arrêter
momentanément ou
reprendre la lecture d’un
disque.
Permet aussi de régler
l’heure.
disques quand ils ne sont
pas dans le changeur de CD.
16
www.insignia-products.com
Page 17

NS-A1111_final_translationDTP.fm Page 17 Friday, February 17, 2006 12:09 PM
Lecteur de CD de salon à 5 disques NS-A1111 de Insignia
Télécommande Affichage
Touche Attente/
Marche
Touche Arrêt
Touche Saut de
disque/Préréglage -
Touche Mémoire
Touche de
syntonisation
décroissante
Touche du
temporisateur
Bouton du
volume +/-
Touche Saut de disque
Touche de
syntonisation
croissante
Touche Lecture/Pause
Touche Saut de
disque/Préréglage +
Touche Répétition
Touche BANDE
Touche de fonction
Commande Symbole Description
Touche Attente/Marche Pour mettre l’appareil sous
Touche Arrêt P our arrêter la lecture d’un
Touche Saut arrière/
Préréglage -
Touch e Mémoire Pour programmer des pistes
Touche de
syntonisation
décroissante
Touche du
temporisateur
Boutons du volume +/- Pour régler le volume.
Touche Saut de disque Pour sauter la lecture de la
Touche de
syntonisation
croissante
Touche Lecture/Pause Pour démarrer ou reprendre
Touche Saut avant/
Préréglage +
Touche Répétition Pour répéter une piste.
Touche Bande Pour basculer entre les
Touche de fonction Pour basculer entre le
et hors tension. Permet
aussi de mettre l’appareil en
mode d’attente.
disque.
Pour sauter la piste d’un CD
ou pour rappeler une piste
mémorisée.
à mémoriser.
Pour régler la syntonisation
de la radio sur une fréquence
inférieure.
Pour programmer une
alarme.
totalité du disque chargé
dans le changeur de CD.
Pour régler la syntonisation
de la radio sur une fréquence
supérieure.
la lecture d’un disque.
Pour arrêter
momentanément la lecture
d’un disque.
Pour démarrer, arrêter
momentanément ou
reprendre la lecture d’un
disque.
fréquences radio AM et FM.
lecteur de CD, le syntoniseur
et l’entrée Aux.
Bande
Horloge
AM/PM
Horloge/
piste du
CD/station
émettrice
STÉRÉO
MÉMOIRE
Mode
Répétitio
Fréquence
radio
Fonction Description
Bande Affiche la bande radio FM ou AM.
Horloge AM/PM Indique si l’heure est avant ou après
midi (AM ou PM).
Horloge/piste du CD/
station émettrice
• En mode horloge, l’heure est
affichée.
• En mode CD, le numéro de la
piste est affiché.
• En mode radio, le numéro de la
station est affiché.
MÉMOIRE S’affiche quand la piste en cours de
lecture est mémorisée.
STÉRÉO Indique que le signal FM est en stéréo.
Mode RÉPÉTITION S’affiche quand la fonction répétition est
activée.
Fréquence radio Indique si la fréquence radio est en
mégahertz ou kilohertz.
Installation du lecteur de CD
de salon
Mise en service de la télécommande
Installation des piles de la télécommande
Avertissement
Ne pas jeter les piles dans le feu. Se débarrasser des
piles usagées en suivant les normes relatives aux
déchets dangereux.
Précaution
Ne pas faire tomber ni démonter la télécommande. Ne
pas mouiller la télécommande.
Pour installer les piles dans la
télécommande:
1 Retirer le couvercle du compartiment de la
pile.
2 Insérer une pile CR2025 (3 V) dans le
compartiment de la pile. Vérifier que les
symboles +/– sur la pile concordent avec les
repères +/– à l’intérieur du compartiment.
www.insignia-products.com
17
Page 18

NS-A1111_final_translationDTP.fm Page 18 Friday, February 17, 2006 12:09 PM
Lecteur de CD de salon à 5 disques NS-A1111 de Insignia
3 Remettre le couv ercle du com partiment de la
pile.
4 Enlever la languette en plastique qui
recouvre le capteur de la télécommande.
5 Pointer la télécommande vers le capteur de
télécommande de l’appareil. La portée
efficace de la télécommande est d’environ 16
pi (5 mètres).
Remarque
S’il est nécessaire de se rapprocher de l’appareil
pour le bon fonctionnement de la télécommande,
remplacer la pile. La télécommande ne
fonctionnera pas correctement si la lumière solaire
directe ou d’une lampe fluorescente à haute
fréquence interfère avec le capteur de la
télécommande. Dans ce cas, modifier l’installation
de l’appareil pour éviter le problème.
Remarque
Retirer la pile si la télécommande ne va pas être
utilisée pendant une période prolongée ou si elle
est morte, pour éviter toute fuite.
Connexion des haut-parleurs à l’appareil
Pour brancher le cordon d’alimentation:
1 Vérifier que les haut-parleurs sont branché s
correctement et que la touche MARCHE/
ARRÊT est réglée surARRÊT.
2 Brancher le cordon d’alimentation CA sur
une prise secteur CA.
Connexion de l’antenne
Pour connecter l’antenne:
1 Dérouler complètement l’antenne filaire FM.
Déployer l’ant enne puis la réorienter pour
obtenir la meilleure réception sonore.
Remarque
Ne pas connecter l’antenne FM de l’appareil à une
antenne extérieure.
2 Connecter l’antenne AM cadre fournie aux
bornes à pression de l’ANTENNE AM
CADRE sur le panneau arrière de l’appareil,
puis la réorienter pour obtenir la meilleure
réception sonore.
Caisson
du
haut-parleur
droit
Caisson
du
haut-parleur
gauche
Connecteurs
de
haut-parleur
de
l’amplificateur
Cordon
d’alimentation
CA
Pour connecter les haut-parleurs:
1 Positionner les haut-parleurs fournis à droite
et à gauche de l’appareil.
Précaution
La connexion de haut-parleurs autre que ceux
fournis peuvent endommager l’appareil.
2 Connecter les fils des haut-parleurs aux
connecteurs de haut-parleur de
l’amplificateur.
Connexion de l’alimentation à l’appareil
Remarque
Avant d’utiliser le lecteur de CD de salon dans un
nouvel emplacement pour la première fois, vérifier que
la tension de fonctionnement de l’appareil est
identique à la tension d'alimentation locale. Cet
appareil doit fonctionner seulement sur la tension de la
source d’alimentation indiquée sur le panneau arrière.
Débrancher l’appareil de la prise secteur s'il n'est pas
utilisé pendant une longue période.
Connexion des appareils externes
Il est possible de connecter des systèmes audio
externes à l’appareil.
Pour connecter des appareils externes:
1 S’assurer que l’appareil est mis hors tension.
2 Brancher la prise de l’appareil externe sur la
prise d'entrée auxiliaire (avec le symbole
d’une note de musique) sur le panneau
avant.
Connexion du casque d’écoute
Pour connecter le casque d’écoute:
1 Baisser le volume de l’appareil.
2 Brancher le casque d’écoute avec une
mini-fiche stéréo de 3,5 mm sur la prise pour
casque d’écoute.
Remarque
Quand le casque d’écoute est branché, les
haut-parleurs de l’appareil sont automatiquement
désactivés.
Utilisation du lecteur de CD
de salon
Mise sous et hors tension de l’appareil
Le message affiché change selon la touche
appuyée ou la fonction sélectionnée.
18
www.insignia-products.com
Page 19

NS-A1111_final_translationDTP.fm Page 19 Friday, February 17, 2006 12:09 PM
Lecteur de CD de salon à 5 disques NS-A1111 de Insignia
Pour mettre l’appareil sous et hors tension:
1 Quand l’appareil est hors tension, appuyer
une fois sur la touche MARCHE/ARRÊT de
l’appareil pour le mettre sous tension. L’écran
affiche d1 et le rétro-éclairage s’allume.
2 Quand l’appareil est sous tension, appuyer
une fois sur la touche MARCHE/ARRÊT de
l’appareil pour le mettre hors tension. Le
rétro-éclairage de l’affichage s’éteint.
Quand l’appareil est hors tension, l’horloge
s’affiche sans le rétro-éclairage. Ceci
s’appelle le mode d’attente.
Remarque
Débrancher le cordon si l’appareil ne doit pas être
utilisé pendant une période prolongée.
Écoute à partir de périphériques externes
Pour écouter à partir de périphériques
externes:
1 Appuyer une fois sur la touche MARCHE/
ARRÊT de l’appareil pour le mettre sous
tension.
2 Appuyer sur la touche de Fonction sur le
panneau avant jusqu’à atteindre A ux, indiqué
par le symbole d’une note de musique sur
l'écran.
3 Mettre le périphérique externe sous tension.
Remarque
Si le périphérique externe est un téléviseur et si le
lecteur de CD de salon est à proximité de ce
dernier, il est possible qu’il y ait des interférences
si la fonction syntoniseur est sélectionnée alors
que le téléviseur marche.
2 Appuyer sur la touche LECTURE/PAUSE
jusqu’à ce que l’heure clignote sur
l’affichage, puis appuyer sur la touche
Recherche/Saut de façon répé tée pour régler
l'heure actuelle.
/
3 Appuyer sur la touche LECTURE/PAUSE
jusqu’à ce que les minutes clignotent sur
l’affichage, puis appuyer sur la touche
Recherche/Saut de façon répé tée pour régler
les minutes actuelles.
/
4 Appuyer sur la touche LECTURE/PAUSE
jusqu’à ce que 12H ou 24H clignote sur
l'écran, puis appuyer sur la touche
Recherche/Saut pour choisir entre le f ormat
12 ou 24 heures.
/
5 Appuyer sur la touche LECTURE/PAUSE
pour confirmer le réglage de l’horloge.
/
Réglage du son
Pour régler le son:
1 Tourner le bouton de réglage du volume pour
obtenir le niveau sonore souhaité.
2 Pour une écoute individuelle, brancher le
casque d’écoute à l’appareil.
Remarque
Quand le casque d’écoute est branché, les
haut-parleurs de l’appareil sont automatiquement
désactivés.
Réglage de l’horloge
Pour régler l’horloge:
1 Quand l’appareil est sous tension, appuyer
sur la touche MARCHE/ARRÊT pour le
mettre hors tension (en mode d'attente).
L’horloge sera affichée sans le
rétro-éclairage.
Réglage de l’alarme programmée
Pour régler l’alarme programmée:
1 Quand l’appareil est sous tension, appuyer
sur la touche MARCHE/ARRÊT pour le
mettre hors tension (en mode d'attente).
L’horloge sera affichée sans le
rétro-éclairage.
2 Appuyer une fois sur la touche
TEMPORISATEUR.
Remarque
Vérifier que l’heure affichée est correcte avant de
régler l'alarme programmée.
3 Appuyer sur la touche LECTURE/PAUSE
jusqu’à ce que l’heure clignote sur
l’affichage, puis appuyer sur la touche
Recherche/Saut de façon répé tée pour régler
l'heure souhaitée.
/
www.insignia-products.com
19
Page 20

N
N
N
N
N
N
N
N
NS-A1111_final_translationDTP.fm Page 20 Friday, February 17, 2006 12:09 PM
Lecteur de CD de salon à 5 disques NS-A1111 de Insignia
4 Appuyer sur la touche LECTURE/PAUSE
jusqu’à ce que les minutes clignotent sur
l’affichage, puis appuyer sur la touche
Recherche/Saut de façon répétée po ur régler
les minutes souhaitées.
/
5 Appuyer sur la touche LECTURE/PAUSE
pour confirmer le réglage de l’alarme
programmée. L’alarme sonne quand l’heure
programmée est atteinte.
/
6 Appuyer une deuxième fois sur la touche
TEMPORISATEUR pour annuler l’alarme
après le réglage de l’alarme pr ogrammée.
Réglage de la radio
Syntonisation manuelle
Pour manuellement syntoniser la radio:
1 Appuyer une fois sur la touche MARCHE/
ARRÊT pour mettre l’appareil sous tension.
2 Appuyer sur la t ouche de FONCTION jusqu’à
atteindre le mode syntoniseur, indiqué par le
témoin fréquence radio sur l'écran.
3 Appuyer sur la touche BANDE pour
sélectionner la bande souhaitée (AM ou FM),
indiquée par le témoin de bande sur l’écran,
puis syntoniser une station.
Remarque
En mode FM, le témoin stéréo s’allume quand la
réception est bonne.
Remarque
Après avoir changé la bande ou mis la radio hors
et sous tension de nouveau, la dernière station
sélectionnée sera accédée.
FUNCTIO
FUNCTIO
FUNCTIO
FUNCTIO
Pour mémoriser des stations radio
préréglées:
1 Sélectionner manuellement une station radio
(voir page 20).
2 Appuyer sur la touche mémoire pour
mémoriser la station.
3 Répéter les étapes 1 et 2 pour programmer
jusqu’à 20 stations AM et 20 stations FM.
Accès à une station préréglée
Pour accéder à une station radio préréglée:
1 Appuyer une fois sur la touche MARCHE/
ARRÊT pour mettre l’appareil sous tension.
2 Appuyer sur la to uche de FONCTION jusqu’à
atteindre le mode syntoniseur, indiqué par le
témoin fréquence radio sur l'écran.
3 Appuyer sur la touche BANDE pour
sélectionner la bande souhaitée (AM ou FM),
indiquée par le témoin de bande sur l’écran,
puis syntoniser une station.
Remarque
En mode FM, le témoin stéréo s’allume quand la
réception est bonne.
Remarque
Après avoir changé la bande ou mis la radio hors
et sous tension de nouveau, la dernière station
sélectionnée sera accédée.
4 Appuyer sur la touche Saut de disque/
Recherche/Préréglage jusqu’à ce que le
numéro souhaité de la station préréglée
s’affiche.
FUNCTIO
FUNCTIO
FUNCTIO
FUNCTIO
Remarque
Les entrées mémorisées (numéro du canal, bande
de fréquence et fréquence) s’affichent en ordre
numérique, quelle que soit la bande de fréquence.
4 Pour la recherche rapide d’une station,
maintenir appuyée la touche de syntonisation
(croissante) ou de syntonisation
(décroissante) de la télécommande. La
recherche d’une station démarre et s’ar rê te
automatiquement quand elle est trouvée.
Préréglage de la syntonisation
L’appareil peut mémoriser jusqu’à 40 stations
(chaque bande a un maximum de 20 stations
préréglées disponibles). Le préréglage permet
d’accéder à une station directement. Un nu méro
préréglé est affecté à chaq ue statio n, à partir de
1 dans l’ordre séquentiel pour chaque bande
(AM et FM).
20
Utilisation du changeur de CD
Chargement des CD
Pour charger les CD dans le changeur:
1 Appuyer une fois sur la touche MARCHE/
ARRÊT pour mettre l’appareil sous tension.
2 Appuyer sur la to uche de FONCTION jusqu’à
l’affichage du mode CD.
3 Appuyer sur la touche Ouvrir/Fermer pour
ouvrir le plateau à disque.
www.insignia-products.com
Page 21

NS-A1111_final_translationDTP.fm Page 21 Friday, February 17, 2006 12:09 PM
Lecteur de CD de salon à 5 disques NS-A1111 de Insignia
4 Insérer le premier CD dans le plateau à
disque avec l'étiquette tournée vers le haut.
5 Appuyer sur la touche saut de disque pour
faire pivoter le plateau dans le sens horaire.
Répéter cette étape pour charger jusqu’à
cinq disques dans l’appareil.
6 Appuyer sur la touche Ouvrir/Fermer pour
fermer le plateau à disque. Un léger délai
interviendra pendant que le changeur de CD
vérifie les disques.
Lecture des CD
Localisation des pistes
Remarque
Les fonctions de recherche et de saut de disque
peuvent être effectuées pendant la lecture ou l’arrêt
momentané, mais seulement pour le CD en cours de
lecture.
Pour sauter à une piste en séquence:
1 P o ur revenir au début de la piste en cours ou
aller à une précédente, appuyer une fois sur
la touche de retour arrière saut de disque/
recherche/préréglage.
2 Pour passer à la piste suivante sur un CD,
appuyer une fois sur la touche avant saut de
disque/recherche/préréglage.
Retour arrière
Saut avant
Pour rechercher un endroit précis sur une
piste:
1 Maintenir appuyée la touche arrière saut de
disque/recherche/préréglage pour un retour
rapide. Relâcher la touche à l’endro it
souhaité.
2 Maintenir appuyée la touche avant saut de
disque/recherche/préréglage pour une
avance rapide. Relâcher la touche à l’endroit
souhaité.
Pour lire les CD:
1 Appuyer sur la touche saut de disque pour
sélectionner le disque souhaité, puis appuy er
sur une des touches saut de disque/
Recherche/Préréglage pour choisir une piste
sur ce disque. Le disque sélectionné clignote
sur l’affichage.
Remarque
Le plateau à disque peut être ouvert pendant la
lecture afin de changer ou ajouter un disque non
lu. Quand le plateau est ouvert, la lecture du
disque sélectionné continue, mais la touche saut
de disque ne fonctionne pas pour sélectionner un
autre disque.
2 Appuyer sur la touche LECTURE/PAUSE
pour commencer la lecture. Appuyer pour
interrompre momentanément la lecture puis
appuyer de nouveau pour reprendre la
lecture normale.
3 Appuyer sur la touche Arrêt pour arrêter la
lecture du disque.
Recherche arrière Reche rche avan t
Répétition d’une piste ou d’un disque
La lecture répétée permet la relecture de la piste
actuelle, d’un disque en entier ou de tous les
disques dans le changeur de CD.
Il est possible d’utiliser la lecture répétée
pendant la lecture normale (mode de lecture),
en mode arrêt ou arrêt momentané.
Pour répéter la lecture en mode de lecture:
1 Pour répéter une piste en cours de lecture,
appuyer sur la touche Répéter de la
télécommande jusqu’à ce que REPEAT et r1
s’affichent (indiquant la répétition de la piste).
La piste en cours de lecture se fera en boucle
jusqu’à ce que la touche ARRÊT soit
appuyée.
Remarque
Les touches saut de disque/recherche peuvent être
utilisées normalement en même temps que cette
fonction.
Remarque
Retirer tous les disques du compartiment avant de
déplacer l’appareil.
www.insignia-products.com
21
Page 22

NS-A1111_final_translationDTP.fm Page 22 Friday, February 17, 2006 12:09 PM
Lecteur de CD de salon à 5 disques NS-A1111 de Insignia
2 Pour répéter to ut le disqu e en cou rs de
lecture, appuyer sur Répéter de la
télécommande jusqu’à l’affichage de
REPEAT et rd (indiquant la répétition du
disque). Le disque en cours de lecture sera
lu en boucle à partir du point sélectionné.
Remarque
Les touches saut de disque/recherche peuvent être
utilisées pendant cette fonction mais seulement en
mode de recherche.
3 Pour répéter tous les disques dans le
changeur de CD, appuyer sur Répéter de la
télécommande jusqu’à l’affichage de
REPEAT et rA (indiquant la répétition de tous
les disques). Les disques seront lus en
boucle à partir du point sélectionné.
4 Appuyer sur les touches recherche/saut de
disque pour choisir une autre piste sur le
disque sélectionné, ou utiliser la touche saut
de disque pour lire la première piste du
nouveau disque sélectionné.
5 Pour annuler la lecture répétée, appuyer sur
Répéter de la télécommande jusqu’à ce que
REPEAT ne soit plus affiché.
Pour programmer la lecture du CD:
1 Quand le lecteur de CD est en mode arrêt,
appuyer sur la touche M (Mémoire). L’écran
affiche P:00 indiquant qu’aucune piste n’a
été programmée.
2 Appuyer sur la touche recherche/saut de
disque pour sélectionner le disque souhaité.
Le numéro du disque s’affiche.
3 Appuyer de nouveau sur la touche
recherche/saut de disque pour sélectionner
la piste souhaitée. Le numéro de piste
s’affiche à côté du numéro du disque.
Pour la lecture répétée pendant les modes
arrêt ou pause:
1 Quand le lecteur de CD est en mode arrêt ou
pause, programmer la fonction de lecture
répétée comme si l’appareil était en mode de
lecture.
2 En mode arrêt, appuyer sur la touche
LECTURE/PAUSE pour commencer la
lecture répétée. Le disque en cours de
lecture reprendra à partir du début de la
première piste.
3 En mode pause, appuyer sur la touche
LECTURE/PAUSE pour commencer la
lecture répétée. Le disque en cours de
lecture reprendra à partir de l’endroit où il
avait été momentanément suspendu.
Programmation des pistes du CD
L’appareil peut mémoriser 20 pistes au total des
disques disponibles dans le plateau à disque.
Ces pistes peuvent être lues dans un ordre
prédéfini.
4 Appuyer de nouveau sur la touche M
(Mémoire) pour mémoriser le disque et la
piste.
5 Répéter les étapes 2 à 4 pour mémoriser
jusqu’à 19 pistes supplémentaires.
Remarque
La même piste peut être sélectionnée plus d’une fois
dans le même programme (par exemple, il est
possible de programmer la lecture de la même piste
20 fois).
22
www.insignia-products.com
Page 23

N
N
N
N
NS-A1111_final_translationDTP.fm Page 23 Friday, February 17, 2006 12:09 PM
Lecteur de CD de salon à 5 disques NS-A1111 de Insignia
6 Pour vérifier le programme, appuyer sur la
touche LECTURE/PAUSE pour commencer
la lecture, puis sur recherche/saut de disque
pour s’assurer de la lecture de la prochaine
piste programmée.
Pour annule r une programmation:
1 Appuyer sur la touche arrêt jusqu’à ce que
MEMORY (Mémoire) ne soit plus affiché.
L’information du disque actu el da ns le
changeur de CD est alors affichée.
OU
2 Ouvrir le plateau à disque en appuya nt sur la
touche OUVRIR/FERMER.
OU
3 Appuyer sur la touche de FONCTION pour
sélectionner une autre fonction.
FUNCTIO
FUNCTIO
FUNCTIO
FUNCTIO
Lecture des pistes programmées
Remarque
Lors de la lecture des pistes programmées, la touche
recherche/saut de disque peut seulement être utilisée
pour sélectionner ces dernières.
Remarque
Lors de la lecture des pistes programmées, la lecture
répétée ne fonctionnera pas pour tous les disques.
1 Appuyer sur la touche LECTURE/PAUSE
pour commencer la lecture. Appuy er pendant
la lecture pour l’interrompre
momentanément, puis appuyer de nouveau
pour la reprendre.
2 Appuyer sur la touche recherche/saut de
disque pour passer à une autre piste
programmée.
Entretien des CD
• Ne pas toucher la surface de la face du
disque dépourvue d’étiquette.
• Ne coller ni papier ni adhésif sur la surface
du disque.
• Ne pas exposer le disque à la lumière solaire
directe ou à d'autres sources de chaleur
excessives.
• Ne pas utiliser de disques à forme irrégulière
(tels que les disques cordiformes ou
octogonaux). Cela peut être source de
fonctionnement défectueux.
Nettoyage d’un CD
Un disque sale provoquera une lecture
défectueuse (son irrégulier) et s’il est très sale il
peut ne pas être lu. Manipuler le disque en le
tenant par la périphérie et le centre.
• Les empreintes digitales et la poussière sur
la surface enregistrée doivent être essuyées
délicatement avec un chiffon doux. Les
essuyer d’un mouvement régulier en partant
du centre vers la périphérie.
• Ne jamais utiliser de diluant, benzène,
nettoyant pour disques conventionnels ou
vaporisateur antistatique sur un CD, cela
pourrait endommager la surface en plastique.
Remarque
Retirer tous les disques du compartiment avant de
déplacer l’appareil.
Problèmes et solutions
Problème Solution
Pas de son. • Tourner le bouton pour au gmenter le
Son du
haut-parleur
absent ou
déséquilibré.
Les sons
venant de
droite et de
gauche sont
inversés.
volume.
• Le casque d'écoute est branché. Le
débrancher.
• Réinitialiser l'appareil en appuyant sur
la touche MARCHE/ARRÊT.
Vérifier les connexions du haut-parleur
inopérant.
Vérifier la connexion du fil du haut-parleur et
son emplacement.
Remarque
Les entrées mémorisées (disque et piste)
s’affichent en ordre numérique.
Entretien du lecteur de CD
de salon
Nettoyage du lecteur
• Essuyer avec un chiffon propre. Si l’appareil
est très sale, humidifier le chiffon avec une
solution diluée de détergent neutre et d’eau
et le nettoyer. Ne pas utiliser d’air comprimé
pour enlever la poussière.
www.insignia-products.com
Ronflement ou
bruit important.
Le témoin
stéréo FM
clignote.
• Le téléviseur ou magnétoscope sont
trop près de l’appareil. Éloigner
l’appareil du téléviseur ou du
magnétoscope.
• Les fiches et les prises sont sales. Les
nettoyer avec un chiffre légèrement
humidifié à l’alcool.
• Nettoyer le disque.
• Régler le fil d’antenne.
La réception est mauvaise. Régler le fil
d’antenne.
23
Page 24

NS-A1111_final_translationDTP.fm Page 24 Friday, February 17, 2006 12:09 PM
Lecteur de CD de salon à 5 disques NS-A1111 de Insignia
Problème Solution
Le
compartiment
du CD ne se
referme pas si
l’appareil est
mis hors
tension ou des
autres
fonctions ont
été
sélectionnées
avant d’avoir
refermé le
compartiment
Le disque n’est
pas lu
Distorsion de la
lecture ou
absence du son
pendant la
lecture du CD
• Appuyer sur la touche MARCHE/
ARRÊT pour mettre l’appareil sous
tension.
• Appuyer sur la touche de Fonction
pour sélectionner le mode CD.
• Appuyer sur la touche OUVRIR/
FERMER pour fermer le compartiment
du CD.
• Le disque est à l’envers ou n’est pas
inséré correctement. Insérer le disque
correctement.
• Nettoyer le disque.
• Le lecteur de CD est en mode pause.
Appuyer sur la touche Lecture pour
annuler le mode pause.
• De la condensation peut s’être formée
à l’intérieur de l’appareil en raison
d’une variation soudaine de
température. Attendre environ une
heure pour que la condensation
s'évapore et essayer de nouveau.
• Le CD est rayé ou sale. Nettoyer le
disque.
Spécifications
La conception et les spécifications sont sujettes
à modifications sans avis préalable.
Sources
d’alimentation
Alimentation 120 V CA
60 Hz
Pile de la
télécommande
Consommation
électrique
Conformité FCC
Cet équipement a été mis à l’essai et déclaré
conforme aux limites prévues pour un appareil
numérique de classe B, définies dans la section
15 de la réglementation FCC. Ces limites ont été
établies pour fournir une protection raisonnable
contre les interférences nuisibles lors d’une
installation résidentielle. Cet équipement
génère, utilise et diffuse des ondes radio et, s’il
n’est pas installé et utilisé conformément aux
instructions dont il fait l’objet, il peut provoquer
des interférences indésirables avec les
communications radio. Cependant, il n’est pas
possible de garantir qu’aucune interférence ne
se produira dans une installation particulière. Si
cet équipement cause des interférences gênant
la réception d'ondes radio ou télévisées
(déterminé en éteignant et en rallumant
l’équipement), il est recommandé que
l’utilisateur tente de corriger le problème en
appliquant au moins l'une des mesures
suivantes:
• Réorienter ou déplacer l’antenne réceptrice.
3V (1)
15 W
• Augmenter la distance entre l’équipement et
le récepteur.
• Brancher l’équipement dans la prise
électrique d’un circuit différent de celui
auquel le récepteur est relié.
• Contacter le revendeur ou un technicien
qualifié pour toute assistance.
Certification relative à la sécurité
Ce lecteur de CD de salon a été fabriqué et testé
pour satisfaire aux normes de sécurité de la
FCC, aux exigences et règles de conformité du
Ministère de la santé des États-Unis (U.S.
Département of Health and Human Services),
ainsi qu’aux normes d’irradiation 21 CFR,
section de chapitre J de la FDA.
Informations sur la garantie
Garantie limitée
Insignia Products garantit au premier acheteur
de ce produit qu’il sera exempt de vices de
matériaux et de fabrication pour une période de
quatre vingt dix (90) jours à partir de la date
d’achat, conformément aux détails ci-des so us:
1 MAIN-D’ŒUVRE: Pendant la période de
garantie, si ce produit est considéré comme
étant défectueux, Insignia le réparera ou le
remplacera, à sa discrétion, gratuitement, ou
paiera les frais de main-d’œuvre à tout
service de réparation agréé par Insignia.
Au-delà de la période de garantie, l’utilisateur
sera redevable de tous les frais afférents à la
main-d’œuvre.
2 PIÈCES DÉTACHÉES: En outre, Insignia
fournira gratuitement les pièces détachées
neuves ou remises à neuf, en échange des
pièces défectueuses pendant la durée de la
garantie. À l’expiration de la période de
garantie le coût de toute pièce détachée ser a
à la charge de l’utilisateur.
Pour obtenir le service de la garantie, le produit
devra être présenté accompagné du reçu
original ou de toute autre preuve d’achat, soit
dans son emballage original, soit dans un
emballage procurant des conditions identiques
de protection, au détaillant le plus proche du
magasin ou du site Web où le produit a été
acheté.
Cette garantie ne couvre pas les dommages
esthétiques, ou ceux résultants de cata strophes
naturelles, de la foudre, d’un accident, d’une
mauvaise utilisation, de manipulations abusives,
de négligence, d’une utilisation commerciale ou
d’une modification de tout ou partie du produit, y
compris l’antenne. Cette garantie ne couvre
aucun dommage ayant pour origine une
utilisation ou une maintenance défectueuses, la
connexion à une source électrique dont la
tension est inadéquate ou encore toute
réparation réalisée par quiconque autre qu’un
service de réparation agréé par Insignia. Cette
garantie ne couvre pas les produits vendus « EN
L’ÉTAT » ou « HORS SERVICE », ou les
consommables (tels que les fusibles ou les
piles). Cette garantie n’est applicable qu’aux
États-Unis et au Canada.
La garantie perd sa validit é si le numéro de série
usine a été altéré ou enlevé du produit.
24
www.insignia-products.com
Page 25

NS-A1111_final_translationDTP.fm Page 25 Friday, February 17, 2006 12:09 PM
Lecteur de CD de salon à 5 disques NS-A1111 de Insignia
LA RÉPARATION OU LE REMPLACEMENT,
TELS QU’OFFERTS PAR LA PRÉSENTE
GARANTIE, CONSTITUENT LE SEUL
RECOURS DU CONSOMMATEUR. INSIGNIA
NE POURRA PAS ÊTRE TENU POUR
RESPONSABLE DE DOMMAGES
ACCESSOIRES OU CONSÉCUTIFS, OU DE
L’INEXÉCUTION D'UNE GARANTIE
EXPRESSE OU IMPLICITE SUR CE PRODUIT.
SAUF DISPOSITIONS CONTRAIRES AUX
LOIS ET RÈGLEMENTS APPLICABLES,
TOUTE GARANTIE IMPLICITE, DÉCLARA TION
OU CONDITION DE QUALITÉ MARCHANDE
OU D’ADAPTATION À UN USAGE
PARTICULIER RELATIVE À CE PRODUIT EST
LIMITÉE À LA PÉRIODE DE GARANTIE
APPLICABLE TELLE QUE DÉCRITE
CI-DESSUS.
Certains états ou provinces ne permettent ni
l'exclusion ni la limitation des dommages
accessoires ou consécutifs, ni les limitations
implicites de durée d'une garantie, de sorte que
les limitations ou exclusions énoncées ci-dessus
peuvent être nulles dans le cas du premier
acheteur. La présente garantie donne au
premier acheteur des garanties juridiques
spécifiques ; il peut aussi bénéficier d'autres
garanties qui varient d'un état ou d'une province
à l'autre.
Pour le service à la clientèle, appeler le
1-877-467-4289
www.insignia-products.com
Insignia Products, Richfield, Minnesota, U.S.A.
Droits d’auteurs
© 2006 Insignia. Insignia et le logo Insignia sont des
marques de commerce de Best Buy Enterprise
Services, Inc. Les autres noms de marques et de
produits mentionnés sont des marques de commerce
ou des marques déposées de leurs propriétaires
respectifs. Les spécifications et caractéristiques sont
susceptibles d’être modifiées sans préavis.
Assistance technique: (877) 467-4289
Adresse Web: www.insignia-products.com
www.insignia-products.com
25
Page 26

NS-A1111_final_translationDTP.fm Page 26 Friday, February 17, 2006 12:09 PM
Sistema de audio tipo ejecutivo con 5 CD NS-A1111 de Insignia
Sistema de audio
tipo ejecutivo con 5
CD NS-A1111 de
Insignia
Contenido
Introducción . . . . . . . . . . . . . . . . . . . . . . . . . . . .26
Información de seguridad . . . . . . . . . . . . . . . . . .26
Características . . . . . . . . . . . . . . . . . . . . . . . . . .28
Preparación de su sistema de audio
tipo ejecutivo . . . . . . . . . . . . . . . . . . . . . . . . . . .29
Uso de su sistema de sonido tipo ejecutivo. . . . .31
Mantenimiento de su sistema de sonido
tipo ejecutivo . . . . . . . . . . . . . . . . . . . . . . . . . . 35
Solución de problemas . . . . . . . . . . . . . . . . . . . .36
Especificaciones . . . . . . . . . . . . . . . . . . . . . . . . 36
Información sobre la Garantía . . . . . . . . . . . . . . 37
Copyright . . . . . . . . . . . . . . . . . . . . . . . . . . . . . . .37
Introducción
Felicitaciones por su compra de un producto de
alta calidad de Insignia. Su sistema de audio
tipo ejecutivo con 5 CD NS-A1111 repr esenta el
más moderno diseño de sistemas estéreo, y
está concebido para brindar un rend i mie n to
confiable y sin problemas.
Información de seguridad
I
Advertencia
Para reducir el riesgo de incendio o choque eléctrico,
no exponga su sistema de audio tipo ejecutivo a la
lluvia o humedad.
I
Advertencia
Para reducir el riesgo de choque eléctrico, no retire la
cubierta (o parte posterior). No hay partes reparables
por el usuario adentro. Para realizar reparaciones
acuda al personal de servicio calificado.
Lea las instrucciones
Lea todas las instrucciones de seguridad y
operación antes de operar su sistema de audio
tipo ejecutivo.
Guarde las instrucciones
Guarde las instrucciones de seguridad y
operación para referencia futura.
Preste atención a las advertencias
Preste atención a todas las advertencias sobre
su sistema de audio tipo ejecutivo y las
instrucciones de operación.
Siga las instrucciones
Siga todas las instrucciones de operación y uso.
Agua y humedad
No use este sistema de audio tipo ejecutivo
cerca del agua. Por ejemplo, evite usarlo cerca
de una bañera, lav abo, fregadero de cocina, tina
de lavandería, en un sótano mojado o cerca de
una piscina.
Montaje en pared o techo
No monte su sistema de audio tipo ejecutivo en
una pared o techo.
Accesorios
Use sólo los aditamentos y accesorios
especificados. Use el sistema de audio tipo
ejecutivo solamente con un carro, plataforma,
trípode, consola o mesa especificados por
Insignia o que se venda con e l sistema de au dio
tipo ejecutivo. Cuando use un carro, tenga
cuidado al mover el carro con el sistema de
audio tipo ejecutivo para evitar lesiones si el
sistema de voltea de lado.
Ventilación
Ranuras y aberturas en la parte posterior o
inferior del gabinete se pro veen pa ra ve ntilación,
para asegurar la operación co nfiable del sistema
de audio tipo ejecutivo, y para protegerlo contra
el sobrecalentamiento. Estas aberturas no se
deben bloquear ni cubrir. No coloque la unidad
sobre una cama, un sofá, una alfombra u otra
superficie similar. No coloque la unidad cerca o
sobre un radiador o fuente de calor. No coloque
su sistema de audio tipo ejecutivo en una
instalación integrada, tal como un librero o
estantería a menos que se proporcione
ventilación apropiada o se hayan seguido las
instrucciones del fabricante.
Fuente de alimentación
Opere su sistema de audio tipo ejecutivo con el
tipo de fuente de alimentación indicado en la
placa de clasificación (ubicada en la parte
posterior del sistema).
Si no está seguro del tipo de fuente de
alimentación en su casa, consulte con el
vendedor del sistema de audio o la compañía
local de energía.
Conexión a tierra y polarización
Su sistema de audio tipo ejecutivo está
equipado con un enchufe polarizado de
corriente alter n a (u n en ch ufe que tiene una
espiga más ancha que la otra). Este enchufe se
conecta en el tomacorriente de una sola forma.
Esta es una característica de seguridad. Si no
puede insertar completamente el enchufe en el
tomacorriente, intente darle vuelta al enchuf e. Si
el enchufe todavía no entra, póngase en
contacto con su electricista para que reemplace
el tomacorriente obsoleto.
En vez de usar un enchufe polarizado de
corriente alterna, su sistema de sonido tipo
ejecutivo puede estar equipad o con un enchufe
de 3 alambres con conexión a t ierra ( un enchuf e
con una tercera lámina conectada a tier ra ). Este
enchufe solamente entrará en un tomacorriente
equipado con conexión a ti erra. Ést a también es
una característica de seguridad. Si no puede
insertar el enchufe en el tomacorriente,
comuníquese con su electricista para que
reemplace el tomacorriente obsoleto. No anule
el propósito de seguridad del tipo de enchufe
con conexión a tierra.
26
www.insignia-products.com
Page 27

NS-A1111_final_translationDTP.fm Page 27 Friday, February 17, 2006 12:09 PM
Sistema de audio tipo ejecutivo con 5 CD NS-A1111 de Insignia
Protección del cable de alimentación
Los cables de alimentación deben colocarse de
manera que no se pisen o sean aplastados por
artículos colocados sobre ellos o contra ellos.
Preste especial atención a los cables en los
enchufes, recept áculos y al punto en que salen
del sistema de audio.
Audífonos
Cuando utilice audífonos, mantenga el volumen
a un nivel moderado. Usar audífonos
continuamente a un volumen alto puede causar
daño al oído.
Rayos
Para proteger su sistema de sonido tipo
ejecutivo durante una tormenta de rayos, o
cuando se deje sin usar por un periodo de
tiempo extensivo, desconéctelo del
tomacorriente y desconecte la antena o el
sistema de cable. Esto evitará daños a su
sistema de audio tipo ejecutivo debido a
relámpagos o sobretensión de energía.
Sobrecarga
No sobrecargue los tomacorrientes y los cables
de extensión ya que esto resultará en riesgo de
incendio o choque eléctrico.
Ingreso de objetos y líquidos
Nunca inserte objetos de ningún tipo a través de
las aberturas del sistema de audio tipo ejecutivo ,
ya que estos pueden tocar puntos de voltaje
peligrosos o hacer cortocircuito con otros
componentes, lo cual puede causar un incendio
o choque eléctrico. Nunca derrame, ni rocíe
líquidos de ninguna clase sobre el sistema de
audio tipo ejecutivo.
Daños que requieren reparación
No intente reparar este sistema de audio tipo
ejecutivo usted mismo. Abrir o remover las
cubiertas lo puede exponer a voltajes pelig rosos
u otros riesgos. Desconecte su sistema de audio
tipo ejecutivo del tomacorriente y refiera la
reparación a personal calificado bajo las
siguientes condiciones:
• Cundo el cable de alimentación o el enchufe
se dañen.
• Si líquido ha sido derramado u objetos han
caído dentro del sistema de audio tipo
ejecutivo.
• Si el sistema de audio ha sido expuesto a la
lluvia o al agua.
• Sí el sistema de audio no funciona
normalmente aún siguiendo las instrucciones
de operación siguientes. Ajuste únicamente
los controles que están cubiertos en las
instrucciones de operación, ya que el ajuste
incorrecto de otros controles puede resultar
en daño y frecuentemente requerirá trabajo
intensivo de un técnico calificado para
restaurar la operación normal del sistema de
audio tipo ejecutivo.
• Si su sistema de audio se ha dejado caer o
se ha dañado el gabinete.
• Si su sistema de audio exhibe un cambio
significativo en el rendimiento.
Piezas de repuesto
Cuando se necesitan repuestos, asegúrese de
que el técnico de reparación use repuestos
especificados por Insignia o que tengan las
mismas características que la parte original. Las
substituciones no autorizadas pueden resultar
en incendio, choque eléctrico u otros riesgos.
Verificación de seguridad
Después de completar la reparación de su
sistema de audio, pídale al técnico de servicio
que realice verificaciones de seguridad para
determinar que su sistema de audio se
encuentra en buena condición de operación.
Calor
No instale su sistema de audio tipo ejecutivo
cerca de fuentes de calor tales como radiadores,
estufas u otros productos (tales co mo
amplificadores) que produzcan calor.
Bandeja de discos
Mantenga los dedos lejos de la bandeja de
discos a medida que ésta cierra. Usted se
podría lastimar.
Disco
No use discos agrietados, deformes o
reparados. Estos discos se rompen fácilmente y
podrían ocasionar serias lesiones personales, y
mal funcionamiento del producto.
Clasificación del equipo
Este sistema está clasificado como equipo
Clase II, lo cual significa que el sistema de audio
tipo ejecutivo tiene doble aislamiento.
F
Seguridad del láser
Este sistema de audio tipo ejecutivo
emplea un sistema de rayo láser óptico
en el mecanismo del CD, el cual está
Radiación de
láser invisible y
peligrosa
cuando está
abierto y han
fallado o se
vencieron los
seguros. Evite la
exposición
directa al rayo
láser.
diseñado con medidas de seguridad
integradas. No intente desensamblarlo.
Acuda al personal de servicio
calificado. La exposición a este ra y o de
luz láser invisible puede ser dañina
para el ojo humano.
Este es un producto láser de Clase 1.
El uso de cualquier otro control, ajuste
o procedimiento que no sea
especificado en este manual puede
resultar en una exposición peligrosa al
rayo de luz láser.
www.insignia-products.com
27
Page 28

NS-A1111_final_translationDTP.fm Page 28 Friday, February 17, 2006 12:09 PM
Características
Sistema de audio tipo ejecutivo
Puerta del CD
Control del Volumen
Botón de Encendido/Apagado
Conector de Audífonos
Botón de Función
Botón para Abrir y Cerrar
Botón de Temporizador
Botón de Memoria
Sistema de audio tipo ejecutivo con 5 CD NS-A1111 de Insignia
Ventana de Visualización
Sensor del Control Remoto
Control del Sintonizador
Indicador de Entrada Auxiliar (Aux In)
Conector de Entrada Auxiliar
Botón de Banda
Botón de Omitir Disco
Botón de Saltar/Buscar/Predefinir
Botón de Reproducir/Pausar/Ajustar Reloj
Almacenamiento de CD
Botón de Detener
Control Símbolo Descripción
Puerta del CD Presione para abrir y cerrar
Control del Volumen Gire para ajustar el volumen.
Botón de Encendido/
Apagado
Conector de Audífonos Conecta audífonos con un
Botón de Función Presione para alternar entre
Botón para Abrir y
Cerrar
Botón de Temporizador Presione para programar la
Botón de Memoria Presione para programar
Botón de Detener Presione para detener la
Ventana de
Visualización
Sensor del Control
Remoto
Control del
Sintonizador
Indicador de Entrada
Auxiliar (Aux In)
Conector de Entrada
Auxiliar
para cargar y descargar
discos.
Presione para encender o
apagar el sistema de audio.
También pone el sistema en
el modo de standby.
mini conector estéreo de
3.5 mm al sistema de audio
tipo ejecutivo.
CD, Sintonizador y Entrada
Auxiliar.
Presione para abrir y cerrar
la puerta del CD.
alarma.
pistas para guardarlas en la
memoria.
reproducción de un disco.
Muestra si el sistema de
audio está encendido o
apagado y muestra la hora.
Indicadores también
muestran los ajustes del
sistema.
Recibe la señal del control
remoto.
Gire para ajustar la
frecuencia de radio.
Se ilumina cuando una
fuente de audio externa
(auxiliar) se conecta.
Conecta fuentes de audio
externas (auxiliares).
Control Símbolo Descripción
Botón de Banda Presione para alternar entre
Botón de Omitir Disco Presione para omitir la
Botón de Saltar/Buscar/
Predefinir
Botón de Reproducir/
Pausar/Ajustar Reloj
Almacenamiento de CD Almacena CD cuando no
las bandas de radio AM y
FM.
reproducción de un disco
entero que se ha cargado en
el cambiador de CD.
Presione para saltar o
/
buscar una pista de CD, o
para llamar una pista
guardada en la memoria.
Presionar para comenzar a
reproducir un disco, para
pausarlo o para reanudar la
reproducción.
También ajusta la hora del
reloj.
están en el cambiador de
CD.
28
www.insignia-products.com
Page 29

NS-A1111_final_translationDTP.fm Page 29 Friday, February 17, 2006 12:09 PM
Sistema de audio tipo ejecutivo con 5 CD NS-A1111 de Insignia
Control Remoto Pantalla
Botón de Standby/
Encendido
Botón de Detener
Botón de Saltar/
Predefinir -
Botón de Memoria
Botón de
Sintonizar (Abajo)
Botón de
Temporizador
Botón de
Volumen +/-
Control Símbolo Descripción
Botón de Standby/
Encendido
Botón de Detener Presione para detener la
Botón de Saltar hacia
Atrás/Predefinir -
Botón de Memoria Presione para programar
Botón de Sintonizar
(Abajo)
Botón de Temporizador Presione para programar la
Botones de Volumen +- Presione para ajustar el
Botón de Omitir Disco Presione para omitir la
Botón de Sintonizar
(Arriba)
Botón de Reproducir/
Pausar
Botón de Saltar hacia
Adelante/Predefinir +
Botón de Repetir Presione para volver a
Presione para encender o
apagar el sistema de audio
tipo ejecutivo. T ambién pone
el sistema en el modo de
standby.
reproducción de un disco.
Presione para saltar una
pista de CD, o para llamar
una pista guardada en la
memoria.
pistas para guardarlas en la
memoria.
Presione para ajustar la
sintonización de una
frecuencia más alta a una
más baja.
alarma.
volumen.
reproducción de un disco
entero que se ha cargado en
el cambiador de CD.
Presione para ajustar la
sintonización de una
frecuencia más baja a una
más alta.
Presionar para comenzar a
reproducir un disco o para
reanudar la reproducción.
Presione para pausar la
reproducción del disco.
Presionar para comenzar a
reproducir un disco, para
pausarlo o para reanudar la
reproducción.
reproducir una pista.
Botón de Omitir Disco
Botón de
Sintonizar (Arriba)
Botón de Reproducir/
Pausar
Botón de Saltar/
Predefinir +
Botón de Repetir
Botón de Banda
Botón de Función
AM/PM
Reloj/Pista
Emisora de
Indicador Descripción
Banda Muestra la banda de radio FM o AM.
Reloj AM/PM Indica que la hora es AM o PM.
Reloj/Pista de CD/
Emisora de radio
MEMORY (Memoria) Muestra cuando la pista que se
STEREO (Estéreo) Indica que la señal FM que se reproduce
Modo de Repetición Se muestra cuando la función de
Frecuencia de radio Muestra si la frecuencia de radio es en
Configuración de su
sistema de audio tipo
ejecutivo
Preparación del control remoto
Instalación de las pilas del control remoto
I
I
Banda
Reloj
de CD/
radio
• En el modo de reloj, muestra la
hora.
• En el modo CD, muestra el
número de pista.
• En el modo de emisora de radio,
muestra el número de la
emisora.
reproduce se encuentra guardada en la
memoria.
está en estéreo.
repetición se encuentra en uso.
MHz o kHz.
Advertencia
No tire las pilas al fuego. Deseche las pilas usadas
como si fuera desperdicios dañinos.
Cuidado
No deje caer ni desarme el control remoto. No moje el
control remoto.
Para instalar las pilas en el control remoto:
1 Retire la cubierta de las pilas.
STEREO
(Estéreo)
Memoria
Modo de
Repetición
Frecuencia
de
Radio
Botón de Banda Presione para alternar entre
las bandas de radio AM y
FM.
Botón de Función Presione para alternar entre
CD, Sintonizador y Entrada
Auxiliar.
www.insignia-products.com
29
Page 30

NS-A1111_final_translationDTP.fm Page 30 Friday, February 17, 2006 12:09 PM
Sistema de audio tipo ejecutivo con 5 CD NS-A1111 de Insignia
2 Inserte una pila CR2025 (3 Voltios) en el
compartimiento de la pila. Asegúrese de que
los símbolos +/- en la pila hagan juego con
las marcas +/- en el compartimiento de la
pila.
3 Vuelva a colocar la cubierta del
compartimiento de la pila.
4 Retire la lámina de plástico que cubre el
sensor del control remoto.
5 Apunte el control remoto al sensor del control
remoto en el sistema de audio. La distancia
efectiva para la operación del control remoto
es de 16 pies (5 metros).
Nota
Cuando use el control remoto y necesite moverse
más cerca al sistema de estéreo para que el
control remoto funcione, reemplace la pila. El
control remoto puede no funcionar correctamente
si la luz solar directa o la luz de una lámpara
fluorescente de alta frecuencia ingresa al sensor
de luz del control remoto. En este caso, cambie la
posición de instalación del sistema para evitar el
problema.
Para conectar los altavoces:
1 Ubique los altavoces proporcionados con el
sistema de audio tipo ejecutivo a la derecha
e izquierda del sistema de audio.
Cuidado
Conectar otros altavoces que no sean los
proporcionados con el sistema de audio pueden
dañar el sistema de audio.
2 Conecte los alambres de los altavoces a los
conectores de altavoz de l amplificador.
Conexión de la alimentación del sistema
de audio tipo ejecutivo
Nota
Antes de hacer funcionar por primera vez el sistema
de audio tipo ejecutivo en un área nueva, debe
verificar que el voltaje de operación del sistema de
audio sea idéntico al voltaje de su fuente de
alimentación local. Este sistema de audio tipo
ejecutivo debe funcionar solamente con el voltaje de
fuente de alimentación impreso en el panel posterior.
Desconéctelo del tomacorriente cuando no se vaya a
usar por un largo período de tiempo.
Para conectar el cable de alimentación:
1 Verifique que los altavoces están con ectados
correctamente y que el botón ON/OFF
(Encendido/Apagado) está en OFF.
2 Conecte el cab le de alimentaci ón de CA a un
tomacorriente de CA.
Conexión de la antena
Para conectar la antena:
1 Desenrolle completamente la antena FM de
alambre. Extienda la antena y muévala para
determinar la mejor recepción de sonido.
Nota
Si el control remoto no se va a usar por un período
de tiempo extendido, o si las pilas están agotadas,
extraiga las pilas para prevenir derrames.
Conexión de los altavoces al sistema de
audio tipo ejecutivo
Caja del
altavoz
izquierdo
Caja del
altavoz
derecho
Conectores
de altavoz
del
amplificador
Cable de
Alimentación
CA
Nota
No conecte la antena FM del sistema de audio a
una antena externa.
2 Conecte la antena AM en bucle
proporcionada a las terminales de AM LOOP
ANTENNA (Antena AM de Bucle) en la parte
posterior del sistema, luego muévala para
determinar la mejor recepción de sonido.
Conexión de equipo externo
Puede conectar sistemas de audio externos al
sistema de audio tipo ejecutivo.
Para conectar el equipo externo:
1 Verifique que el sistema de audio está
apagado.
2 Conecte el enchufe del equipo externo en el
conector de entrada auxiliar [Aux In] (con el
símbolo de la nota musical) en el panel
frontal.
30
www.insignia-products.com
Page 31

NS-A1111_final_translationDTP.fm Page 31 Friday, February 17, 2006 12:09 PM
Sistema de audio tipo ejecutivo con 5 CD NS-A1111 de Insignia
Conexión de audífonos
Para conectar los audífonos:
1 Reduzca el volumen del sistema de audio
tipo ejecutivo.
2 Conecte audífonos con un mini conector
estéreo de 3.5 mm al conector de audífonos.
Nota
Cuando los audífonos están conectados, los
altavoces en el sistema de audio se desactivan
automáticamente.
Uso de su sistema de audio
Encendido y apagado del sistema de
audio
La pantalla cambia de acuerdo al botón
presionado o la función seleccionada.
Para encender y apagar el sistema de audio:
1 Cuando el sistema de audio se encuent ra
apagado, presione le botón ON/OFF
(Encendido/Apagado) en el sistema de audio
para encenderlo. La pantalla mostrará d1 y
activará la retroiluminación de la pantalla.
2 Par escuchar personalmente, conecte
audífonos al sistema de audio.
Nota
Cuando los audífonos están conectados, los
altavoces en el sistema de audio se desactivan
automáticamente.
Ajuste del reloj
Para ajustar el reloj:
1 Cuando el sistema de audio se encuentra
encendido, presione le botón ON/OFF
(Encendido/Apagado) en el sistema de audio
para ingresar al modo standby. El reloj se
mostrará en la pantalla sin retroiluminación.
2 Presione el botón PLAY/PAUSE (Reproducir/
Pausar) hasta que la hora parpadea en la
pantalla, luego presione el botón búsqueda/
saltar repetidamente para ajustar la hora
actual.
/
3 Presione el botón PLAY/PAUSE (Reproducir/
Pausar) hasta que los min utos parpadeen en
la pantalla, luego presione el botón
búsqueda/saltar repetidamente para ajustar
los minutos actuales.
2 Cuando el sistema de audio se encuent ra
encendido, presione le botón ON/OFF
(Encendido/Apagado) en el sistema de audio
una vez para apagarlo. La retroiluminación
de la pantalla se apagará.
Cuando el sistema de audio se encuentra
apagado, el reloj t odavía se mostrará en la
pantalla sin retroiluminación. A esto se le
llama modo standby.
Nota
Desconecte la alimentación si la unidad no se
usará por un periodo de tiempo extendido.
Escuchando equipo externo:
Para escuchar equipo externo:
1 Presione el botón ON/OFF (Encendido/
Apagado) en el sistema de audio para
encenderlo.
2 Presione el botón Function (Función) en el
panel frontal para seleccionar Aux, indicado
con un símbolo de una nota musical en la
pantalla.
3 Encienda el equipo externo.
Nota
Si el equipo externo es un televisor y este sistema
de audio se encuentra cerca del televisor, puede
ser que experimente interferencia si se selecciona
la función de sintonizador mientras el televisor se
encuentra encendido.
Ajuste del sonido
Para ajustar el sonido:
1 Gire la perilla del control de volumen para
obtener el nivel de volumen deseado.
/
4 Presione el botón PLAY/PAUSE (Reproducir/
Pausar) hasta que 12H o 24H parpadeen en
la pantalla, luego presione el botón
búsqueda/saltar para seleccionar ya sea el
formato de tiempo de 12 ó 24 Horas, el
formato de hora entre 12 horas.
/
5 Presione el botón PLAY/PAUSE (Reproducir/
Pausar) para confirmar el ajuste de tiempo.
/
Programación de alarma
Para programar la alarma:
1 Cuando el sistema de audio se encuentra
encendido, presione le botón ON/OFF
(Encendido/Apagado) en el sistema de audio
para ingresar al modo standby. El reloj se
mostrará en la pantalla sin retroiluminación.
2 Presione el botón TIMER (T empo rizador) una
vez.
www.insignia-products.com
31
Page 32

N
N
N
N
N
N
N
N
NS-A1111_final_translationDTP.fm Page 32 Friday, February 17, 2006 12:09 PM
Sistema de audio tipo ejecutivo con 5 CD NS-A1111 de Insignia
Nota
Verifique que el ajuste de tiempo está correcto
antes de programar la alarma.
3 Presione el botón PLAY/PAUSE (Reproducir/
Pausar) hasta que la hora parpadea en la
pantalla, luego presione el botón de
búsqueda/saltar repetidamente par a ajustar
la hora deseada.
/
4 Presione el botón PLAY/PAUSE (Reproducir/
Pausar) hasta que lo s minutos parpadeen en
la pantalla, luego presione el botón
búsqueda/saltar repetidamente par a ajustar
los minutos deseados.
/
5 Presione el botón PLAY/PAUSE (Reproducir/
Pausar) para confirmar el ajuste de tiempo.
Una alarma sonará cuando el tiempo alcance
el tiempo predeterminado.
4 Para buscar una emisora rápidamente,
sostenga el botón de sintonización (arriba) o
sintonizar (abajo) en el control remoto. La
búsqueda de emisoras comenzará
automáticamente y se detendrá cuando se
encuentre una emisora.
Sintonización Predefinida
El sistema de audio almacena un total de 40
canciones. (Cada banda tiene un máximo d e 20
emisoras predefinidas disponib les .) Predefini r le
permite sintonizar una emisora directamente.
Las estaciones se asignan con números
predefinidos, comenzando con 1 en orden
consecutivo para cada banda (AM y FM).
Para programar emisoras de radio
predefinidas:
1 Seleccione manualmente una emisora de
radio (ver página 32).
2 Presione el botón de memoria para
almacenar la emisora en la memoria.
3 Repita los pasos 1 y 2 para predefinir hasta
20 emisoras AM y 20 FM.
Llamando una emisora predefinida
/
6 Presione el botón TIMER (Temporizador) una
segunda vez para cancelar la alarma
después de programar la alar ma.
Sintonización de la radio
Sintonización manual
Para sintonizar manualmente la radio:
1 Presione el botón ON/OFF (Encendido/
Apagado) en el sistema de audio para
encenderlo.
2 Presione el botón FUNCTION (Función) para
seleccionar el modo de sintonizador, lo que
se muestra con el indicador de frecuencia d e
radio en la pantalla.
3 Presione el botón BAND (Banda) para
seleccionar la banda (AM o FM), lo que se
muestra con el indicador de banda en la
pantalla, luego sintonice una emisora.
Nota
En el modo FM, el indicador de estéreo se ilumina
cuando la recepción es buena.
Nota
Después de cambiar la banda y apagar el radio y
encenderlo de nuevo, se llamará la última emisora
seleccionada.
Para llamar una emisora de radio
predefinida:
1 Presione el botón ON/OFF (Encendido/
Apagado) en el sistema de audio para
encenderlo.
2 Presione el botón FUNCTION (Función) para
seleccionar el modo de sintonizador, lo que
se muestra con el indicador de frecuencia de
radio en la pantalla.
3 Presione el botón BAND (Banda) para
seleccionar la banda (AM o FM), lo que se
muestra con el indicador de banda en la
pantalla, luego sintonice una emisora.
Nota
En el modo FM, el indicador de estéreo se ilumina
cuando la recepción es buena.
Nota
Después de cambiar la banda y apagar el radio y
encenderlo de nuevo, se llamará la última emisora
seleccionada.
4 Presione el botón saltar/buscar/predefinido
hasta que el número deseado para la
emisora de radio que muestre el man os en la
pantalla.
FUNCTIO
FUNCTIO
FUNCTIO
FUNCTIO
FUNCTIO
FUNCTIO
FUNCTIO
FUNCTIO
32
www.insignia-products.com
Nota
La entrada de memoria (número de canal, banda
de frecuencia y frecuencia) que ha sido guardada
aparecerá en la pantalla en orden numérico, sin
importar la banda de frecuencia.
Page 33

NS-A1111_final_translationDTP.fm Page 33 Friday, February 17, 2006 12:09 PM
Sistema de audio tipo ejecutivo con 5 CD NS-A1111 de Insignia
Uso del cambiador de CD
Carga de CD
Para cargar CD en el cargador:
1 Presione el botón ON/OFF (Encendido/
Apagado) en el sistema de audio para
encenderlo.
2 Presione el botón FUNCTION (Función) para
seleccionar el modo de CD, lo que se
muestra en la pantalla.
3 Presione el botón abrir/cerrar pa ra abrir la
bandeja del disco.
4 Coloque el primer disco en la bandeja de
discos con el lado de la etiqueta hacia arriba.
Reproducción de CD
Para reproducir CD:
1 Presione el botón de omisión de disco para
seleccionar el disco deseado , luego presio ne
ya sea el botón de saltar/buscar/predefinir
para seleccionar una pista en el disco
seleccionado. El disco seleccionado
parpadeará en la pantalla.
Nota
La bandeja de discos puede ser abierta durante la
reproducción para cambiar o agregar un disco que
no se esté reproduciendo. Mientras la bandeja se
encuentre abierta, el disco seleccionado no dejara
de reproducir, pero el botón de omisión de disco
no seleccionará otro disco.
2 Presione el botón
PLAY/PAUSE
(Reproducir/pausar) para comenzar a
reproducir. Presione durante la reproducción
para pausarla, luego presiónelo para
reanudar la reproducción.
5 Presione el botón de omisión de disco para
girar la bandeja de discos en el sentido de
las agujas del reloj. Repita para cargar hasta
cinco discos en el cambiador de CD.
6 Presione el botón abrir/cerrar para cerrar la
bandeja de discos. Habrá un retardo ligero
mientras el cambiador de CD re visa los
discos.
3 Presione el botón de de tene r par a de tener la
reproducción.
Nota
Antes de transportar la unidad, retire cualquier
disco del compartimiento de discos.
Ubicando pistas
Nota
Buscar y saltar se puede realizar durante la
reproducción o pausa, pero solamente se puede
hacer con el CD que se reproduce actualmente.
Para saltar una pista en secuencia:
1 P ara ir al principio de la pista actual o la pista
anterior, presione el botón de saltar/buscar/
predefinir en reversa una vez.
2 Para ir al principio de la siguiente pista en el
CD, presione el bo tó n de salta r/buscar/
predefinir hacia adelante una vez.
Salto hacia atrás
Salto hacia adelante
Para buscar un punto en la pista:
1 Presione y sostenga el botón de saltar/
buscar/predefinir hacia atrás para moverse
hacia atrás a alta velocidad. Suelte el botón
en el punto deseado.
www.insignia-products.com
33
Page 34

NS-A1111_final_translationDTP.fm Page 34 Friday, February 17, 2006 12:09 PM
Sistema de audio tipo ejecutivo con 5 CD NS-A1111 de Insignia
2 Presione y sostenga el botón de saltar/
buscar/predefinir hacia adelante para
moverse hacia adelante a alta velocidad.
Suelte el botón en el punto deseado.
Búsqueda hacia atrás Búsqueda hacia adelante
Repetición de una pista o un disco
La reproducción repetida le permite repetir la
pista actual, un disco entero, o todos los discos
en el cambiador de CD.
Puede usar la repetición repetida durante la
reproducción normal (modo de reproducción),
modo de detención, o modo pausado.
Para reproducir repe tidamente durante el
modo de reproducción:
1 Para repetir una pista que se está
reproduciendo, presione el botón Repeat
(Repetir) en el control remoto hasta que la
pantalla muestre REPEAT (Repetir) y r1 (lo
que indica una repetición de pista). La pista
que se reproduce actualmente se
reproducirá repetidamente hasta que
presione el botón STOP (Detener).
Nota
Los botones saltar/buscar pueden ser usados durante
esta función y operan normalmente.
4 Presione los botones de búsqueda/saltar
para seleccionar otra pista en el disco
seleccionado, o use el bot ón de omisión de
disco para reproducir la primera pista del
nuevo disco que ha seleccionado.
5 Para cancelar la re pr od u cció n repe tid a ,
presione el botón Repeat (Repetir) en el
control remoto hasta que el indicador
REPEAT (Repetir) desaparezca de la
pantalla.
Para reproducir repetidamente durante el
modo de detención o de pausa:
1 Mientras el reproductor de CD se encuentra
detenido o pausado, programe la función de
reproducción repetida como si el CD se
encontrará en el modo de reproducción.
2 Desde el modo de detención, presione el
botón PLAY/PAUSE (Reproducir/Pausar)
para comenzar la reproducción repetida. El
disco que se reproduce actualmente se
reproducirá desde el principio de la primera
pista.
3 Desde el modo de pausa, presione el botón
PLAY/PAUSE (Reproducir/Pausar) para
comenzar la reproducción repetida. El disco
que se reproduce actualmente se
reproducirá repetidamente desde el punto en
el que se pausó la reproducción.
2 Para repetir el disco entero que se está
reproduciendo, pr esione Repeat (Repetir) en
el control remoto hasta que la pantalla
muestre REPEAT (Repetir) yrd (lo que indica
una repetición de disco). El disco que se
reproduce actualmente se reproducirá
repetidamente desde el punto de
reproducción actual.
Nota
Los botones saltar/buscar pueden ser usados durante
esta función y pero solo funcionan en el modo de
búsqueda.
3 P ara repetir todos los discos en el cambiador
de CD, presione Repeat (Repetir) en el
control remoto hasta que la pantalla muestre
REPEAT (Repetir) yrA (lo que indica una
repetición de todos los discos). Los discos se
reproducirán repetidamente desde el punto
de reproducción actual.
Programación de pistas de CD
El sistema guarda un total de 20 pistas de todos
los discos disponibles en la bandeja de discos.
Estas pistas pueden ser reproducidas en un
orden predeterminado.
Para programar la reproducción del CD:
1 Con el reproductor de CD en el modo de
detención, presione el botón M (memoria).
P:00
se muestra en la pantalla indican do que
no se ha programado ninguna pista.
34
www.insignia-products.com
Page 35

N
N
N
N
NS-A1111_final_translationDTP.fm Page 35 Friday, February 17, 2006 12:09 PM
Sistema de audio tipo ejecutivo con 5 CD NS-A1111 de Insignia
2 Presione el botón de buscar/saltar para
seleccionar el disco deseado. El número de
disco se mostrará en el pantalla.
3 Presione el botón de buscar/saltar de nuevo
para seleccionar la pista deseada. El núme ro
de pista se muestra después del número del
disco en la pantalla.
4 Presione el botón M (memoria) de nuevo
para guardar el disco y la pista en la
memoria.
3 Presione el botón FUNCTION (Función) para
seleccionar otra función.
FUNCTIO
FUNCTIO
FUNCTIO
FUNCTIO
Reproducción de pistas programadas
Nota
Mientras reproduzca pistas programadas, el botón de
buscar/saltar solamente puede usarse para
seleccionar pistas que han sido programadas.
Nota
Mientras se reproducen pistas programadas, la
reproducción repetida no funcionará con todos los
discos.
1 Presione el botón PLAY/PAUSE
(Reproducir/pausar) para comenzar a
reproducir. Presione durante la reproducción
para pausarla, luego presiónelo para
reanudar la reproducción.
2 Presione el botón b uscar/saltar para mo verse
a otra pista programada.
5 Repita los pasos 2 al 4 para programar hasta
19 pistas más en la memoria.
Nota
La misma pista puede ser seleccionada más de una
vez en el mismo programa (por ejemplo, puede crear
un programa que reproduzca la misma pista 20
veces).
6 Para revisar el programa, presione el botón
PLAY/PAUSE (Reproducir/Pausar) para
comenzar a reproducir, luego presione el
botón de buscar/saltar para verificar que se
reproduzca la siguiente pista programada.
Para borrar un programa de CD:
1 Presione el botón de detener hasta que el
indicador MEMORY (Memoria) desaparezca
de la pantalla. La pantalla mostrará la
información del disco actual en el cambiador
de CD.
O
2 Abra la bandeja de discos presionando el
botón OPEN/CLOSE (Abrir/Cerrar).
O
Nota
La entrada de memoria (disco y pista) que han
sido almacenados aparecerán en la pantalla en
orden numérico.
Mantenimiento de su
sistema de audio
Limpieza del reproductor
• Limpiar con un paño suav e . Si el repro ductor
está muy sucio , humedezca un paño con una
solución suave de d etergente ne utral y agua,
y luego límpielo. No use aire comprimido
para limpiar el polvo.
Cuidado de los CD
• No toque la superficie del lado sin etiqueta
del disco.
• No pegue papel o cinta adhesiva en la
superficie del disco.
• No exponga el disco a la luz solar direct a o a
calor excesivo.
• No use discos con formas irregulares (por
ejemplo: discos con forma de corazones u
octagonales). Estos pueden causar un mal
funcionamiento.
Limpieza de CD
Una disco sucio causa saltos de sonido y si está
muy sucio, puede que el CD deje de funcionar
completamente. Manipule el disco sujetándolo
por los bordes interior y exterior.
www.insignia-products.com
35
Page 36

NS-A1111_final_translationDTP.fm Page 36 Friday, February 17, 2006 12:09 PM
Sistema de audio tipo ejecutivo con 5 CD NS-A1111 de Insignia
• Las huellas digitales y el polvo deben
eliminarse cuidadosamente de la superficie
grabada del CD con un paño sua v e. Se de be
limpiar con un movimiento recto desde el
centro hacia la orilla.
• Nunca utilice diluyente, benceno , limpiadores
de discos, o aerosoles antiestáticos en un
CD ya que dichos productos pueden dañar
su superficie plástica.
Nota
Antes de transportar la unidad, retire cualquier
disco del compartimiento del disco.
Solución de Problemas
Problema Solución
No hay sonido. • Aumente el volumen.
No hay sonido
en el altavoz o
está
desequilibrado.
Sonido
izquierdo y
derecho
invertido.
Hay mucho
zumbido o
ruido.
El indicador de
FM estéreo
parpadeará.
• Los audífonos están conectados.
Desconéctelos.
• Reinicie la unidad presionando el
botón ON/OFF (Encendido/Apagado).
Revise las conexiones del altavoz que no
funciona.
Revise la conexión del cable del altavoz y la
ubicación del altavoz.
• Un televisor o videograbadora (VCR)
se encuentra demasiado cerca del
sistema de audio. Separe el sistema
de audio del televisor o
videograbadora (VCR).
• Los enchufes y conectores están
sucios. Limpiarlos con un paño
humedecido ligeramente con alcohol.
• Limpiar el disco.
• Ajuste el alambre de la antena.
La recepción es deficiente. Ajuste el alambre
de la antena.
Especificaciones
El diseño y las especificaciones están sujetos a
cambio sin aviso previo.
Fuentes de
alimentación
Fuente de
alimentación
Pilas del control
remoto
Consumo de
potencia
Declaración de cumplimiento con FCC
Este equipo ha sido sometido a prueba y se ha
determinado que satisface los límites
establecidos para ser clasificado como
dispositivo digital de la Clase B de acuerdo con
la Parte 15 del reglamento FCC. Estos lími tes se
han establecido para proporcionar una
protección razonable contra interferencias
perjudiciales en una instalación residencial. Este
equipo genera, usa y puede emitir energía de
radiofrecuencia. Sí no se instala y usa de
acuerdo con las instrucciones, este aparato
puede causar interferencias perjudiciales a las
comunicaciones de radio. Sin embargo, no se
garantiza que no ocurrirá interferencia en una
instalación particular. Si el equipo causa
interferencias perjudiciales en la recepción de la
señal de radio o televisión, lo cual puede
comprobarse encendiéndolo y apagándolo
alternativamente, se recomienda al usuario
corregir la interferencia mediante uno de los
siguientes procedimientos:
• Cambie la orientación o la ubicación de la
antena receptora.
• Aumente la distancia ent re el equipo y el
receptor.
• Conectar el equipo a un tomacorriente de un
circuito distinto de aquel al que esta
conectado el receptor .
• Solicite consejo al distribuidor o a un técnico
calificado para obtener ayuda.
120 V CA
60 Hz
3V (1)
15 W
La puerta del
CD no se cierra
debido al
apagado u
otras funciones
se seleccionan
antes de cerrar
la puerta
No se puede
reproducir el
disco
Reproducción
distorsionada o
pérdida de
sonido durante
la reproducción
de CD
36
• Presione el botón ON/OFF para
encender el sistema de audio.
• Presione el botón Function (Función)
para seleccionar el modo de CD.
• Presione el botón Open/Close (Abrir/
Cerrar) para cerrar la puerta del CD.
• El disco no está insertado
correctamente o se encuentra al
revés. Inserte el disco correctamente.
• Limpie el disco.
• El sistema de CD se encuentra en el
modo de pausa. Presione el botón
Play (Reproducir) para cancelar el
modo de pausa.
• Puede haberse formado condensación
dentro de la unidad debido a un
cambio repentino de temperatura.
Espere aproximadamente una hora
para que desaparezca la condensación
e intente de nuevo.
• El disco está sucio o rayado. Limpie el
disco.
www.insignia-products.com
Certificación de seguridad
Este sistema de audio tipo ejecutivo está hecho
y probado para cumplir con los estándares de
seguridad de los requisitos del FCC y con el
rendimiento de seguridad del Departamento
Estadounidense de Salud y Servicios Humanos,
y también con los estándares de rendimiento 21
CFR, subcapítulo J de la radiación del FDA.
Page 37

NS-A1111_final_translationDTP.fm Page 37 Friday, February 17, 2006 12:09 PM
Sistema de audio tipo ejecutivo con 5 CD NS-A1111 de Insignia
Información sobre la
Garantía
Garantía limitada
Insignia Products le garantiza a usted, el
comprador original de este Produc to, que éste
estará libre de defectos de material o fabricación
por un período de noventa (90) días contados a
partir de la fecha de compra como se indica a
continuación:
1 MANO DE OBRA: Durante el Período de
Garantía si se determina que este Producto
está defectuoso, Insignia, según su criterio,
reparará o reemplazará el Producto sin
cargo, o pagará los ca rgos de mano de obra
a cualquier centro de servicio autorizado por
Insignia. Después del Período de Garantía,
usted debe pagar por todos los cargos de
mano de obra.
2 REPUESTOS: Además, Insignia
suministrará, sin cargo, piezas de repuesto
nuevas o reconstruidas como intercambio
por las piezas defectuosas durante el
Período de Garantía. Después del Período
de Garantía, usted debe pagar por el costo
de todas las piezas.
Para obte ner el servicio de garant ía, usted deb e
llevar el Producto con su recibo original u otro
comprobante de compra, ya sea en su paquete
original o en un paquete que ofrezca el mismo
grado de protección, al centro de ventas más
cercano de la tienda o sitio de web dónde usted
compró el Producto. Esta garantía no cubre
daño cosmético ni daños causados por fuerza s
de la naturaleza, rayos, accidente, uso
incorrecto, abuso, negligencia, uso comercial o
modificaciones del Producto o de cualquier
parte del mismo, incluyendo la antena. Esta
garantía no cubre daños debidos a una
operación o mantenimiento incorrectos,
conexión a suministro de voltaje incorrecto o
intento de reparación por cualq uiera excepto un
centro autorizado por Insignia para realizar el
servicio de reparación del Producto. Esta
garantía no cubre Productos vendidos EN EL
ESTADO EN QUE SE ENCUENTRAN o CON
TOD AS SUS FALLAS, ni productos consumibles
(como fusibles o pilas). Esta garantía es válida
sólo en los Estados Unidos y Canadá. Esta
garantía no es válida si el número de serie
aplicado en la fábrica ha sido alterado o retirado
del Producto. LA REPARACIÓN O
REEMPLAZO SEGÚN PROVISTO BAJO ESTA
GARANTÍA ES EL ÚNICO RECURSO DEL
CONSUMIDOR. INSIGNIA NO SERÁ
RESPONSABLE POR DAÑOS INCIDENTALES
O CONSECUENTES DEBIDO AL
INCUMPLIMIENTO DE CUALQUIER
GARANTÍA EXPRESA O IMPLÍCITA
RELACIONAD A CON ESTE PRODUCTO.
EXCEPTO EN LA MEDIDA QUE LO PROHÍBA
LA LEY APLICABLE, CUALQUIER GARANTÍA
IMPLÍCITA, DECLARACIÓN O CONDICIÓN DE
COMERCIALIZACIÓN O IDONEIDAD PARA UN
USO PARTICULAR DE ESTE PRODUCTO,
ESTÁ LIMITADA A LA DURACIÓN DE ESTA
GARANTÍA. Algunos estados o provincias no
permiten la exclusión o limitación de los daños
incidentales o consecuentes, ni permiten
limitaciones en la duración de una garantía
implícita, por lo tanto, las limitaciones o
exclusiones anteriores pueden no aplicarse en
su caso. Esta garantía le otorga derechos
legales específicos, y usted puede tener otros
derechos que varían de un estado a otro o de
una provincia a otra. Para servicio al cliente
favor llamar al 1-877-467-4289
www.insignia-products.com Insignia Products,
Richfield, Minnesota, U.S.A.
Derechos de reproducción
© 2006 Insignia. Insignia y el logotipo de Insignia son
marcas de comercio de Best Buy Enterprise Services,
Inc. Otras marcas y nombres de productos son
marcas de comercio o marcas registradas de sus
dueños respectivos. Las especificaciones y
características están sujetas a cambio sin aviso previo
u obligación.
Número de asistencia: (877) 467-4289
URL: www.insignia-products.com
www.insignia-products.com
37
Page 38

NS-A1111_final_translationDTP.fm Page 38 Friday, February 17, 2006 12:09 PM
R1
 Loading...