

Page 1
7" Under-the-Cabinet DVD/LCD TV
Lecteur de DVD/TV ACL de 7 po de dessous d’armoire
Reproductor de DVD/TV con pantalla LCD de 7” bajo el gabinete
NS-7UTCTV
Page 2

Page 3
Insignia NS-7UTCTV
(
)
Safety information
7" Under-the-Cabinet
DVD/LCD TV
Contents
Welcome. . . . . . . . . . . . . . . . . . . . . . . . . . . . . . . . . .1
Safety information. . . . . . . . . . . . . . . . . . . . . . . . . . .1
Features . . . . . . . . . . . . . . . . . . . . . . . . . . . . . . . . . .3
Accessories. . . . . . . . . . . . . . . . . . . . . . . . . . . . . . . . . 4
Front view . . . . . . . . . . . . . . . . . . . . . . . . . . . . . . . . . . 4
Display panel. . . . . . . . . . . . . . . . . . . . . . . . . . . . . . . . 4
Rear view - connectors . . . . . . . . . . . . . . . . . . . . . . . . 5
Remote control . . . . . . . . . . . . . . . . . . . . . . . . . . . . . . 5
Setting up your DVD/TV . . . . . . . . . . . . . . . . . . . . . .6
Installing the remote control batteries . . . . . . . . . . . . . 6
Using the remote control. . . . . . . . . . . . . . . . . . . . . . . 6
Connecting to video sources. . . . . . . . . . . . . . . . . . . . 6
Using your TV. . . . . . . . . . . . . . . . . . . . . . . . . . . . . .9
Turning the power on and off. . . . . . . . . . . . . . . . . . . . 9
Changing the volume . . . . . . . . . . . . . . . . . . . . . . . . . 9
Changing the mode. . . . . . . . . . . . . . . . . . . . . . . . . . . 9
Changing channels . . . . . . . . . . . . . . . . . . . . . . . . . . . 9
Making initial TV mode settings. . . . . . . . . . . . . . . . . . 9
Setting the time . . . . . . . . . . . . . . . . . . . . . . . . . . . . . . 9
Setting the timer . . . . . . . . . . . . . . . . . . . . . . . . . . . . . 9
Using the TV in ATSC (digital) mode. . . . . . . . . . . . . 10
Using your DVD player . . . . . . . . . . . . . . . . . . . . . .12
Playing a DVD . . . . . . . . . . . . . . . . . . . . . . . . . . . . . . 12
Playing a CD . . . . . . . . . . . . . . . . . . . . . . . . . . . . . . . 13
Playing a JPEG disc . . . . . . . . . . . . . . . . . . . . . . . . . 13
Using your Radio . . . . . . . . . . . . . . . . . . . . . . . . . .13
Using the advanced DVD setup menus . . . . . . . . .14
Using the on-screen DVD setup menus . . . . . . . . . . 14
On-screen DVD setup menus . . . . . . . . . . . . . . . . . . 14
Changing the LCD screen settings . . . . . . . . . . . . . . 14
Troubleshooting . . . . . . . . . . . . . . . . . . . . . . . . . . .15
Maintaining. . . . . . . . . . . . . . . . . . . . . . . . . . . . . . .15
Specifications . . . . . . . . . . . . . . . . . . . . . . . . . . . . .16
Legal Notices . . . . . . . . . . . . . . . . . . . . . . . . . . . . .16
1-Year Limited Warranty. . . . . . . . . . . . . . . . . . . . .17
Français. . . . . . . . . . . . . . . . . . . . . . . . 19
Español . . . . . . . . . . . . . . . . . . . . . . . . 39
Welcome
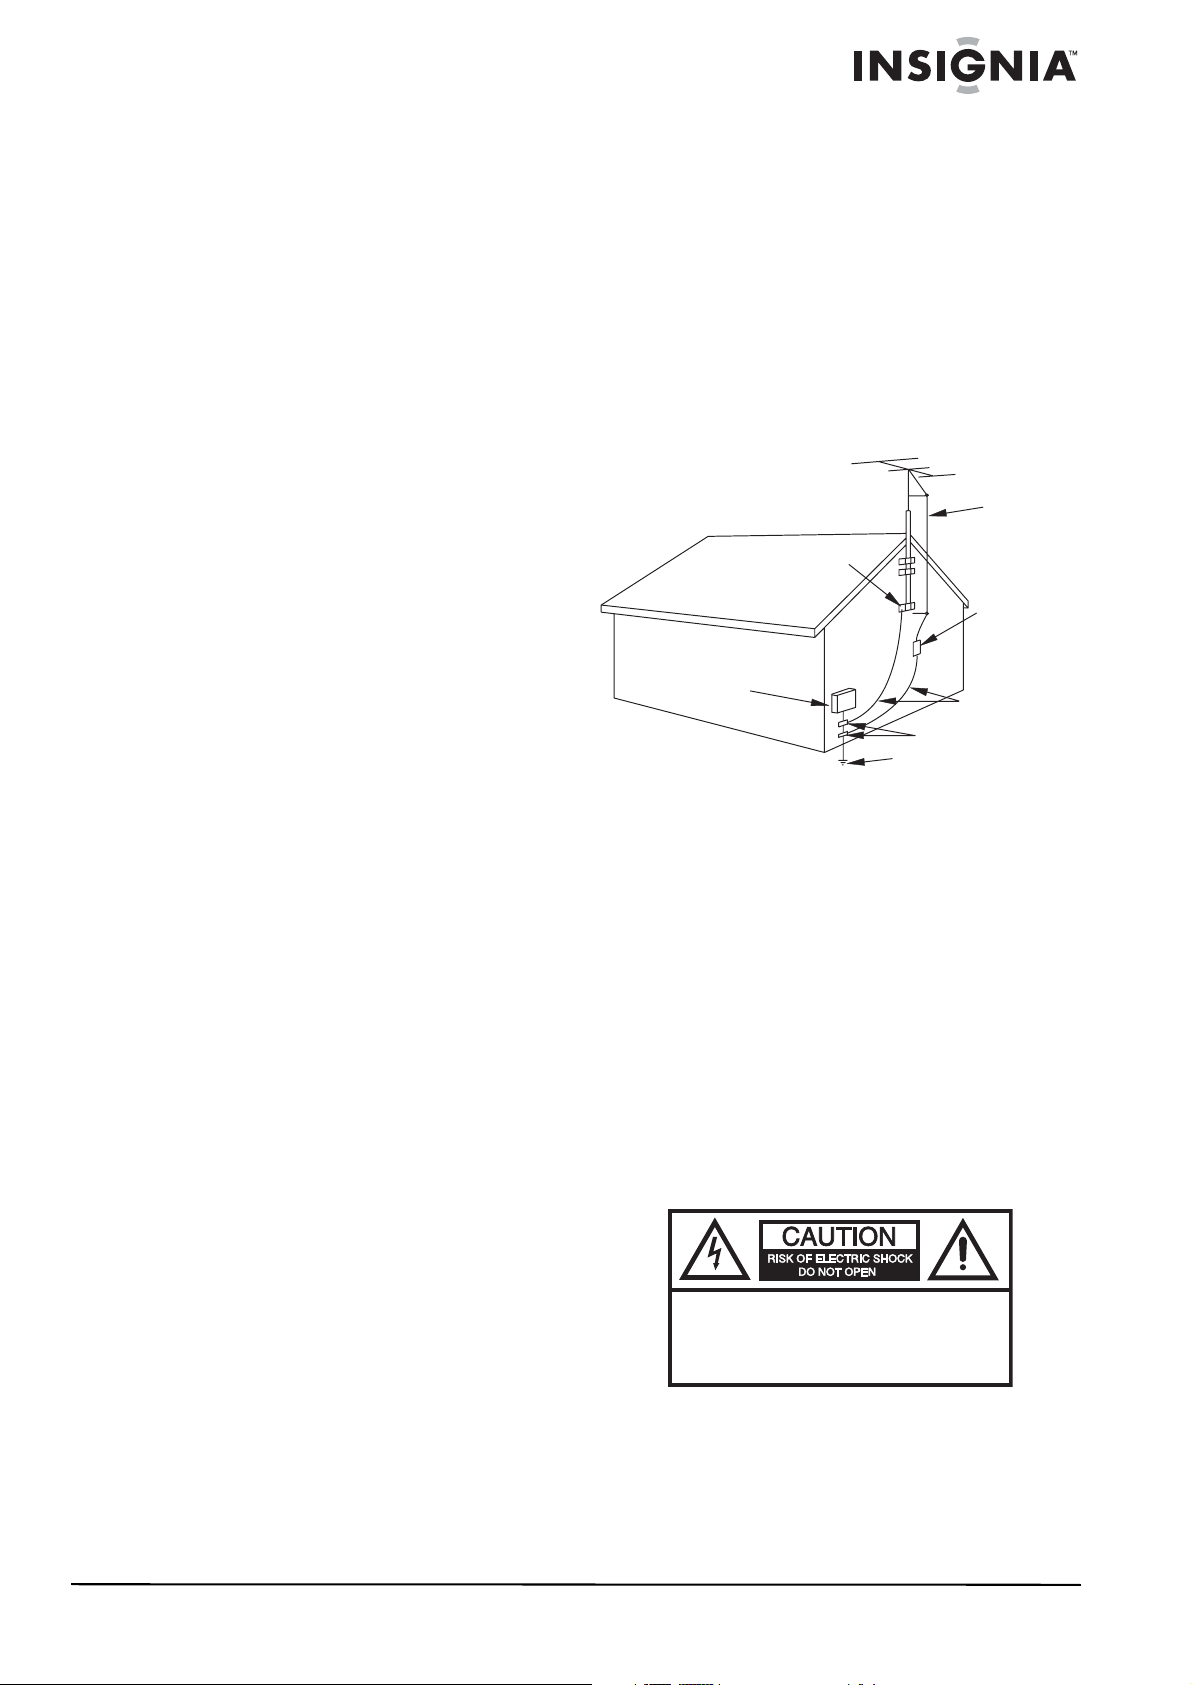
Antenna connections
If an outside antenna is connected to the
television equipment, make sure that the
antenna system is grounded to provide
protection against voltage surges and built-up
static electricity charges. Section 810 of the
National Electrical Code provides information on
proper grounding of the mast and supporting
structure, grounding of the lead-in wire to an
antenna discharge unit, size of the grounding
conductors, location of the antenna discharge
unit, connection to grounding electrodes, and
requirements for the grounding electrode.
EXAMPLE OF ANTENNA GROUNDING AS SPECIFIED
BY NATIONAL ELECTRICAL CODE (NEC)
GROUND
CLAMP
ELECTRIC
SERVICE
EQUIPMENT
GROUND CLAMPS
POWER SERVICE GROUNDING
ELECTRODE SYSTEM
NEC ART 250, PART H
• An outside antenna system should not be
located near overhead power lines or other
electric light or power circuits, or where it can
fall into such power lines or circuits. When
installing an outside antenna system,
extreme care should be taken to keep from
touching such power lines or circuits,
because contact with them can be fatal.
• For added protection during a lightning
storm, or when your DVD/TV is left
unattended and unused for long periods of
time, unplug it from the power outlet and
disconnect the antenna. This will prevent
damage to the equipment due to lightning
and power line surges.
Risk of shock
To prevent fire or shock hazard, do not expose
this appliance to rain or moisture.
ANTENNA
LEAD-IN
WIRE
ANTENNA
DISCHARGE UNIT
(NEC SECTION 810-20)
GROUNDING CONDUCTORS
(NEC SECTION 810-21)
Congratulations on your purchase of a
high-quality Insignia product. Your NS-7UTCTV
represents the state of the art in
under-the-cabinet television and DVD player
design and is designed for reliable and
trouble-free performance.
www.insignia-products.com
CAUTION:
ELECTRIC
COVER
PARTS INSIDE. REFER SERVICING
QUALIFIED SERVICE PERSONNEL.
TO REDUCE THE RISK OF
SHOCK, DO NOT REMOVE
(OR BACK). NO USER-SERVICEABLE
TO
1
Page 4
Insignia NS-7UTCTV 7" Under-the-Cabinet DVD/LCD TV
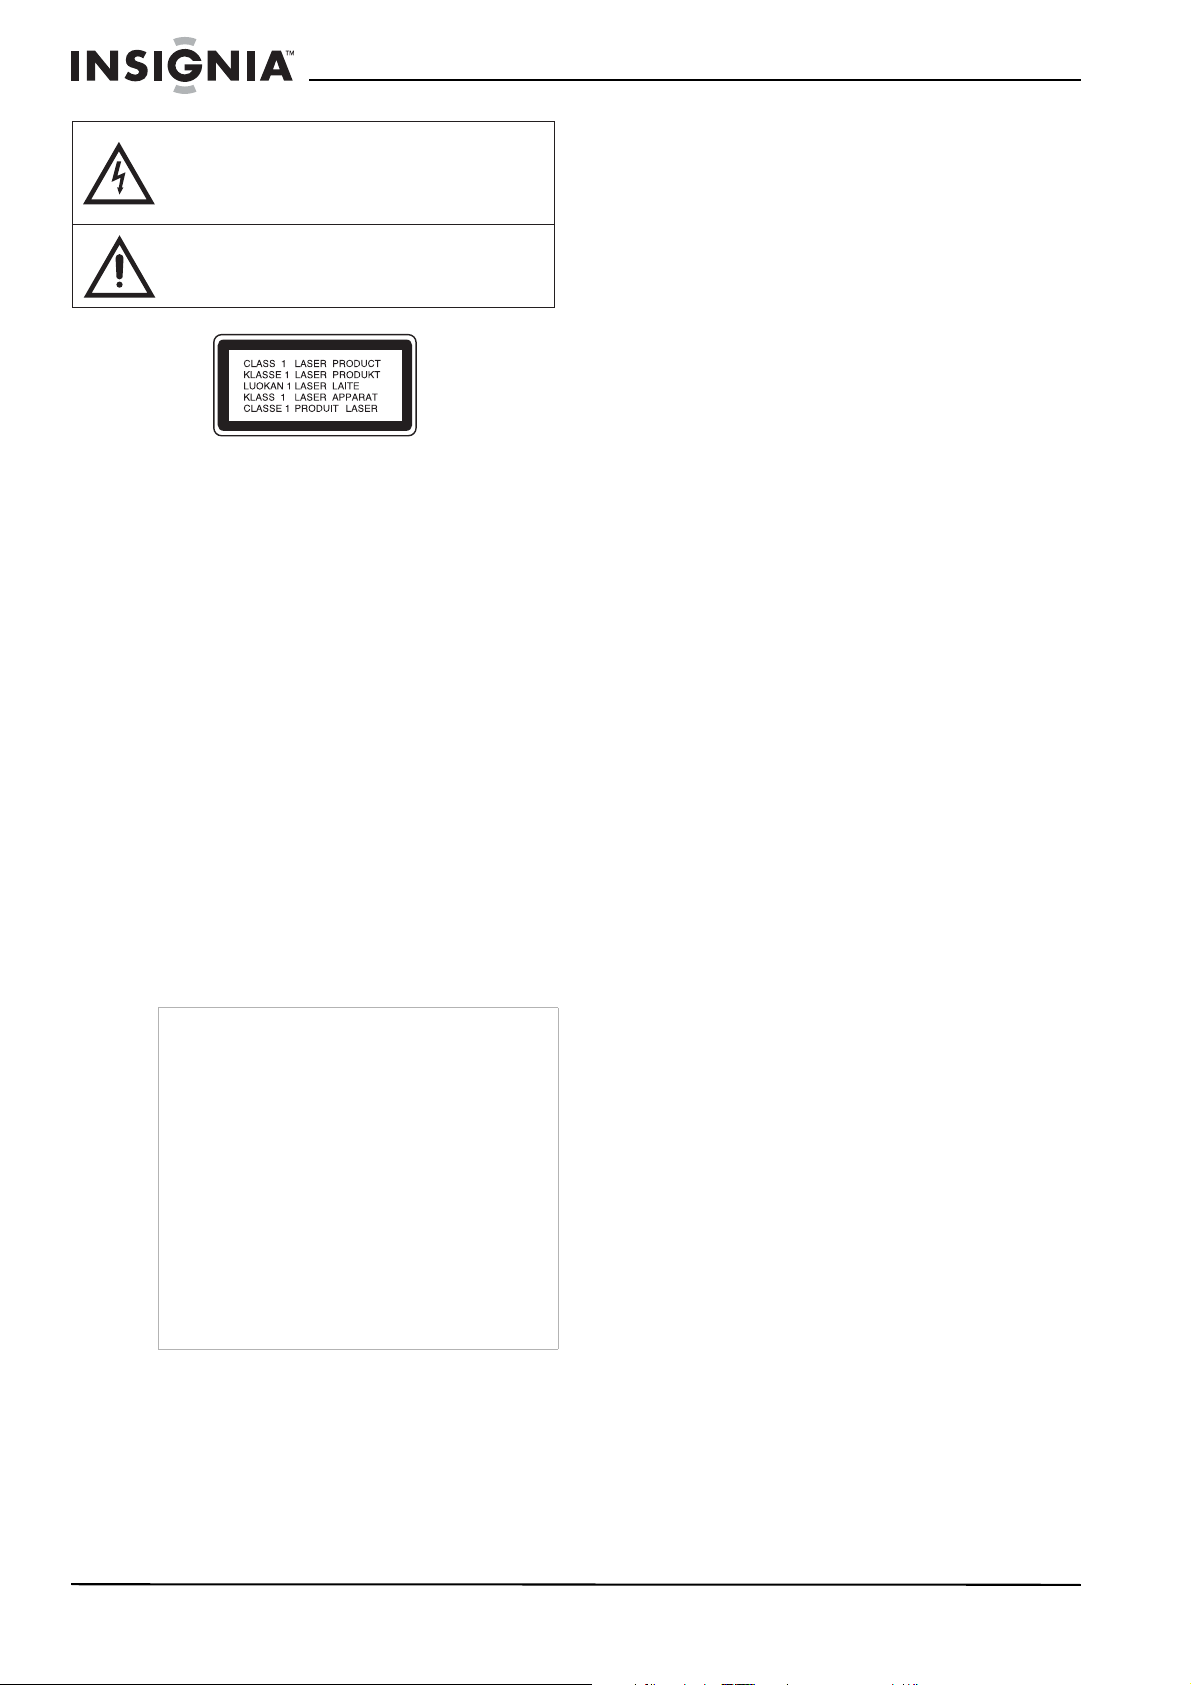
The lightning flash with arrowhead symbol, within an
equilateral triangle is intended to alert the user to the
presence of uninsulated dangerous voltage within the
product’s enclosure that may be of sufficient magnitude
to constitute a risk of electric shock.
The exclamation point within an equilateral triangle is
intended to alert the user to the presence of important
operating and maintenance (servicing) instructions in the
literature accompanying the appliance.
Warning:
Class 1 visible and invisible laser radiation when
open and interlocks defeated. Do not stare into
the beam or look at it directly with an optical
instrument.
Warning:
This D VD/TV emplo ys a laser system. To ensure
correct use of this DVD/TV, read this owner’s
manual carefully and retain it for future
reference. Should your DVD/TV require
maintenance, contact qualified service
personnel.
Making adjustments to controls or performing
procedures other than those specified herein
may result in hazardous radiation exposure.
To prevent direct e xposure to laser beam, do not
try to open the enclosure. DO NOT STARE INT O
BEAM.
Caution:
Your DVD/TV should not be exposed to water
(dripping or splashing) and no objects filled with
liquids, such as vases, should be placed on the
apparatus.
Warning
Do not overload wall outlets. Overloaded wall
outlets, loose or damaged wall outlets, overloaded
extension cords, frayed power cords, or damaged
or cracked wire insulation are dangerous. Any of
these conditions could result in electric shock or
fire. Periodically examine the cord of your D VD/TV,
and if its appearance indicates damage or
deterioration, unplug it, discontinue use of your
DVD /TV, and hav e the c ord replaced with an exact
replacement part by an authorized servicer.
Protect the power cord from physical or
mechanical abuse, such as being twisted, kinked,
pinched, closed in a door, or walked upon. Pay
particular attention to plugs, wall outlets, and the
point where the cord exits your DVD/TV.
To disconnect power from the power outlet, pull
out the power cord plug. When installing your
DVD/TV, make sure that the plug is easily
accessible.
Important safeguards
This DVD/TV has been designed and
manufactured to ensure personal safety.
Improper use can result in electric shock or fire
hazard. The safeguards incorporated in this
DVD/TV will protect you if you observe the
following procedures in installing, using, and
servicing. The internal components of this DVD/
TV cannot be serviced or repaired by the user.
• Read these instructions—Read and
understand all operating instructions before
operating your DVD/TV.
• Keep these instructions—These safety and
operating instructions must be kept in a safe
place for future reference.
• Heed all warnings—All warnings on your
DVD/TV and in these instructions must be
closely followed.
• Follow instructions—All operating
instructions must be followed.
• Accessories—Do not use attachments or
accessories not recommended by Insignia.
Use of improper accessories can result in
accidents.
• Power source—This DVD/TV must operate
on a power source specified on the device
label. If you are not sure of the type of power
supply used in your home, ask your dealer or
local power company.
• AC power cord protection—The AC power
cords must be routed correctly to prevent
damage from people stepping on them or
from objects resting on them. Check the cord
connections at the power outlet and where
the cord attaches to your DVD/TV.
• Overloading—Do not overload AC power
outlets or extension cords. Overloading can
cause fire or electric shock.
• Intrusions and spills—Never insert an object
into your DVD/TV through vents or openings.
High voltage flows in your DVD/TV, and
inserting an object can cause electric shock
and damage electrical components. For the
same reason, do not spill water or liquid on
your DVD/TV.
• Servicing—Do not attempt to service your
DVD/TV yourself. Removing covers can
expose you to high voltage and other
dangerous conditions. Ask a qualified service
technician to perform servicing.
• Repair—If any of the following conditions
occur, unplug the AC power cord from the
AC power outlet, then request a qualified
service technician to perform repairs.
• When the AC power cord or plug is
damaged.
• When liquid has spilled on your DVD/TV
or when objects have f allen into your DVD/
TV.
• When your DVD/TV has been exposed to
rain or water.
• When your DVD/TV does not operate
normally as described in these operating
instructions. Do not adjust controls other
than those described in these
instructions. Incorrect adjustment of
2
www.insignia-products.com
Page 5

Insignia NS-7UTCTV 7" Under-the-Cabinet DVD/LCD TV
controls not described in these
instructions can cause damage, which
often requires extensive adjustment work
by a qualified technician.
• When your DVD/TV has been dropped or
damaged.
• When your DVD/TV displays an abnormal
condition. Any noticeable abnormality in
your DVD/TV indicates that your DVD/TV
needs servicing.
• Replacement parts—In case your DVD/TV
needs replacement parts, make sure that the
service person uses replacement parts
specified by the manufacturer, or those with
the same characteristics and performance as
the original parts. Use of unauthorized parts
can result in fire, electric shock, and other
danger.
• Safety checks—After completion of service
or repair work, ask the service technician to
perform safety checks to mak e sure that y our
DVD/TV is in proper operating condition.
• Wall or ceiling mounting—When mounting
your DVD/TV on a wall or ceiling, make sure
to install your DVD/TV according to the
method recommended by the manufacturer
of the mounting or support device.
• Cleaning—Unplug the AC power cord from
the AC power outlet before cleaning your
DVD/TV. Clean only with a dry cloth. Do not
use liquid or aerosol cleaners.
• Water and moisture—Do not use this DVD/
TV near wet or moist environments, such as
near a bathtub, washbasin, sink, laundry tub,
swimming pool, or wet basement. Do not
expose this DVD/TV to dripping or splashing.
Do not place objects filled with liquid on this
DVD/TV.
• Shelves and carts—Do not place this DVD/
TV on an unstable cart, stand, tripod, or
table. Unstable installation is likely to make
your DVD/TV fall, resulting in serious injuries
as well as damage to your DVD/TV. Use only
the cart, stand, tripod, bracket, or table
specified by Insignia, or sold with your DVD/
TV. When you use a cart, exercise caution
when moving the cart and device to avoid
injury from them tipping over.
• V entilation—The v ents and other openings in
the cabinet are designed for ventilation. Do
not cover or block them, because insufficient
ventilation can overheat and shorten your
DVD/TV’s life span. Do not place your DVD/
TV on a bed, sofa, rug, or other soft surfaces,
because they can block ventilation openings.
This DVD/TV is not designed for built-in
installation. Do not place your DVD/TV in an
enclosed place, such as a bookcase or rack,
unless you provide proper ventilation and the
manufacturer’s instructions are closely
followed.
• Fragile—The LCD panel used in this DVD/TV
is made of glass, and can easily be broken
when your D VD/TV is dropped or receives an
impact. If the panel becomes broken,
exercise extreme caution to prevent injury
from the broken glass.
Note
Do not touch the color TFT LCD screen with your
fingers.
• Non-active pixels—The LCD panel contains
almost 3 million thin-film transistors, which
provide exceptionally sharp video quality.
Occasionally, a few non-active pixels may
appear on the screen as a fixed blue, green,
or red point. These non-active pixels do not
adversely affect the performance of your
DVD/TV and are not considered defects.
• Heat sources—Do not install this DVD/TV
near any heat sources such as radiators,
heat registers, stoves, amplifiers, or other
devices that produce heat.
Features
This TV incorporates a DVD pla y er, LCD display,
TV receiver and radio function in one system. It
is designed for convenient use in the kitchen. It
has the following features:
• Multiple Modes, including:
•DVD
•TV
• Radio
•AV
• ATSC (digital)
• A V input—External audio/video input can be
connected to most external AV sources.
• AV output—Analog audio output can be
connected to an external amplifier.
• LCD (Liquid Crystal Display) screen—
Color video screen designed with LCD
technology clearly shows video data.
• Amplifier function—Built-in 2x3 Watt stereo
amplifier with left and right speakers.
• Switching power adapter—Automatically
adapts to the voltage required.
• Special functions—Supports
multi-languages.
• Advanced DVD playing functions,
including:
• Compatibility–Plays: DVD, CD, JPEG,
and MP3 discs.
• On-Screen display–Displays your choice
of English, Spanish, or French.
• Fast Search function–Multi-speed, fast
forward, fast reverse, slow play, and
repeat playback.
• Zoom function–Lets you enlarge the
picture.
• Search by time–Search f or a certain time
on a disc.
• TV Functions, including:
• Clear TV signal reception.
• Search for TV channels automatically.
• Automatically memorize the channels.
• Radio Functions, including:
• Clear AM/FM signal reception.
• Search for radio stations automatically.
• Store radio stations easily.
• Search for radio stations in high or low
frequency range.
www.insignia-products.com
3
Page 6
Insignia NS-7UTCTV 7" Under-the-Cabinet DVD/LCD TV
Accessories
Make sure that the following accessories are
provided in the packaging:
• Remote control
• Battery (CR2025)
• User Guide
• Mounting template
• Mounting hardware (screws and spacers)
Region code information
DVD players and discs are coded by region. If
the region number described on the DVD disc
does not correspond to the region number of this
D VD pla y er, this player cannot play the disc. The
region code of this unit is 1.
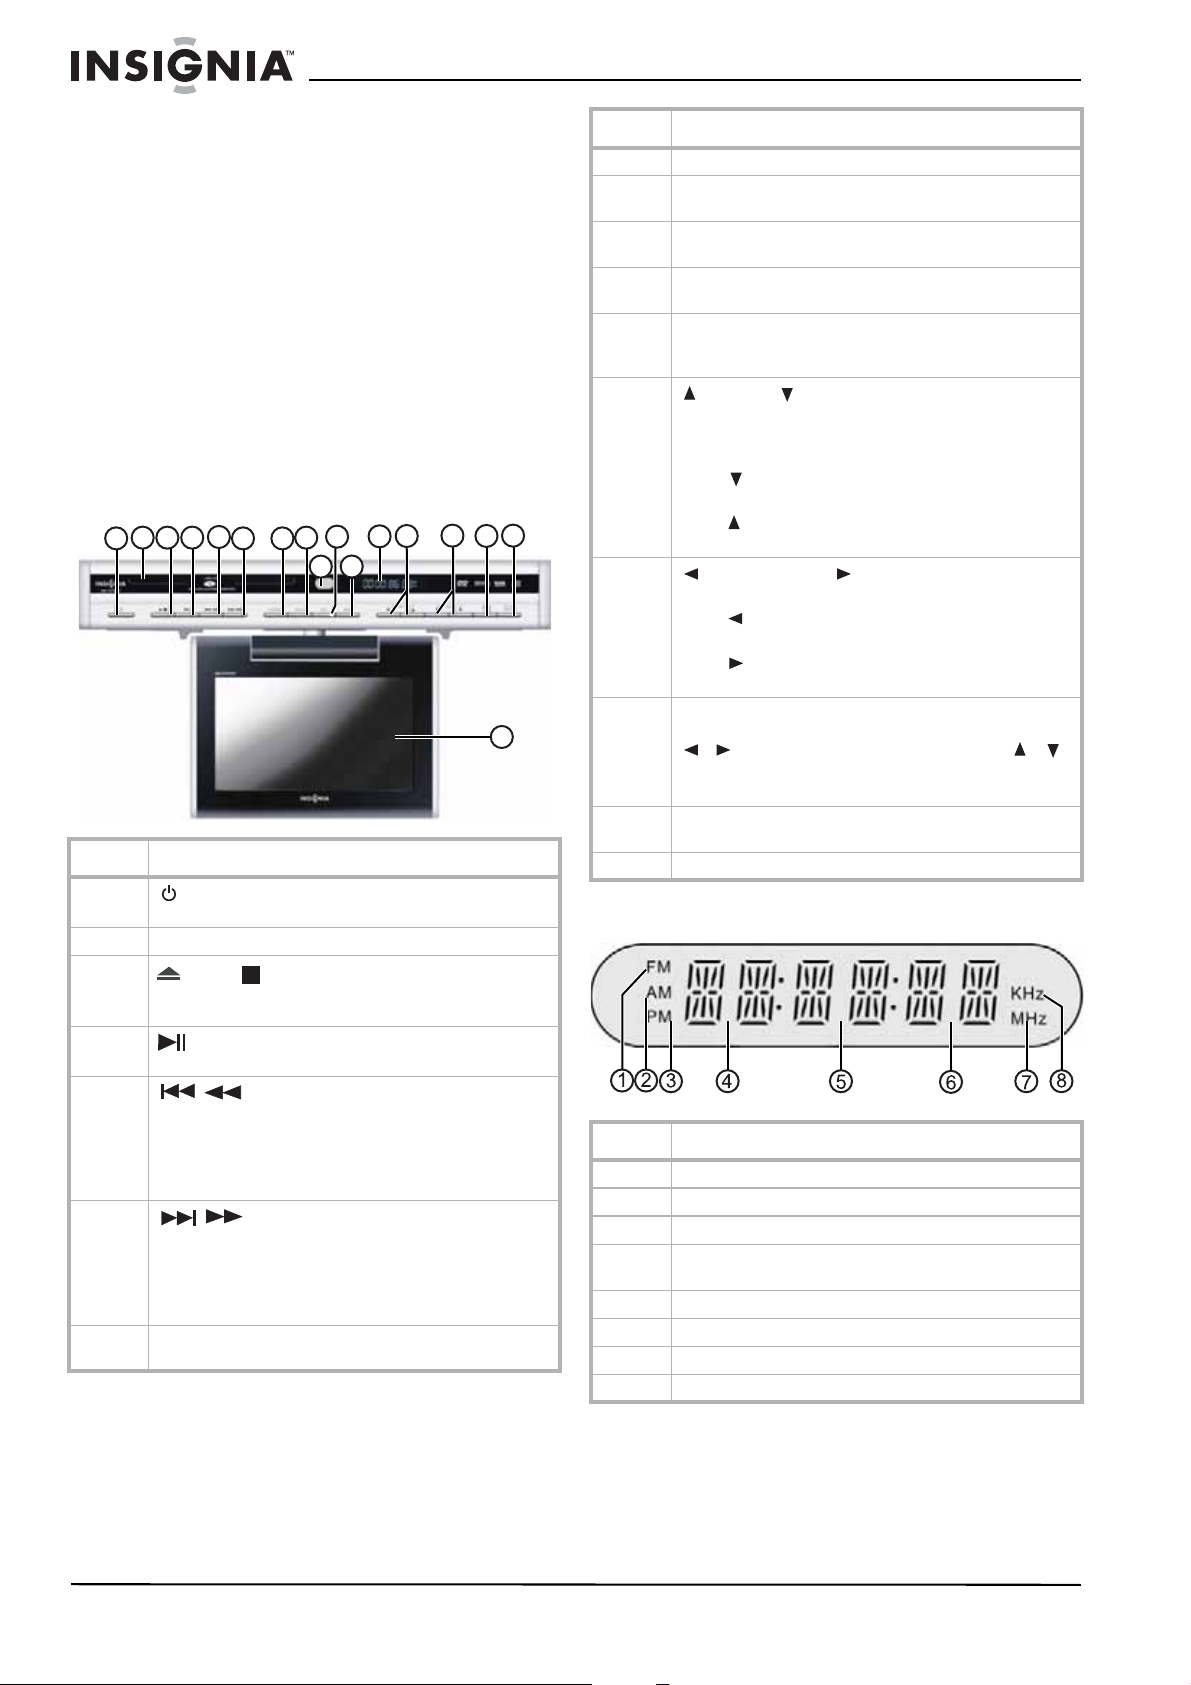
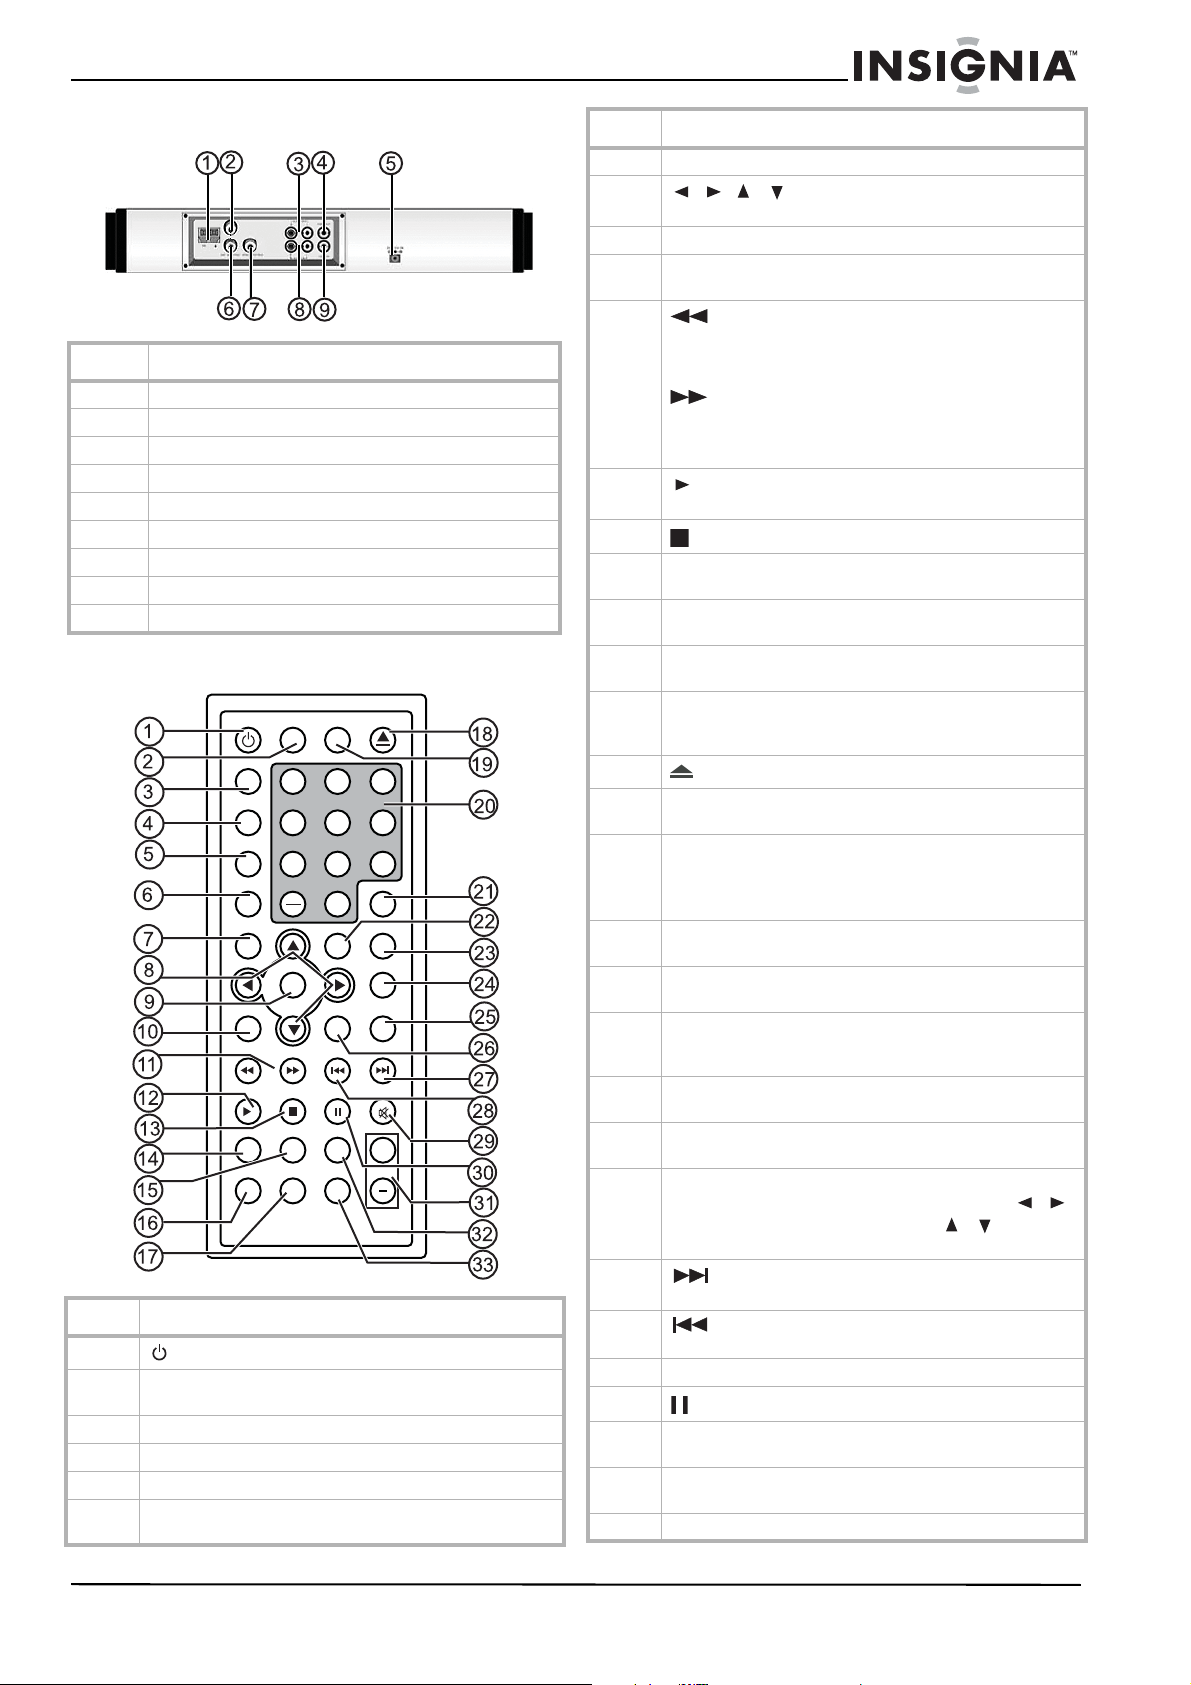
Front view
234 5
1
6
Item Description
1
2 Disc slot. Use to load and unload discs.
3
4
5
6
7 SOURCE button. Press to cycle through DVD, TV, AV,
(Power) button. Press to turn on and turn off the
DVD/TV (exit or enter Standby mode).
EJECT/ (Stop) button. Press to stop playback (in
DVD mode). Press and hold to eject the disc from the
player.
(PLAY/PAUSE) button. In DVD mode, press to start
or pause playback.
/ (REV SCAN) button. In DVD mode, press to
activate fast back. Press and hold to go to the beginning
of the current chapter or track.
In Radio mode, press once to fine tune a radio station
downward or press briefly (1.5 seconds) to search for
radio stations on a lower frequency.
/ (FWD SCAN) button. In DVD mode, press
to activate fast forward. Press and hold to go to the next
chapter or track.
In Radio mode, press once to fine tune a radio station
upward or press briefly (1.5 seconds) to search for radio
stations on a higher frequency.
FM, AM, and ATSC modes.
8
10 12 15 1613 14
7
9
11
17
Item Description
8 MUTE button. Press to mute the sound.
9 Remote sensor. Receives the signal from the remote
10 SET button. Press to enter the Timer Setup menu. In
11 MENU button. Press to open the main DVD on-screen
12 Display panel. Shows the time, status, radio frequency,
13
14
15 TIME/ENT button. Press once to show the current time
control.
Radio mode, press to memorize (preset) a station.
menu.
and radio station number. Also shows the volume level
while adjusting the volume.
CH + and CH - buttons. In Menu mode, press to
select items in the setup menu.
Press to change the TV channel or radio station up or
down.
Press
the time.
Press
time.
to adjust the value downward when setting
to adjust the value upward when setting the
VOL - and VOL + buttons. In Menu mode, press
to select items in the setup menu.
Press
in the picture setup menu.
Press
in the picture setup menu.
on the screen. Press twice to set the time, then use the
to decrease the volume or decrease the value
to increase the volume or increase the value
/ buttons to select the position and the /
buttons to adjust the value of the hour or minute.
In Menu mode, press to confirm selections.
16 TV/LCD SETUP button. Press to open the LCD setup
17 LCD screen. Displays the picture.
menu.
Display panel
Item Description
1 FM radio status indicator
2 AM radio status indicator and AM time indicator
3 PM time indicator
4 Hour or character (for example TV channel, radio
5 Minute or character indicators
6 Second or character indicators
7 FM frequency (MHz) indicator
8 AM frequency (KHz) indicator
frequency, elapsed footage, and so on) indicators
4
www.insignia-products.com
Page 7
Insignia NS-7UTCTV 7" Under-the-Cabinet DVD/LCD TV
Rear view - connectors
Item Description
1 AM antenna jack
2 FM 75 ohm coaxial antenna jack
3 Left and Right AUDIO Output jacks
4 VIDEO Output jack
5 DC 12 V Input jack
6 ANT INPUT jack for TV antenna
7ATSC INPUT jack
8 Left and Right AUDIO Input jacks
9 VIDEO Input jack
Remote control
POWER
DVD
TV
AV
FM/AM
DTV
LAST
__
SEEK +
TITLE
REPEAT/EXIT
Item Description
1
2 SUBTITLE button. Press repeatedly until the subtitle
3 DVD button. Press to switch to DVD mode.
4 TV button. Press to switch to TV mode.
5 AV button. Press to switch to external AV input mode.
6 FM/AM button. Press to switch to FM/AM signal input
POWER button. Press to turn the DVD/TV on and off.
language you want is selected.
mode.
AUDIO
SUBTITLE
EJECT
123
456
789
GOTO
0
SETUP
PICTURE/SET
CH+
TIME
INFO
LCD ON/OFF
MUTE
+
VOL
OK
CH-
MENU ZOOM
A-B SLOW
Item Description
7 DTV button. Press to switch to ATSC mode.
8
9 OK button. Press to confirm menu selections.
10 LAST button. While in TV mode, press to return to the
11
12
13
14 TITLE button. Press to display the current DVD titles, if
15 MENU button. Press to open the disc menu in DVD mode.
16 REPEAT/EXIT button. Press to go into DVD repeat mode,
17 A-B button. Press to repeat a selected portion of a DVD.
18
19 AUDIO button. Press to change the DVD audio language or
20 0-9 number buttons: Press to directly enter channel
21 GOTO button. In DVD mode, press to select the starting
22 SETUP button. Press to open the various Setup menus
23 PICTURE/SET button. Press to enter the LCD Setup or
24 INFO button. Press to show information about the DVD
25 LCD ON/OFF button. Press to turn the LDC screen on or
26 TIME button. Press once to show the current time on the
27
28
29 MUTE button. Press to mute the sound.
30
31 VOL+/- buttons. Press to increase (+) or decrease (-) the
32 ZOOM button. Press to zoom in on the DVD. Press the
33 SLOW button. Press to decrease the DVD playback speed.
/// cursor buttons: Press to navigate
on-screen menus or adjust settings.
previous channel.
SEEK - button. In DVD mode, press to fast reverse.
In Radio mode, press once to fine tune a radio station
downward or press briefly (1.5 seconds) to search for
radio stations on a lower frequency.
SEEK + button. In DVD mode, press to fast forward.
In Radio mode, press once to fine tune a radio station
upward or press briefly (1.5 seconds) to search for radio
stations on a higher frequency.
(Play) button. Press to begin disc playback, or in menu
mode to confirm your selections.
(Stop) button. Press to stop DVD and CD playback.
available.
Press again to exit.
or press to exit the Setup menu.
Press once to set the starting point (A), press again to set
the end point (B), press again to stop A-B repeat.
EJECT button. Press to eject the disc from the player.
options.
numbers, DVD chapter numbers, and CD track numbers.
— (+10) button. If the track or channel number is over 10,
press this button once, then a button 1 through 9.
time, track, or title.
(TV, DVD, or ATSC) in their respective modes.
Timer Setup menu. In Radio mode, press to memorize
(preset) a station.
playing.
off in the DVD, TV, or AV mode.
screen. Press twice to set the time, then use the
/
buttons to select the position, and the / buttons to
adjust the value of the hour or minute.
NEXT button. Press to go to the next chapter or
track. Press again to skip forward by chapter or track.
PREV button. Press to go to the previous chapter or
track. Press again to skip back by chapter or track.
PAUSE button. Press to pause DVD playback.
volume.
direction buttons to pan around the screen.
www.insignia-products.com
5
Page 8
Insignia NS-7UTCTV 7" Under-the-Cabinet DVD/LCD TV
Setting up your DVD/TV
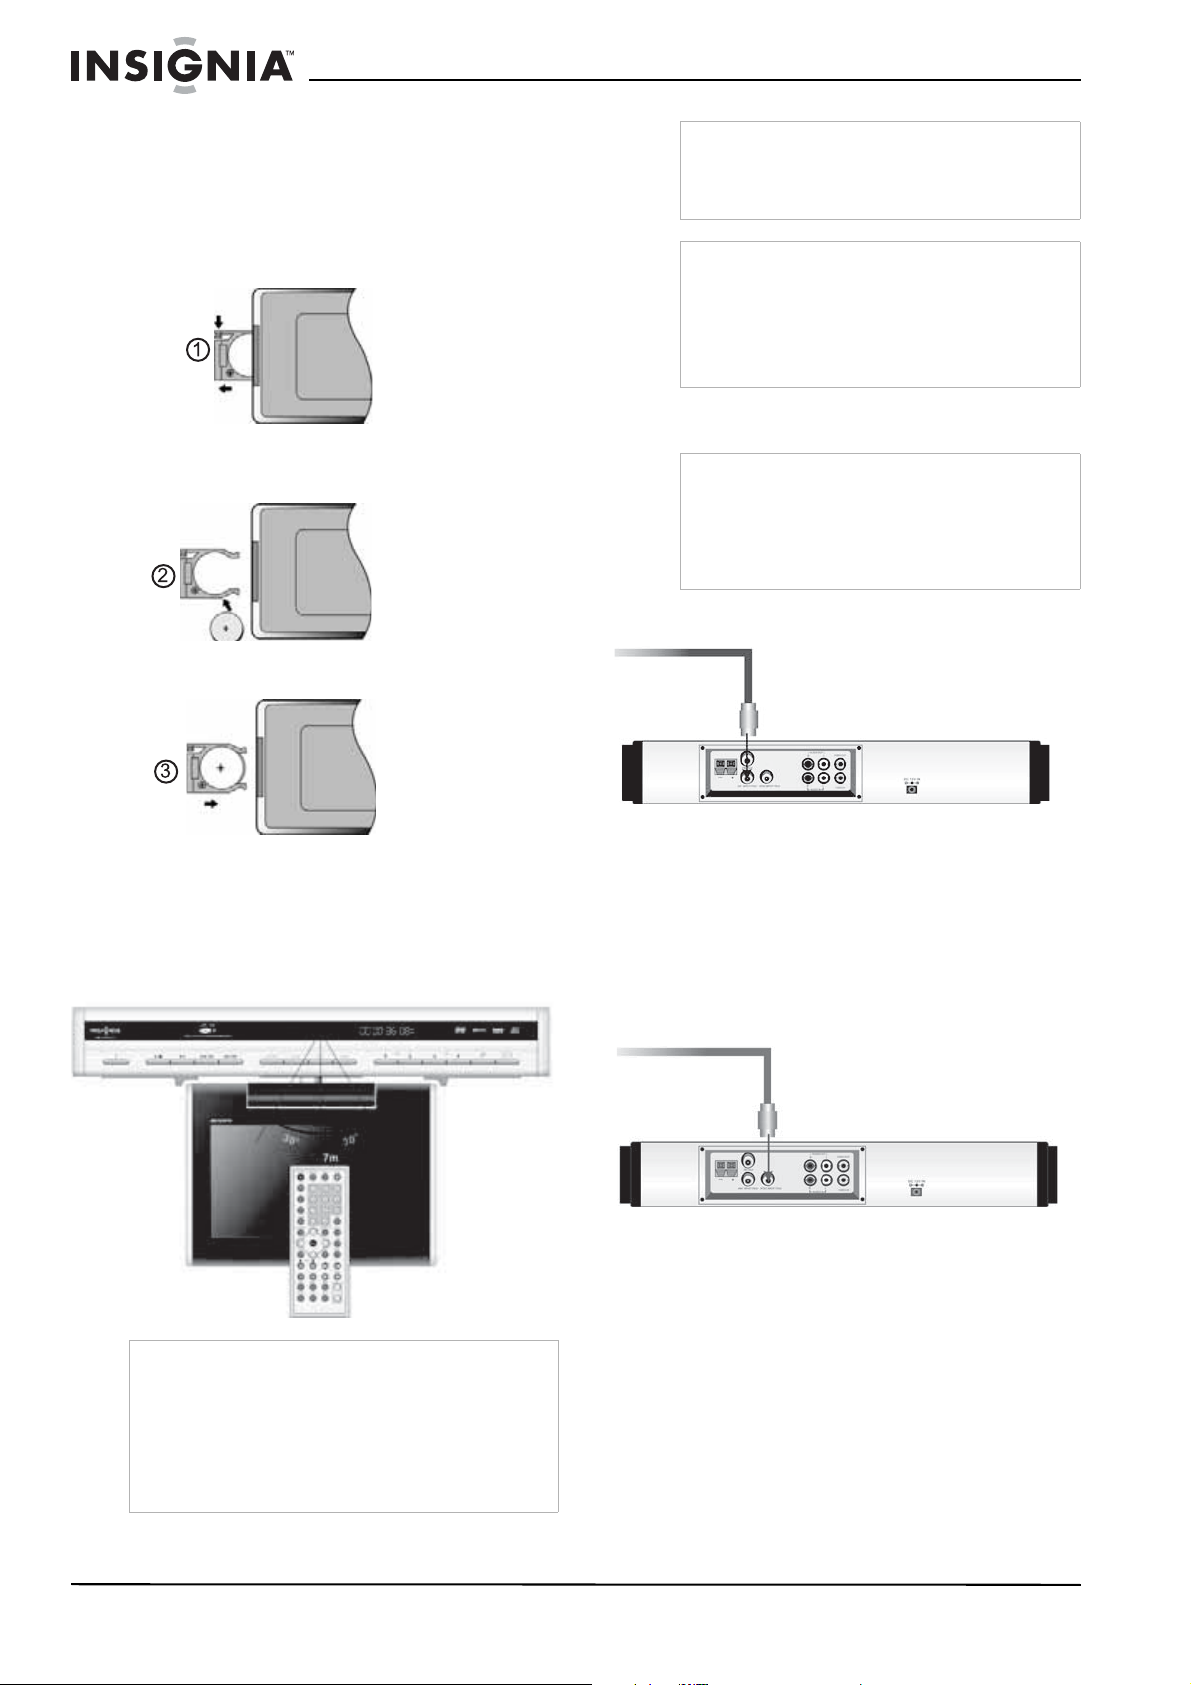
Installing the remote control batteries
To install the batteries:
1 Remove the battery holder on the bottom of
the remote control.
2 Insert the battery (provided) into the battery
holder. Make sure that the (+) symbol on the
battery matches the diagram on the holder.
3 Reinsert the battery holder into the bottom of
the remote control.
Note
Objects between the remote control and the
sensor may weaken the remote control’s IR signal.
Range can be diminished by direct sunlight
shining on the DVD/TV’s IR sensor.
Cautions
Do not expose the remote control to liquids, direct
sunlight, or shock.
The remote control may not work correctly if the
DVD/TV’s IR sensor is under direct sunlight or
strong lighting. In these cases, change the angle
of the lighting or the TV screen, or operate the
remote control closer to the IR sensor.
Connecting to video sources
Note
• Do not connect the power cord until all other
connections have been made.
• Each time you restart your DVD/TV, it
remembers the last function used.
• Make all connections before installing your
DVD/TV.
Connecting to a TV antenna
TV signal input
Using the remote control
To use the remote control:
• Point it directly at the TV, within a 60° angle of
the IR sensor on the front of the TV, and
within 23 feet (about 7 meters).
Notes
• The battery normally lasts for about six months,
depending on how often and for what operations
the remote control is used.
• If the remote control fails to work, even when it is
operated near the player, replace the battery.
• If the remote control is not used for a long period of
time, remove the battery from the compartment to
prevent damage from battery leakage.
To connect an external TV antenna:
1 Connect the antenna cable to the ANT
INPUT jack on the back of your DVD/TV.
2 Press the TV button on the remote control, or
press the SOURCE button on your DVD/TV
repeatedly, to set your DVD/TV’s signal input
to TV.
Connecting to an ATSC (digital) signal source
ATSC signal input
To connect an ATSC (digital) signal source:
1 Connect the cable from the ATSC source to
the ATSC INPUT jack on the back of your
DVD/TV.
2 Press the DTV button on the remote control,
or press the SOURCE button on your DVD/
TV repeatedly, to set the TV’s signal input to
ATSC.
6
www.insignia-products.com
Page 9
Insignia NS-7UTCTV 7" Under-the-Cabinet DVD/LCD TV
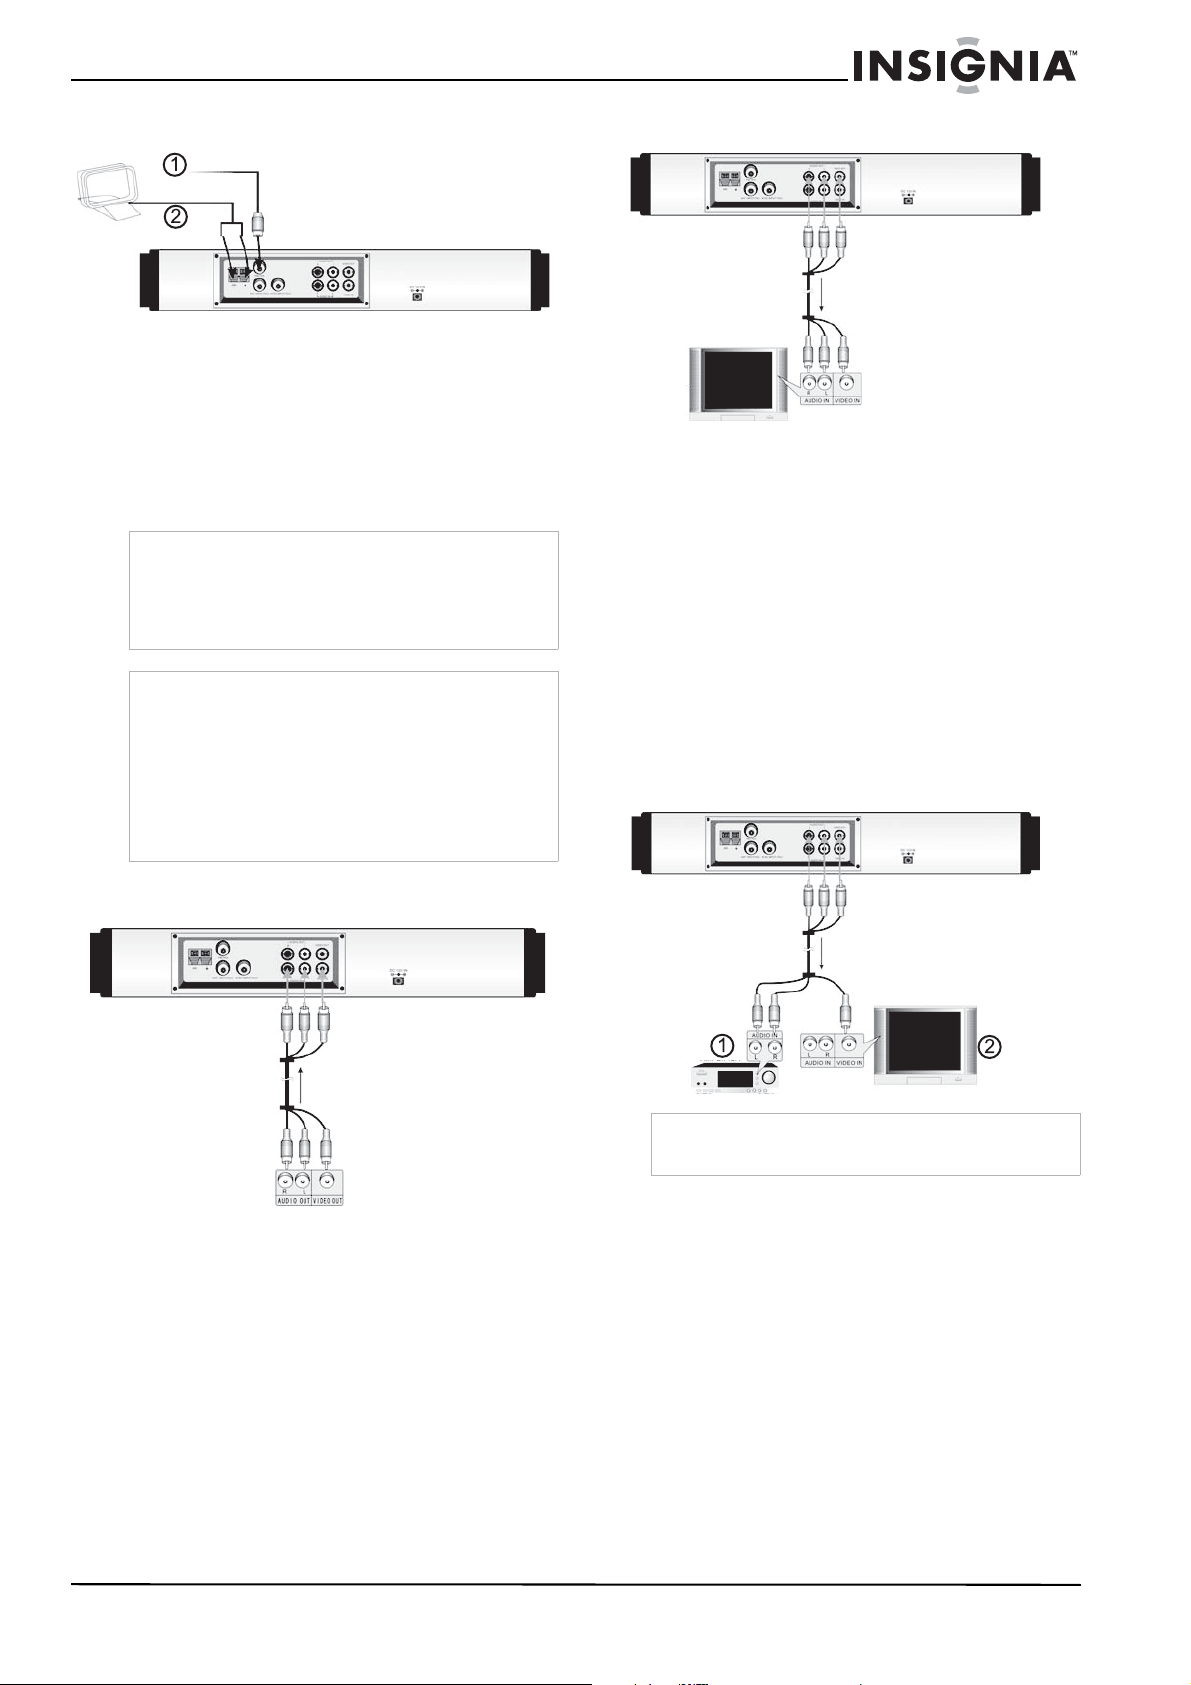
Connecting to a radio antenna
To connect a radio antenna:
1 Connect the cable from the FM antenna (1),
and the wires from the AM antenna (2), to
their respective jacks on the back of TV.
2 Press the FM/AM button on the remote
control, or press the SOURCE button on the
TV repeatedly, to set the radio’s signal input
to FM or AM.
Warning
• If you connect your DVD/TV to an outdoor FM
antenna, you should ground your DVD/TV in order
to avoid the dangers of a lightning strike.
• To prevent a gas explosion, do not connect the
ground wire to a gas pipe.
Notes
• In order to improve the signal, move the AM loop
antenna away from your DVD/TV and other
equipment.
• Extend the FM antenna fully.
• Keep the FM antenna as horizontal as possible
after connecting it to the TV.
• If the FM reception is poor, use a 75 ohm coaxial
cable (not supplied) to connect your DVD/TV to an
outdoor FM antenna.
Connecting the DVD output to a TV
T o connect the D VD output of y our D VD/TV to an external TV:
1 Turn off both TVs.
2 Connect an RCA video cable to the VIDEO
Output jack of your DVD/TV, then to the
VIDEO Input jack on the back of the external
TV.
3 Connect RCA audio cables to the Left and
Right AUDIO Output jacks of your DVD/TV,
then to the Left and Right AUDIO Input jac ks
on the back of the external TV.
4 Turn on your DVD/TV and the external TV.
5 Set the signal source of the external TV to
show the DVD output of your DVD/TV.
Connecting the audio output to an amplifier
Connecting to an external AV signal source
T o connect your D VD/TV to an external signal source:
1 Turn off your DVD/TV and the signal source.
2 Connect an RCA video cable to the VIDEO
OUT jack of the signal source (for e xample , a
VCR), then to the VIDEO Input jack on the
back of your DVD/TV.
3 Connect RCA audio cables to the signal
source’s AUDIO OUT jacks, then to the Left
and Right AUDIO Input jacks on the back of
your DVD/TV.
4 Turn on your DVD/TV and the signal source.
5 Press the AV button on the remote control, or
press the SOURCE button repeated on your
DVD/TV to set the TV’s signal input to AV.
Note
Refer to the operator’s manual of your amplifier before
making any connections.
To connect the audio output of your DVD/TV to an external amplifier:
1 Turn off your DVD/TV and the amplifier.
2 Connect RCA audio cables to the Left and
Right AUDIO Output jacks of your DVD/TV,
then to the Left and Right AUDIO Input jac ks
(1) on the back of the amplifier.
3 Connect an RCA video cable to the VIDEO
Output jack on your DVD/TV, then to the
VIDEO Input
jack (2) of an external TV.
4 Turn on your DVD/TV and the amplifier.
5 Set the signal source of the amplifier to the
audio output of your DVD/TV.
www.insignia-products.com
7
Page 10
Insignia NS-7UTCTV 7" Under-the-Cabinet DVD/LCD TV
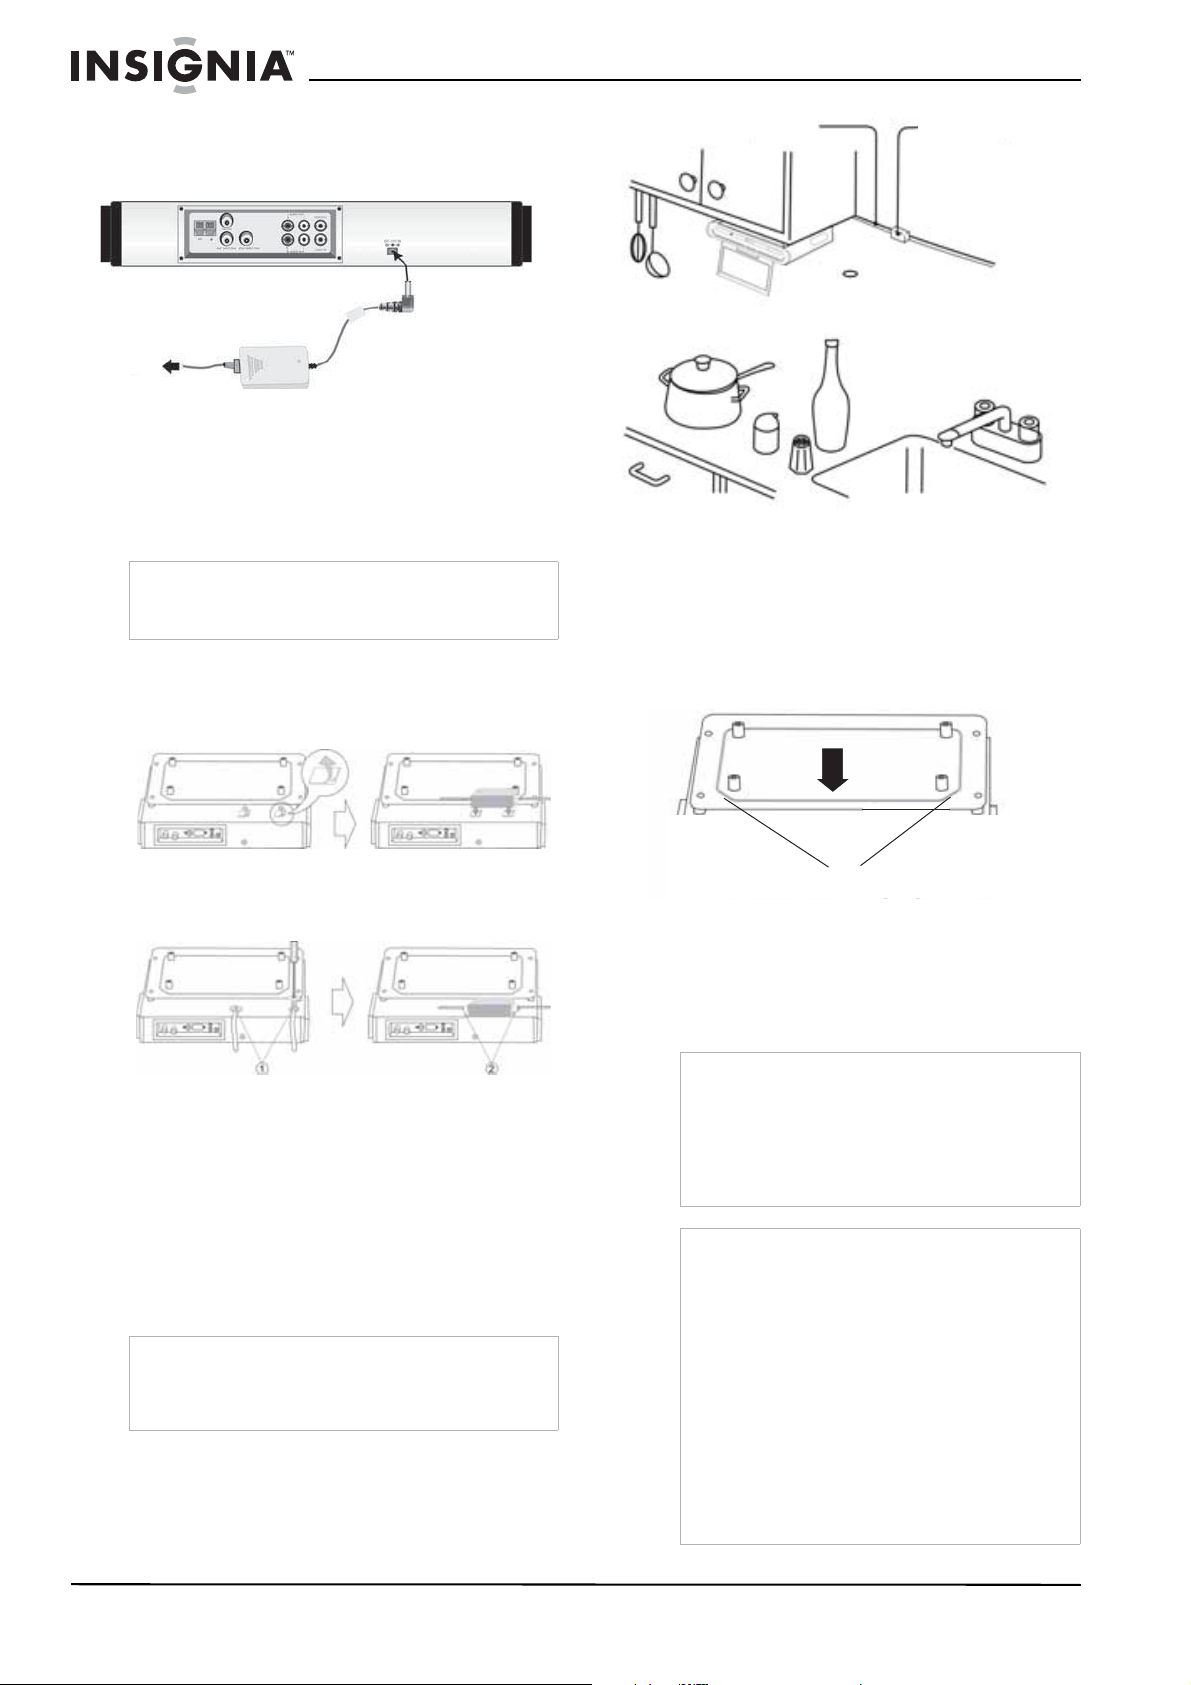
Connecting to the AC power adapter
Your DVD/TV is powered by an AC switching
power adapter (provided).
To AC power outlet
To connect the AC power adapter:
1 Connect the round plug of the AC power
adapter to the DC 12V IN jack on the back of
your DVD/TV.
2 Plug the twin-blade end of the AC power
adapter cord into a standard power outlet.
Note
When you will not be using your DVD/TV for an
extended period of time, turn it off and unplug the
power supply.
T o fix the AC po wer adapter to the top of your DVD/TV:
• Using the two-sided tape (provided), stick the
AC power adapter to the top of your DVD/TV.
AC power cord
Cord clamp
To install your DVD/TV:
1 Mark the position of the four mounting holes
by using the supplied paper template, then
drill four 6.8 mm holes at those locations.
2 Attach the mounting plate to your DVD/TV
with the screws provided. The beveled edge
of the mounting plate must go towards the
front of your DVD/TV.
OR
Or, screw the two retention wires (provided)
to the top of your DVD/TV (1), then wrap the
wires around the power cables to hold the AC
power adapter to the top of your DVD/TV (2).
Installing your D V D/TV
After all the connections are made, you are
ready to install your DVD/TV under a cabinet.
We suggest that you install your DVD/TV under a
wall cabinet (such as a kitchen cabinet), either
with or without the spacer.
Note
The dimensions of your DVD/TV are 3.11” (high) ×
14.76” (wide) × 10.9” (deep) (7.9 × 37.49 × 27.69 cm).
There should be at least 1 .38” clearance between the
back of your DVD/TV and the wall.
Beveled edge toward front
3 Using the four mounting screws and spacers
provided, mount your DVD/TV under the
cabinet.
If the cabinet door overhangs the shelf and
obstructs the front of your D VD/TV, adjust the
installation or shelf height for clearance.
Warnings
• Your DVD/TV is heavy. Be careful when doing
the installation, or you could damage your
DVD/TV or injure yourself.
• To reduce the risk of fire, do not place any
heating or cooking appliances und er your DVD/
TV, especially while the screen is open for
viewing.
Notes
• Mount your DVD/TV so that the AC power cord
can be plugged directly into a power outlet. Do
not use a converter or extension cord.
• Make sure that there is no slack in the AC
power cord, because the cord acts as an FM
wire antenna. Wind any slack cord onto the
cord hook.
• Your DVD/TV has a built-in ferrite bar antenna
for the AM radio. Check the AM radio reception
before fixing it into position.
• To reduce electrical interference, mount your
DVD/TV a s far as possible from other electrical
devices, such as refrigerators, microwave
ovens, fluorescent lamps, and so on.
• Keep the paper template for possible future
use.
8
www.insignia-products.com
Page 11
Insignia NS-7UTCTV 7" Under-the-Cabinet DVD/LCD TV
Using your TV
After the connections have been made and your
DVD/TV has been mounted and plugged in, you
are ready to use your TV.
Turning the power on and off
To turn the power on and off:
1 Press the POWER button on the front panel
of your D VD/TV or on the remote control. The
POWER indicator turns green.
2 To turn off your DVD/TV, press the POWER
button again. The screen image disappears
and the POWER indicator turns red.
Note
A small amount of electric power is consumed
even when the power is turned off.
Changing the volume
You can change the volume using your DVD/
TV’s front panel or the remote control.
To change the volume:
1 Press VOL+ or VOL- on the remote control,
or VOL + or VOL - on the TV to raise
or lower the volume.
2 Press MUTE on the remote control to mute
the sound, and press it again (or the VOL+ or
VOL- ) to restore the sound.
To switch between two channels:
1 Press LAST to change from the currently
tuned channel to the previous channel.
2 Press LAST again to change back to the
originally tuned channel.
Making initial TV mode settings
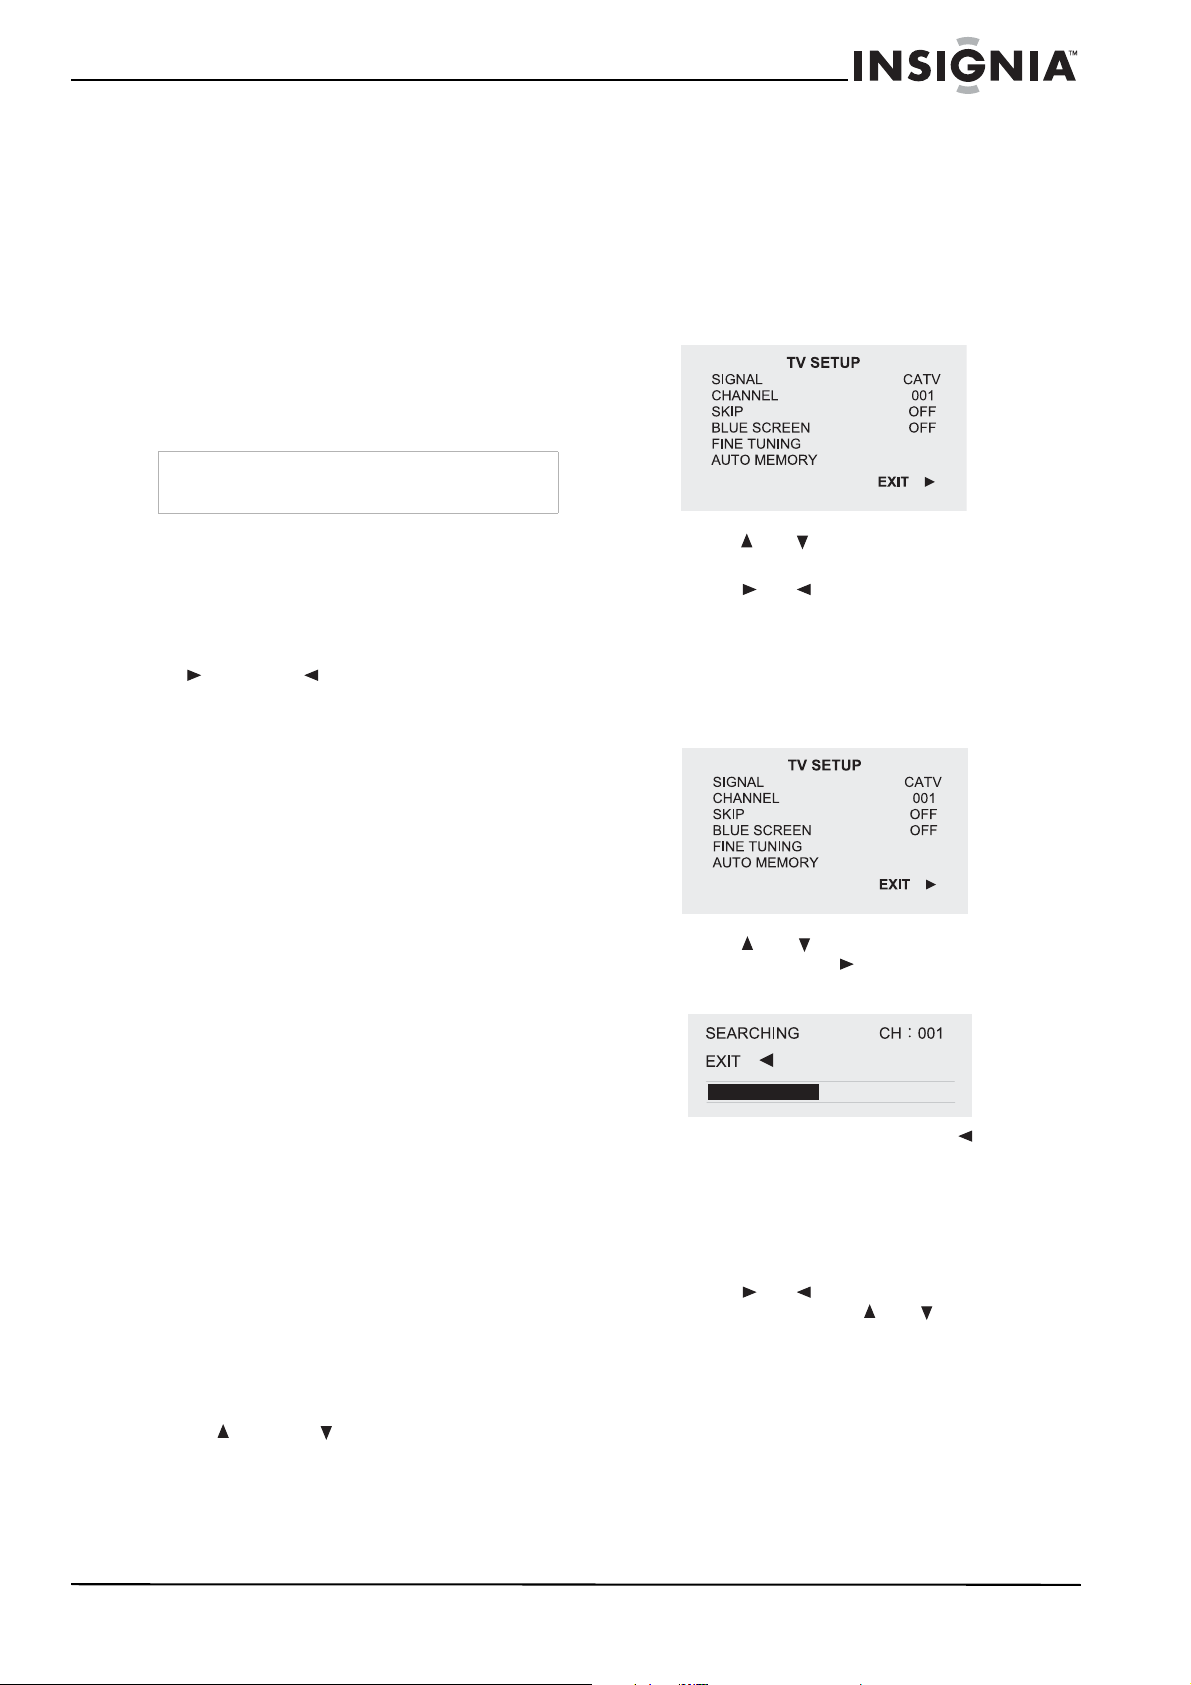
To access and use the TV SETUP menu:
1 Press SETUP. The TV SETUP menu opens.
2 Press or to select the item you want to
set.
3 Press or to go to the item selected.
4 When a confirmation is required, press OK to
confirm your choice.
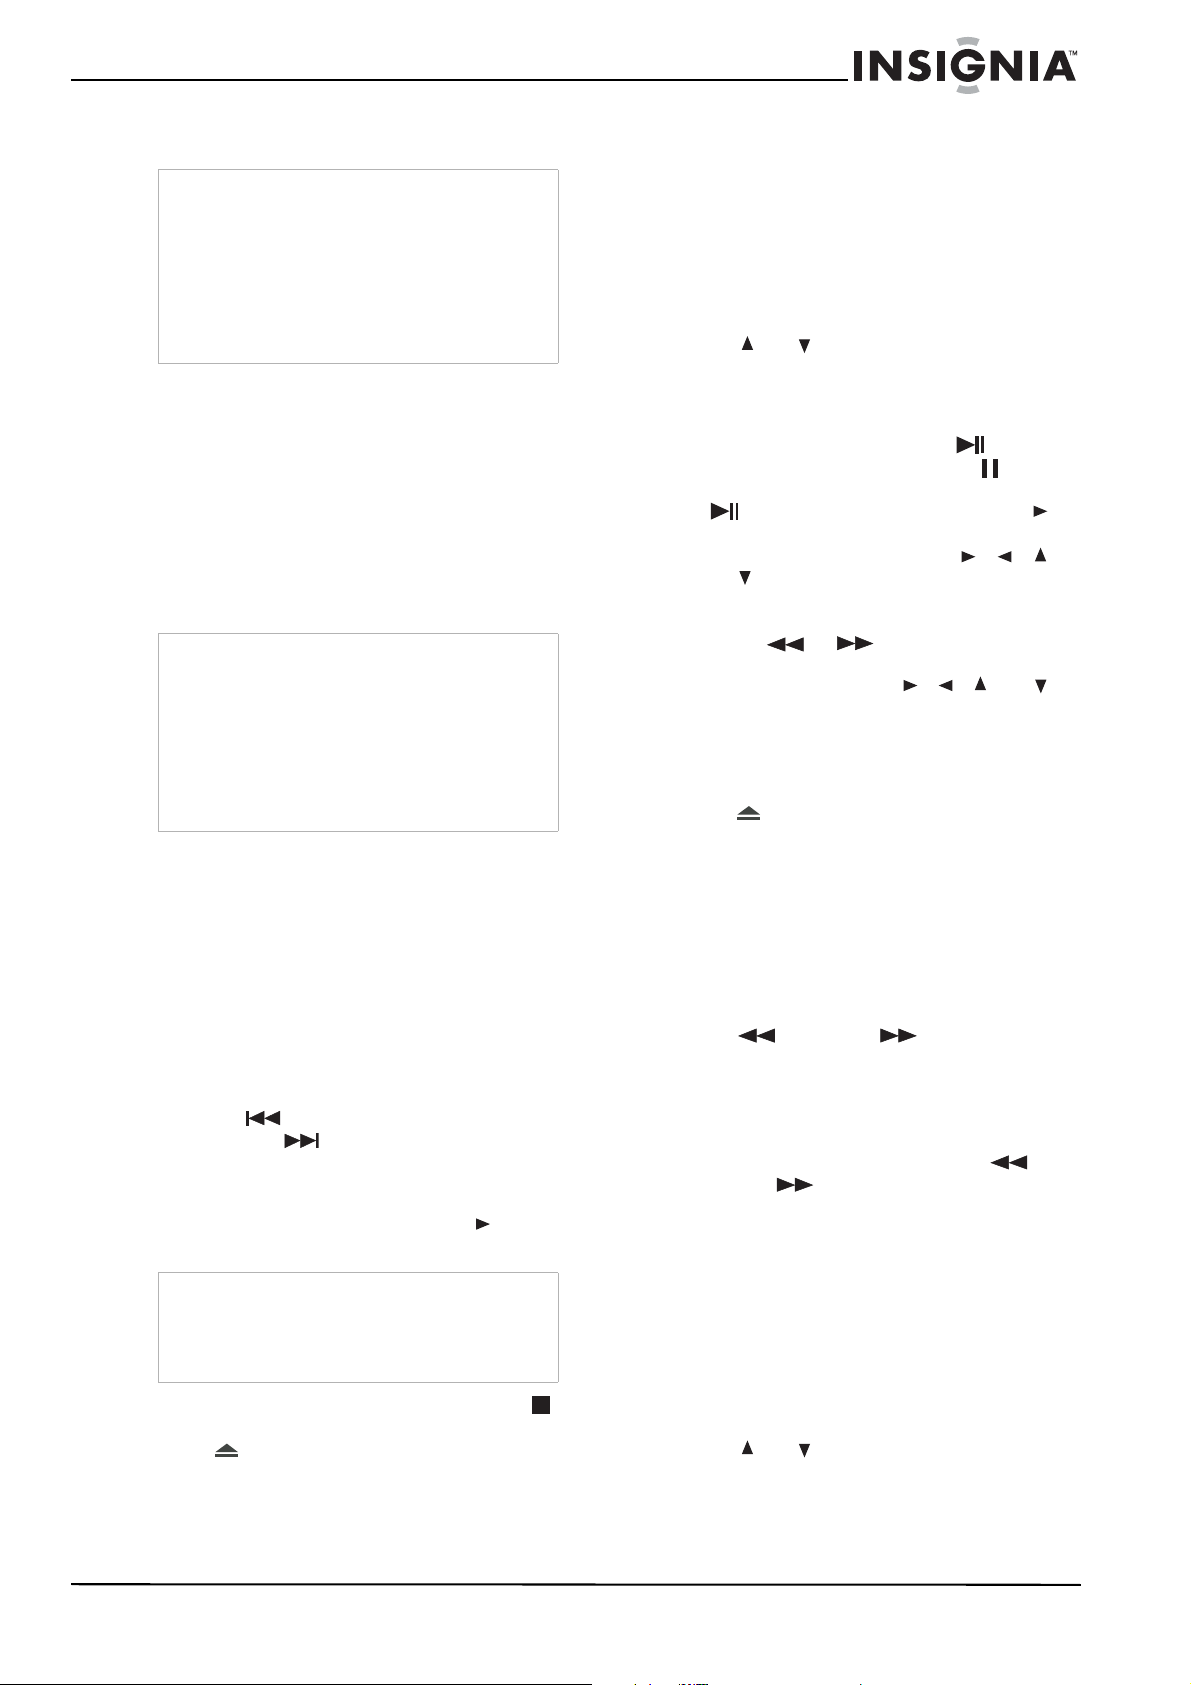
To automatically program channels into memory:
1 Press SETUP. The TV SETUP menu opens.
Changing the mode
Your DVD/TV supports multiple modes of
operation.
To select the operating mode:
• Press the SOURCE button on your DVD/TV
to select from the following modes:
•DVD
•TV
•AV
•FM
•AM
•ATSC
The name of the input source appears on the
display panel when it is selected.
Or, press one of the following on the remote
control to select the mode of your choice:
• DVD button
• TV button
• AV button
• FM/AM button
• DTV button
Changing channels
To change channels:
• Press CH+ or CH- on the remote control or
press CH + or CH - on your DVD/TV.
Or, to enter a channel number directly, press
the number buttons on the remote control.
2 Press or to select AUTO MEMORY,
then press OK or to begin memorizing the
available channels.
3 To stop the auto search, press .
Setting the time
To set the time:
1 Press TIME on the remote control, or TIME/
ENT on your DVD/TV, twice.
2 Press or to select the hour or minute
position, then press or to change the
setting.
Setting the timer
The timer lets you set specific times for the TV to
turn on and off. It also lets you set the signal
source and the channel to watch.
www.insignia-products.com
9
Page 12
Insignia NS-7UTCTV 7" Under-the-Cabinet DVD/LCD TV
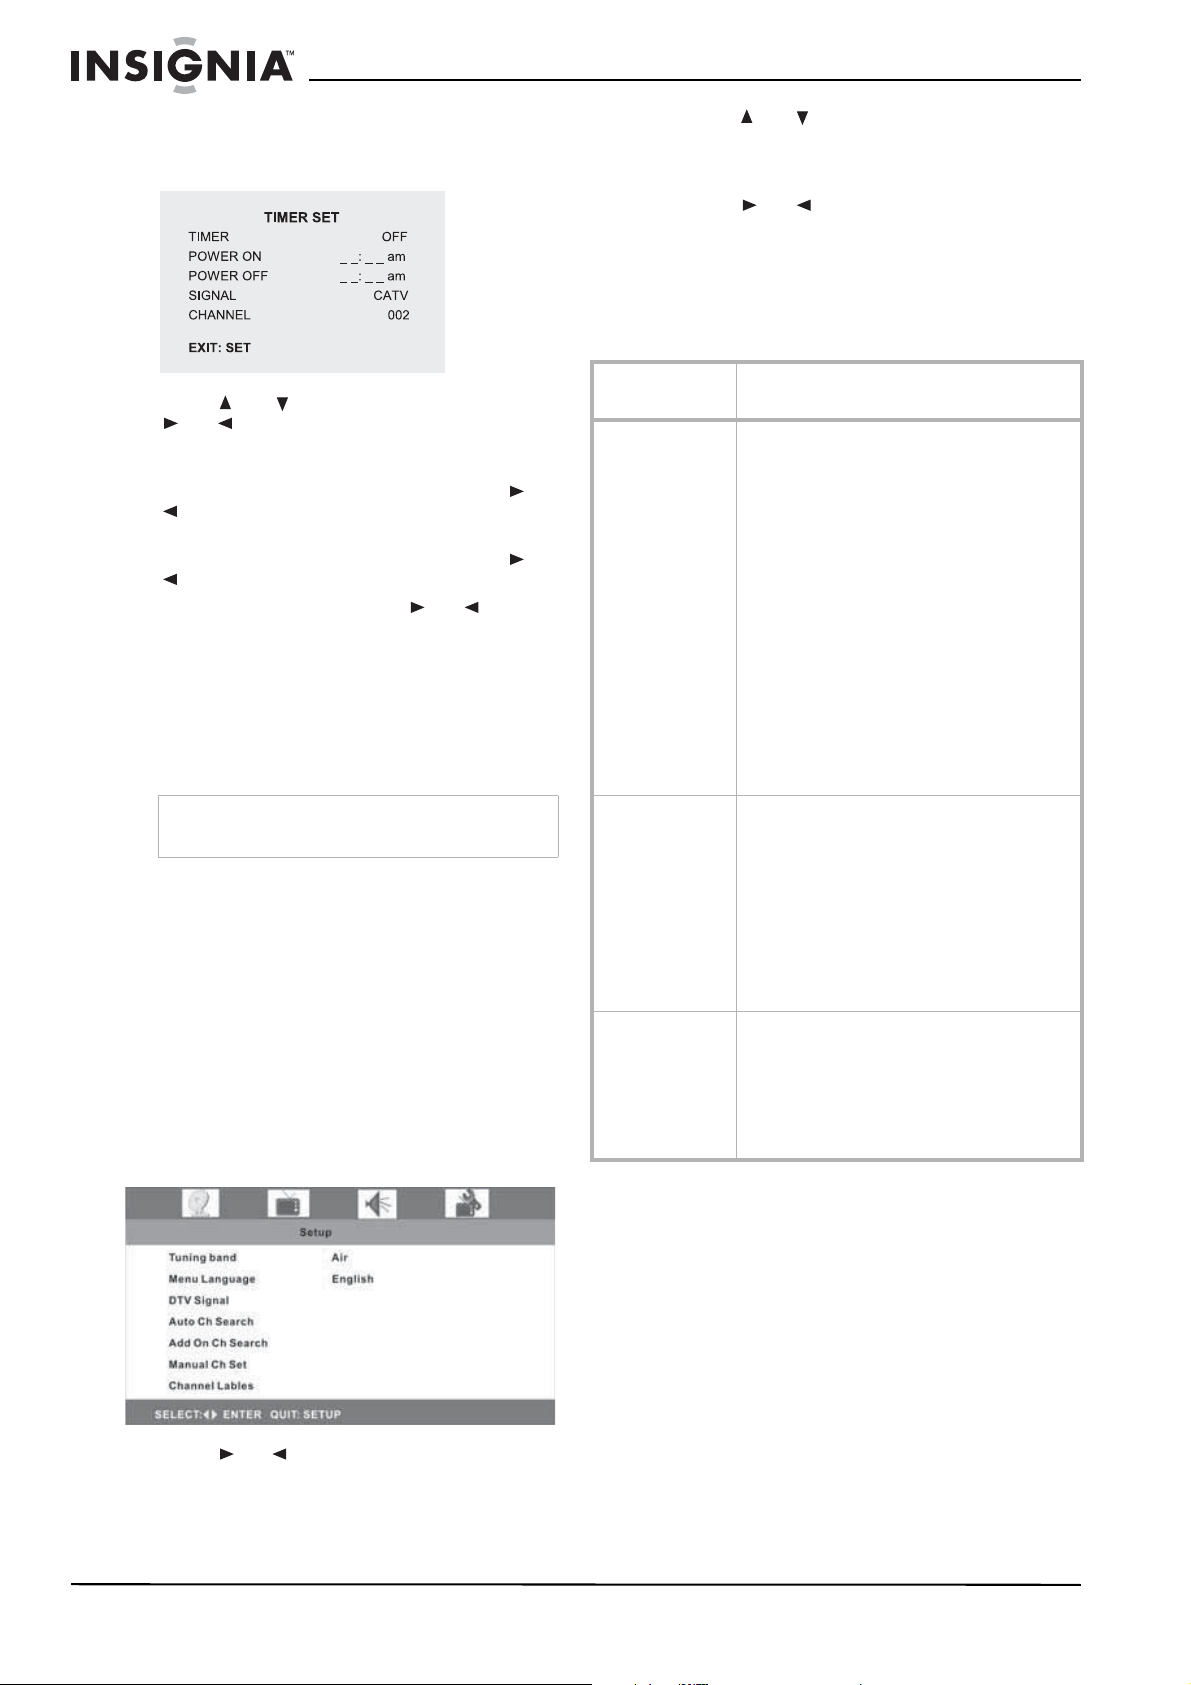
To access and use the TIMER SET menu:
1 Press PICTURE/SET twice. The TIMER SET
menu opens.
2 Press or to select TIMER, then press
or to turn the timer ON or OFF, as
desired.
3 Select POWER ON, then press the number
buttons to set the power on time. Press or
to select AM or PM.
4 Select POWER OFF, then press the number
buttons to set the power off time. Press or
to select AM or PM.
5 Select SIGNAL, then press or to
select CATV, ANT, FM or AM.
6 Select CHANNEL, then press the number
buttons to set the channel you want to watch.
In CATV mode, choose from 124 channels,
and in ANT mode, choose from 68 channels.
7 When you are finished making settings, press
PICTURE/SET again.
Note
This function remains active as long as your DVD/
TV is plugged in.
Using the TV in ATSC (digital) mode
After the connections have been made and your
DVD/TV has been mounted and plugged in, you
can use your DVD/TV in ATSC mode.
To switch to ATSC (digital) mode:
• Press DTV on the remote control, or press
SOURCE on your DVD/TV repeatedly until
ATSC is selected.
To access and use the ATSC on-screen menus:
1 Press SETUP on the remote control. The
ATSC Setup menu opens.
3 Press or to select the item you want to
set, then press OK to go to the item selected,
or a submenu for that item (some items
require you to press OK twice).
4 Press or to change the setting of the
selected item, then press OK to confirm and
return to the previous menu.
Also, ref er to different or additional na vigation
information at the bottom of some menus.
On-screen ATSC menus
On-screen
menu
Setup Tuning band–Lets you select the tuning band
Video Aspect Ratio–Lets you select the aspect ratio
Audio Bass–Lets you adjust the low sounds (bass).
Options
to watch (Air, Cable, Cable HRC, Cable IRC,
or Cable Auto).
Menu Language–Lets you select the language
for the on-screen display (OSD).
DTV Signal–Lets you check the signal strength
of the DTV signal.
Auto Ch Search–Lets you automatically search
for and set up a list of the channels available in
your area for the signal source selected.
Add On Ch Search–Lets you automatically add
channels to your existing list of the channels
available in your area for the signal source
selected.
Manual Ch Search–Lets you manually search
for and set up a list of the channels available in
your area for the signal source selected.
Channel Labels–Lets you add a label to a
channel.
of the picture. Choices include:
•Normal
• Zoom
•Wide
• Cinema
Sharpness–Lets you increase the sharpness
for a cleaner and clearer image, or decrease the
sharpness for a smoother picture.
Tint–Lets you adju st the overall color of the
picture (from red to green).
Treble–Lets you adjust the high sounds
(treble). Available in Personal mode only.
Balance–Lets you adjust the right and left
speaker volumes.
TV Speaker–Lets you turn the TV speaker on
or off.
10
2 Press or to select the on-screen menu
you want.
www.insignia-products.com
Page 13
Insignia NS-7UTCTV 7" Under-the-Cabinet DVD/LCD TV
On-screen
menu
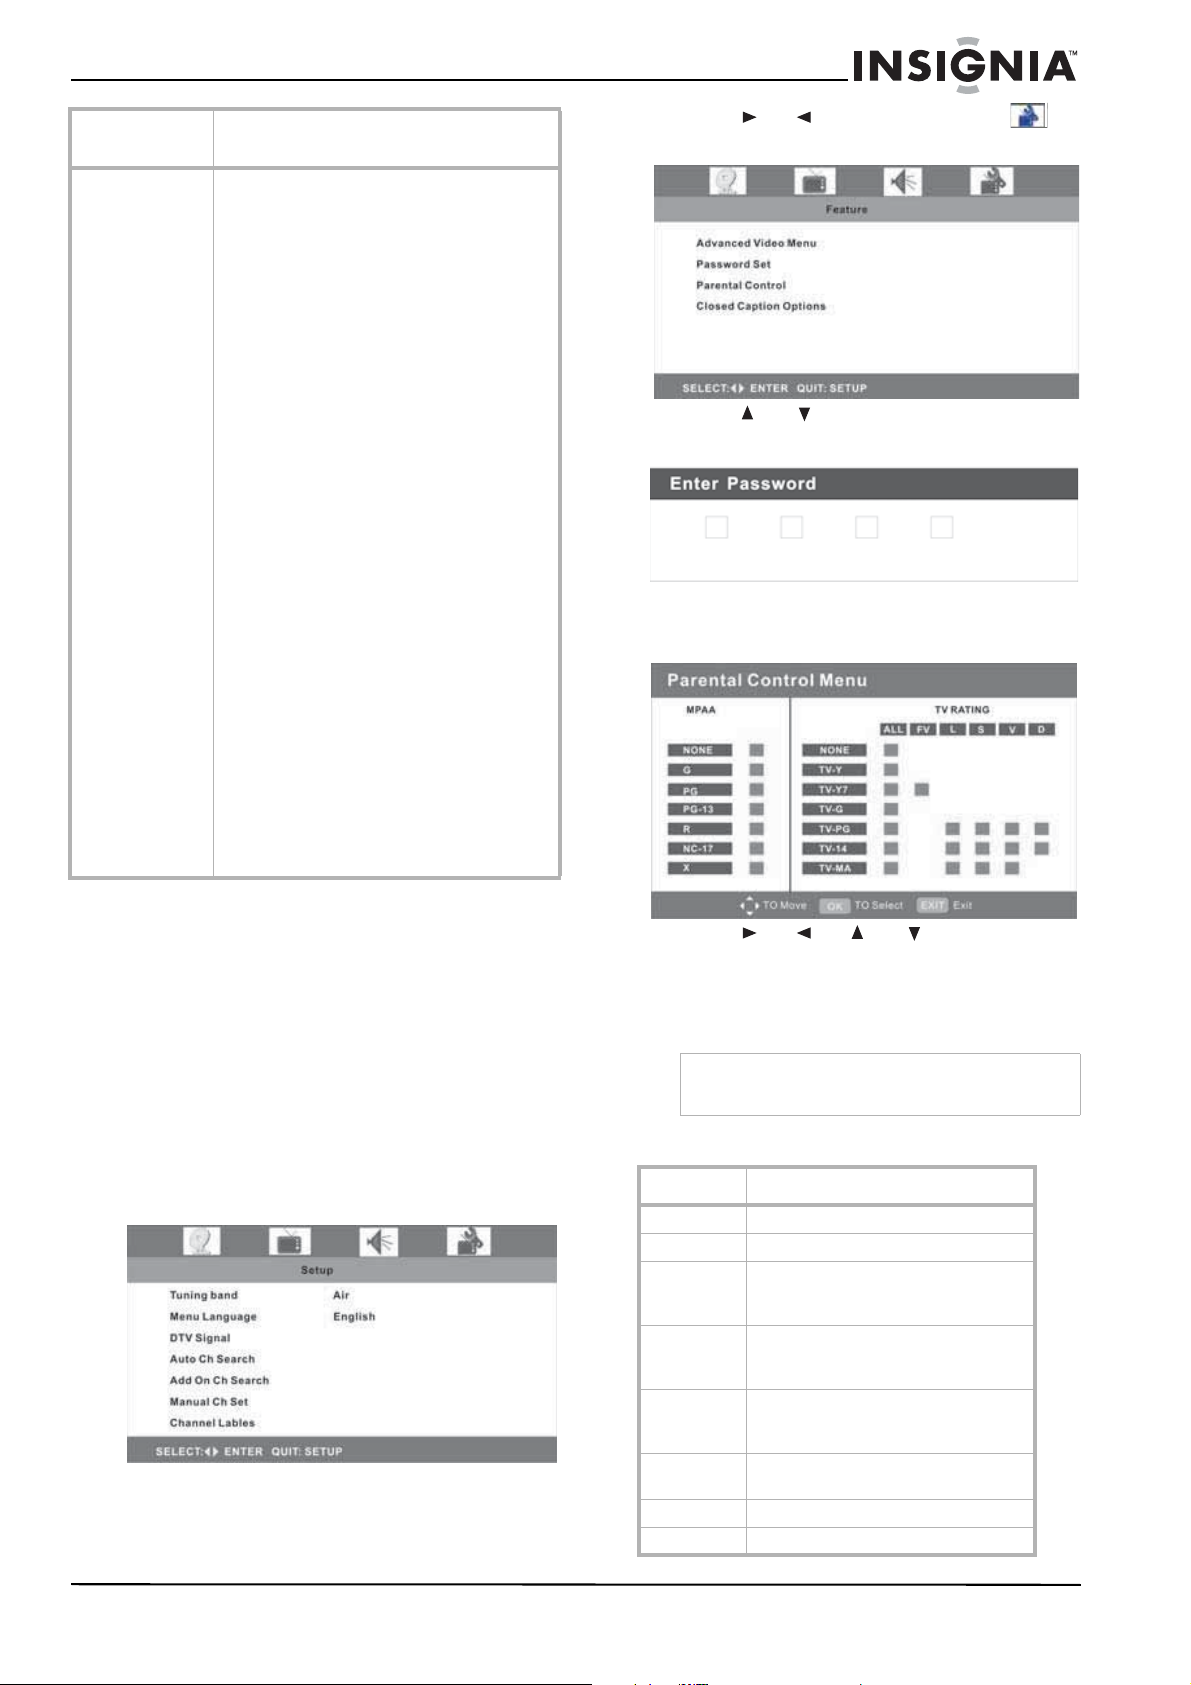
Feature Advanced Video Menu–Lets you make the
Options
following settings:
• Noise Reduction - Spatial (On or Off)
• Noise Reduction - Speckle (On or Off)
• Noise Reduction - T emporal (On or Off)
• Auto Contras t Enhancement (On or Off)
• Color Temperature
• Black Ba r Detection (On or Off)
• 3D Y/C (On or Off)
• RESET–Select this option, then press
OK twice to restore the settings to
factory default.
Password Set–Lets you set a password to
control access to the Parental Controls menu.
The initial password is 0000. Use the number
buttons to enter a new password, then enter it
again for confirmation.
Parental Controls–Lets you change settings to
control the level of programming your children
can watch. You will be prompted for the
password when you select this menu. See
“Setting parental controls” on page 11.
Closed Caption Options–Lets you set up the
way Closed Captions are displayed on the
screen. When Default is set to Automatic, all
settings are determined by the broadcast
signal. The other settings can be made only
when the Default is set to Custom. Settings
include:
• Default
•Size
•Front
• Text Color
• Text Opacity
• Background Color
• Background Opacity
• Style
• Edge Colo r
2 Press or to select the Feature
menu. The Feature menu opens.
3 Press or to select Parental Control.
You will be prompted for the password.
4 Using the number buttons, enter the
password (the initial password is 0000). The
Parental Control Menu opens.
Setting parental controls
In ATSC mode, your D VD/TV uses a V-chip to let
you control the type of programs your children
can watch. Parental controls include two ratings:
MPAA (based on age) and TV Parental
Guidelines (based on content and age). A TV
program may have an MPAA or TV Parental
Guidelines rating, so you should set controls for
both ratings.
Before you can select ratings, y ou need to set up
a parental controls password.
To set up parental controls:
1 In ATSC mode, press SETUP on the remote
control. The ATSC Setup menu opens.
5 Press or or or to select the
rating you want to set, then press OK to set
or cancel the rating.
6 Press the SETUP button to return to the
previous menu, or press EXIT to exit.
Caution
Write down your password and save it for future
use.
MPAA Ratings
Rating Description
NONE or NR Not rated.
G General audiences.
PG Parental guidance suggested. Some
PG 13 Parental guidance strongly suggested.
R Restricted. Not suitable for children
NC 17 Not suitable for children under 17
X Adults only.
OFF No controls.
material may not be suitable for
children.
Some material may not be suitable for
children under 13 years of age.
under 17 years of age unless
accompanied by a parent or guardian.
years of age.
www.insignia-products.com
11
Page 14
Insignia NS-7UTCTV 7" Under-the-Cabinet DVD/LCD TV
TV Ratings
Rating Description
NONE or NR Not rated.
TV-Y All children.
TV-Y7 Children over seven years of age.
TV-G General audiences.
TV-PG Parental guidance suggested.
TV-14 Parents strongly cautioned.
TV-MA Mature audiences only.
Some of the age-based TV Parental Guidelines
ratings also have PG Content-based ratings.
Rating Description
FV Fantasy Violence.
D Dialogue
L Language
SSex
VViolence
Using your DVD player
After the connections have been made and your
DVD/TV has been mounted and plugged in, you
are ready to use your DVD player.
Playing a DVD
To play a DVD:
1 Press the POWER button to turn on your
DVD/TV.
2 Press DVD on the remote control, or
SOURCE repeatedly on the TV, to select
DVD.
3 Insert the DVD into the disc slot with the label
facing up. The player automatically starts
playback.
4 During playback you can:
• Access the DVD Menu—Press the
MENU button on the remote control to
open the DVD menu. Press , , ,
or to highlight the item you want, then
press OK to select it.
• Pause the DVD—Press
PLAY/PAUSE on your DVD/TV, or
(Pause) on the remote, to pause
playback. Press PLAY/PAUSE on the
player, or (Play) on the remote, to
resume playback.
• Fast Reverse the D VD—Press /
(Rev Scan) on your DVD/TV, or
SEEK - on the remote control, to fast
reverse the DVD.
• Fast Forward the D VD—Press /
(Fwd Scan) on your DVD/TV, or
SEEK + on the remote control, to fast
forward the DVD.
• Skip back—Press and hold /
(Rev Scan) on your DVD/TV, or press
(Prev) on the remote, to skip to the
beginning of the current chapter. Press
repeatedly to go to previous chapters.
• Skip forward—Press and hold /
(Fwd Scan) on your DVD/TV, or press
(Next) on the remote, to skip to the
next chapter. Press repeatedly to go to
subsequent chapters.
• Play the DVD in slow motion—To play
the disc in slow motion, press SLOW.
• Zoom in on the picture—To zoom in on
a scene, press ZOOM to cycle through
the available zoom settings.
• Go to a specific time, track, or title—To
go directly to a specific time, track, or title
on the DVD, press GOTO. A menu opens,
letting you specify the point you want to
begin playback. Press or to select
the item you want, then press OK to
confirm. Press to return. Press the
number buttons to enter a title or chapter.
• Repeat a title, chapter, or track—To
repeat a title, chapter, or track, press
REPEAT to cycle through the available
options.
• Repeat a selected portion of the DVD—
To repeat a selected portion of the DVD,
press A-B at the beginning of the
selection, then press A-B again at the end
of the selection. The selection repeats. To
cancel and resume normal playback,
press A-B again.
• Stop playback—To stop DVD playback,
press STOP. Press (Play) to
resume playback from that point. If you
press STOP twice, then press
(Play), playback starts at the beginning of
the disc.
5 Press EJECT to remove the DVD.
Note
Not all DVDs support all functions.
Displaying DVD information
To display DVD information:
• Press INFO on the remote control repeatedly
to cycle through Title Elapsed, Title Remain,
Chapter Elapsed, Chapter Remain, and
Display Off.
Selecting the subtitle language
If the DVD was created with subtitles, you can
change the subtitle language.
To change the subtitle language:
1 Press SUBTITLE repeatedly until the desired
language is selected.
12
www.insignia-products.com
Page 15
Insignia NS-7UTCTV 7" Under-the-Cabinet DVD/LCD TV
2 To remove subtitles, press SUBTITLE until
Off appears on the screen.
Note
Changing the subtitle language using this method
only affects the DVD currently being played. When
the DVD is removed or your DVD/TV is turned off,
the subtitle language reverts to the language
setting specified through your DVD/TV’s main
menu.
Tip
The subtitle language can also be changed
through your DVD/TV’s main menu or the DVD’s
own subtitle settings.
Changing the audio options
If the DVD was created with multiple language
tracks (recorded in different languages), or
multiple sound options, you can temporarily
change your DVD/TV’s audio settings.
To change the audio options:
1 Press AUDIO. The OSD shows the current
audio setting.
2 If multiple audio options are available, press
AUDIO again to select the next audio track.
Note
This feature only works if the DVD was created
with multiple audio tracks. When you choose an
audio language, you only temporarily override the
audio language setting in the DVD player’s main
menu.
Allow a three second interval between selections.
Tip
The audio language can also be changed through
the DVD player’s main menu or the DVD’s own
audio settings.
Playing a JPEG disc
To play a JPEG disc:
1 Press POWER to turn on your DVD/TV.
2 Press DVD on the remote control, or
SOURCE repeatedly on your DVD/TV, to
select DVD.
3 Insert the JPEG disc into the disc slot with
the label facing up. The disc na vigation menu
opens.
4 Press or to select the file (or
submenu) you want, then press OK to
confirm. The slideshow begins.
5 During playback you can:
• Pause the picture—Press
PLAY/PAUSE on the pla yer , or (Pause)
on the remote, to pause the picture. Press
PLAY/PAUSE on the player, or
(Play) on the remote, to resume playback.
• Rotate the picture—Press , , ,
or to rotate the current picture.
• Zoom in on the picture—Press the
ZOOM button to zoom in on the picture.
Press or (Reverse or Forward
Scan) to control the zoom proportion.
While zoomed, press , , , or to
move around the picture. To cancel, press
ZOOM until the picture returns to its
normal view.
• Return to the menu—Press MENU to
return to the disc menu.
6 Press OPEN/CLOSE to remove the disc.
Playing a CD
To play a CD:
1 Press POWER to turn on your DVD/TV.
2 Press DVD on the remote control, or
SOURCE repeatedly on your DVD/TV, to
select DVD.
3 Insert the CD into the disc slot with the label
facing up. The player automatically starts
playback.
4 During playback:
• Press to skip to the previous track,
and press to skip to the next track.
Press repeatedly to continue skipping
backward or forward.
• Press the number buttons to select a
specific track to play, then press (Play)
to play the track.
Tip
If the track number is under 10, press buttons 1
through 9 to select it. If the track number is 10,
press +10 once, then button 0 to select it. If the
track number is over 10, press +10 once, then a
button 1 through 9.
• To completely stop CD playback, press
STOP.
5 Press EJECT to remove the CD.
Using your Radio
To use your Radio:
1 Press POWER to turn on your DVD/TV.
2 Press FM/AM on the remote control, or
SOURCE repeatedly on your DVD/TV, to
select FM or AM.
3 Press SEEK - or SEEK + on the
remote control for 1.5 seconds to search
downward or upward from the current
frequency for stations. The radio frequency
will be displayed on the display panel. Press
the same button to stop searching.
4 To fine tune a station, briefly press
SEEK - or SEEK + on the remote
control.
To memorize and use preset stations:
1 Press POWER to turn on your DVD/TV.
2 Press FM/AM on the remote control, or
SOURCE repeatedly on your DVD/TV, to
select FM or AM.
3 Tune to the desired station, then press
PICTURE/SET. SAVE X X will appear on the
display panel (X X represents the default
preset number).
4 Press or to set the preset number
(0 - 19), then press PICTURE/SET again to
memorize the station to that channel number.
www.insignia-products.com
13
Page 16
Insignia NS-7UTCTV 7" Under-the-Cabinet DVD/LCD TV
Or, press PICTURE/SET again to memorize
the default preset number in sequence.
Note
If you do not press any buttons for three seconds,
the station will not be memorized.
5 To access memorized (preset) stations, enter
the preset number with the number buttons.
After a pause, the radio will go the the
selected station.
Note
To go immediately to the selected preset station,
press ENT.
Or, press or to go to the next or
previous preset stations.
Note
When switching between memorized stations, “CH
XX” appears briefly on the display panel (where
XX is the preset number). After a few seconds the
preset number is replaced by the radio frequency.
Using the advanced DVD setup menus
Using the on-screen DVD setup menus
Your TV has an on-screen menu that lets you
change advanced settings in DVD mode.
To access and use the on-screen menus:
1 In DVD mode, press SETUP. The SETUP
menu opens.
2 Press , , , or to select an option,
then press OK to select the option. All items
in the category appear on the menu.
3 Press to select another category, then
press OK to confirm.
4 Press to go to a different setup menu.
5 To exit the on-screen menu, select EXIT.
On-screen DVD setup menus
On-screen
menu
General Setup TV Display–Lets you select the aspect ratio of
Speaker Setup Downmix–Lets you select the audio output of
Dolby Digital
Setup
Options
the picture. Choices include Normal/PS,
Normal/LB (use these settings when the DVD
will be shown on a normal 4:3 TV), or Wide
(use this setting when the DVD will be shown
on your DVD/TV , or on a wide screen TV).
OSD Lang–Lets you select the language for the
on-screen display. Choices include English,
French, and Spanish.
Screen Saver–Lets you activate Screen Saver
mode, which shows a screen saver on the TV
screen if the same image remains on the
screen for several minutes.
your DVD/TV. Choices inc lude LT/RT (mixed
mono output), or Stereo (stereo output).
Dual Mono–Lets you select the Dolby Digital
audio output of your DVD/TV. Choices include
Stereo, L-Mono, R-Mono, and Mix-Mono.
Dynamic–Lets you adjust the linear dynamic
compression rate to get different signal effects.
On-screen
menu
Video Setup Sharpness–Lets you adjust the sharpness level
Preference Page
(your DVD/TV
must be in Stop
mode to access)
Options
of the picture.
Brightness–Lets you adjust the brightness
level of the picture.
Contrast–Lets you adjust the contrast level of
the picture.
Audio Subtitle and Disc Menu–Lets you select
the subtitle and disc menu language, or to put
the subtitles and disc menus on audio. Choices
include English, French, Spanish, and other
languages, depending on what is available on
the DVD.
Parental–Lets you lock out portions of a DVD,
or the entire DVD, depending on the contents
of the disc. When you select this item, you will
be prompted for a password (see Password,
below). Use the number buttons to enter the
password. For a list of the ratings, see “MPAA
Ratings” on page 11.
Password–Lets you set the password for
access to the Parental setup menu. The initial
password is 1369. Enter the new password
with the number buttons, then press OK to
confirm. When you are prompted to reenter the
password, enter the same password, then
press OK to confirm.
Default Reset–Lets you reset all preference
settings to factory default.
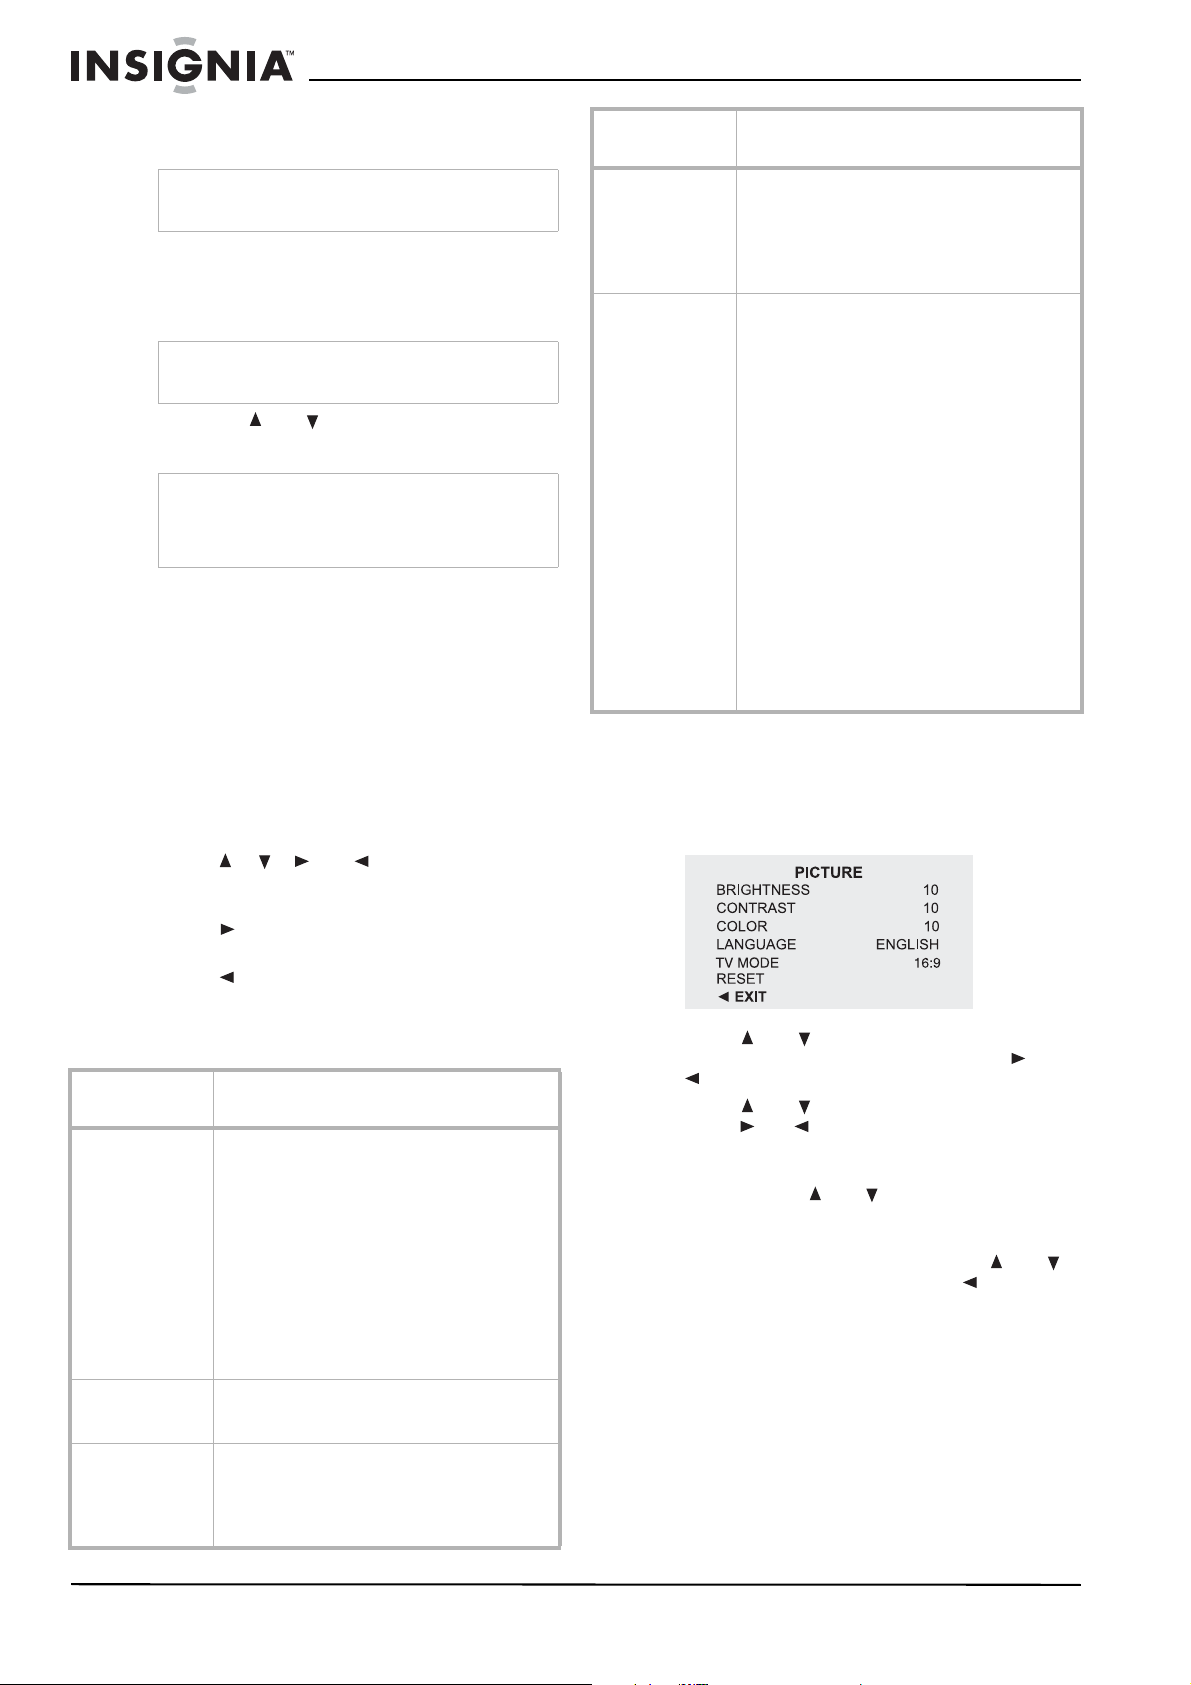
Changing the LCD screen settings
To change LCD screen settings:
1 In DVD mode, press PICTURE/SET. The
PICTURE menu opens.
2 Press or to select BRIGHTNESS,
CONTRAST, or COLOR, then press or
to adjust the setting between 0 and 20.
3 Press or to select Language, then
press or to choose the language you
want.
4 If you want to reset all settings to the factory
default, press or to select Reset, then
press OK. The settings are returned to
factory default.
5 To exit the on-screen menu, press or
to select PICTURE, then press .
14
www.insignia-products.com
Page 17
Insignia NS-7UTCTV 7" Under-the-Cabinet DVD/LCD TV
Troubleshooting
Check the following items before asking for
repair service:
Problem Solution
The DVD player will
not play a disc
Picture is OK, but
no sound.
No picture,
unsteady picture, or
picture incorrectly
positioned.
Plays a section
repeatedly or will
not resume normal
playback.
Remote control
does not work.
Note
Static or other external interference may cause the
player to behave abnormally. If this occurs, unplug
your D VD/TV, then plug it in again to reset your
DVD/TV. If problems persist, disconnect the power
and call your Insignia dealer.
• Make sure that there is a disc in your
DVD/TV.
• Make sure that the disc is loaded label
side up.
• Make sure that the disc is clean and not
warped.
• Make sure that the region code on the
disc matches the code on your DVD/
TV.
• Make sure that there is no water
condensation in your DVD/TV . Remove
the disc and leave the power on until
any condensation evaporates.
• Make sure that all connections are
correct.
• Make sure that the sound has not been
muted (press the MUTE button to
check).
• Make sure that the volume is correctly
adjusted.
• Make sure that the disc is clean and not
warped.
• Make sure that all connections are
correct.
• Make sure that the AV signal source is
NTSC.
• Make sure that the disc is clean and not
warped.
• Make sure that your DVD/TV is not in
A-B repeat mode. (Press the A-B
button to cancel A-B repeat mode.)
• Make sure that the disc is clean and not
warped.
• Point the rem ote control at your DVD/
TV’s IR sensor.
• Make sure the batteries are installed
correctly.
• Change the batteries in the remote
control.
• Remove any obstacles between your
DVD/TV’s IR sensor and the remote
control.
Maintaining
Cleaning the case
• To clean the player, use a soft, dry cloth. If
the surfaces are extremely dirty, use a soft
cloth lightly moistened with a mild detergent
solution.
• Do not use strong solvents such as alcohol,
benzine, or thinner, as these might damage
the surface of your DVD/TV.
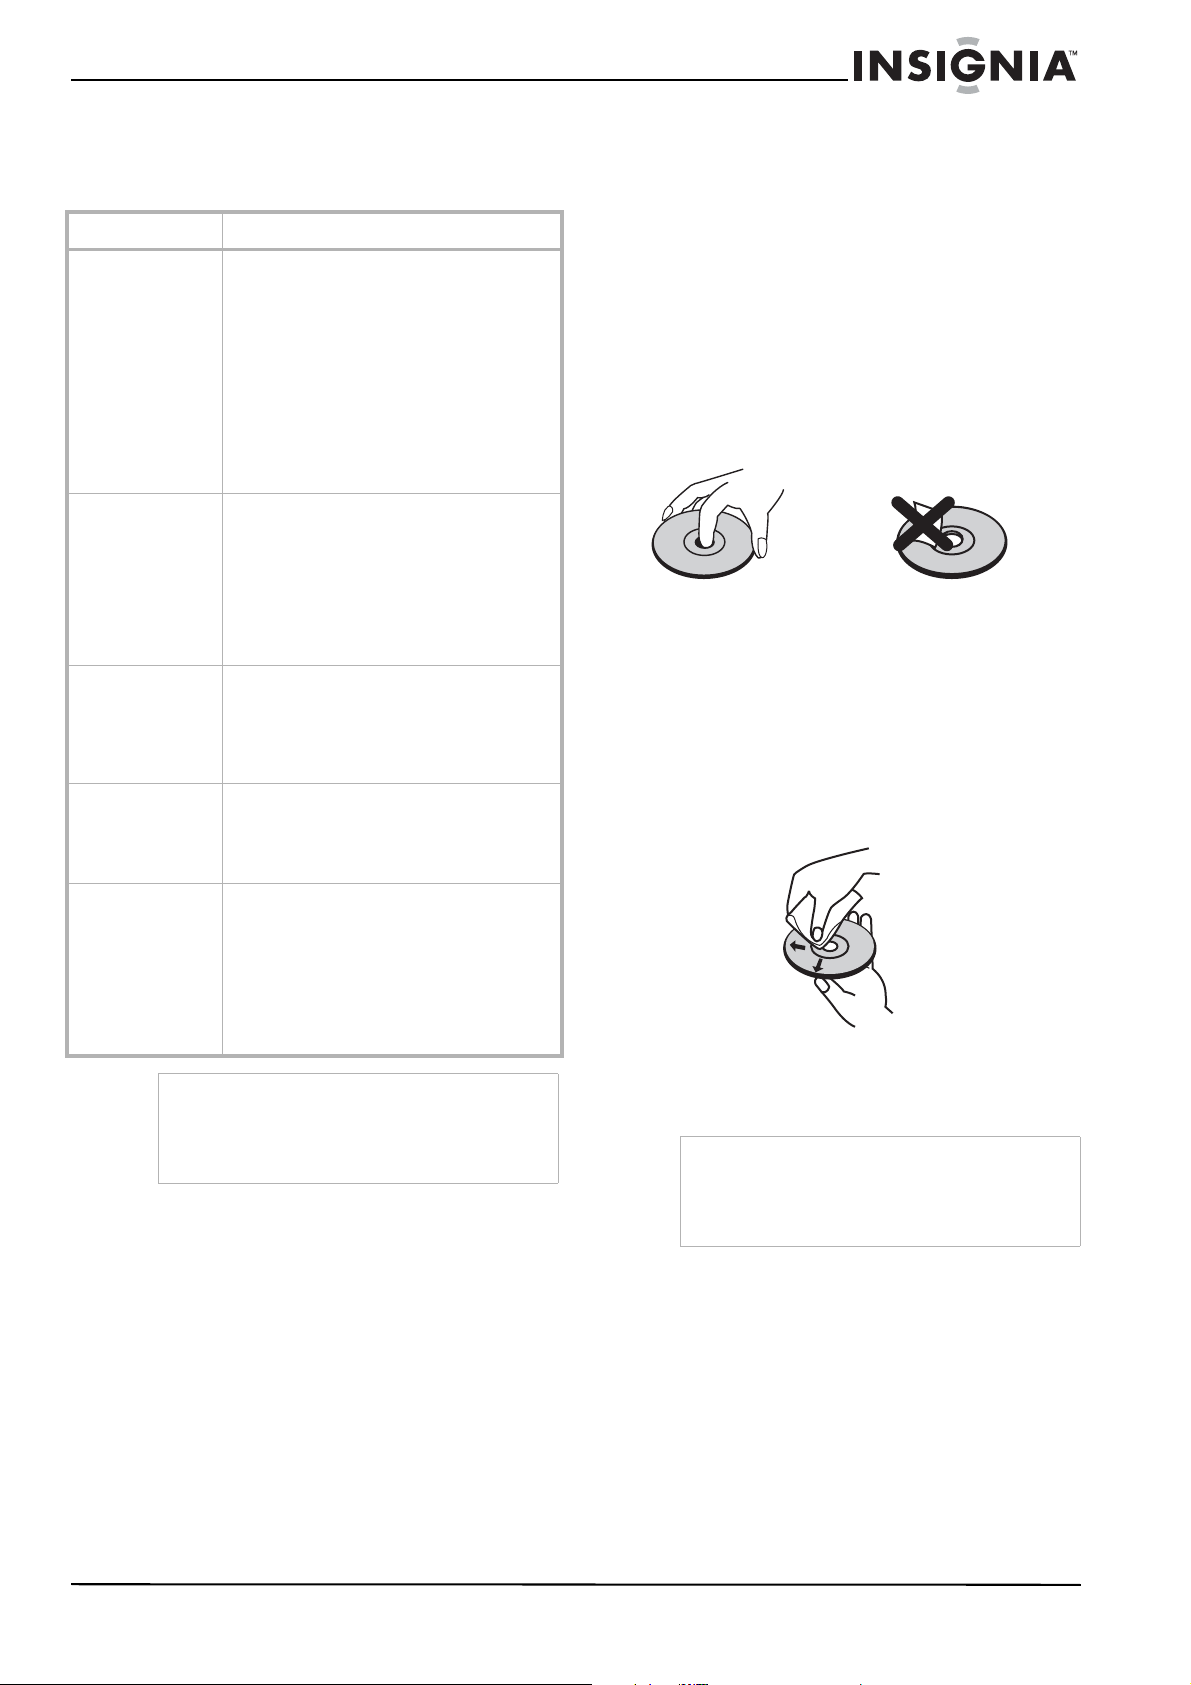
Care and handling of discs
Handling discs
Do not touch the playback side of the disc. Hold
the disc by the edges so that fingerprints do not
get on the surface. Never stick paper or tape on
the disc.
Storing discs
After playing, store the disc in its case. Do not
expose the disc to direct sunlight or sources of
heat and never leave it in a parked car exposed
to direct sunlight.
Cleaning discs
Fingerprints and dust on the disc can cause
poor picture quality and sound distortion. Before
playing, clean the disc with a clean cloth. Wipe
the disc from the center out.
Do not use strong solvents such as alcohol,
benzine, thinner, commercially available
cleaners, or anti-static spray intended for older
vinyl records.
Note
Never operate your DVD/TV immediately after
moving it from a cold location to a warm location.
Leave it for two or three hours without operating it.
If you use your DVD/TV in such a situation, it may
damage tapes, discs, or internal parts.
Handling and cleaning the TV/DVD
Keeping the exterior surfaces clean
• Do not use volatile liquids such as insecticide
spray near the TV/DVD.
• Do not leave rubber or plastic products in
contact with the TV/DVD for a long period of
time because they can leave marks on the
surface.
www.insignia-products.com
15
Page 18
Insignia NS-7UTCTV 7" Under-the-Cabinet DVD/LCD TV
Specifications
LCD screen size
Laser wavelength
Video system
Frequency
response
Audio
signal-to-noise
Audio distortion +
noise
Channel separation
Dynamic range
Radio system
Radio frequency
range
Power
Power consumption
Dimensions
Weight
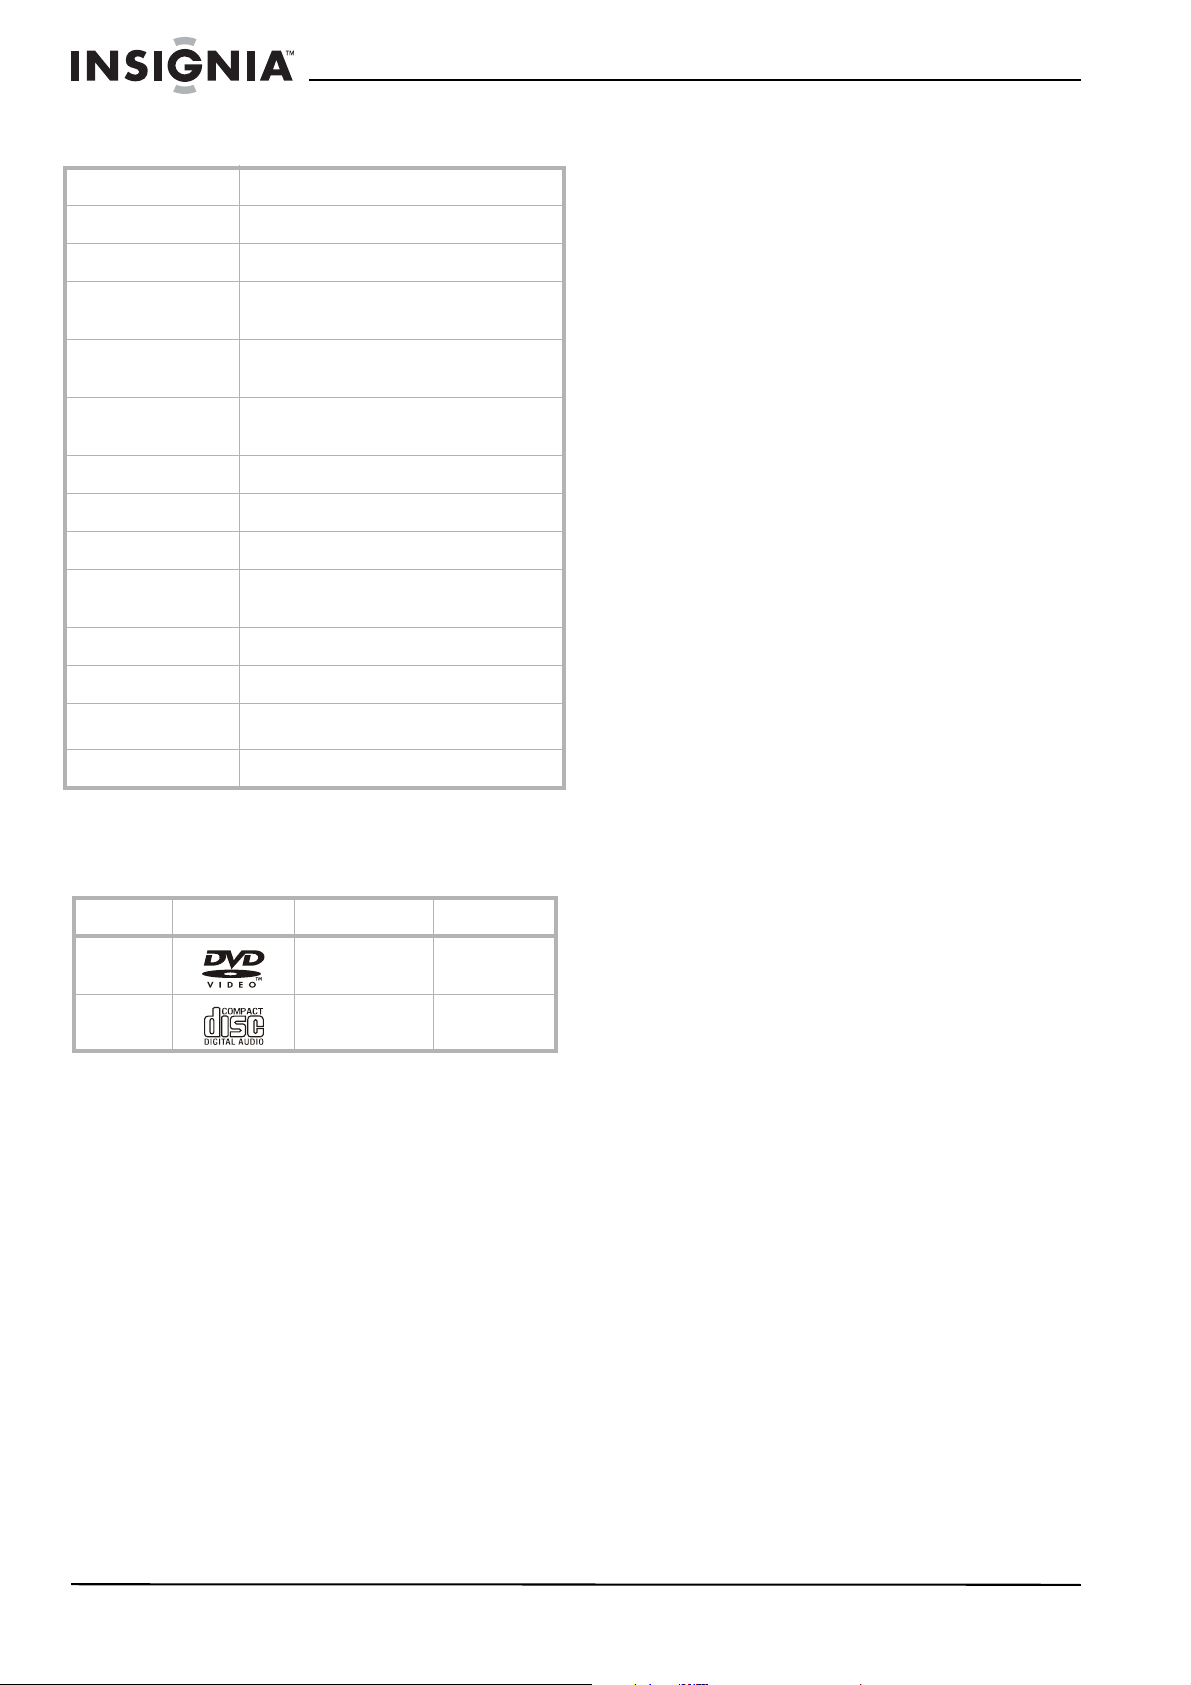
Playable discs
The following discs can be played in the DVD
player.
7 inches
780/650nm
NTSC
20 Hz~20 KHz ±2.5 dB
> 85 dB
< -70 dB (1 KHz)
> 70 dB (1 KHz)
> 80 dB (1 KHz)
PLL
AM - 520~1710 KHz
FM - 87.5~107.9 MHz
100~240 V AC 50/60 Hz
<30 Watts
3.11 × 14.76 × 10.9 inches
(7.9 × 37.49 ×27.69 cm)
Approx. 6.83 lbs. (3.1 kg)
• Connect the equipment into an outlet on a
circuit different from that to which the receiver
is connected.
• Consult the dealer or an experienced radio or
TV technician for help.
• Only a shielded interface cable should be
used.
Modifications
The FCC requires the user to be notified that any
changes or modifications made to this device that are
not expressly approv ed by Insignia may void the user’s
authority to operate the equipment.
Cables
Connections to this device must be made with shielded
cables with metallic RF/EMI connector hoods to
maintain compliance with FCC Rules and Regulations.
Canadian notice
This Class B digital apparatus meets all requirements
of the Canadian Interference-Causing Equipment
Regulations.
Avis Canadian
Cat apparel numerous de la classed B respected
toutes les exigencies du règlement sur le materiel
brouilleur du Canada.
Copyright
© 2007 Insignia. Insignia and the Insignia logo are
trademarks of Best Buy Enterprise Services, Inc. Other
brands and product names are trademarks or
registered trademarks of their respective holders.
Specifications and features are subject to change
without notice or obligation.
For service and support call (877) 467-4289.
Discs Label Contents Dimension
DVD Audio + Video
(moving picture)
CD Audio 12 cm
12 cm
Legal Notices
FCC Part 15
This equipment has been tested and found to comply
with the limit for a Class B digital device, pursuant to
Part 15 of the FCC Rules. These limits are designed to
provide reasonable protection against harmful
interference in a residential installation.
This equipment generates, uses and can radiate radio
frequency energy and, if not installed and used in
accordance with the instructions, may cause harmful
interference to radio communications. However, there
is no guarantee that interference will not occur in a
particular installation.
If this equipment does not cause harmful interference
to radio or television reception which can be
determined by turning the equipment off and on, the
user is encourage to try to correct the interference by
one or more of the following measures.
• Reorient or relocate the receiving antenna.
• Increase the separation between the
equipment and receiver.
16
www.insignia-products.com
Page 19

Insignia NS-7UTCTV 7" Under-the-Cabinet DVD/LCD TV
1-Year Limited Warranty
Insignia Products (“Insignia”) warrants to you, the
original purchaser of this new 7” Under-the-Cabinet
DVD/LCD TV (“Product”), that the Product shall be free
of defects in the original manufacture of the material or
workmanship for a period of one (1) year from the date of
your purchase of the Product (“Warranty Period”). This
Product must be purchased from an authorized dealer of
Insignia brand products and packaged with this warranty
statement. This warranty does not cover refurbished
Product. If you notify Insignia during the Warranty Period
of a defect covered by this warranty that requires
service, terms of this warranty apply.
HOW LONG DOES THE COVERAGE LAST?
The Warranty Period lasts for 1 year (365 days) from the
date you purchased the Prod uct. The purchase date is
printed on the receipt you received with the Product.
WHAT DOES THIS WARRANTY COVER?
During the Warranty Period, if the original manufacture of
the material or workmanship of the Product is
determined to be defective by an authorized Insignia
repair center or store personnel, Insignia will (at its sole
option): (1) repair the Product with new or rebuilt parts;
or (2) replace the Product at no charge w ith new or
rebuilt comparable products or parts. Products and parts
replaced under this warranty become the property of
Insignia and are not returned to you. If service of
Products or parts are required after the Warranty Period
expires, you must pay all labor and parts charges. This
warranty lasts as long as you own your Insignia Product
during the Warranty Period. Warranty coverage
terminates if you sell or otherwise transfer the Product.
HOW TO OBTAIN WARRANTY SERVICE?
If you purchased the Product at a retail store location,
take your original receipt and the Product to the store
you purchased it from. Make sure that you place the
Product in its original pack aging or packaging that
provides the same amount of protection as the original
packaging. If you purchased the Product from an online
web site, mail your original receipt and the Product to the
address listed on the web site. Make sure that you put
the Product in its original packaging or packaging that
provides the same amount of protection as the original
packaging.
T o obtain in-home warranty service for a television with a
screen 25 inches or larger, call 1-888-BESTBUY. Call
agents will diagnose and correct the issue over the
phone or will have an Insignia-approved repair person
dispatched to your home.
WHERE IS THE WARRANTY VALID?
This warranty is valid only to the original purchaser of the
product in the United States and Canada.
WHAT DOES THE WARRANTY NOT COVER?
This warranty does not cover:
• Customer instruction
• Installation
• Set up adjustments
• Cosmetic damage
• Damage due to acts of God, such as lightning
strikes
• Accident
• Misuse
• Abuse
• Negligence
• Commercial use
• Modification of any part of the Product, including
the antenna
• Plasma display panel damaged by static
(non-moving) images applied for lengthy periods
(burn-in).
This warranty also does not cover:
• Damage due to incorrect operation or maintenance
• Connection to an incorrect voltage supply
• Attempted repair by anyon e oth er than a facility
authorized by Insignia to service the Product
• Produc ts sold as is or with all faults
• Consumables, such as fuses or batteries
• Products where the factory applied serial number
has been altered or removed
REPAIR REPLACEMENT AS PROVIDED UNDER THIS
WARRANTY IS YOUR EXCLUSIVE REMEDY.
INSIGNIA SHALL NOT BE LIABLE FOR ANY
INCIDENTAL OR CONSEQUENTIAL DAMAGES FOR
THE BREACH OF ANY EXPRESS OR IMPLIED
WARRANTY ON THIS PRODUCT, INCLUDING, BUT
NOT LIMITED TO, LOST DATA, LOSS OF USE OF
YOUR PRODUCT, LOST BUSINESS OR LOST
PROFITS. INSIGNIA PRODUCTS MAKES NO OTHER
EXPRESS WARRANTIES WITH RESPECT TO THE
PRODUCT, ALL EXPRESS AND IMPLIED
WARRANTIES FOR THE PRODUCT, INCLUDING, BUT
NOT LIMITED TO, ANY IMPLIED WARRANTIES OF
AND CONDITIONS OF MERCHANTABILITY AND
FITNESS FOR A PARTICULAR PURPOSE, ARE
LIMITED IN DURATION TO THE WARRANTY PERIOD
SET FORTH ABOVE AND NO WARRANTIES,
WHETHER EXPRESS OR IMPLIED, WILL APPLY
AFTER THE WARRANTY PERIOD. SOME STATES,
PROVINCES AND JURISDICTIONS DO NOT ALLOW
LIMITATIONS ON HOW LONG AN IMPLIED
WARRANTY LASTS, SO THE ABO VE LIMITATION MAY
NOT APPLY TO YOU. THIS WARRANTY GIVES YOU
SPECIFIC LEGAL RIGHTS, AND YOU MAY ALSO
HAVE OTHER RIGHTS, WHICH VARY FROM STATE
TO STATE OR PROVINCE TO PROVINCE.
Contact Insignia:
For customer service please call 1-877-467-4289
www.insignia-products.com
INSIGNIA™ is a trademark of Best Buy Enterprise
Services, Inc.
Distributed by Best Buy Purchasing, LLC.
Insignia, 7601 Penn Avenue South, Richfield, Minnesota,
U.S.A.
www.insignia-products.com
17
Page 20

Insignia NS-7UTCTV 7" Under-the-Cabinet DVD/LCD TV
18
www.insignia-products.com
Page 21

Insignia NS-7UTCTV Lecteur de DVD/TV ACL de 7 po de dessous d’armoire
(
)
Insignia NS-7UTCTV
Lecteur de DVD/TV
ACL de 7 po de
dessous d’armoire
Table des matières
Bienvenue. . . . . . . . . . . . . . . . . . . . . . . . . . . . . . . .19
Informations sur la sécurité . . . . . . . . . . . . . . . . . .19
Fonctionnalités . . . . . . . . . . . . . . . . . . . . . . . . . . . .21
Accessoires. . . . . . . . . . . . . . . . . . . . . . . . . . . . . . . . 22
Vue avant. . . . . . . . . . . . . . . . . . . . . . . . . . . . . . . . . . 22
Panneau d'affichage . . . . . . . . . . . . . . . . . . . . . . . . . 23
Vue arrière - connecteurs . . . . . . . . . . . . . . . . . . . . . 23
Télécommande . . . . . . . . . . . . . . . . . . . . . . . . . . . . . 23
Configuration de l'appareil . . . . . . . . . . . . . . . . . . .24
Installation des piles de la télécommande. . . . . . . . . 24
Utilisation de la télécommande . . . . . . . . . . . . . . . . . 24
Connexion à des sources vidéo . . . . . . . . . . . . . . . . 25
Utilisation du téléviseur. . . . . . . . . . . . . . . . . . . . . .27
Mise sous et hors tension de l’appareil . . . . . . . . . . . 27
Réglage du volume . . . . . . . . . . . . . . . . . . . . . . . . . . 27
Modification du mode . . . . . . . . . . . . . . . . . . . . . . . . 28
Changement de canal. . . . . . . . . . . . . . . . . . . . . . . . 28
Réglages initiaux en mode TV . . . . . . . . . . . . . . . . . 28
Réglage de l’heure . . . . . . . . . . . . . . . . . . . . . . . . . . 28
Réglage du temporisateur. . . . . . . . . . . . . . . . . . . . . 28
Utilisation du téléviseur en mode ATSC (numérique) 29
Fonctionnement du lecteur de DVD . . . . . . . . . . . .31
Lecture d’un DVD . . . . . . . . . . . . . . . . . . . . . . . . . . . 31
Lecture d’un CD . . . . . . . . . . . . . . . . . . . . . . . . . . . . 32
Lecture d'un disque de fichiers JPEG . . . . . . . . . . . . 32
Utilisation de la radio . . . . . . . . . . . . . . . . . . . . . . .33
Utilisation des menus de configuration avancée du
lecteur de DVD. . . . . . . . . . . . . . . . . . . . . . . . . . .33
Utilisation des menus de configuration du lecteur de DVD
à l'écran . . . . . . . . . . . . . . . . . . . . . . . . . . . . . . . . . 33
Menus de configuration du DVD à l'écran. . . . . . . . . 34
Modification des paramètres de l'écran ACL. . . . . . . 34
Problèmes et solutions. . . . . . . . . . . . . . . . . . . . . .35
Entretien. . . . . . . . . . . . . . . . . . . . . . . . . . . . . . . . .35
Spécifications . . . . . . . . . . . . . . . . . . . . . . . . . . . . .36
Avis juridiques . . . . . . . . . . . . . . . . . . . . . . . . . . . .36
Garantie limitée d’un an . . . . . . . . . . . . . . . . . . . . .37
Bienvenue
Félicitations d’avoir acheté ce produit Insignia de
haute qualité. Le modèle NS-7UTCTV
représente la dernière avancée technologique
dans la conception de téléviseur et lecteur de
DVD de dessous d’armoire et a été conçu pour
des performances et une fiabilité
exceptionnelles.
Informations sur la sécurité
Prises d'antenne
Si le téléviseur est connecté à une antenne
extérieure, vérifier que l'antenne est mise à la
terre afin de bénéficier d'une certaine protection
contre les variations de tension et les charges
électrostatiques L'article 810 du Code national
de l’électricité (CNE) fournit des informations
relatives à la mise à la terre correcte du mât et
du support, à la mise à la terre du câble
d’antenne sur la décharge de l’antenne, au
diamètre des câbles de terre, à l’emplacement
de l’unité de décharge de l’antenne, à la
connexion aux conducteurs de terre ainsi qu'aux
normes en matière de prise de terre.
EXAMPLE OF ANTENNA GROUNDING AS SPECIFIED
BY NATIONAL ELECTRICAL CODE (NEC)
GROUND
CLAMP
ELECTRIC
SERVICE
EQUIPMENT
GROUND CLAMPS
POWER SERVICE GROUNDING
ELECTRODE SYSTEM
NEC ART 250, PART H
• L’antenne externe ne doit pas être située près
de lignes électriques aériennes ou d’autres
circuits d’alimentation et électriques, ni à un
emplacement où elle pourrait tomber sur de
tels circuits ou lignes électriques. Lors de
l'installation d'une antenne extérieure, faire
très attention de ne pas toucher de telles
lignes électriques ou circuits car tout contact
peut être mortel.
• Pour protéger l’appareil pendant un orage ou
s’il se trouve inutilisé et sans surveillance
pendant de longues périodes, le débrancher
de la prise murale et débrancher l'antenne.
Ceci évitera d’endommager l'appareil en cas
de foudre et de variations de tension du
secteur.
Risque de choc électrique
Afin de réduire les risques d’incendie et de choc
électrique, ne pas exposer cet appareil à la pluie
ou l’humidité.
ATTENTION
RISQUE DE CHOC ÉLECTRIQUE
NE PAS OUVRIR
ATTENTION
RISQUES DE CHOC ÉLECTRIQUE, NE RETIREZ
PAS LE COUVERCLE (OU LE PANNEAU ARRIÈRE)
AUCUNE PIÈCE NE PEUT ÊTRE RÉPARÉE PAR
L'UTILISATEUR. CONFIEZ L'APPAREIL À UN
TECHNICIEN QUALIFIÉ.
:
AFIN DE RÉDUIRE LES
ANTENNA
LEAD-IN
WIRE
ANTENNA
DISCHARGE UNIT
(NEC SECTION 810-20)
GROUNDING CONDUCTORS
(NEC SECTION 810-21)
www.insignia-products.com
19
Page 22

Insignia NS-7UTCTV Lecteur de DVD/TV ACL de 7 po de dessous d’armoire
Le symbole représentant un éclair dans un
triangle équilatéral a pour but d'avertir l'utilisateur
du danger présenté par des pièces
non isolées à l'intérieur de l'appareil et dont la
tension est suffisante pour provoquer des
décharges électriques dangereuses.
Le point d'exclamation dans un triangle équilatéral
a pour but d'avertir l'utilisateur que des instructions
importantes relatives à l'utilisation et à l'entretien se
trouvent dans le manuel accompagnant l'appareil.
Avertissement :
Émission de rayon laser visible et invisible de
classe 1 en cas d’ouverture ou de neutralisation
du dispositif de verrouillage. Ne pas fixer des
yeux l’axe du faisceau laser ni le regarder
directement avec des instruments optiques.
Avertissement :
Cet appareil est équipé d'un système au laser.
Pour s’assurer d’une utilisation correcte de cet
appareil, prendre soin de lire attentivement le
manuel de l’opérateur et de le conserver pour
toute référence ultérieure. Contacter un
réparateur qualifié si un entretien de l’appareil
s'avère nécessaire.
L'utilisation de commandes ou l'exécution de
réglages ou procédures autres que celles
indiquées ici peuvent aboutir à une irradiation
dangereuse.
Pour éviter toute exposition directe aux rayons
laser, ne pas essayer d’ouvrir le boîtier. NE PAS
REGARDER DIRECTEMENT DANS L'AXE DU
FAISCEAU.
Attention :
Cet appareil ne doit pas être exposé à des
éclaboussures ou à des gouttes d’eau et aucun
objet rempli de liquide, tel qu’un vase, ne doit
être posé sur l’appareil.
Attention
Ne pas surcharger les prises secteur. Les prises
secteur surchargées, desserrées ou
endommagées, les rallonges surchargées, les
cordons d'alimentation effilochés, l’isolement des
fils fissurés ou endommagée sont dangereux.
N’importe quelle situation de ce type peut être la
cause d’un choc électrique ou d’un incendie.
Examiner régulièrement le cordon d'alimentation
de l’appareil, et en présence de signes de
dommage ou de détérioration, débrancher
l’appareil et ne plus l'utiliser tant qu’un réparateur
agréé n’a pas remplacé le cordon par une pièce
neuve identique.
Protéger le cordon d’alimentation des
détériorations résultant de torsions, déformations,
pincements, coincements dans une porte qui se
ferme ou piétinement. Prêter particul ière me nt
attention au point de branchement du cordon à la
prise, à la prise murale et à l’endroit où il est
raccordé à l’appareil.
Pour débrancher l'appareil de la prise murale, tirer
sur la prise du cordon d'alimentation. Installer
l’appareil afin que la prise soit facilement
accessible.
Importantes mesures de sécurité
Cet appareil a été conçu et fabriqué pour
garantir la sécurité personnelle. Toute utilisation
incorrecte peut provoquer un risque de choc
électrique ou d’incendie. Les dispositifs de
protection intégrés à cet appareil protégeront
l'utilisateur, sous réserve de respecter les
procédures ci-dessous, lors de l’installation, de
l’utilisation et des travaux d’entretien. Les
composants internes de cet appareil ne peuvent
pas être démontés ou réparés par l'utilisateur.
• Lire ces instructions – Lire et comprendre
toutes les instructions de fonctionnement
avant d’utiliser l'appareil.
• Conserver ces instructions – Ces instructions
de sécurité et de fonctionnement doivent être
conservées en lieu sûr afin de pouvoir s’y
référer ultérieurement.
• Respecter tous les avertissements – Tous les
avertissements figurant sur l'appareil et dans
ces instructions doivent être
scrupuleusement observés.
• Suivre les instructions – Toutes les
instructions de fonctionnement doivent être
observées.
• Accessoires – N’utiliser que des outils et des
accessoires recommandés par Insignia.
L’utilisation d’accessoires inadéquats peut
être à l’origine d’accidents.
• Source d'alimentation – Cet appareil doit
fonctionner à partir de la source
d'alimentation spécifiée sur sa plaque
signalétique. En cas d’incertitude sur la
tension d'alimentation électrique de la
maison, consulter le revendeur ou la
compagnie d'électricité.
• Protection du cordon d'alimentation CA – Les
cordons d'alimentation CA doivent être
acheminés correctement pour éviter qu'ils
soient piétinés ou que des objets soient
posés dessus. Vérifier les fiches du cordon
au niveau de la prise secteur et à l'endroit où
le cordon se branche à l'appareil.
• Surcharge – Ne pas surcharger les prises
secteur CA ou les rallonges. Les surcharges
de puissance peuvent provoquer des
incendies ou des risques d’électrocution.
• Introduction d'objets et de liquides – Ne
jamais insérer d'objet dans l'appareil par les
ouvertures ou les ouïes de ventilation. Des
tensions élevées se trouvent à l’intérieur de
l’appareil et l’insertion d’un objet peut
provoquer une décharge électrique et
endommager des composants électriques.
Pour la même raison, ne pas répandre d’eau
ou tout autre liquide sur l’appareil.
• Dépannage – L’utilisateur ne doit pas essayer
de réparer cet appareil lui-même. L’ouverture
du boîtier expose l’utilisateur à des tensions
élevées et autres dangers. Confier toute
réparation à un technicien qualifié.
• Réparations – Si les conditions suivantes se
produisent, débrancher le cordon
d’alimentation CA de la prise secteur et
demander à un technicien qualifié de
procéder aux réparations.
20
www.insignia-products.com
Page 23

Insignia NS-7UTCTV Lecteur de DVD/TV ACL de 7 po de dessous d’armoire
• Lorsque le cordon d’alimentation CA ou la
fiche est endommagé.
• Si un liquide a été répandu ou des objets
sont tombés dans l’appareil.
• Si l’appareil a été exposé à la pluie ou à
l’eau.
• Lorsque l'appareil ne fonctionne pas
comme décrit dans ces instructions
d'utilisation. Ne pas toucher à d’autres
commandes que celles décrites dans ces
instructions. Un réglage inadéquat des
commandes qui ne sont pas décrites
dans ces instructions peut être à l’origine
de détériorations, qui souvent nécessitent
une longue remise en état par un
technicien qualifié.
• Si l’appareil est tombé ou a été
endommagé.
• Lorsque l’appareil présente d’importantes
modifications de performances. Toute
anomalie sensible de fonctionnement de
l’appareil indique qu’il nécessite d’être
réparé.
• Pièces de rechange – Si la réparation de cet
appareil nécessite l’utilisation de pièces de
rechange, s’assurer que le technicien utilise
des pièces spécifiées par le fabricant ou des
pièces ayant les mêmes caractéristiques et
performances que celles d’origine.
L’utilisation de pièces non autorisées peut
être à l'origine d'un incendie, d'une décharge
électrique et d'autres événements
dangereux.
• Contrôles de sécurité – Après avoir terminé
les travaux de maintenance ou de réparation,
l’utilisateur demandera au technicien de
réaliser des contrôles de sécurité afin de
vérifier que l'appareil fonctionne
normalement.
• Montage sur un mur ou au plafond – En cas
de montage de l’appareil sur un mur ou au
plafond, prendre soin de l’installer
conformément à la méthode recommandée
par le fabricant du dispositif de montage ou
de support.
• Nettoyage – Débrancher le cordon
d'alimentation CA de la prise secteur avant
de nettoyer l'appareil. Nettoyer uniquement
avec un chiffon sec. Ne pas utiliser de
nettoyant liquide ou en aérosol.
• Eau et humidité – Ne pas utiliser cet appareil
à proximité d'environnements mouillés ou
humides, par ex emple à côté d’une baignoire,
d'un lavabo, d'un évier, d’un bac à laver,
d'une piscine ou dans une cave humide. Ne
pas exposer cet appareil aux gouttes d’eau
ou aux éclaboussures. Ne pas placer
d’objets remplis de liquide sur cet appareil.
• Étagères et tables roulantes – Ne pas placer
cet appareil sur une table roulante, un pied,
un trépied ou une table instables. Les
installations instables risquent de faire
tomber l'appareil, pouvant occasionner de
graves blessures ainsi que des dégâts à
l'appareil. Utiliser uniquement la table
roulante, le pied, le trépied, le support ou la
table spécifié par Insignia ou vendu avec
l'appareil. Lorsqu’une table roulante est
utilisée, déplacer l’ensemble appareil/table
roulante avec précaution pour éviter les
blessures provoquées par une éventuelle
chute de l’appareil.
• Ventilation – Les aérations et les autres
ouvertures du boîtier sont conçues pour la
ventilation. Ne pas les couvrir ni les obstruer,
sinon une ventilation insuffisante pourrait
provoquer une surchauffe et réduire la durée
d'utilisation de l'appareil. Ne pas placer
l'appareil sur un lit, un sofa, un tapis ou une
autre surface molle susceptible d'obstruer les
ouvertures d'aération. Cet appareil n'est pas
conçu pour être installé dans un meuble
encastré. Ne pas installer l’appareil dans un
espace clos, tel qu’une bibliothèque ou sur
une étagère, sauf si une ventilation adéquate
a été prévue et que les instructions du
fabricant ont été scrupuleusement
respectées.
• Fragile – Le panneau ACL utilisé dans cet
appareil est fabriqué en verre et peut
facilement se briser si l'appareil tombe ou
reçoit un choc. Si le panneau se casse, faire
extrêmement attention de ne pas se blesser
avec le verre brisé.
Remarque
Ne pas toucher l'écran ACL à matrice active.
• Pixels morts – Le panneau ACL contient
presque 3 millions de transistors en couches
minces, ce qui fournit une qualité vidéo d'une
netteté exceptionnelle. Il peut arriver que des
pixels morts apparaissent à l'écran sous
forme de points bleus, verts ou rouges. Ces
pixels morts ne nuisent pas aux
performances de l'appareil et ne sont pas
considérés comme des défauts.
• Sources de chaleur – Installer l’appareil à
l’écart de sources de chaleur, telles que
radiateurs, bouches de chaleur, fours,
amplificateur ou autres appareils qui
produisent de la chaleur.
Fonctionnalités
Ce téléviseur incorpore un lecteur de DVD, un
écran ACL, un récepteur de télévision et un
poste radio en un seul système. Il est conçu
pour une utilisation pratique dans la cuisine. Il
possède les caractéristiques suivantes :
• Modes multiples, tels que :
•DVD
•TV
• Radio
•AV
• ATSC (numérique)
• Entrées AV – Les entrées audio/vidéo se
branchent sur la plupart des sources AV
externes.
• Sorties AV – Les sorties audio analogiques
peuvent être connectées à un amplificateur
externe.
• Écran ACL (cristaux liquides) – L’écran
vidéo couleur conçu grâce à la technologie
ACL permet d'afficher clairement toutes les
données vidéo.
www.insignia-products.com
21
Page 24

Insignia NS-7UTCTV Lecteur de DVD/TV ACL de 7 po de dessous d’armoire
• Fonction d'amplification – Amplificateur
stéréo 2x3 W intégré avec des haut-parleurs
droit et gauche.
• Alimentation à découpage – Elle s'adapte
automatiquement à la tension requise.
• Fonctions spéciales – Prise en charge de
plusieurs langues.
• Fonctions avancées de lecture des DVD,
comprenant :
• Compatibilité – Lecture des disques :
DVD, CD, JPEG et MP3.
• Affichage à l'écran – Affiche les
possibilités de choix entre English
(anglais), Spanish (espagnol) ou French
(français).
• Fonction de recherche rapide –
Plusieurs vitesses, avance rapide, retour
rapide, ralenti et répétition de la lecture.
• Fonction zoom – Permet d'agrandir
l'image.
• Recherche par la durée – Recherche en
fonction de la durée sur un disque.
• Fonctions télévision :
• Réception claire des signaux TV.
• Recherche automatique des canaux.
• Mémorisation automatique des canaux.
• Fonctions radio :
• Réception claire des signaux AM/FM.
• Recherche automatique des stations
radio.
• Mémorisation facile des stations radio.
• Recherche des stations radio dans les
gammes hautes et basses fréquences.
Accessoires
Vérifier que les accessoires suivants sont
fournis dans l’emballage :
• Télécommande
• Piles (CR2025)
• Guide de l'utilisateur
• Modèle de montage
• Matériel de montage (vis et entretoises)
Informations sur les codes de région
Les lecteurs de DVD et les disques sont codés
par région. Si le code de région inscrit sur le
D VD ne correspond pas au numéro de région du
lecteur, ce dernier ne pourra pas lire le disque.
Le code de région de cet appareil est 1.
Vu e avant
234 5
1
6
Élément Description
1
2 Fente d'insertion des disques. Utilisée pour charger et
3
4
5
6
7 Touche SOURCE. Permet de parcourir les modes DVD,
8 Touche SOURDINE. Permet de mettre le son en
9 Capteur de télécommande. Reçoit les signaux de la
10 Touche CONFIGURATION. Permet d'accéder au menu
11 Touche MENU. Permet d’accéder au menu d'écran
12 Panneau d'affichage. Affiche l'heure, l'état, la fréquence
13
Tou che Marche/Arrêt Appuyer sur ce tte touche
pour mettre hors ou sous tension le DVD/TV (pour
quitter ou entrer en mode de Veille).
décharger les disques.
Touche ÉJECTER/ (Arrêt). Appu ye r pour arrêter
la lecture (en mode DVD). Maintenir la touche appuyée
pour éjecter le disque hors du lecteur.
Touche (LECTURE/PAUSE). En mode DVD, permet
de lancer ou d’interrompre momentanément la lecture.
Touche / (BALAYAGE ARRIÈRE). En mode
DVD, appuyer pour activer le retour rapide. Maintenir
appuyée cette touche pour parvenir au début du chapitre
ou de la piste en cours.
En mode Radio, appuyer une fois pour le réglage précis
d'une station de radio (vers le bas) ou appuyer
brièvement (1,5 seconde) pour rechercher des stations
de radio sur une fréquence plus basse.
Touche / (BALAYAGE AVANT). En mode
DVD, appuyer pour activer l'avance rapide. Maintenir
appuyée pour passer à la piste ou au chapitre suivant.
En mode Radio, appuyer une fois pour le réglage précis
d'une station de radio (vers le haut) ou appuyer
brièvement (1,5 seconde) pour rechercher des stations
de radio sur une fréquence plus élevée.
TV, AV , FM, AM et ATSC.
sourdine.
télécommande.
Timer Setup (Configuration du temporisateur). En mode
radio, permet de mémoriser (prérégler) une station.
principal du DVD
radio et le numéro de la station de radio. Permet aussi
d'afficher le niveau du volume pendant son réglage.
Touches CH + et CH -. Dans le mode Menu,
permet de sélectionner des options du menu de
configuration.
Appuyer pour modifier le canal TV ou la station radio
vers le haut ou vers le bas.
Appuyer sur
pendant le réglage de l'heure.
Appuyer sur
pendant le réglage de l'heure.
8
10 12 15 1613 14
7
9
11
17
pour régler la valeur vers le bas
pour régler la valeur vers le haut
22
www.insignia-products.com
Page 25

Insignia NS-7UTCTV Lecteur de DVD/TV ACL de 7 po de dessous d’armoire
Élément Description
14
15 Touche HEURE/ENTRÉE Appuyer une fois pour afficher
16 Touche CONFIGURATION TV/Lecteur de DVD. Permet
17 Écran ACL. Affiche l'image.
T ouches
VOL- et VOL + . Dans le mode Menu,
permet de sélectionner des options du menu de
configuration.
Appuyer sur
pour diminuer le volume ou diminuer
la valeur dans le menu de configuration de l'image.
Appuyer sur
pour augmenter le volume ou
augmenter la valeur dans le menu de configuration de
l'image.
l’heure actuelle sur l’écran. Appuyer deux fois pour
configurer l'heure, puis utiliser
/ pour
sélectionner la position et / pour régler les heures
ou les minutes.
Dans le mode Menu, permet de confirmer les sélections.
d'ouvrir le menu de configuration ACL.
Panneau d'affichage
Élément Description
8 Prises d'entrée AUDIO droite et gauche
9 Prise d’entrée VIDÉO
Télécommande
POWER
DVD
TV
AV
FM/AM
DTV
LAST
__
SEEK +
TITLE
REPEAT/EXIT
AUDIO
SUBTITLE
EJECT
123
456
789
GOTO
0
SETUP
PICTURE/SET
CH+
TIME
INFO
LCD ON/OFF
MUTE
+
VOL
OK
CH-
MENU ZOOM
A-B SLOW
Élément Description
1 Témoin d'état de la radio FM
2 Témoins d'état de la radio et de l'heure en AM
3 Témoin de l'heure PM
4 Témoins Heure ou Caractère (par exemple canal TV,
fréquence radio, durée écoulée, etc.)
5 Témoins Minute ou Caractère
6 Témoins Secondes ou Caractère
7 Témoin de la fréquence FM en MHz
8 Témoin de la fréquence AM en kHz
Vue arrière - connecteurs
Élément Description
1 Prise d'antenne AM
2 Prise d'antenne coaxiale FM 75 ohms
3 Prises de sortie AUDIO droite et gauche
4 Prise de sortie VIDÉO
5 Prise d'entrée CC 12 V
6 Prise d'entrée ANTENNE pour l'antenne TV
7 Prise d'entrée ATSC
Élément Description
1
Touche
d’éteindre l'appareil.
2 Touche SOUS-TITRES. Appuyer plusieurs fois pour
sélectionner la langue souhaitée des sous-titres.
3 Touche DVD Permet de sélectionner le mode DVD.
4 Touche TV. Permet de sélectionner le mode TV.
5 Touche AV. Permet de sélectionner le mode d'entrée AV
externe.
6 Touche AM/FM Permet de commuter le mode d'entrée
des signaux AM/FM.
7 Touche TVN. Permet de commuter sur le mode ATSC.
8
Touches directionnelles
de parcourir les menus à l'écran ou de procéder aux
réglages.
9 Bouton OK . Permet de confirmer la sélection des menus.
10 Touche DERNIER. En mode TV, cette touche permet de
revenir au canal précédent.
11
d'activer le retour rapide. En mode Radio, appuyer une
fois pour le réglage précis d'une station de radio (vers le
bas) ou appuyer brièvement (1,5 seconde) pour
rechercher des stations de radio sur une fréquence plus
basse.
l'avance rapide. En mode Radio, appuyer une fois pour le
réglage précis d'une station de radio (vers le haut) ou
appuyer brièvement (1,5 seconde) pour rechercher des
stations de radio sur une fréquence plus élevée.
MARCHE/ARRÊT. Permet d’allumer et
/// : Permettent
Touche RECHERCHE -. En mode DVD, permet
Touche RECHERCHE +. En mode DVD, permet
www.insignia-products.com
23
Page 26

Insignia NS-7UTCTV Lecteur de DVD/TV ACL de 7 po de dessous d’armoire
Élément Description
12
13
14 Touche TITRE. Permet d’afficher le titre du DVD en cours
15 Touche MENU. Permet d'accéder au menu du disque en
16 Touche RÉPÉTITION/QUITTER. Permet de passer en
17 Touche A-B. Permet de répéter la partie sélectionnée d’un
18
19 Touche AUDIO. Permet de changer la langue de l'audio
20 Touches numériques 0 à 9 : Elles permettent de saisir
21 Touche ALLER À. En mode DVD, permet de sélectionner
22 Touche CONFIGURATION. Permet d'accéder aux divers
23 Touche IMAGE/CONFIGURATION. Permet d'entrer dans
24 Touche INFO. Permet d'afficher des informations sur le
25 Touche MARCHE/ARRÊT ACL. Permet de mettre sous ou
26 ToucheHEURE. Appuyer une fois pour afficher l’heure
27
28
29 Touche SOURDINE. Permet de mettre le son en sourdine.
30
31 Touches VOL+/-. Permettent d’augmenter (+) ou de
32 Touche ZOOM. Permet d'effectuer un zoom avant sur le
33 Touche RALENTI. Permet de réduire la vitesse de lecture
Touche (Lecture). Permet de commencer la lecture
du disque ou en mode menu de confirmer les sélections.
Touche
ou du CD.
de lecture, s'il est disponible.
mode DVD. Appuyer de nouveau pour sortir.
mode de répétition DVD ou de quitter le menu de
configuration (Setup).
DVD. Appuyer une fois pour définir le point de départ (A),
une 2e fois pour définir le point d'arrivée (B) et une 3e
fois pour arrêter la répétition A-B.
lecteur.
du DVD ou les options.
directement les numéros des canaux, les chapitres du
DVD et les pistes du CD.
Touche – (+10). Si le numéro de la piste ou de canal est
supérieur à 10, appuyer une fois sur cette touche, puis
sur une touche entre 1 et 9.
l'heure de démarrage, la piste ou le titre.
menus de configuration (TV, DVD ou ATSC) dans leurs
modes respectifs.
le menu de Configuration ACL (LCD Setup)ou de
Configuration du temporisateur Timer Setup). En mode
radio, permet de mémoriser (prérégler) une station.
DVD en cours de lecture.
hors tension l'écran ACL dans les modes DVD, TV ou AV.
actuelle sur l’écran. Appuyer deux fois pour configurer
l'heure, puis utiliser
position et / pour régler les heures ou les
minutes.
(Arrêt). Permet d’arrêter la lecture du DVD
Touche
ÉJECTER. Permet d'éjecter le disque du
/ pour sélectionner la
Touche SUIVANT. Permet de passer à la piste ou
au chapitre suivant. Appuyer de nouveau pour avancer
par chapitre ou piste.
Touche
ou au chapitre précédent. Appuyer de nouveau pour
revenir en arrière par chapitre ou piste.
Touche
momentanément la lecture d'un DVD.
diminuer (-) le volume.
DVD. Les touches directionnelles permettent de
panoramiquer autour de l'écran.
du DVD.
PRÉCÉDENT. Permet de revenir à la piste
PAUSE. Permet d’interrompre
Configuration de l'appareil
Installation des piles de la télécommande
Pour installer les piles :
1 Retirer le porte-pile de la partie inférieure de
la télécommande.
2 Insérer la pile (fournie) dans le porte-pile.
Vérifier que les symboles (+) et (–) sur la pile
correspondent au schéma du porte-pile.
3 Réinsérer le porte-pile dans la inférieure de
la télécommande.
Utilisation de la télécommande
Pour utiliser la télécommande :
• La pointer directement vers le téléviseur,
avec un angle de 60° par rapport au capteur
infrarouge sur le devant du téléviseur, et à
moins de 23 pieds (7 m).
Remarques
• La pile dure environ six mois en fonction du nombre
d'utilisations et du type d'opérations demandées à
la télécommande.
• Si la télécommande ne fonctionne pas même à
proximité du lecte ur, remplacer la pile.
• Si la télécommande ne doit pas être utilisée
pendant une période prolongée, retirer la pile de
son compartiment pour éviter toute détérioration en
cas de fuite.
24
www.insignia-products.com
Page 27

Insignia NS-7UTCTV Lecteur de DVD/TV ACL de 7 po de dessous d’armoire
Remarque
Des objets entre la télécommande et le capteur
peuvent affaiblir le signal infrarouge de la
télécommande.
La portée peut être réduite si le soleil écla ire
directement le capteur infr arouge de l'appareil.
Avertissements
Ne pas exposer la télécommande à des liquides,
au soleil ou à des chocs.
La télécommande peut ne pas fonctionner
correctement si le capteur infrarouge de l'appareil
reçoit directement la lumière du soleil ou un
éclairage important. Dans ce cas, modifier l’angle
de l'éclairage ou de l'écran du téléviseur ou
rapprocher la télécommande du capteur
infrarouge.
Connexion à des sources vidéo
Remarque
• Ne pas connecter le cordon d'alimentation
avant que toutes les autres connexions n'aient
été réalisées.
• Lors de chaque mise sous tension de
l'appareil, ce dernier se rappelle de la dernière
fonction utilisée.
• Réaliser toutes les connexions avant d'installer
l'appareil.
Raccordement à une antenne TV
Entrée du signal TV
2 Appuyer sur DTV (TVN) de la télécommande
ou appuyer plusieurs fois sur SOURCE de
l'appareil afin de sélectionner l'entrée du
signal de l'appareil sur ATSC.
Connexion à une antenne radio
Pour se connecter à une antenne radio :
1 Connecter le câble provenant de l'antenne
FM (1) et ceux de l'antenne AM (2) sur les
prises correspondantes à l'arrière du
téléviseur.
2 Appuyer sur AM/FM de la télécommande ou
plusieurs fois sur SOURCE du téléviseur afin
de sélectionner l'entrée du signal radio sur
FM ou AM.
Attention
• Si l'appareil est connecté à une antenne FM
extérieure, il doit être relié à la terre afin d'éviter les
dangers liés à la foudre.
• Pour évite r une explosion, ne pas connecter le
câble de terre à une tuyauterie de gaz.
Pour se connecter à une antenne de TV
extérieure :
1 Connecter le câble d'antenne à la prise ANT
INPUT (Entrée antenne) à l'arrière de
l'appareil.
2 Appuyer sur TV de la télécommande ou
appuyer plusieurs fois sur SOURCE de
l'appareil afin de sélectionner l'entrée du
signal de l'appareil sur TV.
Connexion à une source de signal ATSC (numérique)
Entrée du signal
ATSC
Pour se connecter à une source de signal
ATSC (numérique) :
1 Connecter le câble de la source ATSC à la
prise ATSC INPUT (Entrée ATSC) à l'arrière
de l'appareil.
Remarques
• Pour améliorer le signal, éloigner l'antenne cadre
AM de l'appareil et d'autres équipements.
• Déployer complètement l'antenne FM.
• Conserver autant que possible l'antenne FM
horizontale après l'avoir connectée au téléviseur.
• Si la qualité de la réception FM est mauvaise,
utiliser un câble coaxial de 75 ohms (non fourni)
pour connecter l'appareil a une antenne FM
extérieure.
Connexion à une source de signal AV externe
Pour connecter l'appareil a une source
extérieure de signal :
1 Mettre hors tension l'appareil et la source du
signal.
2 Connecter un câble vidéo RCA sur la prise
VIDEO OUT (Sortie vidéo) de la source du
signal (par exemple un magnétoscope) et
ensuite sur la prise VIDEO Input (Entrée
vidéo) à l'arrière de l'appareil.
www.insignia-products.com
25
Page 28

Insignia NS-7UTCTV Lecteur de DVD/TV ACL de 7 po de dessous d’armoire
3 Connecter les câbles audio RCA sur les
prises AUDIO OUT (Sortie audio) de la
source du signal et ensuite sur les prises
gauche et droite AUDIO Input (Entrée audio)
à l'arrière de l'appareil.
4 Mettre l'appareil et la source du signal sous
tension.
5 Appuyer sur AV de la télécommande ou
plusieurs fois sur SOURCE de l'appareil afin
de sélectionner l'entrée du signal du TV sur
AV.
Connexion de la sortie du DVD à un téléviseur
Pour connecter la sortie audio de l'appareil a
un amplificateur externe :
1 Mettre l'appareil et l'amplificateur hors
tension.
2 Connecter les câbles audio RCA sur les
prises AUDIO Output droite et gauche de
l'appareil et ensuite sur les prises (1) AUDIO
Input droite et gauche à l'arrière de
l'amplificateur.
3 Connecter un câble vidéo RCA sur la prise
VIDEO Output de l'appareil et ensuite sur la
prise (2) VIDEO Input à l'arrière du téléviseur
externe.
4 Mettre l'appareil et l'amplificateur sous
tension.
5 Régler la source du signal de l'amplificateur
sur la sortie audio de l'appareil.
Connexion à l’adaptateur d'alimentation CA
L'appareil est alimenté par un adaptateur
d'alimentation CA à découpage (fourni).
Pour connecter la sortie du D V D de l'appareil
sur un téléviseur externe :
1 Mettre les deux téléviseurs hors tension.
2 Connecter un câble vidéo RCA sur la prise
VIDEO Output de l'appareil et ensuite sur la
prise VIDEO Input à l'arrière du téléviseur
externe.
3 Connecter les câbles audio RCA sur les
prises AUDIO Output droite et gauche de
l'appareil et ensuite sur les prises AUDIO
Input droite et gauche à l'arrière du
téléviseur externe.
4 Mettre l'appareil et le téléviseur externe sous
tension.
5 Définir la source du signal du téléviseur
externe pour qu’il affiche la sortie DVD de
l'appareil.
Connexion de la sortie audio à un amplificateur
À la prise secteur
Pour connecter l’adaptateur d’alimentation
CA :
1 Connecter la douille ronde de l'adaptateur
d'alimentation CA sur la prise CC 12 V IN à
l'arrière de l'appareil.
2 Brancher l'extrémité à deux fiches de
l'adaptateur d'alimentation CA sur une prise
secteur.
Remarque
Si l'appareil ne doit pas être utilisé pendant une
période promongée, le mettre hors tension et
débrancher l'alimentation.
Pour fixer l'adaptateur d'alimentation CA en
haut de l'appareil :
• En utilisant du ruban adhésif à double face
(fourni), coller l'adaptateur d'alimentation CA
en haut de l'appareil.
26
Remarque
Se reporter aux manuels de l'opérateur de
l'amplificateur avant de réaliser les connexions.
OU
www.insignia-products.com
Page 29

Insignia NS-7UTCTV Lecteur de DVD/TV ACL de 7 po de dessous d’armoire
Ou visser les deux câbles de retenue
(fournis) en haut de l'appareil (1) et enrouler
ensuite les câbles autour des câbles
d'alimentation afin de maintenir l'adaptateur
d'alimentation CA en partie supérieure de
l'appareil (2).
Installation de l'appareil
Après avoir réalisé toutes les connexions, il est
possible d'installer l'appareil sous une armoire. Il
est suggéré d'installer l'appareil sous une
armoire (ou un meuble de cuisine), avec ou sans
les entretoises.
Remarque
Les dimensions de l'appareil sont les suivantes : 3,11
po (hauteur) × 14,76 po (largeur) × 10,9 po
(profondeur) (7,9 × 37,49 × 27,69 cm). Un
espacement d'au moins 3,5 cm (1, 38 po) est
nécessaire entre l'arrière de l'appareil et le mur.
Cordon
d’alimentation CA
Collier du câble
Si les portes de l'armoire présentent un
porte-à-faux par rapport à l'étagère et sont
une gêne pour la partie avant de l'appareil,
régler l'installation et la hauteur de l'étagère
pour fournir l'espace nécessaire.
Avertissements
• L'appareil est lourd. Prendre garde pendant
l'utilisation de ne pas se blesser ou de
détériorer l'appareil.
• Pour réduire le risque d'incendie, ne pas
installer d'appareils de cuisine ou de chauffage
sous l'appareil, spécialement quand l'écran est
ouvert pendant la visualisation d'un
programme.
Remarques
• Monter l'appareil pour que le cordon
d'alimentation secteur puisse être directement
connecté à une prise secteur. Ne pas utiliser
de convertisseur ou de rallonge.
• S'assurer de l'absence de « mou » sur le
cordon d'alimentation, ce dernier pouvant agir
comme une antenne FM. Enrouler le mou sur
le crochet destiné au cordon d'alimentation.
• L'appareil intègre une antenne composée
d'une barre de ferrite pour la réception AM.
Vérifier la réception en AM avant de la fixer en
position.
• Pour diminuer les interférences électriques,
l'appareil devra être monté aussi loin que
possible de tout autre appareil électrique,
comme un réfrigérateur, un four à micro-ondes,
un éclairage à néon, etc..
• Conserver le modèle en papier pour une
éventuelle réutilisation.
Pour installer l'appareil :
1 Marquer la position des quatre trous de
montage en utilisant le modèle en papier
fourni et percer quatre trous de 6,8 mm sur
ces emplacements.
2 Fixer la plaque de montage sur l'appareil
avec les vis fournies. Le bord biseauté de la
plaque de montage doit regarder la partie
avant de l'appareil.
Bord biseauté vers l'avant
3 En utilisant les quatre vis de montage et les
entretoises fournies, monter l'appareil sous
l'armoire.
Utilisation du téléviseur
Après avoir réalisé toutes les connexions et que
l'appareil a été monté et branché, le téléviseur
est prêt à être utilisé.
Mise sous et hors tension de l’appareil
Pour mettre l’appareil sous et hors tension :
1 Appuyer sur POWER (Marche/Arrêt) du
panneau avant de l'appareil ou de la
télécommande. Le témoin POWER devient
vert.
2 Pour mettre l'appareil hors tension, appuyer
de nouveau sur POWER. L'image à l'écran
disparaît et le témoin POWER devient rouge.
Remarque
Une petite quantité d'électricité est consommée
même lorsque l'appareil est éteint.
Réglage du volume
Le volume sonore peut être réglé à l'aide de la
télécommande ou sur le panneau avant de
l'appareil.
Pour modifier le volume sonore :
1 Appuyer sur VOL+ ou VOL- de la
télécommande, ou sur VOL + ou VOL
- du téléviseur pour augmenter ou diminuer le
volume.
www.insignia-products.com
27
Page 30

Insignia NS-7UTCTV Lecteur de DVD/TV ACL de 7 po de dessous d’armoire
2 Appuyer sur MUTE (Sourdine) de la
télécommande pour mettre le son en
sourdine et une deuxième fois (ou sur VOL+
ou VOL- ) pour le rétablir.
Modification du mode
L'appareil prend en charge plusieurs modes de
fonctionnement.
Pour sélectionner le mode de
fonctionnement :
• Appuyer sur SOURCE de l'appareil pour
sélectionner parmi les modes suivants :
•DVD
•TV
•AV
•FM
•AM
•ATSC
Le nom de la source d'entrée apparaît sur le
panneau d'affichage quand il est sélectionné.
Ou, appuyer sur l'une des touches suivantes
de la télécommande pour sélectionner le
mode choisi :
• Touche DVD
• Touche TV.
• Touche AV
• Touche AM/FM
• Touche DTV (TVN)
4 Lorsque une confirmation est nécessaire,
appuyer sur OK pour confirmer le choix.
Pour mémoriser automatiquement des
canaux :
1 Appuyer sur SETUP (Configuration). Le
menu TV SETUP s’affiche.
2 Appuyer sur ou sur pour sélectionner
AUTO MEMORY (Recherche automatique de
canaux), puis sur OK ou sur pour
commencer la recherche automatique des
canaux disponibles.
3 Pour arrêter la recherche automatique,
appuyer sur .
Réglage de l’heure
Changement de canal
Pour changer de canal :
• Appuyer sur CH+ ou CH- de la
télécommande ou sur CH + ou CH - de
l'appareil.
Ou entrer directement un numéro de canal
en appuyant sur les boutons numérotés de la
télécommande.
Pour basculer entre deux canaux :
1 Appuyer sur LAST (Dernier) pour passer du
canal en cours à celui précédemment choisi.
2 Appuyer de nouveau sur LAST pour revenir
au canal initialement syntonisé.
Réglages initiaux en mode TV
Pour accéder et utiliser le menu TV SETUP
(Configuration TV) :
1 Appuyer sur SETUP (Configuration). Le
menu TV SETUP s’affiche.
Pour régler l’heure :
1 Appuyer deux fois sur TIME (Heure) de la
télécommande ou sur TIME/ENT (Heure/
Entrée) de l'appareil.
2 Appuyer sur ou sur pour sélectionner
l'heure ou les minutes, puis sur ou sur
pour changer le réglage.
Réglage du temporisateur
Le temporisateur permet de définir des horaires
spécifiques de mise sous et hors tension le
téléviseur. Il permet aussi de définir la source du
signal et le canal à visualiser.
Pour accéder et utiliser le menu TIMER SET
(Configuration du temporisateur) :
1 Appuyer deux fois sur PICTURE/SET
(Image/Configuration). Le menu TIMER SET
s’affiche.
28
2 Appuyer sur ou sur pour sélectionner
l'élément à configurer.
3 Appuyer sur ou sur pour passer à
l'élément sélectionné.
www.insignia-products.com
2 Appuyer sur ou sur pour sélectionner
TIMER et ensuite sur ou sur pour
ACTIVER (ON) ou DÉSACTIVER (OFF) le
temporisateur selon le besoin.
Page 31

Insignia NS-7UTCTV Lecteur de DVD/TV ACL de 7 po de dessous d’armoire
3 Sélectionner POWER ON et appuyer ensuite
sur les touches numériques pour définir
l'heure de mise sous tension. Appuyer sur
ou sur pour sélectionner AM (heure du
matin) ou PM (heure de l’après-midi).
4 Sélectionner POWER OFF et appuyer
ensuite sur les touches numériques pour
définir l'heure de mise hors tension. Appuyer
sur ou sur pour sélectionner AM
(heure du matin) ou PM (heure de
l’après-midi).
5 Sélectionner SIGNAL et appuyer ensuite sur
ou sur pour choisir CATV, ANT, FM
(Câblodistribution, Hertzienne, FM) ou AM.
6 Sélectionner CHANNEL (Canal), appuyer
ensuite sur les touches numériques pour
définir le canal devant être visualisé. En
mode CATV, choisir parmi les 124 canaux et
en mode ANT, choisir parmi les 68 canaux.
7 Lorsque les réglages sont terminés, appuyer
de nouveau sur PICTURE/SET.
Remarque
Cette fonction reste active tant que l'appareil est
connecté au secteur.
Utilisation du téléviseur en mode ATSC (numérique)
Après avoir réalisé les connexions et que
l'appareil a été monté et branché, l'appareil est
prêt à être utilisé en mode ATSC.
Pour passer en mode ATSC (numérique) :
• Appuyer plusieurs fois sur DTV (TVN) de la
télécommande ou sur SOURCE de l'appareil
jusqu'à ce que ATSC soit sélectionné.
Pour accéder et utiliser les menus ATSC à
l'écran :
1 Appuyer sur SETUP (Configuration) de la
télécommande. Le menu ATSC Setup
s’affiche.
De plus, se référer à des informations
différentes ou complémentaires de
navigation en partie inférieure de certains
menus.
Menus ATSC à l'écran
Menu d’écran Options
Setup
(Configuration)
Vidéo ASPECT RATIO (Format d'image) – Permet de
Audio Bass (Graves) – Règle les notes basses
Bande de syntonisation – Permet de
sélectionner la bande de syntonisation devant
être visualisée (Hertzienne, Câble, Câble
HRC, Câble IRC ou Câble Auto).
Menu Language (Langue du menu) – Permet
de sélectionner la langue d'affichage des
menus à l'écran.
DTV Signal (Signal TVN) – Permet de vérifier
la puissance du signal TVN.
Auto Ch Search (Recherche automatique des
canaux) – Permet de rechercher
automatiquement et d'établir une liste des
canaux disponibles dans la région pour la
source sélectionnée du signal.
Add On Ch Search (Ajout à la recherche
automatique de canaux) – Permet d'ajouter
automatiquement des canaux à la liste
existante des canaux disponibles dans la
région pour la source sélectionnée du signal.
Manual Ch Search (Recherche manuelle des
canaux) – Permet de rechercher manuellement
et d'établir une liste des canaux disponibles
dans la région pour la source sélectionnée du
signal.
Channel Labels (Étiquettes de canaux) –
Permet d’ajouter une étiquette à un canal.
sélectionner le format de l'image. Les choix
sont les suivants:
•Normal
• Zoom
• W ide (Panoramique)
• C inema (Cinéma)
Sharpness (Netteté) – Permet d'augmenter la
netteté pour une image plus propre et plus
claire, ou de diminuer la netteté pour une
image plus douce.
Tint (Teinte) – Permet de régler la couleur
générale de l'image (du rouge au vert).
(graves).
Treble (Aigus) – Règle les note s éle vées
(aigus). Disponible en mode Personnalisé
seulement.
Balance – Règle la balance des volumes entre
les haut-parleurs droit et gauche.
TV Speaker (Haut-parleur du téléviseur) –
Permet d'activer ou de désactiver le
haut-parleur du téléviseur.
2 Appuyer sur ou sur pour sélectionner
le menu choisi à l'écran.
3 Appuyer sur ou sur pour sélectionner
l'élément devant être configuré et ensuite sur
OK pour passer à l'option choisie ou à un
sous-menu de cette option (certaines options
nécessitent d'appuyer deux fois sur OK).
4 Appuyer sur ou sur pour modifier les
réglages de l'option sélectionnée, puis sur
OK pour confirmer et revenir au menu
précédent.
www.insignia-products.com
29
Page 32

Insignia NS-7UTCTV Lecteur de DVD/TV ACL de 7 po de dessous d’armoire
Menu d’écran Options
Fonctionnalités Advanced Video Menu [Menu Vidéo avancée]
– Permet de réaliser les réglages suivants :
• Noise Reduction - Spatial [Réduction
du bruit - Spatial] (On [Activé] ou Off
[Désactivé])
• Noise Reduction - Speckle [Réduction
du bruit - Modal] (On [Activé] ou Off
[Désactivé])
• Noise Reduction - Temporal
[Réduction du bruit - Temporel] (On
[Activé] ou Off [Désactivé])
• Auto Contras t Enhancement
[Amélioration du contraste
automatique] (On [Activé] ou Off
[Désactivé])
• Color Temperature (Température de
couleur)
• Black Ba r Detection [Détection de la
barre noire] (On [Activé] ou Off
[Désactivé])
• 3D Y/C (On [A ctivé] ou Off [Désactivé])
• RESET(Réinitialisation) – Sélectionner
cette option et appuyer deux fois sur OK
pour restaurer les paramètres d'usine
par défaut.
Password Set (Définition d'un mot de passe) –
Permet de définir un mot de passe de contrôle
de l'accès au menu Contrôle parental. Le mot
de passe par défaut est 0000. Utiliser les
touches numériques pour saisir un nouveau
mot de passe, puis le saisir une deuxième fois
pour confirmation.
Parental Controls (Contrôle Parental) –
Permettent de modifier les réglages du
contrôle du niveau de programmation que les
enfants peuvent visualiser. Lors de la sélection
de ce menu, l'utilisateur sera invité à introduire
un mot de passe. Voir « Configuration du
contrôle parental » à la page 30.
Closed Caption Options (Options des
sous-titres codés) – Permettent de configurer
la manière d'afficher les sous-titres codés à
l'écran. Lorsque Défaut est configuré sur
Automatic (Automatique), tous les paramètres
seront déterminés par le signal transmis. Les
autres réglages ne peuvent être réalisés que si
Default est configuré sur Custom
(personnalisé) Les réglages incluent :
• Default (Par défau t)
• Size (Dimensions)
• Front (Face avant)
• Text Color (Couleur du texte)
• Text Opacity (Opacité du texte)
• Background color (Couleur de fond)
• Background Opacity (Opacité de
l'arrière-plan)
• Style
• Edge Colo r (Couleur des bordures )
Pour configurer le contrôle parental :
1 En mode ATSC, appuyer sur SETUP de la
télécommande. Le menu ATSC Setup
s’affiche.
2 Appuyer sur ou sur pour sélectionner
le menu Feature (Fonctionnalités) Le
menu Feature s’affiche.
3 Appuyer sur ou sur pour sélectionner
Parental Control (Contrôle parental). Le
mot de passe sera demandé.
4 En utilisant les touches numériques, saisir le
mot de passe (le mot de passe initial est
0000). Le Menu Parental Control s’affiche.
Configuration du contrôle parental
En mode ATSC mode, l'appareil utilise une puce
anti-violence (V-chip) permettant de contrôler le
type de programme que les enfants peuvent
regarder. Le contrôle parental inclut deux
classifications : MPAA (en fonction de l’âge) et
les directives parentales TV (en fonction de l'âge
et du contenu). Un programme TV pouvant
utiliser soit les niveaux MPAA ou les directives
parentales TV, les deux classifications doivent
être réglées pour un contrôle total.
Avant de sélectionner les classifications, il est
nécessaire de configurer le mot de passe du
contrôle parental.
30
5 Appuyer sur , , ou sur pour
sélectionner la classification retenue et
appuyer sur OK pour définir ou la
classification.
6 Appuyer sur SETUP (Configuration) pour
revenir au menu précédent ou sur EXIT pour
quitter.
Attention
www.insignia-products.com
Prendre note du mot de passe et en conserver
trace pour référence ultérieure.
Page 33

Insignia NS-7UTCTV Lecteur de DVD/TV ACL de 7 po de dessous d’armoire
Classification MPAA
Classification Description
AUCUNE ou
NON
CLASSIFIÉ
G Tout public.
PG Surv eillance parentale suggérée.
PG13 Surveillance parentale fortement
R Réservé aux adultes. Interdit aux
NC17 Déconseillé aux enfants de moins de
X Pour adultes unique ment.
OFF
(Désactivés)
Non classifié.
Certains aspects peuvent ne pas
convenir à des enfants.
suggérée. Certains aspects peuvent
être totalement inappropriés pour des
enfants de moins de 13 ans.
mineurs de moins de 17 ans ou
accompagnement par un adulte requis.
17 ans.
Pas de contrôle.
Classement des programmes TV
Classification Description
AUCUNE ou
NON CLASSIFIÉ
TV-Y Enfants de tous âges.
TV-Y7 Enfants de 7 ans et plus.
TV-G Tout public.
TV-PG Surveillance parentale suggérée.
TV-14 Parents sérieusement mis en garde.
TV-MA Adultes seulement.
Non classifié.
Certaines des classifications des directives
parentales TV basées sur une tranche d’âge
spécifique ont aussi un classement PG en
fonction du contenu.
Classification Description
FV Violence fictive
D Dialogue
L Langue
SSexe
VViolence
Fonctionnement du lecteur de D VD
Après avoir réalisé toutes les connexions et que
l'appareil a été monté et branché, le lecteur de
DVD est prêt à être utilisé.
Lecture d’un DVD
Pour lire un DVD :
1 Appuyer sur PO WER (Marche/Arrêt) pour
mettre l'appareil en marche.
2 Appuyer sur DVD de la télécommande ou sur
SOURCE plusieurs fois sur le téléviseur , pour
sélectionner DVD.
3 Insérer un DVD dans la fente d'insertion des
disques, avec l’étiquette vers le haut. La
lecture commence automatiquement.
4 Pendant la lecture, il est possible de :
• Accéder au menu DVD – Appuyer sur
MENU de la télécommande pour ouvrir le
menu DVD. Appuyer sur , , ou
pour mettre en surbrillance l'option
retenue, puis sur OK pour le
sélectionner.
• Mettre le DVD en pause – Appuyer sur
PLAY/PAUSE (Lecture/Pause) sur
l'appareil ou (Pause) sur la
télécommande pour arrêter
momentanément la lecture. Appuyer sur
PLAY/PAUSE du lecteur ou sur
(Lecture) de la télécommande pour
reprendre la lecture.
• Retour rapide du DVD – Appuyer sur
/ (Balayage arrière) sur l'appareil
ou sur SEEK - sur la télécommande
pour un retour arrière rapide du DVD.
• Avance rapide du DVD – Appuyer sur
/ (Balayage avant) sur l'appareil
ou sur SEEK + de la télécommande
pour une avance rapide du DVD.
• Retour arrière – Maintenir appuyé /
(Balayage arrière) sur l'appareil, ou
appuyer sur (Précédent) sur la
télécommande pour sauter au début du
chapitre en cours. Appuyer plusieurs fois
pour aller aux chapitres précédents.
• Saut avant – Maintenir appuyé /
(Balayage avant) sur l'appareil, ou
appuyer sur (Suivant) sur la
télécommande pour sauter au début du
chapitre suivant. Appuyer plusieurs fois
pour aller aux chapitres suivants.
• Lecture du DVD au ralenti – Pour lire le
disque au ralenti, appuyer sur SLOW
(Ralenti).
• Zoom avant sur l'image – Pour faire un
zoom avant sur une scène, appuyer sur
ZOOM pour naviguer parmi les réglages
possibles du zoom.
• Passer à une heure, piste ou titre
spécifique – Pour se rendre sur une
heure, une piste ou un titre spécifique sur
le DVD, appuyer sur GOTO (Aller à). Un
menu s'ouvre, permettant de spécifier le
point à partir duquel commencera la
lecture. Appuyer sur ou sur pour
sélectionner l'élément retenu et ensuite
sur OK pour confirmer. Appuyer sur
pour revenir. Utiliser les touches
numériques pour saisir un titre ou
chapitre.
• Répéter un titre, un chapitre ou une
piste – Pour répéter à titre, un chapitre ou
une piste, appuyer sur REPEAT (Répéter)
pour naviguer parmi les options
disponibles.
www.insignia-products.com
31
Page 34

Insignia NS-7UTCTV Lecteur de DVD/TV ACL de 7 po de dessous d’armoire
• Répéter une partie sélectionnée du
DVD – Pour répéter une partie
sélectionner du DVD, appuyer sur A-B au
début de la sélection et à nouveau sur
A-B à la fin de la sélection. La sélection
se répète. Pour annuler et reprendre la
lecture normale, appuyer de nouveau sur
A-B.
• Arrêter la lecture – Pour arrêter la lecture
du DVD, appuyer sur STOP. Appuyer
sur (Lecture) pour reprendre la lecture
à cet emplacement. En appuyant deux
fois sur STOP (Arrêt), puis sur
(Lecture), la lecture commence au début
du disque.
5 Appuyer sur ÉJECTER pour retirer le
DVD.
Remarque
Tous les DVD ne prennent pas en charge toutes
les fonctions.
Affichage de l’information sur le DVD
Pour afficher l’information sur le DVD :
• Appuyer plusieurs fois sur INFO de la
télécommande pour naviguer parmi Title
Elapsed, Title Remain, Chapter Elapsed,
Chapter Remain et Display Off (Durée
écoulée du titre, durée restante du titre,
durée écoulée du chapitre, durée restante du
chapitre et extinction de l'affichage).
Sélection de la langue des sous-titres
Si le DVD a été créé avec des sous-titres, il est
possible de changer la langue de ces
sous-titres.
Pour changer la langue des sous-titres :
1 Appuyer plusieurs fois sur SUBTITLE
(Sous-titres) jusqu’à obtention de la langue
souhaitée.
2 Pour supprimer des sous-titres, appuyer sur
SUBTITLE (Sous-titres) jusqu’à ce que Off
(Désactivés) apparaisse à l'écran.
2 Si plusieurs options audio sont disponibles,
appuyer de nouveau sur AUDIO pour
sélectionner la piste audio suivante.
Remarque
Cette fonction n’est disponible que si le DVD a été
créé avec plusieurs pistes audio. Lors de la
sélection d’une langue au dio , le réglage de langue
audio dans le menu principal du lecteur DVD n’est
suspendu que temporairement.
Permettre un intervalle de trois secondes entre les
sélections.
Conseil
Il est également possible de modifier la langue
audio depuis le menu principal du lecteur de DVD
ou au moyen des réglages audio du DVD
lui-même.
Lecture d’un CD
Pour lire un CD :
1 Appuyer sur POWER (Marche/Arrêt) pour
mettre l'appareil sous tension.
2 Appuyer sur DVD de la télécommande ou sur
SOURCE plusieurs fois de l'appareil pour
sélectionner DVD.
3 Insérer un CD dans la fente d'insertion des
disques, avec l’étiquette vers le haut. La
lecture commence automatiquement.
4 Pendant la lecture :
• Appuyer sur pour revenir au chapitre
précédent et sur pour passer au
chapitre suivant. Appuyer plusieurs fois
pour continuer de revenir en arrière ou
d'avancer.
• Appuyer sur les touches numériques pour
sélectionner une piste spécifique à lire et
appuyer ensuite sur (Lecture) pour la
lire.
Conseil
Si le numéro de la piste est inférieur à 10, appuyer
sur les touches1 à 9 pour la sélectionner. Si le
numéro de la piste est égal à 10, appuyer une fois
sur +10, puis sur 0, pour la sélectionner. Si le
numéro de la piste est supérieur à 10, appuyer
une fois sur +10, puis sur une touche entre 1 et 9.
Remarque
Le changement de langue de sous-titrage au
moyen de cette méthode ne s’applique qu’au DVD
en cours de lecture. Lors du retrait du DVD ou de
la mise hors tension de l'appareil, la langue des
sous-titres revien t à celle définie dans le menu
principal de l'appareil.
Conseil
Il est également possible de modifier la langue
des sous-titres depuis le menu principal de
l'appareil ou au moyen des réglages propres au
DVD.
Modification des options audio
Si le DVD a été créé avec plusieurs pistes de
langues (enregistrées dans des langues
différentes), ou avec des options audio
multiples, il est possible de changer
temporairement les réglages audio de l'appareil.
Pour modifier les options de l’audio :
1 Appuyer sur AUDIO. L'OSD affiche les
paramètres en cours de l'audio.
32
• Pour arrêter complètement la lecture d'un
CD, appuyer sur STOP (Arrêt).
5 Appuyer sur ÉJECTERpour éjecter le CD.
Lecture d'un disque de fichiers JPEG
Pour lire un disque JPEG :
1 Appuyer sur POWER (Marche/Arrêt) pour
mettre l'appareil sous tension.
2 Appuyer sur DVD de la télécommande ou
plusieurs fois sur SOURCE de l'appareil pour
sélectionner DVD.
3 Insérer un disque JPEG dans la fente
d'insertion des disques, avec l’étiquette vers
le haut. Le menu de navigation du disque
s'ouvre.
4 Appuyer sur ou sur pour sélectionner
le fichier (ou le sous-menu) et appuyer sur
OK pour confirmer. Le diaporama
commence.
www.insignia-products.com
Page 35

Insignia NS-7UTCTV Lecteur de DVD/TV ACL de 7 po de dessous d’armoire
5 Pendant la lecture, il est possible de :
• Mettre l’image en pause – Appuyer sur
Appuyer sur
PLAY/PAUSE (Lecture/P ause) du lecteur
ou sur de la télécommande pour
mettre l’image en arrêt momentané.
Appuyer sur PLAY/PAUSE du
lecteur ou sur (Lecture) de la
télécommande pour reprendre la lecture.
• Opérer une rotation de l’image –
Appuyer sur , , ou sur pour
opérer la rotation de l'image en cours.
• Faire un zoom avant sur l'image –
Appuyer sur ZOOM pour un zoom avant
sur l'image. Appuyer sur ou sur
(Balayage a vant ou arrière) pour contrôler
la proportion du zoom. Appuyer sur
, , ou pour se déplacer autour
de l'image. Pour annuler, appuyer sur
ZOOM jusqu'à ce que l'image revienne à
son affichage normal.
• Retour au menu – Appuyer sur MENU
pour revenir au menu du disque.
6 Appuyer sur OPEN/CLOSE (Ouvrir/
Fermer) pour retirer le disque.
Utilisation de la radio
Pour utiliser la radio :
1 Appuyer sur PO WER (Marche/Arrêt) pour
mettre l'appareil sous tension.
2 Appuyer sur AM/FM sur la télécommande ou
plusieurs fois sur SOURCE de l'appareil,
pour sélectionner FM ou AM.
3 Appuyer sur SEEK - ou sur SEEK
+ (Recherche +/-) sur la télécommande
pendant 1,5 seconde pour rechercher vers le
haut ou vers le bas à partir de la fréquence
en cours pour les stations. La fréquence
radio s'affiche à l'écran. Appuyer sur la même
touche pour arrêter la recherche.
4 Pour un réglage précis d'une station, appuyer
brièvement sur SEEK - ou sur
SEEK + de la télécommande.
Pour mémoriser et utiliser des stations
préréglées :
1 Appuyer sur PO WER (Marche/Arrêt) pour
mettre l'appareil sous tension.
2 Appuyer sur AM/FM sur la télécommande ou
plusieurs fois sur SOURCE de l'appareil,
pour sélectionner FM ou AM.
3 Syntoniser la station souhaitée et appuyer
sur PICTURE/SET (Image/Configuration).
SAVE X X (Enregistrer XX) s'affiche (X X
représente le numéro présélectionné par
défaut).
4 Appuyer sur ou sur pour définir le
numéro du préréglage
(0 - 19) et appuyer sur PICTURE/SET de
nouveau pour mémoriser la station sur ce
numéro de canal.
Ou appuyer sur PICTURE/SET de nouveau
pour mémoriser en séquence le numéro
préréglé par défaut.
Remarque
Si aucune touche n'est appuyée pendant trois
secondes, la station ne sera pas mémorisée.
5 Pour accéder aux stations mémorisées
(préréglées), entrer le numéro prédéfini avec
les touches numériques. Après une pause, la
radio se rendra sur la station sélectionnée.
Remarque
Pour se rendre immédiatement sur la station
préréglée sélectionnée, appuyer sur ENT.
Ou, appuyer sur ou sur pour passer à
la station préréglée suivante ou précédente.
Remarque
En passant d'une station mémoriser à une autre,
CH XX apparaît brièvement sur le panneau
d'affichage (XX représente le numéro prédéfini).
Après quelques secondes le numéro prédéfini et
remplacé par la fréquence de la radio.
Utilisation des menus de configuration avancée du lecteur de DVD
Utilisation des menus de configuration du lecteur de DVD à l'écran
Le téléviseur possède un menu à l'écran qui
permet de modifier les paramètres avancés en
mode DVD.
Pour accéder et utiliser les menus à l'écran :
1 En mode DVD, appuyer sur SETUP
(Configuration). Le menu SETUP s’affiche.
2 Appuyer sur , , ou pour
sélectionner une option, puis sur OK pour
sélectionner l'option. Tous les éléments dans
la catégorie apparaissent sur le menu.
3 Appuyer sur pour sélectionner une autre
catégorie et sur OK pour confirmer.
4 Appuyer sur pour passer à un menu de
configuration différent.
5 Pour quitter le menu à l'écran, sélectionner
EXIT.
www.insignia-products.com
33
Page 36

Insignia NS-7UTCTV Lecteur de DVD/TV ACL de 7 po de dessous d’armoire
Menus de configuration du DVD à l'écran Modification des paramètres de l'écran
ACL
Menu d’écran Options
Configuration
générale
Speaker Setup
(Configuration
des
haut-parleurs)
Dolby Digital
Setup
(Configuration
Dolby Digital)
Video Setup
(Configuration
vidéo)
Preference Page
[Page des
préférences]
(l'appareil doit
être en mode Stop
[Arrêt] pour y
accéder)
ASPECT RATIO (Format d'image) – Permet de
sélectionner le format de l'image. Les choix
comprennent Normal/PS (Normal/Recadrage
plein écran), Normal/LB (Normal/Format boîte
aux lettres) (utiliser ces réglages lorsque le
DVD est lu sur un téléviseur normal 4:3) ou
Wide [Panoramique] (utiliser ce réglage
lorsque le DVD est lu sur l'appareil ou sur un
téléviseur à grand écran).
OSD Lang (Langue de l’OSD) – Permet de
sélectionner la langue de l’affichage des menus
à l'écran. Les langues disponibles sont English
(anglais), French (français) et Spanish
(espagnol).
Screen Saver (Économiseur d'écran) – Permet
d'activer le mode Économiseur d'écran qui
affiche ce type d'écran sur le téléviseur si la
même image reste présente pendant plusieurs
minutes.
Downmix (Réduction du mixage) – Permet de
sélectionner la sortie audio de l'appareil. Les
choix comprennent LT/RT [Gauche/Droit]
(sortie mono mixée) ou Stereo (sortie stéréo).
Dual Mono (Mono double) – Permet de
sélectionner la sortie audio Dolby Digital de
l'appareil. Les choix comprennent Stereo
(Stéréo), L-Mono (Mono-gauche), R-Mono
(Mono-droit) et Mix-Mono (Mon o mix te).
Dynamic (Dynamique) – Permet de régler le
taux de compression dynam i que linéaire pour
obtenir des effets différents sur les signaux.
Sharpness (Netteté) – Permet de régler le
niveau de netteté de l'image.
Brightness (Luminosité) – Permet de régler le
niveau de luminosité de l'image.
Contrast (Contraste) – Permet de régler le
niveau de contraste de l'image.
Menus sous-titres audio et disque – Permet
de sélectionner la langue du menu du disque et
des sous-titres ou de mettre des sous-titres et
des menus de disques sur l'audio. Les choix
comprennent English (anglais), French
(français) et Spanish (espagnol) et d'autres
langues en fonction de celles disponibles sur le
DVD.
Parental – Permet de verrouiller des parties
d'un DVD ou le DVD dans son entier, en
fonction du contenu sur le disque. Si cette
option est choisie, une invite apparaîtra pour
introduire un mot de passe (voir Mot de passe
, ci-dessous). Utiliser les touches numérotées
pour saisir le mot de passe. Pour une liste des
classifications, voir « Classification MPAA » à
la page 31.
Password (Mot de passe) – Permet de définir
le mot de passe d'accès au menu de
configuration Parentale. Le mot de passe
d'origine est 1369. Saisir le nouveau mot de
passe à l’aide des touches numériques, puis
appuyer sur OK pour confirmer. À l'invite de
réintroduction du mot de passe, saisir le même
mot et appuyer sur OK pour confirmer.
Default Reset (Réinitialisation par défaut) –
Permet de réinitialiser toutes les préférences
des réglages sur la valeur d'usine par défaut.
Pour modifier les paramètres de l'écran
ACL :
1 En mode DVD, appuyer sur PICTURE/SET
(Image/Configuration). Le menu PICTURE
(Image) s’affiche.
2 Appuyer sur ou sur pour sélectionner
BRIGHTNESS (Luminosité), CONTRAST
(Contraste) ou COLOR (Couleur), puis sur
ou sur pour régler le paramètre entre
0 et 20.
3 Appuyer sur ou pour sélectionner
Language (Langue), puis sur ou sur
pour sélectionner la langue souhaitée.
4 Si tous les paramètres doivent être
réinitialisés selon les valeurs d'usine par
défaut, appuyer sur ou sur pour
sélectionner Reset (Réinitialiser), puis sur
OK. Les paramètres sont redevenus ceux
d'usine par défaut.
5 Pour quitter le menu à l'écran, appuyer sur
ou sur pour sélectionner PICTURE
(Image) et ensuite sur .
34
www.insignia-products.com
Page 37

Insignia NS-7UTCTV Lecteur de DVD/TV ACL de 7 po de dessous d’armoire
Problèmes et solutions
Effectuer les vérifications suivantes avant de
contacter le service de réparation :
Problème Solution
Le disque n’est pas
lu par le lecteur de
DVD
L’image est
correcte, mais pas
de son.
Absence d’image,
image instable ou
image positionnée
incorrectement.
Une section est lue
sans discontinuer
ou la lecture
normale ne reprend
pas.
La télécommande
ne marche pas.
Remarque
L'électricité statique et d'autres interférences
externes peuvent provoquer un fonctionnement
anormal du lecteur. Si cela se produit, débrancher
l’appareil, puis le rebrancher pour le réinitialiser. Si
le problème persiste , déconnecter l’a limentation et
appeler le revendeur Insignia.
• Vérifier qu’un disque est chargé dans
l’appareil.
• Vérifier que le disque est inséré
correctement avec l’étiquette tournée
vers le haut.
• Vérifier que le disque est propre et
n’est pas voilé.
• Vérifier que le code de région du
disque est le même que le code de
l’appareil.
• Vérifier l’absence de toute
condensation d’eau dans l’appareil.
Retirer le disque et laisser l’appareil
sous tension jusqu’à évaporation de la
condensation.
• Vérifier que toutes les connexions sont
correctes.
• Vérifier que le son n’a pas été mis en
sourdine (appuyer sur MUTE pour
vérifier).
• Vérifier que le volume est correctement
réglé.
• Vérifier que le disque est propre et
n’est pas voilé.
• Vérifier que toutes les connexions sont
correctes.
• Vérifier que le signal d’entrée AV est
NTSC.
• Vérifier que le disque est propre et
n’est pas voilé.
• Vérifier que l’appareil n’est pas en
mode répétition de A à B (appuyer sur
A-B pour annuler le mode répétition de
A à B).
• Vérifier que le disque est propre et
n’est pas voilé.
• Pointer la té lécommande en direction
du capteur infrarouge de l’appareil.
• Véri fier que les piles sont installées
correctement.
• Changer les piles de la télécommande.
• Éliminer les obstacles entre le capteur
infrarouge de l’appareil et la
télécommande.
Entretien
Manipulation et nettoyage de l'appareil
Nettoyage du boîtier
• Pour nettoyer l'appareil, utiliser un chiffon
doux, sec. Si les surfaces sont extrêmement
sales, utiliser un chiffon doux légèrement
humecté d’une solution détergente douce.
• Ne pas utiliser des solvants puissants
comme l’alcool, le benzène ou les diluants,
étant donné que ceux-ci peuvent
endommager la surface de l’appareil.
Soins et manipulation des disques
Manipulation des disques
Do not touch the playback side of the disc. Hold
the disc by the edges so that fingerprints do not
get on the surface. Ne jamais coller du papier ou
du ruban sur le disque.
Rangement des disques
Après lecture, ranger le disque dans son boîtier.
Ne pas exposer le disque à la lumière directe du
soleil ou d’autres sources de chaleur et ne
jamais le laisser dans une voiture garée en plein
soleil.
Nettoyage des disques
Des empreintes digitales et de la poussière sur
un disque sont sources d’image médiocre et de
son déformé. Nettoyer le disque avec un chiffon
propre avant de l’utiliser. Essuyer le disque en
partant du centre vers l’extérieur.
Ne pas utiliser des solvants puissants comme
l’alcool, le benzène, les diluants, les nettoyants
disponibles dans le commerce ou les
vaporisateurs antistatiques destinés aux anciens
disques en vinyle.
Remarque
Ne jamais utiliser cet appareil immédiatement
après l’avoir transféré d’un endroit froid à endroit
lieu chaud. Ne pas le faire fonctionner pendant
deux ou trois heures. L’utilisation immédiate de
l’appareil risque d’endommager les cassettes, les
disques ou les composants internes.
Conservation des surfaces extérieures propres
• Ne pas utiliser de liquide volatil, tels qu'un
insecticide en pulvérisation, à proximité de
l'appareil.
• Ne pas laisser des produits en caoutchouc
ou en plastique en contact avec l'appareil
pendant des périodes prolongées, car cela
pourrait laisser des marques sur la surface.
www.insignia-products.com
35
Page 38

Insignia NS-7UTCTV Lecteur de DVD/TV ACL de 7 po de dessous d’armoire
Spécifications
Taille de l’écran
ACL
Longueur d'onde du
laser
Système vidéo
Réponse en
fréquence
Rapport signal à
bruit audio
Distorsion audio +
bruit
Séparation des
canaux
Dynamique du
signal
Radio
Gamme de
fréquences radio
Marche/Arrêt
7 po
780/650 nm
NTSC
20 Hz ~ 20 kHz ± 2,5 dB
>85 dB
< -70 dB (1 kHz)
> 70 dB (1 kHz)
> 80 dB (1 kHz)
Boucle à verrouillage de phase
AM – 520 à 1 710 KHz
FM – 87,5 à 107,9 MHz
CA 100 à 240 V, 50/60 Hz
Si cet équipement cause des interférences gênant la
réception d'ondes radio ou télévisées (déterminé en
éteignant et en rallumant l’équipement), il est
recommandé que l’utilisateur tente de corriger le
problème en appliquant au moins l'une des mesures
suivantes :
• Réorienter ou déplacer l’antenne réceptrice.
• Augmenter la distance entre l’équipement et
le récepteur.
• Brancher l’équipement sur la prise électrique
d’un circuit différent de celui auquel le
récepteur est relié.
• Contacter le revendeur ou un technicien
radio/télévision qualifié pour toute
assistance.
• Utiliser uniquement un câble d'interface
blindé.
Modifications
La FCC exige que l’utilisateur soit notifié que tous
changements ou modifications qui ne seraient pas
expressément approuvés par Insignia pourraient
rendre nul son droit à utiliser cet équipement.
Câbles
Les connexions à cet appareil doivent être eff ectuées à
l’aide de câbles blindés avec boîtier de connecteur
métallique à filtrage radiofréquence et perturbations
électromagnétiques, pour être en conformité avec la
réglementation de la FCC.
Consommation
électrique
Dimensions
Poids
<30 W
3,11 × 14,76 × 10,9 po
(7,9 × 37,49 ×27.69 cm)
Environ 6,83 lb (3,1 kg)
Disques compatibles
Les disques suivants peuvent être lus par le
lecteur de DVD.
Disques Logo Contenu Dimensions
DVD Audio + Vidéo
(film)
CD Audio 12 cm
12 cm
Avis juridiques
FCC article 15
Cet équipement a été testé et déclaré conforme aux
limitations prévues pour les appareils numériques de la
catégorie B, définies par l’article 15 du règlement de la
FCC. Ces limites ont été établies pour fournir une
protection raisonnable contre les interférences
préjudiciables lors d’une installation résidentielle.
Cet équipement génère, utilise et diffuse des ondes
radio et s’il n’est pas installé ni utilisé en conformité
avec les instructions dont il fait l’objet, il peut prov oquer
des interférences indésirables avec les
communications radio. Cependant, il n'est pas possible
de garantir qu’aucune interférence ne se produira pour
une installation particulière.
Avis canadien
Cet appareil numérique de classe B satisfait toutes les
exigences du Règlement canadien sur le matériel
brouilleur.
Droits d'auteurs
© 2007 Insignia. Insignia et le logo Insignia sont des
marques de commerce de Best Buy Enterprise
Services, Inc. Les autres noms de marques et de
produits mentionnés sont des marques de commerce
ou des marques déposées de leurs propriétaires
respectifs. Les spécifications et caractéristiques sont
susceptibles d'être modifiées sans préavis.
Pour l’assistance technique, appeler le (877) 467-4289.
36
www.insignia-products.com
Page 39

Insignia NS-7UTCTV Lecteur de DVD/TV ACL de 7 po de dessous d’armoire
Garantie limitée d’un an
Insignia Products (« Insignia ») garantit au premier
acheteur de ce Lecteur de DVD/TV ACL de 7 po de
dessous d’armoire Insignia NS-7UTCTV neuf
(« Produit »), qu’il est exempt de vices de fabrication et
de main-d’œuvre à l’origine, pour une période d’un (1)
an à partir de la date d’achat du Produit (« Période de
garantie »). Ce Produit doit avoir été acheté chez un
revendeur agréé des produits de la marque Insignia et
emballé avec cette déclaration de garantie. Cette
garantie ne couvre pas les Produits remis à neuf. Les
conditions de la présente garantie s’appliquent à tout
Produit pour lequel Insignia est notifié pendant la
Période de garantie, d’un vice co uvert par cette garantie
qui nécessite une réparation.
QUELLE EST LA DURÉE DE LA COUVERTURE?
La Période de garantie dure 1 an (365 jours) à compter
de la date d’achat de ce Produit. La date d’achat est
imprimée sur le reçu fourni avec le Produit.
QUE COUVRE CETTE GARANTIE?
Pendant la Période de garantie, si un vice de matériau
ou de main-d’œuvre d'origine est détecté sur le Produit
par un service de réparation agréé par Insignia ou le
personnel du magasin, Insignia (à sa seule discrétion) :
(1) réparera le Produit en utilisant des pièces détachées
neuves ou remises à neuf; ou (2) remplacera le Produit
par un produit ou des pièces neuves ou remises à neuf
de qualité comparable. Les produits et pièces remplacés
au titre de cette garantie deviennent la propriété
d’Insignia et ne sont pas retournés à l’acheteur. Si les
Produits ou pièces nécessitent une réparation après
l’expiration de la Période de garantie, l’acheteur devra
payer tous le s fr ais de mai n-d’œuv re et les p ièces . Cet te
garantie reste en vigueur tant que l’acheteur reste
propriétaire du Produit Insignia pendant la Période de
garantie. La garantie prend fin si le Produit est revendu
ou transféré d’une quelconque façon que ce soit à tout
autre propriétaire.
COMMENT OBTENIR UNE RÉPARATION SOUS GARANTIE?
Si le Produit a été acheté chez un détaillant, le rapporter
accompagné du reçu original chez ce détaillant. Prendre
soin de remettre le Produit dans son emballage d’origine
ou dans un emballage qui procure la même qualité de
protection que celui d’origine. Si le Produit a été acheté
en ligne, l’expédier accompagné du reçu original à
l’adresse indiquée sur le site Web. Prendre soin de
remettre le Produit dans son emballage d’origine ou
dans un emballage qui procure la même qualité de
protection que celui d’origine.
Pour obtenir le service de la garantie à domicile pour un
téléviseur avec écran de 25 po ou plus, appeler le
1-888-BESTBUY. L’assistance technique établira un
diagnostic et corrigera le problème au téléphone ou
enverra un technicien agréé par Insignia pour la
réparation à domicile.
OÙ CETTE GARANTIE S’APPLIQUE-T-ELLE?
Cette garantie ne s’applique qu’à l’acheteur original du
Produit aux États-Unis et au Canada.
CE QUI N’EST PAS COUVERT PAR CETTE GARANTIE LIMITÉE
La présente garantie ne couvre pas :
• la formation du client;
• l'installation;
• les réglages de configuration;
• les dommages esthétiques;
• les dommages résultants de catastrophes
naturelles telles que la foudre;
• les accidents;
• une utilisation inadaptée;
• une manipulation abusive;
• la négligence;
• une utilisation commerciale;
• la modification de tout ou partie du Produit, y
compris l’antenne.
• un écran plasma endommagé par les images fixes
(sans mouvement) qui restent affichées pendant de
longues périodes (rémanentes).
La présente garantie ne couvre pas non plus :
• les dommages ayant pour origine une utilisation ou
une maintenance défectueuse;
• la connexion à une source électrique dont la
tension est inadéquate;
• toute réparation effectuée par quiconque autre
qu’un service de réparation agréé par Insignia pour
la réparation du Produit;
• les Produits vendus en l’état ou hors service;
• les consommables tels que les fusibles ou les piles;
• les produits dont le numéro de série usine a été
altéré ou enlevé.
LA RÉPARATION OU LE REMPLACEMENT, TELS
QU’OFFERTS PAR LA PRÉSENTE GARANTIE,
CONSTITUENT LE SEUL RECOURS DE L’ACHETEUR.
INSIGNIA NE SAURAIT ÊTRE TENU POUR
RESPONSABLE DE DOMMAGES ACCESSOIRES OU
CONSÉCUTIFS, RÉSULTANT DE L’INEXÉCUTION
D'UNE GARANTIE EXPRESSE OU IMPLICITE SUR CE
PRODUIT, Y COMPRIS, SANS S’Y LIMITER, LA
PERTE DE DONNÉES, L’IMPOSSIBILITÉ D’UTILISER
LE PRODUIT, L’INTERRUPTION D’ACTIVITÉ OU LA
PERTE DE PROFITS. INSIGNIA PRODUCTS
N’OCTROIE AUCUNE AUTRE GARANTIE EXPRESSE
RELATIVE À CE PRODUIT; TOUTES LES GARANTIES
EXPRESSES OU IMPLICITES POUR CE PRODUIT, Y
COMPRIS MAIS SANS LIMITATION, TOUTE
GARANTIE DE QUALITÉ MARCHANDE,
D'ADÉQUATION À UN BUT PARTICULIER, SONT
LIMITÉES À LA PÉRIODE DE GARANTIE
APPLICABLE TELLE QUE DÉCRITE CI-DESSUS ET
AUCUNE GARANTIE EXPRESSE OU IMPLICITE NE
S’APPLIQUERA APRÈS LA PÉRIODE DE GARANTIE.
CERTAINS ÉTATS ET PROVINCES NE
RECONNAISSENT PAS LES LIMITATIONS DE LA
DURÉE DE VALIDITÉ DES GARANTIES IMPLICITES.
PAR CONSÉQUENT, LES LIMITATIONS
SUSMENTIONNÉES PEUVENT NE P AS S'APPLIQUER
À L’ACHETEUR ORIGINAL. LA PRÉSENTE GARANTIE
DONNE À L'ACHETEUR DES GARANTIES
JURIDIQUES SPÉCIFIQUES; IL PEUT AUSSI
BÉNÉFICIER D'AUTRES GARANTIES QUI VARIENT
D'UN ÉTAT OU D'UNE PROVINCE À L'AUTRE.
Pour contacter Insignia :
Pour le service à la clientèle, appeler le 1-877-467-4289
www.insignia-products.com
INSIGNIA
Enterprise Services, Inc.
Distribué par Best Buy Purchasing, LLC
Insignia, 7601 Penn Avenue South, Richfield, Minnesota,
U.S.A.
MC
est une marque de commerce de Best Buy
www.insignia-products.com
37
Page 40

Insignia NS-7UTCTV Lecteur de DVD/TV ACL de 7 po de dessous d’armoire
38
www.insignia-products.com
Page 41

Insignia NS-7UTCTV Reproductor de DVD/TV con pantalla LCD de 7" bajo el Gabinete
(
)
Insignia NS-7UTCTV
Reproductor de DVD/
TV con pantalla LCD
de 7" bajo el
Gabinete
Contenido
Bienvenido . . . . . . . . . . . . . . . . . . . . . . . . . . . . . . .39
Información de seguridad. . . . . . . . . . . . . . . . . . . .39
Características . . . . . . . . . . . . . . . . . . . . . . . . . . . .41
Accesorios. . . . . . . . . . . . . . . . . . . . . . . . . . . . . . . . . 42
Vista frontal . . . . . . . . . . . . . . . . . . . . . . . . . . . . . . . . 42
Panel de visualización. . . . . . . . . . . . . . . . . . . . . . . . 43
Vista Posterior - tomas . . . . . . . . . . . . . . . . . . . . . . . 43
Control remoto. . . . . . . . . . . . . . . . . . . . . . . . . . . . . . 43
Preparación de su reproductor de DVD/TV . . . . . .44
Instalación de las pilas del control remoto . . . . . . . . 44
Uso del control remoto . . . . . . . . . . . . . . . . . . . . . . . 45
Conexión a las fuentes de video. . . . . . . . . . . . . . . . 45
Uso de su televisor. . . . . . . . . . . . . . . . . . . . . . . . .48
Encendido y apagado de la unidad. . . . . . . . . . . . . . 48
Cambio del volumen . . . . . . . . . . . . . . . . . . . . . . . . . 48
Cambio de modo. . . . . . . . . . . . . . . . . . . . . . . . . . . . 48
Cambio de canales . . . . . . . . . . . . . . . . . . . . . . . . . . 48
Configuración inicial del televisor . . . . . . . . . . . . . . . 48
Ajuste de la hora . . . . . . . . . . . . . . . . . . . . . . . . . . . . 49
Ajuste del temporizador . . . . . . . . . . . . . . . . . . . . . . 49
Uso del televisor en el modo ATSC (digital) . . . . . . . 49
Uso de su reproductor de DVD. . . . . . . . . . . . . . . .52
Reproducción de un DVD . . . . . . . . . . . . . . . . . . . . . 52
Reproducción de un CD . . . . . . . . . . . . . . . . . . . . . . 53
Reproducción de un disco JPEG . . . . . . . . . . . . . . . 53
Uso de su radio . . . . . . . . . . . . . . . . . . . . . . . . . . .54
Uso de los menús de configuración de DVD avanzados
54
Uso de los menús de configuración de DVD en pantalla
54
Menús de configuración de DVD en pantalla . . . . . . 54
Cambiando los ajustes de la pantalla LCD . . . . . . . . 55
Localización y corrección de fallas. . . . . . . . . . . . .55
Mantenimiento . . . . . . . . . . . . . . . . . . . . . . . . . . . .56
Especificaciones. . . . . . . . . . . . . . . . . . . . . . . . . . .56
Avisos Legales . . . . . . . . . . . . . . . . . . . . . . . . . . . .57
Garantía limitada de un año. . . . . . . . . . . . . . . . . .59
Bienvenido
Información de seguridad
Conexiones de la antena
Si una antena externa está conectada al equipo
de televisión, asegúrese de que el sistema de
antena esté conectado a tierra, para proveer una
protección contra sobretensión y la acumulación
de cargas de electricidad estática. La sección
810 del Código Nacional de Electricidad
proporciona información respecto a la conexión
a tierra del poste y la estructura de soporte, la
conexión a tierra del alambre principal de una
unidad de descarga de antena, el tamaño de los
conductores de la conexión a tierra, ubicación
de la unidad de descarga de la antena, conexión
a los electrodos de conexión a tierra y los
requisitos del electrodo de conexión a tierra.
EXAMPLE OF ANTENNA GROUNDING AS SPECIFIED
BY NATIONAL ELECTRICAL CODE (NEC)
GROUND
CLAMP
ELECTRIC
SERVICE
EQUIPMENT
GROUND CLAMPS
POWER SERVICE GROUNDING
ELECTRODE SYSTEM
NEC ART 250, PART H
• Un sistema de antena exterior no debe de
ubicarse en las inmediaciones de líneas
eléctricas u otros circuitos de luz eléctrica o
de energía, o donde pueda caer sobre dichos
circuitos o líneas eléctricas. Al instalar un
sistema de antena exterior, se debe tener
sumo cuidado para no tocar los circuitos o
líneas de alto voltaje ya que el contacto con
ellos podría ser fatal.
• Por protección adicional durante una
tormenta de rayos, o cuando se deje de usar
su reproductor de DVD/TV por un periodo de
tiempo prolongado, desconéctelo del
tomacorriente y desconecte la antena. Esto
evitará daños al equipo debido a
sobretensión de energía o rayos.
Riego de choque
Para reducir el riesgo de incendio o choque
eléctrico, no exponga este aparato a la lluvia o la
humedad.
ANTENNA
LEAD-IN
WIRE
ANTENNA
DISCHARGE UNIT
(NEC SECTION 810-20)
GROUNDING CONDUCTORS
(NEC SECTION 810-21)
Felicitaciones por su compra de un producto de
alta calidad de Insignia. Su NS-7UTCTV
representa el más moderno diseño de televisor y
reproductor de DVD bajo el gabinete, y está
concebido para brindar un rendimiento confiable
y sin problemas.
www.insignia-products.com
AVISO:
PARA REDUCIR EL RIESGO DE DESCARGA
ELÉCTRICA, NO RETIRE LA CUBIERTA (O SECCIÓN
POSTERIOR). EN EL INTERIOR DEL APARATO NO
HAY COMPONENTES QUE REQUIERAN SERVICIO
DE MANTENIMIENTO POR EL USUARIO. SOLICITE
CUALQUIER OPERACIÓN DE MANTENIMIENTO A
PERSONAL DE SERVICIO CALIFICADO.
39
Page 42
Insignia NS-7UTCTV Reproductor de DVD/TV con pantalla LCD de 7" bajo el Gabinete
El símbolo del rayo dentro de un triángulo
equilátero tiene por finalidad alertar al usuario
de la presencia de tensión peligrosa (sin
aislamiento) en el interior del producto, que
puede tener la intensidad suficiente como para
constituir un riesgo de descarga eléctrica.
El signo de exclamación dentro de un triángulo
equilátero tiene por finalidad alertar al usuario
de importantes instrucciones de operación y
mantenimiento (servicio) en la literatura que
acompaña a este aparato.
Advertencia:
Radiación de láser visible e invisible de clase 1
cuando está abierto y se han vencido los
seguros. No mire directamente al haz de luz ni lo
observe directamente con un instrumento
óptico.
Advertencia:
Este reproductor de DVD/TV utiliza un sistema
de láser. Para asegurar el uso correcto de este
reproductor de DVD/TV, lea detenidamente este
manual del propietario y guárdelo para futura
referencia. Si su reproductor de DVD/TV
requiere mantenimiento, comuníquese con el
personal de servicio calificado.
El realizar ajustes a controles o llevar a cabo
procedimientos que no están especificados en
este manual puede resultar en una exposición
peligrosa a la radiación.
Para impedir la exposición directa al rayo láser,
no trate de abrir la caja del equipo. NO MIRE
DIRECTAMENTE EL HAZ DE LUZ.
Cuidado:
Su reproductor de DVD/TV no debe de ser
expuesto al agua (goteo o salpicaduras), y
ningún objeto lleno de líquido, como por ejemplo
vasijas, deberá ser colocado sobre el aparato.
Advertencia:
No sobrecargue los tomacorrientes de pared. Los
tomacorriente sobrecargados, flojos o
defectuosos, los cables de extensión
sobrecargados, los cables de alimentación
pelados o los aislamientos de cables dañados o
agrietados son peligrosos. Cualquiera de estas
condiciones puede causar un choque eléctrico o
un incendio. Examine periódicamente el cable de
su reproductor de DVD/TV y si su aspecto indica
que ha sufrido daño o deterioro, desenchúfelo,
deje de usar su reproductor de DVD/TV y solicite
a un centro de servicio autorizado que cambien el
cable por una pieza de repuesto idéntica.
Proteja el cable de alimentación de abusos físicos
o mecánicos como cuando se retuerce, se
enrosca, se pellizca, se aplasta al cerrar una
puerta o se le pisa. Preste especial atención a los
enchufes, a los tomacorrientes y al punto por
donde el cable sale de su reproductor de DVD/TV.
Para desconectar la alimentación del
tomacorriente, saque el enchufe del cable de
alimentación. Cuando instale su reproductor de
DVD/TV, verifique que el enchufe se puede
acceder fácilmente.
Medidas de seguridad importantes
Este reproductor de DV D/TV ha sido diseñado y
fabricado para garantizar la seguridad personal.
El uso indebido del mismo puede ocasionar un
choque eléctrico o riesgo de incendio. Los
mecanismos de protección incorporados en este
reproductor de D VD/TV le protegerán si observa
los siguientes procedimientos de instalación,
uso y mantenimiento. Los componentes internos
de este reproductor de DVD/TV no pueden ser
reparados o mantenidos por el usuario.
• Lea estas instrucciones – Lea y comprenda
todas las instrucciones de funcionamiento
antes de hacer funcionar su reproductor de
DVD/TV.
• Guarde estas instrucciones — Estas
instrucciones de seguridad y operación
deben guardarse en un lugar seguro para
futura referencia.
• Preste atención a todas las advertencias —
Todas las advertencias en su reproductor de
DVD/TV y en estas instrucciones se deben
seguir detalladamente.
• Siga las instrucciones — Todas las
instrucciones de operación deben ser
seguidas.
• Accesorios — No utilice aditamentos ni
accesorios que no sean recomendados por
Insignia. El uso de accesorios inadecuados
puede causar accidentes.
• Fuente de alimentación – Este reproductor
de D VD/TV debe funcionar con una fuente de
alimentación especificada en la etiqueta del
producto. Si no está seguro del tipo de fuente
de energía usado en su casa, consulte con el
vendedor del producto o la compañía local
de energía.
• Protección del cable de alimentación CA –
Los cables de alimentación CA deben
encaminarse correctamente para evitar
daños debidos a personas que los pisan u
objetos que descansan en ellos. Compruebe
las conexiones del cable en el tomacorriente
y en el lugar donde el cable se conecta a su
reproductor de DVD/TV.
• Sobrecarga – No sobrecargue los
tomacorrientes de CA o los cables de
extensión. La sobrecarga puede causar
incendio o choque eléctrico.
• Intrusiones y derrames – Nunca inserte un
objeto en su reproductor de D VD/TV a tra vés
de las rendijas o aberturas. Su reproductor
de DVD/TV tiene flujo de alto voltaje e
insertar un objeto puede causar choque
eléctrico y dañar los componentes eléctricos.
Por la misma razón, no derrame agua ni
líquidos sobre su reproductor de DVD/TV.
• Servicio – No intente reparar su reproductor
de DVD/TV usted mismo. Al retirar las
cubiertas puede quedar expuesto a alto
voltaje y otras condiciones peligrosas.
Solicite que un técnico de servicio calificado
realice el mantenimiento.
40
www.insignia-products.com
Page 43

Insignia NS-7UTCTV Reproductor de DVD/TV con pantalla LCD de 7" bajo el Gabinete
• Reparación – Si ocurre alguna de las
siguientes condiciones, desenchufe el cable
de alimentación del tomacorriente de CA,
después solicite a un técnico de servicio
calificado que realice las reparaciones.
• Cuando se dañe el cable de alimentación
CA o el enchufe.
• Cuando se ha derramado líquido sobre su
reproductor de DVD/TV o cuando han
caído objetos dentro de su reproductor de
DVD/TV.
• Cuando su reproductor de DVD/TV ha
sido expuesto a la lluvia o al agua.
• Cuando su reproductor de DVD/TV no
funciona correctamente según lo descrito
en estas instrucciones de operación. No
ajuste los controles excepto los descritos
en estas instrucciones. Un ajuste
incorrecto de controles no descrito en
estas instrucciones puede causar daño y
a menudo requerirá trabajo intensivo de
ajuste por un técnico calificado.
• Cuando su reproductor de DVD/TV se ha
dejado caer o se ha dañado.
• Cuando su reproductor de DVD/TV
muestre una condición anormal.
Cualquier anormalidad que se note en su
reproductor de DVD/TV indica que éste
necesita servicio.
• Piezas de repuesto — En caso de que su
reproductor de DVD/TV necesite piezas de
repuesto, asegúrese de que la persona de
servicio utilice las piezas de repuesto
especificadas por el fabricante, u otras con
las mismas características y rendimiento que
las piezas originales. El uso de piezas no
autorizadas puede resultar en incendio,
choque eléctrico y otros peligros.
• Verificaciones de seguridad — Después de
completar el servicio o reparación, pida al
técnico de servicio que realice verificaciones
de seguridad para comprobar que su
reproductor de DVD/TV se encuentra en
buena condición de operación.
• Montaje en pared o en techo — Cuando
monte su reproductor de DVD/TV en una
pared o en un techo, asegúrese de instalarlo
siguiendo el método recomendado por el
fabricante.
• Limpieza – Desenchufe el cable de
alimentación CA del tomacorriente antes de
limpiar su reproductor de DVD/TV. Limpie
únicamente con un paño seco. No use
productos de limpieza líquidos o en aerosol.
• Agua y humedad — No utilice este
reproductor de DVD/TV cerca de entornos
mojados o húmedos, como cerca de una
bañera, lavabo, fregadero de cocina,
lavadero, piscina o sótano mojado. No
exponga este reproductor de DVD/TV a
líquidos que gotean o salpican. No coloque
objetos llenos de líquido sobre este
reproductor de DVD/TV.
• Estantes y carros — No coloque este
reproductor de D VD/TV sobre un carro , base,
trípode o mesa inestable. Es posible que la
instalación inestable haga que su
reproductor de DVD/TV se caiga, resultando
en lesiones graves así como daños al
reproductor de DVD/TV. Use solamente con
carros, bases, trípodes, soportes, o mesas
especificadas por Insignia o que se vendan
con su reproductor de DVD/TV. Cuando use
un carro, tenga cuidado al mov er el carro y el
aparato para evitar lesiones en caso de que
se vuelque.
• Ventilación — Las rendijas de ventilación y
otras aberturas del gabinete están diseñadas
para ventilación. No las cubra ni las bloquee ,
porque la ventilación insuficiente puede
sobrecalentar su reproductor de DVD/TV y
acortar su vida útil. No coloque su
reproductor de DVD/TV sobre una cama, un
sofá, una alfombra u otra superficie blanda,
ya que estos pueden bloquear las aberturas
de ventilación. Este reproductor de DVD/TV
no está diseñado para instalarse empotrado.
No coloque su reproductor de D VD/TV en un
lugar encerrado, como un librero o estante, a
menos que proporcione la ventilación
adecuada y siga detenidamente las
instrucciones del fabricante.
• Frágil — El panel de LCD que se usa en este
reproductor de DVD/TV está hecho de vidrio
y puede romperse fácilmente cuando su
reproductor de D VD/TV se deja caer o recibe
un impacto. Si se rompe el panel, tenga
sumo cuidado para evitar lesiones por el
vidrio roto.
Nota
No toque la pantalla LCD TFT a color con sus dedos.
• Píxeles inactivos — El panel de LCD
contiene casi 3 millones de transistores de
película fina, que proporcionan una calidad
de video excepcionalmente nítida.
Ocasionalmente unos cuantos píxeles
inactivos pueden aparecer en la pantalla
como un punto fijo de color azul, verde o rojo.
Estos píxeles inactivos no afectan
adversamente al rendimiento de su
reproductor de DVD/TV, y no se consideran
defectos.
• Fuentes de calor — No instale este
reproductor de DVD/TV cerca de fuentes de
calor tales como radiadores, calefactores,
estufas, amplificadores u otros aparatos que
produzcan calor.
Características
Este televisor incorpora en un sistema las
funciones de un reproductor de DVD, una
pantalla LCD, un receptor de televisión y un
radio. Está diseñado para el uso con v eniente en
la cocina. Cuenta con las siguientes
características:
• Modos múltiples, incluyendo:
•DVD
•TV
• Radio
•AV
• ATSC (digital)
• Entrada de A V — La entrada de audio/video
externa se puede conectar a la mayoría de
fuentes de AV externas.
• Salida de A V — La salida de audio analógico
se puede conectar a un amplificador externo.
www.insignia-products.com
41
Page 44

Insignia NS-7UTCTV Reproductor de DVD/TV con pantalla LCD de 7" bajo el Gabinete
• Pantalla LCD (Pantalla de Cristal Liquido)
— Pantalla de video a color diseñada con
tecnología LCD que muestra claramente la
información de video.
• Función de amplificador — Amplificador
estéreo integrado de 2 x 3 Watts con
altavoces izquierdo y derecho.
• Adaptador de alimentación conmutable —
Se adapta automáticamente al voltaje
requerido.
• Funciones especiales — Soporta idiomas
múltiples.
• Funciones avanzadas de reproducción de
DVD, incluyendo:
• Compatibilidad – Reproduce: Discos
DVD, CD, JPEG y MP3.
• Visualización en pantalla – Muestra su
elección entre inglés, español o francés.
• Función de búsqueda rápida – Avance
y retroceso rápido de varias velocidades,
cámara lenta y reproducción repetida.
• Función de zoom – Le permite ampliar la
imagen.
• Búsqueda por tiempo – Busca un
tiempo determinado en un disco.
• Funciones de TV, incluyendo:
• Recepción clara de la señal de televisión.
• Búsqueda automática de canales de TV.
• Memorización automática de canales.
• Funciones de radio, incluyendo:
• Recepción clara de la señal de AM/FM.
• Búsqueda automática de emisoras de
radio.
• Almacenamiento fácil de emisoras de
radio.
• Búsqueda de emisoras de radio en el
rango de frecuencia alto o bajo.
Accesorios
Asegúrese de que los siguientes accesorios se
encuentran en el paquete:
• Control remoto
• Pila (CR2025)
• Guía del usuario
• Placa de montaje
• Piezas de montaje (tornillos y espaciadores)
Vista frontal
234 5
1
6
Elemento Descripción
1
2 Ranura para discos. Permite cargar y descargar discos.
3
4
5
6
7 Botón FUENTE. Permite cambiar entre los modos DVD,
(Encendido). Permite encender y apagar el
reproductor de DVD/TV (salir o ingresar al modo de
suspensión).
EXPULSAR/ (Detener). Permite detener la
reproducción (en el modo DVD). Manténgalo
presionado para expulsar el disco del reproductor.
Botón (REPRODUCIR/PAUSAR). En el modo DVD,
permite comenzar o pausar la reproducción.
/ (BÚSQUEDA EN REVERSA) . En el modo
DVD, permite activar el retroceso rápido. Manténgalo
presionado para ir al comienzo de l capítulo o de la pist a
actual.
En el modo de radio, presiónelo una vez para sintonizar
finamente hacia abajo una emisora de radio o
presiónelo brevemente (1.5 segundos) para buscar
emisoras de radio en una frecuencia inferior.
/ (BÚSQUEDA HACIA ADELANTE) . En el
modo DVD, permite activar el avance rápido.
Manténgalo presionado para ir al siguiente capítulo o a
la siguiente pista.
En el modo de radio, presiónelo una vez para sintonizar
finamente hacia arriba una emisora de radio o
presiónelo brevemente (1.5 segundos) para buscar
emisoras de radio en una frecuencia superior.
TV, AV, FM, AM y ATSC.
8
10 12 15 1613 14
7
9
11
17
Información sobre el código regional
Los reproductores de DVD y los discos están
codificados por región. Si el número regional
impreso en el disco DVD no corresponde al
número regional de este reproductor de DVD, la
unidad no podrá reproducir dicho disco. El
número regional de esta unidad es 1.
42
www.insignia-products.com
Page 45

Insignia NS-7UTCTV Reproductor de DVD/TV con pantalla LCD de 7" bajo el Gabinete
Elemento Descripción
8 Botón SILENCIAR. Permite silenciar el sonido.
9 Sensor del control remoto. Recibe la señal del control
remoto.
10 Botón AJUSTAR. Permite ingresar al menú Timer Setup
(Configuración del temporizador). En el modo de radio,
permite memorizar (predefinir) una emisora.
11 Botón MENÚ. Permite abrir el menú de pantalla
principal del DVD.
12 Panel de visualización. Mue stra la hora, el estado, la
frecuencia de radio y el número de la emisora de radio.
También muestra el nivel de volumen mientras se
ajusta el volumen.
13
Botones CANAL + y CANAL -. En el modo de
menú, permiten seleccionar elementos en el menú de
configuración.
Permiten cambiar el canal de TV o la emisora de radio
hacia arriba o abajo.
Presione
para reducir el valor cuando ajuste la
hora.
Presione
para aumentar el valor cuando ajuste la
hora.
14
Botones VOL - y VOL + . En el modo de menú,
permiten seleccionar elementos en el menú de
configuración.
Presione
para bajar el volumen o reducir el valor
en el menú de configuración de imagen.
Presione
para subir el volumen o aumentar el valor
en el menú de configuración de imagen.
15 Botón HORA/ENTRAR. Presione una vez para mostrar
la hora actual en la pantalla. Presione dos veces para
ajustar la hora, luego use los botones
/ para
seleccionar la posición y los botones / para
ajustar el valor de la hora o el minuto.
En el modo de menú, permite confirmar las
selecciones.
16 Botón CONFIGURACIÓN DE TV/LCD. Permite abrir el
menú de configuración del LCD.
17 Pantalla LCD. Muestra la imagen.
Panel de visualización
Vista Posterior - tomas
Elemento Descripción
1 To ma para antena AM
2 To ma de antena FM coaxial de 75 ohmios
3 To mas de salida de AUDIO izquierdo y derecho
4 Tom a de salida de VIDEO
5 Toma de entrada de 12 V CC
6 Toma de ENTRADA DE ANTENA para TV
7 Toma de ENTRADA ATSC
8 Tomas de entrada de AUDIO izquierdo y derecho
9 T oma de entrada de VIDEO
Control remoto
POWER
DVD
TV
AV
FM/AM
DTV
LAST
__
SEEK +
AUDIO
SUBTITLE
EJECT
123
456
789
GOTO
0
SETUP
PICTURE/SET
CH+
TIME
INFO
LCD ON/OFF
OK
CH-
Elemento Descripción
1 Indicador de estado del radio FM
2 Indicador de estado del radio AM e indicador de hora
AM
3 Indicador de hora PM
4 Indicadores de hora o carácter (por ejemplo, canal de
TV, frecuencia de radio, tiempo de película
transcurrido, etc.)
5 Indicadores de minutos o carácter
6 Indicadores de segundo o carácter
7 Indicador de frecuencia FM (MHz)
8 Indicador de frecuencia AM (kHz)
www.insignia-products.com
MUTE
MENU ZOOM
TITLE
REPEAT/EXIT
A-B SLOW
+
VOL
Elemento Descripción
1
2 Botón SUBTÍTULOS. Presione repetidamente hasta que
3 Botón DVD. Permite cambiar al modo DVD.
4 Botón TV. Permite cambiar al modo TV.
5 Botón AV. Permite camb iar al modo de entrada de AV
Botón de ENCENDIDO. Permite encender y apagar
el reproductor de DVD/TV.
se seleccione el idioma de subtítulos deseado.
externa.
43
Page 46

Insignia NS-7UTCTV Reproductor de DVD/TV con pantalla LCD de 7" bajo el Gabinete
Elemento Descripción
6 Botón FM/AM. Permite cambiar al modo de entrada de
7 Botón DTV. Permite cambiar al modo ATSC.
8
9 Botón ACEPTAR. Presione para confirmar las
10 Botón ÚLTIMO. Mientras está en el modo TV, permite
11
12
13
14 Botón TÍTULO. Permite mostrar los títulos de DVD
15 Botón MENÚ. Permite abrir el menú de disco en el
16 Botón REPETIR/SALIR. Permite ir al modo de
17 Botón A-B. Permite repetir una porción seleccionada de
18
19 Botón AUDIO. Permite cambiar el idioma o las
20 Botones numéricos 0-9: Permiten ingresar
21 Botón IR A. En el modo DVD, permite seleccionar el
22 Botón de CONFIGURACIÓN. Permite abrir los distintos
23 Botón IMAGEN/AJUSTAR. Permite ingresar al menú
24 Botón INFO. Presione para mostrar la información
25 Botón LCD ENCENDIDO/APAGADO. Permite encender
señal FM/AM.
Botones de cursor
navegar los menús de pantalla o cambiar los ajustes.
selecciones del menú.
regresar al canal anterior.
Botón
retroceder rápidamente. En el modo de radio,
presiónelo una vez para sintonizar finamente hacia
abajo una emisora de radio o presiónelo brevemente
(1.5 segundos) para buscar emisoras de radio en una
frecuencia inferior.
Botón BUSCAR + . En el modo DVD, permite
avanzar rápidamente. En el modo de radio, presiónelo
una vez para sintonizar finamente hacia arriba una
emisora de radio o presiónelo brevemente (1.5
segundos) para buscar emisoras de radio en una
frecuencia superior.
Botón (Reproducir). Permite comenzar la
reproducción del disco, o en el modo de menú permite
confirmar sus selecciones.
Botón
de DVD y CD.
actuales, si están disponibles.
modo DVD. Presione de nuevo para salir.
repetición de DVD o salir del menú de configuración.
un DVD. Presione una vez para establecer el punto
inicial (A), presione nuevamente para establecer el
punto final (B) y presione nuevamente para detener la
reproducción A-B.
Botón
reproductor.
opciones de audio del DVD.
directamente números de canales, números de
capítulos de DVD y números de pista de CD.
Botón — (+10). Si el número de la pista es mayor que
10, presione este bot ón una vez y d espués un bo tón del
1 al 9.
tiempo de inicio, la pista o el título.
menús de configuración (TV, DVD o ATSC) en sus
modos respectivos.
LCD Setup (Configuración del LCD) o Timer Setup
(Configuración del temporizador). En el modo de radio,
permite memorizar (predefinir) una emisora.
sobre el DVD que se reproduce.
o apagar la pantalla LCD en el modo DVD, TV o AV.
BUSCAR - . En el modo DVD, permite
(Detener). Permite detener la reproducción
EXPULSAR. Permite expulsar el disco del
/// : Permiten
Elemento Descripción
26 Botón HORA. Presione una vez para mostrar la hora
27
28
29 Botón SILENCIAR. Permite silenciar el sonido.
30
31 Botones VOL+/-. Permiten subir (+) o bajar (-) el
32 Botón ZOOM. Permite ampliar el la imagen del DVD.
33 Botón LENTO. Permite reducir la velocidad de
actual en la pantalla. Presione dos veces para ajustar la
hora, luego use los botones
la posición y los botones / para ajustar el valor
de la hora o el minuto.
Botón
SIGUIENTE. Permite ir al siguien te
capítulo o a la siguiente pista. Presione nuevamente
para saltar hacia delante por capítulo o pista.
Botón
ANTERIOR. Permite ir al capítulo o a la
pista anterior. Presione nuevamente para saltar hacia
atrás por capítulo o pista.
Botón
PAUSAR. Permite pausar la reprodu cción del
DVD.
volumen.
Presione los botones direccionales para desplazarse
por la pantalla.
reproducción del DVD.
/ para se lec cionar
Preparación de su reproductor de DVD/TV
Instalación de las pilas del control remoto
Para instalar las pilas:
1 Retire el portapila en la parte inferior del
control remoto.
2 Inserte la pila (suministrada) en el portapila.
Asegúrese de que el símbolo (+) en las pila
coincida con el diagrama dentro del
portapila.
3 Reinserte el portapila en la parte inferior del
control remoto.
44
www.insignia-products.com
Page 47

Insignia NS-7UTCTV Reproductor de DVD/TV con pantalla LCD de 7" bajo el Gabinete
Uso del control remoto
Para usar el control remoto:
• Apúntelo directamente al televisor, dentro de
un ángulo de 60º del sensor infrarrojo en la
parte frontal del televisor y a menos de 23
pies (cerca de 7 metros).
Notas
• La pila normalmente dura como seis me ses,
dependiendo de que tan a menudo y para que
operaciones se usa el control remoto.
• Si el control remoto deja de funcionar, aunque se
utiliza cerca del reproductor, reemplace la pila.
• Si el control remoto no se usa por un periodo de
tiempo extendido, retire la pila del compartimiento
para evitar daño debido a derrame de ácido.
Nota
Los objetos entre el control remoto y el sensor
podrían debilitar la señal infrarroja del control
remoto.
El rango puede verse reducido si la luz del sol
directa brilla sobre el sensor infrarrojo del
reproductor de DVD/TV.
Cuidados
No exponga el control remoto a líquidos, a luz del
sol directa o a impactos.
Es posible que el control remoto no funcione
correctamente si el sensor in frarrojo del
reproductor de DVD/TV se encuentra bajo luz del
sol directa o fuerte iluminación. En es e caso,
cambie el ángulo de la luz o de la pantalla del
televisor o acerque el control remoto al sensor
infrarrojo.
Conexión a una antena de TV
Entrada de señal de
TV
Para conectar una antena de TV externa:
1 Conecte el cable de la antena al toma ANT
INPUT (Entrada de antena) en la parte
posterior de su reproductor de DVD/TV.
2 Presione TV en el control remoto o presione
repetidamente SOURCE (Fuente) en su
reproductor de DVD/TV, para seleccionar TV
como la entrada de señal de su reproductor
de DVD/TV.
Conexión a una fuente de señal ATSC (digital)
Entrada de señal
ATSC
Para conectar una fuente de señal ATSC (digital):
1 Conecte el cable de la fuente ATSC al toma
ATSC INPUT (Entrada ATSC) en la parte
posterior de su reproductor de DVD/TV.
2 Presione DTV en el control remoto o
presione repetidamente SOURCE (Fuente)
en su reproductor de DVD/TV, para
seleccionar ATSC como la entrada de señal
de su televisor.
Conexión a una antena de radio
Conexión a las fuentes de video
Nota
• No conecte el cable de alimen tación hasta qu e
todas las otras conexiones se han realizado.
• Cada vez que reinicie su reproductor de DVD/
TV, éste recordará la última función usada.
• Realice todas las conexiones antes de instalar
su reproductor de DVD/TV.
Para conectar una antena de radio:
1 Conecte el cable de la antena de FM (1) y los
alambres de la antena de AM (2) a los tomas
respectivos den la parte posterior del
televisor.
www.insignia-products.com
45
Page 48

Insignia NS-7UTCTV Reproductor de DVD/TV con pantalla LCD de 7" bajo el Gabinete
2 Presione FM/AM en el control remoto o
presione repetidamente SOURCE (Fuente)
en su televisor, para seleccionar FM o AM
como la entrada de señal del radio.
Advertencia:
• Si conecta su reproductor de DVD/TV a una antena
de FM exterior, deberá conectar a tierra su
reproductor de DVD/TV para evitar los peligros de
la caída de un rayo.
• Para prevenir una explosión de gas, no conecte el
cable de tierra a un tubo de gas.
Notas
• Para mejorar la señal, aleje la antena AM de
bucle de su reproductor de DVD/TV y otros
equipos.
• Extienda completamente la antena de FM.
• Después de conectar la antena de FM al televisor,
manténgala tan cerca de lo horizontal como sea
posible.
• Si la recepción de FM es deficiente, utilice un cable
coaxial de 75 ohmios (no suministrado) para
conectar su reproductor de DVD/TV a una antena
de FM exterior.
Conexión a una fuente de señal AV externa
Conexión de la salida de DVD a un televisor
Para conectar la salida de DVD de su reproductor de DVD/TV a un televisor externo:
1 Encienda los dos televisores.
2 Conecte un cable de video RCA al toma
VIDEO Output (Salida de video) de su
reproductor de DVD/TV y al toma VIDEO
Input (Entrada de video) en la parte posterior
del televisor externo.
3 Conecte los cables de audio RCA a los
tomas izquierdo y derecho AUDIO Output
(Salida de audio) de su reproductor de DVD/
TV y a los tomas izquierdo y derecho de
AUDIO Input (Entrada de audio) en la parte
posterior del televisor externo.
4 Encienda su reproductor de DVD/TV y el
televisor externo.
5 Configure la fuente de señal del televisor
externo para mostrar la salida de DVD de su
reproductor de DVD/TV.
Para conectar su reproductor de DVD/TV a una fuente de señal externa:
1 Apague su reproductor de DVD/TV y la
fuente de señal.
2 Conecte un cable de video RCA al toma
VIDEO OUT (Salida de video) de la fuente de
señal (por ejemplo, un VCR) y al toma
VIDEO Input (Entrada de video) en la parte
posterior de su reproductor de DVD/TV.
3 Conecte los cables de audio RCA a los
tomas AUDIO OUT (Salida de audio) de la
fuente de señal y a los tomas izquierdo y
derecho de AUDIO Input (Entrada de audio)
en la parte posterior de su reproductor de
DVD/TV.
4 Encienda su reproductor de DVD/TV y la
fuente de señal.
5 Presione AV en el control remoto o presione
repetidamente SOURCE (Fuente) en su
reproductor de DVD/TV, para seleccionar AV
como la entrada de señal de su televisor.
Conexión de la salida de audio a un amplificador
Nota
Refiérase al manual del operador de su amplificador
antes de realizar cualquier conexión.
Para conectar la salida de audio de su reproductor de DVD/TV a un amplificador externo:
1 Apague su reproductor de DVD/TV y el
amplificador.
2 Conecte los cables de audio RCA a los
tomas izquierdo y derecho de AUDIO Ou tput
(Salida de audio) de su reproductor de DVD/
TV y a los tomas (1) izquierdo y derecho de
AUDIO Input (Entrada de audio) en la parte
posterior del amplificador.
46
www.insignia-products.com
Page 49

Insignia NS-7UTCTV Reproductor de DVD/TV con pantalla LCD de 7" bajo el Gabinete
3 Conecte un cable de video RCA al toma
VIDEO Output (Salida de video) de su
reproductor de DVD/TV y al toma (2) VIDEO
Input (Entrada de video) de un televisor
externo.
4 Encienda su reproductor de DVD/TV y el
amplificador.
5 Configure la fuente de señal del amplificador
a la salida de audio de su reproductor de
DVD/TV.
Conexión del adaptador de alimentación CA
Su reproductor de DVD/TV se alimenta con un
adaptador de alimentación CA conmutado
(suministrado).
Al tomacorriente de
CA
Para conectar el adaptador de alimentación CA:
1 Conecte el enchufe redondo del adaptador
de alimentación CA al toma DC 12V IN
(Entrada de 12 V CC) en la parte posterior de
su reproductor de DVD/TV.
2 Enchufe el extremo con dos cla vijas del cable
del adaptador de alimentación CA en un
tomacorriente estándar.
O, atornille los dos cables de retención
(suministrado) a la parte superior de su
reproductor de DVD/TV (1), luego enrolle los
cables alrededor de los cables de
alimentación para sostener el adaptador de
alimentación de CA a la parte superior de su
reproductor de DVD/TV (2).
Instalación de su reproductor de DVD/TV
Después de realizar todas las conexiones, se
encontrará listo para instalar su reproductor de
DVD/TV bajo el gabinete. Le sugerimos que
instale su reproductor de DVD/TV bajo un
gabinete de pared (tal como un gabinete de
cocina), con o sin el espaciador.
Nota
Las dimensiones de su reproductor de DVD/TV son
3.11” (alto) × 14.76” (ancho) × 10.9” (profundidad)
(7.9 × 37.49 × 27.69 cm). Tiene que haber por lo
menos 1.38” de separación en tre la parte posterior de
su reproductor de DVD/TV y la pared.
Cable de
alimentación de CA
Retenedor de cable
Nota
Cuando no esté usando su reproductor de DVD/TV
por un periodo de tiempo extendido, apáguelo y
desenchúfelo de la fuente de alimentación.
Para fijar el adaptador de alimentación de CA a la parte superior de su reproductor de D V D/ TV:
• Usando la cinta adhesiva de doble lado
(suministrado), pegue el adaptador de
alimentación de CA a la parte superior de su
reproductor de DVD/TV.
O
Para instalar su reproductor de DVD/TV:
1 Marque la posición de los cuatro agujeros de
montaje usando la plantilla de papel
suministrada y perfore cuatro agujeros de 6.8
mm en esos lugares.
2 Fije la placa de montaje a su reproductor de
DVD/TV con los tornillos suministrados. El
borde biselado de la placa de montaje debe
estar orientado hacia el frente de su
reproductor de DVD/TV.
Borde biselado hacia el frente
3 Usando los cuatro tornillos de montaje y los
espaciadores, monte su reproductor de DVD/
TV bajo el gabinete.
www.insignia-products.com
47
Page 50

Insignia NS-7UTCTV Reproductor de DVD/TV con pantalla LCD de 7" bajo el Gabinete
Si la puerta del gabinete sobresale por
encima del estante y obstruye el frente de su
reproductor de DVD/TV, ajuste la instalación
o la altura del estante para que no interfiera.
Advertencias
• Su reproductor de DVD/TV es pesado. Tenga
cuidado cuando realice la instalación o podría
dañar su reproductor de DVD/TV o lesionarse
usted mismo.
• Para reducir el riesgo de fuego, no coloque
ningún aparato de calefacción o cocina bajo su
reproductor de DVD/TV, especialmente
mientras la pantalla está abier ta para verla.
Notas
• Monte su reproductor de DVD/TV de tal forma
que el cable de alimentación de CA pueda ser
conectado directamente en un tomacorriente
de alimentación. No use un convertidor o un
cable de extensión.
• Asegúrese de que el cable de alimentación de
CA esté bien extendido ya que el cable sirve
cómo un cable de antena de FM. Enrolle
cualquier longitud extra en el gancho del cable.
• Su reproductor de DVD/TV tiene una antena de
barra de ferrita integrada para el radio de AM.
Verifique la recepción de radio de AM antes de
fijarlo en su posición.
• Para reducir la interferencia eléctrica, monte su
reproductor de DVD/TV tan lejos cómo sea
posible de otros equipos eléctricos tal como
refrigeradores, hornos de microonda, lámparas
fluorescentes, etc.
• Guarde la plantilla de papel por si se necesita
en un futuro.
2 Presione MUTE (Silenciar) en el control
remoto para silenciar el sonido y presiónelo
de nuevo (o VOL+ o VOL- ) para restaurar el
sonido.
Cambio de modo
Su reproductor de DVD/TV soporta múltiples
modos de operación.
Para seleccionar el modo de operación:
• Presione SOURCE (Fuente) en su
reproductor de DVD/TV para seleccionar
entre los siguientes modos:
•DVD
•TV
•AV
•FM
•AM
•ATSC
El nombre de la fuente de entrada en el
panel de visualización cuando se selecciona.
O, presione uno de los siguientes botones en
el control remoto para seleccionar el modo
de su elección:
• Botón DVD
• Botón TV
• Botón AV
• Botón FM/AM
• Botón DTV
Cambio de canales
Uso de su televisor
Después de realizar las conexiones y se ha
montado y enchufado su reproductor de DVD/
TV, se encontrará listo para usar su televisor.
Encendido y apagado de la unidad
Para encender y apagar la unidad:
1 Presione POWER (Encendido) en el panel
frontal de su reproductor de DVD/TV o en el
control remoto. El indicador POWER
(Encendido) se ilumina color verde.
2 Para apagar su reproductor de DVD/TV,
presione nuevamente POWER (Encendido).
Desaparece la imagen de la pantalla y el
indicador POWER (Encendido) se vuelve
color rojo.
Nota
Se consume una pequeña cantidad de energía
eléctrica incluso cuando la alimentación está
apagada.
Cambio del volumen
Puede cambiar el volumen usando el panel
lateral de su reproductor de DVD/TV o el control
remoto.
Para cambiar los canales:
• Presione CH+ o CH- en el control remoto o
presione CH + o CH - en su
reproductor de DVD/TV.
O, para ingresar directamente un número de
canal, presione los botones numéricos en el
control remoto.
Para alternar entre dos canales:
1 Presione LAST (Último) para cambiar del
canal sintonizado actualmente al canal
anterior.
2 Presione LAST (Último) de nuevo para
regresar al canal sintonizado originalmente.
Configuración inicial del televisor
Para acceder y usar el menú TV SETUP (Configuración del televisor):
1 Presione SETUP (Configuración). Se abre el
menú TV SETUP (Configuración del
televisor).
Para cambiar el volumen:
1 Presione VOL+ o VOL- en el control remoto,
o VOL + o VOL - en el televisor para
subir o bajar el volumen.
48
2 Presione o para seleccionar el
elemento que desea ajustar.
www.insignia-products.com
Page 51

Insignia NS-7UTCTV Reproductor de DVD/TV con pantalla LCD de 7" bajo el Gabinete
3 Presione o para ir al elemento
seleccionado.
4 Cuando se requiere una confirmación,
presione OK (Aceptar) para confirmar su
selección.
Para programar canales automáticamente en la memoria:
1 Presione SETUP (Configuración). Se abre el
menú TV SETUP (Configuración del
televisor).
2 Presione o para seleccionar AUTO
MEMORY (Memoria automática) y presione
OK (Aceptar) o para comenzar a
memorizar los canales disponibles.
2 Presione o para seleccionar TIMER
(Temporizador) y presione o para
seleccionar ON (Activado) o OFF
(Desactivado), como guste.
3 Seleccione POWER ON (Encendido) y
presione los botones numéricos para
establecer la hora de encendido. Presione
o para seleccionar AM o PM.
4 Seleccione POWER OFF (Apagado) y
presione los botones numéricos para
establecer la hora de apagado. Presione
o para seleccionar AM o PM.
5 Seleccione SIGNAL (Señal) y presione o
para seleccionar CATV, ANT, FM o AM.
6 Seleccione CHANNEL (Canal) y presione los
botones numéricos para seleccionar el canal
que desea ver. En el modo CATV, elija entre
124 canales y en el modo ANT, elija entre 68
canales.
7 Cuando termine de ajustar la configuración,
presione PICTURE/SET (Imagen/Ajustar) de
nuevo.
Nota
Esta función se mantiene activa mientras su
reproductor de DVD/TV se encuentre enchufado.
3 Para detener la búsqueda automática,
presione .
Ajuste de la hora
Para ajustar la hora:
1 Presione TIME (Hora) en el control remoto, o
presione TIME/ENT (Hora/Entrar) dos veces
en su reproductor de DVD/TV.
2 Presione o para seleccionar la
posición de hora o minuto y presione o
para cambiar el ajuste.
Ajuste del temporizador
El temporizador le permite ajustar horas
específicas para que el televisor se encienda y
apague. También le permite ajustar la fuente de
señal y el canal a ver.
Para acceder y usar el menú TIMER SETUP (Configuración del temporizador):
1 Presione PICTURE/SET (Imagen/Ajustar)
dos veces. Se abrirá el menú TIMER SET
(Configuración del temporizador).
Uso del televisor en el modo ATSC (digital)
Después de realizar las conexiones y se ha
montado y enchufado su reproductor de DVD/
TV, podrá usar su reproductor de DVD/TV en el
modo ATSC.
Para cambiar al modo ATSC (digital):
• Presione DTV en el control remoto o
presione repetidamente SOURCE (Fuente)
en su reproductor de DVD/TV hasta que se
seleccione ATSC.
Para acceder y usar los menús de pantalla de ATSC:
1 Presione SETUP (Configuración) en el
control remoto. Se abre el menú Setup
(Configuración) de ATSC.
2 Presione o para seleccionar el menú
de pantalla deseado.
3 Presione o para seleccionar el
elemento que desea ajustar y presione OK
(Aceptar) para ir al elemento seleccionado o
un submenú para ese elemento (algunos
elementos requieren que presione OK
[Aceptar] dos veces).
www.insignia-products.com
49
Page 52

Insignia NS-7UTCTV Reproductor de DVD/TV con pantalla LCD de 7" bajo el Gabinete
4 Presione o para cambiar el ajuste del
elemento seleccionado y presione OK
(Aceptar) para confirmar y regresar al menú
anterior.
También, refiérase a información de
navegación diferente o adicional en la pa rte
posterior de algunos menús.
Menús de pantalla de ATSC
Menú de
pantalla
Setup
(Configuración)
Video Aspect Ratio (Relación de aspecto) – Le
Audio Bass (Graves) – Le permite ajustar los sonidos
Opciones
Tun ing band (Banda de sintonización) – Le
permite seleccionar la banda de sintonización
(Air [Aire], Cable, Cable HRC, Cable IRC, o
Cable Auto).
Menu Language (Idioma del menú) – Le
permite seleccionar el idioma para el menú de
pantalla (OSD).
DTV Signal (Señal de DTV) – Le permite
revisar la intensidad de señal de DTV.
Auto Ch Search (Búsqueda automática de
canales) – Le permite buscar y configurar
automáticamente una lista de los canales
disponibles en su área para la fuente de señal
seleccionada.
Add On Ch Search (Búsqueda de canales a
agregar) – Le permite agregar canales
automáticamente a su lista actual de canales
disponibles en su área para la fuente de señal
seleccionada.
Manual Ch Search (Búsqueda manual de
canales) – Le permite buscar y configurar
manualmente una lista de los canales
disponibles en su área para la fuente de señal
seleccionada.
Channel Labels (Etiquetas de canal) – Le
permite agregar una etiqueta a un canal.
permite seleccionar la relación de aspecto de la
imagen. Las opciones incluyen:
• Normal
• Zoom (Ampliar)
• Wide (An cho)
• Cinema
Sharpness (Nitidez) – Le permite aumentar la
nitidez para una imagen más limpia y clara, o
reducir la nitidez para una imagen más suave.
Tint (Tono) – Le permite ajustar el color global
de la imagen (de rojo a verde).
bajos (graves).
Treble (Agudos) – Le permite ajustar los
sonidos altos (agudos). Disponible únicamente
en el modo Personal.
Balance – Le permite ajustar el volumen del
altavoz derecho e izquierdo.
TV Speaker (Altavoz del televisor) – Le permite
apagar y encender el altavoz del televisor.
Menú de
pantalla
Función Advanced Video Menu (Menú de video
Opciones
avanzado) – Le permite realizar los siguientes
ajustes:
• No ise Reduction - Spatial [Reducción
de ruido – Espacial] (Activar o
desactivar)
• No ise Reduction - Speckle [Reducción
de ruido – Motita] (Activar o desactivar)
• No ise Reduction - Tempo ral
[Reducción de ruido – Temporal]
(Activar o desactivar)
• Auto Contrast Enhancement
[Mejoramiento de contraste
automático] (Activar o desactivar)
• Color Temperature (Temperatura de
color)
• Black Bar Detection [Detección de
barra negra] (Activar o desactivar)
• 3D Y/C (Activar o desactivar)
• RESET (Restaurar) – Seleccione esta
opción y presione dos veces OK
(Aceptar) para restaurar los ajustes a
los valores de fábrica.
Password Set (Configurar contraseña) – Le
permite establecer una contraseña para
controlar el acceso a los controles de los
padres. La contraseña inicial es 0000. Utilice
los botones numéricos para ingresar la
contraseña nueva, luego ingrésela de nuevo
para confirmar.
Parental Controls (Controles de los padres) –
Le permite cambiar ajustes para controlar el
nivel de programación que sus hijos pueden
ver. Se le preguntará por la contraseña cuando
seleccione este menú. Refiérase a
“Configuración de los controles de los padres”
en la página 50.
Closed Caption Options (Opciones de
subtítulos optativos) – Le permite configurar la
forma en que se muestran los subtítulos
optativos en la pantalla. Cuando la opción
Default (Predefinido) se encuentra en
Automatic (Automático) todos los ajustes se
determinan con la señal de transmisión. Los
otros ajustes sólo se pueden realizar cuando la
opción Default se encuentra en Custom
(Personalizado). Los ajustes incluyen:
• De fault (Predefinido)
• Size (Tamaño)
• Front (Frente )
• Text color (Color del texto)
• Text Opacity (Opacidad del texto)
• Background color (Color de fondo)
• Background Opacity (Opacidad de
fondo)
• Style (Estilo)
• Edge Color (Color de borde)
Configuración de los controles de los padres
En el modo ATSC, su reproductor de DVD/TV
utiliza un V-chip que le permite controlar el tipo
de programas que sus niños pueden ver. Los
controles de los padres incluyen dos
clasificaciones: La MPAA (basada en la edad) y
las TV Parental Guidelines [Pautas de TV para
los padres] (basadas en el contenido y la edad).
Un programa de TV puede tener una
clasificación de MPAA o de “TV Parental
Guidelines”, así que deberá configurar los
controles para las dos clasificaciones.
Antes de que seleccione las clasificaciones,
necesitará configurar una contraseña para los
controles de los padres.
50
www.insignia-products.com
Page 53

Insignia NS-7UTCTV Reproductor de DVD/TV con pantalla LCD de 7" bajo el Gabinete
Para ajustar los controles de los padres:
1 En el modo de ATSC, presione SETUP
(Configurar) en el control remoto. Se abre el
menú Setup (Configuración) de ATSC.
2 Presione o para seleccionar el menú
Feature (Función). Se abrirá el menú
Feature (Función).
Clasificaciones de MPAA
Clasificación Descripción
NONE
(Ninguno) o
NR
G Público en general.
PG Se sugiere el consejo de los padres.
PG13 Se recomienda fuertemente la
R Restringido. No se recomienda para
NC17 No se recomienda para niños menores
X Sólo para adultos.
OFF
(Desactivado)
Sin clasificación.
Contiene material que los padres
pueden considerar inadecuado para los
niños.
supervisión de los padres. Este
programa contiene material que los
padres pueden considerar inadecuado
para niños menores de 13 años.
niños menores de 17 años a menos
que estén acompañados por un padre
o un custodio.
de 17 años.
Si controles.
Clasificaciones de TV
3 Presione o para seleccionar Parental
Control (Control de los padres). Se le
preguntará la contraseña.
4 Usando los botones numéricos, ingrese la
contraseña (la contraseña inicial es 0000).
Se abrirá el menú Parental Control Menu
(Menú del control de los padres).
Clasificación Descripción
NONE
(Ninguno) o
NR
TV-Y Todos los niños.
TV-Y7 Dirigido a niños mayores de siete
TV-G Público en general.
TV-PG Se sugiere el consejo de los padres.
TV-14 Enérgico aviso para los padres.
TV-MA Adultos solamente.
Sin clasificación.
años.
Algunas de las clasificaciones de Pautas de TV
para los padres basadas en edad también
tienen clasificaciones basadas en el contenido
PG.
Clasificación Descripción
FV Violencia de fantasía.
D Diálogo
L Idioma
SSexo
V Violencia
5 Presione o o o para
seleccionar la clasificación que desea
configurar y presione OK (Aceptar) para
configurar o cancelar una clasificación.
6 Presione SETUP (Configurar) para regresar
al menú anterior o presione EXIT (Salir) para
salir.
Cuidado
Escriba su contraseña y guárdela para uso futuro.
www.insignia-products.com
51
Page 54

Insignia NS-7UTCTV Reproductor de DVD/TV con pantalla LCD de 7" bajo el Gabinete
Uso de su reproductor de DVD
Después de realizar las conexiones y se ha
montado y enchufado su reproductor de DVD/
TV, se encontrará listo para usar su reproductor
de DVD.
Reproducción de un DVD
Para reproducir un DVD:
1 Presione POWER (Encendido) para
encender su reproductor de DVD/TV.
2 Presione DVD en el control remoto o
presione repetidamente SOURCE (Fuente)
en su TV para seleccionar DVD.
3 Inserte el DVD en ranura de discos con la
etiqueta hacia arriba. El reproductor
comienza la reproducción automáticamente.
4 Durante la reproducción se puede:
• Access the DVD Menu (Acceder el menú
de D VD) — Presione MENU (Menú) en el
control remoto para abrir el menú de DVD.
Presione , , , o para resaltar
el elemento que guste y presione OK
(Aceptar) para seleccionarlo.
• Pause the DVD (Pausar el DVD) —
Presione
PLAY/PAUSE (Reproducir/Pausar) en su
reproductor de DVD/TV, o (Pausar) en
el control remoto para pausar la
reproducción. Presione PLAY/
PAUSE (Reproducir/Pausar) en el
reproductor o (Reproducir) en el
control remoto para reanudar la
reproducción.
• Fast Reverse the DVD (Retroceder
rápidamente el DVD) — Presione /
(Búsqueda en reversa) en su
reproductor de DVD/TV, o SEEK -
(Buscar -) en el control remoto, para
retroceder rápidamente el DVD.
• Fast Forward the DVD (Avanzar
rápidamente el DVD) — Presione /
(Búsqueda hacia adelante) en su
reproductor de DVD/TV, o SEEK +
(Buscar +) en el control remoto, para
avanzar rápidamente el DVD.
• Skip back (Saltar atrás) — Mantenga
presionado / (Buscar hacia
atrás) en su reproductor de DVD/TV, o
presione (Anterior) en el control
remoto, para saltar al principio del
capítulo actual. Presione dos veces para
ir al capítulo anterior.
• Skip forward (Saltar adelante) —
Mantenga presionado / (Buscar
hacia adelante) en su reproductor de
D VD/TV, o presione (Siguiente) en el
control remoto, para saltar al siguiente
capítulo. Presione repetidamente para ir
otros capítulos subsiguientes.
• Play the DVD in slow motion
(Reproducir el DVD en cámara lenta) —
Para reproducir el disco en cámara lenta,
presione SLOW (Lento).
• Zoom in on the picture (Ampliar la
imagen) — Para ampliar una escena,
presione ZOOM para alternar entre los
ajustes de ampliación disponibles.
Go to a specific time, track, or title (Ir a
•
un tiempo, pista o título determinado) —
Para ir directamente a un tiempo, pista o
título determinado en el DVD, presione
GOTO (Ir a). Se abre un menú que le
permite especificar el punto en el cual
desea comenzar la reproducción.
Presione o para resaltar el
elemento que guste y presione OK
(Aceptar) para confirmar. Presione
para regresar. Presione los botones
numéricos para ingresar un título o
capítulo.
• Repeat a title, chapter , or trac k (Repetir
un título, capítulo o pista) — Para repetir
un título, capítulo o pista, presione
REPEAT (Repetir) para alternar entre las
opciones disponibles.
• Repeat a selected portion of the DVD
(Repetir una porción seleccionada de un
DVD) — Para repetir una porción
seleccionada de un DVD, presione A-B al
principio de la selección y presione
nuevamente A-B al final de la selección.
Se repetirá la selección. Para cancelar la
repetición y reanudar la reproducción
normal, presione nuevamente A-B.
• Stop playback (Detener la reproducción)
— Para detener la reproducción de DVD,
presione STOP (Detener). Presione
(Reproducir) para reanudar la
reproducción desde ese punto. Si
presiona STOP (Detener) dos veces y
presiona (Reproducción), la
reproducción comenzará al principio del
disco.
5 Presione EJECT (Expulsar) para sacar el
DVD.
Nota
No todos los DVDs soportan todas las funciones.
Mostrando información del DVD
Para mostrar información del DVD:
• Presione repetidamente INFO en el control
remoto para alternar entre Title Elapsed
(Transcurrido en título), Title Remain
(Restante en título), Chapter Elapsed
(Transcurrido en capítulo), Chapter Remain
(Restante en capítulo) y Display Off
(Visualización desactivada).
Selección del idioma de los subtítulos
Si el D VD se creó con subtítulos, puede cambiar
el idioma de los subtítulos.
Para cambiar el idioma de los subtítulos:
1 Presione SUBTITLE (Subtítulos)
repetidamente hasta que se seleccione el
idioma deseado.
52
www.insignia-products.com
Page 55

Insignia NS-7UTCTV Reproductor de DVD/TV con pantalla LCD de 7" bajo el Gabinete
2 Para hacer desaparecer los subtítulos,
presione SUBTITLE hasta que Off
(Desactivado) aparezca en pantalla.
Nota
Si se cambia el idioma de los subtítulos mediante
este método, el cambio afectará sólo al DVD que
se está reproduciendo en ese momento. Cuando
extrae el DVD o se apaga su reproductor de DVD/
TV, el idioma de los subtítulos regresará al idioma
especificado mediante el menú principal de su
reproductor de DVD/TV.
Consejo
El idioma de los subtítulos también se puede
cambiar a través del menú principal del
reproductor de DVD/TV o mediante el ajuste de
subtítulos del disco.
Cambiando las opciones de audio
Si el DVD fue creado con pistas en diferentes
idiomas (grabadas en diferentes idiomas) o
múltiples opciones de sonido, se puede cambiar
temporalmente la configuración de audio del
reproductor de DVD/TV.
Para cambiar las opciones de audio:
1 Presione AUDIO. El OSD muestra el ajuste
de audio actual.
2 Si hay múltiples opciones de audio
disponibles, presione AUDIO de nuevo para
seleccionar la siguiente pista de audio.
Nota
Esta función solamente funciona si el DVD fue
creado con pistas de audio múltiples. Cuando
usted elige un idioma de audio, solamente anula
temporalmente el ajuste del idioma de audio en el
menú principal del reproductor de DVD.
Deje pasar tres segundos entre cada selección.
Consejo
El idioma de audio se puede también cambiar a
través del menú principal del reproductor de DVD
o los propios ajustes audio del DVD.
Reproducción de un CD
Para reproducir un CD:
1 Presione POWER (Encendido) para
encender su reproductor de DVD/TV.
2 Presione DVD en el control remoto o
presione repetidamente SOURCE (Fuente)
en su reproductor de DVD/TV para
seleccionar DVD.
3 Inserte el CD en la ranura de discos con la
etiqueta hacia arriba. El reproductor
comienza la reproducción automáticamente.
4 Durante la reproducción:
• Presione para saltar a la pista
anterior y presione para saltar a la
siguiente pista. Presione repetidamente
para continuar saltando hacia atrás o
adelante.
• Presione los botones numéricos para
seleccionar una pista determinada a
reproducir y presione (Reproducir)
para reproducir la pista.
Consejo
Si el número de pista es inferior a 10, presiones
los botones del 1 al 9 para seleccionarlo. Si el
número de pista es 10, presione +10 una vez,
después el botón 0 para seleccionarlo. Si el
número de la pista es mayor que 10, presione
+10 una vez y después un botón del 1 al 9.
• Para detener completamente la
reproducción del CD, presione STOP
(Detener).
5 Presione EJECT (Expulsar) para sacar el
CD.
Reproducción de un disco JPEG
Para reproducir un disco JPEG:
1 Presione POWER (Encendido) para
encender su reproductor de DVD/TV.
2 Presione DVD en el control remoto o
presione repetidamente SOURCE (Fuente)
en su reproductor de DVD/TV para
seleccionar DVD.
3 Inserte el disco JPEG en la ranura de discos
con la etiqueta hacia arriba. Se abre el menú
de navegación del disco.
4 Presione o para seleccionar el archivo
(o submenú) que guste y presione OK
(Aceptar) para confirmar. Comenzará la
presentación de diapositivas.
5 Durante la reproducción se puede:
• Pause the picture (Pausar la imagen) —
Presione
PLAY/PAUSE (Reproducir/Pausar) en el
reproductor o (Pausar) en el control
remoto para pausar la imagen. Presione
PLAY/PAUSE (Reproducir/Pausar)
en el reproductor o (Reproducir) en el
control remoto para reanudar la
reproducción.
• Rotate the picture (Girar la imagen) —
Presione , , , o para girar la
imagen actual.
• Zoom in on the picture (Ampliar la
imagen) — Presione ZOOM para ampliar
la imagen. Presione o (Buscar
hacia atrás o adelante) para controlar la
proporción de ampliación. Mientras se
encuentra ampliada, presione , ,
, o para desplazarse sobre la
imagen. Para cancelar, presione ZOOM
hasta que la imagen regresa a su vista
normal.
• Return to the menu (Retornar al menú)
— Presione MENU (Menú) para retornar
al menú del disco.
6 Presione OPEN/CLOSE (Abrir/Cerrar)
para sacar el disco.
www.insignia-products.com
53
Page 56
Insignia NS-7UTCTV Reproductor de DVD/TV con pantalla LCD de 7" bajo el Gabinete
Uso de su radio
Para usar su radio:
1 Presione POWER (Encendido) para
encender su reproductor de DVD/TV.
2 Presione FM/AM en el control remoto o
presione repetidamente SOURCE (Fuente)
en su reproductor de DVD/TV para
seleccionar FM o AM.
3 Presione SEEK - (Buscar -) o
SEEK + (Buscar +) en el control remoto por
1.5 segundos para buscar emisoras hacia
abajo o arriba de la frecuencia actual. La
frecuencia de radio se mostrará en el panel
de visualización. Presione el mismo botón de
nuevo para detener la búsqueda.
4 Para sintonizar finamente una estación,
presione brevemente SEEK - (Buscar -)
o SEEK + (Buscar +) en el control
remoto.
Para memorizar y usar las estaciones predefinidas:
1 Presione POWER (Encendido) para
encender su reproductor de DVD/TV.
2 Presione FM/AM en el control remoto o
presione repetidamente SOURCE (Fuente)
en su reproductor de DVD/TV para
seleccionar FM o AM.
3 Sintonice la emisora deseada y presione
PICTURE/SET (Imagen/Ajustar). SAVE X X
(Guardar X X) aparecerá en el panel de
visualización ( X X representa el número
predefinido de fábrica).
4 Presione o para establecer el número
predefinido.
(0 - 19), y presione nuevamente PICTURE/
SET (Imagen/Ajustar) para memorizar la
emisora en ese número de canal.
O, presione nuevamente PICTURE/SET
(Imagen/Ajustar) para memorizar el número
predefinido de fábrica en secuencia.
Nota
Si no presiona ningún botón por tres segundos, la
emisora no se memorizará.
5 Para acceder las emisoras memorizadas
(predefinidas), ingrese el número predefinido
con los botones numéricos. Después de una
pausa, el radio sintonizará la emisora
seleccionada.
Nota
Para ir inmediatamente a la emisora predefinida
seleccionada, presio ne ENT.
O presione o para ir a la siguiente
emisora predefinida o a la anterior.
Nota
Cuando cambie entre emisoras memorizadas,
“CH XX” (Canal XX) aparecerá brevemente en el
panel de visualización (XX es el número
predefinido). Después de varios segundos, el
número predefinido se reemplazará con la
frecuencia de radio.
Uso de los menús de configuración de DVD avanzados
Uso de los menús de configuración de DVD en pantalla
Su televisor tiene un menú de pantalla que le
permite cambiar los ajustes avanzados en el
modo de DVD.
Para acceder y usar los menús de pantalla:
1 En el modo de DVD, presione SETUP
(Configuración). Se abre el menú SETUP
(Configuración).
2 Presione , , , o para seleccionar
una opción y presione OK (Aceptar) para
seleccionar la opción. Todos los elementos
en la categoría aparecen en el menú.
3 Presione para seleccionar otra categoría
y presione OK (Aceptar) para confirmar.
4 Presione para ir a otro menú de
configuración.
5 Para salir del menú de pantalla, seleccione
EXIT (Salir).
Menús de configuración de DVD en pantalla
Menú de
pantalla
General Setup
(Configuración
general)
Configuración de
altavoces
Dolby Digital
Setup
(Configuración de
Dolby Digital)
Video Setup
(Configuración de
video)
Opciones
TV Display (Pantalla de TV) – Le permite
seleccionar la relación de aspecto de la imagen.
Las opciones incluyen Normal/PS, Normal/LB
] [Normal/Buzón) (utilice este ajuste cuando el
DVD se mostrará en un TV 4:3 normal), o Wide
[Ancho] (utilice este ajuste cuando el DVD se
mostrará en su reproductor de DVD/TV, o en
un TV panorámico).
OSD Lang (Idioma del OSD) – Permite
seleccionar el idioma para la visualización en
pantalla. Las opciones incluyen English
(inglés), French (francés) y Spanish (español).
Screen Saver (Salvapantallas) – Le permite
activar el modo de salvapantallas, lo que
muestra un salvapantallas en la pantalla del TV
si la misma imagen se muestra en la pantalla
por varios minutos.
Downmix (Mezcla) – Le permite seleccionar la
salida de audio de su reproductor de DVD/TV.
Las opciones incluyen LT/RT (salida
monofónica mezclada), o Stereo (salida
estéreo).
Dual Mono (Monofónico doble) – Le permite
seleccionar la salida de audio de Dolby Digital
de su reproductor de DVD/TV. Las opc ion es
incluyen Stereo (Estéreo), L-Mono
(Monofónico izquierdo), R-Mono (Monofónico
derecho) y Mix-Mono (Monofónico mezclado).
Dynamic (Dinámico) – Le permite ajustar la
compresión dinámica lineal para obtener
distintos efectos de señal.
Sharpness (Nitidez) – Le permite ajustar el
nivel de nitidez de la imagen.
Brightness (Brillo) – Le permite ajustar el nivel
de brillo de la imagen.
Contrast (Contraste) – Le permite ajustar el
nivel de contraste de la imagen.
54
www.insignia-products.com
Page 57

Insignia NS-7UTCTV Reproductor de DVD/TV con pantalla LCD de 7" bajo el Gabinete
Menú de
pantalla
Preference Page
[Página de
preferencias] (su
reproductor de
DVD/TV debe
estar en el modo
detenido para
poder accederla)
Opciones
Audio Subtitle and Disc Menu (Menú de audio,
subtítulos y disco) – Le permite seleccionar el
idioma de subtítulos y del menú del disco, o
poner los menús de subtítulos y de disco en
audio. Las opciones incluyen English (inglés),
French (francés), Spanish (español) y otros
idiomas, dependiendo de lo que está disponible
en el DVD.
Parental (De los padres) – Le permite bloquear
porciones de un DVD, o el DVD entero,
dependiendo del contenido del disco. Cuando
seleccione este elemento, se le pedirá una
contraseña (refiérase a Password
(Contraseña), a continuación). Utilice los
botones numéricos para ingresar la
contraseña. Para ver una lista de
clasificaciones, refiérase a “MPAA Ratings” en
la página 51.
Password (Contraseña) – Le permite
establecer la contraseña para acceder el menú
de configuración de los padres. La contraseña
inicial es 1369. Ingrese su contraseña nueva
con los botones numéricos y presione OK
(Aceptar) para confirmar. Cuando se le pide
reingresar la contraseña, ingrese la misma
contraseña y presione OK (Aceptar) para
confirmar.
Default Reset (Restauración de valores
predefinidos) – Le permite restaurar todos los
ajustes de preferencia a los valores de fábrica.
Cambiando los ajustes de la pantalla LCD
Para cambiar los ajustes de la pantalla LCD:
1 En el modo de DVD, presione PICTURE/SET
(Imagen/Ajustar). Se abre el menú PICTURE
(Imagen).
2 Presione o para seleccionar
BRIGHTNESS (Brillo), CONTRAST
(Contraste) o COLOR, y presione o
para ajustar los valores entre 0 y 20.
3 Presione o para seleccionar
Language (Idioma) y presione o para
seleccionar el idioma que guste.
4 Si desea restaurar todos los ajustes a los
valores de fábrica, presione o para
seleccionar Reset (Restaurar) y presione OK
(Aceptar). Los ajustes regresarán a los
valores de fábrica.
5 Para salir del menú de pantalla, presiona
o para seleccionar PICTURE (Imagen) y
presione .
Localización y corrección de fallas
Verifique lo siguiente antes de llamar al servicio
de reparación:
Problema Solución
El reproductor de
DVD no puede
reproducir un disco
La imagen está bien
pero no hay sonido.
No hay imagen, la
imagen es inestable
o está posicionada
incorrectamente.
Reproduce
repetidamente una
sección o no
reanuda la
reproducción
normal.
El control remoto
no funciona.
Nota
Estática u otras interferencias externas pueden
causar que el reproductor se comporte
anormalmente. Si esto ocurre, desenchufe su
reproductor de DVD/TV y reconéctelo para
restaurar su reproductor de DVD/TV. Si el
problema persiste, desconecte la alimentación y
llame a su distribuidor de Insignia.
• Asegúrese de que haya un disco en su
reproductor de DVD/TV.
• Verifique que el disco se ha inse rtado
con la etiqueta hacia arriba.
• Asegúrese de que el disco está limpio y
que no esté combado.
• Asegúrese de que el código regional en
el disco coincide con el código de su
reproductor de DVD/TV.
• Asegúrese de que no haya
condensación de agua dentro de su
reproductor de DVD/TV. Remuev a el
disco y deje la unidad encendida hasta
que cualquier condensación de
evapore.
• Asegúrese de que todas las conexiones
están bien hechas.
• Asegúrese de que el sonido no se ha
silenciado (presione MUTE [silenciar]
para verificar).
• Asegúrese de que el volumen esté
ajustado correctamente.
• Asegúrese de que el disco está limpio y
que no esté combado.
• Asegúrese de que todas las conexiones
están bien hechas.
• Asegúrese de que la señal de fuente de
señal AV es NTSC.
• Asegúrese de que el disco está limpio y
que no esté combado.
• Aseg úrese de que su reproductor de
DVD/TV no se encuentra en el modo de
repetición A-B. (Presione el botón A-B
para cancelar el modo de repetición
A-B.)
• Asegúrese de que el disco está limpio y
que no esté combado.
• Apunte el control remoto al sensor
infrarrojo de su reproductor de DVD/
TV.
• Asegúrese de que las pilas están
instaladas correctamente.
• Cambie las pilas en el control remoto.
• Retire cualquier obstáculo entre el
sensor infrarrojo del reproductor de
DVD/TV y el control remoto.
www.insignia-products.com
55
Page 58

Insignia NS-7UTCTV Reproductor de DVD/TV con pantalla LCD de 7" bajo el Gabinete
Mantenimiento
Manejo y limpieza del reproductor de TV/ DVD
Manteniendo las superficies exteriores limpias
• No use líquidos volátiles, tal como insecticida
de aerosol, cerca del reproductor de D VD/TV.
• No deje productos de hule o plástico en
contacto con el reproductor de DVD/TV por
un periodo de tiempo extendido ya que
pueden dejar marcas en la superficie.
Limpieza de la caja
• Cuando limpie su reproductor, utilice un paño
suave y seco. Si las superficies se
encuentran extremadamente sucias, use un
paño ligeramente humedecido con una
solución detergente suave.
• No utilice solventes fuertes tal como alcohol,
benceno, o diluyente, ya que pueden dañar
la superficie de su reproductor de DVD/TV.
Cuidado y manejo de los discos
Manejo de los discos
No toque el lado de reproducción del disco.
Sujete el disco por el borde para no ensuciar la
superficie con sus huellas digitales. Nunca
pegue papeles o adhesivos en la superficie del
disco.
Almacenamiento de los discos
Después de reproducir un disco, guárdelo en su
estuche. No exponga el disco a la luz directa del
sol ni a fuentes de calor y nunca lo deje dentro
de un automóvil aparcado a la luz directa del sol.
Limpieza de los discos
Las huellas digitales y el polvo en el disco
pueden producir imágenes de calidad deficiente
y sonido distorsionado. Antes de utilizar un
disco, límpielo con un paño limpio. Pase el paño
desde el centro hacia fuera (hacia el borde del
disco).
No utilice solventes fuertes como alcohol,
benceno, diluyente, limpiadores de venta en
comercios o spray antiestático para uso con los
antiguos discos de vinilo.
Nota
Nunca use su reproductor de DVD/TV
inmediatamente después de trasladarlo de un
lugar frío a uno caliente. Deje pasar dos o tres
horas antes de usarlo. Si utiliza su reproductor de
DVD/TV en una situación como la descrita, se
pueden dañar las cintas, los discos o las partes
internas.
Especificaciones
T amaño de pantalla
LCD
Longitud de onda
de láser
Sistema de video
Respuesta en
frecuencia
Relación
señal-ruido de
audio
Distorsión de audio
+ ruido
Separación de
canales
Rango dinámico
Sistema de radio
Rango de
frecuencia de radio
Alimentación
Consumo de
energía
Dimensiones
Peso
Discos reproducibles
Los siguientes discos se pueden reproducir en
el reproductor de DVD.
7 in
780/650 nm
NTSC
20 Hz ~ 20 kHz ± 2.5 dB
> 85 dB
< -70 dB (1 kHz)
> 70 dB (1 kHz)
> 80 dB (1 kHz)
PLL
AM - 520 ~ 1710 kHz
FM - 87.5 ~ 107.9 MHz
100~240 V CA, 50/60 Hz
<30 Watts
3.11 × 14.76 × 10.9 pulgadas
(7.9 × 37.49 ×27.69 cm)
Aprox. 6.83 lb (3.1 kg)
56
Discos Etiqueta Contenido Dimensiones
DVD Audio + Video
CD Audio 12 cm
www.insignia-products.com
12 cm
(imagen móvil)
Page 59

Insignia NS-7UTCTV Reproductor de DVD/TV con pantalla LCD de 7" bajo el Gabinete
Avisos Legales
FCC Parte 15
Este equipo ha sido sometido a pruebas y se ha
determinado que satisface los límites establecidos
para clasificarlo cómo dispositivo digital de Clase B de
acuerdo con la Parte 15 del reglamento FCC. Estos
límites están diseñados para proporcionar una
protección razonable contra interferencias dañinas en
un ambiente residencial.
Este equipo genera, utiliza y puede irradiar energía de
radiofrecuencia y, si no es instalado y utilizado de
acuerdo a las instrucciones, puede causar
interferencias perjudiciales en las comunicaciones de
radio. Sin embargo, no se garantiza que no ocurrirá
interferencia en una instalación particular.
Si el equipo causa interferencias perjudiciales en la
recepción de la señal de radio o televisión, lo cual
puede comprobarse encendiéndolo y apagándolo
alternativamente, se recomienda al usuario corregir la
interferencia mediante uno de los siguientes
procedimientos:
• Cambie la orientación o la ubicación de la
antena receptora.
• Aumente la distancia entre el equipo y el
receptor.
• Conecte el equipo a un tomacorriente de un
circuito distinto de aquel al que está
conectado el receptor.
• Solicitar consejo al distribuidor o a un técnico
experto en radio/TV para obtener ayuda.
• Sólo se debe utilizar un cable de interfaz
blindado.
Modificaciones
La FCC requiere que se notifique al usuario de que
cualquier cambio o modificación hecha a este equipo
que no sea aprobada expresamente por Insignia
puede anular la autoridad del usuario para usar este
equipo.
Cables
Las conexiones a este dispositivo deben ser hechas
con cables blindados con cobertores metálicos de
conectores contra RF/EMI para que se mantenga la
conformidad con el reglamento y las regulaciones de
FCC.
Aviso canadiense
Este aparato digital de la Clase B cumple todos los
requisitos del Reglamento Canadiense sobre Equipos
que Causan Interferencias.
Derechos de reproducción
© 2007 Insignia. Insignia y el logotipo de Insignia son
marcas de comercio de Best Buy Enterprise Services,
Inc. Otras marcas y nombres de productos son marcas
comerciales o marcas registradas de sus dueños
respectivos. Las especificaciones y características
están sujetas a cambio sin aviso previo u obligación.
Para reparación y soporte llamar al (877) 467-4289.
www.insignia-products.com
57
Page 60

Insignia NS-7UTCTV Reproductor de DVD/TV con pantalla LCD de 7" bajo el Gabinete
58
www.insignia-products.com
Page 61

Insignia NS-7UTCTV Reproductor de DVD/TV con pantalla LCD de 7" bajo el Gabinete
Garantía limitada de un año
Insignia Products (“Insignia”) le garantiza a usted, el
comprador original de este nuevo reproductor de DVD/
TV con pantalla LCD de 7” bajo el Gabinete NS-7UTCTV
(“Producto”), que éste se encontrará libre de defectos de
material o de mano de obra en su fabricación original
por un periodo de un (1) año a partir de la fecha de
compra del Producto (“Período de Garantía”). Este
Producto debe ser comprado en un distribuidor
autorizado de productos Insi gnia y empacado con esta
declaración de garantía. Esta garantía no cubre
Productos reacondicionados. Si notifica a Insignia
durante el Período de Garantía sobre un defecto
cubierto por esta garantía que requiere reparación, los
términos de esta garantía s e aplican.
¿CUÁNTO DURA LA GARANTÍA?
El Período de Garantía dura por 1 año (365 días) a partir
de la fecha en que compró el Producto. La fecha de
compra se encuentra impresa en el recibo que recibió
con el Producto.
¿QUÉ ES LO QUE CUBRE ESTA GARANTÍA?
Durante el Período de Garantía, si un centro de
reparación autorizado de Insignia concluye que la
fabricación original del material o la mano de obra del
Producto se encuentran defectuosos Insignia (cómo su
opción exclusiva): (1) reparará el Producto con
repuestos nuevos o reacondicionados; o (2)
reemplazará el Producto con uno nuevo o con uno
reacondicionado con repuestos equivalentes. Los
Productos y repuestos reemplazados bajo esta garantía
se volverán propiedad de Insignia y no se le regresarán
a usted. Si se requiere la reparación de Productos o
partes después de que se vence el Período de Garantía,
usted deberá pagar todos los costos de mano de obra y
de repuestos. Esta gar antía estará vigente con tal que
usted sea el dueño de su producto Insignia durante el
periodo de garantía. El alcance de la garantía se termina
si usted vende o transfiere el producto.
¿CÓMO SE OBTIENE LA REPARACIÓN DE GARANTÍA?
Si ha comprado el Producto en una tienda de ventas,
lleve su recibo original y el Producto a la tienda en
donde lo compró. Asegúrese de que vuelva a colocar el
Producto en su empaque original o en un empaque que
provea la misma protección que el original. Si compró el
Producto en un sitio Web, envíe por correo su recibo
original y el Producto a la dirección postal listada en el
sitio Web. Asegúrese de colocar el Producto en su
empaque original o en un empaque que provea la
misma protección que el origina l.
Para obtener servicio de garantía a domicilio para un
televisor con una pantalla de 25 pulgadas o más, llame
al 1-888-BESTBUY. El soporte técnico diagnosticará y
corregirá el problema por teléfono o enviará un técnico
certificado por Insignia a su casa .
¿EN DÓNDE ES VÁLIDA LA GARANTÍA?
Esta garantía sólo es válida al comprador original del
producto en los Estados Unidos y en Canadá.
¿QUÉ ES LO QUE NO CUBRE LA GARANTÍA?
Esta garantía no cubre:
• Capacitación del cliente
• Instalación
• Ajuste de configuración
• Daños cosméticos
• Daños debido a actos de la naturaleza, tal cómo
rayos
• Accidentes
• Mal uso
• Abuso
• Negligencia
• Uso comercial
• Modificación de alguna parte del Producto ,
incluyendo la antena
• Un panel de pantalla de plasma dañado por la
persistencia de imágenes estáticas (sin
movimiento), mostradas por periodos de tiempo
extendido (efecto “burn-in”).
Esta garantía tampoco cubre:
• Daño debido al uso o mantenimiento incorrecto
• La conexión a una fuente de voltaje incorrecta
• El intento de reparación por alguien que no sea una
compañía autorizada por Insignia para reparar el
Producto
• Productos vendidos tal cual (en el estado en que se
encuentran) o con todas sus fallas
• Productos consumibles, tal cómo fusibles o
baterías
• Productos en los cuales el número de serie
asignado en la fábrica ha sido alterado o removido.
EL REEMPLAZO DE REPARACIÓN SEGÚN
PROVISTO BAJO ESTA GARANTÍA ES SU ÚNICO
RECURSO. INSIGNIA NO SERÁ RESPONSABLE POR
DAÑOS INCIDENTALES O CONSECUENTES DEBIDO
AL INCUMPLIMIENTO DE CUALQUIER GARANTÍA
EXPRESA O IMPLÍCITA RELACIONADA CON ESTE
PRODUCTO, INCLUYENDO PERO SIN LIMITARSE A
LA PÉRDIDA DE INFORMACIÓN, LA PÉRDIDA DE
NEGOCIOS O DE GANANCIAS. INSIGNIA PRODUCTS
NO HACE NINGUNA OTRA GARANTÍA EXPRESA E
IMPLÍCITA RELACIONADA A ESTE PRODUCTO,
INCLUYENDO PERO SIN LIMITARSE A, CUALQUIER
GARANTÍA IMPLÍCITA DE O CONDICIONES DE
COMERCIALIZACIÓN O IDONEIDAD PARA UN USO
PARTICULAR, ESTÁN LIMITADAS EN DURACIÓN AL
PERÍODO DE GARANTÍA DECLARADO
ANTERIORMENTE Y NINGUNA GARANTÍA YA SEA
EXPRESA O IMPLÍCIT A SE APLICARÁ DESPUÉS DEL
PERÍODO DE GARANTÍA. ALGUNOS ESTADOS,
PROVINCIAS Y JURISDICCIONES NO PERMITEN
RESTRICCIONES EN CUANTO A LA DURACIÓN DE
UNA GARANTÍA IMPLÍCITA, ASÍ QUE LA
RESTRICCIÓN ANTERIOR PUEDE NO APLICARSE
EN SU CASO. ESTA GARANTÍA LE DA DERECHOS
LEGALES ESPECÍFICOS, Y USTED PUEDE POSEER
OTROS DERECHOS QUE VARÍAN DE ESTADO A
ESTADO, O DE PROVINCIA A PROVINCIA.
Comuníquese con Insignia:
Para servicio al cliente favor llamar al 1-877-467-4289
www.insignia-products.com
INSIGNIA™ es una marca comercial de Best Buy
Enterprise Services, Inc.
Distribuido por Best Buy Purchasing, LLC
Insignia, 7601 Penn Avenue South, Richfield, Minnesota,
U.S.A.
www.insignia-products.com
59
Page 62

www.insignia-products.com
60
Page 63

www.insignia-products.com
61
Page 64

2007
2007
2007
 Loading...