

Page 1

User Guide | Guide de l’utilisateur | Guía del Usuario
19" DVD Triple Combo
Ensemble DVD triple de 19 po | Combo DVD triple de 19"
NS-19RTR
Page 2
Welcome 19” DVD triple combo
Congratulations on your purchase of a high-quality Insignia product.
Your NS-19RTR represents the state of the art in TV design and is
designed for reliable and trouble-free performance. Your NS-19RTR
is a combination TV, VCR, and DVD player. You can use your DVD
combo to watch TV programs, play and record videotapes, and watch
DVDs.
Contents
Important safeguards . . . . . . . . . . . . . . . . . . . . . . . . . . . . . . . 1
Features . . . . . . . . . . . . . . . . . . . . . . . . . . . . . . . . . . . . . . . . . 7
Setting up your DVD combo . . . . . . . . . . . . . . . . . . . . . . . . . 14
Using your DVD combo. . . . . . . . . . . . . . . . . . . . . . . . . . . . . 17
Specifications . . . . . . . . . . . . . . . . . . . . . . . . . . . . . . . . . . . . 47
Maintaining . . . . . . . . . . . . . . . . . . . . . . . . . . . . . . . . . . . . . . 48
Troubleshooting. . . . . . . . . . . . . . . . . . . . . . . . . . . . . . . . . . . 51
Appendix . . . . . . . . . . . . . . . . . . . . . . . . . . . . . . . . . . . . . . . . 55
Legal notices. . . . . . . . . . . . . . . . . . . . . . . . . . . . . . . . . . . . . 57
Français . . . . . . . . . . . . . . . . . . . . . . . . . . . . . . . . 59
Español. . . . . . . . . . . . . . . . . . . . . . . . . . . . . . . . 124
Important safeguards
Warning
Caution
To reduce the risk of electric shock, do not remove the cover or
back. No user serviceable parts inside. Refer servicing to qualified
service personnel.
To reduce the risk of fire or electric shock, do not expose your DVD
combo to rain or moisture.
To prevent electric shock, match the wide blade on the power cord
plug to the wide slot on an electric outlet. If the plug does not fit,
consult a licensed electrician to replace the obsolete outlet. Do not
modify the power cord plug, or you will defeat this safety feature.
This symbol indicates that dangerous voltage constituting a risk of
electric shock is present within your DVD combo. This label is
located on the back of your DVD combo.
This symbol indicates that there are important operating and
maintenance instructions in the literature accompanying your DVD
combo.
www.insignia-products.com
1
Page 3

Location
For safe operation and satisfactory performance of your DVD combo,
keep the following in mind when selecting a place for its installation:
• Shield your DVD combo from direct sunlight and keep it away
from sources of intense heat.
• Avoid dusty or humid places.
• Avoid places with insufficient ventilation for correct heat
dissipation. Do not block the ventilation holes at the top and
bottom of your DVD combo. Do not place your DVD combo on
a carpet or other soft surface because this will block the
ventilation holes.
• Install your DVD combo in a horizontal position.
• Avoid locations subject to strong vibration.
• Do not place your DVD combo near strong magnetic fields.
• Avoid moving your DVD combo to locations where temperature
differences are extreme.
• Make sure that you remove the disc and unplug the AC power
cord from the outlet before moving your DVD combo.
Avoiding electrical shock and fire hazards
• Do not handle the power cord with wet hands.
• Do not pull on the power cord when disconnecting it from an
AC power outlet. Grasp the cord by the plug.
• If water is spilled on your DVD combo, unplug the power cord
immediately and consult qualified service personnel.
• Do not put your fingers or objects into the disc loading tray.
• Do not place anything directly on top of your DVD combo.
Moisture
Condensation may occur inside your DVD combo when you move it
from a cold place to a warm place, after heating a cold room, or under
conditions of high humidity. If you play a videotape or DVD when your
DVD combo has condensation, the moisture may damage the
videotape, disc, or your DVD combo. When condensation occurs
inside your DVD combo, turn on your DVD combo and leave it on for
at least two hours to dry out before inserting a videotape or disc.
Recycling
Do not throw away or incinerate batteries. Dispose of batteries in
accordance with your local regulations concerning chemical wastes.
NS-19RTR 19" DVD Triple Combo
2
www.insignia-products.com
Page 4

NS-19RTR 19" DVD Triple Combo
In case of theft
You can find your DVD combo’s serial number on the back of your
TV combo. You should record the number and other vital information
here and retain this book as a permanent record of your purchase to
aid identification in case of theft. Serial numbers are not kept on file at
Insignia.
Date of purchase Dealer’s phone
Dealer purchased
from
Dealer’s address Serial number
number
Model number
Read instructions
Read all the safety and operating instructions before you use your
DVD combo.
Retain instructions
Retain safety and operating instructions for future reference.
Follow warnings and instructions
Follow all warnings on your DVD combo and in the operating
instructions. Follow all operating and use instructions.
Cleaning
Unplug your DVD combo from the power outlet before cleaning. Do
not use liquid cleaners or aerosol cleaners. Use a damp cloth for
cleaning.
Exception: A product that is meant for uninterrupted service and,
that for some specific reason, such as the possibility of the loss of an
authorization code for a CATV converter, is not intended to be
unplugged for cleaning or any other purpose, may exclude the
instruction to unplug your DVD combo.
Attachments
Do not use attachments not recommended by Insignia because they
may cause hazards.
Water and moisture
Do not use your DVD combo near water. For example, do not use it
near a bath tub, wash bowl, kitchen sink, or laundry tub, in a wet
basement, or near a swimming pool.
www.insignia-products.com
3
Page 5

Accessories
Do not place your DVD combo on an unstable cart, stand, tripod,
bracket, or table. Your DVD combo may fall, causing serious personal
injury and serious damage to your DVD combo. Use only with a cart,
stand, tripod, bracket, or table recommended by the manufacturer, or
sold with your DVD combo. If you mount your DVD combo to the wall,
follow the manufacturer’s instructions and use a mounting accessory
recommended by the manufacturer. Your DVD combo and cart
combination should be moved with care. Quick stops, excessive
force, and uneven surfaces may cause your DVD combo and cart
combination to overturn.
Ventilation
Slots and openings in the cabinet and the back or bottom are
provided for ventilation, reliable operation, and protection from
overheating. These openings must not be blocked or covered. Do not
block the openings by placing your DVD combo on a bed, sofa, rug, or
other similar surface. Do not place your DVD combo near or over a
radiator or heat register. Do not place your DVD combo in a built-in
installation, such as a bookcase or rack, unless you provide correct
ventilation or follow the manufacturer’s instructions.
Power source
Your DVD combo should be operated only from the type of power
source indicated on the marking label. If you are not sure of what type
power is supplied to your home, consult your DVD combo dealer or
local power company.
Grounding or polarization
Your DVD combo is equipped with a polarized alternating-current line
plug (a plug having one blade wider than the other). This plug fits into
the power outlet only one way. This is a safety feature. If you are
unable to insert the plug fully into the outlet, try reversing the plug. If
the plug does not fit, contact your electrician to replace your obsolete
outlet. Do not defeat the safety purpose of the polarized plug.
Power cord protection
Route power cords so that they are not likely to be walked on or
pinched by items placed on or against them. Pay particular attention
to cords at plugs, convenience receptacles, and the point where they
exit from your DVD combo.
NS-19RTR 19" DVD Triple Combo
4
www.insignia-products.com
Page 6
NS-19RTR 19" DVD Triple Combo
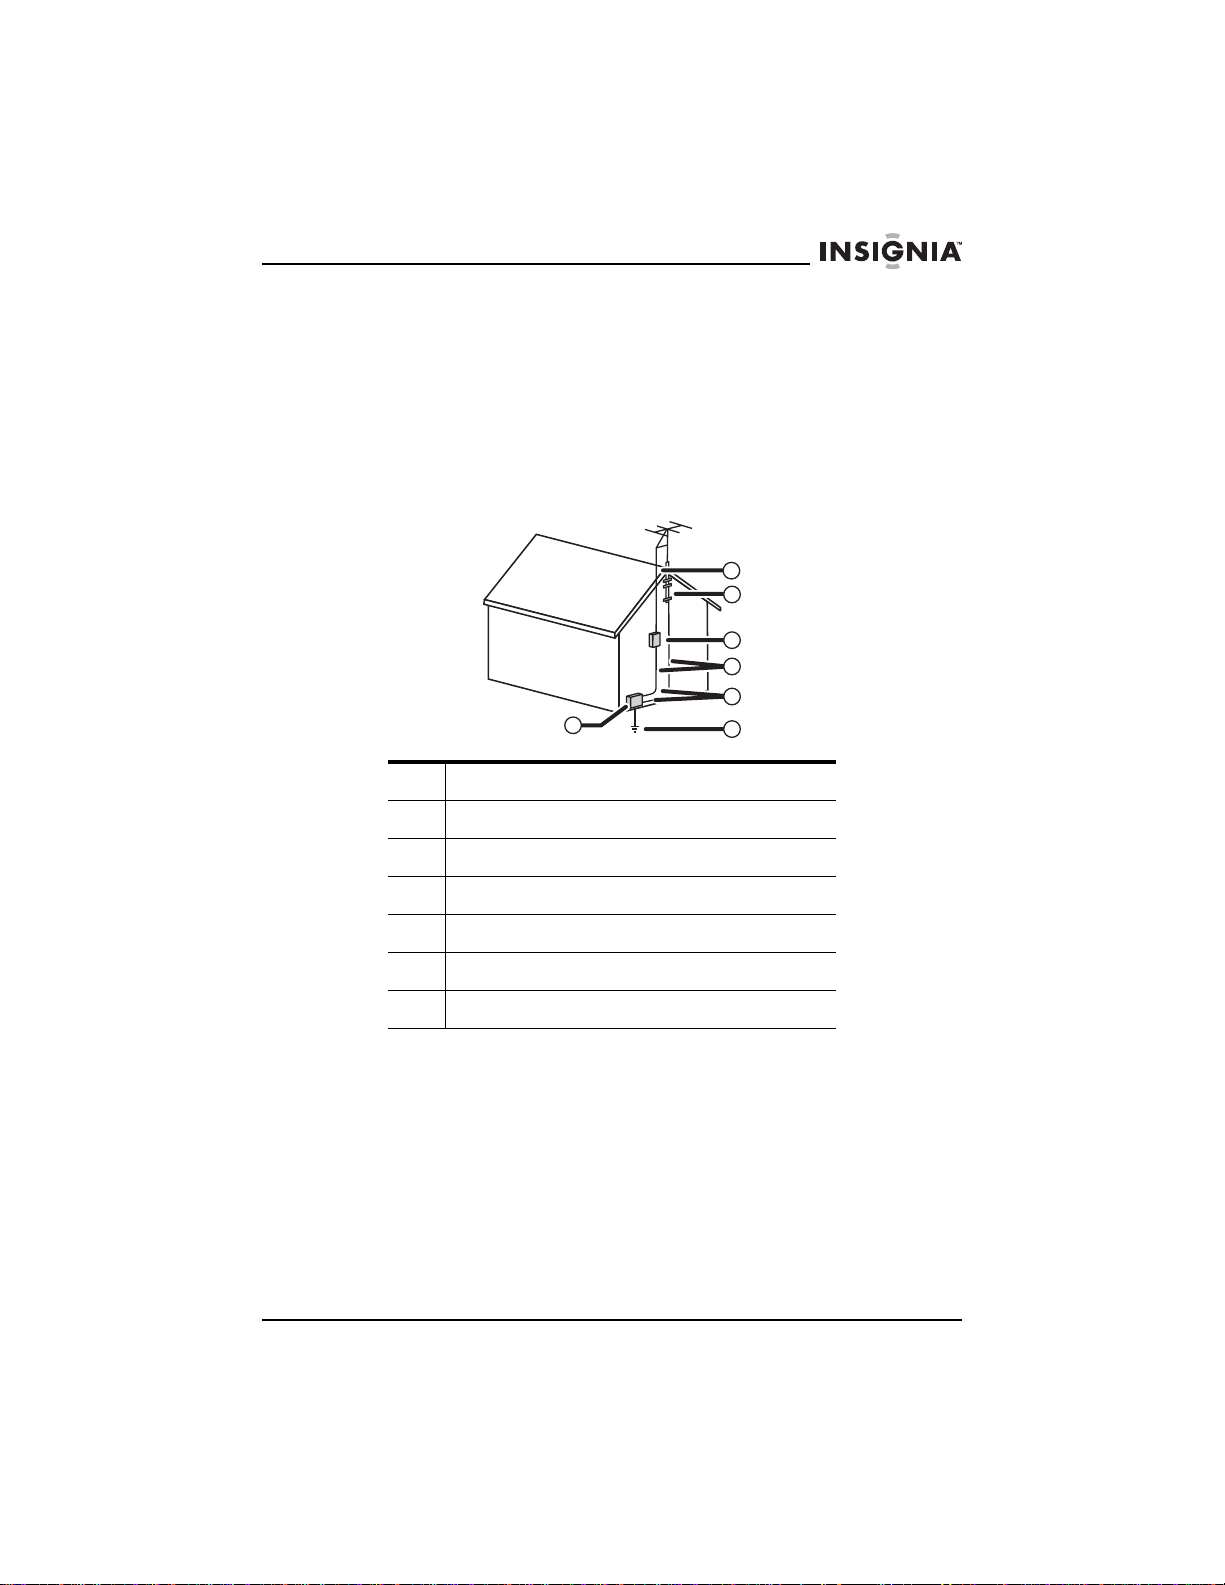
Outdoor antenna grounding
If an outside antenna or cable system is connected to your DVD
combo, make sure that the antenna or cable system is grounded to
provide some protection against voltage surges and built-up static
charges. Article 810 of the National Electrical Code, ANSI/NFPA No.
70, provides information with respect to correct grounding of the mast
and supporting structure, grounding of the lead-in wire to an antenna
discharge unit, size of grounding conductors, location of the
antenna-discharge unit, connection to grounding electrodes, and
requirements for the grounding electrode.
1 Electric service equipment
2 Power service grounding electrode system
7
6
5
4
3
1
2
3 Ground clamps
4 Grounding conductors
5 Antenna discharge unit
6 Grounding clamp
7 Antenna lead-in wire
Note to CATV system installer
This reminder is provided to call the CATV system installer’s attention
to Article 820-40 of the NEC that provides guidelines for correct
grounding and in particular, specifies that the cable ground must be
connected to the grounding system of the building as close to the
point of cable entry as practical.
Lightning
For added protection for your DVD combo’s receiver during a lightning
storm, or when it is left unattended and unused for long periods of
time, unplug it from the power outlet and disconnect the antenna or
cable system. This helps prevent damage to your DVD combo from
lightning and power line surges.
www.insignia-products.com
5
Page 7

Power lines
Do not locate an outside antenna system near overhead power lines
or other electric light or power circuits or where it can fall into such
power lines or circuits. When installing an outside antenna system,
use extreme care to keep from touching such power lines or circuits
because contact with them might be fatal.
Overloading
Do not overload power outlets and extension cords because this can
result in a risk of fire or electric shock.
Object and liquid entry
Never push objects of any kind into your DVD combo through
openings because objects may touch dangerous voltage points or
short out parts that could result in a fire or electric shock. Never spill
liquid of any kind on your DVD combo.
Servicing
Do not attempt to service your DVD combo yourself because opening
or removing covers may expose you to dangerous voltage or other
hazards. Refer all servicing to qualified service personnel.
Damage requiring service
Unplug this unit from the power outlet and refer servicing to qualified
service personnel under the following conditions:
• When the power supply cord or plug is damaged or frayed.
• If liquid has been spilled or objects have fallen into your DVD
combo.
• If your DVD combo has been exposed to rain or water.
• If your DVD combo does not operate normally by following the
operating instructions. Adjust only those controls that are
covered by the operating instructions because incorrect
adjustment of other controls may result in damage and will
often require extensive work by a qualified technician to restore
your DVD combo to its normal operation.
• If your DVD combo has been dropped or damaged in any way.
• When your DVD combo exhibits a distinct change in
performance.
Replacement parts
When replacement parts are required, make sure that the service
technician uses replacement parts specified by the manufacturer that
have the same characteristics as the original part. Unauthorized
substitutions may result in fire, electric shock, personal injury, or other
hazards.
Safety check
After completing any service or repair to this unit, ask the service
technician to perform routine safety checks to determine that your
DVD combo is in correct operating condition.
NS-19RTR 19" DVD Triple Combo
6
www.insignia-products.com
Page 8

NS-19RTR 19" DVD Triple Combo
Heat
Make sure that your DVD combo is located away from heat sources
such as radiators, heat registers, stoves, or other products (including
amplifiers) that produce heat.
Features
Front panel
20
21
22
23
24
13
14
15
16
171819
5
2
1
3
4
9
7
6
12
10
8
11
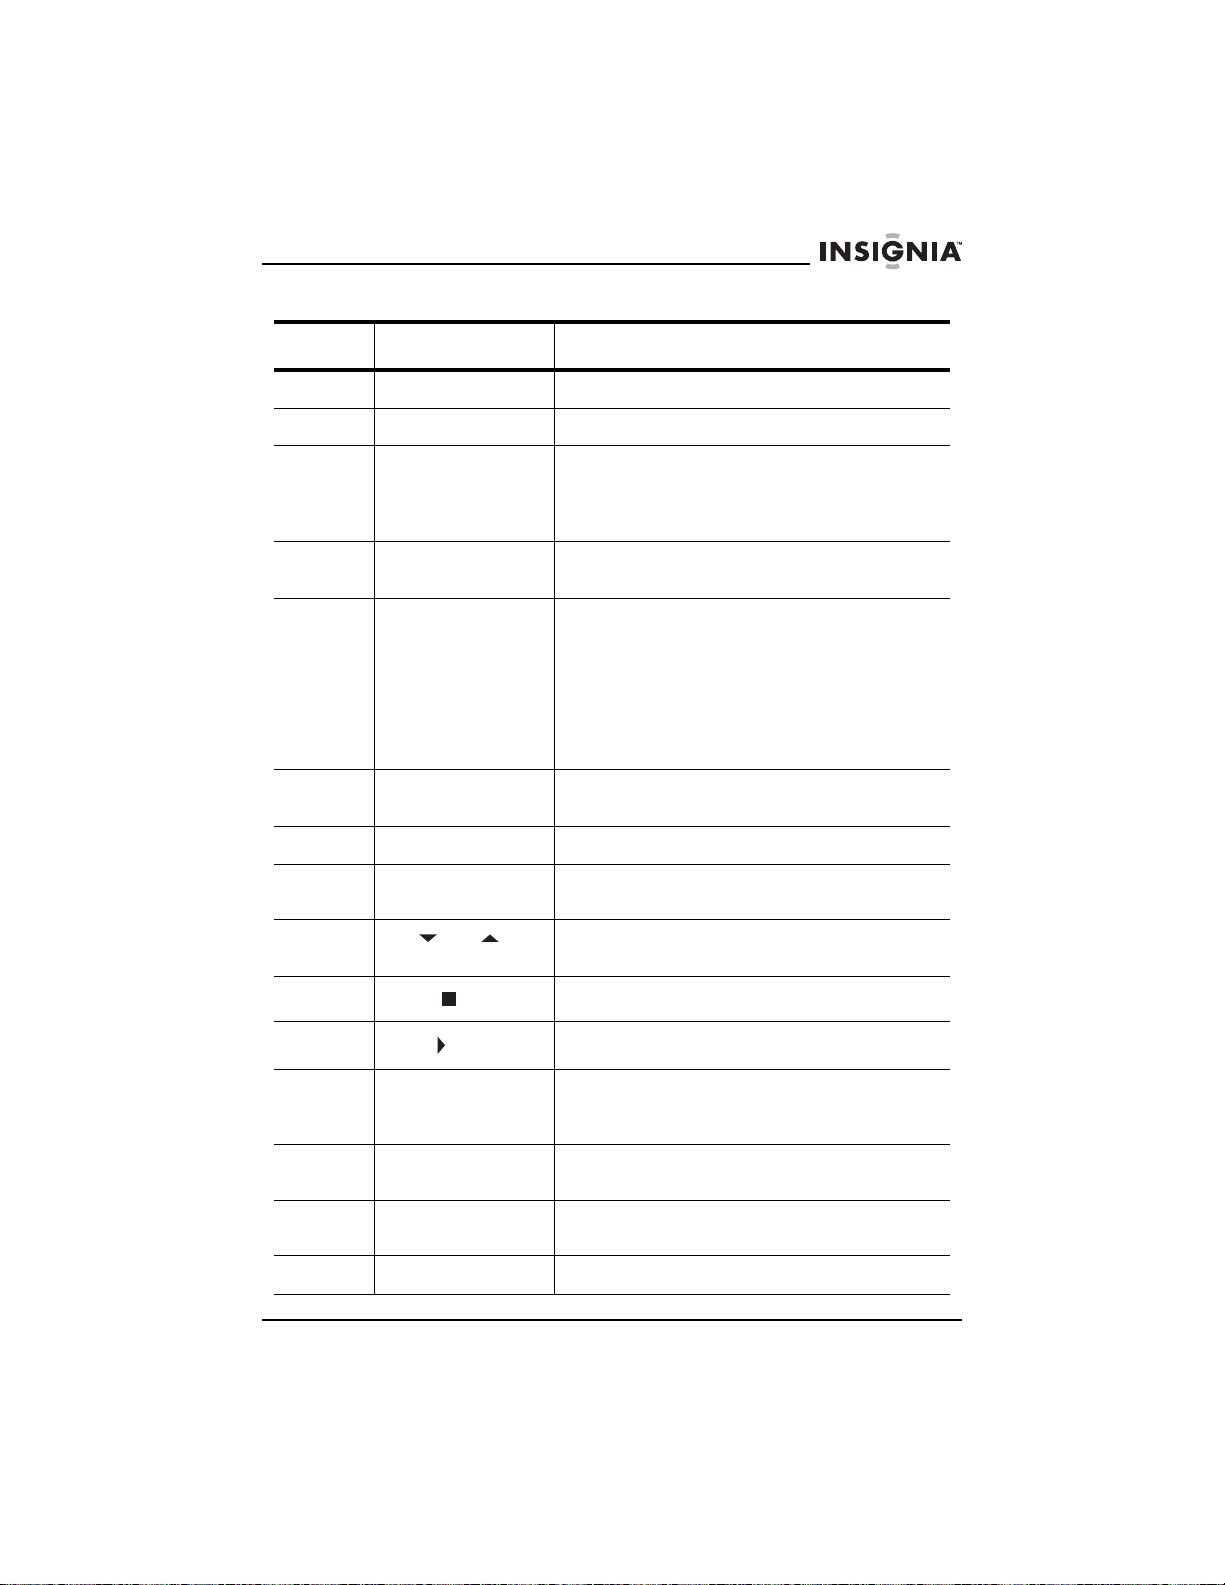
Component Description
1 POWER Press to turn your DVD combo on and off.
2
VOLUME and
3
PLAY
Press to decrease or increase the volume.
Press to start DVD or CD playback.
www.insignia-products.com
7
Page 9
NS-19RTR 19" DVD Triple Combo
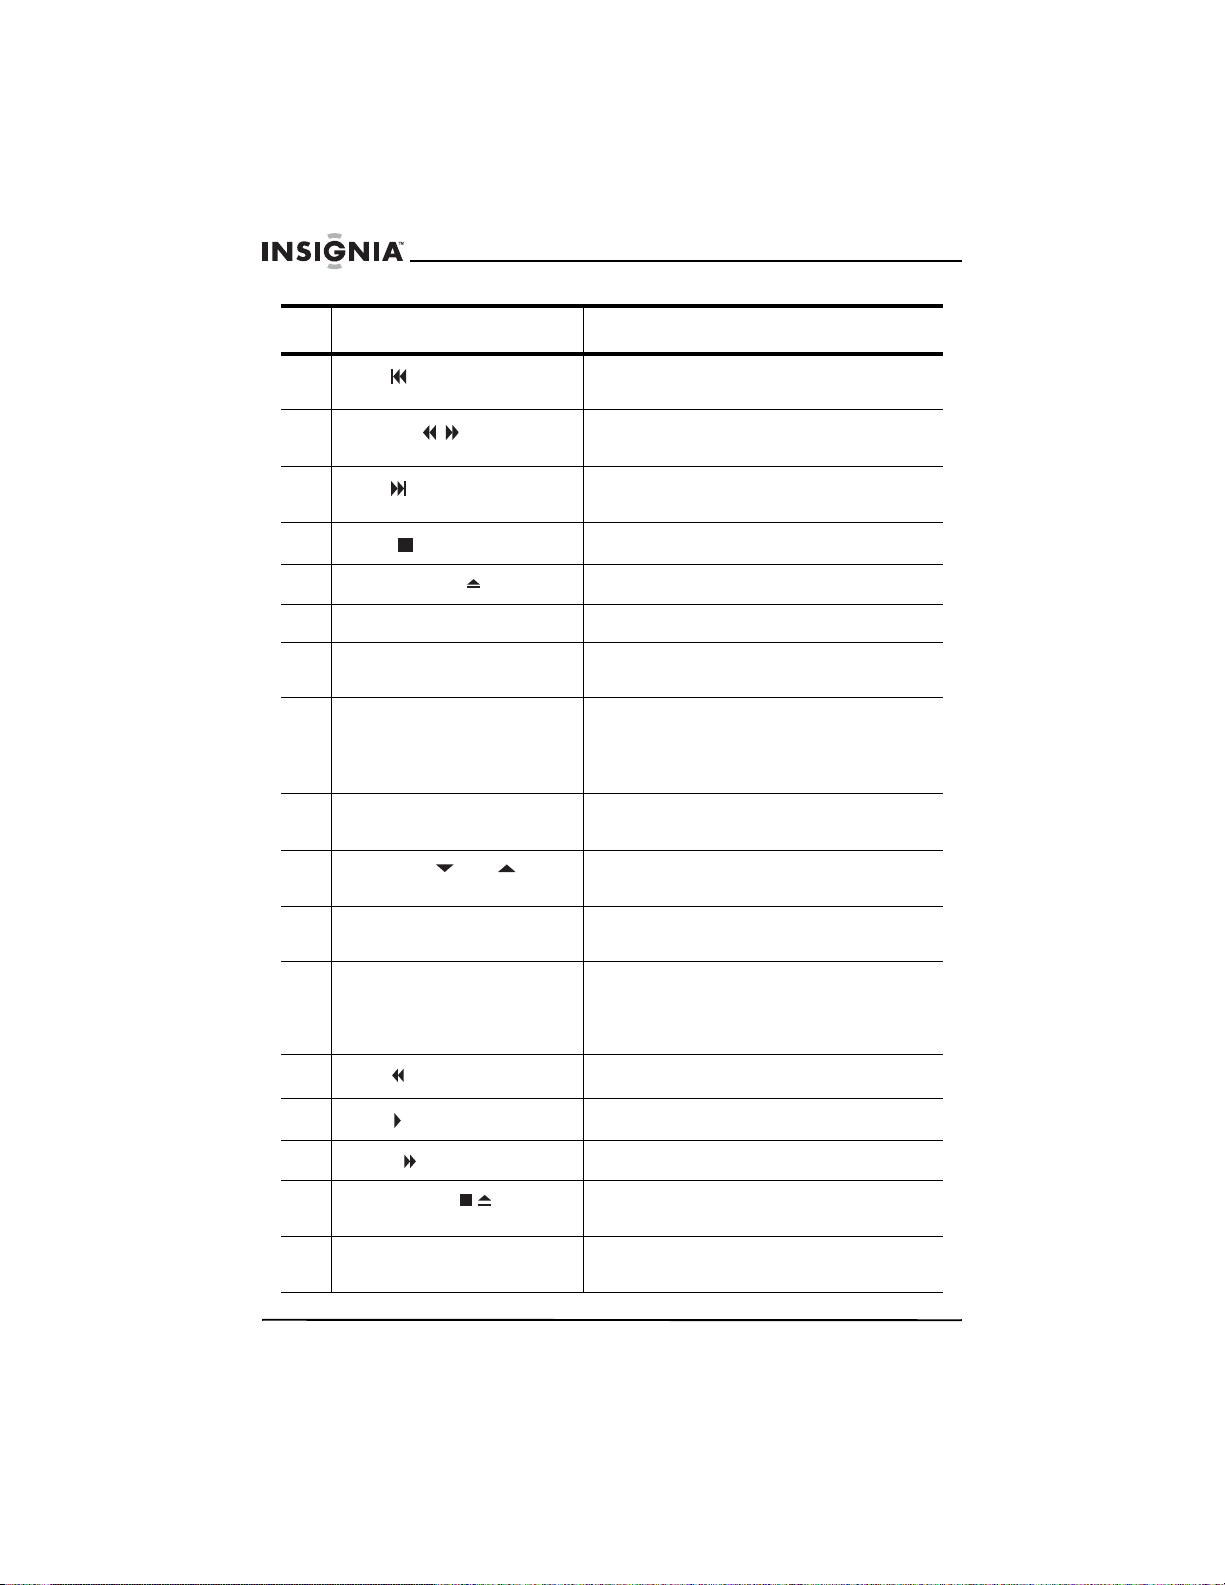
Component Description
4
SKIP
5
SEARCH
6
SKIP
7
STOP
8
OPEN/CLOSE
9 Disc tray Place a disc in this tray.
10 DVD indicator Lights when your DVD combo is in DVD
11 INPUT Press to select:
12 TV/VCR indicator Lights when your DVD combo is in
13 CHANNEL and Press to switch to the next lower or next
14 Recording indicator Lights when your DVD combo is
Press to go to the previous chapter (DVD)
or track (CD) during playback.
Press and hold to fast-reverse or
fast-forward on a DVD or CD.
Press to go to the next chapter (DVD) or
track (CD) during playback.
Press to stop DVD or CD playback.
Press to open or close the disc tray.
mode.
• TV to watch TV
• AUX to use an external video device
• DVD to use the DVD player.
TV/VCR mode.
higher numbered channel.
recording.
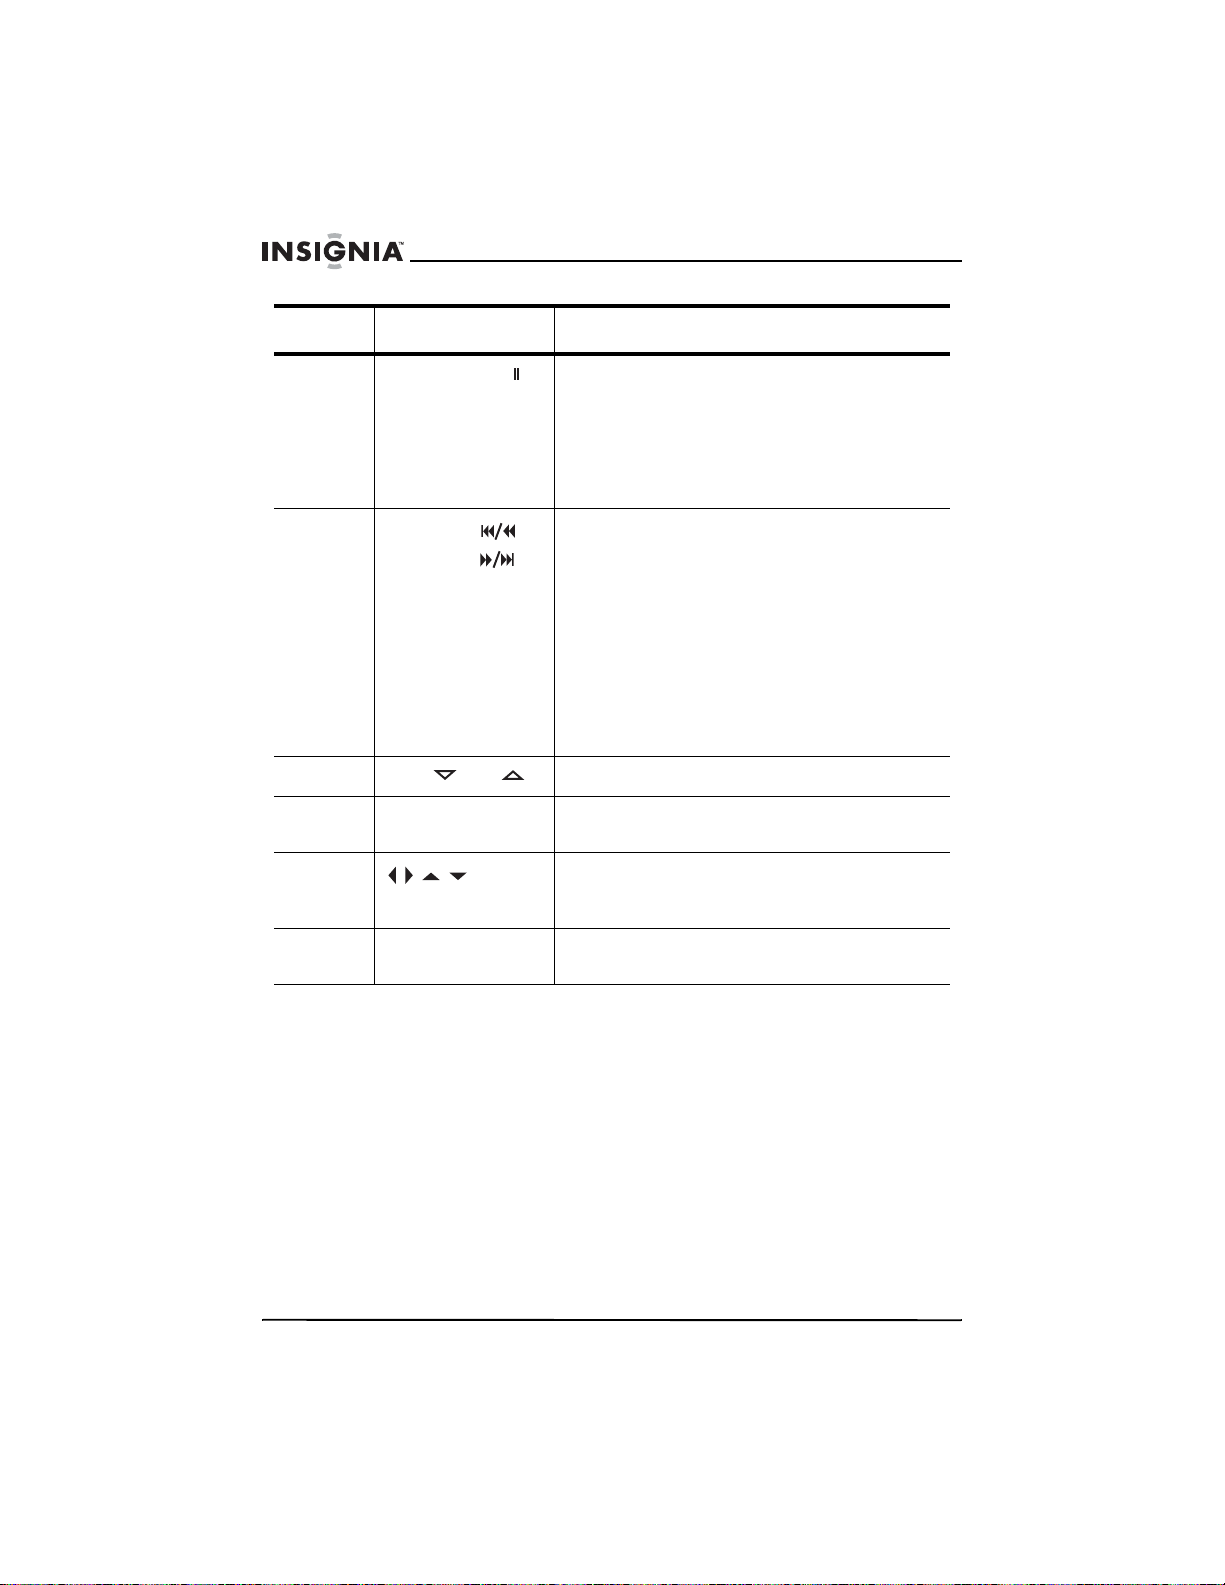
15 REC-OTR Press to start a recording. Press again to
16
REW
17
PLAY
18
F. F W D
19
STOP/EJECT
20 Remote sensor Receives signals from the remote control.
8
www.insignia-products.com
set up a 30 minute OTR. Each time you
press this button the OTR time increases
by 30 minutes to a maximum of 8 hours.
Press to go backward on a videotape.
Press to start VCR playback.
Press to go forward on a videotape.
Press to stop videotape playback. Press
again to eject the videotape.
Point the remote control at this sensor.
Page 10

NS-19RTR 19" DVD Triple Combo
Component Description
21 HEADPHONE Plug headphones into this jack.
22 VIDEO Plug the video cable from an external
23 L-AUDIO-R Plug the audio cables from an external
24 VCR videotape
compartment
video device into this jack.
video device into these jacks.
Insert a videotape into this compartment.
www.insignia-products.com
9
Page 11
Remote control
NS-19RTR 19" DVD Triple Combo
20
15
18
17
14
22
16
21
19
1
2
3
4
5
6
7
8
9
10
11
12
13
10
www.insignia-products.com
Page 12
NS-19RTR 19" DVD Triple Combo
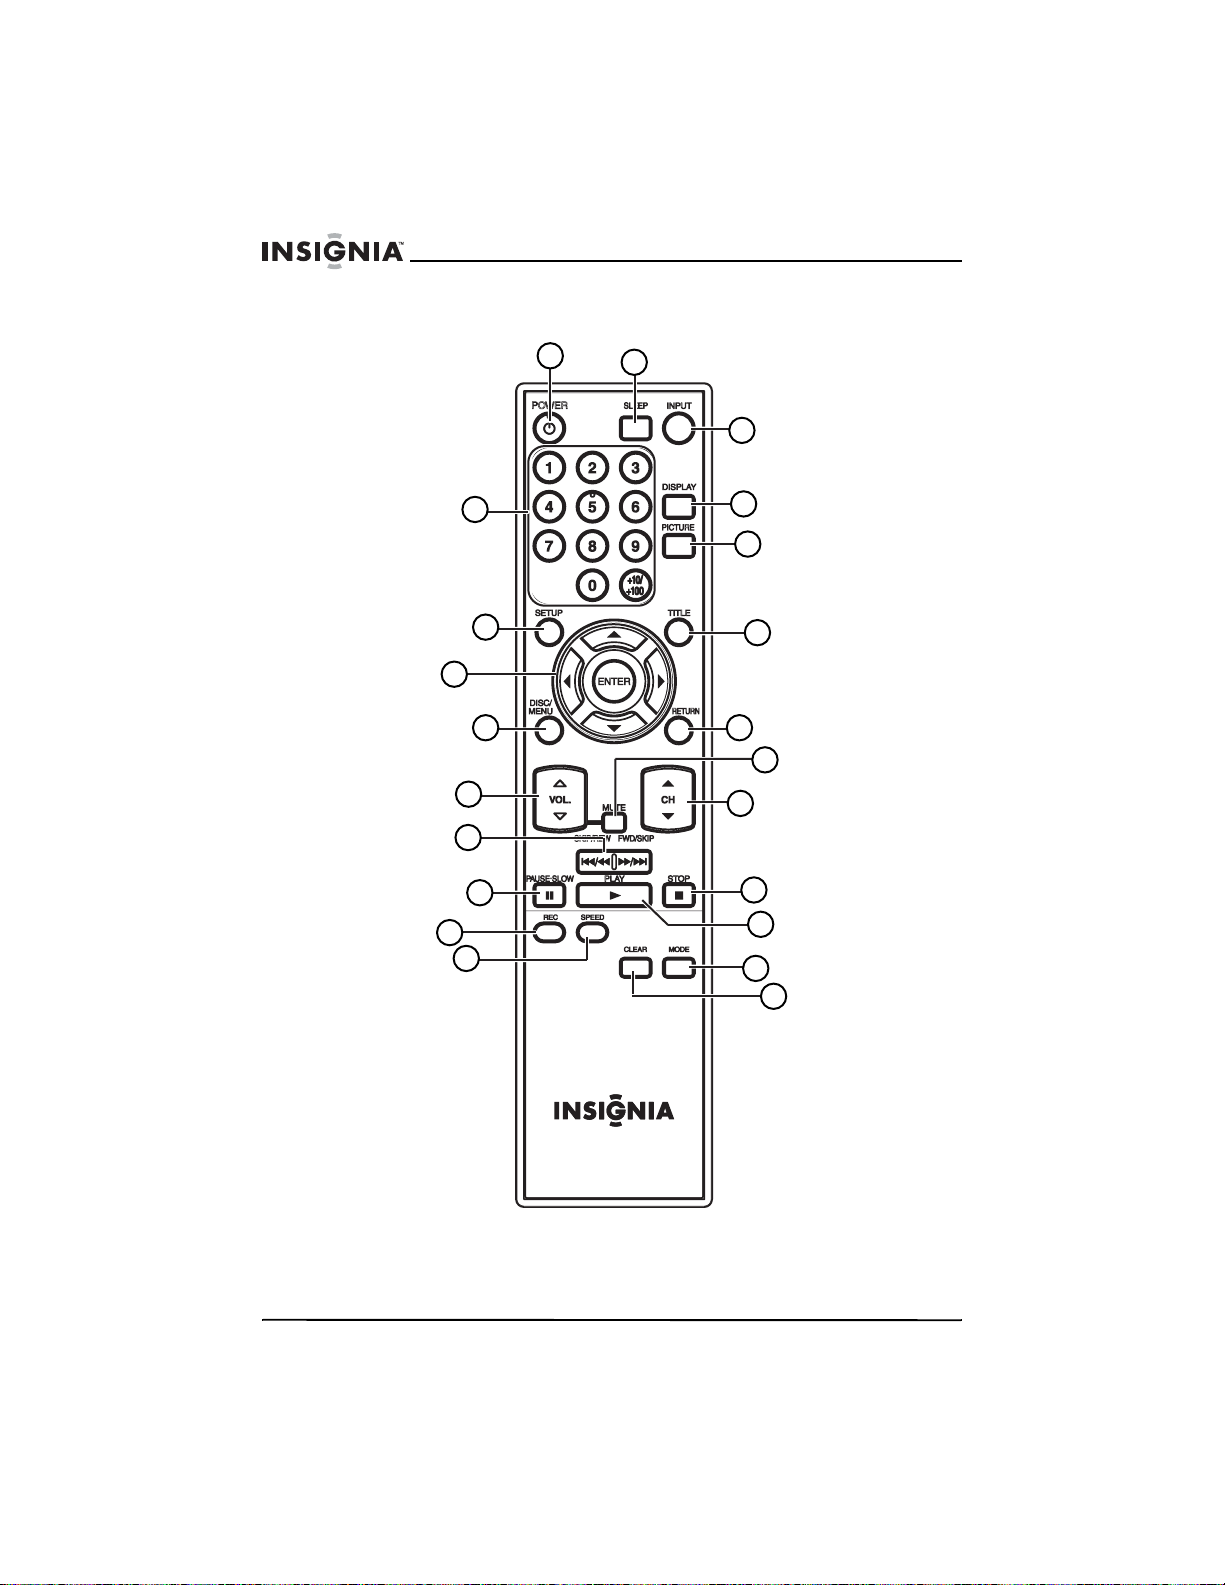
Button Description
1 POWER Press to turn your DVD combo on and off.
2 SLEEP Press to set the sleep timer.
3 INPUT Press to select:
• TV to watch TV
• AUX to use an external video device
• DVD to use the DVD player.
4 DISPLAY Press to display information about the status of
5 PICTURE Press one or more times to adjust basic picture
6 TITLE Press to open a DVD title menu. Some DVDs
7 RETURN Press to go to a previous menu in the OSD.
8 MUTE Press to mute the sound. Press again to
9 CH and Press to switch to the next lower or next higher
10
11
12 MODE In DVD playback mode, press to open menus.
STOP
PLAY
your DVD combo.
settings.
You can select:
•BRIGHT
•CONTRAST
• COLOR
•TINT
• SHARPNESS
do not have title menus.
un-mute the sound.
numbered channel.
Press to stop playback.
Press to start playback.
In CD playback mode, press to select a CD
track.
13 CLEAR Press to clear timers and reset incorrect input
in OSD menus.
14 SPEED When recording a videotape, press to select
the tape speed.
15 REC Press to start recording to a videotape.
www.insignia-products.com
11
Page 13
NS-19RTR 19" DVD Triple Combo
Button Description
16
17
18
19 DISC/MENU Press to open the disc menu on a DVD. Some
20
21 SETUP Press to open and close the on-screen display
PAUSE–SLOW
SKIP/REW
FWD/SKIP
VOL. and
ENTER
Press to pause a videotape, DVD, or CD.
Press this button, then press the FWD/SKIP
button to slow-forward on a videotape or press
and hold the FWD/SKIP button to slow-forward
on a DVD.
Press this button, then press and hold the
SKIP/REW button to slow reverse on a DVD.
Press to fast-reverse or fast-forward on a
videotape or press and hold to fast-reverse or
fast-forward on a DVD.
Press to go to the previous or next DVD
chapter or CD track.
Press the PAUSE-SLOW button, then press
the FWD/SKIP button to slow-forward on a
videotape or press and hold the FWD/SKIP
button to slow-forward on a DVD.
Press the PAUSE-SLOW button, then press
and hold the SKIP/REW button to slow-reverse
on a DVD.
Press to decrease or increase the volume.
DVDs do not have disc menus.
Press the arrows to select menus and options
in the OSD. Press the
confirm your selection.
(OSD).
ENTER button to
12
www.insignia-products.com
Page 14

NS-19RTR 19" DVD Triple Combo
Button Description
22 Numbers/
Notes
+10/+100
Your DVD combo does work with a Philips PMDVR8 remote control
with Code247.
We do not recommend the use of universal remote controls
because they do not control all your DVD combo’s functions. The
code number given by universal remote controls may not work with
your DVD combo. For more details, contact the manufacturer of the
universal remote control.
Unless otherwise stated, all operations described in this guide are
based on remote control use. Some operations can be carried out
using the controls on the front panel.
When watching TV, press the number buttons
to change TV channels.
•Press 0 and a number button for a
one-digit channel number.
• Press the number buttons for a two-digit
channel number.
• Press the +10/+100 button, then press
the last two channel numbers for a
three-digit channel number.
For more information, see “Watching a TV
program” on page 17.
When accessing parental controls, press the
number buttons to enter your access code
(password).
When searching for a DVD chapter or CD
track:
• If the DVD or CD has more than ten
chapters or tracks and you want to select
a one-digit chapter or track, press the 0
button, then press the chapter or track
number.
• If the DVD or CD has more than ten
chapters or tracks and you want to select
a two-digit chapter or track, press the
+10/+100 button, then enter the chapter
or track number.
www.insignia-products.com
13
Page 15
NS-19RTR 19" DVD Triple Combo
Setting up your DVD combo
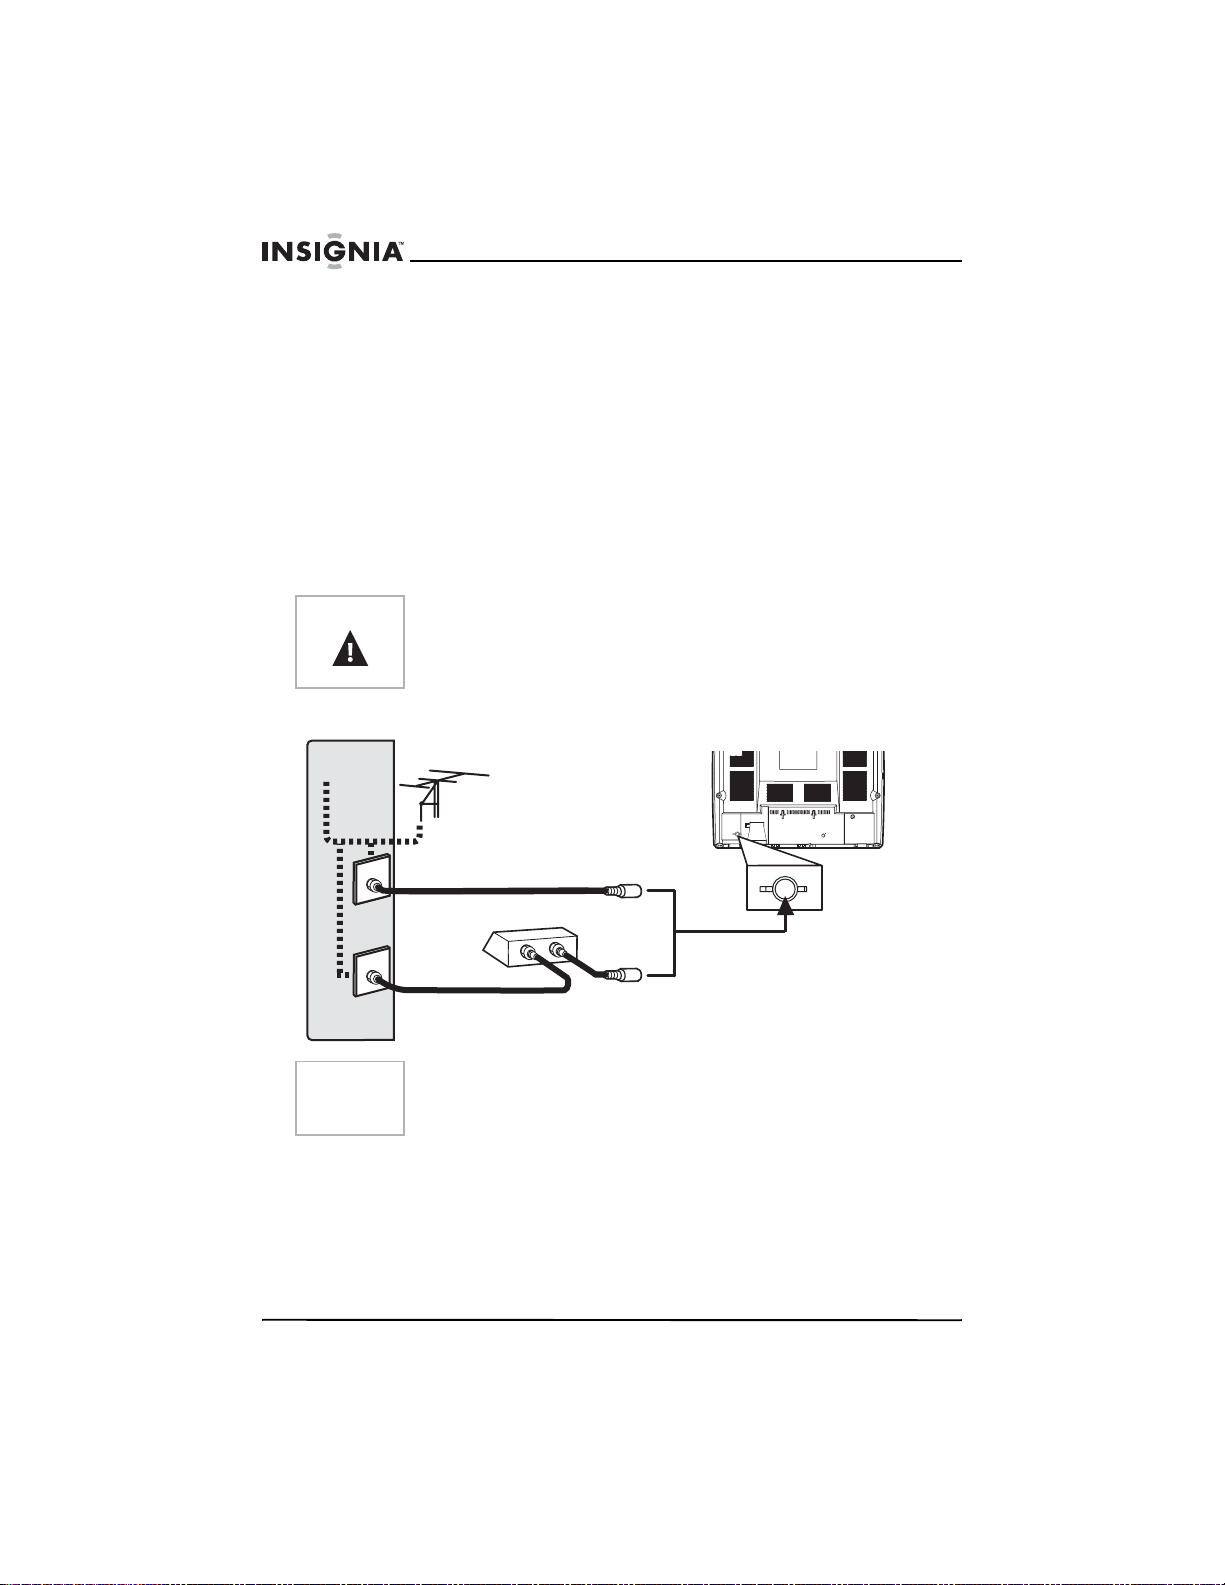
Connecting an antenna, cable TV, or satellite TV
Before you plug in the antenna, cable TV, or satellite TV, check the
cables for bent or broken pins. If a pin is bent, try to straighten it. If
you cannot straighten the pin or if a pin is broken, replace the cable.
If you are connecting an outside antenna or cable TV without a box,
connect the cable to the ANT. jack on the back of your DVD combo
and to the incoming antenna or cable jack.
If you are connecting cable TV with a box, connect a cable to the In
jack on the box and to the incoming cable jack. Then connect a cable
to the Out jack on the box and to the ANT. jack on the back of your
DVD combo.
Warning
Cable TV
OR
Note
Always disconnect power to all devices, including your DVD combo,
when you are installing devices or moving your DVD combo. Always
unplug the antenna, cable TV, or satellite TV before you move your
DVD combo.
Back of DVD combo
Antenna
Incoming
antenna/cable (no box)
OR
T
U
O
IN
ANT.
ANT.
ANT. jack
AUDIO OUT
COAXIAL
Incoming cable or satellite
box (see note)
Do not disconnect the cables at the box. Some cable TV providers
use scrambled signals and require a special converter to receive
scrambled channels. Consult your cable TV provider.
14
www.insignia-products.com
Page 16
NS-19RTR 19" DVD Triple Combo
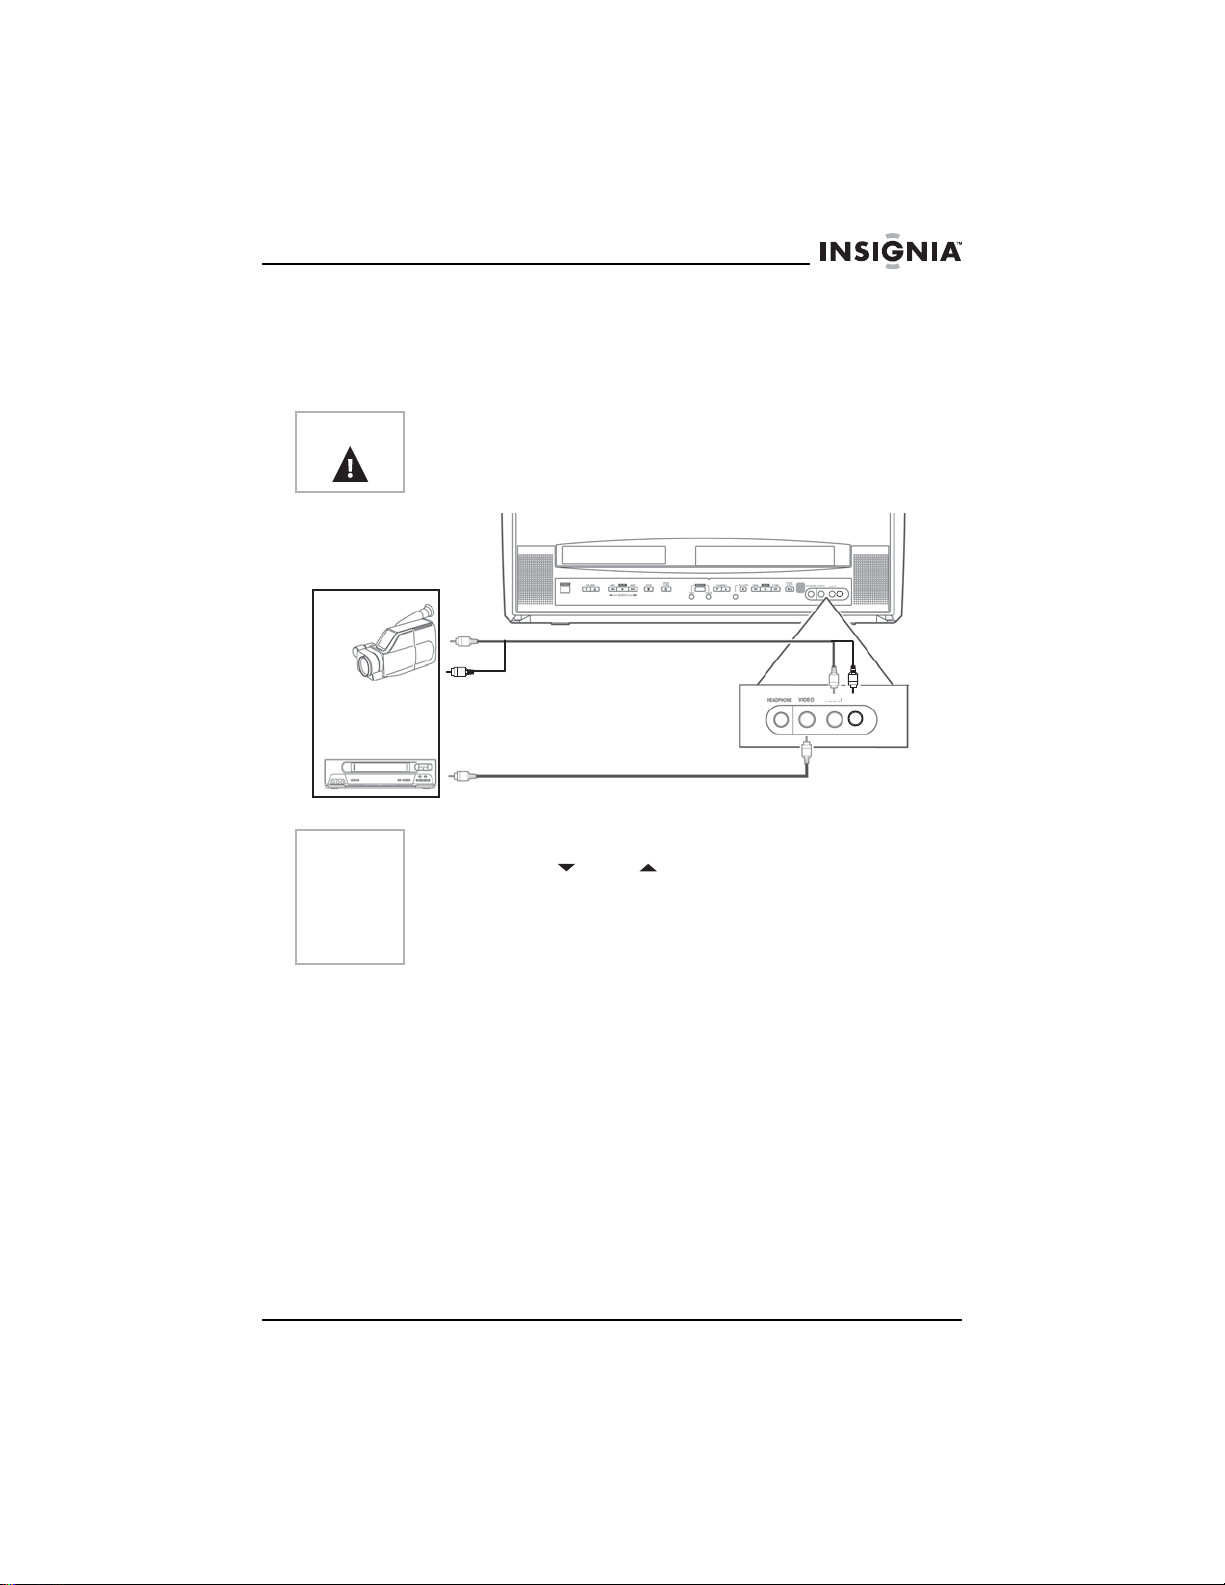
Connecting a device to the front panel
Your DVD combo has audio and video jacks on the front panel. These
front jacks make it easy to connect and disconnect another video
device, such as another VCR or a video camera.
Warning
Notes
Always disconnect power to all devices, including your DVD combo,
when you are installing devices or moving your DVD combo.
L-AUDIO-R
Audio out on
device
Video out on
device
Front audio on
DVD combo
L-AUDIO-R
Front video on
DVD combo
To use the device attached to the front jacks, press the INPUT
button or the CH or CH button one or more times until AUX
appears on the screen.
If you connect a monaural VCR to your DVD combo, connect the
Audio out jack on the monaural VCR to the L-AUDIO jack on the
front of your DVD combo.
www.insignia-products.com
15
Page 17
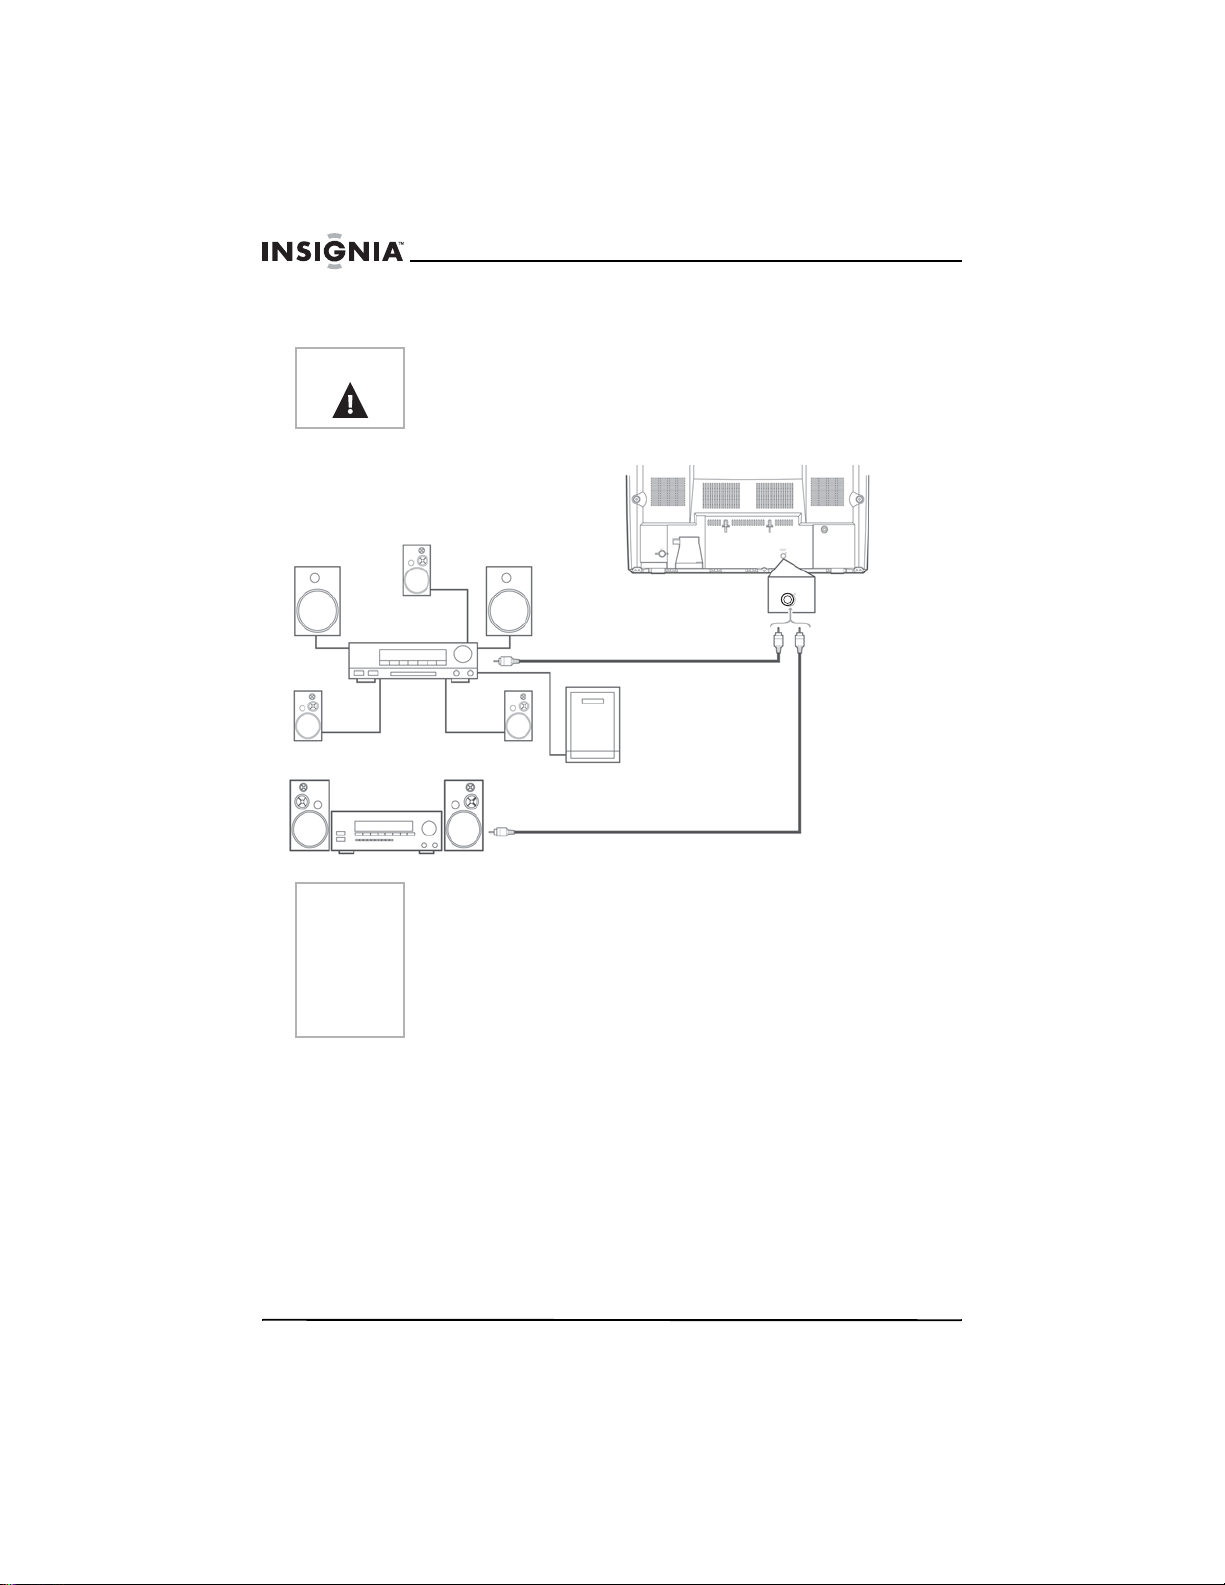
Connecting a digital audio device
NS-19RTR 19" DVD Triple Combo
Warning
Dolby Digital
decoder
MD or DAT
deck
Notes
Always disconnect power to all devices, including your DVD combo,
when you are installing devices or moving your DVD combo.
Back of DVD combo
AUDIO OUT
COAXIAL
To AUDIO OUT
To coaxial digital
audio input jack
COAXIAL jack
(DVD audio out
only)
To coaxial digital
audio input jack
If you are using an MD or DAT deck, you cannot record a disc in
Dolby Digital multi-channel surround format.
When you connect an MD or DAT deck, set DOLBY DIGITAL to
PCM.
When you connect a Dolby Digital decoder, set DOLBY DIGITAL to
BITSTREAM. If the AUDIO mode is not set correctly, the audio may
be distorted and may damage your speakers.
16
www.insignia-products.com
Page 18
NS-19RTR 19" DVD Triple Combo
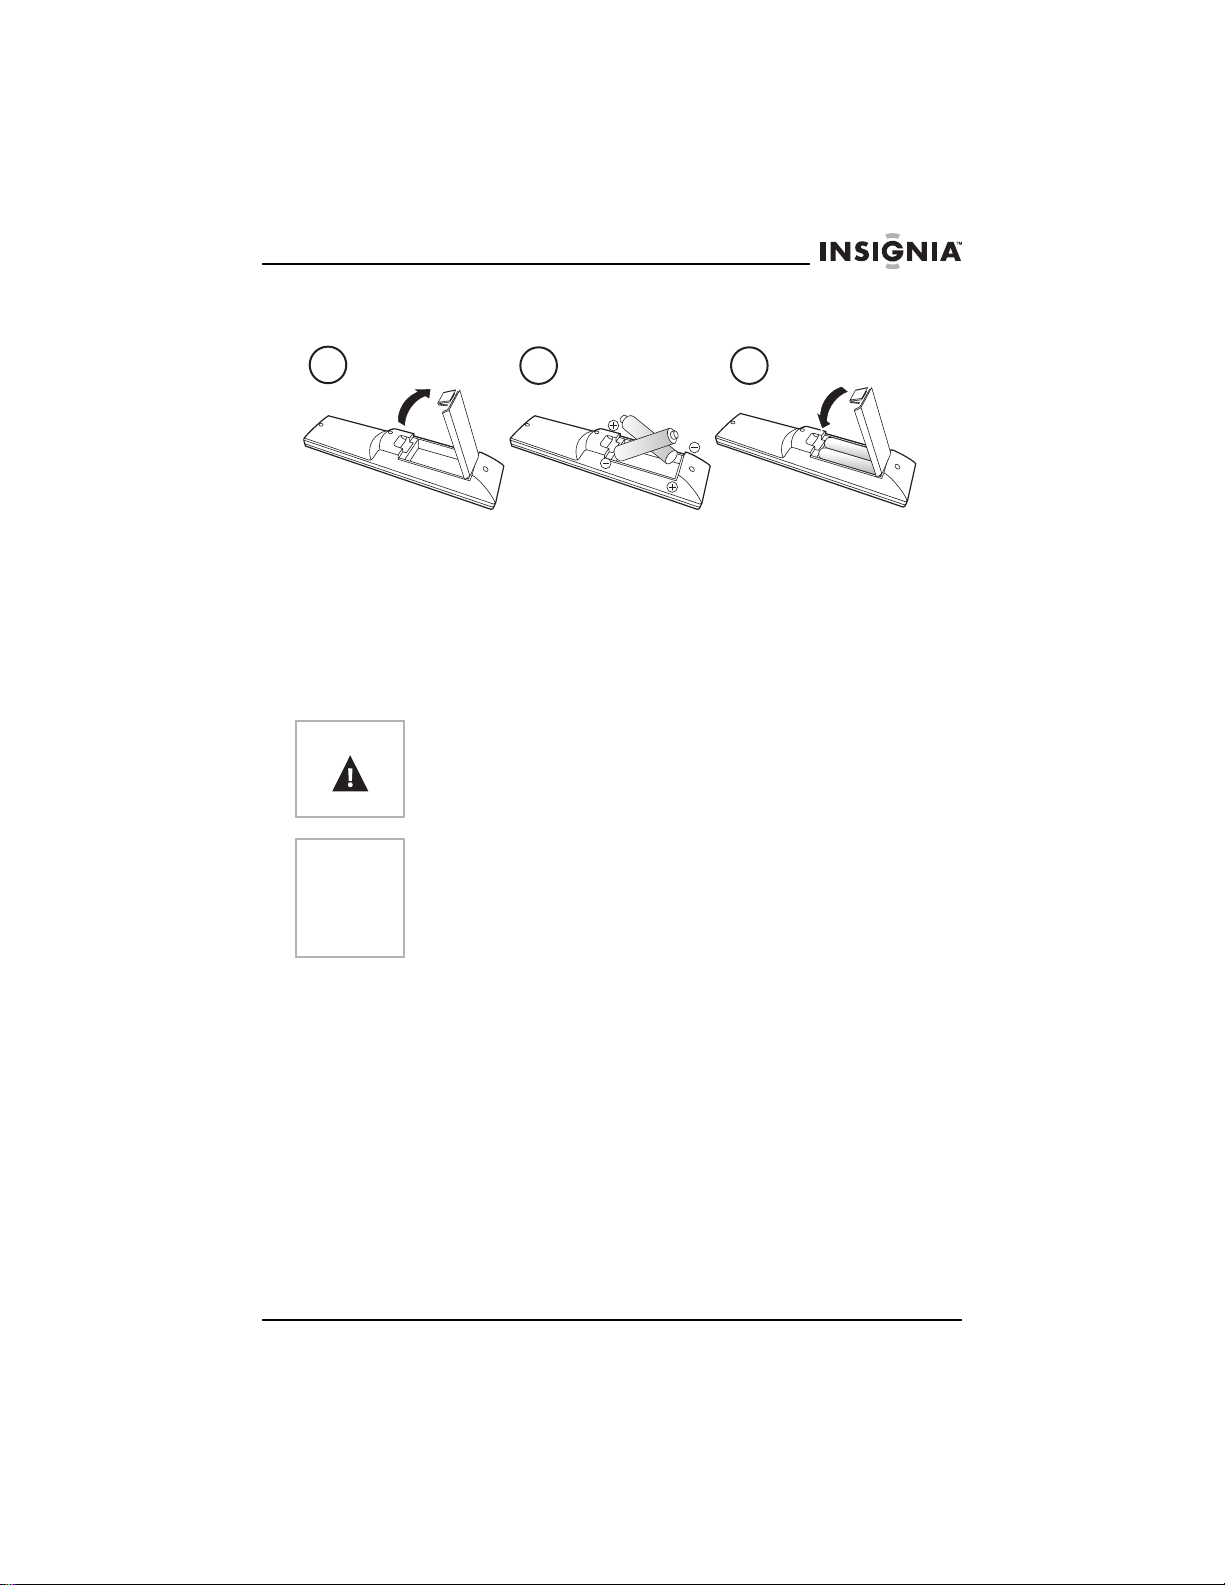
Installing the remote control batteries
1
To install the remote control batteries:
1 Press the battery compartment cover in the direction of the arrow,
then lift the cover.
2 Insert two AA batteries into the battery compartment. Make sure
that the + and – symbols on the batteries align with the + and –
symbols in the battery compartment. If you insert the batteries
incorrectly, you may damage the remote control.
3 Replace the cover.
Warning
Notes
Do not throw the batteries into fire. Dispose of used batteries as
hazardous waste.
Do not try to recharge batteries that are not rechargeable. The
batteries may overheat and rupture.
Do not mix different types of batteries (for example, alkaline and
carbon-zinc).
Do not mix old and new batteries.
If you do not plan to use your DVD combo for a long period of time,
remove the batteries to prevent damage or injury from leakage.
2
3
Using your DVD combo
Using the TV
Watching a TV program
To watch a TV program:
1 Connect your antenna or cable TV.
2 Plug the power cord into a power outlet.
3 Press the POWER button to turn on your DVD combo.
www.insignia-products.com
17
Page 19

NS-19RTR 19" DVD Triple Combo
4 Press the CH or button or the number buttons to select a TV
channel.
If you use the number buttons to select a TV channel:
• Press 0 and a number button for a one-digit channel
number.
• Press the number buttons for a two-digit channel number.
• Press the +10/+100 button, then press the last two channel
numbers for a three-digit channel number.
5 Press the VOL.
or button to adjust the volume.
Note
If you turn off your DVD combo in DVD mode,
when you turn it back on, your DVD combo will
be in TV/VCR mode.
Watching TV from a cable box or satellite box
To watch TV from a cable box or satellite box:
1 Use your DVD combo’s controls to set the channel to the cable or
satellite access channel (usually channel 3 or 4).
2 Use the cable or satellite box to tune to a TV channel.
Watching TV from an external input device
To watch TV from an external input device:
• If your DVD combo is connected an external TV through your
DVD combo’s front audio and video jacks, press the INPUT or
CH
or button until AUX appears on the screen.
Setting up channels
When you first set up your DVD combo, you need to set up the
channels available in your area.
To set up channels:
1 Press the SETUP button.
2 Press the
or button to select CHANNEL SET UP, then press
the ENTER button.
3 Press the
or button to select AUTO PRESET CH (TV) or
AUTO PRESET CH (CATV), then press the ENTER button
DVD combo scans for and stores available TV or CATV channel
numbers in your area. When the scanning is complete, the lowest
channel number found appears on the display.
. Yo u r
18
Note
If NO TV SIGNALS appears on the screen, make sure that your
antenna is connected correctly and securely, then scan again.
You do not need to set up channels if you are connected to a cable
or satellite box. Instead, use your DVD combo’s controls to set the
channel to the cable or satellite access channel (usually channel 3
or 4). Then use the cable or satellite box to tune to a TV channel.
www.insignia-products.com
Page 20

NS-19RTR 19" DVD Triple Combo
Adding or deleting channels
You can add channels that were not set up when you scanned for
channels, or you can delete channels that are no longer available or
that you do not want to be available.
To add or delete channels:
1 Press the SETUP button.
2 Press the
or button to select CHANNEL SET UP, then press
the ENTER button.
3 Press the or button to select ADD/DELETE CH, then press
the ENTER button.
4 Press the CH
or button or the number buttons to select a TV
channel you want to add or delete.
5 Press the ENTER button one or more times to select add or
delete. The channel number changes to red (delete) or blue (add)
each time you press the ENTER button.
6 Press the SETUP button.
Manually setting the clock
You need to set the clock if you want to use your DVD combo to make
timed recordings with the VCR.
The first time you set the clock, we recommend that you set it
manually, then turn on the AUTO CLOCK setting to update the clock
periodically.
Note
You must use the remote control to set the clock.
To manually set the clock:
1 Press the SETUP button.
2 Press the
the
ENTER button.
or button to select SETTING CLOCK, then press
3 If there is no PBS station in your area or through your cable TV
provider, press the or button to select AUTO CLOCK, then
press the ENTER button to turn off the auto clock setting.
4 Press the
or button to select MANUAL CLOCK SET, then
press the ENTER button.
5 Press the
or button to select the month, day, year, hour, and
minute. After you set the first item, press th
to the next item.
6 Press the SETUP button to start the clock.
Note
If you unplug your DVD combo or the power fails for more than
three seconds, you may have to reset the clock.
www.insignia-products.com
e or button to move
19
Page 21

Automatically setting the clock
If a TV station in your area broadcasts date and time information, you
can set up your DVD combo to automatically update the date and
time.
NS-19RTR 19" DVD Triple Combo
Note
You must use the remote control to set the clock.
To automatically set the clock:
1 Press the POWER button to turn on your DVD combo.
2 If you are using a cable or satellite box:
• Make sure that the box is turned on and tuned to your local
PBS station.
• Make sure that your DVD combo is turned to the cable or
satellite TV access channel (usually channel 3 or 4).
3 Press the SETUP button.
4 Press the
or button to select SETTING CLOCK, then press
the ENTER button.
5 Press the ENTER button again to select ON.
6 Press the
7 Press the
button to select AUTO CLOCK CH.
or button to select AUTO.
8 Press the SETUP button.
Note
When your DVD combo is turned off, it periodically checks and
updates the time.
Setting up daylight saving time
To automatically adjust the clock for daylight saving time:
1 Press the SETUP button.
2 Press the
or button to select SETTING CLOCK, then press
the ENTER button.
3 Press the or button to select D.S.T., then press the ENTER
button to select ON.
4 Press the SETUP button.
20
www.insignia-products.com
Page 22
NS-19RTR 19" DVD Triple Combo
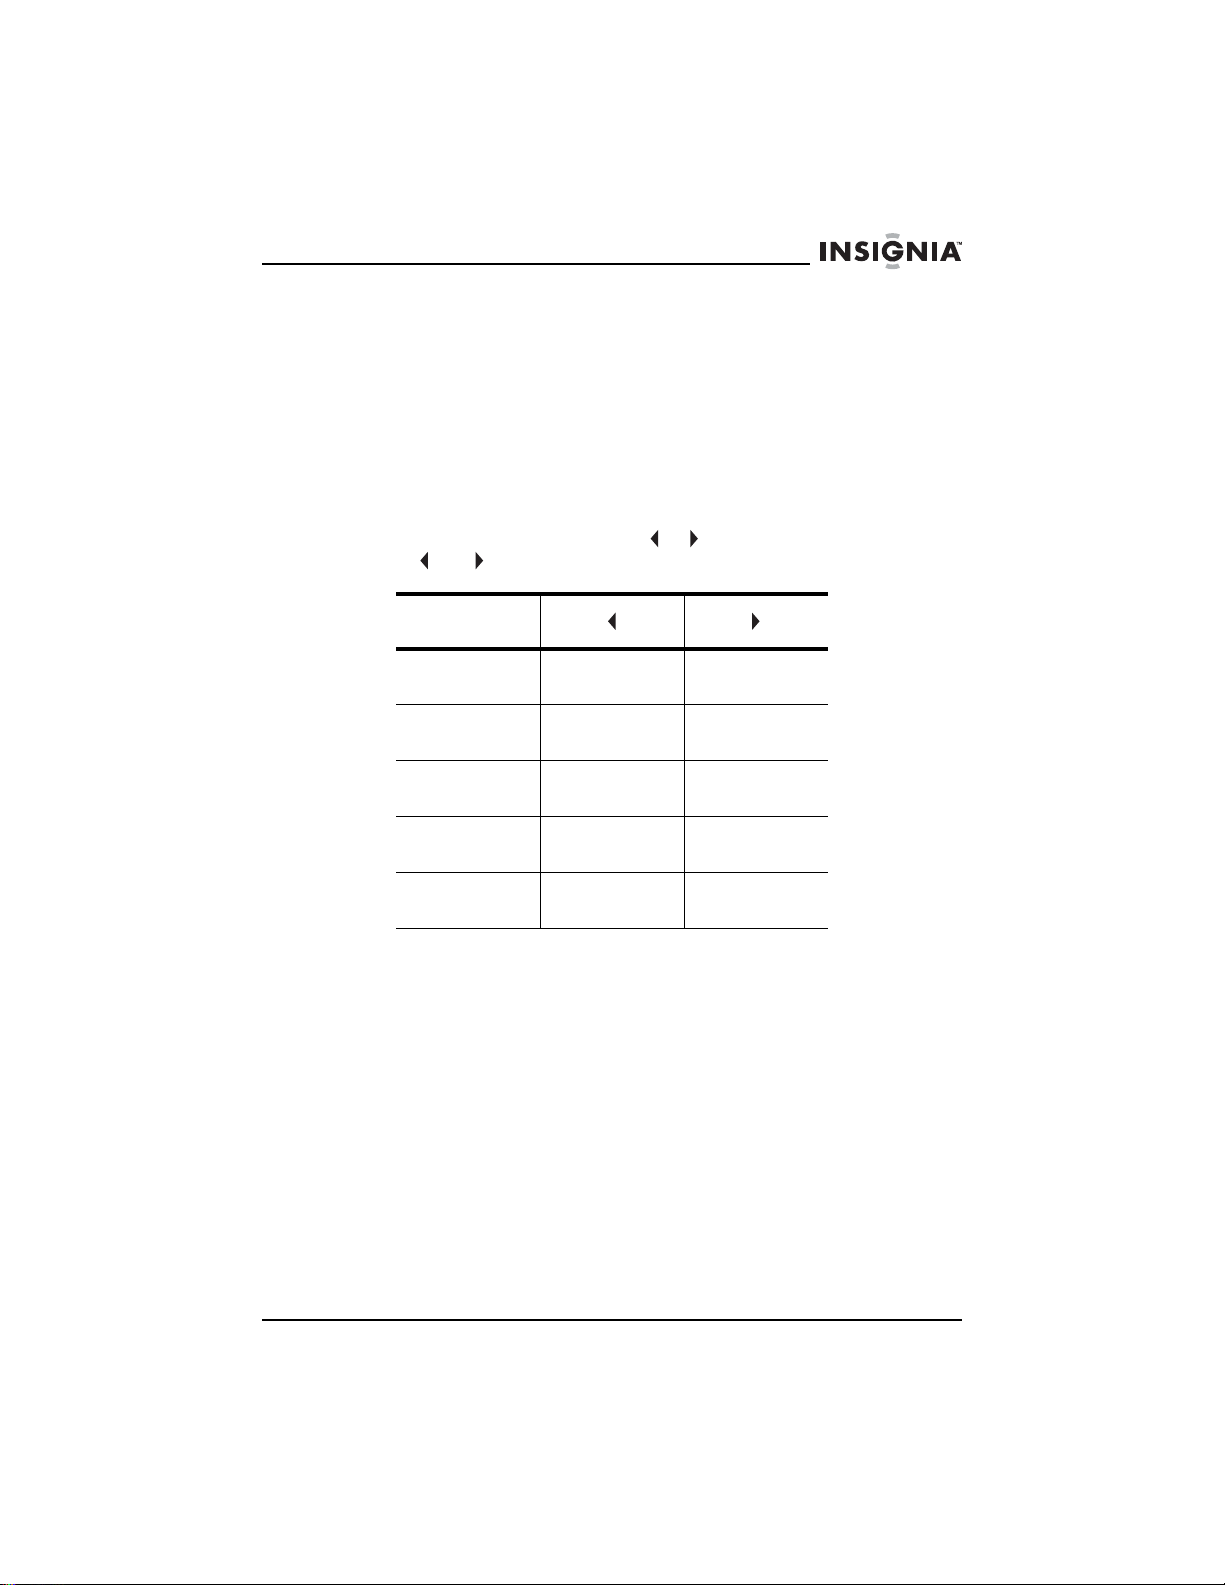
Adjusting picture controls
To adjust basic TV settings:
1 Press the PICTURE button until the setting you want to adjust
appears. You can select:
•BRIGHT (brightness)
•CONTRAST
• COLOR
•TINT
• SHARPNESS
2 Within five seconds, press the
The and buttons adjust the settings as follows:
or button to adjust the setting.
BRIGHT Decreases
CONTRAST Decreases
COLOR Pales the color Brightens the
TINT Makes the tint
SHARPNESS Softens the
Setting the sleep timer
You can set the sleep timer to automatically turn off your DVD combo
at a time you specify. The sleep timer does not work if you are
recording.
To set the sleep timer:
1 Press the SLEEP button.
2 Within five seconds, press the SLEEP
Each time you press a button, the time increases by 30 minutes.
3 To turn off the sleep timer, press the SLEEP
appears.
After you set the sleep timer, you can check the time remaining by
pressing the SLEEP button.
brightness
contrast
more purple
picture
Increases
brightness
Increases
contrast
color
Makes the tint
more green
Clarifies the
picture
button to select a time.
button until 0
www.insignia-products.com
21
Page 23

Using closed captioning
You can turn on closed captioning if a TV program or pre-recorded
videotape has closed captioning.
Closed captioning can be affected by:
• Electric motor noise
• Weak or snowy reception on the TV screen
• Multiplex signal reception that displays ghosts or a fluttering
image
To turn closed captioning on and off:
1 Press the SETUP button.
2 Press the
3 Press the
or button to select CAPTION.
ENTER button to select a closed caption option. You
can select:
• CAPTION1–Displays the primary closed captioning.
• CAPTION2–Displays an alternate language.
• TEXT–Displays text on half the screen.
• OFF–Turns off closed captioning.
Changing the on-screen menu language
Your DVD combo has an on-screen display (OSD) that lets you adjust
settings for your DVD combo. You can change the OSD language.
To change the OSD language:
1 Press the SETUP button.
2 Press the
or button to select LANGUAGE.
3 Press the ENTER button one or more times to select the
language. You can select:
•ENGLISH
• ESPAÑOL
•FRANÇAIS
4 Press the SETUP button.
Setting up parental controls
NS-19RTR 19" DVD Triple Combo
To set up parental controls for TV programs:
1 Make sure that your DVD combo is turned on and tuned to a
channel that is not blocked by previous parental control settings.
2 Press the SETUP button.
3 Press the
or button to select V-CHIP SET UP, then press the
ENTER button.
4 Use the number buttons to enter your access code (password). If
you have not set up an access code, enter 0000.
5 Press the
ENTER
22
or button to select TV RATING, then press the
button.
www.insignia-products.com
Page 24

NS-19RTR 19" DVD Triple Combo
6 Press the or button to select a rating that you want to block.
You can select:
• TV-Y–All children
• TV-Y7–Children seven years of age and older
• TV-G–General audiences
• TV-PG–Parental guidance suggested
• TV-14–Children 14 years of age and older
• TV-MA–Mature audiences only
7 Press the ENTER button to select BLOCK or VIEW. If you block a
rating, that rating and all ratings above that rating are blocked.
8 If you selected TV-Y7, TV-PG,TV-14, or TV-MA, press the ENTER
button twice, then press the
you want to block. You can select:
Rating Sub-rating
TV-Y7
FV Fantasy violence
TV-PG, TV-14, TV-MA
or button to select a sub-rating
D Suggestive dialog (TV-PG
L Coarse language
S Sexual situations
VViolence
and TV-14 only)
9 Press the ENTER button to select BLOCK or VIEW.
10 Press the SETUP button.
To set up parental controls for movies:
1 Press the SETUP button.
2 Press the
or button to select V-CHIP SET UP, then press the
ENTER button.
3 Use the number buttons to enter your access code (password). If
you have not set up an access code, enter 0000.
www.insignia-products.com
23
Page 25

4 Press the or button to select MPAA RATING, then press the
ENTER button.
5 Press the
or button to select a rating that you want to block.
You can select:
• G–General audience
• PG–Parental guidance suggested
• PG13–Children 13 years of age and older
• R–Restricted, adult supervision recommended for children
under 17 years of age
• NC-17–No one under 17 years of age
• X–Adults only.
6 Press the ENTER button to select BLOCK or VIEW. If you block a
rating, that rating and all ratings above that rating are blocked.
7 Press the SETUP button.
Changing your access code (password)
To change your access code:
1 Press the SETUP button.
2 Press the
or button to select V-CHIP SET UP, then press the
ENTER button.
3 Use the number buttons to enter your access code (password). If
you have not set up an access code, enter 0000.
4 Press the
the
ENTER button.
or button to select CHANGE CODE, then press
5 Use the number buttons to enter a new four-digit code in the NEW
CODE box, then re-enter the new four-digit code in the CONFIRM
CODE box. The V-CHIP SET UP screen appears.
6 Press the SETUP button.
NS-19RTR 19" DVD Triple Combo
24
Note
If power fails or you unplug your DVD combo, the your access code
is erased. Use the default code (0000) to set up another access
code. If you forget your access code, turn off and unplug your DVD
combo for about 10 seconds to restore the default code.
www.insignia-products.com
Page 26
NS-19RTR 19" DVD Triple Combo
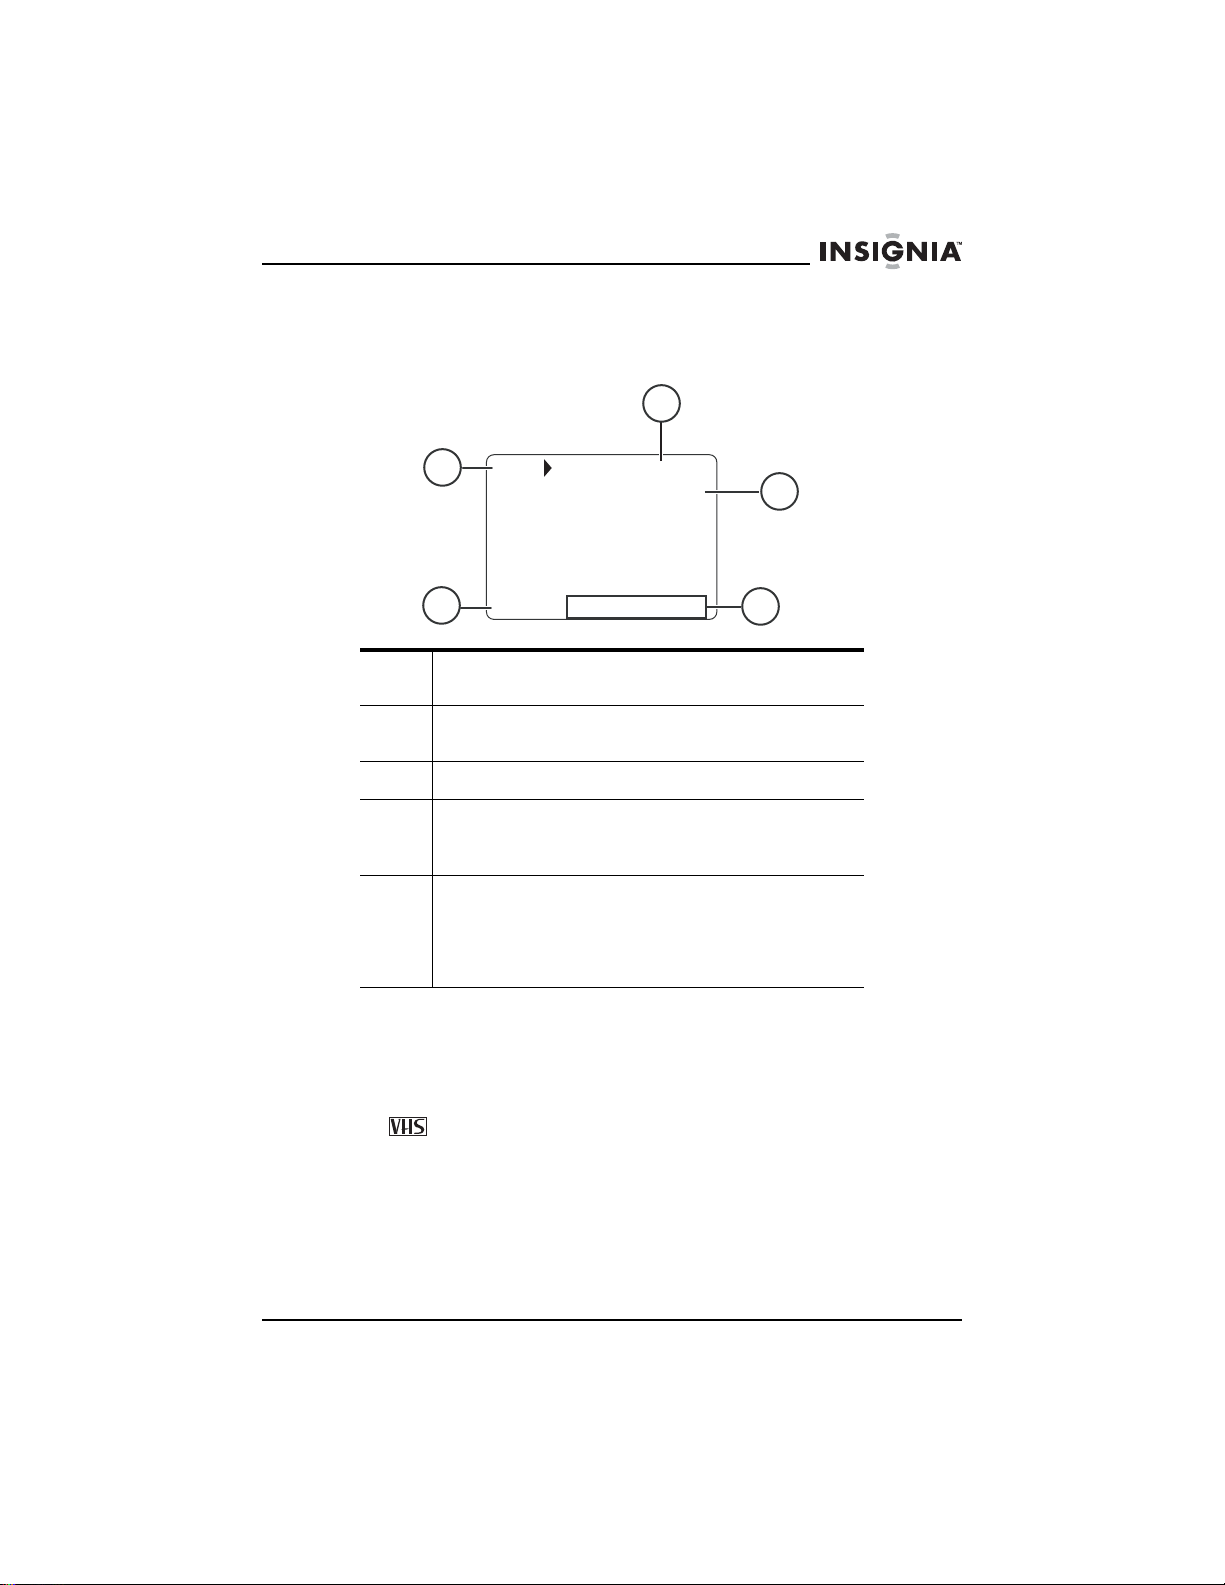
Checking the status
You can view the current status of your DVD combo. Depending on
what mode you are in, the following items appear:
3
1 Displays the current VCR status–PLAY, STOP,
2 Displays the VCR tape recording speed (SP or
3 Displays the current time.
4 Displays the current channel number when a TV
5 Displays the tape counter during VCR playback,
To check the status:
• Press the DISPLAY button one or more times.
Using the VCR
Your DVD combo can play from and record to any videotape that has
the logo.
1
2
PLAY 12:00AM
CH 123
SP COUNT 0:00:00
REC, OTR, PAUSE, EJECT, FF, or REW.
SLP).
program is playing.
mode.
recording, or ejection. This feature is not displayed
for a blank tape or for portions of a tape that are
blank. You can reset this counter by pressing the
CLEAR button.
AUX appears in external input
4
5
www.insignia-products.com
25
Page 27
Playing a videotape
To play a videotape:
1 Press the INPUT button one or more times to select TV/VCR.
2 Insert a pre-recorded tape in the videotape compartment.
3 Press the PLAY
NS-19RTR 19" DVD Triple Combo
button.
Tip
If you are in DVD mode, you can start VCR
playback by pressing the PLAY button on the
VCR side of the front panel.
4 To control playback:
•
To rewind or fast-forward the videotape, press the
SKIP/REW or FWD/SKIP
• To stop playback, press the STOP
•
To stop playback and eject the videotape, press the
STOP/EJECT
• To adjust tracking (when black or white streaks are on the
screen), press the CH
playback, or during Pause, Still, or Slow modes. To stop
manual tracking, stop the videotape and restart it.
• To freeze the picture, press the PA US E– SL OW button.
Each time you press the button, the videotape advances
one frame. Press the PLAY
playback.
• To play the videotape in slow motion, press the
PAUSE–SLOW
button. To stop slow motion, press the PLAY button. After
five minutes of slow motion playback, your DVD combo
automatically returns to normal playback.
Improving playback picture quality
If you are playing a videotape that is old or worn, such as a rented
videotape, you can improve the picture quality.
button.
button.
on the front panel.
or button during normal
button to return to normal
button, then press the FWD/SKIP
To improve the picture quality:
1 Press the SETUP button.
2 Press the
or button to select USER’S SET UP, then press
the ENTER button.
3 Press the
or button to select RENTAL, then press the
ENTER button one or more times to select ON.
4 Press the SETUP button to close the menu.
5 Press the PLAY
Note
26
Your DVD combo remembers this setting even if you turn off your
DVD combo.
www.insignia-products.com
button to start playback.
Page 28

NS-19RTR 19" DVD Triple Combo
Using Repeat mode
1 Press the SETUP button.
2 Press the
the ENTER
3 Press the
4
Press the ENTER button one or more times to select the Repeat mode
you want. You can select:
or button to select USER’S SET UP, then press
button.
or button to select REPEAT PLAY.
• ALL–Plays the entire videotape repeatedly.
• BLANK–Plays the videotape from the beginning of the tape
to the first blank spot on the tape that lasts 10 seconds,
then starts playback at the beginning again.
• OFF–Cancels Repeat mode.
5 Press the SETUP button to close the menu.
6 Press the PLAY
button to start playback.
Notes
Your DVD combo remembers this setting even if you turn off your
DVD combo.
If RENTAL is turned on, RENTAL PLAY appears. If RENTAL is
turned off, REPEAT PLAY appears.
Searching on a videotape
To mark a starting point for playback:
1 Rewind or fast-forward the tape to the starting point you want.
2 Press the CLEAR button repeatedly to set the counter to 0:00:00.
3 Press the PLAY
4 Press the STOP
or REC button to start playback or recording.
button when playback or recording has
finished.
5 Press the SETUP button.
6 Press the
or button to select ZERO RETURN, then press the
ENTER button. Your DVD combo rewinds the tape to the starting
point (the counter shows 0:00:00).
To search for a scene or skip a scene:
1 Start videotape playback.
2 Press the SKIP/REW or FWD/SKIP
backwards or forwards. If you want to search faster, press the
SKIP/REW or FWD/SKIP button again.
3 Press the PLAY
button to resume normal playback.
button to scan
www.insignia-products.com
27
Page 29
To time search:
1 Press the SETUP button.
2 Press the
or button to select TIME SEARCH, then press the
ENTER button.
3 Press the
or button to select the amount of time you want to
skip on the videotape. Each time you press a button the time
changes by 10 minutes. You can select as much as 9 hours and
50 minutes.
If you want to cancel the time search now, press the SETUP
button.
4 Press the or
button to rewind or forward the videotape. When
the setting time reaches 0:00:00, your DVD combo automatically
starts playback.
5 To cancel the time search, press the STOP
To search with index markers:
NS-19RTR 19" DVD Triple Combo
button.
Note
Every time you start recording, an index mark is automatically
created. The index mark also works as the starting point for timer
recordings and OTR.
If you have recorded several programs on one videotape, you can
select the marker for one of the programs. Your DVD combo
automatically searches for the marker and starts playback at the
marker.
1 Press the SETUP button.
2 Press the
or button to select INDEX SEARCH, then press
the ENTER button.
3 Press the
or button until the number of the program you
want to watch appears.
4 Press the or
button. Your DVD combo rewinds or fast-forwards
to the beginning of the program you selected. When the search is
completed, your DVD combo starts playback automatically.
5 To cancel the index search, press the STOP
button.
28
www.insignia-products.com
Page 30
NS-19RTR 19" DVD Triple Combo
Recording tips
Selecting tape speeds
Before you record a videotape, select the tape speed: SP mode
(standard play) or SLP mode (super long play). Recording times vary
depending on the tape speed and type.
Tape Type SP mode SLP mode
T60 1 hour 3 hours
T120 2 hours 6 hours
T160 2 2/3 hours 8 hours
Tip
For best results, use high-quality tapes for recording. Do not use
poor quality, worn, or damaged tapes.
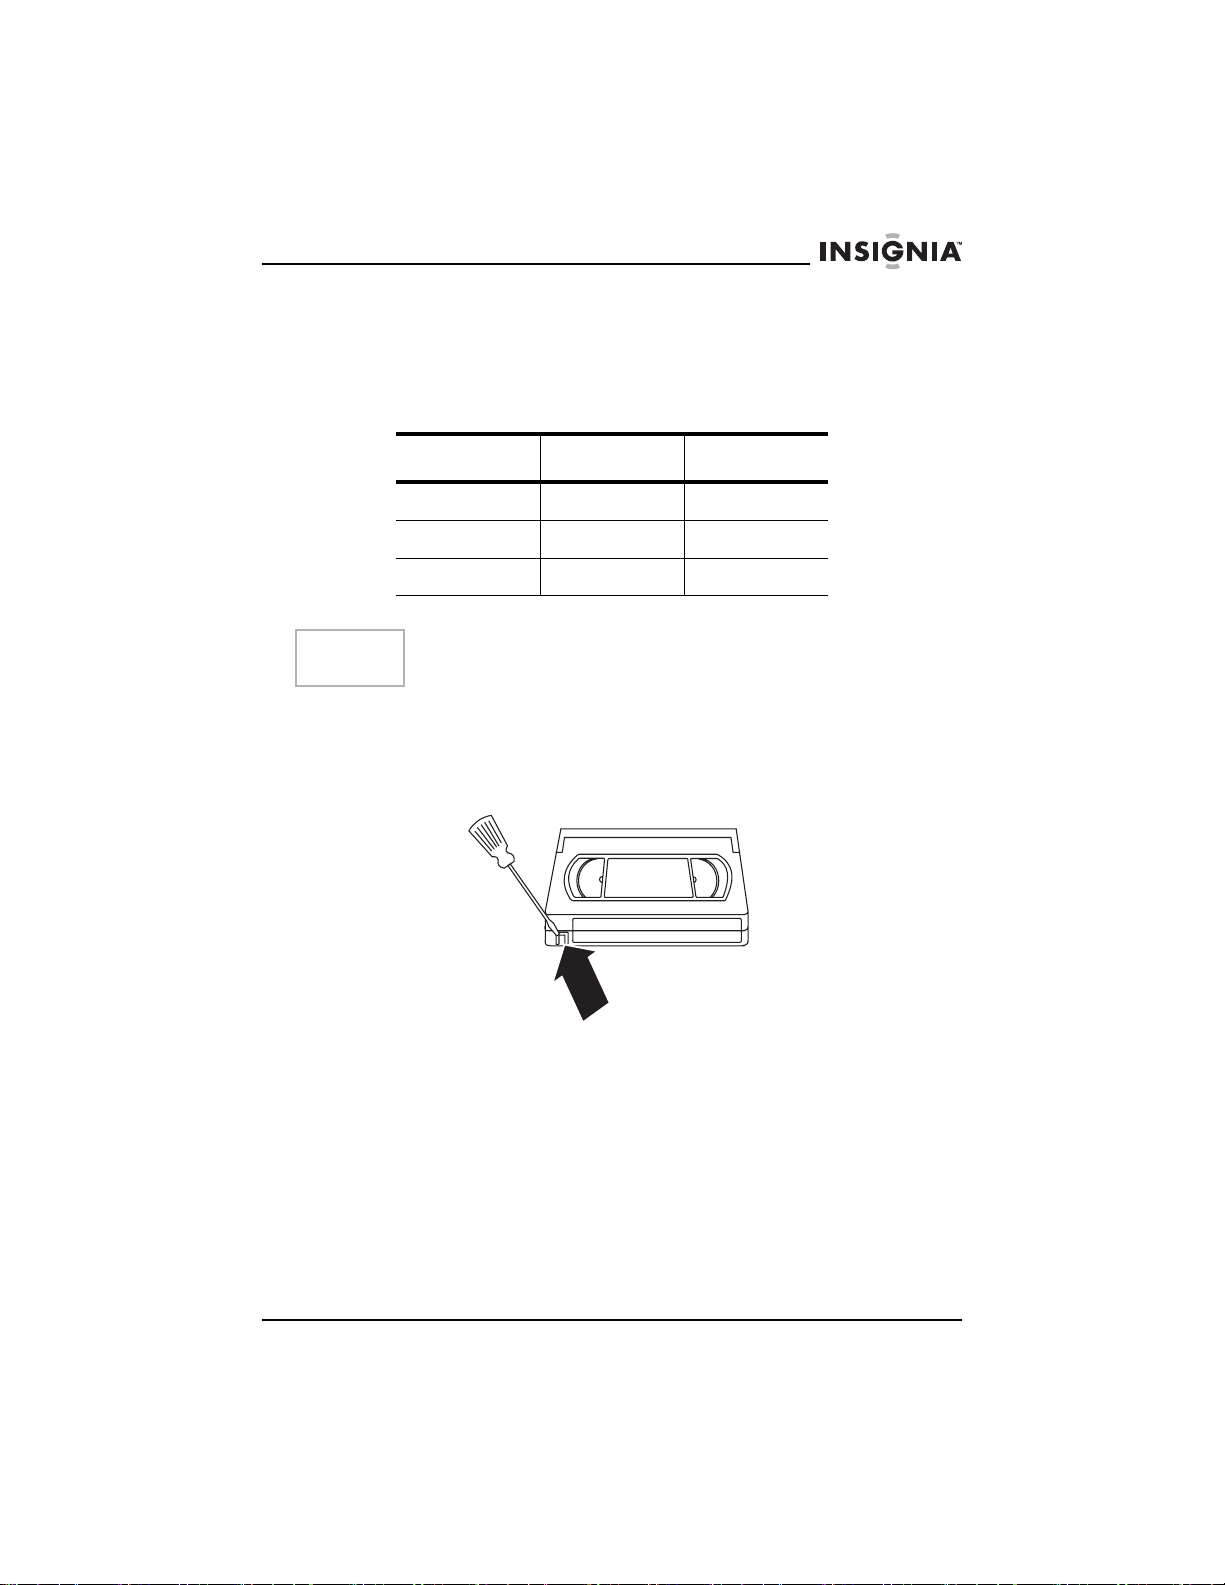
Protecting a recording
After you record a videotape, you can prevent it from being erased by
breaking off the erase-prevention tab on the back edge of the
cassette.
www.insignia-products.com
29
Page 31

If you decide you want to reuse the videotape, cover the opening left
by the tab with tape.
Recording a videotape
NS-19RTR 19" DVD Triple Combo
Notes
You cannot record from your DVD combo’s DVD player.
You cannot watch one TV program while you record another.
To record a videotape:
1 Turn on your DVD combo, then select the TV channel you want to
record.
If your DVD combo is connected to a cable box or satellite box, set
your DVD combo to channel 3 or 4. Use the cable box or satellite
box to select the channel you want to record.
2 Insert a videotape into the videotape compartment.
3 Press the SPEED button to select the tape speed. You can select:
• SP–Standard play
• SLP–Super long play
4 Press the REC button to start the recording.
5 If you want to skip parts of the TV broadcast, press the
PAU SE –SL OW button. Press the PAUSE–SLOW button or the
REC button to resume recording.
Note
6 Press
If you pause the recording for more than five
minutes, your DVD combo automatically
resumes recording to prevent the videotape
from being damaged.
the STOP button.
30
www.insignia-products.com
Page 32

NS-19RTR 19" DVD Triple Combo
Recording a videotape with OTR
OTR (one-touch recording) lets you specify the amount of time you
want to record.
To set up an OTR:
Note
You cannot use the remote control to set up or start an OTR.
1 Turn on your DVD combo, then select the TV channel you want to
record.
If your DVD combo is connected to a cable box or satellite box, set
your DVD combo to channel 3 or 4. Use the cable box or satellite
box to select the channel you want to record.
2 Insert a videotape into the videotape compartment.
3 Press the SPEED button to select the tape speed. You can select:
• SP–Standard play
• SLP–Super long play
4 Press the REC-OTR button on your DVD combo’s front panel one
or more times to select the amount of time you want. Each time
you press the button, the amount of time increase by 30 minutes
to a maximum of 8 hours. Recording starts immediately.
Notes
If you press the POWER button during an OTR, your DVD combo
continues to record.
If the videotape runs out before the end of the time you specified,
your DVD combo stops recording, ejects the tape, and turns off.
To see the remaining time for the OTR, press the DISPLAY button
on the remote control to display
remaining apprears briefly, then disappears.
To cancel an OTR:
• Press the
STOP button or the STOP/EJECT on your
DVD combo’s front panel.
Setting up future recordings
You can set up TV program recordings in advance. You can set up a
single recording, a weekly recording, or a daily recording–all within a
one-year time frame.
When you set up future recordings, keep the following in mind:
• The program with the earliest start has priority.
• After the earliest program finishes, the overlapping programs
begin recording in sequence from the top of the list.
• When the starting time is the same, the program set on the
highest row (position) in the program list has priority.
OTR on the screen. The time
www.insignia-products.com
31
Page 33

To set up a future recording:
1 Press the SETUP button.
2 Press the
or button to select TIMER PROGRAMMING, then
press the ENTER button.
If you have not set the clock, the MANUAL CLOCK SET menu
appears. Follow the instructions in “Manually setting the clock” on
page 19, then start this task again.
3 Press the
or button to select the row you want to use, then
press the button.
4 Press the
or button one or more times to select the channel
you want to record, then press the button.
If you are using a cable or satellite TV box, tune your DVD combo
to the access channel (usually 3 or 4), then use the cable or
satellite TV box to tune to the channel you want to record.
5 Press the or to select the date for the recording, then press
the button.
• For a one-time only recording, select the date.
• For a weekly recording, select EVRY and the day of the
week.
• For a daily recording, select EVRY DAY.
6 Press the or button to select beginning and ending hours
and minutes. Press the button to move from field to field.
7 Press the or button to select the tape speed. For more
information, see “Recording tips” on page 29.
8 Press the ENTER button.
9 To set up additional recordings, repeat Steps 3 through 8.
10 When you finish setting up recordings, press the SETUP button.
11 Insert a videotape that has an erase-prevention tab.
12 Press the POWER button to complete the setup. The recording
indicator lights. If the videotape does not have a tab, your DVD
combo ejects the tape and turns off.
NS-19RTR 19" DVD Triple Combo
32
Notes
You must turn off your DVD combo to activate
the future recording feature. If the power is not
turned off and you are watching TV, TIMER
REC STANDBY starts flashing on the screen
two minutes before the recording start time.
When the recording starts, the TV screen does
not turn on.
During the recording, you can only watch the
TV program being recorded or DVD playback.
If the tape runs out before the end of the
recording time, your DVD combo stops
recording and ejects the tape.
www.insignia-products.com
Page 34

NS-19RTR 19" DVD Triple Combo
To check a future recording schedule:
1 Press the POWER button to turn on your DVD combo.
2 Press the SETUP button.
3 Press the
press the
or button to select TIMER PROGRAMMING, then
ENTER button.
4 Check the recording details.
5 Press the SETUP button.
To change a future recording schedule:
1 Press the POWER button to turn on your DVD combo.
2 Press the SETUP button.
3 Press the
or button to select TIMER PROGRAMMING, then
press the ENTER button.
4 Press the
or button to select the row you want to change,
then press the button.
5 Press the or
button to highlight the item you want to change.
The item flashes.
6 Press the
or button to change the item, then press the
ENTER button.
7 Press the POWER button to turn off your DVD combo and activate
the future recording feature.
To cancel a future recording:
1 Press the POWER button to turn on your DVD combo.
2 If a recording is in progress, press the STOP/EJECT button
on your DVD combo’s front panel to stop the recording.
3 Press the SETUP button.
4 Press the
or button to select TIMER PROGRAMMING, the
press the ENTER button.
5 Press the
or button to select the recording you want to
cancel, then press the CLEAR button.
6 Press the SETUP button to close the menu.
Extending the timer
You can extend the time for a future recording before the recording
starts or while the recording is in progress.
Note
When you extend the time, the tape speed automatically changes
to SLP mode.
To extend the timer:
1 Press the POWER button to turn on your DVD combo.
2 Press the SETUP button.
3 Press the
press the
or button to select TIMER PROGRAMMING, then
ENTER button.
www.insignia-products.com
33
Page 35

NS-19RTR 19" DVD Triple Combo
4 Press the REC button, then press the or button to select the
program you want to adjust.
5 Press the REC button one or more times to select the new
beginning and ending time you want. Each time you press the
button, the time changes by 10 minutes. If the recording is in
progress, only the ending time changes.
6 Press the ENTER button to confirm the setting, then press the
SETUP button to close the menu.
Note
If you want to cancel your changes and return to the original start
and end times, press the PAU SE –S L OW button.
Finding a program on a recorded videotape
After a timer recording finishes, you can search the beginning of the
recorded program(s).
To find a program:
1 Press the SETUP button.
2 Press the
or button to select USER’S SET UP, then press
the ENTER button.
3 Press the
or button to select AUTO RETURN, then press
the ENTER button to select ON.
When all the timer recordings are complete, your DVD combo
rewinds to the beginning of the recorded program(s) and turns
itself off.
To cancel AUTO RETURN function:
1 Press the SETUP button.
2 Press the
or button to select USER’S SET UP, then press
the ENTER button.
3 Press the
or button to select AUTO RETURN, then press
the ENTER button to select OFF.
Tip
Your DVD combo stores the setting for this function even if a power
failure occurs.
Auto rewind and eject feature
When your DVD combo reaches the end of a videotape, it
automatically rewinds and ejects the tape. This feature is active when
REPEAT PLAY is set to OFF. This feature is not active during timer
recordings of OTRs.
34
www.insignia-products.com
Page 36

NS-19RTR 19" DVD Triple Combo
Copying a videotape from another source
You can connect an external device, such as another VCR or
camcorder, and make copies of videotapes or other video sources.
The following task explains how to copy a videotape. You can use the
same steps to copy other video sources.
To copy a videotape:
1 Connect an external VCR.
DVD combo
Audio/video cables
(not supplied)
External VCR
2 Insert the videotape you want to copy from in the external VCR.
3 Insert the videotape you want to copy to in your DVD combo’s
videotape compartment.
4 Press the SPEED button to select the recording speed. You can
select:
•SP
•SLP
5 Press the INPUT button one or more times until AUX appears.
6 Press the REC-OTR button on your DVD combo’s front panel.
7 Start playback on the external VCR.
OUT
OUT
AUDIO
L
R
VIDEO
IN
IN
Note
Use the controls on you DVD combo’s front
panel when possible. Signals from the remote
control may affect the external VCR.
8 To stop copying, press the STOP/EJECT
on your DVD
combo’s front panel, then stop playback on the external VCR.
www.insignia-products.com
35
Page 37

Using the DVD player
Playable discs
NS-19RTR 19" DVD Triple Combo
Playable
discs
DVD-Video
(see notes 1,
2, 4, 6,10, and
11)
DVD-RW
DVD-R
(see notes 1,
3, 4, 5, 6, 7, 9,
and 10)
DVD+RW
DVD+R
(see notes 1,
3, 4, 5, 6, 8, 9,
and 10)
Audio CD
(see notes 4,
6, and 10)
CD-RW CD-R
(see notes 4,
5, 6, 9, and 10)
Disc logo
Region
code
1 or ALL Digital video
Recorded
signals
(MPEG2)
Digital video
(MPEG2)
Digital video
(MPEG2)
Digital audio 12 cm or
Digital audio 12 cm or
Disc
Size
12 cm or
8cm
12 cm or
8cm
12 cm or
8cm
8cm
8cm
36
Notes:
If you cannot play a disc with one of these logos, one of the following
may be the cause.
1 Your DVD combo conforms to the NTSC color system. Your DVD
combo cannot play discs recorded in other color systems such as
PA L .
2 Some video DVDs do not work as described in this guide because
of the limitations set by disc's producers.
3 You cannot playback discs recorded in the VR (Video Recording)
format.
4 You may not be able to play scratched or stained discs.
5 You may not be able to play some discs because of incompatible
recording conditions, characteristics of the recorder, or special
properties of discs.
www.insignia-products.com
Page 38

NS-19RTR 19" DVD Triple Combo
6 You can play discs which bear the marks above. If you use
non-standardized discs, your DVD combo may not play them or
the sound or video quality may be compromised.
7 You may be able to play back the unfinalized DVD-R/RW disc
recorded in the video format. However, depending on the
recording status of a disc, the disc may not play or the picture or
sound may be distorted. In this case, you need to finalize the disc
with the DVD recorder. Refer to the guide that came with the DVD
recorder.
8 You can only play discs that have been recorded in the video
format and finalized. You cannot play unfinalized discs. Depending
on the recording status of a disc, the disc may not play or the
picture or sound may be distorted.
9 If there is too much recording space left on a disc (the used
portion is less than 55 mm across), the disc may not play back
correctly.
10 Do not glue paper or put stickers on to the disc. These may
damage the disc and your DVD combo may not read the disc
correctly.
11 The region code for your DVD combo is 1. You can play DVDs with
region code 1 or ALL. You cannot play DVDs with other region
codes.
Unplayable discs
Do not try to play any of the following discs, or you may damage your
DVD combo:
•DVD-RAM
• CD-i
•Photo CD
• DVD-Audio
• DVD with a region code other than 1 or ALL
•DTS-CD
• Video CD
• CD-R/RW with MP3 files
• DVD-ROM for personal computers
• CD-ROM for personal computers
• Any other discs without compatibility indications
Your DVD combo can only play the sound recorded on the normal CD
layer. Your DVD combo cannot play the sound recorded on the high
density Super Audio CD layer.
Playing a disc
To play a disc:
1 Press the POWER button to turn on your DVD combo.
2 Press the OPEN/CLOSE
disc tray, then insert a disc label side up.
button on the front panel to open the
www.insignia-products.com
37
Page 39

NS-19RTR 19" DVD Triple Combo
3 Press the PLAY or the OPEN/CLOSE button. The disc tray
closes automatically and playback starts.
Note
With DVDs that use titles for playback program
signals, playback may start from the second
title or may skip these titles.
4 To control playback:
• To freeze the picture, press the PA US E– SL OW
Sound is muted when you freeze the picture. Press the
PLAY button to resume playback.
• To temporarily stop playback, press the STOP
once.
Press the PLAY
button to resume playback where you
stopped.
If you turn off your DVD combo after pressing the
button once, your DVD combo remembers where you
stopped and resumes playing at that point where you
stopped.
• To completely stop playback, press the STOP
twice. If you press the PLAY
button, playback starts at the
beginning of the disc.
• To fast-reverse or fast-forward the disc, press and hold the
SKIP/REW or FWD/SKIP
button. Each time you
press one of these buttons, the reverse or forward speed
increases. For DVDs, the fast-reverse and fast-forward
speed varies depending on the DVD. Approximate speeds
are 1 (×2), 2 (×8), 3 (×20), 4 (×50), and 5 (×100). For Audio
CDs, the approximate speeds are 1 (×2), 2 (×8), and
3 (×30). Press the PLAY
button to resume normal
playback.
• To slow-reverse or slow-forward a DVD, press the
PAUSE–SLOW
SKIP/REW or FWD/SKIP
button, then press and hold the
button. Each time you
press and hold one of these buttons, the reverse or forward
speed decreases. Approximate speeds are 1 (1/16), 2 (1/8),
and 3 (1/2).
button.
button
STOP
button
38
Note
If a circle with a line through it appears in the
top right corner of the screen when you try to
use a feature, that feature is not available at
the time.
www.insignia-products.com
Page 40

NS-19RTR 19" DVD Triple Combo
Using the DVD Disc menu and Title menu
Some DVDs have Disc and Title menus. If the DVD you are playing
has one of these menus, you can access this menu during playback.
To use a DVD Disc or Title menu:
1 Press the DISC/MENU or TITLE button. If the DVD has a Disc or
Title menu, the menu opens.
2 Press the
, , , or , button to select an option, then press the
ENTER button.
Notes
If the DVD has a Disc menu, audio language,
subtitle options, chapters for the title, and other
options appear on this menu.
Menu options available on DVDs vary.
Repeating a DVD title or chapter or an audio CD track
To repeat a DVD title or chapter or an audio CD track:
1 During playback, press the MODE button one or more times until
REPEAT appears.
2 Press the
or button to select a repeat mode. You can select:
• For DVDs–OFF, CHAPTER, TITLE
• For CDs–OFF, TRACK, ALL
Note
When you change to a different title, chapter,
or track, the repeat function turns off.
Creating a playback loop for a DVD or audio CD
To create a playback loop:
1 During playback, press the MODE button one or more times until
A-B REPEAT appears.
2 When the disc reaches the starting point you want, press the
ENTER button.
3 When the disc reaches the ending point you want, press the
ENTER button. The playback loop you created starts playing.
4 To cancel the loop, press the MODE button one or more times until
A-B REPEAT appears on the screen.
Notes
You can only create a playback loop for the
current DVD title or current CD.
You cannot create a playback loop with some
scenes in DVDs.
You cannot create a playback loop if another
repeat function is currently active.
www.insignia-products.com
39
Page 41

Creating a CD playlist
You can create a CD playlist that lets you play the tracks on a CD in
any order.
To create an audio CD playlist:
1 Turn on your DVD combo, then insert a CD.
2 If the starts playing CD, press the STOP
3 Press the MODE button.
4 Press the
or button to select a track, then press the ENTER
button.
5 Repeat Step 4 to enter additional tracks.
NS-19RTR 19" DVD Triple Combo
button.
Notes
6 Press the PLAY
7 Press the STOP
You can program as many as 99 tracks.
Press the CLEAR button to erase the last track
you selected.
If you enter more than 8 tracks, you can press
the SKIP/REW
button to scroll through the playlist.
To erase all the tracks in the playlist, select
ALL CLEAR at the bottom of the list.
button to play your playlist.
button once to pause playback. Press the
or FWD/SKIP
PLAY button to resume playback.
8 Press the STOP
button twice to cancel the playlist.
Randomly playing the tracks on an audio CD
To randomly play the tracks on an audio CD:
1 Turn on your DVD combo, then insert a CD.
2 If the CD starts playing, press the STOP
3 Press the MODE button twice. RANDOM appears.
4 Press the PLAY
button to start playback. Your DVD combo plays
the tracks on the CD in random order.
5 Press the STOP
button to cancel random playback.
Adjusting the black level
You can adjust the black level to make the black parts of an image
brighter.
To adjust the black level:
1 During playback, press the MODE button one or more times until
BLACK LEVEL appears.
2 Press the
or button to select ON or OFF.
3 Press the RETURN button to close the menu.
button.
40
www.insignia-products.com
Page 42

NS-19RTR 19" DVD Triple Combo
Selecting the sound mode
To select the sound mode:
1 During audio CD playback, press the MODE button one or more
times until AUDIO appears.
2 Press the
or button to select:
• STEREO–Stereo sound
• L-ch–Left channel audio only
• R-ch–Right channel audio only
3 Press the RETURN button to close the menu.
Creating a virtual surround system
You can create a virtual surround system when using only two
speakers.
To create a virtual surround system:
1 During playback, press the MODE button one or more times until
V.S.S. appears.
2 Press the
or button to select:
• 1–Natural effect
• 2–Emphasized effect
• OFF–Normal sound
3 Press the RETURN button to close the menu.
Tip
When playing back 96 kHz sound with the virtual surround sound
feature turned on, the sound is down-sampled to 48 kHz and
outputted as digital audio for CD playback only.
To use the virtual surround system feature, the sound mode must
be set to STEREO.
Searching on a DVD or CD
To search for a title on a DVD:
1 During playback, press the MODE button one or more times until
SEARCH appears.
2 Press the
or button to select TITLE SEARCH.
3 Use the number buttons to select the title you want. If the DVD has
more than ten titles, and you want to select a one-digit title
number, press 0 then the number. Playback starts automatically
with the title you selected.
If you make a mistake, press the CLEAR button and enter the
number again.
4 Press the RETURN button to close the search screen.
www.insignia-products.com
41
Page 43

NS-19RTR 19" DVD Triple Combo
To search for a chapter on a DVD or track on an audio CD:
1 During playback, press the MODE button one or more times until
SEARCH appears.
2 Within 60 seconds, use the number buttons to select the chapter,
or track you want. If the DVD or CD has more than ten chapters or
tracks, and you want to select a one-digit chapter or track number,
press 0 then the number. If the DVD or CD has more than ten
chapters or tracks, and you want to select a two-digit chapter or
track, press the +10/+100 button, then enter the chapter or track
number. Playback starts automatically with the chapter or track
you selected.
If you make a mistake, press the CLEAR button and enter the
number again.
Note
3 Press the RETURN button to close the search screen.
To time search:
1 During playback, press the MODE button one or more times until
SEARCH appears.
2 Press the
3 Within 60 seconds, use the number buttons to enter the amount to
time you want to skip on the
If you make a mistake, press the CLEAR button and enter the
number again.
4 Press the RETURN button to close the search screen.
To search by markers:
1 During playback, press the MODE button one or more times until
SEARCH appears.
2 Press the
3 Press the or button to select a marker number from 1 to 10.
4 When the disc reaches the point you want to mark, press the
ENTER button. The chapter or track number and elapsed time
appear.
5 When you play the disc again, repeat Steps 1 through 3 to select a
marker, then press the ENTER button.
You can also use the SKIP/REW or
FWD/SKIP
chapter or CD track.
or button to select TIME SEARCH.
button to search for DVD
disc. Playback starts automatically.
or button to select MARKER SEARCH.
42
www.insignia-products.com
Page 44

NS-19RTR 19" DVD Triple Combo
6 To erase a marker, select the marker number, press the CLEAR
button. To clear all markers, press the or button on the list of
markers to select AC
, then press the ENTER button.
Note
You can also clear all markers by:
• Opening the disc tray
• Turning off your DVD combo
• Pressing the INPUT button.
7 Press the RETURN button to close the search screen.
Using zoom
You can enlarge the video image on DVDs.
To enlarge the video image:
1 During playback, press the MODE button one or more times until
ZOOM appears.
2 Press the ENTER button one or more times to select the zoom
size. You can select:
• ZOOM1 to enlarge the image by 1.3 times the normal size.
• ZOOM2 to enlarge the image by 2 times the normal size.
• ZOOM3 to enlarge the image by 4 times the normal size.
3 Press the
4 Press the RETURN button to exit zoom mode.
Tip
• Zoom does not work while the disc menu is open.
• Zoom is not available on some discs.
• It may take several seconds to slide the zoomed picture.
• The picture may be distorted if you operate other functions,
such as pause or fast forward while in the zoom mode.
Setting up parental controls
or button to move through the zoomed image.
To set up parental controls:
1 Make sure that your DVD combo is in DVD mode.
2 If a disc is playing, press the STOP
3 Press the SETUP button twice.
4 Press the
ENTER
5 Press the
or button to select CUSTOM, then press the
button.
or button to select PARENTAL, then press the
ENTER button.
www.insignia-products.com
button.
43
Page 45

NS-19RTR 19" DVD Triple Combo
6 Use the number buttons to enter your access code (password),
then press the ENTER button. If you have not set up an access
code, enter any four numbers (except 4737).
Note
7 Press the
If you forgot your access code, enter 4737, then enter
your new access code. The old access code is cleared
and the parental level is set to
or button to select PARENTAL LEVEL, then press
the ENTER button.
8 Press the
or button to select a rating level, then press the
ENTER button. You can select:
• 1 [KID SAFE]
• 2 [G]
• 3 [PG]
• 4 [PG13]
• 5 [PGR]
•6[R]
•7[NC-17]
• 8[ADULT]
• ALL–Turns off the parental lock.
9 Press the SETUP button.
Changing the access code (password)
To change your access code:
1 Make sure that your DVD combo is in DVD mode.
2 If a disc is playing, press the STOP
3 Press the SETUP button twice.
4 Press the
or button to select CUSTOM, then press the
ENTER button.
5 Press the
or button to select PARENTAL, then press the
ENTER button.
6 Use the number buttons to enter your old access code
(password), then press the ENTER button.
ALL (default).
button.
44
Note If you forgot your access code, enter 4737, then enter
your new access code. The old access code is cleared
and the parental level is set to ALL (default).
7 Press the
press the
or button to select PASSWORD CHANGE, then
ENTER button.
8 Use the number buttons to enter your new access code, then
press the
ENTER button to confirm.
9 Press the SETUP button.
www.insignia-products.com
Page 46

NS-19RTR 19" DVD Triple Combo
Viewing on-screen status information
To view on-screen information about a DVD:
1 Press the DISPLAY button during playback to display the current
chapter and the elapsed and remaining time for the chapter.
2 Press the DISPLAY button again to display the current title and
the elapsed and remaining time for the title.
3 Press the DISPLAY button again to display the bit rate and current
repeat setting. If you are watching a dual-layer DVD, the layer
number is also displayed.
4 Press the DISPLAY button again to close the on-screen display.
To view on-screen information about a CD:
1 Press the DISPLAY button during playback to display the current
track and the elapsed and remaining time for the track.
2 Press the DISPLAY button again to display the total number of
tracks and the elapsed and remaining time for the CD.
3 Press the DISPLAY button again to close the on-screen display.
Using the on-screen display (OSD)
Your DVD combo has a DVD on-screen display (OSD) that lets you
change settings for your DVD player.
To use the DVD OSD:
1 Make sure that your DVD combo is in DVD mode.
2 If a disc is playing, press the STOP
3 Press the SETUP button twice.
4 Press the
or button to select a menu, then press the ENTER
button.
5 Press the
or button to select a submenu or option, then
press the ENTER button.
6 If you selected a submenu, press the
option.
7
Press the ENTER button one or more times to adjust the option.
8 Press the SETUP button to save your changes and close the
OSD.
button.
or button to select a
www.insignia-products.com
45
Page 47

DVD OSD menus
NS-19RTR 19" DVD Triple Combo
DVD OSD
menu
QUICK TV MODE–Changes the display mode. You can select:
INITIALIZE Resets your DVD settings to the factory default settings.
CUSTOM LANGUAGE–Changes the language. If the language you want is not
Options
• 4:3 LETTER BOX (default) shows black bars on top and bottom
of the screen.
• 4:3 PAN & SCAN shows a full-height picture with both sides
trimmed.
DOLBY DIGITAL–Changes the audio mode. You can select:
• DOLBY DIGITAL–BITSTREAM sets the audio output to a Dolby
Digital signal (default). PCM converts the Dolby Digital to
(2-channel stereo).
on a list, select OTHER, then enter the language code. For a list of
language codes, see “Language code list” on page 56. To change
the language for the OSD, see “Changing the on-screen menu
language” on page 22.
You can select:
• AUDIO–Changes the audio language for a DVD.
• SUBTITLE–Changes the subtitle language for a DVD. If you
select a language that is not included on the DVD, subtitles turn
off automatically and the DVD plays the default language.
• DISC MENU–Change the language displayed on the disc
menu. This option may not work with all DVDs. If this option
does not work, press the MODE button to select the language.
DISPLAY–Changes aspects of the DVD display and on-screen
messages. You can select:
• TV MODE–4:3 LETTER BOX (default) shows black bars on top
and bottom of the screen. 4:3 PAN & SCAN shows a full-height
picture with both sides trimmed.
• STILL MODE–AUTO (default) automatically selects the best
resolution setting (FRAME or FIELD) based on the data
characteristics of the pictures. FIELD stabilizes the pictures,
although the picture quality may become coarse because of the
limited amount of data. FRAME displays relatively motionless
pictures in higher resolution. FRAME improves the picture
quality, but pictures may be unstable.
AUDIO–Adjusts the audio for DVD playback. You can select:
• DRC–
• DOWN SAMPLING–If you select ON, the audio output is set to
• DOLBY DIGITAL–BITSTREAM sets the audio output to a Dolby
Dynamic range control
loud audio (default). Select ON or OFF.
48 kHz. If you select OFF, the audio output is set to the original
sound level. When playing a DVD with copyright protection, the
audio outputs at 48 kHz even if you select OFF.
Digital signal (default). PCM converts the Dolby Digital to
(2-channel stereo).
compresses the range of soft to
46
www.insignia-products.com
Page 48

NS-19RTR 19" DVD Triple Combo
DVD OSD
menu
CUSTOM PARENTAL–Block or unblocks DVD ratings and changes the access
Options
code (password).
• PARENTAL LEVEL–Sets the parental rating level. For more
information, see “Setting up parental controls” on page 43.
• PASSWORD CHANGE–Changes the parental rating access
code (password). For more information, see “Changing the
access code (password)” on page 44.
OTHERS
• ANGLE ICON–Turns the angle icon (when multiple viewing
angles are available on a DVD) on or off.
• AUTO POWER OFF–Turns the screen saver and automatic
power-off feature on and off. When this option is turned on, the
screen saver appears when your DVD combo is in Stop mode
for more than five minutes. After 15 minutes, this option turns
off your DVD combo.
Specifications
Designs and specifications subject to change without notice.
TV/VCR
CRT 19-inch in-line gun, 90° deflection tube
Television system NTSC-M
Closed caption system 15.119/FCC
Video Heads Rotary four-head
Tape width ½-inch
Tape speed • SP: 33.40 mm/sec.
• LP: 16.67 mm/sec.
• SLP: 11.12 mm/sec.
Tuner channel • TV VHF Low: #2~#6
• TV VHF High: #7~#13
• TV UHF: #14~#69
• CATV VHF: 5A
• CATV MID band: A5~A1, A~I
• CATV SUPER band: J~W
• CATV HYPER band: W+1~W+84
www.insignia-products.com
47
Page 49

DVD
Product type DVD player
Discs DVD-Video and audio CDs
Output signal format NTSC color
Electrical
Sound output 2 speakers, 1W, 8 ohm
Other
NS-19RTR 19" DVD Triple Combo
Terminals • Antenna input: VHF/UHF/CATV 75 ohm
Remote control Digital encoded infrared light system
Operating temperature 41°F~104°F (5°C to 40°C)
Power requirements AC 120 V, 60 Hz
Power consumption
(maximum)
Picture tube 19-inch
Dimension
H×W×D
Weight 43.2 lbs. (19.6 kg)
unbalanced (F-type)
• Video input: RCA connector × 1
• Audio L/R input: RCA connector × 2
• Headphone: 1/8-inch stereo (3.5 mm)
• Coaxial digital audio output: One pin
jack, 500 m Vpp (75 ohm)
90 W
19.69 × 21.89 × 18.74 inches
(500 × 556 × 476 mm)
Maintaining
Degaussing
A degaussing circuit in your DVD combo clears up color errors on the
TV screen. Color errors occur when excessive magnetism occurs too
close to your DVD combo. Degaussing occurs when you first plug in
your DVD combo. If you see minor color errors, unplug your DVD
combo for about 30 minutes, then plug it back in. The degaussing
circuit should clear the color errors.
48
www.insignia-products.com
Page 50

NS-19RTR 19" DVD Triple Combo
Cleaning the video heads
Dirt accumulates on the VCR’s video heads after long periods of use
or from playing worn tapes. If you see a streaky or snowy picture
during playback, clean the video heads.
Use a good quality VHS video head cleaner, available at most
electronic stores, to clean the video heads. Make sure that you follow
the instructions that come with the video head cleaner.
Note
Clean video heads only when problems occur.
Cleaning the optical lens
If you have followed the instructions in this guide, including the
suggestions in the troubleshooting section, and your disc still does
not play correctly, you may need to clean the laser’s optical lens.
Consult qualified service personnel to have your lens inspected and
cleaned.
Cleaning the cabinet
Wipe the front panel and other exterior surfaces of your DVD combo
with a soft cloth lightly dampened with lukewarm water.
Never use a solvent or alcohol to clean your DVD combo. Do not
spray insecticide near your DVD combo. Such chemicals may cause
damage and discoloration to the exposed surfaces.
Checking the IR signal from the remote control
You can use an AM radio or a digital camera to make sure that the
remote is sending a signal.
To check the remote control signal with the AM radio:
1 Tune an AM radio to a band that is not broadcasting a station.
2 Point the remote control at the remote sensor on your DVD combo,
then press any button. If the remote control is working correctly,
the sound will flutter.
To check the remote control signal with a digital camera:
Tip
You can use the digital camera on a cellular phone.
• Point the remote control at the digital camera, then press and
hold any button on the remote control. If you can see infrared
light through the camera, the remote control is working
correctly.
www.insignia-products.com
49
Page 51

Handling discs
A dirty, scratched, or warped disc may cause skipping or noise.
To care for discs:
• Hold discs by their edges.
• Store discs in their cases when you are not using them.
• Do not expose discs to direct sunlight, high humidity, high
• Do not stick labels or tape on discs.
To clean a disc:
NS-19RTR 19" DVD Triple Combo
temperature, or dust. Prolonged exposure to extreme
temperatures can warp discs.
50
Caution
• With a soft cloth, wipe the disc from the center to the outer
edge.
Do not use detergent or abrasive cleaning agents. They will
damage the disc surface.
www.insignia-products.com
Page 52

NS-19RTR 19" DVD Triple Combo
Troubleshooting
General
Problem Possible solution
No power • Make sure that the power plug is
Remote control does
not work
connected to an AC outlet.
• If power has failed, check the breaker.
• Replace the batteries. Make sure that
you match the + and – symbols in the
battery compartment.
• Make sure that you aim the remote
control at the remote sensor. The
operable range of the remote control is
between 10 feet (3 m) and 23 feet (7 m)
depending on the angle.
• Remove all obstacles to clear the path of
the infrared signal.
• Check the infrared signal output.
• Press the INPUT button to select the
correct video mode.
TV/VCR Mode
Problem Possible solution
Poor or no picture when
watching TV
• Make sure that the antenna is connected
correctly.
• Check the antenna cable for bent or
broken pins. If necessary, replace the
cable.
• Check for sources of reception
interference.
• Press the INPUT button to select the
correct video mode.
• Scan for available TV channels.
• Try another TV channel. If reception is
good, there may be a problem with the
original station’s broadcast signal.
• Adjust picture controls, such as color,
contrast, and brightness.
• Make sure that there are no appliances
nearby that generate a magnetic field.
Turn off or relocate the appliance.
• Try degaussing. For more information,
see “Degaussing” on page 48.
www.insignia-products.com
51
Page 53

NS-19RTR 19" DVD Triple Combo
Problem Possible solution
Poor or no picture
during VCR playback
Poor or no sound • Adjust volume control.
Cannot record a
videotape
The timer recording
does not work
• Adjust the tracking control.
• Make sure that the videotape is not old
or worn. Try another videotape.
• Clean the video head.
• If video reception is good, there may be
a problem with the original station’s
broadcast signal. Try another channel.
• Make sure that your DVD combo is not in
Still mode or Slow Motion playback
mode. Press the PLAY button to return
to normal playback.
Make sure that the videotape has an
erase-prevention tab. If necessary, cover the
hole with plastic tape.
• Make sure that the start and end times
are set correctly.
• Make sure that your DVD combo is
turned off. Your DVD combo must be
turned off to activate a timed recording
feature.
• Make sure that your DVD combo’s clock
is set correctly.
• Some programs contain copy protection
that restricts copying.
• The timer setting overlapped with
another timer setting that had priority.
• The videotape may have run out before
the recording was complete.
• Make sure that power did not fail during
the recording.
Picture or color fades in
and out when copying a
videotape
Misspelling in closed
captions
Closed caption text is
not shown in its entirety,
or the text does not
keep up with the
dialogue
52
Some tapes have copyright protection. You
cannot copy a copyrighted videotape.
• The company that created the closed
captions may have made an error.
• During live broadcasts, closed captions
are created quickly with no time to edit.
A few seconds of delay is common for live
broadcasts. If the dialogue exceeds the
display capacity (220 words per minute),
selective editing is used so that the captions
remain up-to-date with the current dialogue.
www.insignia-products.com
Page 54

NS-19RTR 19" DVD Triple Combo
Problem Possible solution
Closed captions are
scrambled with white
boxes
There are no closed
captions in a program
which that should have
closed captions
No closed captions in a
pre-recorded videotape
that is supposed to
have closed captions
There is a black box in
the TV screen
You may be experiencing interference from
nearby buildings, power lines, or
thunderstorms.
The broadcast may use a time compression
process to speed up the program. The
decoder cannot read the compressed
information and captions are lost.
The videotape may be an illegal copy or the
company that replicated the videotape may
have accidentally made an error during the
copying process.
You are in TEXT mode. Select CAPTION
mode or turn off TEXT mode.
DVD mode
Problem Possible solution
No picture Make sure that the disc is compatible.
Your DVD combo cannot play DVD-RAMs,
CD-i discs, photo CDs, video CDs, or DVDs
with regional codes other than 1 or ALL.
The disc will not play • Clean the disc.
• Make sure that the disc is inserted
correctly with the label side up.
• Make sure that parental settings do not
block the rating for the disc. Turn off
parental controls or change the rating
level.
No sound • Make sure that the audio output settings
are correct and the audio cables are
connected correctly.
• Make sure that the audio settings on the
external audio device are set correctly.
No DTS audio is output Your DVD combo does not support DTS
audio.
www.insignia-products.com
53
Page 55

NS-19RTR 19" DVD Triple Combo
Problem Possible solution
Distorted picture • During the playback of a two-layered
Audio or subtitle
language does not
match the setting
Cannot change the
camera angle
Cannot change the
audio or subtitle
language
The Prohibited icon
appears on the screen
The audio or video is
poor or does not play
disc, pictures may stop for few seconds
when the disc shifts from layer one to
layer two.
• Distortion happens for a few seconds
after fast-forwarding or rewinding.
The language you selected is not available for
audio or subtitle on the DVD.
The DVD does not contain sequences
recorded from different camera angles.
The DVD does not contain audio source or
subtitles in the language you selected.
Your DVD combo or the disc does not support
the action or setting you selected.
• Make sure that the disc is not scratched.
• Try another disc.
54
www.insignia-products.com
Page 56

NS-19RTR 19" DVD Triple Combo
Appendix
Cable channel designations
If you subscribe to cable TV, the channels are displayed as 1 through
125. Cable companies often designate channels with letters or
letter-number combinations. Check with your local cable company.
The following is a chart of common cable channel designations.
CATV channel
TV Display
CATV channel
TV Display
CATV channel
TV Display
CATV channel
TV Display
CATV channel
TV Display
CATV channel
TV Display
CATV channel
TV Display
CATV channel
TV Display
CATV channel
TV Display
5A 2 3 45678 9 10111213 AB
123 45 678 910111213 14 15
CDE FGH I JK LMNOPQ
16 17 18 19 20 21 22 23 24 25 26 27 28 29 30
R S T U V W W+1 W+2 W+3 W+4 W+5 W+6 W+7 W+8 W+9
31 32 33 34 3
W+10 W+11 W+12 W+13 W+14 W+15 W+16 W+17 W+18 W+19 W+20 W+21 W+22 W+23 W+24
46 47 48 49 50 51 52 53 54 55 56 57 58 59 60
W+25 W+26 W+27 W+28 W+29 W+30W+31W+32W+33 W+34W+35W+36W+37W+38 W+39
61 62 63 64 65 66 67 68 69 70 71 72 73 74 75
W+40 W+41 W+42 W+43 W+44 W+45 W+46 W+47 W+48 W+49 W+50 W+51 W+52 W+53 W+54
76 77 78 79 80 81 82 83 84 85 86 87 88 8990
W+55 W+56 W+57 W+58 A-4 A-3 A-2 A-1 W+59 W+60 W+61 W+62 W+63 W+64
91 92 93 94 95 96 97 98 99 100 101 102 103 104 105
W+65 W+66 W+67 W+68 W+69 W+70 W+71 W+72 W+73 W+74 W+75 W+76 W+77 W+78 W+79
106 107 108 109 110 111 112 113 114 115 116 117 118 119 120
W+80W+81W+82W+83 W+84
121 122 123 124 125
5 36 37 38 39404142 43 44 45
A-5
www.insignia-products.com
55
Page 57

Language code list
If you want to use a different language for subtitles, audio, or the Disc
menu and the language you want is not displayed, you can enter a
language code to select the language you want.
If you choose a language that has a three-letter language code, the
code appears every time you change the AUDIO or SUBTITLE
language setting. If you choose another language, --- appears
instead. (If a language has a three-letter code, the code is listed in
brackets next to the language.)
LanguageCode
Abkhazian 4748
Afar4747
Afrikaans 4752
Albanian 6563
Amharic 4759
Arabic 4764
Armenian 5471
Assamese 4765
Aymara 4771
Azerbaijani 4772
Bashkir 4847
Basque5167
Bengali;Bangla 4860
Bhutani 5072
Bihari 4854
Bislama 4855
Breton 4864
Bulgarian4853
Burmese5971
Byelorussian4851
Cambodian 5759
Catalan 4947
Chinese [CHI] 7254
Corsican 4961
Croatian 5464
Czech [CZE] 4965
Danish [DAN] 5047
Dutch [DUT] 6058
English [ENG] 5160
Esperanto 5161
Estonian5166
Faroese5261
Fiji 5256
Finnish [FIN] 5255
French [FRE] 5264
Frisian 5271
Galician5358
Georgian 5747
A-B
C-E
F-H
Language Code
German [GER] 5051
Greek [GRE] 5158
Greenlandic 5758
Guarani 5360
Gujarati 5367
Hausa 5447
Hebrew 5569
Hindi 5455
Hungarian [HUN] 5467
Icelandic [ICE] 5565
Indonesian 5560
Interlingua 5547
Interlingue 5551
Inupiak 5557
Irish [IRI] 5347
Italian [ITA] 5566
Japanese [JPN] 5647
Javanese5669
Kannada 5760
Kashmiri 5765
Kazakh 5757
Kinyarw
Kirghiz 5771
Kirundi 6460
Korean [KOR] 5761
Kurdish5767
Laothian5861
Latin 5847
Latvian;Lettish5868
Lingala 5860
Lithuanian5866
Macedonian5957
Malagasy5953
Malay 5965
Malayalam 5958
Maltese 5966
Maori 5955
Marathi 5964
Moldavian 5961
I-K
anda 6469
L-N
NS-19RTR 19" DVD Triple Combo
LanguageCode
Mongolian5960
Nauru 6047
Nepali 6051
Norwegian [NOR] 6061
Occitan 6149
Oriya 6164
Oromo(Afan) 6159
Panjabi6247
Pashto;Pushto 6265
Persian 5247
Poli sh [POL] 6258
Por tuguese [POR] 6266
Quechua 6367
Rhaeto-Romance 6459
Romanian [RUM] 6461
Russian [RUS]6467
Samoan6559
Sangho 6553
Sanskrit 6547
Scots Gaelic 5350
Serbian6564
S
Sesotho 6566
Setswana 6660
Shona 6560
Sindhi 6550
Singhalese6555
Siswat 6565
Slovak6557
Slovenian 6558
O-R
S
erbo-Croatian6554
LanguageCode
Somali 6561
Spanish [SPA] 5165
Sundanese6567
Swahili 6569
Swedish [SWE] 6568
Tagalog 6658
Tajik 6653
Tamil 6647
Tatar 6666
Tel ugu 6651
Thai 6654
Tibetan4861
Tigrinya 6655
Ton g a 6661
Tsonga 6665
Turkish [TUR] 6664
Turkmen 6657
Twi 6669
Ukrainian 6757
Urdu 6764
Uzbek 6772
Vietnamese68
Vol apuk6861
Welsh4971
Wolof 6961
Xhosa 7054
Yiddish5655
Yo r uba 7161
Zulu 7267
T
U-Z
55
56
www.insignia-products.com
Page 58

NS-19RTR 19" DVD Triple Combo
Legal notices
FCC statement
Radio-TV interference
This equipment has been tested and found to comply with the limits
for a Class B digital device, pursuant to Part 15 of the FCC Rules.
These limits are designed to provide reasonable protection against
harmful interference in a residential installation. This equipment
generates, uses, and can radiate radio frequency energy and, if not
installed and used in accordance with the instructions, may cause
harmful interference to radio communications. However, there is no
guarantee that interference will not occur in a particular installation. If
this equipment does cause harmful interference to radio or television
reception, which can be determined by turning the equipment off and
on, the user is encouraged to try to correct the interference by one or
more of the following measures:
1 Reorient or relocate the receiving antenna.
2 Increase the separation between the equipment and receiver.
3 Connect the equipment into an outlet on a circuit different from
that to which the receiver is connected.
4 Consult the dealer or an experienced radio/TV technician for help.
This Class B digital apparatus complies with Canadian ICES-003.
Cet appareil numérique de la classe B est conforme à la norme
NMB-003 du Canada.
Warning
This equipment may generate or use radio frequency energy.
Changes or modifications to this equipment may cause harmful
interference unless the modifications are expressly approved in the
manual. The user could lose the authority to operate this equipment
if an unauthorized change or modification is made.
Laser safety statement
This unit employs a laser. Only a qualified service person should
remove the cover or attempt to service this device, due to possible
eye injury.
Warning
Caution
The laser is located inside, near the deck mechanism.
Visible and invisible laser radiation when open and interlock
defeated. Do not stare into beam.
Use of controls or adjustments or performance of procedures other
than those specified herein may result in hazardous radiation
exposure.
www.insignia-products.com
57
Page 59

Copyright
© 2006 Insignia. Insignia and the Insignia logo are trademarks of Best Buy Enterprise
Services, Inc. Other brands and product names are trademarks or registered
trademarks of their respective holders. Specifications and features are subject to
change without notice or obligation.
NS-19RTR 19" DVD Triple Combo
Note
Manufactured under license from Dolby Laboratories.
“Dolby” and the double-D symbol are trademarks of Dolby Laboratories.
Unauthorized copying, broadcasting, public performance, and lending of
discs are prohibited.
This product incorporates copyright protection technology that is protected
by U.S. patents and other intellectual property rights. Use of this copyright
protection technology must be authorized by Macrovision and is intended
for home and other limited viewing uses only unless otherwise authorized
by Macrovision. Reverse engineering or disassembly is prohibited.
58
www.insignia-products.com
Page 60

NS-19RTR 19" DVD Triple Combo
Ensemble DVD triple de 19 po NS-19RTR
Bienvenue
Félicitations d’avoir acheté ce produit Insignia de haute qualité. Le
modèle NS-19RTR représente la dernière avancée technologique
dans la conception de téléviseur et a été conçu pour des
performances et une fiabilité exceptionnelles. Le modèle NS-19RTR
inclut un téléviseur un magnétoscope et un lecteur de DVD. Il est
possible d’utiliser l’ensemble DVD pour regarder des émissions
télévisées, lire et enregistrer des bandes vidéo et regarder des DVD.
Table des matières
Importantes mesures de sécurité . . . . . . . . . . . . . . . . . . . . . . 59
Fonctionnalités . . . . . . . . . . . . . . . . . . . . . . . . . . . . . . . . . . . . 66
Configuration de l’appareil . . . . . . . . . . . . . . . . . . . . . . . . . . . 73
Fonctionnement de l’ensemble DVD. . . . . . . . . . . . . . . . . . . . 76
Spécifications . . . . . . . . . . . . . . . . . . . . . . . . . . . . . . . . . . . . 112
Entretien . . . . . . . . . . . . . . . . . . . . . . . . . . . . . . . . . . . . . . . . 113
Problèmes et solutions . . . . . . . . . . . . . . . . . . . . . . . . . . . . . 116
Annexe . . . . . . . . . . . . . . . . . . . . . . . . . . . . . . . . . . . . . . . . . 120
Avis juridiques. . . . . . . . . . . . . . . . . . . . . . . . . . . . . . . . . . . . 122
Importantes mesures de sécurité
Avertissement
Attention
Afin de réduire le risque de choc électrique, ne pas enlever
le couvercle (ou le panneau arrière). Ne contient aucune
pièce réparable par l'utilisateur. Confier l’entretien à du
personnel qualifié.
Afin de réduire le risque d’incendie et de choc électrique, ne
pas exposer cet appareil à la pluie ou l’humidité.
Pour éviter les chocs électriques, introduire la lame la plus
large de la prise du cordon d’alimentation dans la fente
correspondante de la prise secteur. Si la prise ne s'adapte
pas, contacter un électricien afin qu’il remplace la prise
secteur inadéquate. Ne pas modifier la prise du cordon
d’alimentation, sinon ce dispositif de sécurité serait
inopérant.
Ce symbole indique qu'une tension dangereuse, constituant
un risque de choc électrique, est présente dans cet appareil.
Cette étiquette est située au dos de l’appareil.
www.insignia-products.com
59
Page 61

Ce symbole indique que d'importantes instructions
concernant le fonctionnement et la maintenance figurent
dans la documentation qui accompagne cet appareil.
Emplacement
Pour assurer la sécurité du fonctionnement de l'appareil et obtenir
des performances optimales, tenir compte de facteurs suivants lors
du choix d'un endroit pour son installation :
• Protéger l’appareil des rayons directs du soleil et le garder à
l'abri des sources de chaleur intense.
• Éviter les endroits poussiéreux ou humides.
• Éviter les endroits où la ventilation est insuffisante pour
assurer une dissipation correcte de la chaleur. Ne pas obstruer
les ouvertures d'aération qui se trouvent au-dessus ou en
dessous de l’appareil. Ne pas disposer l’appareil sur une
moquette ou autre surface souple, car cela pourrait obstruer
les ouvertures destinées à la ventilation.
• Disposer l’appareil en position horizontale.
• Éviter les emplacements soumis à de fortes vibrations.
• Ne pas placer l’appareil à proximité de champs magnétiques
élevés.
• Éviter de déplacer l’appareil d'un endroit à l'autre lorsque les
différences de température sont importantes.
• Vérifier que le disque a été retiré et le cordon d’alimentation
CA débranché de la prise secteur, avant de déplacer l’appareil.
Éviter les risques de choc et d'incendie
• Ne pas manipuler le cordon d'alimentation avec les mains
mouillées.
• Ne pas tirer sur le cordon d'alimentation pour le débrancher
d'une prise secteur CA. Saisir le cordon par la fiche.
• Si de l’eau est répandue sur l’appareil, débrancher le cordon
d’alimentation immédiatement et consulter un réparateur
qualifié.
• Ne mettre ni les doigts, ni aucun autre objet dans le plateau à
disque de l'appareil.
• Ne rien poser sur le dessus de l’appareil.
NS-19RTR 19" DVD Triple Combo
60
www.insignia-products.com
Page 62

NS-19RTR 19" DVD Triple Combo
Humidité
Une condensation d'humidité peut se produire à l'intérieur de
l'appareil lorsqu'il est transporté d'un endroit froid à un endroit chaud,
lorsqu'une pièce froide est réchauffée ou dans des conditions
d'humidité élevée. En cas de lecture d’une bande vidéo ou d’un DVD
alors que de la condensation s’est formée dans l’appareil, l’humidité
peut endommager la bande, le DVD ou l’appareil lui-même. Si de la
condensation se forme dans l’appareil, mettre ce dernier sous
tension et le laisser sécher pendant au moins deux heures avant
d’insérer une bande vidéo ou un disque.
Recyclage
Les piles ne doivent pas être mises au rebut ni incinérées. Éliminer
toujours les piles de façon conforme à la réglementation locale
relative aux déchets chimiques.
En cas de vol
Le numéro de série est situé sur le panneau arrière de l’appareil.
Noter ici ce numéro, ainsi que toute autre information importante, et
conserver ce manuel en tant que registre permanent de votre achat
pour aider à l'identification en cas de vol. Les numéros de série ne
sont pas conservés par Insignia.
Date d’achat Numéro de
Revendeur chez
qui a été acheté le
produit
Nom du revendeur Numéro de série
téléphone du
revendeur
Numéro de
modèle
Lire les instructions
Lire toutes les instructions de sécurité et de fonctionnement avant
d’utiliser cet ensemble DVD.
Conserver les instructions
Conserver les instructions de sécurité et de fonctionnement pour
toute référence ultérieure.
Respecter les avertissements et les instructions
Respecter tous les avertissements sur cet appareil ainsi que dans les
instructions d’utilisation. Toutes les instructions d’utilisation et de
fonctionnement doivent être observées.
www.insignia-products.com
61
Page 63

Nettoyage
Débrancher l'appareil de la prise secteur avant tout nettoyage. Ne
pas utiliser de nettoyants liquides ou en aérosol. Utiliser un chiffon
humide pour le nettoyage.
Exception : Un produit qui est destiné à un service ininterrompu et
qui, pour une raison spécifique (comme par exemple le risque de
perdre un code d'autorisation pour un convertisseur de TV câblée) ne
doit pas être débranché par l'utilisateur pour le nettoyage ou pour
toute autre raison, pourra ne pas comporter la référence au
débranchement de l’appareil.
Pièces jointes
Ne pas utiliser de périphériques non recommandés par Insignia, car
ils pourraient être source de dangers.
Eau et humidité
Ne pas utiliser cet appareil près de l’eau. Par exemple près d’une
baignoire, un lavabo, un évier ou un baquet à linge, dans un sous-sol
humide ou près d’une piscine.
Accessoires
Ne pas placer cet appareil sur une table roulante, un pied, un trépied,
un support ou une table instables. L’appareil pourrait dans sa chute
blesser gravement des personnes et être fortement endommagé.
N’utiliser qu’avec la table roulante, le pied, le trépied, le support ou la
table recommandés par le fabricant ou vendus avec l’appareil. Pour
installer l’appareil sur un support mural, observer les instructions du
fabricant et utiliser un accessoire de montage recommandé par
celui-ci. Pour une installation sur un meuble à roulettes, déplacer
l’ensemble avec précaution. Un arrêt brusque, l’utilisation d’une force
excessive et des surfaces irrégulières risquent de déstabiliser
l’appareil/meuble à roulettes et de le faire se renverser.
Ventilation
Les fentes et ouvertures au dos et au bas du boîtier sont prévues
pour la ventilation, pour assurer un fonctionnement fiable de l'appareil
et le protéger contre toute surchauffe. Ces ouvertures ne doivent être
ni bloquées ni obstruées. Elles ne doivent jamais être bloquées en
installant l’appareil sur un lit, un sofa, un tapis ou toute autre surface
semblable. Ne pas placer l’appareil à proximité ou au-dessus d’un
radiateur ou d’une source de chaleur. Ne pas installer l’appareil dans
un meuble encastré tel qu’une bibliothèque ou sur une étagère, sauf
si une ventilation adéquate a été prévue ou si les instructions du
fabricant ont été respectées.
Source d’alimentation
Cet appareil doit fonctionner conformément à la source d’alimentation
indiquée sur les étiquettes. En cas d’incertitude sur la tension
d'alimentation électrique de la maison, consulter le revendeur de
l’appareil ou la compagnie d'électricité.
NS-19RTR 19" DVD Triple Combo
62
www.insignia-products.com
Page 64

NS-19RTR 19" DVD Triple Combo
Mise à la terre ou polarisation
Cet appareil est équipé d'une prise de courant CA polarisée (à deux
plots, un plus large que l'autre). Cette fiche ne s'insère dans une prise
secteur que d'une seule façon. Il s'agit d'un dispositif de sécurité. S’il
est impossible d’introduire à fond la fiche dans la prise secteur,
essayer de retourner la prise. Si la fiche ne s'adapte toujours pas à la
prise secteur, contacter un électricien afin qu’il remplace la prise
inadéquate. Ne pas chercher à modifier le dispositif de sécurité de la
prise polarisée.
Protection du cordon d’alimentation
Les cordons d’alimentation électrique doivent être acheminés afin
que personne ne puisse marcher dessus et qu’aucun objet posé
dessus ne vienne les entraver. Prêter particulièrement attention aux
points de branchement du cordon à la prise secteur et à l’endroit d’où
le cordon sort de l’appareil.
Mise à la terre d’une antenne externe
Si cet appareil est connecté à une antenne extérieure ou à un réseau
câblé, vérifier que l'antenne ou la connexion au réseau câblé est mise
à la terre afin de bénéficier d'une certaine protection contre les
sautes de tension et les charges électrostatiques. L'article 810 du
Code national de l’électricité (CNE), ANSI/NFPA Nº 70, fournit des
informations relatives à la mise à la terre correcte du mât et du
support, la mise à la terre du fil conducteur de l’antenne à l’unité de
décharge de l’antenne, la taille des conducteurs de mise à la terre,
l’emplacement de l’unité de décharge de l’antenne, la connexion aux
conducteurs de terre ainsi que les normes en matière de prise de
terre.
7
6
5
4
3
1
1 Équipement de la compagnie d'électricité
2 Système de mise à la terre des électrodes de
la compagnie d’électricité
3 Serre-fils de mise à la terre
4 Conducteurs de mise à la terre
2
www.insignia-products.com
63
Page 65

5 Unité de décharge de l’antenne
6 Serre-fil de mise à la terre
7 Fil conducteur de l’antenne
Avis à l'installateur de TV câblée
Le présent avis a pour objet de rappeler à l'installateur de systèmes
de télévision par câble que l'article 820-40 du Code national de
l'électricité contient des recommandations relatives à la mise à la
masse de l'appareil et, en particulier, stipule que la terre du câble doit
être connectée au système de mise à la terre de l'immeuble, aussi
prêt que possible du point d'entrée du câble.
Foudre
Pour protéger l’appareil pendant un orage ou s’il se trouve inutilisé et
sans surveillance pendant une période prolongée, le débrancher de
la prise secteur et débrancher l'antenne ou la connexion au réseau
câblé. Ceci évitera d’endommager l’appareil en cas de foudre et de
variations de tension du secteur.
Lignes électriques
L’antenne externe ne doit pas être située près de lignes électriques
aériennes ou d’autres circuits d’alimentation et électriques, ni à un
emplacement où elle pourrait tomber sur de tels circuits ou lignes
électriques. Lors de l'installation d'une antenne externe, faire très
attention à ne pas toucher de telles lignes électriques ou circuits car
tout contact peut être mortel.
Surcharge
Les prises secteur et les rallonges ne doivent pas être surchargées,
cela pourrait provoquer des risques d'incendie ou de choc électrique.
Pénétration d’objets ou de liquides
N’enfoncer en aucun cas un objet dans les ouvertures de l’ensemble
DVD car il pourrait entrer en contact avec des tensions dangereuses
ou provoquer un court-circuit à l'origine d'un incendie ou d'un choc
électrique. Ne jamais répandre un liquide sur l’ensemble DVD.
Entretien
L’utilisateur ne doit pas essayer de réparer lui-même l’appareil, car
l’ouverture ou le démontage des couvercles peut l’exposer à des
tensions dangereuses ou à d'autres dangers. Toutes les réparations
doivent être réalisées par du personnel qualifié.
NS-19RTR 19" DVD Triple Combo
64
www.insignia-products.com
Page 66

NS-19RTR 19" DVD Triple Combo
Dégâts nécessitant un entretien
Débrancher l’appareil de la prise secteur et utiliser les services d’un
technicien qualifié dans les conditions suivantes :
• Lorsque le cordon d’alimentation est effiloché ou la prise
endommagée.
• Si un liquide a été répandu ou des objets sont tombés dans
l’appareil.
• Si l’appareil a été exposé à la pluie ou à l’eau.
• Si l’appareil fonctionne anormalement en suivant les
instructions d’utilisation. Ne régler que les commandes
décrites dans les instructions d’utilisation ; en effet, le réglage
incorrect d’autres commandes pourrait provoquer des dégâts,
entraînant souvent d'importantes réparations par un technicien
qualifié pour rétablir le fonctionnement normal de l’appareil.
• Si l’appareil est tombé ou s’il est endommagé de quelque
façon que ce soit.
• Détérioration marquée des performances de l’appareil.
Pièces de rechange
Si des pièces doivent être remplacées, s’assurer que le technicien a
utilisé des pièces de rechange spécifiées par le fabricant qui ont les
mêmes caractéristiques que les pièces d’origine. Toute substitution
par des pièces non autorisées risque de provoquer un incendie, un
choc électrique, des blessures ou d'autres dangers.
Contrôle de sécurité
Après toute opération d’entretien ou réparation de cet appareil,
demander au technicien d’effectuer les contrôles de sécurité de
routine pour vérifier qu’il fonctionne correctement.
Chaleur
S’assurer que l’appareil est installé à l’écart de sources de chaleur,
telles que radiateurs, bouches de chaleur, fours ou autres appareils (y
compris les amplificateurs) qui produisent de la chaleur.
www.insignia-products.com
65
Page 67

Fonctionnalités
Façade amovible
NS-19RTR 19" DVD Triple Combo
20
21
22
23
13
14
15
16
171819
5
2
1
3
4
9
7
6
12
10
8
11
Vidéo à composantes Description
1 MARCHE/ARRÊT Permet de mettre l’appareil sous et hors
2
VOLUME et
3
LECTURE
4
SAUT
66
www.insignia-products.com
tension.
Cette touche permet de diminuer ou
d’augmenter le volume sonore.
Cette touche permet de lire un DVD ou un
CD
Cette touche permet de revenir au
chapitre (DVD) ou à la piste (CD)
précédente.
24
Page 68

NS-19RTR 19" DVD Triple Combo
Vidéo à composantes Description
5
RECHERCHE
6
SAUT
7
ARRÊT
8
OUVRIR/FERMER ( )
9 Plateau à disque Placer un disque sur le plateau.
10 Témoin de DVD S’allume lorsque l’appareil est en mode
11 ENTRÉE Permet de sélectionner :
12 Témoin TV/Magnétoscope S’allume lorsque l’appareil est en mode
13 CANAL et Permet de passer au canal précédent ou
14 Témoin d’enregistrement S’allume lorsque l’appareil enregistre.
Maintenir cette touche appuyée pour une
lecture rapide arrière ou avant d’un DVD
ou d’un CD.
Cette touche permet de passer au
chapitre (DVD) ou à la piste (CD) suivante.
Permet d’arrêter la lecture du DVD ou du
CD.
Permet d’ouvrir ou de fermer le plateau à
disque.
DVD.
• TV pour regarder la télévision
• AUX pour utiliser un périphérique
vidéo
• DVD pour utiliser le lecteur de DVD.
TV/Magnétoscope.
au canal suivant.
15 ENREGISTREMENT
IMMÉDIAT
16
RETOUR RAPIDE
17
LECTURE
18
AVANCE RAPIDE
www.insignia-products.com
Cette touche permet de lancer
l’enregistrement. Appuyer de nouveau
pour programmer un enregistrement
immédiat (OTR) de 30 minutes. À chaque
appui sur la touche le temps OTR
augmente de 30 minutes jusqu’à un
maximum de 8 heures.
Permet de revenir en arrière sur une
bande vidéo.
Permet de lancer la lecture par le
magnétoscope.
Permet d’avancer rapidement dans la
lecture d’une bande vidéo.
67
Page 69

NS-19RTR 19" DVD Triple Combo
Vidéo à composantes Description
19
ARRÊT/ÉJECTER
20 Capteur de télécommande Reçoit les signaux de la télécommande.
21 CASQUE D’ÉCOUTE Prise pour casque d’écoute.
22 VIDÉO Prise pour câble vidéo d’un périphérique
23 G-AUDIO-D Prises pour les câbles audio d’un
24 Logement de la bande vidéo
du magnétoscope.
Permet d’arrêter la lecture. Appuyer de
nouveau sur cette touche pour éjecter la
bande vidéo.
Pointer la télécommande en direction du
capteur.
vidéo.
périphérique vidéo.
Insérer la bande vidéo dans ce
compartiment.
68
www.insignia-products.com
Page 70

NS-19RTR 19" DVD Triple Combo
Télécommande
20
15
18
17
14
22
16
21
19
1
2
3
4
5
6
7
8
9
10
11
12
13
www.insignia-products.com
69
Page 71

NS-19RTR 19" DVD Triple Combo
Touche Description
1 MARCHE/ARRÊT Permet de mettre l’appareil sous et hors
2 ARRÊT DIFFÉRÉ Permet de configurer l’arrêt différé de
3 ENTRÉE Permet de sélectionner :
4 DISPLAY
(Affichage)
5 IMAGE Appuyer une ou plusieurs fois pour régler les
6 TITRE Permet d’afficher le menu principal du DVD.
7 RETOUR Permet de retourner à un menu précédent de
8 SOURDINE Permet de mettre le son en sourdine. Appuyer
tension.
l’appareil.
• TV pour regarder la télévision
• AUX pour utiliser un périphérique vidéo
• DVD pour utiliser le lecteur de DVD.
Permet d’afficher l’information sur l’état de
l’appareil.
paramètres d'image de base
Il est possible de sélectionner :
• BRIGHT (Luminosité)
• CONTRAST (Contraste)
• COLOR (Couleur)
• TINT (Teinte)
• SHARPNESS (Netteté)
Certains DVD n’ont pas de menu principal.
l’affichage à l’écran (OSD).
de nouveau sur cette touche pour supprimer la
mise en sourdine.
9 CANAL et Permet de passer au canal précédent ou au
10
11
12 MODE En mode lecture de DVD, permet d’accéder
13 EFFACER Permet de remettre à zéro les minuteries et de
70
ARRÊT
LECTURE
www.insignia-products.com
canal suivant.
Permet d’interrompre la lecture.
Permet de commencer la lecture.
aux menus. En mode lecture de CD, permet de
sélectionner une piste.
réinitialiser les entrées incorrectes dans les
menus d’affichage à l’écran (OSD).
Page 72

NS-19RTR 19" DVD Triple Combo
Touche Description
14 VITESSE Permet de sélectionner la vitesse de la bande
15 ENREGISTRER Permet de démarrer l’enregistrement d’une
16
17 SAUT/RETOUR
PAUSE-RALENTI
RAPIDE
AVANCE
RAPIDE/SAUT
pour l’enregistrement d’une bande vidéo.
bande vidéo.
Permet d’arrêter momentanément la lecture
d’une bande vidéo, d’un DVD ou d’un CD.
Appuyer sur cette touche, puis sur FWD/SKIP
pour ralentir l’avance rapide d’une bande vidéo
ou maintenir appuyée la touche FWD/SKIP
pour ralentir l’avance rapide d’un DVD.
Appuyer sur cette touche, puis maintenir
appuyée SKIP/REW pour ralentir le retour
arrière d’un DVD.
Permet une lecture arrière ou avant rapide
d’une bande vidéo ; la maintenir appuyée pour
la lecture arrière ou avant rapide d’un DVD.
Cette touche permet d’aller au chapitre/piste
précédent ou suivant d’un DVD/CD.
Appuyer sur la touche PAUSE-SLOW
(Pause-Ralenti), puis FWD/SKIP (Avance
rapide/Saut) pour ralentir l’avance rapide d’une
bande vidéo ou maintenir appuyée la touche
FWD/SKIP (Avance rapide/Saut) pour ralentir
l’avance rapide d’un DVD.
Appuyer sur la touche PAUSE-SLOW , puis
appuyer sur la touche SKIP/REW
(Saut/Retour rapide) pour ralentir le retour
rapide d’un DVD.
18
19 MENU DISQUE Permet d’ouvrir le menu du disque d’un DVD.
20
21 CONFIGURATION Touche d’accès aux menus d’écran (OSD).
VOL. et
ENTRÉE
Cette touche permet de diminuer ou
d’augmenter le volume sonore.
Certains DVD n’ont pas de menu.
Appuyer sur les touches directionnelles pour
sélectionner les menus et options dans le
menu d’écran (OSD). Appuyer sur
(Entrée) pour confirmer la sélection.
ENTER
www.insignia-products.com
71
Page 73

NS-19RTR 19" DVD Triple Combo
Touche Description
22 Pavé numérique/
+10/+100
En mode TV, utiliser le pavé numérique pour
changer de canal TV.
• Appuyer sur 0 et une touche numérique
pour un numéro de canal à un chiffre.
• Appuyer sur les touches numériques
pour un numéro de canal à deux chiffres.
• Appuyer sur la touche +10/+100, puis
appuyer sur les touches numériques
correspondant aux deux derniers chiffres
du canal pour un numéro de canal à trois
chiffres.
Pour plus d’informations, voir “Visualisation
d’un programme télévisé” voir page 76.
Pour l’accès au contrôle parental, appuyer sur
les touches numériques pour rentrer le code
d’accès (mot de passe).
Pour la recherche d’un chapitre de DVD ou
d’une piste de CD :
• Si le DVD ou le CD a plus de dix
chapitres ou pistes, pour sélectionner un
numéro de chapitre ou de piste à un
chiffre appuyer sur la touche 0, puis
entrer le numéro de chapitre ou de piste.
• Si le DVD ou le CD a plus de dix
chapitres ou pistes, pour sélectionner un
numéro de chapitre ou de piste à deux
chiffres appuyer sur la touche +10/+100,
puis entrer le numéro de chapitre ou de
piste.
72
Remarques
Une télécommande Philips PMDVR8 réglée sur Code 247
peut être utilisée avec l’appareil.
L’utilisation d’une télécommande universelle n’est pas
recommandée car elle ne pourra contrôler toutes les
fonctions de l’appareil. Le code fourni avec des
télécommandes universelles peut ne pas fonctionner avec
l’appareil. Pour plus de détails, contacter le fabricant de la
télécommande universelle.
Sauf mention contraire, toutes les opérations décrites dans
ce manuel utilisent la télécommande. Certaines opérations
peuvent être effectuées à partir des touches du panneau
avant.
www.insignia-products.com
Page 74

NS-19RTR 19" DVD Triple Combo
Configuration de l’appareil
Connexion d’une antenne, de la TV câblée, ou de la TV satellite
Avant de brancher l’antenne, la TV câblée, ou la TV satellite, vérifier
que les câbles n’ont pas de broches pliées ou cassées. Si une broche
est pliée, essayer de la redresser. S'il n'est pas possible de redresser
une broche ou si la broche est cassée, remplacer le câble.
En cas de connexion à une antenne externe ou à la TV câblée sans
décodeur, brancher le câble sur la prise ANT. (Antenne) au dos de
l'appareil et sur la prise d'entrée d'antenne ou de TV câblée.
En cas de connexion à la TV câblée sans décodeur, brancher un
câble sur la prise d'entrée du décodeur et sur la prise d'entrée de TV
câblée. Brancher ensuite un câble sur la prise de sortie du décodeur
et sur la prise ANT. au dos de l'appareil.
Avertissement
TV câblée
OU
Remarque
Déconnecter toujours l’alimentation de tous les
périphériques, y compris de l’appareil, avant d'installer des
périphériques ou de déplacer l’appareil. Toujours
débrancher l’antenne, la TV câblée, ou la TV satellite avant
de déplacer l’appareil.
Panneau arrière de l’appareil
Antenne
ANT.
AUDIO OUT
COAXIAL
Arrivée d’antenne/câble
(sans décodeur)
OU
IN
T
U
O
ANT.
Prise ANT.
Décodeur d’arrivée TV câblée
ou satellite (voir remarque)
Ne pas déconnecter les câbles au décodeur. Certains
câblodistributeurs utilisent des signaux cryptés et exigent un
convertisseur spécial pour recevoir des canaux cryptés.
Consulter le câblodistributeur.
www.insignia-products.com
73
Page 75

NS-19RTR 19" DVD Triple Combo
Connexion d’un périphérique au panneau avant
L’appareil a des prises audio et vidéo sur le panneau avant. Ces
prises avant permettent de connecter et de déconnecter facilement
un autre périphérique vidéo, tel qu'un autre magnétoscope ou un
caméscope.
Avertissement
Remarques
Déconnecter toujours l’alimentation de tous les
périphériques, y compris de l’appareil, avant d'installer des
périphériques ou de déplacer l’appareil.
L-AUDIO-R
Sortie audio
du
périphérique
Sortie vidéo du
périphérique
Entrée audio
sur le panneau
avant de
l’appareil
Entrée vidéo sur le panneau
avant de l’appareil
L-AUDIO-R
Pour utiliser le périphérique relié aux prises du panneau
avant, appuyer sur la touche INPUT (Entrée) ou sur CH
CH une ou plusieurs fois, jusqu'à ce que AUX
ou
s’affiche à l'écran.
En cas de connexion d'un magnétoscope monophonique à
l’appareil, connecter la prise de sortie audio du
magnétoscope monophonique à la prise L-AUDIO sur le
panneau avant de l’appareil.
74
www.insignia-products.com
Page 76

NS-19RTR 19" DVD Triple Combo
Connexion d'un périphérique audio numérique
Avertissement
Décodeur
Dolby Digital
Lecteur MD
ou DAT
Remarques
Déconnecter toujours l’alimentation de tous les
périphériques, y compris de l’appareil, avant d'installer des
périphériques ou de déplacer l’appareil.
Panneau arrière de l’appareil
AUDIO OUT
COAXIAL
Vers la prise
Vers une prise d'entrée
audio numérique coaxiale
AUDIO OUT
COAXIAL
(sortie audio
DVD
uniquement)
Vers une prise d'entrée
audio numérique coaxiale
Lors de l'utilisation d'un lecteur MD ou DAT, il n'est pas
possible d'enregistrer un disque en format ambiophonique
multicanal Dolby Digital.
Lors de la connexion d'un lecteur MD ou DAT, régler DOLBY
DIGITAL sur PCM.
Lors de la connexion d'un décodeur Dolby Digital, régler
DOLBY DIGITAL sur BITSTREAM (Train de bits). Si le mode
AUDIO n'est pas réglé correctement, il pourra se produire
une distorsion du son pouvant entraîner des dommages
pour les haut-parleurs.
www.insignia-products.com
75
Page 77

NS-19RTR 19" DVD Triple Combo
Installation des piles de la télécommande
1
Pour installer les piles de la télécommande :
1 Appuyer sur le couvercle du compartiment des piles dans le sens
de la flèche, puis le soulever.
2 Insérer deux piles AA dans le compartiment. Veiller à ce que les
pôles + et – des piles coïncident avec les indications + et –
figurant à l'intérieur du compartiment. Si les piles ne sont pas
insérées correctement, la télécommande risque d'être
endommagée.
3 Remettre le couvercle en place.
Avertissement
Remarques
2
Ne pas jeter les piles dans le feu. Se débarrasser des piles
usagées en suivant les normes relatives aux déchets
dangereux.
Ne pas essayer de recharger des piles qui ne sont pas
rechargeables. Elles peuvent surchauffer et exploser.
Ne pas mélanger différents types de pile (par exemple :
alcalines et au carbone-zinc).
Ne pas mélanger des piles neuves et usagées.
S'il est prévu de ne pas utiliser l’appareil pendant une
période prolongée, retirer les piles afin d'éviter tout
épanchement d'acide éventuel pouvant provoquer des
dommages ou des blessures.
3
Fonctionnement de l’ensemble DVD
Fonctionnement du téléviseur
Visualisation d’un programme télévisé
Pour visualiser un programme télévisé :
1 Connecter l'antenne ou le câble TV.
2 Brancher le cordon d’alimentation sur une prise secteur.
3 Appuyer sur la touche POWER (Marche/Arrêt) pour mettre
l’appareil sous tension.
76
www.insignia-products.com
Page 78

NS-19RTR 19" DVD Triple Combo
4 Appuyer sur la touche CH ou ou sur les touches
numériques pour sélectionner un canal TV.
Utilisation des touches numériques pour sélectionner un canal
TV :
• Appuyer sur 0 et une touche numérique pour un numéro de
canal à un chiffre.
• Appuyer sur les touches numériques pour un numéro de
canal à deux chiffres.
• Appuyer sur la touche +10/+100, puis appuyer sur les
touches numériques correspondant aux deux derniers
chiffres du canal pour un numéro de canal à trois chiffres.
5 Appuyer sur la touche VOL.
ou pour régler le volume.
Remarque
Si l’appareil est éteint en mode DVD, il sera
automatiquement en mode TV/VCR (TV/magnétoscope) à la
mise sous tension suivante.
Visionnement de la télévision à partir d'un décodeur câble ou satellite
Pour visionner la télévision à partir d'un décodeur câble ou satellite :
1 Utiliser les commandes de l’appareil pour régler le canal sur le
canal d'accès au décodeur câble ou satellite (généralement le
canal 3 ou 4).
2 Utiliser le décodeur câble ou satellite pour syntoniser un canal TV.
Visionnement de la télévision à partir d'un périphérique d'entrée
Pour visionner la télévision à partir d'un périphérique d'entrée :
• Si l’appareil est connecté à un téléviseur externe au moyen
des prises audio et vidéo du panneau avant de l’appareil,
appuyer sur la touche INPUT (Entrée) ou CH
ou jusqu'à
ce que AUX s’affiche à l'écran.
Configuration des canaux
Lors de la première configuration de l’appareil, il est nécessaire de
configurer les canaux disponibles localement.
Pour configurer les canaux :
1 Appuyer sur SETUP (Configuration).
2 Appuyer sur la touche
ou pour sélectionner CHANNEL SET
UP (Configuration des canaux), puis appuyer sur la touche
ENTER (Entrée).
www.insignia-products.com
77
Page 79

NS-19RTR 19" DVD Triple Combo
3 Appuyer sur ou sur pour sélectionner AUTO PRESET CH
(TV) (Mise en mémoire automatique des canaux TV) ou AUTO
PRESET CH (CATV) (Mise en mémoire automatique des canaux
câblés) puis appuyer sur la touche ENTER (Entrée)
. L’appareil
recherche et mémorise les numéros des canaux disponibles
localement (de TV câblée et non câblée). Lorsque le balayage est
achevé, le canal trouvé dont le numéro est le plus bas s’affiche à
l’écran.
Remarque
Si le message NO TV SIGNALS (Aucun signal TV) s’affiche
à l'écran, vérifier que l'antenne est correctement connectée,
puis répéter le balayage.
Il n'est pas nécessaire de configurer les canaux en cas de
connexion à un décodeur câble ou satellite. Dans ce cas,
utiliser les commandes de l’appareil pour régler le canal sur
le canal d'accès au décodeur câble ou satellite
(généralement le canal 3 ou 4). Ensuite, utiliser le décodeur
câble ou satellite pour syntoniser un canal TV.
Ajout ou suppression de canaux
Il est possible d'ajouter des canaux qui n'ont pas été configurés au
moment de la recherche de canaux ; il est également possible de
supprimer des canaux qui ne sont plus disponibles ou pour les rendre
indisponibles.
Pour ajouter ou supprimer des canaux :
1 Appuyer sur SETUP (Configuration).
2 Appuyer sur la touche
ou pour sélectionner CHANNEL SET
UP (Configuration des canaux), puis appuyer sur la touche
ENTER (Entrée)
.
3 Appuyer sur la touche ou pour sélectionner ADD/DELET
CH (Ajout/Suppression de canaux), puis appuyer sur la touche
ENTER (Entrée).
4 Appuyer sur la touche CH (Canal)
numériques pour sélectionner un canal TV à ajouter ou à
supprimer.
5 Appuyer sur la touche ENTER (Entrée) une ou plusieurs fois pour
sélectionner l'ajout ou la suppression. Le numéro du canal alterne
entre rouge (suppression) et bleu (ajout) à chaque appui sur la
touche ENTER (Entrée).
6 Appuyer sur SETUP (Configuration).
ou ou sur les touches
78
www.insignia-products.com
Page 80

NS-19RTR 19" DVD Triple Combo
Réglage manuel de l’horloge
Il est nécessaire de régler l'horloge avant d'utiliser l’appareil pour faire
des enregistrements programmés avec le magnétoscope.
Pour le premier réglage de l'horloge, il est recommandé de procéder
manuellement, puis d'activer le paramètre AUTO CLOCK (Réglage
automatique de l'horloge) pour mettre périodiquement à jour
l'horloge.
Remarque
Il faut utiliser la télécommande pour régler l'horloge.
Pour régler l’horloge manuellement :
1 Appuyer sur SETUP (Configuration).
2 Appuyer sur la touche
ou pour sélectionner SETTING
CLOCK (Réglage de l'horloge), puis appuyer sur la touche ENTER
(Entrée).
3 Si aucune station PBS n'est diffusée localement ou fournie par le
câblo-opérateur, appuyer sur la touche
AUTO CLOCK (Réglage automatique de l'horloge), puis appuyer sur
la touche ENTER (Entrée) pour désactiver le réglage automatique
de l'horloge.
4 Appuyer sur la touche
ou pour sélectionner MANUAL
CLOCK SET (Réglage manuel de l'horloge), puis appuyer sur la
touche ENTER (Entrée).
5 Appuyer sur la touche
ou pour sélectionner le mois, le jour,
l'année, l'heure et les minutes. Après avoir configuré le premier
élément, appuyer sur la touche
suivant.
6 Appuyer sur la touche SETUP (Configuration) pour démarrer
l'horloge.
Remarque
Si l’appareil est débranché ou en cas d'interruption de
l'alimentation électrique pendant plus de trois secondes, il
pourra être nécessaire de régler de nouveau l'horloge.
ou pour sélectionner
ou pour passer à l'élément
www.insignia-products.com
79
Page 81

Réglage automatique de l’horloge
Si une station de télévision locale diffuse des informations de date et
heure, il est possible de configurer l’appareil pour mettre à jour
automatiquement la date et l'heure.
NS-19RTR 19" DVD Triple Combo
Remarque
Il faut utiliser la télécommande pour régler l'horloge.
Pour régler automatiquement l’horloge :
1 Appuyer sur la touche POWER (Marche/Arrêt) pour mettre
l’appareil sous tension.
2 En cas d'utilisation d'un décodeur câble ou satellite :
• Vérifier que le décodeur est allumé et réglé sur la station
PBS locale.
• Vérifier que l’appareil est réglé sur le canal d'accès au
décodeur câble ou satellite (généralement le canal 3 ou 4).
3 Appuyer sur SETUP (Configuration).
4 Appuyer sur la touche
ou pour sélectionner SETTING
CLOCK (Réglage de l'horloge), puis appuyer sur la touche ENTER
(Entrée).
5 Appuyer de nouveau sur la touche ENTER (Entrée) pour
sélectionner ON (Marche).
6 Appuyer sur la touche
pour sélectionner AUTO CLOCK CH
(Canal de réglage automatique de l'horloge).
7 Appuyer sur la touche
ou pour sélectionnerAUTO
(automatique).
8 Appuyer sur SETUP (Configuration).
Remarque
Lorsque l’appareil est hors tension, il vérifie et met
périodiquement l'heure à jour.
Configuration de l’heure avancée
Pour régler automatiquement l'horloge sur l'heure d'été :
1 Appuyer sur SETUP (Configuration).
2 Appuyer sur la touche
CLOCK
(Réglage de l'horloge), puis appuyer sur la touche ENTER
ou pour sélectionner SETTING
(Entrée).
3 Appuyer sur la touche ou pour sélectionner D.S.T. (HA), puis
appuyer sur la touche
(Activé).
ENTER (Entrée) pour sélectionner ON
4 Appuyer sur SETUP (Configuration).
80
www.insignia-products.com
Page 82

NS-19RTR 19" DVD Triple Combo
Réglages des contrôles de l'image
Pour régler les paramètres de base du téléviseur :
1 Appuyer sur la touche PICTURE (Image) jusqu'à ce que le
paramètre à régler s’affiche. Il est possible de sélectionner :
• BRIGHT (Luminosité)
• CONTRAST (Contraste)
• COLOR (Couleur)
• TINT (Teinte)
• SHARPNESS (Netteté)
2 Dans les cinq secondes, appuyer sur la touche
le paramètre. Les touches et ajustent les paramètres de la
façon suivante :
ou pour régler
BRIGHT
(Luminosité)
CONTRAST
(Contraste)
COLOR
(Couleur)
TINT (Teinte) Donne une
SHARPNESS
(Netteté)
Réglage de l’arrêt différé
Il est possible de programmer l'arrêt différé de manière à ce que
l’appareil s'éteigne à une heure spécifiée. L'arrêt différé ne fonctionne
pas pendant un enregistrement.
Pour régler l'arrêt différé :
1 Appuyer sur la touche SLEEP (Arrêt différé).
2 Dans les cinq secondes, appuyer sur la touche SLEEP
sélectionner une heure. Chaque fois que la touche est appuyée,
l’heure augmente de 30 minutes.
3 Pour désactiver la fonction d'arrêt différé, appuyer sur la touche
SLEEP
jusqu'à ce que 0 s'affiche sur l'écran.
Une fois que l'arrêt différé est réglé, il est possible de vérifier la durée
restante en appuyant sur la touche SLEEP.
Diminue la
luminosité
Diminue le
contraste
Atténue les
couleurs
teinte plus
violette
Adoucit
l'image
Augmente la
luminosité
Augmente le
contraste
Avive les
couleurs
Donne une
teinte plus
verte
Rend l'image
plus nette
pour
www.insignia-products.com
81
Page 83

NS-19RTR 19" DVD Triple Combo
Utilisation des sous-titres codés
Il est possible d'activer les sous-titres codés si une émission télévisée
ou une bande vidéo pré-enregistrée en contient.
Les sous-titres codés peuvent être affectés par :
• L’interférence d’un moteur électrique
• La faible réception ou une image neigeuse sur l'écran du
téléviseur
• Réception de signal multiplex donnant lieu à un affichage
d'images fantômes ou de scintillement
Pour activer et désactiver les sous-titres codés :
1 Appuyer sur SETUP (Configuration).
2 Appuyer sur la touche
ou pour sélectionner CAPTION
(Sous-titres codés).
3 Appuyer sur la touche
ENTER (Entrée) pour sélectionner une
option de sous-titres codés. Il est possible de sélectionner :
• CAPTION1 (Sous-titres codés 1) – Affiche les sous-titres
codés dans la langue principale.
• CAPTION2 (Sous-titres codés 2) – Affiche les sous-titres
codés dans une autre langue.
• TEXT (Texte) – Affiche du texte sur la moitié de l'écran.
• OFF (Désactivé) – Désactive les sous-titres codés.
Modification de la langue des menus à l'écran
L’appareil a un affichage à l'écran (OSD) qui permet d'ajuster les
paramètres pour l’appareil. Il est possible de modifier la langue de
l'affichage à l'écran.
Pour changer la langue de l'affichage à l'écran :
1 Appuyer sur SETUP (Configuration).
2 Appuyer sur la touche
(Langue).
ou pour sélectionner LANGUAGE
3 Appuyer une ou plusieurs fois sur la touche ENTER (Entrée) pour
sélectionner la langue. Il est possible de sélectionner :
•ENGLISH (Anglais)
• ESPAÑOL (Espagnol)
•FRANÇAIS
4 Appuyer sur SETUP (Configuration).
Configuration du contrôle parental
Pour configurer le contrôle parental pour les émissions télévisées :
1 Vérifier que l’appareil est allumé et réglé sur un canal qui n'est pas
bloqué par un réglage antérieur du contrôle parental.
2 Appuyer sur SETUP (Configuration).
82
www.insignia-products.com
Page 84

NS-19RTR 19" DVD Triple Combo
3 Appuyer sur la touche ou pour sélectionner V-CHIP SET UP
(Configuration de la puce antiviolence), puis appuyer sur la touche
ENTER (Entrée).
4 Saisir le code d'accès (mot de passe) à l’aide des touches
numériques. Si aucun code d'accès n'a été configuré, saisir 0000.
5 Appuyer sur la touche
RATING
(Classification TV), puis appuyer sur la touche ENTER
(Entrée).
6 Appuyer sur la touche
classification à interdire. Il est possible de sélectionner :
• TV-Y – Tous les enfants
• TV-Y7 – Interdit aux enfants de moins de 7 ans
• TV-G – Tout public
• TV-PG – Surveillance parentale suggérée
• TV-14 – Interdit aux enfants de moins de 14 ans
• TV-MA – Adultes
7 Appuyer sur la touche ENTER (Entrée) pour sélectionner BLOCK
(Bloquer) ou VIEW (Autoriser). L'interdiction d'une classification
entraîne l'interdiction de cette classification et de toutes les
classifications supérieures à celle-ci.
8 Si l’option sélectionnée est TV-Y7, TV-PG,TV-14 ou TV-MA,
appuyer deux fois sur la touche ENTER (Entrée), puis appuyer sur
la touche
ou pour sélectionner une sous-classification à
interdire. Il est possible de sélectionner :
ou pour sélectionner TV
ou pour sélectionner une
Classification Sous-classification
TV-Y7
FV Violence fictive
TV-PG, TV-14, TV-MA
D Dialogue suggestif (TV-PG
L Langage vulgaire
S Situations à caractère
VViolence
et TV-14 seulement)
sexuel
9 Appuyer sur la touche ENTER (Entrée) pour sélectionner BLOCK
(Bloquer) ou VIEW (Autoriser).
10 Appuyer sur SETUP (Configuration).
www.insignia-products.com
83
Page 85

NS-19RTR 19" DVD Triple Combo
Pour configurer le contrôle parental pour les films :
1 Appuyer sur SETUP (Configuration).
2 Appuyer sur la touche
(Configuration de la puce antiviolence), puis appuyer sur la touche
ou pour sélectionner V-CHIP SET UP
ENTER (Entrée).
3 Saisir le code d'accès (mot de passe) à l’aide des touches
numériques. Si aucun code d'accès n'a été configuré, saisir 0000.
4 Appuyer sur la touche
ou pour sélectionner MPAA RATING
(Classification MPAA), puis appuyer sur la touche ENTER
(Entrée).
5 Appuyer sur la touche
ou pour sélectionner une
classification à interdire. Il est possible de sélectionner :
• G – Tout public
• PG – Contrôle parental suggéré
• PG13 – Interdit aux enfants de moins de 13 ans
• R – Interdit. Supervision par un adulte recommandée pour
les enfants de moins de 17 ans.
• NC-17 — Interdit aux mineurs de moins de 17 ans
• X – Pour adultes uniquement.
6 Appuyer sur la touche ENTER (Entrée) pour sélectionner BLOCK
(Bloquer) ou VIEW (Autoriser). L'interdiction d'une classification
entraîne l'interdiction de cette classification et de toutes les
classifications supérieures à celle-ci.
7 Appuyer sur SETUP (Configuration).
Modification du code d'accès (mot de passe)
Pour modifier le code d’accès :
1 Appuyer sur SETUP (Configuration).
2 Appuyer sur la touche
(Configuration de la puce antiviolence),
ENTER (Entrée).
3 Saisir le code d'accès (mot de passe) à l’aide des touches
numériques. Si aucun code d'accès n'a été configuré, saisir 0000.
4 Appuyer sur la touche
(Modification du code), puis appuyer sur la touche ENTER
CODE
(Entrée).
5 Utiliser les touches numériques pour saisir un nouveau code
d'accès à quatre chiffres dans la case NEW CODE (Nouveau
code), puis saisir une nouvelle fois le nouveau code à quatre
chiffres dans la case CONFIRM CODE (Confirmer le code).
L'écran V-CHIP SET UP (Configuration de la puce antiviolence)
s’affiche.
84
www.insignia-products.com
ou pour sélectionner V-CHIP SET UP
puis appuyer sur la touche
ou pour sélectionner CHANGE
Page 86

NS-19RTR 19" DVD Triple Combo
6 Appuyer sur SETUP (Configuration).
Remarque
Vérification de l'état
Il est possible de consulter l’état en cours de l’appareil. Selon le mode
actif, les éléments suivants s’affichent :
1
2
1 Affiche l'état en cours du magnétoscope – PLAY
En cas d'interruption de l'alimentation électrique, ou si
l’appareil est débranché, le code d'accès est effacé. Utiliser
le code par défaut (0000) pour définir un autre code d'accès.
En cas d'oubli du code d'accès, éteindre et débrancher
l’appareil pendant environ 10 secondes pour rétablir le code
par défaut.
3
PLAY 12:00AM
CH 123
SP COUNT 0:00:00
(Lecture), STOP (Arrêt), REC (Enregistrement),
OTR (Enregistrement immédiat), PAUSE, EJECT
(Éjecter), FF (Avance rapide) ou REW (Retour
arrière).
4
5
2 Affiche la vitesse d'enregistrement de la bande
3 Affiche l’heure actuelle.
4 Affiche le numéro du canal actuel lors de la
5 Affiche le compteur de défilement de bande
vidéo du magnétoscope (SP ou SLP).
diffusion d'une émission télévisée.
en mode d'entrée externe.
pendant la lecture, l'enregistrement ou l'éjection du
magnétoscope. Cette fonction n'est pas affichée
pour une bande vidéo vierge ou pour des portions
d'une bande vidéo qui sont vierges. Il est possible
de réinitialiser ce compteur de défilement en
appuyant sur la touche
CLEAR (Effacer).
AUX s’affiche
www.insignia-products.com
85
Page 87

Pour vérifier l'état :
• Appuyer une ou plusieurs fois sur la touche DISPLAY
(Affichage).
Utilisation du magnétoscope
L’appareil peut lire et enregistrer toute bande vidéo qui porte le logo
.
Lecture d'une bande vidéo
Pour lire une bande vidéo :
1 Appuyer une ou plusieurs fois sur la touche INPUT (Entrée) pour
sélectionner TV/VCR (Téléviseur/magnétoscope).
2 Insérer une bande vidéo pré-enregistrée dans le compartiment à
bande vidéo.
3 Appuyer sur la touche PLAY
NS-19RTR 19" DVD Triple Combo
(Lecture).
Conseil
À partir du mode DVD, il est possible de
démarrer la lecture du magnétoscope en
appuyant sur la touche PLAY (Lecture) du côté
du magnétoscope sur le panneau avant.
4 Commande de la lecture :
•
Pour effectuer un retour arrière ou une avance rapide de la bande
vidéo,
appuyer sur la touche SKIP/REW (Saut/Retour
arrière) ou FWD/SKIP
(Avance rapide/Saut)
• Pour arrêter la lecture, appuyer sur la touche STOP
(Arrêt).
•
Pour arrêter la lecture et éjecter la bande vidéo, appuyer sur
la touche STOP/EJECT
(Arrêt/Éjecter) sur le panneau
avant.
• Pour ajuster l'alignement (lorsque des stries noires ou
blanches sont visibles à l'écran), appuyer sur la touche CH
ou au cours d'une lecture normale, ou en mode
pause, arrêt sur image ou ralenti. Pour arrêter l'alignement
manuel, arrêter la bande vidéo et la redémarrer.
• Pour un arrêt sur image, appuyer sur la touche PAU SE –
SLOW (Pause/Ralenti). À chaque appui sur la touche, la
bande vidéo avance d'une image. Appuyer sur la touche
PLAY
(Lecture) pour reprendre la lecture normale.
• Pour une lecture au ralenti, appuyer sur la touche
PAUSE–SLOW
touche FWD/SKIP
le ralenti, appuyer sur la touche
(Pause/Ralenti), puis appuyer sur la
(Avance rapide/Saut). Pour arrêter
PLAY (Lecture). Après
cinq minutes de lecture au ralenti, l’appareil se remet
automatiquement en lecture normale.
86
www.insignia-products.com
Page 88

NS-19RTR 19" DVD Triple Combo
Amélioration de la qualité d’image de la lecture
Lors de la lecture d'une bande vidéo vieille ou usée, telle qu'une
bande vidéo louée, il est possible d'améliorer la qualité d'image.
Pour améliorer la qualité de l’image :
1 Appuyer sur SETUP (Configuration).
2 Appuyer sur la touche
(Configuration de l'utilisateur), puis appuyer sur la touche ENTER
UP
ou pour sélectionner USER’S SET
(Entrée).
3 Appuyer sur la touche
(Location), puis appuyer une ou plusieurs fois sur la touche ENTER
ou pour sélectionner RENTAL
(Entrée) pour sélectionner ON (Activé).
4 Appuyer sur la touche SETUP (Configuration) pour fermer le
menu.
5 Appuyer sur la touche PLAY
pour commencer la lecture.
Remarque
L’appareil se souvient de ce réglage même après une mise
hors tension.
Utilisation du mode Répétition
1 Appuyer sur SETUP (Configuration).
2 Appuyer sur la touche
(Configuration de l'utilisateur), puis appuyer sur la touche ENTER
(Entrée).
3 Appuyer sur la touche
(Lecture en boucle).
4
Appuyer sur la touche ENTER (Entrée) une ou plusieurs fois pour
sélectionner le mode Répétition souhaité. Il est possible de sélectionner :
• ALL (Tout) – Lit en boucle la totalité de la bande vidéo.
• BLANK (Blanc) – Lit la bande vidéo depuis le début
jusqu'au premier espace vierge de la bande qui dure au
moins 10 secondes, puis recommence la lecture au début.
• OFF (Désactivé) – Annule le mode Répétition.
5 Appuyer sur la touche SETUP (Configuration) pour fermer le
menu.
6 Appuyer sur la touche PLAY
Remarques
L’appareil se souvient de ce réglage même après une mise
hors tension.
Si l'option RENTAL (Location) est activée, RENTAL PLAY
(Lecture Location) s’affiche. Si l'option RENTAL est
désactivée, REPEAT PLAY (Lecture en boucle) s’affiche.
ou pour sélectionner USER’S SET UP
ou pour sélectionner REPEAT PLAY
pour commencer la lecture.
www.insignia-products.com
87
Page 89

NS-19RTR 19" DVD Triple Combo
Recherche sur une bande vidéo
Pour marquer un point de départ pour la lecture :
1 Effectuer un retour arrière ou une avance rapide de la bande
jusqu'au point de départ souhaité.
2 Appuyer sur la touche CLEAR (Effacer) de façon répétée pour
mettre le compteur de défilement à 0:00:00.
3 Appuyer sur la touche PLAY (Lecture)
pour commencer la lecture ou l'enregistrement.
4 Appuyer sur la touche STOP (Arrêt)
l'enregistrement terminé.
5 Appuyer sur SETUP (Configuration).
6 Appuyer sur la touche
(Retour à zéro), puis appuyer sur la touche
ou pour sélectionner ZERO RETURN
rembobine la bande jusqu'au point de départ (le compteur indique
0:00:00).
Pour rechercher une scène ou sauter une scène :
1 Commencer la lecture de la bande vidéo.
2 Appuyer sur la touche SKIP/REW (Saut/Retour arrière) ou
FWD/SKIP
(Avance rapide/Saut) pour effectuer une recherche
vers l'arrière ou vers l'avant. Pour rechercher plus rapidement,
appuyer de nouveau sur la touche SKIP/REW ou FWD/SKIP
.
3 Appuyer sur la touche PLAY pour revenir en mode de lecture
normal.
ou REC (Enregistrement)
une fois la lecture ou
ENTER (Entrée). L’appareil
Pour utiliser la recherche en fonction de la durée :
1 Appuyer sur SETUP (Configuration).
2 Appuyer sur la touche
(Recherche en fonction de la durée),
ou pour sélectionner TIME SEARCH
puis appuyer sur la touche
ENTER (Entrée).
3 Appuyer sur la touche
ou pour sélectionner la durée à
sauter sur la bande vidéo. Chaque fois qu'une touche est
appuyée, l’heure change de 10 minutes. Il est possible de
sélectionner jusqu'à 9 heures et 50 minutes.
Pour annuler la recherche en fonction de la durée, appuyer sur la
touche SETUP (Configuration).
4 Appuyer sur la touche ou
pour reculer ou avancer la bande
vidéo. Lorsque l'heure affichée atteint
commence automatiquement la lecture.
5 Pour annuler la recherche en fonction de la durée, appuyer sur la
touche STOP
88
.
www.insignia-products.com
0:00:00, l’appareil
Page 90

NS-19RTR 19" DVD Triple Combo
Pour effectuer une recherche au moyen des index :
Remarque
Au début de chaque enregistrement, un index est
automatiquement créé. L'index sert aussi de point de départ
pour les enregistrements programmés et les
enregistrements à simple pression.
Si plusieurs émissions ont été enregistrées sur la même
bande vidéo, il est possible de sélectionner l'index
correspondant à l'une des émissions. L’appareil recherche
automatiquement l'index et commence la lecture à partir de
celui-ci.
1 Appuyer sur SETUP (Configuration).
2 Appuyer sur la touche
(Recherche d'index), puis appuyer sur la touche ENTER (Entrée).
3 Appuyer sur la touche
l'émission souhaitée apparaisse.
4 Appuyer sur la touche ou . L’appareil effectue un retour arrière
ou une avance rapide jusqu'au début de l'émission sélectionnée.
Lorsque la recherche est terminée, l'appareil commence la lecture
automatiquement.
5 Pour annuler la recherche d'index, appuyer sur la touche STOP
(Arrêt).
Conseils pour l'enregistrement
Sélection d'une vitesse de bande vidéo
Avant d'enregistrer une bande vidéo, sélectionner la vitesse de la
bande : mode SP (durée normale) ou mode SLP (durée maxi). Les
durées d'enregistrement varient en fonction de la vitesse et du type
de bande.
ou pour sélectionner INDEX SEARCH
ou jusqu'à ce que le numéro de
Conseil
Type de
bande vidéo
T60 1 heure 3 heures
T120 2 heures 6 heures
T160 2 heures 40
Pour obtenir les meilleurs résultats, utiliser des bandes vidéo de
haute qualité pour l'enregistrement. Ne pas utiliser des bandes
usées, endommagées ou de qualité médiocre.
Mode SP Mode SLP
8 heures
minutes
www.insignia-products.com
89
Page 91

Protection d'un enregistrement
Après avoir enregistré une bande vidéo, il est possible d'empêcher
qu'elle soit effacée en cassant l'onglet de protection contre
l'effacement sur le bord arrière de la bande.
Pour réutiliser ultérieurement la bande vidéo, couvrir l'orifice laissé
par l'onglet au moyen d'un ruban adhésif.
NS-19RTR 19" DVD Triple Combo
Enregistrement d'une bande vidéo
Remarques
Il n'est pas possible d'enregistrer à partir du lecteur de DVD
de l’appareil.
Il n'est pas possible de regarder une émission télévisée et
d'en enregistrer une autre.
Pour enregistrer une bande vidéo :
1 Mettre l’appareil sous tension, puis sélectionner le canal TV à
enregistrer.
Si l’appareil est connecté à un décodeur câble ou satellite, régler
l’appareil sur le canal 3 ou 4. Utiliser le décodeur câble ou satellite
pour sélectionner le canal à enregistrer.
2 Insérer une bande vidéo dans le compartiment à bande vidéo.
90
www.insignia-products.com
Page 92

NS-19RTR 19" DVD Triple Combo
3 Appuyer sur la touche SPEED (Vitesse) pour sélectionner la
vitesse de la bande. Il est possible de sélectionner :
• SP – Durée normale
• SLP – Durée maxi
4 Appuyer sur la touche REC (Enregistrement) pour commencer
l'enregistrement.
5 Pour sauter certaines parties de l'émission télévisée, appuyer sur
la touche
PAU SE– SL OW (Pause/Ralenti). Appuyer sur la touche
PAU SE/ SL OW (Pause/Ralenti) ou sur la touche REC
(Enregistrement) pour continuer l'enregistrement.
Remarque
6 Appuyer sur
Si un arrêt momentané de l'enregistrement dure
plus de cinq minutes, l’appareil reprend
automatiquement l'enregistrement pour éviter que
la bande vidéo ne soit endommagée.
la touche STOP (Arrêt).
Enregistrement d'une bande vidéo avec la fonction d'enregistrement
immédiat
Un OTR (enregistrement immédiat) permet de spécifier la durée d'un
enregistrement.
Pour configurer un enregistrement immédiat :
Remarque
Il n'est pas possible d'utiliser la télécommande pour
configurer ou démarrer un enregistrement
immédiat.
1 Mettre l’appareil sous tension, puis sélectionner le canal TV à
enregistrer.
Si l’appareil est connecté à un décodeur câble ou satellite, régler
l’appareil sur le canal 3 ou 4. Utiliser le décodeur câble ou satellite
pour sélectionner le canal à enregistrer.
2 Insérer une bande vidéo dans le compartiment à bande vidéo.
3 Appuyer sur la touche SPEED (Vitesse) pour sélectionner la
vitesse de la bande. Il est possible de sélectionner :
• SP – Durée normale
• SLP – Durée maxi
www.insignia-products.com
91
Page 93

NS-19RTR 19" DVD Triple Combo
4 Appuyer une ou plusieurs fois sur le bouton REC-OTR
(Enregistrement immédiat) sur le panneau avant de l’appareil pour
sélectionner la durée souhaitée. À chaque appui sur la touche la
durée augmente de 30 minutes jusqu’à un maximum de 8 heures.
L'enregistrement commence immédiatement.
Remarques
Si la touche POWER (Marche/Arrêt) est appuyée pendant
un enregistrement immédiat, l’appareil continue à
enregistrer.
Si la fin de la bande vidéo est atteinte avant la fin de la durée
spécifiée, l’appareil arrête d'enregistrer, éjecte la bande et
s'éteint.
Pour connaître la durée restante pour un enregistrement
immédiat, appuyer sur la touche
télécommande pour afficher OTR sur l'écran. La durée
restante s'affiche brièvement puis disparaît.
Pour annuler un enregistrement immédiat :
• Appuyer sur la touche
STOP (Arrêt) ou sur la touche
STOP/EJECT (Arrêt/Éjection)
l’appareil.
Configuration d'enregistrements futurs
Il est possible de programmer à l'avance l'enregistrement d'émissions
télévisées. Il est possible de programmer un enregistrement unique,
un enregistrement hebdomadaire ou un enregistrement quotidien – le
tout dans un intervalle d'un an.
Lors de la programmation d'enregistrements futurs, tenir compte des
éléments suivants :
• L'émission qui commence le plus tôt a la priorité.
• Une fois la première émission terminée, les émissions qui se
chevauchent commencent à s'enregistrer dans l'ordre à partir
du haut de la liste.
• Lorsque l'heure de début est la même, l'émission qui se trouve
sur la rangée (position) la plus haute dans la liste des
émissions est prioritaire.
DISPLAY (Affichage) de la
sur le panneau avant de
Pour programmer un enregistrement futur :
1 Appuyer sur SETUP (Configuration).
2 Appuyer sur la touche
PROGRAMMING
(Enregistrement programmé), puis appuyer sur la
or pour sélectionner TIMER
touche ENTER (Entrée).
Si l'horloge n'a pas été réglée, le menu MANUAL CLOCK SET
(Réglage manuel de l'horloge) apparaît. Suivre les instructions
figurant dans la section “Réglage manuel de l’horloge” voir
page 79, puis recommencer cette tâche.
3 Appuyer sur la touche
ou pour sélectionner la rangée à
utiliser, puis appuyer sur la touche .
92
www.insignia-products.com
Page 94

NS-19RTR 19" DVD Triple Combo
4 Appuyer une ou plusieurs fois sur la touche or pour
sélectionner le canal à enregistrer, puis appuyer sur la touche .
En cas d'utilisation d'un décodeur câble ou satellite, régler
l’appareil sur le canal d'accès (généralement 3 ou 4), puis utiliser
le décodeur câble ou satellite pour syntoniser le canal à
enregistrer.
5 Appuyer sur la touche ou pour sélectionner la date de
l'enregistrement, puis appuyer sur la touche .
• Pour un enregistrement unique, sélectionner la date.
• Pour un enregistrement hebdomadaire, sélectionner EVRY
(Chaque) et le jour de la semaine.
• Pour un enregistrement quotidien, sélectionner EVRY DAY
(Chaque jour).
6 Appuyer sur la touche ou pour sélectionner les heures et
minutes de début et de fin. Appuyer sur la touche pour passer
d'un champ à un autre.
7 Appuyer sur la touche ou pour sélectionner la vitesse de la
bande. Pour plus d’informations, voir “Conseils pour
l'enregistrement” voir page 89.
8 Appuyer sur la touche ENTER (Entrée).
9 Pour programmer d'autres enregistrements, répéter les étapes 3 à
8.
10 Une fois la programmation des enregistrements terminée,
appuyer sur la touche SETUP (Configuration).
11 Insérer une bande vidéo munie d'un onglet de protection contre
l'effacement.
12 Appuyer sur la touche POWER (Marche/Arrêt) pour achever la
configuration. Le témoin d'enregistrement s'allume. Si la bande
vidéo n'a pas d'onglet, l’appareil éjecte la bande est s'éteint.
Remarques
Il faut éteindre l’appareil pour activer la fonction
d'enregistrement futur. S'il n'est pas mis hors tension et que
le téléviseur est allumé, TIMER REC STANDBY
(Enregistrement programmé en attente) commence à
clignoter à l'écran deux minutes avant l'heure de début de
l'enregistrement.
Lorsque l'enregistrement commence, l'écran du téléviseur
ne s'allume pas.
Pendant l'enregistrement, il est seulement possible de
regarder l'émission télévisée en cours d'enregistrement ou
de lire un DVD.
Si la fin de la bande est atteinte avant la fin de la durée
d'enregistrement, l’appareil arrête d'enregistrer et éjecte la
bande.
www.insignia-products.com
93
Page 95

NS-19RTR 19" DVD Triple Combo
Pour consulter l'horaire d'un enregistrement futur :
1 Appuyer sur la touche POWER (Marche/Arrêt) pour mettre
l’appareil sous tension.
2 Appuyer sur SETUP (Configuration).
3 Appuyer sur la touche
ou pour sélectionner TIMER
PROGRAMMING (Enregistrement programmé), puis appuyer sur la
touche ENTER (Entrée).
4 Vérifier les détails de l'enregistrement.
5 Appuyer sur SETUP (Configuration).
Pour changer l'horaire d'un enregistrement futur :
1 Appuyer sur la touche POWER (Marche/Arrêt) pour mettre
l’appareil sous tension.
2 Appuyer sur SETUP (Configuration).
3 Appuyer sur la touche
ou pour sélectionner TIMER
PROGRAMMING (Enregistrement programmé), puis appuyer sur la
toucheENTER (Entrée).
4 Appuyer sur la touche
modifier, puis appuyer sur la touche
5 Appuyer sur la touche ou
ou pour sélectionner la rangée à
.
pour mettre en surbrillance
l’élément à changer. L'élément clignote.
6 Appuyer sur la touche
ou pour changer d'élément, puis
appuyer sur la touche ENTER (Entrée).
7 Appuyer sur la touche POWER (Marche/Arrêt) pour mettre
l’appareil hors tension et activer la fonction d'enregistrement futur.
Pour annuler un enregistrement futur :
1 Appuyer sur la touche POWER (Marche/Arrêt) pour mettre
l’appareil sous tension.
2 Si un enregistrement est en cours, appuyer sur la touche
STOP/EJECT (Arrêt/Éjecter) du panneau avant de l'appareil
pour arrêter l'enregistrement.
3 Appuyer sur SETUP (Configuration).
4 Appuyer sur la touche
PROGRAMMING (Enregistrement programmé), puis appuyer sur
la toucheENTER (Entrée).
5 Appuyer sur la touche
à annuler, puis appuyer sur la touche CLEAR (Effacer).
6 Appuyer sur la touche SETUP (Configuration) pour fermer le
menu.
94
www.insignia-products.com
or pour sélectionner TIMER
ou pour sélectionner l'enregistrement
Page 96

NS-19RTR 19" DVD Triple Combo
Allongement de l'enregistrement programmé
Il est possible d'augmenter la durée d'un enregistrement futur avant le
début de l'enregistrement ou pendant que l'enregistrement est en
cours.
Remarque
Lors d'une augmentation de la durée d'enregistrement, la
vitesse de la bande passe automatiquement en mode SLP.
Pour allonger l'enregistrement programmé :
1 Appuyer sur la touche POWER (Marche/Arrêt) pour mettre
l’appareil sous tension.
2 Appuyer sur SETUP (Configuration).
3 Appuyer sur la touche
ou pour sélectionner TIMER
PROGRAMMING (Enregistrement programmé), puis appuyer sur
la touche
ENTER (Entrée).
4 Appuyer sur la touche REC (Enregistrement), puis appuyer sur la
touche
ou pour sélectionner l'émission à modifier.
5 Appuyer sur la touche REC (Enregistrement) une ou plusieurs fois
pour sélectionner les nouvelles heures de début et de fin
souhaitées. Chaque fois que la touche est appuyée, l’heure
change de 10 minutes. Si l'enregistrement est en cours, seule
l'heure de fin change.
6 Appuyer sur la touche ENTER (Entrée) pour confirmer le réglage,
puis appuyer sur la touche SETUP (Configuration) pour fermer le
menu.
Remarque
Pour annuler les changements et rétablir les heures
originales de début et de fin, appuyer sur la touche PAUSE–
SLOW (Pause/Ralenti).
Recherche d'une émission sur une bande vidéo enregistrée
Lorsqu'un enregistrement programmé s'achève, il est possible de
rechercher le début du ou des programmes enregistrés.
Pour trouver un programme :
1 Appuyer sur SETUP (Configuration).
2 Appuyer sur la touche
UP (Configuration de l'utilisateur), puis appuyer sur la touche
ENTER (Entrée).
3 Appuyer sur la touche
(Retour automatique), puis appuyer sur la touche ENTER (Entrée)
pour sélectionner ON (Marche).
Lorsque tous les enregistrements programmés sont achevés,
l'appareil se rembobine jusqu'au début du ou des enregistrements
programmés et s'éteint.
www.insignia-products.com
ou pour sélectionner USER’S SET
ou pour sélectionner AUTO RETURN
95
Page 97

NS-19RTR 19" DVD Triple Combo
Pour annuler la fonction AUTO RETURN (Retour automatique) :
1 Appuyer sur SETUP (Configuration).
2 Appuyer sur la touche
ou pour sélectionner USER’S SET
UP (Configuration de l'utilisateur), puis appuyer sur la touche
ENTER (Entrée).
3 Appuyer sur
ou pour sélectionner AUTO RETURN (Retour
automatique) puis appuyer sur ENTER pour sélectionner OFF
(Arrêt).
Conseil
L'appareil conserve en mémoire le réglage de cette fonction même
en cas de panne de secteur.
Fonction de rembobinage et d'éjection automatiques
Lorsque l'appareil atteint la fin d'une bande vidéo, il rembobine et
éjecte la bande automatiquement. Cette fonction est activée lorsque
REPEAT PLAY (Lecture en boucle) est réglée surOFF (Désactivée).
Elle est inactive lors de l'enregistrement programmé d'un OTR.
Copie d'une bande vidéo à partir d'une autre source
Il est possible de connecter un périphérique, tel qu'un autre
magnétoscope ou un caméscope, et de faire des copies de bandes
vidéo ou d'autres sources vidéo.
La tâche suivante explique comment copier une bande vidéo. Les
mêmes étapes peuvent être utilisées pour copier d'autres sources
vidéo.
Pour copier une bande vidéo :
1 Connecter un magnétoscope externe.
Ensemble DVD
Câbles audio/vidéo
(non fournis)
Magnétoscope externe
2 Insérer la bande vidéo à partir de laquelle s'effectuera la copie
dans le magnétoscope externe.
3 Insérer la bande vidéo vers laquelle s'effectuera la copie dans le
compartiment à bande vidéo de l’appareil.
OUT
OUT
AUDIO
L
R
VIDEO
IN
IN
96
www.insignia-products.com
Page 98

NS-19RTR 19" DVD Triple Combo
4 Appuyer sur la touche SPEED (Vitesse) pour sélectionner la
vitesse d'enregistrement. Il est possible de sélectionner :
•SP
•SLP
5 Appuyer une ou plusieurs fois sur la touche INPUT (Entrée)
jusqu’à ce que AUX s’affiche.
6 Appuyer sur la touche REC-OTR (Enregistrement immédiat) sur le
panneau avant de l’appareil.
7 Commencer la lecture sur le magnétoscope externe.
Remarque
Si possible, utiliser les commandes qui se
trouvent sur le panneau avant de l’appareil.
Les signaux de la télécommande pourraient
affecter le magnétoscope externe.
8 Pour arrêter la copie, appuyer sur la touche STOP/EJECT
(Arrêt/Éjecter)
sur le panneau avant de l’appareil, puis arrêter
la lecture sur le magnétoscope externe.
Utilisation du lecteur de DVD
Disques compatibles
Disques
compatibles
DVD-Vidéo
(voir les
remarques 1,
2, 4, 6, 10 et
11)
DVD-RW
DVD-R
(voir les
remarques 1,
3, 4, 5, 6, 7, 9
et 10)
DVD+RW
DVD+R
(voir les
remarques 1,
3, 4, 5, 6, 8, 9
et 10)
Logo du disque
Code de
région
1 ou ALL
(Toutes)
Signaux
enregistrés
Vidéo
numérique
(MPEG2)
Vidéo
numérique
(MPEG2)
Vidéo
numérique
(MPEG2)
Taille du
disque
12 cm ou
8cm
12 cm ou
8cm
12 cm ou
8cm
CD audio
(voir les
remarques 4, 6
et 10)
Audio
numérique
www.insignia-products.com
12 cm ou
8cm
97
Page 99

NS-19RTR 19" DVD Triple Combo
Disques
compatibles
CD-RW CD-R
(voir les
remarques 4,
5, 6, 9 et 10)
Remarques :
Si un disque portant l’un de ces logos ne peut être lu, ce peut être à
cause de l’une des raisons suivantes.
1 Cet appareil est conforme au standard couleur NTSC. L’appareil
ne peut lire des disques qui ont été enregistrés sous d’autres
standards couleur tels que PAL.
2 Certains DVD vidéo ne fonctionnent pas comme décrit dans ce
guide à cause des limitations imposées par leurs producteurs.
3 L'appareil ne peut lire les disques enregistrés en format VR (Video
Recording [Enregistrement Vidéo]).
4 Les disques rayés ou tachés ne seront peut être pas lus.
5 Certains disques ne peuvent pas être lus à cause
d'incompatibilités au niveau des conditions d'enregistrement, des
caractéristiques du dispositif d'enregistrement ou de propriétés
spéciales des disques.
6 Il est possible de lire des disques qui portent les marques
ci-dessus. En cas d’utilisation de disques non standard, l’appareil
peut ne peut pas les lire ou la qualité soit du son soit de la vidéo
peut être moins bonne.
7 Un disque DVD-R/RW non finalisé enregistré en format vidéo
pourra sans doute être lu. Cependant, suivant l'état
d'enregistrement du disque, il est possible que le disque ne puisse
être lu ou que soit l'image soit le son puisse être distordu. Dans ce
cas, finaliser le disque avec le graveur de DVD. Consulter le guide
qui accompagne le graveur de DVD.
8 Il n’est possible de lire que des disques enregistrés au format
vidéo et finalisés. Il n’est pas possible de lire des disques qui n’ont
pas été finalisés. En fonction de l'état d'enregistrement du disque,
il est possible que le disque ne puisse être lu ou que l'image ou le
son soient distordus.
9 S'il reste trop d'espace vierge sur un disque (si la partie utilisée
est inférieure à 55 mm), sa lecture pourra poser des problèmes.
Logo du disque
Code de
région
Signaux
enregistrés
Audio
numérique
Taille du
disque
12 cm ou
8cm
98
www.insignia-products.com
Page 100

NS-19RTR 19" DVD Triple Combo
10 Ne pas coller de papier ou d'autocollants sur le disque. Ceux-ci
peuvent endommager le disque et empêcher l'appareil de le lire
correctement.
11 Le code de région de l’appareil est 1, permettant de lire des DVD
dont le code de région est 1 ou ALL (Toutes). Il n’est pas possible
de lire des DVD ayant d’autres codes de région.
Disques qui ne peuvent être lus
Ne pas essayer de lire les disques de types suivant qui risqueraient
d’endommager l’appareil :
•DVD-RAM
• CD-i
• CD Photo
• DVD audio
• DVD avec code de région autre que 1 ou ALL (Toutes)
•DTS-CD
• CD vidéo
• CD-R/RW avec fichiers MP3
• DVD-ROM pour ordinateurs personnels
• CD-ROM pour ordinateurs personnels
• Tout autre disque sans indication de compatibilité
L’appareil ne peut lire que le son enregistré sur la couche CD
normale. L’appareil ne peut lire le son enregistré sur la couche à
haute densité du CD Super Audio.
Lecture d'un disque
Pour lire un disque :
1 Appuyer sur la touche POWER (Marche/Arrêt) pour mettre
l’appareil sous tension.
2 Appuyer sur la touche OPEN/CLOSE (Ouvrir/Fermer)
panneau avant pour ouvrir le plateau à disque, puis insérer un
disque avec l’étiquette tournée vers le haut.
3 Appuyer sur la touche PLAY (Lecture)
plateau à disque se ferme automatiquement et la lecture
commence.
Remarque
ou OPEN/CLOSE . Le
Avec les DVD qui utilisent des titres pour la
lecture de signaux de programmes, la lecture
peut commencer à partir du second titre ou
peut sauter ces titres.
www.insignia-products.com
sur le
99
 Loading...