

INSIGHT SHARK-R300-KR, SHARK-R300-US, SHARK-R300-EU, SHARK-R300-J2, SHARK-R300-J1 User Manual
...
SHARK User Guide
UHF RFID Reader
RFID Reader & Tag
Copyright(c)2017 by INSIGHT& All rights reserved
#404, 165 Gasandigital-1ro, Gumcheon-gu, Seoul, Korea
INSIGHT& Co., Ltd www.insightn.com
February 13th, 2017
Ver. 17021301

SHARK User Manual
2
The Best in the RFID Business
1. Revision History .................................................................................................................................. 4
2. Scope of Document ............................................................................................................................ 6
2. 1 Configurations ......................................................................................................................................... 7
2. 1. 1 SHARK with RFID and BARCODE Imager ...................................................................................................................................... 7
2. 1. 2 SHARK without RFID ............................................................................................................................................................................... 7
2.1.3 SHARK without BARCODE Imager ....................................................................................................................................................... 8
2.1.4 Accessories ...................................................................................................................................................................................................... 8
3. Getting Started .................................................................................................................................... 9
3. 1 External View ......................................................................................................................................... 10
3.1.1 Integrated Product – External view ..................................................................................................................................................... 10
3. 2 LCD Control Panel ......................................................................................................................................... 13
3. 3 Side Buttons and Lights ............................................................................................................................... 15
3. 4 ICON Definition ............................................................................................................................................. 16
4. Operations ........................................................................................................................................... 17
4. 1 Setting Up the SHARK ................................................................................................................................. 18
4. 1. 1 Battery charging ........................................................................................................................................................................................ 18
4. 2 Mounting a Mobile Device on the SHARK .............................................................................................. 18
4. 2. 1 To mount mobile device ....................................................................................................................................................................... 18
4. 3 Installing the Lanyard ................................................................................................................................... 19
4. 3. 1 To install the optional lanyard ........................................................................................................................................................... 19
4. 4 Booting Message in LCD ............................................................................................................................. 22
4. 4. 1 Battery Check Message.......................................................................................................................................................................... 22
4 .4. 2 S-RAM Check Message .......................................................................................................................................................................... 22
4. 4. 3 BARCODE Module Check Message .................................................................................................................................................. 22
4. 4. 4 RFID Module Check Message ............................................................................................................................................................. 22
4. 5 Menu Control Basis ....................................................................................................................................... 23
4. 6 How to use Menu Item & Sub-Menu Item ............................................................................................. 24
4. 6. 1 Mode Setting .............................................................................................................................................................................................. 24
4. 6. 2 Option Setting ............................................................................................................................................................................................ 25
4. 6. 3 How to use “DATA VIEW” Menu Item ............................................................................................................................................ 27
4. 6. 4 Communication Path Setting .............................................................................................................................................................. 28
4. 6. 5 How to use “F/W VIEW” Menu Item ............................................................................................................................................... 29
Table of Contents

SHARK User Manual
3
The Best in the RFID Business
4. 6. 6 Barcode Mode Setting ........................................................................................................................................................................... 30
4. 6. 7 Barcode Reporting Setting ................................................................................................................................................................... 31
4. 6. 8 Barcode Aim Setting ............................................................................................................................................................................... 33
4. 6. 9 Image Resolution Setting ..................................................................................................................................................................... 34
4. 6. 10 RFID Power Setting ............................................................................................................................................................................... 35
4. 6. 11 RFID Reporting ........................................................................................................................................................................................ 37
4. 7 RFID Operation .............................................................................................................................................. 38
4. 7. 1 Data Reading & Stop ............................................................................................................................................................................. 38
4. 8 BARCODE Operation ..................................................................................................................................... 40
4. 8. 1 Data Reading & Stop (BARCODE Reporting Parameter “Single”) ..................................................................................... 40
4. 8. 2 Data Reading & Stop (BARCODE Reporting Parameter “Multiple”) ................................................................................ 42
4. 8. 3 Data Reading & Stop (BARCODE Reporting Parameter “Continuous”) .......................................................................... 44
ANNEX ............................................................................................................................................................. 46
A. To Update SHARK Firmware .......................................................................................................................... 47
B. Troubleshooting ................................................................................................................................................ 49

SHARK User Manual
4
The Best in the RFID Business
1. Revision History
This section provides you with how this document is
organized

SHARK User Manual
5
The Best in the RFID Business
Document
Number
Description
Revision Date
2016080900
Initial Release
August 2016
2017021300
Add How to download SHARK F/W
February 2017
1. Revision History

SHARK User Manual
6
The Best in the RFID Business
2. Scope of Document
This User Guide is intended for use by any person who
needs to operate or to troubleshoot problems with the
SHARK.
The SHARK provides Radio Frequency Identification (RFID),
and BARCODE scanning functionality.
The unit can be used stand alone or paired with BLE
enabled host device (such as a smart phone).
Configurations

SHARK User Manual
7
The Best in the RFID Business
2. 1 Configurations
2. 1. 1 SHARK with RFID and BARCODE Imager
[ TABLE 2.1.1 ] SHARK with RFID and BARCODE Imager
Configuration
Description
SHARK-R300-KR
KR (with imager)
SHARK-R300-US
US (with imager)
SHARK-R300-EU
EU (with imager)
SHARK-R300-J1
JP, high power (with imager)
SHARK-R300-J2
JP, low power (with imager)
SHARK-R300-CN
CN (with imager)
2. 1. 2 SHARK without RFID
[ TABLE 2.1.2 ] SHARK without RFID
Configuration
Description
SHARK-R100
(with imager)
2. Scope of Document
SHARK User Manual
8
The Best in the RFID Business
2.1.3 SHARK without BARCODE Imager
[ TABLE 2.1.3 ] SHARK without BARCODE Imager
Configuration
Description
SHARK-R200-KR
KR (no imager)
SHARK-R200-US
US (no imager)
SHARK-R200-EU
EU (no imager)
SHARK-R200-J1
JP, high power (no imager)
SHARK-R200-J2
JP, low power (no imager)
SHARK-R200-CN
CN (no imager)
2.1.4 Accessories
[ TABLE 2.1.4 ] Host Adapters
Item
Part Number
Cradle
CRD-SHARK-001C
Cradle power supply
100-240VAC, 5V, 2A
CHPWRS-SHARK-001C
Charging cable
CHCBL-SHARK-001C
Micro USB cable
MUSBCBL-SHARK-001M
Lanyard
LNYD-SHARK-001L
Handle
HDL-SHARK-001H
Lithium-ion battery
BTRY-SHARK-001L

SHARK User Manual
9
The Best in the RFID Business
3. Getting Started
This Section shows ICONs, operational controls and location
of major components used when using SHARK.
Detailed Contents are as follows.
External View
LCD Control Panel
Side Buttons and Lights
ICON Definition
SHARK User Manual
10
The Best in the RFID Business
3. 1 External View
There are 3 types of SHARK; Integrated Product, only for RFID, and only for BARCODE. If Product type is only
for RFID(without BARCODE), appearance is same with integrated product. But it cannot use BAROCDE scanning
functionality. If Product type is only for BARCODE(without RFID), There is no RFID antenna.
3.1.1 Integrated Product – External view
<Fig 3.1.1> Front of SHARK <Fig 3.1.2> Upper Side of SHARK
3. Getting Started

SHARK User Manual
11
The Best in the RFID Business
<Fig 3.1.3> Left Side of SHARK
<Fig 3.1.4> Right Side of SHARK
SHARK User Manual
12
The Best in the RFID Business
<Fig 3.1.5> Compartment of SHARK (Integrated Product)
[ TABLE 3-1-1 ]
No.
Compartment
1
RFID Hot Key
2
BARCODE Hot Key
3
GUN Button
4
Control Panel
5
Power Button
6
Battery Charging LED
7
Bluetooth LED
8
Data LED
9
Micro USB(Type B)
10
Smart Phone
11
RFID Antenna
12
BARCODE
13
Cradle
SHARK User Manual
13
The Best in the RFID Business
3. 2 LCD Control Panel
The control panel contains the LCD that indicates operation and buttons that you may need to press during
operation. Buttons and LCD are described in Figure 3.2.1. Description for each are located in Table 3-2-1, 3-2-
2.
<Fig 3.2.1> Control Panel
[ TABLE 3-2-1 ]
No.
Control Panel Components
1
LCD
2
SELECT Button
3
CANCEL Button
4
UP Button
5
Down Button

SHARK User Manual
14
The Best in the RFID Business
[ TABLE 3-2-2] Description of Control Panel Buttons
Button
Function
OK(Short Key)
Enter the SHARK menu in non-menu state
Select menu parameter
CANCEL(Short Key)
Escape SHARK menu in menu State
Move to top-menu
CANCEL(Long key)
Clear RFID or BARCODE Data in non-menu
state
UP(Short Key)
Move through menu or menu parameter
in menu state
Amplify RFID Power in non-menu state
Down(Short Key)
Move through menu or menu parameter
in menu state
Attenuate RFID power in non-menu state
NOTE
Short Key: Press and Release Key in less than a second
Long Key: Press Key during about 1~2 seconds.

SHARK User Manual
15
The Best in the RFID Business
3. 3 Side Buttons and Lights
The side buttons and lights are labeled in Figure 3.1.5. Descriptions for each are located in Table 3-3-1, Table
3-3-2 and 3-3-3.
[ TABLE 3-3-1 ] Description of Side Buttons
Button
Function
Power
(Long Key)
Power On/Off
RFID Hot Key
(Short Key)
RFID Operation (Regardless of Operation
Mode)
BARCODE Hot Key
(Short Key)
BARCODE Operation (Regardless of
Operation Mode)
.
[ TABLE 3-3-2 ] Description of LED
LED
Status
LED
Battery
Charging LED
On
Battery is Charging
Off
Battery is Not Charging
Bluetooth LED
On
Bluetooth Pairing Success
Off
Bluetooth Pairing Fail
Data LED
On
The SHARK is reading data
Off
The SHARK is not reading
data

SHARK User Manual
16
The Best in the RFID Business
3. 4 ICON Definition
The following ICONs are used throughout SHARK LCD to convey certain information
[ TABLE 3-4-1 ]
ICON
ICON TYPE
Description
SJARK Mode
RFID Mode
SHARK Mode
Barcode Mode
Communication
Path
BLE(Paring Complete)
Communication
Path
BLE(Paring Fail)
Communication
Path
USB
Communication
Path
HID
Option
Volume Max
Option
Volume Mid
Option
Volume Min
Option
Vibration
Option
Option OFF
Battery
Full Battery Level
Battery
Battery Charging
Warning
Low Battery Warning
Warning
Request to Clear Data

SHARK User Manual
17
The Best in the RFID Business
4. Operations
This section provides the procedures for loading SHARK and
using Menu
Detailed Contents are as follows.
Setting Up the SHARK
Booting Message
Menu Control Basis
How to use Menu Item & Sub-Menu Item
RFID Operation
BARCODE Operation

SHARK User Manual
18
The Best in the RFID Business
4. 1 Setting Up the SHARK
To start using the SHARK for the first time, you should charge the SHARK battery.
Battery Charging LED turns green when Shark has full charged.
4. 1. 1 Battery charging
To charge the SHARK, use the Micro USB cable, cup charger, or cradle for wireless charging.
4. 2 Mounting a Mobile Device on the SHARK
4. 2. 1 To mount mobile device
<Fig 4.2.1> Mounting the mobile device on the SHARK
4. Operations

SHARK User Manual
19
The Best in the RFID Business
4. 3 Installing the Lanyard
4. 3. 1 To install the optional lanyard
<Fig 4.3.1> Installing the Lanyard - Step 1
<Fig 4.3.2> Installing the Lanyard - Step 2

SHARK User Manual
20
The Best in the RFID Business
<Fig 4.3.3> Installing the Lanyard - Step 3
<Fig 4.3.4> Installing the Lanyard - Step 4

SHARK User Manual
21
The Best in the RFID Business
<Fig 4.3.5> Installing the Lanyard - Step 5

SHARK User Manual
22
The Best in the RFID Business
4. 4 Booting Message in LCD
4. 4. 1 Battery Check Message
You will find the Battery Check Message when you press the power on button(Long Key). If Battery doesn’t
have any problem, Battery Check Message will be “Battery Check…[o]”
4 .4. 2 S-RAM Check Message
You will find the S-RAM Check Message when you press the power on button. If S-RAM doesn’t have any
problem S-RAM Check Message will be “S-RAM Check…[o]”
4. 4. 3 BARCODE Module Check Message
You will find the BARCODE Check Message when you press the power on button. If BARCODE Module doesn’t
have any problem BARCODE Check Message will be “BARCODE Check…[o]”
4. 4. 4 RFID Module Check Message
You will find the RFID Check Message when you press the power on button. If RFID Module doesn’t have
any problem RFID Check Message will be “RFID Check…[o]”

SHARK User Manual
23
The Best in the RFID Business
4. 5 Menu Control Basis
You will see following LCD image (Figure 4.5.1.1) in the LCD Screen after Booting Message. You can enter the
menu by pressing the Select button in non-menu state. You will see following LCD image (Figure 4.5.1.2) in
the LCD Screen as soon as you enter the menu. There are 11 menu items ( Mode, Option, Data View,
Communication Path, F/W View, Barcode Mode, Barcode Report, Barcode Aim, Resolution, RFID Power, RFID
Report ). You can move through menu by pressing Up button or Down button in menu state. And then you
can choose menu item by pressing Select button and Select sub-menu item by pressing Select button. If you
finish up this process, you can return to Non-menu state by pressing Cancel button.
<Fig 4.5.1.1> Non-menu state
<Fig 4.5.1.2> First image in menu state

SHARK User Manual
24
The Best in the RFID Business
4. 6 How to use Menu Item & Sub-Menu Item
4. 6. 1 Mode Setting
Mode setting procedures are as follows
Step 1) Choose Menu item “MODE” by Pressing Select button.
Step 2) Move to RFID or BARCODE by pressing Up button or Down button. And then apply sub-menu-item
by Pressing Select button.
NOTE:
If you don’t select sub-menu-item, the Sub-Menu-Item will not be applied to SHARK.

SHARK User Manual
25
The Best in the RFID Business
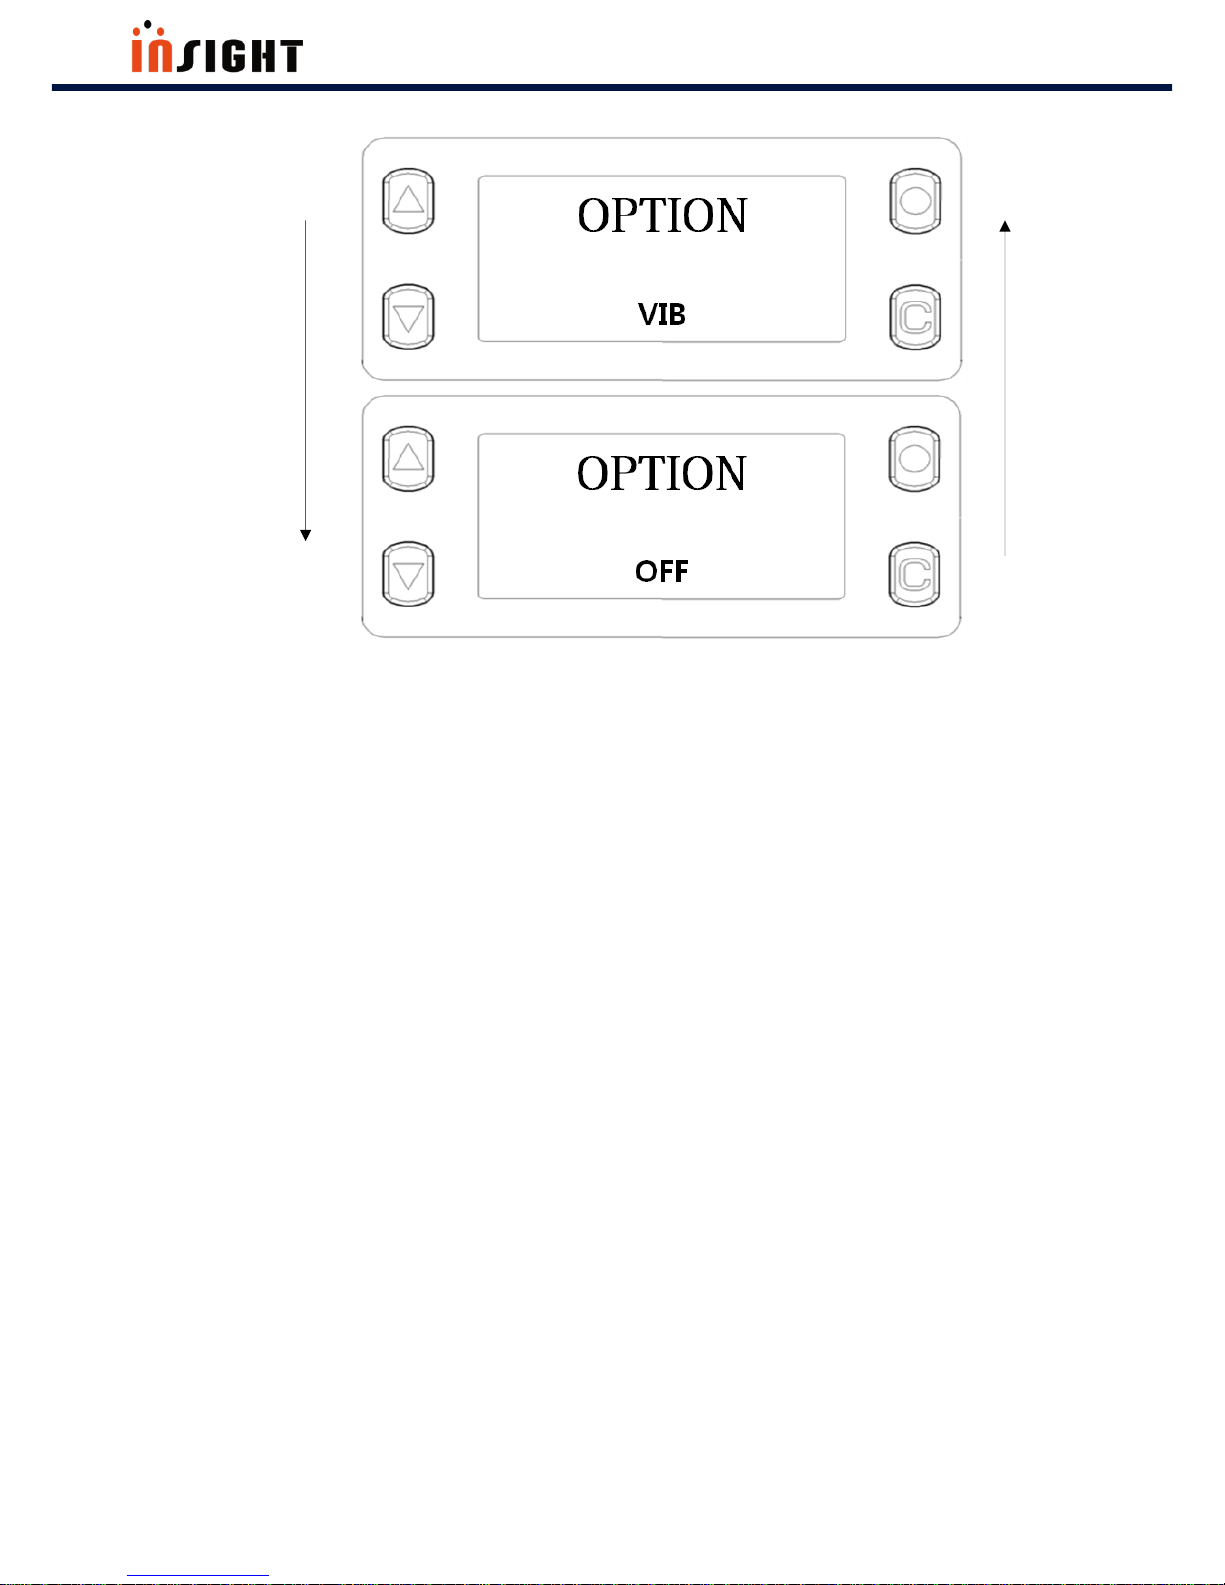
4. 6. 2 Option Setting
Option setting procedures are as follows.
Step 1) Choose Menu item “OPTION” by Pressing Select button.
Step 2) Move to Option parameter(MAX, MID, MIN, VIB, OFF) by pressing Up button or Down button. And
then apply Option by Pressing Select button.
SHARK User Manual
26
The Best in the RFID Business
NOTE:
MAX, MID, MIN mean Buzzer volume.
VIB means vibrator.

SHARK User Manual
27
The Best in the RFID Business
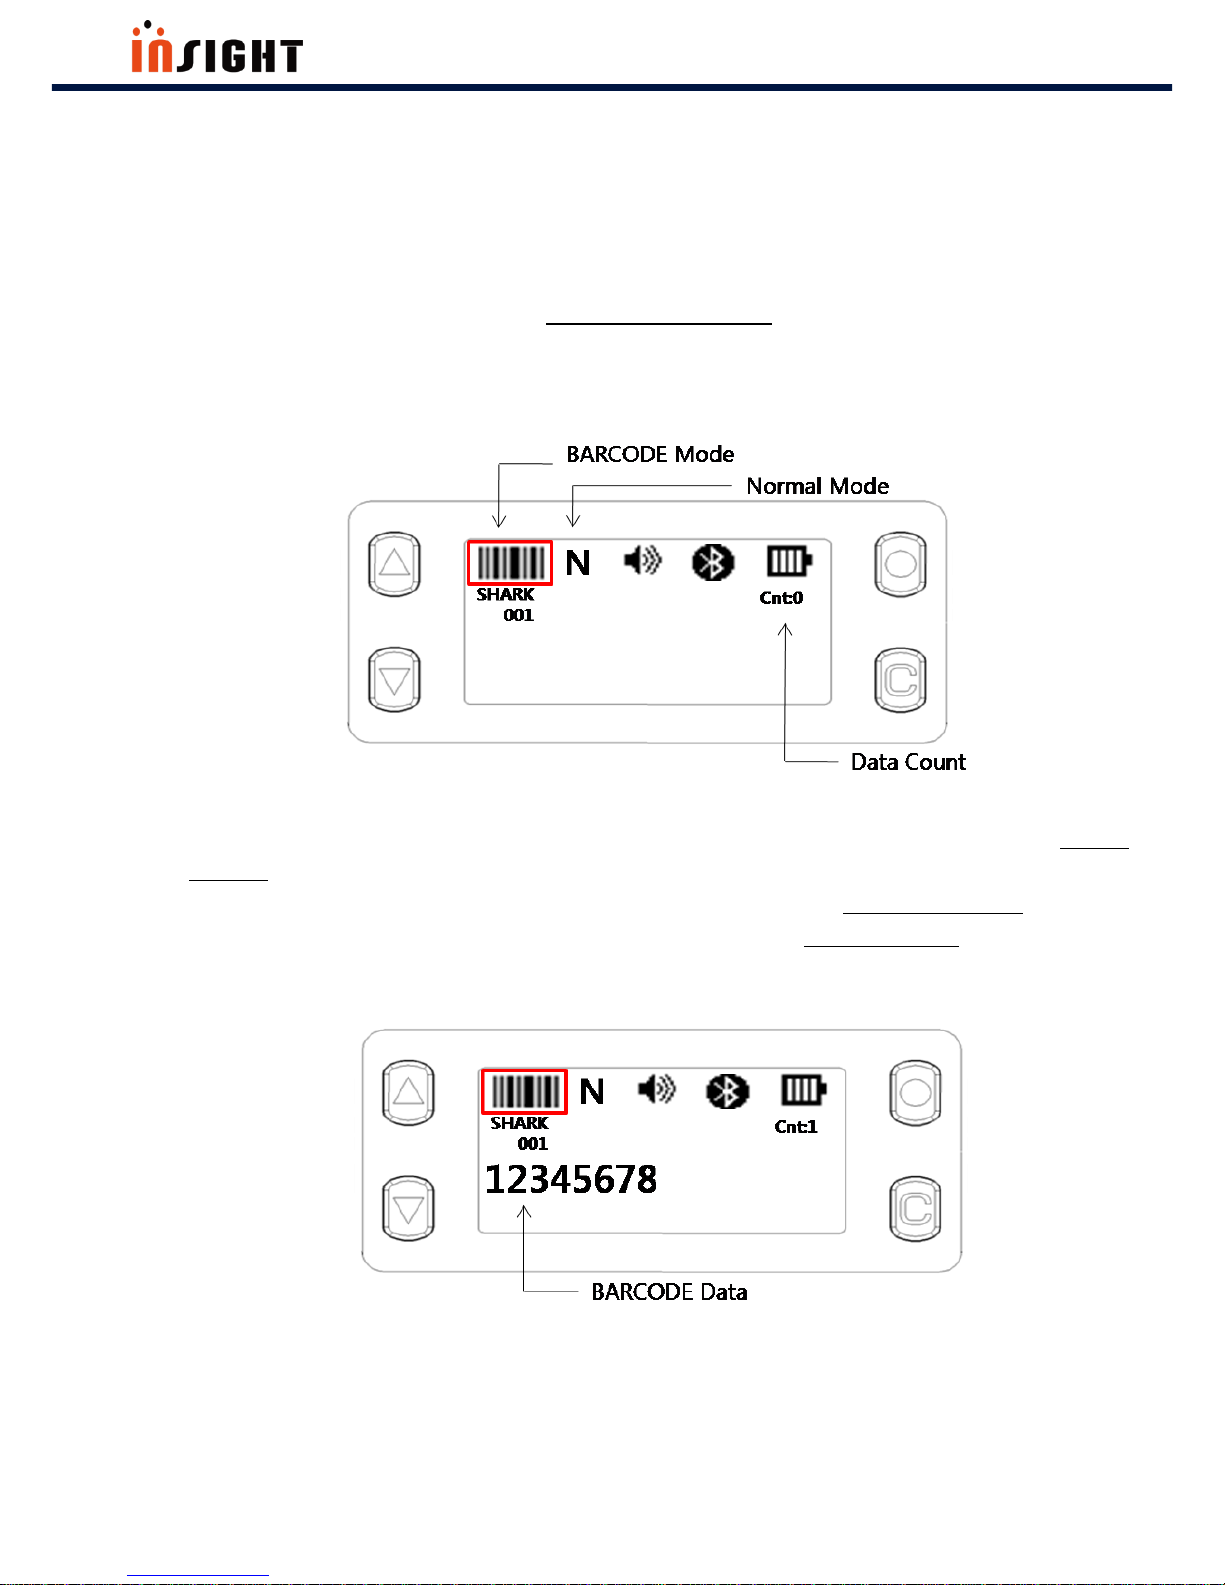
4. 6. 3 How to use “DATA VIEW” Menu Item
The procedures are as follows.
Step 1) Choose Menu item “DATA VIEW” by Pressing Select button.
Step 2) Move to Nth data that you want to see by pressing Up button or Down button.
NOTE:
If data length is longer than 28, press Select button. Then you will see remains.
SHARK User Manual
28
The Best in the RFID Business
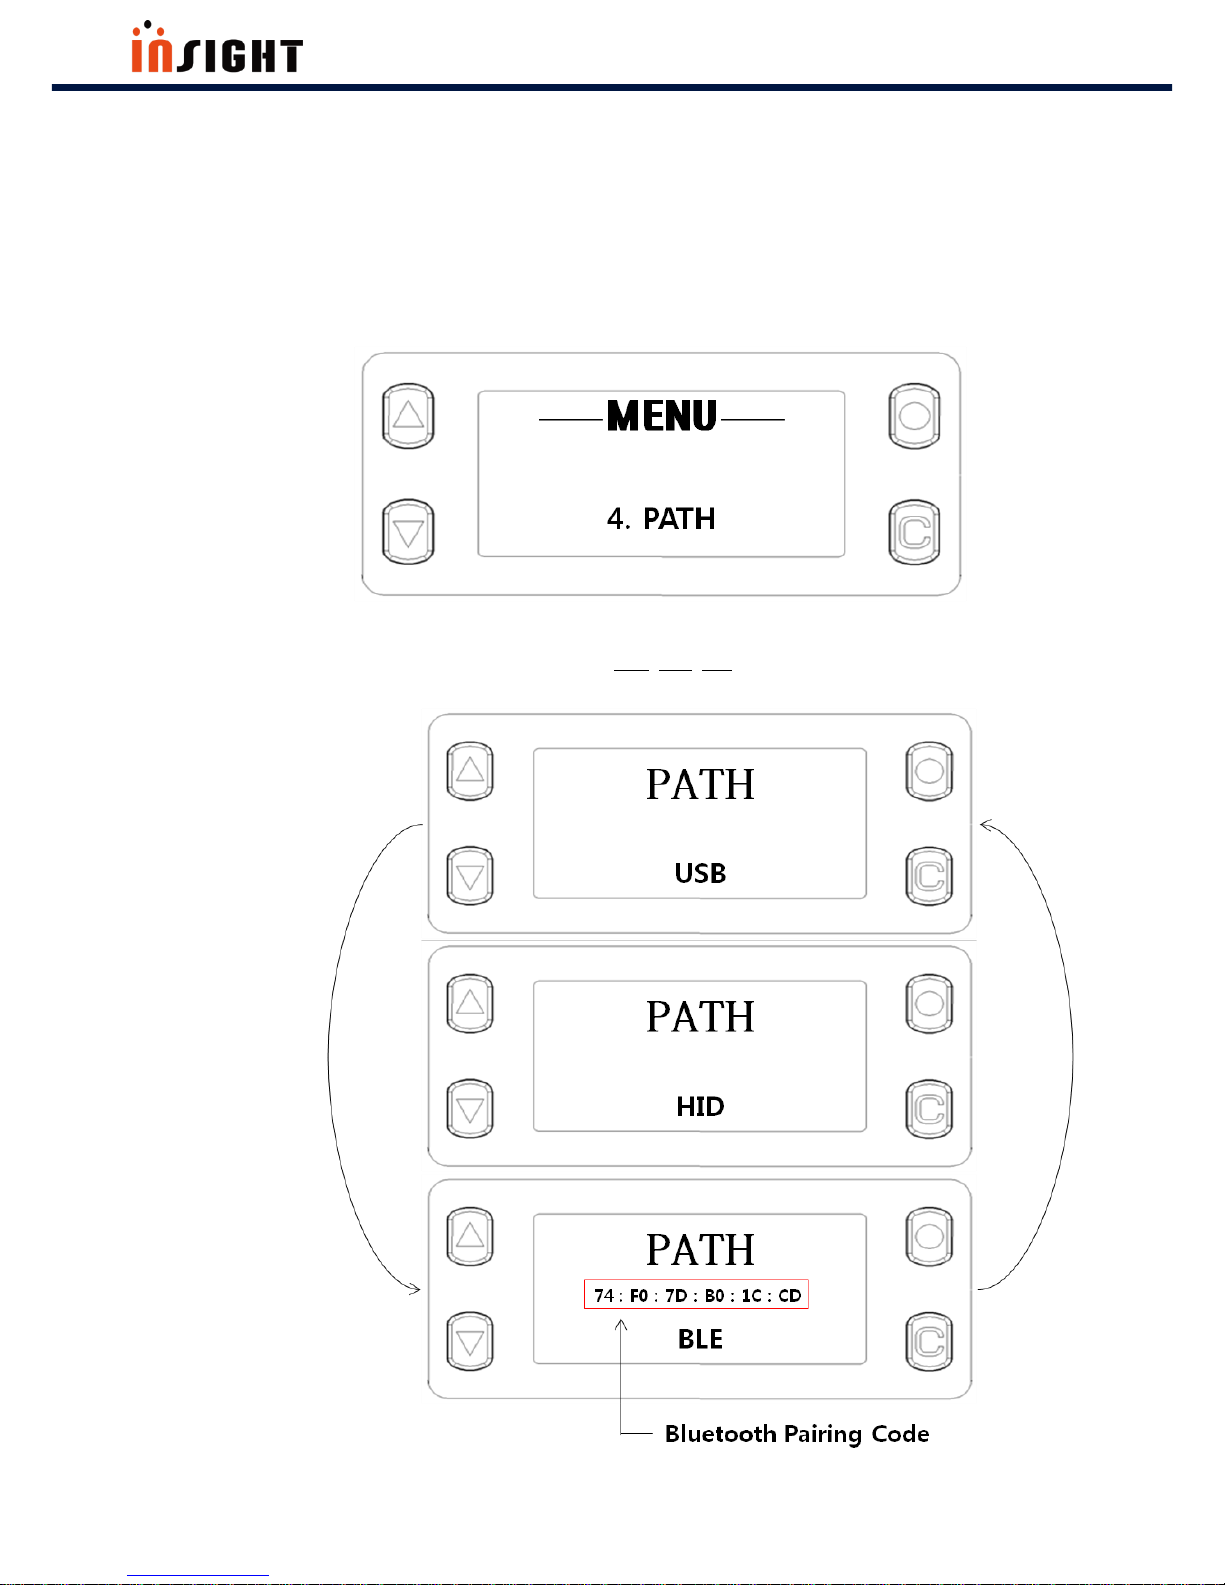
4. 6. 4 Communication Path Setting
The procedures are as follows.
Step 1) Choose Menu item “PATH” by Pressing Select button.
Step 2) Move to Communication Path parameter(USB, HID, BLE) by pressing Up button or Down button. And
then apply Communication Path by Pressing Select button.
SHARK User Manual
29
The Best in the RFID Business
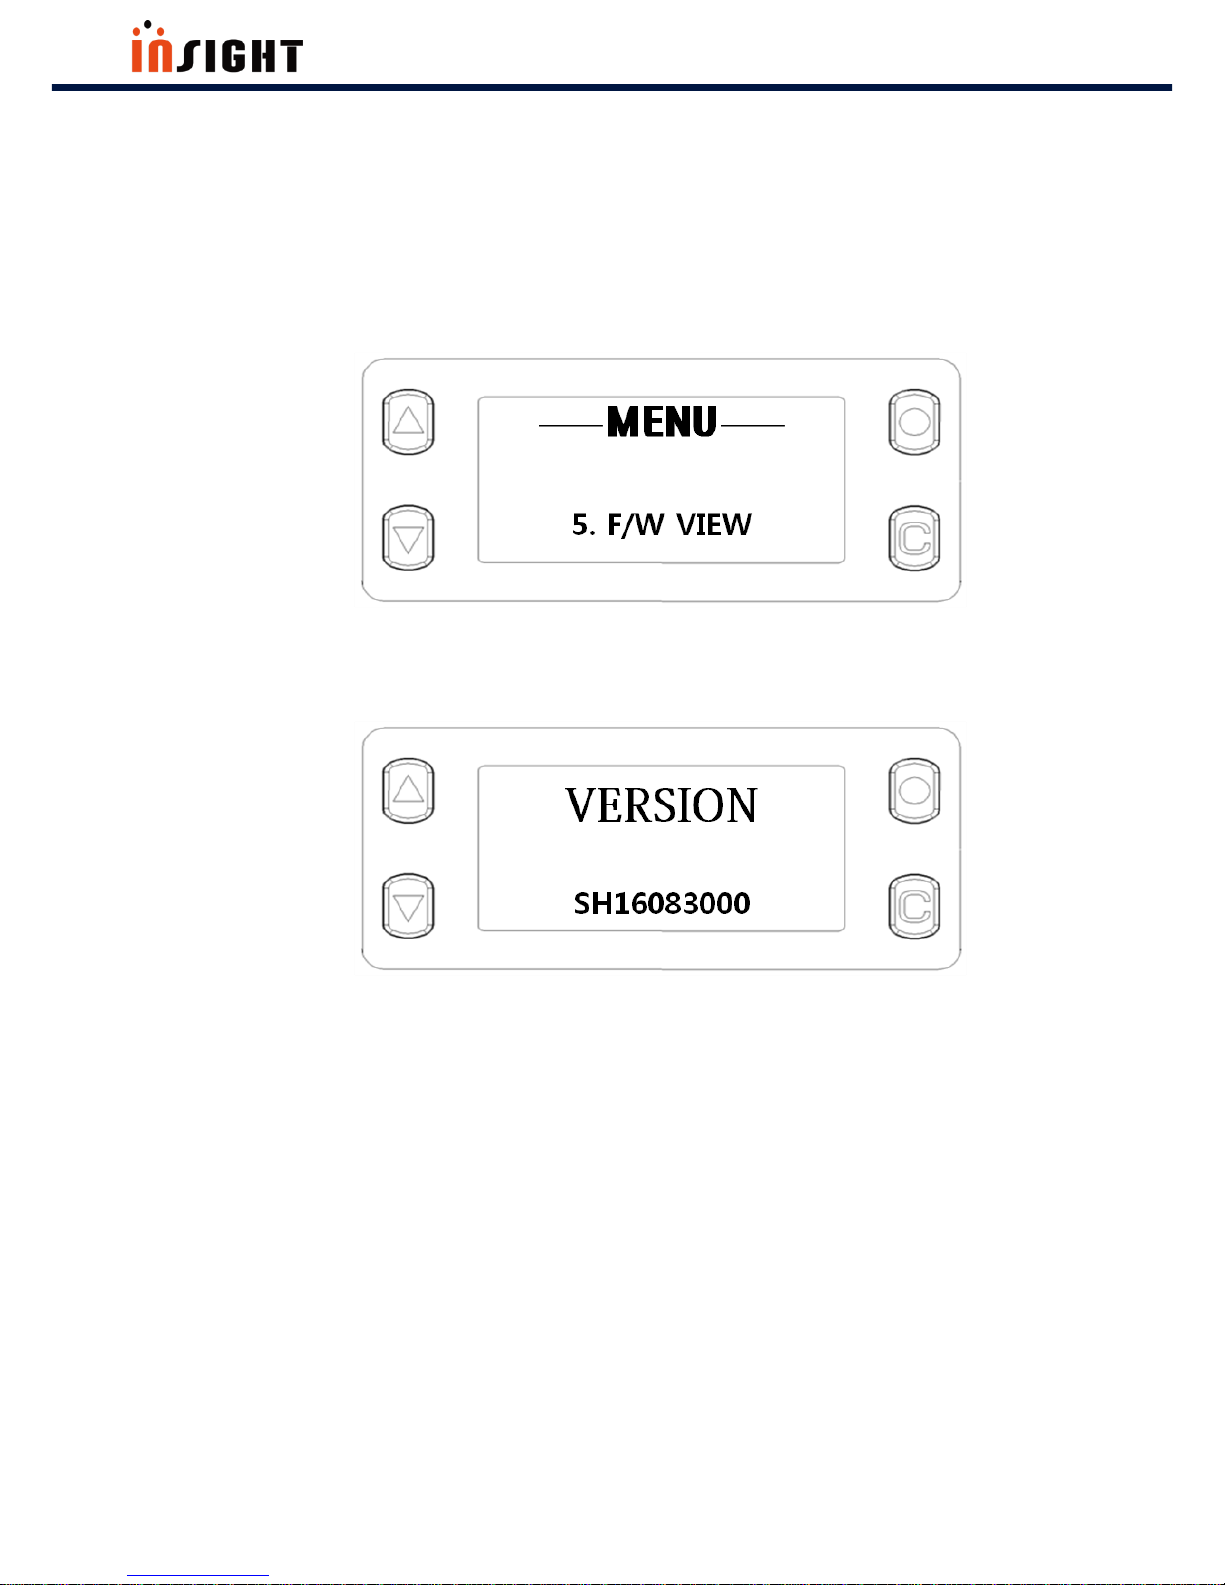
4. 6. 5 How to use “F/W VIEW” Menu Item
The procedures are as follows.
Step 1) Choose Menu item “F/W VIEW” by Pressing Select button.
Then you will see SHARK F/W Version
SHARK User Manual
30
The Best in the RFID Business
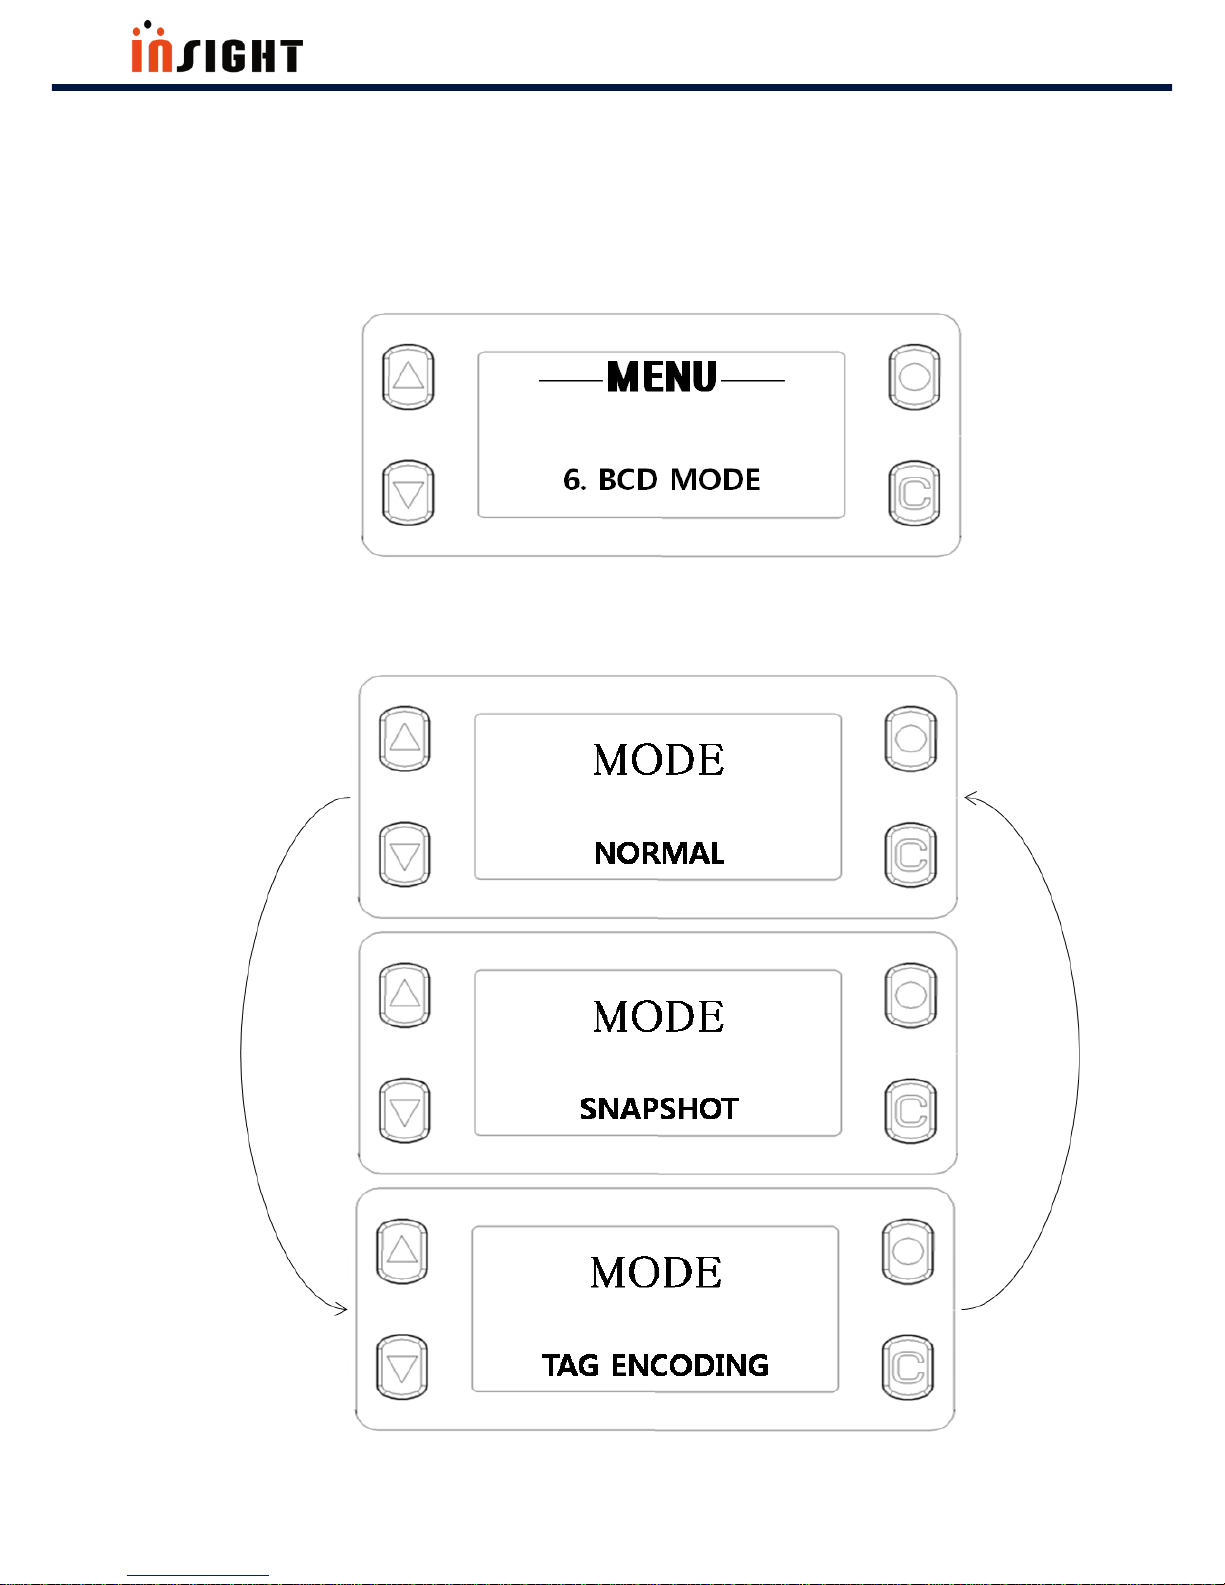
4. 6. 6 Barcode Mode Setting
The procedures are as follows.
Step 1) Choose Menu item “BCD MODE” by Pressing Select button.
Step 2) Move to BCD Mode parameter by pressing Up button or Down button. And then apply sub-menu
item by Pressing Select button.
SHARK User Manual
31
The Best in the RFID Business
NOTE:
NORMAL means using BARCODE Module to decode BAROCDE.
SNAPSHOT means using BARCODE Module to take a snapshot.
TAG ENCODING means writing BARCODE data to Tag’s EPC memory.
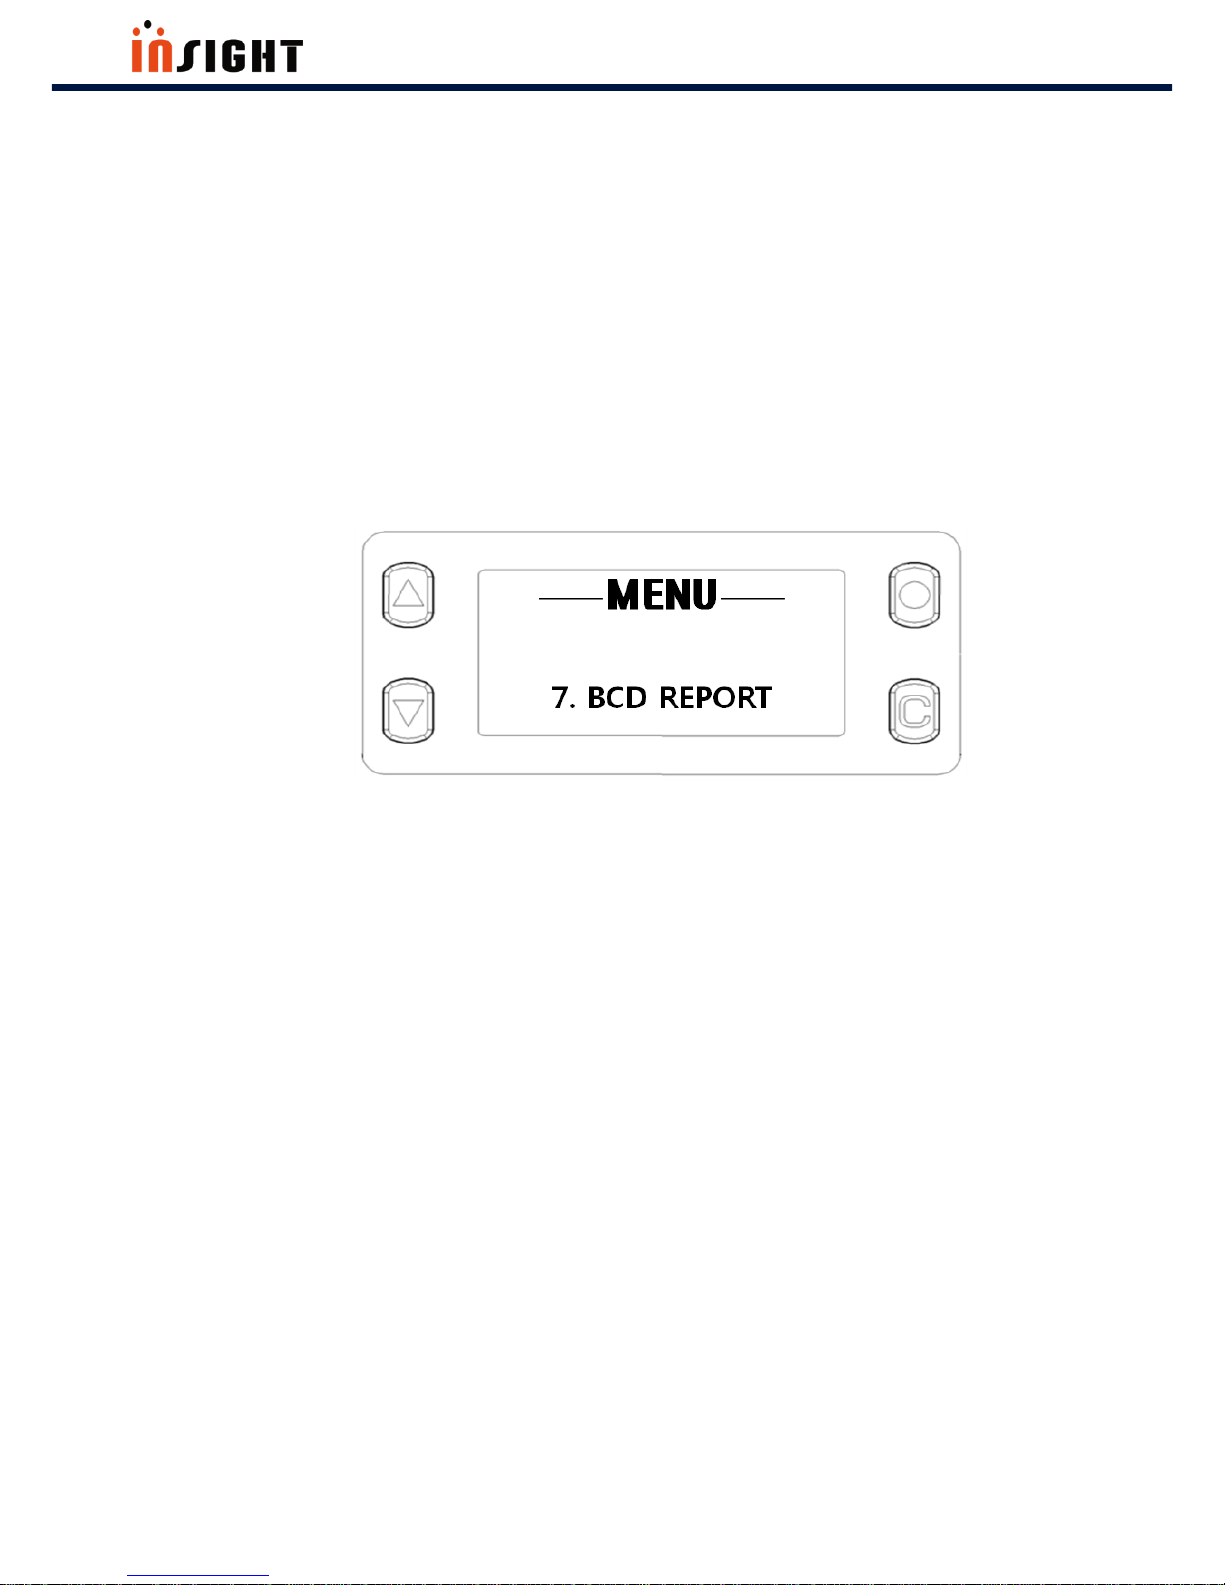
4. 6. 7 Barcode Reporting Setting
The procedures are as follows.
Step 1) Choose Menu item “BCD REPORT” by Pressing Select button.
Step 2) Move to Reporting parameter by pressing Up button or Down button. And then apply sub-menu item
by Pressing Select button.

SHARK User Manual
32
The Best in the RFID Business
NOTE:
Single Reporting: Once SHARK read Barcode data, SHARK will stop decoding, and
Decoding Timeout value is 4 sec.
Multiple Reporting: Even if SHARK read Barcode data, SHARK will stop decoding
immediately. Decoding Timeout value is 4 sec.
Continuous Reporting: Even if SHARK read Barcode data, SHARK will not stop
decoding. And there is no Decoding Timeout value (Only stop command and button
pressing can stop decoding)

SHARK User Manual
33
The Best in the RFID Business
4. 6. 8 Barcode Aim Setting
The procedures are as follows.
Step 1) Choose Menu item “BCD AIM” by Pressing Select button.
Step 2) Move to Auto Aim or Center Aim by pressing Up button or Down button. And then apply sub-menu
item by Pressing Select button.
NOTE:
Auto Aim: SHARK decode in the illumination field.
Center Aim: SHARK decode only center of the illumination field.

SHARK User Manual
34
The Best in the RFID Business
4. 6. 9 Image Resolution Setting
The procedures are as follows.
Step 1) Choose Menu item “RESOLUTION” by Pressing Select button.
Step 2) Move to Resolution parameter(LOW, MID, HIGH) by pressing Up button or Down button. And then
apply sub-menu item by Pressing Select button.

SHARK User Manual
35
The Best in the RFID Business
NOTE:
Low: Image Resolution is 320x200 Pixels
Mid: Image Resolution is 640x400 Pixels
High: Image Resolution is 1280x800 Pixels
4. 6. 10 RFID Power Setting
There are 2 ways to set RFID Power. RFID Power setting procedures are as follows.
First Way
Step 1) Choose Menu item “POWER” by Pressing Select button.
Step 2) Move though RFID Power sub-menu item by pressing Up button or Down button. And then apply
Power value by Pressing Select button.

SHARK User Manual
36
The Best in the RFID Business
Second Way
Press Up button or Down button in non-menu state.
NOTE:
SHARK mode must be RFID mode.
You can change RFID Power in this way only in RFID Mode
SHARK User Manual
37
The Best in the RFID Business
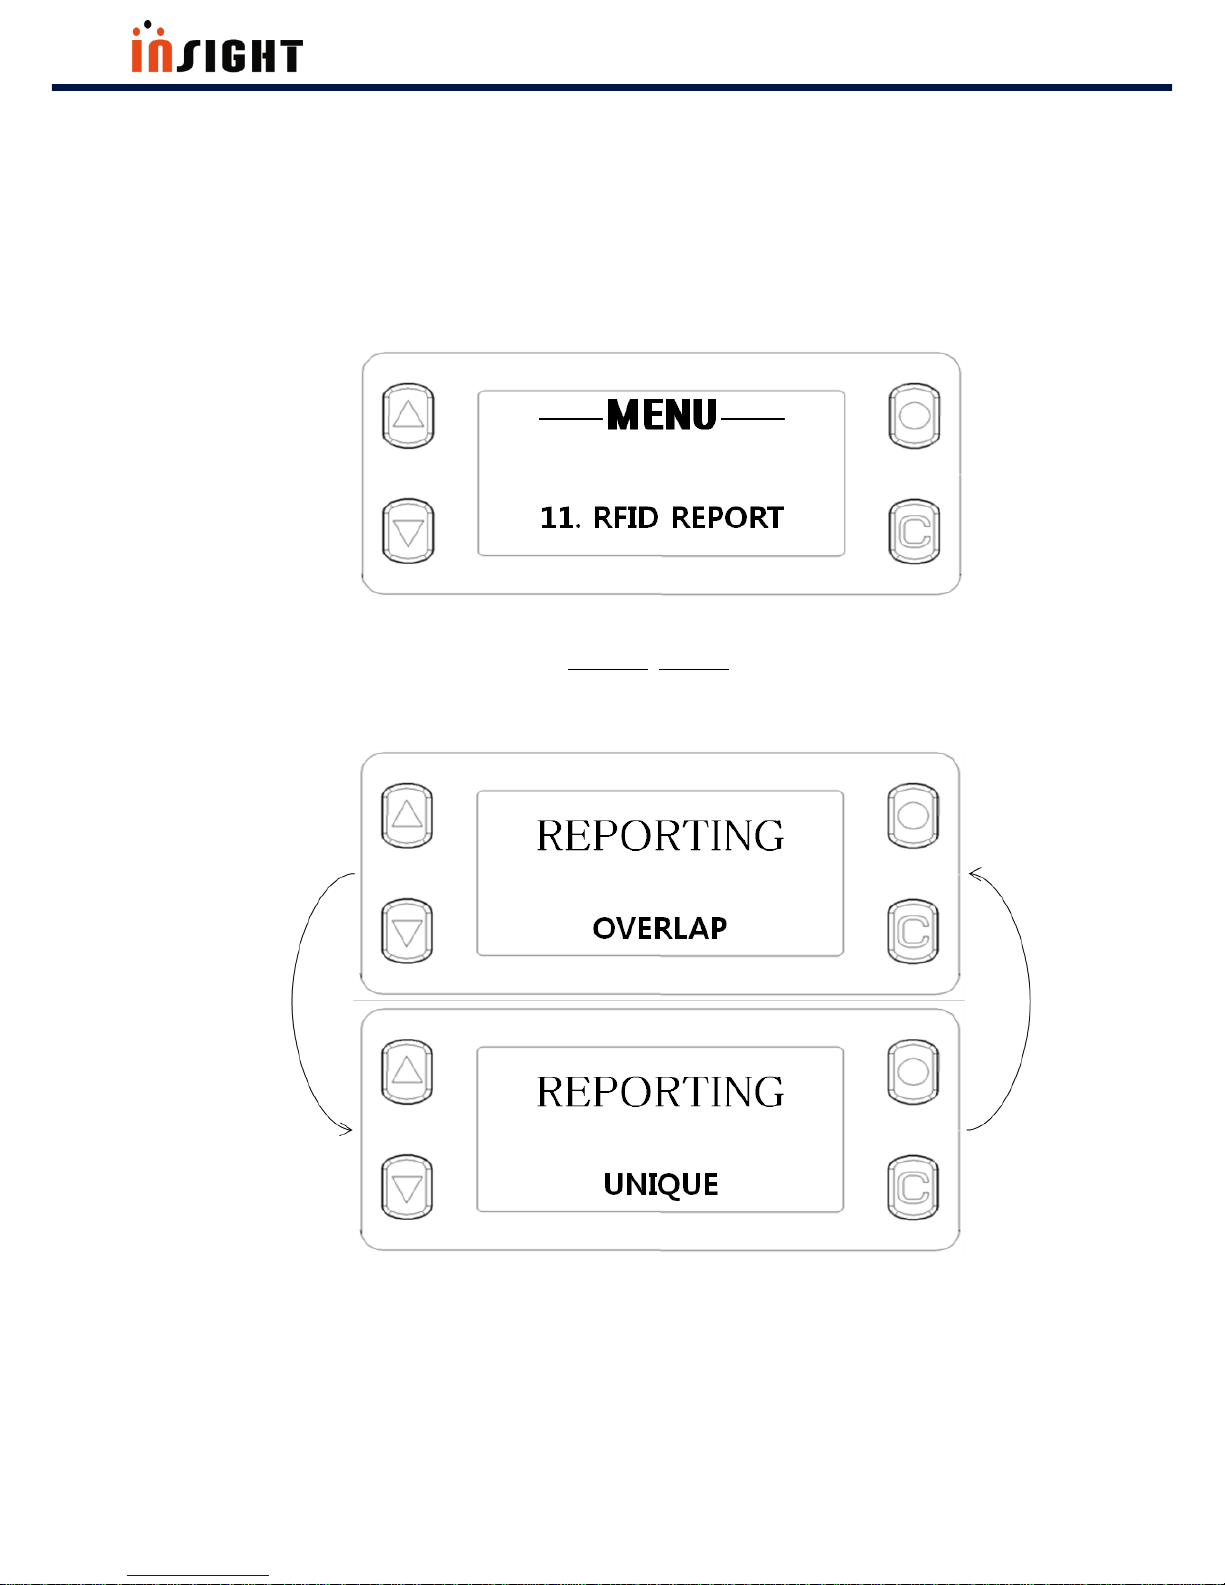
4. 6. 11 RFID Reporting
The procedures are as follows.
Step 1) Choose Menu item “RFID REPORT” by Pressing Select button
Step 2) Move to RFID Reporting parameter(OVERLAP, UNIQUE) by pressing Up button or Down button. And
then apply Reporting by Pressing Select button.

SHARK User Manual
38
The Best in the RFID Business
4. 7 RFID Operation
4. 7. 1 Data Reading & Stop
There are 2 ways to read RFID Data, using SHARK.
The procedures are as follows.
Using GUN button
Step 1) Check the SHARK Operation Mode
Step 2) Press Gun button and hold, then Data Reading will begin. If you want to stop, release Gun button
NOTE:
SHARK mode must be RFID mode.
If RFID Reporting parameter is Unique and if S-RAM has data that is stored in S-RAM,
then total data count will not be incremented

SHARK User Manual
39
The Best in the RFID Business
Using RFID Hot Key
Press RFID Hot Key in Non-menu state. SHARK always Read Tag Data when you use RFID Hot Key regardless
of operation mode. If you want to stop, Press RFID Hot Key one more time.
Once you press RFID Hot Key, SHARK will not stop Data reading until you press RFID Hot Key one more time.
The procedures are as follows.
Step 1)
Step 2)

SHARK User Manual
40
The Best in the RFID Business
4. 8 BARCODE Operation
4. 8. 1 Data Reading & Stop (BARCODE Reporting Parameter “Single”)
There are 2 ways to read BARCODE data, using SHARK.
The procedures are as follows.
Using GUN button
Step 1) Check the SHARK Operation Mode
Step 2) Press and release Gun button. Then BARCODE decoding will begin. BARCODE operation in single
reporting has a BAOCDE scan timeout, so if there is no BARCODE in the BARCODE AIM, SHARK will stop
BAROCDE decoding automatically. Also if SHARK read BARCODE data, then SHARK will stop decoding
immediately in single reporting. (You don’t need to anything to stop operation in single reporting). But if you
want to stop decoding immediately, press and release Gun button one more time

SHARK User Manual
41
The Best in the RFID Business
Using BARCODE Hot Key (BARCODE Reporting Parameter “Single”)
Press BARCODE Hot Key in Non-menu state. SHARK always Read BARCODE Data when you use BARCODE
Hot Key regardless of Operation Mode. If you want to stop decoding immediately, Press BARCODE Hot Key
one more time. BARCODE Hot Key operation is completely same with Gun button operation
SHARK User Manual
42
The Best in the RFID Business
4. 8. 2 Data Reading & Stop (BARCODE Reporting Parameter “Multiple”)
There are 2 ways to read BARCODE data, using SHARK.
The procedures are as follows.
Using GUN button
Step 1) Check the SHARK Operation Mode
Step 2) Press and release Gun button. Then BARCODE decoding will begin. BARCODE Operation in multiple
reporting has a BAOCDE scan timeout, so if there is no BARCODE in the BARCODE AIM, SHARK will stop
BAROCDE decoding automatically. Even if SHARK read the BARCODE data in multiple reporting, SHARK will
not stop immediately. (You don’t need to anything to stop operation in multiple reporting). But if you want to
stop decoding immediately, press and release Gun button one more time

SHARK User Manual
43
The Best in the RFID Business
Using BARCODE Hot Key (BARCODE Reporting Parameter “Multiple”)
BARCODE Hot Key operation is completely same with Gun button operation

SHARK User Manual
44
The Best in the RFID Business
4. 8. 3 Data Reading & Stop (BARCODE Reporting Parameter “Continuous”)
There are 2 ways to read BARCODE data, using SHARK.
The procedures are as follows.
Using GUN button
Step 1) Check the SHARK Operation Mode
Step 2) Press and release Gun button. Then BARCODE decoding will begin. And there is no BARCODE scan
Timeout. Even if SHARK read BARCODE data, SHARK will not stop decoding. So if you want to stop decoding,
press and release Gun button one more time

SHARK User Manual
45
The Best in the RFID Business
Using BARCODE Hot Key (BARCODE Reporting Parameter
“Continuous”)
BARCODE Hot Key operation is completely same with Gun button operation

SHARK User Manual
46
The Best in the RFID Business
ANNEX
This section provides the procedures for updating SHARK
Firmware, troubleshooting solutions for potential problems.
Detailed Contents are as follows.
To Update SHARK Firm Ware
Troubleshooting
SHARK User Manual
47
The Best in the RFID Business
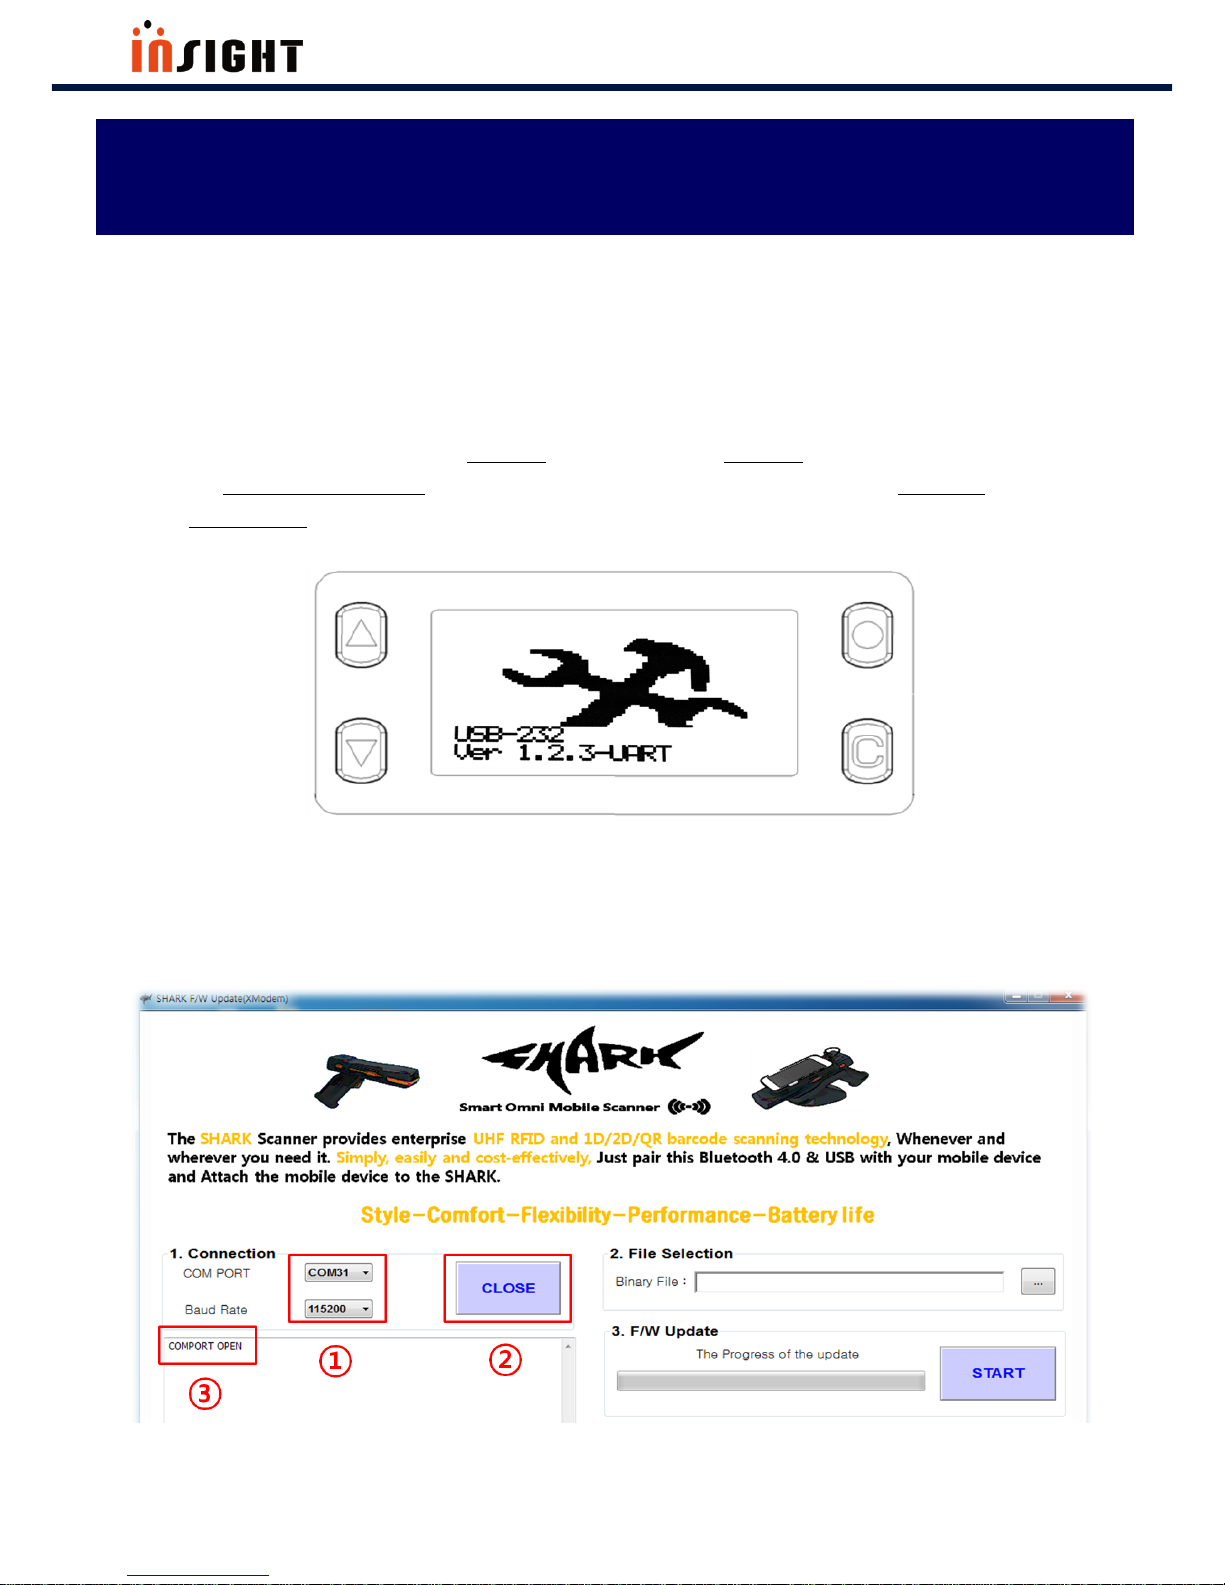
A. To Update SHARK Firmware
The procedures are as follows.
Step 1) Press Power On button(Long Key) and RFID Hot Key(Long Key) simultaneously to enter
the Firmware Update Mode. Then you will see following LCD image that indicates Firmware
Update Mode
Step 2) Connect SHARK and PC using USB cable. And run “SHARK F/W Updater” and check serial port
number.(baudrate is 115200) . Open Communication Port.
ANNEX

SHARK User Manual
48
The Best in the RFID Business
Step 3) Select SHARK binary file for SHARK Update. And Press START Button

SHARK User Manual
49
The Best in the RFID Business
B. Troubleshooting
Always ensure the battery is properly installed.
[ TABLE B ]
Problem
Possible Causes
Possible Solutions
Barcode Imager comes
on, but scanner does
not decode the barcode.
Barcode symbol is unreadable.
Check the symbol to ensure it is not
defaced. Try scanning test barcode
of the same barcode type
SHARK does not fully
charge
Attempt to charge on a nonpowered USB hub
Connect the SHARK to a powered
USB power adapter(5V, 2A)
BLE LED turns off
SHARK is out of range of the BLE
host
Move closer to the host and try reconnect.
Unable to pair the
SHARK with the mobile
device
BLE is off on the mobile device
Turn on Bluetooth on the mobile
device
SHARK communication path is not
BLE
Change a SHARK communication
path to “BLE”
No RFID data displays
in the application on
the mobile device when
the SHARK starts
reading
RFID Reporting parameter is
“UNIQUE” and s-ram has the
same tag data.
Change a RFID Reporting parameter
to “OVERLAP”

SHARK User Manual
50
The Best in the RFID Business
UHF RFID Reader
RFID Reader & Tag
Copyright(c)2017 by INSIGHT& All rights reserved
#404, 165 Gasandigital-1ro, Gumcheon-gu, Seoul, Korea
INSIGHT& Co., Ltd www.insightn.com
 Loading...