

PILOT PCM
INSTALLATION INSTRUCTIONS
SHAPING THE EXPERIENCE OF LIGHT
T681X series Installation Guide
™
NOTE:
Read t he se ins tr uctio ns bef ore us ing pr odu ct .
Lis ez les in struc ti ons av ant d’u tilis er ce prod ui t.
!
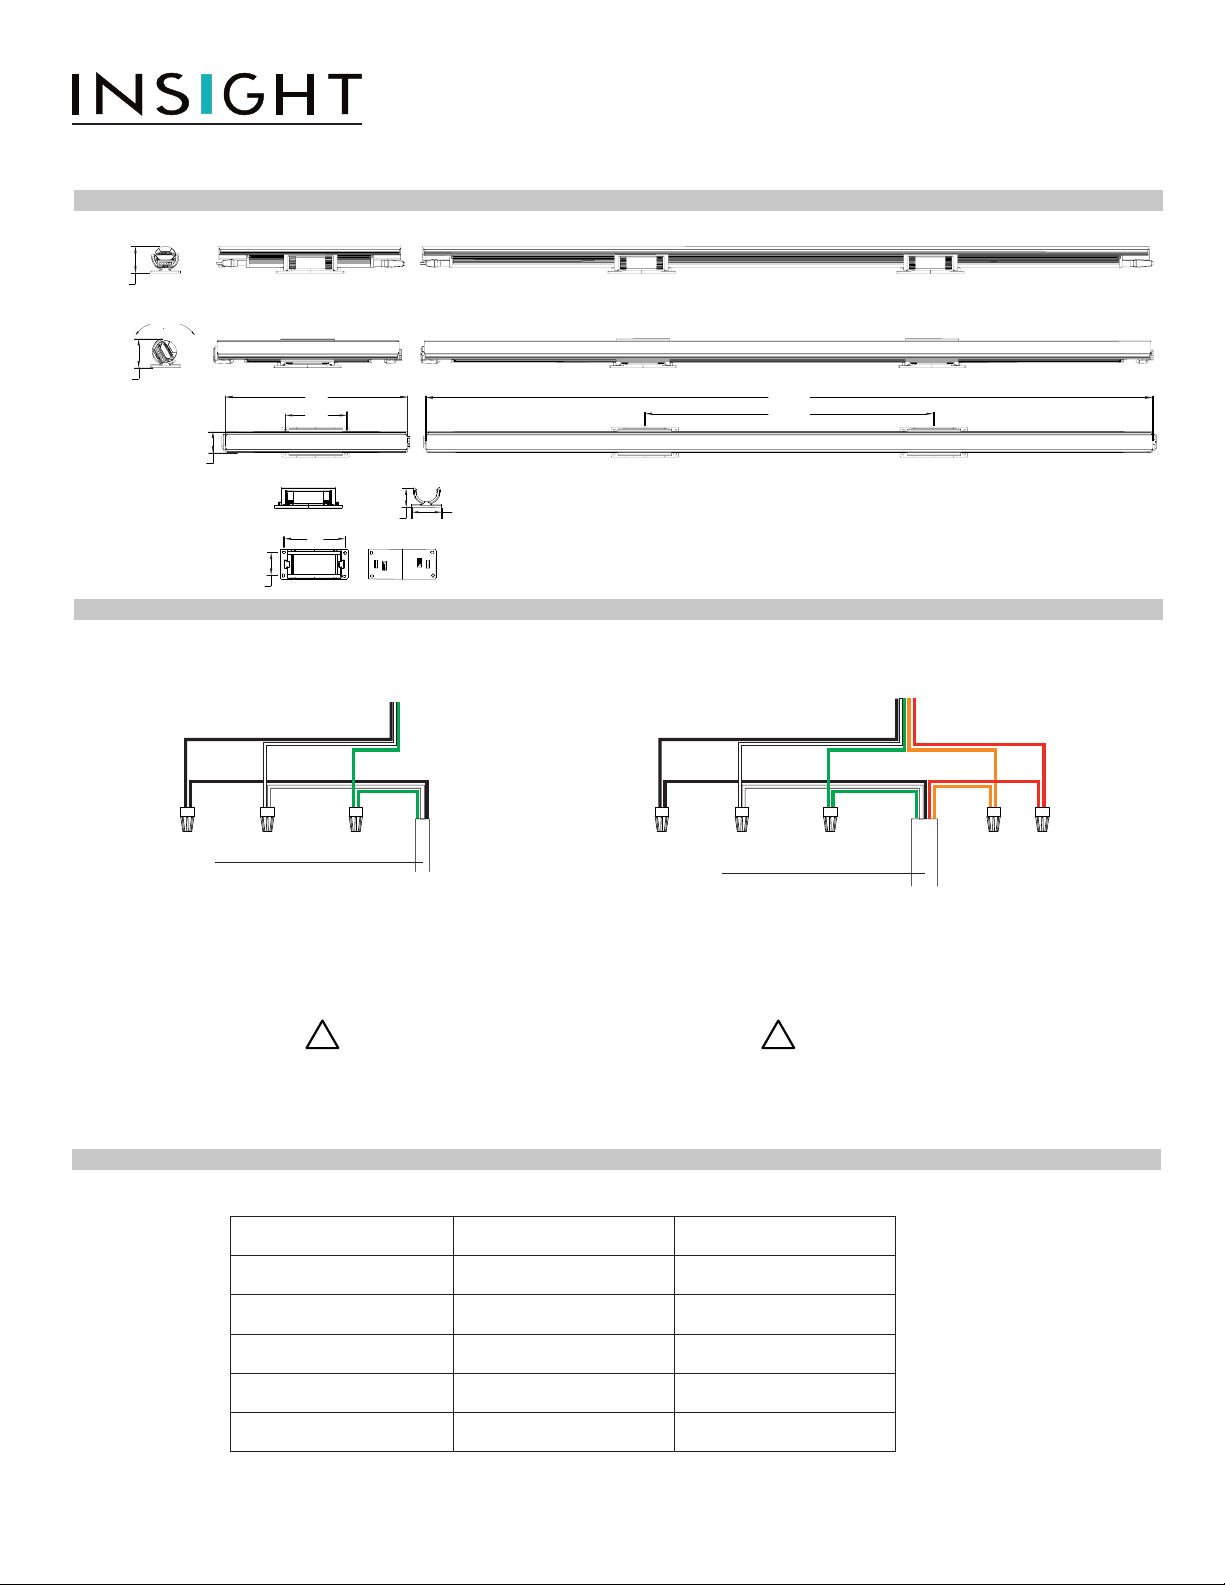
Wiring
Cables
DIMENSIONS
1-7/8"
± 90°
1-15/16"
WIRING
1.4"
LINE
LEADER CABLE
12" 48"
4"
1.3"
4"
TRIAC DIMMIMG NON DIMMING / 0-10V DIMMING
NON/TRIAC DIMMING
2"
20"
0-10V DIMMING
black
black
white green
white
NEUTRAL
GROUND
green
black
black
LINE
LEADER CABLE
white green
white
NEUTRAL
GROUND DATA - DATA +
orange
orange redgreen
or
black
red
or
black
white
DISCONNECT POWER BEFORE INSTALLING OR
SERVICING TO AVOID ELECTRICAL SHOCK.
MAXIMUM RUN LENGTHS
Wattage 120VAC 277VAC
!
WARNING
!
WARNING
POWER CABLE SHOULD NOT SUPPORT
WEIGHT OF FIXTURE: LEAVE LOOSE
3.5W 100 feet 200 feet
5W 100 feet 200 feet
7W 100 feet 200 feet
10W 70 feet 125 feet
13W 55 feet 100 feet
Insight Lighting
www.insightlighting.com
August 30, 2016 4:02 PM 1 of 4

PILOT PCM
INSTALLATION INSTRUCTIONS
SHAPING THE EXPERIENCE OF LIGHT
T681X series Installation Guide
™
INstallation: Section A
NOTE:
Read t he se ins tru ct ion s b efore usi ng prod uc t.
Lis ez les ins tr uc tio ns avant d ’ut ili se r ce pr odu it .
!
Verify electric plan and ensure all hardware is present.
Vérier le plan électrique et assurer que tout le matériel est présent.
Dry/Damp Location Install
Installation Emplacement Sec/Humide
Max Continuous Run: See Section D
Run Continue Max: Voir La Section C
T681X series Installation Guide
™
NOTE:
Rea d these instr uctio ns befo re usin g produ ct.
Lise z les i nstruc tions avant d’utili ser ce produi t.
!
Verify electric plan and ensure all hardware is present
Leader Cable
Jumper Cable
Mount to surface using the 4 screw holes on the bracket. Fasteners by others.
Fixture to Fixure Connection
Terminator
screw hole screw hole
Insight Lighting
www.insightlighting.com
August 30, 2016 4:02 PM 2 of 4

PILOT PCM
INSTALLATION INSTRUCTIONS
SHAPING THE EXPERIENCE OF LIGHT
T681X series Installation Guide
™
INstallation: Section B
NOTE:
Read t he se ins tru ct ion s b efore usi ng prod uc t.
Lis ez les ins tr uc tio ns avant d ’ut ili se r ce pr odu it .
!
Push down on bracket to rotate.
Poussez vers le bas sur le support à tourner.
Push down on bracket to rotate.
Bracket is self locking, do not rotate like a conventional bracket. Place on a at surface and push down on bracket to
release locking mechanism then release once desired position has been reached.
Rotate to desired angle then release.
Insight Lighting
www.insightlighting.com
August 30, 2016 4:02 PM 3 of 4

PILOT PCM
INSTALLATION INSTRUCTIONS
SHAPING THE EXPERIENCE OF LIGHT
!
!
!
!
!
!
!
PRODUCT SAFETY
This product must be installed in accordance with
the applicable installation code by a person familiar
with the construction and operation of the product
and the hazards involved
To avoid risk of electrical shock, disconnect power
before installing, wiring, or servicing xture
Fixture has no user-serviceable parts. Do not
open xture compartments, except as noted in this
document
Do not apply paint, lubricants or other coatings to
xture, suspension cables, or fasteners
INSTALLATION NOTES
To avoid risk of electrical shock, disconnect power before installing, wiring or servicing xtures
ADDITIONAL NOTES
In accordance with national, state, and local electrical code, connect the power cable to the line circuit
If you attach a safety cable, attach it to the xture in
accordance with all national, state, and local construction
codes
Do not use xture if the housing, suspension cables, optics,
or power cable are damaged
Insight Lighting
www.insightlighting.com
August 30, 2016 4:02 PM 4 of 4
 Loading...