

Page 1
Inside Out Networks
A Digi International Company
www.ionetworks.com
7004 Bee Caves Road
Building 3, Suite 200
Austin, TX 78746
512-306-0600 ph
512-306-0694 fax
Digi North America: 877-912-3444
Digi Europe: +49-231-9747-0
Digi Hong Kong: +852-2833-1008
90000407 Rev A
Installation
Guide
Wavespeed/S
W
I R E L E S S S E R I A L D E V I C E
Page 2

Page 3
EMC Directive 89/336/EEC |
Low Voltage Directive 73/2 3/EEC
Amending Directive 93/68 E EC
using the relevant section of the following E U
standards and other normative docu ments:
Safety: IE C 950:1991 +A1, A2, A3, A4
EN 60950:1992 + A1, A2, A3, A4
EMC
The following summarizes the specifications and requirements for EN55024, EN55022 Class B & CISPR
22 Class B emissi on and immunity tests. If th e actual
test levels are hi gher or different than req uired, these
levels are liste d in the appropriate tables .
EN 55022 Class B (1994 w/A1 1995)
EN55024 (1998)
European Contact
Digi International
Joseph-von-Fraunhofer Str. 23
44227 Dortmund , GERMANY
49-231-9747-0
UL/CSA Safety Information
This device complies with the requirements of following
safety standards below:
UL 1950, 3rd edi tion
CSA No. 950
Quality Manager
Austin, Texas
06/03
8
Test Specification
EN55022
Requirement
Radiated
Emissions
— Class B
Conducted
Emissions
CISPR 22 Class B
Test Speci fication
EN55024
Requirement
Electrostatic
Discharge
EN61000-4-2 +4 kV contact
+8kV air
Radiated
Immunity
EN61000-4-3 3 V/m
Electrical
Fast
Transient
Burst
EN61000-4-4 1kV (A/C), .5kV (I/O)
Surge EN61000-4-5 2kV common mode
1kV differential mode
Conducted
Immunity
EN61000-4-6 3V rms
Magnetic
Immunity
EN61000-4-8
1 A/m Not Applicable
Voltage
Dips &
Interrupts
EN61000-4-11 >95%, 30% & >95%
• Re orient or relocate the receiv ing antenna.
• Increase th e separation between the eq uipment and t he
receiver.
• Connect the equipment in to an outlet th at is on a ci rcuit
different from th e receiver.
• Co nsult the dealer or an experienc ed radio/TV technician
for help.
Warning: The connection of a non-shi elded interface
cable to this equip ment will invalidate the FCC Cer tification for this device.
This equipment has been certified to comply with the limits
for a class B computing device, pursuant to FCC Rules. In
order to maintain compliance with FCC regulations, shielded
cables must be used with this equipment. Oper ation with
non-approved e quipment or unshielded ca bles is likely to
result in interfer ence to radio and TV recepti on. The user is
cautioned that ch anges and modifications made to the
equipment witho ut the approval of manufac turer could void
the user's author ity to operate this equi pment.
FCC Regulation - Part 15
Declaration of Conformity (DoC)
FCC ID Q4W55M1073-01 or Q4W55M1074-01
This device complies with Part 15 of the FCC Rules. Op eration is subject to the following two conditio ns:
1. This device may not cause harmful interference and
2. This device m ust accept any interferenc e received, includ-
ing interferenc e that may cause undesire d operation.
This product contai ns either a class 1 or class 2 Bluetooth
transceiver boar d (part numbers 55 001073 and 55001074
respectively). T he following statement refers to this board.
IMPORTANT NOTICE: To comply with the FCC RF Exposure compliance r equirements, the following antenna installation and device operating configurations m ust be satisfied.
The antenna used for this transmitter must be installed to
provide a separa tion distance of at least 20 cm from all
persons and must not be co-located or operati ng in conjunction with any other antenna or transmitter.
Department of Communication ( DOC) Notice
(Canada only)
This Class B digital apparatus meets the requirements of
the Canadian I nterference-Ca using Equipme nt Regulations.
Cet appareil num érique de la Cl asse B respect e toutes les
exigences du Règlement sur le matériel brouiller du Canada.
European Community - CE M ark
Declaration of Conformity (DOC)
According to ISO/IEC Guide 22 and EN 45014
Manufacturer’s Name: Inside Out Network s
Manufacturer’s Addr.: 7004 Bee Cav es Rd.
Bldg. 3, Ste. 200
Austin, TX 78746 USA
declares that t he product
Product Name: Wavespeed/S
Model Number(s): 301-11 21-01, 301-112 3-01
301-1122-01, 30 1-1124-01
301-1124-01
Product Options: All
conforms to the relevant EU Directi ves listed here:
1
WavespeedTM/S
The Wavespeed/S provides an easy-to-use wireless data solution targeted for
legacy and future applications that use a serial link (RS-232) to transfer data
between devices or between devices and a host. The serial cable between two
pieces of hardware can be replaced with a Bluetooth wireless link that is transparent to the software application. The application need only address the correct serial port as before. The Wavespeed/S, following initial configuration using a Windows-based Configuration Wizard, will take on the specified DTE or
DCE personality and port settings. Data and control signals on the hardware’s
COM port will be transmitted through the Wavespeed/S unit(s), which will then
simulate the appropriate signals on their external COM port(s).
Wavespeed/S units can be configured to operate in one of two modes:
Serial Cable Replacement
Two Wavespeed/S units are paired together in a process known as
“bonding.” The two units then form a wireless link acting like a serial cable,
only without the cable.
SPP Server
A single Wavespeed/S unit can be used in server mode. In this mode, the
device will make a Serial Port Profile (SPP) available for connection with
any SPP-capable Bluetooth device.
User Configuration
Serial Cable Replacement Configuration
1. Power the units and connect one of them to a serial port on your computer.
2. Place both units in configuration mode, by sliding the status switch to
the right (away from the power connector) and place the units near
each other.
3. Launch the WvsdpCfg.exe configuration utility.
4. In the first screen, select “Cable Replacement” in the Device Function
box.
Select COM Port
5. Specify the COM port to which the local Wavespeed/S device is attached. The COM port can be selected in one of two ways.
Page 4

a. If you know which COM port the local device is attached to, select the
port from the combo box and select the Set COM Port Selection
button.
b. Or, if you are unsure which port the local device is attached to, click
the Auto Detect button.
6. After the Configuration Wizard has verified that it can communicate
with the local device, it will display the current configuration and MAC
address. Select the Next button to move to the next step of the configuration process.
Discover Devices
Device Discovery and Bonding pairs two Wavespeed/S devices by creating a
unique bond that ensures that, following the configuration procedure, those two
devices will transfer information only to each other. This screen detects and
lists all of the Wavespeed/S devices within the operating range, approximately
10 meters. The Bluetooth Address and product name of the detected devices
are displayed in the Device Selection list.
7. Select the Search button. The Configuration Wizard fills in the list box
with the Wavespeed/S devices that are in the area. If you do not see
the desired device in the list box, continue searching by selecting the
Search button again.
8. If you do not know the address of the remote device that you want to
pair with, select a device address from the list and select the Ping
button. The green LED on the selected device will light for 5 seconds.
Continue selecting addresses and selecting the Ping button until you
find the correct device.
9. Select the address of the device you want to pair with from the list
and select the Bond button. The Configuration Wizard will bond with
the selected device and give you an indication of the status of the
procedure.
10. The Configuration Wizard automatically notifies you that the bonding
was successful. If the procedure fails, retry the bonding process.
11. Select the Next button when bonding is complete.
Configure Local Port Settings
The next step in the configuration process is to specify the local device’s port
emulation settings and type. In this step, you will specify how the Wavespeed/S
device communicates over the COM port to the TARGET application with which
it will be interfacing (not how it communicates with the PC or laptop). In other
words, if your application currently sends data at 9600 baud with 8 data bits, 1
stop bit, no parity, and software flow control, you need to specify those settings
for the Wavespeed/S device. In addition, you must determine if the TARGET
2
7
Green LED
Regulation and Other Information
Inside Out Networks and th e Inside Out Networ ks logo are trademarks of Inside Out Networks, Inc. Di gi, Digi International,
the Digi logo, Wav eport/S, Edgeport, and Hubp ort are either trademarks or r egistered trademarks of Digi International, Inc.
All other trademar ks or registered tradem arks are the property of thei r respective owners.
Information in t his document ation is subj ect to change wi thout notice and does not represent a c ommitment on the part of
Inside Out Networks I nc.
Inside Out Netw orks provides thi s document “as is,” without w arranty of any kind, either ex pressed or implied, includi ng, but
not limited to, th e particular purpose. Inside Out Networks may make improvemen ts and/or changes to this docum entation or
to the product(s) and/or program(s) describ ed in this documentation at any time.
Inside Out Networks assumes no responsibility of any errors, technical inaccuracies, or typographical errors that may appear
in this documentation, nor liability for any damages arising out of its use. Changes are made periodically to the information
herein; these ch anges may be incorporated in new editions of the publ ication.
For U.S. Governme nt use:
Any provision of this doc ument and associat ed computer program s to the U.S. Governme nt is with “Restricted Righ ts.” Use,
duplication, or disclosure by the governme nt is subject to the restri ctions set forth in, subpar agraph (c) (1) (ii) of the Ri ghts in
Technical Data and Computer Software clause of DFARS 52.277-7013.
For non-U.S. Government use:
These programs are supplied under a lice nse. They may be used, di sclosed, and/or copied onl y as supplied under such
license agreeme nt. Any copy must contain the above copyright notice and restricted rights notic e. Use, copying, and/or
disclosure of t he programs is strictly pr ohibited unless otherwise provided for in the licens e agreement.
Federal Communications Com mission (FCC) Regulatory Information (USA only)
This equipment has been tested and fo und to comply with the limits for a Class B di gital device, pur suant to Part 15 of the
FCC Rules. These li mits are designed to provide reas onable protectio n against harmful interference in a resi dential installation. This equipm ent generates, uses, and can radiate radio fr equency energy a nd, if not inst alled and used i n accordance
with the instructi ons, may cause harmful interfe rence to radio communications . However, ther e is no guarant ee that interfer ence will not occur in a particular installation. If this equipment does cause harmful interference to radio or television reception, which can be determined by turning the equi pment off and on, the user is e ncouraged to correct the interf erence by one
or more of the fol lowing measures:
Off The application is not running. Make sure the device has
power and the 3-way switch is not in the OFF position.
Continuously On On power up, the LED remains on while the device initial-
izes.
One rapid blink
every 5 seconds
Device is in normal operation mode and a wireless connection has been successfully made.
Two rapid blinks
every 5 seconds
Device has initialized successfully but is not conencted to
another device.
More than two rapid
blinks every 5 seconds
Internal hardware error condition.
Continuous rapid
blinking
Firmware error condition.
Page 5

6
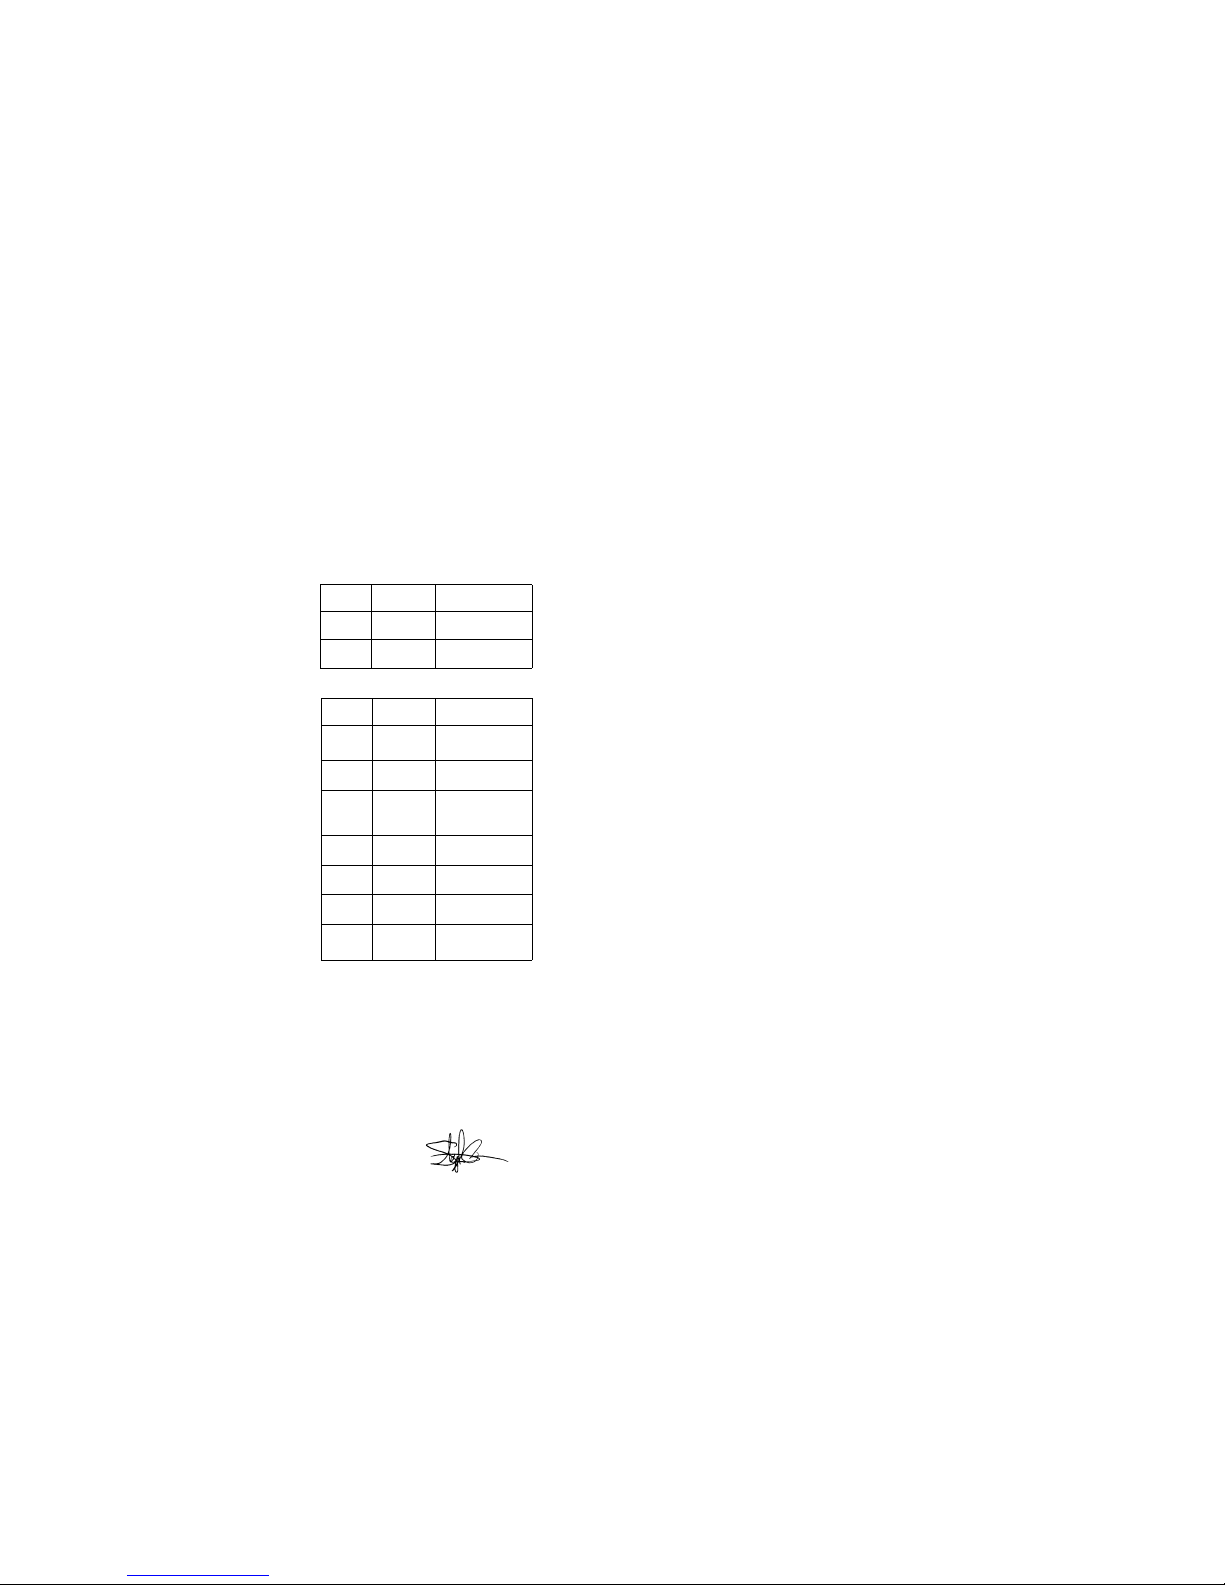
Pin Outs
DTE Device: DCE Device:
The fastest way to determine whether a device is a DTE or a DCE device is to
check the voltage level on pin 2 of the DB-9 when the COM port is active. If the
voltage is –12 V to –3 V, then the device is likely a DCE. You can further confirm that conclusion by checking the voltage on pin 3. On a DCE device, the
level should be at ground.
The opposite is true of a DTE device. The voltage of pin 2 should be ground
and the voltage of pin 3 should be in the –12 V to –3 V range.
PIN
Direction
Signal
PIN Direction Signal
1 Input DCD 1 Output DCD
2 Input RX 2 Output TX
3 Output TX 3 Input RX
4 Output DTR 4 Input DTR
5 -- GND 5 -- GND
6 Input DSR 6 Output DSR
7 Output RTS 7 Input RTS
8 Input CTS 8 Output CTS
9 Input RI 9 Output RI
3
application is a DTE or DCE device. The Wavespeed/S device must be set to
the opposite device type of the device to which it will be attached. One of the
Wavespeed/S devices must be a DTE device and the other must be a DCE device. You may need to use a NULL modem adaptor on one of the devices.
12. For each port setting, select the desired value.
13. When all settings are specified, select the Set Port Configuration
button to send the settings to the local device.
14. After viewing the confirmation message, select the Next button.
Configure Remote Device Port Settings
In most cases, the port settings, such as baud rate, data bits, et cetera, are the
same as those set in the local device configuration. Therefore, the Configuration Wizard initializes the settings to those values.
15. For each category, select the desired value.
16. When all selections are specified, select the Set Port Configuration
button to send the settings to the remote device.
17. After viewing the confirmation message, select the Next button.
18. While in the Save Configuration Settings, select the Save button to
store the settings. Until reconfigured, the devices use the settings that
you selected.
19. Place both Wavespeed/S units in the “On” mode, by sliding the three
position switch back to the left (toward the power connector).
SPP Server Configuration
1. Power the units and connect one of them to a serial port on your computer.
2. Place both units in configuration mode by sliding the status switch to
the right (away from the power connector).
3. Launch the WvsdpCfg.exe configuration utility.
4. In the first screen, select SPP Server in the Device Function box.
Select COM Port
5. Specify the COM port to which the local Wavespeed/S device is attached. The COM port can be selected in one of two ways.
Page 6

a. If you know the COM port, select the port from the combo box and
click Set COM Port Selection.
b. Or, if you are unsure which port the local device is attached to, click
the Auto Detect button.
6. After the Configuration Wizard has verified that it can communicate
with the local device, it displays the current configuration and MAC
address. Select the Next button to move to the next step of the configuration process.
Configure Local Port
The next step in the configuration process is to specify the local device’s port
emulation settings and type. In this step, you specify how the Wavespeed/S
device communicates over the COM port to the TARGET application with which
it will be interfacing (not how it communicates with the PC or laptop). In other
words, if your application currently sends data at 9600 baud with 8 data bits, 1
stop bit, no parity, and software flow control, you need to specify those settings
for the Wavespeed/S device. In addition, you must determine if the TARGET
application is a DTE or DCE device. The Wavespeed/S device must be set to
the opposite device type of the device to which it will be attached.
7. For each port setting, select the desired value.
8. When all settings are specified, select the Set Port Configuration
button to send the settings to the local device.
9. After viewing the confirmation message, select the Next button.
Configure Local Device
10. You may give the device a unique name.
11. You can set the number of seconds before a link is broken with the
link time out. 20 seconds is recommended for most applications.
12. When all selections are specified, select the Set Port Configuration
button to send the settings to the remote device.
13. After viewing the confirmation message, select the Next button.
Flash Update
14. Select the Save button to store the new settings.
15. Place the Wavespeed/S units in the “On” mode, by sliding the threeposition switch back to the left (toward the power connector).
4
5
Specifications
Power Input
Power is input from an included 5-Volt wall-mounted power supply.
3-Position Switch
A 3-position switch (ON/OFF/CONFIG) specifies which mode the device is
in. ON is the normal operational mode for the device. CONFIG puts the
device in configuration mode.
Female DB-9 connector
Configurable Port Settings
• Device Type
• DTE – Data Terminal Equipment
• DCE – Data Communication Equipment
• Baud Rate: 300, 1200, 2400, 4800, 7200, 9600, 19200, 38400, 57600,
115200 (flow control required)
• Data Bits: 7, 8
• Stop Bits: 1, 2
• Parity: None, Odd, Even
• Flow Control
• None
• Software (user-specified XON/XOFF)
• Hardware (RTS/CTS)
 Loading...