

TCW SERIES
Inscale Measurement Technology Ltd
Tel: Fax: Email:
+44(0)1424 200722 +44(0)1424 443976 sales@inscale-scales.co.uk
7 Heron Close, St. Leonards-on-Sea. East Sussex TN38 8DX United Kingdom
Http:www.inscale-scales.co.uk
Solutions in Weighing Technology
Inscale Measurement Technology Ltd follows a policy of continuous improvement and reserves the right to change specifications without notice. © October 2002


INTRODUCTION
The TCW series of scales provides an accurate, fast and versatile series of general
purpose weighing scales with counting, % weighing and check-weighing functions.
There are 2 series of scales within the range, TCW scales use kilograms as the
default unit and the TCWa range are changeable from pounds to kilograms. The
scales in these series share the same functions but special instructions will be given for
the TCWa series to account for the ability to change weighing units.
There are 4 models in each series, with capacities up to 30 kg.
They all have stainless steel weighing platforms on an ABS base assembly.
All the keypads are sealed, colour coded membrane switches and the displays are
large easy to read liquid crystal type displays (LCD). The LCD’s are supplied with a
backlight.
All units include automatic zero tracking, audible alarm for pre-set weights, automatic
tare, pre-set tare and an accumulation facility that allows the count to be stored and
recalled as an accumulated total.


SPECIFICATIONS
TCW SERIES
Model # TCW 3 TCW 6 TCW 15 TCW 30
Maximum
Capacity
3kg 6kg 15kg 30kg
Readability 0.1g 0.2g 0.5g 1g
Resolution 1:30.00 1:30.000 1:30.000 1:30.000
Tare Range -3kg -6kg -10kg -30kg
Minimum
Capacity
2g 4g 10g 20g
Repeatability
(Std Dev)
0.1g 0.2g 0.5g 1g
Linearity ± 0.4g 0.8 2g 4g
Units of
Measure
kg, g, Lb., oz.
TCWa SERIES
Model #
TCW 6a TCW 12a TCW 35a TCW 65a
Maximum
Capacity
6lb / 3kg 12lb / 6kg 35lb / 15kg 65lb / 30kg
Readability 0.0002lb / 0.1g 0.0005lb / 0.2g 0.001lb / 0.5g 0.002lb / 1g
Resolution 1:30.000 1:30.000 1:30.000 1:30.000
Tare range -6lb / -3kg -10lb / -6kg -10lb / -10kg -65lb / -30kg
Minimum
Capacity
0.004lb / 2g 0.01lb / 4g 0.02lb / 10g 0.04lb / 20g
Repeatability
(Std Dev)
0.0002lb / 0.1g 0.0005lb / 0.2g 0.001lb / 0.5g 0.002lb / 1g
Linearity ± 0.0008lb / 0.4g 0.0020lb / 0.8g 0.004lb / 2g 0.008lb / 4g
Units of
Measure
kg, g, Lb., oz.

Common Specifications
Interface RS-232 Output Optional
Stabilisation
Time
2 Seconds typical
Operating
Temperature
0°C - 40°C
32°F - 104°F
Power supply
9Vdc, 800ma
from external adapter
Calibration
Automatic External
Display 6 digits LCD digital display
Draft shield N/A
Balance
Housing
ABS Plastic, Stainless Steel platform
Pan Size
225 x 300mm
8.9 x 11.8”
Overall
Dimensions
(wxdxh)
320 x 340 x 125mm
12.6 x 13.4 x 4.9”
Gross Weight 3.8kg/8.4lb
Applications General Purpose Scale
Functions Weighing, parts counting, % weight, Check weighing,
Other
Features and
Specs
Internal rechargeable battery (~70 hours operation)

INSTALLATION
GENERAL INSTALLATION
The scales should be sited in a location that will not degrade the accuracy.
Avoid extremes of temperature. Do not place in direct sunlight or near air conditioning
vents.
Avoid unsuitable tables. The tables or floor must be rigid and not vibrate. Do not place
near vibrating machinery.
Avoid unstable power sources. Do not use near large users of electricity such as
welding equipment or large motors.
Avoid high humidity that might cause condensation. Avoid direct contact with water. Do
not spray or immerse the scales in water.
Avoid air movement such as from fans or opening doors. Do not place near open
windows.
Keep the scales clean.
Do not stack material on the scales when they are not in use.
INSTALLATION of TCW SERIES
The TCW Series comes with a stainless steel platform packed separately. Place the
platform in the locating holes on the top cover. Do not press with excessive force as this
could damage the load cell inside.
Level the scale by adjusting the four feet. The scale should be adjusted such that the
bubble in the spirit level is in the centre of the level and the scale is supported by all
four feet. If the scale rocks readjust the feet.
Attach the power supply cable to the connector on the bottom of the scale. Plug in the
power supply module. The power switch is located on the base near the front of the
scale.

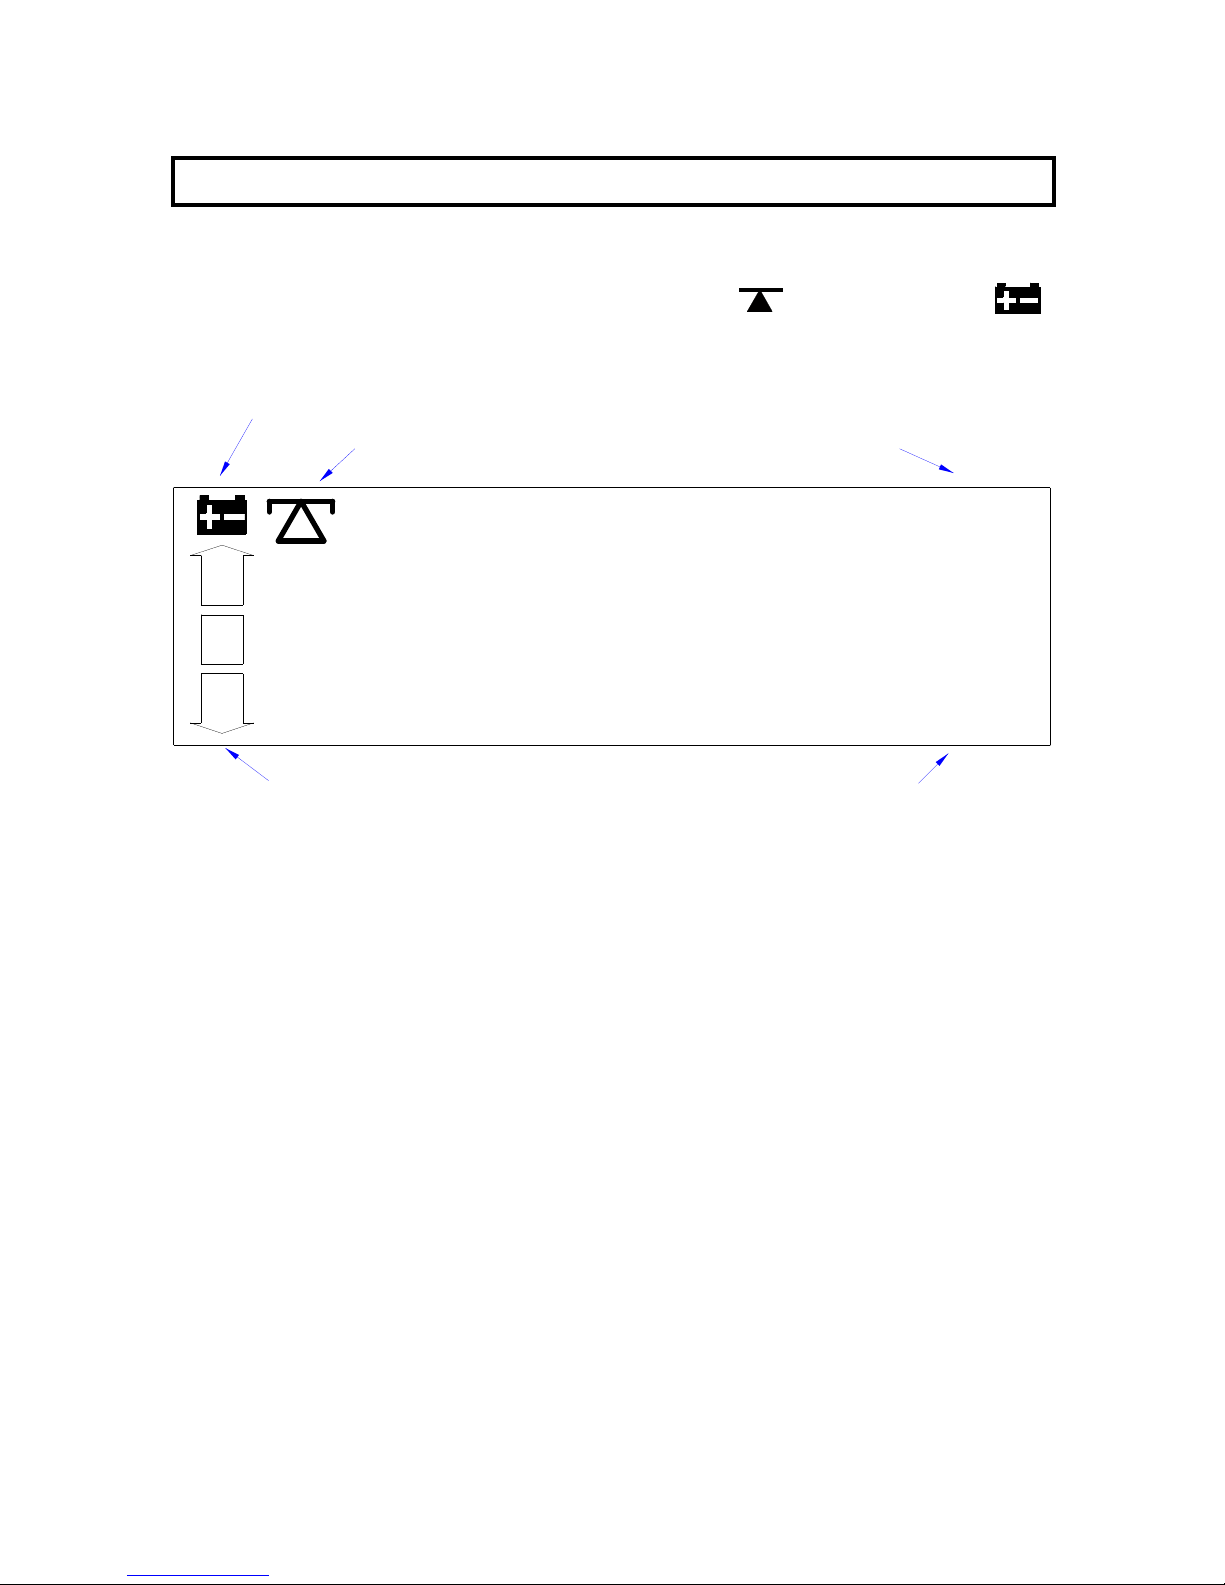
KEY DESCRIPTIONS
Zero or
Set the zero point for all subsequent weighing. The display shows zero.
A secondary function , or "Enter" key when setting parameters or other functions.
Tare or
Tares the scale. Stores the current weight in memory as a tare value, subtracts the tare
value from the weight and shows the results. This is the net weight. Entering a value
using the keypad will store that value as the tare value.
A secondary function , of incrementing the active digit when setting a value for
parameters or other functions.
Limit or
Sets the limits for check weighing. Allows setting of either the low limit or the high limit
or both.
Secondary function , is to move the active digit to the right when setting values for
parameters or other functions.
%
Enters the percent weighing function. Allows the weight, unit weight, and count to be
seen when parts counting.
Secondary function , is to move the active digit to the left when setting values for
parameters or other functions.
Func or
Used to select the function of the scale. If the scale is weighing it will select parts
counting. Of it is not in weighing mode it will return the user to weighing.
Secondary function ( C ) , is to act as a clear key when setting values for parameters or
other functions.
Print or
To print the results to a PC or printer using the optional RS-232 interface. It also adds
the value to the accumulation memory if the accumulation function is not automatic.
Secondary function (ESC) , is to return to normal operation when the scale is in a
parameter setting mode.
TCWa SCALES ONLY
Kg/Lb key
This key will select either kilograms or pounds for the weighing unit.
DISPLAYS
The LCD display will show a value and a unit to the right of the digits.
Other labels are TARE, GROSS weight, ZERO, stable and for Low battery
OK
HI
LO
GROSS
TARE
ZERO
g/pcs
oz %
tkglb
Checkweighing Symbols
Stability Symbol
Low Battery Symbol
Parts Counting Units
Weighing Units

OPERATION
ZEROING THE DISPLAY
You can press the ZERO/ENTER key at any time to set the zero point from which all
other weighing and counting is measured, within 4% of power up zero. This will usually
only be necessary when the platform is empty. When the zero point is obtained the
display will show the indicator for zero.
The scale has an automatic rezeroing function to account for minor drifting or
accumulation of material on the platform. However you may need to press the
ZERO/ENTER key to rezero the scale if small amounts of weight are shown when the
platform is empty.
TARING
Zero the scale by pressing the ZERO/ENTER key if necessary. The zero indicator will
be on.
Place a container on the platform, a value for its weight will be displayed.
Press the TARE key to tare the scale. The weight that was displayed is stored as the
tare value and that value is subtracted from the display, leaving zero on the display.
The "TARE" indicator will be on. As product is added only the weight of the product will
be shown. The scale could be tared a second time if another type of product was to be
added to the first one. Again only the weight that is added after taring will be displayed.
When the container is removed a negative value will be shown. If the scale was tared
just before removing the container this value is the gross weight of the container plus all
product that was removed. The zero indicator will also be on because the platform is
back to the same condition it was when the ZERO/ENTER key was last pressed.

WEIGHING A SAMPLE
To determine the weight of a sample first tare an empty container if used, then place
the sample in the container. The display will show the weight and the units of weight
currently in use.
PERCENT WEIGHING
The scale will allow a sample weight to be shown as 100%. Then any other weight
placed on the scale will be displayed as a percentage of the original sample. For
example is 350g is placed on the scale and the % key is pressed the display will show
100.00%.
Removing the 350g weight and putting a 300g weight on the scale the display will show
85.71% as 300g is 85.71% of 350g.
Note: the scale may jump by large numbers unexpectedly if small weights are used to
set the 100% level. For example if only 23.5g is on a scale with 0.5g increments and
the scale is set to 100%, the display will show 100.00%, however a small change of
weight will cause the display to jump to 102.13% as one scale division (0.5g) increase
to 24.0g will be equivalent to a 2.13% increase.
Pressing the FUNC key will return the scale to weighing.
PARTS COUNTING
Before beginning, tare the weight of any container that will be used, leaving the empty
container on the scale.
When the scale is showing weight, pressing the FUNC key will start the parts counting
function.
Place the number of samples on the scale. The number should match the options for
parts counting, 10, 20, 50, 100 or 200 pieces.
Press the FUNC key to begin. The scale will show "SP 10" asking for a sample size of
10 parts. Change the sample size by pressing the TARE/ key. The display will cycle
through the options: 10, 20, 50, 100, 200 and back to 10.
Press the ZERO/ENTER key when the number matches the number of parts used for
the sample. As more weight is added the display will show the number of parts (pcs).
Press the % key to display unit weight (g/pcs or Lb/pcs), Total weight (kg or Lb) or the
count (pcs). Press the FUNC key to return to normal weighing. The pounds will be
shown on the TCWa scales when the weighing unit is set to pounds.

CHECK-WEIGHING
Check-weighing is a procedure to cause an alarm to sound when the weight on the
scale meets or exceeds values stored in memory. The memory holds values for a high
limit and a low limit. Either limit can be used or both can be used.
Press the LIMIT key. The display will show the current High Limit with the left most digit
flashing and the HI symbol on to the left of the display.
To change the value shown use the %/ and the LIMIT/ to select the digit to
change. Then use the TARE/ key to increment the flashing digit. When the desired
value is shown press the ZERO/ENTER key to accept the value. If you want to reset
the value to zero press the FUNC/C key to clear the value.
After pressing the ZERO/ENTER key the display will then show the Low Limit, the LO
symbol will be on to the left side of the display.
Enter the low limit in the same way the high limit was entered.
After pressing the ZERO/ENTER key the scale will return to weighing with the Checkweighing function enabled.
When a weight is placed on the scale the arrows will show if the weight is above or
below the limits and the beeper will sound as described below.
BOTH LIMITS SET
The display will show OK and the beeper will sound when the weight is
between the limits.
LOW LIMIT SET,
HIGH LIMIT is set to zero
The display will show OK and the beeper will sound when the weight is
less than the Low Limit. Above the Low Limit the display will show HIGH
and the beeper will be off.
HIGH LIMIT SET,
LOW LIMIT is set to zero
The display will show LOW and the beeper will be off when the weight is
less than the High Limit. Above the High Limit the display will show OK
and the beeper will be on.
BOTH LIMITS SET. LOW IS SET GREATER THAN HIGH
The beeper will never sound and the display will show LOW if the weight
is less that the LOW limit, and HIGH if the weight is greater than the Low
Limit.
NOTE: The weight must be greater than 20 scale divisions for the checkweighing to
operate.
To disable the Check-Weighing function enter zero into both limits by pressing the

LIMIT/ key to recall the current settings. Pressing FUNC/C key when the current
limits are shown to clear the settings, then pressing the ZERO/ENTER key to store the
zero values.
ACCUMULATED TOTAL
The scale can be set to accumulate automatically when a weight is added to the scale
or manually by pressing the PRINT key. See the PARAMETERS Section for details of
selecting the method. The accumulation function is only available when weighing. It is
disabled during percent weighing or parts counting.
MANUAL ACCUMULATION
When the scale is set to manual accumulation the weight displayed will be stored in
memory when the PRINT key is pressed and the weight is stable.
The display will show "ACC 1" and then the total in memory for 2 seconds before
returning to normal. If the optional RS-232 interface is installed the weight will be
output to a printer or PC.
Remove the weight, allowing the scale to return to zero and put a second weight on.
Press PRINT, the display will show "ACC 2" and then show the new total.
Continue until all weights have been added.
To view the totals in memory press the PRINT key when the scale is at zero. The
display will show the total number of items "ACC xx" and the total weight before
returning to zero. The totals will also be printed via the RS-232 interface.
To erase the memory press PRINT to view the totals and then press the FUNC/C key to
clear the memory.
AUTOMATIC ACCUMULATION
When the scale has been set to Automatic Accumulation the value is stored in memory
automatically.
Add a weight to the scale, the beeper will sound when the scale is stable to signify the
value is accepted. Remove the weight.
The display will show "ACC 1" and the totals in memory when the scale returns to zero.
Adding a second weight will repeat the process.

While the weight is on the scale it is permissible to press the PRINT key to store the
value immediately. In this case the scale will not store the value when the weight is
removed.
The totals can be viewed as above.
In all cases the scale must return to zero or a negative number before another sample
can be added to the memory.
More product can then be added and PRINT pressed again. This can continue for up to
99 entries, or until the capacity weight display is exceeded.

PARAMETERS
The scale has 6 parameters that can be set by the user. These allow the user to set
the scale to:
• Display the weight in other increments of weight to minimise the affects of vibration,
wind or other environmental conditions.
• Control the back light on the display. It may be necessary to turn the backlight off to
maximise battery life.
• Set the Accumulation to Automatic, manual or set the RS-232 interface to
continuously print the weight.
• Set the accumulation to be active when the PRINT key is pressed or to be inactive.
• Set a range for auto zero.
• Select another weighing unit than the standard.
To set parameters press the FUNC and PRINT keys at the same time.
The display will show "Inc xx" The first value shown is the default scale increment
value. To select a different increment value press the TARE/ key to change the value
then press the ZERO/ENTER key.
For example on a 15kg scale the standard increment is 0.5g, the value can be
changed to 1.0g or 2.0g.
The next parameter is control of the backlight. The standard is to have the backlight
operate automatically, turning off when the scale is not used. The backlight can be set
to be "EL On" , "EL Au" (Automatic) or "EL Off". The maximum battery life is
achieved with the backlight turned off.
Press the TARE/ key to change the value then press the ZERO/ENTER key.
Automatic accumulation is next. With "Au On" the memory will accumulate the weight
automatically, "Au Off" will enable the manual accumulation and with "P Cont" set
the RS-232 interface will send the weight continuously and the accumulation function is
disabled.
Press the TARE/ key to change the value then press the ZERO/ENTER key.
Accumulation of data in memory when PRINT is pressed is set next. To accumulate
weight in memory when the PRINT key is pressed set "ACC on" to use the PRINT key
to only print the weight without adding it to memory set "ACC of".
The Autozero range is set next. The autozero will automatically set the scale to zero
when the displayed weight is near zero. This helps make sure the scale is measuring
weight from an accurate zero stating point. The Autozero value can be set to 0.5, 1, 2
or 4 scale divisions. The normal setting is 1 scale division.
Press the TARE/ key to change the value then press the ZERO/ENTER key.
The displayed unit of weight is set next. The scales are normally calibrated and display
in kilograms, however they will show the weight in grams, ounces or pounds and
selected by this function.
Press the TARE/ key to change the value then press the ZERO/ENTER key.
When the scales are set to display in other units of weight the accumulation function is
still keeping the weight in kilograms (or pounds for the TCWa) in memory and will use
the base weighing unit when printing over the RS-232 output.
TCWa SCALES
The TCWa scales have a key to change from kilograms to pounds immediately. this
also allows the scales to be calibrated in either kilograms or pounds and all memory
accumulations are in either kilograms or pounds as last selected.
These scales can still display in grams or ounces as above.
When the scales are set to grams or ounces the Lb/Kg key will change the units from
grams to ounces and back. To regain the kilograms/pounds options the scales must
be changed again using the parameter setting menu.

BATTERY OPERATION
The scales can be operated from the battery if desired. The battery life is approximately
70 hours.
When the battery needs charging a symbol on the weight display will turn on. The
battery should be charged when the symbol is on. The scale will still operate for about
10 hours after which it will automatically switch off to protect the battery.
To charge the battery simply attach the power supply module to he scale and plug in.
The scale does not need to be turned on.
The battery should be charged for 12 hours for full capacity.
Just above and to the left of the display is an LED to indicate the status of battery
charging. When the scale is plugged into the mains power the internal battery will be
charged. If the LED is green the battery is being charged. If it is Red the battery is
nearly discharged and yellow indicates the battery is increasing the charge level.
Continue to charge overnight for a complete recharge.
As the battery is used it may fail to hold a full charge. If the battery life becomes
unacceptable then contact
Inscale.

RS-232 OUTPUT
The TCW Series of scales can be ordered with an optional RS-232 output.
Specifications:
RS-232 output of weighing data
ASCII code
4800 Baud
8 data bits
No Parity
Connector: 25 pin d-subminiature socket
Pin 2 Output
Pin 3 Input, not used at this time
Pin 7 Signal Ground
Data Format for normal weighing operations, parts counting or recalling of totals from
memory will all be different. Examples follow:
Normal Output
When percent weighing the output is the weight shown in percent only.
GS 1.234kg GS for Gross weight, NT for net weight and a unit of weight
No.. 1 This number increments every time a new value is stored in memory
Total 1.234kg The total value stored in memory
<lf> Includes 2 line feeds
<lf>
GS 100.00% GS for Gross weight, NT for net weight and a unit of weight
<lf> Includes 2 line feeds
<lf>

When parts counting the weight, unit weight and count will be printed.
When recalling the Total weight stored in the accumulation memory the output format
is:
*************** A line of stars is shown
<lf> Includes 1 line feed
TOTAL
No. 5
Wgt 21.456kg .
***************
GS 1.234kg GS for Gross weight, NT for net weight and a unit of weight
U.W. 12.34g/pcs The average piece weight computed by the scale
PCS 100pcs The number of parts counted
<lf> Includes 2 line feeds
<lf>

CALIBRATION
The TCW scales calibrate using metric weights and the TCWa scales can calibrate
using either metric or pound weights, depending on the weighing unit in use before
calibration.
To start calibration turn the scale off and then turn it back on. Press the TARE and %
keys together during the initial counting from 9 to 0 on the display.
The display will show "unLoAd". Remove all weight from the pan and then press the
ZERO/ENTER key to set the initial zero point when the scale is stable.
The display will then show the last calibration weight used. This value can be used
again or a new value can be entered.
To use this value press the
ZERO/ENTER key, the display will show
"LoAd", put the calibration weight on
the platform and then press the
ZERO/ENTER key when the stable
indicator is on.
Or if a different value is desired enter
the value using the arrow key to
select the flashing digit and the to
increment the flashing digit. When the
value is correct press the ZERO/ENTER
key to accept a weight. The display will
show "LoAd", Put the calibration weight
on the platform and then press the
ZERO/ENTER key when the stable
indicator is on.
Remove the calibration weight as the scale counts back from 9 to 0.
If an error message (Err 8) is shown during calibration recheck the calibration and
repeat it if necessary. If the error cannot be corrected contact
Inscale for advice.
After calibration the scale should be checked to verify the calibration and linearity is
correct. If necessary repeat calibration, especially be certain the scale is stable before
accepting any weight.
TCWa scales will also have the Lb or Kg (or g) indicator on to show the
denomination of the weight requested. If the scale was in pounds before starting
calibration the weights requested will be pound values, or if the scale was weighing in
kilograms then metric weights will be requested.

ERROR CODES
During the initial power-on testing or during operation it is possible the scale may show
an error message. The meaning of the error messages is described below.
If an error message is shown repeat the procedure that caused the message, turning
the balance on, calibration or other functions. If the error message still is shown then
contact your dealer for further support.
ERROR CODE DESCRIPTION POSSIBLE CAUSES
Err 4 Initial Zero is greater than
allowed (4% of maximum
capacity) when power is
turned on or when the
ZERO/ENTER key is
pressed,
Weight on the pan when
turning the scale on.
Excessive weight on the
pan when zeroing the
scale.
Improper calibration of the
scale.
Damaged load cell.
Damaged Electronics.
Err 5 Keyboard Error. Improper operation of the
scale.
Err 6 A/D count is not correct
when turning the scale on.
Platform not installed.
Load cell damaged.
Electronics damaged.
Err 8 Calibration Error Attempt calibration again,
make sure the scale is
stable.
To view the A/D count press the ZERO/ENTER key and the % key at the same time
while the scale is performing the initial check at power-on. Press ZERO/ENTER to
return to normal.

Manufacturer’s Declaration of Conformity
This product has been manufactured in accordance with the harmonised European standards, following
the provisions of the below stated directives:
Electro Magnetic Compatibility Directive 89/336/EEC
Low Voltage Directive 73/23/EEC
Inscale Measurement Technology Ltd.
7 Heron Close
St.Leonards-on-Sea
East Sussex TN38 8DX
United Kingdom
FCC COMPLIANCE
This equipment has been tested and found to comply with the limits for a Class A digital device, pursuant
to Part 15 of the FCC Rules. These limits are designed to provide reasonable protection against harmful
interference when the equipment is operated in a commercial environment. The equipment generates,
uses, and can radiate radio frequency energy and, if not installed and used in accordance with the
instruction manual, may cause harmful interference to radio communications. Operation of this
equipment in a residential area is likely to cause harmful interference in which case the user will be
required to correct the interference at his own expense.
Shielded interconnect cables must be employed with this equipment to insure compliance with the
pertinent RF emission limits governing this device.
Changes or modifications not expressly approved by
Inscale could void the user's authority to
operate the equipment.


©Copyright by Inscale. All rights reserved. No part of this publication may be reprinted or
translated in any form or by any means without the prior permission of Inscale.
Inscale reserves the right to make changes to the technology, features, specifications and design of
the equipment without notice.
All information contained within this publication was to the best of our knowledge timely, complete and accurate
when issued. However, we are not responsible for misimpressions which may result form the reading of this
material.
The latest version of this publication can be found on our Website.
.
 Loading...