

Page 1
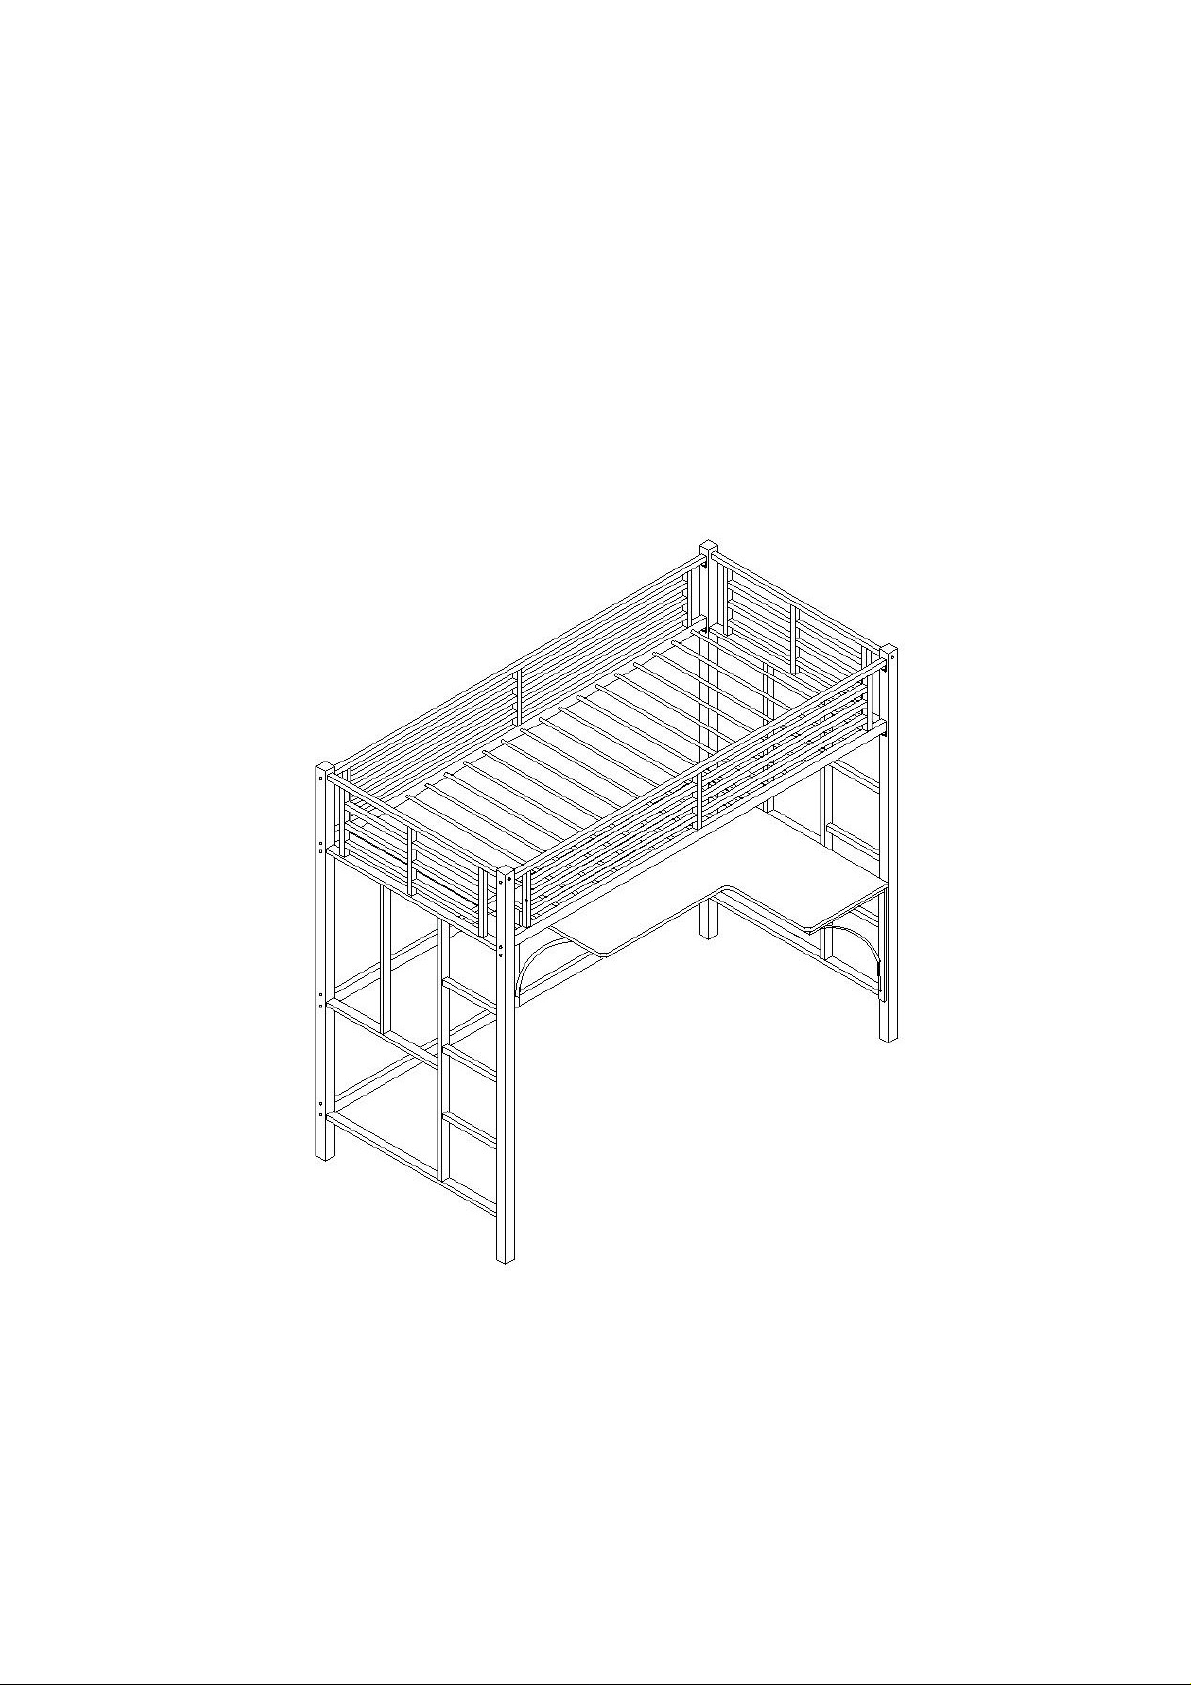
User’s Manual
Model# 4003
Loft Bed
Made In China
Page 2

Dear Customer:
Thank you for selecting one of our bunk beds. Before assembling your bunk
bed, please read this manual carefully.
IMPORTANT
(1) Your bunk bed should be assembled in the room where it is to be used;
(2) It is recommended to assemble your bunk bed on a pad in order to protect the
finish;
(3) It requires at least 3 persons to assemble your bunk bed;
(4) Do not tighten the bolts and nuts until each part is in its assembled place.
WARNINGS
Follow the warnings appearing on one of the upper bunk end structures and
on the carton.
DO NOT REMOVE WARNING LABEL FROM BED.
The mattress foundation is designed to support a mattress without the need for
a posture board or box-spring.
Always use the recommended size mattress or mattress support, or mattress
support, or both, to help prevent the likelihood of entrapment or falls.
Use only a mattress that is 74"-75" long and37½"-38½"wide on either bunk.
Ensure thickness of mattress and foundation combined does not exceed 6".
Mattress surface must be at least 5"(127mm)below the upper edge of guardrails.
Do not allow children less than 6 years of age to use the upper bunk.
Periodically check and ensure that the guardrails, ladders and other components
are in their proper position, free from damage, and that all connectors are tight.
Do not allow horseplay on or under the bed and prohibit jumping on the bed.
Always use the ladder for entering and leaving the upper bunk.
Do not use substitute parts. Contact your local dealer for replacement parts.
Use of a night light may provide added safety precaution for a child using the
upper bunk.
Always use guardrails on both sides of the upper bunk.
Prohibit more than one person on upper bunk.
The use of water or sleep flotation mattress on this bed is prohibited.
PLEASE KEEP THIS MANUAL FOR YOUR FUTURE REFERENCE.
Parts List
Page 3
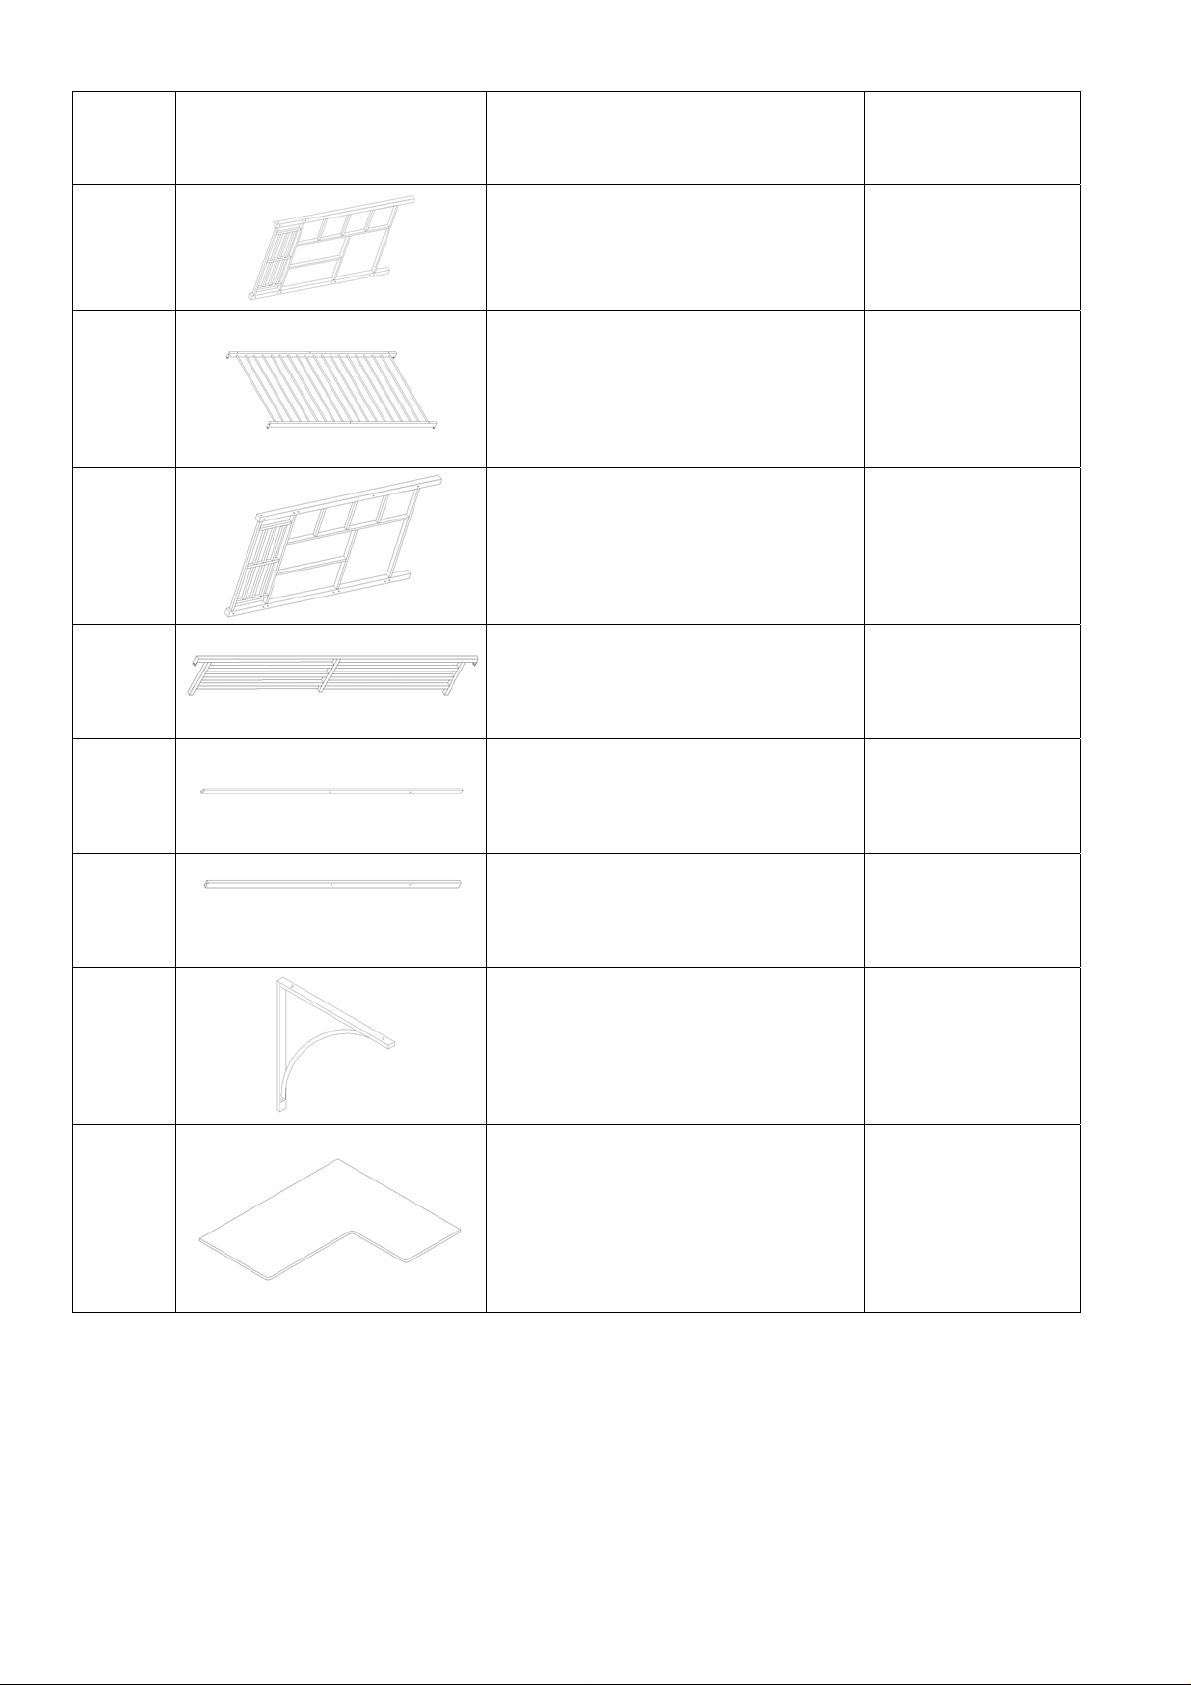
A –Furniture Parts
Parts ID Image Description Qty
A
B
C
D
E
Side Frame (Left) 1
Top Platform 1
Side Frame (Right) 1
Guardrail 2
Cross Bar 1
F
G
H
Cross Support Bar 1
Table Support Bracket 3
Table Top 1
Page 4
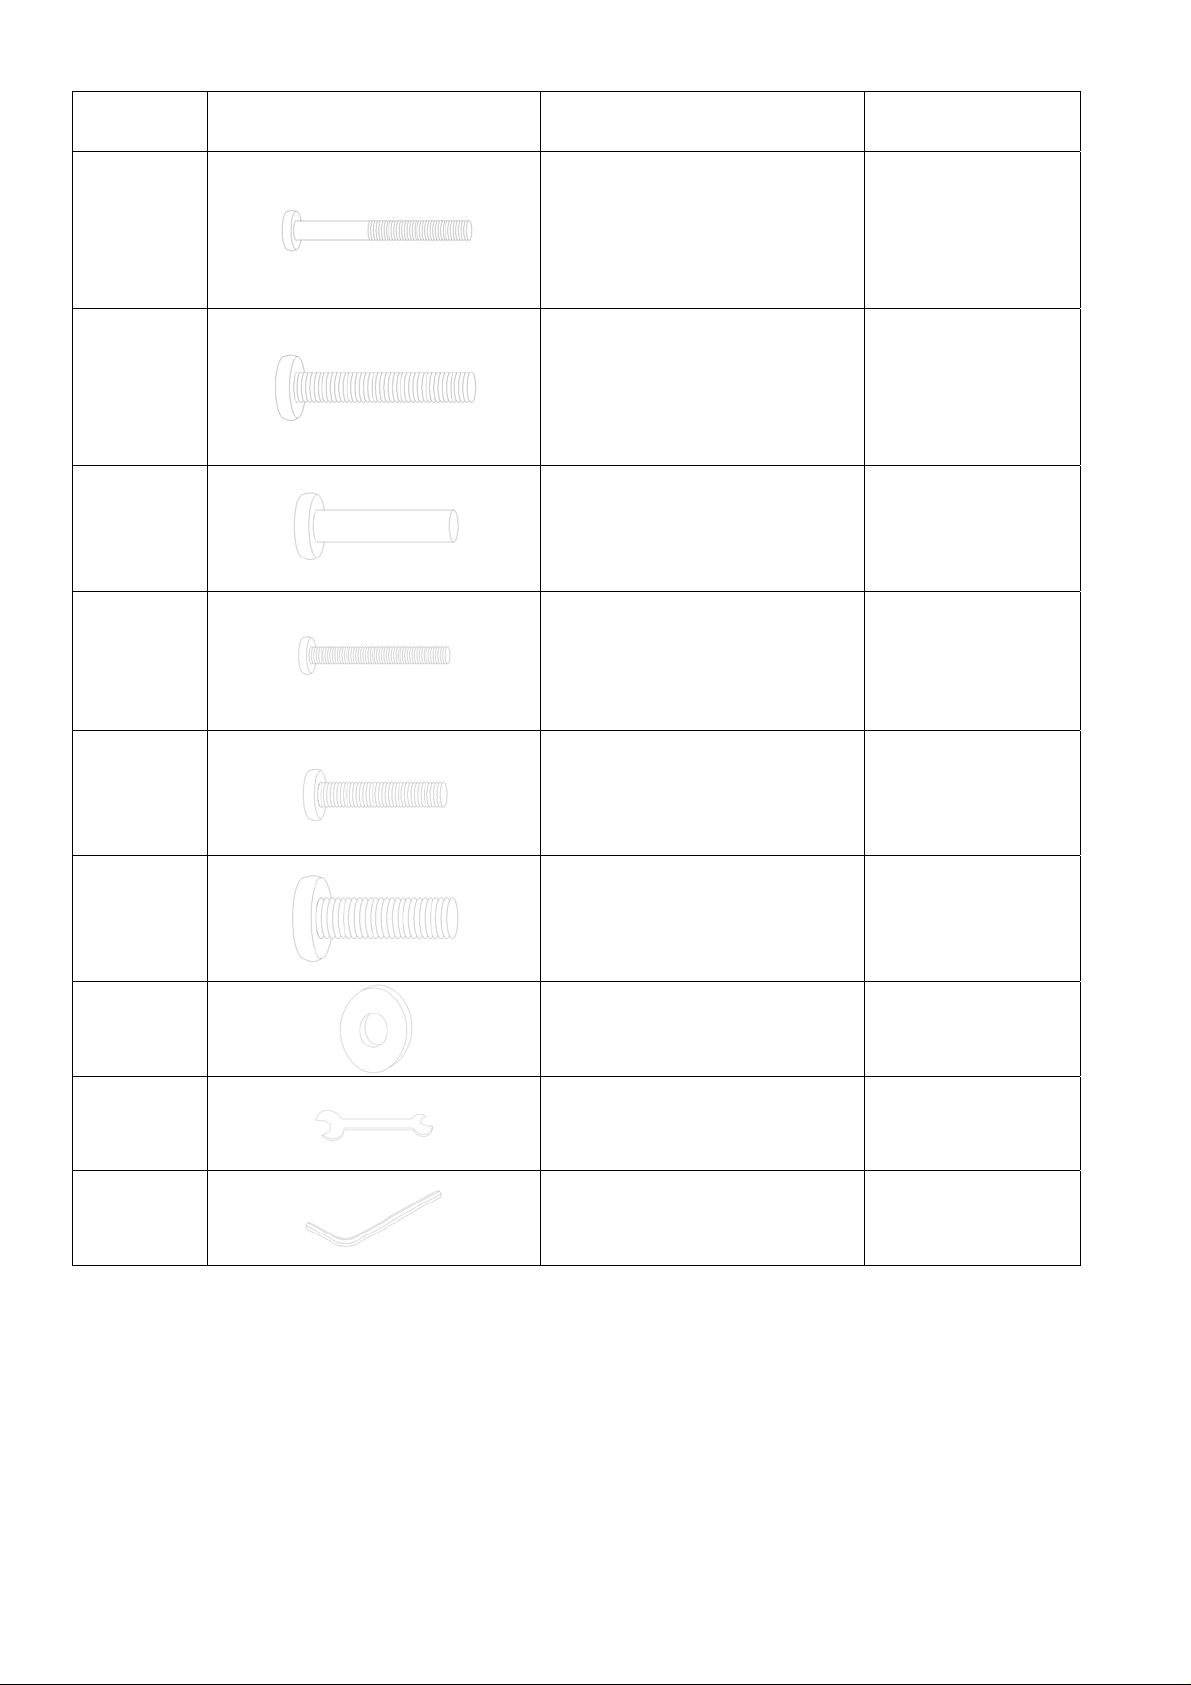
B- Hardware Parts
Parts ID Image Description Qty
1
2
3
4
5
Bolt 70mm 8
Bolt 45mm 12
Nuts 20mm 12
Bolt 65mm 8
Bolt 30mm 4
6
7
8
9
Bolt 25mm 6
Washers 26
Wrench 1
Allen Key 2
Page 5
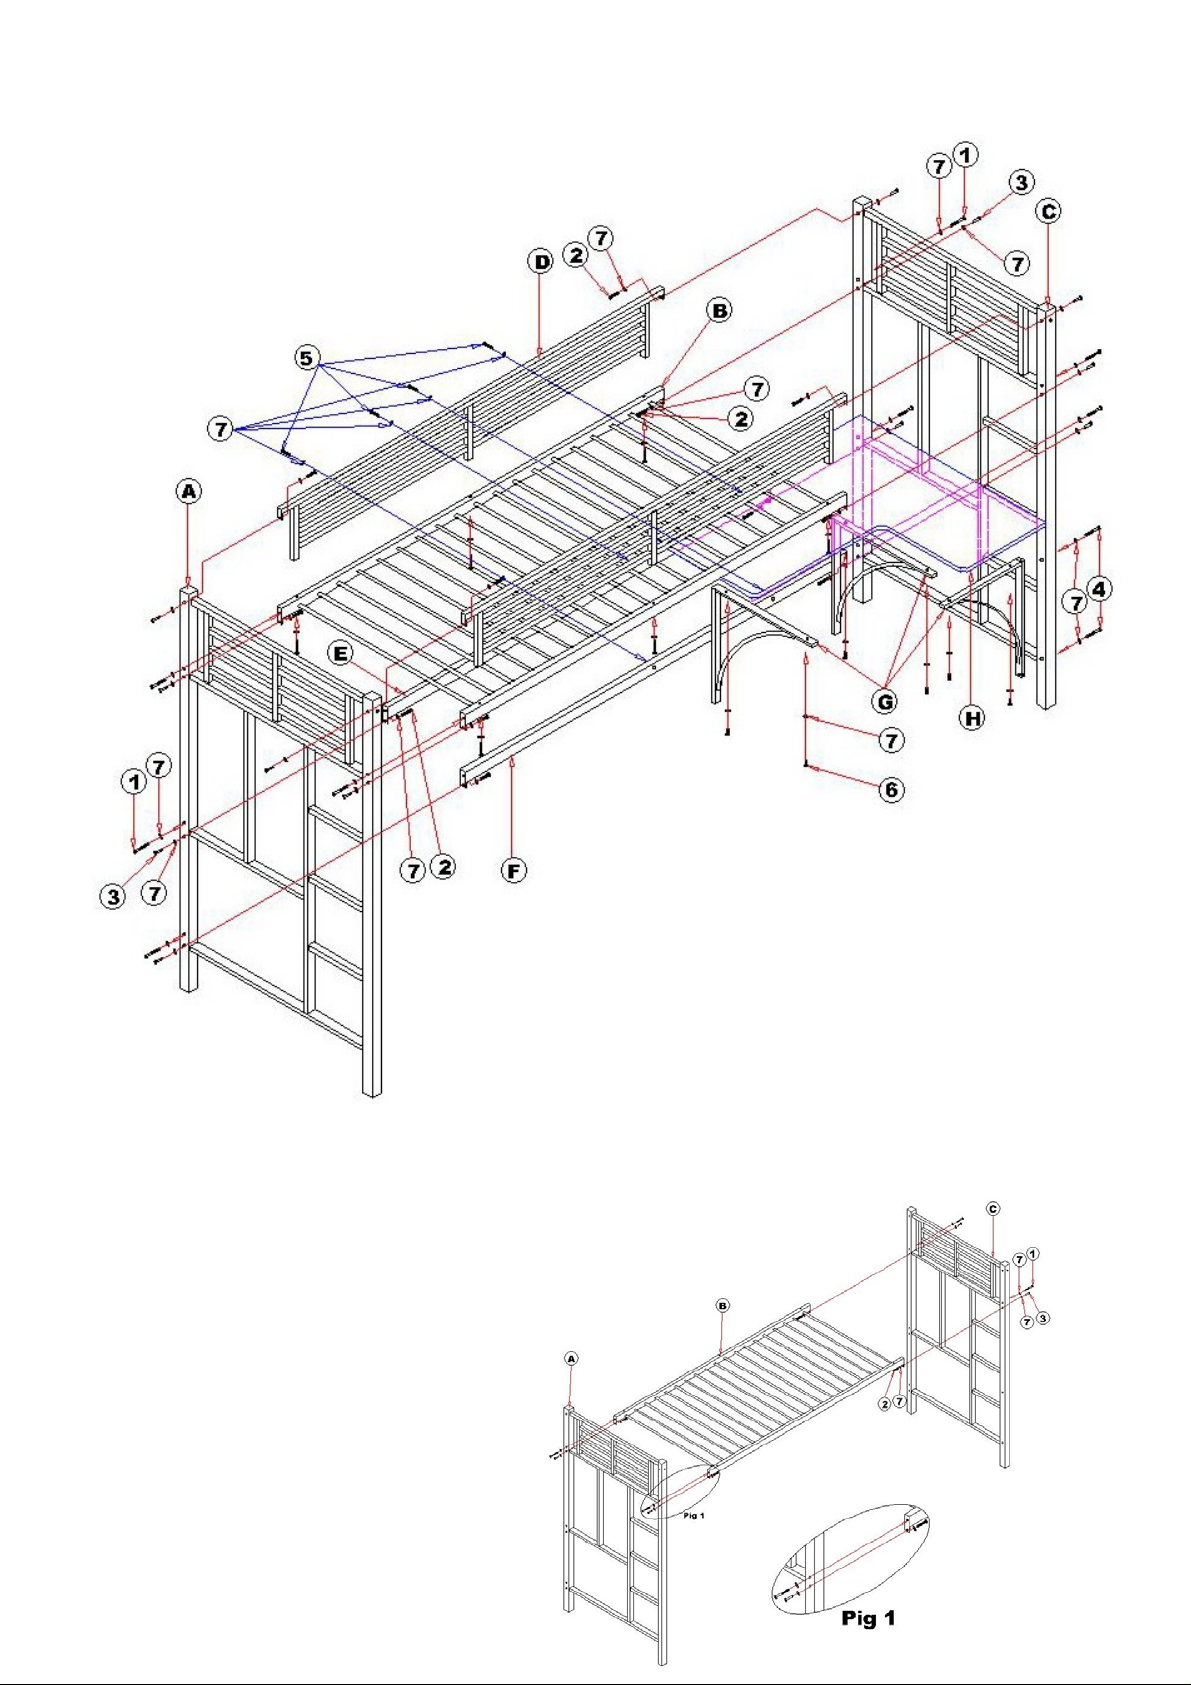
Main Construction and Parts Position Drawing
Please follow the steps to assemble the loft bed
Step 1, assemble Top Platform (B) to the Side
Frame (Left) (A), use Bolts NO 1 & 2 and washer
NO 7 & Nuts NO 3. see Fig1.
and repeat to assemble another side to Side
Frame (Right).
Page 6
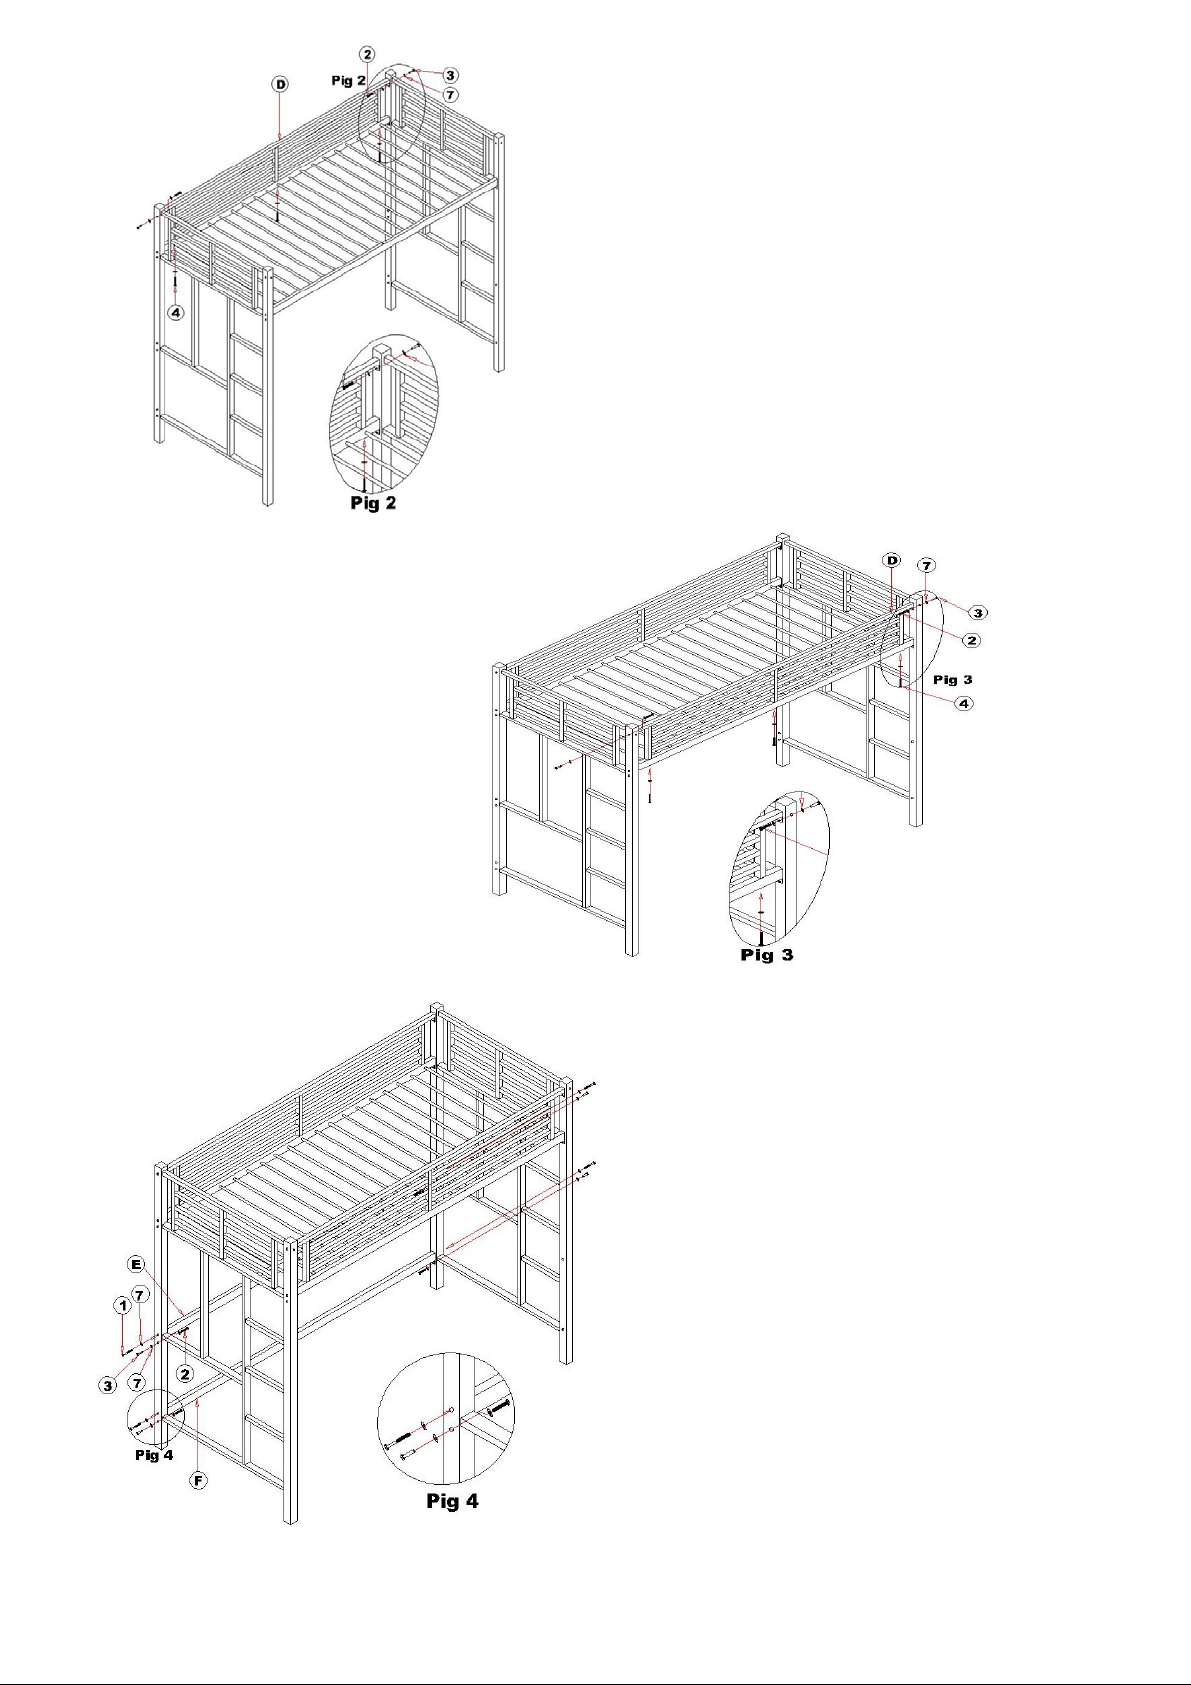
Step2, assemble Guardrail (D) to the Side
frame (A) & (C) and Top Platform (B), use
Bolt NO 2 &NO 4 and Washers NO 7 & Nuts
NO 3, See Fig2.
Repeat to assemble another Guardrail. See
Fig3.
Step4, assemble Support Cross Bar (E) &
(F), to the Side Frame (A) & (C), use Bolt
NO 1 &NO 2 and Washers NO 7 & Nut
NO 3. See Fig 4.
Page 7
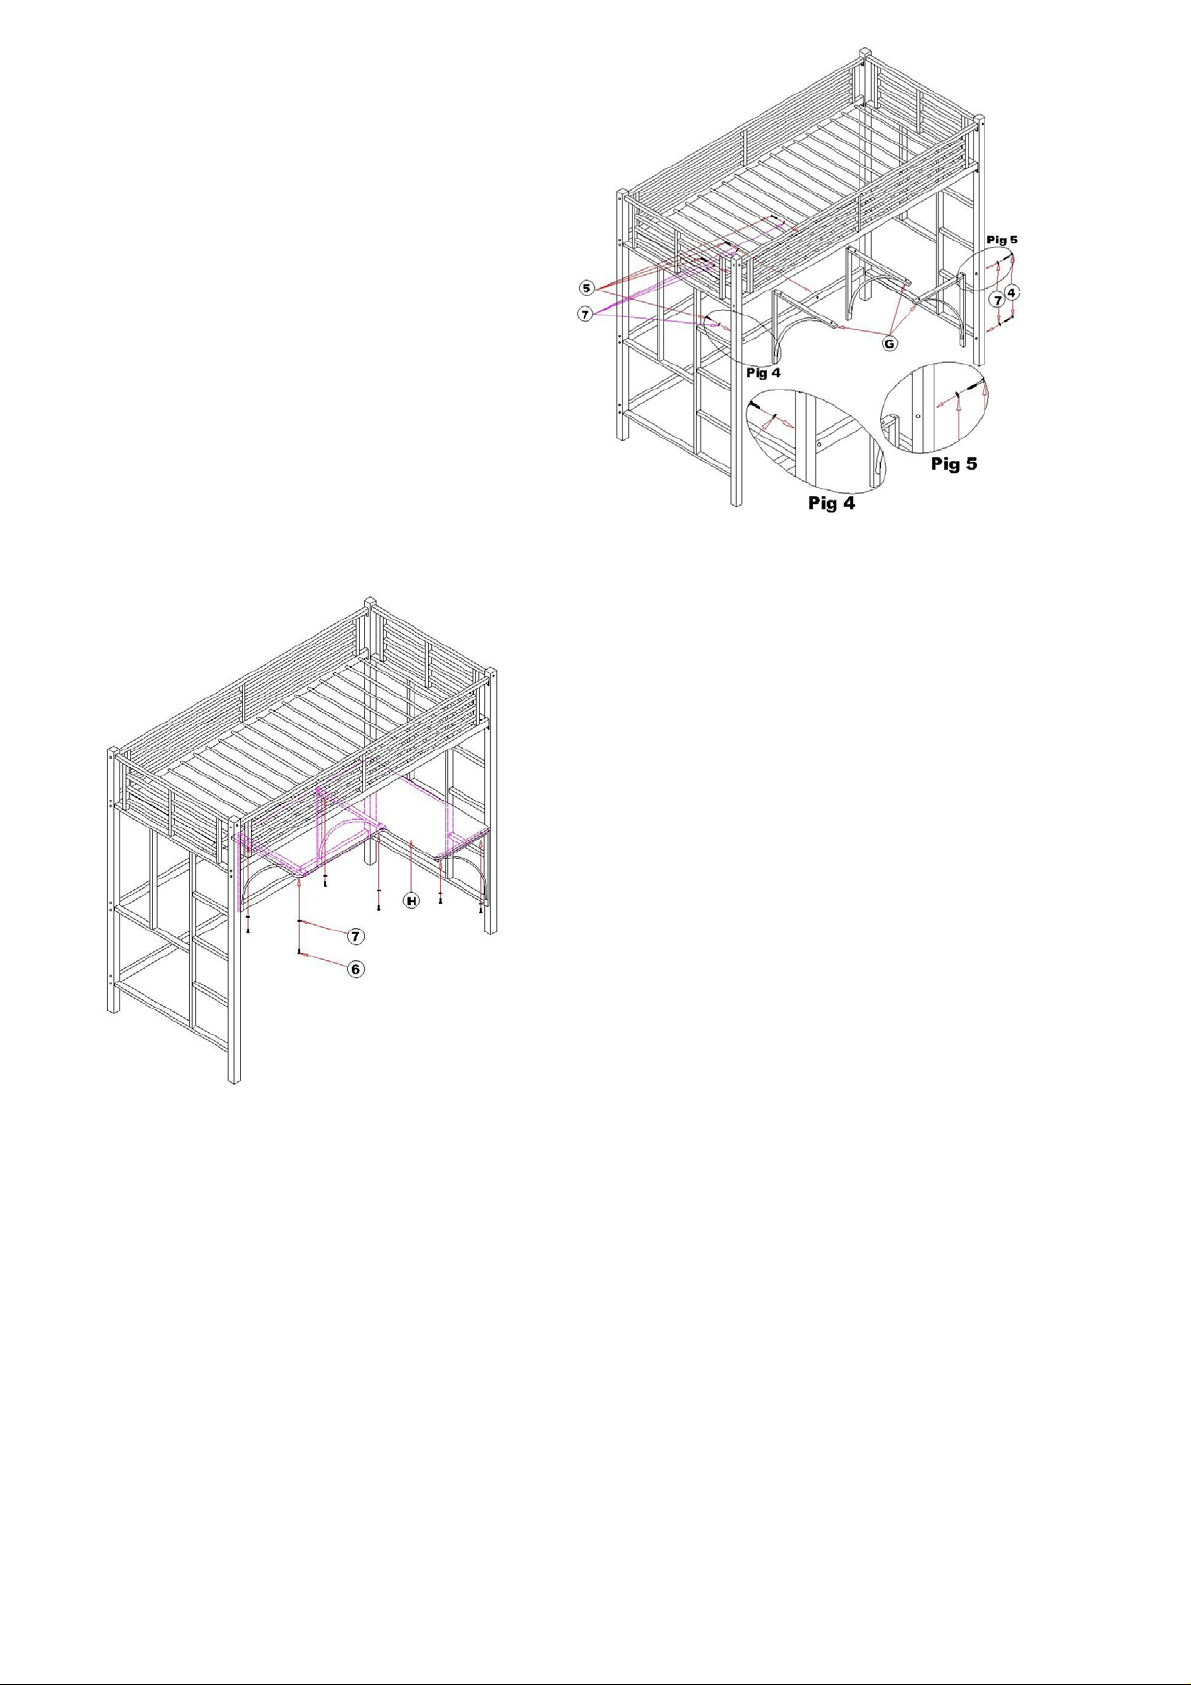
Step 5, assemble Table Support Bracket
(G) to the Cross Bar (E) & (F) and Side
frame (C), use Bolt NO 5 & 4 and Washers
NO 7. See Fig 4 & 5.
Step 6, assemble Table Panel (H) to the Table
Support Bracket (G), Use Bolt NO 6 and Washers
NO 7.
Now Your Loft Bed is ready for use. Please Check Bolts and Nuts regularly during
Use, if any bolts or nuts loosen, please tighten it right away incase any damage to
the user or the item.
Page 8

WARNING
TO HELP PREVENT SERIOUS OR FATAL
INJURIES FROM ENTRAPMENT OR FALLS:
˙Never allow a child under 6 years on upper bunk.
˙Use only mattress which is 74"-75"long and
37½"-38½" wide on upper bunk.
˙Ensure thickness of mattress does not exceed 6"
and mattress is at least 5" below upper edge of guardrails.
˙Use guardrails on both sides of upper bunk.
˙prohibit horseplay on or under bed(s).
˙Prohibit more than one person on upper bunk.
˙Use ladder for entering and leaving upper bunk.
STRANGULATION HAZARD-Never attach or hang items to any part of the bunk bed that are not
designed for use with the bed; for example, but not limited to hooks, belts, and jump ropes.
DO NOT REMOVE THIS LABEL
 Loading...