

Page 1

RO BOT
I
C
VACU
U
TII
CLEAA'ER
WITH
DOCKING
STATIO'V
Operation Manual
t{eu,
fu1ot
[on't
&ink!
%e.*,1*
)'#'A+l
RC530RS
Page 2

SAFEW
INSTRUCTIONS
SPECIAL
FEATURES
MAJOR
COMPONENTS
AND
ATTACH
2
3
3
4
RC53ORS
OVERVIEW
BATTERY
INSTALLATION
AND
REMOVAL
RECHARGING
BATTERY
-.-.--.
--:.
6
INSTALLING
AND
REMOVING
SIDE
BRUSH
REMOVAL
AND
INSTALLATION
OF
DUSTING
PAPER
& HOLDER
--
8
ADJUSTMENT
OF
ANTI.CLIFF
SENSORS
GENERAL
OPERATION
*
Operation
*
Control
Panel
t
Control
Panel
of
Docking
Station
*
Remote
Control
CLEANING
AND
MAINTENANCE
*
Maintenance
Method
*
Cleaihing
Dust
6in
*
Cleaning
lntake
*
Cleaning
Side
Biushes
TROUBLESHOOTING
-----
18
WARNING
OF
BATTERY
&
ADAPTOR
USAGE
10
11
14
Page 3

1. The unit
is for indoors
only.
2. The unit
is not
applicable
for wet
floor.
3. The unit
must NOT
clean
the following items to avoid
danger:
A.
Combustible,
highly volatile
liquids.
B. Sparkling cigarette
butts or burning ashes.
4. To
prevent
from damaging the
vacuum motor, filter must be
installed correctly
prior
to
operation.
5. Use only the battery supplied
with the
package.
6.
The adaptor is for indoors only.
7. Use only the adaptor supplied
with the
package.
8. Never touch
the
adaptor,
plug
or cable
with damp hands.
9.
Before
cleaning
or maintenance the unit, switch off the unit.
10. The adaptor must be disconnected from the unit
when replacing the accessories or
cleaning the unit.
11. Be
sure to switch off the unit before
taking
out
the battery.
12.fhe
unit and the battery
must
be
recycled
and
disposed separately according to
the
taw.
_@-., /rt
\ff
F
\-O'
Ef
4A'E
Page 4
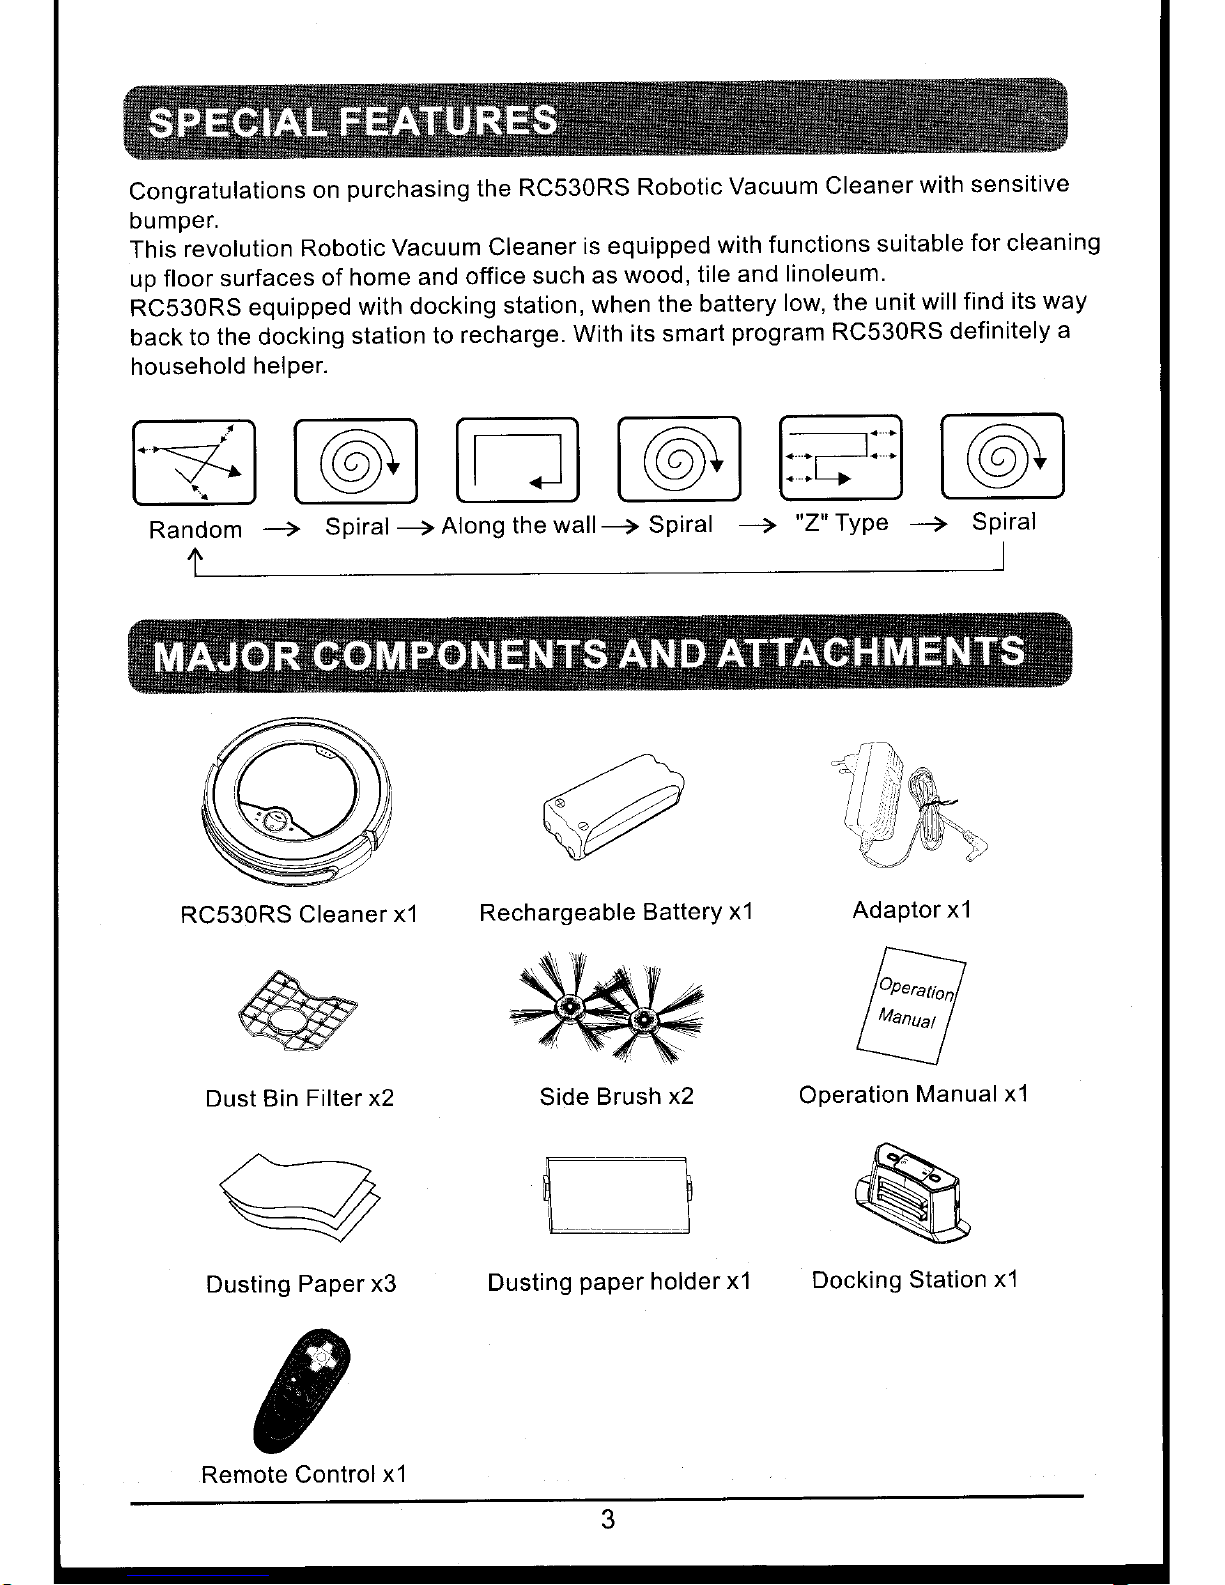
Congratulations
on
purchasing
the
RC530RS
Robotic
Vacuum
Cleaner
with sensitive
DUmper.
This
revolution
Robotic
Vacuum
Cleaner
is equipped
with
functions
suitable
for cleaning
up
floor surfaces
of home
and office
such
as
wood, tile
and
linoleum.
RC530RS
equipped
with docking
station,
when
the battery
low, the
unit
will find
its way
back to
the docking
station
to
recharge.
With
its smart
program
RC530RS
definitely
a
household
helper.
B@E@E@
Random
-)
Spiral
-->
Along
the
wall--> Spiral
--)'
"Z"
Type
-->
Spiral
+l
Rechargeable
BatterY
x1
Adaptor
xl
Operation
Manual
x1
RC530RS
Cleaner
x'l
A\
&2%@
w
Dust Bin
Filter x2
t/\'---------->
(17
w
Dusting
Paper x3
rct
m
I
-
q
Remote Control
x'1
-'ll\
igh
Side
Brush
x2
F:-
[___J
Dusting
paper
holder
x1
Docking Station
x1
Page 5

indication
Panel
Operation
Button
Top
Cover
Function
Button
Contact
plates
for
D.C.
jack
automatic
charging
Liattery
Cover
Contact
points
for
automatic
charging
Front
SmallWheel
Anti-Cliff
Sensor
Side
Brush
Dusting
Paper
Holder
Page 6

1.
Turn
off
the
power
switch
before
installing
the
battery.
2.
Remove
dust
paper
holder.
Push
position
I to
the
left
and
lift up
position
2
at the
same
time.
(Fig
1)
3. Push
to
Open
the
battery
cover.
(Fig
2)
4. Insert
the
battery
into
the
battery
reservoir
as
shown in
Fig
3.
5.
Close
the
battery
cover.
H LEFT
LIFT
UP
o
PUS
Battery
reservoir
Page 7

1. The unit
charge with its
power
switch " ON
"
2.
Plug the adaptor into
the AC
power
supply
tr-g@
3. Charging
directly from the unit.
Insert the output
end of the adaptor into
the D.C.
jack
of the
unit
Switch " ON
"
Adaptor
pug
I
(D.C
4. Charging via the
docking station.
Insert the output
end of the adaptor into the D.C.
jack
of the docking station.
D.C.
jack
Adaptor
plug
(D.C.
19V
600mA)
Turn on the
power
switch of RC530RS
connect the contact
points
in the rear
of
the
unit
with
the contact
plates
of the docking
station.
Function Button
Vacuum
Off
Operation Button
1
9V 600mA)
Page 8

5.
Charging
indiiation
on the
panei:
Charging:
operation
button
with
green
light flashing.
Cha'fging
done:
operation
button
with green
light
on.
"*"Charging
is controlled
by
timer;
it
needs
to be
charged
for
8 hours
continuously
for
_
charging
to
complete.
Any
interruption
occurs; the
charging
time
will
be reset.
Battery
Low:
operation
button
with
red
light flashing
Page 9

To install: Put the brushes directly onto the holder and spread the brush
bristle evenly,
then
press
on
the cap to fix it.(Fig 4)
To remove: Hold the
brush bristle and
pull
upward
to remove the brush.(Fig 5)
Fig
5
Removal of Holder:
Push the lower right
side of the holder
and don't
let
go
then lift up the left upper side of
the holder
to remove the holder.
PUSH
LEFT
LIFT
UP
lnstallation
of The Dusting
Paper:
1. Flat the
dusting
paper
and
put
it
one floor or table. Then
place
the holder
(the
side
with 4 stoppers face
up) on the
paper
at the midpoint.
Hole for the
sropper
Dusting Paper
Page 10

2. Remove
4
stoppers
from
the holders,
fold
the
hem
of dusting
paper
on
two
sides
back
to the holder,
a.nd
place
back
4 stoppers
on top of the
paper
then
press
firmly
to fix the
paper
onto holders.
Installation
of Holder:
Aim
the
2 bolts
of the
dust mopping
paper
holder
at
and
click
the holder
on the
bottom
of
the cleaner
as
*Long
side
must toward
the
back.
the 2 holes
(inside
the 2
big wheels)
below
diagram.
Press
the
two
bolts on
the dusting
paper
holder into
th€
lwo holes
on
lhe
bottom
of the
cleaner.
NorE:
lf
you
don't
nedd
to
use mopping
function,
please
remove
the
dusting
paper
holder
from the
cleaner
before
you
turn it
on for
cleaning.
I
Page 11

There
are three
"Anti-Cliff"
sensors
at the
bottom of RC530RS
to
prevent
the unit from
falling
down
stairs. lf the
distance
between
the stair
and the
ground
is shorter
than
usual,
please
adjust
all windows
of
"Anti-cliff"
sensors
to
"@"
or
"O"
or
"o,"
or
".."
position
to
prevent
the cleaner
from falling
down
stairs. Please
test it
before it starts
to clean.
* ATTENTION;
tt
the color
of the floor
is dark
(ex.
Black), it
means that
reflectivity of
the floor
is
bad, at this
time,
you
have to
open the window
to a larger
scale.
Please
refer
to the
criteria of
adjustment
for adjusting
the windows.
The Criteria
of Adjustment
Darker
floor
Lighter floor
+-<<
Bigger
drop
>H
Shorter drop
@@oo
@@oo
Page 12

ATTENTIONI
Prior
to the
operation,
Make
sure
the
filter
is
installed
correctly
and
the
top
cover
is
closed
properly.
lf
the
top
cover
is not
closed
properly,
the
operation
will
be stopped
and with
B
orange
light on
and
the
clebner
will
automatically
stop. To
remind
user
that
the
top
cover is
not
closed
properly.
OPERATION:
1.
Operation
without
connecting
to the
docking
station:
,
Place
the
cleaner
on
the
floor
and turn
on
the
power
switch
then
press
the
operation
button
to
operate, press
again
to
stop.
2.
Operation
via
the
docking
station:
Turn
on
the
power
switch
and
connect
the
unit with
the
docking
station
.
A. while
the
unit
is
connect
with
docking
station,
pressing
"FULL
Go"
button
on
the
docking
station
(FULL
Go
light
on),
when
RCS3ORS
detects
the
battery
is
fully
.
charged,
it
will
leave
docking
station
and
begin
to work.
Press
again
to
cancel,
B' Press
the
"24H"
button (24H
light
on)
to
set
the
starting
time
for
the
unit.
The
time
user
presses
the
"24H
button
is the
daily
starting
time
of
the
unit.
Press
again
to cancel.
3' When
Sattery
low,
the
unit
is
programmed
to find
the docking
station
automatically
for
recharge.
lf the
unit
is
failed
to
return
to the
docking
station,
user
can
put
it
back
connecting
to
the
docking
station
manually.
11
Page 13

CONTROL
PANEL
Function
Button
CONTROL
PANEL OF
DOCKING
STATION
Vacuum
Off
Operation
Button
lndication
on the
Panel
State
Signal
Working
Operation button
@
with
green
light on and
El
with orange
light on.
Wheel Jammed
Operation
button
@
with red
light on and
@with
red light
flashing.
The unit being
picked
up Operation
button
@
with red
light on and
El
with red
light flashing.
Top cover
is not close
properly
sl
Wittr orange
light on and
the cleaner
will automaiically
stop
Battery
low Operation
button
@with
red
light flashing.
Charging
Operation
button
@
with
green
light flashing.
Charging
completed
Operation
button @ with
green
light on.
Mop function
(vacuum
off) Operation
button
@with
green
light on and
mop
with orange
light on.
lndication
on the
Panel
State
Signal
:::iar::i:i::
FULL GO activated
FULL GO with
Red light on.
Starting
time set
24H with Green
light on.
Page 14

lR
transmitter
(1)
Auto
(3)
Turn
Left
(6)
Backward
(9)
Spiral
(10)
R"Bndorn
(11)Along
the
2'filq7q"
batteries required.
Function
of
buttons:
(2)
Forward
(4)
Turn
Right
(5)
Stop
(7)
Vacuum
switch
(8)
Decking
(12)"Z'type
Key
Pressed
Action
(1)
AUro
)lease
refer
to Table
2 for
Pressing
"AUTO"
button.
(2)
FORWARD
Move
forward
with vacuum
on and
will stop when
bumper
encounter
any
obstacle
or
by
pressing
"STOP"
button.
(3)
LEFr
Turn left
. Pressing
and holding
the
button makes
it turn
left
continuouslv
(4)
RrGHr
Iurn right.
Pressing
and holding
the
button makes
it tum
right
continuously.
(5)
sroP
Stop
the
unit immediately.
(6)
BACKWARQ
The
unit
going
backward
for
20 cm.The
unit doesn't
have
the back
anti-cliff
sensor
to
prevent
it from
falling
from
stairs when
moving
backward.
(7)
vAcuuM
Switch
the
vacuum
power
or to turn
ofi vacuum
and
sweeper
(with
rnop
function
on only).
(8)
DOCKTNG
Search
the docking
station for
recharge.
(9)
SPTRAL
Move
in
spiral
pattem
with
vacuum
on until the
bumper
encounrcr
an
obstacle
or
stairs,
then
the unit will
continue
operate
in
"AUTO"
mode
with
60
minules
working
time
or until
bqttery
low.
(10)
RANDoM
f,perate in
the randorn
mode
continuously
with
0O
minutis
workingtime
or
Jntil
the
battery
low.
11) ALONG
THE
WALL
3perates
unit in the
along-the-wall
mode continuously
with
60 minutes
ilorking
time
or
until the
battery
low.
(12rzrYPE
Jperates
unit in the
"2"
Ape
mode
continuously
with
60 minutes
working
:ime
or
qntil
the
baftery low.
Page 15

Maintenance
Method
The operation and
maintenance
of the RC530RS
is very simple.
After several
uses, clean
any
dirt left behind on
the dust bin and
filter. lt
is not necessary
to clean the
intake after
every
use.
Cleaning
Dust
Bin
1. Push the button
at
"A"
to open
the cover
in the direction
as arrow
"B"
shown
in below
diagram
to
remove the top cover
from the cleaner.
2.
Take out the dust bin
from the
cleaner.
Page 16

3.
Open the
lid of
the dust
bin.
4. Lift
up and
take out
the filter.
5. Throw
away the
dust
and dirt from
the
dust
bin.
Page 17

6.
Rinse
the dust
bin
with
tap
water.
7. Clean
the
filter
gently
with a
soft bristle
brush'
8.
Dry out
the dust-bin
then,
reinstall
the
filter and
the
dust bin
lid.
9. Place
back
the dust
bin and
install
the
top cover
properly.
Page 18

Gleaning Intake
After repeated
use,
dirt and
dust might
accumulate around the intake
of the RC530RS
and
the working
efficiency
could be reduced.
To ensure the best
efficiency and
constant
airflow, the
intake
should
be cleaned
periodically.
lntake
Cleaning
Side Brushes
1.
After
being used
for
a
period
of time,
the
brushes need
to be replaced
for
working
more
effectively.
2. Turn
off
the
power,
place
bottom
of the
cleaner
upward
on a flat
surface. Hold
the
brush
bristle and
pull
upward to remove
the
brush.
3. The
side brushes
can ue rinsed
and if
they
become
crooked,
you
can
soak them in
hot water
to make
them
recover
to the
original
shape. Install
the
brushes
back
after
cleaning.
17
Page 19

Problem
l
Solution
1
@
witr, Red
LED
stays after
power
on.
*
Batterv Low
*
Recharqe
the
battery.
*
The wheels stuck
Remove
RC530RS
from
obslacles.
.
RC530RS
lifted up from
f loor
Place
the unit back
to the
floor.
2
RC530RS
could not
vacuum effectively
when
it is turned on.
The top
cover is
not
properly
installed.
Install the
top cover
properly"
3
RC530RS
is moving
backwards
after being
started.
RC530RS is on
the floor
in darker color
(it
means
the reflectivity
of floor
is
bad).
Please adjust
all windows
of
"Anti-cliff"
sensors.
(Please
referto
page
10.)
4
Operation
button keep
blinking
GREEN after
8
hours charging.
The
power
input could
have been
interrupted
during charging.
As long
as the
total charging
time
of this
cycle
is
over
8
hours,
you
could
start it for
cleaning.
5
The side brush
becomes
crooked,
not
good
to
sweep.
Being used
for a
long
time.
lf
it
becomes
crooked,
you
could
soak
it in hot water
to
have
it recover
to its original
shape.
6
Cannot
start
the
RC53ORS
1. The battery
is not
installed
properly.
2. Battery
power
is very
low.
3. The top cover
is not
installed
properly.
To install the battery
properly,
please
refer to
page
5 for battery
installation.
Have
the battery
fully charged.
Place;back
the top cover
correctly
and
turn it on
again.
1
7
RC530RS circles
around
only.
One
of the
wires of the
wheels
is loosened.
Ooen
the wheel cover
and
connect
the loosened
wire
of
the
wheel set
properly
or
contact
your
loca{"dealer
for
servtce.
B
No
light on when
press
Full Go
button.
The unit is
not
connected
with the
docking
station.
Make sure
RC530RS
is
connected
with the docking
station.
***
lf the solution
can not
solve the
problem,
Please contact
to
you
local
dealer
for service.
***
Page 20

1. Please follow
the voltage and
current specified and
printed
on the
packing
labels.
Gheck
with
salesman or local
power
company if it is
uncertain.
2. Please
apply the same model's battery
(D.C.
14.4V 1600mAh) and
adaptor
(19V
600mA) as equipped with
the
packing.
3.
Forbid
any un-rechargeable or
different type/model battery.
4. To
avoid the
hazard
from battery short circuit,
please
follow the
instruction
of
installing
battery exactly.
5.
The
adaptor
is
applied indoors only.
6.
Do not keep
on using the equipped
battery
if
the
packing
cast is broken.
7. Never touch the
adaptor,
plug
and cable with
wet hands,
8. Unplug, stop
recharging,
and take out the battery before clean the unit.
9.
Remove
the battery before dispose the unit.
10. Unplug or turn
off the unit before take out the battery.
11.
Recycle the disused battery
properly.
12. Keep battery
away
from inflammable
area.
13. Do not soak the battery into water
or
raindrop.
14. Do not
try to disassemble the battery.
15. Do not
disregard kids
playing
with battery.
16. Do not contact
eyes, skin, clothes with battery leaking
fluid,
wipe the
leaking battery with
dry cloth before recycle it
properly.
Page 21

Please Register
at
Avww.v-bot.com.sg"
ForThe
Wananty
'Tcfms
E Coidilbns
Appliedl
SERVICE CENTRE
Blk 34
Whampoa West
#01-87 Sirgapore 330034
Tel:
+656291
1200
 Loading...