

Page 1

NP2 / NP5 QUICK GUIDE V. 1.5
Page 2

Pag. 1
When you find this picture on a device, it means that the device is
compliant with European Directive 2012/19/EU.
All electronic and electric devices should be disposed separately from
normal garbage.
The proper disposal of old devices, accessories, and of the batteries in
particular, it contributes to prevent possible negative consequences for
human health and for the environment.
For more detailed information on the disposal of obsolete devices, contact
the municipality, the garbage disposal service or the shop in which the
product has been acquired.
NP2/NP5 QUICK GUIDE v. 1.5
Warranty
NP2/NP5 has a 24 month warranty on the electronic parts, running from the date of purchase. The
warranty will not be valid in case of tampering with the device or in case personnel not authorised
by the manufacturer or by the authorised dealer should carry out work on it.
N.B. responsibility of the purchaser: in case of operation under warranty, the device must be
packaged so as to prevent damage during transport and shipped to the manufacturer together with
all the accessories.
Warranty rules
1. In order to exercise his warranty rights, the purchaser must enclose with the device a copy of
evidence of purchase duly stamped by the dealer (bill/invoice).
2. The warranty lasts for 24 months for the electronic parts. The warranty is granted at the point
of sale or else directly requested from the manufacturer.
3. The warranty only covers damage to the product which makes it work badly.
4. Work under warranty will only mean repairing or replacing, free of charge, any parts
acknowledged to be defective during manufacture or in their material, including labour costs.
5. The warranty does not apply to damage caused by negligence or failure to comply with the
instructions, or damage caused by unauthorised people, with a special reference to the outside
parts.
6. Also, the warranty does not apply to damage caused to the device by connection to unsuitable
power sources.
7. The warranty does not cover parts subject to wear after use, or the container if the material is
not defective.
8. The warranty does not include transport costs, which will be paid for by the purchaser in
relation to the manner and time of transport.
9. The warranty will run out after 24 months have elapsed. In this case, service will be provided
charging for the parts replaced, labour costs and transport according to the current rates.
10. Any dispute will be settled exclusively before the Court of Law of Venice.
Obsolete devices disposal :
Page 3
Pag. 2
NP2/NP5 QUICK GUIDE v. 1.5
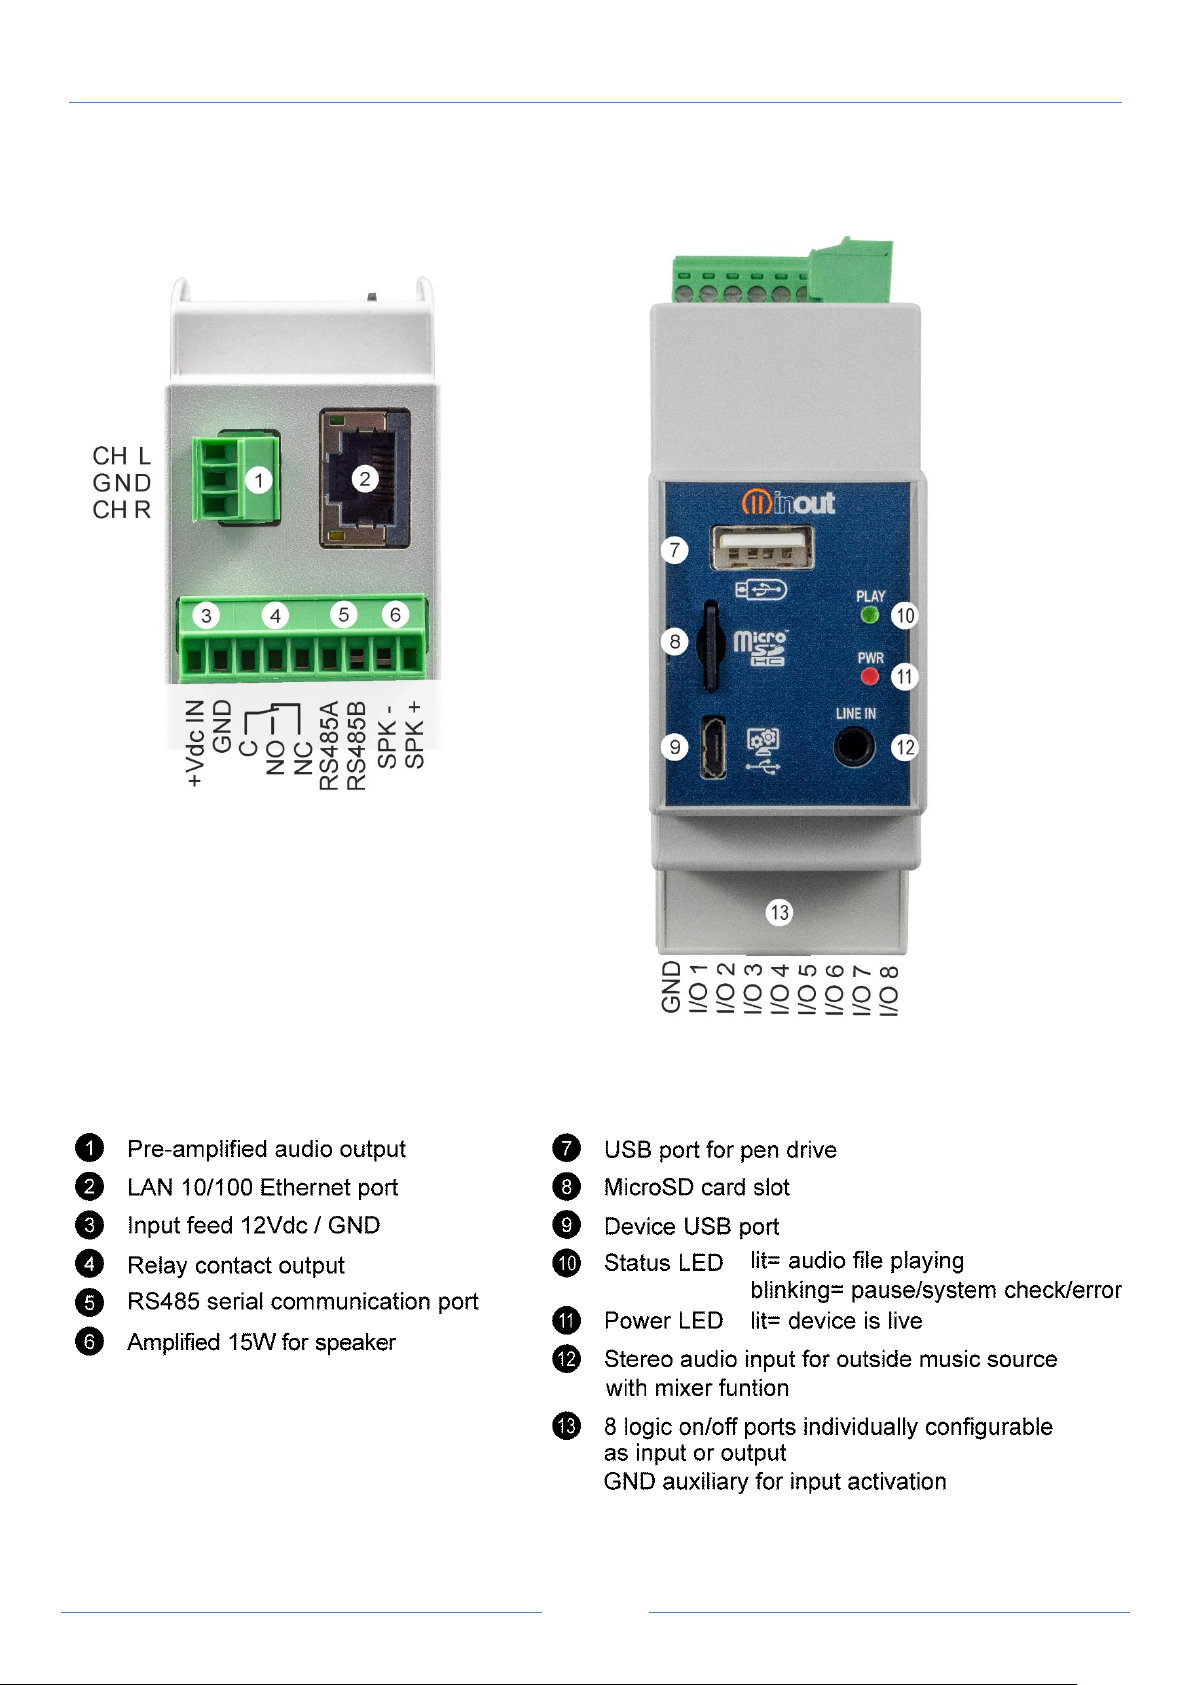
NP2 installation and connection description
Page 4
Pag. 3
NP2/NP5 QUICK GUIDE v. 1.5
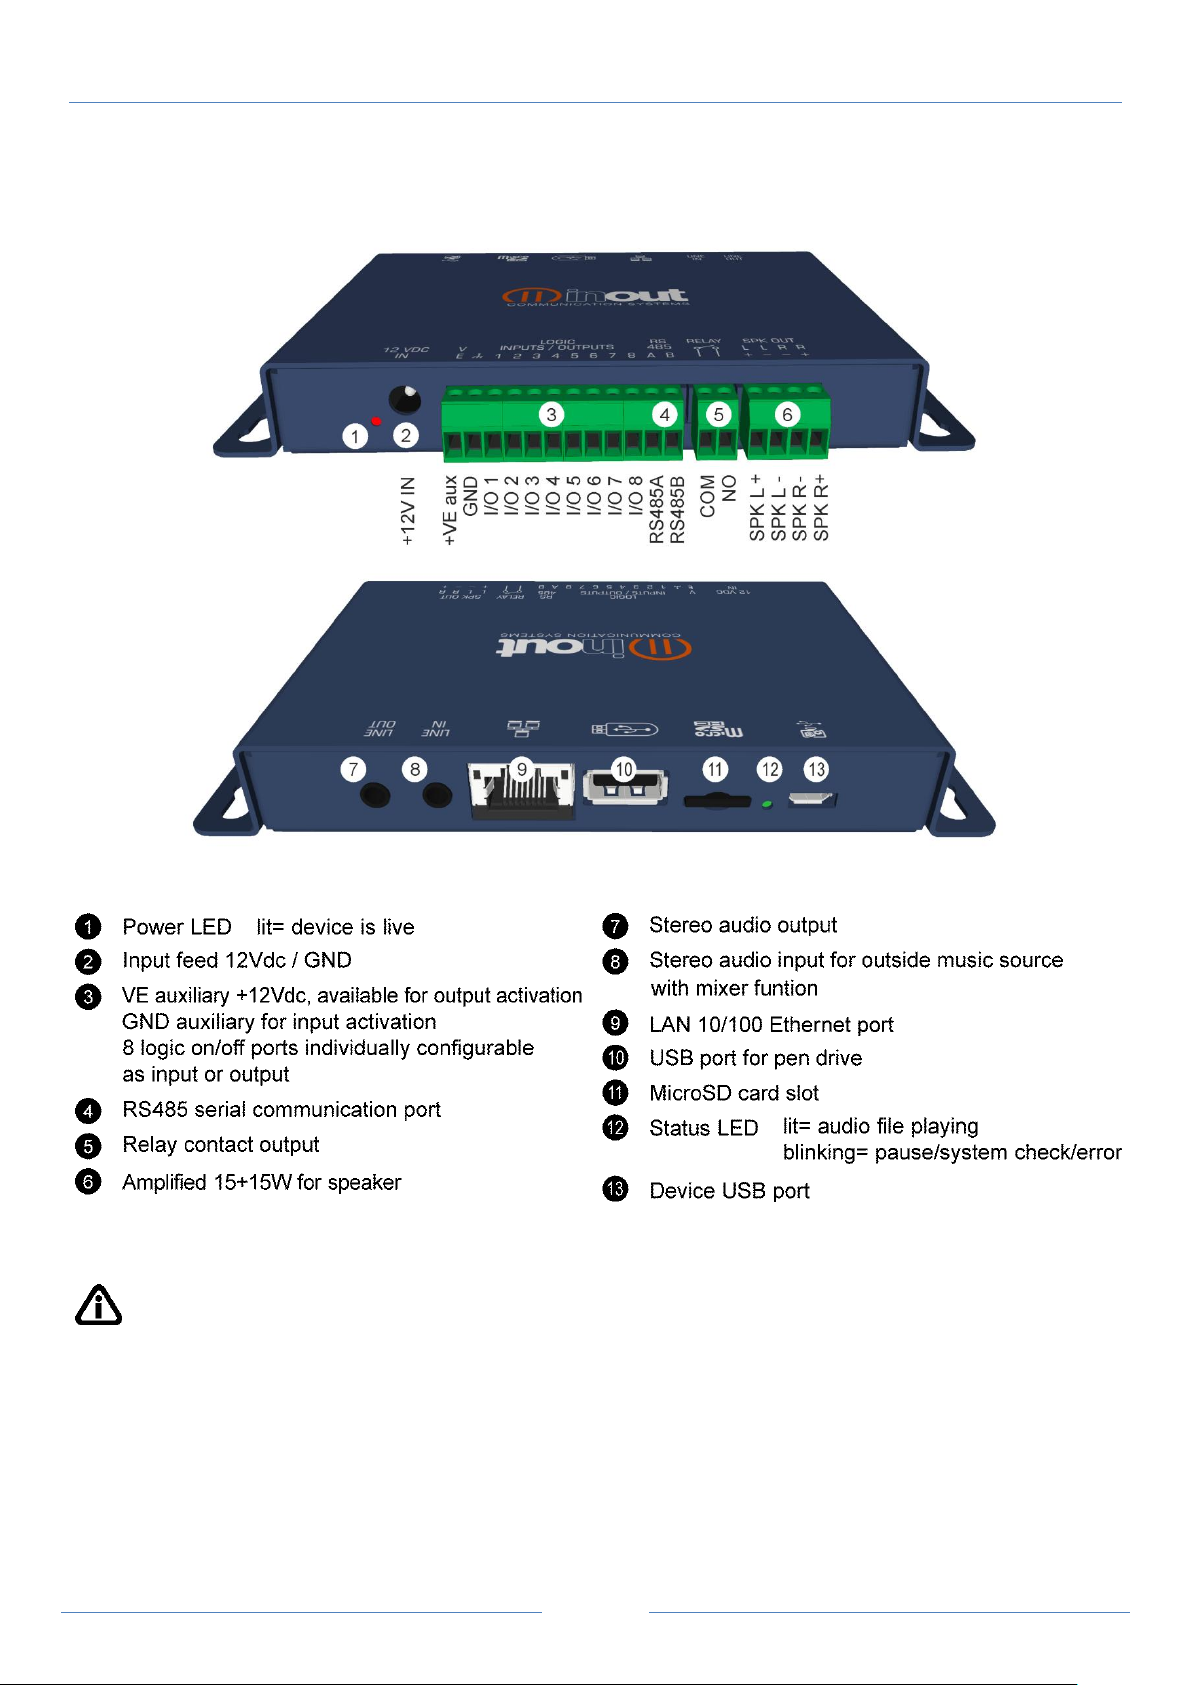
NP5 installation and connection description
IMPORTANT NOTICES.
1. NP2/NP5 has been designed and made to work only with the following mains power supply: 12VDC.
2. The device must be serviced only by qualified staff.
3. Do not put objects inside the device through the openings, in order to prevent the risk of fire or shock.
4. Disconnect the device from the power socket before cleaning. Clean the device using a soft,
dry cloth. Do not use liquids or spray which can contain flammable substances.
Page 5
Pag. 4
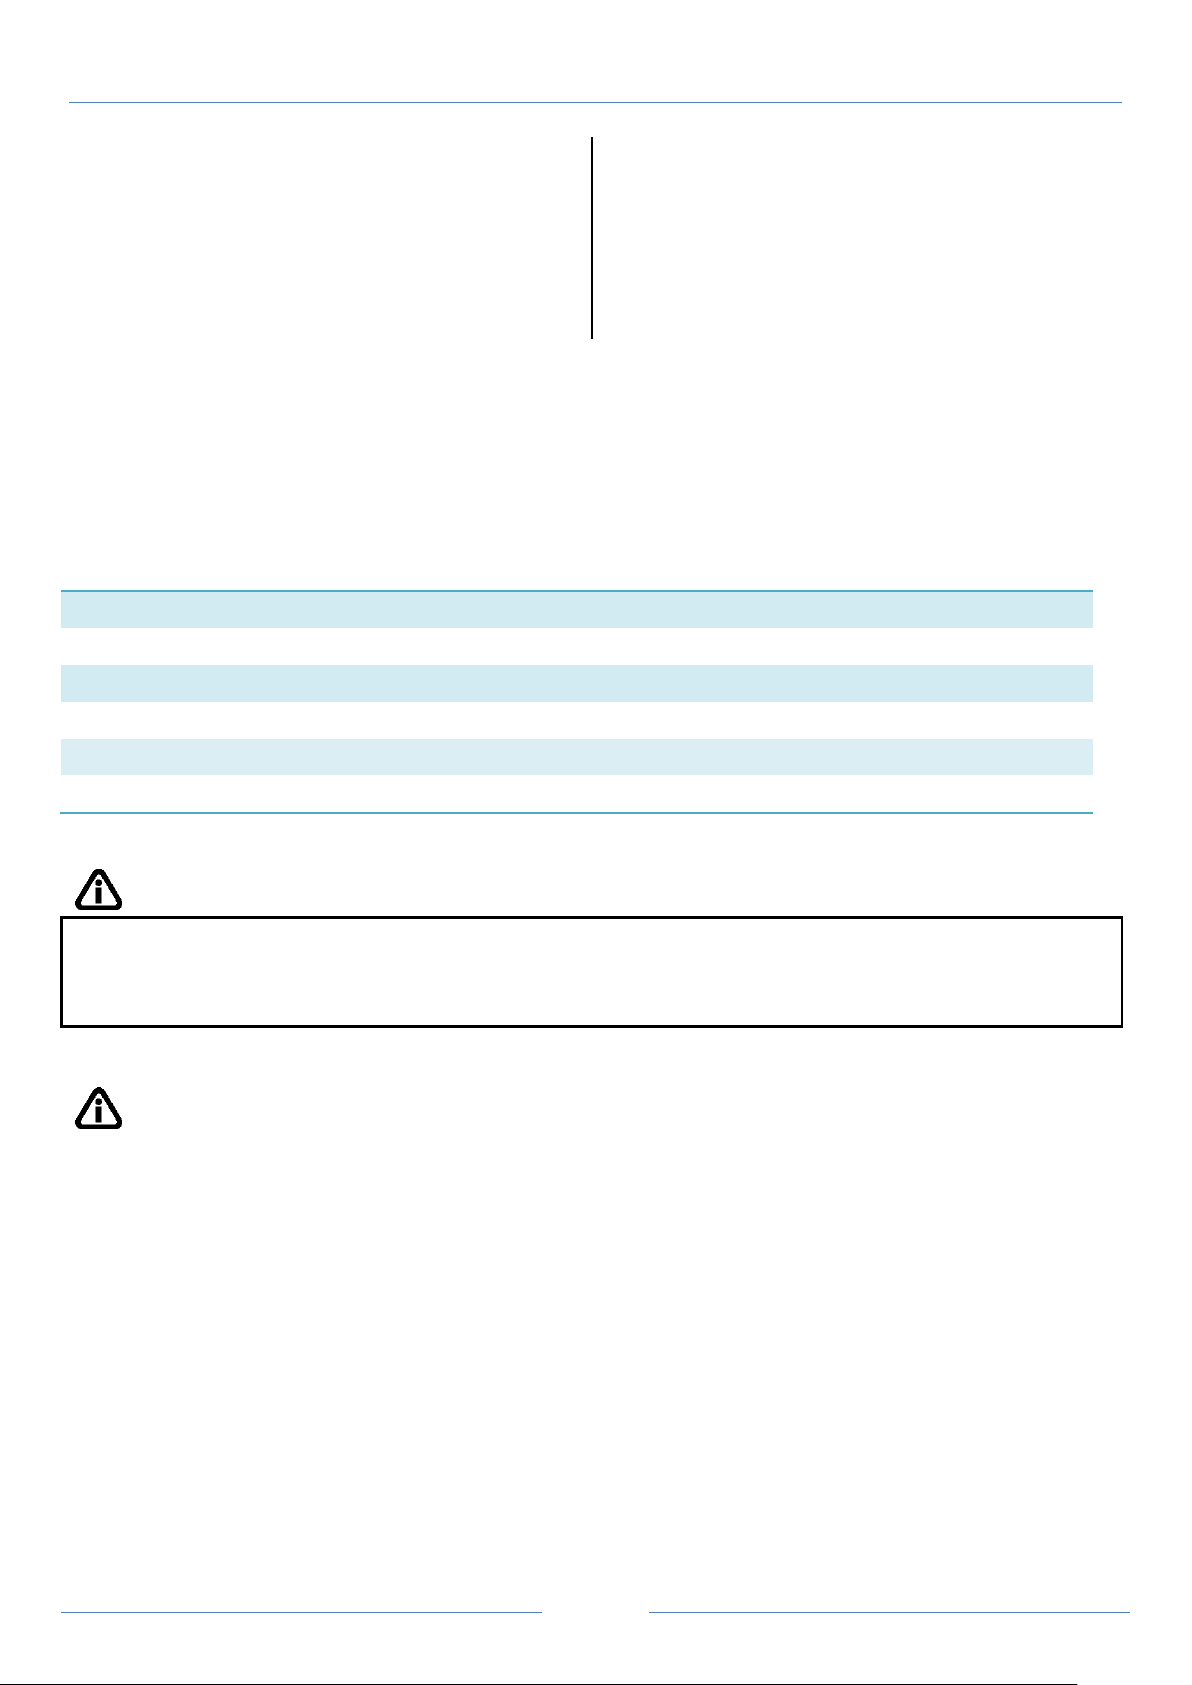
Content of the kit NP2
Content of the kit NP5
- n. 1 NP2 device;
- n. 1 quick guide;
- n. 1 DIN rail adaptor AC/DC 15W/12Vdc out
- n. 1 uSD flash memory.
- n. 1 NP5 device;
- n. 1 quick guide;
- n. 1 mains adaptor AC/DC 30W/12Vdc out
- n. 1 uSD flash memory.
Folders
What they need
config
Folder for memory configurations
music
Folder for music files
playlist
Folder for playlists files
scheduler
Folder to save time schedule
spot
Folder for spot files
system
System Folder and Help Messages
If the microSD is not inserted, NP2/NP5 does not work and the green
LED remains blinking
NP2/NP5 QUICK GUIDE v. 1.5
How to start?
Try out demo examples contained in the supplied microSD.
At power-up, NP2/NP5 performs a system check signaling by flashing the green led, wait for
the LED to turn off.
To create folders into microSD, insert blank flash card into the player and power up NP2/NP5.
IMPORTANT:
IMPORTANT:
NP2/NP5 is compatible with the following browsers.
Chrome 7+
MozillaFirefox 4+
Internet Explorer 10+ / Windows 10 Edge
Safari 6+ for MAC
Page 6
Pag. 5
Default value:
User
Password
Guest
guest
guest
Administrator
admin
admin
NP2/NP5 QUICK GUIDE v. 1.5
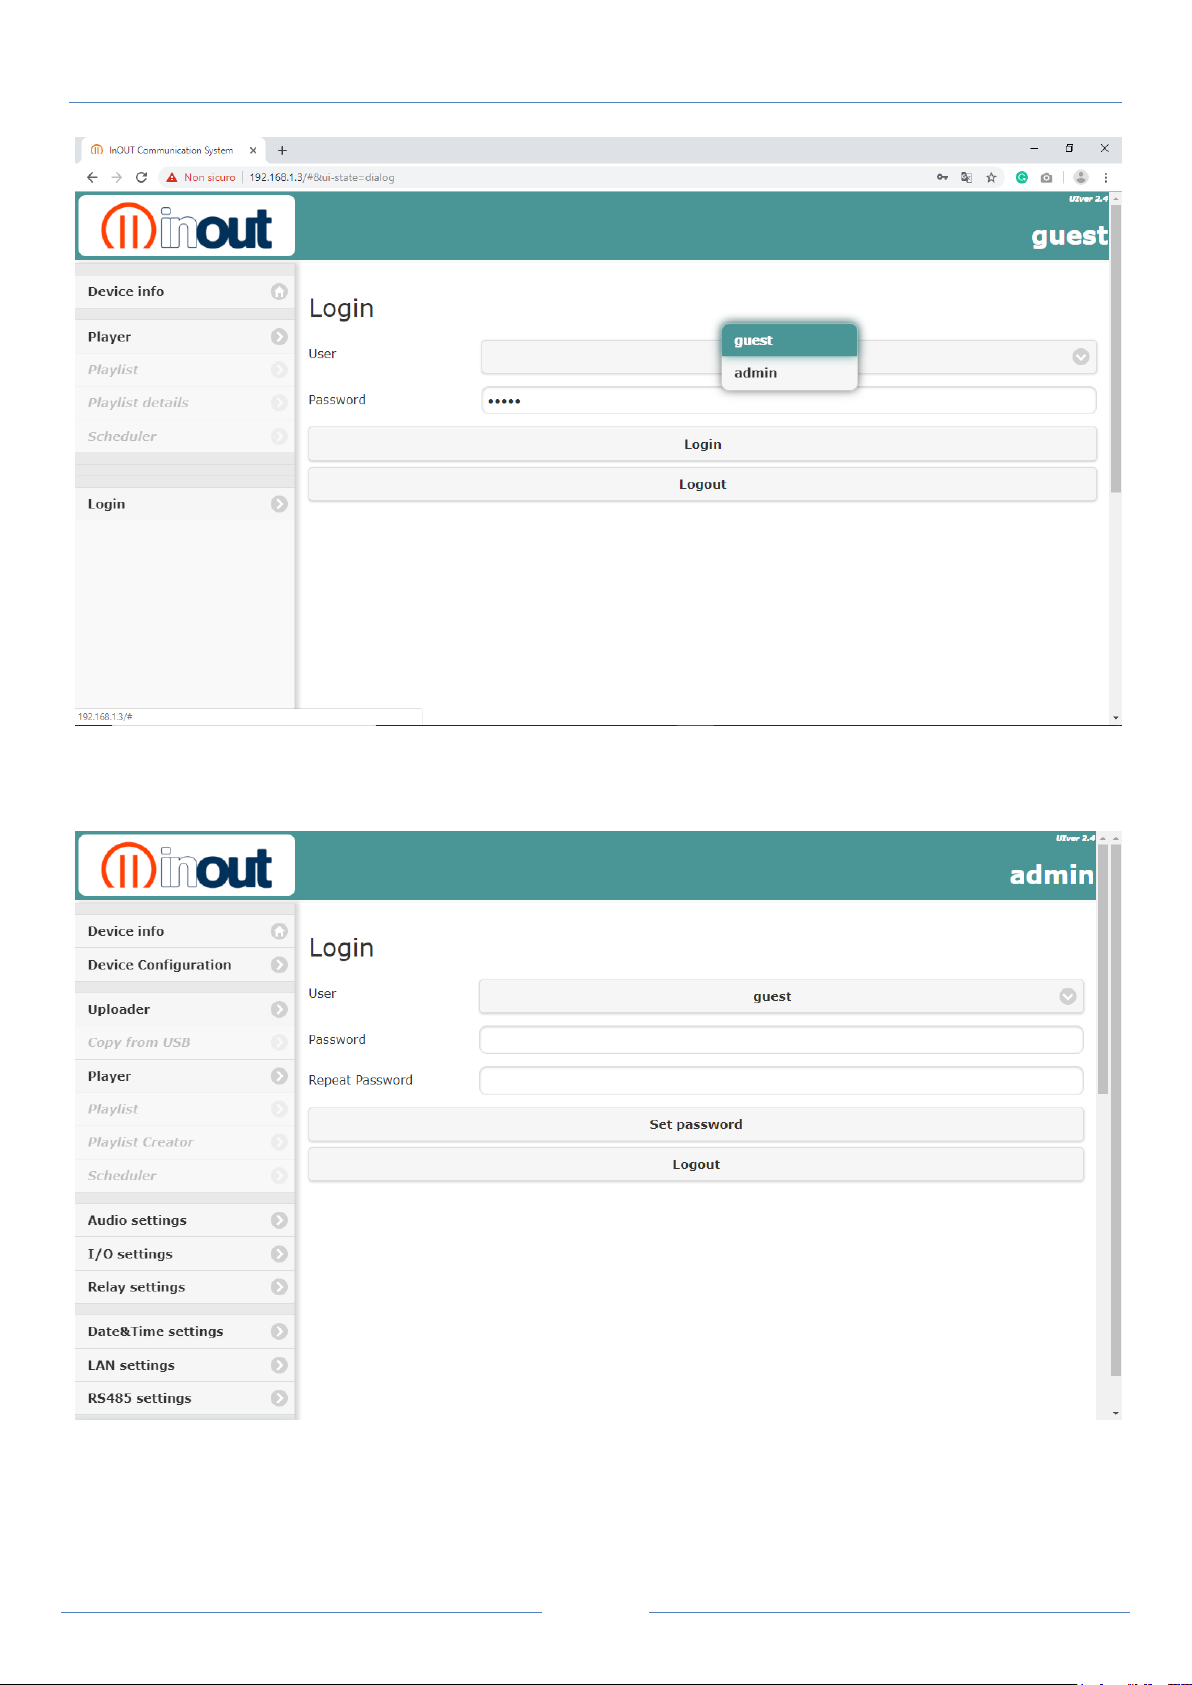
Please connect the NP2/NP5 to your router before executing the following steps.
open your Web browser on your PC (such as CHROME)
on the Address field, type the following address http://192.168.1.1 or IP address of the router.
you will get a window asking for the username and password of the router.
enter the username and the password to log on to the router administrative page.
Check the router’s DHCP clients table by checking the attached device list.
Press Login menù, select User Admin.
IMPORTANT: timeout login 10min.
Page 7
Pag. 6
NP2/NP5 QUICK GUIDE v. 1.5
If you change login, insert password and confirm with Set password button.
Page 8
Pag. 7
NP2/NP5 QUICK GUIDE v. 1.5
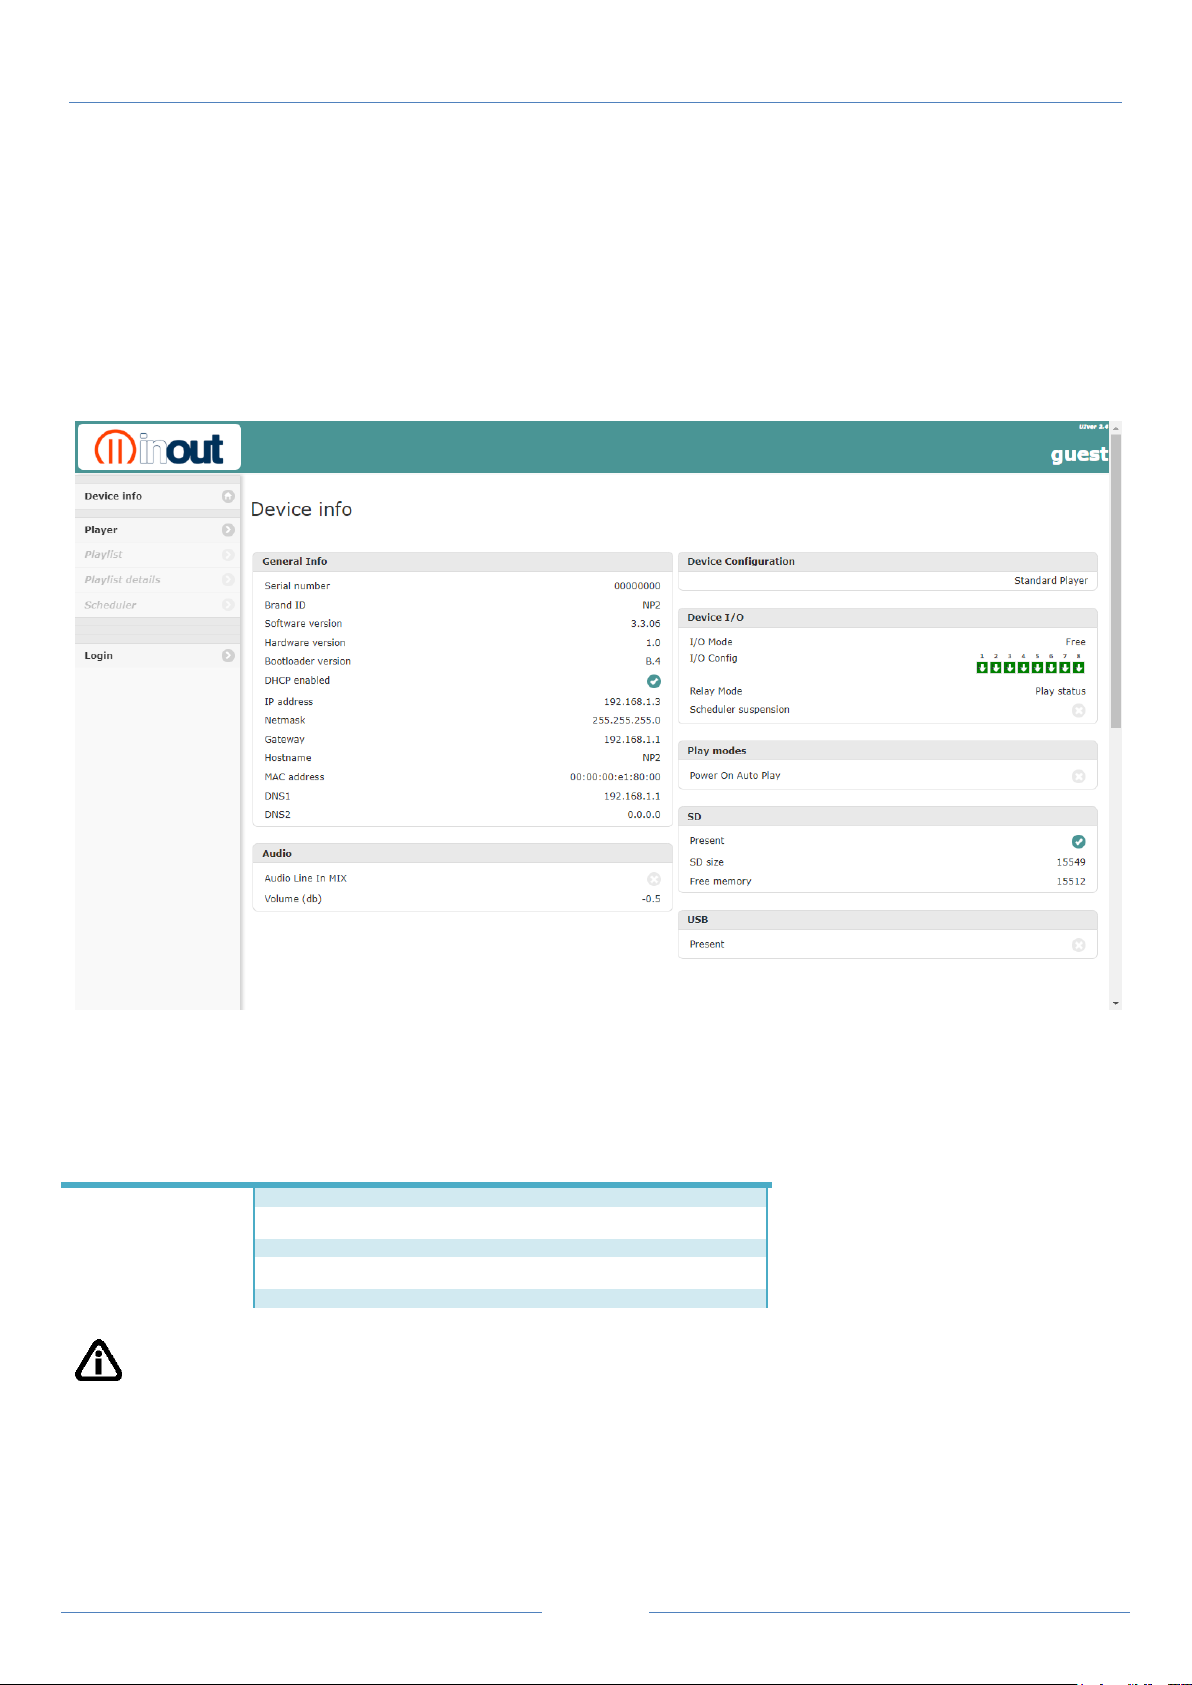
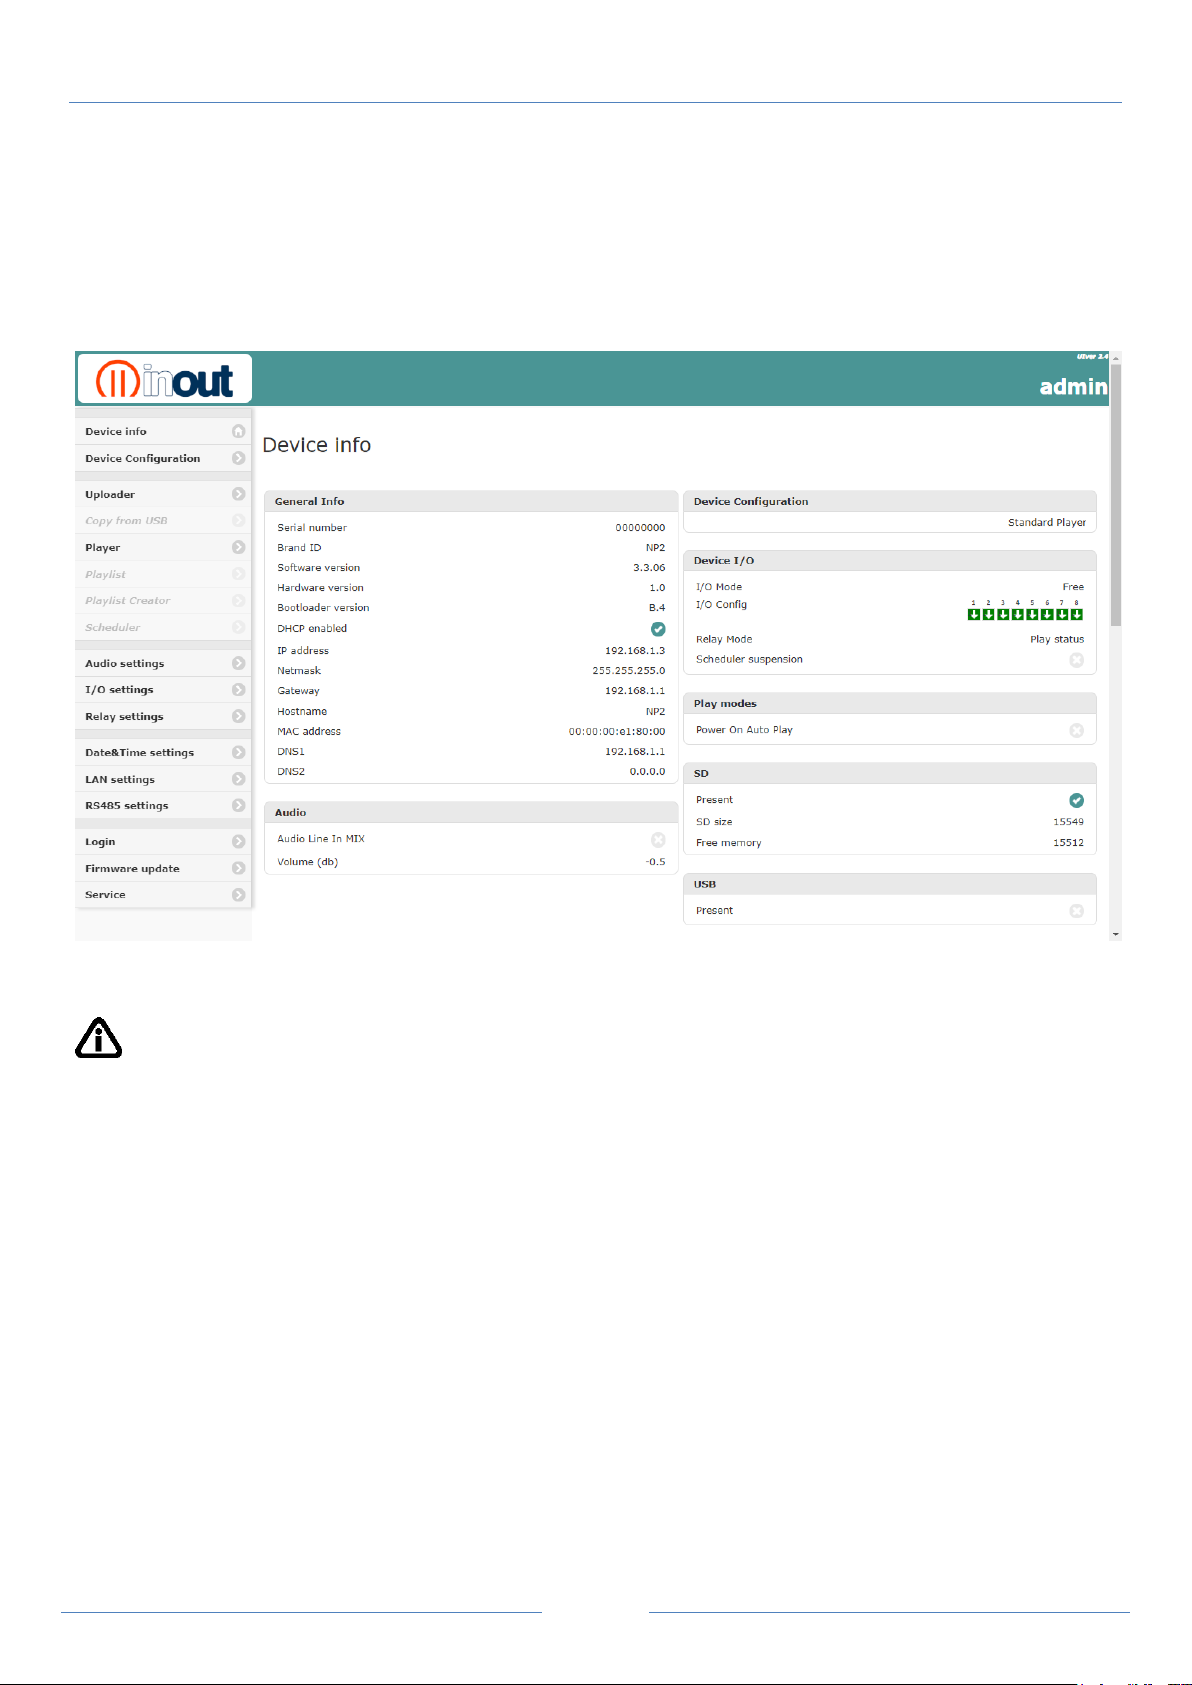
Device Info
Web page displaying all the parameters set in the NP2/NP5 device.
To change settings, select the menu on the left side of the web page
IMPORTANT:
always save the settings with the save/apply button
Page 9
Pag. 8
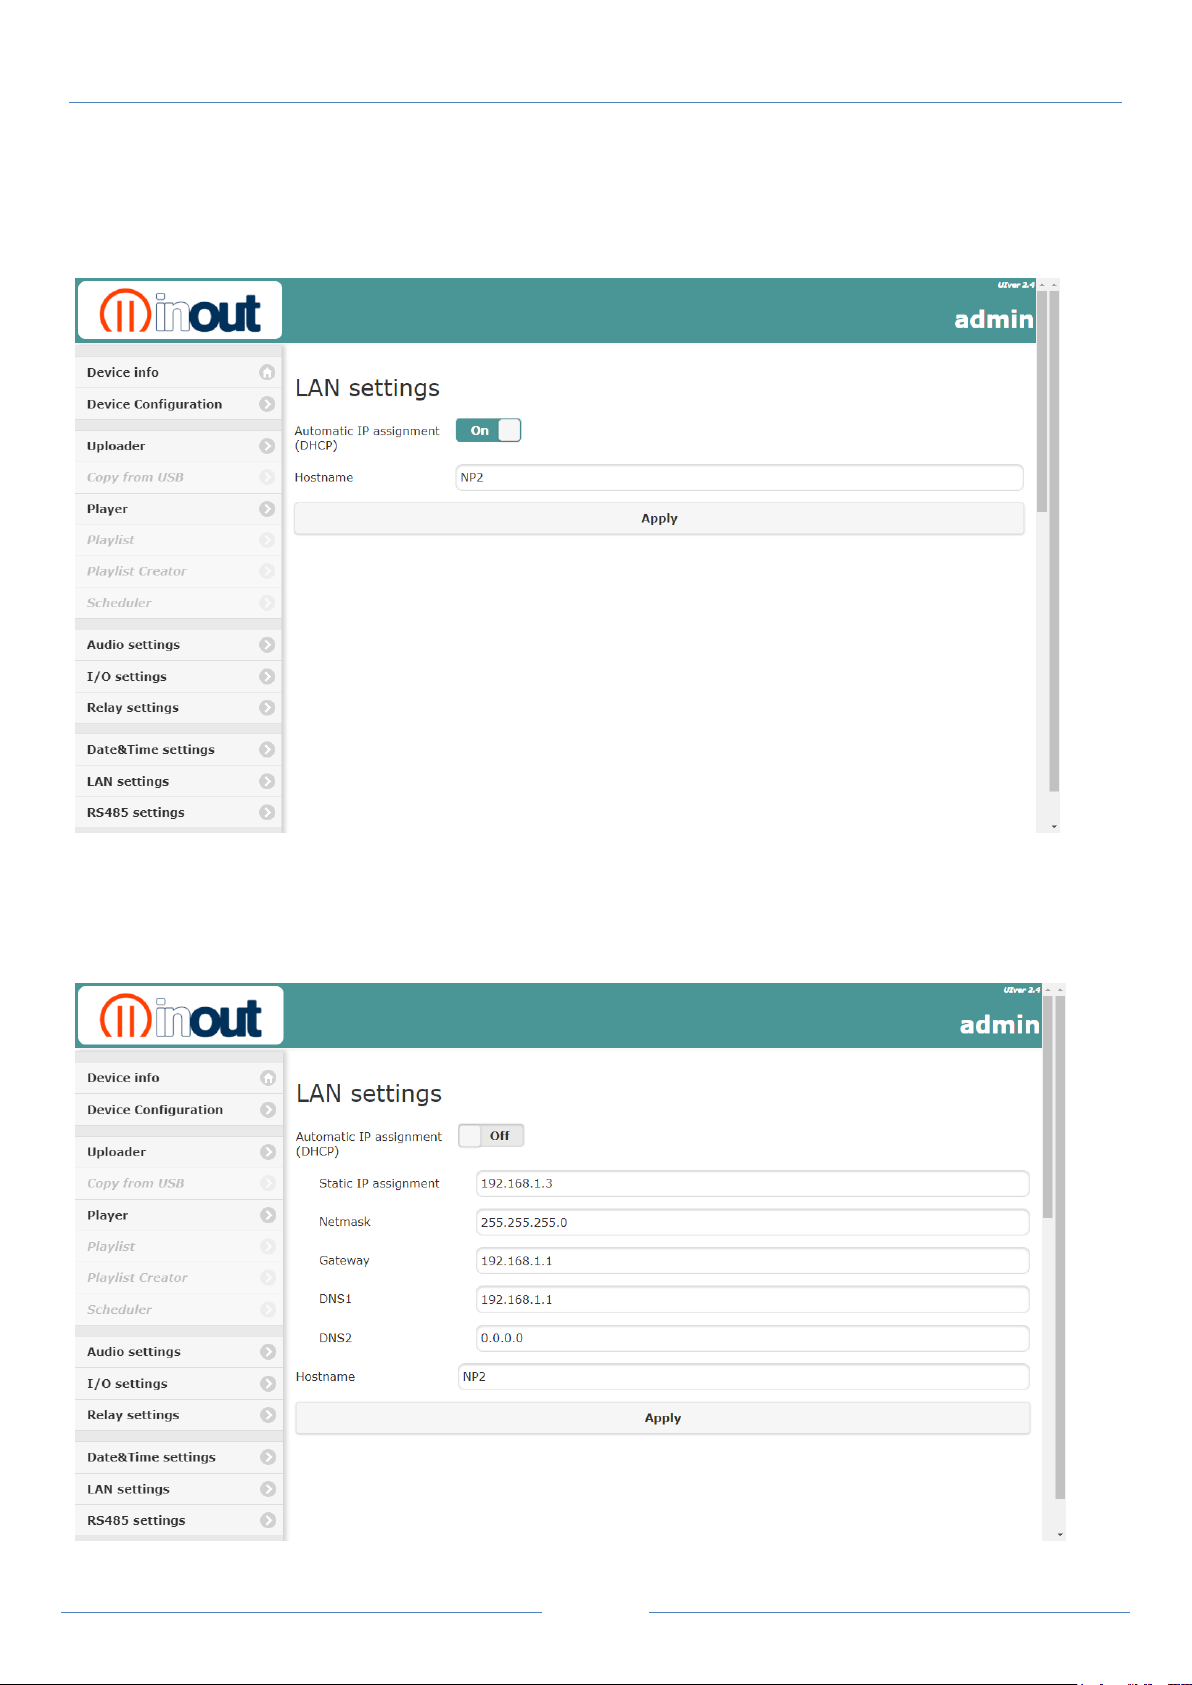
LAN settings
DHCP Automatic IP assignment
Set DHCP ON, enter your prefer Hostname and save with Apply.
NP2/NP5 QUICK GUIDE v. 1.5
Static IP assignment
Set DHCP OFF, enter the IP address, Subnet Mask, Default Gateway and DNS server.
Enter your prefer Hostname and save with Apply.
Page 10
Pag. 9
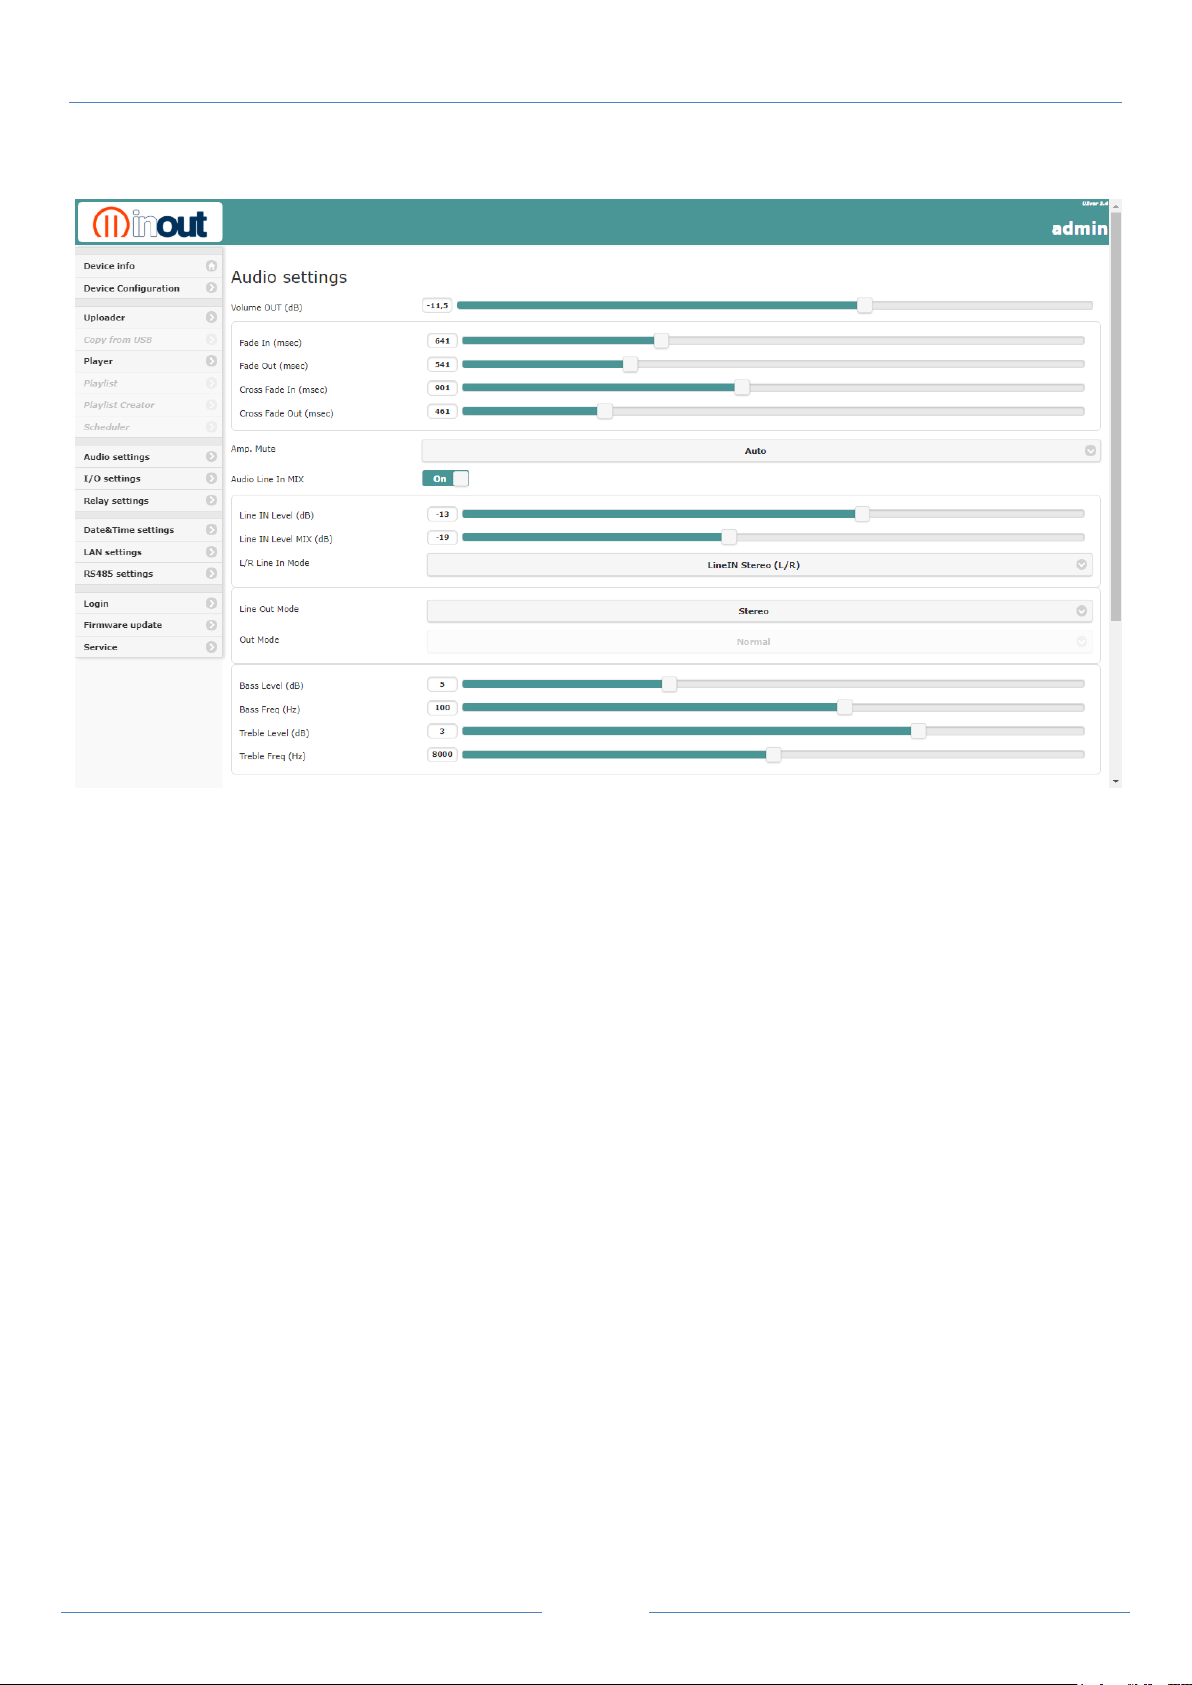
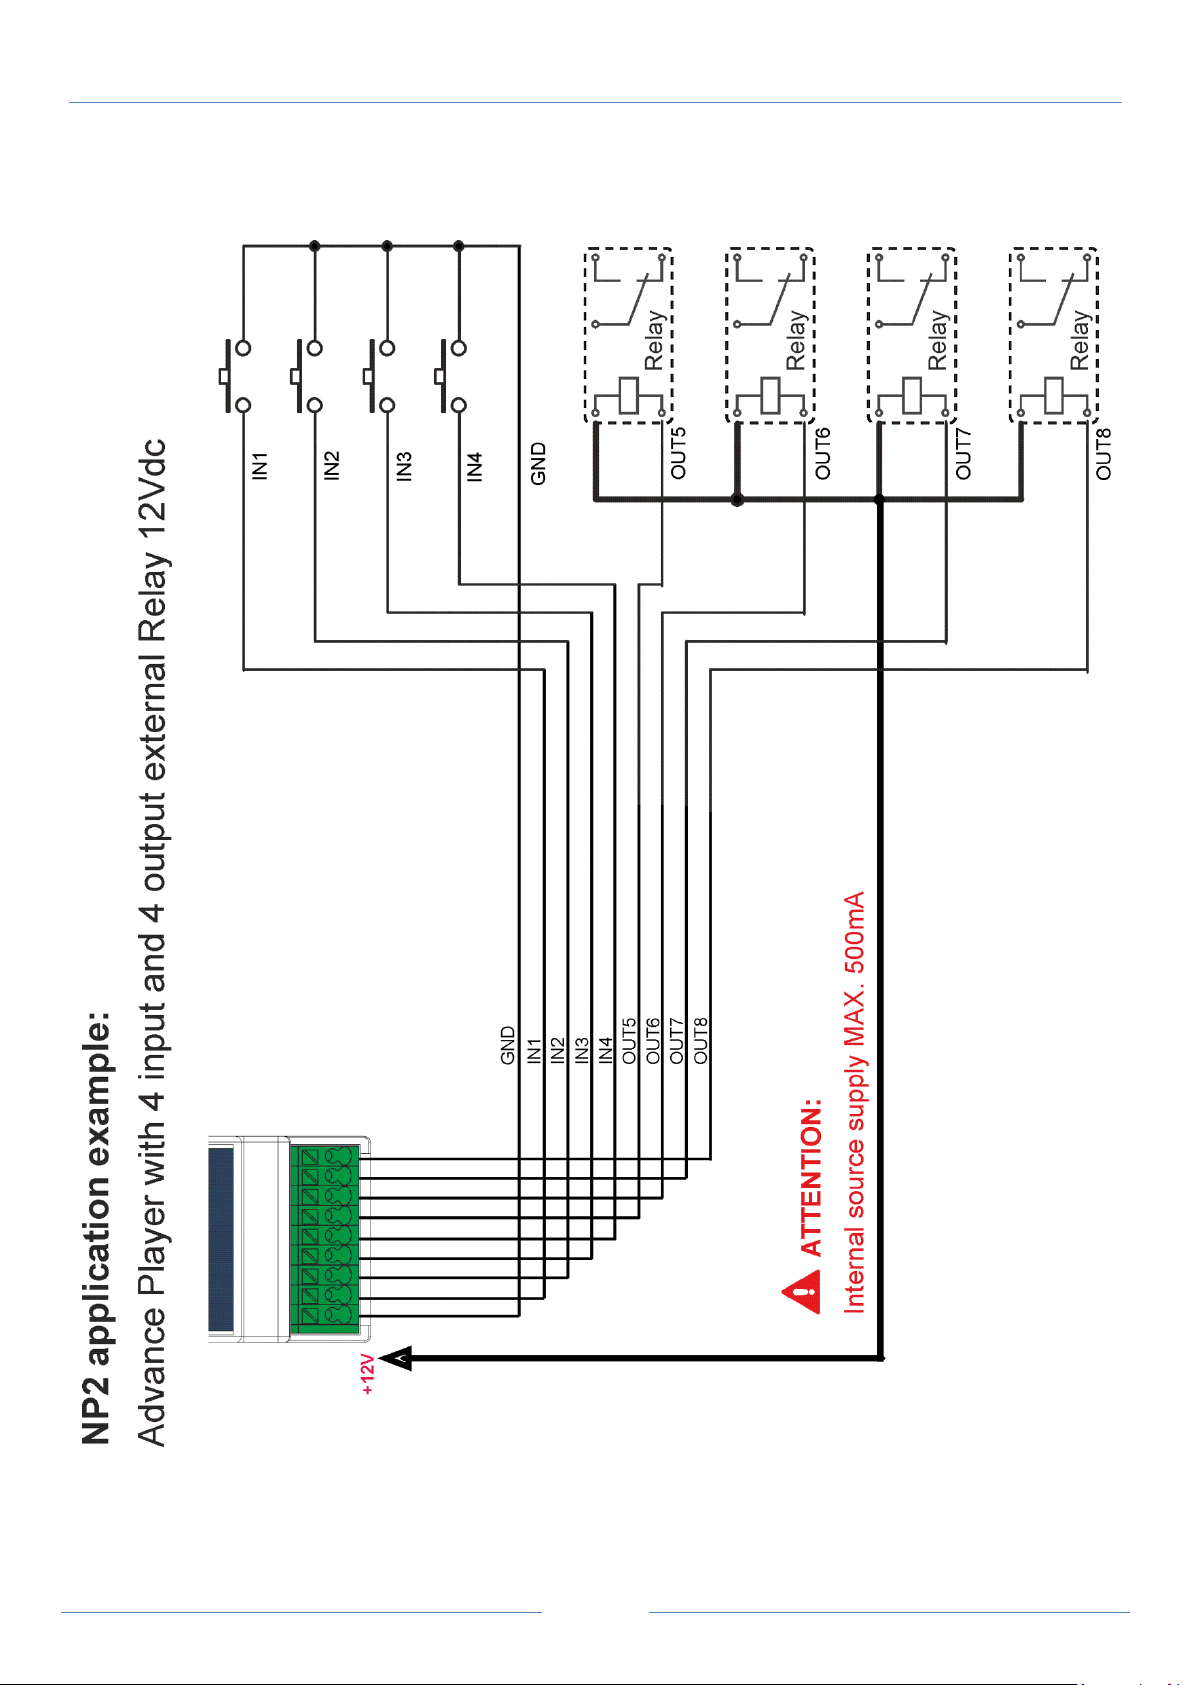
Volume out:
level preamplified and amplified audio output
Fade In:
setting the initial fading time of playing the audio file
Fade Out:
setting the finaly fading time of playing the audio file
Cross Fade In:
setting the fading time of the Line In before playing the audio file.
Cross Fade Out:
setting the fading time of the Line In after playing audio file
Amp. Mute:
- Auto: power amplifier is active only during the audio files playing.
When NP2/NP5 is in STOP mode the power amplifier is in Standby.
- Disable: power Amplifier always active, also when NP2/NP5 is in STOP
mode.
Audio line in mix:
switch on/off audio Line In
Line In Level:
setting level Line In when player in stand by
Line In Level Mix:
setting level Line In of the background during the playing of the audio file.
L/R Line In Mode:
setting Line In mode Stereo / Mono / Left / Right
Line Out Mode:
setting Line Out mode Stereo / Mono
Bass Level:
setting Low tone level control
Bass Freq:
setting Lower limit frequency
Treble Level:
setting High tone level control
Treble Freq:
setting High limit frequency
Audio settings
NP2/NP5 QUICK GUIDE v. 1.5
Page 11
Pag. 10
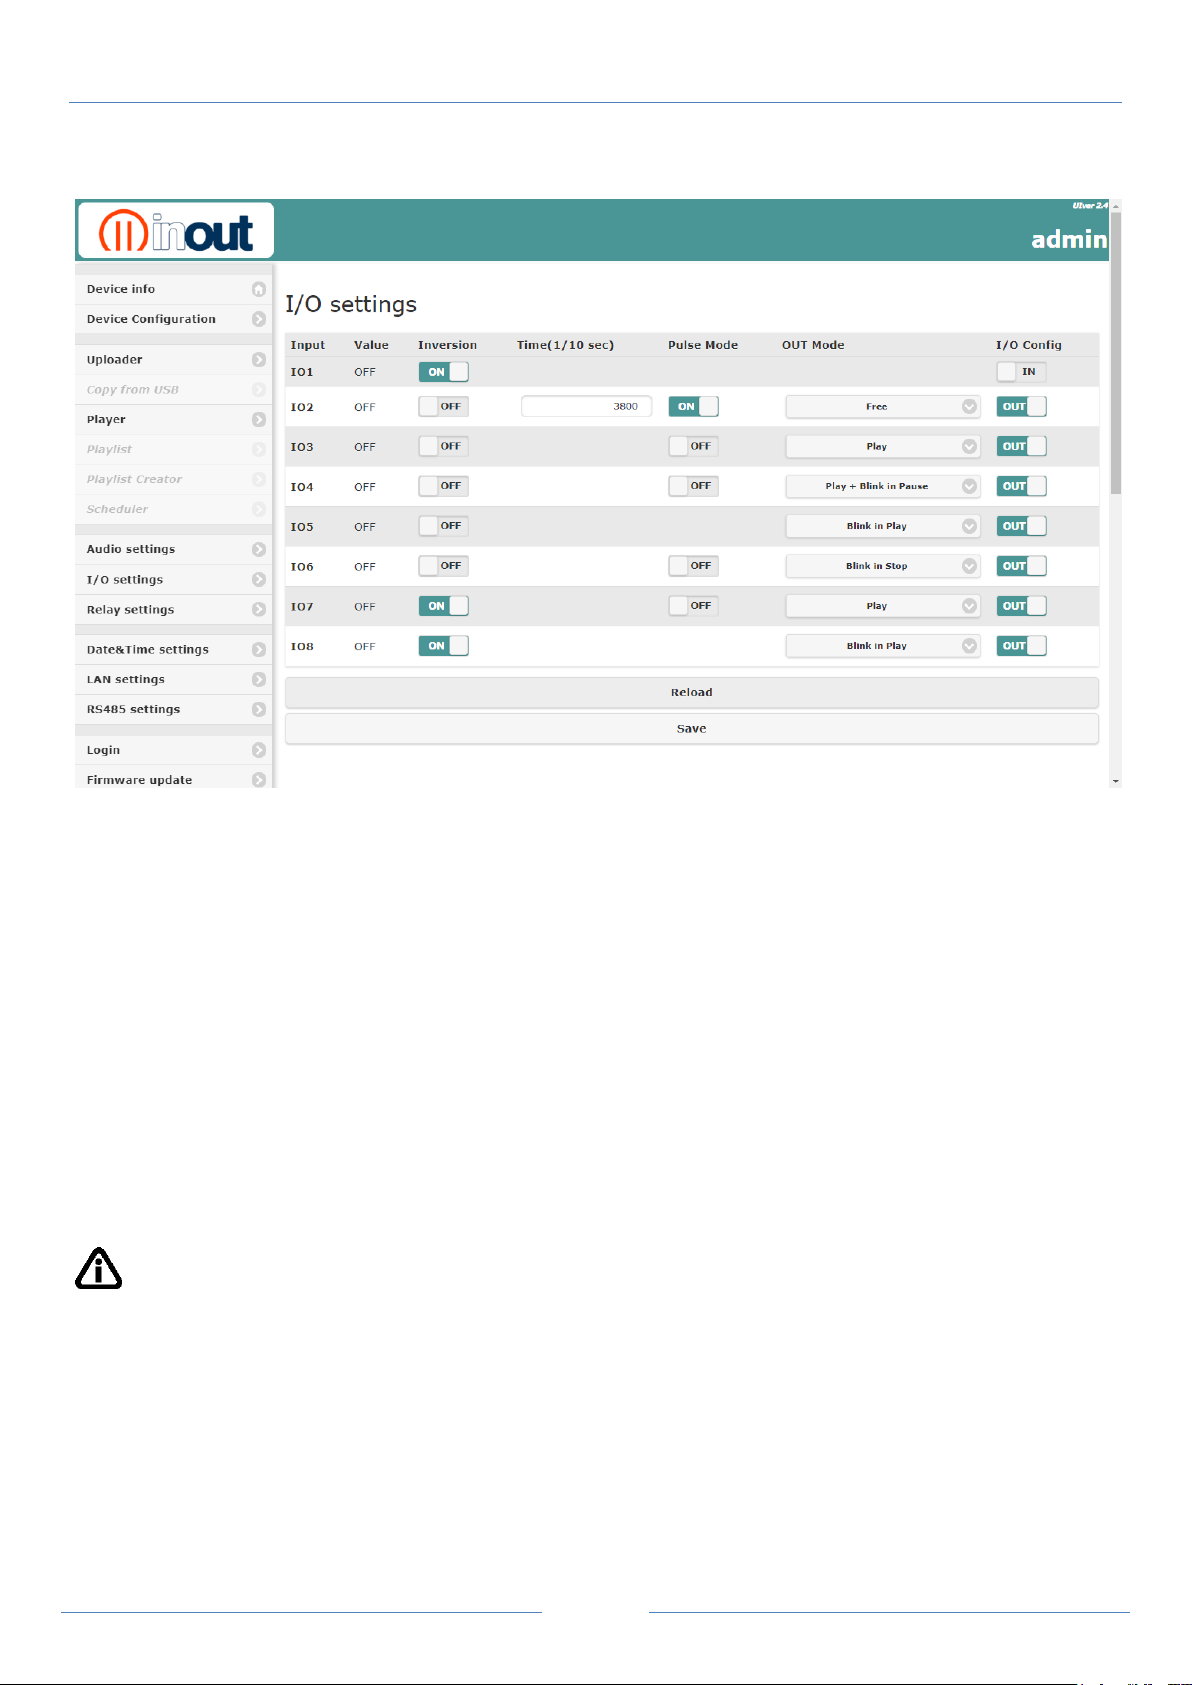
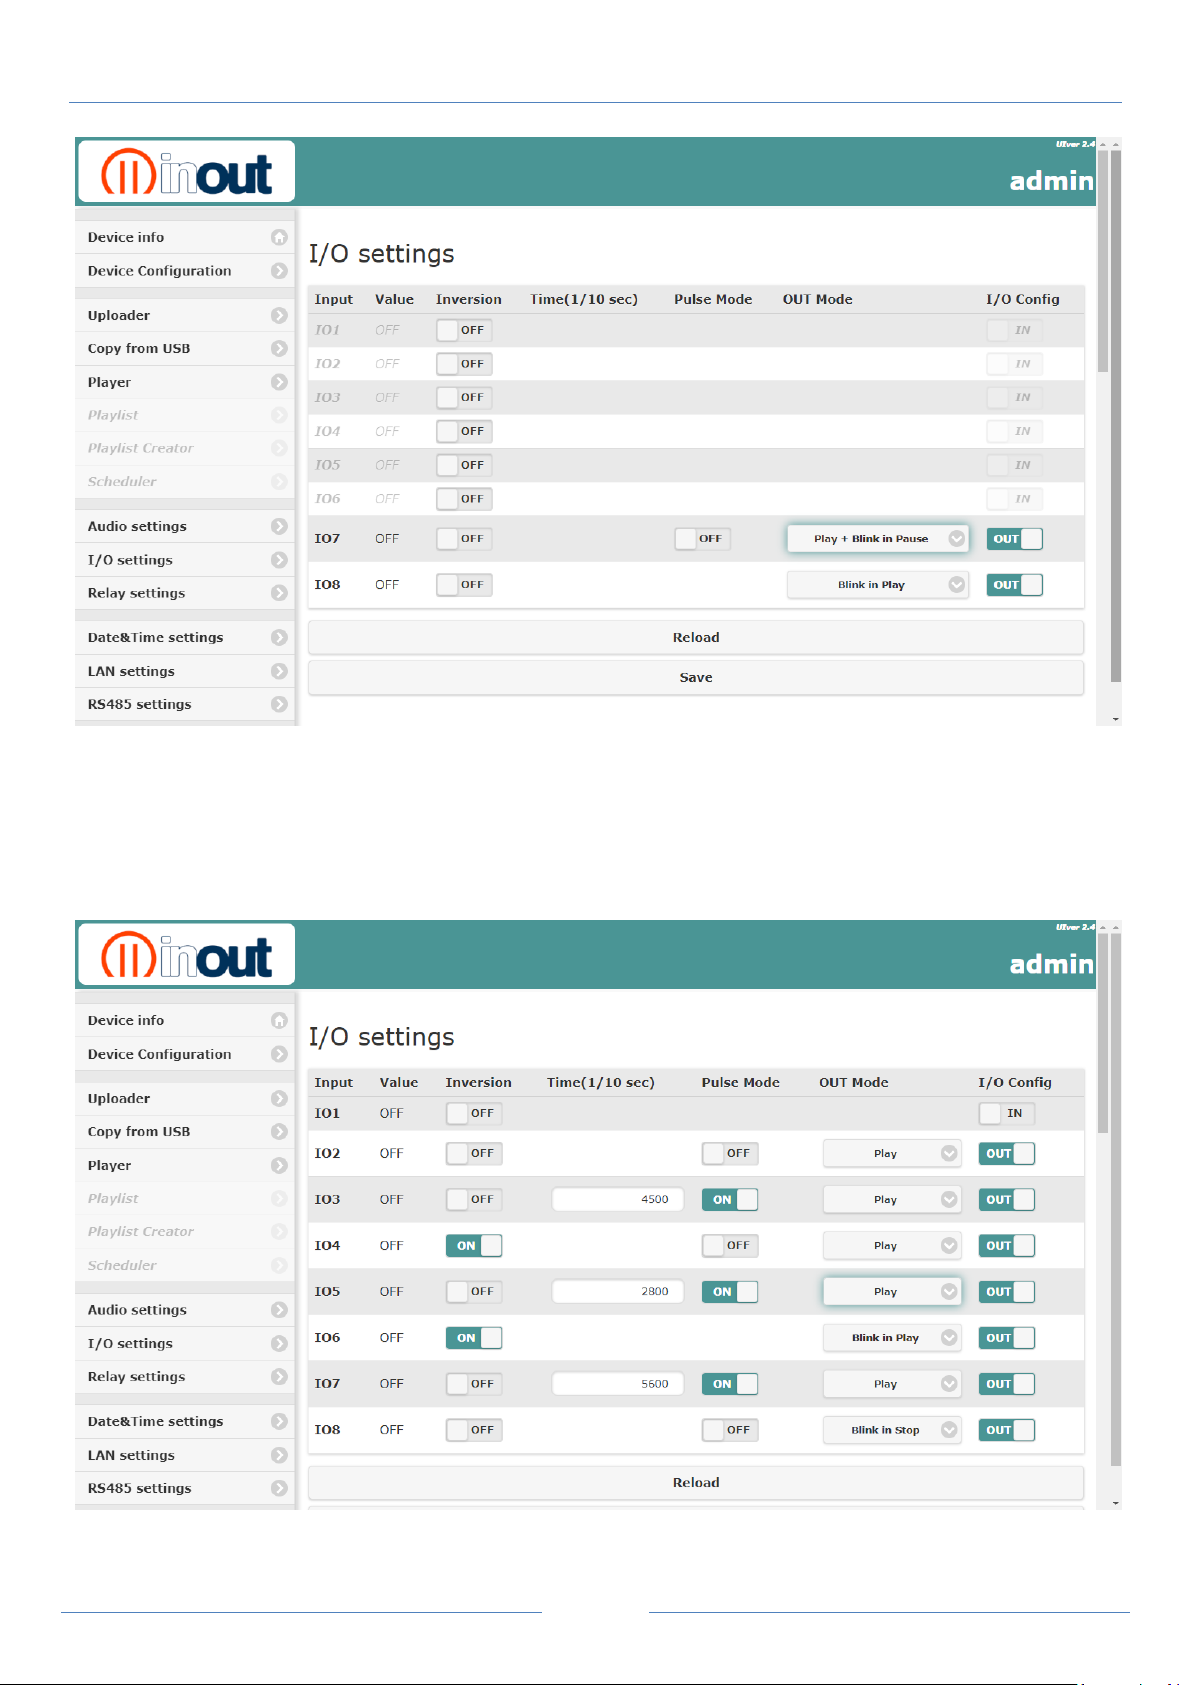
I/O Config:
Setting logic port input or output
Out Mode:
Output logic port setting: free, play, blink when in pause / play / stop.
Pulse Mode:
Setting the output logic port in pulse mode, set the pulse duration time in tenths of
a second.
Inversion:
Setting the mode of input/output active high or active low.
- OFF active-low input mode; the functioning of the input is connected to the
ground/GND of the device.
- ON active-high input mode; the functioning of the input is applied with a positive
voltage between 5 and 12Vdc.
Value:
Test function Output logic port
I/O settings
NP2/NP5 QUICK GUIDE v. 1.5
IMPORTANT: save the settings with the button apply/save
Page 12
Pag. 11
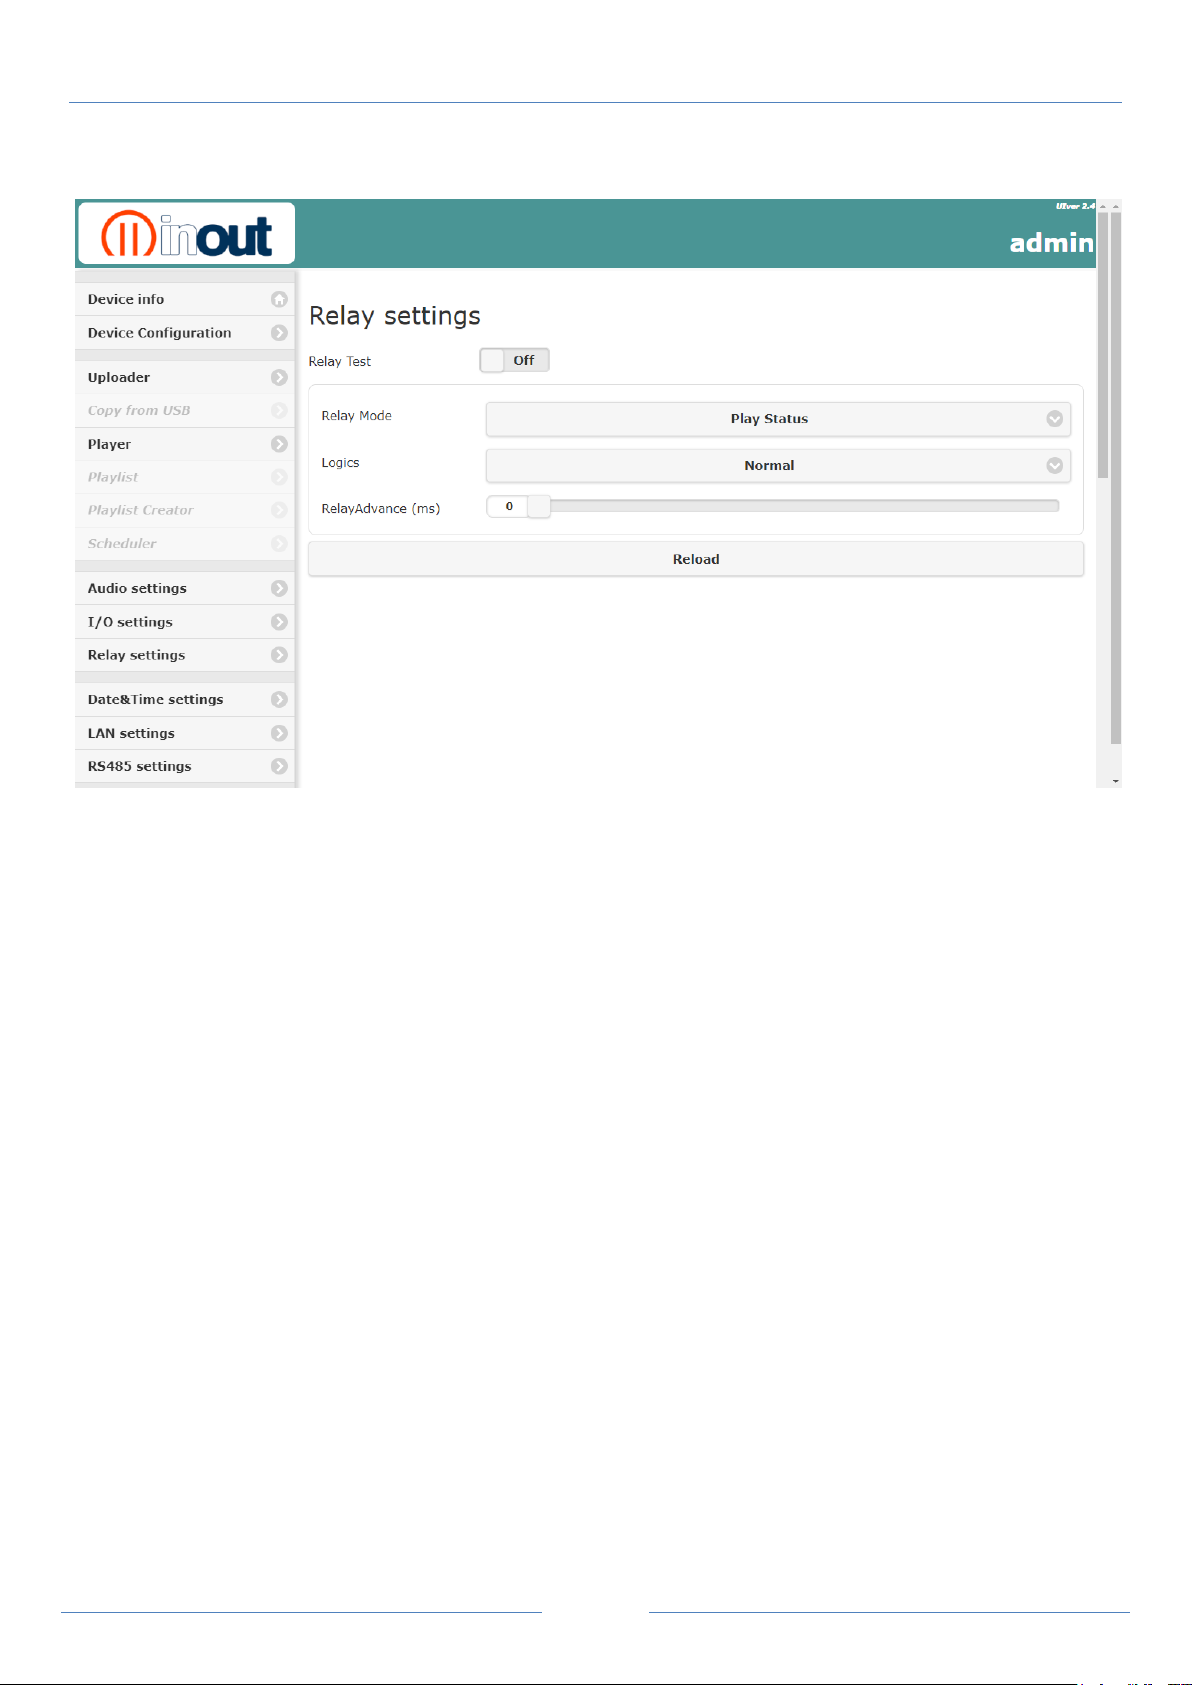
Relay Test:
Only for Test function relay on/off.
Relay Mode:
- Free to remote control or scheduler function
- Play status, relay is active when device is playing
Logics:
setting normal or inverted
Relay Advance:
setting delay time of the play audio file from the activation Relay.
Relay settings
NP2/NP5 QUICK GUIDE v. 1.5
Page 13
Pag. 12
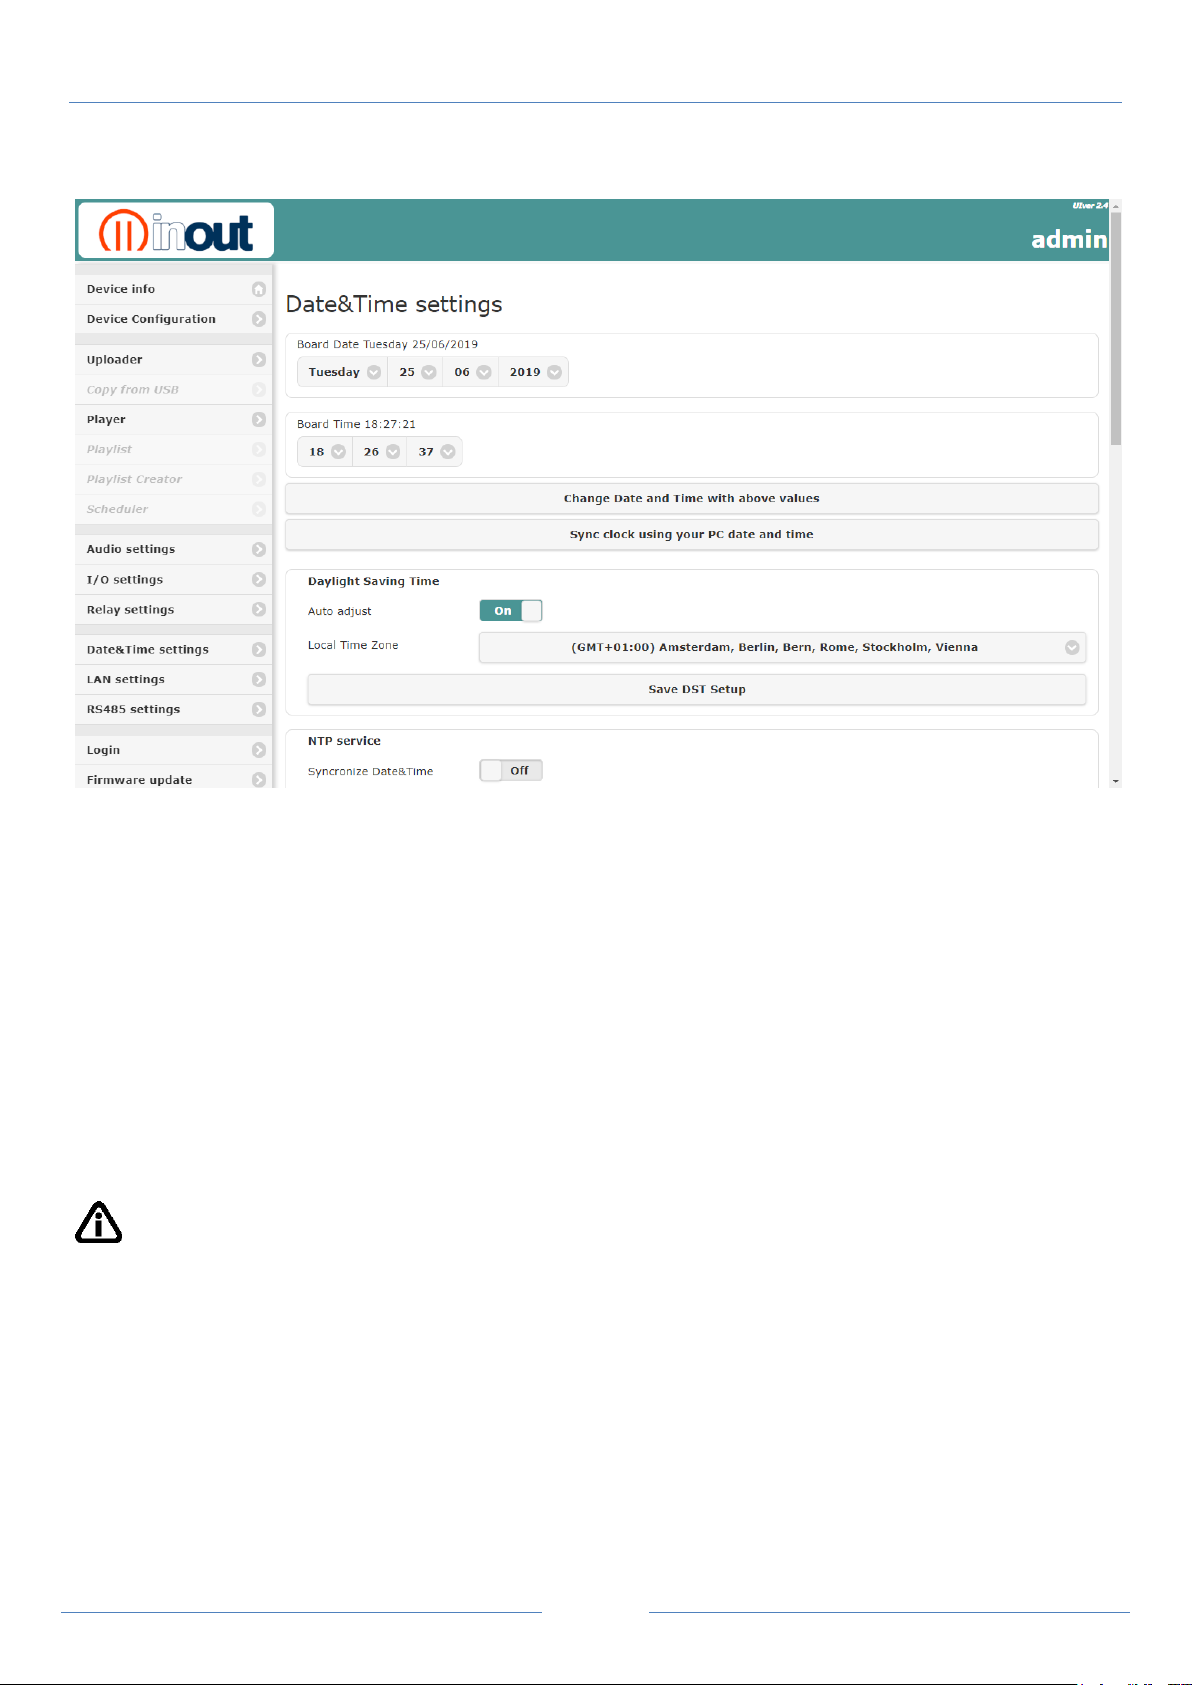
Date&Time settings
NP2/NP5 QUICK GUIDE v. 1.5
Select date and time and press “Change Date and Time with above values” button.
Option set:
Fast setting “ Sync clock using your PC date and time” button.
Daylight Saving Time (DST) is the practice of setting the clocks forward 1 hour from standard
time during the summer months, and back again in the fall, in order to make better use of natural
daylight.
Local Time Zone
The system clock must be on time. Select your country to get the correct time and date
IMPORTANT: save the settings with the button Save DST Setup.
Page 14
Pag. 13
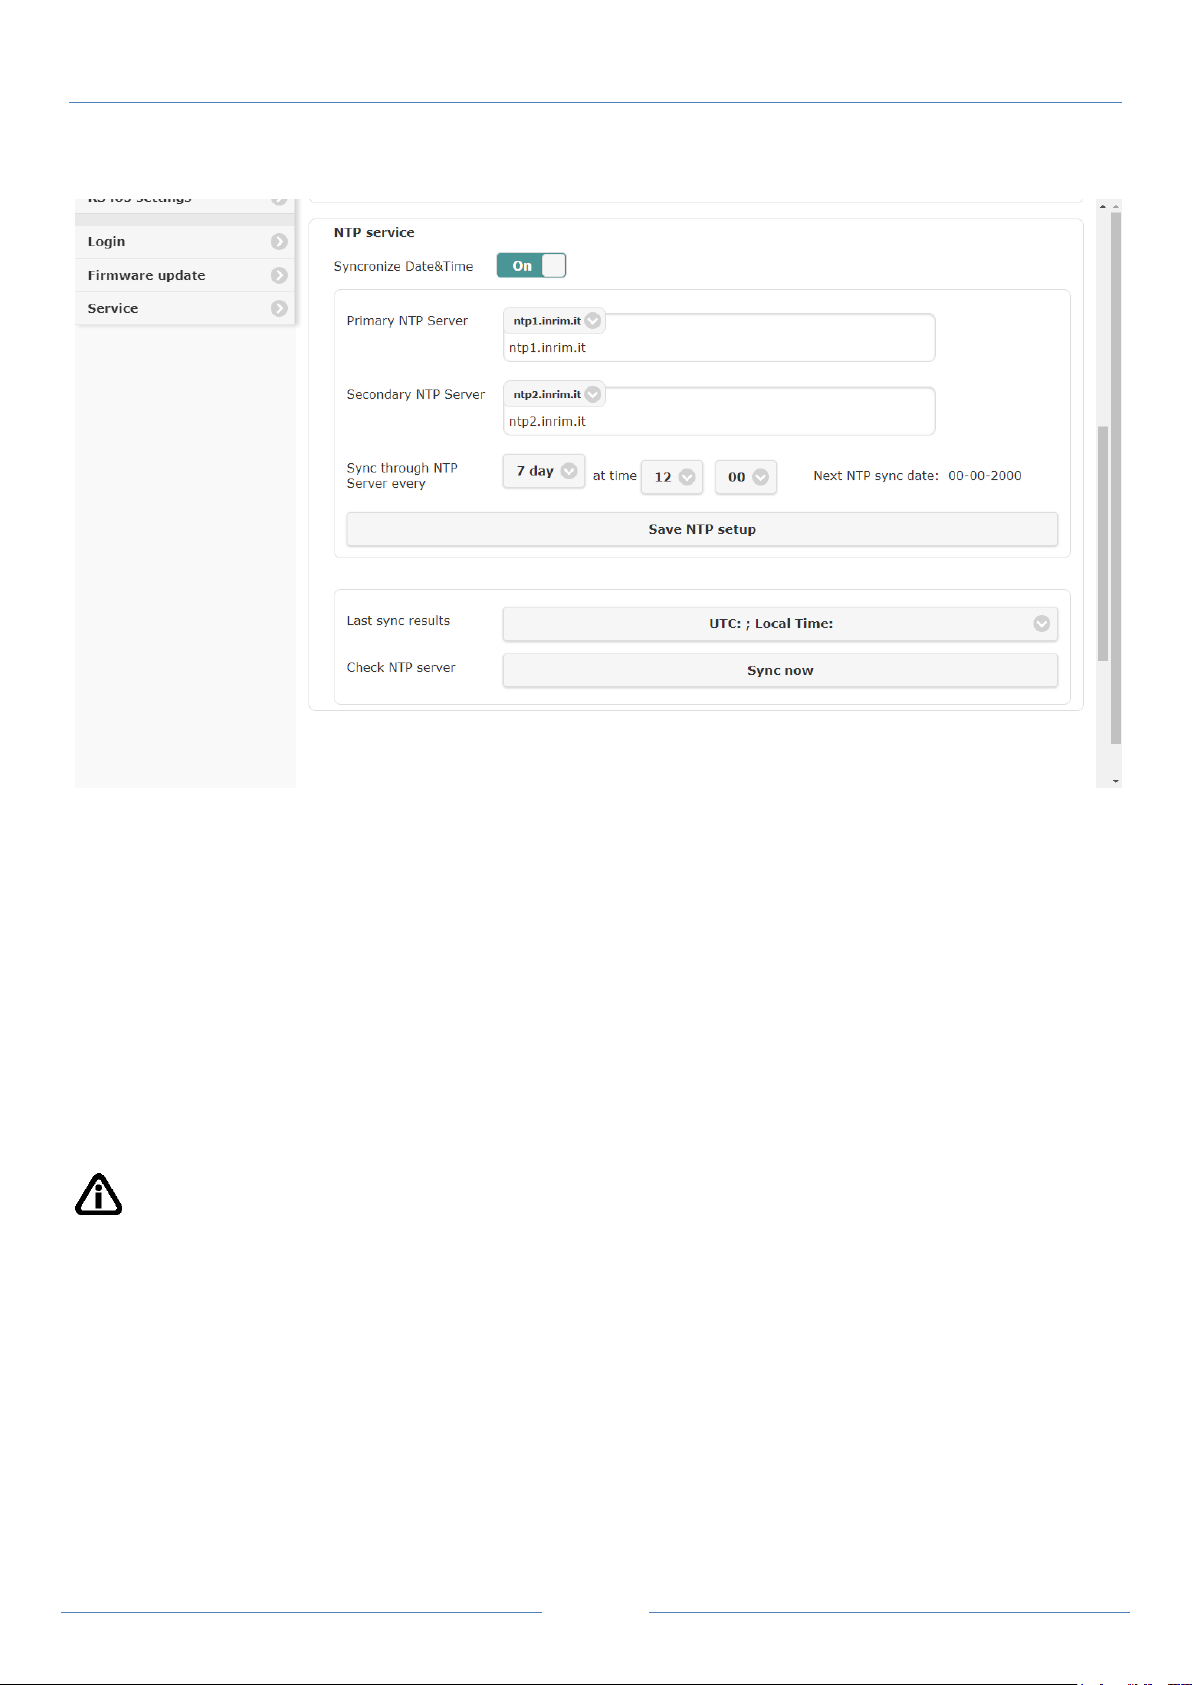
NTP service
NP2/NP5 QUICK GUIDE v. 1.5
A NTP service (Network Time Protocol) can be used to synchronize the time on devices across a
network. A NTP time server is used to obtain the correct time from a time source and adjust the
local time in each connecting device.
INRIM provides a synchronization service for informatics system connected to the Internet, based
on two primary NTP (Network Time Protocol) servers installed at the Time and Frequency
Laboratory.
The INRIM NTP servers can be reached by means of the following addresses:
ntp1.inrim.it (193.204.114.232)
ntp2.inrim.it (193.204.114.233)
IMPORTANT: save the settings with the button Save NTP Setup.
Page 15
Pag. 14
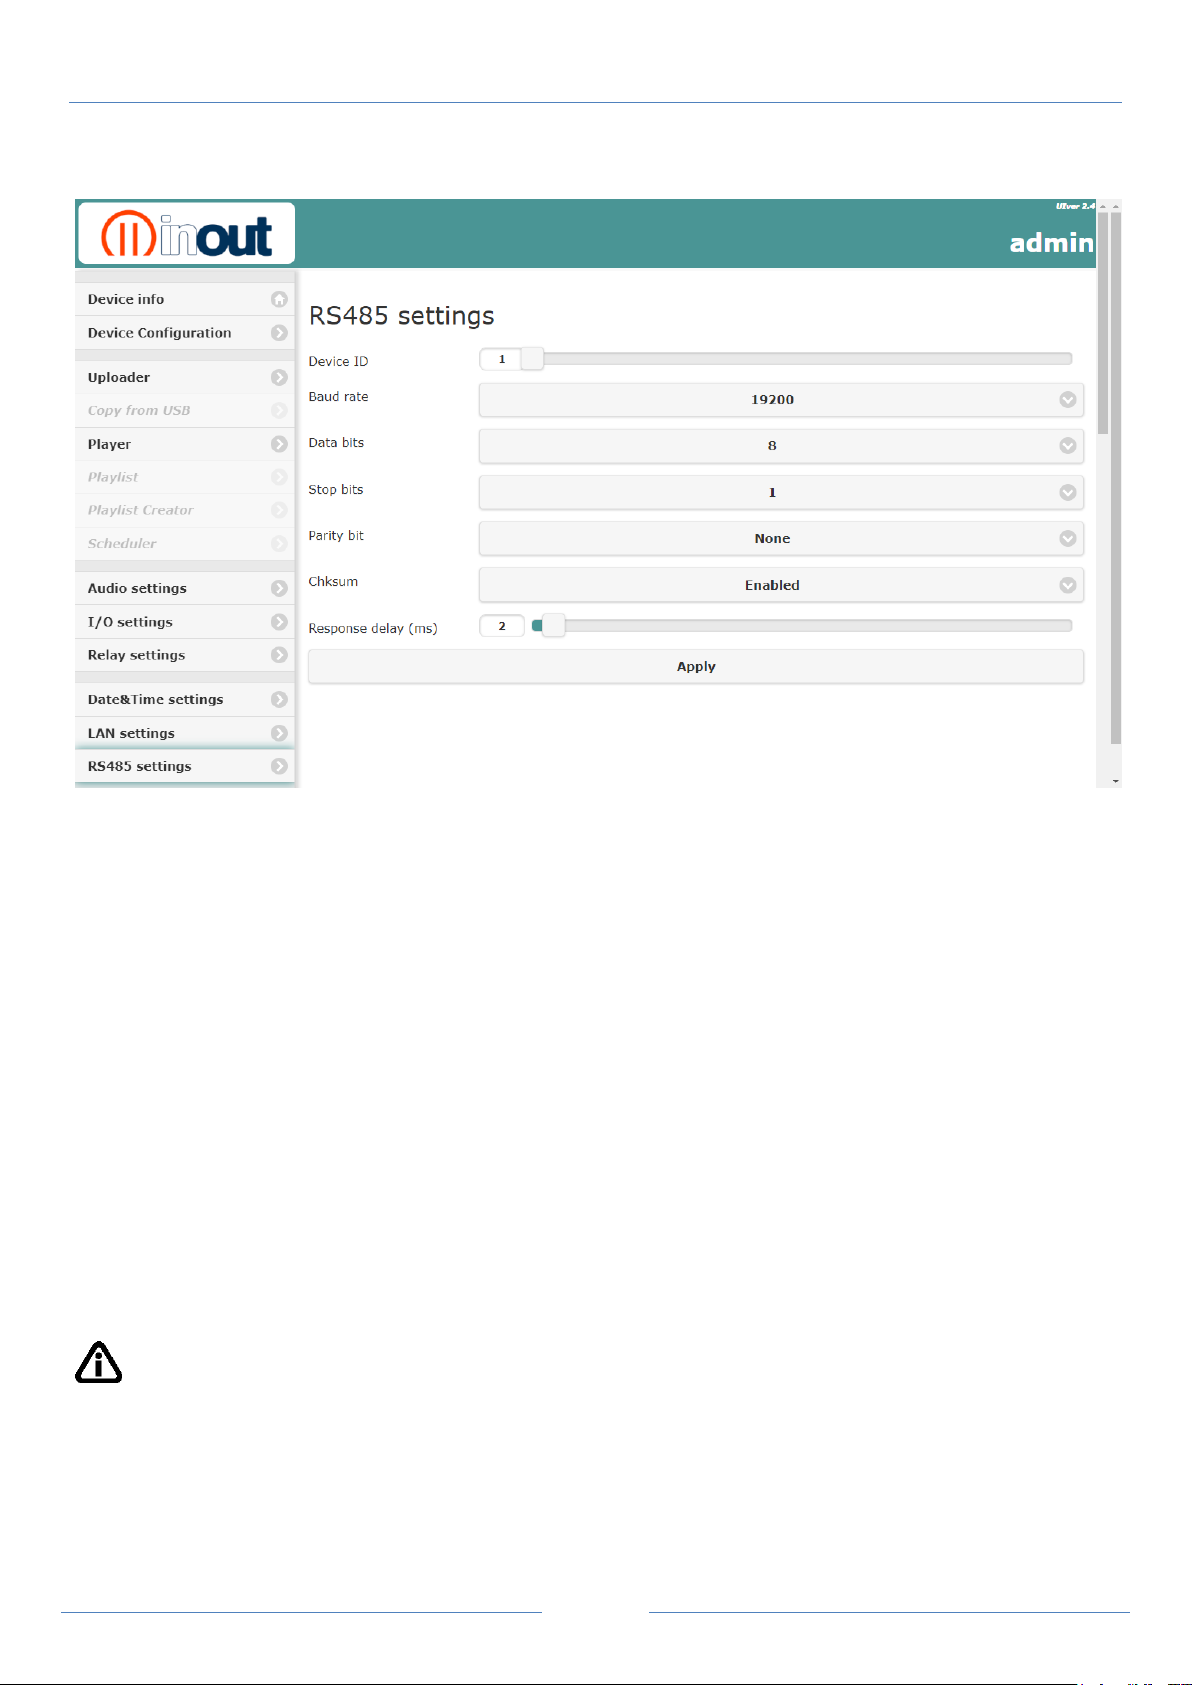
Device ID :
Address NP2/NP5 in the 485 bus. This address MUST be univocal, two
devices with the same address can not co-exist on the same bus.
Response delay:
Minimum delay between end of reception of the pack and delivery of the reply.
RS485 settings
NP2/NP5 QUICK GUIDE v. 1.5
NP2/NP5 can be connected to an RS485 communication bus through a serial port, which is
controlled from a master system or by a computer.
Due to interference from outside the serial line, one may find anomalous behaviour from part of
the master system which could cause possible damage to NP2/NP5. To avoid this mishap one
must take the following precautions:
1. Do not let the serial cables transit in the same conduits as power cables or cables with
elevated voltage. Maintain a safety distance of at least 10 cm. between these cables.
2. Connect serial cable screen to the ground the on one of the two sides (do not connect the
screen from both sides); in addition, the ground connection of the screen must not be made in
the same point in which piloted circuits of elevated tension are connected.
3. Cut the voltage of the entire system before beginning the wiring of the serial lines: even
dispersed or parasite currents could damage the modules.
IMPORTANT:
The internal electronics of NP2/NP5 are not galvanically insulated from the RS485 line; in
case of short circuit or discharge to ground, it is possible to damage not only the NP2/NP5, but
even the master system to which it is connected!
For the RS485 connection, one must remember to ignore the transmission echo from the
master that is returning through the serial line.
Page 16
Pag. 15
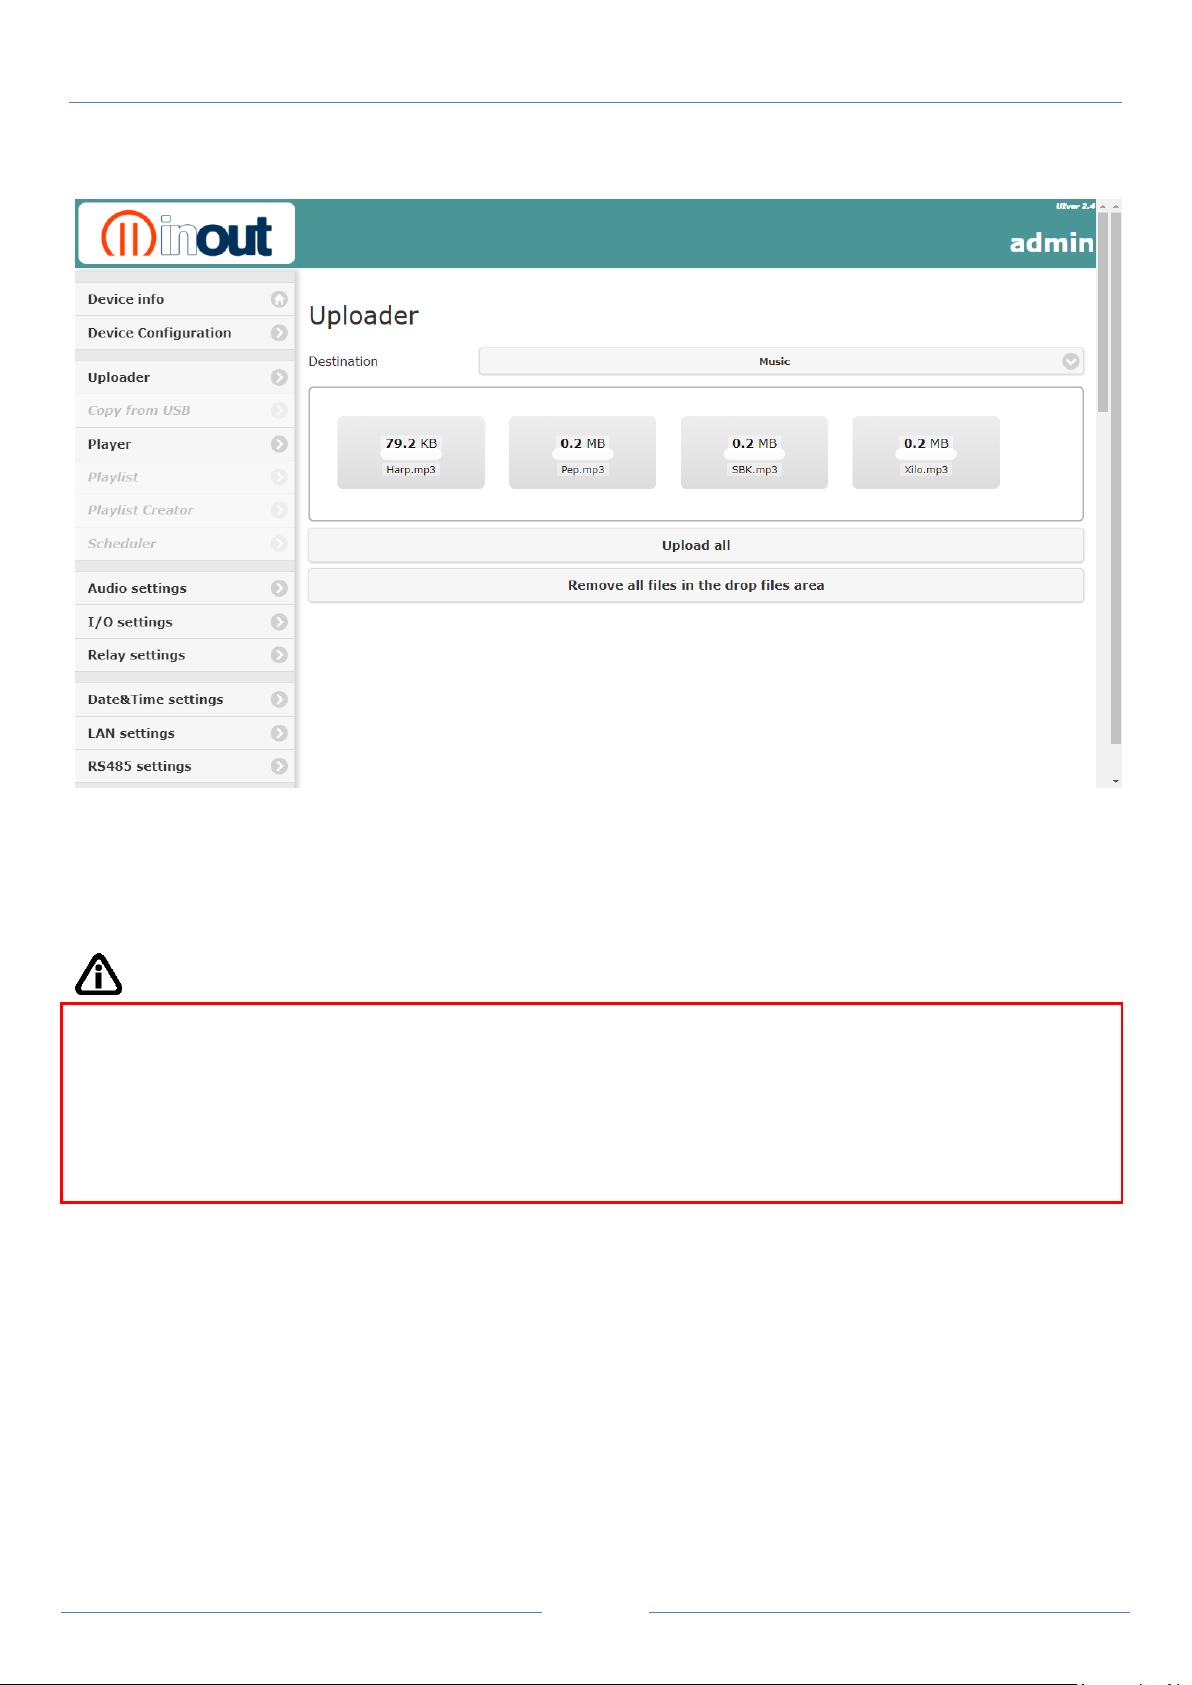
- Before you start Upload, close all other web pages. During the Upload function, do not navigate
to other NP2/NP5 features and do not open other browser web pages.
- Do not start Upload while running a scheduler
- We recommend uploading when the NP2/NP5 is in standby mode.
Uploader
NP2/NP5 QUICK GUIDE v. 1.5
To upload files into NP2/NP5, select the audio files on your computer/device, select dir/folder
destination and press Upload all to copy into microSD storage.
Press Reset to abort Upload.
IMPORTANT:
Page 17
Pag. 16
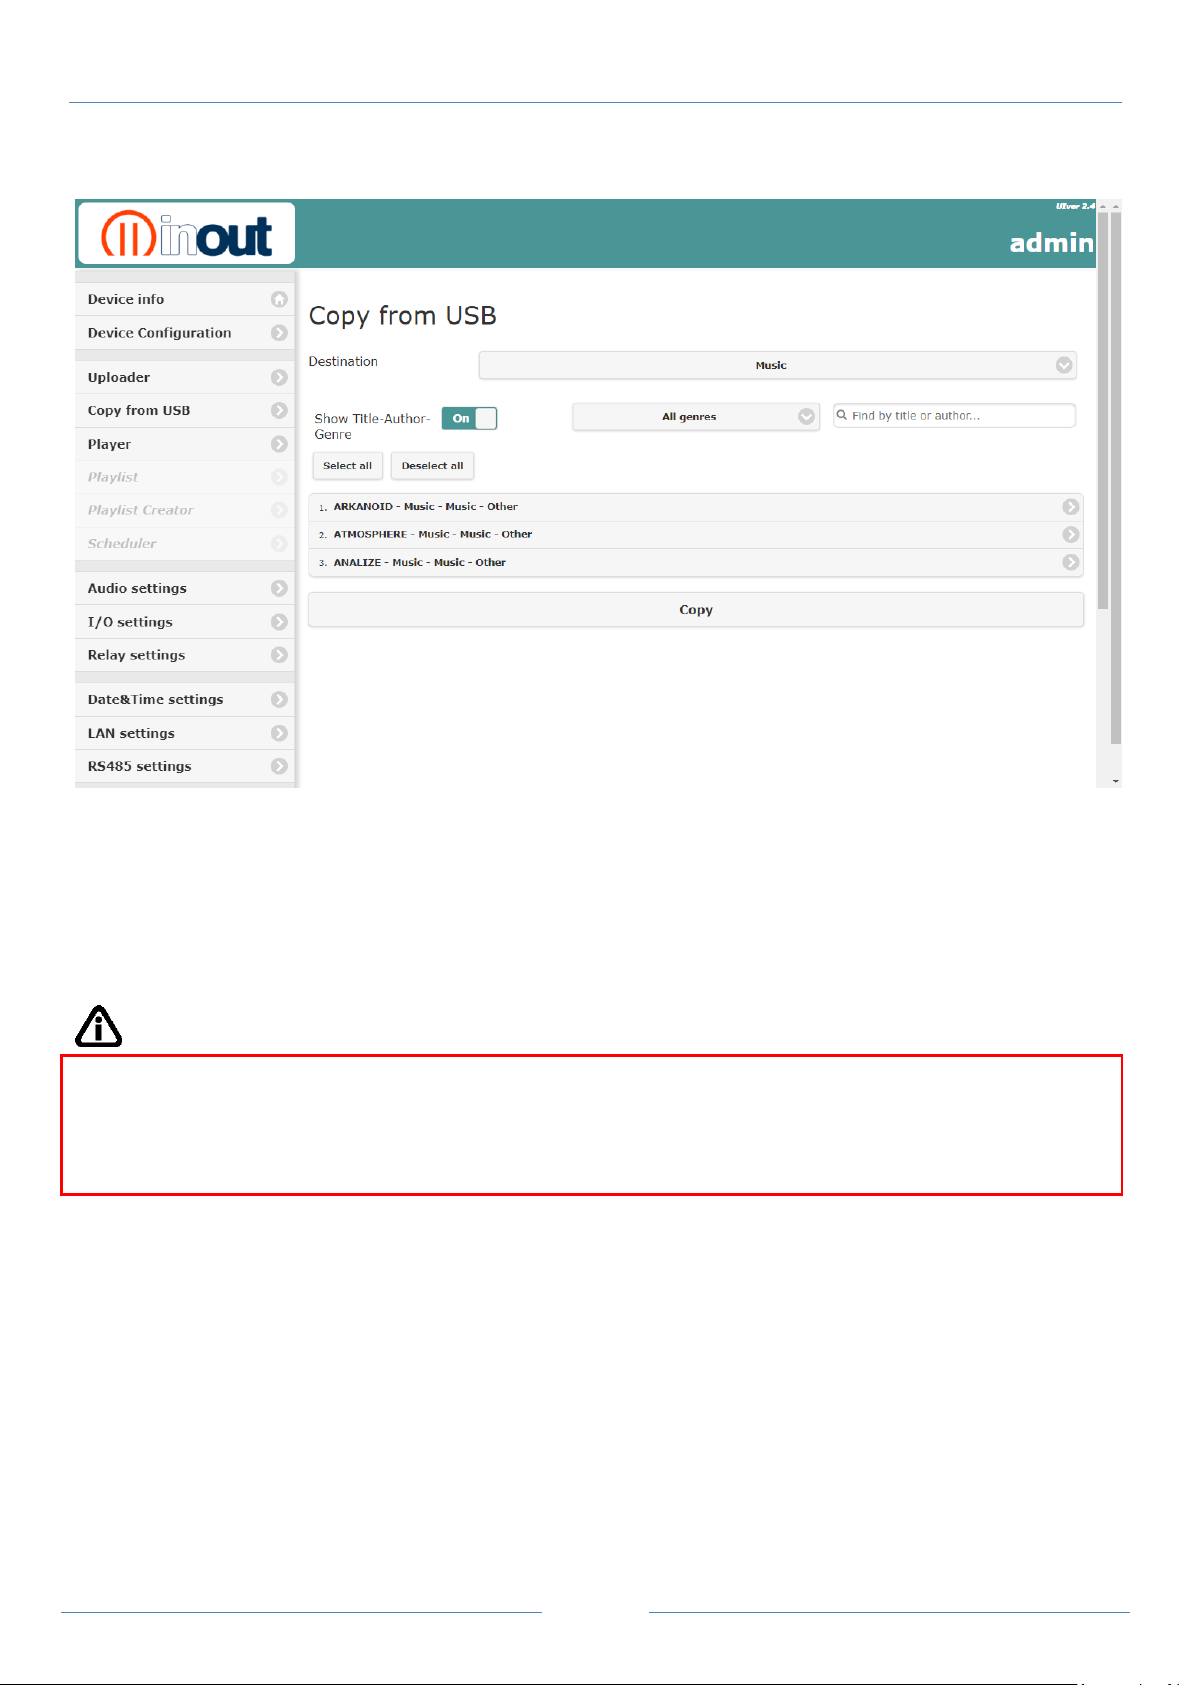
- The files to be transferred must be in the root directory of the USB pen drive
- Do not start Copy while running a scheduler
- We recommend Copy from USB when the NP2/NP5 is in standby mode
Copy from USB
NP2/NP5 QUICK GUIDE v. 1.5
To copy files into NP2/NP5, insert USB pen drive, select the audio files, select dir/folder
destination and press Copy to transfer files into microSD storage.
If the Copy from USB menu does not appear, refresh the web page.
IMPORTANT:
Page 18
Pag. 17
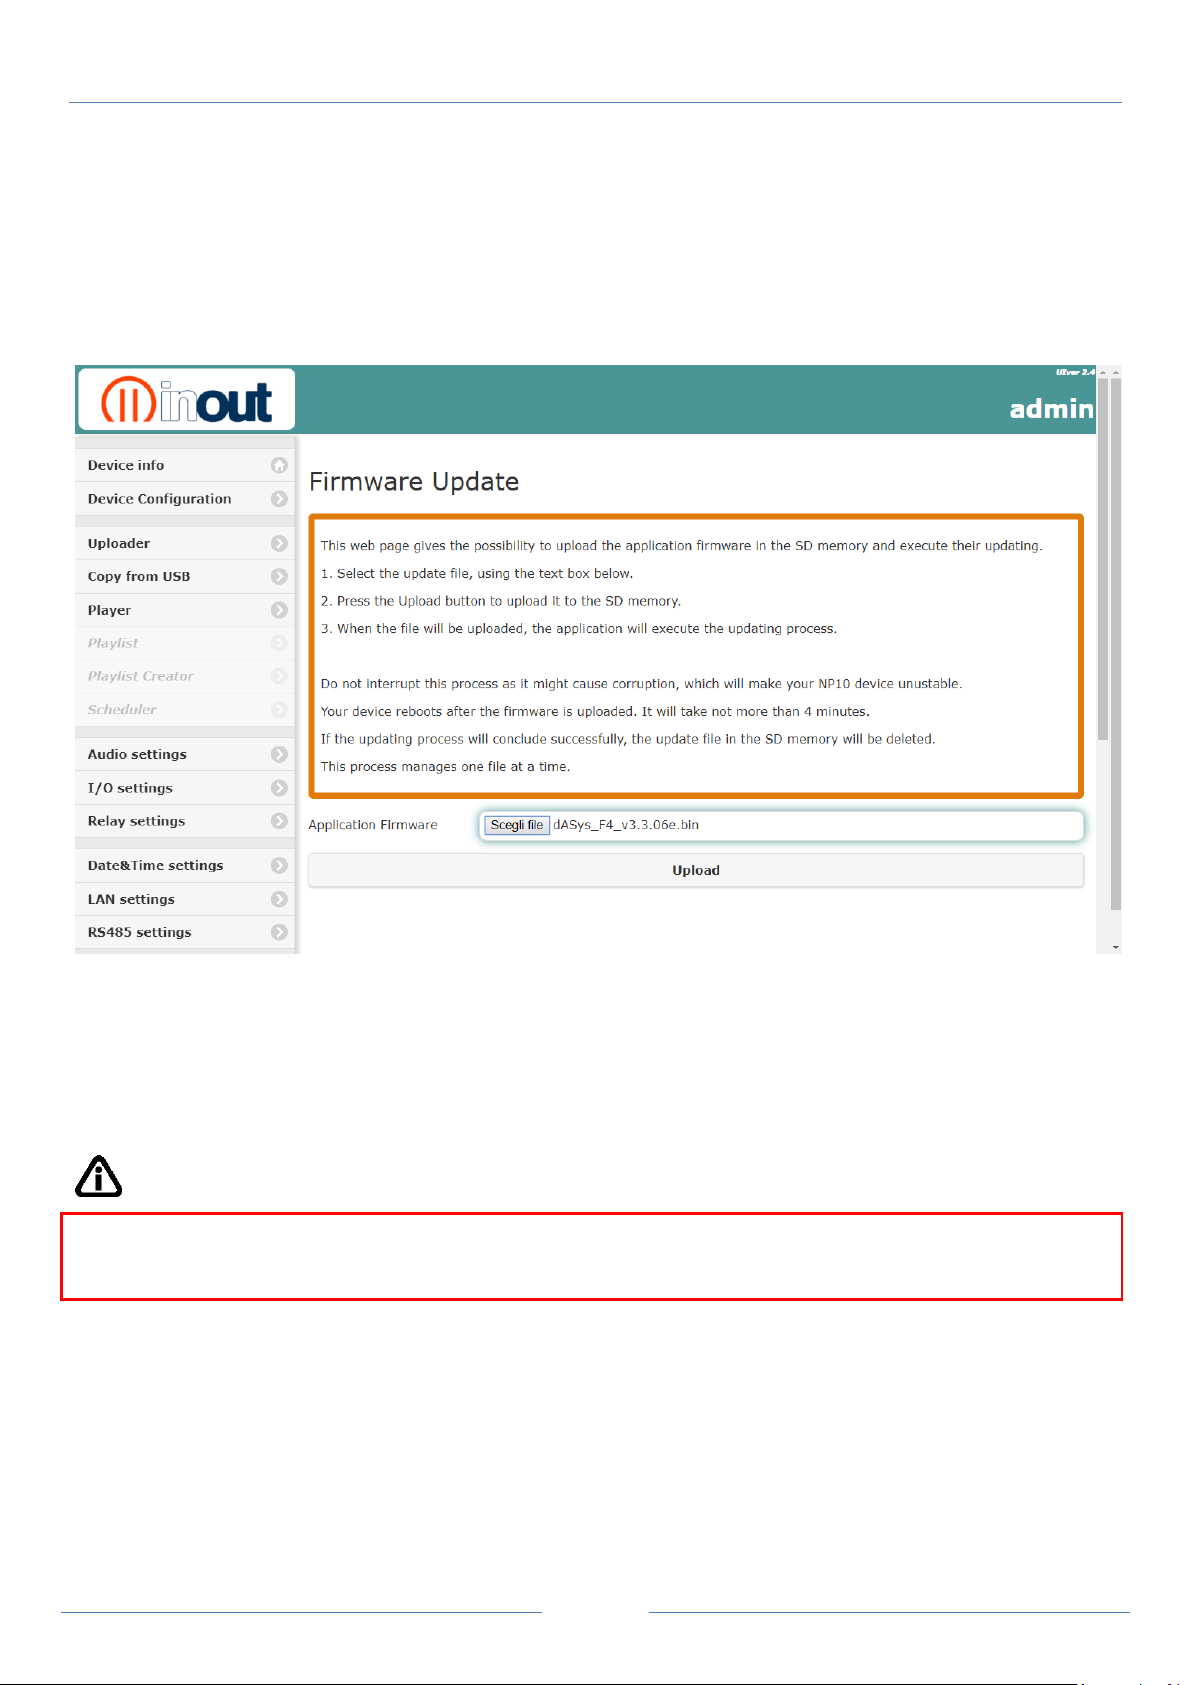
To update firmware wait 4 minutes, after it is recommended to switch off and on
NP2/NP5 device.
NP2/NP5 QUICK GUIDE v. 1.5
How to update the Bootloader (BL) or Application (App) Firmware?
If you have an NP2/NP5 device with the BL firmware version equal or less to the version "A.3",
and the App with version equal or less to the version "3.0.2", it is necessary to follow the below
instructions.
To update the newest firmware versions is it possible to use this web page for both: Bootloader
and Application.
The process uploads the file in the SD card memory, inside the directory "updates", check the file
integrity using the CRC info and then decrypt the data and write them in the Flash area.
Instead, in the App, after the integrity check will recall a sw reset, in order to execute the
bootloader that will find the file in the "updates" directory.
For both process, at the end, in case of success, the update file will be deleted.
IMPORTANT:
USB Firmware Update ( optional )
1. Update the App firmware using the well know USB method, saving in the USB Flash root the file
"dASys_F4_v3.x.xx.bin".
2. Plug the USB Flash memory to the NP2/NP5 device.
3. Power on the NP2/NP5 device and wait 4 minute.
Page 19
Pag. 18
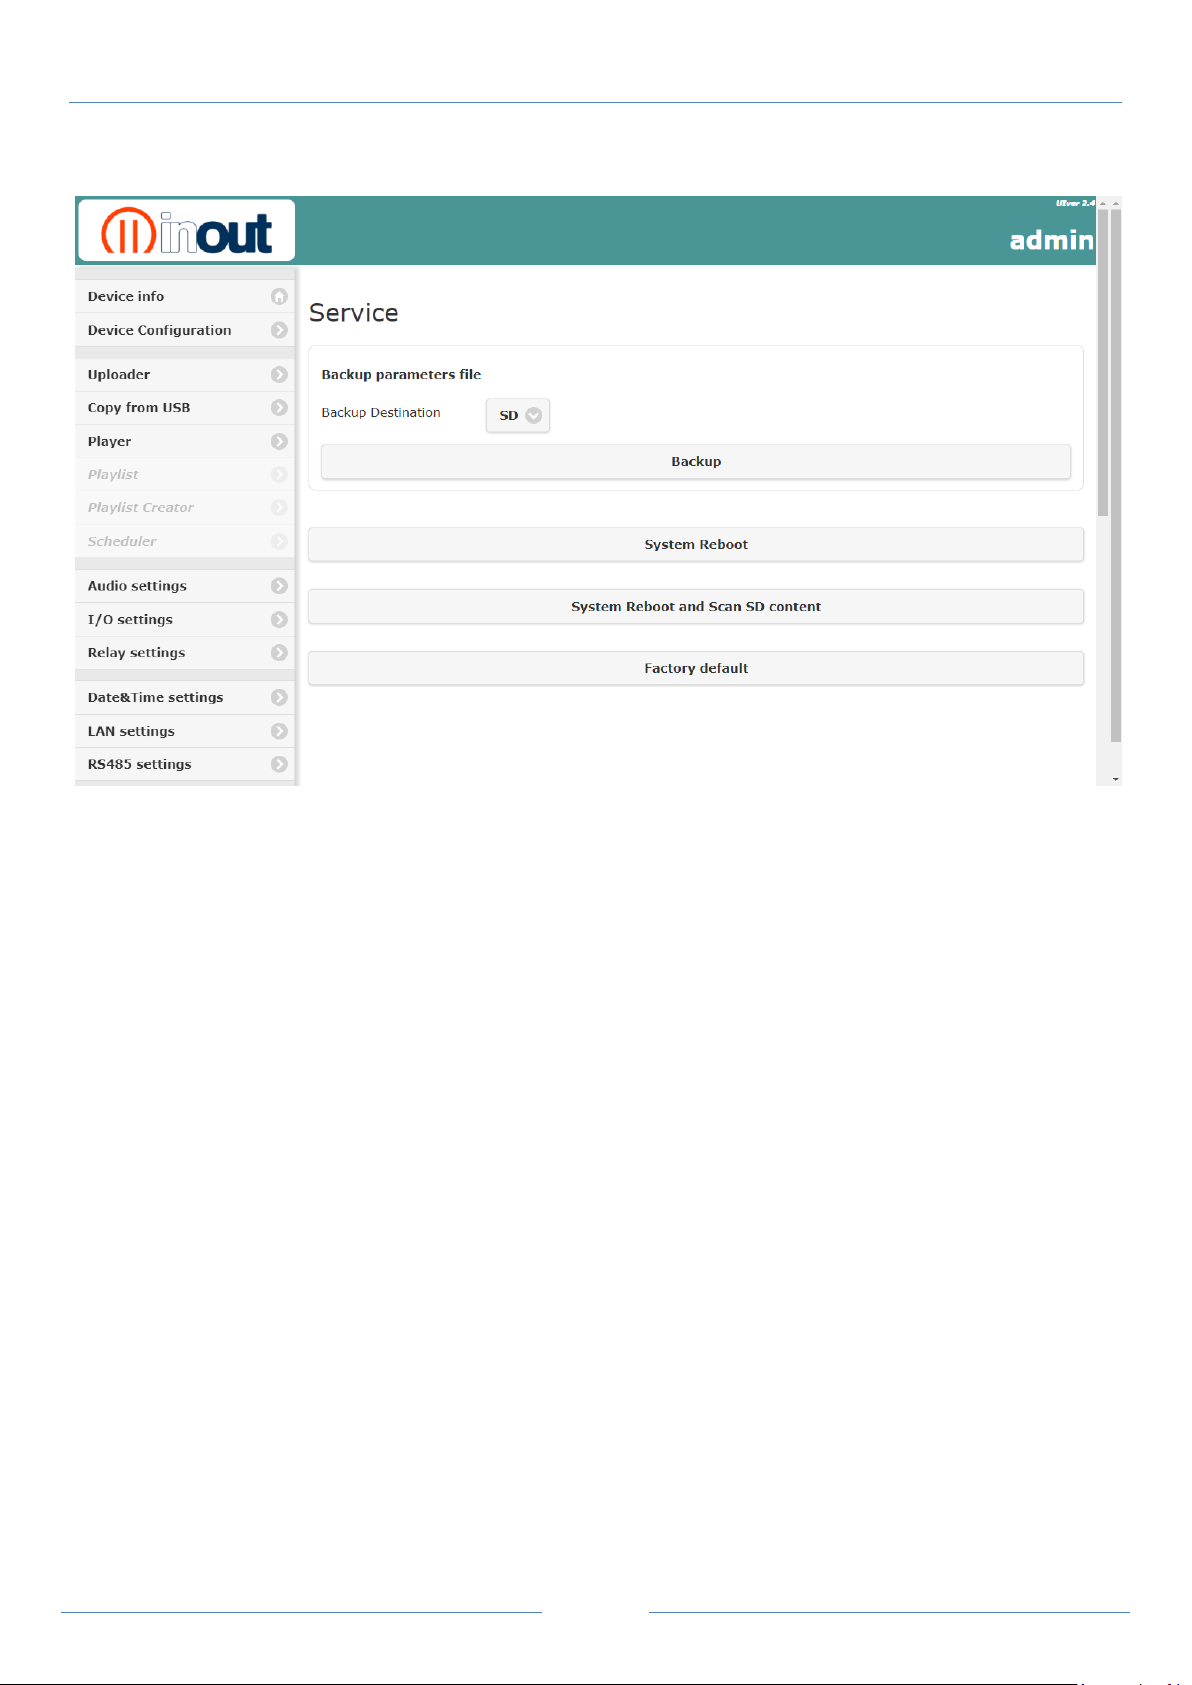
Backup :
Save your player configuration into uSD or USB Key.
System Reboot:
remotely reboot the player
System Reboot:
and scan SD
restart the player remotely and scan the files contained in the SD memory
Factory default:
restore the factory parameters
Service
NP2/NP5 QUICK GUIDE v. 1.5
Page 20
Pag. 19
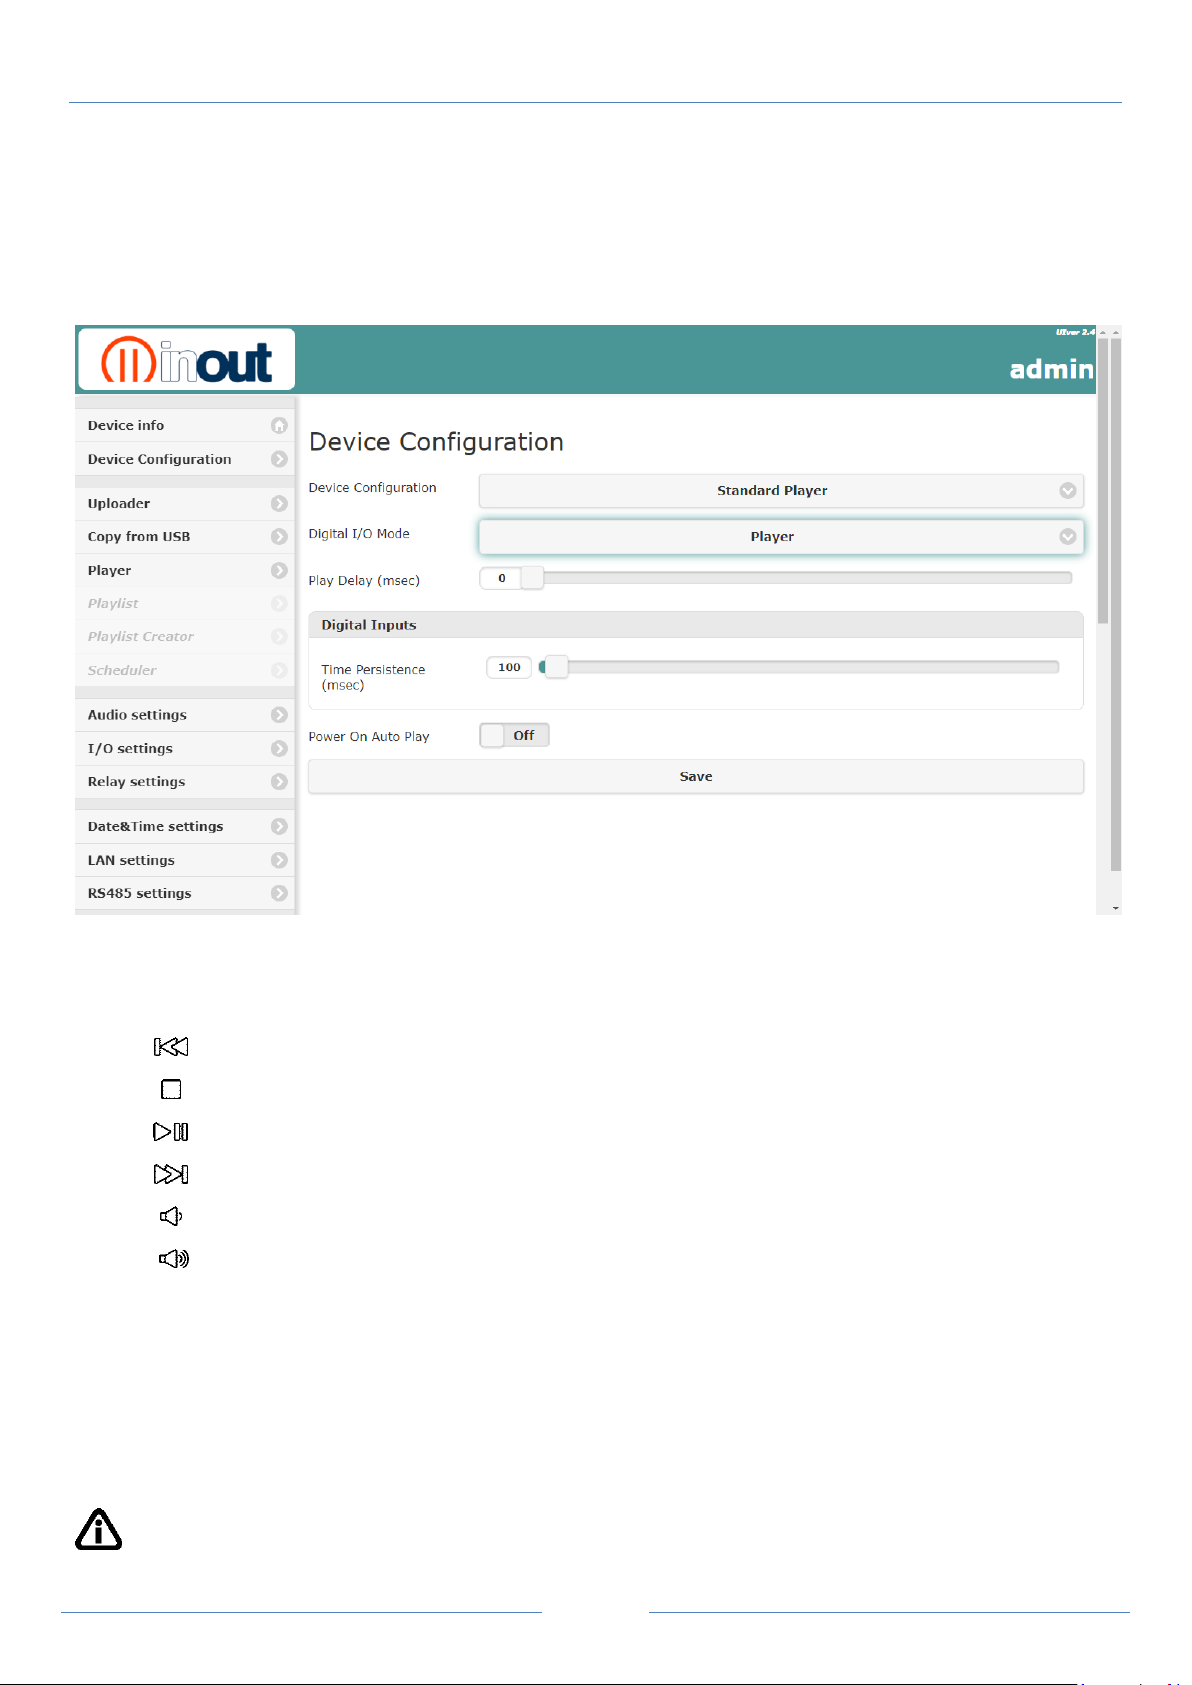
Digital I/O Mode
> Player
IO1
previous file
IO2
Stop file reproduction.
IO3
Play/Pause file
IO4
next file
IO5
reduce output volume
IO6
increase output volume
IO7
free - logic ports are freely configurable as I/O settings webpage.
IO8
free - logic ports are freely configurable as I/O settings webpage.
Time Persistence:
set the persistence time of the input command (time to wait before
NP2/NP5 is able to interpret the input command)
Power On Auto Play:
In this mode, NP2/NP5 will automatically start to play the audio file when
the device is power on.
NP2/NP5 QUICK GUIDE v. 1.5
Standard Player configuration
NP2/NP5 works just like a standard player in this mode and does not require any specific
programming or playlist file. The tracks will be played in the sequence in which they are
memorised in the flash memory; if a block of data is transferred then the written sequence in the
flash memory will depend on the operating system used.
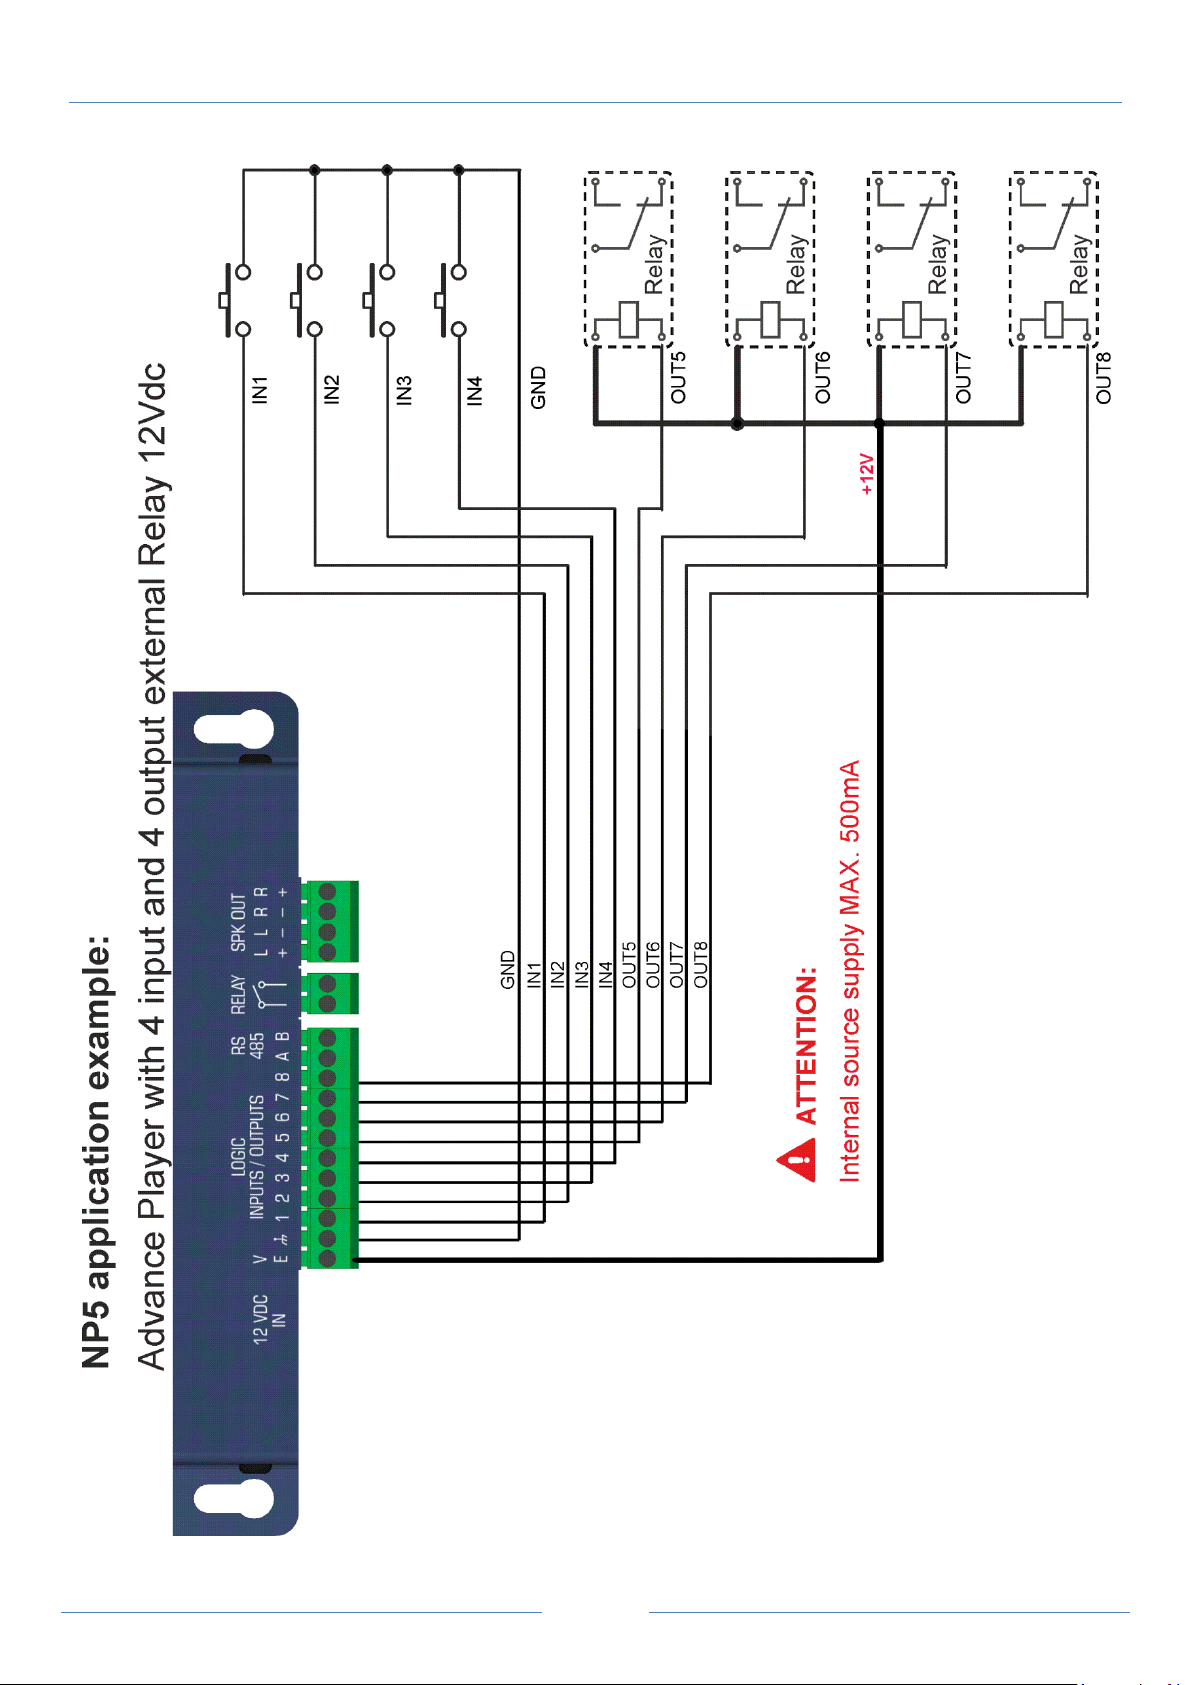
The logical inputs can be used for player control (see example application at the end of guide).
IMPORTANT: save the settings with the button apply/save
Page 21
Pag. 20
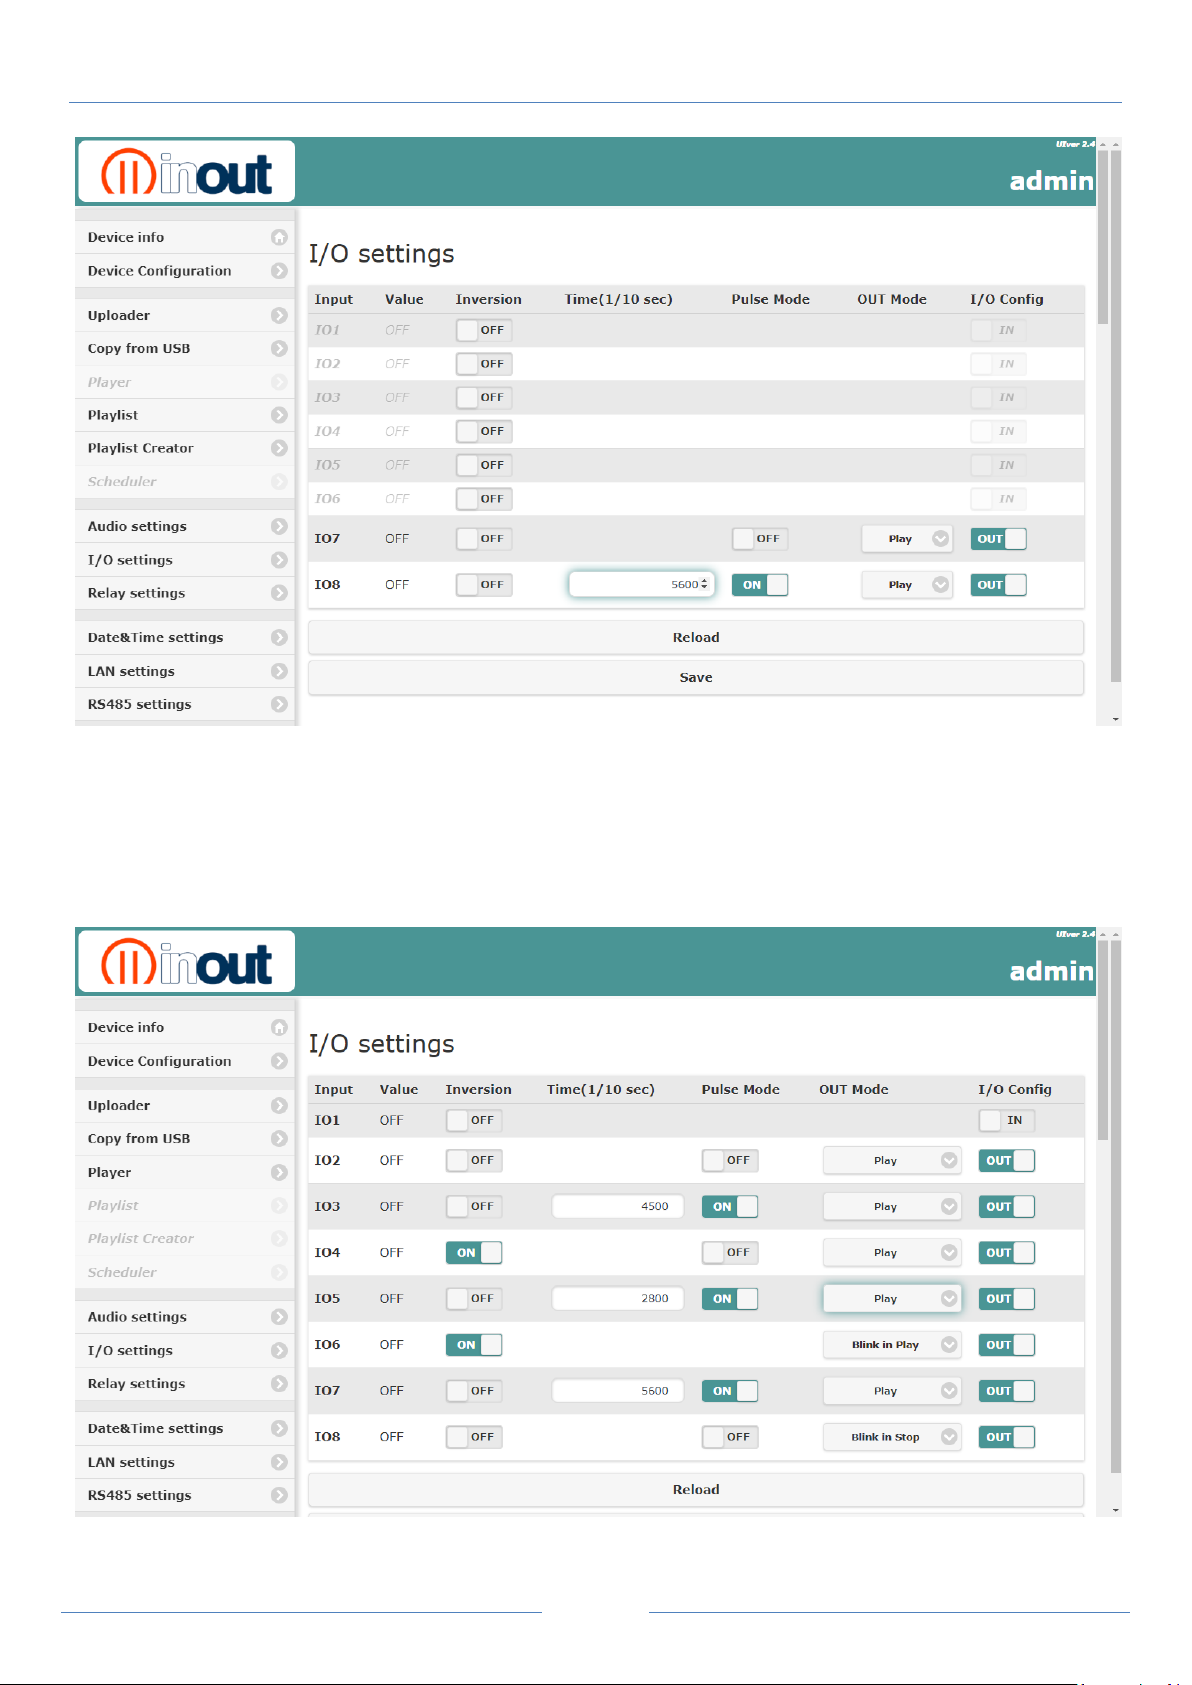
Digital I/O Mode
> Free
NP2/NP5 QUICK GUIDE v. 1.5
Logic ports are freely configurable as I/O settings webpage.
Page 22
Pag. 21
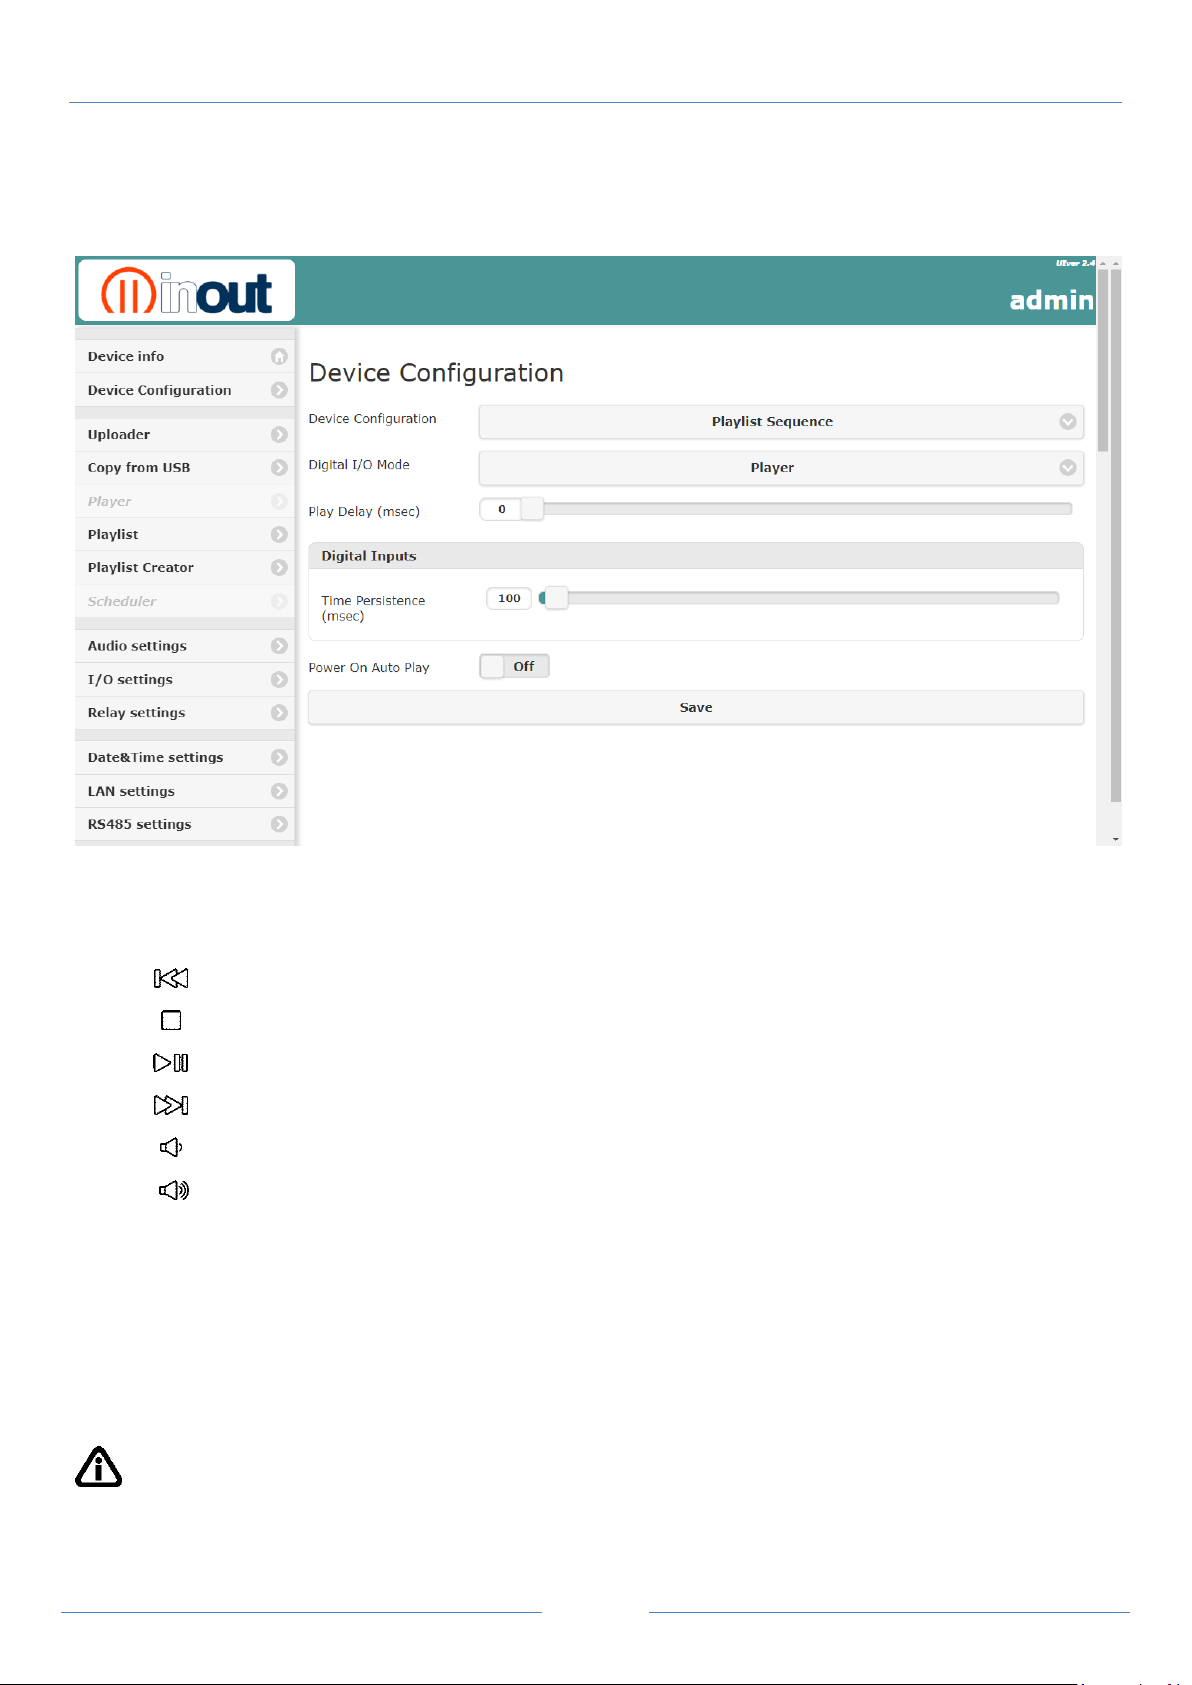
Playlist Sequence Configuration
Digital I/O Mode
> Player
IO1
previous file
IO2
Stop file reproduction.
IO3
Play/Pause file
IO4
next file
IO5
reduce output volume
IO6
increase output volume
IO7
free - logic ports are freely configurable as I/O settings webpage.
IO8
free - logic ports are freely configurable as I/O settings webpage.
Time Persistence:
set the persistence time of the input command (time to wait before
NP2/NP5 is able to interpret the input command)
Power On Auto Play:
In this mode, NP2/NP5 will automatically start to play the audio file when
the device is power on.
IMPORTANT:
- save the settings with the button apply/save
- set continuous play ON for playlist loop
NP2/NP5 QUICK GUIDE v. 1.5
This sequentially performs all the playlists memorised, starting first playlist.
The logical inputs can be used for player control (see example application at the end of guide).
Page 23
Pag. 22
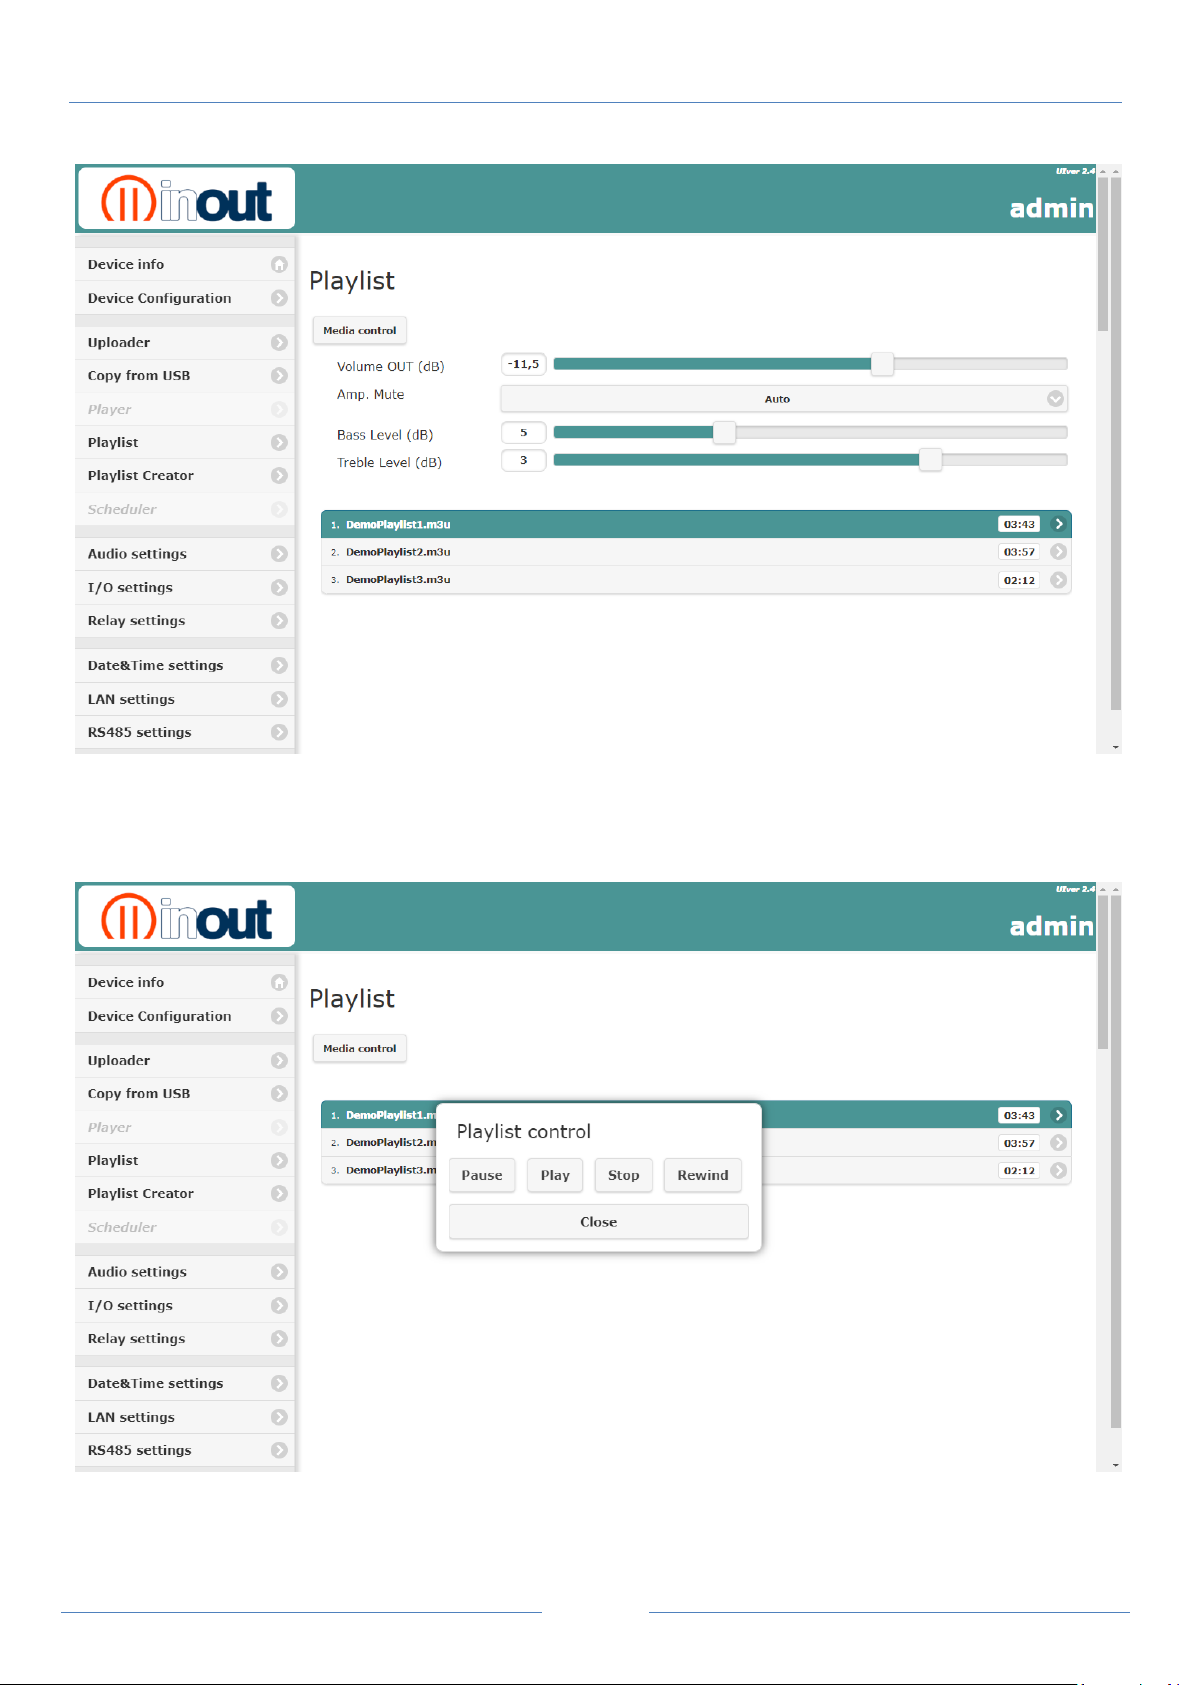
Digital I/O Mode
> Free
NP2/NP5 QUICK GUIDE v. 1.5
Logic ports are freely configurable as I/O settings webpage.
Select a playlist from the “Playlist” web page.
Page 24
Pag. 23
NP2/NP5 QUICK GUIDE v. 1.5
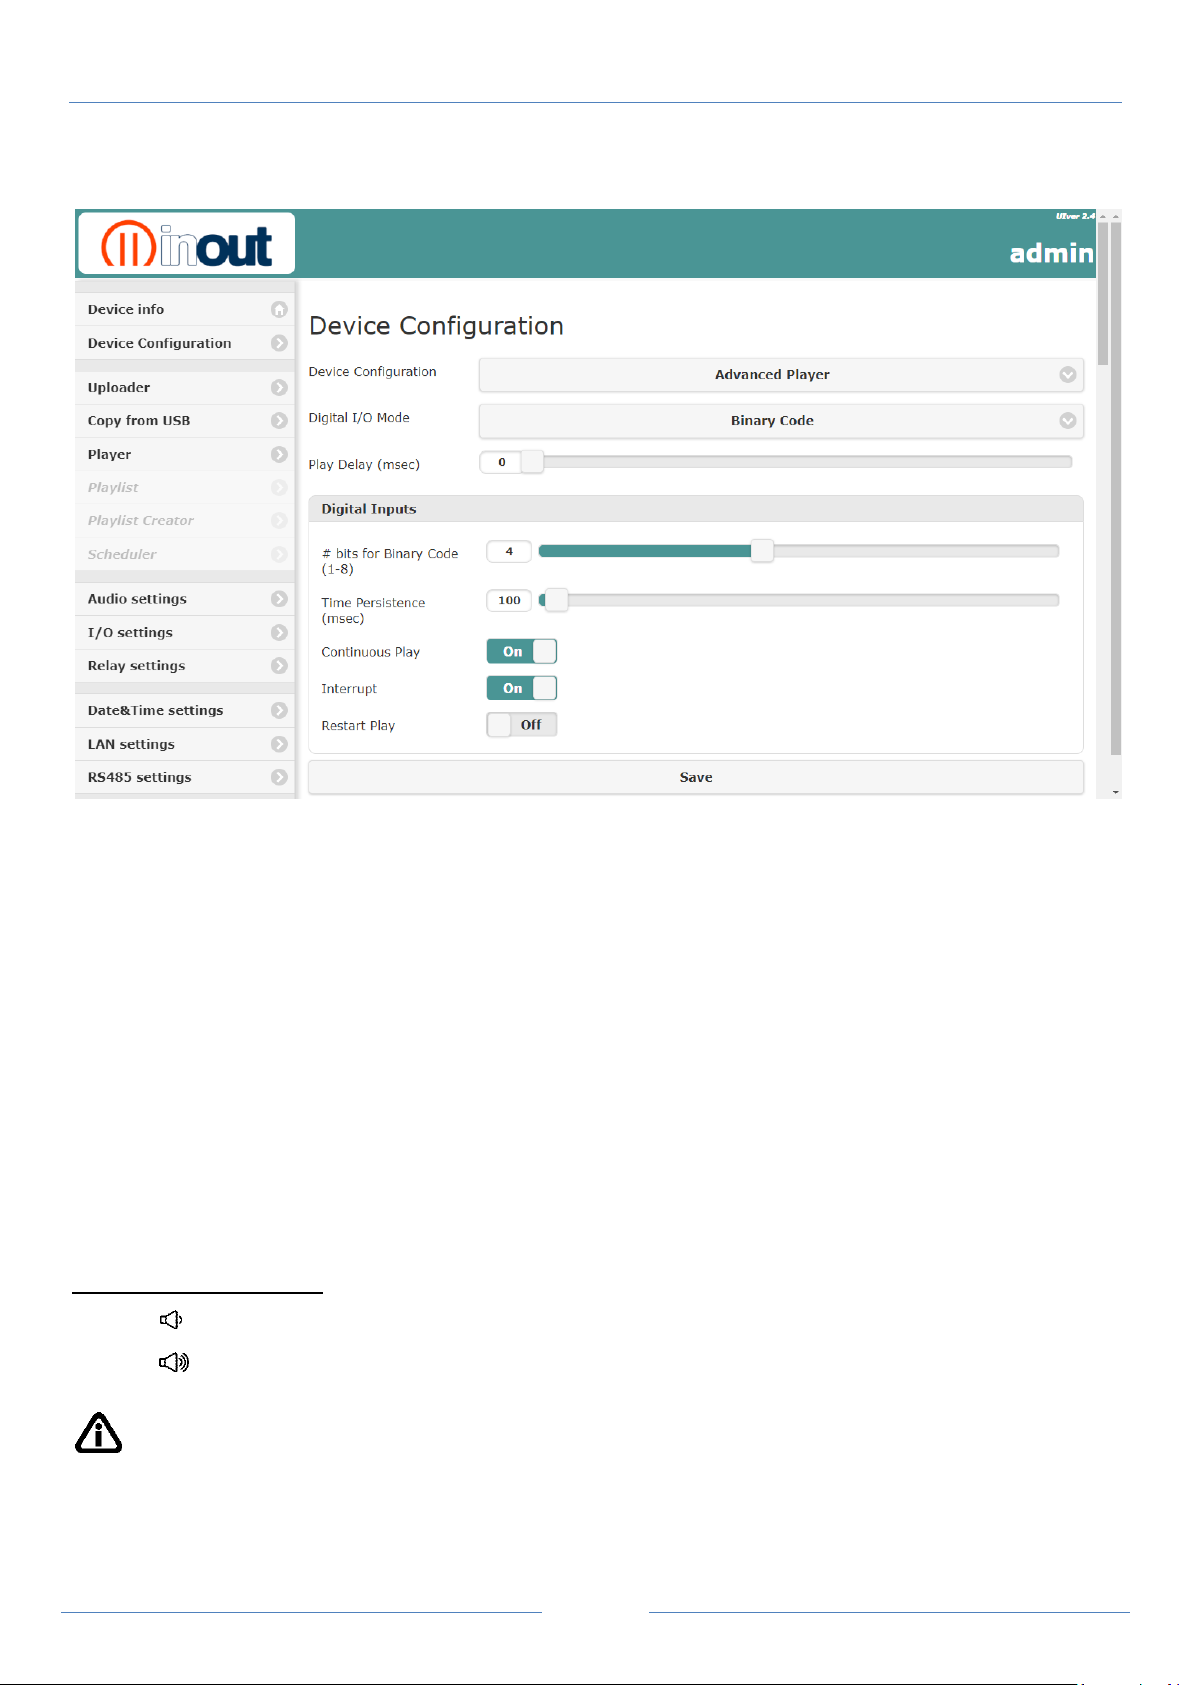
Click on the selected playlist to start the Playlist Control pop-up
Page 25
Pag. 24
Digital I/O Mode
> Binary Code
Digital I/O Mode
> Keypad (12-key telephone keypad)
Digital I/O Mode
> Museum Mode
IO7
reduce output volume
IO8
increase output volume
NP2/NP5 QUICK GUIDE v. 1.5
Advanced Player Configuration
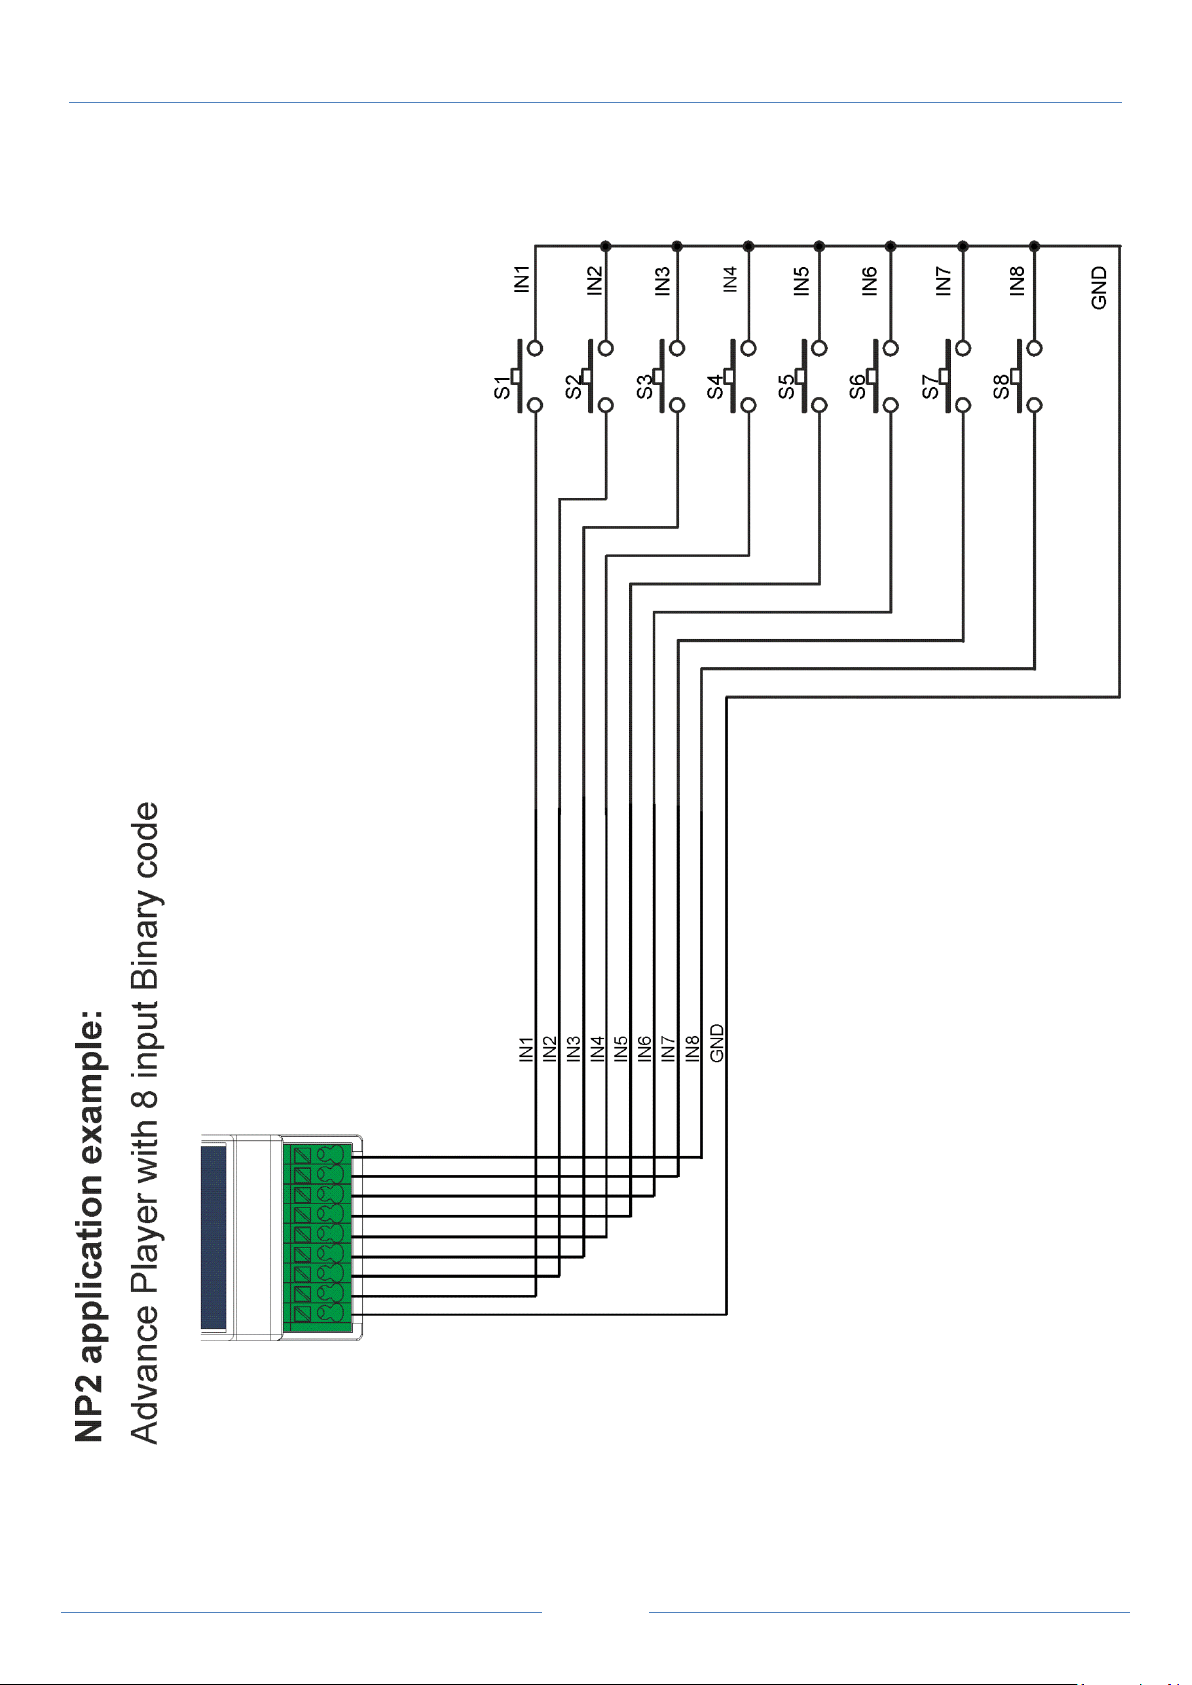
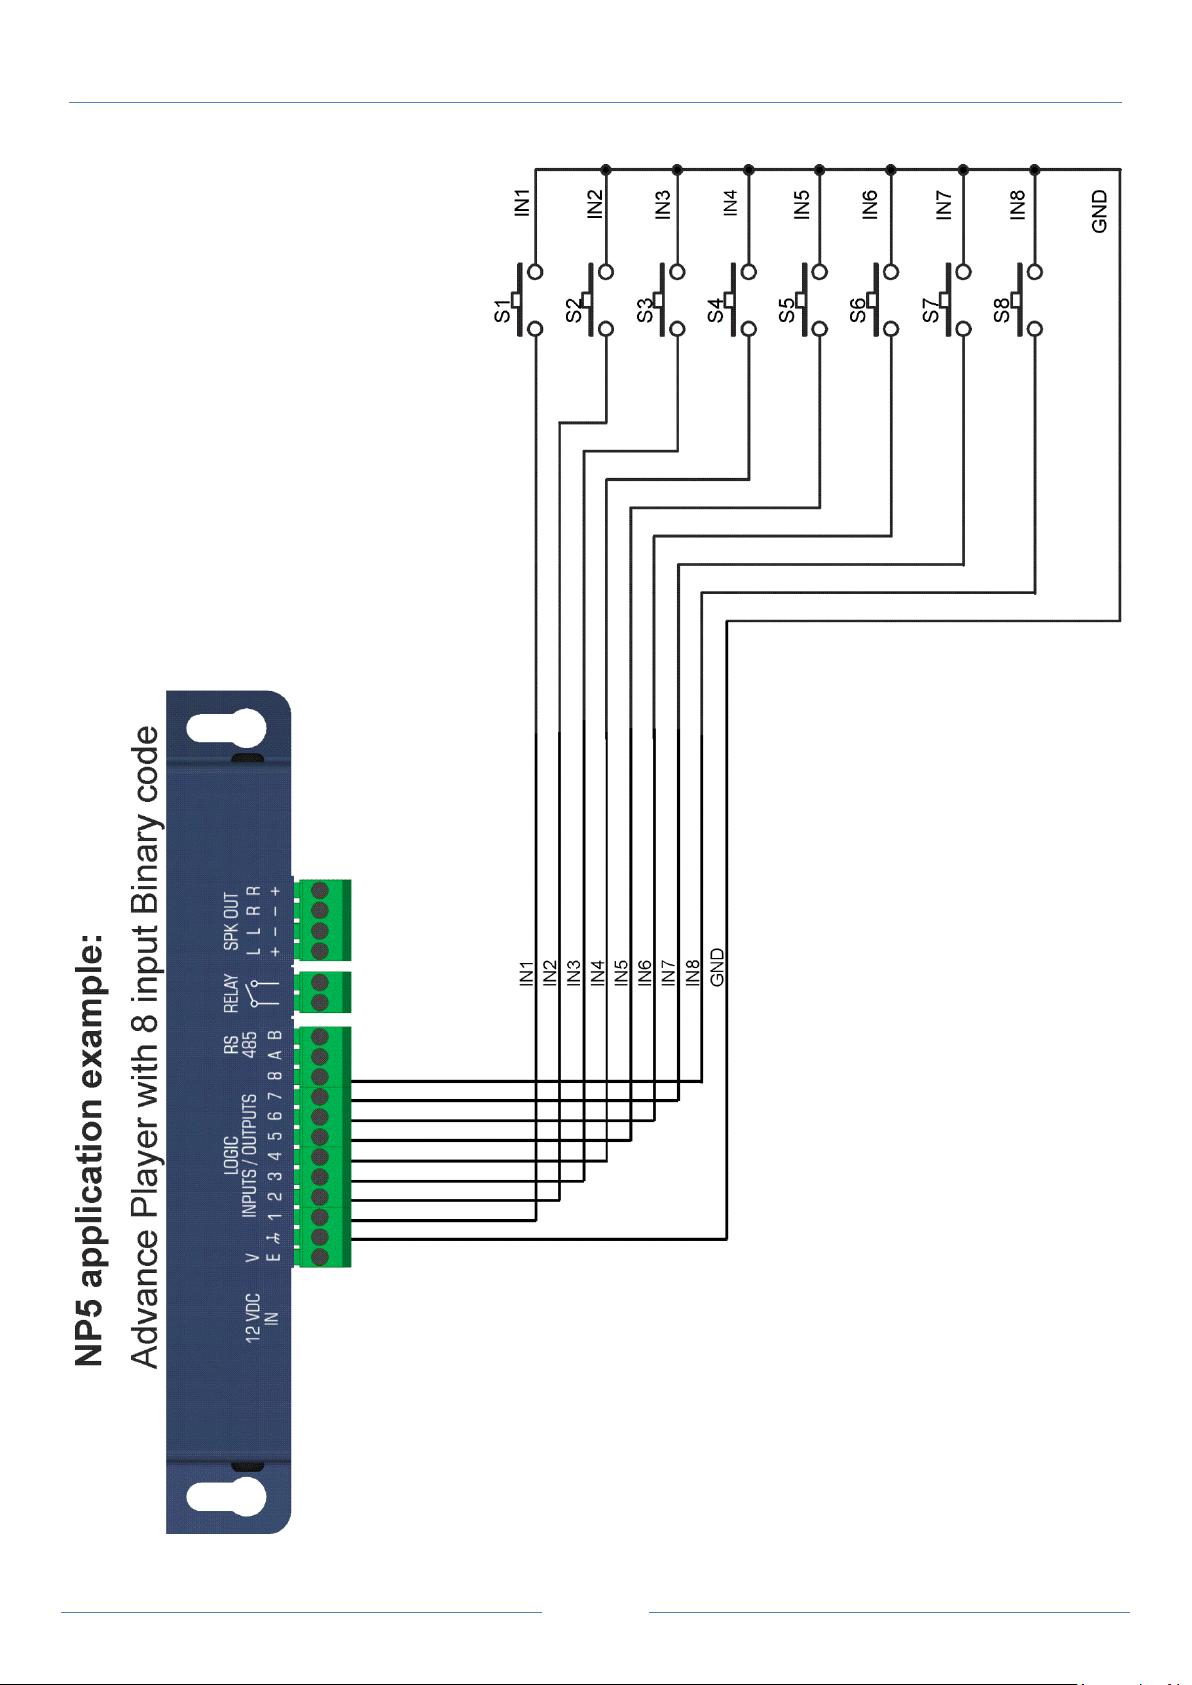
Activating the inputs in binary combination, one can launch the playing of a maximum of 255 file,
naming the audio files es. 1.mp3, 2.mp3, 3.mp3............255.mp3
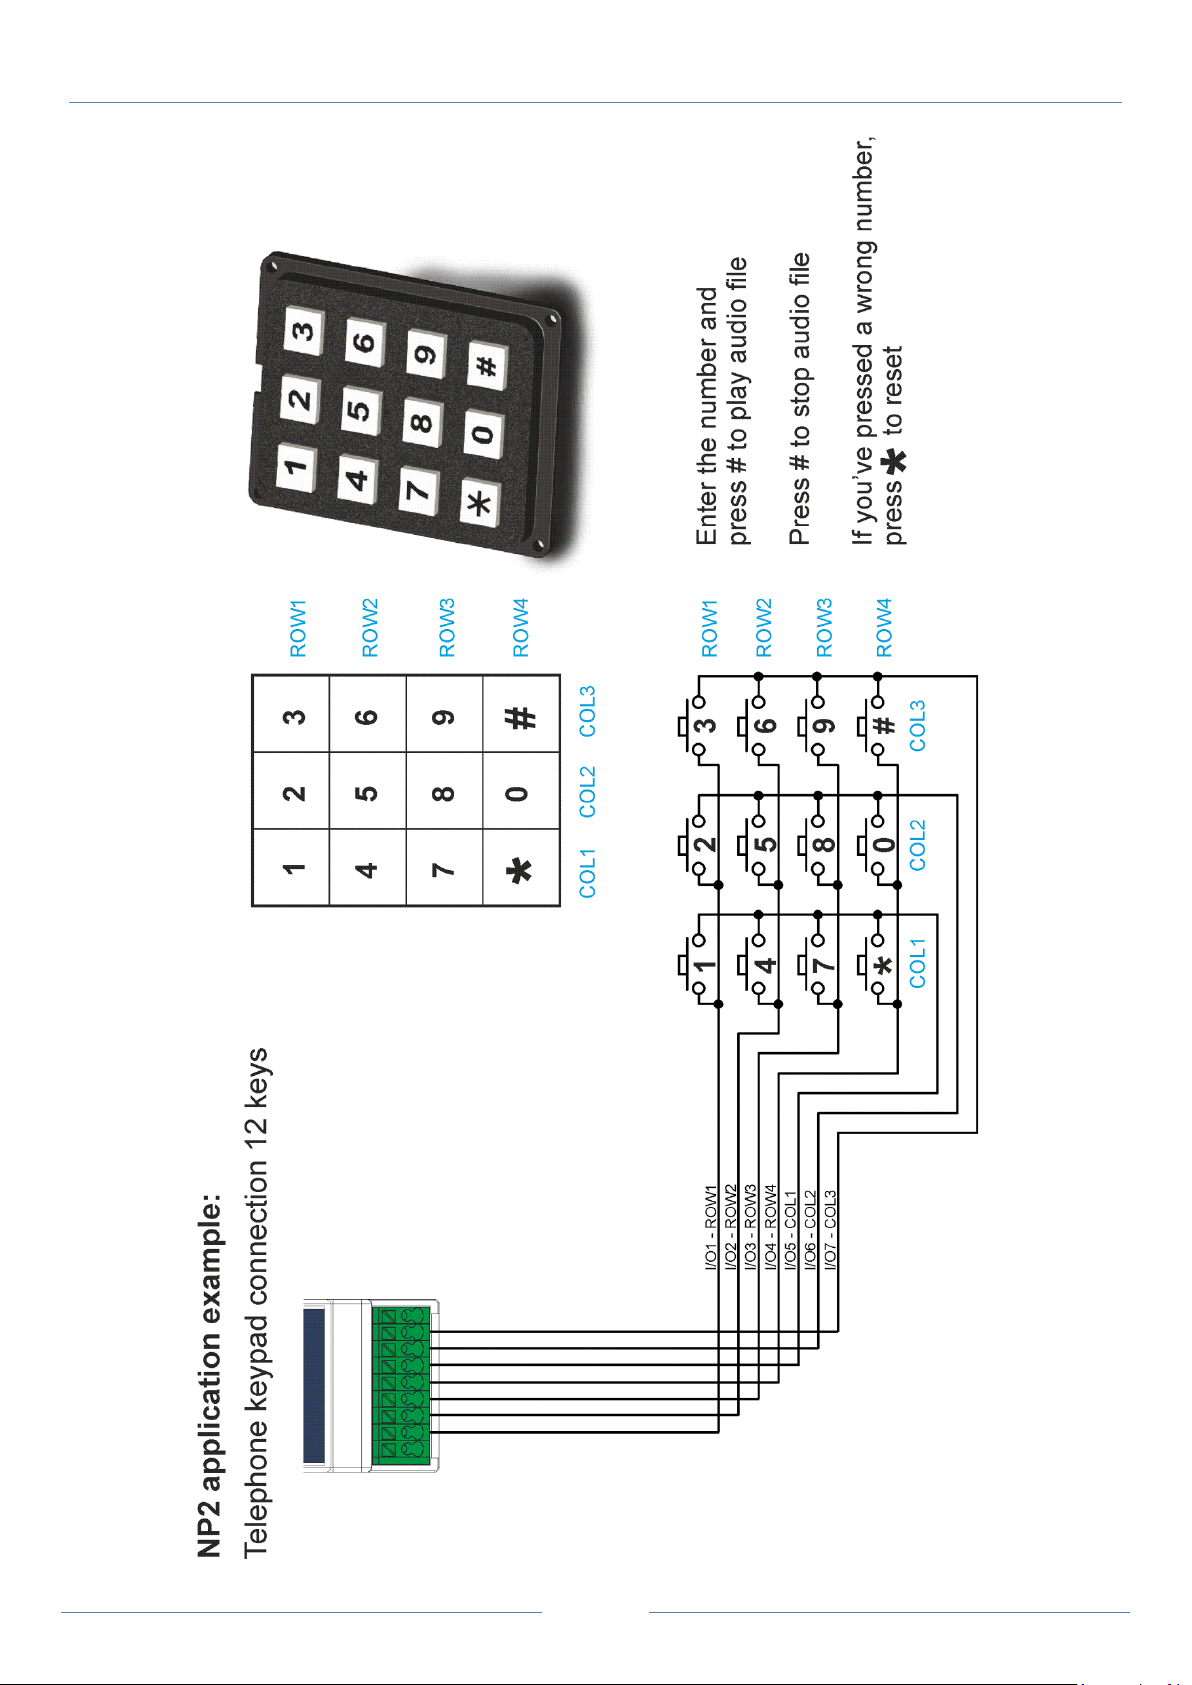
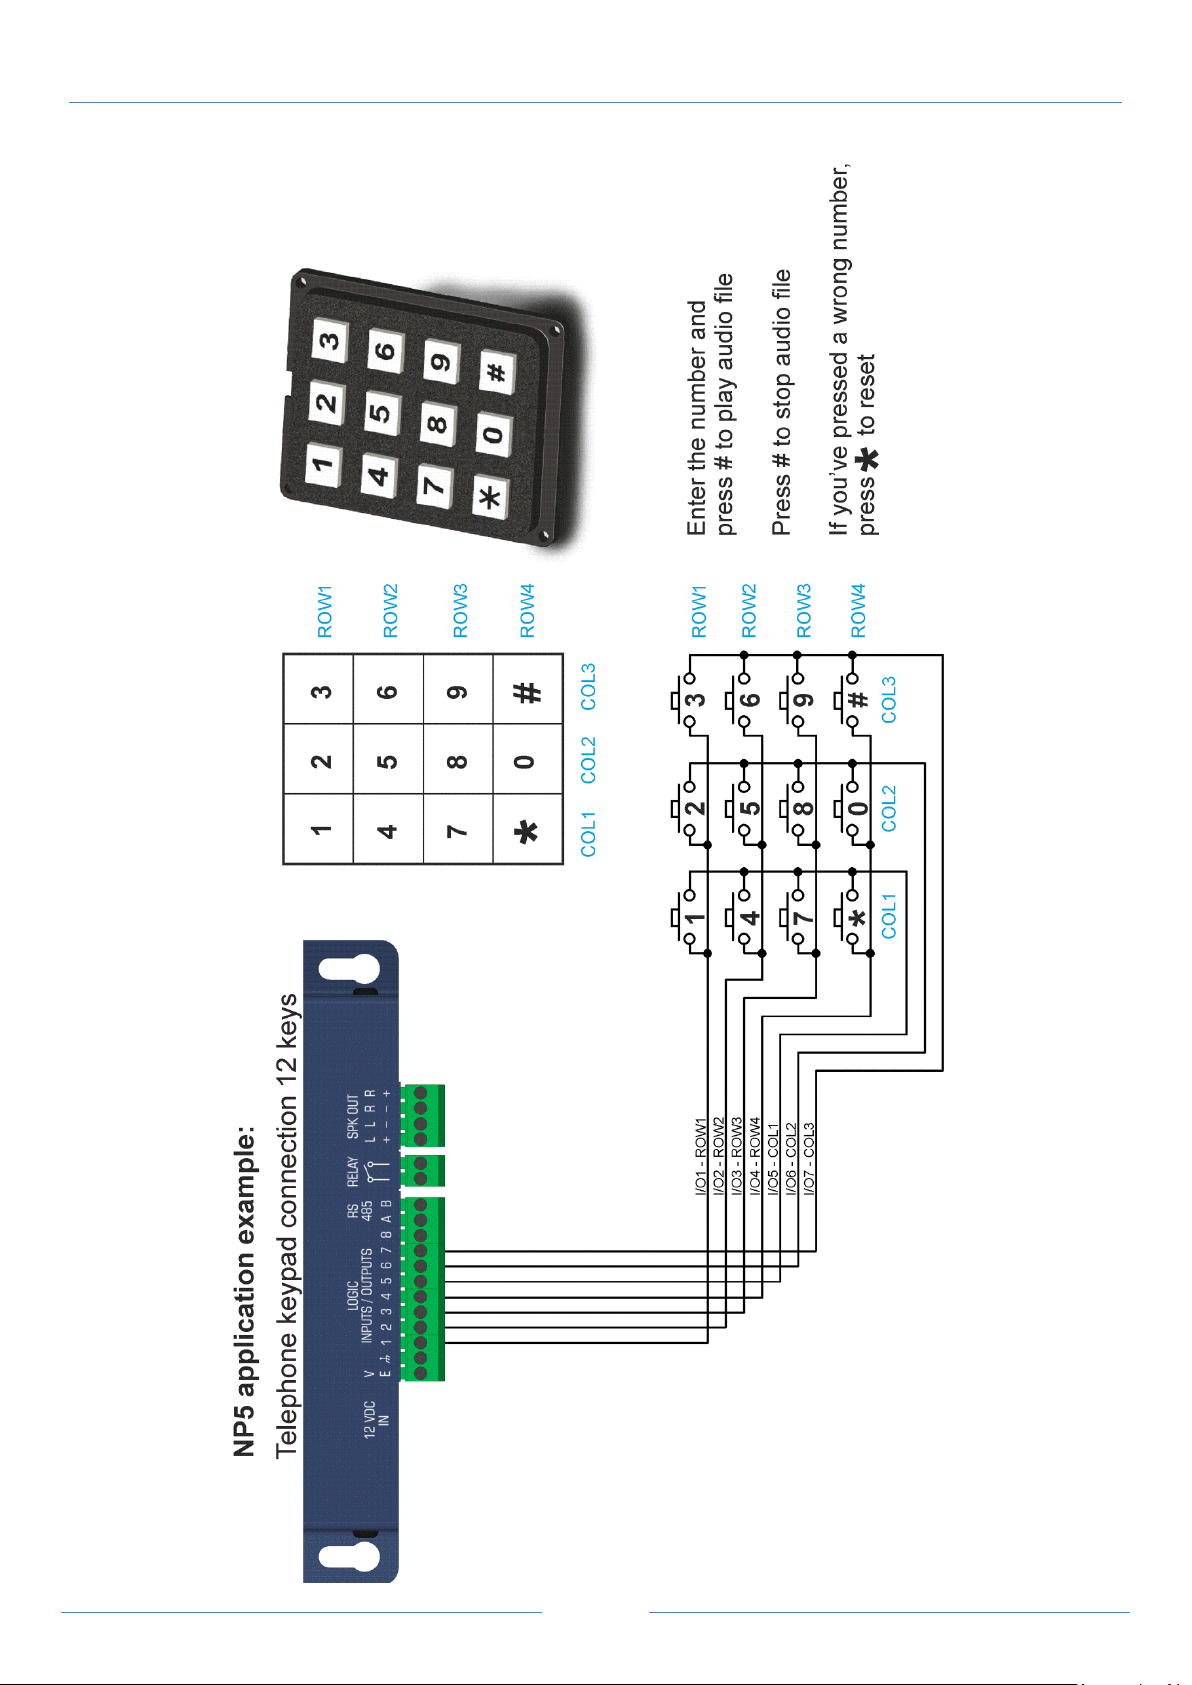
Dedicated operation for telephone keypad connection 12 keys. All I/O ports are dedicated to this
function (see example application at the end of guide).
Naming the audio files es. 1.mp3, 2.mp3, 3.mp3............999.mp3
Activating the inputs in binary combination, one can launch the playing of a maximum of 63 file,
naming the audio files es. 1.mp3, 2.mp3, 3.mp3............63.mp3.
I/O7 and I/O8 reserved:
IMPORTANT: save the settings with the button apply/save
Page 26

Pag. 25
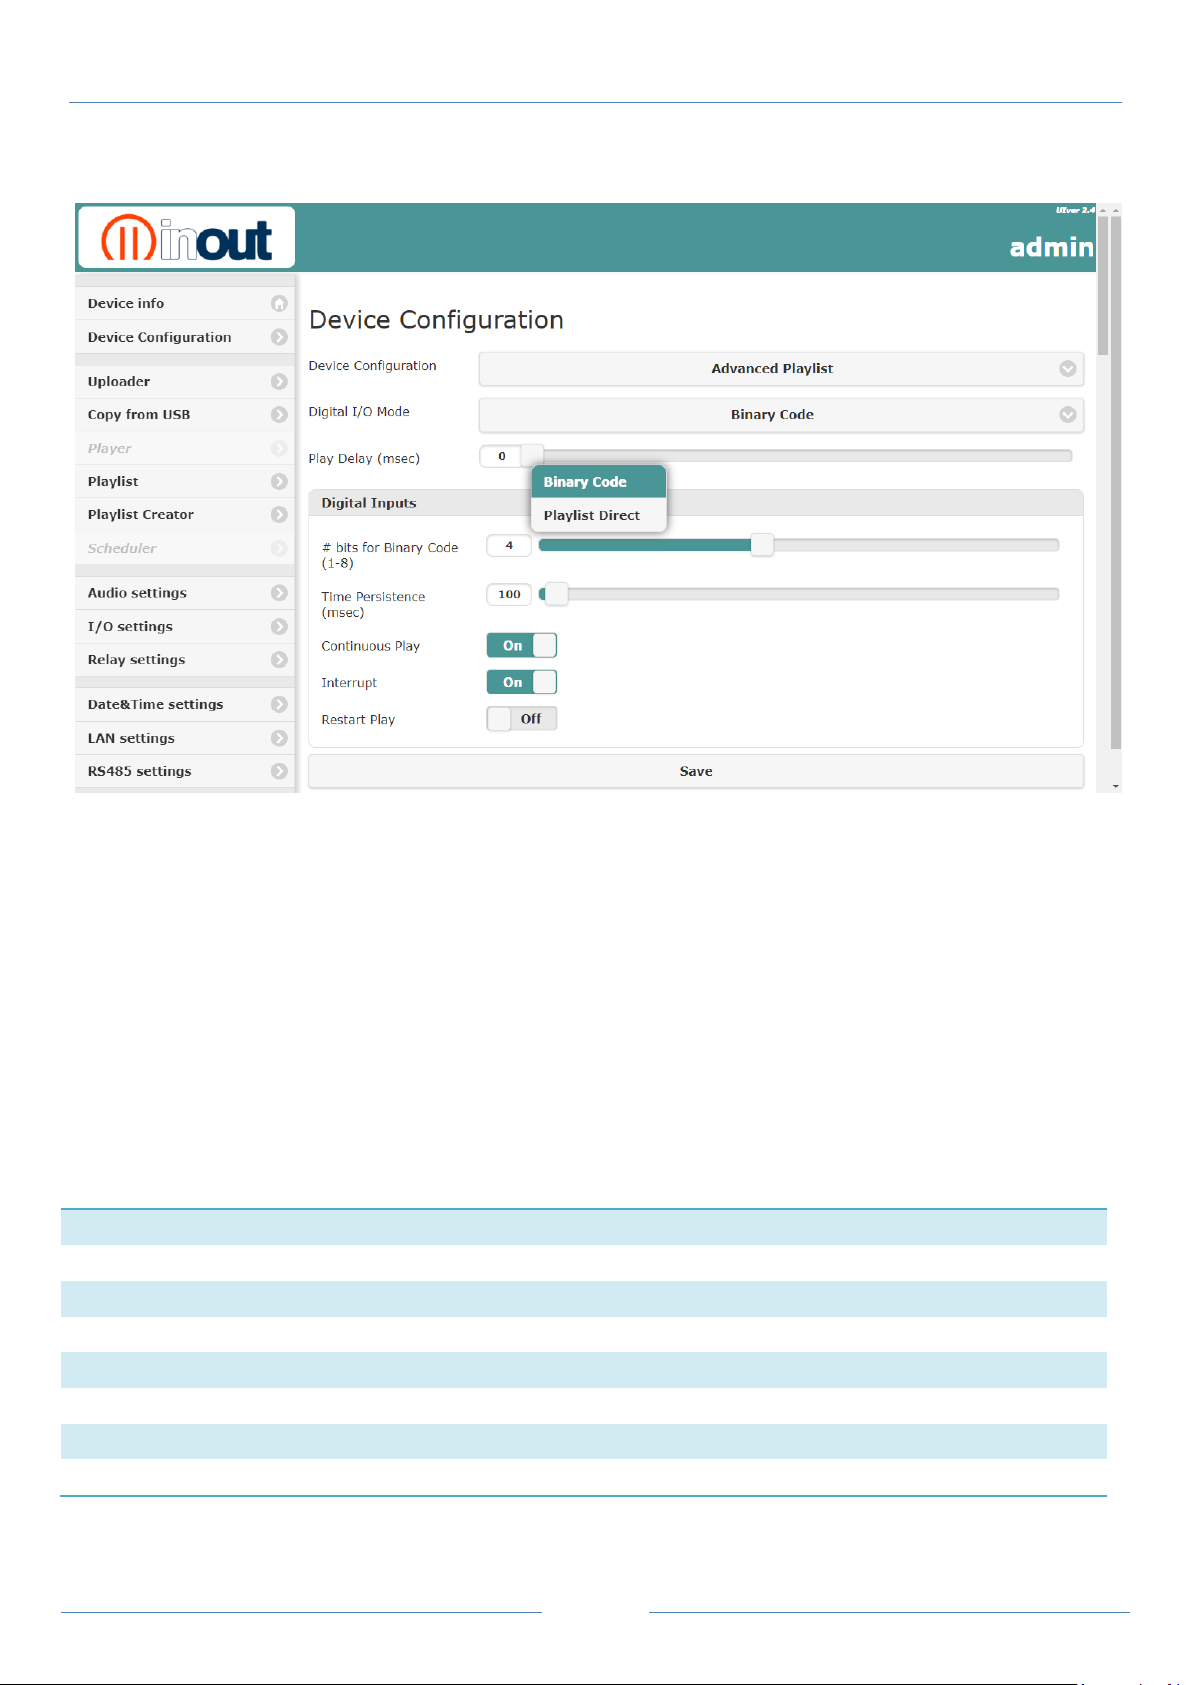
Digital Inputs
# bits for
Dedicated inputs for Playlist Direct or Binary Code, the remaining ones can
be configured as outputs
Time Persistence:
Set the persistence time of the input command (time to wait before
NP2/NP5 is able to interpret the input command).
Continuos Play:
- OFF: Having terminated the playing of the codified file, requested from
the input code, NP2/NP5 goes in standby.
- ON: The requested codified file is continuously played until the relevant
input code is inserted.
Interrupt:
- OFF: Repeated activations or deactivations of the same input or of other
inputs does not influence the playing of the file.
- ON: The activation of a different code can block the playing underway and
activate the playing of the new requested file
Restart Play:
( if Interrupt is ON )
In the moment in which an input code is enabled the playing of the of the
relevant file from its beginning takes place, even if it is already in play.
Digital Inputs Set
NP2/NP5 QUICK GUIDE v. 1.5
IMPORTANT: save the settings with the button apply/save
Page 27
Pag. 26
Advanced Playlist Configuration
Digital I/O Mode
> Playlist Direct
Digital I/O Mode
> Binary Code
Playlist Direct
Binary Code Playlist
Input
Name playlist
Input
Name playlist
IN1
1_nameplaylist.m3u
IN1+IN2
3_nameplaylist.m3u
IN2
2_nameplaylist.m3u
IN1+IN4
9_nameplaylist.m3u
IN3
3_nameplaylist.m3u
IN5
16_nameplaylist.m3u
IN4
4_nameplaylist.m3u
IN2+IN4+IN5
26_nameplaylist.m3u
IN5
5_nameplaylist.m3u
IN6
32_nameplaylist.m3u
IN6
6_nameplaylist.m3u
IN2+IN5+IN6
50_nameplaylist.m3u
IN7
7_nameplaylist.m3u
IN1+IN4+IN5+IN6
57_nameplaylist.m3u
IN8
8_nameplaylist.m3u
IN3+IN4+IN5+IN6
60_nameplaylist.m3u
NP2/NP5 QUICK GUIDE v. 1.5
The 8 available playlists, activated by the logical inputs IN1-IN8, can be played with different
modes, depending upon the varying needs.
Activating the inputs in binary combination, one can launch the playing of a maximum of 255
playlists.
To combine playlists with their inputs, rename playlist names as follows (use clone button with
playlist creator web page):
Page 28
Pag. 27
Digital Inputs
# bits for:
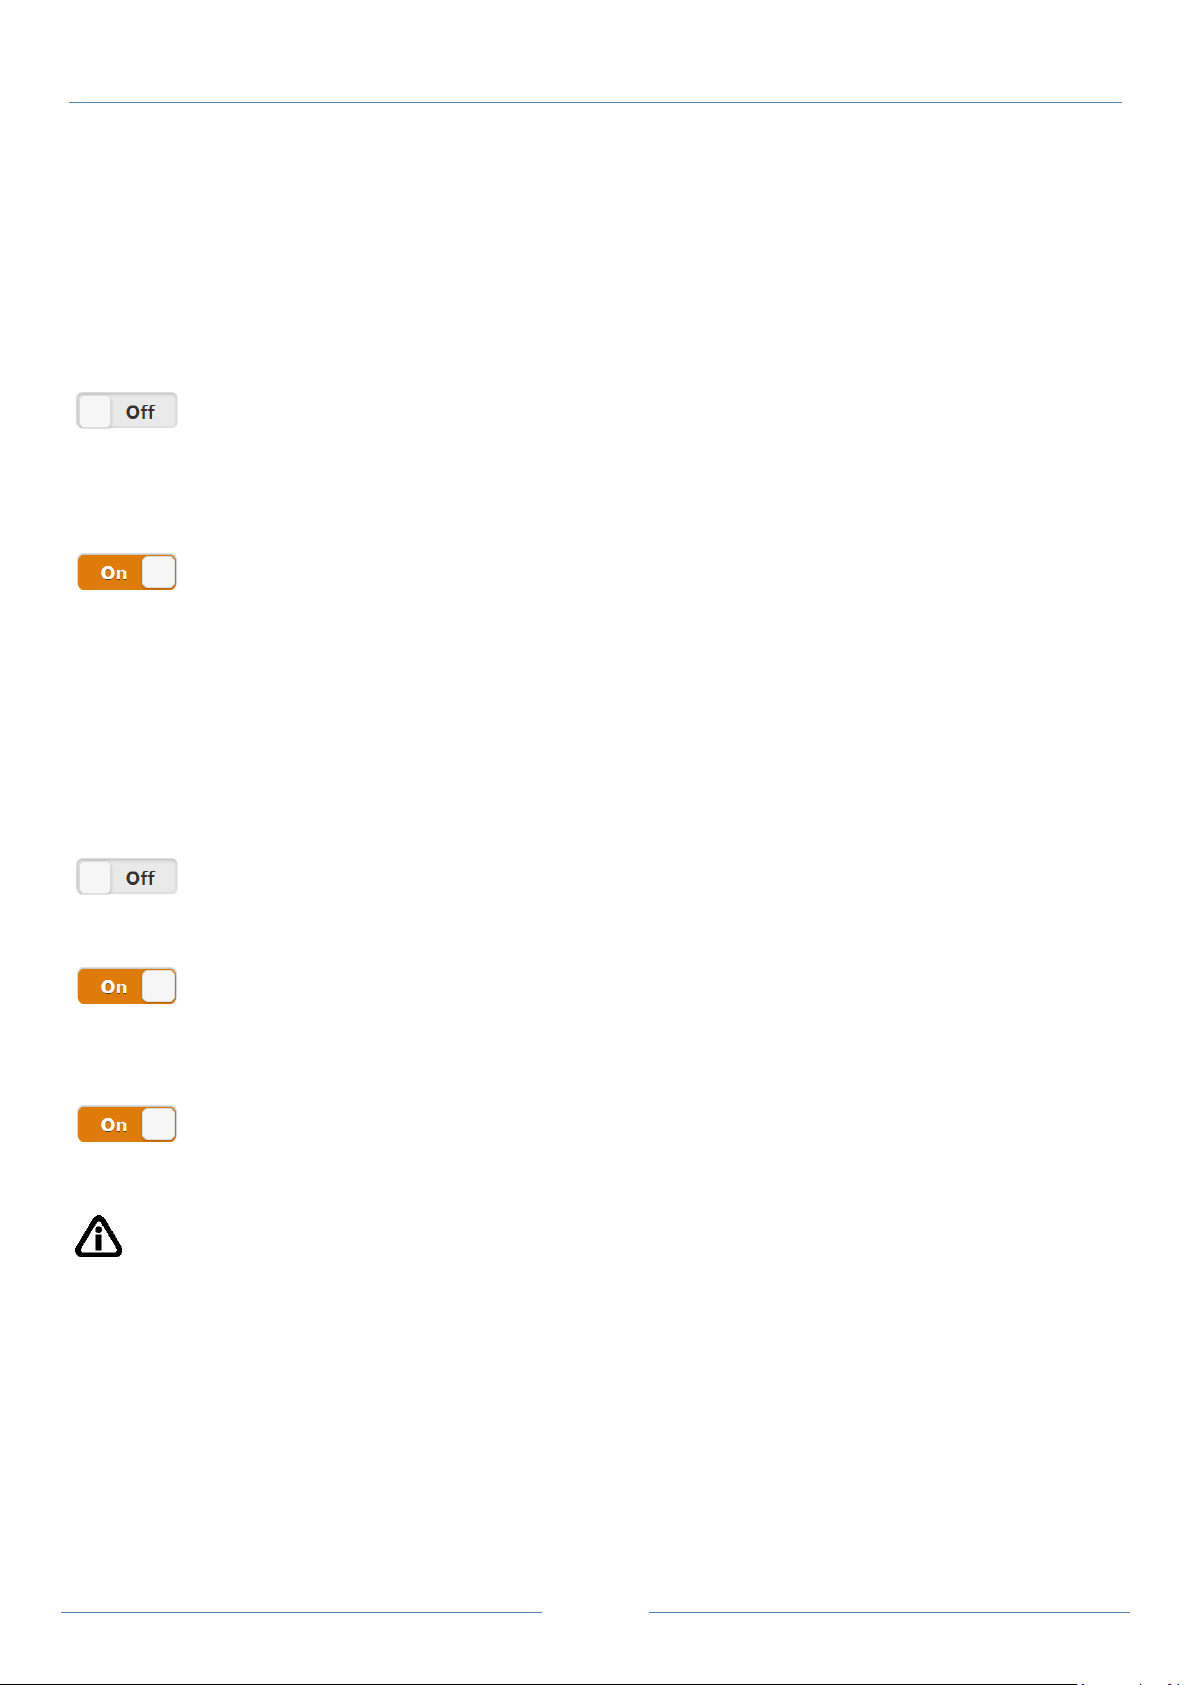
Dedicated inputs for Playlist Direct or Binary Code, the remaining ones can
be configured as outputs
Time Persistence:
Set the persistence time of the input command (time to wait before
NP2/NP5 is able to interpret the input command).
Continuos Play:
- Activated the input, the relative item in the Playlist is played: at the end of
it, NP2/NP5 goes in standby, awaiting a further activation.
- The position of the last item played is stored in memory, in order to start
out again always by the next one in case of restart.
Continuos Play:
- Activated the input, the relative item in the Playlist is played: at the end of
it, NP2/NP5 goes in standby, awaiting a further activation.
Activating the input once again or if the activation remains, the successive
file is played.
- The playlist is activated in loop, as long as the activation of the relative
logical input remains activated.
- The position of the last item played is stored in memory, in order to start
out again always by the next one in case of restart.
Interrupt:
Repeated activations or deactivations of the same input or of other inputs
does not influence the playing of the file.
Interrupt:
Repeated activations or deactivations of the same logical input does not
influence the playing of the file; only the activation of a different input
blocks the playing underway and activates the relative playlist.
Restart Play:
From the moment that the same logical input is reactivated, the restart of
the file is commanded, even if it is playing. The activation of a different
input blocks the playing underway and activates the relative playlist.
Digital Inputs Set
NP2/NP5 QUICK GUIDE v. 1.5
IMPORTANT: save the settings with the button apply/save
Page 29
Pag. 28
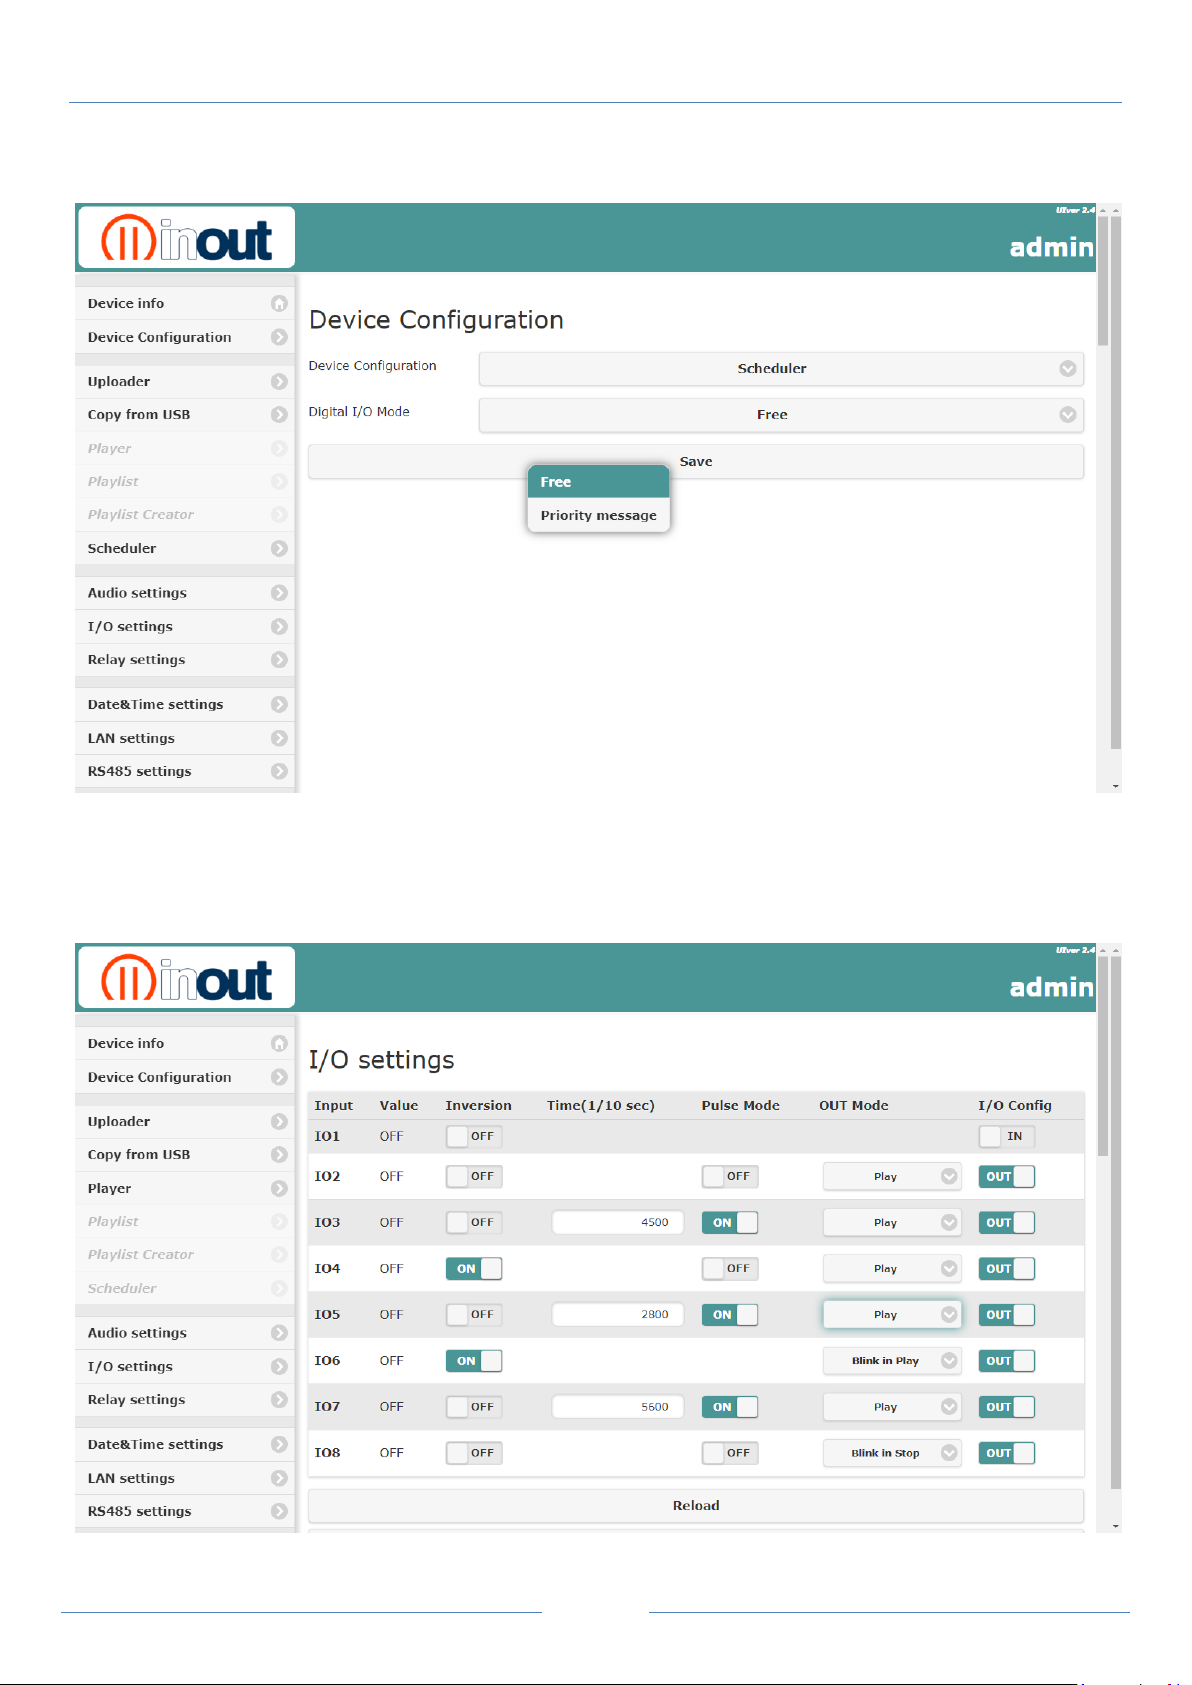
Scheduler Configuration
Digital I/O Mode
> Free
NP2/NP5 QUICK GUIDE v. 1.5
Logic ports are freely configurable as I/O settings webpage.
Page 30
Pag. 29
Digital I/O Mode
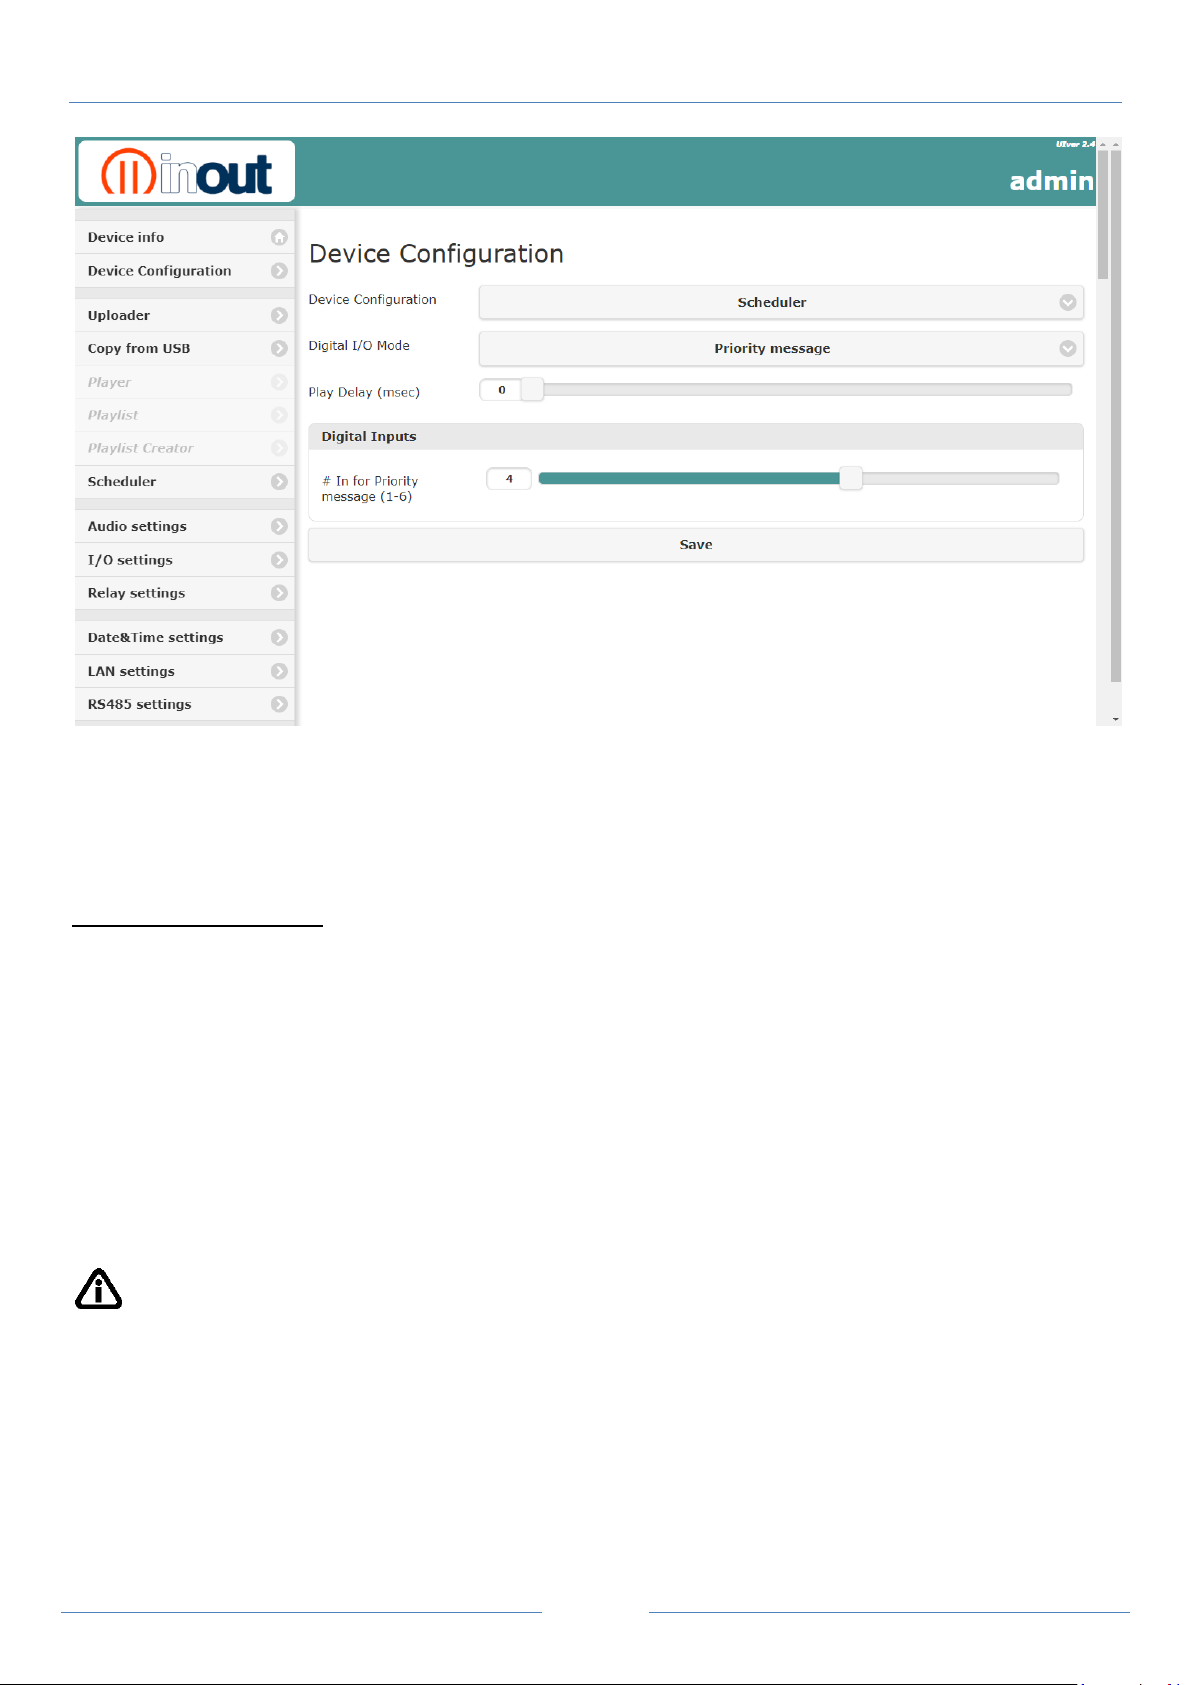
> Priority message
IO7:
If active input, the line in is enabled and mixes in the background during the playback
program's audio file.
When disabled, the audio line in is turned off.
IO8:
If enable, suspends the program scheduler and playback of audio files.
When disabled, resumes the audio playback of the scheduler from the point established of
the time line program
Play Delay:
Setting the delay time of the playback audio file from the activation of the inputs
NP2/NP5 QUICK GUIDE v. 1.5
Activating the inputs in binary combination, one can launch the playing of a maximum of 63 priority
message, naming the audio files es. 1.mp3, 2.mp3, 3.mp3............63.mp3
The remaining logic ports can be configured as outputs
I/O7 and I/O8 reserved:
IMPORTANT: save the settings with the button apply/save
Page 31
Pag. 30
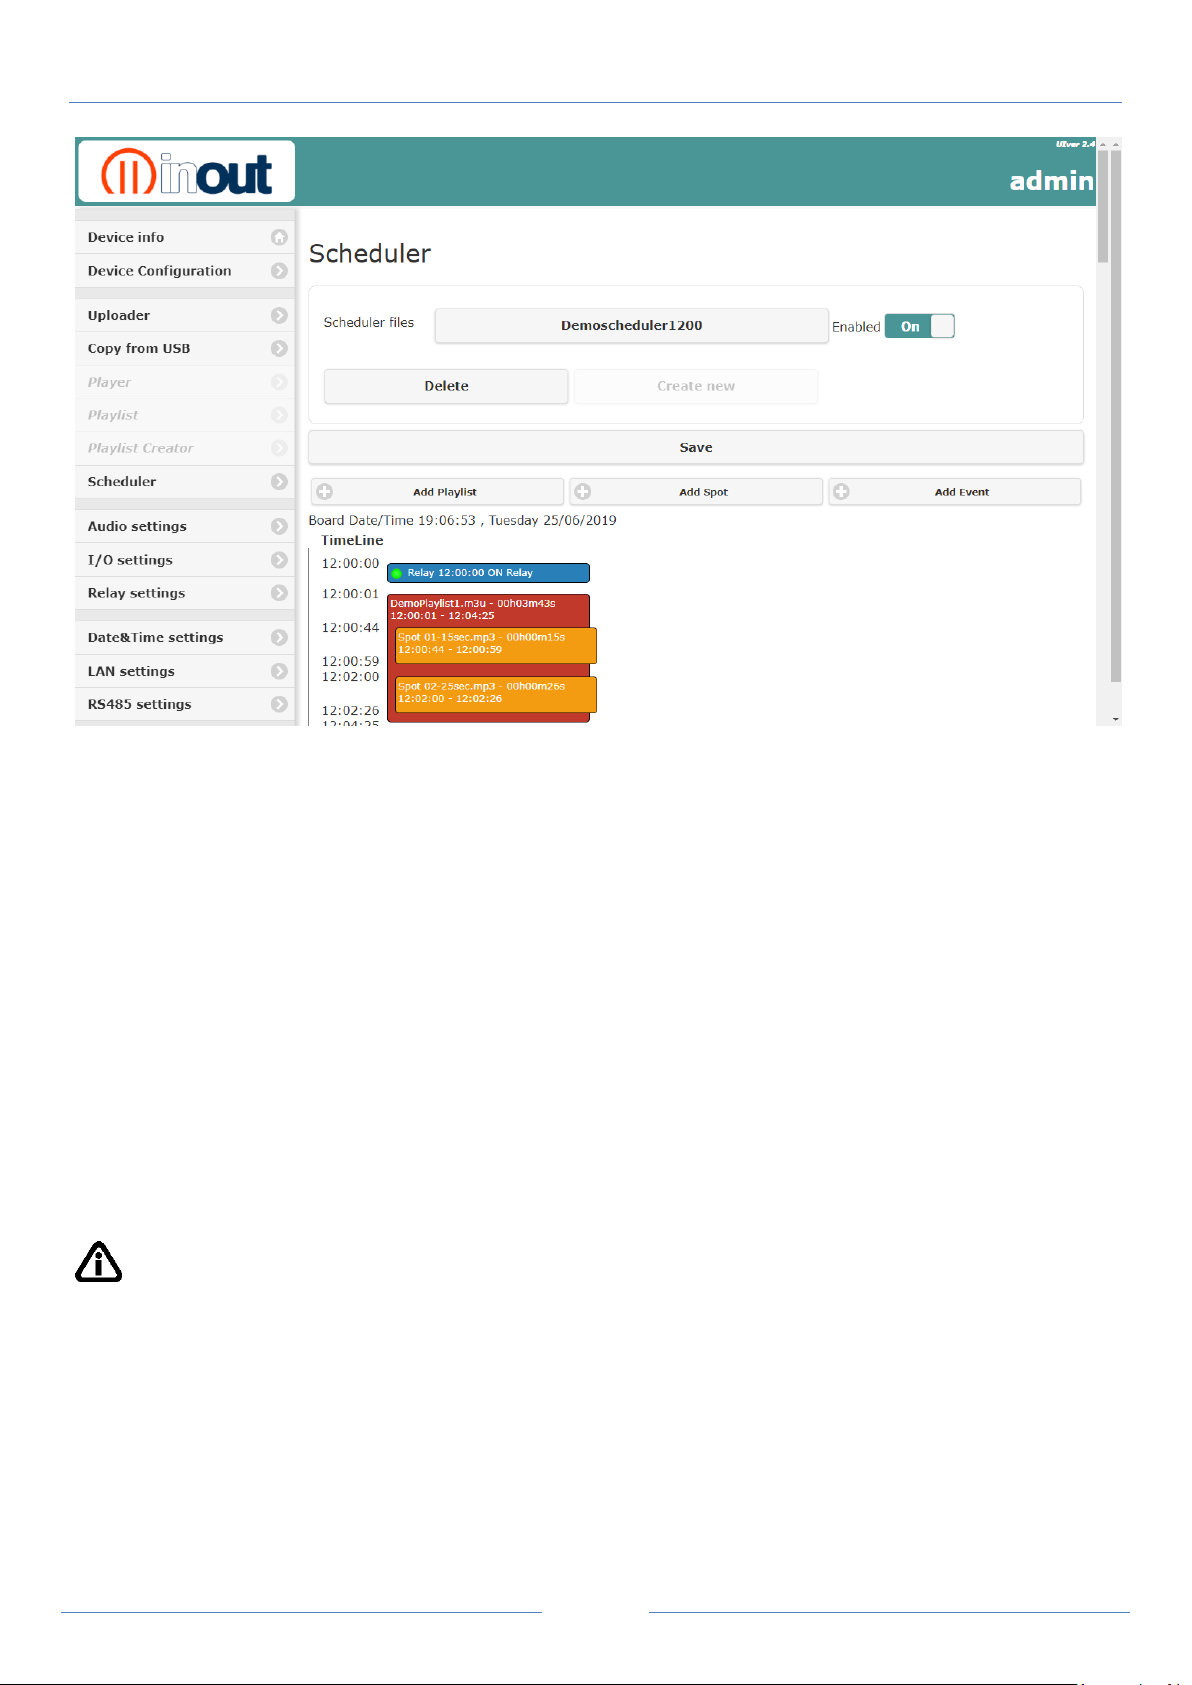
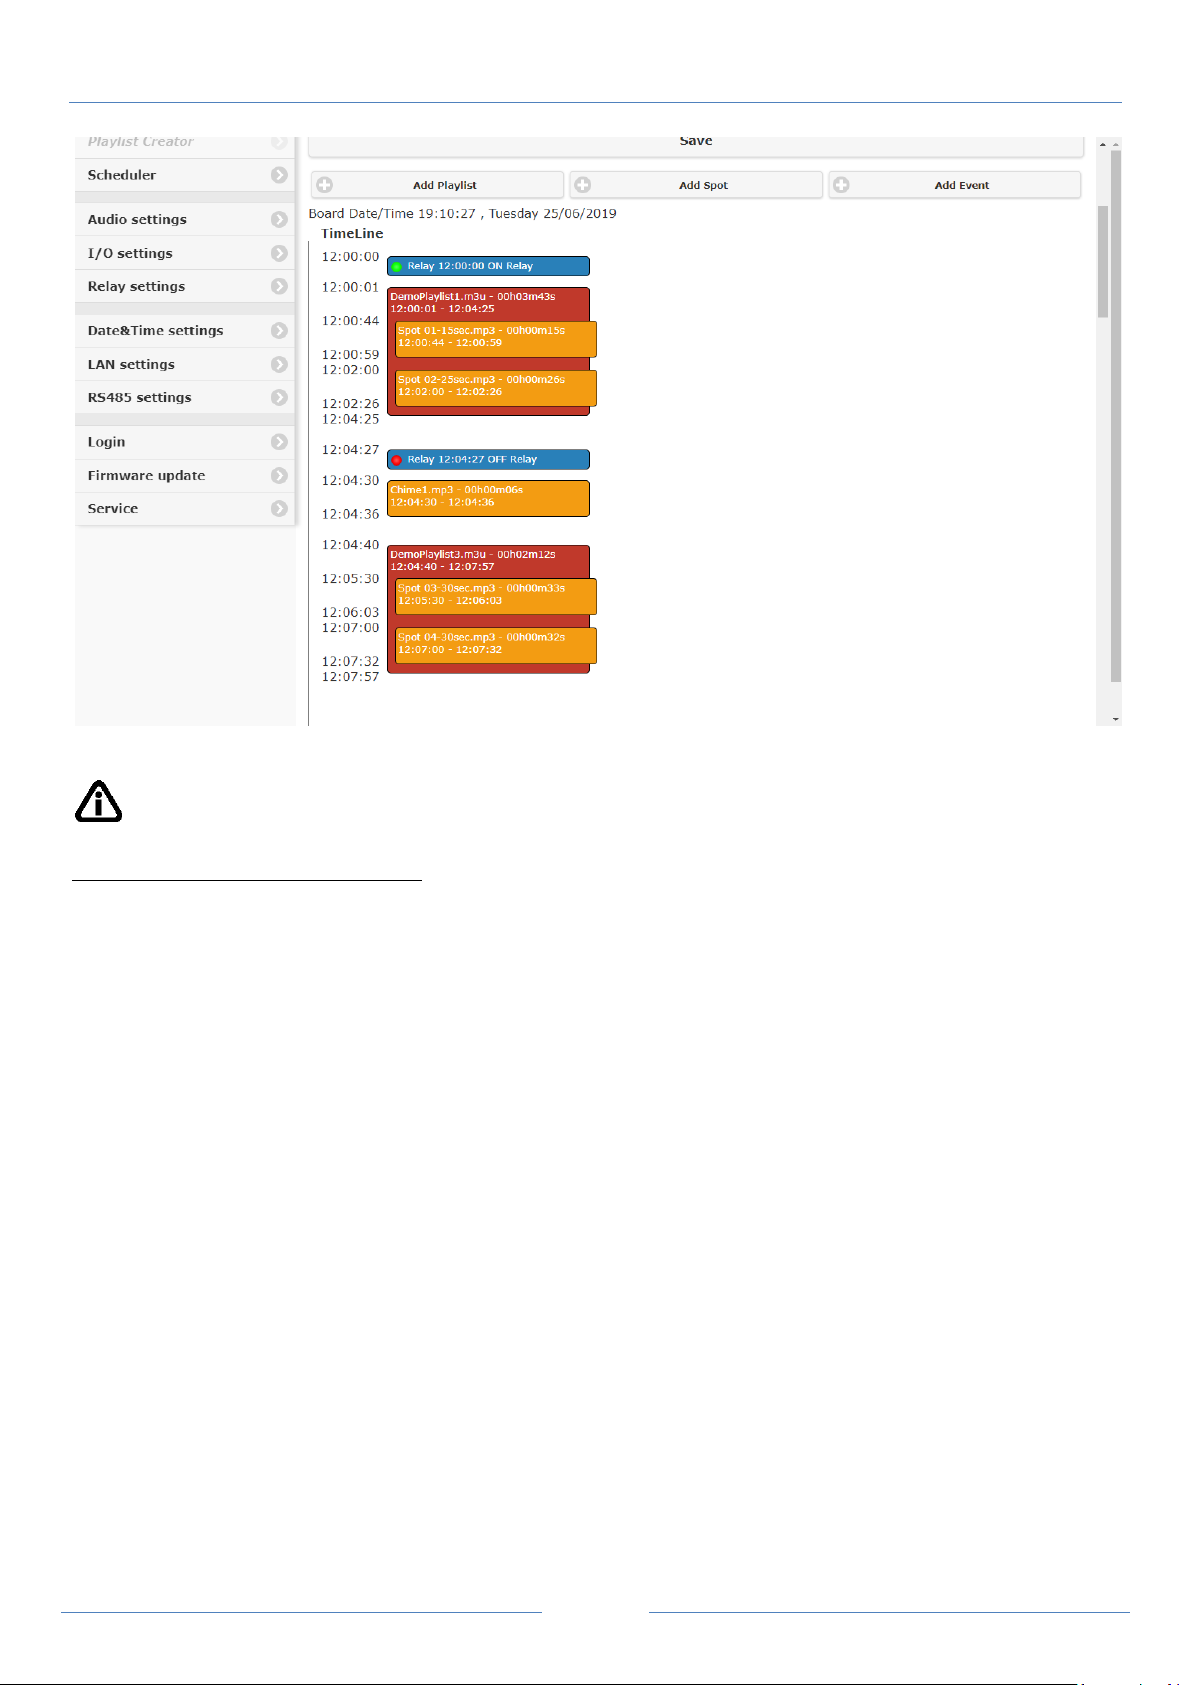
Scheduler files:
Name of the every day scheduler program
Enable:
If active, enable the scheduler.
If switched off, the program is suspended.
Create new:
to create a new scheduler an save name
Delete:
to clear the scheduler program
Add Playlist:
to insert playlists or generate with playlist creator. Press set to enter
Add Spot:
to insert a single spot or an auto repeat for n times and a range between them.
Press set to enter
Add Event:
to insert a time event: Relay, logic output and audio line in. Press set to enter
Enter title, choose output type, value output if ON / OFF, intervention time.
Press set for insertion.
ON = green ball
OFF= red ball
IMPORTANT:
to display output ID, configure logic ports as outputs in I/O settings page
NP2/NP5 QUICK GUIDE v. 1.5
Page 32
Pag. 31
NP2/NP5 QUICK GUIDE v. 1.5
IMPORTANT.
Pay attention to following advice:
We recommend you to create a new scheduler instead of editing and deleting a scheduler file in
memory.
In case of incorrect webpage views, refresh the page by clicking on the InOut logo
Be careful about programming, overlapping schedules can generate errors.
Page 33
Pag. 32
NP2/NP5 QUICK GUIDE v. 1.5
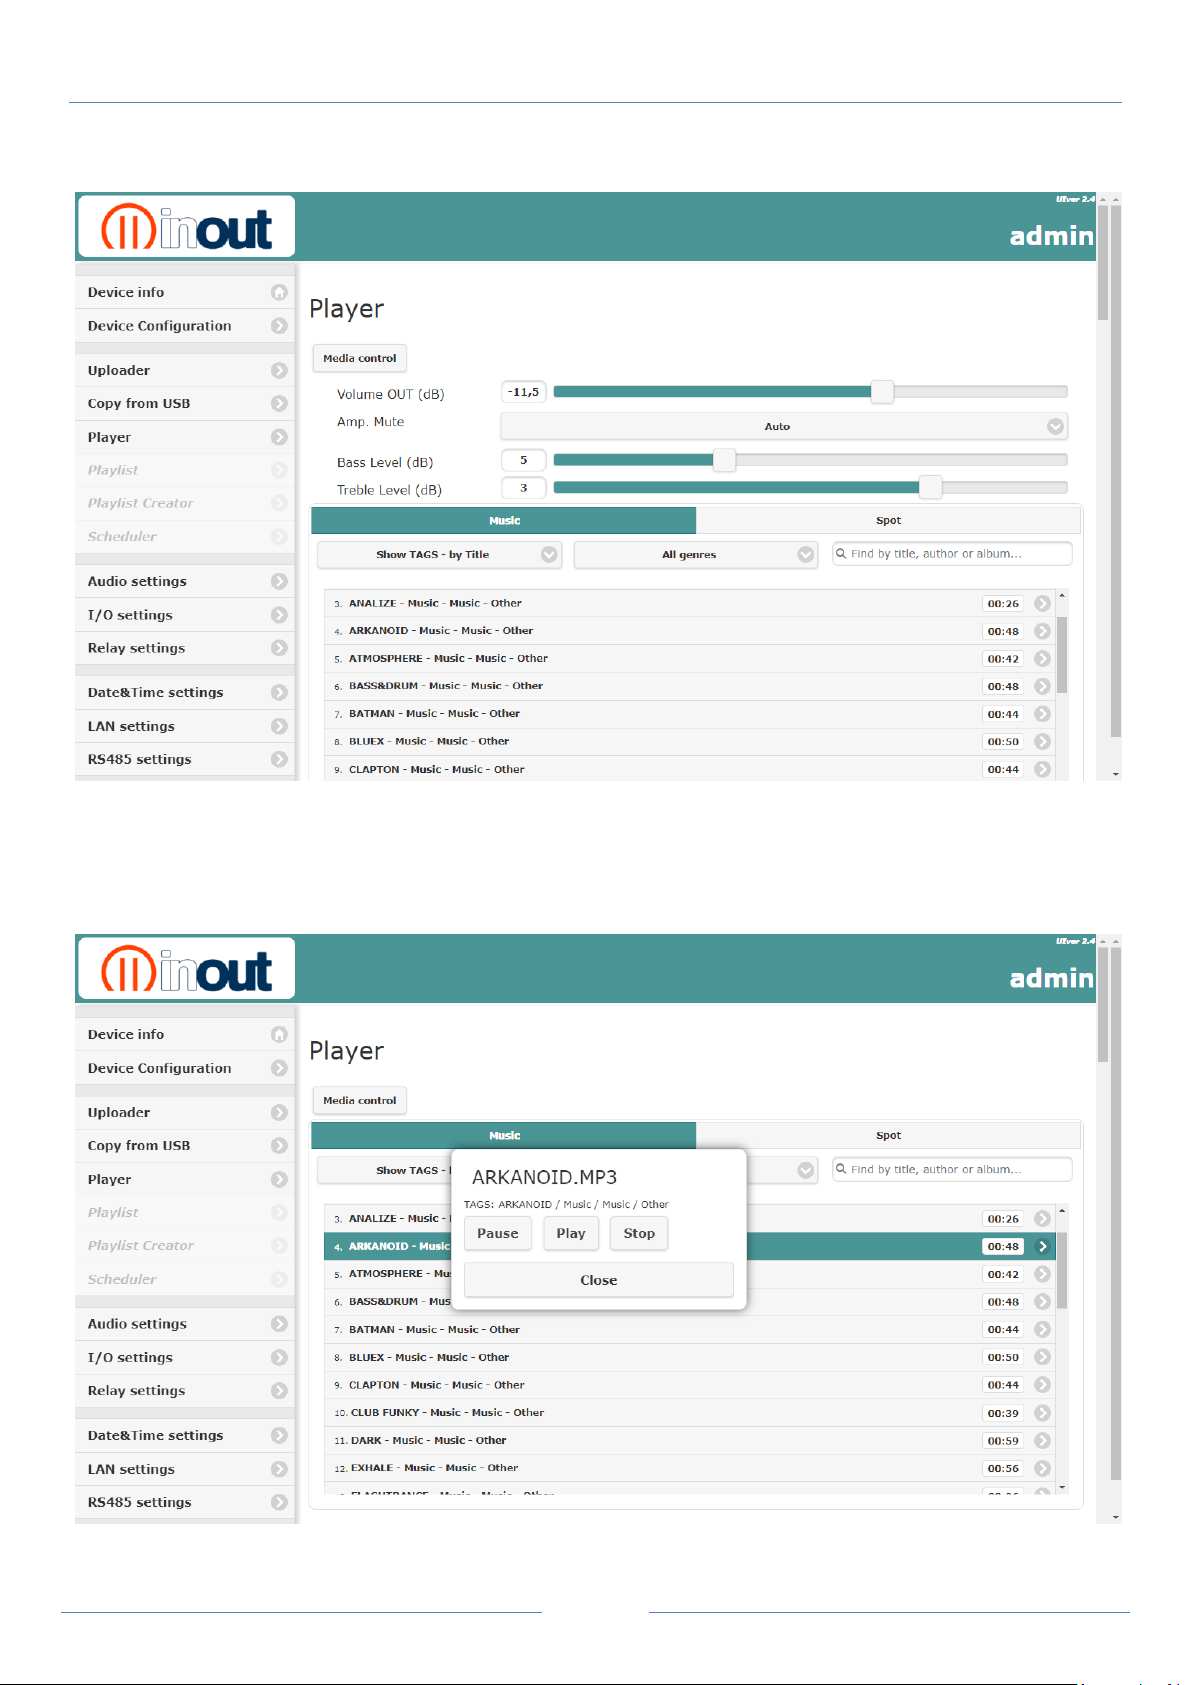
Player - listening to audio files
To listen to the stored files in the uSD, select the Music and Spot folders, click on the file name to
view pop up with the commands.
Press the media control button, further commands and level adjustments are available.
Page 34
Pag. 33
NP2/NP5 QUICK GUIDE v. 1.5
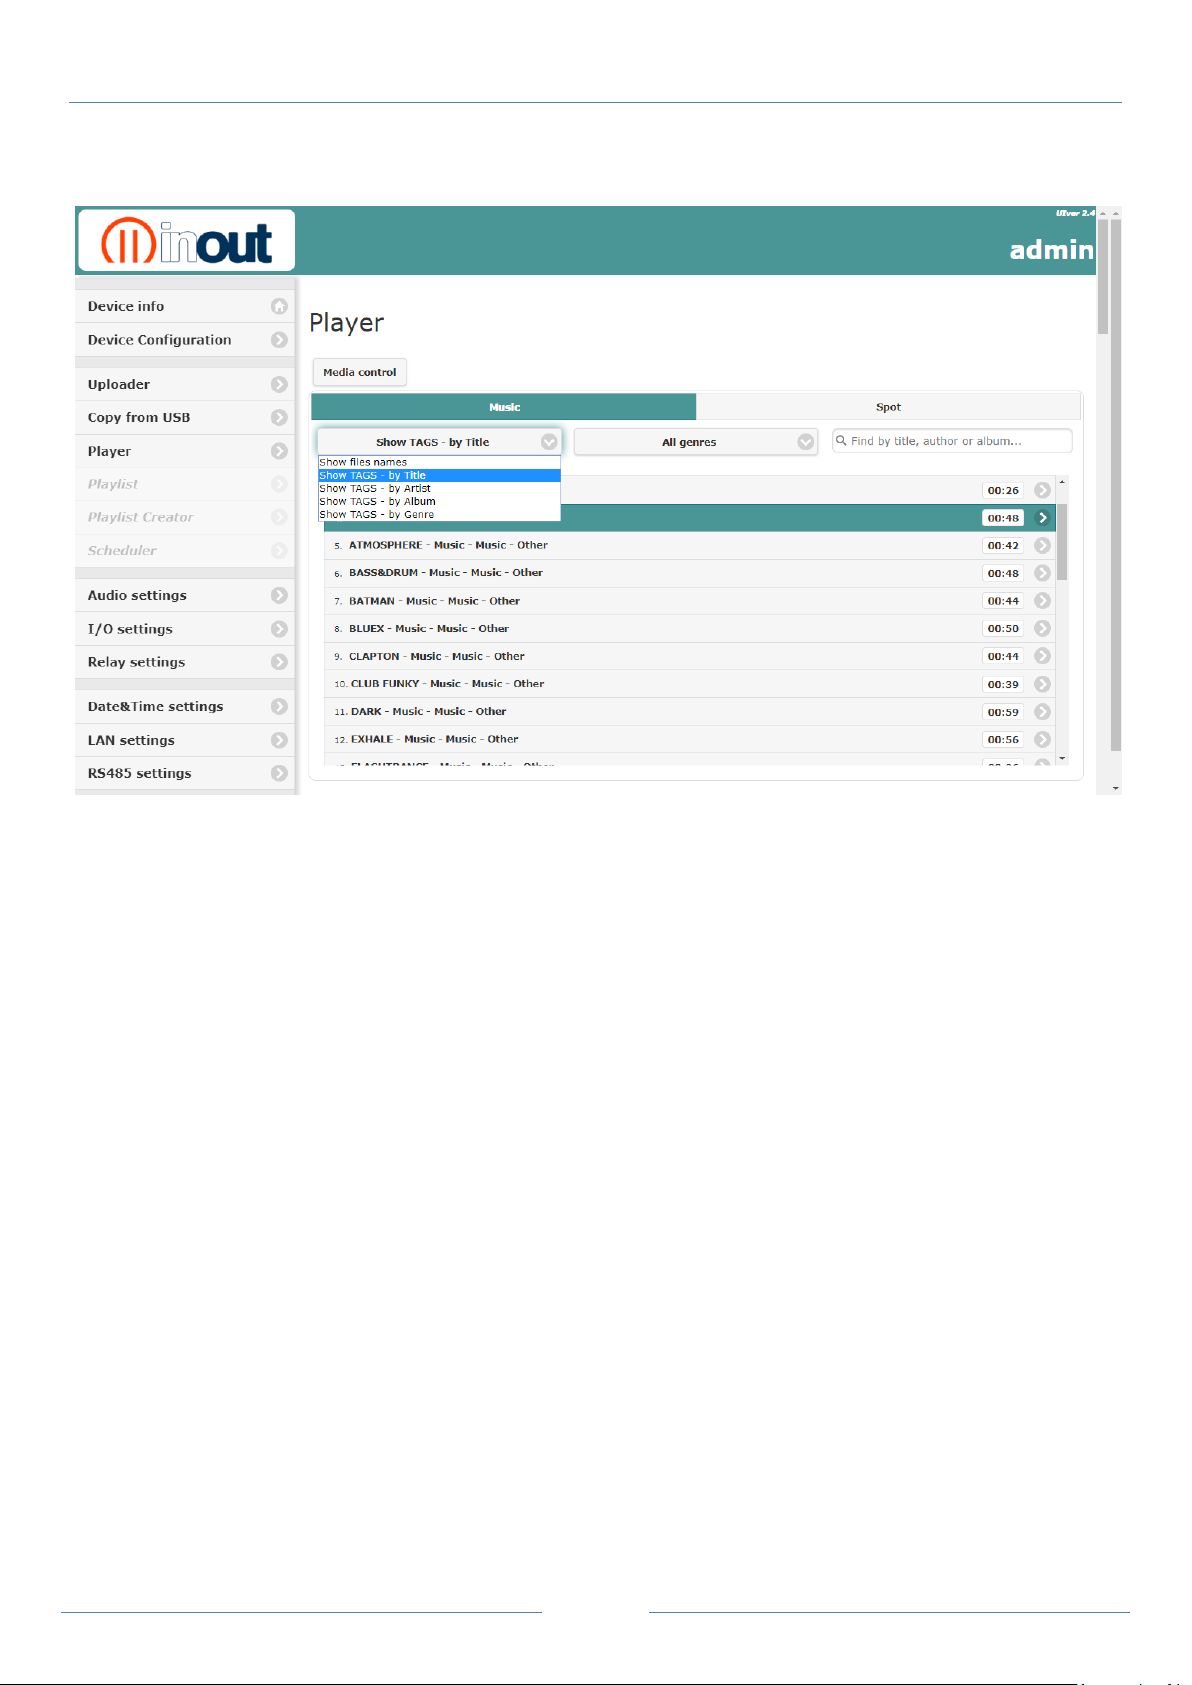
View and search file/song
Press Show files name button to see ID3 TAG of audio file:
- Show files name
- Show TAGS by Title
- Show TAGS by Artist
- Show TAGS by Album
- Show TAGS by Genre
You can view tracks for genre music by pressing the appropriate button
In the box, you can search song by title, author and album
Page 35
Pag. 34
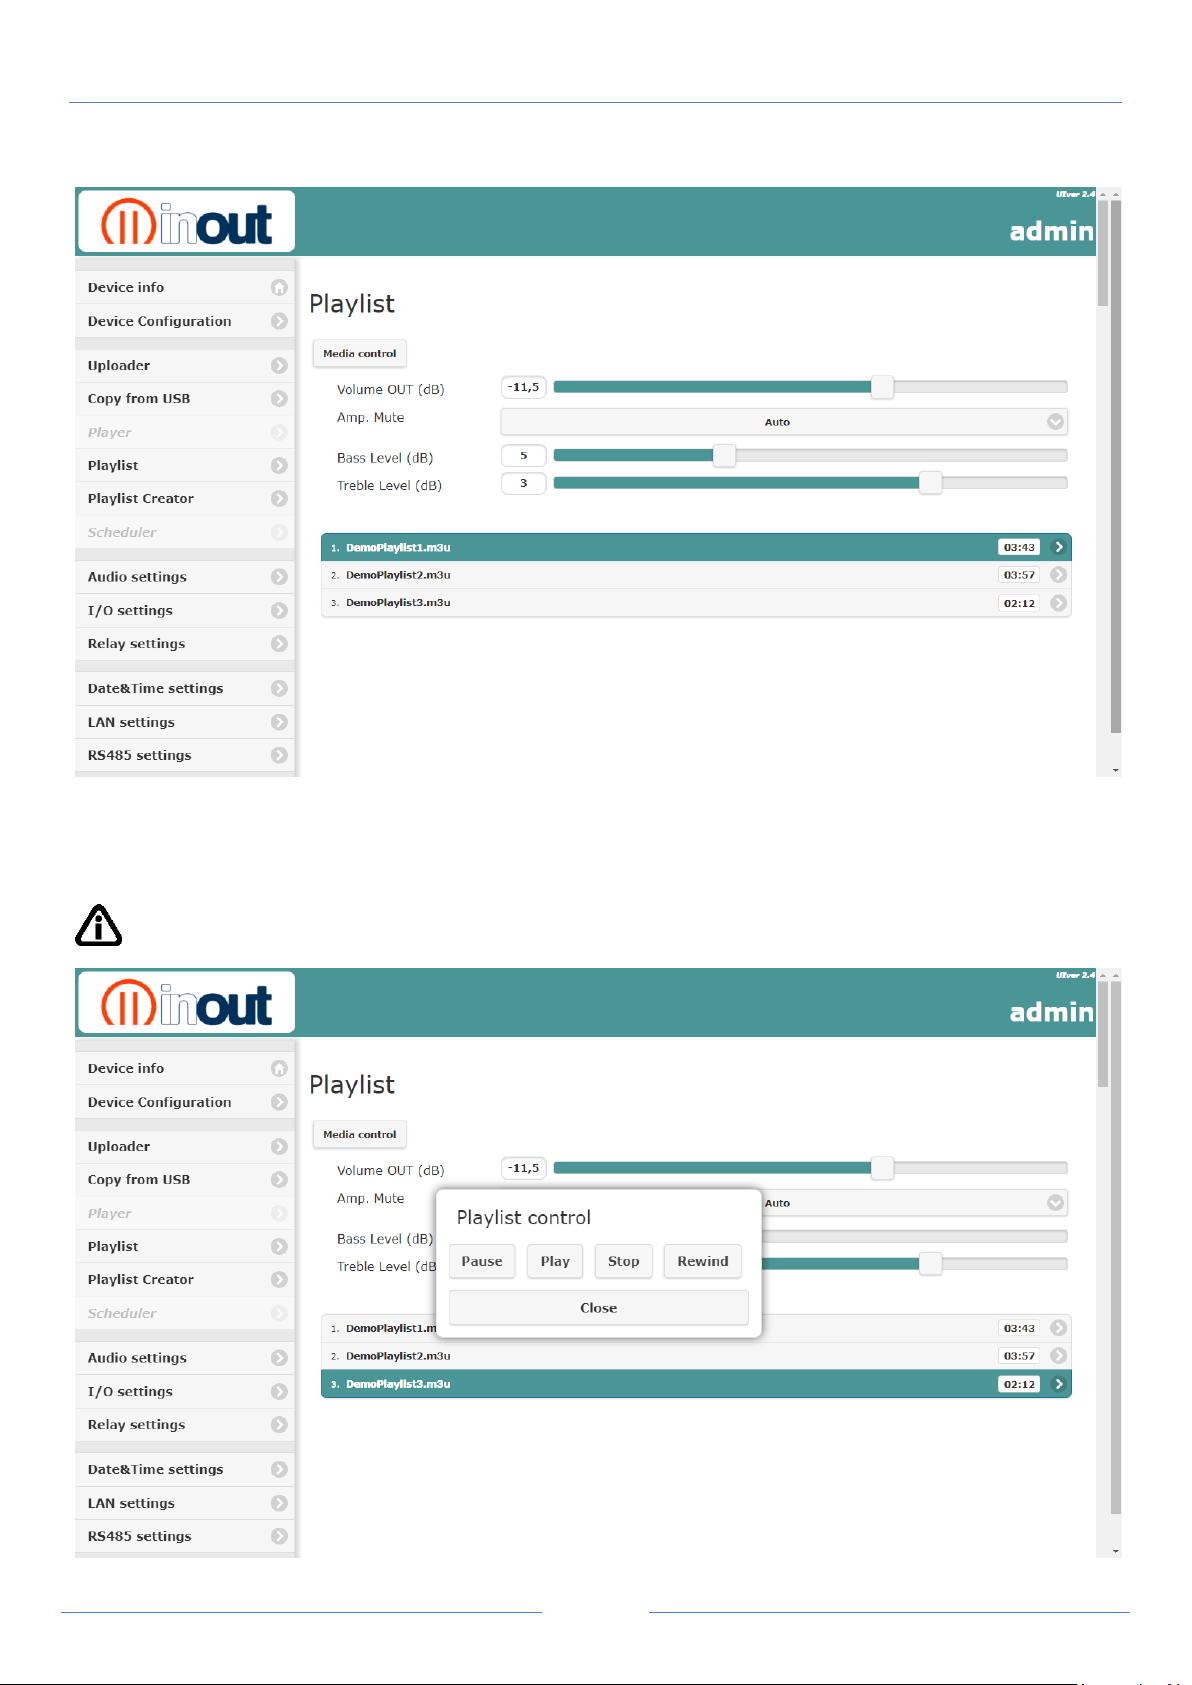
Listening playlist
NP2/NP5 QUICK GUIDE v. 1.5
To listen to the stored playlists, click on the playlist name to display the pop-up with the
commands.
Press the media control button, further commands and level adjustments are available.
IMPORTANT: set continuous play ON for playlist loop
Page 36
Pag. 35
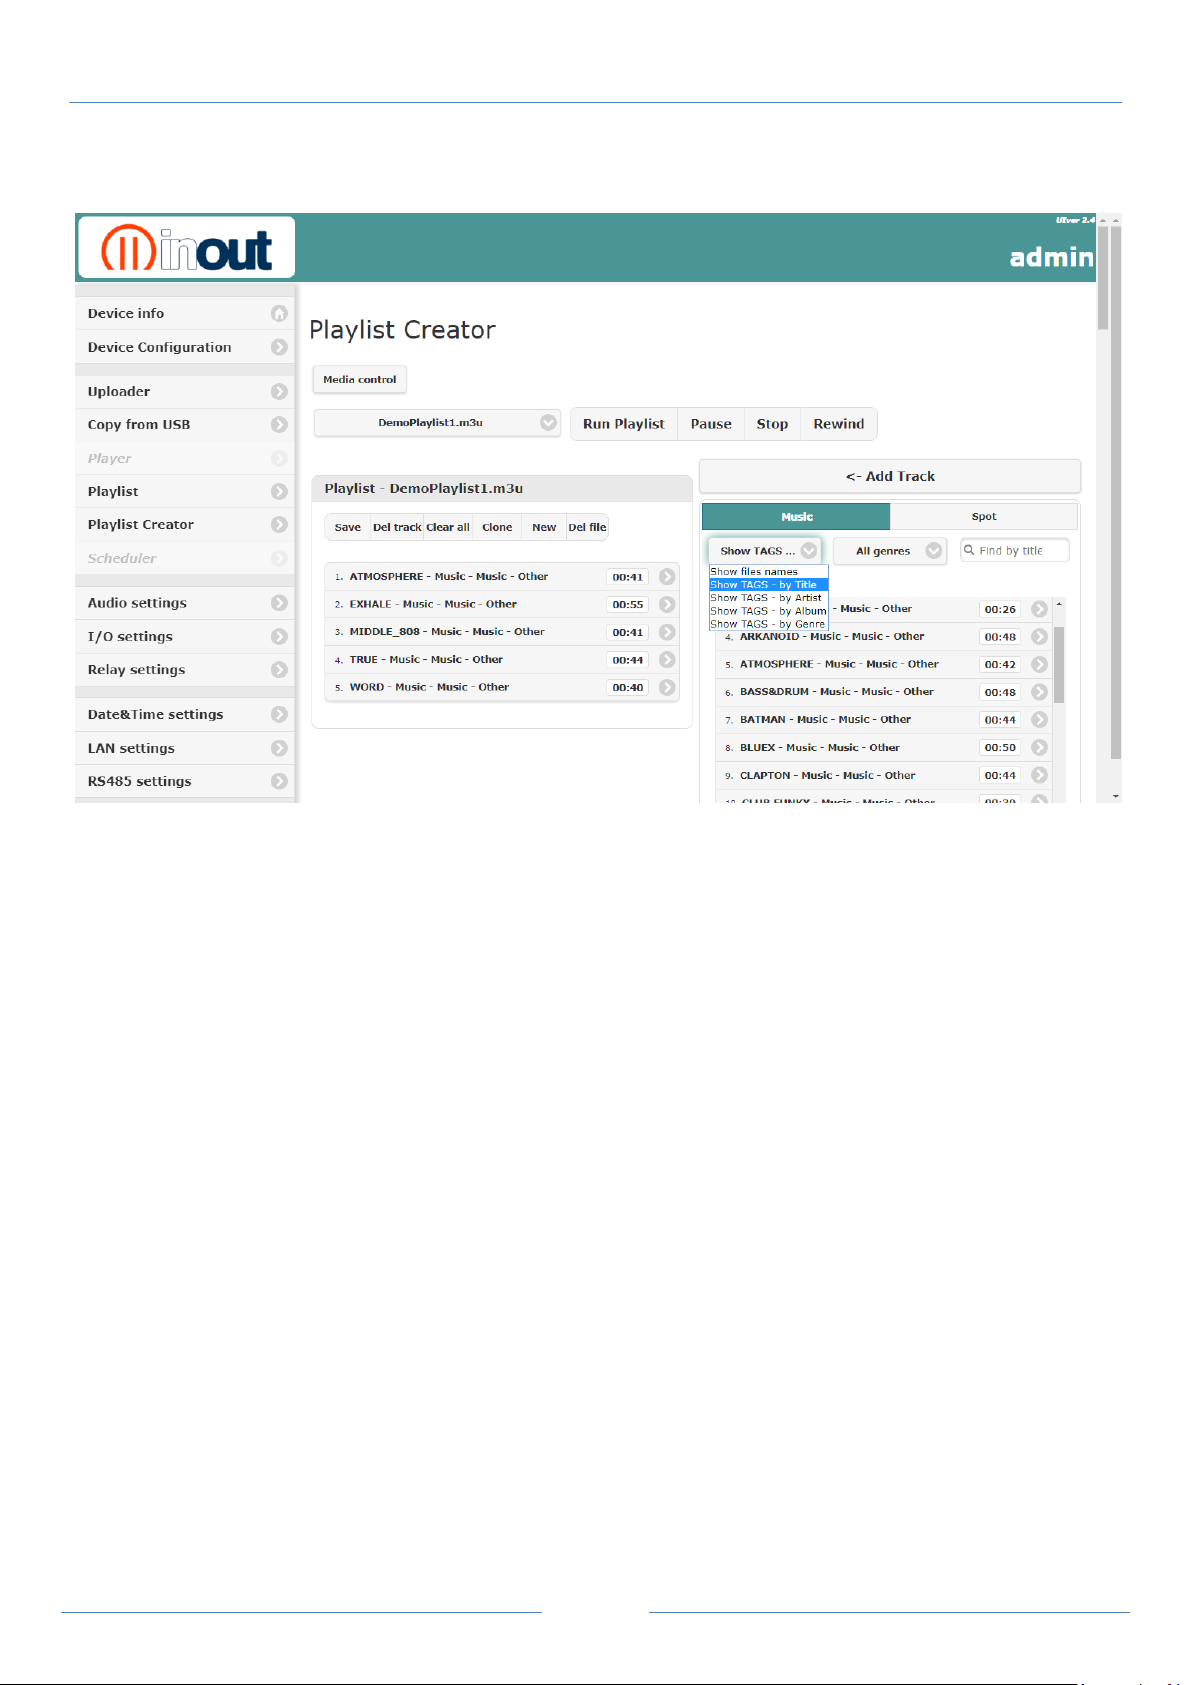
New:
To create a new playlist, enter a name and press save
<-Add Track:
To insert audio files into the playlist, press Add Track
To change the order of the files, drag the file to the desired location.
Del track:
To delete the audio file from the playlist, select and press del track
Clear all:
To delete all files into playlist
Del file:
To delete the playlist
Clone:
To copy the same playlist and give it a different name
Save:
When the playlist is complete, press the Save button
NP2/NP5 QUICK GUIDE v. 1.5
Playlist Creator (to create a new playlist)
Right list is the files stored in the uSD in Music and Spot folders.
Press Show files name button to see ID3 TAG of audio file:
- Show files name
- Show TAGS by Title
- Show TAGS by Artist
- Show TAGS by Album
- Show TAGS by Genre
You can view tracks for genre music by pressing the appropriate button
In the box, you can search song by title, author and album
Page 37
Pag. 36
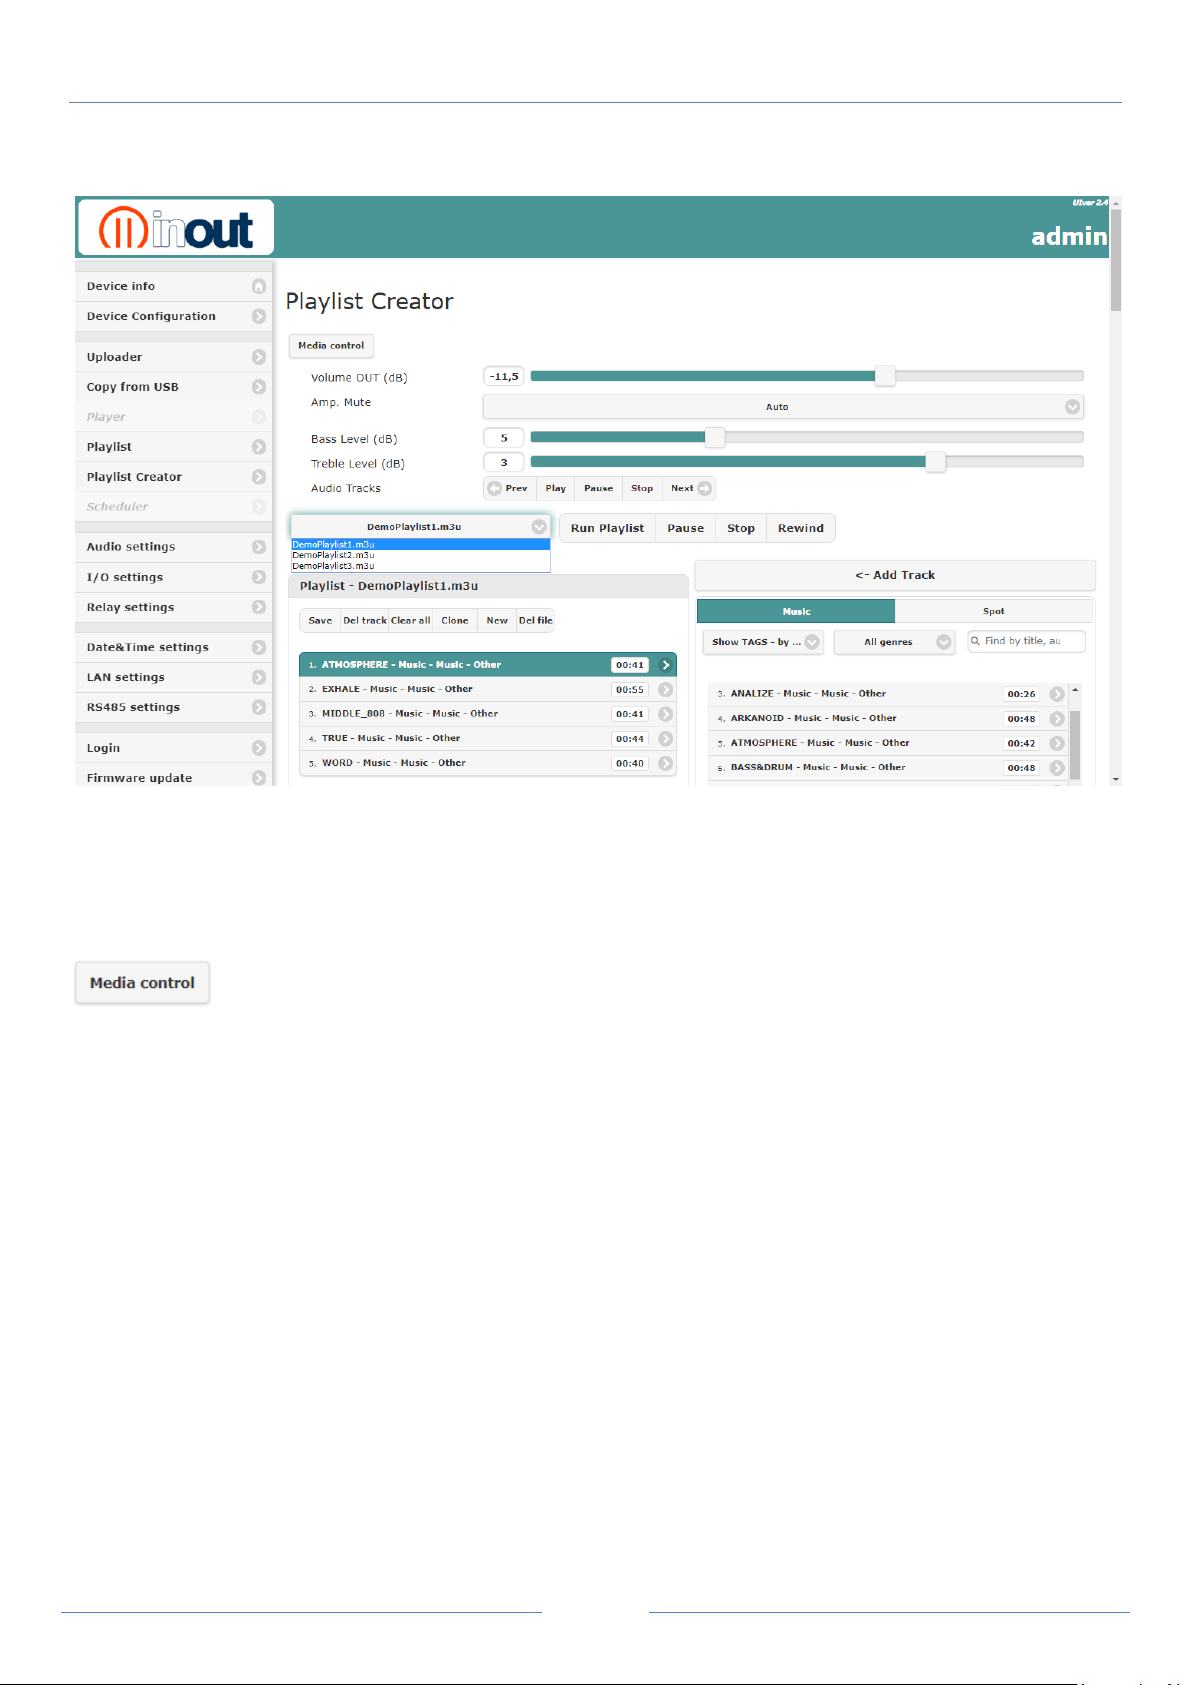
Run Playlist:
to listen a playlists in memory, select playlist name and press Run playlist button.
Rewind:
to listen the playlist from the beginning, press Rewind button.
Pause/Stop:
Pause / Stop playlist
To scroll through the tracks quickly, additional commands are available by
pressing the media control button
Prev
previous file
Play
Play file
Pause
Pause file
Stop
Stop file reproduction.
Next
next file
To listen a new playlist:
NP2/NP5 QUICK GUIDE v. 1.5
Page 38
Pag. 37
Power supply………….…………
: 12VDC / 15W
Consumption in standby ………
: 0,5 W
Protection ……………………….
: inside fuse, 4A delayed.
Capacity of extractable memory
: microSD from 4GB to 32GB ( FAT/FAT32).
Input absorption…………..….….
: 5 mA
Relay contact Max.voltage……..
: 1 A 30Vdc
Formats accepted ………………
: MPEG1 layer 3 (file MP3 from 64 to 360 Kbps)
Response in frequency ………..
: 20 ~ 20.000 Hz (±3dB)
Signal/noise ratio ……………....
: > 90dB.
Harmonic distortion …………....
: < 0,1%
Output power…….………..........
: 15W (8 Ω) THD+N= 5%
Classification……………..……...
: IP 30 on the basis of liquid and dust penetration.
Size/weight ……………………..
: 90x62x36 mm. / 90gr. DIN Rail (EN 60715) mounting,
2 modules according to DIN 43880.
Packing (size and weight)…….....
: 230x180x80mm. / 415gr.
Operating temperature.…..…….
: 0 to +60°C.
Storage temperature.………......
: -20 to +60°C.
Manufactured by:
Noventa di Piave (VE) - ITALY
Product compliant with the safeguard regulations CE about safety and electromagnetic
compatibility.
NP2 Technical features
NP2/NP5 QUICK GUIDE v. 1.5
Page 39
Pag. 38
Power supply………….……..….
: 12VDC / 30W
Consumption in standby ………
: 0,5 W
Protection ……………………….
: inside fuse, 4A delayed.
Capacity of extractable memory
: microSD from 4GB to 32GB ( FAT/FAT32).
Input absorption…………..….….
: 5 mA
Relay contact Max.voltage……..
: 1 A 30Vdc
Formats accepted ………………
: MPEG1 layer 3 (file MP3 from 64 to 360 Kbps)
Response in frequency ………..
: 20 ~ 20.000 Hz (±3dB)
Signal/noise ratio ……………....
: > 90dB.
Harmonic distortion …………....
: < 0,1%
Output power………………...….
: 15+15W (8 Ω) THD+N= 5%
Classification……………..……...
: IP 30 on the basis of liquid and dust penetration.
Size/weight………………………
: 147x84x19mm. / 280gr.
Packing (size and weight)………..
: 230x180x80mm. / 750gr.
Operating temperature.…..…….
: 0 to +60°C.
Storage temperature.………......
: -20 to +60°C.
Manufactured by:
Noventa di Piave (VE) - ITALY
Product compliant with the safeguard regulations CE about safety and electromagnetic
compatibility.
NP2/NP5 QUICK GUIDE v. 1.5
NP5 Technical features
Page 40
Pag. 39
NP2/NP5 QUICK GUIDE v. 1.5
Page 41
Pag. 40
NP2/NP5 QUICK GUIDE v. 1.5
Page 42
Pag. 41
NP2/NP5 QUICK GUIDE v. 1.5
Page 43
Pag. 42
NP2/NP5 QUICK GUIDE v. 1.5
Page 44
Pag. 43
NP2/NP5 QUICK GUIDE v. 1.5
Page 45
Pag. 44
NP2/NP5 QUICK GUIDE v. 1.5
 Loading...