

Page 1
866-696-9558
Page 2

Page 3

Contents
Chapter 1 1 Intended Use, Contraindications and General Precautions
Chapter 2 3 Description of the Inogen One® G2 Oxygen Concentrator
3 Important Parts of the Inogen One® G2 Oxygen Concentrator
4 User Controls
5 User Interfaces
5 Input / Output Connections
6 Power Supply Options
9 Inogen One® G2 Accessories
Chapter 3 11 Operating Instructions
11 General Instructions
15 Additional Operating Instructions
18 Battery Operating Instructions
19 Battery Care and Maintenance
Chapter 4 21 Inogen One® G2 Oxygen Concentrator Audible and
Visible Signals (including Alarms)
Chapter 5 29 Troubleshooting
Chapter 6 31 Cleaning, Care and Maintenance
31 Cannula Replacement
31 Case Cleaning
32 Filter Cleaning and Replacement
34 Other Service and Maintenance
34 Disposal of equipment and accessories
Chapter 7 35 Symbols Used on Concentrator and Accessories
Chapter 8 37 Inogen One® G2 System Specifications
English
Page 4

Page 5

1
Intended Use, Contraindications
and General Precautions
Intended Use, Contraindications and General Precautions Chapter 1 1
Intended Use
The Inogen One® G2 Oxygen Concentrator is used on a prescriptive basis by patients
requiring supplemental oxygen. It supplies a high concentration of oxygen and is used
with a nasal cannula to channel oxygen from the concentrator to the patient. The Inogen
One® G2 may be used in home, institution, vehicle, on an airplane and various mobile
environments.
CAUTION USA Federal law restricts this device to sale by or on the order of a
physician. May also be applicable in other countries.
CAUTION Use of a cannula other than a high flow cannula (e.g. Salter 1600Q)
may restrict oxygen delivery and/or attachment to nozzle fittings.
WARNING Availability of an alternate source of oxygen is recommended in case of
power outage or mechanical failure. Consult your equipment provider for
type of back-up system recommended.
CAUTION It is the responsibility of the patient to make back-up arrangements for
alternative oxygen supply when traveling; Inogen assumes no liability for
persons choosing not to adhere to manufacturer recommendations.
!
C
English
Page 6
2
Contraindications
WARNING This device is NOT INTENDED to be life sustaining or life supporting.
CAUTION
Under certain circumstances, the use of non-prescribed oxygen
therapy can be
hazardous. This device should be used only when
prescribed by a physician.
CAUTION Additional monitoring or attention may be required for patients
using this device who are unable to hear or see alarms or communicate
discomfort. If the patient shows any signs of discomfort, a
physician should be consulted immediately.
CAUTION The Inogen One® G2 is not designed or specified to be used in
conjunction with a humidifier or nebulizer. Use of this device with a
humidifier or nebulizer may impair performance and/or damage the
equipment.
!
C
!
C!C
General Precautions
WARNING The device produces enriched oxygen gas which accelerates
combustion. Do NOT ALLOW SMOKING OR OPEN FLAMES within
10 feet of this device while in use.
WARNING Do not submerse the Inogen One® G2 or any of the accessories in liquid.
Do not expose to water or precipitation. Do not operate in exposed rain.
This could lead to electrical shock and/or damage.
CAUTION
Do not use oil, grease, or petroleum-based products on or near the
Inogen One® G2.
CAUTION Never leave the Inogen One® G2 in an environment which can reach
high temperatures, such as an unoccupied car in high temperature
environments. This could damage the device.
Page 7
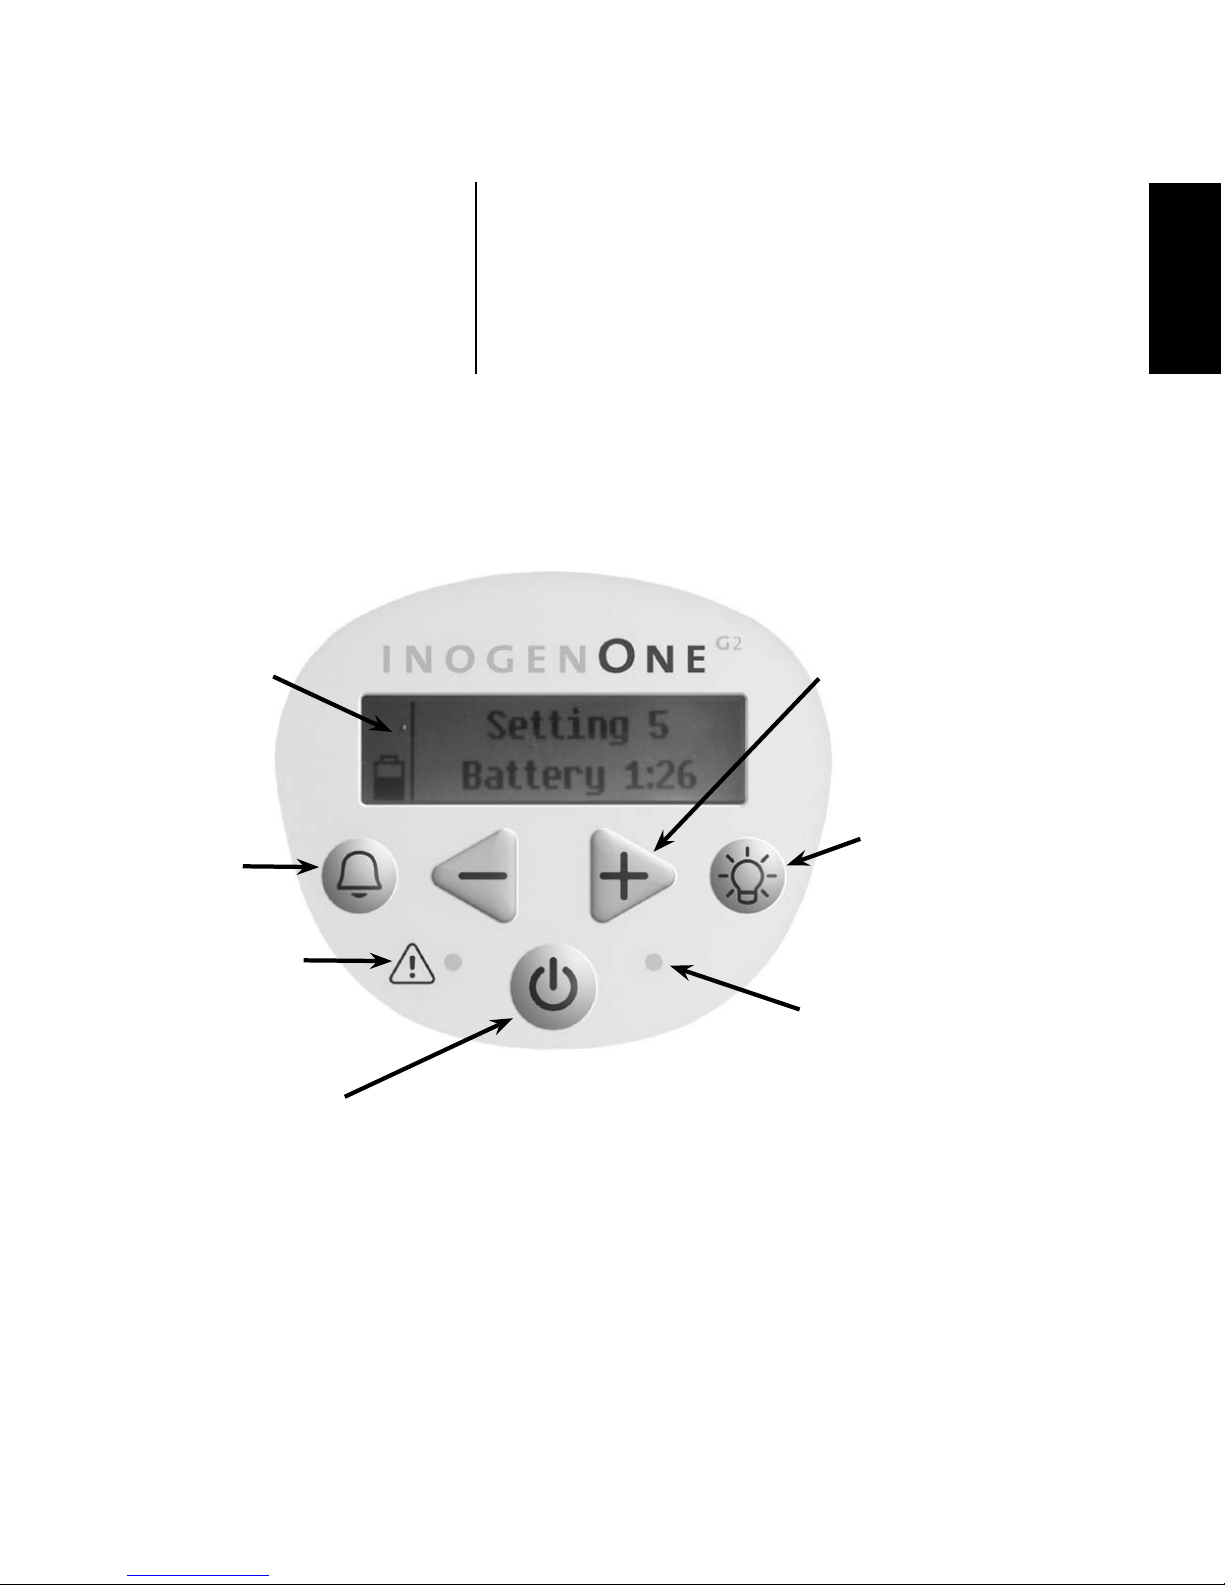
Important Parts of the Inogen One® G2 Oxygen Concentrator
Description of the Inogen One®
G2 Oxygen Concentrator
Description of the Inogen One® G2 Oxygen Concentrator Chapter 2 3
2
On/Off
Button
Alert/Alarm
Light
Flow Control
Display
Display
Backlight
Button
Breath
Detection
Light
Audible
Alarm
Button
English
Page 8
4
User Controls
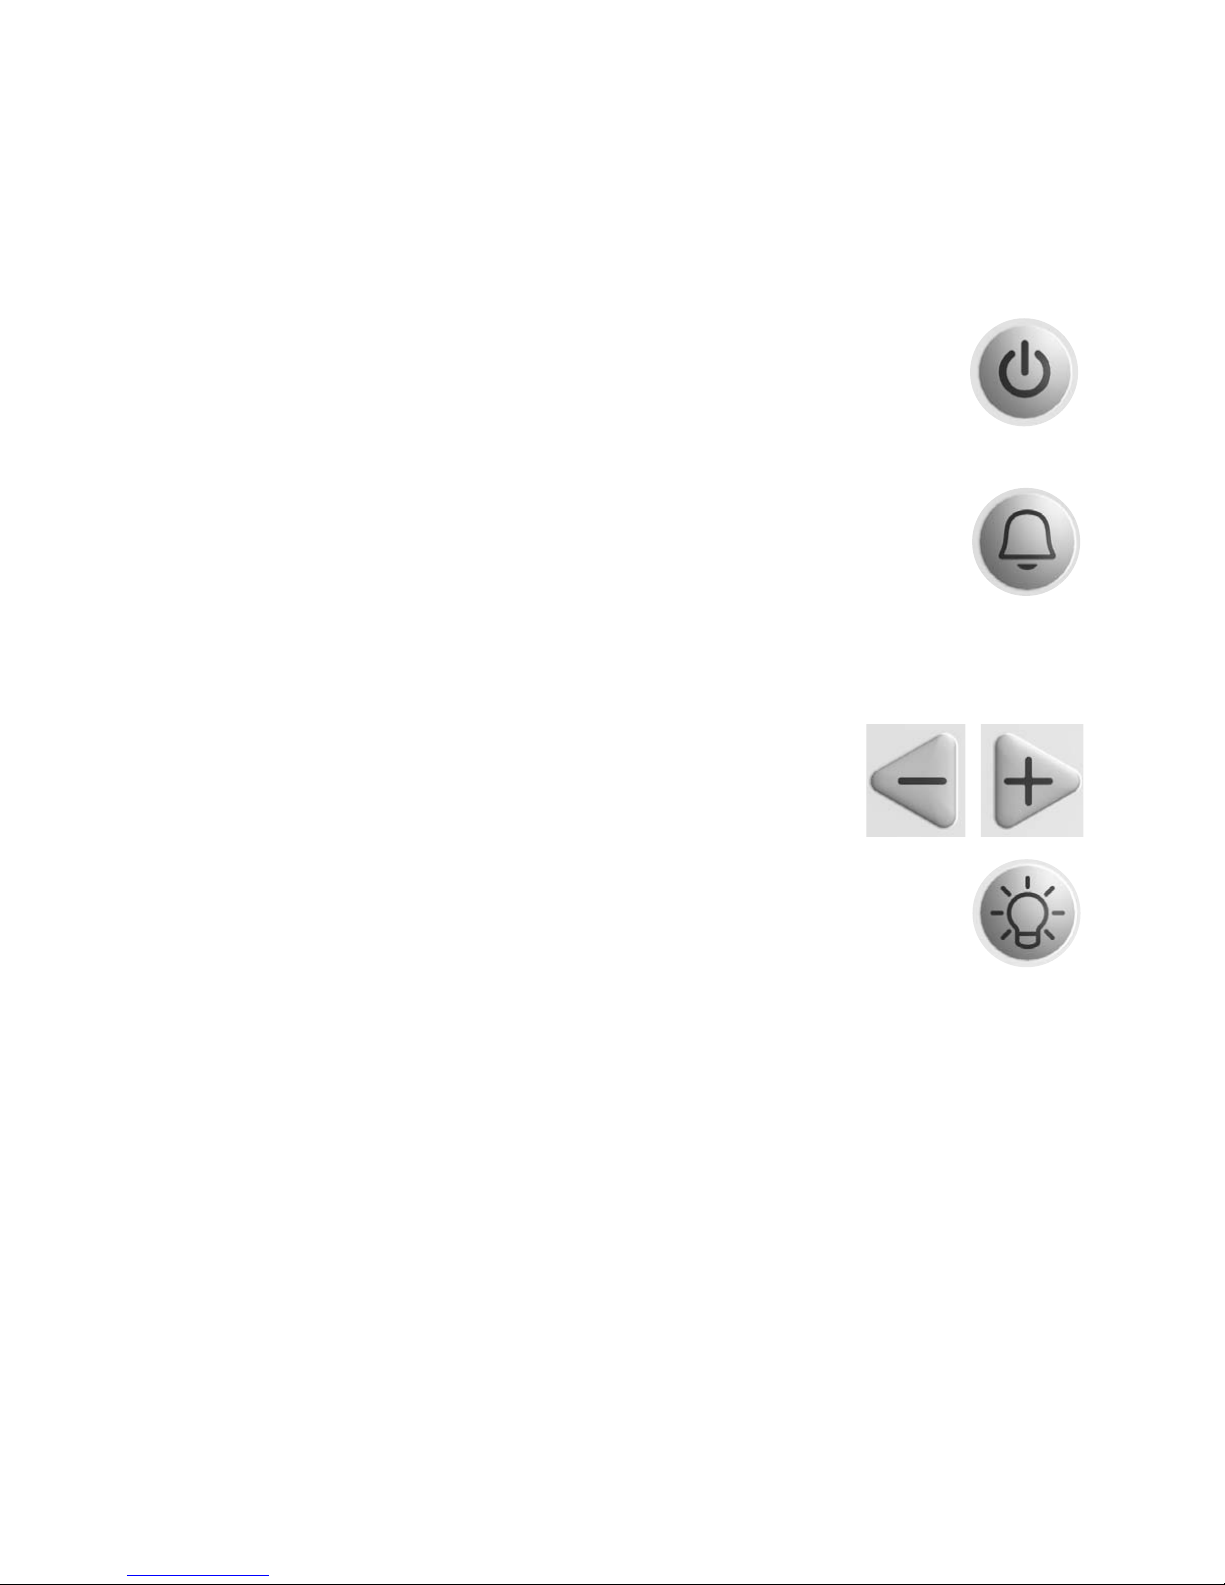
ON / OFF Button
Press once to turn “ON”; Press and hold for one second to turn “OFF”.
Audible Alarm Button
Pressing this button will toggle the Inogen One® G2’s breath detection
alert on and off:
1. Default Mode. When the Inogen One® G2 is powered up, the breath
detection alert is disabled. The display’s mode indication area is empty
in Default Mode.
2.
Breath Detection Alert Mode. The Inogen One® G2 will alert with
audible and visual signals for “no breath detected” when this mode is
enabled and no breath has been detected for 60 seconds. The display’s
mode indication area will show a bell icon when the alert is enabled.
Flow Setting Control Buttons
Use the – or + flow setting control buttons to select the setting
as shown on the display. There are five settings, from 1 to 5.
Display Backlight Button
Push on; automatically turns off after 10 seconds.
Page 9
Description of the Inogen One® G2 Oxygen Concentrator Chapter 2
5
User Interfaces
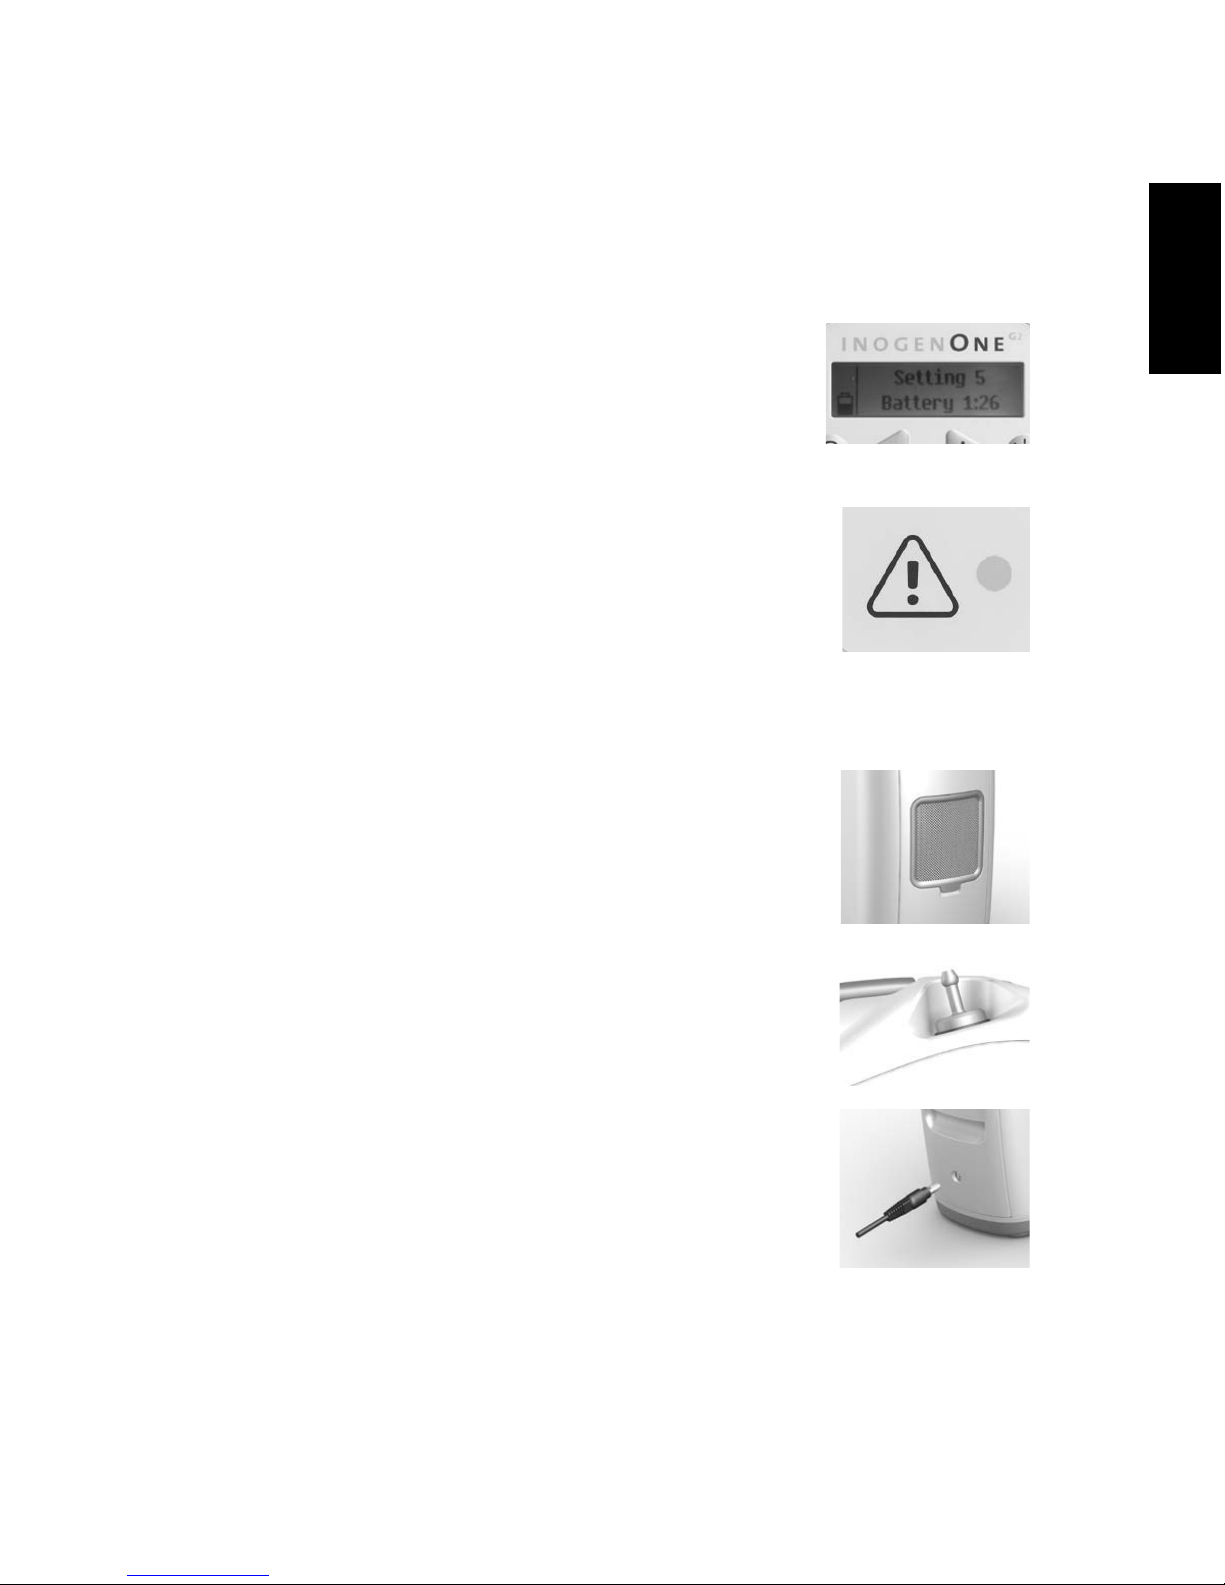
Display
This screen displays information regarding flow setting, power
status, battery life and errors. If you would like to change the
language on the Inogen LCD Screen contact Inogen Client
Services.
Indicator Lights
A red light indicates either a change in operating status or a
condition that may need response (alarm). A flashing light is
higher priority than non-flashing.
Audible Signals
An audible signal (beep) indicates either a change in
operating status or a condition that may need response (alarm).
More frequent beeps indicate higher priority conditions.
Input / Output Connections
Particle Filter
The filter must be in place at the intake end of the concentrator
during operation to keep input air clean.
Cannula Nozzle Fitting
The nasal cannula connects to this nozzle for Inogen One® G2
output of oxygenated air.
DC Power In
Connection for external power from the Universal Power Supply.
English
Page 10

6
Power Supply Options
Single and Double Rechargeable Lithium Ion Batteries
The battery will power the Inogen One® G2 without
connection to an external power source. When fully charged, a
single battery will provide 2 to 4 hours of operation; a double
battery will provide 4 to 8 hours of operation. The battery
recharges when properly installed in the Inogen One® G2 and
the concentrator is connected to AC or DC power. Recharging
time is up to 4 hours for a single battery and up to 8 hours
for a double battery. See information in the “Battery Care and
Maintenance” section.
UNIVERSAL POWER SUPPLY
Overview
The Inogen Universal Power Supply (BA-107/207) is used to power the Inogen One® G2
concentrator from an AC power source or a DC power source. This allows the user to
power the concentrator in the home, in a vehicle or other places where AC or DC power is
available.
Description
The Inogen One® G2 Universal Power Supply is specifically designed for use with the
Inogen One® G2 Oxygen Concentrator (IO-200). The Universal Power Supply provides the
precise current and voltage required to safely power the Inogen One® G2 and is designed
to operate from specified AC and DC power sources. When used with AC power sources,
the power supply automatically adapts to input voltages from 100V to 240V (50-60HZ)
permitting use with most power sources throughout the world.
The Universal Power Supply will charge the Inogen One® G2 Battery when used with AC
input power or when used with a DC power supply, such as the one found in your car. Due
to aircraft power limitations, the Universal Power Supply cannot be used to charge the
Inogen One® G2 Battery when used on an aircraft.
The Universal Power Supply is used with the following components:
• Power Supply with attached power output cable to connect to the Inogen One® G2
• Automobile DC cigarette lighter Power Input Cable
• AC Power Input Cable
Page 11
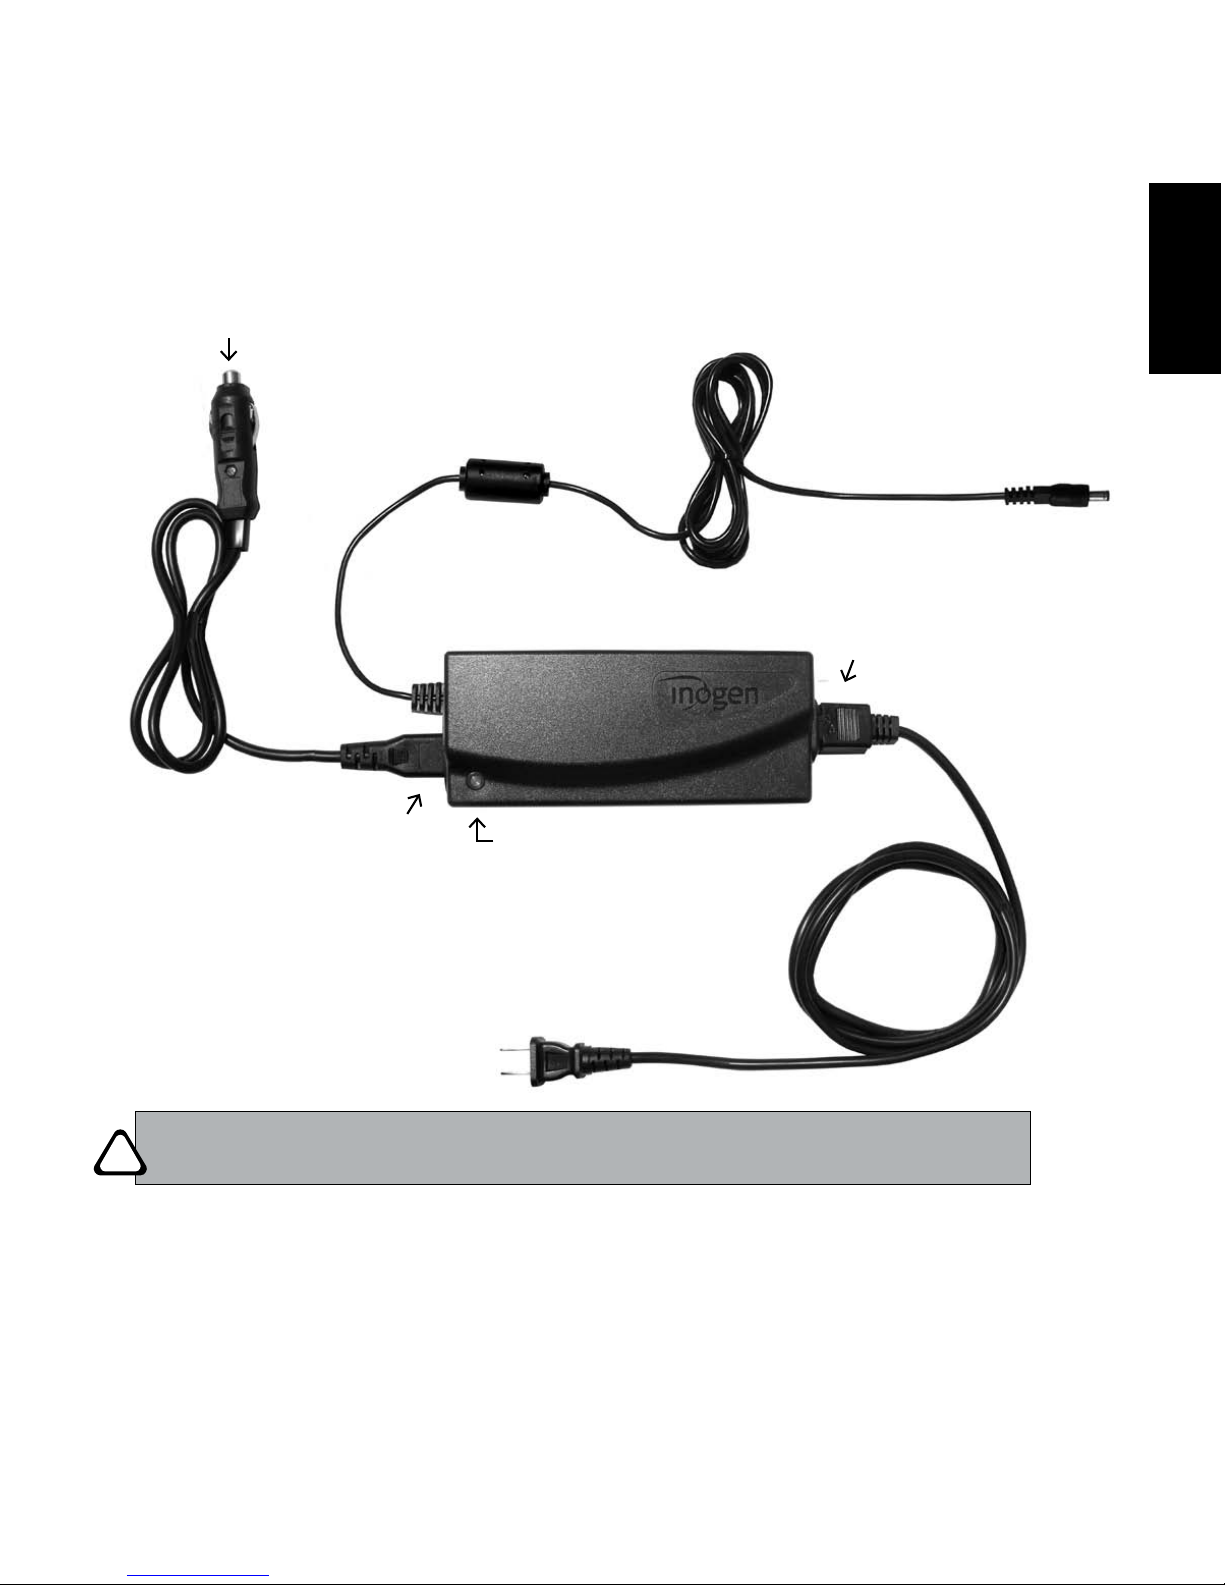
7Description of the Inogen One® G2 Oxygen Concentrator Chapter 2
Power Output Plug
Universal Power Supply
LED Indicator Light
AC Input
DC cigarette lighter Power Plug for use in Automobile/RV/Boat/Aircraft
DC Input
AC Power Plug
*
WARNING Do not wrap cords around Power Supply for storage. Doing so may lead to
damaged cords and a failure to provide power to the concentrator.
Model# BA-107
!
C
* Actual product appearance may vary
.
English
Page 12
8
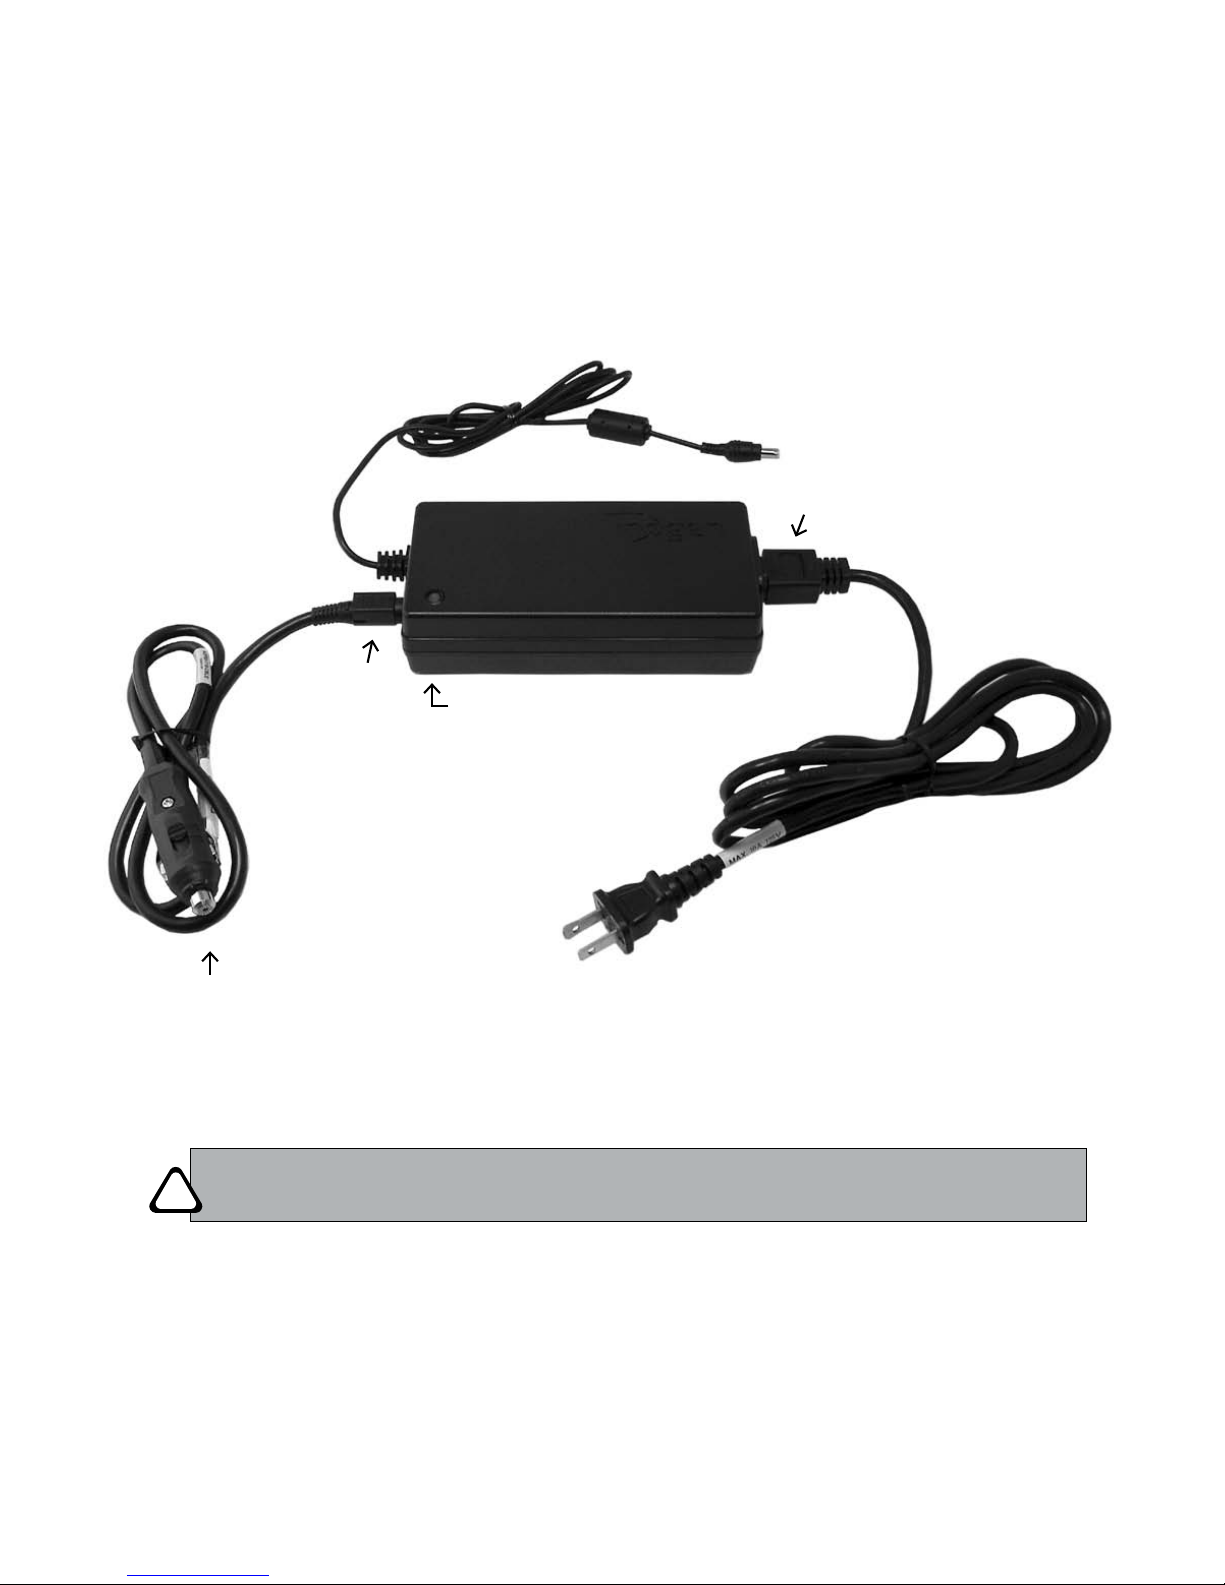
Power Output Plug
Universal Power Supply
LED Indicator Light
AC Input
DC cigarette lighter
Power Plug for use in
Automobile/RV/Boat/Aircraft
DC Input
AC Power Plug
*
Model# BA-207
WARNING Do not wrap cords around Power Supply for storage. Doing so may lead to
damaged cords and a failure to provide power to the concentrator.
!
C
* Actual product appearance may vary
.
Page 13

Inogen One® G2 Accessories
Nasal Cannula
A nasal cannula must be used with the Inogen One® G2 to provide
oxygen from the concentrator. A single lumen cannula up to 25 feet
in length is recommended to ensure proper breath detection and
oxygen delivery.
NOTE
Increasing the cannula length may reduce the perceived noise during
oxygen bolus delivery.
Carry Bag
The Carry Bag provides a protective cover with a handle and
shoulder strap to enable you to carry the Inogen One® G2.
The Inogen One® G2 can be operated using battery power
during transport with the Carry Bag.
Cart
The Cart has wheels and a telescoping handle
to provide easy transport of the Inogen One®
G2. The Inogen One® G2 can be operated using
battery power during transport. Place the
Carry Bag over the Cart. Make sure the Cart
handle is inserted between the elastic strap in
the back of the carry bag and the front of the
carry bag.
Description of the Inogen One® G2 Oxygen Concentrator Chapter 2
9
English
Page 14
Inogen One® G2 Optional Accessory
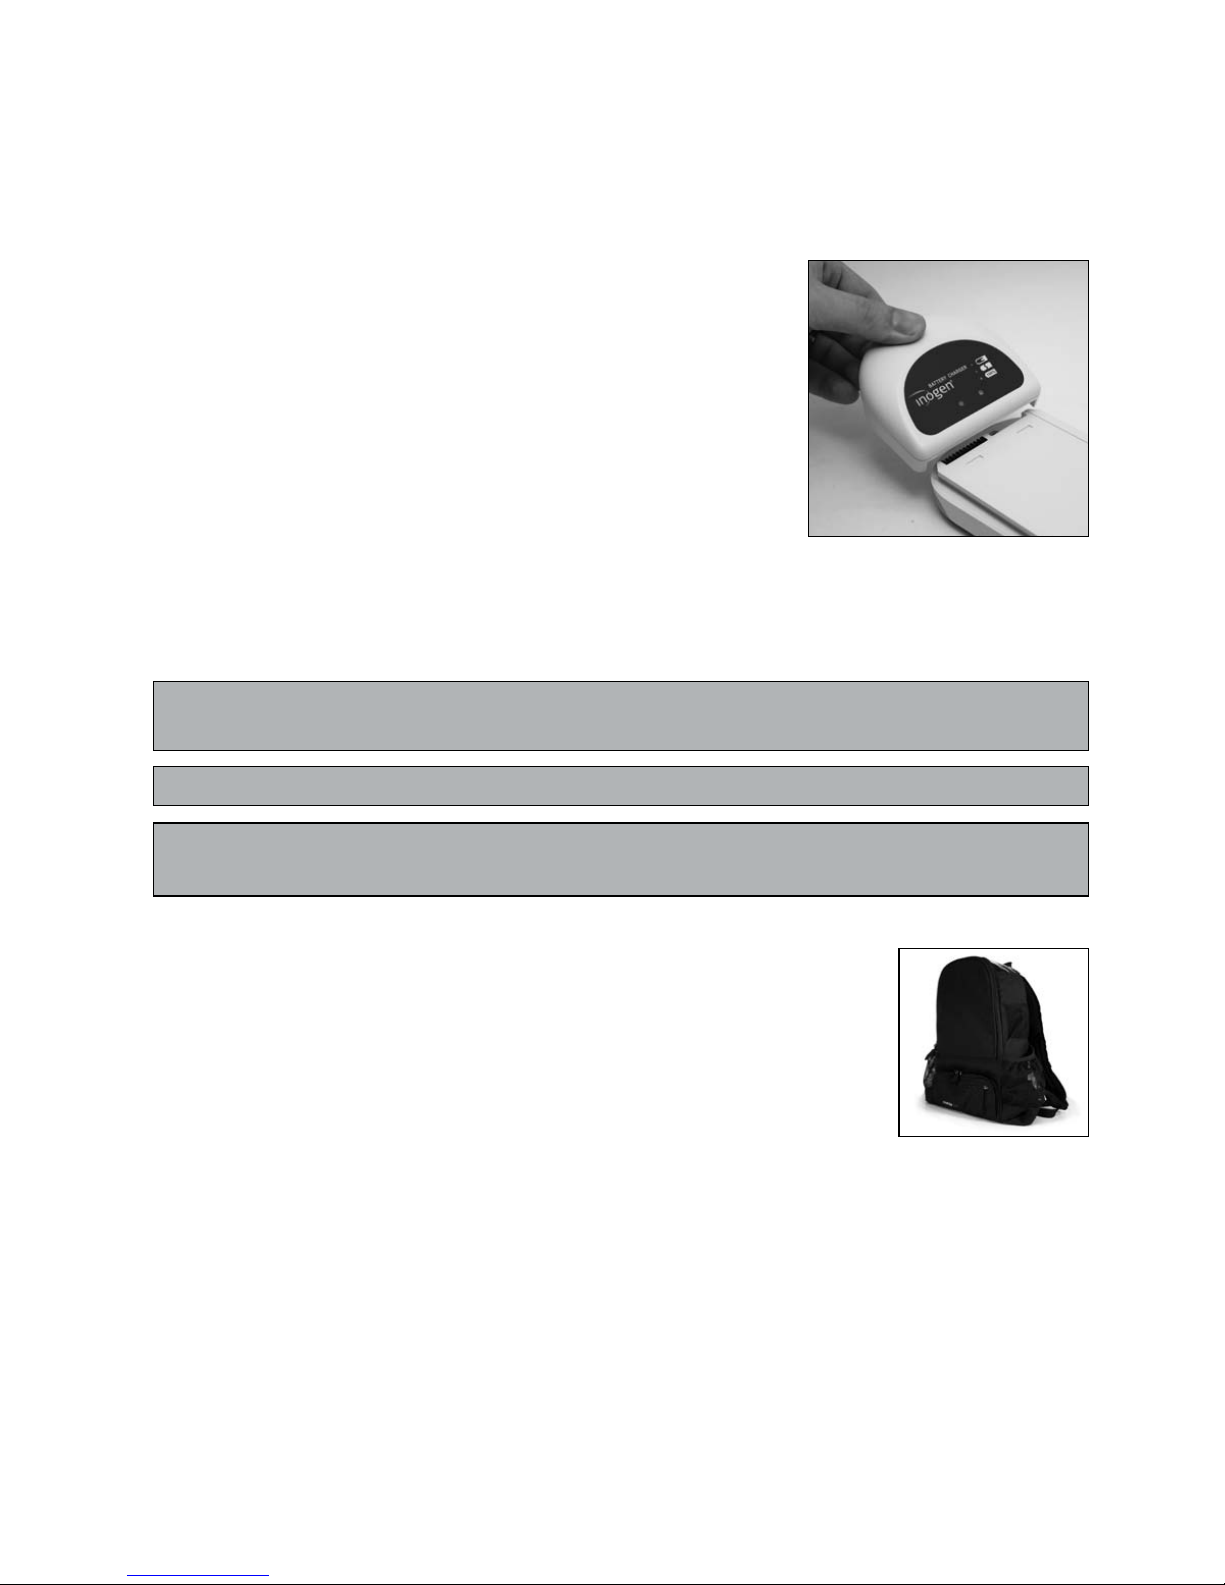
External Battery Charger
1. Plug the External Battery Charger AC power supply
cord into an electrical outlet.
2. Plug the External Battery Charger AC power supply into
the battery charger.
3. Slide your charger onto the Inogen One G2 Battery by
clicking and locking into the charger.
4. When the battery is in the correct position, a solid red light
will indicate that the battery is charging.
5. When the green light illuminates, the battery is
fully charged.
CAUTION Avoid touching the recessed electrical contacts of the External Battery
Charger; damage to contacts may affect charger operation.
NOTE
These contacts are not powered unless a battery is in place and charging.
NOTE
To completely remove power from the External Battery Charger, remove
the plug.
Inogen One G2 Backpack
Alternative/optional way of carrying your Inogen One G2,
hands free, more comfort, out of your way with extra pockets
for additional accessories.
To order please call Inogen Client Services.
10
Page 15
Operating Instructions
Operating Instructions Chapter 3
11
3
!
C
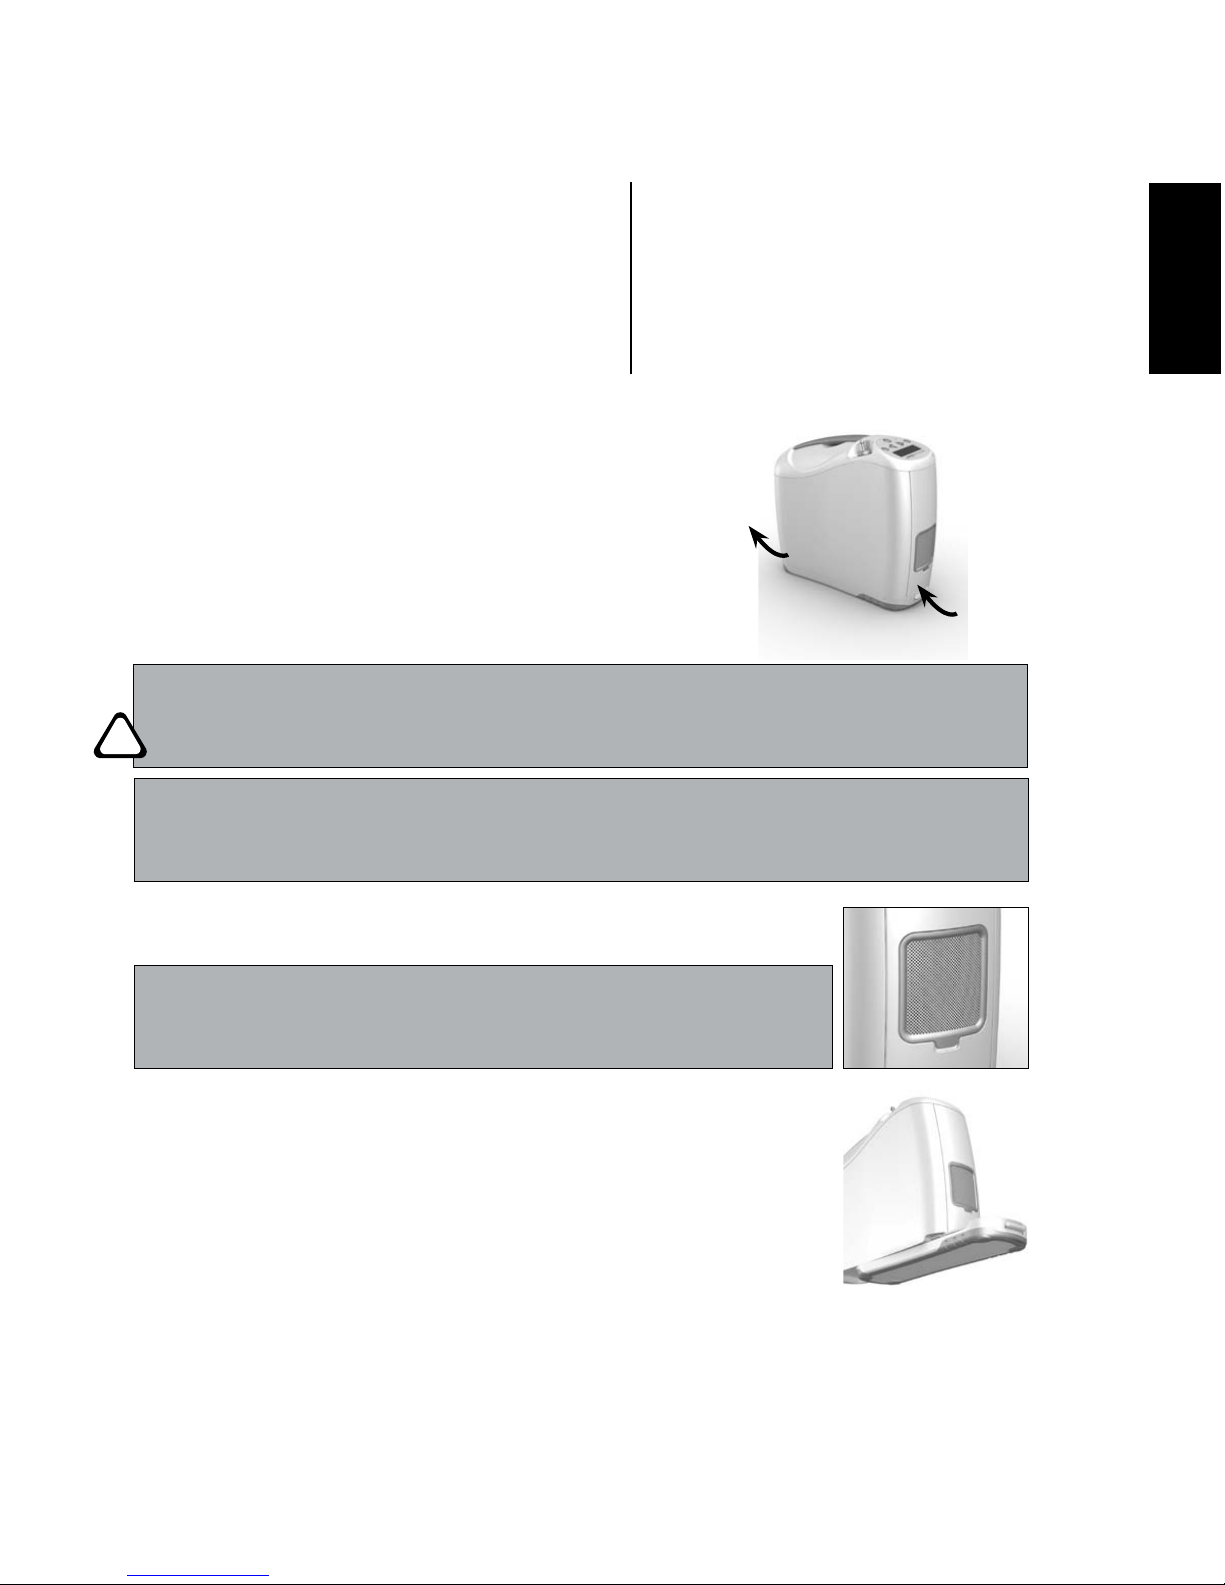
Intake
Exhaust
General Instructions
1. Place the Inogen One® G2 in a well ventilated
location.
Air intake and exhaust must have clear access.
Locate the Inogen One® G2 in such a way that any auditory
alarms may be heard.
WARNING Avoid use of the Inogen One® G2 in presence of pollutants, smoke
or fumes. Do not use the Inogen One® G2 in presence of flammable
anesthetics, cleaning agents or other chemical vapors.
CAUTION Do not obstruct air intake or exhaust when operating the device.
Blockage of air circulation or proximity to a heat source may lead to
internal heat buildup and shutdown or damage to the concentrator.
2. Ensure the particle filter is in place.
CAUTION Do not operate the Inogen One® G2 without the
particle filter in place. Particles drawn into the
system may damage the equipment.
3. Install the battery.
Insert the Inogen One® G2 battery by sliding battery into place
and locking at bottom of concentrator.
English
Page 16

12
CAUTION The Inogen One® G2 battery acts as a secondary power supply in the event of
a planned or unexpected loss of the AC or DC external power supply. When
operating the Inogen One® G2 from an AC or DC external power supply, a
properly inserted Inogen One® G2 battery should be maintained in the unit.
This procedure will ensure uninterrupted operation and will operate all
alarms and alerts in the event of a loss of the external power supply.
NOTE
The Inogen One® G2 Battery requires an initial full charge of uninterrupted
charging from an empty state using the Inogen One® G2 on the AC power
source. Do not run the Inogen One® G2 on battery power until this initial
charging has been completed. Once the initial charge is completed, the battery
may be used with any amount of charge level.
4. Connect the Universal Power Supply.
Connect the AC Power plug to the Universal Power Supply. Connect the
AC Power Plug to the power source and connect the Power Output Plug to
the Inogen One® G2. The green LED on the Universal Power Supply will be
illuminated and a beep will sound from the concentrator.
CAUTION Ensure the Universal Power Supply is in a well ventilated location as it relies
on air circulation for heat dissipation. The Universal Power Supply may become
hot during operation. Make sure the Universal Power Supply cools down before
handling.
CAUTION The Universal Power Supply is not water resistant.
CAUTION Do not disassemble the Universal Power Supply. This may lead to
component failure and/or safety risk.
CAUTION Do not place anything in the Universal Power Supply port other than the
supplied wall cord. Avoid the use of electrical extension cords with the Inogen
One® G2. If an extension cord must be used, use an extension cord that has
an Underwriters Laboratory (UL) Mark and a minimum wire thickness of 18
gauge. Do not connect any other devices to the same extension cord.
Page 17
Operating Instructions Chapter 3
13
NOTE Under certain conditions (see Technical Specifications) the Universal
Power Supply may shut down. The green LED will blink or will no longer
be illuminated. If this occurs, disconnect the Power Supply for at least
10 seconds and reconnect.
NOTE
When the
Universal
Power Supply is disconnected from the AC outlet, also
disconnect it from the concentrator to avoid unnecessary battery discharge.
5. Connect the nasal cannula tubing to the nozzle fitting.
Nozzle fitting is located next to the handle of the Inogen One® G2.
Use of a single lumen cannula up to 25 feet in length is recommended to
ensure proper breath detection and oxygen delivery
. Additional
titration may be needed to ensure proper oxygen
delivery when using a particular cannula.
CAUTION
To ensure oxygen flow, ensure that the nasal cannula is properly connected to
the nozzle fitting and that the tubing is not kinked or pinched in any way.
CAUTION
Replace the nasal cannula on a regular basis. Check
with your equipment
provider or physician to determine how often the
cannula should be replaced.
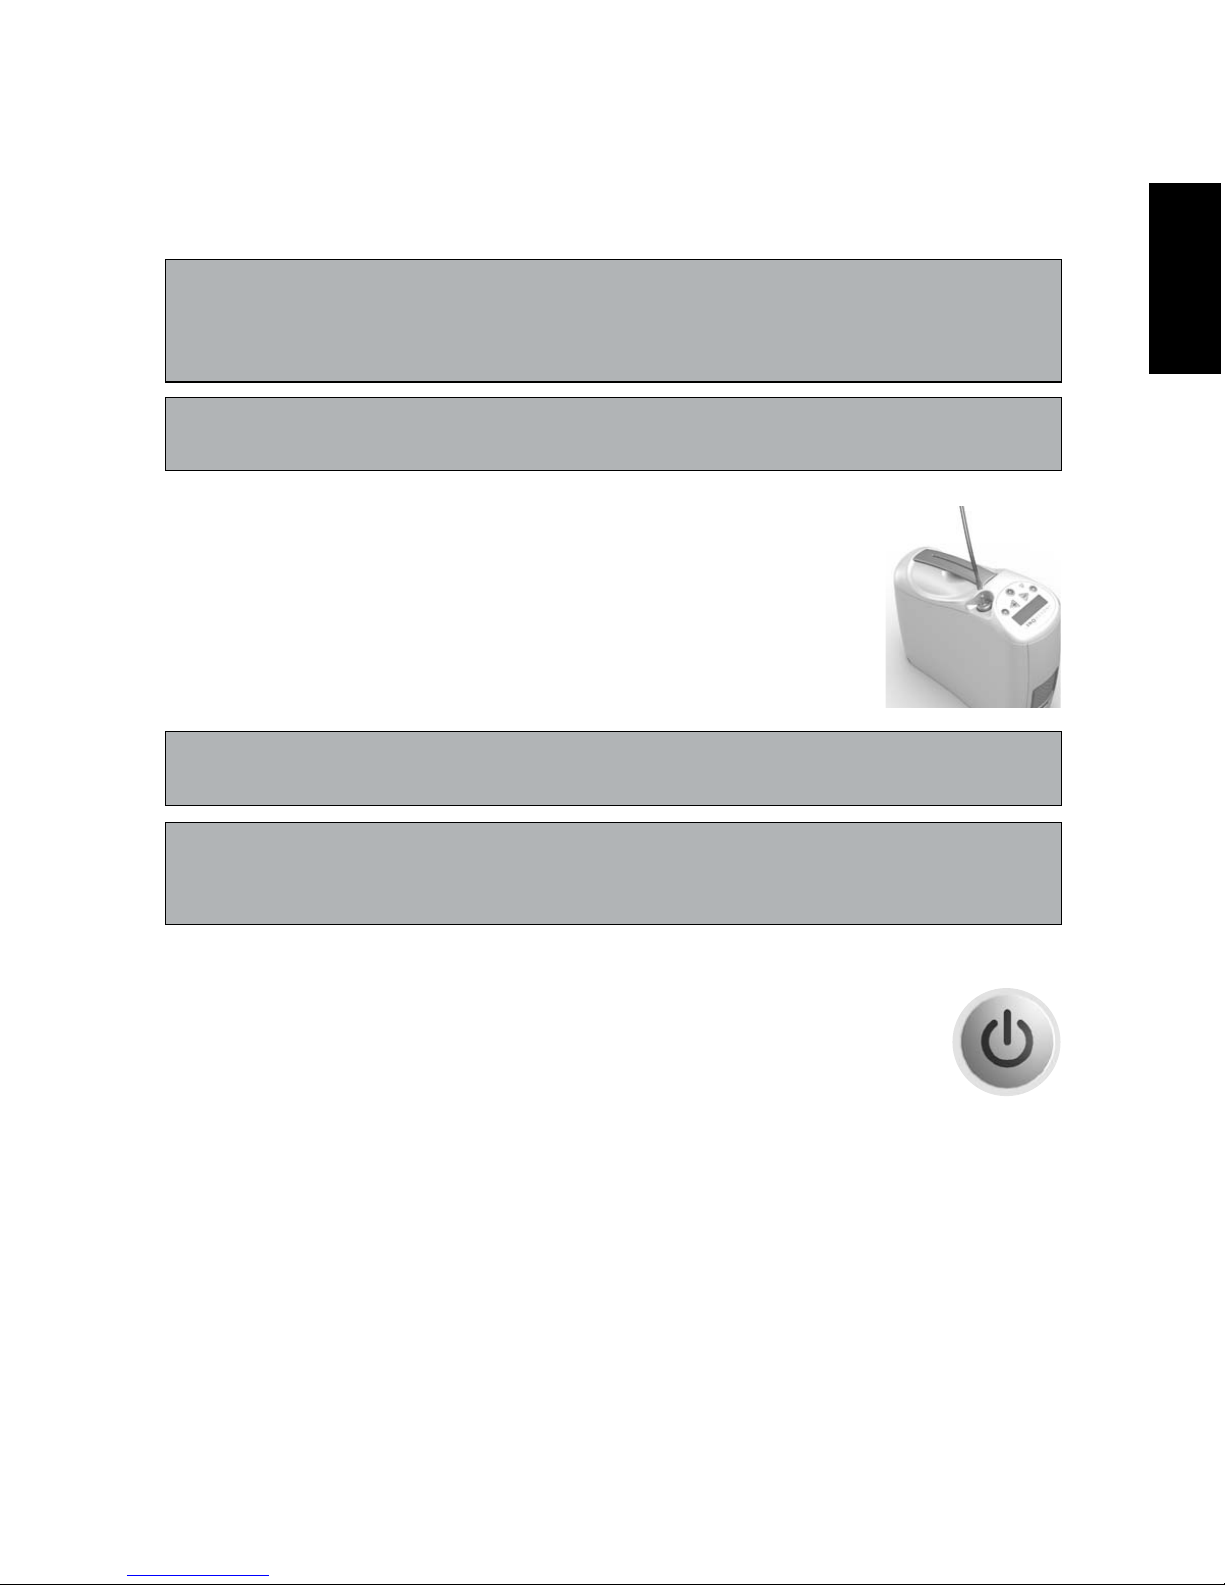
6. Turn on your Inogen One® G2 by pressing the ON/OFF Button.
A single short beep will sound after the Inogen logo is displayed. “Please
Wait” will appear while the concentrator starts up. The display will indicate
the selected flow setting and power condition. Following a brief start-up
sequence, a warm up period up to 2 minutes will initiate. During this time
period the oxygen concentration is building to but may not have reached
specification. Additional warm up time may be needed if your Inogen One®
G2 has been stored in extremely cold temperatures.
English
Page 18

!
C
14
7. Set the Inogen One® G2 Concentrator to the flow rate prescribed by your physician or
clinician.
Use the + or – setting buttons to adjust the Inogen One® G2 to the desired setting.
The current setting can be viewed on the display.
8. Position the nasal cannula on your face and breathe through your nose.
The Inogen One® G2 will sense the onset of inhalation and deliver
a burst of oxygen at a precise time when you inhale. The Inogen
One® G2 will sense each breath and continue to deliver oxygen
in this manner. As your breathing rate changes, the Inogen One®
G2 will sense these changes and deliver oxygen only as you need
it. At times, if you inhale very quickly between breaths the Inogen
One® G2 may ignore one of the breaths, giving the appearance of a
missed breath. This may be normal as the Inogen One® G2 senses
and monitors the changes in your breathing pattern. The Inogen
One® G2 will normally sense the next breath and deliver oxygen
accordingly.
A green light will flash each time a breath is detected. Make certain that the nasal cannula
is properly aligned on your face and you are breathing through your nose.
WARNING If you begin to feel ill or are experiencing discomfort while using this
device, consult your physician immediately.
CAUTION The Inogen One® G2 is designed to provide a flow of high purity oxygen.
An advisory alarm, “Oxygen Low”, will inform you if oxygen concentration
drops. If alarm persists, contact your equipment provider.
General
To remove power, unplug the input cord from its source (i.e., AC wall outlet, DC car
cigarette lighter adapter).
CAUTION Ensure the Universal Power Supply is powered from only one power source
(AC or DC) at any given time. The Universal Power Supply may not operate
properly if simultaneously powered using both AC and DC sources.
Page 19
Operating Instructions Chapter 3
15
Additional Operating Instructions
For Use In Home With AC Power
For operation of the Power Supply using an AC power source, follow these instructions:
1. Connect the AC Input to the power supply.
2. Connect the AC Power Plug to the power source and connect the Power Output
Plug to the Inogen One® G2. The green LED will be illuminated, indicating the
Universal Power Supply has input power.
Traveling With Your Inogen One® G2 System
The Inogen One® G2 System makes travel by plane, boat, car or train more convenient
for oxygen users than ever before. Now you get the same quality performance and
convenience while on the go that you’re used to receiving from your Inogen One® G2 at
home. Here are some useful and important instructions for maximizing performance
and convenience when using your Inogen One® G2 while traveling.
You should begin planning for a trip with a checklist of items to remember. This checklist
should include:
✓ Universal Power Supply
✓ Extra Battery(s) if required
✓ Important phone numbers, such as those of your physician and home healthcare
provider, or providers in the area you will be traveling
✓ Plan for backup oxygen in the event of a prolonged power outage or mechanical failure.
For Use In Automobile/RV/Boat
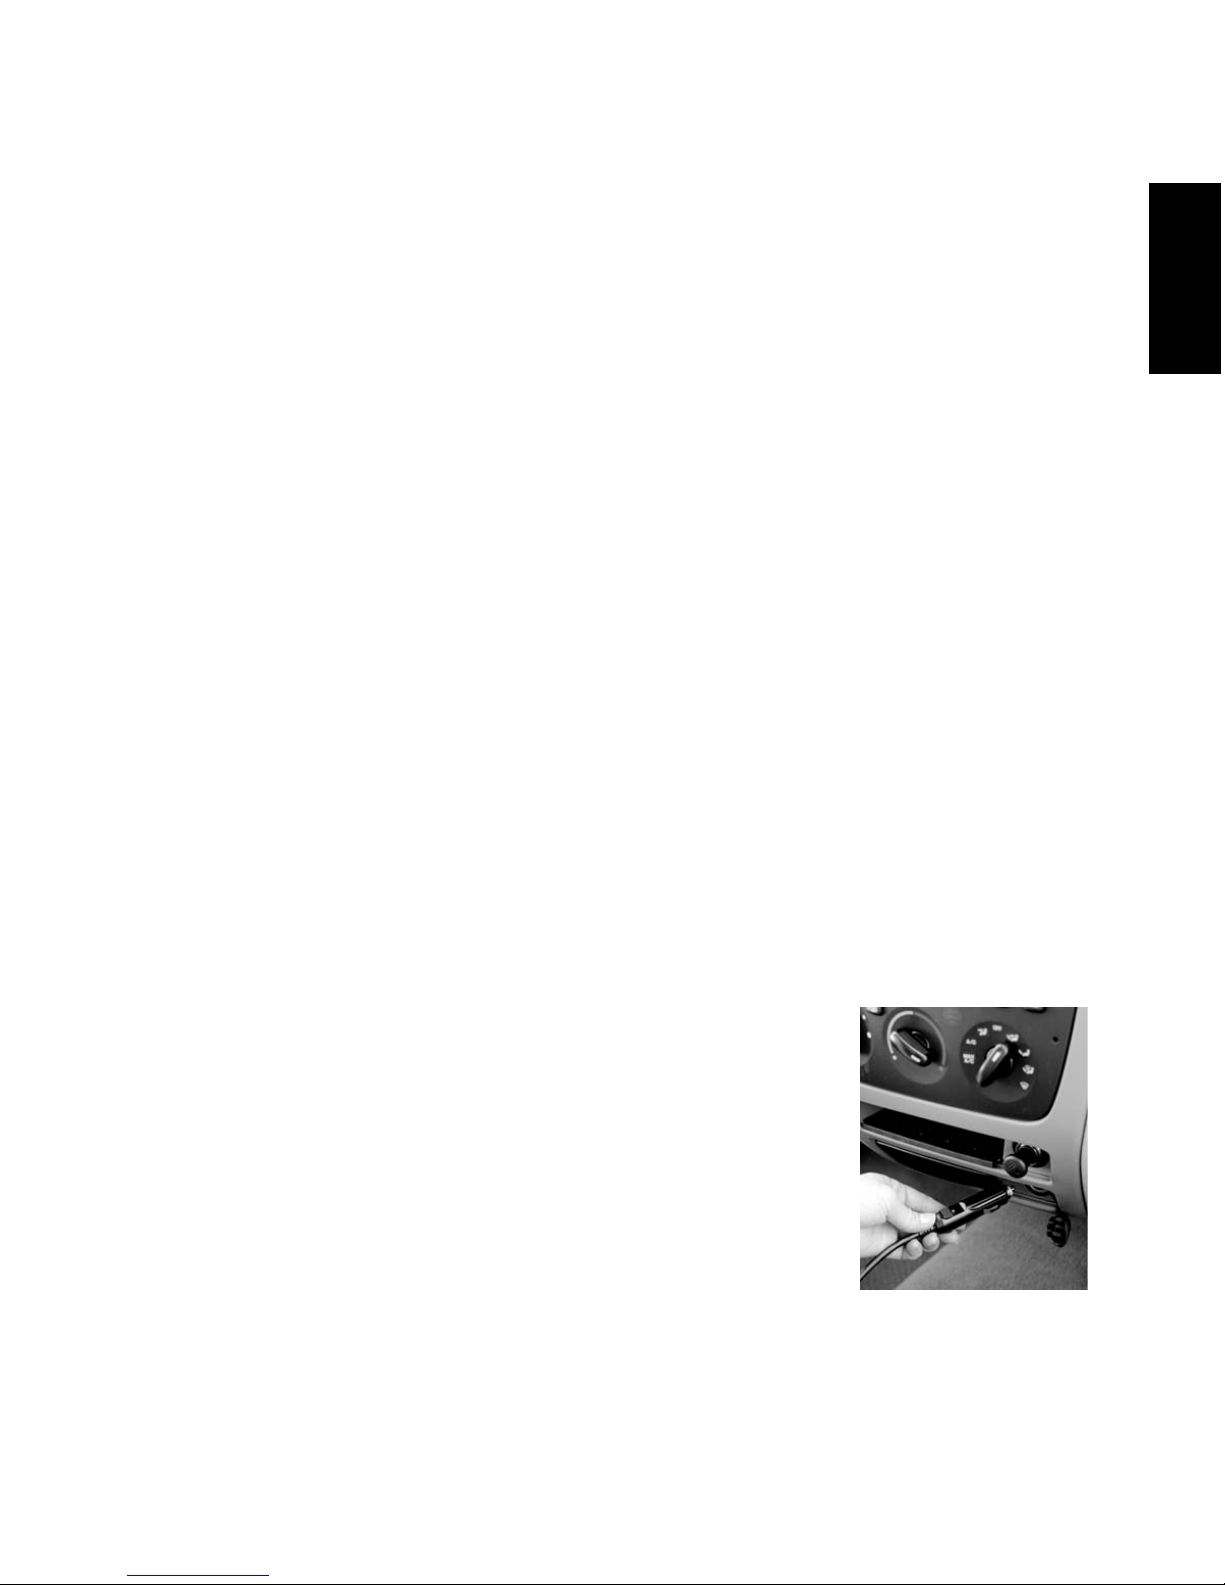
For operation of the Universal Power Supply using a DC power
source, follow these instructions:
1. Connect the DC Input to the power supply.
2. Connect the DC Power Plug (Cigarette Lighter Adapter) to
the power source and connect the Power Output Plug to the
Inogen One® G2. The green LED will be illuminated, indicating
the power supply has input power.
English
Page 20

3. The plug should insert into the socket without excessive force and securely remain in
place. The Cigarette Lighter Adapter comes with a slide switch pre-adjusted to the narrow
position. This will fit most automobile cigarette lighter sockets. If the Cigarette Lighter
Adapter is loose in the socket, adjust the switch to the "wide" position.
WARNING Ensure that the automobile power socket is adequately fused for the Inogen
One® G2 power requirements (minimum 15 Amp). If the power socket cannot
support a 15 Amp load, the fuse may blow or the socket may be damaged.
WARNING The tip of the Cigarette Adapter Plug becomes HOT when in use. Do not touch
the tip immediately after removal from an auto cigarette lighter socket.
CAUTION Ensure the automobile power socket is clean of cigarette ash and the adapter
plug fits properly, otherwise overheating may occur.
CAUTION Do not use the Universal Power Supply with a cigarette plug splitter or with
an extension cable. This may cause overheating of the DC power input cable.
CAUTION Do not jump start the automobile with the Universal Power Supply connected.
This may lead to voltage spikes which could shut down and/or damage the
Universal Power Supply.
CAUTION When powering the Inogen One® G2 in an automobile ensure the engine is
running. Operating the device without the engine running may drain the car
battery.
Traveling By Air
The FAA allows the Inogen One® G2 onboard all U.S. aircraft, here are a few points to make air
travel easy.
Planning Your Flight
When flying with the Inogen One® G2, you must inform the airline that you will be using your
Inogen One® G2 onboard the aircraft. You must also keep a signed statement from your
physician with you that includes:
• Your ability to see/hear alarms and appropriately respond.
• When oxygen use is necessary (all or a portion of the trip).
• Maximum flow rate corresponding to the pressure in the cabin under normal operating
conditions.
16
!
C
!
C
Page 21

• A new statement will not be necessary each time you fly, but the statement should be
available during every flight.
• Some airlines may equip their aircraft with onboard electrical power. You may have an
opportunity to request a seat with a power port which can be used to power your Inogen One®
G2. However, availability varies by airline, type of aircraft and class of service. You should check
with your airlines for availability and always plan on having sufficient battery power for the
duration of your flight, plus a conservative estimate of unanticipated delays.
• Your universal power supply is equipped with a commonly used cigarette lighter adapter.
However, aircrafts use different power port configurations and it is difficult to determine
which type of power port compatibility your aircraft may supply; it’s a good idea to purchase
an adapter such as Magellan’s Em Power Socket Connector Item #EA270. Contact Magellan’s
at 800-962-4943 or visit www.magellans.com for a store location near you or purchase options online.
Before Your Flight
Here are some things to keep in mind the day your flight departs:
• Ensure your Inogen One® G2 is clean, in good condition and free from damage or other signs
of excessive wear or abuse.
• Bring enough charged batteries with you to power your Inogen One® G2 for the duration of
the flight plus a conservative estimate of unanticipated delays.
• Regional/Commuter airlines do not offer onboard electrical power. If your travel plans call for
flights on regional airlines, you will need sufficient battery power for the duration of the flight,
plus a conservative estimate of unanticipated delays.
CAUTION Airlines may not be equipped to provide backup oxygen.
• Arrive at the airport early. Airport security screening personnel may require extra time to
inspect your Inogen One® G2.
• While waiting to board your flight, you may be able to conserve battery power by using the
Universal Power Supply to power your Inogen One® G2 from an electrical outlet in the airport
terminal if available.
• You should inform the airline you will be using your Inogen One® G2. Have your physician
letter with you and ready for inspection if requested.
Operating Instructions Chapter 3
17
English
Page 22

During Your Flight
1. If using airline power port, remove the Battery from the Inogen One® G2 Oxygen
Concentrator. Due to aircraft power limitations, the Universal Power Supply cannot
be used to charge the Inogen One® G2 Battery when onboard aircraft.
2. Connect the DC Power Plug for available airline power. Check with airline personnel
to ensure compatibility.
• During taxi, takeoff and landing, stow your InogenOne® G2 under the seat in front of you.
Your Inogen One® G2 will fit upright under most airline seats. However, if it doesn’t fit you
may turn it on its side.
• It is not necessary to turn off your Inogen One® G2 during taxi, takeoff and landing if your
physician’s written statement requires you receive oxygen during these periods.
CAUTION A change in altitude (for example, from sea level to mountains) may affect
total oxygen available to the patient. The Inogen One® G2 has been verified
to provide oxygen to specification up to 10,000 ft (3048 m). Consult your
physician before traveling to higher or lower altitudes to determine if your
flow settings should be changed.
After Your Flight
• Remember to recharge additional batteries you may have used prior to your next flight.
Traveling By Bus, Train or Boat
Contact your carrier to find out about power port availability.
Battery Operating Instructions
Ensure that the battery is in place and charged. Disconnect the Inogen One® G2 from its
power source. While the Inogen One® G2 is operating on battery power, the battery will
discharge. The display will indicate the estimated remaining percentage (%) or minutes of use.
When the concentrator detects that the battery life is below 10% remaining, a low priority
alert will sound. When the battery is empty, the alert will change to a high priority.
When battery life is low, do one of the following:
• Plug the Inogen One® G2 into an AC or DC power source using the Universal Power Supply.
• Replace the battery with a charged battery after turning off the Inogen One® G2
(by pressing the ON/OFF button).
• If the battery is drained, charge the battery or remove it from the concentrator.
18
Page 23

Operating Instructions Chapter 3
19
If the Inogen One® G2 is being powered by the Universal Power Supply, batteries will charge
during operation. Leaving your Inogen One® G2 plugged in past the full charge time will not
harm the concentrator or the battery.
Normal Battery Charging
To ensure that your battery is properly charging, inspect that the correct AC and DC power
output plug adapter is being used and that the adapter is properly inserted into the power
outlet. Observe the display or lights that indicate charging status.
NOTE When starting to charge a fully discharged battery, the charging process may
start and stop during the first few minutes.
Battery Care and Maintenance
Your Inogen One® G2 Lithium Ion Battery requires special care to ensure proper performance
and long life. Use only Inogen One® G2 Batteries with your Inogen One® G2 Concentrator.
Keep Dry
Always keep liquids away from batteries. If batteries become wet, discontinue use
immediately and dispose of battery properly.
Effect of Temperature on Battery Performance
The Inogen One® G2 single battery powers the Inogen One® G2 Concentrator from 2 to 4
hours under most environmental conditions. To extend the run-time of your battery, avoid
running in temperatures less than 41˚F (5˚C) or higher than 95˚F (35˚C) for extended periods
of time.
Battery Time Remaining Clock
The Inogen One® G2 continuously displays battery time remaining. This displayed time is only
an estimate and the actual time remaining may vary from this value.
Please Follow These Important Guidelines to Maximize Battery Performance and Life:
• Store battery in a cool, dry place. Store with a charge of 40-50%.
• If using multiple batteries, make sure that each battery is labeled (1, 2, 3 or A, B, C, etc.) and
rotate on a regular basis. Batteries should not be left dormant for extended periods of time.
English
Page 24

Page 25
Mode
Power
Text
Display Icons
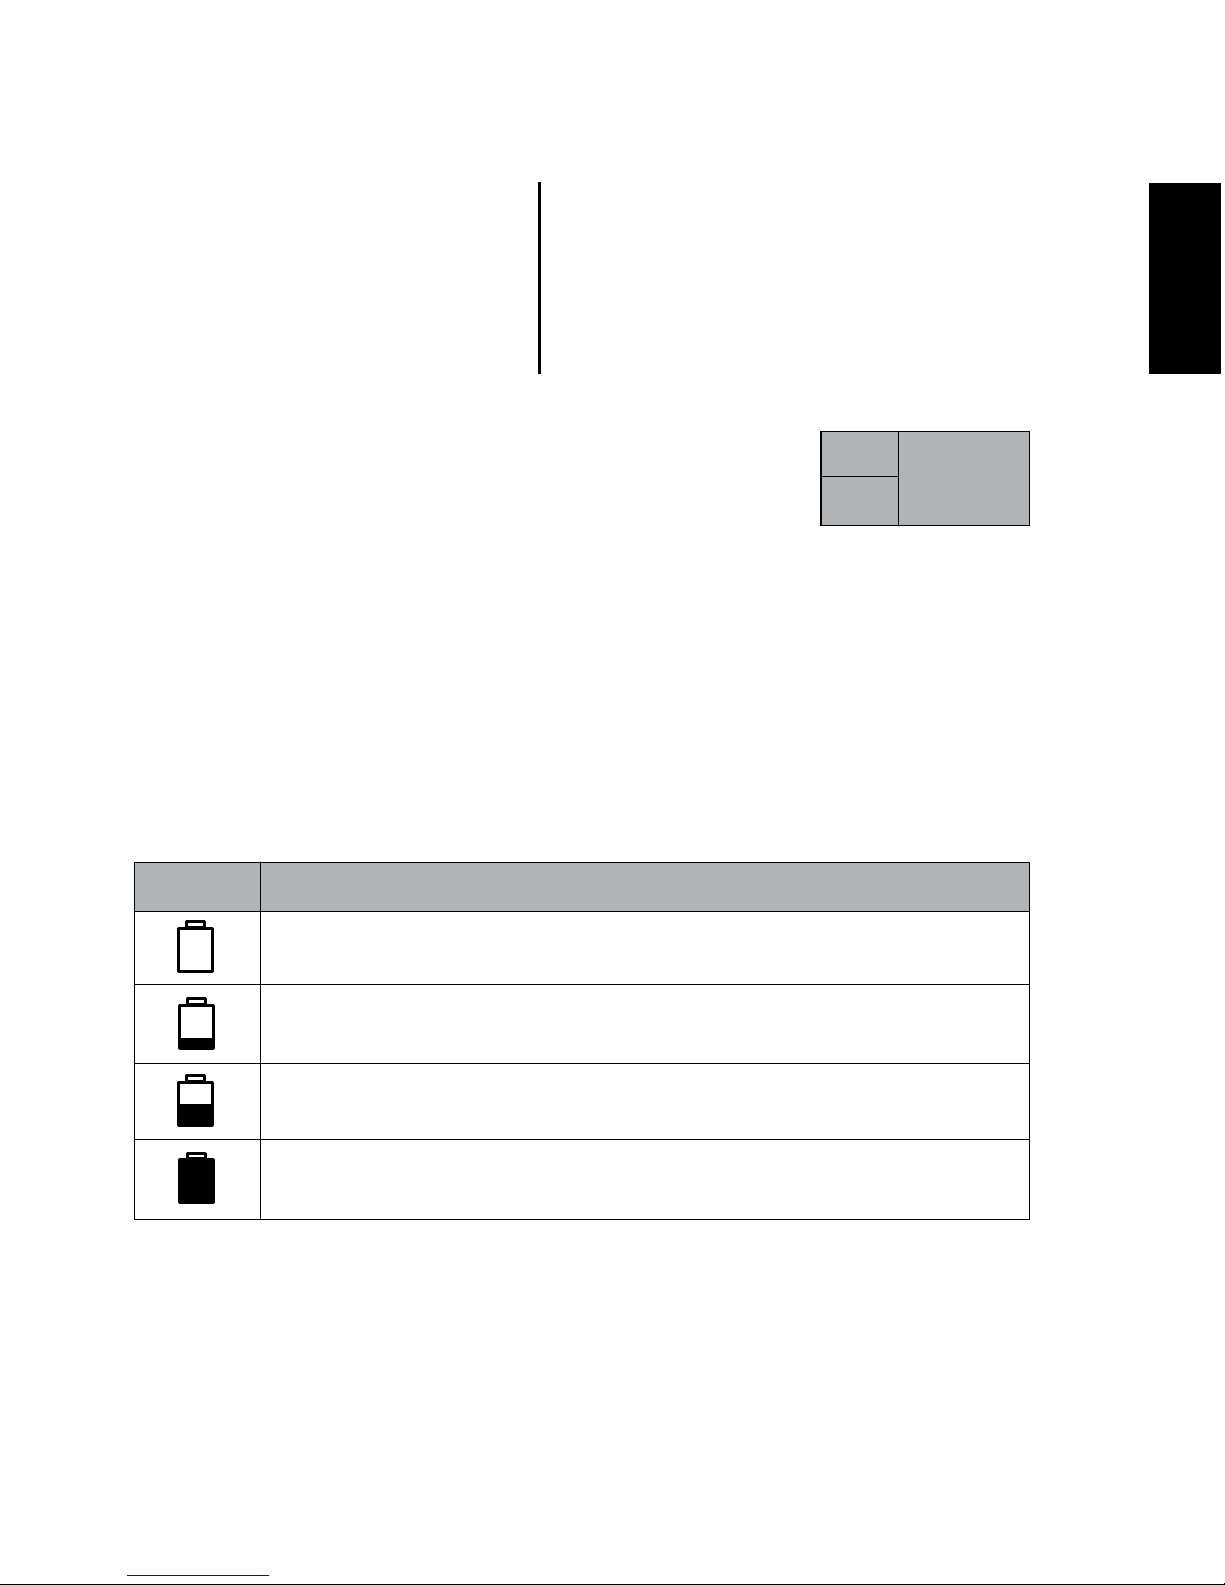
The Inogen One® G2 display is divided into three areas. The upper left corner of the
display shows the breath detection alert status. The lower left corner indicates power
source and battery charge level. The right side of the display contains text information,
such as flow setting, battery time remaining and error notifications.
Power Status Icons
These icons are examples of those shown in the display’s power status window when the
Inogen One® G2 is operating on battery power.
Inogen One® G2 Oxygen
Concentrator Audible
and Visible Signals
Audible and Visible Signals Chapter 4
!
C
!
C
!
C
Meaning
Battery is empty.
Battery has less than 10% charge remaining. This icon flashes.
Battery has approximately 40% to 50% charge remaining.
Battery is full.
Icon
21
4
English
Page 26
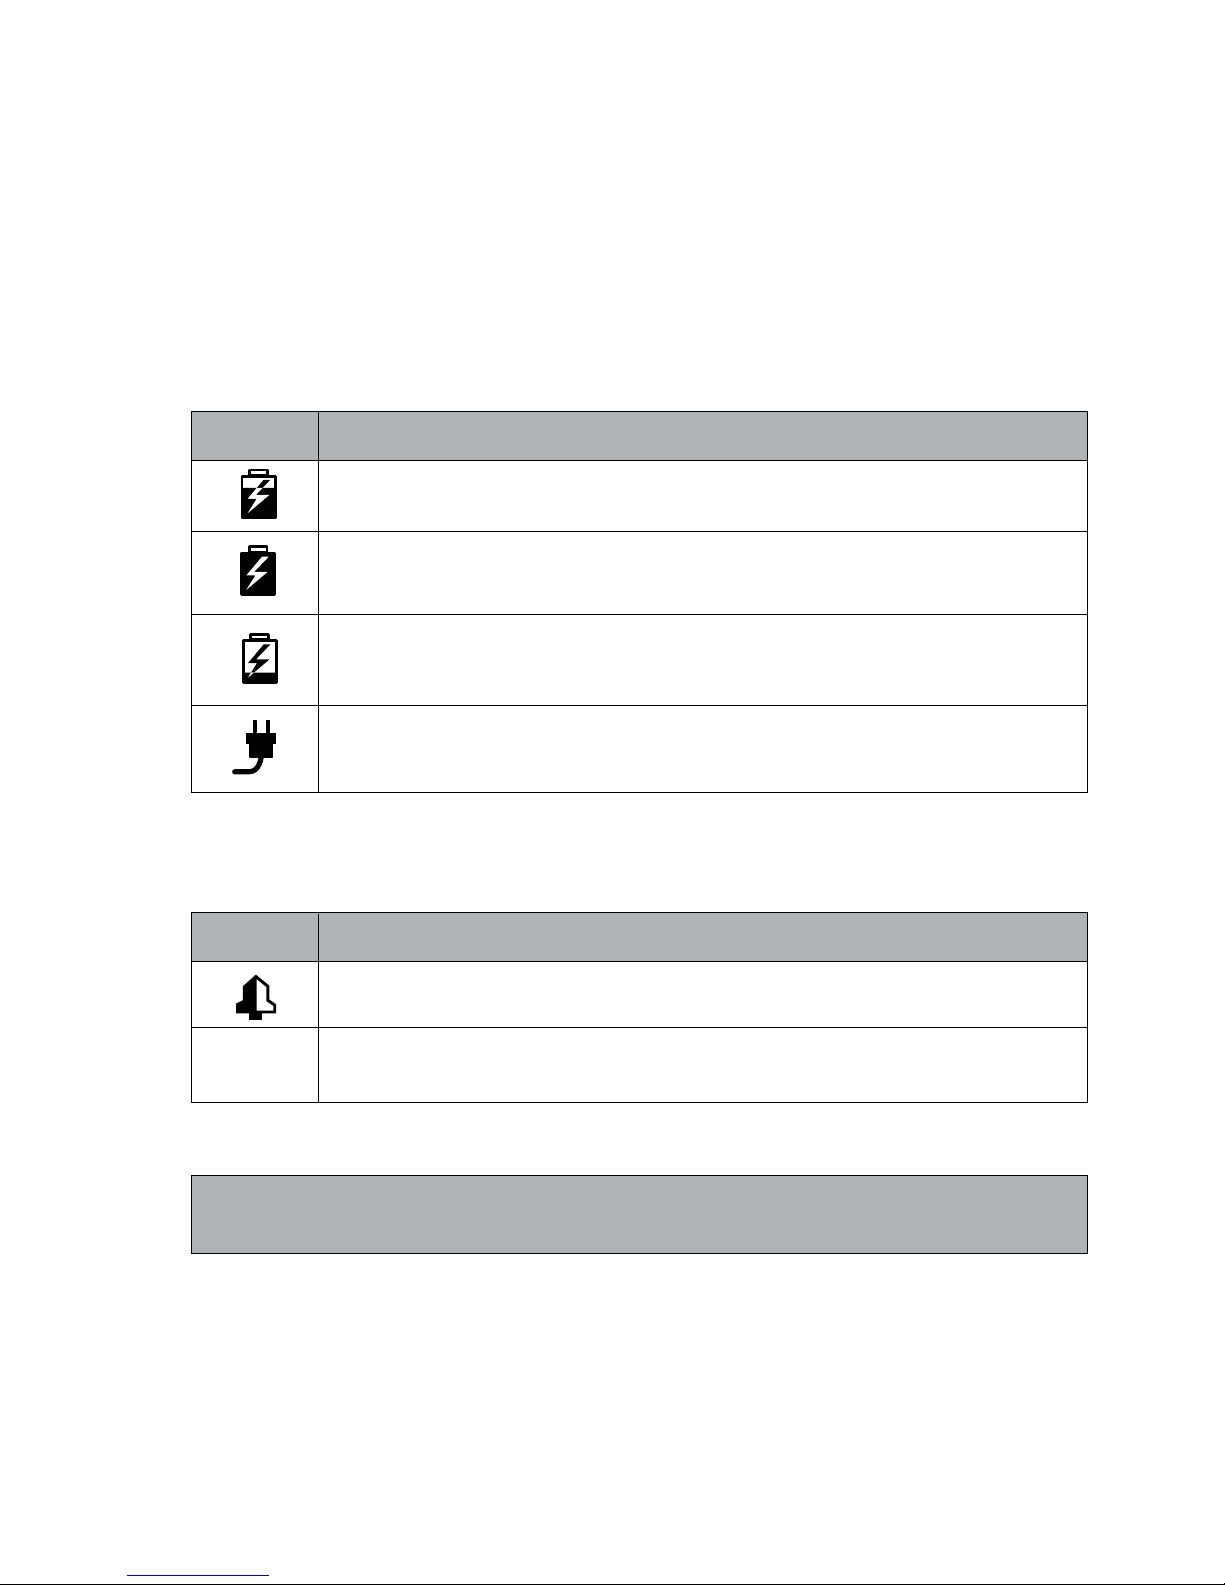
Power Status Icons (continued)
The icons below are examples of those shown when the Inogen One® G2 is operating
from an external power supply and charging the battery. The lightening bolt indicates
that an external power supply is connected.
C
!
C
Meaning
Battery is charging with charge level between 60% and 70%.
The battery is fully charged and is charging as necessary to
maintain its charge.
Battery is charging with charge level less than 10%.
The Inogen One® G2 is operating from an external power source with no
battery present.
Icon
22
Mode Icons
These are the icons shown in the display’s mode window.
Display Text
NOTE When two conditions occur simultaneously, the condition with the
higher priority will be displayed.
Meaning
The breath detection alarm has been enabled.
The concentrator is in the standard breath detect mode, and the breath
detection alert is disabled. This is the default condition.
Icon
[blank]
!
C
Page 27
Audible and Visible Signals Chapter 4
23
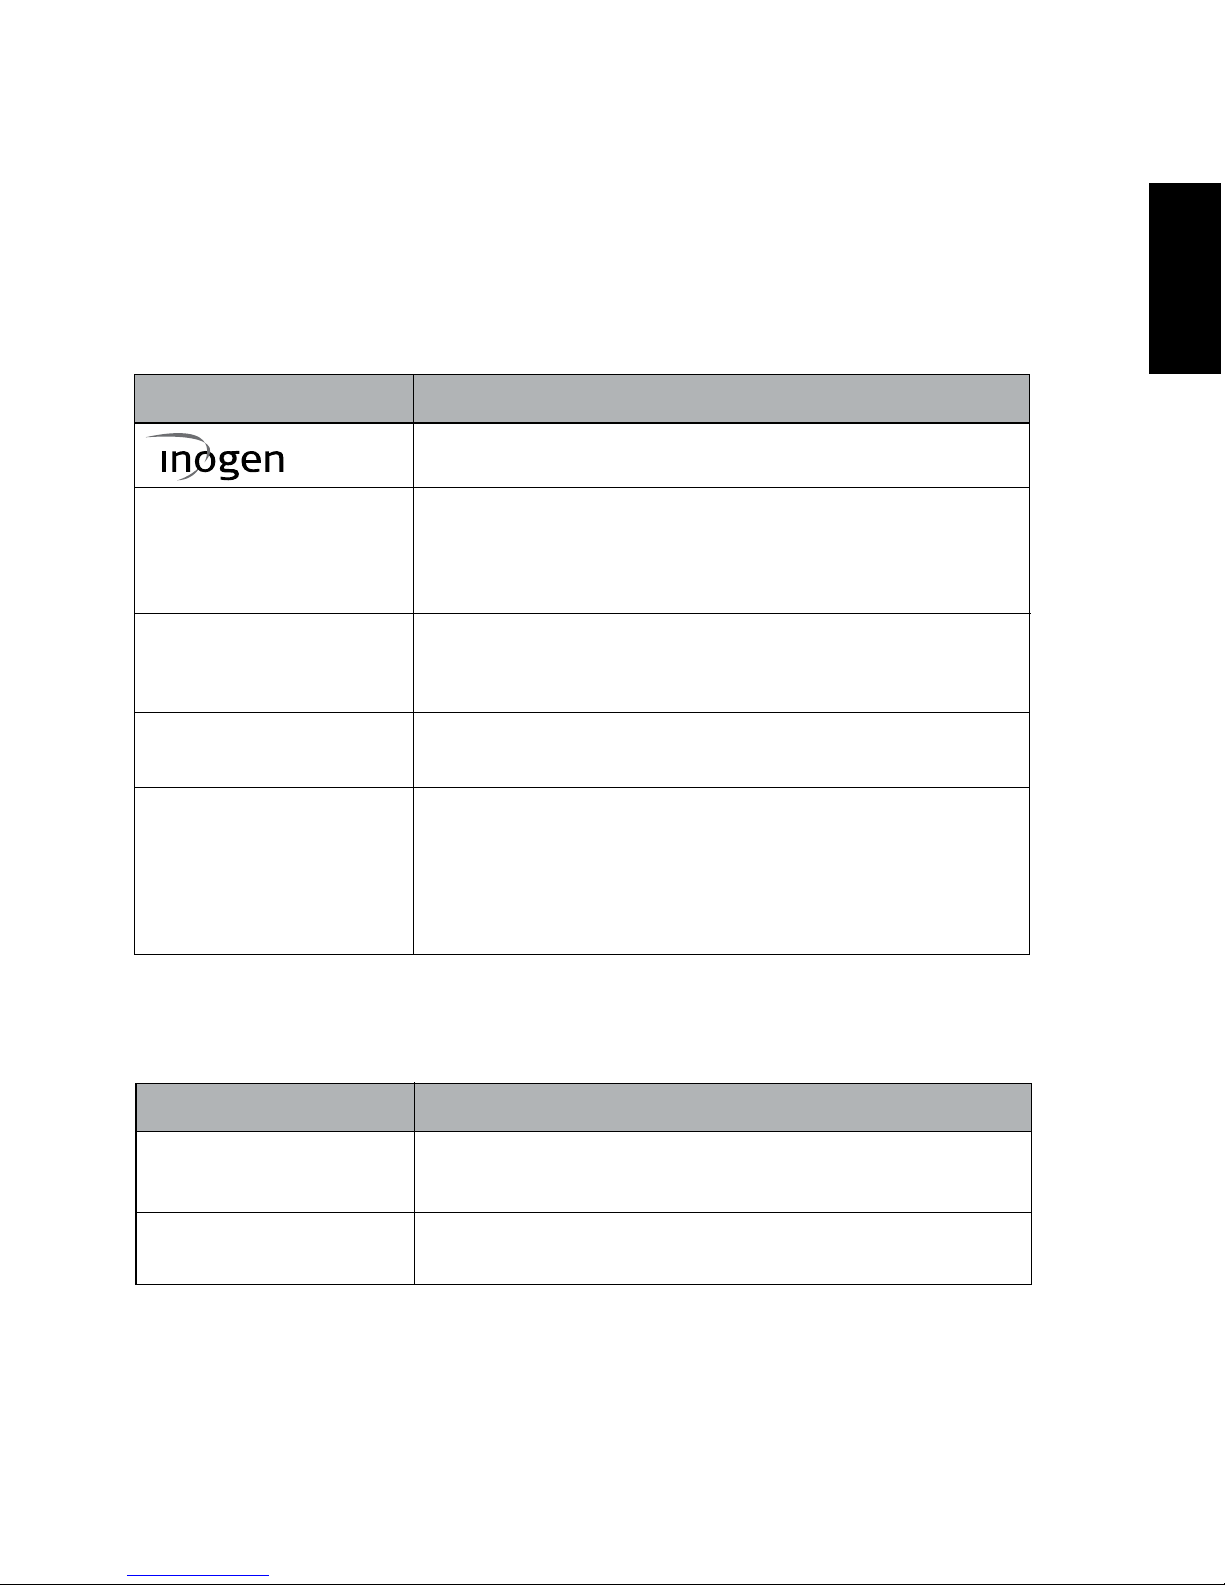
Informational Messages
The following information displays are not accompanied by any audible feedback or any
visual change in the indicator lights.
Condition/Action/Explanation
The Inogen logo is displayed at startup.
Default display when operating on battery power. “X”
represents the selected flow setting (e.g., Setting 2).
“HH:MM” represents the approximate time remaining on
the battery charge (e.g., 1:45).
Default display when operating on an external power
supply and the battery is charging. “xx%” represents the
percent battery charge (e.g., 86%).
Default display when the battery is not charging or when the
time remaining is not available from the battery.
Display when the concentrator is plugged in and being used
to charge a battery (not being used for oxygen production).
It is normal to see a fully charged battery read between 95%
and 100% when external power is removed. This feature
maximizes the useful life of the battery.
Message Display & Text
Setting X Battery
HH:MM
Setting X Charging xx
(or) Battery Full
Setting X Battery xx%
Charging xx% (0r)
Battery Full
Notifications
The following notification messages are accompanied by a single, short beep.
Condition/Action/Explanation
On/Off button has been pressed for two seconds.
Concentrator is performing system shut down.
Audible Alarm has been pressed for five seconds.
Message Display & Text
Inogen One®
Shutting Down
HH:MM
Vx.x:Serial Number
English
Page 28

Low Priority Alerts
The following low priority alert messages are accompanied by a double beep and a
solid red light.
Condition/Action/Explanation
External power supply is too low to run the unit, which
is running on battery power despite being plugged in.
Check external power supply connections. If condition
persists, contact your equipment provider.
External power supply is too high. Check external power
supply connections. If condition persists, contact your
equipment provider.
Battery power is low, with less than 6% remaining.
Attach external power supply or power down and insert
a fully charged battery.
Battery error has occurred. Switch to a new battery or
remove battery and operate concentrator using external
power supply. If battery error recurs with same battery,
stop using the battery and contact your equipment
provider.
Concentrator is producing oxygen at a slightly low level
(<82%). If condition persists, contact your
equipment
provider
.
Message Display & Text
External
Power Low
External
Power High
Battery Low
Attach Plug
Battery Error
See Manual
Oxygen Low
See Manual
24
Page 29

Low Priority Alerts (continued)
Condition/Action/Explanation
Battery has exceeded its charging temperature and charging
has stopped. The battery will not charge while this alert
is present but will begin to charge when the battery
temperature returns to the normal operating range.
If battery charging is desired sooner, remove the battery
from the concentrator and allow it to cool in an open area for
approximately 10-15 minutes. Then, re-insert the battery into
the Inogen One® G2. If the problem still persists, contact your
equipment provider.
Concentrator is producing oxygen but cannot report
battery status. Replace battery. If condition persists,
contact your equipment provider.
The concentrator requires servicing at the earliest
convenience. The concentrator is operating to specification
and may continue to be used. Contact your equipment
provider to arrange for service.
The concentrator’s oxygen sensor has malfunctioned.
You may continue to use the concentrator. If the condition
persists, contact your equipment provider.
Message Display & Text
Remove Battery
to Cool
Comm Error
See Manual
Service Needed
02 Sensor Fail
See Manual
Audible and Visible Signals Chapter 4
25
English
Page 30

Condition/Action/Explanation
Battery has exceeded temperature limit while concentrator
is running on battery power. If possible, move concentrator
to a cooler location or power unit with an external power
supply and remove battery. If condition persists, contact
your equipment provider.
Concentrator is not detecting a breath.
• Check that cannula is connected to concentrator, there
are no kinks in tubing and cannula is positioned properly
in your nose.
Concentrator is experiencing an error but is capable of
continued operation.
• Remove and re-insert battery and/or
• Check external power supply connections.
If condition persists, contact your equipment provider.
Oxygen output concentration is below 50%. If condition
persists, switch to your backup oxygen source and contact
your equipment provider to arrange for service.
Message Display & Text
Battery HOT
Warning
No Breath Detect
Check Cannula
System Error
See Manual
Oxygen Error
Service Needed
Medium Priority Alerts
The following medium priority alert messages are accompanied by a triple beep,
repeated every 25 seconds, and a flashing red light.
26
Page 31

Condition/Action/Explanation
Concentrator has insufficient battery power to produce
oxygen. Attach external power supply or exchange battery,
then restart unit if necessary by pressing On/Off button.
Battery has exceeded temperature limit while concentrator
is running on battery power. Concentrator has stopped
producing oxygen. If possible, move concentrator to a
cooler location, then turn power off and back on. Ensure air
intake and outlet vents have clear access and particle filter
is clean. If condition persists, switch to a backup source of
oxygen and contact your equipment provider.
Concentrator temperature is too high and oxygen
production is shutting down. Ensure air intake and outlet
vents have clear access and particle filter is clean. If
condition persists, switch to a backup source of oxygen and
contact your equipment provider.
Message Display & Text
Battery Empty
Attach Plug
Battery HOT
Shut Down
System HOT
Shut Down
High Priority Alerts
CAUTION If you are not near the Inogen One® G2 you may not be able to hear or
see the high priority alerts. Make sure the Inogen One® G2 is in a
location where the alerts and alarms will be recognized if they occur.
The following high priority alert messages are accompanied by a five beep pattern,
repeated every 10 seconds and a flashing red light.
Audible and Visible Signals Chapter 4
27
English
Page 32

Condition/Action/Explanation
This may result from the concentrator being stored in a
cold environment (below 0ºC (32ºF)). Move to a warmer
environment to allow the unit to warm up before starting
it. If condition persists, switch to a backup source of
oxygen and contact your equipment provider.
Concentrator has stopped producing oxygen and is
shutting down. You should:
1. Note error number
2. Switch to backup oxygen source
3. Contact your equipment provider
Message Display & Text
System COLD
Shut Down
Error (###)
Service Needed
High Priority Alerts (continued)
28
Page 33

Troubleshooting
Troubleshooting Chapter 5
Use external power supply or
replace battery with one that is
fully charged
Check power supply connection and
verify green light is solid
Contact your equipment provider
Press On/Off button to power
concentrator
Check cannula and its connection
to concentrator nozzle
Battery is discharged
or no battery is
present
Power supply is not
connected properly
Malfunction
Concentrator is not
powered on
Cannula is not
connected properly or
is kinked or obstructed
Concentrator does
not power on when
On/Off button is
pressed
No oxygen
Recommended Solution
Refer to Chapter 4
Possible Cause
Refer to Chapter 4
Problem
Any problem
accompanied
by information
on concentrator
display, indicator
lights and/or
audible signals
Solutions to some possible issues you may encounter are described in this section.
Inogen One® G2 Oxygen Concentrator
29
5
English
Page 34

Page 35

Cannula Replacement
Your nasal cannula should be replaced on a regular basis. Consult with your physician
and/or equipment provider and/or cannula manufacturer’s instructions for replacement
information. A single lumen cannula up to 25 feet in length is recommended to ensure
proper breath detection and oxygen delivery.
CAUTION Use of a cannula other than a high flow cannula (e.g. Salter 1600Q)
may restrict oxygen delivery and/or attachment to nozzle fittings.
Case Cleaning
You may clean the outside case using a cloth dampened with a mild liquid detergent
(such as Dawn
TM
) and water.
WARNING Do not submerse the Inogen One® G2 or its accessories in water or allow
water to enter into the case; this may lead to electrical shock and/or
damage.
WARNING Do not use cleaning agents other than those specified in this User
Manual. Do not use alcohol, isopropyl alcohol, ethylene chloride or
petroleum based cleaners on the cases or on the particle filters.
Cleaning, Care
and Maintenance
31
Cleaning, Care and Maintenance Chapter 6
6
!
C
!
C
English
Page 36

Filter Cleaning and Replacement
The particle filter must be cleaned weekly to ensure the ease of air flow.
Remove filter from the front of the device. Clean the particle filter
with a mild
liquid detergent (such as DawnTM) and water
; rinse in water and dry before
reuse.
NOTE It may be necessary to clean the particle filter more often in dusty
environments.
To purchase additional particle filters contact your equipment provider or Inogen.
Output Filter
The output filter is intended to protect the user from inhalation of small particles in the
product gas flow. The Inogen One® G2 includes an output filter conveniently located
behind the removable cannula nozzle fitting. Inogen requires that this filter be replaced
between patients.
The output filter may be replaced by the equipment provider or by the owner using the
Output Filter Replacement Kit (RP-107).
DC Input Cable Fuse Replacement
The Cigarette Lighter DC Power Plug contains a fuse. If the DC Input Cable is being
used with a known good power source and the power supply is not operative (no output
power and the green LED is not illuminated), the fuse may need to be replaced.
32
Page 37
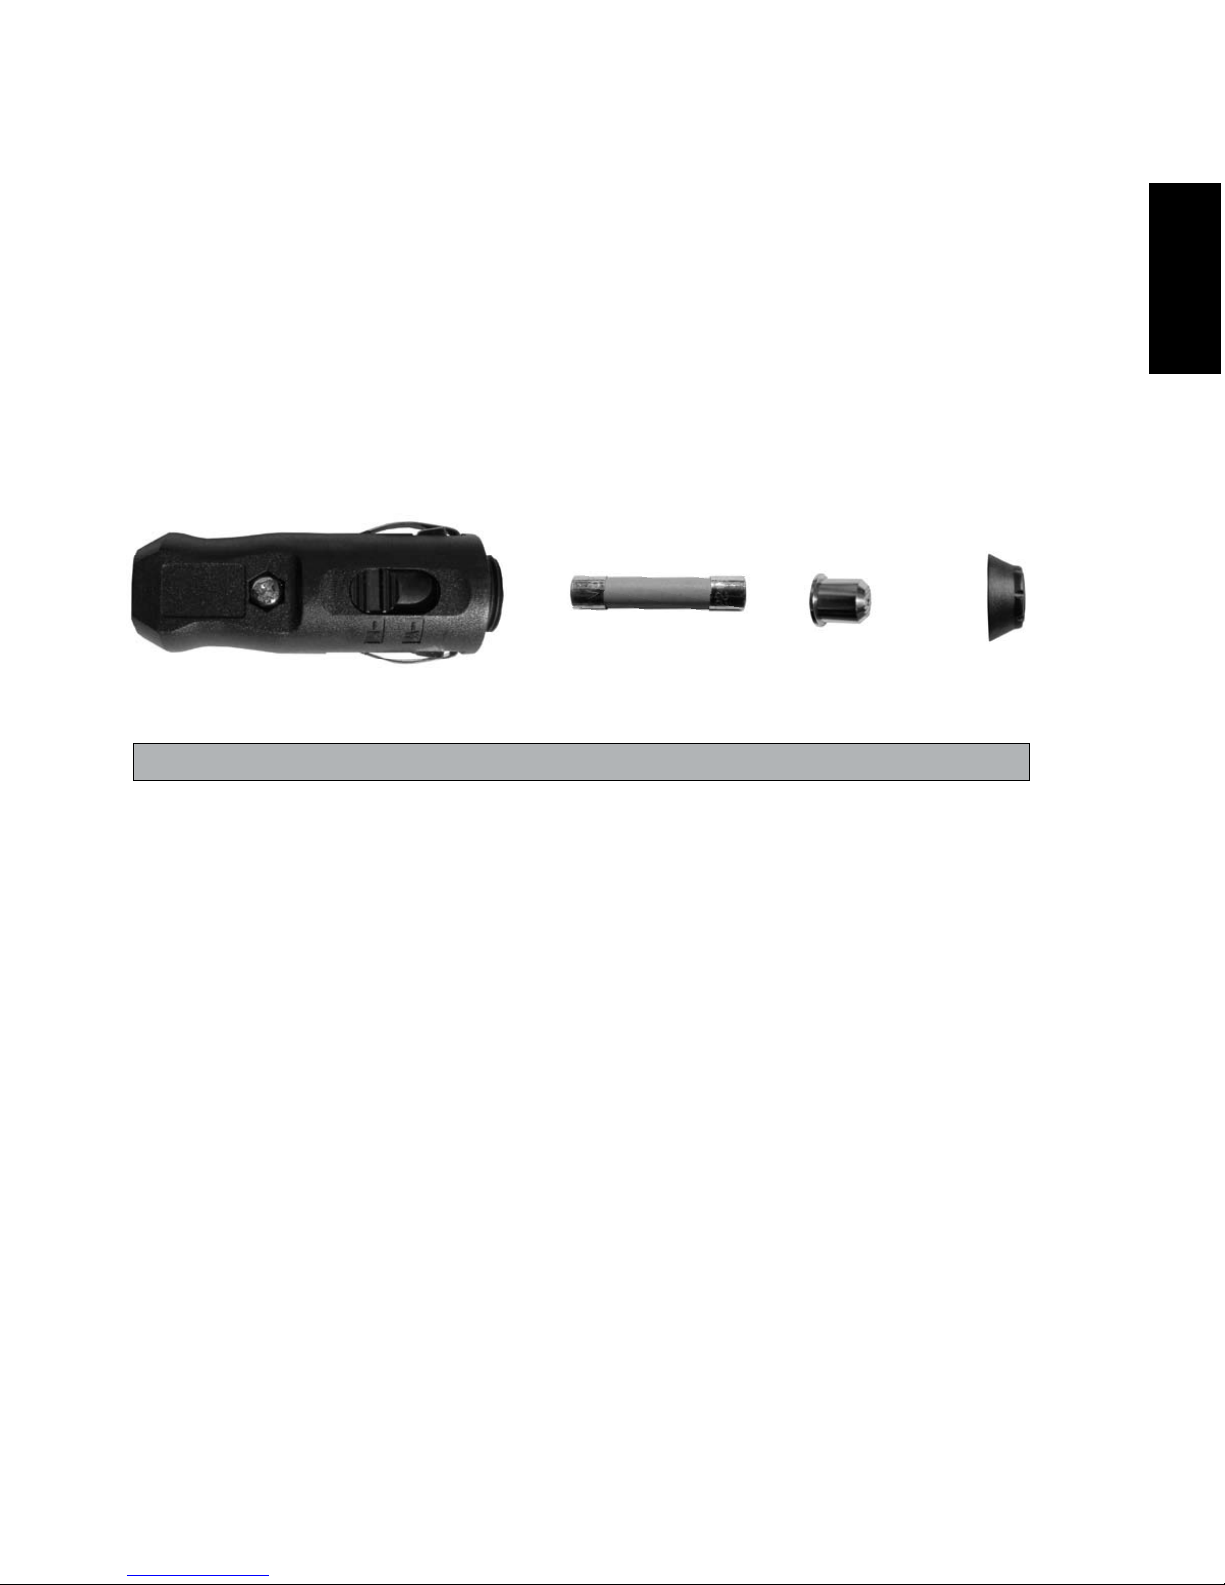
Fuse
Cigarette Adapter Plug
Retainer Tip
Retainer
CAUTION For continued protection against risk of fire, only use fuse specified.
33
Cleaning, Care and Maintenance Chapter 6
To replace the fuse, follow these instructions and refer to the photograph below.
1. Remove the tip by unscrewing the retainer. Use a tool if necessary.
2. Remove the retainer, tip and fuse.
3. The spring should remain inside the Cigarette Lighter Adapter housing. If the spring
is removed, make sure to replace the spring first before inserting the replacement
fuse.
4. Install a replacement fuse, Inogen RP#125 (BUSS MDA-12) and reassemble the tip.
Ensure the retainer ring is properly seated and tightened.
English
Page 38

34
Disposal of Equipment and Accessories
Follow your local governing ordinances for disposal and recycling of the Inogen One®
G2 and accessories. If WEEE regulations apply, do not dispose of in unsorted municipal
waste. Within Europe, contact the EU Authorized Representative for disposal instructions.
The battery contains lithium ion cells and should be recycled. The battery must not
be incinerated.
Maintenance Items List
• Inogen One® G2 single battery (model # BA- 200)
• Inogen One® G2 double battery (model # BA- 224)
• Replacement intake particle filters (model # RP- 200)
• Output Filter Replacement Kit (model # RP-107)
Other Service and Maintenance
WARNING Do not disassemble the Inogen One® G2 or any of the accessories
or attempt any maintenance other than tasks described in the
troubleshooting section; disassembly creates a hazard of electrical shock
and will void your warranty. Do not remove tamper evident label. For
events other than those described in this manual, contact your equipment
provider for servicing by authorized personnel.
CAUTION Do not use lubricants on the Inogen One® G2 or its accessories.
!
C
Page 39
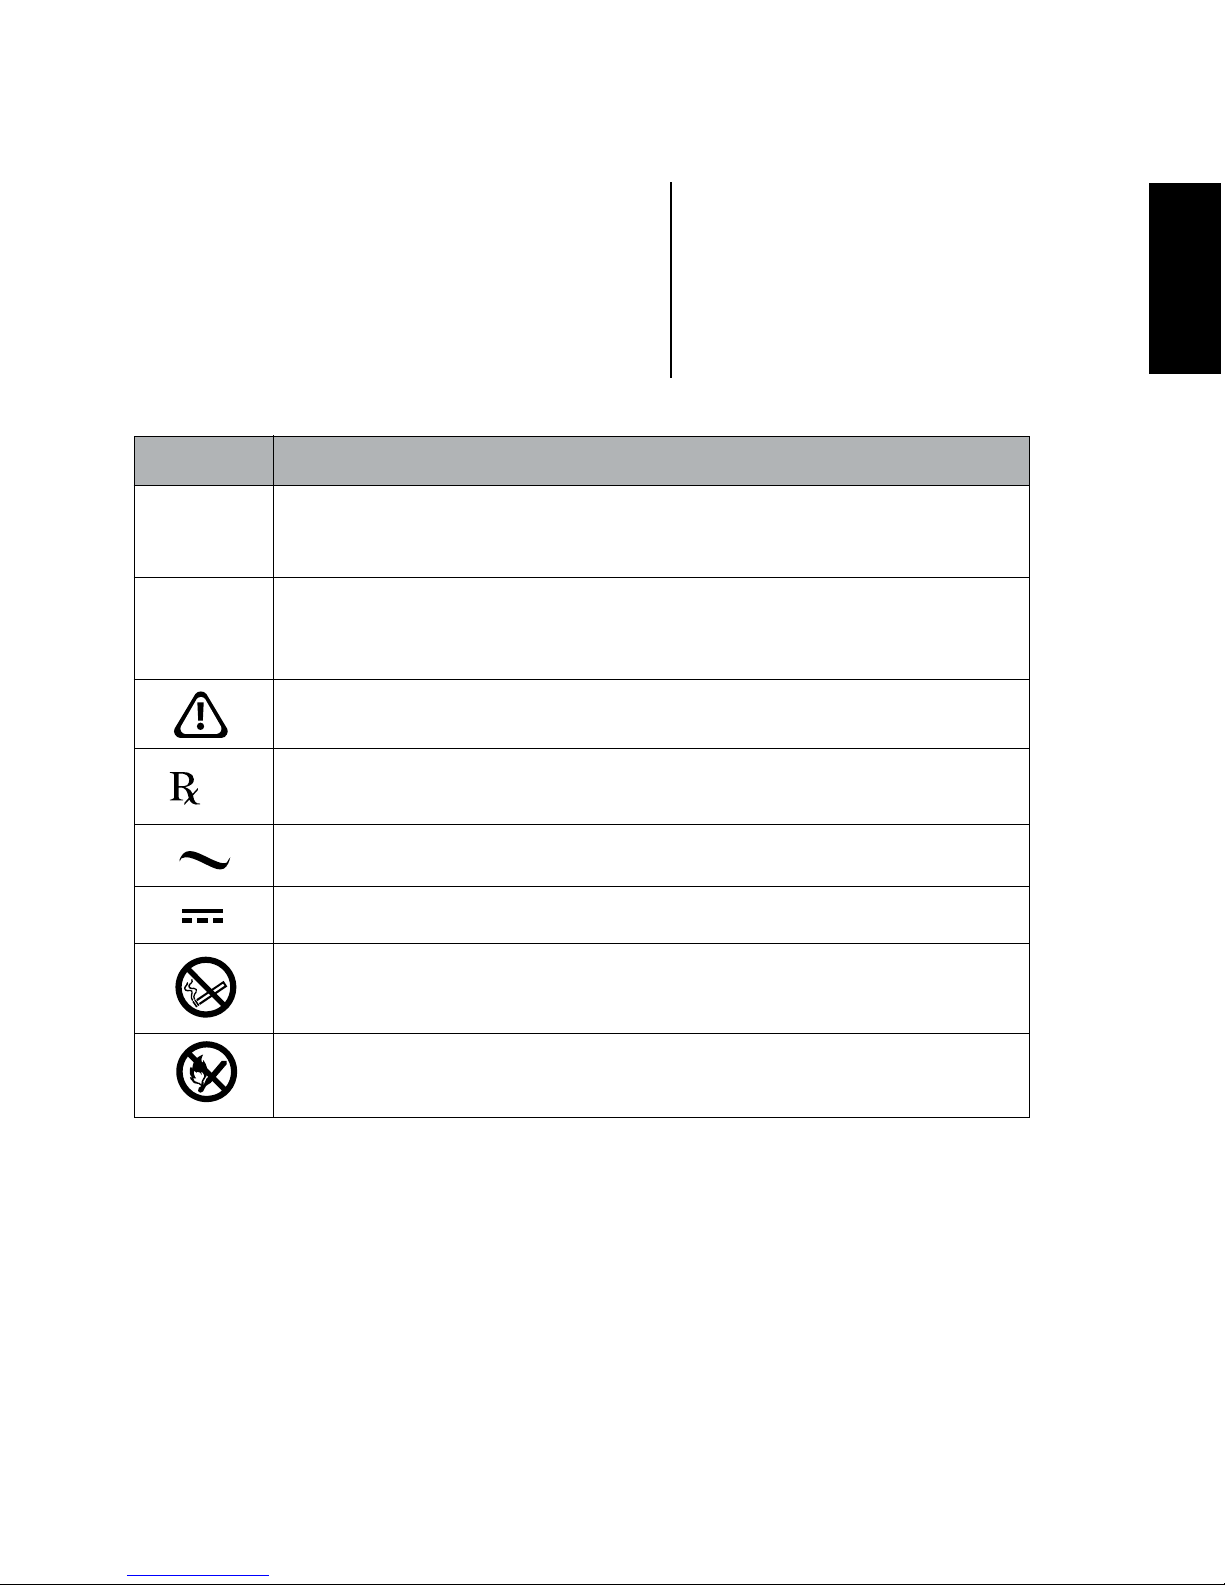
Symbols Used
On Concentrator
and Accessories
Meaning
A warning indicates that the personal safety of the patient may be
involved. Disregarding a warning could result in significant injury.
A caution indicates that a precaution or service procedure must be
followed. Disregarding a caution could lead to a minor injury or
damage to equipment.
See User Manual for Instructions
U.S. Federal Regulation Restricts this Device to Sale by Order of
Physician. May also be applicable in other Countries.
AC Power
DC Power
No Smoking while device is in use.
No Open Flames (Concentrator);
Do not incinerate (Battery)
Symbol
WARNING
CAUTION
ONLY
Symbols Used on Concentrator and Accessories Chapter 7
35
7
English
Page 40
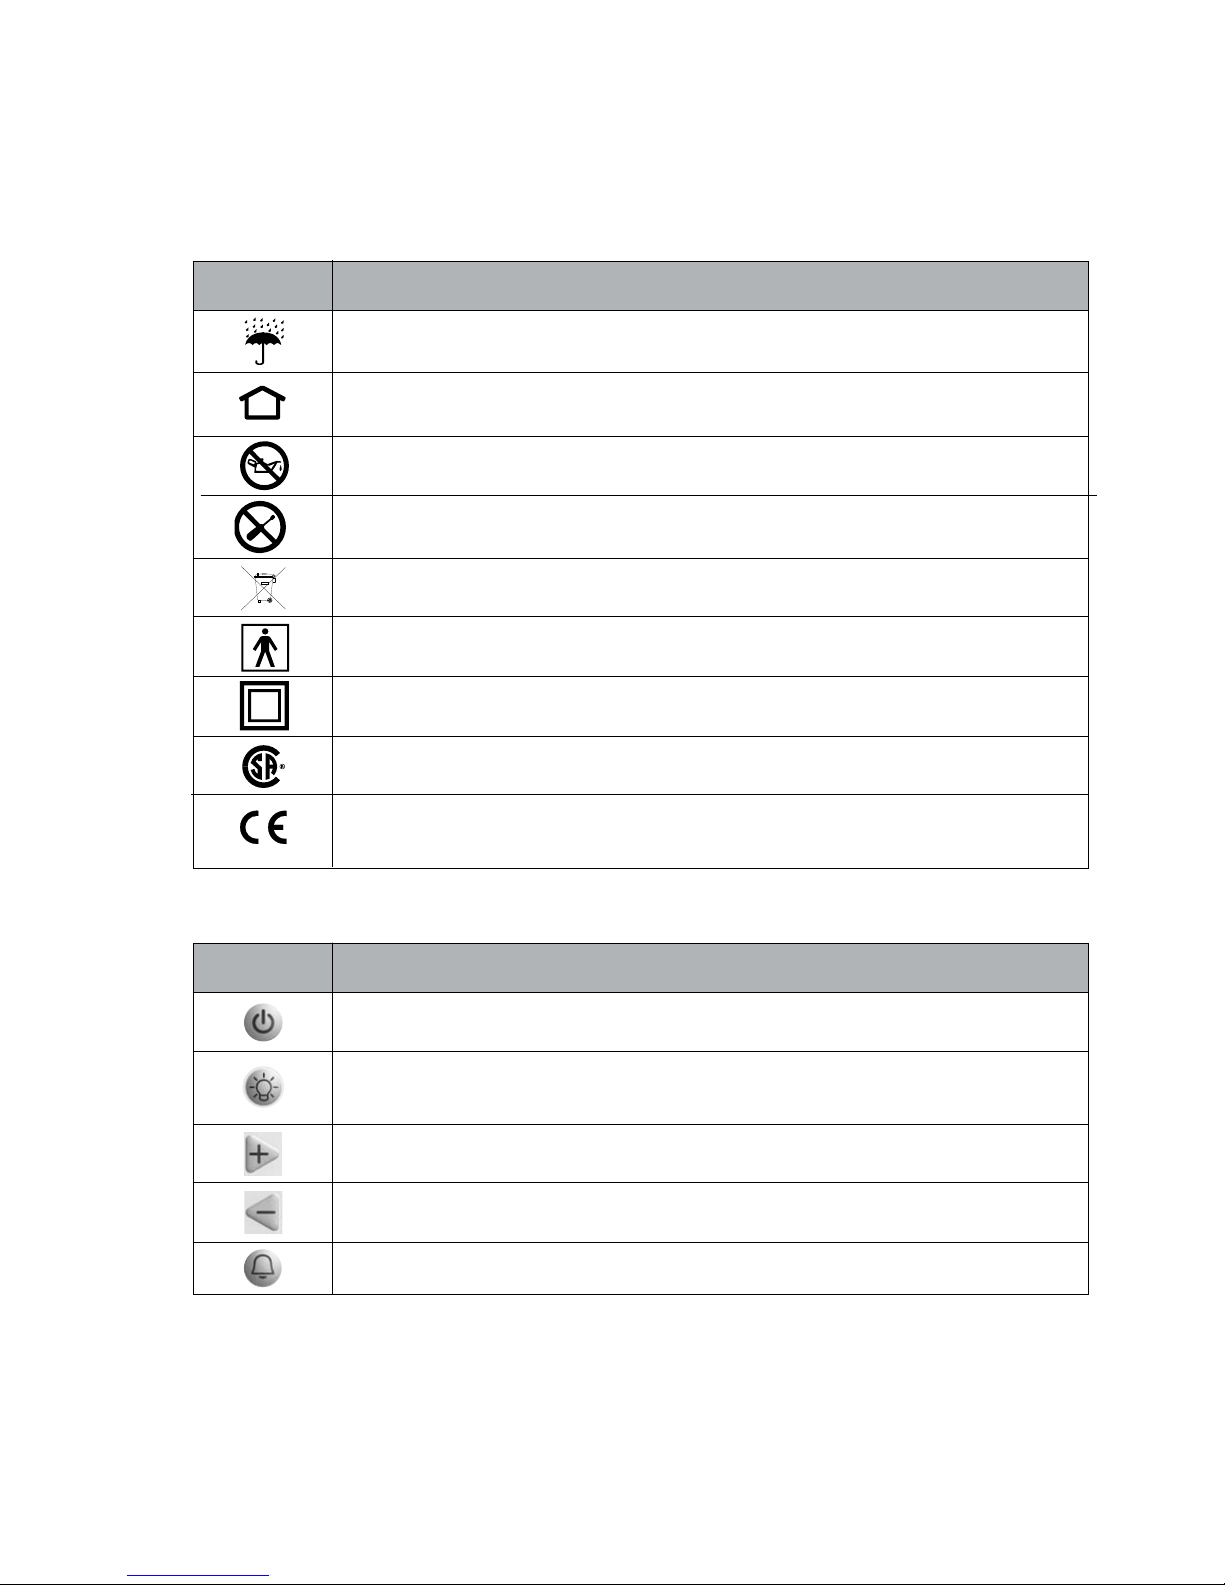
Meaning
Keep Dry
Indoor or Dry Location Use Only, Do Not Get Wet
Use No Oil or Grease
Do Not Disassemble
Do Not Dispose of In Unsorted Municipal Waste
Type BF Applied Part, Not Intended for Cardiac Application
Class II Device
Electrical Safety Agency Certification Logo
Complies With Applicable EU Directives Including Medical Device
Directive
Symbol
User Interface Label
Meaning
ON / OFF Button
Display Backlight Button
Increase Flow Setting
Decrease Flow Setting
Audible Alarm Button
Symbol
36
0123
Page 41

Inogen One® G2 Concentrator
Dimensions:
With single battery:
L / W / H : 10.7 in (27.2cm) / 3.9 in (9.9cm) / 8.75 in (22.2cm)
L / W / H : 10.7 in (27.2cm) / 3.9 in (9.9cm) / 9.5 in (24.2cm)
Weight:
7.25 pounds (3.3kg) (includes single battery)
Noise: Less than 38dBA (as packaged) on setting 2
Warm-Up Time: 2 minutes
Oxygen Concentration: 90% - 3% /+ 6% at all settings
Flow Control Settings: 5 settings: 1 to 5
Power: Universal Power Supply:
AC Input: 100 to 240 VAC
50 to 60 Hz
Auto-Sensing:
1.0A
DC Input: 13.5-15VDC,10A
DC Output: 19 VDC, 5.0A max.
Rechargeable Battery: Voltage: 12.0 to 16.8 VDC
Battery Duration:
Up to 4 hours with single battery
Up to 8 hours with double battery
Battery Charging Time:
Up to 4 hours for a single battery
Up to 8 hours for a double battery
Environmental Ranges
Intended for Use:
Temperature: 41 to 104˚F (4 to 40˚C)
Humidity: 0% to 95%, non-condensing
Altitude: 0 to 10,000 ft (0 to 3048 meters)
Environmental Ranges
Intended for Storage:
Temperature: -4 to 140˚F (-20 to 60˚C)
Humidity: 0% to 95%, non-condensing
Store in a dry environment
Transportation: Keep Dry, Handle With Care
Inogen One® G2 System Specifications Chapter 8
Inogen One® G2
System Specifications
8
37
English
Page 42

Inogen One® G2 Concentrator (continued)
Classifications
Mode of Operation: Continuous Duty
Type of Protection Against Electrical
Shock:
Class II
Degree of Protection Against Electrical
Shock:
Type BF
Not intended for cardiac application
Degree of Protection Against Ingress of
Water:
IP20
Degree of Safety for Application in
Presence of Anesthetic Gases:
Not suitable for such application
38
ELECTROMAGNETIC COMPATIBILITY
This CE Marked equipment has been tested and found to comply with the EMC limits for
the Medical Device Directive 93/42/EEC [EN 55011 Class B and EN 60601-1-2]. These limits
are designed to provide reasonable protection against harmful interference in a typical
medical installation.
The equipment generates uses and can radiate radio frequency energy and if not
installed and used in accordance with the instructions, may cause harmful interference
to other devices in the vicinity.
Tested by Independent
Laboratory:
Safety: IEC 60601-1
CAN/CSA C22.2 No. 60601-1
Electromagnetic Compatibility:
IEC 60601-1-2
RTCA DO 160
Page 43

Inogen One® G2 System Specifications Chapter 8
39
However, there is no guarantee that interference will not occur in a particular
installation. If this equipment does cause harmful interference with other devices,
which can be determined by turning the equipment off and on, the user is encouraged
to try to correct the interference by one or more of the following measures:
1. Reorient or relocate the receiving device.
2. Increase the separation between the equipment.
3. Connect the equipment into an outlet on a circuit different from that to
which the other device(s) is connected.
4. Consult Inogen or your equipment provider for assistance.
CAUTION Portable and mobile RF communications equipment can affect medical
electrical equipment.
CAUTION Stacking or placing equipment adjacent to other devices is not
recommended, where such configurations are necessary, all equipment
in question should be carefully observed to ensure that EMI does not
degrade performance.
CAUTION Use of accessories, transducers and cables other than those specified,
with the exception of transducers and cables sold by the manufacturer
of the equipment as replacement parts for internal components,
may result in increased emissions and decreased immunity of the
equipment or system.
English
Page 44

Guidance and Manufacturer’s Declaration – Electromagnetic Emissions
The Inogen One® G2 Oxygen Concentrator is intended for use in the electromagnetic
environment specified below. The customer or the user of the Inogen One® G2 Oxygen
Concentrator should assure that it is used in such an environment.
Emissions Test Compliance Electromagnetic Environment - Guidance
RF emissions
CISPR 11
Group 1 The Inogen One® G2 Oxygen
Concentrator uses RF energy only for
its internal function. Therefore its RF
emissions are very low and not likely
to cause any interference in nearby
equipment.
RF emissions
CISPR 11
Class B The Inogen One® G2 Oxygen
Concentrator is suitable for use in all
establishments including domestic
establishments and those directly
connected to the public low-voltage
power supply network that supplies
buildings used for domestic purposes.
Harmonic Emissions
IEC 61000-3-2
Class A
Voltage fluctuations /
flicker emissions
IEC 61000-3-3
Complies
40
 Loading...