

Page 1
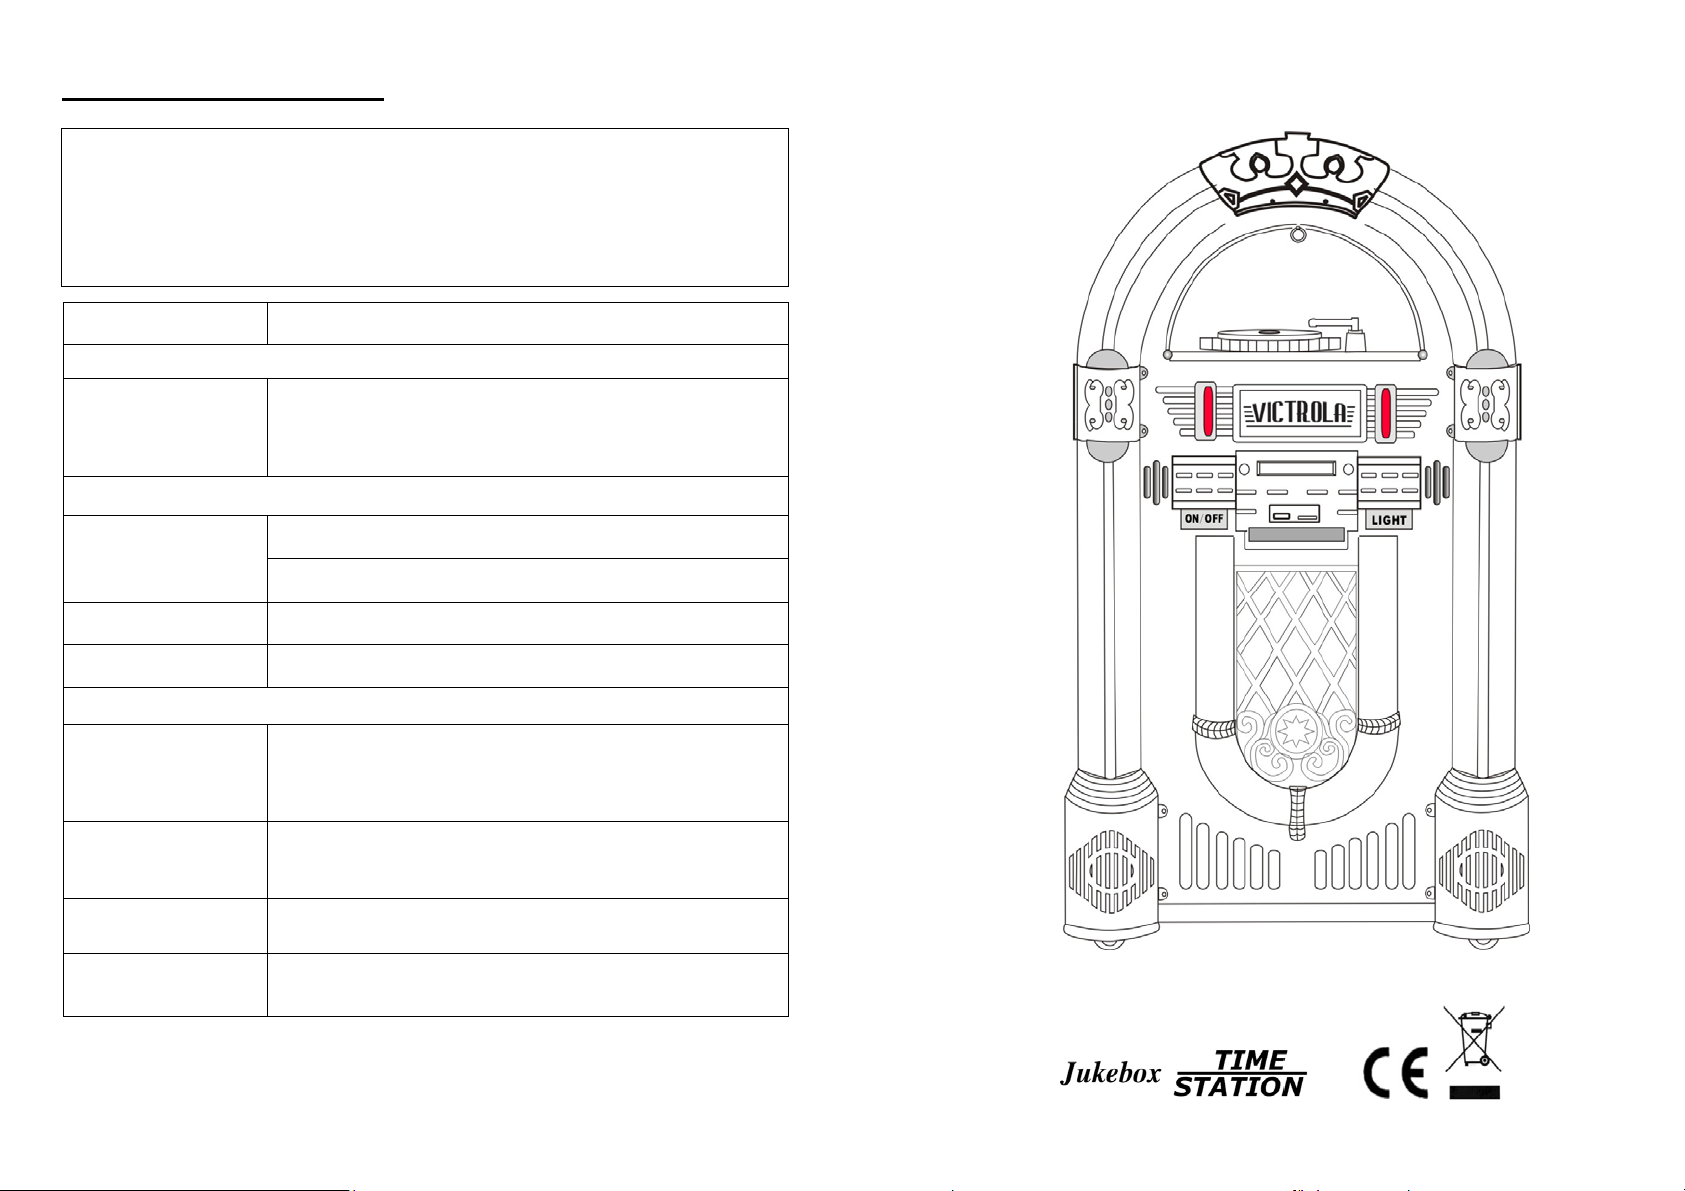
TROUBLESHOOTING GUIDE
Unit i
The following checks will assist in the correction of most problems which you
may encounter with your set. Before going through the check list below, first
check the following points.
Should any problem persist after you have made these checks consult
your nearest dealer
Symptom Possible Causes (and Remedies)
RADIO RECEPTION
The power cord must be connected firmly.
OPERATING INSTRUCTIONS
No radio
reception
CD PLAYER OPERATION
Disc does not play
Or sound skips
Sound skips
s not
working.
The MODE selector has not been set to the correct position.
Adjust the VOLUME knob.
Rotate the TUNING knob to find a radio station.
Switch the AUX IN jack to “OFF”
Reload the disc with the label side up
Clean the disc.
Change the installation location.
Press the Reset button.
Press the STOP button and then program the tracks.
GENERAL
Programmed disc
play will not
function
No sound output.
Severe hum or
noise.
Display garbled,
non-functional.
THE OPERATING INSTRUCTIONS REFLECT THE CURRENT TECHNICAL
SPECIFICATION OF THIS PRODUCT AT TIME OF PRINT.
WE RESERVE THE RIGHT TO CHANGE SPECIFICATIONS FOR TECHNICAL REASONS
WITHOUT PRIOR NOTICE.
The AC power cord is not connected to an AC wall outlet.
Check that the power cord is connected firmly.
Push the power button from the “OFF” position to the “ON”
position.
Turn VOLUME knob clockwise. Press the Reset button.
Switch the AUX IN jack to “OFF” and remove the RCA cord.
Switch the external speaker jack on the back cover.
The TV or VCR is too close to the stereo system.
Separate from the TV or VCR.
Turn Off the power to restart.
12
BYL-12: JUKEBOX-PHONOGRAPH
Page 2
SAFETY INSTRUCTIONS
WARNING: TO PREVENT FIRE OR SHOCK HAZARD, DO NOT EXPOSE
THIS APPLIANCE TO RAIN OR MOISTURE.
The lightning flash and arrow
head within the triangle is a
warning sign alerting you of
“dangerous voltage” inside the
product.
RISK OF ELECTRIC SHOCK
CAUTION: TO REDUCE THE RISK OF
ELECTRIC SHOCK DO NOT REMOVE COVER
(OR BACK) NO USER SERVICEABLE PARTS
INSIDE. REFER SERVICING TO QUALIFIED
CAUTION
DO NOT OPEN
The exclamation point within
the triangle is a warning sign
alerting you of important
instructions accompanying the
product.
IMPORTANT SAFETY INSTRUCTIONS
1. Read instructions - All the safety and operating instructions should be read
before the appliance is operated
2. Retain instructions - The safety and operating instructions should be retained
for future reference.
3. Heed Warnings - All warnings on the appliance and in the operating
instructions should be adhered to.
4. Follow instructions - All operation and use instructions should be followed.
5. Water and Moisture - The appliance should not be used near water; for
example, near a bathtub, washbowl, kitchen sink, laundry tub, in a wet
basement, or near a swimming pool, and the like.
Unit Specifications –
FREQUENCY RANGE: FM 87.5--108 MHZ
POWER SUPPLY: INPUT---100-240VAC ~ 50/60 Hz
OUTPUT---18V7A DC
POWER CONSUMPTIONS: 126 W
POWER SOURCE: REFER TO RATING LABEL AT BACK PLATE.
2
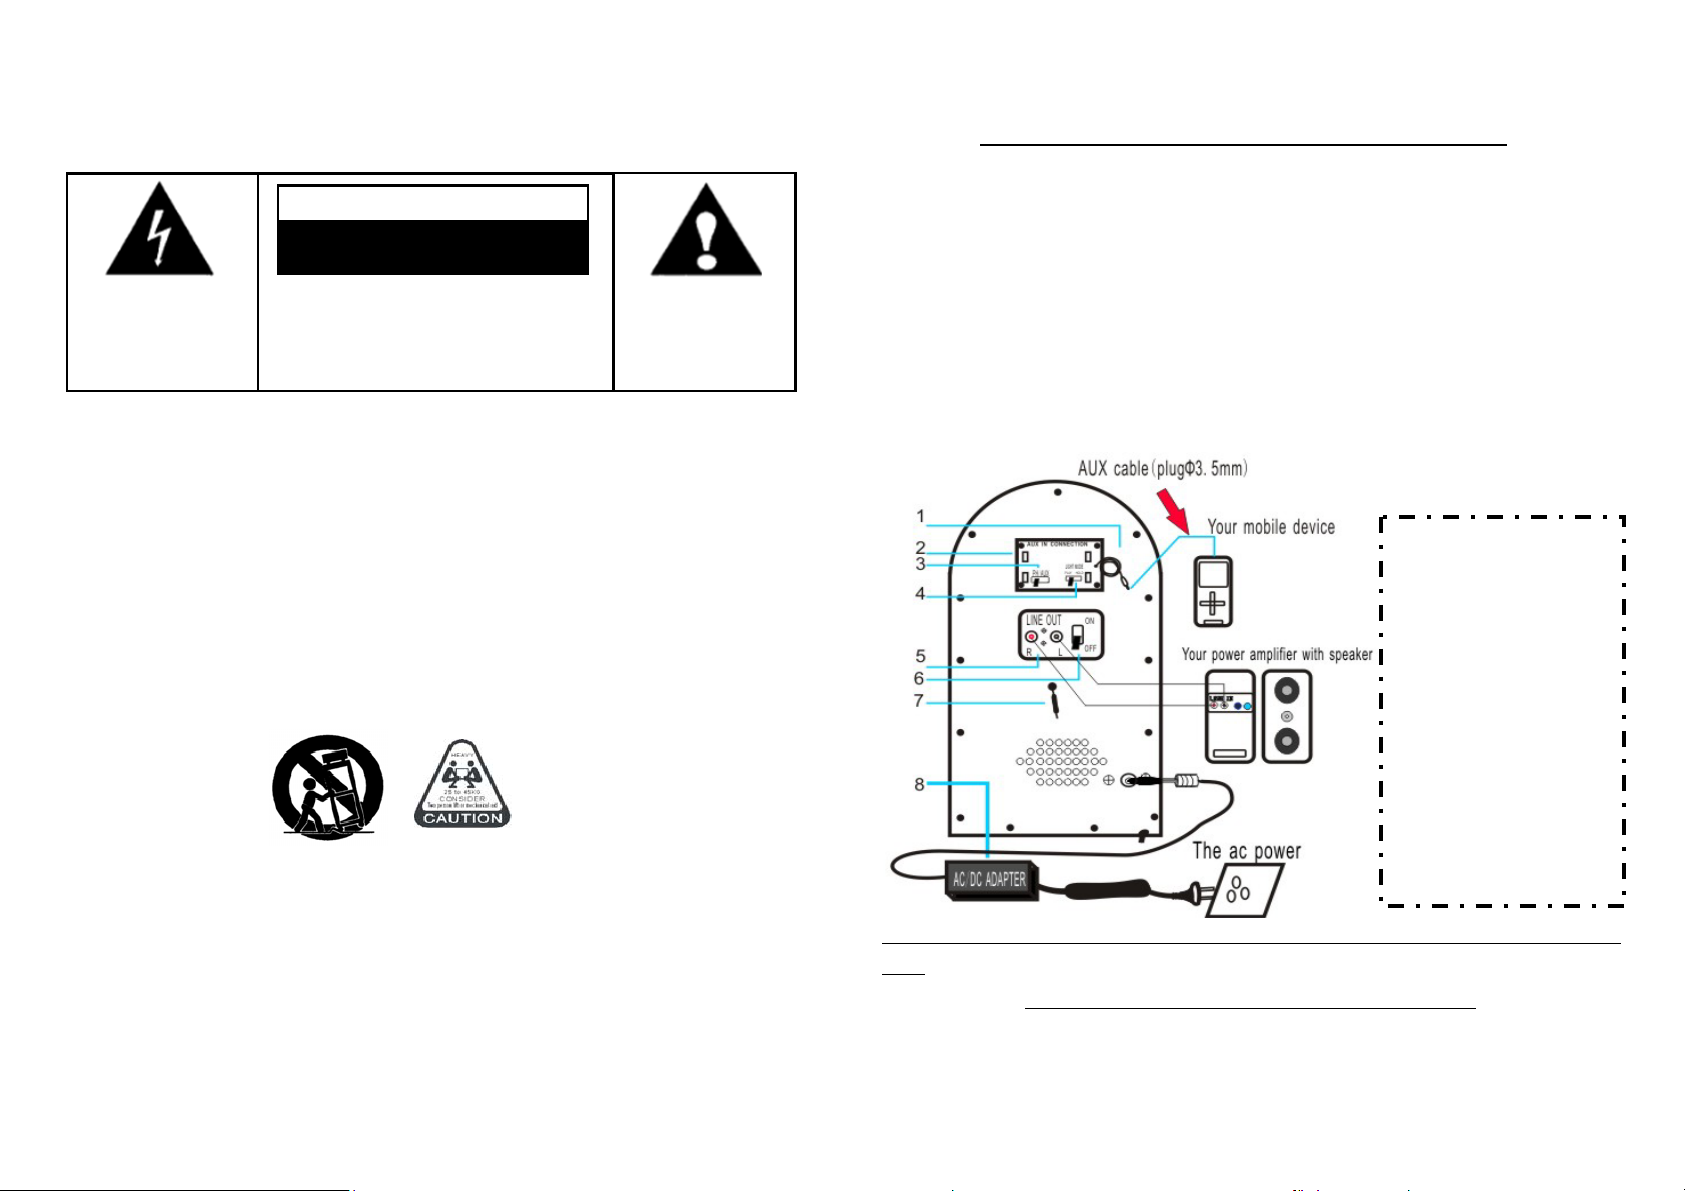
AUX IN and LINE OUT operation
:
AUX IN-(If equipped with, please refer to the, otherwise, ignore).
1.On the display lens "PH", under the condition of product on the back
"PH/AUX " switch choose "AUX".
2.Plug the AUX in lead at the back of the juke box into your iPhone/iPod
or other MP3 device. The AUX lead needs to be plugged into the earphone
socket of your iPhone/iPod or other MP3 device.
3.Ensure line out switch at the back of the juke box is in the "AUX"
position when using AUX in.
4.You can then begin playback from your iPhone/iPod or MP3 device.
If you cannot hear anything, turn up the volume on the juke box.
Figure 4:
1)AUX IN cable
2)MP3 box buckle bit
3)PHONO/AUX
Conversion system
4)LIGHT
Flash)
5)LINE OUT L/R
6)The line out switch
system
7)FM Antenna
8)The power adapter
Note:AUX IN play music, need to make sure PHONO needle return back to needle on
shelf.(Otherwise may be abnormal).
LINE OUT-(
"LINE OUT" switch system selection "ON".
1.
2. Inserted the audio cable a jukebox "LINE OUT" jack, audio signal through the connection
to an external amplifier device through the left/right channel.
After the connection is successful, through the external power amplifier plays music.
If equipped with, please refer to the, otherwise, ignore).
11
MODE(Color
Page 3

TURNING ON THE LIGHTING EFFECTS
The Jukebox features 2 colour changing LED light tubes that are
displayed on the Jukebox parts diagram as items figure 4-4. There are
also several other multicoloured LED lighting effects that are featured in
the CD player and USB/SD compartment and at the bottom of the
speaker panel.
To turn on the LED lighting effects simply press the LIGHT button (No.
2-2 on the control panel diagram of 24). All the LED lighting effects will
illuminate.
NOTE: The lighting effects operate independently of the POWER
button (No. 2-2 on the control panel diagram). The LIGHT button
controls The power to The lighting effects and The on The back of The
machine.
On the rear of the Jukebox, there is an LED Light Mode Switch
(Number 4 On the Jukebox with parts diagram item 4), the Colour
Changing LED Light Tubes will fade in and out of several different
colours continuously. When set to HOLD mode the LED Light Tubes
will be illuminated in only one colour. By switching to PLAY mode, the
LED Light Tube will begin to cycle through the colours. By switching
back to HOLD, different colours can be selected to display and hold
(please note that these colours have been predetermined and may not
be the exact same colour as the light tube was illuminated when
switched to “HOLD” mode).
To turn OFF the lighting effects all together simply press the “LIGHT”
button once again, and all lighting effects will no longer be illuminated.
Note: in the "hold" mode, there may be no visible light, is normal (need to adjust
the switch).
10
6.
The appliance should always be used or stored on a flat stable surface
indoors.
7. Ventilation - The appliance should be situated so that its location or position
does not interfere with its proper ventilation. For example, the appliance
should not be situated on a bed, sofa, rug, or similar surface that may block
the ventilation openings; or placed in a built-in installation, such as a
bookcase or cabinet that may impede the flow of air through the ventilation
openings.
8. Heat - The appliance should be situated away from heat sources such as
radiators, heat registers, stoves or other appliances (including amplifiers) that
produce heat.
9. Power Sources - The United States is 120 vac-60Hz; Japan is 100
vac-60Hz.Power-Cord Protection - Power supply cords should be routed so
that they are not likely to be walked on or pinched by items placed upon or
against them.
10. Power cords should be regularly inspected and if any damage is discernible
then stop using and consult a qualified electrical technician.
11. This item is fitted with a 3amp fuse only.
12. Cleaning - The appliance should be cleaned only as recommended by the
Manufacturer.
13. Non use Periods - The power cord of the appliance should be unplugged
from the outlet when left unused for a long period of time.
14. Object and Liquid Entry - Care should be taken so that objects do not fall
and liquids are not spilled into the enclosure through openings. Switch off
immediately at power source if the item comes into contact with liquids and
refer to a qualified electrical technician.
15. Refer to s suitable qualified technician if the appliance is damaged, needs
servicing or has been dropped.
16. Servicing - The user should not attempt to service the appliance beyond
general cleaning and changing of stylus.
17. This appliance / product is not intended for use by persons (including
children) with reduced physical, sensory or mental capabilities, or lack of
experience and knowledge, unless they have been given supervision or
instruction concerning the use of the appliance by a person responsible for
their safety. Children should be supervised so that they do not play with the
appliance.
3
Page 4

SETTING THE CORRECT TIME
American :
version: When the Jukebox enters standby mode the LCD display panel will illuminate
and the time “12:00” will appear on the LCD display panel.
European version:
When the Jukebox enters standby mode the LCD display panel will illuminate and the time “
00:00” .
For example , the American version of the operation:
To set the time, simply press the “PROG” button on the control panel or remote
control (No. 22 on the Control panel diagram or No. 6 on the remote control
diagram) and hold this button down for 3 -5 seconds, until “12-H” is displayed on
the screen (“12-H” indicates that the time will be set in 12 hour format),
"NEXT" or "BACK" can choose 12 or 24 hour format;
screen press the “PROG” button again. The display will revert to “00:00” on the
display, however, with the “12” flashing. Use the “NEXT” and/or “BACK” buttons
on the control panel or the “PREV/F.R” and/or “NEXT/F.F ”buttons on the
remote control (No. 3 and 6 on the control panel diagram or remote control
diagram), to select the correct hour (keep in mind it will be set it 12 hour time),
then press the “PROG” button to confirm. The second “00” will now be flashing.
Use the “NEXT” and/or “BACK” buttons or the “PREV/F.R” and/or “NEXT/F.F”
buttons to select the correct minutes, then press the “PROG” button to lock this
figure in.
NOTE:
you wish to save the set time into your Jukebox, do not press the POWER button (No. 2 on the
control panel diagram) to turn the unit off, simply press the ON/OFF button (No. 3 on the control
panel diagram) to set the Jukebox to standby. If the POWER button (No. 2 on the control panel
diagram) is used to turn the Jukebox off, it will erase the time setting and the above process will
need to be repeated in order to reset the correct time the next time it is turned on.
The time will only be saved in The Jukebox The when it is working or standby mode. If
Once “12-H” is displayed on the
4
Then,press
7 Folder-: press to skip to the first track in the previous folder. If the
Jukebox is in random (“RAN”) mode the folder skipping function
will be disabled.
8 Repeat: press to replay one particular song. press the button
once repeating ONE song only, press the button twice repeating
ALL the songs, press the button three times repeated RANDOM
play.
9 Auto: press to Radio Auto-search and save stations
10 ST/Mono: Stereo / Mono Selection in Radio (where available)
11 PRE-: To playback previous stored radio station
12 MEM: tune the radio to the desired station The Jukebox has a 20 station
memory to store the user’s favourite radio stations.
In the condition of CD, CD door opening and closing.
13 PRE+: To playback a next stored radio station
14 EQ: To change the Equalizer setting equalizer settings preloaded on to the
Jukebox are Pop (POP),Rock (ROC), Classical (CLA).and Flat (FLA), (To
start the use of "POP" model for default).
15 Folder+: press to skip to the first track in the next folder. If the
Jukebox is in random (“RAN”) mode the folder skipping function
will be disabled.
16 NEXT/F.F: fast forward, press to go to the next track or fast
forward through a track. You can then press the playback button
to start playback.
17 VOL + : increase the voice, press the button repeatedly or press
once and hold down until you reach the desired volume level.
18 Play/pause button: press to play or pause a track.
9
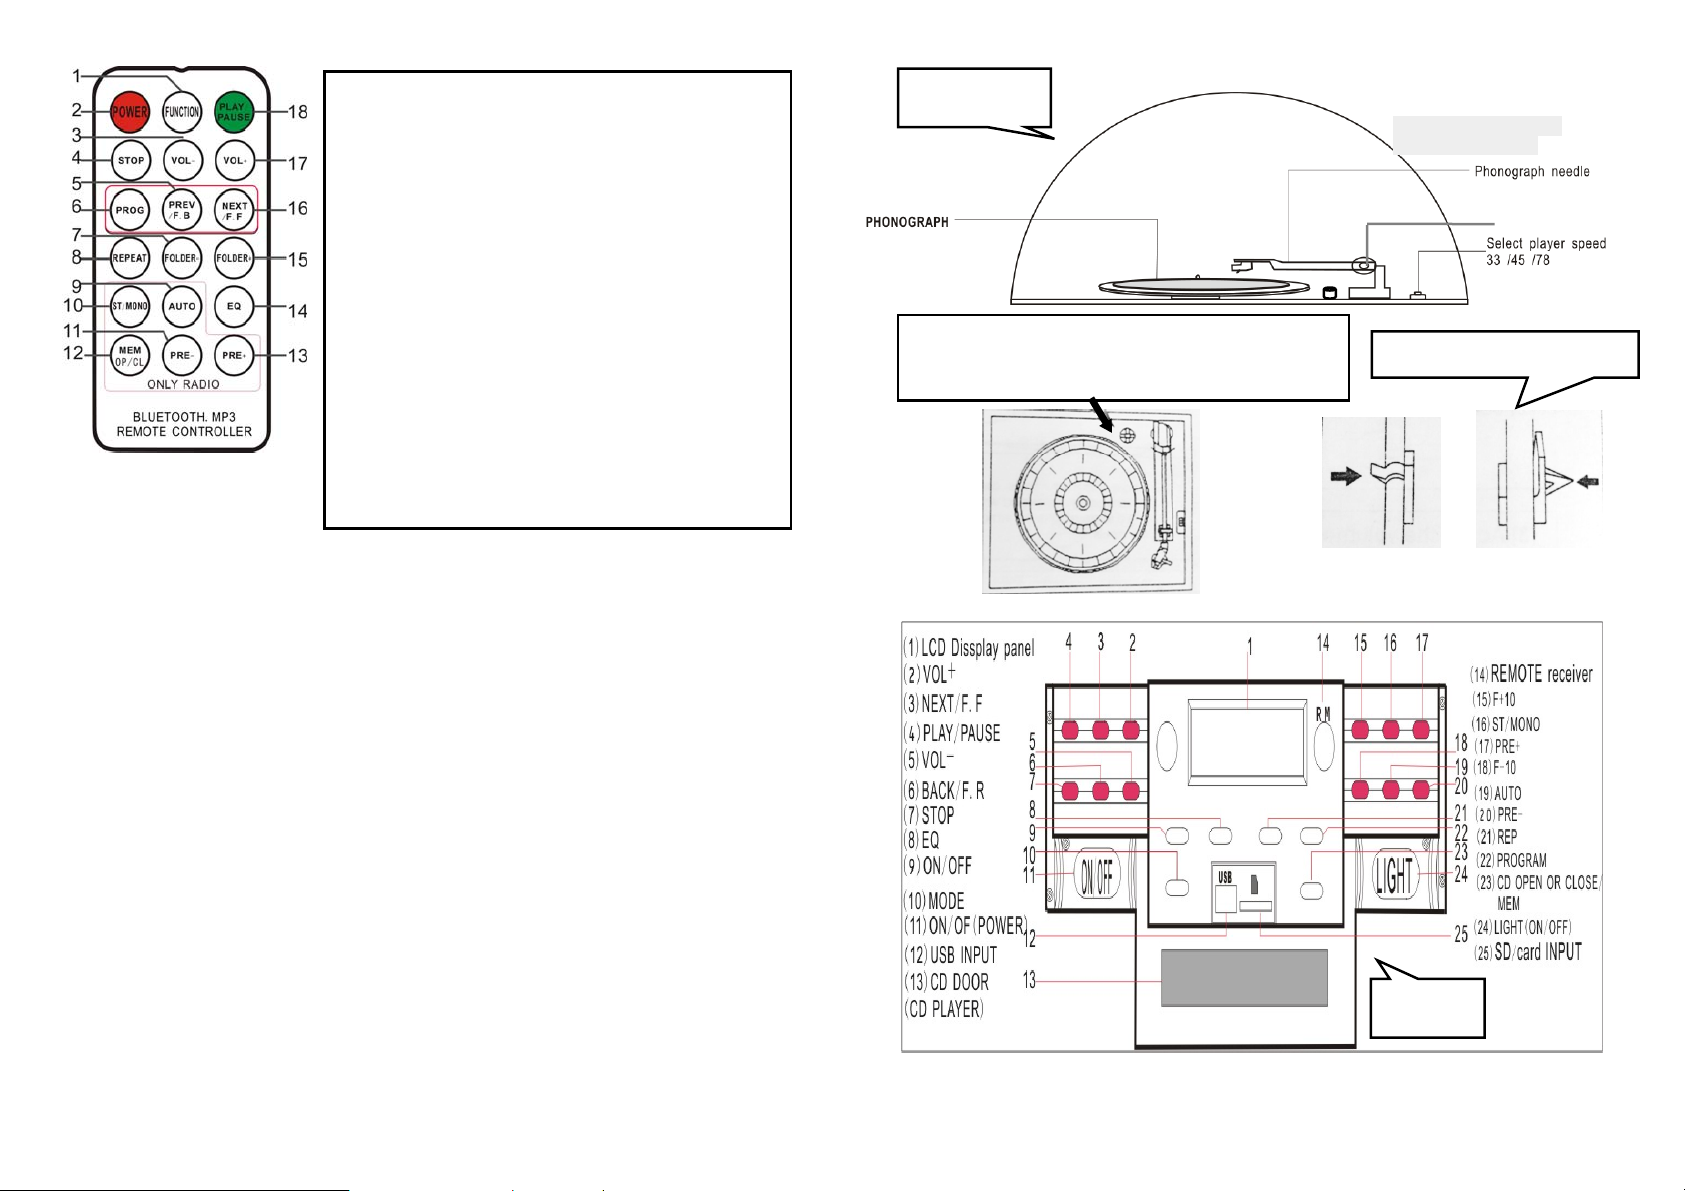
REMOTE CONTROL DIAGRAM
Page 5
PROGRAM:
a. While playing back from a music source, press the stop button.
b. Press the program button to enter the program mode. The word
PROG will flash in the bottom left corner of the display screen. A
position number will also be flashing on the screen (eg: p01).
c. Press the next or back buttons to select which track you want to
program into position. When you have made your selection, press
the program button to save it.
d. You can then repeat the same steps to fill in more positions.
e. When done, press play to begin your music playback. You can do
this at any stage once you have programmed the amount of tracks
you want.
f. At any stage during the program process you can press stop to
cancel.
g. 'FUL' will display on the LCD screen when the Max amount of
memory location have had been filled.
FUNCTIONS ON THE REMOTE CONTROL
1. Function: To select between the different functions such as the
FM tuner, CD player, USB input, SD input ,Bluetooth and
Phonograph.
2. Power: the POWER button on the remote control diagram to
exit standby mode and enter AM/FM Radio Mode.
3. VOL - : reduce voice, press the button repeatedly or press once
and hold down until you reach the desired volume level.
4. Stop : press to stop a track.
5. PREV/F.B(fast back): press to go to the previous track or
rewind back through a track. You can then press the play
button to start playback.
6. Program: Allows you to program only particular songs of your
choice to playback from your music source.(Further info on this
function on the left upper corner of the page)
8
FUNCTIONS ON THE JUKE BOX
Figure 2-1:
there is a screw to protect the phonograph chassis
during transportation.
turn the screw clockwise with a coin to its lowest
position before you use the phonograph for the first time.
5
USING THE FUNCTIONS
the end of play tone-arm
return to in situ please
Tone-arm
remove the lock before releasing
the tone arm
OPEN
Figure 2-2:
CLOSE
Page 6

1.Radio operation
This Jukebox features an inbuilt FM Tuner with auto-search function and a 20
station programmable memory. When using for the first time, press the POWER
button and the Jukebox will switch to standby mode. Press the ON/OFF button on
the control panel or the POWER button on the remote control to turn the Jukebox
ON. The Jukebox should start in FM radio mode, the LCD display will show FM
87.5MHz and the speakers will emit a fuzzy sound (unless the frequency 87.5MHz
contains a radio station in your area). If it does not automatically start in FM radio
mode, press the MODE button on the Jukebox or the FUNCTION button on the
remote control until FM radio mode is entered.
Note:
The American version of "FM" frequency, forward or backward, jumped 0.1
MHz;The European version of the "FM frequency, forward or backward, jumped
0.05 MHz;FM antenna, it needs long, put in the radio effect is the best location.(FM
antenna In the back of the product).
2. CD operation
a. Press "MODE" button until led display indicate "- - - -", Press "OP - CL" button,
CD door opening,Right into the CD,then display will show number of songs
and then begin to start playback.
b. Press "Next/F.F" to select your desire song.
c. Press "REP" once to repeat one song, the REP indication at the top left corner
on the led display will flash. Press "REP" one more time to repeat all songs in
the track and the REP indication at the top left corner on the led display will
appear. Press "REP" again to cancel repeat function.
d. To play songs randomly, press "REP" button until the led display "RAN" on the
bottom of the display.
e. For programming, press "STOP" button to stop playback. Press "PROG" to
enter programming mode. The led display will flash and indicate "P 01", select
the song that you want to program and then press "PROG" again. Press
"Play/Pause" to stop programming and start to playback the programmed
songs. This unit can program up to 20 songs( Further info on this function on
page 8).
(CD should be placed on the tray with the label side up)
3. USB/SD operation.
a. Press "Mode" button until led display indicate " USB - - - -", then display will show
number of folder, then number of songs and start playback.
b. Press "Next or Prev" or "F+/-10" to select your desire song.
6
c. Press "REP" once to repeat one song, the REP indication at the top left
corner on the led display will flash.
album;
Press "REP" one more time to repeat all songs in the track and the REP
Press the "REP" display "REP FOLDER" repeat
indication at the top left corner on the led display will appear. Press "REP"
again to cancel repeat function.
d. To play songs randomly, press "REP" button until the led display "RAN" on
the bottom of the display.
e. For programming, press "STOP" button to stop playback. Press "PROG" to
enter programming mode. The led display will flash and indicate "P 01", select
the song that you want to program and then press "PROG" again. Press
"Play/Pause" to stop programming and start to playback the programmed
songs. This unit can program up to 20 songs.
4. To begin pairing with a Bluetooth device.
1) Press "MODE" button until LCD display "bLUE" and wait for 3 seconds to
make the Jukebox speaker discoverable.
2) Turn on the Bluetooth device and let it automatically search for available
Bluetooth devices.
3) From the Bluetooth device list, select the device named "JUKEBOX".
4) Once the pairing is completed, the Bluetooth will indicated "connected".
To start playback songs from your Bluetooth device. You can control from your
Bluetooth device or from the Jukebox itself or remote control(provided).
a. Control from the Bluetooth device. Use keys on the display to select songs,
volume +/-, play/pause and next/prev function.
b. Control from the Jukebox/remote control.
c. Once pairing is completed, the song from the Bluetooth device
automatically start to playback.f
d. Press "VOL+/-" to control the sound level.
e. Press "Next or PREV" to select next and previous song respectively.
f. Press "PLAY/PAUSE" to pause or continue playback.
g. To end the pairing, press "MODE" button to other functions or turn off the
Bluetooth connection from the Bluetooth device.
5.Phonograph Record
Note: PHONO play music, need to make sure the product back "PH/AUX"
conversion system selection "PH"(Switch on the back of the product pos ition).If
equipped with AUX IN, this switch operation, otherwise skip。
1. Press "MODE" button until led display indicate "PH", Put the phonograph
record into the player, select player speed 33/45/78, the needle moved to the
record above, began to playback(
In the on page 5 -Figure 2-1).
2. NOTE: the tone-arm will automatically return to the tone arm-rest after
reaching the end of the record.
7
Page 7

Warning:
This device complies with Part 15 of the FCC Rules. Operation is subject to the
following two conditions: (1) this device may not cause harmful interference, and (2)
this device must accept any interference received, including interference that may
cause undesired operation. changes or modifications not expressly approved by the
party responsible for compliance could void the user's authority to operate the
equipment.
This equipment has been tested and found to comply with the limits for a
Class B digital device, pursuant to Part 15 of the FCC Rules. These limits are
designed to provide reasonable protection against harmful interference in a
residential installation. This equipment generates, uses and can radiate radio
frequency energy and, if not installed and used in accordance with the
instructions, may cause harmful interference to radio communications. However,
there is no guarantee that interference will not occur in a particular installation.
If this equipment does cause harmful interference to radio or television reception,
which can be determined by turning the equipment off and on, the user is
encouraged to try to correct the interference by one or more of the following
measures:
-- Reorient or relocate the receiving antenna.
-- Increase the separation between the equipment and receiver.
-- Connect the equipment into an outlet on a circuit different
from that to which the receiver is connected.
-- Consult the dealer or an experienced radio/TV technician for help.
This device and its antenna(s) must not be co-located or operation in conjunction
with any other antenna or transmitter.
with a minimum distance of 20 centimeters between the radiator and your body.
This equipment should be installed and operated
 Loading...