

Page 1

1
OPERATING MANUAL
MODEL: ITRR-700
RETRO USB TURNTABLE
Page 2

2
IMPORTANT SAFETY INSTRUCTIONS FOR
AUDIO PRODUCTS-READ ALL OF THE FOLLOWING
IMPORTANT SAFEGUARDS CAREFULLY
When using electrical products, basic precautions should always be followed including:
1. Read Instructions-All the safety and operating instructions should be read before the product
is operated.
2. Retain Instructions-The safety and operating instructions should be retained for future
reference.
3. Heed Instructions-All warnings on the product and in the operating instructions should be
adhered to.
4. Follow Instructions-All operating and user instructions should be followed.
5. Cleaning-Unplug this product from the wall outlet before cleaning. Do not use liquid cleaners or
aerosol cleaners. Use a damp cloth for cleaning.
6. Attachments-Do not use attachments not recommended by the product manufacturer as they
may cause hazards.
7. Water and Moisture-Do not use this product near water-for example, near a bath tub, wash
bowl, kitchen sink, or laundry tub, in a wet basement, or near a swimming pool, etc.
8. Accessories-Do not place this product on a surface. The product may fall, causing serious
injury to a child or adult and serious damage to the product. Use only with a stand, bracket, or
table recommended by the manufacturer, or sold with the product. Any mounting of the product
should follow the manufacturer’s instructions, and should use a mounting accessory
recommended by the manufacturer.
9. Transporting-This product should be moved with care to avoid
damage or injury.
10. Ventilation-Slots and openings in the cabinet are provided for
ventilation, to ensure reliable operation of the product and to protect it
from overheating. These openings must not be blocked or covered. The
openings should never be blocked by placing the product on a bed,
sofa, rug, or similar surface. This product should not be placed in a
built-in installation such as a bookcase or rack unless proper ventilation is provided or the
manufacturer’s instructions have been adhered to.
11. Power Sources-This product should be operated only from the type of power source indicated
on the marking label. If you are not sure of the type of power supply to your home, consult your
product dealer or local power company. For products intended to operate from battery power, or
other sources, refer to the operation instructions.
12. Power-Cord Protection- Power-supply cords should be routed so that they are not likely to be
trapped in any way.
Page 3

3
13. Lightning-For added protection for this product during a lightning storm, or when it is left
unattended and unused for long periods of time, unplug it from the wall outlet and disconnect
the antenna or cable system. This will prevent damage to the product due to lightning and
power-line surges.
14. Power Lines-An outside antenna system should not be located in the vicinity of overhead
power lines or other electric light or power circuits, or where it can fall into such power lines or
circuits. When installing an outside antenna system, extreme care should be taken to keep from
touching such power lines or circuits as contact with them might be fatal.
15. Overloading-Do not overloads wall outlets, extension cords, or integral convenience
receptacles as this can result in a risk of fire or electric shock.
16. Object and Liquid Entry-Never push objects of any kind into this product through openings as
they may touch dangerous voltage points or short-out parts that could result in a fire or electric
shock. Never spill liquid of any kind on the product.
17. Servicing-Do not attempt to service this product yourself as opening or removing covers may
expose you to dangerous voltage or other hazards. Refer all servicing to qualified service
personnel.
18. Damage Requiring Service-Unplug this product from the wall outlet and refer servicing to
qualified service personnel under the following conditions:
a. If the power-supply cord or plug is damaged.
b. If liquid has spilled, or objects have fallen into the product.
c. If the product has been exposed to rain or water.
d. If the product does not operate normally by following the operating instructions. Adjust only
those controls that are covered by the operating instructions, as an improper adjustment of
other controls may result in damage and will often require extensive work by a qualified
technician to restore the product to its normal operation.
e. If the product has been dropped or damaged in any way, and the product exhibits a distinct
change in performance-this indicates a need for service.
19. Replacement Parts-When replacement parts are required, be sure the service technician has
used replacement parts specified by the manufacturer or have the same characteristics as the
original part. Unauthorized substitutions may result in fire, electric shock, or other hazards.
20. Safety Check-Upon completion of any service or repairs to this product, ask the service
technician to perform safety checks to determine that the product is in proper operating
condition.
21. Wall or Ceiling Mounting-The product should be mounted to a wall or ceiling only as
recommended by the manufacturer.
22. Heat-The product should be situated away from heat sources such as radiators, heat registers,
stoves or other products(including amplifiers)that produce heat.
Page 4
4
Precautions
Safety Information
CAUTION:
1. In order to shut off the power to this product completely, unplug the power cord from the wall outlet.
Be sure to unplug the unit if you do not intend to use it for an extended period of time such as a
vacation.
2. Use of controls and adjustments or performance of procedures other than those specified herein
may result in hazardous radiation exposure.
3. If this product develops trouble, contact a qualified service center, and do not use the product in a
defective state.
4. WARNING: To reduce the risk of electric shock, this appliance has a polarized plug (one blade is
wider than the other). This plug will fit in a polarized outlet only one way. If the plug does not fit fully in
the outlet, reverse the plug. If it still does not fit, contact a qualified electrician to install the proper
outlet. Do not modify the plug in any way.
Safety Precautions
WARNING:
To reduce the risk of fire or electric shock, do not expose this appliance to rain or moisture.
CAUTION
RISKS OF ELECTRIC SHOCK- DO NOT OPEN!
To reduce the risk of electric shock, do not remove cover or back.
No user serviceable parts inside. Refer servicing to qualified service personnel.
The light flash with arrowhead symbol, within an equilateral triangle, is intended to alert
user to the presence of non insulated “dangerous voltage” within the product’s enclosure
that may be of sufficient magnitude to constitute risk of electric shock to persons.
The exclamation point within an equilateral triangle is intended to alert user to the
presence of important operating and maintenance (servicing) instructions in the literature
accompanying the appliance.
CAUTION:
For compact disc units only: invisible laser radiation when open and interlock failed or
defeated. Avoid direct exposure to laser beam.
(See markings on the back of the unit)
CAUTION:
To prevent electric shock, match wide blade of plug to wide slot, fully insert.
Page 5

5
FCC WARNING: Changes or modifications to this unit not expressly approved by the party
responsible for compliance will void the user’s authority to operate the equipment.
NOTE: This equipment has been tested and found to comply with the limits for Class B digital device,
pursuant to Part 15 of the FCC Rules. These limits are designed to provide reasonable protection
against harmful interference in a residential installation. This equipment generates, uses and can
radiate radio frequency energy and, if not installed and used in accordance with the instructions, may
cause harmful interference to radio or television reception. If this equipment does cause harmful
interference, which can be determined by turning the equipment off and on, the user is encouraged
to try to correct the interference by one or more of the following measures: -Reorient or relocate the
receiving antenna. -Move the transmitter to a different physical location. -Increase the separation
between the equipment and receiver. -Connect the equipment into an outlet on a circuit different from
that to which the receiver is connected. -Consult the dealer or an experienced radio/TV technician for
help. -If you cannot eliminate the interference, the FCC requires that you stop using your device.
Statement that the product complies with Part15 ( i.e. This device complies with Part15 of FCC
Rules. Operation is subject to following two conditions: (1) This device may not cause harmful
interference, and (2) This device must accept any interference received, including interference that
may cause undesired operation.)
CALIFORNIA PROP 65 WARNING
WARNING :This product contains chemicals known to the State of California to cause birth defects
or other reproductive harm. For more information on these regulations and a list of chemicals, log on
the following website address: http://www.oehha.ca.gov/prop65.html
Page 6

6
Before Use
1. Choose the location of the unit’s installation carefully. Avoid placing it in direct sunlight or close to
a source of heat. Also avoid locations subject to vibrations and excessive dust, cold or moisture.
Keep away from sources that hum, such as transformers or motors.
2. Do not open the cabinet as this might result in damage to the circuitry or electrical shock. If a
foreign object should get into the set, contact your dealer.
3. Be sure not to handle discs with dirty fingers. Never insert a disc that has a crack on the surface.
4. When removing the power plug from the wall outlet, always pull directly on the plug, never pull the
cord.
5. To keep the laser pickup clean, do not touch it, and do not forget to close the disc tray.
6. Do not attempt to clean the unit with chemical solvents as this might damage the finish. Use a
clean, dry cloth.
7. In order to shut off the power to this product completely, unplug the power cord from the wall outlet.
Be sure to unplug the unit if you do not intend to use it for an extended period of time, such as a
vacation.
8. Keep this manual in a safe place for future reference.
Beware of Condensation
When the player (or a compact disc) is moved from a cold to a warm place or is used after a sudden
temperature change, there is a danger of condensation. Water vapor in the air could condense on
the mechanism or the laser pickup. If droplets of water form on these parts, correct playback will be
impossible because the laser cannot read the information from the disc correctly. To prevent this, if
you are going to use the player in a condition where condensation could occur, you should leave the
player for 1 or 2 hours after plugging it into an AC outlet depending on the amount of condensation. If
this is done, the player will stabilize at the temperature of its surroundings.
Page 7

7
Handing Compact Disc or Tape
Compact Disc
Handing the Discs:
This unit has been designed specifically for sound reproduction from compact discs bearing the
mark. No other discs can be used.
1. Always place the compact disc in the disc tray with
the label facing upward. (Compact discs can be
played only on one side).
2. To remove a disc from its storage case, press down
on the centre of the case and lift the disc out, holding
it carefully by the edge.
3. Fingerprints and dust should be carefully wiped off
the disc recorded surface with a clean cloth (not
included).
4. Never use chemicals such as: record sprays,
anti-static sprays or fluid, benzene or thinner to clean
compact discs. Such chemicals will do irreparable
damage to the disc’s plastic surface.
5. Discs should be returned to their cases after use to
avoid serious scratches that could cause the laser
pick up to skip.
6. Do not expose discs to direct sunlight or high
humidity and temperature for extended periods.
7. Do not stick paper or write anything with a ballpoint
pen on the surface of the label side.
8. Do not use irregular shaped CD’s (octagonal,
heart-shape, etc.), all of which can damage the unit.
Page 8
8
Cassette Tape
Tape Handling:
Do not store tapes in the following places:
1. On top of heaters, exposed to direct sunlight or in any other places with high temperatures.
2. Near speakers, on TV sets or amplifiers or where they would be exposed to strong magnetic fields.
3. Where humidity is high and in dirty, dusty places.
4. Avoid dropping or subjecting cassettes to excessive shocks.
5. As C-120 tapes are physically weak and could become entangled in the transport mechanism, do
not use them.
Preparation for Use
1. Connect the AC power cord to the nearest power outlet.
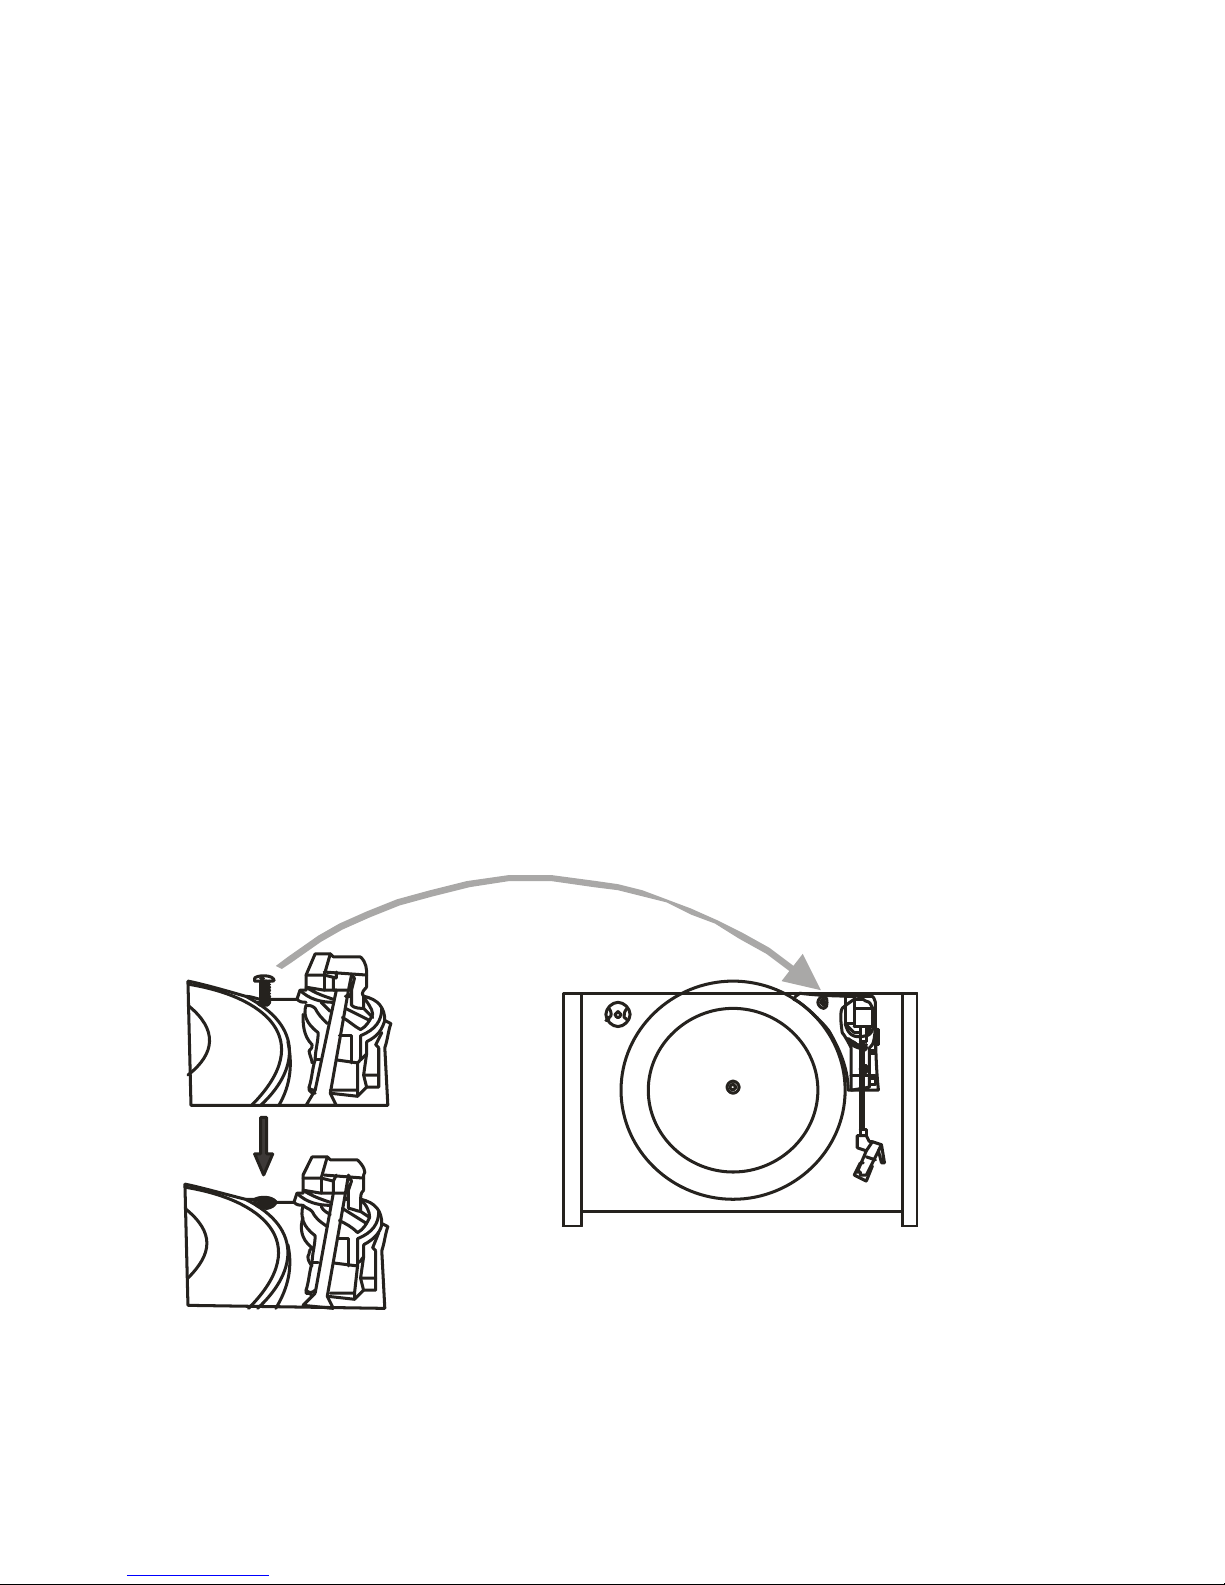
2. The silver screw protects the phonograph chassis during transportation. If the speed of your
phonograph seems slow or you hear a rubbing sound, adjust the screw with a coin to correct the
balance of the turntable.
Page 9

9
How To Replace The Turntable Stylus
Removing old stylus
1. Set a screwdriver at the tip of the stylus and push
down to the direction shown in "A".
2. Remove the stylus by pulling it down and forward.
Installing a new stylus
1. Hold the tip of the stylus and insert the other edge
by pressing in the direction shown in "B".
2. Push up in the direction of "C" until it locks at the tip.
Basic Operation
1. Power on.
Connect the power plug into the wall outlet.
2. Rotate the VOLUME knob clockwise to turn the unit on.
Rotate this knob clockwise or counterclockwise to adjust
the desired volume.
3. Select the source.
4. Listening through Earphones/Headphones
(not included).
The sound from all speakers is cut off.
Page 10

10
Listening to a Record
1. Press the PHONO button.
2.Select player speed.
3. Put a record onto the turntable (use the 45
rpm adaptor provided when playing a single
record).
4. Remove the tone arm-rest holder.
5. Lift the Que-lever and move the tone arm
gently to the desired position over the record.
6. Lower the Que-lever slowly.
7. Return the tone arm to the tone arm-rest
after reaching the end of the record.
Page 11
11
Listening to a CD/MP3
1. Press the CD button.
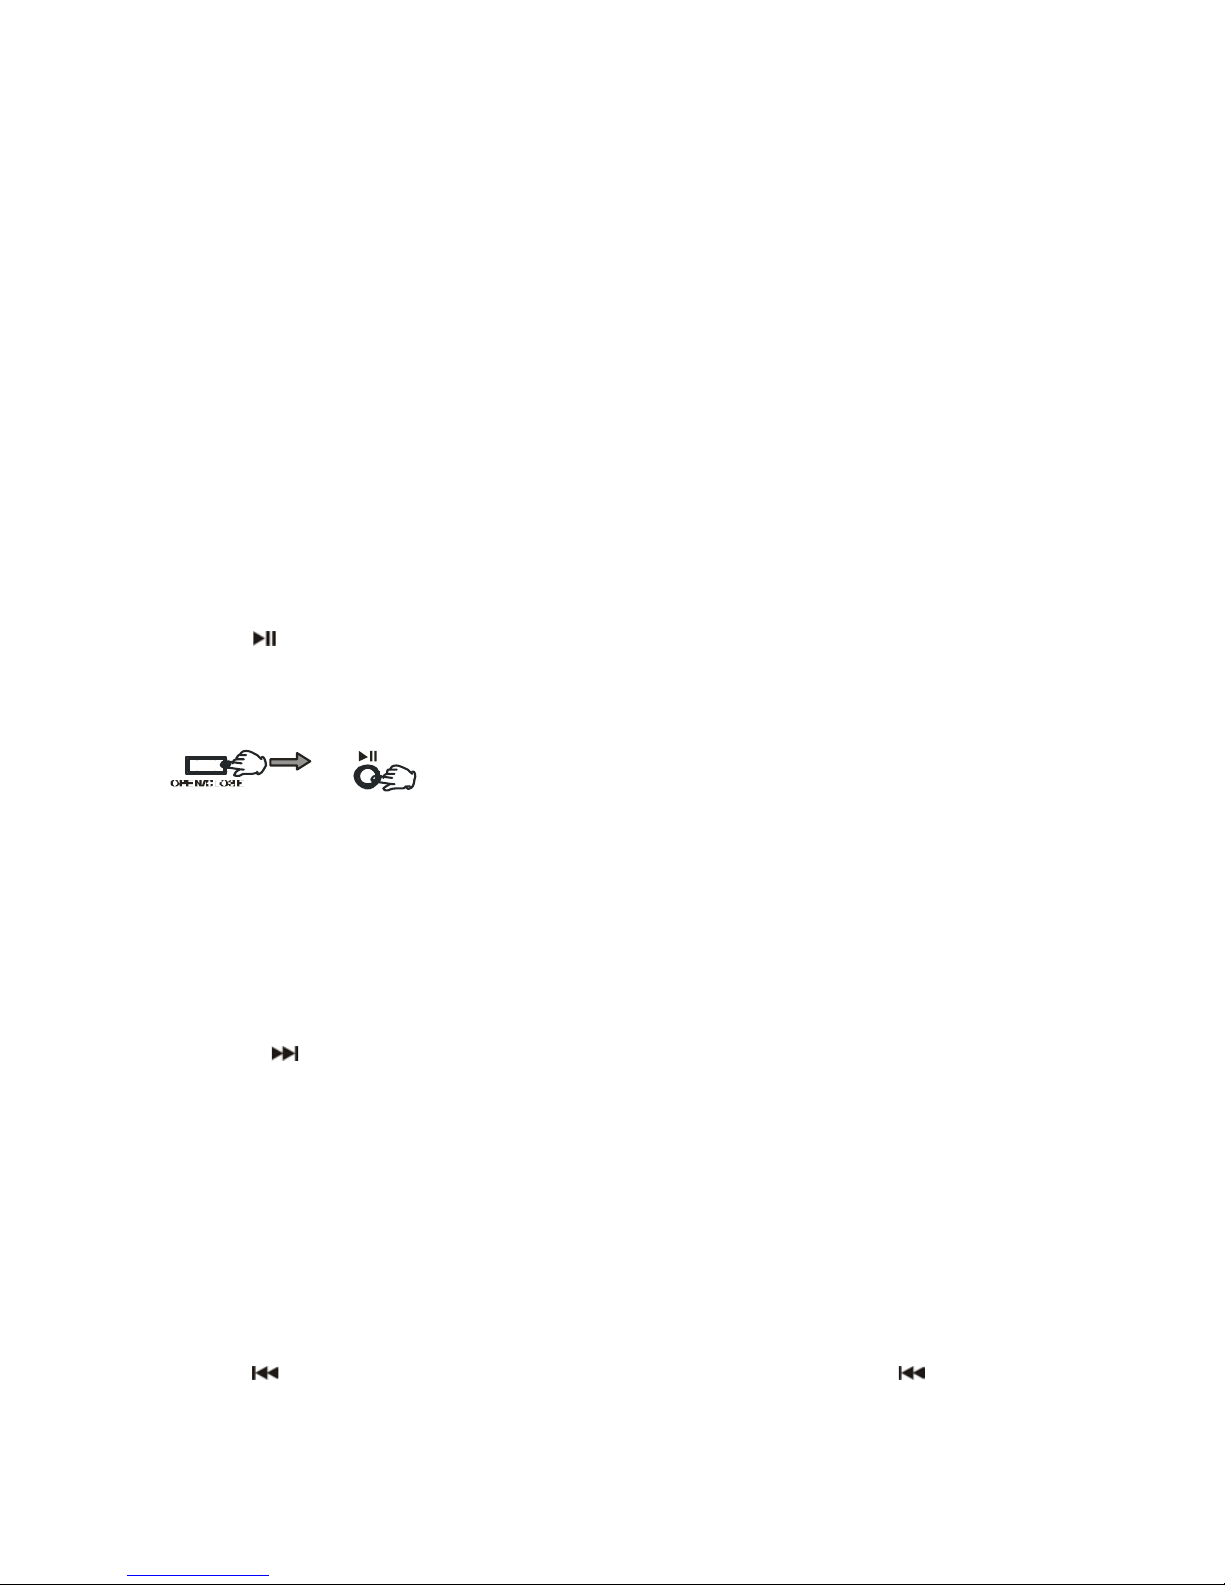
2. Press the OPEN/CLOSE button to open the
tray, and place the CD/MP3 disc on the tray.
Press the OPEN/CLOSE button again to
close the tray.
3. Press the
button to start playing the
CD/MP3 disc.
The CD disc will start playing from the first track.
When playing an MP3 disc, the unit can take some time to read thru the disc due to the number of
songs per disc. It is normal since MP3 disks can contain many songs.
4. Press the
button once to go the start of the next track.
5. Press the
button once to go back to the start of the current track. Press the button twice to
go back to the start of the previous track.
CD should be placed on the tray with
the label side up.
Page 12

12
Fast Reverse (
) and Fast Forward ( )
You can reverse or forward to any point in a selected track by pushing and holding the
or
button.
NOTE: Do not push both buttons together as this may damage the unit.
As the unit is tracking quickly, forward or backward you will hear your selection playing at a distorted
speed. Simply release the depressed button to continue playing at normal speed at the desired
position in the selected track.
6. Press the REPEAT button, the unit will have “Repeat 1”, “Repeat all” or “Random play”
Repeat 1--- Press this button once to repeat playing current track, and “REPEAT 1” will show on the
display.
Repeat all---Press this button for a second time to repeat all of the tracks on the current disc.
“REPEAT ALL” will show on the display.
Press this button for a third time to begin random play of all tracks on the current disc. “RANDOM”
will show on the display.
To cancel the repeat, press “REPEAT” button again.
7. Press the PROG button on the unit to begin the program function.
In stop state, press the PROG button, the LED display will show 01, and “MEMORY” will flash on the
left corner of the display. Then press the F.F or F.R button to select the desired tracks, pressing the
PROG. button to repeat this step. Up to 32 songs may be programmed. Press the STOP button to
delete this function.
8. Pausing the CD/MP3 play.
Pressing the PLAY/PAUSE button will restart the CD/MP3 disc where it was paused.
Do not switch the unit off while playing a CD/MP3 disc as this will damage the unit.
9. Stopping the CD/MP3 disc play.
Page 13

13
Listening to the Radio
1. Press the AM/FM button to listen the radio.
2 . Tune to the desired frequency.
3. Antenna
For optimal FM reception be sure to stretch
the built-in FM antenna wire located at the lower
back of the unit and move it around until the
station you have tuned in is being received clearly.
Page 14

14
Listening to TAPE
(1) Load Cassette Tape into the unit (located on side of the unit) Playback will automatically begin.
(2) Press the button halfway to Fast Forward the Tape. Press the button lightly and playback will
resume.
(3) Press button all the way to end playback and eject Tape.
NOTE: When a cassette tape is inserted, the CD/radio/phono will automatically shuts off.
AUX IN Operation
An external (auxiliary) audio source (ie., personal CD player or MP3 player) can be connected to this
unit and heard through the speakers.
1. Plug one end of cable (included) into the AUX IN socket on the back of the unit.
2. Plug the other end of the cable into the headphone or Line Out socket of the external source.
3. Once the aux cable plug-in, it will cut all other function. You should remove the cable to resume
normal operation of the unit.
Page 15

15
USB Host-Playback of MP3 song via USB storage media
The system is able to decode and playback MP3 files
stored on various memory media by using the USB
connection port.
1. Press the USB button. “USB” will flash on the display.
2. Insert an external audio source (ie. MP3 player)
into the USB jack.
3. Press PLAY (
) button to play the external audio source.
4. Press the FF (
) button once to go to the start of the next track.
5. Press the FR (
) button once to go back to the start of the current track. Press the FR ( ) button
twice to go back to the start of the previous track.
6. Press the REP. button, the unit will have “Repeat 1”, “Repeat album”, ”Repeat all” and “Random
play”.
Repeat 1--- Press this button once to repeat playing the current track. “REPEAT 1” will show on the
display.
Repeat Album---Press this button for a second time to repeat playing album on the current disc.
“REPEAT ALBUM” will show on the display.
Repeat all---Press this button for third time to repeat playing all tracks on the current disc. “REPEAT
ALL” will show on the display.
Press this button for a forth time to randomly play all the tracks on the current disc. “RANDOM” will
show on the display.
To cancel the repeat, press “REP.” button again.
Page 16

16
7. Press the PROG button, the unit will begin the program function.
In stop state, press the PROG button, the LCD display will show 01, and “MEMORY” will flash on the
left corner. Then press the F.F or F.R button to select the desired tracks. Press the PROG. button to
repeat the step. Up to 32 songs may be programmed. Press STOP button to delete this function.
8. Pausing the playing.
9. Stopping the playing.
10. Press the FOLDER-UP button to find the last folder.
11. Press the FOLDER-DN button to find the next folder.
12. FILE DELETE- The system is able to erase the file stored inside the USB drive
1. Short press DEL button, “DEL ONE” is appear on the display, press the button again to confirm the
setting.
2. Long press DEL button and then press FOLDER-UP or FOLDER-DN button to Select: DEL ONE
(one file delete), DEL DIR (directory delete), DEL ALL (all files delete), or FORMAT (format the drive).
Then, press DEL button to confirm the mode.
3. While the deletion mode is blinking, you may cancel the operation by pressing the STOP (
)
button, or wait for 8 seconds until the blinking deletion mode disappears. Press the DEL button again
to continue the delete function.
Page 17

17
NOTE : REMOVING OF USB
Before removing USB memory devices, turn off the power to the unit, or switch the function mode to
either CD, Radio or Aux first.
NOTE : If the system is connected to an MP3 player via the USB socket, due to variances in MP3
encoding format, some MP3 files may not be able to play (or be copied) via the USB socket. This is
not a malfunction of the system. Further more, the system does not support iPOD.
ENCODING OF CD/PHONO/AUX IN/TAPE TO USB
The system is able to encode normal CD, Aux input, or from turntable to MP3 format and record to
memory media such as Flash memory sticks via the USB connection port. Before beginning, make
sure to insert a memory media device with ample file space into the USB port.
A .CD ENCODING
1. Perform normal playback of the CD track you want to encode and record.
2. Long press REC/COPY button and then press FOLDER-UP or FOLDER-DN button to select “RIP
ONE” or “RIP ALL”.
3. Press REC/COPY button again to confirm setting.
4. Press the STOP (
) button two times to cancel the recording.
B.ENCODING BITRATE- You may select the desired bitrate for the encode quality. Select from 96KB,
128KB, and 256KB by pressing the REC/QUALITY button.
C. Copying of CD-MP3 disc- When inserting an MP3 disc, instead of a CD disc, the system will copy
the files to the USB memory device.
The operation procedure is the same as with CD encoding as mentioned on above. First, long press
the REC/COPY button and then press FOLDER-UP or FOLDER-DN button to select “COPY ONE”,
“COPY DIR” and “COPY ALL”.
Page 18

18
D. PHONO/AUX INPUT/TAPE ENCODING.
1. Set the function to the desired media: Phono, Aux, or tape mode. Begin playing the turntable, Aux
input, or tape you want to record.
2. Press the REC/COPY button to start recording.
3. Press the REC/QUALITY button to select encoding quality.
4. During encoding, press FOLDER-UP button to add recording track quantity.
5. Press the REC/COPY or REC-QUALITY when complete the record.
Note :
1. Press STOP (
) button, “CANCEL” will appear on the display, press the button again to confirm.
2. Recording will be complete only when the entire song has been encoded. If the encoding process
is terminated intermediately, there will be no track recorded nor saved to the USB memory device.
3. No song title will be recorded during encoding mode.
4. The recording speed is 1 : 1 and according to the actual playing time of the CD track.
5. Some USB drives may not be supported for recording because they are not formatted in a
supported parameter. In such cases, backup the content in the drive, and then use the FORMAT
function as described in the previous section and then try recording again. Most of the incompatibility
problems of recording can be resolved by following these steps.
6. The unit can record songs directly to memory media via the USB port on the front, so neither a
USB host nor Audacity software is needed. Also, there is no need to set up a USB drive before
encoding.
7. The unit can directly record songs from AUX IN onto memory media such as flash memory sticks
via USB port. If you want to listen to the recorded songs on your computer, plug in the USB device to
any computer.
8. It cannot play music files from your PC if you connect the unit via USB port.
Page 19

19
Specifications
AMPLIFIER section
Output Power…………………………..2.0 W + 2.0 W
Frequency Response………………….60 TO 20, 000 Hz
TUNER section
FM Section
Frequency Range……………………....87.5 to 108 MHz
AM Section
Frequency Range………………….……530 to 1700 KHz
CD PLAYER section
Frequency Response……………….…..60 to 20, 000 Hz +/-4 Db
Signal-to-Noise Ratio……………….…..55 dB (IEC-A)
CASSETTE DECK section
Track System...........................................4 Track, 2 channels stereo
Tape Speed..............................................4.8 cm/sec
Wow and Flutter.......................................0.4% (WRMS)
Frequency Response...............................125 to 6300 Hz +/-6 Db
RECORD PLAYER section
Motor……………………………..………..DC servo motor
Drive System………………………..…….Belt Drive
Speeds………………………………..……33-1/3 rpm, 45 rpm and 78 rpm
Wow & Flutter………………………….….Less than 0.25% (WTD)
S/N Ratio…………………….…………….More than 50 dB
Cartridge Type…………………………….Ceramic Stereo Cartridge
Stylus……………………………………….402-M208-165
Output Level……………….………………160-380 mV (5 cm/sec at 1 KHz)
SPEAKER SYSTEM section
Type……………………………….……….1-way
Impedance…………………………….…..8 ohms
Input Power…………………..…..……….Max. 5 W
GENERAL
Power Requirements……..……….………AC 120 V~ 60 Hz
Power Consumption………………..……..19 W
Page 20

20
Dimensions ( Lx D x H )…………..……..18.4’’x13.2’’x9.6’’(approx.)
Weight……………………….………….…18 Ibs. (approx.)
Standard Accessories………..………..…Operating Instruction Booklet
45 rpm Adapter
Auxiliary Cable
Page 21
21
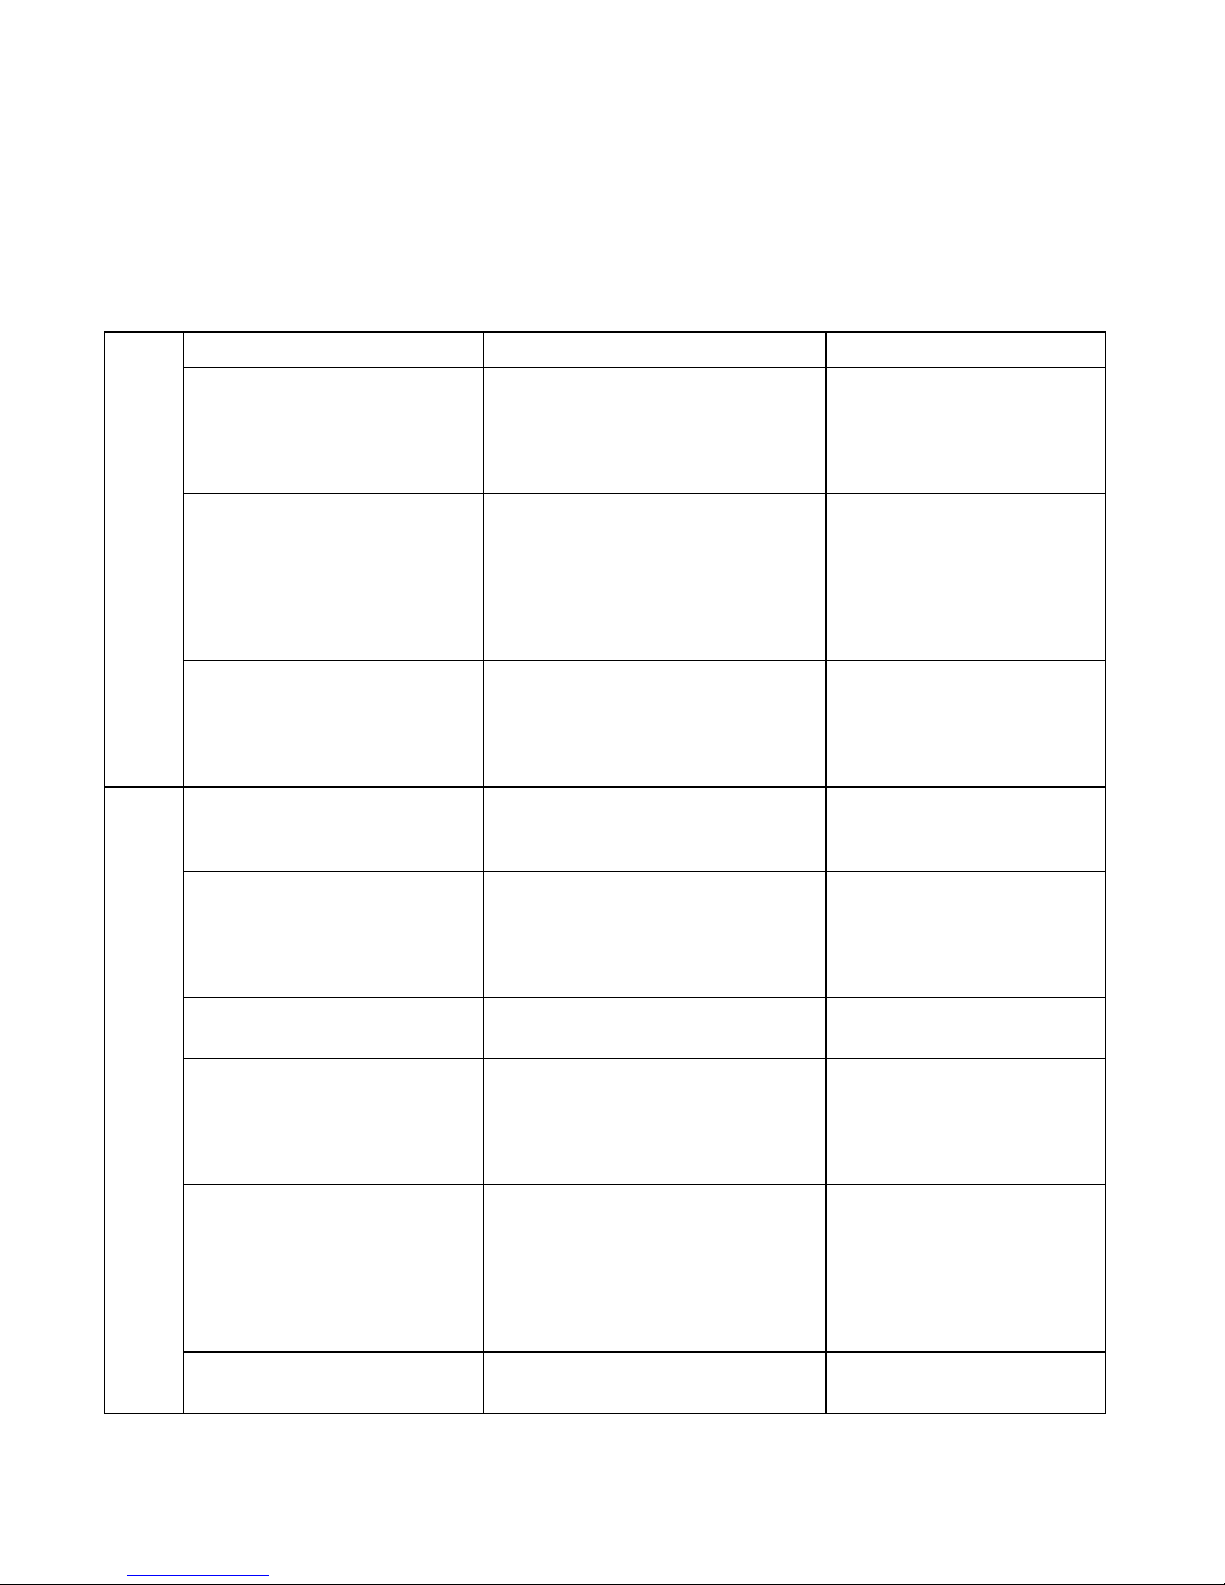
Troubleshooting Guide
In case of trouble with the unit, please look through this chart and see if you can solve the problem by
yourself before contacting your dealer.
Problem
Cause
Solution
Power does not come on
when the power switch is
pressed.
Unit is unplugged.
Connect the unit to the AC
power supply.
No sound comes out of the
speakers.
The volume is turned down (to
MIN).
The input selector does not
match the playback source.
Adjust the volume.
Re-select the desired
input source.
THE WHOLE UNIT
The sound is noisy.
The unit is too close to a TV set
or another similar appliance.
Turn off the TV or other
appliance, and relocate
the unit.
The cassette deck door
cannot be closed.
The cassette tape is not inserted
properly.
Insert the cassette tape
correctly.
The tape does not move.
The cassette tape is not inserted
properly.
The tape has reached the end.
Insert the cassette tape
correctly.
Flip the cassette.
No sound from tape.
The tape heads are dirty.
Clean the tape heads.
Cannot record.
The write-protect tabs on the
cassette have been broken off.
The tape heads are dirty.
Tape over the holes with
cellophane tape.
Clean the tape heads.
When recording over a
previously recorded tape,
the original signal can still be
heard.
The tape heads are dirty.
You are trying to record on metal
(Type IV) tape.
Clean the tape heads.
Use a normal (Type I)
tape.
TAPE DECK
The sound is distorted or
The tape heads are dirty.
Clean the tape heads.
Page 22
22
The sound is distorted or
faint.
The tape heads are dirty.
Clean the tape heads.
Cannot listen to any station,
or signal appears weak.
The station is not tuned-in
properly.
A TV set is being used nearby
Properly tune-in the
desired station.
Turn-off the interfering TV
TUNER UNIT
The sound is distorted
The antenna is not oriented
properly.
Re-orient the antenna until
reception improves.
CD stops immediately after
starting, or unit pauses or
stops during play.
The CD is inserted upside down.
The CD is dusty or dirty or there
is condensation on the CD.
Insert the CD with the
printed side right-side up.
Carefully clean and dry the
CD.
No sound.
The CD player is paused.
Press the PLAY/PAUSE
button.
Specific CD is noisy, or
playback stops or
skips.
The CD is scratched, damaged
or warped.
The disc is very dirty.
The CD should be
changed.
Carefully clean the CD.
CD PLAYER
“NO” is shown on the CD
display.
An unplayable CD type is in the
unit.
Make sure you only play
“regular” (CD-DA) type
Page 23

23
Innovative Technology Electronics Corp.
Limited Warranty: 90 Days Labor, One Year Parts
Innovative Technology Electronics Corp. (IT) warrants the product to be free from “Defects” in
materials under normal use for a period of “One Year” from the date of the original purchase. The
Warranty is “Not” transferable. IT agrees, within the initial “90 Day” period, to repair the product if it is
determined to be defective at “No Charge”. It is further agreed that IT will cover the cost to repair or
replace damaged “Parts” only for a total period of “One Year” from the date of the original purchase.
The warranty does not cover cosmetic damage, antennas, AC cords, cabinets, headbands, ear-pads,
or damage due to line power surges, conction to improper voltage supply or settings, misuse,
mishandling, accident, acts of God or attempted repair by an unauthorized service agent.
To obtain service, the original purchaser MUST present a sales receipt / proof of purchase indicating
date of purchase, amount paid, and place of purchase. Send the unit prepaid to the address below in
the original packaging or reasonable substitute to prevent damage. You “Must” include your full name,
shipping address and telephone number. No return will be shipped back to a PO Box. Please include
your check or money order in the amount of $12.00, payable to Innovative Technology Electronics
Corp. to cover handling and return shipping charges. (IT) will not be responsible for delays or
unprocessed claims resulting from a purchaser’s failure to provide any or all of the necessary
information.
Send all inquires or returns to:
Customer Service Dept.
Innovative Technology Electronics Corp.
4 Anchor Way, Port Washington, NY 11050
Tel : 1-877-ITECH-97 (1-877-483-2497)
EMAIL: [email protected]
There are no express warranties except as listed above.
REPAIR OR REPLACEMENT AS PROVIDED UNDER THIS WARRANTY IS THE EXCLUSIVE
REMEDY OF THE CUSTOMER, (IT) SHALL NOT BE LIABLE FOR ANY INCIDENTAL OR
CONSEQUENTIAL DAMAGES FOR BREACH OF ANY EXPRESS OR IMPLIED WARRANTY ON
THIS PRODUCT EXCEPT TO THE EXTENT PROHIBITED BY APPLICABLE LAW. ANY IMPLIED
WARRANTY OF MERCHANTABILITY OR FITNESS FOR A PARTICULAR PURPOSE ON THIS
PRODUCT IS LIMITED IN DURATION TO THE DURATION OF THIS WARRANTY.
Some states do not allow the exclusion or limitation of incidental or consequential damages, or
limitations on how long an implied warranty lasts, so the above exclusions or limitations may not
apply to you. This warranty gives you specific legal rights and you may also have other rights, which
vary from state to state.
 Loading...