

Page 1

iPod Docking Station. IT-6022
USER’S MANUAL
PLEASE READ CAREFULLY BEFORE USE
Table of Contents
IMPORTANT SAFETY INSTRUCTIONS
Operating Element Diagram
Power Source: Connection
Audio/Video Connection
General Operation
iPod Operation
Radio Operation
“AUX” Mode: Listening to an External Audio Device
Clock: Setting the Time
Clock: Using the Alarm
Troubleshooting
Specifications
CAUTION: To reduce the risk of fire or electric shock, do not expose this appliance to rain or moisture.
WARNING: To prevent electric shock, do not use this (polarized) plug with an extension cord, receptacle
or other outlet unless the blades can be fully inserted to prevent blade exposure
WARNING: Invisible laser radiation when open and interlock failed or defeated. Avoid direct exposure to laser
beam.
10
10
1. Read these instructions.
2. Keep these instructions
3. Heed all warnings
4. Follow all instructions
5. Do not use this apparatus near water. This apparatus shall not be exposed to dripping or splashing, and no
objects filled with liquids, such as vases, shall be placed on the apparatus.
6. Clean only with a dry cloth
7. Do not block any ventilation openings. Install in accordance with the manufacturer’s instructions. The apparatus
should not be situated on a bed, sofa, rug or similar surface that may block the ventilation openings. The
apparatus must not be placed in a built-in installation, such as a closed bookcase or cabinet that may impede
the flow of air through the ventilation openings. Ventilation should not be impeded by covering the openings
with items such as newspapers, tablecloths, curtains, etc.
8. Do not install near any heat sources such as radiators, heat registers, stoves, or other apparatus (including
amplifiers) that product heat. Extended exposure to temperatures higher that 170 degrees Fahrenheit, for
example inside a closed vehicle during the summer, may result in damage to your product.
9. No open flame sources, such as lighted candles, should be placed on the apparatus.
10. Do not defeat the safety purpose of the polarized or grounding-type plug. A polarized plug has two blades with
one wider than the other. A grounding type plug has two blades and a third grounding prong. The wide blade
or the third prong are provided for your safety. If the provided plug does not fit into your outlet, consult an
electrician for the replacement of the obsolete outlet.
11. Protect the power cord from being walked on or pinched – particularly at plugs, convenience receptacles, and
the point where they exit from the apparatus.
12. Do not install in an area which impedes the access to the power plug. Disconnecting the power plug is the
only way to completely remove power to the product and must be readily accessible at all times.
13. Power source – Use only power supplies of the type specified in the operating instructions or as marked on the
appliance. If a separate power supply is included with this apparatus, do not substitute with any other power
supply – use only manufacturer-provided power supplies.
14. Unplug this apparatus during lightning storms or when unused for long periods of time.
2
3
4
5
6
7
7
8
8
9
15. If the unit will be unused for long periods of time, the batteries should be removed.
16. Refer all servicing to qualified service personnel. Servicing is required when the apparatus has been damages
in any way: the power-supply cord or plug is damages, liquid has been spilled or objects have fallen into the
apparatus, the apparatus has been exposed to rain or moisture, does not operate normally, or has been
dropped
17. For products which incorporate batteries, please refer to local regulations for proper battery disposal.
FCC WARNING: Changes or modifications to this unit not expressly approved by the party responsible for
compliance will void the user’s authority to operate the equipment.
NOTE: This equipment has been tested and found to comply with the limits for Class B digital device, pursuant
to Part 15 of the FCC Rules. These limits are designed to provide reasonable protection against harmful
interference in a residential installation. This equipment generates, uses and can radiate radio frequency
energy and, if not installed and used in accordance with the instructions, may cause harmful interference to
radio or television reception. If this equipment does cause harmful interference, which can be determined by
turning the equipment off and on, the user is encouraged to try to try to correct the interference by one or
more of the following measures:
- Reorient or relocate the receiving antenna.
- Move the transmitter to a different physical location.
- Increase the separation between the equipment and receiver.
- Connect the equipment into an outlet on a circuit different from that to which the receiver is connected.
- Consult the dealer or an experienced radio/TV technician for help.
- If you cannot eliminate the interference, the FCC requires that you stop using your headphones.
Important Safety Instructions
2
Page 2
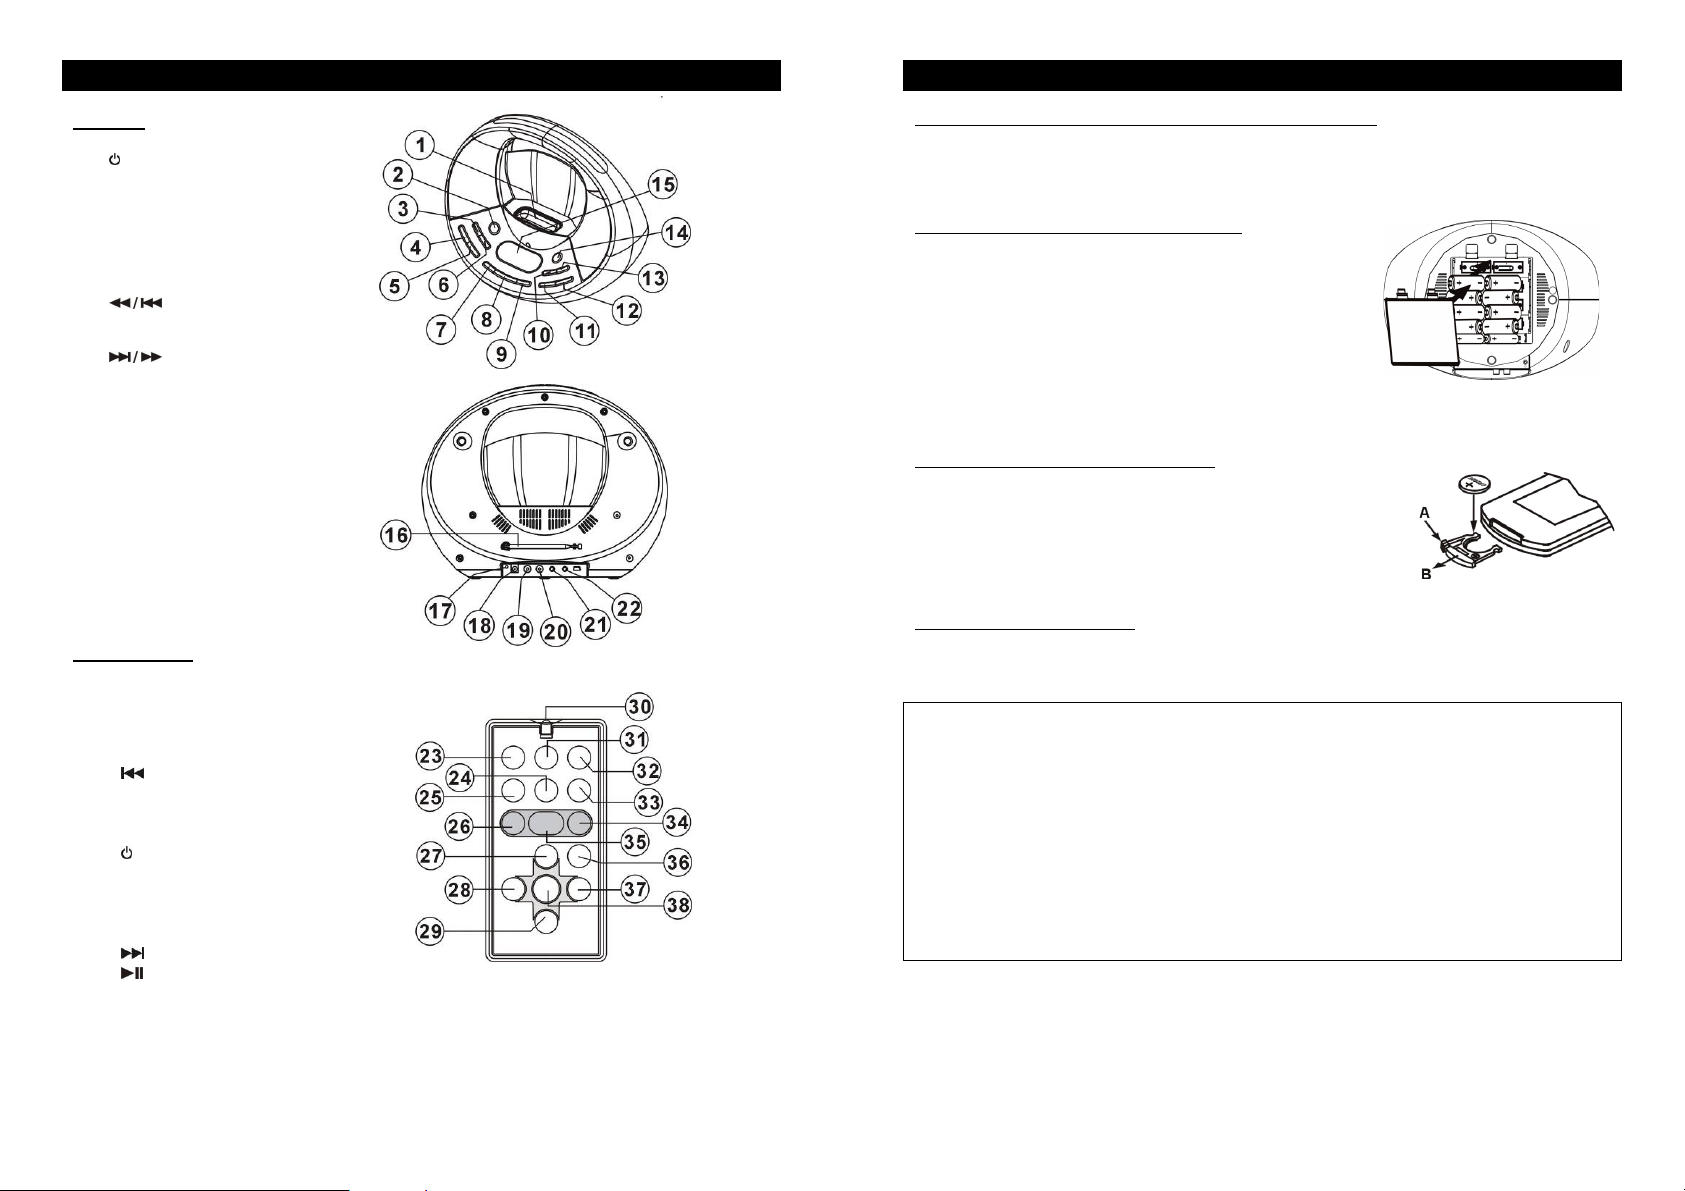
Operating Elements Diagram
Main Unit
1. iPod Dock
2.
STANDBY Button
3. AL1 / MEM- Button
4. MEMORY / SET Button
5. SLEEP Button
6. AL2 / MEM+ Button
7. FUNCTION Button
8. SNOOZE / Dimmer Button
9. X-BASS Button
10.
11. VOLUME - Button
12. VOLUME + Button
13.
14. / BAND Button
15. Display
16. FM Rod Antenna
17. RESET Switch
18. DC – 12V Jack
19. VIDEO Jack
20. SUBWOOFER Jack
21. PHONES Jack
22.
Remote Control
23. MUTE Button
24. AL2 / M+ Button
25. AL1 / M- Button
26. REPEAT / ST-MO Button
27. VOL + Button
28.
29. VOL – Button
30. Infrared Sensor
31. FUNC. Button
32.
33. SLEEP Button
34. MEMORY / SET Button
35. SNOOZE / DIMMER Button
36. XBASS Button
37.
38.
Button
Button
AUX IN Jack
/ TUNING Button
Button
/ TUNING Button
/ BAND Button
Power Source: Connection
Connecting to a Wall Outlet using the AC Adapter (Main Unit)
Connect the power supply to the DC – 12V jack on the back of the unit, then connect to a wall
power outlet.
Warning: Disconnect plug from the supply socket when not in use.
Installing & Replacing Batteries (Main Unit)
1. Remove the battery door on the bottom of the unit by
depressing the two levers marked “OPEN” on the battery
door.
2. In order to maintain operation of the memory function in
the event of power failure, insert 2 x “AAA” size batteries
(not included) into the smaller battery compartment.
3. Insert 8 x “C” alkaline batteries in the battery
compartment.
Note: Be sure to install the batteries in the correct orientation, noting the polarity (+/-) marking
inside the battery compartment.
Replacing the Battery (Remote Control)
Note: A battery is pre-installed in the remote. When the remote
control stops operating, please replace this battery with a new one.
1. Squeeze the notched tab A while pulling the battery door latch B
out to remove the battery tray.
2. Insert a “CR2025” 3V lithium battery. Make sure the polarity (the
+ and – sides of the battery) is correct.
3. Slide the battery tray back in the remote control.
Battery cycle recommendation:
9 All the batteries should be tested regularly (approx every 3 months).
9 All the batteries for the station memory should be changed every year.
BATTERY PRECAUTIONS
9 Do not swallow batteries, as they can cause serious damage to health.
9 Do not heat or throw into fire (EXPLOSION RISK!).
9 Use only the specified size and type of the battery.
9 Be sure to follow the correct polarity when installing the battery as indicated in the battery compartment.
Reversed polarity may cause damage to the device.
9 Do not mix different types of batteries (e.g. Alkaline & Carbon-zinc or old batteries & fresh ones.)
9 If the device is not to be used for a long period of time, remove the batteries to prevent damage or injury
from possible battery leakage.
9 Do not try to recharge batteries not intended to recharge; they can overheat and rupture. (Follow battery
manufacturer’s directions.)
9 Remove the battery if the unit is not to be used for a long period of time.
9 Old or leaking batteries can cause damage to the unit and may void the warranty.
9
3
4
Page 3

iPod Dock Adapter: Installation
This unit comes with 5 different sized removable dock adapters designed to help your iPod fit
securely in the dock. These adapters are NOT guaranteed to fit all newly released iPod models. No
adapters are provided for the 5G (fifth generation) 30GB and 60GB iPods with video capability.
Please use the adapters that were included with these iPods at time of purchase.
To Install a Dock Adapter
Select the dock adapter that best fits your iPod model and gently place it in the dock.
Note: These dock adapters are not designed to accommodate iPod cases.
To Remove/Replace a Dock Adapter
1. Remove your iPod from the dock
2. Grip the dock adapter and gently pull upwards.
Note: To avoid damage to your iPod, ensure that you are using the correct dock adapter for your
iPod and that your iPod is properly docked.
Note: If no iPods will be docked for a long period of time, use the dust cover to protect the dock
connector.
iPod is a registered trademark owned by Apple Computer Inc. in the U.S. and in other countries
Audio/Video Connection
PHONES Connection
You can use headphones (not included) to listen in privacy. Insert the headphone’s 3.5mm plug into
the PHONES Jack (21). Use the corresponding adaptors (not included) if your headphone is a
different size. The speakers will automatically deactivate when headphones are connected.
Listening Safely
To protect your hearing, follow these guideline when you use headphones.
9 Reduce sound level to a minimum before begin putting on headphones, then adjust volume to
your desired sound level.
9 Do not listen at extremely high volume levels. Extended high volume listening can lead to
permanent hearing loss.
9 Once you set the volume, do not increase it. Overtime, your ears adapt to the volume level, so
a volume level that does not cause discomfort might still damage your hearing.
SUBWOOFER Connection
1. Connect one end of the RCA cable (not included) to SUB-WOOFER Jack (20) and the other
end to your subwoofer.
2. Press
3. Make sure your subwoofer is turned on.
(Subwoofer not supplied with this product)
STANDBY to turn the unit on.
VIDEO OUTPUT Connection
1. With an iPod with video capability docked, you can view your videos on your TV.
Connect one end of an RCA cable (not included) to the VIDEO Jack (19) and the other end to
the video input jack of your TV.
2. Press
3. Press FUNCTION (7, 31) button to select iPod mode. “iPod” will be indicated on the display.
4. Select the correct video input setting on your TV.
5. Play the iPod docked with the unit.
AUX Connection
1. Connect one end of a 3.5mm plug signal wire (not included)*
2. Press
3. Press FUNCTION (7,31) button to select AUX mode.
4. Play your audio device.
* The cable must have a 3.5mm (1/8 inch) stereo plug on both ends.
STANDBY to turn the unit on.
to the AUX IN Jack (22), and the other end to your
audio device.
STANDBY to turn the unit on.
“AUX” will be indicated on the display.
General Operation
Turning the Unit On
In this mode, you will have control of your music and play mode.
Press
STANDBY. The unit will light up, and begin playing the selected play mode
(RADIO/iPod/AUX).
Turning the Unit Off (Standby Mode)
In this mode, you will have control of the clock/alarm clock.
Press
STANDBY. The unit’s lights will turn off (with the exception of the display).
Selecting the Play Mode
Switch between RADIO/iPod/AUX by pressing FUNCTION.
Playing Music
/ BAND button:
iPod mode: Press to play/pause the selected playlist on the connected iPod.
Radio mode: Press to switch between AM and FM band.
VOLUME – / VOLUME + buttons:
Press to adjust the volume level. There are a total of 31 steps: “00” is the minimum level, and “30”
is the maximum level.
X-BASS button:
Press the X-BASS button so that “XBASS” appears on the display. The bass output will increase.
Press the X-BASS button again to deactivate.
5
6
Page 4

iPod Operation
A
A
Charging Your iPod
While the unit is plugged into a wall outlet, it will charge your docked iPod until it is fully charged.
Note: Non-docking iPod models will NOT charge.
Operating iPod with the Main Unit
1. Press
2. Press FUNCTION until “iPod” appears on the display.
3. Select your desired music, photos or videos, etc., and play the
connected iPod as usual.
4. You can also select the desired previous or next music tracks by
pressing
and press
5. Press VOLUME – or VOLUME + (12, 27) button to adjust to the desired sound level.
Note: To view photos and videos from the iPod, the VIDEO Jack must be connected to your home
TV by an RCA cable. (Refer to “ VIDEO OUTPUT Connection ” section, Page 6.)
Note: To avoid the damage to your iPod, connect your iPod to the dock before you turn on the unit,
do not remove your iPod while it is playing, and turn off both the unit and your iPod before you
remove your iPod.
STANDBY button to turn the unit on.
(10, 28) or (13, 37) button repeatedly,
/ BAND (14, 38) button to play or pause.
FM - Extend and rotate FM Rod
ntenna (16) for best reception
Radio Operation
Tuning to a Radio Station
Manual Scan
1. Press
2. Press FUNCTION until “RADIO” appears on the display.
3. Press
4. Press
Automatic Scan
Press and hold
automatic scan. The unit will continue to scan until a station with a strong signal is found. The scan
can also be stopped at any time by pressing
Note: During the automatic scan, the sound level will be muted automatically.
Note: If a stereo broadcast is received, “(( ST ))” will appear on the left of the display.
Programming Memory
The unit’s memory can store up to 20 stations (both AM and FM).
1. In “RADIO” mode, press
2. Scan to the desired station.
3. Press MEMORY/SET to activate the memory function. On the display,
4. Press AL1 / MEM- or AL2 / MEM+ repeatedly to select the desired memory position (1-20).
5. Press MEMORY/SET again to save your selected station.
Selecting a Programmed Memory Position
In “RADIO” mode, press AL1 / MEM- or AL2 / MEM+ to select the programmed memory position.
The unit will automatically tune to the memorized station.
STANDBY button to turn the unit on.
/ BAND button to switch between the AM and FM band.
“MEMORY” will begin to blink.
Note: If no buttons are pressed, after approx. 5 seconds, the current radio station will
automatically be programmed to the displayed memory position.
or repeatedly to the desired radio station
or button approx 2 seconds to start the
or again.
/ BAND to select AM or FM.
Radio Reception Tips:
FM – Extend and adjust
antenna for best reception
.
M – Rotate the unit for
best reception
“AUX” Mode: Listening to an External Audio Device
1. Press
2. Press FUNCTION until “AUX” appears on the display.
3. Connect one end of a 3.5mm stereo plug connector cable (not included)* to the AUX IN Jack
4. Turn on your audio equipment and begin playing as normal.
5. Adjust the volume to the desired level.
STANDBY button to turn the unit on.
(22), and the other end to your audio device.
* The cable must have a 3.5mm (1/8 inch) stereo plug on both ends.
Note: Make sure that the volume of the audio device is set to an appropriate level (if it is set
too low, there will be no sound output).
Clock: Setting the Time
Current Time Setting
After plugging in the AC adaptor or inserting 8 fresh “C” batteries, the current
time appears on the display (15).
1. Press MEMORY/SET in standby mode (power off). “
indicates on the display (15)
2. Press
3. Press MEMORY/SET again to save the hour format setting. The hour
digit will start blinking. Press
current hour.
4. Press MEMORY/SET again to save the hour setting. The minute digit
will start blinking, press
the current minute.
5. Press MEMORY/SET again to complete the current time setting.
SLEEP (Automatic Shutoff Timer) Setting
With the unit on, press SLEEP repeatedly to switch the timer setting to 15, 30, 60, 90, or 120
minutes The unit will turn off automatically after the selected time period.
Note: If your iPod playlist or AUX device’s playtime is shorter than your
selected sleep time, the music will stop at the end of the disc/playlist.
or to switch between 12 or 24 hour format.
or repeatedly to set the
or button repeatedly to set
” or “ ”
7
8
Page 5

Clock: Using the Alarm
This unit can store two different wake up times that can be used independently or simultaneously.
Alarm1
1. In standby mode, press and hold AL1 / MEM- for 3 seconds. The hour digit will begin to blink.
2. Press
3. Press AL1 / MEM- to save the hour setting. The minute digit will begin to blink.
4. Press
5. Press AL1 / MEM- to complete the wake up setting.
Alarm1
Press AL1 / MEM- to set the Wake-Up Mode for Alarm1 (
Wake to Buzzer
Wake to Radio
Wake to iPod
Alarm2
Follow the steps above, using AL2 / MEM+ instead.
Note: When Alarm1
between alarms.
Turning Off the Alarm
Using the Snooze Feature (temporary deactivation)
When the alarm sounds, pressing the SNOOZE / dimmer button will temporarily deactivate the
alarm. The alarm will automatically sound again after a period of 9 minutes.
Note: After pressing the snooze button, the active alarm icons will flash.
Deactivating the Alarm (permanent deactivation)
Press the corresponding AL1 / MEM- or AL2 / MEM+ button until the
Adjusting the Display Dimmer
While in standby mode, press the SNOOZE / Dimmer Button to adjust the dimmer to LO/MID/HI.
Note: After turning on the unit, the dimmer will automatically be set to high backlight.
Time Setting
or to adjust to the desired hour and AM/PM setting.
or to adjust your desired minute digit.
Wake-Up Mode
Buzzer / Radio/ iPod).
Press AL1 / MEM- until
1. Press AL1 / MEM- until
2. Press
STANDBY button to turn the unit on.
and are visible.
and are visible.
3. Follow the procedure in “TUNER OPERATION” to select your desired radio station.
4. Press
STANDBY button to turn the unit off. The radio will automatically turn on at the
alarm time.
1. Press AL1 / MEM- until
2. Press
STANDBY button to turn the unit on.
and are visible.
3. Follow the procedure in “iPod OPERATION.”
4. Press
STANDBY button to turn the unit off. The iPod will automatically start playing at
the set alarm time.
Time Setting & Wake-Up Mode
and Alarm2 are both set, the corresponding icons will flash, alternating
/ icon disappears.
Troubleshooting
Symptom Solution
Display / Controls not operating properly Use a sharp tipped object to press the reset switch (17)
Radio Noise/Distortion Extend FM Rod Antenna completely and reposition it.
Rotate the unit until best reception is obtained.
Manually scan to the AM or FM broadcast station
FM STEREO icon does not appear on
display
Select another FM station. The current station may not
have a stereo signal.
No sound Make sure the unit is turned on.
Make sure the correct play mode is selected.
Try increasing the volume level of the unit. If in “AUX”
mode, also try increasing the audio device’s volume.
iPod will not play Make sure “iPod” play mode is selected.
Re-insert the iPod into the dock
Note: Use a toothpick, straightened paperclip, or similar object to
depress and hold the reset button for few seconds.
Customer Service:
For further assistance with your product, call Innovative Technology at 516-883-8220
Specifications
GENERAL
Power source DC 12V / 500mA
2x “AAA” alkaline batteries (not included) for memory back-up
3V “CR2025” lithium battery (included) for remote
Dimension (W x D x H in mm)
Weight
TUNER SECTION
Frequency range
AM: 522 - 1620 KHz
AUDIO SECTION
Power Output
Speaker impedance 4 ohms
Headphone Impedance 8 – 32 ohms
AUX input sensitivity
ACCESSORIES
AC Adaptor 1
Instruction Manual 1 pc
Remote handset 1 pc
iPod dock adapter and dust cover
Remote Control Range 6 meters
You can help protect the environment!
Please remember to respect your local regulations: Turn in non-working electrical
equipment to an appropriate waste disposal centre.
8 x “C” alkaline batteries (not included) for main unit
306 x 227 x 240 mm
1.32kg
FM: 87.5 - 108MHz
2x 1.5 Watts @10% THD per Channel
300 mV
pc
1 kit (5 adapters &1 dust cover.)
9
10
Page 6

Innovative Technology Electronics Corp.
Limited Warranty
90 Days Labor, One Year Parts
Innovative Technology Electronics Corp. (IT) warrants the product to be free from “Defects” in
materials under normal use for a period of “One Year” from the date of the original purchase. The
Warranty is “Not” transferable. IT agrees, that within the initial “90 Day” period to repair the product
if it is determined to be defective at “No Charge”. It is further agreed that IT will cover the cost to
repair or replace damaged “Parts” only for a total period of “One Year” from the date of the original
purchase. The warranty does not cover cosmetic damage, antennas, AC cords, cabinets,
headbands, ear-pads, or damage due to line power surges, connection to improper voltage supply
or settings, misuse, mishandling, accident, acts of God or attempted repair by an unauthorized
service agent.
To obtain service please contact IT for Merchandise Return Authorization (MRA) number by
sending a self addressed stamped envelope to the address below. The original purchaser MUST
present a sales receipt / proof of purchase indicating date of purchase, amount paid, and place of
purchase. Send the unit prepaid to the address below in the original packaging or reasonable
substitute to prevent damage. You “Must” include your full name, shipping address and telephone
number and Merchandise Return Authorization (MRA) number for our reference. No return will be
shipped back to a PO Box. Please include your check or money order in the amount of $12.00,
payable to Innovative Technology Electronics Corp., to cover handling and return shipping
charges. IT will not be responsible for delays or unprocessed claims resulting from a purchaser’s
failure to provide any or all of the necessary information.
Send all inquires or returns to:
Customer Service Dept.
Innovative Technology Electronics Corp
4 Anchor Way, Port Washington, NY 11050
Tel : 516-883-8220
There are no express warranties except as listed above.
REPAIR OR REPLACEMENT AS PROVIDED UNDER THIS WARRANTY IS THE EXCLUSIVE
REMEDY OF THE CUSTOMER, IT SHALL NOT BE LIABLE FOR ANY INCIDENTAL OR
CONSEQUENTIAL DAMAGES FOR BREACH OF ANY EXPRESS OR IMPLIED WARRANTY ON
THIS PRODUCT EXCEPT TO THE EXTENT PROHIBITED BY APPLICABLE LAW. ANY IMPLIED
WARRANTY OF MERCHANTABILITY OR FITNESS FOR A PARTICULAR PURPOSE ON THIS
PRODUCT IS LIMITED IN DURATION TO THE DURATION OF THIS WARRANTY.
Some states do not allow the exclusion or limitation of incidental or consequential damages, or
limitations on how long an implied warranty lasts, so the above exclusions or limitations may not
apply to you. This warranty gives you specific legal rights and you may also have other rights,
which vary from state to state.
11
 Loading...