

Page 1

LED PROJECTOR User manual
Introduction
Thanks for using our LED mini-projector!
Our mini-projector is designed for home, entertainment, business or other environmental.
In addition to playing the most basic of video images, the ability to play TV (optional) /
MP3/MP4/DVB-T (optional) / VGA/Componet, etc., a variety of sources, it is convenience
your work and leisure activities.
Item features
The projector integrates high-performance sequential color LED driver and the color
sequence LCOS projector engine technology. And friendly user interface to provide you
with high reliability and ease of use.
RGB LED light source and more vivid colors, And color gamut up to 120%
For data / video display can be adjusted to provide the color balance control
Highlight the choice of model to adapt to different use of the environment
Off-axis design let you to be more convenient installation
Instant off & on, no need waiting for complete cooling
HDMI input
Electric Keystone
Important Safety Instructions
1. Please read this user manual before using projector and please keep it for future
reference.
2. Do not look directly at the lens during use, strong beam may damage the eyes.
3. Projection failure only by professional service.
4. When the Projector on the working, do not block the lens with any object in order to
avoid thermal deformation of the object, damage, or even fire.
5. Do not place the projector unstable car, shelf or table, the projector may fall, causing as
serious damage
6. Do not disassemble the projector, the projector is the only place for maintenance of the
machine to the right side of the dust cover, remove dust, people can be use a soft brush
cleaning
7. When the projector on the work, the heat and odor from the discharge outlet, which is
normal is not a product defect.
8. Do not place the projector in any of the following environment
9. Poorly ventilated or confined spaces But please ensure that air circulation around.
10. Excessive heat place , such as the closed car.The place as Humid and dusty smoke ,
Page 2
to avoid contamination of optical devices.
11. Do not plug the outlet and do not place the projector in a blanket or other soft surface,
12. Do not leave flammable materials near the projector and do not cover with a cloth or
other materials projector.
13. Do not trample the projector or the projector placed under any object. It is possible
damage the projector and could lead to accidents or personal injury.
14. Do not place liquid on the projector or near by the projector. If the spilled liquid inside
of the projector may cause the projector does not work. If the projector has been splashed
wet, please turn off the power, then call our service center authorized by the projector to
have repair requests.
15. This product can be installed on the roof for lifting projection.
Warning
Please use the appropriate installation package to install hanging ceiling projector and
make sure the projector is installed securely.Do not moving the projector when the
projector in using. To extend the life of the projector, we recommended continuous use
less than 4 hours.
When you Installation of equipment in the fixed wiring to add ready-made power plant, or
equipment, the power plug to the socket near the ease of use; If the device fails during
operation, Pls off the power or unplug it.
Projector exterior view
Page 3
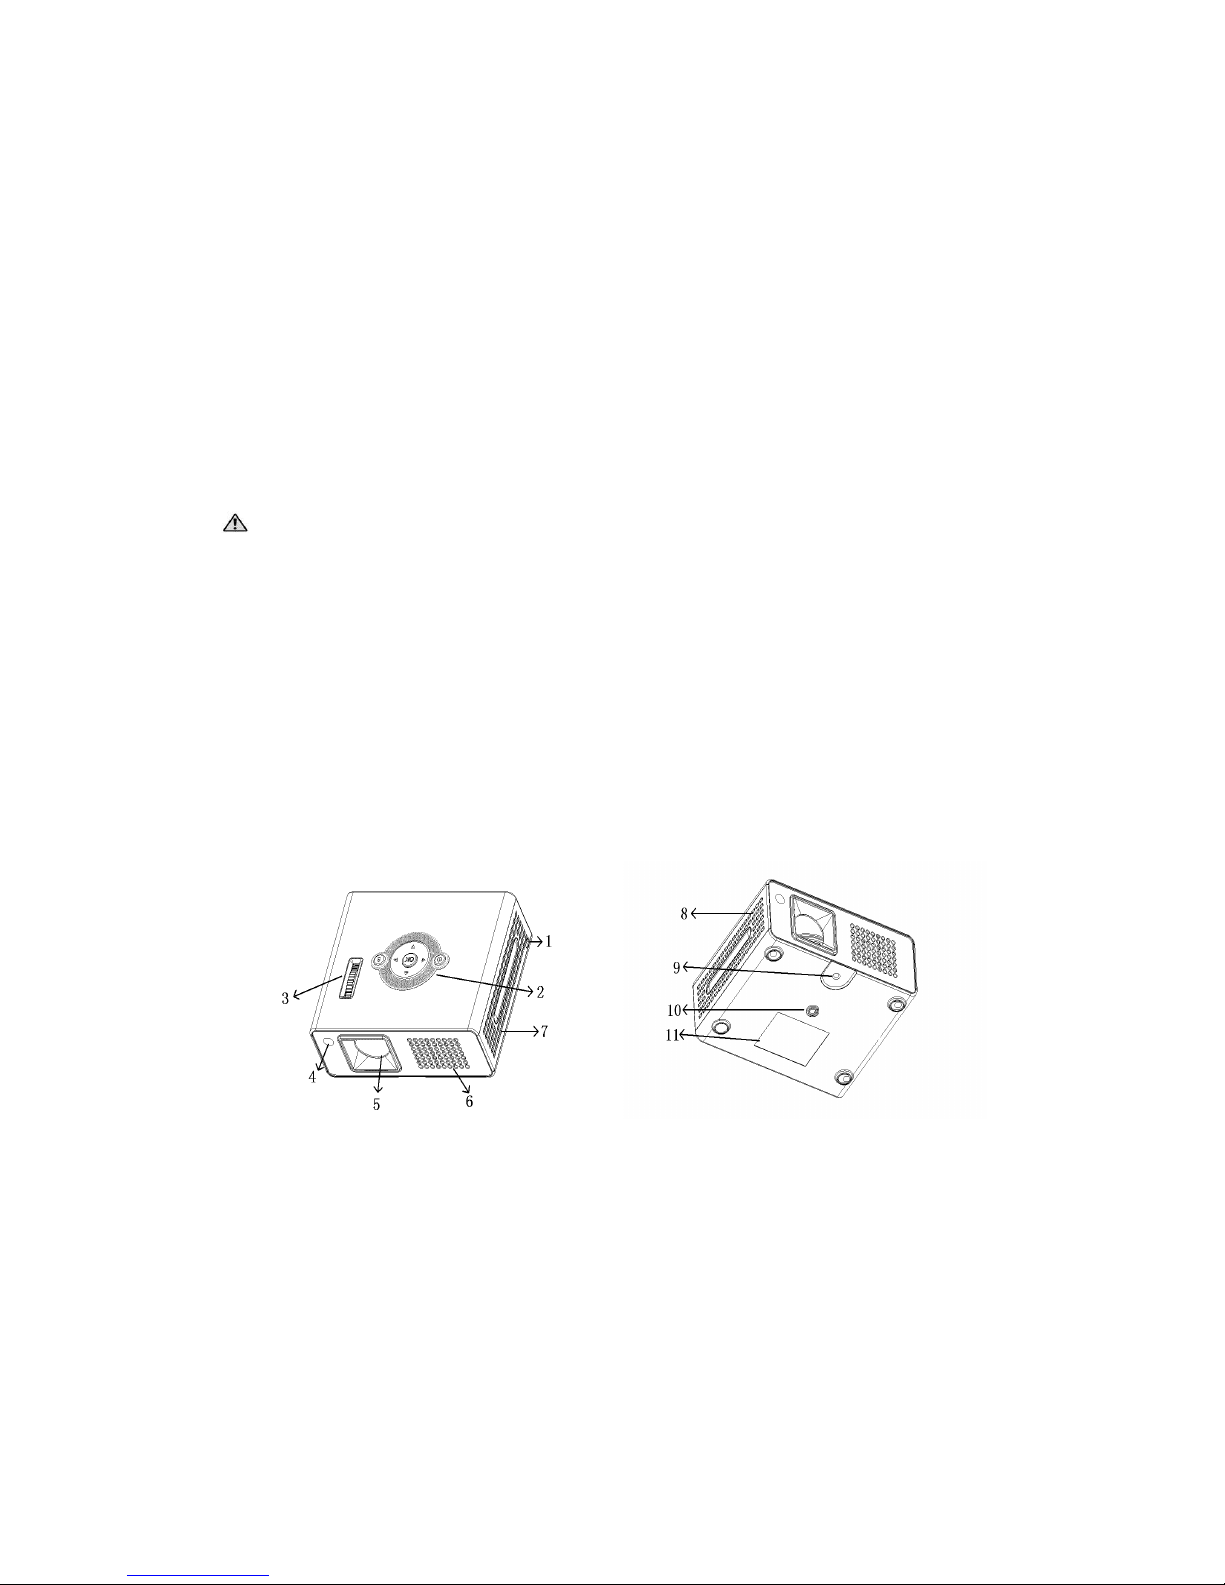
1:Safety lock 2:Panel Botton
3:Focus 4:Infrared receive window
5:Lens 6:Air Outlet
7:Speaker 8:Speaker
9:Projector Leg 10:Installation Hole
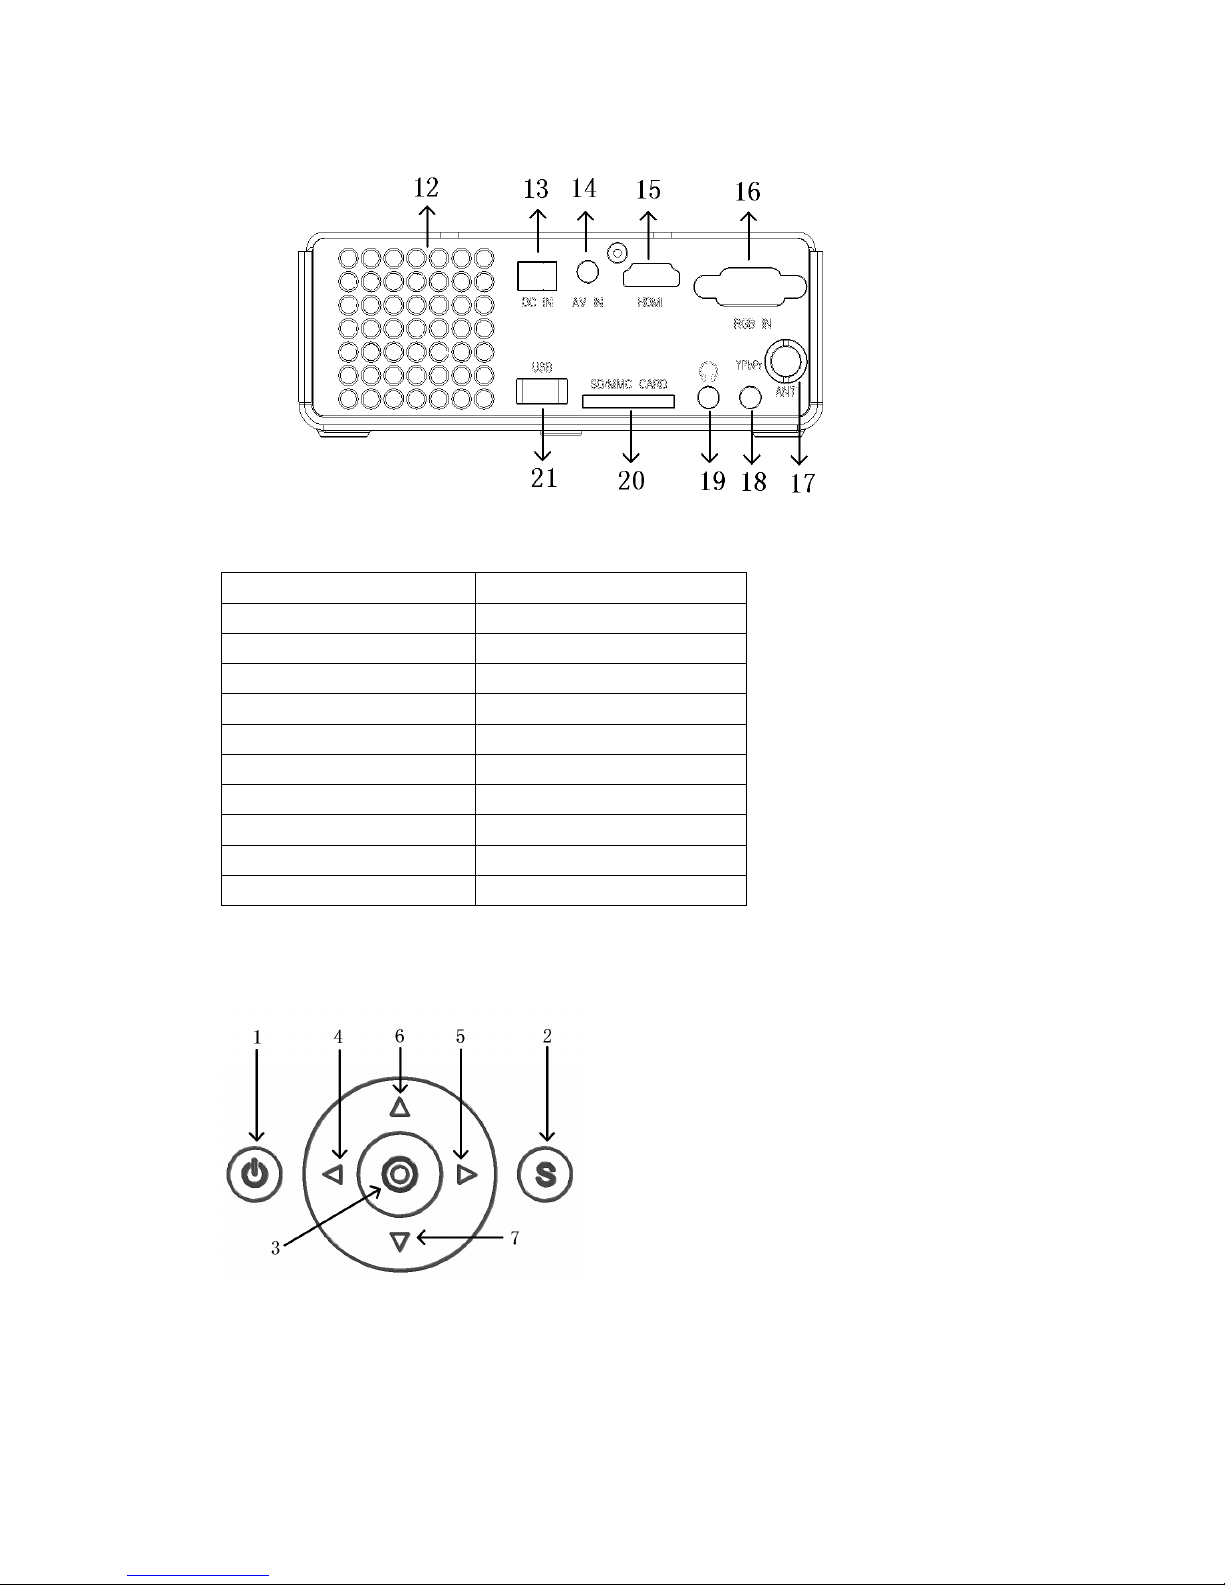
11:Name Plate 12:Air Input
13:DC IN 14:Audio Input
15:HDMI Input 16:VGA Input
17:ANT(TV) Input 18:Componet Input
19:Headphone 20:SDCard Reader
21:USB
Panel Instructions
1:Power; 2:Source; 3:Multi-function Key----If it is no-multimedia,the middlekey
is MENU,the left/right key is V+/V-,the UP/DOWn is P+/P-,SOURCEis source switch
key(If enter the MENU, the SOURCEis exit menu);If it is multimedia,press and hold
on the MENU key is enter menu,press and hold on the left/right key is V+/V-,the
UP/DOWn is P+/P-(If enter the MENU, the SOURCEis exit menu),shout press the
Page 4
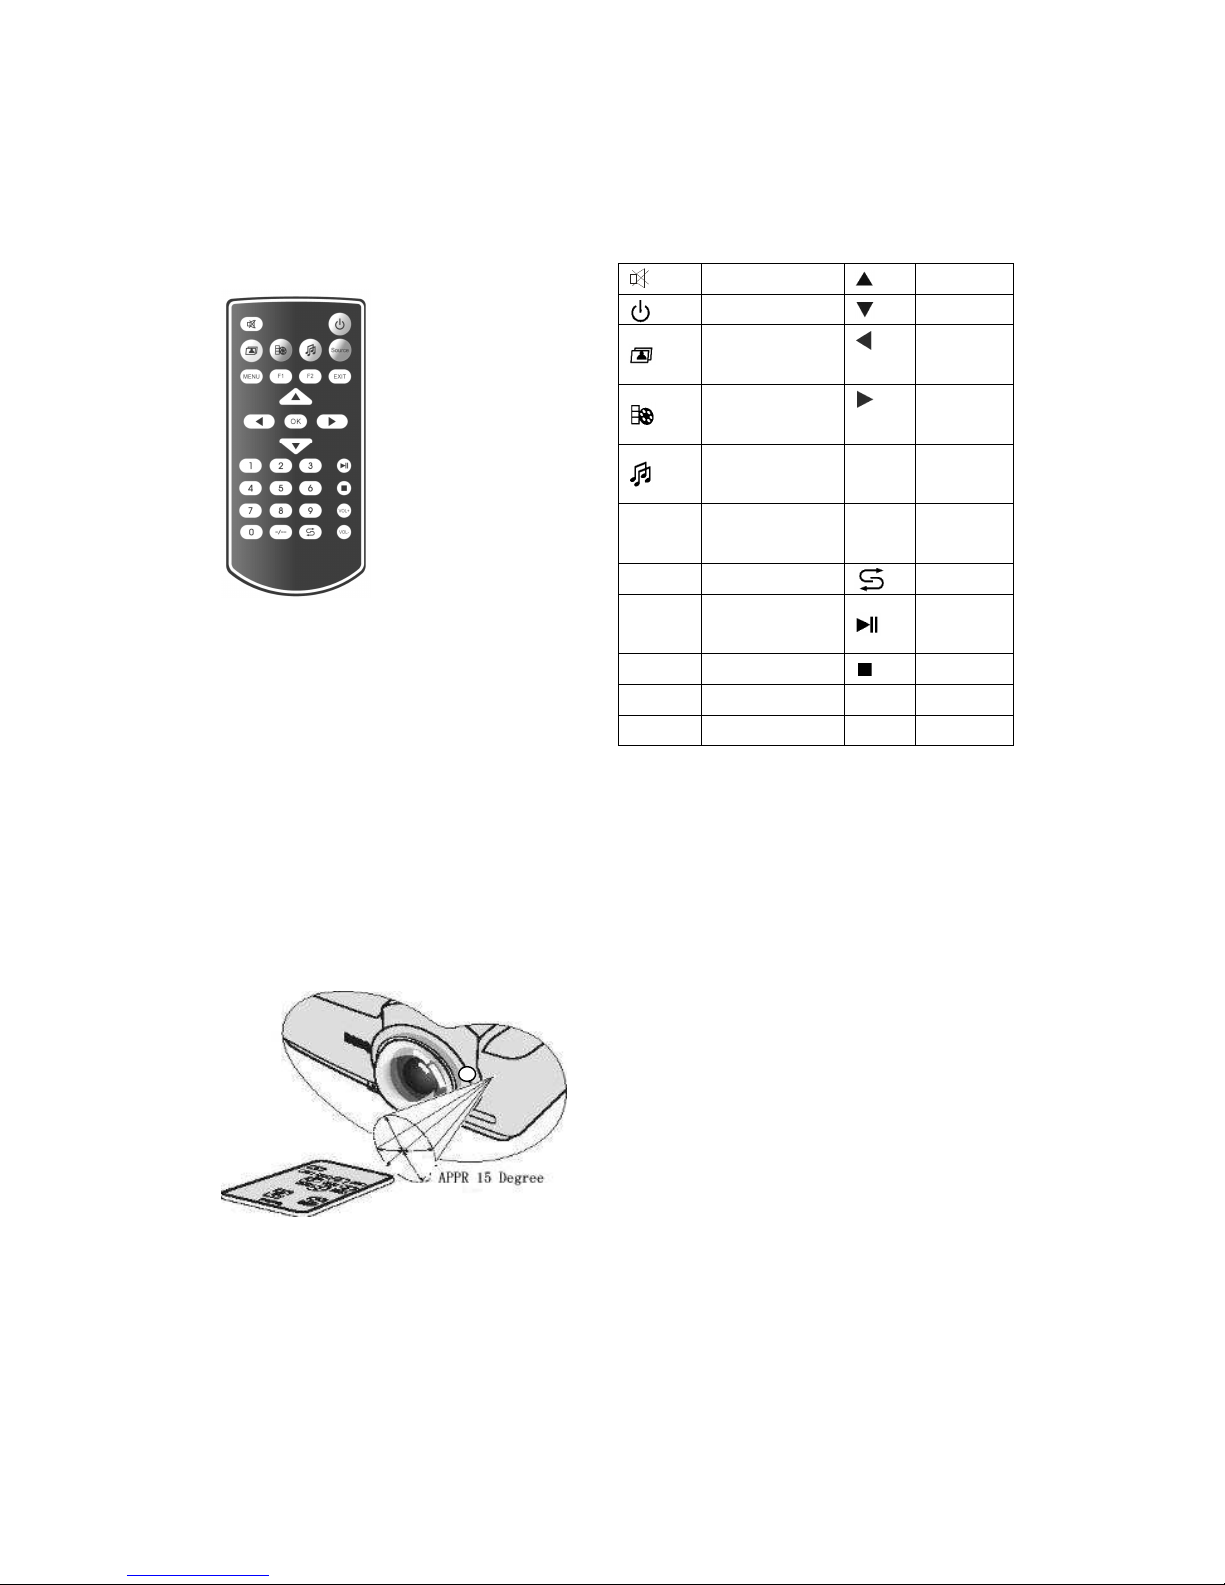
mideele key is OK key,shout press the UP/DOWN/Left/Right key is move and select
key, shout press the SOURCEkey is paust; 4-7:Four Direction Key
Remote Instructions
Infrared remote control sensor is located in front projectors. When you Hold the remote
control, you must be with the projector's infrared remote sensor to maintain the vertical
angle of 30 degrees or less to normal function; Remote control and the distance between
the sensor must not exceed 8 meters (26 feet). Remote control and infrared sensor on the
projector can be made between any obstructions will block the infrared beam.
It shoube no block between the remote and infrared recive window.
Insert the battery to the Remote
You should insert two seven batteries before using the remote.
• Please use the alkaline battery only。
How to insert the battery to the remote
Mute
UP
Power
DOWN
Photo Broad
Cast
Left
Video Broad
Cast
Right
Audio Broad
Cast
0-10 TV0-9
Source Source Select -/--
Tv digit
Swtich
MENU Menu
Previous
F1
Projection
Mode Select
Pause
F2 16:9/4:3
Stop
EXIT Exit VOL+
OK OK VOL-
Page 5
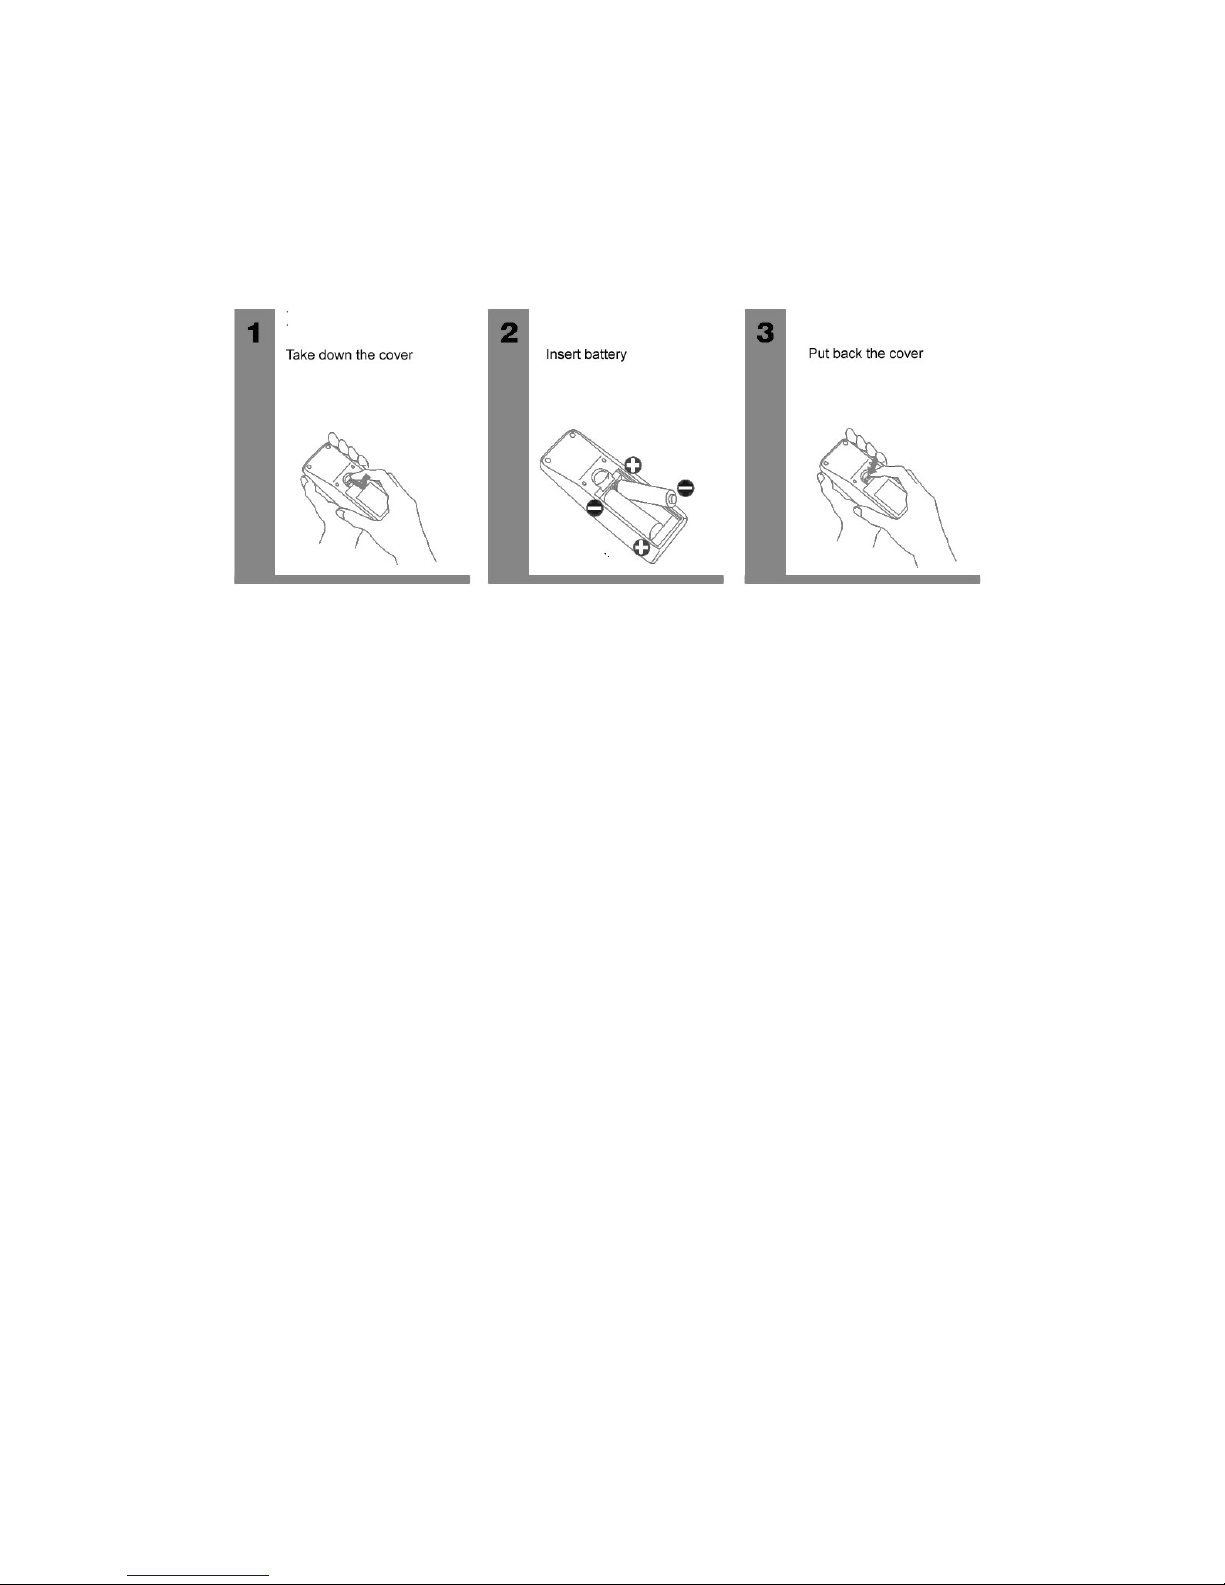
1. Take down the battery cover from the remote back.
• If there is old battery, please take it out。
2. Put the battery in,be sure that the positive pole and negative pole is correct。
3. Put the battery cover back.
Please refer to below pictures:
Select location for projector install
You can decide which installation configuration as your room layout or personal
preference. To consider screen size and position, the right location of electrical outlets, as
well as the location and distance between projectors and other equipment etc factors.
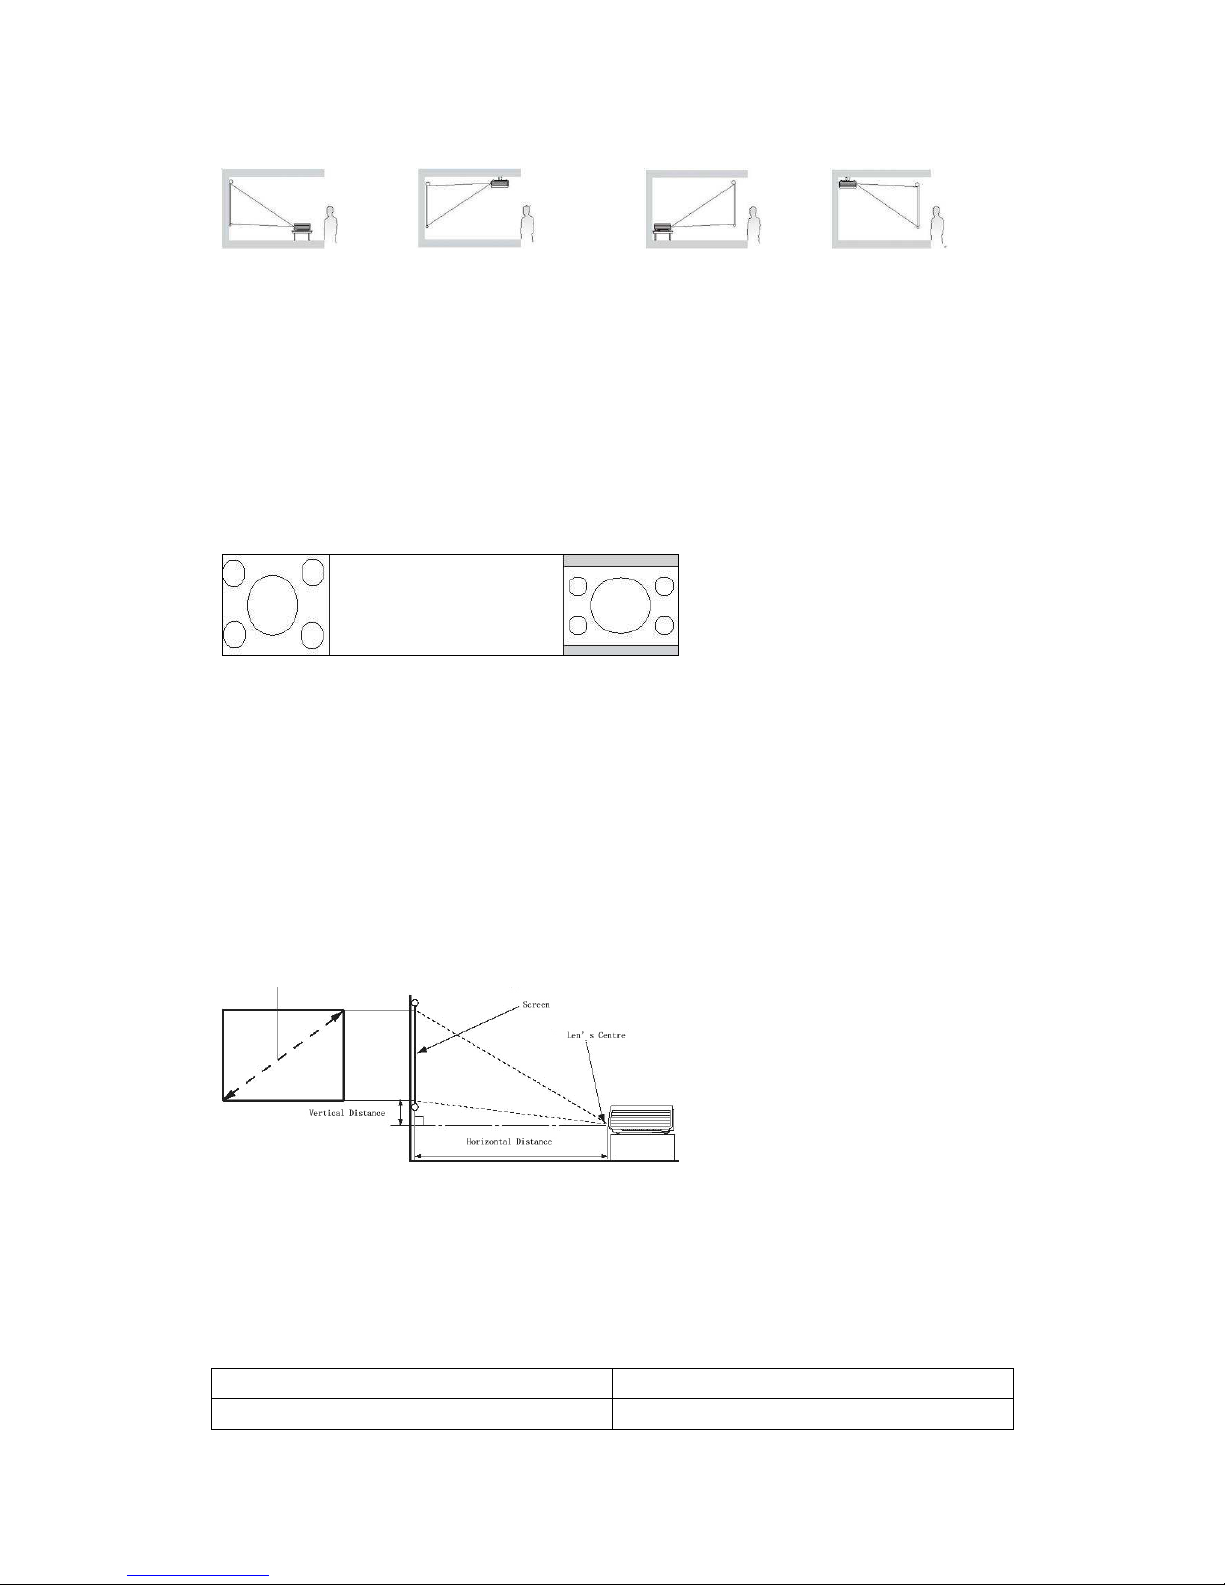
Projector can be expressed in the following four types of installation configuration for
installation
1.Front Project on Table
Select this position, the projector is located in front of the screen. This is the most
common place way of the projector, install quickly and have the mobility
2.Hanging Front Project
Select the location, the projector hanging upside down on the ceiling in front of the screen.
Please buy projector ceiling mounting kit from reseller to hang the projector installed in the
ceiling. Open the projector, select the F1 and F2 combination of remote control
operation to achieve the normal screen
3.Back Project on Table
Select this location , the projector is located behind the screen.
Please note, when back projector, you need a dedicated projection screen.
Open the projector, select the F1 and F2 combination of remote control operation to
achieve the normal screen.
4.Hanging Back project
Select this position, the projector hanging upside down on the ceiling behind the screen.
Please note that this installation position requires a dedicated projection screen and
projector ceiling mount kit suspension
Open the projector, select the F1 and F2 combination of remote control operation to
Page 6
achieve the normal screen
Hanging Front Project Hanging Front Project Table Front Project Hanging back Project
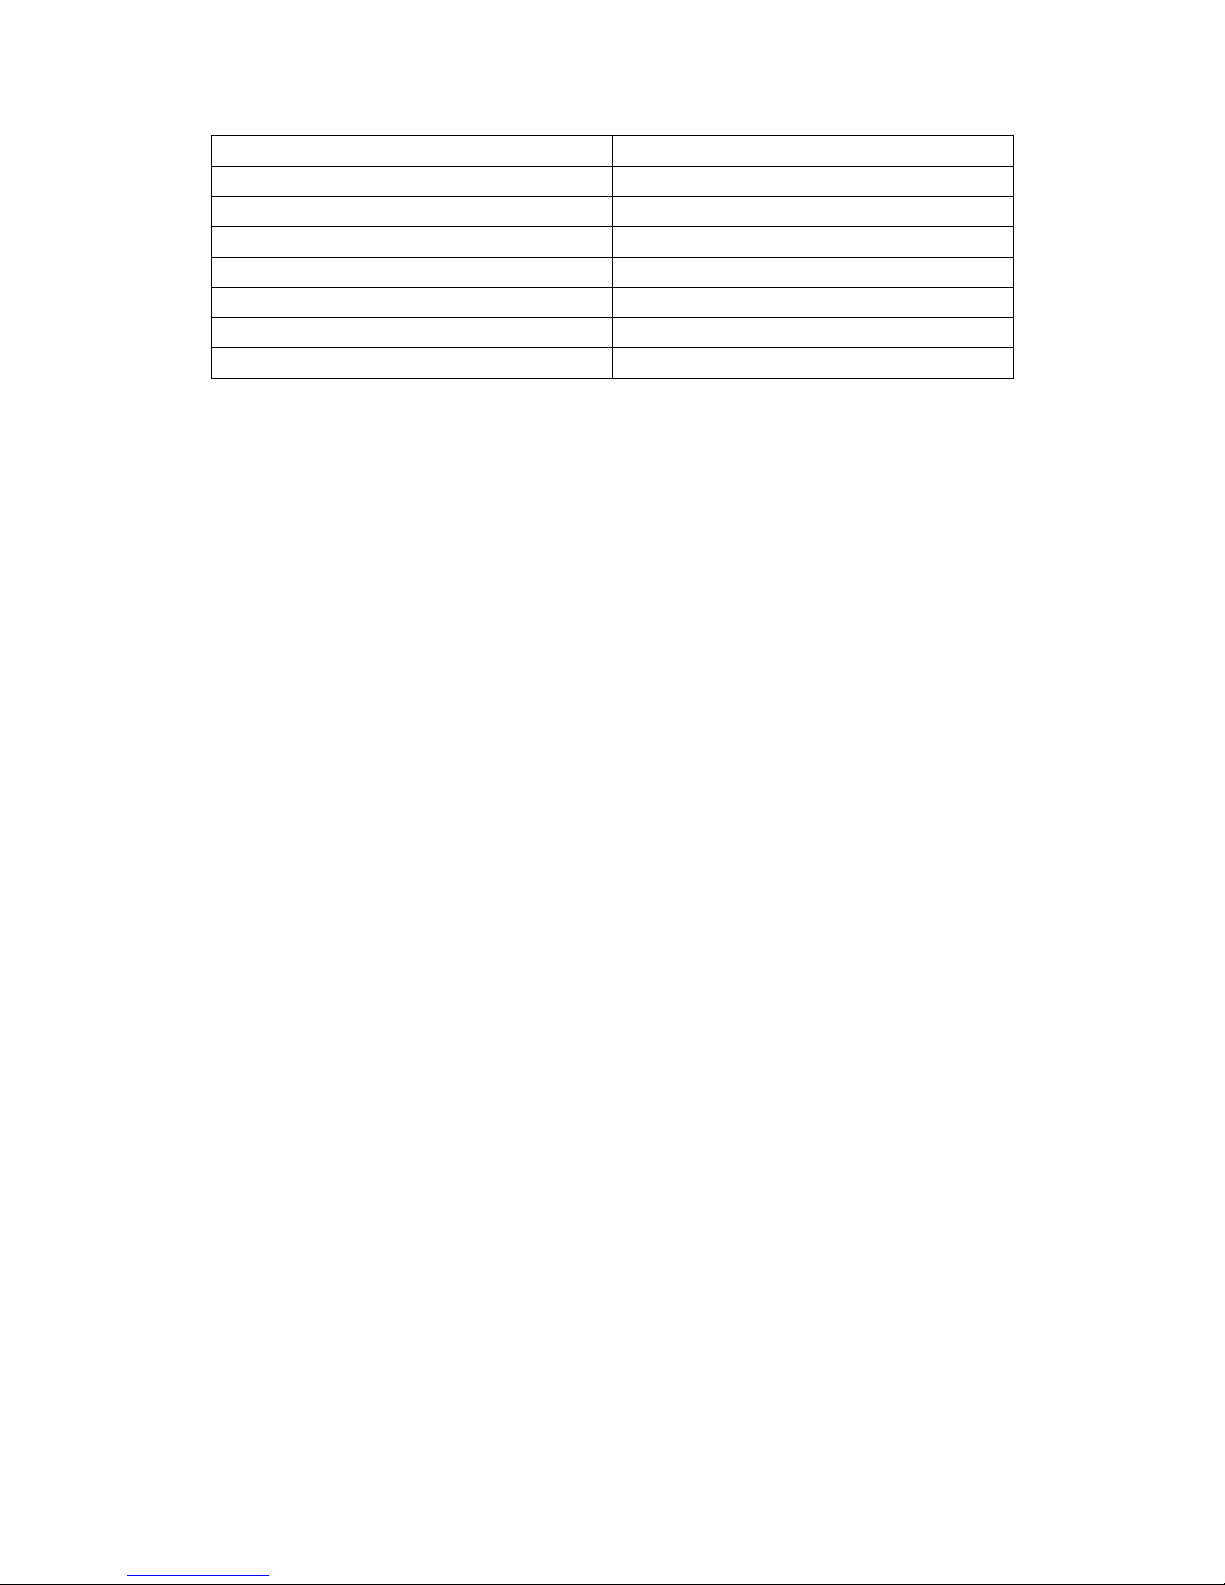
Get the size of projected image
Projector lens to screen distance, zoom setting (if any) and video formats will affect the
projected image size.
4:3 is a natural aspect ratio of the projector. In order to complete projection 16:9 (wide
screen) aspect ratio images, the projector can re-set the size and wide-screen image to
adjust to the optimum width ratio of the projector. This causes the image scaled down to
the best projection height of the projector 75%
When the projector farther away from the screen, projected image is larger, the vertical
offset will also increase accordingly.
In determining the location of the screen and projector, you need to take into account the
projected image size and the size of the vertical offset, which is proportional to the
distance projection.
Here to provide you with a 4:3 aspect ratio screen size tables to help you determine the
ideal position of the projector. There are two dimensions to consider, one is horizontal and
the vertical distance from center of the screen (projection distance), the other is the level
of the projector and the screen height of the edge of the vertical offset (shift).
4:3 Diagonal screen size
As the optical components of the differences, in these figures in tolerance. Recommended,
if you want to fixed installation projector in a place, first to use this projector for the actual
test, to confirm the size and distance of projection and with reference to their optical
properties to do installation. This will help you find the most suitable installation location.
4:3Screen size (Unit: inch) Projection distance (unit: m)
20 0.81±0.05
Page 7
30 1.24±0.05
40 1.65±0.05
50 2.08±0.05
60 2.49±0.05
70 2.89±0.05
80 3.29±0.05
100 4.14±0.05
120 4.94±0.05
The figures are for information purposes only, please measure shall prevail in kind
Connections
When connecting the signal source to the projector, please confirm:
1. To shut down all equipment before making any connections.
2. To each signal source to use the correct signal cables.
3. To ensure the cable is firmly inserted.
Connection shown in the following, some cables may not be included in this projector
package,Please refer to part ("lists"). Electrical store you can buy the cable you need.
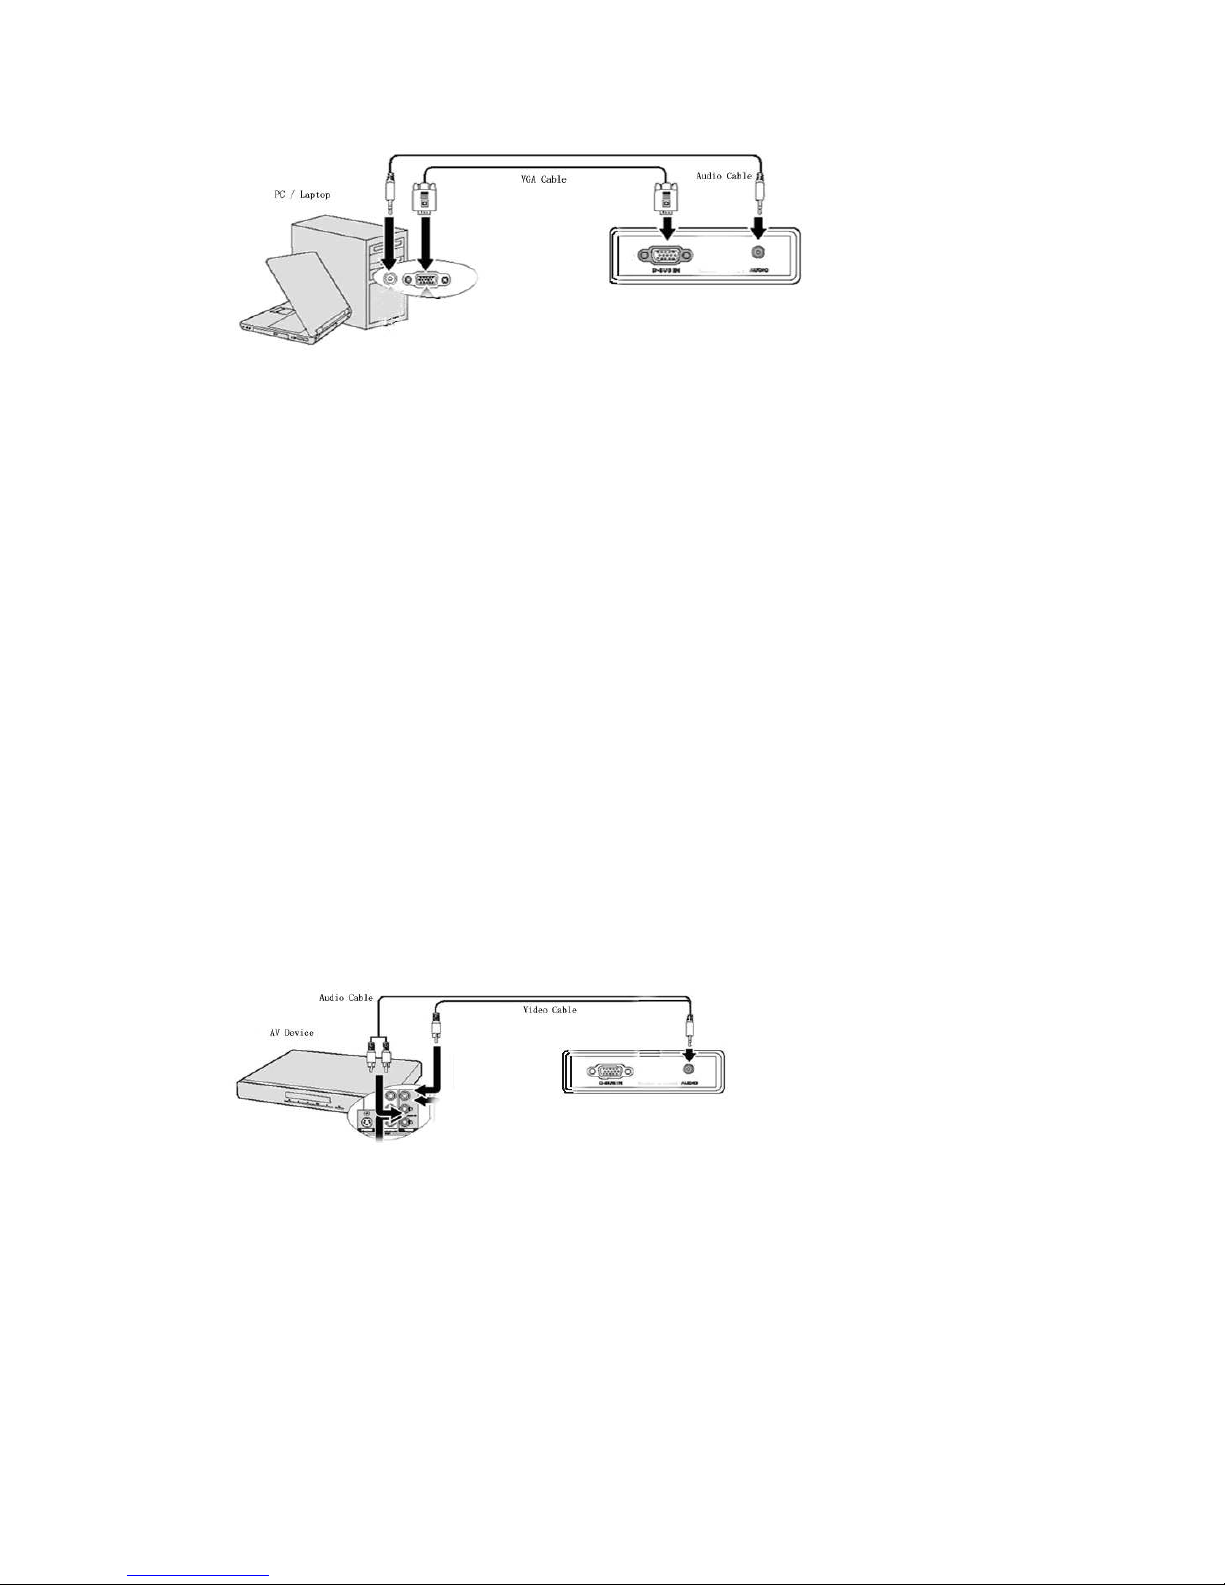
Connect computer
Projector has a VGA input jack for connecting IBM ® compatible or Macintosh ®
computer.
Connect the projector to the laptop or desktop
computer:
1. Using the included VGA cable, the 15-pin male end connect to the computer D-Sub
output jacks.
2. The other end of the VGA cable to connect to the projector's VGA input jack.
3. If you want to use the projector during the presentation (mono) speaker, the appropriate
audio cable to connect to the device's audio output jack, the other end connected to the
projector AV IN jack.
When Connection is completed, use the (OSD) menu to control the audio. For details, see
"Operating Instructions."
The final connection path should be as shown below:
Page 8
Many laptop connected to the projector does not turn on their external video port. Typically,
according to the key combination [FN] + [F3] or CRT / LCD button to turn on / off external
monitor. Found on the notebook labeled CRT / LCD display with function keys or function
key symbol. Then while pressing [FN] and labeled function keys. Please refer to the
notebook computer's documentation to find the combination of key features.
Please set the resolution of the computer to 1024*768 to get best performace.
Connect AV equipment
Connect the projector to a composite video signal source equipment:
1. One end of the video cable to connect to the video signal source equipment, composite
video output jack.
2. The other end of the video cable to connect to the VIDEO jack on the projector.
3. If you want the demo to use the projector (mixed mono) speaker, set the appropriate
audio cable to connect to the device's audio output jack, the other end connected to the
projector's AUDIO jack. When connection is completed, use the (OSD) menu to control
the audio. For more information, see "Operating Instructions."
The final connection path should be as shown below:
● This projector can only play mixed mono audio, stereo audio input signal even if the
connection is also true. For details, see "Connecting the audio."
● After the projector open and select the correct video source, if the selected video
image does not appear, please check video source device is turned on and correctly.
Needs to check the signal cable is properly connected.
Connect TV
Page 9
The TV signal using a standard RF cable to connect to this machine ANT input. For more
information, see "Operating Instructions.
Instructions
1. Turn on the projector
The projector comes with a power adapter required to connect to the DC IN socket on the
projector, then indicator will be flashed quickly;
① Press the on the remote or projector to turn on the projector.
② Press the [Source] on the projector or remote to select the signal source (move the
direction keys to select TV/AV/Componet/Multimedia/VGA/HDMI you need).
③Adjust the screen clear by use the focus knob.
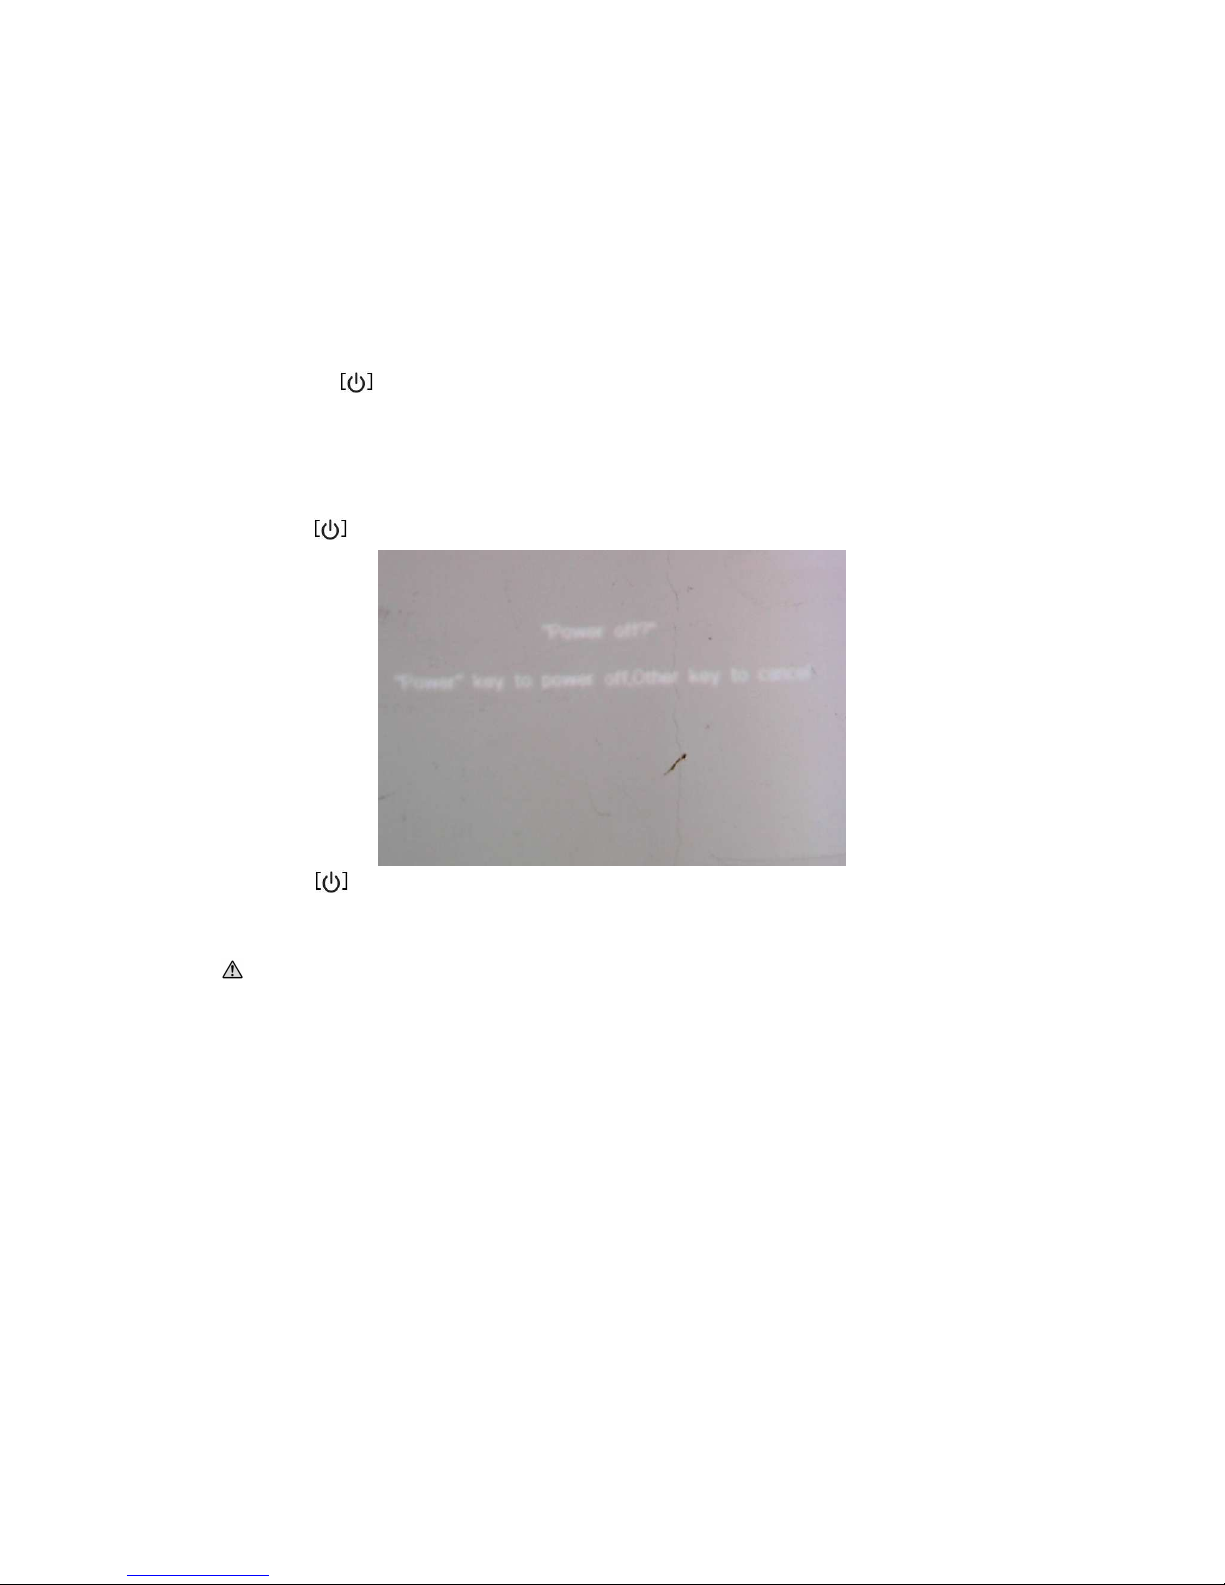
2. Turn off the projector
Press the on the projector or remote one time, displays like below:
Press the again to turn off the projector, press any other key or press no key, return
to previous state.
3. Remote menu operation
If the cursor move to one option(the option is grey),it indicates that the option can
notbe adjusted!
1. Input Source Select
A: Press【Source】,display like below:
Page 10
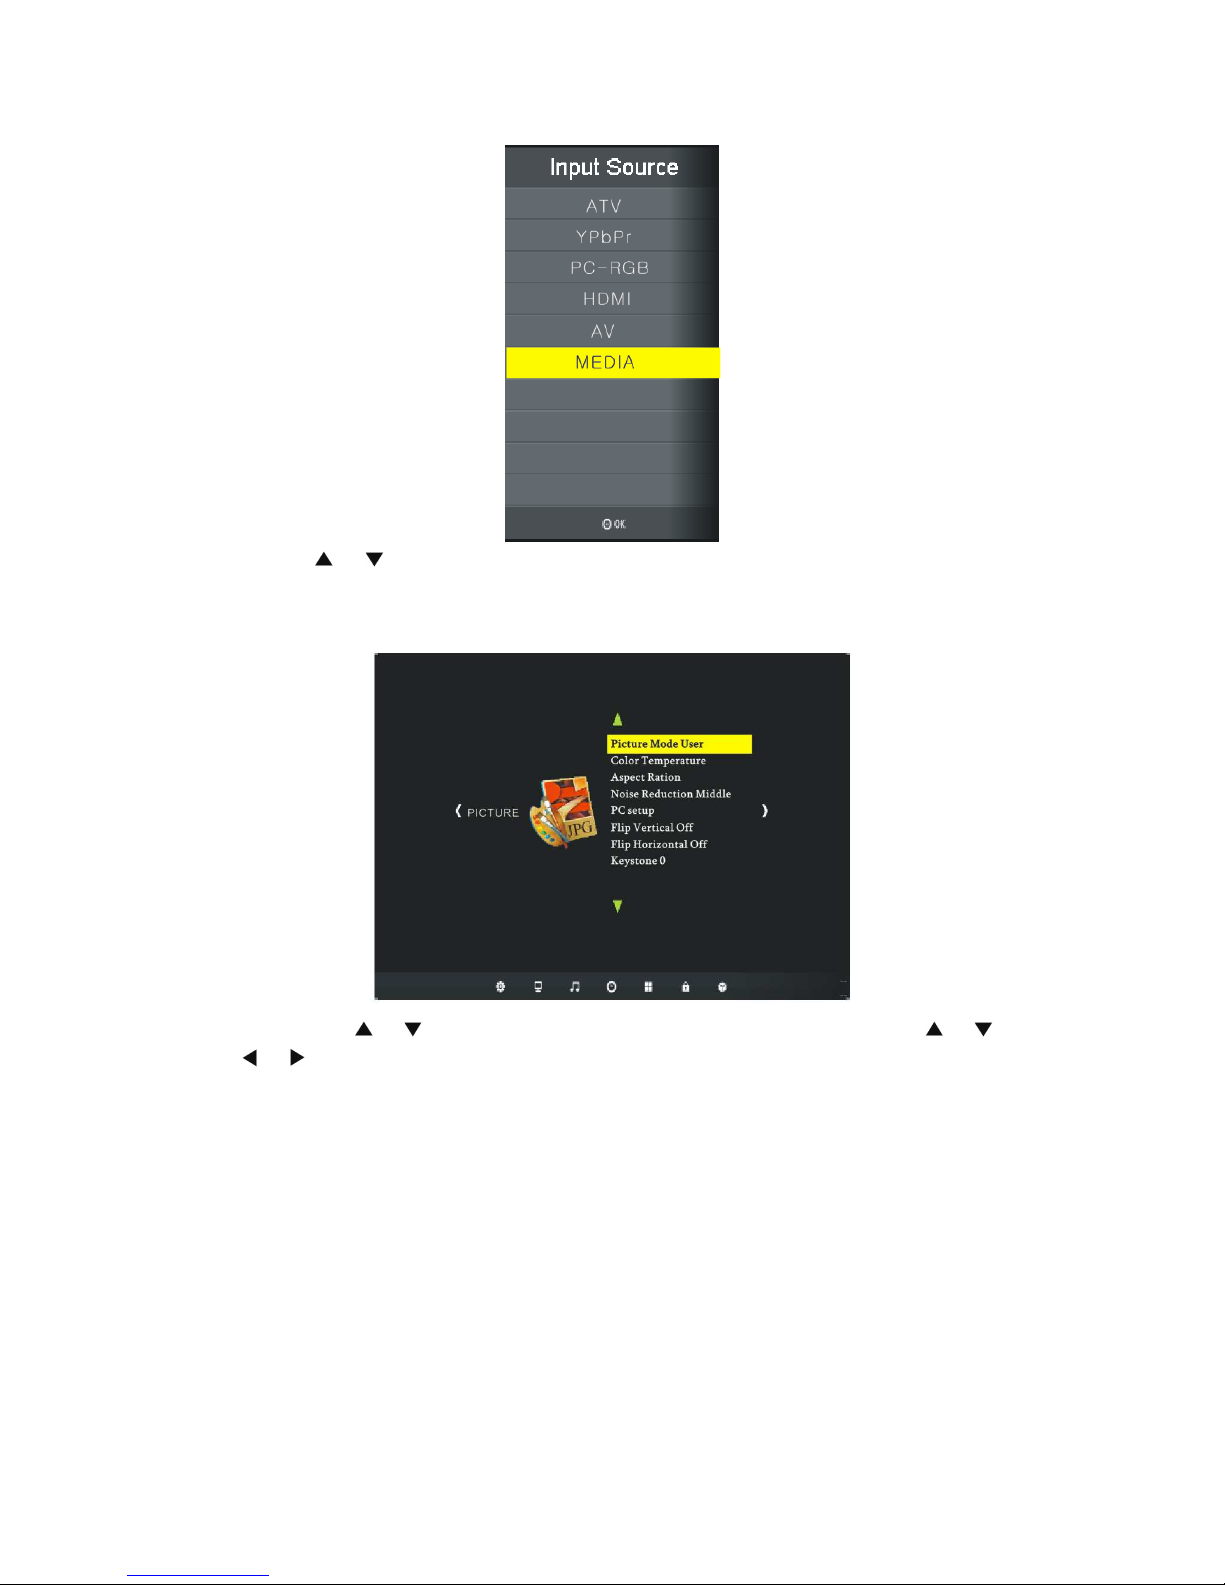
B: Move【 】【 】to the source you need,press【OK】to confirm。
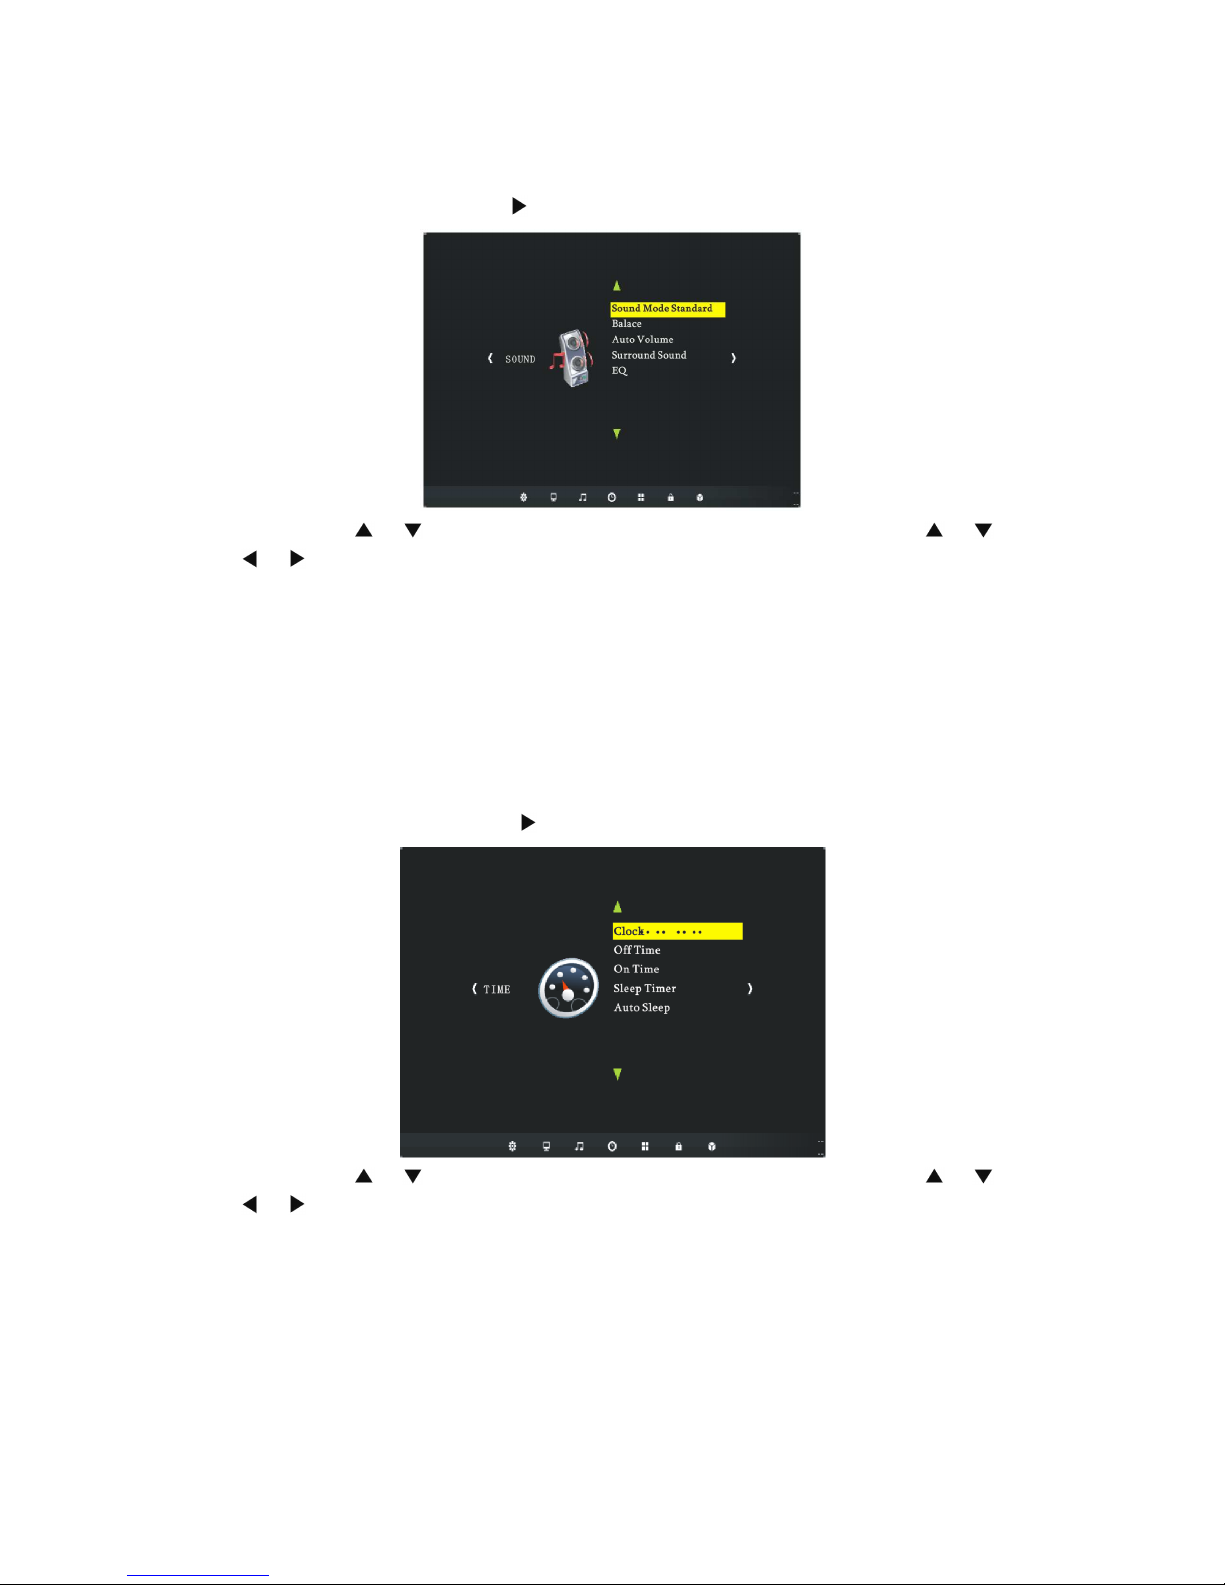
2....Picture
A: Press【MENU】,display like below:
B: Move the 【 】【 】to the sub-menu,press【OK】to enter。By using the【 】【 】
【 】【 】to adjust。
a:Picture Moce This option included:User(you can adjust the contrast ratio,brightness,
RGB,sharpness,tone is valid when the input singal is NTSC),dynamic,standard,
Mild。
b:Color Temperature This option included:User(You can adjust the RGB figure under
this state),cool ,medium, warm。
c:Aspect Ratio This option included:auto,4:3,16:9,zoom 1-5。
d:Noise Reduction This option included:OFF,low,middle,high。
e:PC Setup This option included(the option is valid when the input singal is VGA):auto
Adjust,Vertical Pos., Horizontal Pos., size,phase。
f:Flip Vertical This option included: ON, OFF。
g:Flip Horizontal This option included: ON, OFF。
h:Keystone The range of the keystone is from-30
0
to +300。
Page 11
C:Under Sub-menu state, press【MENU】,return to up menu;press【EXIT】to exit。
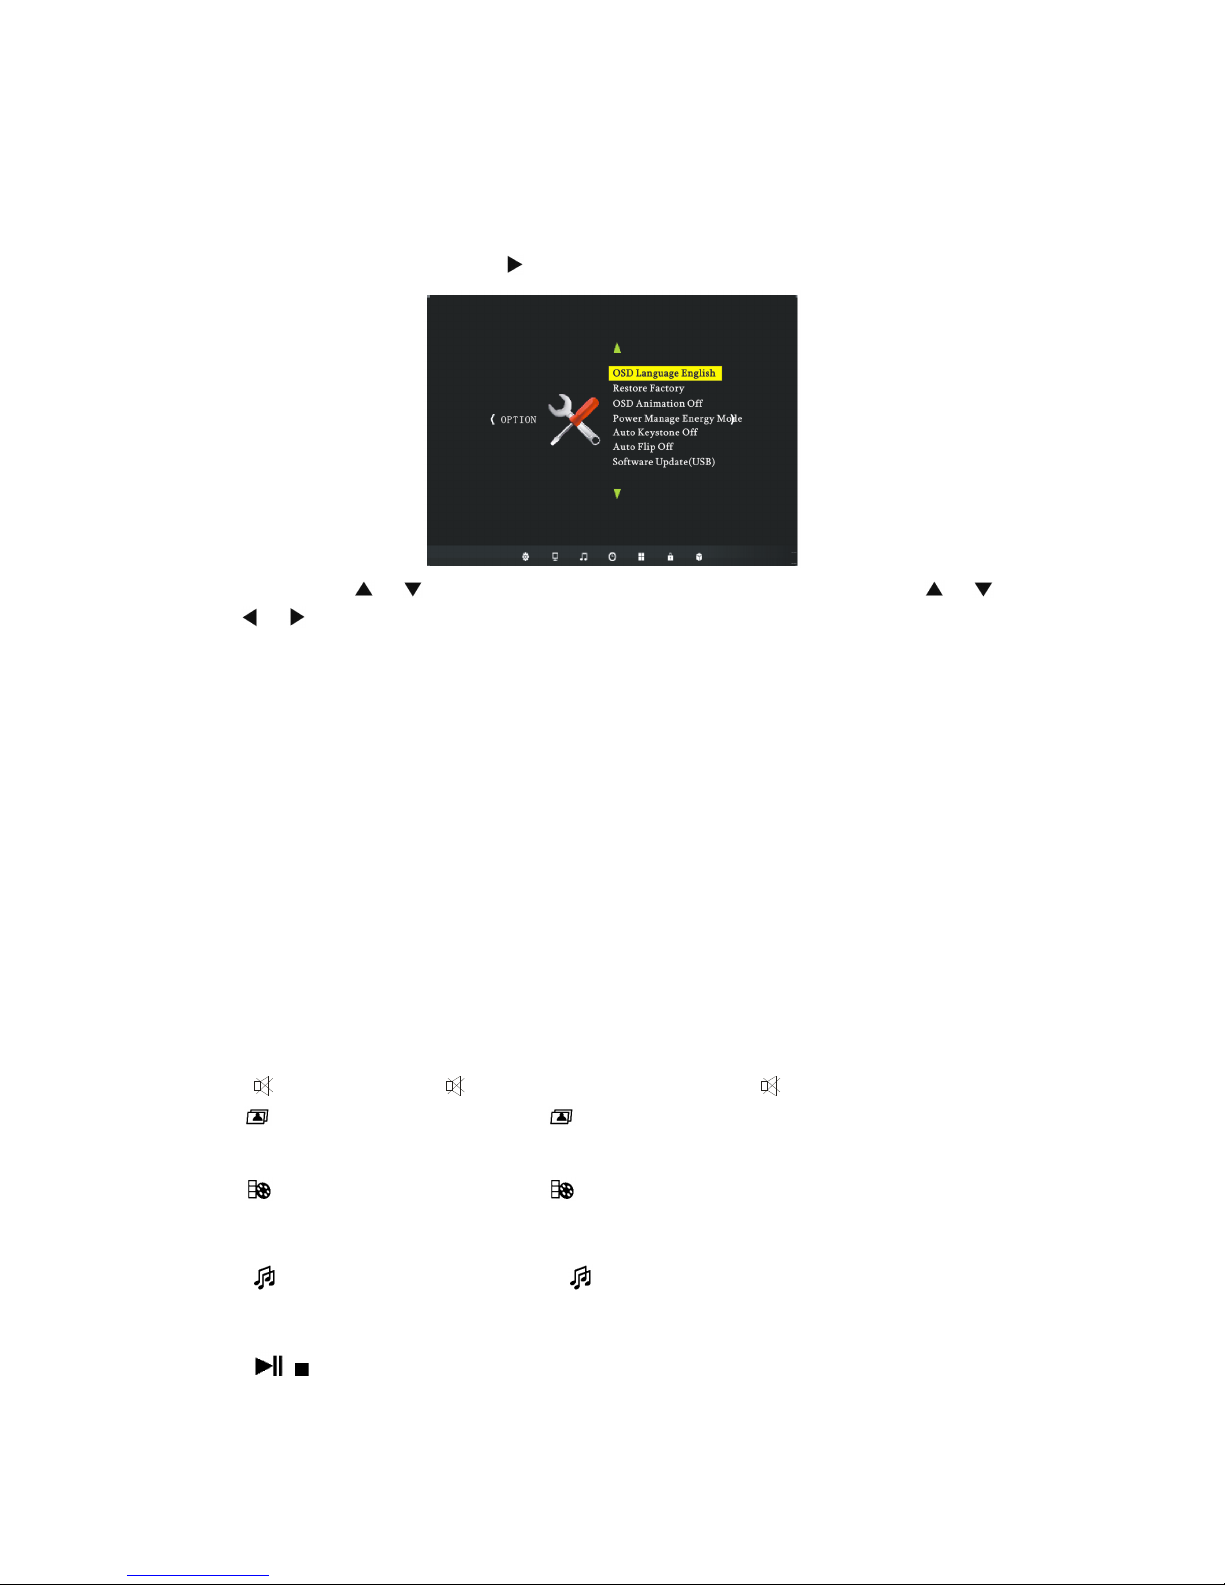
3.Sound
A:Press【MENU】,then press【 】 one time,display like below:
B: Move the 【 】【 】to the sub-menu,press【OK】to enter。By using the【 】【 】
【 】【 】to adjust。
a:Sound Mode This option included:user(you can adjust the high or low pitch under this
state),standard,music,movie,sports。
b:Balance The range of this option is from -500 to 500。
c:Auto Volume This option include ON, OFF。
d:Surround Sound This option included ON, OFF。
e:EQ This option included:120HZ,500HZ,1.5KHZ,5KHZ,10KHZ
C: Under Sub-menu state, press【MENU】,return to up menu;press【EXIT】to exit。
4.Time
A:Press the MENU,then press【 】twice,display like below:
B: Move the 【 】【 】to the sub-menu,press【OK】to enter。By using the【 】【 】
【 】【 】to adjust。
a:Clock You can set the system clock,setting included:day,month,year,hour,minute。
b:Off Time When the option ON, you can set the off time every day/Monday to
Friday/Monday to Saturday/Sunday。When the option is OFF,there is no off time setting。
c:On Time When the option ON, you can set the off time every day/Monday to
Friday/Monday to Saturday/Sunday。When the option is OFF,there is no off time setting。
d:Sleep Timer When the option is ON you can set power off the projector auto,you can
set:10minutes,20 minutes,30 minutes,60 minutes,90 minutes,120 minutes,180
Page 12
minutes,240 minutes。When the option is OFF, there is no time task。
e:Auto Sleep This option included ON, OFF.
C: Under Sub-menu state, press【MENU】,return to up menu;press【EXIT】to exit。
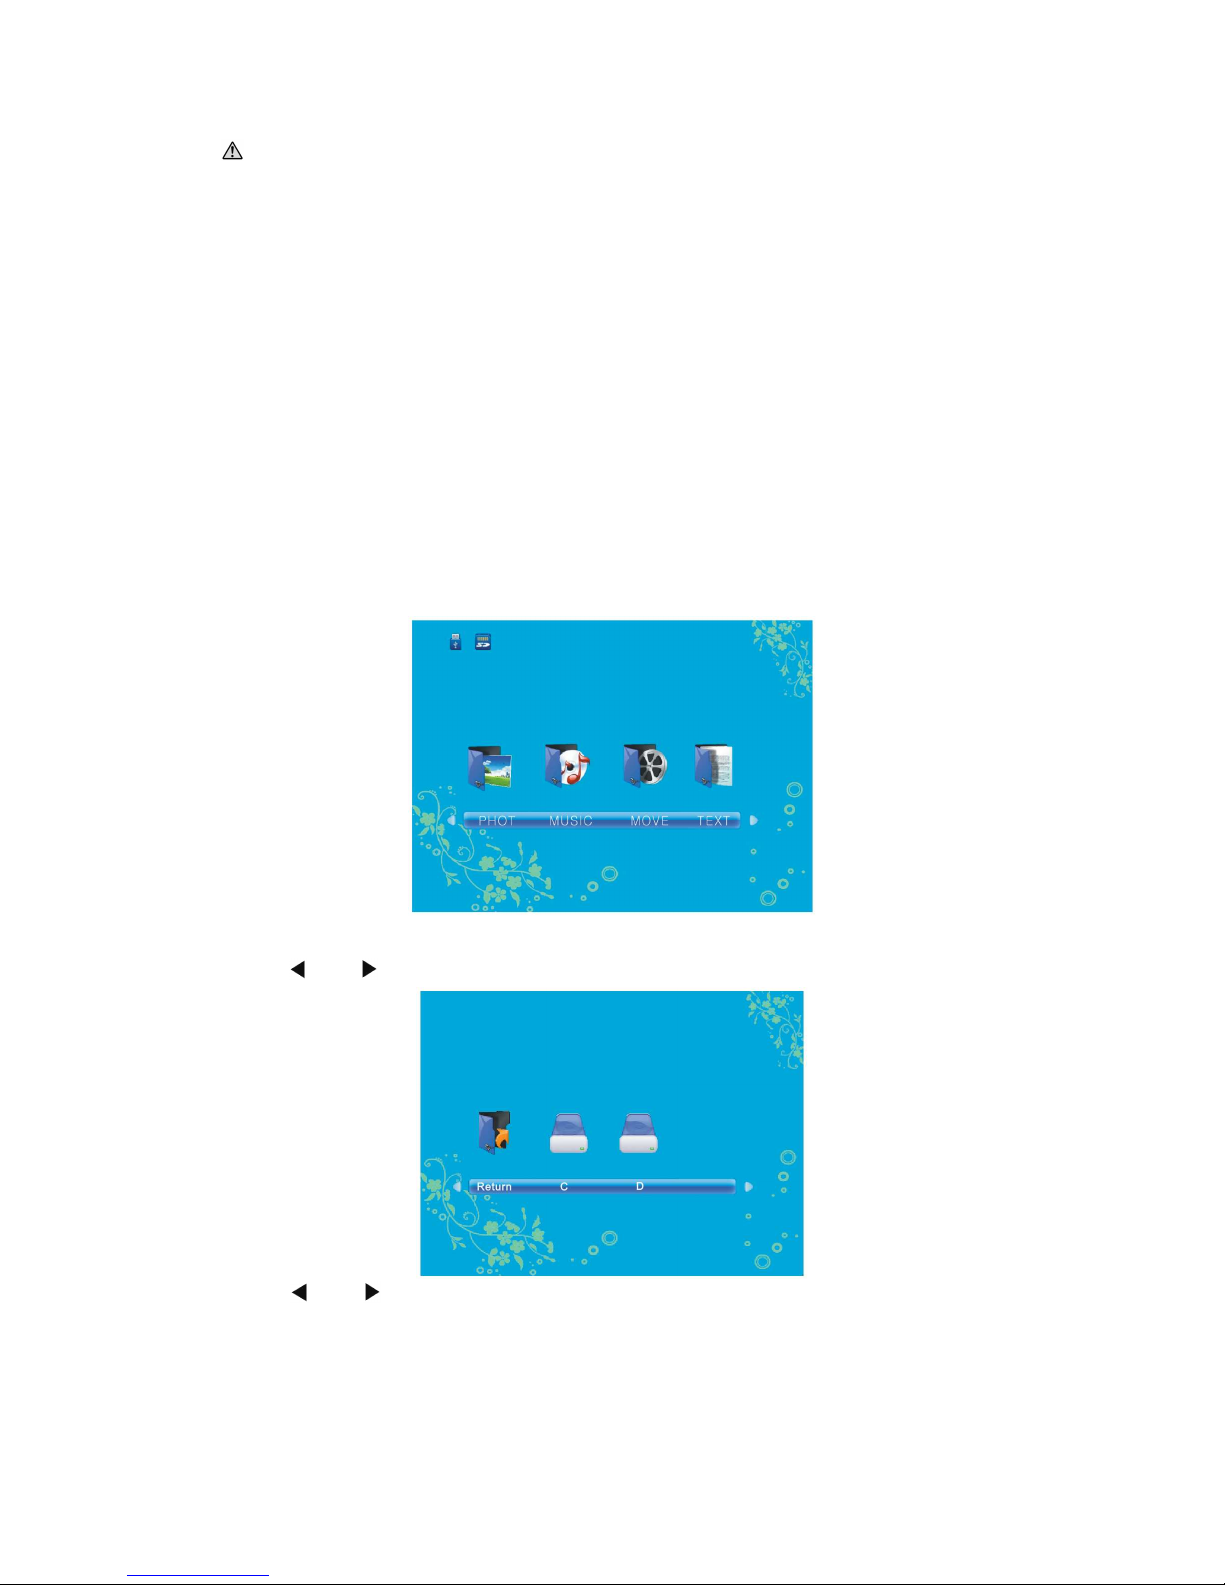
5.Setting
A:Press【MENU】键,press 【 】three times,display like below:
B: Move the 【 】【 】to the sub-menu,press【OK】to enter。By using the【 】【 】
【 】【 】to adjust。
a:OSD Language This optuion included:Chinese_Sim,Slovak,Croatian,Serbian,
Bulgarian, Romanian,Russian,Czech,Slovene,Hungarian,Polish,Finnish,Norwegian,
Greek, Danish,Swedish,Dutch,Portuguese,Italian,Spanish,German,French,
English。
b:Restore Factory Default:You can use the factory reset when your set is improper or the
procedure run wrong。
c:OSD Animation:This option included the modes of the menu display 。
d:Power Manage:This option included:standard mode,KTV mode,Demo mode,Cinema
mode,Energe mode,user mode。
e:Auto Keystone This option included ON, OFF。
f:Auto Flip This option included ON, OFF.
g:Software Update(USB))This option can update the software by USB(You can update
the software by USB)。
C: Under Sub-menu state, press【MENU】,return to up menu;press【EXIT】to exit。
四.Shourcut Key Instructions
1. Mute Press the to close the volume,press the to resume。
2. Photo Broad Cast Press the , set the input source to multimedia and read the
picture of the USB,and play them by film slide。
3. Video Broad Cast Press the , set the input source to multimedia and read the
picture of the USB,and play the first video file。
4. Audio Broad Cast Press the , set the input source to multimedia and read
the picture of the USB,and play the first audio file。
5. , play/puase/stop is valid when play multimedia under multimedia input.。
6. F1 Projection Mode Selection,it has four projection mode:
Page 13
Mode 1 ——Applied to front projection
Mode 2 ——Applied to ceiling front projection
Mode 3 ——Applied to ceiling back projection
Mode 4 ——Applied to back projection
五.Multimedia
Supported Formats:
MPEG-2 Video MP@HL (1080i、720p、SDTV)
MPEG-4 ASP Video decoding (1080P@30fps)
RM/RMVB( 支 持 RV8,RV9,RV10,RA8-LBR和 HE-AAC,Max1080P@30fps)
MPG . MPEG .DAT . AVI . MOV . MP4 .VOB
Supported Photo Formats: JPG .BMP .PNG .GIF .TIFF
Supported Video Formats: MPEG-1. MPEG-2(Layer / ) .MP3. AAC-LC .WMA
Supported Text Formats: TXT
Supported Card Formats: SD . MMC
Power on the projector, swtich to multimedia input, display like below:
Insert the flash memory or SD/MMC card to the according interfaces.
Press【 】or【 】 to move,select the file,press【OK】to confirm,display like below:
Press【 】or【 】 to move,select the file,press【OK】to confirm,display like below
Page 14
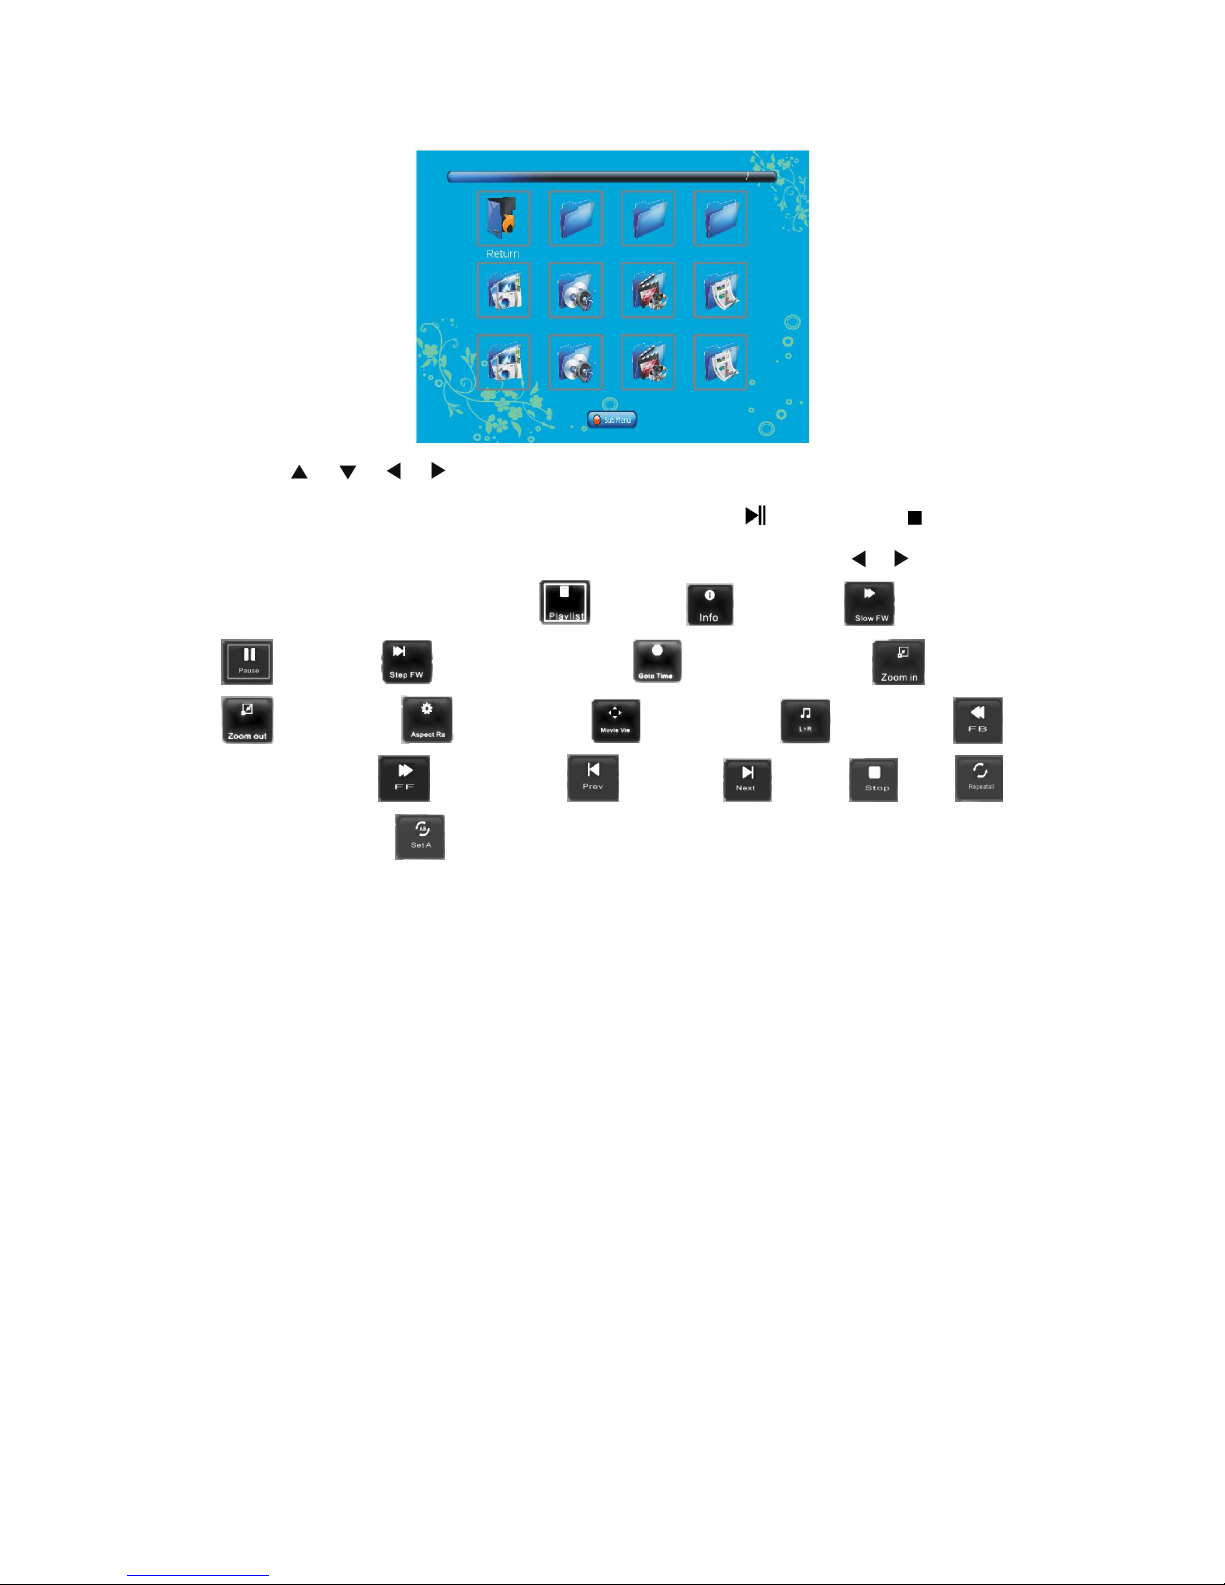
Press【 】【 】【 】【 】to move cursor,select the file, press【OK】to confirm(single
selection/multiple selection,selected file marked √),press【 】to play.press【 】to stop.
Under Multimedia,press【OK】display options,total two layers,press【 】【 】to select:
the indications are under below: playlist; file info; slow play;
pause; frame by frame play; optional time play; zoom in;
zoom out; picture scale; picture move; channel se;
fast backward ; fast forward; previous; next; stop;
loopped playback; section set play;
Under Sub-menu state, press【MENU】,return to up menu;press【EXIT】to exit。
DVB-T program playing(Optional)
In DVB-T, 【MENU】is the menu, 【search】is the search, other operations refer to TV
operations.
Information in this document is subject to change without notice.
Maintenance
The projector need maintain. You should do maintenance regular to keep the lens
clean.Do not disassemble any part of the projector(expect the detachable plate )
Lens Clean
You can clean the lens when you find dust or dirty on the lens.
• Use the compressed air tank to clean the dust.
• If there is dust or dirty on the clean, use the special lens paper or wet soft cloth with
cleanser to wipe the lens gently.
Projector Box Clean
Page 15
Be sure that the power is off before cleaning the box.
• Please use the soft、lint free cloth to clean the box.
• Please use the water or neutral cleanser to clear the cloth
• Do not use paraffin、alcohol、diluent or other chemical cleanser to clean the box.
Projector Storage
If you want to storre the projector long term, please refer to below instructions:
• Be sure that the temperature and humidity is under the range of the recommended
range. Withdraw the machine leg.
• Remove the battery of the remote.
• Use the initial or equivalent package to pack the projector.
Projector Transportation
Use the initial or equivalent package to transport the projector.
Troubleshootings
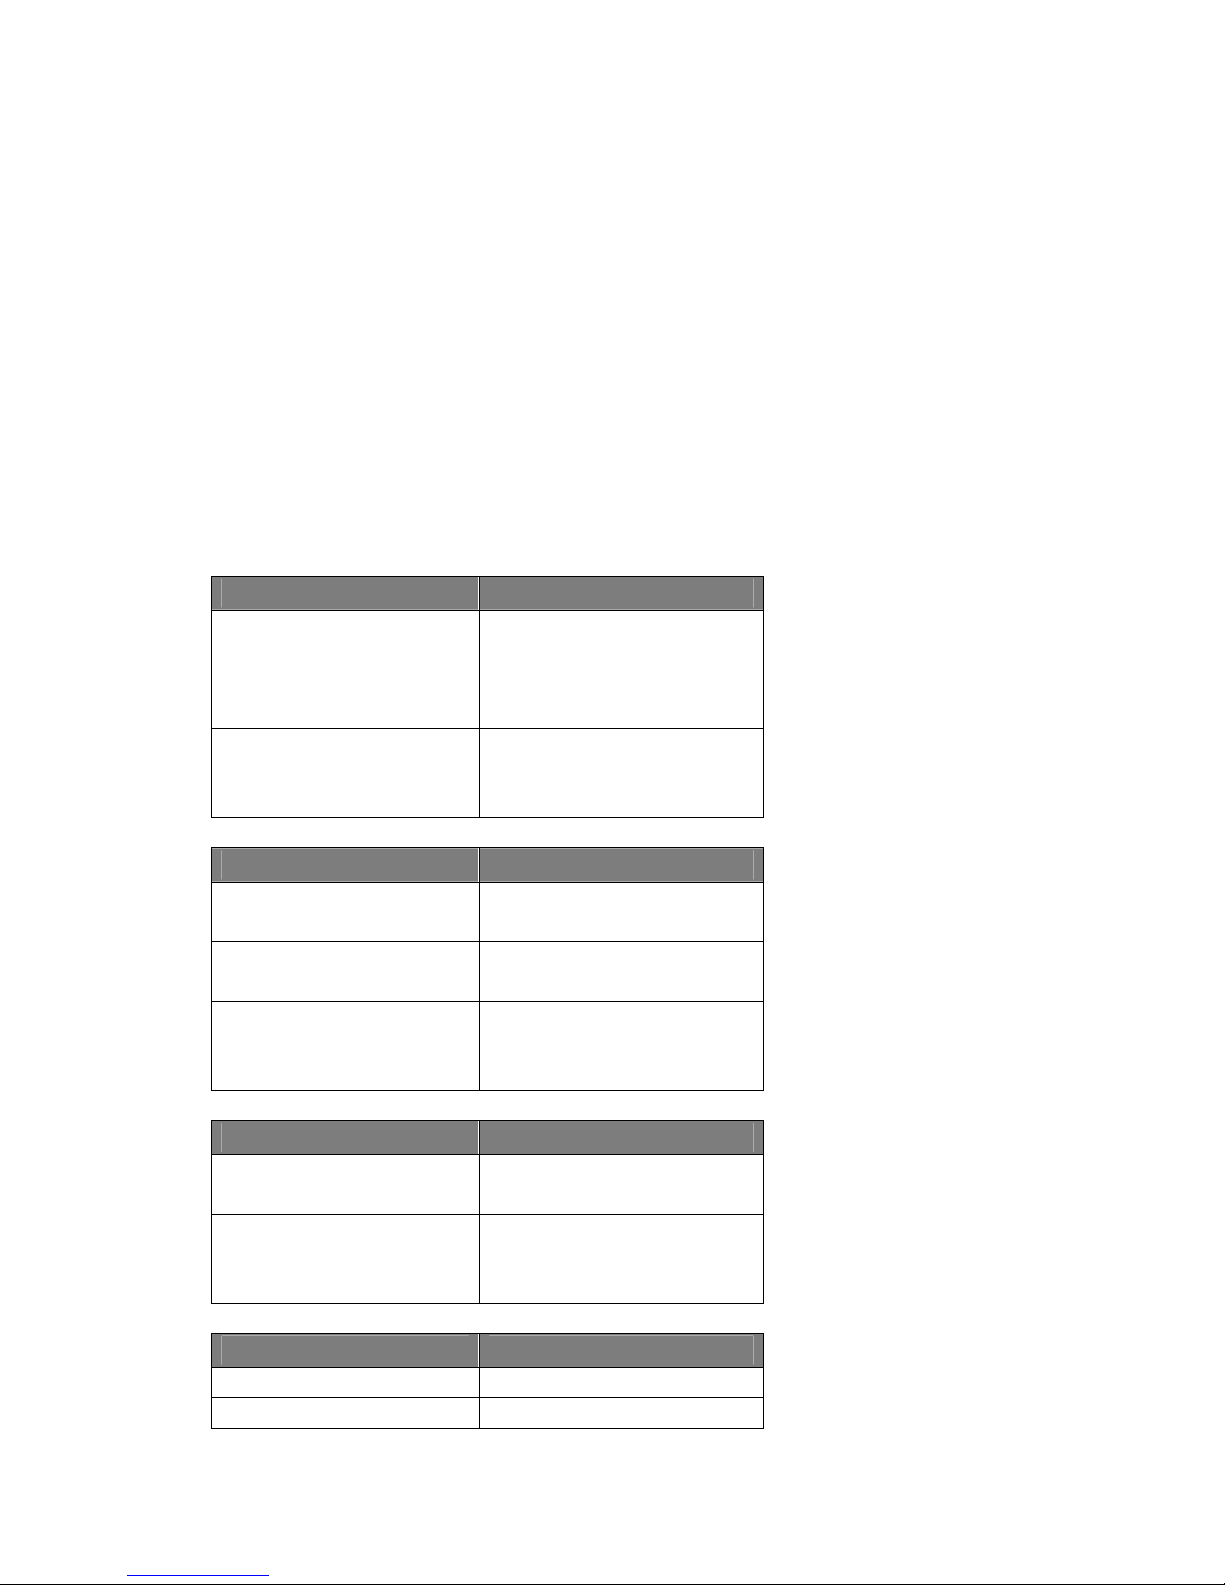
Projector can not power on
Reason Solutions
Power cable without
electrical loading
Insert one side of the cable to
the adaptor,the other side to
the socket. Be sure the switch
of the socket is on.
Projector without electrical
loading
Insert the DC port of the
adaptor to the DC-IN of the
projector
No image
Reason Solutions
Video sources does not
poweronor connect wrong
Power on the video soruces
and inspect the connection.
Projector does not connect
withinput singals correctly.
Inspect the connection
Select wrong input singal
Press the M on the projector
or SOURCE on the remote to
select the input singal.
Image Blurring
Reason Solutions
Projector lens does not
focus correctly
Use the focus to adjust
Projector does not aim the
screen
Adjust the angle and
direction,or
height if nesseary.
Remote failure
Reason Solutions
Battery runs low Replace battery
Barrier between remote and Remote barrier
Page 16
projector
Distance too long
The distance do not exceed
8m(26 feet)
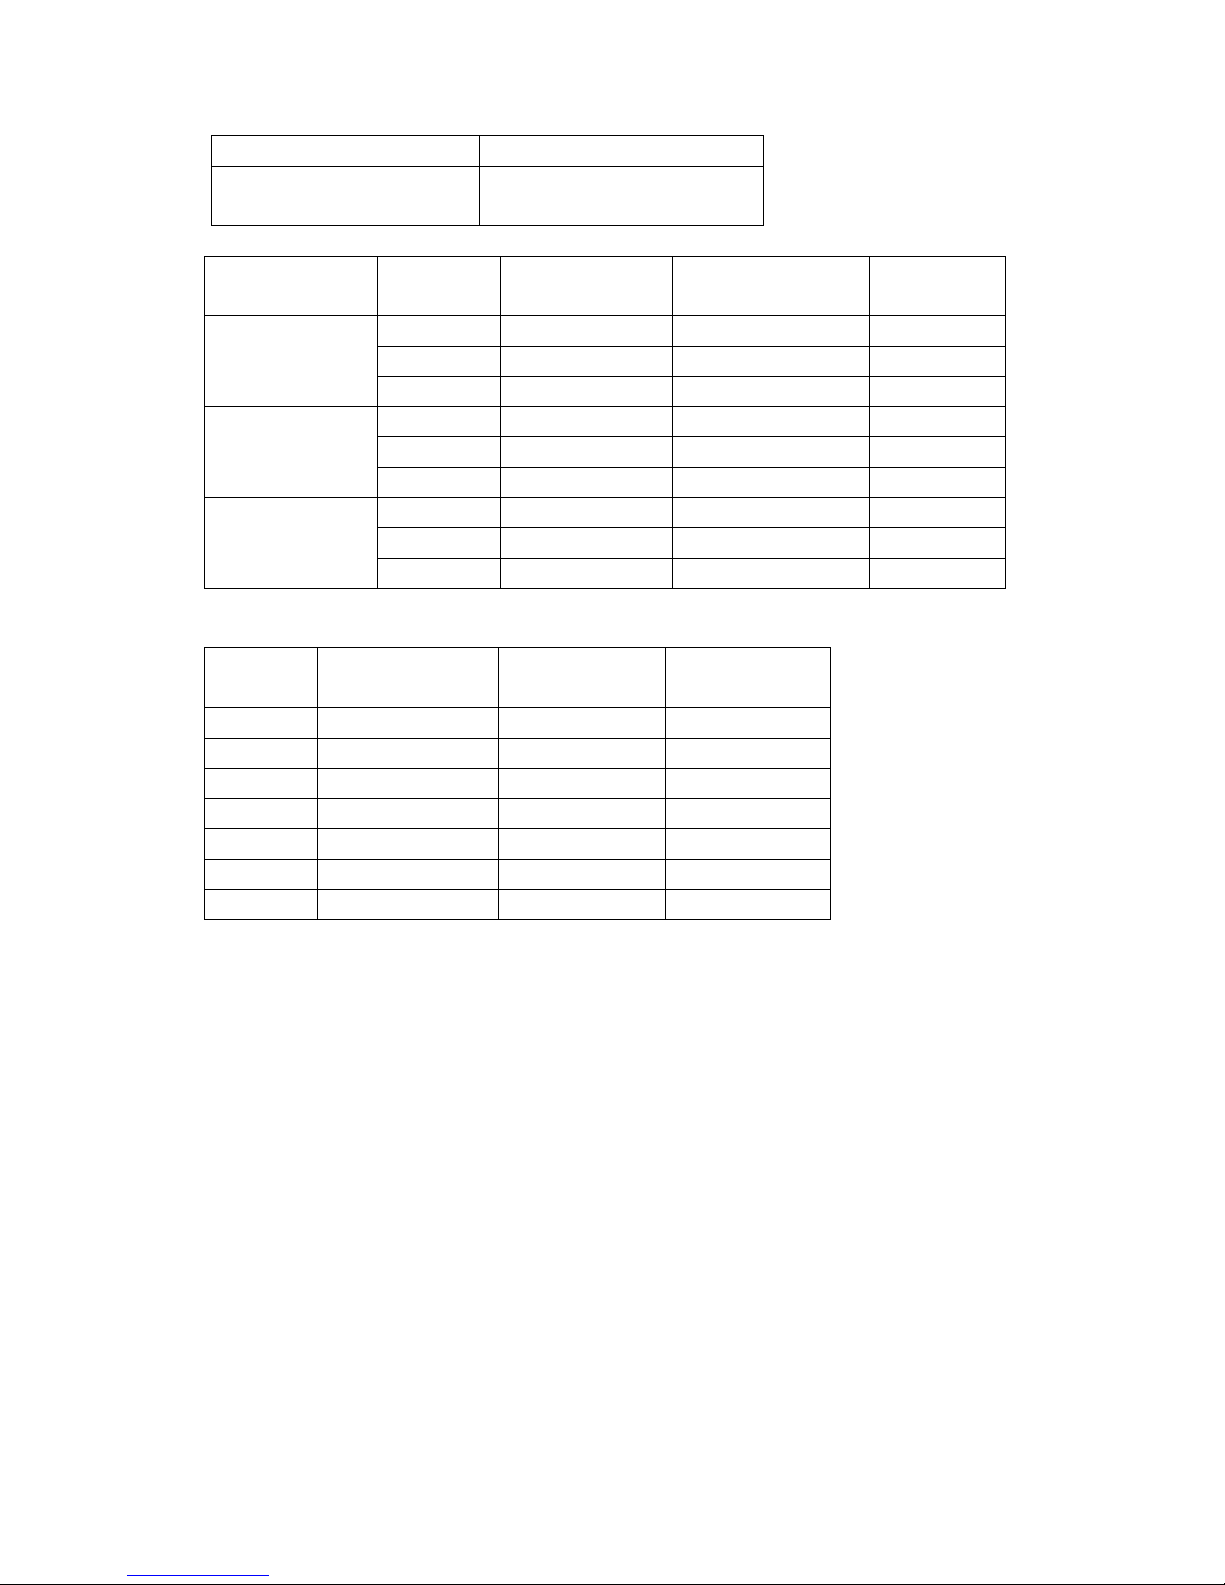
Compatibility PC Mode
Resolution
Mode Refresh Rate
(Hz)
H.Frequency(kHz) Clock(MHz)
VGA_60 59.940 31.469 25.175
VGA_72 72.809 37.861 31.500
640 x 480
VGA_75 75.000 37.500 31.500
SVGA_60 60.317 37.879 40.000
SVGA_72 72.188 48.077 50.000
800 x 600
SVGA_75 75.000 46.875 49.500
XGA_60 60.004 48.363 65.000
XGA_70 70.069 56.476 75.000
1024 x 768
XGA_75 75.029 60.023 78.750
Compatibility Video Mode
Video
Mode
H.Frequency(kHz) V.Frequency(Hz)
Chrominance
Subcarrier(MHz)
NTSC 15.73 60 3.58
PAL 15.63 50 4.43
SECAM 15.63 50 4.25 or 4.41
PAL-M 15.73 60 3.58
PAL-N 15.63 50 3.58
PAL-60 15.73 60 4.43
NTSC4.43 15.73 60 4.43
Limited warranty
In normal use and storage conditions, the Company of any of the product defects in
material and workmanship warranty.
When asked to provide valid warranty warranty card and valid invoice. Discovered during
the warranty period if the product is defective, the sole obligation of the Company and for
your exclusive remedy is to replace any defective parts (including labor costs). When you
purchase the products should immediately notify the dealer of any defects to obtain
warranty service.
Important:
If the customer fails to LED projector written instructions to use the product, the warranty
will not apply. Especially the ambient humidity must be between 10% and 90%, and the
temperature between 0 ° C and 35 ° C, between less than 2000 meters above sea level,
and to avoid dusty environment in the operation of the projector. This warranty gives you
specific legal rights, and you may also have other rights, depending on the area you
purchase.
 Loading...