

Page 1

User Manual
Color and appearance may differ with the icons in this manual,product
specifications may vary due to the improved performance without notice
V 1.0
innovative
.
K8
www.innovative.com.sg
Page 2

Features… … … … … … … … … … … … … … … … … … … … … … … … … … … … … … … … .1
Safety Instructions… … … … … … … … … … … … … … … … … … … … … … … … … .2
List of Items… … … … … … … … … … … … … … … … … … … … … … … … … … … … .10
Pr o je c t o r E xt e r i o r Vi e w … … … … … … … … … … … … … … … … … … … … … … . 11
Touch Key Instructions And Remote Instructions………………………………………………………………….12
P r o j e c t i o n D i s t a n c e a n d S i z e … … … … … … … … … … … … … … … … … … … . 1 3
Op era tio ns Instructions… … … … … … … … … … … … … … … … … … … … … … … . 13
Focus adjustment… … … … … … … … … … … … … … … … … … … … … … … .14
Select Input Source… … … … … … … … … … … … … … … … … … … … … … … .15
Connect to U-Disk or Multimedia… … … … … … … … … … … … … … … … … … … … … … … .16
Co nnecting to video device… … … … … … … … … … … … … … … … … … … .17
Connecting to Audio Device … … … … … … … … … … … … … … … … … … … . 18
Connect to Wifi Display Dongle… … … … … … … … … … … … … … … … … … … … .19
Connecting to HDMI device… … … … … … … … … … … … … … … … … … … … … … … … … … .20
Connecting to PC… … … … … … … … … … … … … … … … … … … … … … … … … … .21
System Setting Menu… … … … … … … … … … … … … … … … … … … … … … … … … … .22
3 D F u n c t i o n … … … … … … … … … … … … … … … … … … … … … … … … … … . 2 6
Watching 3D Image Requirements… … … … … … … … … … … … … … … … … … … … … … … … … … .26
… … … … … … … … … … … … … … … … … … … … … … … … … … .27
…………………………………………………………………….
Mu ltimedia Menu… … … … … … … … … … … … … … … … … … … … … … … … … .29
… … … … … … … … … … … … … … … … … … … … … … … … … ......... 30.
PPT/PDF Document Play … … … … … … … … … … … … … … … … … … … … … … … .32
Trouble Shooting… … … … … … … … … … … … … … … … … … … … … … … … … … … … .34
Technical Specificatio n… … … … … … … … … … … … … … … … … … … … … … … .36
Watch 3D Movie
Use DLP-LINK (DLP-Ready) type glasses 28
Multimedia Interface
Content
Page 3

1
Thank you for our LED mini projector!purchasing
Please read the manual carefully before you start to use the projector. The projector is designed
for home entertainment, and it will project a big screen as you like at any time.
1 Features
The projector integrates high performance optical engine and friendly interfaces with high reliability.
Driven by RGB LED and DLP, it provides you with vivid images.
● 1280×800 Resolution; Support DLP-LINK 3D READY
● R/G/B LED, over 20000 hours lamp life;
● Support AV/HDMI/VGA sources; HDMI port can supply power for smart dongle; Coaxial audio
output for multi-channel surround sound;
● Built-in multimedia, support 1080P, 3D video/Music/Photo/E-book;
● Video playback breakpoint memory function;
● Built-in TV(optional);built-inli-ion battery(optional);built-in FM audio transmitter(optional);
● 100% offset, easy to use and install;
● Instant ON/OFF, without waiting for the machine to cool;
● Display 16.7 million color.
Page 4

2
1.1 Safety Instructions
● To ensure the safety of using this product, please follow the using instructions.
● Please use the adaptor specified, other products may damage the projector.
Page 5

3
● Do not disassemble, modify, throw, or drop the projector, otherwise it may cause damage;
● The Projector must be repaired by professional technicians;
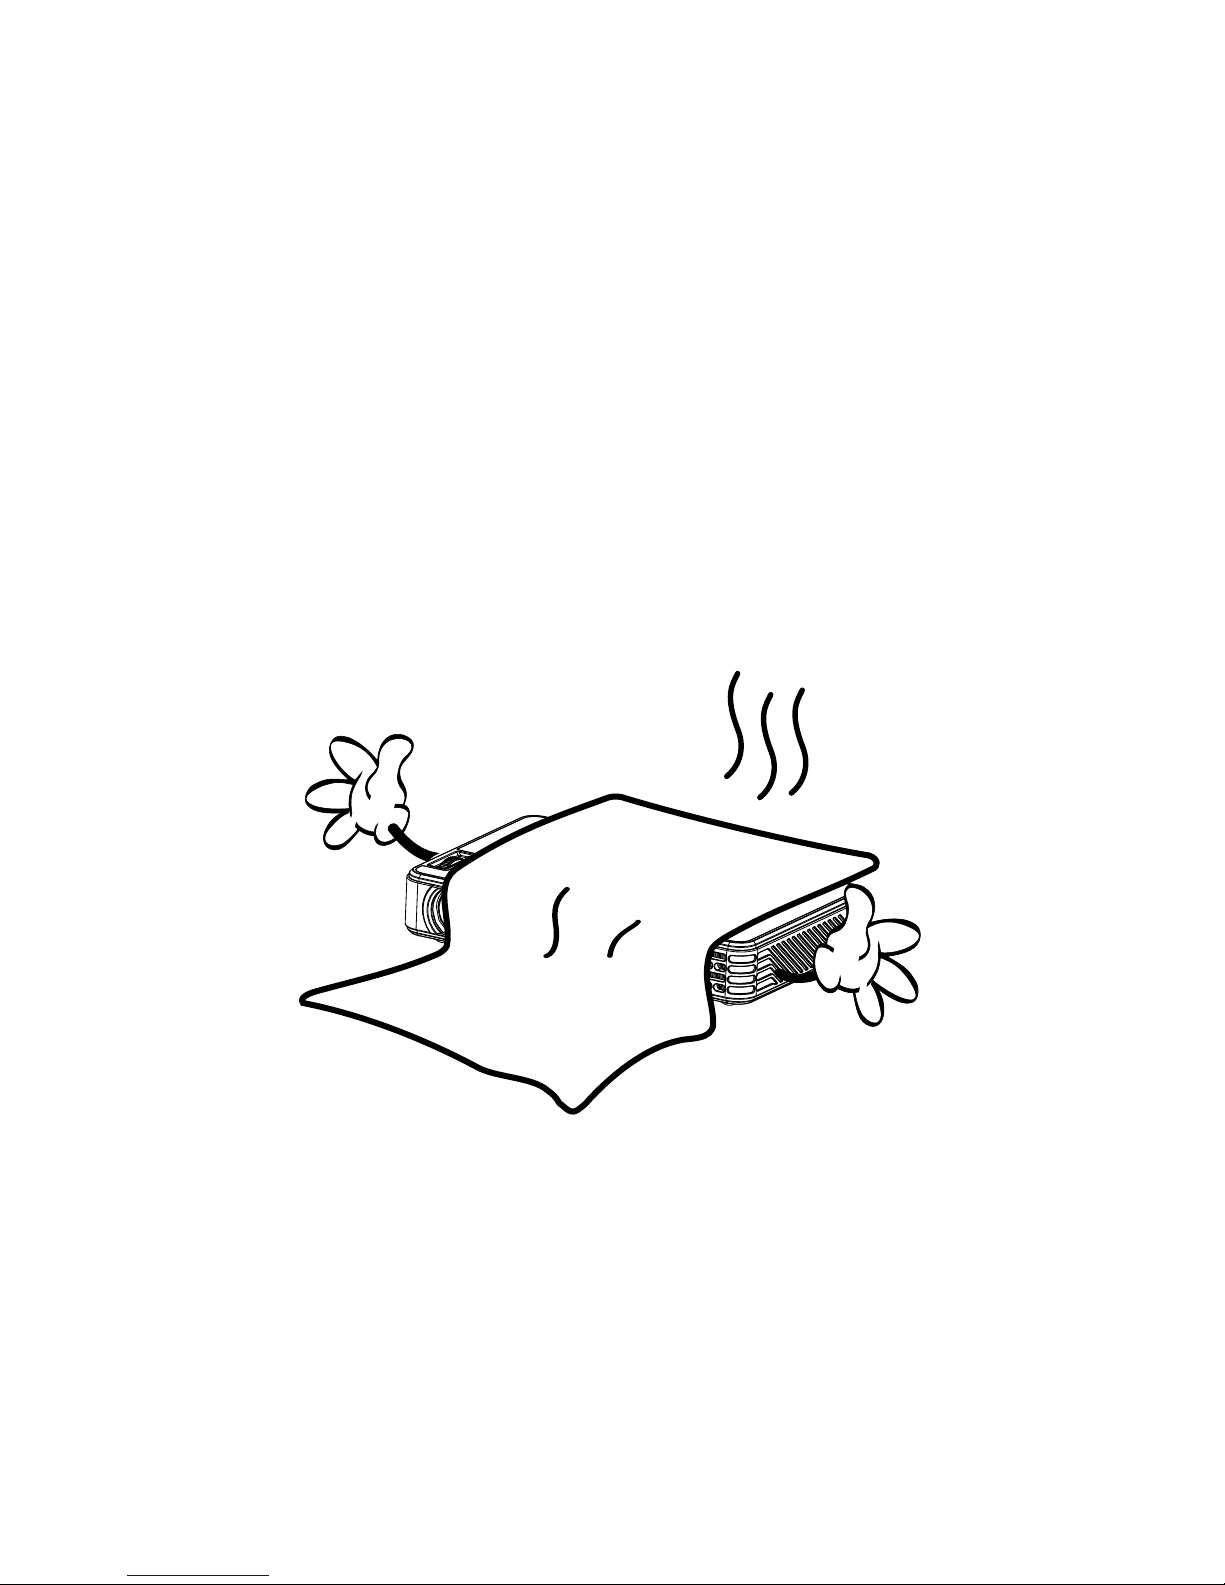
● The battery is integrated, do not to cover up or modify.
Page 6
4
● Do not drop metal objects into the projector, otherwise it will result in damage; if any external objects
land inside the projector, please turn off the power quickly.
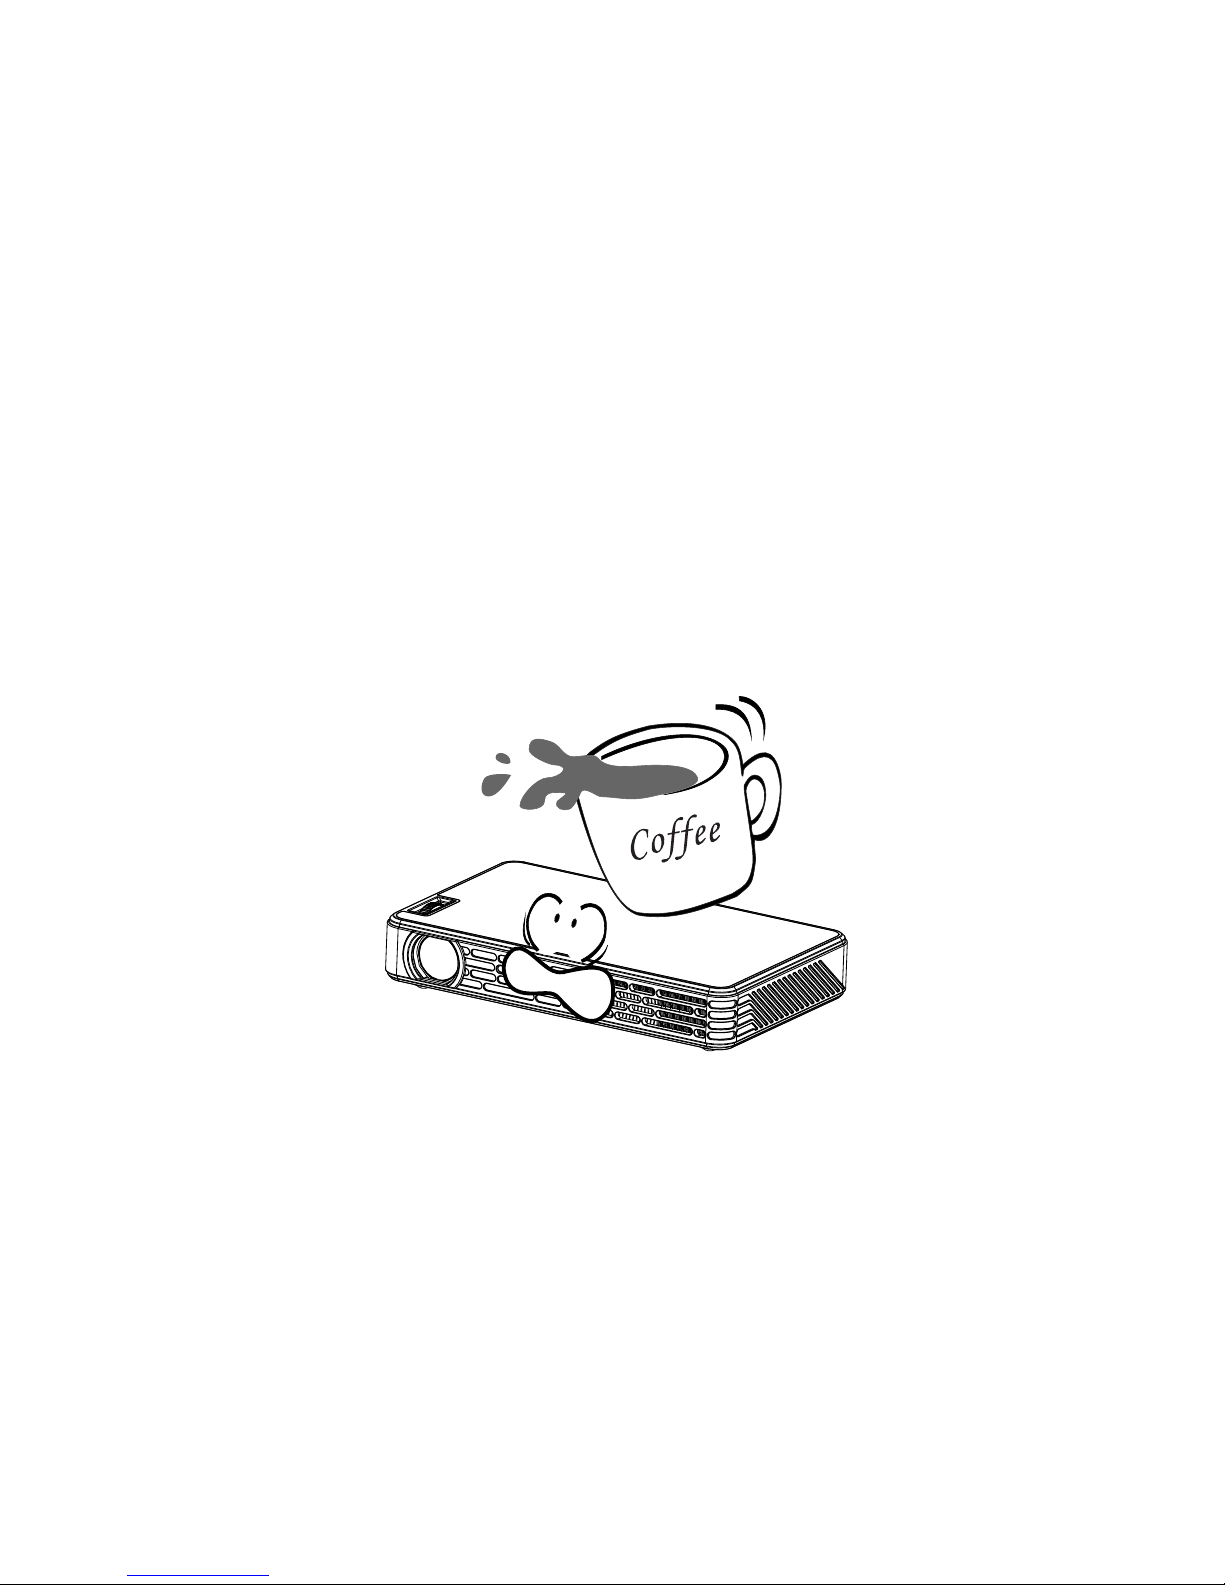
Do not place liquids near or on the projector. If liquid has been spilled into the machine, immediately
turn off the power, and do not use.
●
Page 7
5
Page 8
6
● Do not use the projector under extreme light or near a strong magnetic field.
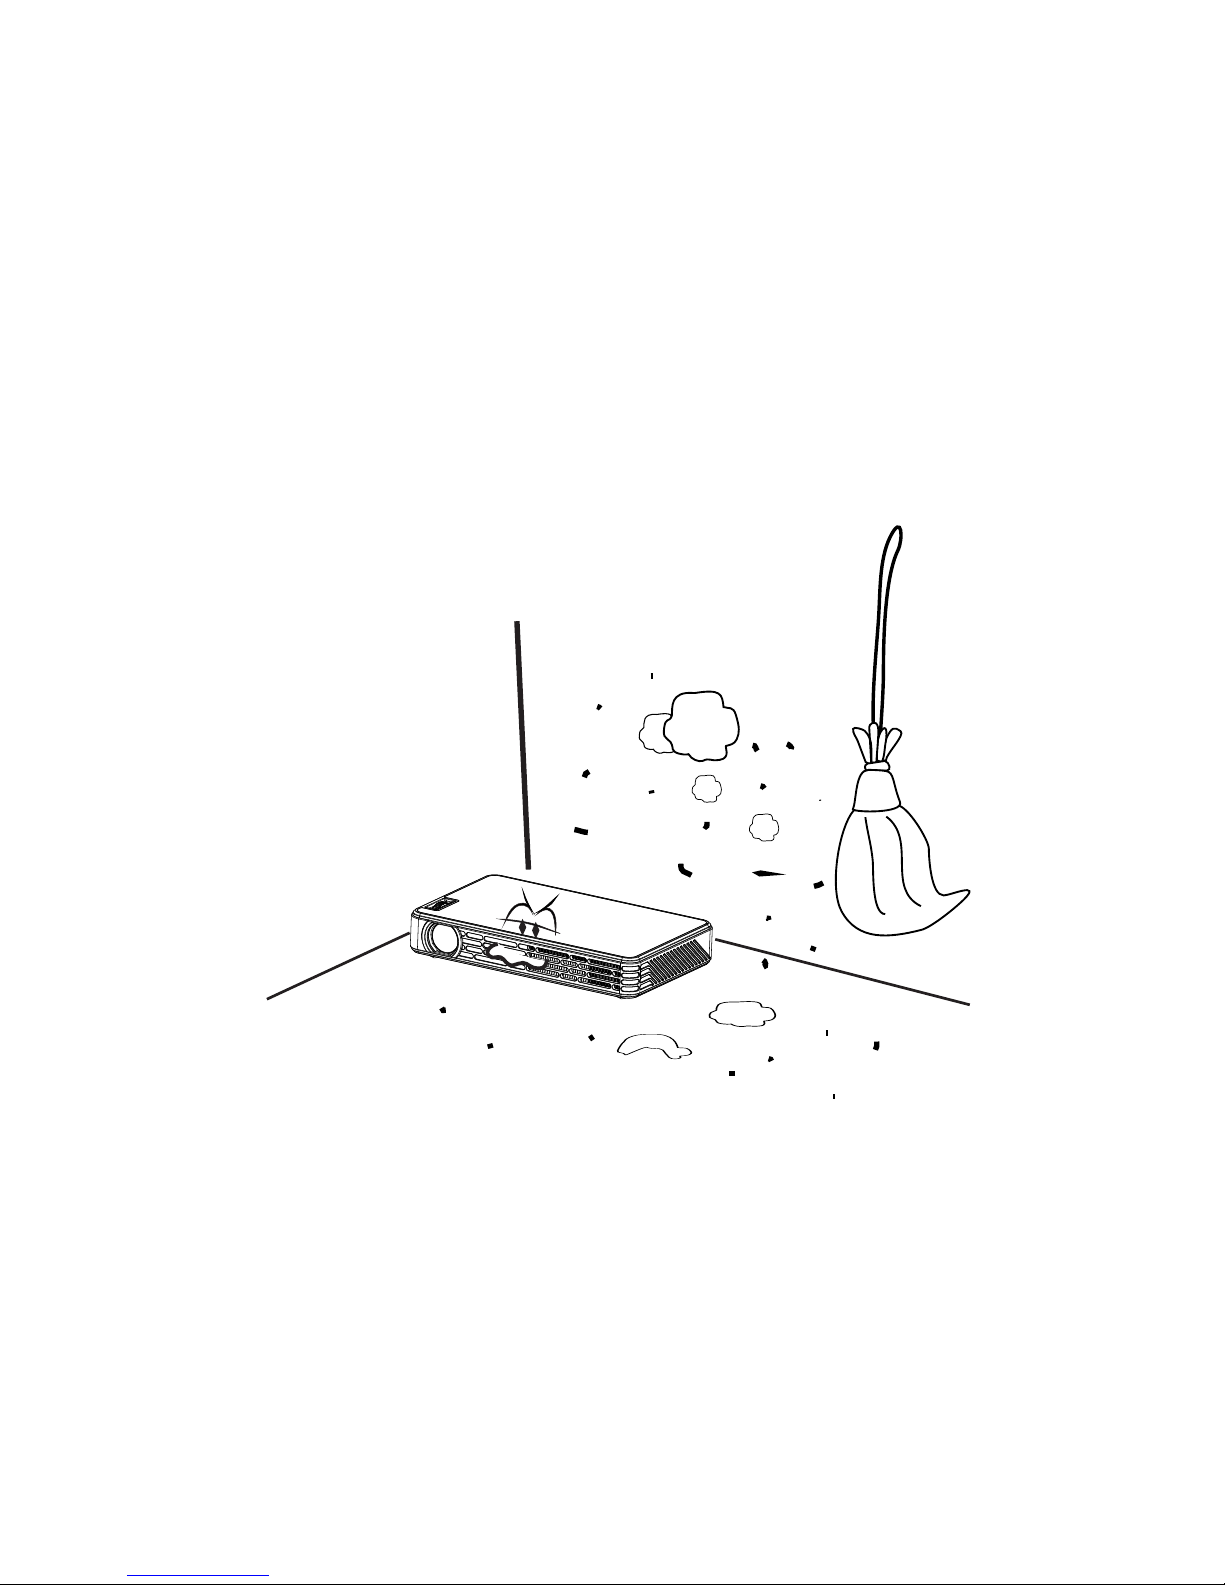
● Do not use the projector in dirty or dusty condition.
Page 9

7
● Do not look directly into the lens while the projector is running, it may damage your eyes.
● This product and the user manual for further improvement or supplementsed without notice.
Page 10

8
Attention for viewing 3D movie
● Long close watch will affect vision;
● Wear stereo glasses watch program or game for long time will cause dizziness or eye fatigue;
● Pregnant women, elderly, patients with heart disease or prone to vomiting, to avoid excessive viewing;
● May make viewing three-dimensional images as reality frightened or excited。
● Do not place fragile or dangerous goods around when viewing stereo movie;
● The illusion of viewing stereo movie may cause people have suddenly action to injure other person;
● Prohibit children under 5 years old to view stereo movie. May affect the normal visual development;
● Photosensitive (light anaphylactic) allergy warning
1.Some people see specific things or flashing screen or certain mode screen in video or game,
there will be an exception. Viewer or a loved one has epilepsy, photosensitive allergy history, please
consult with a doctor before watching. Such as the viewing of the following symptoms immediately
terminate and rest.
2.Dizziness, visual disorders, eyes or facial instability, as unconscious, convulsions, loss of
consciousness, confusion, disorientation, nausea. If the above phenomenon continues, please consult your
doctor.
● Taking the following measures to reduce the risk of allergies and other photosensitive when view 3D movie
1.Please rest 5-15 minutes when watch an hour.
Page 11

9
2.If the vision of two eyes are different, please watch after correction.
3.The eye height aim the 3D image, positive watch.
4.Please stop watching when feel headache or fatigue, dizziness.
5.Do not watch long when hardship, fatigue or illness.
● Children watch in the guardian care.
Please confirm when watching 3D
1.Please watch 3D image in effective audition angle and distance.
2.May not see the screen outside the valid audition or distance. You can not see the screen when prone
position.
3.There is a short adaption time to re-watch screen when divert attention in watch halfway.
4.Under fluorescent lights(50 Hz ~ 60 Hz), 3-wavelenth lights, window around, the image may flick when
watching.Recommend use the curtain to block the lights, to maintain indoor dim.
5.Must use the active 3D glasses support the DLP-LINK.
6.Can not see the image when there is a obstacle between the projector and glasses.
7.The position of the projector should keep a distance as far as possible with other machines.
● Product and user manual may vary due to the improved performance without notice.
Page 12
10
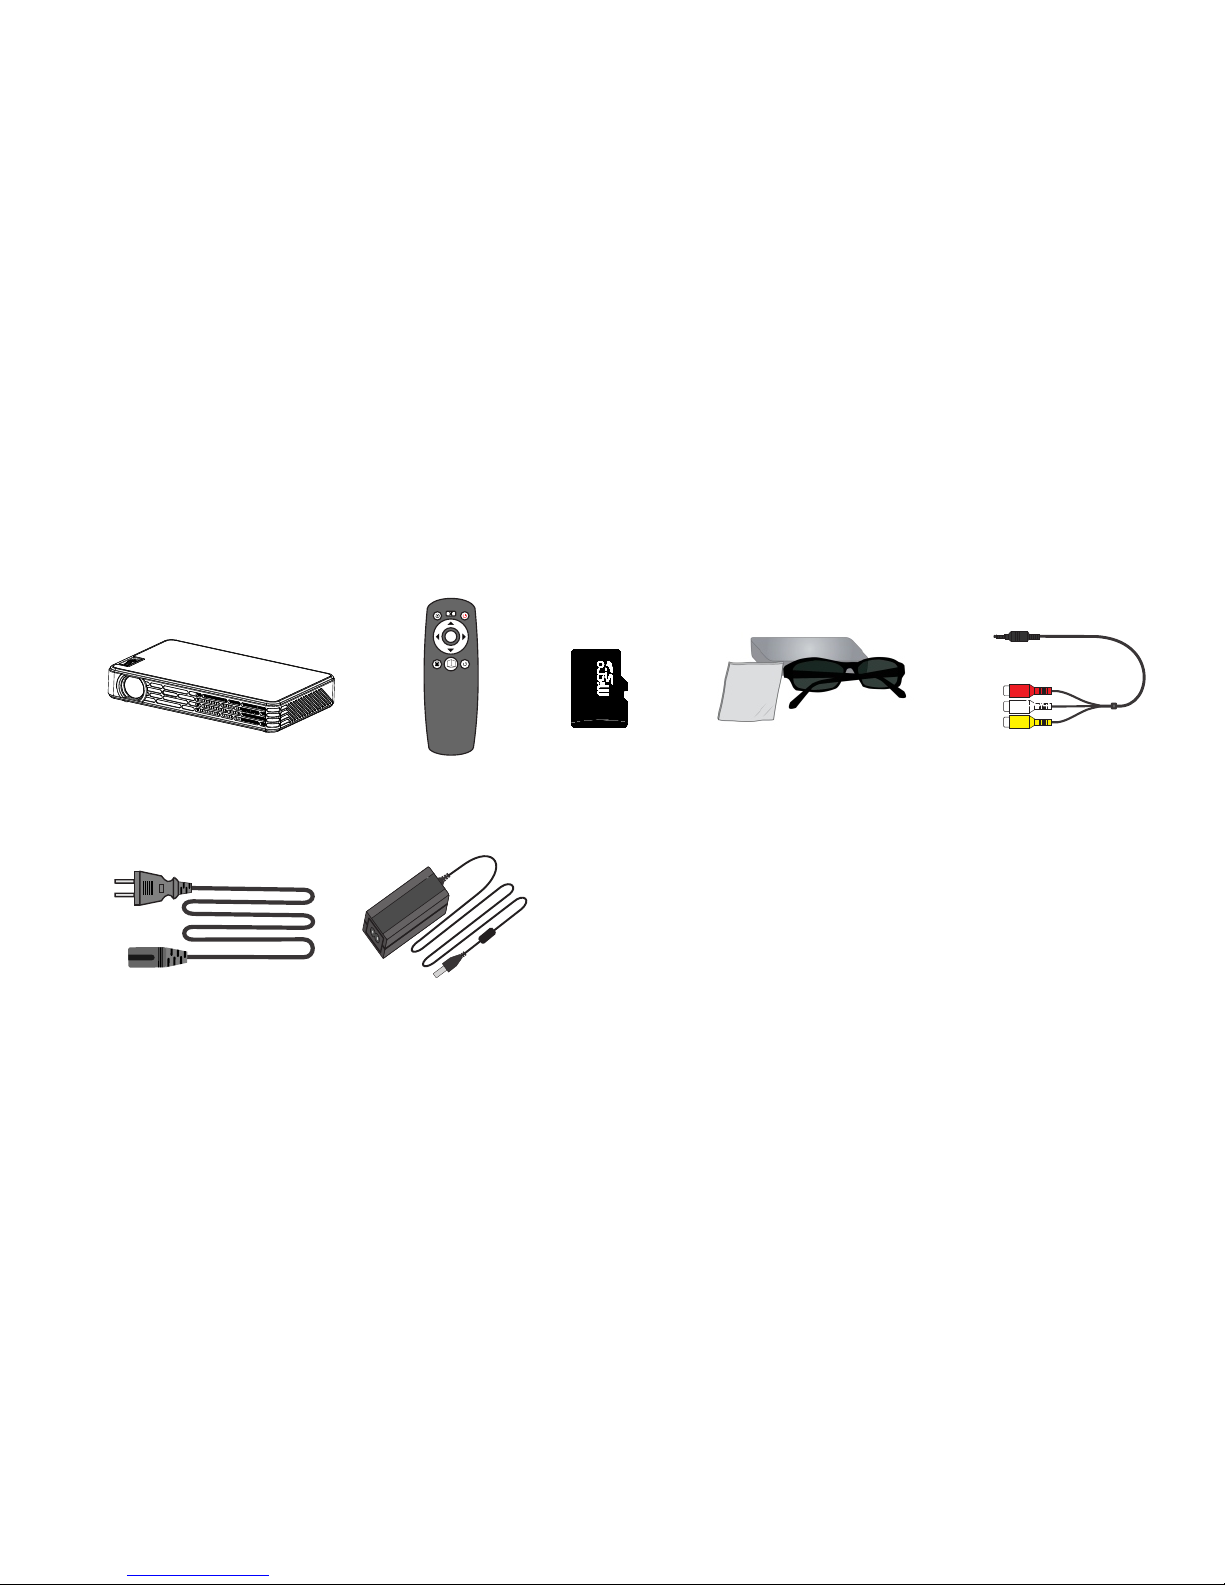
Please unpack the box carefully; Box contents include:
1.2 List of items
Projector
Remote
TF card
(optional)
Power Cable
Adaptor
AV CABLE
active
(optional)
3D
OK
3
3
D
D
Page 13
11
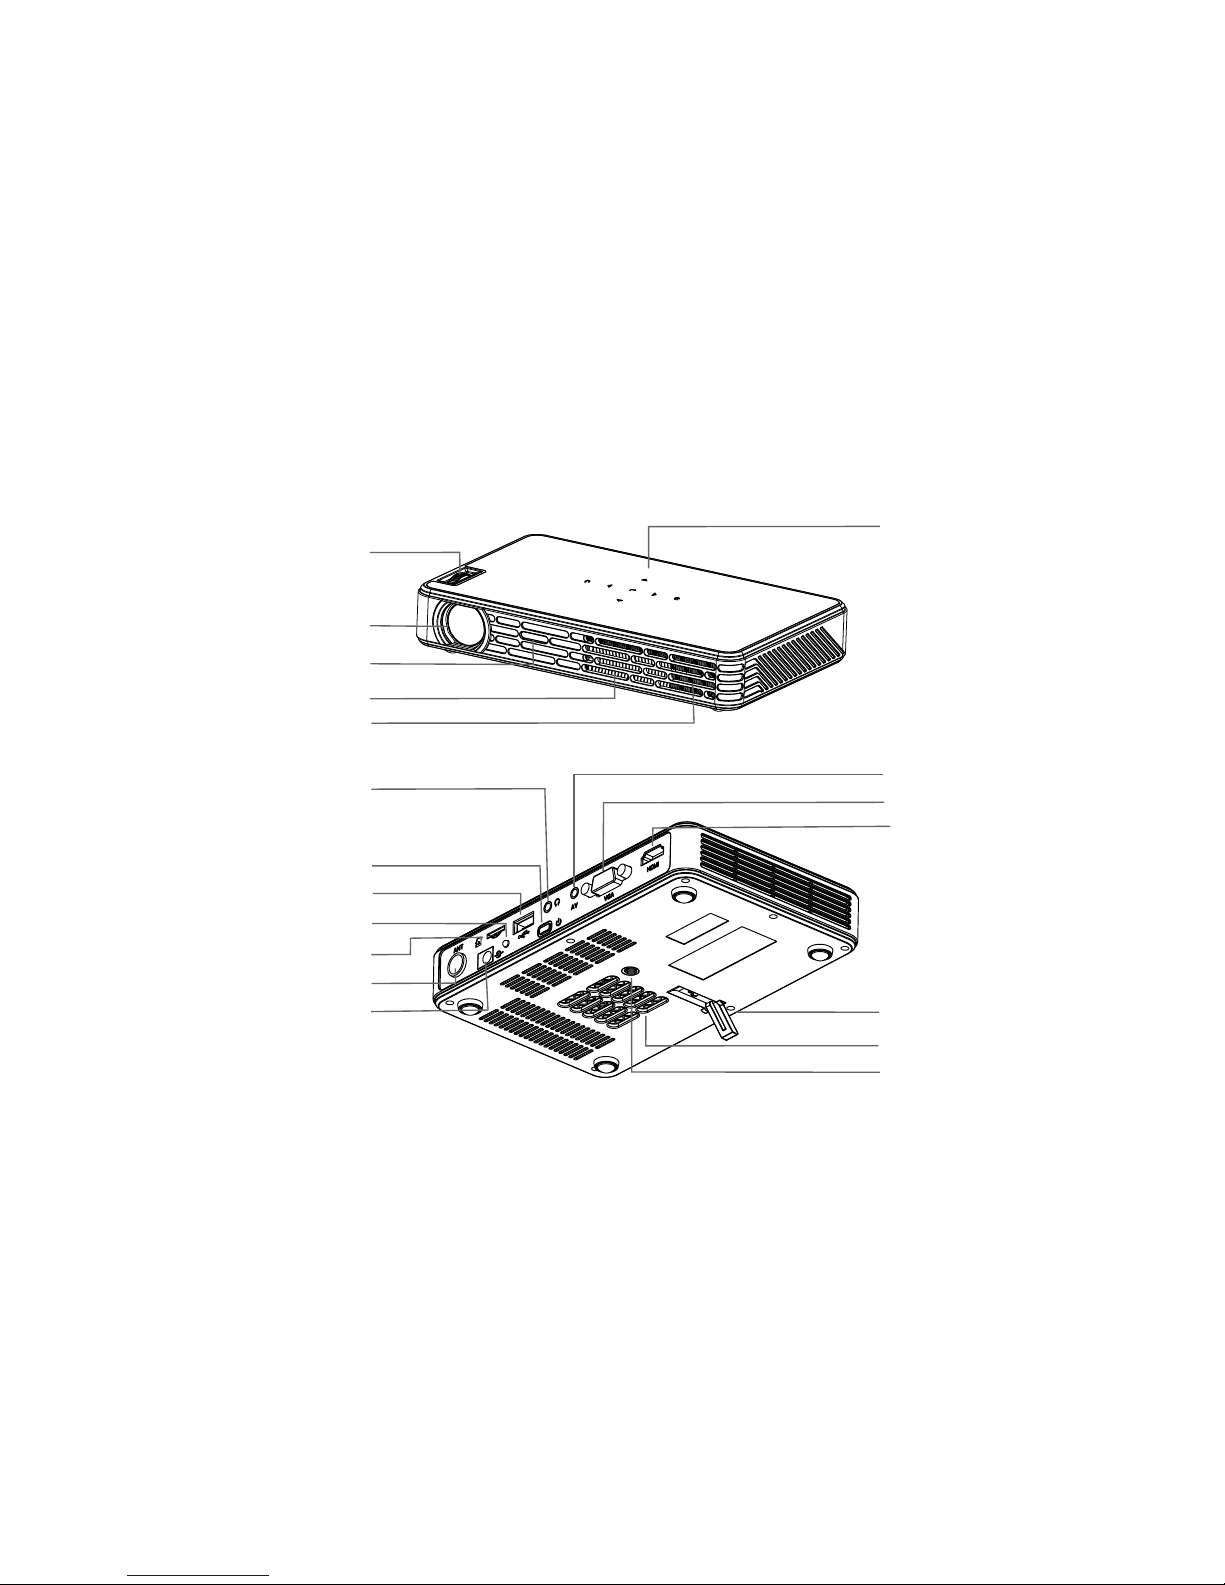
2 Projector Exterior View
Lens
Touch Panel(optional)
Infrared receiver window
Focus
Coaxial audio output
Outlet
Speaker
AV
VGA
HDMI
Support tripod
Inlet
Lifting screw
Headphone/
Power ON/OFF
USB
Charging indicator
TF card
TV
Power
(optional)
Page 14
OK
3
3
D
D
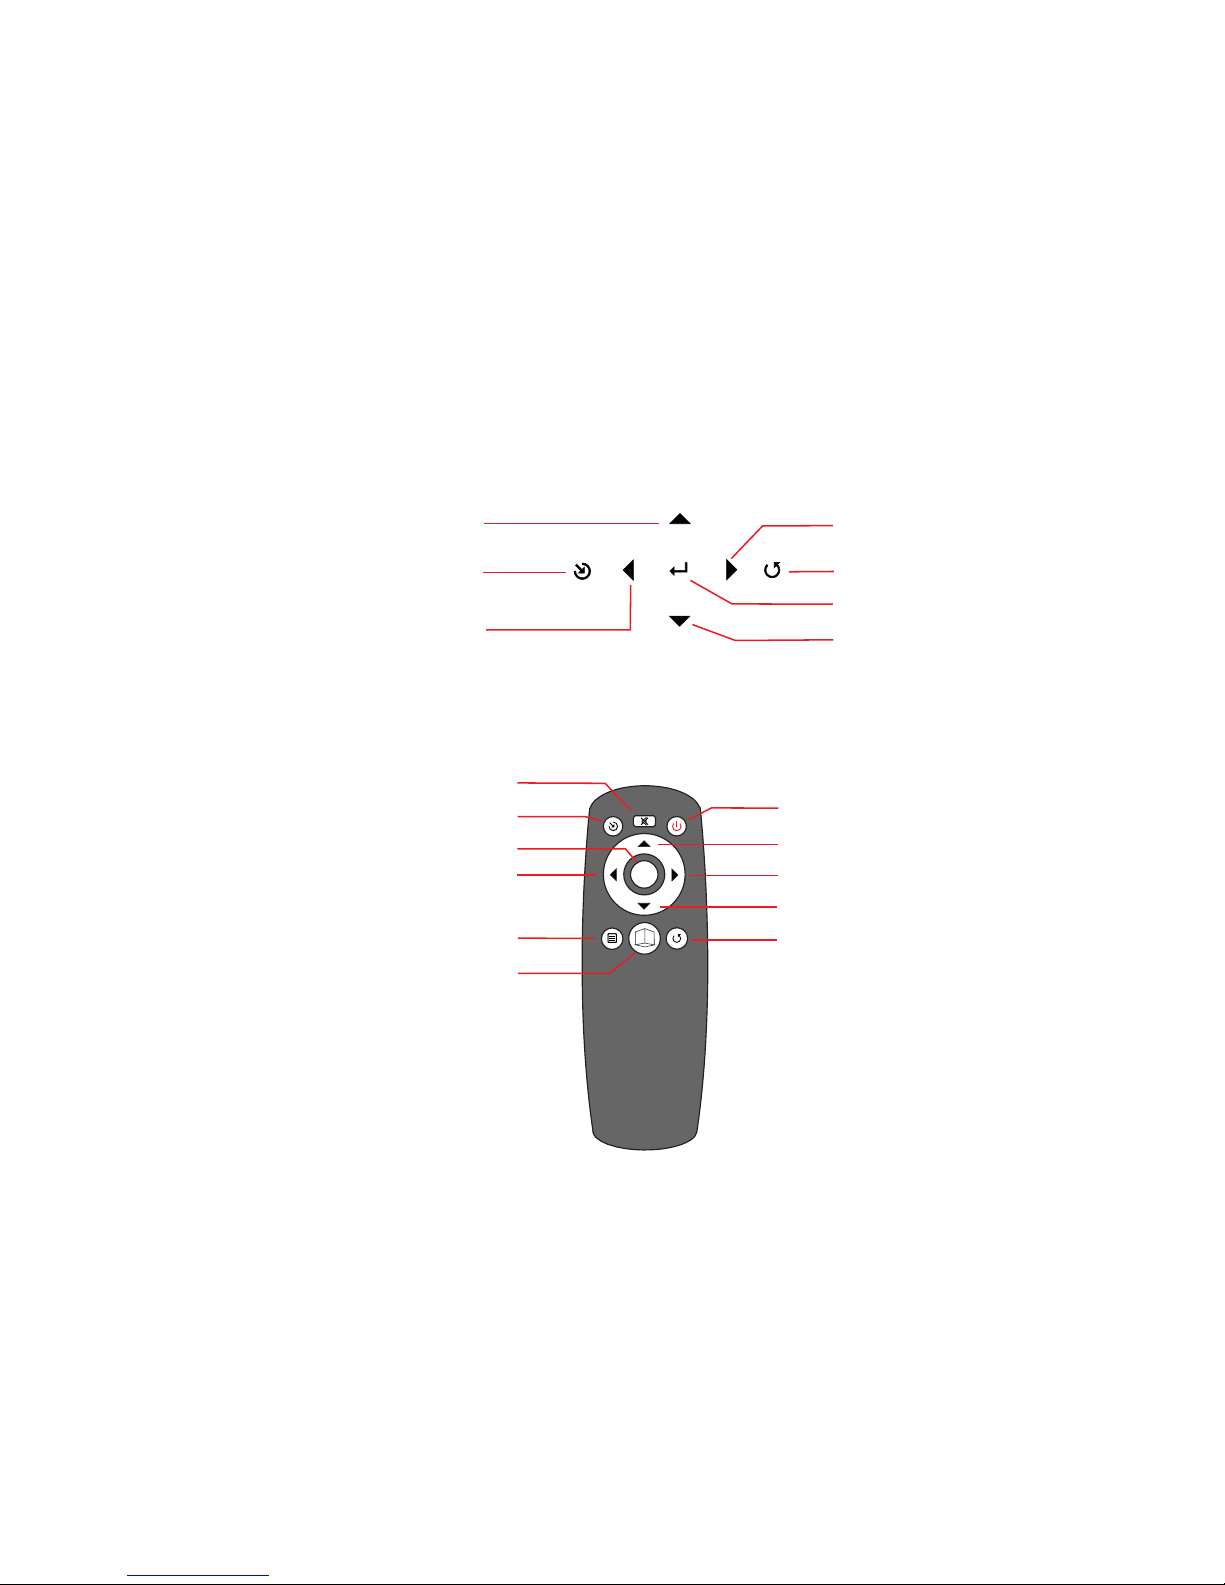
Left/Vol+
ON/OFF
Source
UP/Prev
Return
OSD Menu
Mute
Left/Vol-
OK
Down/Next
3D Mode
Return
OK/Menu
Source
Left/Vol-
UP/Prev
Right/Vol+
Down/Next
3. Touch Key Instructions
12
Page 15
13
4 Projection size and distance table(just for reference)
Turn the focal wheel to adjust the focal length to obtain a more clear picture.
5 Projector operations
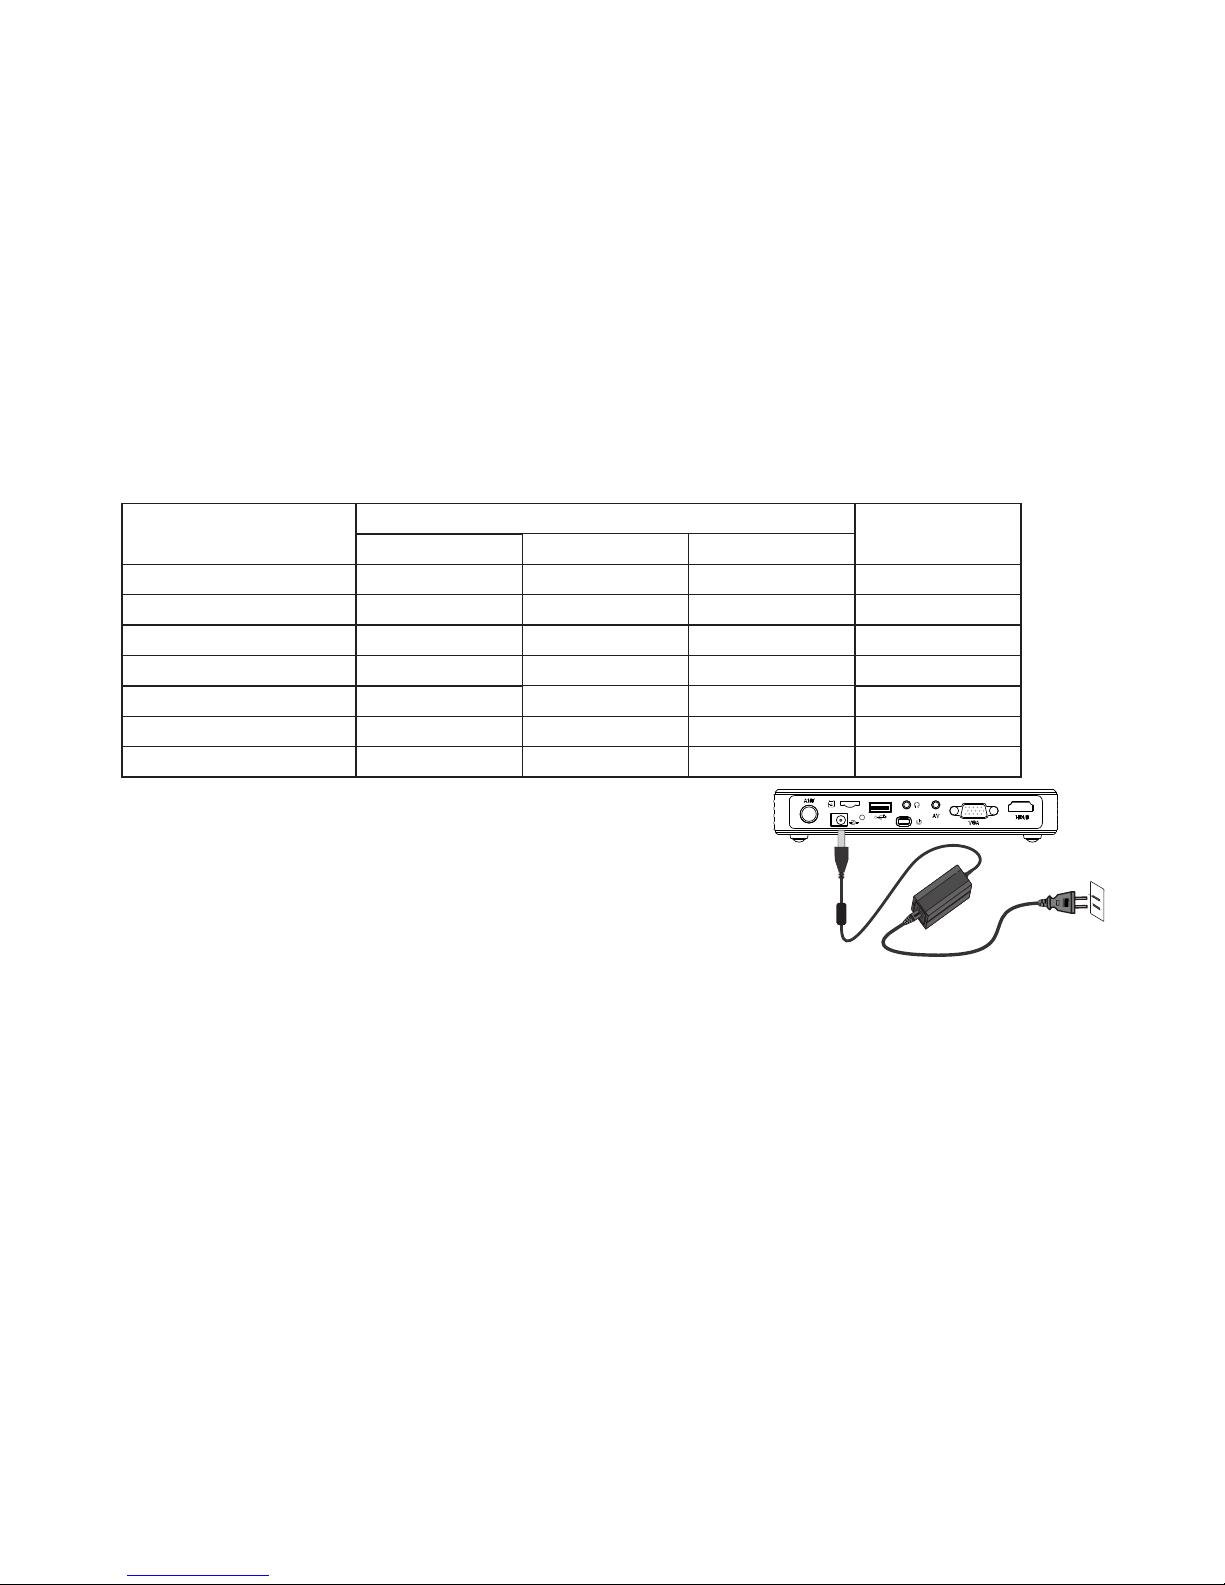
Connect one side of the projector to the AC plug,
the other side to the projector DC port, then press the
power for 3 seconds, the indicator flash till normally
on, then access signal, select the corresponding channel
can get the required image.
Note: When there is no signal for 15 minutes, it will shutdown automatically.
The projector may be equipped with battery, charging indicator light, said charging;
charging indicator off, suggesting the power is full, completely full of power will take
1-4 hours. When using the battery, the remote boot is disabled, you can only press the
body switch key to start the projector.
20
0.50-0.53
40
1.04-1.08
50
1.30-1.34
60
1.56-1.62
80
2.09-2.17
100
2.60-2.70
120 3.16-3.28
16:10
0.53-0.55
1.06-1.10
1.33-1.37
1.59-1.65
2.12-2.20
2.65-2.75
3.22-3.34
16:9
0.57-0.61
1.16-1.20
1.46-1.50
1.75-1.81
2.33-2.41
2.91-3.01
3.49-3.61
4:3
0.63-0.66
1.27-1.31
1.59-1.63
1.92-1.95
2.56-2.59
3.20-3.25
3.84-3.90
Distance(unit:m)
Series number with H
16:10
Size (u nit:inch)
Remar k: The sug gested p roject ion is bet ween
40 inch es and 100 i nches.
Page 16
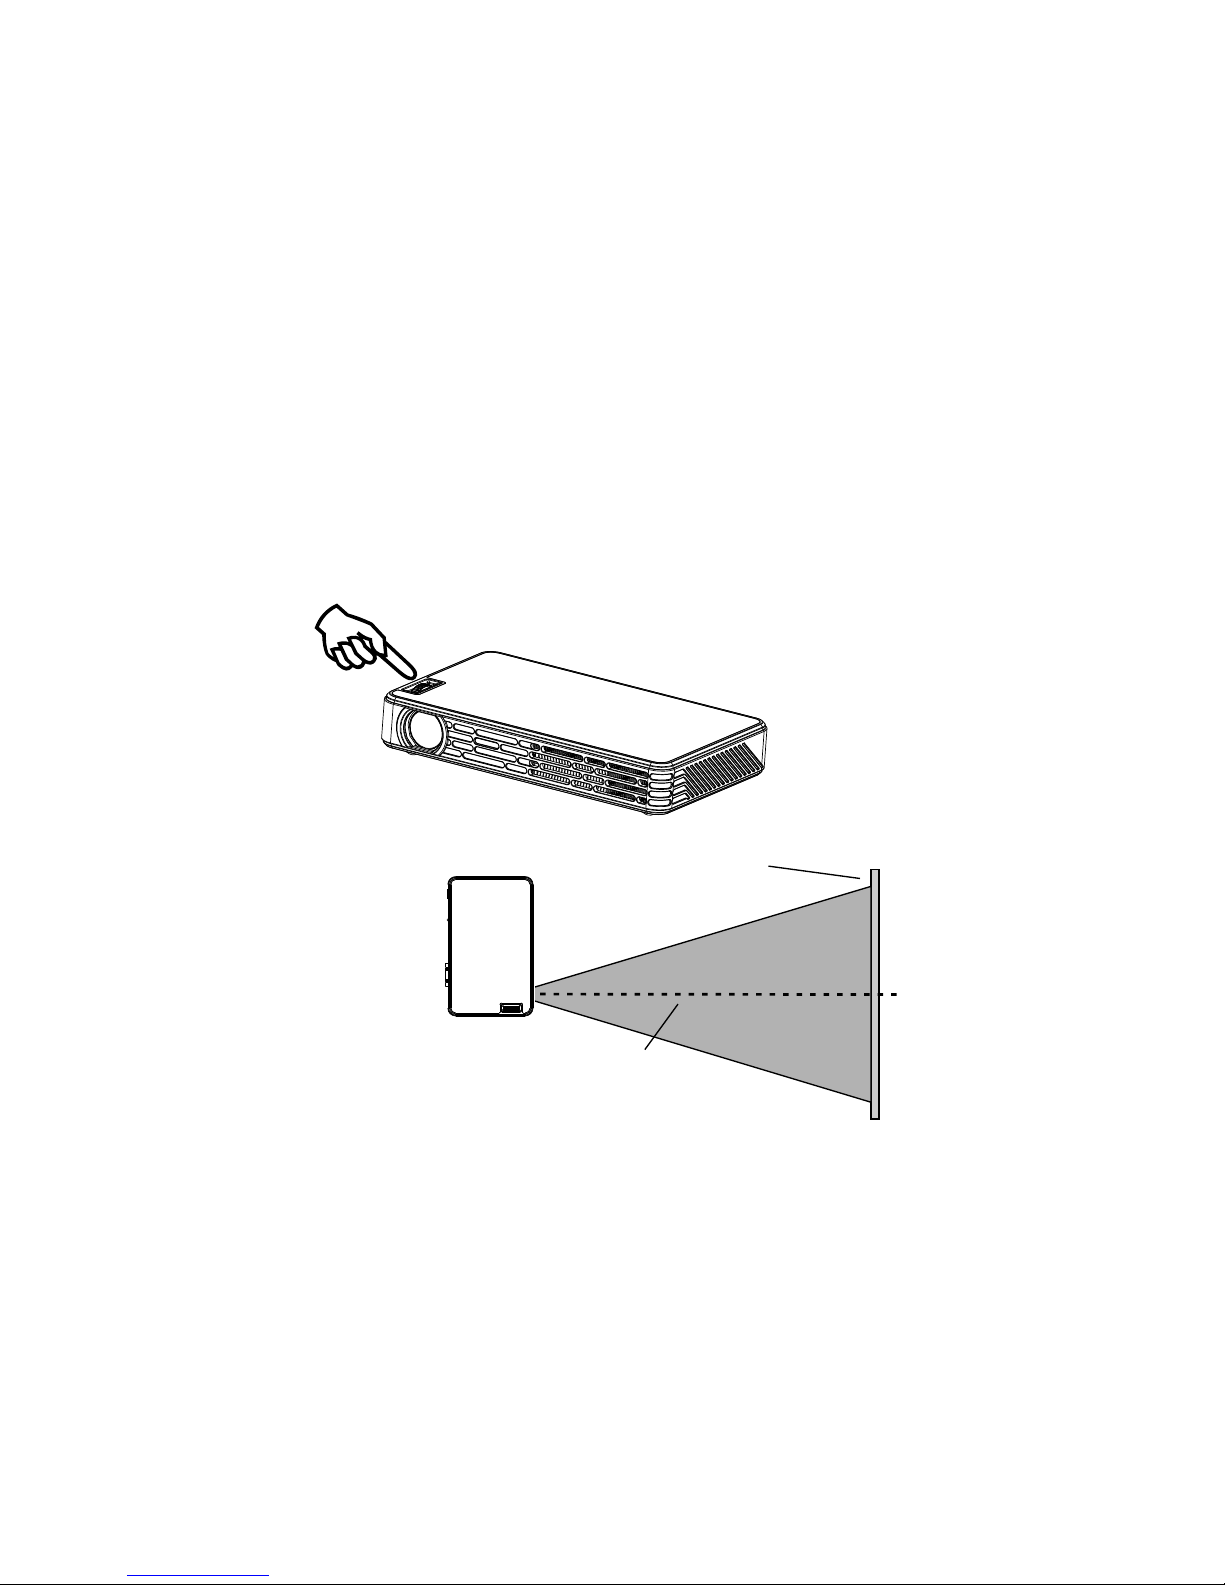
Push this wheel forward or backward
5.1 Focus Adjustment
Push the forward or backward make the clear.wheel picture
Note: keep projector and screen in horizontal level
Screen
Light Axis
14
Page 17

5.2 Select Input Source
This projector support following sources:
T-Flash------Play contents inside TF-card
HDMI------Connect to external devices with HDMI output
Blue-ray DVD----Connect Blue-ray player with HDMI output
VGA-----Connect to PC with VGA output
USB----play contents inside USB stick
AV----connect external devices with AV output
Press “Source” button upon the projector or the remote control and select related source input,
press “OK” or “Enter” button for confirmation.
OK
3
3
D
D
»É´ĂĽ
15
Page 18
14
TF
U-flash memory or mobile HDD
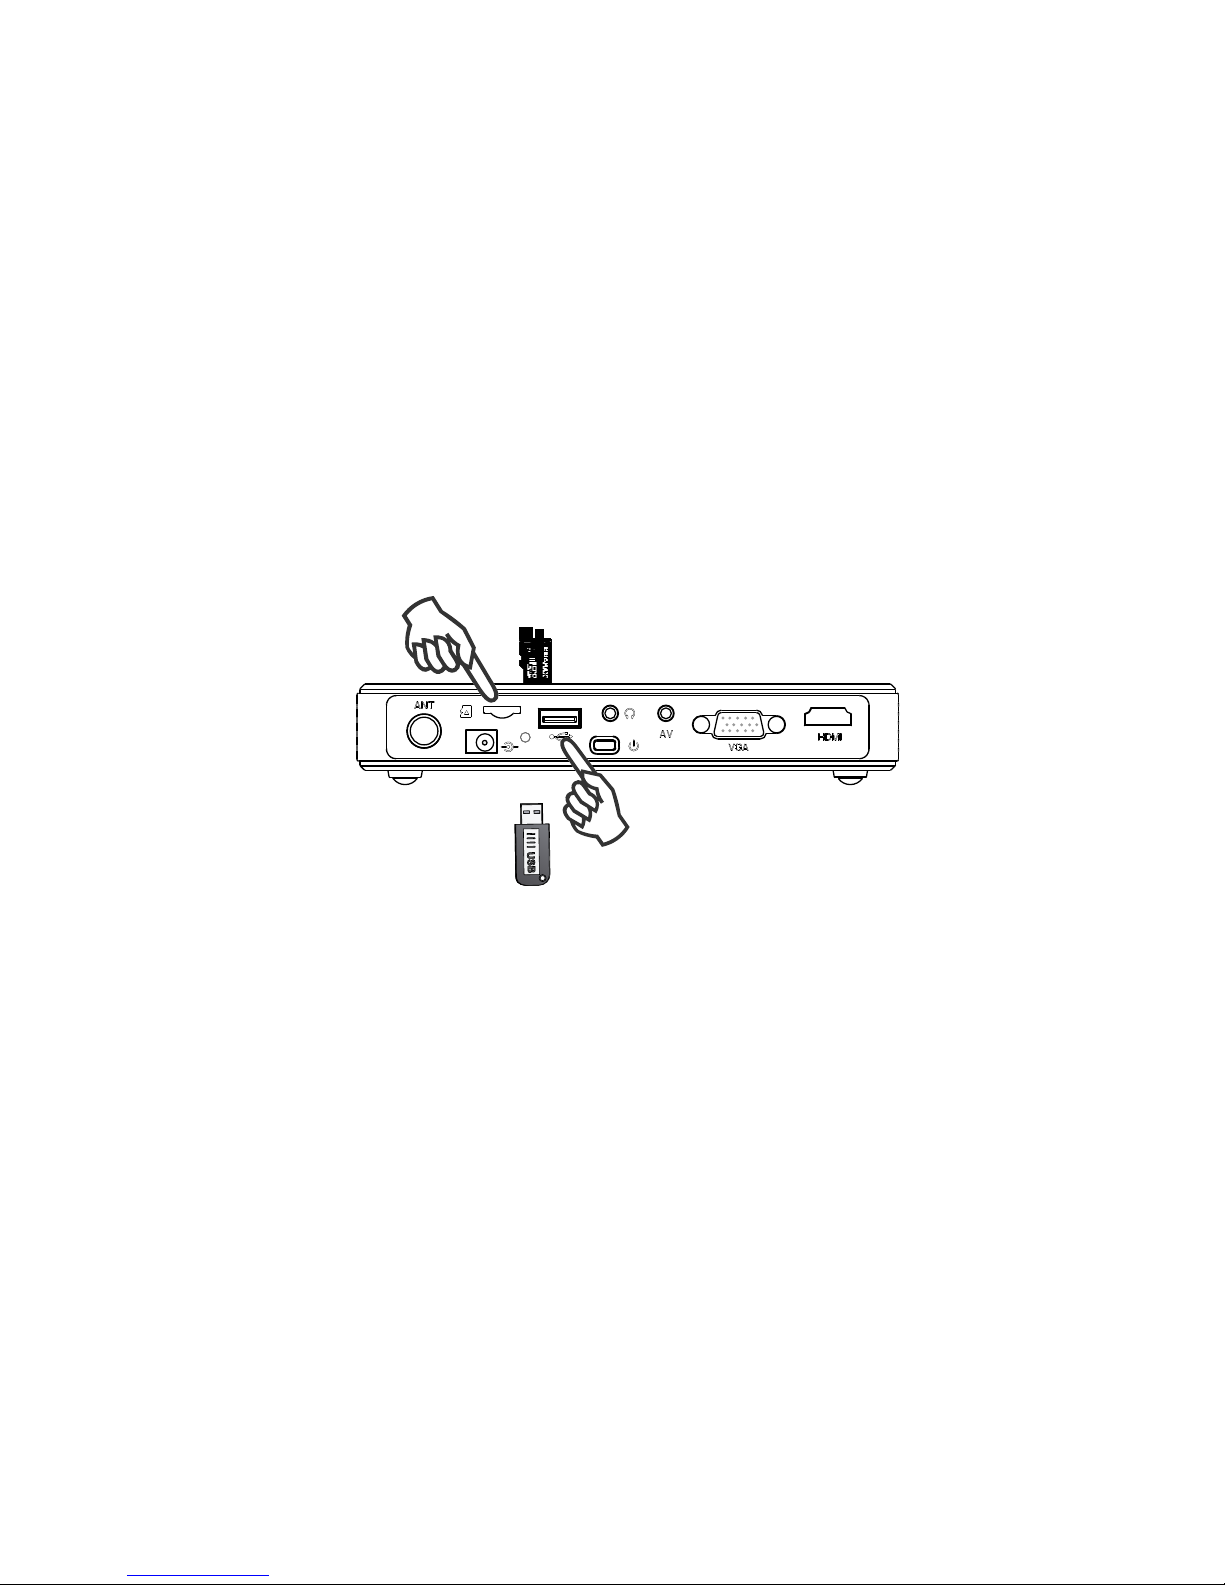
5.3 Connect to U-Disk or Multimedia
Operating the projector into multimedia system
Connecting U-disk or TF card, insert U-disk or TF card into the marked direction of the
projector, select the media type in the main menu, enter the file fold of the USB or TF,
choose the corresponding file to play.
16
Page 19
17
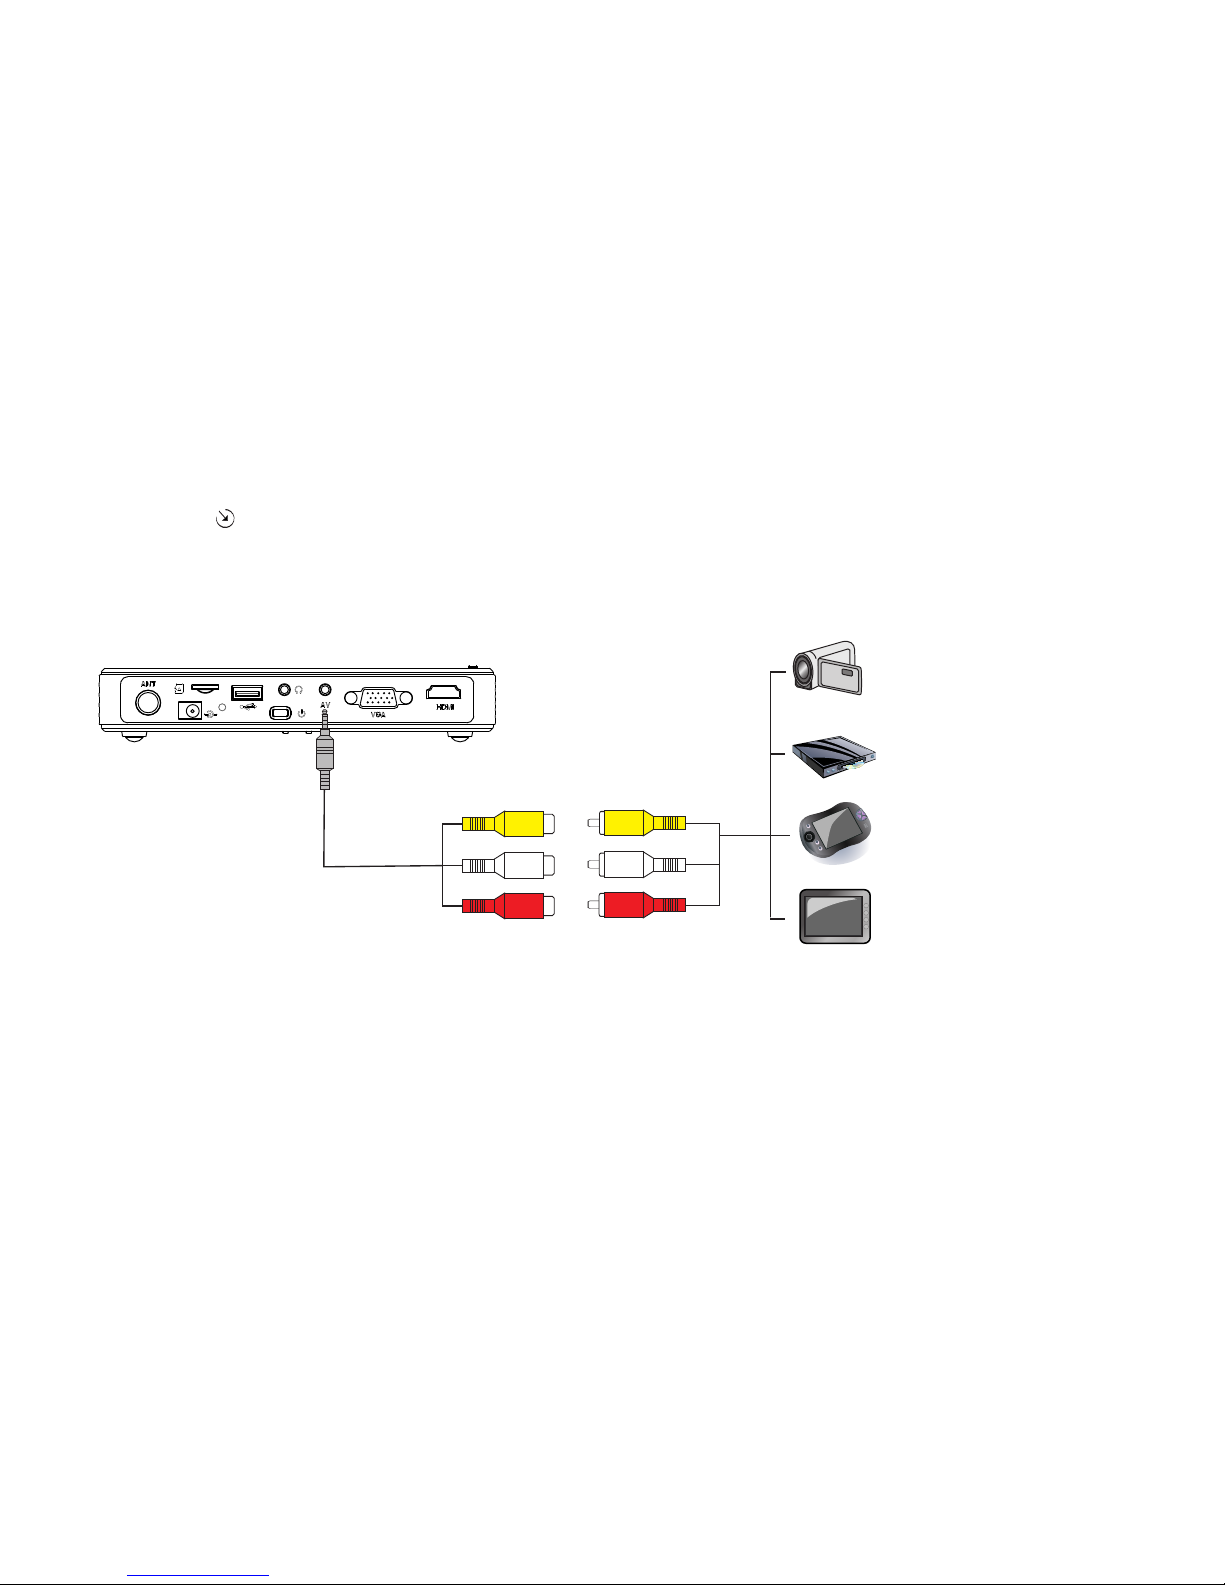
5.4 Connecting to video device
Connect one end of the AV cable to the projector, the other end to the AV equipment corresponding
hole. press on the panel or Source on the remote to change AV channel.
The complete connection should be like shown below.
Note: There is different definition of the AV port, please use the AV cable in the packing.
DVD player/SAT
Game console
Portable media player
DV
Composite AV cable
Projector AV
input cable
yellow
white
red
yellow
white
red
Page 20
18
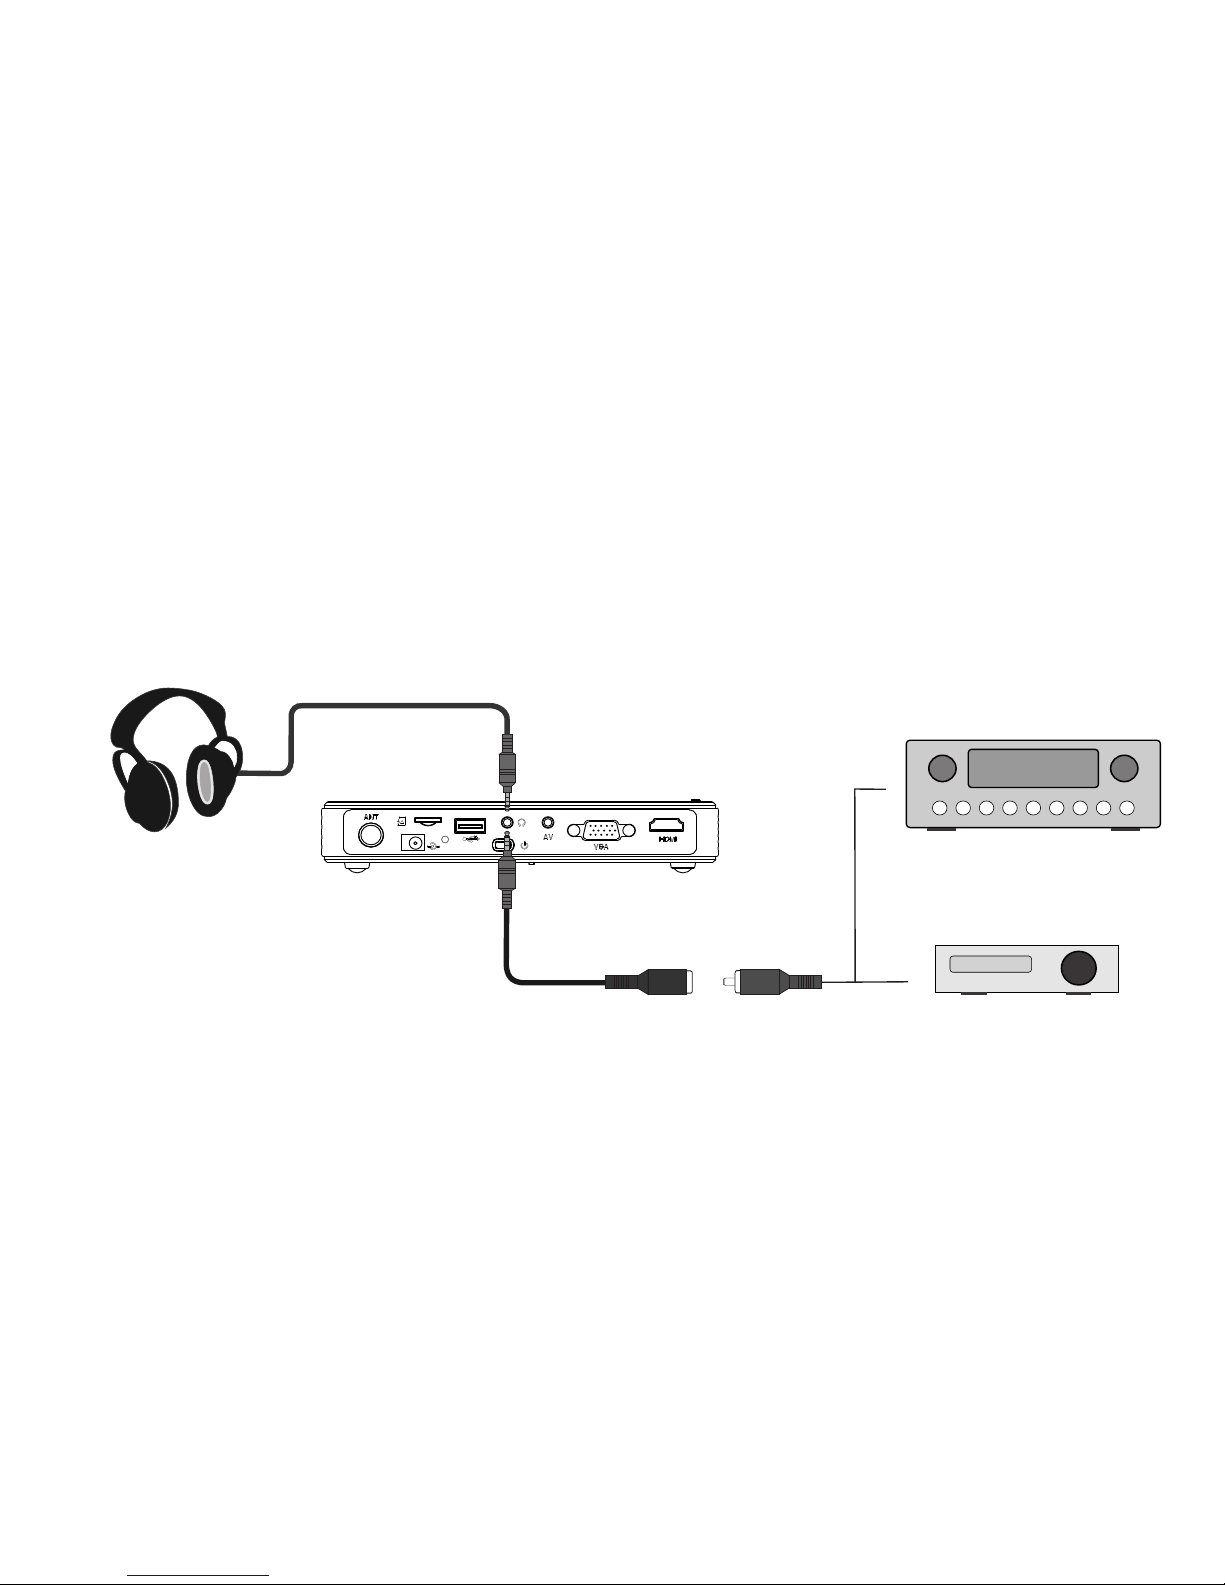
5.5 Connecting to Audio device
Plug one end of the coaxial audio cable into the projector, the other end to the audio device that support
AC-3/DTS decoding, you can enjoy 5.1 multi-channel surround sound, or plug in the stereo
headphones to appreciate 2.0 stereo.
The complete connection should be like shown below.
Note: There is different definition of the coaxial audio out pine, please use out dedicated coaxial
audio output line.
Headphone
Dedicated coaxial audio output line()optional)
AC-3\DTS decoder
Amplifier support AC-3\DTS decoding
Page 21

19
5.6 Connect to Wifi Display Dongle
:
Note: If you do not choose the wireless application, but select the HDMI signal, the wifi
dongle will no image output.
Insert the Wifi display stick to HDMI port upon the projector, press “ ” button and switch to
Wifi display
Connecting method as below photo
*Dongle is an optional purchase
Page 22
HDM I
HDM I
20
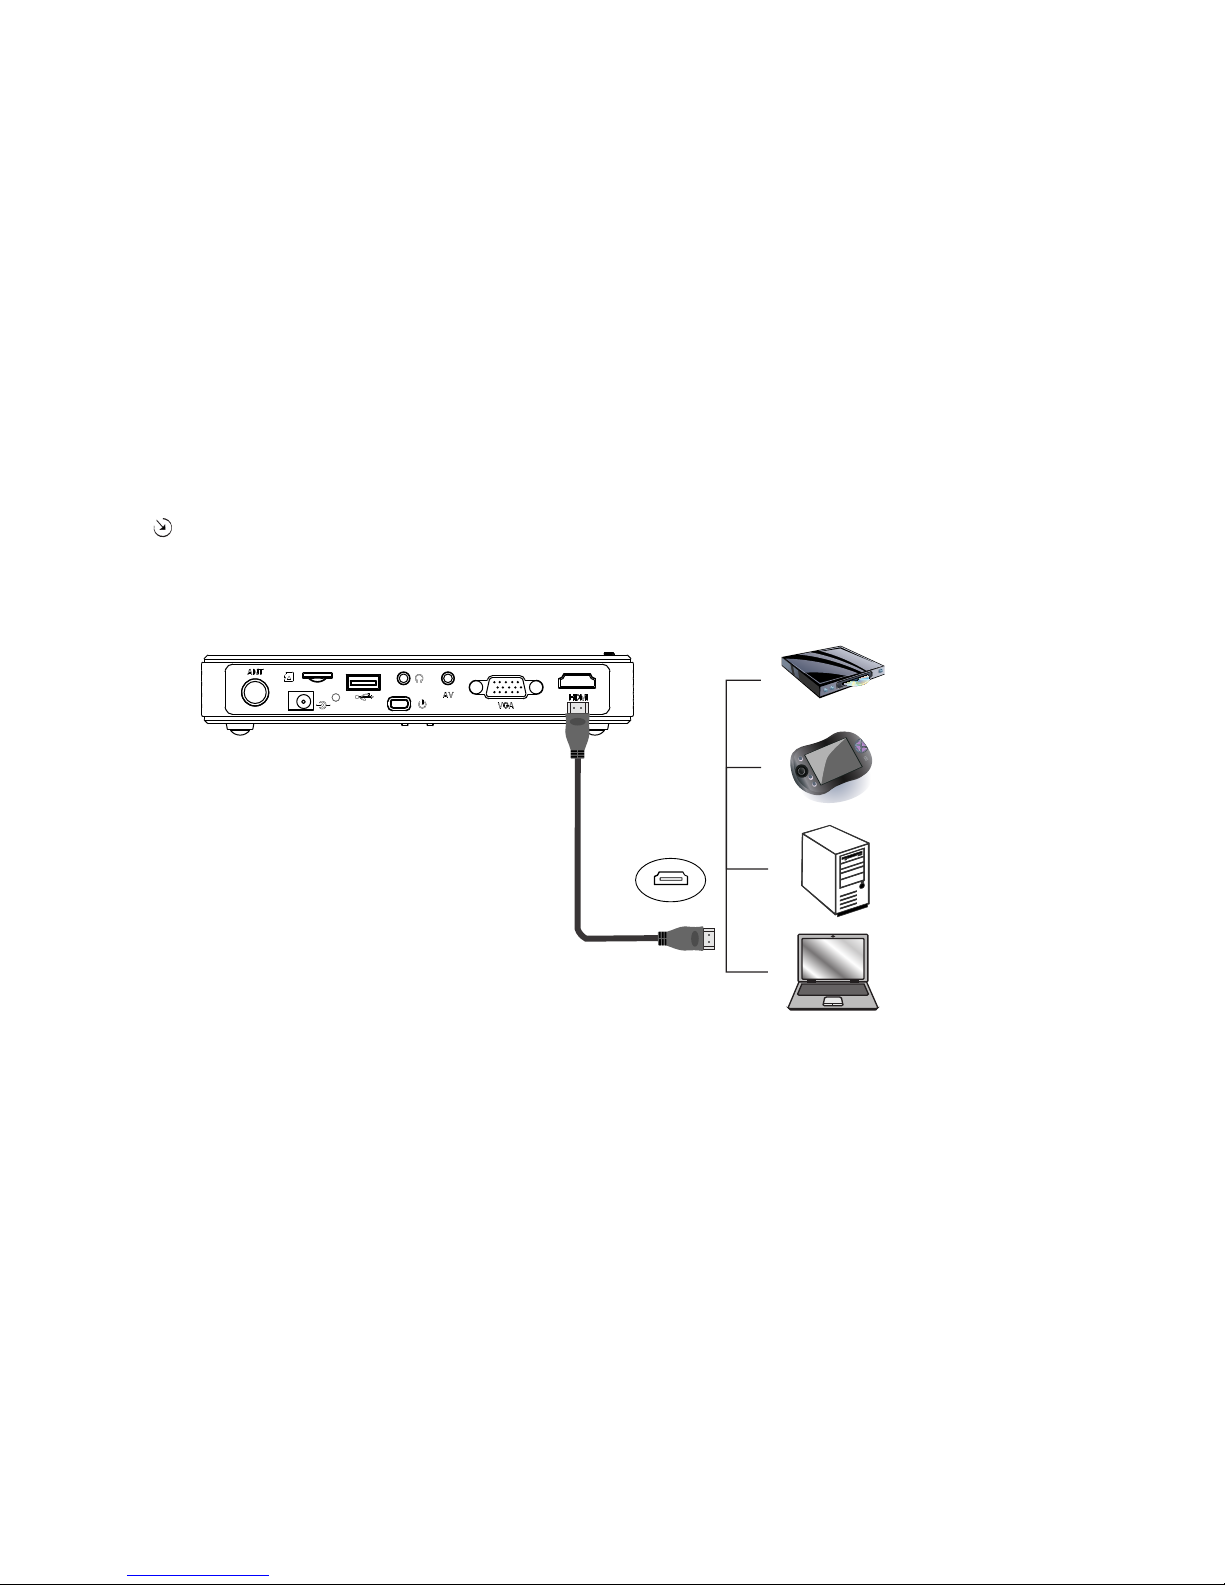
5.7 Connecting to HDMI device
Connect one end of the HDMI cable to the projector, the other end to the HDMI device.
Press on the panel or Source on the remote to change to HDMI channel.
The complete connection should be like shown below.
Note: Laptop with HDMi, press Fn+OSD button to switch, some laptop with automatic HDMI
identification HDMI output, others need to set external display.
DVD player
PC
Laptop
Game console
HDMI can supply power for android stick
Page 23

21
Note: If the projector can not display the VGA when boot and select the VGA channel, please
follow the following steps to check and set the computer.
1 Check the VGA cable is connected properly, the input channel change to VGA channel;
2 Set the computer resolution to 1280×720;
3 Turn on the computer external video port. Press the Fn and the screen switching key, to
copy or switch the computer display information to the projector;
4 There is copy and expand display to the external display device function in the computer
setting, if it can not confirm whether the projection display, please check the setting.
5.8 Connecting to PC
Connect one end of the VGA cable to the projector, the other end to the pc or laptop.
Press on the panel or Source on the remote to change to VGA channel.
The complete connection should be like shown below.
Page 24
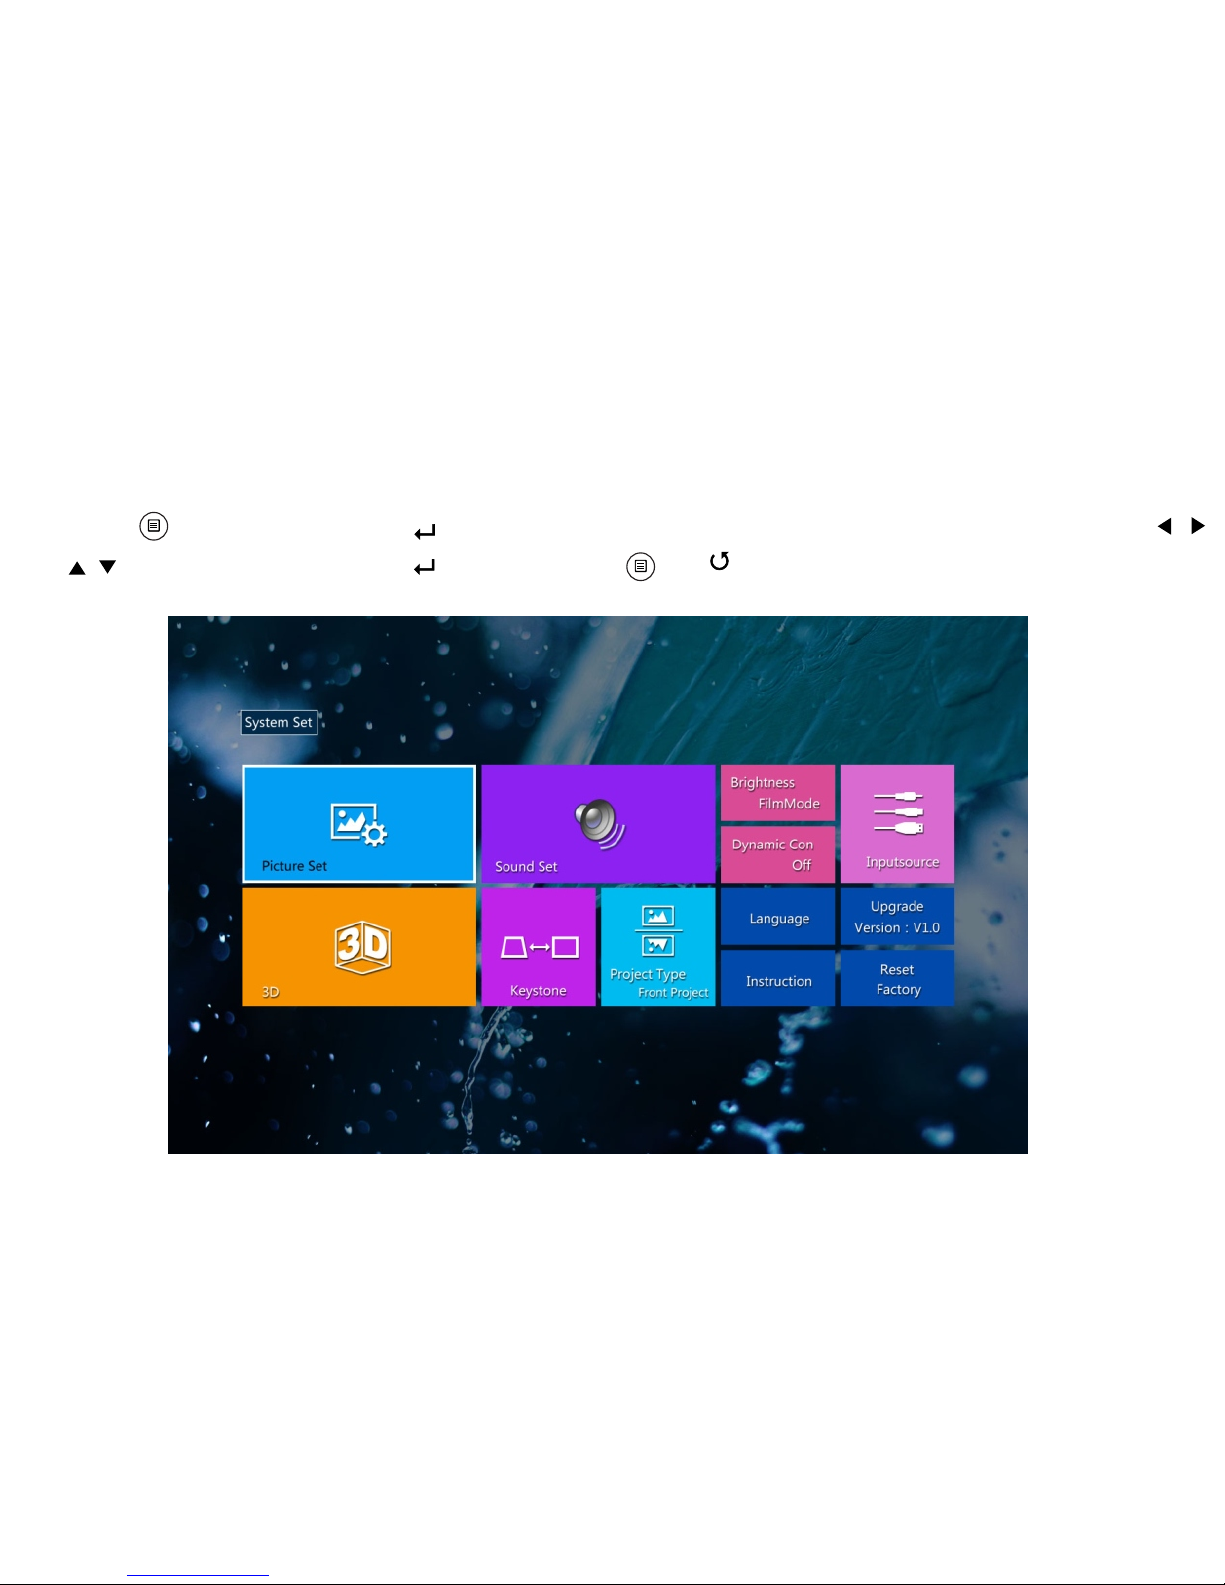
5.9 System Setting Menu
Press on remote or press on machine,appears corresponding menu interface press
to adjust. Press OK or to enter.Press or to exit or waiting for several seconds
until the system exit automatically.
22
Page 25

5.9.2 Function Explanation
Picture Set: picture setting option
Sound set: sound setting option
Brightness standard: set projector brightness mode “Cinema mode, Eco mode1, Eco mode2”
Dynamic Con: turn on the option, projector will adjust contrast ratio automatically through
different projection images
Input source: sources setting option
3D: 3D mode setting
Keystone: keystone correction setting
Projection type: Front, Rear, Ceiling mount projection etc option
Auto reverse (realize image reverse automatically through projection type)
Language: set projector language
Upgrade: upgrade the projector hardware
Instruction: after insert the TF-card equipped with projector, click on “Instruction” to get the
electronic user manual
Reset factory: renew to factory default setting
5.9.3 Keystone Correction
Auto keystone correction: turn on, the projector will correct keystone automatically
to the projection imagecorresponding
Manual adjustment: vertical +-40degrees
23
Page 26
图像模式 标准
Brightness Mode
Sigal Auto Detect
Restore Factory Default
Software Update(USB)
24
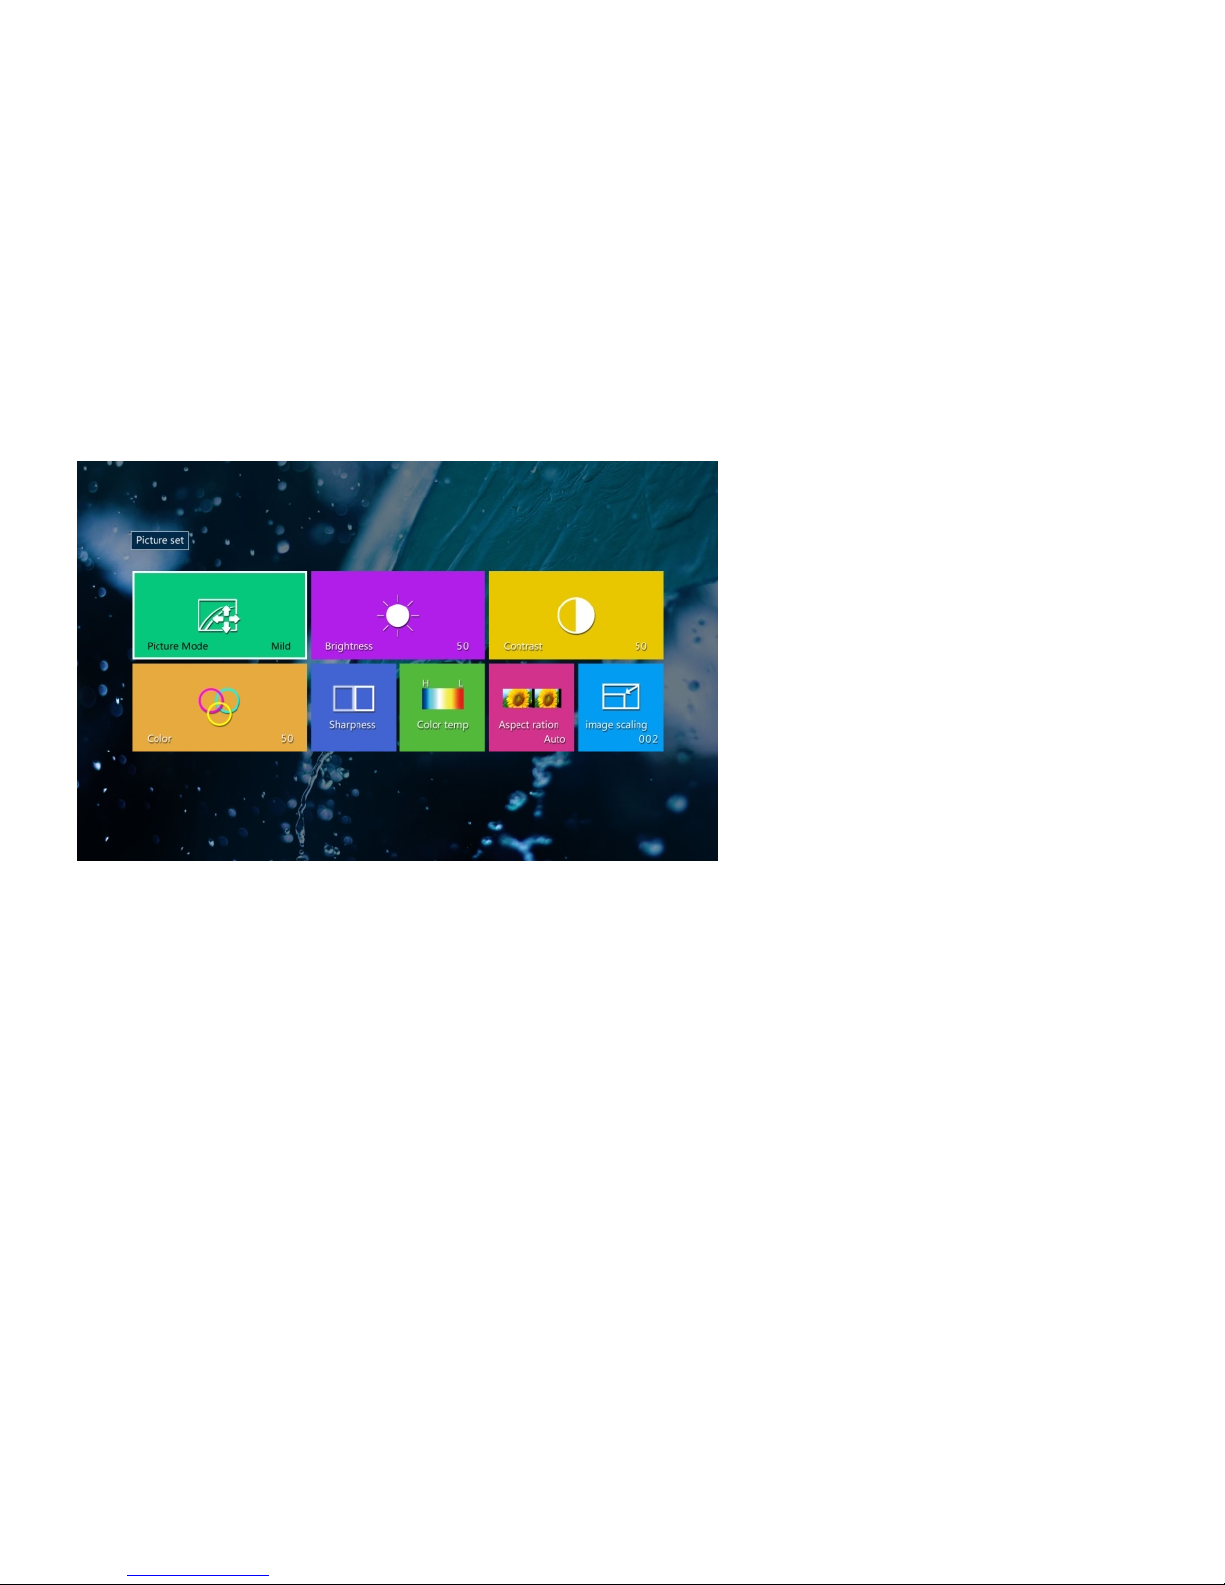
Picture mode: Standard/Soft/ User/Dynamic
Brightness: 0-100
Contrast ratio: 0-100
Color:0-100
Sharpness: 0-100
Color temp: Standard/Warm/User/Cold
Aspect ratio: Auto/4:3/16:9/16:10
Image scaling: reduce image size “0-6” 6different options
5.9.3 Picture Set
Page 27
25
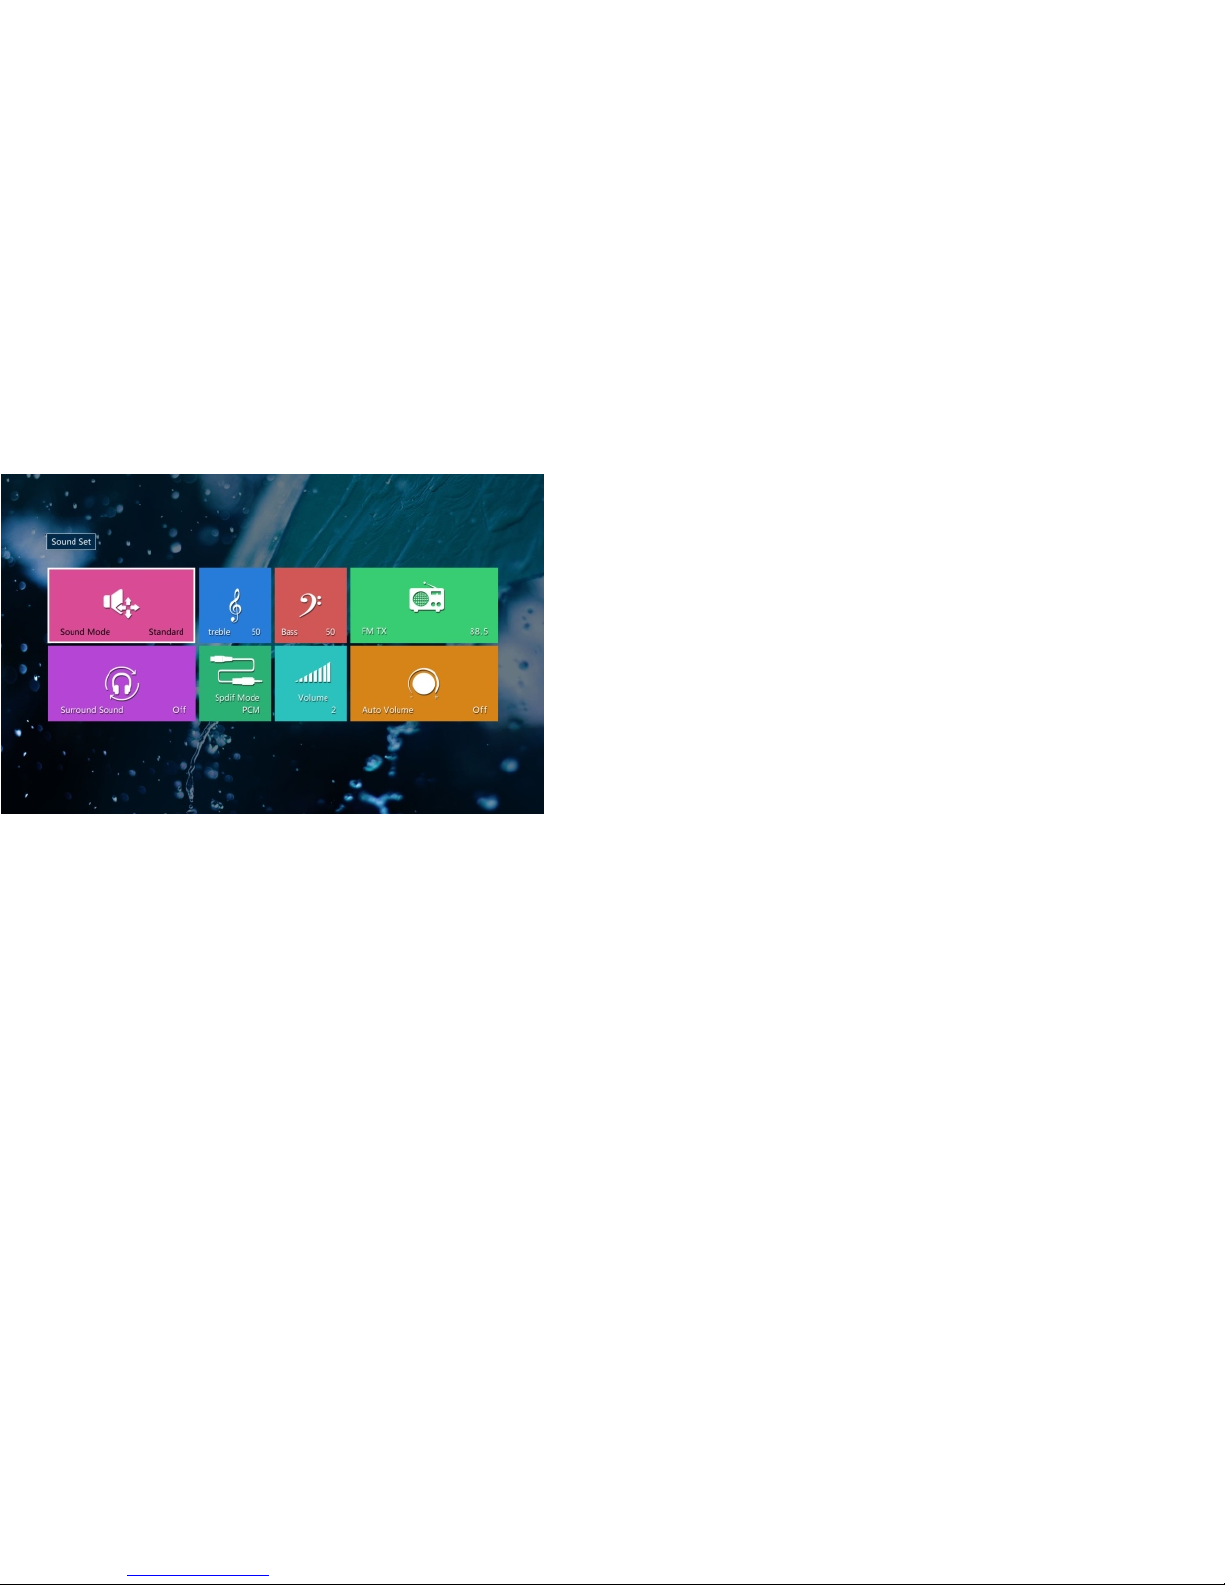
Sound mode: Standard, Music, Cinema, Move, User
Treble: 0-100
Bass: 0-100
FM TX: Turn on/off FM function and set FM frequency
(Note: ensure frequency different with the frequency applied by local radio station)
SPDIF Mode: set coaxial audio output format
Surround sound: Set surround or SRS effect
Auto volume: turn on “Auto volume”, volume in projector will adjust automatically according to requirement
Syste m Setti ng s
5.9.4 Sound Set
Page 28
6. 3D Function
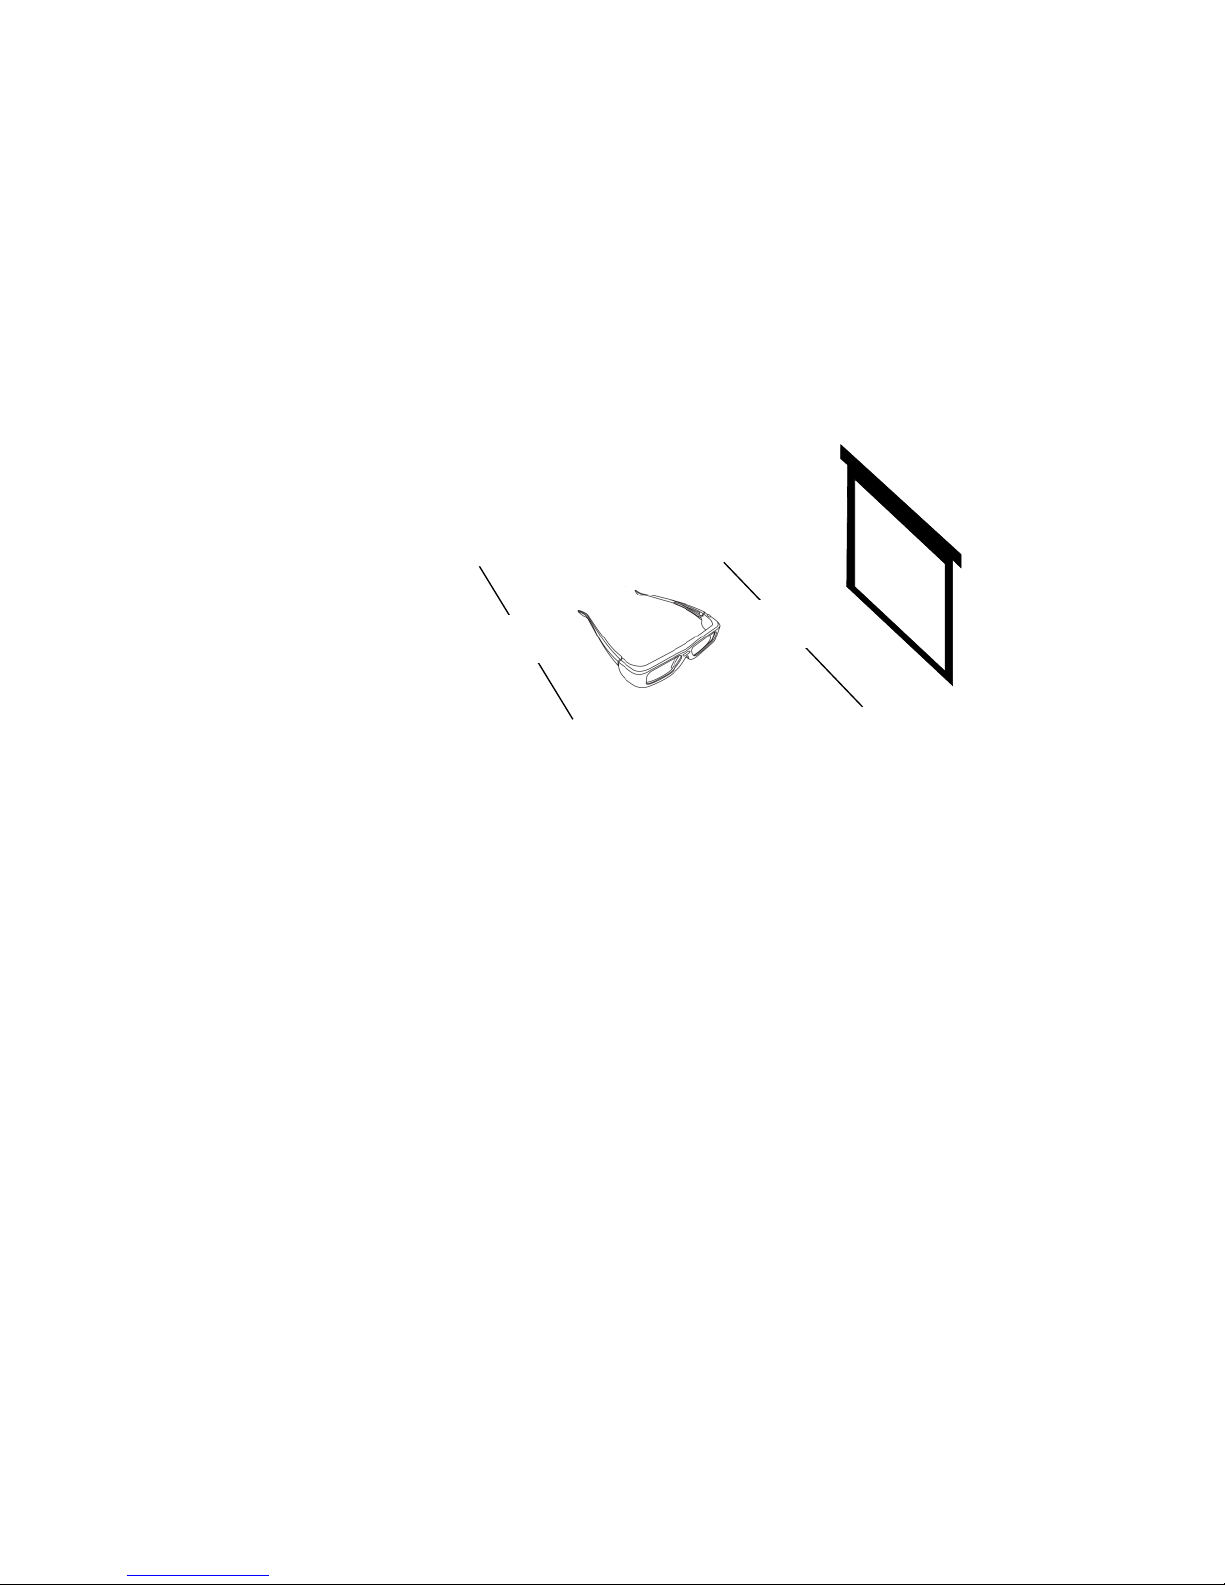
6.1 Watching 3D Image Requirements
Best viewing angle: Up/Down/Left/Right 9°
Best viewing distance: 3-5m
Suggest Projection Size: 60 inches
* Usually, only to watch 3D video in a dark room.
* Set the brightness mode to standard when watching 3D video.
Notice
1.The pairing of the DLP-LINK glasses is impacted by the intensity of the reflected light of screen.
Therefor, the pairing of the DLP-LINK glasses can not work in following cases: the reflected light of the screen is not enough
(such as the surround area is too bright) , the screen is too big or start a maximum energy mode.
5M
3M
26
Page 29
6.2 Watch 3D Movie
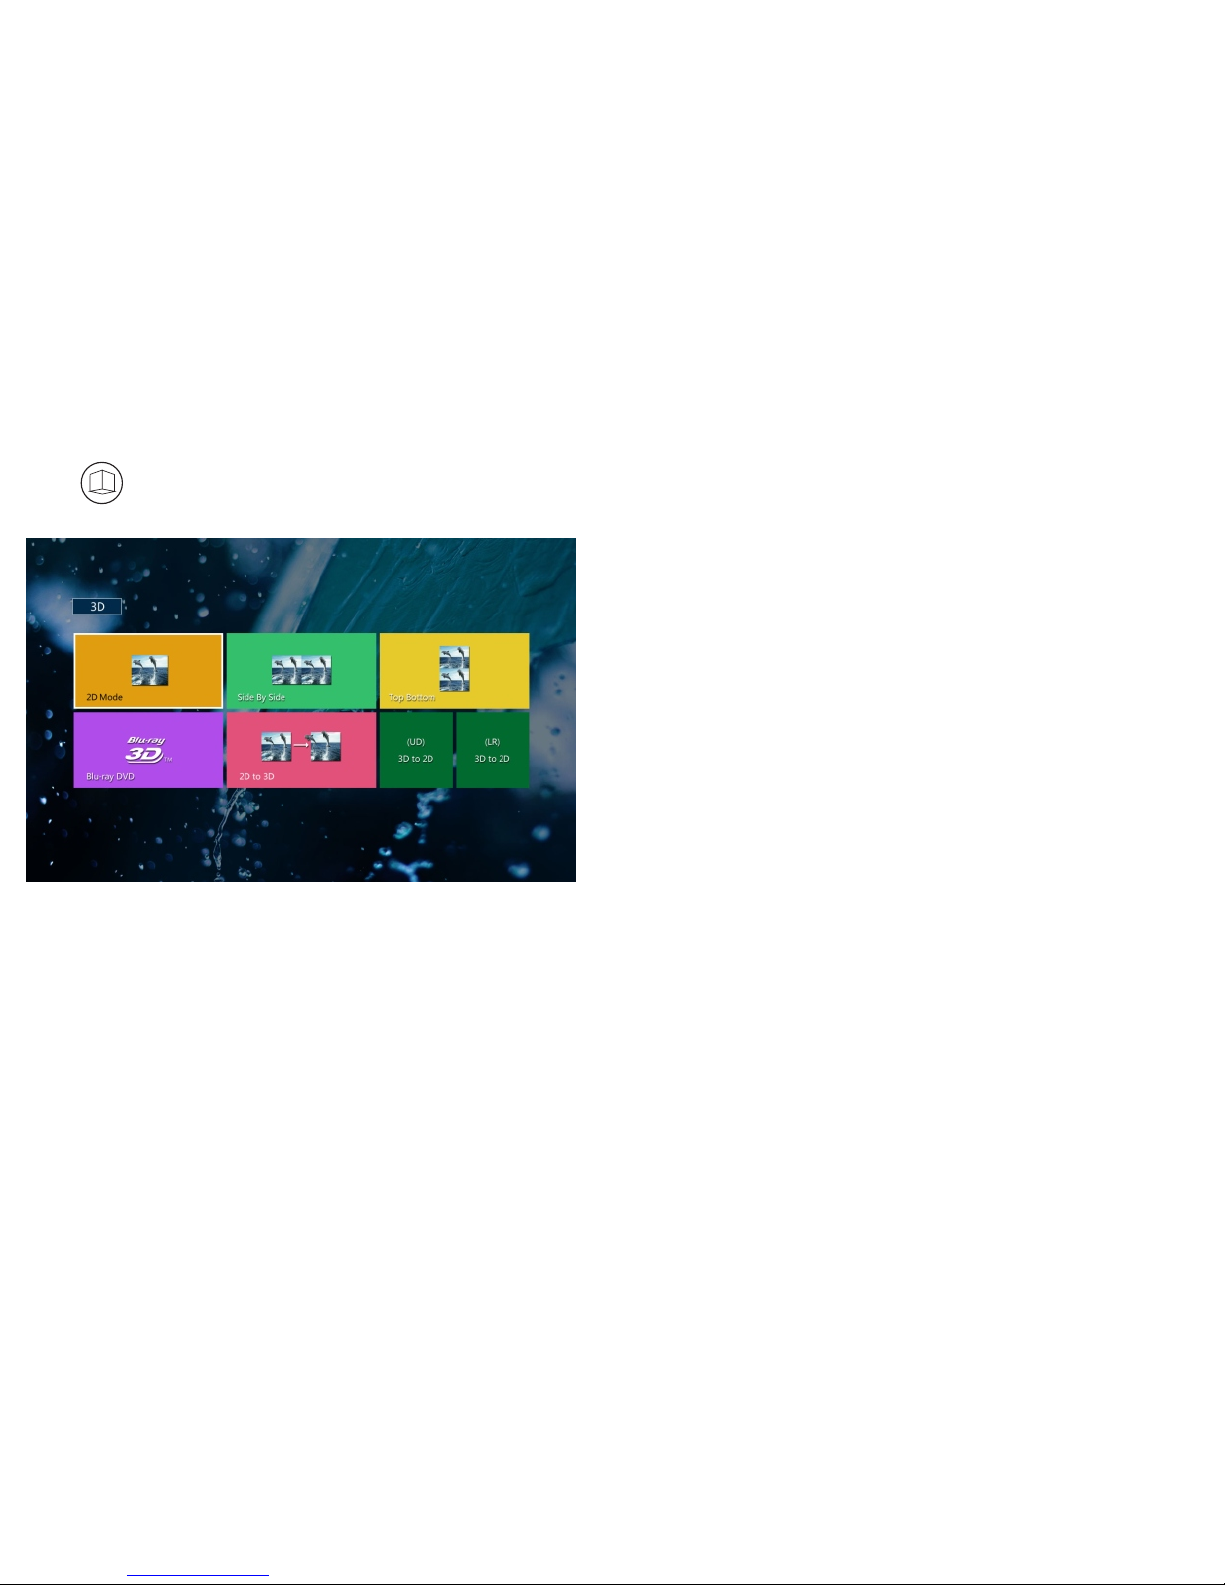
Press on remote or enter “System Setting menu” and select 3D mode, then select the
correct 3D mode inside the projector to play Side by side, Blue-ray, Top bottom format 3D sources.
3
3
D
D
*3D on/off: turn on the 3D option before check 3D content
*Side by side 3D
*top bottom 3D
*Blue-ray 3D (connect to Blue-ray 3D player to play 3D movies)
*2D to 3D (2D movies transfer to 3D directly via projector)
*3D to 2D (side by side, top bottom 3D sources transfer to 2D source)
Note: If connect projector to Blue-ray Player to play 3D movies, please make sure HDMI cable
is higher than 1.4, otherwise the Blue ray Player can not work normally.
27
Page 30

28
6.3 Use DLP-LINK (DLP-Ready) type glasses
1 Press the button on the glasses when watching 3D images.
2 The glasses will flick after press the button, and synchronize with 3D images.
(The flashing is a unique operation of DLP-LINK type glasses. This may be different due
to the different types of glasses.
3 If glasses flashes When viewing 3D images or there is a problem, please turn off the lights .
Please contact your projector Machine vendors, consulting glasses aspects.
Supported 3D Input format
* Only HDMI channel support 3D,projector recognize 3D signal automatically.
* The maximum resolution in 3D mode is 1280x720。
* Some menu may not work in 120HZ input.
Input Resol ut ion Vertica l Fr equency (Hz )
HDMI 1280x7 20 120
Notice for viewing 3D image
* If screen rock from side to side, because the computer configuration is not
enough, please select higher configuration.
* When Watch the 3D images, you can press the button on the glasses to
switch the image play direction left / right.
* It is a normal phenomenon if the picture partial red or ghosting without 3D
glasses to watch. Please wear 3D glasses to watch.
* You can not change the 3D images size.
Page 31

29
7.1 Multimedia Menu
The projector can play these media files(video/photo/music/text), and the support format includes:
MPEG1 DAT/MPG/MPEG \ 1920×1080/30P 20Mbps
MPEG2 MPEG \ 1920×1080/30P 20Mbps
MPEG4 AVI/MP4 DIVX.XVID 1920×1080/30P 20Mbps
RM/RMVB RM/RMVB RV8,RV9,RV10 1280×720/30P 10Mbps
H.264 MKV/MOV H.264 1920×1080/30P 20Mbps
MJPEG AVI H.264 640×480/30P 10Mbps
WMA 8K-48K 32K-320Kbps Mono.Stereo
MP3 32K-48K 32K-320Kbps Mono.Stereo
M4A(AAC) 8K-48K 32K-320Kbps Mono.Stereo
JPEG 15360×8640
BMP 9600×6400
PNG 9600×6400
Video Format:
Suffix Name
Internal Code
Max Resolution
Max Baud Rate
Music Format
Sampling Rate Baud Rate Sound Channel
Photo Format Max Resolution
Remarks: 1 Support DIVX﹑XVID﹑H264 encoded file, do not support: MSVC/CRAM﹑MP42 GMC﹑IV32﹑RLE﹑cvid﹑RV20.
2 Support AC3﹑MP3﹑AAC﹑Cook encoded file, do not support: SonyATRAC3﹑Dobly HD.
3 Subtitle file and video file name must be the same, in the same folder.Not subtitle file name format: xx.xx.suffixn
xx..xx.suffix, special symbols or formatting
Video Format:(support video play with subtitle file. support file suffix:srt,idx,ssa,ass,smi,txt,ttx,sub.)
Music Format:
Photo Format:
Page 32

30
7.2 Multimedia Interface
Enter multimedia operating interface, press “left” “right” button at remote control or upon
projector to select corresponding file type(photo,music,video,txt); then press “ok” and get
interface as below image:
Select the right storage device, find the right file and press “Ok” button to play.
Page 33
Pause
31
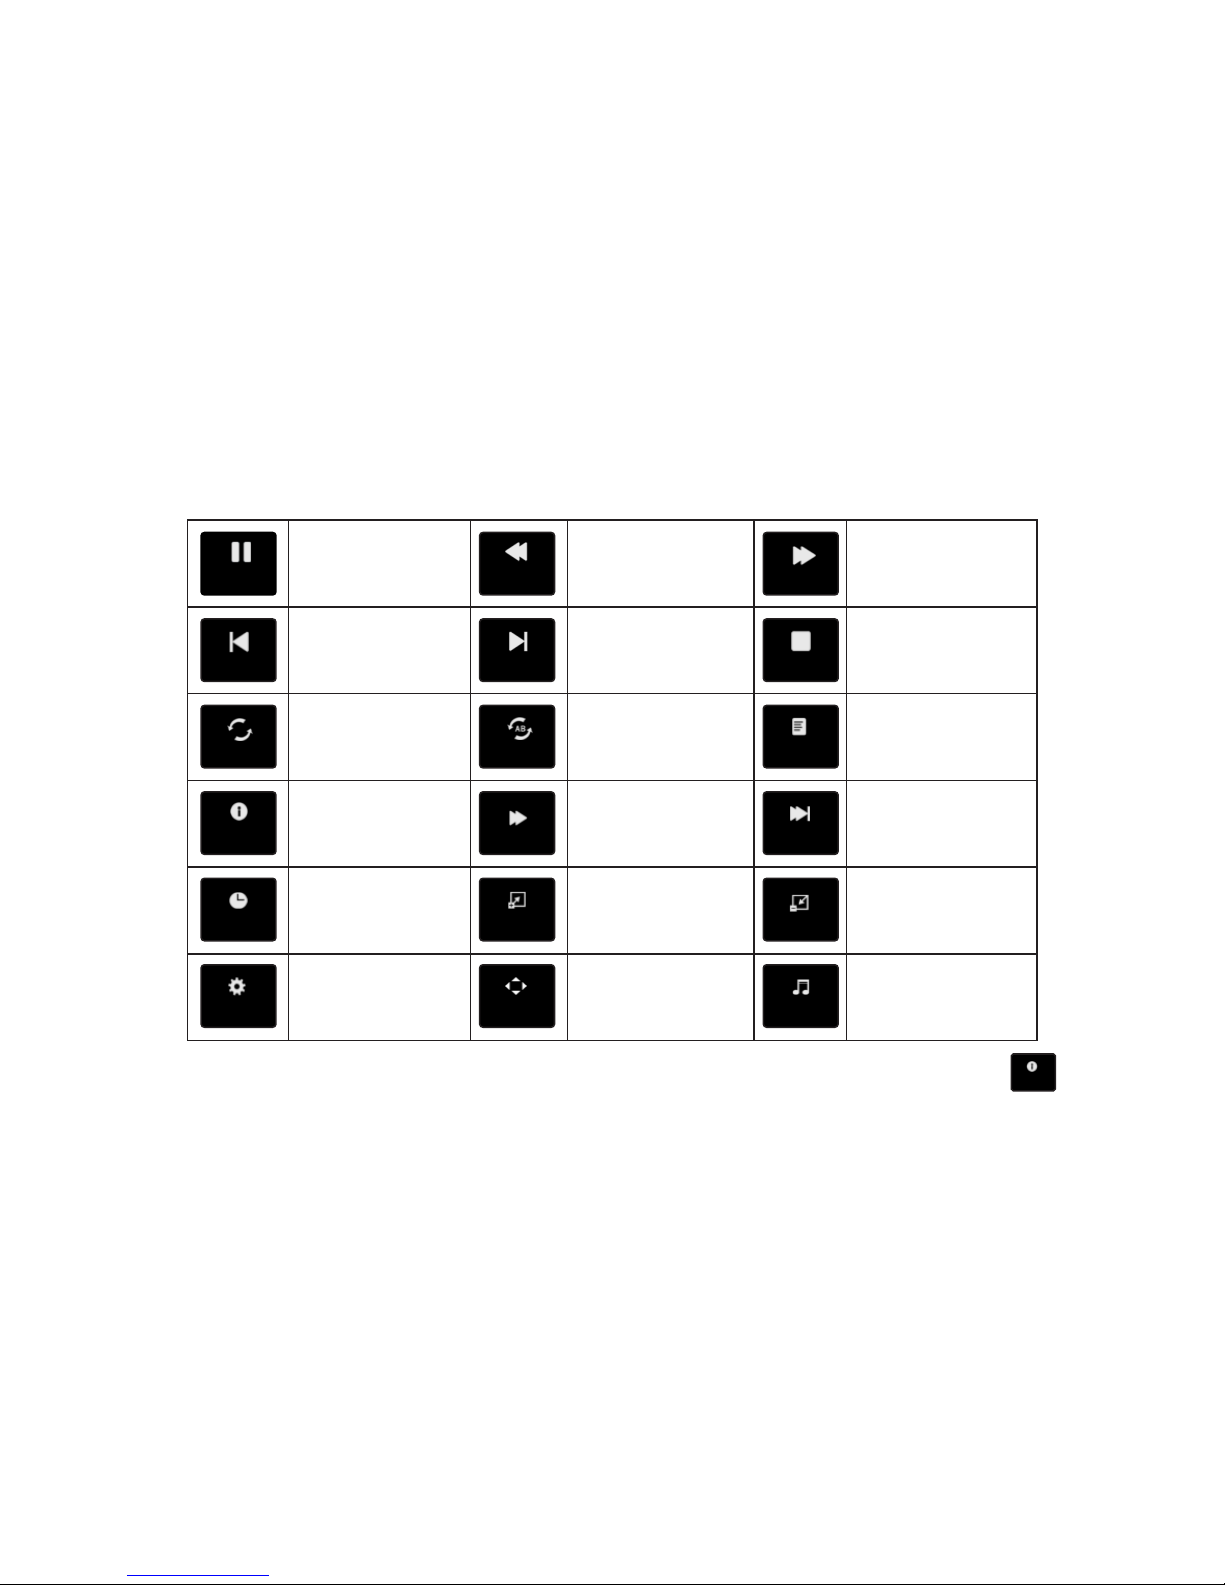
Multimedia shorcut menu:
Fast Forward
Stop
Playlist
Step Forward
Zoom out
L+R
Fast Back
Next
Set A
Slow Forward
Zoom in
Move
Pause
Previous
Repeat
Information
Timing
Aspect Ratio
Note: You can choose channel, subtitles, chapters to play in the file info option.
FB
FF
Prev.
Next.
Stop
Repeat
Set A
List
Info
Slow FW
Step FW
Timin g
Zoom In
ZoomOut
Aspect..
Move
L+R
Inf o
Page 34
32
8. PPT/PDF File Play
Before playing PDF/PPT files, you need to convert the file to MPTG file to play.
System requirements CPU: Intel Pentium processor M1.5G or higher
Memory:above 256M
OS: Windows XP Sp2、Windows Vista、Win7
Office: Offce2003.Offce2007
PDF Reader: Adobe Reader8、9、9.1
8.1 Install the convert program
1 insert the Tfcard to the computer, find the installer.
2 double-click the icons to run the installation wizard, then follow the screen instructions.
3 when the installation is complete, there is a icon on your desktop.
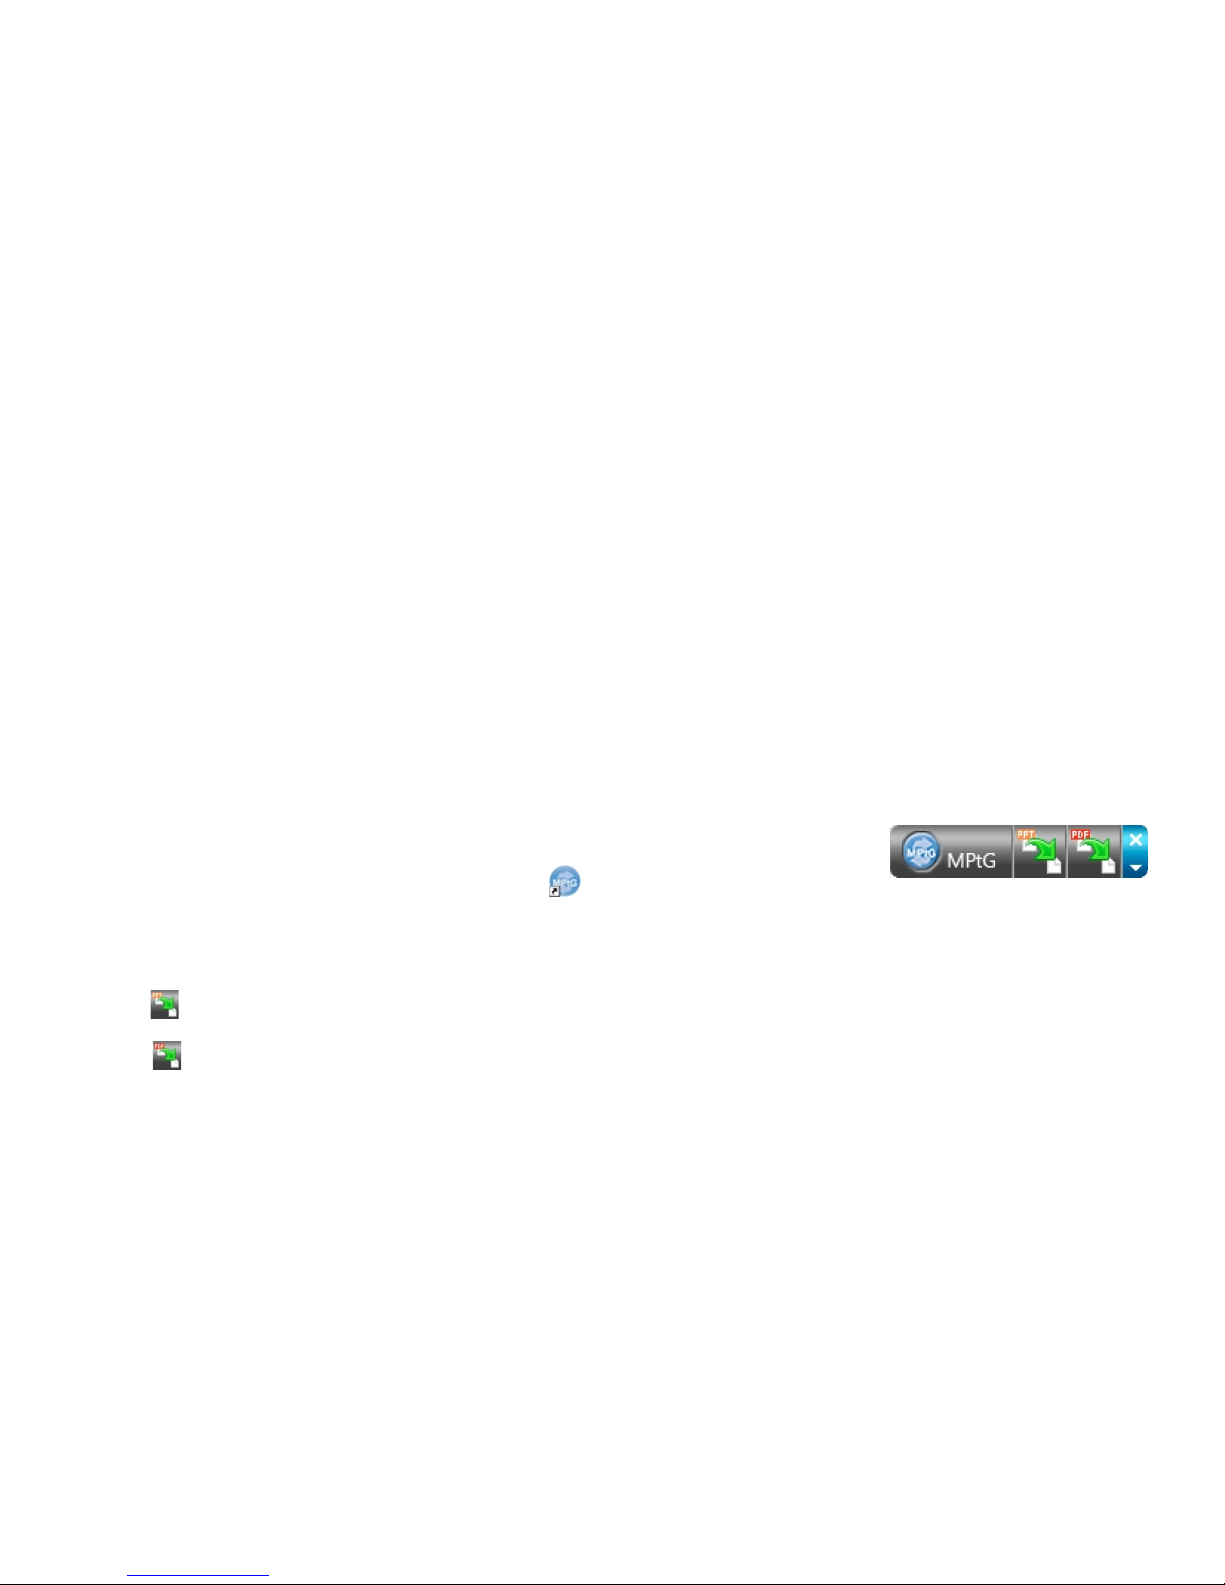
4 double-click the icon to start program. The control panel of this program as shown below:
8.2 Convert PPT/PDF to MPtG
1 Select the operations on the control panel:
*Click convert PPT to MPtG.
*Click convert PDF to MPtG.
2 Select the PPT/PDF file need to convert.
Page 35
33
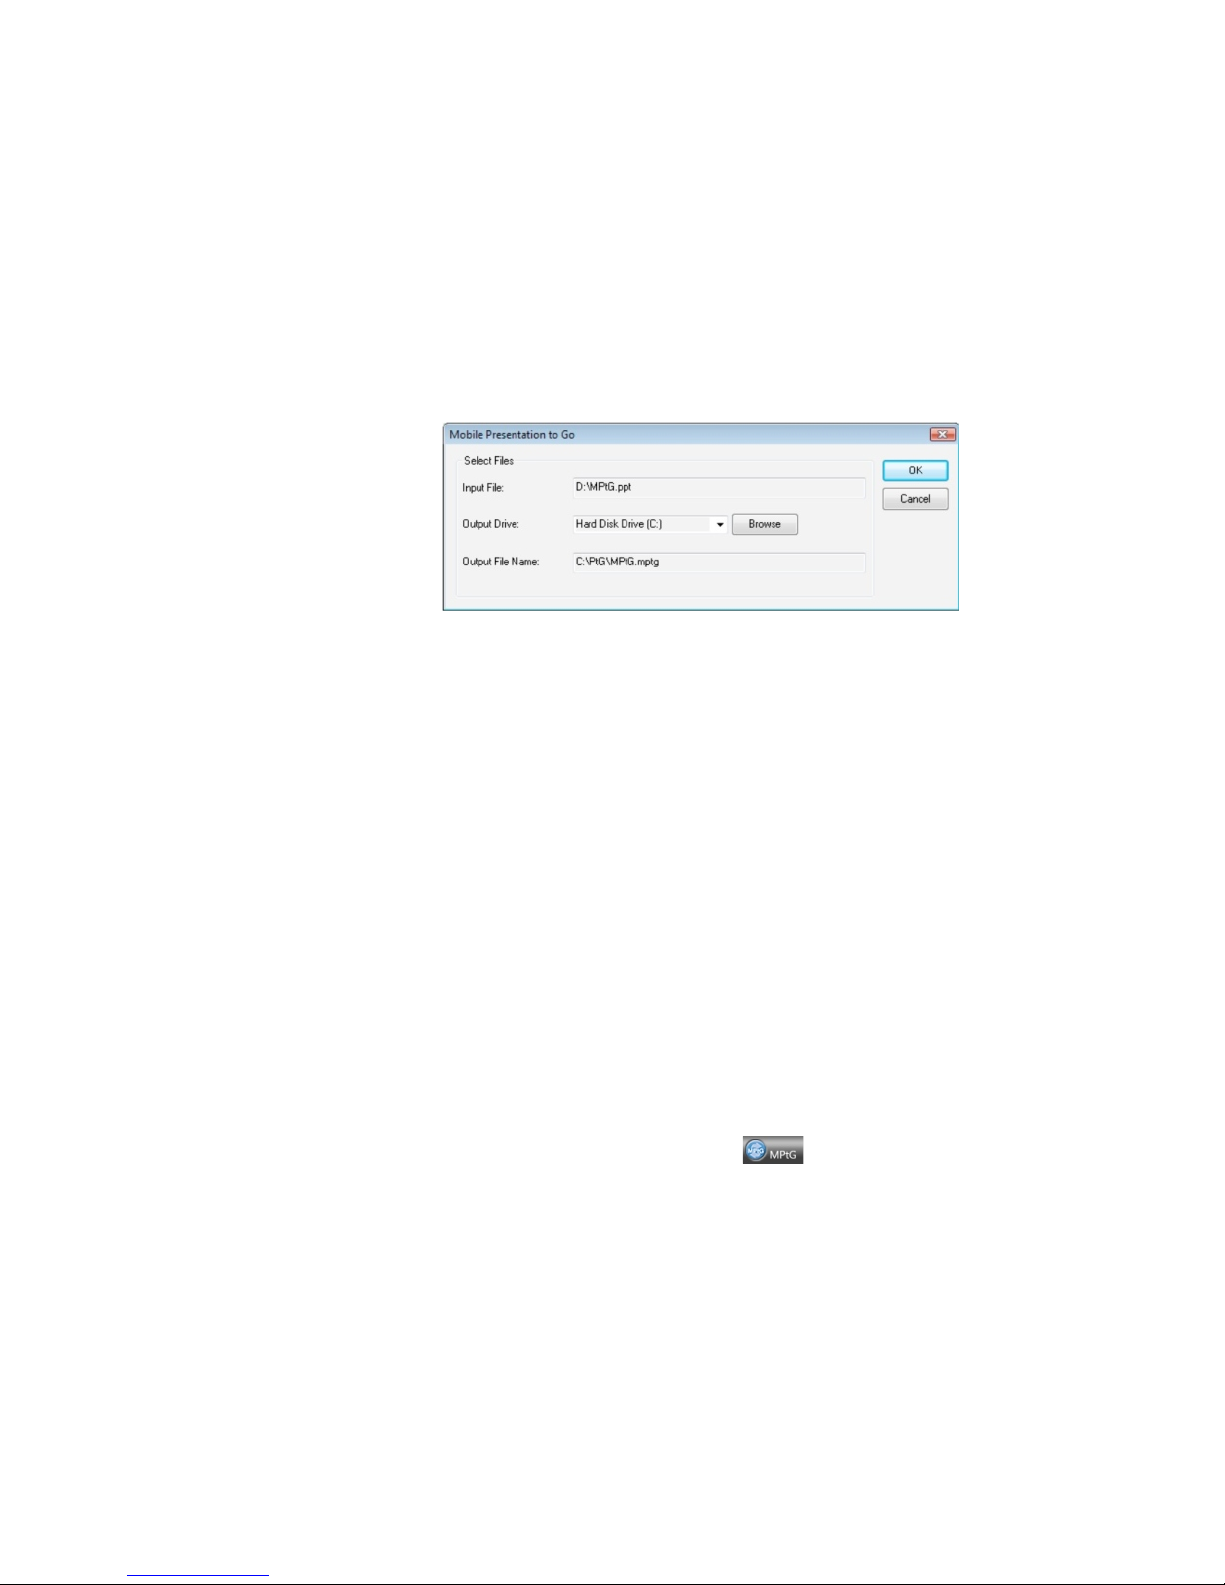
3.Select the target location.
* Input file: the full path to the selected PPT/PDF file.
* Output driver: the target disk storage path.
* Output file name: convert name the full path to the file. The convert file is same name as
the source file and store in the same path. (if not detected any removable disk)
4.Click OK to convert. After conversion, you can play the file on the projector directly.
MPtG support most animation of the PPT on the desktop screen, except:
* Using timer or automatic repeat playback animation
* Longer than 60 seconds of a single animation. If there is repeated animation, MPtG
recording to 60 seconds.
* If the PPT screen stopped 3 seconds to replace the picture, the system will recognize
it as a complete animation, and send the Enter key to the PPT.
* Embeded VBA and OLE objects.
* To change the time limit of animation, click the icon , then select 10/20/30/60.
Restrictions and settings
Page 36

34
9 Trouble Shootings
If you encounter any problem during using the projector, please refer to the below methods to
solve the problem, if you still can not solve the problem, please contact the distributor.
9.1 Projector can not be powered on, no image
1 check the power connection, the power work normal or not
Connect one end of the power cable to the projector, the other end to the socket. Be sure that
the connection is correct, and the power indicator works. If the indicator does not light on, please
replace the power cable or the adaptor.
2 Over-heat protection
If the projector works long time, the heat will high, when it reaches a setting figure, the projector
will be power off.
3 Obstacle in front of the lens
Remove the obstacle.
4 If using the battery to start the projector, no battery
Charging the battery and then use it. About the charging time, please refer to content in manual.
9.2 Image blurring
1 Projector lens does not focus properly
Use the focus to adjust.
Page 37

35
2 Projector does not aim the screen
Adjust the angle and direction, or height if necessary.
3 Lens is dirty
Clean the lens.
4 Light is strong
Pull down the curtain or power off some bulbs to lower the light.
9.3 No image
1 Video sources does not power on or connect wrong
Power on the video sources and inspect the connection.
2 Projector does not connect to the input port properly
Inspect the correction.
3 Select wrong input signal
Press on the panel or Source on the remote to select correct input signal.
9.4 Remote failure
1 Battery runs out
Replace battery.
2 Barrier between projector and remote
Remove barrier.
3 Distance between projector and remote too long
The distance can not exceed 5m.
Page 38

36
10 Technical Specifications
● This product and the user manual for further improvement or supplementsed without notice.
3D
Audio output
1280×800
DLP
≥110%
100V-240V 0.8A
25W
180×110×28mm
0℃-35℃
0-85%
USB TF NTFS,FAT16,FAT32
4Ω/1W/3W
DLP-LINK 3D Ready
5.1 coaxial audio output
Name
CS-LED projector
Resolution
Display Technology
Lamp
R,G,B LED
Color gamut
Power
Power consumption
Dimension(L×W×H)
Weight
520g/450g(No battery)
VGA input
standard VGA input port
3.5mm AV input port
AV input
HDMI input
Support storage device file system
standard HDMI input port
Headphone
3.5mm sterio headphone
Speaker
Working Temperature
Working Humidity
 Loading...