

Page 1
PERMANENT TARGET GROUND TUBE INSTALLATION
Page 1
Parts (included per target
location)
• Installation Tube
WARNING: Before digging always contact your local utilities and property maintenance to locate any
STOP
underground lines. (Water, Gas, Electrical, Sprinkler, etc...)
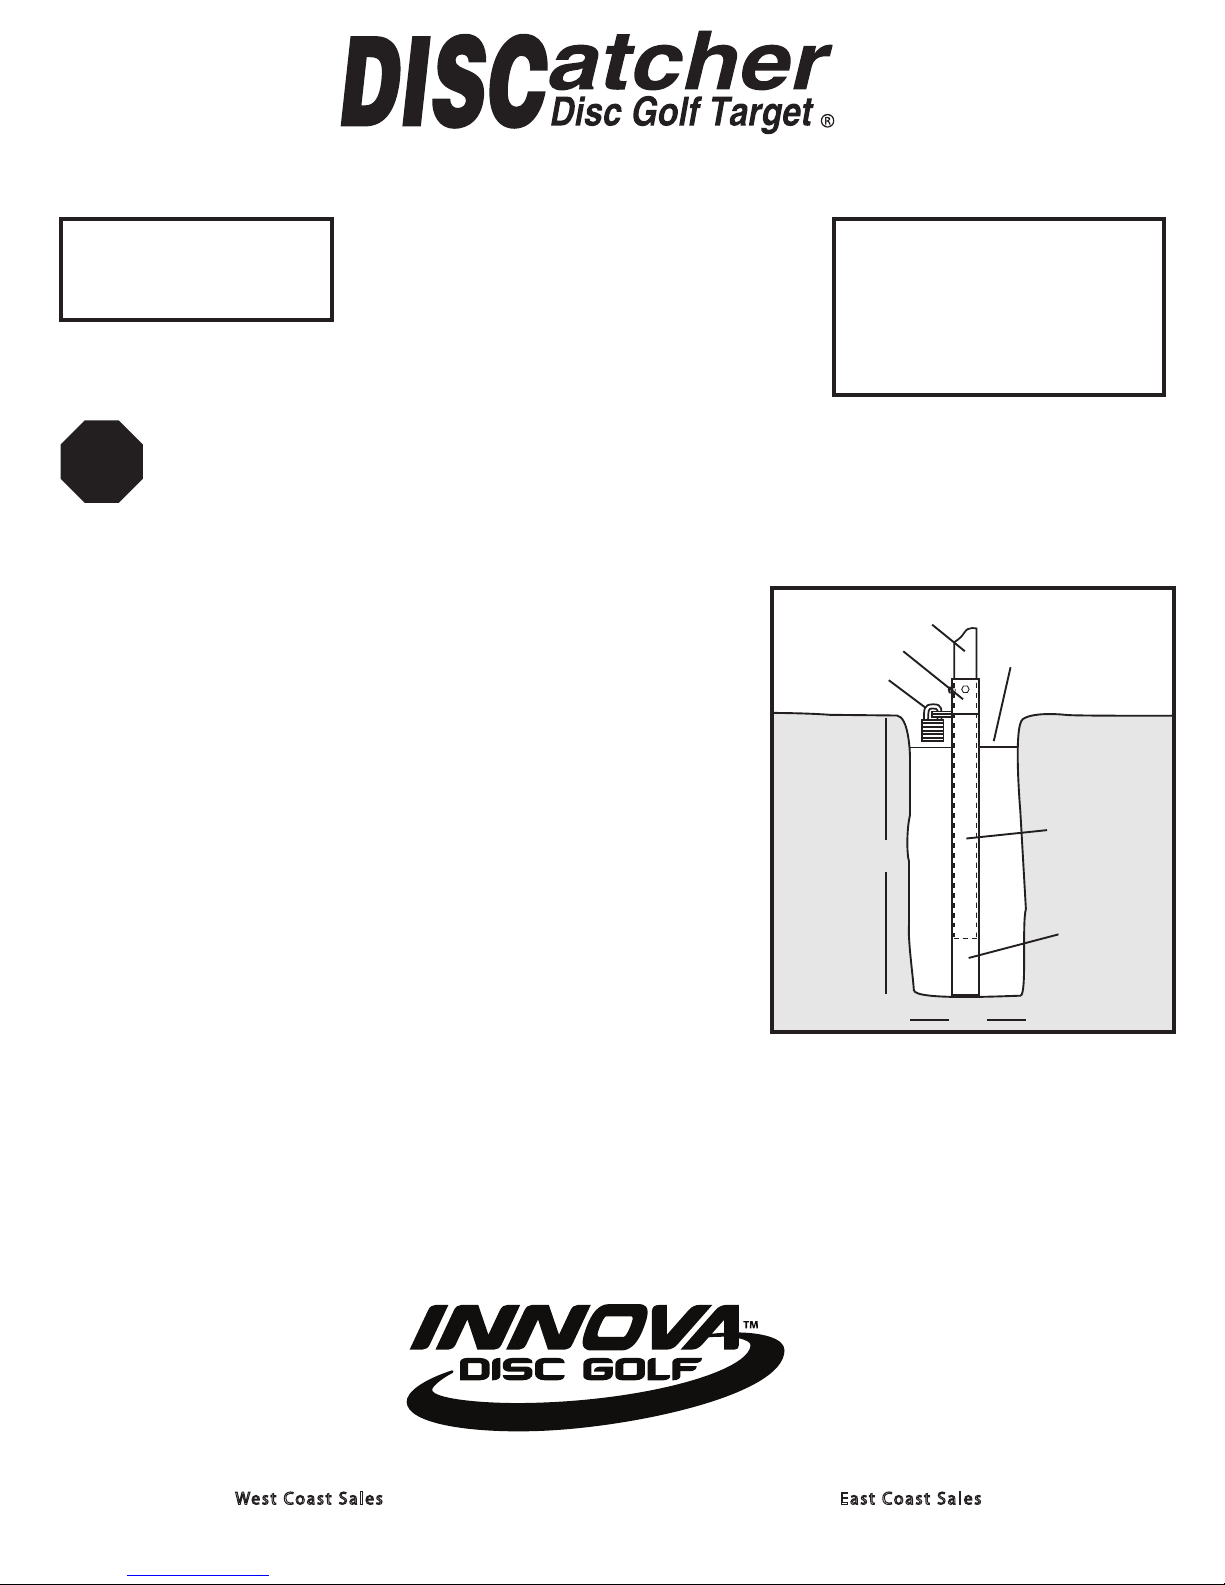
SE T TING THE I N STALLATION TUBE (Di a gram 1)
Step 1 Dig a hole that is at least 6 inches in diameter and 24 inches deep. Most
manual post hole diggers create a 6 inch diameter hole, but if you are
installing an entire course it is maybe worth the money to rent a two man
auger with a 6 inch bit.
Step 2 Assemble one pole and locking collar according to Step 1 of Target
Assembly (see other page). Tape the bottom of the installation tube with
duct tape or packing tape to prevent any concrete getting into the tube
during installation. Place the installation tube in the hole with the tab
pointing towards the tee or line of play, (this will assure that the number
on the target faces the tee). The tab should be at, or slightly below grade
level to keep it away from lawn mower blades and to establish the correct
height for the target. Slide the target pole with locking collar attached
into the installation tube. This will keep cement out of the installation
tube while pouring. Just one pole with locking collar can be used to set
up the installation tubes for your entire course.
Installation tools and extras needed
• One Target Pole & Locking Collar
assembled from Step 1 on page 2.
• Duct or packing tape
• 60 pounds of concrete per target
• Post hole digger or auger
• Torpedo level or carpenter’s level
Target Pole
Locking Collar
Padlock
(not included)
24"
Top of concrete
should be 2 inches
below grade
Grade Level
Pole
Installation
Tube
Step 1 Pour the concrete into the hole around the installation tube to no higher
than two inches below grade level. This will allow room for a padlock (not
included). Use a level to plumb the pole on at least two sides 90˚ from
each other. A torpedo level works best. After leveling the pole, make sure
the tab still points toward the tee or line of play, clean o any concrete on
the locking tab and then carefully remove the pole from the tube.
i
d
a
v
o
n
w
w
n
i
.
Still have questions? Give us a call.
We st Coast Sales
(800) 408-8449
900 S. Dupont Ave. | Ontario, CA 91761
w
www.innovadiscs.com
Diagram 1
m
o
c
.
s
c
s
East Coast Sales
(800) 476-3968
2850 Commerce Drive | Rock Hill, SC 29730
6"
Page 2
Page 2
Parts (included per target)
• One Pole
• One Target Top (w/chains)
• One Basket
• One Locking Collar
WAIT AT LEAST 24 HOURS AFTER POURING CONCRETE TO INSTALL ASSEMBLED TARGETS.
STOP
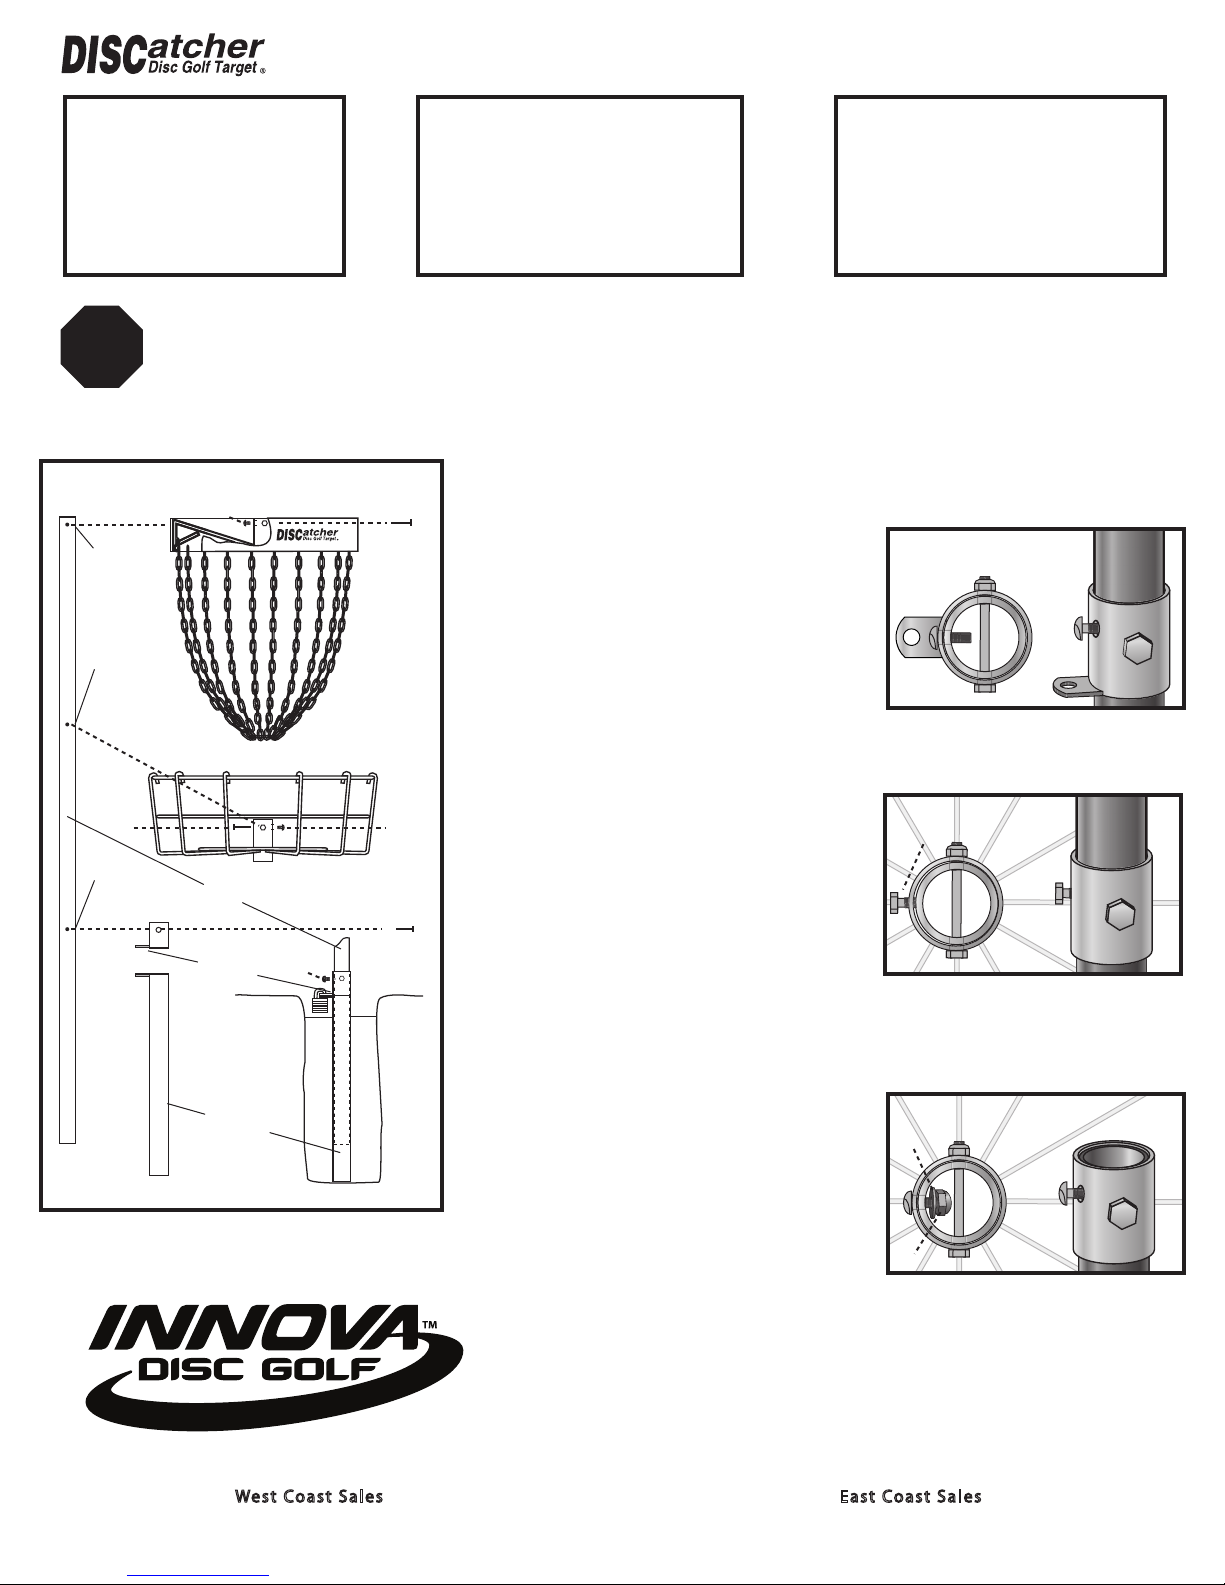
Diagram 2
mounting
holes
mounting
holes
You must be patient enough to let the concrete set thoroughly before putting the target in. This
usually takes at least one day.
one-way
screw
Hardware (included per target)
• Three ⁄” x 2¾” hex head bolts
• Two ¼” x ¾”
One ¼” x ⁄” hex head bolt
•
• Three /” lock nuts
• One ¼” lock nut
one-way screws
Assembly Tools and Extras
(not included)
• One padlock per target
• Two ½
• Flat head screwdriver (short)
” and one /”
• One ¼” washer
ASSEMBLING THE DISCATCHER® TARGET (Di agram 2)
The easiest way to assemble the DISCatcher® Target is with the pole on the ground
(the top of the main pole has mounting holes drilled within an inch of the end).
Step 1
LOCKING COLLAR - From the
bottom end of the pole the locking
Diagram 2.1 Locking Collar
collar should slide onto and line up
with the bottom 3 mounting holes,
with the tab portion at the bottom
of the collar. Insert and tighten the
1/4" x 3/4" one-way screw into the
threaded hole above the tab. Insert
the 5/16" x 2 3/4" hex bolt through the
collar and pole and tighten locknut.
basket
hex head
bolt
target
top
wrenches or sockets
hex head
bolt
mounting
holes
w
target pole
locking tab
w
w
installation
tube
o
n
n
i
.
v
one-way
screw
d
a
s
c
s
i
small hex
bolt
hex head
bolt
m
o
c
.
Still have questions? Give us a call.
Step 2
Step 3
BASKET - From the top of the pole
slide the basket down and line up
Diagram 2.2 Basket
1/4 x 3/8 Bolt
the 2 holes for the hex bolt, with the
threaded hole on the same side of
the pole as the locking collar tab.
Insert 5/16" x 2 3/4" hex bolt and
tighten locknut. Apply a small
amount of threadlock to the 1/4" x
3/8" hex bolt and insert into the
threaded hole on the basket and
tighten against the pole.
TARGET TOP - Hold up target top to
make sure chains hang freely and
Diagram 2.3 Target Top
washer
are not tangled. While holding up
target top tilt slightly and slide the
two rings at bottom of chains onto
top of pole. Be careful not to let any
chains cross between the top of the
locknut
pole and the hole in the center of
the target top , as you put the target top onto the pole. Line up the three
holes on the target top with the top 3 holes on the pole. Insert and
tighten 1/4" x 3/4" one-way screw into threaded hole on front of target
top lining up with tab of locking collar. Start the 1/4" washer and locknut
onto back of owe-way screw. (Do not tighten) Insert 5/16" x 2 3/4" hex
bolt through target top and pole tighten locknut. At this point tighten
the 1/4" locknut onto one-way screw.
We st Coast Sales
(800) 408-8449
900 S. Dupont Ave. | Ontario, CA 91761
East Coast Sales
(800) 476-3968
2850 Commerce Drive | Rock Hill, SC 29730
 Loading...