

Page 1

eServer
e
SETUP AND SITE INSTALLATION INSTRUCTIONS
Page 2

Proprietary
No part of this technical manual may be reproduced, transmitted, transcribed, stored in a retrieval
system, or translated into any language or computer language, in any form or by any means, without
prior written permission of Mass Electronics Pty Ltd.
Trademark
The term ‘Innotech’ used in this manual is a trademark of Mass Electronics Pty Ltd trading as
Innotech Control Systems Australia.
'Microso' and 'Windows' are registered trademarks of the Microso Corporation in the United States
and other countries.
Disclaimer
While great eorts have been made to assure the accuracy and clarity of this document, Mass
Electronics Pty Ltd assumes no liability resulting from any omissions in this document, or from
misuse of the information obtained herein. The information in this document has been carefully
checked and is believed to be entirely reliable with all of the necessary information included. Mass
Electronics Pty Ltd reserves the right to make changes to any products described herein to improve
reliability, function and design, and reserves the right to revise this document and make changes
from time to time in content hereof with no obligation to notify any persons of revisions or changes.
Mass Electronics Pty Ltd does not assume any liability arising out of the application or any use of any
product or circuit described herein; neither does it convey licence under its patent rights or the rights
of others.
Page 2 © Mass Electronics Pty Ltd 2009Edition 5.0 dated 07/01/2014
Page 3

Document Management
Document Title:
eServer Setup & Site Installation Instructions
Revision History
Version
Number
1.0 2009 Draft release of document, for comment.
2.0 July 2009 Full Release.
3.0 December 2010
4.0 December 2011
5.0 January 2014
Date Summary of Changes
Updates to guide for changed eServer Setup workow. Addition of
information for the use of eServer with SQL Server 2008 R2 Express
Edition databases. Added relevant setup information for eServer on
a Windows Server 2008 R2 computer.
Updated draft document including changes in setup due to new
release of eServer. Added General Troubleshooting Tips section.
Contact Details update, Style update, Internet Explorer 10 and 11
compatibility troubleshooting added, other minor information
added and errors fixed.
Page 3 © Mass Electronics Pty Ltd 2009Edition 5.0 dated 07/01/2014
Page 4

This page has been le intentionally blank.
Page 4 © Mass Electronics Pty Ltd 2009Edition 5.0 dated 07/01/2014
Page 5

Contents
Chapter 1 - Preliminary Information .............................................................13
1-1 Introduction ............................................................................................................. 14
1-1.1 Systems Covered by this Manual ............................................................................ 14
1-1.2 Terminology used in this Manual ............................................................................14
1-1.3 Scope of this Technical Manual...............................................................................15
1-2 System Requirements ............................................................................................. 16
1-2.1 Minimum Computer Requirements ........................................................................ 16
1-3 Special Considerations ............................................................................................ 16
1-4 Advanced Site Considerations ................................................................................ 17
1-5 Installation Plans .................................................................................................... 17
1-5.1 Required Soware on Site Computer .....................................................................17
Chapter 2 - Installation and Configuration of eServer Soware ....................... 19
2-1 Overview .................................................................................................................. 20
2-2 Pre-installation Tasks .............................................................................................. 20
2-2.1 Overview ..................................................................................................................20
2-2.2 Remote Access, Ports and Security Information .................................................... 20
2-2.3 Setup of a Dedicated Site Computer with ADSL Connection ................................ 22
2-3 Installation of eServer Soware ..............................................................................24
2-3.1 Overview ..................................................................................................................24
2-2.4 Domain Name System (DNS) Setup ........................................................................ 24
2-3.2 Installation Steps ..................................................................................................... 25
2-4 Installation of ATOM Reports Component .............................................................. 28
2-4.1 Overview ..................................................................................................................28
2-4.2 Installation Steps ..................................................................................................... 28
2-5 Security Access to the c:\MyWebPages Directory ................................................... 30
2-5.1 Overview ..................................................................................................................30
2-5.2 Create Special User "Everyone" for c:\MyWebPages ............................................. 30
2-5.3 Configure Security Settings for Special User "Everyone" ......................................32
Chapter 3 - Configuring Internet Information Services (IIS) .............................35
3-1 Overview .................................................................................................................. 36
Page 5 © Mass Electronics Pty Ltd 2009Edition 5.0 dated 07/01/2014
Page 6

Contents (Continued)
3-2 Installing Internet Information Services (IIS) .........................................................36
3-2.1 Overview ..................................................................................................................36
3-2.2 Installing IIS on Windows Server 2008 R2 ...............................................................36
3-2.3 Installing IIS on Windows 7 .....................................................................................43
3-2.4 Installing IIS on Windows Vista ...............................................................................45
3-2.5 Installing IIS on Windows XP ................................................................................... 47
3-3 Launching Internet Information Services (IIS) .......................................................50
3-3.1 Overview ..................................................................................................................50
3-3.2 Launching IIS on Windows Server 2008 R2 ............................................................50
3-3.3 Launching IIS on Windows 7 ...................................................................................51
3-3.4 Launching IIS on Windows Vista .............................................................................53
3-3.5 Launching IIS on Windows XP ................................................................................. 54
3-4 Configuring Internet Information Services (IIS) .....................................................55
3-4.1 Overview ..................................................................................................................55
3-4.2 Configure IIS on Windows Server 2008 R2, 7 and Vista .......................................... 55
3-4.3 Configure IIS on Windows XP ..................................................................................62
Chapter 4 - Configuring eServer Communications .......................................... 73
4-1 Overview .................................................................................................................. 74
4-2 Configure eServer Project Settings ......................................................................... 74
4-2.1 Overview ..................................................................................................................74
4-2.2 Launch Project for Configuration ...........................................................................74
4-2.3 Set Project Properties for the Access Database .....................................................75
4-2.4 Set Project Properties for the SQL Database .........................................................77
4-2.5 Set iComm Connection Properties .........................................................................80
4-2.6 Set iComm Connection Properties .........................................................................82
4-2.7 Save Project Settings ............................................................................................... 83
4-3 Setup SQL Server Communications ........................................................................ 84
4-3.1 Overview ..................................................................................................................84
4-3.2 Default SQL Server 2008 R2 Express Edition Settings ............................................ 85
4-4 Setup eServer Security and Access Control ............................................................ 86
4-4.1 Overview ..................................................................................................................86
4-4.2 Configure eServer Security .....................................................................................86
4-4.3 Enabling eServer Access Control ............................................................................87
4-4.4 Test eServer Connectivity........................................................................................88
Page 6 © Mass Electronics Pty Ltd 2009Edition 5.0 dated 07/01/2014
Page 7

Contents (Continued)
4-5 Setup of eServer Client Computer .......................................................................... 89
4-5.1 Overview ..................................................................................................................89
4-5.2 Connection Steps ....................................................................................................89
4-5.3 Setup Crystal Reports Soware on eServer Client Computer ............................... 93
Chapter 5 - General Troubleshooting Tips ......................................................99
5-1 Introduction ........................................................................................................... 100
5-1.1 Download and Install Unsigned ActiveX Controls ................................................100
5-1.2 Bypass Proxy Server Settings ................................................................................ 102
5-2 Internet Explorer Compatibility with eServer ...................................................... 104
5-2.1 Internet Explorer 10 ............................................................................................... 104
5-2.2 Internet Explorer 11 ............................................................................................... 104
Appendix A - Upgrade Guide for eServer 1.20E or Greater ............................. 105
A-1 Overview ................................................................................................................ 106
A-2 Updating DNS Name or Static IP Address Settings .............................................. 106
A-2.1 Overview ................................................................................................................ 106
A-2.2 Updating eServer / Magellan Project Settings ..................................................... 107
A-3 Updating Internet Information Services (IIS) Settings .........................................109
A-3.1 Overview ................................................................................................................ 109
A-3.2 Updating IIS Settings on Windows Server 2008 R2, 7 and Vista .......................... 109
A-3.3 Updating IIS Settings on Windows XP ..................................................................113
Customer Assistance ................................................................................. 118
Innotech Support ............................................................................................................118
Page 7 © Mass Electronics Pty Ltd 2009Edition 5.0 dated 07/01/2014
Page 8

List of Illustrations
Figure 2-1:
Figure 2-2:
Figure 2-3:
Figure 2-4:
Figure 2-5:
Figure 2-6:
Figure 2-7:
Figure 2-8:
Figure 2-9:
Figure 2-10:
Figure 2-11:
Figure 2-12:
Figure 2-13:
Figure 2-14:
Figure 2-15:
Figure 2-16:
Figure 2-17:
Example of eServer Setup Network Topology .......................................................22
Example of Forwarding Requests for Ports to Static Ip Addresses ....................... 23
Commence Installation of the eServer Soware ...................................................25
eServer Soware Licence Agreement ....................................................................25
eServer Soware Customer Information ...............................................................26
eServer Soware Installation Location .................................................................. 26
eServer Soware File Installation ..........................................................................27
ATOM Reports Component Installation Preparation .............................................28
Commence ATOM Reports Component Installation .............................................29
Select the Specific ATOM Reports Components to Install .....................................29
Edit Security Groups for c:\MyWebPages ............................................................... 30
Add the new Security Group "Everyone" ............................................................... 31
Enter the new Security Group "Everyone".............................................................31
Edit properties for Security Group "Everyone" .....................................................32
Select Full Control for Security Group "Everyone" ................................................32
Open Advanced Security Settings for Security Group "Everyone" ....................... 33
Edit Advanced Security Settings for Security Group "Everyone" ......................... 33
Figure 2-18:
Figure 2-19:
Figure 3-1:
Figure 3-2:
Figure 3-3:
Figure 3-4:
Figure 3-5:
Figure 3-6:
Figure 3-7:
Figure 3-8:
Figure 3-9:
Figure 3-10:
Figure 3-11:
Figure 3-12:
Figure 3-13:
Figure 3-14:
Figure 3-15:
Set Advanced Security Settings for Security Group "Everyone" ..........................34
Confirm Advanced Security Settings for Security Group "Everyone" .................. 34
Initial Configuration Tasks on Windows Server 2008 R2 ....................................... 37
Server Manager Window on Windows Server 2008 R2 .......................................... 38
Confirm that initial setup of your server computer is correct .............................. 38
Select Web Server (IIS) from available Server Roles .............................................39
Read the Introduction to Web Server (IIS) .............................................................39
Setup IIS options for a Windows Server 2008 R2 computer ..................................40
Confirm IIS installation options for a Windows Server 2008 R2 computer ..........40
IIS installation in progress on a Windows Server 2008 R2 computer ...................41
Review IIS installation results on Windows Server 2008 R2 .................................. 41
Validate the role Web Server (IIS) in the Server Manager window .......................42
Opening Control Panel on Windows 7 ...............................................................................43
Open Programs and Features from the Control Panel on Windows 7 ..................43
Selecting "Turn Windows Features On or O" on Windows 7 .............................. 44
Setup IIS Features on Windows 7 ...........................................................................44
Opening Control Panel on Windows Vista ........................................................................45
Page 8 © Mass Electronics Pty Ltd 2009Edition 5.0 dated 07/01/2014
Page 9

List of Illustrations (Continued)
Figure 3-16:
Figure 3-17:
Figure 3-18:
Figure 3-19:
Figure 3-20:
Figure 3-21:
Figure 3-22:
Figure 3-23:
Figure 3-24:
Figure 3-25:
Figure 3-26:
Figure 3-27:
Figure 3-28:
Figure 3-29:
Figure 3-30:
Figure 3-31:
Figure 3-32:
Opening Programs and Features on Windows Vista ..................................................... 45
Opening Windows Features Menu on Windows Vista............................................ 46
Setup IIS Features on Windows Vista .....................................................................46
Opening "Add and Remove Programs" from the Control Panel in Windows XP ..47
Opening "Add/Remove Windows Components" on Windows XP......................... 47
Check if IIS is installed on Windows XP .................................................................. 48
Installing IIS from the Windows XP Installation Disk .............................................48
Adding IIS components on Windows XP ................................................................49
Launch the IIS Manager on Windows Server 2008 R2 ...........................................50
Home screen of the IIS Manager on Windows Server 2008 R2 .............................. 51
Opening Control Panel in Windows 7 ..................................................................... 51
Open Administrative Tools on Windows 7 .............................................................52
Launch IIS on Windows 7 ........................................................................................ 52
Opening Control Panel in Windows Vista ...............................................................53
Opening Administrative Tools on Windows Vista .........................................................53
Launch IIS on Windows Server ............................................................................... 54
Launch Internet Information Services on Windows XP ......................................... 54
Figure 3-33:
Figure 3-34:
Figure 3-35:
Figure 3-36:
Figure 3-37:
Figure 3-38:
Figure 3-39:
Figure 3-40:
Figure 3-41:
Figure 3-42:
Figure 3-43:
Figure 3-44:
Figure 3-45:
Figure 3-46:
Figure 3-47:
Figure 3-48:
Figure 3-49:
Open Basic Settings for Default Web Site .............................................................. 55
Configure Physical Path for c:\MyWebPages .........................................................56
Set Authentication properties for Default Web Site .............................................. 56
Edit Anonymous Authentication properties .......................................................... 57
Set Anonymous user identity .................................................................................57
Set IUSR credentials ................................................................................................ 57
Save and Exit Anonymous Authentication Setup ..................................................58
Open Default Document Menu for Default Website ..............................................58
Select Default Document index.htm ...................................................................... 59
Confirm Selection of Default Document index.htm ..............................................59
Locate the Default Document index.htm ...............................................................60
Open MIME Types for Default Web Site ..................................................................60
MIME Types Screen ..................................................................................................61
Add the new MIME Type for the Default Web Site .................................................. 61
Open Default Web Site Properties on Windows XP ...............................................62
Configure Default Web Site Identification Properties on Windows XP .................62
Configure Directory Security for Default Web Site on Windows XP ......................63
Figure 3-50:
Figure 3-51:
Authentication Methods for Default Web Site with eServer on a Domain ...........63
Open locations to Browse for Default Web Site computer ...................................64
Page 9 © Mass Electronics Pty Ltd 2009Edition 5.0 dated 07/01/2014
Page 10

List of Illustrations (Continued)
Figure 3-52:
Figure 3-53:
Figure 3-54:
Figure 3-55:
Figure 3-56:
Figure 3-57:
Figure 3-58:
Figure 3-59:
Figure 3-60:
Figure 3-61:
Figure 3-62:
Figure 3-63:
Figure 3-64:
Figure 3-65:
Figure 3-66:
Figure 3-67:
Figure 4-1:
Select Location of Computer for Authentication Details ......................................64
Enable IIS Password Control with Windows XP on a Local Domain ..................... 64
Enable Windows XP IIS Password Control on a Local Domain .............................65
Authentication Methods for Default Web Site on a Standalone Computer .........65
Search for user on Windows XP standalone computer ......................................... 66
Select Authentication Name for Default Web Site on Windows XP ...................... 66
Enable IIS password control with Windows XP on a standalone computer.........67
Set Home Directory on Windows XP ......................................................................67
Set Documents for Default Web Site on Windows XP ............................................ 68
Add Document index.htm for Default Web Site on Windows XP ..........................68
Apply Document Settings for Default Web Site on Windows XP ........................... 69
Configure MIME Types on Windows XP ..................................................................69
Add new MIME Type on Windows XP ......................................................................70
New MIME Type Window .........................................................................................70
Validate two new MIME Types on Windows XP ...................................................... 71
Ensure that the Default Web Site is running on Windows XP................................71
Open the Magellan project .....................................................................................74
Figure 4-2:
Figure 4-3:
Figure 4-4:
Figure 4-5:
Figure 4-6:
Figure 4-7:
Figure 4-8:
Figure 4-9:
Figure 4-10:
Figure 4-11:
Figure 4-12:
Figure 4-13:
Figure 4-14:
Figure 4-15:
Figure 4-16:
Figure 4-17:
Figure 4-18:
Open Project Properties to enter the Access database settings ...........................75
Selecting Access database in Magellan Project Properties ...................................75
Selecting Access database Type in Magellan Project Properties ..........................76
Open Magellan Project Properties .........................................................................77
Selecting SQL database in Magellan Project Properties ....................................... 77
eServer and Chronicle Server Settings for the SQL Server ...................................78
Open iComm Server Properties in the Magellan project ......................................79
Point Properties ......................................................................................................80
Check the eServer and Chronicle Server settings for the iComm Server ............. 81
Example Device Properties for Connection 1, Device 1 ......................................... 82
Example Device Properties for Connection 2, Device 1 ......................................... 82
Validate your Device Settings with the iComm Server .......................................... 82
Save updated Magellan project settings................................................................83
Create new Magellan package ................................................................................ 83
Load the Magellan project into eServer ................................................................. 86
Open eServer Project Preferences .........................................................................86
Configure eServer Connection Security ................................................................. 87
Figure 4-19:
Figure 4-20:
Enable eServer Access Control ...............................................................................87
Entering Connection Authentication Details .........................................................88
Page 10 © Mass Electronics Pty Ltd 2009Edition 5.0 dated 07/01/2014
Page 11

List of Illustrations (Continued)
Figure 4-21:
Figure 4-22:
Figure 4-23:
Figure 4-24:
Figure 4-25:
Figure 4-26:
Figure 4-27:
Figure 4-28:
Figure 4-29:
Figure 4-30:
Figure 4-31:
Figure 4-32:
Figure 4-33:
Figure 4-34:
Figure 4-35:
Figure 4-36:
Figure 4-37:
Launch Internet Explorer and Connect to eServer Computer .............................. 89
Install Magellan ActiveX Control .............................................................................90
Internet Explorer Information Bar when Installing Magellan ActiveX Control ..... 90
Internet Explorer Security Warning when Installing eServer Native Client..........91
Internet Explorer Information Bar when Running Magellan ActiveX Control ...... 91
Launch the Magellan ActiveX Control ....................................................................92
Confirm eServer connection ................................................................................... 92
Index.htm file contents ........................................................................................... 92
Launch the Crystal Reports Web Components installer .......................................93
Confirm Installation Location for Crystal Reports Web Components ..................94
Commence Installation of Crystal Reports Web Components .............................94
Crystal Reports Web Components Commencing Installation ..............................95
Crystal Reports Web Components Continuing Installation .................................. 95
Crystal Reports Web Components Installation Complete ....................................95
Message Advising that Crystal Reports Web Components are needed ................ 96
Select to Download the Crystal Reports Web Component ...................................96
Downloading the Crystal Reports Web Component .............................................97
Figure 5-1:
Figure 5-2:
Figure 5-3:
Figure 5-4:
Figure 5-5:
Figure 5-6:
Figure 5-7:
Figure 5-8:
Figure A-1:
Figure A-2:
Figure A-3:
Figure A-4:
Figure A-5:
Figure A-6:
Figure A-7:
Figure A-8:
Figure A-9:
Local Intranet Settings in Internet Explorer ......................................................... 100
Configure IE to Download Unsigned ActiveX Controls ........................................101
Configure LAN Settings in Internet Explorer ........................................................102
Bypass Proxy Server Settings in Internet Explorer ..............................................103
Enter Proxy Server Exceptions in Internet Explorer ............................................103
Internet Explorer 10 "Broken Page" icon .............................................................104
Internet Explorer 11 "Cog" Settings Menu ...........................................................104
Internet Explorer 11 Compatibility View Settings ................................................104
Open iComm Server Properties............................................................................107
Set iComm Server Properties ...............................................................................108
Open Default Document Menu for Default Web Site ........................................... 109
Locate the Default Document index.htm .............................................................110
Accept List Change for the Default Document index.htm ................................... 110
Confirm the Default Document index.htm is First ............................................... 111
Open MIME Types for Default Web Site ................................................................111
Add a new MIME Type for the Default Web Site ...................................................112
Add the First New MIME Type for the Default Web Site .......................................112
Figure A-10:
Figure A-11:
Open Default Web Site Properties on Windows XP .............................................113
Set Documents for Default Web Site on Windows XP .......................................... 113
Page 11 © Mass Electronics Pty Ltd 2009Edition 5.0 dated 07/01/2014
Page 12

List of Illustrations (Continued)
Figure A-12:
Figure A-13:
Figure A-14:
Figure A-15:
Figure A-16:
Figure A-17:
Figure A-18:
Add Document index.htm for Default Web Site on Windows XP ........................114
Apply Document Settings for Default Web Site on Windows XP ......................... 114
Configure MIME Types on Windows XP ................................................................114
Mime File Types Window ......................................................................................115
Add the new MIME Type on Windows XP ..............................................................115
Validate two new MIME Types on Windows XP .................................................... 115
Ensure that the Default Web Site is running on Windows XP..............................116
List of Tables
Table 1-1:
Table 2-1:
Table 4-1:
Document Chapters ................................................................................................ 15
Required Ports for an Innotech System ................................................................. 21
Default SQL Server 2008 R2 Express Edition connection settings ........................85
Page 12 © Mass Electronics Pty Ltd 2009Edition 5.0 dated 07/01/2014
Page 13

eServer
SETUP AND SITE INSTALLATION INSTRUCTIONS
Chapter 1 - Preliminary Information
Page 14
eServer Setup and Site Installation Instructions
1-1 Introduction
This manual is intended to provide the customer with complete and comprehensive documentation
to set up and configure the Innotech eServer soware for a site computer. eServer enables local
and remote client computers access to a Magellan Explorer interface from within their web browser,
enabling direct access to information on the site computer.
Although the intent of this manual is to simplify the installation task, instructions contained in
this manual are based on the assumption that the typical installer is familiar with the operation
of the Microso Windows 7 Professional, Vista Business, or XP Professional operating systems.
Furthermore, basic installation and configuration instructions are provided for sites with a Windows
Server 2008 R2 computer.
Customers should familiarise themselves with the content of this manual before attempting
installation and setup of eServer on their computer.
Throughout this manual there are icons to illustrate general notes and important notes, as illustrated
below:
NOTE
Note - provides extra information about the details contained on the page that you should take notice of.
IMPORTANT
Important - provides information about tasks that must be completed before continuing to reach the desired
outcome.
1-1.1 Systems Covered by this Manual
The manual covers the preparation and configuration of a remote computer to access and display
a Magellan Explorer interface from within a web browser, while accessing information on a remote
computer. This is facilitated through the Innotech eServer soware when using an Microso Internet
Explorer web browser.
1-1.2 Terminology used in this Manual
In order to simplify the instructions, common terminology and references to other Innotech products
are used throughout this manual. A brief description of some of the terminology is provided in this
section.
eServer Client computer: any computer which is connecting to the eServer Host computer. In
common scenarios, an eServer Client computer will be a laptop computer, a computer on the site's
local area network or an external computer connecting to the eServer Host computer via a secure
Internet connection. The eServer Client computer requires both a supported Windows operating
system and Internet Explorer soware.
eServer Host computer: the computer which is running the Innotech eServer soware and has the
Magellan project loaded. In common scenarios, this will be a computer on site, and accessible from
computers on the local area network and computers on external networks if required. The eServer
Host computer requires a supported Windows operating system.
Page 14 © Mass Electronics Pty Ltd 2009Edition 5.0 dated 07/01/2014
Page 15
eServer Setup and Site Installation Instructions
DNS: Domain Name System, a naming system for computers, services or any resources on a private
network.
eServer: a web-based Magellan Explorer solution that allows a remote computer to display a
Magellan Explorer interface from within their web browser while accessing information on a remote
computer.
iComm: Innotech's communications server used by applications soware.
IIS: Microso Internet Information Services soware. This soware enables your eServer Host
computer running capability to interact securely with connecting eServer Client computers.
IP address: a numerical label that is assigned to any device participating in a computer network that
uses the Internet Protocol for communication between its nodes.
Magellan Builder: an event driven, object oriented real-time Supervisory Control and Data
Acquisition package. Magellan Builder is used to create or modify a Magellan Project, which is run by
Magellan Explorer or eServer soware.
1-1.3 Scope of this Technical Manual
This technical manual contains:
Table 1-1: Document Chapters
Chapter
Number
Chapter Name Description
1 Preliminary Information
2
3
4
5
A
Installation of eServer
Soware
Configuring Internet
Information Services (IIS)
Configuring eServer
Communications
General Troubleshooting
Tips
Upgrade Guide for
eServer 1.20 or Greater
Contains initialisation related information of a general
nature such as computer requirements and pre-installation
materials.
Contains instructions for the installation and basic
configuration of the eServer soware onto a computer, and
installation of the additional ATOM Reports Component if
required.
Contains instructions for configuring IIS on supported
Windows operating systems.
Contains instructions for the configuration of security and
access control on eServer soware. Additionally, steps are
provided to enable eServer to communicate with an SQL
Server database.
Contains instructions for troubleshooting and resolving
general issues that may arise during the installation and
configuration of eServer soware.
Provides steps to upgrade an existing eServer Host computer
running eServer v1.1 (with no SQL support) to eServer v1.20
or greater with SQL capabilities.
Page 15
© Mass Electronics Pty Ltd 2009Chapter 1 – Preliminary Information
Page 16

eServer Setup and Site Installation Instructions
1-2 System Requirements
Both the eServer Host computer and any connecting eServer Client computers must meet the
minimum computer requirements to ensure correct operation.
1-2.1 Minimum Computer Requirements
Supported Operating Systems:
• Windows Server 2008 R2 with Service Pack 1
• Windows 7 Professional (32-bit / 64-bit) with Service Pack 1
• Windows XP Professional 32-bit with Service Pack 3
Minimum System Requirements:
• Intel Pentium Dual-Core 2.8GHz processor or equivalent
• 2GB of RAM
• 80GB Hard Disk Drive
• 1024 x 768 display with 16-bit video card
• CD-ROM or DVD-Drive
• Keyboard and mouse of compatible pointing device
IMPORTANT
eServer software is not compatible with Windows Vista when used with Innotech ATOM and Chronicle Server software
package. Additionally, the eServer Host computer as well as all eServer Client computers will require 1280 x 768
minimum display resolution when running Innotech ATOM software.
1-3 Special Considerations
The following installation considerations must be observed to ensure the proper installation and
configuration of eServer, Magellan Web-Based graphics, ATOM Reports Component and Internet
Information Services. The eServer soware allows five concurrent connections to the Magellan
project, and the following items are required for proper operation:
• eServer v1.20 or greater installation package and required security dongle
• Magellan Builder v1.20 or greater installation package and the appropriate security dongle for
installation. Magellan Builder is required for site setup only.
• Completed Magellan project
• Windows Internet Information Services (IIS) must be installed on the computer running the eServer
soware according to the operating system. This is enabled on Windows 7 from the Windows
Features Setup. For Windows Vista Business, and Windows XP Professional, this is supplied on the
installation disks. For Windows Server 2008 R2, IIS is an additional configuration option.
• A static IP address from the ISP and proper Firewall / Router configuration if using internet access
Page 16 © Mass Electronics Pty Ltd 2009Edition 5.0 dated 07/01/2014
Page 17

eServer Setup and Site Installation Instructions
1-4 Advanced Site Considerations
The following installation considerations must be observed for sites with advanced data logging
requirements, such as connection to an SQL Server database:
• Both the eServer Host computer and any connecting eServer Client computers must meet
the minimum computer requirements to ensure correct operation. Depending on the site
requirements, more advanced computer specifications may be required for the eServer Host
computer, such as RAID-based redundancy systems, and a higher-end computer processor. Refer
to 1-2 - System Requirements for more information.
• Consult with the site IT Manager to ensure that connecting eServer Client computers can access
the eSever Host computer and the SQL Server database in a safe and secure way.
• Be aware that installing SQL Server 2008 R2 Standard Edition may take up to 60 minutes to
complete. SQL Server Express 2008 R2 can take up to 20 minutes.
1-5 Installation Plans
The following installation data should be gathered and made available to the installation team in the
event that connection to an SQL Server is required:
• This technical manual.
• Ensure you are logged into the computer as a System Administrator when installing soware and
commissioning eServer Host and eServer Client computers
• Site Information Technology security and installation requirements
• Magellan Builder security dongle to configure project settings. Magellan Builder is required for site
setup and project modifications only. You may remove the dongle once the site is commissioned.
• eServer security dongle for the eServer Host computer. This must remain connected to the eServer
Host computer in order for eServer to run.
• For the setup of eServer Client computers that require access to eServer generated Crystal Reports,
you may choose to download the Crystal Reports for Web Components package from the Innotech
website and install it manually as it is a 100MB file download.
• DNS name or static IP address of the SQL Server computer.
• Name of the SQL Server Database being used for point logging.
• Any other data source as it becomes known
1-5.1 Required Soware on Site Computer
The following soware needs to be installed on the site computer.
• Magellan Builder v1.20 or greater with security dongle. You may remove the Magellan Builder
security dongle once setup is completed.
• eServer v1.20 or greater with security dongle. The eServer security dongle must remain connected
to the eServer Host computer in order for eServer to run.
• ATOM Reports Component
• iComm Communication Server
• Windows Internet Information Services (IIS)
NOTE
The eServer software may be used on an intranet (internal Ethernet), externally via the internet or both.
Page 17
© Mass Electronics Pty Ltd 2009Chapter 1 – Preliminary Information
Page 18

eServer Setup and Site Installation Instructions
This page has been le intentionally blank.
Page 18 © Mass Electronics Pty Ltd 2009Edition 5.0 dated 07/01/2014
Page 19

eServer
SETUP AND SITE INSTALLATION INSTRUCTIONS
Chapter 2 - Installation
and Configuration of
eServer Soware
Page 20

eServer Setup and Site Installation Instructions
2-1 Overview
This section provides an overview of the steps required for the installation and basic configuration
of the eServer soware onto a computer, and installation of the additional Magellan Crystal Report
additions if required.
NOTE
The installation program for eServer v1.20 or greater automatically creates and congures the necessary web page
les on your computer in the location c:\MyWebPages. Once eServer and the ATOM Reports Component (if required)
have been installed, you will have to check the security settings for c:\MyWebPages and your computer's Internet
Information Services Settings.
See the following for more information:
• 2-5 Security Access to the c:\MyWebPages Directory
• Chapter 3 - Configuring Internet Information Services (IIS)
2-2 Pre-installation Tasks
2-2.1 Overview
Prior to installing eServer v1.20 or greater there are a series of pre-installation tasks to undertake.
This includes gathering all the required information to make the installation process easier, and
preparing site computer security settings to facilitate an easy setup process.
IMPORTANT
Many of the processes within the Pre-installation Tasks assume a moderate to high degree of technical IT expertise. It is
recommended to consult with the site IT Manager for assistance and site specic security settings where required.
2-2.2 Remote Access, Ports and Security Information
2-2.2.1 Internet Access
You may use an existing and available Broadband Cable/ADSL Internet Connection, however in this
scenario the site will need to have a DNS name or static IP address setup through the Internet
Service Provider (ISP), and also allow the opening of Ports through their Firewall / Router.
NOTE
If the site IT Sta deny the setup of required ports, a separate ADSL internet connection will need to be provided to a
dedicated computer. This computer can be congured with a Static External IP address and congured to have Port
Forwarding. In this instance, IT Sta will only need to enable Port 80 for internet connection and accept outgoing
connections on 1433, 20000 and 20001, not incoming through their own Firewalls. Regardless, the computer running
eServer and iComm needs to have the full incoming and outgoing connections to the Ports setup.
Page 20 © Mass Electronics Pty Ltd 2009Edition 5.0 dated 07/01/2014
Page 21
eServer Setup and Site Installation Instructions
2-2.2.2 Port Forwarding and Firewalls
The following Ports are required to be opened through the Firewall to allow incoming and outgoing
connections to specific parts of the Innotech System.
Table 2-1: Required Ports for an Innotech System
Required Ports Usage
Port 80 Standard Internet Port
Port 20000 Innotech Communications Server (iComm)
Port 20001 Innotech eServer Graphics
Port 21000 Innotech Facility Manager (if required)
Port 1433 (TCP) SQL Server Express database
Recommended Additional Ports
1
Port 5900 For VNC (Virtual Network Computing)
Port 21 For FTP (File Transfer Protocol)
Port 1723 For VPN (Virtual Private Network)
Optional Ports Usage
Innotech Chronicle Manager remote communications with the
Port 8227, 8228, 8230
Port 3389
3
2
Chronicle Server (if required)
For Remote Desktop (mstsc)
1
Enabling VNC, FTP or VPN assists with remote site access to the computer for management and
file transfers. This is optional but highly recommended as it allows remote diagnostics, analysis
and troubleshooting of site problems if they occur.
2
Enabling Ports 8227, 8228 and 8230 is only necessary for remote access using Chronicle Manager
to configure the site Chronicle Server.
3
The HASP security dongles used by eServer and Magellan do not fully support Remote Desktop.
You will not be able to launch eServer or Magellan through Remote Desktop.
NOTE
At a minimum ensure to enable Port 80 (Internet), Port 1433 (SQL database), Port 20000 (iComm) and Port 20001
(eServer graphics).
Page 21
© Mass Electronics Pty Ltd 2009Chapter 2 – Installation and Configuration
Page 22
eServer Setup and Site Installation Instructions
2-2.2.3 Security Information
Both iComm and eServer are resistant to denial of service attacks from unauthenticated clients,
and both support 32-bit encryption with initial login challenge/response authentication. If a client's
login name and passwordis not authenticated immediately by eServer or iComm, the connection is
terminated.
Both servers have been tested for buer overrun attacks, and both servers have an audit trail of
connection attempts. It is not possible, even with a custom-written rogue program that manages
proper authentication, for any program to connect to either of these servers and execute a file
or download unauthorised data from the server. Neither of these programs currentlycontains
functionality to allow file downloads, server-side execution, or any kind of interactive login.
To setup access over the internet, you will need to open Ports 80, 1433, 20000 and 20001through the
Firewall to transmit and receive data. Then acceptincoming connections, and Port Forward from the
external static IP address, to the internal static IP address of the computer running the iComm Server
and eServer soware.You will be able to see who has logged in via the audit trails, even from an
eServer Client computer.
From the eServer Client computer, only ports 80, 1433, 20000 and 20001 need to be open for an
outgoing connection.
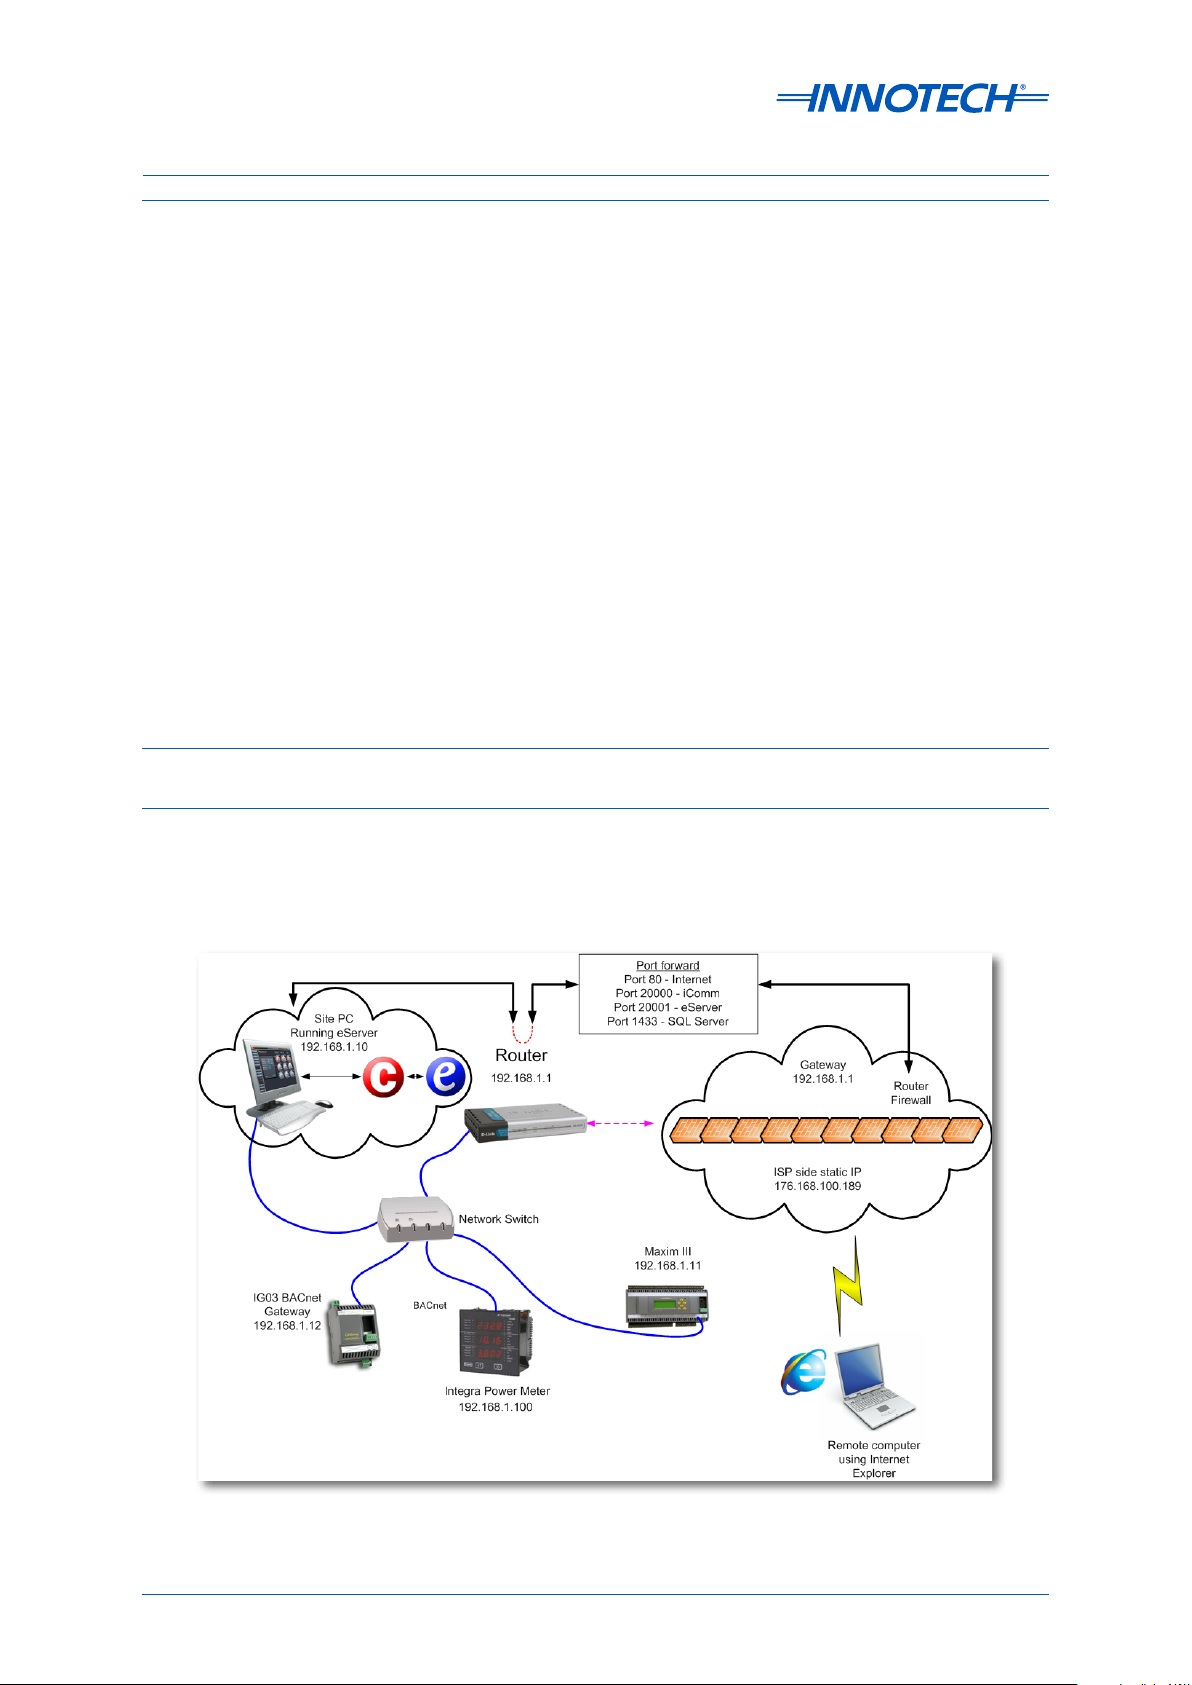
2-2.3 Setup of a Dedicated Site Computer with ADSL Connection
2-2.3.1 Overview
This section provides detailed information for configuring a site computer with a dedicated ADSL
connection for running the eServer soware. Refer to Figure 2-1 for an example eServer setup
network topology.
Figure 2-1: Example of eServer Setup Network Topology
Page 22 © Mass Electronics Pty Ltd 2009Edition 5.0 dated 07/01/2014
Page 23
eServer Setup and Site Installation Instructions
2-2.4.1 Computer Setup
Once the ADSL connection to the eServer Host computer is completed, the computer must be
protected. The following is required to complete this step:
• Antivirus soware from a reputable provider. Some antivirus and security soware will
block eServer communication and port traic by default. If this occurs, allow the required
communications on the computer. Refer to the specific antivirus or security soware help manual
for more details on how to do this.
• Firewall enabled and configured - either Windows firewall or third party soware. Ensure to
enable the required ports for eServer communications.
• Administration rights on the computer with a valid username and password
• Static IP address for the ADSL connection
• Static IP address on the local computer
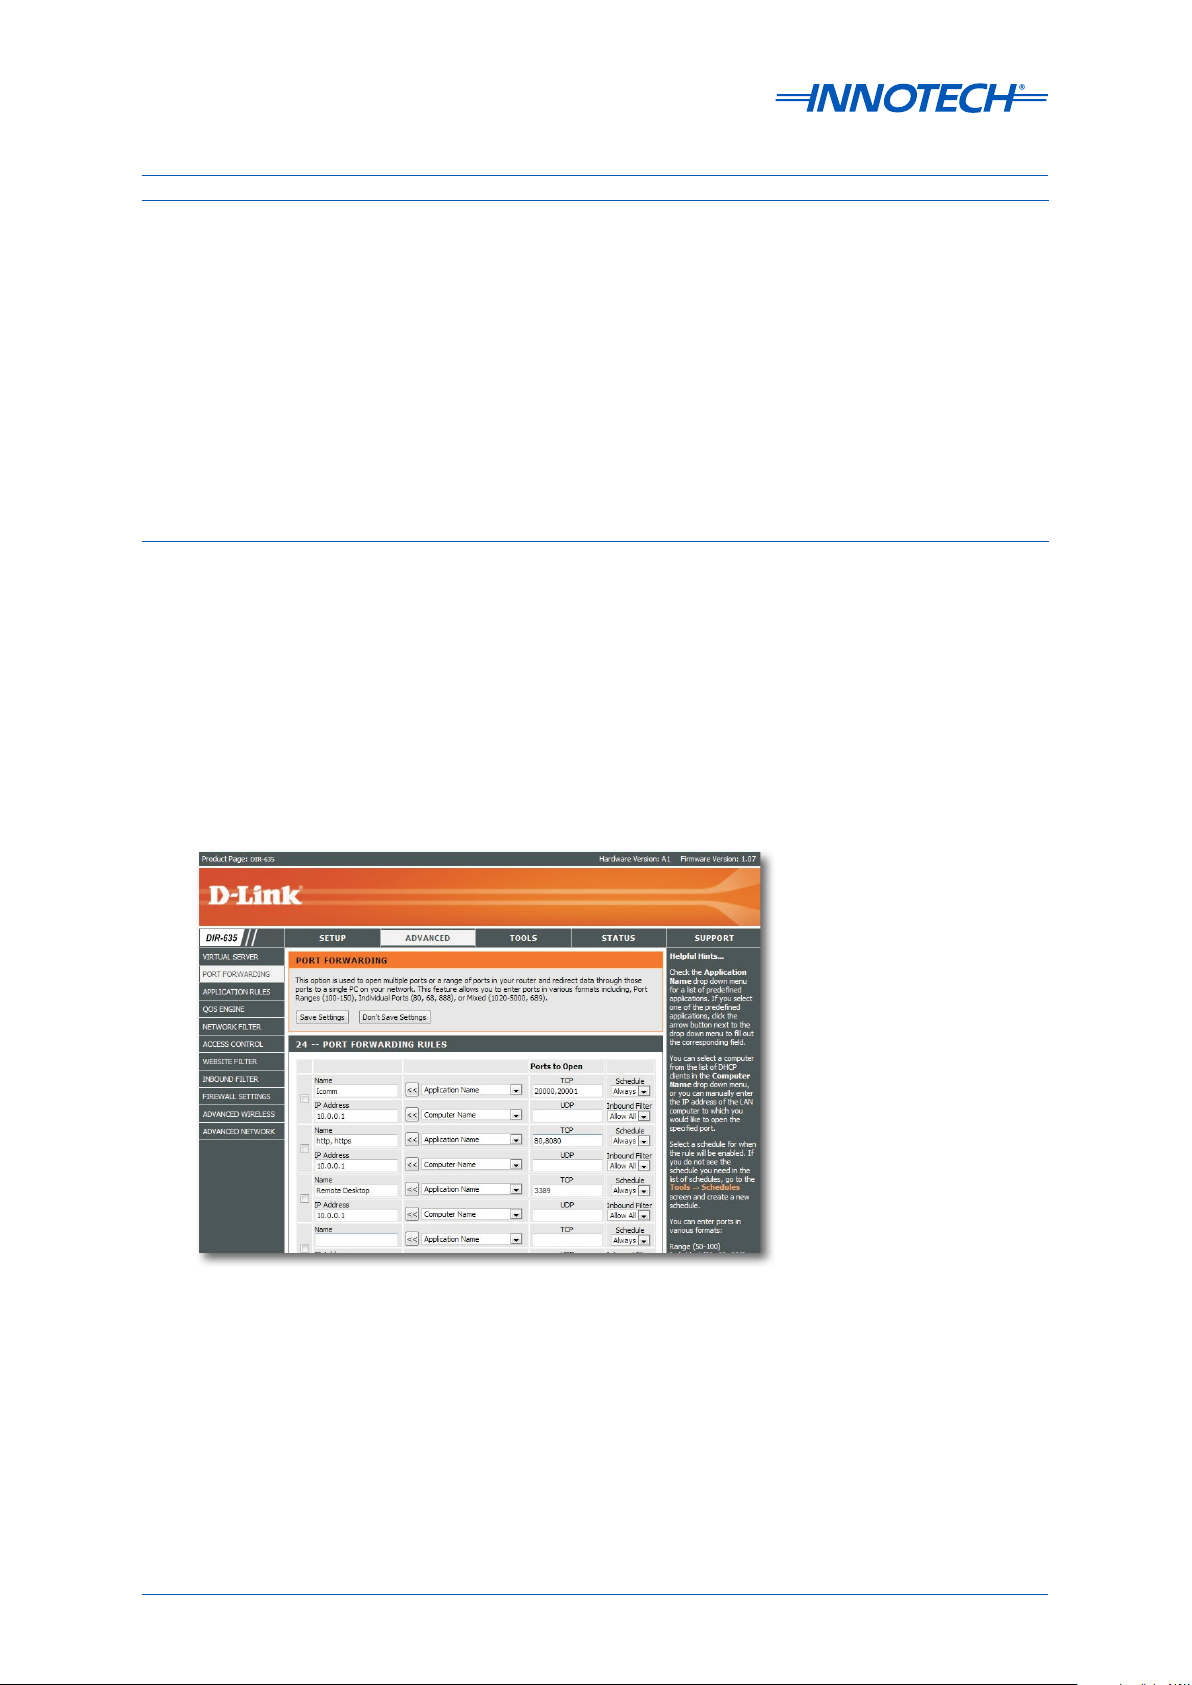
2-2.3.2 Router Setup
1. Set up the computer with a temporary IP address and make it the same as the default IP range
of the ADSL router being used.
2. Log onto the router and set a new username and password. Go to the Port Settings (generally
found in Security) and allow the ports described previously in 2-2.2.2 Port Forwarding and
Firewalls.
3. You will need to forward the requests for each Port to the static IP address of the computer
running iComm and/or eServer as shown below in Figure 2-2 (Please note that this screenshot
is for soware that is specific to this router, and may vary depending on the brand and model of
the router).
Figure 2-2: Example of Forwarding Requests for Ports to Static Ip Addresses
Page 23
© Mass Electronics Pty Ltd 2009Chapter 2 – Installation and Configuration
Page 24

eServer Setup and Site Installation Instructions
2-2.4 Domain Name System (DNS) Setup
To use eServer with an SQL Server on the dedicated site computer and remotely you will both need
internal and external access to iComm. To do this, you will need to use an actual DNS name that is
accessible from the External and Internal Addresses. In most projects with stand-alone computers
accessing the internet the router is basic and is not a DNS server.
Use the following site to set one up.
Go to http://dyn.com and create a DNS account (these are not expensive and are very reliable).
Eg: sitename.dyndns.org
Download the Dynamic DNS Updater and install it on your Site computer. This will ensure the
External Address is always linked to the DNS name.
2-3 Installation of eServer Soware
2-3.1 Overview
The installation program for eServer v1.20 or greater automatically installs all web page files on your
computer to work with minimal user intervention.
The following steps describe the process to install the eServer soware onto a site eServer Host
computer.
IMPORTANT
Ensure that the eServer Host computer meets the minimum specications outlined in 1-2 System Requirements
before installing the eServer software. Ensure that you have congured and DNS and Port Security settings prior to
installation, as during installation you will be asked to enter this information.
NOTE
There are common installation steps for all supported Operating Systems. Any specic dierences are described at the
relevant section in the document.
Page 24 © Mass Electronics Pty Ltd 2009Edition 5.0 dated 07/01/2014
Page 25
eServer Setup and Site Installation Instructions
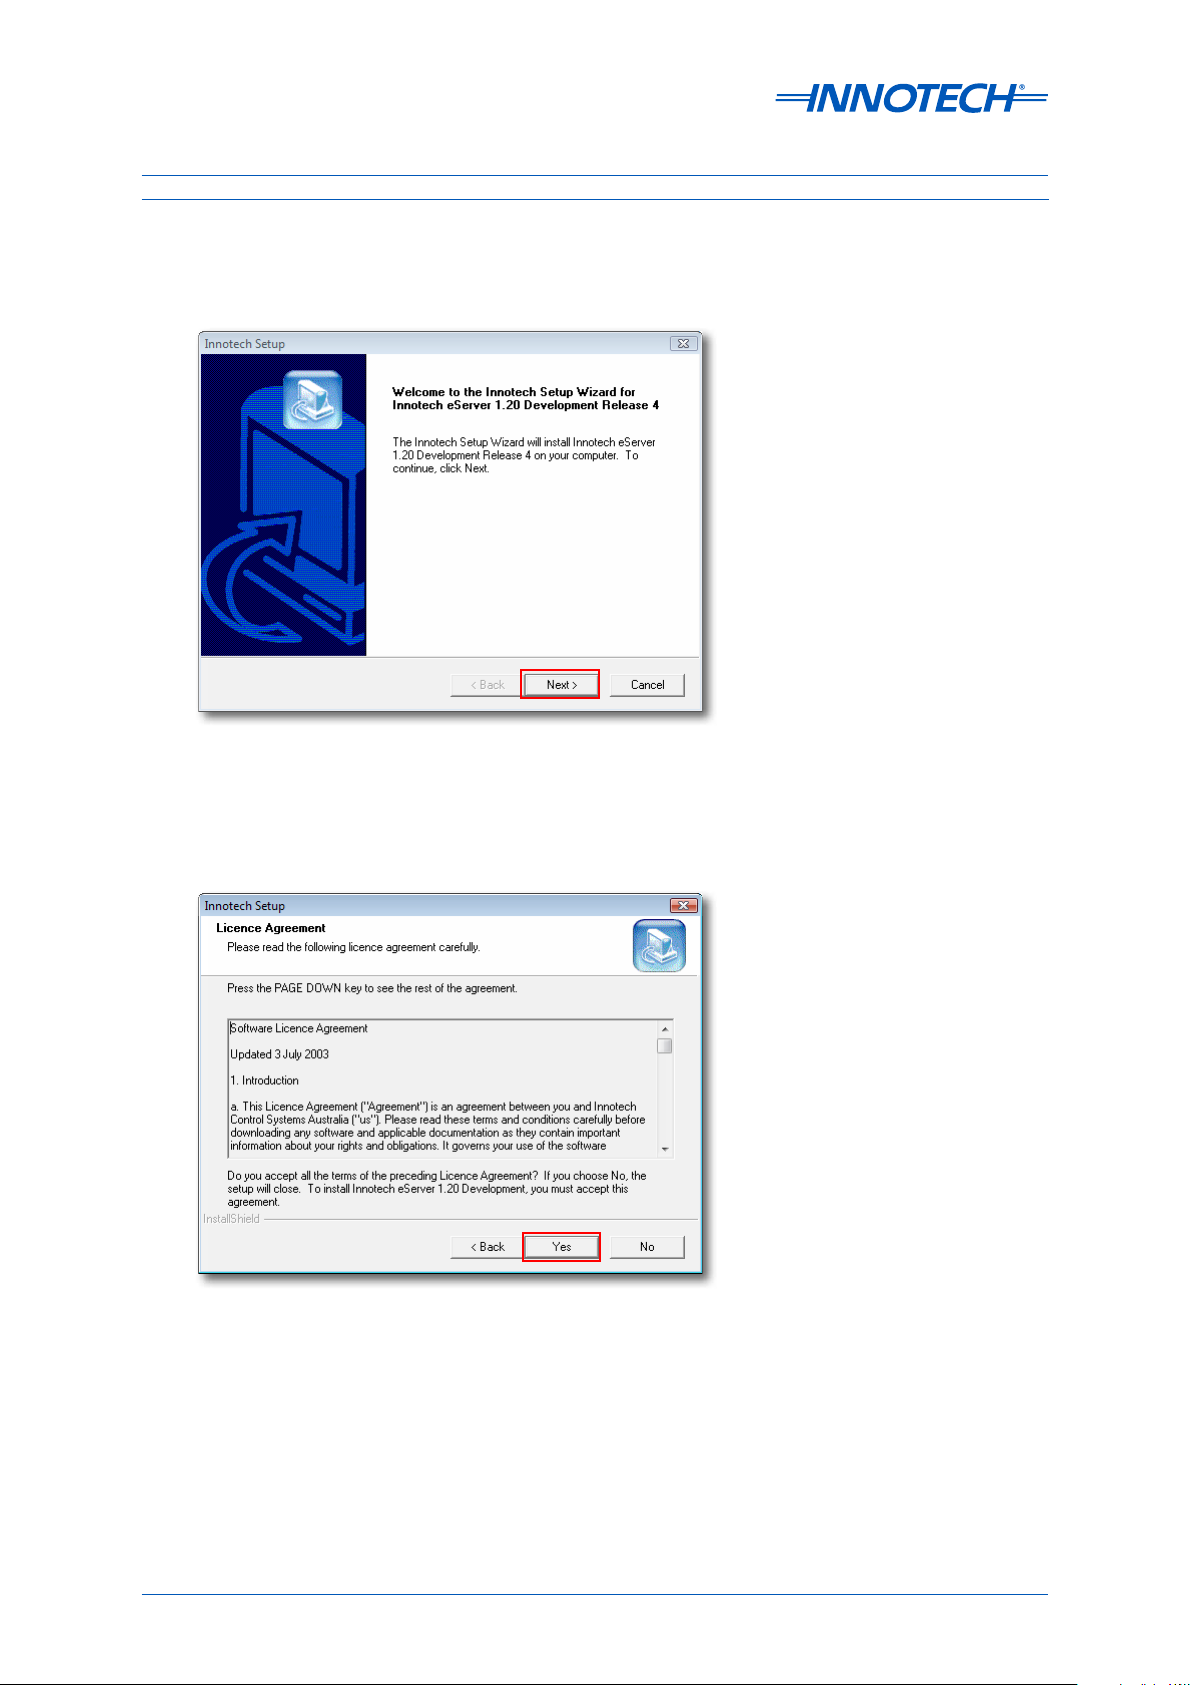
2-3.2 Installation Steps
Launch the eServer Installation Program. From the Setup window, select Next to commence
installation, as illustrated below in Figure 2-3.
Figure 2-3: Commence Installation of the eServer Software
Read and acknowledge the eServer Soware Licence Agreement, as illustrated below in Figure 2-4.
Click Yes to continue.
Figure 2-4: eServer Software Licence Agreement
Page 25
© Mass Electronics Pty Ltd 2009Chapter 2 – Installation and Configuration
Page 26
eServer Setup and Site Installation Instructions
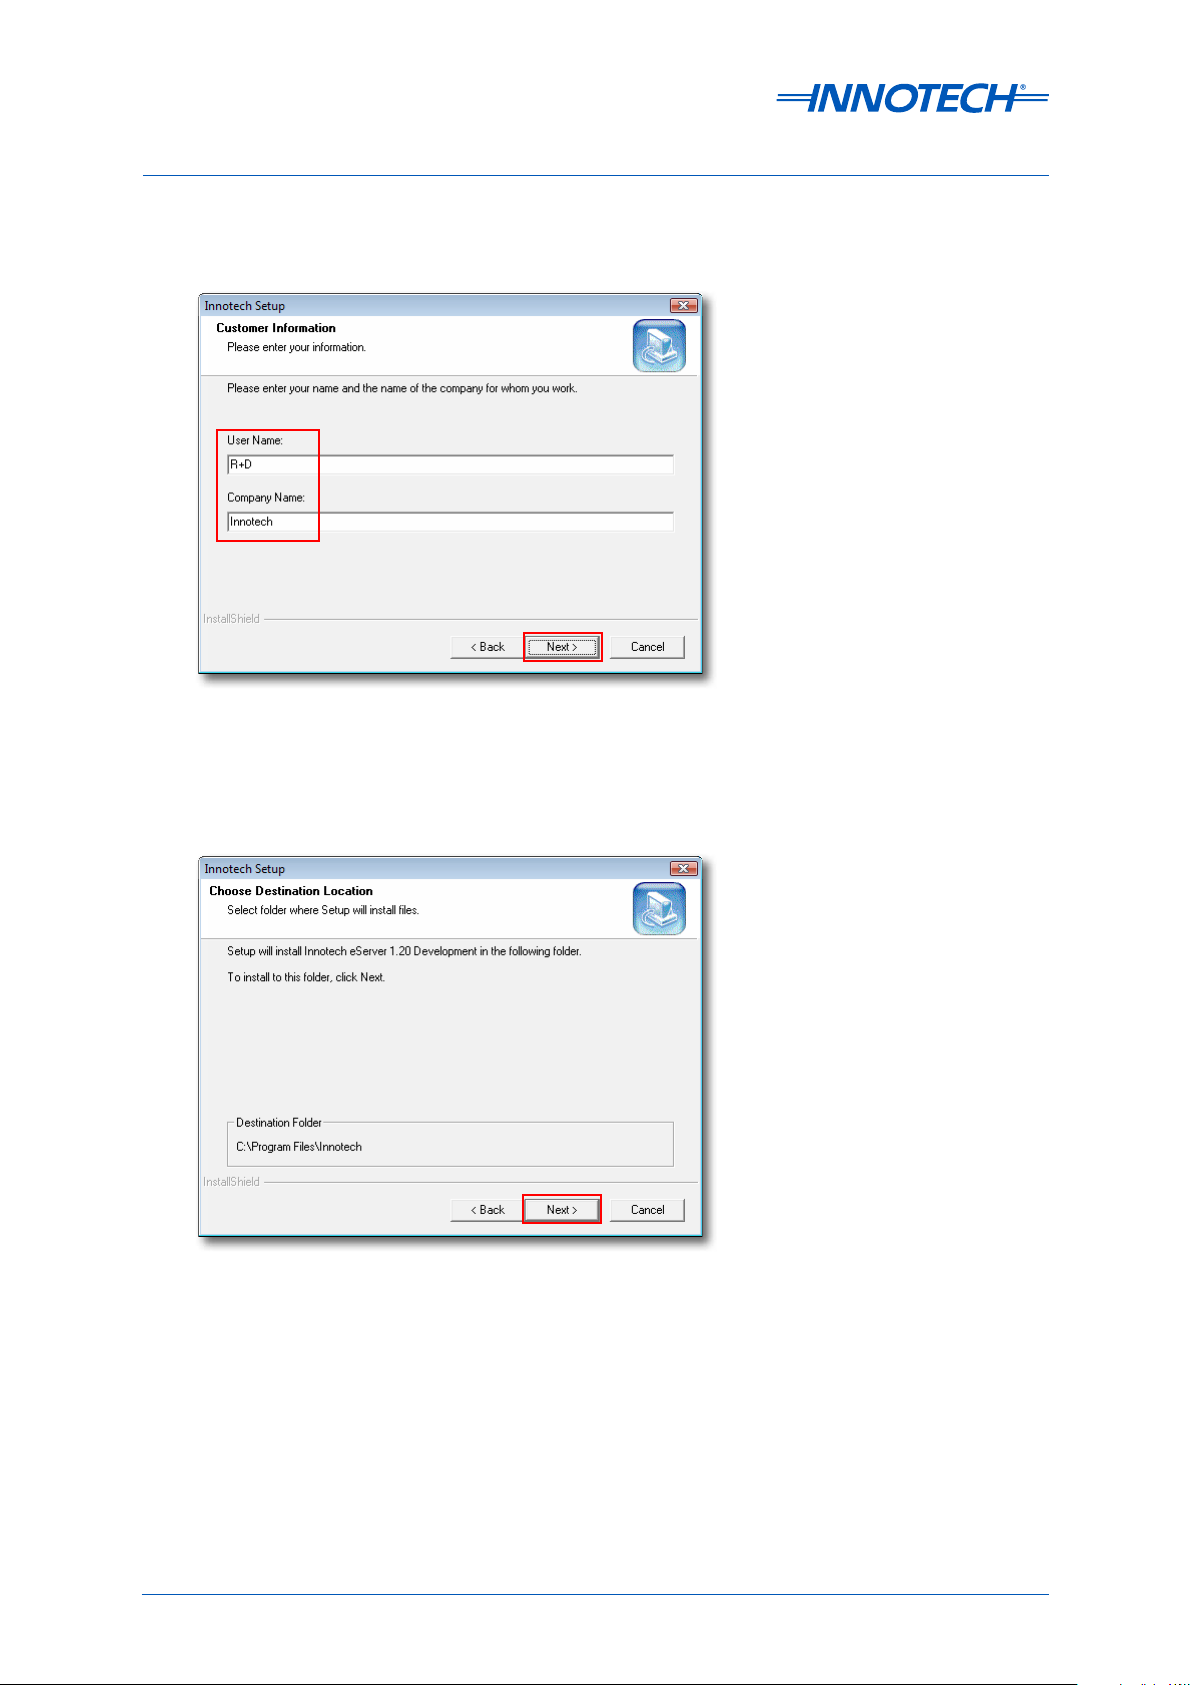
Enter the Customer Information for your eServer soware installation, as illustrated below in Figure
2-5. Click Next to continue.
Figure 2-5: eServer Soware Customer Information
Confirm the eServer soware installation location, as illustrated below in Figure 2-6. Click Next to
continue.
Figure 2-6: eServer Soware Installation Location
Page 26 © Mass Electronics Pty Ltd 2009Edition 5.0 dated 07/01/2014
Page 27
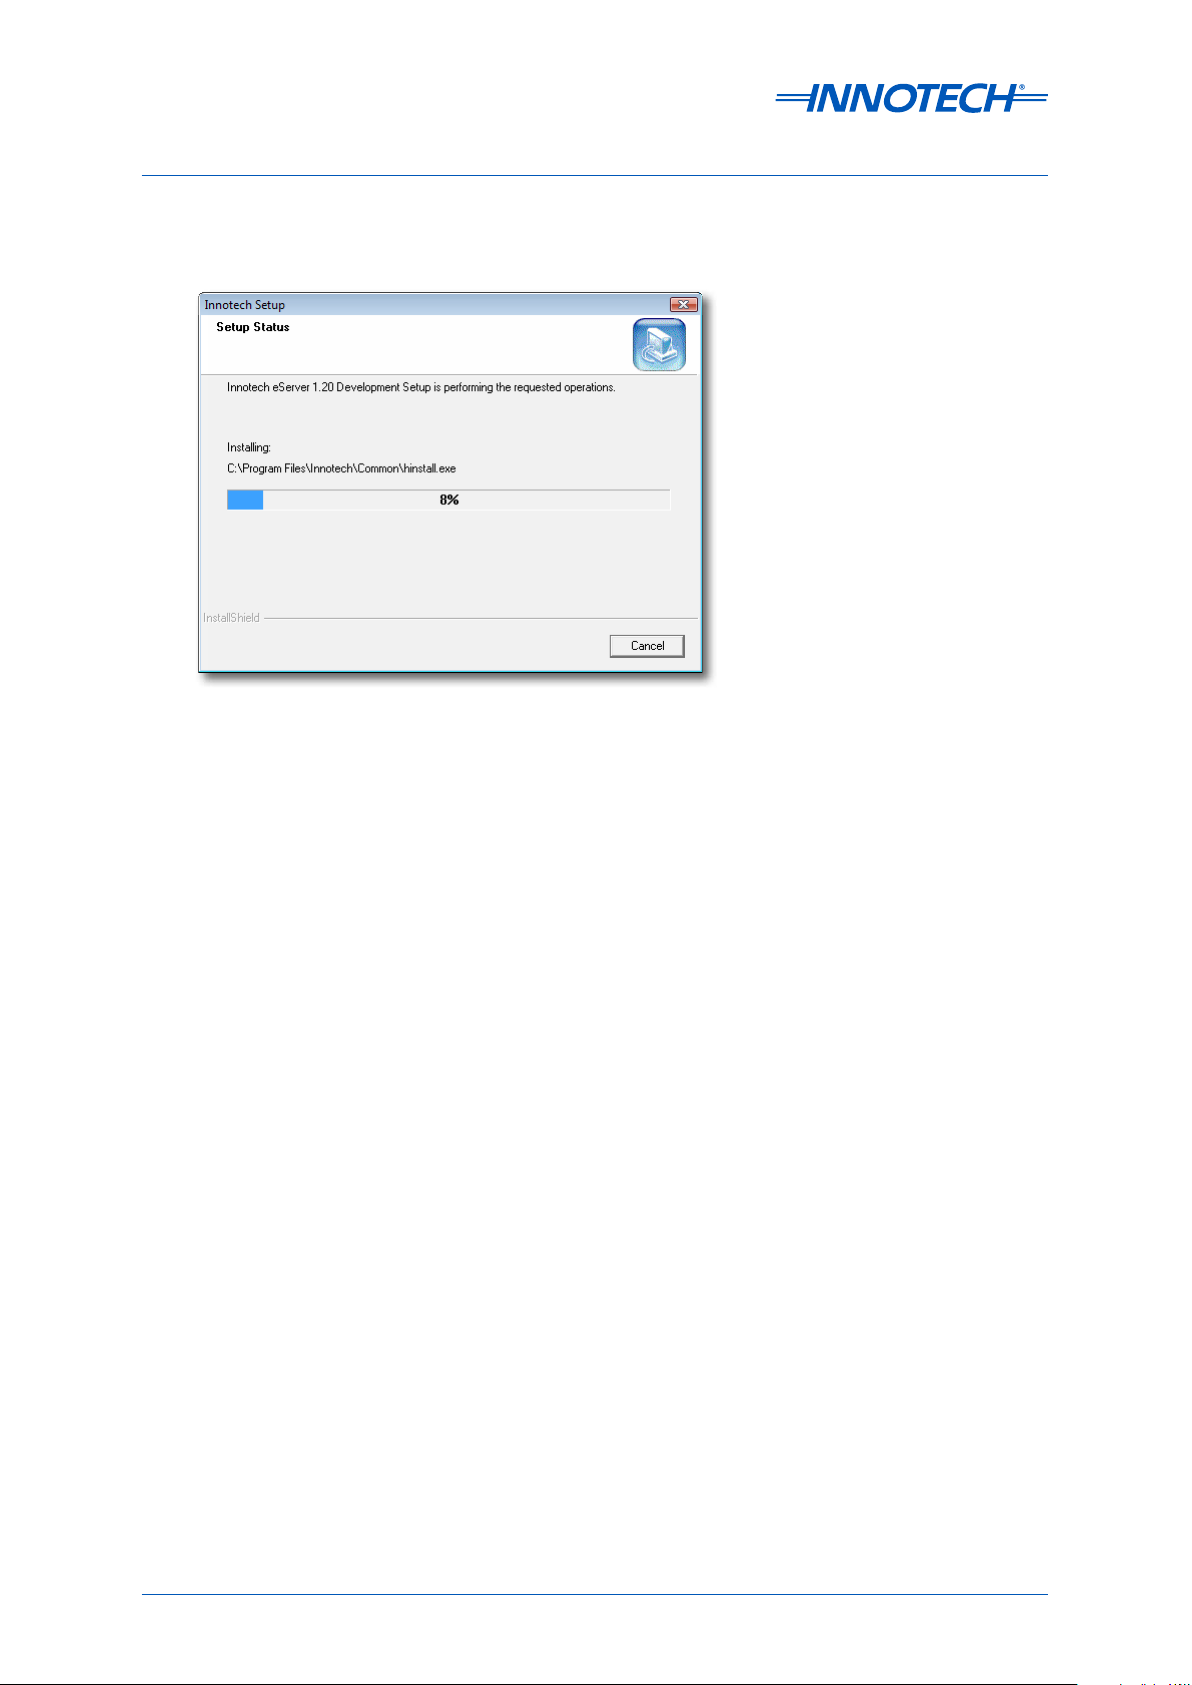
eServer Setup and Site Installation Instructions
Wait wait a few minutes as the eServer soware is installed on your computer, as illustrated below in
Figure 2-7.
Figure 2-7: eServer Software File Installation
When the eServer soware installation process is completed, click Finish to close and exit.
Page 27
© Mass Electronics Pty Ltd 2009Chapter 2 – Installation and Configuration
Page 28
eServer Setup and Site Installation Instructions
2-4 Installation of ATOM Reports Component
2-4.1 Overview
The ATOM Reports Component allows for advanced report generation from Magellan or eServer
soware using the Innotech ATOM soware. This is a separate optional install which is required for
the generation of ATOM Reports.
NOTE
The ATOM Reports Component is intended to work in a system where the Magellan or eServer Software is accessing
data stored in a SQL Server database. This is part of a system utilising the Innotech ATOM software.
See the following for more information:
• Chapter 4 - Configuring eServer Communications
2-4.2 Installation Steps
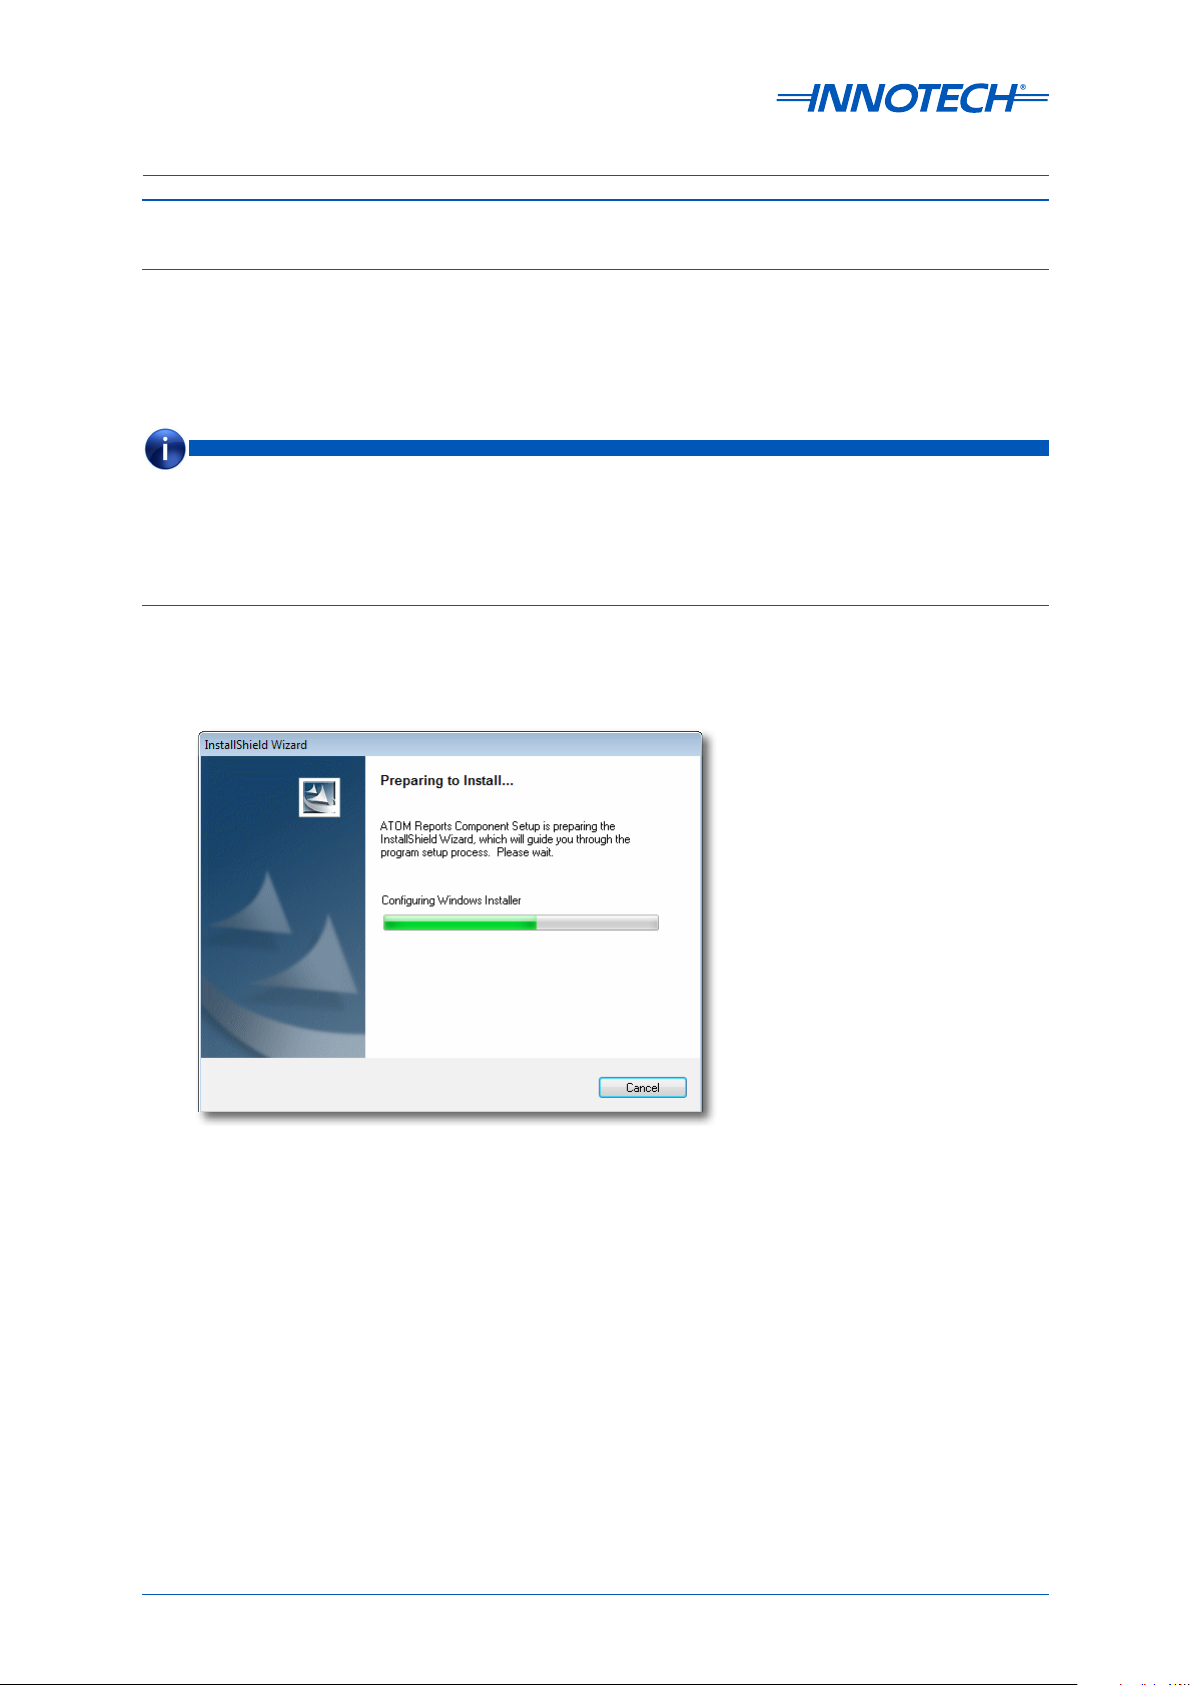
Launch the ATOM Reports Component Installation Program. The program will detect your system
configuration to install the required files, as illustrated below in Figure 2-8.
Figure 2-8: ATOM Reports Component Installation Preparation
Page 28 © Mass Electronics Pty Ltd 2009Edition 5.0 dated 07/01/2014
Page 29
eServer Setup and Site Installation Instructions
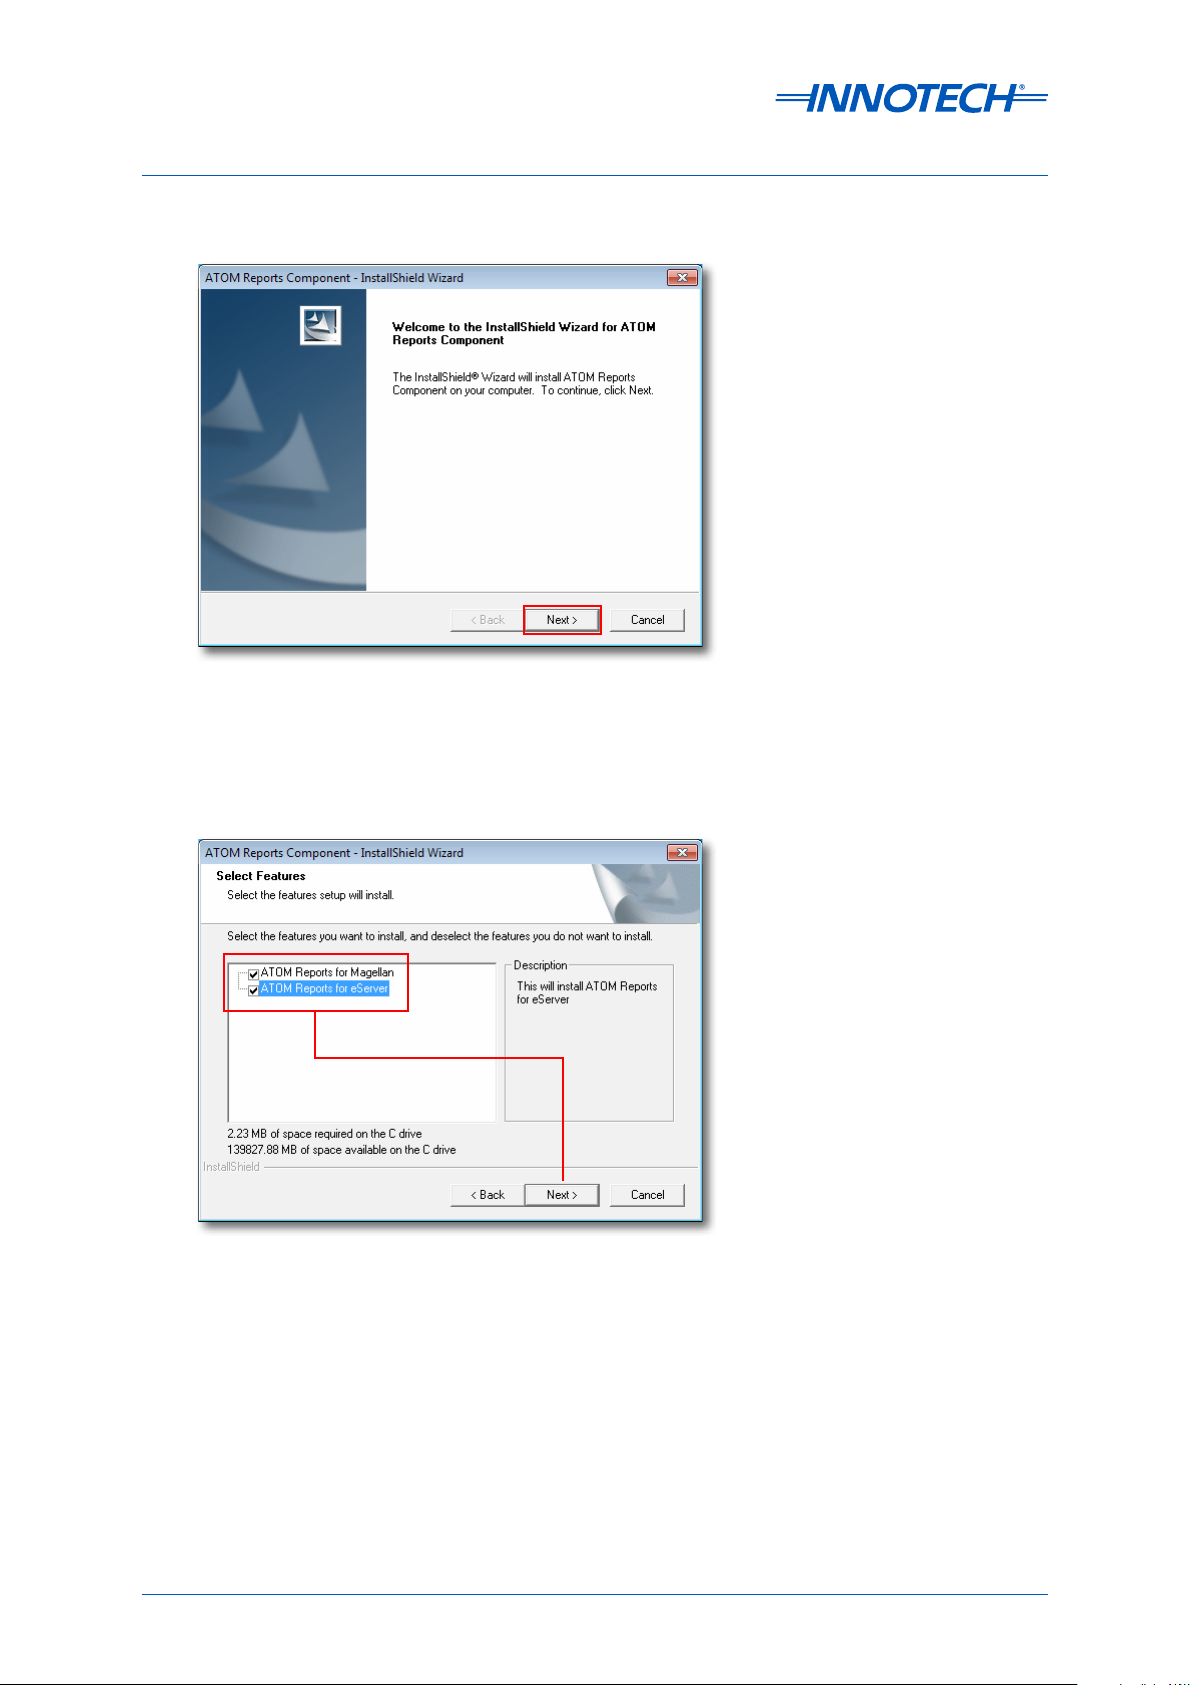
Click Next to commence installation, as illustrated below in Figure 2-9.
Figure 2-9: Commence ATOM Reports Component Installation
Select the specific ATOM Reports Component items to install. The default is to install the files
required for both the Magellan and eServer soware, as illustrated below in Figure 2-10. Click
Next to continue.
Figure 2-10: Select the Specic ATOM Reports Components to Install
When the ATOM Reports Component installation process is completed, click Finish to close and exit.
Page 29
© Mass Electronics Pty Ltd 2009Chapter 2 – Installation and Configuration
Page 30
eServer Setup and Site Installation Instructions
2-5 Security Access to the c:\MyWebPages Directory
2-5.1 Overview
To enable eServer Client computers connection and access to the contents of the c:\MyWebPages
directory, you will need to configure folder security settings. This allows eServer Client computers to
access to necessary files of the eServer project.
NOTE
You will need to enable security access to a user called "Everyone", and then customise the security settings for
"Everyone". If the user "Everyone" already exists for this directory, check that the suitable security and access settings
have been enabled for this directory.
2-5.2 Create Special User "Everyone" for c:\MyWebPages
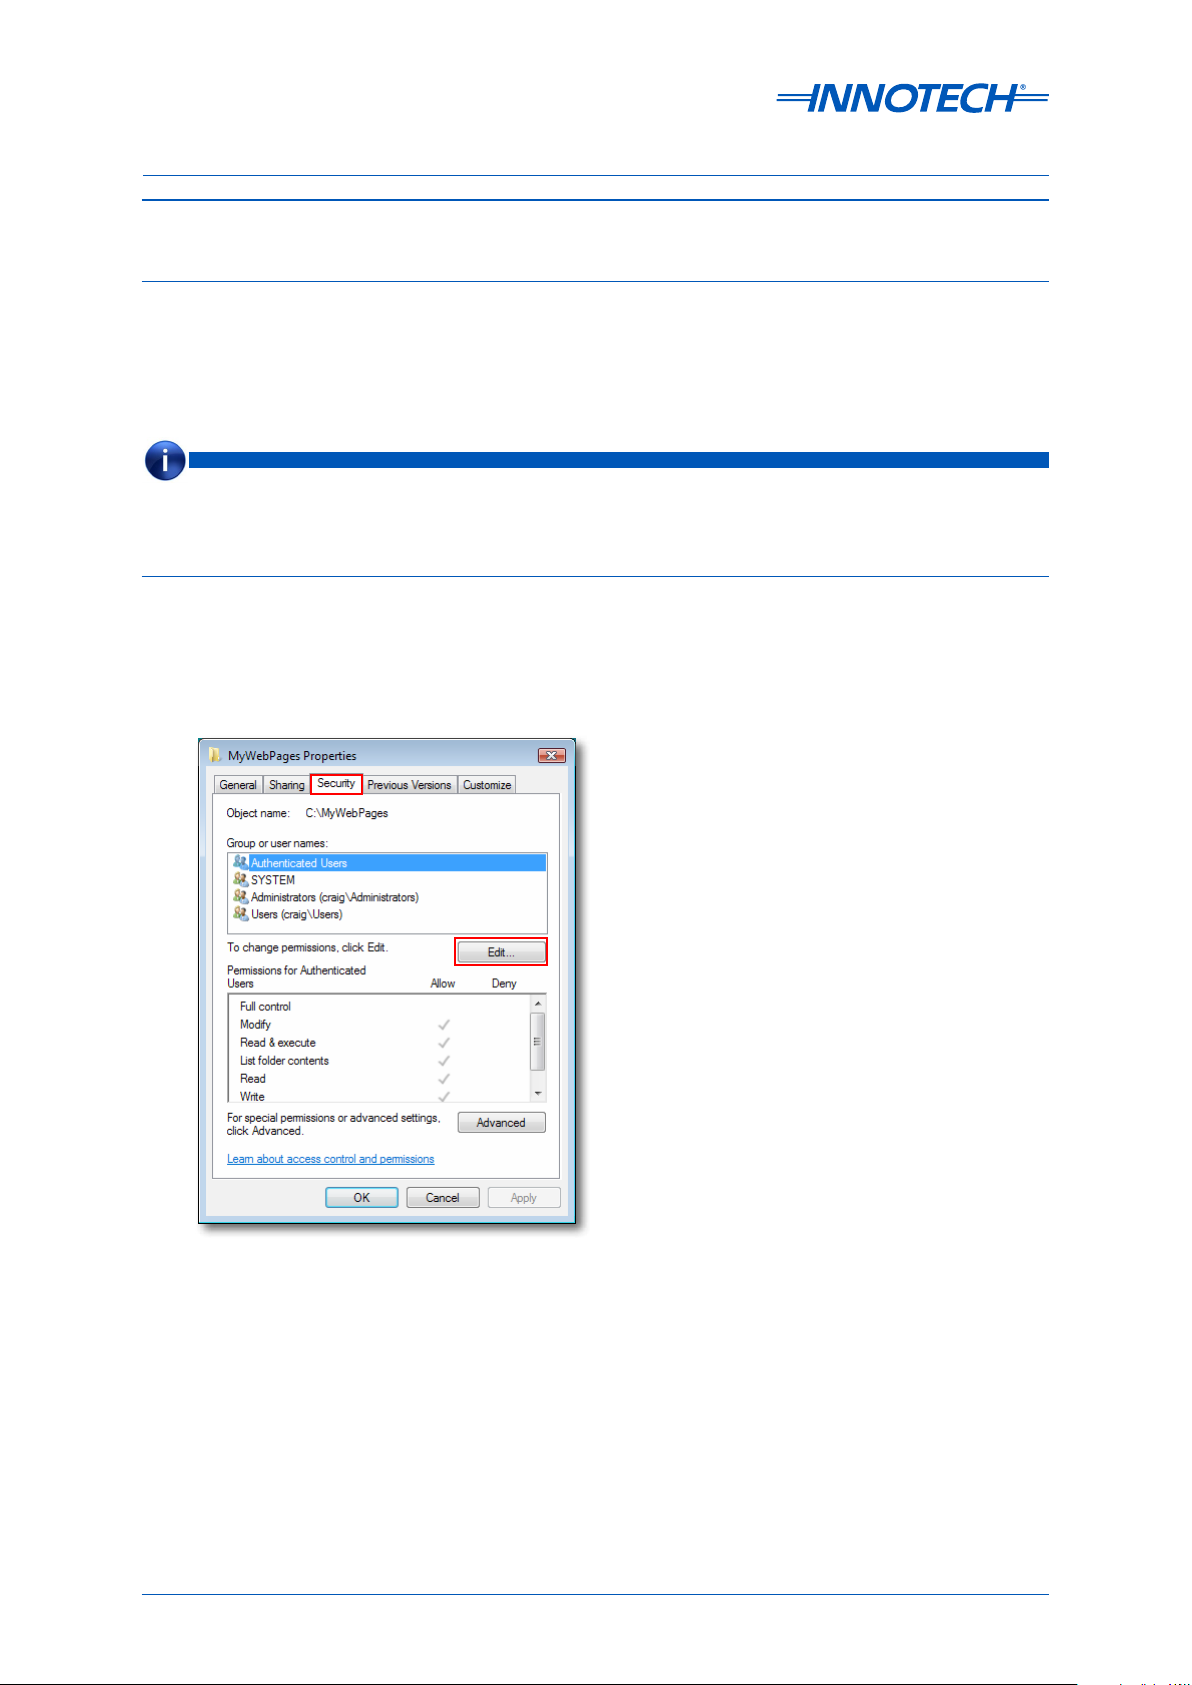
Navigate to c:\MyWebPages on your computer. Right-click on the MyWebPages folder and select
Properties from the popup menu. Select the Security tab and click Edit to change permissions, as
illustrated below in Figure 2-11.
Figure 2-11: Edit Security Groups for c:\MyWebPages
Page 30 © Mass Electronics Pty Ltd 2009Edition 5.0 dated 07/01/2014
Page 31

eServer Setup and Site Installation Instructions
Click Add to create the new Security Group "Everyone", as illustrated below in Figure 2-12
Figure 2-12: Add the new Security Group "Everyone"
Type Everyone into the Object Name field and click OK to apply, as illustrated below in Figure 2-13.
Figure 2-13: Enter the new Security Group "Everyone"
Click Apply and OK to close the Security Properties settings for c:\MyWebPages, exiting to the main
window.
Page 31
© Mass Electronics Pty Ltd 2009Chapter 2 – Installation and Configuration
Page 32

eServer Setup and Site Installation Instructions
2-5.3 Configure Security Settings for Special User "Everyone"
Navigate to c:\MyWebPages on your computer. Right-click on the MyWebPages folder and select
Properties from the popup menu. Select the Security tab. Ensure that the user "Everyone" is
present in the Groups and User Names list. Click Edit to configure properties for Security Group
"Everyone", as illustrated below in Figure 2-14.
Figure 2-14: Edit properties for Security Group "Everyone"
Select Everyone in the Groups or User Names List. In the Permissions List, ensure that Full Control is
enabled, as illustrated below in Figure 2-15. Click Apply to confirm your settings, and OK to return to
the previous window.
Figure 2-15: Select Full Control for Security Group "Everyone"
Page 32 © Mass Electronics Pty Ltd 2009Edition 5.0 dated 07/01/2014
Page 33

eServer Setup and Site Installation Instructions
With Full Control Enabled for "Everyone", click Advanced to configure Special Permissions for
Security Group "Everyone", as illustrated below in Figure 2-16.
Figure 2-16: Open Advanced Security Settings for Security Group "Everyone"
Select Everyone into the Object Name field and click Change Permissions..., as illustrated below in
Figure 2-17.
NOTE
On Windows Vista, the Change Permissions... button is titled Edit. However, the functionality is the same.
Figure 2-17: Edit Advanced Security Settings for Security Group "Everyone"
Page 33
© Mass Electronics Pty Ltd 2009Chapter 2 – Installation and Configuration
Page 34

eServer Setup and Site Installation Instructions
Ensure that both security options for the "Everyone" Security Group are selected, as illustrated
below in Figure 2-18. Click Apply to confirm your settings.
Figure 2-18: Set Advanced Security Settings for Security Group "Everyone"
Changing security settings for "Everyone" will launch a Windows Security warning. Click Yes to
confirm the security settings for the "Everyone" Security Group, as illustrated below in Figure 2-19.
Figure 2-19: Conrm Advanced Security Settings for Security Group "Everyone"
Click Apply and OK to exit all the way out of the c:\MyWebPages Properties Window.
Page 34 © Mass Electronics Pty Ltd 2009Edition 5.0 dated 07/01/2014
Page 35

eServer
SETUP AND SITE INSTALLATION INSTRUCTIONS
Chapter 3 - Configuring Internet Information Services (IIS)
Page 36

eServer Setup and Site Installation Instructions
3-1 Overview
This section provides an overview of the steps required to install and configure Windows Internet
Information Services (IIS) settings.
NOTE
IIS enables your eServer Host computer (the computer running the eServer software) the capability to interact
securely with connecting eServer Client computers. IIS is not enabled by default on a fresh install of Windows.
3-2 Installing Internet Information Services (IIS)
3-2.1 Overview
This section provides an overview of the steps required to install Windows Internet Information
Services (IIS) on supported operating systems. If the computer already has IIS Installed, you may skip
this section.
NOTE
IIS enables your eServer Host computer the capability to interact securely with connecting eServer Client computers.
Once IIS has been installed, you will need to congure it to correctly to enable eServer to operate.
3-2.2 Installing IIS on Windows Server 2008 R2
These instructions detail the process for installing IIS on a Windows Server 2008 R2 computer. For a
computer with a fresh install of Windows Server 2008 R2, there will be an interface presented on the
screen to setup initial configuration options for your server computer.
NOTE
It is recommended to have the server computer's initial conguration settings set by the site IT Manager.
Page 36 © Mass Electronics Pty Ltd 2009Edition 5.0 dated 07/01/2014
Page 37

eServer Setup and Site Installation Instructions
Once your server computer's initial settings are correct, you can use the Initial Configuration Tasks
window to commence setup of IIS functionality. Select Add Roles from the Customise this Server
options, as illustrated below in Figure 3-1.
Figure 3-1: Initial Configuration Tasks on Windows Server 2008 R2
Page 37
© Mass Electronics Pty Ltd 2009Chapter 3 – Configuring Internet Information Services (IIS)
Page 38

eServer Setup and Site Installation Instructions
If your server computer has had the initial settings configured, and a restart has occurred, you can
select to add the IIS role to the server through the Server Homepage window, which will appear on
the desktop by default. Select Roles in the le menu, and click Add Roles, as illustrated below in
Figure 3-2.
Figure 3-2: Server Manager Window on Windows Server 2008 R2
Check the initial information, and follow any steps which have been missed before you continue
to setup IIS on the server computer. Once prepared, click Next to continue, as illustrated below in
Figure 3-3.
Figure 3-3: Confirm that initial setup of your server computer is correct
Page 38 © Mass Electronics Pty Ltd 2009Edition 5.0 dated 07/01/2014
Page 39

eServer Setup and Site Installation Instructions
From the list of Server Roles, select Web Server (IIS) and click Next to continue, as illustrated below in
Figure 3-4.
Figure 3-4: Select Web Server (IIS) from available Server Roles
Read through the Web Server (IIS) information. Click Next to continue, as illustrated below in Figure
3-5.
Figure 3-5: Read the Introduction to Web Server (IIS)
Page 39
© Mass Electronics Pty Ltd 2009Chapter 3 – Configuring Internet Information Services (IIS)
Page 40

eServer Setup and Site Installation Instructions
Scroll down the list of available options for IIS and select Basic Authentication, as illustrated below
in Figure 3-6. Click Next to continue.
Figure 3-6: Setup IIS options for a Windows Server 2008 R2 computer
Confirm your installation settings. Click Install to commence setup of IIS, as illustrated below in
Figure 3-7.
Figure 3-7: Confirm IIS installation options for a Windows Server 2008 R2 computer
Page 40 © Mass Electronics Pty Ltd 2009Edition 5.0 dated 07/01/2014
Page 41

eServer Setup and Site Installation Instructions
Wait a few minutes whilst IIS is installed, as illustrated below in Figure 3-8.
Figure 3-8: IIS installation in progress on a Windows Server 2008 R2 computer
Review the results and any warnings post-install. Consult with the site IT Manager for any sitespecific or computer-specific warnings which may occur. Click Close to exit, as illustrated below in
Figure 3-9.
Figure 3-9: Review IIS installation results on Windows Server 2008 R2
Page 41
© Mass Electronics Pty Ltd 2009Chapter 3 – Configuring Internet Information Services (IIS)
Page 42

eServer Setup and Site Installation Instructions
Once your server computer has been setup with the new role as a Web Server (IIS) you are ready to
configure IIS to work with the eServer soware
Firstly, confirm that the role Web Server (IIS) has been initialised on your server computer. From the
Server Manager window, select Roles and validate that the role is present in the Roles Summary
list, as illustrated below in Figure 3-10.
Figure 3-10: Validate the role Web Server (IIS) in the Server Manager window
Page 42 © Mass Electronics Pty Ltd 2009Edition 5.0 dated 07/01/2014
Page 43

eServer Setup and Site Installation Instructions
3-2.3 Installing IIS on Windows 7
These instructions detail the process for installing IIS on a Windows 7 computer.
NOTE
It is recommended to have the server computer's initial conguration settings set by the site IT Manager.
Verify if IIS has previously been installed on the Windows 7 computer by opening Control Panel from
the Windows Start menu, as illustrated below in Figure 3-11.
Figure 3-11: Opening Control Panel on Windows 7
Select Small Icons on the top right to open up the complete list of Control Panel options. Select
Programs and Features from the Control Panel list, as illustrated below in Figure 3-12.
Figure 3-12: Open Programs and Features from the Control Panel on Windows 7
Page 43
© Mass Electronics Pty Ltd 2009Chapter 3 – Configuring Internet Information Services (IIS)
Page 44

eServer Setup and Site Installation Instructions
Click Turn Windows features on or o from the le pane of the Programs and Features window, as
illustrated below in Figure 3-13.
Figure 3-13: Selecting "Turn Windows Features On or O" on Windows 7
From the Windows Features menu, do the following:
• Scroll down the list of Windows Features, and expand the Internet Information Services tree list.
Underneath that, expand the Web Management Tools list. Ensure that IIS Management Console is
selected, as illustrated below in Figure 3-14.
• Immediately underneath, ensure that World Wide Web Services is selected with a blue square, as
illustrated below in Figure 3-14.
• The IIS Management Console is NOT activated by default on Windows 7. This feature can be
enabled from Windows Features.
Figure 3-14: Setup IIS Features on Windows 7
NOTE
If the IIS Management Console box is not checked, click on the box and then click on OK to install the IIS Management
Console. Please have the Windows Vista installation disk available. Follow the on-screen prompts to complete this
process. If required, this process may be completed by the site IT department.
Page 44 © Mass Electronics Pty Ltd 2009Edition 5.0 dated 07/01/2014
Page 45

eServer Setup and Site Installation Instructions
3-2.4 Installing IIS on Windows Vista
These instructions detail the process for installing IIS on a Windows Vista computer.
NOTE
The Windows Vista installation disk may be required to complete the installation of IIS.
Verify if IIS has previously been installed on the Windows Vista computer by opening Control Panel
from the Windows Start menu, as illustrated below in Figure 3-15.
Figure 3-15: Opening Control Panel on Windows Vista
Select Classic View from the le pane to display the complete list of Control Panel options. Doubleclick on Programs and Features from the Control Panel list, as illustrated below in Figure 3-16.
Figure 3-16: Opening Programs and Features on Windows Vista
Page 45
© Mass Electronics Pty Ltd 2009Chapter 3 – Configuring Internet Information Services (IIS)
Page 46

eServer Setup and Site Installation Instructions
Click on Turn Windows features on or o, located on the le pane of the Programs and Features
window and illustrated below in Figure 3-17.
Figure 3-17: Opening Windows Features Menu on Windows Vista
From the Windows Features menu, do the following:
• Scroll down the list of Windows Features, and expand the Internet Information Services tree list.
Underneath that, expand the Web Management Tools list. Ensure that IIS Management Console
is selected, as illustrated below in Figure 3-18.
• Immediately underneath, ensure that World Wide Web Services is selected with a blue square, as
illustrated below in Figure 3-18.
• The IIS Management Console is NOT installed by default on Windows Vista. The Windows Vista
installation disk may be required to install this feature.
Figure 3-18: Setup IIS Features on Windows Vista
NOTE
If the IIS Management Console box is not checked, click on the box and then click on OK to install the IIS Management
Console. Please have the Windows Vista installation disk available. Follow the on-screen prompts to complete this
process. If required, this process may be completed by the site IT department.
Page 46 © Mass Electronics Pty Ltd 2009Edition 5.0 dated 07/01/2014
Page 47
eServer Setup and Site Installation Instructions
3-2.5 Installing IIS on Windows XP
These instructions detail the process for installing IIS on a Windows XP computer.
NOTE
The Windows XP installation disk may be required to complete the installation of IIS.
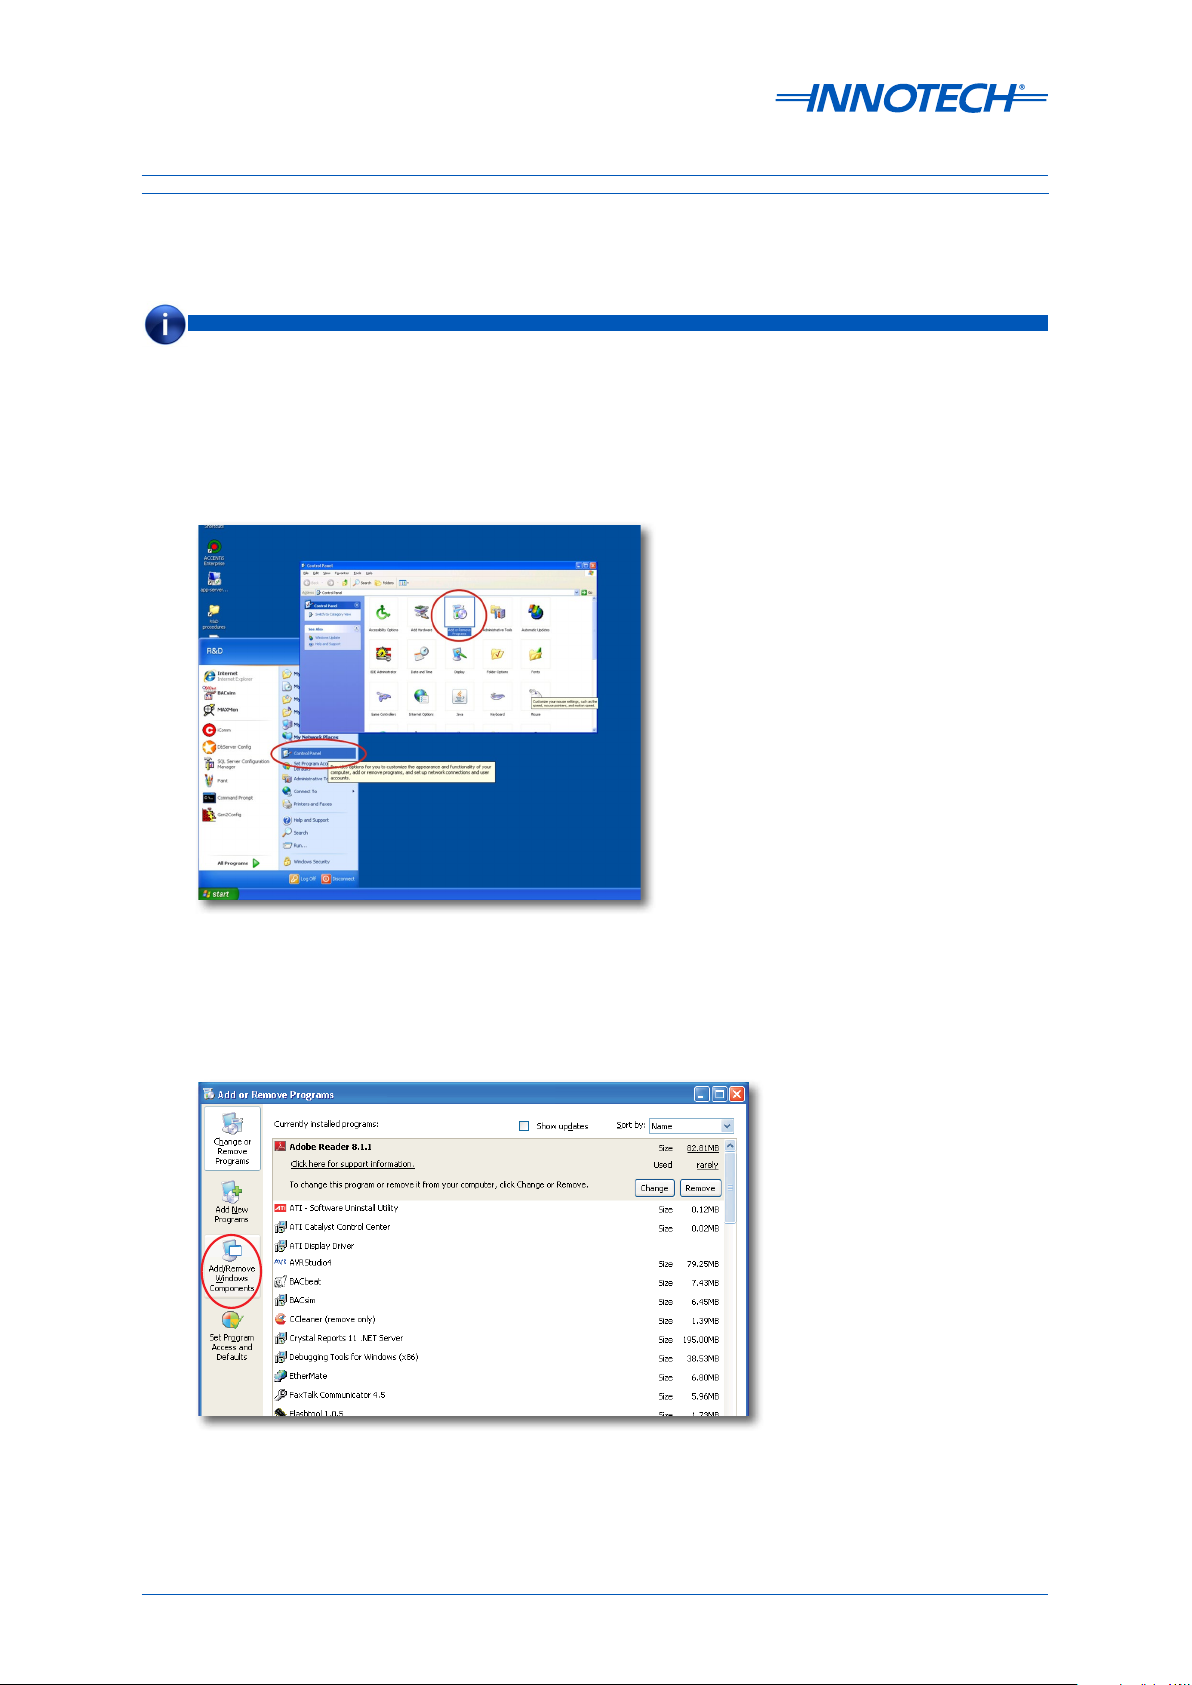
Verify if IIS has previously been installed on the Windows XP computer by opening Control Panel
from the Windows Start menu and launching the Add and Remove Programs interface, as
illustrated below in Figure 3-19.
Figure 3-19: Opening "Add and Remove Programs" from the Control Panel in Windows XP
Click on Add/Remove Windows Components in the le pane of the window, as illustrated below in
Figure 3-20.
Figure 3-20: Opening "Add/Remove Windows Components" on Windows XP
Page 47
© Mass Electronics Pty Ltd 2009Chapter 3 – Configuring Internet Information Services (IIS)
Page 48

eServer Setup and Site Installation Instructions
From the Windows Components Wizard, check to see if Internet Information Services (IIS) is
installed. If not, as illustrated below in Figure 3-21, you will require the Windows XP Installation Disk
to complete the IIS installation. Below you can see that IIS is not currently installed (the adjacent box
is not checked).
Figure 3-21: Check if IIS is installed on Windows XP
To install the additional IIS components, insert the Windows XP Installation Disk. A dialogue box will
appear, as illustrated below in Figure 3-22. Click on Install optional Windows components.
Figure 3-22: Installing IIS from the Windows XP Installation Disk
Page 48 © Mass Electronics Pty Ltd 2009Edition 5.0 dated 07/01/2014
Page 49

eServer Setup and Site Installation Instructions
The Windows Components window will reappear. Tick the Internet Information Services check box
and click on Next, as illustrated below in Figure 3-23.
Figure 3-23: Adding IIS components on Windows XP
Once IIS is installed, click on Finish to complete the installation process. Press Exit to exit the
installation process.
Page 49
© Mass Electronics Pty Ltd 2009Chapter 3 – Configuring Internet Information Services (IIS)
Page 50

eServer Setup and Site Installation Instructions
3-3 Launching Internet Information Services (IIS)
3-3.1 Overview
There are dierent ways to launch the IIS Manager window on dierent Operating Systems. This
section provides steps to open IIS on supported Operating Systems.
3-3.2 Launching IIS on Windows Server 2008 R2
Open the IIS Manager from the Windows Start Menu. Select Administrative Tools and click Internet
Information Services (IIS) Manager, as illustrated below in Figure 3-24.
Figure 3-24: Launch the IIS Manager on Windows Server 2008 R2
Page 50 © Mass Electronics Pty Ltd 2009Edition 5.0 dated 07/01/2014
Page 51

eServer Setup and Site Installation Instructions
This will launch the home screen of the IIS Manager, as illustrated below in Figure 3-25.
Figure 3-25: Home screen of the IIS Manager on Windows Server 2008 R2
3-3.3 Launching IIS on Windows 7
Open the Control Panel from the Windows Start Menu, as illustrated below in Figure 3-26.
Figure 3-26: Opening Control Panel in Windows 7
Page 51
© Mass Electronics Pty Ltd 2009Chapter 3 – Configuring Internet Information Services (IIS)
Page 52

eServer Setup and Site Installation Instructions
Select Small Icons view from the top right panel, which will open the complete list of Control Panel
options. Select Administrative Tools from the Control Panel list, as illustrated below in Figure 3-27.
Figure 3-27: Open Administrative Tools on Windows 7
Select Internet Information Services (IIS) Manager from the Administrative Tools menu, as
illustrated below in Figure 3-28.
Figure 3-28: Launch IIS on Windows 7
Page 52 © Mass Electronics Pty Ltd 2009Edition 5.0 dated 07/01/2014
Page 53

eServer Setup and Site Installation Instructions
3-3.4 Launching IIS on Windows Vista
Open the Control Panel from the Windows Start Menu, as illustrated below in Figure 3-29.
Figure 3-29: Opening Control Panel in Windows Vista
Select Classic View from the le pane to display the complete list of Control Panel options. Doubleclick on Administrative Tools from the Control Panel list, as illustrated below in Figure 3-30.
Figure 3-30: Opening Administrative Tools on Windows Vista
Page 53
© Mass Electronics Pty Ltd 2009Chapter 3 – Configuring Internet Information Services (IIS)
Page 54

eServer Setup and Site Installation Instructions
Double-click on Internet Information Services (IIS) Manager from the Administrative Tools menu,
as illustrated below in Figure 3-31.
Figure 3-31: Launch IIS on Windows Server
3-3.5 Launching IIS on Windows XP
Launch Internet Information Services from the Control Panel, as illustrated below in Figure 3-32.
Figure 3-32: Launch Internet Information Services on Windows XP
Page 54 © Mass Electronics Pty Ltd 2009Edition 5.0 dated 07/01/2014
Page 55

eServer Setup and Site Installation Instructions
3-4 Configuring Internet Information Services (IIS)
3-4.1 Overview
This section provides the steps to configure Internet Information Services to work as part of an
Innotech system using eServer.
There are common steps to setup IIS on Windows Server 2008 R2, Windows 7, Windows Vista and XP,
which are outlined in 3-3.2 to 3-3.5.
3-4.2 Configure IIS on Windows Server 2008 R2, 7 and Vista
From the IIS Manager window, select expand the Connections list to view the Default Web Site. This
will display menu options for the Default Web Site. Select Basic Settings... from the Actions menu,
as illustrated below in Figure 3-33.
Figure 3-33: Open Basic Settings for Default Web Site
Page 55
© Mass Electronics Pty Ltd 2009Chapter 3 – Configuring Internet Information Services (IIS)
Page 56

eServer Setup and Site Installation Instructions
Set physical location path for Default Web Site to be c:\MyWebPages, as illustrated below in Figure
3-34. Click OK to save and exit.
Figure 3-34: Configure Physical Path for c:\MyWebPages
Set the Authentication properties for the Default Web Site. Select Default Web Site and click on the
Authentication icon, as illustrated below in Figure 3-35.
Figure 3-35: Set Authentication properties for Default Web Site
Page 56 © Mass Electronics Pty Ltd 2009Edition 5.0 dated 07/01/2014
Page 57

eServer Setup and Site Installation Instructions
In the Authentication list, click on Anonymous Authentication and click on Edit... in the Actions
Pane on the right, as illustrated below in Figure 3-36.
Figure 3-36: Edit Anonymous Authentication properties
Ensure that Specific User is selected, and click on the Set... button, as illustrated below in Figure
3-37.
Figure 3-37: Set Anonymous user identity
Enter IUSR as the Username. Leave all other fields blank and click OK to apply, as illustrated below in
Figure 3-38.
Figure 3-38: Set IUSR credentials
Page 57
© Mass Electronics Pty Ltd 2009Chapter 3 – Configuring Internet Information Services (IIS)
Page 58
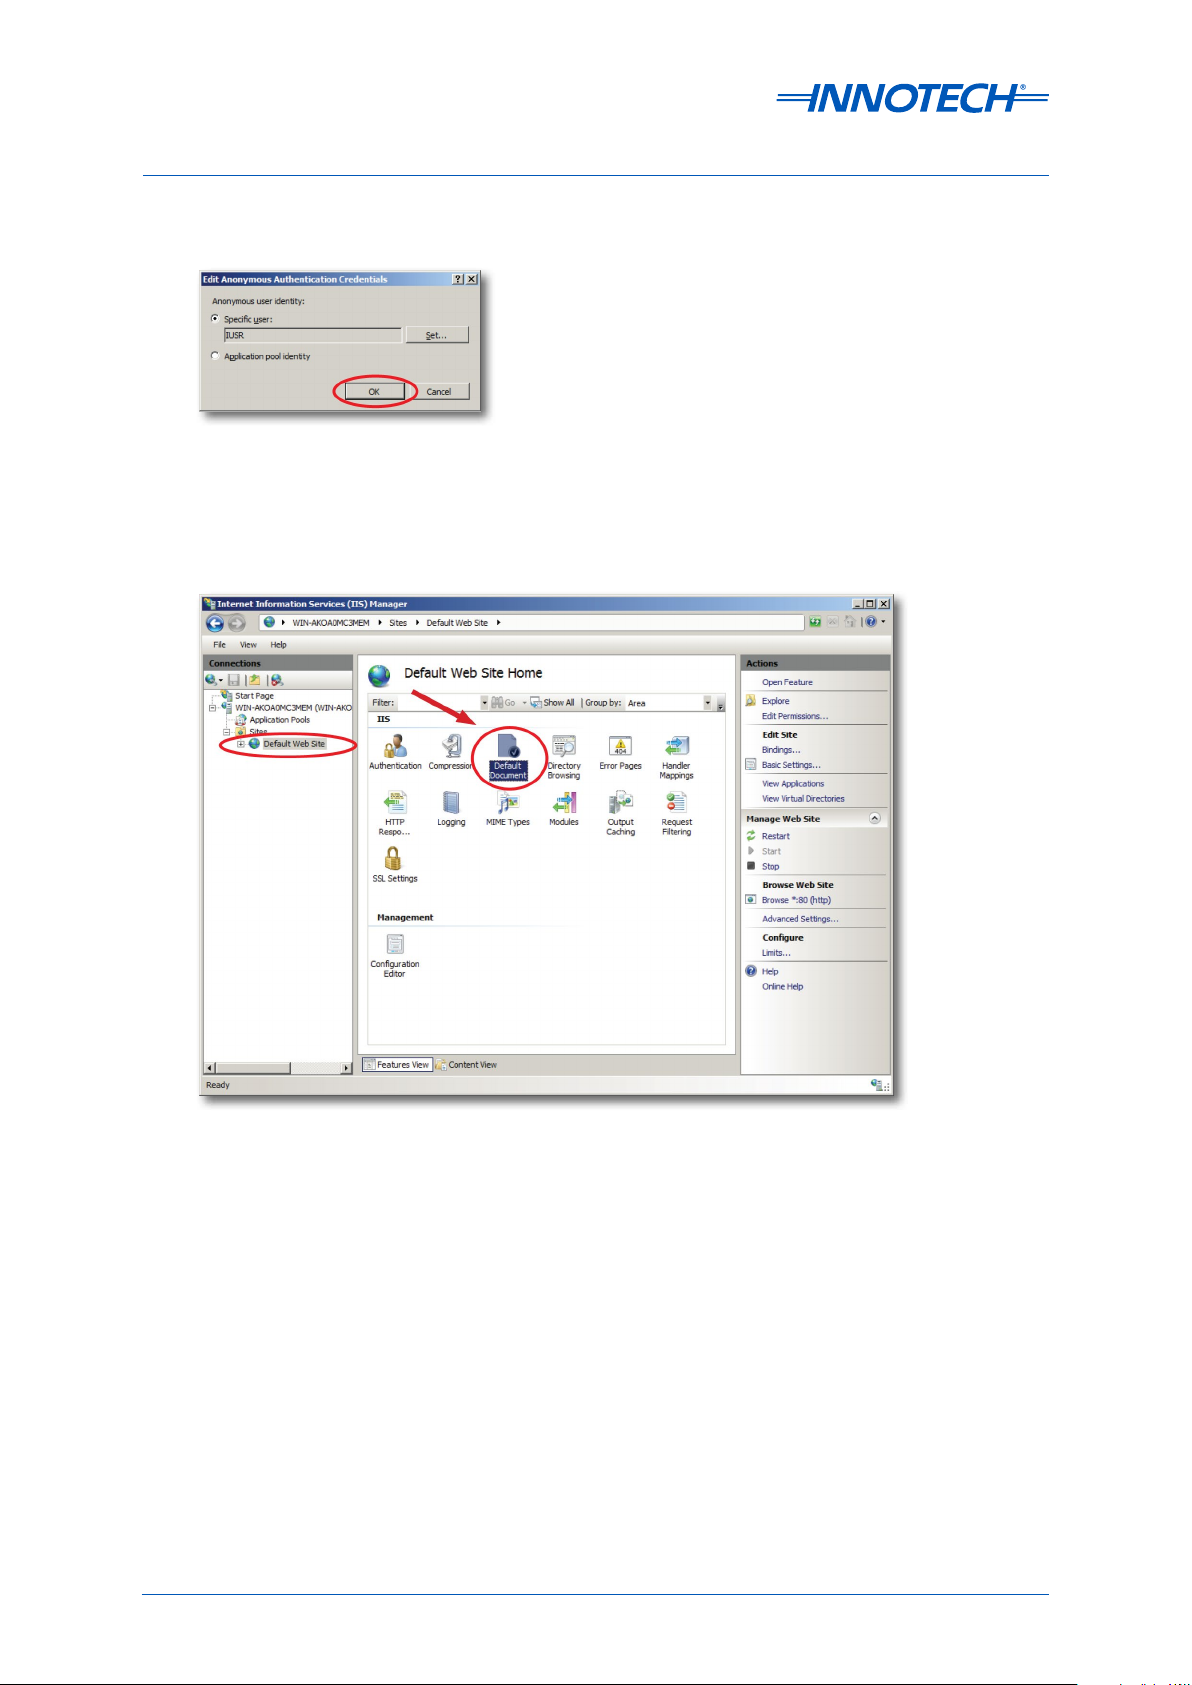
eServer Setup and Site Installation Instructions
Click OK to save and exit Anonymous Authentication setup, as illustrated below in Figure 3-39.
Figure 3-39: Save and Exit Anonymous Authentication Setup
Return to the main window as illustrated below and open Default Document as illustrated below in
Figure 3-40.
Figure 3-40: Open Default Document Menu for Default Website
Page 58 © Mass Electronics Pty Ltd 2009Edition 5.0 dated 07/01/2014
Page 59

eServer Setup and Site Installation Instructions
Select index.htm in the Default Document list. If it does not exist, click the Add... button to add
the document index.htm. Use the Move Up button to move index.htm to the top of the Default
Document list, as illustrated below in Figure 3-41.
IMPORTANT
There may be both a Index.html and Index.htm les in this list. Ensure to use the le Index.htm.
Figure 3-41: Select Default Document index.htm
If an information window appears, read the dialogue and click Yes to accept, as illustrated below in
Figure 3-42. The default settings for Default Document are suitable for eServer implementation.
Figure 3-42: Conrm Selection of Default Document index.htm
Page 59
© Mass Electronics Pty Ltd 2009Chapter 3 – Configuring Internet Information Services (IIS)
Page 60

eServer Setup and Site Installation Instructions
Validate that index.htm is at the top of the Default Document list (not index.html), as illustrated
below in Figure 3-43.
Figure 3-43: Locate the Default Document index.htm
Return to the main window as illustrated below and open MIME Types as illustrated below in Figure
3-44.
Figure 3-44: Open MIME Types for Default Web Site
Page 60 © Mass Electronics Pty Ltd 2009Edition 5.0 dated 07/01/2014
Page 61

eServer Setup and Site Installation Instructions
IIS setup for eServer will require the addition of a new MIME type. From the MIME Types window, click
on Add... in the Actions pane on the right, as illustrated below in Figure 3-45.
Figure 3-45: MIME Types Screen
Add the first MIME type. Enter the following into the Add MIME Type window, as illustrated below in
Figure 3-46:
• File name extension = .rpt
• MIME Type = application/x-rpt
Click OK to save the first new MIME type
Figure 3-46: Add the new MIME Type for the Default Web Site
Close and exit all IIS menu windows. IIS setup for eServer is complete for the Windows Server 2008
R2, Windows 7 or Windows Vista Operating Systems.
Page 61
© Mass Electronics Pty Ltd 2009Chapter 3 – Configuring Internet Information Services (IIS)
Page 62

eServer Setup and Site Installation Instructions
3-4.3 Configure IIS on Windows XP
From the Internet Information Services (IIS) window, select and expand the Connections list on the
le to view the Web Sites folder, but do not expand this item. Right-click on Default Web Site select
Properties from the popup window, as illustrated below in Figure 3-47.
Figure 3-47: Open Default Web Site Properties on Windows XP
Select the Web Site tab to configure basic properties. Ensure that the Web Site Identification fields
have been set as:
• Description: Default Web Site
• IP Address: All Unassigned
• TCP Port: 80
See below example Figure 3-48.
Figure 3-48: Configure Default Web Site Identification Properties on Windows XP
Page 62 © Mass Electronics Pty Ltd 2009Edition 5.0 dated 07/01/2014
Page 63

eServer Setup and Site Installation Instructions
Select the Directory Security tab. Configure Anonymous Access and Authentication Control by
clicking on the Edit... button, as illustrated below in Figure 3-49.
Figure 3-49: Configure Directory Security for Default Web Site on Windows XP
NOTE
If using eServer on a Domain (a network of computers with a hardware authentication server) use the following
Authentication Methods Settings.
From the Authentication Methods window, ensure that Anonymous access is enabled. Setup the
login account by clicking the Browse... button, as illustrated below in Figure 3-50.
Figure 3-50: Authentication Methods for Default Web Site with eServer on a Domain
Page 63
© Mass Electronics Pty Ltd 2009Chapter 3 – Configuring Internet Information Services (IIS)
Page 64

eServer Setup and Site Installation Instructions
Ensure that the location information is correct, by clicking on the Browse button, as illustrated below
in Figure 3-51.
Figure 3-51: Open locations to Browse for Default Web Site computer
Select the Computer Name from the list of Locations. For most scenarios it will be the first item
in the list, as illustrated below in Figure 3-52. If not, check with the site IT Manager for correct
configuration settings.
Figure 3-52: Select Location of Computer for Authentication Details
In the Select User window, type in the user name exactly as is shown in the Authentication Methods
window. Click on Check Names to confirm that the user name has been found, as illustrated below
in Figure 3-53.
Figure 3-53: Enable IIS Password Control with Windows XP on a Local Domain
Page 64 © Mass Electronics Pty Ltd 2009Edition 5.0 dated 07/01/2014
Page 65

eServer Setup and Site Installation Instructions
Ensure that Allow IIS to Control Password is enabled, as illustrated below in Figure 3-54. If a
notification window appears, click Yes to confirm your selection.
Figure 3-54: Enable Windows XP IIS Password Control on a Local Domain
NOTE
If using eServer on a standalone computer (WorkGroup) use the following Authentication Methods Settings.
From the Authentication Methods window, ensure that both Anonymous access is enabled. Setup
the login account by clicking the Browse... button, as illustrated below in Figure 3-55.
Figure 3-55: Authentication Methods for Default Web Site on a Standalone Computer
Page 65
© Mass Electronics Pty Ltd 2009Chapter 3 – Configuring Internet Information Services (IIS)
Page 66

eServer Setup and Site Installation Instructions
Click on Locations and Find Now to search for users, as illustrated below in Figure 3-56.
Figure 3-56: Search for user on Windows XP standalone computer
From the list of names, select IUSER_"Your Computer Name" and click OK to apply, as illustrated
below in Figure 3-57.
Figure 3-57: Select Authentication Name for Default Web Site on Windows XP
Page 66 © Mass Electronics Pty Ltd 2009Edition 5.0 dated 07/01/2014
Page 67

eServer Setup and Site Installation Instructions
Ensure that Allow IIS to Control Password is enabled, as illustrated below in Figure 3-58. If a
notification window appears, click Yes to confirm your selection.
Figure 3-58: Enable IIS password control with Windows XP on a standalone computer
Now that Authentication details are configured, select the Home Directory tab. Ensure that "A
directory located on this computer" is selected, and enter c:\MyWebPages into the Local Path field
and click Apply to save, as illustrated below in Figure 3-59.
Figure 3-59: Set Home Directory on Windows XP
Page 67
© Mass Electronics Pty Ltd 2009Chapter 3 – Configuring Internet Information Services (IIS)
Page 68

eServer Setup and Site Installation Instructions
Select the Documents tab. Ensure that "Enable Default Document" is selected, and click Add... to
add a new document, as illustrated below in Figure 3-60.
NOTE
You will be adding a document called "index.htm". If this document exists in the list, use the arrow buttons to move it to
the top of the list.
Figure 3-60: Set Documents for Default Web Site on Windows XP
Add a new document called index.htm, as illustrated below in Figure Figure 3-61.
Figure 3-61: Add Document index.htm for Default Web Site on Windows XP
Page 68 © Mass Electronics Pty Ltd 2009Edition 5.0 dated 07/01/2014
Page 69

eServer Setup and Site Installation Instructions
Ensure that the new document index.htm is at the top of the list. If required, use the arrow buttons
to move index.htm to the top. Click Apply when complete, as illustrated below in Figure 3-62.
IMPORTANT
There may be both a Index.html and Index.htm les in this list. Ensure to use the le Index.htm.
Figure 3-62: Apply Document Settings for Default Web Site on Windows XP
Select the HTTP Headers tab. You will need to configure a new MIME type for the Default Web Site.
Click on File Types..., as illustrated below in Figure 3-63.
Figure 3-63: Configure MIME Types on Windows XP
Page 69
© Mass Electronics Pty Ltd 2009Chapter 3 – Configuring Internet Information Services (IIS)
Page 70

eServer Setup and Site Installation Instructions
Click on New Type... to add a new MIME File Type, as illustrated below in Figure 3-64.
Figure 3-64: Add new MIME Type on Windows XP
Enter the first new MIME File Type details. Ensure that the File Type fields have been set as:
• Associated extension: .rpt
• Content Type [MIME]: application/x-rpt
See below example Figure 3-65.
Figure 3-65: New MIME Type Window
Page 70 © Mass Electronics Pty Ltd 2009Edition 5.0 dated 07/01/2014
Page 71

eServer Setup and Site Installation Instructions
Validate that the new MIME File Type have been added to the File Types list. Click OK to save and
exit, as illustrated below in Figure 3-66.
Figure 3-66: Validate two new MIME Types on Windows XP
Ensure that the Default Web Site is Running, as illustrated below in Figure 3-67. If not, press the Play
button to start it. Close the IIS window.
Figure 3-67: Ensure that the Default Web Site is running on Windows XP
Close and exit all IIS menu windows. IIS setup for eServer is complete for the Windows XP Operating
Systems.
Page 71
© Mass Electronics Pty Ltd 2009Chapter 3 – Configuring Internet Information Services (IIS)
Page 72

eServer Setup and Site Installation Instructions
This page has been le intentionally blank.
Page 72 © Mass Electronics Pty Ltd 2009Edition 5.0 dated 07/01/2014
Page 73

eServer
SETUP AND SITE INSTALLATION INSTRUCTIONS
Chapter 4 Configuring eServer
Communications
Page 74

eServer Setup and Site Installation Instructions
4-1 Overview
This section provides an overview of the steps required to configure security and access control on
eServer soware to allow remote computers to access Magellan projects via the eServer soware.
Additionally, steps are provided to enable eServer to communicate with an SQL Server database.
4-2 Configure eServer Project Settings
4-2.1 Overview
This section provides instructions on how to configure your eServer Project Settings to work as part
of a system including Innotech eServer 1.20 or greater. Specifically, this section provides information
on how to open your project and set project connection properties for a database, iComm server
and connected devices.
NOTE
Ensure you are logged into the computer as a System Administrator. You will need to use Magellan Builder v1.20
or greater to congure the project settings, so ensure you have a Magellan Builder security dongle in addition to the
eServer security dongle. Once you have setup the eServer Host computer, you may remove the Magellan Builder
security dongle, leaving just the eServer security dongle installed.
4-2.2 Launch Project for Configuration
Shutdown eServer and open Magellan Builder v1.20 or greater. From the menu bar, open the
Magellan Package, as illustrate below in Figure 4-1.
Figure 4-1: Open the Magellan project
Page 74 © Mass Electronics Pty Ltd 2009Edition 5.0 dated 07/01/2014
Page 75

eServer Setup and Site Installation Instructions
4-2.3 Set Project Properties for the Access Database
Select Project from the menu bar, and open the Project Properties as illustrated below in Figure 4-2.
Figure 4-2: Open Project Properties to enter the Access database settings
In the Project Properties menu, select the Database Server type. The default is No Database. Use the
dropdown list to select the Access database as illustrated below in Figure 4-3.
Figure 4-3: Selecting Access database in Magellan Project Properties
Page 75
© Mass Electronics Pty Ltd 2009Chapter 4 – Configuring eServer Communications
Page 76

eServer Setup and Site Installation Instructions
Enter the Access Database settings as described below, and illustrated below in Figure 4-4.
Access Driver: Select the appropriate Access Driver to use for the Access Database. For an Innotech
iComm Access Database, use version 2000-2003.
Access Database File: Navigate to and select the Access Database to use with Magellan. For an
Innotech iComm Access Database, the default path is:
c:\Program Files\Innotech\iComm\iCommDatabase
Automatically Connect on Startup: Select this option to enable automatic connection to the Access
Database at project launch (Recommended). Alternatively, use Magellan commands to connect /
disconnect as required during runtime.
Figure 4-4: Selecting Access database Type in Magellan Project Properties
Click OK to save and apply your Magellan Project Properties changes.
Page 76 © Mass Electronics Pty Ltd 2009Edition 5.0 dated 07/01/2014
Page 77

eServer Setup and Site Installation Instructions
4-2.4 Set Project Properties for the SQL Database
Select Project from the menu bar, and open the Project Properties as illustrated below in Figure 4-5.
Figure 4-5: Open Magellan Project Properties
In the Project Properties menu, select the Database Server type. The default is No Database. Use the
dropdown list to select a SQL or Access database, as illustrated below in Figure 4-6.
Figure 4-6: Selecting SQL database in Magellan Project Properties
Selecting a SQL Database will automatically open the Connection Settings window, allowing you to
enter the details for the SQL Database connection, as illustrated on the next page in Figure 4-7.
Page 77
© Mass Electronics Pty Ltd 2009Chapter 4 – Configuring eServer Communications
Page 78

eServer Setup and Site Installation Instructions
In the Connection Settings window, enter the required SQL Database connection settings within each
available field. The example below is suited for when connecting to the Innotech Chronicle database.
NOTE
If using the default Chronicle Server or ATOM Package installation processes, the SQL Database will have been
allocated the Database Name: GreenstarLogging by default.
For connection to the Innotech Chronicle database, enter the following:
Connection Name: Enter a name for the connection. This is used only within Magellan but must
be a single word with no spaces.
Server Address: Enter the valid internal network DNS name or static IP address for the computer
running the SQL Server; for example "Computername\SQLExpress".
External Address: Enter the valid external DNS name or external static IP address for the computer
running the SQL Server; for example "DNSName.domain.com".
Database type (selection buttons): Select SQL Server Express to use eServer in collaboration with
the Innotech Chronicle database (recommended). Select Access to use a legacy iComm database.
Database Name: Ensure this is set to GreenstarLogging in order to use the Innotech Chronicle
database.
Requires Log-in: Enter the valid username and password for the SQL Server.
IMPORTANT
It is critical that the settings entered in the Magellan Project and the Chronicle Server (which writes to the SQL Server
database) exactly correspond. Refer to the representation below at Figure 4-7 for a guide on which elds relate directly.
The use of the term localhost, or address 127.0.0.1 for any elds or settings is not recommended. Please use a valid
DNS name or static IP address for all connection details.
Ser ver Address < -> SQL Ser ver Location
Database Name <-> Database
Figure 4-7: eServer and Chronicle Server Settings for the SQL Server
Click OK to save and apply your new SQL Server connection.
Page 78 © Mass Electronics Pty Ltd 2009Edition 5.0 dated 07/01/2014
Page 79

eServer Setup and Site Installation Instructions
Upon creating the new SQL Server connection, the Project Properties window will list the connection.
Up to 100 SQL database connections can be configured. Choose the default SQL Server connection
as illustrated below in Figure 4-8.
Before applying, choose the enable automatic connection (recommended):
Automatically connect on startup: Select this option to automatically connect to the SQL Server
database at startup of eServer (recommended). Alternatively, you can program a particular frame
in your Magellan Project to launch the "dbopen" command to connect when the frame is launched.
Refer to the Magellan Online Help for more information on the use of the "dbopen" command.
Figure 4-8: Open iComm Server Properties in the Magellan project
Click OK to save and apply your new Project Properties.
Page 79
© Mass Electronics Pty Ltd 2009Chapter 4 – Configuring eServer Communications
Page 80

eServer Setup and Site Installation Instructions
4-2.5 Set iComm Connection Properties
In the Magellan Project, navigate to the Points Manager and check all connection settings. Open the
Properties of the site iComm Server, as illustrated below in Figure 4-9.
NOTE
You may need to create a new iComm Server if none are visible in the project. From the drop down menu illustrated
below in Figure 4-9, select New IO Server.
Figure 4-9: Point Properties
Page 80 © Mass Electronics Pty Ltd 2009Edition 5.0 dated 07/01/2014
Page 81

eServer Setup and Site Installation Instructions
From the IO Server Properties General Tab, enter site specific IO Server Properties and connection
information, as illustrated below in Figure 4-10. For example, enter the following:
IO Server Name: enter a name for your IO Server (for your reference)
Type of IO Server: Select the type of IO Server (iComm Server, or other)
Host Computer:- Enter the internal network DNS name or internal static IP address for the computer
running the IO Server; for example "iComm on Computername".
External Address: Enter the valid external DNS name or external static IP address for the computer
running the IO Server; for example "DNSName.domain.com".
IMPORTANT
It is critical that the settings entered for Host Computer and IO Server Security exactly match settings in the Innotech
Chronicle software (which writes to the SQL Server database). Refer to the representation at Figu re 4-10 below for a
guide on which elds relate directly.
The use of the term localhost, or address 127.0.0.1 for any elds or settings is not recommended. Please use a valid
DNS name or static IP address for all connection details.
Figure 4-10: Check the eServer and Chronicle Server settings for the iComm Server
Page 81
© Mass Electronics Pty Ltd 2009Chapter 4 – Configuring eServer Communications
Page 82

eServer Setup and Site Installation Instructions
4-2.6 Set iComm Connection Properties
Once your iComm Server Settings are correct, select each Device and check the internal Device
Settings correspond correctly with the iComm Server, as illustrated below in Figure 4-11, Figure 4-12
and Figure 4-13.
NOTE
You can import devices and points to an iComm Server in the Points Manager. Right click on the iComm Server and
select Import Points to locate and import from a valid Genesis or MAXIM conguration le.
IMPORTANT
The most cricital item on this window is the Remote Device Name Field, which uses the format [iComm Server
Connection ID]:[Device ID]. So for a device at address 1 on iComm connection 1, its correct Remote Device Name
Field would be 1:1
Figure 4-11: Example Device Properties for Connection 1, Device 1
Figure 4-12: Example Device Properties for Connection 2, Device 1
Figure 4-13: Validate your Device Settings with the iComm Server
Page 82 © Mass Electronics Pty Ltd 2009Edition 5.0 dated 07/01/2014
Page 83
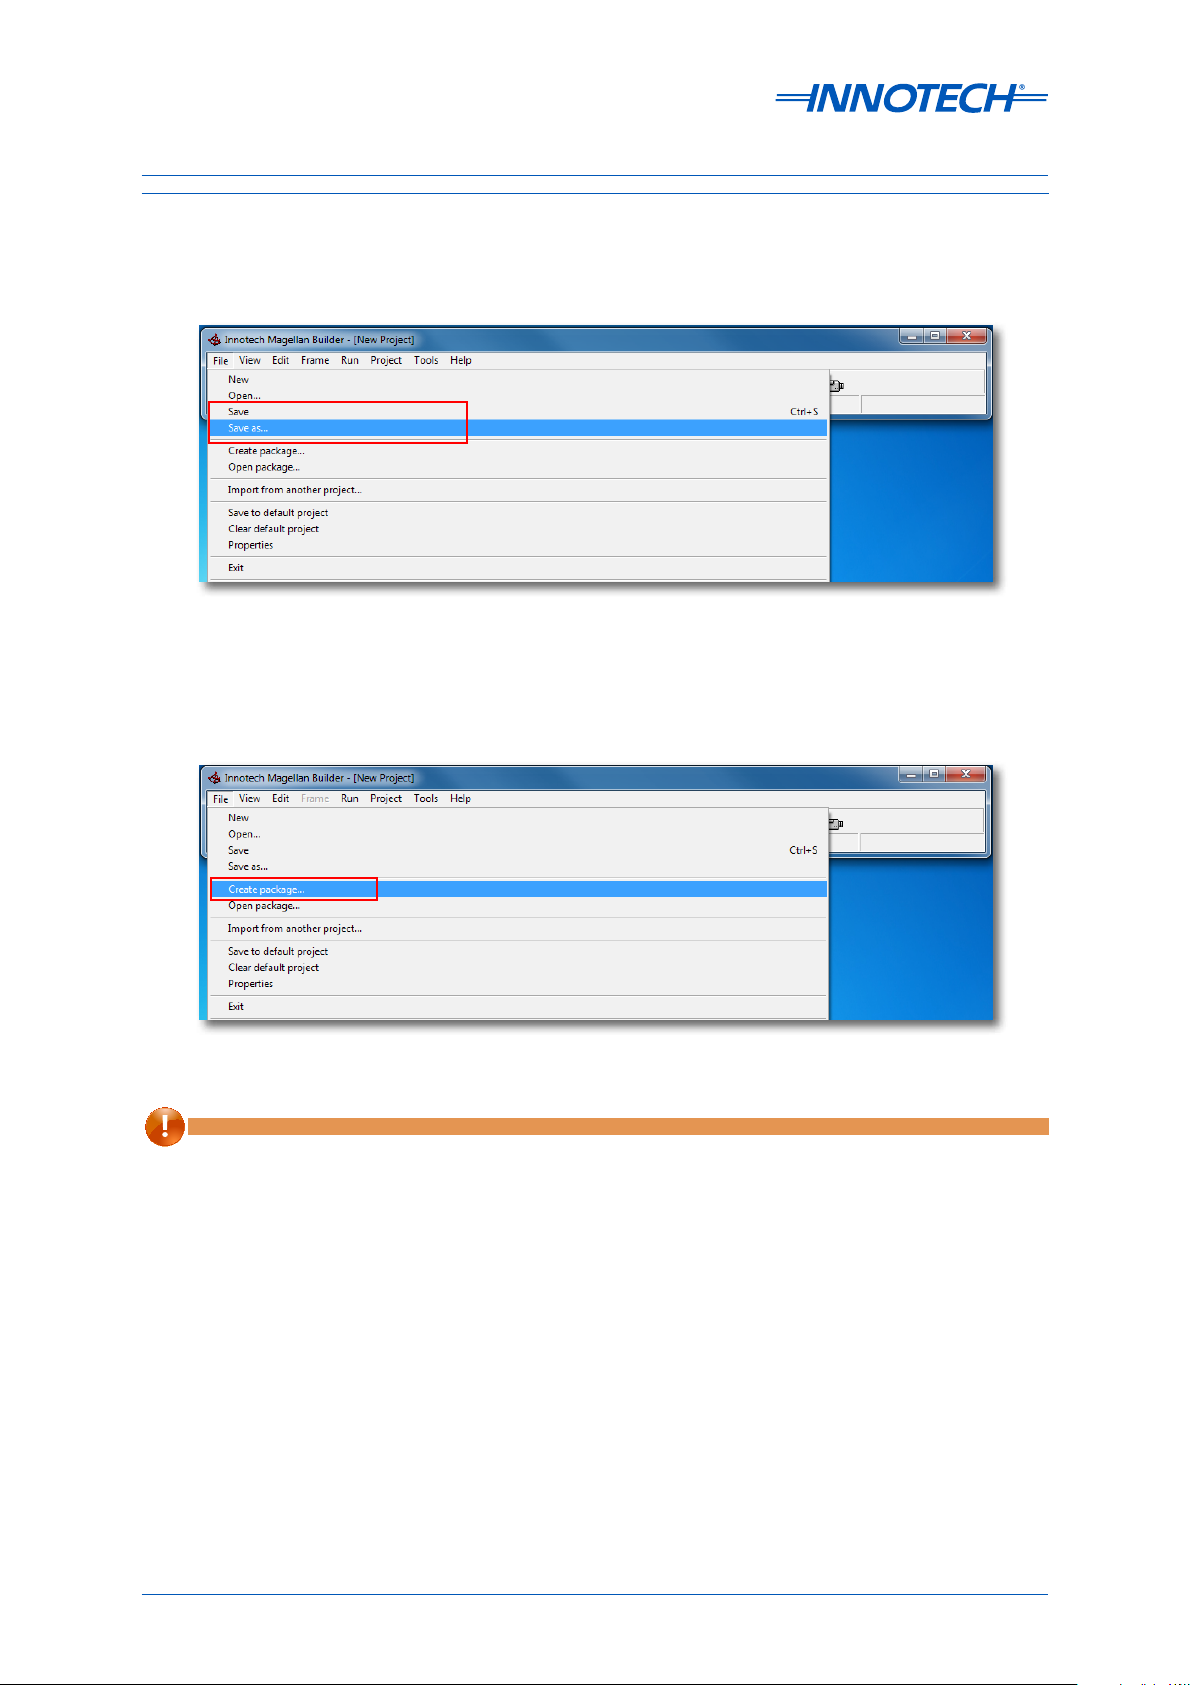
eServer Setup and Site Installation Instructions
4-2.7 Save Project Settings
Once all project settings have been updated, ensure to use Save As to save a new revision of the
Magellan project file, as illustrated below in Figure 4-14.
Figure 4-14: Save updated Magellan project settings
Relaunch eServer. Check that it is using the updated Magellan project. Ensure to create a new
Magellan Package file for use with eServer, as illustrated below in Figure 4-15.
Figure 4-15: Create new Magellan package
IMPORTANT
Before nishing, ensure to remove the Magellan Builder security dongle, leaving just the eServer security dongle
to enable operation of the eServer software.
Page 83
© Mass Electronics Pty Ltd 2009Chapter 4 – Configuring eServer Communications
Page 84

eServer Setup and Site Installation Instructions
4-3 Setup SQL Server Communications
4-3.1 Overview
The following information is intended to provide qualified technical personnel with the required
settings for a manual setup of a Microso SQL Server 2008 R2 Express Edition database.
NOTE
SQL Server 2008 R2 Express Edition is required for site which are using historic Trends or ATOM Reporting functionality.
Innotech recommends where possible to use the Innotech Chronicle Server Installation Package which automates the
installation and conguration of SQL Server to operate correctly with eServer. Contact Innotech Sales for more
information on Chronicle, ATOM and other BMS solutions. Note that this requires a computer which has not had
any version of SQL Server installed previously.
IMPORTANT
To integrate with an existing SQL Server, or upgrade to SQL Server 2008 R2 Express Edition, consult with the Site IT
Manager to ensure that the SQL Server settings are correctly congured as listed below in 4-3.2 Default SQL Server
2008 R2 Express Edition Settings.
Page 84 © Mass Electronics Pty Ltd 2009Edition 5.0 dated 07/01/2014
Page 85

eServer Setup and Site Installation Instructions
4-3.2 Default SQL Server 2008 R2 Express Edition Settings
IMPORTANT
Recommended for advanced users only!
Table 4-1: Default SQL Server 2008 R2 Express Edition connection settings
Parameter Recommended Setting Notes
Default Instance MSSQLSERVER
Instance ID MSSQLSERVER
Authentication Mode Mixed Mode
SQL Server Authentication Enabled
Communication Protocol Configuration
Shared Memory Protocol Enabled
Named Pipes Protocol Enabled
TCP/IP Protocol Enabled
TCP/IP Protocol Default
Port
UDP/IP Protocol Default
Port
VIA Protocol Disabled
1433
1434
Required for remote access to SQL
Server.
Ensure no other applications are
using port 1433 and 1434. Ensure
a firewall is not blocking incoming
or outgoing traic on port 1433
and 1434.
Use the SQL Server Configuration Manager to manage Communication Protocol settings. This tool
is accessible from the Windows Start Menu once SQL Server 2008 R2 Express Edition is installed.
Page 85
© Mass Electronics Pty Ltd 2009Chapter 4 – Configuring eServer Communications
Page 86

eServer Setup and Site Installation Instructions
4-4 Setup eServer Security and Access Control
4-4.1 Overview
Information contained in this section includes configuration settings for security and access control
allowing eServer to facilitate secure connection with connecting eServer Client computers.
4-4.2 Configure eServer Security
Start the eServer program (it will minimize on the bottom right of your toolbar). Double-click on the
eServer icon on the toolbar to interrogate it. From the File Menu, select Load Configuration to select
and load your eServer Project, as illustrated below in Figure 4-16.
NOTE
Magellan saves the project by default as a .mag project. Use Magellan to export the project as a .mpk le, which is a
packaged version for delivery, including all the project's graphical objects. The .mpk le is the le to open using
eServer.
Figure 4-16: Load the Magellan project into eServer
To enable security for incoming connections, open the Preferences Menu, as illustrated below in
Figure 4-17.
Figure 4-17: Open eServer Project Preferences
Page 86 © Mass Electronics Pty Ltd 2009Edition 5.0 dated 07/01/2014
Page 87

eServer Setup and Site Installation Instructions
From the Preferences Menu, tick the Enable security for connection to eServer box and enter the
required Username and Password, as illustrated below in Figure 4-18 (if you don’t want extra eServer
Connection security, leave it blank).
Figure 4-18: Configure eServer Connection Security
4-4.3 Enabling eServer Access Control
If you want Access Control on your project, go to Access Control. Tick the Enable access control
for this project box, and enter the information, as illustrated below in Figure 4-19. If you don’t want
Access Control, leave it blank.
NOTE
If your Magellan Project has access control setup already, simply check the box and this information will be added
automatically.
Figure 4-19: Enable eServer Access Control
Page 87
© Mass Electronics Pty Ltd 2009Chapter 4 – Configuring eServer Communications
Page 88

eServer Setup and Site Installation Instructions
4-4.4 Test eServer Connectivity
Open Internet Explorer and in the Address Bar, enter your computer name or IP Address and the
HTML page name:
Example 1: http://[Computer Name]/index.htm
Example 2: http://[IP Address]/index.htm
If Security is set up on the project, you will be required to enter the authentication details, as
illustrated below in Figure 4-20.
Figure 4-20: Entering Connection Authentication Details
You will need to allow downloading of the Magellan ActiveX Control if prompted. Follow all
onscreen instructions to complete the test connection, and follow the steps outlined next in 4-5 -
Setup of eServer Client Computer.
NOTE
There is a an online troubleshooting guide included for any connecting eServer Client computers. This will help to
resolve common connection problems such as Internet Explorer Security Settings which may block the installation of
the Magellan ActiveX Control.
When you exit the project, Internet Explorer will still be open. Add the address to your Favourites so
you don’t need to enter it manually each time.
Page 88 © Mass Electronics Pty Ltd 2009Edition 5.0 dated 07/01/2014
Page 89

eServer Setup and Site Installation Instructions
4-5 Setup of eServer Client Computer
4-5.1 Overview
eServer 1.20 or greater enables automatic configuration of eServer Client computers. Upon
connection of an eServer Client Computer, eServer will automatically download and install the
necessary ancillary files to complete the setup.
NOTE
Ensure that you are logged into the eServer Client computer as a System Administrator , and have a functional
network connection to download and install necessary ancillary les from the eServer Host computer. Otherwise refer
to Section 5 - General Troubleshooting Tips.
These instructions detail the rst connection of an eServer Client computer to a eServer Host computer running
eServer 1.20 or greater. This will require the download and installation of the eServer Native Client and Magellan
ActiveX Control. You will only be required to download and install the these components the rst time a eServer Client
computer connects to an eServer Host computer running eServer 1.20 or greater, unless a new version is installed on the
eServer Host Computer.
4-5.2 Connection Steps
Follow all onscreen instructions during setup of connecting eServer Client computers. The most
common issue faced with initial connection of eServer Client computers is ensuring that security
settings are correct and that Internet Explorer is correctly shutdown and restarted when advised by
onscreen instructions.
Launch Internet Explorer. In the address bar, enter the specific DNS name or static IP address or
computer name of the eServer computer you are connecting to, as illustrated below in Figure 4-21.
Figure 4-21: Launch Internet Explorer and Connect to eServer Computer
Page 89
© Mass Electronics Pty Ltd 2009Chapter 4 – Configuring eServer Communications
Page 90
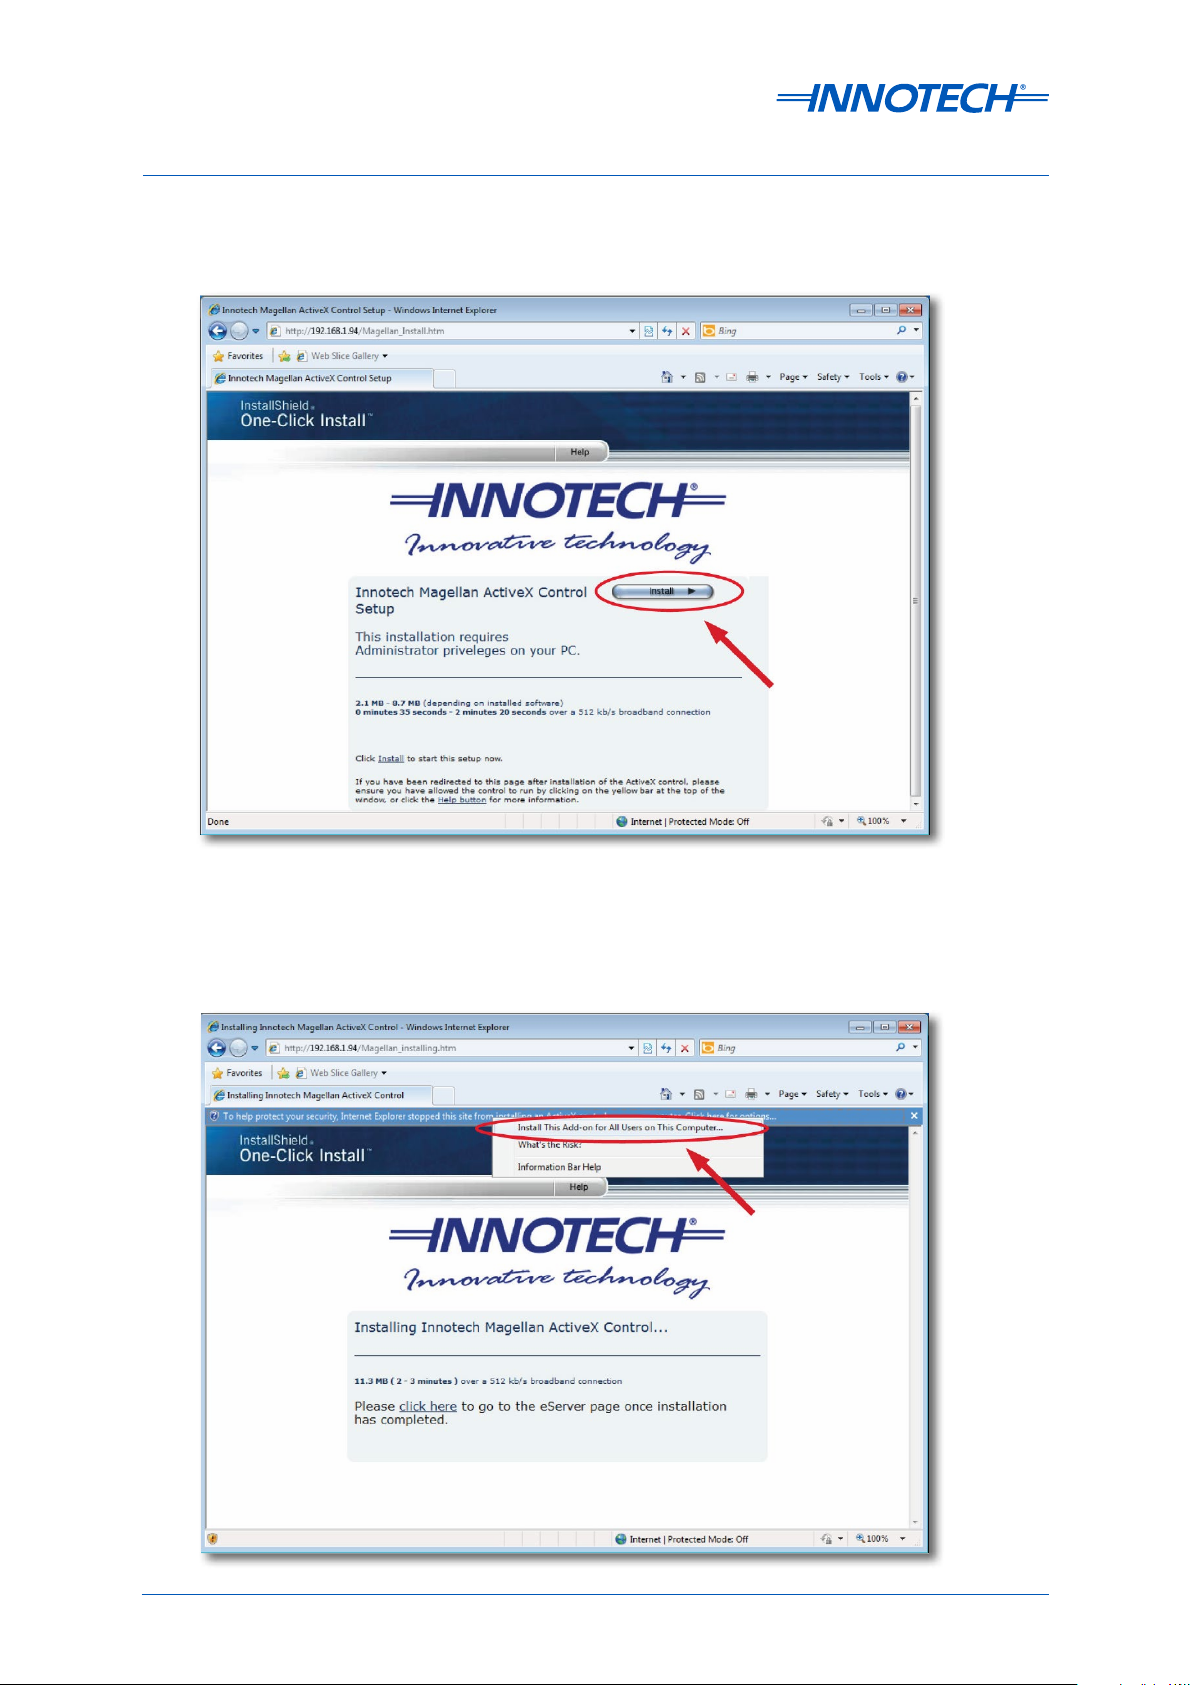
eServer Setup and Site Installation Instructions
From the Magellan ActiveX Control Setup page, click Install to install the updated Magellan ActiveX
control on the computer, as illustrated below in Figure 4-22.
Figure 4-22: Install Magellan ActiveX Control
Observe the Information Bar. Right-click on the notification and select Install This Add-on for All
Users on This Computer... from the popup menu, as illustrated below at Figure 4-23.
Figure 4-23: Internet Explorer Information Bar when Installing Magellan ActiveX Control
Page 90 © Mass Electronics Pty Ltd 2009Edition 5.0 dated 07/01/2014
Page 91

eServer Setup and Site Installation Instructions
From the Internet Explorer Security Warning, click Install to install the eServer Native Client, as
illustrated below in Figure 4-24.
Figure 4-24: Internet Explorer Security Warning when Installing eServer Native Client
Continue to connect to the eServer computer. Observe the Information Bar. Right-click on the
notification and select Run Add-on from the popup menu, as illustrated below at Figure 4-25.
NOTE
This will be the rst step for any computer which has previously been setup with the new eServer Native Client installer.
Figure 4-25: Internet Explorer Information Bar when Running Magellan ActiveX Control
Page 91
© Mass Electronics Pty Ltd 2009Chapter 4 – Configuring eServer Communications
Page 92

eServer Setup and Site Installation Instructions
From the Internet Explorer Security Warning, click Run to launch the Magellan ActiveX Control, as
illustrated below in Figure 4-26.
Figure 4-26: Launch the Magellan ActiveX Control
Observe the popup warning window. Click Yes to confirm connection to the eServer computer, as
illustrated below at Figure 4-27.
Figure 4-27: Confirm eServer connection
At this point the eServer project should be launched on the computer.
4-5.2.1 How to disable the Project Loading Confirmation
Follow the steps below to disable the loading confirmation window shown in Figure 4-27.
1. Open the index.htm file located in the MyWebPages folder of the eServer Computer in a text
editor such as Notepad.
2. Below the Control.DisplayHeight line add a new line with the text control.Silent = 1 as shown
below.
3. Save the file and when you load the project from the client computer, the confirmation should
no longer be displayed.
Figure 4-28: Index.htm file contents
Page 92 © Mass Electronics Pty Ltd 2009Edition 5.0 dated 07/01/2014
Page 93

eServer Setup and Site Installation Instructions
4-5.3 Setup Crystal Reports Soware on eServer Client Computer
4-5.3.1 Overview
eServer 1.20 or greater supports the generation of Crystal Reports. This requires the installation of
the Crystal Reports Web Components soware on the eServer Client computer.
NOTE
The Crystal Reports Web Components software is only required for eServer Client computers which are connecting to
an eServer 1.20 or greater and are requesting the generation of Crystal Reports. Note that the Crystal Reports Web
Components are necessary for the generation of Crystal Reports using the Innotech ATOM software.
Installation of the Crystal Reports Web Components can be done during site commissioning; alternatively for
computers which do not have the Crystal Reports Web Components installed, if required by eServer the user will be
guided through the download and installation process.
IMPORTANT
The Crystal Reports Web Components bundle is a 100MB le download. Installing this software will require being
logged in as a System Administrator.
4-5.3.2 Manual Installation of Crystal Reports Web Components
NOTE
Ensure to be logged into the computer as a System Administrator to install the Crystal Reports Web Components.
Select the Crystal Reports Web Components installation program, and double-click to launch. From
the welcome screen, click Next to commence installation, as illustrated below in Figure 4-29.
Figure 4-29: Launch the Crystal Reports Web Components installer
Page 93
© Mass Electronics Pty Ltd 2009Chapter 4 – Configuring eServer Communications
Page 94

eServer Setup and Site Installation Instructions
Choose the patch on the computer to install the Crystal Reports Web Components. It is
recommended to install to the default location. Click Next to confirm installation path, as illustrated
below in Figure 4-30.
Figure 4-30: Confirm Installation Location for Crystal Reports Web Components
Click Install to install Crystal Reports Web Components, as illustrated below in Figure 4-31.
Figure 4-31: Commence Installation of Crystal Reports Web Components
Page 94 © Mass Electronics Pty Ltd 2009Edition 5.0 dated 07/01/2014
Page 95

eServer Setup and Site Installation Instructions
Wait a few minutes while the soware is installed, as illustrated below at Figure 4-32 and Figure 4-33.
Figure 4-32: Crystal Reports Web Components Commencing Installation
Figure 4-33: Crystal Reports Web Components Continuing Installation
Once installation is complete, click Finish to exit the Crystal Reports Web Components installation
program, as illustrated below at Figure 4-34
Figure 4-34: Crystal Reports Web Components Installation Complete
Page 95
© Mass Electronics Pty Ltd 2009Chapter 4 – Configuring eServer Communications
Page 96

eServer Setup and Site Installation Instructions
4-5.3.3 Automated Installation of Crystal Reports Web Components
An eServer Client computer that does not have the Crystal Reports Web Component installed is still
able to connect and interact with an eServer Host computer. However, if a request if made by the
client to generate a Crystal Report, the eServer Client computer will be required to download and
install the required components from the Innotech website.
NOTE
Ensure to be logged into the computer as a System Administrator to install the Crystal Reports Web Components.
If an eServer client proceeds to generate a Crystal Report, the client is guided through the process
as described in this section. When the eServer Client requests the generation of a Crystal Report, an
information window appears on the screen advising that additional components must be installed,
as illustrated below at Figure 4-35.
Figure 4-35: Message Advising that Crystal Reports Web Components are needed
From the File Download window, select Run to download and run the soware, as illustrated below
at Figure 4-36. Alternatively, you may want to save to file to use the downloaded installer on another
eServer Client computer.
Figure 4-36: Select to Download the Crystal Reports Web Component
Page 96 © Mass Electronics Pty Ltd 2009Edition 5.0 dated 07/01/2014
Page 97

eServer Setup and Site Installation Instructions
Wait a few minutes for the file to download, as illustrated below at Figure 4-37. Once complete, follow
the steps outlined previously in 4-5.3.2 Manual Installation of Crystal Reports Web Components to
implement the soware setup.
Figure 4-37: Downloading the Crystal Reports Web Component
Once the Crystal Reports Web Components has been installed, relaunch Internet Explorer and
connect to the eServer Host computer to continue.
Page 97
© Mass Electronics Pty Ltd 2009Chapter 4 – Configuring eServer Communications
Page 98

eServer Setup and Site Installation Instructions
This page has been le intentionally blank.
Page 98 © Mass Electronics Pty Ltd 2009Edition 5.0 dated 07/01/2014
Page 99

eServer
SETUP AND SITE INSTALLATION INSTRUCTIONS
Chapter 5 - General Troubleshooting Tips
Page 100

eServer Setup and Site Installation Instructions
5-1 Introduction
This section provides general troubleshooting tips for some of the common problems that may
be encountered during the eServer setup and configuration process. Please contact your IT
department, or nearest Innotech oice for further information.
IMPORTANT
Always consult with the Site IT Administrator for any special requirements needed for a particular IT network
conguration.
5-1.1 Download and Install Unsigned ActiveX Controls
If the host computer running the eServer software and the client computer are on an isolated
intranet without internet access, the eServer client computer will not be able to download and install
the eServerNativeClient and ActiveX control from the host computer. Therefore you will have to
congure Internet Explorer so that it can download and install unsigned ActiveX controls. You can do
this by following the steps below.
Open Internet Options in Internet Explorer and click on Tools Internet Options. From the Security
tab in the Internet Options window, click on Local intranet and then click on Custom level... as
illustrated below in Figure 5-1.
Figure 5-1: Local Intranet Settings in Internet Explorer
Page 100 © Mass Electronics Pty Ltd 2009Edition 5.0 dated 07/01/2014
 Loading...