

InnoMax Hardside Fluid User Manual


The Benefits Of Fluid Support
The Benefits Of Fluid Support
Why a waterbed? Today, the waterbed enjoys wide acceptance among people in all age
brackets, income levels, and life styles. Waterbeds can be found in hospitals, rest homes,
hotels, and motels. As more and more people experienced waterbeds, the special benefits
became well known. Comfort, health, cleanliness, warmth, and more even support for a
restful sleep.
Waterbeds and medicine, who can benefit? The principles of flotation have been
documented to be especially helpful with many conditions, from arthritis to orthopedic
problems to home care of various ailments. The controlled heated waterbed can help by
offering a unique system of flotation. With this system, the body is uniformly supported by
the water, and the body weight is distributed more evenly over the surface. This eliminates
pressure on various parts of the body, the shoulders, small of back, hip, tail bone and heels.
Circulation is improved. The motion and warmth of the bed helps a person to relax,
provides comfort and helps in producing better sleep habits. The waterbed represents an
important advance in the care of patients, from helping to reduce pain to enhancing sleep
- the benefits of sleeping on water far outweigh that of a traditional mattress.
1
WATERBED ASSEMBLY INSTRUCTIONS
WATERBED ASSEMBLY INSTRUCTIONS
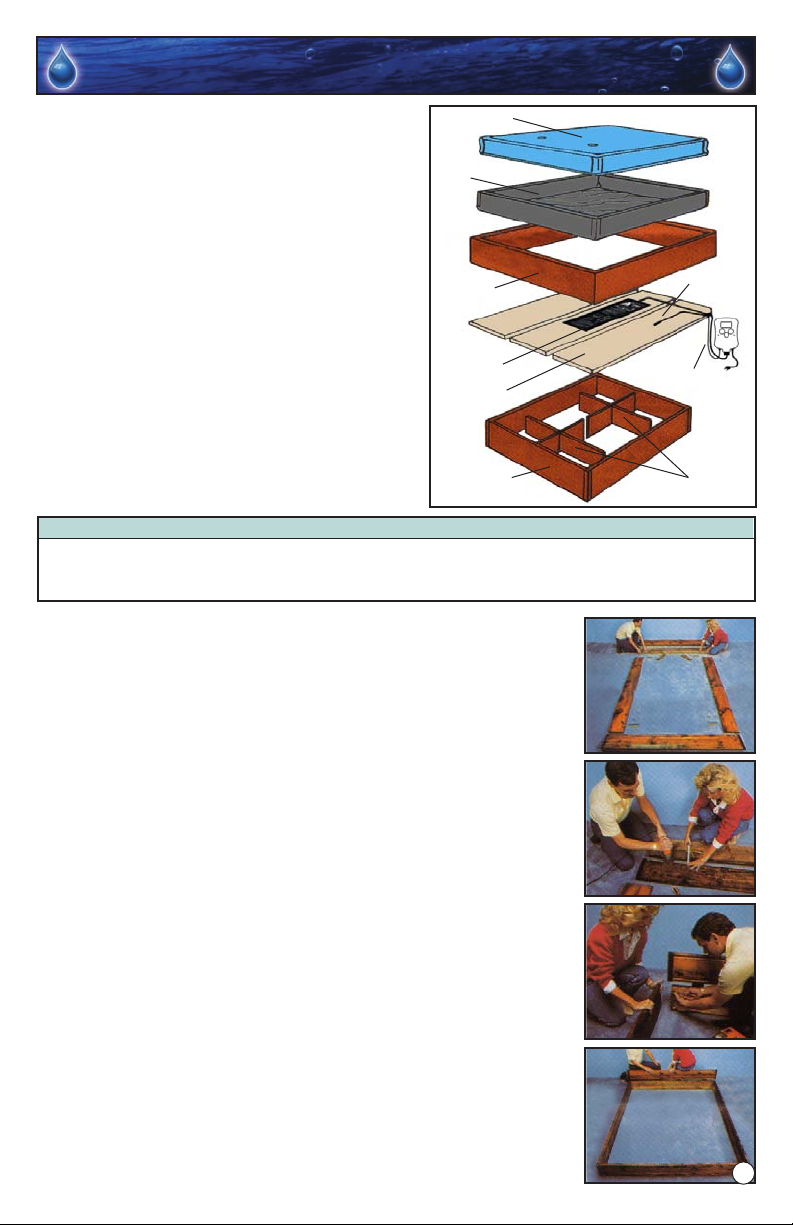
WARNING:
THE MATTRESS
Never leave any infant, or handicapped
child who cannot turn over, unattended
on this or any other adult mattress.
THE SAFETY
LINER
Infant or handicapped children can
suffocate in the face down position or
get caught between the mattress and
frame, headboard or wall and suffocate.
NOTE: A mattress pad and linens are
very important to your waterbed. Not
THE FRAME
TEMPERATURE
CONTROL PAD
DECKING
HEATER
CONTROL
THERMISTER
only will it make it more comfortable, but
it stops the waterbed from robbing you
of natural body heat as well as soaking
up normal body oils that can deteriorate
your mattress over time.
Dimensions King Queen S.S.
Interior dimensions 72W x 84L 60W x 84L 48W x 84L
Exterior dimensions (panel H.B.) 75W x 87L 63W x 87L 51W x 87L
Exterior dimensions (bkcse. H.B.) 75W x 93L 63W x 93L 51W x 93L
THE PEDESTAL
(Pedestal May Vary)
INTERNAL SUPPORTS
STEP 1: BUILD THE FRAME
Panel Headboard or No Headboard
A. Lay out your frame and hardware. Note that the footboard
and backboard have grooved bottoms. The grooves should
face in toward each other. Make sure all frame boards have
finished surfaces facing down on the floor.
B. If your frame includes a headboard, attach it to the back
frame board using the slats and screws provided.
REMEMBER: The groove in the frame board must face inward
once the headboard is secured.
C. Assemble the frame with the corner brackets and screws
provided. Note the finished top to the frame is facing up.
D. Position your assembled frame exactly where you want it in
your room. Now refer to Step 2 - Building the Pedestal.
2
BOOKCASE HEADBOARD
A. Lay out your frame and hardware. Note: The footboard and
backboard have grooved bottoms that should face inward
toward each other. Also the finished side of the frame boards
should face the floor.
B. Assemble the frame with the corner brackets and screws
provided. Note that the side frame boards extend past the
backboard.
bookcase headboard. A sure way to insure correct internal
spacing from head to foot is to use one of the deck boards (see
Step 2), as a measure. Lay the 1 piece of deck into the groove
at the foot, now bring the head frame board in between the side
rails until the deck fits in the groove. Mount at that point. Now
remove the deck board and go to Step 2 - Building the Pedestal.
C. Position your assembled frame exactly where you want it in
your room. This photo shows how the bookcase headboard will
be positioned on the extended frame A
NOT MOUNT NOW! Refer to Step #2.
The extended portion of the frame will support your
T A LATER TIME. DO
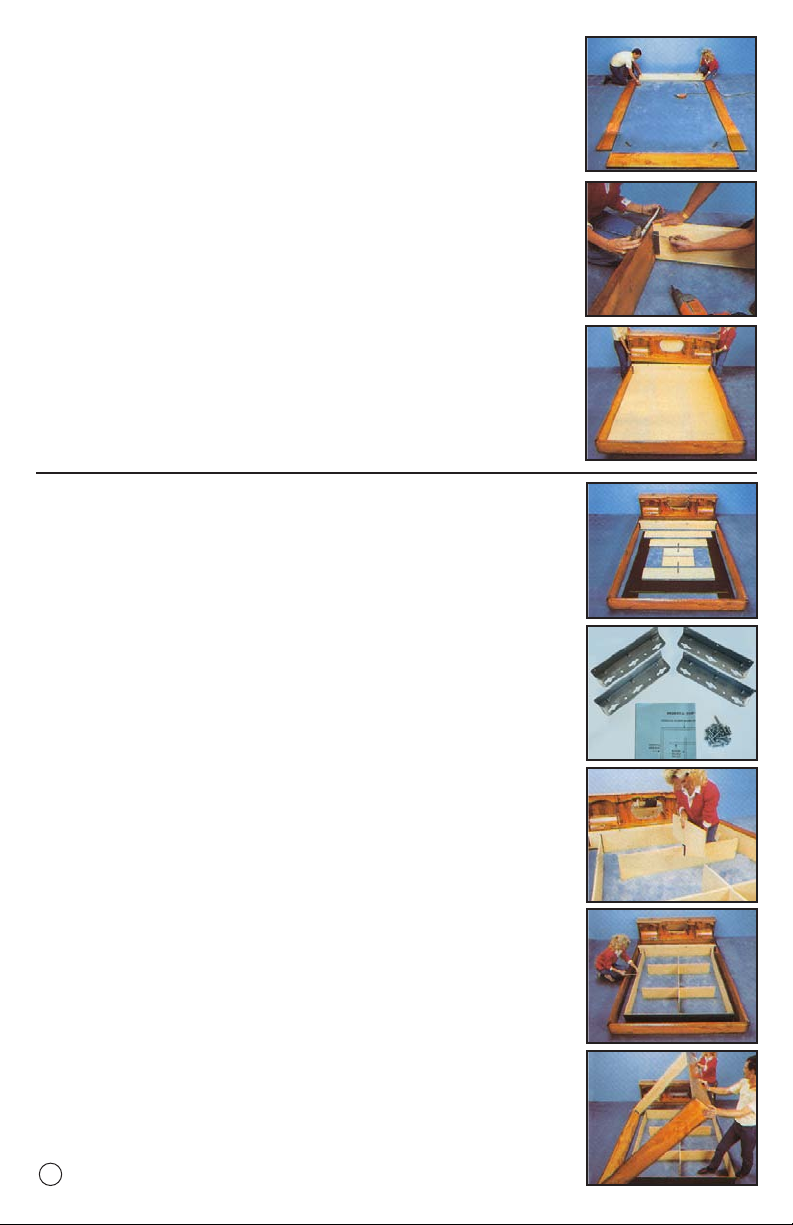
STEP 2: BUILDING THE PEDESTAL
Standard Pedestal (Riser Pedestal)
A. Lay out the pieces of your standard pedestal inside of the
frame as pictured. The finished sides when assembled are to
face outward.
B. Use the L-Brackets included to assemble the pedestal.
C. Assemble the two sets of the center support system, by
inserting the slotted pieces into one another
internal supports in the center of the pedestal, head to foot and
side to side. You may receive a center support system of one
longer piece and two shorter pieces that are slotted. Position
down the middle of the pedestal.
D. The pedestal should be accurately centered within the frame
in its final position.
E. Next, without letting it slide out of place, tilt the frame on to one
side.
Avoid moving the pedestal. After Step 3 you will lower the
frame onto the deck boards which will be mounted on the
pedestal.
3
. Position the two
 Loading...