

Page 1
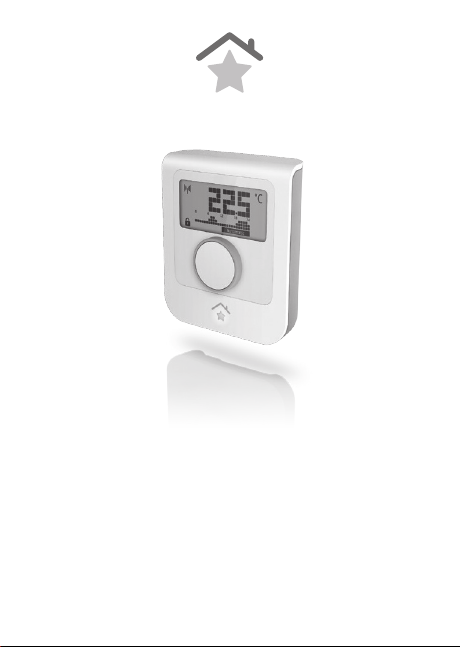
DE Raumthermostat Seite 2
EN Room thermostat Pa ge 12
FR Thermostat d’ambiance Page 22
NL Kamerthermostaat Pagina 32
Page 2
DE
Herzlichen Glückwunsch!
Mit dem innogy Raumthermostat haben Sie ein bewährtes Gerät für Ihr SmartHome erworben. Anhand dieser
Anleitung können Sie das Thermostat schnell und leicht
montieren und in Betrieb nehmen.
Noch schneller geht‘s allerdings über die innogy
SmartHome App, erhältlich per Download im App Store
von Apple oder im Google Play Store.
Besitzen Sie bereits die App, klicken Sie auf dem
Homescreen einfach auf das Plus-Zeichen oben
rechts und warten, bis das eingeschaltete Gerät
in der Suche auftaucht. Sie können aber auch unter
dem Menüpunkt Geräte das Raumthermostat
manuell einbinden – animierte Grafiken zu Montage
und Einbindung unterstützen Sie dabei.
Inhalt
Gefahrenhinweise 4
Funktion 5
Montieren und Einbinden 6
Bedeutung der Symbole 7
Funktionstest 8
Technische Daten 9
Entsorgungshinweis 10
Allgemeiner Hinweis 10
2
Page 3
Wir sind für Sie da!
Wenn Sie bei der Installation weitere Informationen oder
Unterstützung benötigen, haben wir für Sie die passende
Hilfe:
Online-Hilfe
https:/service.startsmarthome.de
Kostenfreie Hotline
T 0800 1234060
Allgemeine Fragen rund um innogy SmartHome
(Mo– Fr 8 –20 Uhr · Sa 8 –14 Uhr)
SmartHome Community
https://innogy.com/community
Facebook
https://facebook.com/innogysmarthome
Helfer vor Ort: innogy friends von mila
Erfahrene und geprüfte SmartHome User kommen zu Ihnen und helfen bei Montage und
Einrichten Ihre SmartHome
Weitere Infos: https://innogy.mila.com
DE
3
Page 4
DE
Gefahrenhinweise
Bei Sach- oder Personenschäden, die durch unsachgemäße Handhabung oder das Nichtbeachten der Sicherheitshinweise verursacht werden, übernehmen wir
keine Haftung. In solchen Fällen erlischt jeder Gewährleistungsanspruch! Für Folgeschäden übernehmen wir
keine Haftung!
Öffnen Sie das Gerät nicht. Es enthält keine durch den
Anwender zu wartenden Teile. Im Fehlerfall nehmen
Sie bitte Kontakt mit unserem Service auf.
Das Gerät nicht verwenden, wenn es von außen erkennbare Schäden z. B. am Gehäuse, an Bedienelementen
oder an den Anschlussbuchsen bzw. eine Funktionsstörung aufweist. Im Zweifelsfall das Gerät von unserem
Service prüfen lassen.
Aus Sicherheits- und Zulassungsgründen (CE) ist das
eigenmächtige Umbauen und/oder Verändern des Produkts nicht gestattet.
Betreiben Sie das Gerät nur in trockener, staubfreier
Umgebung, setzen Sie es keinem Einfluss von Feuchtigkeit, Vibrationen, ständiger Sonnen- oder anderer Wärmeeinstrahlung, Kälte und keinen mechanischen Belastungen aus.
Das Gerät ist kein Spielzeug, erlauben Sie Kindern
nicht, damit zu spielen. Lassen Sie das Verpackungsmaterial nicht achtlos liegen. Plastikfolien/-tüten, Styroporteile etc. könnten für Kinder gefährlich werden.
4
Page 5
Reinigen Sie das Gerät mit einem trockenen Tuch, das
bei starken Verschmutzungen leicht angefeuchtet sein
kann. Verwenden Sie zur Reinigung keine lösemittelhaltigen Reinigungsmittel. Achten Sie darauf, dass
keine Feuchtigkeit in das Geräteinnere gelangt.
Jeder andere Einsatz als in dieser Bedienungsanleitung
beschrieben ist nicht bestimmungsgemäß und führt zu
Gewährleistungs- und Haftungsausschluss. Dies gilt
auch für Umbauten und Veränderungen. Das Gerät ist
ausschließlich für den privaten Gebrauch gedacht.
Batterien dürfen niemals aufgeladen werden. Batterien
nicht ins Feuer werfen. Batterien nicht übermäßiger
Wärme aussetzen. Batterien nicht kurzschließen:
Explosionsgefahr!
Funktion
Mit dem Raumthermostat kann für jeden Raum eine individuelle Temperatur eingestellt werden. Dabei wird die
vom Thermostat gemessene Temperatur mit der für den
jeweiligen Raum eingestellten Zieltemperatur verglichen.
Über eine verschlüsselte Funkverbindung überträgt das
Raumthermostat die Temperaturdifferenz sicher an das
entsprechende Heizkörperthermostat bzw. die Ventilsteller der Fußbodenheizung.
DE
5
Page 6
DE
Montieren und Einbinden
Das Raumthermostat können Sie sowohl als Stand- als
auch als Wandgerät verwenden. Damit passt sich das
SmartHome Gerät harmonisch ihrer Wohnumgebung an.
1. Legen Sie die beiden mitglieferten Batterien (Typ
AA) polrichtig ins Batteriefach ein.
2. Raumthermostat als Standgerät verwenden:
Schieben Sie den mitgelieferten Standfuß in
die Aussparungen auf der Rückseite des
Geräts, bis er einrastet.
Raumthermostat als Wandgerät verwenden:
Bohren Sie ein Loch (Durchmesser: 5 mm) und
setzen den mitgelieferten Dübel hinein.
Befestigen Sie anschließend den Wandhalter
mit der beiliegenden Senkkopfschraube.
Schieben Sie das Thermostat auf den Halter.
3. Binden Sie das Gerät über die SmartHome App
(Plus-Zeichen oben rechts) in Ihr SmartHome ein.
Tipps und Tricks zur Montage finden Sie unter:
https://service.startsmarthome.de/raumthermostat/montage
6
Page 7
Bedeutung der Symbole
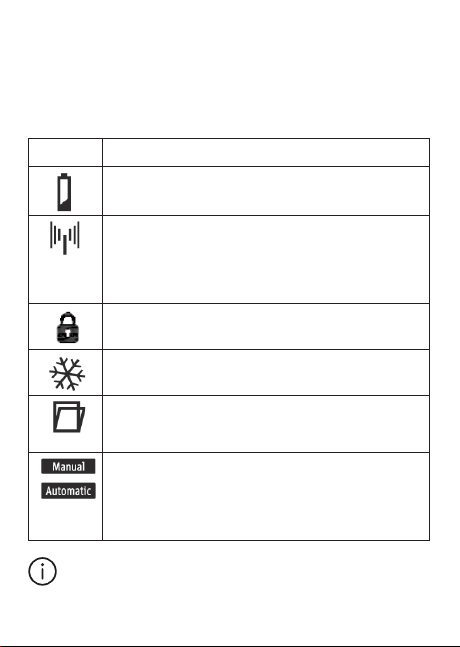
Im Display werden neben der gewünschten Zieltemperatur auch Statussymbole angezeigt. Sie informieren über
die aktuelle Situation des Raumthermostats.
Symbol Bedeutung
Zeigt an, dass die B atterien erschöpft sin d. Bitte w echseln Sie umgehend die Batterien.
Zeigt die Qualität des Funkempfangs an. Ein dauerhaftes
Leuchten signalisiert einen guten Empfang. Bei schwacher Funkübertragung blinkt das Symbol. Prüfen Sie in
diesem Fall Störeinflüss e (z. B. Mikrowelle, s chnurlose
Telefone) und bauliche Gegebenheiten vor Ort.
Die Kindersicherung ist eingeschaltet, manuelle Bedienung am Raumthermostat ist nicht mehr möglich.
Zeigt die Aktivierung des Frost schutzes an.
Das Symbol erscheint bei starkem Temperaturabfall (z. B.
durch ein offenes Fenster) oder wenn ein Tür-/Fenstersensor die Öffnung eines Fensters signalisiert.
Zeigt die aktiv ierte Betriebs art an. B ei der Betriebsart
„Manual“ werden zeitgesteuerte Szenarien ignoriert,
z.B. die automatische Absenkung der Raumtemperatur
bei Abwesenheit. Die Raumtemperatur wird stattdessen
auf den im Display angezeigten Wert geregelt.
Weitere Hinweise zu den Symbolen finden Sie unter:
https://service.startsmarthome.de/raumthermostat/symbole
DE
7
Page 8
DE
Funktionstest
Sobald Sie die Batterien eingelegt haben, erscheint auf
dem Display 21 °C als Standard-Zieltemperatur. Sie lässt
sich durch Drehen des Knopfs verändern. Drücken Sie den
Drehknopf für fünf Sekunden, wechselt die Anzeige kontinuierlich und zeigt die aktuelle Raumtemperatur, die
relative Luftfeuchtigkeit sowie die einstellbare Maximalund Minimaltemperatur an. Beenden Sie die Wechselanzeige durch Drücken des Drehknopfs.
Ist das Raumthermostat korrekt in Ihr SmartHome eingebunden, erscheint permanent das Funksymbol. Ein blinkendes Symbol signalisiert keine oder eine fehlerhafte
Einbindung. Binden Sie das Raumthermostat erneut ein.
Weitere Hinweise zum Test finden Sie unter:
https://service.startsmarthome.de/raumthermostat/test
Zurücksetzen in den Auslieferungszustand
1. Nehmen Sie eine Batterie aus dem Batteriefach.
2. Halten Sie den Drehknopf gedrückt und legen
dabei die Batterie wieder ein.
3. Halten Sie den Knopf weitere 10 Sekunden
gedrückt. Die LED leuchtet in dieser Zeit dauerhaft.
4. Wenn die LED fünfmal blinkt, lassen Sie den Knopf los.
Das Gerät ist nun zurückgesetzt und lässt sich neu einbinden.
8
Page 9

Technische Daten
Gerätebezeichnung WRT
Stromversorgung 2 x LR06 (Mignon/AA)
Batterielebensdauer bis zu 2 Jahre
Funkfrequenz 868,3 MHz
Max. Sendeleistung 10 mW
Freifeldreichweite ca. 100 m
Empfängerklasse SRD category 2
Wirkungsweise Typ 1
Verschmutzungsgrad 2
Display LCD
Schutzart IP20
Umgebungstemperatur +5 °C bis +35 °C
Abmessungen 17 x 117 x 32 mm (B x H x T)
Gewicht 120 g (ohne Batterien)
Technische Änderungen vorbehalten.
DE
9
Page 10
DE
Entsorgungshinweis
Gerät nicht im Hausmüll entsorgen!
Elektronische Geräte sind entsprechend der Richtlinie für Elektro- und Elektronik-Altgeräte über die
örtlichen Sammelstellen für Elektronik-Altgeräte zu
entsorgen. Verbrauchte Batterien gehören nicht in
den Hausmüll! Bitte entsorgen Sie diese in der örtlichen Batteriesammelstelle.
Allgemeiner Hinweis
Hiermit erklärt die eQ-3 AG, dass sich dieses Gerät in
Übereinstimmung mit den grundlegenden Anforderungen und den anderen relevanten Vorschriften der Richtlinie 2014/53/EU befindet. Die vollständige Konformitätserklärung finden Sie unter:
www.eq-3.de/service/downloads.html
eQ-3 AG,
Maiburger Str. 29
26789 Leer
10
Page 11

4. Ausgabe Deutsch 03/2019
Dokumentation © 2011-2019 innogy SE, Deutschland.
Alle Rechte vorbehalten. Für Fehler technischer oder
drucktechnischer Art und ihre Folgen übernehmen wir
keine Haftung. Alle Warenzeichen und Schutzrechte werden anerkannt.
Änderungen im Sinne des technischen Fortschritts können ohne Vorankündigung vorgenommen werden.
innogy SE
Freistuhl 7
44137 Dortmund
Deutschland
DE
11
Page 12
EN
Congratulations!
With the innogy room thermostat you have purchased a
proven device for your SmartHome. These instructions
will help you mount and commission the thermostat
quickly and easily.
Even faster is the innogy SmartHome App, available for
download from Apple‘s App Store or the Google Play
Store.
If you already own the app, simply click on the plus
sign in the upper right corner of the Home screen
and wait for the device to show up in the search.
However, you can also manually integrate the room
thermostat under the menu item Devices – animated
graphics formounting support you in this.
Content
Safety note 14
Function 15
Installing and integrating 16
Meaning of the symbols 17
Function test 18
Resetting the device to factory settings 18
Technical data 19
Information about disposal 20
General information 20
12
Page 13
We are here for you!
If you require further information or support during
installation, we have the perfect help for you:
Online help
https:/service.startsmarthome.de
Free Hotline
T 0800 1234060
General questions about innogy SmartHome
(Mo– Fr 8 o‘clock - 20 o‘clock
Sa 8 o‘clock - 14 o‘clock)
SmartHome Community
https://innogy.com/community
Facebook
https://facebook.com/innogysmarthome
On site helper: innogy friends of mila
Experienced and qualified SmartHome users
come to you and help you install and integrate
your SmartHome.
Further information: https://innogy.mila.com
EN
13
Page 14
EN
Safety note
We do not assume any liability for damage to property
or personal injury caused by improper use or the failure
to observe the safety instructions. In such cases, any
warranty claim is invalid. We do not assume any liability
for any resulting damages.
Do not open the device. It does not contain any parts
to be serviced by the user. If a fault occurs, please contact our Customer Service.
Do not use the device if you can see from the outside
that it is damaged , e.g. on the housing, controls or
connection sockets, or if it malfunctions. If you have
any doubts, have the device checked by our Customer
Service.
For safety and approval reasons (CE), unauthorised
modifications/changes to the product are not permitted.
Operate the device in a dry, dust-free environment
only. Do not expose it to moisture, vibrations, constant
heat from sunlight or other sources, cold or mechanical
stress.
The device is not a toy, so do not let children play with
it. Do not leave the packaging lying around. Plastic film
and bags, polystyrene parts and so on can be dangerous in the hands of children.
14
Page 15

Clean the device with a dry, linen cloth, which may be
slightly moistened in case of stubborn dirt. Do not use
any solvent-based cleaning agents. Make sure that no
moisture gets inside the device.
Any use other than that described in these operating
instructions is not intended and will result in exclusion
of warranty and liability. This also applies to modifications and alterations. The device is intended exclusively for private use.
The batteries must never be charged. Do not dispose
of batteries in a fire. Do not expose batteries to excessive heat. Do not short-circuit batteries. Risk of explosion!
Function
The room thermostat can be used to set an individual
temperature for every room. During this process, the
temperature measured by the thermostat is compared
with the target temperature that is set for the respective
room.
The room thermostat securely transmits the temperature
difference to the corresponding radiator thermostat or
the valve actuators of the underfloor heating system via
an encrypted radio connection.
EN
15
Page 16
EN
Installing and integrating
The room thermostat can be used both as a stand-alone
unit and as a wall- mounted unit. Thus the SmartHome
device adapts harmoniously to your living environment.
1. Insert the two supplied batteries (type AA) into the
battery compartment, ensuring the correct polarity.
2. Using the room thermostat as a free-standing device:
Slide the supplied stand into the recesses
found on the rear of the device until it clicks
into place.
Using the room thermostat as a wall-mounted device:
Drill a hole (diameter: 5 mm) and insert the
supplied dowels.
Then attach the wall bracket to the wall using
the supplied countersunk screw.
Place the thermostat on the bracket.
3. Integrate the device in your SmartHome using the
SmartHome app (plus sign in the upper right corner).
You can find tips and tricks for installation at:
https://service.startsmarthome.de/roomthermostat/installation
16
Page 17
Meaning of the symbols
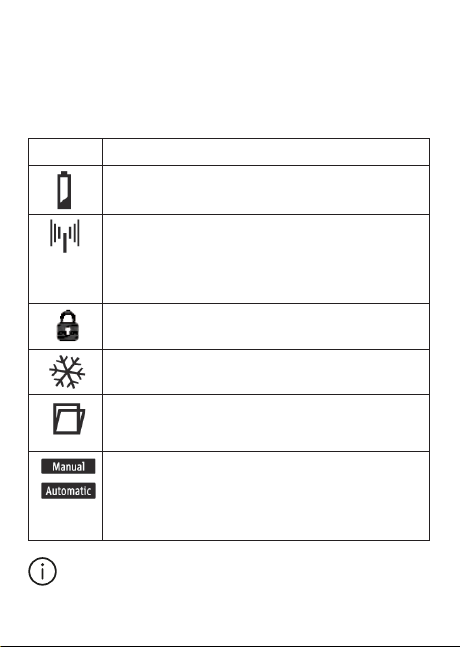
Status symbols appear in the display alongside the desired target temperature. They provide information on the
room thermostat’s current status.
Symbol Meaning
Shows t hat the batteries are worn out. Please change the
batteries immediately.
Displays the quality of th e radio reception. A continuo us
light signals good reception. The symbol flashes if the
radio transmission is weak. In this case, check disturbances (e.g. microwave s, cordle ss telephones) and the structural conditions.
If parental controls are enabled, manual operation of the
room thermostat will no longer be possible.
Shows that frost protection has been activated.
The symbol appears when the temperature drops considerably (e.g. due to a n open window) or when a door/
window sensor signals the opening of a window.
Shows which operating mode has been activated. In
“manual” mode, ti me-controlled scenarios, suc h as an
automatic reduction in the room temperature during
periods of absence, are ignored. The room temperature
is instead set to the value shown on the display.
For more information on the symbols, see:
https://service.startsmarthome.de/roomthermostat/symbols
EN
17
Page 18
EN
Function test
Once you have inserted the batteries, 21°C will appear on
the display as the standard target temperature. Turn the
control knob to change this. Press the control knob for
five seconds and the display will switch continuously,
showing the current room temperature, the relative humidity and the adjustable maximum and minimum temperatures. Press the control knob to exit the adjustment display.
If the room thermostat has been correctly integrated in
your SmartHome system, the radio symbol will appear
permanently. A flashing symbol indicates that the integration has failed or been interrupted. Integrate the room
thermostat again.
For more information on the test, see:
https://service.startsmarthome.de/roomthermostat/test
Resetting the device to factory settings
1. Take a battery out of the battery compartment.
2. Press and hold the control knob and re-insert the
battery into the device.
3. Press and hold the control knob for a further ten
seconds. The LED will light up continuously during
this period.
4. If the LED flashes five times, release the control knob.
The device has now been reset and can be integrated again.
18
Page 19

Technical data
Name of device WRT
Power supply 2 x LR06 (Mignon/AA)
Battery service life up to 2 year
Radio frequency 868,3 MHz
Max. transmission power 10 mW
Open air range approx. 100 m
Receiver class SRD category 2
Mode of operation Typ e 1
Contamination level 2
Display LCD
Protection class IP20
Ambient temperature +5 °C to +35 °C
Dimensions 17 x 117 x 32 mm (W xH xD )
Weight 120 g (excluding batteries)
Technical changes reserved.
EN
19
Page 20
EN
Information about disposal
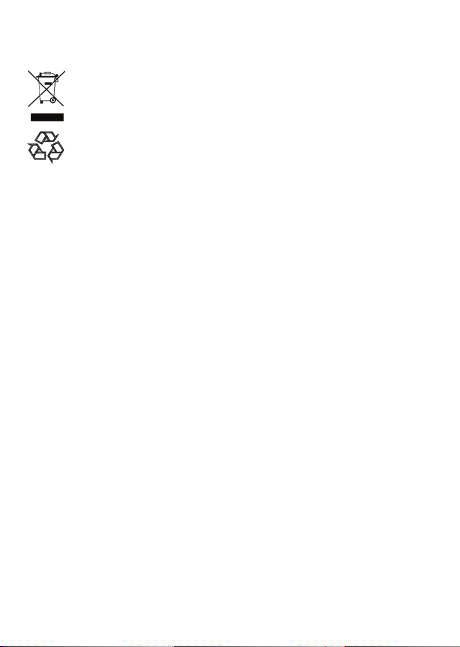
Do not dispose of the device in the household
waste!
Electronic devices are to be disposed of via the
local collection points for old electronic devices in
accordance with the Waste Electrical and Electronic
Equipment Directive. Used batteries do not belong
in the household waste! Please take them to your
local battery collection point for disposal.
General information
eQ-3 Entwicklung GmbH hereby declares that this device
meets the basic requirements and the other relevant regulations laid down in Directive 2014/53/EC. You can find
the complete declaration of conformity at:
www.eq-3.de/service/downloads.html
eQ-3 AG,
Maiburger Str. 29
26789 Leer
Germany
20
Page 21

4th English edition 03/2019
Documentation © 2011-2019 innogy SE, Germany.
All rights reserved. We accept no liability for errors of a
technical or typographical nature or their consequences.
All trademarks and property rights are recognised.
Changes in response to technical progress can be made
without prior notice.
innogy SE
Freistuhl 7
44137 Dortmund
Germany
EN
21
Page 22
FR
Félicitations!
Avec le thermostat d’ambiance innogy, vous avez acheté
un appareil éprouvé pour votre SmartHome. Ces instructions vous aideront à monter et à mettre en service le
capteur rapidement et facilement.
Mais c’est encore plus rapide avec l’innogy SmartHome
App, disponible en téléchargement sur l’App Store
d’Apple ou le Google Play Store.
Si vous possédez déjà l‘application, cliquez simplement sur le signe plus dans le coin supérieur droit
de l‘ écran d‘accueil et attendre que l’appareil soit
allumé dans la recherche. Mais vous pouvez également intégrer manuellement le thermostat d’ambiance sous le point de menu Appareils – des graphiques animés pour le montage et l‘intégration vous
y aident.
Content
Remarques relatives aux risques potentiels 24
Fonction 25
Installation et intégration 26
Signification des symboles 27
Test de fonctionnement 28
Rétablissement de l‘état à la livraison 28
Caractéristiques techniques 29
Remarque relative à l’élimination 30
Généralités sur la télécommande 30
22
Page 23
Nous sommes là pour vous !
Si vous avez besoin d’autres informations ou d’aide pour
l’installation, nous mettons à votre disposition l’aide
nécessaires :
Aide en ligne
https:/service.startsmarthome.de
Hotline gratuite
T 0800 1234060
Questions générales sur innogy SmartHome
(Lun – Ven 8 h - 20 h · Sam 8 h - 14 h)
SmartHome Community
https://innogy.com/community
Facebook
https://facebook.com/innogysmarthome
Un assistant sur place : innogy friends de
mila
Des utilisateurs expérimentés et certifiés
SmartHome viennent chez vous et vous aident
pour le montage et l’installation de votre
SmartHome.
Plus d’informations : https://innogy.mila.com
FR
23
Page 24
FR
Remarques relatives aux risques potentiels
Nous excluons toute responsabilité en cas de préjudices matériels ou corporels liés à un maniement non
conforme ou au non-respect des remarques relatives à
la sécurité. Dans ces cas, tout droit à garantie expirera
! Nous déclinons toute responsabilité en cas de dommages consécutifs !
N’ouvrez pas l’appareil. Il ne contient aucune pièce
pouvant faire l’objet d’un remplacement ou d’une
maintenance par l’utilisateur. En cas de défaut ou d’erreur, veuillez contacter notre SAV.
N’utilisez pas l’appareil s’il présente des dommages
visibles de l’extérieur (au niveau du boîtier, des éléments de commande ou des prises de raccordement,
par exemple) ou un dysfonctionnement. Dans le doute,
faites contrôler l’appareil par notre SAV.
Pour des raisons de sécurité et d’autorisation (CE), les
transformations et/ou modifications apportées de
manière arbitraire au produit ne sont pas permises.
N’utilisez l’appareil que dans un environnement sec et
exempt de poussières. Ne l’exposez pas à l’humidité,
aux vibrations, au soleil ou à toute autre source permanente de chaleur ou de froid ou à des contraintes mécaniques.
L’appareil n’est pas un jouet. Ne laissez pas des enfants
jouer avec. Ne laissez pas traîner les matériaux d’emballage. Les films et sacs en plastique et le polystyrène,
24
Page 25

entre autres, pourraient se transformer en jouets dangereux pour les enfants.
Nettoyez l’appareil avec un tissu en lin sec, que vous
pouvez légèrement humidifier en cas d’encrassement
important. N’utilisez aucun produit de nettoyage
contenant des solvants pour le nettoyage. Veillez à ce
qu’aucune humidité ne pénètre dans l’appareil.
Toute autre utilisation que celle décrite dans les présentes instructions de service n’est pas conforme à la
destination du produit et entraîne une décharge de
responsabilité et une exclusion de garantie. Ceci s’applique également pour les transformations et les modifications. L’appareil est exclusivement destiné à un
usage privé.
Ne jamais recharger les piles. Ne pas jeter les piles dans
le feu. Ne pas exposer les piles à une chaleur trop forte.
Ne pas court-circuiter les piles. Risque d’explosion !
Fonction
Pour ce faire, la température mesurée par le thermostat
est comparée avec la température de consigne réglée
pour la pièce concernée. Le thermostat d’ambiance transmet en toute sécurité la différence de température au
thermostat du radiateur correspondant ou aux actionneurs de vanne de l’installation de chauffage par le sol
via une liaison radio cryptée.
FR
25
Page 26
FR
Installation et intégration
Le thermostat d’ambiance peut être utilisé aussi bien
comme appareil autonome que comme appareil mural.
Ainsi, l’appareil SmartHome s’adapte harmonieusement à
votre environnement de vie.
1. Placez les deux piles (type AA) fournies dans le compartiment des piles en veillant à respecter la polarité.
2. Utilisation du thermostat d’ambiance comme appareil sur pied :
Faites glisser le pied fourni dans les encoches
situées au dos de l’appareil jusqu’à encli quetage.
Utilisation du thermostat d’ambiance comme appa-
reil mural :
Percez un trou de 5 mm de diamètre et insérez
la cheville fournie.
Fixez ensuite le support mural à l’aide de la vis
à tête fraisée fournie.
Glissez le thermostat sur le support.
3. Intégrez l’appareil dans SmartHome par le biais de
l’application (signe plus en haut à droite).
Vous trouverez des conseils et des astuces pour le
montage sur le site :
https://service.startsmarthome.de/thermostat-ambiance/installation
26
Page 27
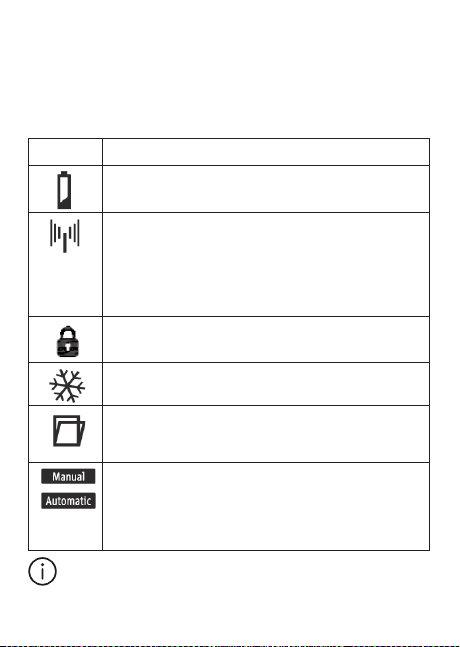
Signification des symboles
Sur l’écran, des symboles de statut sont affichés à côté
de la température de consigne souhaitée. Ils vous informent de la situation actuelle du thermostat d’ambiance.
Symbol Signification
Signale que les piles sont épuisées. Changez immédiatement les piles.
Indique la qualité de la réce ption radio. Si ce symbole est
allum é en permanence, la ré ception e st bonne. Si la
transmission radio est faible, le symbole clignote. Dans
ce cas, vérifiez s’il y a des sources de perturb ations (par
exemple micro-ondes ou téléphones sans fil) et des obstacles dus à la configuration du bâtiment.
La sécurité enfant est activée. L a command e manuelle
sur le thermostat d’ambiance n’est plus possible.
Signale l’activation de l’antigel.
Le symbole apparaît lorsque la température baisse considérablement ou lorsqu‘une capteur de porte/fenêtre
signale l‘ouverture d‘une fenêtre.
Signale le mode sélectionné. En mode de fonctionnement « Manual », les scénarios temporisés sont ig norés
(par exemple la baisse automatique de la température de
la pièce en cas d’absence). La températu re de la pièce est
alor s réglée sur la valeur affichée à l’écran.
Pour plus d‘informations sur les symboles, voir :
https://service.startsmarthome.de/thermostat-ambiance/symboles
FR
27
Page 28
FR
Test de fonctionnement
Dès que vous avez inséré les piles, la valeur 21 °C s’affiche comme température de consigne standard sur
l’écran. Elle peut être modifiée en tournant le bouton.
Appuyez sur le bouton variateur pendant cinq secondes.
L’affichage défile en continu et bascule entre la température actuelle de la pièce, l’humidité relative et les températures maximale et minimale qui peuvent être réglées.
Appuyez sur le bouton variateur pour quitter cet affichage.
Si le thermostat d’ambiance est correctement intégré
dans votre SmartHome, le symbole radio reste affiché en
permanence. Un symbole qui clignote signale que l’intégration n‘a pas eu lieu ou qu’elle n‘a pas été effectuée
correctement. Intégrez à nouveau le thermostat d’ambiance.
Pour plus d‘informations sur le test, voir :
https://service.startsmarthome.de/thermostat-ambiance/test
Rétablissement de l‘état à la livraison
1. Retirez une pile du compartiment des piles.
2. Maintenez enfoncé le bouton variateur et insérez
de nouveau la pile.
3. Maintenez le bouton enfoncé pendant encore 10
secondes. Pendant ce laps de temps, la LED
demeure allumée en permanence.
4. Lorsque le voyant LED clignote 5 fois, relâchez le bouton.
L’appareil a été réinitialisé et peut être de nouveau intégré.
28
Page 29

Caractéristiques techniques
Désignation de l’appareil WRT
Alimentation courant 2 x LR06 (Mignon/AA)
Durée de vie de la pile 2 ans maximum
Fréquence radio 868,3 MHz
Puissance max. à l’émission 10 mW
Portée en champ libre env. 100 m
Classe de réception SRD category 2
Fonctionnement Type 1
Degré de pollution
Display LCD
Mode de protection IP20
Température ambiante +5 °C à +35 °C
Dimensions 17 x 117 x 32 mm (l xh xp)
Poids 120 g (sans piles)
Sous réserve de modifications techniques.
2
FR
29
Page 30
FR
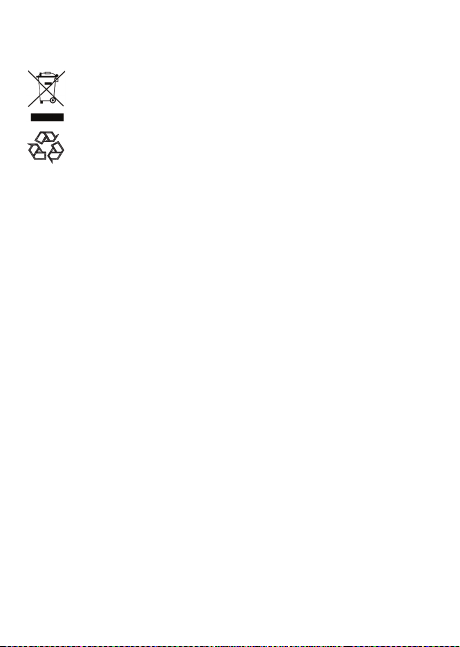
Remarque relative à l’élimination
Ne pas jeter cet appareil avec les ordures ménagères !
Tout appareil électronique doit être éliminé en
conformité avec la Directive relative aux déchets
d’équipement électriques et électroniques. Il devra
donc être déposé dans un centre de récupération
local pour déchets électroniques. Ne pas jeter les
piles à la poubelle mais les porter à l’endroit de la
collecte locale!
Généralités sur la télécommande
La société eQ-3 Entwicklung GmbH déclare que le présent appareil est conforme aux critères fondamentaux et
autres règles applicables de la Directive 2014/53/CE.
Vous trouverez la déclaration de conformité intégrale sur
le site :
www.eq-3.de/service/downloads.html
eQ-3 AG,
Maiburger Str. 29
26789 Leer
Allemagne
30
Page 31

4ème édition française 03/2019
Documentation © 2011-2019 innogy SE, Allemagne.
Tous droits réservés. Nous déclinons toute responsabilité
pour les erreurs typographiques ou d’impression ainsi
que pour les conséquences en découlant. Nous reconnaissons tous les droits de protection et les marques.
Sous réserve de modifications sans préavis dues à l’évolution technique.
innogy SE
Freistuhl 7
44137 Dortmund
Allemagne
FR
31
Page 32
NL
Gefeliciteerd!
Met de innogy kamerthermostaat heeft u een bewezen
apparaat voor uw SmartHome aangeschaft. Deze instructies helpen u om de sensor snel en eenvoudig te monteren en in bedrijf te stellen.
Maar het gaat nog sneller met de innogy SmartHome
App, te downloaden in de App Store van Apple of de
Google Play Store.
Als u de app al in uw bezit heef t, klikt u gewoon op
het plusteken in de rechterbovenhoek van het startscherm en wacht tot het apparaat is ingeschakeld
in de zoektocht. U kunt de kamerthermostaat echter ook
handmatig integreren onder het menupunt Apparaten – geanimeerde grafieken voor de montage en
integratie ondersteunen u hierbij.
Content
Gevarenaanduidingen 34
Functie 35
Monteren en aansluiten 36
Betekenis van de symbolen 37
Functietest 38
Reset naar fabrieksinstellingen 38
Technische gegevens 39
Verwijderingsinstructies 40
Algemene informatie 40
32
Page 33
Wij zijn er voor u!
Als u tijdens de installatie meer informatie of ondersteuning nodig heeft, hebben wij de juiste hulp voor u:
Online hulp
https:/service.startsmarthome.de
Gratis hotline
T 0800 1234060
Algemene vragen over innogy SmartHome
(Ma - Vrij 8 uur - 20 uur · Zat 8 uur - 14 uur)
SmartHome Community
https://innogy.com/community
Facebook
https://facebook.com/innogysmarthome
Hulp ter plaatse: innogy friends van mila
Ervaren en geverifieerde smarthome gebruikers
komen naar u toe en helpen u bij de montage en
het opzetten van uw smarthome.
Meer informatie: https://innogy.mila.com
NL
33
Page 34
NL
Gevarenaanduidingen
Wij aanvaarden geen aansprakelijkheid voor materiële
of persoonlijke schade veroorzaakt door onoordeelkundige behandeling of niet-naleving van de veiligheidsinstructies. In dergelijke gevallen vervalt iedere
garantieclaim! Wij aanvaarden geen aansprakelijkheid
voor gevolgschade!
Open het apparaat niet. De apparaten bevatten geen
onderdelen die onderhouden moeten worden. Neem
bij een fout contact op met onze serviceafdeling.
Gebruik het apparaat niet als het is blootgesteld aan
externe schade, bijv. aan de behuizing, bedieningselementen, verbindingsstukken of als er een functiestoring is. In geval van twijfel kunt u het apparaat door
onze serviceafdeling laten controleren.
Om veiligheidsoverwegingen en toelatingsgronden
(CE) is het ongeoorloofd ombouwen en/of veranderen
van het product niet toegestaan.
Gebruik het apparaat alleen in een droge, stofvrije
omgeving en stel het niet bloot aan vocht, trillingen,
permanent zonlicht of andere warmtestraling, kou of
mechanische belastingen.
Het apparaat is geen speelgoed, laat kinderen er niet
mee spelen. Laat het verpakkingsmateriaal niet onbeheerd achter. Plasticfolie of -zakken, piepschuim e.d.
kunnen voor kinderen gevaarlijk speelgoed worden.
34
Page 35
Reinig het apparaat met een droge doek die bij sterke
vervuiling eventueel licht bevochtigd kan worden.
Gebruik bij het reinigen geen oplosmiddelen. Zorg
ervoor, dat er geen vocht in het binnenste van het
apparaat komt.
Elk ander gebruik dan zoals beschreven in deze handleiding is niet conform de bestemming en resulteert in
de uitsluiting van garantie en aansprakelijkheid. Dit
geldt ook voor het ombouwen en veranderen. Het
apparaat is uitsluitend bedoeld voor privé gebruik.
Laad de batterijen nooit op. Werp de batterijen nooit in
open vuur. Stel de batterijen niet bloot aan overmatige
hitte. Zorg ervoor dat de batterijen niet kortsluiten. Er
bestaat explosiegevaar!
Functie
De kamerthermostaat kan worden gebruikt om een individuele temperatuur voor elke ruimte in te stellen. De
door de thermostaat gemeten temperatuur wordt vergeleken met de streeftemperatuur voor de desbetreffende
ruimte.
De kamerthermostaat geeft het temperatuurverschil via
een gecodeerde radioverbinding veilig door aan de
betreffende radiatorthermostaat of de ventielaandrijvingen van het vloerverwarmingssysteem.
NL
35
Page 36
NL
Monteren en aansluiten
De kamerthermostaat kan zowel als stand-alone unit als
wandmontage unit worden gebruikt. Zo past het
toestel zich harmonieus aan uw woonomgeving aan.
1. Leg de twee meegeleverde batterijen (type AA) met
de juiste polariteit in het batterijvakje.
2. Gebruik de ruimtethermostaat als vaste apparatuur:
Plaats de meegeleverde standaard in de
uitsparingen aan de achterkant van het appa raat totdat hij vastklikt.
Gebruik de ruimtethermostaat voor wandgebruik:
Boor een gat (diameter: 5 mm) en steek de
meegeleverde plug erin.
Bevestig vervolgens de wandhouder met de
bijgeleverde schroef met verzonken kop.
Schuif de thermostaat op de houder.
3. Sluit het apparaat aan op uw smarthome met behulp
van de smarthome app (plus-teken bovenaan rechts).
Voor installatietips en trucs, zie:
https://service.startsmarthome.de/kamerthermostaat/montage
36
Page 37
Betekenis van de symbolen
Naast de gewenste doeltemperatuur worden in het display ook statussymbolen weergegeven. Zij informeren
over de actuele situatie van de kamerthermostaat.
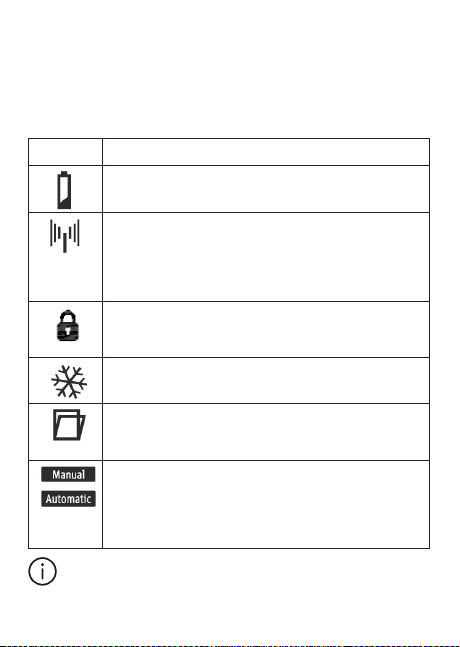
Symbol Betekenis
Geeft aan dat de batterijen op zijn. Vervang onmiddellijk
de batterijen.
Geef t de kwalite it van de radio- ontvangst aan. Een aanhoudend licht geeft een goede ontvangst aan. Bij een
zwak radiosignaal knippert het symbool. Controleer in dit
geval op storingen (bijv. magnetrons, draadloze telefoons) en structurele omstandigheden ter plaatse.
Het kinderslot is ingeschakeld en een handmatige
bediening van de thermostaat van d e kamer is niet meer
mogelijk.
Toont de activering van de vorstbescherming.
Het symbool verschijnt wanneer de temperatuur aanzienlijk daalt (bijv. door een ope n raam) of wanneer een de ur/
raamsensor het openen van een raam signaleert.
Geef t de actieve modus aan. In de „manuele“ modus worden de tijdgestuurde scenario‘ s genegeerd, bijvoorbeeld
bij afwezigheid de automatische verlaging van de kamertemperatuur. De kamertemperatuur wordt dan op de in
het display aangegeven waarde geregeld.
Voor meer informatie over symbolen, zie:
https://service.startsmarthome.de/kamerthermostaat/symbolen
NL
37
Page 38
NL
Functietest
Zodra u de batterijen er hebt ingelegd verschijnt op het
display 21°C standaard streeftemperatuur. Deze kan worden veranderd door aan de knop te draaien. Druk vijf
seconden op de draaiknop, het display verandert voortdurend en toont de huidige ruimtetemperatuur, de relatieve vochtigheid en de instelbare maximale en minimale
temperatuur. Schakel de variabele wisselstand uit door
op de draaiknop te drukken.
Als de ruimtethermostaat correct in uw smarthome is
geïntegreerd, verschijnt het radiosymbool aanhoudend.
Een knipperend symbool geeft geen of een defecte aansluiting aan. Sluit de thermostaat weer aan.
Voor meer informatie over de test, zie:
https://service.startsmarthome.de/kamerthermostaat/test
Terugzetten naar de fabrieksinstelling
1. Haal een batterij uit het batterijvakje.
2. Houd de draaiknop ingedrukt vast en leg de batterij er weer in.
3. Houd de knop nog 10 seconden ingedrukt. De LED
licht gedurende deze tijd aanhoudend op.
4. Wanneer de LED vijf keer knippert kunt u de knop
loslaten.
Het apparaat is nu gereset en kan opnieuw worden geïntgrerd.
38
Page 39

Technische gegevens
Naam van het apparaat WRT
Stroomvoorziening 2 x LR06 (Mignon/AA)
Levensduur batterij maximaal 2 jaar
Radiofrequentie 868,3 MHz
Max. zendvermogen 10 mW
Bereik in het vrije veld env. 100 m
Ontvangerklasse SRD category 2
Werking Typ e 1
Vervuilingsgraad
Display LCD
Beschermingsgraad IP20
Omgevingstemperatuur +5 °C tot +35 °C
Afmetingen 17 x 117 x 32 mm (bxh xd )
Gewicht 120 g (zonder batterijen)
Technische wijzigingen voorbehouden.
2
NL
39
Page 40
NL
Verwijderingsinstructies
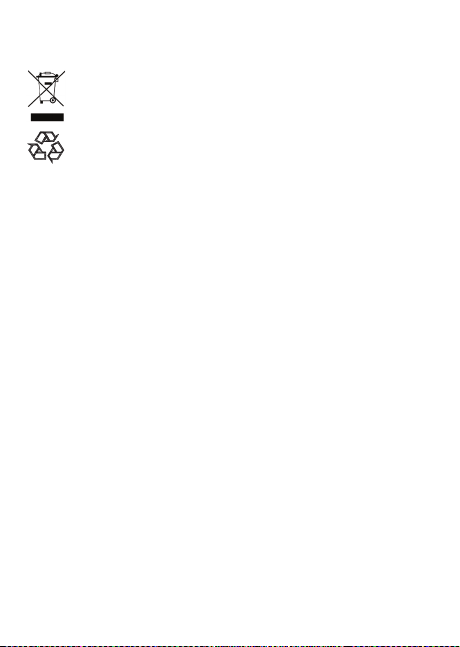
Dit apparaat mag niet als huishoudelijk afval worden verwijderd!
Elektrische apparaten dienen overeenkomstig de
richtlijn voor afgedankte elektrische en elektronische apparatuur naar de daarvoor bestemde plaatselijke inzamelpunten te worden gebracht. Lege
batterijen niet bij het huishoudelijke afval doen!
Lever de batterijen in bij het plaatselijke batterij-inzamelpunt.
Algemene informatie
Hiermee verklaart eQ-3 Entwicklung GmbH dat dit apparaat in overeenstemming is met de eisen en de andere
relevante bepalingen van richtlijn 2014/53/EG. De volledige conformiteitsverklaring vindt u op:
www.eq-3.de/service/downloads.html
eQ-3 AG,
Maiburger Str. 29
26789 Leer
Duitsland
40
Page 41

4e uitgave Nederlands 03/2019
Documentatie © 2011-2019 innogy SE, Duitsland.
Alle rechten voorbehouden. Wij zijn niet aansprakelijk
voor technische of druktechnische fouten of de gevolgen
daarvan. Alle handelsmerken en industriële eigendomsrechten worden gerespecteerd.
Wijzigingen n.a.v. technische vooruitgang kunnen worden aangebracht zonder voorafgaande bekendmaking.
innogy SE
Freistuhl 7
44137 Dortmund
Duitsland
NL
41
Page 42

Page 43

Page 44

 Loading...