

Page 1
Bedienungsanleitung | User Manual
EGRIP 2 LIGHT
Page 2

SPRACHEN / LANGUAGES
Deutsch
� � � � � � � � � � � � � � � � � � � � � � � � � � � � � � � � � � � � � � � � � � � � � � � � � � � � � � � � � � � � � � � � � � � � � � � � S� 01
English
� � � � � � � � � � � � � � � � � � � � � � � � � � � � � � � � � � � � � � � � � � � � � � � � � � � � � � � � � � � � � � � � � � � � � � � � � S� 32
Page 3

01
INNOCIGS EGRIP 2 LIGHT – TECHNOLOGIE IM BOX-DESIGN
Nutzerhinweise
Vielen Dank, dass Sie sich für InnoCigs entschieden haben! Bitte lesen Sie die Bedienungsanleitung vor Gebrauch
sorgsam durch, um eine korrekte Nutzung der InnoCigs eGrip 2 Light E-Zigarette zu gewährleisten. Verwenden Sie in
Kombination mit diesem Produkt bitte nur originale bzw. empfohlene Produkte. Der Hersteller gewährleistet keinen
Service und/oder Garantie bei der Nutzung mit nicht empfohlenen Produkten.
Sollten Sie Fragen rund um Ihre InnoCigs eGrip 2 Light haben oder weitere Informationen brauchen, kontaktieren Sie bitte
Ihren Fachhändler oder besuchen Sie uns unter der Website www.innocigs.com.
Page 4
02
INNOCIGS EGRIP 2 LIGHT – INHALTSVERZEICHNIS
Hinweise & Vorsichtsmaßnahmen . . . . . . . . . . . . . . . . . . . . . . . . . . . . . . . . . . . . . . . . . . . . . . . . . . . . . . . . . . . . . . . . . . . . . . . . . . . . . . . . . . . . . . . . . . . . . . .03
InnoCigs eGrip 2 Light – Technologie im Box-Design . . . . . . . . . . . . . . . . . . . . . . . . . . . . . . . . . . . . . . . . . . . . . . . . . . . . . . . . . . . . . . . . . . . . . . . . . . . . . . .06
Lieferumfang . . . . . . . . . . . . . . . . . . . . . . . . . . . . . . . . . . . . . . . . . . . . . . . . . . . . . . . . . . . . . . . . . . . . . . . . . . . . . . . . . . . . . . . . . . . . . . . . . . . . . . . . . . . . . . . .07
Aufbau der eGrip 2 Light . . . . . . . . . . . . . . . . . . . . . . . . . . . . . . . . . . . . . . . . . . . . . . . . . . . . . . . . . . . . . . . . . . . . . . . . . . . . . . . . . . . . . . . . . . . . . . . . . . . . . .08
Bedienung der Geräte . . . . . . . . . . . . . . . . . . . . . . . . . . . . . . . . . . . . . . . . . . . . . . . . . . . . . . . . . . . . . . . . . . . . . . . . . . . . . . . . . . . . . . . . . . . . . . . . . . . . . . . . .09
Bedienungshinweis – Hinweis zur Reinigung – Sicherheitsfunktionen . . . . . . . . . . . . . . . . . . . . . . . . . . . . . . . . . . . . . . . . . . . . . . . . . . . . . . . . . . . . .09
Power On/Off – Dampfen . . . . . . . . . . . . . . . . . . . . . . . . . . . . . . . . . . . . . . . . . . . . . . . . . . . . . . . . . . . . . . . . . . . . . . . . . . . . . . . . . . . . . . . . . . . . . . . . . .10
Ändern der LED Farbe – Screen Protection Time wählen . . . . . . . . . . . . . . . . . . . . . . . . . . . . . . . . . . . . . . . . . . . . . . . . . . . . . . . . . . . . . . . . . . . . . . . .11
Einstell-Tasten “Auf” und “Ab” sperren – Display-Anzeige drehen . . . . . . . . . . . . . . . . . . . . . . . . . . . . . . . . . . . . . . . . . . . . . . . . . . . . . . . . . . . . . . . .12
Wechsel des Verdampferkopfes – Nachfüllen von Liquid . . . . . . . . . . . . . . . . . . . . . . . . . . . . . . . . . . . . . . . . . . . . . . . . . . . . . . . . . . . . . . . . . . . . . . . .13
Einstellen der Luftzufuhr . . . . . . . . . . . . . . . . . . . . . . . . . . . . . . . . . . . . . . . . . . . . . . . . . . . . . . . . . . . . . . . . . . . . . . . . . . . . . . . . . . . . . . . . . . . . . . . . . . .14
Auswahl der Display-Anzeige .................................. . . . . . . . . . . . . . . . . . . . . . . . . . . . . . . . . . . . . . . . . . . . . . . . . . . . . . . . . . . . . . . . . .15
Uhrzeit & Datum einstellen . . . . . . . . . . . . . . . . . . . . . . . . . . . . . . . . . . . . . . . . . . . . . . . . . . . . . . . . . . . . . . . . . . . . . . . . . . . . . . . . . . . . . . . . . . . . . . . . . . . .16
Regelung der Leistungsabgabe ................................. . . . . . . . . . . . . . . . . . . . . . . . . . . . . . . . . . . . . . . . . . . . . . . . . . . . . . . . . . . . . . . . . .17
Anpassen VT-Modus – TCR-Modus ......................... . . . . . . . . . . . . . . . . . . . . . . . . . . . . . . . . . . . . . . . . . . . . . . . . . . . . . . . . . . . . . . . . .19
Installieren neuer Verdampferköpfe ........................ . . . . . . . . . . . . . . . . . . . . . . . . . . . . . . . . . . . . . . . . . . . . . . . . . . . . . . . . . . . . . . . . .23
Anpassen VW Modus . . . . . . . . . . . . . . . . . . . . . . . . . . . . . . . . . . . . . . . . . . . . . . . . . . . . . . . . . . . . . . . . . . . . . . . . . . . . . . . . . . . . . . . . . . . . . . . . . . . . .24
Laden & Updaten des Geräts .................................. . . . . . . . . . . . . . . . . . . . . . . . . . . . . . . . . . . . . . . . . . . . . . . . . . . . . . . . . . . . . . . . . .25
Fehlermeldungen & Schutzfunktionen .......................... . . . . . . . . . . . . . . . . . . . . . . . . . . . . . . . . . . . . . . . . . . . . . . . . . . . . . . . . . . . . . . . . .26
Eckdaten und Leistungsmerkmale .............................. . . . . . . . . . . . . . . . . . . . . . . . . . . . . . . . . . . . . . . . . . . . . . . . . . . . . . . . . . . . . . . . . .28
Garantieleistungen & Reparaturen . . . . . . . . . . . . . . . . . . . . . . . . . . . . . . . . . . . . . . . . . . . . . . . . . . . . . . . . . . . . . . . . . . . . . . . . . . . . . . . . . . . . . . . . . . . . . .29
Garantie & Service | Kontakt . . . . . . . . . . . . . . . . . . . . . . . . . . . . . . . . . . . . . . . . . . . . . . . . . . . . . . . . . . . . . . . . . . . . . . . . . . . . . . . . . . . . . . . . . . . . . . . . . . .31
Page 5
03
INNOCIGS EGRIP 2 LIGHT – HINWEISE & VORSICHTSMASSNAHMEN
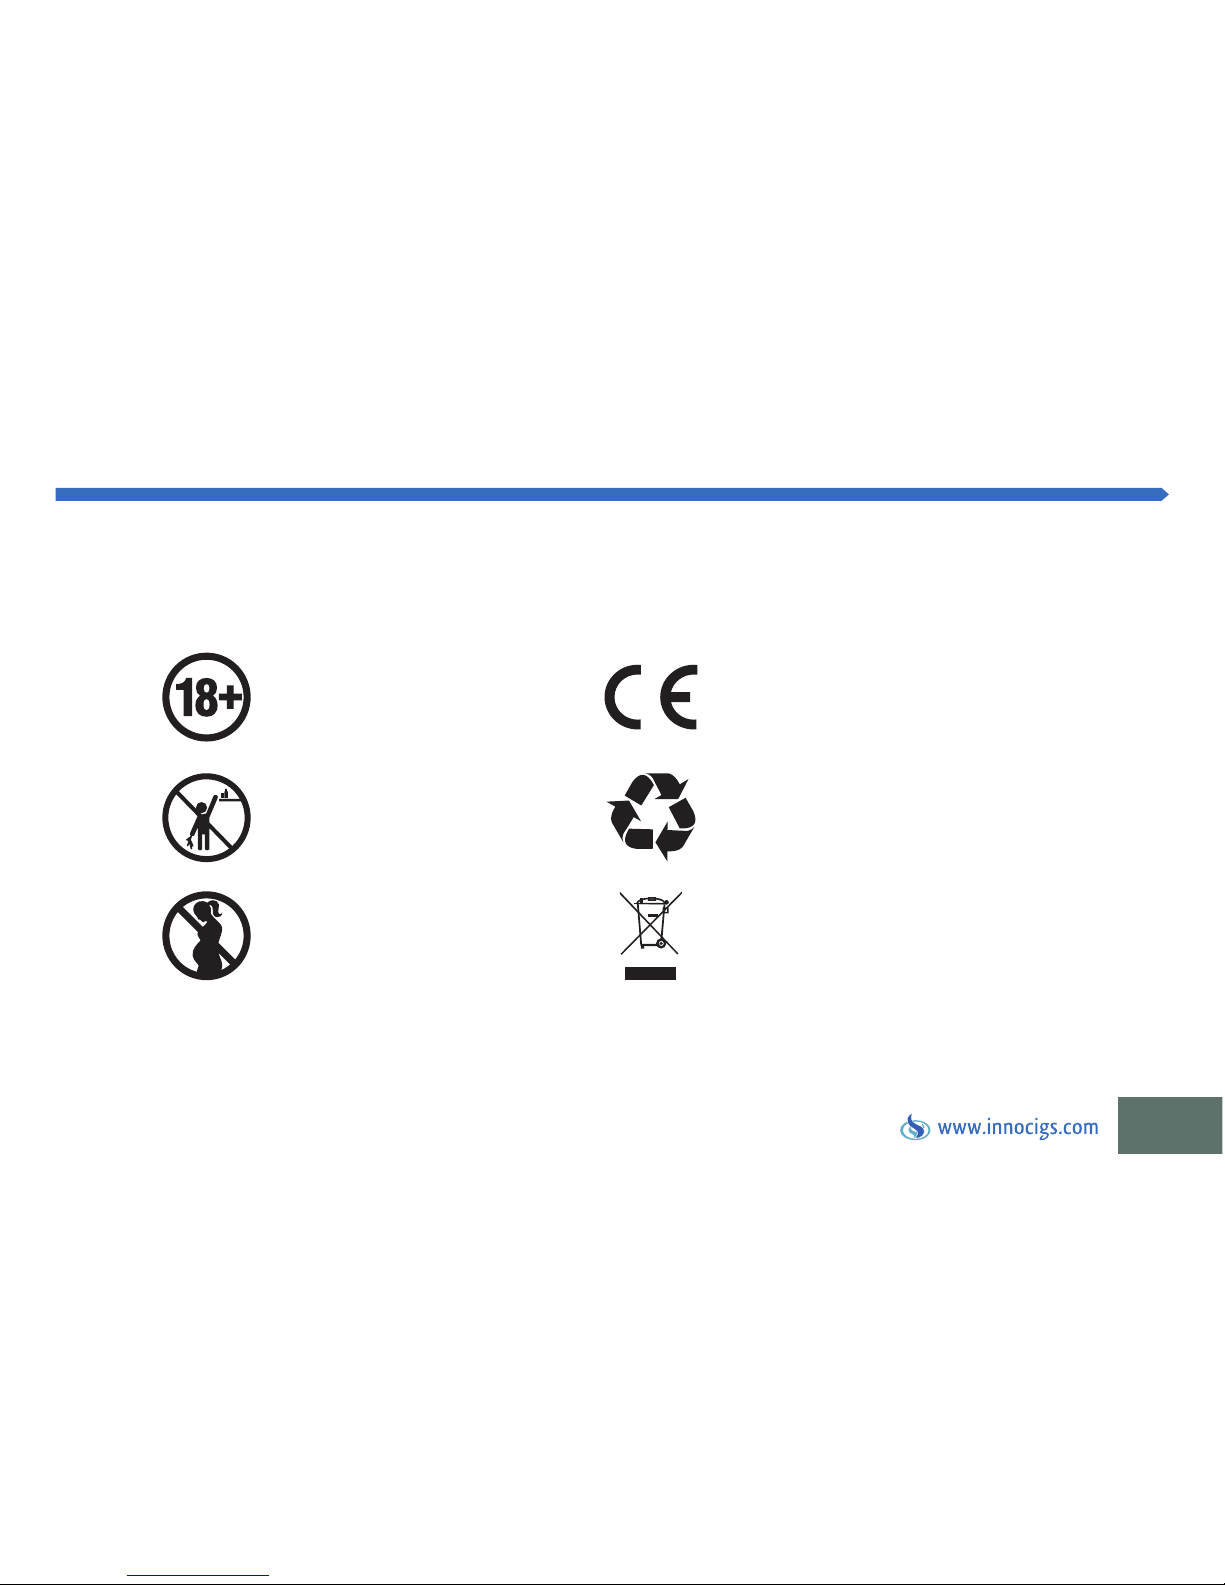
Personen unter 18 Jahren, Schwangere, stillende Mütter und Menschen mit Herz-Kreislauf-Erkrankungen dürfen dieses Produkt nicht
verwenden. Nicht empfohlen für Nichtraucher. E-Zigarettenprodukt für Kinder und Jugendliche unzugänglich aufbewahren.
Dieses Produkt darf
nicht von Minderjährigen
verwendet werden.
Dieses Produkt darf nicht von
Schwangeren oder stillenden
Müttern genutzt werden.
Dieses Produkt muss für Kinder
und Jugendliche unzugänglich
aufbewahrt werden.
Dieses Produkt besteht teils aus wiederverwertbaren
Gütern, die recycelt werden können.
Alte Elektrogeräte oder verbrauchte Akkus
gehören nicht in den Hausmüll! Bitte entsorgen
Sie Altbatterien und -geräte – wie vom Gesetzgeber vorgeschrieben – an einer kommunalen
Sammelstelle oder geben Sie sie im Handel vor
Ort kostenlos ab, damit Rohstoffe und mögliche
Schadstoffe gezielt verwertet werden können.
Dieses Produkt entspricht den innerhalb der EU
gültigen Bestimmungen für technische Geräte und
darf in den Ländern der EU vertrieben werden.
Page 6
04
INNOCIGS EGRIP 2 LIGHT – HINWEISE & VORSICHTSMASSNAHMEN
Benutzerhinweise
1. Sollte Ihnen das Gerät heruntergefallen sein, überprüfen Sie bitte, ob sich keine Komponenten gelockert haben, ob kein E-Liquid
austritt und ob kein Defekt am Mundstück vorliegt. Sofern nach visueller Prüfung des Produkts keine Anzeichen einer Beschä-
digung vorliegen, können Sie das Gerät weiterbenutzen. Bitte wischen Sie das Mundstück zuvor aus hygienischen Gründen mit
einem Tuch ab.
2. Das Gerät sollte nicht benutzt werden, wenn sich Risse oder Deformationen im Material zeigen oder ein defektes Teil ausgetauscht
werden sollte. Versuchen Sie bei einem Defekt niemals, das Gerät selbst zu reparieren.
3. Die elektrische Zigarette sollte nicht benutzt werden, wenn das Liquid im Clearomizer-Tank verbraucht oder fast verbraucht ist.
Gleiches gilt für den Fall, dass Sie eine Veränderung des Geschmacks wahrnehmen. Bitte befüllen Sie den Tank mit frischem Liquid
und tauschen Sie den Verdampferkopf durch einen neuen aus, bevor Sie die E-Zigarette weiterbenutzen.
4. Lagern Sie die eGrip 2 Light nie in Räumen mit sehr hohen Temperaturen oder mit besonders hoher Luftfeuchtigkeit. Vermeiden
Sie längere direkte Sonneneinstrahlung.
5. Die geeignete Temperatur liegt für das Aufladen des Akkus bei 0°C bis 45°C und für den Gebrauch bei -10°C bis 60°C.
6. Wenn Liquid mit Ihrer Haut in Berührung kommt, wischen Sie es schnellstmöglich ab und reinigen Sie die Stelle anschließend
gründlich mit klarem Wasser.
Page 7

05
INNOCIGS EGRIP 2 LIGHT – HINWEISE & VORSICHTSMASSNAHMEN
7. Wenn Sie versehentlich Liquid verschlucken, wenden Sie sich bitte an eine Vergiftungszentrale. Unter der Telefonnummer
+49 (0)30 – 19 240 erreichen Sie Tag und Nacht den Giftnotruf der Charité Universitätsmedizin Berlin. In Notfällen verständigen
Sie bitte umgehend den Notruf.
8. Das Inhalieren nikotinhaltigen Liquids kann die Herzfrequenz und/oder den Blutdruck erhöhen. Nikotin kann Übelkeit, Schwindel
und/oder Magenschmerzen verursachen. Wenn Sie an sich oder Menschen in Ihrer Umgebung unerwünschte Wirkungen feststel-
len, verwenden Sie dieses Produkt bitte nicht weiter und konsultieren Sie einen Arzt.
9. Beachten Sie bei der Nutzung von E-Zigaretten lokale Gesetze.
10. Halten Sie das Produkt von Kindern und Jugendlichen fern.
Warnhinweis
Die InnoCigs eGrip 2 Light kann mit nikotinhaltigem Liquid verwendet werden. Nikotin ist ein Stoff, der sehr stark abhängig macht.
Page 8
06
INNOCIGS EGRIP 2 LIGHT – TECHNOLOGIE IM BOX-DESIGN
Produkthinweise
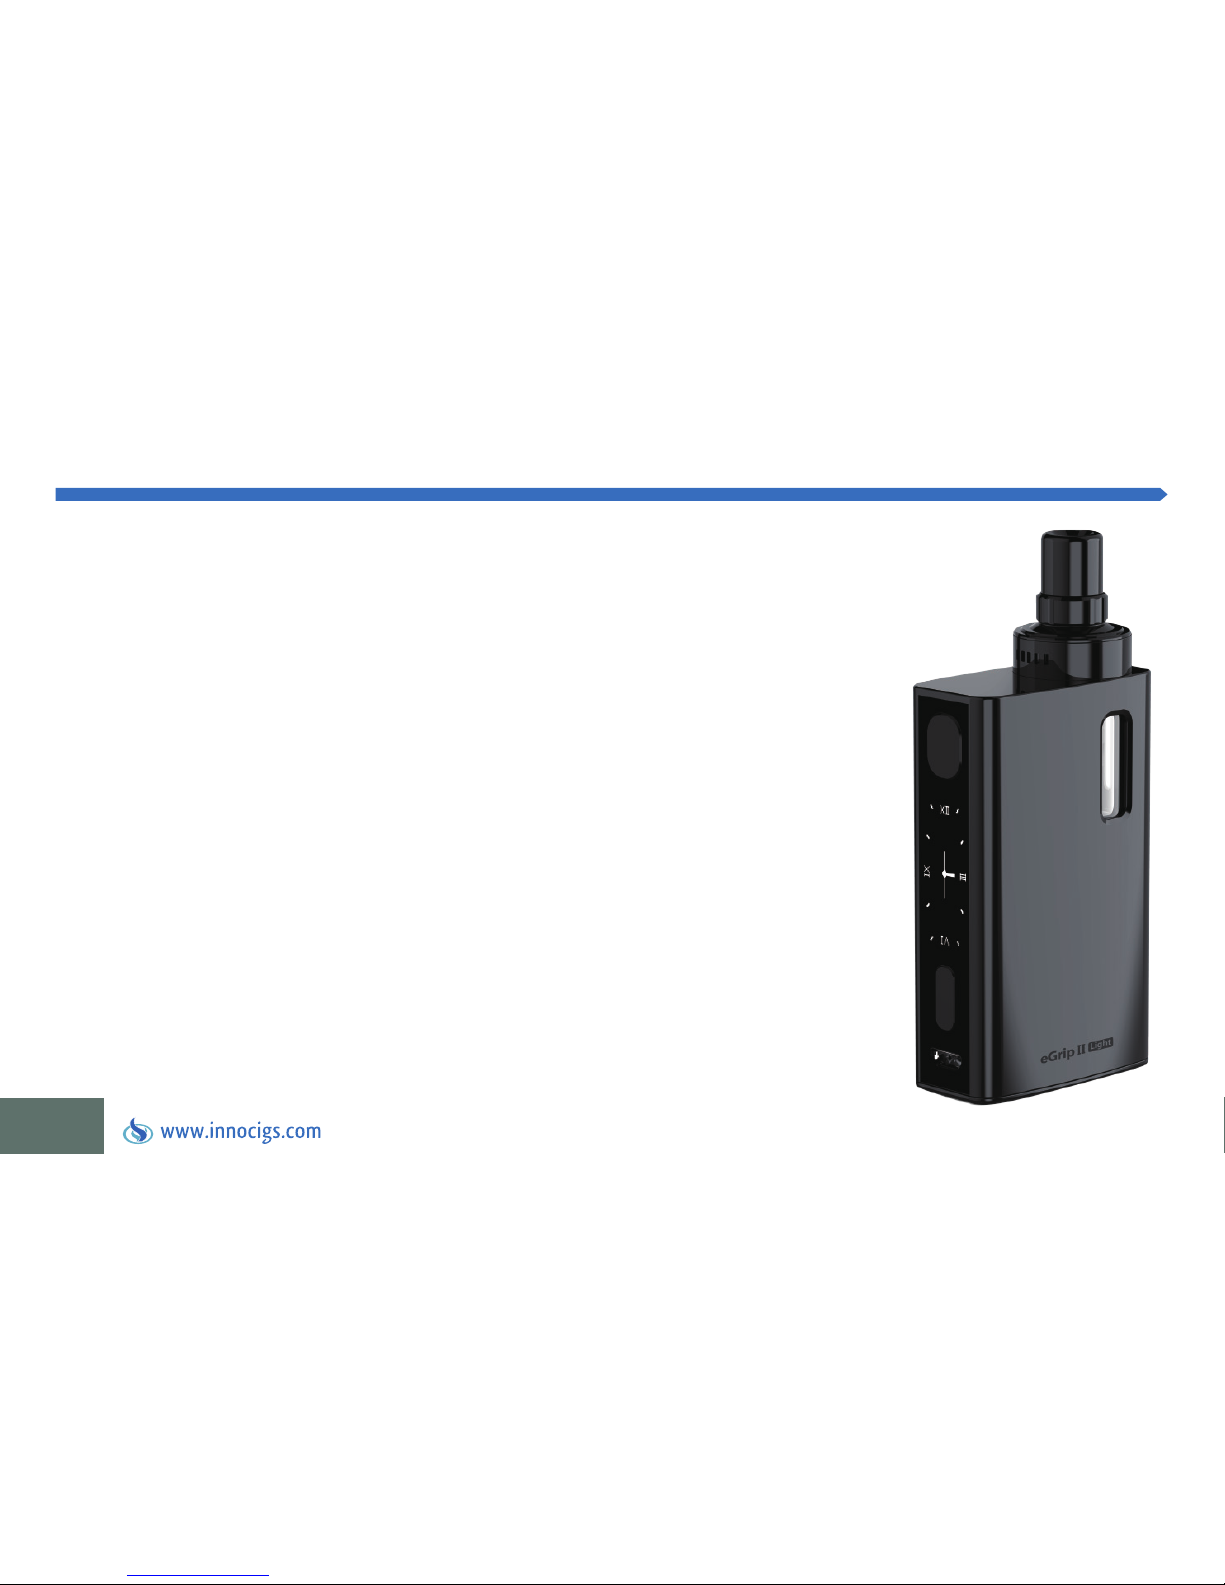
Die InnoCigs eGrip 2 Light ist eine E-Zigarette mit Magnesiumlegierung für weniger als 130 Gramm
Gewicht. Der integrierte 3,5 Milliliter Top Filling Clearomizer kann dank eines 510er Adapters mit
anderen Clearomizern ausgetauscht werden. Technische Features sind Variable Temperature (VT)
und Variable Wattage (VW) für die individuelle Steuerung von Temperaturen zwischen 100°C und
315°C und Leistungswerten zwischen 1 und 80 Watt mit Titan, Nickel oder Edelstahl (SS316) Verdampferköpfen (Heads). Zusätzlich stehen der Temperature Coefficient of Resistance (TCR) Modus,
der die Temperatur in Zusammenhang mit dem Widerstand der Wicklungen setzt, und die Bypass
Funktion, die die Dampfproduktion an die verfügbare Akkuleistung anpasst, zur Verfügung.
Page 9

07
INNOCIGS EGRIP 2 LIGHT – LIEFERUMFANG
Inhalt des InnoCigs eGrip 2 Light Sets
1 x eGrip 2 Light mit 2100 mAh
1 x NotchCoil
TM
Head 0,25 Ohm
1 x BF SS316 Head 0,5 Ohm.
1 x BF Clapton Head 1,5 Ohm
2 x Mundstück
1 x Clearomizer Adapter (510er Gewinde)
1 x USB Ladekabel
1 x Bedienungsanleitung
Page 10
08
INNOCIGS EGRIP 2 LIGHT – TECHNOLOGIE IM BOX-DESIGN
InnoCigs eGrip 2 Light Set
Der integrierte Clearomizer der updatefähigen eGrip 2 Light
E-Zigarette ist mit Top Filling und Top Airflow Control (TFTA)
Technologie ausgestattet. Damit lässt sich die eGrip 2 Light von
oben mit bis zu 3,5 ml Liquid befüllen, während sich die Luftzufuhr beim Dampfen ebenfalls oberhalb des Bodys steuern lässt.
Mit dem im Set enthaltenen NotchCoil
TM
Head (0,25 Ohm), dem
BF SS316 Head (0,5 Ohm) und dem BF Clapton Head (1,5 Ohm)
öffnet sich ein Spektrum von moderaten bis zu subohmen
Dampftechniken. Neben dem Adapter für weitere Clearomizer
unterscheidet sich die eGrip 2 Light mit Magnesiumlegierung
insbesondere in ihrem geringerem Gewicht von bisherigen
eGrip 2 Modellen.
Der wiederaufladbare 2100 mAh Akku liefert die Energie für
die 4 Funktionsmodi VW, VT, Bypass sowie TCR und bildet alle
Einstellungen inklusive der Uhrzeit auf dem OLED Display der
eGrip 2 Light ab.
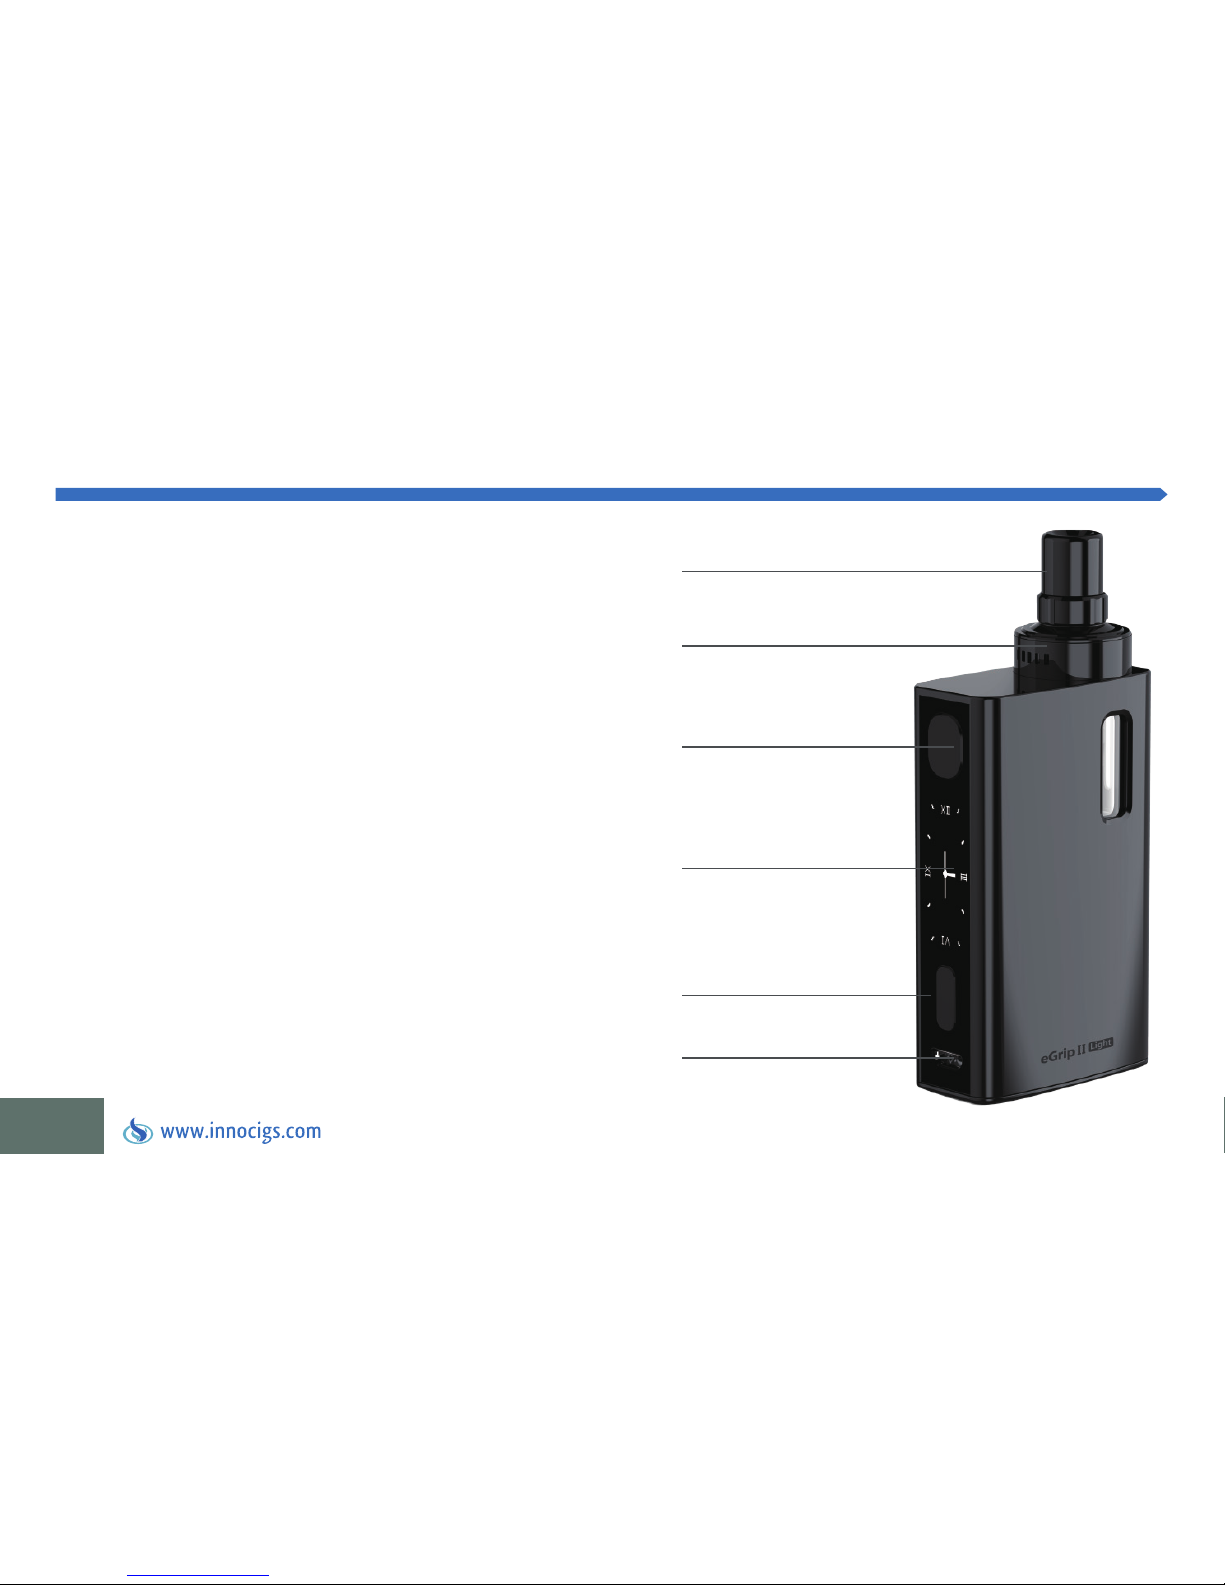
Top Cap mit Airflow Control
Feuer-Taste
OLED Display
“Auf”/”Ab”-Einstell-Taste
Micro USB Anschluss
Mundstück
Page 11

09
INNOCIGS EGRIP 2 LIGHT – BEDIENUNG DES GERÄTS
Bedienungshinweise
Hinweis zur Reinigung
Sicherheitsfunktionen
Bitte laden Sie den Akku vor dem ersten Gebrauch vollständig auf. Verbinden Sie die Einzelteile des Produkts miteinander, sofern dies
noch nicht der Fall ist
Verwenden Sie zur Reinigung des Geräts ein trockenes Tuch oder ein Wattestäbchen
Die InnoCigs eGrip 2 Light verfügt über eine automatische Deaktivierung und einem Schutz vor unbeabsichtigter Entladung: Bei durchgehendem Drücken der Feuertaste für ca. 10 Sekunden wird der Akku zum Schutz vor Überhitzung deaktiviert.
Page 12
10
INNOCIGS EGRIP 2 LIGHT – BEDIENUNG DES GERÄTS
Power On/Off
Dampfen
Betätigen Sie die Feuer-Taste fünf Mal schnell hintereinander, um das Gerät einzuschalten und fünf Mal, um es wieder auszuschalten.
Wir empfehlen Ihnen, Ihren InnoCigs eGrip 2 Light Akku während des Transports und bei längerer Nichtbenutzung auszuschalten.
Halten Sie die Feuer-Taste des angeschalteten Geräts gedrückt und inhalieren Sie den Dampf langsam und kontinuierlich über das
Mundstück Ihrer E-Zigarette.
Lassen Sie den Verdampferkopf etwa 15 Minuten lang Liquid aufsaugen, bevor Sie das Gerät in Betrieb nehmen, um Kokeln zu vermeiden. Bitte achten Sie darauf, die Leistung des Geräts passend zu Ihrem Verdampferkopf einzustellen, bevor Sie mit dem Dampfen
beginnen.
Page 13
11
INNOCIGS EGRIP 2 LIGHT – BEDIENUNG DES GERÄTS
Ändern der LED-Farbe
Screen Protection Time wählen
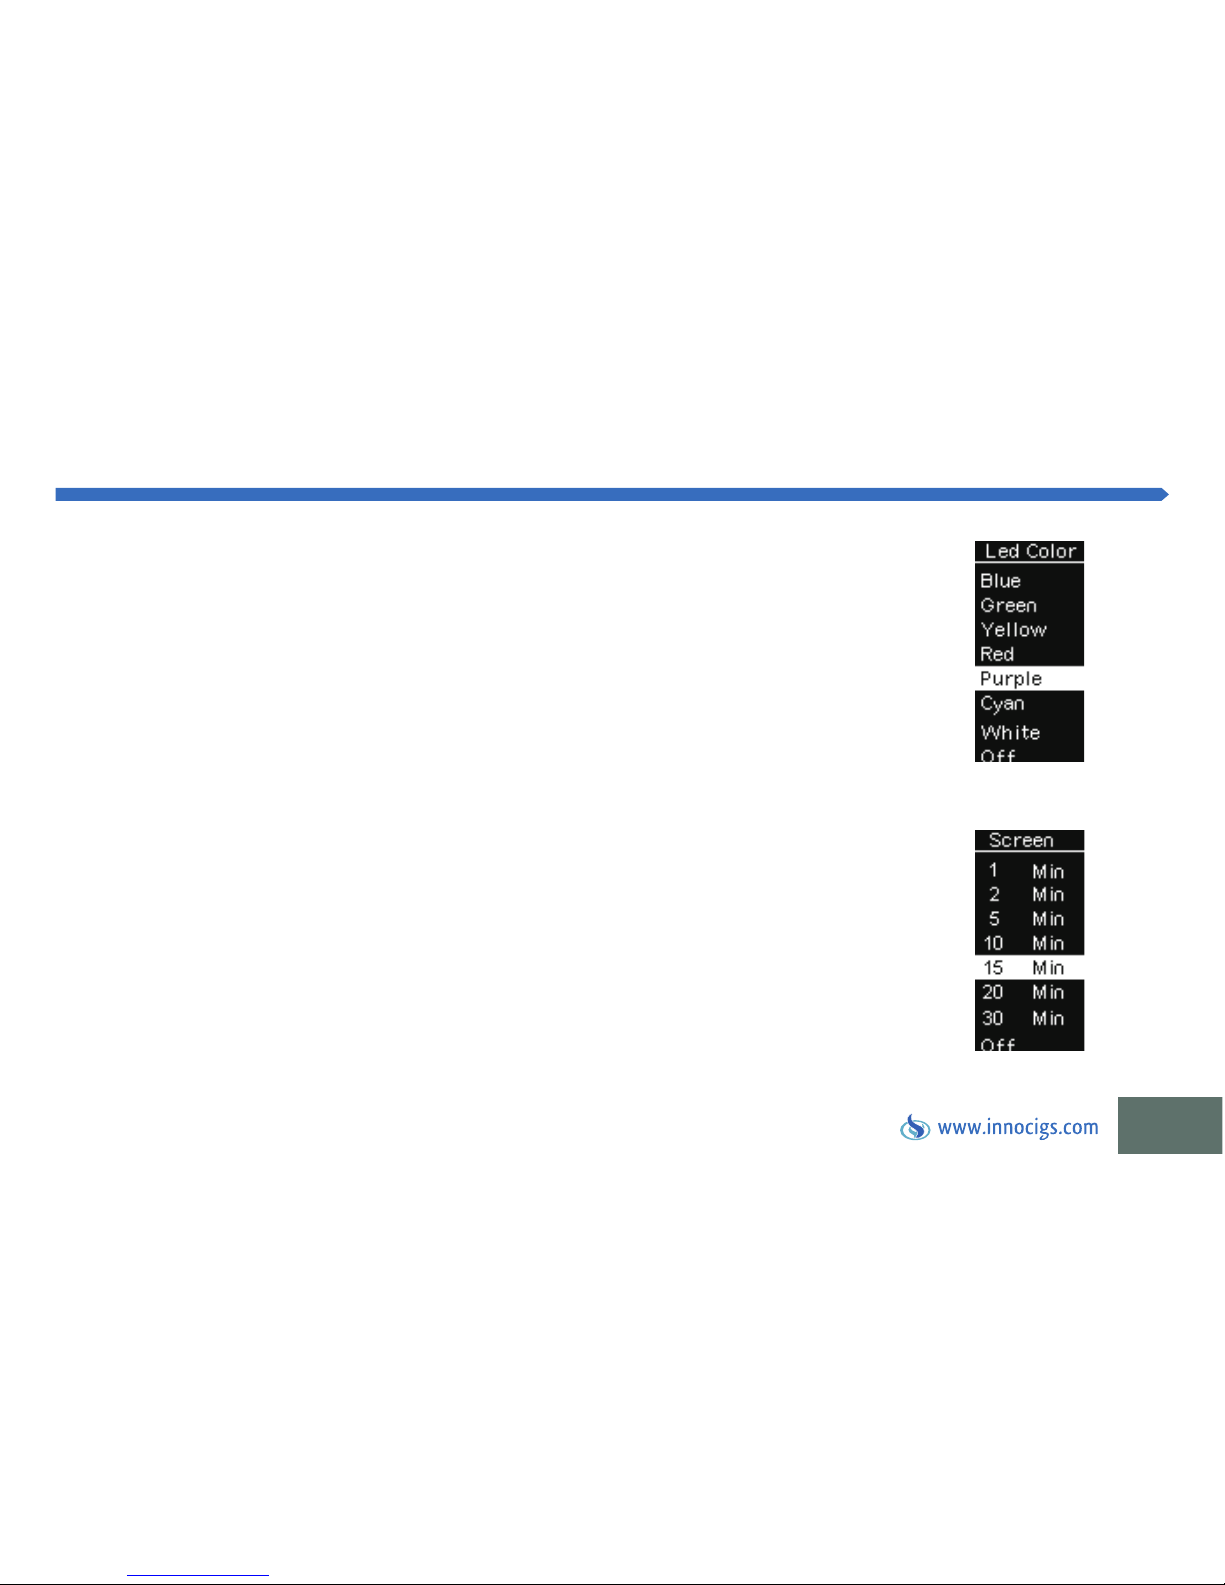
Drücken Sie beim eingeschalteten Gerät gleichzeitig die Feuer- und die “Auf”-Taste, um zu den
LED-Einstellungen zu gelangen. Mit der “Ab”-Taste navigieren Sie durch die Farben Blau, Grün, Gelb,
Rot, Purpurrot, Türkis und Weiß. Bestätigen Sie Ihre Farbauswahl, indem Sie die Feuer-Taste drücken.
Drücken Sie beim eingeschalteten Gerät gleichzeitig die Feuer- und die “Auf”-Taste, um zu den
LED-Einstellungen zu gelangen. Betätigen Sie die “Auf”-Taste erneut, um in die Screenschutz-Einstellungen zu gelangen. Wählen Sie nun mit der “Ab”-Taste den zeitlichen Intervall aus, nach dem die
Display-Anzeige erlöschen soll. Bestätigen Sie Ihre Auswahl, indem Sie die Feuer-Taste drücken.
Page 14
12
INNOCIGS EGRIP 2 LIGHT – BEDIENUNG DES GERÄTS
Sperren der Einstell-Tasten “Auf” und “Ab”
Drehen der Display-Anzeige
Um das eingeschaltete Gerät zu verriegeln, halten Sie die Einstelltasten “Auf” und “Ab” mittig für zwei Sekunden gedrückt, bis das
Display “Key Lock” anzeigt. Halten Sie die Tasten zum Entsperren weitere zwei Sekunden gedrückt, bis Ihnen “Key Unlock” angezeigt
wird. Mit dieser Funktion vermeiden Sie unbeabsichtigtes Verstellen der von Ihnen gewählten Vaping-Einstellungen.
Halten Sie die Einstelltaste “Auf”/“Ab” bei deaktiviertem Akku gedrückt. Das Display dreht sich um 180 Grad. Diese Funktion ermöglicht Ihnen, Ihre Einstellungen aus zwei unterschiedlichen Winkeln abzulesen.
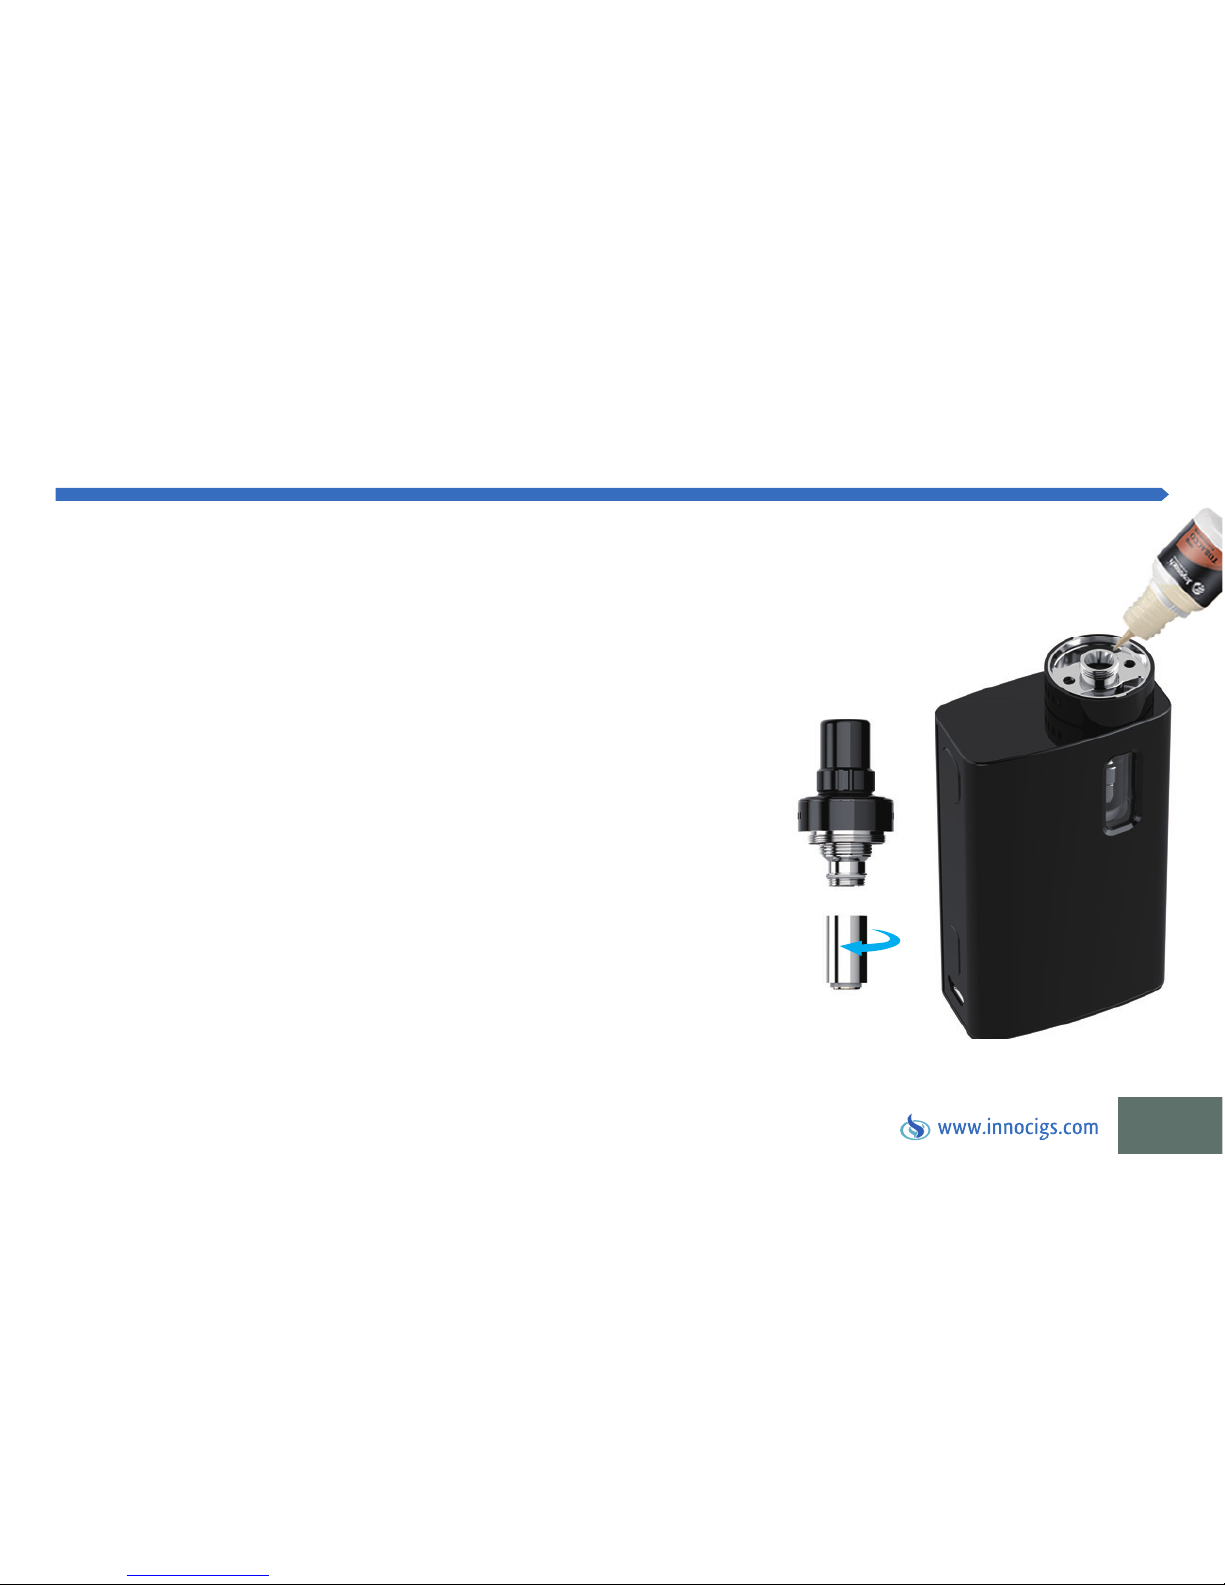
Einsetzen des Clearomizer Adapters
Lösen Sie die gesamte Top Cap mit Airflow Control durch Drehen von der eGrip 2 Light und befestigen Sie den Adapter mittels eines
Hilfswerkzeugs, wie z.B. einer Münze, durch Drehen in der Öffnung.
Page 15
13
INNOCIGS EGRIP 2 LIGHT – BEDIENUNG DES GERÄTS
Nachfüllen von E-Liquid
Entfernen Sie die Top Cap vom Akku-Body der eGrip 2
Light. Füllen Sie Ihr Liquid langsam durch die Öffnung
in den Clearomizer-Tank Ihres Geräts. Nutzen Sie die
seitlichen Öffnungen und achten Sie darauf, dass kein
Liquid in die mittlere Öffnung gelangt. Befüllen Sie den
Tank vorsichtig, um Überlaufen zu vermeiden.
Wechsel des Verdampferkopfs
Entfernen Sie die Top Cap vom Akku-Body der eGrip 2 Light.
Entnehmen Sie den Verdampferkopf, der in der Base sitzt,
und tauschen Sie ihn durch einen neuen aus.
Page 16
14
Einstellen der Luftzufuhr
Durch Drehen der verborgenen Airflow Control unterhalb des eGrip 2 Light Mundstücks regeln Sie sie Luftzufuhr.
Bitte beachten Sie Folgendes:
Träufeln Sie vor dem ersten Gebrauch unbedingt einige Tropfen Ihres Liquids auf den Verdampferkopf und lassen Sie ihn nach dem
Installieren etwa 15 Minuten lang im mit Liquid befüllten Tank stehen, bevor Sie dampfen. Reinigen Sie den Verdampferkopf nicht mit
Wasser. Wischen Sie ihn im Bedarfsfall lediglich mit einem trockenen Tuch ab. Da es sich bei Verdampferköpfen um Verschleißteile
handelt, müssen sie regelmäßig gewechselt werden.
INNOCIGS EGRIP 2 LIGHT – BEDIENUNG DES GERÄTS
Page 17
15
INNOCIGS EGRIP 2 LIGHT – AUSWAHL DER DISPLAY-ANZEIGE
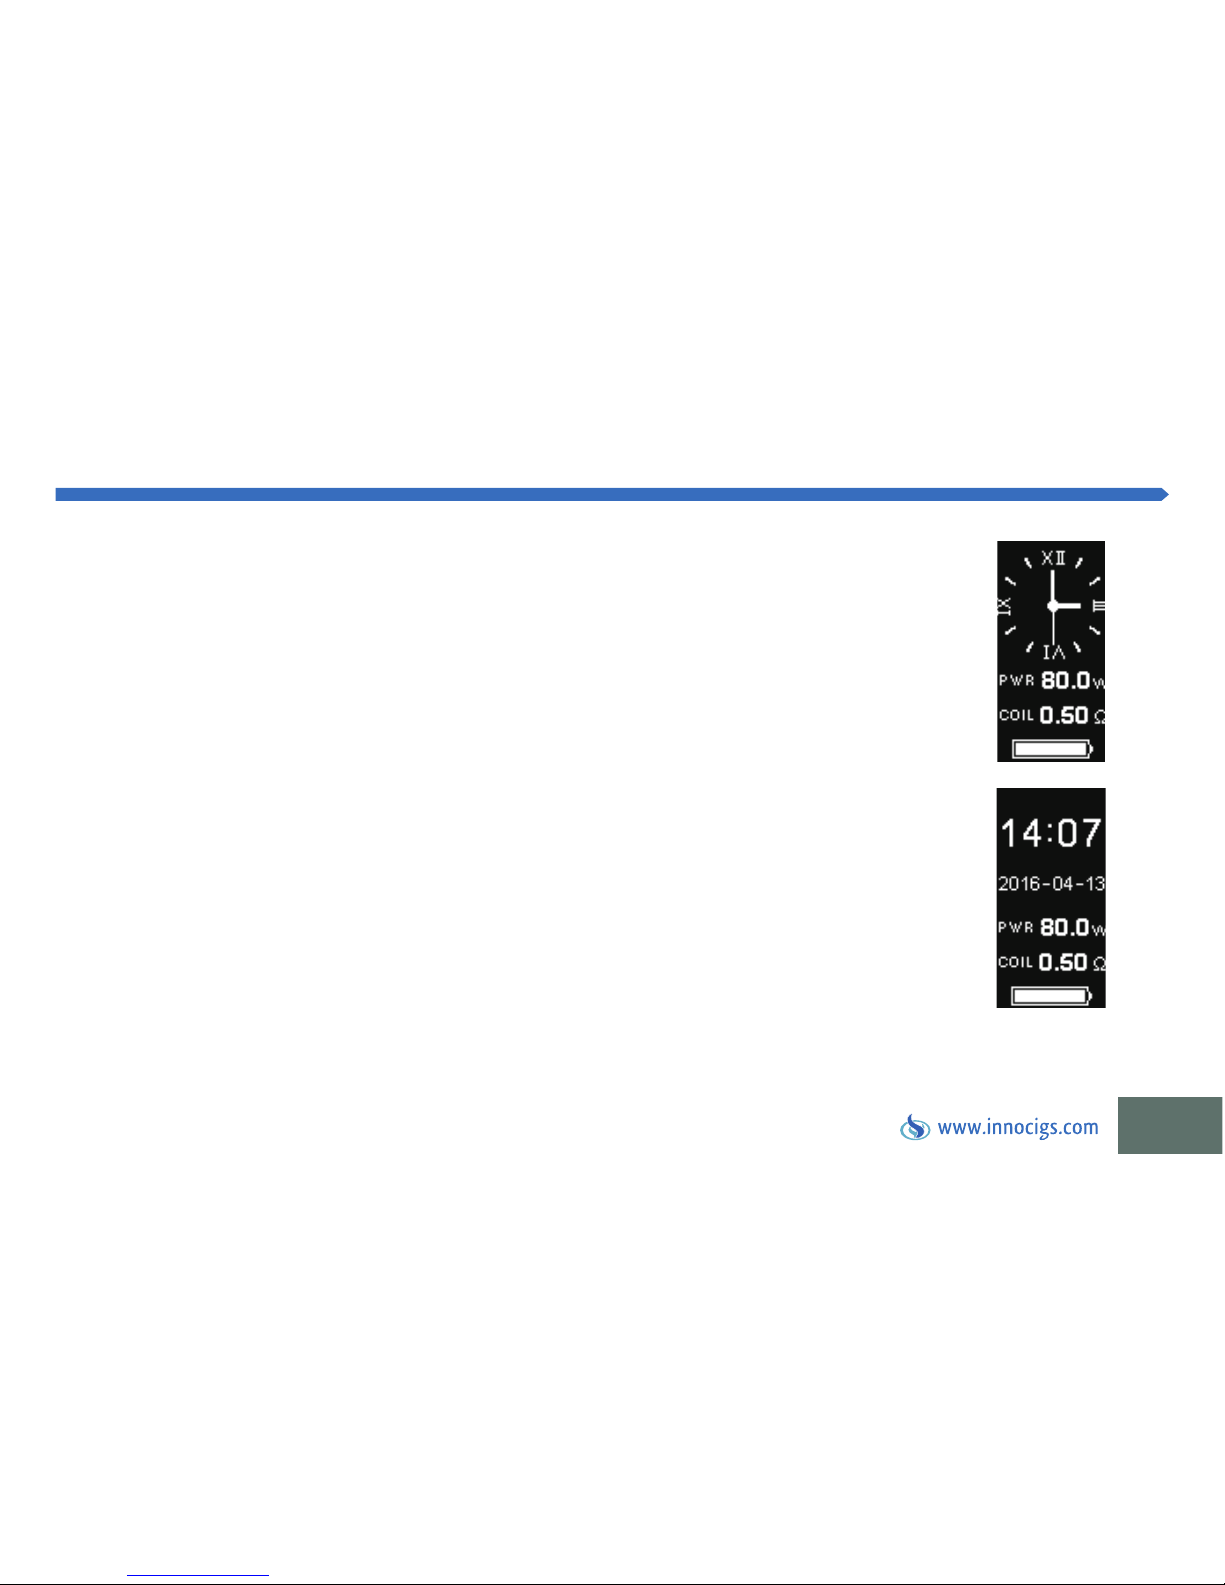
Wechsel zwischen Ziffernblatt und numerischer Anzeige
Bei der eGrip 2 Light E-Zigarette mit RTC können Sie sich die Uhrzeit auf zwei Arten anzeigen lassen:
Sie haben die Wahl aus einer Ziffernblatt- und einer numerischen Anzeige.
Für eine numerische Anzeige der Uhrzeit drücken Sie die Feuer-Taste zunächst 3 Mal, um in das Menü
für entsprechende Einstellungen zu gelangen. Der Wechsel zum Einstellungsmodus wird Ihnen durch
Blinken der Anzeige signalisiert. Drücken Sie nun die “Ab”-Taste, um das Datum einzustellen und die
“Auf”-Taste, um die numerische Uhrzeitanzeige zum Ziffernblatt zu ändern. Um die Ziffernblatt-Anzeige wiederum in die numerische zu ändern, drücken Sie die Feuer-Taste erneut 3 Mal. Auch hier
zeigt Ihnen ein Blinken des Displays an, dass weitere Einstellungen vorgenommen werden können.
Drücken Sie nun die “Ab”-Taste, um Stunden und Sekunden einzustellen. Drücken Sie die “Auf”-Taste,
um wieder zur numerischen Anzeige zu wechseln.
Page 18
16
Einstellen der Uhrzeit und des Datums
Drücken Sie die Feuer-Taste 3 Mal, um Einstellungen an der Zeitanzeige vornehmen zu können. Die Möglichkeit wird Ihnen durch ein
Blinken signalisiert. Durch Drücken der “Ab”-Taste gelangen Sie zu den Einstellungen von Stunde, Minute, Jahr, Monat und Tag. Zur
Änderung eines dieser Werte drücken Sie die “Auf”-Taste. (Beachten Sie bitte, dass ausschließlich die Jahresanzeige durch Drücken
der “Ab”-Taste zurückgestellt werden kann!) Durch längeres Drücken der “Auf”- bzw. “Ab”-Taste wird der Wechsel der Angaben
beschleunigt.
INNOCIGS EGRIP 2 LIGHT – EINSTELLEN DER UHRZEIT
Page 19

17
INNOCIGS EGRIP 2 LIGHT – REGELUNG DER LEISTUNGSABGABE
Allgemeine Bedienung zur Regelung der Leistungsabgabe
Die Wattzahl kann zwischen 1 Watt bis hin zu 80 Watt betragen. Eine Änderung der Wattzahl verändert auch den Geschmack und das
Dampfverhalten. Je höher die eingestellte Wattzahl ist, desto intensiver die Dampfentwicklung. Ähnlich verhält es sich mit der Temperature Control: Je höher die Temperatur, desto größer ist die Dampfentwicklung. Halten Sie die “Auf”- bzw. die “Ab”-Taste gedrückt,
um eine automatisch fortlaufende Steigerung oder Minderung der Wattzahl bzw. der Temperatur durchzuführen.
Bitte beachten Sie, dass der Widerstand des verwendeten Verdampferkopfes vor der ersten Nutzung im Temperature Control-Modus
festgesetzt werden muss.
Page 20
18
INNOCIGS EGRIP 2 LIGHT – REGELUNG DER LEISTUNGSABGABE
Wechsel zwischen VT-Ni-, VT-Ti-, VT-SS316-, VW-, Bypass-, TCR-Modus:
Drücken Sie die Feuer-Taste drei Mal schnell hintereinander, um das Menü aufzurufen. Das Blinken der ersten Zeile signalisiert Ihnen,
dass Sie sich im Menü befinden. Betätigen Sie die “Auf”-Taste um zwischen den Modi TEMP (VT), TCR, POWER (VW) und BYPASS zu
navigieren. Drücken Sie die Feuer-Taste oder warten Sie, bis das Display zehn Mal blinkt, um die aktuellen Einstellungen zu bestätigen
und das Menü zu verlassen.
1. Drücken Sie nach Auswahl des Modus TEMP oder TCR die “Ab”-Einstelltaste, während das Display noch blinkt, um in die Unterme-
nüs VT, PWR, COIL und AMP zu gelangen. Betätigen Sie nach Auswahl des VT-Modus die “Auf”-Taste, um zwischen den Modi TEMP
NI, TEMP TI, TEMP SS316 sowie TCR M1, M2, M3 zu navigieren. Drücken Sie die Feuer-Taste, um Ihre Auswahl zu bestätigen. Wenn
die AMP Zeile aufblinkt, drücken Sie die “Auf”-Taste, um zwischen AMP, PUFF und TIME zu wechseln.
2. Drücken Sie nach Auswahl des Modus POWER oder BYPASS die “Ab”-Einstelltaste, während das Display noch blinkt, um in die
Untermenüs VT, PWR, COIL und AMP zu gelangen. Wenn die AMP Zeile aufblinkt, drücken Sie die “Auf”-Taste, um zwischen AMP,
PUFF und TIME zu wechseln.
Page 21
19
INNOCIGS EGRIP 2 LIGHT – REGELUNG DER LEISTUNGSABGABE
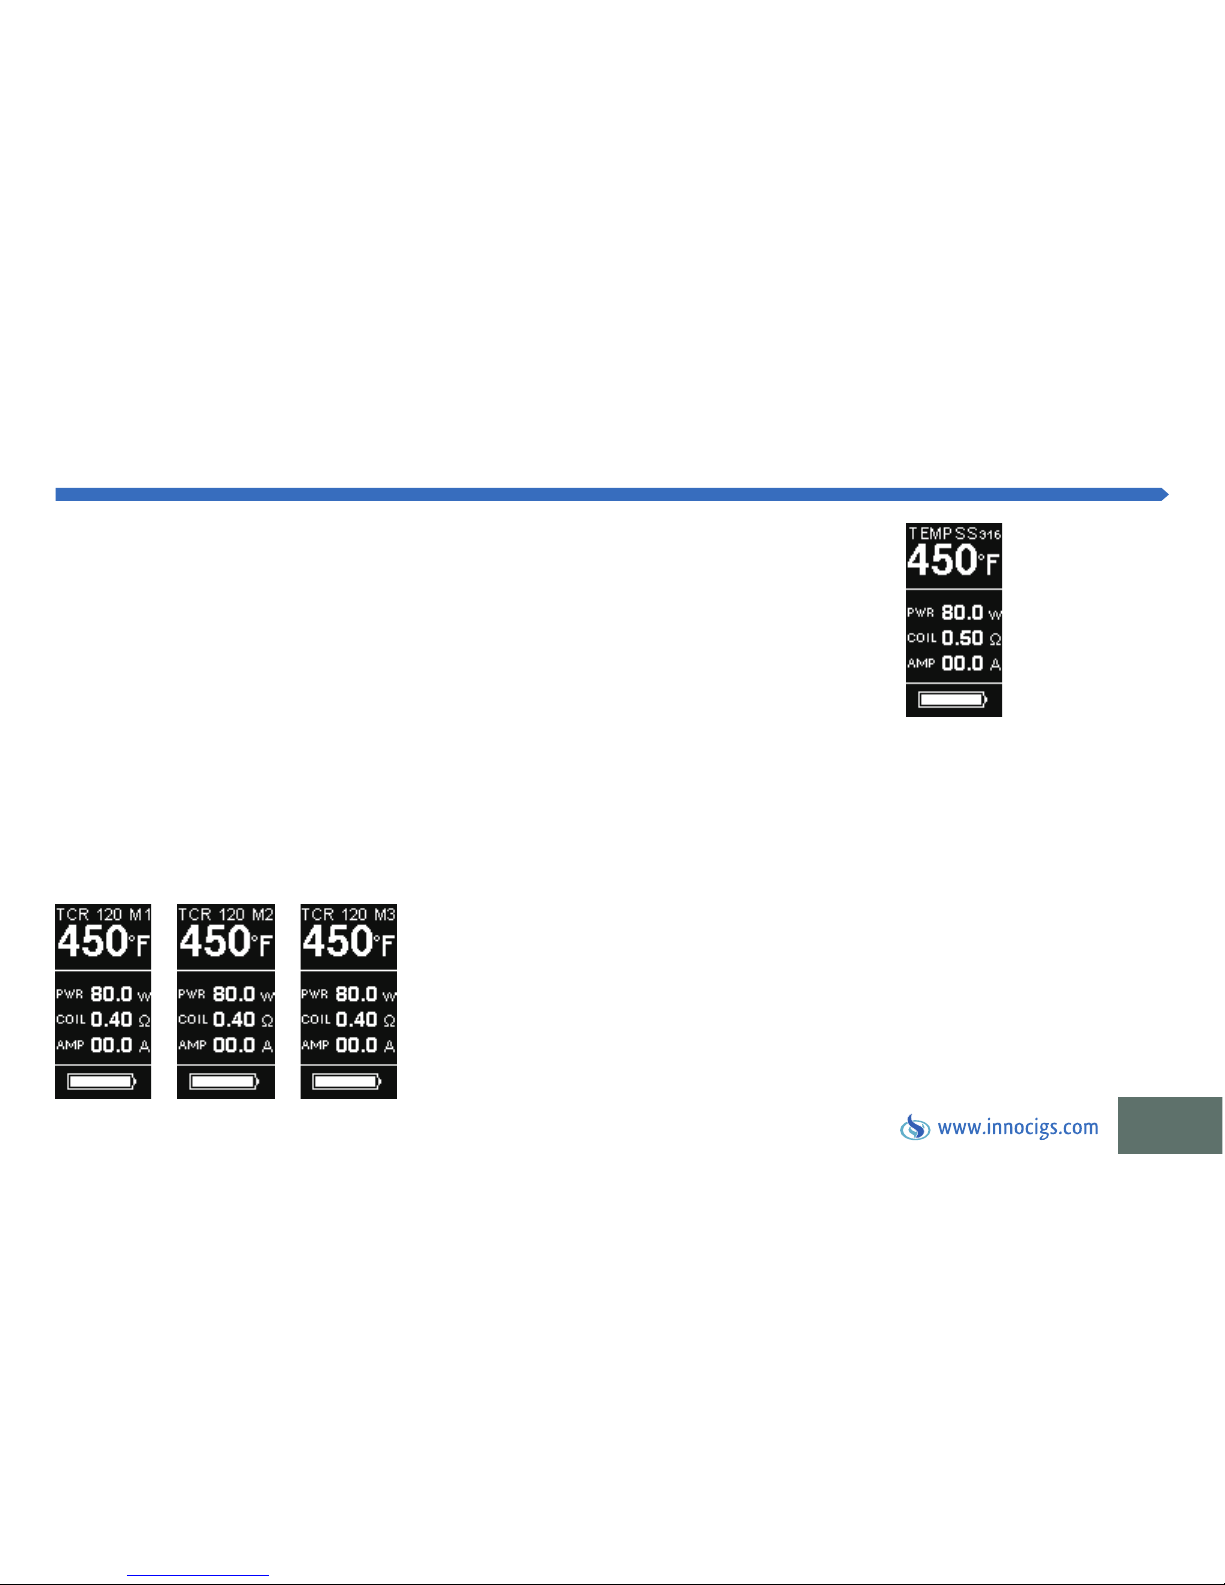
Erläuterung zum TEMP SS316-Modus
Erläuterung zum TCR (M1, M2, M3)-Modus
Dieser Modus wurde eigens für das Dampfen mit SS316 Verdampferköpfen
konzipiert. Wir empfehlen Ihnen die BF SS316 Heads von InnoCigs.
TCR (Temperaturkoeffizienten des Widerstandes), ist ein relativ neuer Vaping-Modus, der speziell für InnoCigs Produkte wie die
eGrip 2 Light entwickelt wurde.
Drücken Sie im TCR-Modus, während die Modus-Anzeige noch blinkt, die linke “Ab”-Einstelltaste, um die Untermenüs (M1, M2, M3)
zu erreichen. Drücken Sie die “Auf”-Taste, während die Modus-Anzeige noch immer blinkt, und wählen Sie durch Navigieren aus M1,
M2 und M3 aus. Drücken Sie die Feuer-Taste, um Ihre Auswahl zu bestätigen.
Page 22
20
INNOCIGS EGRIP 2 LIGHT – REGELUNG DER LEISTUNGSABGABE
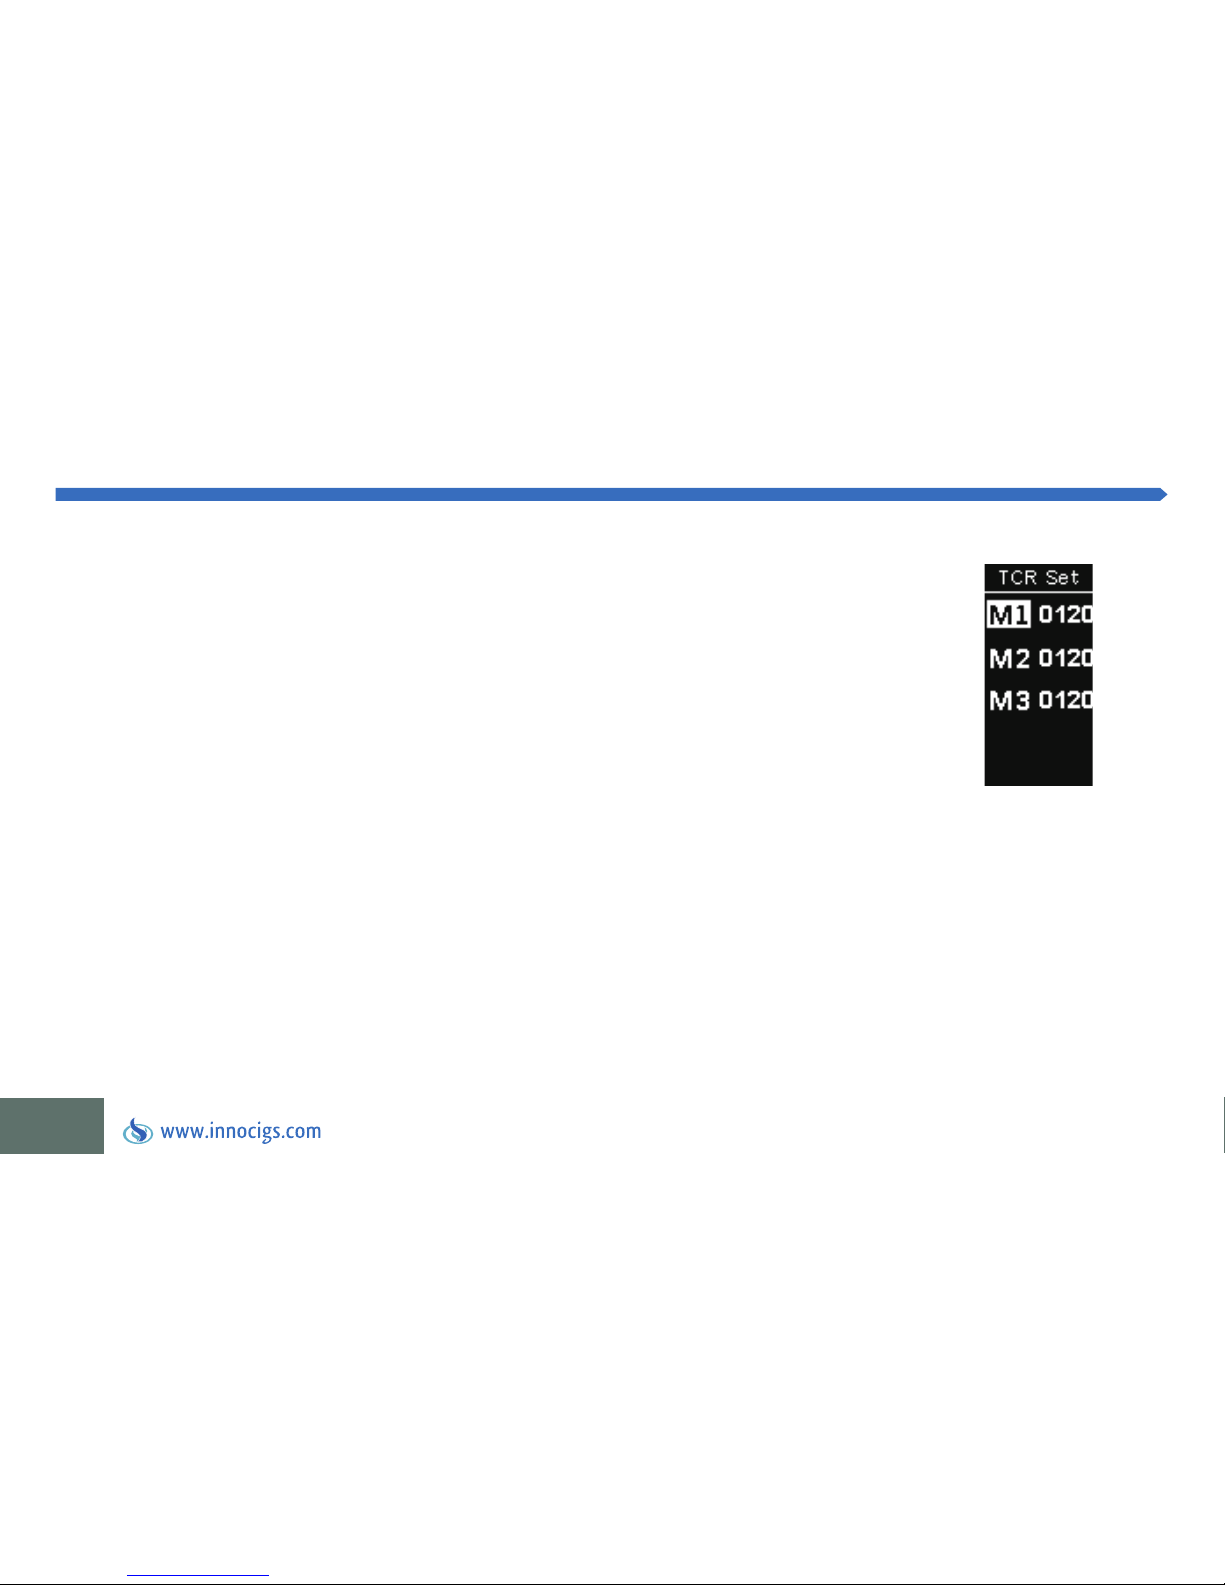
Einstellen des TCR-Modus
Drücken Sie, während die eGrip 2 Light ausgeschaltet ist, den Feuerknopf und die “Auf”-Einstelltaste
gleichzeitig etwa 5 Sekunden lang, um in das TCR-Menü zu gelangen:
1. Drücken Sie die “Auf”- bzw. “Ab”-Taste, um zwischen TCR M1, M2 und M3 zu wechseln.
2. Bestätigen Sie den gewünschten Modus durch Drücken der Feuer-Taste.
3. Drücken Sie die “Auf”- bzw. “Ab”-Taste, um die Parameter zu erhöhen oder zu verringern.
4. Bestätigen Sie Ihre Einstellung mit der Feuer-Taste oder warten Sie einfach 10 Sekunden ab.
Page 23
21
INNOCIGS EGRIP 2 LIGHT – REGELUNG DER LEISTUNGSABGABE
Hinweis
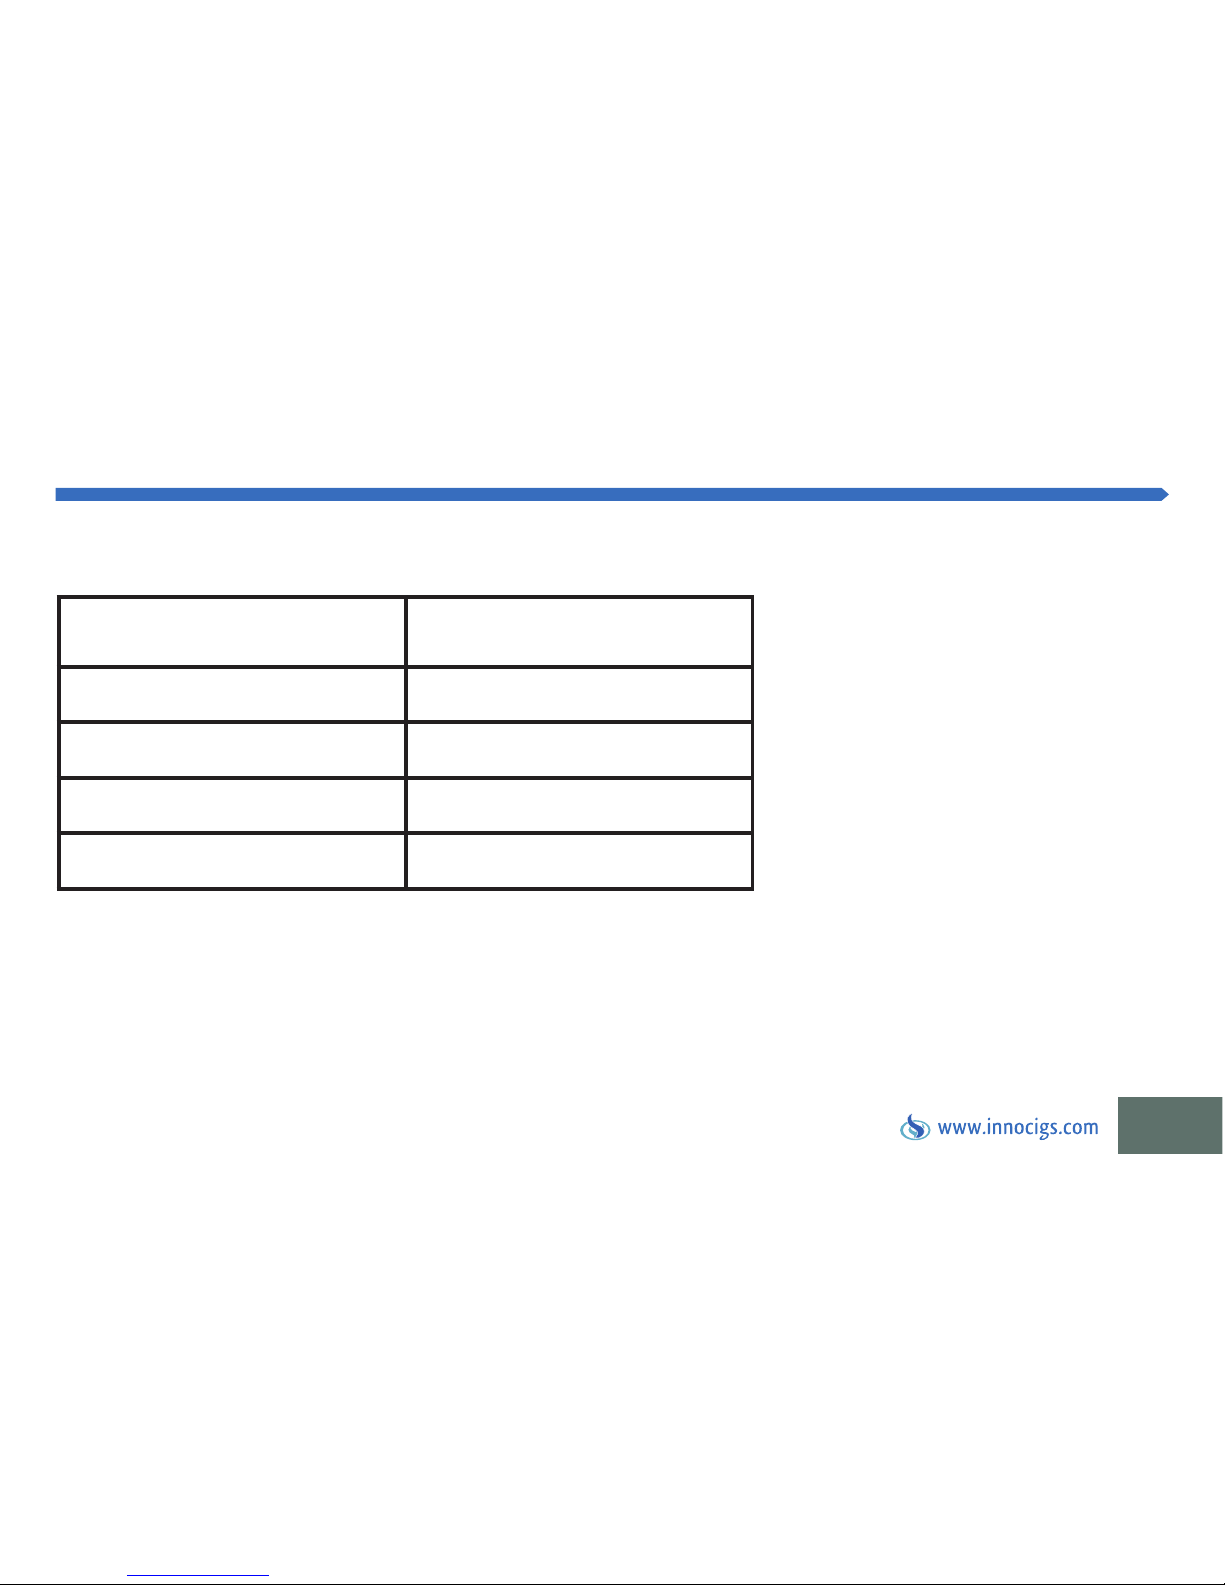
TCR-Wertebereich für unterschiedliche Materialien
1. Der TCR-Wert in der Tabelle wird mit 10 5 multipliziert im aktuellen TCR.
2. Der TCR-Wertebereich liegt zwischen 1 und 1000.
Material TCR Wertebereich
Nickel 600-700
NiFe 300-400
Titan 300-400
SS (303, 304, 316, 317) 80-200
Page 24
22
INNOCIGS EGRIP 2 LIGHT – REGELUNG DER LEISTUNGSABGABE
Erläuterung zum TCR- und VT-Modus (TEMP)
1. Sperren und Entsperren des Verdampferwiderstandes im VT Modus
Hinweis
Im VT-Modus können Sie die Temperatur der Spule zwischen 100°C und 315°C bzw. 200°F und 600°F mittels der Einstelltasten
regulieren. Drücken Sie die “Auf”-Taste, um die Temperatur zu erhöhen, oder die “Ab”-Taste, um sie zu verringern. Pro Tastendruck
ändert sich die Temperatur um 5°C bzw. 10°F. Halten Sie die Einstelltaste “Auf” oder “Ab” kontinuierlich gedrückt, so ändert sich die
Temperatur schnell fortlaufend.
Drücken Sie die Feuer-Taste drei Mal, um in das Menü zu gelangen. Drücken Sie die linke Einstelltaste zwei Mal, sodass die zweite
Zeile im Display für den Widerstand blinkt. Drücken Sie die “Auf”-Taste, um den Widerstand des Verdampfers zu sperren oder zu
entsperren. Erscheint das “Lock” Zeichen im Display, ist der Widerstand gesperrt.
a) Sperren Sie den Widerstand bitte nur, wenn die Spule Raumtemperatur hat. Dadurch wird der richtige “Basiswiderstand” des
Verdampfers gelockt. Die Temperaturkontrolle arbeitet weiterhin korrekt, solange der Head nicht durch einen anderen ausgetauscht
wird. Ist der Widerstand gesperrt, können Sie die Top Cap entfernen, egal ob der Verdampferkopf heiß oder kalt ist.
Page 25
23
INNOCIGS EGRIP 2 LIGHT – REGELUNG DER LEISTUNGSABGABE
2. Installieren neuer Verdampferköpfe
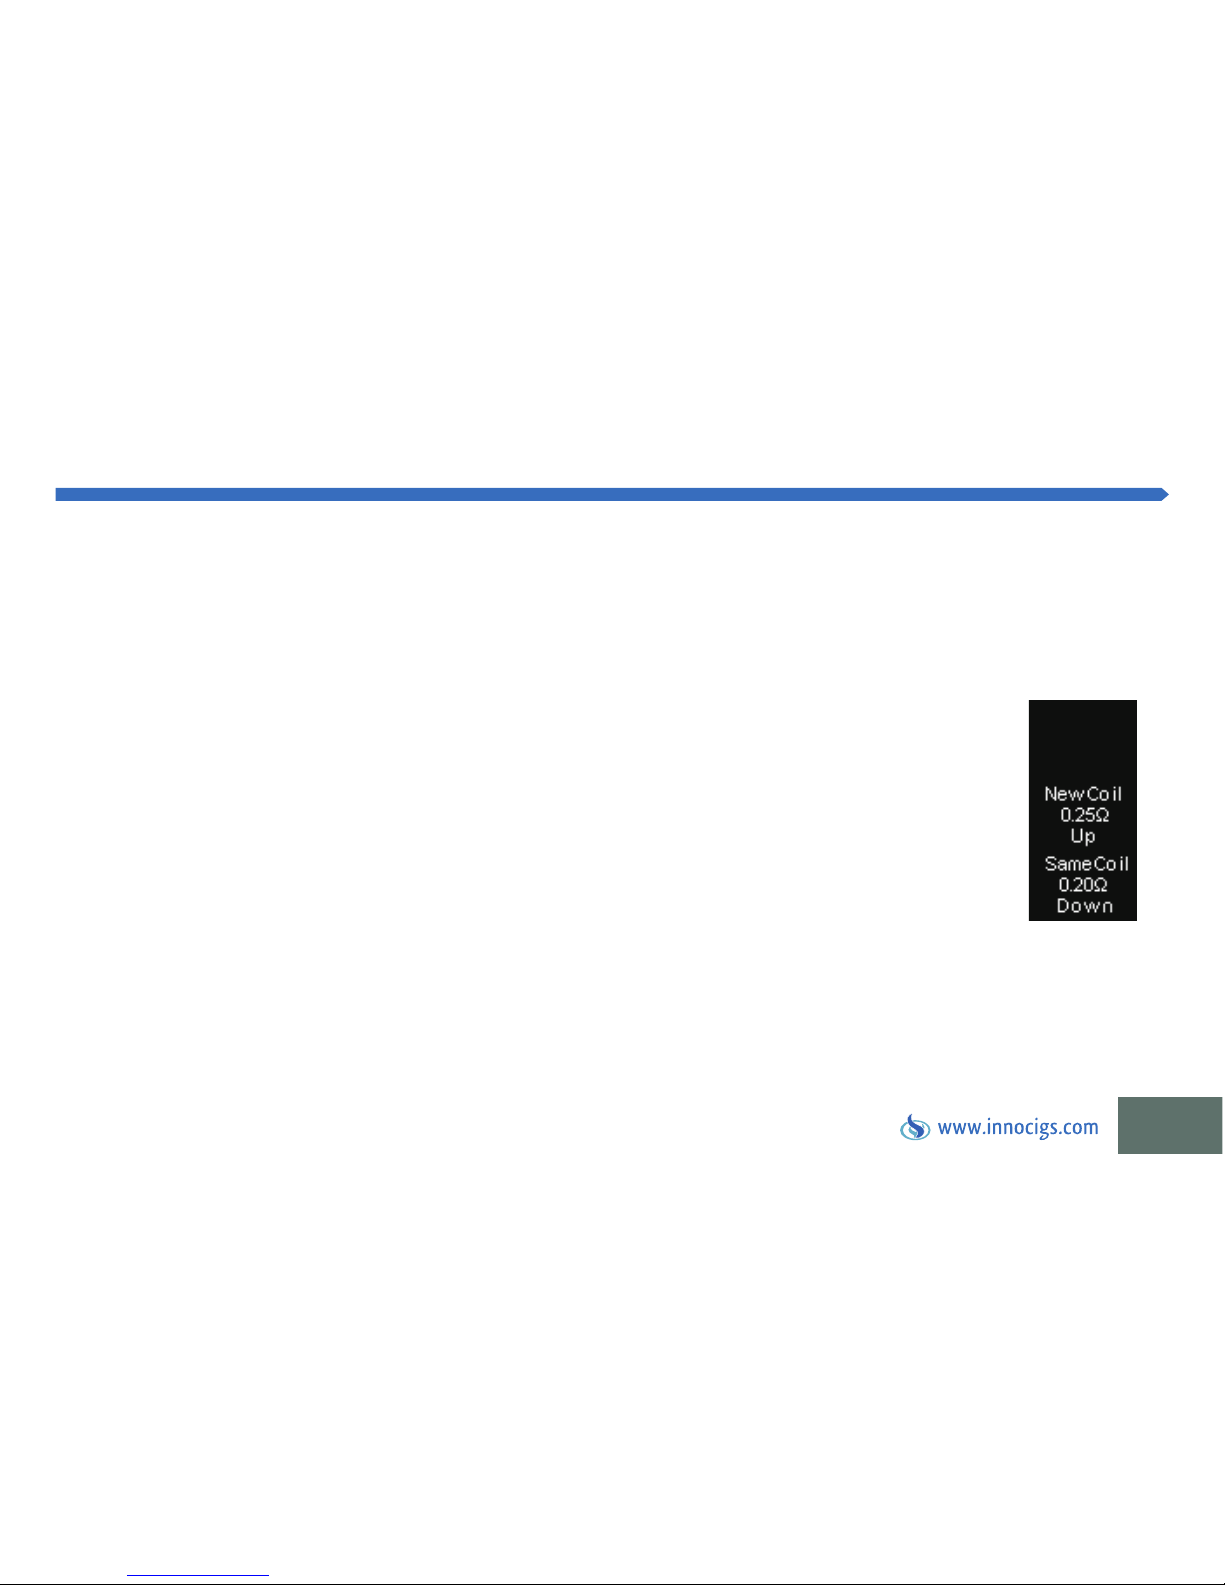
Wird ein Head ausgetauscht, der einen größeren Widerstand aufweist als der vorherige, ist es wichtig die
“Base Resistance” des Verdampfers zurückzusetzen. Dies ist der Widerstand der Spule bei Raumtemperatur.
Initiieren Sie ein Reset, indem Sie die Feuer-Taste der eGrip 2 Light betätigen, wobei die Clearomizer Base nicht
angebracht sein darf. Nach dem Verbinden des Clearomizers Base samt neuem Head mit dem Akku erscheint
im Display die Anzeige “New Coil, Same Coil”. Bestätigen Sie mit der “Auf”-Einstelltaste, dass ein neuer Head
installiert wurde.
Sollten Sie diese Nachricht aus anderen Gründen sehen – insbesondere bei der Neuinstallation des gleichen
Heads, der vom letzten Einsatz noch warm ist – drücken Sie die “Ab”-Einstelltaste, sodass der “Basiswiderstand”
nicht zurückgesetzt wird.
Denken Sie immer daran, den Betriebsmodus an den verwendeten Head anzupassen, um eine korrekte
Temperatursteuerung sicherzustellen.
b) Bitte entsperren Sie den Widerstand, wenn Sie einen anderen Verdampferkopf verwenden wollen. Sonst arbeitet das VT-System
nicht korrekt. Im “Widerstand Entsperren”-Modus stellen Sie bitte sicher, dass der Head bei Raumtemperatur gewechselt wird, um
eine hohe Temperaturgenauigkeit zu gewährleisten.
Page 26
24
INNOCIGS EGRIP 2 LIGHT – REGELUNG DER LEISTUNGSABGABE
3. Anpassen der Wattleistung im VT-Modus
Hinweis
Sie können die maximale Ausgangsleistung im VT-Modus einstellen. Drücken Sie die Feuer-Taste 3 Mal, um das Menü aufzurufen.
Betätigen Sie die “Ab” Einstell-Taste, sodass die zweite Zeile blinkt. Drücken Sie anschließend die “Auf” Einstell-Taste, um die Wattzahl
anzupassen. Bestätigen Sie diese, indem Sie den Feuerknopf drücken.
a) Der VT-Modus unterstützt einen Maximalwiderstand von 1,5 Ohm. Das Gerät wechselt automatisch in den VW-Modus, wenn der
Widerstand mehr als 1,5 Ohm beträgt.
b) Benutzen Sie Heads mit Kanthal-Wicklung, wechselt das Gerät nach zwei Sekunden automatisch in den VW-Modus.
Page 27
25
INNOCIGS EGRIP 2 LIGHT – LADEN UND UPDATEN DES GERÄTS
Aufladen und updaten des InnoCigs eGrip 2 Light Akkus
Akku-Leistung & -Lebensdauer
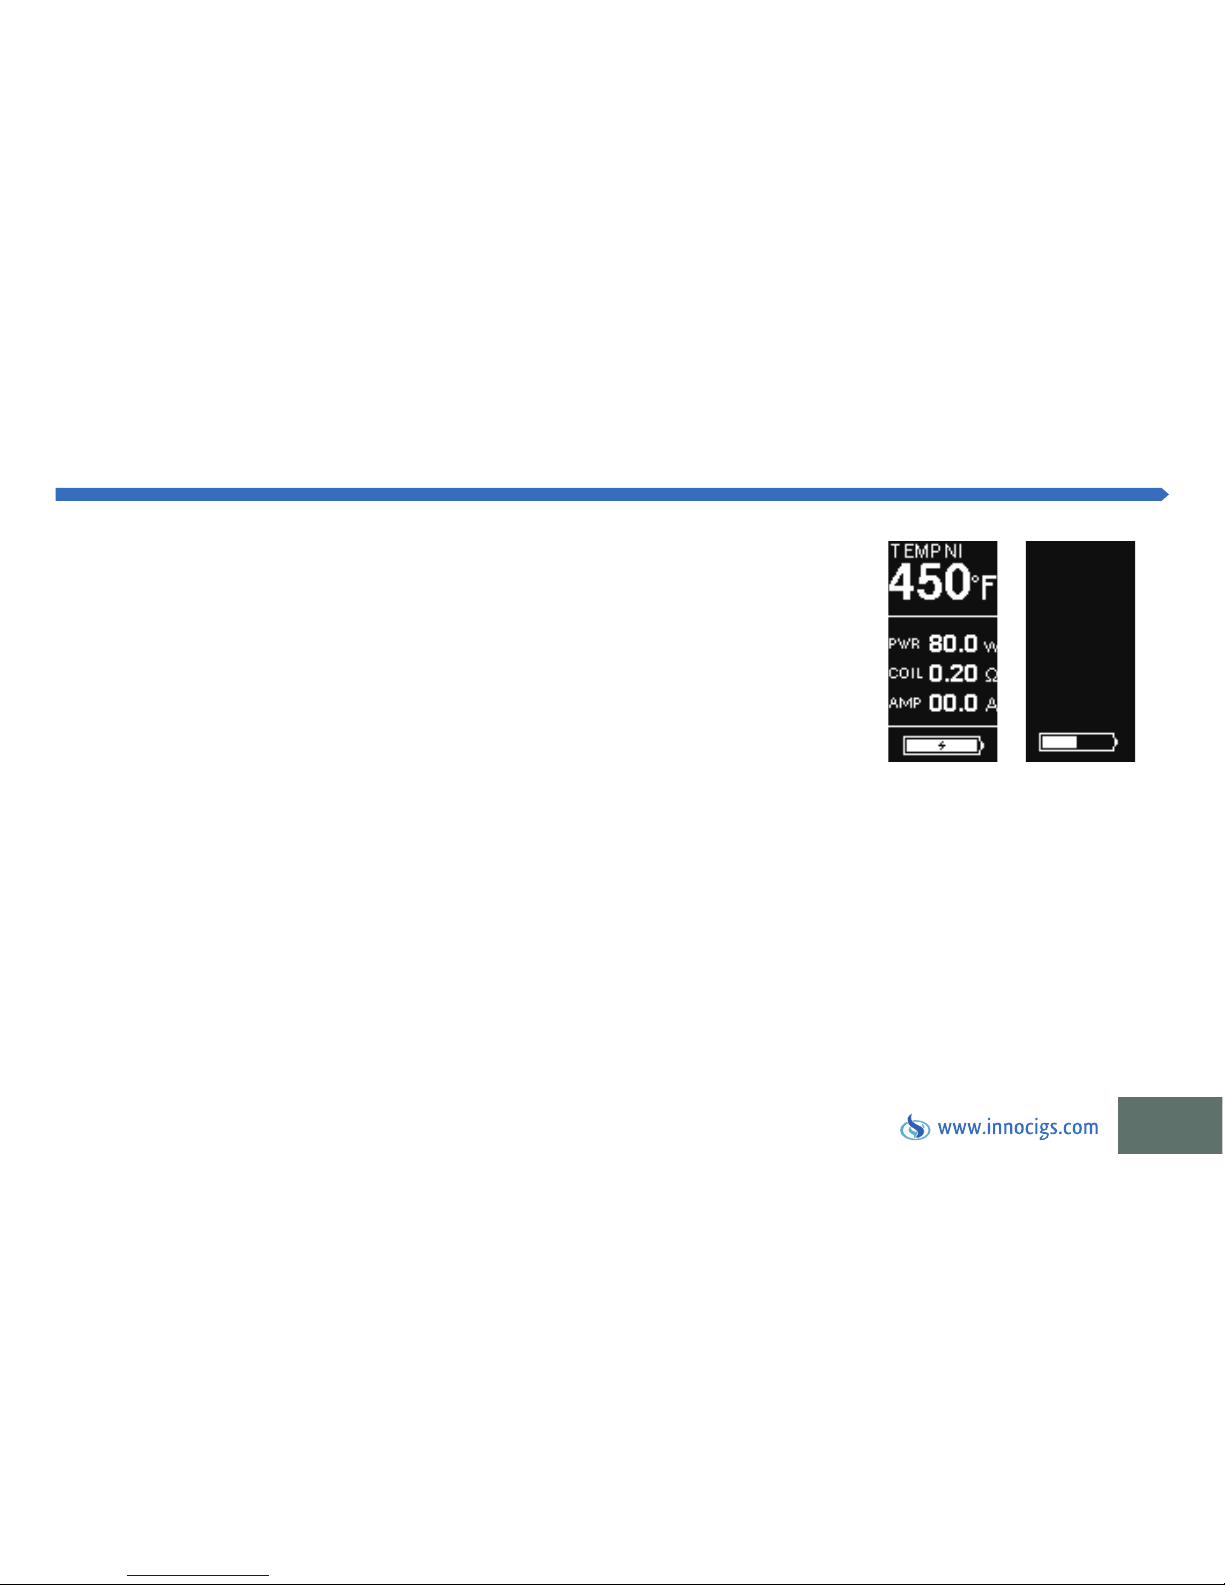
Der Micro USB Anschluss befindet sich bei der eGrip 2 Light unterhalb der Einstelltaste
“Auf” und “Ab”. Verbinden Sie das Micro USB Ladekabel zum Aufladen oder für ein
Upgrade mit dem Gerät. Sie können die eGrip 2 mit dem USB Kabel am Computer oder
mit einem passenden Adapter über eine Steckdose aufladen. Ob der Akku voll geladen
ist oder sich noch im Ladeprozess befindet, erkennen Sie an der Ladestandanzeige des
Batterie-Symbols.
Wenn der Akku längere Zeit nicht benutzt wird, verliert er – entsprechend der Industriestandards und -normen –
nach 3 Monaten 5% bis 10%, nach 6 Monaten 15% bis 20% und nach einem Jahr 25% bis 30% seiner Leistung.
Wir empfehlen Ihnen, den Akku mindestens alle 3 Monate aufzuladen, um eine lange Lebensdauer sicherzustellen.
Page 28
26
INNOCIGS EGRIP 2 LIGHT – FEHLERMELDUNGEN & SCHUTZFUNKTIONEN
Über 10 Sek.-Schutz
Verdampfer-Schutz
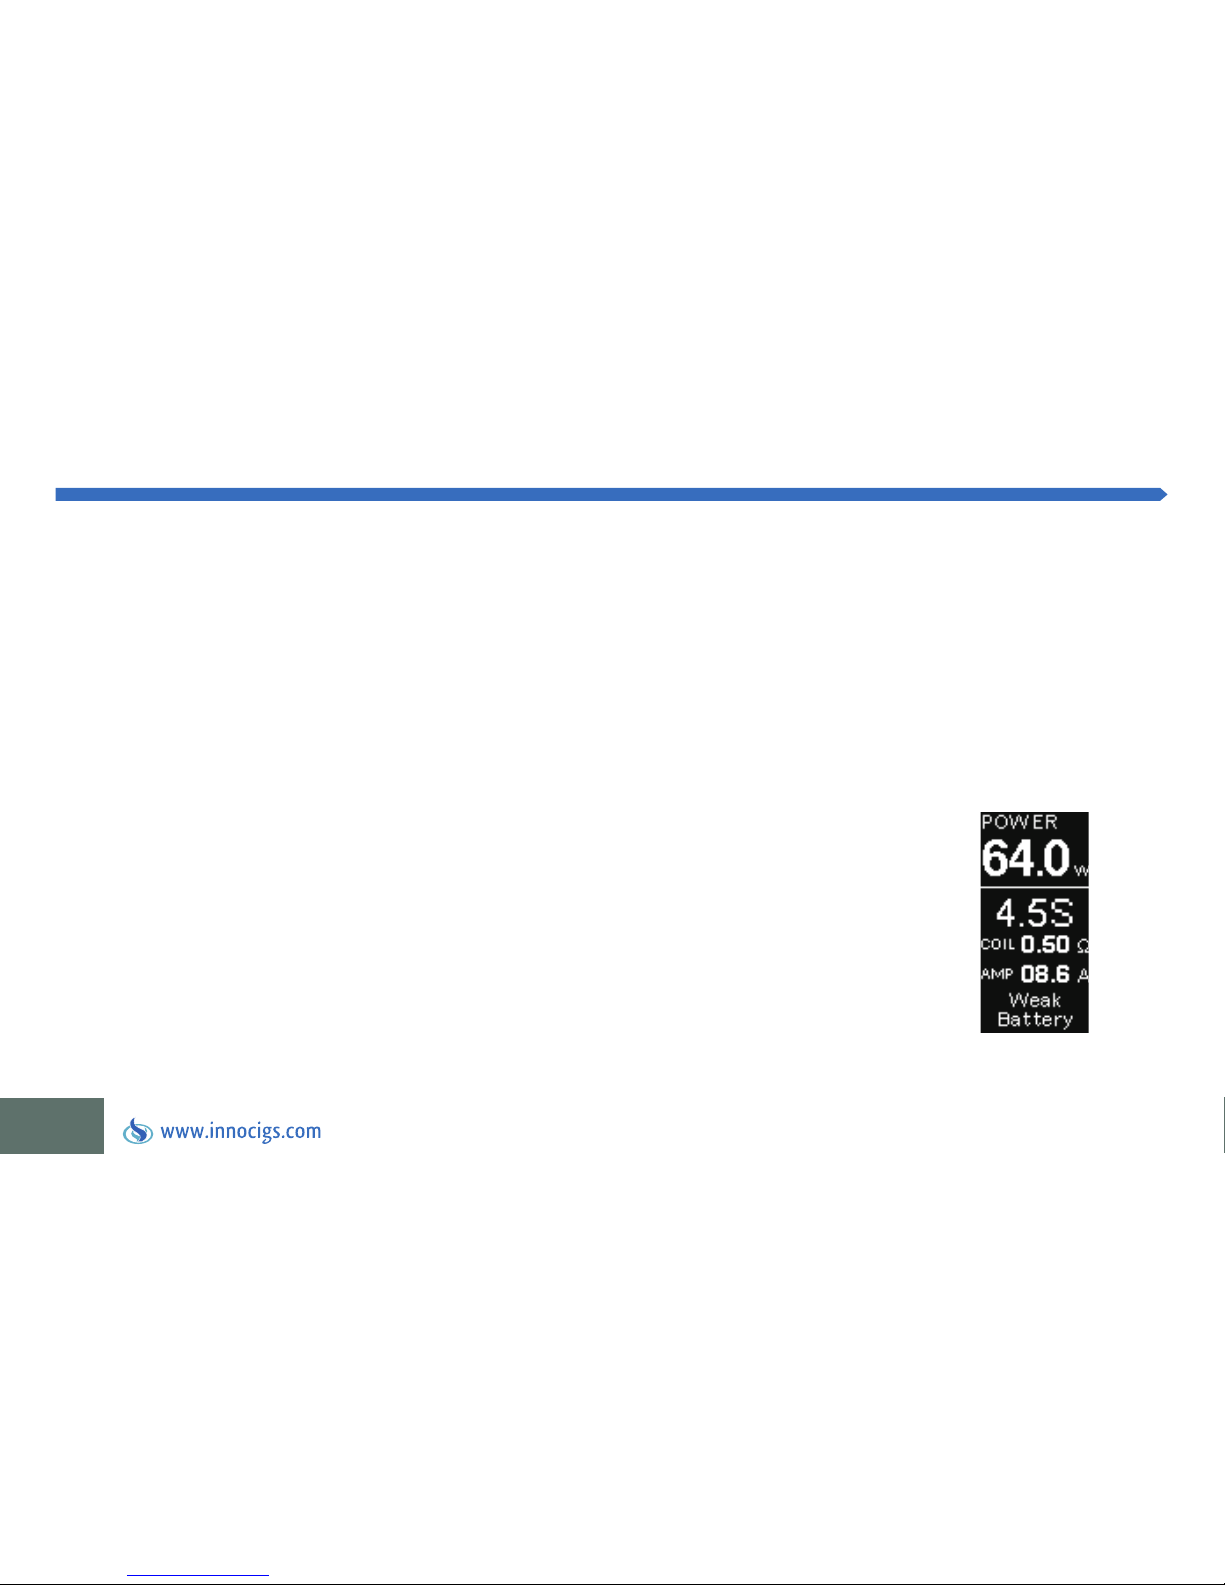
Akkukapazität lässt nach
Wenn Sie die Feuer-Taste des Geräts länger als 10 Sekunden gedrückt halten, schaltet sich das Gerät
automatisch ab. Auf dem Display erscheint “Over 10s Protection”.
Falls eine Überspannung am Verdampfer auftritt, zeigt das Gerät “Atomizer Short” an.
Wenn die Spannung des Akkus im VW-/VT-Modus unter 2,9 Volt liegt, erscheint auf dem Display
“Weak Battery”. Die Ausgangsspannung wird synchron zur Spannung reduziert.
Page 29

27
INNOCIGS EGRIP 2 LIGHT – FEHLERMELDUNGEN & SCHUTZFUNKTIONEN
Low Power-Alarm:
Atomizer Low-Alarm
Temperatur-Schutz
Gerät zu heiß
Wenn die Spannung des Akkus unter 3,3 V sinkt, zeigt das Gerät “Battery Low” an. Wenn Sie weiterhin den Feuerknopf gedrückt
halten, zeigt das Gerät “Battery Low Lock” an und schaltet sich ab. Sobald Sie das Gerät laden, entsperrt sich der Low Power Schutz.
Wenn der Widerstand des Verdampfer im VW-Modus niedriger als 0,1 Ohm oder im VT-Modus niedriger als 0,05 Ohm ist, zeigt Ihnen
das Display “Atomizer Low” an.
Erreicht der Verdampferkopf im VT-Modus die von Ihnen gewählte Temperatur, so zeigt das Gerät “Protection” an.
Wenn die Temperatur des Geräts über 70°C steigt, schaltet sich die Leistung ab und im Display wird “Device Too Hot” angezeigt.
Page 30
28
*Durchmesser der Liquidtank-Öffnung
*
INNOCIGS EGRIP 2 LIGHT – ECKDATEN & LEISTUNGSMERKMALE
InnoCigs eGrip 2 Light Eckdaten
Akkukapazität
Elektrische Spannung
Ladespannung
Maße
Gewicht
Tankvolumen
2100 mAh
9,0 V (max.)
5,0 V
45 mm x 100,55 mm x 24 mm
129 g
3,5 ml
Ausgabemodi
Ausgangsleistung
Widerstandsbereich
Temperaturbereich
geeignete
Verdampferköpfe
VT (Ni, Ti, SS316) / TCR (M1, M2, M3) / VW / Bypass
1 bis 80 Watt
0,05 bis 1,5 Ohm im VT -Modus
0,1 bis 3,5 Ohm im VW- / Bypass-Modus
100°C bis 315°C / 200°F bis 600°F
BF SS316 Head-Serie 0,5 Ohm | 0,6 Ohm | 1,0 Ohm, BF Clapton Head 1,5 Ohm, NotchCoil™ 0,25 Ohm
3,5
mm
Page 31

29
INNOCIGS – GARANTIELEISTUNGEN & REPARATUREN
Garantiebedingungen
Alle Produkte von InnoCigs unterliegen einer strengen Qualitätskontrolle. Sie erhalten zusätzlich zu der gesetzlichen
Gewährleistungspflicht eine 6-monatige Garantie auf alle InnoCigs-Produkte. Die Garantiezeit von 6 Monaten gilt ab
Kaufdatum beim Fachhändler. Das Datum auf Ihrem Kaufbeleg ist ausschlaggebend. Während der Garantiezeit werden
Geräte, die Defekte aufweisen, von der Firma InnoCigs repariert oder ersetzt.
Verschleißteile wie Mundstücke und Verdampferköpfe sind von der Garantie ausgenommen.
Ersetzte Geräte oder Einzelteile gehen in das Eigentum von InnoCigs über. Die Garantieleistungen bewirken weder eine Verlängerung der Garantiezeit, noch setzen sie eine neue Garantie in Gang.
Page 32
30
INNOCIGS – GARANTIELEISTUNGEN & REPARATUREN
Garantieansprüche sind ausgeschlossen bei Schäden durch:
- missbräuchliche oder unsachgemäße Behandlung
- Umwelteinflüsse (z. B. Feuchtigkeit, Hitze, Staub etc.)
- Nichtbeachtung der für das Gerät geltenden Sicherheitshinweise
- Nichtbeachtung der Bedienungsanleitung
- Gewaltanwendung (z. B. Schlag, Stoß, Fall)
- Eingriffe, die nicht durch die von InnoCigs autorisierten Serviceadressen vorgenommen wurden
- eigenmächtige Reparaturversuche
- Einsendung in nicht transportsicherer Verpackung
InnoCigs behält sich bei allen Garantiefällen das Recht einer genauen Prüfung bis zur endgültigen Entscheidung vor. InnoCigs behält
sich ebenfalls das Recht vor, die Gewährleistungsbedingungen zu überarbeiten.
Page 33

31
INNOCIGS – GARANTIE & SERVICE | KONTAKT
Garantie, Gewährleistung & Service
Sollte das Produkt nicht funktionieren oder in irgendeiner Weise defekt sein, so wenden Sie sich zunächst bitte direkt an den
Fachhändler, von dem Sie das Produkt erworben haben. Sollte die Geltendmachung einer Garantie erforderlich sein, gehen Sie
bitte wie folgt vor: Bitte setzen Sie sich mit dem InnoCigs Kundenservice per E-Mail, Fax oder Telefon in Verbindung. Alternativ
können Sie den Austausch-Service auf unserer Webseite www.innocigs.com nutzen.
Bei Fragen rund um die Bedienung und Verwendung wenden Sie sich gerne an unseren Kundenservice.
InnoCigs GmbH & Co. KG
Stahltwiete 23
22761 Hamburg | GERMANY
Telefon: +49 (0) 40 - 22 86 729 0
Fax: +49 (0) 40 - 22 86 729 99
E-Mail: [email protected]
Page 34
32
INNOCIGS EGRIP 2 LIGHT – TECHNOLOGY IN A BOX DESIGN
Instructions for the user
Thank you for choosing InnoCigs! Read the usage instructions carefully before use in order to ensure correct use of the InnoCigs
eGrip 2 Light. Use only original and/or recommended products in combination with this product. The manufacturer shall not
provide any service or warranty when non-recommended products are used together with this product.
Should you have questions or need more information about your InnoCigs eGrip 2 Light, please contact your dealer or visit our
website at www.innocigs.com.
Page 35

33
INNOCIGS EGRIP 2 LIGHT – CONTENTS
Notes & Precautions . . . . . . . . . . . . . . . . . . . . . . . . . . . . . . . . . . . . . . . . . . . . . . . . . . . . . . . . . . . . . . . . . . . . . . . . . . . . . . . . . . . . . . . . . . . . . . . . . . . . . . . . . .34
InnoCigs eGrip 2 Light – Technology in a Box Design . . . . . . . . . . . . . . . . . . . . . . . . . . . . . . . . . . . . . . . . . . . . . . . . . . . . . . . . . . . . . . . . . . . . . . . . . . . . . . .37
Package Contents . . . . . . . . . . . . . . . . . . . . . . . . . . . . . . . . . . . . . . . . . . . . . . . . . . . . . . . . . . . . . . . . . . . . . . . . . . . . . . . . . . . . . . . . . . . . . . . . . . . . . . . . . . . .38
Design & Features . . . . . . . . . . . . . . . . . . . . . . . . . . . . . . . . . . . . . . . . . . . . . . . . . . . . . . . . . . . . . . . . . . . . . . . . . . . . . . . . . . . . . . . . . . . . . . . . . . . . . . . . . . . .39
Using the Devices . . . . . . . . . . . . . . . . . . . . . . . . . . . . . . . . . . . . . . . . . . . . . . . . . . . . . . . . . . . . . . . . . . . . . . . . . . . . . . . . . . . . . . . . . . . . . . . . . . . . . . . . . . . .40
Operating Instructions – Note for Cleaning – Security Features . . . . . . . . . . . . . . . . . . . . . . . . . . . . . . . . . . . . . . . . . . . . . . . . . . . . . . . . . . . . . . . . . .40
Power On/Off – Vaping . . . . . . . . . . . . . . . . . . . . . . . . . . . . . . . . . . . . . . . . . . . . . . . . . . . . . . . . . . . . . . . . . . . . . . . . . . . . . . . . . . . . . . . . . . . . . . . . . . . .41
Changing LED Color – Setting Screen Protection Time . . . . . . . . . . . . . . . . . . . . . . . . . . . . . . . . . . . . . . . . . . . . . . . . . . . . . . . . . . . . . . . . . . . . . . . . . .42
Locking the “up“ and “down“ buttons – Rotating the Display – Applying the Clearomizer Adapter . . . . . . . . . . . . . . . . . . . . . . . . . . . . . . . . . . . .43
Changing the Atomizer Coil – Refilling E-liquid . . . . . . . . . . . . . . . . . . . . . . . . . . . . . . . . . . . . . . . . . . . . . . . . . . . . . . . . . . . . . . . . . . . . . . . . . . . . . . . .44
Setting the Air Flow . . . . . . . . . . . . . . . . . . . . . . . . . . . . . . . . . . . . . . . . . . . . . . . . . . . . . . . . . . . . . . . . . . . . . . . . . . . . . . . . . . . . . . . . . . . . . . . . . . . . . .45
Choosing the Display Type . . . . . . . . . . . . . . . . . . . . . . . . . . . . . . . . . . . . . . . . . . . . . . . . . . . . . . . . . . . . . . . . . . . . . . . . . . . . . . . . . . . . . . . . . . . . . . . . . . . . .46
Setting Date & Time . . . . . . . . . . . . . . . . . . . . . . . . . . . . . . . . . . . . . . . . . . . . . . . . . . . . . . . . . . . . . . . . . . . . . . . . . . . . . . . . . . . . . . . . . . . . . . . . . . . . . . . . . .47
Changing & Operating of Modes ............................... . . . . . . . . . . . . . . . . . . . . . . . . . . . . . . . . . . . . . . . . . . . . . . . . . . . . . . . . . . . . . . . . .48
TCR-Mode – VT-Mode .................................... . . . . . . . . . . . . . . . . . . . . . . . . . . . . . . . . . . . . . . . . . . . . . . . . . . . . . . . . . . . . . . . . .50
Installing a new Atomizer Coil ............................. . . . . . . . . . . . . . . . . . . . . . . . . . . . . . . . . . . . . . . . . . . . . . . . . . . . . . . . . . . . . . . . . .54
Settings in VW Modes . . . . . . . . . . . . . . . . . . . . . . . . . . . . . . . . . . . . . . . . . . . . . . . . . . . . . . . . . . . . . . . . . . . . . . . . . . . . . . . . . . . . . . . . . . . . . . . . . . . . .55
Charging & Updating the Device ............................... . . . . . . . . . . . . . . . . . . . . . . . . . . . . . . . . . . . . . . . . . . . . . . . . . . . . . . . . . . . . . . . . .56
Error Messages & Protections . . . . . . . . . . . . . . . . . . . . . . . . . . . . . . . . . . . . . . . . . . . . . . . . . . . . . . . . . . . . . . . . . . . . . . . . . . . . . . . . . . . . . . . . . . . . . . . . . .57
Main Features & Performance ................................. . . . . . . . . . . . . . . . . . . . . . . . . . . . . . . . . . . . . . . . . . . . . . . . . . . . . . . . . . . . . . . . . .59
Warranty & Repair. . . . . . . . . . . . . . . . . . . . . . . . . . . . . . . . . . . . . . . . . . . . . . . . . . . . . . . . . . . . . . . . . . . . . . . . . . . . . . . . . . . . . . . . . . . . . . . . . . . . . . . . . . . .60
Warranty & Service | Contact ................................. . . . . . . . . . . . . . . . . . . . . . . . . . . . . . . . . . . . . . . . . . . . . . . . . . . . . . . . . . . . . . . . . .62
Page 36
34
INNOCIGS EGRIP 2 LIGHT – NOTES & PRECAUTIONS
Persons under 18 years, pregnant women, nursing mothers and people with cardiovascular disease should not use this product.
Not recommended for non-smokers. Please keep out of reach of children and minors.
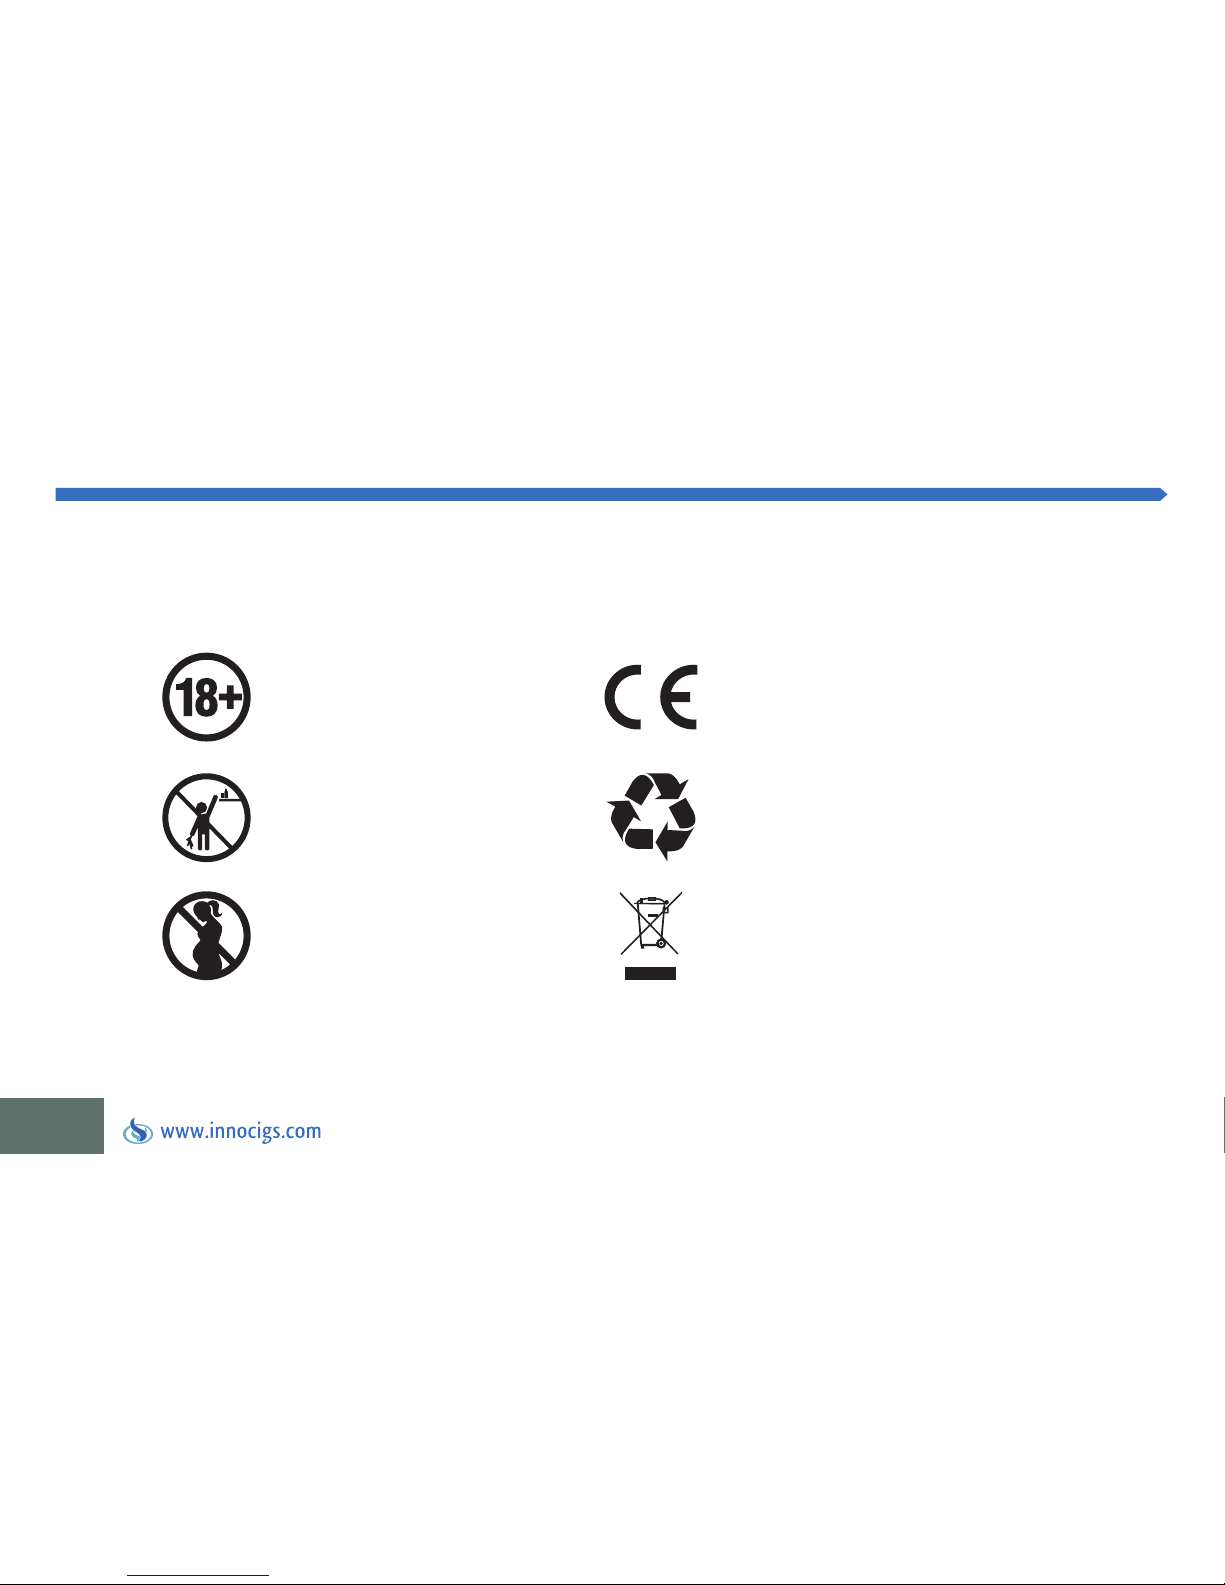
This product must not
be used by minors.
This Product must not be
used by pregnant or nursing
women.
This product must be kept away
from children.
This product is in parts made of reusable materials
that can be recycled.
Electronic goods and batteries should not be
disposed with normal household waste! Please
dispose of used electronic goods and batteries
– as required by law – at a municipal collection
location, so that raw materials and potentially
harmful substances can be properly removed
and recycled.
This product complies with EU requirements on
technical goods and may be sold throughout the
European Union.
Page 37

35
INNOCIGS EGRIP 2 LIGHT – NOTES & PRECAUTIONS
User instructions
1. If the device is dropped, you should check that there are no loose components, that there is no leakage of e-liquid, and that the
mouthpiece is not damaged. If there are no signs of damage upon visual inspection of the product, you can continue using the
device. For hygienic reasons, please wipe the mouthpiece with a cloth before reusing.
2. The device should not be used if parts are cracked or deformed and the defective items should be replaced. Never attempt to
repair the device on your own if a defect occurs.
3. The device should not be used when the liquid in the tank is empty or almost empty, as well as in the event that you notice a
change in taste. Please replace the atomizer coil with a new one before you continue to use the e-cigarette.
4. Never store the InnoCigs eGrip 2 Light in rooms with extremely high temperatures or in rooms with extremely high humidity.
Avoid long periods of direct sunlight.
5. The recommended temperature range for charging the battery is 0°C to 45°C, and -10°C to 60°C for the use of the product.
6. If e-liquid comes in contact with your skin, wipe it off as soon as possible and wash the area of contact.
7. If e-liquid is swallowed, contact your local poison control center. The Poison Emergency Call of the Charité University Hospital Berlin
can be reached day and night by phone at +49 (0)30 – 19 240. In cases of emergency, immediately contact local emergency officials.
Page 38
36
INNOCIGS EGRIP 2 LIGHT – NOTES & PRECAUTIONS
8. Nicotine can increase the heart rate and / or blood pressure and cause nausea, dizziness, and / or abdominal pain. If you notice
any undesirable effects, discontinue use and consult a physician.
9. Please comply with all local laws when using this e-cigarette.
10. Keep product out of reach of children and minors.
Warning
The InnoCigs eGrip 2 Light can be used with nicotine-containing liquid. Nicotine is a highly addictive substance.
Page 39
INNOCIGS EGRIP 2 LIGHT – TECHNOLOGY IN A BOX DESIGN
37
Notes on the Product
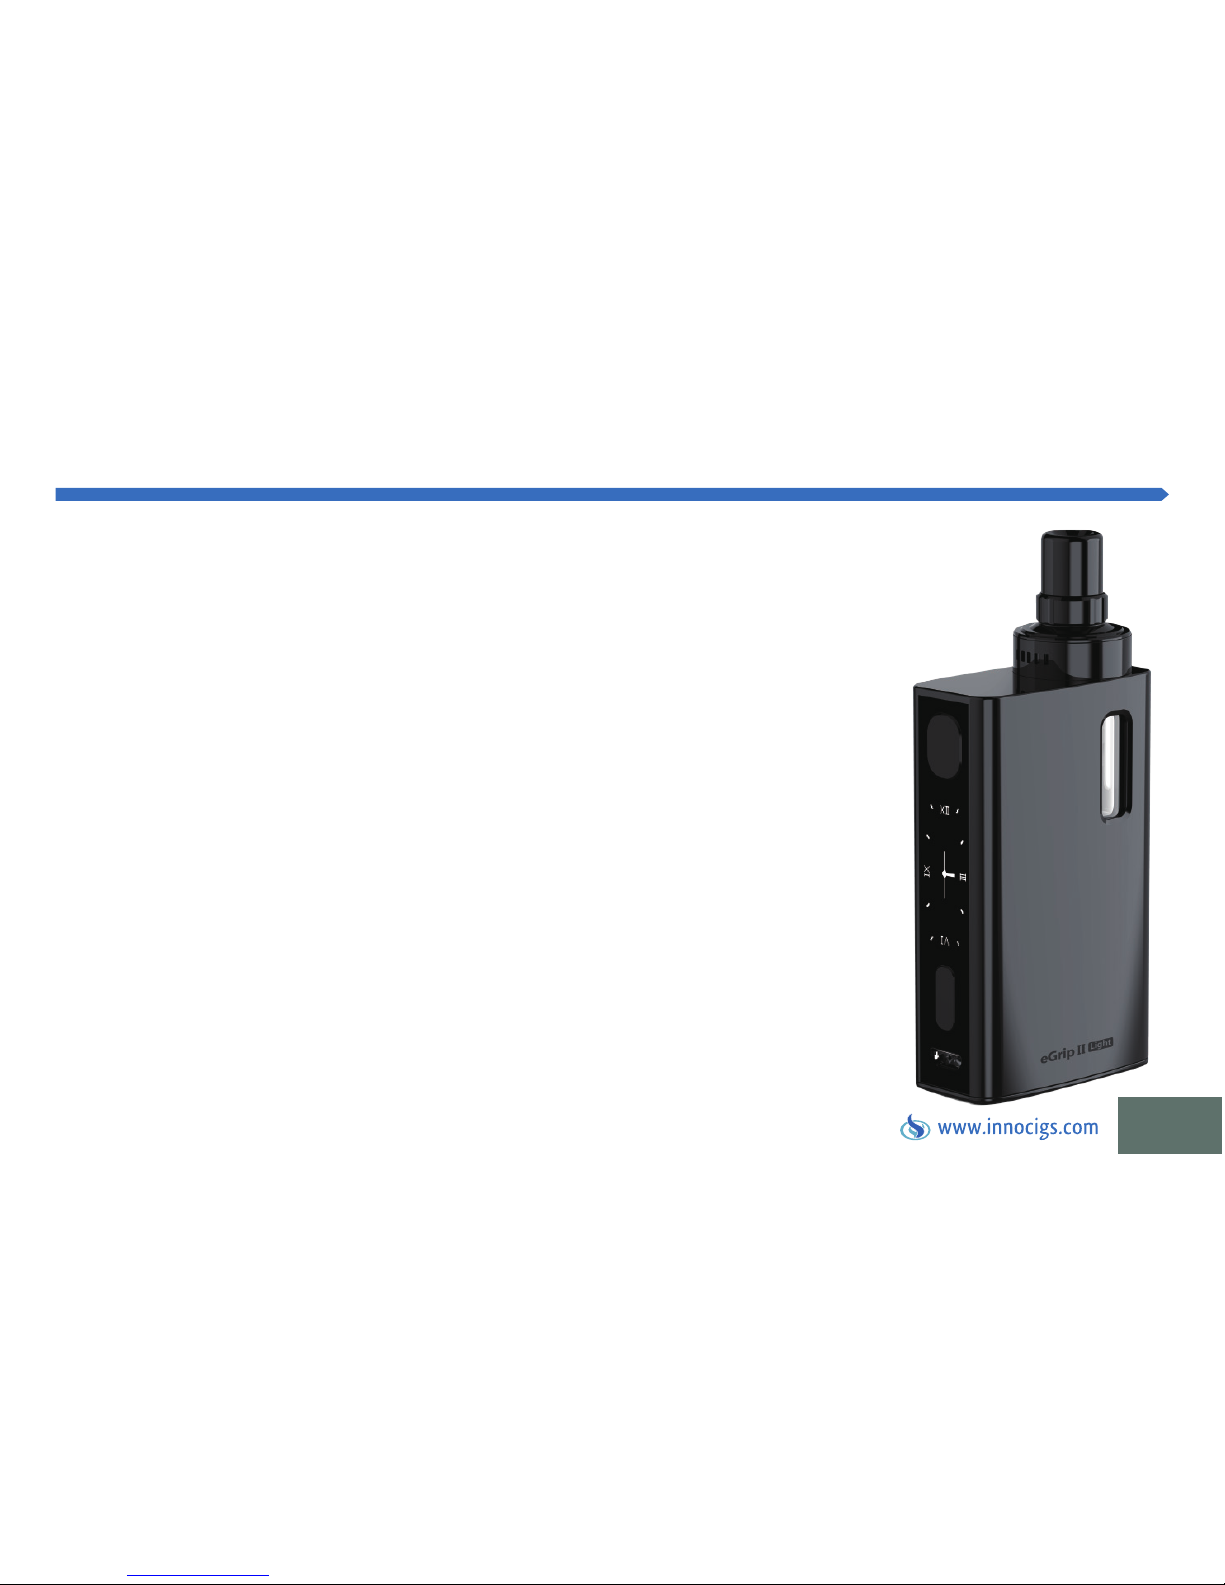
The InnoCigs eGrip 2 Light is an e-cigarette with magnesium alloy for a weight of less
than 130 grams. The integrated 3.5 milliliters top filling clearomizer can be exchanged
with various devices thanks to a 510 thread type adapter. Technical features are
Variable Temperature (VT) and Variable Wattage (VW) for an individual setting of
temperatures between 100°C and 315°C and power output between 1 and 80 watts
with titanium, nickel or stainless steel (SS316) atomizer heads. Further modes of function are the temperature coefficient of resistance (TCR) and a bypass setting adapting
performance to its battery power.
Page 40
38
INNOCIGS EGRIP 2 LIGHT – PACKAGE CONTENTS
Contents of the InnoCigs eGrip 2 Light Set
1 x eGrip 2 Light
1 x NotchCoil
TM
head 0.25 ohm
1 x BF SS316 head 0.5 ohm
1 x BF Clapton head 1.5 ohm
2 x Mouthpiece
1 x Atomizer Adapter (510 thread type)
1 x USB Charger
1 x Manual
Page 41
39
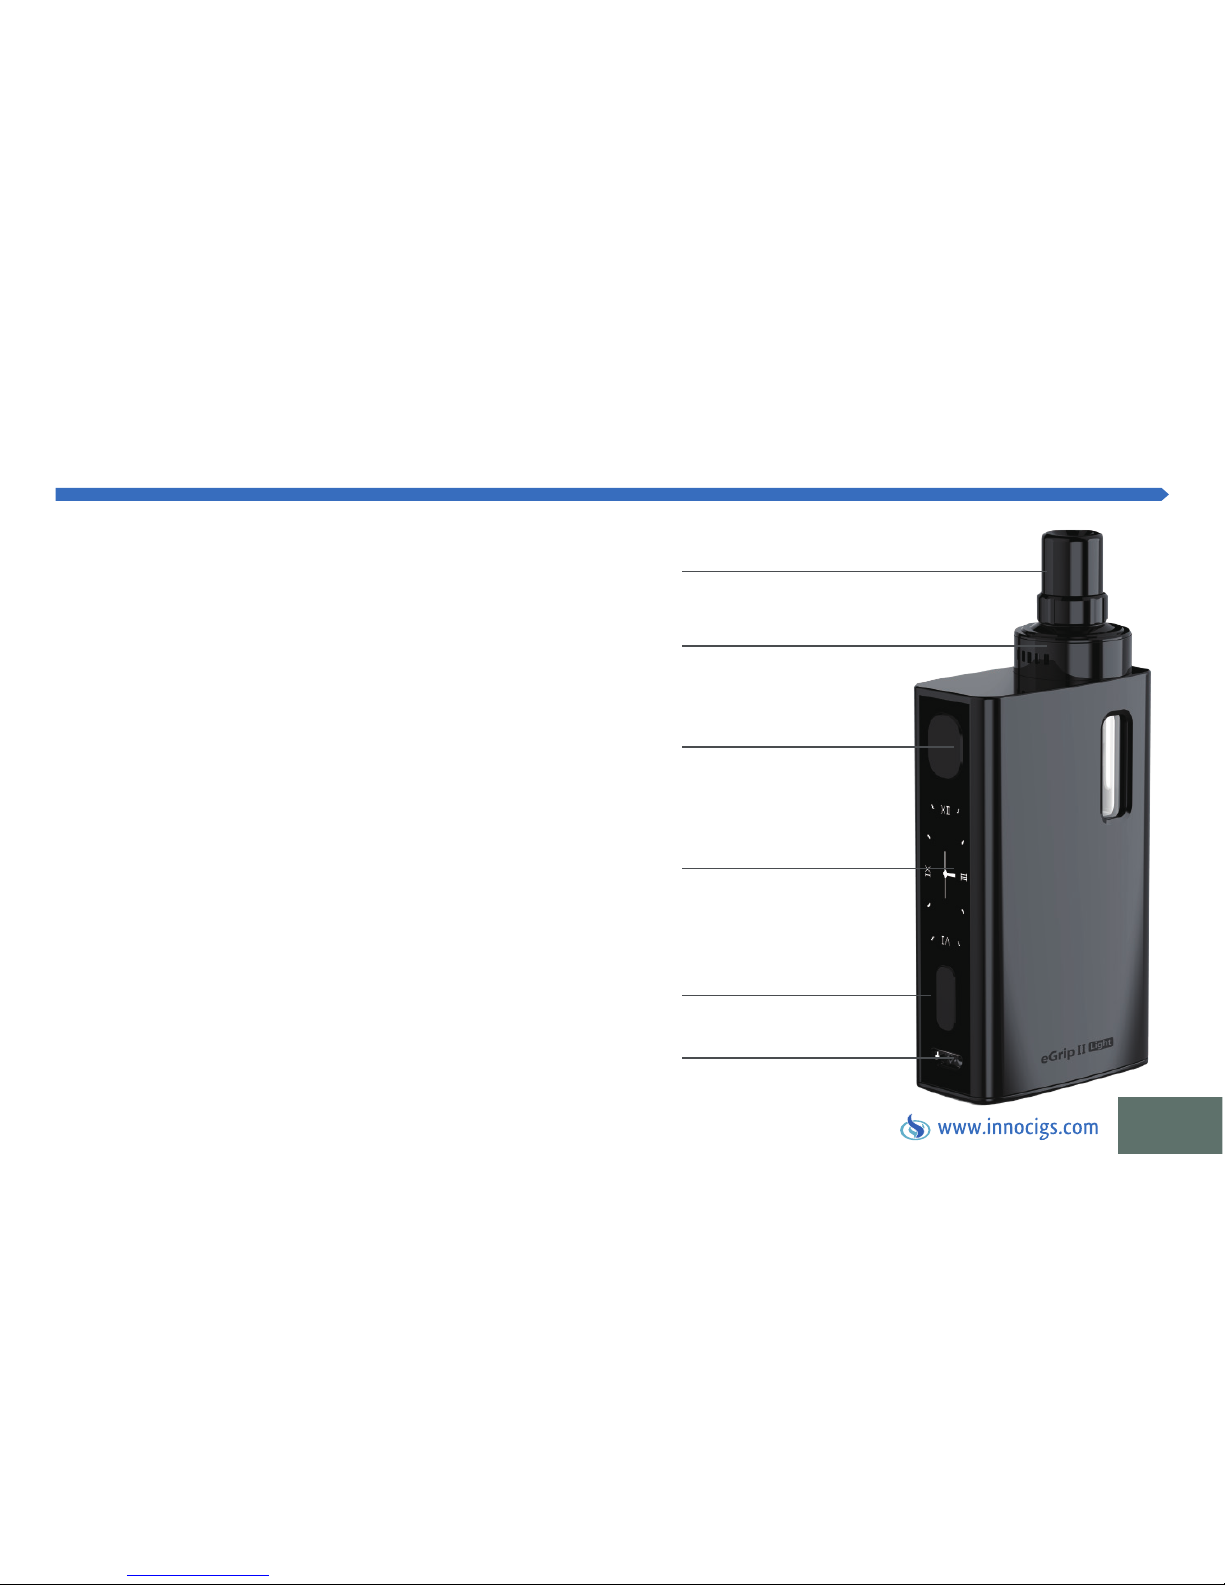
THE INNOCIGS EGRIP 2 LIGHT SET
InnoCigs eGrip 2 Light Set
The integrated clearomizer of the upgradeable eGrip 2 Light
e-cigarette is equipped with a top filling system and a top
airflow control technology (TFTA). Thus the eGrip 2 Light can
be filled with up to 3.5 milliliters of e-liquid from the top, while
the air supply is controlled above the device’s body as well.
With the included NotchCoil
TM
head (0.25 ohm), the BF SS316
head (0.5 ohm) and BF Clapton head (1.5 ohm) the eGrip 2
Light Set opens a spectrum of moderate and sub-ohm vaping
techniques. Besides the adapter for various clearomizers, the
eGrip 2 Light with magnesium alloy differs significantly from
other eGrip 2 models with its lighter weight.
The rechargeable 2100 mAh battery gives power to the
4 modes of function VW, VT, Bypass and TCR and displays all
settings including time and date on the OLED screen of the
eGrip 2 Light.
Top cap with Airflow Control
Fire button
OLED display
Up and down buttons
Micro USB connection
Mouthpiece
Page 42
40
INNOCIGS EGRIP 2 LIGHT – USING THE DEVICE
Operating instructions
Note for cleaning
Security features
Please completely charge the battery before initial use. Connect the individual parts of the product together, if this is not already
completed.
Use a dry cloth or cotton swab to clean the device.
The InnoCigs eGrip 2 Light has an automatic deactivation and protection against accidental discharge: With an uninterrupted pressing
of the fire button for 10 seconds, the battery disconnects to prevent overheating.
Page 43

41
INNOCIGS EGRIP 2 LIGHT – USING THE DEVICE
Power On/Off
Vaping
Press the fire button five times in quick succession to turn on the unit and five times to turn it off again. We recommend that you
turn off your InnoCigs eGrip 2 Light battery during transport and during long periods without use.
While holding the fire button of the device, inhale the vapor easily through the mouthpiece of your clearomizer. Let the atomizer
coil soak with liquid at least 15 minutes before operating the device to avoid burning. Please adjust the wattage to a proper range
according to your atomizer head before use.
Page 44
42
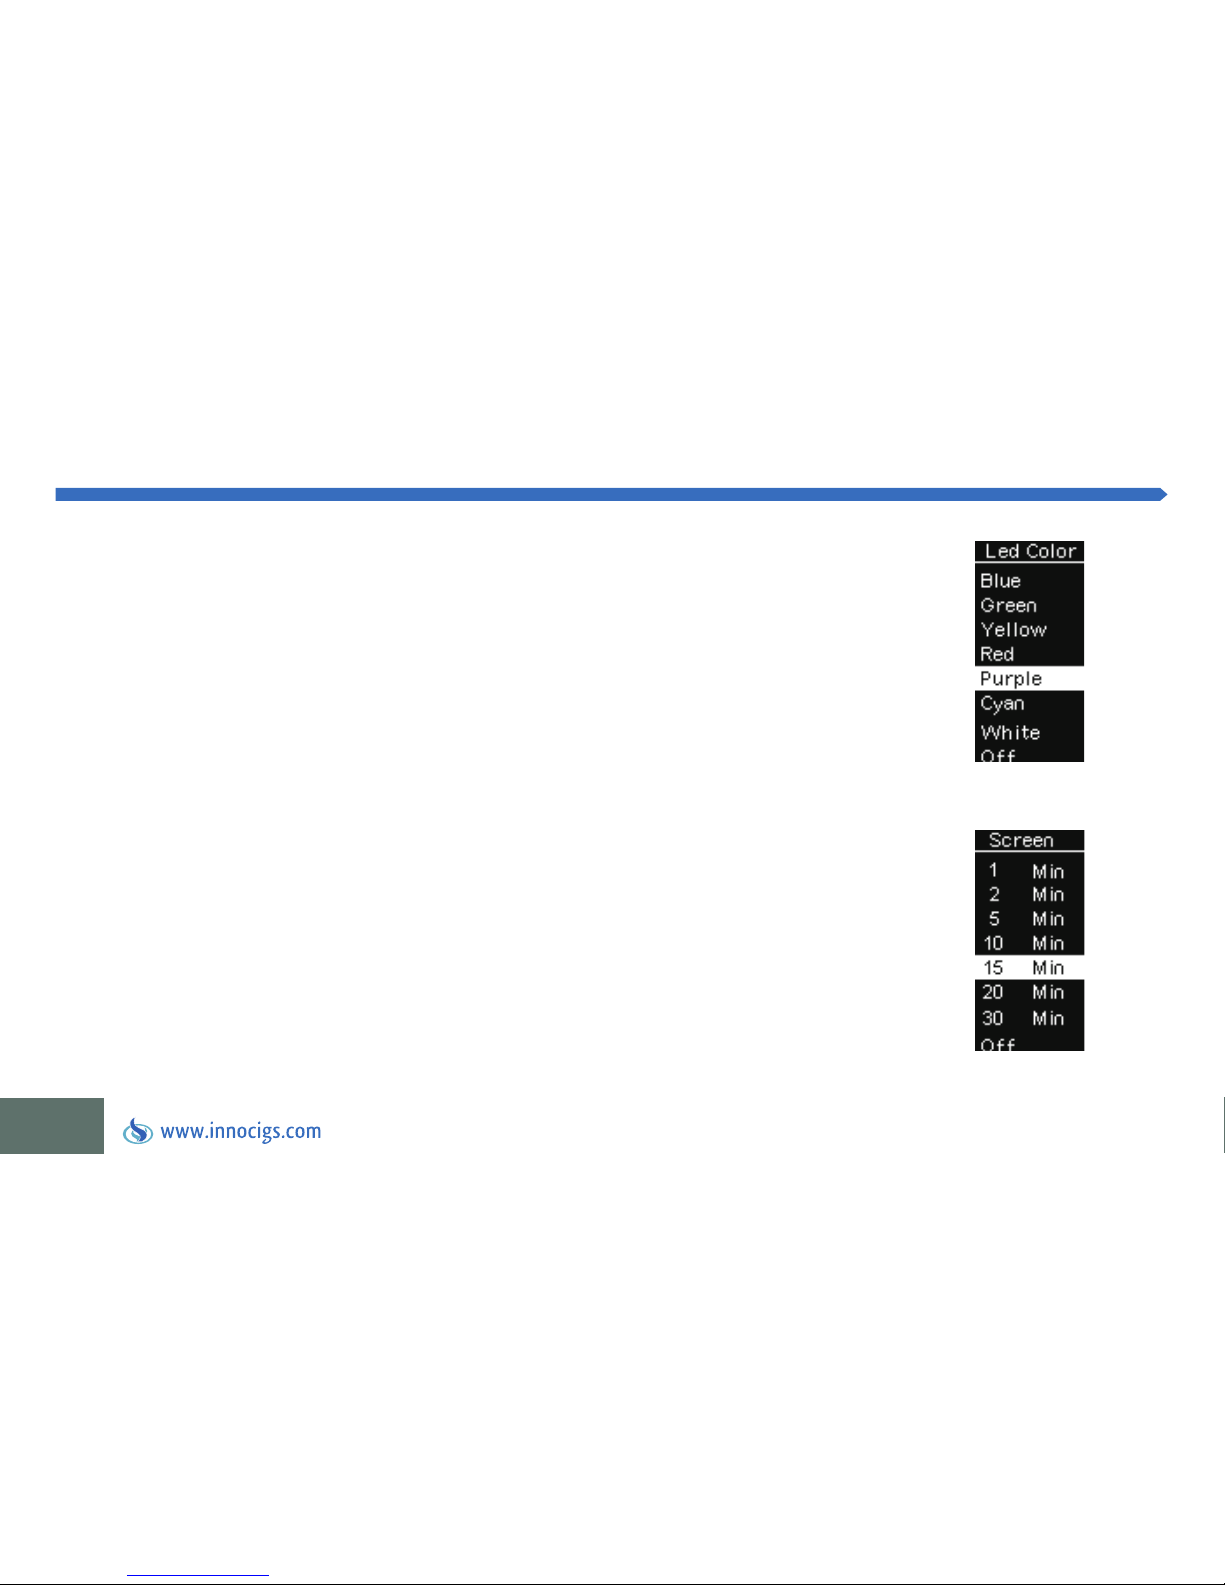
Changing the LED color
Setting Screen Protection Time
While the device is switched on, press the fire button at the same time as the up button to access
the LED settings. Press the down button to toggle between the colors blue, green, yellow, red, purple,
turquiose, and white. Confirm your choice of color by pressing the fire button.
While the device is switched on, press the fire button at the same time as the up button to access
the LED settings. Press the “up“ button again to enter the screen protection settings. Now use the
“down“ button to change the time interval after which the screen display shuts off. Confirm your
selection by pressing the fire button.
INNOCIGS EGRIP 2 LIGHT – USING THE DEVICE
Page 45

43
INNOCIGS EGRIP 2 LIGHT – USING THE DEVICE
Locking the “up“ and “down“ buttons
Rotating the display
To lock the up and down keys while the device is turned on, press and hold the “up“ and “down“ for two seconds until
the display reads “Key Lock”. To unlock the keys, press and hold the same keys down for two seconds until “Key Unlock”
appears on the display. This feature allows you to avoid accidental adustment of your settings while vaping.
While the device is turned off, press and hold the “up“ and “down“ buttons. The display will rotate 180 degrees. This
feature allows you to read your settings from two different angles.
Applying the Clearomizer Adapter
Unscrew the top cap including the Airflow Control from the eGrip 2 Light body and screw the atomizer adapter tightly
with an auxiliary tool (e.g. a coin) into the body. After that you can apply other types of 510 thread type clearomizers
with the eGrip 2 Light.
Page 46
44
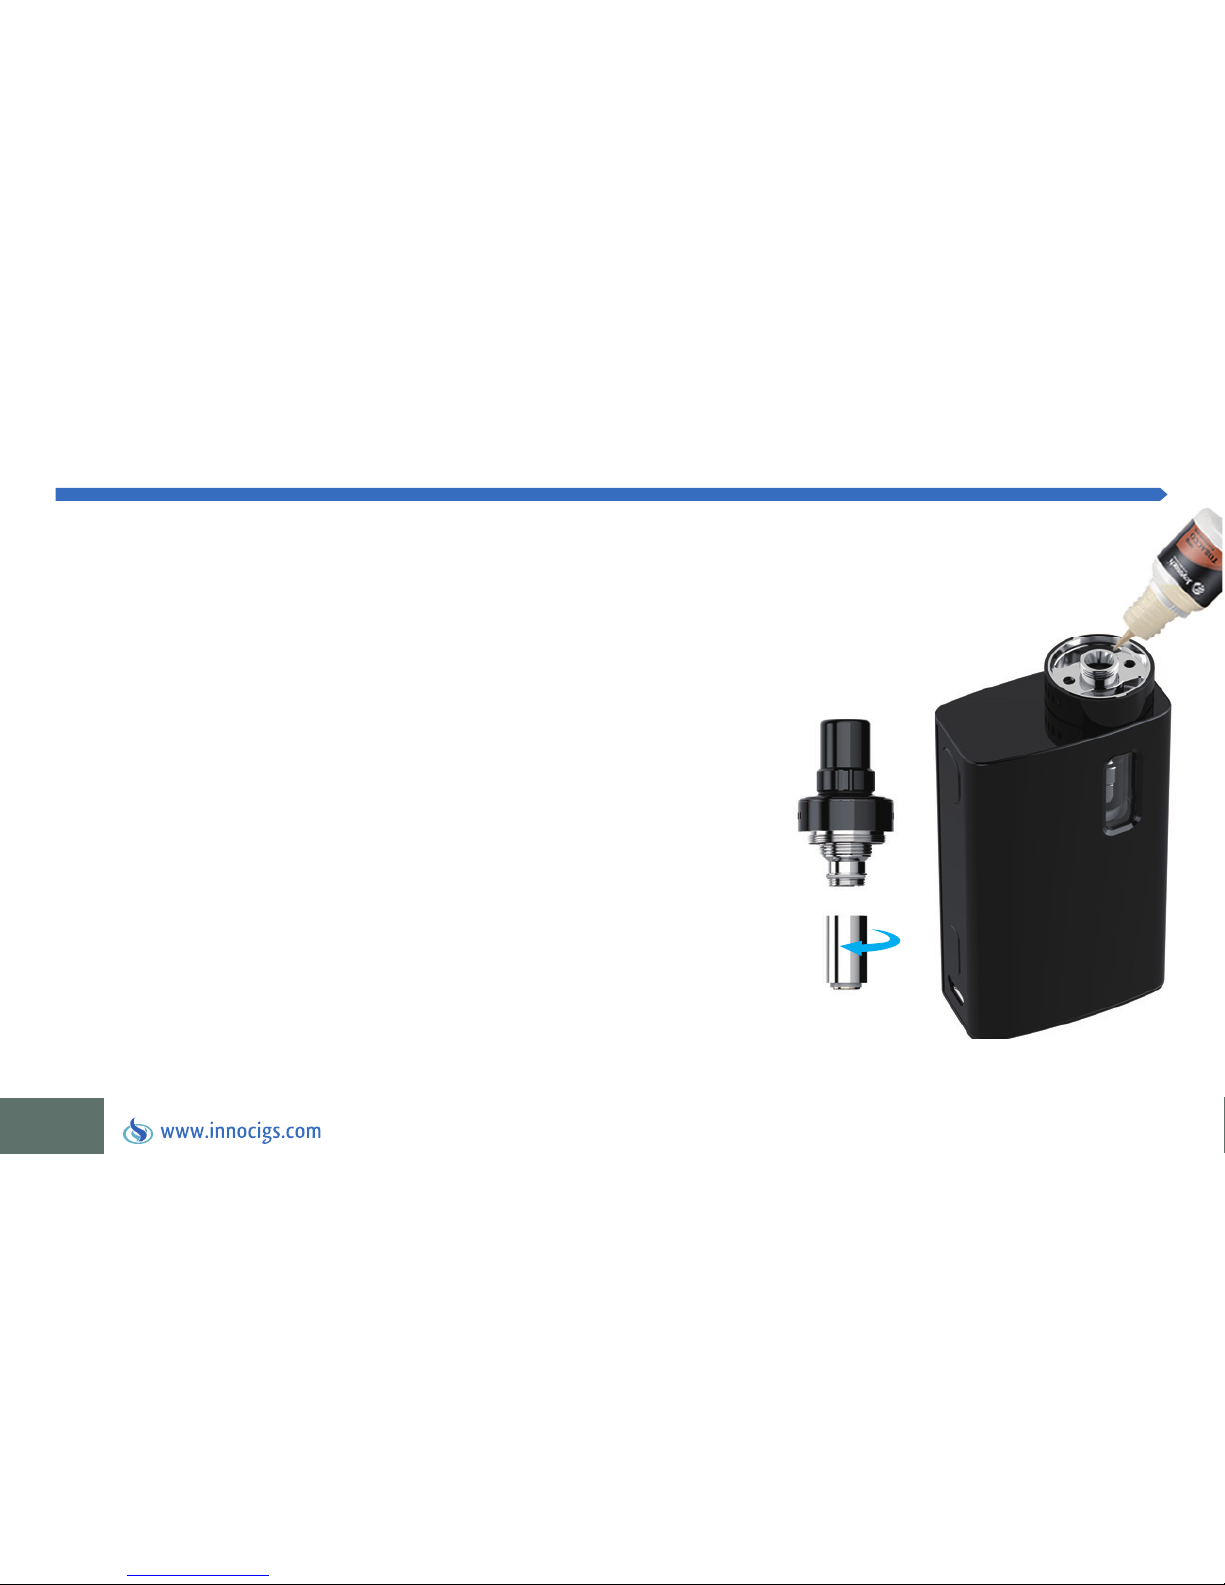
Refilling e-liquid
Remove the top cap from body of the eGrip 2 Light.
Slowly fill your liquid through the opening in the tank of
your device. Please use the openings at the side and be
careful not to fill any e-liquid into the middle hole. Fill the
tank cautiously to prevent it from overflowing.
Changing the atomizer coil
Remove the top cap from the body of the eGrip 2 Light.
Remove the atomizer coil attached to the base, and replace
it with a new one.
INNOCIGS EGRIP 2 LIGHT – USING THE DEVICE
Page 47

45
INNOCIGS EGRIP 2 LIGHT – USING THE DEVICE
Setting the air flow
Set the airflow by turning the hidden Airflow Control below the eGrip 2 Light mouthpiece.
Please note the following:
Prior to first use, drip a few drops of your liquid on the atomizer coil. Leave the atomizer sit for about 15 minutes in the e-liquid
filled tank and take several puffs without activating the atomizer before use.
Don’t clean atomizer heads with water. Because atomizer coils are wearing parts, they must be changed regularly.
Page 48
46
INNOCIGS EGRIP 2 LIGHT – CHOOSING THE DISPLAY TYPE
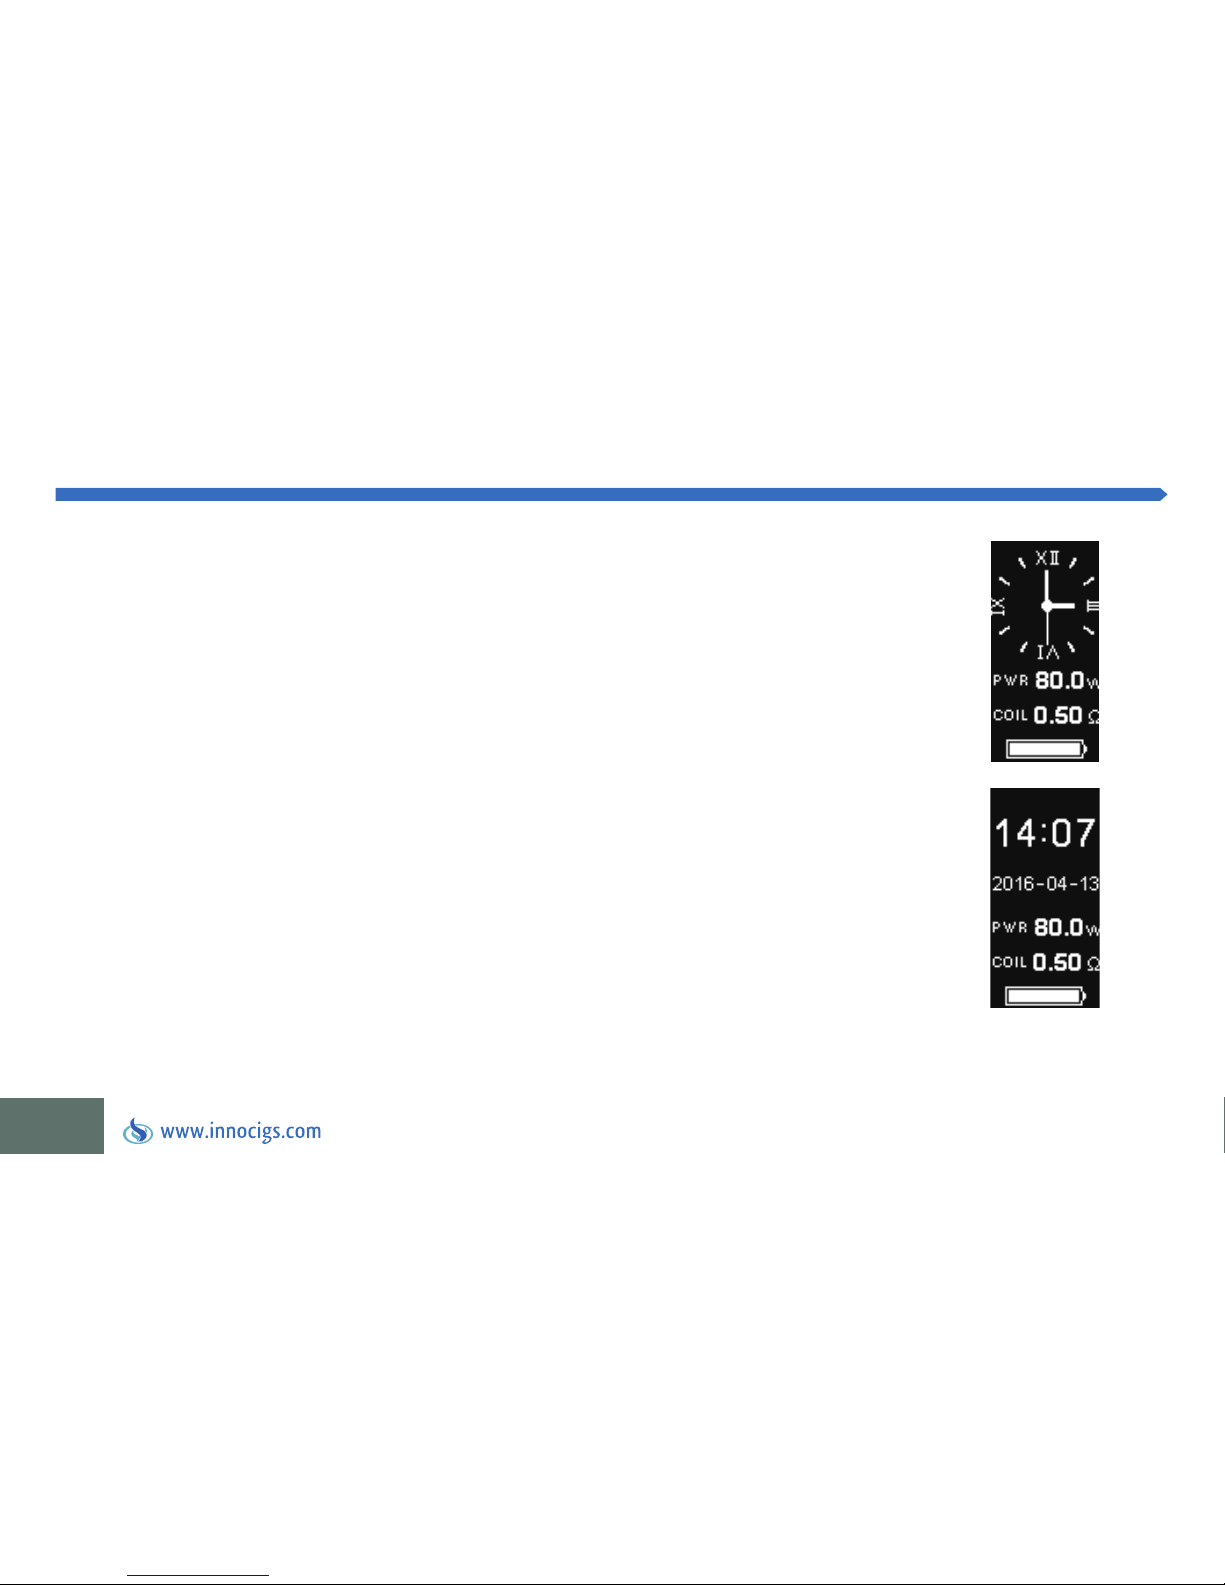
Switching between analog and digital display
When using the eGrip 2 Light e-cigarette with RTC, you can display the time in two ways: you can
choose from an analog or digital display.
To display the time digitally, press the fire button 3 times to enter the menu for the settings. The
first row will flash, indicating you are in the settings menu. Press the down button to set the date
and the up button to change the digital display to analog. To change the analog display to digital,
press the fire button again 3 times. Again, the display will flash indicating that further adjustments
can be made. Now press the “down“ button to adjust hours and seconds or press the “up“ button to
return to the digital display.
Page 49

47
INNOCIGS EGRIP 2 LIGHT – SETTING THE DATE & TIME
Setting the date and time
Press the fire button 3 times to make adjustments to the time and date. The display will indicate you are in the settings menu by
flashing. By pressing the “down“ button, you will access the settings of hour, minute, year, month and day. To change one of these
values, press the “up“ button. (Please note that only the year can be changed by pressing the “down“ button!) By pressing and
holding the “up“ or “down“ button, the changing of digits is accelerated.
Page 50
48
INNOCIGS EGRIP 2 LIGHT – CHANGING & OPERATING OF MODES
Procedures for adjusting the output
The wattage can be adjusted between 1 watt to 80 watts. A change in wattage also changes the taste and vapor behavior.
The higher the set wattage, the more intense the vapor production. The situation is similar with the temperature control: The higher
the temperature, the greater the vapor production. Press and hold the “up“ or the “down“ button to continuously increase or reduce
the wattage or temperature.
Please note that the resistance of the atomizer used must be set before the first use in the temperature control mode.
Page 51

49
INNOCIGS EGRIP 2 LIGHT – CHANGING & OPERATING OF MODES
Changing between the VT-Ni, Ti-VT, VT SS316, VW, bypass, TCR mode:
Press the fire button three times in quick succession to enter the menu. The display will indicate you are in the settings menu by
flashing. Press the “up“ button to toggle between TEMP (VT), TCR, POWER (VW) and BYPASS modes. Press the fire button or wait
until the display flashes ten times to confirm the current settings and exit the menu.
1. To select the TEMP or TCR mode, press the “down“ button while the display is flashing to enter the submenus VT, PWR, COIL and
AMP. When adjusting VT, press the “up” button to switch among Temp NI, Temp TI, and Temp SS316 as well as M1, M2 and M3
mode. Press the fire button to confirm. When the AMP row is flashing, press the “up” button to switch among AMP, PUFF and
TIME.
2. After selecting the POWER or BYPASS mode, press the “down“ button while the display is flashing to enter the submenus VT,
PWR, COIL and AMP. When the AMP row is flashing, press the “up” button to switch among AMP, PUFF and TIME.
Page 52
50
INNOCIGS EGRIP 2 LIGHT – CHANGING & OPERATING OF MODES
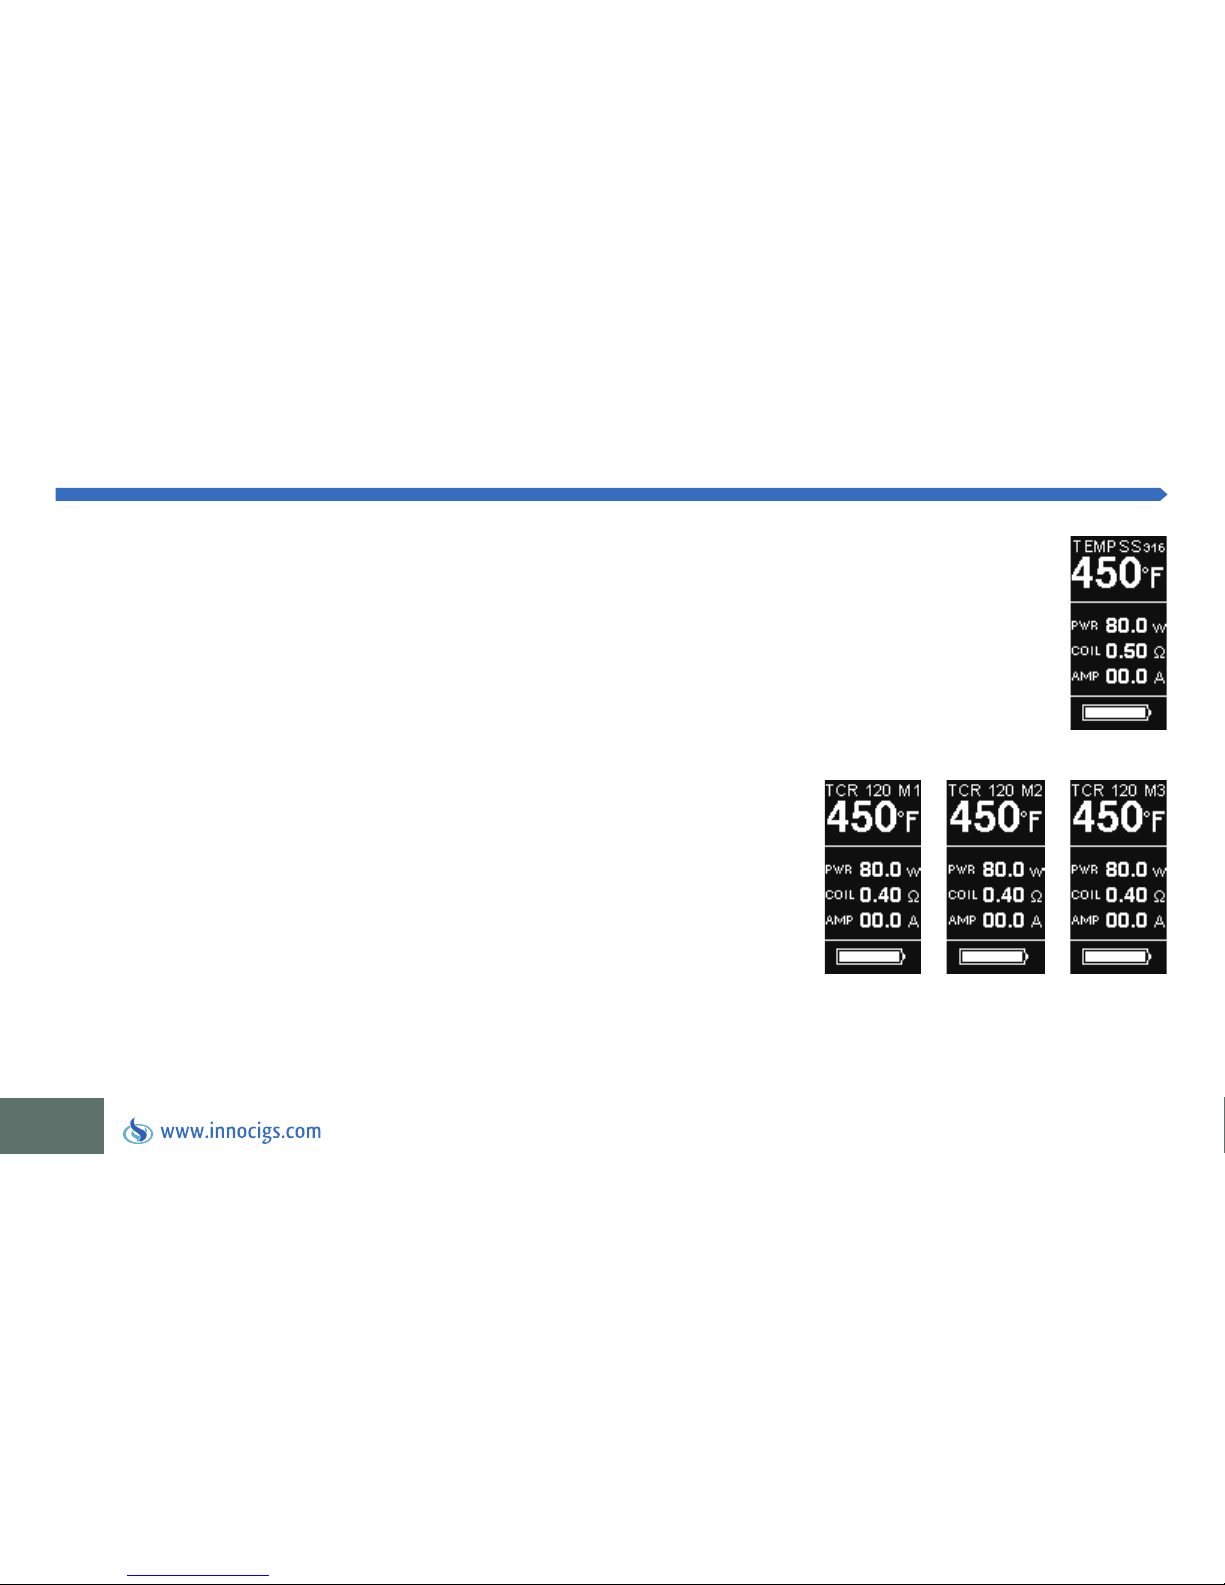
Explanation of TEMP SS316 mode
Explanation of the TCR (M1, M2, M3) mode
This mode has been specially designed for vaping with SS316 atomizer coils.
We suggest the BF SS316 coils from InnoCigs.
TCR (temperature coefficient of resistance) is a relatively new vaping mode
which is designed specifically for products like the InnoCigs eGrip 2 Light.
Press the down button while the indicator is flashing in TCR mode to reach the
sub menus (M1, M2, M3). Press the “up“ button while the mode indicator is still
flashing to navigate between M1, M2 and M3. Press the fire button to confirm
your selection.
Page 53
51
INNOCIGS EGRIP 2 LIGHT – CHANGING & OPERATING OF MODES
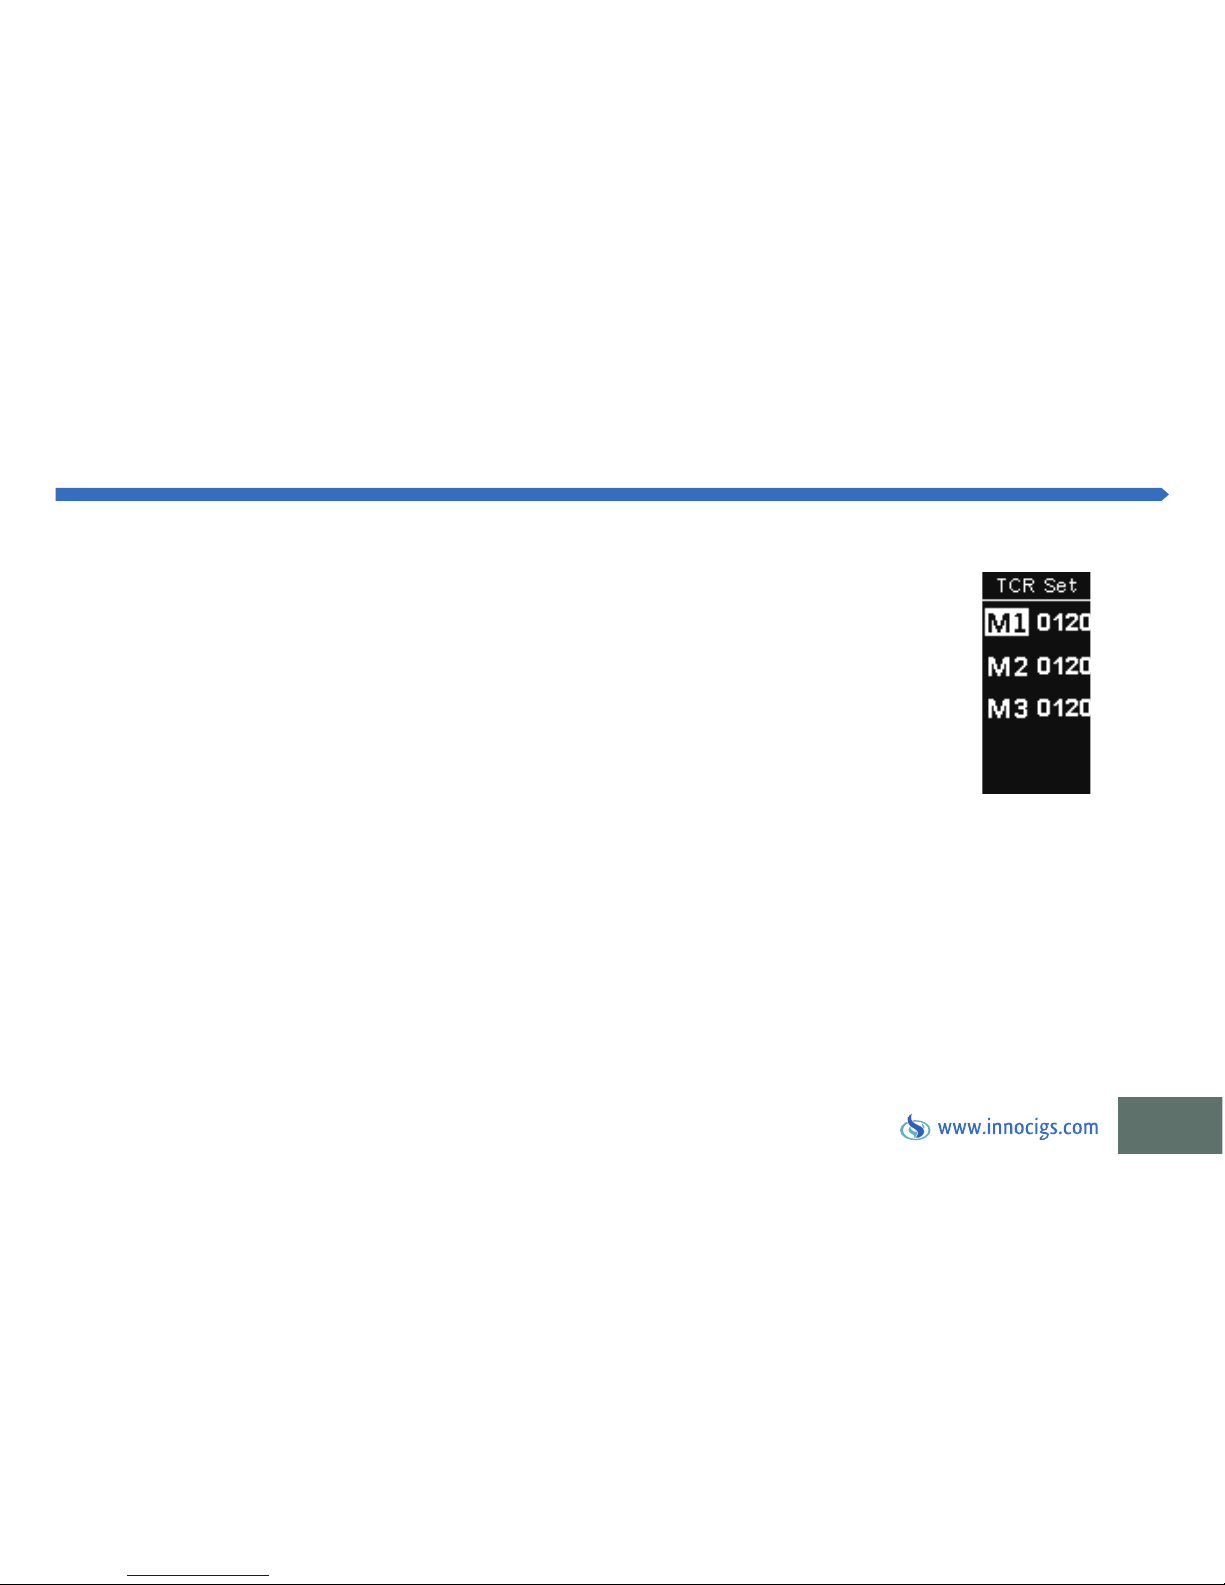
Adjusting the TCR mode
While the eGrip 2 Light is turned off, press and hold the fire button and „up“ button at the same
time for about 5 seconds to enter in the TCR-menu:
1. Press “up“ or “down“ buttons to switch between TCR M1, M2 and M3.
2. Confirm the desired mode by pressing the fire button.
3. Press the “up“ or “down“ button to increase or decrease the settings
4. Confirm your setting with the fire button or wait 10 seconds.
Page 54
52
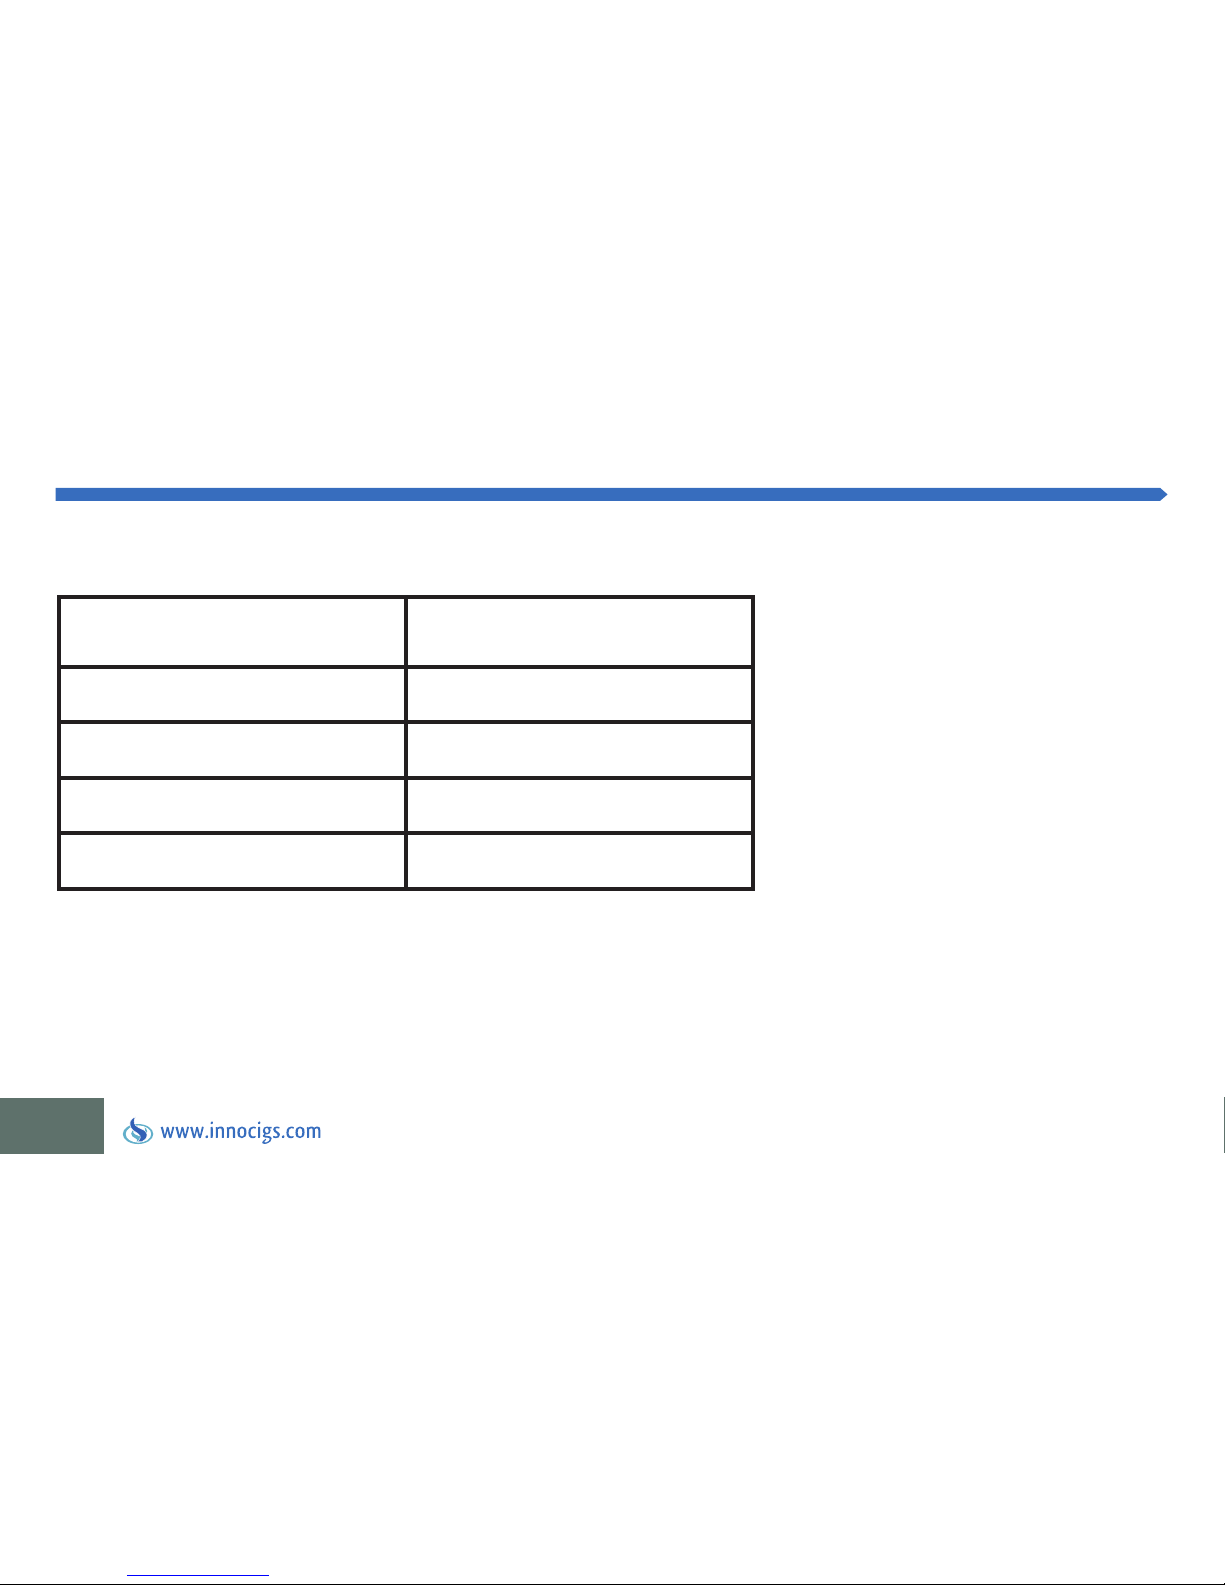
Note
TCR value range for various materials
1. The TCR values listed in the table are the actual TCR value multiplied by 10 5.
2. The TCR value range is 1-1000.
Material TCR Value Range
Nickel 600-700
NiFe 300-400
Titanium 300-400
SS (303, 304, 316, 317) 80-200
INNOCIGS EGRIP 2 LIGHT – CHANGING & OPERATING OF MODES
Page 55

53
INNOCIGS EGRIP 2 LIGHT – CHANGING & OPERATING OF MODES
Explanation of the TCR and VT modes (TEMP)
1. Locking and unlocking the coil resistance in VT mode
Note
In VT mode, you can regulate the temperature of the coil between 100°C and 315°C or 200°F and 600°F. Press the “up“ button to
raise the temperature or the “down“ button to reduce it. Each key press changes the temperature by 5°C or 10°F. Press and hold the
“up“ or “down“ buttons to quickly and continuously change the temperature.
Press the fire button three times to enter the menu. Press the down button twice so the second line displaying the resistance flashes
on the display. Press the „up“ button to lock or unlock the resistance of the atomizer. When the „lock“ symbol is shown on the
display, the resistance is locked.
a) Only lock the resistance when the coil is at room temperature. This will ensure that the correct “base resistance“ of the atomizer
coil is locked. The temperature control will remain correct, as long as the coil is not replaced. If the resistance is locked, you can
remove the top cap regardless of whether the atomizer coil is hot or cold.
Page 56
54
INNOCIGS EGRIP 2 LIGHT – CHANGING & OPERATING OF MODES
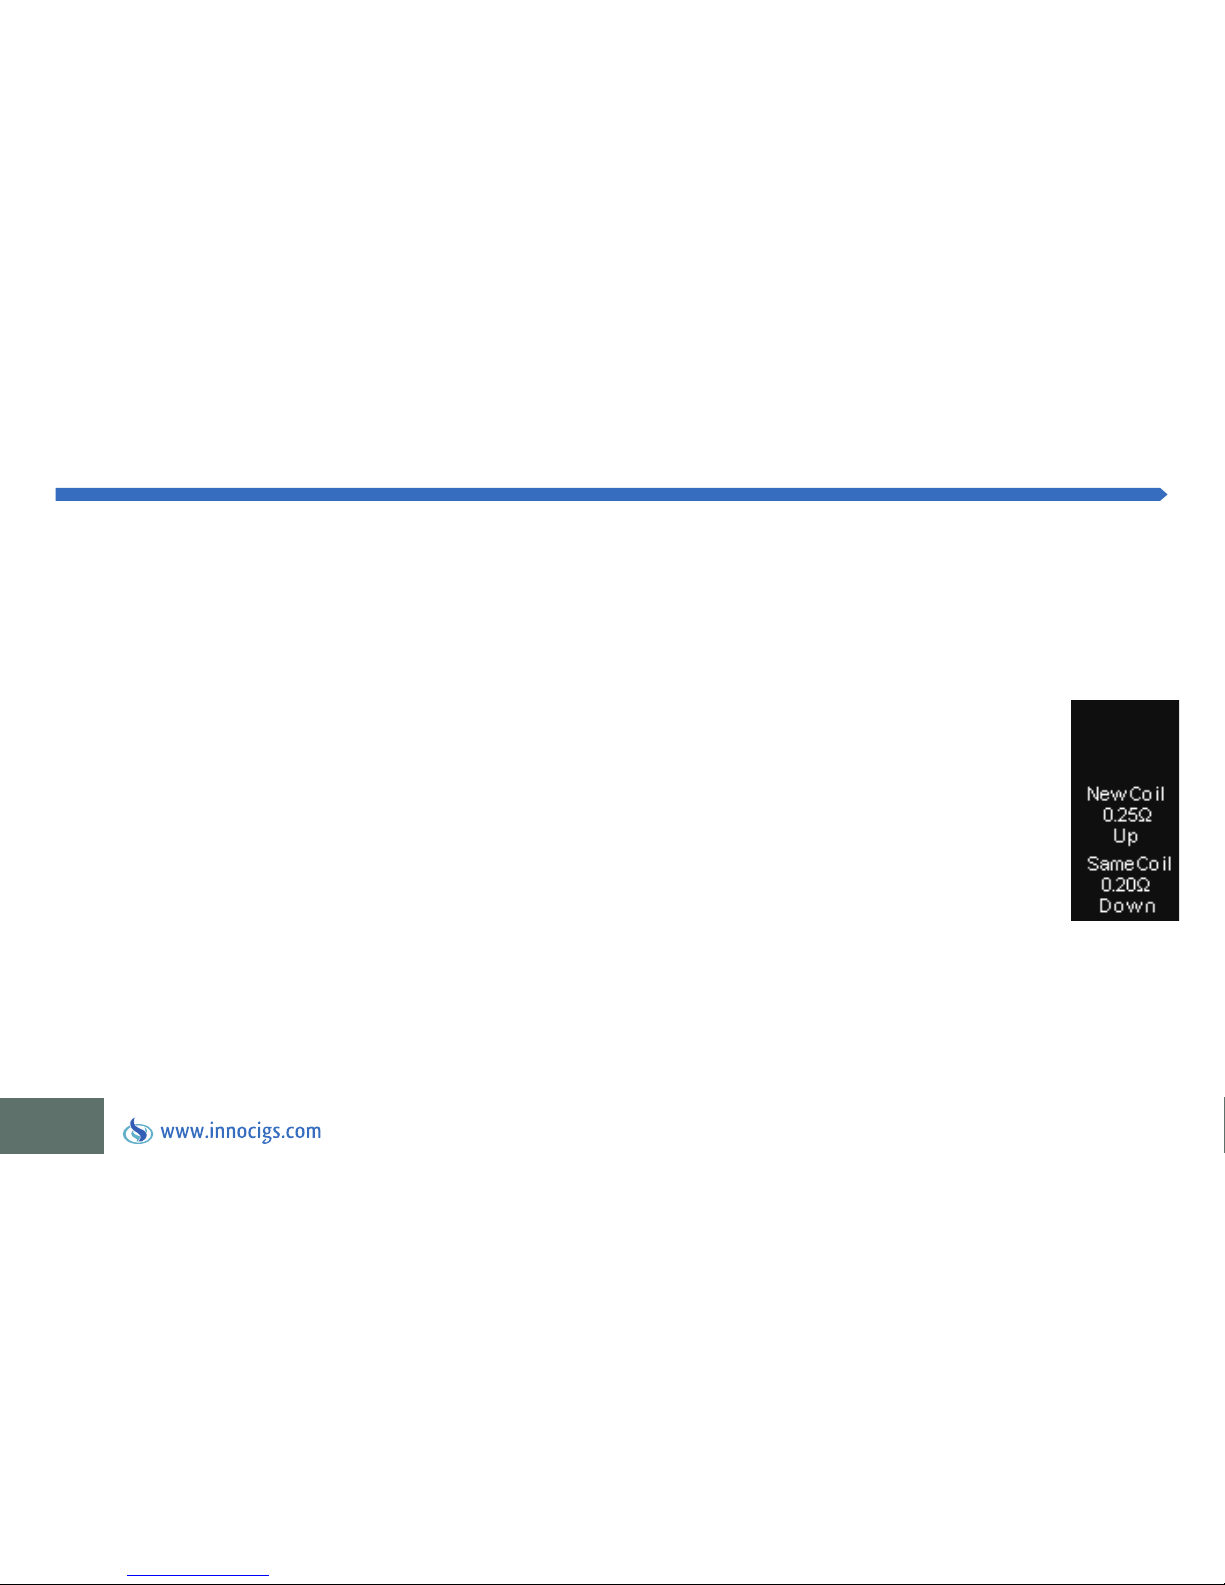
2. Installing new atomizer coils
If an atomizer coil is replaced with one which has a greater resistance than the previous one, it is important
to reset the “Base Resistance“ of the atomizer. This is the resistance of the coil at room temperature. Initiate
a reset by pressing the fire button of the eGrip 2 Light while the clearomizer and base are not attached. After
connecting the clearomizers base with a new head, “New Coil Up, Coil Same Down“ will appear on the display.
Confirm that a new coil has been installed by pressing the “up“ button.
If you see this message in other instances - especially when you reinstall the same coil which is still warm
from recent use - press the down button, so that the “base resistance“ is not reset.
Always remember to adjust the operating mode of the coil used to ensure proper temperature control.
b) Before changing to another atomizer coil, unlock the resistance. Otherwise, the VT system will not work properly. In “Resistance
Unlock“ mode, please make sure that the coil is changed at room temperature to ensure temperature accuracy.
Page 57

55
INNOCIGS EGRIP 2 LIGHT – CHANGING & OPERATING OF MODES
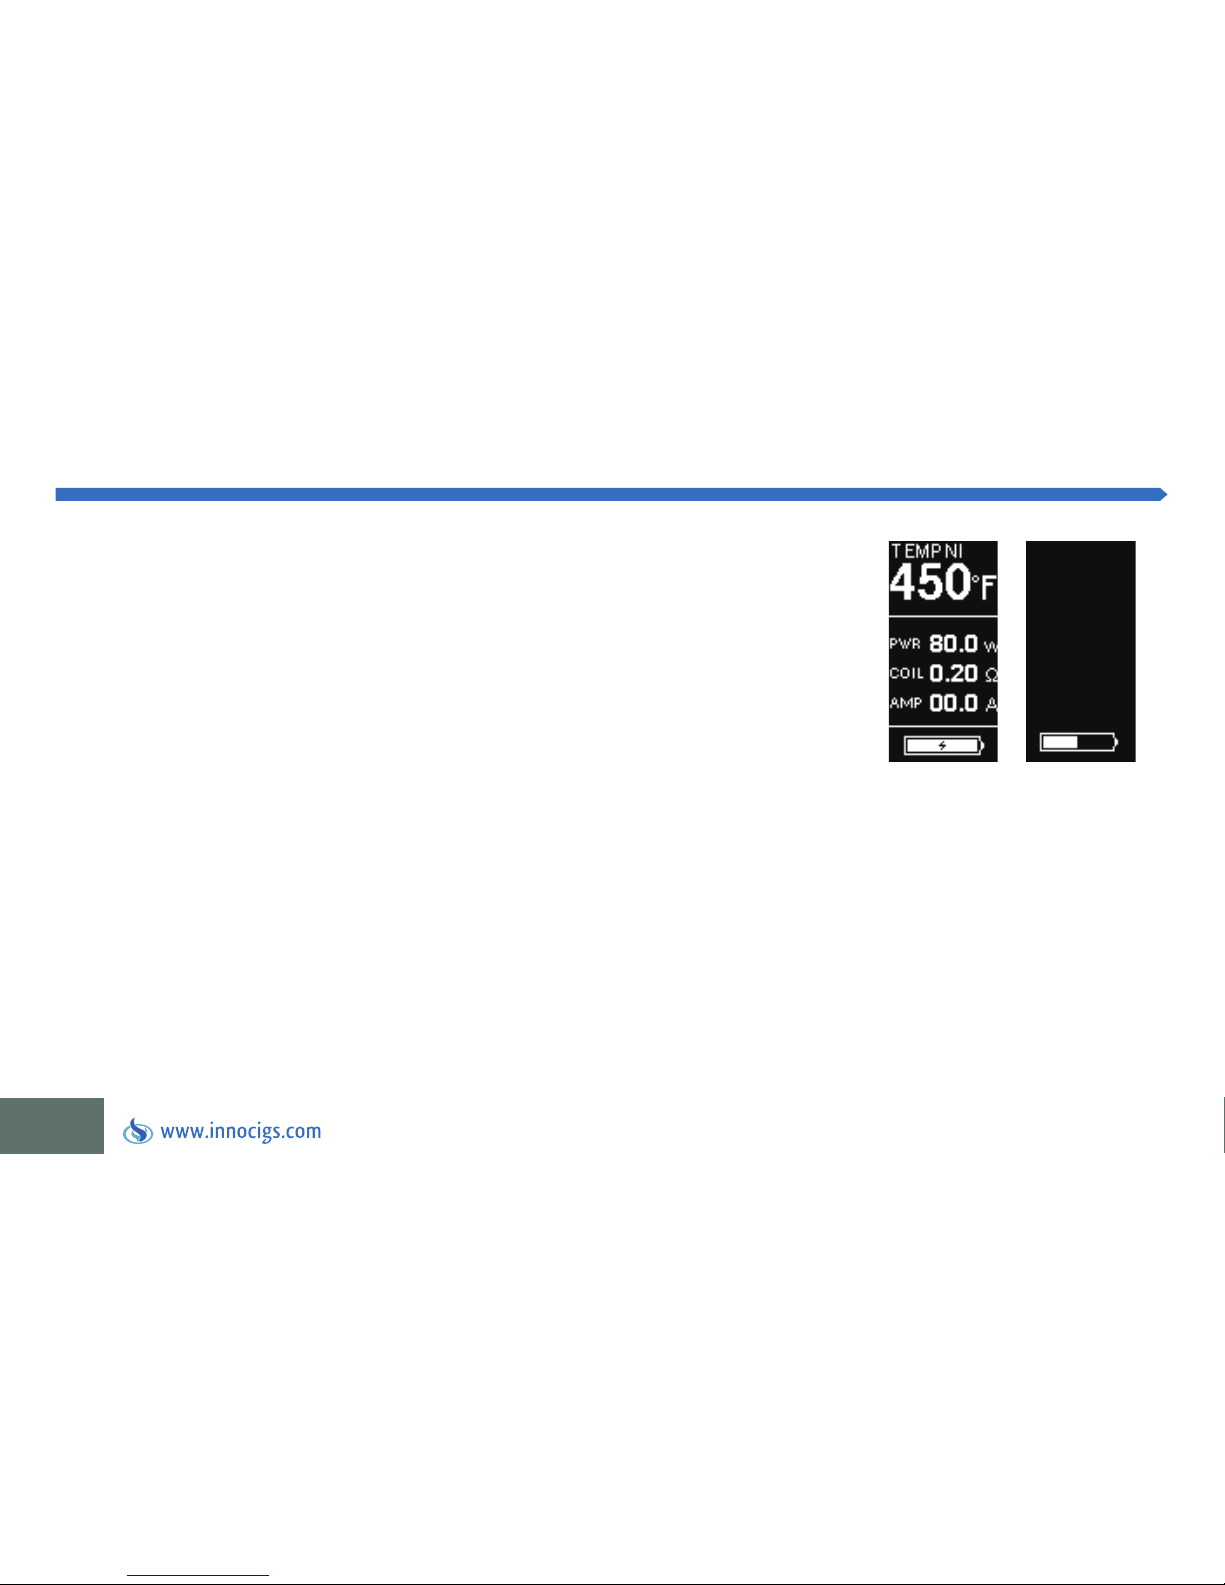
3. Adjusting the wattage in VT mode
Note
You can set the maximum power output in VT mode. Press the fire button 3 times to enter the menu. Press the “down“ button, so
that the second line flashes. Then press the “up“ button to adjust the wattage. Confirm this by pressing the “fire“ button.
a) The VT mode supports a maximum resistance of 1.5 ohms. The device automatically switches to the VW mode when
the resistance is more than 1.5 ohms.
b) When using coils with Kanthal winding, the unit will change to VW mode after two seconds.
Page 58
56
INNOCIGS EGRIP 2 LIGHT – CHARGING & UPDATING THE DEVICE
Charging and updating the InnoCigs eGrip 2 Light
Battery power and lifetime
The micro USB port is located beneath the “up“ and “down“ buttons of the eGrip 2 Light.
Connect the micro USB charging cable for charging or to upgrade to the device. You can
recharge the eGrip 2 Light with the USB cable connected to the USB port of a computer
or with a suitable USB wall adapter. Whether the battery is fully charged or is still in the
charging process, you will see the charging status on the battery icon on the display.
When the battery is not in operation for long periods of time, it loses – in accordance with the industry standards and norms after 3 months 5% to 10%, after 6 months 15% to 20% and after one year 25% to 30% of its power. We recommend that you
charge the battery at least every 3 months to ensure a long service life.
Page 59
57
INNOCIGS EGRIP 2 LIGHT – ERROR MESSAGES & PROTECTIONS
Over 10 second protection
Atomizer protection
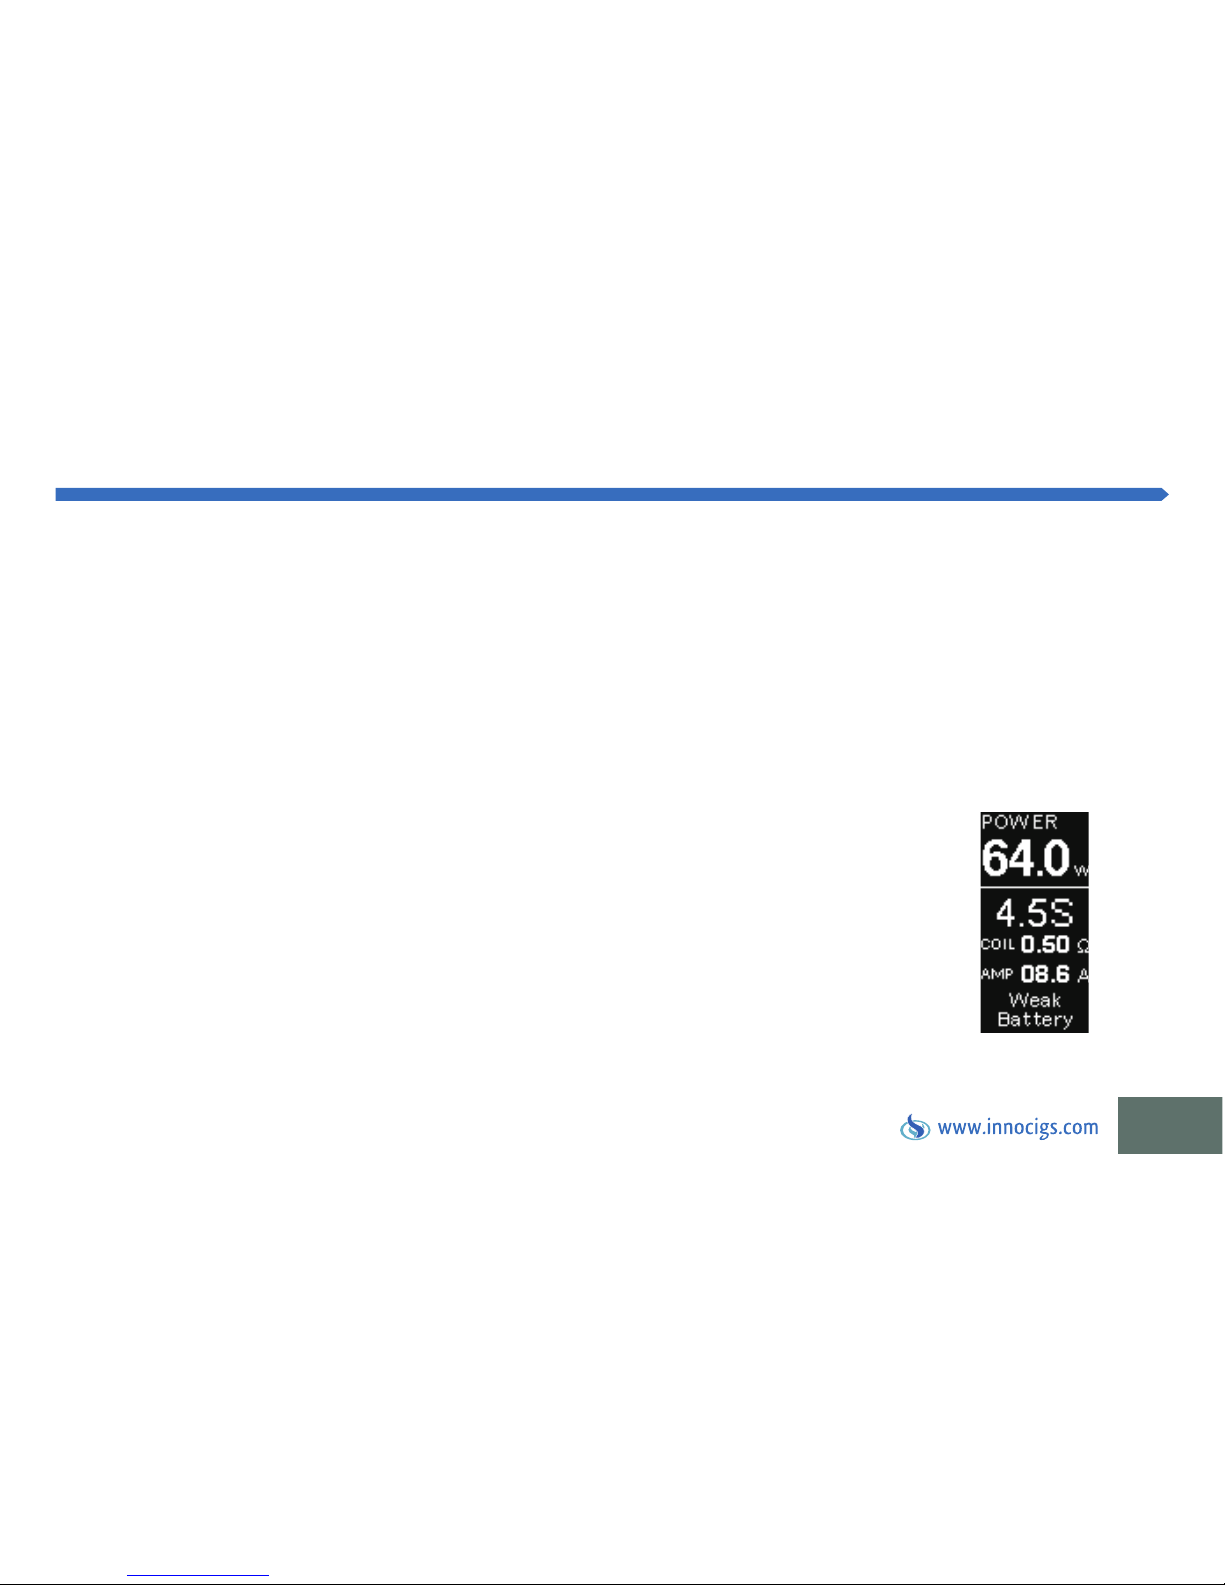
Weak battery
If you hold the fire button longer than 10 seconds, the device switches itself off automatically.
“Over 10s Protection“ will appear on the display.
If an voltage surge occurs at the atomizer, the unit will display “Atomizer Short”.
If the battery voltage in VW / VT mode is less than 2.9 volts, “Weak Battery” will appear on the
display. The output voltage will be reduced to the available volts.
Page 60
58
INNOCIGS EGRIP 2 LIGHT – ERROR MESSAGES & PROTECTIONS
Low Power Alarm:
Atomizer Low Alarm
Temperature Protection
Unit too hot
If the battery voltage drops below 3.1V, the device indicates “Battery Low”. If you continue to hold down the fire button, the unit
displays “Battery Low Lock” and switches itself off. Charge the battery again to unlock the device.
If the resistance of the coil is lower than 0.1 ohm in VW mode or 0.05 ohm in VT mode, the display will show “Atomizer Low”.
If the temperature of the atomizer coil is above the temperature you set in VT mode, the unit will display “Temp Protection”.
When the temperature of the device increases above 70°C, the power turns off and the display will read “Device Too Hot”.
Page 61

59
INNOCIGS EGRIP 2 LIGHT – MAIN FEATURES & PERFORMANCE
InnoCigs eGrip 2 Light key data
Battery capacity
Electical voltage
Charging voltage
Dimensions
Weight
Tank volume
2100 mAh
9.0 V (max.)
5.0 V
45 mm x 100,55 mm x 24 mm
129 g
3.5 ml
suitable
Atomizer coils
BF SS316 Head-Series 0.5 Ohm | 0.6 Ohm | 1.0 Ohm, BF Clapton Head 1.5 Ohm, NotchCoil™ 0.25 Ohm
Output modes
Power output
Resistance range
Temperature range
VT (Ni, Ti, SS316) / TCR (M1, M2, M3) / VW / Bypass
1 to 80 Watt
0.05 to 1.5 ohm in VT mode
0.1 to 3.5 ohm in VW & Bypass modes
100°C to 315°C / 200°F to 600°F
*Diameter of the e-liquid tank’s filling hole
*
3,5
mm
Page 62
60
INNOCIGS – WARRANTY & REPAIR
Warranty terms
All products of InnoCigs are subject to strict quality control. You will receive, along with the legally required warranty,
a 6-month warranty on all InnoCigs products. The warranty period of 6 months applies from the date of purchase from
your dealer. The date on your sales receipt is decisive. During the warranty period, devices that have defects will be
repaired or replaced through the company InnoCigs.
Wearing parts such as mouthpieces and clearomizer heads are excluded from the guarantee.
Replaced devices or parts shall become the property of InnoCigs. The guarantee does not extend the warranty period
nor does it initiate a new warranty in transition.
Page 63

61
INNOCIGS – WARRANTY & REPAIR
Warranty claims are excluded for damage resulting from:
- Misuse or improper handling
- Environmental factors (Ex: moisture, heat, dust, etc.)
- Failure to comply with the safety notes of the device
- Not following the instructions
- Use of force (Ex: shock, impact, case)
- Submission of claims that have not been authorized through InnoCigs service addresses
- Unauthorized repair attempts
- Sending warranty repair in unsafe packaging
InnoCigs reserves in all warranty cases, the right to scrutinize the claim until the final decision. InnoCigs reserves the right to revise
these warranty conditions.
Page 64
62
INNOCIGS EGRIP 2 LIGHT – WARRANTY & SERVICE | CONTACT
Warranty & Service
If the product ceases functioning or is defective in any way, please contact the specialist retailer where you purchased the
product.
If a warranty claim is necessary, please proceed as follows: Contact the InnoCigs customer service by e-mail, fax or phone.
Alternatively, you can use the exchange service on our website www.innocigs.com.
For questions about the operation and use please feel free to contact our Customer Service.
InnoCigs GmbH & Co. KG
Stahltwiete 23
22761 Hamburg | GERMANY
Phone: +49 (0) 40 - 22 86 729 0
Fax: +49 (0) 40 - 22 86 729 99
E-mail: [email protected]
Page 65

InnoCigs GmbH & Co. KG
Stahltwiete 23
22761 Hamburg | GERMANY
E-mail: [email protected]
Phone: +49 (0) 40 - 22 86 729 0
Web: www.innocigs.com
Produced for InnoCigs by
| Made in China
 Loading...