

INMUSIC RA08 User Manual

A
x
User Guide
Guía del usuario
Guide d’utilisation
Guida per l’uso
Benutzerhandbuch
ppendi
English (3–7)
Español (8–11)
Français (12–15)
Italiano (16–19)
Deutsch (20–23)
English (24–26)

2

User Guide (English)
Introduction
Box Contents
Black & Blue
Power Cable
USB Cable
Euroblock
(3) Bluetooth antennas
User Guide
Rack Ears (attached to unit)
Safety & Warranty Manual
Support
For the latest information about this product (documentation, technical specifications, system
requirements, compatibility information, etc.) and product registration, visit rane.com.
For additional product support, visit rane.com/support.
3
r
r
A
r
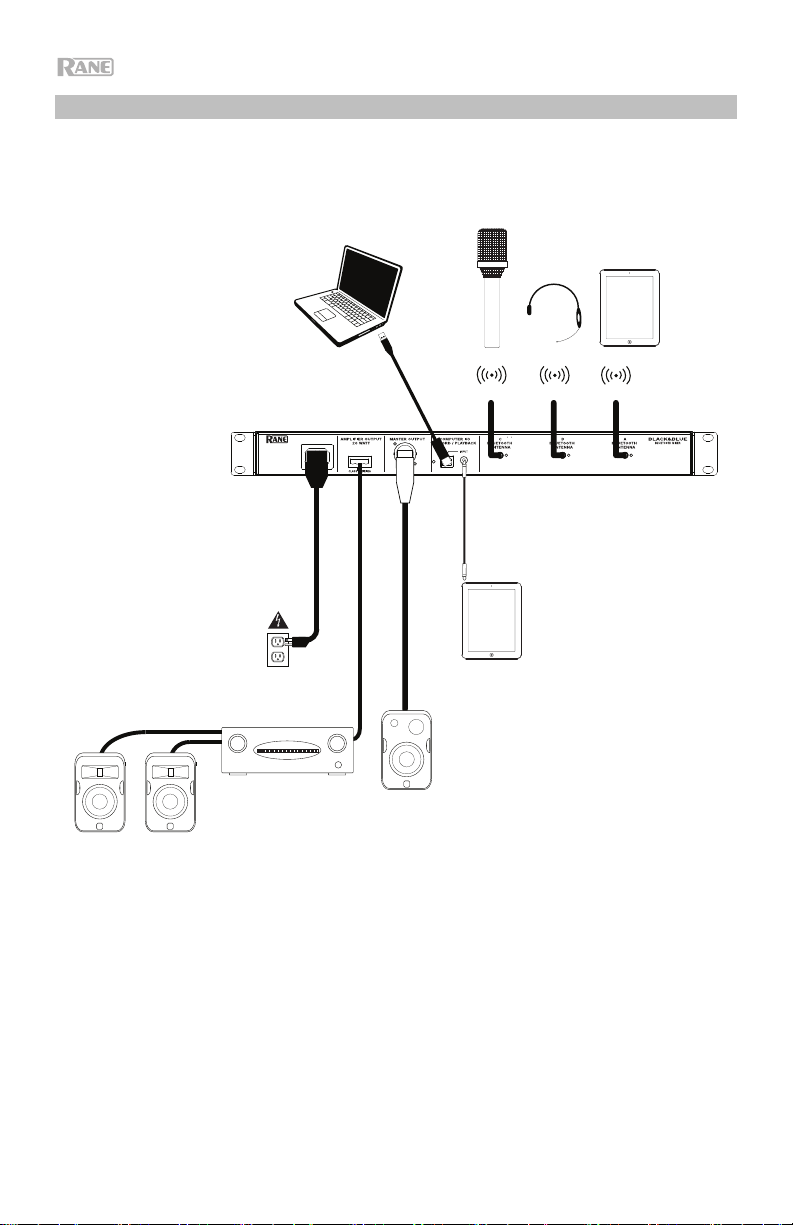
Setup Diagram
Items not listed under Introduction > Box Contents are sold separately.
Bluetooth
Sources
Compute
Tablet
Powe
Bluetooth
ntennas
Loudspeake
4 - 8 @ 70 V and 100 V
4
Amplifier
Loudspeaker
s
Application Examples
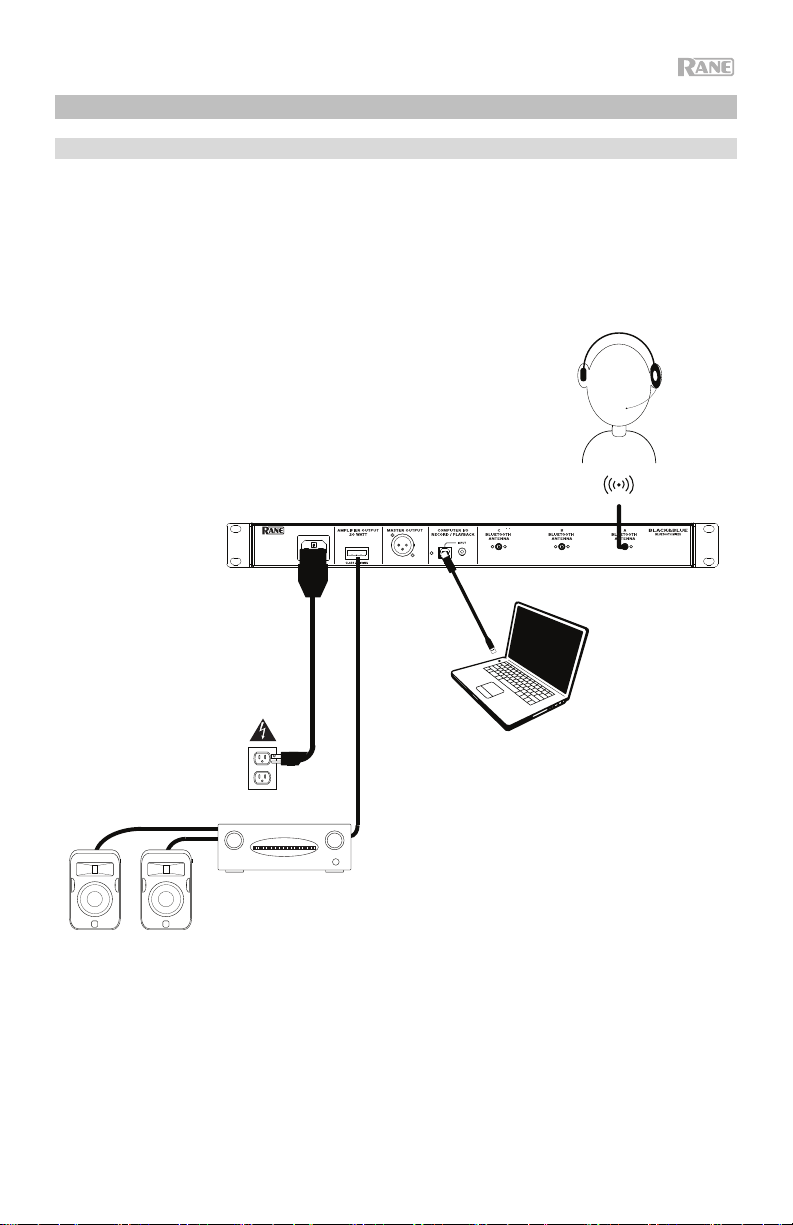
Meeting Room
This example shows:
- a head-worn Bluetooth microphone paired to Bluetooth input A
- the Amplifier output connected to full-range speakers
- the Mix button is depressed to monitor a mix of the Bluetooth A and Computer sources
Loudspeakers
4 - 8
@ 70 V and
100 V
Power
Amplifier
Bluetooth
microphone
Computer
5

Coffee Bar
This example shows:
- a head-worn Bluetooth microphone paired to Bluetooth input A
- a smartphone paired to Bluetooth input B
- a TV with a Bluetooth transmitter paired to Bluetooth input C
- the Amplifier output connected to full-range speakers
Power
Loudspeakers
4 - 8 @ 70 V and 100 V
6
Amplifier
TV with Bluetooth
transmitter
Bluetooth
microphone
Smartphone
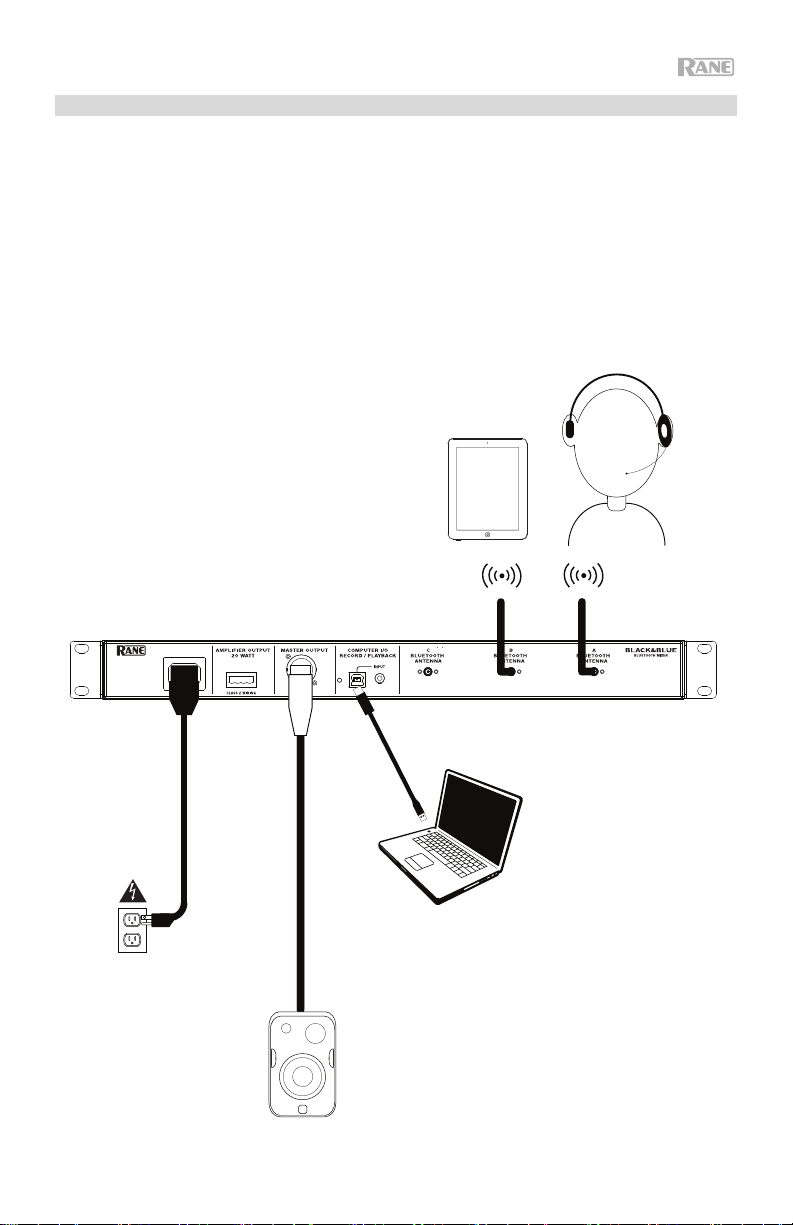
Trade Show
This example shows:
- a tablet streaming music paired to Bluetooth input B
- a head-worn Bluetooth microphone paired to Bluetooth input A
- the USB port connected to a laptop to record a presentation
- the Master output connected to a powered speaker
- the Mix button is depressed to monitor a mix of the Bluetooth A and B sources
Tablet
Bluetooth
microphone
Power
Loudspeaker
Computer
7
9
1
234
1
234
1
234
5
6
7
8
10
11
12
13
14
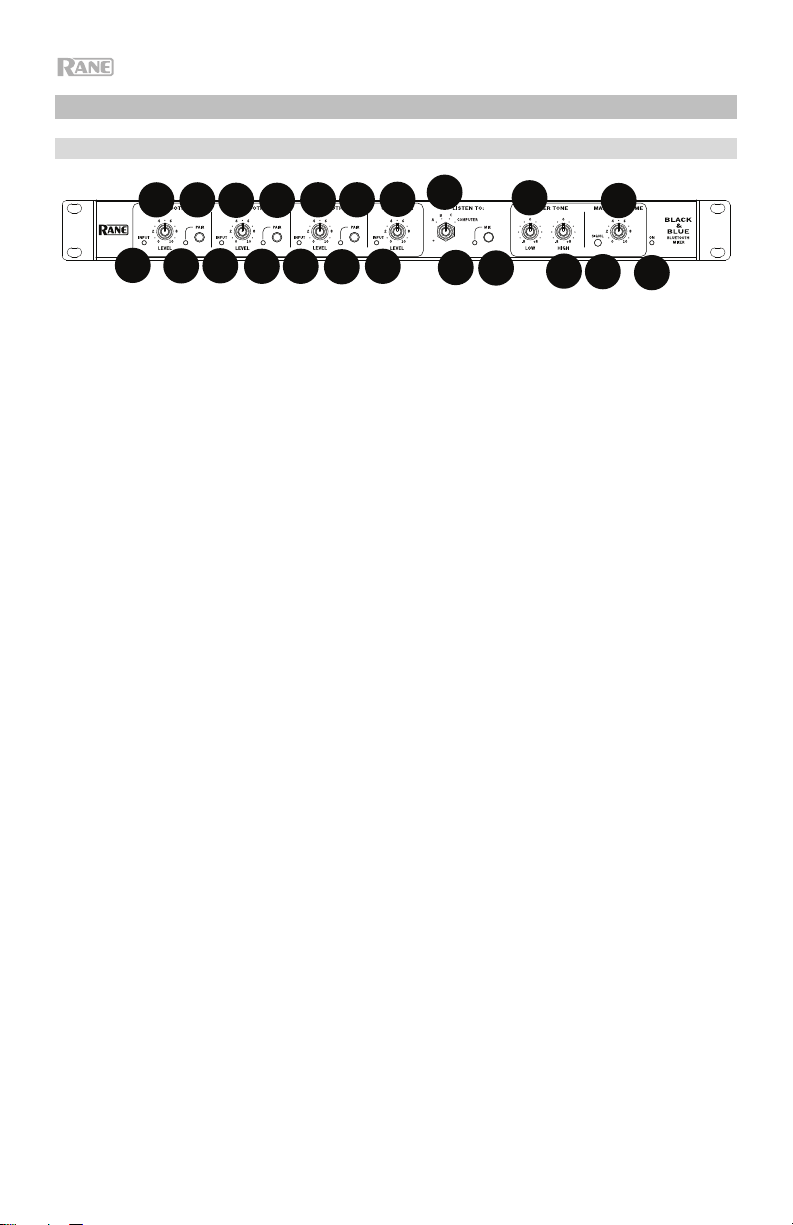
Features
Front Panel
10
1. Bluetooth Signal LED: This LED will illuminate green when the Bluetooth signal
exceeds -40 dBFS.
2. Input Level Knob: Turn this knob to adjust the input signal level for the
individual Bluetooth channels.
3. Pairing LED: This LED flashes when the Pair button is pressed and held for 3
seconds and is lit solid when paired to a Bluetooth source.
4. Pair Button: Press and hold this button for 3 seconds to pair to a Bluetooth
source. Press and hold this button to disconnect from a Bluetooth source.
5. Computer Signal LED: This LED will illuminate green when the computer USB
signal exceeds -40 dBFS.
6. Computer Level Knob: Turn this knob to adjust the level for the computer USB
playback or the 1/8” (3.5 mm) TRS input.
7. Listen To Knob: Turn this knob to select which input signal (Bluetooth A, B, C,
or Computer) is sent to the Master output or Amplifier output.
8. Mix LED: This LED illuminates yellow when Mix mode is selected.
9. Mix Button: Depress this button to monitor a mix of the Bluetooth A, B, C, and
Computer sources.
10. Low EQ: Adjust this knob to increase or decrease the low (bass) frequencies
for the 1/8” (3.5 mm) input and Bluetooth sources.
11. High EQ: Adjust this knob to increase or decrease the high (treble) frequencies
for the 1/8” (3.5 mm) input and Bluetooth sources.
12. Signal LED: This LED illuminates green when the master volume exceeds -40
dBFS, illuminates yellow when the signal exceeds -10 dBFS, and illuminates
red when the signal exceeds 0 dBFS. If the LED illuminates red, adjust the
Input Level knob to get a strong signal without “clipping” or distortion.
13. Master Volume Knob: Turn this knob to increase or decrease the signal level
sent to the Master output, Amplifier output, and USB port.
14. Power LED: This LED illuminates yellow when the unit is powered on.
8
11
13
12
14
9
1
234
1
234
1
234
5
6
7
8
10
11
12
13
14
1 2 3 456 7
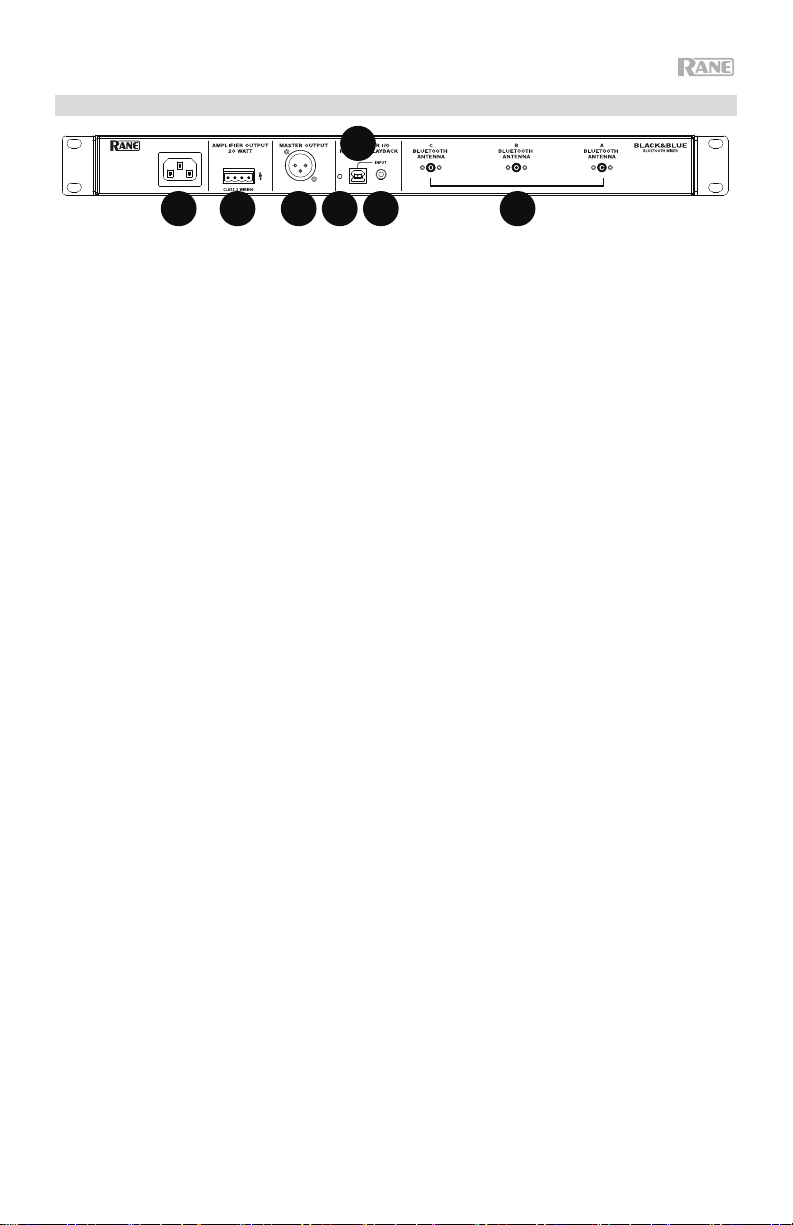
Rear Panel
1. Power Input: Connect the included power cable here.
2. Power Amplifier Output: This sends the main/master signal to your amplifier.
Connect this to your amplifier using a properly wired 4-pin Euroblock connector
and speaker wire. See the section Operation > Euroblock Setup for more
information.
Note: This output is always summed to a mono signal.
3. Master Output: Connect this balanced mono XLR output to a powered
speaker.
Note: This output is always summed to a mono signal.
4. USB LED: This LED will illuminate when the USB port is connected to a
computer’s USB port.
5. USB Port: Use the included USB cable to connect to a computer’s USB port
for audio playback and recording.
Note: This output is always summed to a mono signal.
6. 1/8” (3.5 mm) TRS Input: Connect a line-level device such as a smartphone,
tablet, CD player, etc. here.
Note: Connecting to this jack disconnects USB input (playback). USB output
(recording) is unaffected. This allows for recording of three Bluetooth signals
and the 1/8" (3.5 mm) TRS input to the computer using the USB port.
7. Bluetooth Antenna: Connect the 3 included Bluetooth antennas here for
pairing to Bluetooth sources.
9

Operation
Pairing Bluetooth Sources
1. Connect the 3 included Bluetooth antennas to the connectors on Black & Blue’s
rear panel.
2. Power on Black & Blue. The power LED will illuminate solid.
3. Press and hold the Pair button for 3 seconds for the particular Bluetooth input
you desire to connect to for your Bluetooth source. The Pair LED will flash.
4. Pair your Bluetooth source to Black & Blue.
a. Smartphone: open Bluetooth settings in your smartphone, find RA08-A,
and connect. The pair LED on Black&Blue will be lit solid once connected.
b. Bluetooth headset mic: turn on the headset mic. The mic LED will flash
quickly when searching for Black & Blue. When paired successfully, the
mic LED will flash slowly and Black&Blue’s pair LED will be lit solid.
Note: If the mic connects with a different Bluetooth source (for example, RA08-A)
which is not desired, press the search button on the Bluetooth headset mic and
connect to the next Bluetooth source (RA08-B or RA08-C).
Note: Repeat the above steps to connect to the other Bluetooth inputs.
Selecting Sources
1. Connect the included Bluetooth antennas to the connectors on Black & Blue’s
rear panel.
2. Press and hold the Pair button(s) for 3 seconds to connect to your Bluetooth
source(s).
3. Use the included USB cable to connect Black & Blue's USB port to an available
USB port on your computer.
4. Adjust the Listen To knob to choose whether to monitor Bluetooth A, B, C, or
Computer. Press the Mix button to monitor a mix of all sources from the Master
output or Power Amplifier output.
5. Turn the Master Volume knob to adjust the signal level sent to the Master
output and Power Amplifier output.
10
Recording
1. Connect the included USB cable from Black & Blue's USB port to an available
USB port on your computer.
2. See the section Computer Setup > Setting Black & Blue as the Default
Recording Device
to set Black & Blue as the default recording device.
3. On your computer, open your favorite recording software.
Note: To listen to music while it’s playing, listen through your computer's
speakers, or connect Black & Blue's Master output to an amplifier or powered
speakers.
Playback
You can listen to the music on your computer through Black & Blue. See the section
Computer Setup > Setting Your Computer’s Soundcard as the Default
Playback Device before playing back your computer music.
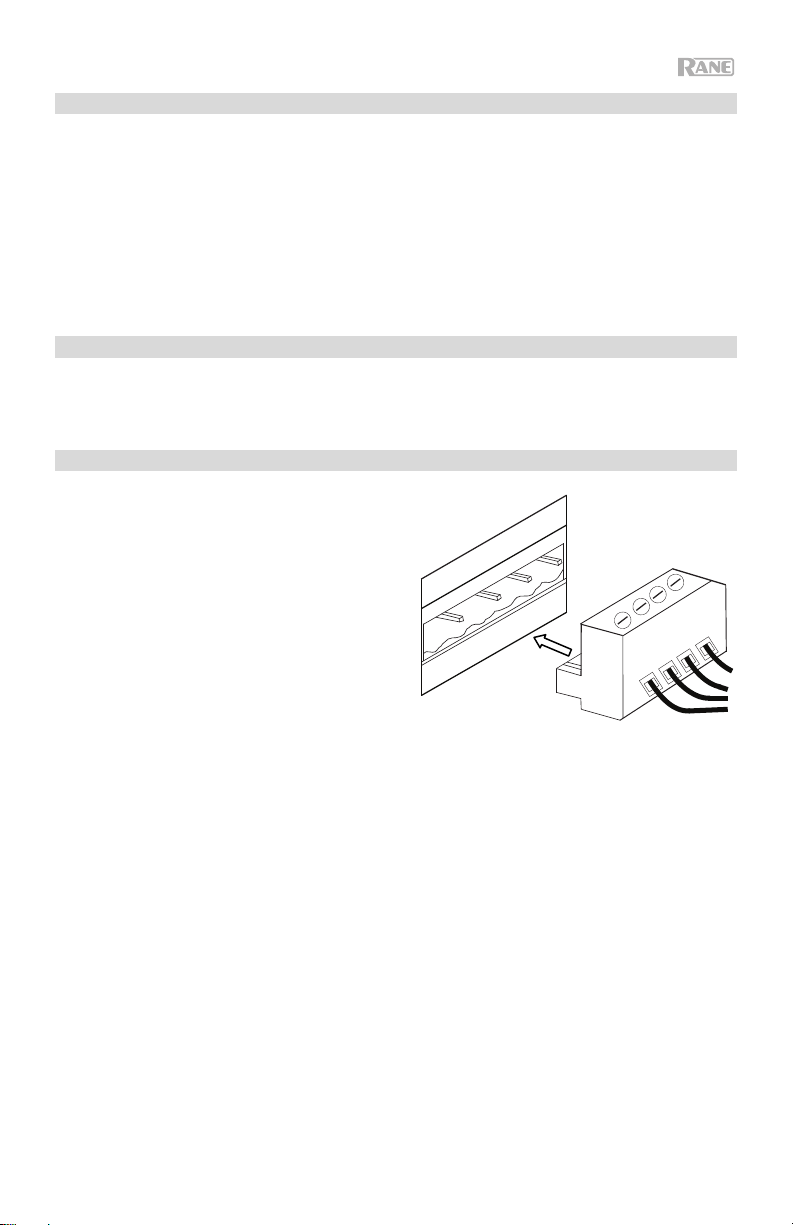
Euroblock Setup
1. Connect a device to the 1/8” (3.5
mm) TRS Input or pair your
Bluetooth source to Black&Blue.
2. Twist the speaker wire to form a tight
strand and insert this into the
appropriate port, pushing the wire
until it is secured inside. To
disconnect a wire, use a small
screwdriver to press in the spring
above the insert port while pulling out
the wire.
3. Attach the Euroblock connector to the
Amplifier Output on Black&Blue.
4. Make sure all Level knobs are set to “0”.
5. Connect the included power cable from the power input to a power outlet;
power on Black&Blue.
6. Adjust the individual channel input Level knobs and the Master Volume knob
to get a strong signal without distortion or “clipping”.
7. Adjust the Low EQ and High EQ knobs to further control the frequencies of the
sound.
11

Computer Setup
Setting Black & Blue as the Default Recording Device
• Windows XP: Click Start Menu Control Panel (or Settings Control Panel in Classic View)
Sound and Audio Devices. Click the Audio tab and under Sound recording, select USB Audio
Codec as the default device. Select Properties and click the Advanced tab to select the Default
Format, 44100 Hz or 48000 Hz.
• Windows Vista: Click Start Menu Control Panel (or Settings Control Panel in Classic View)
Hardware and Sound Sound. Click the Recording tab and select USB Audio Codec as the default
device. Select Properties and click the Advanced tab to select the Default Format, 44100 Hz or 48000
Hz.
• Windows 7: Click Start Menu Control Panel Sound. Click the Recording tab and select USB
Audio Codec as the default device. Select Properties and click the Advanced tab to select the Default
Format, 44100 Hz or 48000 Hz.
• Windows 8: From the Start Menu, click the lower-left corner of the screen to bring yourself to the
Desktop. In the bottom-right corner of the Taskbar, locate the Volume Control "Speaker" icon. Rightclick the speaker and select Playback Devices. In the Windows Sound control panel select the
Recording tab. If USB Audio Codec does not have a green "check mark" symbol next to it, right-click
it and select "Set as Default Device". Select Properties and click the Advanced tab to select the
Default Format, 44100 Hz or 48000 Hz.
• Windows 10: Click Start Menu Control Panel (or Settings Control Panel in Classic View)
Hardware and Sound Sound. In the Windows Sound control panel select the Recording tab. If
USB Audio Codec does not have a green "check mark" symbol next to it, right-click it and select "Set
as Default Device". Select Properties and click the Advanced tab to select the Default Format,
44100 Hz or 48000 Hz.
• Mac OS X 10.4-10.11: Click the upper-left "apple" icon then click System Preferences Sound.
Click the Input tab. From the menu, select USB Audio Codec as the device. Under Format, select
44100 Hz or 48000 Hz.
Setting Black & Blue as the Default Playback Device
• Windows XP: Click Start Menu Control Panel (or Settings Control Panel in Classic View)
Sound and Audio Devices. Click the Audio tab and under Sound playback, select USB Audio
Codec.
• Windows Vista: Click Start Menu Control Panel (or Settings Control Panel in Classic View)
Hardware and Sound Sound. Click the Playback tab and select USB Audio Codec.
• Windows 7: Click Start Menu Control Panel Sound. Click the Playback tab and select USB
Audio Codec as the default device.
• Windows 8: From the Start menu, click the lower-left corner of the screen to bring yourself to the
Desktop. In the bottom-right corner of the Taskbar, locate the Volume Control "Speaker" icon. Rightclick the speaker and select Playback Devices. The Windows Sound control panel should appear set
on the Playback tab. If USB Audio Codec does not have a green "check mark" symbol next to it, rightclick it and select "Set as Default Device".
• Windows 10: Click Start Menu Control Panel Sound. Click the Playback tab and select USB
Audio Codec as the default device.
• Mac OS X 10.4-10.11: Click the upper-left "apple" icon then click System Preferences Sound.
Click the Output tab. From the menu, select USB Audio Codec as the device.
12
Appendix (English)
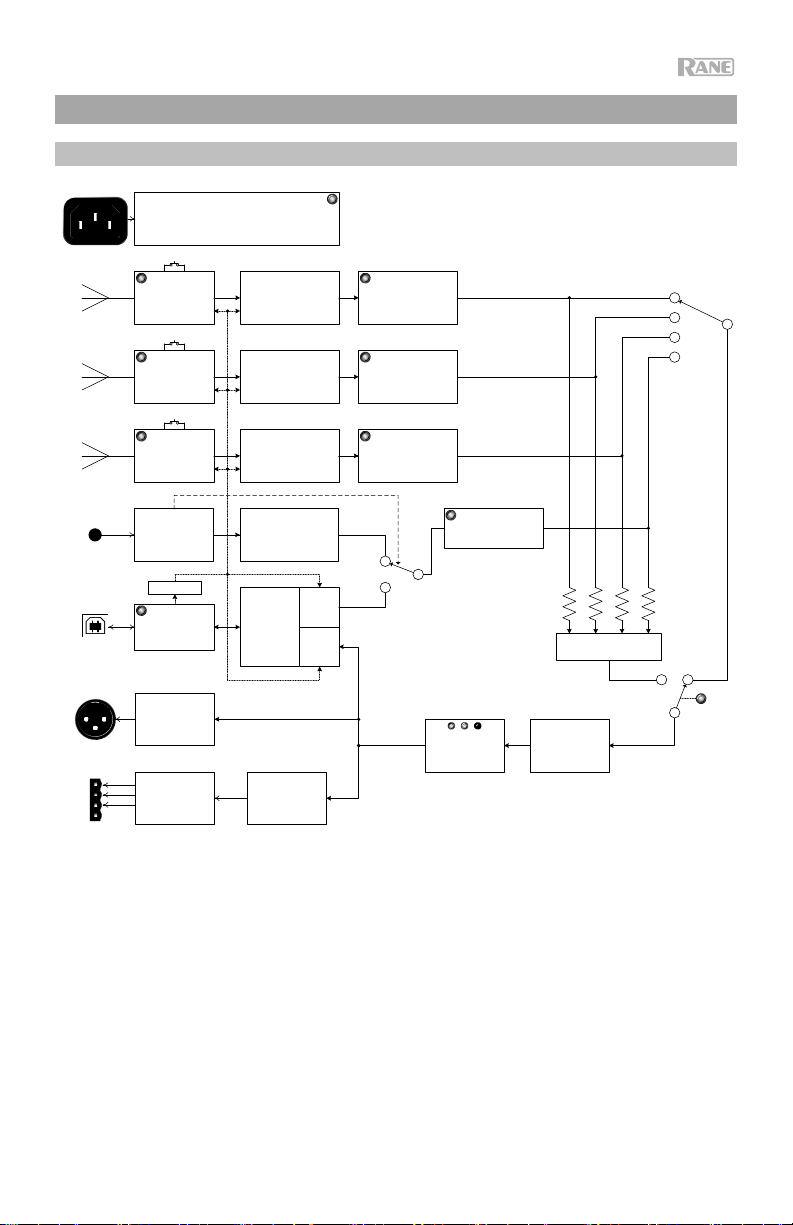
Block Diagram
UNIVERSAL AC MAINS
POWER SUPPLY
&
POINT OF LOAD REGULATORS
PAIR
BLUETOOTH 4.0
A
PAIR
BLUETOOTH 4.0
B
PAIR
BLUETOOTH 4.0
C
D/A
D/A
D/A
INPUT BUFFER
LEVEL CONTR OL
SIG
INPUT BUFFER
LEVEL CONTR OL
SIG
INPUT BUFFER
LEVEL CONTR OL
SIG
INPUT
MINI TRS
(sum T/R)
CLK MST
USB 2.0
CLASS COMPLIANT
MASTER OUTPUT
XLR
100V
70V
XFMR
4
BUFFER
USB 2.0
CONTROLLER
CLASS-D
AMP MODULE
D/A
A/D SUM
20W
INPUT BUFFER
LEVEL CONTROL
MASTER LEVEL
SIG/OL
SIG
MASTER TONE
LOW/HIGH
13
 Loading...