

INMUSIC LQVL User Manual

User Guide
English ( 3 – 5 )
Guía del usuario
Español ( 6 – 8 )
Guide d’utilisation
Français ( 9 – 11 )
Guida per l’uso
Italiano ( 12 – 14 )
Benutzerhandbuch
Deutsch ( 15 – 17 )
Appendix
English ( 18 )

2
User Guide (English)
Introduction
Box Contents
Vortex Wireless 2 Strap User Guide
USB Wireless Receiver Cable Harness Safety & Warranty Manual
USB Cable Software Download Cards
Important: Visit alesis.com and register your Vortex Wireless 2 to download the included
editor software.
Support
For the latest information about this product (system requirements, compatibility information,
etc.) and product registration, visit alesis.com.
For additional product support, visit alesis.com/support.
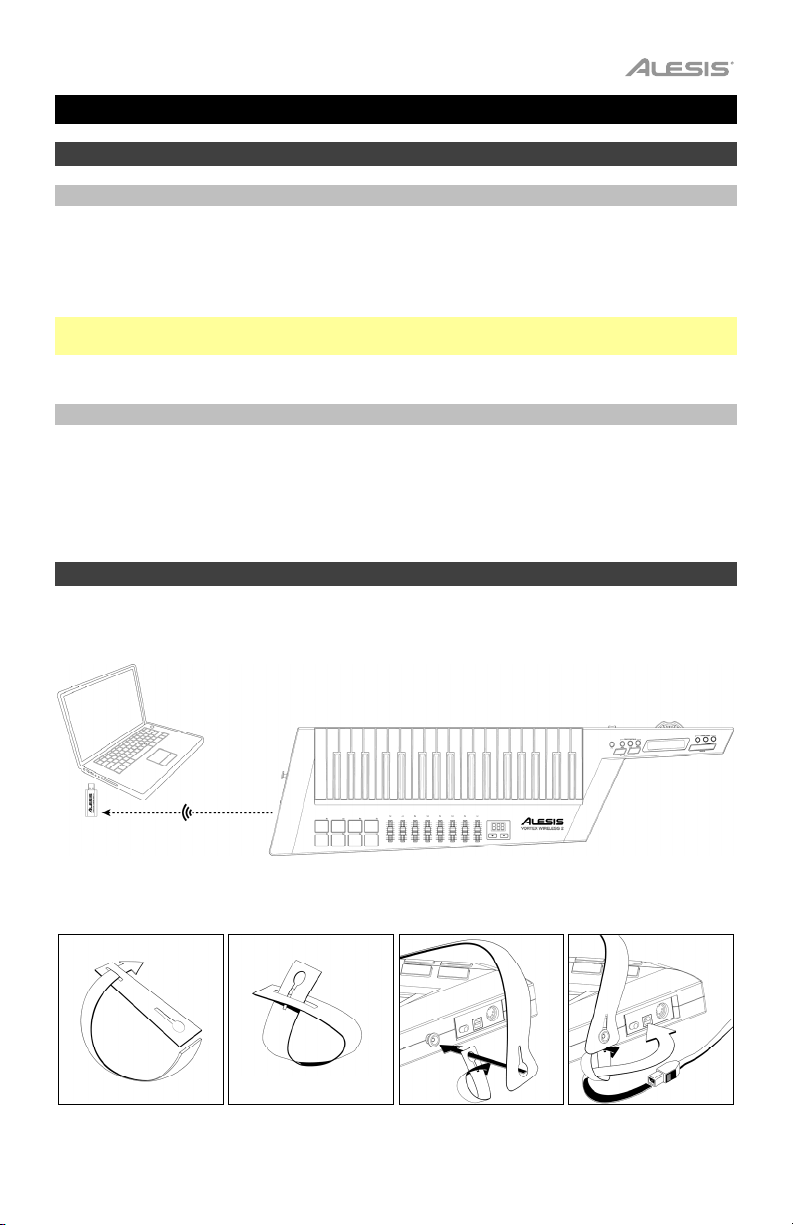
Setup
Items not listed in
Introduction > Box Contents are sold separately.
Computer
USB Wireless
Receiver
Strap and cable harness attachment (optional):
Vortex Wireless 2
3
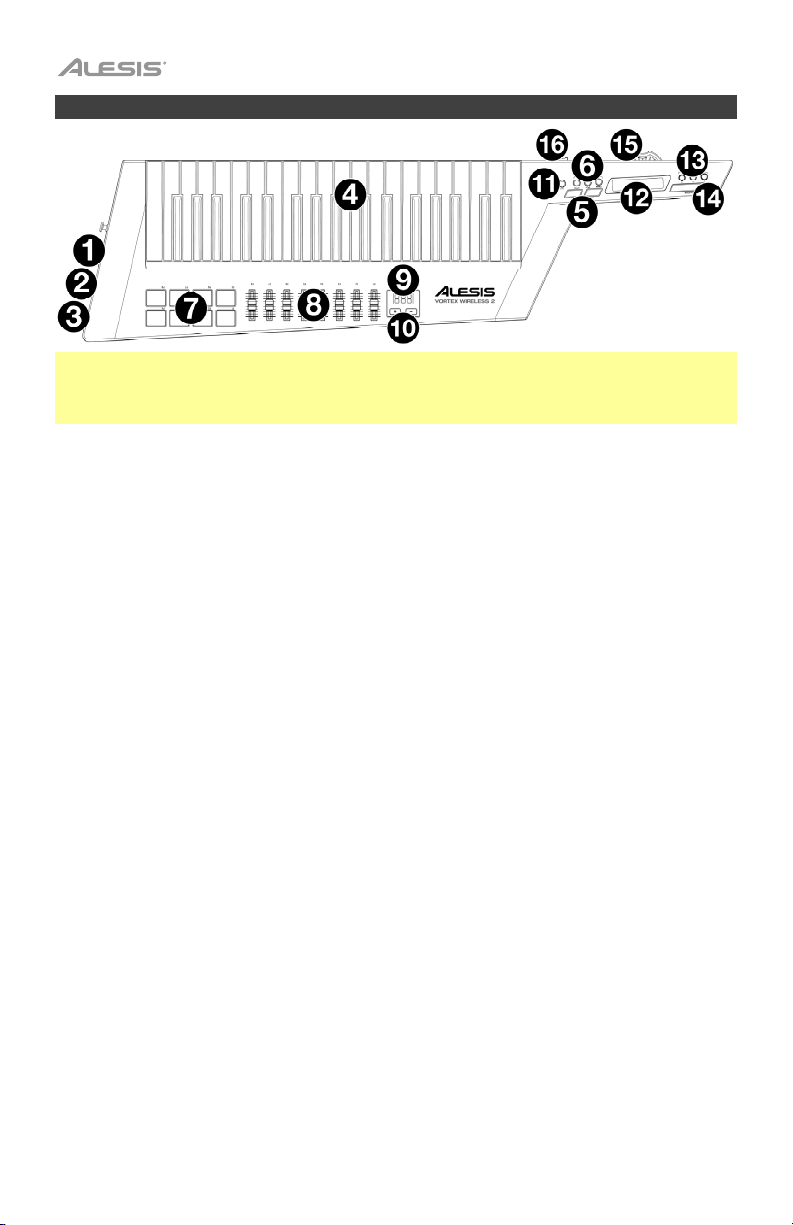
Features
Important: Use the Vortex Wireless 2 editor software to assign various MIDI commands to: the
pads, the faders, the three modes of the ribbon controller, the Sustain button, the pitch bend
wheel, and the volume slider. Visit alesis.com and register your Vortex Wireless 2 to download the
included editor software.
1. Power Switch: Use this three-position switch to power Vortex Wireless 2 on or off. Set this to
Batt to power it on using 4 AA batteries (install these beforehand). Set this to USB to power it
on using USB power from a connected computer. Set this to Off to power it off.
2. USB Port: Use a standard USB cable to connect this USB port to your computer. The
computer’s USB port provides ample power to Vortex Wireless 2. This connection is also used
to send and receive MIDI data to and from your computer.
3. MIDI Out (5-pin DIN): Use a standard five-pin MIDI cable to connect this output to the MIDI
input of an external MIDI device (e.g., a synthesizer, sequencer, drum machine, etc.).
4. Keys: This 37-note keyboard is velocity-sensitive with aftertouch and, in conjunction with the
Octave Up/Down buttons, can access the full range of 127 available MIDI notes (10 octaves).
5. Octave Up/Down: Press one of these buttons to move the keyboard up or down an octave.
Press both buttons simultaneously to reset the octave shift to “zero.”
6. Keyboard Zones (Lower, Split, Upper): Use these buttons to select the corresponding zones
on the keyboard. Press Lower or Upper will apply the lower zone settings or upper zone
settings to all 37 keys. Press Split to apply both lower and upper zone settings to the keyboard
and use the split point. You can edit the range of each zone in the editor software.
7. Pads: Use these velocity-sensitive pads to trigger drum sounds or clips in your software or
hardware. You can use the editor software to assign each pad’s LED colors and the type of
MIDI message it sends: note on/off, control change (toggle), control change (momentary),
program change, or MIDI panic (all notes off).
8. Faders: Use these faders to send MIDI CC messages to your software. You can set the range
and CC message number—and the direction (“polarity”) of the fader—in the editor software.
9. Display: Use this screen to view parameter values, settings, and messages relevant to Vortex
Wireless 2’s current operation.
10. Up/Down (+/–): Use these buttons to move to the previous or next preset.
11. Tilt: Press this button to turn the built-in accelerometer on or off.
12. Ribbon Controller: Place and/or move your finger on this touch-sensitive strip to send a MIDI
CC or pitch bend message. The length of the ribbon controller is similar to a fader; its minimum
and maximium positions correspond to the highest and lowest values assigned to that MIDI
message. You can set the range and type of MIDI message—and the direction (“polarity”) of
the ribbon controller—in the editor software. Use the Ribbon Bank buttons to select a bank.
You can also set the ribbon controller’s MIDI messages to Latch or Return. When set to Latch,
the ribbon controller will not send additional MIDI messages when you release it, which is useful
for changing modulation parameters. When set to Return, it will send the default MIDI message
for the controller when you release it, which is useful for changing parameters like pitch-bend.
4
13. Ribbon Banks (1–3): Use these buttons to select any of the three banks of the ribbon controller. In
each bank, the ribbon controller can send a different type of MIDI message, enabling you to send
up to three different messages per preset. You can set the range (the values corresponding to its
minimum and maximum positions) and type of MIDI message in the software editor.
14. Sustain: Press and hold this button to sustain any notes that are playing. Release the button to
stop sustaining them.
15. Pitch Bend Wheel: Move this wheel to send MIDI pitch bend information. You can set the
direction (“polarity”) of the pitch bend wheel in the editor software.
16. Volume Slider: Move this slider to send a MIDI CC message. This control is set to volume (CC
#7) by default, but you can edit the range and number of the CC message in the editor software.
Operation
Connecting Wirelessly to the USB Receiver
Vortex Wireless 2 can send its MIDI messages wireless to the included USB receiver. Simply connect
the USB receiver to a USB port on your computer. The USB receiver is always “paired” (wirelessly
connected) to your Vortex Wireless 2, so no further steps are required.
Calibrating the Accelerometer
Before using Vortex Wireless 2 for the first time, we recommend calibrating the accelerometer so it
responds to your particular playing style.
To calibrate the accelerometer:
1. Press and hold Tilt for 5 seconds. XY1 will appear in the display.
2. Position Vortex Wireless 2 in the “minimum” position.
3. Press the Tilt button. XY2 will appear in the display.
4. Position Vortex Wireless 2 in the “maximum” position.
5. Press the Tilt button. PAS will appear in the display for 3 seconds, and the calibration will be
saved to Vortex Wireless 2.
Editor Software
Visit alesis.com and register your Vortex Wireless 2 to download the included editor software.
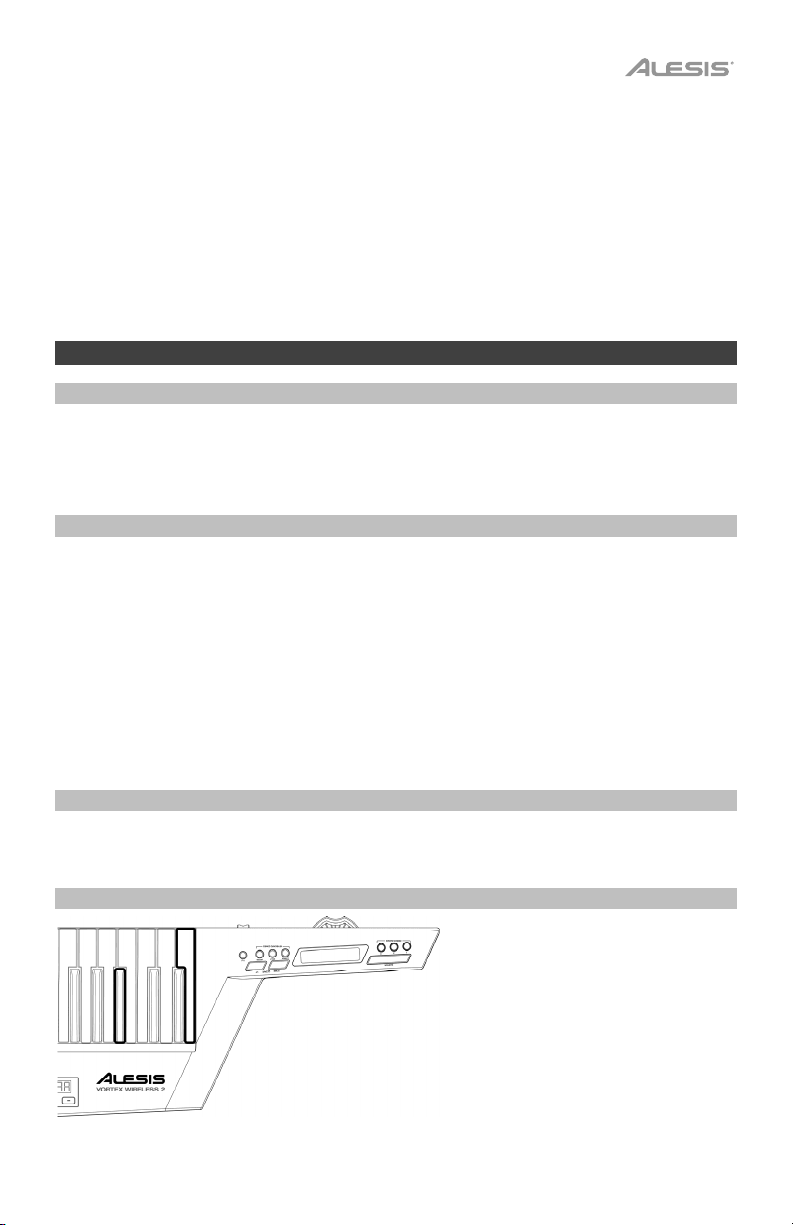
Restoring the Default Settings
You can erase all settings currently stored
in your Vortex Wireless 2 and restore its
original/default settings (a “factory reset”).
To restore the default settings, press
and hold the lowest C and Gb keys on the
keyboard and use the power switch to
power it on.
5

A
Guía del usuario (Español)
Introducción
Contenido de la caja
Vortex Wireless 2 Correa Guía del usuario
Receptor inalámbrico USB
Cable USB Tarjetas de descarga de software
Importante: Visite alesis.com y registre su Vortex Wireless 2 para descargar el software de
edición incluido.
Soporte
Para obtener la información más completa acerca de este product (los requisitos del sistema,
compatibilidad, etc) y registro del producto, visite alesis.com.
Para soporte adicional del producto, visite alesis.com/support.
Instalación
Los elementos que no se enumeran en Introducción > Contenido de la caja se venden por separado.
rnés del cable Manual sobre la
seguridad y garantía
Computadora
Receptor inalámbrico USB
Correa y accesorio para el arnés del cable (opcional):
6
Vortex Wireless 2
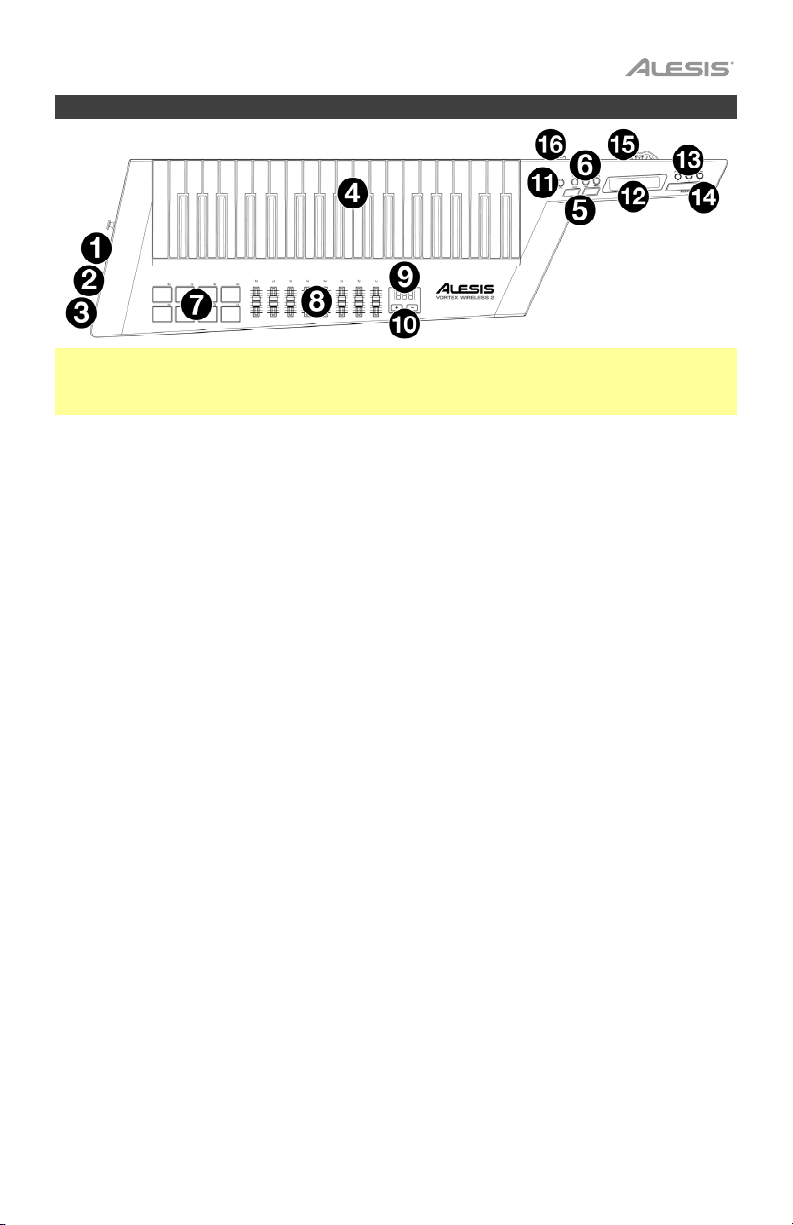
Características
Importante: Use el software de edición del Vortex Wireless 2 para asignar diversos comandos MIDI a: los
pads, los faders, los tres modos del controlador de cinta, el botón Sustain, la rueda de inflexión de tono
y el deslizador de volumen. Visite alesis.com y registre su Vortex Wireless 2 para descargar el software de
edición incluido.
1. Interruptor de encendido: Utilice este interruptor de tres posiciones para encender o apagar el
Vortex Wireless 2. Colóquelo en Batt para encenderlo utilizando 4 pilas AA (instálelas de antemano).
Colóquelo en USB para encenderlo utilizando la corriente del USB de un ordenador conectado.
Colóquelo en Off para apagarlo.
2. Puerto USB: Utilice un cable USB estándar para conectar este puerto USB a su ordenador. El puerto
USB del ordenador suministra suficiente corriente al Vortex Wireless 2. Esta conexión también se
utiliza para enviar y recibir datos MIDI desde y hacia su ordenador.
3. Salida MIDI (DIN de 5 patillas): Utilice un cable MIDI estándar de cinco patillas para conectar esta
salida MIDI a la entrada MIDI de un dispositivo MIDI externo (por ejemplo, un sintetizador,
secuenciador, caja de ritmos, etc.).
4. Teclas: Este teclado de 37 notas con post-pulsación es sensible a la velocidad y, en conjunto con los
botones subir/bajar octava, puede acceder a la gama completa de 127 notas MIDI (10 octavas).
5. Subir/bajar octava: Pulse uno de estos botones para desplazar el teclado una octava hacia arriba o
abajo. Pulse ambos botones simultáneamente para resetear el desplazamiento de octavas a “cero”.
6. Keyboard Zones (Lower, Split, Upper): Utilice estos botones para seleccionar las zonas correspondientes
en el teclado. Pulsar Lower o Upper aplica los ajustes de la zona inferior o los ajustes de la zona superior a
todas las 37 teclas. Pulse Split para aplicar los ajustes de la zona tanto inferior como superior al teclado y
utilizar el punto de división. Puede editar el rango de cada zona en el software de edición.
7. Pads: Utilice los pads sensibles a la velocidad para disparar sonidos o clips de batería en su software
o hardware. Puede utilizar el software de edición para asignar los colores de los LED de cada PAD y
el tipo de mensaje MIDI que envía: nota encendida/apagada, cambio de control (conmutación),
cambio de control (momentáneo), cambio de programa o pánico de MIDI (apagar todas las notas).
8. Faders: Utilice estos faders para mandar mensajes de CC MIDI a su software. Puede ajustar el rango
y número de mensaje de CC—y la dirección (“polaridad”) del fader—en el software de edición.
9. Pantalla: Utilice esta pantalla para ver valores de parámetros, ajustes y mensajes correspondientes a
la operación del Vortex Wireless 2 en ese momento.
10. Subir/Bajar (+/
–): Utilice estos botones para pasar al preset anterior o siguiente.
11. Tilt: Pulse este botón para encender o apagar el acelerómetro integrado.
12. Controlador de cinta: Coloque y/o mueva su dedo en esta tira sensible al tacto para enviar un mensaje
de CC MIDI o inflexión de tono. La longitud del controlador de cinta es similar a la de un fader; sus
posiciones mínima y máxima corresponden a los valores más altos y más bajos asignados a ese mensaje
MIDI. Puede ajustar el rango y tipo de mensaje MIDI—y la dirección (“polaridad”) del controlador de
cinta—en el software de edición. Utilice los botones Ribbon Banks para seleccionar un banco.
También puede ajustar los mensajes MIDI del controlador de cinta a bloqueo o retorno. Cuando se
ajusta en bloqueo, el controlador de cinta no enviará mensajes MIDI adicionales cuando lo suelte, lo
cual resulta útil para cambiar parámetros de modulación. Cuando se lo ajusta en retorno, enviará el
mensaje MIDI por defecto para el controlador cuando lo suelte, lo cual resulta útil para cambiar
parámetros tales como la inflexión del tono.
7
 Loading...