

INMUSIC JP11 User Manual

Quickstart Guide
English ( 2 – 9 )
Guía de inicio rápido
Guide d’utilisation rapide
Guida rapida
Schnellstart-Anleitung
Appendix
Español ( 10 – 17 )
Français ( 18 – 25 )
Italiano ( 26 – 33 )
Deutsch ( 34 – 41 )
English ( 42 – 43 )

Quickstart Guide (English)
Introduction
Thank you for purchasing the PRIME GO. At Denon DJ, we know how serious music is to you.
That’s why we design our equipment with only one thing in mind—to make your performance
the best it can be. We’re honored and excited to play a part in your musical & creative DJ
journey!
Box Contents
PRIME GO
Power Adapter
USB Cable
Engine DJ Software Download Card
Display Cleaning Cloth
Quickstart Guide
Safety & Warranty Manual
Important: Visit denondj.com and find the webpage for PRIME GO to download the
complete User Guide.
Support
For the latest information about this product (documentation, technical specifications, system
requirements, compatibility information, etc.) and product registration, visit denondj.com.
For additional product support, visit denondj.com/support.
Product Registration
Your product may include exclusive software and/or promotions which can only be accessed
by registering your new product on the Denon DJ website.
To check eligibility and access the available content, please register your product by following
the instructions below.
1. Visit denondj.com.
2. Click “Sign In” to access your existing account or to create a new account.
3. Once signed in, click “My Registered Products”.
4. Enter the product serial number into the box and click “Register Product”.
5. Upon successful registration, any applicable software downloads, exclusive content, and
promotional offers will be shown in your account.
2
Setup
Items not listed under the Introduction > Box Contents are sold separately.
Important: Occasionally, we may update PRIME GO’s firmware to add exciting new features
and improvements. Visit denondj.com to check for available firmware updates, especially
after you update your software (firmware updates may address new software features).
1. Visit denondj.com and log into your account. (Create an account if this is your first
Denon DJ product.)
2. In your account, download and install the latest firmware version of Engine Prime.
Double-click the .exe (Windows) or .dmg (macOS) installer file you downloaded, and then
follow the on-screen instructions to install Engine Prime.
Computer
(optional)
Headphones
(front panel)
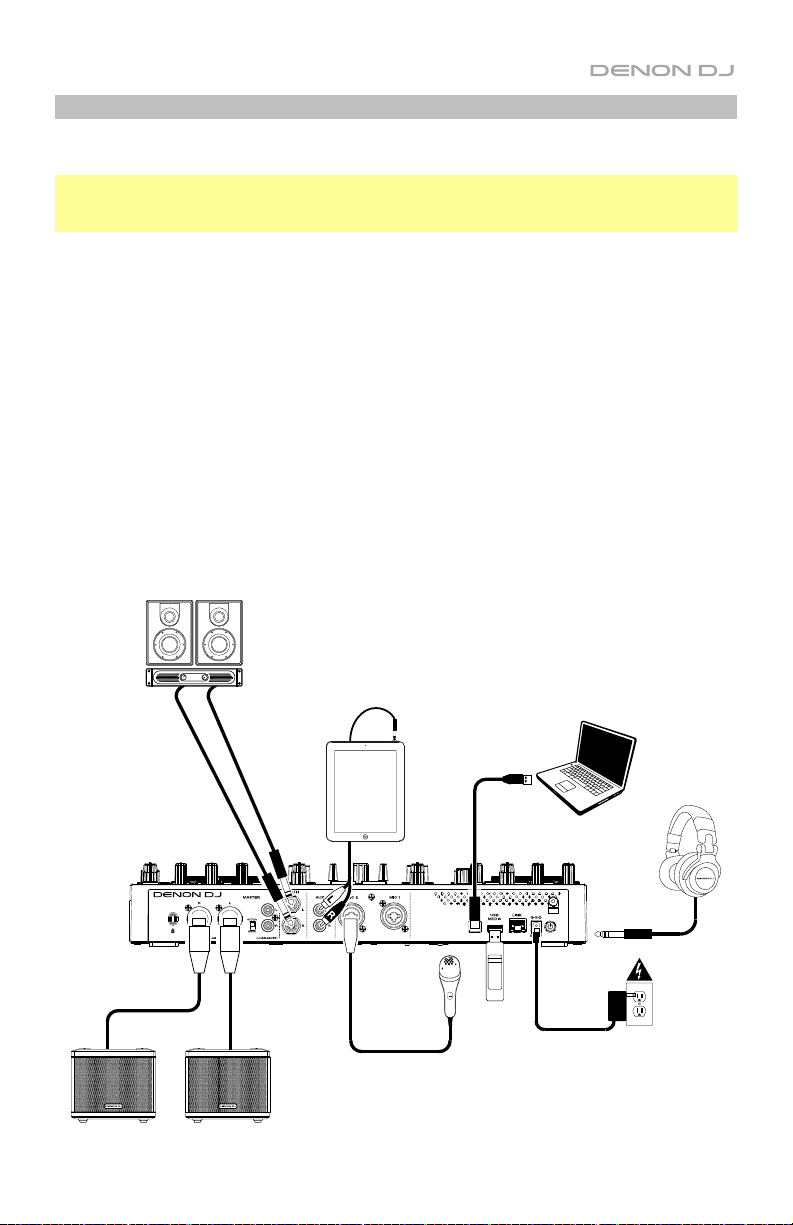
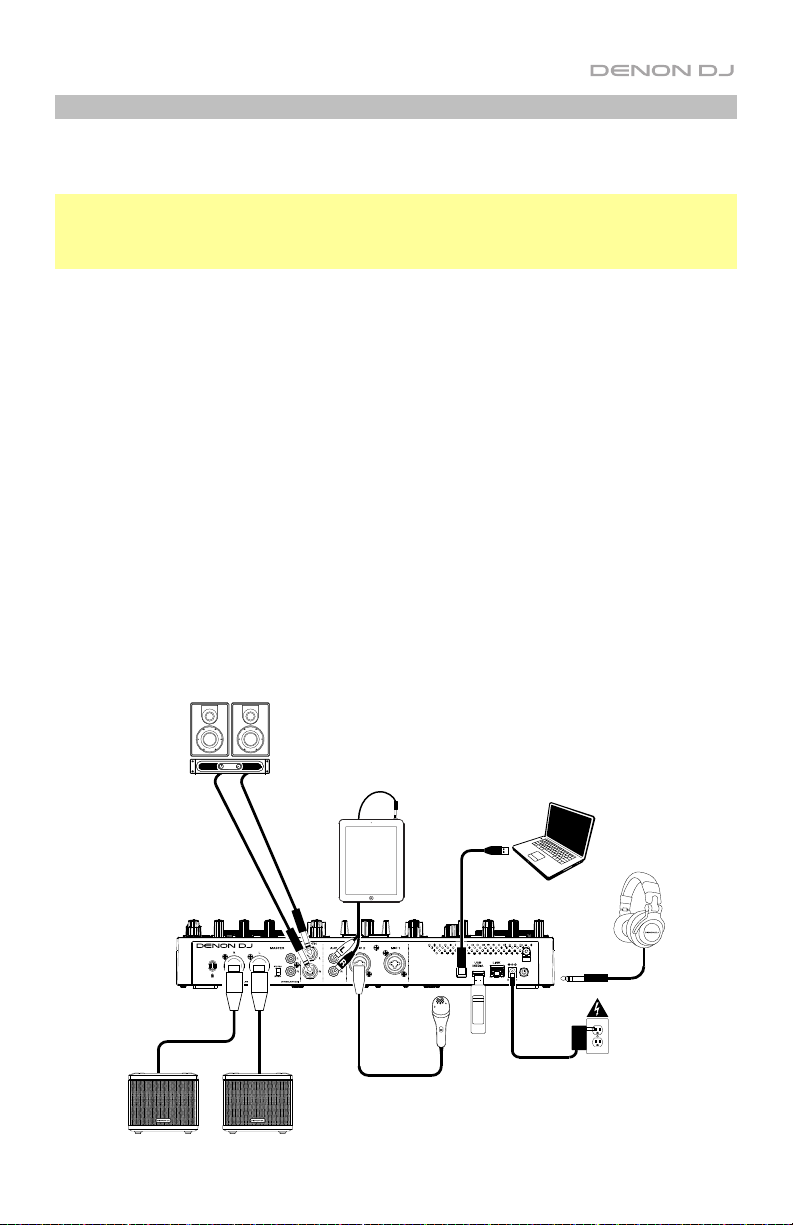
3. Transfer your music to a media device to be used with PRIME GO.
4. Connect input sources (microphones, CD players, etc.) to PRIME GO.
5. Connect output devices (headphones, power amplifiers, loudspeakers, etc.) to PRIME
GO.
6. Plug all devices into power sources, and turn on devices in proper order:
• When starting a session, turn on (1) input sources, (2) PRIME GO, (3) output devices.
• When ending a session, turn off (1) output devices, (2) PRIME GO, (3) input sources.
7. To use Engine (standalone playback): Insert a USB flash drive or SD card (with an
Engine-configured music library) to PRIME GO’s USB port or SD Card Slot.
Booth Monitors
Tablet
Microphone
Powered Loudspeakers
USB
Flash
Drive
Power
3

Features
Top Panel
31
32
33
29
34
39
42
30
36
37
35
1
38
40
37
41
36
20
19
21
22
10
11 12
13
3 4
2
5
6
10
11 12
13
16
17 18
20
19
21
22
16
17 18
7
26
23
14
24
25
27 28
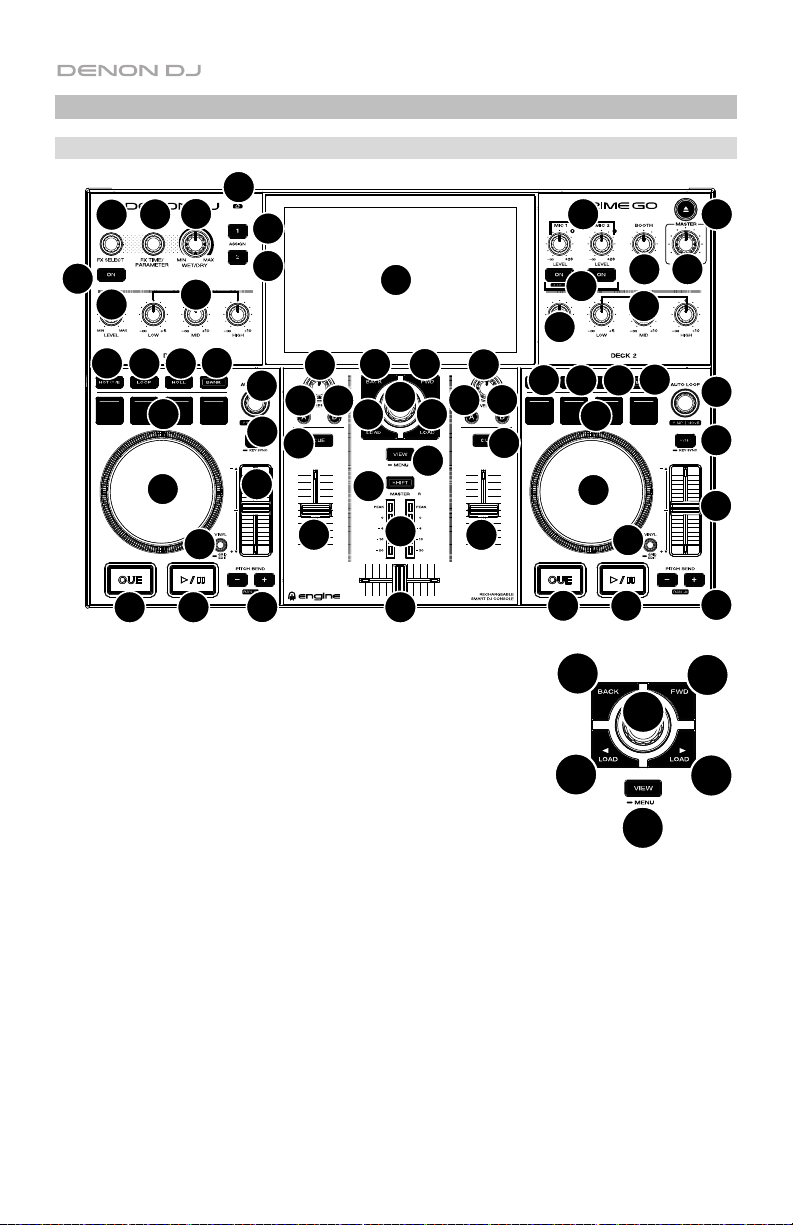
1. Touchscreen: This full-color, multi-touch display shows
information relevant to PRIME GO's current operation.
Touch the touchscreen (and use the hardware controls) to
control the PRIME GO interface.
2. Browse Knob: Turn this knob to navigate through lists.
Press the knob to move forward in the touchscreen or select
a song to load on either deck. Hold Shift and press the
Browse knob to add a track to the Prepare list.
3. Back: Press this button to move back in the touchscreen.
4. Forward (FWD): Press this button to move forward in the
touchscreen.
Hold Shift and press FWD to turn Quantize on/off.
5. Load : Press this button to load the selected track to Deck 1.
Quickly double-press this button to instant double the track currently playing on Deck 2 to
Deck 1.
6. Load : Press this button to load the selected track to Deck 2. Quickly double-press this button
to instant double the track currently playing on Deck 1 to Deck 2.
7. View: Press this button to cycle between the Library and Performance views. Press and hold this
button to show the Utility/Preferences menu.
Hold Shift and press the View button to switch between horizontal and vertical waveform views in
Performance Mode.
4
8
9
15
14
25
26
27 28
3
23
24
4
2
5
6
7
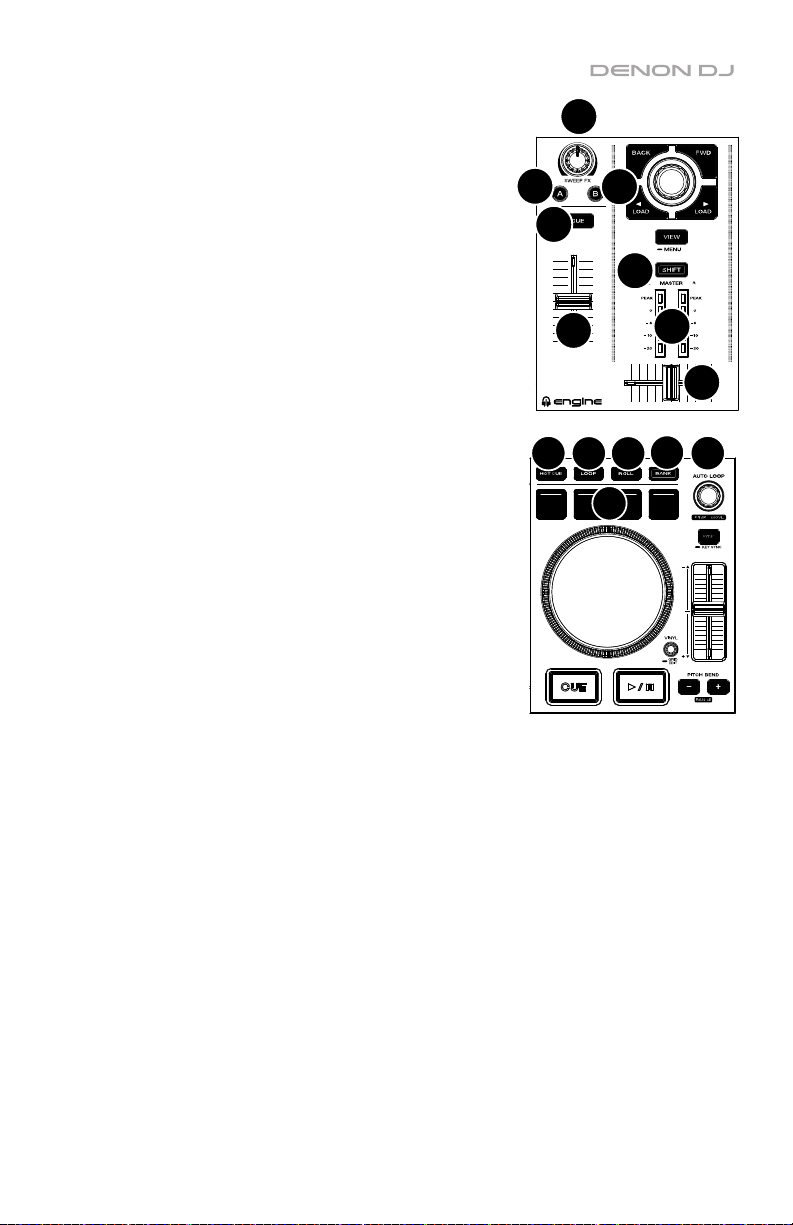
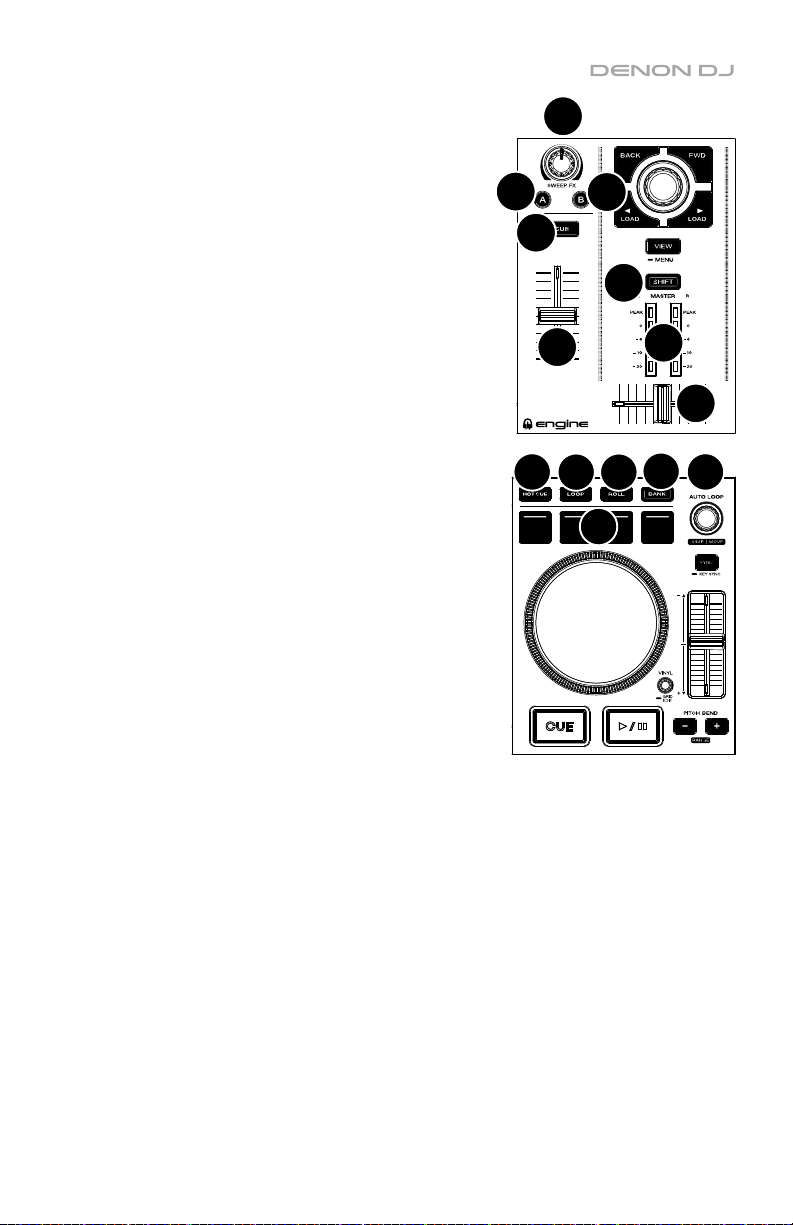
8. Shift: Press and hold this button to access secondary
functions of other controls.
9. Master Level Meters: These LEDs display the audio signal
level of the master mix (sent out of the Master Outputs).
10. Sweep FX: Turn this knob to control the active Sweep FX
A or FX B.
11. Sweep FX A: Press this button to activate Sweep FX A
(Filter). This effect applies a filter to the channel. Starting
from the center (12:00) position, turn a Sweep FX knob
counter-clockwise to apply a low-pass filter, or turn it
clockwise to apply a high-pass filter.
12. Sweep FX B: Press this button to activate Sweep FX B
(Wash Out). This creates a transition effect. Turn a Sweep
FX knob to its most counter-clockwise (minimum) position
to apply a 1-beat echo that will also mute the channel’s
normal audio signal, or turn it to its most clockwise
(maximum) position to apply a 1/2-beat echo.
13. Channel Cue: Press this button to send the channel’s prefader signal to the headphones’ cue channel.
14. Channel Fader: Use this fader to adjust the channel’s
volume level.
15. Crossfader: Use the crossfader to mix between Deck 1
and Deck 2.
16. Hot Cue: Press this button to enter Hot Cue Mode.
17. Loop: Press this button once to enter Manual Loop Mode
and press it again to enter Auto Loop Mode.
18. Roll: Press this button to enter Roll Mode.
19. Bank: This button is used to change the value of the 4
performance pads. The button will blink while accessing
pads 5-8.
20. Performance Pads: These pads have different functions
on each deck depending on the current pad mode. See the
full User Guide for more information.
21. Auto Loop: Turn this knob to set the size of an automatic loop. The value will be shown in the
touchscreen.
Press this knob to activate or deactivate an automatic loop at the current location of the track.
Jump/Move: Press and hold Shift and turn this knob to shift the active loop to the left or right
(Loop Move). When the loop is inactive, press and hold Shift and turn this knob to jump
forward or backwards in the track by a pre-determined quantized value (Beat Jump).
11
13
16
10
14
17 18
12
20
8
9
19
15
21
5

22. Sync: Press this button to activate sync. When Key
Lock is activated, the track’s key will remain the
same even if you adjust its speed.
Key Sync: When a track is playing back, press and
hold this button to activate key sync to that track.
23. Pitch Fader: Move this fader to adjust the speed
(pitch) of the track.
Press and hold Shift and then press one of the Pitch
Bend buttons to adjust the total range.
24. Pitch Bend –/+: Press and hold one of these buttons
to momentarily reduce or increase (respectively) the
speed of the track.
Press and hold Shift and then press one of these
buttons to set the range of the pitch fader.
25. Platter: This capacitive, touch-sensitive platter
controls the audio playhead when the wheel is
touched and moved.
26. Vinyl: Press this button to activate/deactivate a “vinyl mode” for the platter. When activated,
you can use the platter to “scratch” the track as you would with a vinyl record. When
deactivated (or if you are touching only the side of the platter), move the platter to temporarily
adjust the track’s speed.
Press and hold Vinyl to enter/exit Grid Edit Mode.
27. Cue: During playback, press this button to return the track to the initial cue point and stop
playback. To move the initial cue point, make sure the track is paused, move the platter to
place the audio playhead at the desired location, and then press this button. If the deck is
paused, press and hold this button to temporarily play the track from the initial cue point.
Release the button to return the track to the initial cue point and pause it. To continue playback
without returning to the initial cue point, press and hold this button and then press and hold the
Play button, and then release both buttons.
During playback, press and hold Shift and then press this button to set the initial cue point.
28. Play/Pause: This button pauses or resumes playback.
Press and hold Shift and then press this button to “stutter-play” the track from the initial cue
point.
22
25
23
26
24
27 28
6
31
32
33
29
34
39
42
30
35
40
41
38
36
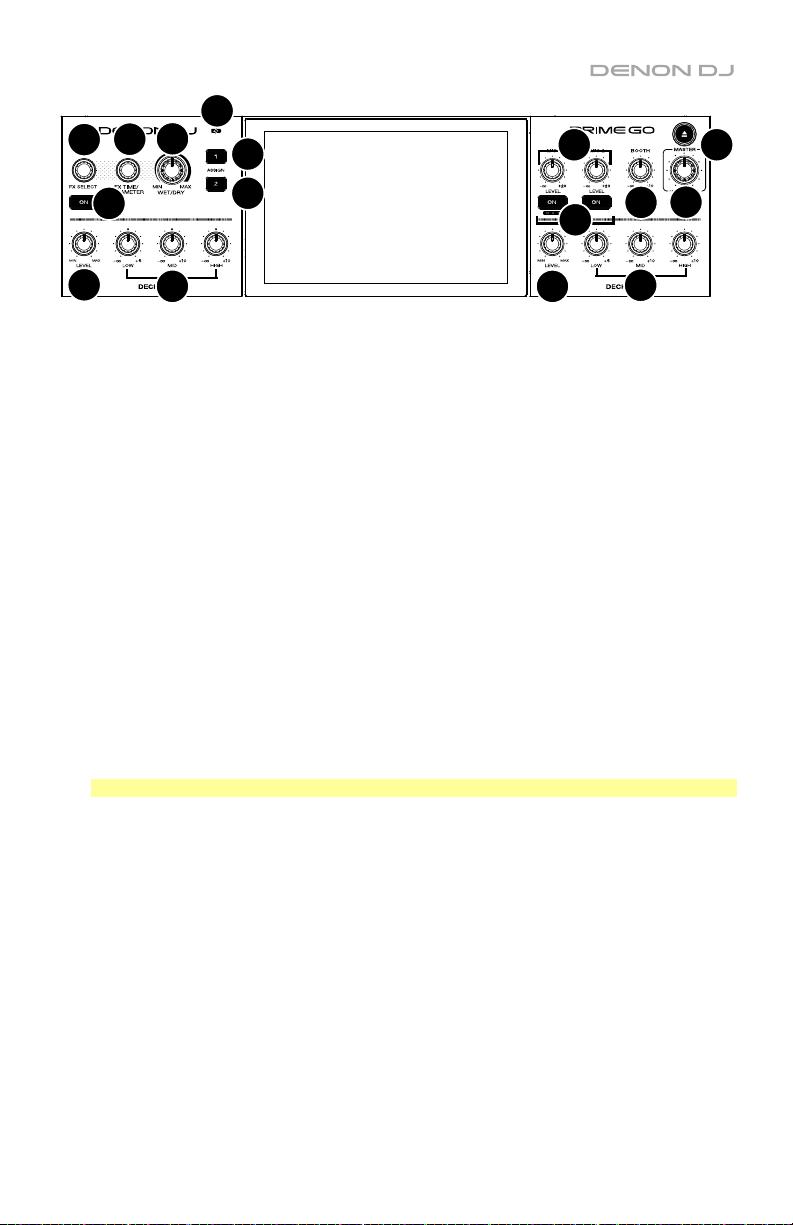
29. Battery Charging Indicator: This LED is solid green while charging. When charging is
complete, the LED will turn off.
30. FX On: Press this button to enable or disable the selected effect.
Hold Shift and press FX On to show or hide the FX bar.
31. FX Select: Turn this knob to select the active effect for FX 1 and FX 2.
32. FX Time: Turn this knob to decrease or increase the rate of time-based effects. Press the
encoder knob to switch between FX Time and FX Parameter.
33. FX Wet/Dry Knob: Turn this knob to adjust the wet/dry mix of the effects.
34. FX Assign 1: Press this button to assign effect routing to Deck 1.
35. FX Assign 2: Press this button to assign effect routing to Deck 2.
36. Channel Level: Turn this knob to adjust the level of the pre-fader, pre-EQ audio signal for the
channel.
37. Channel EQ: Turn these knobs to boost or cut the low, mid-range, and high frequencies for the
channel.
38. Mic On/Off: Press this button to toggle the microphone signal on/off.
Hold Shift and press Mic On/Off for Mic 1 to turn Talkover on/off, which automatically
reduces the volume level of the master mix when you speak into the microphone.
39. Mic Level: Turn these knobs to adjust the volume levels of the corresponding microphone
inputs. The Peak light next to each knob indicates the current signal level by its color: green
(low), amber (normal/optimal), or red (maximum/peak). You can adjust the microphone
attenuation in the Utility menu.
Important: The audio signals from the microphones are routed directly to the Master Outputs.
40. Booth Level: Turn this knob to adjust the volume level of the Booth Outputs.
41. Master Level: Turn this knob to adjust the volume level of the Master Outputs.
42. Eject: Press this button to display a list of connected media devices on the touchscreen. Tap
one of the listed media sources to eject that device.
Press and hold Shift and press this button to open the Source menu.
37
36
37
7

Front Panel
2
1
1. Headphones (1/4”, 1/8”) (6.35 mm, 3.5 mm): Connect your 1/4” or 1/8” (6.35 mm or 3.5
mm) headphones to this output for cueing and mix monitoring. The headphone volume is
controlled using the Phones Level knob.
2. Cue Mix:
together in the headphones.
3. Phones Level: Turn this knob to adjust the volume level in your headphones.
4. Aux Level: Turn this knob to adjust the volume level of the Auxiliary input.
Note: The Auxiliary input signal is only sent to the Master Outputs.
5. SD Card Slot: Insert a standard SD card to this slot. You can use the touchscreen to
select and load tracks from your SD card.
3
Turn this knob to adjust the blend of the pre-fader and master channels
4
5
8
Rear Panel
8
12
9
7
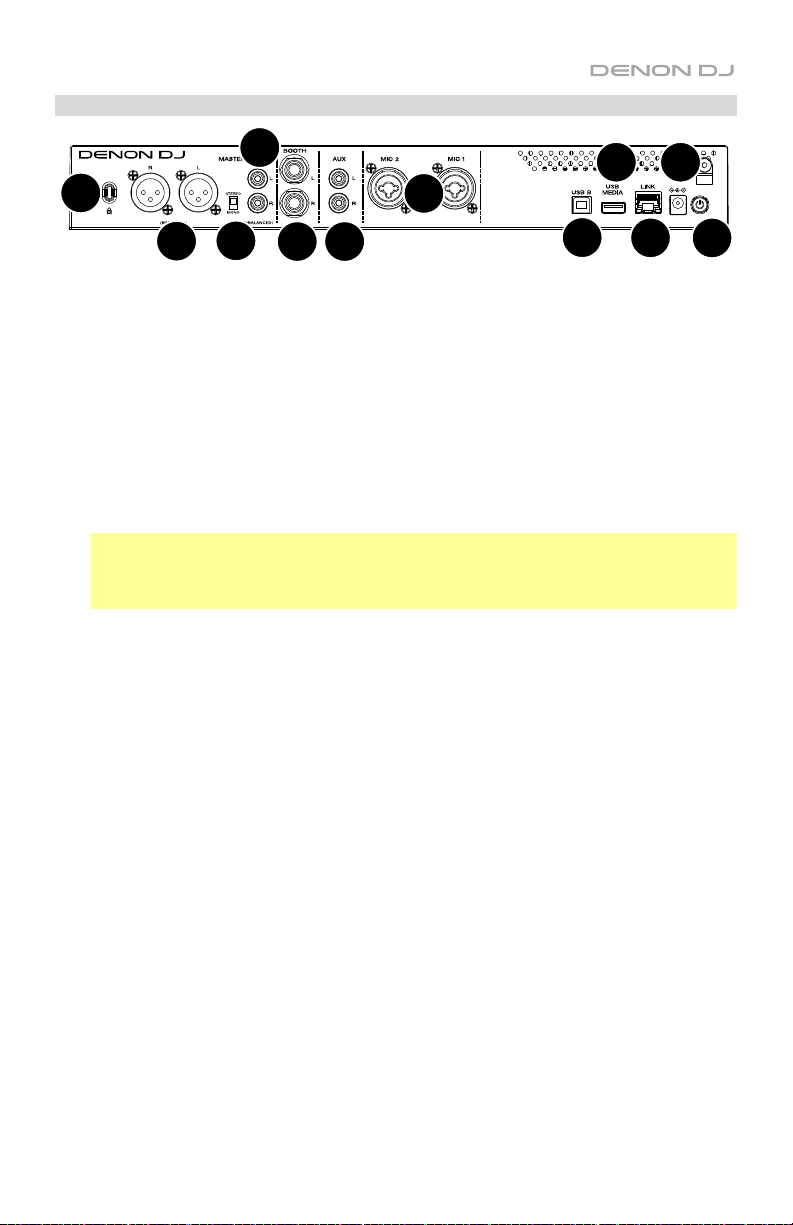
1. Power Input: Use the included power adapter to power the unit or charge the internal
lithium-ion battery.
2. Power Button: Press this button to power PRIME GO on. Power on PRIME GO only
after you have connected all of your input devices and before you power on your
amplifiers and loudspeakers.
To power off PRIME GO, press this button and follow the prompts on the touchscreen.
Power off your amplifiers and loudspeakers before powering off PRIME GO.
3. Rear USB Port: Connect a standard USB drive to this USB port. When you select a USB
drive as a source, you can use the touchscreen to select and load tracks from your USB
drive.
4. USB B: Use a standard USB cable (included) to connect this USB port to an available
USB port on your computer.
Note: Although PRIME GO can play tracks that have not been analyzed yet, preanalyzing them allows its features to work most effectively. We recommend using the
Engine Prime software to configure your music library on your SD card or USB flash drive
before connecting to PRIME GO. See the full User Guide for more information.
5. Link Port: Use a standard Ethernet cable to connect this port to a computer. PRIME GO
will send time, BPM, and other track data to the compatible Stagelinq lighting and video
software over this connection.
6. Booth Outputs (1/4” / 6.35 mm): Use standard 1/4” (6.35 mm) cables to connect these
outputs to booth monitors or a booth amplifier system. Use the Booth Level knob on the
top panel to control the volume level.
7. Master Outputs (XLR, balanced): Use standard XLR cables to connect these outputs to
loudspeakers or an amplifier system. Use the Master Level knob on the top panel to
control the volume level.
8. Master Outputs (RCA, unbalanced): Use standard RCA cables to connect these outputs
to loudspeakers or an amplifier system. Use the Master Level knob on the top panel to
control the volume level.
9. Stereo/Mono: Use this switch to set the channel configuration of the Master Outputs:
Stereo (binaural audio using separate left and right channels) or Mono (summed
monaural audio through both left and right channels).
10. Aux Inputs (RCA, unbalanced): Use standard RCA cables to connect these line-level
inputs to an external audio source. Use the Aux Level knob on the top panel to control
the volume level.
11. Mic Inputs (XLR or 1/4” / 6.35 mm): Use standard XLR or 1/4” (6.35 mm) cables (not
included) to connect standard dynamic microphones to these inputs. Use the Mic 1 and
Mic 2 Level knobs on the top panel to control the volume level.
12. Kensington
®
Lock Slot: Use this slot to secure PRIME GO to a table or other surface.
6
10
11
3
4
5
1
2
9

Guía de inicio rapido (Español)
Introducción
Gracias por comprar el PRIME GO. En Denon DJ, sabemos que usted se toma la música en
serio. Por eso es que diseñamos nuestros equipos con una sola cosa en mente—hacer que
pueda tocar su mejor interpretación. ¡Nos sentimos muy honrados y entusiasmados de
participar en su viaje musical y creativo como DJ!
Contenido de la caja
PRIME GO
Adaptador de alimentación
Cable USB
Tarjeta de descarga de Engine DJ software
Paño de limpieza de la pantalla
Guía de inicio rapido
Manual sobre la seguridad y garantía
Importante: Descargue la guía del usuario completa de PRIME GO de denondj.com.
Soporte
Para obtener la información más reciente acerca de este producto (documentación,
especificaciones técnicas, requisitos de sistema, información de compatibilidad, etc.) y
registrarlo, visite denondj.com.
Para obtener soporte adicional del producto, visite denondj.com/support.
Registro del producto
Su producto puede incluir software y/o promociones exclusivas a las que sólo se puede
acceder registrando su producto nuevo en el sitio web de Denon DJ.
Para verificar su elegibilidad y acceso al contenido disponible, sírvase registrar su producto
siguiendo las instrucciones a continuación:
1. Visite denondj.com.
2. Haga clic en Iniciar sesión para acceder a su cuenta existente o cree una nueva.
3. Una vez que haya iniciado sesión, haga clic en Mis productos registrados.
4. Introduzca el número de serie del producto en el recuadro y haga clic en Registrar
producto.
5. Una vez registrado exitosamente, toda descarga de software, contenido exclusivo y
ofertas promocionales aplicables se mostrarán en su cuenta.
10
Instalación
Los elementos que no se enumeran en Introducción > Contenido de la caja se venden por
separado.
Importante: Ocasionalmente, es posible que actualicemos el firmware del PRIME GO para
añadir excitantes mejoras y características. Visite denondj.com para encontrar las
actualizaciones de firmware disponibles, especialmente luego de actualizar su software (las
actualizaciones de firmware pueden contemplar las nuevas características del software).
1. Visite denondj.com e inicie sesión con su cuenta. (Cree una cuenta si este es su primer
producto Denon DJ).
2. En su cuenta, descargue e instale la última firmware versión de Engine Prime. En su
cuenta, descargue e instale la última versión de Engine Prime. Haga doble clic en el
archivo instalador .exe (Windows
instrucciones en pantalla para instalar Engine Prime.
3. Transfiera su música a un dispositivo de medios que se usará con el PRIME GO.
4. Conecte los dispositivos de salida (auriculares, amplificadores de potencia, altavoces,
etc.) al PRIME GO.
5. Enchufe todos los dispositivos a la fuente de alimentación y enciéndalos en el orden
correcto:
• Al iniciar la sesión, encienda (1) las fuentes de entrada, (2) el PRIME GO y (3) los
dispositivos de salida.
• Al finalizar la sesión, encienda (1) los dispositivos de salida, (2) el PRIME GO y (3) las
fuentes de entrada.
6. Cómo utilizar el Engine (reproducción autónoma): Inserte una unidad de
almacenamiento USB o tarjeta SD (con una biblioteca musical configurada para Engine)
en el puerto USB o ranuras para tarjeta SD del PRIME GO.
Monitores de cabina
®
) o .dmg (macOS®) descargado y luego siga las
Tableta
Computadora
(opcional)
Micrófono
Altavoces activos
Memoria
USB
Toma de corriente
Auriculares
(en el panel
frontal)
11
Características
Panel superior
33
32
31
29
34
39
42
30
36
37
35
1
38
40
37
41
36
20
19
21
22
10
11 12
13
3 4
2
5
6
10
11 12
13
16
17 18
20
19
21
22
16
17 18
7
26
23
14
24
25
27 28
1. Pantalla táctil: Esta pantalla multitáctil a todo color muestra
información relevante para el funcionamiento actual del PRIME
GO. Toque la pantalla táctil (y utilice los controles de hardware)
para controlar la interfaz del PRIME GO.
2. Perilla de desplazamiento: Gire esta perilla para recorrer las
listas. Pulse la perilla para moverse hacia delante en la pantalla
táctil o seleccionar una canción para cargar en cualquiera de los
mazos. Mantenga presionada la tecla Shift y presione el botón
Browse para agregar una pista a la lista Preparar.
3. Back: Pulse este botón para desplazarse hacia atrás por la
pantalla.
4. Adelante (FWD): Pulse este botón para desplazarse hacia
adelante por la pantalla táctil.
Mantenga pulsado Shift y pulse FWD para encender/apagar el Quantize.
5. Load : Pulse este botón para cargar la pista seleccionada en la bandeja 1.
Realice una doble pulsación rápida sobre este botón para duplicar instantáneamente la pista
que se está reproduciendo actualmente en la bandeja 2 a la bandeja 1.
6. Load : Pulse este botón para cargar la pista seleccionada en la bandeja 2.
Realice una doble pulsación rápida sobre este botón para duplicar instantáneamente la pista
que se está reproduciendo actualmente en la bandeja 1 a la bandeja 2.
7. View: Pulse este botón para alternar entre la vista de la biblioteca y la vista de la actuación.
Mantenga pulsado este botón para mostrar el menú de utilidades/preferencias.
Mantenga pulsado Shift y pulse el botón View para alternar entre las vistas de forma de onda
horizontal y vertical.
12
8
9
15
14
25
26
27 28
3
23
24
4
2
5
6
7
8. Shift: Mantenga pulsado este botón para acceder a las
funciones secundarias de otros controles.
9. Medidores de nivel maestro: Estos LED exhiben el
nivel de la señal de audio de la mezcla maestra (enviada
hacia afuera por las salidas maestras).
10. Sweep FX: Gire esta perilla para controlar el Sweep FX
A o FX B activo.
11. Sweep FX A: presione este botón para activar Sweep
FX A (Filtro). Este efecto aplica un filtro al canal.
Comenzando desde la posición central (12:00), gire la
perilla Sweep FX en sentido antihorario para aplicar un
filtro de paso bajo, o gírela en sentido horario para
aplicar un filtro de paso alto.
12. Sweep FX B: presione este botón para activar Sweep
FX B (Wash Out). Esto crea un efecto de transición. Gire
una perilla Sweep FX a su posición más en sentido
antihorario (mínimo) para aplicar un eco de 1 latido que
también silenciará la señal de audio normal del canal, o
gírela a su posición más en sentido horario (máximo)
para aplicar 1 / 2- beat echo.
13. Cue del canal: Pulse este botón para enviar la señal del
pre-fader del canal al canal de cue de los auriculares.
14. Fader de canal: Utilice este fader para ajustar el nivel
del volumen del canal.
15. Crossfader: Utilice el crossfader para mezclar entre la
bandeja 1 y la bandeja 2.
16. Hot Cue: Pulse este botón para entrar al modo de Hot
Cue.
17. Loop: Pulse este botón una vez para entrar al modo
Manual Loop y presiónelo nuevamente para ingresar al
Auto Loop Mode.
18. Roll: Pulse este botón para entrar al modo Roll.
19. Banco: Esto se utiliza para modificar el funcionamiento
de los 4 pads para actuaciones en vivo. El botón
parpadeará mientras accede a los pads 5-8.
20. Pads para actuaciones en vivo: Estos pads tienen distintas funciones en cada bandeja en
función del modo de pad activo. Consulte la guía del usuario completa para obtener más
información.
21. Bucle: Gire esta perilla para ajustar el tamaño de un bucle automático. El valor aparecerá en la
pantalla táctil.
Pulse esta perilla para activar o desactivar un bucle automático en la posición actual de la
pista.
Movimiento de bucle: Mantenga pulsado Shift y gire esta perilla para desplazar el bucle
activo a la izquierda o a la derecha (Loop Move). Cuando el bucle esté inactivo mantenga
pulsado Shift y gire esta perilla para moverse hacia delante o hacia atrás por la pista en un
valor cuantificado predeterminado (salteo de beats).
11
13
16
10
14
17 18
12
20
8
9
19
15
21
13

22. Sync: Pulse este botón para activar la sincronización.
Una vez activado el bloqueo de tono, el tono de la
pista permanecerá igual por más que modifique su
velocidad.
Key Sync: Cuando se esté reproduciendo una pista,
mantenga pulsado este botón para activar la
sincronización de tono en esa pista.
23. Fader de tono: Mueva este fader para ajustar la
velocidad (tono) de la pista.
Mantenga pulsado Shift y luego pulse uno de los
botones Pitch Bend para ajustar el rango completo.
24. Pitch Bend –/+: Mantenga pulsado uno de estos
botones para reducir o aumentar (respectivamente) la
velocidad de la pista momentáneamente.
Mantenga pulsado Shift y pulse uno de estos botones
para ajustar el rango del fader de pitch.
25. Plato: Este plato capacitivo sensible al tacto controla el cabezal de reproducción cuando se
toca y se mueve la rueda.
26. Vinyl: Pulse este botón para activar/desactivar el "modo vinilo" para el plato. Una vez activado,
puede utilizar el plato para "rayar" la pista como si se tratara de un disco de vinilo. Cuando el
plato esté desactivado (o si está tocando solo su costado), muévalo para ajustar
temporalmente la velocidad de la pista.
Mantenga pulsado Vinyl para entrar/salir del modo de edición de cuadrícula.
27. Cue: Durante la reproducción, pulse este botón para regresar la pista al punto de cue inicial y
detener la reproducción. Para mover el punto de cue inicial, asegúrese de que la pista esté en
pausa, mueva el plato para posicionar el cabezal de reproducción en la posición deseada y
luego pulse este botón. Si la bandeja está en pausa, mantenga pulsado este botón para
reproducir momentáneamente la pista desde el punto de cue inicial. Suelte el botón para
regresar la pista al punto de cue inicial y ponerla en pausa. Para continuar la reproducción sin
volver al punto de cue inicial, mantenga pulsado este botón y luego mantenga pulsado el botón
Play y luego suelte ambos botones.
Durante la reproducción, mantenga pulsado Shift y pulse este botón para establecer el punto
de cue inicial.
28. Play/Pause: Con este botón se pone en pausa o reanuda la reproducción.
Mantenga pulsado Shift y pulse este botón para que la pista "tartamudee" desde el punto de
cue inicial.
22
25
23
26
24
27 28
14
 Loading...