

Inkel WD-1 User Manual

WD-1
NETWORK AV ADAPTER
ADAPTATEUR AV RÉSEAU
ADAPTADOR AV CON CONEXIÓN DE RED
OPERATING INSTRUCTIONS
GUIDE D’UTILISATION
INSTRUCCIONES DE FUNCIONAMIENTO
Safety Information
READ THIS BEFORE OPERATING YOUR UNIT
CAUTION
CAUTION
RISK OF ELECTRIC SHOCK
DO NOT OPEN
This symbol indicates the presence of uninsulated “dangerous voltage” within the product’s
enclosure that may be of sufcient magnitude to constitute a risk of electric shock.
This symbol indicates important operating and maintenance (servicing) instructions in the
literature accompanying the appliance.
WARNING: TO REDUCE THE RISK OF FIRE OR ELECTRIC SHOCK, DO NOT EXPOSE
THIS APPLIANCE TO RAIN OR MOISTURE.
TO REDUCE THE RISK OF ELECTRIC SHOCK,
DO NOT REMOVE FRONT OR BACK COVER.
NO USER-SERVICEABLE PARTS INSIDE.
REFER SERVICING TO QUALIFIED SERVICE
PERSONNEL.
CAUTION
Leave space around the unit for sufcient
•
ventilation.
•Avoid installation in extremely hot or cold
locations, or in an area that is exposed to
direct sunlight or heating equipment.
•Keep the unit free from moisture, water, and
dust.
•Do not let foreign objects in the unit.
•Keep the ventilation openings clear of items,
such as newspapers, linens, or curtains.
Keep open ame from candles or other
•
sources away from the unit.
•Observe the local regulations regarding
disposal of packaging materials, exhausted
batteries and old equipment.
•Do not expose the unit to dripping or
splashing, or place objects lled with liquids
such as vases.
•Do not let insecticides, benzene, or thinner
come in contact with the unit.
•Never disassemble or modify the unit in any
way.
Notes on the AC power cord and the wall
outlet
•The unit remains connected to AC power
as long as it is plugged into the wall outlet,
even if the unit has been turned off.
•To completely disconnect this product from
AC power, disconnect the plug from the wall
socket outlet.
When setting up this product, make sure
•
that the AC outlet you are using is easily
accessible.
•Disconnect the plug from the wall outlet
when not using the unit for long periods of
time.
FCC Notice
This equipment has been tested and found
to comply with the limits for a Class B digital
device, pursuant to Part 15 of the FCC
Rules. These limits are designed to provide
reasonable protection against harmful
interference in a residential installation.
This equipment generates, uses and can
radiate radio frequency energy and, if not
installed and used in accordance with the
instructions, may cause harmful interference
to radio communications. However, there is
no guarantee that interference will not occur
in a particular installation. If this equipment
does cause harmful interference to radio or
television reception, which can be determined
by turning the equipment off and on, the user is
encouraged to try to correct the interference by
one or more of the following measures:
2
Safety Information
Reorient or relocate the receiving antenna.
Increase the separation between the equipment
and the receiver.
Connect the equipment to an outlet on a circuit
different from that to which the receiver is
connected.
Consult the dealer or an experienced radio/TV
technician for help.
This device complies with part 15 of the
FCC Rules. Operation is subject to the
following two conditions:
(a) This device may not cause harmful
interference, and
(b) This device must accept any
interference received, including
interference that may cause undesired
operation.
(FCC Part 15.21) Caution: changes or
modications not expressly approved by the
party responsible for compliance could void the
user’s authority to operate the equipment.
For Canadian customers:
This Class B digital apparatus complies with
Canadian ICES-003.
FCC Radiation Exposure Statement:
This equipment complies with FCC radiation
exposure limits set forth for an uncontrolled
environment. This equipment should be
installed and operated with a minimum distance
of 20 cm between the radiator and your body.
This transmitter must not be co-located or
operated in conjunction with any other antenna
or transmitter.
Important Safety Instructions
1 Read these instructions.
2 Keep these instructions.
3 Heed all warnings.
4 Follow all instructions.
5 Do not use this apparatus near water.
6 Clean only with dry cloth.
7 Do not block any ventilation openings.
Install in accordance with the
manufacturer’s instructions.
8 Do not install near any heat sources such
as radiators, heat registers, stoves, or
other apparatus (including ampliers) that
produce heat.
9 Do not defeat the safety purpose of
the polarized or grounding-type plug. A
polarized plug has two blades with one
wider than the other. A grounding type
plug has two blades and a third grounding
prong. The wide blade or the third prong
is provided for your safety. If the provided
plug does not t into your outlet, consult an
electrician for replacement of the obsolete
outlet.
10 Protect the power cord from being walked
on or pinched particularly at plugs,
convenience receptacles, and the point
where they exit from the apparatus.
11 Only use attachments/accessories
specied by the manufacturer.
12 Use only with the cart, stand,
tripod, bracket, or table
specied by the manufacturer,
or sold with the apparatus.
When a cart is used, use
caution when moving the cart/apparatus
combination to avoid injury from tip-over.
13 Unplug this apparatus during lightning
storms or when unused for long periods of
time.
14 Refer all servicing to qualied service
personnel. Servicing is required when
the apparatus has been damaged in any
way, such as power-supply cord or plug
is damaged, liquid has been spilled or
objects have fallen into the apparatus, the
apparatus has been exposed to rain or
moisture, does not operate normally, or has
been dropped.
Product Name: Network AV ADAPTER
Model Number: WD-1
Responsible Party Name:
ETRON CORPORATION
Address:
6120 Valley View Buena Park, Ca. 90620
Phone: 1-714-739-2000
URL: http://www.sherwoodamerica.com
English
3

T able of Contents
2 SAFETY INFORMATION
5 GETTING STARTED
5 What's Included
6 Installing the Remote Control Battery
6 Operating the range of the Remote
Control
7 Parts Description
9 MAkING CONNECTIONS
9 Connecting HDMI Components
10 Connecting Digital Audio Components
10 Connecting to a Network
11 Connecting Power
12 OPERA TING YOUR DEvICE
12 Turning on Your Unit
12 Setting the Network Standby Control
12 Setting the Network Setup
14 Listening to Internet Radio
15 Listening to Music from the Media Server
16 Using the Sherwood Remote Application
21 Updating the Firmware
23 TROUBLESHOOTING
24 ADDITIONAL INFORMATION
24 Specications
25 TRADEMARkS AND LICENSES
4
Getting Started
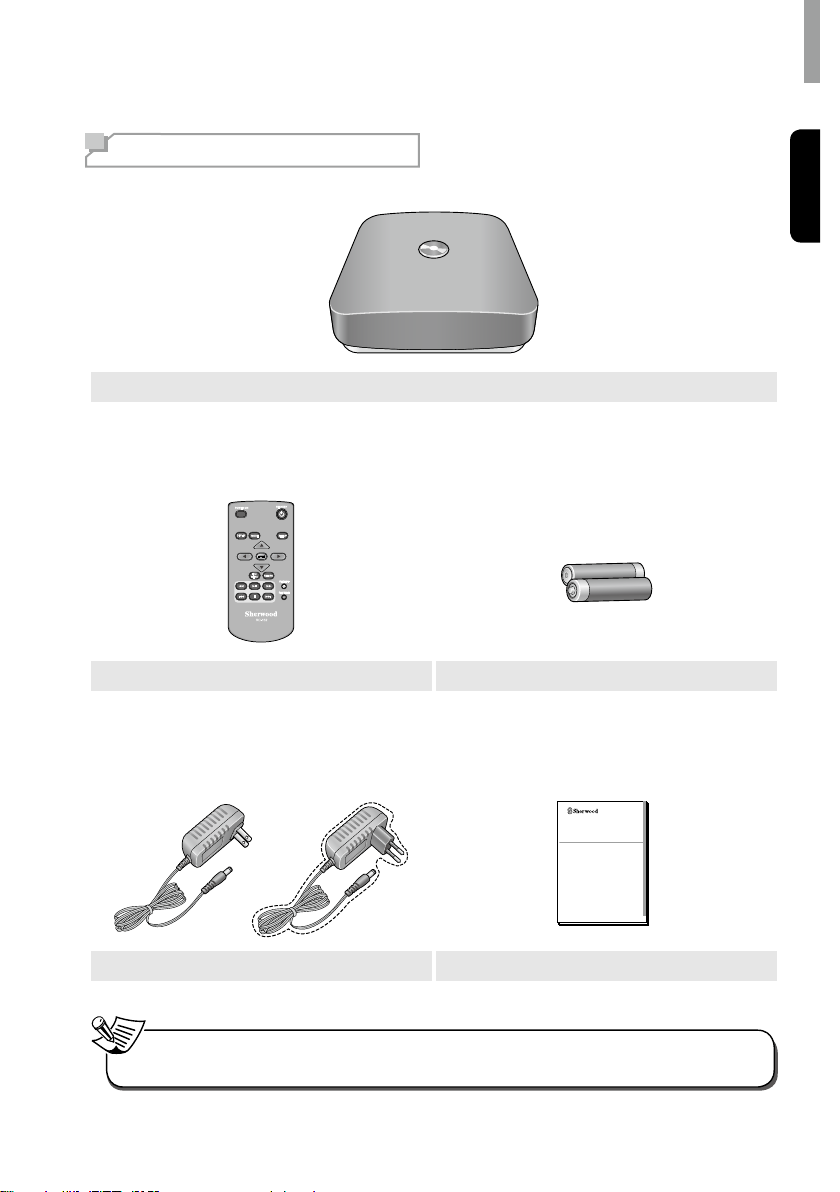
What's Included
English
Main unit
Remote control (1 ea) Battery “AAA” size, 1.5v (2 ea)
WD-1
NETWORK AV ADAPTER
OPERATING INSTRUCTIONS
Power adapter (1 ea) User manual (1 ea)
Note
•The items supplied with your unit are subject to change without prior notice.
5

WD-1 NETWORk Av ADAPTER
Installing the Remote
Control Battery
Remove the battery cover.
1
Insert two AAA size batteries with the
2
polarity matched properly.
Caution
Always use alkaline batteries, and do not
•
use the rechargeable batteries (Ni-Cd
type).
•If the batteries run out, remove the old
batteries and replace them with new ones
within several minutes.
•If the batteries are removed or have been
exhausted for a longer period of time,
memorized contents will be cleared. In
this case, you should memorize them
again.
•If the battery is placed incorrectly, it can
cause explosion.
•Remove the battery if the remote control
is not used for a long period of time.
•Do not leave the product in a hot or
humid place.
•Do not handle and store the battery with
metallic tools.
Operating the range of
the Remote Control
Use the remote control within a range of
about 7 meters (23 feet) and angles of up
to 30 degrees aiming at the remote control
sensor.
7m
30 30
6
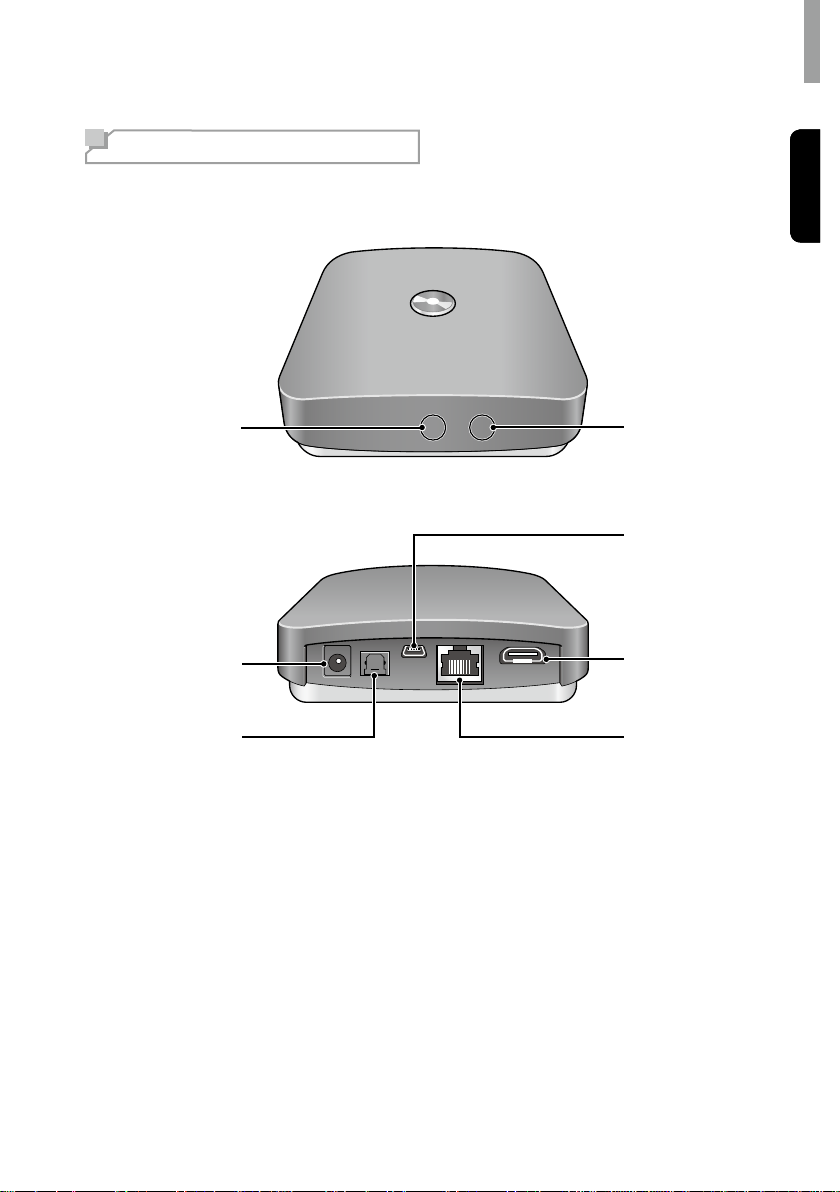
Parts Description
Getting Started
Front and Rear Panel
1
2
3
English
English
7
6
5
4
Status LED
1
Power Connector
2
OPTICAL OUT Connector
3
LAN/ETHERNET Connector
4
HDMI Connector
5
USB Connector (For Upgrade only)
6
IR Sensor
7
7
WD-1 NETWORk Av ADAPTER
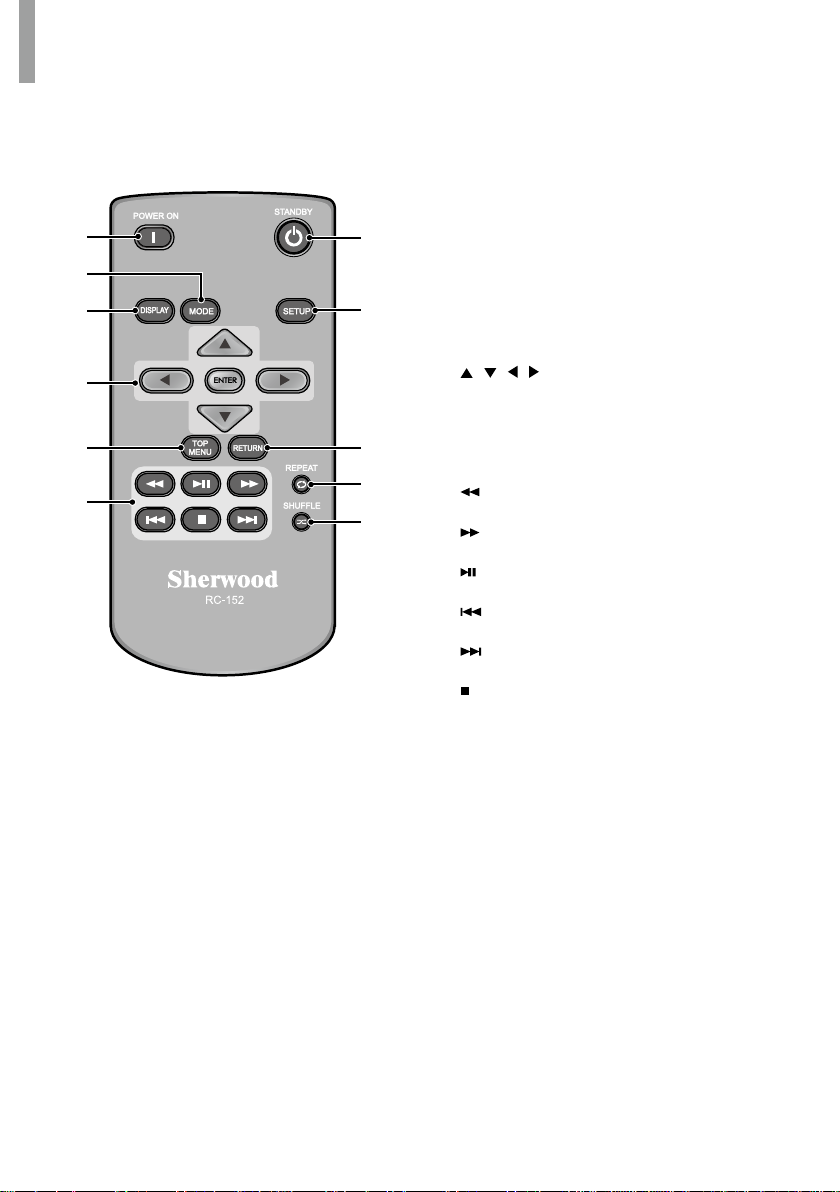
Remote Control
1
2
3
4
5
6
11
10
9
8
7
POWER ON
1
Turn on the main unit.
MODE
2
Adjust the screen resolution. (Original/Full)
DISPLAY
3
When playing audio or video les, turns on
•
or off the progress bar.
•When viewing photos, turns on or off the
slideshow transition time display.
/ / / / ENTER
4
•Navigate through the menus.
Conrm a setting option or menu.
•
TOP MENU
5
Move to the top menu for each media or
service.
6
Fast-reverse the current le.
Fast-forward the current le.
Play or pause playback.
Select the previous le.
8
Select the next le.
Stop playback.
SHUFFLE
7
Activate the random playback.
REPEAT
8
Activate the repeat function.
RETURN
9
Return to the previous menu.
SETUP
10
Enter or exit the system setup menu.
STANDBY
11
Turn off the main unit to the normal standby
mode.
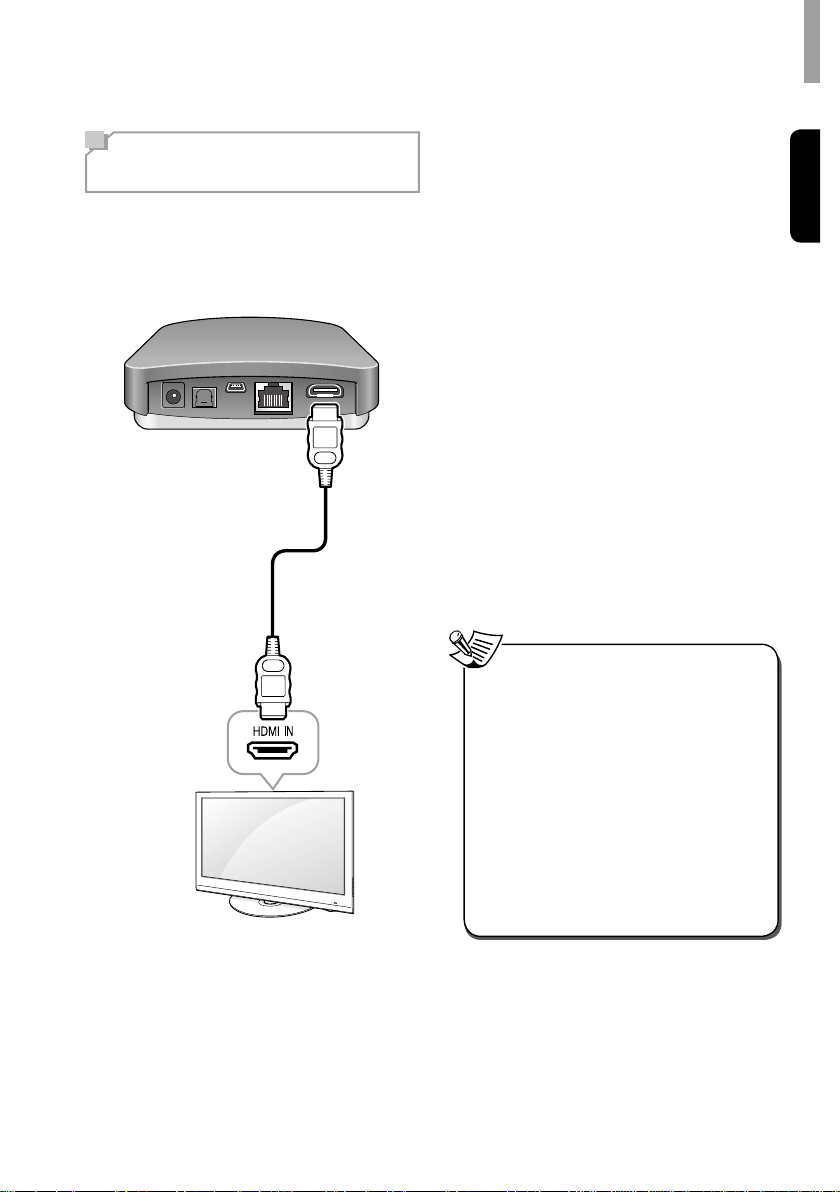
Making Connections
Connecting HDMI
Components
With HDMI, you can easily enjoy high
quality sounds and images. The main unit
plays audio from HDMI compatible products
while also passing on the video signal to a
HDMI-connected TV .
About HDMI
HDMI (High Denition Multimedia Interface)
supports both audio and video on a single
digital connection for use with DVD players,
DTV, set-top boxes, and other AV devices.
HDMI was developed to provide the
technologies of High Bandwidth Digital Content
Protection (HDCP) as well as Digital Visual
Interface (DVI) in one specication. HDCP is
used to protect the digital content transmitted
and received by DVI-compliant displays.
HDMI has the capability to support standard,
enhanced, or high-denition video plus
standard to multi-channel surround-sound
audio. HDMI features include uncompressed
digital video, a bandwidth of up to 2.2 gigabytes
per second (with HDTV signals), one connector
(instead of several cables and connectors), and
communication between the AV source and AV
devices such as DTVs.
This main unit is also compatible with the
DeepColor and x.v.Color feature (x.v.Color is
trademarks of Sony Corporation.).
Note
Check the setup of the connected
•
component if an image is poor or there is
no sound from a component connected
via the HDMI cable.
•Audio signals (sampling frequency,
bit length, etc.) transmitted from an
HDMI jack may be suppressed by the
connected component.
•When the connected component is not
compatible with copyright protection
technology (HDCP), the image and the
sound from the HDMI TV OUT jack may
be distorted or may be not output. In
this case, check the specication of the
connected component.
English
9

WD-1 NETWORk Av ADAPTER
Connecting Digital
Audio Components
You can connect components equipped with an
optical input jack. Then, the main unit transmits
the digital audio signal to the connected
external device.
OPTICAL
IN
Connecting to a
Network
If you have an internet connection, you can
connect the main unit to the internet as well as
using a wireless or a wired LAN connection.
The following illustration is a conguration
example of a home network with the main unit
and a server. It is recommended to connect the
server to the router with a wired connection.
Modem
Internet
To WAN side
Router
PC
10
To LAN port
To LAN port
LAN port/Ethernet
connector
Main Unit

Making Connections
Note
After making a broadband internet
•
connection, you should set the
communication settings. For details, see
“Setting the Network Setup” on page 12.
•When using a broadband internet
connection, a contract with an internet
service provider is required. For more
information, contact local internet service
provider.
•Since the connected equipment and
connection method may differ depending
on your internet environment, refer to the
operating instructions of the equipment.
Connecting Power
Make sure to plug in after you have connected
all your components to the main unit. Plug the
supplied AC input cord into the AC inlet and
then into the wall AC outlet.
To the Wall Outlet
Caution
•The supplied AC adapter is designed
exclusively for use with this unit. Do not
attempt to use it with any device for which
was not expressly designed, since res
or shocks may occur.
•Handle the power cord by the plug part.
Do not pull out the plug by tugging the
cord, and never touch the power cord
when your hands are wet, as this could
cause a short circuit or electric shock.
•The main unit should be disconnected
by removing the main plug from the wall
outlet when not in regular use for a long
period of time.
English
11
 Loading...