

Inkel S9 User Manual

Safety Information
READ THIS BEFORE OPERATING YOUR UNIT
CAUTION
CAUTION
RISK OF ELECTRIC SHOCK
DO NOT OPEN
This symbol indicates the presence of uninsulated “dangerous voltage” within
the product’s enclosure that may be of sufcient magnitude to constitute a risk of
electric shock.
This symbol indicates important operating and maintenance (servicing)
instructions in the literature accompanying the appliance.
TO REDUCE THE RISK OF ELECTRIC SHOCK,
DO NOT REMOVE FRONT OR BACK COVER.
NO USER-SERVICEABLE PARTS INSIDE.
REFER SERVICING TO QUALIFIED SERVICE
PERSONNEL.
WARNING
: TO REDUCE THE RISK OF FIRE OR ELECTRIC SHOCK, DO NOT EXPOSE THIS
APPLIANCE TO RAIN OR MOISTURE.
CAUTION
•Leave space around the unit for sufcient
ventilation.
•Avoid installation in extremely hot or cold
locations, or in an area that is exposed to
direct sunlight or heating equipment.
•Keep the unit free from moisture, water, and
dust.
•Do not let foreign objects in the unit.
•Keep the ventilation openings clear of items,
such as newspapers, linens, or curtains.
•Keep open ame from candles or other
sources away from the unit.
•Observe the local regulations regarding
disposal of packaging materials, exhausted
batteries and old equipment.
•Do not expose the unit to dripping or
splashing, or place objects lled with liquids
such as vases.
•Do not let insecticides, benzene, or thinner
come in contact with the unit.
•Never disassemble or modify the unit in any
way.
Notes on the AC power cord and the wall
outlet
•The unit remains connected to AC power
as long as it is plugged into the wall outlet,
even if the unit has been turned off.
•To completely disconnect this product from
AC power, disconnect the plug from the wall
socket outlet.
•When setting up this product, make sure
that the AC outlet you are using is easily
accessible.
•Disconnect the plug from the wall outlet
when not using the unit for long periods of
time.
2
FCC Notice
Safety Information
This equipment has been tested and found to comply with the limits for a Class B digital device,
pursuant to Part 15 of the FCC Rules. These limits are designed to provide reasonable protection
against harmful interference in a residential installation. This equipment generates, uses and can
radiate radio frequency energy and, if not installed and used in accordance with the instructions,
may cause harmful interference to radio communications. However, there is no guarantee
that interference will not occur in a particular installation. If this equipment does cause harmful
interference to radio or television reception, which can be determined by turning the equipment off
and on, the user is encouraged to try to correct the interference by one or more of the following
measures:
Reorient or relocate the receiving antenna.
Increase the separation between the equipment and the receiver.
Connect the equipment to an outlet on a circuit different from that to which the receiver is
connected.
Consult the dealer or an experienced radio/TV technician for help.
This device complies with part 15 of the FCC Rules. Operation is subject to the following
two conditions :
(a) This device may not cause harmful interference, and
(b) This device must accept any interference received, including interference that may
cause undesired operation.
(FCC Part 15.21) Caution: changes or modications not expressly approved by the party
responsible for compliance could void the user’s authority to operate the equipment.
For Canadian customers:
This Class B digital apparatus complies with Canadian ICES-003.
Cet appareil numerique de la Classe B est conforme a la norme NMB-003 du Canada.
English
FCC Radiation Exposure Statement:
This equipment complies with FCC radiation exposure limits set forth for an uncontrolled
environment. This equipment should be installed and operated with a minimum distance of 20 cm
between the radiator and your body.
This transmitter must not be co-located or operated in conjunction with any other antenna or
transmitter.
3

S9/S7 3D Sound Soundbar
Important Safety Instructions
1 Read these instructions.
2 Keep these instructions.
3 Heed all warnings.
4 Follow all instructions.
5 Do not use this apparatus near water.
6 Clean only with dry cloth.
7 Do not block any ventilation openings. Install in accordance with the manufacturer’s instructions.
8 Do not install near any heat sources such as radiators, heat registers, stoves, or other
apparatus (including ampliers) that produce heat.
9 Do not defeat the safety purpose of the polarized or grounding-type plug. A polarized plug has
two blades with one wider than the other. A grounding type plug has two blades and a third
grounding prong. The wide blade or the third prong are provided for your safety. If the provided
plug does not t into your outlet, consult an electrician for replacement of the obsolete outlet.
10 Protect the power cord from being walked on or pinched particularly at plugs, convenience
receptacles, and the point where they exit from the apparatus.
11 Only use attachments/accessories specied by the manufacturer.
12 Use only with the cart, stand, tripod, bracket, or table specied by the manufacturer,
or sold with the apparatus. When a cart is used, use caution when moving the cart/
apparatus combination to avoid injury from tip-over.
13 Unplug this apparatus during lightning storms or when unused for long periods of
time.
14 Refer all servicing to qualied service personnel. Servicing is required when the apparatus has
been damaged in any way, such as power-supply cord or plug is damaged, liquid has been
spilled or objects have fallen into the apparatus, the apparatus has been exposed to rain or
moisture, does not operate normally, or has been dropped.
4

Table of Contents
2 SAFETY INFORMATION
6 GETTING STARTED
6 What's Included
7 Parts Description
10 INSTALLATION
10 Installing the System
11 Installing the Remote Control Battery
12 CONNECTIONS
12 Subwoofer Connection
12 Connecting to HDMI Components
14 Connecting to Audio Components
15 Connecting the FM Antenna (Only for S9)
15 Power Connection
16 OPERATION
16 Listening to Your System
18 Listening to USB (Only for S9)
20 Listening to FM Radio (Only for S9)
22 Listening to Music via Bluetooth (Only for S9)
23 SETTINGS
23 Setting the System
English
25 TROUBLESHOOTING
27 SPECIFICATIONS
28 TRADEMARKS AND LICENSES
29 INDEX
5

Getting Started
What's Included
Main unit
Remote control (1 ea) Battery (1 ea) HDMI cable (1 ea)
Power adapter (1 ea)
6
FM antenna (1 ea)
(Only for S9)
User manual (1 ea)

Parts Description
Getting Started
Front Panel
Sherwood BRAND
1
Power Button
2
Press to turn the main unit on or turn off to
standby mode.
Input Selector
Rotate to select an input source for playback.
21 3 4 5
Display Panel
3
Displays the current status of the main unit.
Volume Controller
4
Adjusts the volume level.
USB Port (Only for S9)
5
Connects a USB device.
English
7
S9/S7 3D Sound Soundbar
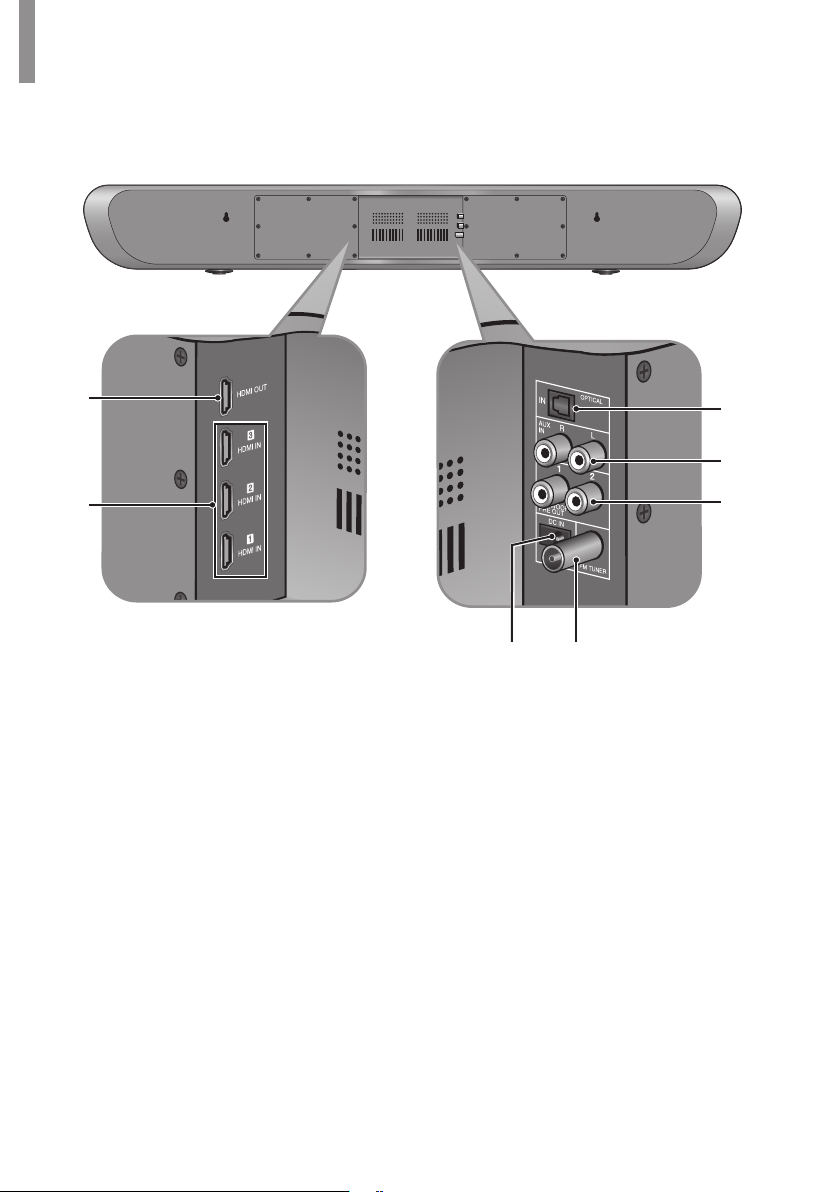
Rear Panel
1
2
HDMI OUT
1
See page 12.
HDMI IN 1/2/3
2
See page 12.
DC IN
3
See page 15.
FM TUNER (Only for S9)
4
See page 15.
7
6
5
3 4
SUBWOOFER PRE OUT 1/2
5
See page 12.
AUX IN R/L
6
See page 14.
OPTICAL IN
7
See page 14.
8
Remote Control
1 11
2
3
4
5
10
9
8
7
6
Getting Started
SETUP
1
2
3
4
(
5
(
/ (
6
7
/ / /
8
9
10
11
Enters or exits the system setup menu.
SURROUND
Selects surround mode.
DISPLAY
Displays the current status of the main unit.
MUTE
Mutes or activates the sound.
Starts or pauses playback.
SEARCH.M
Searches FM tuner stations.
USB
Stops playback.
MO/ST
Toggles between FM stereo and mono modes.
Skips to the next or returns to the previous le
or track.
REPEAT
Selects a repeat function.
RANDOM
Selects random playback.
SLEEP
Sets a certain period of time for the main unit
to be turned off.
DIMMER
Dims or brightens the display panel.
•Selects a le, folder, or track for music les.
•Selects a setting option or menu.
TUNE +/ TUNE -
Tunes to a desired FM station.
PRESET -/PRESET +
Selects a preset FM station.
ENTER/MEMO
•Conrms the selection.
•Stores a preset station.
VOLUME
Adjusts the volume level.
INPUT SELECT
Selects an input source for play back.
ON/STANDBY
Turns on the main unit or turn off to normal
standby mode.
USB
)
(
)
(
FM TUNER
FM TUNER
)
USB
(
)
USB
(
)
USB
)
)
English
9
 Loading...