


FISC CDM
Network Ready CD Mirror Server
User’s Manual
Version 1.03
Part Number : 505115.0010.00


Important Notice
Trademarks
FISC CDM and Ingrasys are trademarks of Ingrasys Technology Inc.
Microsoft® is a registered trademark.
DOS, Windows 95, Windows 98 and Windows NT are the registered
trademarks of Microsoft Corporation.
NetWare is the registered trademarks of Novell Inc.
MediaGXi™ is the trademark of Cyrix Corporation, USA
All other company and product names are trademarks of their respective
owners.
Licensing
No part of this publication may be reproduced, transmitted, transcribed,
stored in a retrieval system or translated into any languages in any
forms or by any means without prior written permission from Ingrasys
Technology Inc.
Disclaimer
Ingrasys makes no representations or warranties with respect to the
contents of this publication and specifically disclaims any implied
warranties, merchantability, or fitness for any particular purpose.
Ingrasys reserves the right to revise this publication without notice.
Copyright © 1999,2000 Ingrasys Technology Inc. All rights reserved.
First Edition, June, 1999
Printed in Taiwan
(this manual is intended for FISC CDM firmware 3.30 and beyond)

The FISC CDM User’s Manual
ii
Electronic Emission Notice
Federal Communications Commission (FCC)
This equipment has been tested and found to co mply with the limits for
a Class B digital device, pursuant to Part 15 of the FCC Rules. These
limits are designed to provide reasonable protection against harmful
interference when the equipment is operated in a residential
environment.
CE Notice
This device complies with the EMC directive of the European
Community and meets or exceeds the following technical standard:
• EN 55022 ~ “Limits and Methods of Measurement of Radio
interference Characteristics of information Technology
Equipment.” This device complies with CISPR Cla ss B
standard.
• EN 50082-1 ~ “Electromagnetic compatibility – Generic
immunity standard Part1: Residential, and light industry.”
• ICE 801-2 ~ “Electromagnetic compatibility for industrial-
process measurement and control equipment Part2: Electrostatic
discharge requirements” – Severity level 3.
• ICE 801-3 ~ “Electromagnetic compatibility for industrial-
process measurement and control equipment Part3: Radiated
electromagnetic field requirements.” – Severity level 2.
• ICE 804-4 ~ “Electromagnetic compatibility for industrial-
process measurement and control equipment Part4: Electrical
fast transient/burst requirements. “ – Severity level 2.

Introduction
iii
Safety Information
• To reduce the risk of fire or electric shock, install the unit in a
temperature-controlled indoor area free of conductive
contaminants. Do not place the unit near liquids or in an
excessivel y humid e nvir on me nt .
• Do not allow liquids or foreign objects to enter the unit.
• All servicing of this equipment must be performed by qualified
service perso nnel. Remove rings, watche s and other jewelry
before servicing the unit.
• Before maintenance, repair or shipment, the unit must be
completely switched off and unplugged and all connections
must be removed.

The FISC CDM User’s Manual
iv
About This Manual
This User Manua l de scrib es yo ur FI SC CDM ne twor k-re ad y CD Mir ror
Server and explains how to install and begin to use it. Separate chapters
in the manual cover the following topics:
Chapter 1
Introduction
Describes the FISC CDM and lists
all of its functions and features
Chapter 2
Getting Started
Explains how to install your FISC
CDM and how to start using it.
Chapter 3
Configuration & Management
of FISC CDM
Explains the configuration and
management of your FISC CDM
and how to enable your FISC
CDM to operate correctly
Chapter 4
Using FISC CDM on Client
Workstations
Explains how to enable client
workstations to access your FISC
CDM
Appendix A
Technical Specifications
Describes the technical
specifications of the FISC CDM
Appendix B
LED Indicators
Explains the meaning of the FISC
CDM LED codes.
Appendix C
Jumper Settings and
Connectors
Demonstrates the settings of the
jumpers and connectors on the
FISC CDM main board
Conventions
The following icons are for drawing your attention to advisory
messages.
Caution!
Ignoring this information could result in personal
injury.
Ignoring this information could result in loss of
data or harm to your equipment.
Importa nt!
These notes contain remarks, tips and other
useful supplementary information.

Introduction
v
Abbreviations
The following abbreviations are used in this manual:
BOOTP
Bootstrap Protocol
CD
Compact Disc
CIFS
Common Internet File System
DHCP
Dynamic Host Configuration Protocol
DMA
Direct Memory Access
DVD
Digital Versatile Disc
EDO
Extended Data Out
HTTP
Hyper Text Transport Protocol
IDE
Integrated Drive Electronics
IP
Internet Protocol
LED
Light Emitting Diode
MAC
Media Access Control
MB
Mega Byte
Mbps
Mega Bit Per Second
MHz
Mega Hertz
NCP
NetWare Core Protocol
NFS
Network Files System
RARP
Reverse Address Resolution Protocol
SIMM
Single In-line Memory Module
SMB
Server Message Block
TCP
Transmission Control Protocol
URL
Universal Resource Locator
UTP
Unshielded Twisted Pair
WINS
Windows Internet Naming Service

The FISC CDM User’s Manual
vi
Table of Contents
Chapter 1 .........................................................................................................1
About FISC CDM........................................................................................1
Chapter 2 .........................................................................................................3
Unpacking your FISC CDM Package.......................................................... 3
Site Considerations......................................................................................3
Installing FISC CDM into a Tower.............................................................4
SIMM Installation and Removal..................................................................6
Connecting CD-ROM Drives...................................................................... 8
Connecting Power to the FISC CDM Tower............................................. 10
Connecting FISC CDM to the Network ....................................................11
Chapter 3 .......................................................................................................12
First-time Setup .........................................................................................12
ROM-based IP Manager............................................................................12
Changing the TCP/IP Address of Your PC................................................16
Managing FISC CDM through Web Browsers..........................................19
CD-ROM List............................................................................................20
Server Setting Menu..................................................................................22
Share Control Menu...................................................................................26
Please select Physical Share device.......................................................26
Physical Share Menu.............................................................................26
Please select Virtual Share: ...................................................................29
Virtual Share Menu ...............................................................................29
User Level Security: add/delete users....................................................32
Configuration Menu ..................................................................................33
More IP Addresses.....................................................................................38
Statistics.....................................................................................................40
Maintenance...............................................................................................41
Help ...........................................................................................................46
How to Configure User Level Security .....................................................47
Configure as User Level Security..........................................................47
Create User Database.............................................................................51
Assign User Access Rights....................................................................55
Details of NFS Access Rights................................................................58
How to Configure and Create CD Images.................................................60
Chapter 4 .......................................................................................................67
Ins talli n g S o f t w are C ompon ents i n W indow s 9 5 / 9 8.....................................67
Using FISC CDM in Windows 95/98........................................................69
Ins talli n g S o f tware C o m p o nents in W indow s N T.........................................71
Using the FISC CDM in Windows NT......................................................73
Ins tall ing Software Components in Wi ndows fo r Wor kgro ups.....................73
Using FISC C DM under W indows for Workgroups.....................................74
Using FISC CDM under DOS with Microso ft N etwork Clien t 3.0 ................76
Using FISC CDM under OS/2 Warp 3.0...................................................77

Introduction
vii
Using FISC CDM under Novell NetWare Clients.....................................78
Volume / Directory Structure for NetWare ...........................................79
Security Management for NetWare....................................................... 80
Configuring Clients and Protocols for NetWare Clients .......................81
Using FISC CDM under NFS Clients........................................................92
How to use FISC CDM under NFS Clients...........................................92
Appendix A ...................................................................................................95
Technical Specifications............................................................................95
Appendix B....................................................................................................97
Description of LED Indicators...................................................................97
Diagram of Front Panel .........................................................................97
Appendix C....................................................................................................99
Jumpers......................................................................................................99
Connectors...............................................................................................100

The FISC CDM User’s Manual
viii
—This page intentionally left blank—

C
HAPTER
1
IInnttrroodduuccttiioonn
AAbboouutt FFIISSCC CCDDMM
Thank you for choo sing the FISC CDM network-re ady CD Mirror
Server. The FISC CDM is the only stand-alone CD Mirror Server in
the world that is able to adopt the latest technological advances
developed in PC industry. The FISC CDM uses standardized
components and the latest advances in CD-ROM architecture to
achieve the highest cost-performance available in the market.
The FISC CDM Network Ready CD Mirror Server comes with the
following features:
• Massive
- Hosts up to 640 CD images
- Single CD image size is up to 4 GB
• Multimedia
- Sustains over 20 MPEG-I video playback without gaps and
jitters
- Supports multimedia title formats like DVD Video, Audio
CD, and Video CD
• Mighty
- Pumps over 7MB per second to network, 3 to 5 times faster
than competitors
• Manageable
- Identifies duplicate CD images automatically
- All administration job s are done through WWW browsers
The FISC CDM deploys a Cyrix Media GX CPU, a Fast-Ethernet
network interface, PCI bus-mastering technology, embedded
network file sharing and network transport system, a real-time OS
and intelligent cache system into one highly integrated sing le board
controller. FISC CDM is definitely your best choice for CD-ROM
networking!

The FISC CDM User’s Manual
2
—This page intentionally left blank—

C
HAPTER
2
GGeettttiinngg SSttaarrtteedd
UUnnppaacckkiinngg yyoouurr FFIISSCC CCDDMM PPaacckkaaggee
Please unpack your FISC CDM package carefully and verify that
you receive the following components:
• One FISC CDM Controller
• One Network Connection Board
• One floppy disk containing the Remote Mirror Utility
• One UTP cable
• Four IDE flat cables
• Four short screws (for the FISC CDM controller)
• Two screws (for Network Connection Board)
• Three jumpers
• This User’s Manual
If any of the components is damaged or missing, please contact your
dealer.
This list does not apply if you bought a complete
system from your FISC CDM dealer.
SSiittee CCoonnssiiddeerraattiioonnss
Before installing the FISC CDM, prepare a suitable workplace.
Select a clean installation operation site that meets the temperature
and humidity requirement listed in Appendix A — Technical
Specifications.

The FISC CDM User’s Manual
4
IInnssttaalllliinngg FFIISSCC CCDDMM iinnttoo aa TToowweerr
Since FISC CDM is equipped with 4 IDE channels that can host 8
EIDE HD or CD-ROM drives, you might use 9-bay tower cases. If
you purchase a FISC CDM Tower, the FISC CDM controller has
already been properly pre-installed into the bay in the center of the
tower while the IDE flat cables have also been plugged onto the
FISC CDM controller. All you have to do is to co nnect your EIDE
HD or CD-ROM drives to the IDE cables. Please refer to page 8 —
Connecting CD-ROM Drives.
For instructions on installing the FISC CDM into a third party 9-bay
tower case, please refer to the power and fan requirements stated in
Appendix A — Technical Specifications and the following
installation steps.
Cauti on!
In order to avoid the possible risk of electrical shock
and any other injury, please disconnect the power
before installation.
1. Remove the screws at the rear of the tower that secure the
cover of the tower to the tower chassis. Remove the cover
of the tower.
2. Slide the FISC CDM controller into the fifth bay (in the
center of the tower). Refer to the following illustration.
FISC CDM
Figure 2-1: Installing the FISC CDM Controller

Getting Started
5
3. Secure the FISC CDM controller to the Tower chassis with
the screws included in the package.
Please note that the length of the screws must no t
exceed 4 mm. Otherwise, the FISC CDM controller
may be damaged.
4. Connect the power cord to FISC CDM. The power
connector of the FISC CDM is a standard PC 4 pin power
supply connector (12 and 5 V DC). See Figure 2-2.
Before connecting the power cord to FISC CDM, be
aware that Pin 4 (+5V) of power cord connector is
next to UTP connector. Please refer to Appendix C
Jumper Settings and Connectors.
5. Connect one end of the supplied UTP cable to the RJ 45
connector on the FISC CDM. See Figure 2-2.
Connect
Power
Here
Connect
UTP Cable
Here
Figure 2-2: Connecting Power to the FISC CDM
6. Connect the network connection boar d to FISC CDM using
the other end of the UTP cable and then mount the
connection board on the back of the CD-ROM tower. Refer
to Figure 2-3.

The FISC CDM User’s Manual
6
Network
Connection
Board
UTP
Cable
Figure 2-3: Connecting the Network Connection Board
The ideal air flow circulation of a FISC CDM to wer is
through the front of the tower to the rear. Therefore,
the front panel of FISC CDM must not be blocked or
shielded. If you are using a tower with a front door,
the tower must have ventilation holes on b oth sides of
the door.
SSIIMMMM IInnssttaallllaattiioonn aanndd RReemmoovvaall
In addition to the on-board 8MB of RAM, the FISC CD M comes
with two SIMM sockets, which allow you to increase the total
memory capacity. Use standard 8MB, 16MB or 32MB EDO SIMM
modules to upgrade the memory of the FISC CDM.
Installing a SIMM
1. Remove the four screws that secure the top cover of the
FISC CDM. Remove the top cover.
2. Locate the 72-pin SIMM sockets.
3. Firmly insert the module into the socket at an angle as in
Figure 2-4, #1. Make sure that the SIMM is seated evenly.
4. Press the top edge of the SIMM module in the direction of
#2 in the illustration until the retaining latches click into
place. Refer to the following illustration:

Getting Started
7
Push these tabs
In the direc tion o f the a rrow s
1
2
F
ront View
Side View
Figure 2-4: Installing a SIMM Module
Removing a SIMM Module
1. Gently push the retaining latches outwards and carefully but
firmly pull the module in the opposite direction of #2 in
Figure 2-4.
2. Remove the module from the socket.
Memory Upgrade Path
Upgrade Path Total Memory On Board Socket 1 Socket 2
1 8MB 8MB 0 0
2 24MB 8MB 8MB 8MB
3 40MB 8MB 16MB 16MB
4 72MB 8MB 32MB 32MB

The FISC CDM User’s Manual
8
CCoonnnneeccttiinngg CCDD--RROOMM DDrriivveess
A single FISC CDM can host up to 8 EIDE HD or CD-ROM drives
using the 4 IDE flat cables which are included in your FISC CDM
package.
To comply with ATA-4 specification, the following
restrictions should be applied to the IDE cables used
with the FISC CDM: the total length of a single IDE
cable shall not exceed 0.46m (18 inch); and the cable
capacitance shall not exceed 35pf.
To connect IDE HD or CD-ROM drives to FISC CDM, please refer
to the following steps:
1. Connect one end of the IDE cables to the FISC CDM IDE
connectors. The 4 IDE channel numbers are indicated
besides the connectors on the main board of the FISC CDM.
Refer to Figure 2-5.
IDE Connector
Channel 2
IDE Connecto
r
Channel 1
IDE Connecto
r
Channel 4
IDE Connecto
r
Channel 3
Figure 2-5: Connecting EIDE HD or CD-ROM Drives to the FISC
CDM Controller
2. Connect the other end of the IDE cables to the IDE HD or
CD-ROM drives.
3. The HD or CD-ROM drives which are going to be installed
in the 1
st
and 2nd bays should be connected to IDE Channel 1;
the 3
rd
and 4th bays should be connected to IDE Channel 2;
the 6
th
and 7th bays to IDE Channel 3; and the 8th and 9th to
IDE Channel 4. Refer to Figure 2-6 and the following table
for drive and channel configuration:

Getting Started
9
IDE Channel Configuration
BAY IDE Channel
1 and 2 Connect to channel 1
3 and 4 Connect to channel 2
6 and 7 Connect to channel 3
8 and 9 Connect to channel 4
IDE ch1
IDE ch2
IDE ch3
IDE ch4
Ch 2
Ch 4
Ch 1
Ch 3
Upper view of FISC CDM
Side view of FISC CDM
UTP Cable
FISC CDM
Controller
IDE
Cable
LAN port
Network
connection
board
Power Supply
Master
Slave
Master
Slave
Master
Slave
Master
Slave
Figure 2-6: IDE Channel Connections
Importa nt!
We recommend you use IDE CD-ROM drives that
have passed our compatibility test listed in the
“CD-ROM Drive Compatibility Sheet” (available
from your dealer) with the FISC CDM controller.

The FISC CDM User’s Manual
10
CCoonnnneeccttiinngg PPoowweerr ttoo tthhee FFIISSCC CCDDMM TToowweerr
Now you can connect power and your computer or Network hub to
the FISC CDM tower. Please refer to the illustration and
instructions below:
1. Connect the female end of the supplied power cable to the
socket at the rear of the FISC CDM tower. Refer to Figure
2-7.
2. Connect the male end of the power cable to a convenient
grounded wall soc ket .
3. Connect the UTP Network Cable to the LAN port at the rear
of the tower. Refer to Figure 2-7.
Connect AC Power Here
Connect the UTP
Network Cable Here
Power On/Off
Switch
Figure 2-7: Connecting Power to the FISC CDM Tower

Getting Started
11
Importa nt!
The best kind of AC power source to connect to
the FISC CDM tower is a UPS (Uninterrup tible
Power Supply). Lacking this, use a power strip
with a built-in surge protector. Do not use
inferior extension cords as this may result in
damage to your FISC CDM.
CCoonnnneeccttiinngg FFIISSCC CCDDMM ttoo tthhee NNeettwwoorrkk
To connect the FISC CDM to your network, please refer to the
following steps:
1. Connect the UTP network cable to your hub or switching
hub. You can use a 10Mbps, 100Mbps or auto-sensing hub;
the FISC CDM will adjust itself automatically.
2. Turn on the power. The POWER, FAULT and LAN LED
indicators will be lit for a short time (about 1 sec) during
early POST (Power-On Self Test). Then the Power LED
will flash to indicate that a POST (Power-On Self Test) is
still running. After the POST is completed, the system will
begin to mount the installed HD and CD-ROM drives. The
FISC CDM is ready for use after all drives are mounted.
For further information about POST statuses and the
meanings of LED codes, please refer to Appendix B —
LED Indicators.
This concludes Chapter Two. Chapter Three covers how to
configure and manage FISC CDM.

C
HAPTER
3
CCoonnffiigguurraattiioonn aanndd MMaannaaggeemmeenntt
This chapter presents easy-to-follow instructions to configure and manage
your FISC CDM using Internet Web browsers. Configuration and changes of
all the parameters of FISC CDM are done through your Web browser.
FFiirrsstt--ttiimmee SSeettuupp
Before you access FISC CDM using your Web browser, please ensure that
the FISC CDM is properly installed and configured with a valid IP address.
There are two ways to configure the IP address of FISC CDM: through the
ROM-based IP Manager or by changing the TCP/IP address of your PC.
RROOMM--bbaasseedd IIPP MMaannaaggeerr
The ROM-based IP Manager is a Win32 program that is stored in
the flash ROM of the FISC CDM for the convenience of setting up
the FISC CDM under the Windows 95/98 and Windows NT
environments.
Before you can use the ROM-based IP Manager to change the
installed IP address of the FISC CDM, you must ensure that the
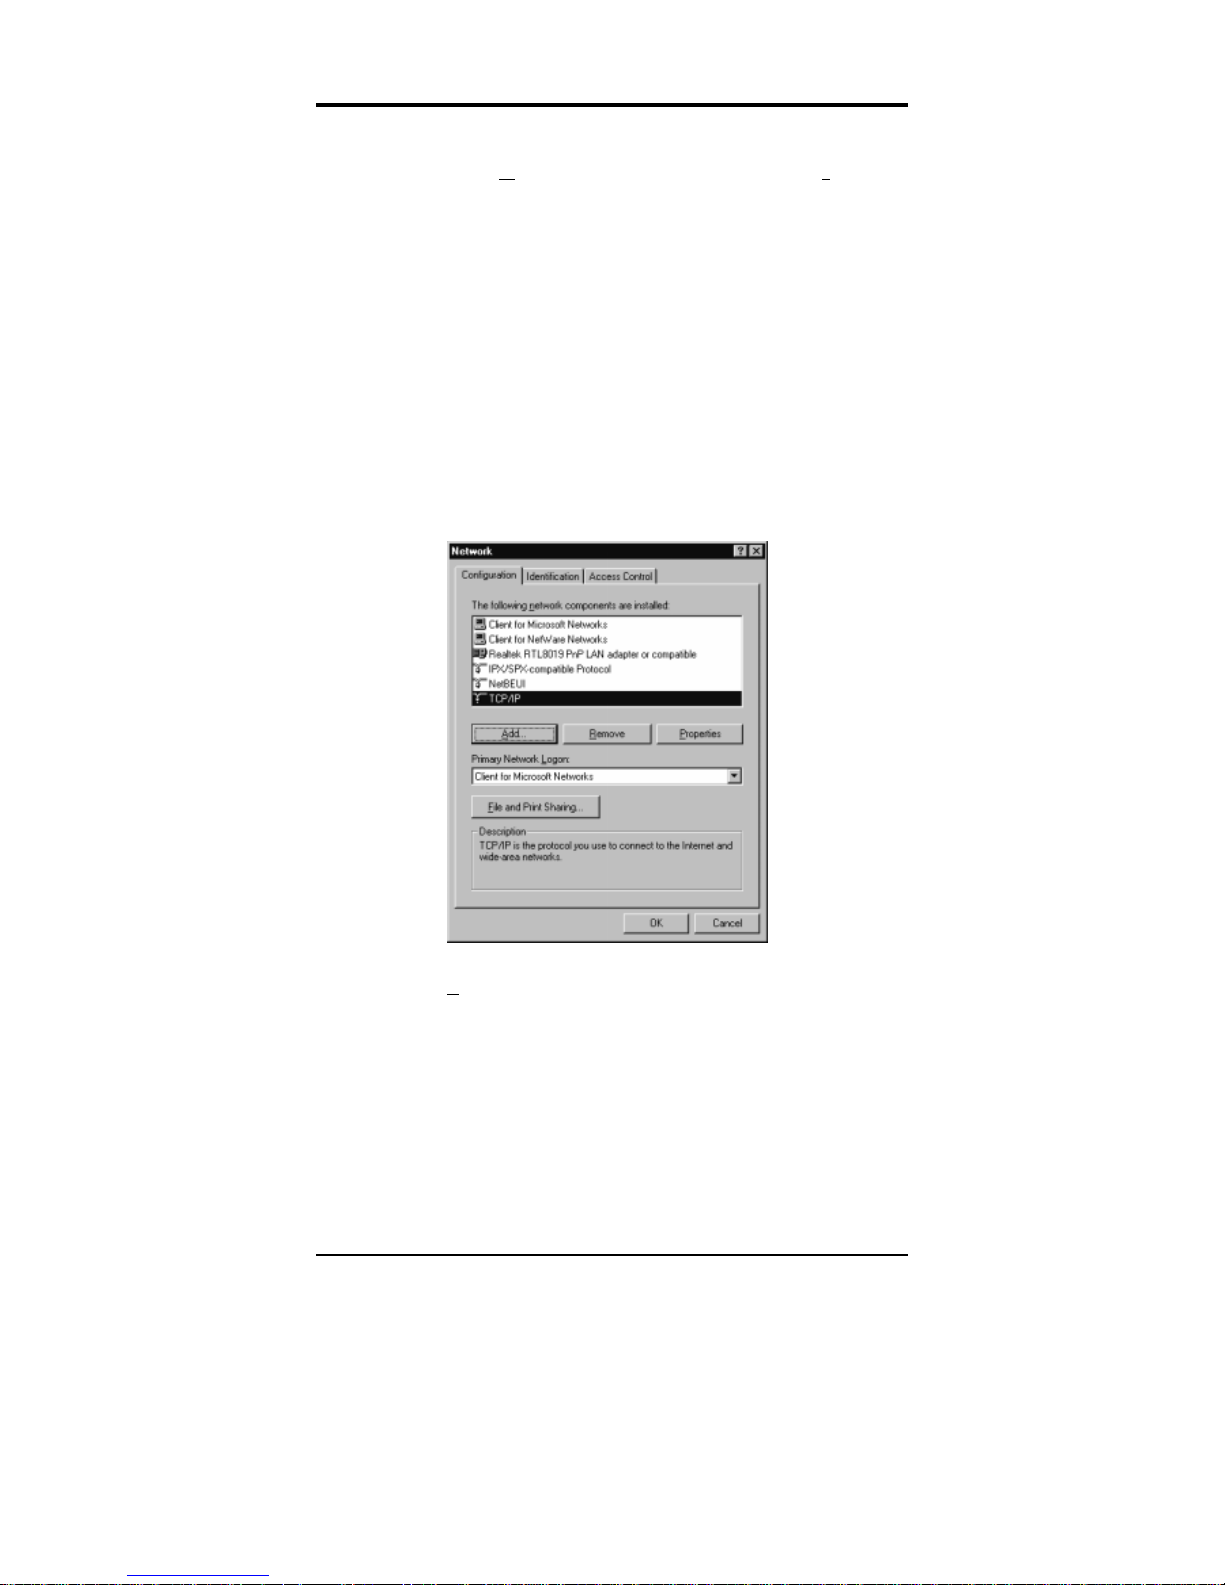
Microsoft NetBEUI protocol is activated. Please follow these steps:
1. Open the Windows Control Panel and double click the
Network icon. The following window opens:

Configuration and Management
13
2. If the NetBEUI protocol is not listed click the Add button to
open the Select Network Component Type window:
3. Select the Protocol network component and then click A
dd.
The following window opens:
4. Under M
anufacturers: select Microsoft. Under Network
Protocols: select NetBEUI. Insert your Windows 95/98
CD-ROM into the CD-ROM drive if necessary, and click
OK.
5. Windows will copy files to your hard disk drive and install
the NetBEUI protocol.
Now you can configure the IP address for the FISC CDM.
1. Connect your FISC CDM to a Microsoft network where the
NetBEUI protocol is activated and turn on the power.
2. Select a PC (running Windows 95/98 or Windows NT) that
is physically connected to the same network segment as the
FISC CDM.
3. Please go to “Network Neighborhood” of this PC and
browse the network by double clicking "Entire Network".
You will find a new workgroup in the name "Workgroup".
Please browse this workgroup and you will find FISC CDM
in the name of “SMBxxxxxxxx” where xxxxxxxx are the
last 8 digits of FISC CDM’s MAC (Media Access Control)
address.

The FISC CDM User’s Manual
14
4. Enter the FISC CDM directories by double clicking
“SMBxxxxxxxx”. Locate the directory named “root” under
FISC CDM.
5. Double click "root" and locate the execution file
"svrsetup.exe". "svrsetup.exe" is the FISC CDM IP Manager
/ Server Setup Program.
6. Double click "svrsetup.exe" to run the Server Setup program.
The “Found Servers on LAN” window will pop up.
Available FIS C CDM servers o n your network and relating
MAC addresses (Ethernet Address) and IP addresses will b e
detected and shown in the window. Click the “Browse”.
button to browse the content of the selected FISC CDM
server. Click the “Search Again” button to search again for
available FISC CDM servers on LAN.

Configuration and Management
15
7. Select the FISC CDM you want to configure and click the
icon “Setup.” A Setup window will pop-up.
8. You will then be able to configure the FISC CDM’s Server
Name, Group/Domain Name, TCP/IP, IP Address, Subnet
Mask and Gateway Address. Please refer to Server Setting
Menu and Configuration Menu later in this chapter for
detailed description of these parameters.
9. Acquire a valid IP address, the IP subnet mask, and the
gateway IP address from your network a dministrator for the
FISC CDM and fill in the appropriate boxes in this setup
window.
10. After setting up the parameters above and restarting your
FISC CDM, you will be able to access the FISC CDM
server via your Web browsers.
Importa nt!
1. Please let the FISC CDM restart itself in
order to effect your setup changes.
2. Please configure your preferred
administration password right away so that
your FISC CDM ROM- based IP Manager
program can be password-protected to avoid
unauthorized changes to the server settings.

The FISC CDM User’s Manual
16
CChhaannggiinngg tthhee TTCCPP//IIPP AAddddrreessss ooff YYoouurr PPCC
This section illustrates how to access the FISC CDM by changing
the TCP/IP address of an existing PC. You must first ensure that the
TCP/IP protocol is installed on your system. Please follow these
instructions to install the TCP/IP protoco l on your system:
1. Open the Windows Control Panel and double click the
Network icon. The following window opens:
2. If the TCP/IP protocol is not listed click the A
dd button to
open the Select Network Component Type window:
3. Select the Protocol network component and then click A
dd.
The following window opens:
Configuration and Management
17
4. Under Manufacturers: select Microsoft. Under Network
Protocols: select TCP/IP. Insert your Windows 95/98 CDROM into the CD-ROM drive and click OK.
5. Windows will copy the appropriate files to your hard disk
drive and install the TCP/IP protocol.
Next, you need to change the IP address of your PC in order to
configure the FISC CDM.
1. Select a PC (running Windows 95/98 or Windows NT) that
is physically connected to the same network segment as the
FISC CDM.
2. Make sure the TCP/IP protocol of this PC is installed and
activated successfully.
3. Open the Control Panel and double click the Network icon
to open the Network dialog box:
4. In the installed protocols window, select TCP/IP and click
P
roperties. The TCP/IP Properties window will open:

The FISC CDM User’s Manual
18
5. Click the IP Address tab. Click the radio button next to
S
pecify an IP address. In the IP Address field enter the IP
address “192.168.1.2”. In the Su
bnet Mask field enter
“255.255.255.0”. Click OK to enter the changes and return
to the Network dialog box. Click OK to exit the Network
dialog box. You will be prompted to restart your computer.
6. Click Y
es to restart the computer and complete changes to
the system settings.
Since the default IP address of FISC CDM is “192.168.1.1”, this
procedure will put the local PC and the FISC CDM on the same net.
You will be able to access FISC CDM via Web browsers after the
changes have been made. Please follow these instructions to access
the FISC CDM via Netscape Navigator 2.0 or later, or Microsoft
Internet Explorer 3.0 or later.
1. To access the FISC CDM using a browser, give the URL in
the browser location box as http://<FISC CDM’s IP
Address>. The default FISC CDM IP address is
“192.168.1.1”. Type http://192.168.1.1 in your browser
location box to access the FISC CDM.
Configuration and Management
19
2. For the first-time setup, you can enter the Administration
Page directly without needing to provide the password. The
default setting of FISC CDM is not password-protected.
3. Configure your preferred administration password so that
your FISC CDM Ad minist rati on P age i s pass word-p ro tecte d.
Refer to the section entitled Server Setting in this chapter.
4. Configure the Server Settings and IP address of the FISC
CDM to enable FISC CDM to be accessed by the other
client stations of your network. Please refer to the section
entitled Server Setting and Configuration Menu later in
this chapter.
MMaannaaggiinngg FFIISSCC CCDDMM tthhrroouugghh WWeebb BBrroowwsseerrss
Netscape Navigator 2.0 or later, or Microsoft Internet Explorer 3.0
or later are required for managing the FISC CDM in a Web browser.
To open the Administration Page, simply add /admin at the end of
FISC CDM’s URL or IP address (i.e., http://<FISC CDM’s IP
address>/admin) in your browser’s location box and press [Enter].
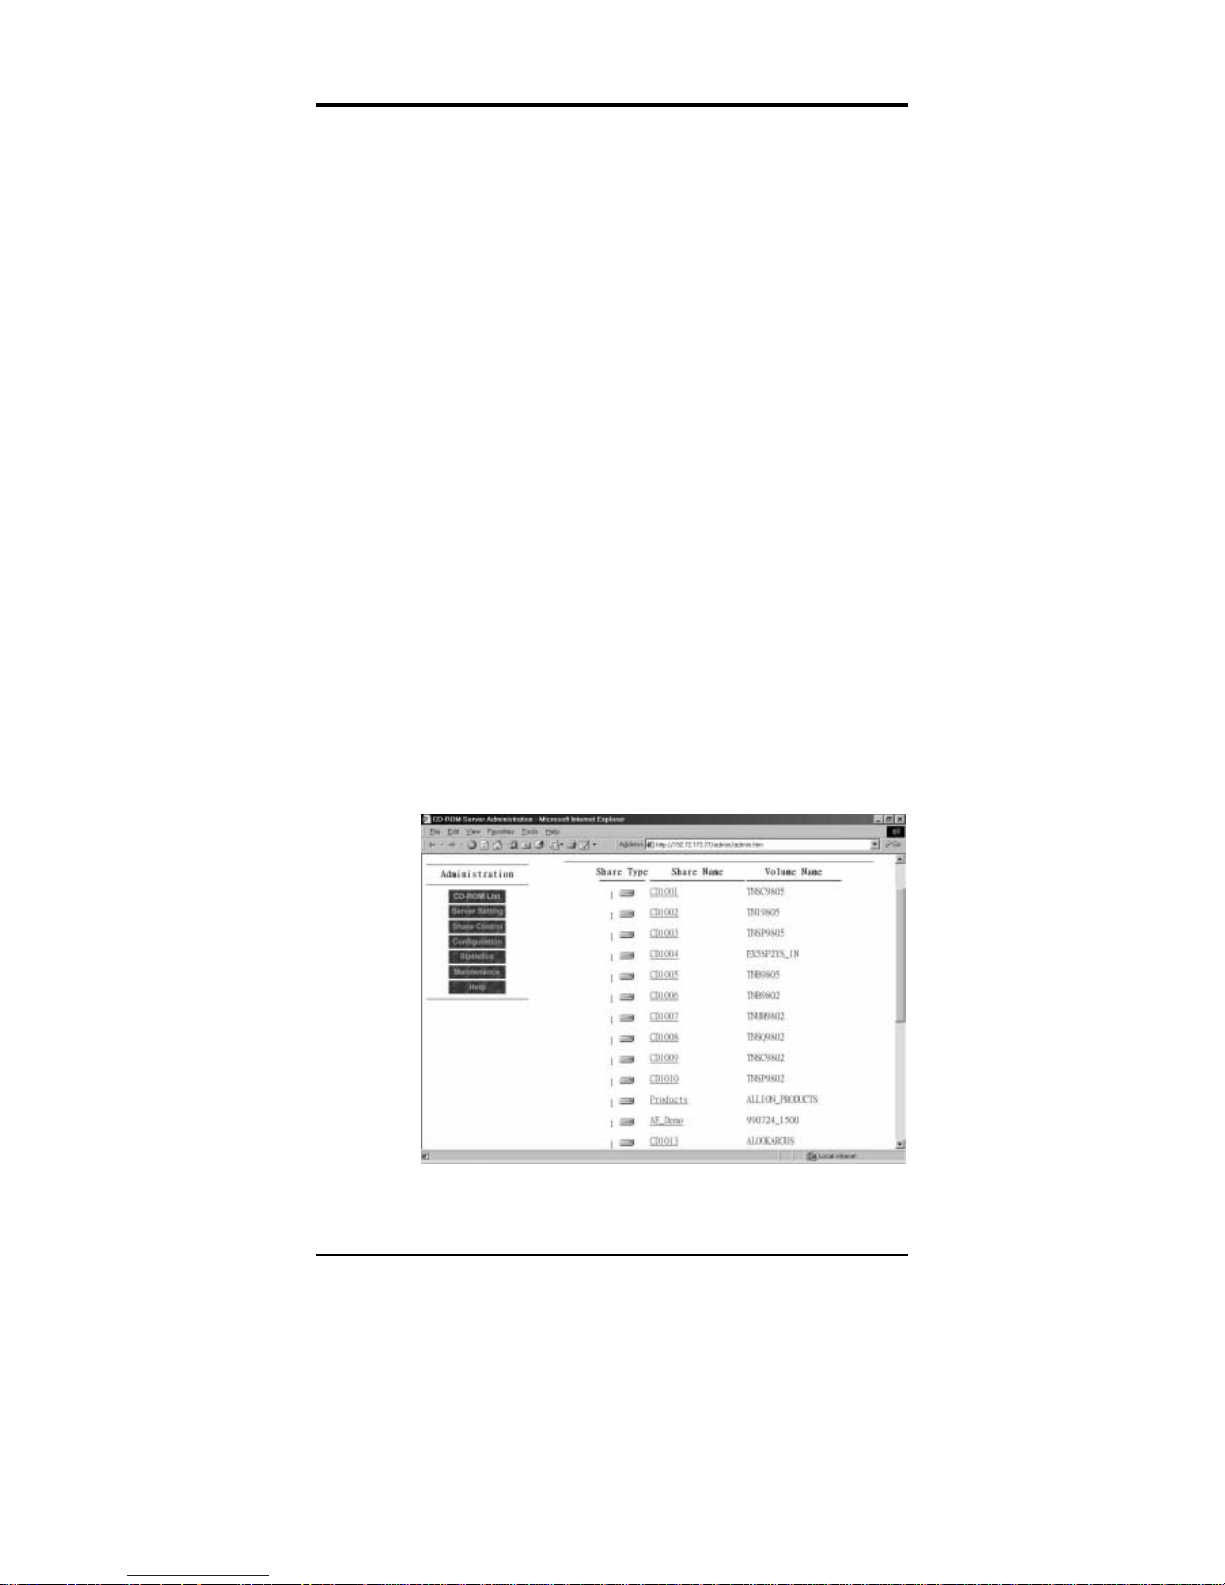
The Administration Page will appear in the browser. For example,
if the IP address of the FISC CDM you want to manage is
192.9.54.200, then the URL you have to open is
http://192.9.54.200/admin. The following illustration shows the
Administratio n page o pened wi th the defa ult FIS C CDM IP address
(192.72.173.77):
The FISC CDM User’s Manual
20
The FISC CDM Administration Page contains two windows
(frames). The left frame contains the menu of options for
administrative tasks. When you click on the menu item, the
corresponding page will appear in the right frame. Initially the right
frame contains the CD-ROM list. All the functions in this page are
self-explanatory and easy to follow.
The administration menu contains the following sub-menus:
1. CD-ROM List
2. Server Setting
3. Share Control
4. Configuration
5. Statistics
6. Maintenance
7. Help
The functions and the operation of these sub-menus are described in the
sections below.
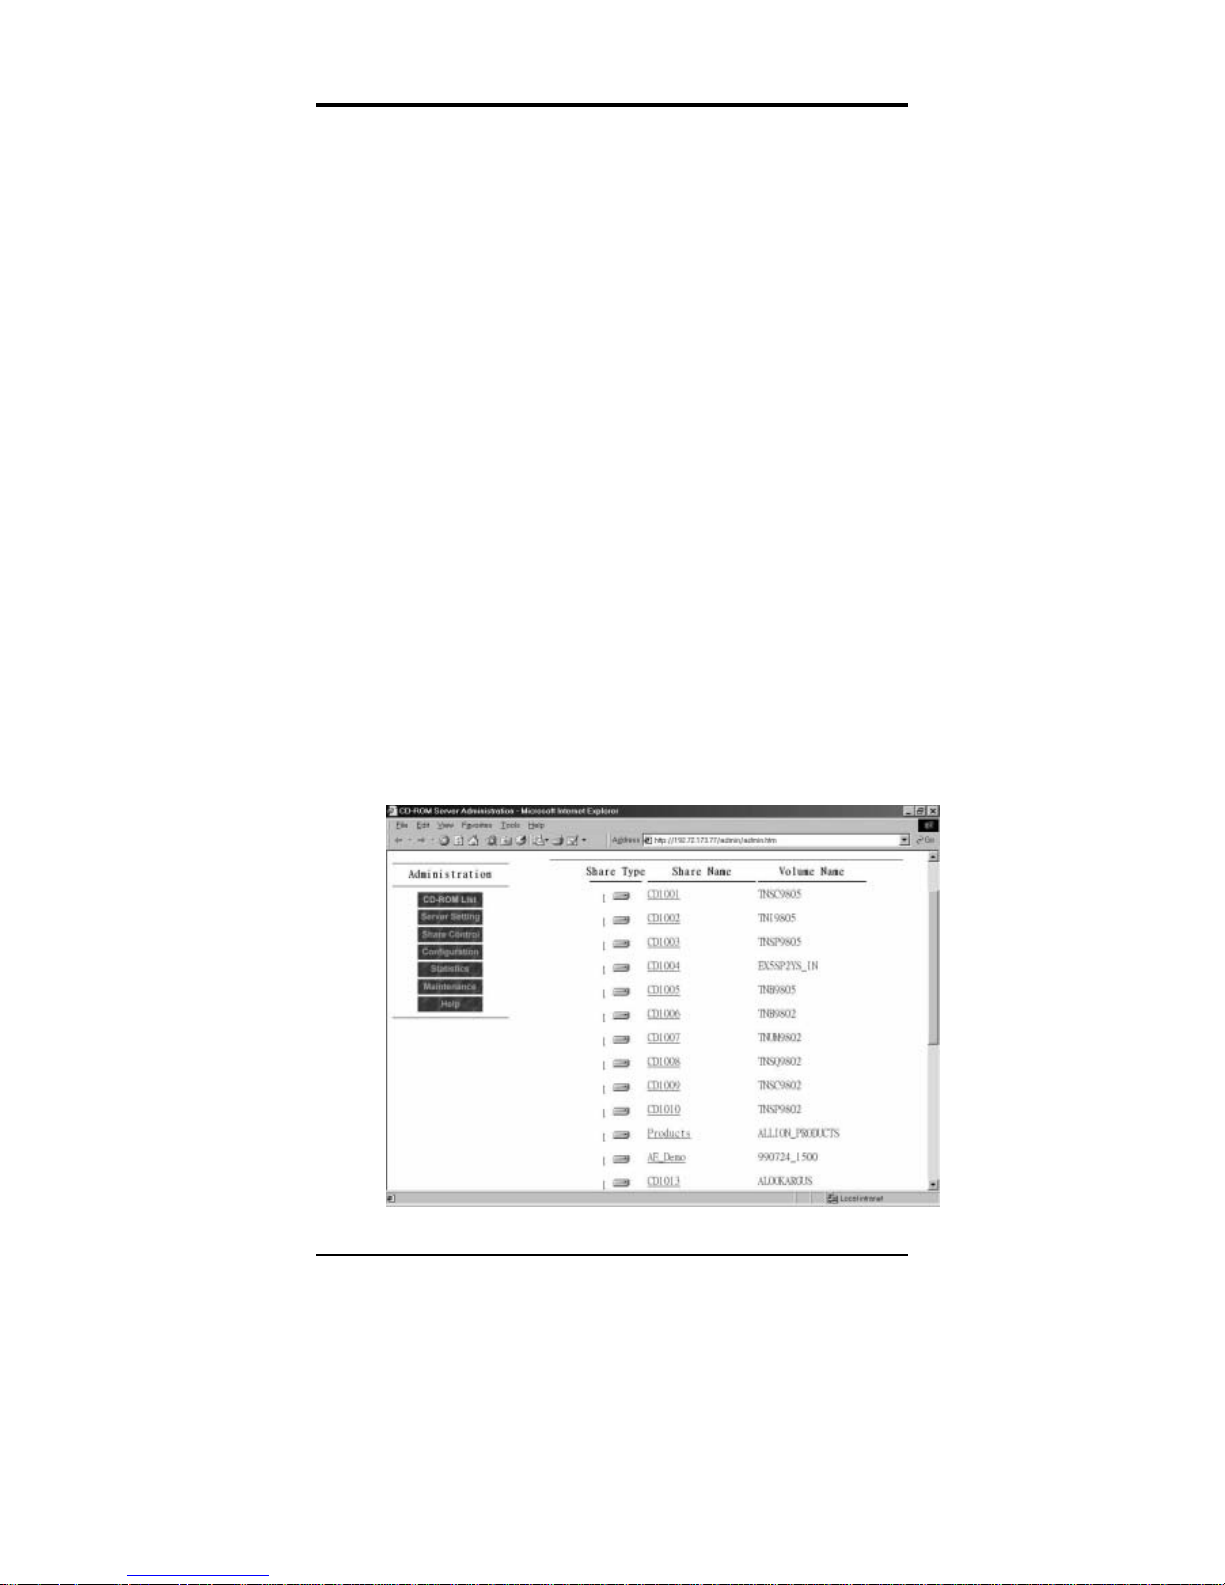
CCDD--RROOMM LLiisstt
Click the CD-ROM List button to view the currently loaded CD
Titles:
Configuration and Management
21
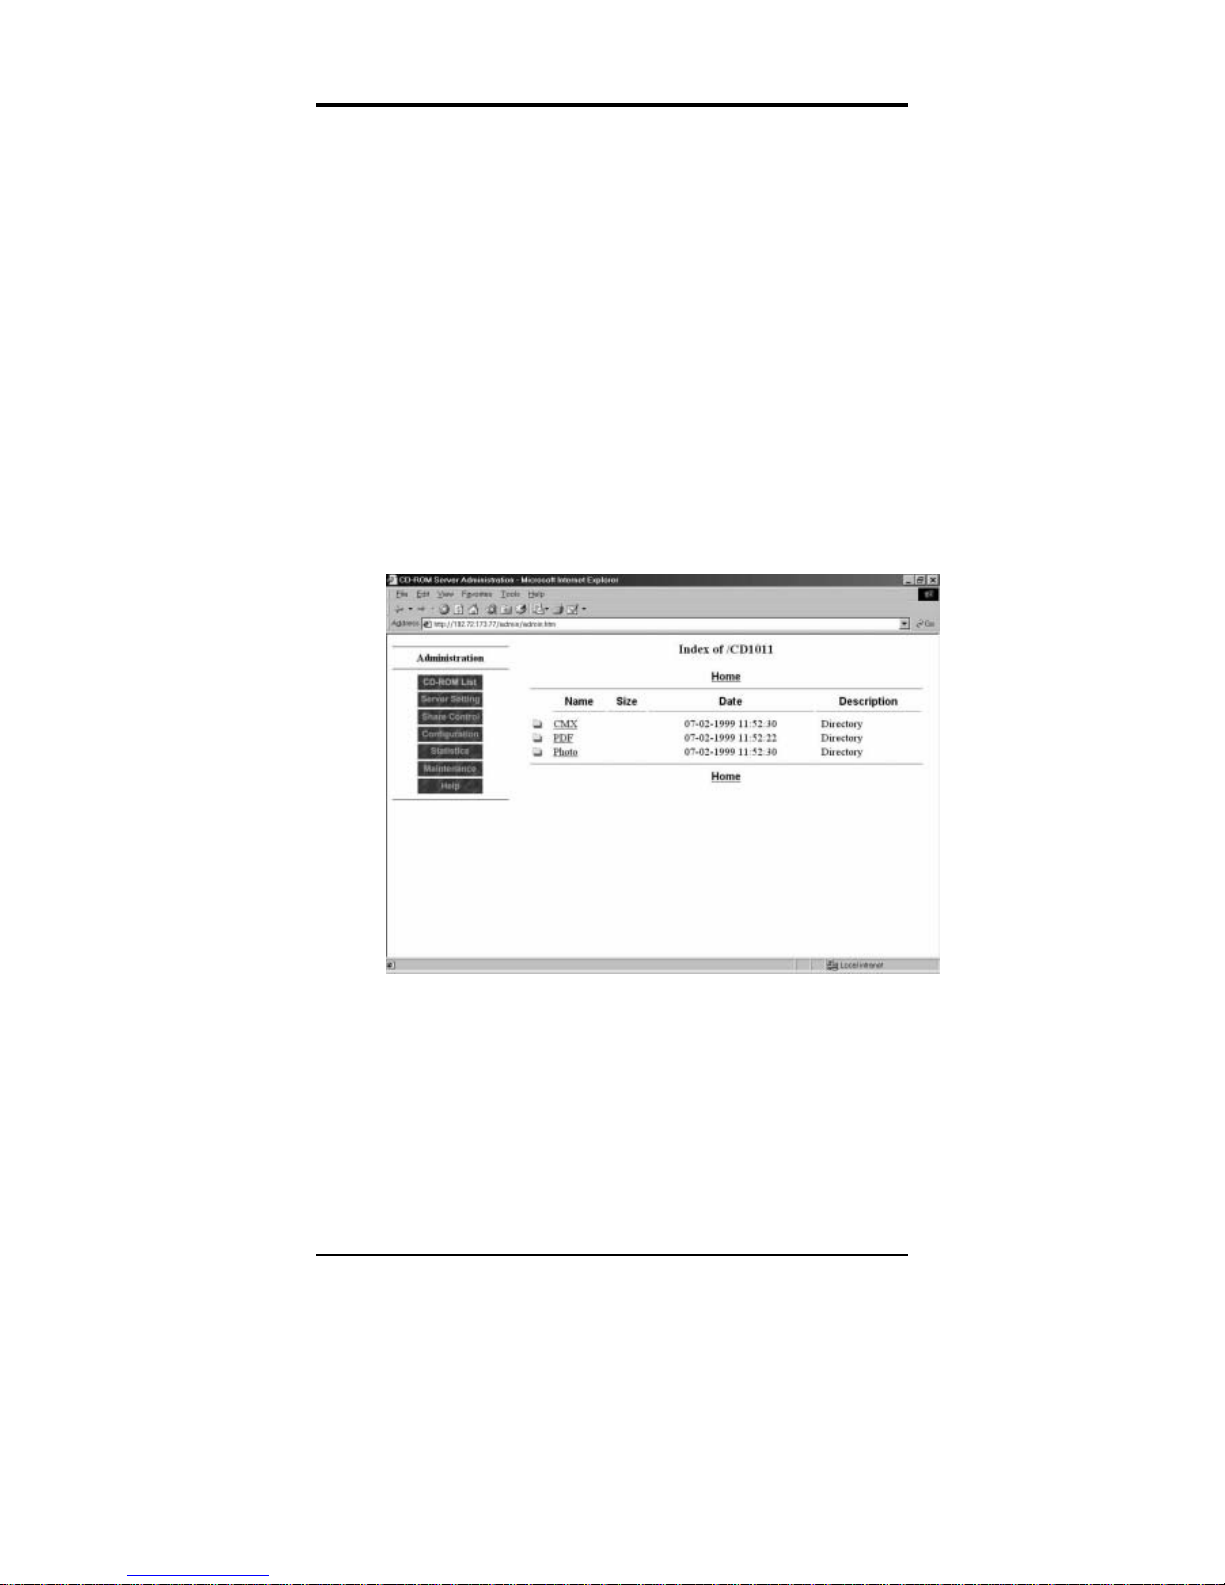
When you access FISC CDM through a Web browser, the FISC
CDM default ho me page wil l appea r, containing a l ist of CD-RO M
volumes currently present on the FISC CDM. By clicking the CDROM volume name in the list, you can browse the content of each
CD-ROM.
FISC CDM also supports CD changers. The default share name for
changer is CDX00Y where X is the drive number, the same as in the
case for CD-ROM drives; and Y is the CD number inside the
changer. For example:
"CD2001" is the first CD title inserted in the HD or the CD changer
connected as the second drive (slave) of IDE Channel 1, and
"CD2002" is the second CD title inserted in the HD or the CD
changer connected as the second drive of IDE Channel 1, and so on.
For an easy identification, CD-ROM drives, CD changers, and HD
drives are represented by different icons in the CD-ROM List page.
FISC CDM can also act as a simple Web server that can handle
requests for fi les on the CD -ROM vol umes of FI SC CDM. Refer to
the HTTP entry under Config uration Menu later in this chapter for
more details.

The FISC CDM User’s Manual
22
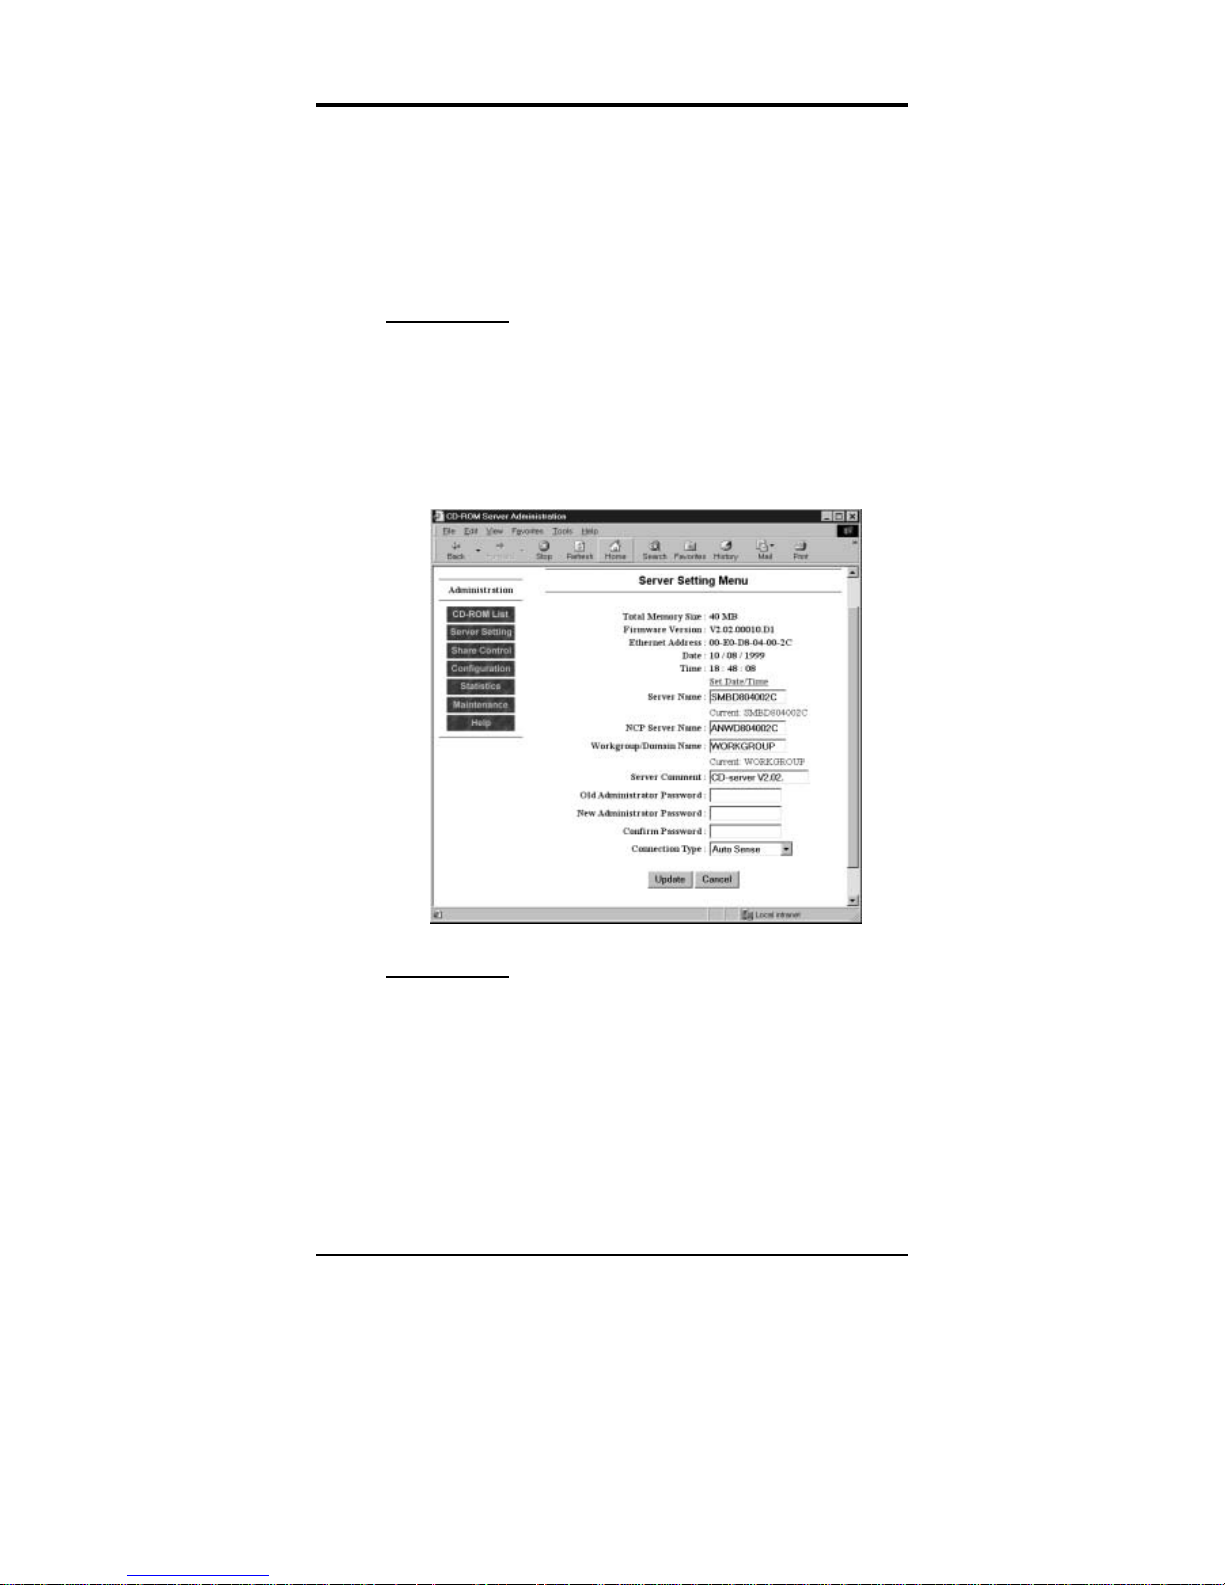
SSeerrvveerr SSeettttiinngg MMeennuu
Click the Server Setting button in the left frame. The Server Setting
Menu will appear in the right frame:
The Server Setting Menu contains the following items:
1. Total Memory Size
2. Firmware Version
3. Ethernet Address
4. Date / Time
5. Server Name
6. NCP Server Name
7. Workgroup/Domain Name
8. Server Comme nt
9. Administration Password
10. Mirror Manager Password
11. Network Connection Mode

Configuration and Management
23
Each item is described below.
Total memory size
This field shows the total memory size of the FISC CDM. The
FISC CDM has 8MB on-board memory that can be expanded up to
72MB via two SIMM slots (using two standard 32MB EDO RAM
modules).
Firmware Version
This field shows the current firmware version of the FISC CDM.
The firmware can be upgraded when a new version is released.
Detailed instructions for upgrading the firmware can be found in the
Maintenance section later in this chapter.
Ethernet Address
This field displays the MAC (Media Access Control) address of the
FISC CDM. The default server name of the FISC CDM will be
assigned based on this address.
Date / Time
These two fields show the current system date and time of the FISC
CDM. You can change the date and time by clicking the Set
Date/Time hyperlink located below the date and time fields.
Server Name
This field allows you to change the FISC CDM server name. The
default setting is SMBXXXXXXXX, where XXXXXXXX are the last
8 digits of the FISC CDM’s MAC address.
This field allows you to change the server name of the FISC CDM
that will appear on a Microsoft network. The current server name is
shown below the Server Name field.
NCP Server Name
This field allows you to change the server name of the FISC CDM
on a Novell Network. The default name is ANWXXXXXXXX where
XXXXXXXX are the last 8 digits of the FISC CDM's MAC address.

The FISC CDM User’s Manual
24
Workgroup/Domain Name
This field allows you to change the Workgroup/Domain Name that
the FISC CDM belongs to. The default Workgroup/Domain name is
Workgroup. The current Workgr oup/Do main na me is sho wn belo w
the “Workgroup/Domain Name” field.
Server Comment
The Server Comment field shows the comment displayed by
Windows Explorer or File Manager and allo ws you to change the
message. The default is no message.
Administrator Password
The FISC CDM provides administrative password-protection. The
default setting is not password -protected; you will not be asked to
provide the password when you enter the Administration Page for
the first time. However, you can configure your preferred
administrator password to prevent unauthorized access to the FISC
CDM Administra tio n Pa ge.
Please follow these instructions to set the Administration Pa ssword:
1. Type in your preferred password in the “New
Administration Password” box.
2. Type the password again in the “Confirm Password” box.
3. Click the Update button on the bottom of the page to
activate your ne w Ad mi nis tr at io n Pa ss word .
Once the password is configured successfully, you will be prompted
to enter your user name and password every time you enter the
Administratio n P age since the co nfigur atio n o f FISC CDM ca n only
be made under Administration Mode. Enter the user name as Admin
and your FISC CDM Administration Password to enter the
Administration Menu of the FISC CDM.
If you would like to change the administration Password, type in
your current password in the “Old Administration Password” box,
your new password in the “New Administration Password” and
“Confirm Password” boxes. Then click the Update button on the
bottom of this page to activate your new Administration Password.

Configuration and Management
25
Mirror Manager Password
Mirror Manager, bundled with FISC CDM, is a program that
remotely duplicates files or CD/DVDs into FISC CDM thr ough the
network. Mirror Manager prompts for a password when it tries to
write the image into FISC CDM. This is the password specified here.
Network Connection Mode
This field allows you to set the network sp eed of the FISC CDM.
The available options are Auto Sense, 100Mbps Half-Duplex or
10Mbps Half Duplex. The default setting is Auto Sense.
Importa nt!
Please click the icon "Update" on the bottom of
this page after changing the server setting
parameters in order to activate the changes you
made.

The FISC CDM User’s Manual
26
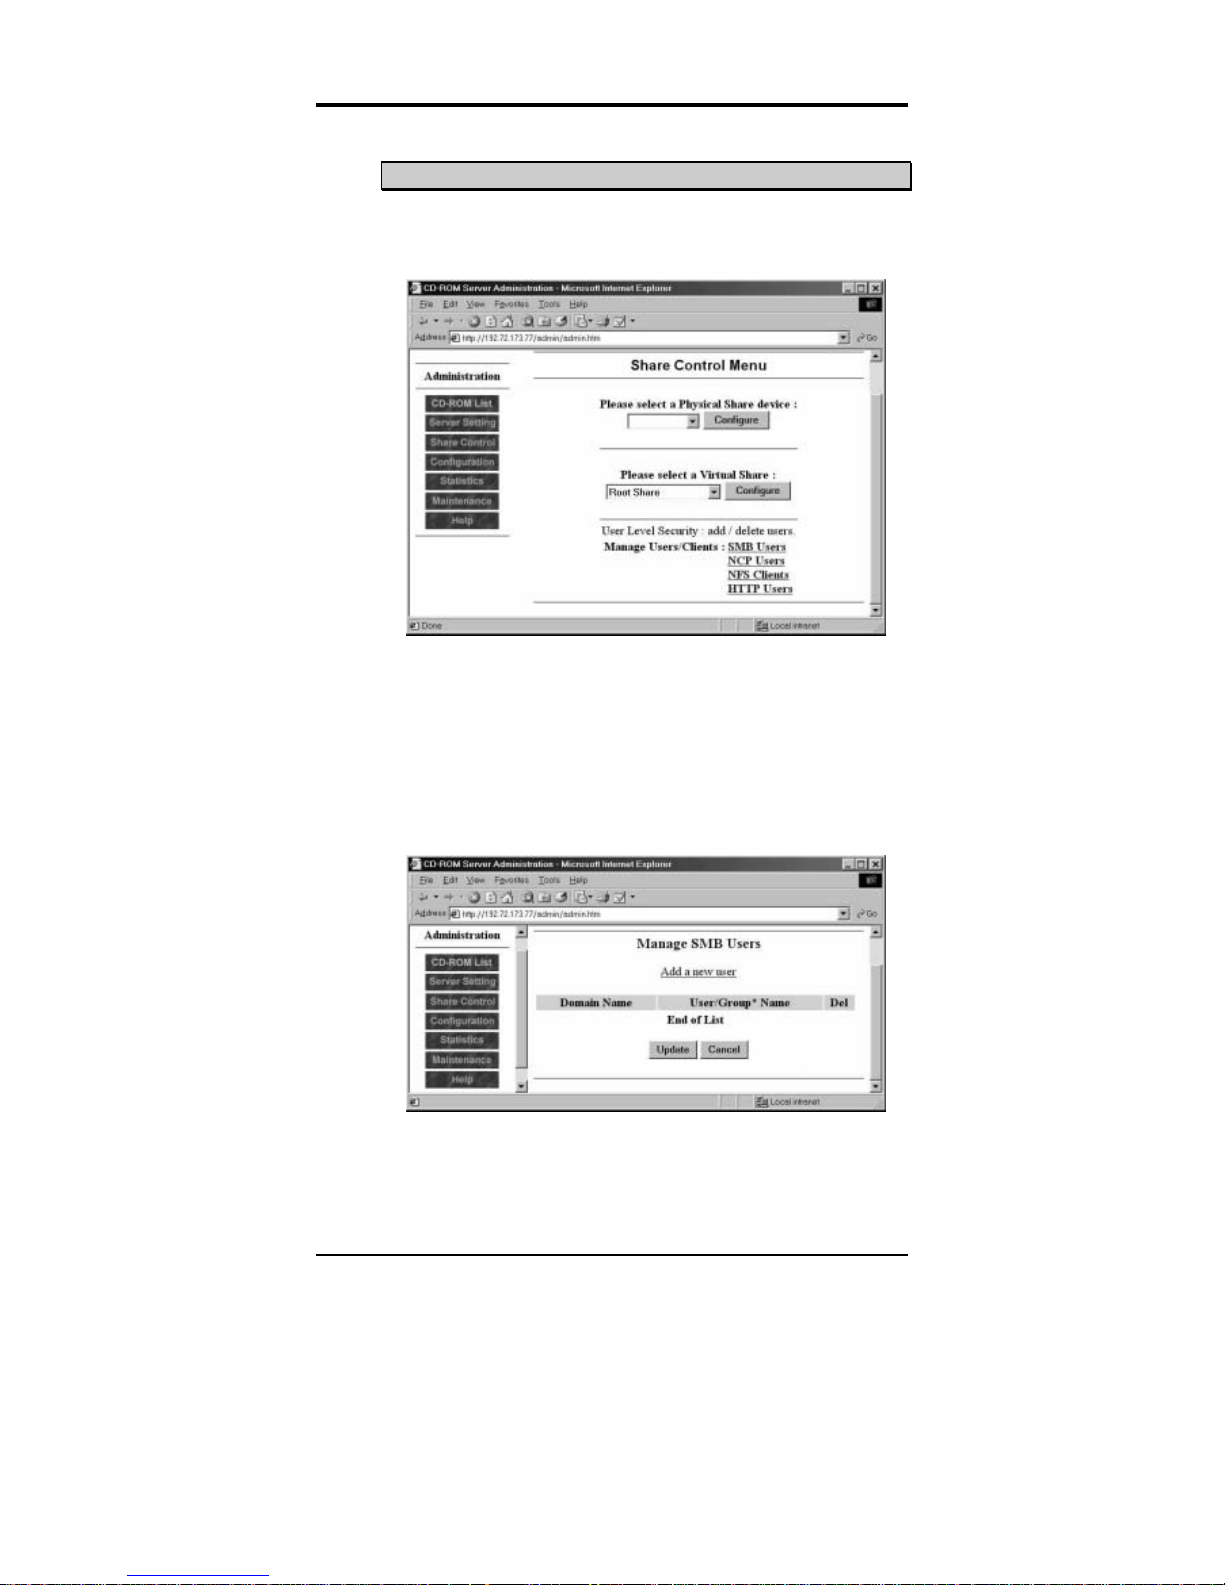
SShhaarree CCoonnttrrooll MMeennuu
Click the Share Control Menu in the left frame. The Share Control
Menu will appear in the right frame:
This field allows you to configure the physical share properties of
every individual CD and the virtual share properties of a group of
CDs that will appear on your network (e.g., the “Network
Neighborhood” of a Windows 95/98 or Windows NT network).
You can map the Physical Share and the Virtual Share you defined
as drive letters on your desktop.
Please select Physical Share device
Here you can configure the Physical Share of each CD. The CDs
are presented by the device number and the disc number. For
example, if you connect a CD-ROM drive at Position 1 of IDE
Channel 1, the CD inserted in this CD-ROM is presented as “De vice
1 Disc 1”. If you connect a 5-disc CD changer at the second drive
(slave) of IDE Channel 3, the CDs inserted in this CD changer are
presented as “Device 6 Disc 1”, “Device 6 Disc 2”, etc. To
configure a Physical Share, simply select a CD and click the
"Configure" button.
Physical Share Menu

Configuration and Management
27
Select one of the CDs in the “Please Select Physical Share device”
drop-down menu and click the Configure button. The Configure
screen appears:
This menu allows you to co nfigure the parameters of each Physical
Shared CD. The menu has the following fields:
1. Physical Share Enabled
2. Share name
3. Share Comment
4. Share password
5. Confirm password
6. Limited number of users
7. Lock the CD
8. User Level Security: Permission Lists
9. CD Mirror Function (only valid for CD/DVD-ROM drives;
not valid for CD images on HD)
Physical Share Enabled
Clicking the Enable check box activates the Physical Share of the
selected CD. Enabling the Physical Share of the CD allows you to
view the selected CD on the network and map it as a Drive Letter.

The FISC CDM User’s Manual
28
Share Name
You can define the CD’s name as it appears on the network. There
are three options:
1. Default Name (Auto Comment)
Use the Default Name “CD1”, “CD2”, “CD3”, etc., as the
Share Name with the respective volume name of each CD as
its Share Comment. To view the Share Comment of a
physical share, simply go to “Network Neighborhood”
under Windows 95/98 & Windows NT and choose “view”,
“details” or type “net view” under DOS prompt.
2. Volume Name (Auto Comment)
Using the respective volume names of each CD as the Share
Name with the Device number and Disc number as its Share
Comment.
3. User Defined
Define any Share Name and Share Comment you prefer.
Share Password / Confirm Password
Each CD is shared without password-protection by default. You can
set up a password to protect the access of each CD. Type the
password in the Share Password box and again in the Confirm
Password box. Click the Update button at the bottom of the page to
enable share protection.
Maximum number of users
For software license or performance reasons, you may want to limit
the number of users for the specified CD. This field allows you to
specify the maximum number of users who can access the CD.
Lock the CD
By clicking the Locked check box, the eject button on the front
panel of the CD-ROM drive will be disabled; the CD titles cannot be
removed from the CD-ROM drives. Please note that the "Lock the
CD" check box is void for CD changers.
Importa nt!
Please click the "Update" button on the bottom of
this page after changing the parameters in order
to activate the changes you made.

Configuration and Management
29
User Level Security: Permission Lists
Configure user/client access rights here. There are four protocols
supporting User Level Security, including SMB, NCP, NFS, and
HTTP. Click one of them to maintain user permission lists.
To get details about how to configure User Level Security, please
refer to the section How to Configure User Level Security later on
page 47.
CD Mirror Function
Please note that the CD Mirror Function menu appears only for
CD/DVD drives and CD changers. You can choose from a variety
of mirror options on the Physical Share Menu for the Mirror Drive.
To get details about how to configure CD Mirror Function, please
refer to the section How to Configure and Create CD Im ages on
page 60.
Please select Virtual Share:
Here you can c onfig ure the V irtual S hare o f groups o f seve ral CDs.
The Virtual Shares are presented as “Root Share” (User Defined
Share 1), “User Defined Share 2”, “User Defined Share 3”, etc.
“Root Share” is a pre-defined Virtual Share that hosts all the
available CDs under the FISC CDM server. For example, when you
map “Root Share” as Drive Letter E on your desktop, all the
available CDs will be listed as sub-directories under Drive Letter E.
“User Defined Share” allows you to select and group the available
CDs randomly into one Virtual Share. When you map one of the
“User Define Share” as a Drive Letter on your desktop, the CDs you
selected are the sub-directories under that Drive Letter. To
configure a Virtual Share, simply select a Virtual Share in the dropdown menu a nd click the Configure button.
Virtual Share Menu
Click one of the share items in the drop-down menu and click the
Configure button. It will bring up the following screen:

The FISC CDM User’s Manual
30
From this menu, you can configure the parameters of each Virtual
Shared CD. This menu contains items:
1. User Defined Share Enabled
2. Share Name
3. Share Comment
4. Share Password
5. Confirm Password
6. Limited Number of Users
7. Select Enabled CDs
8. User Level Security: Permission Lists
User Defined Share Enabled
Clicking the Enable check box activates the selected Virtual Share
allowing you to view the selected Virtual Share on the network and
map it as a Drive Letter.
Share Name
You can define the Virtual Share Name as it appears on the network.

Configuration and Management
31
Share Comment
You can define the Share Comment of the Virtual Share as it
appears on the network. To view the Share Comment of a Virtual
Share, go to “Network Neighborhood” under Windows 95/98 &
Windows NT and choose view, details or type “net view” at the
DOS prompt.
Share Password / Confirm Password
Each Virtual Share is shared without password-protection by default.
You can set up a password to protect the sharing of each Virtual
Share. Type the password in the Share Password box and again in
the Confirm Password box. Click the Update button at the bottom
of the page to enable share protection.
Maximum number of users
You can specify the maximum number of users who can access the
Virtual Share.
Select enable CDs
You can select and group the available CDs randomly into one
Virtual Share. “Root Share” (User Defined Share 1), by default,
enables and hosts all the available CDs under FISC CDM. For
example, you can select the CDs of “Device 1 Disc 1” and “Device
6 Disc 1” as your User Defined Share 2. To select multiple CDs
press and hold the [Ctrl] key on the keyboard and click the CDs in
the selection menu.
Importa nt!
Please click the "Update" button on the bottom of
this page after changing the parameters in order
to activate the changes you made.
User Level Security: Permission Lists
Configure user/client access rights here. There are four protocols
supporting User Level Security, including SMB, NCP, NFS, and
HTTP. Click one of them to maintain user permission lists.

The FISC CDM User’s Manual
32
To get more details about how to configure User Level Security,
please refer to the section How to Configure User Level Security on
page 47.
User Level Security: add/delete users
Maintain FISC CDM’s internal user database here. There are four
protocols supporting User Level Security, including SMB, NCP,
NFS, and HTTP. Click one of them to add or delete user accounts.
To get details about how to configure User Level Security, please
refer to the section How to Configure User Level Security on page
47.
Configuration and Management
33
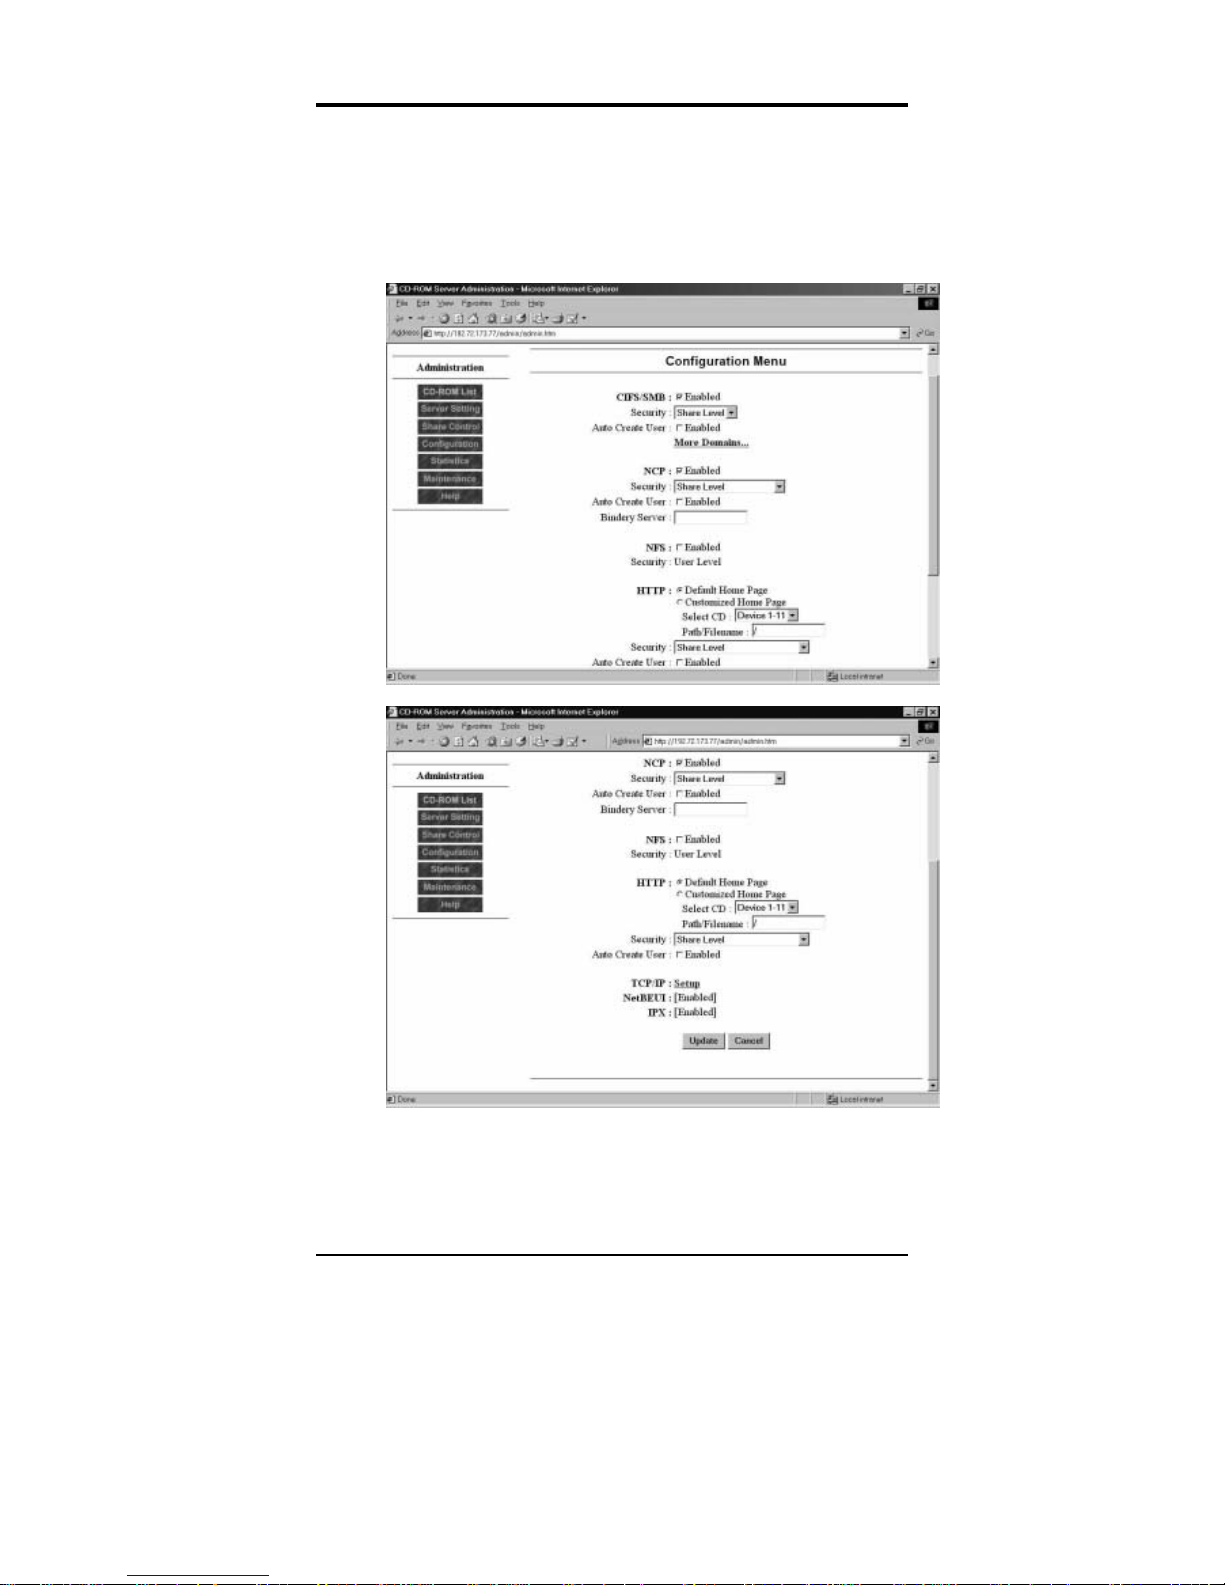
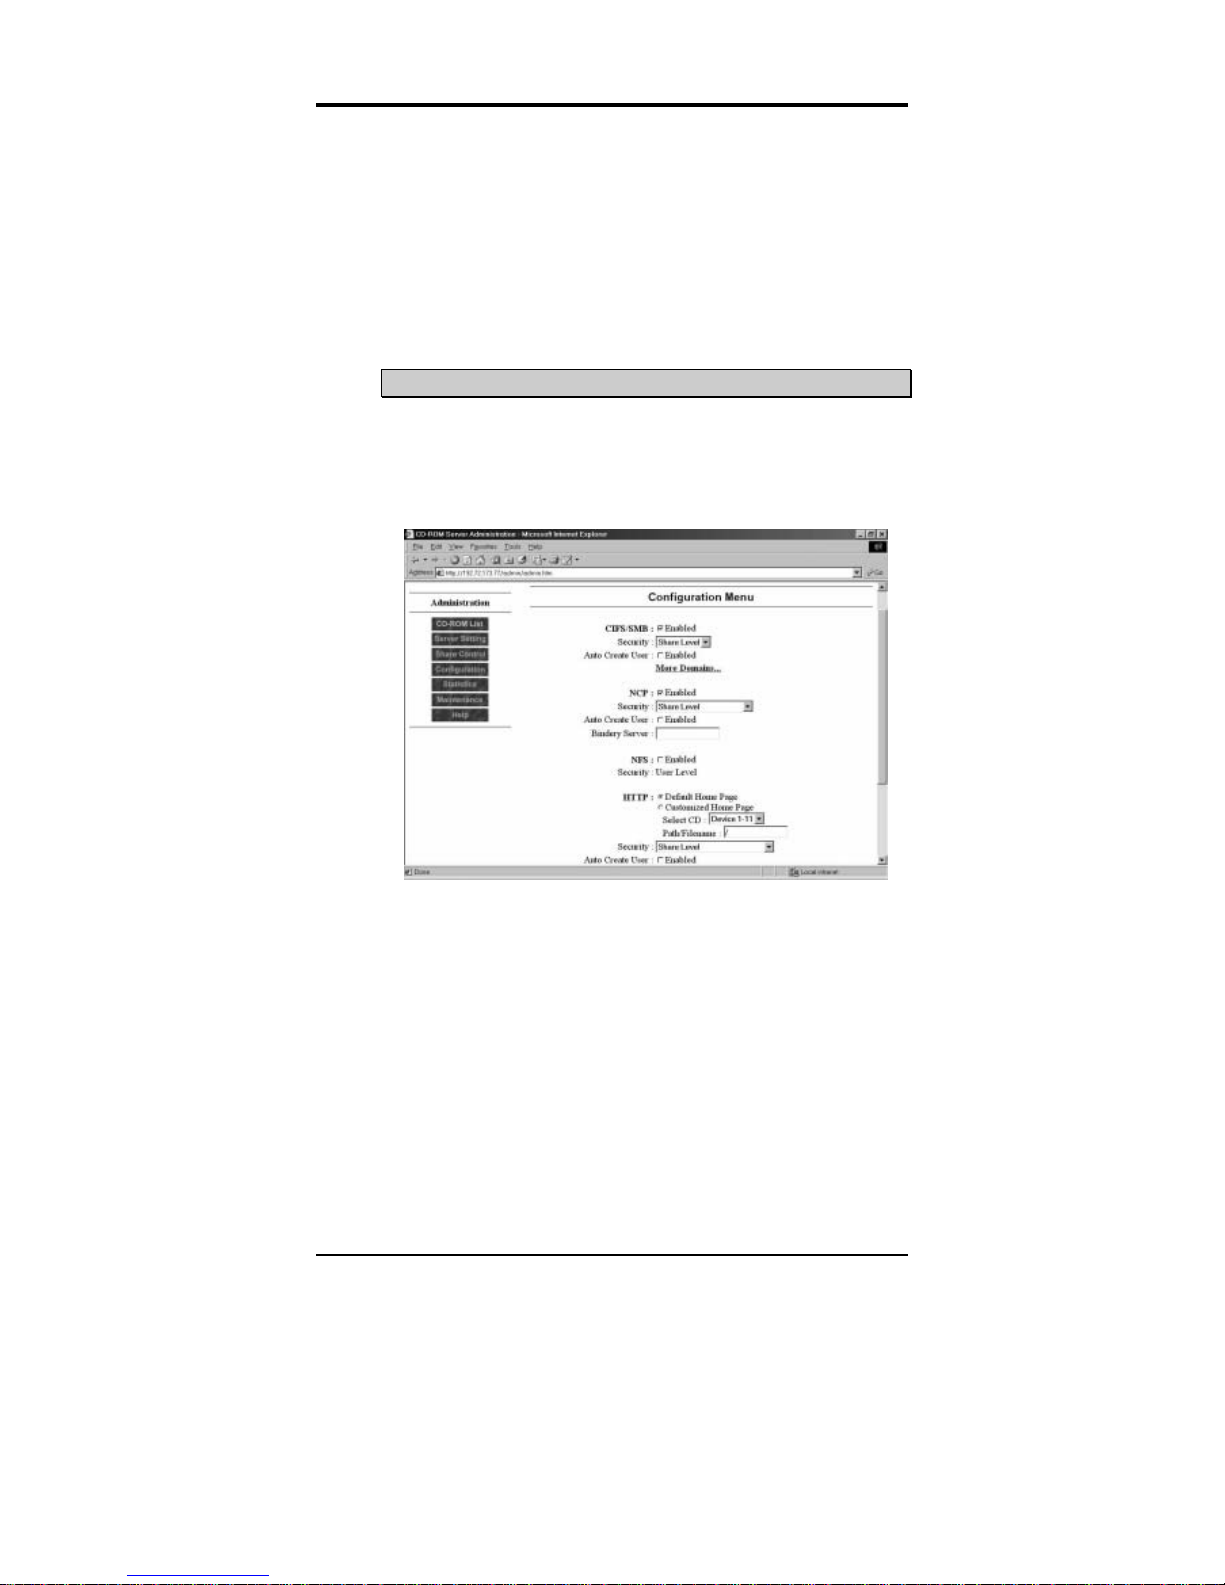
CCoonnffiigguurraattiioonn MMeennuu
Click the Configuration button in the left frame. The Configuration
Menu will appear in the right frame:
The configuration menu contains t he followin g items:
1. CIFS/SMB
2. NCP

The FISC CDM User’s Manual
34
3. NFS
4. HTTP
5. TCP/IP
6. NetBUEI
7. IPX
Each item is described below.
CIFS/SMB
By checking the Enabled box next to CIFS/SMB, you can enable
the CIFS/SMB protocol support of FISC CDM.
Click the Security list box to choose the security level of CIFS/SMB.
The CIFS/SMB protocol supports two kinds of security levels:
Share Level and User Level. The items, Auto Create User and More
Domains, are functional only when user level security is enabled.
Check the Enabled check box of Auto Create User to allo w FISC
CDM to automatically create user accounts. Click More Do mains to
specify additional PDC servers on LAN. Please refer to t he section
How to Configure User Level Security on page 47 for details.
SMB (Server Message Block) is the networking protocol used in
Microsoft Windows, IBM OS/2, or LAN Manager networks that
allows files and printers to be shared across the network.
CIFS (Common Internet File System) is an enhanced version of the
SMB file sharing protocol for the Internet.
NCP
By checking the “Enabled” box, you can enable the NCP protocol
support of FISC CDM.
Click the Security list box to choose the security level of NCP.
There are two options, Share Level and Users of Bindery Server.
The items Auto Create User and Bindery Server take effect only
when user level security is enabled.
Check the Enabled check box of Auto Create User to let FISC CDM
create user accounts automatically. The Bindery Server field
specifies a bindery server on LAN. Please refer to the section How
to Configure User Level Security on page 47 for more information.

Configuration and Management
35
NCP (NetWare Core Protocol) is NetWare’s application layer
protocol. NCP is the internal NetWare language used to
communicate between client and server and provides functions such
as opening, closing, reading and writing files and obtaining access to
the NetWare servers.
NFS
By checking the “Enabled” box, you can enable the NFS protocol
support of FISC CDM.
FISC CDM only supports user level security under the NFS protocol.
Share level security is not supported.
NFS (Network File System), developed by Sun Computer, is the
UNIX networking protocol that allows files and printers to be shared
across the network. NFS is a high-level network protocol, like NCP
and SMB.
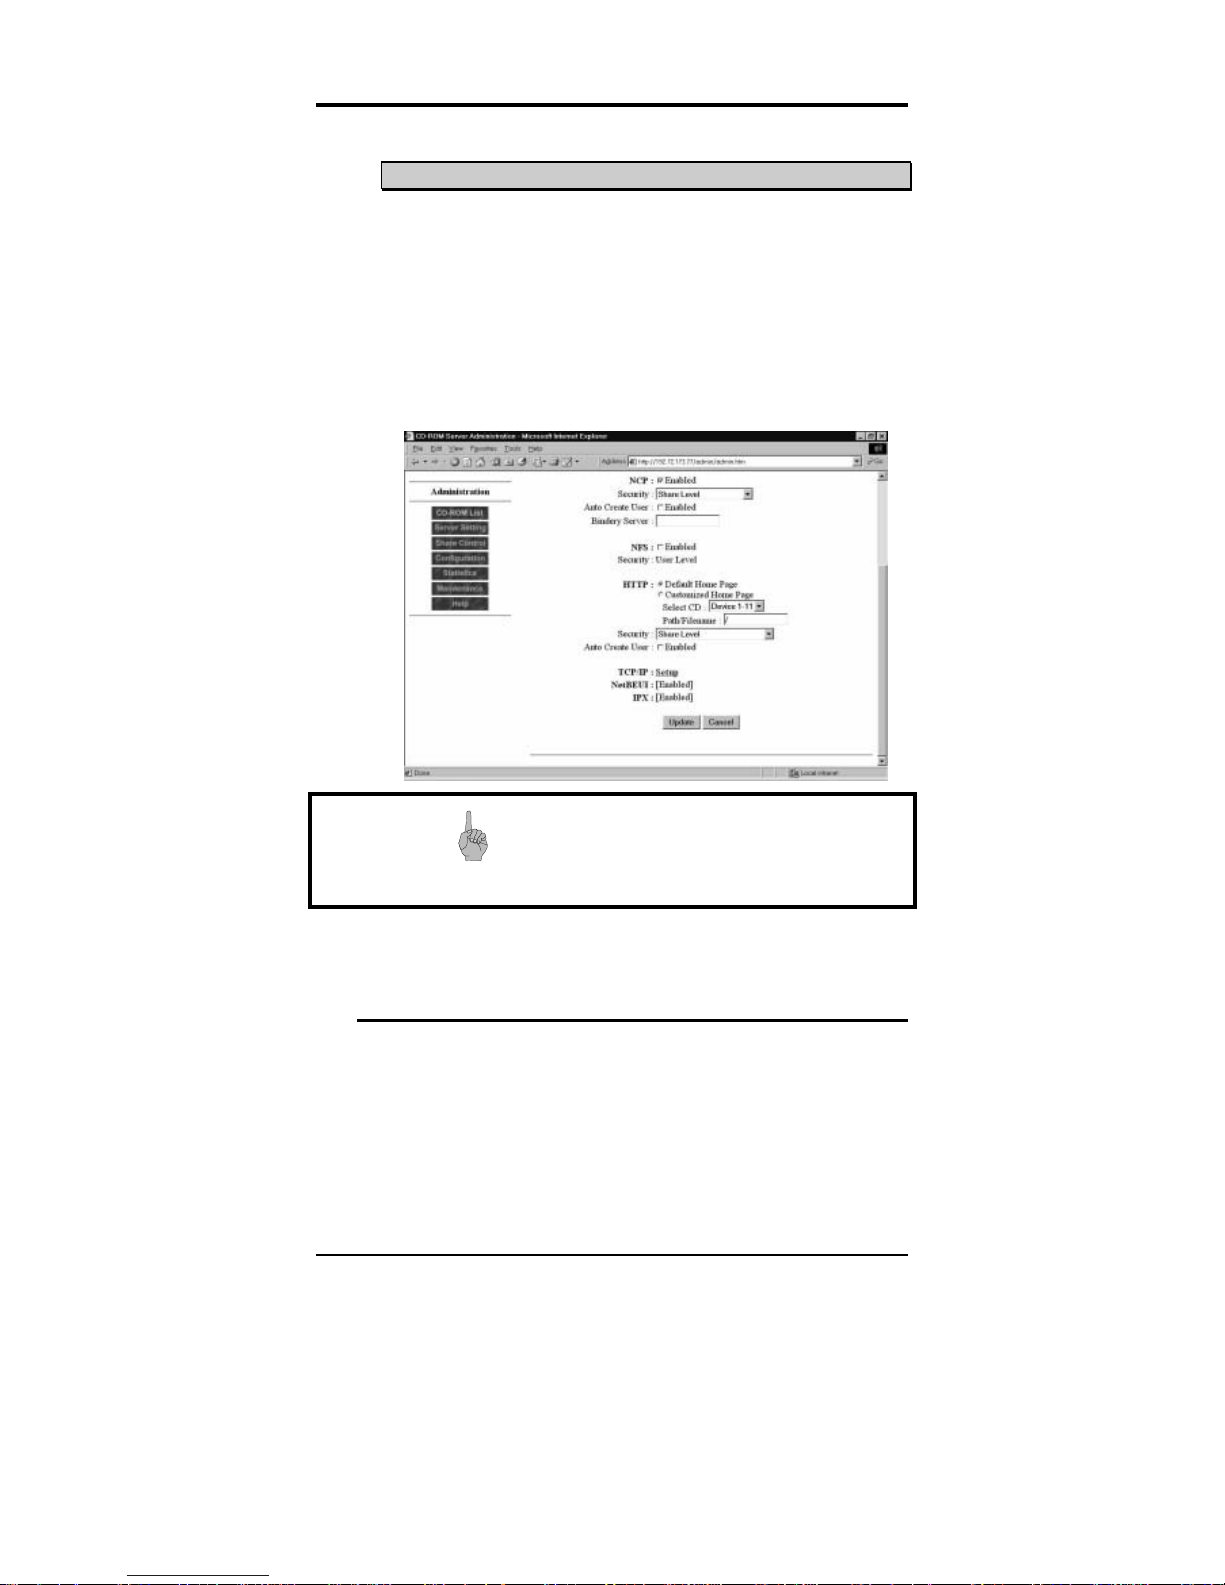
HTTP
The default homepage of FISC CDM shows CD-ROMs that are
hosted under FSIC CD (by clicking the “Default Home Page” radio
button).
You can configur e FISC CD M to be your We b Server by assi gning
any HTML file as the home page of your FISC CDM IP address (by
clicking the radio button of “Customized Home Page”). This
feature makes FISC CDM an easily managed and hacker-proof Web
server.
1. Click the “Customized Home Page” radio button.
2. Select the specific CD where the HTML file is located in
“Select CD” (for example, “Device 1 Disc 1”).
3. Give the path of the HTML file in “Path/File Name” (for
example “\home\page.html”).
4. Click the Update button. The next time you access FISC
CDM via its IP address, FISC CDM will bring you to the
HTML file you assigned instead of the default homepage of
the CD-ROM list.
Click the Security list box to choose the security level of HTTP.
There are two options: Share Level and Users of SMB Primary
Domain. The item Auto Create User takes effect only when user
level security is enabled.
The FISC CDM User’s Manual
36
Check the Enabled check box of Auto Create User to let FISC CDM
create user accounts automatically. Please refer to the section How
to Configure User Level Security later in this chapter for more
information.
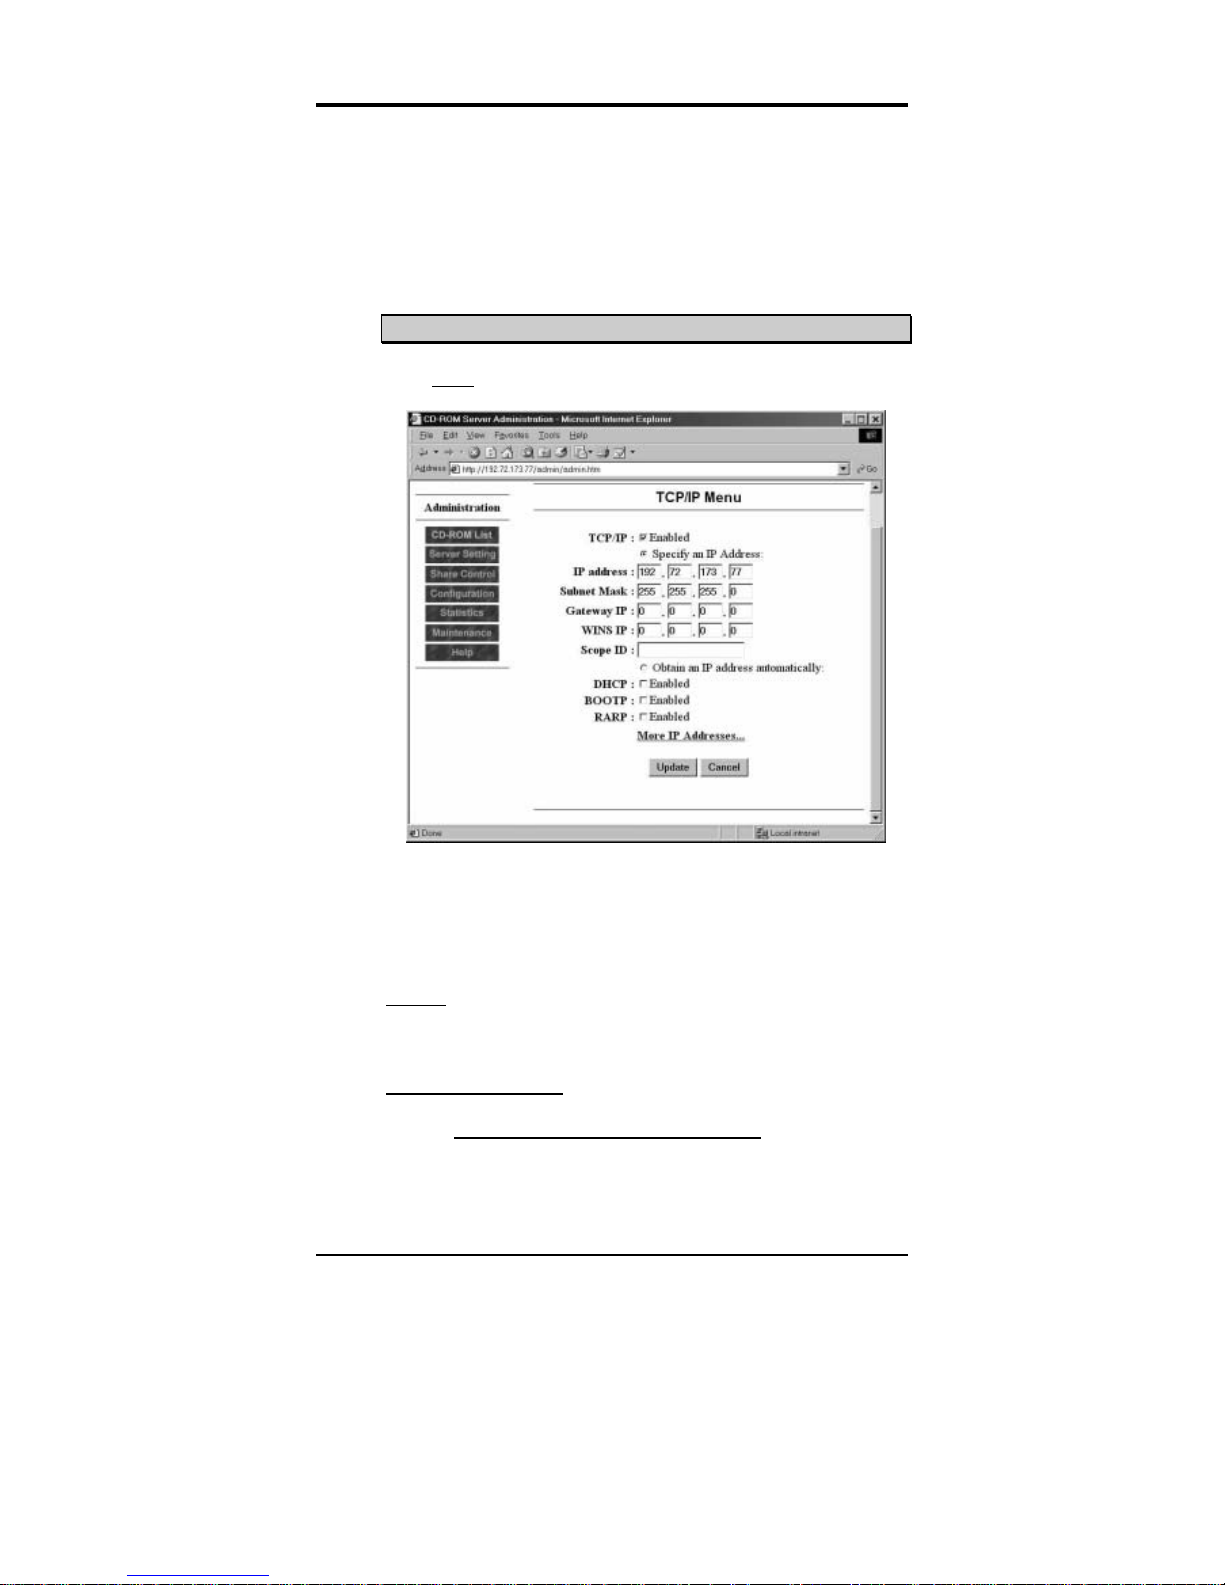
TCP/IP
Click Setup next to TCP/IP: to bring up the TCP/IP setup submenu:
This menu allows you to configure the TCP/IP settings of the FISC
CDM. In order to build up the communication with FISC CDM in a
TCP/IP network, you must assign an appropriate IP address. Each
item in this submenu is described below:
TCP/IP
Simply check Enabled check box to enable the TCP/IP protocol
Specify an IP Address:
IP Address / Subnet Mask / Gateway IP
If you can acquire a valid IP address from your network
administrator, please enable Specify an IP Address check

Configuration and Management
37
box to assign the IP address, subnet mask and the gateway
IP address for the FISC CDM.
WINS IP
If there is a WINS (Windows Internet Naming Service)
server on your network and you would like to enable WINS
support of the FISC CDM, please acquire a WINS IP from
your network administr ator.
FISC CDM can use WINS to register itself in the WINS
server. To enable WINS support, go to the TCP IP setting
of Configuration menu in the FISC CDM Administration
page to give IP address of WINS server in WINS IP box
and the scope identifier in the Scope ID box.
The Scope ID box is usually left blank; it is used only for
communication based on NetBIOS over TCP/IP. In such a
case, all computers on all the TCP/IP networks must have
the same Scope ID. The scope ID can be assigned to a
group of computers if those computers communicate within
the group only.
Obtain an IP address automatically:
If you want an automatic assignment of IP address for
FISC CDM, please enable Obtain an IP Address
Automatically check box and select the following three
ways to obtain an IP address for FISC CDM.
DHCP
Check the Enabled check box to enable DHCP support for
the FISC CDM.
BOOTP
Check the Enabled check box to enable BOOTP support
for the FISC CDM.
RARP
Check the Enabled check box to enable RARP support for
the FISC CDM.

The FISC CDM User’s Manual
38
Importa nt!
Please click the icon “Update” on the bottom of
this page after making new changes to the
TCP/IP setting parameters in order to activate the
changes you made.
MMoorree IIPP AAddddrreesssseess
FISC CDM provides seven add itional IP addresses and homepages
for HTTP applications. With total 8 IP addresses and 8 homepage s,
FISC CDM can work as an instant Web server, providing virtual
host capability that hosts 8 different homepages at the same ti me.
How to configure the multiple IP addresses?
1. Go to the Configuration menu in the FISC CDM
Administration page and click TCP/IP setup to enter the
TCP/IP menu.
2. Click More IP Addresses… to enter the Advanced IP Menu
and configure the additional IP addresses and home page files.
3. Check Enable check box in Enable IP1 to activate the first
additional IP address and assign the IP address and subnet mask for
your first additional homepage.

Configuration and Management
39
4. Check the Customized Home Page check box; select the
specific CD where the HTML homepage file is located in the Select
CD list box; give the path of the HTML file in Path/Filename.
Click Update button.
5. Re-accessing FISC CDM by typing the first additional IP
address, FISC CDM will br in g you to t he H T ML homepage that yo u
just assigned.
6. Repeat the above procedures for the other 6 additional IP
addresses, FISC CDM then becomes a Web server that can host
totally 8 different homepages at the same time.
Please note that the Gateway IP, WINS, DHCP, BOOTP, RARP and
Direct Ping functions are only valid for the "main" IP address setting
in the TCP/IP menu. That is, the seven IP addresses in Advanced IP
Menu are only fo r the functio n of Web hosting a nd have no ef fect
on the TCP/IP setting of the FISC CDM server.

The FISC CDM User’s Manual
40
SSttaattiissttiiccss
Click the Statistics button in the left frame. The Statist ics me nu will
appear in the right frame:
You can see certain statistical information related to network
protocols, including SMB, NCP, and NFS.
Click Run-time event log to watch the system log. FISC CDM will
record system event s after FISC CDM sta rts or resets. FISC CDM
will log the following system events: system starts, network
interface gets ready, CD-ROM drives get mounted and securityrelated events and warnings.

Configuration and Management
41
By clicking “CD Titles Access List”, it lists the amount of data and
times of being read of each CD share.
By clicking “Current mirroring list”, it displays all CD duplicating
tasks that are currently going on.
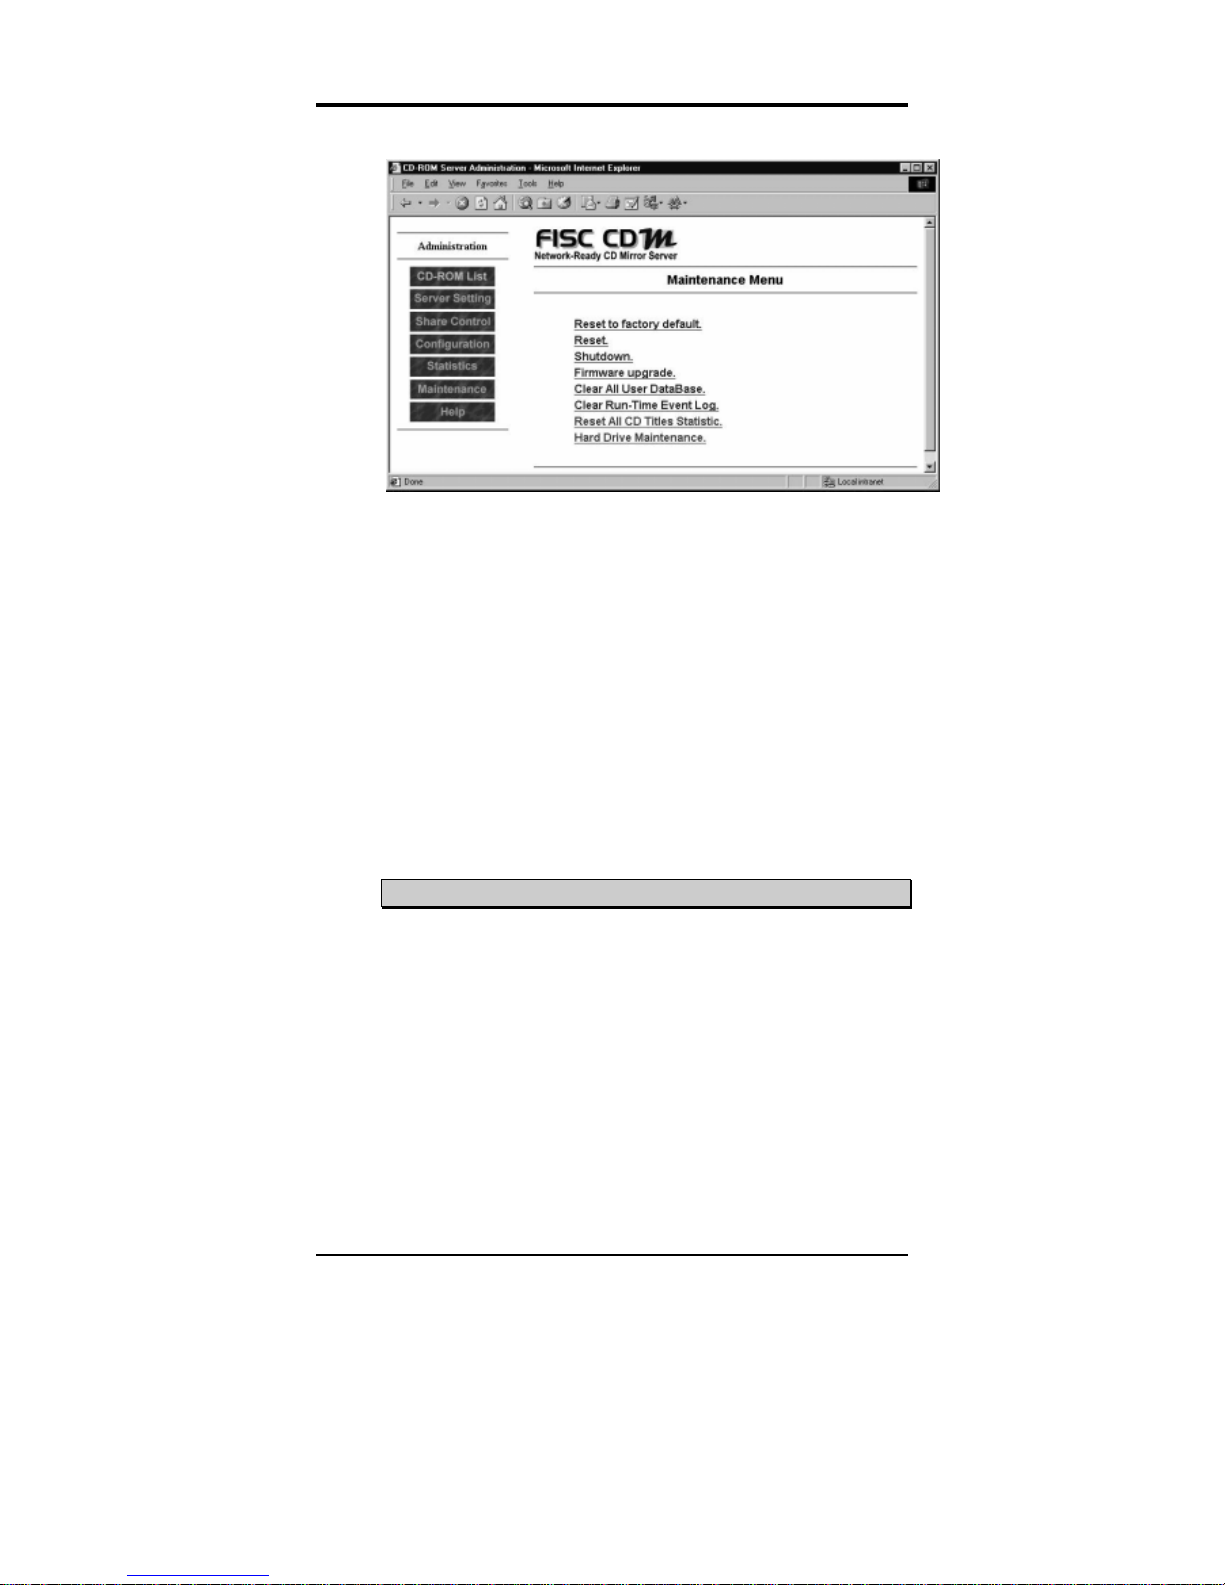
MMaaiinntteennaannccee
Click the Maintenance button in the left frame. The Maintenance
menu will appear in the right frame:
The FISC CDM User’s Manual
42
The Maintenance menu contains the following items:
1. Reset configuration to factory default
2. Reset
3. Shutdown
4. Firmware Upgrade
5. Clear All User Database
6. Clear Run-Time Event Log
7. Reset All CD Titles Statistics
8. Hard Drive Maintenance
Each item is described below.
Reset configuration to factory default
This option will load the factory default se ttings for the FIS C CDM.
The FISC CDM will use the factory default configuration the next
time you restart the FISC CDM server. All settings and pa rameters
will be set to the factory defaults; however, the administration
password will still be maintained. To reset the administration
password to the factory default (to delete the administration
password), please refer to Appendix C — Jumper Settings and
Connectors.

Configuration and Management
43
Reset
This option will perform the system reset of FISC CDM. Before
resetting the system, make sure that there is no on-line user
accessing the FISC CDM.
Shutdown
Use this function to shut down FISC CDM.
Importa nt!
For easy management of a name space network
like SMB/CIFS, we strongly sugg e st that you shut
down the FISC CDM using this procedure before
you turn off the power of FISC CDM.
Firmware Upgrade
The firmware of FISC CDM can be upgraded through Web
browsers supporting “File Upload” functions, such as Netscape
Navigator 2.0 or later and Internet Explorer 4.0 or later.
When you click the Firmware Upgrade link in the administration
pages, you will be prompted to confirm that you want to e nter the
upgrade mode. This mode will stop the normal function of FISC
CDM and the administrator will be the only one who has the access
to that FISC CDM.

The FISC CDM User’s Manual
44
If you click Yes, Continue, it will bring up a screen as above.
There is a field for entering an upgrade key. For minor firmware
upgrade, you do not need the upgrade key. Just leave the field blank.
However, you do have to get a key for major fir mware upg rade. I f
you are prompted to enter an upgrade key after you press the
Upgrade button, please contact your dealer for more information.
To upgrade the firmware, give the path where the new firmware
image file is located and click the Upgrade button. After the
firmware upgrade process has been completed, the FISC CDM will
automatically reset. After the FISC CDM has restarted, we suggest
the administrator to check if the FISC CDM has been successfully
upgraded.
Clear All User Database
To support user level security, FISC CDM maintains an internal
user database, which stores the information of user accounts and
lists of permitted users. This function, Clear All User Database,
erases the user database clearly.

Configuration and Management
45
Clear Run-Time Event Log
On the Statistics menu of the Administration Page, there is an
item – Run Time Event Log, that shows the system event log.
Choose “Clear Run-Time Event Log” to clear the log there.
Reset All CD Titles Statistics
On the Statistics menu of the Administration Page, there is an item,
CD Titles Access List, that shows the statistics of user access to
shares. Choose “Reset All CD Titles Statistics” to clear the log.
Hard Drive Maintenance
FISC CDM use hard drives for storing CD images. Use this
function to list and delete CD images on hard drives.

The FISC CDM User’s Manual
46
Please refer to the “How to Configure and Create CD Images”
section for more details of hard drive maintenance.
HHeellpp
Click on the Help button to open the Help screen:
This screen provides on-line help for all the menu options for the
FISC CDM configuration.
Configuration and Management
47
HHooww ttoo CCoonnffiigguurree UUsseerr LLeevveell SSeeccuurriittyy
It takes three steps to configure user level security. First, configure
the security level of FISC CDM as “User Level Security”. Second,
create a user database. Third, assign user access rights to each CDROM share. Details are described below. After you complete these
steps, unauthorized users will be prohibited from accessing FISC
CDM.
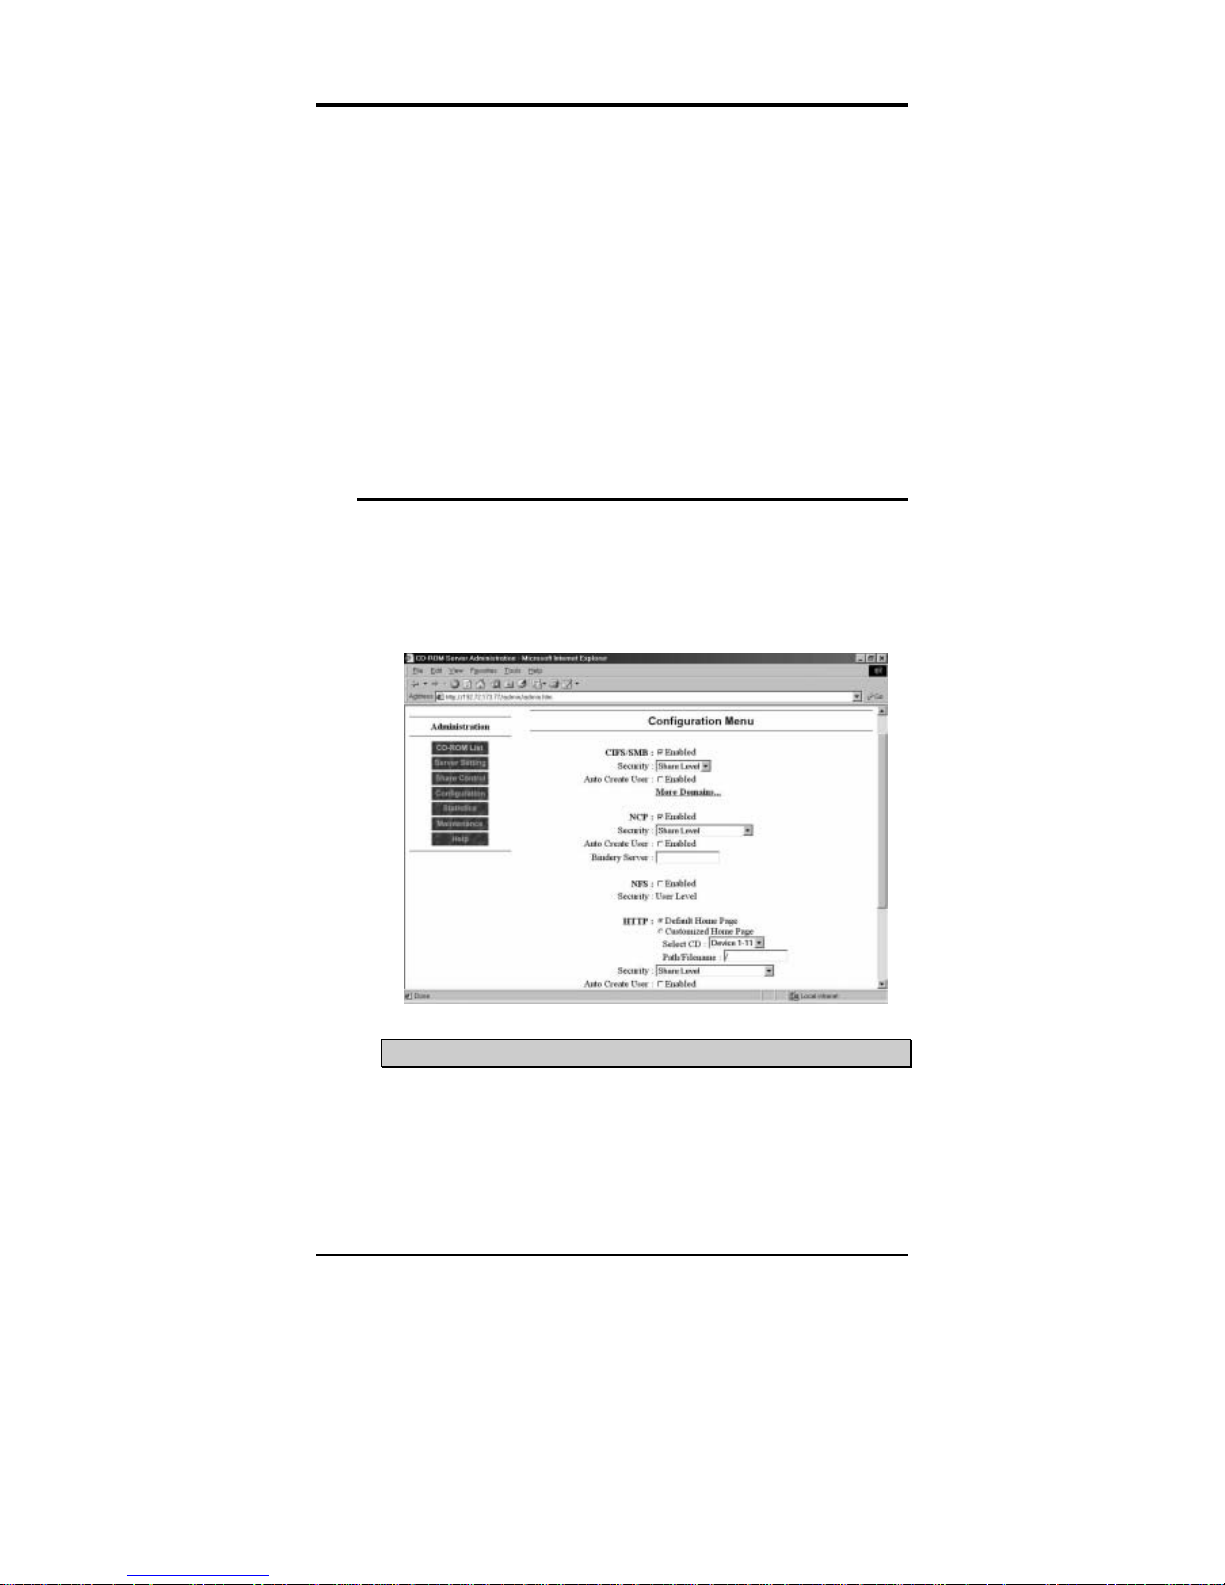
Configure as User Level Security
On the Administration page, click Configuration to enter the
Configuration Menu. There are four protocols supporting user level
security. They are CIFS/SMB, NCP, NFS and HTTP. All of them
except NFS support both share and user level security. NFS
supports user level security only.
To enable user level security of CIFS/SMB:
Click the Security: list box under CIFS/SMB on the Configuration
Menu. You can see two items after clicking on the list box: Share
Level and User Level. Select User Level. Click the Update button
to confirm the change.
Note:
The FISC CDM User’s Manual
48
You should have at least one PDC (Primary Domain Controller)
server on your LAN to validate the user level security of CIFS/SMB.
PDC servers maintain user security information. FISC CDM needs
a PDC server to authenticate the username and password provided
by users.
Single Domain:
If you would like to use one PDC server for user authentication,
please fill the Workgroup/Domain Name field on the Server Setting
Menu with the domain name of the PDC server.
Although FISC CDM has to be in the same domain of the PDC
server, this is not the case with client PCs. You can access FISC
CDM from any client PC that resides in a different domain.
More Domains:
If there are several PDC servers that maintain user security
information, you have to specify these PDC servers during FISC
CDM configuration.
Suppose there are 3 PDC servers on your LAN – PDC1, PDC2, and
PDC3. Please put the first PDC server, PDC1, in the
Workgroup/Domain Name field on the Server Setting Menu as
above. As for other PDC servers, please go to Configuration Menu.
Click More Domains under CIFS/SMB. You will see More

Configuration and Management
49
Domains menu. Please put PDC2 in the Domain name 1: field and
PDC3 in Domain name 2:.
Suppose there are three users – user A, user B and user C. User A
has logged on to PDC1, user B to PDC2, user C to PDC3.
Since user A is in PDC1’s domain, FISC CDM will ask PDC1
whether user A is legal when user A tries to access any CD share in
FISC CDM. If user A is legal, then FISC CDM will begin to check
its internal user database to see if user A is allowed to read the CD
share.
The FISC CDM User’s Manual
50
When user B tries to access any CD share in FISC CDM, FISC
CDM will ask PDC2 for authentication because user B is in P DC2’s
domain. If user C tries to access, FISC CDM will ask PDC3.
To get more information about how to create FISC CDM internal
user database, and how to grant access rights to users, please refer to
these sections: Create User Database and Assign User Access
Rights.
To enable user level security of NCP
Click the Security: list box under NCP on the Configuration Menu.
Select Users of Bindery Server. Please also specify the bindery
server by filling in the Bindery Server: field. Click the Update
button to confirm the change.
Note:
FISC CDM only supports NetWare bindery so far. You should have
a bindery server on your LAN to validate the user level security of
NCP.
If a user tries to access any CD share in FISC CDM, FISC CDM
will prompt a dialog box for username and password. Then FISC
CDM will ask the bindery server whether the user is legal. If the
bindery server approves and the user is marked READ in the
permission list, the user will be able to access the CD share.
Configuration and Management
51
To enable user level security of HTTP
Click the Security: list box under HTTP on the Configuration Menu.
Select Users of SMB primary domain to enable the user level
security of HTTP. Click the Update button to confirm the change.
The user level security of HTTP is implemented just a s the single
domain case of SMB. It also requires one PDC server on your LAN.
They even share the same internal user database. The difference is
that FISC CDM will not check users’ domains when users try to
access via Internet browsers.
Importa nt!
Please click the icon “Update” on the bottom of
this page after making new changes to the
TCP/IP setting parameters in order to activate the
changes you made.
Create User Database
A user database can be created manually or automatically. To create
a user account manually, follow Guideline 1. To create a user
account automatically, follow Guideline 2.
The FISC CDM User’s Manual
52
Guideline 1. How to create a user manually.
1. On the Administrat ion page, click Share Control to enter the
Share Control Menu.
2. You will see Manage Users/Clients: on the screen. Please click
SMB Users, NCP Users, NFS Clie nts or HTTP Users to enter
the Manage XXX* Users (or Clients) men u.
*:XXX means SMB, NCP, NFS or HTTP.
3. Click Add a new user on the Manage XXX* Users(Clients)
menu. You will see Add XXX User/Group.
a. If you would like to add a new SMB user, fill in the
Domain Name: and User/Group Name: fields. Choose
User next to the Type: item. Then click the Add button.
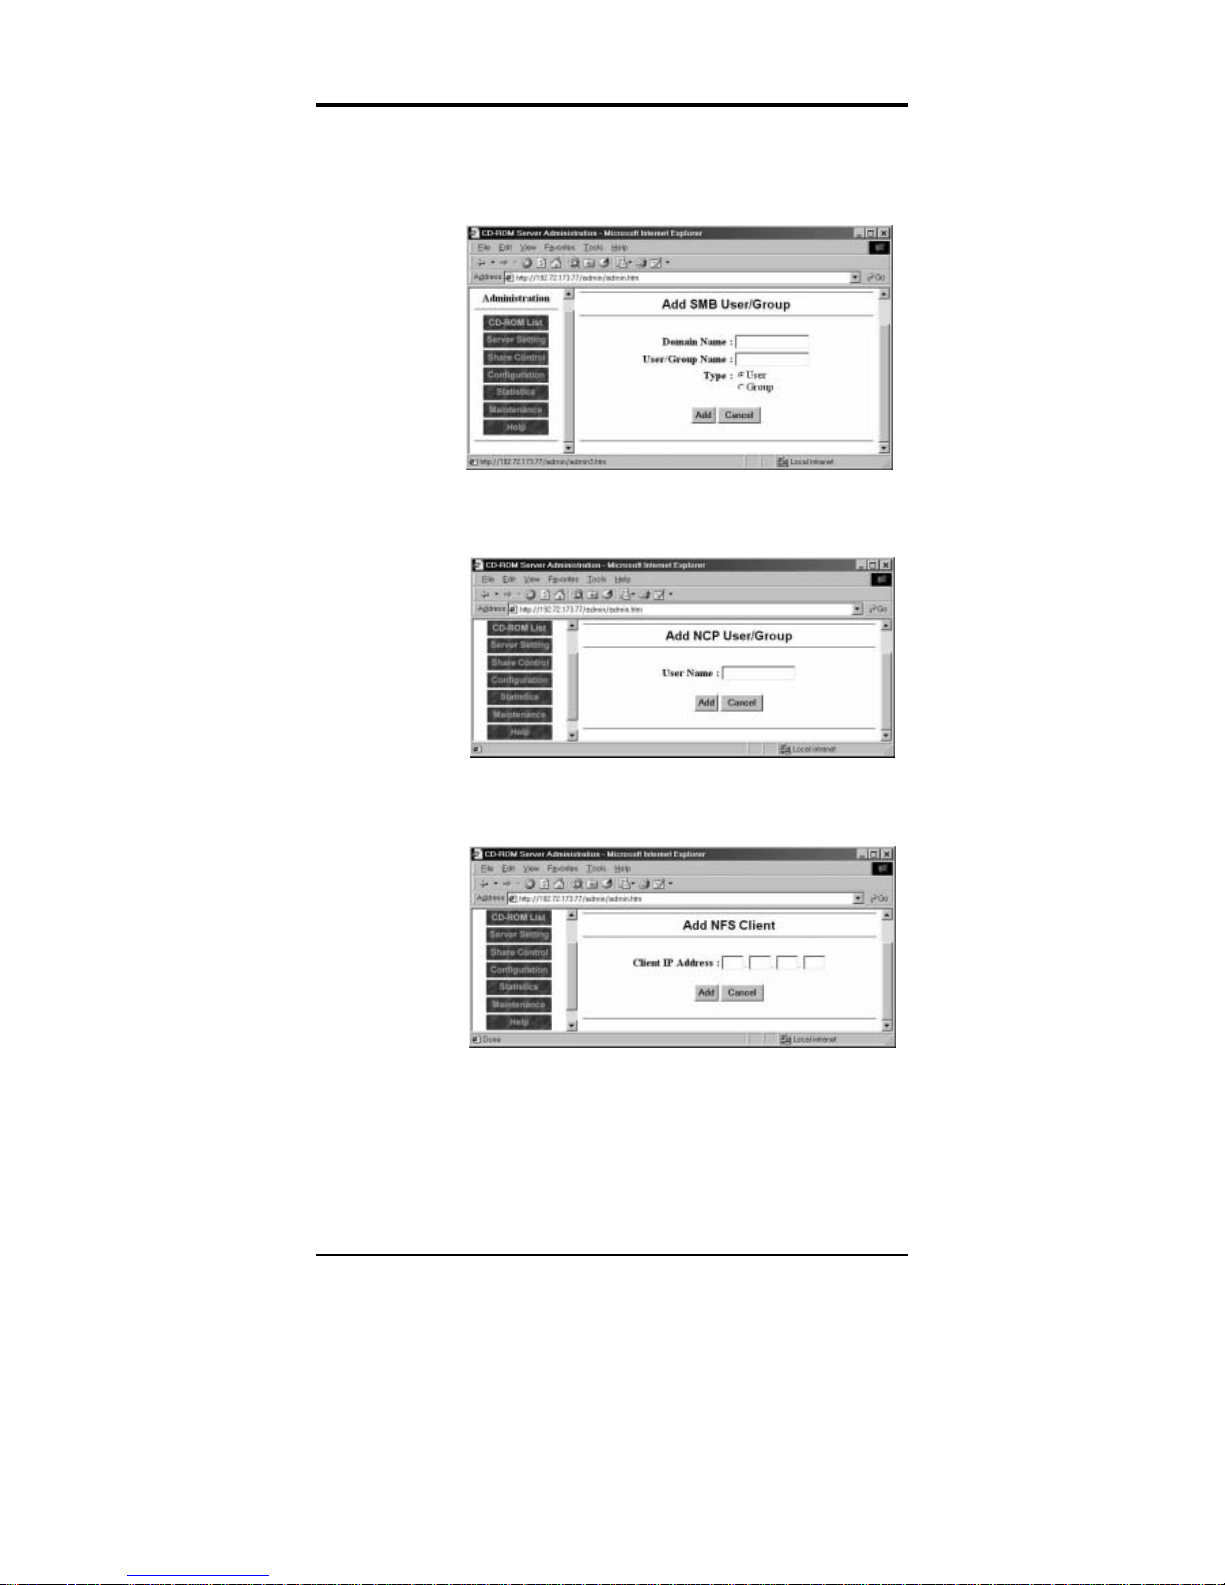
Configuration and Management
53
If you would like to add a new SMB group, please choose
Group next to the Type: item.
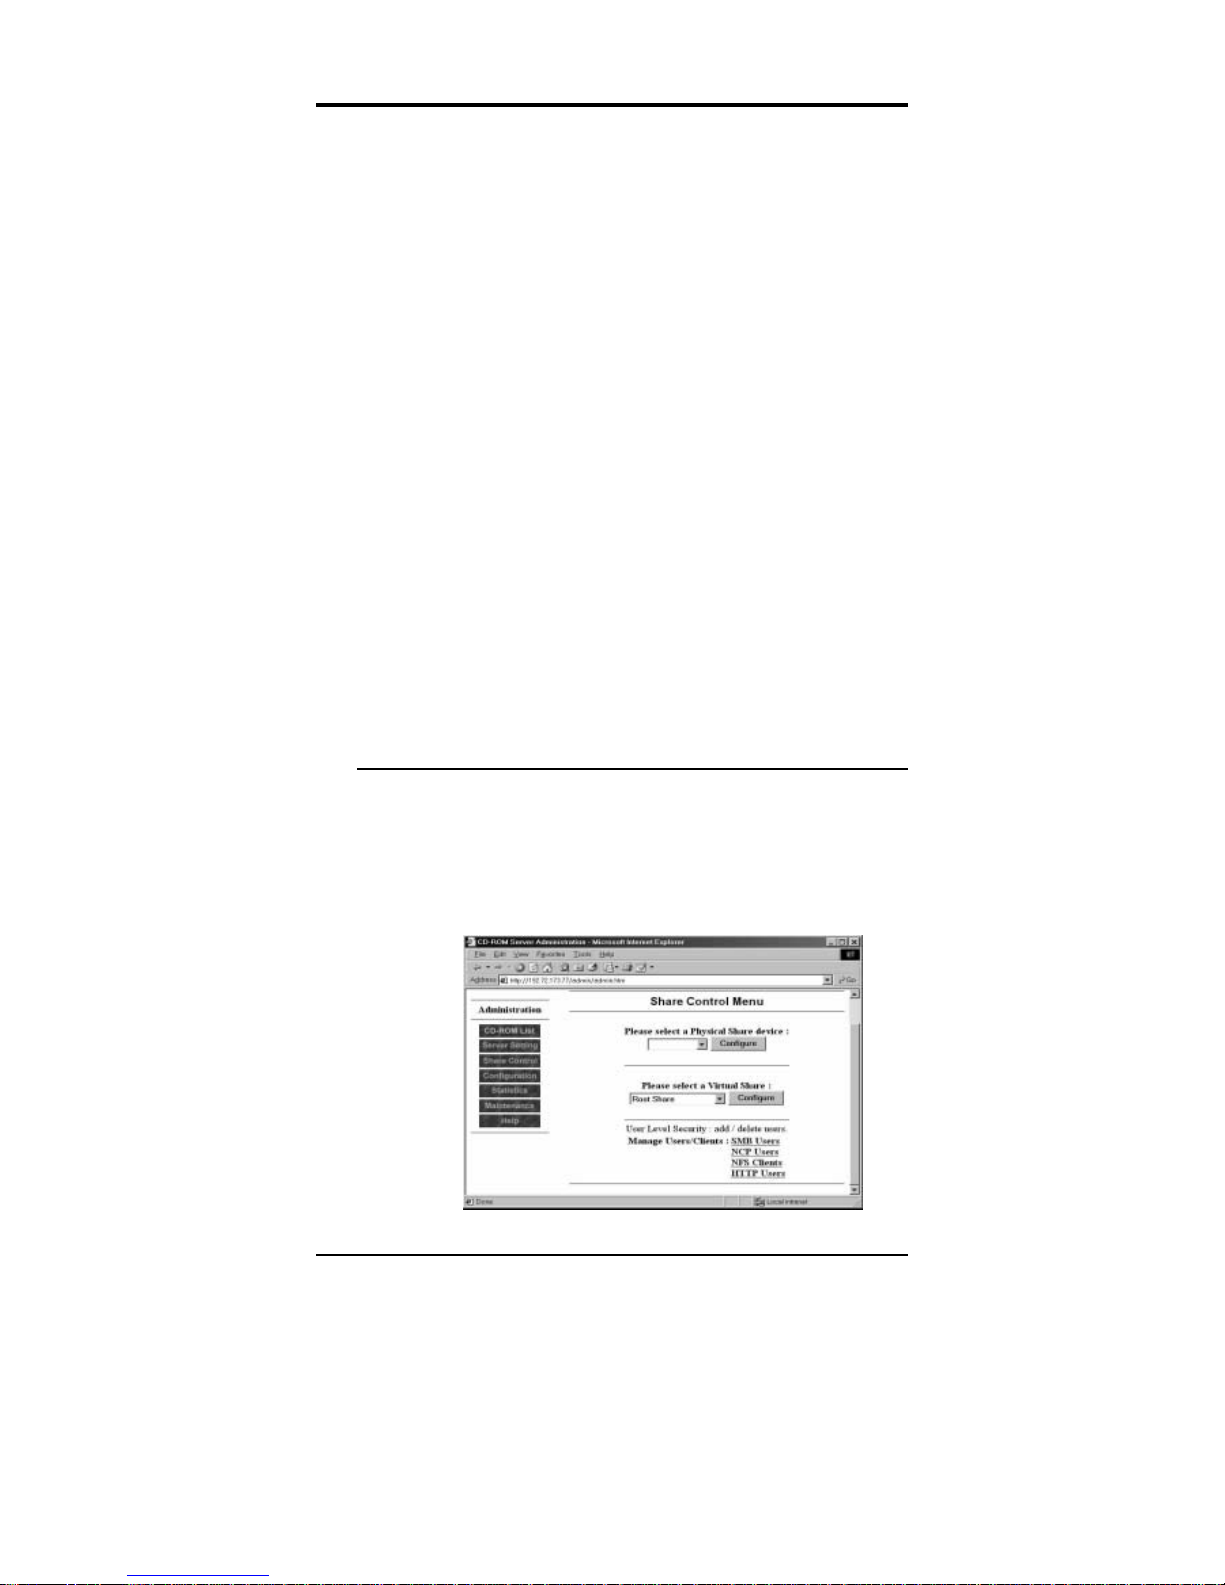
b. If you would like to add a new NCP user, fill in the User
Name: field and click the Add button.
c. If you would like to add a new NFS user, fill in the Client
IP Address: field and click the Add button.
d. If you would like to add a new HTTP user, fill in the
User/Group Name: field, choose to add User or Group and
click the Add button.

The FISC CDM User’s Manual
54
4. To delete a user, go to the Manage XXX* Users (Clients)
menu, check the user’s Del check box and press the Update
button.
Guideline 2. How to create a user automatically.
1. Click Configuration on the Administration page to enter the
Configuration Menu.
2. Under CIFS/SMB, NCP or HTTP, you will see Auto Create
Users: check boxes. Check the box under the protocol of
which you want to enable the function. The default optio n is
Enabled. Click the Update button at the bottom of the screen
if you make any change s.
3. Have a user read any CD share in FISC CDM using the
protocol you just chose. The access will be prohibited.
Configuration and Management
55
However, b y do ing thi s, t he s yst e m wil l p ut t he use r ’s na m e in
the user database, automatically.
Take the CIFS/SMB protocol as an example.
a. On the Configuration Menu, check the Auto Create Users
check box under CIFS/SMB.
b. Click the Update button.
c. If you want to ad d user AA A t o t he SM B use r da ta ba se, the
only task is to have user AAA read any CD in FISC CDM
through CIFS/SMB. The access will be prohibited
because user AAA has no access rights yet. However, the
system will put the user’s name in the user database
automatically.
For accessing FISC CDM through CIFS/SMB, please refer
to the section “Using FISC CDM in Windows 95/98” in
Chapter 4: “Using FISC CDM on Client Workstations”.
d. Enter the Share Control Menu, and click Manage
Users/Clients: SMB Users. You will see that user AAA
has been put in the user list. Ho wever, his/her access will
still be prohibited until he/she is granted access rights.
Assign User Access Rights
Even when a user is in the user database, he/she will still be
prohibited from accessing until he/she is granted access rights.
Follow the following steps to assign access rights.
1. On the Administration page, click Share Control to enter the
Share Control Menu.

The FISC CDM User’s Manual
56
2. Please select one Physical Share device or Virtual Share in the
list boxes for configuration. Click the Configure button. You
will enter the Physical Share Menu or Virtual Share Menu.
3. On the Physical Share Menu or Virtual Share Menu, find
Permitted Users/Clients at the bottom of the page. You can add
permitted users (or clients) here, including SMB users, NCP
users, NFS clients and HTTP u sers.
Click SMB Users to configure access rights of SMB users.
You will see a SMB user list here. There are 3 fields:
Domain Name, User/Group* Name and Read/None. If you
want to grant user AAA of SMB access right, choose the
corresponding Read and click the Update button.
Click NCP users to configure access rights of NCP users.
You will see a NCP user list here. There are 2 fields: User
Name and Read/None. If you want to grant us er AAA of
NCP access right, choose user AAA’s Read and click the
Update button.

Configuration and Management
57
Click NFS Users to m anage access rights of NFS users.
On this page you must specify from which computer the
user can access the CD, and who has the access rights.
i) Assign from which computer users can access the CD:
If you click the Enabled check box next to All hosts
permitted: , all computers will have access rights to the CD
regardless of their IP addresses.
If you would like to assign exactly from which computer
users can access FISC CDM, please select the
corresponding Read next to the computer ’s client IP.
Click the Update button for all changes to take effect.
ii) Specify who has the access rights:
First, specify which user/group can access the CD share by
entering the UID and GID fields. Then, fill in the Access
Rights (3-octet): field to assign the access rights of the CD

The FISC CDM User’s Manual
58
share. Please refer to the following table to know more
about Access Rights.
Details of NFS Access Rights
Access Rights – 3-octet digits in details:
1
st
octet digit (3 bits) 2nd octet digit (3 bits) 3rd octet digit (3 bits)
USER access right s GROUP access right s OTHERS access rights
ru w
u
xu rg w
g
xg ro w
o
xo
ru, wu, xu, rg, wg, xg, ro, wo, xo are all single bits.
In UNIX, there are 3 kinds of access rights:
r: means Read access rights.
w: means Write access rights, not applicable here.
x: means eXecute access rights.
To give an example, suppose user AAA’s UID is 123, GID is 5. Group BBB’s
GID is 9.
If you would like to give Read and eXecute access rights to user AAA, p lease
fill in the
UID
field with 123. FISC CDM will not check
GID
value in this case.
As for
Access Rights
, ru will be 1, xu will be 1, other binar y dig its are 0, so
Access Rights
should be 101 000 000 in binary, which is 500 in octet.
If you would like to give Read and eXecute ac c ess righ ts to group BBB, please
fill in the
GID
field with 9. FISC CDM will not check
UID
field here. In this
case, r
g
=1, xg=1, other binary di gits are 0, so
Access Rights
should be 000
101 000 in binary, which is 050 in octet.
Importa nt!
Please click the icon “Update” on the bottom of
this page after making new changes to the
TCP/IP setting parameters in order to activate the
changes you made.
Click HTTP Users to manage access rights of HTTP users.
You will see an HTTP user list here. There are 2 fields:
User Name and Read/None. If you want to grant user AAA

Configuration and Management
59
of HTTP access right, choose user AAA’s Read and click
the Update button.

The FISC CDM User’s Manual
60
HHooww ttoo CCoonnffiigguurree aanndd CCrreeaattee CCDD IImmaaggeess
Basic Concepts and Terminology
1. To start mirroring, simply enable any CD drive (select
Physical Share under Share Control Menu) to b e the
"Mirror Drive". Once you put a CD into that drive, the
Mirror operation will be initiated as per the configuration in
the CD Mirror Function menu. Please refer to the
“Configure CD Mirror Options” subsection later in this
section for more details of the configuration.
2. The CD mirror images are organized as “slots”. Each hard
drive is able to host up to 80 slots, or CD images. You may
wish to think of the hard drive as a large CD changer with
80 slots. Creating a CD image on a hard drive is just like
putting a CD into a changer slot.
3. You can host up to 480 CD images if the CD server is
connected with 6 hard drives, or 640 images with 8 hard
drives. There is no limitation on the size of hard drive. The
maximum size per CD image is 4GB.
4. Every time you create a CD image, a corresponding
Physical Share will automatically be created to all the
protocols that have been enabled. The default share –
“Root” (or any of the 7 customizable virtual shares) can host
up to 63 shares.
Adding & Initializing Hard Drive For CD Mirroring
To install hard drives, simply connect them with the controller’s
IDE channels starting from channel #1 master & slave then #2
master & slave etc. Up to 6 drives on three channels.
Note: We suggest using hard drive of the same brand. If you install
a single drive, please configure it as master and do not connect any
other device on the same channel.
Once installed, all the hard drives will be initialized (erased) upon
boot-up.
Note: The CD server WILL NOT check if the hard drive has data
on it.

Configuration and Management
61
Configure CD Mirror Options
Please click Share Control in the left frame of the Administration
Page. On the page, select a real CD-ROM drive in the list box
below “Please select a Physical Share device :”. Then click the
Configure button to enter the Physical Control Menu. If you select
a real CD drive, you should see a Physical Control Menu as below.
Scroll the page down until you see CD Mirror Function.

The FISC CDM User’s Manual
62
The CD Mirror Function submenu contains the following items:
1. Mirror CD
2. Target Name
3. Launch Ta rget
4. Launch Schedule
5. Mirror Option
Each item is described below.
Mirror CD: Check this to enable this drive as a Mirror Drive
Target Name: You can specify how to name the created CD/DVD
image here. “Default Name” means a name will be generated
automatically as CDxxxx. “Volume Name” means the created
CD/DVD image has the same name as the volume name of the
source CD/DVD.
Launch Target: Select one of the three options to choose where to
put the image:
! Auto & Smart Mode: The CD server will choose an
available hard drive and slot automatically, and checks if
there is a duplicate CD image existing on the any of the
hard drives. If a duplicated image is found, it will simply
bypass mirroring the CD.
! Auto & Force Mode: The CD server will choose the
available hard drive and slot automatically, and will NOT
check if there is a pre-existing duplicate CD image.
! Manual Mode: You can select the hard drive and slot
number manually. The duplicate CD check will not be
performed.
Launch Schedule: Select one of the two op tions to determi ne when
to launch the mirror operation:
! As Soon A s Possible: The Mirror job will start as soon as
the CD is inserted into the CD drive.
! Schedule M irror Date: Start mirror job at the given date
and time.
Mirror Option: Check any of the options for more convenient
scheduling and control:

Configuration and Management
63
! Prioritized network access: Check this to set mirroring
jobs to a LOWER priority than network CD access. This
option will speed up network access and is useful if the
CD server is located in a busy CD networking
environment.
! Lock CD door during mirror: If enabled, the door of
Mirror Drive cannot be opened by pushing the eject
button on the CD drive during the mirroring operation.
! Eject CD when mirror is completed: CD server will eject
CD when the mirror job is finished. This option is valid
for both successful or failed mirror operations.
Note: You need to check the event-log (or under the Share Name in
the CD List) to make sure that the mirroring job has been successful.
How to Create CD images
Here are the steps to create a CD image.
1. Choose the CD drive as the Mirror Drive by enabling the
Mirror CD check box on its Physical Share Menu (under
Share Control Menu).
2. Configure the options, as you required. As a normal default
setup, you might choose Auto & Smart Mode and check
Eject CD when mirror is completed.
3. Click the Update button.
4. Put the target CD into the Mirror Drive. The mirror function
starts automatically.
5. Check if the mirror images are created successfully by either
clicking on the Share Name in the CD-ROM List (the
additional images will be displayed as additional hard d r ive
slots) or reading the Run-Time Event Log on the Statistics
menu.
List CD Images on Hard Drives & Delete CD Images
Please go to the Maintenance Menu by clicking Maintenance on
the left frame of the Administration page.
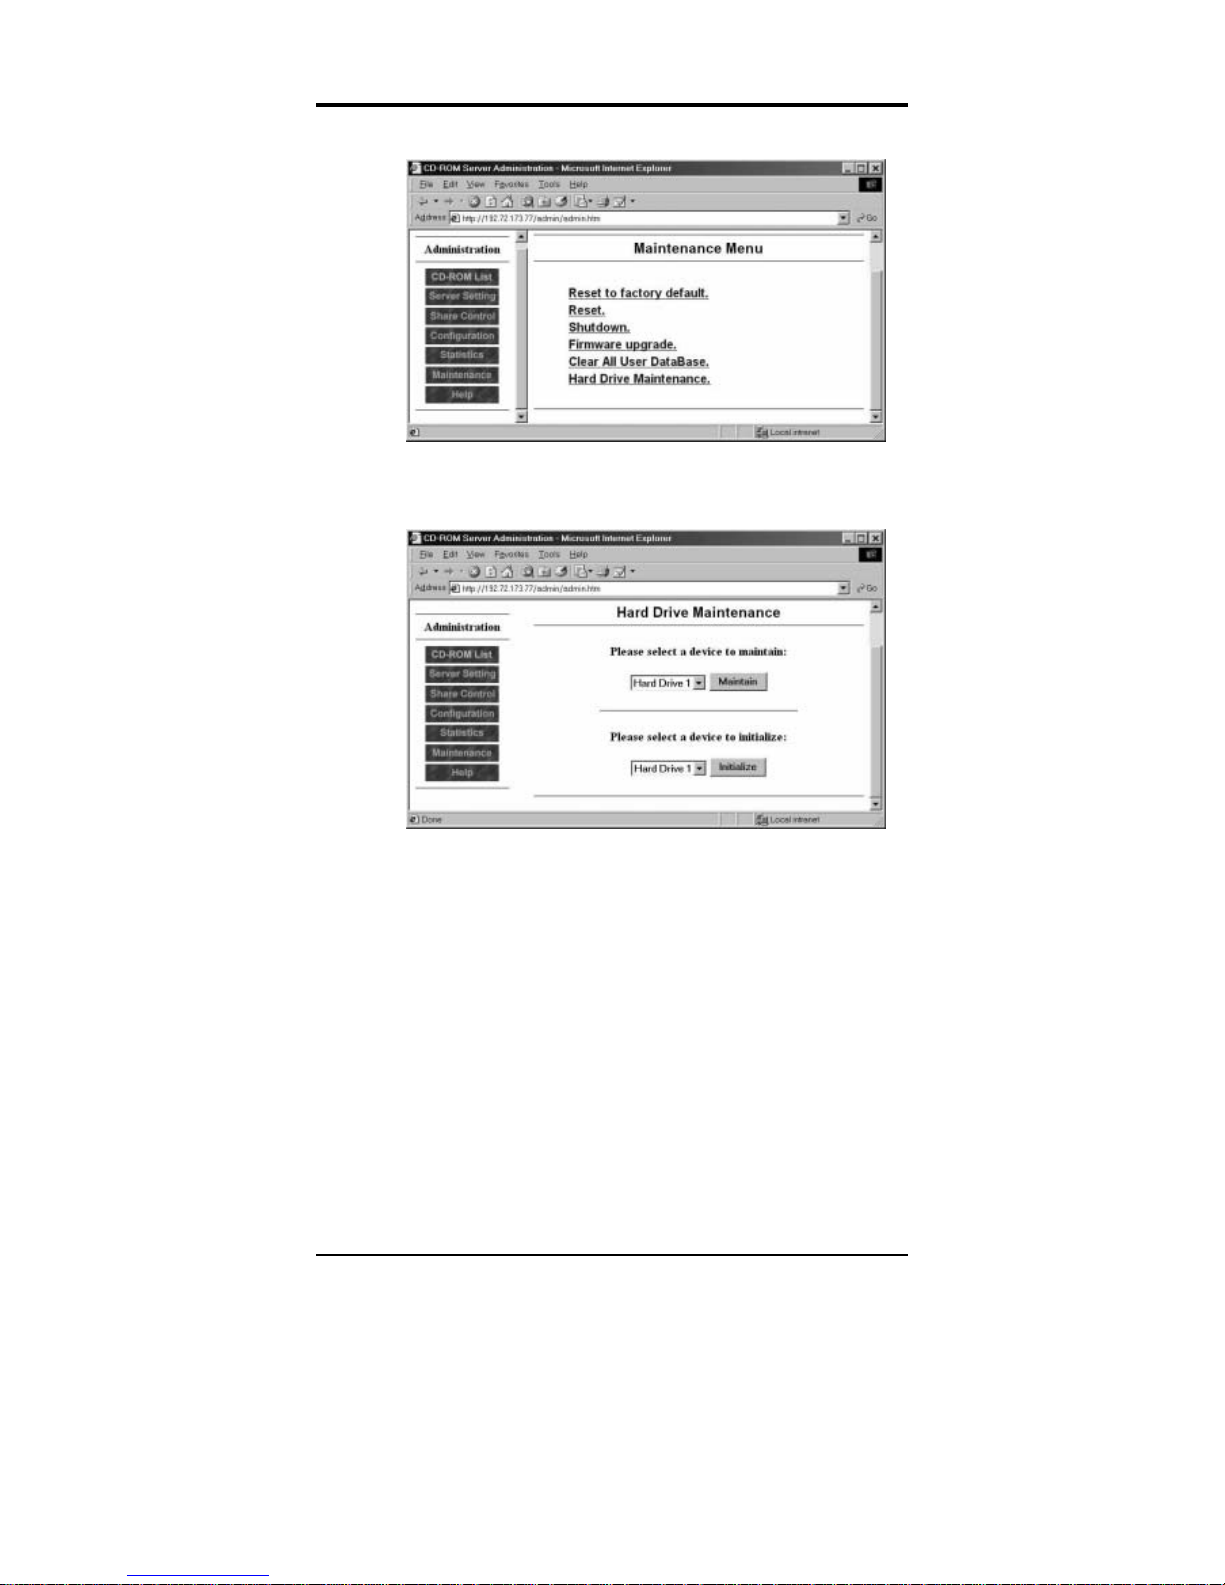
The FISC CDM User’s Manual
64
On the Maintenance Menu, click Hard Drive Maintenance. The
screen will appear as below.
Please choose a hard drive in the list box next to the Maintenance
button. Click the Maintain button to bring up the follo wing screen.
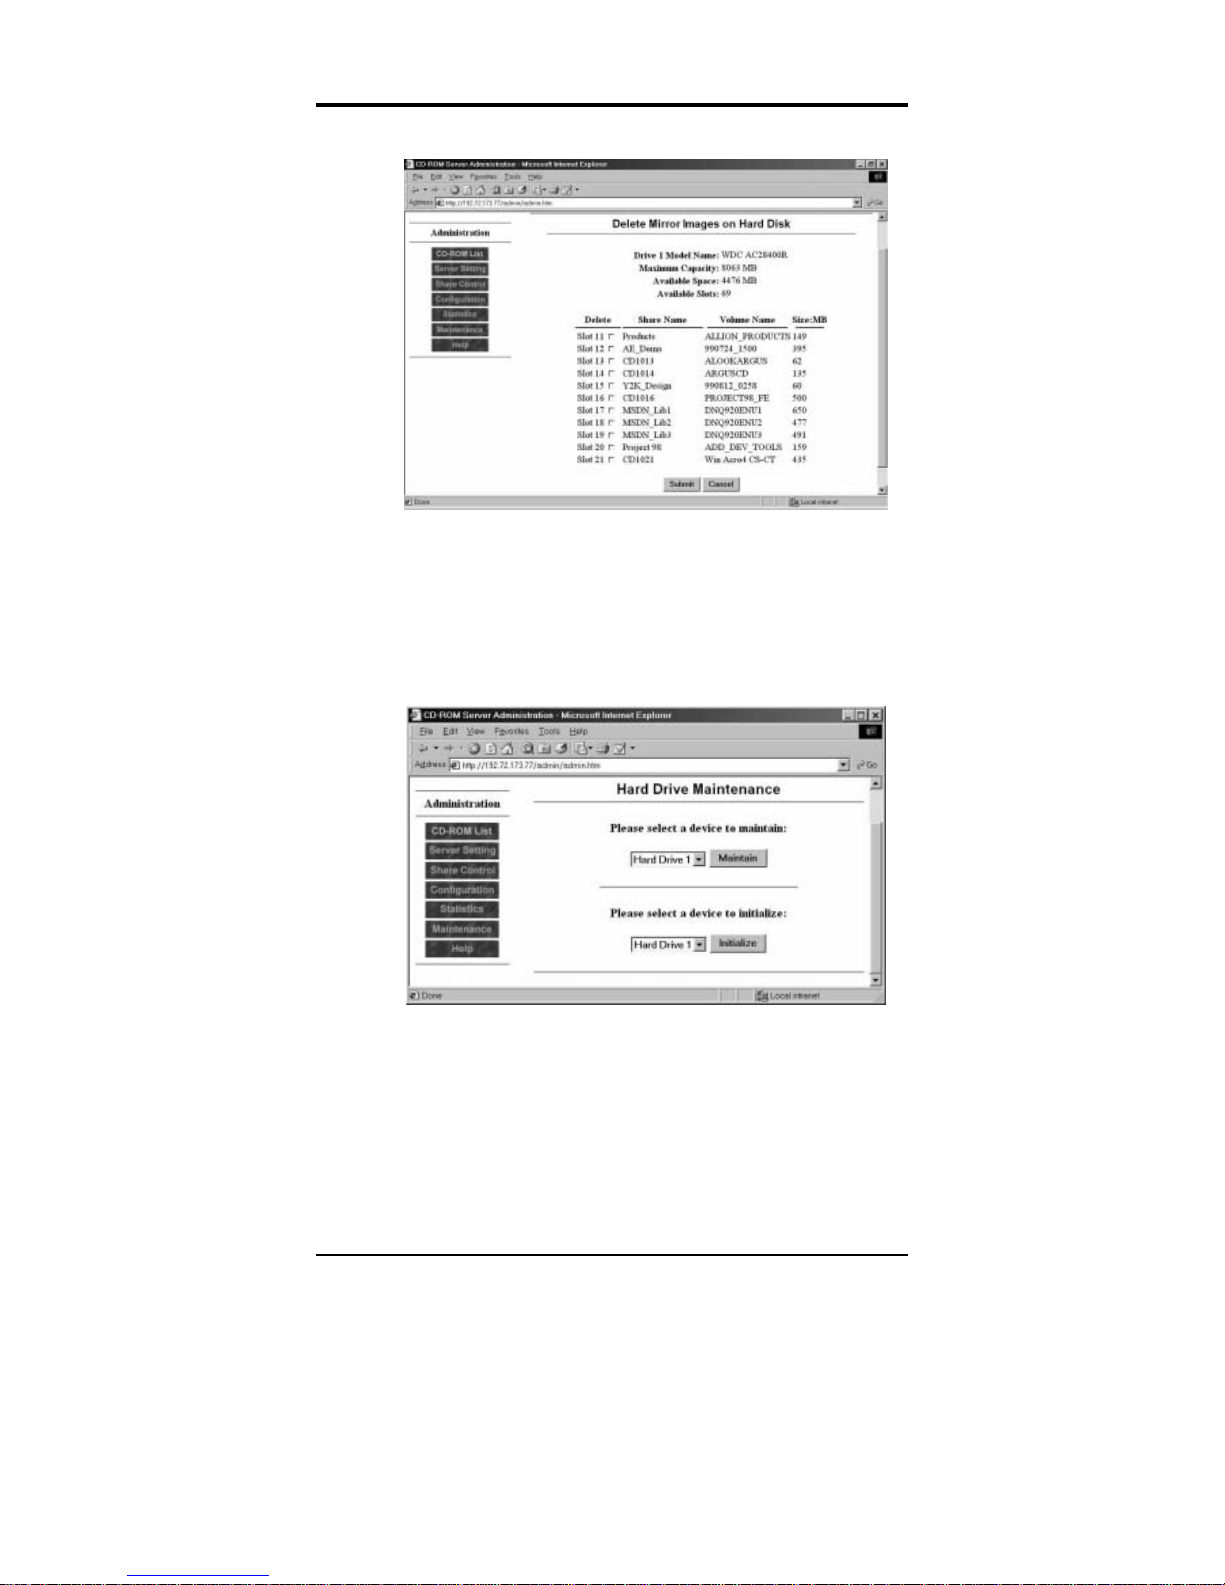
Configuration and Management
65
On the screen, it displays the information about the hard drive,
including the model name of the hard drive, its maximum capacity,
available space, and available slots (the number of empty slots).
Also included is a list of all CD images on the hard drive.
To delete a CD image, please check the corresponding Delete check
box and click the Submit button.
You can manually initialize (format) a hard drive installed in the CD
server. To initialize a hard drive, choose a hard drive in the list box
next to the Initialize button on the Hard Drive Maintenance menu.
It will bring up the screen:

The FISC CDM User’s Manual
66
Click the Submit button on the screen to proceed. The hard drive
will be initialized the next time the system restarts.
Note: This can also be used as a quick way of deleting all CD
images on a hard drive.
This concludes Chapter Three. Chapter Four covers using the FISC
CDM on client workstations.

C
HAPTER
4
UUssiinngg FFIISSCC CCDDMM oonn CClliieenntt
WWoorrkkssttaattiioonnss
FISC CDM integrates itself into your network once the setup and
configuration is completed. You can access the FISC CDM server
by means of the browsing and mapping tools that are built into your
network operating system. The following sections briefly explain
how to setup each client and access the FISC CDM from your
desktop in various client environments. For technical support,
please consult your network administrator or FISC CDM dealer.
IInnssttaalllliinngg SSooffttwwaarree CCoommppoonneennttss iinn WWiinnddoowwss
9955//9988
Before you can use t he FIS C CDM und er Wi ndo ws 95 /98 , you must
ensure that you have the necessary protocol, client, and service
components configured in the Control Panel. The following section
will help you to enable these network options.
Please follow these instructions to configure the client, protocol and
service components:
1. Open the Control Panel and double click the Network icon.
The Network Configuration screen will open:
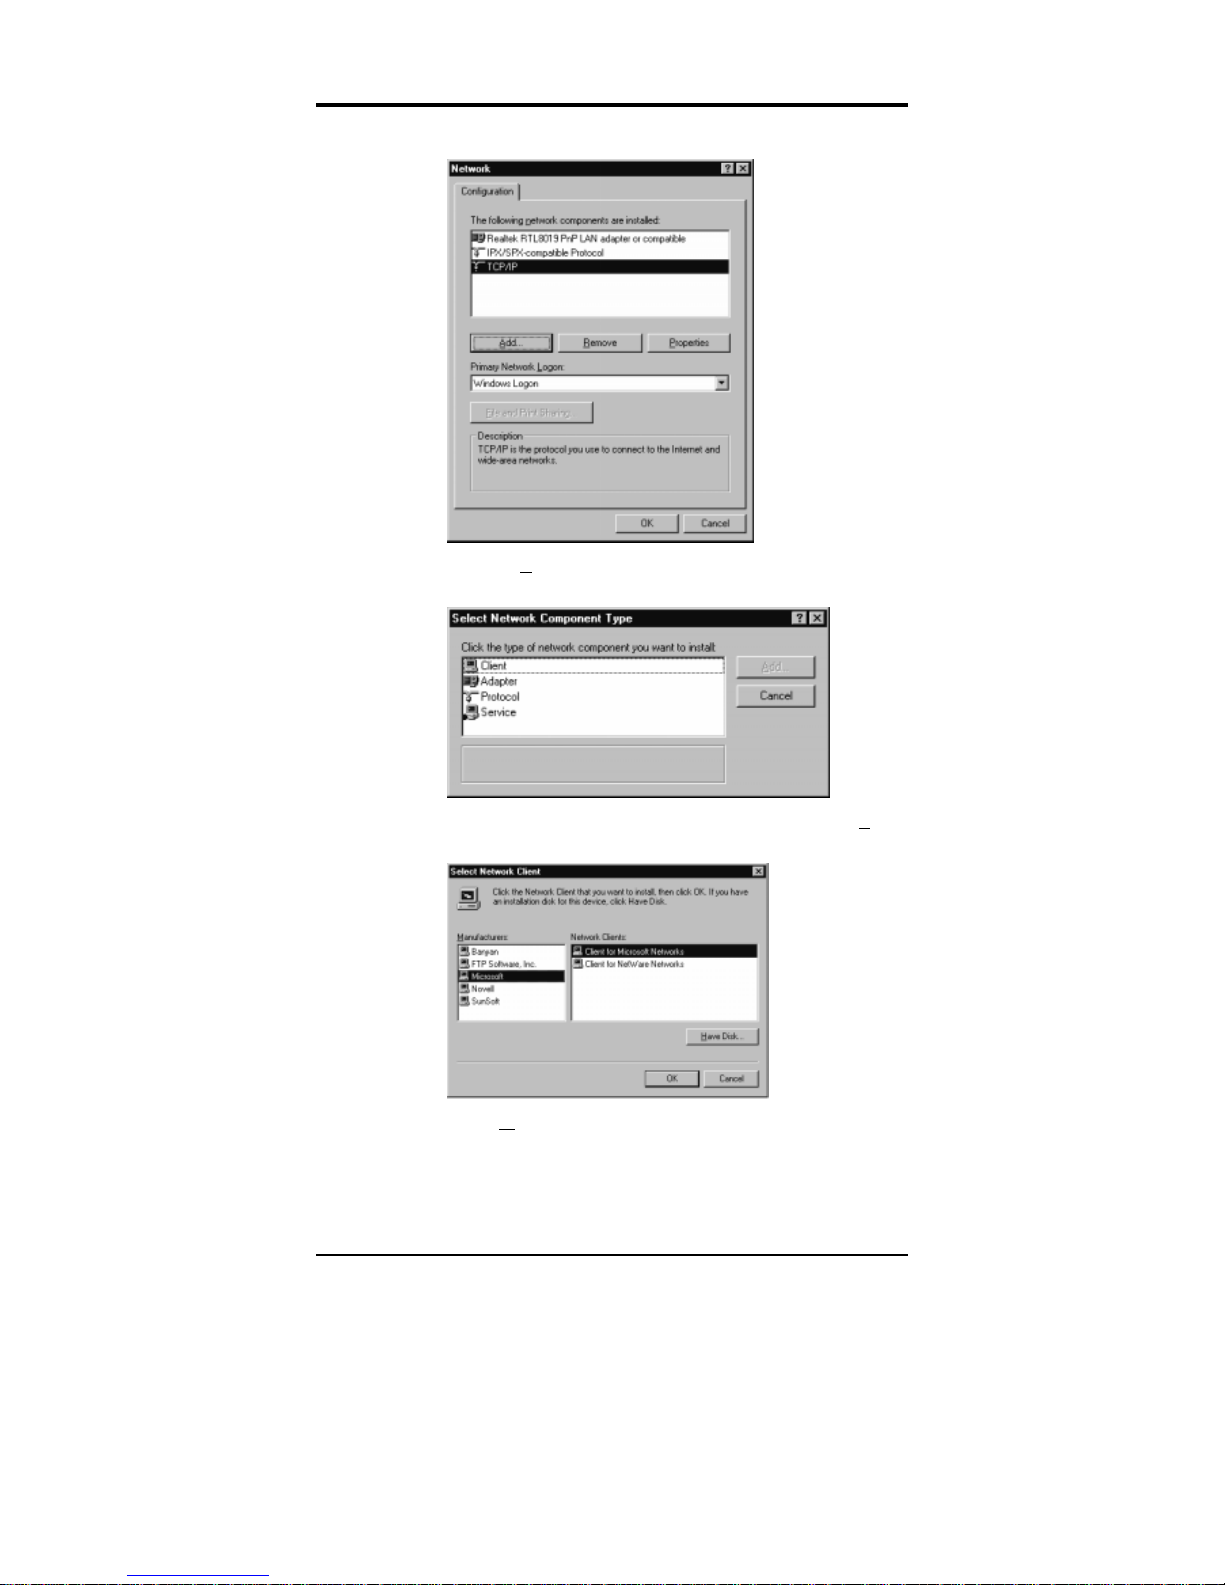
The FISC CDM User’s Manual
68
2. Click the A
dd button. The Select Network Component
Type dialog box will open:
3. Choose the “Client” network component and click the A
dd
button. The following screen will appear:
4. Under M
anufacturers, choose “Microsoft”. Under Network
Clients choose “Clients for Microsoft Networks”. Click OK.
You will be returned to the Network Configuration screen.
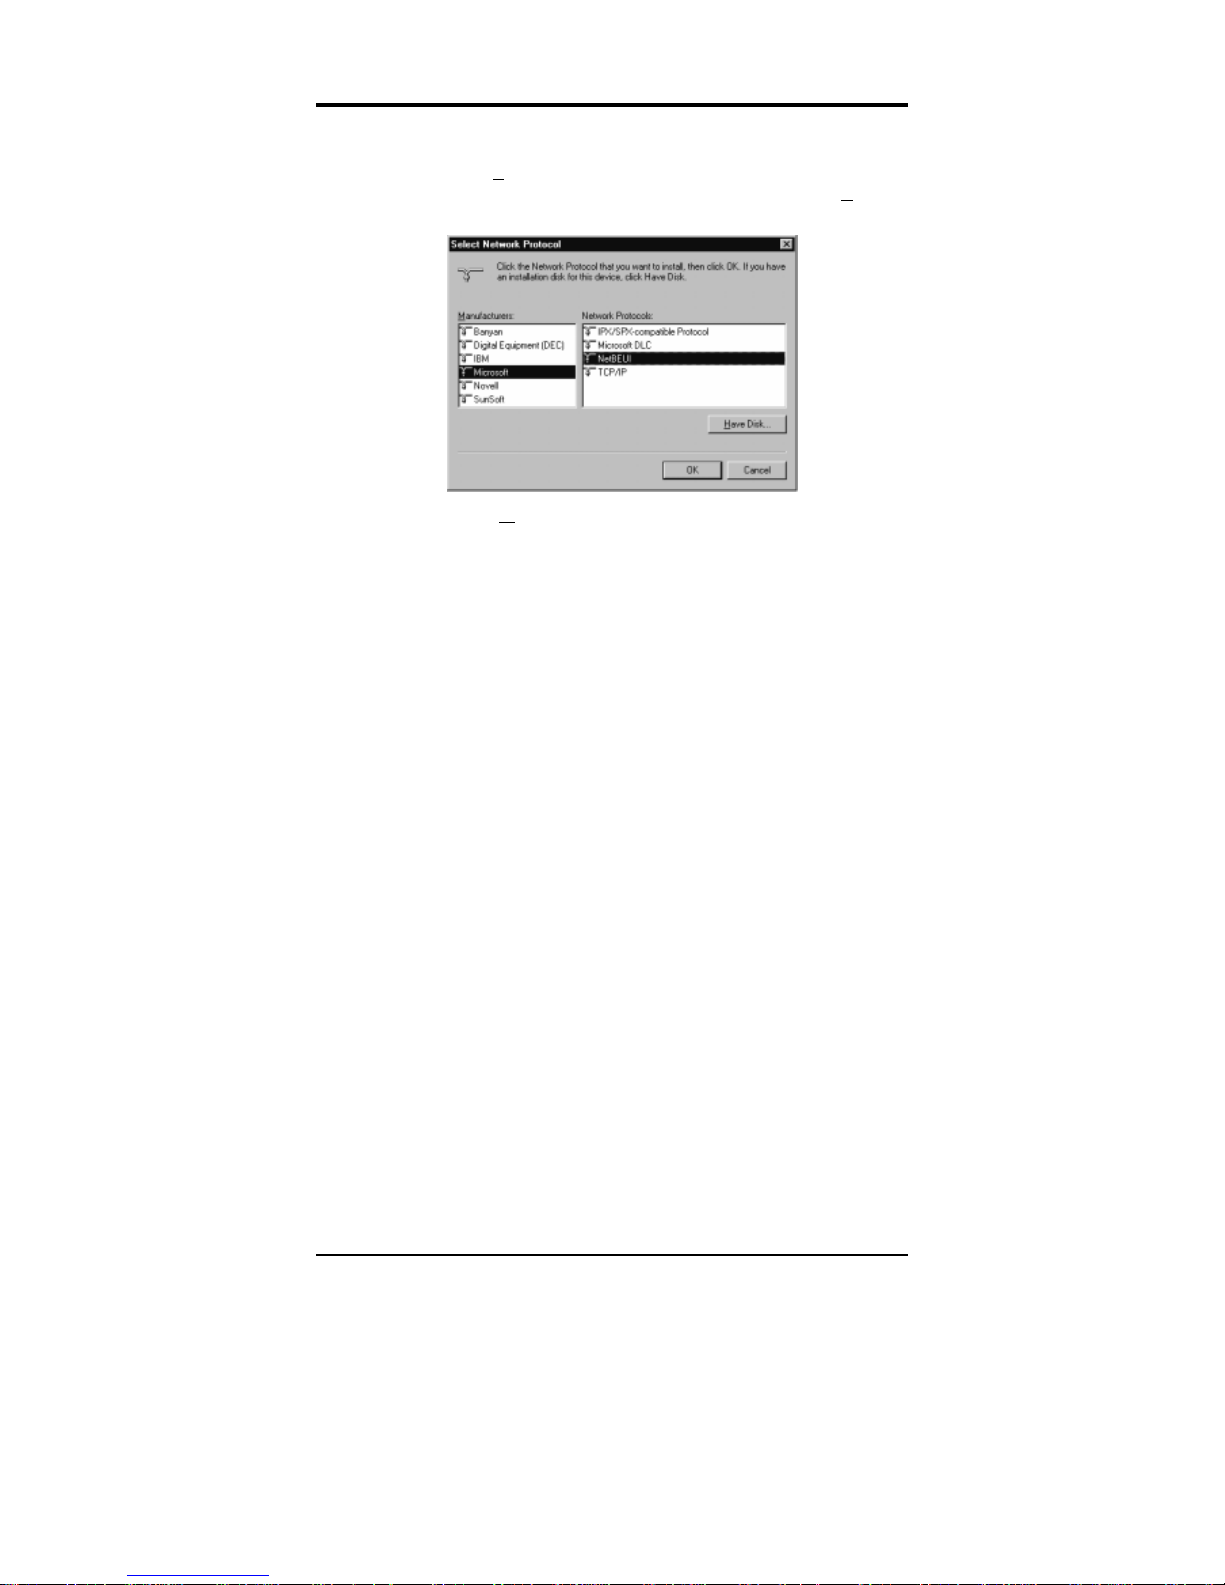
Using FISC CDM on Client Workstations
69
5. Click Add to open the Select Network Component Type
window. This time choose “Protocol” and click the A
dd
button. The following screen will appear:
6. Under M
anufacturers select “Microsoft”. Under Network
Protocols select “NetBEUI”. Click the OK button. You
will be returned to the Network Configuration screen.
7. If necessary, insert your Windows 95/98 CD-ROM into the
CD-ROM drive. Click OK again. Windows will copy files
to your HDD.
8. After Windows has finished copying files, you will be
prompted to restart your system. This is necessary for the
above changes to take effect.
UUssiinngg FFIISSCC CCDDMM iinn WWiinnddoowwss 9955//9988
Start Windows Explorer or Network Neighborhood. The FISC
CDM will appear as a machine icon in the workgroup, whose name
was specified in “Server Name” under the “Server Setting Menu”
of the Administration Page of FISC CDM (refer to Chapter 3 —
Server Setting Menu).
Double click the icon that represents the FISC CDM. You will find
all the CD/DVDs in the FISC CDM. The physical share name of
each CD-ROM is displayed as a file folder with default names as
CD1, CD2, etc. The virtual share name represents a group of all
CD-ROMs, also displayed as a file folder with the default name
ROOT. Refer to the following illustration:

The FISC CDM User’s Manual
70
You can now access the FISC CDM by double clicking the file
folders mentioned above.
The CDs inserted in a CD changer will also be shown as folders, the
same way as CDs inserted in a CD-ROM drive. Please refer to User
Manual Chapter 3 "Configuration and Management" to configure
them.
Mapping FISC Drives in Windows 95/98
To map the FISC CDM, follow these steps:
1. Start Windows Explorer from the Start Menu.
2. Expand the Network Neighborhood. The FISC CDM
SMB server name will be shown beneath the specific
workgroup (“WORKGROUP” is the default workgroup
name of the FISC CDM).
3. Double click the server name of the FISC CDM. The
followi n g window wil l op e n:

Using FISC CDM on Client Workstations
71
4. Choose a specific share (such as “CD1”) and open Tools,
“Map Network Drive…” from the menu to map this share to
a local client. Note that you must have a CD-ROM inserted
in the CD-ROM drive to map the drive using this method.
5. Click OK to finish mapping the drive.
Alternatively, you can click the folder icon you want using the right
mouse button and select “Map Network Drive…” from the dropdown menu. All the physical shared CD-ROMs and virtual shared
CD-ROM groups can be mapped as drive letters. Please refer to
your Windows 95/98 User’s Manual for more information on how to
map network-shared directories as drive letters.
IInnssttaalllliinngg SSooffttwwaarree CCoommppoonneennttss iinn WWiinnddoowwss NNTT
Before you can use the FISC CDM under Windo ws NT, you must
ensure that you have Windows NT protocol and service components
configured in the Windows NT Control Panel. The following
section will help you install these network components.
1. Open the Windows NT Control Panel and double click the
Network icon.
2. In the Network Configuration window, click the Protocols
tab. Click the A
dd button. You will see the following
screen:

The FISC CDM User’s Manual
72
3. Under N
etwork Protocol select the "Net BEUI Protocol"
option and click OK.
4. In the Network Configuration window, cl ick the Services
tab. Ensure that the following services are enabled:
• Computer Browser
• NetBIOS Interface
• Workstation
5. If the service is not enabled, click the A
dd button to add the
service.
6. Your screen should look like the following:
7. When you have finished c onfiguring the services, click the
OK button. You will be prompted to restart your computer.
8. Click Y
es to restart the computer and finalize the
configuration of the client in Windows NT.

Using FISC CDM on Client Workstations
73
UUssiinngg tthhee FFIISSCC CCDDMM iinn WWiinnddoowwss NNTT
The way to use the FISC CDM in Windows NT 4.0 is quite similar
to the routine in a Windows 95/98 environment. Start “Network
Neighborhood”, and select the “Microsoft Windows Network” item.
Double click the FISC CDM name you assigned at setup. The
physical share names of CD-ROM drives are displayed as file
folders named CD1, CD2, etc. by default. The virtual share name of
the group containing all CD-ROMs is also displayed as a file folder
named ROOT by default.
IInnssttaalllliinngg SSooffttwwaarree CCoommppoonneennttss iinn WWiinnddoowwss ffoorr
WWoorrkkggrroouuppss
Before you ca n use t he FI SC CDM unde r W indo ws for Wo rkgro ups,
you must ensure that you have the Windows NetBEUI (for file
access) and TCP/IP (for access through the Web browser) protocols
configured. The following section will help you install these
network opti ons.
1. Open the Windows Control Panel and double click the
Network icon.
2. In the Network Setup window, click the Protocol tab.
Click the A
dd button. You will see the following screen:
3. To access the FISC CDM server in Windows for
Workgroups, install the Microsoft TCP/IP and the NetBEUI
protocols.
4. Click OK to install the protocols. You will be prompted to
restart your machine.
5. Click Y
es to restart your computer and finalize the
installation of the NetBEUI and TCP/IP protocols.

The FISC CDM User’s Manual
74
UUssiinngg FFIISSCC CCDDMM uunnddeerr WWiinnddoowwss ffoorr
WWoorrkkggrroouuppss
In Windows for Workgroups, start the File Manager, and then
select “Connect Network Drive...” in the Disk menu. A dialog box
entitled Connect Network Drive will pop-up.
In the Show Shared Directories frame, double click the FISC CDM
workgroup to expand the entire server in this group. If the FISC
CDM workgroup name does not appear in this list, click the Browse
button to refresh the network status.
Double click the FISC CDM name; each CD-ROM now appears as
a folder in the lower part of the Share Directories field.
Mapping FISC Drives in Windows for Workgroups
To map the FISC CDM in Windows for Workgroups, please follow
these steps:
1. Start the File Manager program group.
2. Choose Disk from the menu bar and click “Connect
Network Drive”.
3. The SMB server name of the FISC CDM will be shown
beneath the specific workgroup (“WORKGROUP” is the
default FISC CDM wo rkgroup name).
4. Double click the FISC CDM name. The following window
will appear:

Using FISC CDM on Client Workstations
75
5. Choose a specific share (such as “CD1”) and press OK to
map this share to a local client. You can now access the
FISC CDM drive as a normal drive letter.
Please refer to your Windows for Workgroups User’s Manua l for
further information on how to map network-shared directories as
drive letters.

The FISC CDM User’s Manual
76
UUssiinngg FFIISSCC CCDDMM uunnddeerr DDOOSS wwiitthh MMiiccrroossoofftt
NNeettwwoorrkk CClliieenntt 33..00
In order to access FISC CDM under DOS environment, please
install Microsoft Network Client 3.0 and enable NetBEUI or TCP/IP
protocol then use the "NET USE" command to access FISC CDM.
Example 1:
Syntax:
net use <logical drive letter:> \\(FISC CDM's name)\share name
To map the share name "cd1" of a FISC CDM with default server
name "smbd8040007" as the drive letter F, type:
net use f: \\smbd8040007\cd1
Example 2:
Syntax:
net use * \\(FISC CDM's name)\share name
To map the share name "cd1" of a FISC CDM with default server
name "smbd8040007" as the next available drive letter, type:
net use * \\smbd8040007\cd1

Using FISC CDM on Client Workstations
77
UUssiinngg FFIISSCC CCDDMM uunnddeerr OOSS//22 WWaarrpp 33..00
To access the FISC CDM server under OS/2 Warp 3.0, install
NetBIOS over the TCP/IP protocol available in Warp Connect.
(NetBIOS is available in the network kit for OS/2 Warp.) There are
two ways to access the FISC CDM from an OS/2 computer: by
using the “Net Use” command at the OS/2 command prompt; or by
using the "OS/2 Peer" icon at the Desktop level.
Connecting by means of the NET USE command
Example:
To view the share names on the FISC CDM with the default server
name “smbd8040007”, type:
net view \\smbd8040007
The above command lists all the available shares on the FISC CDM
“smbd8040007”.
To map the drive letter to a physical share "cd1" of a FISC CDM
with the default server name “smbd8040007”, type:
net use e: \\smbd8040007\cd1
The above command maps the drive letter E to the physical share
"cd1" on FISC CDM “smbd8040007”(peer desktop).
Accessing the FISC CDM by Means of an OS/2 Peer
1. Click the OS/2 Peer icon on the Desktop.
2. Click the Sharing and Connecting icon in the OS/2 Peer
window.
3. Select “Create” from the Connection menu item.
4. Type the FISC CDM server name in the Workstation box.
5. Press [Tab].
After this, the OS/2 gains the share names from the FISC CDM and
displays them in the Share/alias box. Please wait a few seconds for
the shares list to appear. Then follow these instructions:
1. Select the Share name to connect from the Share/alias Box.
2. Select the drive letter from the Local driver letter Box.
3. Click the Create button or press [Enter].

The FISC CDM User’s Manual
78
UUssiinngg FFIISSCC CCDDMM uunnddeerr NNoovveellll NNeettWWaarree CClliieennttss
This section outlines the basic configuration settings for running
FISC CDM in the Novell NetWare environment. It also describes
how to access CD-ROM drives managed by FISC CDM from
various NetWare clients and how to setup the access restrictions.
Configuration for NetWare
FISC CDM emulates itself as a Novell NetWare 3.x bindery server.
In order to explore the name and resources of the FISC CDM to
every NetWare client, a Novell NetWare 3.x/4.x server is
required in the same network where the FISC CDM is located.
NetWare Server Name
The default NetWare server name of the FISC CDM is
ANWXXXXXXXX, where XXXXXXXX is the last 8 dig its of the
FISC CDM serial number. This name can easily be changed via the
FISC CDM HTML administration page under “Server Setting –
NetWare server name” using any Internet browser (refer to Chapter
3 — Server Setting Menu).
NCP Protocol
Be sure to enable NCP protocol. The default values of this option is
set to “enable”; and this option can be easily found/changed in the
HTML administration page under “Configuration” (refer to
Chapter 3 — Configuration).
Installing As a Bindery Server
Bindery server characteristics are an advantage to using the FISC
CDM. No specific installation is required prior to accessing the
FISC CDM. Please see information later in this section regarding
security management in the NetWare bindery mode.

Using FISC CDM on Client Workstations
79
Volume / Directory Structure for NetWare
The FISC CDM will be available to your system as a NetWare file
server. Just like any other NetWare file server, FISC CDM has it
own volume and directory (folder) structure where files are stored.
The “SYS:” is the only available volume of the FISC CDM when it
configures itself as a NetWare bindery server. The content
contained be neath “SYS:” depe nds on the user na me tha t you use to
access the FISC CDM. The following examples will illustrate ho w
to use different user names to access the FISC CDM:
Example #1:
If you are using “ROOT” (default share name of virtual share device)
as the user name for FISC CDM to authenticate, the directory
structure should look as follows:
In this case, you are able to access any CD titles managed by the
FISC CDM from your NetWare client if the “ROOT” user has been
successfully authenticated.
CD1
(CD Title #1)
SYS:
(Virtual Share -
- "ROOT")
Data contained in
CD Title #1
CD2
(CD Title #2)
CD3
(CD Title #3)
CD8
(CD Title #8)
Volume Shares
Directories /
Files
Data contained in
CD Title #2
Data contained in
CD Title #3
Data contained in
CD Title #8

The FISC CDM User’s Manual
80
Example #2:
If you are using “CD1” (the default share name of physical share
device #1) as the user name for the FISC CDM to authenticate, the
directory structure should look as follows:
In this case, you are authorized to access directories/files located
beneath CD1 (CD title #1) from your NetWare client if “CD1” user
has been successfully authenticated.
Security Management for NetWare
The way to ma nage se curit y fo r NetW are user depe nds on using t he
mode NetWare Bindery Mode without Authentication.
In this mode, user authentication is not required to access the FISC
CDM. This means that it is not necessary for the FISC CDM to
logon to any authentication server (NetWare 3.x) to authenticate the
user and read which group he belongs to. To restrict access to the
FISC CDM from NetWare clients, a set of built-in users is already
provided in the FISC CDM. For NetWare clients, the user name and
password required for accessing the FISC CDM are naturally
coming with the share name and share password of shared devices.
In short, “Share name” of share device = “User name” for accessing
this share device and “Share password” of share device = “User
password” for accessing this share device
Sub-directory
located in root
directory of CD
title #1
SYS:
(Physical
Share --
"CD1")
Data contained in
this directory
Sub-directory
located in root
directory of CD
title #1
Sub-directory
located in root
directory of CD
title #1
Files located in
root directory of
CD title #1
Volume Folders / Files
Data contained in
this directory
Data contained in
this directory

Using FISC CDM on Client Workstations
81
Before you can set up the FISC CDM to be used with Novell
NetWare Clients, you must first install the appropriate protocols and
clients for your platform. The next section will briefly cover the
installation of the protocols and clients for NetWare.
Configuring Clients and Protocols for NetWare Clients
The following sections describe the configuration of Clients and
Protocols for various platforms running Novell NetWare.
Windows 95/98 without Client 32 for NetWare
Configuring Your Client
Make sure that the following Protocols and Clients are installed in
the Network Neighborhood Properties dialog box to enable you to
access data from the FISC CDM.
IPX/SPX Compa tible Protocol
Client for NetWare Networks

The FISC CDM User’s Manual
82
Map Drive from FISC CDM
To map the FISC CDM, follow these steps:
1. Start Windows Explorer from the Start Menu.
2. Expand the Network Neighborhood icon and then expand
the Entire Network. The FISC CDM NCP server name
(ANWxxxxxxxx) will be shown as follows:
3. Double click the NCP name “FISC CDM”. The system will
prompt you to enter a user name and password as follows:
Importa nt!
Use the share name (root, CD1, etc.) as the User
Name, and the share password as the Password.
4. After a user name and password have been entered,
available resources will be shown in the Windows
Explorer as follows:
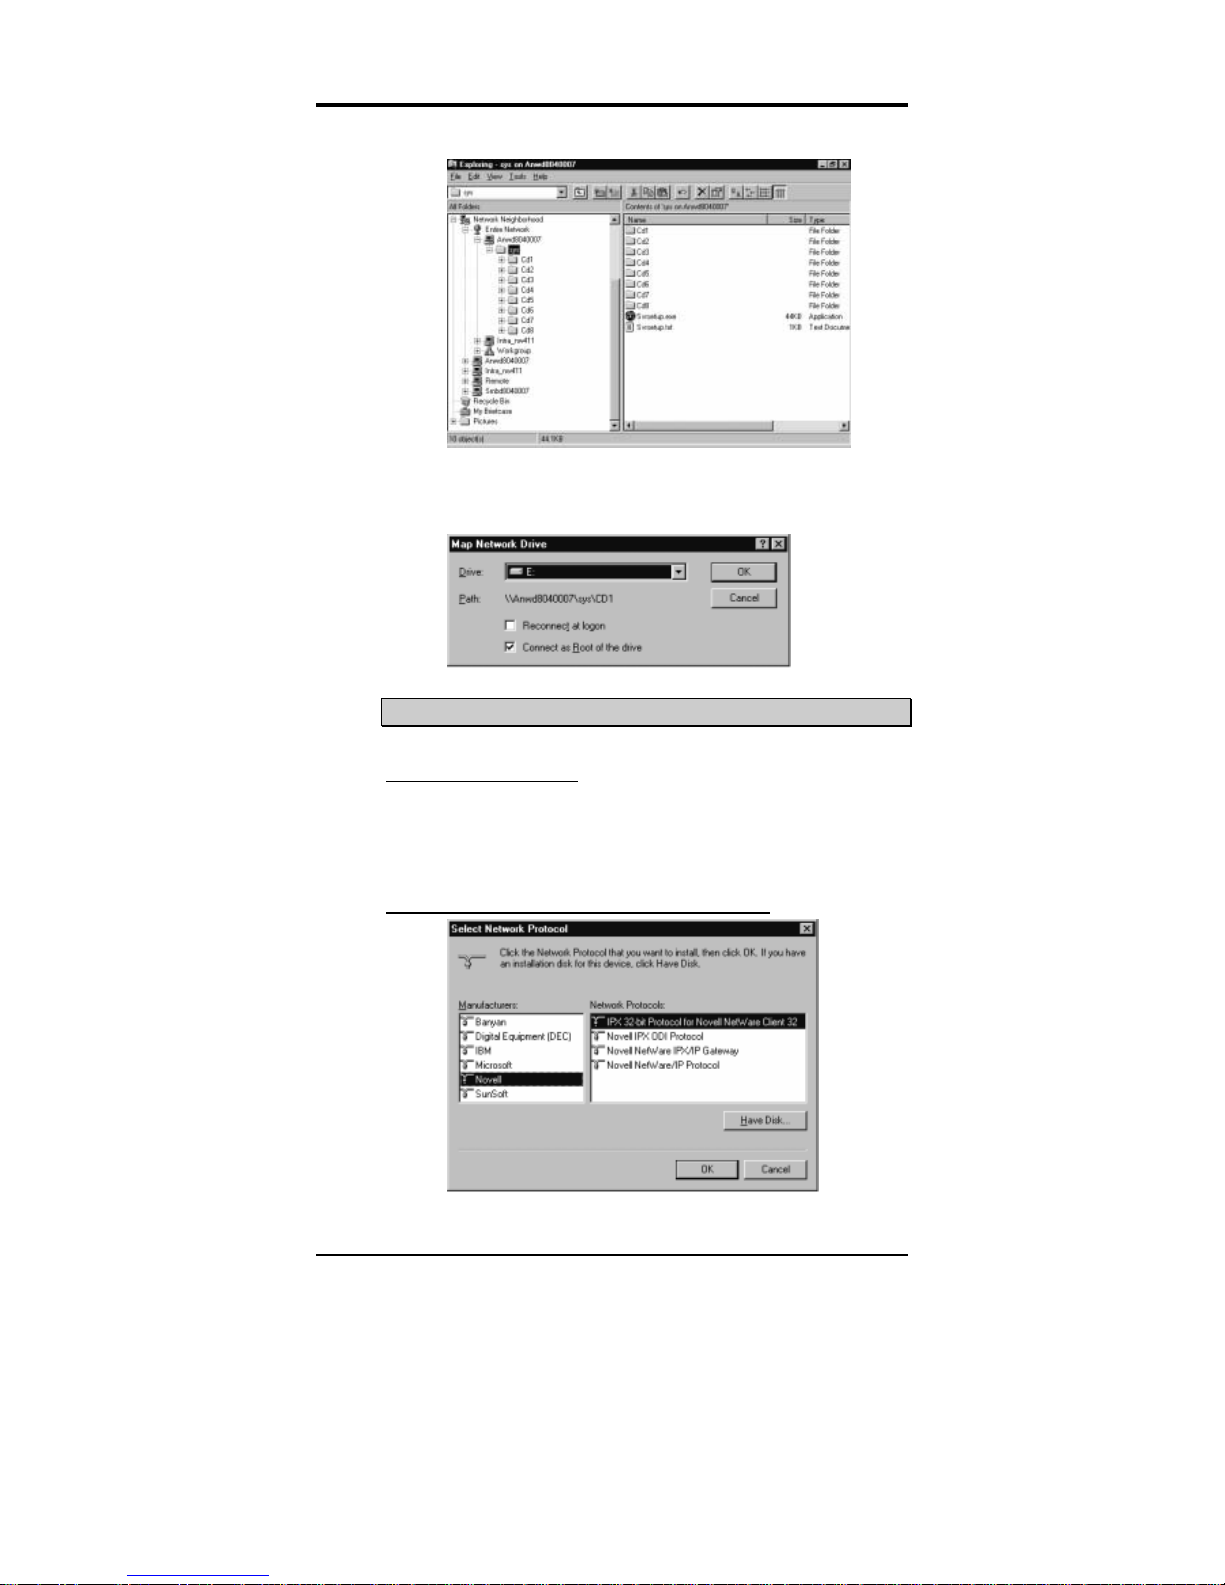
Using FISC CDM on Client Workstations
83
5. Choose a specific volume (such as “SYS”) or folder (such as
“CD1”). Click File on the menu bar and then click “Map
Network Drive…” to map this resource to a local client.
Windows 95/98 with Client 32 for NetWare
Configuring Your Client
Ensure that the following Protocols and Clie nts are installed in the
Network Neighborhood Properties dialog box to enable you to
access data from the FISC CDM.
IPX 32-bit Protocol for Novell NetWare Client 32
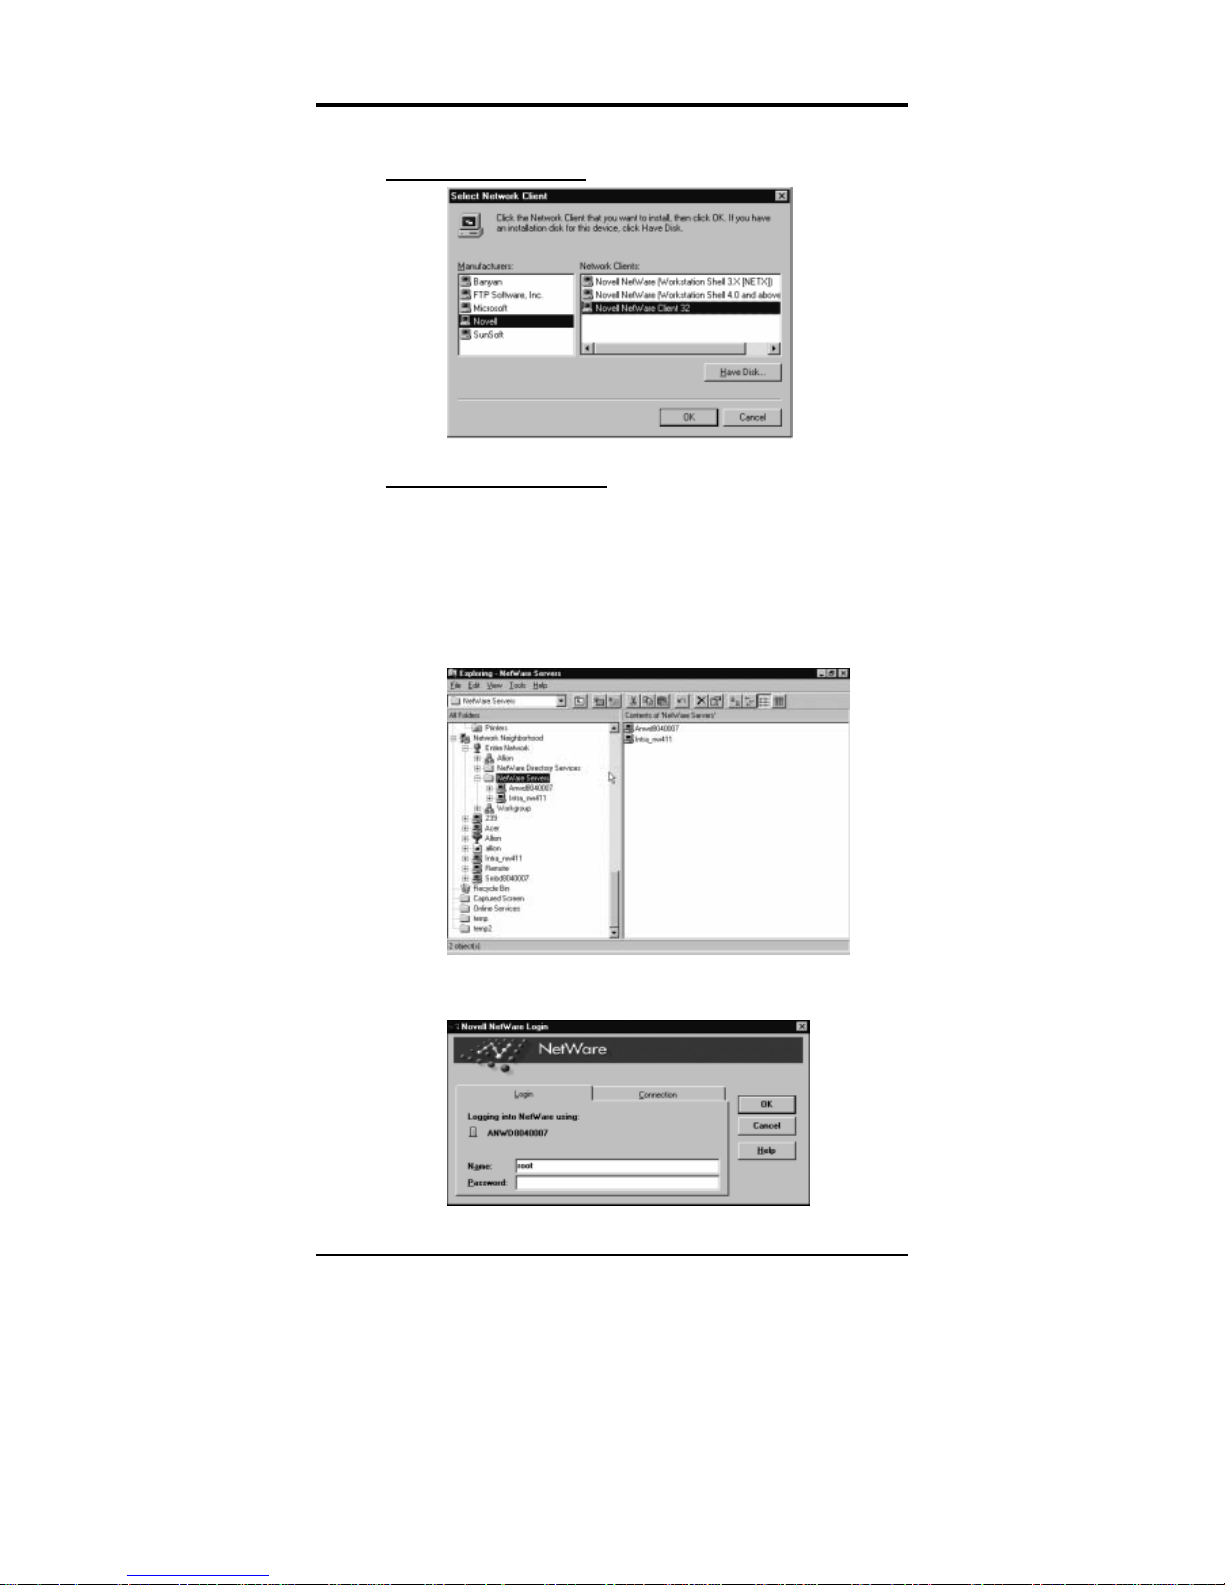
The FISC CDM User’s Manual
84
Novell NetWare Client 32
Map Drive from FISC CDM
To map the FISC CDM, follow these steps:
1. Start the Windows Explorer from the Start Menu.
2. Expand the Network Neighborhood icon and then expand
the Entire Network and NetWare Servers. The FISC
CDM NCP will be located beneath the “NetWare Servers”
group.
3. Double click the FISC CDM entry. You will be prompted
to enter a user name and password as follows:
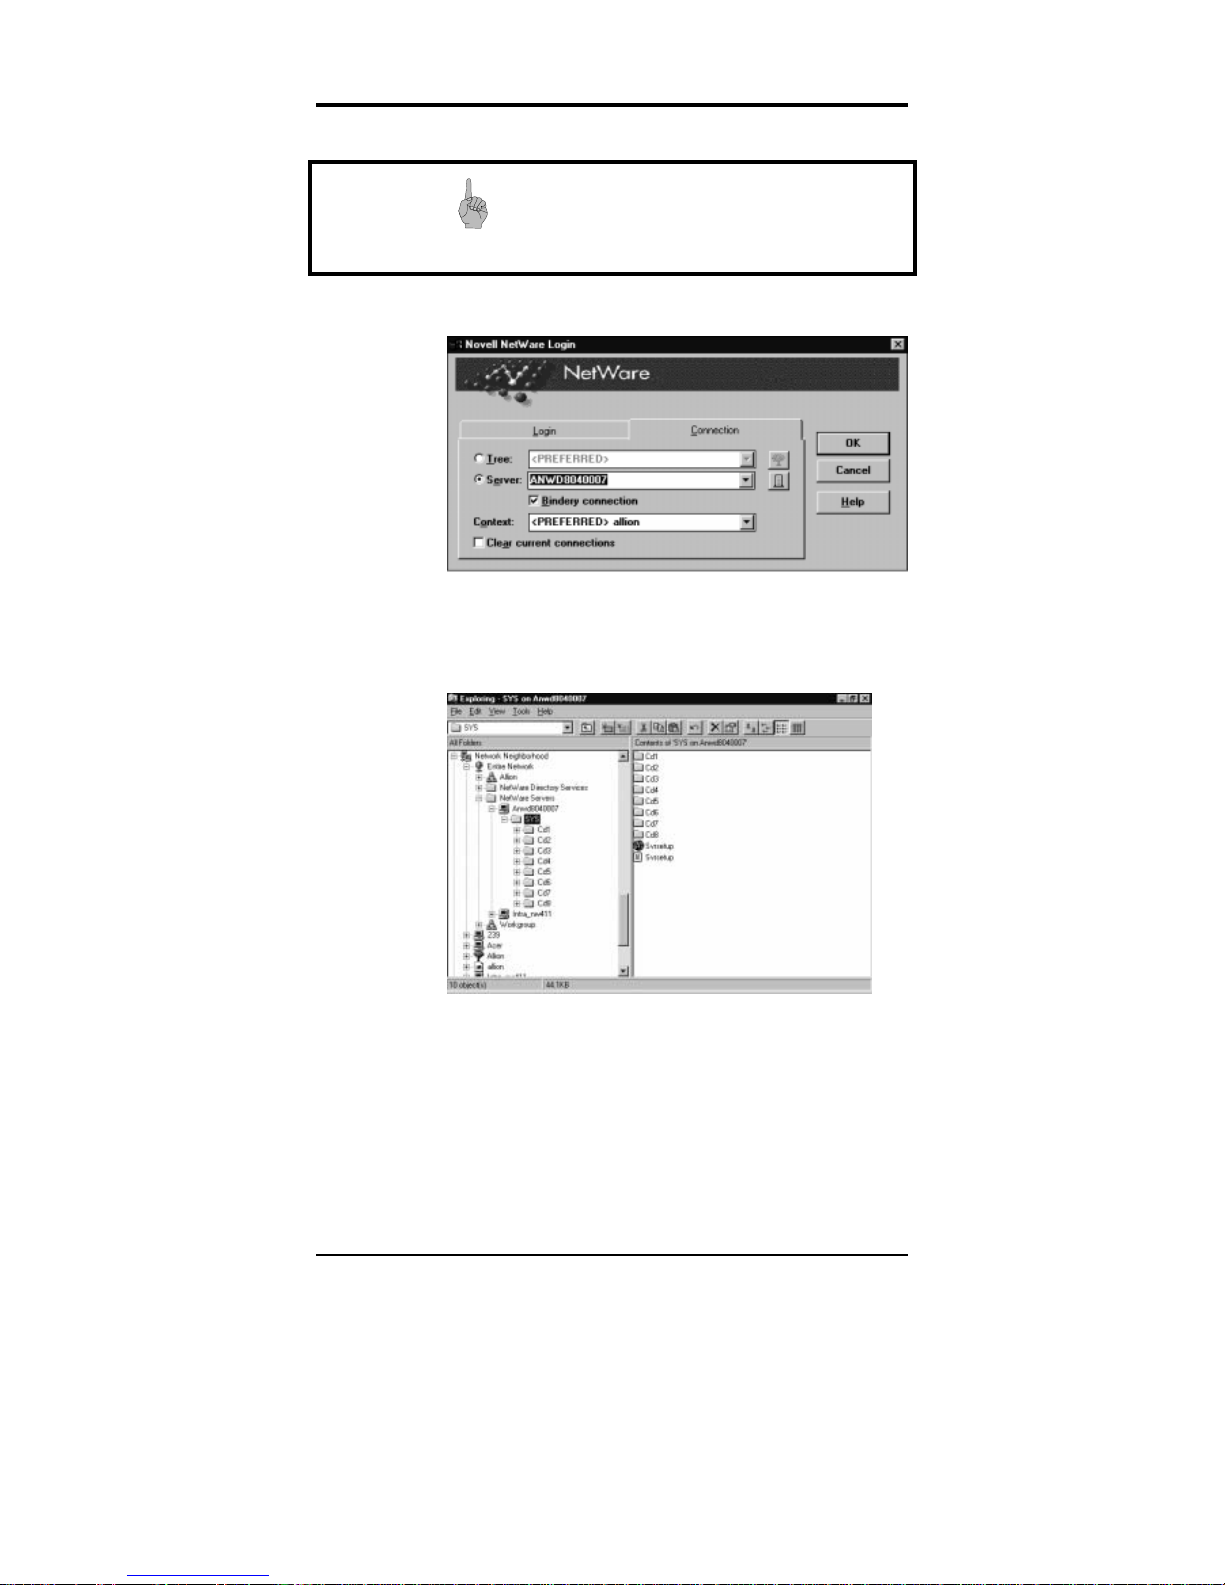
Using FISC CDM on Client Workstations
85
Importa nt!
Use the share name (root, CD1, etc.) as the User
Name, and the share password as the Password.
4. Click the Connection tab. The following screen appears:
5. Check “Bindery Connection”. Click OK to attach the FISC
CDM.
6. Once the FISC CDM has been successfully attached, expand
the “SYS” volume to display all available resources:
7. Choose a specific volume (such as “SYS”) or folder (such as
“CD1”) and click File, “Map Network Drive…”on the menu
bar to map this resource to a local client.

The FISC CDM User’s Manual
86
Windows NT 4.0 without IntraNetWare Client
Configuring Your Client
Ensure that the following Protocols and Services are installed in the
Network Neighborhood Properties dialog box to enable you to
access data from the FISC CDM.
NWLink IPX/SPX Compatible Transport
Gateway (and Client) Services for NetWare

Using FISC CDM on Client Workstations
87
Map Drive from FISC CDM
The procedure for mapping the drive is virtually the same as the
procedure for Windows 95/98 in the previous section.
Windows NT 4.0 with IntraNetWare Client
Configuring Your Client
Ensure that the following Protocols and Services are installed in the
Network Neighborhood Properties dialog box to enable you to
access data from the FISC CDM.
NWLink IPX/SPX Compatible Transport
Novell IntranetWare Client fo r Windows NT

The FISC CDM User’s Manual
88
Map Drive from the FISC CDM
The procedure for mapping the drive is virtually the same as the
procedure for Windows 95/98 in the previous section.
Windows for Workgroups without Client 32 for NetWare
Configuring Your Client
Be sure the following Protocols and Networks are installed in the
Network Setup before you access data from the FISC CDM.
Ensure that the following Protocols and Networks are installed in
the Network Setup dialog box to enable you to access data from the
FISC CDM.
IPX/SPX Compatible Transport
Microsoft Windows Network
Map Drive from FISC CDM
The procedure for mapping the drive is virtually the same as the
procedure for Windows 95/98 in the previous section.

Using FISC CDM on Client Workstations
89
Windows for Workgroup with Client 32 for NetWare
Configuring Your Client
Ensure that the following Protocols, Networks and NetWare Tools
are installed in the Network Setup and NetWare Client 32 dialog
boxes for DOS/Win 3.x to enable you to access data from the FISC
CDM.
IPX/SPX Compatible Transport with NetBIOS
Microsoft Windows Network
NetWare Tools

The FISC CDM User’s Manual
90
Map Drive from FISC CDM
The procedure for mapping the drive is virtually the same as the
procedure for Windows 95/98 in the previous section.
DOS with Client 32 for NetWare
Configuring Your Client
Ensure that the appropriate NetWare Link Support utility, driver,
protocol and shell have been successfully loaded and login Novell
NetWare server with valid user account.
Map Drive from FISC CDM
Please use the following commands to map shared resources to
access FISC CDM:
Syntax:
Map <logical drive lette r:>=<FISC CDM's NetWare se rv er
name>\SYS:
Example 1:
To map the virtual share "root" of a FISC CDM with the default
NetWare server name "anwd8040007" as drive letter F, type:
map f:=anwd8040007\sys:
FISC CDM will prompt you to enter your user
name and password. Please type the virtual share "root" as the user
name and the virtual share password of "root" as the password.
Then this virtual share "root" will be assigned as the "sys"
volume and mapped to drive G: of local machine while all the
mounted CDs will be shown as directories under "sys" volume.
Example 2:
To map the physical share "cd1" of a FISC CDM with the default
NetWare server name "anwd8040007" as drive letter H, type:
map h:=anwd8040007\sys:
FISC CDM will prompt you to enter your user
name and password. Please type the physical share "cd1" as the user
name and the physical share password of "cd1" as the password.
Then this physical share "cd1 will be assigned as the "sys"
 Loading...