

Page 1

Table
of
Table
Table
Tableof
General
General
Precautions
Precautions
System
System
Descriptionofof
Description
Starttoto
Start
ApplicationtotoPCPC………………………………………………………………………………..33
Application
Technical
Technical
Co nte nts:
of
Contents:
ofContents:
Contents:
descriptionofof
description
……………………………………………………………………………………....11
……………………………………………………………………………………
requirements
requirements
use
……………………………………………………………………………………
use
……………………………………………………………………………………
Install
Battery
Install
Battery
UseSDSD
Card
Use
Card
Choose
Focus
Choose
Focus
Adjust
Adjust
Poweronon
Power
Function
Function
Date
Date
Indicator
Indicator
Video
Video
Camera
Camera
Playback
Playback
Setup
Setup
ConnecttotoPCPC
Connect
Driver
Driver
Operation
Operation
the
the
and
and
mode
mode
mode
mode
Install
Install
parameter
parameter
function
……………………………………………………………….1.1
function
………………………………………………………………
…………………………………………………………………………
…………………………………………………………………………
outline
and
button
outline
and
……………………………………………………
……………………………………………………
……………………………………………………..
……………………………………………………
Mode
Mode
wrist
wrist
and
off
………………………………………………………………………99
and
off
………………………………………………………………………
mode
change
mode
change
Time
Settings
Time
Settings
Light
…………………………………………………………………………
Light
…………………………………………………………………………
………………………………………………....
………………………………………………
mode
………………………………………………………………………....1515
mode
………………………………………………………………………
mode
…………………………………………………………..…………2020
mode
…………………………………………………………
………………………………………………………………………..
………………………………………………………………………
…………………………………………………………………
…………………………………………………………………
………………………………………………………………………………3434
………………………………………………………………………………
instructionsonon
instructions
…………………………………………………………………………..5151
…………………………………………………………………………
……………………………………………………………....55
button
……………………………………………………………
....……..……………………
………………....
……………………………………………....
……………………………………………
belt
length
belt
over
over
attached
attached
………………………………………………..88
length
………………………………………………
……………………………………………………………....99
……………………………………………………………
………………………………………………………
………………………………………………………
software
…………………………………………..3939
software
…………………………………………
………………
………………………....77
………………………
…………………………
…………………………
……………………..66
………
………
………2929
………
…………3333
....…………
...100
...1
...44
...
...55
...
7
....7
..100
..1
..111
..1
Page 2

General
10V002_V1
General
General
General
General
General
General
General
Description
Description
Description
Description
Descrip tion
Description
Description
Description
of
of
of
o f
of
of
of
of
Function
Function
Function
Function
Functio n
Function
Function
Function
Itisabletousethecameraforadigitalphotoofmaximum5megapixelspicture,andis
abletoshootAVIshortfilm.Thecameraisabletoautoadjustexposureandcolor
balance,andithas4×focusingfunction.TheproductcanbeusedasaPCcamerawhen
connectingwithcomputer.
Thecontentscoveredinthemanualwerereferredtothelatestinformationwhenthe
manualwascompiled.Thescreendisplayandillustration,etc.adoptedinthemanualare
forelaborationofthedigitalcamerainawayofmuchmoredetailandstraight.Theymay
differslightlyfromyourpracticaldigitalcamerabecauseofthedifferentbatchoftechnical
developmentandproduction.
Precautions
Precautions
Precautions
Precautions
Precautions
Precautions
Precautions
Precautions
PleasereadcarefullythePrecautionssectionbeforeusingthedigitalcamerasoasto
ensuretheaccurateandsafeapplication,bringingyouthebestcapabilityofdigital
cameraandlengtheningtheservicelifeofthedigitalcamera.
Neversettlethecameraunderdirectsunlight,nortodirectthelenstowardthesun.
Otherwise,theimagesensormaybedamaged.
Itisrequiredtotakecareofthecameraandpreventwaterorsandfromdropping
intoitwhenusingthecameraatasandybeachornearwater.Thewater,sanddrop,
dustorsaltycomponentmaydamagethecamera.
Pleaseputthecamerafarfromthedustandchemicalsubject,anditisrequiredto
putitinacool,dryandwellventilatedlocation.Neverdeposititinalocationofhigh
temperature,humidityordusttopreventfailure.
1
1
1
1
Page 3

Itisrequiredtooperatecameraregularlyduringlongtimestorage.Pleasecheck
whetherthecameraoperatesnormallyornotbeforeusingthecameraagain.
Ifdirtorstainisaccumulatedonthecameraorlens,itisrequiredtouseapieceof
soft,cleananddryclothtowipeitoutlightly.Ifthecameraorlensisstainedwith
sandgrain,itisavailabletoblowitawaylightly.Neveruseclothtowipe.Otherwise,
itmayscrapethecameraorlenssurface.
Ifitisrequiredtocleanthelenssurface,blowawayfirstlythesanddust
accumulatedonthesurface,andthenusedishclothorpapertowelsuitableforthe
opticalequipmenttowipethelenslightly.Ifthereissuchrequirement,pleaseuse
thelenscleaningcompound.Neveruseorganicsolventtocleanthecamera.
Nevertouchthelenssurfacewithfinger.
Ifitisthefirsttimetouseamemorycardinthedigitalcamera,pleasecarryon
informationbackupforthecardfirst.Thenformatthememorycardonceatthe
digitalcamera.
TheexternalSDcardandMMCcardaremadewithpreciseelectroniccomponents.
Thefollowingconditionsmaycausetheinformationlostordamage:
1.Usethememorycardincorrectly.
2.Memorycardissubjectedtobend,fallorimpact.
3.Heat,humidityanddirectsunlight.
4.Staticorelectromagneticfieldaroundthememorycard.
5.Takeoutthememorycardorinterferethedigitalcamerapowersupplywhen
thedigitalcameraorcomputerisaccessingthememorycard(i.e.read,write
andformat,etc.)
2
2
2
2
Page 4

6.Touchthemetalcontactsurfaceofthecardwithfingerormetalsubject.
7.Thememorycardoutrunsitsservicelife(pleasepurchaseregularlyanew
memorycard.)
3
3
3
3
Page 5

System
System
System
System
System
System
System
System
requirements
requirements
requirements
requirements
requirements
requirements
requirements
requirements
System
System
System
System Requirements
Operating
Operating
Operating
Operating System
Central
Central
Central
Central Processing
unit
unit
unit
unit
Memory
Memory
Memory
Memory Above 128 MB
Sound
Sound
Sound
Sound Card,
Card
Card
Card
Card
CD
CD
CD
CD Driver
Hard
Hard
Hard
Hard Disk
Other
Other
Other
Other One standard USB 1.1 interface or USB 2.0
System
System
System Microsoft Windows 2000,
Processing
Processing
Processing
Card,
Card,
Card, Display
Driver
Driver
Driver 4 times of speed or above
Disk
Disk
Disk Surplus space above 500 MB
Above Intel Pentium 166MHz or CPU of equal performance
Display
Display
Display
The sound card and the display card shall support DirectX8 or
higher version.
Requirements
Requirements
Requirements
XP,
Vista, 7
4
4
4
4
Page 6

Description
Description
Description
Description
Description
Description
Description
Description
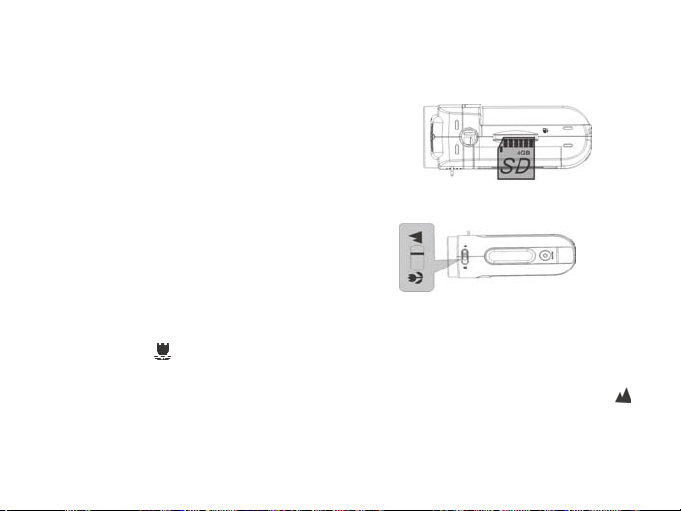
1
lens
1
len s
1
1lens
lens
2
Macro
2
Macro
2
2Macro
Macroswitch
3
Shutter
3
Shutter
3
3Shutter
Shutterkey
4
Busy
4
Busy
4
4 Busy
Busylight
5
Power
5
Power
5
5Power
Powerkey
6
OK
key
6
OK
key
6
6 OK
OKkey
key
7
D
irection
7
D
irection
7
7 D
Direction
irectionkey
Up
Up
U p
Up
Down
Down
Down
Down
Right/LED
Right/LED
Right/LED
Right/LEDswitch
Left/Self
Left/Self
Left/Self
Left/Selftimer
8
Mode
8
Mode
8
8Mode
Modekey
9
Battery
9
Battery
9
9 Battery
Batterylid
10
Speake r
10
Speaker
1 0
10Speaker
Speaker
11
Wrist
strap
11
Wr ist
st rap
11
11Wrist
Wriststrap
straploop
12
Wrist
strap
12
Wr ist
st rap
12
12Wrist
Wriststrap
straphole
13
Zoom
13
Zoo m
13
13Zoom
Zoomin
14
Zoom
14
Zoo m
1 4
14Zoom
Zoomout
15
USB/TV
15
U SB/TV
1 5
15USB/TV
USB/TVout
16
LED
l ight
16
LED
li ght
16
16LED
LEDlight
light
17
Self
time
17
Sel f
tim e
17
17Self
Selftime
timelight(red
18
Tripod
18
T ripod
18
18Tripod
Tripodnut
19
SD
car d
19
SD
car d
1 9
19SD
SDcard
cardslot
of
o f
of
of
of
of
of
of
switch
s witch
switch
key
key
key
light
li ght
light
key
key
key
key
key
key:
switch
s witch
switch
timer
ti mer
timer
key
key
key
lid
lid
lid
loop
loo p
loop
hole
hol e
hole
in
key
in
k ey
inkey
key
out
k ey
out
key
outkey
key
out
p ort
out
por t
outport
port
light( red
light(red
light(redLED)
nut
nut
nut
slot
slo t
slot
outline
outline
outline
outline
outlin e
outline
outline
outline
:
:
:
LED)
LED )
LED)
and
button
and
button
a nd
and
button
button
and
button
and
b utton
and
and
button
button
5
5
5
5
Page 7

S
tart
t o
use
S
tart
S
S
tart
tart
S
tart
S
tart
S
S
tart
tart
1.
Insta ll
1.
Install
1.
1.Install
InstallBattery
_______
to
use
_______
to
to
use
use
_______
_______
to
use
_______
to
use
_______
to
to
use
u se
_______
_______
Batte ry
Battery
Battery
1.Openthebatterylid
2.Put3piecesofAAA(7#)batteriesinaccordingtothepolarityinstruction.
3.Insertthefrontendofthebatterylidintothebatterystack,pressthebackendofthe
batterylidandthenpushthebatterylidinwardstoallowthebatterylidtocloselyattach
thebody.
TakedownbatterylidInstallthebatteriesClosethebatterylid
6
6
6
6
Page 8

2.
Use
SD
2.
2.
2.Use
There
There
There
Thereis
and
and
and
andthe
camera
camera
camera
cameraor
Please
Please
Please
Pleaseuse
3
.
3
.
3
3.
.Choose
macroandnormalfocus.
using,pushthemacroswitchtotheendmarkedwith .
pushthemacroswitchtotheendmarkedwith.
Ca rd
Use
SD
Ca rd
U seSD
SDCard
Card
1.PushtheSDcardintotheslotuntilitiscompletelyinsertedaccordingtoinstructions.
2.LightlypressthecardendinwardsandtheSDcardwilleject.
is
about
7MB
is
about
isabout
about7MB
the
images
the
images
theimages
imagesin
or
out
or
out
orout
outof
use
SD
use
SD
useSD
Choos e
Focus
Choose
F ocus
ChooseFocus
Pressthemacroswitchonthetopofthebodyandthenyoucanswitchbetweenthe
1.Macro:itissuitableforshootingobjects15cm~25cmawayfromthelens;when
2.Normalfocus:itissuitableforshootingobjects1.4mawayfromthelens;whenusing,
FocusMode
7MB
7MBmemory
in
it
in
it
init
itwill
of
the
of
the
ofthe
theelectric
memory
memory
SDmemory
memorycard
Mode
Mo de
Mode
memory
memory
memorybuild
build
build
buildin
will
lost
due
will
lost
due
willlost
lostdue
dueto
electric
power
electric
power
electricpower
power!
card
to
card
to
cardto
torecording!!!
in
camera,
in
camera,
incamera,
camera,
to
power
to
power
topower
poweroff
!
!
!
recording!!!
recording!!!
recording!!!
off
the
off
the
offthe
the
7
7
7
7
Page 9

4.
Adjus t
the
wrist
belt
4.
Adjust
4.
4.Adjust
Adjustthe
the
w rist
t hewrist
wristbelt
lengt h
be lt
length
beltlength
length
1.Pullthemagicstickeronthewristbelt.
2.Pullthenylonstrapstuckonthemagicsticker.
3.Adjustthebendinglengthofthewristbelt.
4.Fastenthenylonstraponthemagicsticker.
5.Foldandniptightlythemagicsticker.
1
1
1
1 2
4
4
4
4 5
2
2
2
8
8
8
8
3
3
3
3
5
5
5
Page 10

5
.
Power
on
an d
5
.
Power
5
5.
.Power
Poweron
1.Poweron:pressthepowerkeyforawhile,lightthescreenandtheunitwillbepower
on.
on
onand
and
a ndoff
off
off
o ff
2.Poweroff:pressthepowerkeyoncewhilecameraisidlestate,itwillbepoweroff.
Autopoweroff:Whilethecameraisidlefor1minute,itwillbepoweroffautomatically.
Theautomaticallypowerofftimecanbesetto1/3/5minuteinsetupmode.
3.Lowpower:WhilethebatterypowerisverylowandLCDdisplayicon“”,The
camerawillpoweroffautomatically
6.
Funct ion
6.
Function
6.
6.Function
Functionmode
Thereare3modessuchasVideo,Cameraandplayback.YouwillentertheVideo
modedirectlyafterswitch-onandyoucanpresstheMODE
mode
chang e
mo de
change
modechange
changeover
over
ov er
over
MODE
MO DE
MODEkeytoswitchbetweenthe
cameramodeandrecordmode.
Videomode:cantakesomemovies
Cameramode:cantakesomephotos
Playbackmode:canplaythemoviesorphotos
9
9
9
9
Page 11

7.
Date
and
Time
7.
Da te
and
7.
7.Date
Dateand
a ndTime
Y
ou
can
Y
ou
can
Y
Y
ou
oucan
c anenter
Atsettingwindow,adjustthedateortimebydirectionkey:UporDownforadjust,
Rightkeyformovethecursor,OKkeyforconfirm,Leftforexitsetupmode.
8.
Indic ator
8.
Indicator
8.
8.Indicator
IndicatorLight:
Busy
light :
Busy
light:
Busy
Busylight:
light:thelightwillbeillumedwhilethecameraisbusy(e.g.Recordingmovie,
Setti ngs:
Ti me
Settings:
TimeSettings:
Settings:
enter
Setup
e nter
S etup
enterSetup
Setupmenu
Light :
Light:
Light:
menu
mode
me nu
mo de
menumode
modeto
to
to
toset
se t
set
s etthe
the
syste m
the
system
t hesystem
systemdate
date
da te
dateand
and
time:
and
t ime:
a ndtime:
time:
capturephoto,somekeywaspressed,connectingtocomputeretc).
LED
light :
LED
light:
LED
LEDlight:
light:toreinforcelightintensityforrecording.
S
elf
timer
S
elf
S
Self
elftimer
light :
t imer
light:
timerlight:
light:toreminduserthecameraisdoingtheoperationofselftimer.
10
10
10
10
Page 12

9
Video
mode
mo de
mode:
mode
mo de
mode
:
:
:
9
Video
9
9Video
Videomode
Preview
Preview
Preview
Previewmode
1:Modesymbol,Indicateisvideomode.
Auto
Auto
2Auto
Auto:IndicatetheWhitebalanceisautomode.
CansetitisAuto/Daylight/Cloudy/
Fluorescent/Tungsten.
3Meteringmode:Center/Multi/Spot
4
640
:Indicateisvideoresolution,itcanbeset
is640x480/320x240.
00:01:08
00:01:08
500:01:08
00:01:08:timecounter,Itisindicatecan
recoding1minute8secondsmovie.
6SDcardicon:thatisindicatethereareoneSDcardisusing.
7Batteryicon:Thatisindicatethebatterypower.
8Zoomicon:thatisindicatethezoomlevel(Max.4X).
9LEDlighticon;thatisindicateLEDisonstate.
Shooting:
Shooting:
Shooting:
Shooting:
1SwitchonthecamerabypressPowerkeytoenterpreviewmode;
2PressShutterkeytostartrecodingmovie;
3Ifyouwanttostoprecoding,pressShutterkeyagain;andifthememorycardfull,It
willstoprecodingautomatically.
11
11
11
11
Page 13

4YoucandozoominorzoomoutoperationduringrecordingbyZoomkey.
Themax.windowis4Xfordigitalzoom.
12
12
12
12
Page 14

Video
menu
Video
me nu
Video
Videomenu
menu
Atvideopreviewmode,pressOKkeyentermainmenu:
13
13
13
13
Page 15

14
14
14
14
Page 16

10
Camer a
10
Camera
10
10Camera
Preview
Preview
Preview
Previewmode
mode
mo de
Cameramode
mode:
mode
mo de
mode
:
:
:
1:Modesymbol,
Indicateissnapphotomode.
2:Selftimermodesymbol.
3Auto:Indicatethe
Whitebalanceisautomode.
4:Meteringmode.
5:Exposuremode.
6:Imageresolutionmode.
7:Imagequalitymode.
8:Imagecounter(defaultisreduce).
9:SelftimerIndicatesnapphotoautomaticallyafter10s.
10:SDicon,itwillbedisplaywhilethereisSD/MMCcardwasplugin.
:
:
:
:IndicatetheSDcardwaslocked.
11
:Batteryicon.12Zoomindicator.13
13
13
13 :
15
15
15
15
:
:
:LEDlighticon
Page 17

Shooting:
Shooting:
Shooting:
Shooting:
1SwitchonthecamerabypressPowerkeytoentervideopreviewmode;
2PressModekeyoncetoswitchtoCamerapreviewmode;
3PressShutterkeyoncetosnaponephoto;
Camera
mode
Camera
Camera
Cameramode
menu:
mo de
m enu:
modemenu:
menu:
Atcamerapreviewmode,pressOKkeyentermainmenu:
16
16
16
16
Page 18

17
17
17
17
Page 19

18
18
18
18
Page 20

Self
timer :
Self
timer:
Self
Selftimer:
timer:
SettheDrivermodeisSelftimer2sor10satmenu,thenpressShutterkeywill
timewithbeep,after2secondsor10seconds,thecamerawillsnaponephoto
automatically
Continuously
Continuously
Continuously
Continuouslytake
take
three
ta ke
t hree
takethree
threephotos:
photo s:
photos:
photos:
SettheDrivermodeisBurstatmenu,thenpressShutterkeywillsnapthree
photoscontinuously
19
19
19
19
Page 21

11
Playb ack
11
Playback
11
11Playback
Playbackmode
Enter
Enter
Enter
EnterPlayback
mode
:
mo de
:
mode:
Playb ack
Playback
Playbackmode
:
mode
mo de
mode
PressmodekeycontinuouslycanenterPlaybackmodeorpressittwicetoenter
PlaybackmodeafterpressPowerkeyswitchonthecamera.
AVIfileJPGfile
YoucanviewotherphotosorAVIfilesbydirectionkeyofleftorright;
Youcanzoominorzoomoutthephototoviewbypresszoomkey
20
20
20
20
Page 22

Thumbnail
Thumbnail
Thumbnail
Thumbnailmode
mode
mo de
mode
PressZoomoutkeycanenterthumbnailmodeatplaybackmode:
Note:
:ThisiconindicatethatisoneA VImediafile.
:ThisiconindicatethatisoneJPGfilewithvoicememo.
Y
oucanpressdirectionkeytochoosethedesiredimagefile,andpressZoominkey
toexitthisthumbnailmodereturnfullscreenmode.
21
21
21
21
Page 23

Play
AVI
AVI
A VIfile
file
fi le
file
Play
Play
PlayAVI
PressShutterkeytostartplaytheselectedAVIfilesatplaybackmode,andyou
canpressShutterkeyagaintostopplaying.
StopmodePlayingmode
22
22
22
22
Page 24

Play
JPG(w ith
Play
JPG(with
Play
PlayJPG(with
JPG(withvoice
voice
memo)
v oice
m emo)
voicememo)
memo)file
file
fi le
file
1Selectthephotowasaddedvoicememoatplaybackmode;
2PressShutterkeytostartplaytheselectedjpg(withvoicememo)file:
PressOKkeytostopplaying,UPkeytopause/resumeplaying,
1Playbackmodeicon5Timerofplaying
2Counterofimage6Controlpanelforplaying
3VoiceMemoindicator
4IndicatorofJPGfile
23
23
23
23
Page 25

Playback
Playback
Playback
Playbackmenu:
menu:
m enu:
menu:
AtPlaybackmode,pressOKkeyentermainmenu:
24
24
24
24
Note
:
The
locked
Note
:
The
Note
:
The
Note
:
The
can
not
be
can
not
be
can
not
be
can
not
be
unlock
them
unlock
them
unlock
them
unlock
them
the
operation
the
operation
the
operation
the
operation
files
locked
files
locked
files
locked
files
delete
until
delete
until
delete
until
delete
until
or
do
or
do
or
do
or
do
of
format.
of
format.
of
format.
of
format.
Page 26

Add
effec t
Add
effect
Add
Addeffect
effectfor
for
image
for
i mage
f orimage
image
25
25
25
25
Page 27

Resize
funct ion:
Resize
function:
Resize
Resizefunction:
function:
The
image
The
i mage
The
Theimage
imagesize
size
selec ted
si ze
selected
sizeselected
selectedmust
must
mu st
mustbe
be
sm all er
be
smaller
besmaller
smallerthan
26
26
26
26
than
th an
thanthe
the
the
t hesize
size
size
s izeof
of
cu rre nt
of
current
ofcurrent
currentphoto.
photo .
photo.
photo.
Page 28

Add
Voice
Add
V oice
Add
AddVoice
VoiceMemo
The
time
The
ti me
The
Thetime
timeof
Memo
Me mo
Memofor
of
Vo ice
of
V oice
ofVoice
VoiceMemo
for
image :
for
image:
f orimage:
image:
Memo
Me mo
Memocan
can
can
c anbe
be
re cor ded
be
recorded
berecorded
recordedabout
27
27
27
27
about
a bout
about30s
30s
30s
3 0sonly
only
on ly
only
Page 29

28
28
28
28
Page 30

12
Setup
mode
12
S etup
12
12Setup
Setupmode
mo de
mode:
:
:
:
PressOKkeyatprevieworplaybackmodeandthenpressdirectionofRightkey
oncewillenterSetupmode.YoucanchoosethemenuitembyUporDownkey,enter
orexitsubmenubyLeftorRightkey ,andconfirmsettingbyOKkey.
29
29
29
29
Page 31

30
30
30
30
Page 32

31
31
31
31
Page 33

Note:
Note:
Note:
Note:
1Thefilesstoredincardwillbelostduetoformatoperation,pleasebackup
thedatabeforeformattingthememorycard.
2The“Myimage”menucanbeactivatedwhileyouhadset“Start-upImage”
function.
32
32
32
32
Page 34

Application
Application
Application
Application
Application
Application
Application
Application
to
PC
_______
t o
P C
_______
to
to
PC
PC
_______
_______
to
PC
_______
to
PC
_______
to
to
PC
PC
_______
_______
1ConnecttoPC
Pleaseinstallthedriveprogramfirstbeforeconnectingthecameratothecomputer.
ThecameratherearetwoUSBmode,theyareMSDCandPCCAM,defaultis
MSDCmode,Turnonthecamerapower.IfthePCcamerafunctionofthecameraisto
beused,setthecameraisPCCAMmodeatsetupmenu.Iftheremovablediscfunction
ofthecameraistobeused,pleasesetthecameraisMSDCmodeatsetupmode.
Connectthe4PINendoftheUSBlinetotheavailableUSBinterfaceonthe
computer.Connecttheotherend(5PIN)totheUSBinterfaceofthecamera.
Downloadfilesfromthecameratothecomputer:Whentheremovablediscfunction
ofthecameraisused,Theremovabledisciconwillappearinthewindowof“My
Computer”.Thephotos/videofilesyouhaveshotaresavedinthefilefolder\DCIM\
100MEDIAintheremovabledisc.Selecttheshot/recordedfilesinthefilefolder
"100MEDIA".Copy(ordragbyusingthemouse)thefilestothefilefolderinthehard
discinwhichyouaregoingtosaveyourfiles.
Note:UseMSDCfunctionnoneedinstalldriveronwindowsMEorhigherwindows
version
33
33
33
33
Page 35

2DriverInstall
YoucanuseandoperatethemovablediscfunctionandPCCameraprovidedby
thedigitalcamerathroughPC.Pleaseinstallthesoftwaredriverprogramaccordingtothe
followingstepsbeforeapplication.
Note:Don'tconnectthecameraandcomputerUSBportbeforeinstallingthedrivertothe
computertopreventdriverinstallationmistake.
◎Softwareinstallationinterface
1.PleaseloadtheinstallationCDinthefittingintothecomputerphotodriver;
2.ThesystemwillruntheinstallationprograminCDautomatically,andthe
screenwillpresentthefollowingwindowasshownbelow:
34
34
34
34
Page 36

(Ifyouropticaldriverhasnoautoexecutionorcloseautoexecutionfunction,
pleasedirectlyclickandrunautorun.exeprogramlocatedattheCDroot
directory.)
ForWindowsVista,thefollowingwindowwillpopupwhenthesystem
Run
automaticallyexecutestheinstallerintheCD.Pleaseclick Run
SoftwareInstaller.exe
SoftwareInstaller.exe
SoftwareInstaller.exe
SoftwareInstaller.exetocontinue.
35
35
35
35
Run
Run
Page 37

Driverinstallation
Click“Driver”button,andcompletetheinstallationasperthewizard.Then,reboot
thecomputer.
Note:
Note:
Note:
Note:ForWindowsVista,thefollowingwindowwillpopupwheninstallingthesoftware.
Pleaseclick tocontinue.
36
36
36
36
Page 38

PleaserestartthePCafterinstallation.
ThedriverprogramissuitabletotheoperatingsystemofWindows2000,WindowsME,
WindowsXPandWindowsVista.Ifthereappearsthefollowingwindow,pleaseclick
“Yes”buttontogoonwiththeinstallation.
37
37
37
37
Page 39

Hint
Hint
Hint
Hint:InWindows98SEoperationsystem,ifitisrequiredtoplaythevideo
record,pleaseinstallVideoImpressionfirst.Withthehelpofthe
DirectX9moduleintheVideoImpression,thevideoshotbythecamera
willbesuccessfullyplayedonthecomputer.
38
38
38
38
Page 40

3Operationinstructionsonattachedsoftware
Installation
Installation
Installation
Installationand
In stallingthePhotoImpression5:
PleaseputtheinstallationCDcontainedintheaccessoriesintotheCD-ROMoftheP C,windowswill
displaybelowpicture:
and
Opera tion
and
Operation
a ndOperation
Operationof
of
Ph oto Impression
of
PhotoImpression
ofPhotoImpression
PhotoImpression5:
5:
5:
5:
39
39
39
39
Page 41

Clickbuttonandfinishtheinstallationstepbystepaccordingtotheindications.
Note:ForWindowsVista,thefollowingwindowswillpopupwheninstallingthesoftware.Pleaseclick
tocontinue.
40
40
40
40
Page 42

PleaserestartyourPCafterinstallation.
Running
the
Running
Running
Runningthe
Double-clickthe icononthedesktop,orrunPhotoImpression5in“Start→Programs”.
ThefollowingwindowwillpopupwhenopeningPhotoImpression5.Pleaseleft-clickthecenterofthewindowto
closeit.PhotoImpressioncanbeopenedafterthewindowisclosed.
Photo Impression5:
the
PhotoImpression5:
t hePhotoImpression5:
PhotoImpression5:
41
41
41
41
Page 43

AfteropeningthePhotoImpression,“GetPhoto”windoww illappear.
42
42
42
42
Page 44

Selectthedesiredimagefro m“GetPhoto”window,andyouwillfindtheimageisdisplayedatthecentralareaof
thewindow.Afterthat,youcanselecttheimagetoedit.
DetailedoperationmethodofPhotoImpressioncanbereferredto"Help"oftheprogram(asshow ninthe
followingfigure).
43
43
43
43
Page 45

Installation
Installation
Installation
Installationand
In stallingVideoImpression2:
Clickbuttonandfinishtheinstallationstepbystepaccordingtotheindications.
Note:ForWindowsVista,thefollowingwindowswillpopupwheninstallingthesoftware.Pleaseclick
and
Opera tion
and
Operation
a ndOperation
Operationof
tocontinue.
of
Vi deo Impression
of
VideoImpression
ofVideoImpression
VideoImpression2:
2:
2:
2:
44
44
44
44
Page 46

45
45
45
45
Page 47

PleaserestartyourPCafterinstallation.
RunningtheVideoImpression2:
Double-clickthe icononthedesktop,oropenVideoImpression2in“Start→Programs”.
46
46
46
46
Page 48

DetailedoperationmethodofVideoImpression2canbereferredto“Help”oftheprogram(asshowninthe
followingfigure).
47
47
47
47
Page 49

48
48
48
48
Page 50

Technical
Technical
Technical
Technical
Technical
Technical
Technical
Technical
Image
Image
Image
Image sensor
Function
Function
Function
Function mode
Lens
Lens
Lens
Lens F3.1 f=6.5mm
Focal
Focal
Focal
Focal distance
Digital
Digital
Digital
Digital zoom
Shutter
Shutter
Shutter
Shutter Electronic shutter
LCD
LCD
LCD
LCD display
screen
s
scre
screen
Picture
Picture
Picture
Picture
resolution
resolution
resolution
resolution
Video
Video
Video
Video record
resolution
resolution
resolution
resolution
White
White
White
White balance
Exposure
Exposure
Exposure
Exposure Automatic/manual (-2.0EVx+2.0EV, 0.3EV/step)
Self-shoot
Self-shoot
Self-shoot timer
Self
Parameters
Parameters
Parameters
Parameters
Parameters
Parameters
Parameters
Parameters
sensor
sensor
sensor 1.3 Mega Pixels(CMOS)
mode
mode
mode
distance
distance
distance 15cmx25cm (Macro) / 140cm~infinity (standard mode)
zoom
zoom
zoom 4×
display
display
display
creen
en
Video record, Shoot photo and Voice record, playback, Mass
storage
280×220 pixels, 1.44〞TFT LCD
2592x1944, 2048×1536, 1280x1024, 640×480
record
record
record
balance
balance
balance Auto/manual: Daylight, cloudy, Tungsten and Fluoresce
-shoot
VGA: 640x480(30/15fps), QVGA: 320×240(30/15fps)
timer
timer
timer 10 seconds delay
Video AVI
File
format
File
format
File
File format
format
Photo JPEG
Voice WAV
49
49
49
49
Page 51

Memory
Memory
Memory
Memory
medium
medium
medium
medium
USB
i
nterface
USB
i
nterface
USB
USB i
interface
nterface High Speed USB 2.0 interface
Power
supply
Power
supply
Power
Power supply
supply Battery: 3 x AAA (LR03) alkaline 1.5V
Dimensions
Dimensions
Dimensions
Dimensions
(L
×
W
×
H)
(L
×
W
×
H)
(L
(L×
×W
W×
×H)
H)
Weight
Weight
Weight
Weight Not including battery: 120 grams
Electrical and electronic equipment (EEE) contains materials, parts and substances
which can be dangerous to the environment and harmful to human health if waste of
electrical and electronic e quipment (WEEE) is not disposed of correctly.
Equipment, which is marked with the WEEE logo (as shown on the left), should not be
thrown away with your household waste. Contact your Local Authority Wast e Disposal
Department as they will be able to provide details of the recycling options available in
your area.
Used batteries are hazardous waste and NOT to be disposed of with the household
waste! As a consumer you are legally obligated to return all batteries for
environmentally responsible recycling – no matter whether or not the batteries
contain harmful substances*).
Return batteries free of charge to public collection points in your community or to
shops selling batteries of the respective kind.
8MB internal SDRA M memory
Support SD/MMC/SDHC card (maximum supports 8GB) not included
98x56x39 mm
DISPOSAL
50
50
50
50
Page 52

Only return full y discharged batteries.
• Used batteries are hazardous waste and NOT to be disposed of the household
*) marked Cd = cadmin, H g = m ercury, Pb=lead
• Only use mercury and cadmium-free batteries.
waste!!! Return the batteries to your dealer or to collection poin ts in your community.
• Keep batteries away from children. Children might swallow batteries.
Contact a physician immediately if a battery was swallowed.
• Check your batteries regularly to avoid battery leakage.
• Batteries s hall not be exposed to excessive heat such as sunshine, fire or the like.
• CAUTION: Danger of explosion if battery is incorrect ly replaced
Replace only with the same or equivalent type.
Ingo Devices ass umes no responsibility for any errors that may appea r in this manual.
Due to our continuous improvement, Ingo Devices reserves the right to change
without notice , product offerings, specifica tions and compatibility.
www.ingodevices.com
DISPOSAL
51
Page 53

T
a
bla
d
e
l
c
ont
e
T
a
bla
d
T
Ta
abla
b lad
de
escriripcpciióónngegenenerraal.l.……..……..……..…………
DDesc
ecauucciiooneness……
PPrreca
Requisititooss
Requis
Caracteríí
Caracter
PPrereppaarrararlalaccáámara...
IInnssttaallaarrbbaatteerrííaa……………………
UUsasarrttaarjrjeettaaddeeSDSD……....…………
ElElegegirirmmooddooddeeeennffooqquuee…………
Ajustarlacorreadeagarredelacámara…...………………………………………………....…………………………..88
ncendidoyy
EEncendido
CCaammbbiiaarrmmododooddeefunc
Cambiar
Cambiar
LuLuzziindndiicadora
MMododooViViddeeoo…………..……………………………………………
MMooddooCCáámamarraa…………………
Modoo
Mod
MMododooConfiguraci
Conexióónn
Conexi
onecttaarralaloorr
CConec
IInsnsttaallaarreellsoftware
IInnsstrtruucccciioonneessddelelssooffttwwaare
Especificacionesttéé
Especificaciones
nido:
e
l
c
ont
e
n ido:
el
lc
cont
o nte
enido:
nido:
………………………………
…………
informáá
ticos………………………………………………………………………………………………………………………………………………......44
inform
sticasdedelalaccáá
sticas
videocáá
videoc
ticos
mara..……..
mara...
fechayy
fecha
cadora……..………………………………………………………………………………………………………………………………
Reproduccióónn……..……....………………………………………………………………………………………………………………..…………2200
Reproducci
Configuracióónn
mara..
……………………
…………
…………………………
apagado.
apagado.
funciióónn…………………………………………………………………………………………………………………………....99
hora……....…………..…………
hora
……………………………………………....
………………………
mara--oorrdedenanaddoorr…………………………………………………………..32
mara
denadorr
denado
software
………………
…………
cnicas...…………
cnicas...
....……..……..……..……..……..……..……..……..……..……..……..……..……..
....
………………………………
…………
………………………
…………………
………………………
…………………
……………………………………....……..……………………
………………
……………………....
…………………
………
…………………
……………
………..
………
re………………………….
………………
…………………………………..
…………………
………………………………………………………99
………………………………………………………
………………………
…………………
………………………
…………………
……………………………
……………
………………………………………
……………
…………………………………………………………3333
…………………………………………………………
……………………
………………
………………………………
…………
………………………
…………………
………………………
…………………
……………………....
……………………
……………………
………………
…………………………11
…………
…………………...5.5
…………………
………………….....6.6
……………
……………………....
…………
………………
…………
………………………
…………………
…………………
……………
…………………..…………
…………………
…………………………………..
……………
…………………………………....……………………3322
………
……………………
………………
…………
…………
………………………….5.500
………………
…………….1.1
……………
………….6.6
…………
………....77
………
…………
…………
………......1100
………
………....1100
………
…………....1111
…………
………....1155
………
………2288
………
...……..3388
...
..7
..7
Page 54

D
10V002_V1
es
c
rip
c
i
ó
n
g
e
n
e
r
a
D
e s
c
rip
c
i
ó
D
D
es
es
D
es
D
es
D
D
es
es
Conestacámarapodráhacerfotosdigitalesconunaresolucióndeimagendehasta
5MPXy
automáticamente,ademástienefuncióndeenfoquex4.Ademáspodráusarla
videocámaracomoweb-cámaracuandoseconectealordenador.
n
c
c
r ip
rip
c
c
i
i
ó
ó
n
n
c
rip
c
i
ó
n
c
rip
c
i
ó
n
c
c
rip
rip
c
c
i
i
ó
ó
n
n
grabarvideosformatoAVI.Podráajustarlaexposiciónyelbalancedecolor
l
g
e
n
e
r
a
l
g
g
e
e
n
n
e
e
r
r
a
a
l
l
g
e
n
e
r
a
l
g
e
n
e
r
a
l
g
g
e
e
n
n
e
e
r
r
a
a
l
l
Antesdeempezarausarestavideo-cámara,porfavor,lealasinstruccionesdeusodel
manualyconsultedetalladamentetodaslasinformacionescadavezquelonecesite.
Pr
eca
u
c
ion
e
Pr
eca
Pr
Pr
eca
eca
Pr
eca
Pr
eca
Pr
Pr
eca
eca
LeaatentamenteesteapartadodePrecaucionesantesdeusarlavideocámara.Deeste
modo,haráunusoapropiadoysegurodelavideocámara,alargandolavidadel
producto.
‹
s
u
c
ion
e
s
u
u
c
c
ion
ion
e
e
s
s
u
c
ion
e
s
u
c
ion
e
s
u
u
c
c
ion
ion
e
e
s
s
Nuncapongalacámarabajolosrayosdesoldirectamente,onodirijala
lentedirectamentehaciaelsol.Encasocontrario,elsensordelaimagenpuede
resultardañado.
‹
Serequiereespecialcuidadoconlacámaraconelfindeevitardañosirreparables.
Alejelacámaradelaguaylaarena,ynoladejecaeralsuelo.
Elagua,laarena,el
polvoolasalpuedenresultarrealmenteperjudicialesparalacámara.
‹
Alejelacámaradepolvosoelementosquímicos.Mantengalacámaraenlugares
secos,yconbuenaventilación.
Noladejeenlugaresconaltastemperaturasycon
humedadesparaevitarposiblesfallos.
1
1
1
1
Page 55

Examinesilacámarafuncionanormalmenteonoantesdeusarlacámaraotravez
‹
‹
Silalenteestásucia,límpielaconunpañosuaveyseco.
Silalentedelacámara
estásuciaporarena,puedesoplarsuavementeparalimpiarla.Enestecasonouse
unpañoparalimpiarporquepodríarallarlalente.
‹
Siesnecesariolimpiarlasuperficiedelalente,antesquenada,sopleparaeliminar
losgranosdearenaquepudieranquedar.Luego,conlaayudadeunpañodetelao
unagamuzalimpiadoraespecialparaproductosópticoslimpiesuavementelalente.
Nouseproductosquímicosparalimpiarlalente.
‹
Notoquelasuperficiedelalenteconlosdedos.
‹
Sieslaprimeravezqueusalatarjetadememoriaenlavideocámara,noolvide
hacerunacopiadeseguridaddetodoelcontenidodelatarjeta,paraevitarperder
información.Luegoformateelatarjetacuandoestéinstaladaenlacámaradigital.
‹
LastarjetasexternasSDoMMCsecomponendematerialeselectrónicos
delicados.EsposiblequesepierdainformacióndelastarjetasSDenlassiguientes
condiciones:
1.Usarlatarjetadememoriaincorrectamente.
2.Latarjetadememoriaestádoblada,rotaoharecibidoungolpe.
3.Calor,humedadoluzdelsoldirecta.
4.Existenciadecampoestáticooeletromagnéticoalrededordelatarjeta
dememoria.
2
2
2
2
Page 56

5.Extraerlatarjetadememoriadelavideocámaracuandolacámaradigital
estátransfiriendoimágenesoarchivosalordenadoroviceversa.
6.Tocarconlosdedosoconobjetosmetaleslasuperficiedemetaldela
tarjetaquehacecontactoconlaranuradelavideocámara.
7.Caducidaddelatarjetadememoria.Renueve,latarjetaamedidaquelavidade
serviciodelatarjetasevayaagotando.(Compreregularmenteunatarjetade
memorianueva.)
3
3
3
3
Page 57

R
e
qui
s
itos
inform
á
tico
R
e
qui
s
itos
R
R
e
e
qui
qui
R
e
qui
R
e
qui
R
R
e
e
qui
q ui
inform
s
s
itos
itos
inform
inform
s
itos
infor m
s
it os
inform
s
s
itos
itos
inform
inform
s
á
tico
s
á
á
tico
tico
s
s
á
tico
s
á
ti co
s
á
á
tico
tico
s
s
Requi sitos
Requisitos
Requisitos
Requisitosinform
Sistema
operativo
Sistema
operativo
Sistema
operativo
Sistema
operativo
Procesador
Procesador
Procesador
Procesador
M
emoria
M
emoria
M
emoria
M
emoria
T
arje
t
a
T
T
T
T
T
T
T
Conduc
Conduc
Conduc
Conduc
Disco
Disco
Disco
Disco
Otros
Otros
Otros
Otros
de
arje
t
a
de
arje
t
a
de
arje
t
a
de
arje
t
a
demost
arje
t
a
demost
arje
t
a
dem ost
arje
t
a
demost
t
or
de
t
or
de
t
or
de
t
or
de
d
u
ro
d
u
ro
d
u
ro
d
u
ro
MicrosoftWindows2000,XP,Vista,7
IntelPentium166MHzoCPUdecomportamientoigual
128MB
s
on
i
do,
s
on
i
do,
s
on
i
do,
s
on
i
do,
T
arjetadesonidoylatarjetadedemostracióndebensoportar
r
aci
ó
n
r
aci
ó
n
r
aci
ó
n
r
aci
ó
n
DirectX8oversiónsuperior.
CD
CD
CD
CD
4vecesdevelocidadosobre
Espaciolibrede500MB
USB1.1est andarizadointerfaceoUSB2.0
inform
i nform
informá
4
4
4
4
á
ticos
á
tic os
áticos
ticos
Page 58

Caracter
Caracter
Caracter
Caracter
Caracter
Caracter
Caracter
Caracter
1
Lente
1
Lente
1
1Lente
Lente
2
M
a
2
M
a
2
2M
Ma
ac
3
Bot
3
Bot
3
3Bot
Botó
4
Luz
4
Luz
4
4Luz
Luzde
5
Bot
5
Bot
5
5Bot
Botó
6
Bot
6
Bot
6
6Bot
Botó
7
Bot
7
Bot
7
7B ot
Botó
Arriba
Arriba
Ar riba
Arriba
A
b
a
j
A
b
a
j
A
Ab
ba
aj
Cor
r
Cor
r
Cor
Corr
rect
Sal
i
r
Sal
i
r
Sal
Sali
ir
r/
8
Bot
8
Bot
8
8Bot
Botó
9
T
a
p
9
T
a
p
9
9
T
T
a
ap
pa
10
A
l
t
a
vo
10
A
l
t
a
vo
10
10A
Al
l
t
t
a
avo
voz
1
1
Correa
1
1
Correa
1
11
1 Correa
Correapara
12
Corre a
12
Correa
12
12Correa
Correapara
13
Bot
ó
13
Bot
ó
13
13Bot
B otó
ón
14
Bot
ó
14
Bot
ó
14
14Bot
B otó
ón
15
USB/T V
15
USB/TV
15
15USB/TV
USB/TV
16
Luz
16
Luz
16
16Luz
L uzLED
17
Luz
17
Luz
17
17Luz
L uzcuenta-atr
18
T
r
í
pode
18
T
r
í
po de
18
18
T
T
r
rí
ípode
pode
19
Ranur a
19
Ranura
19
19Ranura
Ranurapara
í
sticas
í
sticas
í
í
sticas
sticas
í
stica s
í
sticas
í
í
sticas
sticas
c
r
o
i
n
te
c
r
o
i
n
te
cr
ro
oi
in
nte
ter
ó
n
Dispa rador
ó
n
Disparador
ón
nDisparador
Disparador
de
e
s
t
ado
de
e
s
t
ado
dee
es
s
t
t
a do
a doocu
ó
n
POWER
ó
n
P OWER
ón
nPOWER
POWER
ó
n
OK
ó
n
OK
ón
nOK
OK
ó
n
de
di
ó
n
de
d i
ón
nde
dedi
dir
o
o
jo
o
ect
o
/i
n
t
ect
o
/i
n
t
e cto
o/i
/in
nt
t e
/
A
u
tocon
/
A
u
t ocon
/A
Au
utocon
tocont
ó
n
Modo
ó
n
Mo do
ón
nModo
Modo
a
de
bater
a
de
b ater
ade
debater
baterí
z
z
z
para
sujet ar
pa ra
sujetar
parasujetar
sujetarla
para
pa ra
parasujetar
n
Zoom
n
Zo om
nZoom
Zoomi
n
Zoom
n
Zo om
nZoom
Zoomout
LED
LED
L ED
cuent a-atr
cuenta-atr
cuenta-atrá
para
pa ra
para
d e
de
de
de
de
de
de
de
r
c
a
mb
r
c
a
mb
rc
c a
amb
mbi
ocu
r
e
c
r
e
c
re
e c
cc
e
r
c
amb
e
r
c
amb
er
rc
camb
a mbi
t
ador
t
ad or
tador
ador
í
a
í
a
ía
a
sujet ar
sujetar
sujetarla
i
n
i
n
in
n
out
out
o ut
á
s(
á
s(
ás(
s(r
t
arj
e
t
arj
e
t
t
arj
a rje
e
ocu
o cup
c
c
ci
t
t
t
t
l a
la
la
la
la
la
la
la
i
ó
i
ó
ió
ón:
r
r
ro
a
a
a
aSD
i
a dor
i
ad or
iador
ador
la
la
lac
la
la
lac
o
o
o j
SD
p
p
pado
n:
n:
n:
i
i
iador
j
j
ja
SD
SD
c
á
mara
c
á
mara
c
c
á
á
mara
mara
c
á
mara
c
á
ma ra
c
c
á
á
mara
mara
ado
ado
a do
ador
ad or
adorLED
c
á
mara
c
á
ma ra
cá
á mara
mara
c
á
mara
c
á
ma ra
cá
á mara
mara
a
LED)
a
LE D)
aLED)
LED)
LED
LED
L ED
(1)
(1)
(1)
( 1)
(2)
(2)
(2)
( 2)
5
5
5
5
Page 59

Pr
e
p
a
r
a
r
l a
c
á
Pr
e
p
a
Pr
Pr
e
e
p
p
a
a
Pr
e
p
a
Pr
e
p
a
Pr
Pr
e
e
p
p
a
a
1.
In
s
1.
In
s
1.
1.In
Ins
st
mara
r
a
r
la
c
á
mara
r
r
a
a
r
r
la
la
c
c
á
á
mara
mara
r
a
r
la
c
á
mara
r
a
r
la
c
á
ma ra
r
r
a
a
r
r
la
la
c
c
á
á
mara
mara
t
a
l
ar
l
a
b
a
t
e
r
í
t
a
l
ar
t a
al
lar
arl
a
l
a
b
a
t
e
r
í
a
la
a b
ba
at
te
er
rí
ía
a
1.Abrirlatapadelabatería.
2.Insertar3pilasAAAsegúnlainstruccióndepolaridad.
3.Colocarlatapadelabatería,yempujarhaciaadentrohastaquequedefijaensu
sitioynosecaiga.
SacarlatapadebateríaInsertarlaspilasCerrarlatapa
6
6
6
6
Page 60
2
.
U
s
ar
la
t
a
r
je
t
a
d
e
2
.
U
s
ar
l a
t
Us
El
El
Ele
sar
arla
e
g ir
e
gir
egir
g irmodo
lat
ta
Hay
Hay
Hay
Hay7M
s
e
s
e
s
se
ep
b
a
t
b
a
t
b
ba
at
te
gu
ar
gu
ar
gu
guar
ardar
modo
mo do
modode
a
a r
p
p
pe
e
e
er
2
2.
.U
1. InsertarlatarjetadeSDenlaranuraespecialparatarjetasSD.
2.ParaexpulsarlatarjetaSDapretehaciaadentroyseexpulsaráautomáticamente.
3
.
3
.
3
3.
.El
Escojaelmododeenfoqueparalasfotos:enfoquenormaloenfoquemacro,segúnla
r
je
t
rje
jet
ta
7M
B
7M
B
7MB
Bde
e
r
d
er
e
r
d
er
er
rd
der
erá
r
í
a.
r
í
a.
rí
ía.
a.U
dar
dar
darl
SD
a
d
e
SD
a d
de
eSD
SD
de
memoria
de
memoria
dememoria
memoriainterna.
á
n
si
se
á
n
si
se
án
nsi
sise
seapaga
U
sar
una
U
sar
una
Usar
saruna
unata
l
as
im
á
gen
l
as
im
á
gen
las
asim
imá
ágen
genes
de
e
n foqu e
de
e
nfoque
dee
enfoque
nfoque
apaga
apaga
apagala
ta
rje
ta
rje
tarje
rjet
es
es
es.
interna.
interna.
interna.Las
la
c
á
la
c
á
lac
cá
ámara
t
a
de
memor
t
a
de
memor
ta
ade
dememor
memori
.
.
.
mara
mara
marao
Las
Las
Lasim
im
im
imá
o
o
ose
i
a
i
a
ia
aSD
á
ge
á
ge
áge
gen
se
queda
se
queda
sequeda
quedasin
SD
SD
SDp
n
es
e
n
ella
n
es
e
n
ella
nes
ese
en
nella
ella
sin
sin
sin
p
a
ra
p
a
ra
pa
ara
ra
distanciadelosobjetosparasusfotos.
1.EnfoqueMacro:esadecuadoparafotografiarobjetosaunadistanciade15cm
~25cm.Parausaresteenfoqueempujeelmacrointercambiadorhastaelfinal
marcadopor.
2.Enfoquenormal:esadecuadoparafotografiarobjetosaunadistanciade1.4m.
Parausaresteenfoqueempujeelmacrointercambiadorhastaelfinalmarcado
7
7
7
7
por .
Page 61

4
.
A
j
u
s
t
a
r
la
co rre a
de
ag arr e
de
la
c
á
4
.
A
j
u
s
t
a
r
la
correa
de
4
4.
.A
Aj
ju
us
st
ta
ar
rla
lacorrea
correade
agarre
deagarre
agarrede
de
dela
mara
l a
c
á
ma ra
lac
cá
á mara
mara
1.Estirarlaetiquetaadhesivadelacorrea.
2.Estirarlacorreadenilónenlaetiquetaadhesiva.
3.Ajustaralalongituddeseadadelacorrea.
4.Sujetarlacorreadenilónenlaetiquetaadhesiva.
5.Doblaryapretarlaetiquetaadhesivasuavemente.
1
1
1
12
4
4
4
45
2
2
2
8
8
8
8
3
3
3
3
5
5
5
Page 62

5
.
Encen dido
5
.
Encendido
5
5.
.Encendido
Encendidoy
y
apaga do
y
apagado
yapagado
apagado
1.Encenderlacámara:PulsarelbotónPOWERduranteunossegundoshastaquese
enciendalapantalla.
2.Apagarlacámara:PulsarelbotónPOWERunavezyseapagará.
Apagadoautomáticodelacámara:Lacámaraseauto-apagarácuandonose
utilicedurante1minuto.Puedeajustarelintervalodetiempodeauto-apagadoen1,
3o5minutos.
3.Bateríabaja:Cuandolaenergíadelabateríaestébaja,enlapantalladelacámara
apareceráelicono“ ”ylacámaraseapagaráautomáticamente.
6
.
C
a
mbio
m
o
do
de
fu n
c
i
ó
6
.
C
a
mbio
m
o
do
6
6.
.C
Ca
ambio
mbiom
d e
mo
odo
dode
defun
Hay3modos:Video,CámarayReproducción.Entraráenelmododevideo
directamentedespuésdeencenderlacámaraypuedeapretarlallavedeMODE
n
fun
c
i
ó
n
f unc
ci
ió
ón
n
MODE
MO DE
MODEpara
cambiaralmododecámaraoeldegrabar.
Mododevideo:permitegrabar
Mododecámara:permitehacerfotos
Mododereproducción:permitemostrarlosvideosofotos
9
9
9
9
Page 63

7.
Cambi ar
7.
Cambiar
7.
7.Cambiar
Cambiarfecha
fecha
f echa
fechay
y
hora:
y
h ora:
yhora:
hora:
PuedeentrarenelMenúdeConfiguraciónparaajustarlafechaylahora:
Unavezenlaconfiguracióndefechayhora,podráajustarlahoramedianteelbotónde
dirección,ArribaoAbajo.LuegohagaclicenelbotónOKparamoverelcursor.Para
confirmarvuelvaapulsarelbotónOK.
8
.
Luz
indic
a
i ndic
indica
dora:
a
d ora:
adora:
dora:
:
:
:laluzseiluminarácuandolacámaraestéocupada.(ej.
8
.
Luz
8
8.
.Luz
Luzindic
Luzestadoocupado:
Grabandovideos,haciendofotos,conectandoconelordenador,etc…).
LED:
LED:
LuzLED:
LED:paraintensificarlaluzparahacervideos.
:
Luzcuenta-atrás:
:
:paraavisarquelacámaraestáhaciendolacuenta-atráspara
hacerlafoto.
10
10
10
10
Page 64

9
Modo
Vid
e
9
Mo do
9
9Modo
ModoVid
o:
Vid
e
o:
V ide
eo:
o:
Mo doVer
1:Símbolodelmodoqueindicaelfunciona
A
u
t
o
A
u
t
o
2A
Au
ut
to
o:Balancedecolorblancoestáautomático
PuedeescogerentreAuto/luzdedía/nublado/
Fluorescente/Tungsteno.
3Mododedistancia:Centro/Multi/Enfocado
4
640
:Resolucióndelvideo,puede
Escogerentre640x480/320x240.
0
0
:
01
:0
8
0
0
:
01
:0
50
8
00
0:
:01
01:0
:08
8:Contadordeltiempo
6 IconodetarjetadeSD:IndicaqueunatarjetadeSDestáfuncionando.
7Iconodebatería:indicaelniveldelabatería.
8IconodeZoom:indicaqueelniveldeZoom(Max.4X).
9IconodeluzdeLED:indicaqueLEDestáfuncionando.
Fotogr
a
fi
a
Fotogr
Fotogr
Fotogra
r :
a
fi
a
r:
afi
fia
ar:
r:
1P ulsarelbotónPOWERparacambiaralmodopregrabado.
2Pulsarelbotóndisparadorparaempezaragrabarunvideo.
11
11
11
11
Page 65

3Paraparardegrabar,pulsedenuevoelbotónDisparador.Silatarjetadememoria
estállena,lagrabaciónsepararáautomáticamente.
4PuedepulsarlosbotonesZoominoZoomoutparaacercaroalejarelobjetivodela
cámaradurantelagrabación.
Laventanamáximaes4x
12
12
12
12
Page 66

M
e
n
ú
Vid
e
M
e
M
Me
en
o
n
ú
Vid
e
o
nú
úVid
V ide
eo
o
Enelmododevideo,pulseOKparaentrarenelmenúprincipal:
13
13
13
13
Page 67

14
14
14
14
Page 68

1
0
Modo
C
á
mar
a
1
0
1
10
0Modo
Mo do
ModoC
Modo
Modo
Modo
Modode
:
C
á
mar
a
:
Cá
ámar
m ara
a:
:
de
re pro ducci
de
reproducci
dereproducci
reproducció
ó
n
ó
n
ón
n
1:SímboloModocámaradefotografías
2:Símbolodelmododeautocontador.
3Auto:Elbalancedecolorblanco
estáenelmododeauto
4:Mododeenfocar.
5:Mododeexposición.
6:Mododeresolucióndeimagen.
7:Mododecalidaddeimagen.
8:Contadordelasimágenes.
9:Cuenta-atrásparaquesehagalafotoautomáticamentedentrode10
segundos.
10:iconodetarjetaSD,aparecerácuandoestáinsertadaunatarjetadeSD.
:
:
:
:latarjetadeSDestábloqueada.
11:Iconodebatería.
:
12IndicadordeZoom.13 :
:
:IconoLED
15
15
15
15
Page 69

Fo
t
og
r
a
f
i
a
Fo
Fo
Fot
r:
t
og
r
a
f
i
a
r:
tog
ogr
ra
a f
fi
ia
ar:
r:
1E nciendalacámarapulsandoelbotónPOWERyentreenModoreproducción;
2PulseelbotónModoparacambiardelmodoreproducciónalmodocámara;
3PulseelbotónDisparadorparaempezarahacerfotos.
M
e
n
ú
modo
c
á
m
a
r
a
M
e
n
ú
modo
M
Me
en
nú
úmodo
modoc
:
c
á
m
a
r
a
:
cá
ám
ma
ar
ra
a:
:
Enelmododereproducción,pulseOKparaentrarenelmenúprincipal:
16
16
16
16
Page 70

17
17
17
17
Page 71

18
18
18
18
Page 72

Cuenta-atr
Cuenta-atr
Cuenta-atr
Cuenta-atrá
á
á
ás
s
s
sdel
del
del
d elt
t
i
e
t
i
e
ti
ie
mpo:
mp o:
empo:
mpo:
Puedeajustareltiempodelacuenta-atrásentre2sa10s,luegopulseelbotón
Disparador,en2segundoso10segundoslacámaraharáautomáticamenteunafoto.
T
o
m
a
r
3
fotos
c
ontin u
a
m
e
nt
e
T
o
m
a
r
3
fotos
c
T
T
o
om
ma
ar
r3
3fotos
fotosc
ontinu
continu
ontinua
:
a
m
e
nt
e
:
am
me
ent
nte
e:
:
A justeelmododecapturadefotosenelmenú,luegopulseelbotónDisparador,la
cámaratomará3fotoscontinuamente
1
1
Modo
Ver
1
1
1
11
1Modo
Modo
ModoVer
Ent
r
a
Ent
r
a
En t
Entr
ra
ar
Repro ducci
Ver
Reproducci
V erReproducci
Reproducció
r
e
n
modo
r
e
n
mo do
re
en
nmodo
modoReproducci
ó
n:
ó
n:
ón:
n:
Repro ducci
Reproducci
Reproducció
ó
n
ó
n
ón
n
MantengapulsadoelbotónModoparaentrarenModoReproducciónopulsedos
veceselbotónmodoreproduccióndespuésdepulsarelbotónPOWERpara
encenderlacámara.
Archivo
A
VIArchivoJPG
19
19
19
19
Page 73

-PuedeverotrasfotosovideosAVIpulsandolosbotonesdedirecciónhacia
laizquierdaohacialaderecha;
-PulseZoominoZoomoutparaverlasfotosconmayordetalle.
Modo
M
ini
a
M
Mini
turas
ini
a
t uras
i nia
aturas
turas
Modo
Modo
ModoM
PulseelbotónZoomoutparaentrarenelmododeminiaturasdelmodoreproducción:
20
20
20
20
Page 74

Notas:
:Esteiconoindicaqueesunarchivo
A
VI.
:EsteiconoindicaqueesunarchivoJPGconvoz.
Puedepulsarlosbotonesdedirecciónparaescogerlaimagendeseada,ypulseel
botónZoominparasalirdelmodominiaturasyentrar,así,enelmodopantallaentera.
Repro ducir
Reproducir
Reproducir
Reproducirv
v
í
deos
A
í
de os
ídeos
deos
VI
A
VI
A
A
VI
VI
v
ví
Pa rareproducirvídeosAVI,pulseelbotónDisparadorparaempezarareproducirel
vídeoelegidoenelmodoreproducción.LuegovuelvaaapretarelbotónDisparador
paraterminarlaactuación.
ModofinreproducciónModoreproducir
21
21
21
21
Page 75

Reproducir
Reproducir
Reproducir
Reproducira
a
r
c
h
i
v
os
J
P G
(
c
on
v
o
a
r
c
h
i
v
os
J
ar
rc
PG
ch
hi
iv
vos
osJ
JPG
PG(
z)
(
c
on
v
o
z)
(c
c on
onv
vo
o z)
z)
1Elegirlafotoconvozenelmododereproducción;
2PulseelbotónDisparadorparaverlaimagenelegida(convoz):
PulseelbotónOKparapararlareproducción,YpulseelbotónArriba
parainterrumpir/reiniciarlareproducción.
1Iconodelmodoreproducción5Tiempodelareproducción
2Contadordeimágenes6Paneldecontrol
3Indicadordevoz
4IndicadordearchivoenJPG
22
22
22
22
Page 76

M
e
n
ú
d
e
M
M
Me
e
n
ú
en
nú
úd
repro ducci
d
e
reproducci
de
ereproducci
reproducció
ó
n:
ó
n:
ón:
n:
En elmododereproducción,pulseelbotónOKparaentrarenelmenúprincipal:
No
t
a
:
Los
ar
c
No
t
a
:
Los
No
t
a
:
Los
No
t
a
:
Los
cerrad
o
s
cerrad
o
s
cerrad
o
s
cerrad
o
s
borrar
h
a
s
borrar
h
a
s
borrar
h
a
s
borrar
h
a
s
abran
o
se
abran
o
se
abran
o
se
abran
o
se
23
23
23
23
h
ar
c
h
ar
c
h
ar
c
h
no
se
p
uede
no
se
p
uede
no
se
p
uede
no
se
p
uede
t
a
q
u
e
t
a
q
u
e
t
a
q
u
e
t
a
q
u
e
fo
r
mat
e
en
fo
r
mat
e
en
fo
r
mat
e
en
fo
r
mat
e
en
i
v
os
i
v
os
i
v
os
i
v
os
se
se
se
se
Page 77

A
ñ
adir
A
ñ
ad ir
A
Añ
ñadir
adirefectos
efect os
efectos
efectosen
en
en
enla
la
im age n
l a
imagen
laimagen
imagen
24
24
24
24
Page 78

Redimensionar
Redimensionar
Redimensionar
Redimensionarimagen
image n
imagen
imagen
Eltamañodelaimagenelegidatienequesermenosqueeldelaimagenoriginal.
25
25
25
25
.
.
.
Page 79

A
ñ
adir
voz
en
la
im age n
A
A
Añ
ñ
ad ir
ñadir
adirvoz
voz
v ozen
en
enla
l a
laimagen
imagen
imagen:
:
:
:
Eltiempodevozsólopuededurarunos30segundos.
26
26
26
26
Page 80

27
27
27
27
Page 81

1
2
Modo
1
2
Mo do
1
12
2Modo
Modoconfiguraci
confi guraci
configuraci
configuració
ó
n:
ó
n:
ón:
n:
Pu lseelbotónOKenelmododereproducciónyluegopulseelbotóndedirección
hacialaderechaparaentrarenelmodoconfiguración.Puedeseleccionarelajuste
quedeseecambiarconlosbotonesArribaoAbajo,yluegoconfirmelaelreajuste
pulsandoelbotónOK.
28
28
28
28
Page 82

29
29
29
29
Page 83

30
30
30
30
Page 84

:
:
Notas:
:
1Guardetodoslosarchivosdelatarjetadememoriaantesdeformatearla.
Puedeperdertodoelcontenidodelatarjeta.
2Elmenú“Myimage”seactivaráunavezconfiguradalafunción
31
31
31
31
“Start-upImage”.
Page 85

Conexi
ó
n
videoc
á
mara
-
o r
d
e
n
a
dor
_
_ _
_
_
_
Conexi
Conexi
Conexi
Conexi
Conexi
Conexi
Conexi
1
1
1
1C
ó
n
videoc
á
mara
-
or
d
e
n
a
ó
ó
n
n
videoc
videoc
á
á
mara
video c
videoc
videoc
videoc
t
a
t
a
ta
ar
mara
á
mara
á
ma ra
á
á
mara
mara
r
a
l
o
r
de
n
a
r
a
ra
al
d
l
o
r
de
n
a
d
lo
or
rde
den
na
a d
dor
ó
n
ó
n
ó
ó
n
n
C
o
n
ec
C
o
n
ec
Co
on
nec
ect
dor
-
-
or
or
d
d
e
e
n
n
a
a
dor
dor
-
or
d
e
n
a
dor
-
or
d
e
n
a
dor
-
-
or
or
d
d
e
e
n
n
a
a
dor
d or
or
or
or
_
_
__
_
_
_
_
_
_
__
__
_
_
_
_
_
_
_
_
_
__
_
_
_
_
_
__
_
_
_
_
_
_
__
__
_
_
_
_
_
_
_
_
En primerlugarinstaleelCD-driverdelavideocámaraantesdeconectarlacámaraasu
ordenador.
EnlacámarahaydosmodosdeUSB:MSDCyPCCAM,aunqueelmodoMSDCesel
máscomún.Enciendalacámara.Siquiereusarlafuncióndecámara-web,
configureelmododePCCAMenelmenúdeconfiguración.Sinecesitausarla
funcióndediscoextraíble,configureelmododeMSDCenelmenúconfiguración.
Conecteelextremo4PINdelcableUSBenlaclavijaUSBdelordenador.Luegoconecte
elotroextremo(5PIN)delcableUSBalacámara.
D
es
c
a
r
ga
r
a
r
chi
v
o
s
d
e
l
a
c
á
m
a
r
a
a
l
o
r
d
e
n
a
d
o
D
es
c
a
r
ga
r
a
r
chi
v
o
s
d
e
l
a
c
á
m
a
r
a
a
l
D
Des
esc
ca
ar
rga
gar
ra
a r
rchi
c hiv
vo
os
sd
de
el
la
ac
cá
ám
ma
o
ar
ra
aa
al
lo
or
r
r
d
e
n
a
d
o
r
rd
de
en
na
ad
do
or
r:Cuandolafuncióndedisco
extraíbleestéenuso,eliconodeldiscoextraíbleapareceráenlaventana“MiPC”.
Lasfotos/videosquehayenlacámaraestánguardadasenelarchivofolder\
DCIM\100MEDIAdeldiscoextraíble.Elijalosarchivosguardadosenelarchivo
"100MEDIA"yluegocopie(oarrastreusandoelratón)losarchivosenlascarpetas
seleccionadasdeldiscodurodondequieraguardarlos
32
32
32
32
.
Page 86

Nota:ParausarlafunciónMSDCnosenecesitainstalarlosdriversenWindowsME
oversionessuperioresdeWindows.
2
Ins
t
a
lar
e
l
2
2
2Ins
Ins
I nst
softw are
t
a
lar
e
l
software
ta
alar
l are
el
lsoftware
software
Instaleelsoftwaredeldriversegúnlospasossiguientesantesdelaaplicación.
Notas:NoconectelacámaraenelUSBdelordenadorantesdeinstalarelsoftwaredel
CD-driverenelPCparaevitarerroresenlainstalación.
◎Instalacióndelsoftware
1.Cargareldiscodeinstalaciónenelordenador;
2.Elordenadoriniciaráelprogramadeinstalacióndeldiscoautomáticamente,y
enlapantallaapareceránlassiguientesventanas:
33
33
33
33
Page 87

z
(Sielconductorópticodelordenadornotieneauto-ejecución,hagaclic
directamenteenelprogramaautorun.exelocalizadoenelraízdel
directoriodeldisco,parainiciarlainstalación.)
z
ParalosquetienenWindowsVista,apareceráimmediatamantela
siguienteventanayseejecutaráelinstaladordeldisco.HagaclicenRun
Sof
t
w
a
r
e
In
s
t al
l
e
r
.e
x
Sof
Sof
Soft
t
w
a
r
e
In
s
tw
wa
ar
re
eIn
Ins
stal
tal
l
e
r
t all
le
er
r.e
e
.e
x
e
.ex
xe
ep aracontinuar.
34
34
34
34
Run
Run
R un
Page 88

In
s
t
a
l
ac
i
ó
n
d
e
l
c
o
nd
u
c
t
In
s
t
a
l
ac
i
ó
n
d
e
In
Ins
st
ta
al
lac
aci
l
ió
ó n
nd
de
el
lc
or
c
o
nd
u
c
t
or
co
ond
ndu
uc
c t
tor
or
Ha cerclicenelbotón“Driver”,ycompletelainstalacióncomosedescribeen
elprogramaWizard.Luego,reinicieelordenador.
No
t
a
:
No
t
a
:
No
Not
ta
a:
:ParaWindowsVista,lassiguientesventanasapareceráninmediatamentecuando
seinstaleelsoftware.Hacerclicen paracontinuar.
35
35
35
35
Page 89

Despuésdelainstalaciónhayreinicieelordenador.
Esteasistentedeinstalacióndelsoftwareesválidoparasistemasoperativoscon
Windows2000,WindowsME,WindowsXPyWindowsVista.
Siaparecelasiguienteventana,hacerclicenelbotónde“Yes”paracontinuarenla
instalación:
36
36
36
36
Page 90

Sug
e
r
e
n
c
Sug
Sug
Suge
ia
e
r
e
n
c
ia
er
re
en
nc
cia
ia:EnelsistemadeoperativodeWindows98SE,siquiere
r eproducirunvideo,debeinstalarprimeramenteelVideoImpression.
ConlaayudadelmóduloDirectX9delVideoImpression,podrá
reproducirlosvideoquedesee,ensuordenador.
37
37
37
37
Page 91

3
Instr uc
c
ion
e
s
del
s
o
f
t
w
a
3
Instruc
3
3Instruc
Instrucc
Ins
t
alar
Ins
t
al ar
In s
Inst
talar
alarP
c
ion
e
s
del
cion
i one
es
sdel
d els
P
h
ot
o
I mpre ss
P
h
ot
o
Impress
Ph
hot
oto
oImpress
Impressi
s
so
i
on5:
i
on 5:
ion5:
on5:
re
o
f
t
w
a
re
of
ft
tw
wa
are
re
Porfavor,inserteelCD-driverdeinstalacióndePhotoImpression5,elasistentede
instalaciónactuaráautomaticamente:
38
38
38
38
Page 92

Pulseelbotón ysigaelprocesodeinstalaci ónpasoporp asosegúnlasindicaciones.
Nota:ParaWindowsVista,cuandoseinstaleelsoftwareapareceránlassiguientesventanas.Hagaclicenel
botónparacontinuar.
39
39
39
39
Page 93

Reinicieelordenadordespuésdelainstalación.
Abrir
Photo Impres
Abrir
PhotoImpres
Abrir
AbrirPhotoImpres
PhotoImpress
Hacerdobleclicenelicono delescritorio,opulsePhotoImpression5en“Iniciar→Programas”.
CuandoabraPhotoImpression5aparecerálasiguienteventana.Hagaclicenlaizquierdadelaventanapar a
cerrarla.PhotoImpressionseabrirádespuésdequelavent anasecierre.
s
ion5:
s
i on5:
sion5:
ion5:
40
40
40
40
Page 94

DespuésdeabrirPhotoImpression,aparecerálaventanade“GetPhoto”.
41
41
41
41
Page 95

Elijalaimagendeseadadentrodelaventana“GetPhoto”,deestaformapodráelegirlaimagenparaeditar.
Elasistente“Help”(Ayuda),leresolverásusdudasrespectocómofuncionaelprogramaPhotoImpression.
(comosemuestraenlasiguienteim agen).
42
42
42
42
Page 96

In
s
t
a
l
ac
i
ó
n
de
V
i deoI m
pr
es sio n
2
In
s
t
a
l
ac
i
ó
n
de
V
ideoIm
In
Ins
st
ta
al
lac
aci
ió
ó n
nde
deV
Hagaclicenelbotónysigaelprocesodeinstalaci ónpasoporpasosegúnlasindicaciones.
Nota:ParaWindowsVist a,cuandoseinstaleelsoftwareapareceránlassiguientesventanas.Pulseelbotón
paracontinuar.
VideoIm
ideoImpr
pr
pression
ession
ession2
:
2
:
2:
:
43
43
43
43
44
Page 97

44
44
44
Page 98

Reinicieelordenadordespuésdelainstalación.
A
brir
V
ideoI mpress
A
br ir
V
ideoImpress
A
Abrir
brirV
VideoImpress
ideoImpressi
H acerdobleclicenelicono delescritorio,opulsePhotoImpression5en“Iniciar→Programas”.
i
on
2
:
i
on
2
:
ion
on2
2:
:
45
45
45
45
Page 99

Elasistente“Help”(Ayuda),leresolverásusdudasrespectocómofuncionaelprogramaPhotoImpression.
(comosemuestraenlasiguienteim agen).
46
46
46
46
Page 100

47
47
47
47
 Loading...