


DuraCam XT
Therm al I m age Cam e ra
User Manual
INFRARED CAMERAS INC.

! W ar nin gs, Cau tions and N ot es
De finit ions
! W ARN I N G Could cause bod ily inj ur y or death.
! CAUTI ON Could cau se dam age t o equipm ent or perm anent loss of dat a.
! N O T E pr ovides u seful inform at ion t o the operat or.
I m port an t I nf or m at ion – Rea d be fo r e usin g t he I nstr u m e nt
! W ARN I N G – Laser Radiation is em it ted from this device. D o N ot st ar e
in t o Laser Beam . Cla ss 2 La se r , 6 35 nm , 0 .9 m W
! CAUTI ON - Nev er point t he lens d irect ly t oward a str ong r adiation source
( ie. Sun, dir ect or r eflect ed laser beam , etc ), w it h power on or pow er of f, as
dam age m ay r esult t o t h e t h erm al det ect or u sed inside. Per m a n en t
dam ag e m ay re sult !
! CAUTI ON - The original shipping cart on shou ld be kept for use for f u t ure
tran sport at ion . Do not dr op, sh ake or im pact t he ther m al im ager
excessively, in use or durin g t ransport ation .
! CAUTI ON - St or e t h e unit in it s or iginal case in a cool, dr y, w ell- vent ilat ed
ar ea aw ay fr om st r ong el ect rom agnetic fields.
! CAUTI ON - Prot ect t he sur f ace of t he lens fr om b ein g st ain ed or dam aged
by for eign obj ects su ch as sludge or chem icals. Please r eplace t he len s cap
aft er use.
! CAUTI ON - Please r em em ber t o back u p im age dat a regular ly t o av oid
losing im port ant dat a.
! N O T E - For m ax im um m easurem en t accuracy, allow 3 t o 5 m inut es f or
cam era t o st abilize af t er initial pow er up.
! N O T E - Each cam era is factory calibr at ed. I t is recom m ended that
calibr at ion be perfor m ed every 12 m ont h s.
2

! CAUTI ON - Do not open case. Unit does n ot con t ain any user serviceab le
part s. Repair sh ould be perform ed by fact ory au t horized t echnicians on ly.
3

Cont ent s
! W arnings, Ca u tion s and N ot es .......... . . . . . . .. . . . . .. . . . .. . . . . .. . . . .. . . . . .. . . . . .. . . . .. 2
1 I nt roduct ion ............ . . . . . . .. . . . .. . . . . .. . . . .. . . . . .. . . . .. . . . . .. . . . . .. . . . .. . . . . .. . . . .. . . . . . 6
1.1 St andard accessories ................................................................................................ 8
1.2 Optional accessor ies .................................................................................................. 8
2 Cam e r a ove r view ....... . . . . . . .. . . . .. . . . . .. . . . .. . . . . .. . . . . .. . . . .. . . . . .. . . . .. . . . . .. . . . .. . . . 9
2.1 Funct ion key s ............................................................................................................... 9
2.2 I n t erface....................................................................................................................... 12
3 Ba sic o p e rat ion .. .. . . . .. . . . . .. . . . . .. . . . .. . . . . .. . . . .. . . . . .. . . . . .. . . . .. . . . . .. . . . .. . . . . .. . . . 1 4
3.1 Bat ter y I nst allat ion and Replacem ent .............................................................. 14
3.1.1 I nsert ing or r em oving batt ery ..................................................................... 14
3.1.2 Replacing bat ter y .............................................................................................. 15
3.2 Bat ter y safet y and usage ...................................................................................... 16
3.3 Quick access ............................................................................................................... 16
3.3.1 Capture an im age ............................................................................................. 16
3.3.2 Tem per at u r e m easurem en t .......................... Error! Bookmark not defined.
3.3.3 save im ag e .......................................................... Error! Bookmark not defined.
3.3.4 Playbak c I m age ................................................. Error! Bookmark not defined.
3.3.5 Dow n load t h e saved files ............................................................................... 19
3.3.6 Scr een Sett ing ................................................................................................... 19
3.3.7 Manu operat ion intr odu ct ion ........................................................................ 20
4 Oper a tion guide .... . . . . . . .. . . . .. . . . . .. . . . .. . . . . .. . . . . .. . . . .. . . . . .. . . . .. . . . . .. . . . .. . . . . .. 2 1
4.1 Graphic int erface descr ipt ion ............................................................................... 21
4.1.1 Scr een graphic int erface ................................................................................ 21
4.1.2 Float ing Bar interface ...................................... Error! Bookmark not defined.
4.1.3 Main m anu ........................................................... Error! Bookmark not defined.
4.1.4 sub- man u inter face .......................................... Error! Bookmark not defined.
4.2 Measu r em ent object ad ding ................................. Error! Bookmark not defined.
4.3 Recordin g ..................................................................... Error! Bookmark not defined.
4.4 Photo ............................................................................. Error! Bookmark not defined.
4.5 Preview ......................................................................... Error! Bookmark not defined.
4.6 Set tin g an d Norm al sett ing ................................... Error! Bookmark not defined.
4.6.1 Measurer ing Set t ing ........................................ Error! Bookmark not defined.
4.6.2 Adj ustm en t .......................................................................................................... 30
4.6.3 I mag e set ting ..................................................................................................... 31
4.6.4 Net wor d set up ................................................................................................... 34
4.6.5 TF card m anagem en t ...................................... Error! Bookmark not defined.
4.6.6 phot o set tin g ...................................................... Error! Bookmark not defined.
4

4.6.7 syst em sett ing ................................................... Error! Bookmark not defined.
4.7 File Managem ent....................................................................................................... 40
4.7.1 Play back ............................................................................................................... 40
4.7.2 Blu et oot h t ransm ission ................................................................................... 42
4.7.3 Delet e .................................................................................................................... 43
5. Webpage operate 44
5.1 webpage loin 44
5.2 surveillacne image 44
5.3 function operation 45
5.3.1 system parameter set 45
5.3.2 Photo settint 46
5.3.3 Graphic setting 47
5.3.4 Measurement Setting 47
5.3.5 Network 48
5.3.6 Local setting 49
5.3.7 System Maintenace 49
6 Config u rat ions .. . . .. . . . . .. . . . .. . . . . .. . . . .. . . . . .. . . . . . Error! Bookm ark n ot defin ed.
7 Tr ou b le shoot in g ... . . . . . .. . . . . .. . . . . .. . . . .. . . . . .. . . . .. Error! Bookm ar k n ot defin ed.
Ap p e nd ix A .. . . . .. . . . .. . . . . .. . . . .. . . . . .. . . . . .. . . . .. . . . . .. . . . .. . . . . .. . . . .. . . . . .. . . . . .. . . . .. . . . . .. . 5 5
Com m on m at erial em issiv it y(FYI) ............................................................................. 55
Ap p e nd ix B . . . . . . .. . . . . .. . . . .. . . . . .. . . . .. . . . . .. . . . . .. . . . .. . . . . .. . . . .. . . . . .. . . . . .. . . . .. . . . . .. . . . .. 5 6
Fact or y default par am eter set t ing t able ...................................................................... 56
5

1 I nt rodu ct ion
Thank you for choosing I CI Instr um ent s “ DURACAM XT” h and- held i nfr ared
ther mal im ager.
Mode l I de n tif ica t ion
DURACAM XT im ager s use t h e det ect or with 25um 3 8 4 * 2 8 8 , and
m easurem en t ran ge from - 2 0 ° C~+ 650° C
Fe a tur es
DURACAM XT include t he follow ing featu r es:
11 user select able color palet tes
11 user select able languages
2X ,4X dig it al zoom
5 rem ovable sp ot m easurem ent s
5 Ar eas m easur em ent s
2 lin es m easur em ents
Cust om shor t cut s
Blu e toot h
Power sav ing m od e
LCD Br ight ness adj ust m ent
Video Out p u t – NTSC or PAL
I n t ernet set t ings
Tim e and Date set t ings
Factory sett ings restore
TF car d uninst all, for m att ing
TF card im age st orage, video st orage
Tex t and Audio annot at ion via im age storage
Consecu t iv e im age sh ot st orage
Alarm im age capture
Alar m video recor d
I sot her m m easur em ent fu nction
Tem per at ur e m easur em ent set tings
6

Built in Emissiv ity Table list of com mon m at erials
CMOS visible im age and st orag e
I n f rared an d visib le im age fusion
Mer ge set
Upgrade s and Op tion s
DURACAM XT model is fact ory upgradeable for Wide Angle or Telephoto
Len ses.
DURACAM XT m odel is fact ory upgradeable f or high t em p erat u r e
ex pan sion lens to a wide tem perature m easurem ent range.
App lica tions:
Pre ven tiv e m a in te na nce
Power indust r y: Pow er line and power f acility t h erm al stat e checking;
problem and defect diagnosis.
Elect rical syst em : I dent ify pot ential cir cuit overloads.
Mech anical syst em : Reduce downt im e and avoid catastr ophic failure.
Const ru ct io n scien ce
Roof : Quick ident ificat ion of wat er penet rat ion pr oblems.
St r u cture: Com m ercial and r esidential ener gy aud its.
Moistur e det ect ion: Det erm ine root cau se of m oist ur e an d m ildew .
Evaluat ion:Evaluat e t he resolut ion t o en sure t he ar ea com plet ely dry.
Ot her s
I r on and st eel industr y : I nspect steel refining and rolling processes;
diagn ose h ot- blast st ov e def ect s; det ect t he em bry o t em perat ur e of ar m or
plat e, et c.
Fir e figh t ing: Forest fire pr evention and det ect ion of latent ign it ion
source. Preven t iv e det ect ion on specific m at erials of aut o- ignit ion. Det ect ion
of poten t ial sp ark ign ition sources.
Medical: Hum an b ody surface t em p erat ur e det ect ion and screening.
7

Pet r o/ ch em ical: Oil pipel ine st at us i nspect ion ; m at er ial surface
temper ature d etect ion; insulat ion inspect ion ; pow er equipm ent st at u s, etc.
1 . 1 St anda rd a ccessor ie s
Infrar ed t herm al im age cam era ( wit h w r ist st rap)
Car ry ing case
Video out cable
Lithium ion bat ter ies(2)
User m anu al, I nfrar ed r eport and analysis soft ware syst em CD
Lithiu m bat t ery ch arger
Lens cap
TF car d
TF car d r ead er
USB cable
1 . 2 Opt iona l a ccessories
Ext ernal 0.5x wide- angle len s
Ext ernal 2x t elescopic len s
Eye pat ch
Pow er adapt er(w it h pow er cable and plug)
Europ ean st andar d plug
Brit ish st andard plu g
Aust ralian stan dard plug
8

2 Ca m e r a over view
4
5
6
7
2 . 1 Funct ion keys
1
2
9

[1] Pow e r k ey
Press and hold t h e Power Key f or > 3 seconds t o pow er on/ off th e cam era.
! N o t e: Aft er powering of f, please wait t en seconds befor e power ing t he
cam era on again .
[2] Se le ct / Au to ke y ( Ma r ke d “ A”)
Th e “ A” or at tribu t e but ton per f orm s 2 f unct ions.
a) Th e f irst funct ion is m odif ication of select ed p aram et ers. I t is obtained
by a quick press and release ( less t h an 2 seconds) , w it h t his fu nct ion s to
m odif y t heir param eters. Subsequent presses will “ scr oll” t hr ough t he
availab le param eter s. Th e select ed fu n ct ion w ill be h ighlight ed in yellow. The
funct ions include:
• M ea sur em en t point s, a r ea s, a n d lin es
Poin t s, ar eas, lin es – swit ching t h e added points, areas and lin es in t he
in t erface fr om Up t o Dow n , pr ess Menu t o set pr oper t ies, press C t o delet e th e
selected m easurin g objects.
Color Pa l e tt e
Pressing t h e left or right arrows w ill scroll t h r ough the availab le color
palet tes, displaying t heir nam e abov e th e palet te. Th e select ed palet te w ill
becom e act ive aft er about 3 seconds of select ing it and w ill be set as t he
default p ow er on palet t e.
• Le v el/ Spa n v alue s
Pr essing t he left or righ t arrow will reduce or incr ease the Sp an and
pressing t he up or down ar row w ill r educe or incr ease t h e Level. I f the u n it is
in Autom at ic m od e, m odifyin g any of t hese param et ers w ill select Manual
m ode.
b)The secon d funct ion per form ed is t o force an inter n al calibrat ion cycle.
This is per f orm ed b y pressin g an d holdin g t h e A key for 5
The cam era will m ake aut om at ic cor r ect ion to get t he m ost accurat e t h erm al
m easu r em ent .
c) I m age tr ansm ission via blu e t ooth. Open blu e-t oot h, select obj ect im age,
10
seconds or m or e.

shor t press A, it will display send ing d ialog .
[3] Can cel/ Cam er a k e y ( Mar k ed “ C” )
• Pressing and releasing the C key cancels t h e pr esen t op erat ion when in
Men u m ode.
• Pressing and releasing t he C key w h en an im age is fr ozen or bein g v iew ed
from m em ory, will ret u r n t o real-t im e m easurem en t st at u s.
• When not in m enu m ode or param eter ed iting, pressin g an d releasing t he C
key w ill t oggle bet ween t he t herm al im age and t h e visib le CCD cam era
im age.
• When a p aram eter is select ed, such as a m easu r em ent cursor, pr essing t he
C key w ill delet e the h ighlight ed m easurem ent.
[4] Fr eez e / Sa ve k e y ( Ma r ked “ S”)
Used for freezing or sav ing therm al im age. Press the key on ce t o freeze the
im ag e. Press Confir m t o save t he im age or Press C t o retur n t o real- t im e
m easu r em ent . I f Audio recordin g is enabled, Au d io com men t dialog box w ill
display. I n d ocum ent m an agem en t , pr ess S t o delet e video or im age.
[5] Me n u/ Con fir m k e y ( ba r)
I n cludes U p , D o w n, Lef t , Righ t and Me n u/ Con f ir m ( cen ter) k ey s.
Funct ion varies wit h operation m ode.
I n M enu m od e , it is used for m enu selection . U p and D ow n k eys are for
sam e level of m enu operat ion. Le f t and Right key s ar e for different lev els
m enu operat ion . Confirm key (center ) is t o act ivate t he m enu and confir m the
choice.
I n I m a ge m ode, pr ess U p or D ow n key t o act ivat e X2 digit al zoom . The
scr een w ill display “ X2” in t h e upp er left cor n er. Press Up or Dow n key t o
return t o t h e or igin al im age.
I n Sp ot M easur e m ent editing m ode ( act ivat ed im m ediately af t er ad ding
a sp ot or by selectin g via t he A key ), press t he M e nu key t o pop u p t he
11

at trib ut e box. Press four navigat ion keys t o m ove t h e spot locat ion .
I n line t em p erat ure m easur em ent edit ing m ode ( act ivat ed im m ediat ely
aft er adding a line or by select ing v ia t he A key ), pr ess the Men u key t o pop up
the at t ribut e box. I f m easurem ent lin e is h orizon t al, pr ess Up an d Dow n key s
t o m ove t he line locat ion; pr ess Le ft an d Right keys t o m ove t he refer ence line.
I f m easur em ent line is ver tical, pr ess Lef t an d Ri g ht keys t o m ov e t h e line;
press U p an d D ow n key s to m ove t he r efer ence line.
I n area m easurem ent edit ing m ode (act ivat ed im mediat ely after add ing an
ar ea or by selecting via t he A key) , pr ess the Con fir m key to pop up t he
at tribut e box. Select in t he at tr ibut e box t he param eter t o be edit ed, either size
or posit ion . Press the four nav igat ion key s t o m ove the ar ea locat ion or ch ange
t h e size of t h e ar ea.
[6] Trigger / Shor t cut k ey
The t r igger key serves as a sh ort cu t t o access t he followin g functions:
Laser – Pulling t rigger activat es laser sight and r eleasing deactivat es it .
Spot, Ar ea– Pulling and releasin g t r igger adds a spot or area. Pulling and
releasing t rigger again rem oves the spot or ar ea.
Vid eo and I m age Sav e –pressing t o init iat e a Save cy cle.
Zoom - pr essing t o zoom t he in frared im age
LCD bright n ess adjust m ent - pr essing t o act ivat e
[7] Microphone
Used for recordin g a v oice m essage with the Saved im age
12

2.2 Interface
4
1
2
3
[ 1 ] USB to RJ45 o u tpu t
Used f or int er n et connect ing.
[ 2 ] TF Ca r d slot
Accepting st andard size TF card such as su pplied 8 GB capacit y card, f or
device upgrade or im age stor age.
[ 3 ] Vide o p o r t
I t is a video out put interface.
[ 4 ] P ow er in ter f a ce
Ext ernal power input inter f ace. Power source should be + 12 VDC. Cent er
pin is posit ive t erm inal.
13
3 Basic opera t ion
3 . 1 Battery I n st alla t ion an d Re pla cem ent
3.1.1 I nser tin g or re m ovin g b at te r y
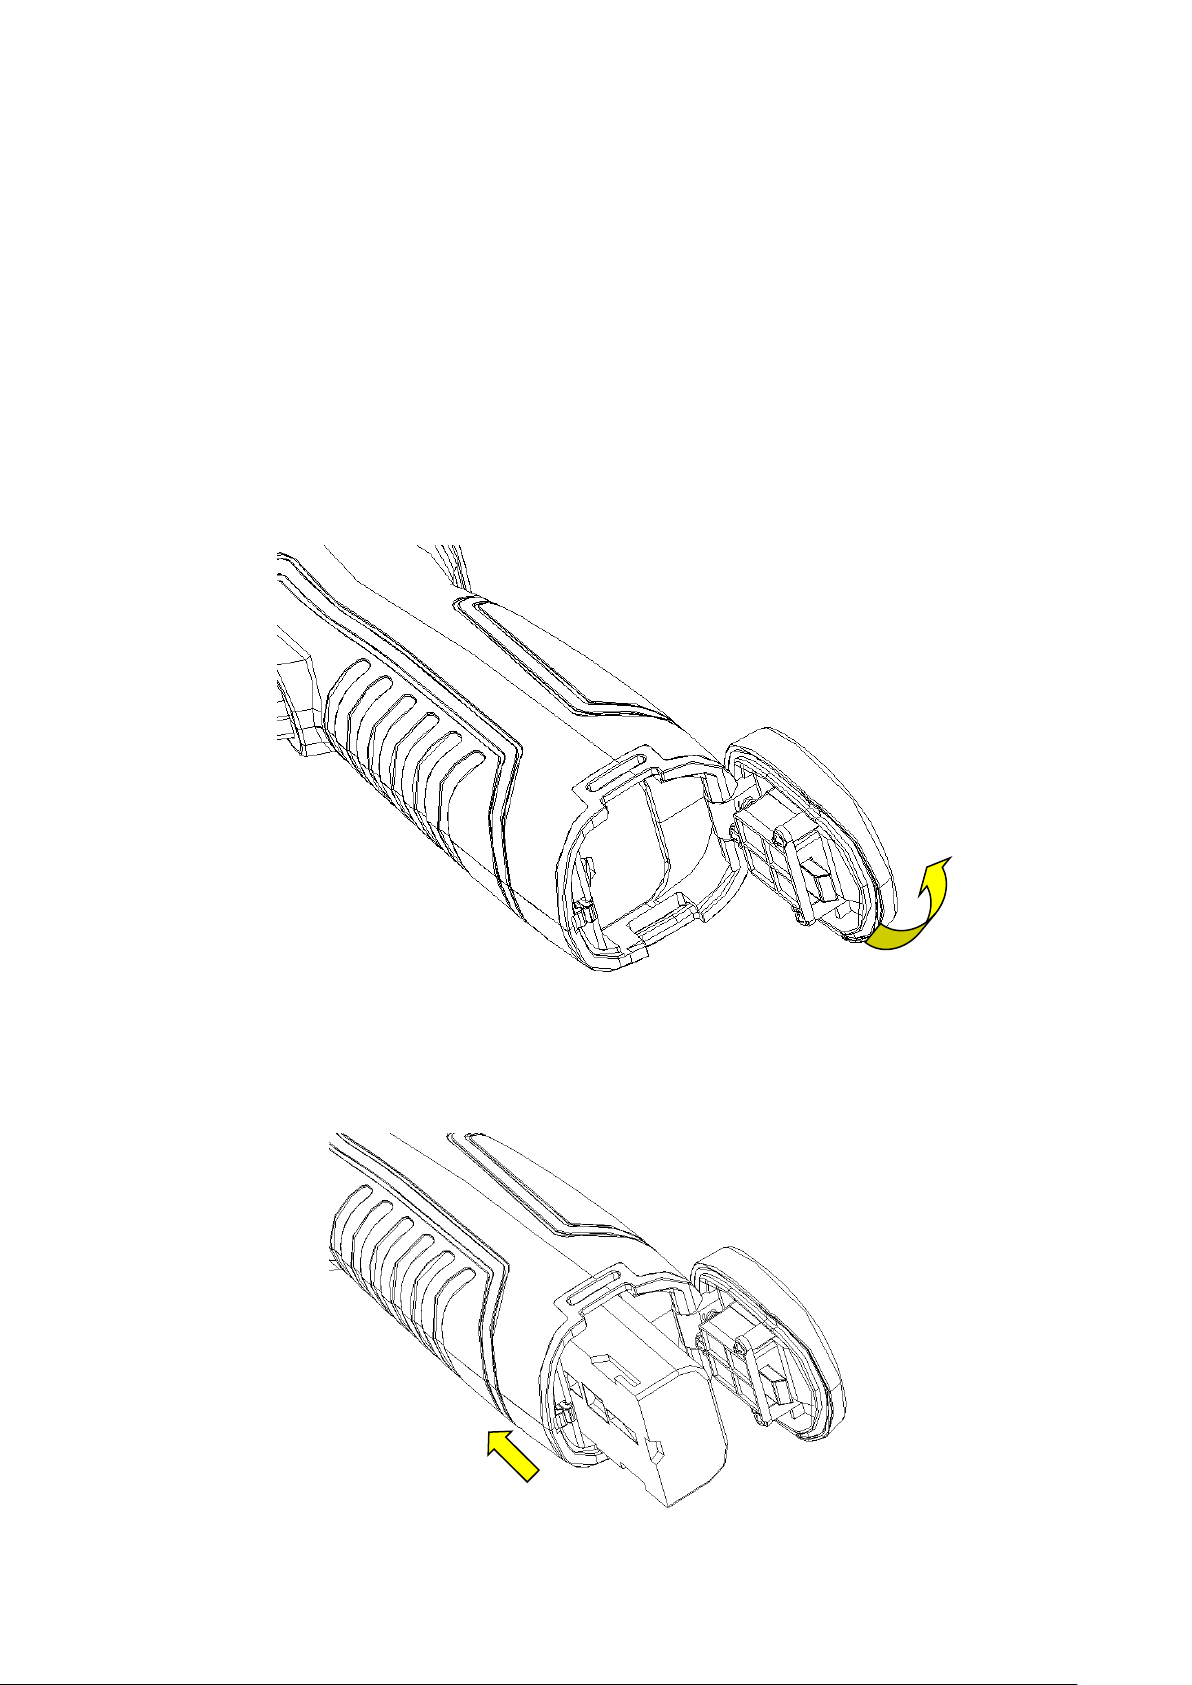
Bat ter y com partm ent is located inside t he handle. Tur n t h e cover
count er- clockw ise t o r em ov e. Rem ove b at t ery f or r eplacem ent .
I nsert the bat ter y ( t he bat t ery cont act s m ust face int o the batt ery
compar tm ent ) .
14

Replace the cov er and scr ew dow n .
! CAUTI ON : Use only or igin al m anufactur er r eplacem ent bat tery. Use of
in corr ect batt ery m ay result in phy sical or electr ical dam age to the in str um en t
due t o in cor rect volt age or physical size dif f eren ce.
3.1.2 Re placing b at te ry
When batt ery disp lay s em pt y and f lashes for about 1 m inut e and 50
seconds, t h e inst ru m en t displays a low batt ery dialog and shut dow n
aut om at ically aft er about 10 seconds.
Power ing off d isp lay
15

I t ’s bet ter t o replace batt eries now.
3 . 2 Battery sa fet y a n d usa ge
Batt eries shou ld be st or ed in an am bient t em perat ur e of - 4° F ( –20 ° C) t o
67.9° F ( + 20° C). Lit hium batt eries w ill self- dischar ge during storage, so
they should b e fu lly char g ed before storag e. Self- dischar ge m ay aff ect long
t erm batt ery per form ance. Fur ther mor e, it is r ecom m ended t hat t he b at tery
shou ld be char g ed in a set t im e, as b elow;
Am bient t em p erat ure of:
- 4° F ( –2 0 ° C) t o 67. 9 ° F (+ 20° C), once every 6 m on t hs
6 7 . 9° F ( + 20° C) to 113° F ( + 45° C), once ev ery 3 m ont hs
1 1 3° F ( + 45° C) t o 149° F ( + 60° C) , once every m ont h
Bat ter y sh ould have great er than 50% char g e p r ior t o rech arge.
The am bien t tem perat ur e for charging should b e 32 ° F ( 0° C) to 1 0 4 ° F
( + 40° C). I f under 3 2 ° F ( 0° C), t h e bat t ery capacity w ill be dim in ished ; if
over 1 04° F ( + 4 0° C), t he bat t ery m ay over heat , r esult ing in perm anent
dam ag e.
! W ARN I NG:
! Nev er disassem ble, incinerat e or pu nctur e bat t er y
! Never shor t cir cuit t he bat t ery
! Keep bat t er y dr y
! Keep out of reach of childr en
! Alw ays dispose of bat t ery in accordance wit h local, state and f ederal
regu lation s
3 . 3 Qu ick a cce ss
3.3.1 Ca pt u re a n im ag e
After installing the battery, press and hold the power key (≥3 seconds)
until t h e display com es on. Aft er approx im ately 50 seconds, t h e p ower
on r outine will finish and t h e cam era will st art it s m easurem ent s.
Rem ov e th e lens cap an d aim at t he t ar get . Ad j ust t he focus for t h e
16

clear est t arget t herm al im age.
! Note:Focus is not clear, and will lead to measurement error.
3.3.2 Temperature Measurement
To move the target object to the screen on the point of crossing temperature, the
upper-right corner of the screen shows "XX" is the temperature measurement point at the
target temperature. If you want to measure more accurately, keep press the "A" button for
3 seconds。
If wish to detailed analysis the thermal image of the current screen, you can press the "S"
key to frozen the image, then analysis. Sustainable pressing the "S" key for 3 seconds, the
thermal image stored, and then analyzed.
When the target temperature is greater than or less than the relevant thermal image' Max
or Min temperature, the temperature of the screen display> XXX ° C or <XXX ° C.
If you need to modify the properties of the temperature measurement object, you should
first check the temperature of the object, and then press the Enter key, the temperature of
the object's Properties dialog box pops up on the screen. The following figure is the
temperature measurement points, the temperature line, the temperature measurement area
of the Properties dialog box:
Point Measurement Properties Dialog Box
The attributes of the measurement points can be modified amplitude coefficient ratio,
the distance and the reference object, the left and right arrow keys to the left and right
selection, press the A key to switch up and down. Temperature value is displayed when
the "reference object" option changes to "open", and other measuring object with the
temperature difference of the temperature measurement points.
17

Line Measurement Properties Dialog Box
Line temperature measurement properties can be modified amplitude coefficient
ratio, distance, maximum temperature, minimum temperature, average temperature,
maximum temperature difference, the crossing point temperature and the reference
object, the left and right arrow keys to the left and right selection, press the A key to
switch up and down. Temperature value is displayed when the "reference object" option
changes to "open", and other measuring object with the temperature difference of the
temperature measurement points.
Area Measurement Properties Dialog Box
Area temperature measurement properties can be modified amplitude coefficient
ratio, distance, maximum temperature, minimum temperature, average temperature, the
maximum temperature and the reference temperature properties can be modified, and the
18

left and right arrow keys to the left and right selection, press the A key to switch up and
down. Temperature value is displayed when the "reference object" option changes to
"open", and other measuring object with the result of the temperature difference between
the temperature measurement of the temperature measurement area
! Note:It can only set one reference target.
3.3.3 Save Image
Obtain the current image to store, you can choose one of the following four ways:
Press Ok button and will show panel menu, select the "photo" option in the menu, the
system will automatically save images
Press S key, the image will froze, and press the same key again and the image will be
saved.
Keep press S key for 3 second, the image will be automatically saved.
To set a shortcut key as Take Photo, then just need press this key to save image.
3.3.4 Playback Image
Two way to open the image file:
1、 Press the Ok key to activate the main menu, select "File Manager" menu , then select the
submenu (via the arrow keys to select)
2、 Click the "Preview" option in the floating panel to open the selected file (via the left and
right keys to switch selection)
After you open the image, you could use upper and lower sections of the playback control
panel keys to playback the current store images.
Press Cancel key to exit and return to the current state.
3.3.5 Download the Save Files
Can use card reader to download, delete, format the TF files.
! Note:Use the recommended form to format the TF card。
3.3.6 Screen Setting
There’s two ways to set up: 1) Via g eneral setup menu of “LCD brightness adjustment” to
do screen brightness settings, so as to achieve the best effect. 2) by setting shortcut keys
for the “LCD brightness adjustment”, then use the shortcut key to adjust the LCD screen
brightness.
19

3.3.7 Manu Operation Introduction
Keyboard operation: press the "OK" button to pop up the floating panel, use left and right
arrow keys on the floating panels to select the icon, click "OK" key to enter the relevant
interface.
Main menu interface: via "up and down" key to select the menu icon, click "OK" key to enter
the submenu.
Sub-menu interface: via "up and down" key to select, if there’s the ">" mark, using
right-click to enter the lower menu
Parameter interface: The "up and down" key is to modify, the “left and right” key is to choose
< > means modify the setting of the current manu.
Press the "OK" button to confirm the changes, save and return to the previous menu, press the
"C" key to cancel the changes and return to the previous menu.
Cancel and return to the previous menu button; Save and return to the
previous menu button. (For touch screen)
Switch button, by the left and right keys to modify the switch settings
20

4 Opera t ion gu ide
1
6
13
3
11
8
4 . 1 Graph ic in t e r face d escr iption
4.1.1 Scr ee n gr ap h ic int er fa ce
15 16 17 18 19 20
2
4
5
[1] Company logo
[2] Emissivity
[3] Reference Temperature
[4] Result
: Indicates the temperature value of the target object. Black and yellow denotes the
: ICI
: the current emissivity setting
12
10
9
7
: Fixed reference temperature
temperature value of the selected object.
[5] Spot temperature measurement
[6] System
[7] Min temperature
[8] Auto Enhancement
[9] Manual Enhancement
[10] Palette
: the current system time
: indicate minimum value of the palette
: select auto enhancement mode
: select manual enhancement mode
: palette bar. User can choose different palettes
:white crosshair
21

[11]Bluetooth
:select Bluetooth function
[12] Max temperature
[13] Battery status
[14] TF card
:indicate the TF card load status
[15] Freeze logo
[16] Zoom
[17] Recording
:indicate the image is zoomed
:indicate the recording status
[18] Continuous snap-shot
[19] Voice recording
[20] Calibration
: indicate the max value of the palette
: indicate the current battery status
:indicate the current image is frozen
:indicate the continuous snap-shot status
:indicate the voice recording status
:indicate the calibration status
! NOTE: Not all m od els have all funct ions, so the working st at us scr een m ay n ot
show all featur es.
4.1.2 Floating Bar Interface
Float in g bar int erface
photo, preview and settings manu.
:From left to right is namely the temperature measurement, video,
Float ing bar in t erface
22

4.1.3 Main Manu
1
2
4
Main Manu
The main menu items: display the main menu item, namely the document management,
temperature settings, image settings, camera settings, general settings, network
settings, TF card management and system setting.
4.1.4 Sub-manu interface
Sub-manu interface
[1] Figure name: Displays the name of the dialog box. The name of the dialog box as shown in the
example is "temperature measurement setting.
[2] Item title: A dialog box may contain more than one item. As shown in the above figure
[3] Item Content: each item corresponds to the content of a project, the left and right keys to make
changes, ">" indicates the lower menu.
23

[4] Parameter options: press the left button to select a different parameter.
4.2 Measurement Object Adding
This feature is used to increase or clear the measuring object. The following dialog box pops
up, press the Enter key, floating menu pops up, select the temperature measurement target to add
and press the Enter key.
Temperature Measurement Object Adding Manu
If select“
! NOTE: When you delete a single temperature measurement object, direclty press “A” key and
choose the object, then press the "C" key to delete.
”, then press OK key,then the all the objects will be cleared.
4.3 Recording
This function is used to save the video, save format to MP4. Pressing the Enter key, floating
menu pops up, select video and press the Enter key, as shown below.
24

Recording Figure
Press stop key to end the recording, and return to the current operation status
4.4 Photo
This item is for photo. And back up in the JPG format. Pop up the floating menu after
pressing confirming key. Then finish the photo. If turn up function of mark. Backup note
will pop up in the OSD as followed.
Voice record note for photo
Continuous photos mark will appears in the status column if set the continuous photo
4.5 Preview
This item is for the preview files of backup. Press confirming key. Pop up the floating items ,
select preview and press confirming key will appears as followed .
25
Preview OSD
Switch to files by pressing key of left or right. Open it and it appears in the screen by pressing
confirming key. Press C key to quit
4.6 Setting
Main OSD
26

Normal setting OSD
Press confirming key will pop up the panel and select the SETTING to open the main menu.
Select the Normal setting in the main menu. Normal setting OSD will pop up after pressing
confirming key. Users could set the time of auto calibration / definition of shortcut key
/Bluetooth/pattern of power saving/ brightness adjustment of LCD / unit of temperature / unit of
distance .totally 7 items. Switch to items by pressing key of up or down. Change the value by
pressing key of left or right. “>” means secondary -menu and enter the menu by pressing key of
right .
Time of Auto calibration:Set time interval of auto calibration to get better thermal image
and improve the precision. The unit is second
Auto calibration OSD
Shortcut key :Users could set the Functions of shortcut key. System offers record .screenshot.
Enlargement. Reduction. Enlarge brightness of LCD. Reduce brightness. of LCD Laser.
27
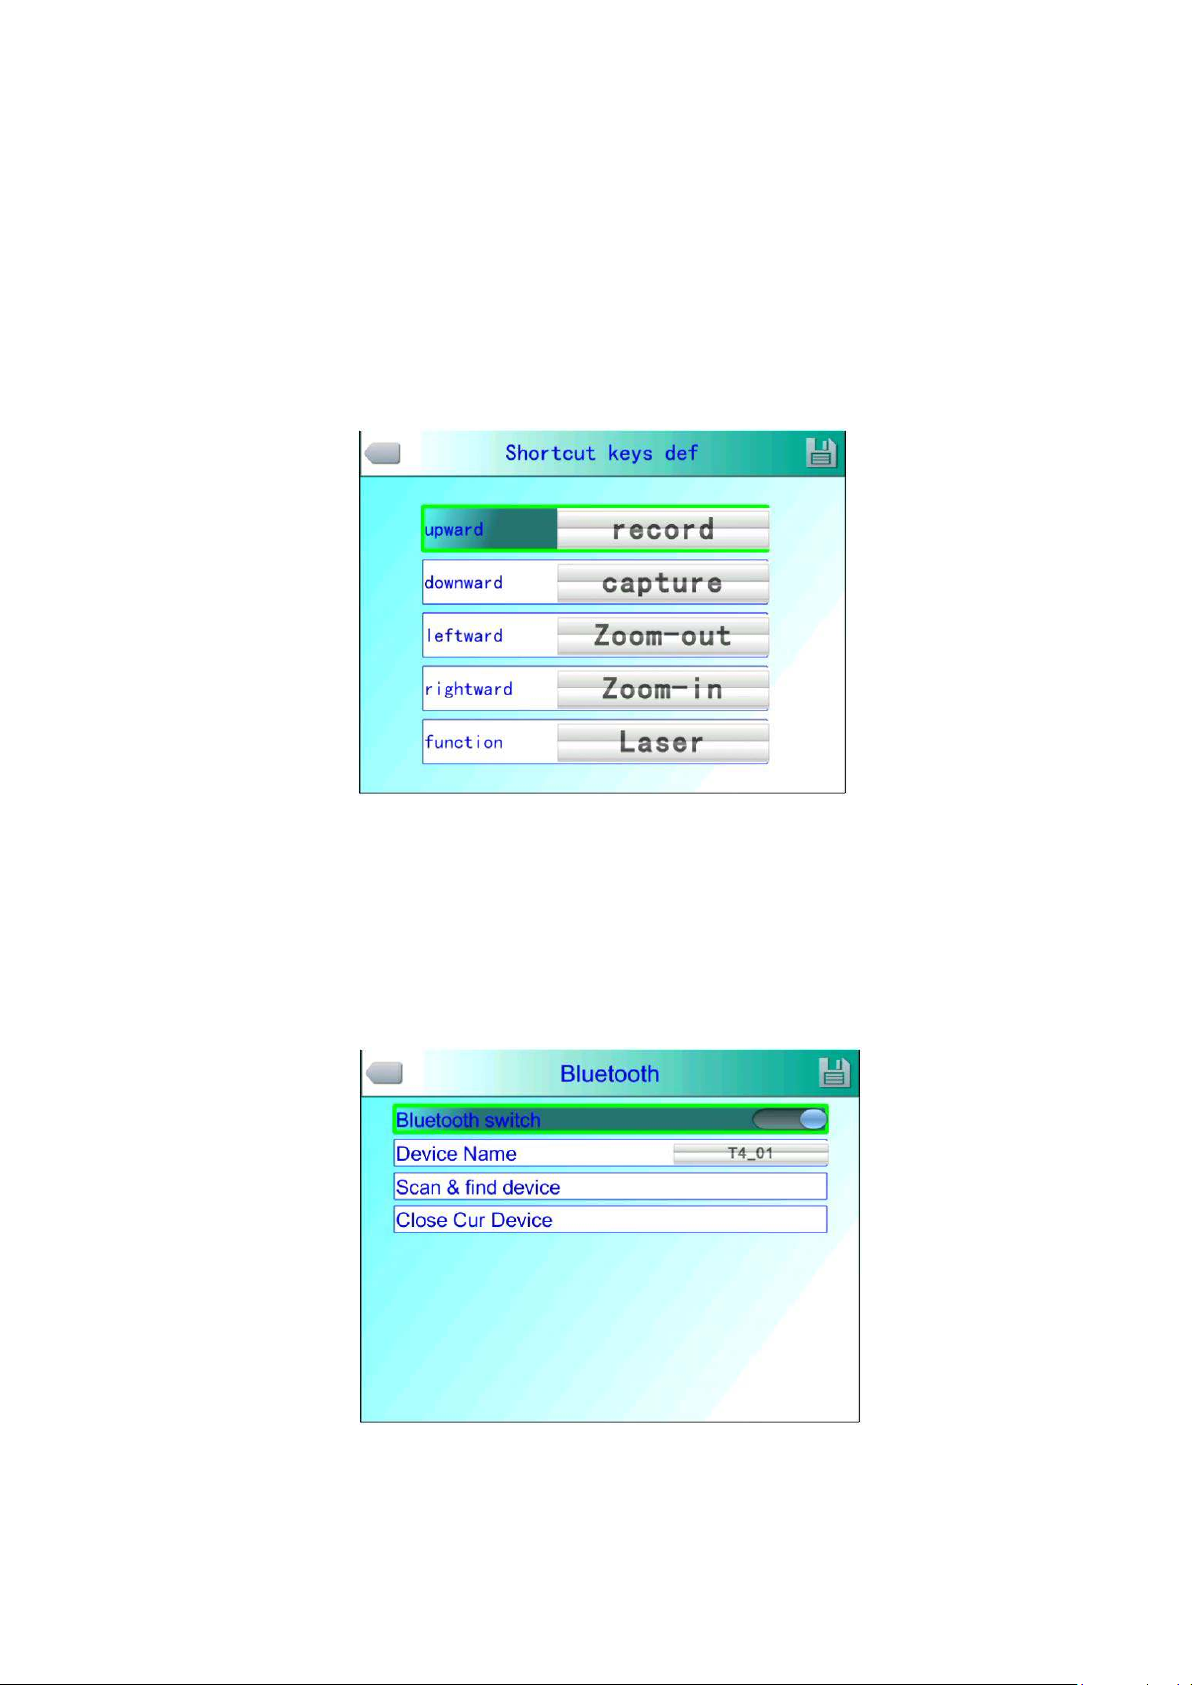
Lightness. Adding or removing spot 1 of testing temperature. Adding or removing area 1 of
testing temperature and so on. When select shortcut key of laser. It will open the aimer of laser.
Then it closes. When select shortcut key of light. It will open the lighting. Then it closes. When
select shortcut key of spot 1. It will add or remove the spot 1. When select shortcut key of area
1. It will add or remove the area 1. When select shortcut key of record. It starts to record. When
select shortcut key of photo. It starts to save the photos you took.
Shortcut key setting
Bluetooth :Turn on the Bluetooth will enable status of scanning and searching below,Turn
off Bluetooth the status is not valid .Select scan and search key and start to scan the Bluetooth
device .the model and the name of devices will show in the OSD .Enable status of Bluetooth
the device will scan and search one time automatically
Power saving
Bluetooth OSD
:Screen off and power off
28

Time of scree off :If without any operation ,thermal imaging camera will screen off to save
power。Press any key except the power key,thermal imaging camera will
screen on 。This function is not valid when time is set to 00 minute.
Time of power off :If without any operation ,thermal imaging camera will power off to save
power。This function is not valid when time is set to 00 minute.
Pow e r saving OSD
LCD b r ig h tne ss a d just m ent
LCD br igh t ness ad j ust OSD
:It is valid when changing the brightness.
29

4.6.1 Measuring setting
Measuring setting Menu
Press OK button to call out the Setting Menu. Select “Measuring Setting”,then press “OK”
again to call out the setting interface. In this interface ,Level ,magnification,Environment
Temp,Ref Temp can be set. Use UP &Down button to select ,” >” means there is sub menu, press
Right Button to enter the sub menu.
Level: Seeting the Measuring Level of the thermal camera.
Magnification: Seeting the Magnification and the different Temp range.
Environment Temp: It will automaticly detect the Environment Temp after the
camera start-up.
Ref Temp: When it is enabled , the target temperature shown on the LCD is the
D-Value between the real temp and the Ref-Temp.
Ref Temp Menu
30

4.6.2 Adjustment
Adjustment Menu
Press OK button to call out the “Adjustment” under menu “Measuring Setting”. In this menu ,
Emissivity, Tcorrect, Distance , Humidity ,TReflect can be set. Use UP &Down button to
select ,use LEFT & Right to set the value. ” >” means there is sub menu, press Right Button to
enter the sub menu.
Emissivity: Different target has different emissivity, so the user can set different emissivity
for different target. If it is not set , then will use default setting. Attached
Common emissivity table for reference.
Tcorrect: Correct the target Temperature.
Distance: Setting the distance between the camera and the target to make sure exact
measuring. Set the real distance if the distance is shorter than 10 meters. (unit
0.5m)
Humidity: Set the humidity of the using environment.
TReflect: It will only functioned after it is enabled. Can use fixed temp as
reference temperature.
31

4.6.3 Image Setting
Image Setting Menu
Press OK button to call out the Image setting menu under “Setting” . in this menu ,
Manual/Auto-Enhance Mode, Alarm types, Alarm Tempe , IR transparency, Alarm color,
Alarmlink, Tiem Interval can be set. Use UP &Down button to select ,use LEFT & Right
to set the value. ” >” means there is sub menu, press Right Button to enter the sub menu.
Manual/Auto/Auto-Enhance Mode:Adjust the image quality for the user to get
better image for analysis purpose
When Auto-Enhance Mode is activated,can switch between manual and automatic. Press “A
“ button will enter manul mode,it can adjust the pallet with “UP, Down, LEFT, Right” buttons.
Press “C” will return into Auto Mode.
When Auto-Enhance Mode is deactivated,can switch between manual and automatic. Press
“A “ button will enter manul mode,it can adjust the pallet with “UP, Down, LEFT, Right” buttons.
Press “C” will return into Auto Mode.
The modes can be switched with the Auto-enhance mode Button.
If select auto mode, the camera will automatic adjust the sense of hierarchicy of the
.
image
If select “Auto-Enhancement “ , both High temp target and low temp target can be viewed in
the image.
32

If Slect Manual mode, User can set the pallet value to adjust the image quality. Press “UP”
button to increase the level range , press Down to decrease the level range. Press Left button to
reduce the upper limit, increase the bottom limit; Press RIGHT button to increase the
upper limit, decrease the bottom limit.
Alarm Setting
Alarm Types : It is only functioned when measurting. User cab set alarm OFF , High temp
alarm,Low temp alarm here. It will alarm when proper setting is selected. Alarm
color can be set in “Alarm Color”
Alarm Color: The color of the target area shown on the LCD will be changed into the alarm
color set when the temperature is over the alarm temp. 9 color types can be
selected. If “colorless”is selected, then the color will not change when alarm.
Alarm Temperature: Setting alarm Temperature. Only functioned when it is enabled。
Alarmlink
: It will automatic saved when there is alarm including snapshots and video
record.
Time Intervel
: Set the alarmlink time intervel.
33

Isotherm Setup Menu
Isotherm: Act ivates the Isother m disp lay by disp laying t he im age in t he
set t em perat ur e rang e by t h e specif ied color.
Isotherm Color
: 9 colors available for your choice,Set tin g t o Off, disables th e
feat ur e.
Isotherm low value:Set the Isotherm low value。
Isotherm upper value:Set the Isotherm upper value。
IR Fusion High & Low temperature Menu
IR Fusion High & Low temperature
:
I t con sist s of t hree option s- - IR Fusion Hig h Tem p, I R fusion Low Tem p, and OFF.
Set I R Fusion High Tem p, w h en t he act ual tem p erat u r e is h igher t h an the
t em perat ur e of I R f u sion set up, CCD im ag e will be sh own . Vice ver sa.
34

4.6.4 Network setup
Network Setup Menu
Press the menu button to show up the floating panel and choose the “setup” option to active
the main menu. Select “Network function.
IP Address
: This IP address must be the only one, can not be conflicted with the other IP address
of the same network segment.
Sub network mask
Default network gateway
: Divide the segment of the sub network.
: Set the gateway address to realize the communication among
different segment.
Link type
: Default 10M/100M self-adapt, 10M、100M.
35

4.6.5 TF Card Management
TF Card Management Figure
TF Unload
TF Card Format Figure
36

TF Card Format Successful
Press the Enter key to pop up floating panel, then select "Settings" option to activate the main
menu, select the "TF Card Management item in the setup menu.
Unload
Format
the confirm key to format, press cancel or "C" key to cancel the formatting
! Note: Verify that the file is no longer needed or have been backed up before formatting;
after formation, the saved thermal imaging pictures will be lost unrecoverable. If format by PC,
:Unload TF card.
: This function is used to format the TF card. Select the formatting options, pressing
please select FAT16 to format the card.
4.6.6 Photo Setting
Photo Setting Manu
Pressing confirm key to pop up the floating panel, then select "Settings" option to activate the
main menu, selected the camera settings option
37

Associated Pictures
: This function is to associate the infrared images with digital image, to
save the picture together.
Image annotation mode
: This option has two kinds of annotations,audio annotations and
text annotations. Audio annotations is to add voice when you save the picture; text annotation is to
add text messages when save the image.
CS Shots
Continuous Capture Interval
Record Time
Manu Setting
:Set Continuous capture the number of sheets can be set for 1, 3, 5, 10 shot.
: can be 0.5s or 1s.
:can set 1、3、5、10 or 15 minutes to shut off the recording.
:
Manu Setting
Set the path to save the file, directory type can be set by custom, by month, by date. In
preview mode, the playback file path set by directory type.
4.6.7 System Setting
System Setting Manu
38

Press the Enter key to pop up "Settings" option to activate the main menu, select "System
Settings" item in the setup menu. Users can customize the set system language, time / date formats,
time / date, restore the factory value items. Pressing the up/down key to switch the setting, use left
and right arrow keys to set the contents of the setting. The ">" indicates that there’s a lower-level
menu, use right-click to enter.
Language
Time / Date Format
:Set the languages
:
Time/Date Setting Manu
Change the format of the time/date
Time Setting
:
Time Setting Manu
Customer can via the Time Setting manu to set the thermal imaging camera’s time. After the
setting, the data the time will be saved.
Users can customize to set the year, month, day, hour, minute entries. Press the left and right
39

key to do the settings.
! Note: When left unused for a long time, due to the limited internal battery power, the thermal
imaging camera need to re-adjust the system time.
Restore the factory settings
: This function is used to restore the factory settings. Pressing
the confirmation button, the setting manu will come up, continue to press the confirm key system
to restore the factory settings. When pressing the cancel button to exit, the restore the factory
settings will be cancelled. The details of the thermal imaging camera’ factory parameters listed
please see the Annex parameter table.
Recover Factory Setting
: Recover factory setting will cancel all user-defined parameters.
! Note
System Version Info
:
System Version Figure
Display thermal imaging device model, device number, software version number and MAC
address
40

Import: New TF card the Create DCIM / Import directory on the TF card, import the fixed
file name as PicNote.cfg
File Name Form:
[Note]
Note1 =
Note2 =
Note3 =
Each line is not more than 20 words. After the import is complete, restart the instrument to
take effect.
Export: TF card, make sure the TF card is in the machine, then select the menu and then click
the Export button to export the contents stored in the TF card the DCIM / Export directory.
4.7 File Management
4.7.1 Playback
Two modes of playback:
File Management Figure
1、 File management mode: press the Enter key to pop up floating panel select "Settings"
option to activate the main menu, select the file management menu in the setup menu,
press the confirm button to open the infrared image in the storage. The image
41

arrangement format has abalone grid , press the upper, lower, left, and right arrow keys
can switched the stored image. Pressing the "C" key to exit open image and return to the
measurement state.
Preview Mode Figure
2、 Preview mode: press the OK button to pop-up floating panel to select "Preview" option,
enter the preview mode. Through the left and right keys to switch selection, selected
press the OK button to enter the playback. Pressing the "C" key to exit open image and
return to the measurement state.
Video Playback Interface
Video playback interface: Via the left and right key to select the play button on the status bar,
press the "confirm" key to take effect on the next key to show and hide the playback status bar
42

(press the "on" button is displayed, press the "next" button is hidden)
The icon buttons from left to right is as follow: play / pause, stop, rewind, fast-forward, the
former one, the next.
Image Playback Interface
The image playback interface: Via the left, right key to select the play button on the status bar,
press the "confirm" key to take effect on the next key to show and hide the playback status bar
(press the "on" button is displayed, press the "next" button is hidden)
The icon buttons from left to right is as follows: the former one (above), the next (paragraph),
sound recording, voice playback, text playback.
4.7.2 Bluetooth Transmission
This function is used to transfer the stored images on TF card. First, turn on Bluetooth, then
open the file manager, and the arrow keys to select the files you want to transfer and Bluetooth
transmission prompt box pops up, press the "A" key, as shown below:
43
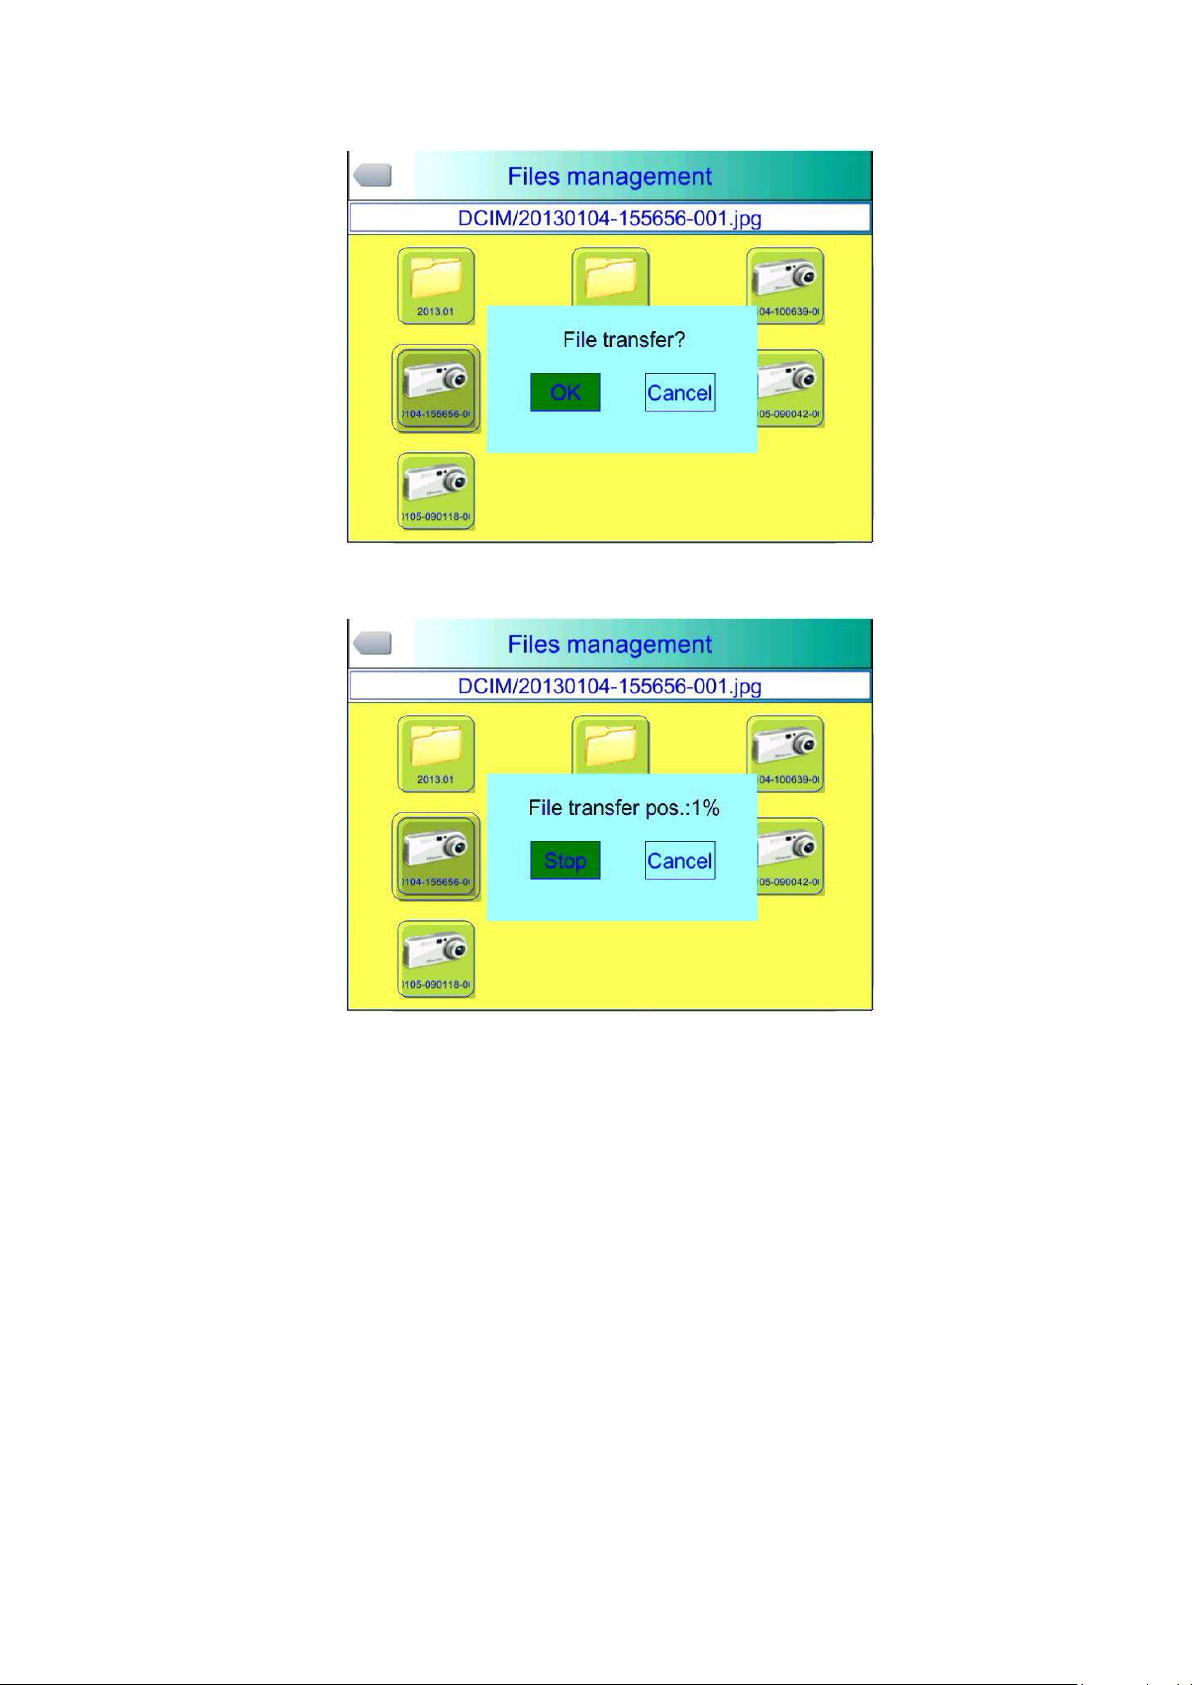
Bluetooth Transmission Figure
Press confirm key, will show the progress bar, as shown below:
Transmission Progress Bar
4.7.3 Delete
This function is used to delete data stored in files on the TF card. Open File Manager by the up
and down keys to select the file you want to delete, press the "S" key to bring up the prompt box,
delete the currently selected image files when the Enter key is pressed, the image voice or text
comments will also be deleted, then press the "C" key to undelete
44
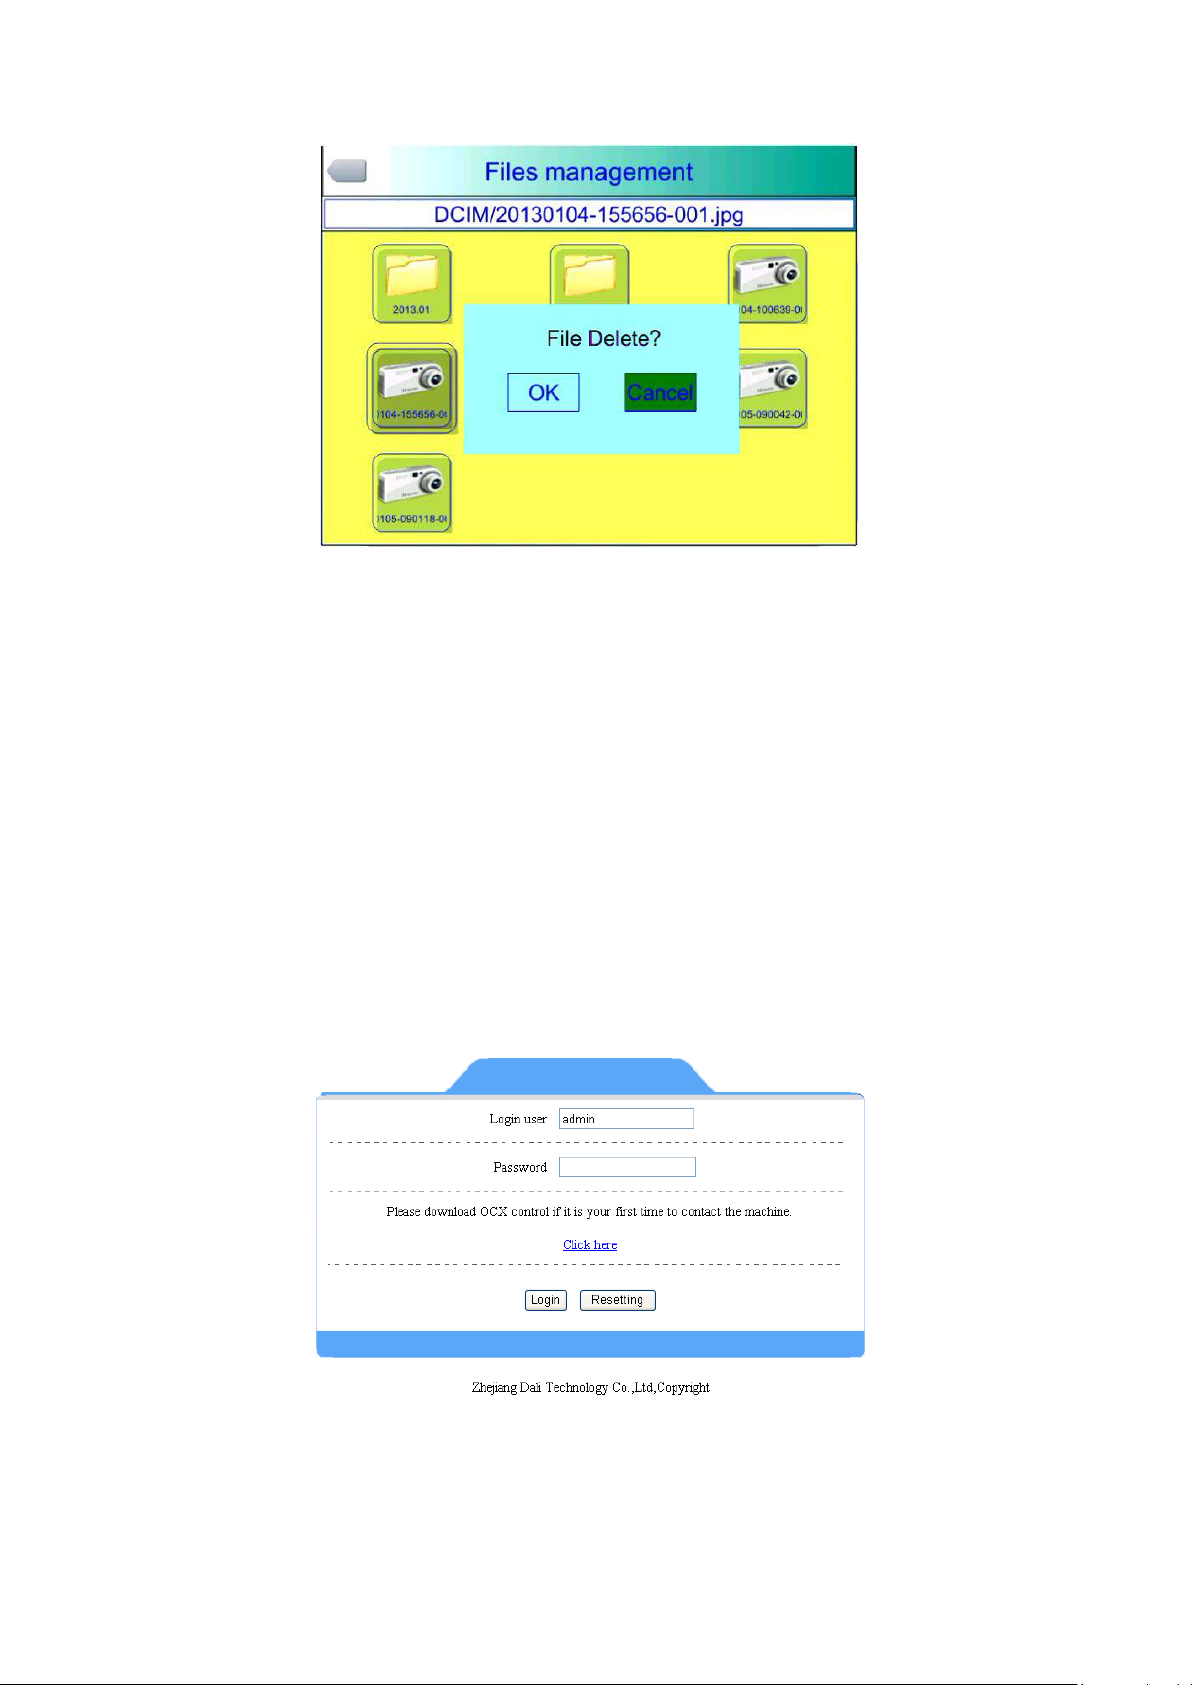
File Delete Figure
! Note: Before deletion, make sure that the file is no longer needed or have backup, the
deleted image can not be recovered
5 Webpage operate
5.1 Webpage login
Will pop up a menu after inputting the IP of camera ,as bellow:
Login interface
User ID and code both is admin .Enter the operate menu after press the
login. If ActiveX cannot download automatically .please download
manually.
45

5.2 Surveillance image
Surveillance image will be shown as follow :
Monitoring Figure
Switch :Switch on /off to open and close the image
Link save :save the thermal image and visual image both
Local capture:Save image in BMP format
Local record :Save the video in AVI format
Automatic /manually:refer to manual。
Calibration :refer to manual 。
Original data save:There are two types. One is frame rate
Another is interval time between two frames. Frames rate means
frames per seconds. Could set as different modes like continuous
/5/20/50/100/random. Interval time means time between two frame .it
could also set different modes .like 20/40/100/200/1000/random。
5.3 Function operate
Press buttons are shown in the left in the screen:
46

Buttons
5.3.1 System parameter set
System parameter menu will pop up after login:
System Configuration Manu
The manu include the setting for time, for system setting
47

and for the short key, see as the operation guide.
5.3.2 Photo Setting
Click photo setting, and come to the setting manu, see
as the follow
:
Photo Setting
The details please see as the operation guide
5.3.3 Graphic setting
Click the setting, and see as the follow:
Graphic Setting
It include tow sub-manu, one is graphic setting, another
is the alarm setting.
48

5.3.4 Measurement Setting
Click the measurement setting, and see as follow:
Measuring Parameters Menu
Under Measuring Parameters Menu there are sub-menu of Measuring Settings,
measuring correction and isothermal . For the detailed function operation please refer the
operation manual.
5.3.5 Network
User can enter network setting with pressing network
button,refer below picture
Network setting Menu
Refer the operation manual for the detailed functional
49

descriptions.
5.3.6 Local Settings
Press Local settings can enter into local settings menu.
Refer below picture:
Menu of local settings
Default Vedio port number is 5000 . The file saving path
can be defined by user.
5.3.7 System Maintainance
Press System Maintainance will show menu as below
picture:
Sub-manu
Restore factory Setting : Refer operation Manual for
50
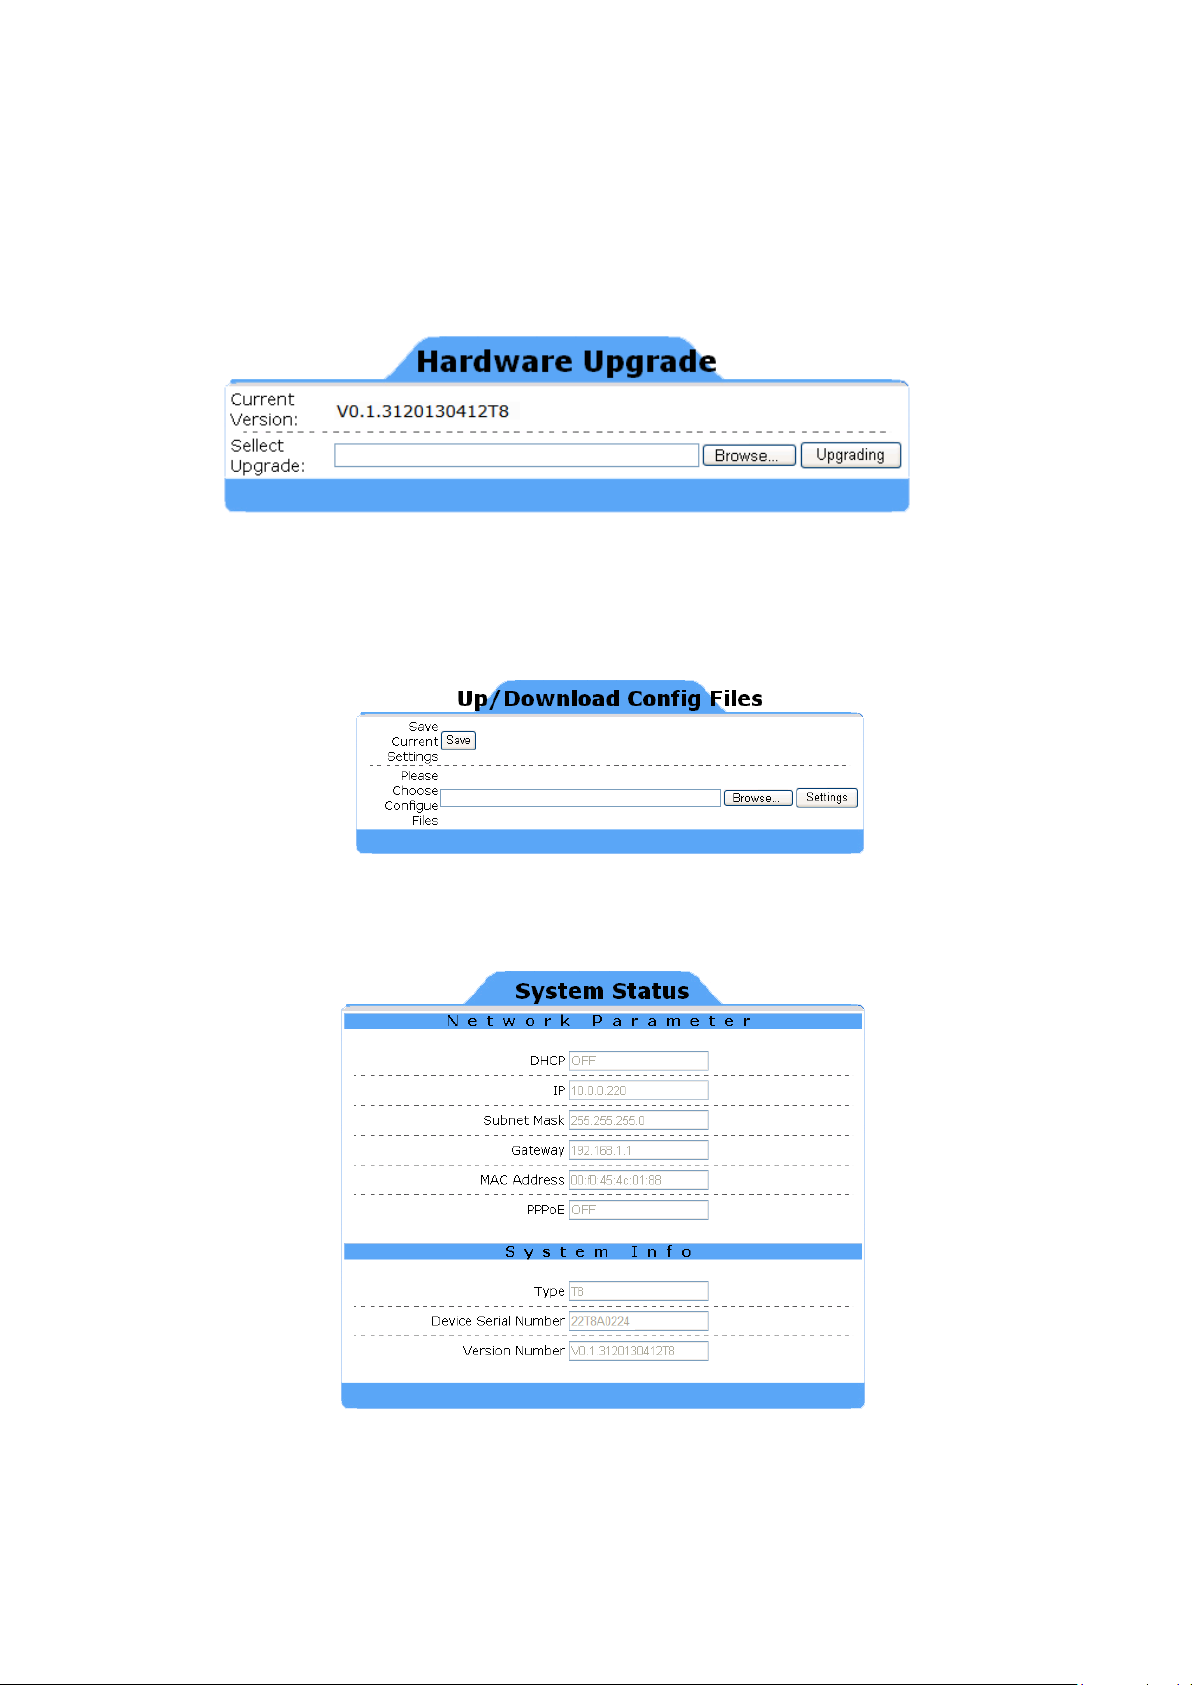
detailed funcation description.
Press Firmware update,it will switch into upgrade interface
as below:
Hardware Upgrade Figure
upload/download configuration :click this function, and
will seeasfolow:
upload/download configuration figure
System State:Click system situation, then will see :
System State Figure
51

6 Con figurat ion
Technical Specification
DURACAM XT
Type
Un- cooled FPA m icro-bolom et er
Array size
384*288
Pixel Pitch
25μm
Spectral range
8-14μm
Frame rate
50Hz
Thermal sensitivity
0.04℃@30℃
FOV
25°×19°
Min Focus
Distance
Focus
Manual
Option Lens
0.5x/2x
Interface Type
Screw Type
IFOV
1.32mrad
Zoom
2X、4X
CCD
3 million pixel,CMOS module
Frame Rare
50HZ/60HZ,
Video Output
PAL / NTSC
LCD display
3.6″TFT LCD,640*480,touch screen
Color Palette
11 color palette for option
Image adjustment
Auto/manual to adjust brightness, contrast
Fast switch between infrared image and ccd image, with fusion
function.
Image Enhance
Auto/manual enhance mode
-20℃~+650
(two range)
Extend to1200℃or2000℃
Accuracy
± 2 ° C or ± 2 % of r ead ing, Wh ich ever is gr eat er
Measurement
Correction
Up t o 5 m ov able spot s. Up t o 5 m ovable
Tem per at u r e differen ce. Alarm (voice, color )
Emissivity
correct ion
Background Tem
correction
At m osph er ic
correct ion
Time/Date, ℃/℉/K, language, brightness/contrast, LCD
brightness, IP address
Card
8GB Micro TFcard,max 32GB
Auto/manual saving, single thermal images and ccd image
ccd fusion function.
Item
Detect
or
10cm
Lens
Image
Image
Displa
y
Measu
remen
t
Image
Range
Mode
tran sm ission
Setting Option
℃,
Auto / Manual
ar eas( m axim um , m inim um and aver age t emperatures) .
Up t o 2 m ovable lines. Line pr ofile. I sot her m s.
Variab le f r om 0 . 0 1 t o 1.0
Auto
Autom at ic correction according t o user input object
dist ance, hum idit y and t em per ature
Image
Storag
e
Mode
association, thermal video and ccd association, thermal and
52

Format
JPEG format
H.264 format
CCD image format
JPEG、H.264,include fusion
Voice annotation
60s, saved together with the image
Text annotation
can upload
File Manu
can upload
Bat ter y t ype
Li- I on, r ech argeab le
Bat ter y
op erating tim e
charging
Intelligent charge or power adaptor or 12v car power charge
Charging time
1.5 hour to 50% full
Power saving
auto sleep, auto shut down
SD card slot
Micro SD(TF)slot
Net
Mini-USB
power
DC12V)
video
yes
Auto/data
Bluetooth(earphone/RS232)
Mic
yes
buzzer
yes
Flash light
2 LED
Laser point
red,1mw/635nm,two level,IEC60285
Triple
1/4″-20-UNC
Hand strap
Can install on two side
Lens cover
yes
Sky shade
yes
Operation
temperature
Save temperature
-40℃~+70℃
Humidity
≤90%
Encapsulation
IP54
Shock resistance
25G,IEC68-2-29
Vibration
resistance
Drop resistance
2 meters
Dimen
sion
Dimension
105x230x245mm
weight
980g
Power
source
Interfa
ce
other
Enviro
nment
3 hours continu ous oper at ion
(
-15℃~+50℃
2G,IEC68-2-6
53

7 Troub leshoot ing
The cam era does not
Bat tery not inst alled or inst alled
The cam era pow ers off
Bat tery is out of power.
Environm ent al t em p erat ure is t oo low
Rechargeable bat t ery is n ot ch arged
Rechargeable bat t ery is out of power
Lens cov er is not r em oved .
Whit e- black palet te is select ed
Please follow t he t able below t o diagnose and cor rect t he problem . I f
problem st ill exists, please contact our service departm ent (400-887-1897).
Pr o b le m Cau se & Solu tion
in correct ly
→I n stall b att ery or r e-install bat t ery
pow er on .
aut om at ically.
Bat ter y deplet ion is t oo fast
No ther m al im age
Therm al im age is wh it e- black .
Bat t ery is out of power.
→Change batt ery.
“ Power off” pr ot ect ion is enab led
→Wait for 5 seconds an d r eboot.
→Chan ge batt ery
Au t oOffTim e opt ion is en abled
→Set as Non e.
com p letely.
→Recharge t he bat t ery.
complet ely and cannot be r echar ged.
→Change t o new bat ter y.
→Rem ove lens cov er.
I n im age freeze st at u s
→Press C k ey t o ex it .
→Select n orm al palet t e.
54

Appe ndix A
Ma t e ri a l
Su r f a ce
Te m pe r a t ur e ° C
Em i ssivit y(ε)
Non- oxid ized
100
0.2 0
Oxidi zed
100
0.5 5
Dull lu st er
38
0.2 2
Oxidi zed
100
0.6 1
Rust y
25
0.6 5
Cast ir on
Oxidi zed
200
0.6 4
Non- Ox idized
100
0.2 1
Quar r y- faced
25
0.9 4
Polished
38
0.2 8
Glass
Polished plat e
20
0.9 4
Whit e
100
0.9 2
Black
100
0.9 7
Cand le soot
20
0.9 5
Rough lead su r face
20
0.9 8
Pap er
Whit e
20
0.9 3
San d soil
Surface
20
0.9 0
Thin
21
0.9 0
Thick
21
0.9 3
Com m on m a t e r ia l em issiv it y
Alum inum
Bur n ished t o Brow n 2 0 0.4 0
Brass
Copper Ser iously Ox idized 20 0.78
Oxidi zed 100 0.7 4
I r o n
Wrou ght iron
Nickel Oxidi zed 200 0.3 7
St ain less steel Ox idized 60 0. 85
St eel Oxidi zed 200 0.79
Com m on br ick Surface 20 0.93
(FYI )
Concret e Surface 20 0.92
Lacq u er
Sm o ke black 25 0.95
Car bon
Oil paint Value of 16 color s 100 0.9 4
Tim ber Dr essed 20 0.90
Wa t er Distilled wat er 20 0.96
Skin Hum a n 32 0.98
Cer am i c
55

Appe ndix B
Value
Du raCam XT
Tem per at u r e Range
-20 - 650°C
Len s
St andard
Tem p Unit
°C
Re f Ty p e
Off
Re f Te m p
30°C
Par am et er
Value
Emissivity
0.96
TCorr ect
0°C
TAmbien t Tem p
Off
Par am et er
Value
Tem p Alar m
Off
Alar m in g Tem p
50.0°C
Alar m ing Color
None
I sot herm Color
Off
I sot herm Tem p
50.0°C
I sot herm Widt h
1.0°C
Par am et er
Value
Language
English
Brigh t ness
60S
Aut o Calib
60%
Video Mod e
Laser sight
Quick Access
NTSC
St andby Tim e
5 mins
Aut oOffTim e
15 mins
Fact ory d efa u lt pa r a m e t e r sett in g table
Table .1 Me a sur e m ent t em per a tur e set tin g t able
Par am et er
Table .2 Me a sur e m ent t em per a tur e cor rect io n t able
Table .3 An alysis set t in g t able
Table .4 Sy st e m set t in g t able
56
 Loading...