

Page 1
ReadyNAS
TM
1100
Please use qualified SATA disks from the ReadyNAS Device Compatibility List if you need to install disks by yourself.
Getting Started Guide
The Ultra Efficient 1U NAS
Page 2
Package Contents:
(1) ReadyNAS 1100
(4) Hard Disk Trays
(1) Getting Started Guide
(1) Warranty Card
(1) Power Cable
(1) Ethernet Cable
(1) ReadyNAS Installation CD
(16) Screws for Hard Disk Installation*
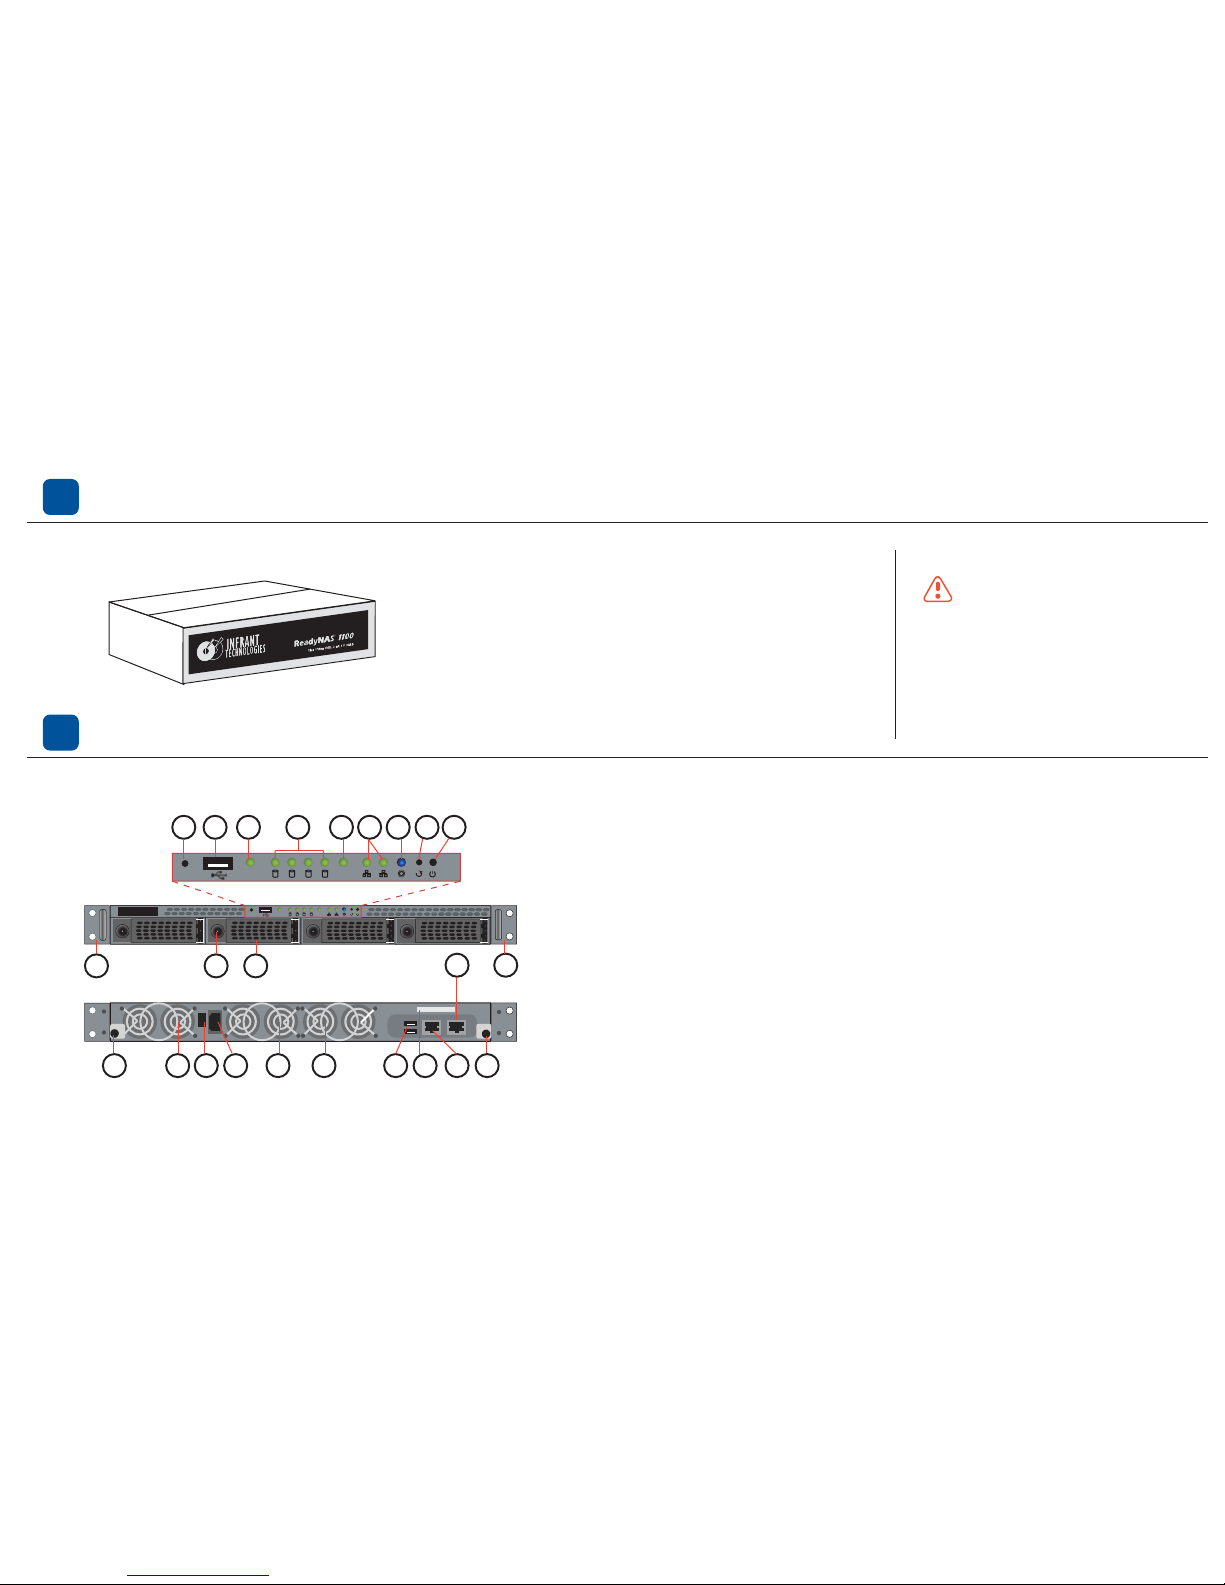
Programmable Backup Button
USB Port
USB (1) activity LED
Disk LEDs. Lights up green for disk online
Activity LED. Blinking for disk access activities
Ethernet (1) and (2) activity LED
Power LED
System Reset Button
Power Button. To power off, Depress for 5 seconds or untill the disk LEDs blink
Mounting-ear with screw holes for 2-post rack mounting
Disk Tray Door Access
Disk Tray with lock-on latch
Latch with thumb screw to access the System Module
Cooling Fan
Power Switch
Power Connector (100~240VAC, 50/60Hz)
Label (with Serial number, MAC address)
Ethernet Port (2) S - Ethernet Port (1)
If you purchased a diskless unit,
please read the optional
disk installation section before
connecting ReadyNAS to the network.
* For diskless unit only
Unpack and Check the Contents
About ReadyNAS 1100
A
B
C
D
E
F
G
H
I
J
K
L
M
N
O
P
Q
R
-
-
-
-
-
-
-
-
-
-
-
-
-
-
-
-
-
-
1
2
F
H
M
J
O P B Q RSMN
GBA D EC
J
I
LK
p1
ReadyNAS
Act
USB
Backup
1 32 4
Act
USB
Backup
N N
Page 3
Install Hard Disks (Optional - only if you purchased a diskless unit)
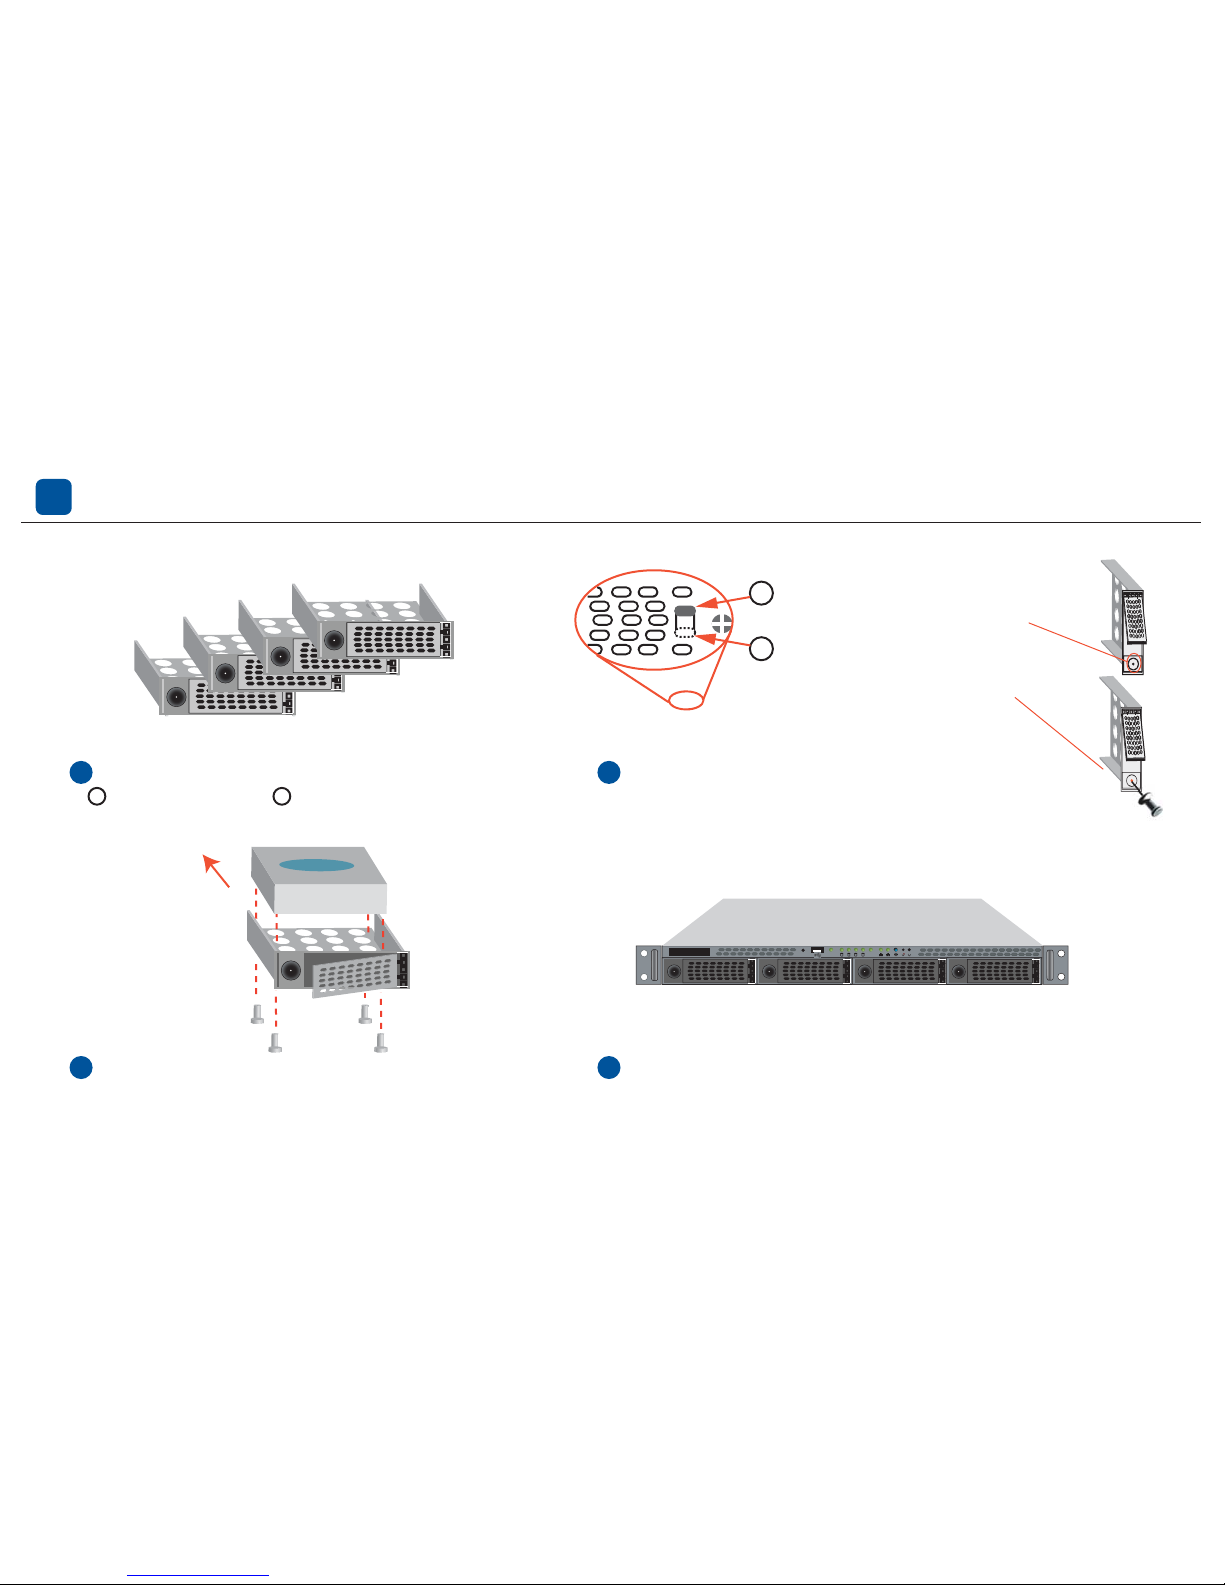
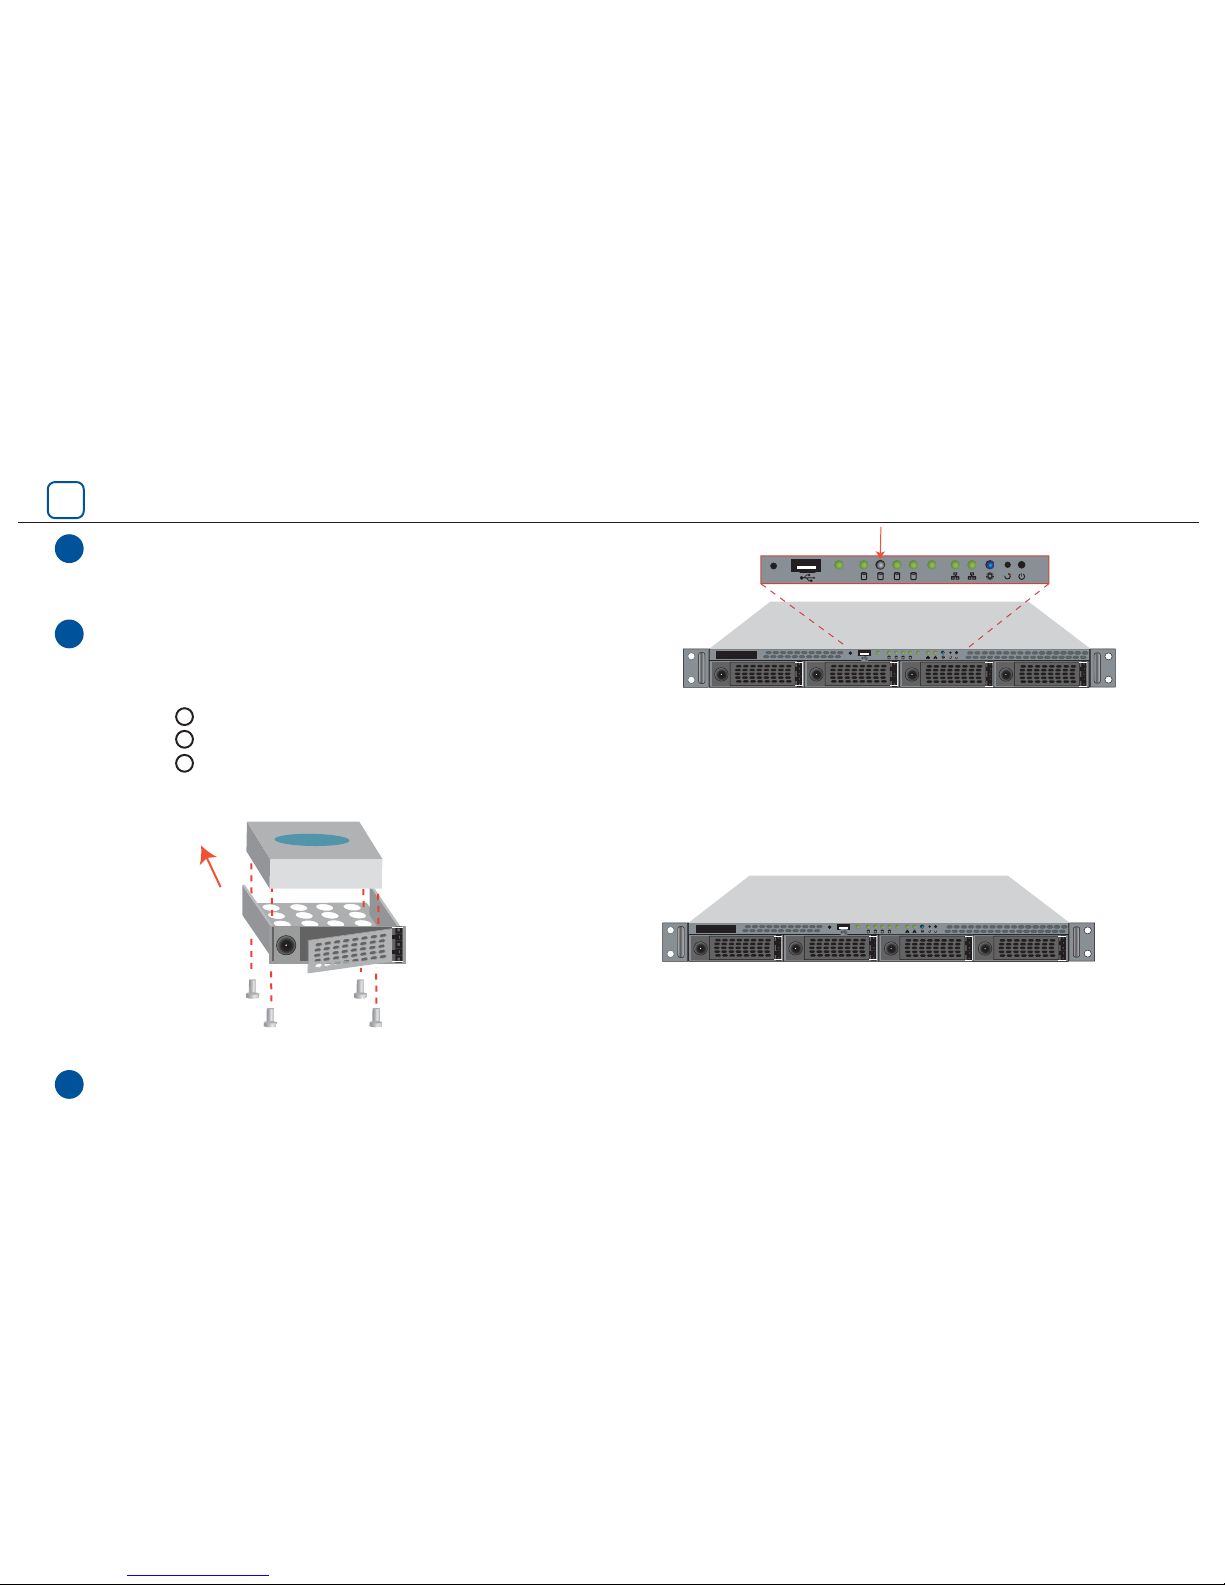
Remove disk trays from the unit:
Press to release latch. Pull the tray out.
Hard disk
SATA connector
facing away
SATA Hard Disk Drive
Disk Tray
Set the lock before installing
the hard disk into the tray. (Optional)
Unlocked (Default position)
To open the tray, press the round button.
Locked (the lower position)
Use a push-pin to release the latch and
open the tray.
With the latch in the open position, slide the disk trays into
the unit completely, secure the latch and the disk installation is completed.
Install hard disks into the trays.
Screws
3
1 2
1 2
3 4
A
B
p2
ReadyNAS
Act
USB
Backup
Page 4
Connect ReadyNAS 1100 to Your Network
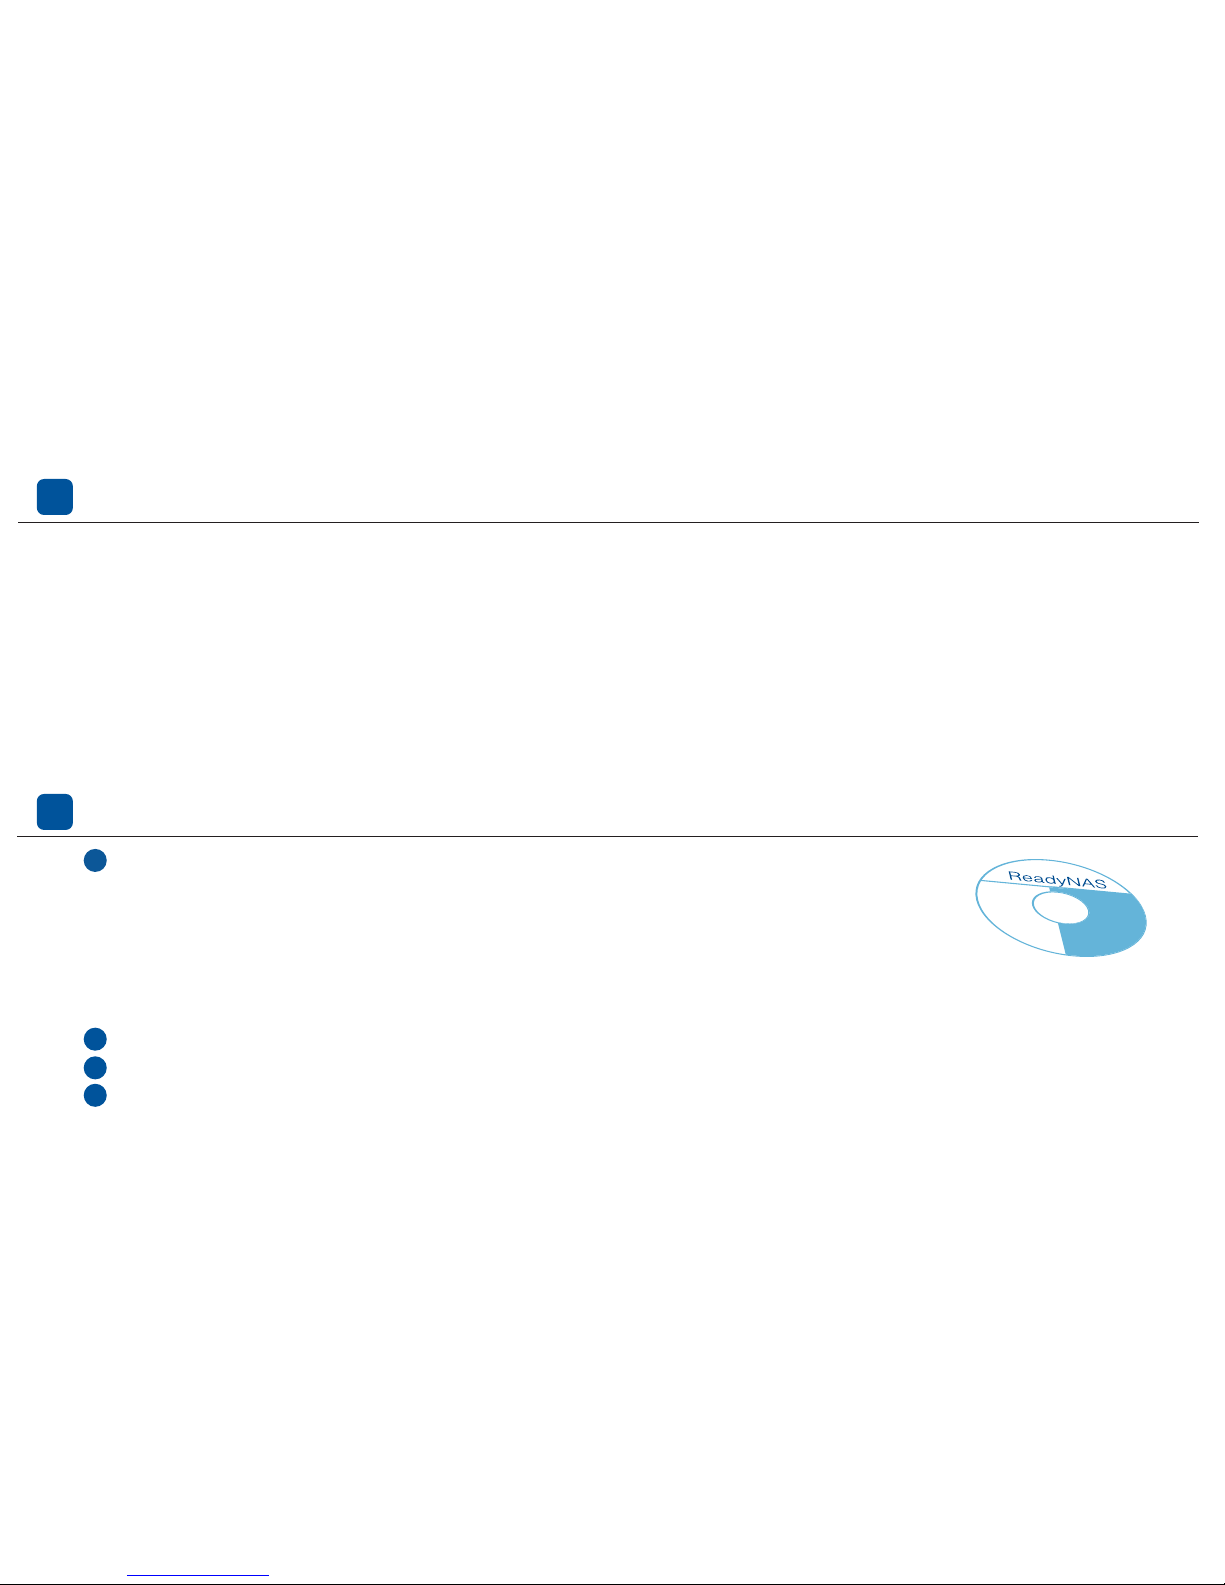
Connect ReadyNAS directly
(no crossover cable is needed)
Connect ReadyNAS to Network
4
p3
Install RAIDar
Installation CD Contents:
- RAIDar Utility for Windows, Mac, and Linux
- ReadyNAS Quick Setup Guide
- ReadyNAS Users Guide
- End User License Agreement
- EMC Retrospect Backup Software *
Install RAIDar Utility for your Windows, or Mac or Linux client.
Start RAIDar. (Refer to the Quick Setup Guide in the CD-ROM for more detail.)
Power on the ReadyNAS.
* EMC Retrospect Backup Software package includes:
5
1
2
3
4
- EMC Retrospect Desktop for Macintosh (5-client license)
- EMC Retrospect Professional for Windows (5-client license)
Page 5
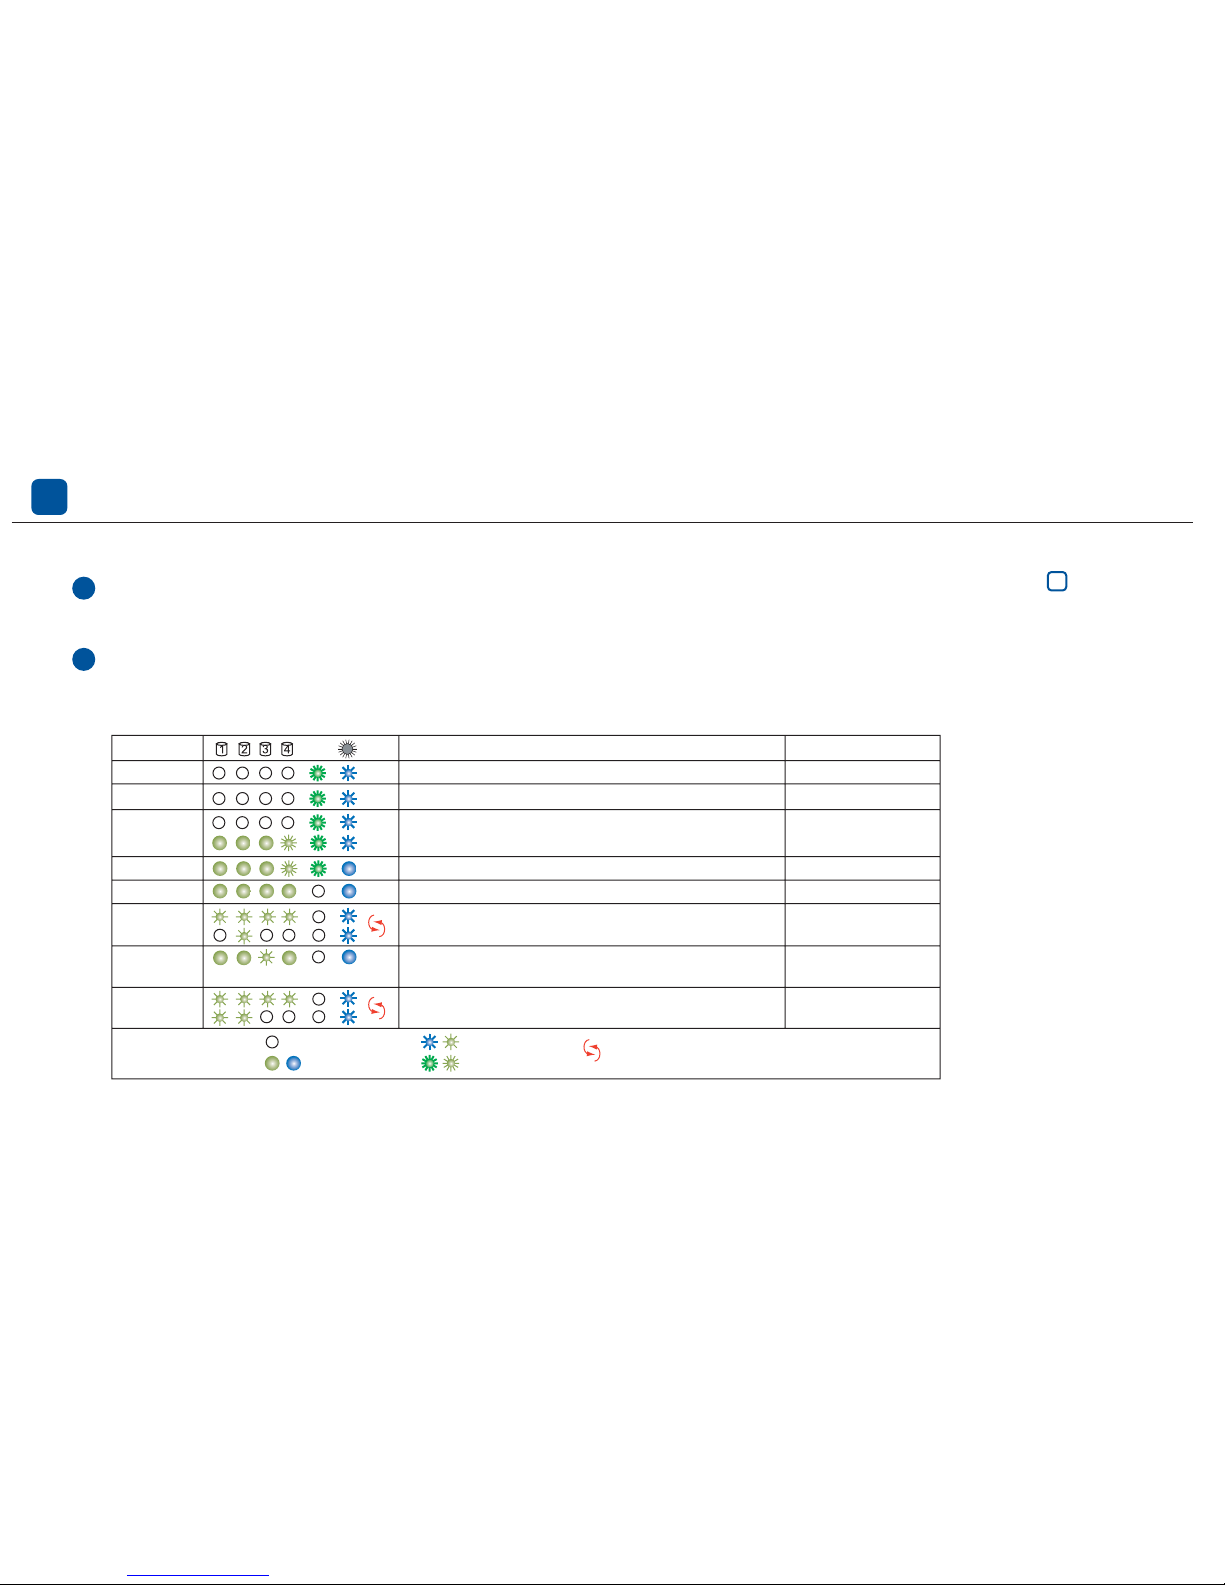
If you purchased a diskless ReadyNAS, after installing hard disks and going through the optional RAID Configuration (See Section ),
you will need to wait until the volume creation is finished before accessing the ReadyNAS Setup Wizard. It will take up to 2 hours depending on disk capacity.
It will take an additional 2 to 10 hours before the RAID synchronization is completed and the system is fully redundant. During the
background RAID synchronization, access to the NAS will be slower than normal. RAIDar Info column will display the current installation
task or error if a problem is detected. Refer to the following chart for the expected LED blinking during hard disk drive initialization.
Volume creation.
ReadyNAS is not accessible during this time.
‘Firmware Version’
‘Firmware Version’
No disks detected
‘Firmware Version’
Corrupt root
Click Setup
Installing
Creating / Booting
Perform the RAID Configuration on RAIDar (Optional)
Description RAIDar Info Column
RAID synchronization. ReadyNAS is accessible during this time.
Normal status. ReadyNAS is fully redundant.
No disks detected if all disk LEDs flash once, and disk #2 LED
flashes once, repetitively .
Bad disk detected if one disk LED flashes once per second.
The disk corresponding to this LED is bad.
Root image needs repair if the 4 disk LEDs flash and then #1 and #2
disk LEDs are lit up, repetitively.
* Note that installation will abort on any error detected.
LED off.LEGEND:
LED solid on.
LED slow blinking.
LED fast blinking.
Repetitive pattern.
Duration / Info
up to
2 hours
up to 10 hours
Error *
Error *
Error *
2 minutes
10 minutes
Initialize Hard Disks (For diskless users only)
A
Act
1
2
6
p4
Page 6

Set up ReadyNAS 1100
After powering up the unit, you will see the ReadyNAS system in the RAIDar scan list. When the Setup button becomes clickable, click Setup
to start the Setup Wizard. Use user name admin and password infrant1 to login.
After completing setup, your ReadyNAS is ready for use. (Refer to Quick Setup Guide and Users Guide for setup details.)
The Info column displays boot
and installation status, or the
OS version when ReadyNAS is
ready to use.
Setup Button
1
2
p5
7
A
1
2
1
2
3
4
X-RAID
RAID RAID RAID
015
RAID Configuration (Optional)
Follow the steps below to switch between RAID 0/1/5 Flexible Volume mode and the X-RAID
Expandable Volume mode only if you wish to change the above default configuration. (Please
note that it is not necessary to perform this procedure every time. The device will remain in the
selected mode until explicitly changed.)
Factory Default will erase all your data on the hard disks.
Make sure ReadyNAS is connected to the network and RAIDar is running when performing the
Factory Default.
Your ReadyNAS 1100 comes in one of the following three configurations:
- Diskless system
- System with pre-installed disks in RAID 5 (Flexible Volume)
RAID Configuration
Legend: Redundancy against single disk of failure.
Storage capacity (base on single volumn configuration).
Default RAID setting.
X-RAID auto volume expansion.
Number
of disk
Installed
Set RAID mode by performing a Factory Default.
Page 7

4
1
2
3
Select RAID Level and Volume Type in RAIDar
If you take no action within 10 minutes the system will default to RAID 5
with 5GB reserved space for snapshots.
A ReadyNAS Volume Setup screen pops up
after clicking the “Setup” button.
Select Expandable Volume (X-RAID) or Flexible
Volume (RAID 0,1,5), and click ”Create Volume now”
to start the volume creation and initialization process.
After the factory default, the RAIDar will prompt
“Click Setup” in the Info column.
RAID Configuration (continue...)
p6
3
1
2
3
4
5
Factory Default Step-by-step
Make sure the device is power off.
Insert a paper clip or push pin to trigger the “System Reset” switch.
Depress the “System Reset” switch for 30 seconds while powering on the unit.
As an indication, the 4 disk LEDs will light up for 2 sec. at the 5th and the 30th sec.
As soon as the LEDs light at the 30th second, release the switch.
ON
OFF
Page 8
ReadyNAS
Act
USB
Backup
1 32 4
Act
USB
Backup
1
2
B
1
2
3
Hard disk
SATA connector
facing away
SATA Hard Disk Drive
Disk Tray
Screws
ReadyNAS
Act
USB
Backup
The Disk Status LED corresponding to the failed disk will blink slowly.
Remove the failed disk tray from the unit. from the unit.
The ReadyNAS 1100 supports hotswap disk trays, so
you do not need to power down the device.
The system will perform background RAID synchronization, and notify the user by email when it’s done.
Disk #2 failed
Replacing a Failed Disk
Press the button and the latch pops out.
Pull the disk tray out.
Replace failed disk, re-assemble, and slide the disk tray back in.
3
Install hard disk tray back
p7
Page 9
ReadyNAS
Act
USB
Backup
1
2
C
D
1 32 4
Act
USB
Backup
1
1
1
2
2
2
3
3
3
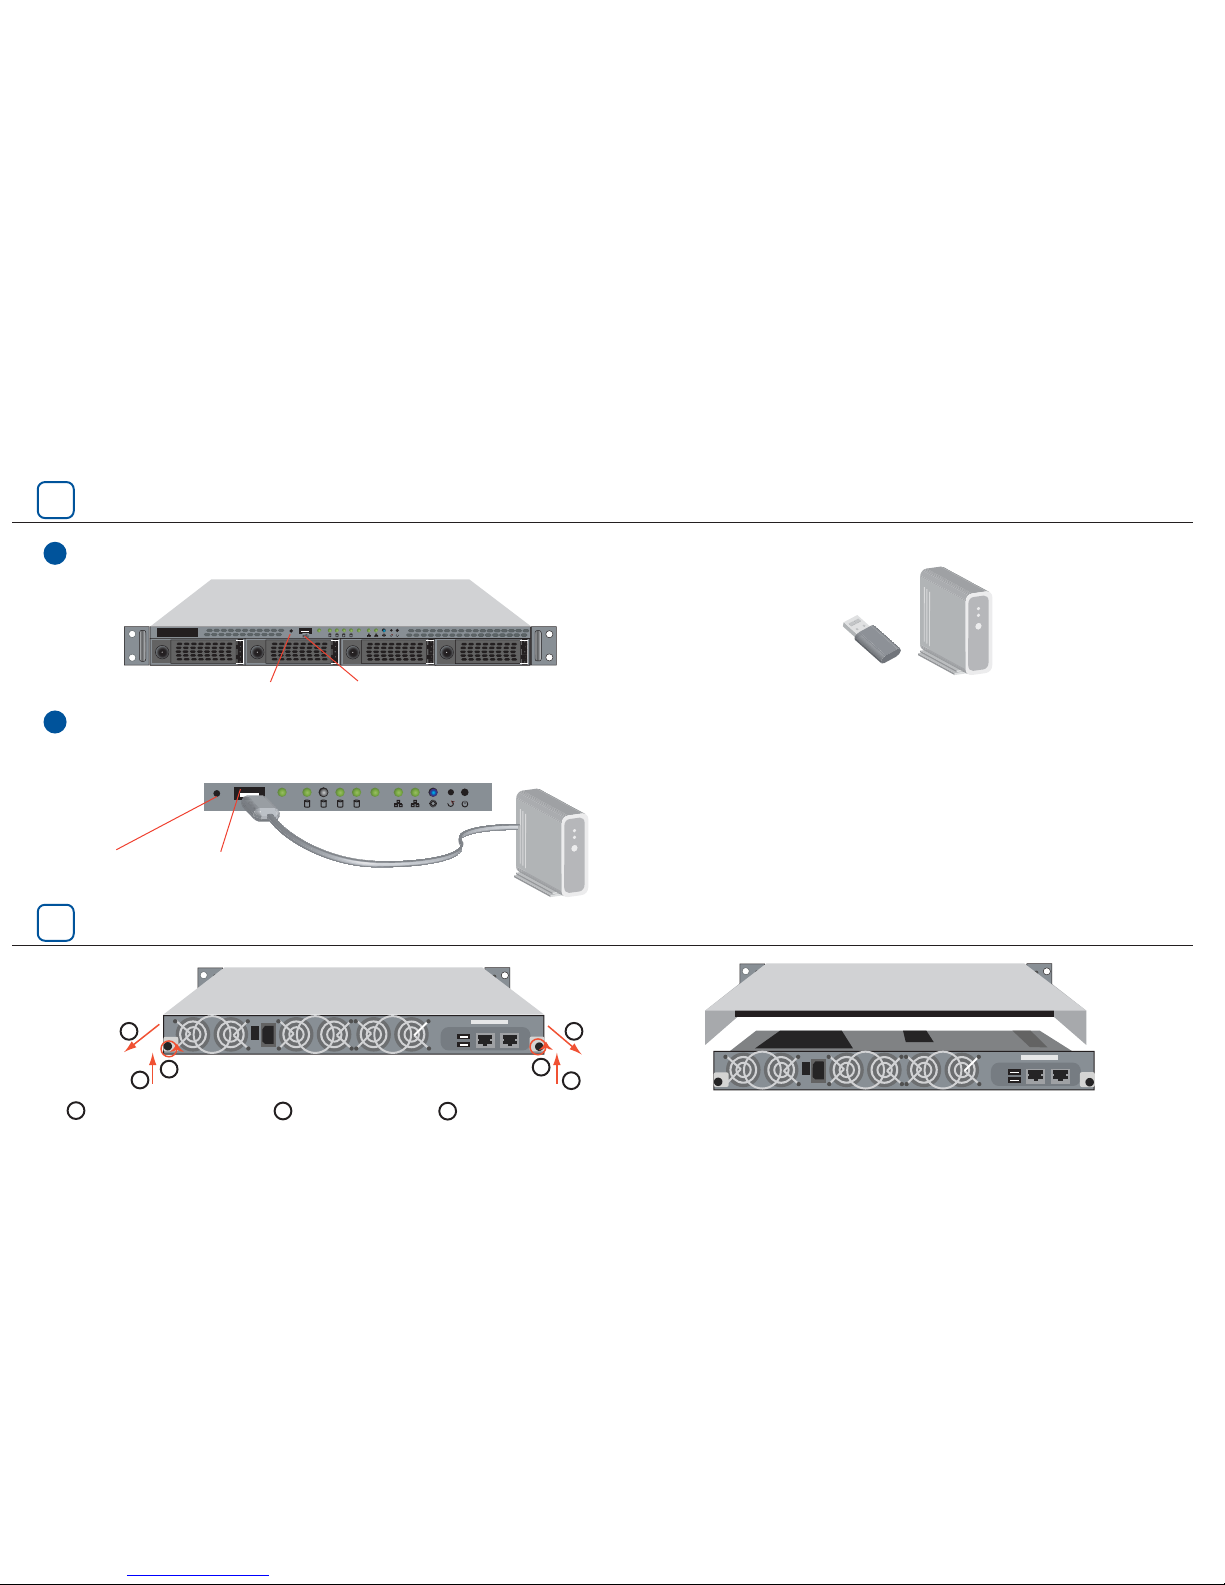
The Backup Button is associated with the Front USB Port.
Backup Button and Front USB Port
Access the System Module
Backup Button Front USB Port
USB Hard Drive
By default, the Backup Button copies the data on [backup] share of the ReadyNAS to the USB disk directly connected to this Front USB Port.
You can easily program the Backup Button in the FrontView Backup menu to backup one or more pre-defined backup jobs.
p8
Backup Button Front USB Port
Power off the unit , unscrew; Lift up the latch, and Pull to slide the System Module out. ReadyNAS 1100 with the System Module sliding out
 Loading...