

INFOTO PCL-LT9000X, PCL-LT9000W, PCL-LT9000U User Manual

Features and design
This Projector is designed with the most advanced technology for portability, durability, and ease
of use. This projector has built-in multimedia features, and support the LCD technology by using
the color depth of 1.07 billion color.
Simple Computer System Setting
The projector has the Multi-scan system to
conform to almost all computer output signals
quickly. Up to WUXGA resolution can be
accepted.
Useful Functions for Presentations
The digital zoom function allows you to
focus on the crucial information during a
presentation.
Lamp Control
Brightness of the projection lamp can be
selected.
Logo Function
The Logo function allows you to customize the
screen logo. You can capture any imageon the
screen.
Multilanguage Menu Display
The screen menu of the projector is available
in 26 languages: English, German, French,
Italian, Spanish, Polish, Swedish, Dutch,
Portuguese, Japanese, Simplified Chinese,
traditional Chinese, Korean, Russian,Arabic,
Turkey, Finland, Norway, Denmark, Indonesia,
Hungary, Czech Republic, Kazakhstan,
Vietnamese, Thai, Farsi.
Convenient Maintenance Functions
Lamp and filter maintenance functions provide
for better and proper maintenance of the
projector.
projector.
Auto Setup Function
This function enables input source search,
AUTO PC adjust and AUTO Keystone by
simple pressing the AUTO button on the
remote control.
Colorboard Function
At the time of simple projection on the colored
wall, you can get the close color image to the
color image projected on a white screen by
selecting the similar color to the wall color from
the preset four colors.
Switchable interface terminals
This projector has switchable interface.You can
use them as computer input or as a monitor
output.
Power Management
The Power management function reduces
power consumption and maintains the lamp
life.
Closed Caption
This is a printed version of the program sound
or other information displayed on the screen.
You can turn on the feature and switch the
channels.
Security Function
The Security function helps you to ensure
security of the projector. With the Key lock
function, you can lock the operation on the
control panel or remote control. PIN code lock
function prevents unauthorized use of the
Note:
- The screen menu and images in the manual may slightly differ from the real product.
- The manual is subject to change without prior notice.
2

Content
Features and design.....................................2
Content ..........................................................3
Safety operation guideline ...........................4
Safety instruction ........................................4
Chemical Substances table ........................5
Notes ..........................................................7
Air ventilation ..............................................9
Place your projector correctly ....................9
Moving your projector ..............................10
Compliance .................................................11
Accessory ..................................................12
Name and function of your projector .......13
Front/top ............................................................. 13
Rear ................................................................... 13
Bottom ................................................................ 13
Terminals ............................................................ 14
Top control panel and indicators
Remote controller ............................................... 16
Remote controller operation range ..................... 17
Install battery of remote controller ...................... 18
................. 15
Installation ...................................................19
Lens installation ................................................. 19
Set up your projector .......................................... 20
Ajustment pad .................................................... 21
Lens shift adjustment ......................................... 22
Connect to PC .................................................... 23
Connect to video equipment .............................. 23
Connect to audio equipment .............................. 24
Connect to USB equipment ................................ 24
Connect the AC power cord ...............................25
Basic operation
Power on your projector ..................................... 26
Power off your projector .................................... 27
How to use the OSD .......................................... 28
Menu item overview ........................................... 29
Zoom /focus function .......................................... 30
Lens movement function .................................... 30
Auto setting function ........................................... 30
Keystone adjustment ......................................... 31
H/VKeystone adjust ............................................ 31
Volume adjustment ............................................32
Menu operation ................................................. 32
Remote controller operation ............................... 33
Input selectiont .................................................. 34
................................................................. 36
Display
Auto PC adj ........................................................ 36
Fine sync ............................................................ 36
H position ........................................................... 36
V position ........................................................... 37
H size ................................................................. 37
Aspect ............................................................... 37
Project way ......................................................... 38
Menu position ..................................................... 39
Background display ........................................... 39
System .............................................................. 40
................................................. 26
Color adjust .................................................42
Image mode ....................................................... 42
Color adjust ( for PC.) ........................................ 43
Color adjust( for Video, S-video or component) 44
Setting .........................................................45
On start ................................................................... 45
Standby mode .................................................... 45
High land ............................................................ 46
Lamp control ...................................................... 46
IRIS .................................................................... 46
Cooling Fast ....................................................... 47
Closed caption ................................................... 47
Key lock .............................................................. 48
Sound ................................................................ 48
Remote control ................................................... 49
HDMI setup ........................................................ 50
Expand.........................................................51
Language ........................................................... 51
Auto setup .......................................................... 52
keystone ............................................................. 55
Logo .................................................................. 54
Security .............................................................. 56
Power management ........................................... 57
Filter counter ...................................................... 58
Text pattern ........................................................ 58
Factory default ................................................... 58
Network .............................................................. 59
Lamp counter ..................................................... 59
Memory Viewer ...........................................60
Set slide ............................................................. 60
Slide transition effect .......................................... 60
Sort order ........................................................... 60
Rotate ................................................................ 61
Best t ................................................................ 61
Repeat ................................................................ 61
Apply .................................................................. 61
....................................................................... 62
Info.
HD- Base T function
Network control
Useful function
Memory Viewer .................................................. 76
USB display function .......................................... 78
Maintenance and cleaning
WARNING light indicator .................................... 81
Clean the lens .................................................... 82
Clean casing of your projector ........................... 82
Clear the lter ..................................................... 82
Reset the lter counter ....................................... 83
Lamp replacement ............................................. 83
Appendix
............................................................. 85
Troubleshooting..................................................85
Menu tree ........................................................... 87
Light indicator status .......................................... 92
Compatible computer screen ............................. 93
Terminal conguration ........................................ 94
Dimensions ........................................................ 94
Technical specications ...................................... 96
RS232 control mode .......................................... 97
Back cover ....................................................... 101
........................................ 63
............................................... 64
................................................ 76
............................ 81
3
Safety operation guideline
Safety instructions
This document and your projector employ certain symbols to illustrate how to use your projector
safely. They are described below: Please get yourself familiar with them before going through this
document.
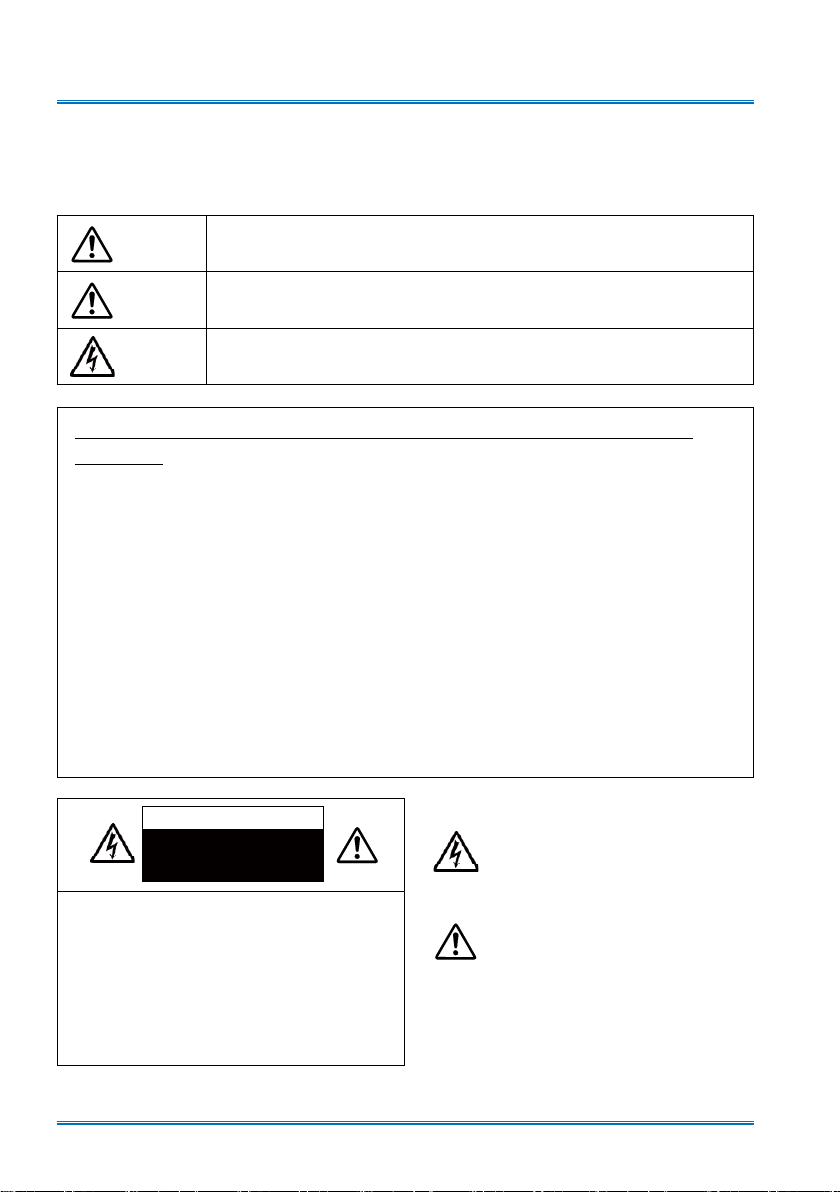
Caution
Note
Ignoring messages indicated by this symbol may lead to personal injuries
or deaths due to human errors.
Ignoring messages indicated by this symbol may lead to personal injuries
or property damage.
High voltage inside with risks of electric shock.
Please read this manual carefully before installing and operating your
projector.
Your projector comes with a lot of convenient features and functions. You may make the
most of these features and keep your projector in good working conditions by using it
correctly. Invalid operation of your projector may not only shorten its life cycle but also may
lead to product failure, re, or other incidents.
In case of any operation abnormality, refer to this manual to check your operation and
connections and try solutions given in the “Troubleshooting” section at end of this manual.
If the problem persists, call your dealer or our service center.
Your projector’s lamp is a consumable and will get dimmer after long-term use. It’s normal
for an older lamp to be dimmer than a newer one. Please power on and off your projector
by strictly following steps given in “Power on your projector” and “Power off your projector”
section of this manual. Execute regular maintenance and cleaning according to instructions
set forth in “Maintaining and cleaning your projector” section of this manual. Fail to do so
may shorten life cycle of your projector and its lamps sharply or even damage your projector
and its lamps before long.
Caution
Note: DO NOT remove the casing (or back
cover) as this may result in electric shock.
Users shall not execute any maintenance
work on components within your projector
except replacing lamps. Call qualied
maintenance personnel in case of any
maintenance requirements.
Danger of electric shock
DO NOT open this.
High voltage inside with risks of
electric shock.
Operation and maintenance tips
about these components.
4
Safety operation guideline
We will persevere in our efforts to keep clean environment. Please return the non - repairable
components to the sales department or recycling center.
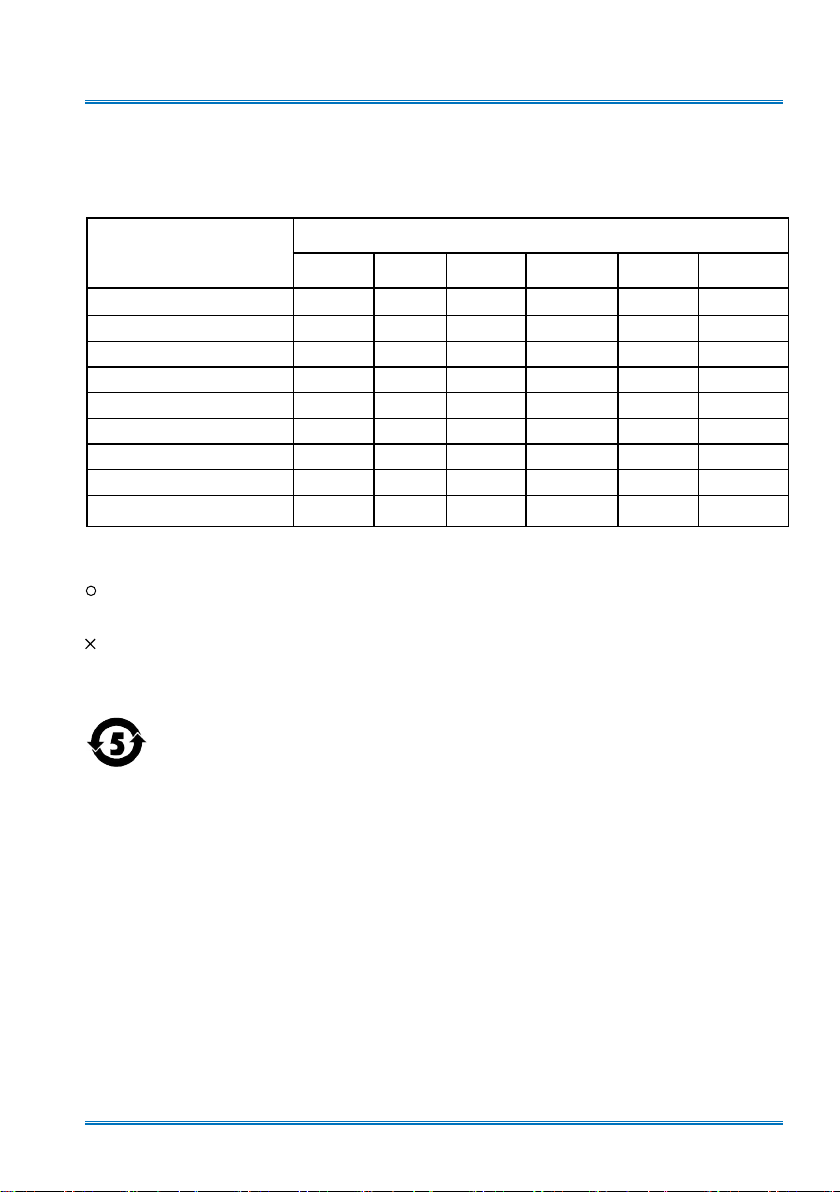
Chemical Substances table
Component name
PCB
Optical components
Projection lens
Projection lamp
Outer casing
Internal mechanical parts
Speaker
Remote control
Annex
This table is made according to SJ/T 11364 specications.
The contents of toxic and hazardous substances in all homogeneous materials of this part is
below the limit requirement in GB/T 26572.
The contents of toxic and hazardous substances in at least one of the homogeneous materials
of this part is above the limit requirement in GB/T 26572 .
The date of
protection period
products compatible with the projection lamp
Pb Hg Cd
×
×
×
× ×
×
×
×
×
×
is ve years
○ ○ ○ ○ ○
○ ○ ○ ○ ○
○ ○ ○ ○ ○
○ ○ ○ ○ ○
○ ○ ○ ○ ○
○ ○ ○ ○ ○
○ ○ ○ ○ ○
○ ○ ○ ○ ○
Harmful substances
Cd(vi) PBB PBDE
○ ○ ○ ○
within the environmental
5
Safety operation Guideline
0.7’(20cm)
1.5’(50cm)
3’(1m)
3’(1m)
Notes
Caution
Safety precautions:
●GROUND your projector.
●Lens of your projector projects strong light. DO NOT look at the light beam directly. You
may get your eyesight hurt. This is especially the case with children.
●Unplug the AC power plug if your projector will not be used for long time.
●DO NOT overload the socket of power cord as it may lead to re or electric shock. DO
NOT subject the power cord to any object. DO NOT place your projector in locations
where its power cord may become damaged by treading by passersby.
●Disconnect the power plug before cleaning your projector. DO NOT apply liquid or sprays
to your projector. DO NOT wipe your projector with wet cloth.
●Please follow warnings and instructions given in labels attached to your projector. Unplug
your projector when your projector is exposed to thunderstorm weather, is unmanned, or
not in use for long periods to prevent damage caused by lightning and power surges.
●DO NOT use accessories without recommendation by the manufacturer as it may result in
potential risks.
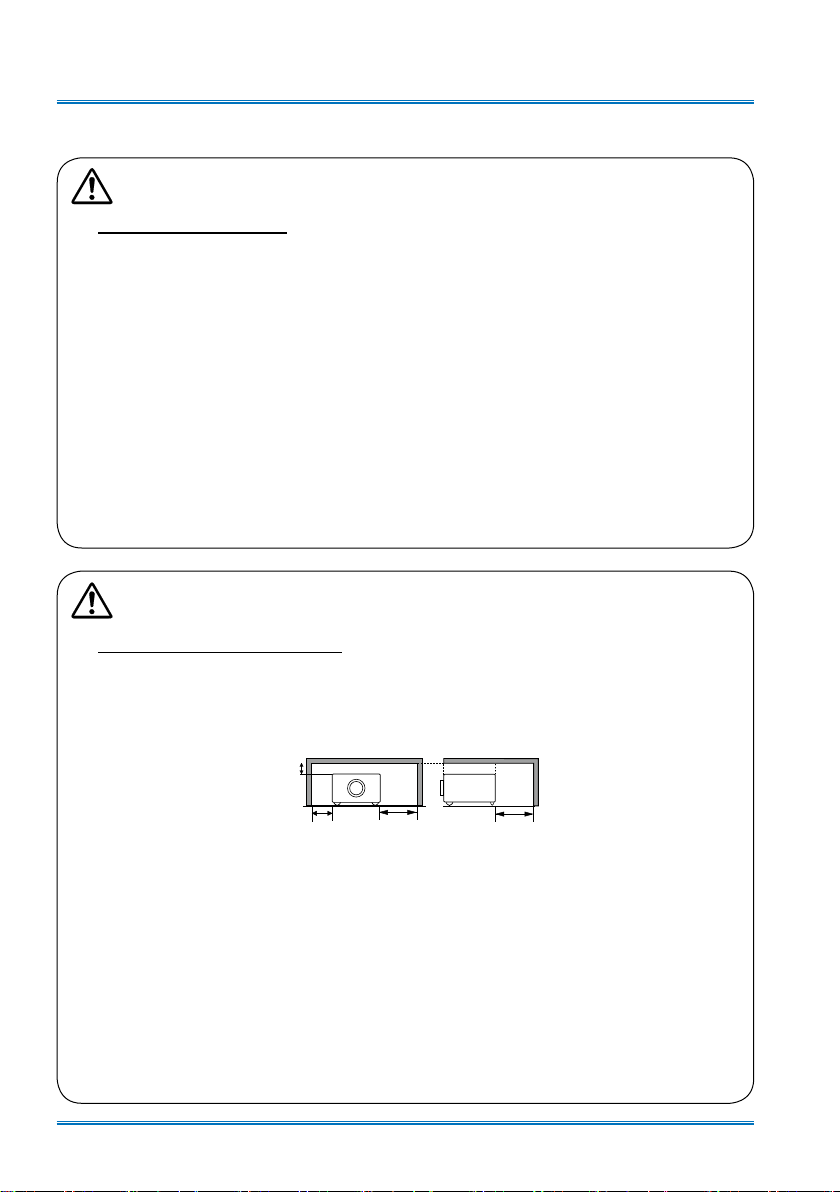
Caution
Precautions on air outlet:
●Keep adequate clearance around your projector for its ventilation and cooling. See gure
below for the least clearance requirements. The least clearance is a MUST when your projector is placed within a cabinet or other closed environment.
Sides and bottom Rear
●DO NOT cover the air outlet of your projector. Poor ventilation not only shorten life cycle
of your projector but also may lead to risks.
●Slots and openings at rear and bottom of your projector are designed for ventilation. Keep
your projector from overheated to ensure its steady operation.
●DO NOT cover the air outlet with cloth or other objects. DO NOT place your projector on
the surface of bed, sofa, carpets, or similar object as this may block the air outlets at its
bottom.
●DO NOT place your projector in closed environment, e.g. a bookcase, unless it is well ven-
tilated.
● Keep any matter from falling in your projector through the air outlets as they may touch
high voltage parts and lead to re or electric shock by short circuits. DO NOT splash liquid
to your projector.
6
Safety operation guideline
Note:
Precautions on location of your projector:
●Place your projector in a proper location or it may result in re.
●DO NOT expose your projector in rain or high humidity environments or it may result in re
or electric shock. DO NOT your projector near water or splashing water. DO NOT place any
water container, e.g. ower vase, atop your projector.
●DO NOT place your projector in environments of soot, moisture or smoke, e.g. your kitchen,
or it may lead to product failure or accidents. Your projector may be damaged by contact with
oil or chemicals.
●DO NOT place your projector near exhaust pipe or air conditioning equipment.
●DO NOT place your projector near radiator or heating pipes.
●DO NOT place your projector atop unstable truck, rack, or table. It may fall of the surface and
lead to personal injuries and property damages. Please use cart or rack recommended by the
manufacturer or included with your product. Please follow steps given in installation guideline
included with the wall and ceiling mount racks for installation. Use installation components
approved by the manufacturer.
●Be careful when moving your projector with cart. Abrupt stops, pushing too hard and rugged
surfaces may topple your projector and the cart together.
FOR EU USERS
The symbol mark and recycling systems described below apply to EU countries and do not
apply to countries in other areas of the world.
Your product is designed and manufactured with high quality materials and components
which can be recycled and/or reused.
The symbol mark means that electrical and electronic equipment, batteries and accumulators,
at their end-of-life, should be disposed of separately from your household waste.
Note:
If a chemical symbol is printed beneath the symbol mark, this chemical symbol means
that the battery or accumulator contains a heavy metal at a certain concentration.
This will be indicated as follows: Hg: mercury, Cd: cadmium, Pb: lead In the European
Union there are separate collection systems for used electrical and electronic equipment, batteries and
accumulators.
Please, dispose of them correctly at your local community waste collection/recycling centre.
Please help us to conserve the environment we live in!
Caution:
Contains mercury
For more information on safe handling procedures, the measures to be taken in case of accidental
breakage and safe disposal options visit: ec.gc.ca/mercure-mercury/
Dispose of or recycle in accordance with applicable laws.
7
Safety operation Guideline
Note:
Precautions on using your projector:
●DO NOT project the same image for long time as residual images may be left in the panel.
This is a property of LCD panel.
●Use power as indicated in tags attached to your projector. If you have doubts over available
power type, consult your dealer or local power company rst.
●DO NOT open or remove the casing for maintenance as this may lead to electric shock or
other damages. Call qualied maintenance personnel in case of any maintenance require-
ments.
– In case of the following, unplug the power cord and call qualied maintenance personnel
for service immediately:
a. Damaged or broken power cord or plug
b. Liquid splashed in your projector
c. Your projector exposed to rain or water
d. If your projector fails to work as expected by following operation instructions, adjust it ac-
cording to given instructions. Other invalid operations may damage your projector, which
requires the technician to spend more time before returning it back to normal.
e. The projector falls off to ground or its casing is damaged.
f. In case of any abnormal change in your projector during its use, then maintenance ser-
vices would be required.
●In case components replacement is required, make sure the replacements have been ap-
proved by the manufacturer and features the same with the one being replaced. Use of
unauthorized parts may lead to re, electric shock or personal injury.
●After the completion of maintenance or repair work, get the maintenance personnel to run
routine safety check to ensure your projector’s safety operation status.
●This product is only for indoor use.
Information for users in the European Union
This is a device to project images onto a screen, etc., and is not intended for use as indoor lighting in a
domestic environment. Directive 2009/125/EC.
NOTE FOR CUSTOMERS IN THE US
Hg LAMP(S) INSIDE THIS PRODUCT CONTAIN MERCURY AND MUST BE RECYCLED OR DISPOSED
OF ACCORDING TO LOCAL STATE OR FEDERAL LAWS.
8
Safety operation guideline
M6x10
10mm
M6x10
10mm
Air ventilation
Openings in the casing are designed for
ventilation and overheating prevention. DO
NOT block or cover these openings to keep
your projector in normal operation and from
overheating.
Note:
Heat exhaust at the air outlet Keep the
following in mind when using or installing
your projector:
– DO NOT place ammable materials or
sprayers near your projector.
– Keep the air outlet one meter away
from other objects.
– DO NOT touch the area close to the air
outlet especially the metal components,
e.g. screws. This area and parts will get
very hot once your projector starts operating.
– DO NOT place any object atop your
projector. They may not only be dam-
aged but also lead to re after being
overheated.
Cooling fans are designed for cooling
your projector. Fan speed is auto adjusted
subject to internal temperature of your
projector.
Air outlet
(For heat exhaust)
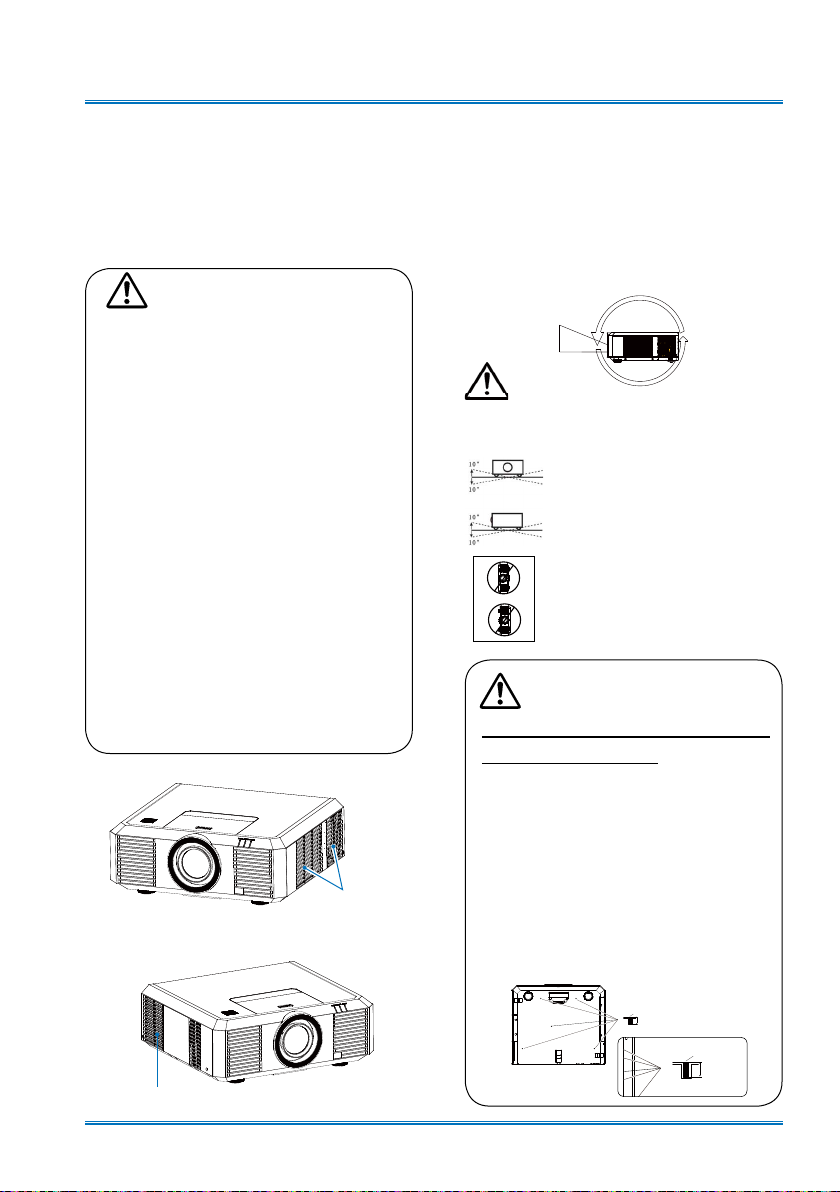
Place your projector correctly
Use your projector at specified location in
correct way. Invalid projector location may
shorten life-cycle of lamps or even lead to
severe incidents or re.
● Enable the “Ceiling” function if ip over
screen is required.The projector supports
360° projection in Vertical.
360°
Note:
Avoid the following situations illustrated
below when installing your projector.
DO NOT tilt your projector more
than 10 degrees.
DO NOT tilt your projector more
than 10 degrees.
DO NOT tap the projector to
make a projection.
Note:
Precautions on ceiling mount
racket installation:
●Get qualified technician to install the
ceiling mount racket.
●Warranty of your projector does not
cover hazards and damage caused by
using ceiling mount rackets provided
by unauthorized dealers.
●Remove the ceiling mount racket when
it is not in use.
●Apply to rque driver instead of power
driver or impact driver in your projector.
Air intake
9
Safety operation Guideline
Moving your projector
When moving your projector close its adjustment legs as they may damage the lens and casing.
Keep your projector in suitable box when it is not to be used for a long time.
Note:
Precautions on moving or shipping your projector:
●DO NOT drop or impact your projector as it may get damaged or failed in operation.
●Please employ proper container for movement.
●Prohibit express or other shipping service provider personnel from shipping your projector
with improper boxes. Your projector may become damaged. Please consult your dealers for
shipping your projector by express or other shipping service providers.
●Place your projector in box only after it has been fully cooled down.
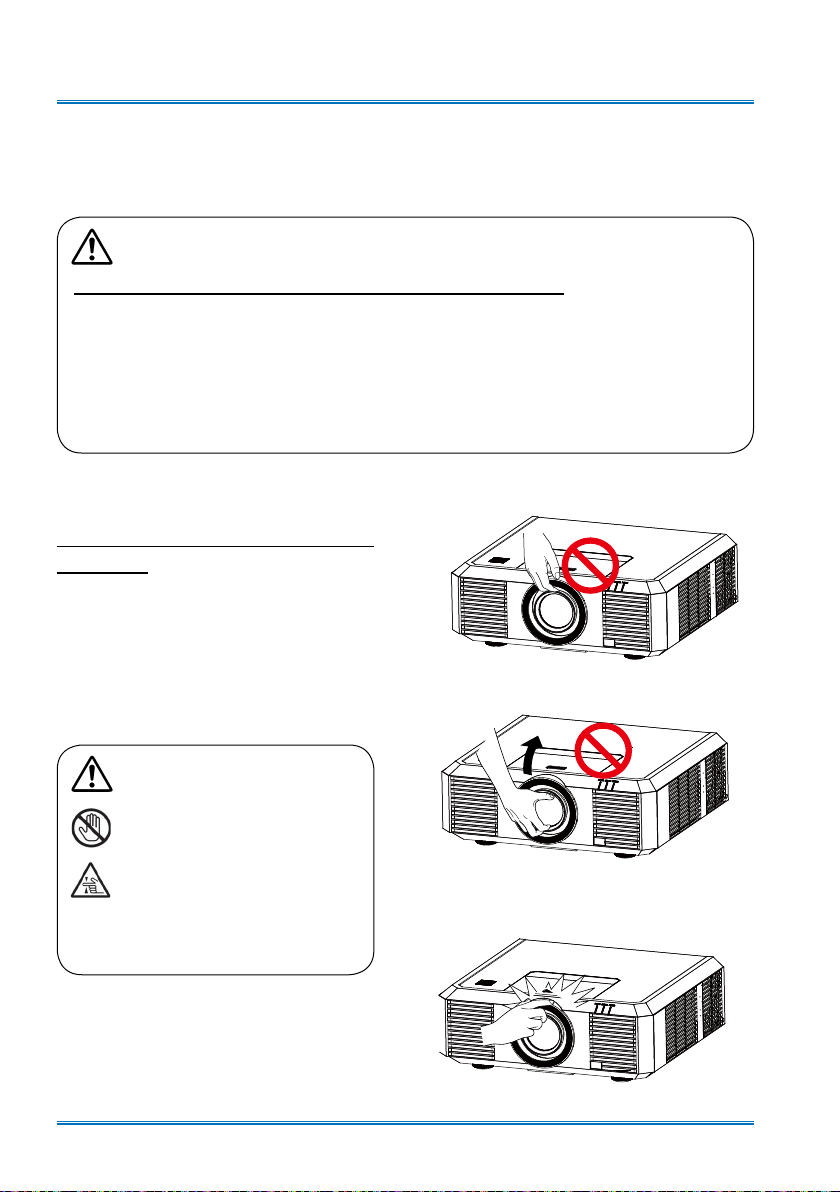
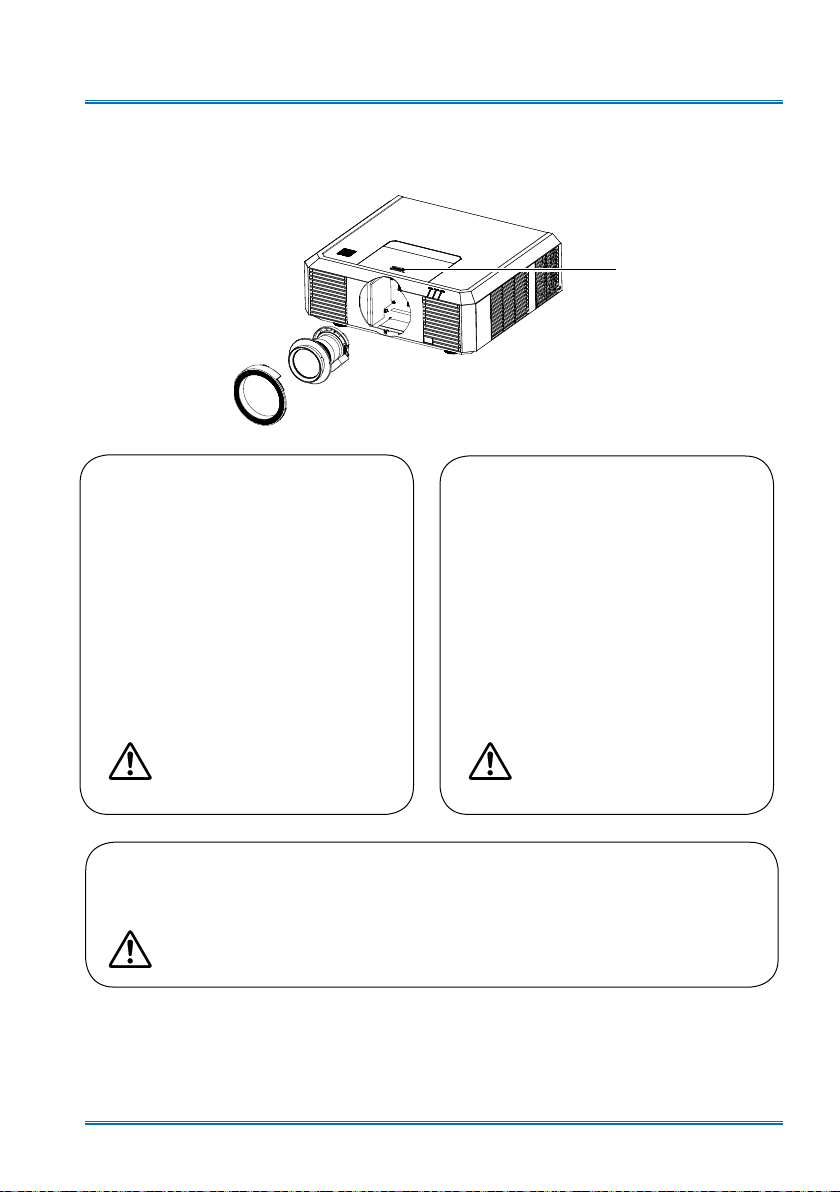
Precautions on dealing with your
projector:
DO NOT lift or move your projector by holding the lens or projecting decoration ring as
it may damage the lens and your projector.
Be careful when handling your projector. DO
NOT drop it, subject it to external forces, or
place objects atop it.
Note:
Projection lens are manual ones.
Precautions on using your projector:
●DO NOT touch the lens when it
is working as your ngers may
get hurt.
●DO NOT let children touch the
lens.
DO NOT hold the lens or area around it.
10

Compliance
Caution
This is A grade product. Products may cause radio interference in the living environment, in this
case, the user may need to take effective measures to interfere.
Description of the term of environmental protection
This logo is used for the sale of electronic information products in the PRC, and the number of the
central gures for the use of the term of environmental protection. Under the condition that users
follow the instructions shown in the provisions of safety operation guideline,it will not cause any
environmental pollution or affect people and their property from the date of production within the
environmental protection period.
THE SOCKET-OUTLET SHOULD BE INSTALLED NEAR THE EQUIPMENT AND EASILY ACCESSIBLE.
11

Accessory
Accessory for PCL-LT9000 series XGA / WXGA / WUXGA as follows:
Owner's Manual(CD) AC Power Cord
Note: The AC Power Cord
specication depands on the location
of your projector.
VGA Cable Quick Start Guide
Remote Control With
Batteries
(AAA*2)
12
Name and function of your projector
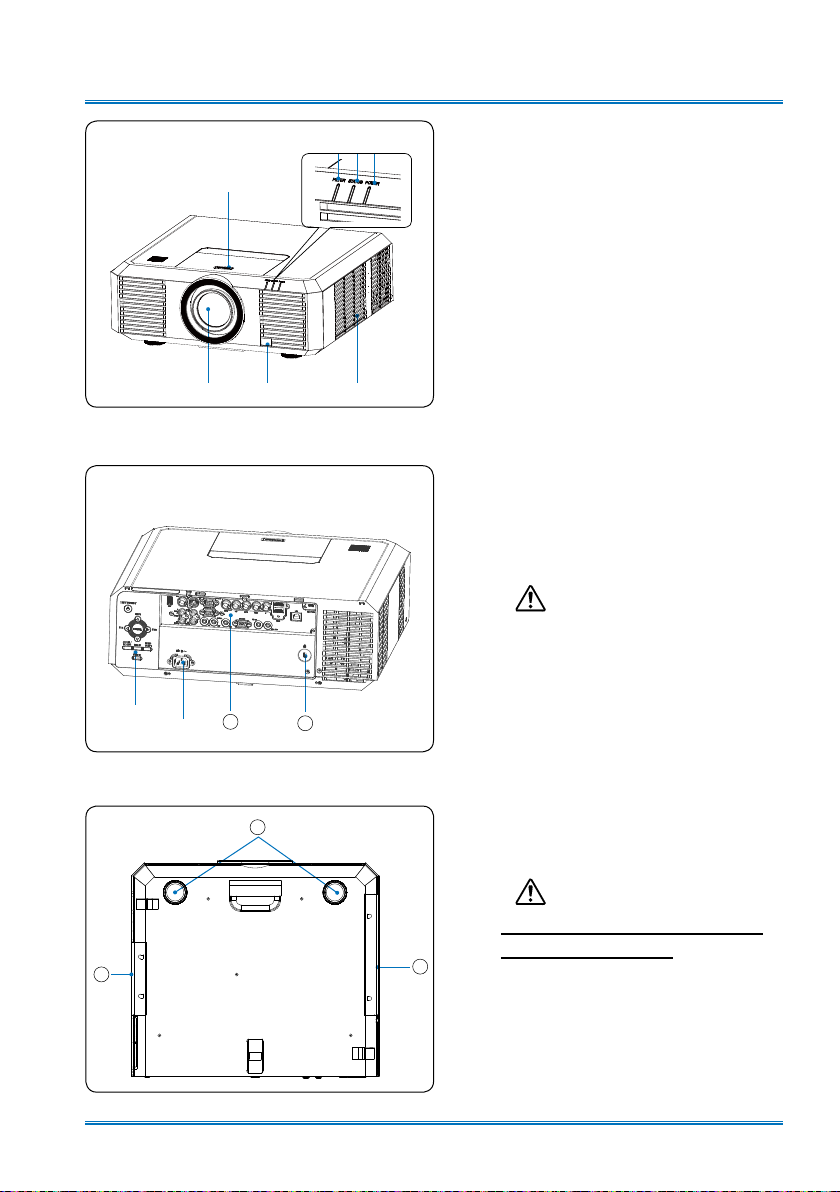
Front/Top
Rear
⑧
⑨
② ③④
①
⑤ ⑥ ⑦
10
11
Lens release button
①
FILTER indicator
②
STATUS indicator
③
POWER indicator
④
Projection lens
⑤
Remote Receiver (Front)
⑥
Air intake with lter
⑦
Rear control panel
⑧
AC Power Cord port
⑨
Terminal
⑩
Kensington Security Slot
⑪
Note:
● Kensington Security Slot is for a
Kensington lock used to deter theft
of the projector.
● Kensington is a registered trademark
of ACCO Brands Corporation.
Bottom
13
Adjustment pad
12
⑫
Air exhaust
⑬
Air intake
⑭
Note:
Donot place your hands or other
14
objects near the vent:
● Vent will shed heat. Do not put
your hands or face, or thermolabile
objects placed near the outlet . You
need keep at least a distance of 3"
away, or it may cause it
(1m)
burnning or damage.
13
Name and function of your projector
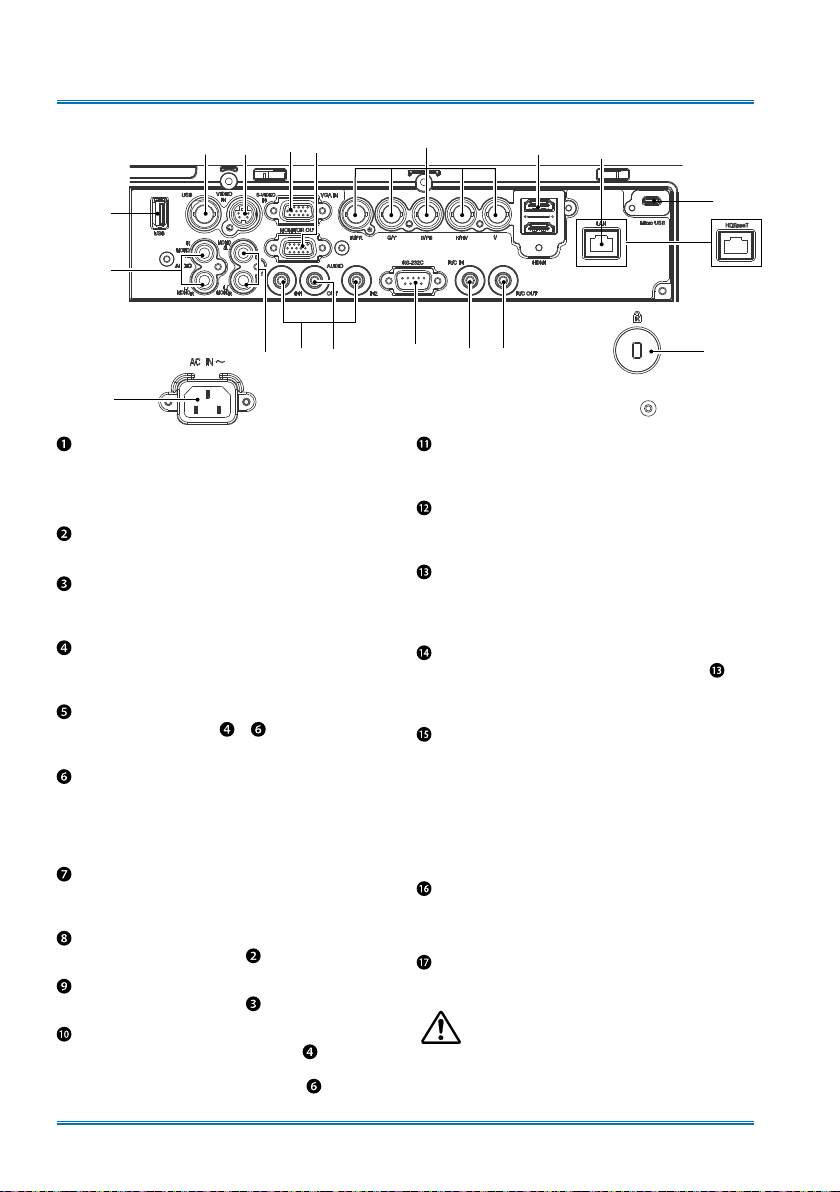
Terminals
❷ ❸ ❹❻❺
❶
❽
❿
❾
⓫
⓱
USB -A connector
When using the Memory Viewer function,
insert the USB memory directly to this
terminal.
VIDEO IN
Connect video output signal to this terminal.
S-VIDEO IN
Connect S-VIDEO output signal of video device to
this terminal.
VGA IN
Connect output signal from computer to this
terminal.
MONITOR OUT
Transmit signals from or to other displays
when your projector is acting as a display output.
R(PR)/G(Y)/B(PB)/H(HV)/V
– Connect RGBHV format (5-core) signals to
R/G/B/HS/VS terminal respectively.
– Connect component signals to Y, Pb, Pr
terminal respectively.
HDMIconnector
Connect HDMI digital output signals or MHL
digital output signals to this terminal.
AUDIO (Video)
Connect audio signal from to this terminal.
MONO(L/R) (Video)
Connect audio signal from to this terminal.
AUDIO IN1/AUDIO IN2
– Connect audio signals for device
to AUDIO IN1.
– Connect audio signals for device
to AUDIO IN2.
❼
⓬
AUDIO OUT
SERIAL
REMOTE IN
REMOTE OUT
LAN terminal
– Connect mesh cable to this terminal when using
network control and operate your projector.
– When the projector is equipped with HD-Base
T function, connect to this terminal through a
network cable to achieve the function as for it is
optional.
MICRO USB connector
The terminal is to use the USB display
Power cord connector
⓲ Anti-theft slot
⓮
⓭
Output audio signals to amplier or other audio
equipment.
Connect serial cable to this terminal when using
network to control and operate your projector.
Connect wired remote controller to this terminal.
Connection of a wired remote controller will
disable the wireless one.
Transmit wired remote controller signals of to
another projector when a wired remote controller
is used.
function,When connecte the projector to calculator
machine with USB cable.
⓯
NOTE
● The terminal is
shown above when
equipped with
HD-BaseT function.
⓲
Note:
HD-Base T function is optional. Refer to the
●
HD-Base T function in the Additional appendix
for details.
⓰
:
14

Name and function of your projector
Top control panel and indicators
① ② ③
④
⑤
⑥
⑦
⑩
FILTER indicator
①
It turns red when the lter needs be replaced.
STATUS indicator
②
It ashes red when internal temperature of your projector is out of operation range.
POWER indicator
③
– The power indicator turns steady red when your projector is in standby mode.
– It turns steady green when your projector is in normal operation.
ON/STAND-BY
④
Power on or off your projector.
Arrow
⑤
– Select items or adjust the data in the OSD menu.
– Shift the image in the "Digital zoom +/-" mode.
– Adjust the volume.
⑥
Enter the OSD menu or select options in a menu.
⑦
– Enter the optical zoom adjustment mode.
– Enter the focus adjustment mode.
▲▼
ENTER
ZOOM/FOCUS
/UP/DOWN/VOL-/VOL+
▲
▲
⑧
⑨
LENS SHIFT
⑧
Enter the lens moving mode.
MENU
⑨
Open or close the OSD menu.
BLANK
⑩
Dark out screen images temporarily.
15
Name and function of your projector
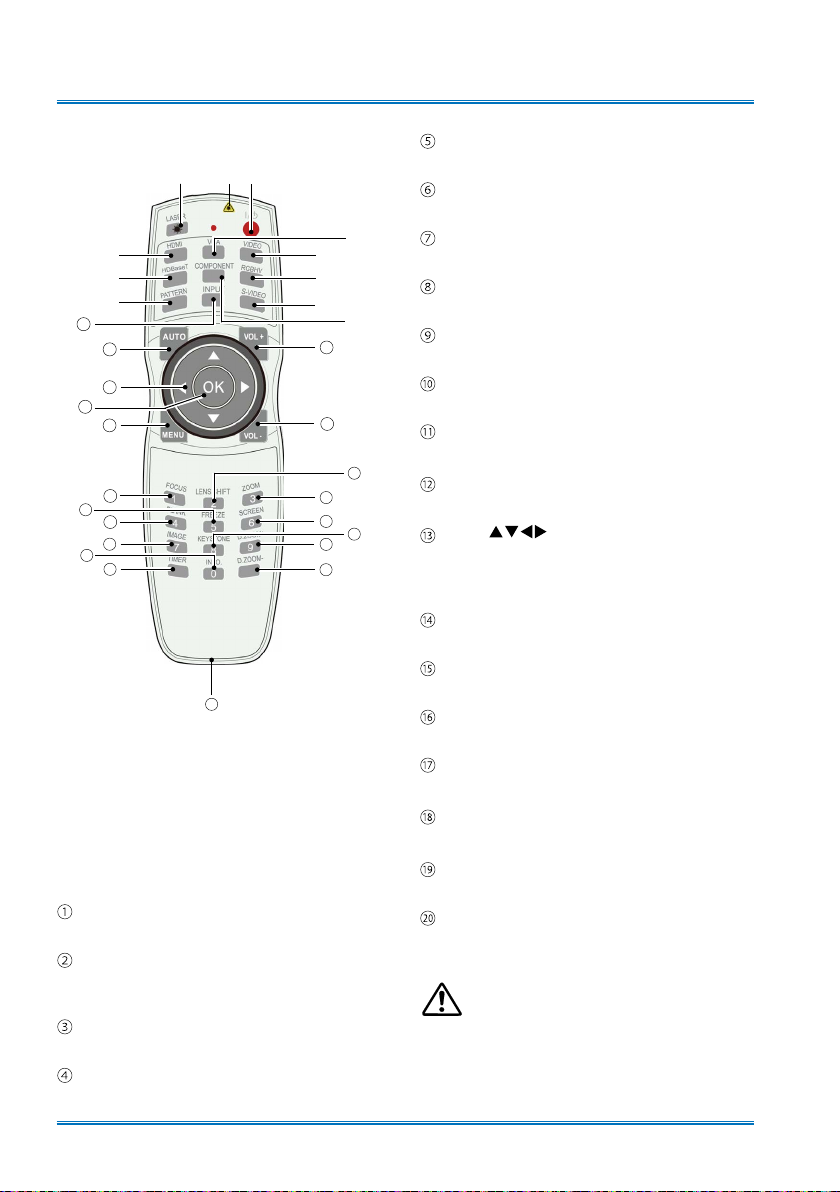
Remote controller
②
③
④
⑤
11
12
13
14
15
18
23
19
20
25
21
*
Laser Transmitting Window:
Laser beam will emit from this window while
pressing LASER button during the projection
to use the remote controller as a laser pointer.
Do not stare directly at the laser transmitting
window or aim the window at human body, to
avoid any physical injury.
POWER
Power on or off your projector.
LASER
Press the LASER button during presentation to
use the remote controller as laser pointer.
HDMI
Select HDMI input source.
HDBaseT
Select
HDBaseT
①
*
30
input source.
⑥
⑦
⑧
⑨
⑩
16
17
22
26
27
24
28
29
PATTERN
Select built-in test pattern of your projector.
VGA
Select VGA input source.
VIDEO
Select VIDEO input source.
RGBHV
Select RGBHV input source.
S-VIDEO
Select S-VIDEO input source.
COMPONENT
Select Component input source.
INPUT
Open or close the INPUT menu.
AUTO
Enter auto adjustment mode
Arrow
– Select items or adjust values in the OSD
menu.
– Select display area in digital zoom+ mode.
OK
Enter the OSD menu or select options in it.
MENU
Open or close the OSD menu.
VOLUME +
Increase volume.
VOLUME -
Decrease volume.
FOCUS
Enter the focus adjustment mode.
BLANK
Dark out screen images temporarily.
IMAGE
Select image mode.
Note:
● The test pattern is not available under USB
DISPLAY channel.Then a warning icon
display when pressing PATTERN button.
● DVI button is unavailable.
16
Name and function of your projector
5M
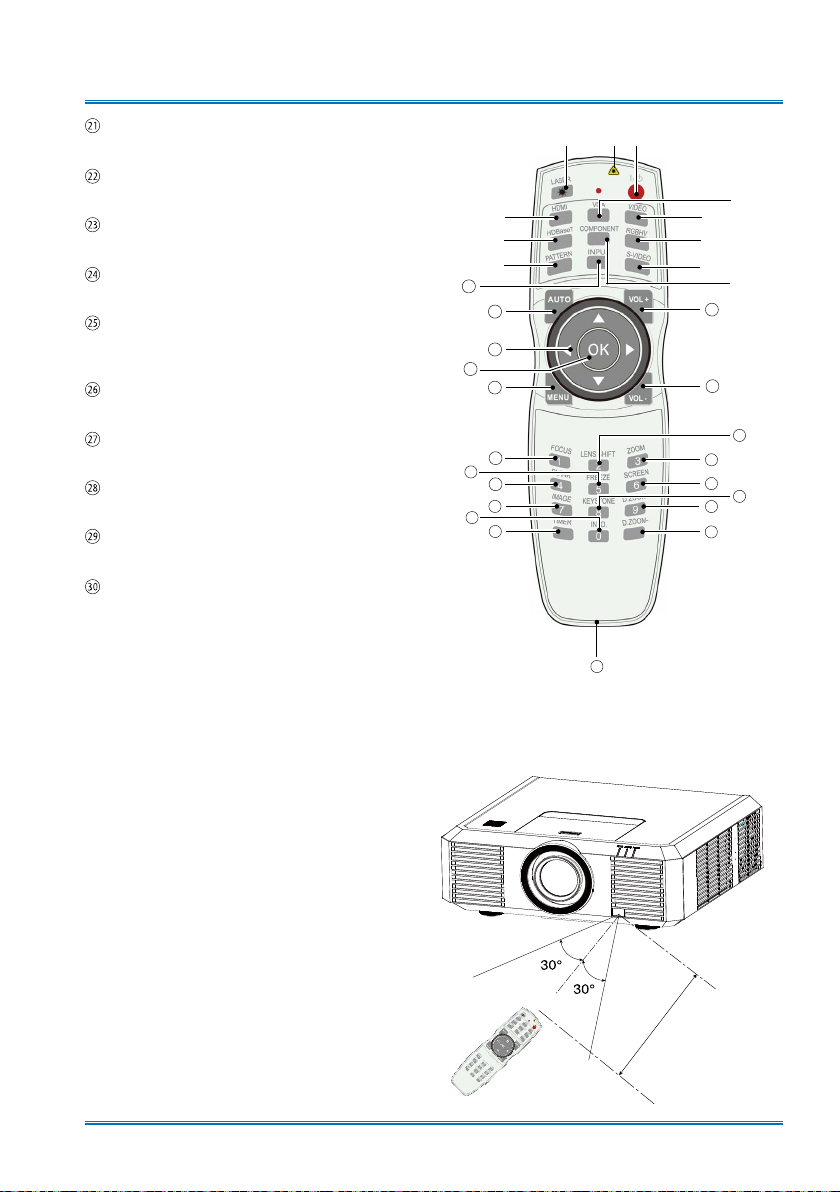
TIMER
Enable the timer function.
LENS SHIFT
Enter the lens moving mode.
FREEZE
Freeze projected images.
KEYSTONE
Keystone calibration.
INFO.
Display current status information of your
projector.
ZOOM
Enter the zooming mode.
SCREEN
Select screen size.
D.ZOOM+
Zoom in projected image.
D.ZOOM-
Zoom out projected image.
Wired remote controller output terminal
Connect cable of wired remote controller to
this port while operating the projector by wired
remote control.
②
③
④
⑤
11
12
13
14
15
18
23
19
20
25
21
①
*
⑥
⑦
⑧
⑨
⑩
16
17
22
26
27
24
28
29
30
Remote controller operation
range
Point your remote controller to the IR receiver
of your projector
Maximum operation range of your remote
controller is an area of radius 5 meters and arc
60° in front of and behind your projector
.
17
Name and function of your projector
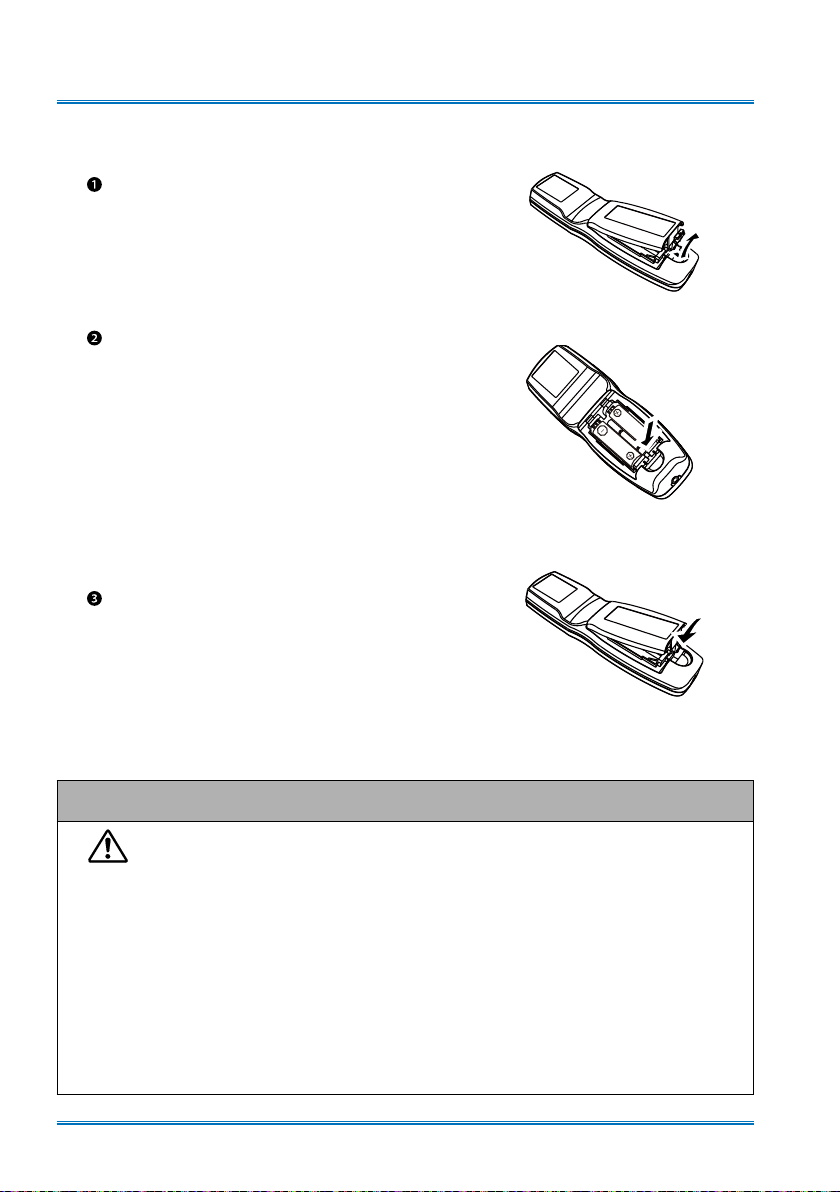
Install battery of remote controller
Open the battery cover.
Insert a new battery in it.
Two AA batteries
Place your batteries with its
anode and cathode (+ and -)
in correct direction. Keep both
poles in good connection to the
contacts within the compartment.
Put the cover back.
Please follow the following rules for safety operation:
Use two of AAA batteries.
●
Replace both batteries at the same time.
●
Do not mix new and old batteries as one pair.
●
Keep your remote controller away from water or other liquids.
●
Do not expose your remote controller to environments with high humidity or
●
temperature.
Do not drop your remote controller.
●
In case of any battery solution leaking in the compartment, clear it thoroughly
●
before placing new batteries in it.
Using battery of other types than what specied on this manual may lead to risks
●
of explosion.
Please dispose your old battery by following instructions given in tag of the
●
battery or local regulations.
18
Installation
Lens installation
Please follow steps given below to install lens after its replacement or when optional ones are
employed. Please consult your dealers for details on optional lenses.
Lens release
button
Remove the lens
1 Center the lens with its movement
function. (Hold 5 sec. on Lens Shift
button. Refer to the Page 30).
2 Power off your projector and unplug the
AC power cord.
3 Turn the lens counterclockwise and
remove its decoration ring.
4 Press and hold the lens release
button at top of the casing. Turn it
counterclockwise until it sticks, and then
pull it out of your projector gently.
Note:
Be careful in removing the lens.
Do not drop it.
Installing lens
1 Align the red mark on your lens and your
projector and insert the lens in the latter.
2 Turn the lens clockwise slowly until you
hear a click. Make sure the lens is fully
inserted in your projector.
Note:
Do not press and hold the lens
release button when installing it.
Remove the lens ring
1 Hold the upper part of the lens ring on one hand, while hold the lower part of it on the other
hand. Then pull out the lens ring gently and rotate the lens ring counterclockwise.
Note:
Be careful in removing the lens ring .
Do not touch or remove any other component except the lens and parts related to it.
●
Otherwise, you may experience product failure, electric shock, re, or other incidents.
Make sure model of the lens is compatible with your projector before installing it.
●
For details on lens and its installation, please call local dealers.
●
19
Installation
30˝
646×404mm
100˝
2154×1346mm
150˝
3231×2019mm
200˝
4308×2692mm
300˝
6462×4039mm
1.227m
3.142m
4.738m
6.334m
9.526m
30˝
610×457mm
100˝
2032×1524mm
150˝
3048×2286mm
200˝
4064×3048mm
300˝
6096×4572mm
0.86m
2.99m
4.50m
6.02m
9.06m
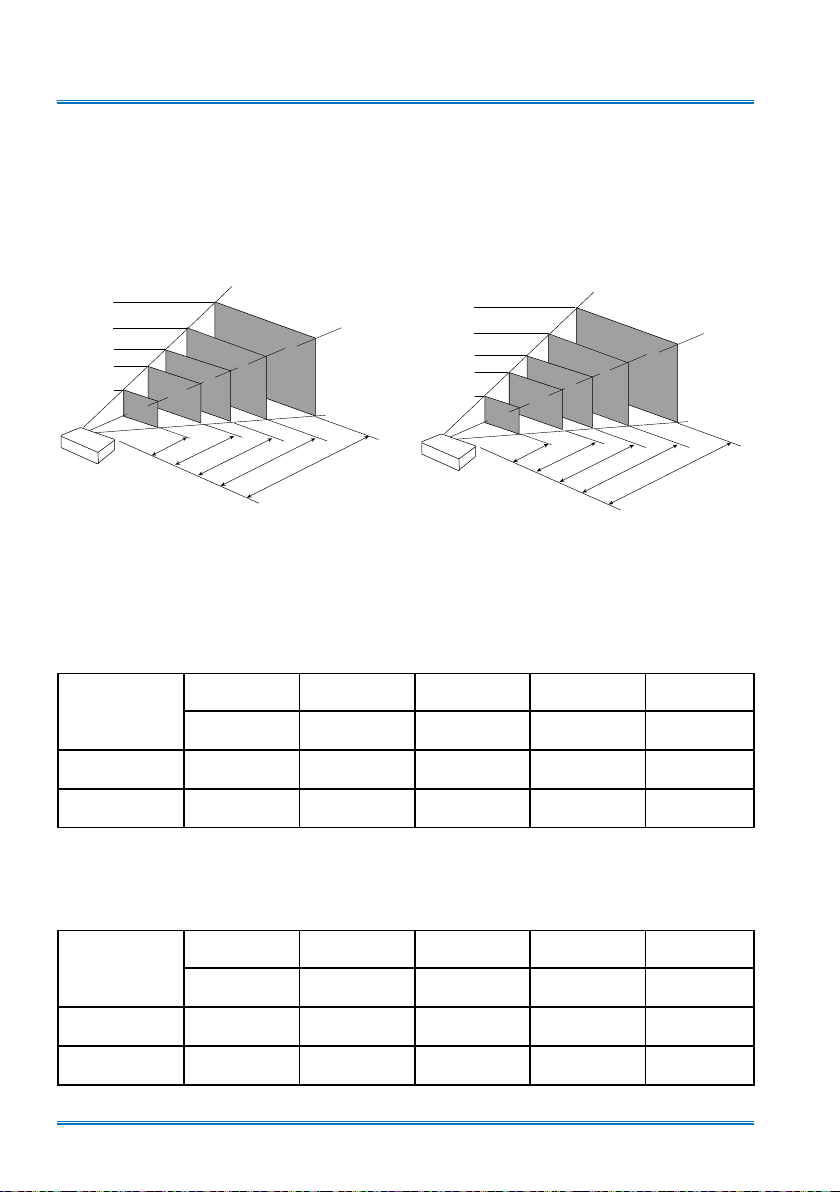
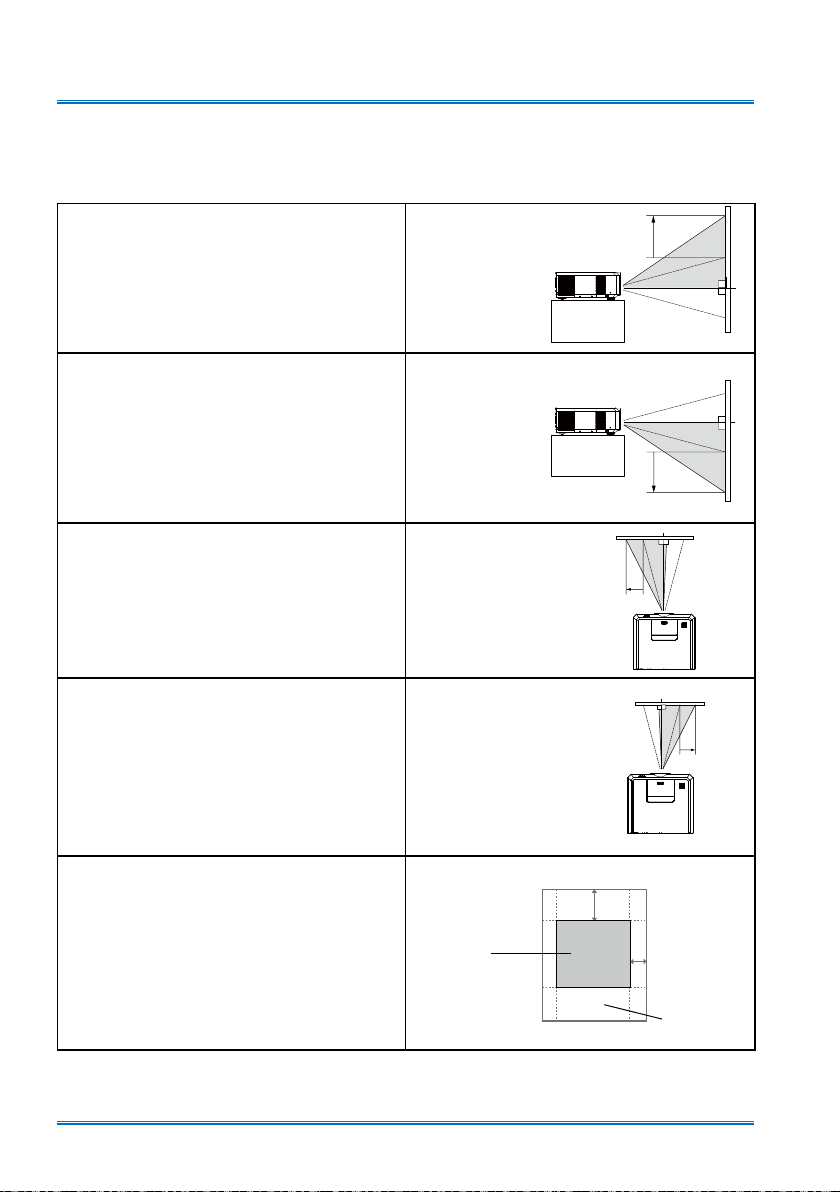
Set up your projector
● Ambient brightness may affect your projection image quality. For the optimal image effect, it is
recommended to control brightness in your environment.
● Values shown in gure below are approximates only. They may differ from the actual ones.
XGA series
300˝
6096×4572mm
200˝
4064×3048mm
150˝
3048×2286mm
100˝
2032×1524mm
30˝
610×457mm
0.86m
2.99m
4.50m
NOTE
:
● Chart above shows about the data of 4: 3.
Screen size
(WxH)m
0.610x0.457 2.032x1.524 3.048x2.286 4.064x3.048 6.096x4.572
Wide 0.86m 2.99m 4.50m 6.02m 9.06m
Distance 1.60m 5.44m 8.18m 10.92m 16.40m
6.02m
30" 100" 150" 200" 300"
WXGA / WUXGA series
300˝
6462×4039mm
200˝
4308×2692mm
150˝
3231×2019mm
100˝
2154×1346mm
30˝
646×404mm
0.89m
3.07m
9.06m
NOTE
:
4.62m
6.18m
9.29m
● Chart above shows about the data of 16:10.
PCL-LT9000X XGA
PCL-LT9000W / PCL-LT9000U WXGA / WUXGA
Screen size
(WxH)m
Wide 0.89m 3.07m 4.62m 6.18m 9.29m
Tele 1.64m 5.57m 8.38m 11.19m 16.81m
30" 100" 150" 200" 300"
0.646x0.404 2.154x1.346 3.231x2.019 4.308x2.692 6.462x4.039
20
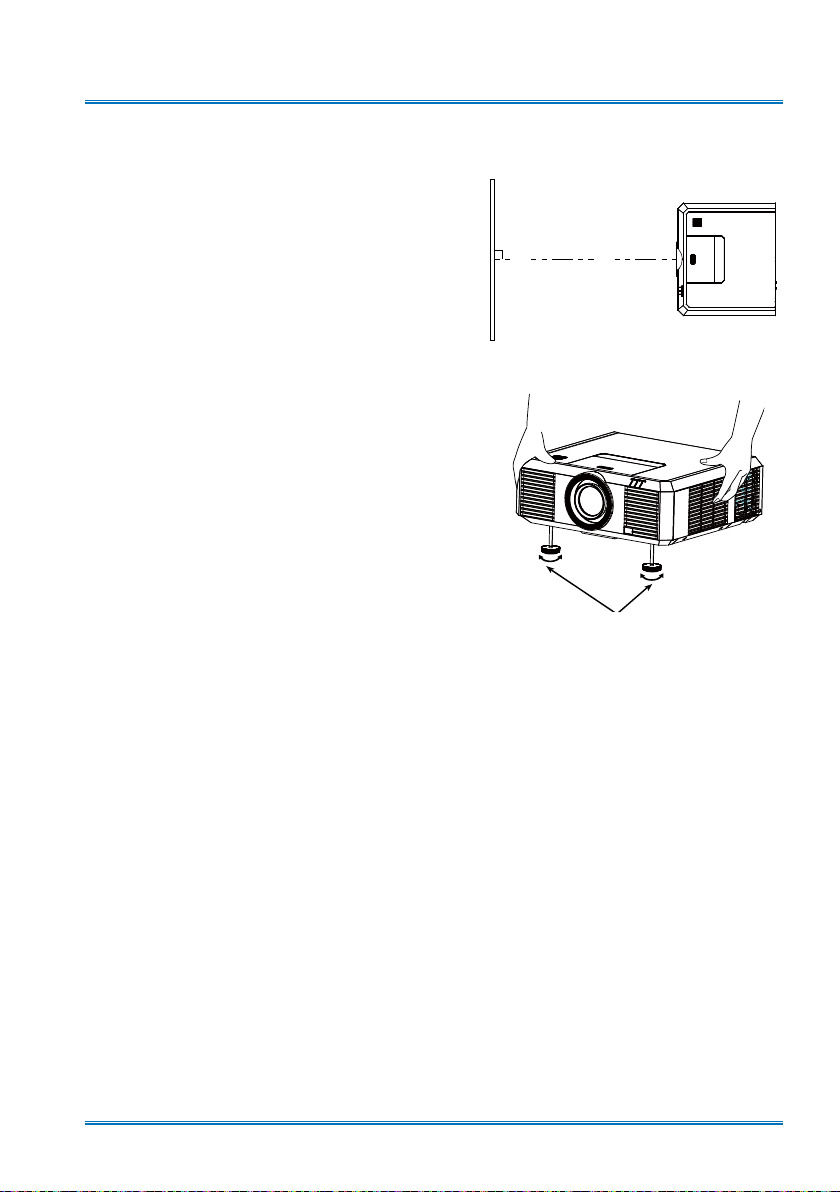
Adjustment pad
Place the projector properly so that it is vertical to
the screen.
You may use the adjustment leg to raise your
projector up to 5.0 degree.
Turn the pad to tilt your projector to required height.
To raise your projector, turn both pads clockwise.
To lower down your projector or close the pad, turn
both pads counterclockwise.
You may use the auto setup function to adjust
your projector’s keystone distortion automatically
or do this with the remote controller or OSD menu
manually.
Installation
Adjustable pad
21
Installation
60%
30%
Lens shift adjustment
The electric lens shift function may adjust your lens in all four directions.
This function enables easy image position adjustment.
The projection location of your image may be
moved upward a distance up to 60% (XGA
/ WXGA / WUXGA) between the upper and
lower range of the image.
The projection location of your image may be
moved downward a distance up to 60% (XGA
/ WXGA / WUXGA) between the upper and
lower range of the image.
Move lens to it top
position
Move lens to it
bottom position
The projection location of your image may be
moved leftward a distance up to 30% (XGA /
WXGA/ WUXGA)of the width of the image.
The projection location of your image may be
moved rightward a distance up to 30% (XGA /
WXGA/ WUXGA)of the width of the image.
Scope of lens shift adjustment (when the
Llens move to the limit, the screen will be
dark or shadow)
Move lens to it
leftmost position
Move lens to it
rightmost position
Center the
lens
Lens shift
range
* This table is measured with standard lens.
* When the setting of LENS SHIFT as the maximum position, the corner of projection image might be darker.
22
Installation
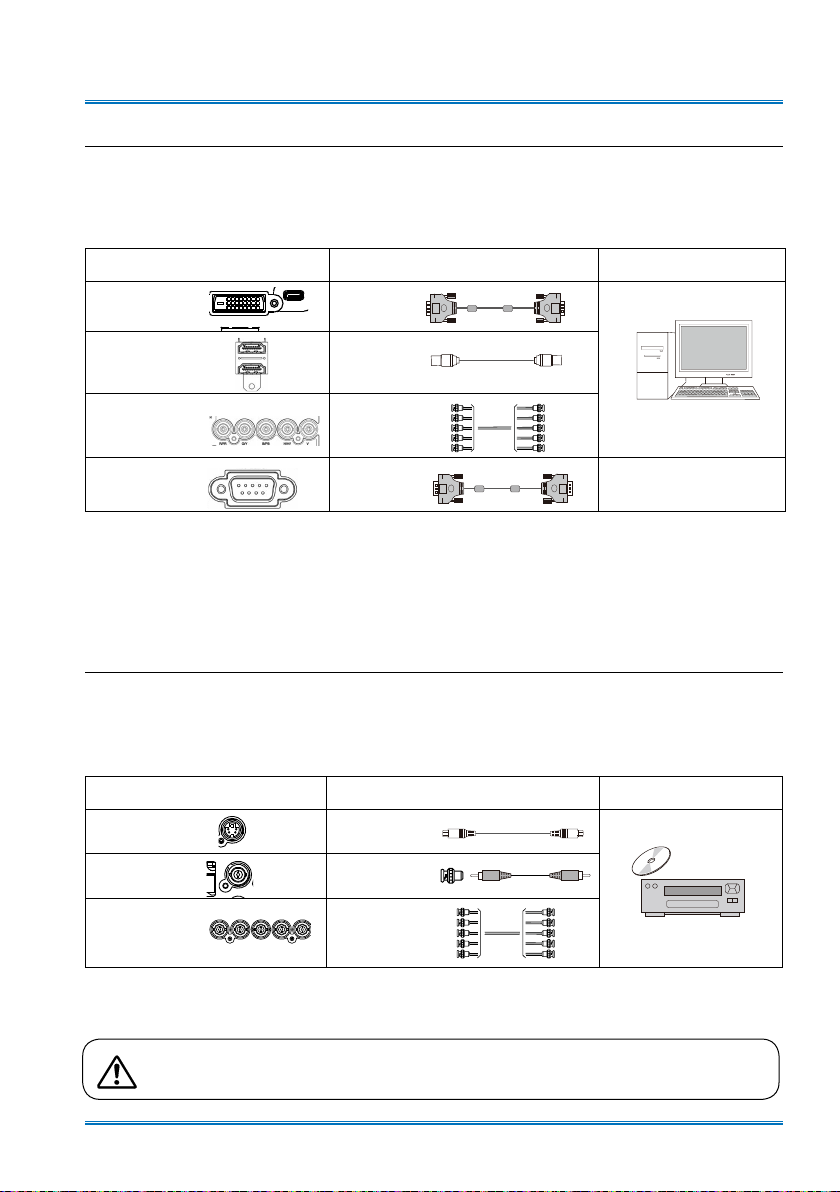
Connection to the PC
Cables for connection:
● VGA cable ● BNC cable*
● HDMI cable*
(* This cable is not included. )
Ports on your projector Connection
DVI-D(HDCP) DVI cable
HDMI HDMI cable
R(PR) / G(Y) /
B(PB) / H(HV) / V
SERIAL
(Digital and Analog RGB)
BNC cable
CROSSOVER
cable
Connect to video equipment
Cables for connection:
● S-VIDEO cable* ● VIDEO cable*
● BNC cable*
(* This cable is not included.)
cable
Equipment
Ports on your projector Connection cable Equipment
S-VIDEO IN S-VIDEO cable
VIDEO IN VIDEO cable
R(PR) / G(Y) /
B(PB) / H(HV) / V
Unplug power cords of your projector and all external equipment before connecting
any cable to them.
BNC cable
23

Installation
Connection to audio equipment
Cables for connection:
●
Audio cable*
(* This cable is
not included.
)
Ports on your projector Connection cable
MONO L/R
AUDIO IN
AUDIO IN / OUT
RC IN/OUT
Audio cable
Audio cable
Audio cable
Audio cable
Connect to USB equipment
Cables for connection:
● Micro USB cable*
(* This cable is not included. And it only for PCL-LT9000U.)
Ports on your projector Connection cable
Micro USB
Micro USB
cable
Equipment
Equipment
USB-A
USB
cable
Unplug power cords of your projector and all external equipment before connecting
any cable to them.
24
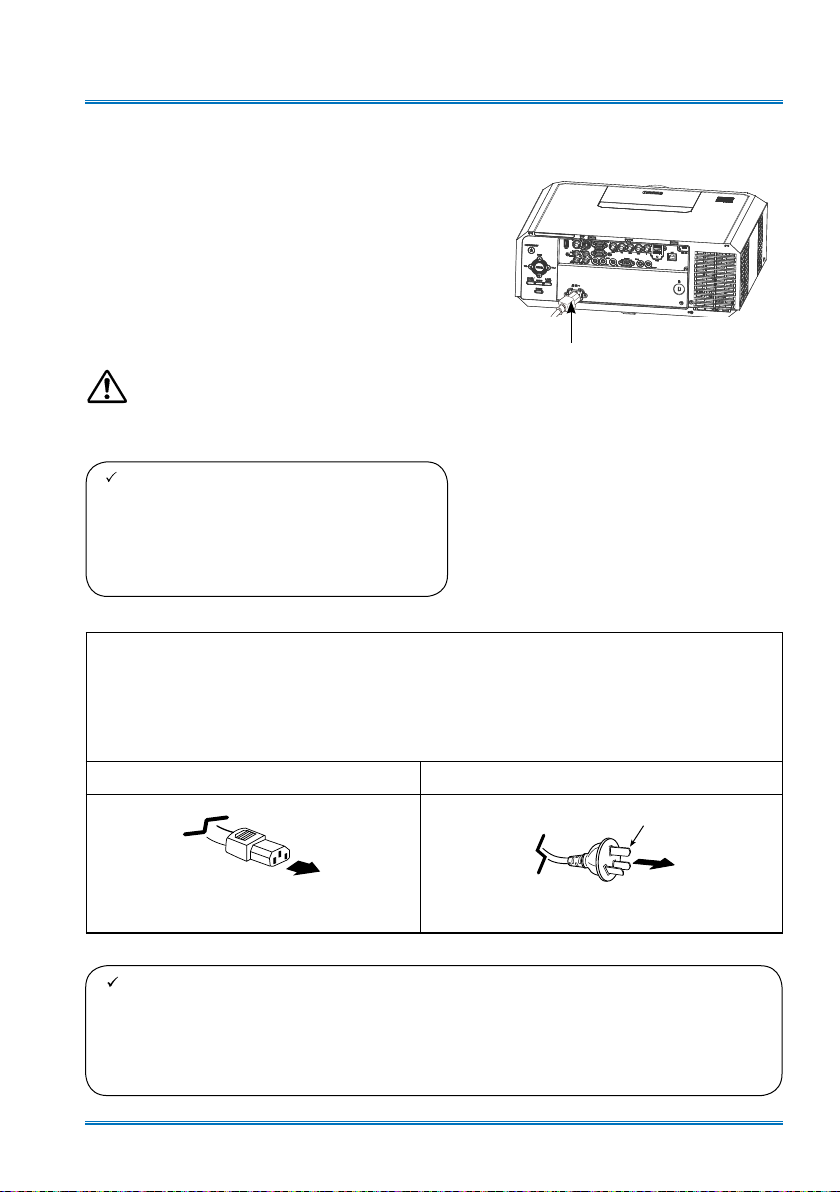
Installation
Connect the AC power cord
Standard voltage employed by your projector is
AC 100-240V. It adapts to different input voltage
automatically. Your projector employs single-phase
power cord with neutral ground cable.
Do not use any other type of power cords or you
may face the risks of electric shock. In case you
have any doubt on type of power cord you are
using, please call authorized dealer or service
center for help. Before powering on your projector,
get all external equipment connected in advance.
Note:
Keep your AC power socket close to your projector
for easy plugging and unplugging.
Note:
For safety reasons, unplug the AC power
cord when your projector is not in use. Your
projector will consume a small amount of
power when it is connected to AC grid power
and in standby mode.
Precautions on power cord
Your AC power cord should meet regulations of the country/district where the projector is used.
Please make sure the type of the power plug is compliant with those given in gure below.
Make sure you are using a valid AC power cord.
In case the included AC power cord does not comply with the AC power socket in your location,
call your dealer for replacement.
The projector side Connect to the AC power socket
Connect included AC power
cord to your projector.
Grounding end
Connect to power cord connector of
your projector
Note:
● Use of invalid power cord may hamper product performance or even lead to electric
shock, re, and other incidents. Please use power cord compliant with the included one
to ensure product performance and operation safety.
● The frequently used cables are: AC power cord, VGA cable, audio cable, video cable,
and serial control cable.
Connect to AC power socket
25
Basic operation
Power on your projector
1. Connect all external equipment to your projector
(e.g. computer or camera) before powering it
on.
2. Connect AC power cord of your projector to an
AC power socket. The Power indicator turns on
in red.
3. Press the Power button on the top control panel
or the remote controller.
The Power indicator lights in green and the
cooling fan starts running.
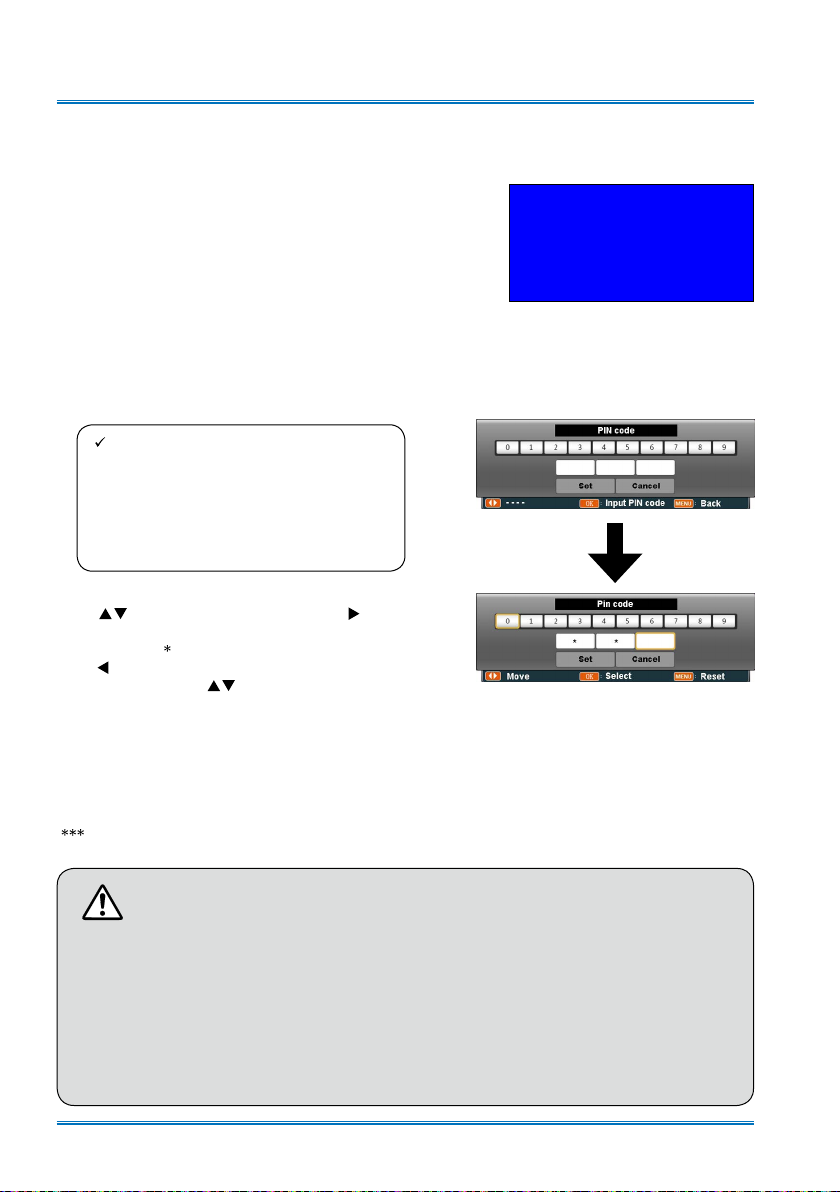
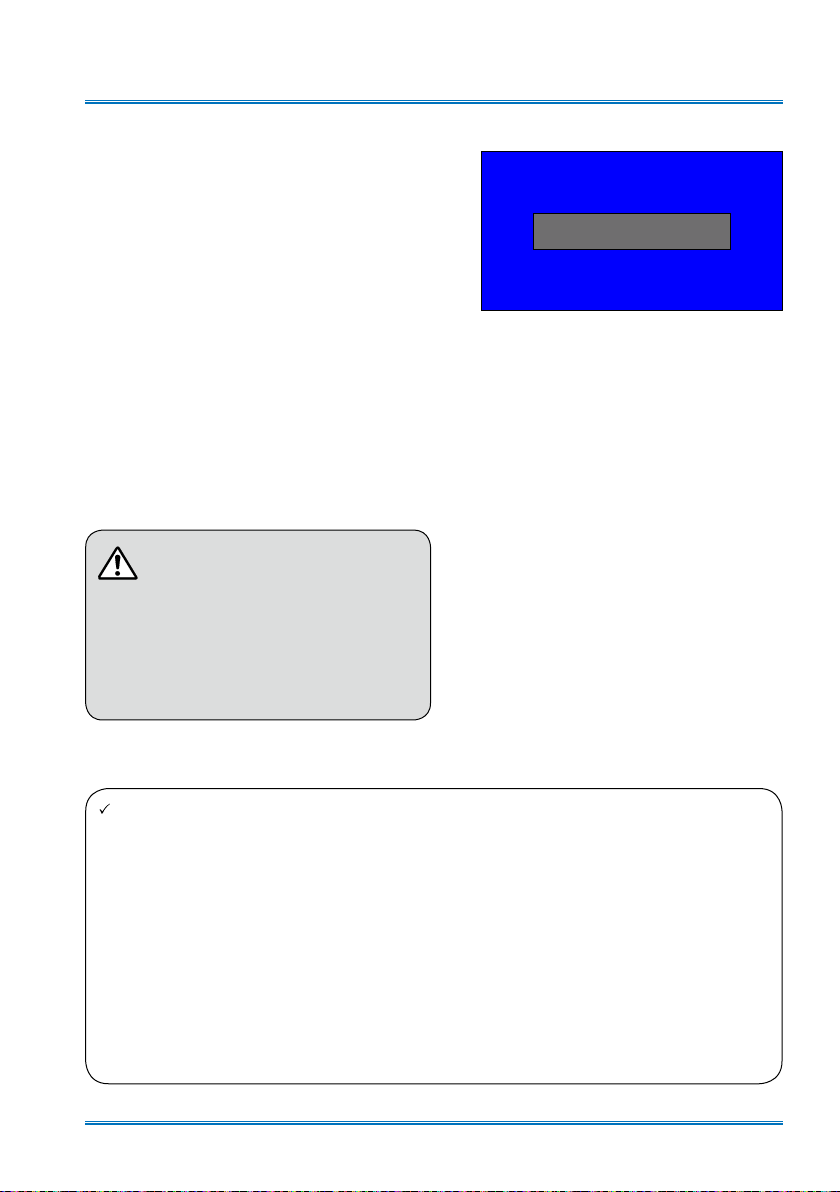
4. If your projector is setting as password protected, the password dialog box displays. Enter
your password as instructed below.
Note:
● In case the “Logo Select” option is set
to OFF, then no welcome image will
display in screen.
● You can do nothing but powering off
your projector during the welcome
image is displaying.
Enter password (PIN)
Press button to select a number, press button
to enter it and move the cursor. The number you typed
is displayed as “ ”. To edit number you have entered,
press button to move the cursor to the number you
want to change, press button to select the correct
one.
Repeat this step to type in a 3-digit number.
Move the cursor to SET after you have typed the 3-digit
number. Press the
to use your projector.
If the password is invalid, the password displayed as
“
” will be in red. Please try again with a valid one.
button and now you are ready
OK
15
Move the cursor to Set button,then
press the OK button.
What is a password (PIN)?
A password (PIN) is an ID code for identifying people with knowledge about it to operate
your projector. A password (PIN) setting may help preventing your projector from unauthorized use.
You password (PIN) code is a 3-digit number. To find out more about protecting your
projector with a password (PIN), please refer to the PIN Code Lock function in the Setup
menu on Page 54 for details.
Precautions on password (PIN) operation
You cannot operate a password (PIN) protected projector without correct password (PIN)
Please set up a new password (PIN) and keep your operation manual in safe place. In
case the password (PIN) is lost or forgotten, call your dealer or service center.
26
Power off your projector
1. Press the Power button at the top control
panel or the remote controller, the “Power
off?” message displays.
2. Press the Power button again in 4 seconds
after the “Power off?” message prompted
to you. The POWER indicator ashes red
while the cooling fan continues running.
(Users can set up the the speed of the
cooling fan.) Unplug the power cord until
the fan stops running. Failure to do so
may shorten life cycle of your projector
or lead to power on failures or operation
abnormalities.
3. The POWER indicator stops ashing once
the projector has been cooled down to
ready for power on again.
To maintain the life cycle of the lamp,
power off your projector after it has
been turn on for at least ve minutes.
Do not use your projector without
stop. As it may hurt the life cycle of
your lamp. Power off your projector at
least once every 24 hours and have
it idle for an hour.
Basic operation
Power off?
“Power off?” message disappears
in 4 seconds.
Note:
● If the “On Start” function is set to “On”, your projector will power on once it is connected to an
AC power socket. (Refer to page 45)
● Speed of the cooling fan varies with internal temperature of your projector.
● Do not place your projector in any box before it is fully cooled down.
● In case the POWER indicator flashes or turns red, refer to the “Status light indicator ” for
instructions. (Refer to page 92 )
● The POWER indicator flashes when the lamp is cooling down. Do not power on your projector
at this time. Power on your projector only after the POWER indicator turns red.
● Unplug the power cord after your projector has been turned off. The fan stops running.
● The POWER indicator turns red when your projector is ready for power on again. It takes less
time to restart your projector after it was powered off in the standard power off procedure than
that of the non-standard one.
27
Basic operation
INPUT
How to operate the OSD
You can adjust or set up the projector on the
on-screen menu .
The menu has a multilayer structure. Each
main menu is divided into several sub-level
menus, then each submenus is divided into
several submenus.
Please refer to the appropriate section of this
manual for the procedure for the adjustment
and settings.
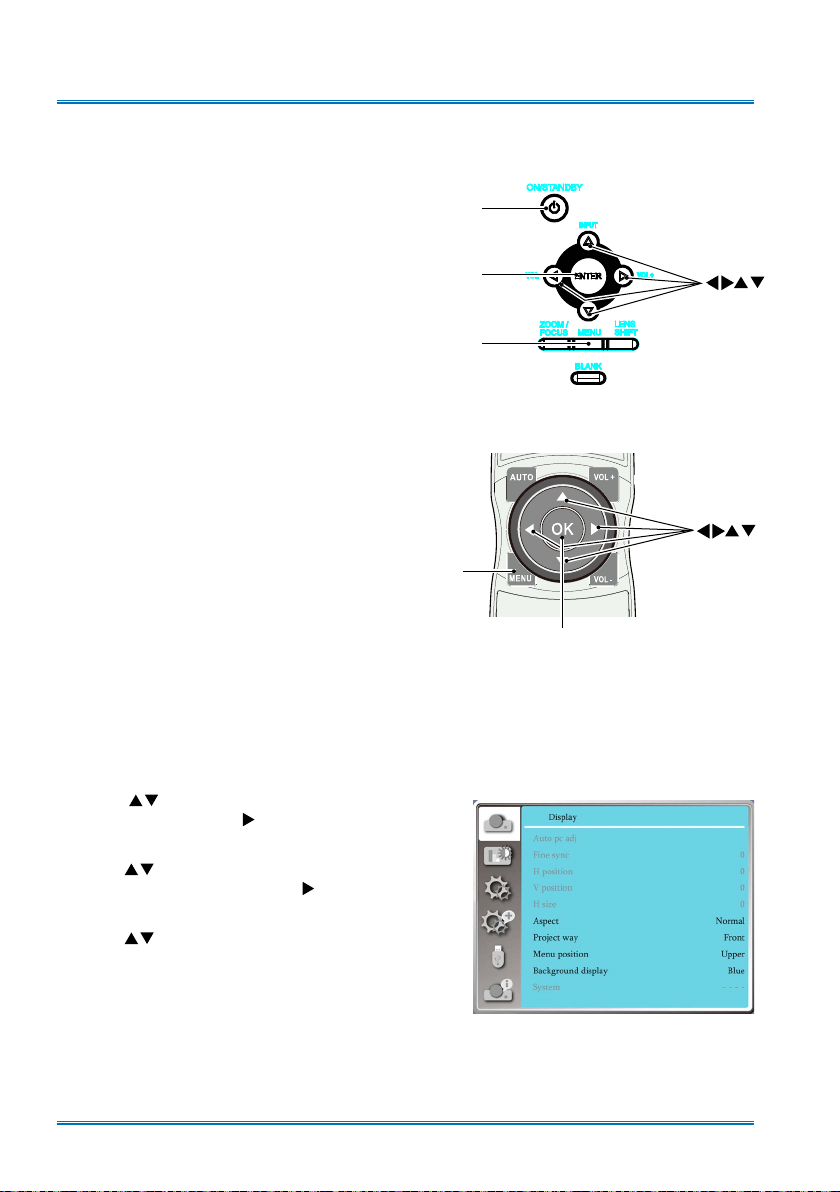
Rear control panel
POWER
ENTER
MENU
Remote controller
MENU
OK
1. Press the MENU button on the back control
panel or remote controller and the OSD
displays.
2. Press
mainmenu item. Press button or OK
button to enter a submenu.
3. Press
menu, then press OK button or button to
set up or enter an option.
4. Press
igate options, then press OK button to act
on the item and exit.
5. Press button to return to mainmenu.
Press the MENU button on remote controller or control panel to exit the OSD.
button to act on or select one
button to select required sub-
button to select settings or nav-
OSD Menu
28
Basic operation
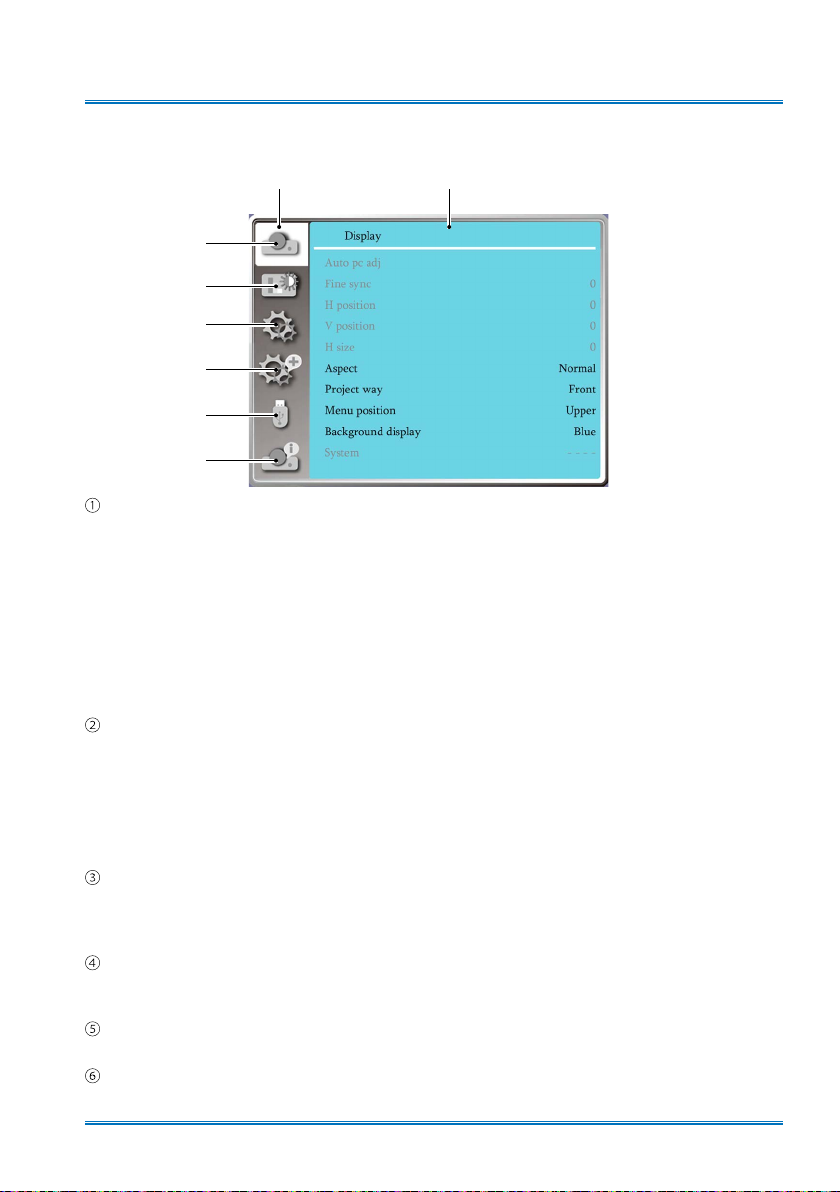
Menu item overview
Mainmenu Submemu
①
②
③
④
⑤
⑥
Display menu
●
Select Auto PC adj., Fine sync, H Position, V Position, H. size to adjust the parameters to
match the VGA format.
●
Aspect : Normal, Widescreen, Advanced.
●
Project way: Choose Front, Rear, Ceiling / Front, Ceiling / Rear, Auto ceiling/Front and Auto
ceiling/Rear .
●
Menu position: Set screen menu display position on the screen.
●
Background display: Set the background color of the projection screen.
●
System: Select the compatible system signal format with input source .
Color adjust menu
Available options in the Image Select menu are Dynamic, DICOM, Normal, Cinema, Blackboard
(Green), Colorboard, or User Image.
●
For AV signal input ,the available color adjust options : Contrast, Brightness, Color, Tint,
White balance(Red, Green, Blue) and Sharpness.
●
For PC signal input ,the available color adjust options :Contrast, Brightness, Color temp. ,
White balance(Red, Green, Blue) and Sharpness.
Setting menu
Conguration of the basic function operation on the projector: On start, Standby mode, High
land, Lamp control, Cooling fast , Closed caption, Key lock, Iris, Remote Control, Sound and
HDMI Setup.
Expand menu
Available adjust options are Language, Auto Setup, Keystone, LOGO , Security, Power
management, Filter counter, Test pattern, Network, Factory default and Lamp counter.
Memory Viewer menu
Select Parameter Of Set slide, Slide transition effect,Sort order, Rotate, Best t, Repeat, Apply.
Information menu
Display information about the projector.
29
INPUT
Basic operation
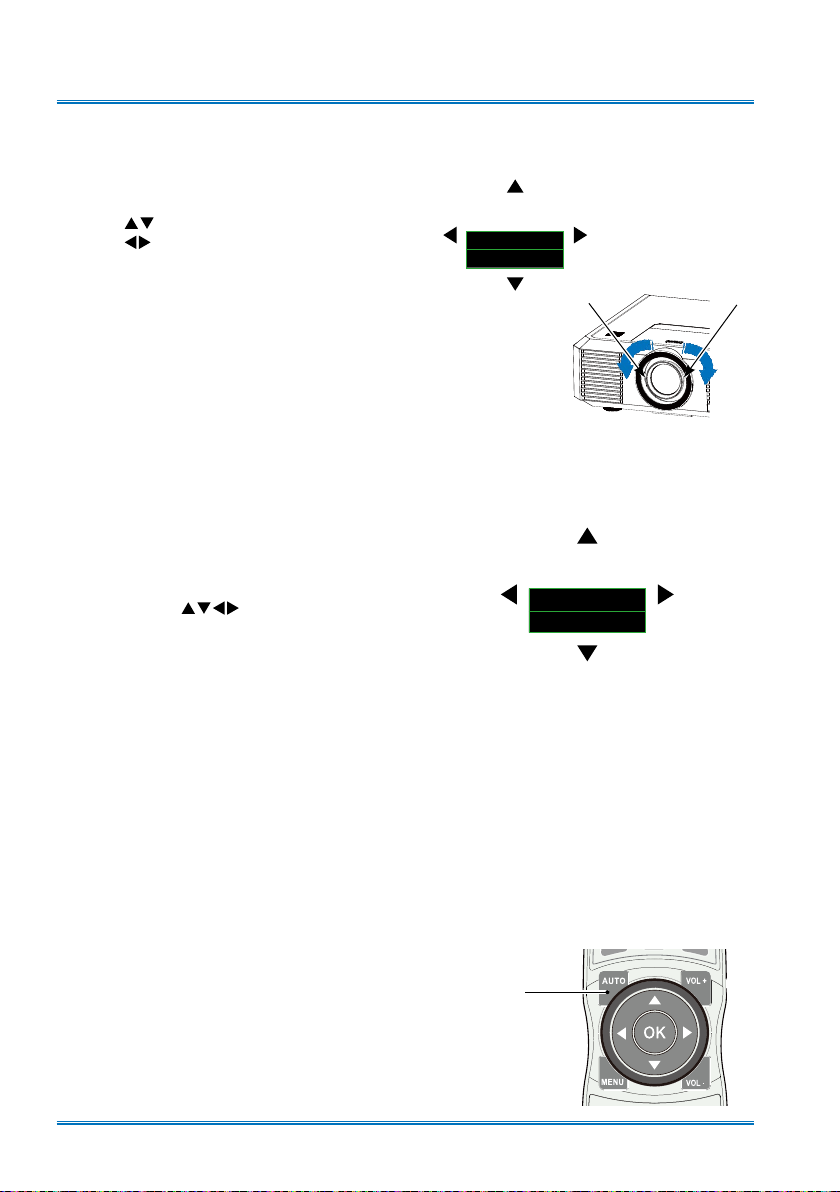
Zoom / focus function
1. Press the ZOOM / FOCUS button on the
rear control panel or remote controller for
zooming and focusing.
2. Press
button to zoom in and out.
Press button to change focus of
image. Default adjustment speed is set to
FAST. You may press the ENTER button,
select STEP for speed fine-tuning.
Lens movement function
1. Press the LENS SHIFT on the rear control
panel or remote controller to adjust
position of the lens. Default adjustment
speed is set to FAST. You may press the
ENTER button, select STEP for speed
fine-tuning.
2. Movement of the lens is shown on the
screen. Press
the screen to required location without
any image distortion. Range of screen
movement - Upward or downward from
the lens movement axis is 60% (XGA
/ WUXGA) or 70% for WXGA series .
Leftward or rightward: 30%.
3. Press and hold the LENS SHIFT button on
the rear control panel or remote controller
for 5 seconds to home it to the center
position.
button to move
Zoom / focus
▲
▼
ZOOM
FOCUS
FAST
SELECT:ENTER
Lens movement
SELECT:ENTER
Focus
LENS
SHIFT
FAST
Zoom
Auto setting function
Press the AUTO button on the top control
panel or your remote controller to auto execute settings given in the Auto Setup on the
Expand menu (including input search, Auto
PC adj. and Auto keystone).
Remote controller
AUTO
30
 Loading...