


Blood Glucose Monitoring System
for self testing
Instructions for Use
0.5ul
5
sec
Auto
Coding
Auto
Ejector


Blood Glucose Monitoring System
for self testing
Instructions for Use
0.5ul
5
sec
Auto
Coding
Auto
Ejector

• 4 •
Dear Finetest™ Lite Blood Glucose Monitoring System
Owner,
Thank you for choosing the Finetest™ Lite Blood Glucose Monitoring System. This manual
contains everything you need to know about your new glucometer and how it works. Please
take a moment to read the instructions carefully.
We understand that self-testing of blood glucose level provides a way to control your
diabetes and may give you peace of mind by testing regularly. Finetest™ Lite has been
developed to provide you with a fast and accurate reading in a convenient and simple
process. Our goal for the Finetest™ Lite Blood Glucose Monitoring System is to provide you
with the best quality healthcare products coupled with superior customer service. Always
consult with your healthcare professional, before making any changes to your diabetes
management. The Finetest™ Lite Blood Glucose Monitoring System is for in-vitro
diagnostic use only.
Important Information
The Finetest™ Lite Blood Glucose Monitoring System is intended for use outside the body
(in-vitro diagnostic use only). It should be used only for testing blood glucose with fresh
whole blood samples(Capillary and/or venous). It should not be used for the diagnosis of
diabetes. Consult with your physician or diabetic healthcare professional about daily
management of your diabetes and proper use of the glucometer. Please pay close attention
when handling blood. Improper procedures may cause serious hazards to your health. The
Finetest™ Lite Blood Glucose Monitoring System contains small parts, which could be a
choking hazard for children if swallowed.
Customer Service is available 24 hours a day, 7 days a week, and 365 days a year.
Please call customer support center in your local area.

• 5 •
Test Principle
Finetest™ Lite
blood glucose test strip is the bio-sensor which is composed of the
FAD-dependent glucose dehydrogenase(enzyme). FAD-GDH(enzyme) quantitatively
reacts with the glucose in the whole blood and the mediator. Glucose in the whole blood
sample reacts with the reagent of the test strip and generates an electrical current. The
amount of current, which is related with glucose concentration, is measured by the current,
for which the method is called amperometry.
NOTE:
1. Blood Glucose Monitoring System may also be called as Blood Glucose Te st Meter,
the Meter, Te st Meter throughout this manual, for which they have equal meaning to
each other.
2. Blood Glucose Test Strips may be referred to as Te st Strip throughout this manual.
WARNING
1. All parts of the kit are considered bio-hazardous and can potentially transmit
infectious diseases, even after you have taken cleaning and disinfection measures.
2. Always use a new, sterile lancet. Lancets are for single use only.
3. Avoid getting hand lotions, oil, dirt or debris on the meter, lancets or lancet device.
4. Please refer to page 33 for cleaning and disinfecting
Finetest™ Lite
Blood Glucose
Monitoring System.
5. Do not change your medication based on the
Finetest™ Lite
meter test results
without contacting your physician or healthcare professional first.
6. Do not assemble or disassemble the blood glucose test meter.
7. Keep out of direct sunlight.
CAUTION
1. Please keep your monitoring system of the reach of children.
2. Make sure it does not come in contact with water and moisture.
3. Avoid exposure to dirt or moisture.
4. Close supervision may be required when equipment is used by, on, or near children,
handicapped persons or invalids.
5. Do not place the equipment in or near liquid, nor put it where it could fall into liquid. If
the equipment becomes wet, unplug it before touching it.
6. Do not use accessories which are not supplied or recommended by the manufacturer.
7. Do not place anything on top of the equipment.
Table of Contents
1. Learning the System
Intended use of blood glucose test meter--------------------------------------------------- 7
Finetest™ Lite
Finetest™ Lite
Finetest™ Lite
Finetest™ Lite
2. Before Testing:
Setting your meter ------------------------------------------------------------------------------13
Auto-coding function ----------------------------------------------------------------------------15
Performing a Glucose Control Solution Test------------------------------------------ 16-19
3. Performing your test:
Testing Blood - preparation -------------------------------------------------------------- 20-21
Performing a blood test with your finger tip ------------------------------------------ 22-26
Test Strip ejector function ---------------------------------------------------------------------27
4. Reviewing Your Results:
Reviewing your blood sugar ------------------------------------------------------------------28
Reviewing your averages ----------------------------------------------------------------------28
5. Alternate Site Test:
Lancing and sampling from an alternate site area --------------------------------- 29-31
Lancing device clear tip is used for alternate site testing-------------------------- 31-32
6. Caring for Your Finetest™ Lite System:
Cleaning your meter and maintenance ---------------------------------------------------33
Storage of your
7. Transferring Your Result Data --------------------------------------------------------------36
8. Battery Installation -----------------------------------------------------------------------------37
9. Disposal -------------------------------------------------------------------------------------------38
10. Trouble-shooting ------------------------------------------------------------------------- 39-41
11. Inconsistent or Unexpected Test Results ----------------------------------------------42
12. Warranty -----------------------------------------------------------------------------------------43
13. Specifications ----------------------------------------------------------------------------------44
14. Symbol Reference-----------------------------------------------------------------------------45

• 6 •
Table of Contents
1. Learning the System
Intended use of blood glucose test meter--------------------------------------------------- 7
Finetest™ Lite
kit contents ---------------------------------------------------------------------- 8
Finetest™ Lite
meter ----------------------------------------------------------------------------- 9
Finetest™ Lite
meter Display -----------------------------------------------------------------10
Finetest™ Lite
test strip ------------------------------------------------------------------------ 11
2. Before Testing:
Setting your meter ------------------------------------------------------------------------------13
Auto-coding function ----------------------------------------------------------------------------15
Performing a Glucose Control Solution Test------------------------------------------ 16-19
3. Performing your test:
Testing Blood - preparation -------------------------------------------------------------- 20-21
Performing a blood test with your finger tip ------------------------------------------ 22-26
Test Strip ejector function ---------------------------------------------------------------------27
4. Reviewing Your Results:
Reviewing your blood sugar ------------------------------------------------------------------28
Reviewing your averages ----------------------------------------------------------------------28
5. Alternate Site Test:
Lancing and sampling from an alternate site area --------------------------------- 29-31
Lancing device clear tip is used for alternate site testing-------------------------- 31-32
6. Caring for Your Finetest™ Lite System:
Cleaning your meter and maintenance ---------------------------------------------------33
Storage of your
Finetest™ Lite
system ------------------------------------------------- 34-35
7. Transferring Your Result Data --------------------------------------------------------------36
8. Battery Installation -----------------------------------------------------------------------------37
9. Disposal -------------------------------------------------------------------------------------------38
10. Trouble-shooting ------------------------------------------------------------------------- 39-41
11. Inconsistent or Unexpected Test Results ----------------------------------------------42
12. Warranty -----------------------------------------------------------------------------------------43
13. Specifications ----------------------------------------------------------------------------------44
14. Symbol Reference-----------------------------------------------------------------------------45

• 7 •
Learning the System
Intended use
The
Finetest™ Lite
test meter is used with
Finetest™ Lite
test strip for the measurement of
glucose in fresh whole blood samples(Capillary and/or venous).
It should not be used for the diagnosis or screening of diabetes or for the testing of new born
babies.
Finetest™ Lite
Blood Glucose Monitoring System is intended for use outside the body only
(in-vitro diagnostic use).
Finetest™ Lite
Blood Glucose Monitoring System is for self-testing by people with diabetes
and by healthcare professionals.
Recorded results make it easier for your doctor to access your metabolic control.
However, the self-testing should not take the place of overall diabetes management
assessment from your doctor.
Finetest™ Lite Kit Contents
Your
Finetest™ Lite
contents. If you find your seal has been broken, please return it to the place of purchase.
CAUTION
- Do not use system for any other purpose than blood glucose test.
- Cholesterol concentrations > 27.7 mmol/L or triglyceride concentrations > 116.5 mmol/L
may produce elevated reading.
- Icodextrin does not interfere with
Finetest™ Lite
test strips.
- Do not use during or soon after xylose absorption testing. Xylose in the blood will cause
interference.
- Before using any product, please read all instructions.
- Consult with your physician or diabetic healthcare professional about daily management of your diabetes and proper use of the glucometer. If you have any questions
about the
Finetest™ Lite
product, please contact Neon Diagnostics Ltd.
WARNING
- Before using
Finetest™ Lite
system, read all instructions in this manual, and practice
for accurate and safe testing. You should have received training from your diabetes
healthcare professional, to demonstrate how to use the meter and how to manage your
diabetes.
- If you think your blood glucose results are too low or too high, or if the results are
doubtful, please contact your doctor.
- If your blood glucose result is unusually low or high, or you do not feel the result is
correct, repeat the test again with a new test strip.
- If the results are still inconsistent, please consult with your physician before making any
decision in controlling your diabetes.
1.
Finetest™ Lite
2.
Finetest™ Lite
3. Reusable Lancing Device
4. Lancets
5. Operation Manual
Battery

• 8 •
Finetest™ Lite Kit Contents
Your
Finetest™ Lite
Blood Glucose Monitoring System has been sealed to protect the
contents. If you find your seal has been broken, please return it to the place of purchase.
1.
Finetest™ Lite
Meter
2.
Finetest™ Lite
Test strip
3. Reusable Lancing Device
4. Lancets
5. Operation Manual
6. Warranty Registration Card
7. Carrying Case
8. Patient Logbook
9. 3V Coin (1EA) Battery (CR2032)
Lancing Device
Lancets
Carrying Case
Meter
Battery

• 9 •
Finetest™ Lite Meter Display
Test Strip Port:
Insert the
Finetest™ Lite
test strip
Display Screen:
Displays your test results, symbols, and messages.
Power/Enter Button:
Power the meter on/off, prompts memory data and acts as
an “Enter” button during setup and after tests.
Up/Down Arrow Buttons:
Scroll up or down to adjust settings or retrieve memory.
Test Strip Ejector:
Releases and discards test strip.
Serial Number
Battery Cover
Finetest™ Lite Meter
CAUTION
1. Do not use
Finetest™ Lite
glucose test meter in a dry environment, especially if
synthetic materials are present. Synthetic clothes, carpets, etc., may cause
damaging static discharge in a dry environment.
2. Do not use
Finetest™ Lite
glucose test meter near cellular or cordless telephones,
walkie-talkies, garage door openers, radio transmitters, or other electrical equipment
that are sources of electromagnetic radiation, as these may interfere with the proper
operation of the glucose test meter.
DATE

• 10 •
Finetest™ Lite Meter Display
Low Battery Warning Symbol
Alarm Symbol
Troubleshooting Symbol
Average Test Result System
Before Having a Meal
After Having a Meal
After Taking Medication
After Sport Activity
Control Solution Symbol
Blood Drop Symbol for Test
Test Strip Code Symbol
Test Result Unit Symbol
Temperature / Date
DATE

• 11 •
Before Testing
WARNING
To reduce the chance of infection:
1. Lancing device and lancets should NOT be shared with others.
2. Always use a new lancet and a new blood glucose test strip.
3. Practice using the lancing device and become accustomed with its use.
4. Lancets and blood glucose test strips should be single use only.
5. Wash your hands in warm clean running water using soap before testing.
6. Avoid getting hand lotion, oils, dirt or debris on the lancets or on the lancing device.
7. Dry your hands completely before testing.
Finetest™ Lite Test Strip
Caution
1. Store the
Finetest™ Lite
test strip containers in a cool, dry place. Keep out of direct
sunlight. Do not freeze.
2. Store test strips in their original container only. Do not mix the test strips in new
container or in any other container.
3. Immediately replace the container lid and close tightly after removing the required test
strip from the container.
4. Make a note of the expiry date, which is six months from the date you first open a new
container of test strips. Throw
Finetest™ Lite
test strips and container away after the
expiry date and the container away after the expiry date has passed.
5. Do not use the test strips after the expiration date printed on the package or container,
since it may cause inaccurate results.
6.
Finetest™ Lite
test strips should be single use only. DO NOT RE-USE.
7. Do not test at temperatures below 10℃(50°F) or above 40℃(104°F).
8. Do not test in the condition that humidity is below 10% or above 90%.
9. Do not bend, cut, or alter the test strip.
10. Avoid getting dirt, food, and water on the test strip with wet hands.
11. Avoid getting dirt, food, and water on the color-coding label (backside of test strip)
12. Refer to additional information in the
Finetest™ Lite
test strip package.
Test Strip Port
Contact Bar

• 12 •
Before Testing
WARNING
To reduce the chance of infection:
1. Lancing device and lancets should NOT be shared with others.
2. Always use a new lancet and a new blood glucose test strip.
3. Practice using the lancing device and become accustomed with its use.
4. Lancets and blood glucose test strips should be single use only.
5. Wash your hands in warm clean running water using soap before testing.
6. Avoid getting hand lotion, oils, dirt or debris on the lancets or on the lancing device.
7. Dry your hands completely before testing.

• 13 •
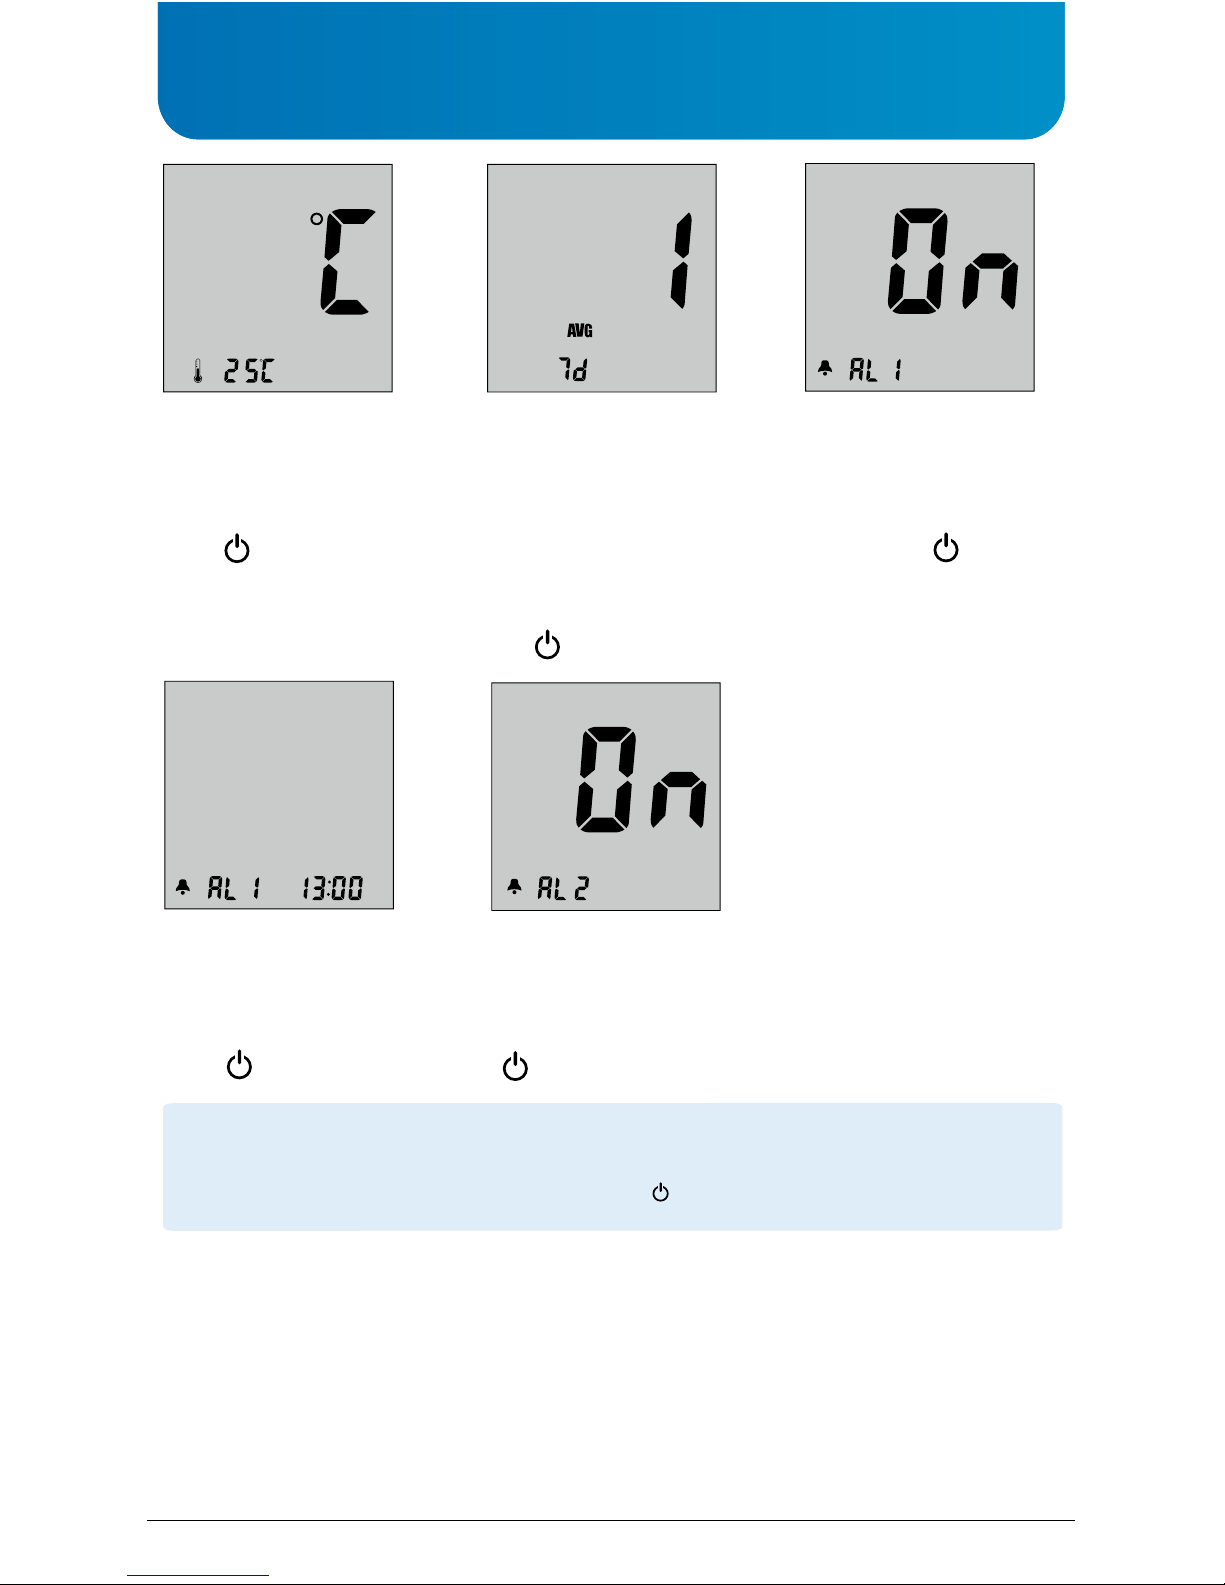
Setting Your Meter
The
Finetest™ Lite
Meter has a wide variety of functions to choose from. Within the setup
mode you can turn activity/meal flags, set the date/time, designate three unique averages,
and set up to five daily alarms.
Power On
Press for 3
seconds at least.
Date / Time
After pressing and
releasing either or
buttons to set the date
and time, respectively
push button.
User Activity Option
After pressing and
releasing either or
buttons to turn the User
Activity Option on/off,
push button.
Year
After pressing and
releasing either or
buttons to set the year,
push button.
Temperature Unit
After pressing and
releasing either or
buttons to set
℃
or
push button.
Alarm time
After pressing and releasing
either or buttons to set
the alarm hour and minute,
push button.
CAUTION
1. You cannot test your blood glucose in the setting mode.
2. To turn the meter off during the setup, press for at least 3 seconds.
• 14 •
Number of days for
average
After pressing and releasing
either or buttons to set
the number of days for
average calculation (3
different settings possible),
push button.
Alarm on/off
After pressing and
releasing either or
buttons to turn the alarm
on/off, push button.
Temperature Unit
After pressing and
releasing either or
buttons to set
℃
or ℉ and
push button.
Alarm time
After pressing and releasing
either or buttons to set
the alarm hour and minute,
push button.
Alarm
After programming the
number of desired alarms
(5 alarms possible),push
button.
CAUTION
1. You cannot test your blood glucose in the setting mode.
2. To turn the meter off during the setup, press for at least 3 seconds.

• 15 •
Auto-coding Function
1.
Finetest™ Lite
has automatic code recognition function
(e.g. CODE 125)
2. It recolonises the code number automatically.
This is a
very convenient function preventing the inconvenience of setting the code number on the glucose
test
meter every time. Check the code onon the
container
to see if the codes match
CAUTION
1. Do not bend the glucose test strip to prevent the automatic code recognition failure.
2. If the code recognition label is damaged, code recognition may fail. Please check the
code number on the LCD window together with the code number on the glucose test
strip container to see if code numbers match each other.
Performing a Glucose Control Solution Test
Finetest™ Lite
control solution contains a known amount of glucose that reacts with
Finetest™ Lite
test strip. By comparing your control solution test results with the expected
range printed on the strip container, you are able to check that the meter and test strips are
working properly, and that you are performing the test correctly. it is very important that you
perform routine checks to ensure accurate results.
The Glucose control solution should be used:
- Before using a new box of test strips.
- Whenever you suspect the blood glucose test meter or blood glucose test strip is not
functioning properly.
- If your blood glucose test results are not consistent with your symptoms, or if you think
results are not accurate.
- If you have dropped the blood glucose test meter.
- For quality control in the point of care usage.
- For teaching or learning the system.
- When using the meter for blood glucose tests after any disinfection procedure.

• 16 •
Performing a Glucose Control Solution Test
Finetest™ Lite
control solution contains a known amount of glucose that reacts with
Finetest™ Lite
test strip. By comparing your control solution test results with the expected
range printed on the strip container, you are able to check that the meter and test strips are
working properly, and that you are performing the test correctly. it is very important that you
perform routine checks to ensure accurate results.
The Glucose control solution should be used:
- Before using a new box of test strips.
- Whenever you suspect the blood glucose test meter or blood glucose test strip is not
functioning properly.
- If your blood glucose test results are not consistent with your symptoms, or if you think
results are not accurate.
- If you have dropped the blood glucose test meter.
- For quality control in the point of care usage.
- For teaching or learning the system.
- When using the meter for blood glucose tests after any disinfection procedure.
Firmly insert the test strip into the meter test port. Insert
deeply in direction of arrow on test strip (arrow down). Please
do not insert the glucose test strip upside down.
When you insert the glucose test strip into the glucose test
meter, the power automatically adjusts the meter
accordingly.
Press and release either the or button, then, Control
Solution container icon will appear. Then, press
( ).

• 17 •
CAUTION
1. Control solution is for in-vitro diagnostic use only. This means that it is only used for
testing outside the body.
2.
Control solution is exclusively made for the
Finetest™ Lite
Blood Glucose Monitoring
System. Do not use any other brand of control solution, made by other manufacturers.
3. Check the expiration date on the container. Do not use, if expired.
4. Once opened, use it for the next three months only. Record the discard date on the
control solution container. Discard after three months.
5. Do not swallow. This is NOT for human or animal consumption.
6. The control solution bottle icon contains letter ‘C,’ so as not to be confused with the
medication container. This will allow you to understand differences between a control
solution test and an actual blood test.
For example only
If you are using the normal control solution, according to this particular container of strips,
your meter should show a number between 4.3 and 6.7mmol/l.
Please note that the control values shown in the picture are not control ranges.
NOTE
- It is recommended that glucose control solution is stored at room temperature 20~25
℃ (68~77℉) before testing.
- Check the expiration date before performing a glucose control solution test.
-
Do not use beyond expiration date. Once opened, the control solution expires after 3 months.
If your control solution test falls out of range, please follow the next steps before
contacting customer support:
- Check the expiration dates on all the products you are using. Be sure you are using
Finetest™ Lite
- Try another control solution test.
If this test falls out of range, try another control solution test with a new unopened
container of test strips.
If you continue to get control soulution test results that fall outside the range, do not
perform a glucose test. please call Neon Diagnostics Ltd.
H.
N.
L.
14.2-19.1
4.3-6.7
1.9-3.6
4.Dip the test strip into the control
solution liquid.
Results will appear in 5 seconds.
Compare the result to the range
printed on the test strip container.
Results should fall within that range.
3.Discard the 1st drop of
control solution. This will
eliminate any residue.
Place a drop of control
solution liquid on a clean,
dry surface (e.g. the lid of
the test strip container)
2.Gently shake the control
solution before use.
1.Check the expiration date before
performing a control solution test. Do
not use if expired. Please note the
expiration date is marked on the control
solution container. Once opened, the
control solution expires after 3 months.

• 18 •
For example only
If you are using the normal control solution, according to this particular container of strips,
your meter should show a number between 4.3 and 6.7mmol/l.
Please note that the control values shown in the picture are not control ranges.
NOTE
- It is recommended that glucose control solution is stored at room temperature 20~25
℃ (68~77℉) before testing.
- Check the expiration date before performing a glucose control solution test.
-
Do not use beyond expiration date. Once opened, the control solution expires after 3 months.
If your control solution test falls out of range, please follow the next steps before
contacting customer support:
- Check the expiration dates on all the products you are using. Be sure you are using
Finetest™ Lite
Control Solution.
- Try another control solution test.
If this test falls out of range, try another control solution test with a new unopened
container of test strips.
If you continue to get control soulution test results that fall outside the range, do not
perform a glucose test. please call Neon Diagnostics Ltd.
H.
N.
L.
14.2-19.1
4.3-6.7
1.9-3.6

• 19 •
1. Check your meter and test strips with the glucose control solution.
2. Perform your test again.
CAUTION
1. If your glucose control solution falls out of range, do not perform a glucose test and
please contact Neon Diagnostics Ltd.
2. The glucose control solution’s measurement range has nothing to do with individual’s
blood glucose level, as its own purpose is to check the status of test strip and meter.
Discard the used control solution and test strips carefully, according to the local
regulation.
Follow-up Action
Performing Your Test
Testing Blood - Preparation
The Lancet Device is a convenient medical tool for collecting capillary blood samples for
glucose monitoring or other tests which require one or two drops of blood.
Being a more advanced lancing device, it provides ultimate safety and comfort for obtaining
blood samples. An adjustable tip offers 5 different strength levels of skin penetration for
individual user’s comfort, while a lancet ejector enables the safe disposal of the used lancet.
As an added bonus, this also comes with a transparent tip for AST (Alternative Site Testing).
CAUTION
1. Never use a lancet that has been used by someone else. Sharing lancets could lead
to contamination.
2. If the lancing device is to be used by another person, the unit must be properly
disinfected, before and after each use.
3. Do not leave the lancet in the device after use.
4. A new lancet must only be placed into the lancing device directly before testing.
5. This device has many small parts and could be a choking hazard for children if
swallowed.
6. In the case of hospital use, hospitals need to observe their own infection control
protocols in order to avoid any contamination.
7. Always dispose used lancets in a biohazard sharps container.

• 20 •
Performing Your Test
Testing Blood - Preparation
The Lancet Device is a convenient medical tool for collecting capillary blood samples for
glucose monitoring or other tests which require one or two drops of blood.
Being a more advanced lancing device, it provides ultimate safety and comfort for obtaining
blood samples. An adjustable tip offers 5 different strength levels of skin penetration for
individual user’s comfort, while a lancet ejector enables the safe disposal of the used lancet.
As an added bonus, this also comes with a transparent tip for AST (Alternative Site Testing).
CAUTION
1. Never use a lancet that has been used by someone else. Sharing lancets could lead
to contamination.
2. If the lancing device is to be used by another person, the unit must be properly
disinfected, before and after each use.
3. Do not leave the lancet in the device after use.
4. A new lancet must only be placed into the lancing device directly before testing.
5. This device has many small parts and could be a choking hazard for children if
swallowed.
6. In the case of hospital use, hospitals need to observe their own infection control
protocols in order to avoid any contamination.
7. Always dispose used lancets in a biohazard sharps container.

• 21 •
COMPONENTS
USING THE CLEAR TIP (AST)
1. Place the lancing device and lancet on the skin in the chosen area, press and hold it
continuously for a few seconds, then push the release button to take a blood sample.
2. Watch through the clear tip until a sufficient blood sample is taken. If there is not enough
blood, gently massage the area until a sufficient sample is collected.
STORAGE
Products must be stored at room temperature and protected from sunlight or moisture.
CLEANING AND DISINFECTION
-Clean and wipe the outer part of lancing device once a week at the minimum with a soft
cloth dampened with mild soap and water. Wash the adjustable tip and clear tip, once a
week with mild soap.
-DO NOT immerse the lancing device in water or liquid.
WARRANTY
The lancet device has a 2-year warranty from the date of purchase.
A malfunctioning device should be returned to the following address:
Neon Diagnostics Ltd
Swanbridge Business Park
Black Croft Road
Witham
Essex
CM8 3YN
Depth Indicator/Adjustable Tip
Lancet Holder
Clear Tip
Ejection SystemSliding Barrel
Release Button
ප
ඳ
ඳ
ඳ
˦
Performing a blood test with your fingertip
CAUTION
1. If you do not see the code displayed, pull the glucose test strip out of the port, and
re-start the procedure from the beginning.
2. If you do not see the code displayed match the code printed on the container, please
contact Neon Diagnostics Ltd.
3. Avoid testing under direct sunlight, for a more accurate test result.
4. If you apply your blood sample before a flashing test strip appears on the screen, Er5
message will appear on the screen. Please refer to page 40.
Step 1

• 22 •
Performing a blood test with your fingertip
CAUTION
1. If you do not see the code displayed, pull the glucose test strip out of the port, and
re-start the procedure from the beginning.
2. If you do not see the code displayed match the code printed on the container, please
contact Neon Diagnostics Ltd.
3. Avoid testing under direct sunlight, for a more accurate test result.
4. If you apply your blood sample before a flashing test strip appears on the screen, Er5
message will appear on the screen. Please refer to page 40.
Step 1
Firmly insert the test strip into the meter test port in the direction
of arrow on test strip (arrow down). Please do not insert the
glucose test strip upside down.
When you insert the glucose test strip into the glucose test meter,
the power automatically turns on with the code and temperature.
Make sure the code number matches on the test strip
container
(e.g. CODE 125).
Finetest™ Lite
automatically
recognises the test strip code number and adjusts the meter
accordingly.
A flashing test strip will appear at the top of the screen, which
indicates that the meter is ready for testing.

• 23 •
WARNING
1. All parts of the kit are considered bio hazardous and can potentially transmit infectious
disease, even after you have conducted cleaning and disinfection measures.
2. Avoid getting hand lotion, oil, dirt or debris in or on the lancets (single use only) and
the lancing device.
3. Wash your hands thoroughly with soap and clean water after handling the meter,
lancing device and/or test strip.
1. Unscrew the lancing device tip.
2. Insert a sterile lancet into the lancing device.
3. Twist the protective cover off. Do not discard.
To obtain a suitable blood samples
• Before obtaining a blood sample, wash your hands with warm, clean water and soap. Dry
hands completely before testing.
Step 2
CAUTION
1. If the blood smears or runs, do not use this blood sample. Dry the area and gently
squeeze another drop or puncture a new area of the finger.
2. Do not share reusable lancing device with anyone including other family members.

• 24 •
4. Twist the lancet device tip, above the blue
band.
5. To adjust the depth setting:
Use strength level 1-2 for soft skin, 3 for
average skin, 4-5 for thick or calloused skin.
6. Pull the end of the lancet device back.
7. To prick your finger, push the center button.
CAUTION
1. If the blood smears or runs, do not use this blood sample. Dry the area and gently
squeeze another drop or puncture a new area of the finger.
2. Do not share reusable lancing device with anyone including other family members.
12345

• 25 •
Step 3
CAUTION
1. If the countdown does not start, do not add more blood to the glucose test strip.
Discard the glucose test strip and re-start testing.
2. If you do not conduct the test within 3 minutes, the glucose test meter will automatically
power off to save battery life. In this case, test procedure should start again from the
beginning.
3. You may get an inaccurate result if the blood sample is not completely filled.
4. If you inject the blood downwardly, it may cause device errors and failure.
Finetest™ Lite Test Meter only requires
0.5 ul sample volume.
• Stick the edge of the test strip to the drop of blood.
• The blood will automatically be ‘drawn’ into the test strip channel.
• When your sample blood is enough, your meter will automatically
count down.
• Apply your blood to the glucose test strip and do not take off your
finger until you get the beep sound. The test will automatically start.
• Only apply 0.5ul of blood. To o much blood may cause the meter to malfunction, by
contaminating it.
• Correct
Completely Filled
• Incorrect
Poorly filled
• Applying Blood
Step 4
CAUTION
1. If the test result is out of the test range, “HI/Lo” message will be shown on the LCD
window.
2. Safely discard used glucose test strips and lancets in the proper place, according to the
local regulation.
Correct
Incorrect

• 26 •
Step 4
• Record the result value in your logbook.
When glucose test strip is removed, glucose test meter turns
off automatically.
• If you selected to use the User Activity option during set up,
press and release or button to select the activity (
,
, , ) that correlates with your result, then press and
release the power button .
• If you do not select to use User Activity option during set up,
press the power button .
CAUTION
1. If the test result is out of the test range, “HI/Lo” message will be shown on the LCD
window.
2. Safely discard used glucose test strips and lancets in the proper place, according to the
local regulation.
• After the beeping sound, test
will begin automatically, and
your results will appear in 5
seconds. It should begin counting
down from 5 to 1 second on
the LCD display window. LCD
window will display the result
of your blood glucose level,
temperature and time.

• 27 •
Test Strip Ejector Function
Disposing of your test strip
Disposing of your lancet
1. Once the test is complete, push the test strip forward to
remove the test strip from the meter.
2. Used test strips may be considered bio hazardous waste
in your area.
Please ensure you follow local regulations.
1. Push the needle into the protective cover.
2. Pull the lancet out and discard accordingly.
CAUTION
1. Pushing the ejector button too hard could cause a damage to the meter.
2. Do not give strong impact to blood glucose test meter.
3. Please follow the waste disposal regulations on the used lancets and strips imposed
by your local authorities.
Reviewing Your Results
The
Finetest™ Lite
average sugar level for the number of days, which you had preset the glucose test meter to
calculate.
Press and release button. The most recent result appears first. Note the time and day
of your blood sugar result. Press and release the button and your previous result will
appear on the display
Press and release the button, and your average result will be displayed.
Reviewing Your blood sugar
Reviewing Your averages

• 28 •
Reviewing Your Results
The
Finetest™ Lite
meter stores up to 500 test results in its built-in memory, along with the
average sugar level for the number of days, which you had preset the glucose test meter to
calculate.
Press and release button. The most recent result appears first. Note the time and day
of your blood sugar result. Press and release the button and your previous result will
appear on the display
Press and release the button, and your average result will be displayed.
Reviewing Your blood sugar
Reviewing Your averages
Average Test Result
Test Unit
Test Result Amount
Average Test Result Days

• 29 •
Finetest™ Lite
blood glucose monitoring system gives you the ability to test your glucose
from various areas of your body.
The figure shown above displays the areas where you can test using your
Finetest™ Lite
meter.You may test your blood sugar from your forearm, upper arm, palm (ventral palm
or dorsal hand), or fingertips.
Lancing and sampling from an alternative site area
Sampling from your upper arm, forearm, ventral palm, or dorsal hand allows you to use your
fingertips less often.
You may find that obtaining a blood sample from an alternative site is less painful than using
a fingertip.
LIMITATION
1. Alternative site testing results should never be used to calibrate continuous glucose
monitoring systems.
2. Alternative sampling results should never be used in insulin dosing calculations.
IMPORTANT
It is recommended that alternative site testing be used when sugars are stable: before
meals and before bedtime. However, when sugars are changing, blood from the fingertip
may show these changes sooner than blood from other body areas.
Upper Arm
Forearm
Ventral Palm
Dorsal Hand
Fingertips
Alternative Site Test

• 30 •
Choose a fleshy area of the forearm or upper arm away from bone, visible veins and thick
hairs of the arm. Sometimes there is less blood flow to these areas than to the fingertip.
To help you get enough drops of blood, you may gently massage or apply a heating pad to
the site to increase blood flow.
Choose a fleshy area on the palm, below your thumb or
pinky finger. Select a spot without any visible veins and
away from any deep lines, which may cause your blood
sample to smear.
Ventral palm/Dorsal hand
Forearm
Upper arm
IMPORTANT
We recommend that you test on your fingertips if you are testing for hypoglycemia (low
blood glucose) or if you are suffering from hypoglycemia unawareness.
How to use the lancing device
The lancing device clear tip is used for alternate site testing
WARNING
To reduce the chances of getting infection: never share a lancet or lancing device with
anyone.

• 31 •
To ensure accurate results when lancing your arm
(forearm or upper arm), or palm (ventral palm or dorsal
hand), clean the test site with soap and water.
Make sure there is no cream or lotion on the test site.
Thoroughly dry your hands and test site.
How to use the lancing device
1. Remove the lancing tip by twisting off.
2. Insert lancet and replace with the clear tip.
3. To bring fresh blood to the surface of the test site, rub
the test site vigorously for a few seconds until you feel
it getting warm. Applying heat may be helpful.
4. Adjust clear tip to the highest setting. Hold the clear tip
down against a fleshy area on the alternative site.
Press the release button. Do not lift up.
The lancing device clear tip is used for alternate site testing
WARNING
To reduce the chances of getting infection: never share a lancet or lancing device with
anyone.
12345

• 32 •
5. Continue to hold the lancing device and gradually
increase pressure for several seconds.
6. While holding the lancing device on your test site, look
through the clear tip until a round drop of blood
appears.
7. Lift the lancing device straight up; be careful not to
smear the blood on your testing site.
8. Stick the edge of the test strip to the drop of blood.
Blood will automatically be drawn up.
REMEMBER
1. Consult with your healthcare professional before using alternate site testing.
2. Choose a different puncture site each time you test. Repeated punctures in the same
spot may cause soreness and calluses.
3. If bruising occurs at an alternate site or you have difficulty getting a sample, consider
sampling from a fingertip instead. Yo u may want to review the choice of sites with your
healthcare professional.
4. Do not share the reusable lancing device with anyone, including other family members.
Caring for Your Finetest™ Lite System
Cleaning your meter and maintenance
Blood glucose test meter:
Your blood glucose test meter does not require special maintenance or cleaning. Avoid
getting dirt, dust, blood, glucose control solution, or liquids on the blood glucose test meter,
the test port, or data port. Your blood glucose test meter’s operation temperature is
10~40°C(50~104°F).It is recommended that you store the blood glucose test meter in the
portable pouch after each use.
A cloth dampened with water and mild detergent can be used to wipe down the outer part of
the blood glucose test meter. Your
instrument. Please handle it with care.
Lancing device:
Clean the lancing device and tips with soap and tepid water. To disinfect the lancing device,
prepare a disinfectant solution household bleach and water in 1(bleach) : 9(water) ratio.
Dampen a cloth with this solution and wipe the lancing device thoroughly. Soak only the tip
for at least 30 minutes in the disinfectant solution. Do not soak the lancing device in liquid.
Rinse the lancing device and tip with water, and dry thoroughly.
1. For detailed instructions concerning
blood glucose test strip package inserted and found in the blood glucose test strip box.
2. Please store the
out of reach of children. Do not freeze. For a more accurate test result, avoid testing
under direct sunlight.
3. Do not soak the blood glucose test meter or blood glucose test strips in water or liquid.
4. Do not subject the meter or blood glucose test strips to excessive heat.
5. Use your meter according to the instructions in the manual.
6. if you require a lancing device, lancets or blood glucose test strips, contact Neon
Diagnostics Ltd.
7. Discard the used lancets carefully, to prevent any infection.
CAUTION
Do not test on your forearm or palm when:
1. You think you blood glucose is rapidly falling. For example within two hours of
exercise, rapid-action insulin injection, or an insulin pump bolus.
2. Testing with a fingertip sample may identify hypoglycemia or an insulin reaction
sooner than testing with a forearm or palm sample.

• 33 •
Caring for Your Finetest™ Lite System
Cleaning your meter and maintenance
Blood glucose test meter:
Your blood glucose test meter does not require special maintenance or cleaning. Avoid
getting dirt, dust, blood, glucose control solution, or liquids on the blood glucose test meter,
the test port, or data port. Your blood glucose test meter’s operation temperature is
10~40°C(50~104°F).It is recommended that you store the blood glucose test meter in the
portable pouch after each use.
A cloth dampened with water and mild detergent can be used to wipe down the outer part of
the blood glucose test meter. Your
Finetest™ Lite
blood glucose test meter is a precision
instrument. Please handle it with care.
Lancing device:
Clean the lancing device and tips with soap and tepid water. To disinfect the lancing device,
prepare a disinfectant solution household bleach and water in 1(bleach) : 9(water) ratio.
Dampen a cloth with this solution and wipe the lancing device thoroughly. Soak only the tip
for at least 30 minutes in the disinfectant solution. Do not soak the lancing device in liquid.
Rinse the lancing device and tip with water, and dry thoroughly.
1. For detailed instructions concerning
Finetest™ Lite
blood glucose test strips, refer to the
blood glucose test strip package inserted and found in the blood glucose test strip box.
2. Please store the
Finetest™ Lite
blood glucose monitoring system in a cool and dry area,
out of reach of children. Do not freeze. For a more accurate test result, avoid testing
under direct sunlight.
3. Do not soak the blood glucose test meter or blood glucose test strips in water or liquid.
4. Do not subject the meter or blood glucose test strips to excessive heat.
5. Use your meter according to the instructions in the manual.
6. if you require a lancing device, lancets or blood glucose test strips, contact Neon
Diagnostics Ltd.
7. Discard the used lancets carefully, to prevent any infection.

• 34 •
Storage of your Finetest™ Lite System
To prevent the meter and test strips from getting dirt y, dusty or other contamination, please
wash and dry your hands thoroughly before use.
Meter Storage
• Storage condition: 2~30℃ or 36~86℉ (Temperature)
• Always store and transport the meter in its original storage case.
• Avoid dropping and strong impact.
• Avoid direct sunlight and humidity.
Test Strip Storage
• Storage condition: 2~30 ℃ or 36~86 ℉ (Temperature)
• Store your test strips in their original container only. Do not store the test strips in other
containers.
• Store test strip packages in a cool and dry place. Keep away from direct sunlight and heat
.
• Do not freeze.
• After removing a test strip from the container, immediately close it tightly.
• Record the discard date (date container opened, plus 6 months) on the test strip label.
• Do not use if it is expired(2 years) after manufacturing.
• Touch the test strip with clean and dry hands.
• Do not use if 6 months have been passed, since the opening of the container cap for test
strips.
Control Solution Storage
• Storage condition: Store in a cool, dry place at between 8~30 ℃ or 46~86 ℉ (Temperature)
• After use, close cap tightly.
• Make sure the control solution bottle is tightly closed.
• Record the discard date (date container opened, plus 3 months) on the control solution on
the bottle.
• Do not use if expiry date has passed.
• It expires in 24 months after manufacturing date.
• It expires in 3 months after opening the container cap.
CAUTION
1. Store the
Finetest™ Lite
sunlight. Do not freeze.
2. Store test strips in their original container only. Do not mix the test strips in new
containers or in any other container.
3. Immediately replace the container cap and close tightly after removing any test
strips from the container.
4. Make a note of the discard date, which is six months from the date you first open a
new container of test strips. Throw
after the discard date.
5. Do not use the test strips after the expiration date printed on the package or
container, Testing with expired strips it may cause inaccurate results.
6. Do not test at temperatures below 10℃(50°F) or above 40℃(104°F).
7. Do not test with humidity below 10% or above 90%.
8. Do not bend, cut, or alter the test strip.
9. Avoid getting dirt, food, and water on the test strip with wet hands.
10. Avoid getting dirt, food, and water on the color-coding label (backside of test strip).

• 35 •
CAUTION
1. Store the
Finetest™ Lite
test strip container in a cool, dry place. Keep out of direct
sunlight. Do not freeze.
2. Store test strips in their original container only. Do not mix the test strips in new
containers or in any other container.
3. Immediately replace the container cap and close tightly after removing any test
strips from the container.
4. Make a note of the discard date, which is six months from the date you first open a
new container of test strips. Throw
Finetest™ Lite
test strips and container away
after the discard date.
5. Do not use the test strips after the expiration date printed on the package or
container, Testing with expired strips it may cause inaccurate results.
6. Do not test at temperatures below 10℃(50°F) or above 40℃(104°F).
7. Do not test with humidity below 10% or above 90%.
8. Do not bend, cut, or alter the test strip.
9. Avoid getting dirt, food, and water on the test strip with wet hands.
10. Avoid getting dirt, food, and water on the color-coding label (backside of test strip).

• 36 •
Transferring Your Result Data
You can transfer test results from the
Finetest™ Lite
meter to a computer.
You will need to download the software from the following web site
(www.neondiagnostics.co.uk) and and obtain the USB cable from Neon Diagnostics Ltd.
[User]
[cable]
[PC]
Follow-up Action
1. Check your meter with the glucose control solution.
2. Perform your test again.
3. If you are experiencing symptoms that are not consistent with your
blood glucose test results, call your healthcare professional.
NOTE
1. Make sure your date and time are correct after changing your battery.
2. Please recycle or dispose of used batteries using your local battery collection systems
and in compliance with your local environmental laws and regulations.
3. Caution risk of explosion if battery is replaced by an incorrect type.
Battery Installation
The low battery icon will appear in the upper left corner of the LCD display to alert
you when the battery power is running low, which is an indication that a new battery is
needed.
Your
Finetest™ Lite
which is included. When replacing battery, only CR2032 or equivalent lithium battery should
be used.

• 37 •
Follow-up Action
1. Check your meter with the glucose control solution.
2. Perform your test again.
3. If you are experiencing symptoms that are not consistent with your
blood glucose test results, call your healthcare professional.
NOTE
1. Make sure your date and time are correct after changing your battery.
2. Please recycle or dispose of used batteries using your local battery collection systems
and in compliance with your local environmental laws and regulations.
3. Caution risk of explosion if battery is replaced by an incorrect type.
Battery Installation
The low battery icon will appear in the upper left corner of the LCD display to alert
you when the battery power is running low, which is an indication that a new battery is
needed.
Your
Finetest™ Lite
blood glucose test meter uses only one 3V lithium battery (CR2032),
which is included. When replacing battery, only CR2032 or equivalent lithium battery should
be used.

• 38 •
Disposal of meter:
The meter must be disposed of according to the local regulations concerning the disposal of electrical
and electronic equipment.
The Waste Electrical and Electronic Equipment(WEEE) regulation implement provisions of the
European Parliament and Council Directive 2012/19/EU aimed to reducing the amount of EEE waste
going for final disposal.
The manufacturer, has specific instructions for the recovery of the meter. Please contact your distributor.
Disposal of batteries:
Please recycle or dispose of used batteries using your local battery collection systems and in
compliance with your local environmental laws and regulations.
Batteries contain chemicals that, if released, may affect the environment and human health. The
crossed-out wheeled-bin symbol indicates the need for the separate collection for batteries.
Disposal of meter and batteries
Discard your Blood glucose test strip
Discard your Blood glucose test Lancet
Once the test is complete, push the ejector
forward to remove the Blood glucose test strip
from the
Finetest™ Lite
Blood glucose test
meter.
Dispose used blood glucose test strips in
accordance with local regulations.
Push the needle into its protective cover. Pull the lancet out and discard appropriately.
Disposing of your Blood glucose test strips and lancets
The following chart may help you identify certain problems, but may not solve all the
problems that could occur. Contact Neon Diagnostics if an issue or enquiry arises if the
problem continues.
Trouble-shooting
MessageWhat it means Action required

• 39 •
The following chart may help you identify certain problems, but may not solve all the
problems that could occur. Contact Neon Diagnostics if an issue or enquiry arises if the
problem continues.
Trouble-shooting
Problem with the blood
glucose test meter
Place the battery again, and set the
blood glucose test meter. If the
problem persists, please contact
Neon Diagnostics Ltd.
Caused by either used
or wet blood glucose test
strip
Please insert a new glucose test strip
and perform your test again.
Caused by less blood
or irregular blood fill
Please insert a new glucose test strip
and apply the blood sample.
Caused by reagent
damage in the test strip
Please insert a new glucose test strip
and perform your test again.
MessageWhat it means Action required

• 40 •
Trouble-shooting
User applied the blood
sample before the LCD
display was
blinking
Wait for the meter to display the flashing
icon before applying your blood sample.
Caused by color bar
contamination or foreign
test strip
Please insert a new glucose test strip
and perform your test again. If “Sun”is
blinking, avoid direct sunlight and re-test.
please contact Neon Diagnostics Ltd., if
the problem persists.
The ambient temperature is less than 10℃
(50℉)
Place the meter at a temperature
between 10 ~ 40℃ (50 ~ 104℉) for
more than 30 minutes and test again.
The ambient
temperature is over 40
℃ (104℉)
Place the meter at a temperature
between 10 ~ 40℃ (50 ~ 104℉) for 30
minutes or longer, and then test again.
Test result is lower than
1.1mmol/L
You may have a very low blood glucose
level. Treat this condition immediately
according to your doctor's recommendations. Perform a control solution test to
check the accuracy of your test strip.
Message What it means Action required
Trouble-shooting
The glucose test
meter will not turn on
Glucose test meter
does not start after
being applied blood
sample.
Results are inconsis-
tent
MessageWhat it means Action required

• 41 •
Trouble-shooting
Test result is higher than
33.3mmol/L
Check the accuracy of your blood
glucose test strip by performing a
glucose control solution test. If the test
results in a normal reading, re-test
your blood sample two or three times.
If "Hi" persists, consult with your
doctor immediately.
Change the battery and if the problem
persists, contact Neon Diagnostics
Ltd.
Please insert a new test strip and
perform your test again.
Please insert a new test strip and
perform your test again.
There are no readings
stored in the meter
Not enough readings in
the memory to display
designated average
The glucose test
meter will not turn on
Glucose test meter
does not start after
being applied blood
sample.
Results are inconsistent
There may be a
problem with the
glucose test strip
Insufficient amount of
blood.
Battery is dead, or
there is a problem
with the meter
MessageWhat it means Action required

• 42 •
Inconsistent or Unexpected Test Results
If you continue to get unexpected results, check your system with control solution. If you
experience symptoms that are not consistent with your glucose results, review and follow all
the instructions in this manual. Do not ignore symptoms or make significant changes to your
diabetes control program. Please contact your healthcare professional if your symptoms
and/or concerns.
CAUTION
1. Low Glucose Results: If your result is lower than 3.9mmol/L, you may have episodes
of hypoglycemia (low blood sugar). This may require immediate treatment, according
to your healthcare professional’s recommendations. Although this result could be
due to a test error, it is safer to treat first and you may test again.
2. High Glucose Results: if your test result is higher than 10 mmol/L, you may have
episodes of hyperglycemia (high blood sugar). If you are uncertain about your test
results, consider re-testing. Your health care professional will help you to decide how
you need to act. If the meter displays “HI” all the time, please re-check your blood
sugar. If the “HI” continues, please consult with your healthcare professional
immediately.
Warranty
Manufacturer’s Warranty
Infopia Co.,Ltd. warrants to the original purchaser that this instrument will be free from
defects in workmanship for 3 years from the date of original purchase.
Limitations of Warranty
This warranty is subject to the following exceptions and limitations.
1. Infopia Co.,Ltd. shall not be required to replace any units which are damaged or
malfunctioning due to abuse, accidents, alteration, neglect, misuse, maintenance by
someone other than Infopia Co.,Ltd. or failure to operate, in accordance with the
instructions.
2. Infopia Co.,Ltd. reserves the right to make changes in design without obligation to
incorporate such changes into previously manufactured instruments.
3. Infopia Co.,Ltd. has no knowledge of the performance of the instrument when the test
strip is altered or modified in any manner.
For Warranty Service
Purchaser must contact the customer service department of Infopia Co.,Ltd. by calling
+82-31-460-0300, for assistance and/or instructions for obtaining service of this instrument.
Service Information
Neon Diagnostics Ltd. have trained specialists to help you 24 hours a day, 7 days a week,
and 365 days a year.
IMPORTANT NOTICE
Please confirm with Neon Diagnostics Ltd. representative before returning your meter for
any reason. You will be given the information needed to get your problem handled correctly
and efficiently. Keep your meter, test strip and control solution with you, when you call.

• 43 •
Warranty
Manufacturer’s Warranty
Infopia Co.,Ltd. warrants to the original purchaser that this instrument will be free from
defects in workmanship for 3 years from the date of original purchase.
Limitations of Warranty
This warranty is subject to the following exceptions and limitations.
1. Infopia Co.,Ltd. shall not be required to replace any units which are damaged or
malfunctioning due to abuse, accidents, alteration, neglect, misuse, maintenance by
someone other than Infopia Co.,Ltd. or failure to operate, in accordance with the
instructions.
2. Infopia Co.,Ltd. reserves the right to make changes in design without obligation to
incorporate such changes into previously manufactured instruments.
3. Infopia Co.,Ltd. has no knowledge of the performance of the instrument when the test
strip is altered or modified in any manner.
For Warranty Service
Purchaser must contact the customer service department of Infopia Co.,Ltd. by calling
+82-31-460-0300, for assistance and/or instructions for obtaining service of this instrument.
Service Information
Neon Diagnostics Ltd. have trained specialists to help you 24 hours a day, 7 days a week,
and 365 days a year.
IMPORTANT NOTICE
Please confirm with Neon Diagnostics Ltd. representative before returning your meter for
any reason. You will be given the information needed to get your problem handled correctly
and efficiently. Keep your meter, test strip and control solution with you, when you call.

• 44 •
Specifications
Sample Volume
0.5 ㎕
Test Range 1.1 ~ 33.3 mmol/L
Calibration Plasma – equivalent
Hematocrit 20 ~ 65%
Altitude 3048 meter Up to (10,000 feet)
Operating Temperature
10 ~ 40℃ (50 ~ 104
℉
)
Operating Humidity 10 ~ 90%
Dimension(HxDxT) 83.1 X 56.2 X 17.7 ±1 (mm)
Weight
Power Source 3V Li Battery (CR2032) X 1
43±1g (Including Battery)
Battery lifeOne year after purchasing
Test Strip Storage Te mperature
Store 2~30℃(36~86℉) and no direct
sunlight.
Do not Freeze
Display Type
LCD
Reading Time
5 seconds
Sample Type Capillary and/or venous whole blood
Symbol Reference
SN
Symbol Description

• 45 •
Symbol Reference
Consult Instructions for use
Use By date
This product fulfills the requirements of Directive
98/79/EC on in vitro diagnostic medical devices
Attention, See Instructions for use
For In Vitro Diagnostic Use
Batch code
Do not reuse
Serial number
Date of Manufacture
Manufacturer
Keep away from sunlight
Waste electrical and electronic equipment Symbol
Temperature limitation
Catalogue Number
Self-testing Used
Authorised representative in the European community
Waste batteries and accumulators
Biohazard
SN
Symbol Description

IMC01226 Rev. 2015-06-01
132, Anyangcheondong-ro, Dongan-gu,
Anyang-si, Gyeonggi-do, Korea
www.infopia21.com
INFOPIA Co.,Ltd.
Bd. General Wahis 53, 1030 Brussels, Belgium
Tel : +(32) 2.732.59.54 / Fax : +(32) 2.732.60.03
E-mail : mail@obelis.net
Obelis S.A
INFM001EFGB
Blood Glucose Monitoring System
for self testing
5
sec
Auto
Coding
 Loading...