


I ii
Sign of Trouble
If you are experiencing any of the issues below, call customer service at
1-888-446-3246.
lThe meter doesn't power on when the new test strip inserted into the meter.
lThe meter doesn't power on when you replace the batteries.
lThe meter doesn't show the test result after the test is completed.
lThe LCD does not display correctly or is distorted after changing the batteries.
If you encounter any issues including the ones mentioned above, call
customer service at 1-888-446-3246.
Important Safety Instruction
lBlood glucose meters are at high risk of contamination with blood borne pathogens
such as Hepatitis B Virus (HBV), Hepatitis C Virus (HCV), and Human
Immunodeficiency Virus (HIV).Transmission of these viruses from user to user has been
documented due to contaminated blood glucose devices. Accordingly, cleaning
and disinfecting of meters between users can prevent the transmission of these
viruses through indirect contact.
lThe meter and lancing device are for single patient use. Do not share them with
anyone including other family members. Do not use on multiple patients.
lAll parts of the kit are considered as biohazards. The system may transmit infectious
diseases, even after it has been cleaned or disinfected.
lIf the meter is being operated by a second person who is providing testing assistance
to the user, the meter and lancing device should be disinfected prior to use by the
second person.
lReferences
1. FDA Public Health Notification: Use of Fingerstick Devices on More than One Person
Poses Risk for Transmitting Blood Pathogens:Initial
Communication(2010)http://www.fda.gov/MedicalDevices/Safety/AlertsandNotices
/ucm224025.htm
2. CDC Clinical Reminder: Use of Fingerstick Devices on More than One Person Poses
Risk for Transmitting Blood borne Pathogens(2010)
http://www.cdc.gov/injectionsafety/Fingerstick-DevicesBGM.html

Contents
nAbout Your New System
Welcome
Intended Use
Application
Test Principle
Special Features
Usage and storage
Important Test Strip Information
Safety Information
System Components
nTesting Your Blood Glucose
Disinfection Before test
Performing a Blood Glucose Test
Flagging Test Results
Handling the Used Test Strips
Alternate Site Testing (AST)
nMeter Setup, Memory and Downloading
01
01
02
02
03
04
05
06
08
12
13
22
23
24
Setting up Your Meter
Reviewing Test Results
Downloading Test Results to a PC
nControl Test
Performing a Control Test
Understanding Control Test Results
nMaintenance and Troubleshooting
Cleaning and Disinfecting
Replacing the Batteries
Screen Messages
Troubleshooting
nTechnical Information and Warranty
Specifications
Warranty
Disposing of your Meter
Additional Supplies Available
.........................................................................................................
...................................................................................................
.....................................................................................................
...................................................................................................
.............................................................................................
........................................................................................
...................................................................
..........................................................................................
.....................................................................................
..................................................................................
.................................................................
......................................................................................
.........................................................................
...........................................................................
.....................................................................................
.....................................................................................
.................................................................
...............................................................................
...............................................................
.............................................................................
..................................................................................
............................................................................................
...............................................................................................
..................................................................................................
...........................................................................................................
.................................................................................
........................................................................
28
36
39
40
44
45
50
52
56
58
60
61
63

0201
About Your New System
Welcome
Thank you for selecting the Element Compact Blood Glucose Monitoring
System. This user manual is designed to provide the information that you are
looking for, when you need it. Follow steps for using the system in this manual.
Before using your monitoring system for the first time, please read this manual
carefully. If you have any questions, please contact Customer Service at 1 888446-3246, anytime-24 hours a day. You can also obtain information at
www.infopiausa.com.
Intended Use
The system is intended for the quantitative measurement of the concentration
of glucose in whole blood drawn from fingertip, palm, and forearm by a single
patient(lay user) as an aid in the management of diabetes, is intended for self
testing by persons at home, is for single patient use only, and should not be
shared.
It is intended for use the outside of body(in vitro diagnostic use) and not for
diagnosis of or screening for diabetes, nor for use on neonates.
The alternative site testing (palm and forearm) in this system can only be used
during steady state blood glucose conditions.
Application
Element Compact Blood Glucose Test Strips are for in vitro diagnostic use and
for self testing only. The Element Compact Blood Glucose Meter is not a
substitute for your physician or healthcare professional. Use the Element
Compact Blood Glucose Meter in conjunction with your healthcare program.
Test Principle
Glucose in the blood sample reacts with glucose oxidase on the test strip and a
harmless electrical current is produced. The strength of these currents change
with the amount of glucose in the blood sample and the Element Compact
Blood Glucose Meter automatically interprets this reaction.

03 04
Glucose measurements are reported as plasma equivalents. This system uses
plasma referenced method. Results that use a plasma referenced method are
approximately 11% higher than those obtained with whole-blood referenced
test strips.
Special Features
lAccurate result in 5 seconds using only 0.5㎕ blood sample.
lThe Element Compact Glucose Meter meter identifies the test strip code
automatically.
lStores up to 300 test results.
lBlood glucose measurement units are pre-set in mg/dL.
Usage and Storage
lBefore using your monitoring system, please place it in the environment of the
system's normal operating temperature range of 50-104 ℉ for about
twenty (20) minutes.
lDo not allow dirt or dust into the test strip port in order to avoid affecting the
monitoring system's accuracy.
lDo not attempt to repair or alter your monitoring system.
lDo not put the monitoring system near any electromagnetic field. (e.g. TV,
microwave oven, mobile phone)
lHandle your monitoring system with care.
lKeep away from direct sunlight and humid conditions.
lPlease use a soft cotton cloth to wipe the system.
lDon't use a corrosive product (e.g. Benzene, Acetone) to clean your
monitoring system.

05 06
Important Test Strip Information
lMake sure to use your test strip immediately after retrieving it from the vial, be
sure to keep the test strip vial lid closed tightly at all times.
lFor the most accurate results, make sure your hands are clean and dry
before removing the test strips from their vial.
lDo not use test strips that have expired, using expired test strips may cause
inaccurate test results.
lNever reuse a test strip that has had either blood or control solution applied.
The Element Compact Test Strip is for single use only.
lThis product is not recommended for pregnant women, newborns or if you
are severely dehydrated.
lBefore the test you must make sure that the code number displayed on the
meter matches the code number on the test strip vial.
lBe sure to check the glucose measurement unit on the meter before the test.
lMake sure the lid is closed tightly and store the vial in a cool and dry
environment between 39 ~ 86℉.
lKeep away from direct sunlight and heat. Do not refrigerate.
lDo not use any anticoagulants or preservatives other than heparin when
collecting capillary blood into test tubes.
Safety Information
lBefore using the Element Compact Blood Glucose Monitoring System, please
read this manual carefully.
lThe meter and test strips should be handled at the same temperature.
lFor accurate test results, keep the Element Compact Blood Glucose
Monitoring System operating temperature at a range between 50-104 for
more than twenty (20) minutes before testing.
℉
CAUTION: Use only Element Compact Test Strips with your Element Compact
Meter.

07 08
l
Inaccurate results may occur for individuals or patient in shock.
Inaccurate results may occur for individuals experiencing a hyperglycemichypersmolar state with or without ketosis. Critically ill patients should not be
tested with a blood glucose meter.
Keep your Element Compact Blood Glucose Meter, lancing device, lancets
and control solution out of reach of children.
lBe sure to clean and disinfect your Element Compact Blood Glucose Meter
regularly.
lDo not reuse the test strips.
lHandle and dispose of the used test strip and lancet carefully.
lThe Element Compact Blood Glucose Monitoring System is for testing outside
of the body (in vitro diagnostic use).
l
l
The Complete Element Compact
Blood Glucose Monitoring System
The Element Compact Blood Glucose Monitoring System includes theElement
Compact Meter, User Manual, Warranty Card and (2) 3.0 Volt CR2032 Lithium
Batteries.
Element Compact test strips and control solution can be provided by
contacting your supplier, or for additional information you can contact Infopia
America customer support at 1-888-446-3246.

09 10
Element Compact Blood Glucose Meter
Display
'M' Button
'C' Button
Test Strip port
Serial port
Battery Lid
Label
Test Strip Ejector
Element Compact Blood Glucose Test
Strip
lUse Element Compact Blood Glucose Test Strips with the Element Compact
Blood Glucose Meter.
lCheck the expiration date of your test strips before using.
lWrite the opening date of the new test strip vial in order to avoid using any
expired products.
Lot Number
Expiration Date
Sample
Channel
Test Strip Vial Element Compact Blood Glucose Test Strip
A
B

11 12
Explanation of Display
Low Battery Warning
Stored Test Results
Test Results
Unit of Measure
Temperature Error
Beeping Sound Muted
Pre Meal/Post Meal Tags
Ready to Test
Control Solution
Average Result
Month/Date
Time
Testing Your Blood Glucose
Disinfect Before Testing
lBefore testing, wash your hands with soap and water and dry thoroughly.
lUse an alcohol prep pad to wipe the area before testing.
lWait until the alcohol dries completely.

13 14
Performing a Blood Glucose Test
1. Remove your lancing device cap.
2. Install the new lancet into your lancing device.
3. Remove the protective cap from the lancet. Replace the lancing device
cap.
NOTICE: Refer to the lancing device instruction for additional detailed
information. The lancing device instruction depicted in this manual is for most
universal lancing devices.
1 2 3
A01
Element
4. Insert a test strip to turn on the meter. Make sure it is inserted completely
without bending the test strip.
5. The meter identifies the code number automatically. Compare the code
number displayed on the LCD with the code number shown on the test strip
vial. If they do not match try again with an another test strip. If the problem
persists contact customer support at 1-888-446-3246.
6. When the blood symbol appears, you can proceed with your test.
4 5 6

15 16
7 8
7. Adjust the puncture depth setting if necessary by turning the lancing device
cap, number 1 is the shallowest depth while number 5 is the deepest. Slide
the ejection/cocking control barrel back until it clicks. If it does not click, the
lancing device may have been cocked when the lancet was inserted.
8. Hold the lancing device firmly against your finger. Press the release button.
9
9. Gently squeeze your finger to assist the flow of blood. Do not squeeze
excessively on the puncture site.

17 18
10
10. Hold the tip of the test strip to the drop of blood, the test strip will
automatically draw the blood into the test strip. When the test strip has
enough blood the meter will beep and count down from five seconds. After
five seconds your test result will appear.
NOTICE: When the blood sample is not sufficient, the display screen will show
the message of "Er 4"(Please refer to error message in this manual.)
CAUTION:
lDo not drop the blood directly on the end of the test strip.
lThe sample channel at the end of the test strip should show full. When you
hear a beeping sound, you have enough blood in the test strip.
lInaccurate results may occur for individuals or patient in shock.
Inaccurate results may occur for individuals experiencing a
hyperglycemic-hypersmolar state, with or without ketosis. Critically ill
patients should not be tested with a blood glucose meter.

19 20
11
12
11. The test result will appear after the meter counts down from five (5)
seconds. Keep the meter still while it is counting down.
12. After five (5) seconds you will hear a second beeping sound and your test
result will be displayed on the LCD screen. You can remove the test strip by
pushing the test strip ejector on the back of the meter and the meter will
shut off automatically.
NOTICE:
If the test result is abnormal, please retest with a new test strip. If the test result
also has a problem, please refer to the Troubleshooting section in this manual.
CAUTION:
lDo not leave the lancet in the lancing device after use, be sure to dispose
of properly.
lIf you have taken the cap off of the lancet and the lancet has fallen to the
ground, do not use it. Make sure you dispose of it and replace it with a new
lancet.
lAlways dispose of the used lancets in a biohazard container.
lKeep your Glucose Meter, test strips, control solution, lancing device and
lancets out of reach of children at all times.
lDo not reuse lancets, lancets are for single use only.

21 22
lBlood glucose meters are at high risk of becoming contaminated with
blood borne pathogens such as Hepatitis B Virus (HBV), Hepatitis C Virus
(HCV), and Human Immunodeficiency Virus (HIV). Transmission of these
viruses from resident to resident has been documented due to
contaminated blood glucose devices. Accordingly, cleaning and
disinfecting of meters between resident uses can prevent the transmission of
these viruses through indirect contact.
lThe meter and lacing device are for single patient use. Do not share them
with anyone including other family members. Do not use on multiple
patients.
lAll parts of the kit are considered bio hazardous and can potentially
transmit infectious diseases, even after you have performed cleaning and
disinfection.
lUser should wash hands thoroughly with soap and water after handling the
meter, lancing device or test strips.
lPlease see the section of "Cleaning and Disinfection" to clean and disinfect
the meter or lancing device.
Flagging Test Results
If you want to flag pre-meal, post-meal or control solution readings press the
Button after your test result is displayed. The icon for post-meal (Knife and Fork)
will be displayed on your screen. Press the Button to toggle between premeal (Icon with the X across the Knife and Fork), post-meal (Knife and Fork)
and control solution (Control Solution Bottle). After you have identified the
activity you would like to flag simply remove the test strip. (see explanation of
display on page 11)
'M'
'C'
NOTICE:
Control Solution Test results are not included in the 14-day average.

23 24
Handling Used Test Strips
1. Be sure to document your test result by writing it in your logbook after your
test. You can then take your logbook to your physician who can review your
results.
2. Use the test strip ejector located on the back of the meter to remove the
used test strip.
3. The meter will turn off automatically once the test strip is removed.
4.The used test strip should be handled carefully and disposed of properly.
Alternate Site Testing
Contact your healthcare professional before using any alternative sites to test
your blood glucose.
lAlternative site results may be different from fingertip results when glucose
levels are changing rapidly (e.g., after a meal, after taking insulin, or during or
after exercise).
lUse alternative site testing only two hours or more after taking insulin, two hours
or more after a meal, two hours or more after exercise.
lDo not use alternative site testing if you are aware that your glucose level is
not as stable as usual, or if you think you may have hypoglycemia (low blood
glucose) hyperglycemia (high blood glucose), or you think your blood glucose
may be rising or falling rapidly.
lDo not use alternative site testing if your alternative site testing results do not
match the way you feel.
lAST measurements should never be used to calibrate continuous glucose
monitors (CGM).
lAST measurements should never be used in insulin dosing calculations.

25 26
Do not rely on test results at an alternative sampling site, but use samples taken
from the fingertip, if any of the following applies:
lyou think your blood sugar is low
lyou are not aware of symptoms when you become hypoglycemic
lthe site results do not agree with the way you feel
lafter a meal
lafter exercise
lduring illness
lduring times of stress
CAUTION:
lNever change your treatment without first consulting your Physician or a
Healthcare Professional.
lNever ignore symptoms of high or low blood glucose.
lIf your blood glucose does not match how you feel, perform a
fingertip/palm test to confirm your result. If the fingertip/palm result still
does not match how you feel, call your healthcare professional.
Lancing and Sampling from an Alternate
Site
Sampling from your palm or forearm allows you to use your fingertips less often.
You may find that obtaining a blood sample from an alternative site is less
painful than using a fingertip. Getting a blood sample from your forearm or
palm is different than getting a sample from your fingertips.
lForearm sampling: Choose a fleshy area of the forearm away
from the bone, visible veins and hair. Sometimes there is less
blood flow to the forearm than to the fingertips. To help you get
a large enough drop of blood, you may gently massage or
apply warmth to the site to increase blood flow.
lPalm sampling: Choose a fleshy area on the palm below your
thumb or little finger. Select an area away from veins or deep
creases which may cause your blood sample to smear.
Foream
Palm
27 28
The Lancing Device Clear Cap is used for forearm and palm sampling only.
Replace the lancing device cap to the clear cap and follow same steps
descried on the chapter titled "Performing Blood Glucose Test".
NOTICE:
lYou may need to wait a little longer to get a large enough drop of blood
from the forearm or palm. Do not squeeze the site excessively.
lIf the sample drop of blood runs or spreads due to contact with hair or a
crease in your palm, do not use that sample. Try puncturing again in a
smoother area.
lYou may have to adjust the lancing device to a deeper setting to get a large
enough drop of blood.
Meter Setup, Memory and Downloading
Setting up Your Meter
1 2
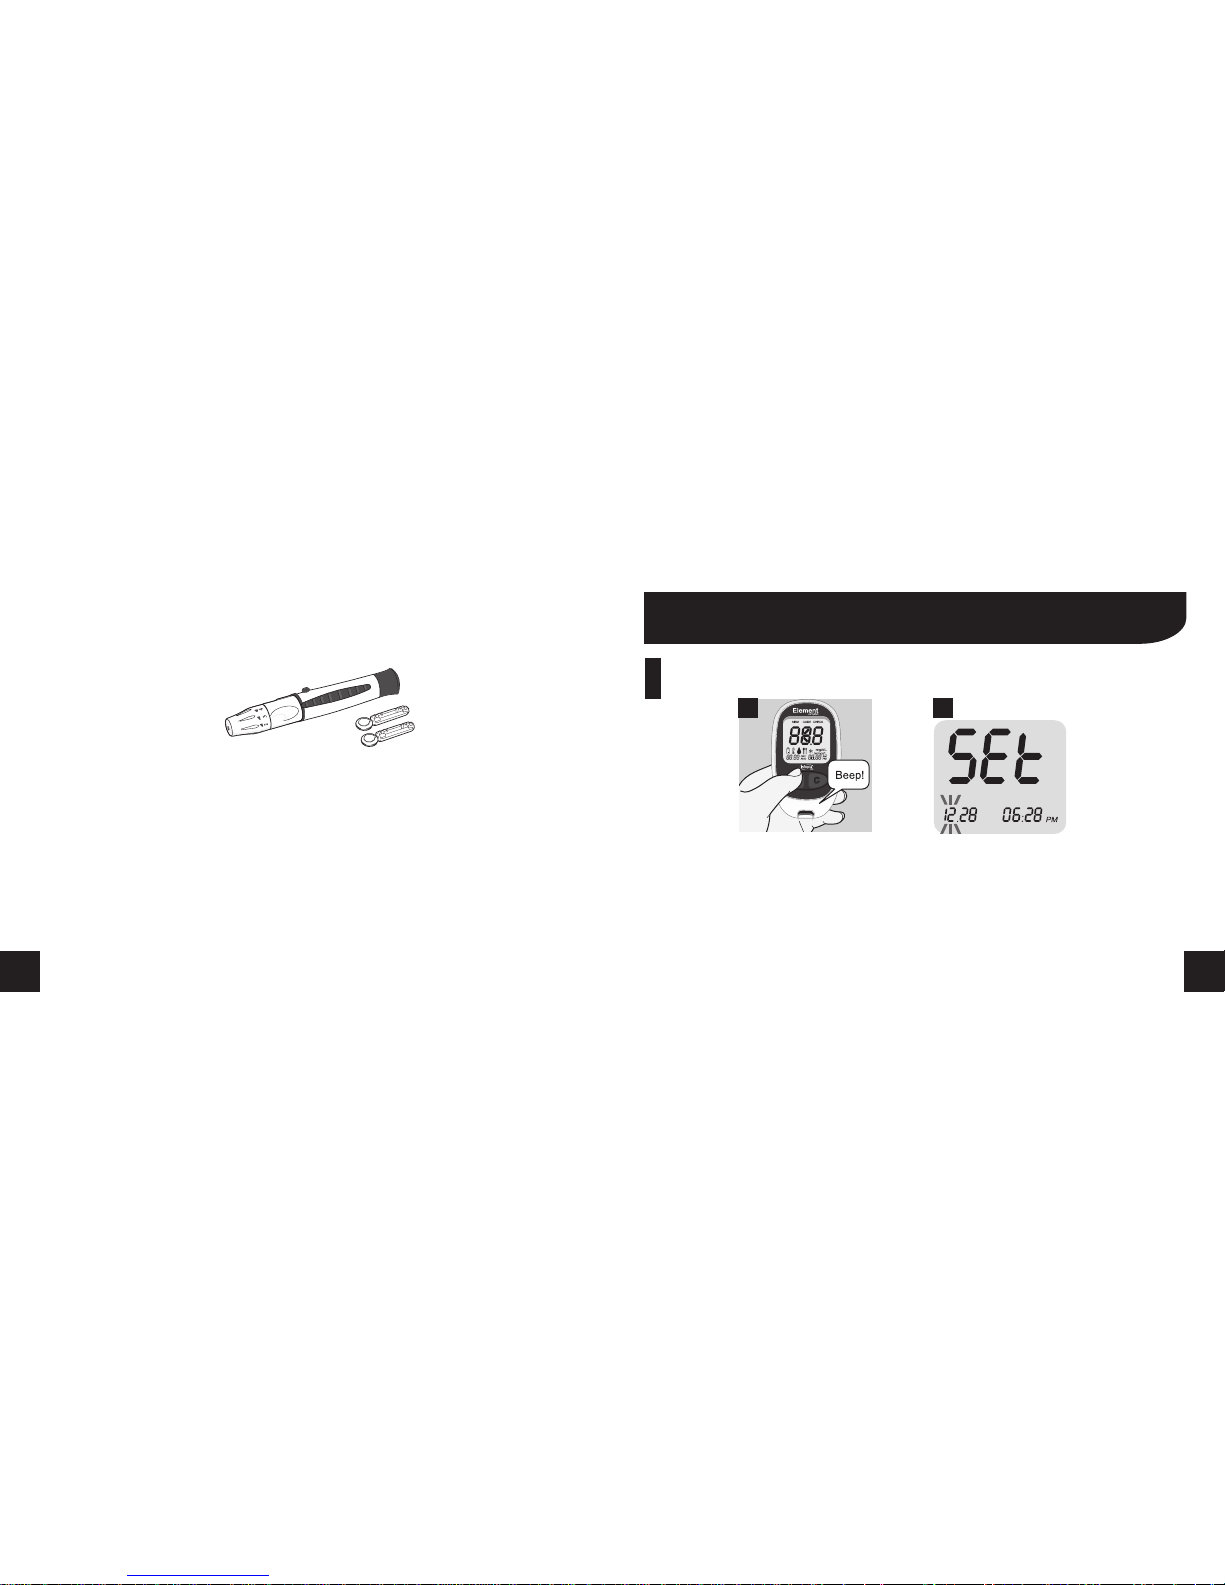
1. Press and hold the button for roughly three seconds, you will hear a beep
sound and the LCD Screen will display the screen icons of the meter.
2. Continue to hold the button and "SET" will appear on the screen.
'M'
'M'

29 30
3 4
3. Setting the Month : When the month blinks, press and release the 'C' Button
until the correct month appears, then press the Button to set the correct
month and move to the date setting.
4. Setting the Date : When the date blinks, press and release the Button until
the correct date appears, then press the Button to set the correct date
and move to the time setting.
'M'
'C'
'M'
5 6
5. Setting the Time Format : The meter can be set to show the time in AM/PM 12
hour format or 24 hour Military Time . With the "12 h blinking press the
Button to move between 12 h and 24 h, then press the Button to set and
move to the hour setting.
6. Setting the Hour : When the hour blinks, press and release the Button until
the correct hour appears, then press the Button to set the correct hour
and move to the minute setting.
" " " 'C'
'M'
'C'
'M'

31 32
7 8
7. Setting the Minute: When the minute blinks, press and release the Button
until the correct minute appears, then press the Button to set the correct
minute and move to the year setting.
8. Setting the Year: The year will appear on the screen, press and release the
Button until the correct year appears, then press the Button to set the
correct year and move to confirming the unit type mode.
'C'
'M'
'C'
'M'
9
9. Measurement Unit : The glucose measurement unit is defaulted to "mg/dL".
Press the Button to move on to turning the Beeping sound on or off.
NOTICE: This cannot be changed, if you have any questions concerning the
Unit Type contact Customer Service at 1-888-446-3246.
'M' " "

33 34
CAUTION:
lUse of the wrong unit of measure may cause you to misinterpret your blood
glucose level, and incorrect treatment.
lContact your healthcare professional if you have any question about
measuring units.
10
10. Turning the Beeping Sound On or Off: The meter has the beeping sound
defaulted to "On". To turn the beeping sound off on the meter press the
Button until OFF is displayed on the screen, then press the Button to
confirm and move to Deleting Your Test Results.
NOTICE: Turning the beeping sound On or Off does not affect your glucose
measurement.
'C'
" " 'M'

35 36
11 12
13
11. Deleting Your Test Result: Select the Button to toggle between YES and
NO . If you want to keep your readings in the memory toggle to NO then
select the Button to confirm.
12. If you want to delete all of the readings in the memory toggle to YES then
select the Button to confirm.
13. After deleting, the screen will show as pictured above. Press the Button
again and the meter will turn off.
'C' " "
" " " "
'M'
" "
'M'
'M'
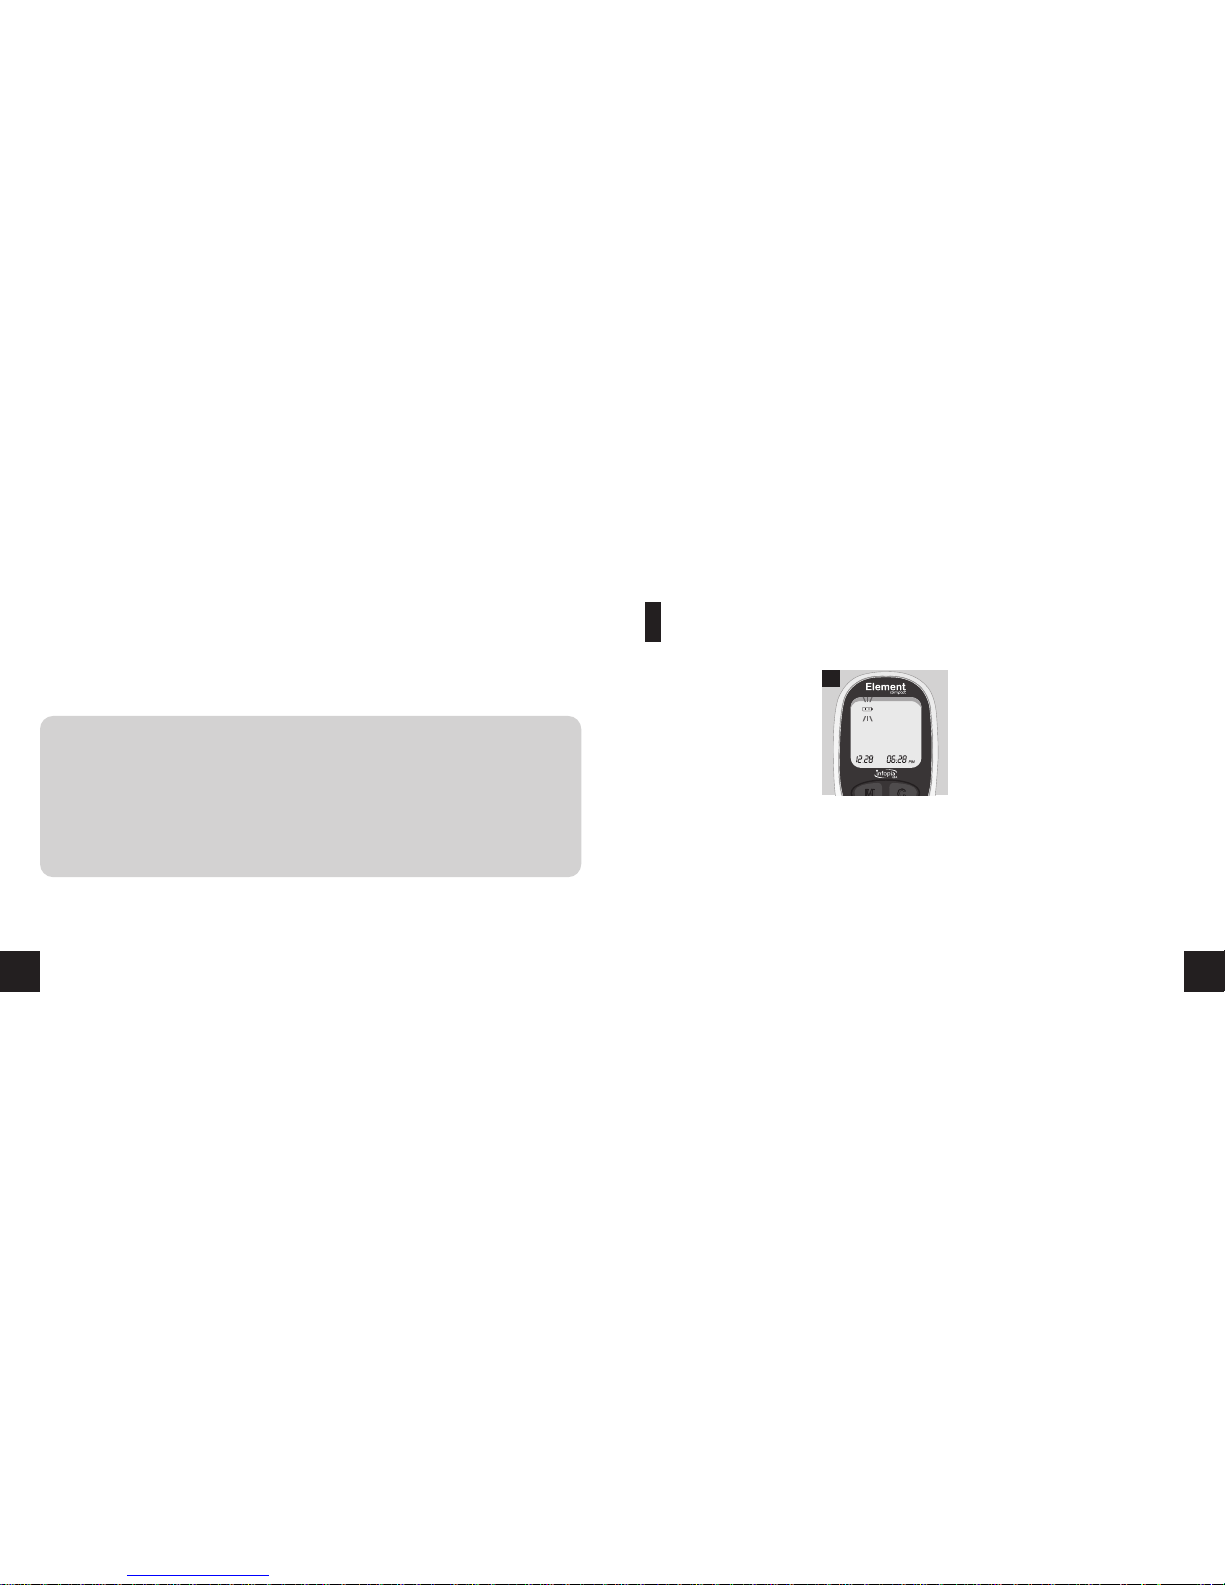
Reviewing Test Results
1 2
1. Begin with the meter off. Press the Button, you will hear a beeping sound
and the meter will turn on.
2. The screen will display the date and time and after a few seconds the last 14
day average will be displayed.
'M'

37 38
3 4
5
3. Press the Button once and the screen will show the most recent test result.
4. Each time you continue to press the Button the screen will show the
previous test result.
5. After you are done reviewing your test results, press the Button to turn off
the meter.
'C'
'C'
'M'
NOTICE:
The meter has an automatic shut off and will turn off in roughly two (2) minutes
if no changes are detected.

39 40
Downloading Test Results to PC
You can transfer test results from the Element Compact Blood Glucose Meter to
a computer where they can be summarized in a report with graphs and tables.
To use this feature you will need to download the Element Compact Software
and use the Element Compact Link USB Cable.
For more information, please contact Customer Service at 1-888-446-3246, or
visit our website at www.infopiausa.com
Control Test
Performing a Control Test
Performing a control test lets you know that your meter and test strips are
working properly. You should perform a control test when:
lYou open a new box of test strips.
lYou left the test strip container open.
lYou want to check the meter and test strips.
lYour test strips were stored in extreme temperature or humidity.
lYou dropped the meter.
lYour test result does not agree with how you feel.
lYou want to check if you are testing correctly.

41 42
Performing a Control Solution Test
1 2
1. Insert the test strip with the arrow facing up and pointing towards the test strip
port. The code number will appear on the screen,verify that the code number
displayed matches with the code number on the vial of test strips. If the two
code numbers do not match, call Customer Service at 1-888-446-3246.
2. Shake well before using. Discard the first drop and wipe the dispenser tip.
Squeeze a drop of control solution onto a clean, dry, non-absorbent surface.
Do not apply control solution to the test strip directly from the bottle. Replace
the lid on the control solution vial immediately after use.
5
3. Gently touch the drop of the control solution to the tip of the test strip.
4. When the test strip confirmation window is full, the meter will beep. The meter
will count down from five seconds and then show the reading. Make sure the
reading on the screen is between the ranges displayed on your test strip vial
(refer to page 44 for the control solution ranges).
5. Mark all control solution test with 'Control Solution Mark' to distinguish them
from blood glucose test results in the meter memory. Marked control solution
result will not be included in 14 day average. For more detailed information
of Flagging Your Test Results refer to page 22 for help.
3 4

43 44
CAUTION:
lIf you continue to get control solution results that fall outside of the range
printed on the vial, the system may not be working properly. Do not use the
meter. Please contact Customer Service at 1-888-446-3246.
lUser should periodically compare the test system to another test system
known to be well maintained and monitored by a healthcare provider.
lUse Element Glucose Control Solution only for the Element Compact
System Control Test.
Understanding Control Solution Test
Results
Range (mg/dL)
Level 2
Level 3 (H igh):
(Nor mal ):
The Ran ge d isplayed is f or
EXAMP LE P URPOSES ONLY.
lThe example label shown above on the test strip vial shows the acceptable
ranges for Levels 2(Normal), 3(High) Control Solution for the Element
Compact Glucose Meter.
lThe result you get should be inside this range. Make sure you compare the
result to the correct level of control.
lEach batch of test strip has different acceptable ranges.
64-96
213-2 88
A
B

45 46
Maintenance and Troubleshooting
Cleaning and Disinfecting
The meter should be cleaned and disinfected to prevent the transmission of
blood borne pathogens. Cleaning is done to remove germs, dirt and impurities
from your Glucose Meter. Disinfection is done to kill the germs on the surface of
your Glucose Meter.
Prepare a EPA-registered disinfectant, CaviWipes to clean and disinfect the
outside of the meter. The towelette is available for purchase through Medex
Supply Company, you can call them at 1-888-433-2300 or visit their website at
www.medexsupply.com. This product can also be found through large online
retail distribution sites such as www.amazon.com, www.ebay.com, etc.
Cleaning Instructions : Use the CaviWipes Towelettes for a cleaner and
disinfectant. Whenever your Glucose Meter is dirty, clean the outside of the
meter with a new CaviWipes Towelette.
CAUTION:
Do not use other cleaners or disinfectants as they may damage the meter.
Disinfection Instructions: Your Glucose Meter should be disinfected once per
week or as needed, and be cleaned prior to disinfecting. Use a second
towelette to thoroughly wipe the entire pre-cleaned Glucose Meter and allow
it to remain wet for two (2) minutes at 68 per manufacture instructions. Allow
to air dry when done.
℉

47 48
Ele
m
e
n
t
STEP1: Dispose of used test strip.
STEP2: Remove wipe from the container and follow the instructions on the
package. If needed wring wipe slightly to remove excess liquid.
STEP3: Completely wipe the Glucose Meter including the front, back and sides,
and take care not to get any liquid in the test strip, test strip port and
serial port. Do not wrap the meter in a wipe. Take extreme care not to
get liquid in the test strip, test strip port and serial port of the meter. Allow
to remain wet for two (2) minutes at 68 .℉
STEP1 STEP2 STEP3
STEP4
STEP4: Let the meter dry per the towelette manufacturer's instructions. Dispose
of wipe when finished.
lUser should wash hands thoroughly with soap and water after handling the
meter, or test strips.
lThe life of the device is three (3) years. The Element Compact meter was
demonstrated that there was no change in performance or in the external
materials of the meter after 11,000 cleanings with disinfection cycles
designed to simulate three (3) years for ten (10) times per day.
49 50
lFor more information on cleaning and disinfecting, contact Customer Service
at (1 888-446-3246).
CAUTION:
lSqueeze the excess liquid from the cloth before you wipe the meter’s
surface.
lThe meter must be off when you clean or disinfect the meter.
lDo not get moisture on the test strip or in the test strip port or serial port.
lDo not spray any cleaning solution directly onto the meter.
lDo not put the meter under water or liquid.
lNever immerse the meter because this will damage it.
Replacing the Batteries
1
1. When the batteries are low the screen will display and blink the low battery
icon in the top left hand corner. This indicates that there is only enough
power left in the meter for about fifty more tests and the batteries should be
replaced. When replacing the batteries your test results will be stored in the
meter, however you may need to reset the date and time. Refer to pages
28-31 for more information.

51 52
Screen Messages
Messages Descriptions Solutions
The meter has detected a
problem with the test strip. The
test strip is either used or
damaged.
The blood sample was
applied to the test strip before
the blood symbol ( )
appeared on the screen.
Repeat the test with a new
test strip.
Remove and discard the test
strip and insert a new one.
Apply blood to the test strip
after the blood symbol
appears on the screen.
2. Open the battery compartment lid on the back of the meter and remove the
batteries and replace them with two new CR2032 batteries. Make sure to
align the + side facing up toward you. Once the new batteries are in place,
snap the battery lid back onto the meter.

53 54
Messages Descriptions Solutions
The temperature is above or
below the proper range for
testing.
The temperature should be 50104 . Move the meter and test
strips to an area that is within
the temperature range to
perform the test. Wait about
twenty minutes or until the
meter has reached the proper
range and retest. Do not raise
or lower the meter temperature
artificially.
℉
Messages Descriptions Solutions
There is not enough blood in
the strip to perform a test.
Repeat the test with a new test
strip and make sure enough
blood has been applied to the
strip.
The wrong strip has been put
into the meter.
Make sure you are using an
Element Compact test strip
and repeat the test.
There is an internal error with
the meter.
Please contact Customer
Service at 1-888-446-3246.

55 56
Causes Solutions
Messages Descriptions Solutions
When the test result is higher
than 600mg/dL, the screen will
show the "Hi" mark. This
indicates that the value of
your blood glucose is too high.
Retest with new test strip. If "Hi"
mark appears again, please
call your doctor or healthcare
professional immediately.
When the test result is lower
than 20mg/dL, the screen will
show the "Lo" mark. This
indicates that the value of
your blood glucose is too low.
Retest with new test strip. If "Lo"
mark appears again, please
call your doctor or healthcare
professional immediately.
Troubleshooting
The meter does
not work after
the blood is
applied.
lMake sure that the test strip is inserted into the test strip
port completely.
lSee if the test strip is covered in debris or lint.
lMake sure the blood is applied to the test strip correctly.
lMake sure the test strip is inserted correctly and repeat
the test.
The test result is
abnormal.
lSee if the test strip is covered in debris or lint. Also make
sure the test strip has not been out of its container for any
extended period of time.
lMake sure the test strip has not been used before.
lVerify the expiration date on the test strip vial.

57 58
Causes Solutions
lMake sure the test strip vial has not been opened for
longer than three (3) months.
lMake sure the meter code and test strip code match.
The
thermometer
icon ( ) appears
on the screen.
lPlace the meter and test strip in a temperature
environment of 50-104 . You should use it after about 20
minutes in the appropriate conditions.
lIf the thermometer icon is constantly showing, contact
Customer Service at 1-888-446-3246.
℉
The meter does
not work after
the test strip is
inserted.
lMake sure the test strip is completely inserted into the test
strip port.
lMake sure the batteries are inserted correctly, with the +
sign up and facing the right direction.
Technical Information and Warranty
Specifications
Product Name
Test Sample
Calibration
Sample size
Test Strip Type
Measuring Range
Measuring Time
Power
Battery Life
Memory Capacity
Data Transport
Element Compact Blood Glucose Monitoring System
Fresh capillary whole blood
Plasma-equivalent
0.5㎕
Element Compact Blood Glucose Test Strip
20 - 600 mg/dL
5 Seconds
(2) 3.0 Volt CR2032 lithium batteries
Approximately1000 tests
300 test results
Data transport cable

59 60
Display
Operating Temp
Operating Humidity
Storage Temp
Dimensions
Weight
LCD
50 - 104
10 - 90 % RH
39 - 86
18 x 51 x 88 mm
48g (with batteries)
℉
℉
Warranty
Infopia America, LLC guarantees that the Element Compact Glucose Meter
shall be free of defects in material and workmanship for a period of three
years. This guarantee is valid from the date of purchase. This guarantee
extends only to the original purchaser and is not transferable.
The warranty ceases to apply under the following conditions:
lThe meter is damaged as a result of incorrect use.
lThe meter is damaged as a result of natural disasters (e.g. hurricane,
earthquake etc.).
lThe meter is damaged due to using incompatible products.
lThe meter is damaged as a result of attempting repair.

61 62
Disposing of your Meter
During blood glucose measurement the meter itself may come into contact
with blood. Used meters therefore carry a risk of infection. Please dispose of
your used meter - after removing the batteries - according to the regulations
applicable in your area. For information about correct disposal, please contact
your local council and authority. The meter falls outside the scope of European
Directive 2002/96/EC (Directive on waste electrical and electronic
equipment(WEEE)).
Blood Glucose Target Range
Normal blood glucose reference value for non-diabetics is as follows:
lBefore eating : < 100 mg/dL
l2 hours after meals : <140 mg/dL
In case results are out of reference range, please contact your healthcare
professional and follow their advice.
Reference:Diabetes care, October2010, vol.33 no.102184-2189.

63
Additional Supplies Available
The following supplies and accessories are available from your supplier, for
more information contact Customer Service at 1-888-446-3246.
Element Compact Link Cable
Element Compact Link Software
Element Compact Test Strips
Element Brand Control Solution
This test system is waived under CLIA
A184104115-06 Rev.A 6/13
 Loading...