


Blood Glucose Monitoring System Operation Manual
IMM20-019 Rev.2010-10-01
infopia Co., Ltd.
INFM02A
891, Hogye-dong, Dongan-gu,
Anyang, Kyunggi,
431-080, Korea
www.infopia21.com
Obelis S.A.
Bd. General Wahis 53,
1030 Brussels, Belgium
Tel: +(32) 2. 732.59.54
Fax: +(32) 2.732.60.03
E-Mail : mail@obelis.net
Lancing Device : GMMC
Room No. 1112, Ace Tower 9th Bldg.,
345-30, Kasan-Dong,
Kumchon-Ku, Seoul,
South Korea
Lancet : SAE HAN Medical Corp.
1155-1, Pubgot-Dong,
Ilsanseo-Gu, Goyang-City,
Gyeonggi-Do, Korea

Blood Glucose Monitoring System Operation Manual
EasyGluco
TM

EasyGluco
TM
EasyGluco
TM
EasyGluco
TM
System Owner
Dear EasyGlucoTMSystem Owner
Thank you for choosing the EasyGluco
TM
Blood Glucose Monitoring System. This booklet has important information
you must know about the EasyGluco
TM
system. Please read it carefully.
We understand that self-testing of blood glucose level provides a way to control your diabetes and may give you
peace of mind by testing regularly. As a result EasyGluco
TM
was developed to provide you with a FAST and Accurate
reading with a convenient and simple process. Our goal at EasyGluco
TM
is to provide the best quality healthcare
products coupled with superior customer service. Always consult with your healthcare professional before
making any changes. The EasyGluco
TM
System is for in vitro diagnostic use only.
A warranty registration card is included with your system. Please complete the three year warranty card and send it
to us. This will ensure that you receive any new information about your EasyGluco
TM
System. If you have any
questions, please contact your local representative.
Quick Reference
Insert EasyGlucoTMtest strip.
Apply blood sample to the test strip. Apply sample until confirmation
window is completely filled before the
Meter begins to countdown. If the
confirmation window does not fill
completely, do not add more blood to
the test strip. Immediately discard the
test strip and then retest.
Test results in 9 seconds.
1 2 3 4
This is intended only for quick reference.
Please read the entire manual before you use the EasyGlucoTMmonitoring system.

EasyGluco
TM
Important Information
·The EasyGlucoTMBlood Glucose Monitoring System is intended for use outside the body (in vitro diagnostic use only).
·EasyGluco
TM
was designed only to test blood glucose (sugar) levels and can only be used with fresh capillary whole blood samples.
·It should not be used for the diagnosis of diabetes or for the testing of newborns (neonates).
·Do not use the EasyGluco
TM
System for any purpose other than for blood glucose testing.
·Consult with your physician or diabetes healthcare professional for the proper use of this meter and daily management of your diabetes.
·Please pay close attention when handling blood. Improper procedures may cause serious hazards to your health.
If you have any questions about the use of the EasyGlucoTMproduct, please contact your local representative.
Before using the EasyGluco
TM
Blood Glucose Monitoring System, read all of the operating instructions in this Operation Manual to practice
for safe and accurate testing.
EasyGlucoTMBlood Glucose Monitoring System KIT Contents
EasyGluco
TM
Blood Glucose Meter
EasyGluco
TM
Blood Glucose Meter Display
EasyGluco
TM
Blood Glucose Test Strip
Important EasyGluco
TM
Test Strip Information
Checking the Meter with the Check Strip
Coding The Meter
Checking the System with the EasyGluco
TM
Control Solution
Setting The Meter
Collecting a Drop of Blood
Testing Your Blood
Reviewing Your Results
Maintaining the EasyGluco
TM
Meter
Battery
1
2
3
4
5
6
7
8~11
12~13
14~15
16~19
20~21
22
23
24~27
28
29
30
Learning The System
Before Testing
Testing Your Blood
Reviewing Your Results
Caring for Your Meter
Troubleshooting
Specifications
Warranty
EasyGluco
TM
TABLE OF CONTENTS
Note

INFOPIA [ 2 ][ 1 ]
EasyGluco
TM
EasyGlucoTMmeter
EasyGluco
TM
test strips
Lancing Device, Lancets and Check Strip
Operation Manual
Warranty Registration Card
Patient Logbook
Two 3V Li-CR2032 batteries
Carrying Case
Check your EasyGlucoTMsystem to make sure that it is unopened prior to use and that it contains all of the
complete parts shown above. If either of these conditions are not met, please return your system to the place
of purchase or contact your nearest Infopia representative.
EasyGluco
TM
Blood Glucose Monitoring System KIT Contents
EasyGlucoTMBlood Glucose Meter
Test port
Product Label
Batteries
Display
Dataport
MEM button
SET button
TEST PORT : Insert the EasyGlucoTMTest Strip here.
DISPLAY : Symbols, simple messages, and test results appear here.
MEM BUTTON : Use for reviewing past records and setting for Time,Date, Month and Year(Refer to pages 12, 13, 20 and 21).
SET BUTTON : Use for recalling past results, and setting Time, Date, Month, Year mode and the code number(Refer to
pages 7, 12, 13, 20 and 21).

INFOPIA [ 4 ]
[3 ]
EasyGluco
TM
Strip-Shape blinking indicates
ready to test
Appears with the
Strip code number
Message area reads the
results and messages
Indication for deleting
records
Direction of blood sample
Month Day Hour Minutes
Low battery warning
Memory empty
EasyGlucoTMBlood Glucose Meter Display
LCD display segment
System Check
Unit of result
EasyGlucoTMBlood Glucose Test Strip
The EasyGlucoTMSystem measures the amount of glucose in your blood.
Apply blood here
Check here to confirm
if enough blood have
been applied
Blood is applied to the Top Edge of
the EasyGluco
TM
Test Strip and is
automatically drawn into the channel
where the reaction takes place
Insert this end into the
Meter.
Push it all the way in
until it will go no further.
CONTACT BAR
front back

INFOPIA [ 6 ]
Checking the Meter with the Check Strip
·The Check Strip automatically checks the Meter when inserted
into the Test Port. A “V”symbol will appear on the LCD screen,
indicating that the Check has been made.
·Please Insert the Check Strip with “<<<”facing up into the test
port of the Meter. If the value displayed is ranged between 107-
127, the Meter is good to use.
If the value displayed does not meet the proper range, reinsert
the calibration key 2 or 3 more times. If it’s still does not meet the
proper range, please contact your local representative.
·Please note that the Check Strip does not check the POWER-
ONstatus of the Meter.
The "Check Strip" is to make sure that the Meter functions properly.
[ 5 ]
EasyGluco
TM
Important EasyGlucoTMTest Strip Information
·Store the EasyGlucoTMTest Strip vials in a cool, dry place between 36-86。F (2-30℃). Keep out of
direct sunlight. Do not freeze.
·Store test strips in it’s original vials only. Do not mix the test strips in new vials or in any other
container.
·Immediately replace the vial cap and close tightly after removing an EasyGlucoTMTest Strip.
·Use test strip immediately after removing it from the vial.
·Make a notation of the discard date on the vial label when you first open it. Discard remaining
EasyGlucoTMTest Strips 3 months after first opening the vial.
·Avoid getting dirt, food, and water on the test strip. Do not handle test strips with wet hands.
·Do not use test strips after the expiration date printed on the package or vial since it may cause
inaccurate results.
·Do not bend, cut, or alter an EasyGlucoTMTest Strip.
·EasyGlucoTMTest Strips are for single use only. Do NOT re-use.
·Refer to additional information in the EasyGlucoTMTest Strip package.

Checking the System with the EasyGluco
TM
Control Solution
Note: The EasyGlucoTMControl Solution is sold separately. Both, the low and high level control solution can be obtained through
Infopia Co., Ltd.
Refer to the EasyGlucoTMControl Solution package for additional information.
The EasyGlucoTMControl Solution is used to check that the Meter and the Test Strips are working together as a system and that you are
performing the test correctly. It is very important that the control solution is used routinely to make sure that you receive accurate results.
The EasyGluco
TM
Control Solution contains a measured amount of glucose that reacts with the EasyGluco
TM
Test Strips. Compare your
control solution test results with the expected range printed on the Strip vial label.
The EasyGluco
TM
Control Solution should be used to:
·Practice the test procedure.
·Make sure your meter and test strips are working together properly.
·Ensure you are performing the test correctly.
Before you use the EasyGluco
TM
Meter to test your blood for the first time, practice the procedure using the control solution.
When you can do three tests in a row that are within the expected range, you are ready to test your blood.
Do a control solution test:
·When a new vial of test strips are opened.
·Any suspicion that the meter or test strips are not working properly.
·When your blood glucose test results are not consistent with your symptoms, or if you think they are not accurate.
·If you drop the meter.
·Use routinely to obtain accurate results.
The control solution test is similar to a blood test except that you use the EasyGluco
TM
Control Solution instead of a drop of blood.
Code numbers are used to calibrate the EasyGlucoTMMeter with the EasyGlucoTMTest Strips for accurate results. You must code the
meter before using it. Confirm the code number for the first time and then every time you change to another vial of test strips.
STEP 1
Insert the EasyGlucoTMTest Strip to turn on the Meter. Push it all the way in until it will go no further.
Avoid bending the test strip. The code number will appear on the LCD window for 3 seconds.
Compare the code number (example: C17) on the Meter’s LCD window with the code number on the
test strip vial. If these two code number matches, you can start testing. If any error messages appear
any time, refer to the Troubleshooting section of the booklet for more information, see page 24.
STEP 2
If the two code numbers do NOT match, you must code the meter according to the test strip vial code
number before the LCD display ends. Press the SET button to select the correct code. The number
increases by one digit every time you press the SET button. To move more quickly, press and hold the
SET button.
After selecting the correct code number, it will appear solid for a second.
Then the Strip-Shape symbol on the LCD will starts blinking, indicating that the EasyGluco
TM
System is
ready for testing.
CAUTION : If you do not adjust and match the code numbers, you may
receive inaccurate test results.
Important: Each time you test, be sure to check that the code number on
the meter display matches the code number on the Test Strip vial.
Coding The Meter
[ 7 ]
EasyGluco
TM
INFOPIA [ 8 ]

Checking the System with the EasyGluco
TM
Control Solution
Important Control Solution Test Information
·Use only the EasyGlucoTMControl Solution.
·Check the expiration date on the control solution vial. DO NOT USE if expired.
·The EasyGlucoTMNormal Control Solution should be stored at room temperature below 86。F (30℃).
Do not refrigerate.
·Shake the control solution, and wipe off the vial tip and reseal tightly after each use.
·Use only for three months after first opening. Record the discard date on the control solution vial.
Discard after three months.
CAUTION : The control solution range printed on the Test Strip vial is for the EasyGluco
TM
Control Solution only.
It is used to test the meter and test strip performance. It is not a recommended range for your blood glucose level.
Checking the System with the EasyGluco
TM
Control Solution
[ 9 ]
EasyGluco
TM
INFOPIA [ 10 ]
How to do the EasyGlucoTMControl Solution test
STEP 1: Insert Test Strip
Insert a Test Strip, with the arrow side “”facing up and in the direction of the arrow, insert it into the test port of the Meter firmly. The
meter will automatically turn on and display the code number. Make sure the code number on display matches the code number on the
test strip vial (picture1). If the code number does not match, code the meter correctly. Once completed, “Strip-Shape”symbol will
appear on the LCD.
STEP 2: Apply Control Solution
Shake the control solution vial well. Remove the cap. Invert the bottle and discard the first drop of the control solution. If large bubbles
are present at the tip of the vial, wipe the bubbles off with a clean tissue before applying the drop of control solution to the test spot. Do
not drop bubbles on the test strip. Apply an entire drop of the control solution onto the test spot at once by gently squeezing the vial to
form a small drop. Take the meter with the test strip inserted and touch the end of the test strip to the hanging drop (picture 2). Be sure
to hold the test strip to the drop until you hear a “beep”sound.
12 3

Setting The Meter
STEP 3: Result appears in 9 seconds
Once you hear the “beep”, it indicates that the test strip is filled and the meter will begin to count down from “9”seconds to “1”second
and the control solution test result will be displayed (picture 3). Compare the result with the range printed on the Test Strip vial. The
result should fall within that range.
Comparing Control Solution Results
If the control solution test results fall outside the range, repeat the test. Out of range results may be caused by one or more of the
following:
·Error in performing the test.
·Failure to shake the control solution vial well enough (must shake vigorously).
·Failure to discard the first drop of control solution.
·Expired or contaminated control solution.
·Test Strip deterioration.
·Meter malfunction (Use the Check Strip in your EasyGlucoTMkit to check the meter).
·Control solution that is too warm or cool.
Checking the System with the EasyGluco
TM
Control Solution
[ 11 ]
EasyGluco
TM
INFOPIA [ 12 ]
The EasyGlucoTMMeter has three functional modes as settings: 1) Average period, 2) Unit, 3) Date & Time.
If you need to change the time, or if you remove the battery, you may need to enter the setting mode and reset.
The setting mode begins with setting the number of days of which you would like to receive an average calculation of your glucose level.
The LCD window will be flashing the most recent number of days that was selected. The number of days can range from 7 days to 90
days. To increase the number of days, press the SET button; holding the SET button down will increase the value at a quicker rate.
With the correct number of days displayed, press the MEM button. This will set the number of days that you would like to receive your
average blood glucose calculation. (By pressing the MEM button it saves your settings as well as moves you to your next item to set).
Turn on the meter by pressing the SET button for 3 seconds. This will initiate the “Set the Meter”mode.
Enter set mode Change the status Move to next
How to Calculate Your Average Blood Glucose Level

[ 13 ]
EasyGluco
TM
Collecting a Drop of Blood
You should now be at the Unit of Measurement selection. Select the proper unit of measurement (mg/dL or
mmol/L) for your blood glucose result by pressing the SET button. Once the unit of measurement is selected,
press the MEM button. This will save the unit of measurement that you have selected for your blood glucose result.
Note: The past results in memory will appear automatically in proper values according to the unit selection.
Set the Year and Date
Press and release the SET button to select year. You can select the year from 2000 to year 2099 with SET key
(Year does not display on the LCD in normal operation). After setting the year, press MEM button to select month.
With the correct month selected on the display, press the MEM button and the day setting will starts flashing. Press
the SET button to advance one day. To move faster, hold the SET button down.
Set the Time
Press and release the SET button to select the proper hour. With the correct hour on display, press the MEM
button and the minutes setting will start flashing. Press the SET button to advance one minute. To move faster,
hold the SET button down. With the correct minute on display, press the MEM button and the 12-hour format
(AM/PM) setting will start flashing. Press the SET button to select the appropriate time format. Press the MEM
button to set the time format and the date setting will start flashing.
After setting your meter, the meter will display all your settings that were made for about 3 seconds. Once that
occurs, the Meter will automatically turn off.
CAUTION :
Without setting the date properly, the average glucose level and the results in memory will not
show proper values but instead an error message will be displayed. It is highly recommended to set the meter
before use and when new batteries are installed. You cannot test your blood glucose while in the setting
mode.
INFOPIA [ 14 ]
Setting The Meter
1. Unscrew the lancing device tip
and insert a lancet firmly into the
carrier.
2. Pinch the lancet and twist off the
protective cover. Do not discard
the cover.
3. The tip of the lancing device
offers 5 different levels of skin
penetration. To select the best
depth : Use 1-2 for soft or thin
skin, 3 for average skin, 4-5 for
thick or calloused skin.
CAUTION :
·Use a new, sterile lancet every time you test.
·Do not use lancet if protective cover has been removed or damaged.
·Never share a lancet with anyone.
Note : For even finer adjustment, the arrow may be placed between any
two numbers.

Testing Your Blood
4. Hold the tip in one hand and pull
on the sliding barrel with other
hand. Pull the ends apart and you
will feel a click. This indicates that
the lancing device is in a locked
position ready for lancing.
5. Release the sleeve. It will
automatically contract and move
back to its original position near
the trigger hub.
6. Place the lancing device against
the tip of the finger. Press the
trigger button. Your blood sample
should now be ready to be
applied on the test strip. Lift the
lancing device out and away.
Maintaining your Lancing Device
- Unscrew the lancing device tip. Carefully stick the protective disk cover back on the used lancet.
- Grip the holder firmly and pull the lancet safely out of holder. Screw the tip back on the lancing device.
- Discard the used lancet to a proper place. Clean the lancing device if blood or stain remains.
CAUTION :
·Use a new sterile lancet every time you test.
·Do not use lancet if protective cover has been removed or damaged.
·Never share a lancet with anyone.
INFOPIA [ 16 ]
Collecting a Drop of Blood
[ 15 ]
EasyGluco
TM
Before testing, be sure to read this section and the test strip
package insert found in the test strip box carefully. Make sure
you have all the necessary items to begin testing:
·EasyGluco
TM
Meter
·EasyGluco
TM
Blood Glucose Test Strip
·Lancing Device
·Sterile Lancets
WARNING :
To reduce the chance of infection:
·The Lancing Device and Sterile Lancets should NOT be shared with others.
It is only for your own personal use.
·Always use a new, sterile lancet. Lancets are for single use only.
·Avoid getting hand lotion, oils, dirt, or debris in or on the Lancets and the Lancing Device.
·Dry your hands completely before testing.

[ 17 ]
EasyGluco
TM
Testing Your Blood
STEP 1.
Firmly insert the EasyGlucoTMTest Strip into the EasyGlucoTMMeter test port. With the
Arrow side “”facing up and in the direction of the arrow, insert it into the test port of the
Meter firmly. The meter will automatically turn on and display the code number. Make sure
the code number on display matches the code number on the test strip vial. If the code
number does not match, code the meter correctly. See “Coding The Meter”page.
Note: Inserting the test strip in the wrong direction will turn the meter on or
but the test will not be done.
CAUTION :
·If you did not confirm the code in 3 seconds, pull the electrode out of the port, and re-start the procedure from the beginning.
·If the codes on the LCD display window and on the test strip vial do not match, do the “Coding The Meter”procedure for
accurate result.
Practice using the Lancing Device and become accustomed with its use. Wash your hands with warm, clean water and soap. Dry your
hands completely before testing.
INFOPIA [ 18 ]
Testing Your Blood
STEP 2.
Place your fingertip to the top edge of EasyGluco
TM
Test Strip.
The blood on your finger will automatically draw into the applying channel of the test strip (on the electrode). Allow your finger
toremain untill you hear a “beep”sound from the EasyGlucoTMMeter. A sample volume of 3㎕is required
completely
filled
correct
poorly filled
incorrect
CAUTION :
·
If you do not conduct the test after 3 minutes, the meter will automatically power off to save battery life. In this case,
the test procedure should start again from the beginning.
[ 19 ]
EasyGluco
TM
Reviewing Your Results
INFOPIA [ 20 ]
Testing Your Blood
STEP 3.
After you hear the “beep”sound, the test will begin automatically and your results will appear after 9 seconds. It should begin
counting down from 9 seconds to 1 second on the LCD display window. The LCD display window will indicate the result of your
blood glucose level.
STEP 4. Record the result value in your EasyGluco
TM
logbook. This will help you reference your blood glucose levels historically.
When the testing is complete, discard the used test strip and lancet to a proper place. Make sure to retain all necessary
EasyGlucoTMitems in the leather case for your next test. Clean the meter if necessary according to “Maintaining the
EasyGlucoTMMeter”.
CAUTION :
If you receive any error messages please refer to the “Troubleshooting”section of this Manual.
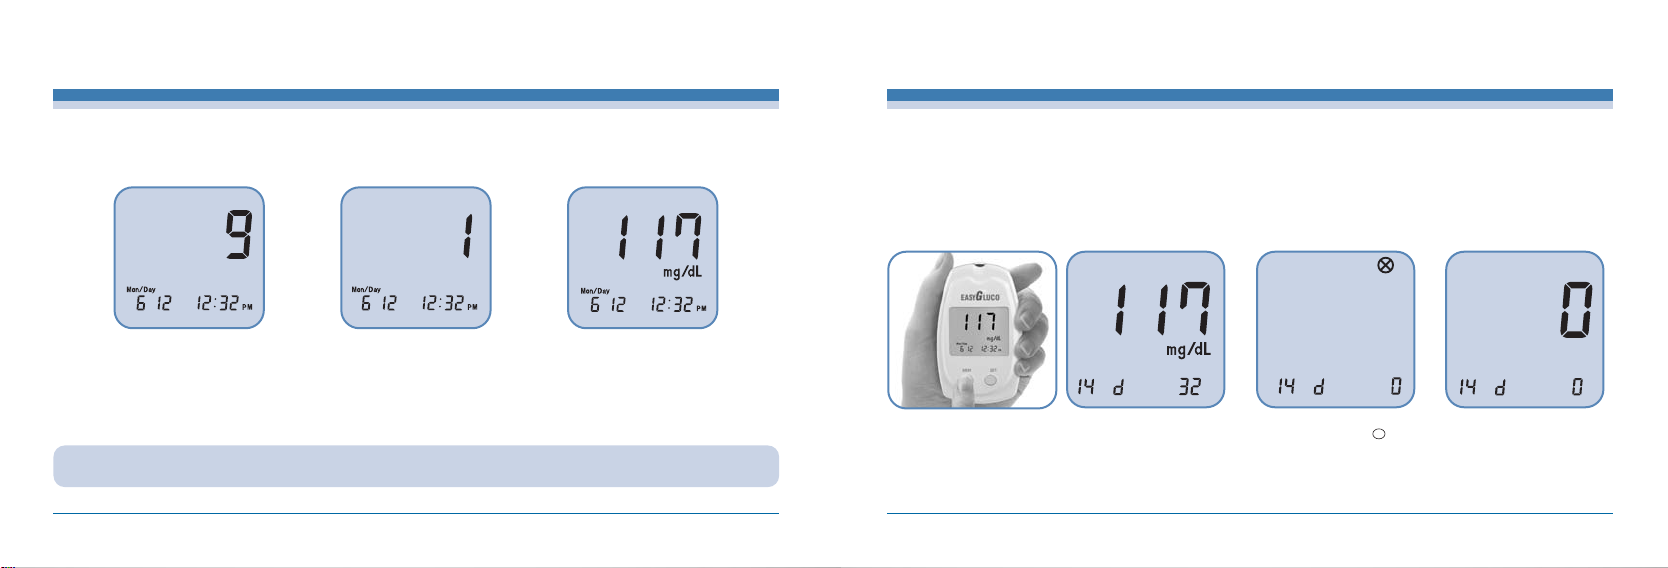
The EasyGlucoTM( Meter saves up to 200 test results in built-in memory and records the average glucose level for the number of days in
which you had preset to be calculated and saved. These values will appear on the LCD display window by recalling any time you want to
see it. The newest result will replace the oldest beyond the 200 saved data.
The meter enters “Reviewing Your Results”mode by pressing the MEM button.
The first display shows the current date and time, then the
average glucose level calculation over the period that was
already pre-set.
If no data was saved, the
meter will display X and
powers off automatically
after 3 seconds.
If no data was saved for the
pre-set days for the average
glucose calculation, the
meter will display a zero and
display each value of the
past results

[ 21 ]
EasyGluco
TM
Maintaining the EasyGluco
TM
Meter
To delete test results individually, press the SET button for 5 seconds until you
hear 3 beep sounds and the LCD display shows the test result and time you want
to delete.
To delete all test results in memory, press the SET button until you hear a beep
sound and at the same time press the MEM button. Please be careful, once the
results is deleted it cannot be restored.
CAUTION :
If you do not set the Meter properly, the average glucose level for the days you set and the results in memory will not
show proper value but indicate an error message. Improper settings will cause an “Er3”message to appear on the
LCD window. Refer to “Setting the Meter.”
In displaying past results mode, press the SET button to review the saved results starting from the newest with the test date and time.
INFOPIA [ 22 ]
Reviewing Your Results
For safe, accurate and long-lasting use of the EasyGlucoTMMeter, the meter must be maintained with proper care:
1. The lancing device should be cleaned if blood or stain remains after testing to prevent infectious diseases.
2. The meter should be cared for after testing and cleaned if necessary with a soft cloth or tissue. If necessary, rubbing alcohol can be
used to wipe away dirt on the outer surface of the meter. Do not use chemical solutions such as benzol or acetone since both of
these solutions can harm and damage the meter surface. When cleansing the meter with rubbing alcohol, DO NOT pour directly onto
the meter, but use the cloth soaked with a small amount of alcohol. After cleansing the meter, dry completely at a cool place avoiding
the sun rays.
3. After testing, place the EasyGluco
TM
Meter in the leather carrying case to prevent loss or damage. Make sure it is placed in a cool and
dry area and out of the reach of children. Do not refrigerate. Avoid exposure to the sun.
4. For detailed instructions of the EasyGlucoTMTest Strip, refer to the test strip package insert found in the EasyGlucoTMTest Strip box.
5. When you need to purchase the lancing device, the lancets and the test strips, visit your local pharmacy or contact your local
representative.
6. Do not soak the meter and test strips into water or liquid.
7. Do not subjet the meter and the strips to exesive heat.
8. Use your EasyGluco
TM
Meter according to the instuctions in the manual.

[ 23 ]
EasyGluco
TM
The meter will alert you when the power is getting low by displaying this symbol (symbol of battery and
its low sign) or when the meter does not power on by any means.
To replace the battery, make sure that the Meter is in the OFF position when changing the batteries.
When changing the batteries, be careful of the polarity of the batteries which is printed in the battery
deck of the meter.
After changing the batteries, “Setting The Meter”, MUST be done again for secure and accurate test
results.
Your EasyGlucoTMMeter comes with two 3.0V (CR2032 or equivalent) lithium batteries. The batteries will provide you with enough power
to perform about 5,000 tests. When replacing the battery, 3.0V (CR2032 or equivalent) lithium battery can only be used.
INFOPIA [ 24 ]
Battery
Problem with the test strip With a new test strip and sufficient blood sample, re-test.
Troubleshooting
Problems that you may encounter : Following may help you to identify certain problems but may not represent all the problem that occurs.
Please avoid any IMPROPER use of the meter and the parts associated with the EasyGlucoTMSystem.
MESSAGE CAUSED BY WHAT TO DO
Problem with the Meter If problem persist,contact your local representative.
The meter has not been properly set See “Setting The Meter”

[ 25 ]
EasyGluco
TM
Troubleshooting
No saved data
The ambient temperature is
too low
The ambient temperature is
too high
Place the meter at the operating temperature range for more
than 10 minutes, and re-test.
Place the meter at the operating temperature range for more
than 10 minutes, and re-test.
MESSAGE CAUSED BY WHAT TO DO
INFOPIA [ 26 ]
Troubleshooting
If you believe that your result is incorrect, recheck the meter by
using the EasyGluco
TM
Control Solution. With normal result, re-test
with blood samples two or three times. “HI”results indicate severe
hyperglycemia (high blood glucose). If the “HI”message persists,
please seek medical attention immediately.
The test result is higher than
600mg/dL (33.3mmol/L)
If you believe that your result is incorrect, recheck the meter by
using the EasyGluco
TM
Control Solution. With normal result, re-test
with blood samples two or three times. “LO”results indicate severe
hypoglycemia (low blood glucose). If the “LO”message persists,
please contact your physician or diabetes healthcare professional.
MESSAGE CAUSED BY WHAT TO DO
The test result is lower than
10mg/dL (0.6mmol/L)

[ 27 ]
EasyGluco
TM
Troubleshooting
Please refer to the table below to identify problems that persist with no messages appearing.
PROBLEM CAUSED BY WHAT TO DO
The meter does not
power on
There may be a problem with
the test strip
Re-test with a new strip.
Re-code the meter and re-test.
The codes of the meter and
of the test strip vial do not
match
Change the batteries and if the problem persists, contact
your local representative.
Batteries are dead or there is
a problem with the meter.
Poor amount of sample Apply a sufficient amount of the blood sample to a new test
strip and re-test.
Re-test with a new strip.
Problem with the test strip
Test does not start
after applying blood
sample
The result is doubtful
INFOPIA [ 28 ]
Specifications
Model IGM-0002A
Test Range 0.6~33.3 mmol/L (10~600 mg/dL)
Reading Time 9 sec
Memory Capacity 200 test results
Operating Temperature 50-104˚F(10-40˚C )
Operating Humidity 10 ~ 90%
Sample Type Capillary Whole Blood
Calibration Plasma-Equivalent
Hematocrit 30 ~ 55%
Sample Volume Minimum 1.5 ㎕
Display Type LCD
Size (D X W X H) 22.8
X 54.5 X 91 (mm)
Weight 55g (including batteries)
Power Source 3V Li Battery (CR2032)
X 2
Battery Life running 5000 tests
Glucose Unit Either mmol/L or mg/dL
Specifications

[ 30 ]
Note
Please refer to the table below to identify symbol
[ 29 ]
EasyGluco
TM
Warranty
Three-Year Warranty
If, at any time during the first three years after purchase, the meter does not work for any reason with
the exception of obvious abuse, misuse, or disastrous damage, Infopia will replace your EasyGluco
TM
‚
Meter or equivalence free of charge.
The Warranty Policy of Infopia only applies to the original purchaser of the Meter and will not include
the batteries supplied with the Meter set.
Please fill in the warranty card attached to the set.
Mail or fax it back to us.
The EasyGlucoTM‚ Meter has a full three-year warranty from the original date of your purchase. For
your convenience, please include your date and place of purchase.
Serial number
This product fulfills the requirements of Directive
98/79/EC on invitro diagnostic medical devices.
Caution, consuit accompanying documents
In vitro diagnostic device
Batch code
Catalogue number
Store at
Consult operating instructions
Used by
Manufactuing date
Keep away from sunlight
Self-testing Used
Waste electrical and electorinic equipment
Manufacturer

MemoMemo
 Loading...