

Page 1

TD30
USER’S GUIDE
Page 2

Table of Contents
Notes -------------------------------------------------------------------------------------1
Maintenance, Storage and Proper Placing
TV System Integration----------------------------------------------------------------5
Introduction of Front Panel Functions --------------------------------------------6
Introduction of Connection in the back -------------------------------------------7
Miscellaneous Function Adjustment -------------------------------------------- 10
1. PICTURE ------------------------------------------------------------------------ 10
1-1 Brightness---------------------------------------------------------------- 10
1-2 Contrast ------------------------------------------------------------------ 10
1-3 Auto Picture ------------------------------------------------------------- 10
1-4 Manual Picture---------------------------------------------------------- 11
1-4-1 V Position -------------------------------------------------------- 11
1-4-2 H Size ------------------------------------------------------------- 11
1-4-3 H Position -------------------------------------------------------- 11
1-4-4 Fine Tune--------------------------------------------------------- 11
1-5 Sharpness --------------------------------------------------------------- 12
1-6 Color Temp--------------------------------------------------------------- 12
2. VIDEO ---------------------------------------------------------------------------- 13
2-1 Brightness---------------------------------------------------------------- 13
2-2 Picture -------------------------------------------------------------------- 13
2-3 Color----------------------------------------------------------------------- 13
2-4 TINT ----------------------------------------------------------------------- 13
2-5 Sharpness --------------------------------------------------------------- 13
2-6 Color Temp--------------------------------------------------------------- 14
2-7 Video Enhance---------------------------------------------------------- 14
2-8 NR(Noise Reduction)-------------------------------------------------- 14
3. AUDIO---------------------------------------------------------------------------- 15
3-1 Volume-------------------------------------------------------------------- 15
3-2 Treble --------------------------------------------------------------------- 15
3-3 Bass ----------------------------------------------------------------------- 15
3-4 SRS------------------------------------------------------------------------ 15
3-5 SRS Level---------------------------------------------------------------- 15
3-6 MTS(TV Mode) --------------------------------------------------------- 15
4. SETUP --------------------------------------------------------------------------- 16
4-1 Language ---------------------------------------------------------------- 16
4-2 Gamma ------------------------------------------------------------------- 16
4-3 Aspect--------------------------------------------------------------------- 16
1
Page 3

4-4 PIP ------------------------------------------------------------------------- 16
4-4-1 Size ---------------------------------------------------------------- 16
4-4-2 Pos----------------------------------------------------------------- 17
4-4-3 Source ------------------------------------------------------------ 17
4-4-4 PIP TV Channel------------------------------------------------- 17
4-5 OSD Style---------------------------------------------------------------- 17
4-6 Factory Reset ----------------------------------------------------------- 17
Other TV Signal setting ------------------------------------------------------------ 18
Specifications------------------------------------------------------------------------- 19
The Remote Control Unit ---------------------------------------------------------- 20
Specifications of TV Tuner--------------------------------------------------------- 22
Accessories --------------------------------------------------------------------------- 22
2
Page 4
r
r
t
r
Notes
1. Due to the high-voltage power within this LCD, do not expose it to rain or
water. To avoid electric shock or fire, please do not open the LCD back
cover, perform adjustment or clean on it.
2. Please read the manual and notes carefully before operating it.
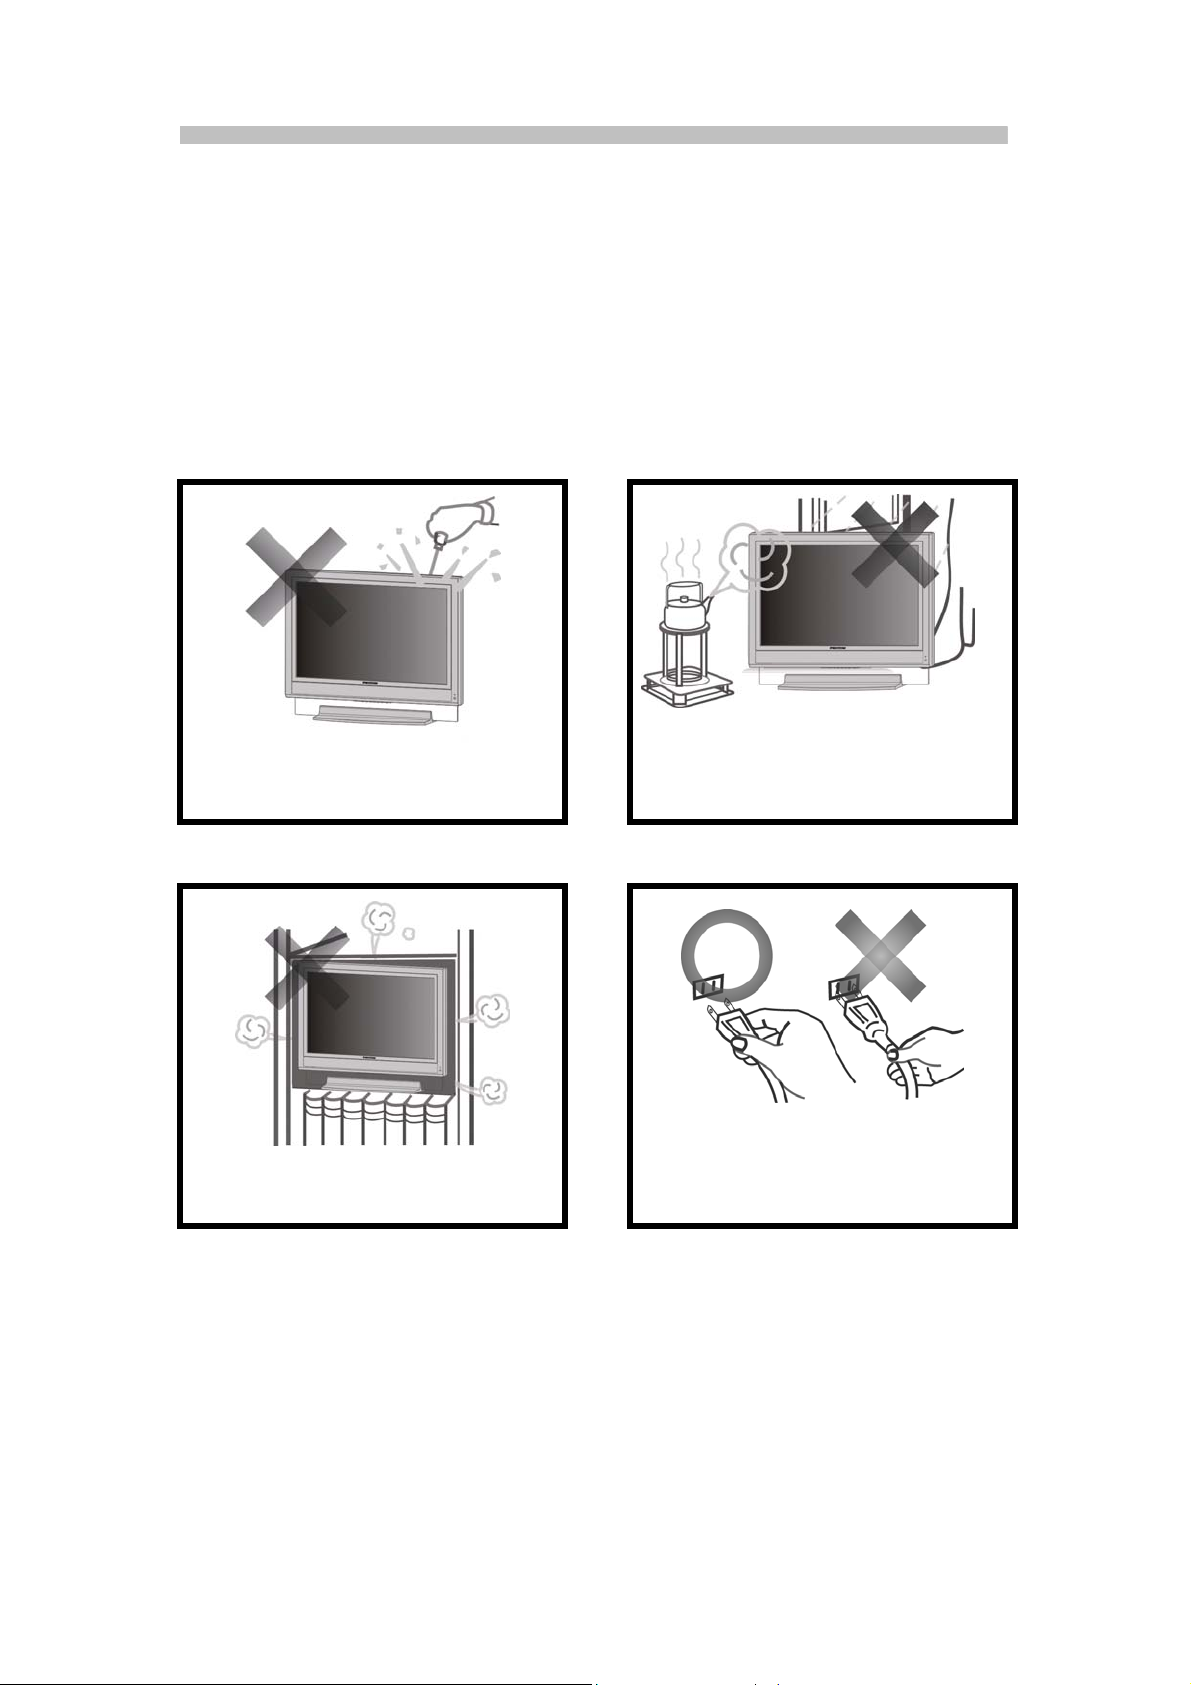
Maintenance, Storage and Proper Placing
Do not open the LCD case, only an
authorized technician can perform
services on it.
For ventilation, do not place you
LCD monitor on a cluttered stack o
in a closet.
To avoid fire or electric shock, do no
expose your LCD monitor to rain o
water.
Do not pull the cable while you are
disconnecting LCD monitor power.
Please hold the plug and then
disconnect the power cable.
3
Page 5
r
y
g
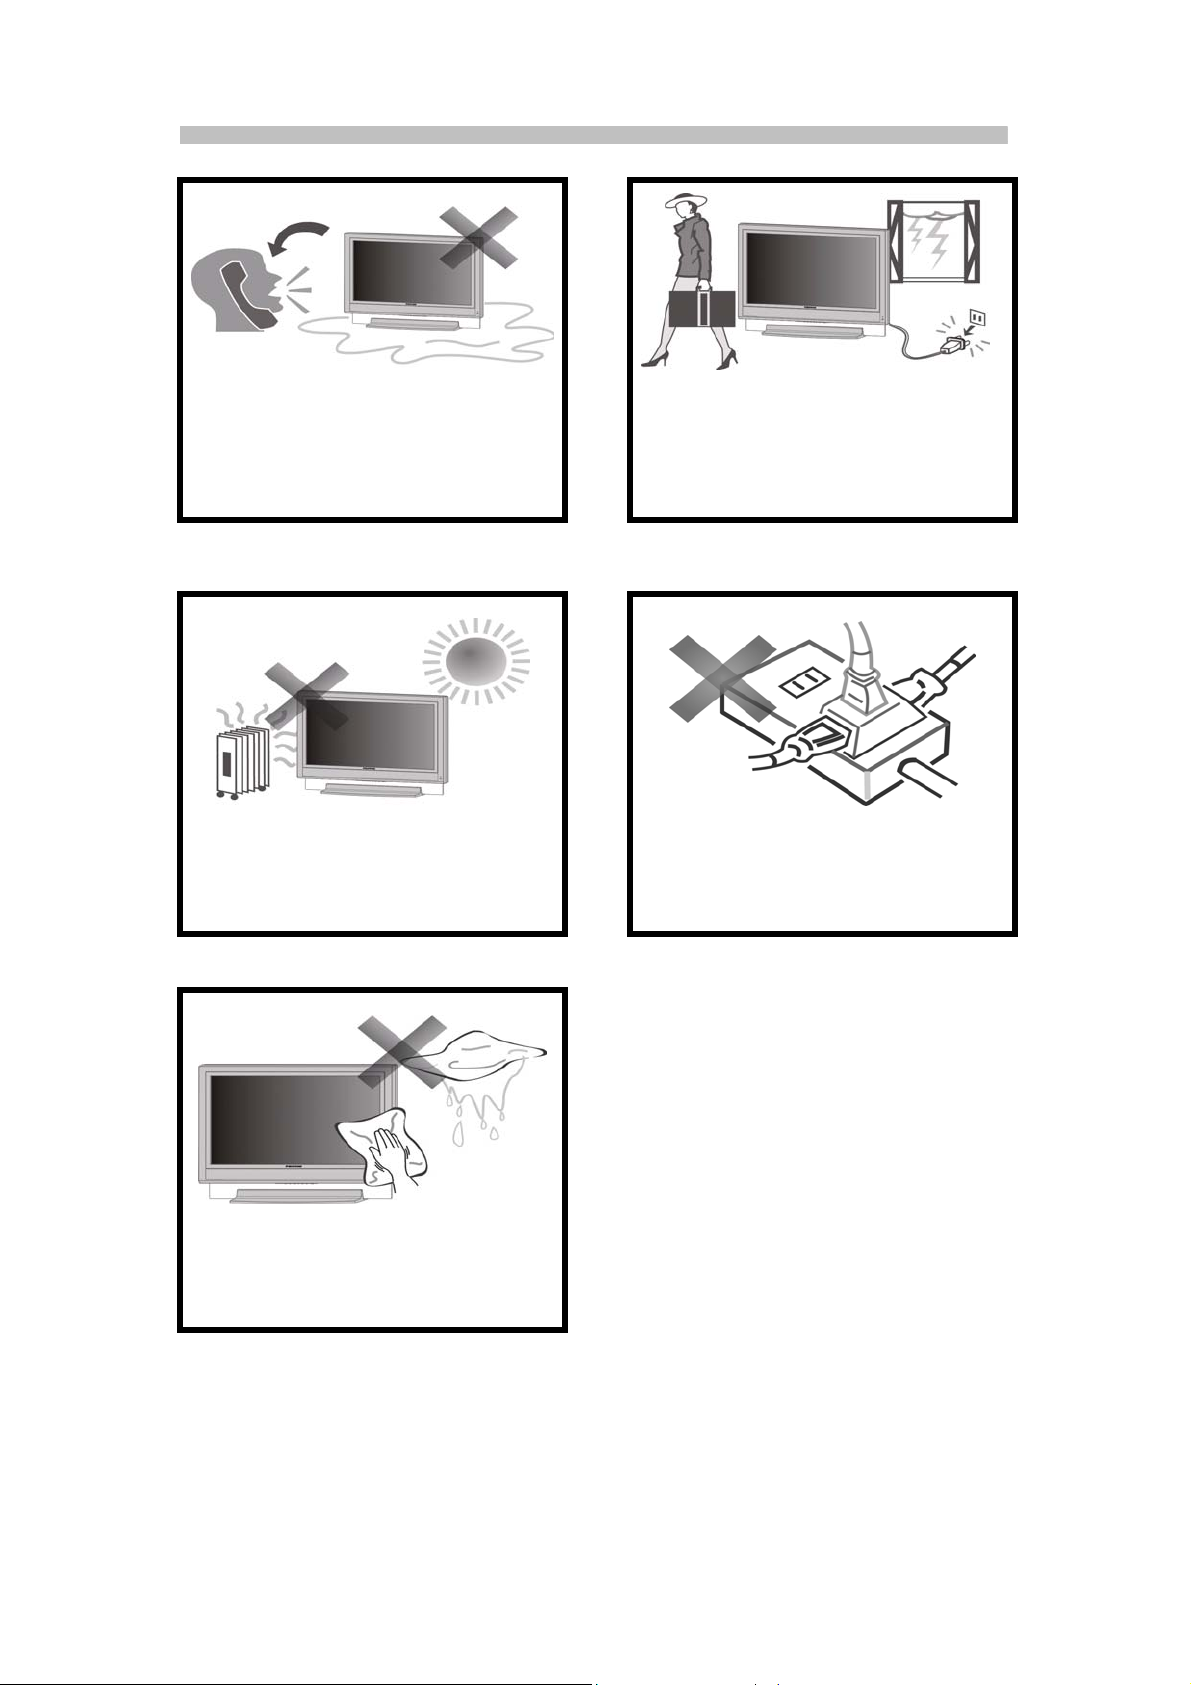
Do not operate your LCD monito
when liquids or solids spill or drop
into the monitor, call an authorized
technician immediately.
When it’s raining with thunder or you
will leave for a period of time, unplug
power.
Do not place your monitor in a high
temperature, moist or dusty place.
Clean your monitor with a slightl
damp rag. Do not use a chemical
cleanin
solution.
Do not plug the monitor into a
heavily used outlet.
4
Page 6
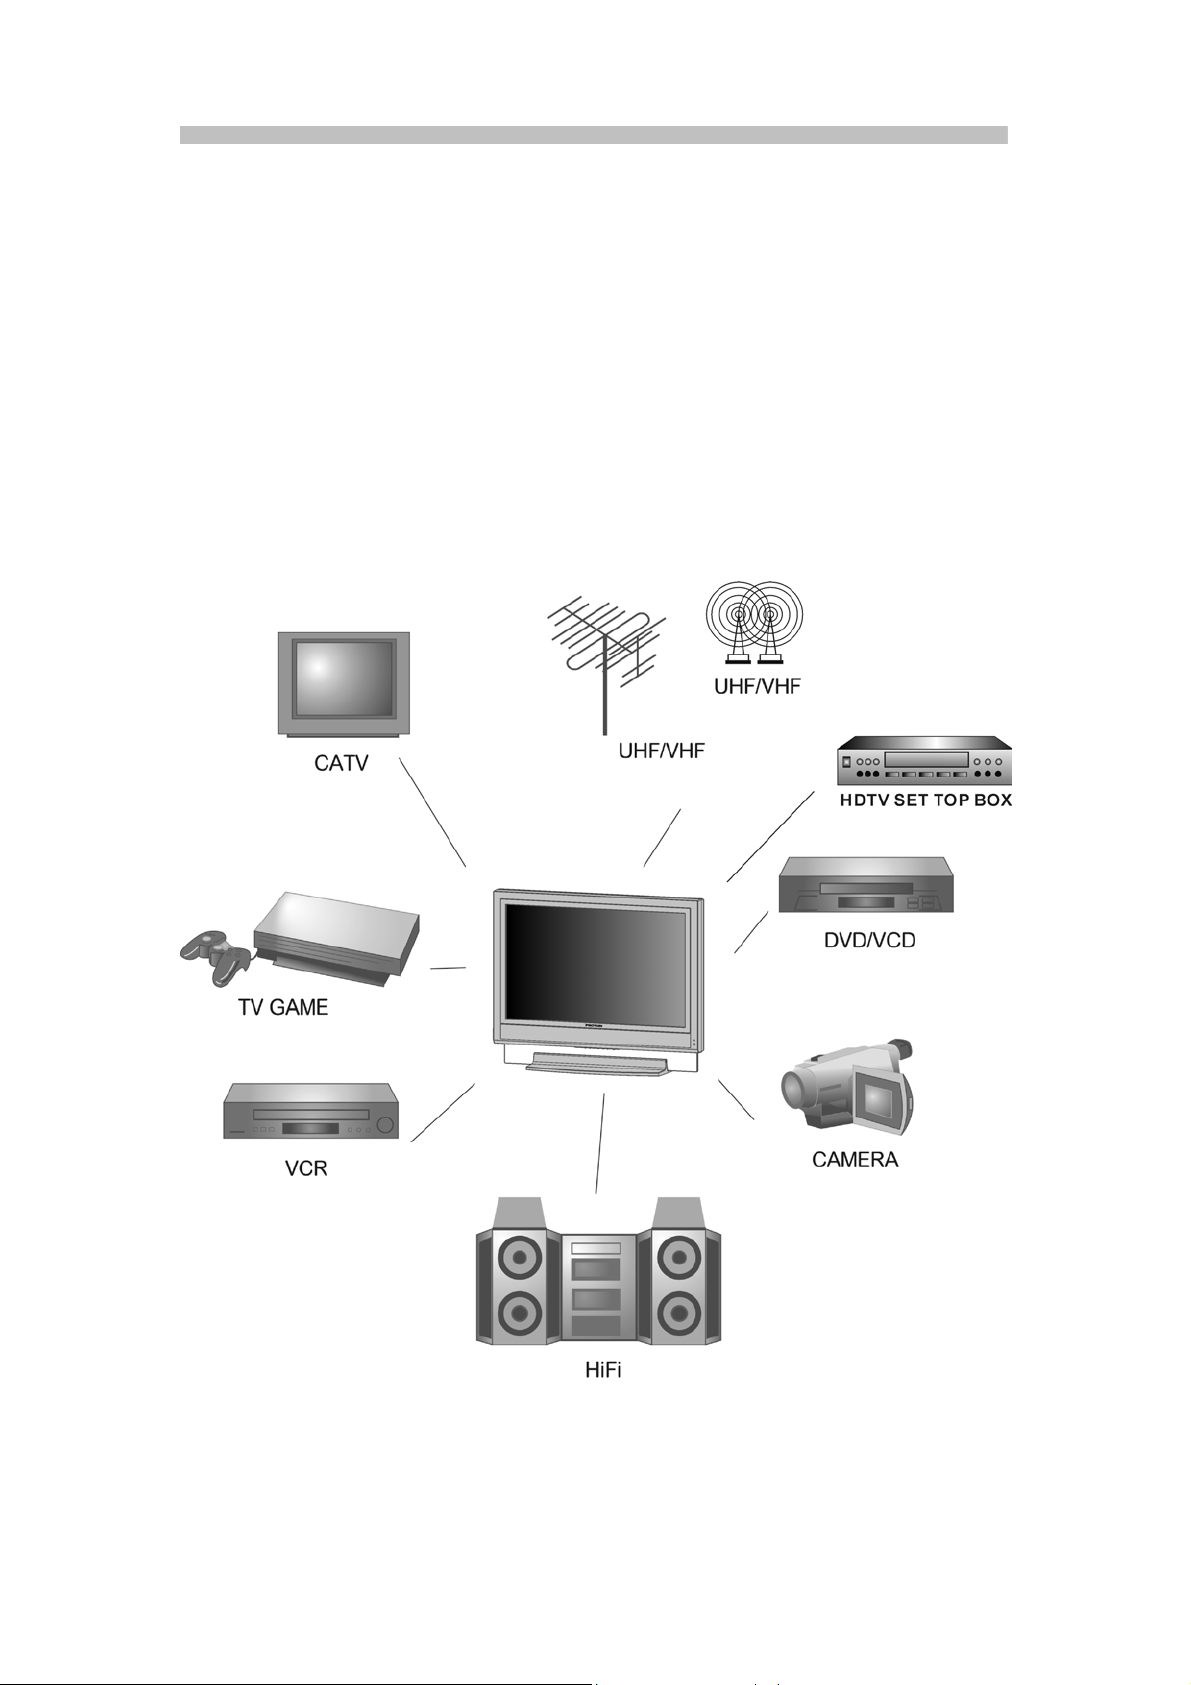
TV System Integration
TD30 with professional TV tuner can receive 181 channels (2-69 channels for
wireless TV, 1-125 channels for cable TV), and has the MTS decoding function
to play Stereo or SAP. The parental control prevents views from watching
programs that are not age-appropriate, such as programs containing violence
or adult language; the closed captions includes CC1, CC2, text1 and text2,
show the text under a picture, caption on video are text located somewhere on
the picture.
Function Integration System
5
Page 7
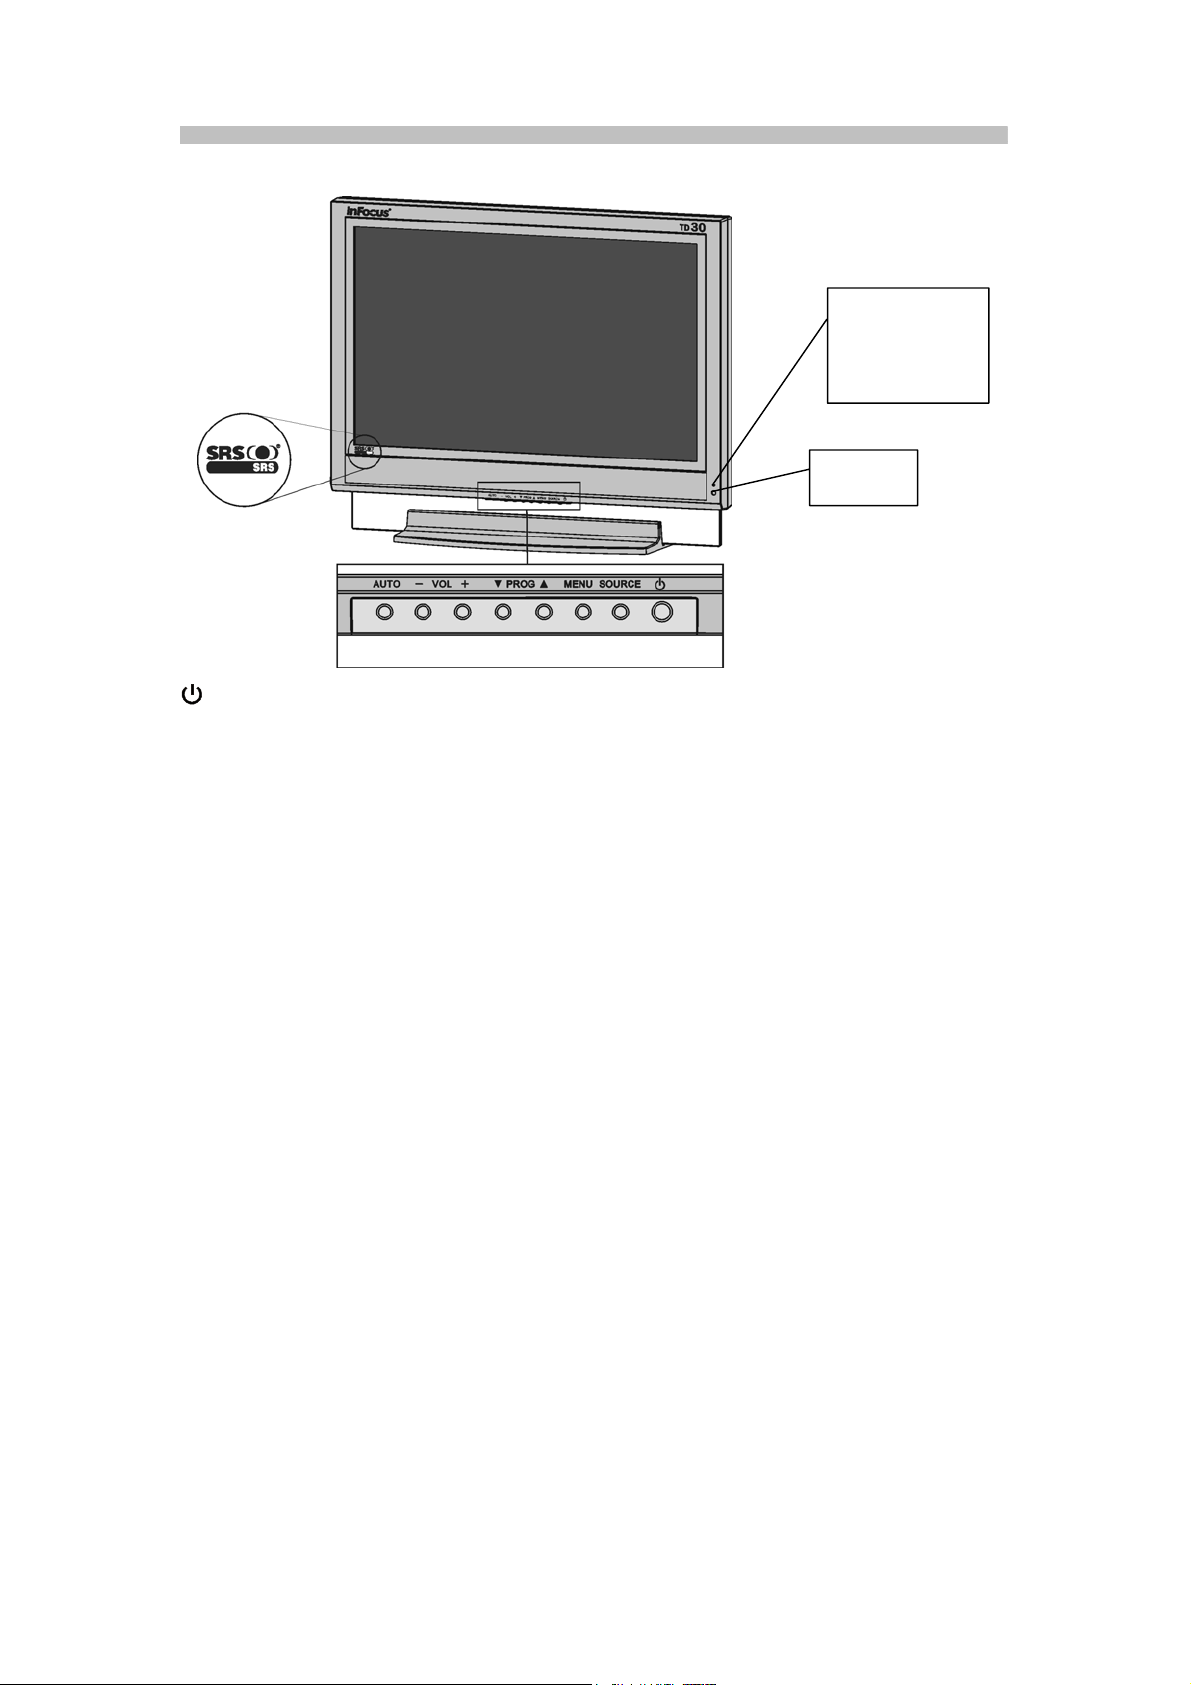
Introduction of Front Panel Functions
LED indicator:
Blue when On,
and Orange
when Off.
Remote
receiver
button You can turn on/off the LCD with this button. The LED indicator
is blue when the LCD is on, and is orange when the LCD is off.
SOURCE
button
Press this button to change and display TV signals such as
RGB/DVI/HDTV YPbPr/Component/S-Video/AV-Video1/
AV-Video 2/TV.
MENU button Press this button to open the OSD, and continuously press this
button to select the main function to use.
(please see page 9; OSD operation)
PROG▲▼
button
Press ▲ button to select channel forward and ▼ button
to select channel backward
If you use this button with the MENU button, you can select
the desired item after opening the OSD.
VOL+/Button
Press + button to increase the audio volume and – button
to decrease the audio volume.
With the MENU button, you can use this button to adjust
functions.
AUTO button Press this button to perform automatic adjustment.
6
Page 8

Introduction of Connection in the back
This high-resolution LCD monitor can be substituted for your domestic TV or
small CRT monitor. it can receive signals from UHF/VHF/CATV/HDTV and
VCD/DVD.
AC Input This terminal is for the connection of 110~264VAC power
supply.
RS-232C Input This terminal is especially for the manufacturer and after
sales service, not for customers.
DIGITAL Input This 24-pin DVI-D terminal is for the digital RGB input
signal from the computer.
ANALOG Input This 15-pin mini D-sub terminal is for the analog RGB
input signal from the computer.
AUDIO Input This 3.5ψMini jack is for the audio input signal from the
computer.
7
Page 9

8
Page 10

HDTV (Y/Pb/Pr) Input
COMPONENT
(Y,Pb/Cb,Pr/Cr) Input
4V1L1R1 AV Input
S-VIDEO/V2L2R2
AV Input
VIDEO Output
It can receive 480i/480p/720p/1080i AV signal to
provide a better image.
It can receive general DVD-level 480i/480p AV signal
to provide Hi-fi image.
It is provided for AV equipment such as
VCR/VCD/DVD.
Note: If you want to connect to a mono video player, plug
the yellow and white connectors to their corresponding
jacks.
It is provided for AV equipment such as
VCR/VCD/DVD.
When S-Video and AV inputs simultaneously receive
signals, the S-Video input will receive signals first.
You can connect it to the video player to record TV
programs.
LR Audio Output
You can connect it to AUX or a family amplifier to
enhance sound effects.
RF Input
This terminal is for general antennas and CATV.
TD30 has 4 types of standard video connections. You should use the
Tip:
best connection available to get the best display.
For example, Ypbpr (HDTV) > Ycbcr (Component) > S-video > AV (Composite)
> Coaxial (RF)
9
Page 11

j
g
Miscellaneous Function Adjustments
The following description is for the main signal source “Analog RGB”
Note: The text within the brackets relate to the same buttons on the remote control.
1. PICTURE
1-1 Brightness
Press and hold the MENU button until the OSD screen appears, and
press PROG▲▼ buttons to select Brightness, then you can easily
adjust the desired brightness with the VOL +/- buttons.
Note :
You may need to re-ad
of a setting could tire out your eyes easily.
1-2 Contrast
Press and hold the MENU button until the OSD screen appears, and
press PROG▲▼ buttons to select Contrast, then you can easily
adjust the desired contrast with the VOL +/- buttons.
1-3 Auto Picture
Press and hold the MENU button until the OSD screen appears, and
press PROG▲▼ buttons to select Auto Picture, then press the VOL
+/- buttons to perform automatic adjustment.
Note :
Perform the Auto Picture first after the installation is completed for the first
time.
Use the full and bright screen to perform Auto Picture.
you should perform Auto Picture under a Windows environment, and doin
so can adjust the screen to the best display.
The Auto Picture function will disappear when the main signal source is
DVI
ust brightness after the TD30 warms up. Too bright
We recommend that
10
Page 12

1-4 Manual Picture
Press and hold the MENU button until the OSD screen appears, and
press PROG▲▼ buttons to select Manual Picture, then the submenu
will appear as illustrated below:
1-4-1 V Position
Press PROG▲▼ buttons to select the V Position, press VOL
+/- buttons, and then you can manually adjust the screen position
in vertical directions.
1-4-2 H Size
Press PROG▲▼ buttons to select the H Size, press VOL +/-
buttons, and then you can manually adjust the screen width.
1-4-3 H Position
Press PROG▲▼ buttons to select the H Position, press VOL
+/- buttons, and then you can manually adjust the screen position
in horizontal directions.
1-4-4 Fine Tune
Press PROG▲▼ buttons to select the Fine Tune, press VOL +/-
buttons, and then you can reduce or eliminate the abnormal
displays (e.g., Trembling screen), which may be caused by
various display adapters.
Note : The Manual Adjustment function will disappear when the main signal
source is DVI.
11
Page 13

1-5 Sharpness
Press and hold the MENU button until the OSD screen appears, and
press PROG▲▼ buttons to select Sharpness, then you can easily
adjust your preferred sharpness with the VOL +/- buttons.
1-6 Color Temp
Press and hold the MENU button until the OSD screen appears, and
press PROG▲▼ buttons to select Color Temp, then you can easily
adjust your preferred color temperature in “9300K”, “6500K”, “5000K”
or “User” with the VOL +/- buttons.
If you select the User mode, the submenu will appear. You can press
PROG▲▼ buttons to select Red, Green or Blue, and easily customize
your preferred color temperature with the VOL +/- buttons as illustrated
below.
12
Page 14

2. VIDEO
Caution: This TV tuner has 6 kinds of input signal sources, including TV,
S-Video, AV-Video 1, AV-Video 2, HDTV YpbPr and Component. To
set the input signal source, you have to connect it first to display the
following screen when setting. The following description is for TV
setting:
2-1 Brightness
Press and hold the MENU button until the Image screen appears, and
press PROG▲▼ buttons to select Brightness, then you can easily
adjust the desired brightness with the VOL +/- buttons.
2-2 Picture
Press and hold the MENU button until the Image screen appears, and
press PROG▲▼ buttons to select Contrast, then you can easily
adjust the desired contrast with the VOL +/- buttons.
2-3 Color
Press and hold the MENU button until the Image screen appears, and
press PROG▲▼ buttons to select Color, then you can easily adjust
the desired tint with the VOL +/- buttons.
2-4 TINT
Press and hold the MENU button until the Image screen appears, and
press PROG▲▼ buttons to select Tint, then you can easily adjust the
desired hue with the VOL +/- buttons.
2-5 Sharpness
Press and hold the MENU button until the Image screen appears, and
press PROG▲▼ buttons to select Sharpness, then you can easily
13
Page 15

adjust your preferred sharpness with the VOL +/- buttons.
2-6 Color Temp
Press and hold the MENU button until the Image screen appears, and
press PROG▲▼ buttons to select Color Temp, then you can easily
adjust the desired color temperature with the VOL +/- buttons.
2-7 Video Enhance
Press and hold the MENU button until the Image screen appears, and
press PROG▲▼ buttons to select Video Enhance, then you can
easily set the image to softness (Off) or sharpness (On) with the VOL
+/- buttons.
2-8 NR(Noise Reduction)
Press and hold the MENU button until the Image screen appears, and
press PROG▲▼ buttons to select N R, then you can easily reduce the
screen’s noise by demand with the VOL +/- buttons.
14
Page 16

3. AUDIO
3-1 Volume
3-2 Treble
3-3 Bass
3-4 SRS
Press and hold the MENU button until the Audio screen appears, and
press PROG▲▼ buttons to select Vo l ume, then you can easily adjust
the volume with the VOL +/- buttons.
Press and hold the MENU button until the Audio screen appears, and
press PROG▲▼ buttons to select Treble, then you can easily adjust
the treble intensity with the VOL +/- buttons.
Press and hold the MENU button until the Audio screen appears, and
press PROG▲▼ buttons to select Bass, then you can easily adjust
the bass intensity with the VOL +/- buttons.
Press and hold the MENU button until the Audio screen appears, and
press PROG▲▼ buttons to select SRS, then you can easily turn on/off
the surround sound effect with the VOL +/- buttons.
3-5 SRS Level
Press and hold the MENU button until the Audio screen appears, and
press PROG▲▼ buttons to select SRS Level, then you can easily
adjust the surround intensity with the VOL +/- buttons.
3-6 MTS (TV Mode)
Press and hold the MENU button until the Audio screen appears, and
press PROG▲▼ buttons to select MTS, then you can set the sound to
Mono, Stereo or SAP with the VOL +/- buttons.
15
Page 17

4. SETUP
4-1 Language
Press and hold the MENU button until the OSD screen appears, and
press PROG ▲▼ buttons to select Language, and then press
VOL+/- buttons for Chinese or English.
4-2 Gamma
Press and hold the MENU button until the OSD screen appears, and
press PROG ▲▼ buttons to select Gamma, then press VOL+/-
buttons to select Vivid1, Vivid2, Vivid3 or Vivid4 mode.
4-3 Aspect
Press and hold the MENU button until the OSD screen appears, and
press PROG▲▼ buttons to select Aspect, then press VOL+/- buttons
to perform Full Screen, Panoramic, 4:3, Zoom, Enlarge or 4:3 to
16:9.
4-4 PIP
Press and hold the MENU button until the OSD screen appears, and
press PROG▲▼ buttons to select PIP, then press the VOL+/- buttons
to enter following window.
4-4-1 Size
Press PROG▲▼ buttons to select Size, and press the VOL+/-
buttons to perform off, Small or Large.
16
Page 18

4-4-2 POS
Press PROG▲▼ buttons to select POS, and press the VOL+/-
buttons for Upper Left, Upper Center, Upper Right, Middle
Left, Middle Right, Lower Left, Lower Center or Lower Right.
4-4-3 Source
Press PROG▲▼ buttons to select Source, and press the
VOL+/- buttons to perform Component, S-Video,
Composite1,Composite2, or TV.
4-4-4 PIP TV Channel
Press PROG▲▼ buttons to select PIP TV Channel which will
show the current Channel of the PIP Screen.
Note: The function displays only when the Signal Source is set to TV.。
4-5 OSD Style
Press and hold the MENU button until the OSD screen appears, and
press PROG▲▼ buttons to select OSD Style, and then press VOL+/-
buttons for Opaque or Transparent OSD window.
4-6 Factory Reset
Press and hold the MENU button until the OSD screen appears, and
press PROG▲▼ buttons to select Factory Reset , and then press
VOL+/- buttons to bring all settings back to the Factory Defaults.
17
Page 19

Other TV Signal Settings:
1. The basic operations of S-Video, AV-Vi d e o 1 , AV-Vi d eo2 and
Component (Y/Cb/Cr) are the same as the descriptions above (TV
Section 1) except the MTS function in Item 2: Audio Settings and Item 3:
TV Settings.
2. The basic operations of HDTV and Component (Y/Pb/Pr) are as
descriptions above (TV Section) except the Image Enhancement and
Noise Reduction functions of Item 1: Image Settings, the MTS function of
Item 2: Audio Settings and Item 3: TV Settings.
3. For HDTV signal, the 2-Tuner PIP Ratio can only adjust to Small or Large.
18
Page 20

Specifications
LCD Panel Size 29.6-inch (Diagonal, about 762mm)
Pixels per inch 1280 (W) X 768 (H)
Pixel Pitch (mm) 0.5025 (W) X 0.5025 (H)
Max. Display Area (mm) 643.2 (W) X 385.92 (H)
Display Color 16.7 million colors
Brightness 450 cd/m
Contrast 350:1 (typ)
Response Time (Tr+Tf) 25ms
View Angle Horizontal: 170 deg., Vertical: 170 deg.
Surface Process Anti-Glare
Power Voltage AC 100-240Vac, 50/60Hz
Input Signal RGB RGB 0.7Vpp/ 75 ohm
H.V. Separate/Composite Sync Signals,
TTL and Sync on Green compatible
Vertical Frequency Bandwidth: 30-70KHz;
Horizontal: 50-85Hz;
Frequency: 110MHz
Vertical Frequency Bandwidth: 30-70KHz;
TMDS
Resolutions: Main Mode VESA 1280 x 768 @ 60Hz
Compatibility PC Max. to 1280 x 1024 @ 60Hz
Power Macintosh® Max. to 1152 x 870 @ 75Hz
Connector Analogy Signal Input 15 pin Mini D-Sub type
Digital Signal Input 24 pin DVI-D type
Speaker Input 1Vrms/ 47K ohm
Connector
Operating
Conditions
Humidity 10% - 90%
Storage
Conditions
Humidity 10% - 90%
Dimension Life Size 595mm (H) x 740mm (W) x 198mm (D)
Weight Net/Gross Weight 20.5 Kg/29 Kg
Power Saving Turn on (Blue LED) Max. 170W
Turn off (Orange LED) 3W
Output Power
Consumption
Temperature
Temperature
Package Size
Horizontal: 50-85Hz;
Frequency: 110MHz
5W X 2
3.5ψjack
5℃ - 30℃
-20℃ - 50℃
340mm (H) x 910mm (W) x 720mm (D)
2
(typ)
19
Page 21

The Remote Control Unit
POWER
SOURCE
MUTE
MENU
INFO
SLEEP
You can turn on/off the LCD with this
button. The LED indicator is blue when
LCD is on, and is orange when LCD is off.
Press this button to change and display TV
signals such as S-Video/AV-Video1/
AV-Video 2/TV/RGB/DVI/HDTV
YPbPr/Component.
Press this button to turn on/off the sound.
Press this button to open the OSD, and
continuously press this button to select the
main function to use.
Press this button to turn on/off channel
display. Press once to turn on, twice to turn
off.
Press this button to select when you want
the TV auto turn off. Press once for 1 min.,
max. to 120 minutes.
ASPECT
RESET
SWAP
AUDIO
SOURCE
PIP
DIGITS
(0~9, 100)
RETURN
“
”
Press this button to change the screen
ratio to Full
Screen/Panoramic/4:3/Enlarge/4:3 to 16: 9
mode.
Press this button twice to restore all
settings to factory defaults.
Press this button to exchange the location
of Main/PIP sources.
Press this button to select the audio from
Main or PIP screen.
Press this button to open 2-Tuner PIP and
adjust various operations of PIP Screen
with VOL+/- buttons.
Press these digits to select channels
directly, the digits display on the screen
indicated actual channel number.
Exchange between 2 channels. After
changing channel, press this button to last
channel.
20
Page 22

VOL
CH
MTS
FAV
CH±
FAV±
Press VOL▲ button to increase volume
and VOL▼ button decrease volume.
Press CH▲ button to select the channel
forward and CH▼ button to select the
channel backward.
Press this button to set the sound to
MONO/Stereo/SAP (Note: Input signal
should has more than 2 languages.)
Press this button to switch your favor
channel.
Press this button to add current channel
into memory when + shows, or delete it
when – shows.
Press this button to add your favor into
memory when + shows, or delete it when –
shows.
21
Page 23

Specifications of TV Tuner
Input Signal
Composite 1Vp-p/75ohm
S-Video Y: 1Vp-p/75ohm; C: 0.3Vp-p/75ohm
Component (Y/Cb/Cr)
HDTV (Y/Pb/Pr)
Audio 1Vrms, 47K ohm
Output Signal Composite 1Vp-p/75ohm
Audio
Connector RF Input F-type
Composite Input RCA type
S-Video Input 4-pin mini DIN type
Component (Y/Cb/Cr) Input RCA type
HDTV (Y/Pb/Pr) Input RCA type
Audio Input RCA L/R type
Composite Output RCA type
Audio Output RCA L/R type
Operating
Conditions
Humidity 10% - 90%
Storage
Conditions
Humidity 10% - 90%
Temperature
Temperature
5℃ - 30℃
-20℃ - 50℃
Specifications are subject to change without notice.
The LCD monitor meets the VESA® DPMS (Display Power Management
Signaling) standard. To the normal operation of power saving function, the
display adapter or the PC should also meet VESA DPMS standard. Turn Off
means the LCD monitor has the lowest DPMS state and has the highest
power saving efficiency.
Accessories: User Manual, Power Cord, 15-pin mini D-sub Signal Cable,
3.5ψAudio Cable, Warranty card, Remote Control Unit, Batteries, A/V cable (3
x RCA yellow, red, white shrouded connectors) and Registration Card.
22
 Loading...