

InFocus SimpleShare INA-SIMS1, SimpleShare INA-SIMPS1, SimpleShare INA-SIMRC1, SimpleShare INA-SIMTM1 User Manual

1
www.infocus.com/SimpleShare
User Manual
Models:
INA-SIMS1
INA-SIMPS1
INA-SIMRC1
INA-SIMTM1
English . Español . Français . Deutsche
1
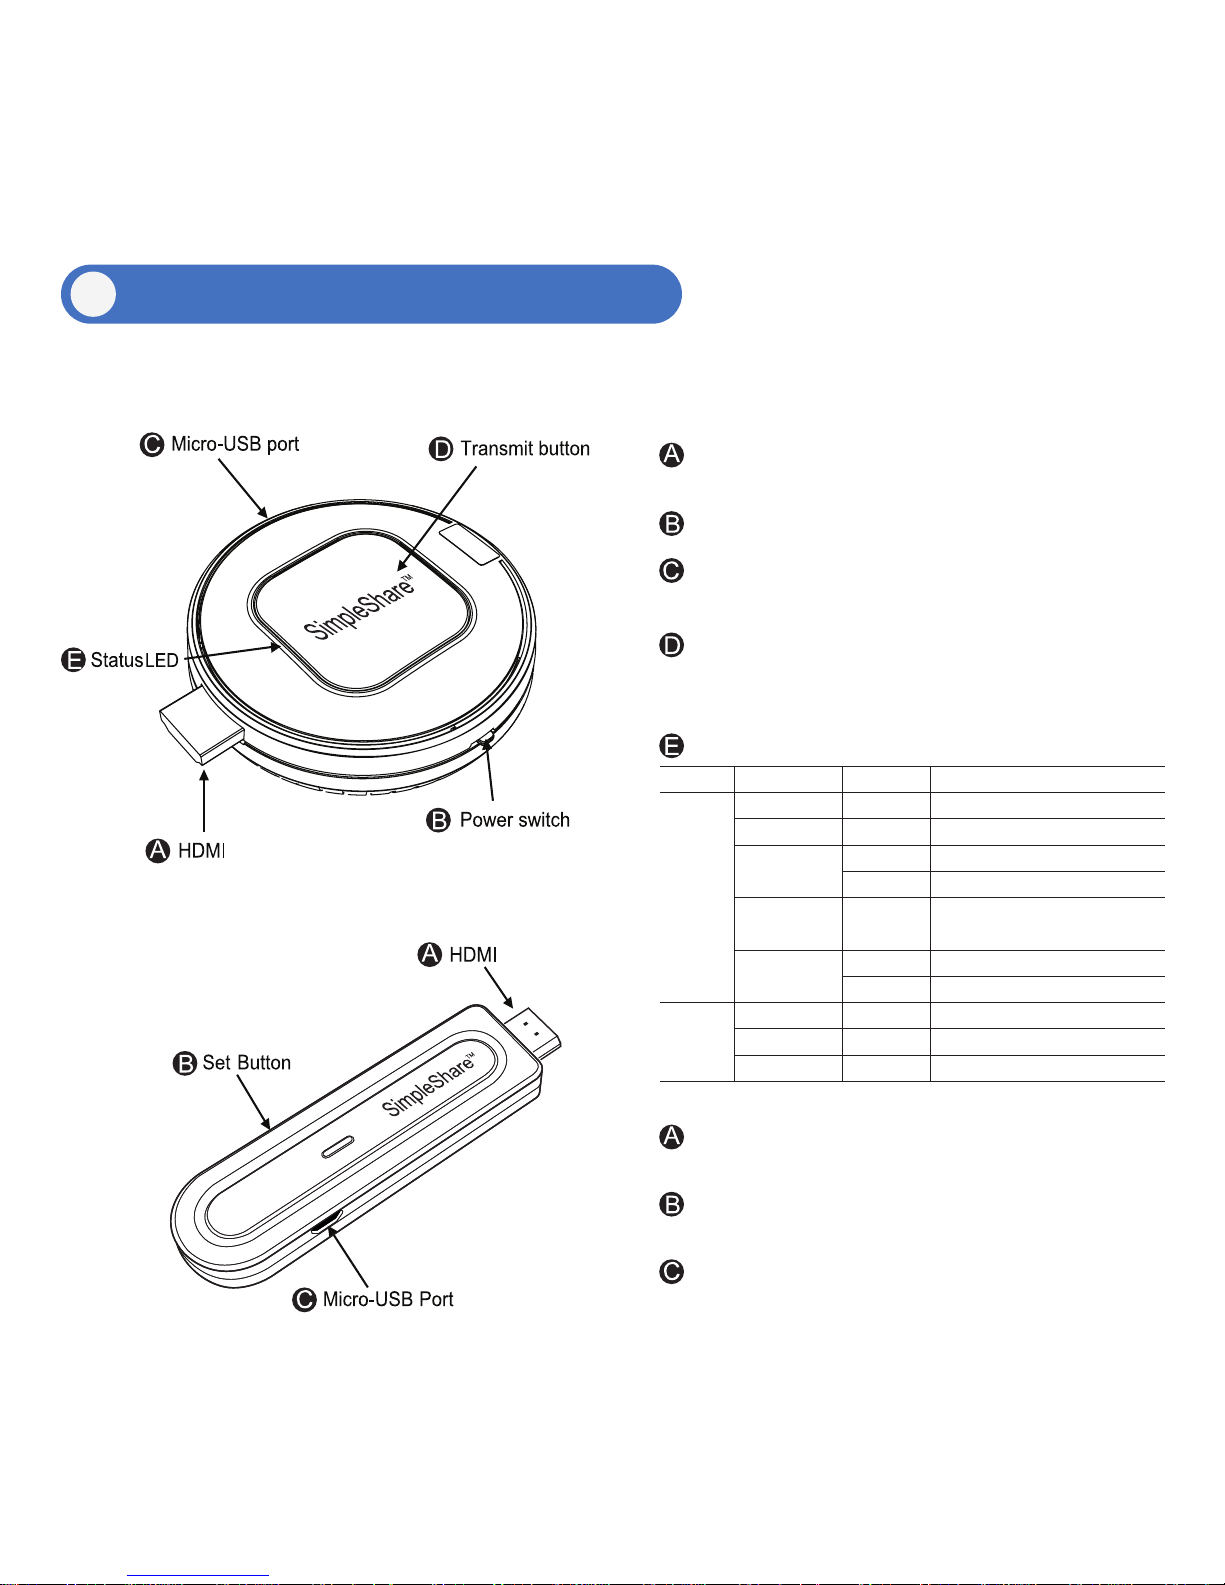
Product Appearance & Features
1
TRANSMITTER
RECEIVER
HDMI : Connect to HDMI output port of source
device.
POWER SWITCH : Power ON/OFF
Micro-USB Port : Power input for micro USB
plug of charging cable.
TRANSMIT button
STATUS LED
Mode
Live
Mode
Setting
Mode
Status DescriptionLED Color
No Light
PURPLE
Solid
Solid
Solid
Solid
Solid
Solid
Blinking
Blinking
Blinking
System booting
No power
Ready to transmit
HDMI Pairing error
Low Battery Warning
(20% of battery remaining)
Charging
Pairing
Video Streaming
Pairing success
Waiting for re-booting
BLUE
ORANGE
RED
PURPLE
BLUE
RED
HDMI : Connect to HDMI input port of display
device
SET button : Configure for pairing with
transmitter
Micro-USB Port : Power input for micro USB
plug of charging cable
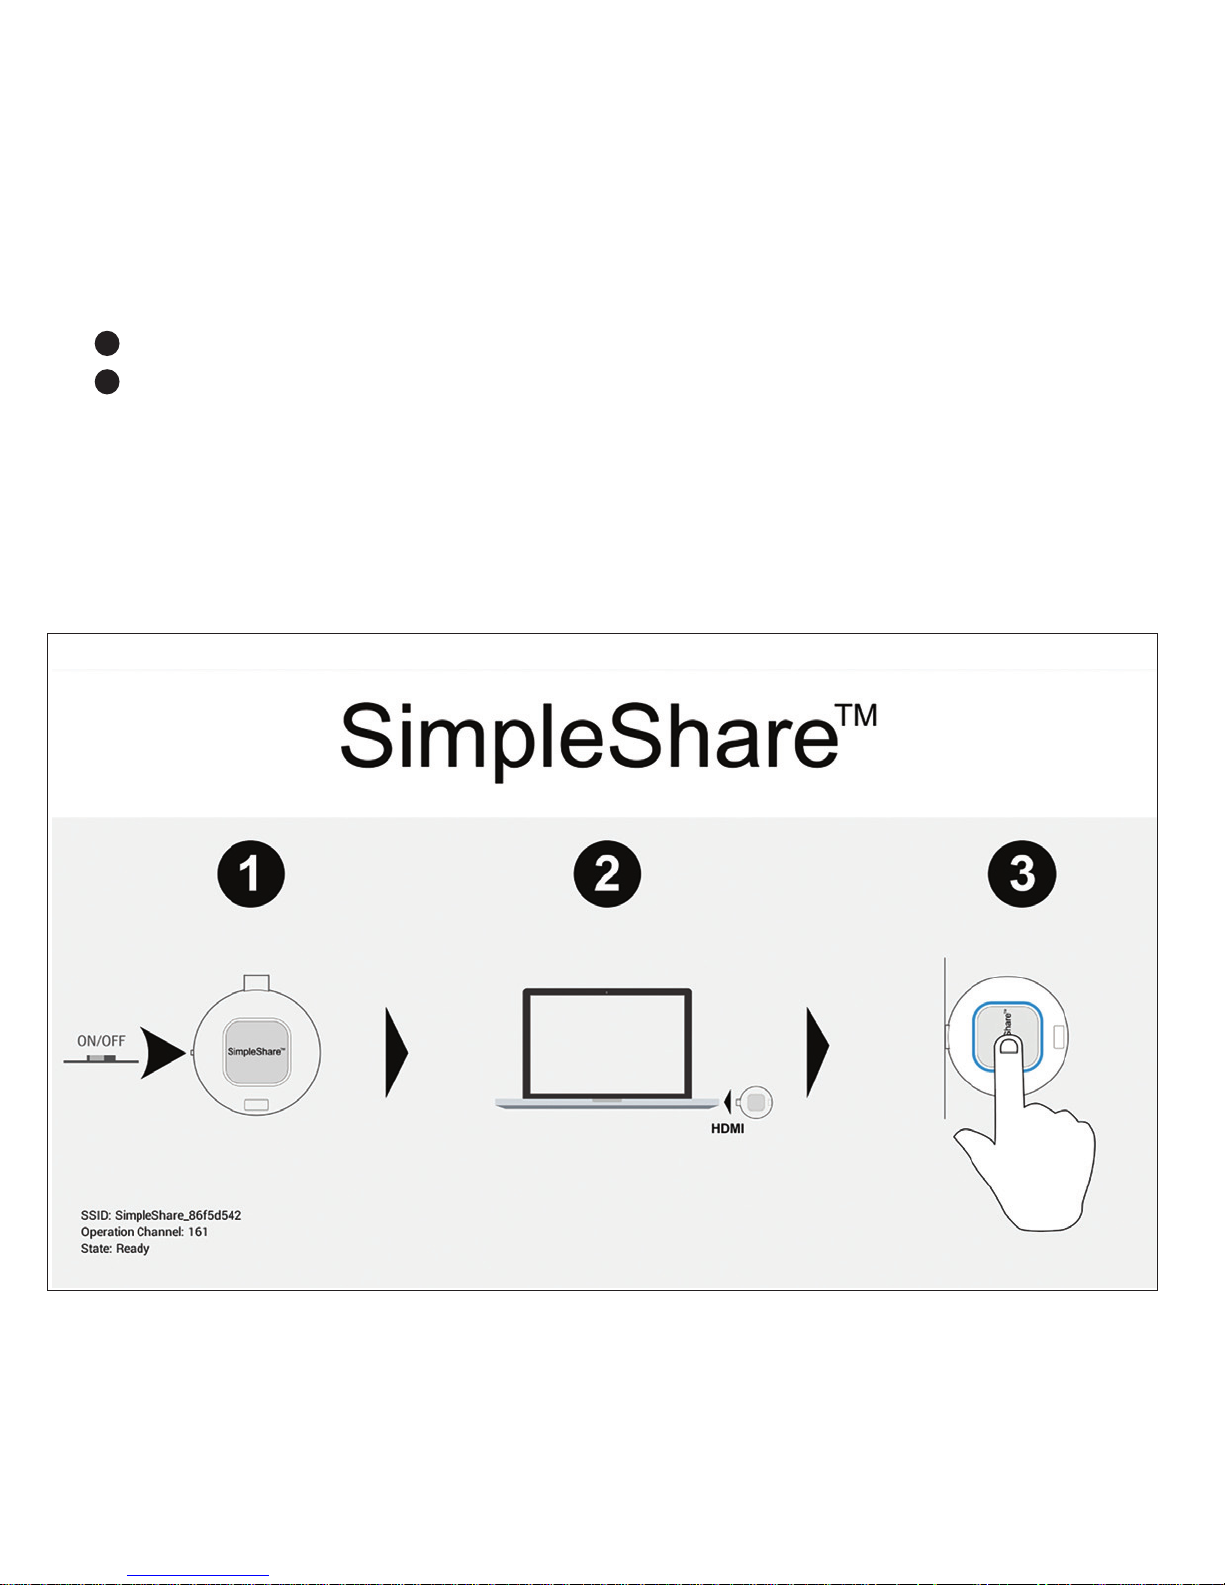
a. Start/End Transmission
b. Switch device if using multi-transmitters
2
2
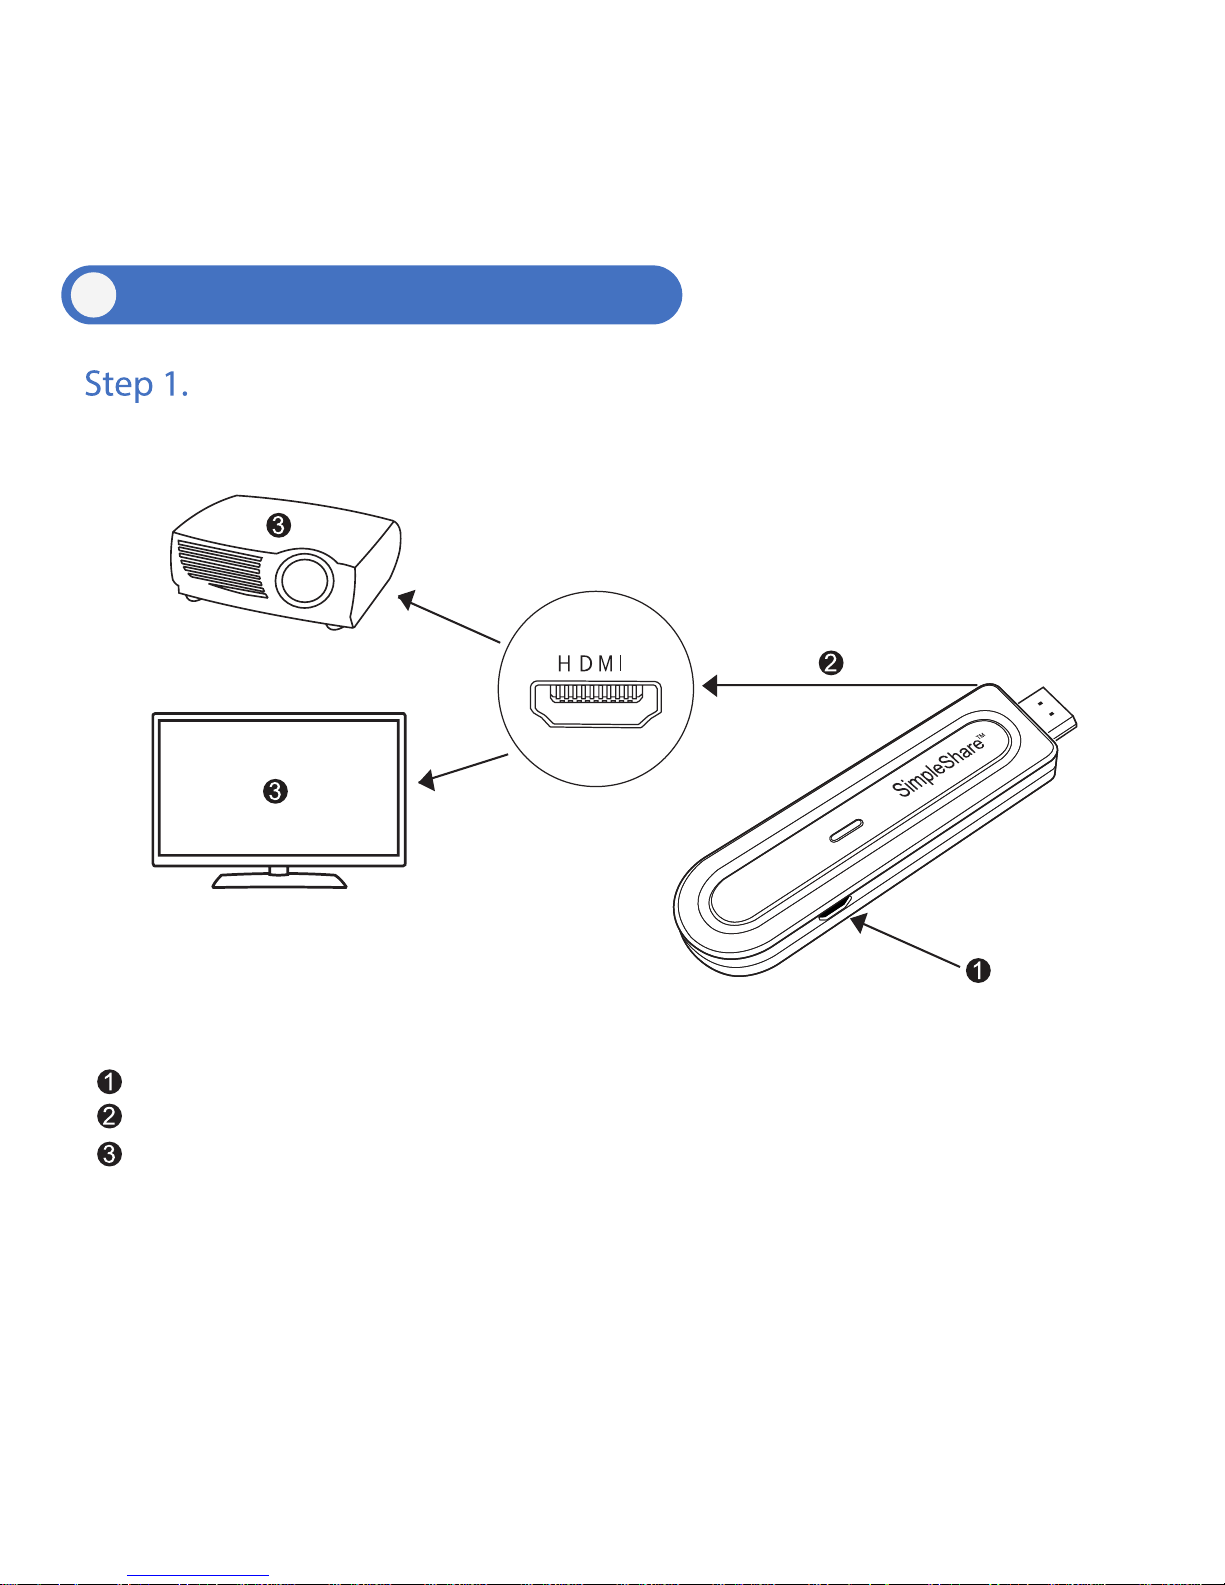
Installation
Installing the Receiver
Connect micro USB plug of charging cable to micro USB port of SimpleShare Receiver.
Connect SimpleShare Receiver into HDMI input port of the display device (eg projector, TV, etc).
Connect USB plug of charging cable to USB port of display device.
* If display device has no USB input or if USB power on display device is rated at under 600mA,
use adapter to power.
3
4
5
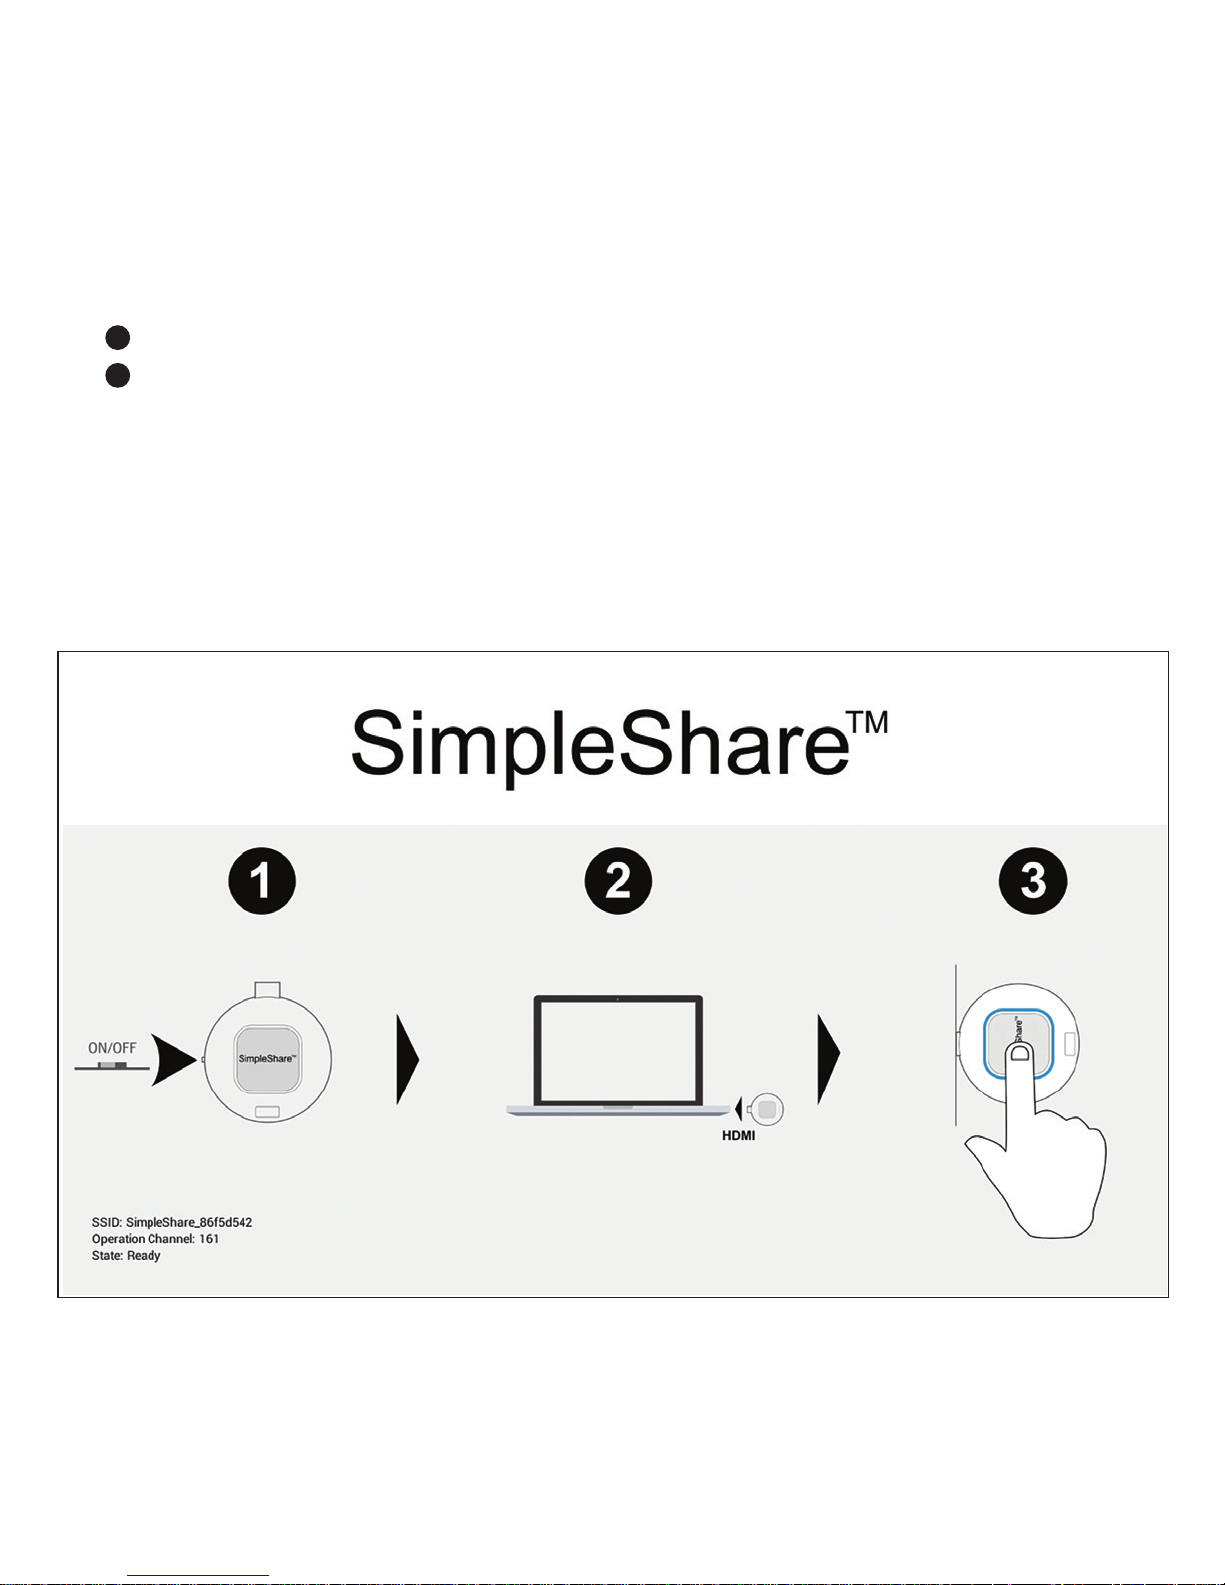
Select HDMI source input to which SimpleShare Receiver is connected.
Stand-by screen will appear within 30 seconds.
4
SimpleShare Receiver : While stand-by screen is on, press SET
button for 5 seconds to enter Setting Mode.
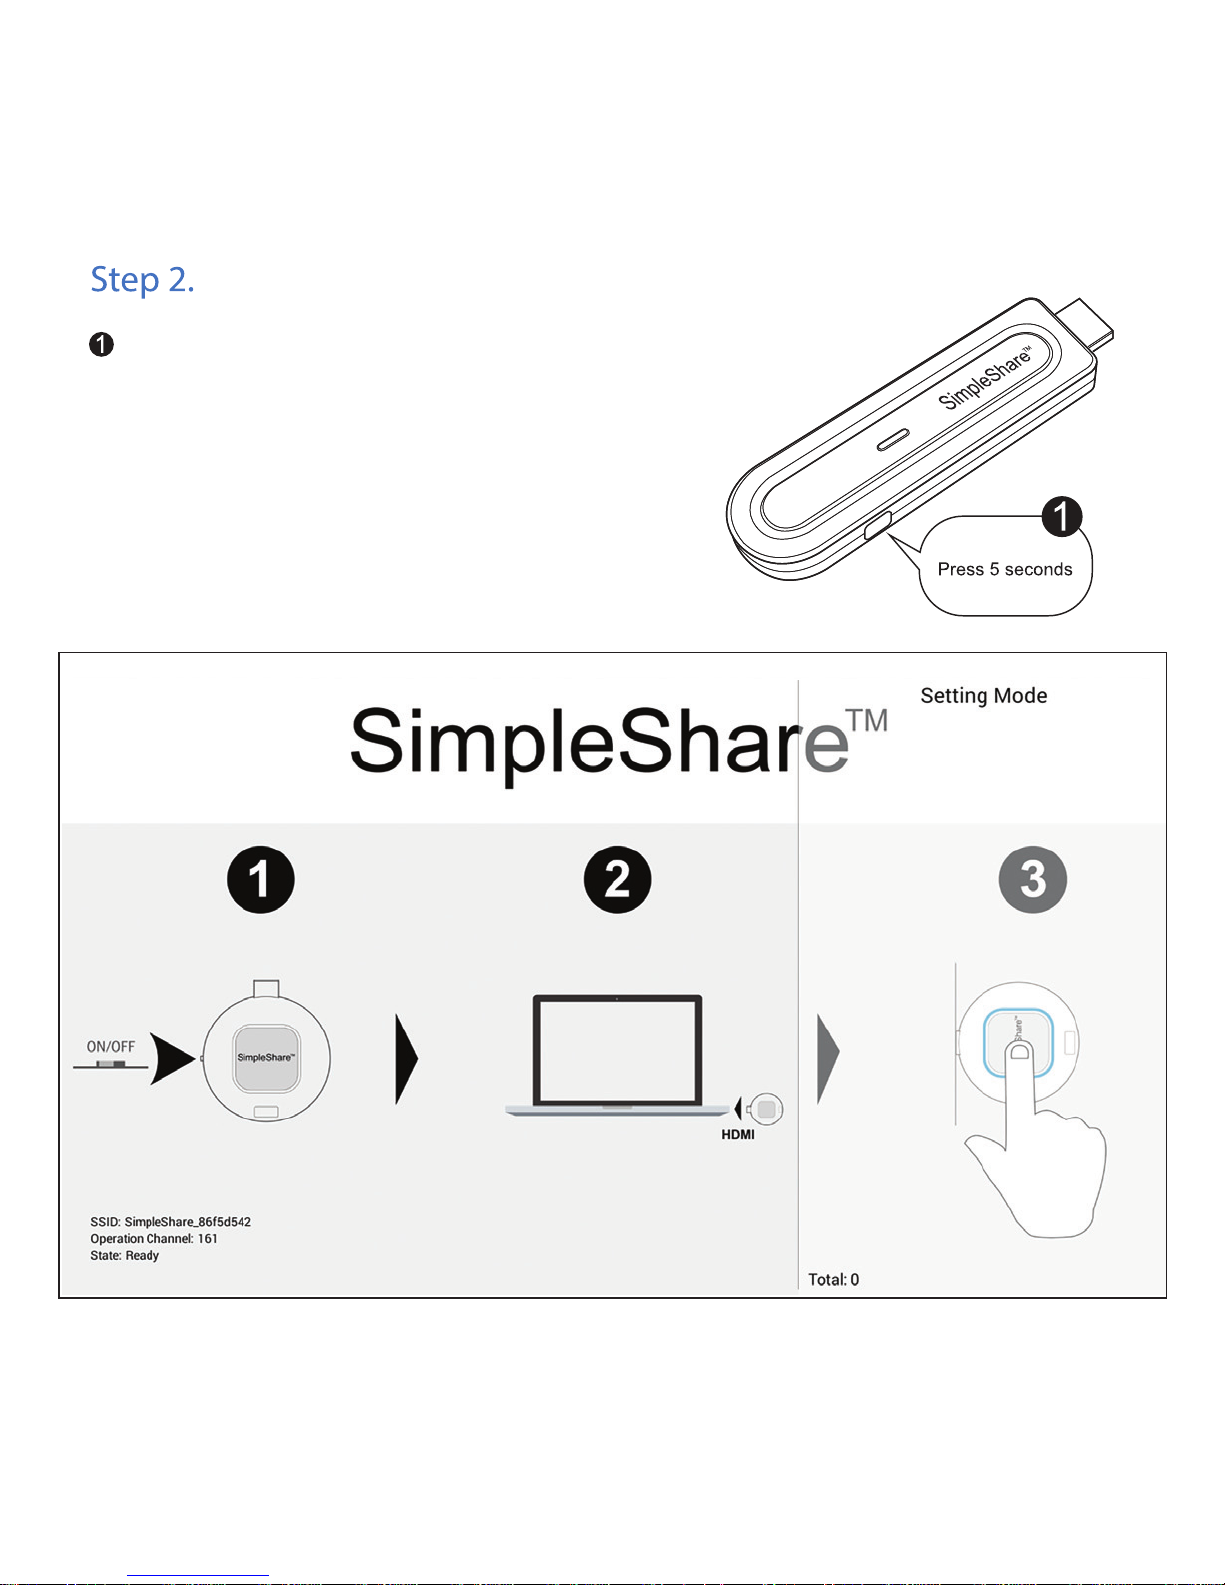
Pairing Transmitter to Receiver
5
* Repeat for each Simpleshare
Transmitter you wish to pai
r. Up to 254
Transmitters can be paired with one
Simple
S
hare Receive
r.
4
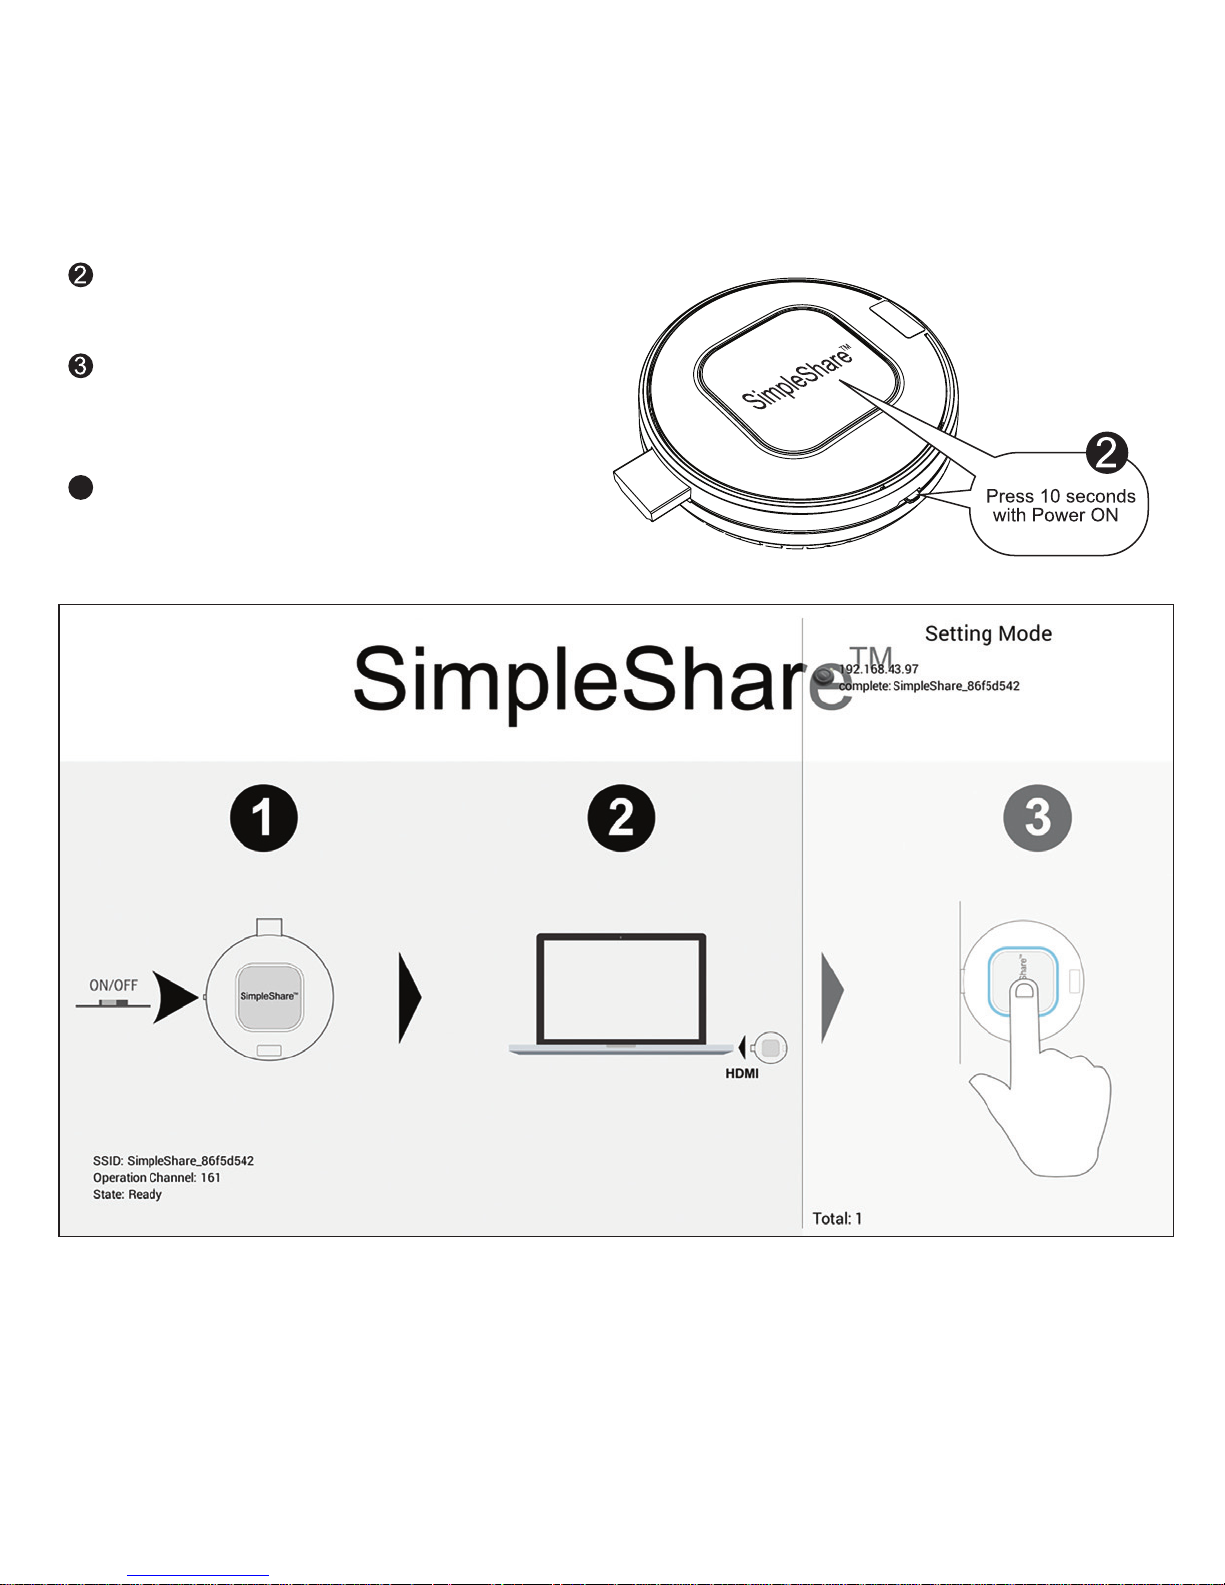
SimpleShare Transmitter : Turn POWER SWITCH on
→ Status LED will turn Purple
Simple
S
hare Transmitter : Press TRANSMIT
button for 10 seconds until Status LED starts
blinking Blue.
IP address will appear on the upper right side
of Setting Mode screen. Pairing is complete.
6
5
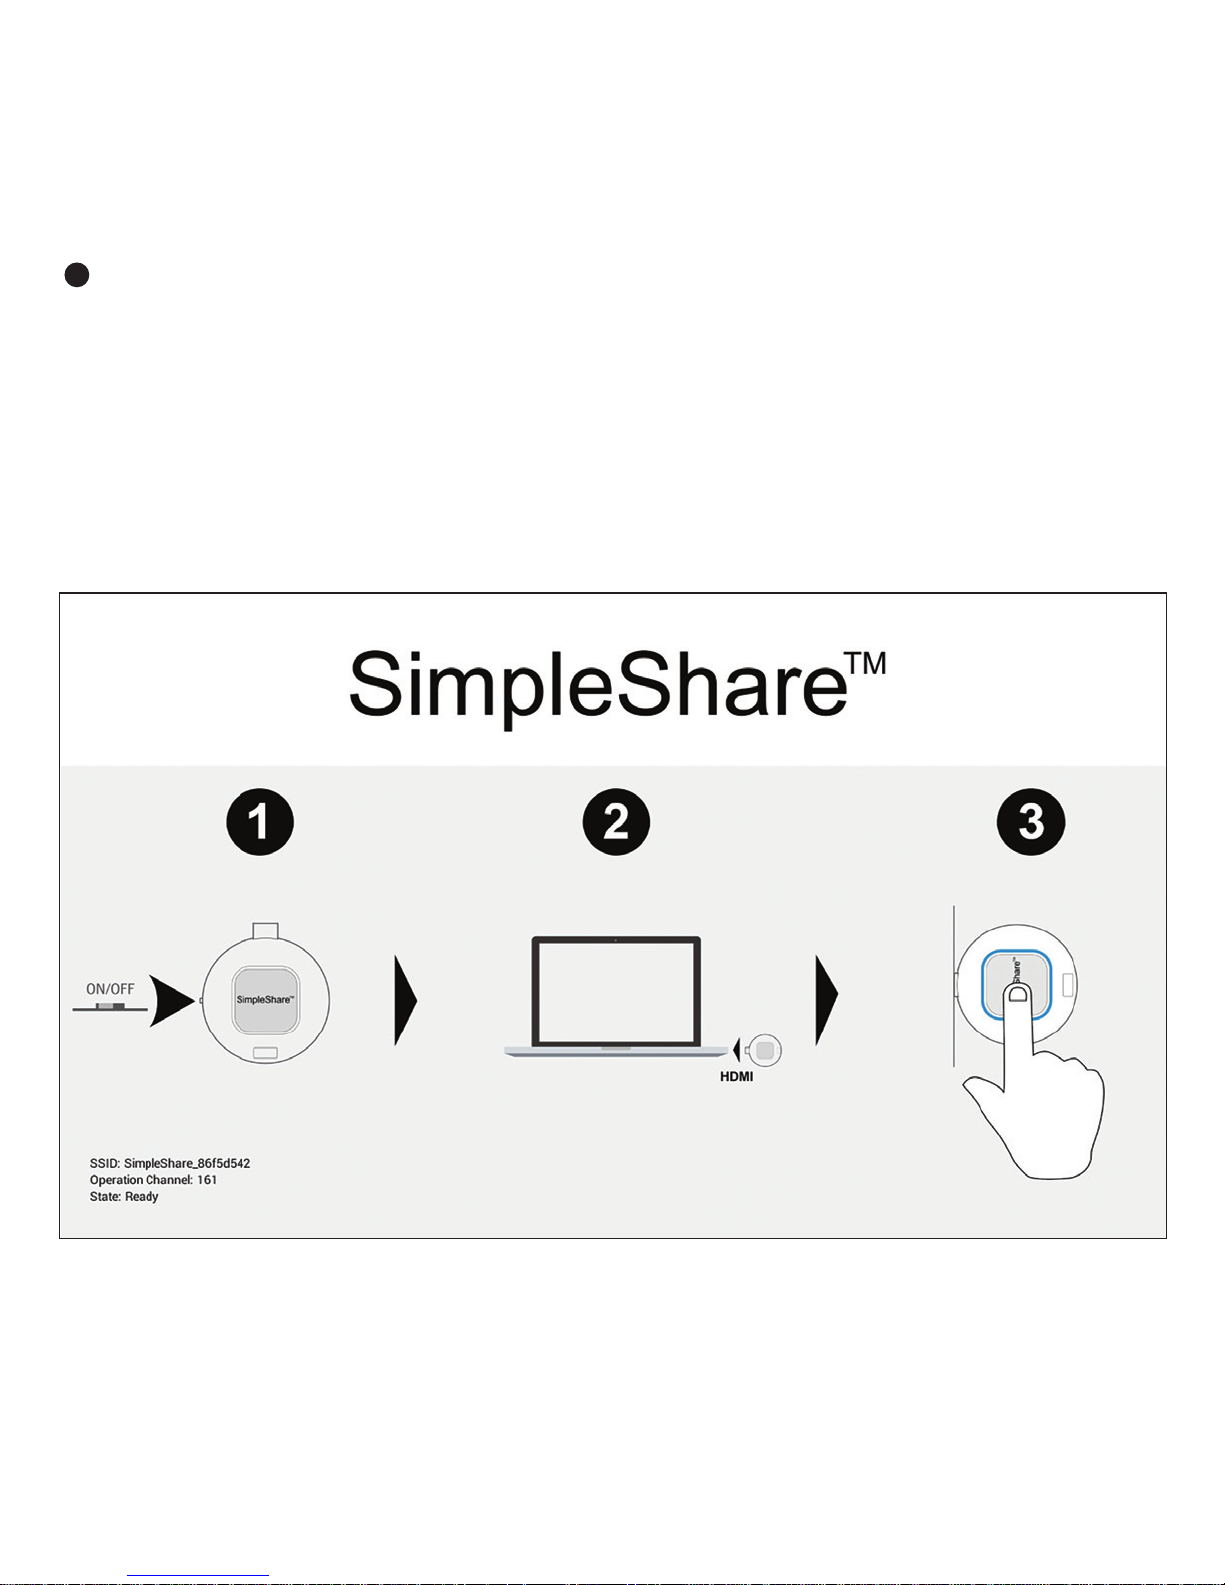
SimpleShare Receiver : Once pairing is complete, press SET button for 5 seconds to exit Setting Mode
and enter Live Mode
7

Plug SimpleShare Transmitter into HDMI input port on pairing device (eg laptop or tablet PC) while the
power is on.
Click TRANSMIT button to start screen transfer to display device where the paired SimpleShare Receiver is
connected.
Connecting the Transmitter
*HDMI extension connector may be used if there is no HDMI input port on pairing device.
*If multiple Transmitters are paired to one Receiver, click TRANSMIT button of paired device you wish to
transfer. Only one device will display at a time.
8
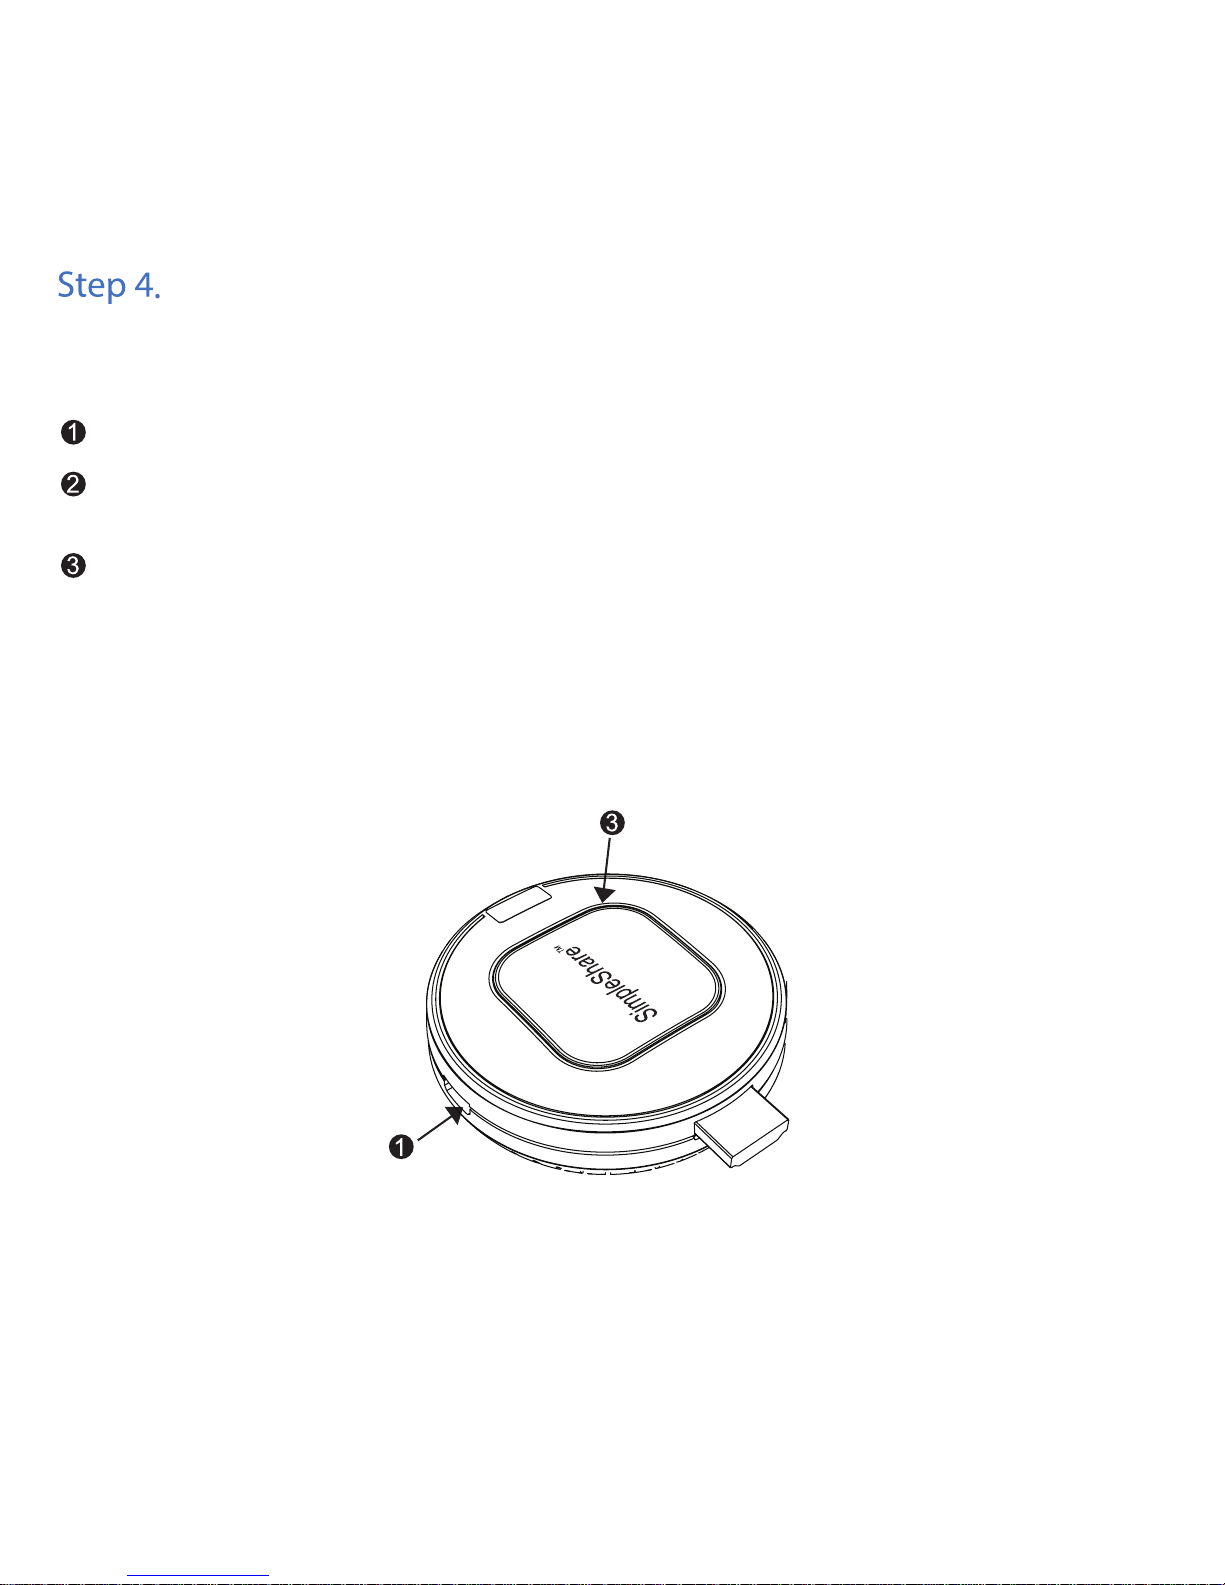
Recharging the Battery of the SimpleShare Transmitter
Please recharge the battery with the power turned off
Connect micro USB plug of charging cable to micro USB port of SimpleShare Transmitter.
Connect USB plug of charging cable of SimpleShare Transmitter to an adapter or a USB port on source
device.
While the Transmitter is being charged, the status LED will glow Red.
The Red status LED will turn off once charging is complete.
*Charging time will depend on the level of the charging current. If battery is empty, it will take ~2.5 hours for a full charge
with an adapter of 5V / 2A
9
*Transmitter will be shut down by system if power is not turned off.
Connect micro USB plug of charging cable to micro USB port of SimpleShare Transmitter.
Connect USB plug of charging cable of SimpleShare Transmitter to an adapter or a USB port on source device.
Power on SimpleShare Transmitter will remain on but device will not charge.
Turn off Power Switch of SimpleShare Transmitter before removing the USB power cable system stability.
The screen in part may not transfer if the aspect ratio of source device does not match with that of the display
device.
Maximum range for wireless application may vary depending on the environment.
The wireless device in use may be subjected to radio interference during operation.
Turn power OFF when not in use.
This device comply with part15 of FCC rules. (FCC Part 15.19(a))
Operation is subject to the following two conditions:
• This device may not cause harmful interference.
• This device & its accessories must accept any interference received, including interference that may
cause undesired operation.
RF specification: 5180 MHz ~ 5220 MHz , 5745 MHz ~ 5825 MHz
Hardware Version: 0.1
Software Version: 17.1.24
Operating Temperature : 0C~40C
Using SimpleShare Transmitter for Extended Periods
5
4
3
10

11
Class B digital device or peripheral (FCC Part 15.105)
This equipment has been tested and found to comply with the limits for a Class B digital device, pursuant to
Part 15 of the FCC Rules. These limits are designed to provide reasonable protection against harmful
interference in a residential installation. This equipment generates, uses and can radiate radio frequency
energy and, if not installed and used in accordance with the instructions, may cause harmful interference to
radio communications. However, there is no guarantee that interference will not occur in a particular installation.
If this equipment does cause harmful interference to radio or television reception, which can be determined by
turning the equipment off and on, the user is encouraged to try to correct the interference by one or more of
the following measures:
• Reorient or relocate the receiving antenna.
• Increase the separation between the equipment and receiver.
• Connect the equipment into an outlet on a circuit different from that to which the receiver is connected.
• Consult the dealer or an experienced radio/TV technician for help.
* A
m
erican N
ational S
tandards Institute; N
ational C
ouncil on R
adiation P
rotection and M
easurem
ents ;
International C
om
m
ission on N
on-Ionizing R
adiation P
rotection.
Caution (FCC Part 15.21) : Any changes or modifications not expressly approved by the party responsible for
compliance could void the user's authority to operate the equipment.
RF Exposure
Your wireless device is a low power radio transmitter and receiver.
When it is on, it receives and also sends out radio frequency (RF) signals.
In August, 1996, the Federal Communications Commissions (FCC) adopted RF exposure guidelines with
safety levels for wireless device. Those guidelines are consistent with the safety standards
previously set by both U.S. and international standards bodies:
ANSI C95.1 (1992) *
NCRP Report 86 (1986)
ICNIRP (1996)
Those standards were based on comprehensive and periodic evaluations of the relevant scientific literature.
For example, over 120 scientists, engineers, and physicians from universities, government
health agencies, and industry reviewed the available body of research to develop the ANSI
Standard (C95.1).
The design of your device complies with the FCC guidelines (and those standards).
This equipment should be installed and operated with minimum 20 cm between the radiator and your body.

Advertencia de batería baja
(20% de batería restante)
Color de LED
1
RECEPTOR
HDMI : Conectar al puerto de salida HDMI del
dispositivo Fuente
INTERRUPTOR DE ENCENDIDO :
Alimentación ENCENDIDO/APAGADO
Puerto micro-USB : Entrada de alimentación
para enchufe de micro USB del cable de carga.
Botón de TRANSMISIÓN
LED DE ESTADO
Estado Descripción
HDMI : Conectar al puerto de entrada HDMI
del dispositivo pantalla
Botón de AJUSTES : Configurar para
emparejar con el transmisor
Puerto micro-USB : Entrada de alimentación
para enchufe de micro USB del cable de carga
a. Iniciar/Finalizar transmission
b. Dispositivo de encendido si se utilizan
múltiples transmisores
Sin luz
VIOLETAS ólido
Sólido
Intermitente
Intermitente
Listo para transmitir
Emparejamiento completo
Transmisión de video
Sólido
Sólido
Sólido
Iniciando sistema
Sin alimentación
Error de emparejamiento
Cargando
AZUL
ANARANJADA
ROJO
Transmitir botón
Puerto Micro-Usb
Interruptor de
alimentación
LED de
estado
Botón de ajuste
Puerto Micro-Usb
12

Paso 1. Instalación del receptor
2
Conectar el enchufe micro USB del cable de carga al puerto micro-USB del Receptor SimpleShare
Conectar el Receptor SimpleShare al puerto de entrada HDMI del dispositivo pantalla
(por ejemplo, proyector, TV, etc.).
Conectar el enchufe USB del cable de carga a los puertos USB del dispositivo pantalla
* Si el dispositivo pantalla no tiene entrada USB o si la potencia del USB del dispositivo pantalla
es menor de 600mA, utilizar un adaptador para la alimentación.
13
4
5
Seleccionar la entrada de la fuente HDMI al que se conecta el Receptor SimpleShare.
Aparecerá la pantalla en modo Stand-by dentro de los 30 segundos
14
 Loading...