

Page 1
Page 2

Page 3

Contents
Overview ......................................................................................................5
Launch the Mondopad software ...............................................................................................5
Touch screen techniques ..........................................................................................................5
Mondopad home page ..............................................................................................................6
Mondopad toolbar ....................................................................................................................7
Change users ............................................................................................................................9
Restart the Mondopad device ...................................................................................................9
Power the Mondopad device down ..........................................................................................9
Set up a secondary device for use with the dual display feature ...........................................10
Using the dual display feature .................................................................................................10
View & Share .............................................................................................11
Browser view.......................................................................................................... 11
Copy a file to/from a USB thumb drive or network drive ........................................................12
Upload a file or files using email .............................................................................................12
Upload a file using the WLAN .................................................................................................13
Upload a file using a wireless hotspot connection .................................................................14
Access a file in Dropbox .........................................................................................................17
Folder security ....................................................................................................... 17
Add a security PIN code .........................................................................................................17
Remove a security PIN code ...................................................................................................18
Forgotten security PIN code ...................................................................................................18
Delete files and folders .......................................................................................... 18
Send a file back ..................................................................................................... 18
Present View & Share files ..................................................................................... 19
View & Share file-level tools ....................................................................................................19
Annotation .............................................................................................................. 22
Create a drawing .....................................................................................................................22
Add text ...................................................................................................................................22
Save the file .............................................................................................................................23
Share the file ...........................................................................................................................23
Annotation tools (varies by file type) .......................................................................................24
Invite others to a meeting ...................................................................................... 27
Invite Mondopad via Mondopad Invite ...................................................................................27
Presentation View via a browser .............................................................................................27
Browser .....................................................................................................29
Page 4

Whiteboard ................................................................................................ 31
Create a drawing .....................................................................................................................31
Add text ...................................................................................................................................31
Grow the whiteboard canvas ..................................................................................................31
Navigate in the whiteboard canvas .........................................................................................32
Clear the canvas ....................................................................................................................32
Save the Whiteboard file .........................................................................................................32
Share the Whiteboard file ........................................................................................................32
Whiteboard tools .....................................................................................................................33
Video Meeting ...........................................................................................36
Screen overview ..................................................................................................... 36
Call Management ................................................................................................... 40
Make a call using the dial pad ...............................................................................................40
Make a call using the Contacts tab .........................................................................................40
Accept the call .......................................................................................................................41
End the call ............................................................................................................................41
Share the Mondopad screen ..................................................................................................41
Share a third-party application or the desktop .......................................................................44
Adjust the PTZ Camera ...........................................................................................................46
InstantConference ................................................................................................. 47
Obtain InstantConference .......................................................................................................47
Register 121 Premium .............................................................................................................47
InstantConference behavior ....................................................................................................47
Call History ............................................................................................................. 48
Save contact from call history .................................................................................................48
Call contact using call history .................................................................................................48
Search for contact in History tab ............................................................................................48
Clear call history ......................................................................................................................48
Contacts ................................................................................................................. 49
Add a contact ..........................................................................................................................49
Edit contact information ..........................................................................................................49
Delete a contact ......................................................................................................................50
Search for a contact ................................................................................................................50
Save contact to the desktop or to the Mondopad toolbar .....................................................50
Export Local Contacts ............................................................................................................51
Import Local Contacts ............................................................................................................51
Page 5

Settings .................................................................................................................. 52
Setting tab features .................................................................................................................52
Cast ...........................................................................................................55
AirPlay .................................................................................................................... 56
Chrome Browser and Chromebook Cast .............................................................. 56
Extras ........................................................................................................57
ControlView 2.0 ......................................................................................... 59
Download ControlView 2.0 .................................................................................... 59
Connect to a Mondopad device ............................................................................ 59
Control the Mondopad device from a PC, tablet, or mobile device ..................... 61
Control a PC, tablet, or mobile device from the Mondopad device ...................... 62
Change Controlview settings ................................................................................. 63
Troubleshooting ........................................................................................64
Software End-User License Agreement (EULA) ........................................ 66
Page 6

Page 4
Page 7

Overview
Launch the Mondopad software
1) Turn on the Mondopad device.
2) Your Mondopad device has been pre-installed with Mondopad software. Once the Mondopad device is turned on,
the behavior of the Mondopad software varies depending on how the Mondopad device was congured within your
organization and whether local administration rights have been dened.
If the Mondopad home page displays:
• Begin using the software.
If the Windows logon screen displays:
a. Log on using a valid user account name and password. The Mondopad logon screen appears.
b. Type the same user account name and password into the Mondopad logon screen. The Mondopad home page
appears.
If the Windows desktop displays:
• Tap the Mondopad icon or launch the software through Start > All Programs > InFocus > Mondopad.
The Mondopad home page appears.
If a Windows or Mondopad registration page displays: Contact your administrator. Your Mondopad device has
not been congured.
Touch screen techniques
Tap: Quickly touch the screen once with your nger or stylus. This action is the same as single-clicking the left button of a
mouse.
Double-tap: Quickly touch the screen twice with your nger or stylus. This action is the same as double-clicking the left
button on a mouse.
Pan: Touch the screen and move your nger in the direction you want to scroll through the image, document, or page.
Swipe: Touch the screen and swipe your nger in the direction you want to move through the document or through the
folder images.
Two-Fingered Swipe: Using two ngers, touch the screen and swipe your ngers left to add a page to your Whiteboard,
right to go to the previous Whiteboard page, up to increase the Whiteboard page size, or down to scroll up the Whiteboard
page.
Drag and Drop: Touch the screen with your nger and hold it until a copy of the le or folder is visible. Without lifting your
nger, move your nger across the screen to the location you want to drop your le or folder. Lift your nger.
Zoom In: Using two ngertips, touch the screen and move your ngertips closer together to decrease the image or docu-
ment size.
Zoom Out: Using two ngertips, touch the screen and move your ngertips away from each other to increase the image
or document size.
NOTES:
• Avoid placing objects within 1/4” (6mm) of the touch screen, such as shirt sleeves, the palm of your hand, pens, and
non-pointing ngers. These objects interfere with touch screen commands.
• When using a pointing device, make certain that it does not scratch or damage the touch screen surface.
Mondopad v2.0 Software Guide
Page 5
Page 8
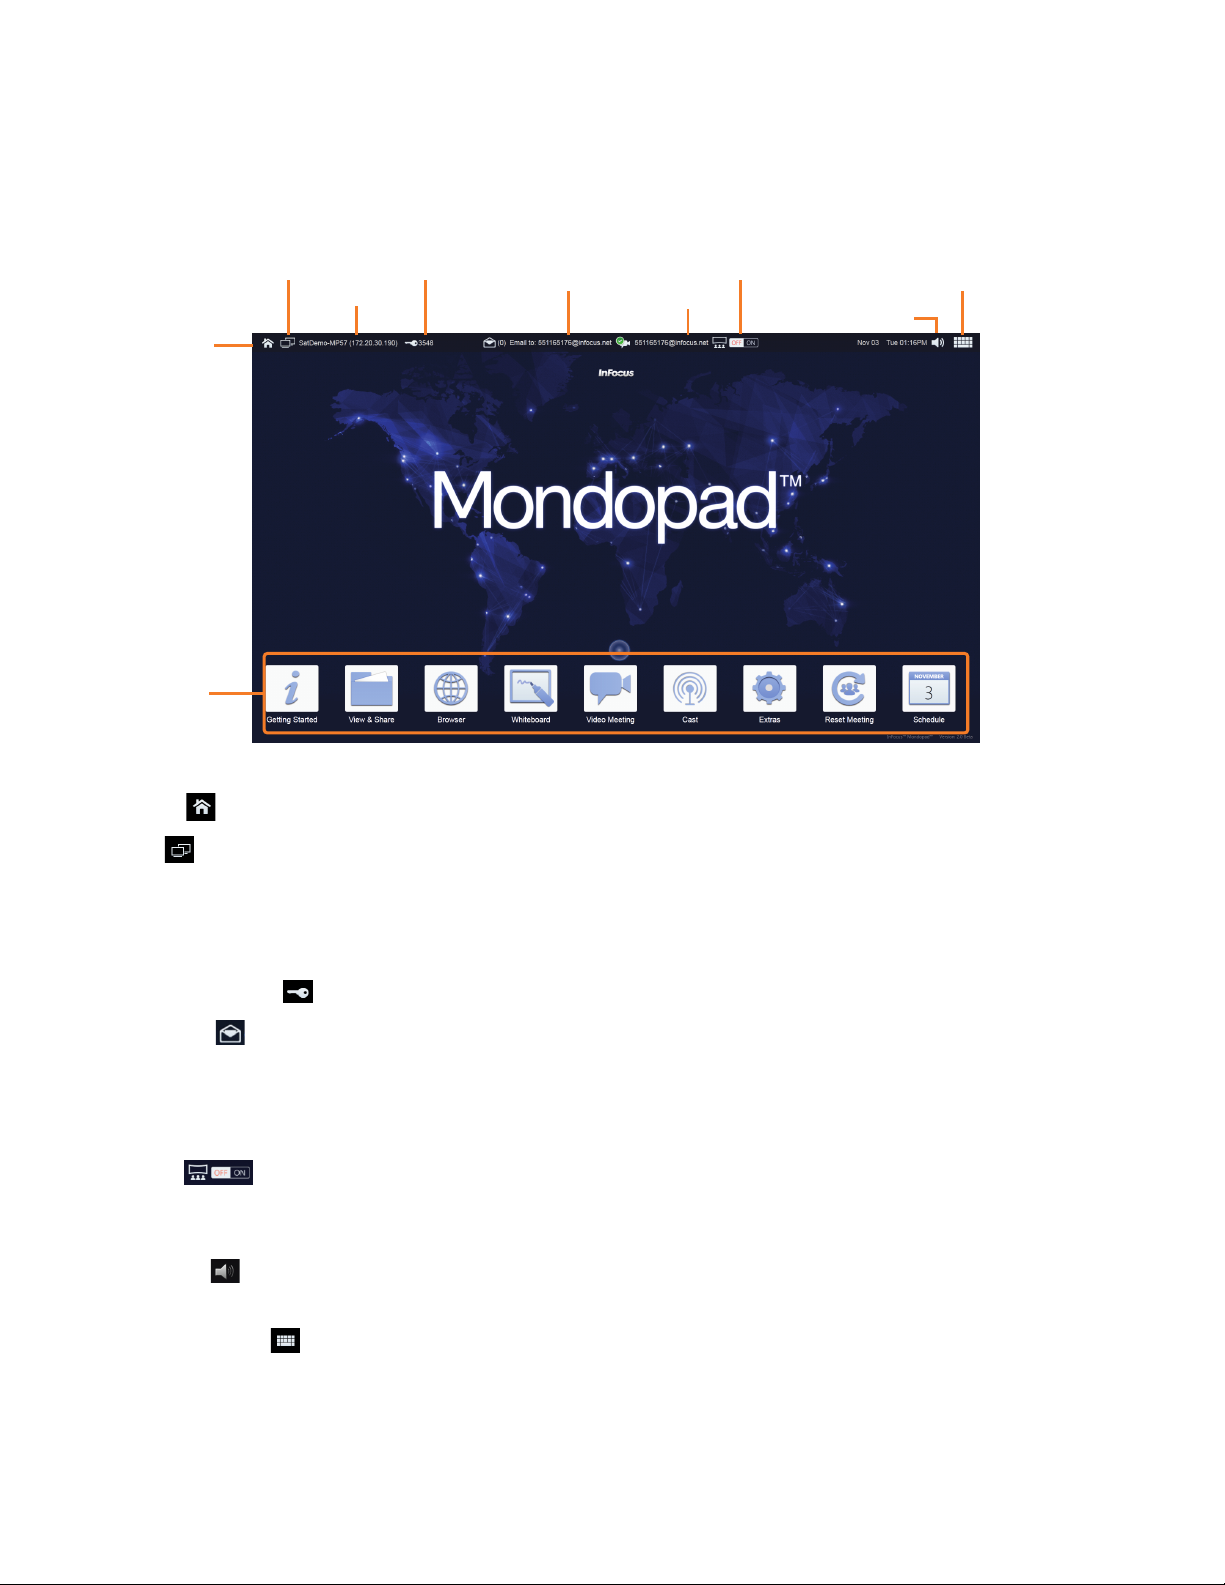
Mondopad home page
Mondopad software transforms touch screen devices into interactive collaboration tools. This section overviews the Mondopad software features, starting with the Mondopad home page.
From the Home page, you can access all the features of the Mondopad software.
Meeting
MP Invite
Home Page
Mondopad
Toolbar
Home Page : provides quick access from any screen back to the Mondopad home page.
Access Code
IP Address
Email Address
SaturnCast
SIP URI
Audio Control
On-screen
keyboard
MP Invite : enables you to invite another Mondopad within the same WLAN/LAN network to join the Mondopad
session. NOTE: IP addresses which are manually entered, must be pingable.
IP Address: displays the current IP address associated with the Mondopad which allows others within the same network
to join the presentation.
Meeting Access Code : displays the access code which participants must use to view and load presentations.
Email Address : displays the email address which presenters can send View & Share les to. This email service is
limited to transferring les only.
SIP URI: displays the video conferencing address associated with the Mondopad which others can call into from other
devices within the network.
SaturnCast : enables you to turn the SaturnCast multi-conguration video conferencing display system feature on
or off. Note: This is an experimental feature which must be enabled by your administrator. If SaturnCast is not enabled,
the SaturnCast toggle switch is not displayed.
Audio Control : controls the Mondopad software volume, including mute, and inter-operates with both Windows and
the device audio controls.
On-screen keyboard : tap to display and use the on-screen keyboard.
Page 6
Page 9
Mondopad toolbar
The Mondopad toolbar varies based on the Mondopad software settings. The following features are the options available
in the software. 3rd party application shortcuts can also be added to the Mondopad toolbar. See Using 3rd Party Applications and subsequent chapters for more information about Mondopad settings.
Getting Started: displays instructions on how to upload your presentation, invite another Mondopad or user to
the meeting, and how to wirelessly control your PC from the Mondopad device or control the Mondopad device
from your PC, iPad or Android.
View & Share: displays a list of les which are available for presentation. Supported formats include Windows®,
Word®, Excel®, and PowerPoint® les, Adobe® PDF les, and standard video, image, music and text les. Files
can be sent via email, viewed from a thumb drive, Dropbox, or uploaded through the network to the View & Share
folder. Network les can also be accessed from the View & Share folder, if the administrator sets up this feature.
Browser: provides you with access to the internet using a Chromium browser. Multiple websites can be opened
simultaneously and displayed as tabs along the bottom edge of the screen. Standard navigation tools, such as
Back, Forward, Refresh, Stop, and Add to Favorites, are available. The Browser also allows the administrator to
access Mondopad administrative settings. NOTE: Chromium is only available on Mondopad devices larger than
55" wide. 55" Mondopad devices must be upgraded to i7 PCs (and have 8GB of available memory) in order to be
compatible with this feature.
Browser IE: provides you with access to the internet using an Internet Explorer browser. Multiple websites can
be opened simultaneously and displayed as tabs along the bottom edge of the screen. Standard navigation tools,
such as Back, Forward, Refresh, Stop, and Add to Favorites, are available. The Browser also allows the adminis-
trator to access Mondopad administrative settings.
Whiteboard: provides a blank whiteboard surface for brainstorming, project updates, and other visual ideas. A
complete set of writing and drawing tool tools are available in various sizes and colors for drawing and annotation
purposes. Whiteboard pages can also be saved for access later as a fully editable le, or saved as JPEG images
or PDF les and emailed to another person.
Video Meeting: The Mondopad device is a SIP endpoint, which allows you to have a video meeting using any
SIP-based video conferencing service partner. H232, Skype, Lync calls are supported. Video conferences with
multiple callers are also supported when InFocus.net premium service is purchased. Additional protocols may be
supported through SIP-based translation services offered by your video conferencing service partner.
Cast: displays instructions on how to wirelessly display your computer, tablet, or phone content on the panel using ControlView 2.0 or AirPlay. This screen will also indicate when Mondopad is casting to your local machines.
Extras: provides you with the ability to launch 3rd party applications which have been setup by your administrator. Your administrator also has the ability to upload and manage 3rd party Windows compatible applications to
Mondopad and to access the Mondopad device’s desktop and control panel from the Extras area.
Reset Meeting: exits the current meeting and prepares a clean, secure session for a new meeting. NOTE: 3rd
party applications are unaffected.
Schedule: allows your administrator to display a Microsoft® Exchange calendar (Ofce® 365 or
Ofce® 2007 and later, using EWS service).
3rd party application shortcuts which have been added to the Mondopad toolbar by your administrator may appear with a Microsoft symbol in the lower right-hand corner. Tap the shortcut to open the application.
The Mondopad toolbar displays shortcuts for open 3rd party applications. These shortcuts have a green arrow in
the lower right-hand corner. Tap the shortcut to switch between the Mondopad interface and the open application.
Mondopad v2.0 Software Guide
Page 7
Page 10
Getting Started
View & Share
Browser
Video Meeting
Whiteboard
Cast
Page 8
Extras
Schedule
Page 11

Change users
Use this process to change users without rebooting the Mondopad device.
1) From the Home Page, tap Extras.
2) Tap Log Off User.
3) Tap Yes to display the Windows logon screen.
Restart the Mondopad device
Use this process to close all open applications and restart the Mondopad device.
1) From the Home Page, tap Extras.
2) Tap Reboot.
3) Tap Yes.
Power the Mondopad device down
Use this process to close all open applications and shut down the Mondopad device.
1) From the Home Page, tap Extras.
2) Tap Shutdown.
3) Tap Yes.
Mondopad v2.0 Software Guide
Page 9
Page 12

Set up a secondary device for use with the dual display feature
Use these instructions to set up a secondary InFocus touch screen device for use with the Mondopad dual display feature. NOTE: The secondary device must be an InFocus touch screen device that is larger than 55" wide. 55" Mondopad
devices must be upgraded to i7 PCs (and have 8GB of available memory).
1) Connect an HDMI cable from the Mondopad device HDMI out port to an HDMI port on the secondary InFocus touch
screen device.
2) Connect a USB cable from the Mondopad device to the secondary InFocus touch screen device.
3) From the Mondopad device's Control Panel, navigate to the Display > Screen Resolution settings.
4) Tap the Multiple Displays drop-down list and select Extend these displays.
5) Tap the Identify button and verify that the Mondopad device is detected as Display 1.
6) Tap OK.
7) Navigate to Tablet PC Settings.
8) Tap Setup and follow the device prompts.
9) When the touch screens have both been identied, tap OK.
10) Close the Control Panel.
Using the dual display feature
Once a secondary InFocus touch screen device has been set up and the Dual Display mode has been congured, the
Dual Display feature operates as follows:
• When Mondopad detects a secondary device, it will automatically display either the Browser (IE or Chromium), Whiteboard, and View & Share module on that device. This is based on the conguration settings dened by your adminis-
trator.
• Depending on the conguration settings, you may see a Move button in the module toolbar. If you see the Move
button, use this button to move the module between the two monitors.
• If you do not see a Move button, then you can open two instances of the module (one on each monitor) simultaneously, however you will not be able to move the open modules between the monitors. NOTE: Although View & Share
can be opened on both monitor, PowerPoint is restricted to a single monitor. This is a Windows limitation.
Page 10
Page 13
View & Share
A variety of le types can be presented, saved, and shared from the View & Share folder.
Supported File Types File Extensions
PowerPoint .ppt, .pptx, .pps, .ppsx, .ppsm
Excel .xls, .xlsx
Word .doc, .docx
Images .jpg, .jpeg, .gif, .bmp, .png, .jpe, .ico
AV les .wmv, .mp4, .mp3, .avi, .3gp, .wma,
.wav, .mov*, .asf
Adobe PDF .pdf
Other les .txt, .rtf, .xml
*.MOV les can be a variety of different video codec formats. Mondopad devices do not ship with all video codecs due
to licensing restrictions, however you can download additional video codecs to improve .MOV le support. For example,
Apple's QuickTime application installs additional video codecs.
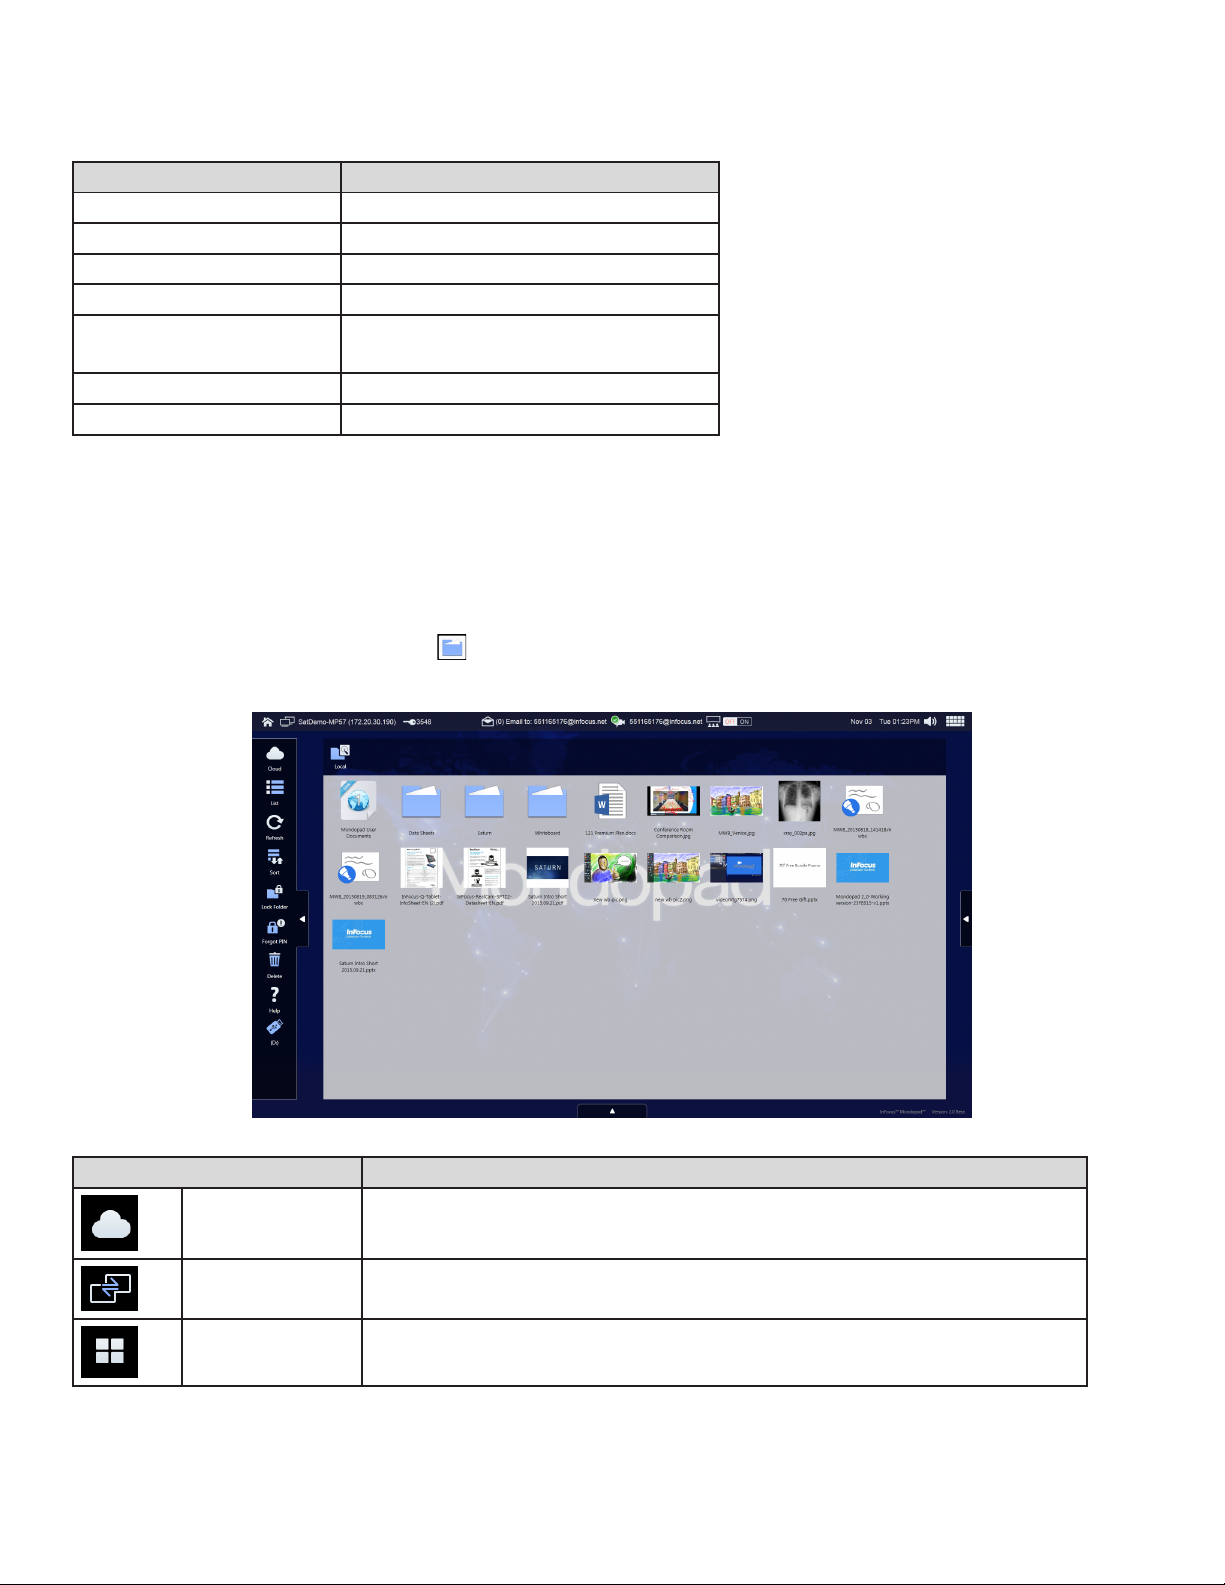
Browser view
From the Home page, tap View & Share . From the View & Share browser view, you can select a le to display, lock
and unlock folders, and copy, send back, and delete les.
Buttons Description
Cloud toggles between local les and Dropbox les on the Cloud.
Move Tap to move the current module to the other screen.
Thumbnail toggles between a list view and a thumbnail view.
Mondopad v2.0 Software Guide
Page 11
Page 14
Refresh refreshes the View & Share folder. This is helpful when les have been sent to
the Mondopad device via email.
Sort allows the les and folders to be sorted by name, date modied or type.
Lock Folder locks folders which have been copied to or created on the Mondopad device.
Forgot PIN sends the folder security PIN code of emailed folders back to the original email
address.
Delete deletes selected les and folders.
Help displays View & Share Help information.
USB allows the user to quickly navigate to les and folders on an attached USB
thumb drive.
Copy allows the user to copy les between the local folder and the USB thumb drive.
Send Back Only available for les sent to the View & Share folder by email. This feature al-
lows users to send back the edited le to the original source email address.
Copy a file to/from a USB thumb drive or network drive
1) From the Mondopad toolbar, tap View & Share .
2) Insert an USB thumb drive or select a network drive. If using an USB thumb drive, tap OK. (If the dialog box does
not appear, tap the USB icon in the left-hand View & Share folder toolbar.)
3) Tap Copy.
4) Tap OK.
5) Tap and hold the le you wish to copy until a ghost image of the le icon appears.
6) Drag the ghost image to the destination location.
7) Tap Done.
Upload a file or files using email
1) Use your computer (or smart device) to send the le or les to the email address displayed at the top of the Mondo-
pad screen (or on the Getting Started > Upload Presentations tab). NOTE: An email message from the Mondopad
device is sent letting you know that your le was received.
2) Navigate to the View & Share folder and tap the folder named after your email address.
3) If the folder is not visible, tap Refresh. Large les may take several minutes to be delivered to the Mondopad device,
depending on network trafc.
Page 12
Page 15
4) Tap the folder.
5) If prompted for an access code, type the access code which was sent to your email address. NOTE: If you do not
see the email which contains your access code, check your junk email folder, or tap Forgot PIN to have another
email sent.
6) Tap OK.
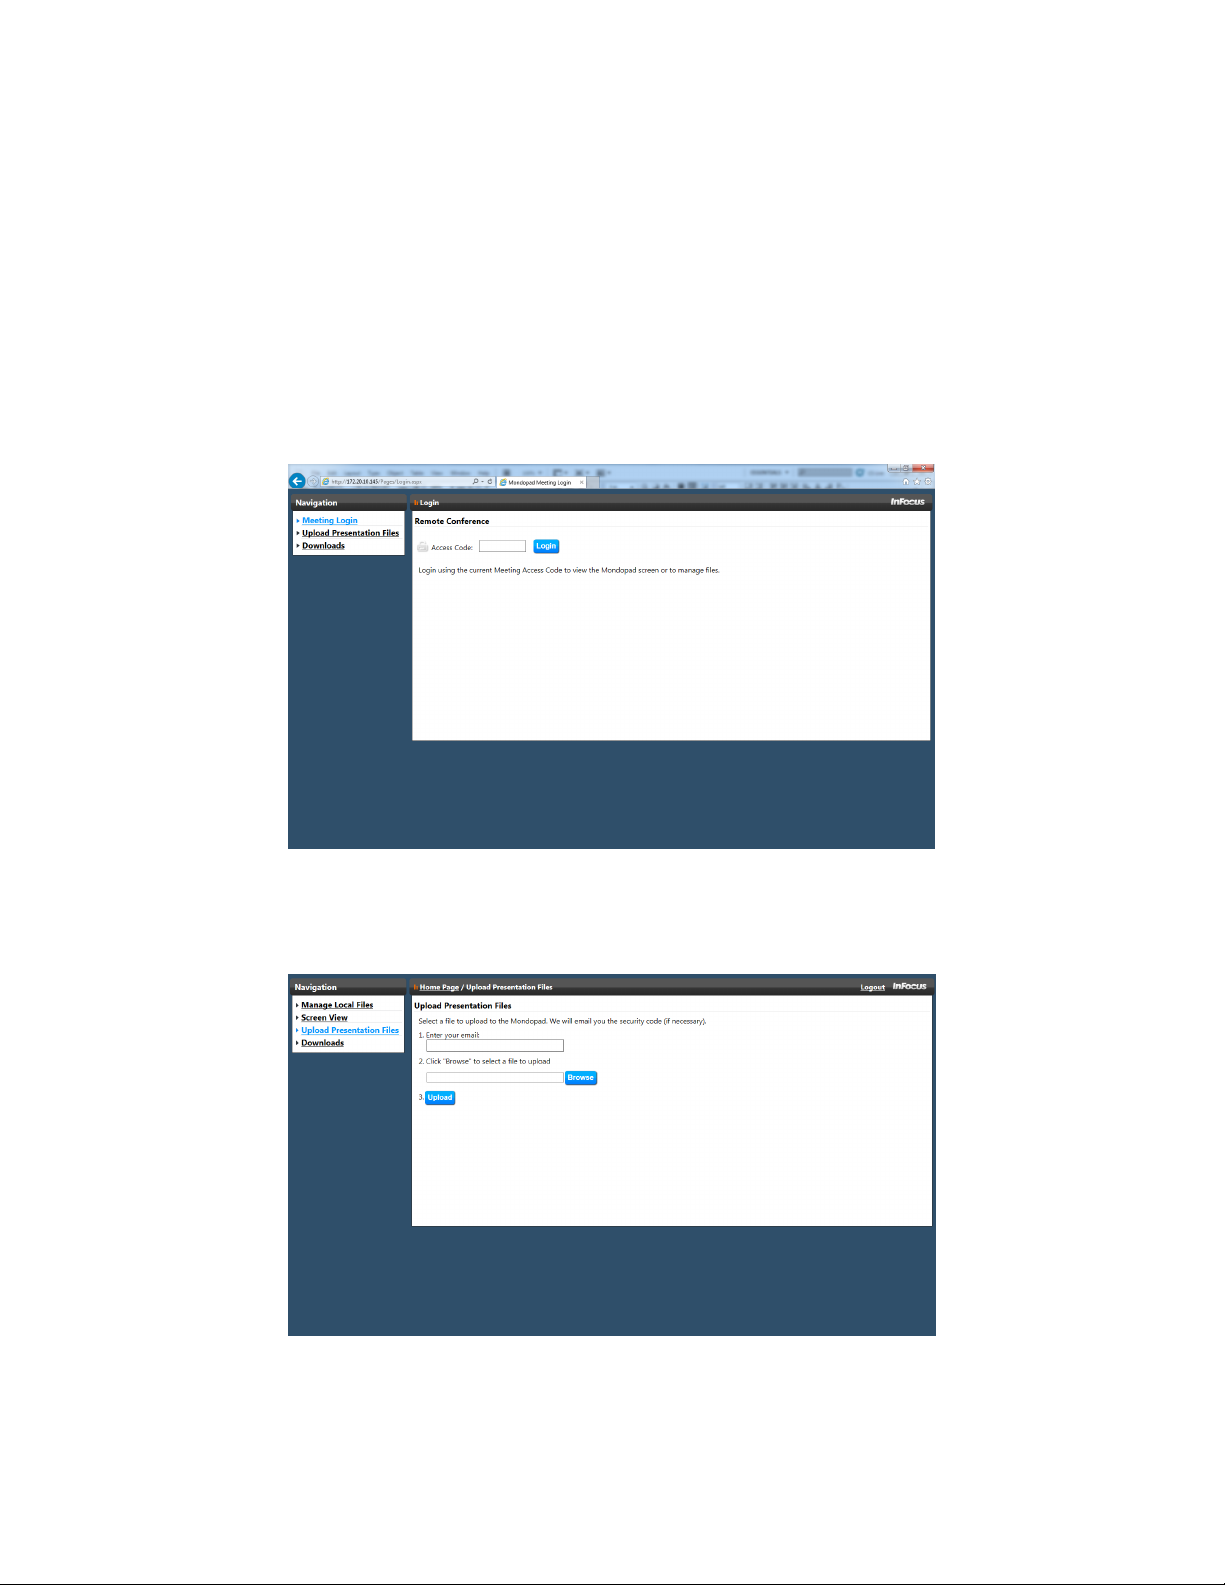
Upload a file using the WLAN
1) Using your computer or smart device (not Mondopad), open a web browser. NOTE: You must be logged into the
same network as the Mondopad device.
2) Type the IP address (for example, 172.20.30.82) displayed at the top of the Mondopad screen into the computer or
smart device address bar and click Enter (or scan the QR code on the Getting Started > Upload presentations >
Via Web Browser tab).
3) The Mondopad Remote Conference interface displays.
4) Option 1 - Create a personal folder in the View & Share folder:
a. Click Upload Presentation Files in the left-hand navigation menu.
Mondopad v2.0 Software Guide
Page 13
Page 16
b. Type your email address.
c. Click Browse.
d. Locate the desired le on your computer (or smart device) and click Open.
e. Click Upload. A folder with your email address and les now appears in the View & Share folder.
5) Option 2 - Upload a single le to the View & Share folder:
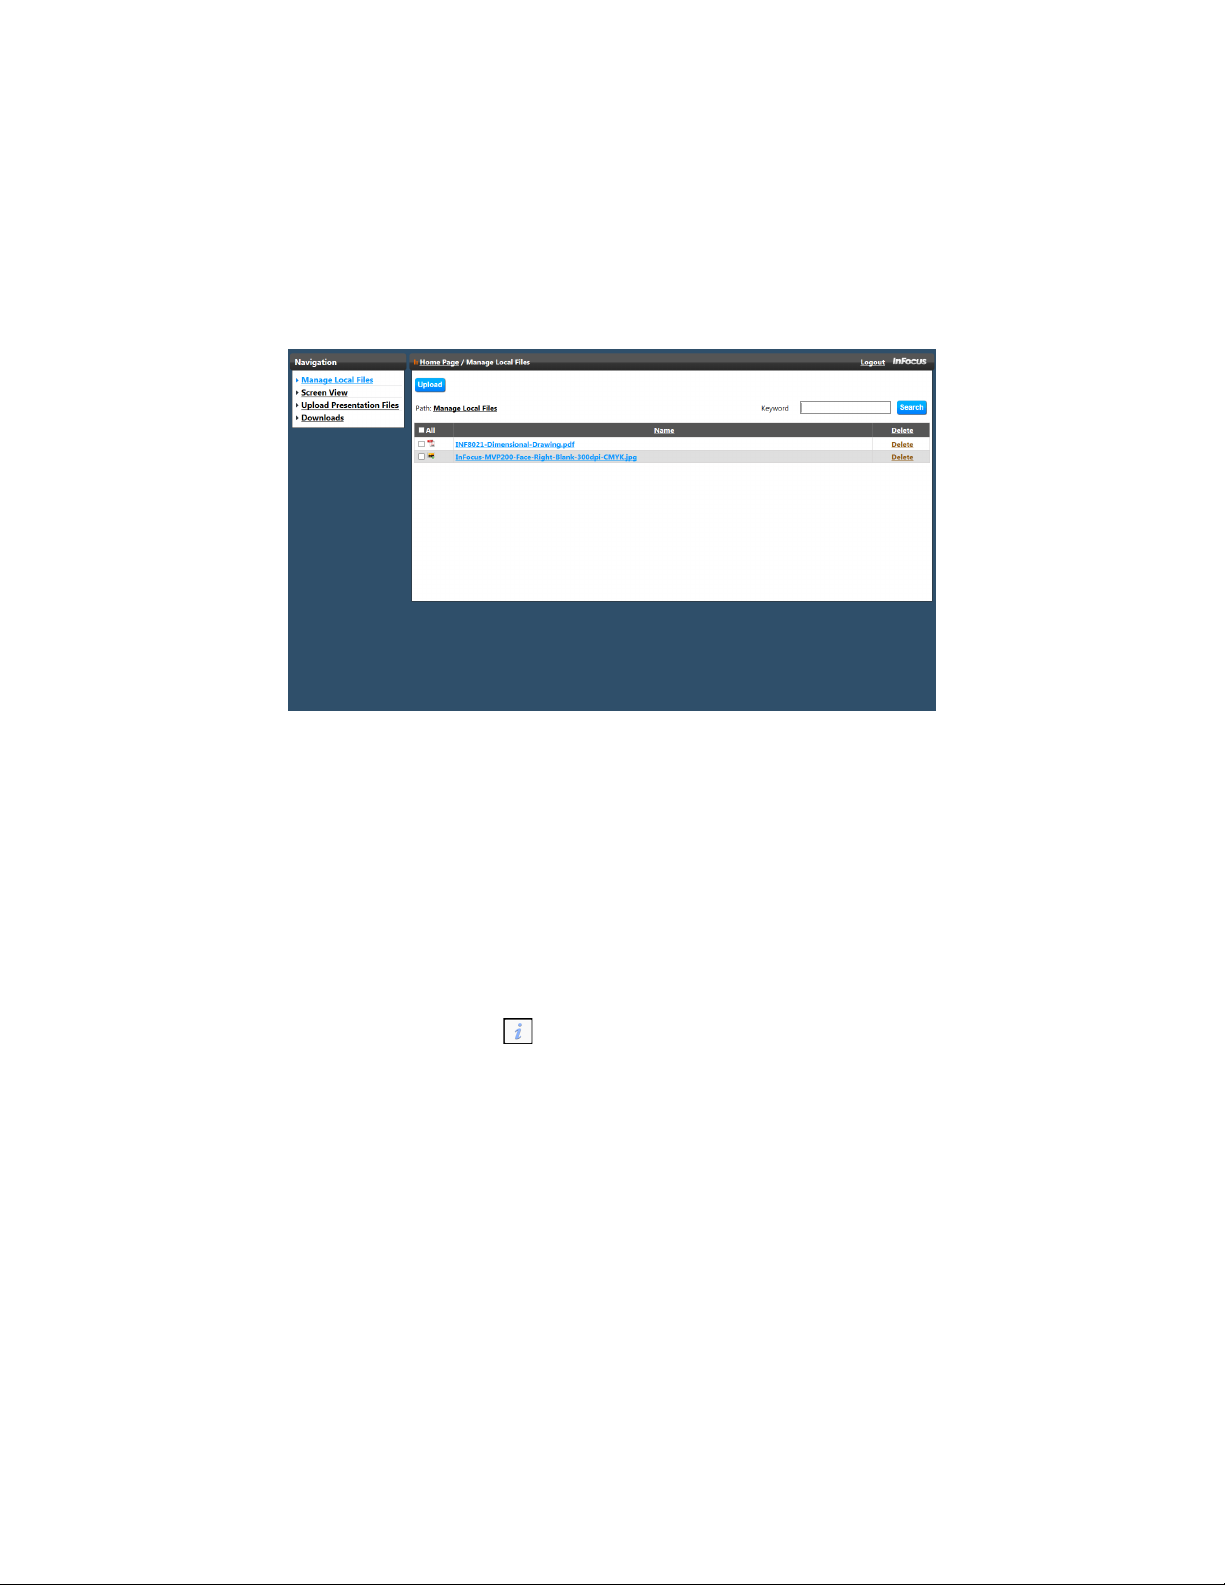
a. On the Meeting Login page, type the Meeting Access Code from the Mondopad device (for example, 7023)
and click Login. Manage Local Files displays.
b. Click Upload.
c. Click Browse.
d. Locate the desired le on your computer (or smart device) and click Open.
e. Click Upload. The le now appears in the View & Share folder.
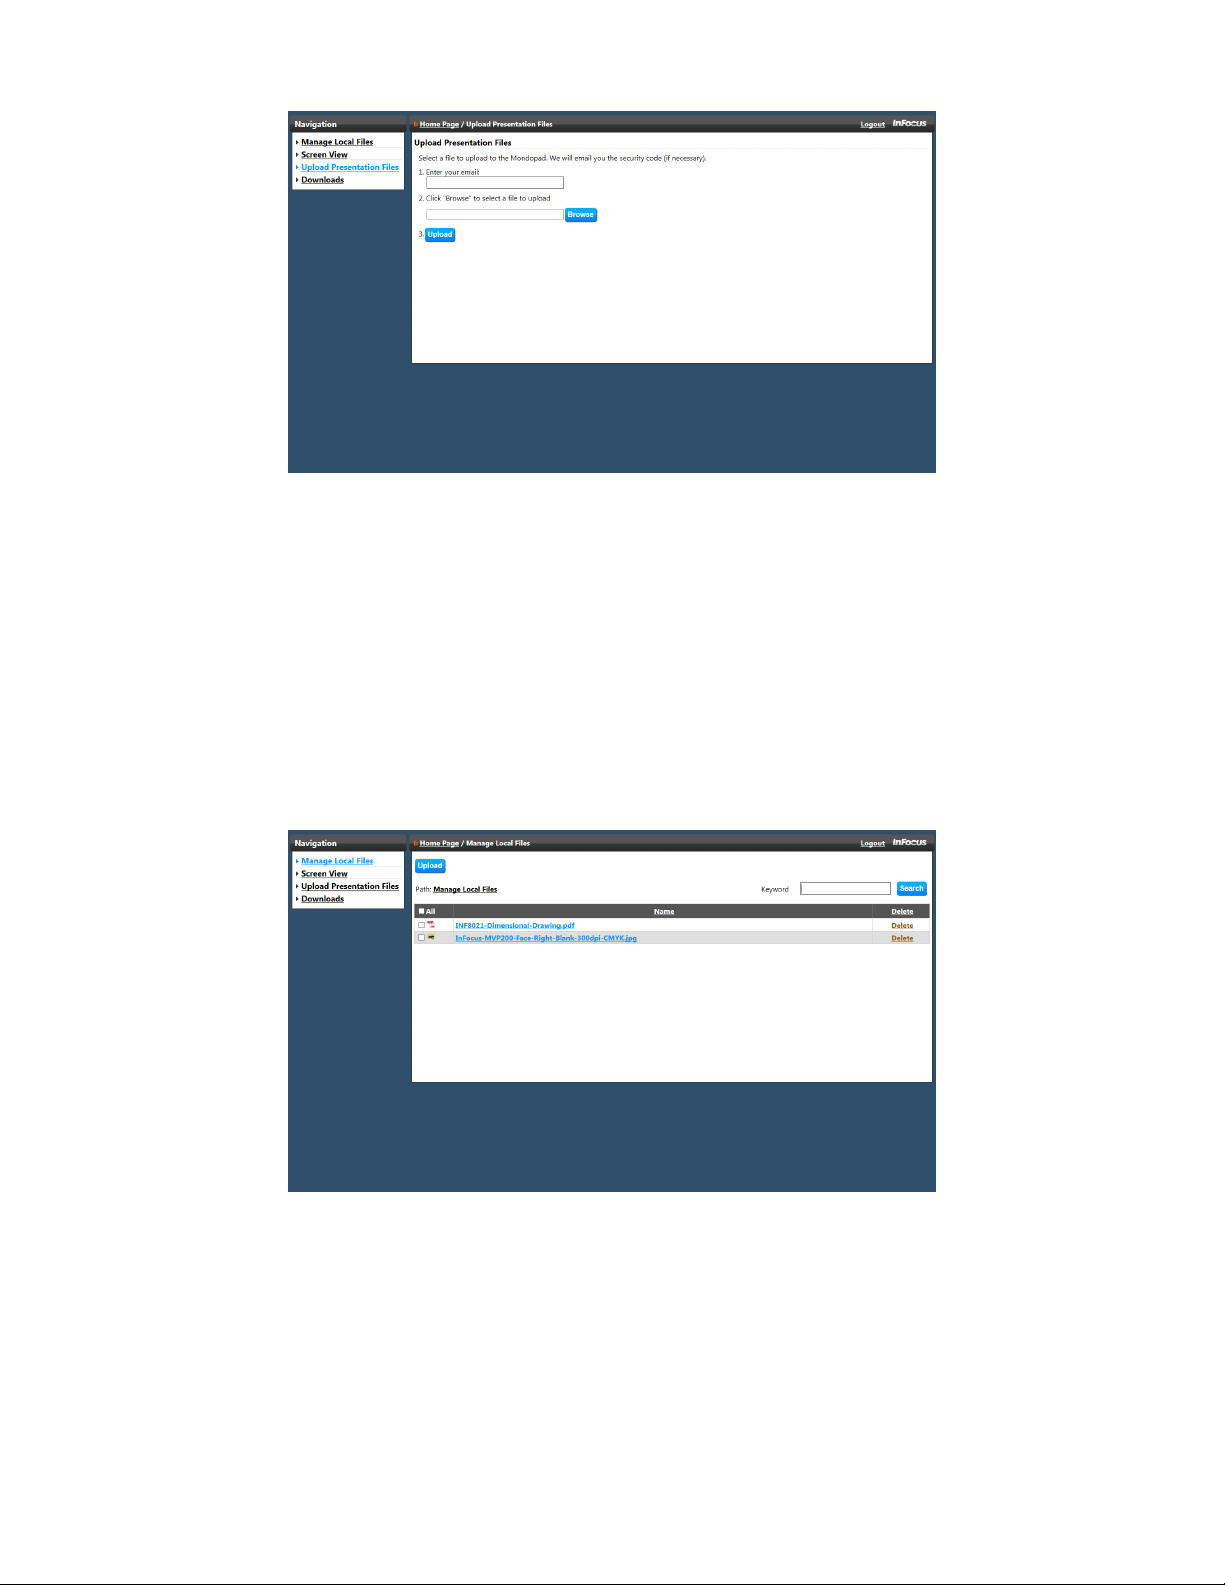
Upload a file using a wireless hotspot connection
NOTE: Your administrator must set up a Hotspot connection before the Guest presenter can upload their presentation.
1) From the Home page, tap Getting Started .
2) Navigate to the Upload Presentations > Via Web Browser tab.
3) Open the Wireless Network Connections on your computer (or smart device).
4) Click the Wireless Network Connection which matches the one listed in the Hotspot information.
5) Click Connect.
Page 14
Page 17
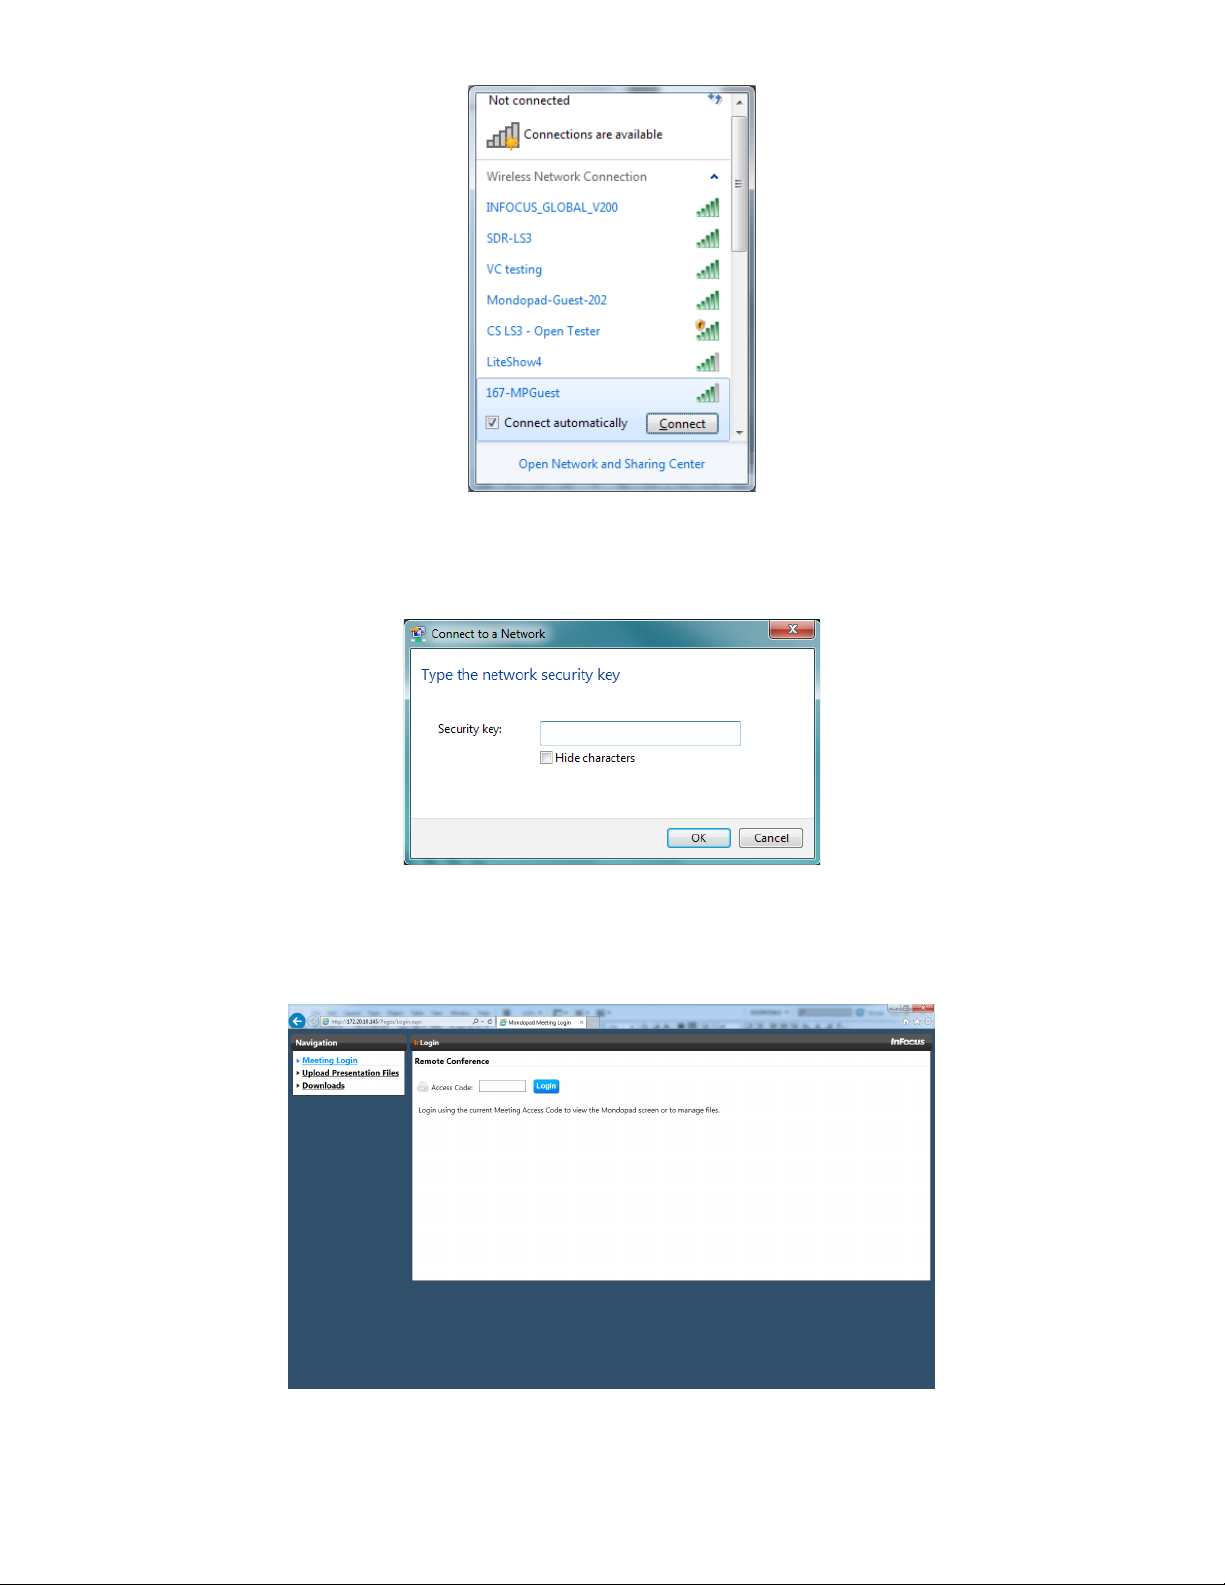
6) Type the network security key (passcode).
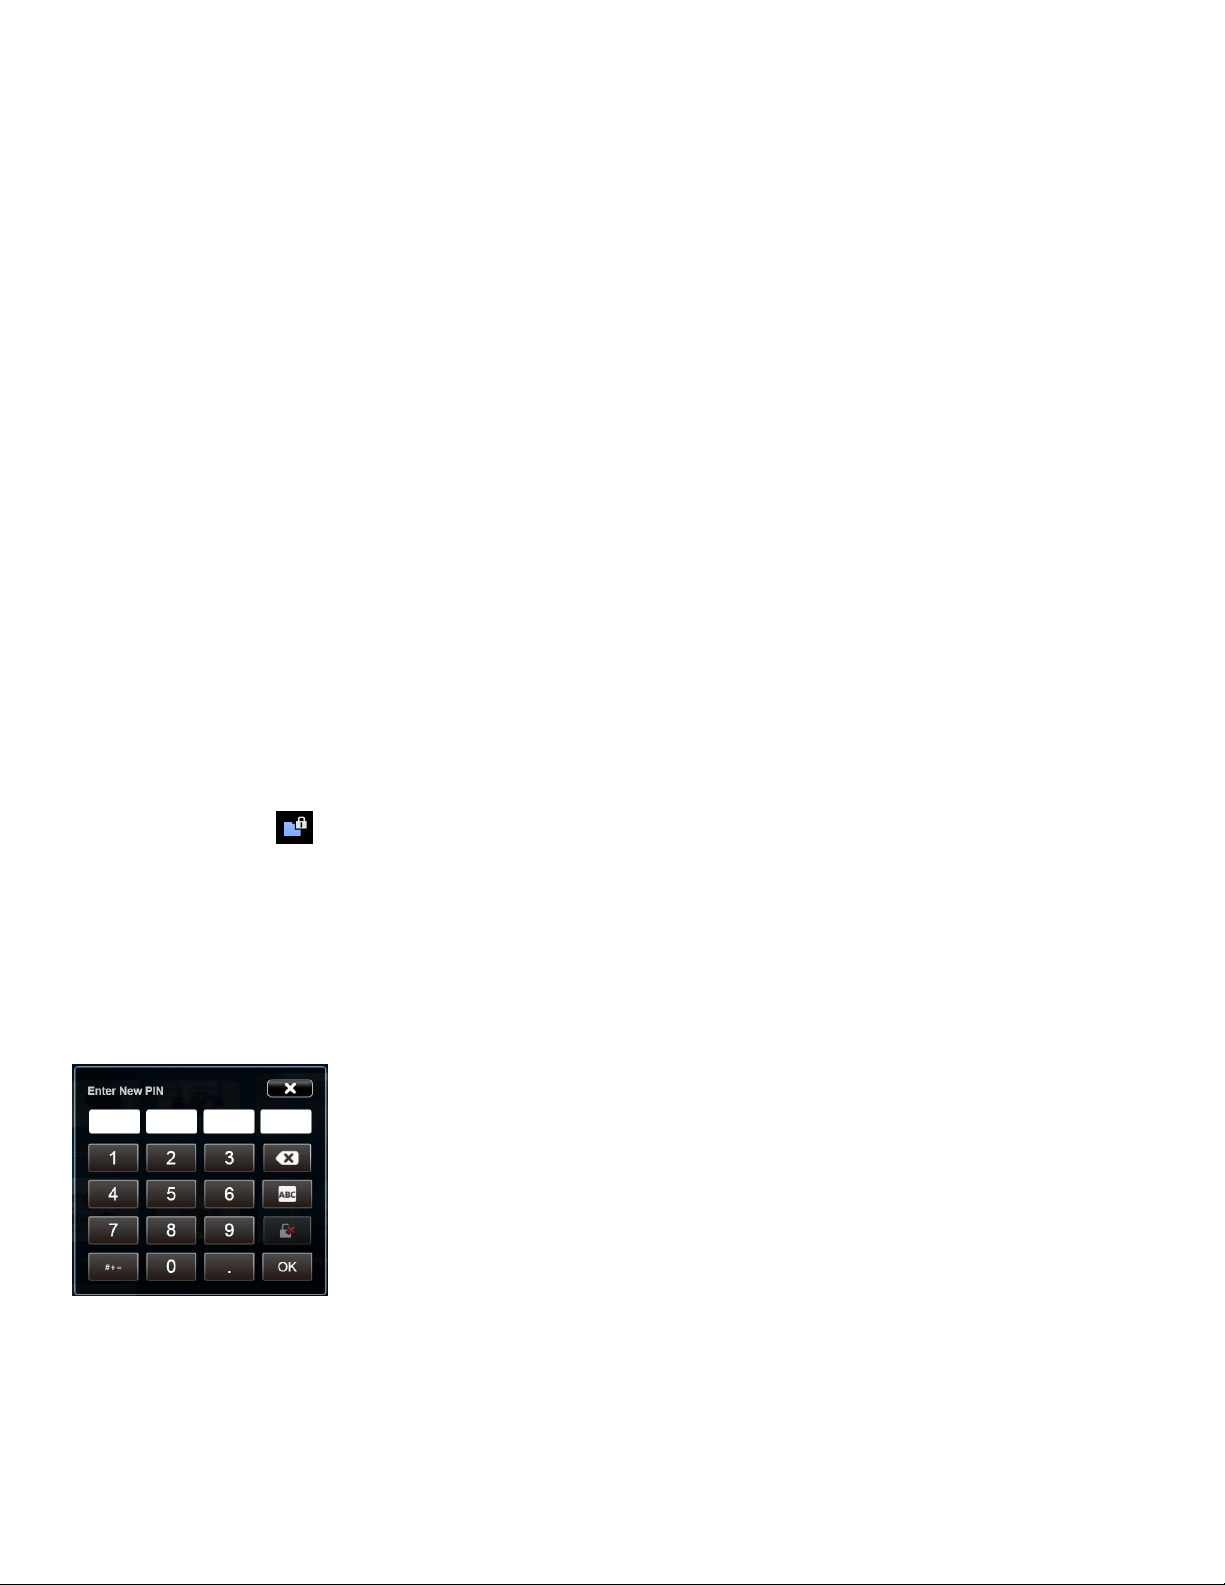
7) Click OK.
8) Open the laptop’s web browser. If the Mondopad Remote Conference interface does not automatically display, type
the Mondopad IP address in the address bar and click Enter (or scan the QR code on the Getting Started > Upload
presentations > Via Web Browser tab).
9) The Mondopad Remote Conference interface displays.
Mondopad v2.0 Software Guide
Page 15
Page 18
10) Option 1 - Create a personal folder in the View & Share folder:
11) Click Upload Presentation Files in the left-hand navigation menu.
a. Type your email address.
b. Click Browse.
c. Locate the desired le on your computer (or smart device) and click Open.
d. Click Upload. A folder with your email address and les now appears in the View & Share folder.
12) Option 2 - Upload a single le to the View & Share folder:
a. On the Meeting Login page, type the Meeting Access Code from the Mondopad device (for example, 7023)
and click Login. The Manage Local Files page displays.
b. Click Upload.
c. Click Browse.
d. Locate the desired le on your computer (or smart device) and click Open.
e. Click Upload. The le now appears in the View & Share folder.
Page 16
Page 19
Access a file in Dropbox
Mondopad is not linked to the Dropbox account. Files are only temporarily accessible during the View & Share Dropbox
login session. Once you log out of the Dropbox account or reset the meeting, these les are no longer accessible any-
where on Mondopad.
1) Navigate to View & Share.
2) Tap Cloud.
3) Tap Dropbox login. The Sign in to Dropbox window displays.
4) Enter the Dropbox email address and password.
5) Tap the Sign in button.
6) Tap Allow.
7) Navigate to the desired le.
8) When done, tap Exit. Your Dropbox account closes.
Folder security
A personal security PIN code can be added to a folder to prevent other people from accessing les within the folder. The
method varies based on the type of folder.
Add a security PIN code
This process allows users to lock personal folders that were created or copied into the View & Share folder. This process
does not work for folders that were emailed to the Mondopad device.
1) Tap Lock Folder in the left-hand column. The Lock Folder dialog box displays.
2) Tap OK.
3) Tap the folder you want to lock. NOTE: Only folders which can be locked are accessible. All others are grayed out.
4) Type an alphanumeric Folder Security PIN code. NOTE: The PIN code length is determined by administrative set-
tings.
5) Tap OK.
6) Enter the same PIN code in Conrm New PIN and tap OK.
7) Tap Done. The folder now requires the PIN to be entered before it can be opened.
Mondopad v2.0 Software Guide
Page 17
Page 20

Remove a security PIN code
Security PIN codes can be removed by the original folder owner or by an administrator, if the administrator has set up a
Global Override PIN.
1) Tap the locked folder.
2) Type the associated PIN code.
3) Tap the Remove PIN icon .
Forgotten security PIN code
This process only works for emailed folders, and causes an email, with the folder security PIN code, to be sent back to the
original email address. If the locked folder was created or copied into the View & Share le, contact your administrator for
assistance.
1) Tap the Forgot PIN button . The Forgot PIN dialog box displays.
2) Tap OK.
3) Tap the emailed folder.
4) Tap Send in the top right-hand corner of the screen. An email with the security PIN code is sent to the original email
address. NOTE: Your administrator also has the ability to access locked les.
Delete files and folders
To delete a single le or folder:
1) Tap and hold the le until a le ghost appears.
2) Drag the le to Delete and release.
3) Tap OK to conrm deletion.
To delete folders and multiple les:
1) Tap the Delete icon.
2) Tap the les and folders you wish to delete.
3) Once all les and folders have been selected, tap OK in the top right-hand corner of the screen.
NOTE: Some Mondopad folders are protected from deletion. These folders cannot be deleted and appear grayed out.
Send a file back
This process sends an emailed le back to its owner.
1) Tap the emailed folder.
2) Tap Send Back.
3) Select the les to be returned.
4) Tap Send in the top right-hand corner of the screen.
Page 18
Page 21

Present View & Share files
1) Tap the View & Share le you wish to present. The le opens. NOTE: Files can be opened from local or network fold-
ers, Dropbox, or a USB thumb drive.
2) If the folder containing the le is locked, enter the PIN code and tap OK.
3) Use touchscreen hand gestures or the menu options to navigate through the le. NOTE: File-level tools vary de-
pending on the le type.
NOTE: If the le was originally emailed to the Mondopad device, you can send the modied le back to the original email
address using the Send Back icon in the View & Share browser toolbar.
View & Share file-level tools
NOTE: File-level tools vary depending on the le type.
Button Description
To Files Tap to return to the View & Share folder.
Move Tap to switch the module between the screens.
Previous Tap to display the previous page in the le.
Previous Tap to display the previous image in the folder.
Mondopad v2.0 Software Guide
Page 19
Page 22
Next Tap to display the next page in the le.
Next Tap to display the next image in the folder.
Laser Pen Tap to highlight something temporarily. The mark disappears when a new mark
is made. Laser marks cannot be saved.
Annotation Tap to annotate the le. See "Annotation tools (varies by le type)" on page
24 for details.
Edit Tap to open the Microsoft or Adobe Reader application and make changes to
the les. Closing the application returns you to the View & Share folder.
Zoom In Tap to magnify a portion of the open le.
Zoom Out Tap to reduce a portion of the open le.
100% Tap to return the le to its original size.
HD Displays when images are greater than 1920x1080. This indicates the image
was downsized for the Mondopad device. To display the image in its native
resolution, tap the HD icon.
Rotate Left Tap to rotate the image 45 degrees to the left.
Rotate Right Tap to rotate the image 45 degrees to the right.
Enable Links Tap to activate the embedded PDF and PowerPoint le links.
Size Tap to adjust the displayed size of the Word document without affecting the print
size. Options include Letter (default), Legal, A4 or A5.
One Page Tap to display a single page of the Word le at a time.
Page 20
Page 23

Two Page Tap to display two pages of the Word le at a time.
Play Tap to start the PowerPoint slideshow.
Thumbnails Tap to display a thumbnail view of the le.
Close Tap to close the current document.
Print Tap to send the document to a network printer. NOTE: The printer must be
installed through the Windows operating system on the Mondopad device.
Help Tap to display View & Share help information.
When audio or video les are displayed, you can adjust the volume, pause, and
play the le.
Play/Pause
Fast Forward
Rewind
Mute and Volume
Control
Full Screen
Mondopad v2.0 Software Guide
Page 21
Page 24

Annotation
View & Share les can be annotated, saved, and shared with others using the Annotation submenu.
Create a drawing
1) Open a le from the View & Share folder.
2) Tap Annotation.
3) Tap a drawing object, and the color, pen width, and opacity desired.
4) Draw on the page with a stylus or your nger. TIP: Keep other objects, including writing utensils, other ngers, and
knuckles away from the drawing surface to draw your image cleanly.
5) Use Select, Lasso, Undo, Re-do, Clear, and Eraser to modify the drawing. See "Annotation tools (varies by le
type)" on page 24.
Add text
1) Open a le from the View & Share folder.
2) Tap Annotation.
3) Tap Text.
4) Tap the screen where you want the text box to be. A text box opens.
5) Adjust the font family, size, color, and text box position, as desired.
6) Using either a keyboard or the on-screen keyboard, type your text.
NOTE: The text overlays the open document and does not affect the text within the displayed document. To edit the
original source document, close annotation, and tap Edit in the View & Share Navigation toolbar.
7) Tap OK when nished.
Page 22
Page 25

Save the file
1) Tap Save.
2) Type the le Name.
3) Select the desired File Type (MWBX*, JPG, and PDF).
4) For JPG and PDF le types, select to save the Current View or Whole View.
5) Browse to the Location you would like to save the le to or accept the default location.
6) Tap OK.
*MWBX les are proprietary Mondopad Whiteboard les which can be shared, opened and edited between devices running Mondopad software.
Share the file
1) Tap Share.
2) Select the desired File Type (JPG or PDF).
3) Select to share the Current View or Whole View of the le.
4) Tap OK.
5) Enter or select the destination email addresses and make sure they are listed in the Send to: window.
a. To select an existing email address: Tap the desired email address from the Previously accessed address-
es list and tap the green arrow.
b. To add a new email address: Type the email address into the Enter new email address to add to Send To
list text box, and tap Add.
NOTE: You can also add email addresses using the Email Contact Editor menu in the Mondopad Administrative Set-
tings menus.
6) When the Send To list is complete, tap OK. An email message with the subject line "Annotation Screen Capture" is
sent to the email addresses. If the email message is not received, have the recipients look in their Junk Mailbox.
Mondopad v2.0 Software Guide
Page 23
Page 26

Annotation tools (varies by file type)
Icon
Tool Name Description
Drawing
Objects
Colors, pen
width, and
opacity
Clear Tap to remove all drawing objects and images from the current page.
Text Tap Text. Then tap the existing text object, or another area on the screen where
Select Tap Select. Tap and drag the selection box around the drawing objects and images
Lasso Tap Lasso and then draw around the drawing objects and images to select them.
Tap to select a drawing object.
Tap the color you want to use for the currently selected drawing object.
Adjust the pen width and opacity level by sliding the thumbnail buttons. NOTE: The
opacity slider is disabled for the pen object, since the pen object is always solid.
you want a new text box to be placed, and adjust the placement, font size, color,
and type attributes as desired. Type your text and tap OK.
which you want to move, copy, paste, re-size, or delete.
Once selected:
• Tap inside the selection and drag to move the selection.
• Tap and drag a sizing handle to resize the selection.
• Tap Copy to copy the selection, and then tap Paste to create a duplicate
object set.
• Tap Delete to delete the selection.
Once selected:
• Tap inside the selection and drag to move the selection.
• Tap and drag a sizing handle to resize the selection.
• Tap Copy to copy the selection, and then tap Paste to create a duplicate
object set.
• Tap Delete to delete the selection.
Eraser Tap Eraser, and then tap and drag across the drawing object to erase the portion
you touched. Dragging across the edge of an image deletes the image from the
current view.
Auto Tap to enable Auto Shape mode where pen and highlighter strokes are automati-
cally converted into regular shapes such as straight lines, triangles, quadrangles,
or circles. Tap again to disable Auto Shape mode.
Laser Pen Tap to highlight something temporarily. The mark disappears when a new mark is
made. Laser marks cannot be saved.
Undo Tap to reverse the last executed command.
Page 24
Page 27

Redo Tap to reverse the last Undo command.
Save Tap to save the annotated pages as a Whiteboard le (.mwbx), JPG images, or
PDF le.
Print Tap to send the annotated pages to a network printer. NOTE: The printer must be
installed through the Windows operating system on the Mondopad device.
Paste Tap to paste bitmap data from the system clipboard onto the annotation canvas.
Text objects cannot be pasted onto the annotation canvas.
Share Tap to send an email with an attachment of the annotated pages as either a JPG
or PDF le. Tap again to remove.
Invite Tap to send an email message with an active link for someone to join the meeting
and participate in the annotation session.
NOTES: Microsoft Silverlight is required and installs automatically on compatible
PC products. The Invite feature only works with devices that support Microsoft
Silverlight, such as
Windows and Apple computers (iOS devices do not currently support Silverlight),
and that are within the same network as the Mondopad.
Play Tap to play the audio-video le.
Pause Tap to pause the audio-video le.
Grid Tap to show a grid overlay on the canvas. Tap again to remove.
NOTE: The grid pattern is not part of the drawing. It is simply an aid.
Help Tap to display tips and information.
Toolbar Tap to turn the simplied quick access tool bar on and off.
SaturnCast Tap to turn the SaturnCast feature on or off. When SaturnCast is turned on, the
Mondopad desktop is shared in the InFocus.net meeting room and all changes you
make will be visible to meeting participants. Note: This is an experimental feature
which must be enabled by your administrator. If SaturnCast is not enabled, the
SaturnCast toggle switch is not displayed.
Previous Tap to go to the previous page of the le.
Mondopad v2.0 Software Guide
Page 25
Page 28

Annotation
Tap to close the annotation menu.
Off
Next Tap to go to the next page of the le.
Thumbnails Tap to view thumbnails of all the edited pages. Tap a thumbnail to navigate to that
page.
Page 26
Page 29

Invite others to a meeting
Invite Mondopad via Mondopad Invite
1) Tap MP Invite . A list of Mondopad devices within the same network appears.
2) Tap the desired Mondopad device and tap OK.
3) If the Mondopad device is not listed:
a. Tap Send Invitation and type the IP/Host name. NOTE: Manually entered IP addresses must be pingable and
allow port trafc.
b. Tap Send.
4) The other Mondopad party must tap OK to accept the invitation and be joined into the session. The primary Mondo-
pad device is now synchronized to the invited Mondopad device.
5) To end the session, tap the MP Invite icon, and tap the white Disconnect button next to the Mondopad names
you wish to disconnect, or tap the Disconnect All button to disconnect all connected Mondopad devices. Tap OK.
Presentation View via a browser
1) Ask the person coordinating the Mondopad session to provide you with the IP address (for example 172.20.30.82 )
and the Meeting Access Code from the Mondopad device (for example, 7023).
2) Using your computer or smart device (not Mondopad), open a web browser.
3) Enter the IP address into the address bar and click Enter.
4) The Mondopad Remote Conference interface and the Meeting Login page displays.
5) Type the Access Code and click Login.
6) Click Screen View.
Mondopad v2.0 Software Guide
Page 27
Page 30

7) Use the navigation tools displayed on the right-hand side to control and view the presentation.
8) To end the session, click Logout, or close your browser window.
NOTES:
• You must be logged into the same network as the Mondopad device.
• Screen View provides a limited number of navigation controls for the presenter located on the far right-hand side of
the window. Any navigation tools displayed within the presentation window itself are non-functional.
Page 28
Page 31

Browser
Use the Browser to access the internet. Depending on the Mondopad conguration settings, Internet Explorer and/or
Chromium browsers may be accessible from the Mondopad home page. NOTE: Chromium is only available on Mondopad
devices larger than 55" wide. 55" Mondopad devices must be upgraded to i7 PCs (and have 8GB of available memory) in
order to be compatible with this feature.
Icon
Tool
Name
Home Tap to return to the Home page.
Favorite Tap to add the current view to your Favorite list.
Annotation
Print Tap to send the document to a network printer. NOTE: The printer must be installed
Back Tap to go back to the previous webpage.
Forward Tap to go back to the next webpage.
Refresh Tap to refresh the browser.
Description
Tap to access the Annotation menu. See page 24 for detailed information.
through the Windows operating system on the Mondopad device.
Mondopad v2.0 Software Guide
Page 29
Page 32

Delete Tap to delete the URL.
Clear Tap to clear the browser's temporary le cache. This may be necessary in some cases to
allow a page to be viewed correctly.
Zoom in Tap to zoom the webpage in.
Zoom out Tap to zoom the webpage out.
Cancel
Tap to return to the native webpage size.
Zoom
Add Tap to open another browser tab.
Page 30
Page 33

Whiteboard
Use the Whiteboard to brainstorm ideas, create graphs, and workows, or whatever you desire. This blank slate lets you
collaborate, share, and save your ideas.
From the Home page, tap Whiteboard .
Create a drawing
1) Tap the drawing object you wish to use.
1) Tap the color, pen width, and opacity you desire.
2) Draw on the canvas with a stylus or your nger. TIP: Keep other objects, including writing utensils, other ngers, and
knuckles away from the drawing surface to draw your image cleanly.
3) Use Select, Lasso, Undo, Re-do, Clear, and Eraser to modify the drawing. See "Whiteboard tools" on page 33.
Add text
1) Tap Text.
2) Tap the screen where you want the text box to be. A text box opens.
3) Adjust the font family, size, color, and text box position, as desired.
4) Using either a keyboard or the on-screen keyboard, type your text.
5) Tap OK when nished.
Grow the whiteboard canvas
Your whiteboard canvas can grow to be 10 x 10 cells or pages. A new whiteboard has a canvas of 1x1. Grow the canvas
by tapping the arrow buttons. If the current view is on the edge of the canvas, tapping the arrow buttons will grow the canvas in the direction of the arrow. Show the canvas map with the Map button.
Note you can only grow a canvas. You cannot shrink the canvas.
Mondopad v2.0 Software Guide
Page 31
Page 34

Navigate in the whiteboard canvas
Tap the canvas map arrow keys to move the current view 1/2 page in the direction of the arrow. If the arrow is gray, you
have reached the maximum edge of the canvas. Tap on any cell in the map to move directly to that page. Tap and hold on
the view selector to move it to any location in the map.
Clear the canvas
• Use Clear All to remove all whiteboard data from the entire whiteboard canvas.
• Use Clear Current to remove only the data shown in the current view.
Save the Whiteboard file
1) Tap Save.
2) Type the desired le name in the Name text box.
3) Select the desired File Type (MWBX*, JPG, and PDF).
4) For JPG and PDF le types, select Current View or Whole View.
5) Browse to the Location you would like to save the le to.
6) Tap OK.
*MWBX les are proprietary Mondopad Whiteboard les which can be shared, opened and edited between devices running Mondopad software.
Share the Whiteboard file
1) Tap Share.
2) Select the desired File Type (JPG or PDF).
3) Select Current View or Whole View.
4) Tap OK.
5) Enter or select the destination email addresses and make sure they are listed in the Sent to: window.
a. To select an existing email address: Tap the desired email address from the Previously accessed address-
es list and tap the green arrow.
Page 32
Page 35

b. To add a new email address: Type the email address into the Enter new email address to add to Send To
list text box, and tap Add.
NOTE: You can also add email addresses using the Email Contact Editor menu in the Mondopad Administrative Set-
tings menus.
6) When the Send To list is complete, tap OK. An email message with the subject line "Annotation Screen Capture" is
sent to the email addresses. If the email message is not received, have the recipients look in their Junk Mailbox.
Whiteboard tools
Icon
Tool
Description
Name
Home
Tap to go to the Mondopad home page.
Page
Move Tap to switch the module between the screens.
MP Invite Tap to invite another Mondopad within the same WLAN/LAN network to join the Mon-
dopad session. NOTE: IP addresses which are manually entered, must be pingable.
Drawing
Tap to select a drawing object.
Objects
Colors,
pen width,
and opac-
ity
Tap the color you want to use for the currently selected drawing object.
Adjust the pen width and opacity level by sliding the thumbnail buttons. NOTE: The
opacity slider is disabled for the pen object, since the pen object is always solid.
Pictures Tap to import an image into the whiteboard canvas. To modify the image, select the
image with the Select tool.
Grab the sizing handles or pinch to resize the image. Pinch and turn to adjust the
angle of the image. Tap OK when done.
Mondopad v2.0 Software Guide
To remove an imported image, tap the red X in the top right-hand corner of the image.
Page 33
Page 36

Background
Tap to add a background image to the current view (the visible canvas) or as wallpaper for the whole view (the entire canvas).
To delete a background image, tap the Background icon and tap Remove Back-
ground.
All Tap to remove all drawing objects and images from the whole view.
NOTE: Background images are not affected.
Screen Tap to remove all drawing objects and images from the current view.
NOTE: Background images are not affected.
Text Tap Text. Then tap the existing text object, or another area on the screen where you
want a new text box to be placed, and adjust the placement, font size, color, and type
attributes as desired. Type your text and tap OK.
Select Tap Select. Tap and drag the selection box around the drawing objects and images
which you want to move, copy, paste, re-size, or delete.
Once selected:
• Tap inside the selection and drag to move the selection.
• Tap and drag a sizing handle to resize the selection.
• Tap Copy to copy the selection, and then tap Paste to create a duplicate object
set.
• Tap Delete to delete the selection.
Lasso Tap Lasso and then draw around the drawing objects and images to select them.
Once selected:
• Tap inside the selection and drag to move the selection.
• Tap and drag a sizing handle to resize the selection.
• Tap Copy to copy the selection, and then tap Paste to create a duplicate object
set.
• Tap Delete to delete the selection.
Eraser Tap Eraser, and then tap and drag across the drawing object to erase the portion you
touched. Dragging across the edge of an image deletes the image from the current
view.
Auto Tap to enable Auto Shape mode where pen and highlighter strokes are automati-
cally converted into regular shapes such as straight lines, triangles, quadrangles, or
circles. Tap again to disable Auto Shape mode.
Laser pen Tap to highlight something temporarily. The mark disappears when a new mark is
made. Laser marks cannot be saved.
Undo Tap to reverse the last executed command.
Redo Tap to reverse the last Undo function.
Page 34
New Tap to open a new whiteboard canvas.
Page 37

Open Tap to open a saved whiteboard (.mwbx) le.
Save Tap to save the le as a Whiteboard le (.mwbx), JPG images, or PDF le.
Print Tap to send the Whiteboard le to a network printer. NOTE: The printer must be in-
stalled through the Windows operating system on the Mondopad device.
Paste Tap to paste bitmap data from the system clipboard onto the whiteboard canvas. Text
objects cannot be pasted on the Whiteboard.
Share Tap to send an email with an attachment of the whiteboard canvas as either a JPG or
PDF le. Tap again to remove.
Invite Tap to send an email message with an active link for someone to join the meeting and
participate in the annotation session.
NOTES: Microsoft Silverlight is required and installs automatically on compatible PC
products. The Invite feature only works with devices that support Microsoft Silverlight,
such as Windows and Apple computers (iOS devices do not currently support Silver-
light), and that are within the same network as the Mondopad.
Grid Tap to show a grid overlay on the canvas. Tap again to remove.
NOTE: The grid pattern is not part of the drawing. It is simply an aid.
Help Tap to display tips and information.
SaturnCast
Tap to turn the SaturnCast feature on or off. When SaturnCast is turned on, the Mondopad desktop is shared in the InFocus.net meeting room and all changes you make
will be visible to meeting participants. Note: This is an experimental feature which
must be enabled by your administrator. If SaturnCast is not enabled, the SaturnCast
toggle switch is not displayed.
Toolbar Tap to turn the simplied quick access tool bar on and off.
Left Tap to scroll 1/2 page left in the Whiteboard canvas.
Up Tap to scroll 1/2 page up in the Whiteboard canvas.
Canvas
map view
Tap to view thumbnails of the entire Whiteboard canvas. Tap a thumbnail to navigate
to that area of the canvas.
Right Tap to scroll 1/2 page right in the Whiteboard canvas.
Down Tap to scroll 1/2 page down in the Whiteboard canvas.
Mondopad v2.0 Software Guide
Page 35
Page 38

Video Meeting
Your administrator has three options for setting up video conferencing with the Mondopad. If your administrator is using
the embedded SIP interface for video conferencing services, continue reviewing this chapter.
However if your administrator set up a 3rd party application, such as Skype, look in the Mondopad toolbar for the application shortcut.
If your administratorconnected a 3rd party video calling system to an external video input port, you must change to that
source, using the Input button on the remote or keypad. NOTE: Only audio is routed through Mondopad using this method. An external camera must be connected to the 3rd party video calling system directly.
Screen overview
Dial pad
Tabs
SIP service icon
SIP URI
Volume control
Video area
Toolbar
Page 36
Page 39

SIP Service icon: This read-only icon (see below) provides you with the status of the SIP-based conferencing service.
A call is being made or received.
Registration has failed. You are not connected to the
video conferencing service.
Ready for a call to be placed.
SIP URI: displays the video conferencing address others can call into.
Volume control: allows you to increase and decrease the audio volume.
Video area: displays windows of the video conferencing participants. If a bridge call is occurring with multiple participants,
the largest window is utilized by the dominant speaker and the small windows around the edges of the dominant image
are utilized by other participants.
Dial pad: Use to initiate a video conferencing call.
Button Description
Backspace Tap to delete the last type character in the dial eld.
Add Con-
Tap to add a new contact or to add the number to an existing contact.
tact
Call Tap to make a call.
Call merge For InFocus.net 121 Premium users only. Tap to add another caller to the video
meeting.
End Call Tap to end the call.
Secondary
Tap to make a H.323, Skype, Lync, or SIP audio call.
call button
Hold/Re-
Tap to put a call on hold or resume the call.
sume call
Transfer Tap to transfer the current call to somewhere else.
Shift Tap to toggle between the alphanumeric dial pad and special characters dial pad.
Mondopad v2.0 Software Guide
Page 37
Page 40

History tab: displays your call history.
Button Description
Search Tap to search the History tab for the criteria entered into the Search text box.
Clear
Tap to clear the History tab.
History
Add
Tap to add the selected contact to the Contact tab.
Contact
Call
Tap to initiate a video meeting with the contact.
Contact
Delete
Tap to remove a local contact or group.
Contact
Contact tab: displays contacts from your personalized address book and other available sources.
Button Description
Search Tap to search the Contact tab for the criteria entered into the Search text box.
New
Tap to a new contact to the Contact tab.
Contact
Export Contacts
Import Con-
Tap to save local contacts to an XML le. This le can be used to import the contacts to another Mondopad device.
Tap to import contacts from an XML le to the Mondopad device.
tacts
Call
Tap to initiate a video meeting with the contact.
Contact
Edit
Tap to edit the contact information.
Contact
Save to le Tap to save the selected contact information to a CONX le, and/or create a
link on the Mondopad menu bar (Bottom Bar Tile) or create a Windows desktop
shortcut.
Settings: allows you to change the video meeting settings.
Accounts: For administrators only. Used for setting up new and modifying existing account information.
Stats: displays read-only statistics associated with the current call. When call quality is impacted, the numbers will turn
orange.
Page 38
Page 41

Toolbar:
The toolbar auto-hides after 5 seconds of inactivity. Tap the screen to display the toolbar again.
Button Description
Self View Tap to display the image from the Mondopad device's camera. This is especially
useful when you wants to adjust the pan and tilt of the camera on top of the de-
vice.
Volume Use the slidebar to increase and decrease the volume level of the call.
Audio On/
Tap to mute or unmute the audio to the remote party.
Off
Video On/
Tap to mute or unmute the video signal to the remote party.
Mute
Mic On/Off Tap to turn your microphone on or off.
Share Tap to share an application on your PC screen or your entire PC screen with
other video call participants.
Full/Normal
Tap to toggle between full screen and normal screen video.
Screen
Add Caller For InFocus.net 121 Premium users only. Tap to add another caller to the video
meeting.
PTZ Remote Tap to access the PTZ camera control menu. See "Adjust the PTZ Camera" on
page 46 for more information.
Switch
Tap to switch between multiple cameras.
Camera
Layout Tap to change the layout of the video meeting participant windows.
Hold/Resume
End Call Tap to end the call.
Mondopad v2.0 Software Guide
Tap to put a call on hold or resume the call.
Page 39
Page 42

Call Management
Please refer to the documentation your video conferencing service provided for detailed information on how to make and
receive calls.
Make a call using the dial pad
Enter the other party’s video conferencing or IP address using the dial pad and tap the Call icon. Alternatively, if the desired party is listed in the History or Contacts tab, tap the Camera icon located to the right of the desired contact number.
If you are making a Skype, Lync, or audio call, Tap the Secondary call button and select the appropriate option from the
drop-down list. NOTE: If making a Skype call, follow the Skype window prompts.
1) Using the dial pad, type the other party’s video conferencing address.
2) Tap Call.
NOTE: If the Mondopad devices are on the same internal network and are on the same side of the rewall, you can call
the SIP address directly by typing a pound sign (#) before the IP address. This bypasses the proxy server.
3) If you have InFocus.net 121 Premium service and you would like to add another party to the video conference, type
the other party's video conferencing address, and then tap the Call merge or Add Caller button.
Make a call using the Contacts tab
1) Tap the Contacts or History tab.
2) Tap the contact you wish to call.
3) Tap the Camera icon .
Page 40
Page 43

Accept the call
Once the call is recognized by the Mondopad device, tap Accept Call on the pop-up window to begin the audio/video
conferencing call, or tap Ignore Call to refuse the call. If you have 121 Premium, you can tap Merge Call to have a video
conference with multiple parties.
End the call
Tap End Call to end the call. If an InFocus.net 121 Premium video conference is in progress, the following window will
display. Tap Exit and Close Meeting to end the conference completely. Tap Exit and leave Meeting Open to leave the
meeting and allow the other conference participants to continue the meeting.
Share the Mondopad screen
1) Start a video call.
2) Tap the Share button .
Mondopad v2.0 Software Guide
Page 41
Page 44

3) Select the Mondopad feature you wish to share and tap Start.
4) Use the icons on the video meeting participant window and also on the toolbar to control the call.
Button Description
Minimize Tap to minimize the small video meeting participant window.
Swap Tap to stop sharing and return to the standard video meeting screen.
Transpar-
ency
Use the slidebar to increase and decrease the transparency level of the call.
NOTE: If you have a 55" Mondopad device with an i5 computer, you will not see
the Transparency feature. Your device must have an i7 computer and 8GB of
available memory to use this feature.
Volume Use the slidebar to increase and decrease the volume level of the call.
Audio On/
Tap to mute or unmute the audio to the remote party.
Off
Video On/
Tap to mute or unmute the video signal to the remote party.
Mute
Mic On/Off Tap to turn your microphone on or off.
Share Tap to share an application on your PC screen or your entire PC screen with
other video call participants.
Page 42
Full Screen Tap to toggle between full screen and normal screen video.
Page 45

Switch
Tap to switch between multiple cameras.
Camera
Layout Tap to change the layout of the video meeting participant windows.
Hold/Re-
Tap to put a call on hold or resume the call.
sume
End Call Tap to end the call.
5) To stop sharing, tap the End Share or Swap button as appropriate for your Mondopad device.
Mondopad v2.0 Software Guide
Page 43
Page 46

Share a third-party application or the desktop
1) Start a video call.
2) Tap the Share button . A list of desktops and applications display depending on the Admin settings of your device.
3) Select the desktop or application you wish to share and tap Start.
Page 44
Page 47

4) Use the icons on the video meeting participant window and also on the toolbar to control the call:
Button Description
Audio On/
Tap to mute or unmute the audio to the remote party.
Off
Mic On/
Tap to mute or unmute the microprhone to the remote party.
Mute
Pen tool Tap to temporarily highlight items on the shared screen. These marks are only
available when sharing data in full screen and cannot be saved.
Laser tool Tap to temporarily annotate on the shared screen. These marks are only avail-
able when sharing data in full screen and cannot be saved.
End share Tap to stop sharing your screen.
End call Tap to end the call.
5) To stop sharing, tap the End Share button.
Mondopad v2.0 Software Guide
Page 45
Page 48

Adjust the PTZ Camera
If a video meeting is in progress and a PTZ camera has been installed, adjustments can be made to the camera position
by tapping the PTZ menu icon .
• To shift the camera position, tap the appropriate arrow buttons.
• To zoom the image, swipe the Zoom button clockwise to zoom in and counter-clockwise to zoom out.
• To reset the camera to its default position, tap Reset Camera.
• If multiple PTZ cameras are installed, tap the Select Camera arrow at the bottom right of the PTZ camera menu to
switch between the PTZ cameras.
• To dene presets and review other controls (such as focus and backlighting), tap the menu icon in the upper left of the
menu.
• To close the menu, tap the menu button in the main menu bar.
Page 46
Page 49

InstantConference
Obtain InstantConference
Instant Conference is a feature of the InFocus.net 121 Premium subscription level. Users with InFocus video conferenc-
ing products (Mondopad, MVP100, BigConnect, etc.) can upgrade their 121 subscription from 121 Basic to 121 Premium.
To upgrade your subscription level, you must purchase the 121 Premium Upgrade (p/n IN121PRM-UP). To renew your
existing subscription, you must purchase one of three annual subscription terms: IN121PRM-1Y, IN121PRM-2Y, or
IN121PRM-3Y.
Register 121 Premium
1) Once you purchase the 121 Premium subscription, you will receive an activation code. Use this code at www.info-
cus.net to register your product.
2) To use InstantConference features immediately, power on the Mondopad device and navigate to Video Meeting.
3) Navigate to the Accounts tab.
4) Edit the default account information.
5) Tap the Provision button. InstantConference features are now available.
NOTE: If you do not manually provision your Mondopad device as shown in steps 2 - 5, it may take up to 15 minutes before the auto provisioning cycle is complete.
InstantConference behavior
If your device has InstantConference capabilities, or you are using a different bridge call service, multiple video windows
will be open simultaneously. The largest video window displays the most active participant.
TIP: To change the layout of your video streams, tap *3 on your keyboard. To change the number of participant cells
shown in your combined video stream, tap *4 on your keyboard.
Mondopad v2.0 Software Guide
Page 47
Page 50

Call History
Save contact from call history
1) From the History tab, navigate to that specic call and tap the Add Contact button.
2) Tap Add to Existing to add the information to an existing contact or tap Create New to create a New Contact.
3) Add the contact information and tap Save.
Call contact using call history
1) From the History tab, navigate to the number you wish to call.
2) Tap the Video call button or the Audio call button to initiate a call.
Search for contact in History tab
1) From the History tab, type a few alphanumeric characters in the Search eld. The contact/history list will immedi-
ately display the information which ts the search criteria.
2) To clear the search criteria, tap the X in the search eld.
Clear call history
To clear the call history associated with a particular call: Navigate to a specic call record and tap the Delete button
to the right of the call record. The call record is deleted immediately.
To clear the entire call history: Tap the Clear History button at the top of the History tab, and tap OK in the Con-
rm window.
Page 48
Page 51

Contacts
Add a contact
1) Tap the Contacts tab.
2) Tap the Add Contact icon .
3) Type the contact information into the Display Name, First Name, Last
Name, and number text boxes.
4) Tap the Local Group drop-down list and select the desired group or tap
Edit Group and the plus icon to add a new group.
5) Use the drop-downs to dene the type (SIP, Lync, or Skype) and descrip-
tion of the contact numbers (Other, Mobile, Work, Home, Video).
6) Tap Save.
Edit contact information
1) Tap the Contacts tab.
2) Tap the contact you wish to edit.
3) Tap the Edit button .
4) Tap and modify the information as needed.
5) Tap Save.
Mondopad v2.0 Software Guide
Page 49
Page 52

Delete a contact
1) Tap the Contacts tab.
2) Tap the desired contact and tap the Edit button .
3) Tap Delete Contact.
Search for a contact
1) Tap the Contacts (or History) tab.
2) Type a few alphanumeric characters in the Search eld. The list updates to reect the records that meet the search
criteria.
3) To clear the search criteria, tap the X in the Search eld.
Save contact to the desktop or to the Mondopad toolbar
This process saves a shortcut to your desktop or Mondopad toolbar with the contact number. Double-clicking the shortcut
automatically launches the Mondopad shell (if it is not already open) and makes the call.
To remove the desktop shortcut, drag it to the recycle bin. To remove the toolbar shortcut, follow the instructions below
and tap the Delete from bottom bar tile button.
1) Tap the Contacts tab.
2) Tap the contact you wish to edit.
3) Tap the Save icon .
4) Type the le name if desired.
5) To add the shortcut to the desktop, tap the Create Desktop Shortcut button.
6) To add the shortcut to the Mondopad toolbar, tap the Add to Bottom Bar Tile button.
Page 50
Page 53

Export Local Contacts
This process saves an XML le of local contacts, which can be used to import the same contact list to other Mondopad
devices.
1) Tap the Contacts tab.
2) Tap the Export Contacts icon .
3) Tap Browse and navigate to the location where you want to save the resulting XML le.
4) Type a le name in the Name eld.
5) Tap OK.
Import Local Contacts
This process imports contacts listed in an XML le to the Mondopad device.
1) Tap the Contacts tab.
2) Tap the Import Contacts icon .
3) Naviigate to the location where the XML le is located.
4) Tap Open.
Mondopad v2.0 Software Guide
Page 51
Page 54

Settings
1) Tap the Settings tab.
2) To return to the default settings, tap Default Settings.
3) To make changes, navigate to the desired feature (see below) and tap the drop-down box.
4) Tap the desired option and tap Save Settings to save your changes. (Or tap Default Settings to return the setting
options to their factory default settings.)
Setting tab features
Basic
• Answer Mode: Select the desired answer mode for Mondopad. Options include: Identify caller, Auto reject,
and Auto answer.
• Ring Timeout: Select the number of times Mondopad should ring before rejecting the call. Options include:
Ring until answered, 10, 20, or 30 seconds.
• Auto Full Screen: When enabled, the video conferencing window automatically expands to full screen when a
call is connected.
• Call Forward Mode: When enabled, all calls are routed to the number associated with Forward All Calls To
eld. Options include: Always, NoAnswer, and Busy.
• Forward All Calls To: Select the number that all calls should be routed to when call forwarding is enabled (Op-
tions: Forward Number 1, 2, or 3).
• Forward Number 1: Dene a number for calls to be routed to, if call forwarding has been enabled and For-
ward Number 1 has been selected.
• Forward Number 2: Dene a number for calls to be routed to, if call forwarding has been enabled and For-
ward Number 2 has been selected.
• Forward Number 3: Dene a number for calls to be routed to, if call forwarding has been enabled and For-
ward Number 3 has been selected.
Page 52
Page 55

Bandwidth
• Max Send Bandwidth: Select the maximum amount of bandwidth outgoing calls should use on the corporate
network. Options include: 128, 192, 256, 320, 384, 512, 768, 1024, 1152, 1536, 2048, 3072, or 4096 kbps.
• Max Receive Bandwidth: Select the maximum amount of bandwidth incoming calls should use on the corpo-
rate network. Options include: 128, 192, 256, 320, 384, 512, 768, 1024, 1152, 1536, 2048, 3072, or 4096 kbps.
Audio
• Preset Audio/Speaker: The Mondopad device will automatically select between the various presets depending on your hardware setup. If you want to customize the following settings, select Non STD mode.
• SW Echo Cancellation: When enabled, Echo Cancellation removes the echo from the video conferencing call
in order to improve voice quality. Options include: Preferred, Alternative, and Off.
• Microphone: Select which microphone should be used by Mondopad.
• Microphone Auto Ctrl: When enabled, reduces microphone volume uctuations automatically.
• Microphone Volume: When Microphone Auto Control is disabled, tap the slider to adjust the microphone
volume.
• Speaker: Select which speaker should be used during a Mondopad video meeting. Other applications contin-
ues to use the default speaker device set up in Windows.
• Speaker Volume: Tap the slider to adjust the speaker volume.
Video
• Preferred Camera: Select which camera should be used by Mondopad.
• Aspect ratio: Select the preferred video image aspect ratio. Options include 4:3 and 16:9.
• Camera Properties: Tap Properties to access the Video Process Amp and Camera Control Setting submenus
associated with the selected camera.
Provisioning
• Provisioning URL: Select InFocus Provisioning if an InFocus.net account is being used, or select Provi-
sioning Server 1 or Provisioning Server 2. If infocus.net is selected, the Mondopad device automatically
provisions within 10-15 minutes.
• Provisioning Server 1: Dene a different provisioning server. This is used to set up a local MCU.
• Provisioning Server 2: Dene a different provisioning server. This is used to set up a local MCU.
Address Book URL
• Address Book URL: enter the URL which contains the video meeting address book information.
Network
• DiffServ Audio Priority: Network control for Mondopad audio trafc prioritization. It is recommended that you
leave this at its default setting.
• DiffServ Video Priority: Network control for Mondopad video trafc prioritization. It is recommended that you
leave this at its default setting.
• Max. Packet Size: The maximum size of a single data unit. It is recommended that you leave this at its default
setting.
• RTP Lowest Port Number: This setting determines the range of UDP ports used by Mondopad for sending
and receiving RTP (audio and video) data. Although the allowable range is 0 to 65535, values below 10000 are
Mondopad v2.0 Software Guide
Page 53
Page 56

not recommended. The highest port number must be at least 100 ports higher than the lowest port number (for
example, if the RTP Lowest Port Number is 20000, the RTP Highest Port Number must be at least 20099).
• RTP Highest Port Number: This setting determines the range of UDP ports used by Mondopad for sending
and receiving RTP (audio and video) data. Although the allowable range is 0 to 65535, values below 10000 are
not recommended. The highest port number must be at least 100 ports higher than the lowest port number (for
example, if the RTP Lowest Port Number is 20000, the RTP Highest Port Number must be at least 20099).
Page 54
Page 57

Cast
The Casting feature allows users to send or receive images using the ControlView 2.0 feature, or embedded AirPlay or
Chrome applications. Multiple screens can be casted, including both screens when in Dual Display mode.
1) Tap Cast from the Mondopad toolbar. The LightCast welcome screen displays with instructions on how to display
computer, tablet, or phone content on the panel using ControlView 2.0, AirPlay, or Chrome.
2) Follow the instructions listed based on your desired device.
3) When LightCast is casting, a green LiteCast icon will display in the top bar. A white LiteCast icon indicates that
devices are connected, but are not casting.
Mondopad v2.0 Software Guide
Page 55
Page 58

AirPlay
Airplay has the ability to cast from iOS on the same network with sound (maximum 720p resolution). You must have an
Apple device with embedded AirPlay in order to use this AirPlay feature on this monitor. In addition, your network must follow Airplay conguration guidelines as specied by Apple.
Notes: Do not use the YouTube app on the iOS device. Use the YouTube website for better performance. If Airplay is not
available, check with your system administrator.
Using iOS on an iPad or iPhone
1) Open the Control Center on your device by swiping up from the bottom of your iPad or iPhone screen.
2) Tap the Airplay icon.
3) Make sure Mirroring is turned on.
4) Select the device name listed in step 3 of the Connect with AirPlay window.
Using an OS X device
1) Select the Airplay icon from the menu bar on OS X device.
2) Make sure Mirroring is turned on.
3) Select the device name listed in step 2 of the Connect with AirPlay window.
Chrome Browser and Chromebook Cast
1) Install Lightcast Sender extension from Chrome app store.
2) Tap the LightCast Sender icon.
3) Select what you would like to display:
a. Tap Select Desktop to cast the desktop of one of your monitors. This mode does not support audio.
b. Tap select Current Tab to cast your selected tab with audio.
Page 56
Page 59

Extras
Button Description
Applications
Admin
Page
Your system administrator can congure the Mondopad device to allow users
to run additional applications from within the Mondopad software shell. Tap the
desired application icon to run the application. More than one application can be
run simultaneously with the Mondopad software suite. To close the application,
tap the Close button or select the appropriate menu item such as File Close.
WARNING: Some applications may not fully function with the Mondopad environment. If your application interferes with the Mondopad system, notify your system
administrator.
For administrators only. Provides access to the Mondopad administrative settings
menu.
Add/Remove Apps
Minimize For administrators only. Minimizes the Mondopad software and exposes the Win-
Exit MP For administrators only. Closes the Mondopad shell and returns the user to the
Admin
Login
Admin
Logout
Logoff User For Mondopad devices using local or domain-based user accounts, users can
For administrators only. Provides access to the system les to locate executable
programs and add them to the Applications list.
dows desktop. Tap the Mondopad icon in the task bar to return to the Mondopad
shell.
Windows desktop.
For administrators only. To ensure the Mondopad device operates consistently
for all users, system conguration is restricted to the system administrator and
requires and Admin PIN. NOTE: When Personal Mode is enabled through the
administrative web pages, all Extras administrative level features are immediately
available and do not require an Admin PIN to be entered.
For administrators only. Logs the system administrator out of the Extras administrative area. NOTE: When Personal Mode is enabled through the administrative
web pages, all Extras administrative level features are immediately available and
do not require an Admin PIN to be entered.
terminate their session by logging off. This returns the system to the Windows
user login page and is controlled by the Windows operating system.
Reboot Restarts the Mondopad device.
Shutdown Powers down the Mondopad device.
Mondopad v2.0 Software Guide
Page 57
Page 60

About For administrators only. Displays Mondopad software version number, the Com-
puter ID, and the date the Mondopad Software Maintenance plan expires. The
Computer ID can be used with Technical Support to help administer your software license key.
Check for Update: InFocus provides periodic software updates for Mondopad
devices which have active software maintenance plans. If your Mondopad software maintenance plan is active, tap Check for Update and follow the prompts
to update your Mondopad device. If available, the software update will download
and install automatically.
Input Software Maintenance Plan Key: If your Mondopad software maintenance plan has expired, you must purchase a new license from InFocus. Tap
Input Software Maintenance Plan Key to enter a new license.
Help Displays tips and information.
Page 58
Page 61

ControlView 2.0
In order to use the ControlView application, your computer must be within the same LAN or WLAN as the Mondopad
device.
Download ControlView 2.0
1) For a Windows computer, open the Mondopad device's IP address on your computer and click Downloads to down-
load the ControlView installer, or download directly from: http://www.infocus.com/accessories/controlview.
For a tablet or mobile device, go to the Google Play Store (Android) or the AppStore (Apple) and search for InFocus
ControlView.
2) Click Run and follow the prompts to install the software application.
Connect to a Mondopad device
3) Open Controlview.
4) Locate the Mondopad device you would like to use.
5) If the device you would like to use is not listed:
a. Click Add.
b. Enter the device name and the device's IP address.
c. Click OK.
Mondopad v2.0 Software Guide
Page 59
Page 62

6) Click Connect.
7) Type the Mondopad device's Meeting Access Code.
8) Click Submit. The ControlView menu bar displays.
Page 60
Page 63

Control the Mondopad device from a PC, tablet, or mobile device
1) Open Controlview and select your device.
2) From the Controlview menu:
• Click Receive to duplicate and control the Mondopad device screen on your PC, tablet, or mobile device.
• Click Keyboard Mouse to control the Mondopad device without displaying the Mondopad device screen on
your PC.
3) Use your PC, tablet, or mobile device to control the Mondopad device.
4) When nished, click the X in the upper right corner of the shared window. The Warning box displays.
5) Click OK.
Mondopad v2.0 Software Guide
Page 61
Page 64

Control a PC, tablet, or mobile device from the Mondopad device
1) Open Controlview and select your device.
2) From the Controlview menu, tap Cast to duplicate and control your PC, tablet, or mobile device image onto the Mondopad device.
3) The ControlView icon will appear in your Taskbar next to the clock, and an invitation is sent to the Mondopad device.
NOTE: The invitation must be accepted within 30 seconds otherwise your casting session will end.
4) Use the Mondopad device to control your PC, tablet, or mobile device.
5) When nished, tap the X in the upper right corner of the shared window. The Warning box displays.
6) Tap OK.
Page 62
Page 65

Change Controlview settings
From the Controlview settings window, you can disconnect from the current device, choose to automatically run Controlview when the computer starts, check for updates, and remember the current connection.
1) Open Controlview and select your device.
2) From the Controlview menu, tap the Settings icon .
3) Make any desired changes and tap Save.
Mondopad v2.0 Software Guide
Page 63
Page 66

Troubleshooting
Symptom Possible Solutions
I can’t see some types of View &
Share les
No access to the internet • Check Network Setup settings in the Mondopad™ software.
Can’t pick-up a video conferencing attendee call
No image on video conferencing
call
No audio for the video conferencing call
Can’t register, make or receive
video conferencing calls
Poor video conferencing call qual-
ity
Can’t access the Mondopad Con-
trol Panel or system les
Can’t add or delete any programs • Programs cannot be added or deleted without entering the password protected
The calendar is not populating
correctly
• Only certain les types are compatible with the Mondopad software. See "View
& Share" on page 11 for a full listing of compatible le types. If desired, you
can display the les from an external source (bypassing the Mondopad soft-
ware).
• Check the Answer Mode setting in the Video Meeting Settings > General tab.
The Answer Mode should not be set to Auto Reject.
• Verify that the call has not been placed on hold.
• If you are using a 3rd party video calling system, an external camera must be
connected directly to the 3rd party video calling system.
• If you are unable to see yourself, verify that the camera has been plugged into
an available USB A jack on the device.
• Verify that the call has not been muted or placed on hold.
• Contact your Administrator.
• Contact your Administrator.
• To access the Mondopad Control Panel and system les, you must access the
password-protected Applications area of the Mondopad software. If the Admin
Access Code has been forgotten, tap Forgot PIN from the Browser Admin login
screen.
Applications area of the Mondopad software. If the Admin Access Code has
been forgotten, tap Forgot PIN from the Browser Admin login screen.
• This feature is only compatible with Windows® Exchange 2007 (or newer) and
Ofce 365 with EWS service.
“Cannot register to server, reason:
...”
A Meeting Invite was not received • Have the invited party check his/her junk mail.
Email messages are not being
received by Mondopad
A View & Share folder is locked • Have the sender check his/her email for the Access Code.
PowerPoint and images keep
panning rather than scrolling
Page 64
• Contact your Administrator.
• Microsoft Silverlight is required and installs automatically on compatible PC
products.
• The Invite feature only works with devices that support Microsoft Silverlight,
such as Windows and Apple computers (iOS devices do not currently support
Silverlight), and that are within the same network as the Mondopad.
• Contact your Administrator.
• Images and les cannot be scrolled when the les are zoomed in or out. Re-
store the images to their normal size and try again.
Page 67

The remote Whiteboard applica-
• Reduce the page size in the Browser settings.
tion is only partially visible.
For additional troubleshooting support, please contact:
InFocus Corporation
Technical Support
6am-5pm PST
877-388-8385
www.infocus.com/support
Mondopad v2.0 Software Guide
Page 65
Page 68

Software End-User License Agreement (EULA)
IMPORTANT PLEASE READ THE TERMS AND CONDITIONS OF THIS LICENSE AGREEMENT CAREFULLY BEFORE CONTINUING WITH THIS PROGRAM INSTALL: This End-User License Agreement ("EULA") is a legal agreement
between you (either an individual or a single entity) and InFocus Corp. for the Mondopad software product(s) identied
above which may include associated software components, media, printed materials, and "online" or electronic documentation ("SOFTWARE PRODUCT"). By installing, copying, or otherwise using the SOFTWARE PRODUCT, you agree to
be bound by the terms of this EULA. This license agreement represents the entire agreement concerning the program
between you and InFocus Corp., (referred to as "licenser"), and it supersedes any prior proposal, representation, or
understanding between the parties. If you do not agree to the terms of this EULA, do not install or use the SOFTWARE
PRODUCT.
The SOFTWARE PRODUCT is protected by copyright laws and international copyright treaties, as well as other intellectual property laws and treaties. The SOFTWARE PRODUCT is licensed, not sold.
1. GRANT OF LICENSE.
The SOFTWARE PRODUCT is licensed as follows:
(a) Installation and Use
InFocus Corp. grants you the right to install (if applicable) and use of the SOFTWARE PRODUCT on the installed Mondopad computing device or PC (personal computer) running a validly licensed copy of the operating system for which the
SOFTWARE PRODUCT was designed [e.g., Windows 7].
(b) Backup Copies
You may also make a copy of the SOFTWARE PRODUCT as necessary for backup and archival purposes.
(c) If this software was pre-installed on a computing product, you may not copy the SOFTWARE PRODUCT, except for
the purpose of creating a backup copy, and install it on any additional device.
2. DESCRIPTION OF OTHER RIGHTS AND LIMITATIONS.
(a) Maintenance of Copyright Notices
You must not remove or alter any copyright notices on any and all copies of the SOFTWARE PRODUCT.
(b) Distribution
You may not distribute registered copies of the SOFTWARE PRODUCT to third parties.
(c) Prohibition on Reverse Engineering, Decompilation, and Disassembly.
You may not reverse engineer, decompile, or disassemble the SOFTWARE PRODUCT, except and only to the extent that
applicable law notwithstanding this limitation expressly permits such activity.
The SOFTWARE PRODUCT is licensed as a single product. Its component parts may not be separated for use on more
than one computer.
(d) Rental
You may not rent, lease, or lend the SOFTWARE PRODUCT.
(e) Not for Resale
This SOFTWARE PRODUCT is NOT FOR SALE OR RESALE and as such you may not use or transfer the SOFTWARE
PRODUCT for neither commercial purposes nor sell, or otherwise transfer it for value. Commercial purposes include the
use of the SOFTWARE PRODUCT in the creation of publicly distributed computer software.
(f) Software Transfer
Page 66
Page 69

You may permanently transfer all of your rights under this EULA, provided you (a) retain no copies, (b) transfer all of the
SOFTWARE PRODUCT (including all component parts, the media and printed materials, any upgrades, this EULA, and,
if applicable, the Certicate of Authenticity), and (c) the recipient agrees to abide by all of the terms of this EULA. If the
SOFTWARE PRODUCT is an upgrade, any transfer must include all prior versions of the SOFTWARE PRODUCT and all
of your rights therein, if any.
(g) Support Services
InFocus Corp. may at its discretion provide you with support services related to the SOFTWARE PRODUCT ("Support
Services"). Any supplemental software code provided to you as part of the Support Services shall be considered part of
the SOFTWARE PRODUCT and subject to the terms and conditions of this EULA. With respect to technical information
you provide to InFocus as part of the Support Services, InFocus may use such information for its business purpose, in-
cluding for product updates and development. InFocus strives to utilize such technical information in a form that does not
personally identify you.
(h) Updates
InFocus Corp. may provide you with software updates to the SOFTWARE PRODUCT ("Updates"). Any supplemental
software code provided to you as part of the Updates shall be considered part of the SOFTWARE PRODUCT and subject
to the terms and conditions of this EULA.
Updates to any third party software are subject to applicable licenses but not necessarily this EULA.
(i) Compliance with Applicable Laws
You must comply with all applicable laws regarding use of the SOFTWARE PRODUCT.
3. TERMINATION
Without prejudice to any other rights, InFocus Corp. may terminate this EULA if you fail to comply with the terms and conditions of this EULA. In such event, you must destroy all copies of the SOFTWARE PRODUCT in your possession.
4. COPYRIGHT AND TRADEMARKS
All title, trademarks and copyrights in and pertaining to the SOFTWARE PRODUCT (including but not limited to any images, photographs, animation, video, audio, Music, text, and applets incorporated into the SOFTWARE PRODUCT), the
accompanying, printed materials and any copies of the SOFTWARE PRODUCT are owned by InFocus. The SOFTWARE
PRODUCT is protected by copyright and trademark laws and international treaty provisions. You must treat the SOFTWARE PRODUCT like any other copyrighted for archival purposes, and you may not copy the printed materials, if any,
accompanying the SOFTWARE PRODUCT.
You may not remove, modify or alter any InFocus copyright or trademark notice from any part of the SOFTWARE PRODUCT, including but not limited to any such notices contained in the physical and/or electronic media or documentation, in
the InFocus Setup Wizard dialogue or 'about' boxes, in any of the runtime resources and/or in any web-presence or webenabled notices, code or other embodiments originally contained in or dynamically or otherwise created by the SOFTWARE PRODUCT.
5. MISCELLANEOUS
If you acquired or use this SOFTWARE PRODUCT in the United States, this EULA is governed by the laws of the State of
Oregon. If this SOFTWARE PRODUCT was acquired and is used exclusively outside of the United States, then local law
may also apply. Should you have any questions concerning this EULA, or if you desire to contact InFocus for any reason,
please contact the InFocus distributor serving your country, or write: In Focus Corporation, Inc. at the address referenced
in Section 6 above. Any suit or action arising out of or in connection with this EULA shall be brought and maintained in the
federal or state courts of Portland, Oregon, USA and both parties submit to the exclusive jurisdiction of the federal or state
courts of Portland, Oregon, USA in relation to any dispute concerning this agreement. The controlling language of this
EULA is English. You agree to bear any and all costs of interpreters if necessary. If you have received a translation into
Mondopad v2.0 Software Guide
Page 67
Page 70

another language, it has been provided for your convenience only.
6. DISCLAIMER OF WARRANTIES
If you are a customer who is a consumer (someone who uses the Software Product outside of your trade, business or
profession), you many have legal rights in your country of residence which would prohibit the following limitations from
applying to you, and where prohibited they will not apply to you. To nd out more about your rights, you should contact a
local consumer advice organization.
YOU EXPRESSLY ACKNOWLEDGE AND AGREE THAT, TO THE EXTEND PERMITTED BY APPLICABLE LAW, USE
OF THE SOFTWARE PRODUCT AND SERVICES IS AT YOUR SOLE RISK AND THAT THE ENTIRE RISK AS TO SATISFACTORY QUALITY, PERFORMANCE, ACCURACY AND EFFORT IS WITH YOU.
TO THE MAXIMUM EXTENT PERMITTED BY APPLICABLE LAW, USE OF THE SOFTWARE PRODUCT AND SERVICES PERFORMED BY THE SOFTWARE PRODUCT ARE PROVIDED “AS IS” AND “AS AVAILABLE” WITH ALL FAULTS
AND WITHOUT WARRANTY OF ANY KIND, AND INFOCUS AND INFOCUS’ LICENSORS HEREBY DISCLAIM ALL
WARRANTIES AND CONDITIONS WITH RESPECT TO THE SOFTWARE PRODUCT AND SERVICES, EITHER EXPRESS, IMPLIED OR STATUTORY, INCLUDING BUT NOT LIMITED TO, THE IMPLIED WARRANTIES AND/OR CONDITIONS OF MERCHANTABILITY, SATISFACTORY QUALITY, FITNESS FOR A PARTICULAR PURPOSE, ACCURACY,
QUIET ENJOYMENT, AND NON-INFRINGEMENT OF THIRD PARTY RIGHTS.
INFOCUS DOES NOT WARRANT AGAINST INTERFERENCE WITH YOUR ENJOYMENT OF THE SOFTWARE PRODUCT AND SERVICES, THAT THE FUNCTIONS CONTAINED IN OR SERVICES PERFORMED BY THE SOFTWARE
PRODUCT WILL MEET YOUR REQUIREMENTS, THAT THE OPERATION OF THE SOFTWARE PRODUCT AND
SERVICES WILL BE UNINTERRUPTED OR ERROR-FREE, THAT ANY SERVICE WILL CONTINUE TO BE MADE
AVAILABLE, THAT DEFECTS IN THE SOFTWARE PRODUCT OR SERVICES WILL BE CORRECTED, OR THAT THE
SOFTWARE PRODUCT WILL BE COMPATIBLE OR WORK WITH ANY THIRD PARTY SOFTWARE, APPLICATIONS
OR THIRD PARTY SERVICES. INSTALLATION OF THIS SOFTWARE PRODUCT MAY AFFECT THE USABILITY OF
THIRD PARTY SOFTWARE, APPLICATIONS OR THIRD PARTY SERVICES.
YOU FURTHER ACKNOWLEDGE THAT THE SOFTWARE PRODUCT AND SERVICES ARE NOT INTENDED OR SUITABLE FOR USE IN SITUATIONS OR ENVIRONMENTS WHERE THE FAILURE OR TIME DELAYS OF, OR ERRORS
OR INACCURACIES IN, THE CONTENT, DATA OR INFORMATION PROVIDED BY THE MONDOPAD SOFTWARE OR
SERVICES COULD LEAD TO DEATH, PERSONAL INJURY OR SEVERE PHYSICAL OR ENVIRONMENTAL DAMAGE,
INCLUDING WITHOUT LIMITATION THE OPERATION OF NUCLEAR FACILITIES, AIRCRAFT NAVIGATION OR COMMUNICATIONS SYSTEMS, AIR TRAFFIC CONTROL, LIFE SUPPORT OR WEAPONS SYSTEMS.
NO ORAL OR WRITTEN INFORMATION OR ADVICE GIVEN BY INFOCUS OR AN INFOCUS AUTHORIZED REPRESENTATIVE SHALL CREATE A WARRANTY. SHOULD THE SOFTWARE PRODUCT OR SERVICE PROVE DEFECTIVE, YOU ASSUME THE ENTIRE COST OF ALL NECESSARY SERVICING, REPAIR OR CORRECTION. SOME
JURISDICTIONS DO NOT ALLOW THE EXCLUSION OF IMPLIED WARRANTIES OR LIMITATIONS OF APPLICABLE
STATUTORY RIGHTS OF A CONSUMER, SO THE ABOVE EXCLUSION AND LIMITATIONS MAY NOT APPLY TO YOU.
TO THE EXTENT IMPLIED WARRANTIES MAY NOT BE ENTIRELY DISCLAIMED BY IMPLIED WARRANTY LIMITATIONS ARE ALLOWED BY APPLICABLE LAW, IMPLIED WARRANTIES ON THE SOFTWARE PRODUCT, IF ANY ARE
LIMITED TO NINETY (90) DAYS.
7. LIMITATION OF LIABILITY
TO THE MAXIMUM EXTENT NOT PROHIBITED BY APPLICABLE LAW, IN NO EVENT SHALL INFOCUS OR ITS SUPPLIERS BE LIABLE FOR PERSONAL INJURY, OR ANY SPECIAL, INCIDENTAL, INDIRECT, OR CONSEQUENTIAL
DAMAGES WHATSOEVER (INCLUDING, WITHOUT LIMITATION, DAMAGES FOR LOSS OF BUSINESS PROFITS,
BUSINESS INTERRUPTION, COMPUTER INTERRUPTION, CORRUPTION OR LOSS OF DATA, LOSS OF BUSINESS
INFORMATION, FAILURE TO TRANSMIT OR RECEIVE ANY DATA, OR ANY OTHER PECUNIARY LOSS) ARISING
OUT OF OR RELATED TO THE USE OF OR INABILITY TO USE THE SOFTWARE PRODUCT OR THE PROVISION OF
Page 68
Page 71

OR FAILURE TO PROVIDE SUPPORT SERVICES, OR ANY THIRD PARTY SOFTWARE OR APPLICATIONS IN CONJUNCTION WITH THE SOFTWARE PRODUCT, HOWEVER CAUSED, REGARDLESS OF THE THEORY OF LIABILITY
(CONTRACT, TORT OR OTHERWISE) AND EVEN IF INFOCUS HAS BEEN ADVISED OF THE POSSIBILITY OF SUCH
DAMAGES. BECAUSE SOME STATES AND JURISDICTIONS DO NOT ALLOW THE EXCLUSION OR LIMITATION OF
LIABILITY, THE ABOVE LIMITATION MAY NOT APPLY TO YOU. In no event shall InFocus’ total liability for all damages
(other than as may be required by applicable law in cases involving personal injury) exceed the amount of two hundred
and fty dollars (U.S. $250.00). The foregoing limitations will apply even if the above stated remedy fails of its essential
purpose.
June 13, 2011
InFocus Corporation
13190 SW 68th Parkway Suite 200
Portland, Oregon 97223
Mondopad v2.0 Software Guide
Page 69
 Loading...