

Page 1

TABLE OF CONTENTS
Safety Summary iii
Introduction 1
Image Resolution 1
Compatibility 2
Unpacking the Projector 2
Usage Guidelines 4
If You Need Assistance 4
Warranty 4
Setti ng up the Projector 5
Connecting the CableWizard to the Projector 6
Selecting Connectors on the CableWizard 7
Preparing to Connect Your Equipment to the Projector 8
Connecting an IBM-Compatible Desktop Computer 9
Connecting an IBM-Compatible Laptop Computer 11
Connecting a Macintosh Desktop Computer 13
Connecting an Apple PowerBook Computer 15
Connecting a Video Player 17
Connecting an External Speaker and a Subwoofer 19
Connecting a Microphone 19
Connecting a PS/2-Compatible Mouse 20
Connecting the Remote Control Cabl e 20
Powering up the Projector and Adjusting the Image 21
Turning Off the Projector 23
Using the Projector 25
Basic Image Adjustment 25
Using the Remote Control 25
Adjusting the Projector 26
Changing between Color and Monochrome Modes 28
Using the Re m ote and Keypad Buttons 29
Using the Disk Mouse 32
Using the On-Screen Menus 32
Display Menu Functions 34
Audio Menu Functions 35
Image Menu Functions 37
Controls Menu Functions 39
i
Page 2

Table of Contents
Maintenance & T r oubleshooting 41
Cleaning th e Lens 41
Replacing the Proje ction Lamp 41
Resetting the Lamp Monitor Light 44
Replacing the Batteries in the Remote Control 44
Using the Kensington Lock 44
Troubleshooting 45
Solutions to Common Problems 46
Appendix 51
Specifications 51
Accessories 53
Portable and Laptop Activation Chart 55
Using Video Mirroring with a PowerBook Computer 59
Proje cted Image Size 60
Index 63
ii
Page 3

SA FE TY S UM MAR Y
Ple ase read these instruct ion s caref ully be fore usin g your LitePro
610 or 620. Failure to comply with them could result in fire, electrical shock, personal injury or damage to equipment.
These graphics are used throughout this manual to draw your
attention to importan t information about the projec tors.
NOTE: Additional useful details or tips.
CAUTION: Steps to avoid damage to your equipment.
WARNING: Steps to avoid personal injury.
These graphics are used on LitePro labels.
Attention: Refer to this User’s Guide for important
safety information.
Hot Surfaces: Avoid touc hing ho t surf aces. Do not touch
until the LitePro has cooled.
Lamp Explosi o n Hazard: If you continue to use th e
lamp after the lamp monitor light comes on, it may
explode, severely damaging your LitePro. Be sure to
replace the lamp when t he lamp monitor light comes on
as described in this User’s Guide. Refer to the section
titled “Replacing the Projection Lamp” for information
about changing the bulb.
iii
Page 4

Safety Summary
Do not look into the lens!
Be extr emely careful not to look i nto th e pr oject ion len s when the
LitePro is turned on. T he bright light may harm your eyes. Be
especially careful to keep children from looking into the l ens.
Turning projector on and off
Allow the projector to warm up for three m inutes before turning
it off; allow the projector to cool d o wn for three minutes before
turning it back on. Repeatedly turning the projector on and off
without waiting three minutes may cause the lamp to ex plode.
Power source
Use only a th ree-wire groundin g type power source. The nominal
power source should not exceed 240 volts rms between the supply conductors or between either conductor and the ground.
CAUTION: Be sure to replace
the projection bulb when the lamp
monitor light comes on as
described on page 41. If the lamp
rem ains in use too long, there is a
Power cord
Use only the power cord that was shipped with the LitePro.
Although other pow er cords might be similar in appearan ce, they
hav e not been safety-tested with the 610 or 620. Do not use a
power cord if it has become damaged or frayed. Contact your In
Focus dealer or call In Focus if you need to replace your power
cord.
Grounding
The projector is grounded through the grounding conductor on
the power cord. To avoid el ectric shock, plug the po wer cord into
a properly wired recept acle. Do not defeat the purpose of the
grounding-type plug.
Lamp
To avoid overheating and unacceptable image quality, replace
the projection lamp with a lamp of the specified type. Refer to
page 52 for lamp specific ations and to page 41 for instruct ion s o n
replacing the lamp.
danger of bulb explosion. If this
happens, your LitePro will be
severely damaged.
iv
Page 5

Lamp compartment
To avoid burns or an explosion hazard, do not open the lamp
module door until the projector is turned off and the lamp has
cooled. The hot lamp contains high pressure and can explode if
damaged or old. Follow the instructions in this manual for lamp
replacement carefully.
Hot su rfaces
Allow the projector to cool at leas t 45 minutes before replacing a
lamp. When you open the lamp housing, be very careful not to
touch the hot surfaces inside.
Ventilation and overheating
Openings in t he projec tor cas e provide ventilation to prote c t it
from o verhe atin g. K eep loo se paper s and other object s well away
from th e bott om, top an d side grills. Do not place the proje ctor on
top of or close to a computer or other heat-producing equipment.
Liquid spills
Do not set drink s on top of the projector. Spill ed liquids can flow
inside and cause damage.
Do not disassemble
All service must be perf ormed by an In Fo cu s Authorize d Service
Provider. T he only user-serviceable part in the projector is the
projection lamp, which you can replace by opening the lamp
cove r in t he front of the project or as descri bed on page 41. Do not
ope n any other part of the projector. If your LitePro needs repair,
call In Focus Customer Service as described on page4. Before
you call Customer Service, you may want to refer to “Troubleshooting” starting on page 45 to see if you can resolve the problem yourself.
NOTE: If you open the projector,
you will void the warranty.
v
Page 6

INTRODUCTION
The In Focus Systems LitePro® 610 and 620 multimedia projectors combine powerful and sophisticated features with easy-touse, intuitive controls. Built-in multimedia features include highfidelity stere o audio by JBL™, a palette of 16.7 million colors and
Digital Light Processing™ (DLP) technology. The 600 series projectors are ideal for high-performance business, train ing and
imaging applications that demand exceptional color quality. The
610 has VGA graphics, the 620 has SVGA graphics. The user
interfaces of the two products are identical; information in this
User’s Guide applies to both products.
Image Resolution
LitePro 610
The VGA resolution of the projected image of the 610 is 640x480.
The projector displays computer images that are 640x480 or
lower just as they appear on your computer’s monitor. Screen
resolutions between 640x480 and 800x600 are compressed to
640x480. The projector cannot compres s screen resolutions above
800x600. If your computer’s screen resolution is higher than
800x600, reset it to a lower resolution before you connect the projector.
LitePro 620
The SV GA resoluti on of the project ed image of t he 620 is 800x600.
The projector displays computer images that are 800x600 or
lower just as they appear on your computer’s monitor. Screen
resolutions between 800x600 and 1024x768 are compressed to
800x600. The projector cannot compres s screen resolutions above
1024x768. If your computer’s screen resolution is higher than
1024x768, reset it to a lower resolution before you connect the
projector.
NOTE: The 620 automatically
expands 640x480 images to
800x600. You can display these
images at 640x480 by turning off
the Auto Resize feature. See “A uto
Resize” on page 37 for more
information.
1
Page 7

Introduction
Compatibility
The pro jector i s compatible with a wide variety of comput ers and
video devices, including:
• IBM-compatible computers, including laptops, up to 800x600
resolution (LitePro 610) or 1024x768 resolution (LitePro 620) at
60Hz.
• IBM PS/2 in VGA and MCGA modes.
• Apple Macintosh and PowerBook computers up to 800x600
resolution (LitePro 610) or 1024x768 resolution (LitePro 620).
• Various VCRs, camcorders and laser disc players.
The projector is not compatible with these systems:
• IBM-compatible computers in CGA or EGA graphics mode.
NOTE: The contents of your
shipping box may vary depending
on the LitePro 610/620
configuration you ordered.
• Macintosh 128, 512, Plus, SE, SE/30 or Classic.
Unpacking the Projector
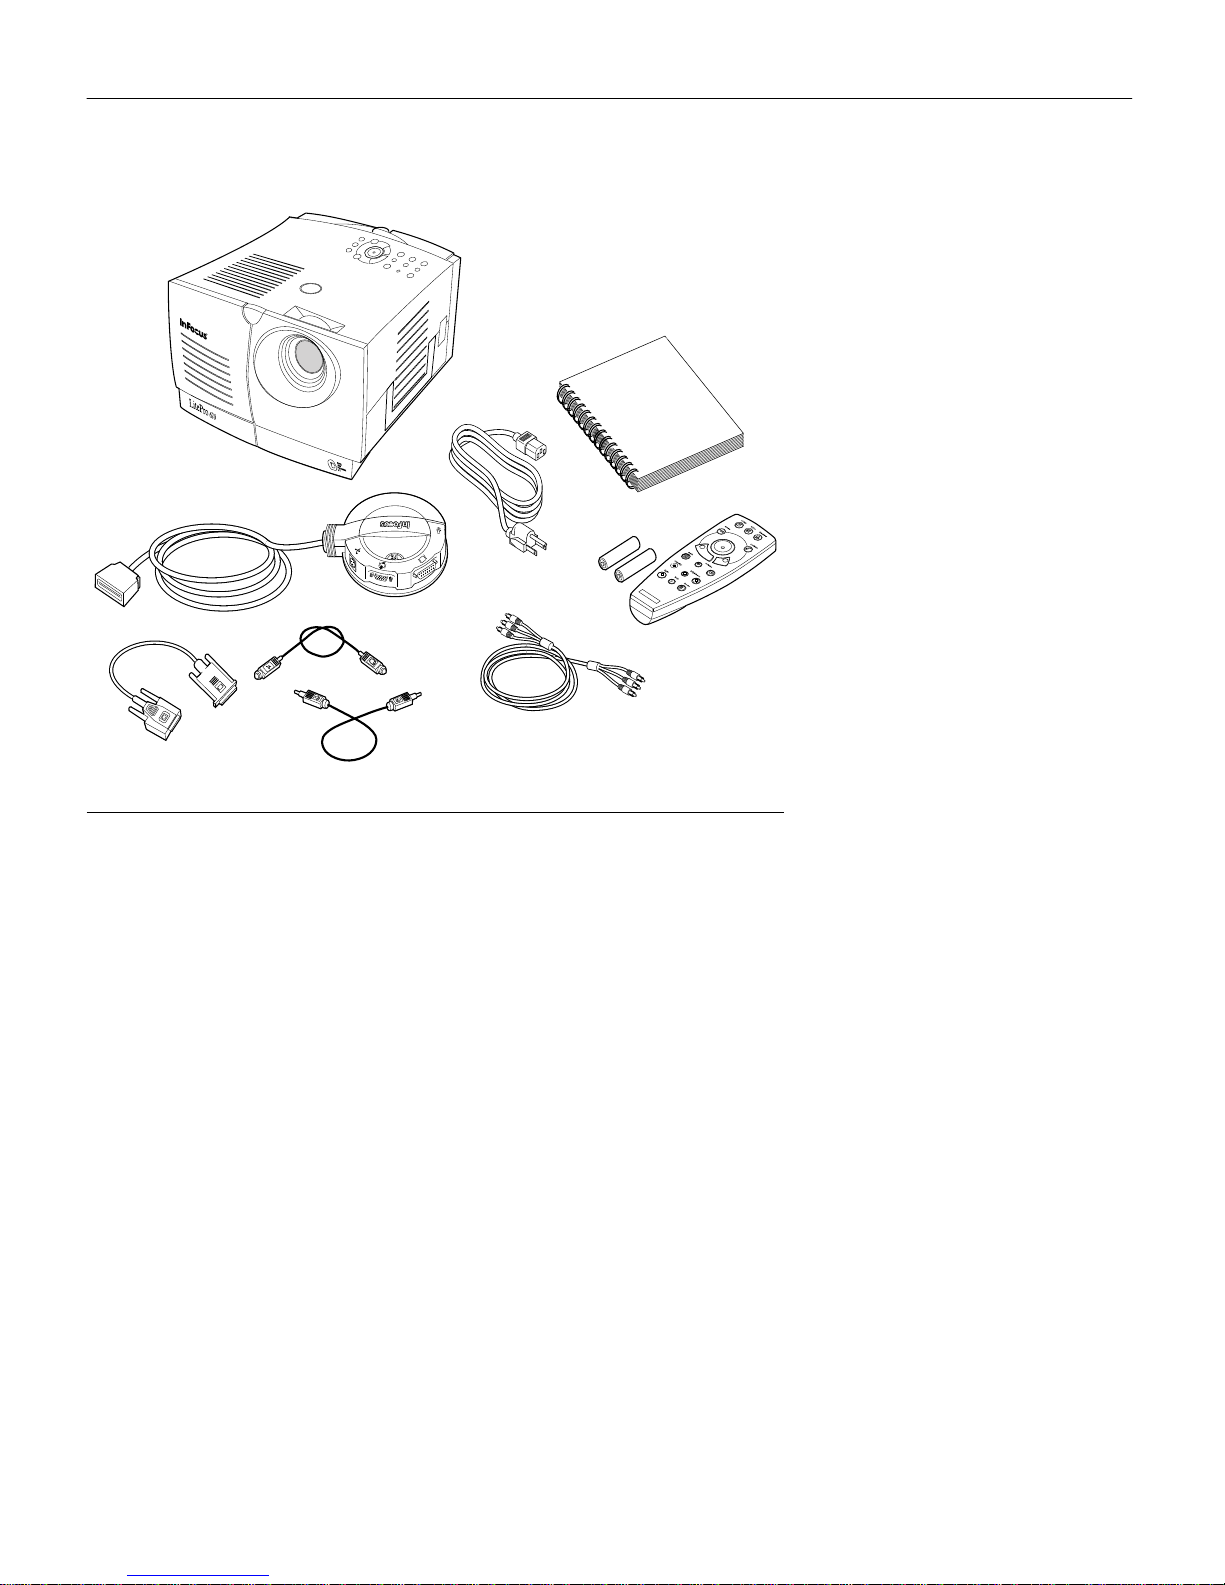
The projector comes with the parts shown in Figure 1. Check to
make sure all are included. If any parts are missing, contact your
In Focus dealer immediately.
If you are experien ced in setting up presentat ion system s, use the
LitePro 610/620 Quick Start card that was included in the shipping
box. For complete details on c onnectin g and operating th e projector, refer to the appropriate sections of this User’s Guide.
2
Page 8
2
1
3
6
8
5
4
7
9
FIGURE 1
Shipping box contents
1. LitePro 610 or 620 projector 6. CableWi zard
2. LitePr o 610/620 User’s Guide 7. CableWizard computer cable
3. power cord 8. CableWizard mouse cable
4. remote and batteries 9. CableWizard audio cable
5. RCA audio/video (A/V) cable Not shown: Quick Start card,
remote cable
3
Page 9

Introduction
Usage Guidelines
• Do not look directly into the project ion le ns when the proj ector
is turned on. The bright light may harm your eyes.
• The top and bottom of the projector can be very hot to the
touch after use. Use extreme care or let it cool before lifting it.
• Do not block the grills at the front, side, top or bottom of the
projector. Restricting the air flow through the projec tor can
cause it to overheat and turn off.
Handle the projector as you would any product with glass
•
components. Be especially careful not to drop it.
• Avoid leaving the projector in direct sunlight or extreme cold
for extended periods of time. If t his happens, allow it to reach
NOTE: If the projector overheats
and turns off, you must wait 45
seconds before you attempt to
room temperature before use.
• Transport t he projector in a vendor-approved hard or soft ca se.
Call your In Focus dealer for more information.
turn it back on.
If You Need Ass istan ce
The first place to look for help is in this manual. Be sure to check
the guidelines in “Troubleshooting” on page 45.
If this manual doesn’t answer your question, call your In Focus
dealer. You can also call In Focus Customer Service directly at
1-800-799-9911. Call between 6 a.m. and 5 p.m. PST, Monday
through Friday. In Europe, call In Focus in The Ne therlands at
(31) 23-5623200. In Singapore, call (65) 334-9005.
The In Focus World Wide Web address is htt p:\\www.infs.com.
Warranty
These products are backed by a limited one-year warranty. The
details of the warranty are printed at the back of this manual.
Longer term warranties can be purchased from your In Focus
dealer. Refer to page 54 for part nu mbers.
4
Page 10
SETTING UP THE PROJECTOR
1 Place the projector on a flat surf ace.
• The projector must be within 10 feet of your power source
and within 10 feet of your computer.
If you wa nt to project from behind a translucent s c r een, set
•
up the projector behind your screen. See “Rear Projection”
on page 40 to revers e the image.
• If you are installing the projector on the ceiling, see t he
LitePro 610/620 Ceiling Mount Installation Guide for recommendations . To turn the image upside down, see “Ceiling”
on page 39. The Ceiling Mount Kit is sold separately. See
“Accessories” on page 53.
2 Position the projector th e desired distance from t h e screen.
• The distance from the lens of th e projector to the screen
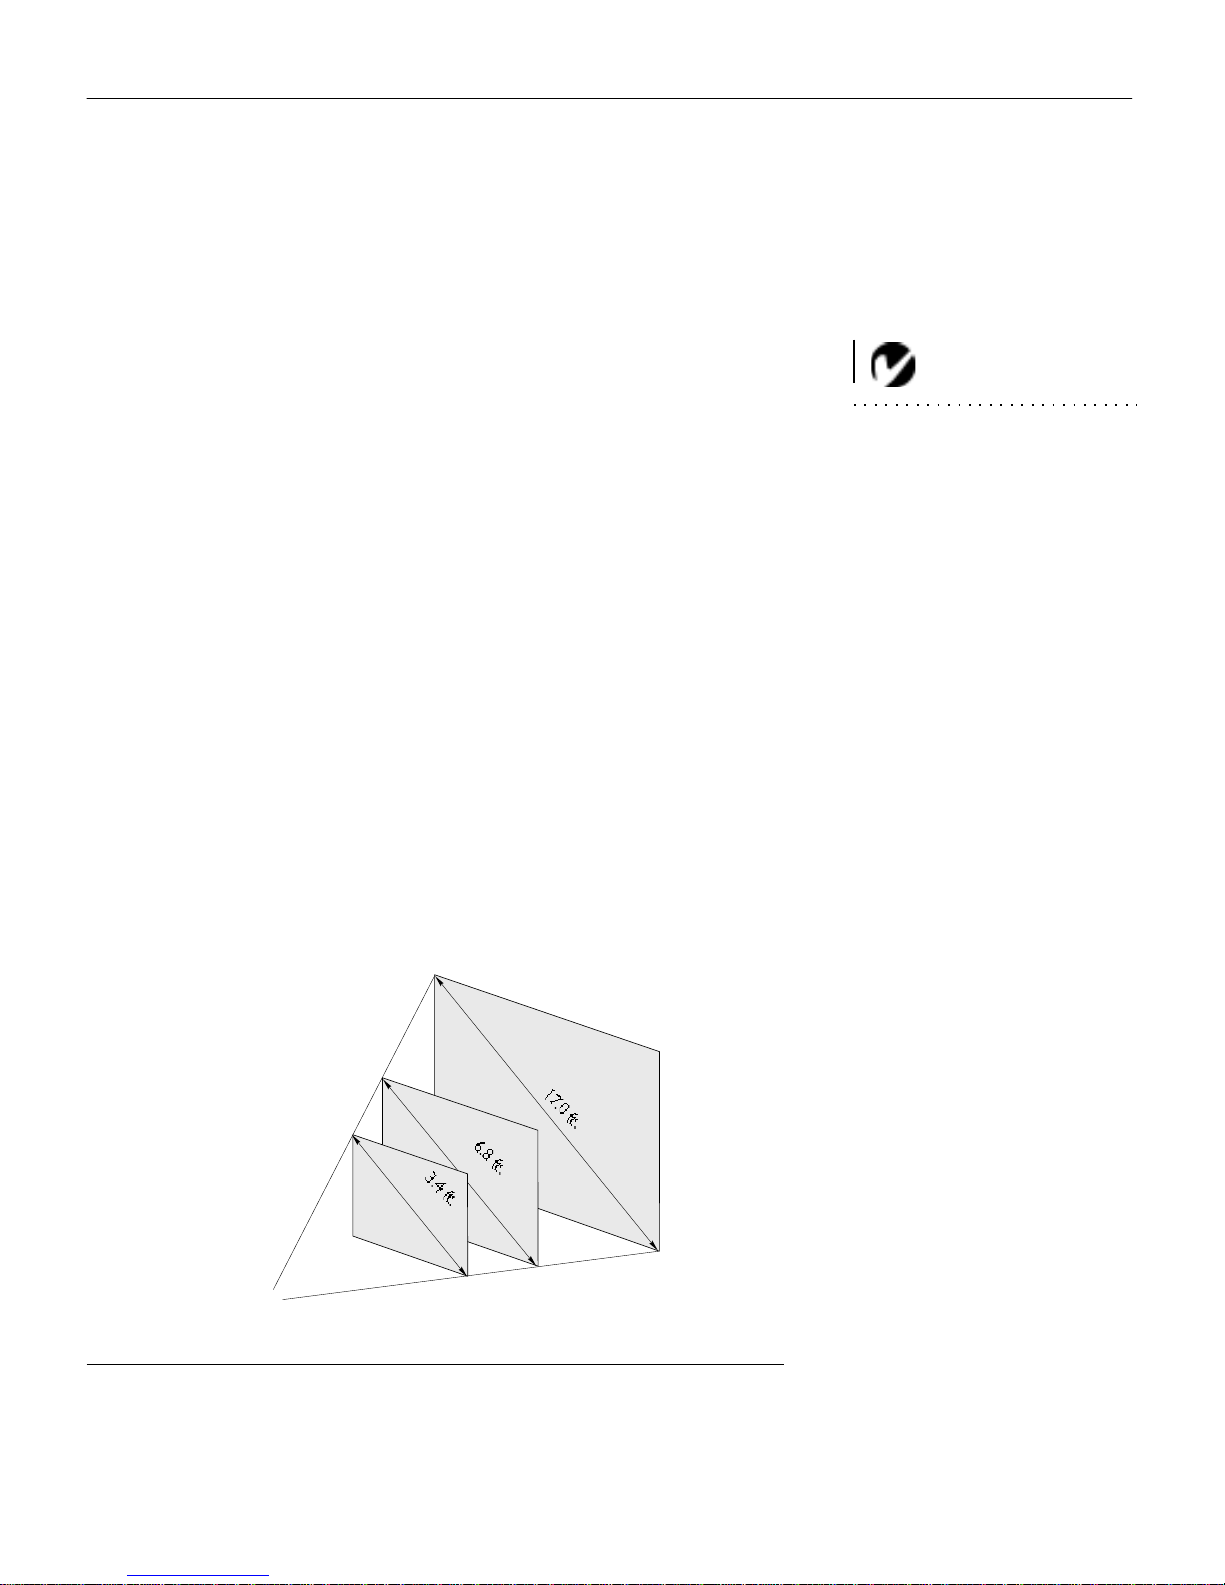
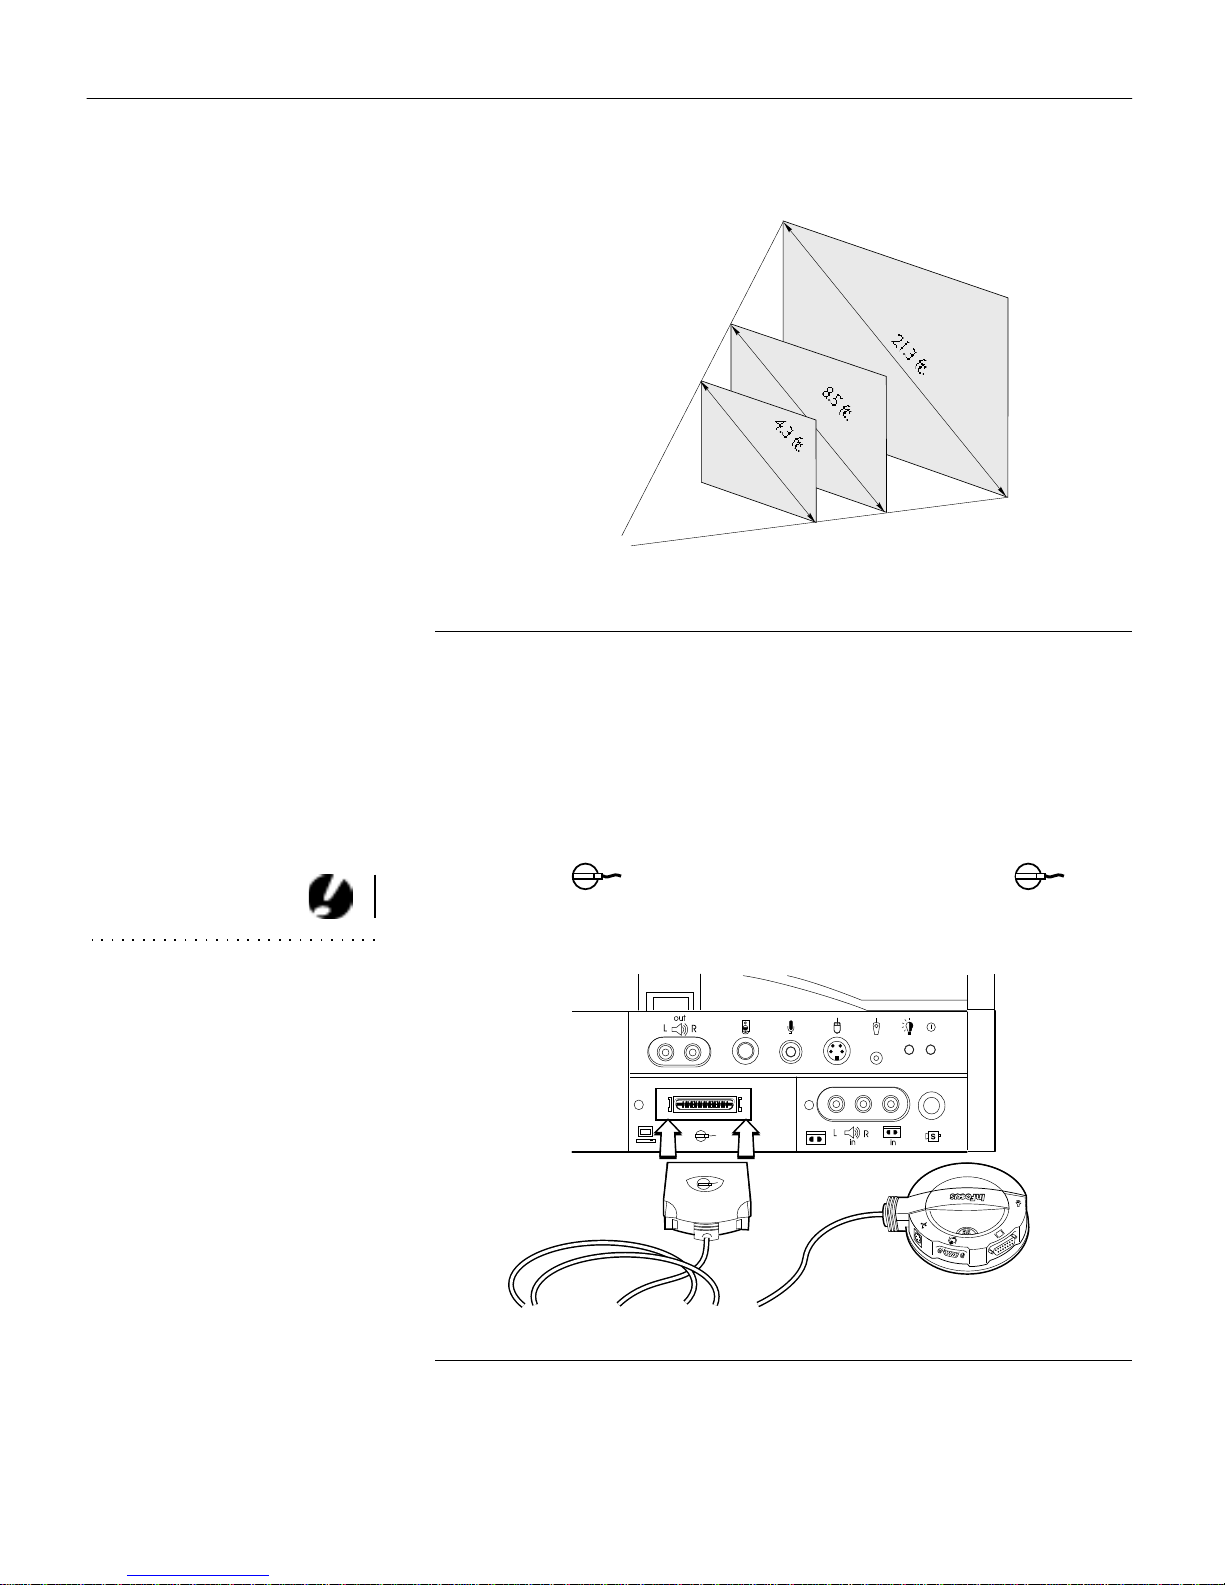
determines the size of the projected image. Figure 2 shows
three projected image sizes for the 610; Figure 3 shows
image s i z es for the 620. For more information, see “Projected Image Size” on page 60.
NOTE: An optional extension
cable, sold separately, lets you
increase the distance between the
projector and your computer to 50
feet. See “Accessories” on
page 53.
3 Make sure the projector and your computer are turned off.
25 ft.
5 ft.
10 ft.
PRO JECT OR
FIGURE 2
Projected image size for LitePro 610
5
Page 11
Setting up the Projector
5 ft.
10 ft.
PRO JECTOR
IGURE 3
F
Projected image size f or LitePro 620
25 ft.
CAUTION: Turn off your
computer, monitor and the
projector whenever you connect
or disconnect cables.
Connecting the CableWizard to the Projector
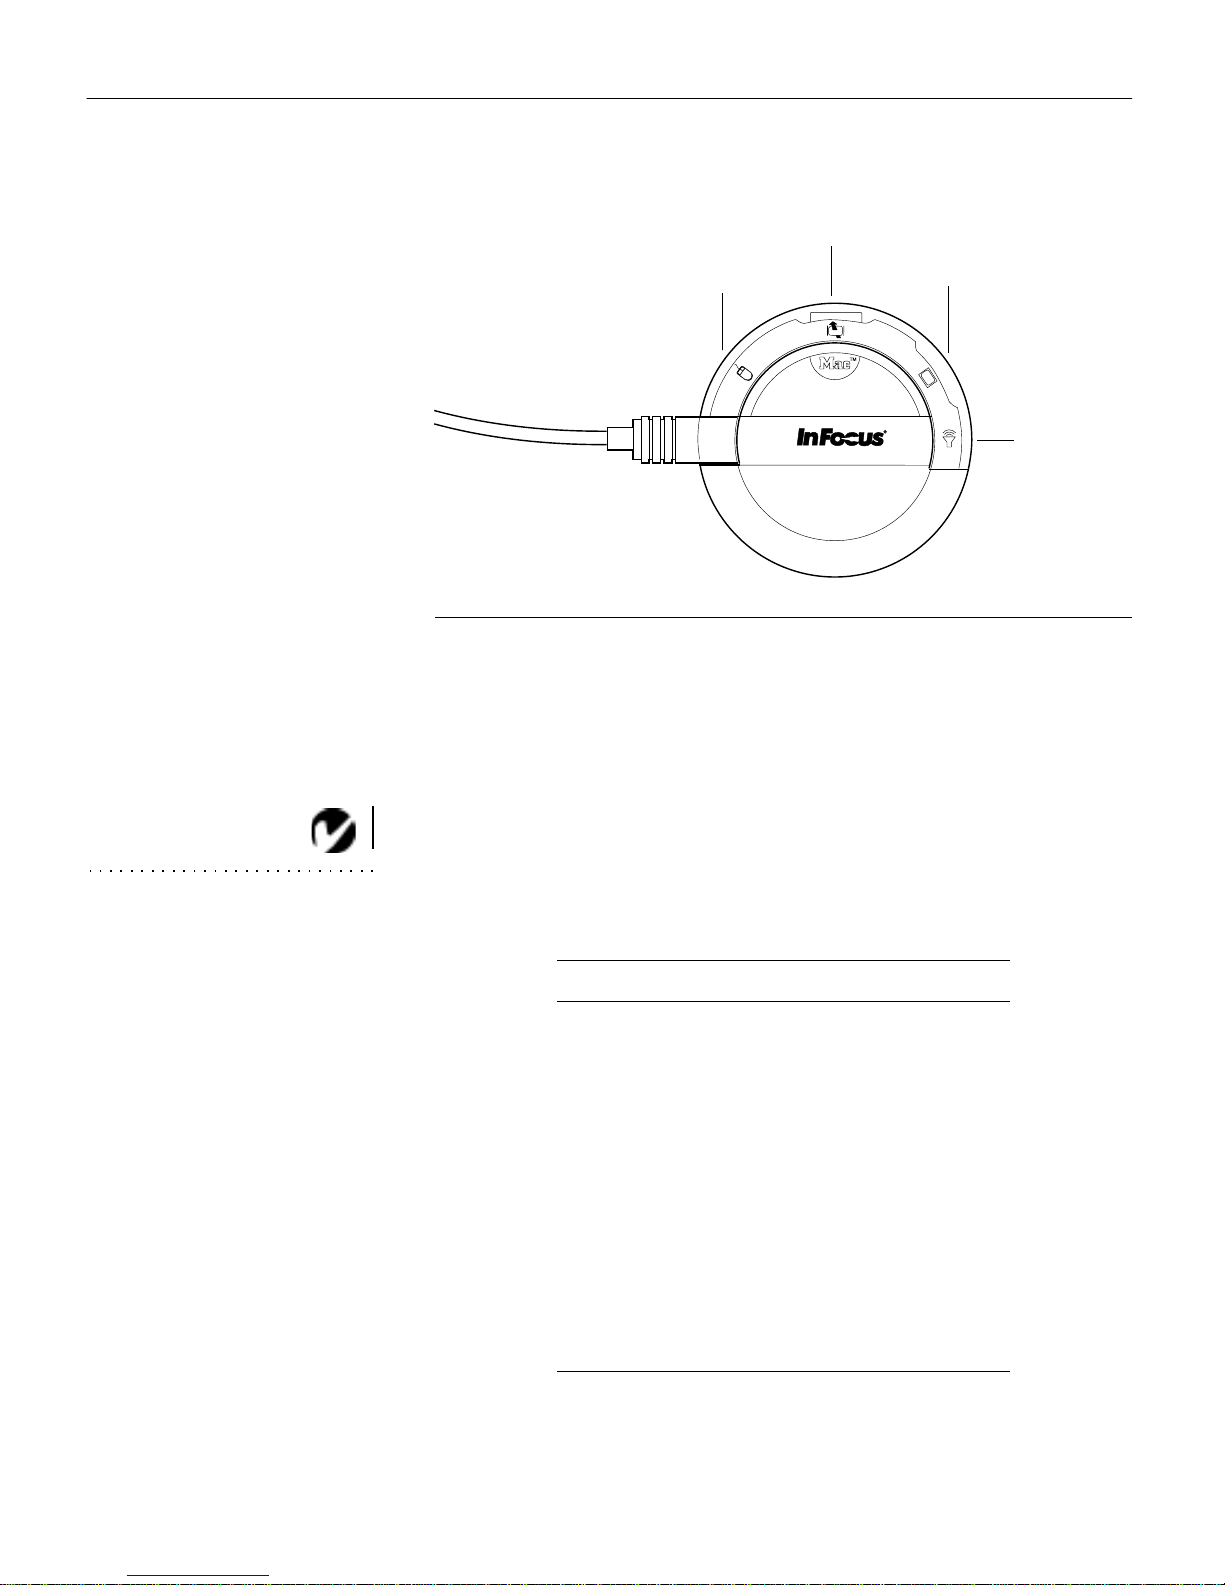
The CableWizard™ simplifies the connec tion process by providing a central hub for all the connec tions between th e projector
and your computer. The connectors on the CableWizard are
labeled with icons.
Connect the end of the CableWizard cord to the connector on the projector’s connector panel (Figure 4).
6
IGURE 4
F
Connecting the CableWizard cable to the projector
Page 12

Selecting Conne ctors on the CableWizard
Turn the selector on the top of the CableWizard to reveal the
correct connectors for your compu ter.
FIGURE 5
Selecting connectors on the CableWizard
• If you’re connecting an IBM-compatible desktop or laptop com-
puter
, turn the s elector until the window di splays “PC”.
computer
audio
monitor
mouse
IGURE 6
F
Selecting the IBM-compatible connectors on the CableWizard
If you’re c onne cti n g a Macintosh desktop or an Apple PowerB ook
•
computer
, t urn the se lect or until t he window displays “Mac™”
(Figure 7).
NOTE: You must disconnect all
cables before turning the selector
on the CableWizard.
7
Page 13
Setting up the Projector
monitor
computer
audio
F
IGURE 7
mouse
Selecting the Macintosh connectors on the CableWizard
Preparing to Connect Your Equipmen t to the Projector
Now you’re ready to connect your equipment. Computers are
connected to the CableWizard. Video players and other equipment, such as external speakers, are connected directly to the
proj ector.
NOTE: Before you continue,
make sure the projector and your
equipment are turned off. If you’re
connecting a computer, make sure
the distance between it and the
projector is 10 feet or less and
you’ve selected the appropriate
connectors on the CableWizard.
Steps for connecting differ ent types of equipment are given on
the pag es listed below.
Computer/Equipment Page
IBM-compatible desktop computer page 9
IBM-compatible laptop computer page11
Macintosh desktop computer page13
Apple PowerBook page15
Video player page17
External speakers or subwoofer page19
Microphone page19
PS/2-compatible mouse page20
Remote control cable page20
8
Page 14

Connectin g an IBM-Compatible Desktop Computer
1 Locat e the cable that con nects your m onit or to your comput er.
Unplug it from the computer.
2 Plug the end of the CableWizard computer cable into the
video connector on your computer.
3 Plug the end of the CableWizard computer cable into the
connector on the CableWizard.
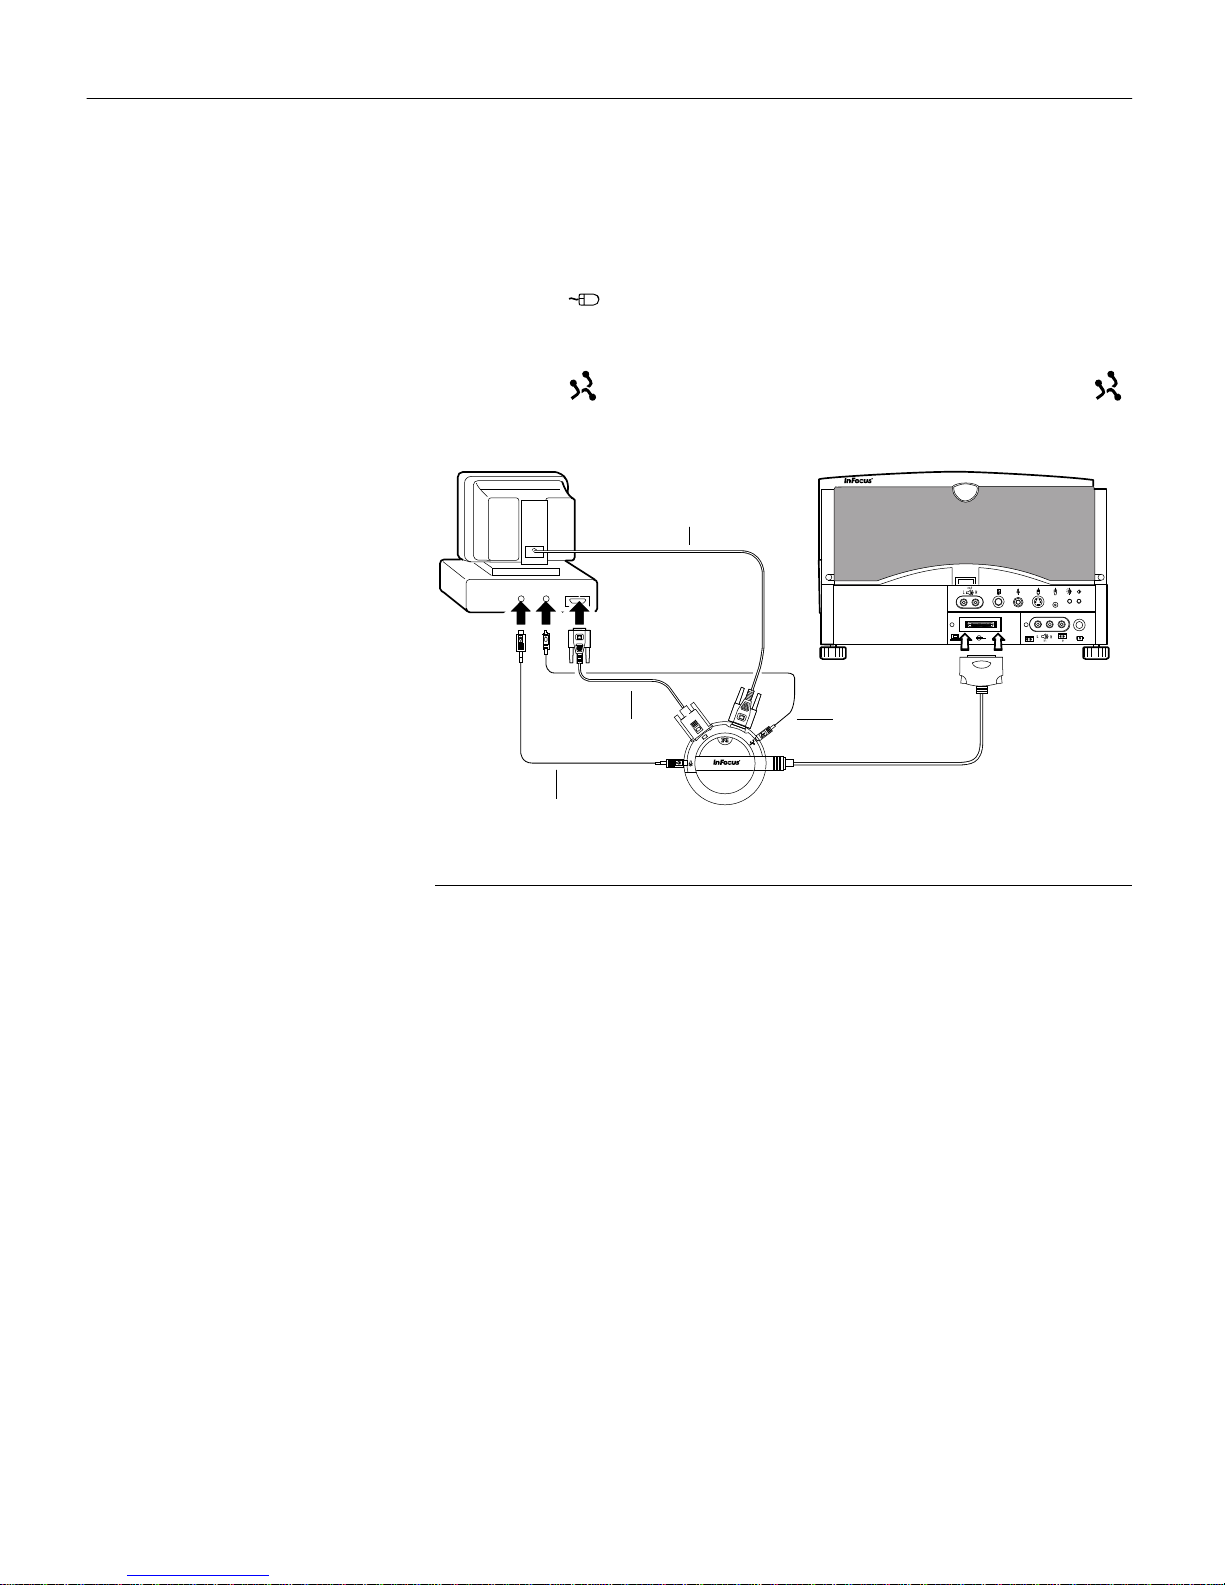
computer cable
FIGURE 8
Connecting the CableWizard computer cable to an IBM-compatible desktop computer
Do you want to display the image on your computer’s monitor as
well as on the projection screen?
1 Plug your monitor’s cable into the connector on the
CableWizard.
Do you want to play your computer’s au dio on the projector?
1 Unplug the audio cable, if present, from your computer.
2 Pl ug either end of t he CableWizard audio cable into the audio
connector on your computer.
3 Plug the ot her end of the CableWizard audio cable into the
connector on the CableWizard.
9
Page 15
Setting up the Projector
Do you want to control your computer’s mouse from the projector’s
remote or keypad?
1 Unplug the mouse cable from your computer.
2 Plug the end of the CableWizard mouse cable into the
mouse connector on your computer.
3 Pl ug th e end of the CableWizard mouse cable into the
connector on the CableWizard.
monitor cable
computer
cable
audio cable
FIGURE 9
Connecting the CableWizard monitor, audio and mouse cables to an IBM-compatible
desktop computer
mouse cable
Now you’re ready to power up the projector and your computer.
Skip to “Powering up the Projector and Adjusting the Image” on
page 21.
10
Page 16

Connecting an IBM-Compatible Laptop Computer
1 Plug the end of the CableWizard computer cable into the
video connector on your computer.
2 Plug the end of the CableWizard computer cable into the
connector on the CableWizard.
computer cable
FIGURE 10
Connecting the CableWizard computer cable to an IBM-compatible laptop computer
Do you want to play your computer’s au dio on the projector?
1 Plu g either end of the CableWi zard audio cable into the audio
connector on your computer.
NOTE: Many laptop computers
do not automatically turn on their
external video port when a secondary display device such as a projector is connected. Refer to your
computer manual for the command that activates the external
video port. Activation commands
for some laptop computers are
listed in the Appendix of this manual on page 55.
NOTE: If you don’t want audio or
mouse control, you can use the
2 Plug the ot her end of the CableWizard audio cable into the
connector on the CableWizard.
CableWizard Lite. CableWiza rd
Lite is ordered separately. See
“Accessories” on page 53.
11
Page 17

Setting up the Projector
Do you want to control the computer’s mouse from the projector’s
remote or keypad?
1 Locate the mouse cable and unplug it from your computer.
2 Plug the end of the CableWizard mouse cable into the
mouse connector on your computer.
3 Pl ug th e end of th e CableWizard mouse cable into the
connector on the CableWizard.
mouse cable
computer
cable
audio cable
FIGURE 11
Connecting the CableWizard audio and mouse cables to an IBM-compa tible laptop
computer
Now you’re ready to power up the projector and your laptop.
Skip to “Powering up the Projector and Adjusting the Image” on
page 21.
12
Page 18

Connecting a Macint osh Desktop Computer
1 Locate the cable that connects the monitor to your computer.
Unplug it from the computer.
2 Plug the end of the CableWizard computer cable into the
video connector on your computer.
3 Plug the e nd of th e CableWizard com puter cable into t he
conn ector on the CableWizard.
computer cable
FIGURE 12
Connecting the CableWizard computer cable to a Macintosh desktop computer
Do you want to display the image on your computer’s monitor as
well as on the projection screen?
1 Plug the monitor’s cable into the connector on the
CableWizard.
Do you want to play your computer’s au dio on the projector?
1 Unplug the audio cable, if present, from your computer.
2 Pl ug either end of t he CableWizard audio cable into the audio
connector on your Macintosh.
3 Plug the other end of the CableWizard audio cable in to the
connector on the CableWizard.
13
Page 19

Setting up the Projector
Do you want to control the computer’s mouse from the projector’s
remote or keypad?
1 Unplug the mouse from your Macintosh or locate an unused
ADB connector.
2 Plug the end of the CableWizard mouse cable into the
mouse or the (ADB) conne ctor on your Macintosh.
3 Pl ug the en d of the CableWizard mouse cable int o t he
connector on the CableWizard.
monitor cable
mouse cable
FIGURE 13
Connecting the CableWizard monitor, audio and mouse cables to a Macintosh desktop
computer
computer cable
audio cable
Now you’re ready to power up the projector and the Macintosh.
Skip to “Powering up the Projector and Adjusting the Image” on
page 21.
14
Page 20

Connecting an Apple PowerBook Computer
1 Plug the end of the CableWizard computer cable i nto the
video connector on your PowerBook.
2 Plug the end of the CableWizard computer cable into the
conn ector on the CableWizard.
3 If you want the projector’s display to be t he same as the
PowerBook’s screen, turn on video mirroring. (See “Using
Video Mirrorin g with a PowerBook Comput er” on page 59 for
additional information.)
computer cable
Apple-supplied
video-out cable
FIGURE 14
NOTE: Some PowerBooks
require the Apple-supplied videoout cable for external video. Connect it between the PowerBook
and the CableWizard computer
cable as shown in Figure 14.
Connecting the CableWizard computer cable to an Apple PowerBook
Do you want to play your computer’s au dio on the projector?
1 Plu g either end of the CableWi zard audio cable into the audio
connector on your PowerBook.
2 Plug the other end of the CableWizard audio cable in to the
connector on the CableWizard.
15
Page 21

Setting up the Projector
Do you want to control the computer’s mouse from the projector’s
remote or keypad?
1 Locate the mouse cable and unplug it from your PowerBook.
2 Pl ug the end of the CableWizard mouse cable into the
(ADB) connector on your PowerBook.
3 Plug the end of the CableWizard mouse cable into the
connector on the CableWizard.
mouse cable
audio cable
computer
cable
FIGURE 15
Connecting the CableWizard audio and mouse cables to a PowerBook
PowerBook
video-out cab le
Now you’re ready to power up the projector and your PowerBook. Skip to “Powering up the Projector and Adjusting the
Image” on page 21.
16
Page 22
Connecting a Vi d eo Player
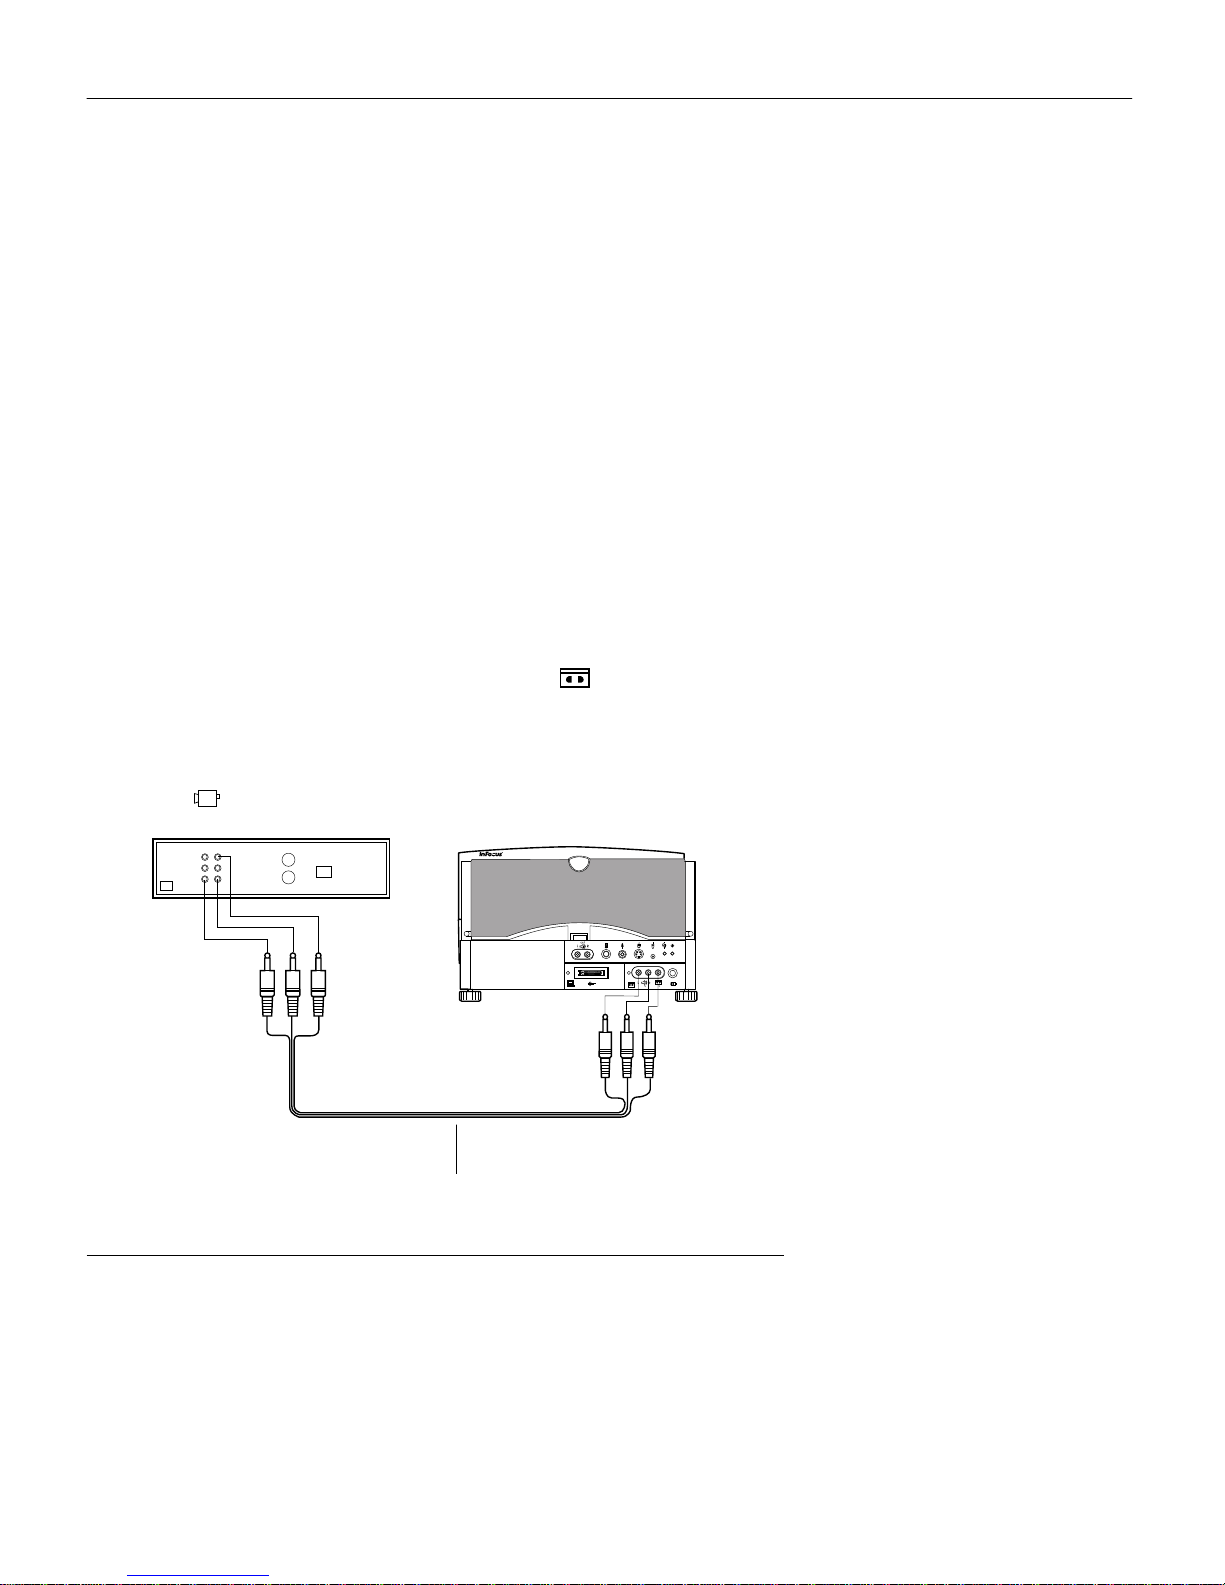
1 If your video player uses a round, o ne-prong composit e video
c onnecto r, you’ll need only the A/V cable that shipped with
the projector.
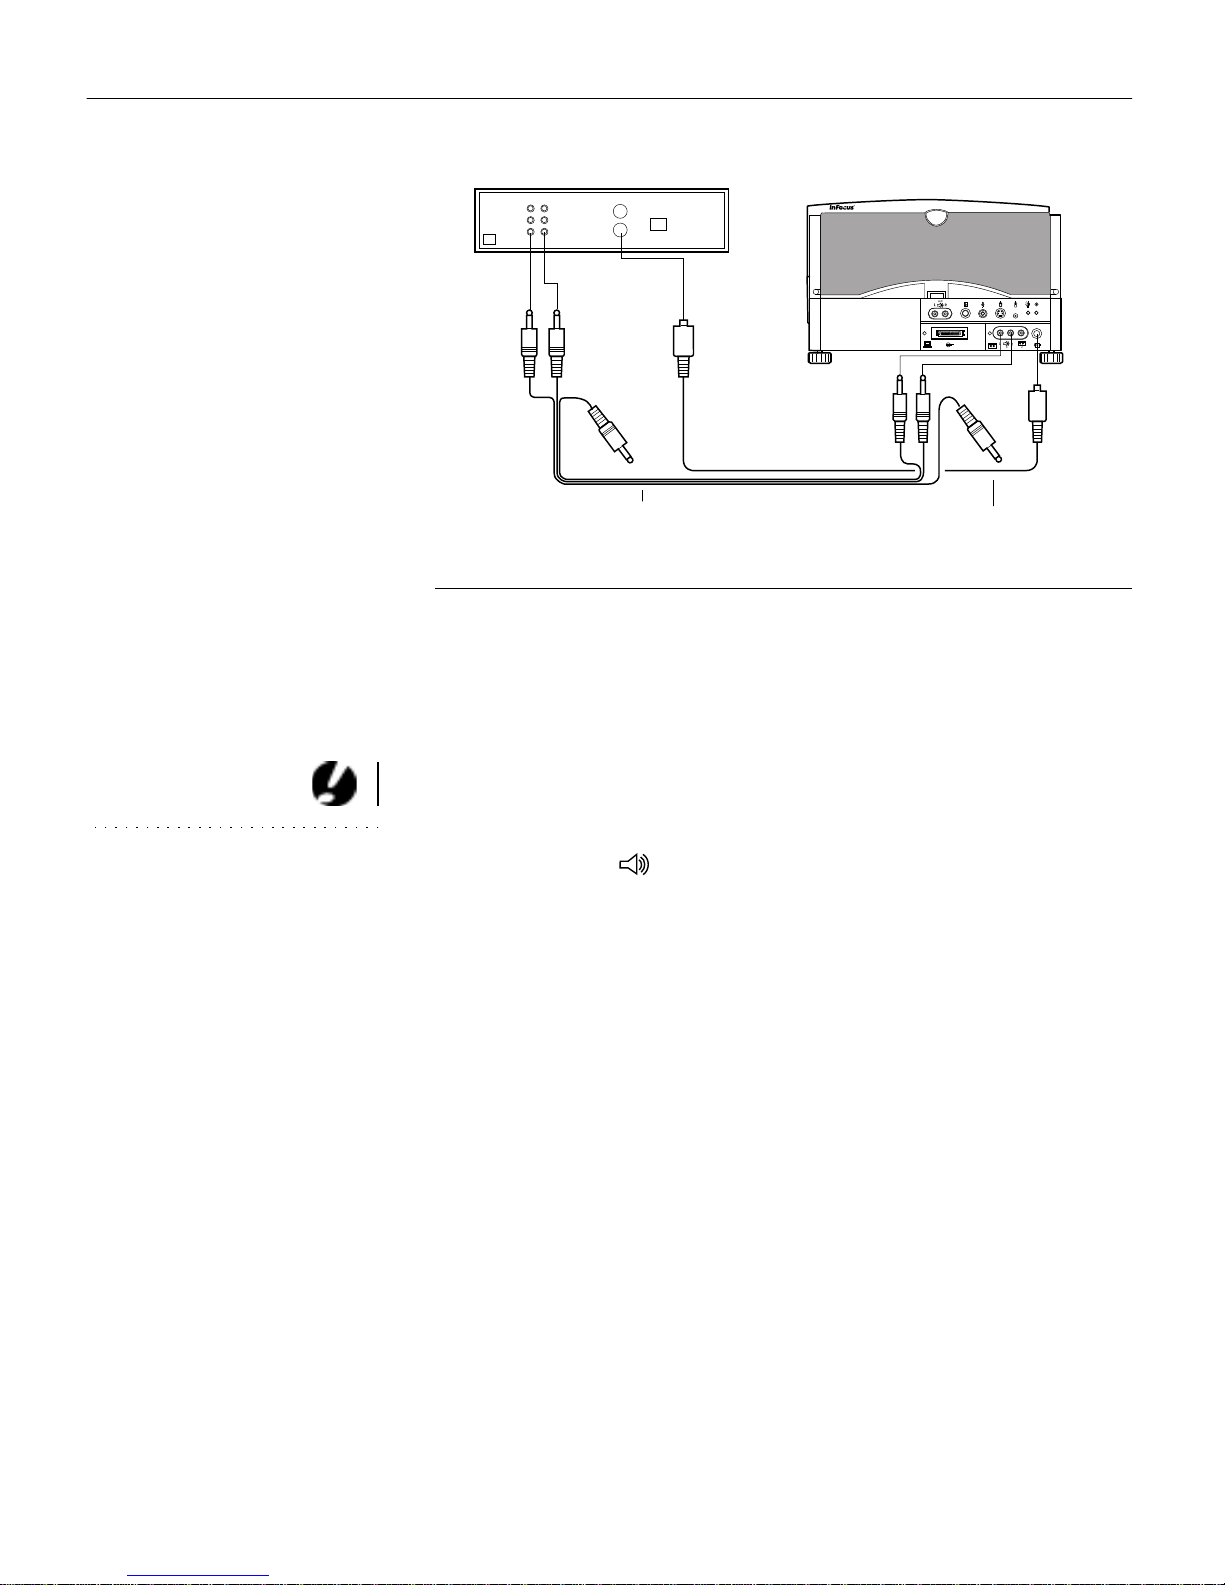
• If your video player uses a round, four-prong S-video con-
nector, you’ll also need an S-video cable in add i tion to the
A/V cable. The S-video cable is sold separately. (Se e
“Accessories” on page 53.)
2 Plug the A/V cable’s yellow connector into the “video-out”
port on y our video player (Figure 16). This port may be
labeled “To Monitor.”
• If you’re using an S-video cable, connect it to the “s-video
out” connector on the video player (Figure 17).
3 Plug the other yellow connector into the (composite
video) connector on the back of the projector.
• If you’re using S-video, plug the other end of the cable into
the (s-video) connector on the projector (Figure 17).
audio/video cable
FIGURE 16
Connecting the pro jector to a video player using the standard A/V cable (with composite
video connector)
17
Page 23
Setting up the Projector
A/V cable S-video cable
F
IGURE 17
Connecting the projector to a video player using an S-video cable and the audio connectors on the standard A/V cable
CAUTION: Your video player
may also have a “Video Out” port
for a coaxial cable connection. Do
not use this to connect to the
projector.
4 Plug the A/V c able’s white con nector int o the l eft “audio out”
port on your video player. Plug the cable’s red connector into
the right “audio out” port on the video player (Figure 16 and
Figure 17).
5 Plug the A/V cable’s other whit e and red connectors into the
left and right (audio in) ports on the projector.
The projector is compatible with the t hree major broadcast video
standards: NTSC, PAL and SECAM. It automatically adjusts to
optimize its performan ce for the in comi ng vi deo. You can also set
the video standard manually from th e projector’s Controls menu;
see “Video Standard” on page 39.
18
Page 24
Connecting an External Speaker and a Subw oofer
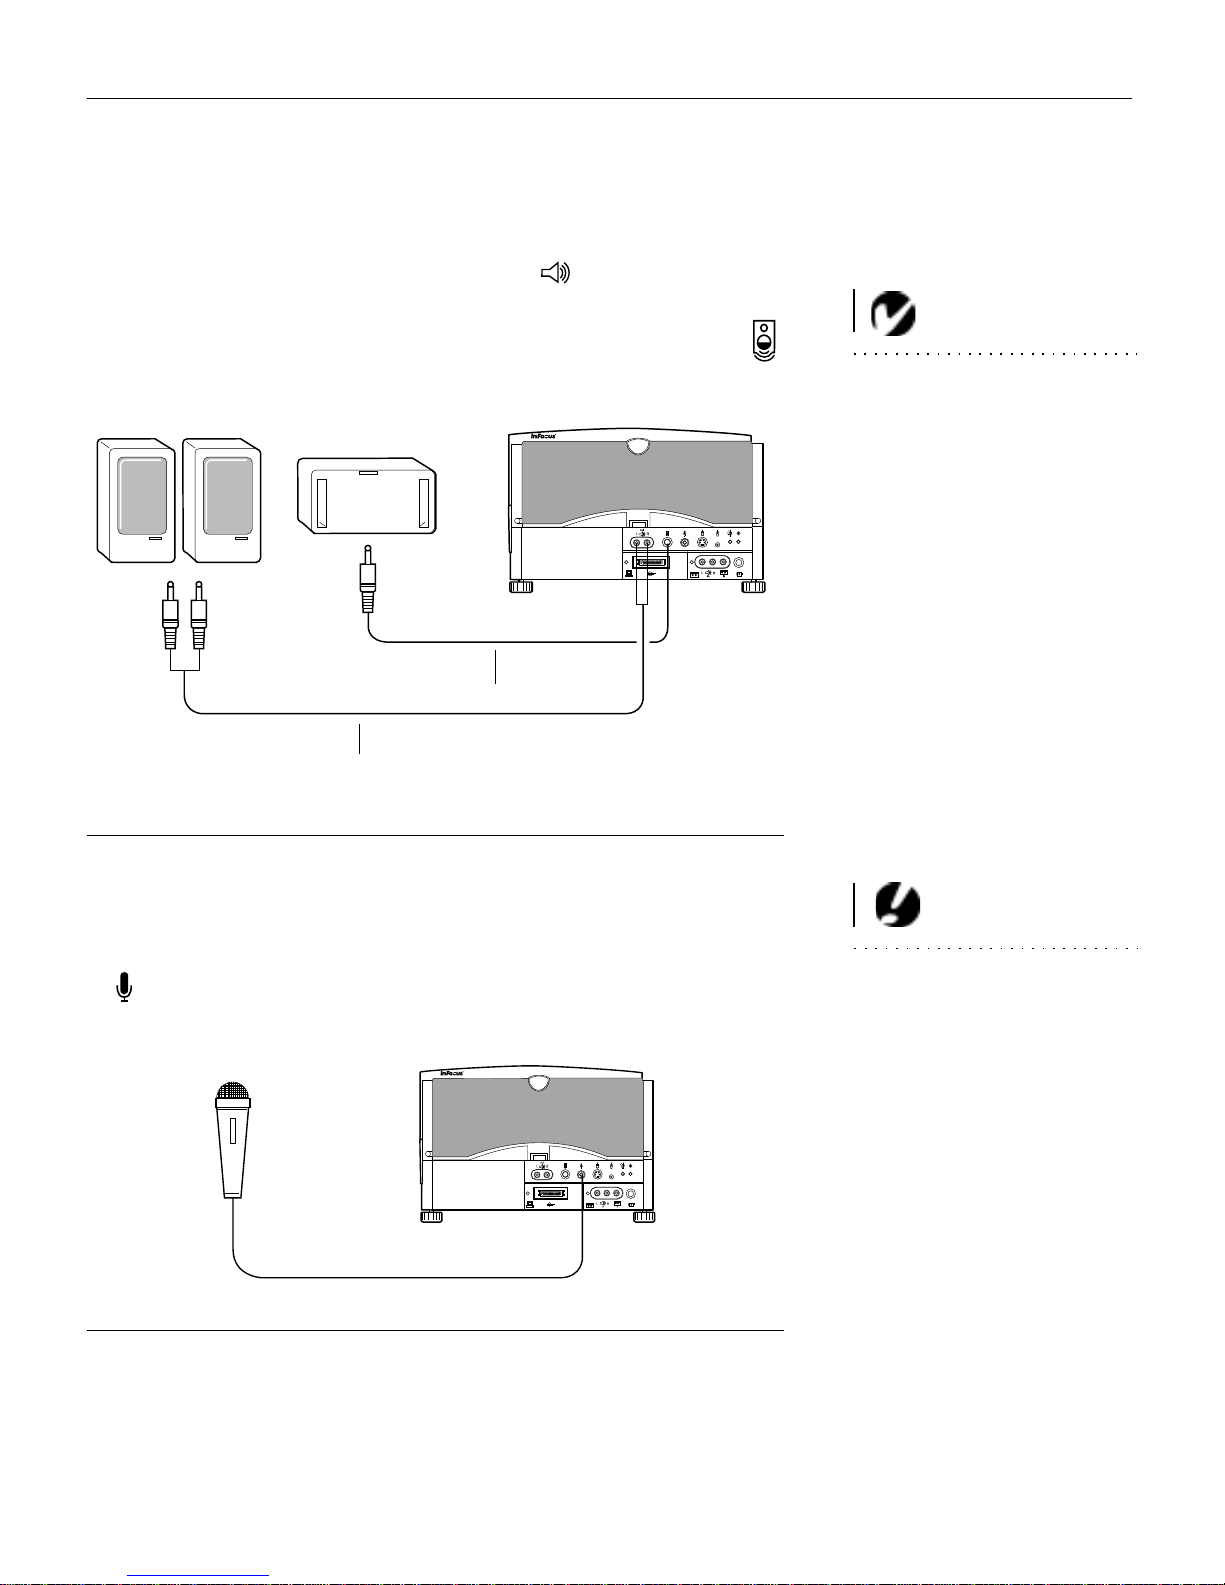
• To connect one or two external spea kers, plug the speaker
cables into the separate red and white L R (audio out) connectors on the projector.
•
To conn ect a subw oofer, plug the subwoofe r’s cable into the
conn e ctor on t he projec tor.
subwoofer cable
speaker cable
NOTE: The external speakers
mu st have t heir ow n power s ource.
FIGURE 18
Connecting an external speaker and a subwoofer
Connecting a Microphone
To connect a microphone, plug the microphone cable into the
•
connector on the back of the projector.
FIGURE 19
Connecting a microphone
CAUTION: Always keep the
source volume at its lowest level
when installing the microphone.
For information about setting the
microphone level, see page 35 .
19
Page 25
Setting up the Projector
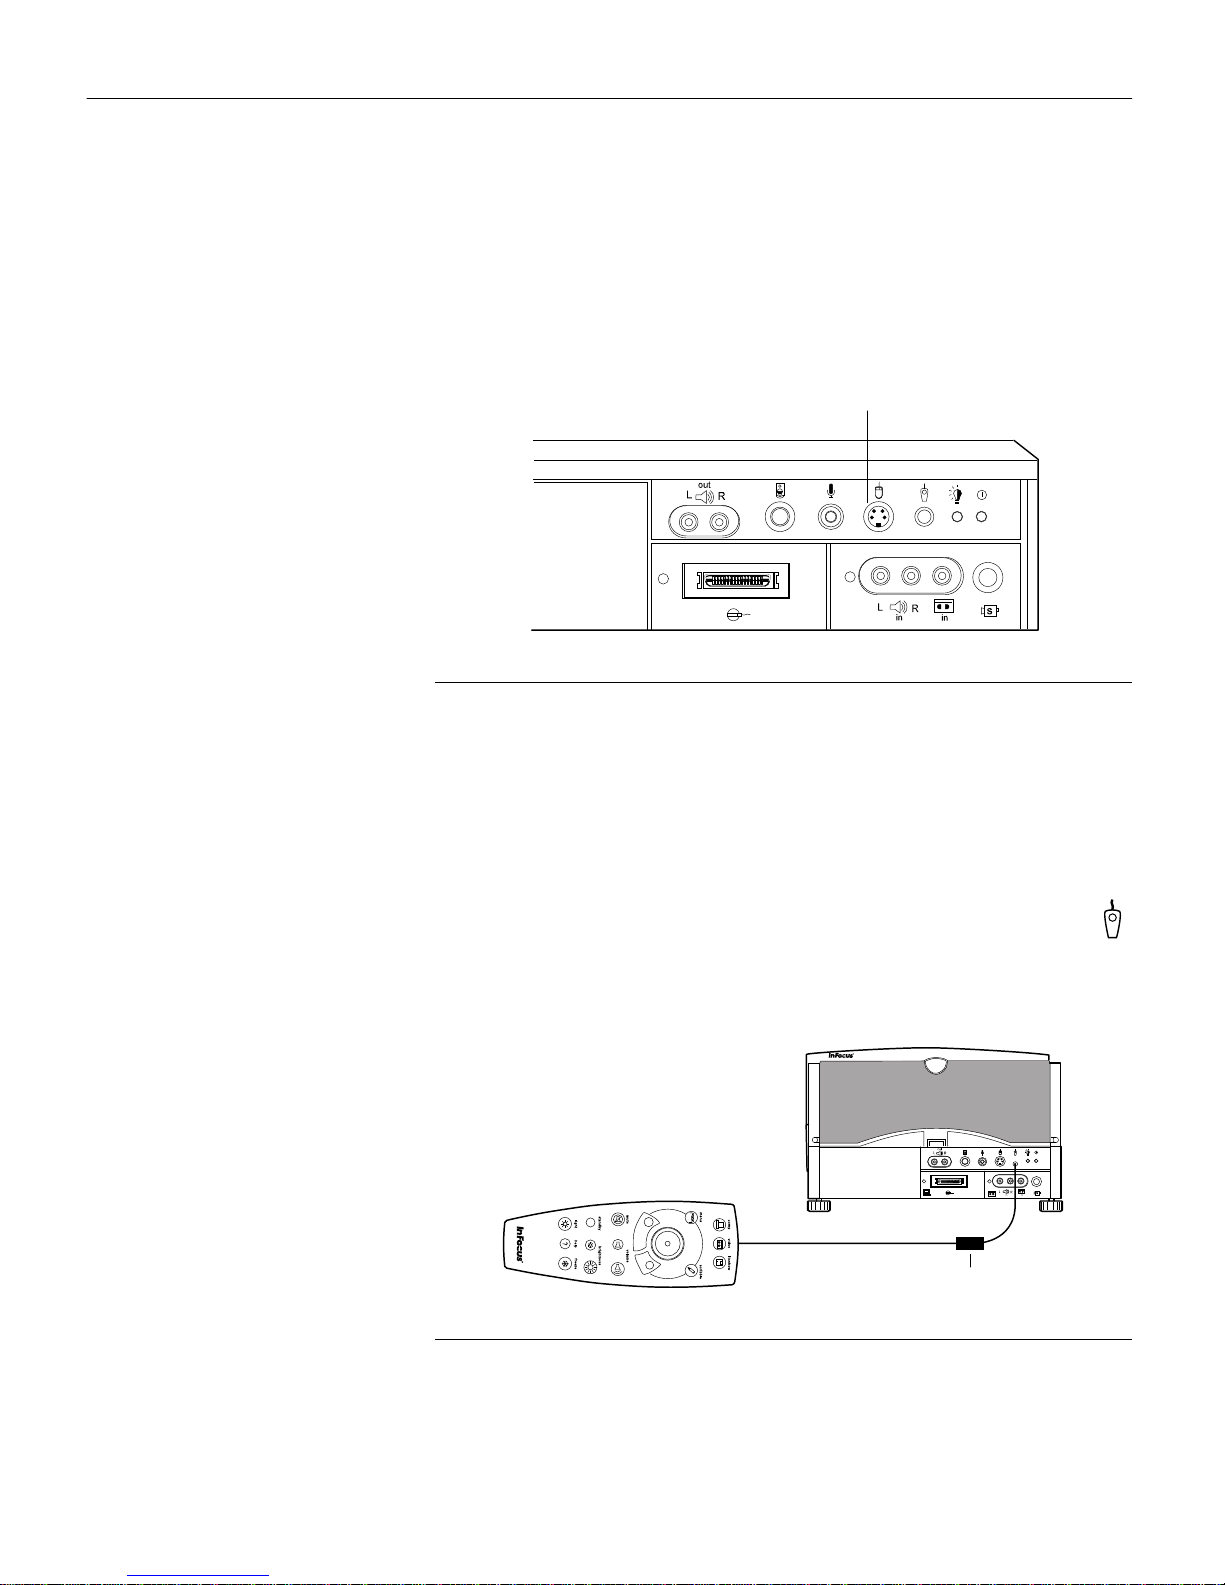
Connecting a PS/2-Compatible Mouse
The mouse connector on the projector will be used to conn ect a
PS/2-compatible mouse. Call your In Focus dealer for
availability.
PS/2-compatible
mouse connector
FIGURE 20
The PS/2-compatible mouse connector on the projector
Connecting the Remote Control Cable
If the projector cannot receive the remote’s signal, as may be the
case if you’re using rear project ion, con nect th e remote directl y to
the projector with the remote cable.
1 Plug the end of the remote cable with the cylinder into the
connector on the projector.
2 Plug th e other end into the connector on the remote.
20
cylinder
FIGURE 21
Connecting the remote control cable
Page 26
Powering up the Projector and Adjusting the Image
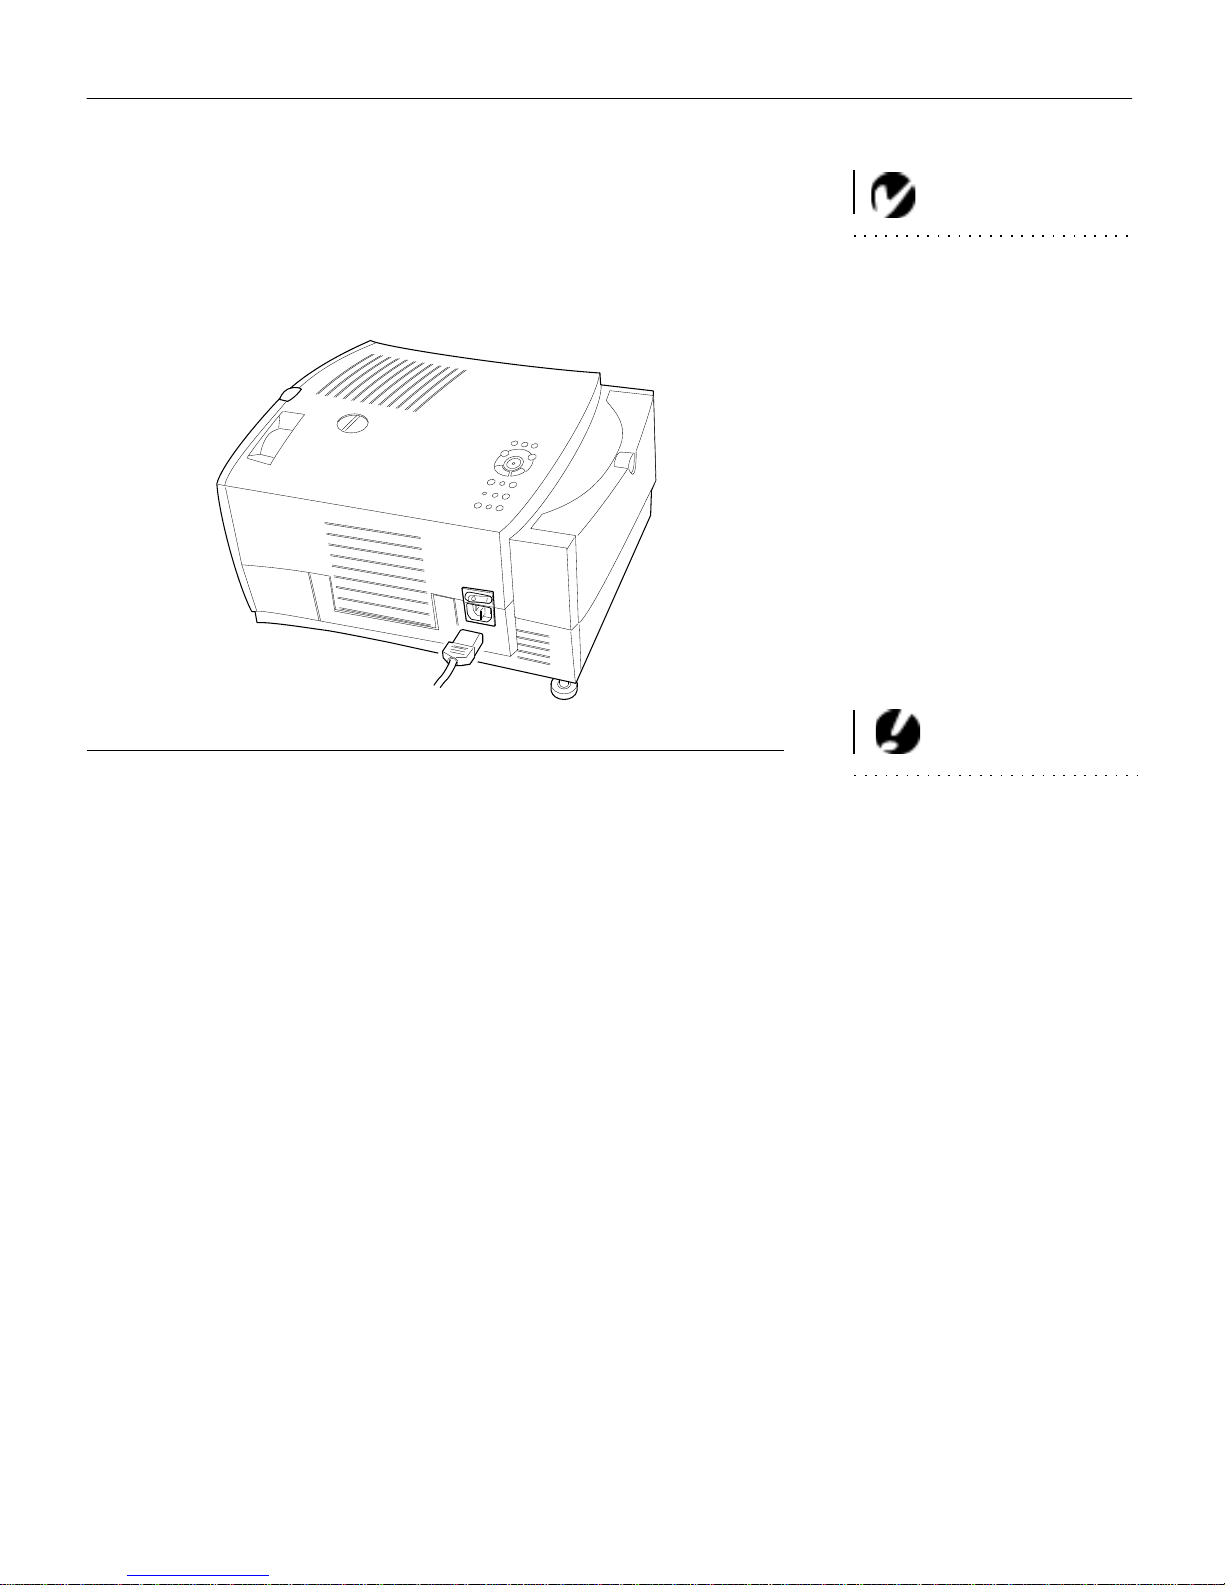
1 Pl ug the power cord into the projector (Figure 22), then plug it
into your electrical outlet. A surge-protected power strip is
recommended if power surges are common in your area.
IGURE 22
F
Connecting the power cord to the projector
NOTE: Always use the power
cord that shipped with the projector .
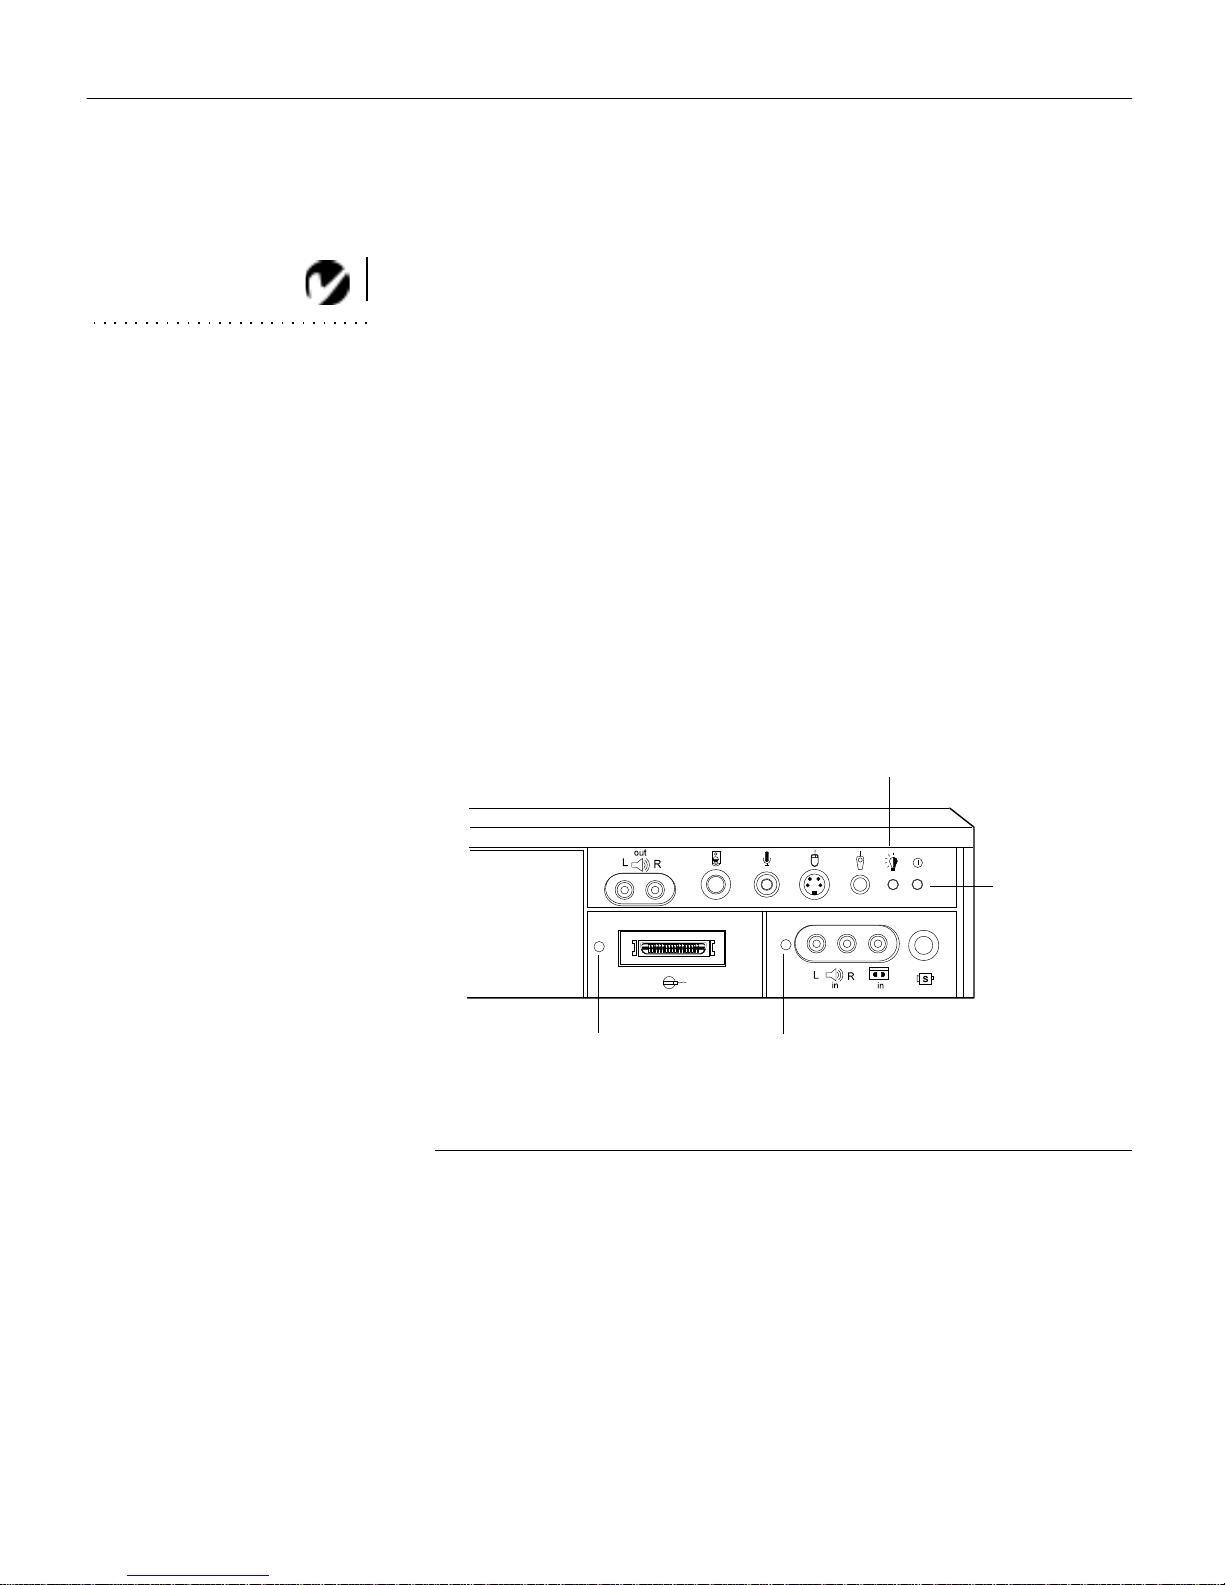
2 Turn on the projector by pressing the “l” side of the power
switch.
• The power indicator and lamp module LEDs light solidly
while the projector initializes, the n the power LED blinks
green while the projector powers up. When the projector
reaches full power, the power LED lights solid green and
the lamp LED goes out (Figure 23).
3 If you connected a video play er, turn it on.
• Press the video button t o display the image f rom your video
player. The video source indicator LED displays a solid
gree n indicat in g the video source is active (Figure 23). Pres s
computer to return to your computer’s image.
• Use the volume buttons on the remo t e control or keypad to
adjust the volume.
• If you don’t want to h ear the so und from your video player,
press the mute button.
CAUTION: If the lamp LED
remains solidly lit after the LitePro
has powered on, the lamp needs
to be replaced. If the lamp
remains in use too long, it may
explode and severely damage the
LitePro. Refer to “Replacing the
Projection Lamp” on page 41 for
details.
21
Page 27
Setting up the Projector
4Turn on your monitor if you’ve connected it.
5 Turn on your computer. The computer image should display
on the projection screen.
The computer source indicator LED displays a solid green
•
NOTE: With some computers,
indicating the computer source is active (Figure 23).
the order in which you power up
the equipment is very important.
We recommend that you always
turn on the computer LAST.
• If necessary, us e the brightness butt o ns on t he remot e con-
trol or keypad to adjust the brightness. You can make further adjustments to the image from the projector’s onscreen menus. To open the menus, press the menu button
on the remote control or keypad. Then select the Display
menu or the Image menu. For more information about the
menus, see page 32.
• If you don’t want to hear t he sound from your computer or
video player, press the mute button on the remote con trol
or keypad. (Pressing mute does not mute the microphone.)
lamp module
indicator LED
power/standby
indicator LED
22
computer source
indicator LE D
FIGURE 23
Indicator LEDs
video source
indicator LED
Page 28

Turni ng Off the Projector
If you want to turn off the projector for a short period of time,
press the standby button on the remote control or keypad. This
turns off the lamp but keeps the projector running. The power/
standby indicator LED (Figure 23) blinks green while t he projector is in standby. To exit standby mode, press the standby button
once. (It takes several seconds for the projection lamp to reach
full power and project the image again.)
CAUTION: Do not repeatedly
turn the proj ector on and of f. It
To completely power off the projector, press the “O” side of the
power switch. If you want to turn the projector back on immediately, you should allow at least three minutes for the lamp to
cool.
may cause the lamp to explode.
NOTE: When you disconnect the
projector, always remove the
power cord from the electrical outlet first, then from the projector.
23
Page 29

USING THE PROJECTOR
This section describes how to use and make adju stments to the
projector. It also provides a ref erence to the remote control buttons and the options available from the on-screen menus.
Basic Image Adjustment
1 Make sure you have powered up your equipment in the right
order (page21).
2 If the image doesn’t display completely, adjust the height of
the projector (page 26) or center the image by adjusting its
horizontal or v ertical position (page 38).
3 If the image is out of focus, rotate the lens to focus it (page 26).
4 If the image appears to shimmer or if it has blurry vertical
bars after you have adjusted the focus, turn Auto Image
(page 37) off and the n back on to reset the automat ic sync and
tracking. If that doesn’t clear up the image, adjust the sync
(page 37) and/or the tracking (page38) manually.
5 If the c olors don’t look right, adjust the brightness (page 29).
The signal synchronization might need readjustment after
changing the brightness (page 37).
Using the Remote Control
Poin t the remote control at the projection screen or at the front or
rear of the projector. The range for optimum operation is about
40 feet. If you point the remote at th e projection screen, the distance to th e screen and back to the projector must be less than or
equal to 40 feet. For best res ults, point the remote directly at the
front or the rear of the projector.
NOTE: If you can’t aim the
remote control at the projector so
that its signal is received
example, when using rear projec-
— use the remote control
tion
cable to connect the remote
directly to the projector (page 20).
— for
25
Page 30
Using the Projector
Adjusting the Projector
To focus the image, rotate the projection lens until the image is
clear.
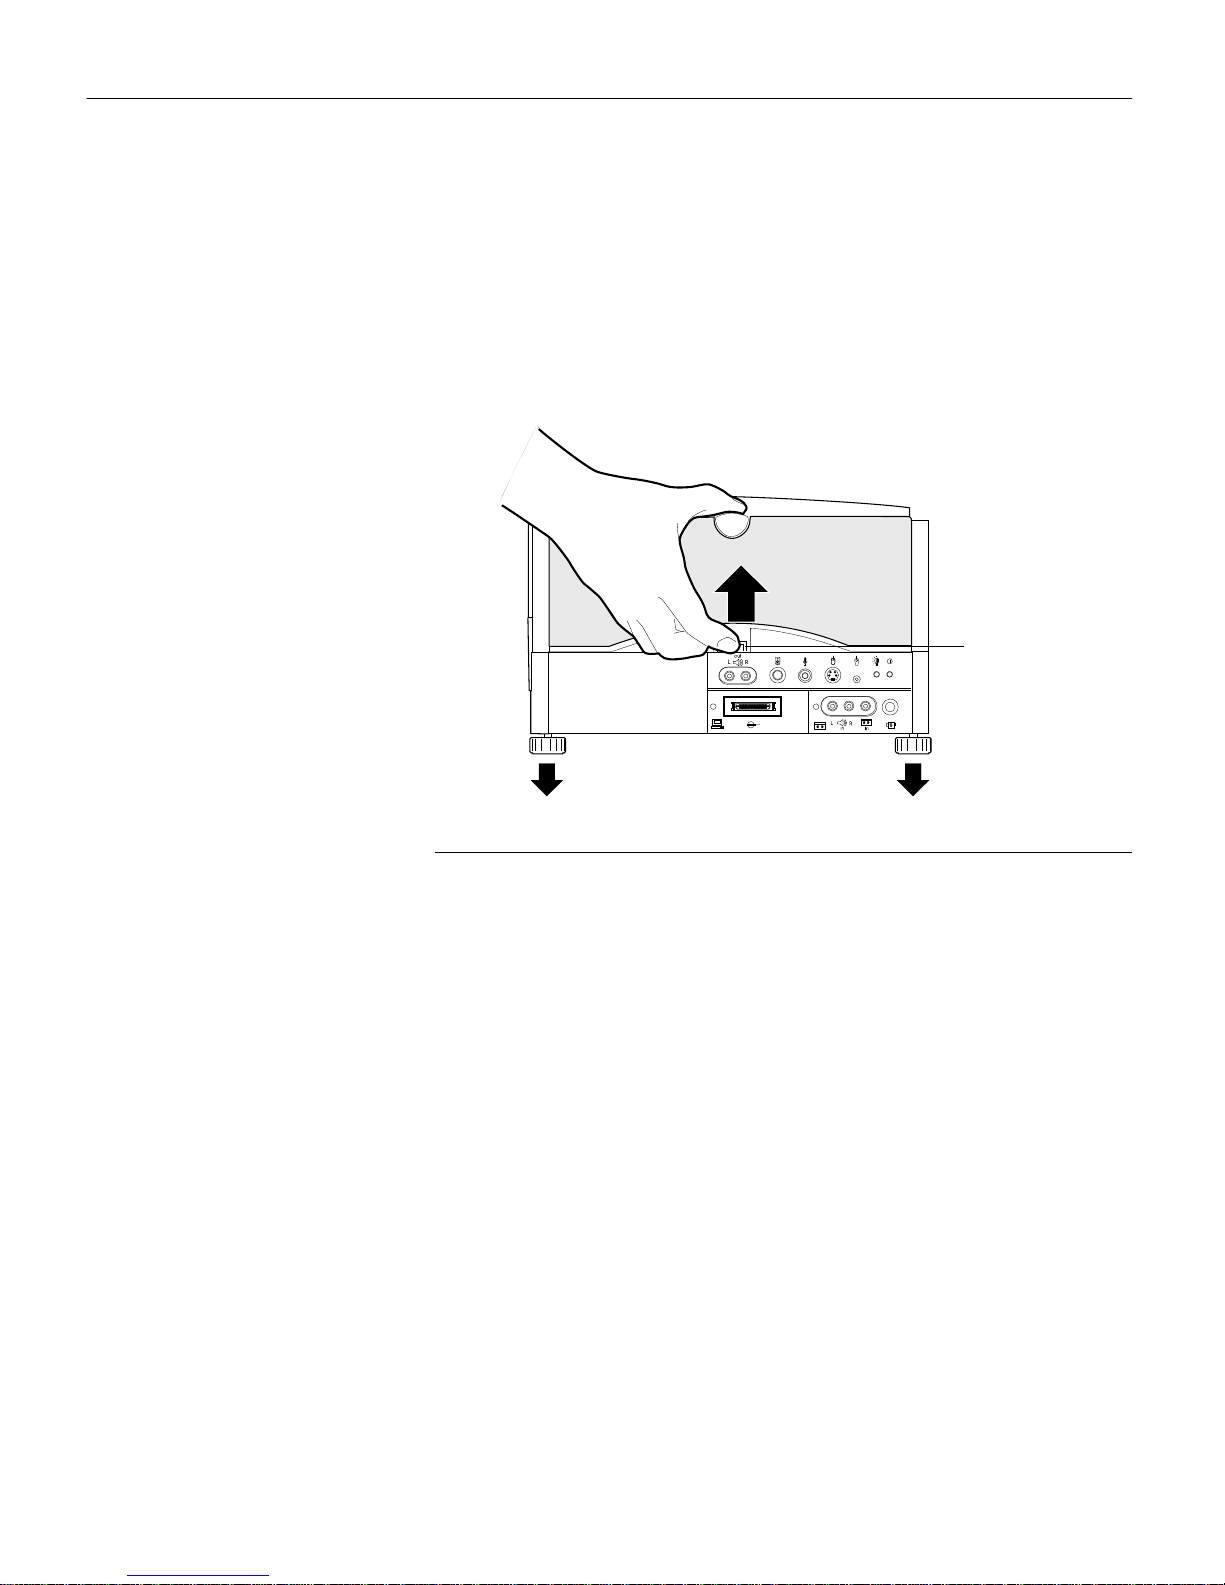
The projector is equipped with a self-locking, quick-release elevator button and adjustable-height feet. By raising the back of the
projector, you lower the projected image.
elevator button
FIGURE 24
Quick-release elevator button and adjustable feet
To raise the projector (lower the image):
1 P r ess the quick-release button up while lifting the rear of the
projector (Figure 24). The elevator feet automatically lower.
2 When th e projector is the he ight you want, releas e the button
to lock the elevator feet into position.
3 If n ecessa ry, rotate the elevator feet (Figure 25) to adjust the
angle of the projected image.
26
Page 31
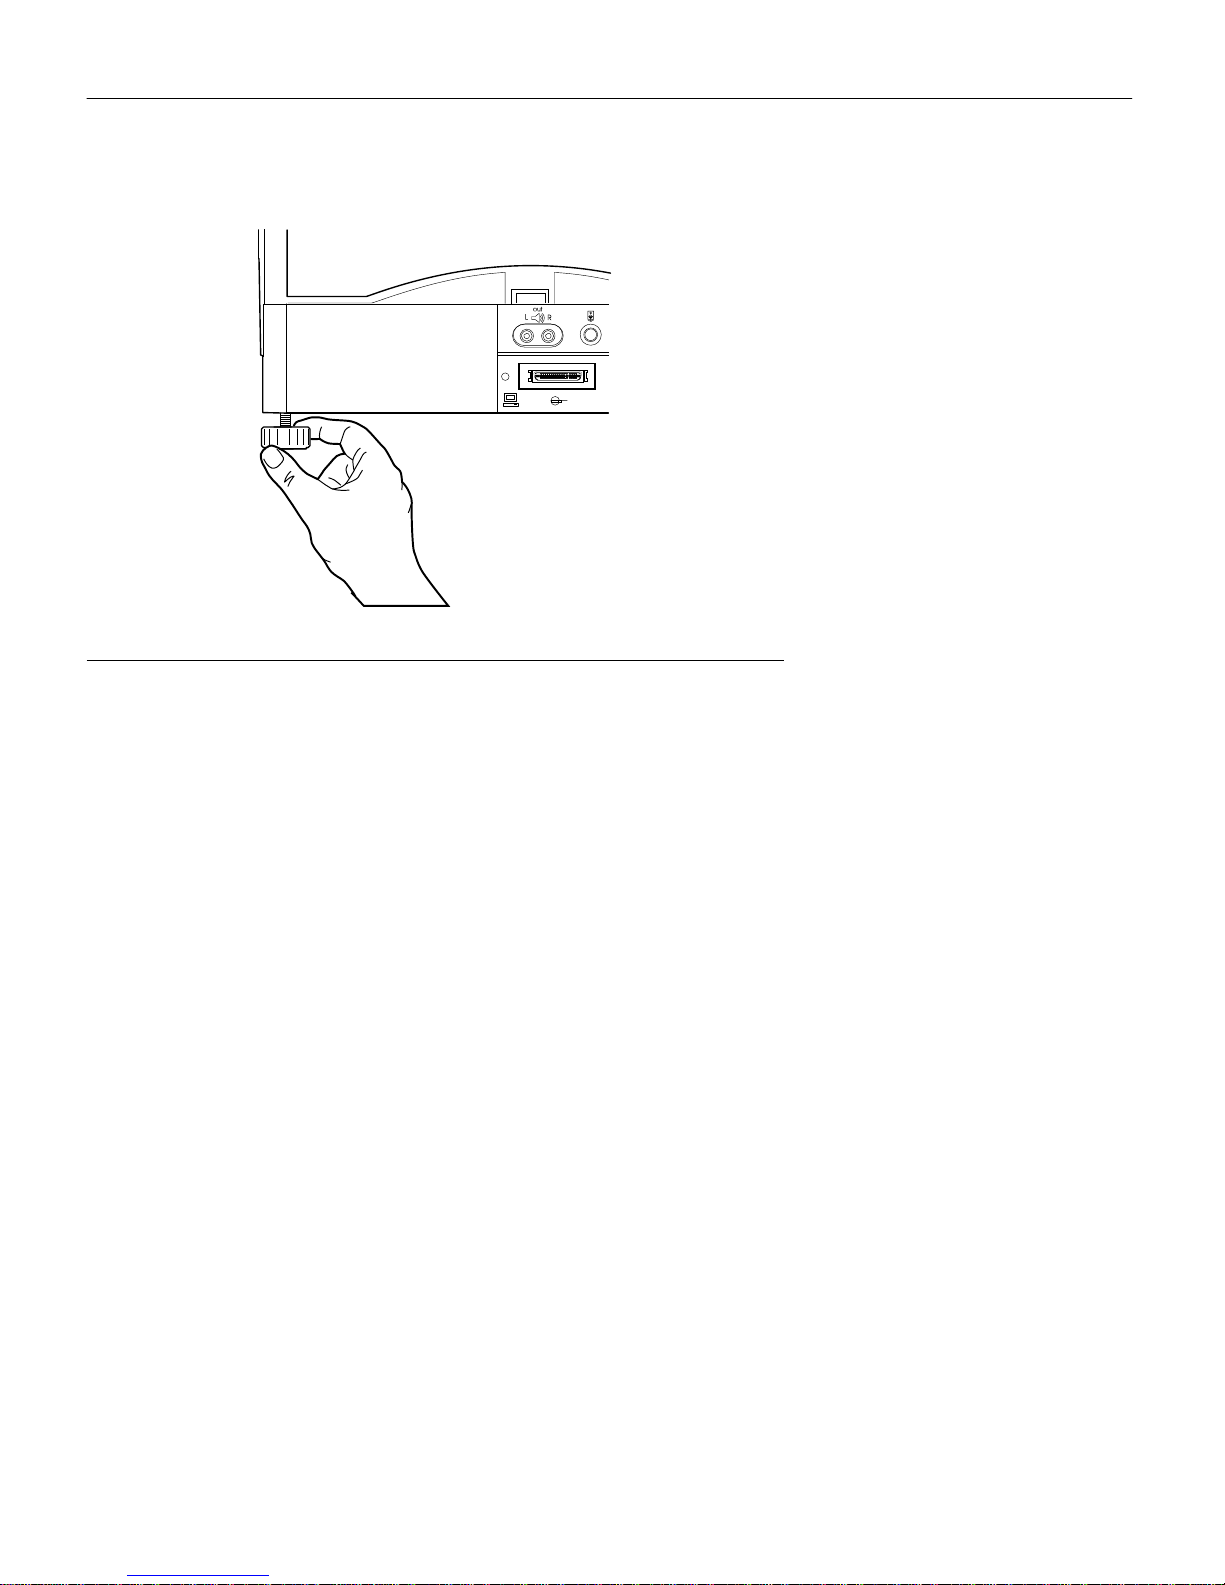
FIGURE 25
Adjusting the angle of the projected image
To lower the projector (raise the image):
1 Press the elevator’s q uick releas e button.
2 Push the projector down.
3 If necessary, rotate the elevator feet (Figure 25) to readju st th e
angle of the projected image.
27
Page 32
Using the Projector
Cha nging between Co lor an d Monoch rome Modes
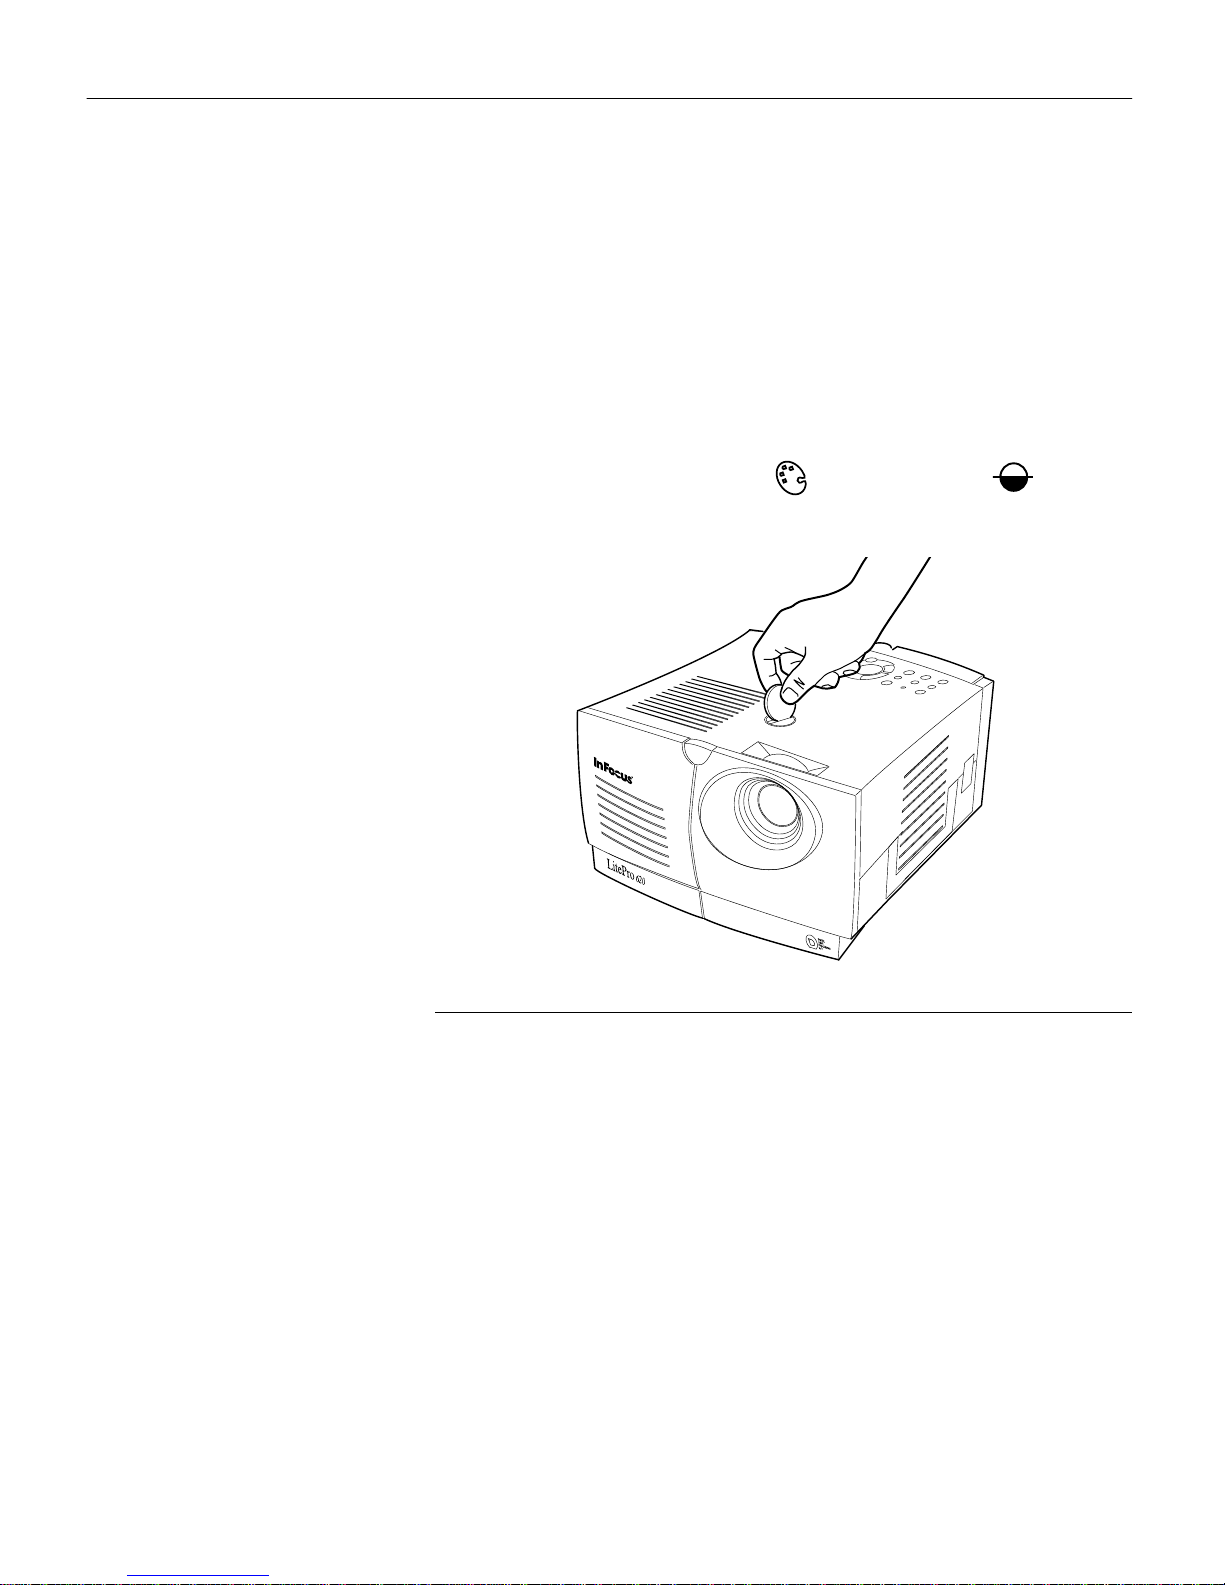
The color dial on the top of the projector (Figure 26) allows you to
select either color or monochrome modes. A monochrome image
is significantly brighter than a color image.
To change color mode:
1 Insert a coin or ot her flat object into dial on the top of the pro-
jector.
2 Turn the dial to either color or monochrome .
28
FIGURE 26
Changing color modes
Page 33
Using the Remote and Keypad Buttons
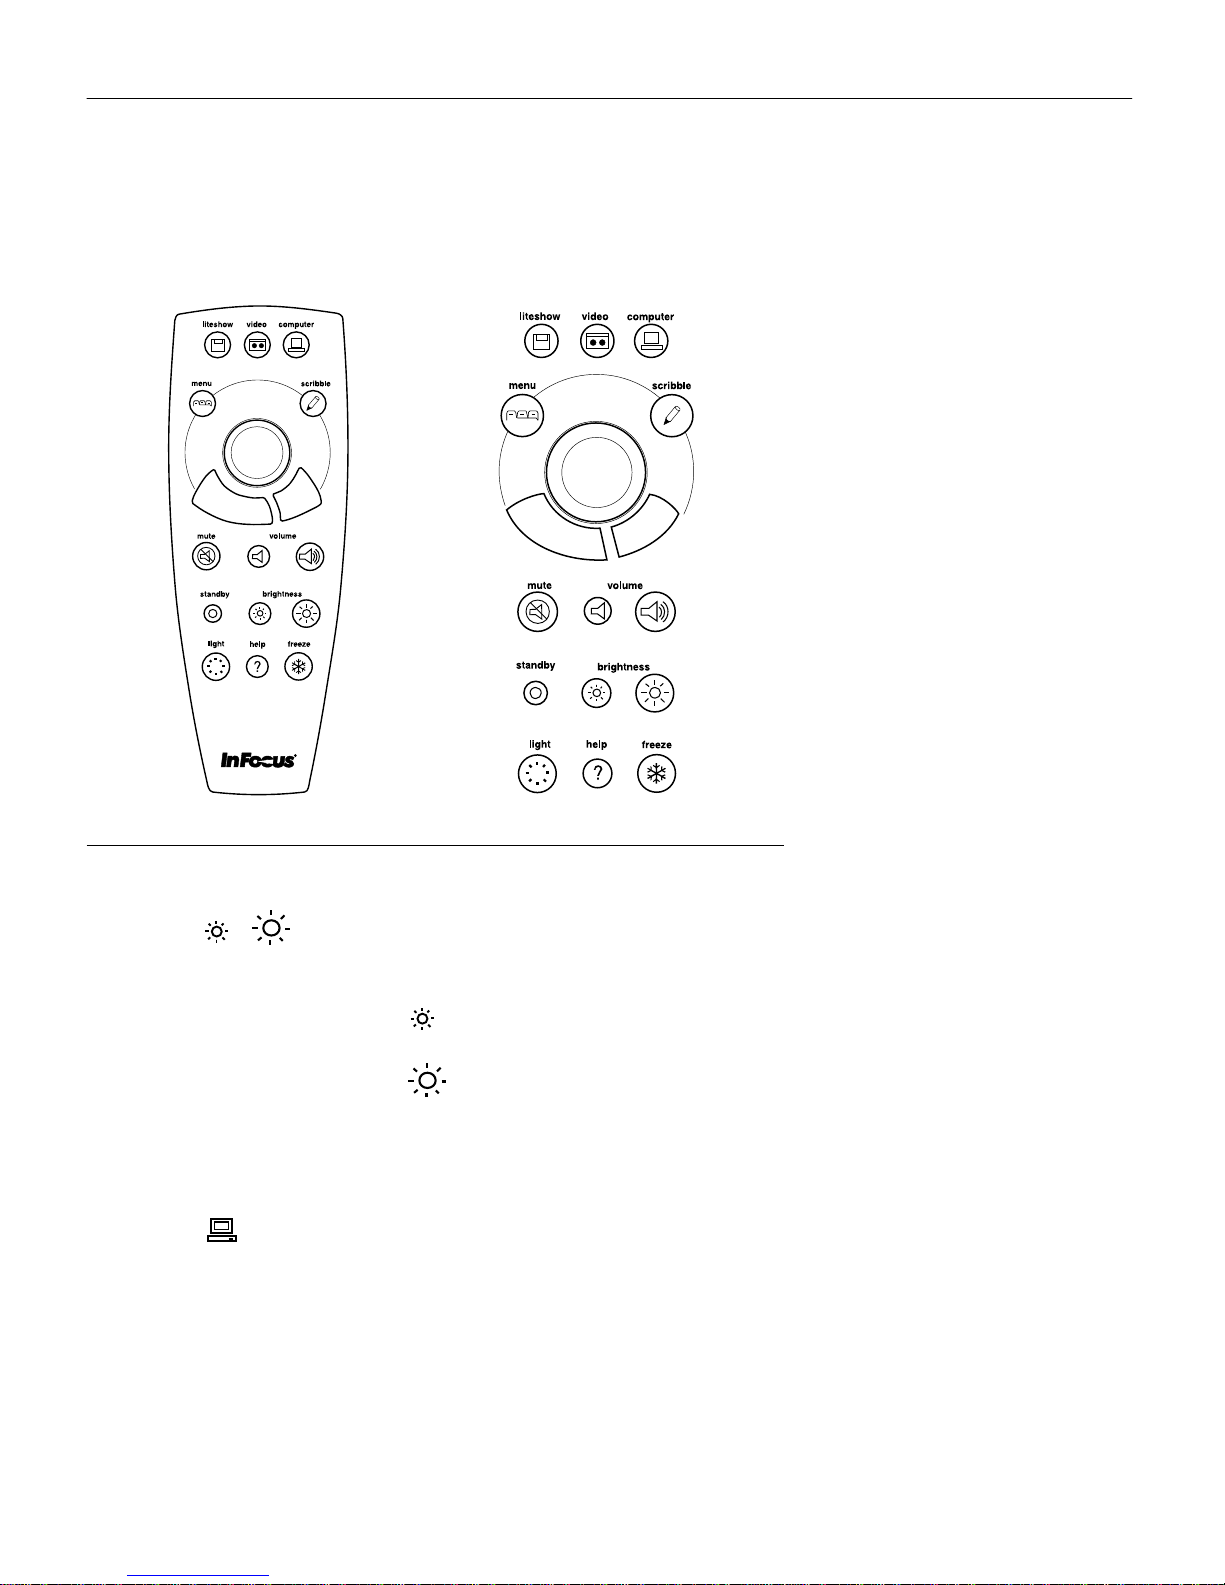
This section provides an alphabetical reference to the remote and
keypad buttons.
FIGURE 27
Remote control and keypad
Brightness
Adjusting the brightness lightens or darkens the image.
• To darken the image, press
• To lighten the image, press
The brightness buttons are auto-repeating; they repeat their function as long as you hold down the button.
Computer
When you have more than one source (computer or video) connected to the projector, you select b etween them by pressing the
butt o n for the source you want.
Pres s computer to display the c ompu t e r image.
29
Page 34

Using the Projector
Freeze
The freeze but ton halts, or “freezes” the projected image. Use t his
button to freeze a frame of video (the video continues to run but
the image is frozen). You also can freeze an image from a computer source on the screen, allowing you to perform other operations on the computer without the audience seeing them. Press
freeze again when y ou want the image to return to normal.
Help
Pres s help to display the online help information.
Ligh t
Pres s light to illuminate the buttons on the rem ote control or
keypad. The light goes off automatically 10 seconds after you
press any button .
NOTE: Pressing mute has no
effect on microphone volume.
Liteshow
The liteshow button will be used to display a LiteShow presentation from disk. Call your In Focus dealer for availability.
Menu
Pres s menu to open the on-screen menus. Press menu again to
close the menus. When you close the menus, the projector saves
any changes you made. For more information about the onscreen menus, see page 32.
Mute
Pressing the mute button silences the internal speakers. It also
silences any external speakers that are connected. It does not
mute th e microphone. To return the volume to its previous setting, press mute again or press either volume button.
Scribble
The scribble button activates on-screen annotation.
30
1 Press the scribble button. The cursor changes to a pencil.
Page 35

2 Press the right disk mou se button to display the color sele ctor .
Position the cursor on the desired color, th en press the left
mouse button. Press the right button again to close the color
selector.
3 Mov e the pencil to where you want to start the annotation.
4 P ress the left mouse button on the disk mouse. The cursor
changes to an upright pencil.
5 Use the disk mouse to draw your annotation. Press the left
mouse button to finish the annotation.
6 To exit Scribble, press the scribble button. The annotation is
automatically dele ted (it cannot be saved).
Standby
When you press standby, the display and audio turn off and the
screen becomes black. After 15 seconds the lamp goes out if you
haven’t pressed any other buttons.
• If you press standby again within 15 seconds, the projector
returns to normal operations immediately.
• If you press standby again after the lamp goes out, there can be
up to a 30-second delay before the lamp turns back on.
Video
When you have more than one source (computer or video) connected to the projector, you select b etween them by pressing the
butt o n for the source you want.
Pres s video to display the image from your video player.
Volume
•
To increase the volume, press
• To decreas e the volume, press
The volume buttons are auto-repeating; they continue to adjust
the volume as long as you hold t hem down. Volum e adju stment s
are saved for each source you have con nected.
31
Page 36
Using the Projector
Using the Disk Mouse
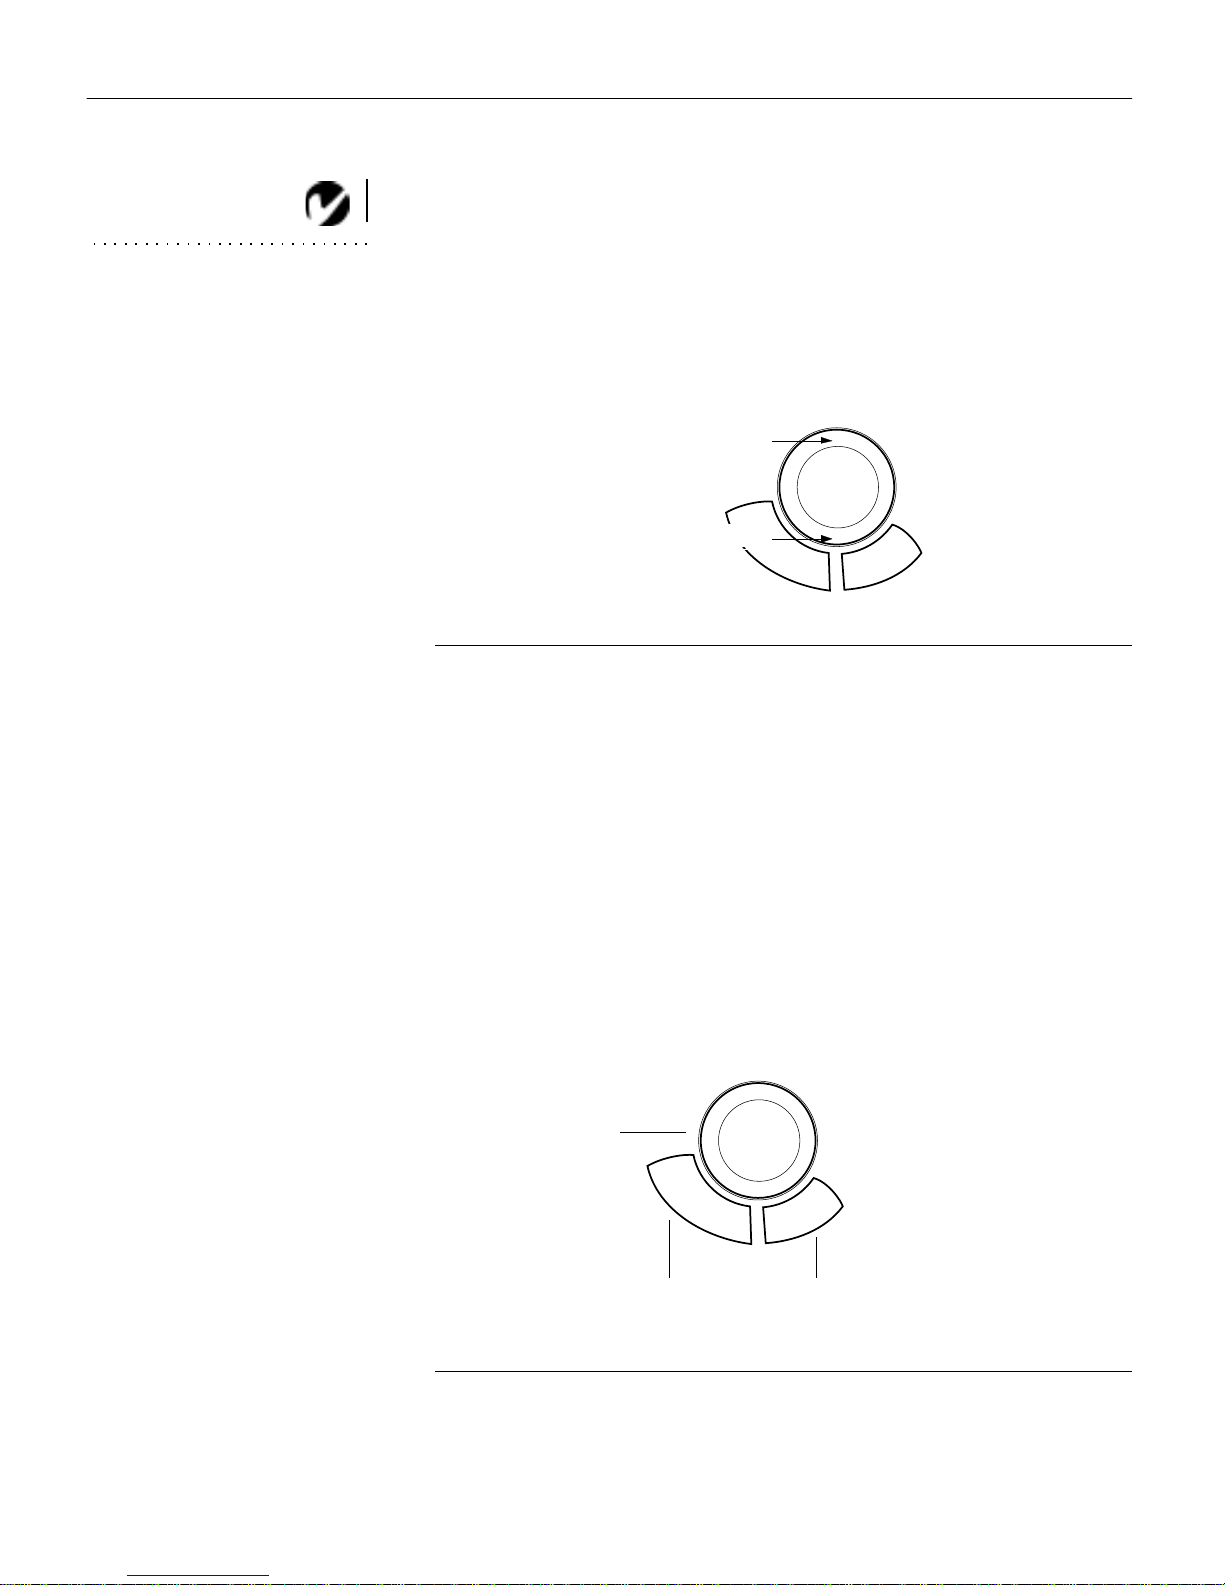
Pre ss anywhe re on t he edge of the disk m ou se t o move the cursor
NOTE: Using a light touch on the
disk mouse often gets the best
on the screen. For example, if you press the top edge of the disk,
the cursor moves up the screen; if you press the bottom edge, the
cursor moves down (Figure 28). You can move the cursor at any
results.
angle by pressing the corresponding edge of the disk.
press here to move the cursor up
press here to move the cursor down
FIGURE 28
Using the disk mouse
Using the O n-Screen Menus
The projector has four on-screen menus that allow you to make
image adj ustments and chan ge a vari ety of set ting s. Most of the se
adjustments aren’t available directly from the r emote or keypad.
To open the on-screen menus, press the menu butt o n on the
remote or keypad. Press menu again when you want to close the
menus.
To selec t o ne of the other menus, use the disk mouse on the
remote or keypad to move the cursor to the tab for the menu you
want, then click eithe r mouse button.
disk mouse
32
left mouse rig ht mouse
button button
FIGURE 29
Disk mouse and mouse buttons
Page 37
To change a menu setting, use the disk mouse to move the cursor
to the setting you want to chan ge, then use one of the two buttons
below the disk mouse to make the changes.
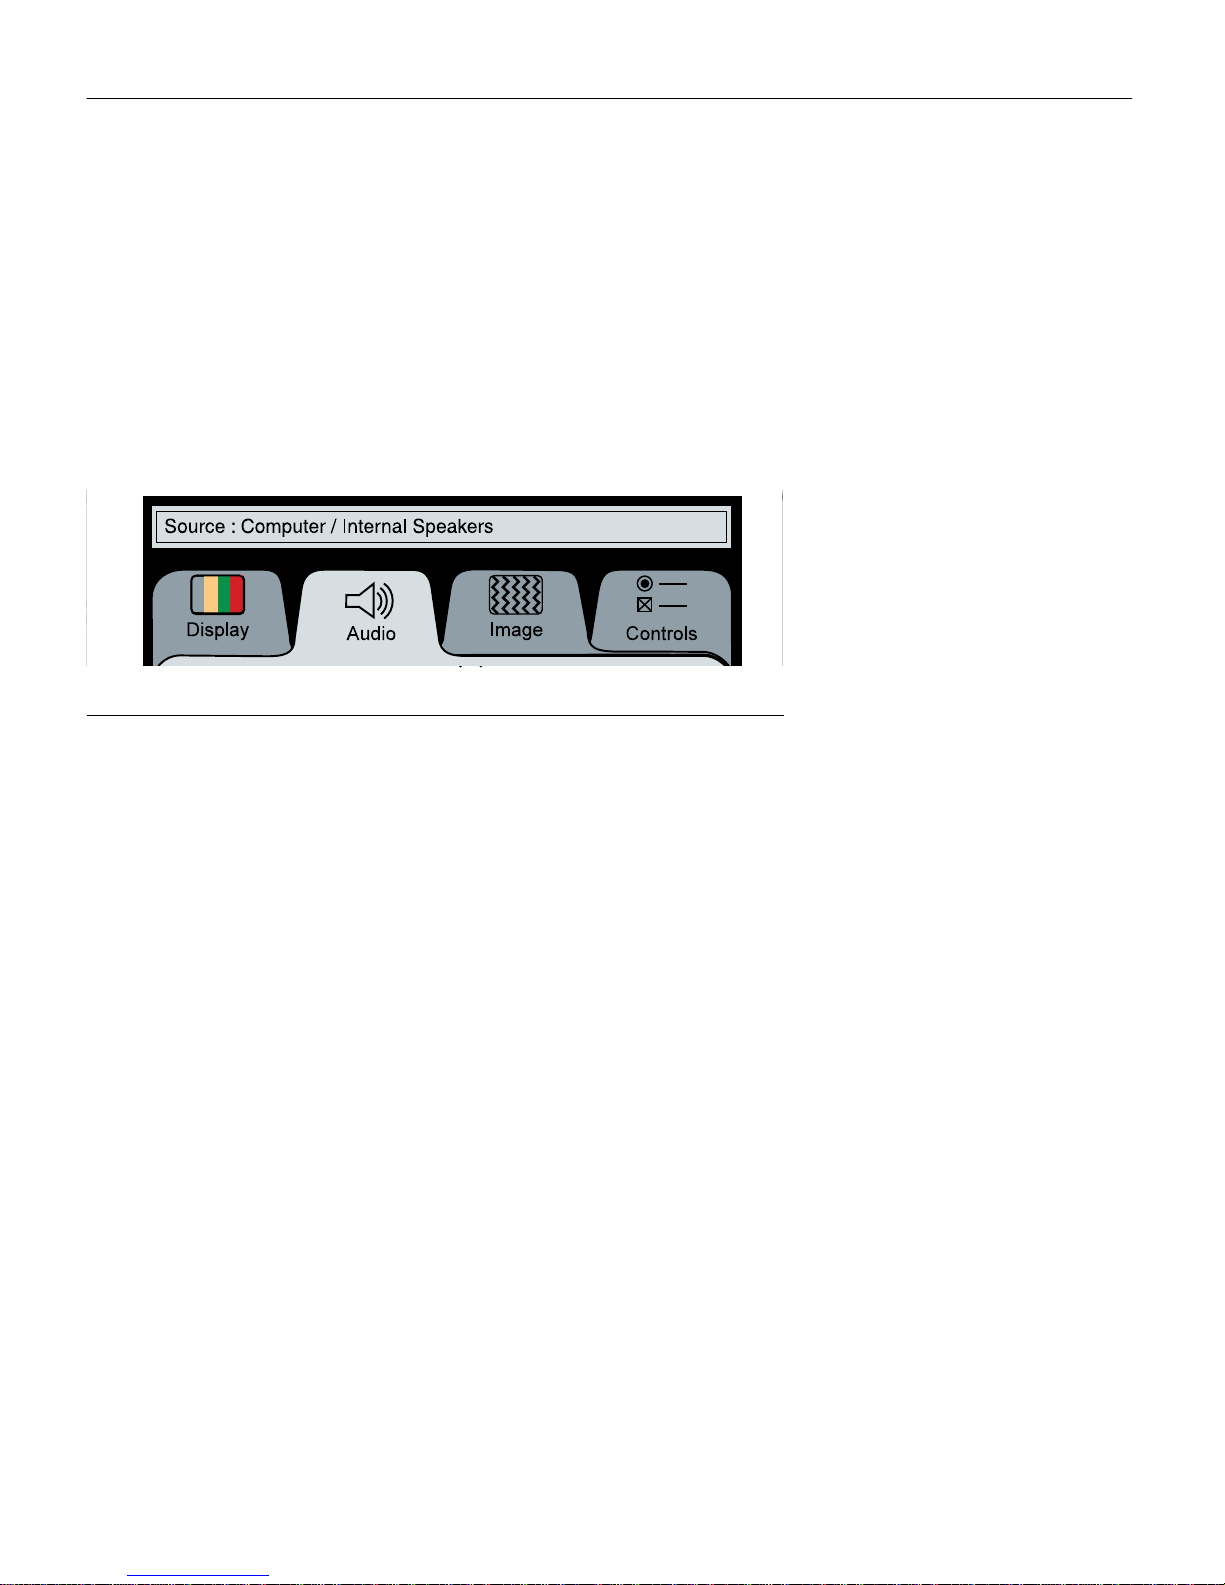
The status bar at the top of each menu indicates the source that is
currently active. For example, if you have both a computer and a
video player connected, “Source: Computer” or “Source: Video”
displays depending on whether you’ve pres sed the computer or
the video button.
FIGURE 30
On-screen menu status bar
33
Page 38
Using the Projector
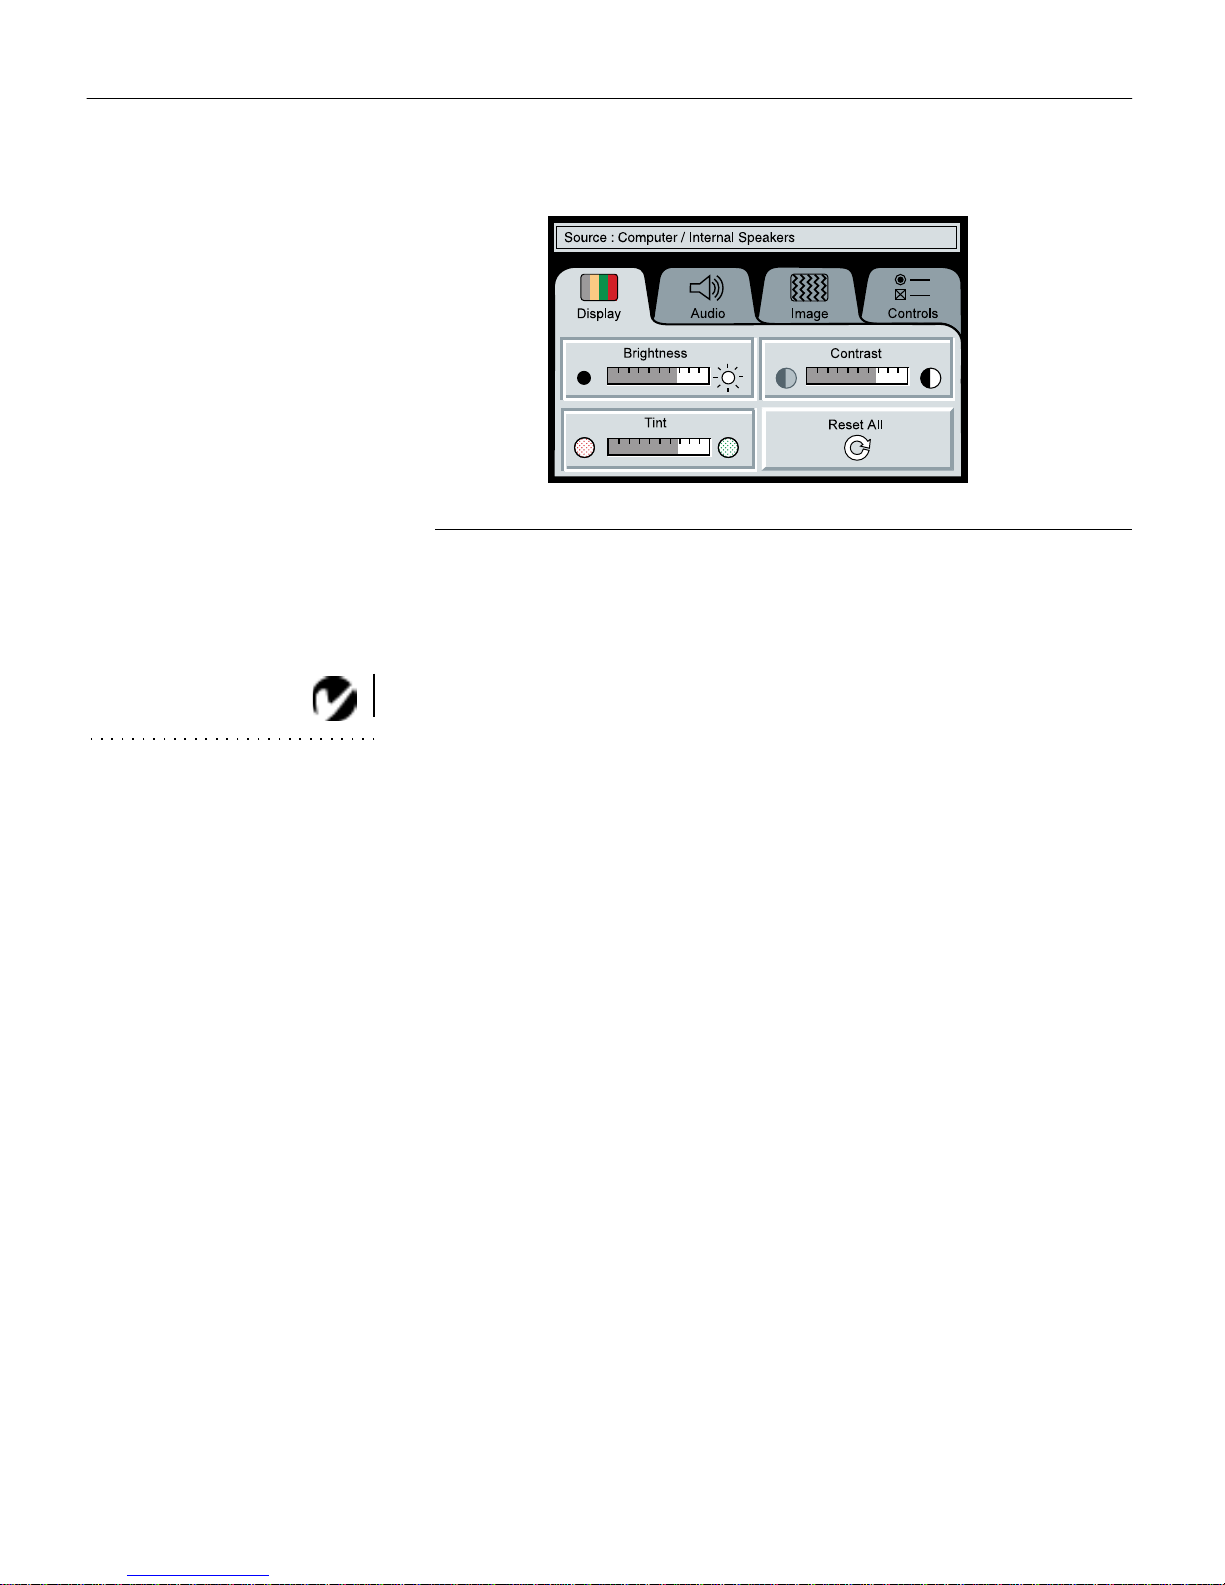
Disp la y Menu Functions
FIGURE 31
Display menu
Brightness
Adjus ting the brightness changes the intensity of the image.
NOTE: Changing the brightness
using the menu is the same as
changing it using the remote or
keypad.
• Pres s the left mouse button to d arken the image.
• Pres s the right mouse button to lighten the image.
Contrast
Contrast controls the degree of difference between the lightest
and darkest parts of the picture. Adjusting the contrast changes
the amount of black and white in the image.
• Pres s the left mouse button to decrease the contrast.
• Pres s the right mouse button to increase the contrast, making
the blacks appear blacker and the whites appear whiter.
Tint
Tint adjusts the red-green color balance in the projected image.
Changing the Tint setting has no effect on PAL or SECAM video
sources.
• Pres s the left mouse button to increase the amount of green in
the image.
34
• Pres s the right mouse button to increase the amount of red in
the image.
Reset All
Click either mouse button to reset all the options (except Language) in all the m enus to their default settings. This also returns
Free z e and Mute to their default (off) settings .
Page 39
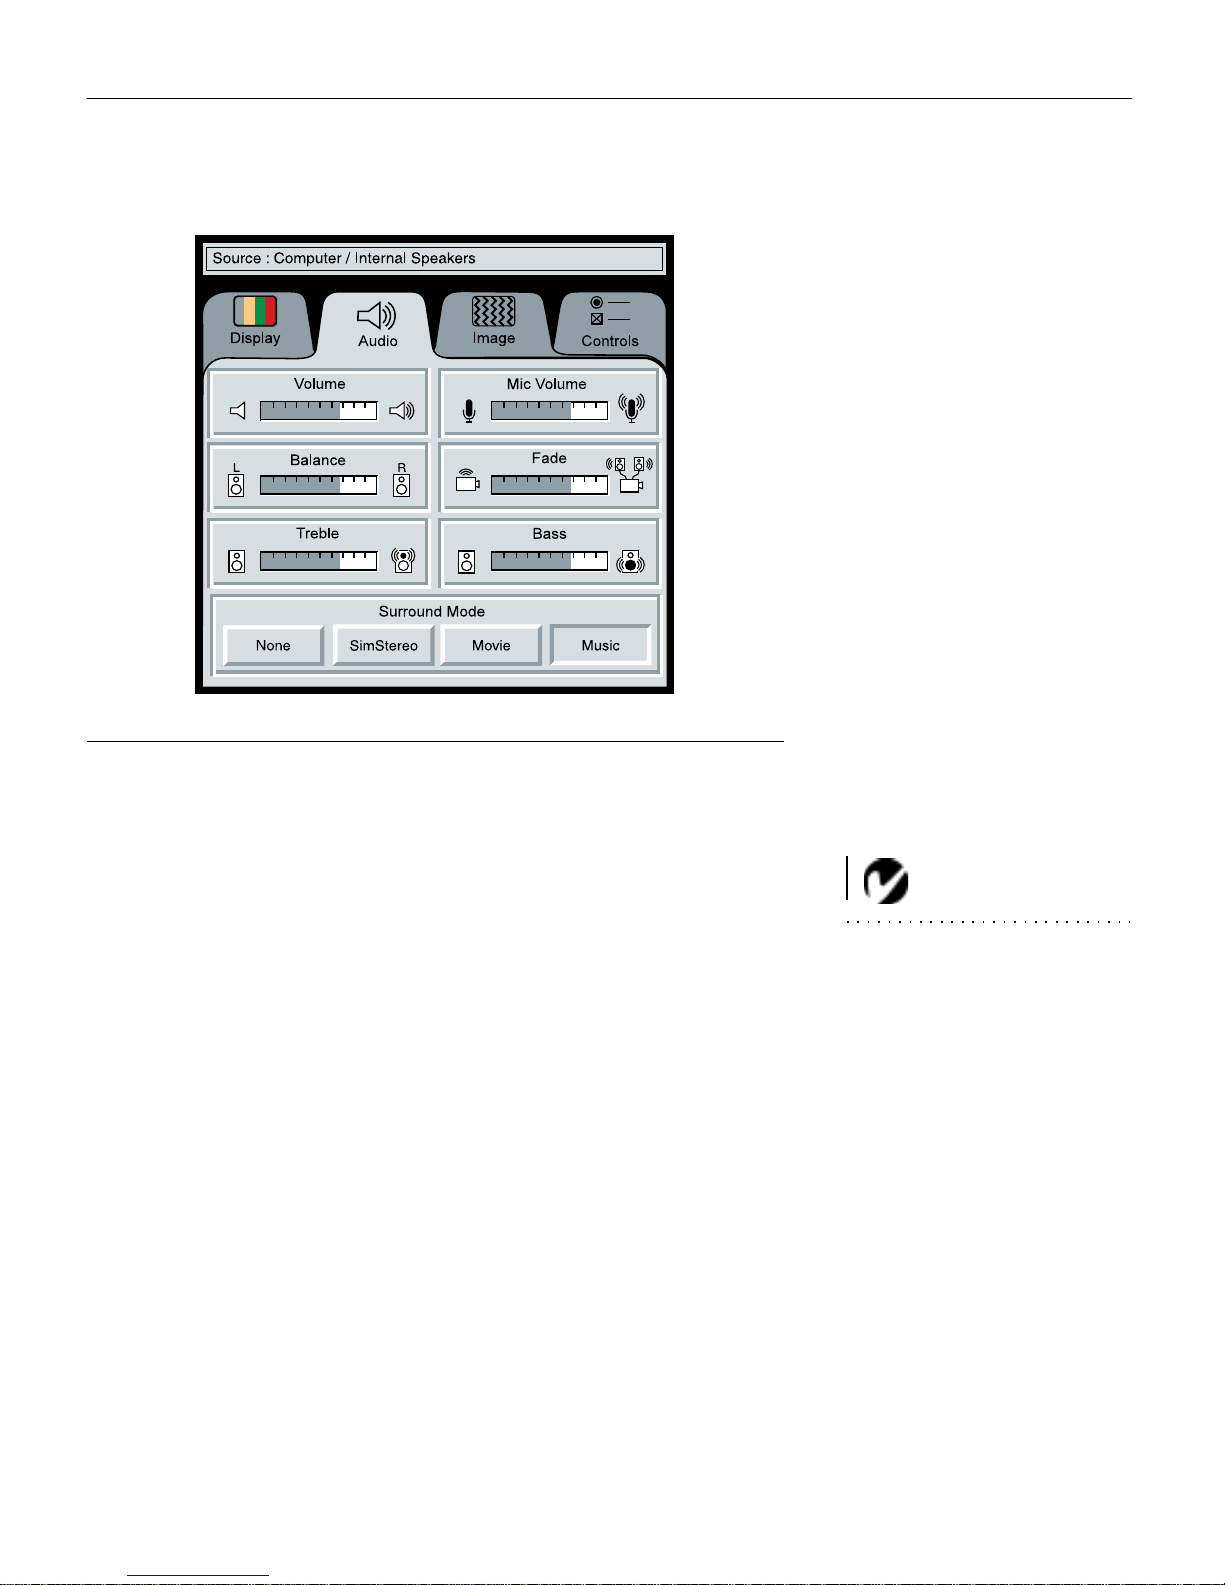
Audio Menu Functions
FIGURE 32
Audio menu
Volume
Volume adjustments you make are saved for each source.
• Pres s the left mouse button to decrease th e volume.
• Pres s the right mouse button to increase the v o lume.
Mic Volume
Pres s the left mouse button to decrease the microphon e
•
volume.
• Pres s the right mouse button to increase the microphone
volume.
Balance
Balance controls the balance between t he left and right internal
and external speakers. The balance setting applies to all sources
you have connected.
• Press the left mouse button to increase the amount of sound
coming from the left speakers.
NOTE: Changing the volume
using the menu is the same as
changing it using the remote or
keypad.
35
Page 40

Using the Projector
•
Press the right mouse button to increase the amount of sound
coming from the rig ht speakers.
Fade
Fade con trols the balance between the internal and external
speaker s. The setti ng appears gray and won’ t h ighli gh t if exte rnal
speakers aren’t connected.
• Press the left mouse button to increase the amount of sound
coming from the internal speakers.
• Press the right mouse button to increase the amount of sound
coming from the external speakers.
Treble
Treble controls the higher frequencies of your audio source.
Pres s the left mouse button to decrease the treble.
•
NOTE: The Treble and Bass
settings apply only to the
projector’s internal speakers.
Most external speakers have their
own tone controls.
• Pres s the right mouse button to increase the t r eble.
Bass
Bass co ntrols the lower frequencies of your audio s ource.
• Press the left mouse button to decrease the bass.
• Pres s the right mouse button to increase the bass.
Surround Mode
Surround Mode controls the spaciousness of the sound quality
from the project or’s four internal speakers. Sele ct among the f our
options:
• Movie—simulates a center channel speaker for the dialog in
movi es.
• Music—emphasizes the spaciousness of musical tracks.
• Simulated Stereo—simulates stereo from a monaural source.
• None—normal stereo mode with no additional audio
processing.
36
Page 41
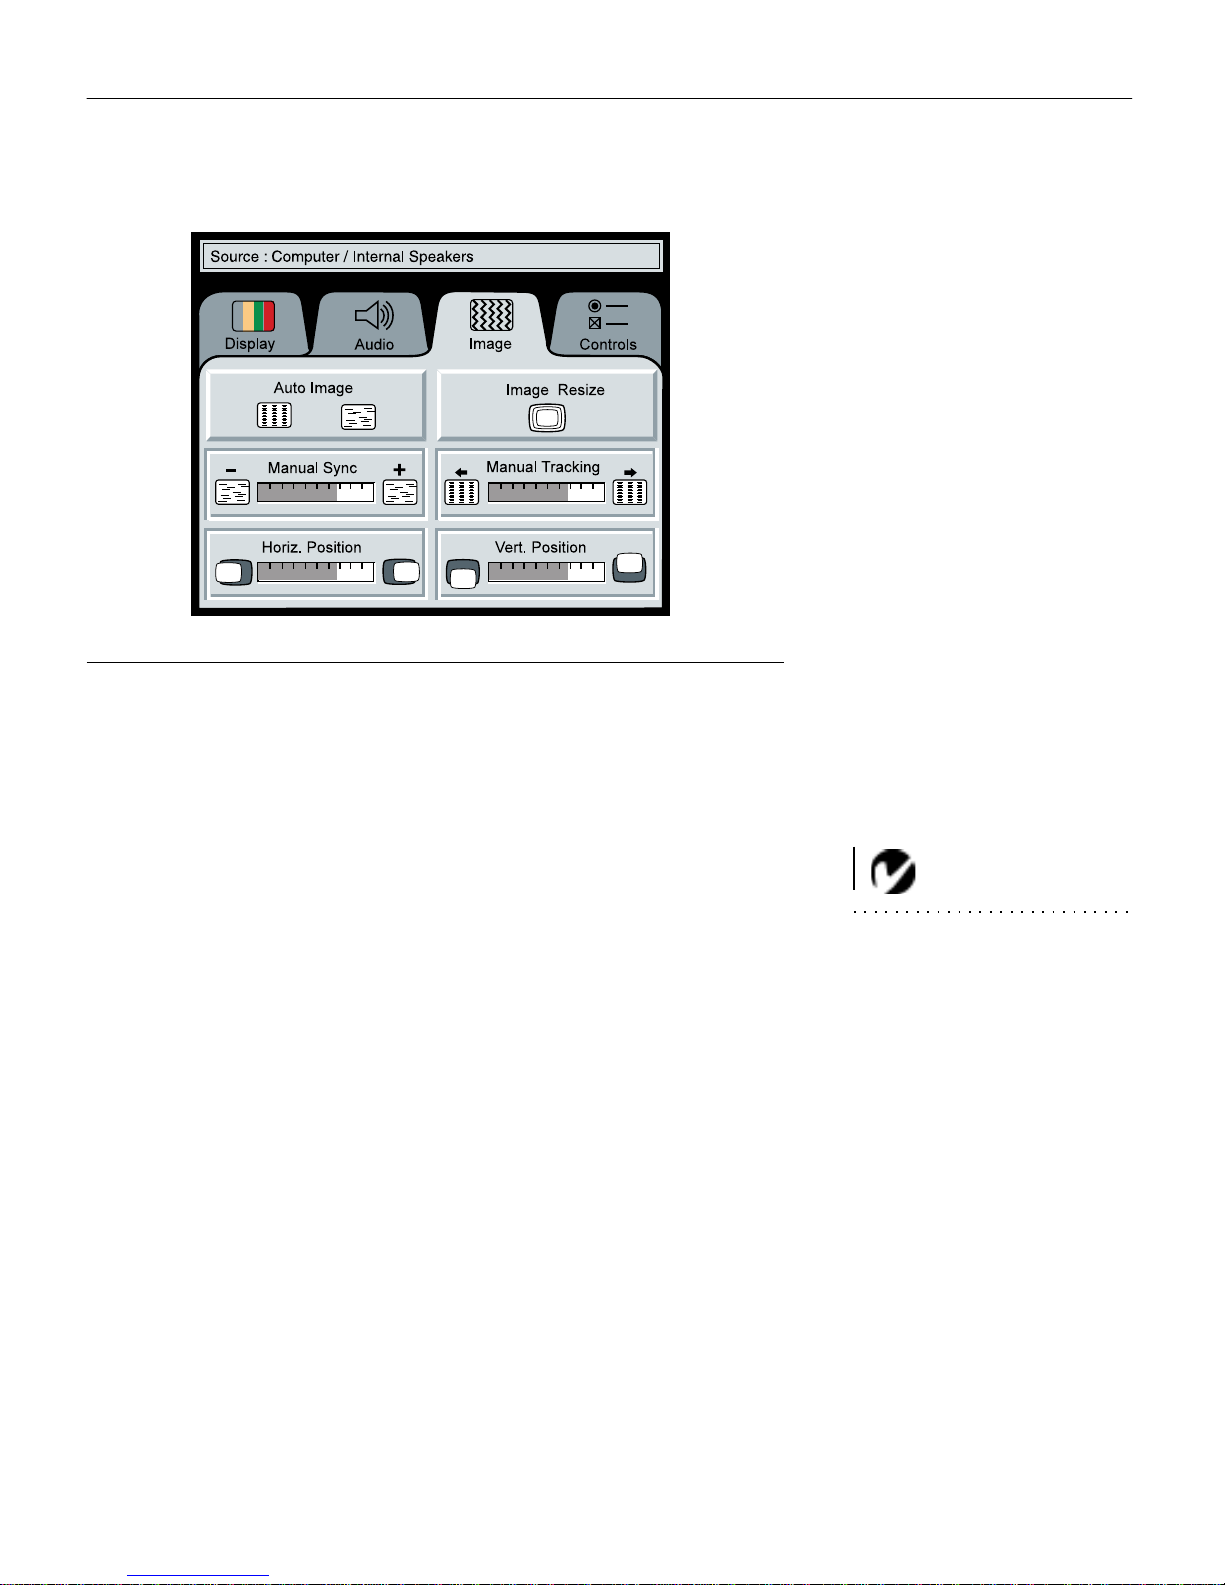
Image Menu Functions
FIGURE 33
Image menu
Auto Image
Auto Image adjusts tracking, signal synchronization and vertical
an d horizontal position auto mati cally for most computers. If you
want to adjust these fe atures manually, you must turn off Auto
Image first by clicking it.
Auto Resize
Auto Resize automatically resizes the image by scaling it up or
down. It is available only for computer sources.
When Auto Resize is on, the proje ctor makes the best f i t of the
image to the screen. If you turn Auto Resize off (by clicking it),
the image may be eit her cropped or too small for the screen.
Manual Sync
The projector adjusts signal synchronization automatically for
mos t computers. But if the proje cted compute r image looks fuzzy
or streaked, try turnin g Auto Image off then back on again. If the
image still looks bad, try adjusting the signal synchronization
manually.
NOTE: Some screen savers interfere with Auto Image. If you’re
experiencing problems, try turning
your screen saver off, then turning
Auto Image off and on.
37
Page 42

Using the Projector
1Click the Auto Image button to turn Auto Image off.
2 Move the cursor to Manual Sync, then press the left or right
mouse buttons repeatedly until the image is sharp and free of
streaks.
Manual Tracking
NOTE: The Manual Sync,
Manual Tracking, Horiz. Position
and Vert. Position buttons are
available only for computer
sources. These settings are
adjusted automatically for a video
source so they appear gray.
The tracking function adjusts the projector to match the signal
from your computer. The projector usually adjusts the tracking
automatically when you connect your computer. However, if the
display shows evenl y spaced, fuzzy, vertical lines or if the projected image is too wide or too narrow for the screen, try turning
Auto Image off then back on again. If the image is still bad, try
adjusting the tracking manually.
1 Click the Auto Image button to turn Auto Image off.
2 Move the cursor to Manual Tracking, then press the left or
right mouse buttons repeatedly unti l the fuzzy vertical bars
are gone.
Horiz . Position
Follow these steps to manually adjust the horizontal position.
1 Click the Auto Image button to turn Auto Image off.
2 Move the cursor to Horiz. Position, then press the left mouse
butt on to move the i mage right or press the right mous e button to move the image left .
Positioning adjustments are saved when you power off the projector.
Vert. Position
Follow these steps to manually adjust the vertical position.
1 Click the Auto Image button to turn Auto Image off.
2 Move the cursor to Vert. Position, then press the left mouse
button to mov e the image down or press the right mouse button to move the image up.
38
Positioning adjustments are saved when you power off the projector.
Page 43
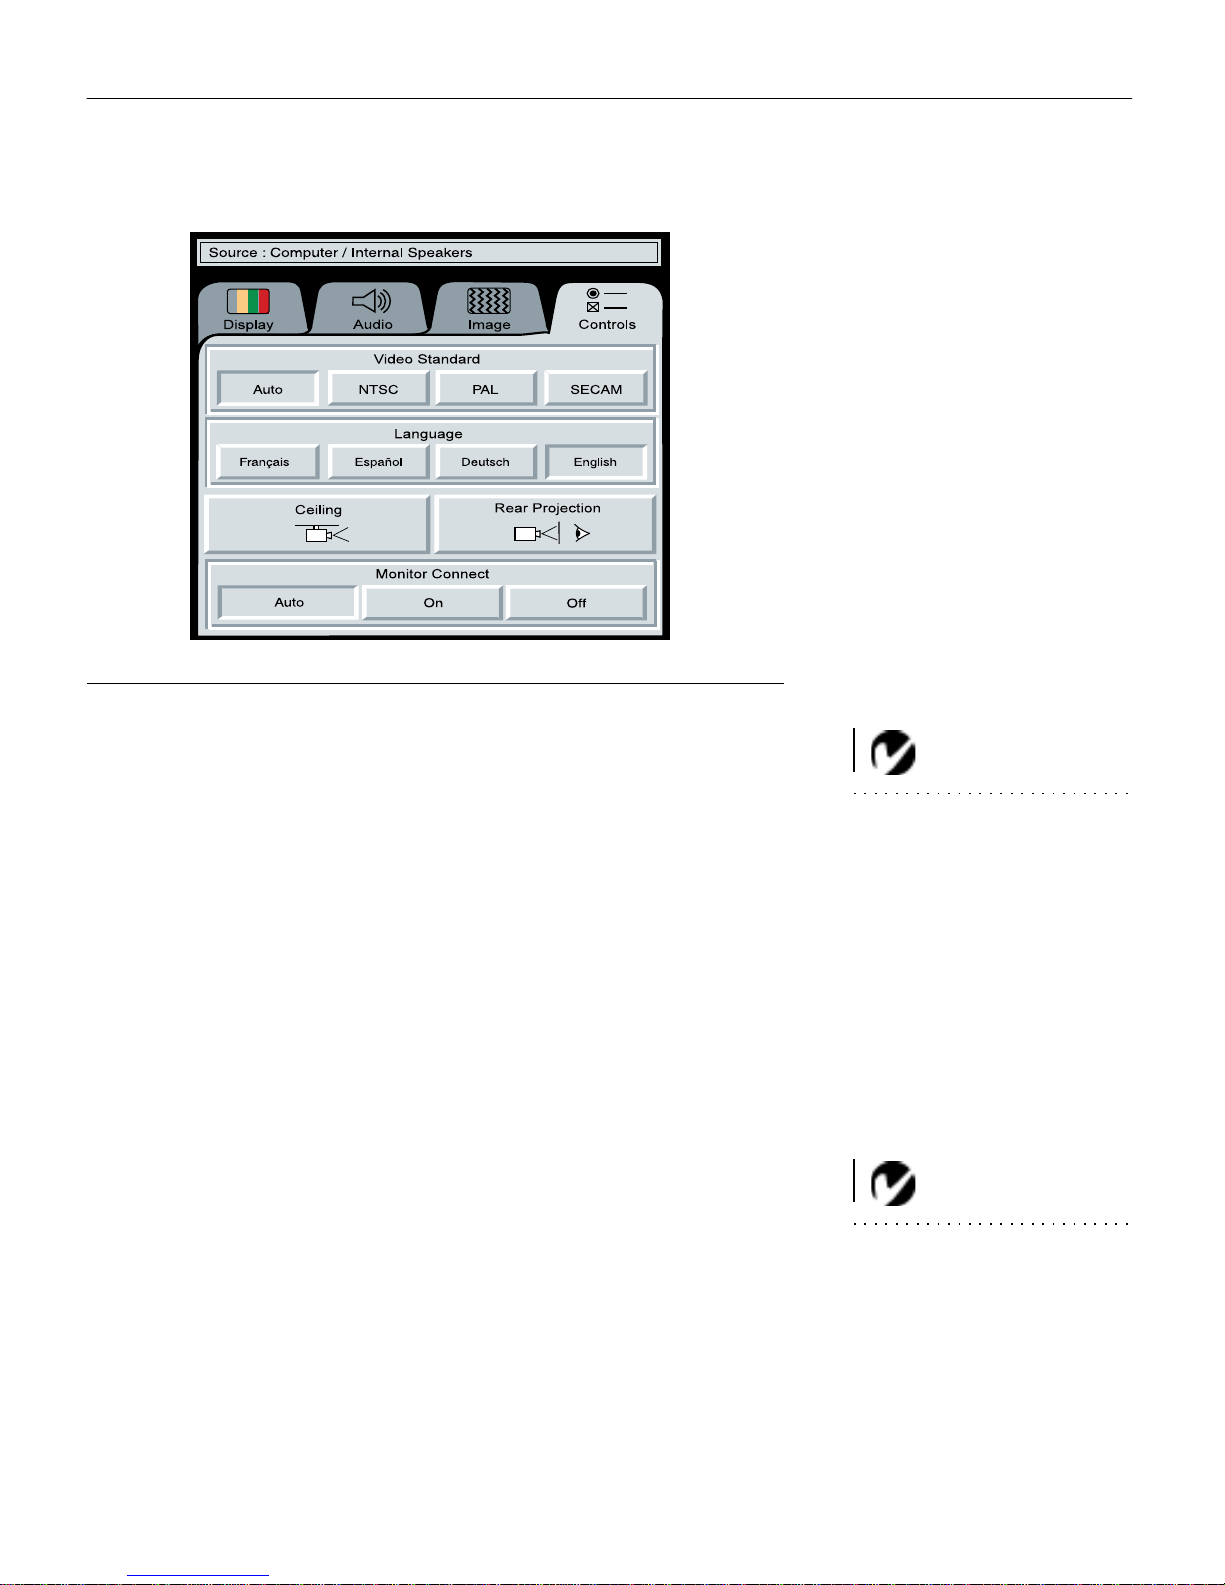
Contr ols Menu Function s
FIGURE 34
Controls menu
Video Standard
When Auto is selected, the projector attempts to pick the correct
video standard (NTSC, PAL or SECAM) based on the input signal it receives. If the proj ector i s unable to detect the stan dard, the
colors might not look right or the image might appear “torn.” If
this happens, manually sel ect a standard by selecting one of the
other buttons.
NOTE: If you already know the
standard used in your geographical
area, it’s often best to manually
select it.
Language
You can display the on-screen menus in English, French, Spanish
and German. The default is English.
• Click the button for the language you want. The menus redraw
immediately.
Cei ling
Click ei t her mous e button to turn the image upside down for
•
ceiling-mounted projection.
NOTE: To order the ceiling
mount kit, refer to “Accessories”
on page 53.
39
Page 44

Using the Projector
Rear Projection
When you select Rear Projection, th e proje ctor re verses the image
so you can project from behind a translucent screen.
• Click either mouse button to reverse the image for rear projec-
tion.
Monitor Con nect
When Auto is selected, the projector attempts to pick the correct
monitor connection based on the input signal it receives. This setting produces the best results in most situations. Select “On” or
“Off” only if th e image is very dim or not project ed.
• Select “On” if your monitor is connected directly to the
CableWizard and the images are excessively dim.
Select “Off” if your monitor is not conn ected directly to th e
•
NOTE: Do not select “Off” if
your monitor is connected directly
CableWizard and the image is not projected. (Some IBM
ThinkPad computers exhibit this problem, especially the
ThinkPad 760.)
to the CableWizard.
40
Page 45

MAINTENANCE & TROUBLESHOOTING
This chapter d escribes how to:
• clean the lens
• replace the projection lamp and reset the lamp monitor light
• replace the batteries in the remote control
• use the Kensington lock feature
• troubleshoot the projector
Clea ning the Lens
Follow these steps to clean the projection lens:
1 Apply a non-abrasive camera lens cleaner to a soft, dry clean-
ing cloth.
• Avoid using an excess ive amount of cleaner.
• Abrasive cleaners, solvents or other harsh chemicals might
scratch the lens.
2 Lightly wipe the cleaning cloth over the lens.
Replacing the Projection Lamp
Replace the lamp m odule when (lam p monit o r indic ator L ED)
lights up (see Figure 23). If you don’t replace the lamp soon after
the monitor lig ht comes on, the lamp switches off completely.
You can order new lamp modules from your In Focus dealer. See
“Accessories” on page53 for information.
Follow these steps to replace the projec tion lamp:
1 Turn off the projector and unplug the power cord.
2 Wait 45 minutes to allow it to cool thoroughly.
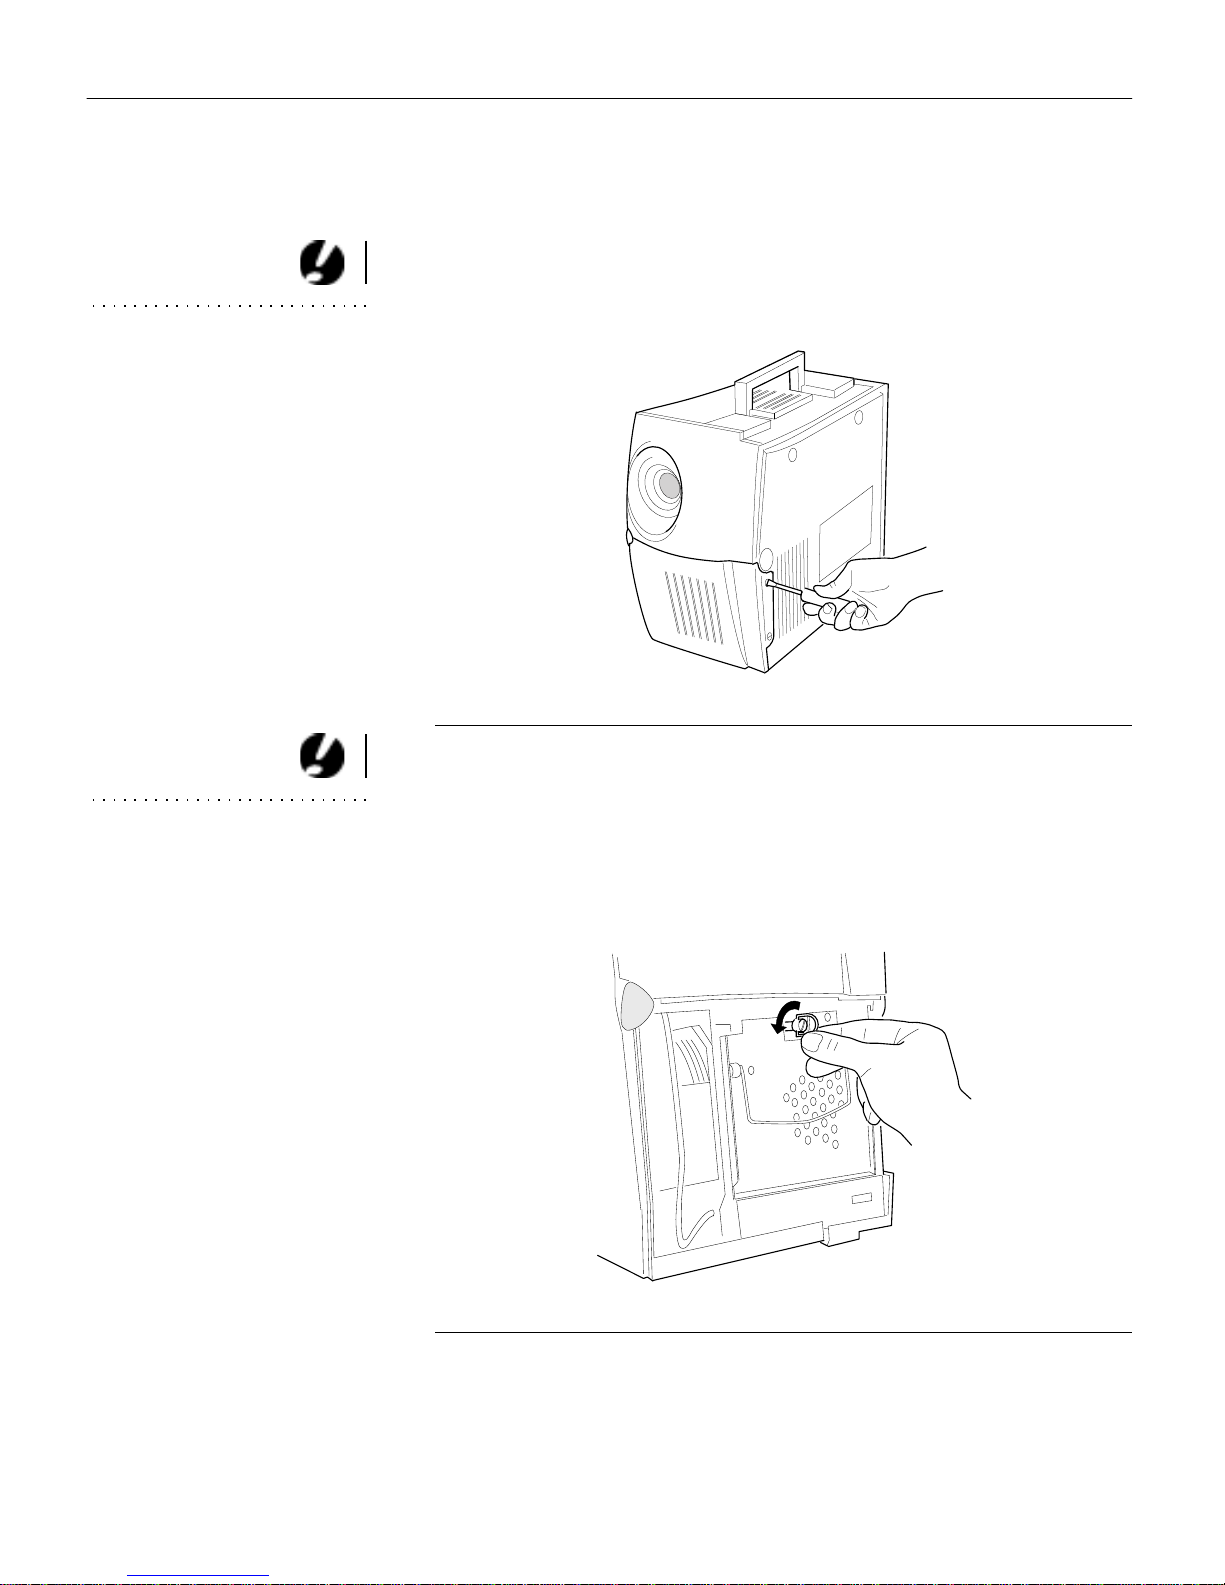
3 Remove the lamp module door on the front of the projector
(Figure 35).
WARNING: To avoid burns and
lamp explosion, be sure to allow
the projector to cool for 45 minutes before you open the lamp
module door. Never try to extract
the lamp module while the lamp is
operating.
41
Page 46
Maintenance & Troubleshooting
•
Using a small, flat-blade screw driver, remove the two
screws on the bottom of the projector on the outside of the
lamp module cover.
Pull th e lamp cover up and remove it.
•
CAUTION: Never ope r a te t he
projector with the lamp cover open
or removed. This disrupts the air
flow and causes the projector to
overh eat.
CAUTION: Be sure to replace
the projection bulb as soon as
possible after the lamp monitor
light comes on. If the lamp
rem ains in use too long, there is a
danger of lamp explosion. If this
happens, your LitePro will be
severely damaged.
FIGURE 35
Removing the lamp module cover
4 Remove the lamp module.
• Lift the ring of the screw fastener up and turn it 1/4 turn
counterclockwise (th e screw remains attached to the lamp
module) .
42
FIGURE 36
Turning the ring of the screw fastener
Page 47
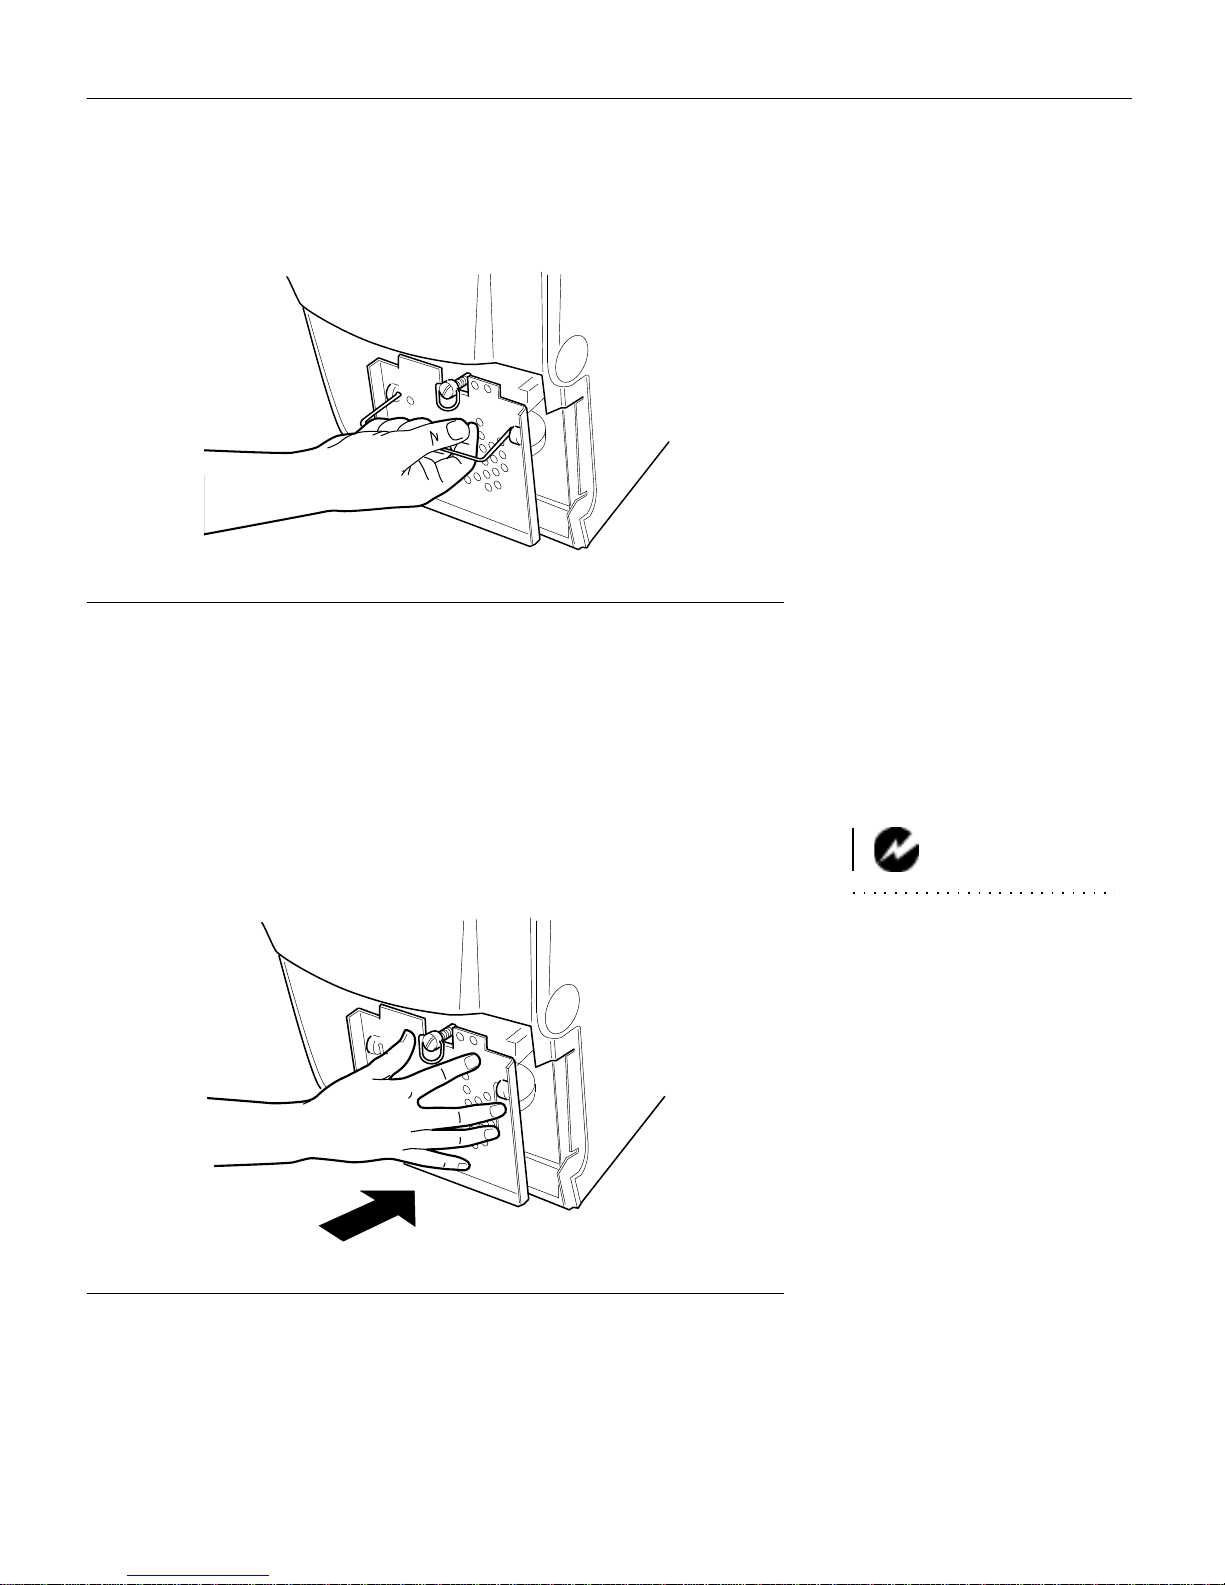
• Pull the handle out to remove the module.
FIGURE 37
Removing the lamp module
5 Fit the new lamp module in place (Figure 38).
• Align the module i n the correct direction (wit h the screw
fasten e r at the top).
• Gently push the module in as far as it g oes.
• Tighten th e screw fastener.
Installing a new lamp module
IGURE 38
F
WARNING: Do not drop t he
lamp module or touch the glass
bulb! The glass can shatter and
cause injury.
43
Page 48

Maintenance & Troubleshooting
6Replace the lamp cover.
Reposition the cover.
•
NOTE: You must reset the lamp
monitor light so the projector can
keep track of the usable life of the
new lamp.
• Replace the s crews and tighten them.
7 Turn the projector back on.
Resetting the Lamp Mon itor Light
After replacing the lamp, you must reset the lamp monitor light.
1 Pre ss and hold the t wo brig htne ss butt ons on t he keypad for at
least 5 seconds with the projector on.
2 Release the buttons.
Replacing the Batteries in the Remote Control
The life of the batteries depends on how often and how long you
use the remote. Symptoms of low battery charge include erratic
responses when using the r e mote and a reduced range of operation.
Follow these steps to replace the batteries:
1 Turn t he remote face down in your hand.
2 Slide the battery cover off the end of t he remote.
3 Remove the old batteries.
4 Install two new AA alk aline batteries. Make sure you install
each in the correct direction.
5 Slide the battery cover back on the remote.
Using the Kensington Lock
The projector has a Kens ington Security Standard connector for
use with a Kensington MicroSaver Security System (Figure 39).
Refer to the information that came with the system for instructions on how to use it to secure the projector.
44
Page 49
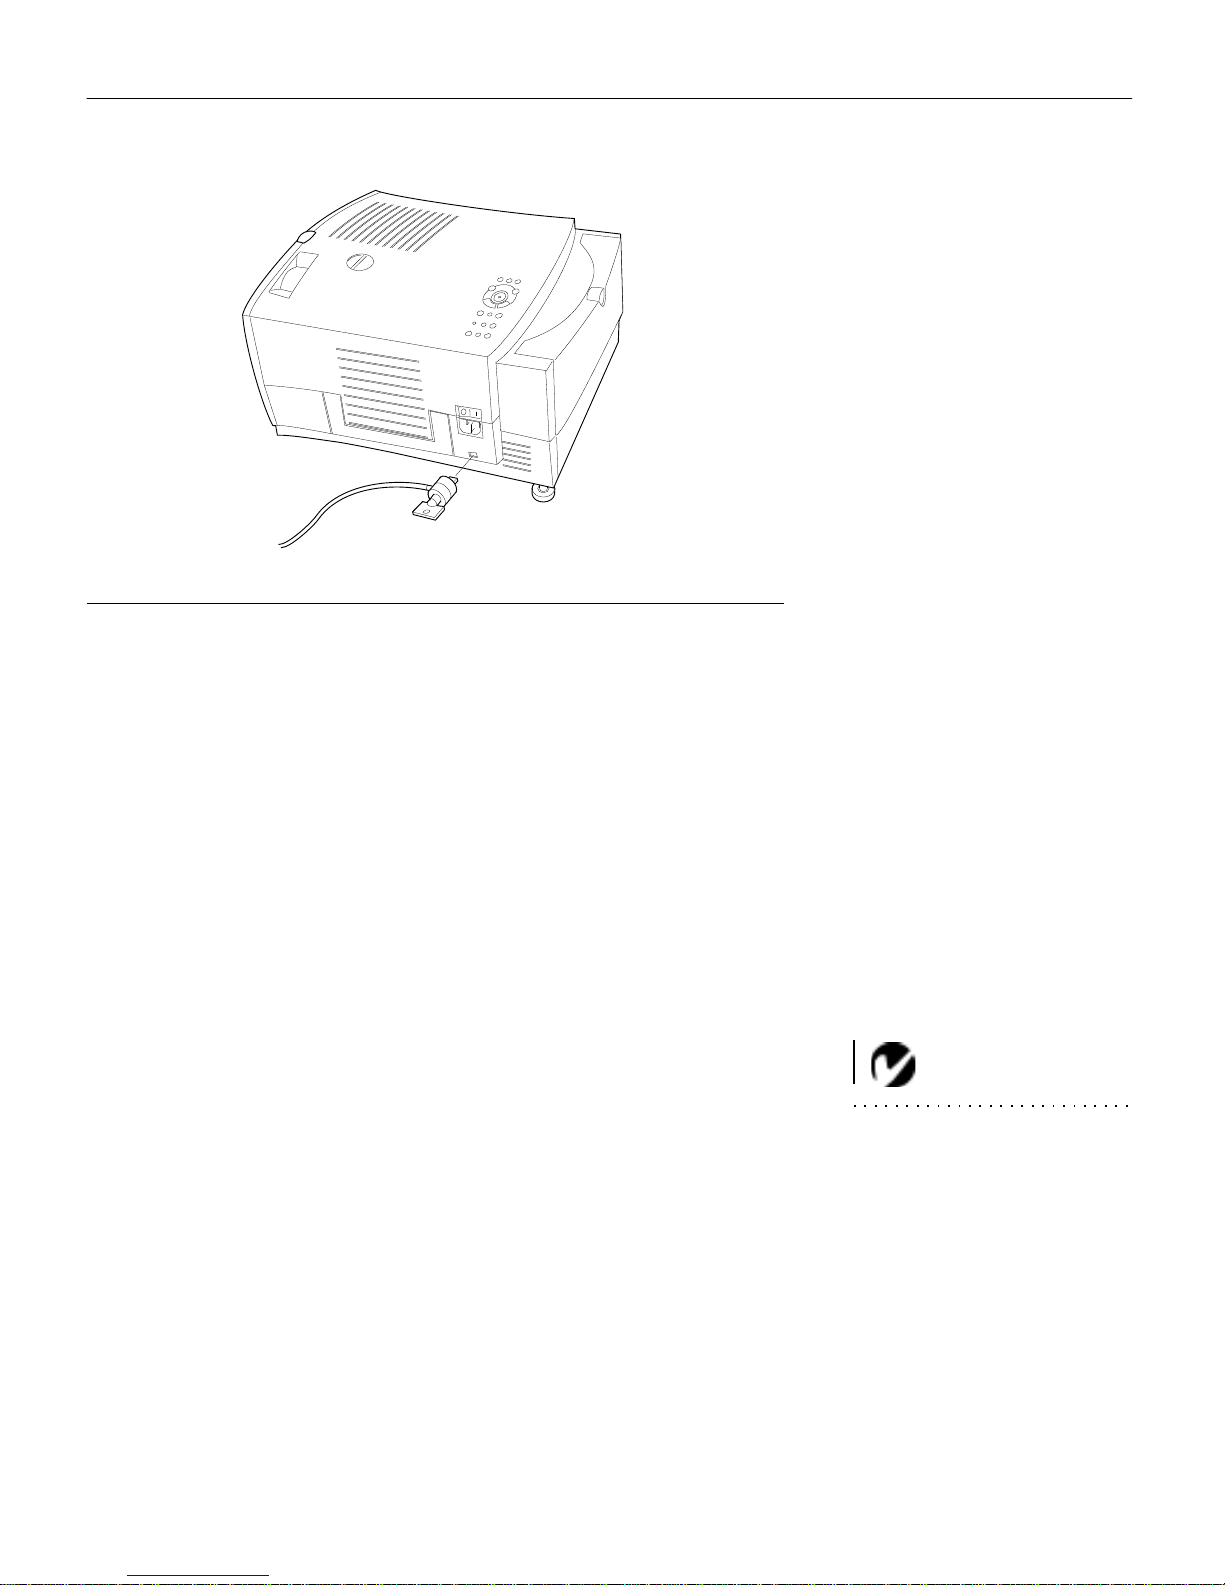
FIGURE 39
Installing the Kensington lock
Troubleshooting
If you’re experiencing trouble with the projector, follow these
steps to make sure everything is properly connected before you
call Customer Service for assi stance.
1 C heck cable c onnections. Verify that all computer, CableWiz-
ard and power cables are properly connected.
2 Verify that all power is switched on.
3 Verify that the projector has not been switched off with the
standby button on the r emo te or keypad .
4 If the projector still doesn’t display an image, restart the com-
puter.
5 If the problem still exists, unplug the projector from the com-
puter and check the computer monitor’s display. The maximum resolution the 610 can display is 800x600 pixels,
preferably 640x480; the maximum resolution the 620 can display is 1024x768 pixels, preferably 800x600. The problem
might be with the gr aphics controller in your computer rather
than with the projector. When you reconnect the projector,
remember to turn the computer and monitor off before you
power up the projector. Power the equipment back up in t his
order: projector, monitor, computer.
NOTE: Macintosh computers
require a specific power-up
sequence: the projector must be
turned on before you turn on the
computer.
45
Page 50

Maintenance & Troubleshooting
6If you’re using a laptop computer and its monitor is not dis-
playing your presentation, make sure you have re-activated
the computer’s monitor. Most laptop computers de-activate
their own monitor when a second display device, such as a
projector, is connected. Refer to page 55 for more information.
7 If the problem still exists, read through the problems and
solutions in this chapter.
If you call Customer Service for assistance:
• Find out w hat kind of graphics controller card is installed in
your computer. The projector is connected to this circuit board
in the computer. Most PCs use a VGA or SVGA graphics controller.
Solutions to Common Problems
Problem: Nothing on projection screen
Make sure that the power cord is properly connected to a func-
•
tional AC electrical outlet. Make sure that the power cord is
properly connected to the projector.
• If the projector is plugged into a power strip, make sure the
power strip is turned on.
• Make sure the projector is swit che d on.
• Make sure the projector’s lamp is securely connected. See
“Replacing the Projection Lamp” on page 41.
• Make sure that the CableWizard and the cables do not have
any bent pins. Check the power cord for bent pins also.
• Make sure the projector is adjusted properly. See “Basic Image
Adjustment” on page 25.
Problem: Color or VGA text not being projected
You might need to adjust the brightness up or down until the
•
text is visible. Refer to “Brightness ” on page 29 for more information.
46
• Verify that the appropriate input source is selec ted. See “Com-
puter” on page 29 or “Video” on page 31.
Page 51

Problem: The screen resolution is not right
Make s u re the computer ’s graphics card is set for a resolution
•
of no greater than 800x600 for the 610, 1024x768 for the 620.
Problem: Image isn’t centered on the screen
Reposition the image. Refer to “Horiz. Position” on page 38
•
and “Vert. Position” on page 38.
• If you’re using an extension cable between the CableWizard
and the projector, make sure it’s In Focus-approved.
Problem: Only the start-up screen displays
Verif y that the cables are connec ted corre ctly. Check to se e that
•
the CableWizard cable is correctly connected to th e monitor
connector on the computer (this is the connector where your
monitor cable usually goes.) See page 6 through page15 for
connection procedures.
• Verify that the proper input source is connected. See “Com-
puter” on page 29 or “Video” on page 31.
• You might need to turn everything off a nd power up the
equipment again. Make sure you power up in this order: projector, monitor, computer. It is especially important t hat you
follow this sequence for Macintosh computers.
• Make sure your computer’s graphics board is installed and
configured correctly.
If you’re using Windows 3.x:
1 In the Windows Program Manager, double-click the Win-
dows Setup icon in the Main program group.
2 Verify that the Display setting is 800x600 or less, prefera-
bly 640x480.
If you’re using Windows 95:
1 Open “My Computer” icon, the Control Panel folder and
th en the Display icon.
2 Click the Settings tab.
47
Page 52

Maintenance & Troubleshooting
3Verify that the Desktop area is set to 800x600 or less, pref-
erably 640x480.
Also check the following:
• Does your computer have a compatible graphics board? The
projectors aren’t CGA or EGA compatible.
• Is your comput er’s graphic s board turn ed on? Thi s is e specially
true for laptop computers. See “Portable and Laptop Activ ation Chart” on page 55.
Problem: Image is too wide or narrow for screen
You might n eed to manually adjust the tracking to reduce or
•
enlarge the projec ted image. Refer to “Manual Tracking” on
page 38.
• Adjust the resolution of your monitor if it’s greater than
800x600 for the 610 or 1024x768 for the 620. Only these resolutions at 60 Hz or less display on the projector.
• Make sure that your computer has a compatible graphics
board. The projector is not compatible with CGA, EGA, or
1280x1024 graphics modes.
Problem: Image i s out of focus
Turn the projection lens to focus the image.
•
• Make s ure the projection screen is at least 5 feet from the pro-
jector.
• Check the projection lens to see if it needs cleaning.
Problem: Image and menus are reversed left to right
The rear projection mode is probably set. Switch back to for-
•
ward projection from the Controls menu. The image should
immediately return to forward projection. See “Rear Projection” on page 40.
Problem: Image and menus are upside down
Ceiling mode is probably set. Turn off the mode from the Con-
•
trols menu. T he image should immediately return to forward
proje c tion. Se e “Ceiling” on page 39.
48
Page 53

Problem: the projector displays vertical lines, “bleeding” or spots
Adjust the brightn ess. See “Brightness” on page 29.
•
• Check the projection lens to see if it needs cleaning.
Problem: Image is “noisy” or streaked
1 Deactivate your compute r’s screen saver.
2 Turn Auto Image off and then back on. See “Auto Image” on
page 37.
3 Adjust the synchronization manually to find an optimal set-
ting. See “Manual Sync” on page 37.
4 Adjust the tracking manually to find an optimal setting. See
“Manual Tracking” on page 38.
• If you’re using an extension cable between the CableWizard
and the projector, make sure it’s In Focus-approved.
• Conne c t anoth er computer with a di fferent video card to find
out if the problem is with the computer rather than with the
projector.
Problem: Projected colors don’t match the computer or video
player’s colors
•
Adjus t the brightn ess, tint and/or co ntrast from the Display
menu. Just as there are differences in the displays of different
monitors, there are often differences between the computer
image and the projected image. See “Brightness” on page 29,
“Tint” on page34 and “Contrast” on page 34.
Problem: Lamp seems to be getting dimmer
The lamp begin s to lose brigh tness when it has been in use for a
•
long time. Replace the lamp as described in “Replacing the Projection Lamp” on page 41.
Problem: Lamp shuts off
A minor power surge may cause the lamp to shut off. Turn the
•
proj ector off, wait at least th ree minutes, then turn it back on to
return to normal operations.
49
Page 54

Maintenance & Troubleshooting
Problem: Remote not operating correctly
You might n eed to replace the batteries. See page 44.
•
• Make sure you’re pointing the remo te ei ther at the back or
front of t he projector, or at the projection screen.
• Make s ure the remote is within i ts operating range of 40 feet.
50
Page 55

APPENDIX
Specifications
The LitePro 610 and 620 must be operated and stored within th e
temperature and humidity ranges specified.
Temperature
Operating
Non-operating
Humidity
Operating and non-oper. 10% to 95% relative humidity, non-condensing
Dimensions
8.3 x 13 x 15.6 inches (21.3 x 33.3 x 40 cm)
Weight
24 lbs. (10.8 kg) unpacked
10 C to 40° C
-20 to 60
° C
Altitude
Operating 0 to 10,000 feet (3048 meters)
Non-operating 20,000 feet (6096 meters)
Left and Right Audio Outputs
Frequency Response 10 Hz - 20 KHz
Output Impedance 1.2 K ohm nominal
Output Voltage 2 Vrms maximum (open circuit)
Connector Type red and white RCA jacks
Subwoofer Outputs
Frequency Response 10 Hz - 10 KHz
Output Impedance 200 ohms nominal
Output Voltage 2 Vrms maximum (open circuit)
Connector Type black RCA jack
Optics
Focus Range 5 feet to infinity
51
Page 56

Appendix
Microphone Input
Input Impedance 3.5 K ohm nominal
Maximum Input Voltage 60 mVrms for THD ≤ 0.3%, main inputs off
Sensitivity 800 Vrms at 1 KHz for 88 dB SPL at 1 meter
Microphone Impedance < 8K ohms
Connector Type 6.3 mm (1/4 inch) monaural phone jack
(unbalanced)
Lamp
Type 270-watt metal halide
Remote Control
Battery Two (2) AA alkaline cells
Input Power Requirements
100 to 240VAC, 8.0A to 4.0 A, 50 to 60 Hz.
Video Module Input
Input Impedance 5K ohm DC coupled
Maximum Input Voltage (L
+ RIN)
IN
or RIN < 2.0 Vrms for THD ≤ 0.3%
L
IN
< 4.5 V for THD ≤ 0.3%
PEAK
Sensitivity 100 mV at 1 KHz for 88 dB SPL at 1 meter
Connector Type RCA jack
CableWizard Audio Input
Input Impedance 10K ohm nominal, AC coupled
Maximum Input Voltage (L
+ RIN)
IN
L
or RIN < 2.0 Vrms for THD ≤ 0.3%
IN
< 4.5 V for THD ≤ 0.3%
PEAK
Sensitivity 100 mV at 1 KHz for 88 dB SPL at 1 meter
Connector Type 3.5 mm (1/8 inch) stereo phone jack
52
Page 57

Accessories
Standard Acc essories (ship with the
projector) Pa r t Num ber
LitePr o 610/620 Qu ick Start card 009-0279-xx
LitePr o 610/620 User’s Guide 010-0115-xx
Shipping Box 110-0143-xx
CableWizard and Cables 591-0182-xx
CableWizard Audio Cable 210-0079-xx
CableWizard Computer Cable 210-0076-xx
CableWizard Mouse Cable 210-0078-xx
Projection Lamp Module 232-0086-xx
Audio/Video Cable 210-0062-xx
Remote Control with Cable and 2 Batteries 590-0198-xx
Remote Cable (50 ft) 210-0088-xx
Power Cords (one ships with projector,
type depends on country)
North American Power Cord 210-0023-xx
Australian Power Cord 210-0027-xx
UK Power Cord 210-0028-xx
European Power Cord 210-0029-xx
Danish Power Cord 210-0030-xx
Swiss Power Cord 210-0031-xx
Optional Accessories
Soft Carry Case CA-C78
ATA Shipping Case CA-C121
CableWizard Lite 210-0075-xx
Mac Adapter for CableWizard Lite 515-0037-xx
CableWizard Extension Cable, 50 ft 210-0077-xx
Kensington Lock 591-0202-xx
53
Page 58

Appendix
JBL Satellite Speakers 591-0203-xx
JBL Subwoofer 591-0204-xx
S-Video Cable 515-0027-xx
Microphone 591-0201-xx
LitePro Ceiling Mount Kit SP-CEIL-LP6.
1 Year Extended Warranty for:
LitePro 610
LitePro 620
EW-LP610
EW-LP620
2 Year Extended Warranty for:
LitePro 610
LitePro 620
EW-LP610-2
EW-LP620-2
54
Page 59

Porta bl e and Laptop Ac ti vat ion Chart
Computer
Key command to
activate port
Key command to
de-activate port
Acer Ctrl-Alt-Esc (for setup) Ctrl-Alt-Esc (for setup)
AST* ** FN-D or Ctrl-D FN-D or Ctrl-D
Ctr l-FN-D Ctr l-FN-D
FN-F5 FN-F5
type from A:/IVGA/CRT type from A:/IVGA/CRT
FN-F12 FN-F12
Advanced Logic
Ctrl-Alt-V Ctrl-Alt-V
Research
Altima Shift-Ctrl-Alt-C Shift-Ctrl-Alt-L
setup VGA/
Conf.Simulscan
setup VGA/
Conf.Simulscan
Ambra** FN-F12 FN-F12
FN-F5 FN-F5
F2/Choose Option/F5 F2/Choose Option/F5
Amrel* ** setup menu setup menu
NOTE: Most laptop computers
de-activate their built-in monitors
when a second display device is
connected. The following chart lists
the commands that re-activate the
laptop’s monitor. If your computer
is not listed, refer to the computer’ s documentation.
Shift-Ctrl-D Shift-Ctrl-D
Apple see Mac Portable and Mac PowerBook
Aspen automatic automatic
BCC* automatic reboot computer
Bondwell LCD or CRT options
after bootup
reboot for LCD or CRT
options to appear
Chaplet** setup screen setup screen
FN-F6 FN-F6
FN-F4 FN-F4
Commax Ctrl-Alt-#6 Ctrl-Alt-#5
55
Page 60

Appendix
Computer
Key command to
activate port
Key command to
de-activate port
Compaq* ** Ctrl-Alt-< Ctr l-Alt->
FN-F4 FN-F4
automatic automatic
mode/? (for setup option) mode/? (for setup option)
Compuadd* ** automatic automatic
Alt-F for screen setup
option
Alt-F for screen setup
option
Data General Ctrl-Alt-Command Ctrl-Alt-Command
Data General
2 CRT/X at DOS prompt reboot
Walkabout
Datavue Ctrl-S hift-M Ctrl-Shift-M
Dell** Ctrl-Alt-< Ctrl-Alt->
Ctrl-Alt-F10 Ctrl-Alt-F10
FN-F8 (CRT/LCD) FN-F8
FN-D FN-D
FN-F12 FN-F12
Digital* automatic reboot
FN-F2 FN-F2
Dolch dip switch to CRT dip switch to LCD
Epson dip switch to CRT dip switch to LCD
Everex* setup screen option setup screen option
For-A Ctrl-Alt-Shift-C Ctrl-Shift-Alt-L
Gatewa y FN-F1/FN-F1 again simul-
FN-F1
taneous
Grid* ** FN-F2, choose auto or
FN-F2
simultaneous
Ctrl-Alt-Tab Ctrl-Alt-Tab
Hyundai setup screen option setup screen option
IBM 970* automatic warm reboot
56
Page 61

Computer
Key command to
activate port
Key command to
de-activate port
IBM ThinkPad** reboot, enter setup menu FN-F2
FN-F7, select choice
from setup menu
FN-F1, select choice
FN-F5, select choice
PS/2 SC select choice
(CRT, LCD, etc.)
Kaypro boot up, monitor plugged inunplug monitor
Kris Tech FN-F8 FN-F8
Mac Portable
no video port: not compatible
100
Mac PowerBook
140, 145, 150,
no video port: requires a 3rd-party interface
170
160, 165, 180,
520, 540, 5300
Control Panel folder,
PowerBook Display
warm reboot
folder; Activate Video
Mirroring
210, 230, 250,
requires Apple Docking Station or Mini Dock
270, 280, 2300
Magitronic FN-F4 FN-F4
Mastersport FN-F2 FN-F1
Micro Express* automatic warm reboot
Microslate* automatic warm reboot
Mitsubishi SW2 On-Off-Off -Off SW2 Off-On-On-On
NCR setup screen option setup screen option
NEC* ** setup screen option setup screen option
CRT at the DOS prompt LCD at the DOS prompt
FN-F31 FN-F3
Olivetti* automatic automatic
FN-O/* FN-O/*
FN- | | FN- | |
57
Page 62

Appendix
Computer
Key command to
activate port
Key command to
de-activate port
Packard Bell** FN-F2 FN-F2
Ctrl-Alt-< Ctrl-Alt->
Panasonic FN-F2 FN-F2
Samsung* setup screen option setup screen option
Sanyo setup screen option setup screen option
Sharp dip switch to CRT dip switch to L C D
Sun SPARC-
Ctrl-Shift-M Ctrl-S hift-M
Dataview
Tandy** Ctrl-Alt-Insert Ctrl-Alt-Insert
setup screen option s etup screen option
Texas Instru-
setup screen option s etup screen option
ments*
Top-Link* ** setup screen option setup screen option
FN-F6 FN-F6
Toshiba* ** Ctrl-Alt-End Ctrl-Alt-Home
FN-End FN-Home
FN-F5 FN-F5
setup screen option s etup screen option
Twinhead* FN-F7 FN-F7
FN-F5 FN-F5
Automatic Automatic
WinBook Ctrl-Alt-F10 Ctrl-Alt-F10
Wyse software driven software driven
Zenith** FN-F10 FN-F10
FN-F2 FN-F2
FN-F1 FN-F1
* These manufacturers have models that automatically send video
to the external CRT port when some type of display device is
attached.
** These manufacturers offer more than one key command depend-
ing on the computer model.
58
Page 63

Using Video Mirroring with a PowerBook Computer
When you turn video mirroring on, the projector displays the
same information that appears on your PowerBook’s built-in
screen. When video mirroring is off, the projector acts like a separate display.
To turn on video mirroring for the first time:
1 Open th e Monitors control panel, then click Monitor 2.
2 Set the number of colors you want.
3 Open the Control Strip, the n click th e monitor icon.
4 Select “Turn Video Mirroring On.”
Now you can turn video mirroring on and off from the Control
Strip without having to ope n the Monitors control panel again.
When using video mirroring and high color graphics such as
slide shows, the projected image occasionally might turn black
and white. If t his happens, perform the following steps:
1 Turn off video mirroring.
2 Open the Monitors control panel.
3 Move the w hite menu bar to Monitor 2 to set the projector as
the primary monitor.
4 Restart the PowerBook.
59
Page 64
Appendix
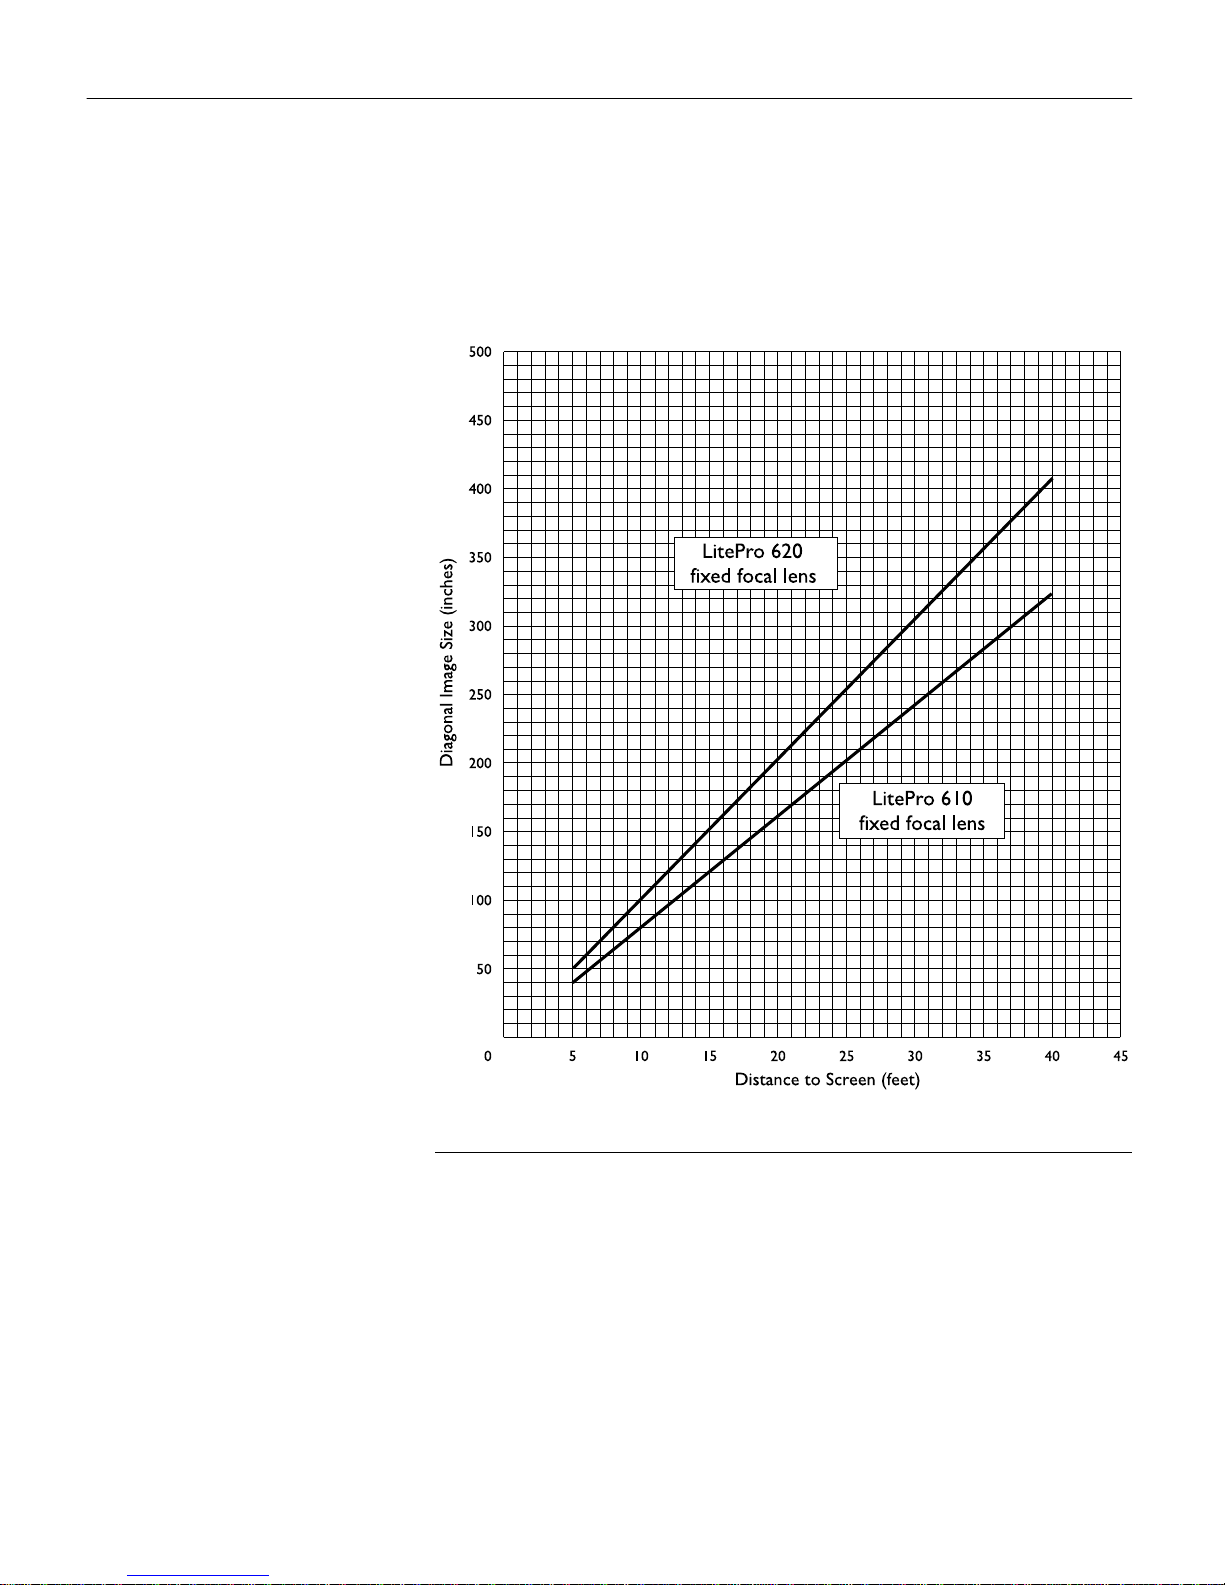
Projected Image Size
Use the chart and the table to help you determine projected
image sizes.
60
FIGURE 40
Projected image size
Page 65

Table 1:
Image Size, Width and Height for LitePro 610
Distance to
Screen (feet)
Diag onal
(inches)
Width
(inches)
Height
(inches)
5 40.8 32.6 24.5
10 81.6 65.3 49.0
15 122.4 97.9 73.4
20 163.2 130.6 97.9
25 204.0 163.2 122.4
30 244.8 195.8 146.9
35 285.6 228.5 171.4
40 326.4 261.1 195.8
Table 2:
Image Size, Width and Height for LitePro 620
Distance to
Screen (feet)
Diag onal
(inches)
Width
(inches)
Height
(inches)
5 51.0 40.8 30.6
10 102.0 81.6 61.2
15 153.0 122.4 91.8
20 204.0 163.2 122.4
25 255.3 204.0 153.0
30 306.0 244.8 183.6
35 357.0 285.6 214.2
40 408.0 326.4 244.8
61
Page 66

INDEX
A
accessories, ordering 53
activation commands for laptop
computers 55
adjusting
balance 35
bass 36
brightness 29
contrast 34
fade 36
height of projector 26
microphone volume 35
tint 34
treble 36
volume 31, 35
altitude limits 51
annotating 30
assistance. See Customer Service
Audio menu 35
Audio menu options
Balance 35
Bass 36
Fade 36
Mic volume 35
Surround mode 36
Treble 36
Volume 35
B
balance, adjusting 35
bass, adjusting 36
Brightness buttons 29
brightness, adjusting 29, 34
bulb. See lamp
But tons on remote and keypad
Brightness 29
Computer 29
Freeze 30
Help 30
Light 30
Liteshow 30
Menu 30
Mute 30
Scribble 30, 31
Standby 31
Video 31
Volume 30
C
cabl es
A/V 17
CableWizard 3, 9–16, 53
CableWizard extension 53
compos ite video 17
ordering 53
power iv, 53
remote control 20
S-video 17
CableWizard
cables 3, 9–16
connecting equipment to 8
connecting to the projector 6
extension cable 53
selecting connectors 7
CableWizard Lite, ordering 53
cases, ordering 53
ceiling-mounted projection 39
CGA graphics 2
cleaning the projection lens 41
color mode, changing 28
colors
changing between color and
monochrome 28
don’t match monitor colors 49
not displayed 46
compatibility
IBM-compatible 1
Macintosh 1
63
Page 67

Index
compo s ite video cable
connecting 17
ordering (A/V cable) 53
Computer button 29
computers, compatible 1
connecting
Appl e PowerBook 15
external speakers 19
IBM-compatible desktop 9
IBM-compatible laptop 11
Macintosh desktop 13
microphone 19
power cord 21
PS/ 2-compatible mouse 20
remote control cable 20
subwoofer 19
video player 17
connector panel
audio out 19
LEDs 21
microphone 19
P S/2 mouse 20
remote cable 20
subwoofer 19
video connectors 17
contrast, adjusting 34
Controls menu 39
Controls menu options
Ceiling 39
Language 39
Monitor Connect 40
Rear Projection 40
Video Standard 39
cords . See cables
Customer Service
in Europe 4
in Singapore 4
in USA 4
information to have on hand
before you call 46
things to try before you call 45
D
Display menu 34
Display menu options
Brightness 34
Contrast 34
Reset All 34
Tint 34
displaying
online help information 30
on-screen menus 30
E
EGA graphics 2
elevator feet 26
extension cable 5
external speakers, connecting 19
F
fade, adjusting 36
Freeze button 30
freezing the display 30
fuzzy lines 38
H
Help button 30
hot surfaces v
I
IBM-compatible computers
compatibility 9
connecting 9
icons
on CableWizard 9–16
on projector 17–21
on pr ojector labels iii
image
adjusting 25
centering 25
colors don’t match computer’s 49
focusing 26
fuzzy lines 25, 38
has lines or spots 49
monochrome 28
64
Page 68

not centered 47
not displayed 46
not level 26
out of focus 48
quality 45–50
resolution 1
reversed 48
size 5
streaked 49
too dark or too light 29
too high 26
too low 27
too wide or too narrow 25, 48
Image menu 37
Image menu options
Auto Image 37
Auto Resize 37
Horiz. Position 38
Manual Sync 37
Manual Tracking 38
Vert. Position 38
indicator LEDs 22
K
Kensington Lock 44, 53
keypad, description of buttons 29
L
labels on projector iii
lamp
explosion hazard iii
ordering 53
overheating v
replacing 41
safety iv
turns off unexpectedly 49
language, selecting for menus 39
laptop computers
activation sequence to allow
secondary display 55
compatibility 11
connecting 11
LEDs, indicator 22
lens, cleaning 41
leveling the proj ector 26
Light button 30
LitePro 610/620
cases 53
hot surfaces v
not working 45
project from behind the screen 40
sett ing up 5
specifications 51
turning on and off iv, 21, 23
ventilation and overheating v
voiding the warranty v
Liteshow button 30
M
Macintosh computers
compatibility 13
connecting desktop models 13
connecting PowerBooks 15
Menu button 30, 32
menus. See on-screen menus
microphone
adjusting volume 35
connecting 19
ordering 54
Monitor Connect option 40
monitor, projected colors don’t
match 49
mouse, connecting to Lit ePro 20
Mute button 30
N
NTSC video 39
65
Page 69

Index
O
on-screen menus
Audio menu 35
changing language of 39
Controls menu 39
Display menu 34
displaying 32
Image menu 37
making changes to menu
functions 33
removing from the screen 33
P
PAL video 34, 39
power cord
connecting 21
grounding iv
ordering 53
safety iv
power source, safety iv
power switch 21
power up sequen ce 22, 47
PowerBook, connecting 15
projection lamp, replacing 41
R
rear projection 40
remote control
description of buttons 29
illuminating buttons 30
not working 49
ordering 53
replacing the batteries 44
specifications 52
using 25
repair. See Customer Service
replacing projection lamp module 41
re-positioning the image on the
screen 26, 38
resett ing adjust ments on Display
menu 34
S
safety guidelines iii–v
Scribble button 30, 31
SECAM vi deo 34, 39
security feature 44
service. See Customer Service
speakers
external 30, 54
internal 30
muting 30
subwoofer 54
specifications 51
Standby button 31
start-up screen 47
surround mode, se lecting 36
S-video
connecting 17
ordering cable 54
sync, adjusting 25
synchronization 38
T
Technical Support
voiding the warranty v
Technical Support. See Customer
Service
temperature limits 51
text not visible 46
tint, adjusting 34
treble, adjusting 36
troubleshooting 45
turning off
LitePro iv, 23
sound 30
turning on the LitePro iv, 21
U
using
disk mouse 33
keypad buttons 29
on-screen menus 32
remote control 25
66
Page 70

V
vertical lines displayed 38, 49
Video button 31
video mirroring on a
PowerBook 15, 59
video standards, selecting 39
volume
adjusting 31
adjusting microphone 35
muting 30
Volume buttons 30, 31
W
warranty v
World Wide Web address 4
67
 Loading...