


InFocus LP610, LP620, LitePro 610, LitePro 620 User Manual

TABLE OF CONTENTS
Safety Summary iii
Introduction 1
Image Resolution 1
Compatibility 2
Unpacking the Projector 2
Usage Guidelines 4
If You Need Assistance 4
Warranty 4
Setti ng up the Projector 5
Connecting the CableWizard to the Projector 6
Selecting Connectors on the CableWizard 7
Preparing to Connect Your Equipment to the Projector 8
Connecting an IBM-Compatible Desktop Computer 9
Connecting an IBM-Compatible Laptop Computer 11
Connecting a Macintosh Desktop Computer 13
Connecting an Apple PowerBook Computer 15
Connecting a Video Player 17
Connecting an External Speaker and a Subwoofer 19
Connecting a Microphone 19
Connecting a PS/2-Compatible Mouse 20
Connecting the Remote Control Cabl e 20
Powering up the Projector and Adjusting the Image 21
Turning Off the Projector 23
Using the Projector 25
Basic Image Adjustment 25
Using the Remote Control 25
Adjusting the Projector 26
Changing between Color and Monochrome Modes 28
Using the Re m ote and Keypad Buttons 29
Using the Disk Mouse 32
Using the On-Screen Menus 32
Display Menu Functions 34
Audio Menu Functions 35
Image Menu Functions 37
Controls Menu Functions 39
i

Table of Contents
Maintenance & T r oubleshooting 41
Cleaning th e Lens 41
Replacing the Proje ction Lamp 41
Resetting the Lamp Monitor Light 44
Replacing the Batteries in the Remote Control 44
Using the Kensington Lock 44
Troubleshooting 45
Solutions to Common Problems 46
Appendix 51
Specifications 51
Accessories 53
Portable and Laptop Activation Chart 55
Using Video Mirroring with a PowerBook Computer 59
Proje cted Image Size 60
Index 63
ii

SA FE TY S UM MAR Y
Ple ase read these instruct ion s caref ully be fore usin g your LitePro
610 or 620. Failure to comply with them could result in fire, electrical shock, personal injury or damage to equipment.
These graphics are used throughout this manual to draw your
attention to importan t information about the projec tors.
NOTE: Additional useful details or tips.
CAUTION: Steps to avoid damage to your equipment.
WARNING: Steps to avoid personal injury.
These graphics are used on LitePro labels.
Attention: Refer to this User’s Guide for important
safety information.
Hot Surfaces: Avoid touc hing ho t surf aces. Do not touch
until the LitePro has cooled.
Lamp Explosi o n Hazard: If you continue to use th e
lamp after the lamp monitor light comes on, it may
explode, severely damaging your LitePro. Be sure to
replace the lamp when t he lamp monitor light comes on
as described in this User’s Guide. Refer to the section
titled “Replacing the Projection Lamp” for information
about changing the bulb.
iii

Safety Summary
Do not look into the lens!
Be extr emely careful not to look i nto th e pr oject ion len s when the
LitePro is turned on. T he bright light may harm your eyes. Be
especially careful to keep children from looking into the l ens.
Turning projector on and off
Allow the projector to warm up for three m inutes before turning
it off; allow the projector to cool d o wn for three minutes before
turning it back on. Repeatedly turning the projector on and off
without waiting three minutes may cause the lamp to ex plode.
Power source
Use only a th ree-wire groundin g type power source. The nominal
power source should not exceed 240 volts rms between the supply conductors or between either conductor and the ground.
CAUTION: Be sure to replace
the projection bulb when the lamp
monitor light comes on as
described on page 41. If the lamp
rem ains in use too long, there is a
Power cord
Use only the power cord that was shipped with the LitePro.
Although other pow er cords might be similar in appearan ce, they
hav e not been safety-tested with the 610 or 620. Do not use a
power cord if it has become damaged or frayed. Contact your In
Focus dealer or call In Focus if you need to replace your power
cord.
Grounding
The projector is grounded through the grounding conductor on
the power cord. To avoid el ectric shock, plug the po wer cord into
a properly wired recept acle. Do not defeat the purpose of the
grounding-type plug.
Lamp
To avoid overheating and unacceptable image quality, replace
the projection lamp with a lamp of the specified type. Refer to
page 52 for lamp specific ations and to page 41 for instruct ion s o n
replacing the lamp.
danger of bulb explosion. If this
happens, your LitePro will be
severely damaged.
iv

Lamp compartment
To avoid burns or an explosion hazard, do not open the lamp
module door until the projector is turned off and the lamp has
cooled. The hot lamp contains high pressure and can explode if
damaged or old. Follow the instructions in this manual for lamp
replacement carefully.
Hot su rfaces
Allow the projector to cool at leas t 45 minutes before replacing a
lamp. When you open the lamp housing, be very careful not to
touch the hot surfaces inside.
Ventilation and overheating
Openings in t he projec tor cas e provide ventilation to prote c t it
from o verhe atin g. K eep loo se paper s and other object s well away
from th e bott om, top an d side grills. Do not place the proje ctor on
top of or close to a computer or other heat-producing equipment.
Liquid spills
Do not set drink s on top of the projector. Spill ed liquids can flow
inside and cause damage.
Do not disassemble
All service must be perf ormed by an In Fo cu s Authorize d Service
Provider. T he only user-serviceable part in the projector is the
projection lamp, which you can replace by opening the lamp
cove r in t he front of the project or as descri bed on page 41. Do not
ope n any other part of the projector. If your LitePro needs repair,
call In Focus Customer Service as described on page4. Before
you call Customer Service, you may want to refer to “Troubleshooting” starting on page 45 to see if you can resolve the problem yourself.
NOTE: If you open the projector,
you will void the warranty.
v

INTRODUCTION
The In Focus Systems LitePro® 610 and 620 multimedia projectors combine powerful and sophisticated features with easy-touse, intuitive controls. Built-in multimedia features include highfidelity stere o audio by JBL™, a palette of 16.7 million colors and
Digital Light Processing™ (DLP) technology. The 600 series projectors are ideal for high-performance business, train ing and
imaging applications that demand exceptional color quality. The
610 has VGA graphics, the 620 has SVGA graphics. The user
interfaces of the two products are identical; information in this
User’s Guide applies to both products.
Image Resolution
LitePro 610
The VGA resolution of the projected image of the 610 is 640x480.
The projector displays computer images that are 640x480 or
lower just as they appear on your computer’s monitor. Screen
resolutions between 640x480 and 800x600 are compressed to
640x480. The projector cannot compres s screen resolutions above
800x600. If your computer’s screen resolution is higher than
800x600, reset it to a lower resolution before you connect the projector.
LitePro 620
The SV GA resoluti on of the project ed image of t he 620 is 800x600.
The projector displays computer images that are 800x600 or
lower just as they appear on your computer’s monitor. Screen
resolutions between 800x600 and 1024x768 are compressed to
800x600. The projector cannot compres s screen resolutions above
1024x768. If your computer’s screen resolution is higher than
1024x768, reset it to a lower resolution before you connect the
projector.
NOTE: The 620 automatically
expands 640x480 images to
800x600. You can display these
images at 640x480 by turning off
the Auto Resize feature. See “A uto
Resize” on page 37 for more
information.
1

Introduction
Compatibility
The pro jector i s compatible with a wide variety of comput ers and
video devices, including:
• IBM-compatible computers, including laptops, up to 800x600
resolution (LitePro 610) or 1024x768 resolution (LitePro 620) at
60Hz.
• IBM PS/2 in VGA and MCGA modes.
• Apple Macintosh and PowerBook computers up to 800x600
resolution (LitePro 610) or 1024x768 resolution (LitePro 620).
• Various VCRs, camcorders and laser disc players.
The projector is not compatible with these systems:
• IBM-compatible computers in CGA or EGA graphics mode.
NOTE: The contents of your
shipping box may vary depending
on the LitePro 610/620
configuration you ordered.
• Macintosh 128, 512, Plus, SE, SE/30 or Classic.
Unpacking the Projector
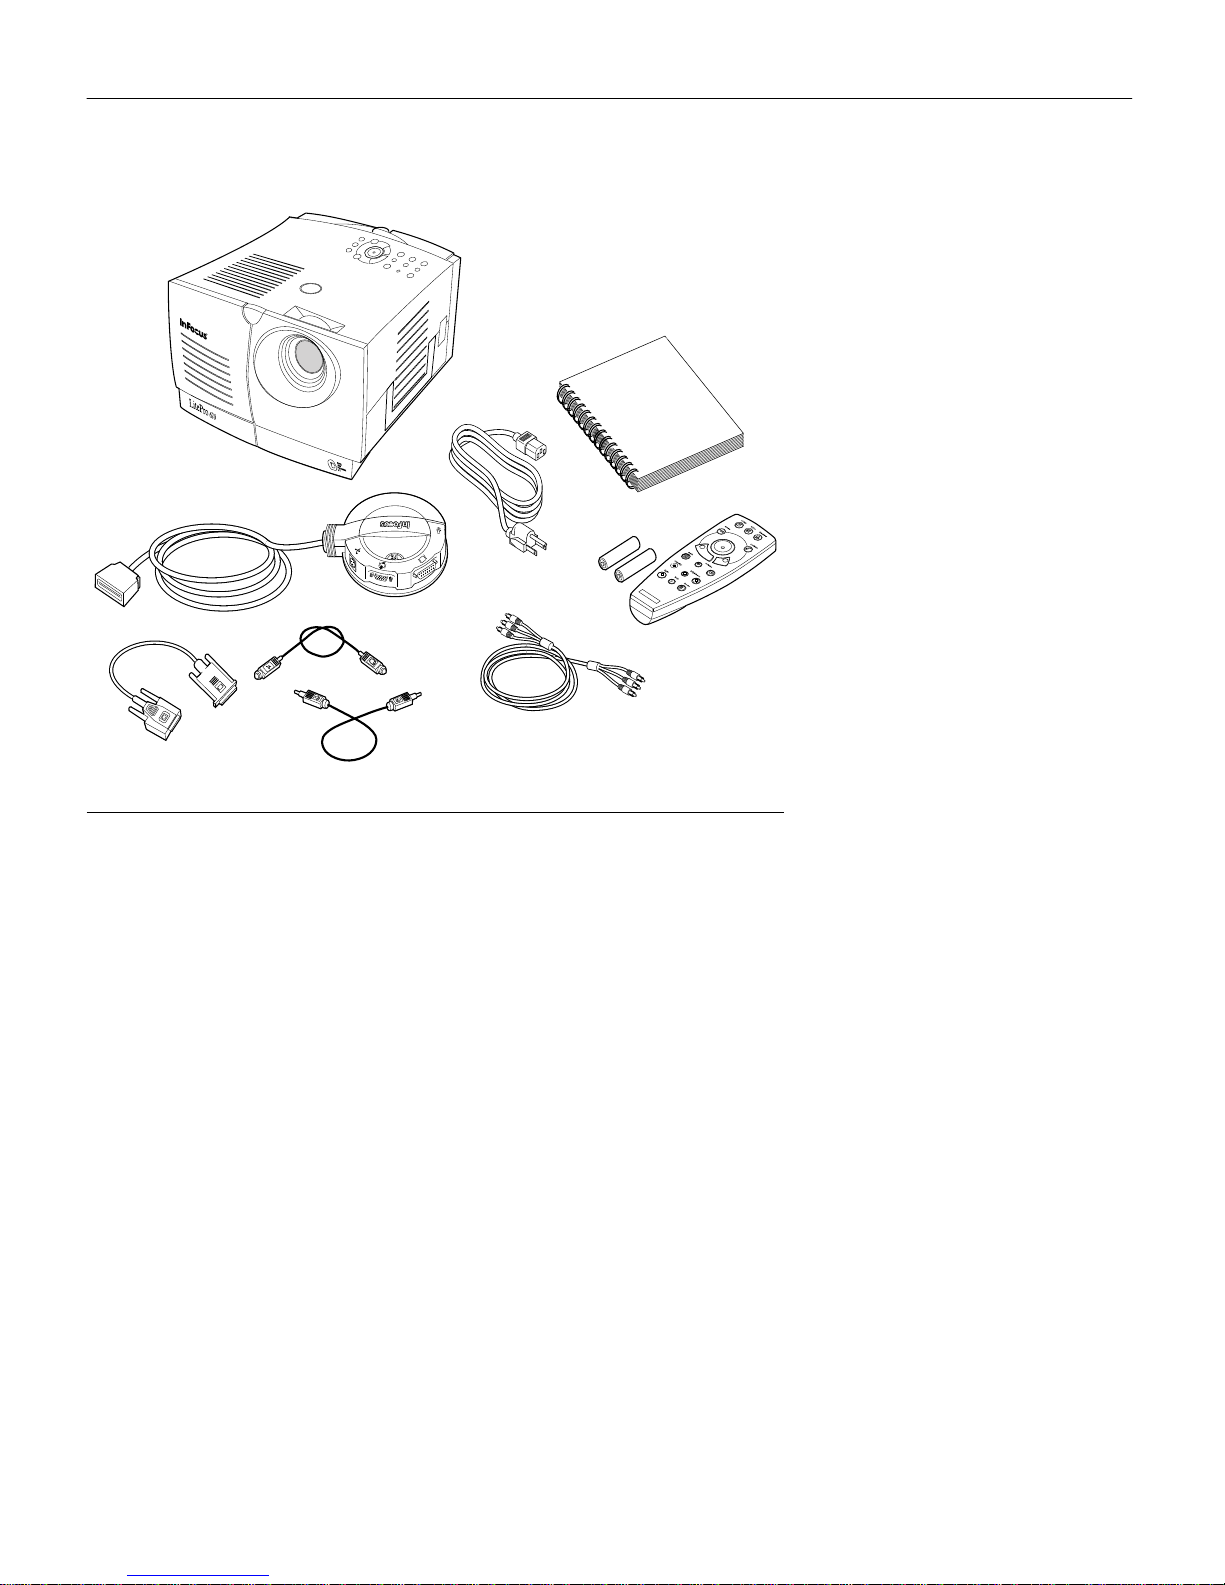
The projector comes with the parts shown in Figure 1. Check to
make sure all are included. If any parts are missing, contact your
In Focus dealer immediately.
If you are experien ced in setting up presentat ion system s, use the
LitePro 610/620 Quick Start card that was included in the shipping
box. For complete details on c onnectin g and operating th e projector, refer to the appropriate sections of this User’s Guide.
2
2
1
3
6
8
5
4
7
9
FIGURE 1
Shipping box contents
1. LitePro 610 or 620 projector 6. CableWi zard
2. LitePr o 610/620 User’s Guide 7. CableWizard computer cable
3. power cord 8. CableWizard mouse cable
4. remote and batteries 9. CableWizard audio cable
5. RCA audio/video (A/V) cable Not shown: Quick Start card,
remote cable
3

Introduction
Usage Guidelines
• Do not look directly into the project ion le ns when the proj ector
is turned on. The bright light may harm your eyes.
• The top and bottom of the projector can be very hot to the
touch after use. Use extreme care or let it cool before lifting it.
• Do not block the grills at the front, side, top or bottom of the
projector. Restricting the air flow through the projec tor can
cause it to overheat and turn off.
Handle the projector as you would any product with glass
•
components. Be especially careful not to drop it.
• Avoid leaving the projector in direct sunlight or extreme cold
for extended periods of time. If t his happens, allow it to reach
NOTE: If the projector overheats
and turns off, you must wait 45
seconds before you attempt to
room temperature before use.
• Transport t he projector in a vendor-approved hard or soft ca se.
Call your In Focus dealer for more information.
turn it back on.
If You Need Ass istan ce
The first place to look for help is in this manual. Be sure to check
the guidelines in “Troubleshooting” on page 45.
If this manual doesn’t answer your question, call your In Focus
dealer. You can also call In Focus Customer Service directly at
1-800-799-9911. Call between 6 a.m. and 5 p.m. PST, Monday
through Friday. In Europe, call In Focus in The Ne therlands at
(31) 23-5623200. In Singapore, call (65) 334-9005.
The In Focus World Wide Web address is htt p:\\www.infs.com.
Warranty
These products are backed by a limited one-year warranty. The
details of the warranty are printed at the back of this manual.
Longer term warranties can be purchased from your In Focus
dealer. Refer to page 54 for part nu mbers.
4
SETTING UP THE PROJECTOR
1 Place the projector on a flat surf ace.
• The projector must be within 10 feet of your power source
and within 10 feet of your computer.
If you wa nt to project from behind a translucent s c r een, set
•
up the projector behind your screen. See “Rear Projection”
on page 40 to revers e the image.
• If you are installing the projector on the ceiling, see t he
LitePro 610/620 Ceiling Mount Installation Guide for recommendations . To turn the image upside down, see “Ceiling”
on page 39. The Ceiling Mount Kit is sold separately. See
“Accessories” on page 53.
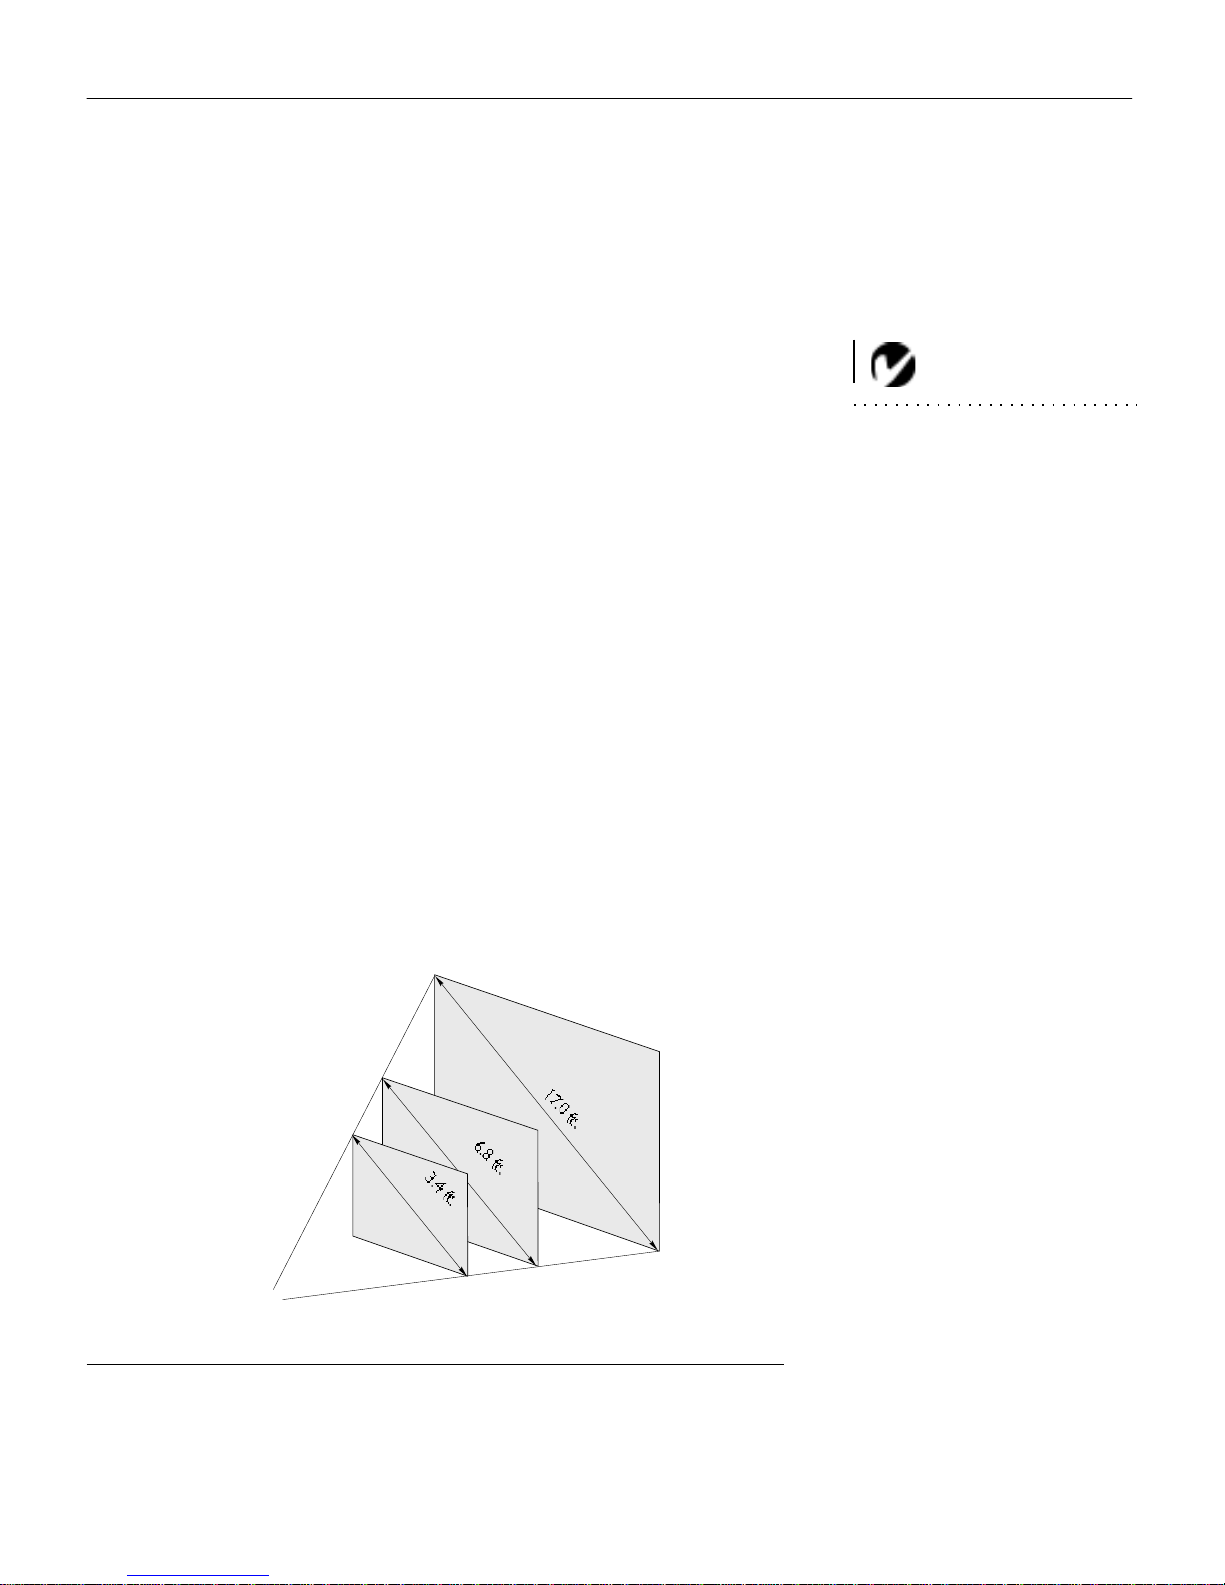
2 Position the projector th e desired distance from t h e screen.
• The distance from the lens of th e projector to the screen
determines the size of the projected image. Figure 2 shows
three projected image sizes for the 610; Figure 3 shows
image s i z es for the 620. For more information, see “Projected Image Size” on page 60.
NOTE: An optional extension
cable, sold separately, lets you
increase the distance between the
projector and your computer to 50
feet. See “Accessories” on
page 53.
3 Make sure the projector and your computer are turned off.
25 ft.
5 ft.
10 ft.
PRO JECT OR
FIGURE 2
Projected image size for LitePro 610
5
Setting up the Projector
5 ft.
10 ft.
PRO JECTOR
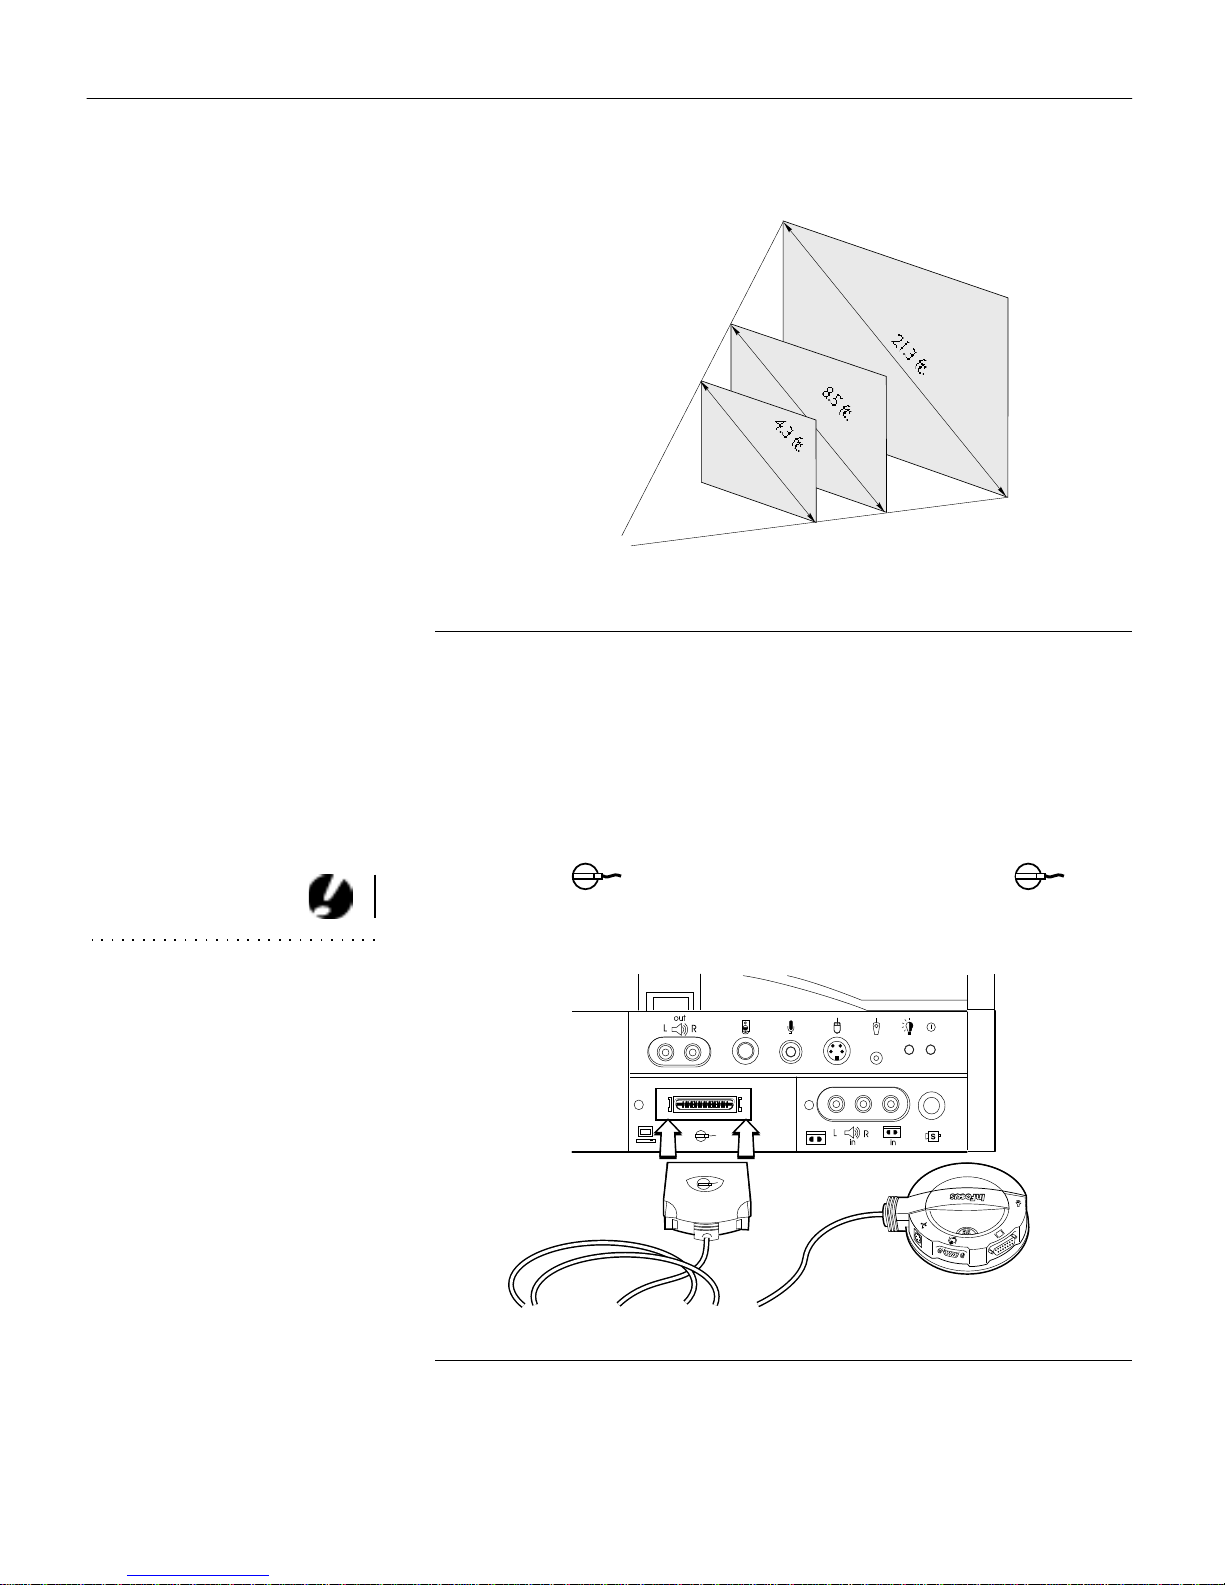
IGURE 3
F
Projected image size f or LitePro 620
25 ft.
CAUTION: Turn off your
computer, monitor and the
projector whenever you connect
or disconnect cables.
Connecting the CableWizard to the Projector
The CableWizard™ simplifies the connec tion process by providing a central hub for all the connec tions between th e projector
and your computer. The connectors on the CableWizard are
labeled with icons.
Connect the end of the CableWizard cord to the connector on the projector’s connector panel (Figure 4).
6
IGURE 4
F
Connecting the CableWizard cable to the projector

Selecting Conne ctors on the CableWizard
Turn the selector on the top of the CableWizard to reveal the
correct connectors for your compu ter.
FIGURE 5
Selecting connectors on the CableWizard
• If you’re connecting an IBM-compatible desktop or laptop com-
puter
, turn the s elector until the window di splays “PC”.
computer
audio
monitor
mouse
IGURE 6
F
Selecting the IBM-compatible connectors on the CableWizard
If you’re c onne cti n g a Macintosh desktop or an Apple PowerB ook
•
computer
, t urn the se lect or until t he window displays “Mac™”
(Figure 7).
NOTE: You must disconnect all
cables before turning the selector
on the CableWizard.
7

Setting up the Projector
monitor
computer
audio
F
IGURE 7
mouse
Selecting the Macintosh connectors on the CableWizard
Preparing to Connect Your Equipmen t to the Projector
Now you’re ready to connect your equipment. Computers are
connected to the CableWizard. Video players and other equipment, such as external speakers, are connected directly to the
proj ector.
NOTE: Before you continue,
make sure the projector and your
equipment are turned off. If you’re
connecting a computer, make sure
the distance between it and the
projector is 10 feet or less and
you’ve selected the appropriate
connectors on the CableWizard.
Steps for connecting differ ent types of equipment are given on
the pag es listed below.
Computer/Equipment Page
IBM-compatible desktop computer page 9
IBM-compatible laptop computer page11
Macintosh desktop computer page13
Apple PowerBook page15
Video player page17
External speakers or subwoofer page19
Microphone page19
PS/2-compatible mouse page20
Remote control cable page20
8

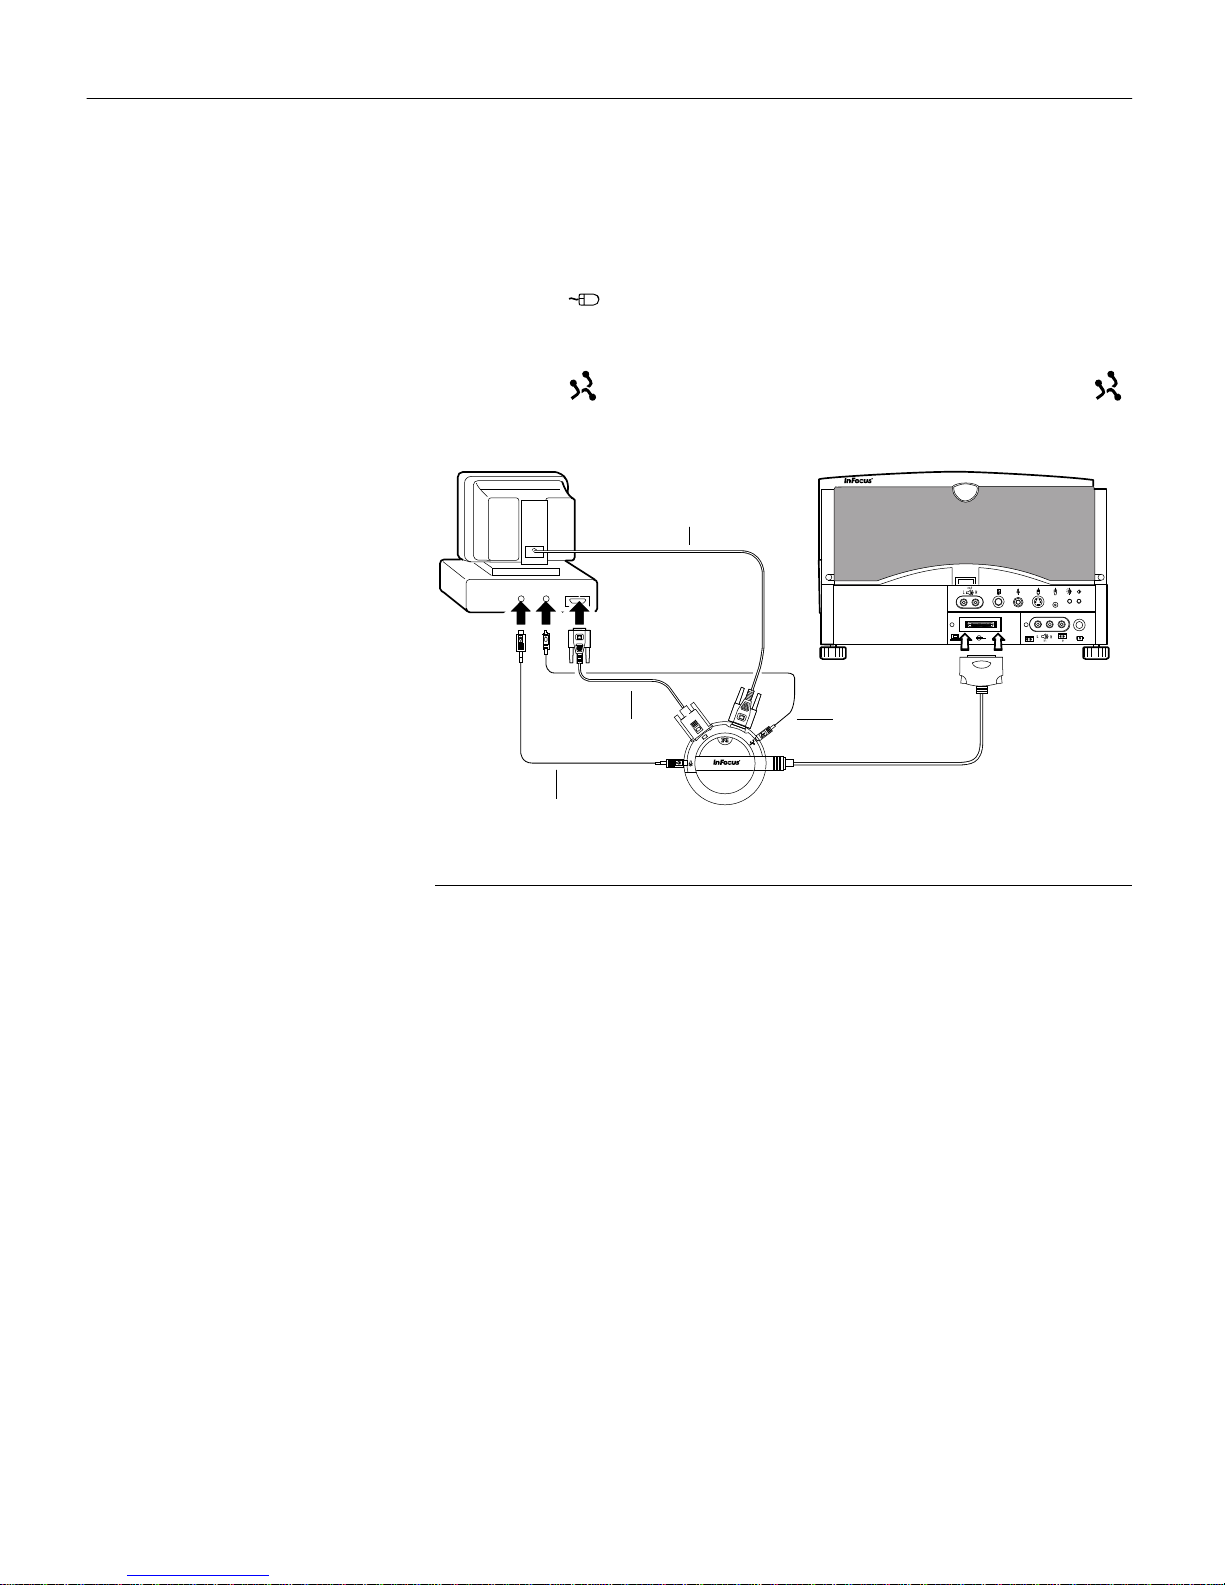
Connectin g an IBM-Compatible Desktop Computer
1 Locat e the cable that con nects your m onit or to your comput er.
Unplug it from the computer.
2 Plug the end of the CableWizard computer cable into the
video connector on your computer.
3 Plug the end of the CableWizard computer cable into the
connector on the CableWizard.
computer cable
FIGURE 8
Connecting the CableWizard computer cable to an IBM-compatible desktop computer
Do you want to display the image on your computer’s monitor as
well as on the projection screen?
1 Plug your monitor’s cable into the connector on the
CableWizard.
Do you want to play your computer’s au dio on the projector?
1 Unplug the audio cable, if present, from your computer.
2 Pl ug either end of t he CableWizard audio cable into the audio
connector on your computer.
3 Plug the ot her end of the CableWizard audio cable into the
connector on the CableWizard.
9
Setting up the Projector
Do you want to control your computer’s mouse from the projector’s
remote or keypad?
1 Unplug the mouse cable from your computer.
2 Plug the end of the CableWizard mouse cable into the
mouse connector on your computer.
3 Pl ug th e end of the CableWizard mouse cable into the
connector on the CableWizard.
monitor cable
computer
cable
audio cable
FIGURE 9
Connecting the CableWizard monitor, audio and mouse cables to an IBM-compatible
desktop computer
mouse cable
Now you’re ready to power up the projector and your computer.
Skip to “Powering up the Projector and Adjusting the Image” on
page 21.
10

Connecting an IBM-Compatible Laptop Computer
1 Plug the end of the CableWizard computer cable into the
video connector on your computer.
2 Plug the end of the CableWizard computer cable into the
connector on the CableWizard.
computer cable
FIGURE 10
Connecting the CableWizard computer cable to an IBM-compatible laptop computer
Do you want to play your computer’s au dio on the projector?
1 Plu g either end of the CableWi zard audio cable into the audio
connector on your computer.
NOTE: Many laptop computers
do not automatically turn on their
external video port when a secondary display device such as a projector is connected. Refer to your
computer manual for the command that activates the external
video port. Activation commands
for some laptop computers are
listed in the Appendix of this manual on page 55.
NOTE: If you don’t want audio or
mouse control, you can use the
2 Plug the ot her end of the CableWizard audio cable into the
connector on the CableWizard.
CableWizard Lite. CableWiza rd
Lite is ordered separately. See
“Accessories” on page 53.
11

Setting up the Projector
Do you want to control the computer’s mouse from the projector’s
remote or keypad?
1 Locate the mouse cable and unplug it from your computer.
2 Plug the end of the CableWizard mouse cable into the
mouse connector on your computer.
3 Pl ug th e end of th e CableWizard mouse cable into the
connector on the CableWizard.
mouse cable
computer
cable
audio cable
FIGURE 11
Connecting the CableWizard audio and mouse cables to an IBM-compa tible laptop
computer
Now you’re ready to power up the projector and your laptop.
Skip to “Powering up the Projector and Adjusting the Image” on
page 21.
12

Connecting a Macint osh Desktop Computer
1 Locate the cable that connects the monitor to your computer.
Unplug it from the computer.
2 Plug the end of the CableWizard computer cable into the
video connector on your computer.
3 Plug the e nd of th e CableWizard com puter cable into t he
conn ector on the CableWizard.
computer cable
FIGURE 12
Connecting the CableWizard computer cable to a Macintosh desktop computer
Do you want to display the image on your computer’s monitor as
well as on the projection screen?
1 Plug the monitor’s cable into the connector on the
CableWizard.
Do you want to play your computer’s au dio on the projector?
1 Unplug the audio cable, if present, from your computer.
2 Pl ug either end of t he CableWizard audio cable into the audio
connector on your Macintosh.
3 Plug the other end of the CableWizard audio cable in to the
connector on the CableWizard.
13

Setting up the Projector
Do you want to control the computer’s mouse from the projector’s
remote or keypad?
1 Unplug the mouse from your Macintosh or locate an unused
ADB connector.
2 Plug the end of the CableWizard mouse cable into the
mouse or the (ADB) conne ctor on your Macintosh.
3 Pl ug the en d of the CableWizard mouse cable int o t he
connector on the CableWizard.
monitor cable
mouse cable
FIGURE 13
Connecting the CableWizard monitor, audio and mouse cables to a Macintosh desktop
computer
computer cable
audio cable
Now you’re ready to power up the projector and the Macintosh.
Skip to “Powering up the Projector and Adjusting the Image” on
page 21.
14

Connecting an Apple PowerBook Computer
1 Plug the end of the CableWizard computer cable i nto the
video connector on your PowerBook.
2 Plug the end of the CableWizard computer cable into the
conn ector on the CableWizard.
3 If you want the projector’s display to be t he same as the
PowerBook’s screen, turn on video mirroring. (See “Using
Video Mirrorin g with a PowerBook Comput er” on page 59 for
additional information.)
computer cable
Apple-supplied
video-out cable
FIGURE 14
NOTE: Some PowerBooks
require the Apple-supplied videoout cable for external video. Connect it between the PowerBook
and the CableWizard computer
cable as shown in Figure 14.
Connecting the CableWizard computer cable to an Apple PowerBook
Do you want to play your computer’s au dio on the projector?
1 Plu g either end of the CableWi zard audio cable into the audio
connector on your PowerBook.
2 Plug the other end of the CableWizard audio cable in to the
connector on the CableWizard.
15

Setting up the Projector
Do you want to control the computer’s mouse from the projector’s
remote or keypad?
1 Locate the mouse cable and unplug it from your PowerBook.
2 Pl ug the end of the CableWizard mouse cable into the
(ADB) connector on your PowerBook.
3 Plug the end of the CableWizard mouse cable into the
connector on the CableWizard.
mouse cable
audio cable
computer
cable
FIGURE 15
Connecting the CableWizard audio and mouse cables to a PowerBook
PowerBook
video-out cab le
Now you’re ready to power up the projector and your PowerBook. Skip to “Powering up the Projector and Adjusting the
Image” on page 21.
16