

InFocus INF8630eAG, INF8630AG, JTouch Plus INF7530AG, JTouch Plus INF7530eAG Hardware Manual
Page 1

INF8630AG / INF8630eAG
Hardware Guide
009-1752-00
Page 2

Page 3

CONTENTS
Declaration of Conformity ..................................................................................................................................................................3
Safety Considerations ..........................................................................................................................................................................4
General ............................................................................................................................................................................................... 4
Moving this Display .......................................................................................................................................................................4
Installation and Location ..............................................................................................................................................................4
Ventilation ........................................................................................................................................................................................5
Power Source, Power Cord, Plugs .............................................................................................................................................5
Medical Concerns ............................................................................................................................................................................5
Treatment of Display and Remote ............................................................................................................................................6
Cleaning the Display ......................................................................................................................................................................6
What’s Included ..................................................................................................................................................................................... 7
Setup .........................................................................................................................................................................................................8
Mounting ..........................................................................................................................................................................................8
Mounting Location .........................................................................................................................................................................8
Mounting Technique ......................................................................................................................................................................8
Panel Front, Under, and Side .......................................................................................................................................................9
Panel Back and Side ......................................................................................................................................................................9
Connecting AC Power .........................................................................................................................................................................10
Connecting to Other Devices ............................................................................................................................................................11
Side Panel Ports .............................................................................................................................................................................11
Front Panel Ports ..........................................................................................................................................................................14
Working With the Remote ................................................................................................................................................................15
Understanding the Remote Buttons ....................................................................................................................................... 15
Installing Remote Batteries .......................................................................................................................................................16
Operating the Remote .................................................................................................................................................................16
Treatment of the Remote/Display and Batteries .......................................................................................................................16
Using the Keypad Buttons on Front of Display ......................................................................................................................... 17
Locating the Keypad .................................................................................................................................................................... 17
Understanding the Keypad Buttons ....................................................................................................................................... 17
LED Indicators ...................................................................................................................................................................................... 18
Connecting the Display to a PC.......................................................................................................................................................18
Connecting To the Optional PC In the Bay On Back Of Panel.........................................................................................18
Understanding the Display and External PC Connections...............................................................................................19
Connecting the Display to an External PC ........................................................................................................................... 20
Plugging a PC Into the Display ........................................................................................................................................ 20
Connecting the Display To a PC Using Wi ..................................................................................................................21
Page 4

Basic Functions ................................................................................................................................................................................... 22
Turning On the Display .............................................................................................................................................................. 22
Turning O the Display .............................................................................................................................................................. 23
Adjusting Volume Without Using the On Screen Display Menus ................................................................................. 24
Total Touch Control.............................................................................................................................................................................25
Dening Total Touch Control .................................................................................................................................................... 25
Understanding the Total Touch Control Menu Options .................................................................................................... 25
Using Total Touch Control .........................................................................................................................................................26
Working with Sources ....................................................................................................................................................................... 27
Accessing Sources Using Total Touch Control .................................................................................................................... 27
Understanding Source Touch Control Icons ................................................................................................................. 27
Selecting a Source Using Total Touch Control .............................................................................................................28
Accessing Sources Using the Remote ...................................................................................................................................29
Understanding Source Options ........................................................................................................................................ 29
Selecting a Source Using The Remote ............................................................................................................................31
Working with Total Touch Control Advanced Functions Menu ............................................................................................ 32
Understanding Total Touch Control Advanced Functions Menu ..................................................................................32
Selecting an Advanced Function Option Using Touch Control ..................................................................................... 33
Working With the On Screen Display Settings ......................................................................................................................... 34
Dening On Screen Display ...................................................................................................................................................... 34
Understanding On Screen Display Menu Selections ......................................................................................................... 34
Picture Mode Menu ............................................................................................................................................................. 34
Sound Mode Menu ............................................................................................................................................................... 36
Settings Mode Menu ........................................................................................................................................................... 37
Selecting an On Screen Display Menu...................................................................................................................................38
Adjusting Display Picture, Using the On Screen Display Menu .................................................................................... 40
Adjusting the Sound Mode Using the On Screen Display Menu ....................................................................................41
Adjusting Display Settings Using the On Screen Display Menu ................................................................................... 43
Working with Android Settings ..................................................................................................................................................... 44
Android Setting Overview ......................................................................................................................................................... 44
Device .............................................................................................................................................................................................. 44
Preferences .................................................................................................................................................................................... 46
Personal ...........................................................................................................................................................................................47
Troubleshooting .................................................................................................................................................................................. 48
Limited Warranty ................................................................................................................................................................................ 51
Page 5

DECLARATION OF CONFORMITY
Manufacturer: InFocus Corporation, 13190 SW 68th Parkway, Suite 200, Portland, Oregon 97223-8368 USA
Trademarks
Apple, Mac and Facetime are trademarks or registered trademarks of Apple, Inc. Microsoft, Windows, PowerPoint, Excel and Word
are trademarks or registered trademarks of Microsoft Corporation. Adobe and Acrobat are trademarks or registered trademarks of
Adobe Systems Incorporated. HDMI logo and “High Denition Multimedia Interface” are registered trademarks of HDMI Licensing
LLC. Manufactured under license from Dolby Laboratories. Dolby and the double-D symbol are trademarks of Dolby Laboratories. SRS
TruSurround HD and SRS TruVolume are trademarks of SRS Labs, Inc. TruSurround HD and TruVolume technologies are incorporated
under license from SRS Labs, Inc. InFocus, In Focus, INFOCUS (stylized), MondoCenter, Mondopad, BigTouch, JTouch, and ShareView are
either registered trademarks or trademarks of InFocus Corporation in the United States and other countries. All other trademarks are
the property of their respective owners. Any other trademarks, service marks, personal names or product names are assumed to be the
property of their respective owners and are used only for reference. There is no implied sponsorship, aliation, certication, approval or
endorsement if we use one of these terms.
FCC Warning
This equipment has been tested and found to comply with the limits for a Class A digital device, pursuant to part 15 of the FCC
Rules. These limits are designed to provide reasonable protection against harmful interference when the equipment is operated in
a commercial environment. This equipment generates, uses and can radiate radio frequency energy and, if not installed and used in
accordance with the instruction manual, may cause harmful interference to radio communications.
Operation of the equipment in a residential area is likely to cause harmful interference in which case the user will be required to correct
the interference at his own expense. Changes or modications not expressly approved by InFocus Corporation may void authority to
operate the equipment.
This device complies with part 15 of the FCC Rules. Operation is subject to the following two conditions: (1) This device may not cause
harmful interference and (2) this device must accept any interference received, including interference that may cause undesired
operation.
The manufacturer is not responsible for any radio or TV interference caused by unauthorized modications to this equipment. Such
modications could void the user's authority to operate the equipment.
Canada
This Class A digital apparatus complies with Canadian ICES-003.
Cet appareil numérique de la classe A est conforme à la norme NMB-003 du Canada.
EU/EEC
Warning: This is a class A product. In a domestic environment this product may cause radio interference in which case the user may be
required to take adequate measures.
Agency Approvals
See product certication label.
This document applies to regulatory model: D104
Input ratings: AC 100-240V AC, 4.5A, 50-60Hz
InFocus reserves the right to alter product oerings and specications at any time without notice.
INF8630eAG / INF8630AG Hardware Guide
Page 3
Page 6

SAFETY CONSIDERATIONS
Please read and follow all safety instructions provided below and on the display before connecting the display to a power
source. Failure to comply with safety instructions may result in re, electrical shock, or personal injury and may damage or
impair protection provided by the equipment. Please save all safety instructions.
General
• Refer to this guide for proper startup and shutdown procedures.
• Follow all warnings and cautions in this manual and on the display.
• Turn o display and unplug power, if there is a power outage, unstable voltage, thunder or lighting storm, abnormal sound or smell,
damaged power cord, or product damaged caused by impact, fall, or strike.
Moving this Display
• Move and install this display with two individuals, as it is very heavy. Do not attempt to move or install the display by yourself,
otherwise injury and/or damage may occur.
• Hold the display rmly using the handles and side or bottom bezels, when you move it. Do not hold the top bezel.
• Hold the four corners and bottom side of the display. To not exert pressure on the front of the display.
• Do not tilt or invert the carton, when you move the display or carton. Always keep display and carton in an upright orientation.
• Disconnect all accessories and cables before moving or repositioning the display.
Installation and Location
WARNING: Securely attach this display to the oor/wall per installation instructions. Tipping, shaking, or rocking the machine may
cause injury or death.
• Use only properly rated wall and stand mounting hardware, which meets this product’s specications and follow the manufacturer
installation instructions. The warranty does not cover any damage caused by use of improperly rated mounting hardware or from
improper installation.
• Use only metric 8 (12 mm) screws, when you mount the display to a wall. In addition, the mounting interface should comply with
the UL1678 standard in North America. The mounting means should be strong enough to bear the weight of the display.
• Do not install or use the display or speakers near any heat sources such as radiators, heat registers, stoves, or other devices
(including ampliers) that produce heat.
• Do not place the display in direct sunlight, humid, greasy or dusty places or in places where the display may come into contact with
rain, smoke, steam, ammable or explosive substances, combustible or corrosive gasses.
• Do not use any components of the display, including the speakers, near water.
• Make sure no naked ame source, such as lighted candles, are placed on the display.
• Do not install the display in places subject to mechanical vibration.
• Do not place the display on an unstable surface, which could result in serious personal injuries and display damage. When
mounting the display to a stand, be sure to following the manufacturer’s instructions. Use only the mounting hardware
recommended by the manufacturer.
Page 4
Page 7

Ventilation
• Maintain a distance of at least 1.98” (5 cm) between the display and the wall to provide adequate ventilation, if the display is
installed against the wall.
• Locate the display at least 4’ (1.2 m) away from heating and cooling vents.
• Do not block ventilation openings. Locate the display in a well-ventilated area without obstructions to intake or exhaust vents.
• Maintain 1 1/2" (30 cm) above, 1/2" (10 cm) on each side, and 1/2" (10 cm) below display to provide adequate ventilation.
Power Source, Power Cord, Plugs
• Make sure the power outlet used to power this display is readily accessible for fast disconnection, in case
of emergency.
• Do not use an outlet that has been damaged or has a non-standard power supply.
• Use the power cord provided.
• Ensure a good connection as you connect the power cord to a receptacle with a protective safety (earth) ground terminal.
• Ground Class 1 display.
• Use a surge-protected power strip. Do not overload wall outlets.
• Do not use the display with the power cord near water: for instance, near a bathtub, washbowl, kitchen sink or swimming pool, etc.
• Do not place any heavy objects on the power cord.
• Protect the power cord from being walked on or pinched particularly at plugs, convenience receptacles and the point where they
exit from the display.
• Unplug the display if you are not going to use it for an extensive period of time.
• Hold the plug, not the cord, when you disconnect the system.
• Keep power plug free of dusk and metal attachments.
• Unplug the display if you need to clean it with the included micro-ber cleaning cloth. The screen may be wiped with the cleaning
cloth when the power is o. Never use alcohol, solvents or ammonia-based liquids on this display.
• Do not touch the power cord with wet hands.
Medical Concerns
• Rinse skin for 15 minutes, in the event that the LCD screen breaks and leeks onto skin.
• Use the display with adequate light. Insucient light or continuous use may damage vision.
INF8630eAG / INF8630AG Hardware Guide
Page 5
Page 8

Treatment of Display and Remote
WARNING: Do not expose this equipment or any component of this equipment to rain or moisture, because re or
electric shock may result.
WARNING: Do not allow children to climb on display.
WARNING: Do not insert any sharp objects, metal, or liquid into the unit. Do not allow such objects to contact ventilation holes or
signal connectors. Short circuiting of the product, damage, or electrical shock may result.
WARNING: Do not remove the cover or back or service your display, yourself; doing so can be dangerous and will void your warranty.
Refer all service to qualied service personnel.
WARNING: Unplug Panel before a lighting/ thunder storm. Damage to product or electrical overload could result if power surge is
allowed to overload system.
• Use only replacement parts, specied by InFocus. Unauthorized substitutions may result in re, electrical shock, or injury and may
void the warranty.
• Do not drop the display.
• Do not spill liquid on the display. Spilled liquid may damage the display.
• Wash hands after handling the cables supplied with this display.
• Do not use hard objects or press forcibly on the display screen.
• Do not twist the display.
• Do not use harsh chemicals to clean display.
• Do not allow any image, text or icon to display indenitely on the screen. Ghosting of an image may occur and is not covered by
warranty.
• Allow display to adjust to new temperature slowly, upon change of location. Do not use it immediately.
• Make sure the polarity (+/-) of the remote control's batteries is correctly aligned. Dispose of used batteries in accordance with local
disposal laws. Batteries are not included.
Cleaning the Display
Clean the display with a soft cloth and a cleaner, made for cleaning high tech screens. Spray a soft cloth with minimal cleaner and rub
carefully to remove smudges and nger oils.
Note: Most common window cleaners will not hurt the display; use them limitedly and carefully.
WARNING: Never spill liquids or use excessive cleaning products on the screen or any part of the display.
WARNING: Follow these instructions to help ensure personal safety and image quality over the life of the
display. Failure to follow these instructions may aect the warranty.
Page 6
Page 9

WHAT’S INCLUDED
47.28" x 78.35" x 4.57"
1201mm x 1990mm x 116.1mm
POWER SCREENSHOT MUTE
ABC DEF GHI
3
1
2
JKL MNO PQR
654
STU VWX YZ-
9
8
7
F1
CHLIST
FREEZE
0
HOME MENU
OK
VOL
CH
SOURCE
AUDIO INFO ZOOM
IMAGE SYS STEREO
PLAY PAUSE STOP ROTATE
PREV NEXT BACK SPEED
Remote Control
Quick Start
(Batteries Optional)
INF8630eAG / INF8630AG Hardware Guide
009-1740-XX
Guide
Power Cord ( Varies by Country)
009-1724-XX
Combo Guide:
HDMI
Warranty
Safety
Certicate of
Conformity
USB Cable
A to B
Styli
Page 7
Page 10

SETUP
Mounting
This product does not ship with mounting accessories. Only use commercially manufactured mounting accessories which meet this
product's specications and follow the manufacturer installation instructions.
WARNING: This display must be securely attached to the oor/wall per installation instructions. Tipping, shaking, or rocking the
machine may cause injury or death.
Mounting Location
• Install the display near an easily accessible AC power outlet.
• Mount display to solid wall or stable horizontal surface.
• Do not install the display in places subject to mechanical vibration.
• Do not place the display on an unstable surface, which could result in serious personal injuries and display damage. When you
mount the display to a stand, be sure to follow the manufacturer’s instructions. Use only the mounting hardware recommended by
the manufacturer.
• Do not install or use the display near any heat sources such as radiators, heat registers, stoves, or other devices (including
ampliers) that produce heat.
• Do not place the display in direct sunlight, humid, greasy or dusty places or in places where the display may come into contact with
rain, smoke or steam.
• Protect display from environmental hazards; that is: heavy dust, insects, condensation, other moisture, and strong electromagnetic
elds.
Mounting Technique
• Use a professional technician to properly install display.
• Use only properly rated wall and stand mounting hardware that meet this product’s specications and follow the manufacturer
installation instructions. The warranty does not cover any damage caused by use of improperly rated mounting hardware or from
improper installation.
• Place your display front face-down on a clean, cushioned surface, to prevent damage to the screen surface.
• Use metric 8 (12 mm) screws, when you mount the display to a wall. Use spring washers to prevent the screws from coming loose.
In addition, the mounting interface should comply with the UL1678 standard in North America. The mounting means should be
strong enough to bear the weight of the display.
• Maintain a distance of at least 1.98” (5 cm) between the display and the wall, if the display is installed against the wall; this
distance provides adequate ventilation.
Page 8
Page 11

Panel Front, Under, and Side
AV-OUT Y Pb Pr AV-IN L-IN R-IN USB3.0 USB3.0 USB2.0
SPDIF TOUCH-USB1 TOUCH-USB2 TOUCH-USB3 TOUCH-USB4 OPS PC-USB RS232-IN RS232-OUT
HDMI1 HDMI2 HDMI3 HDMI-OUT LAN HDMI4(MHL) VGA PC-AUDIO
Optional PC Ports
Side Panel Ports
Light and Sensor
Under Panel Ports
PC USB MEDIA USB
Front Panel Ports Front Panel Buttons
TOUCH USB HDMI
Panel Back and Side
Trapezoid Plug In On/O Switch
INF8630eAG / INF8630AG Hardware Guide
Page 9
Page 12
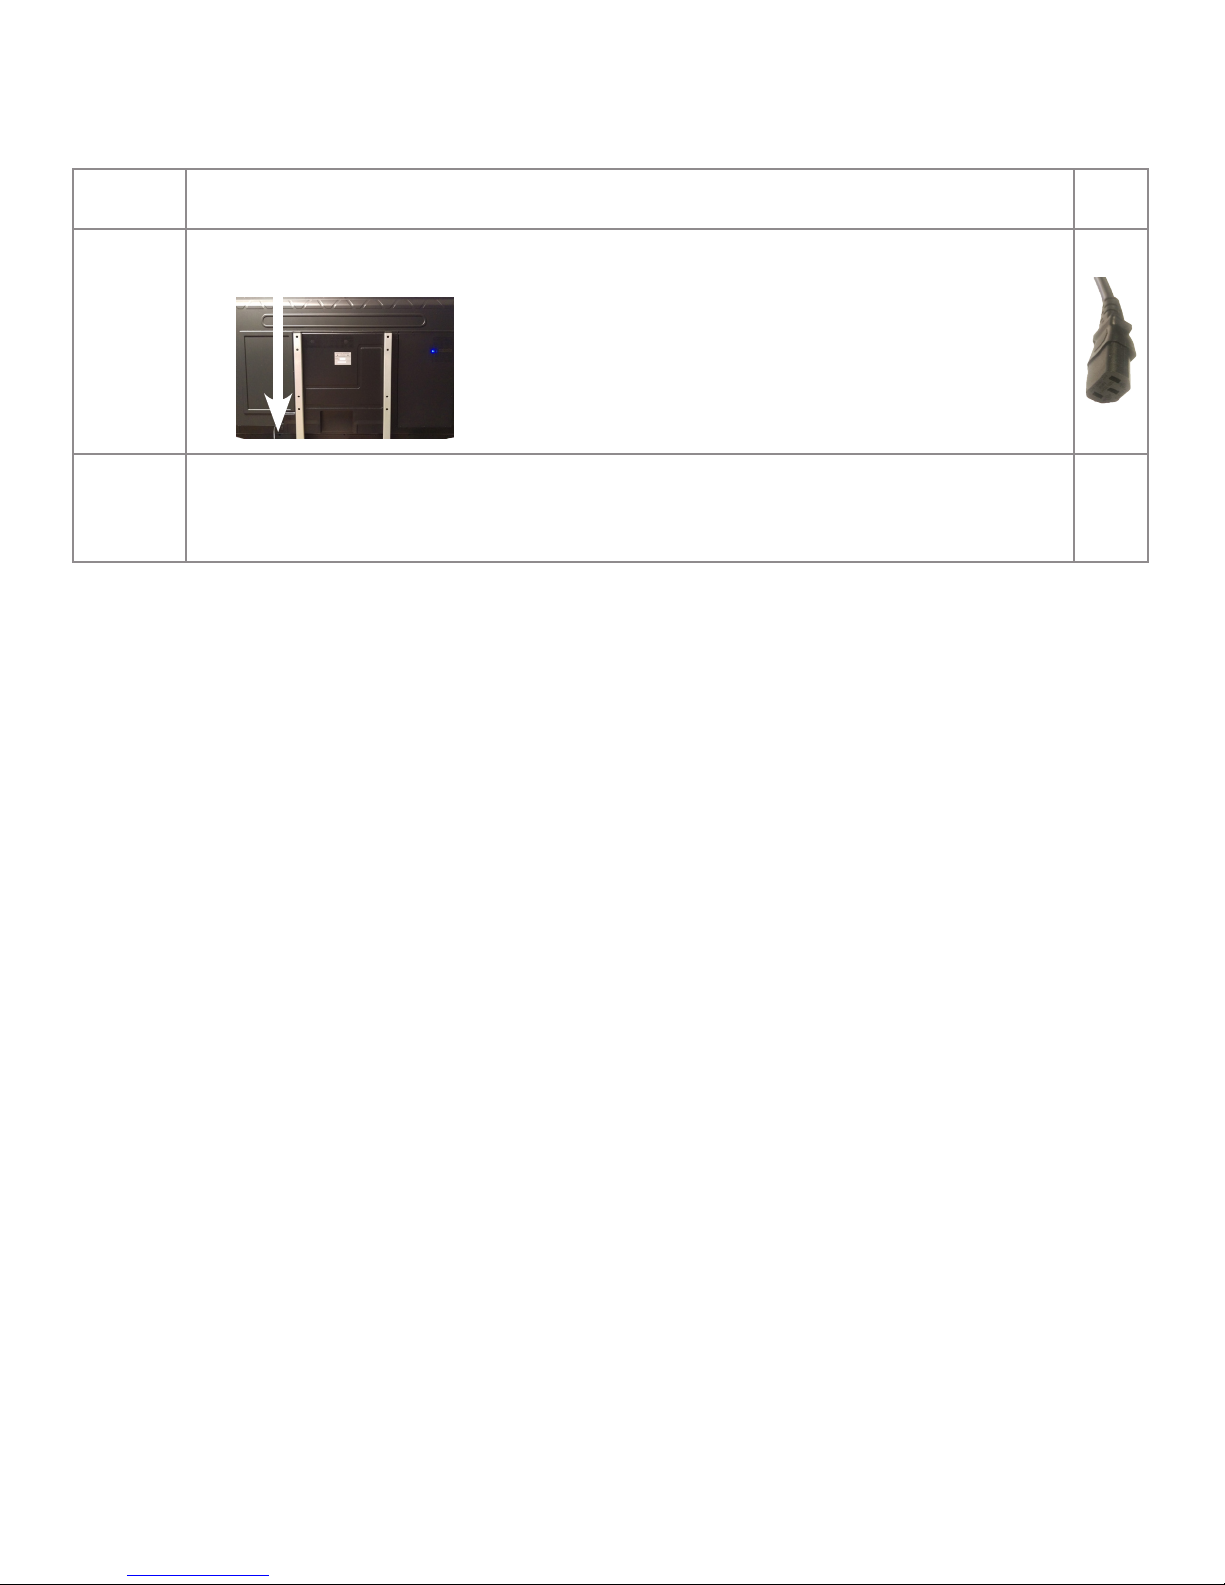
CONNECTING AC POWER
Step Action
Connect the trapezoid plug end of the AC power cord to the AC In jack on the back of the display.
1
Connect the other end of the AC power cord to an AC outlet.
2
Note: Depending on your country, you may need to check the proper voltage of the outlet and product
requirements.
Plug
End
CAUTION:
• Operate the display from the power source indicated on the label.
• Unplug the AC power cord from the power outlet when you are not using your display for an extended period of time, before you
move it, or when you are connecting other devices.
Page 10
Page 13
CONNECTING TO OTHER DEVICES
Connection ports are located on the side in the back, and under the display which can be connected to a full range of digital input
devices, and output devices including: accessories, source devices, PCs, tablets, daisy-chain displays, etc.
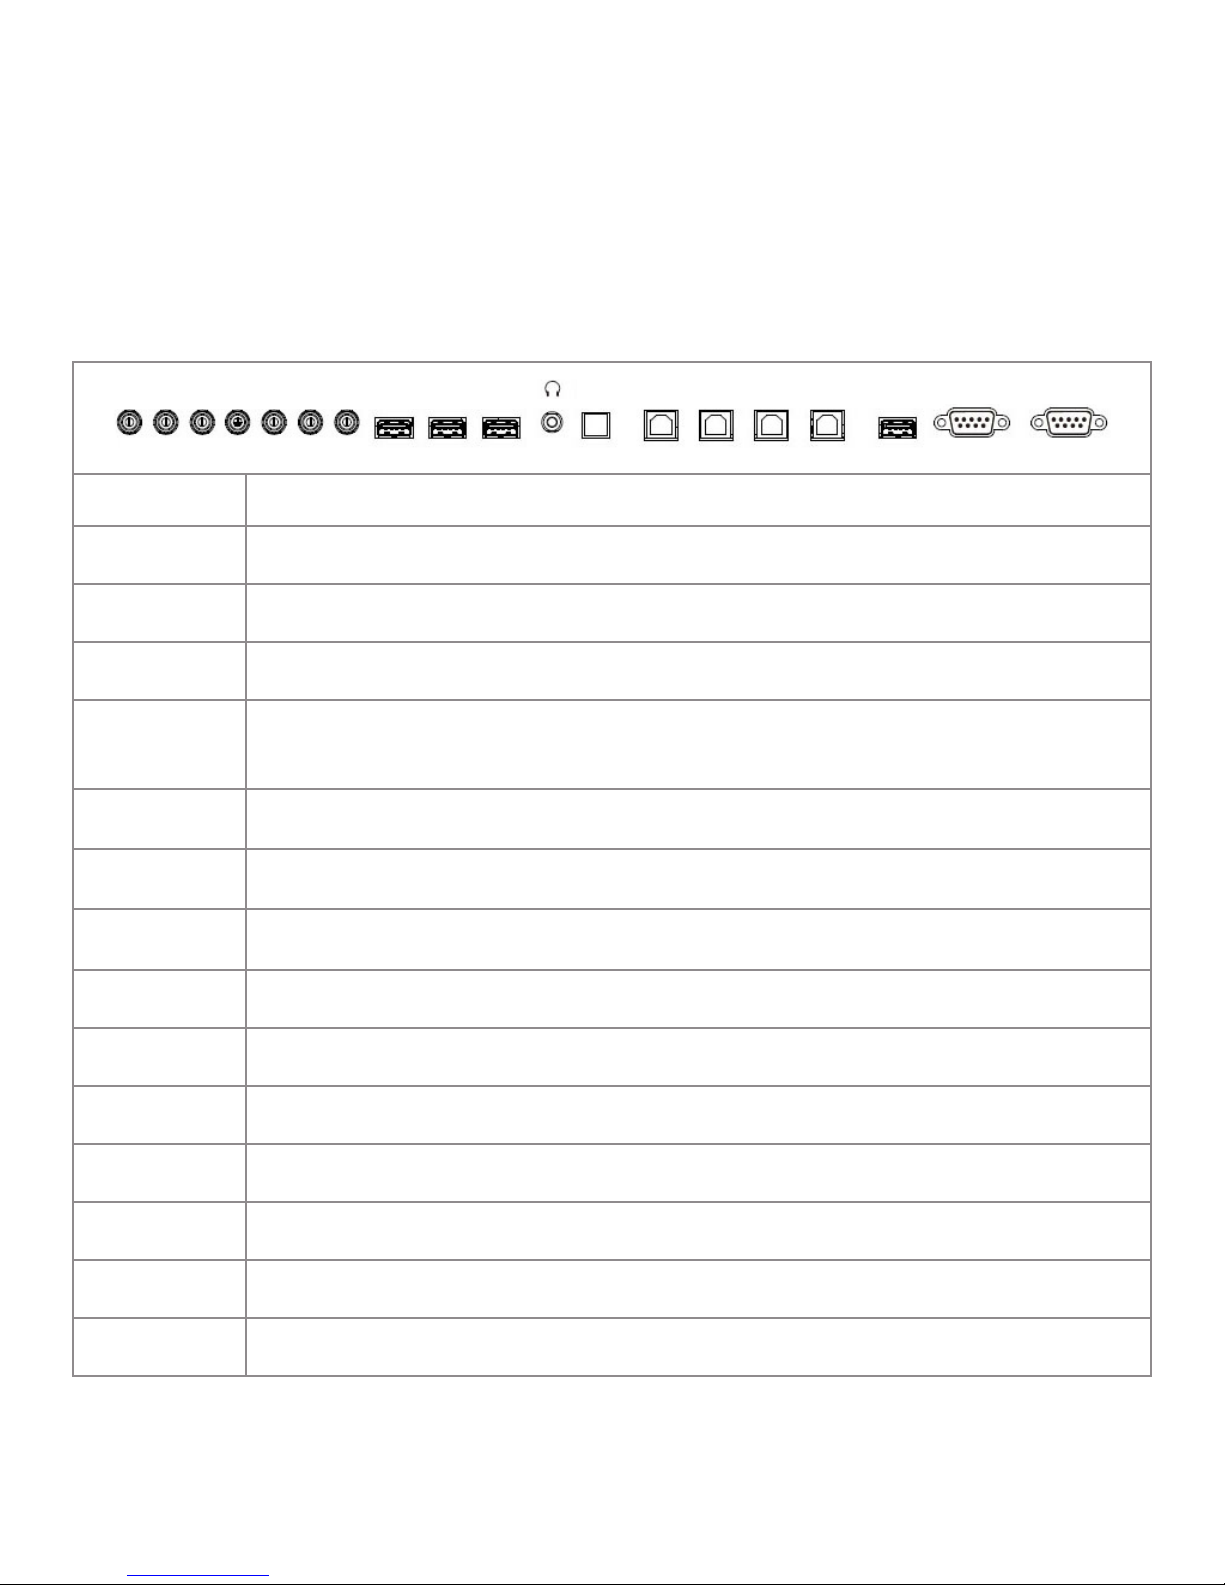
Side Panel Ports
The side panel ports are located on the left side of the back of the display. This table shows how to connect them.
AV-OUT Y Pb Pr AV-IN L-IN R-IN USB3.0 USB3.0 USB2.0
Port Connection Instructions
RS232 IN Connect to RS232 control device for remote control applications.
RS232 OUT Connect to RS232 control device for remote control applications.
OPS PC USB Connect a USB 2.0 device to the OPS module.
Connect a A-B cable between this type B port and your computer to get touch control.
Touch USB 4
Touch USB 3
Touch USB 2
Touch USB 1
Touch USB port 4 should be used with HDMI port 4, or any of the other video imputes
(VGA, component, composite).
Connect a A-B cable between this type B port and your computer to get touch control.
Touch USB port 3 should be used with HDMI port 3.
Connect a A-B cable between this type B port and your computer to get touch control.
Touch USB port 2 should be used with HDMI port 2.
Connect a A-B cable between this type B port and your computer to get touch control.
Touch USB port 1 should be used with HDMI port 1.
SPDIF TOUCH-USB1 TOUCH-USB2 TOUCH-USB3 TOUCH-USB4 OPS PC-USB RS232-IN RS232-OUT
SPDIF Connect a SPDIF cable to Output audio.
Headset Connect a 3.5 mm headset to output audio. This will mute the internal speakers.
USB 2.0 Connect a USB 2.0 device to the internal Android PC.
USB 3.0 Connect a USB 2.0/3.0 device to the internal Android PC.
USB 3.0 Connect a USB 2.0/3.0 device to the internal Android PC.
R-IN Connect an RCA L/R audio cable to an external device, provides audio in for the AV- IN source.
L-IN Connect an RCA L/R audio cable to an external device, provides audio in for the AV- IN source.
INF8630eAG / INF8630AG Hardware Guide
Page 11
Page 14
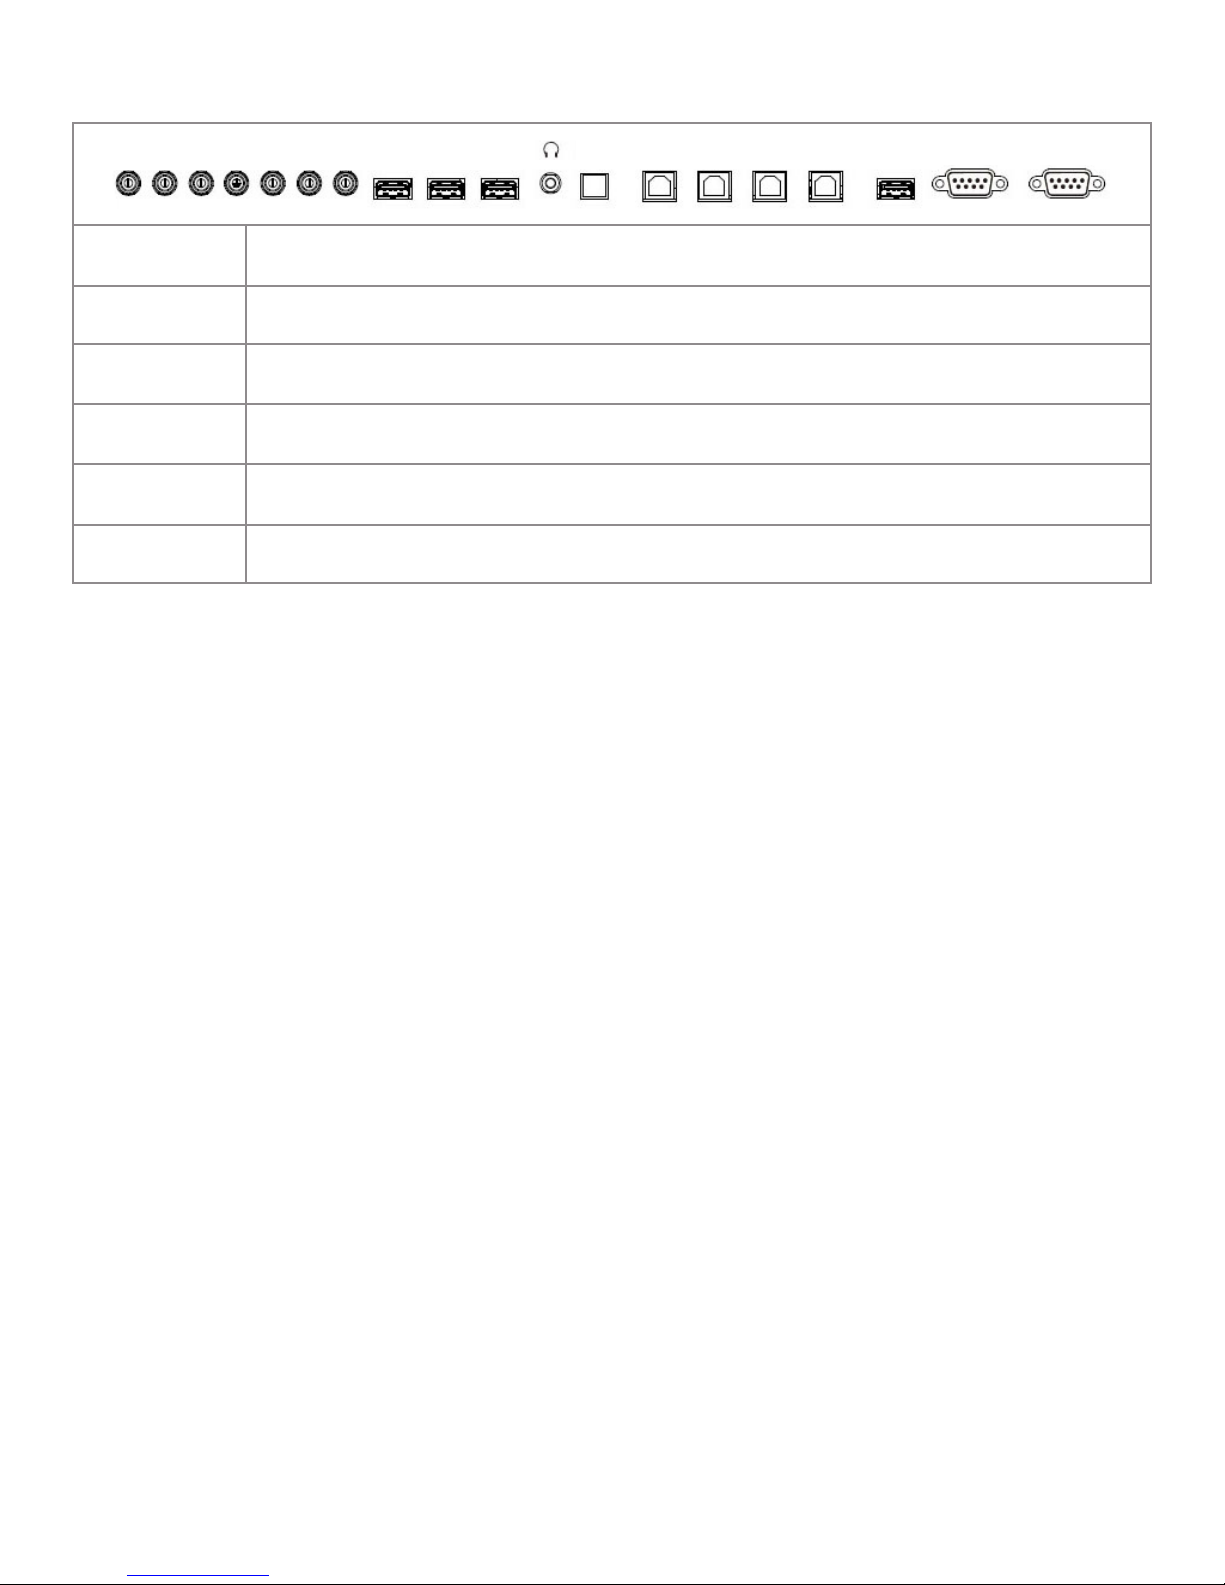
AV-OUT Y Pb Pr AV-IN L-IN R-IN USB3.0 USB3.0 USB2.0
SPDIF TOUCH-USB1 TOUCH-USB2 TOUCH-USB3 TOUCH-USB4 OPS PC-USB RS232-IN RS232-OUT
Port Connection Instructions
AV-IN Connect a composite video cable from the display to an external device (such as VCR or DVD player).
Pr
Pb
Y
Connect Red component RCA video cable from the display to an external device
(such as a DVD player, HD device, or Laser Disc player) Pr signal.
Connect Blue component RCA video cable from the display to an external device
(such as a DVD player, HD device, or Laser Disc player) Pb signal.
Connect Red component RCA video cable from the display to an external device
(such as a DVD player, HD device, or Laser Disc player) Y signal.
AV-Out Connect a composite video cable to display the Output from AV-IN.
Page 12
Page 15

Under Panel Ports
The under panel ports are located on the left side of the bottom of the display. This table shows how to connect them.
HDMI1 HDMI2 HDMI3 HDMI-OUT LAN HDMI4(MHL) VGA PC-AUDIO
Port
Name
Connection Instructions
HDMI 1 Connect a HDMI cable from the display to a HDMI external device.
HDMI 2 Connect a HDMI cable from the display to a HDMI external device.
HDMI 3 Connect a HDMI cable from the display to a HDMI external device.
HDMIOut
Connect an HDMI cable from this port to an HDMI Input port on another display.
This will mirror the content of this display to the 2nd display. Only works with HDMI inputs 1-3.
LAN Connect RJ45 cable to provide network connections for Internal Android.
HDMI 4
(MHL)
Connect a HDMI cable from the display to a HDMI external device, such as your computer.
Supports HDMI 2.0/HDCP 2.2 and MHL standards.
VGA Connect a VGA computer cable from the monitor to an external computer.
PC
Audio
Connect a 3.5 mm audio cable to your computer for audio when displaying VGA input.
INF8630eAG / INF8630AG Hardware Guide
Page 13
Page 16

Front Panel Ports
The front panel ports are located on the left side of the bottom front of the display. This table shows how to connect them.
PC USB MEDIA USB
Port
Name
Headset Connect a 3.5 mm headset to output audio. This will mute the internal speakers.
Mic Connect a 3.5 mm microphone or cable for audio input. Overrides audio from all other sources when connected.
PC USB Connect a USB 2.0 device to the OPS module.
Media
USB
Connection Instructions
Connect a USB 2.0 device to the Internal Android.
TOUCH USB HDMI
Touch
USB
HDMI Connect an HDMI cable from the display to an HDMI external device, such as a computer.
Connect a USB A-B cable between this type B port and your computer to get touch control.
This works with front HDMI port.
Page 14
Page 17
WORKING WITH THE REMOTE
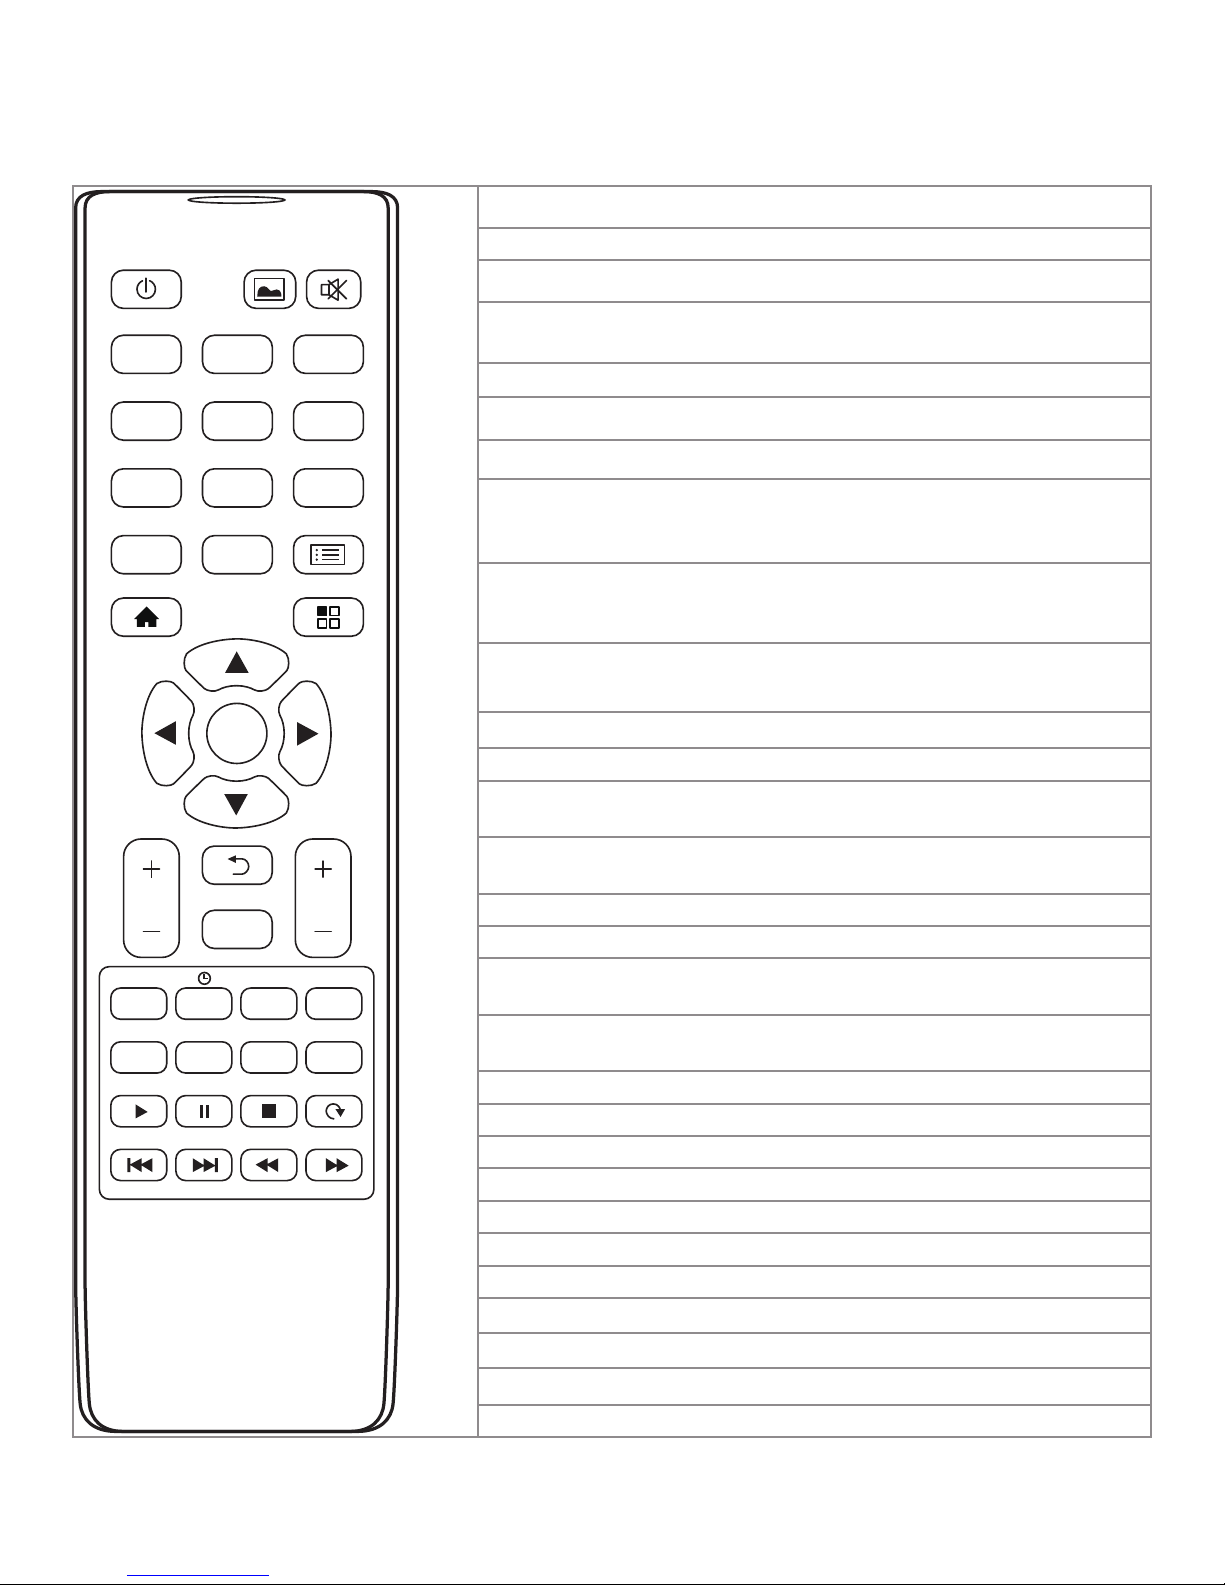
Understanding the Remote Buttons
Power: Switches the power on or puts the display into Standby.
POWER SCREENSHOT MUTE
ABC DEF GHI
1
JKL MNO PQR
4
STU VWX YZ-
7
0
HOME MENU
2
5
8
F1
FREEZE
OK
VOL
SOURCE
AUDIO INFO ZOOM
IMAGE SYS STEREO
PLAY PAUSE STOP ROTATE
PREV NEXT BACK SPEED
3
6
9
CHLIST
CH
Screen Shot: Takes a screen shot.
Mute: Switches the audio on or o.
Numbered Keys: Inputs any letter or number.
Note: When you begin entering numbers, the on screen keyboard appears.
F1 3D (Freeze): When enabled, freezes the image which is currently displayed.
CH List: Reserved for future use.
Home: Displays the Home Screen.
Menu: Displays small On Screen Display Menus Mode when accessed from a
screen, other than the Home Screen.
Note: Menu key has no function in the Home Screen.
Cursor Keys (Left, Right, Up, Down Arrows): Use these buttons to navigate
through and make changes to the On-screen Menu features.
OK: Conrms the operation (Enter).
Volume Up: Increases the audio volume.
Volume Down: Decreases the audio volume.
Back: Returns the user to the previous menu.
Source: Displays the Source Selection Menu on the bottom of the display.
CH Up: Reserved for future use.
CH Down: Reserved for future use.
Audio (Sound Mode): Accesses On Screen Display Sound Mode Menu:
Movie Sports, User, Standard, Music settings.
Sleep mode: Allows you set a "sleep time" for the display.
OSD: Reserved for future use.
Zoom: Accesses ODS Menu Mode for Panorama, PC Mode, Just Scan, Auto, Default
settings.
Image (Picture Mode): Accesses On Screen Display Picture Mode Menu:
User, Standard, Lightness, Soft, PC settings.
Blank: Reserved for future use.
SYS: Reserved for future use.
Stereo: Reserved for future use.
Play: For online video - Plays media.
Pause: For online video - Pauses media play.
Stop: For online video - Stops media play.
Rotate: For online video - Rotates picture.
Previous: For online video - Skips to previous scene.
INF8630eAG / INF8630AG Hardware Guide
Next: For online video - Skips to next scene.
Back (Fast Reverse): For online video - Shows media backwards quickly.
Speed (Fast Forward): For online video - Shows media forwards quickly.
Page 15
Page 18

Installing Remote Batteries
Step Action
1 Remove the cover from the remote’s back.
2 Align the + and – ends of the batteries
3 Slide the batteries into place.
4 Replace the cover.
Note: The remote uses two (2) AAA batteries (not included).
Operating the Remote
Step Action
1 Point the remote at the display sensor at the bottom right-hand corner of the display.
2 Keep the remote in optimum range for best operation, about 26’ (8 m) from remote to display and within a horizontal
and vertical angle of 30 degrees of the sensor; see picture.
30˚ 30˚
TREATMENT OF THE REMOTE/DISPLAY AND BATTERIES
Remote and Display Batteries
Keep remote dry; if the remote control gets wet, wipe it dry
immediately.
Protect the Display and Remote from excessive heat and
humidity.
Note: Batteries are not included.
Remove batteries from the remote control when storing
or not in use for a prolonged period.
Do not mix new and old batteries or dierent types of
batteries together.
Ensure the batteries’ polarity (+/-) is properly aligned.
Replace the batteries as soon as they run out.
Dispose of batteries in an environmentally proper manner.
Page 16
Page 19

USING THE KEYPAD BUTTONS ON FRONT OF DISPLAY
Locating the Keypad
The keypad, located on the right side of the front, bottom of the display.
Understanding the Keypad Buttons
The keypad has the following buttons:
Icon
Power: Switches the power to the screen on/o or puts the display into Standby Mode. ??
Settings: Displays the Settings Menus.
Note: This button is not functional on from the Home Screen.
Display must be connected to a PC, and the selected source must be the PC.
Note: To access menu options for Picture Mode and Sound Mode Menu choices, each menu title bar
must be set to "User."
Volume +/-: Increases or decreases the volume. Buttons have same functionality as those on remote.
Navigation: These buttons can also serve as navigation tools for selecting options on the left and right of the current
selection. Touch the screen or press OK on the remote to select the highlighted choice.
Navigation: These buttons serve as navigation tools for selecting options to the right and left of the current selection.
Touch the screen or press OK on the remote to select the highlighted choice.
Total Touch Control - Enable/Disable: Enables or disables touch screen gesture function for the display screen.
Press this button to activate and deactivate Total Touch Control so that you can make selections by touching the display
screen.
INF8630eAG / INF8630AG Hardware Guide
Page 17
Page 20

LED INDICATORS
Front LED Color
(near IR sensor)
Red The display is powered o or the display is in standby mode.
Green The display is powered on.
Flashing Green The display is changing to standby mode.
O The system does not have power.
Meaning
Note: Press the Power button on the remote or on the lower front, right of the display,
to turn on the display.
Note: Sometimes it takes a few seconds for the display screen to brighten.
CONNECTING THE DISPLAY TO A PC
Connecting To the Optional PC In the Bay On Back Of Panel
Infocus sells a PC that can be installed in the bay. In addition, PCs can be purchased from other venders that can be installed in the bay
at the back of the panel. To connect the a PC using the bay:
1) Unplug the Display for safety.
2) Push the PC into place in the bay.
Note: If the PC will not go all the way in, turn it over. The antenna should be on the top, pointing up.
3) Screw in the thumb screws until moderately tight.
Result: The PC and the Display connect.
Note: Choose OPS as a Source. See "Selecting a Source Using Total Touch Control" on page 28.
Page 18
Page 21

Understanding the Display and External PC Connections
Follow the schematic drawing, below, to hook up an external PC.
Note: Remember to disconnect the display from power, before you connect/disconnect it from the PC.
HDMI 1
HDMI 2
Under Display Ports
PC Ports
HDMIDC-IN
VGA SDIF USB LAN AUDIO-OUT MIC-IN TOUCH USB
HDMI 3 HDMI OUT HDMI 4 (MHL) VGA PC-AUDIOLAN
INF8630eAG / INF8630AG Hardware Guide
USB
Page 19
Page 22

Connecting the Display to an External PC
Plugging a PC Into the Display
To connect a laptop or other external computer by plugging into the display, follow theses steps:
Step Do This... Location Connection Ends
1 Unplug the Display from power, for safety.
2 Connect an external computer to the display
using one of these cables:
HDMI (Front Panel Port) or
VGA (Under Panel Port).
HDMI
Note: The HDMI in the front of the display is
unnumbered.
3 Connect the A to B USB cable to the USB Type A
jack on the computer and to the USB Type B jack,
labeled "Touch Control" on the front, left (Front
Ports) of the display.
Note: This connection allows you to use touch
control on the computer screen to control the
display.
Front Panel Ports
PC USB MEDIA USB
TOUCH USB HDMI
Under Panel Ports
HDMI1 HDMI2 HDMI3 HDMI-OUT LAN HDMI4(MHL) VGA PC-AUDIO
Front Panel Ports
PC USB MEDIA USB
TOUCH USB HDMI
VGA
USB A to B
4 Choose the appropriate connections, when
prompted.
5 Set the unnumbered HDMI or VGA as your source.
Note: See "Understanding Source Touch Control
Icons" on page 27.
Page 20
Page 23

Connecting the Display To a PC Using Wi
To connect a laptop or other external computer wirelessly, follow theses steps:
Step Do This... Location Result
1
Remove the USB dongle, , from it's packaging
and connect it to the USB 2.0 port on the back
side of the display.
2 Choose the Display in the connection pop-up
window on your PC.
Note: The pop-up window usually displays
with signal strength bars and identies the wi
signals in your area. Usually it is accessed by
clicking the signal bars on the lower right of your
computer screen.
Note: You may have to enter a password for
your local wi server.
Once the PC is connected, it will
automatically be selected as the source.
Note: This connection allows you to
cast from your PC screen to the display
screen and to control the display screen
from your PC.
INF8630eAG / INF8630AG Hardware Guide
Page 21
Page 24

BASIC FUNCTIONS
Turning On the Display
Step Do This... Press Location Result
1 Verify the power cord is
connected to power outlet and
the trapezoid plug is connected
to the back of the display.
Note: See "Connecting AC
Power" on page 10.
2 Turn ON the Power Switch on
the back of the display.
3 Press the Power Button on the
remote.
The system has access to power.
The system power turns on.
Press the Power Button on the
bottom, right side of the front
of the display.
The display power turns on and the
Home Screen displays.
The green LED on the front of the
display turns on, indicating that both
the system and screen have power.
Page 22
Page 25

Turning O the Display
Step Do This... Press Location Result
1 Press the Power Button on
the remote.
The display power turns o and the
screen goes black.
Press the Power Button on
the bottom, right side of the
front of the display.
2 Turn OFF the Power Switch
on the back of the display.
The green LED on the front of the
display ashes and then turns to red,
indicating that the system still has
power but the screen does not.
The system power turns o.
The red LED on the front of the display
turns o, indicating that the system
power is o.
Note: Remember to unplug the display from the power outlet before you move it; this prevents bodily harm or harm to the display.
Remember to unplug the display from the power outlet during an electrical storm; this prevents an electrical surge from harming the
display.
INF8630eAG / INF8630AG Hardware Guide
Page 23
Page 26

Adjusting Volume Without Using the On Screen Display Menus
To adjust the volume of the display from any screen without using the on screen display menus, take one of these actions.
Step Do this... Tap or
Press
1 Press the Volume button on the remote
to increase or decrease the volume.
Press the Arrow buttons on the lower
right of the display, to increase or
decrease the volume.
Location Result
The volume changes.
Touch the Volume button on the Total
Touch Control Menu.
Note: See "Selecting an Advanced
Function Option Using Touch Control"
on page 33.
2 Slide the bar at the center of the scale
to the right to increase volume or left
to decrease volume.
A Volume Sliding Scale displays.
The volume changes.
Page 24
Page 27

TOTAL TOUCH CONTROL
Dening Total Touch Control
Total Touch control means that once the display is turned on, from within an Android application, anything you need to do with
the display can be done by touching the screen. Use the touch controlled menus to move through desired tasks, choose tools, and
manipulate the display.
Note: The remote control and the buttons on the bottom lower right of display can also be used to assist you in navigation
and selection.
Understanding the Total Touch Control Menu Options
The table below denes the base Total Touch Control Menu icons, which appear on either side of the screen, when you tap the side
arrow on either side of the screen.
Left
Arrow
Right
Arrow
Icon
Icon
Name
Source
Back
Arrow
Freeze
Menu
Does This... Sub Menu Icons
Displays a Menu of
Sources.
Takes you back a
level in an application
or back a page in a
browser.
Returns to previous
displayed screen.
Freezes the display,
temporarily.
Displays other menus,
from which to choose.
Home
INF8630eAG / INF8630AG Hardware Guide
Displays the Home
Screen.
Page 25
Page 28

Using Total Touch Control
To access any of the Total Touch Control Menu Options from within Android applications, follow these steps:
Step Do This... Press or
Tap
1 Make sure touch gestures are enabled;
press the Total Touch Control button, lower
right of display.
Note: Total Touch Control button enables
and disables touch gestures for the display.
Repeated presses of the Total Touch Control
button will toggle between enabling and
disabling touch gestures.
2 Tap the Arrow on either side of the screen.
Note: To display any of the Side SubMenus, select a Total Touch Control Menu
Option by touching it.
Location Result
Total Touch Control is
enabled.
The Total Touch Control
Menu Icons Display.
Page 26
Page 29

WORKING WITH SOURCES
Accessing Sources Using Total Touch Control
Understanding Source Touch Control Icons
Source Sub-menu Icons Icon Name Location of Source Port Description
Under Panel Ports
VGA
Video Graphics
Array
Side Panel Ports
Connect Video Media Device.
AV Composite
Component Connect to component devices.
PC Bay
OPS
Open Plug-able
Standard (PC)
Front and Under Panel Ports
Connect to DVD.
Connect to the optional PC in the bay
on back of panel.
HDMI (Blank)
INF8630eAG / INF8630AG Hardware Guide
Connect to an external PC.
Note: This HDMI selection is blank;
it's on panel front.
HDMI (1-4) Connect to an external PC.
Page 27
Page 30

Selecting a Source Using Total Touch Control
The "Return to Source" selection on the Home Screen displays the last source, which was selected.
To select a new source using touch control, rst ensure that Total Touch Control is enabled, then follow these steps:
Step Do This... Press Location Result
1 Tap the Arrow Bar at the
either side of the display,
to reveal the Total Touch
Control Menu Options.
The Total Touch Control Menu Icons
display.
2 Tap Source.
3 Tap the source icon that
shows the port, that
is connected to your
desired source .
Any
source
icon
The Source Menu Options display.
The source you selected is connected.
Note: For a list of source
denitions, see "Working with Total
Touch Control Advanced Functions
Menu" on page 32.
Note: If you want to connect to PC, select a source which is attached to the PC. Select OPS as the source, for a PC in the bay on the
back of the panel. For connecting to an external PC, see "Connecting the Display to an External PC" on page 20.
Page 28
Page 31

Accessing Sources Using the Remote
Understanding Source Options
When you access source options with the remote control, your choices appear at the bottom of the screen. Here they are:
Source Icon Icon Name Location Description
Under Panel Ports
VGA
Video Graphics
Array
Side Panel Ports
AV Composite
Component Connect to component devices.
Connect Video Media Device.
Connect to DVD.
INF8630eAG / INF8630AG Hardware Guide
Page 29
Page 32

PC Bay
OPS
Open Plug-able
Standard
Connect to the optional PC in the bay
on back of panel.
Connect to an external PC.
HDMI (Blank)
Note: This HDMI selection is blank;
it's on panel front.
Front and Under Panel Ports
HDMI (1-4) Connect to an external PC or other HDMI device.
Note: Connect to the USB port on the front
of the panel.
Note: If you want to choose an external computer as your source, then choose the port, to which the computer is connected.
If you want to choose the PC in the bay on the back of the Display as the source, choose "OPS" as the source.
Page 30
Page 33

Selecting a Source Using The Remote
The "Return to Source" selection on the Home Screen displays the last source, which was selected.
To select a new source with the remote control, follow these steps:
Step Do This... Press Location Result
1 Press Source on the Remote.
2 Navigate to port that is
connected to your desired
source, using the remote
arrows: then press OK.
The Source Menu Options display at the bottom of the
screen.
Note: The OPS (in bay PC) option is highlighted.
The selected option is set as source.
INF8630eAG / INF8630AG Hardware Guide
Page 31
Page 34

WORKING WITH TOTAL TOUCH CONTROL ADVANCED FUNCTIONS MENU
Understanding Total Touch Control Advanced Functions Menu
The table below denes the Total Touch Control Advanced Function Menu options. They look like this on the screen.
Menu Icon Icon Name Function
File
(Image Upload)
Settings
Allows you to browse to select a le or image to view or upload to Display.
Allows you to access several Android menus and sub menus. Menu categories include
Device, Preferences, and Personal.
Device: Used to control various Display features.
Network: Wi, Ethernet, PPPoE
Note: WiFi works only with a dongle.
System Sounds: Toggle On and O
App: Downloaded Apps, System Apps, Running Apps
Storage & Reset: Storage and Factory Reset
About: System Information- Model, Android Version, Software Version
Preferences
Language: English (US) and Chinese
Keyboard: Congure- Auto Caps, Sound on Key Press, Voice Input Key, Text
Correction, Show Correction
Personal
Add Accessory: Bluetooth Compatibility
Security & Restrictions: Unknown Sources, Verify Apps, Restricted Prole,
Device Administration
Date & Time: Auto, Manual Date and Time Adjustment
Volume
Page 32
(Sound Settings)
Screen Shot
Annotation
Function
Allows you to adjust the volume level for the Display's speakers.
Takes a screen shot of the display screen and saves it to internal memory by default, or
saves to an attached USB Thumb Drive, if inserted in front USB media port, on bottom
left of display.
Note: The USB on the left side, front of the display is the default storage location.
Allows you to Annotate on any video input source screen.
You can then take a Screen Shot of the Annotation and current video image.
Allows you to Annotate (draw) on any background, without aecting the original image.
Page 35

Selecting an Advanced Function Option Using Touch Control
To select one of the Advanced Functions using touch control, rst ensure that Total Touch Control is enabled, then follow these steps:
Step Do This... Tap Location Result
1 Tap the Arrow Bar at the
either side of the display,
to reveal the Total Touch
Control Menu Options.
The Total Touch Control Menu Icons
display.
2 Tap the Advanced
Function Menu icon.
The Advanced Function Menu options
display.
3 Tap your desired
Advanced Function
Menu option icon
INF8630eAG / INF8630AG Hardware Guide
Any one
of the
Advanced
Function
Menu
option
icons
The menu item you selected will
allow you to take the action you have
chosen.
Note: For a list of menu denitions,
see "Working with Total Touch Control
Advanced Functions Menu" on page
32.
Page 33
Page 36

WORKING WITH THE ON SCREEN DISPLAY SETTINGS
Dening On Screen Display
The On Screen Display settings let you adjust the picture, sound, and other settings, so you can personalize your display. The display
has to be connected to a PC, and the selected source must be a PC, in order for you to access the On Screen Display Menus. In addition,
one can not access the On Screen Display Menus from the Home Screen.
Understanding On Screen Display Menu Selections
The On Screen Display Menus let you adjust various features of your Display. The three On Screen Display Menus are: Picture Mode,
Sound Mode and Settings Mode.
Picture Mode Menu
Option Function
Picture Mode Controls which settings are accessible and the overall look of the display screen.
Choose the picture mode which best ts your source and displays the picture according to your preferences.
User Must be in this mode to adjust other settings; allows you to customize your display
PC Predened setting
Lightness Predened setting
Standard Recommended general purpose color scheme
Soft Predened setting
Contrast Increases or decreases the contrast between light and dark values of the images on the display.
Brightness Increases or decreases brightness of the images on the display.
Hue Allows an adjustment of the image hues.
Sharpness Increases or decreases the sharpness (edges) between various colors of the images on the display.
Page 34
Page 37

Option Function
Saturation Increases or decreases the intensity of the colors of the images on the display.
PC Image Mode Adjusts timing of an analog PC signal.
Color Temperature Adjusts the color temperature.
Warm 7500K
Cool 13,000K
Nature 10,000K
Zoom Mode Changes the size of the image projected onto the Display: Default, Just Scan, 14.9, PC Mode, 4.3, Auto,
Panorama.
INF8630eAG / INF8630AG Hardware Guide
Page 35
Page 38

Sound Mode Menu
Option Function
Sound Mode Controls which settings are accessible, and optimizes sound settings for preset uses.
Music Optimizes sound for music listening experience.
Movie Optimizes sound for movie watching experience.
Sports Optimizes sound for sports watching experience.
User Must be in this mode to access other settings.
Standard Balances sound range.
Low Pitch Adjusts bass level in User mode.
High Pitch Adjusts treble level in User mode.
Balance Balances the sound between the right and left display speakers.
SPDIF Output Computability mode for audio output to other connected devices. This setting allows you to choose the
appropriate type of audio data for your device.
Raw Outputs raw audio data.
Note: Raw data means the data is of a higher quality than "CD quality." Some sound systems can not accept
a signal that is higher quality than CD quality. You will hear silence, if your system can't decode the signal, so
unless you have sound system that can decode raw data, you may want to turn Raw o.
PCM Outputs encoded audio data.
Note: PCM stands for "Pulse Code Modulation." This means that the audio signal will be exactly CD quality.
This signal is compatible with older or less expensive sound systems.
Page 36
Page 39

Settings Mode Menu
Option Function
Menu Time Sets length of time a menu displays, before disappearing (5 - 30 seconds)
MHL Auto Switch Mobile High Denition Link
Allows you to plug in your phone via it's charging port, and watch your phone's screen in 1080p.
Note: You must have the correct adapter, and your phone must support MHL.
Light Sensor Toggles the light sensor On and O.
HDMI_CEC Consumer Electronics Control
Allows the Display remote to control other devices that are plugged into the HDMI port.
Note: Your device must support Consumer Electronics Control, CEC.
HDMI EDID
Version
HDMI Extended Display Identication Data
Allows you to choose the version of HDMI that is compatible with your device.
Supported HDMI versions include: 1.4, 2.0.
Note: Only change this setting if a device has a compatibility issue.
Boot Source
(default source)
Sets the default source, when the display powers on.
Options include: Last Input, VGA, Android, AV, YPb, Pr, Ops (Installed PC), HDMI, HDMI 1-4.
Note: Choose Android to view the Home Screen by default.
Note: See "Understanding Source Touch Control Icons" on page 27, for a description of dierent sources.
Restore to Default Returns the Display Settings Mode to Factory Settings.
INF8630eAG / INF8630AG Hardware Guide
Page 37
Page 40

Selecting an On Screen Display Menu
To access the On Screen Display Menu Options, ensure your display is connected to a PC, then follow these steps:
Step
Do This... Press Location Result
1 Press the Menu button on the
remote.
Note: The remote Menu button
is active when viewing one of the
video input sources. The remote
Menu button doesn't work from the
Home Screen or when in an Android
application.
Press the Menu button on the lower
right of the display.
The rst of the On Screen
Display Settings Menus
appears.
Page 38
Page 41

Step
Do This... Press Location Result
2 To Select a menu: Picture Mode,
Sound Mode, or Setting Mode
Use the navigation buttons on
your remote to scroll though menu
selections, then press OK.
Use the panel buttons, to scroll
though menu selections, then tap
your selection.
One of the three On Screen
Display Menus is selected:
Picture Mode, Sound Mode, or
Setting Mode.
Swipe the scroll bar at the top
of the Settings screens, to scroll
though menu selections, then tap
your selection.
INF8630eAG / INF8630AG Hardware Guide
Page 39
Page 42

Adjusting Display Picture, Using the On Screen Display Menu
To adjust the display picture, follow the instructions for choosing an On Screen Display Menu, "Selecting an On Screen Display Menu"
on page 38. Make sure that a PC is connected to the display and that it is selected as a source. Make sure that Total Touch Control is
activated. Select the Picture Mode Menu and follow these steps:
Step Do this... Tap or Press Location Result
1 Tap the Picture Mode line
at the top of the menu
repeatedly, until the setting
reads, "User."
Note: This menu displays
several options. It is
necessary for this setting
to be set to "User" for
adjustments to be available.
2 Choose a setting to adjust:
• Contrast
• Brightness
• Hue
• Sharpness
• Saturation
• PC Image Mode
• Color Temperature Mode
• Zoom
The Picture Mode is set to
"User."
Contrast, Brightness, Hue,
Sharpness, Saturation:
Your selection highlights and
a sliding scale with bar-line
appears on your chosen setting.
Use the navigation buttons
on your remote to navigate to
your selection and press OK.
Use the panel buttons, to
navigate to your selection,
then touch it.
Touch your selection.
Image Mode, Color Temperature
Mode, Zoom:
Your setting selection highlights.
Page 40
Page 43

3 Contrast, Brightness, Hue,
Sharpness, Saturation:
Touch the bar-line, and drag
it to the left to decrease and
right to increase your chosen
adjustment.
Your adjustment is implemented.
Image Mode, Color
Temperature Mode, Zoom:
Repeatedly tap your chosen
setting option to toggle
through the choices, until the
one you want appears.
When the menu disappears, your
adjustment is implemented.
Adjusting the Sound Mode Using the On Screen Display Menu
To adjust the display sound level, follow the instructions for choosing an On Screen Display Menu, "Understanding On Screen Display
Menu Selections" on page 34. Make sure that a PC is connected to the display and that it is selected as a source. Make sure that
Total Touch Control is activated. Select the Sound Mode Menu and follow these steps:
Step Do this... Tap or Press Location Result
1 Tap the Sound Mode line at the
top of the menu repeatedly,
until the setting reads, "User."
The Sound Mode is set to "User."
Note: This menu displays
several options. It is necessary
for this setting to be set to
"User" for adjustments to be
available.
INF8630eAG / INF8630AG Hardware Guide
Page 41
Page 44

Step Do this... Tap or Press Location Result
2 Choose a setting to adjust:
• Low Pitch
• High Pitch
• Balance
• SPDIF Output
(Digital Audio Signal)
Raw Audio Data
PCM - Encoded Audio
Data
Use the navigation buttons
on your remote to navigate to
your selection and press OK.
Note: "Understanding
On Screen Display Menu
Selections" on page 34.
Use the panel buttons, to
navigate to your selection, then
touch it.
Low Pitch, High Pitch and
Balance:
Your selection highlights.
A sliding scale with bar-line
appears on your chosen setting.
SPDIF Output:
Your selection highlights.
Touch your selection.
3 Low Pitch, High Pitch and
Balance:
Touch the bar-line, and drag
it to the left to decrease and
right to increase your chosen
adjustment.
SPDIF Output:
Tap the SPDIF selection until it
toggles to your choice of PCM
or Raw
Your adjustment is implemented.
Page 42
Page 45

Adjusting Display Settings Using the On Screen Display Menu
To adjust the display picture, follow the instructions for choosing an On Screen Display Menu, "Selecting an On Screen Display Menu"
on page 38. Make sure that a PC is connected to the display and that it is selected as a source. Make sure that Total Touch Control is
activated. Select the Settings Mode Menu and follow these steps:
Step Do this... Tap or Press Location Result
1 Choose a setting to adjust:
• Menu Time
• MHL Auto Switch
• Light Sensor
• HDMI_CEC
• HDMI EDID Version
• Boot Source
• Restore to Default
Use the navigation buttons
on your remote to navigate to
your selection and press OK.
Use the panel buttons, to
navigate to your selection,
then touch it.
Your selection highlights and
a sliding scale with bar-line
appears on your chosen setting.
Touch your selection.
2 Repeatedly tap your selection
to toggle through the choices
until the setting that you
want displays.
Your adjustment is implemented.
INF8630eAG / INF8630AG Hardware Guide
Page 43
Page 46

WORKING WITH ANDROID SETTINGS
Android Setting Overview
The Display has three main categories of Android setting screens: Device, Preferences, and Personal. These settings allow you to
choose various default settings and personalize your Display. To access these settings from any Android screen, press the settings
menu icon, , on the screen. See "Selecting an Advanced Function Option Using Touch Control" on page 33.
Category options display as highlighted, when chosen. To scroll to see other categories, swipe from bottom to top.
Device
The Device category includes Network, System Sounds, Apps, Storage & Reset, and About.
Category Icon Name Function
Network
Wi- • Toggles Wi- On and O
• Connects to available networks
• Gives status and information on networks: IP address, signal strength, etc.
• Oers you a chance to cancel networks from Display memory
• Oers other Wi- options such as portable hotspots and adding networks
Ethernet • Connect and disconnect
PPPoE • Point-to-Point Protocol over Ethernet
• Oers ability to save a new account
System Sound
System Sounds • Toggles the Sound System On and O
Apps
Downloaded
Apps
System Apps • Apps come pre-loaded on the system from the factory
Running Apps • Apps are currently being used by the system
• Apps are currently loaded onto the system and can be used
Page 44
Page 47

Category Icon Name Function
Storage and Reset
Storage • Gives the User information on how much storage space is taken by Apps,
Photos, etc. It also tells User how much storage space is available
Factory Data
Reset
About
• Allows you to reset the system default settings to the factory specications
• Gives information about the system: System update, device name, model,
Android version, Software version, etc.
INF8630eAG / INF8630AG Hardware Guide
Page 45
Page 48

Preferences
The Preferences category includes Date & Time, Language, and Keyboard.
Category Icon Name Function
Date & Time
Auto Date & Time
Date • Allows manual setting of the date in dierent formats
Time • Allows manual setting of the time in dierent time zones
24 Hour Clock • Allows user to display a 24 hour clock
Language
• Allows an automatic update of the date and time through internet
Language
Keyboard
Current
Keyboard
Congure
Keyboard
Personal
Dictionary
• English
• Chinese
• Android Keyboard layout loaded
• Allows Users to download a dierent Android on screen keyboard layout
• Allows changes to an on screen keyboard
• Settings include: Voice input key, Auto caps, Pop-up on key press, Text
Auto Correction, Show Correction Suggestions, etc.
Note: In order to use the voice command function, one must rst purchase
a microphone and connect it to the panel.
• Allows Users to add words to the dictionary
• Checks spelling
Page 46
Page 49

Personal
The Personal category includes Add accessory and Security & Restrictions.
Category Icon Name Function
Add Accessory
Accessory • Allows Users to connect to Bluetooth devices, if bluetooth is available
Security & Restrictions
Toggles On and O
• Allows/Disallows Users to install apps from places other than trusted
Unknown Sources
sources
Note: For Example: A trusted source would be the Google Play Store. An
un-trusted source might be the Amazon App Store.
Verify apps
Restricted Prole
Device
Administrators
Toggles On and O
• Veries applications
Toggles On and O
• Restricts certain identied sources from accessing the Display
• Administrator level settings, such as setting a new pin
INF8630eAG / INF8630AG Hardware Guide
Page 47
Page 50

TROUBLESHOOTING
If This Happens... Try This...
Screen is black.
This is probably because the
display has no power. If the
display has power, the small
green light in the right corner
of the front of the display panel
should be on.
No Image shows on the display,
but power is on to system and to
display.
Display says "No Signal." Display
is looking for a connected video
source.
Verify that:
• Both ends of the power cord are connected.
• The system power switch is on.
• The display is on.
• Verify that the outlet is suppling proper voltage
with a volt meter , for some countries and
locations.
Verify that:
• The cables, cords, and connections are in good
condition.
• A correct input source is selected and that the
input signal is compatible with the display.
• Connect to any video source: VHS, Apple TV,
external PC, etc.
Icon/
Button
Reference
(Link or document)
See "" on page 21.
See "Power Source, Power
Cord, Plugs" on page 5.
See "Understanding Source
Touch Control Icons" on page
27.
See ""Connecting the Display
to an External PC" on page
20.
The display shuts down
suddenly.
Note: The display may have
overheated.
The display screen does not
respond touch gestures.
• Verify that a source is active
(the connection is still viable).
• Remove any objects blocking the vents.
• Press the Total Touch Control button on the right,
bottom of the front of the display to turn on
touch control.
• Cycle Power; that is: power o the display, wait a
few seconds, then power on the display.
See "Working with Sources"
on page 27.
See "Connecting the Display
to an External PC" on page
20.
See "Ventilation" on page
5.
Page 48
Page 51

If This Happens... Try This...
There is no touch control from a
connected external PC.
Verify that:
• The USB B to USB type A cable is plugged from
the computer into the display correctly.
• The computer's operating system is
Windows® 7, 8, 10, 16.
Note: The display touchpad supports only
Windows.
The colors aren't correct on the
display.
• Adjust the color settings in the Picture menu.
• Reset the picture settings.
Verify that:
• Connections between the source and the display
have been made correctly.
• Cables, cords, and connections are in good
condition.
• Correct input source is selected and that the input
signal is compatible with the display.
Icon/
Button
Reference
(Link or document)
See "Connecting the Display
to an External PC" on page
20.
See "Selecting an Advanced
Function Option Using Touch
Control" on page 33.
See "Understanding Source
Touch Control Icons" on page
27.
See "Power Source, Power
Cord, Plugs" on page 5.
Remote functions are not
working properly.
Feedback noise is coming
through the speakers.
Verify that:
• The display is turned on, press Power button on
the remote.
• The remote batteries are situated correctly in the
remote and that they are fresh. (Batteries are not
included.)
• Replace remote batteries with fresh ones.
(Batteries are not included.)
• Aim the remote to the right, lower edge of the
panel; where the sensor is.
• Ensure that you are pointing the remote at the
sensor at an angle between 26 and 30 degrees,
both vertically and horizontally.
• Remove any obstruction in front of the sensor.
Move the infrared communication equipment away
from the display.
Note: Noise can occur when infrared
communication equipment (for example, infrared
cordless headphones) is used near the display.
POWER SCREENSHOT MUTE
ABC DEF GHI
1
2
JKL MNO PQR
5
4
STU VWX YZ-
8
7
F1
CHLIST
FREEZE
0
HOME MENU
OK
VOL
SOURCE
AUDIO INFO ZOOM
IMAGE SYS STEREO
PLAY PAUSE STOP ROTATE
PREV NEXT BACK SPEED
See "Understanding the
3
6
Remote Buttons" on page
9
15.
See "Installing Remote
CH
Batteries" on page 16.
See "Operating the Remote"
on page 16.
INF8630eAG / INF8630AG Hardware Guide
Page 49
Page 52

If This Happens... Try This...
There is NO sound is coming
from external connected
speakers or device.
Verify that:
• The speakers are connected properly and that the
speaker power switch is turned on.
• An audio cable is correctly installed between an
external device and the display.
• "Mute" is not active; test the Mute button on the
remote.
• The volume is turned up.
Note: An HDMI® 1.3 (or higher) source and source
device is required to hear audio via the HDMI cable.
There is No sound is coming from
internal speakers.
Verify that:
• The volume is turned up.
• The sound has not been muted, from remote
control. (See above.)
• Verify the playback has not been paused and that
the video’s audio has not been muted,
for video viewing.
The On Screen Display Menus
don't display.
Verify that:
• There is a PC correctly connected.
• The PC is selected as the source.
• You are not trying to access the On Screen
Display Menus from the Home Screen.
• If you are trying to access the Picture Mode
settings or the Sound Mode settings, set the
menu (title bar) to "User."
Icon/
Button
POWER SCREENSHOT MUTE
ABC DEF GHI
1
2
JKL MNO PQR
5
4
STU VWX YZ-
8
7
F1
FREEZE
0
HOME MENU
OK
VOL
SOURCE
AUDIO INFO ZOOM
IMAGE SYS STEREO
PLAY PAUSE STOP ROTATE
PREV NEXT BACK SPEED
Reference
(Link or document)
See "Connecting to Other
Devices" on page 11.
See "Adjusting Volume
3
6
Without Using the On Screen
9
CHLIST
Display Menus" on page
24.
CH
See "Adjusting Volume
Without Using the On Screen
Display Menus" on page
24.
See "Selecting an Advanced
Function Option Using Touch
Control" on page 33.
See "Selecting an On Screen
Display Menu" on page 38.
See "Adjusting Display
Picture, Using the On Screen
Display Menu" on page 40.
PC and Display do not recognize
each other.
Change the EDID setting, under the Settings Menu in
the On Screen Display.
My device isn't communicating
with the Display.
For additional troubleshooting support, please contact:
InFocus Corporation - Technical Support
6AM-5PM PST
877-388-8385
www.infocus.com/support
Page 50
See "Adjusting the Sound
Mode Using the On Screen
Display Menu" on page 41.
See "Understanding On
Screen Display Menu
Selections" on page 34.
See "Adjusting Display
Settings Using the On Screen
Display Menu" on page 43.
Page 53

LIMITED WARRANTY
InFocus Limited Warranty For InFocus Branded Hardware Products Only
LIMITED WARRANTY. InFocus’ warranty obligations for the hardware products are limited to the terms set forth herein. InFocus
warrants the InFocus-branded hardware products against defects in materials and workmanship under normal use for a period outlined
in the Limited Warranty Periods section below from the date of retail purchase by the original end-user purchaser (“Warranty Period”).
The Warranty Period starts on the date of purchase. Your dated sales or delivery receipt, showing the date of purchase of the product,
is your proof of the purchase date. You may be required to provide proof of purchase and proof that the product was purchased new
as a condition of receiving warranty service. If a hardware defect arises and a valid claim is received within the Warranty Period,
at its option and to the extent permitted by law, InFocus will either (1) repair the hardware defect at no charge, using new parts or
refurbished parts that are equivalent to new in performance and reliability, (2) exchange the product with a product that is new or
refurbished that is equivalent to new in performance and reliability and is at least functionally equivalent to the original product, or
(3) refund the purchase price of the product. InFocus may request that you replace defective parts with customer-installable new
or refurbished parts that InFocus provides in fulllment of its warranty obligation (“Customer Self Repair”). A replacement product
or part, including a Customer Self Repair part that has been installed in accordance with instructions provided by InFocus, assumes
the remaining warranty of the original product or ninety (90) days from the date of replacement or repair, whichever provides longer
coverage. When a product or part is exchanged, any replacement item becomes your property and the replaced item becomes InFocus’s
property. Parts provided by InFocus in fulllment of its warranty obligation must be used in products for which warranty service is
claimed. When a refund is given, the product for which the refund is provided must be returned to InFocus and becomes InFocus’s
property. This is your exclusive remedy for defective products.
Limited Warranty Periods vary depending on your product model and the country of purchase. To review the warranty period
associated with your product model, please refer to the product specications information on www.infocus.com. By inputting your
product model in the Quick Search box on the website, you will nd warranty terms in the Specications matrix.
EXCLUSIONS AND LIMITATIONS. This Limited Warranty applies only to the hardware products manufactured by or for InFocus,
and sold by InFocus, its worldwide subsidiaries, authorized re-sellers or country distributors, that can be identied by the “InFocus”
trademark, trade name, or logo axed to it, and to required rmware. The Limited Warranty does not apply to any non-InFocus
hardware products or peripherals external to the InFocus-branded hardware products (including but not limited to external storage
subsystems, displays, printers, speakers or other peripherals), or to any software applications or programs, even if packaged or sold
with the InFocus hardware. Manufacturers, suppliers, or publishers of products, software or peripherals, other than InFocus, may
provide their own warranties to the end user purchaser, but InFocus, in so far as permitted by law, provides their products “AS IS”
without the InFocus Limited Warranty. Software distributed by InFocus with or without the InFocus brand name (including, but not
limited to system software) is not covered under this Limited Warranty. Refer to the licensing agreement accompanying the software
for details of your rights with respect to its use.
InFocus does not warrant that the operation of the products will be uninterrupted or error-free. InFocus is not responsible for damage
arising from failure to follow instructions relating to the products’ use.
INFOCUS IS NOT RESPONSIBLE FOR DAMAGE TO OR LOSS OF ANY PROGRAMS, DATA, OR REMOVABLE STORAGE MEDIA. INFOCUS
IS NOT RESPONSIBLE FOR THE RESTORATION OR REINSTALLATION OF ANY PROGRAMS OR DATA OTHER THAN SOFTWARE
INSTALLED BY INFOCUS WHEN THE PRODUCT IS MANUFACTURED.
To enable InFocus to provide the best possible support and service during the Limited Warranty Period, you will be required to:
• Maintain a proper and adequate environment, and use the InFocus hardware products in accordance with the instructions
furnished.
• Verify congurations, load most recent rmware, install software patches, run InFocus diagnostics and utilities, and implement
temporary procedures or work-arounds provided by InFocus while InFocus works on permanent solutions.
INF8630eAG / INF8630AG Hardware Guide
Page 51
Page 54

• Allow InFocus to keep resident on your systems or sites certain system and network diagnosis and maintenance tools to facilitate
the performance of warranty support (collectively referred to as “Proprietary Service Tools”); Proprietary Service Tools are and
remain the sole and exclusive property of InFocus.
Additional Limitations:
• Products external to the system processor (CPU) box, such as external storage subsystems, printers and other peripherals, are
covered by the applicable warranty for those products or options.
• An eective repair does not necessarily require the replacement of a defective part. For example, cleaning the heads of a oppy
drive or updating revision levels of ROM BIOS on a PCA board are activities that in many instances deliver an eective repair.
• BIOS/Firmware upgrades are not covered under the Limited Warranty. Firmware that is an integral part of the option hardware
board is not automatically upgraded when new versions of rmware are released.
• It is the responsibility of the customer to ensure that their software is compatible with the latest
BIOS/rmware revision.
This Limited Warranty does not apply: (a) to consumable or expendable parts, such as batteries, or protective coatings designed to
diminish over time unless failure has occurred due to a defect in materials or workmanship; (b) to cartons, carrying cases, shipping
cases, external cabinets, accessories used in connection with the product; (c) to cosmetic damage, including but not limited to scratches,
dents, and broken plastic on ports; (d) to damage caused by use with non-InFocus products; (e) to damage caused by accident,
abuse, misuse, improper ventilation, smoke exposure, contamination, improper or inadequate maintenance, cleaning or calibration,
liquid contact, unusual physical or electrical stress and/or power surges, virus infection, re, earthquake, disaster, lightning or other
external causes; (f) to damage caused by operating the product outside the permitted or intended uses or usage parameters described
by InFocus (including burned display screens and incorrect input voltage); (g) to damage caused by service (including upgrades and
expansions) performed by anyone other than a representative of InFocus or an InFocus Authorized Service Provider (“ASP”) or your own
installation of customer-installable parts as instructed by InFocus; (h) to a product or part that has been modied to alter functionality
or capability without the written permission of InFocus (including use of an unauthorized mount); (i) to defects caused by normal wear
and tear or otherwise due to the normal aging of the product; (j) to failure to follow maintenance procedures as outlined in the product
user documentation including where a schedule is specied for regular cleaning of certain parts (based on usage and environment); (k)
to loss or damage in transit; or (l) if the product is not used under normal operating conditions which are dened as use not in excess
of 16 hours continuously per day with a minimum 8 hour period of continuous rest in the powered o state; or (m) if any InFocus serial
number has been removed or defaced. In addition, LCD burn-in as a result of excessive display of static images on the product is not
covered under the terms of this Limited Warranty.
Important: Do not open the hardware products unless otherwise directed by InFocus for the purposes of a Customer Self Repair (CSR).
Opening the hardware products may cause damage that is not covered by this Limited Warranty. Only InFocus or an ASP should
perform service on the hardware products.
TO THE EXTENT PERMITTED BY LAW, THIS WARRANTY AND THE REMEDIES SET FORTH ABOVE ARE EXCLUSIVE AND IN LIEU
OF ALL OTHER WARRANTIES, REMEDIES AND CONDITIONS, WHETHER ORAL, WRITTEN, STATUTORY, EXPRESS OR IMPLIED. AS
PERMITTED BY APPLICABLE LAW, INFOCUS SPECIFICALLY DISCLAIMS ANY AND ALL STATUTORY OR IMPLIED WARRANTIES,
INCLUDING, WITHOUT LIMITATION, WARRANTIES OF MERCHANTABILITY AND FITNESS FOR A PARTICULAR PURPOSE AND
WARRANTIES AGAINST HIDDEN OR LATENT DEFECTS. IF INFOCUS CANNOT LAWFULLY DISCLAIM STATUTORY OR IMPLIED
WARRANTIES THEN TO THE EXTENT PERMITTED BY LAW, ALL SUCH WARRANTIES SHALL BE LIMITED IN DURATION TO THE
DURATION OF THE EXPRESS WARRANTY AND TO THE REPAIR OR REPLACEMENT SERVICE AS DETERMINED BY INFOCUS IN ITS
SOLE DISCRETION. No InFocus reseller, agent, or employee is authorized to make any modication, extension, or addition to this
warranty. If any term is held to be illegal or unenforceable, the legality or enforceability of the remaining terms shall not be aected or
impaired.
Page 52
Page 55

EXCEPT AS PROVIDED IN THIS WARRANTY AND TO THE MAXIMUM EXTENT PERMITTED BY LAW, INFOCUS IS NOT RESPONSIBLE
FOR DIRECT, SPECIAL, INCIDENTAL OR CONSEQUENTIAL DAMAGES RESULTING FROM ANY BREACH OF WARRANTY OR
CONDITION, OR UNDER ANY OTHER LEGAL THEORY, INCLUDING BUT NOT LIMITED TO LOSS OF USE; LOSS OF REVENUE; LOSS
OF ACTUAL OR ANTICIPATED PROFITS (INCLUDING LOSS OF PROFITS ON CONTRACTS); LOSS OF THE USE OF MONEY; LOSS
OF ANTICIPATED SAVINGS; LOSS OF BUSINESS; LOSS OF OPPORTUNITY; LOSS OF GOODWILL; LOSS OF REPUTATION; LOSS OF,
DAMAGE TO, COMPROMISE OR CORRUPTION OF DATA; OR ANY INDIRECT OR CONSEQUENTIAL LOSS OR DAMAGE HOWSOEVER
CAUSED INCLUDING THE REPLACEMENT OF EQUIPMENT AND PROPERTY, ANY COSTS OF RECOVERING, PROGRAMMING OR
REPRODUCING ANY PROGRAM OR DATA STORED IN OR USED WITH THE INFOCUS PRODUCT AND ANY FAILURE TO MAINTAIN THE
CONFIDENTIALITY OF DATA STORED ON THE PRODUCT. THE FOREGOING LIMITATION SHALL NOT APPLY TO DEATH OR PERSONAL
INJURY CLAIMS, OR ANY STATUTORY LIABILITY FOR INTENTIONAL AND GROSS NEGLIGENT ACTS AND/OR OMISSIONS. INFOCUS
DISCLAIMS ANY REPRESENTATION THAT IT WILL BE ABLE TO REPAIR ANY PRODUCT UNDER THIS WARRANTY OR MAKE A
PRODUCT EXCHANGE WITHOUT RISK TO OR LOSS OF PROGRAMS OR DATA.
Limitation on Bringing Action: No action, regardless of form, arising out of the agreement to purchase the Product may be brought
by purchaser more than one year after the cause of action has accrued. Governing Law: Any action, regardless of form, arising out
of the agreement to purchase the Product is governed by the laws of the State of Oregon, U.S.A. Mandatory Arbitration – Any action,
regardless of form, arising out of the agreement to purchase the Product is subject to mandatory arbitration.
ADDITIONAL RIGHTS. FOR CUSTOMERS, WHO ARE COVERED BY CONSUMER PROTECTION LAWS OR REGULATIONS IN THEIR
COUNTRY OF PURCHASE OR, IF DIFFERENT, THEIR COUNTRY OF RESIDENCE, THE BENEFITS CONFERRED BY THIS WARRANTY
ARE IN ADDITION TO ALL RIGHTS AND REMEDIES PROVIDED BY SUCH CONSUMER PROTECTION LAWS AND REGULATIONS. THIS
WARRANTY DOES NOT EXCLUDE, LIMIT OR SUSPEND ANY RIGHTS OF CONSUMERS ARISING OUT OF NONCONFORMITY WITH A
SALES CONTRACT. SOME COUNTRIES, STATES AND PROVINCES DO NOT ALLOW THE EXCLUSION OR LIMITATION OF INCIDENTAL OR
CONSEQUENTIAL DAMAGES OR ALLOW LIMITATIONS ON HOW LONG AN IMPLIED WARRANTY OR CONDITION MAY LAST, SO THE
LIMITATIONS OR EXCLUSIONS DESCRIBED BELOW MAY NOT APPLY TO YOU. THIS WARRANTY GIVES YOU SPECIFIC LEGAL RIGHTS,
AND YOU MAY ALSO HAVE OTHER RIGHTS THAT VARY BY COUNTRY, STATE OR PROVINCE. INFOCUS, THE WARRANTOR UNDER
THIS LIMITED WARRANTY, IS IDENTIFIED AT THE END OF THIS DOCUMENT.
EXTENDED WARRANTIES. InFocus extended product warranties are available for an additional charge. For further information on
InFocus extended product warranties, please contact InFocus or your product reseller.
OBTAINING WARRANTY SERVICE. Please access and review the online help resources located at www.infocus.com/support before
seeking warranty service. If the product is still not functioning properly after making use of these resources, please contact InFocus
Technical Support or, if applicable, an ASP using the information provided below. When contacting InFocus via telephone, other charges
may apply depending on your location. When calling, InFocus Technical Support or an ASP will help determine whether your product
requires service and, if it does, will inform you how InFocus will provide it. You must assist in diagnosing issues with your product and
follow InFocus’s warranty processes. InFocus may restrict service to the country where InFocus or its Authorized Distributors originally
sold the hardware product. InFocus will provide warranty service either (i) at an ASP location, where service is performed at the
location, or the ASP may send the product to an InFocus repair service location for service, (ii) by sending you prepaid way bills (and if
you no longer have the original packaging, InFocus may send you packaging material at your cost) to enable you to ship the product
to an InFocus repair service location, or (iii) by sending you customer-installable new or refurbished replacement parts to enable you to
conduct Customer Self Repair, or (iv) by exchanging the product for a new or refurbished replacement.
Customer Self Repair
InFocus products are designed with many Customer Self Repair (CSR) parts to minimize repair time and allow for greater exibility in
performing defective parts replacement. If during the diagnosis period, InFocus identies that the repair can be accomplished by the
use of a CSR part, InFocus will ship that part directly to you for replacement. There are two categories of CSR parts:
• Parts for which customer self repair is mandatory. If you request InFocus to replace these parts, you will be charged for the travel
and labor costs of this service.
INF8630eAG / INF8630AG Hardware Guide
Page 53
Page 56

• Parts for which customer self repair is optional. These parts are also designed for customer self repair. If, however, you require
that InFocus replace them for you, this may be done at no additional charge under the type of warranty service designated for your
product.
Based on availability and where geography permits, InFocus will attempt to ship CSR parts out the next business day. Customer receipt
will vary based upon the actual part, customer location and shipping method. Next Day service may be oered at an additional charge
where geography permits. If assistance is required, you can call the InFocus Technical Support Center and a technician will help you
over the phone. InFocus species in the materials shipped with a replacement CSR part whether a defective part must be returned to
InFocus. In cases where it is required to return the defective part to InFocus, you must ship the defective part back to InFocus within
a dened period of time, normally ve (5) business days, and clearly display the Return Material Authorization (RMA#) on the outside
of the shipping carton or a similar package aording an equal degree of protection. The defective part must be returned with the
associated documentation in the provided shipping material. Failure to return the defective part may result in InFocus charging you for
the replacement. With a Customer Self Repair, InFocus will pay all shipping and part return costs and determine the courier/carrier to
be used.
Upon receipt of the replacement product or part, the original product or part becomes the property of InFocus and you agree to
follow instructions, including arranging the return of original product or part to InFocus in a timely manner. When providing a product
exchange or Customer Self Repair (CSR) part requiring the return of the original product or part, InFocus may require a credit card
authorization as security for the retail price of the replacement product or part and applicable shipping costs. When returning product
to InFocus, a Return Material Authorization Number (RMA #) is required and must be clearly displayed on the outside of the shipping
carton or a similar package aording an equal degree of protection. Service options, parts availability and response times may vary
according to the country in which service is requested. Service options are subject to change at any time. You may be responsible for
shipping and handling charges if the product cannot be serviced in the country in which service is requested. If you seek service in a
country that is not the country of original purchase, you will comply with all applicable import and export laws and regulations and be
responsible for all custom duties, V.A.T. and other associated taxes and charges. Where international service is available, InFocus may
repair or exchange defective products and parts with comparable products and parts that comply with local standards. In accordance
with applicable law, InFocus may require that you furnish proof of purchase details and/or comply with registration requirements before
receiving warranty service. Resources with more details on this and other matters on obtaining warranty service are described below.
PRIVACY. InFocus will maintain and use customer information in accordance with the InFocus Privacy Policy available at www.Infocus.
com/privacy and InFocus’s applicable legal obligations.
BACKUP. If your product is capable of storing software programs, data and other information, you should protect its contents against
possible operational failures. Before you deliver your product for warranty service it is your responsibility to keep a separate backup
copy of the contents, remove all personal information and data that you want to protect and disable any security passwords. THE
CONTENTS OF YOUR PRODUCT WILL BE DELETED AND THE STORAGE MEDIA REFORMATTED IN THE COURSE OF WARRANTY
SERVICE. Your product or a replacement product will be returned to you as your product was congured when originally purchased,
subject to applicable updates. InFocus may install system software updates as part of warranty service that will prevent the hardware
from reverting to an earlier version of the system software. Third party applications installed on the hardware may not be compatible or
work with the hardware as a result of the system software update. You will be responsible for reinstalling all other software programs,
data and passwords. Recovery and reinstallation of software programs and user data are not covered under this Limited Warranty.
RESOURCES. Support and service information including Authorized Distributor and Authorized Service Provider locations is available at:
www.infocus.com/support.
InFocus Corporation, 13190 SW 68th Parkway, Suite 200, Portland, OR 97223-8368 USA
© 2016 InFocus Corp. All rights reserved. InFocus and the InFocus logo are trademarks of InFocus Corp., registered in the U.S. and
other countries.
Page 54
 Loading...