

InFocus INF8630eAG, INF8630AG, JTouch Plus INF7530AG, JTouch Plus INF7530eAG Hardware Manual

INF8630AG / INF8630eAG
Hardware Guide
009-1752-00


CONTENTS
Declaration of Conformity ..................................................................................................................................................................3
Safety Considerations ..........................................................................................................................................................................4
General ............................................................................................................................................................................................... 4
Moving this Display .......................................................................................................................................................................4
Installation and Location ..............................................................................................................................................................4
Ventilation ........................................................................................................................................................................................5
Power Source, Power Cord, Plugs .............................................................................................................................................5
Medical Concerns ............................................................................................................................................................................5
Treatment of Display and Remote ............................................................................................................................................6
Cleaning the Display ......................................................................................................................................................................6
What’s Included ..................................................................................................................................................................................... 7
Setup .........................................................................................................................................................................................................8
Mounting ..........................................................................................................................................................................................8
Mounting Location .........................................................................................................................................................................8
Mounting Technique ......................................................................................................................................................................8
Panel Front, Under, and Side .......................................................................................................................................................9
Panel Back and Side ......................................................................................................................................................................9
Connecting AC Power .........................................................................................................................................................................10
Connecting to Other Devices ............................................................................................................................................................11
Side Panel Ports .............................................................................................................................................................................11
Front Panel Ports ..........................................................................................................................................................................14
Working With the Remote ................................................................................................................................................................15
Understanding the Remote Buttons ....................................................................................................................................... 15
Installing Remote Batteries .......................................................................................................................................................16
Operating the Remote .................................................................................................................................................................16
Treatment of the Remote/Display and Batteries .......................................................................................................................16
Using the Keypad Buttons on Front of Display ......................................................................................................................... 17
Locating the Keypad .................................................................................................................................................................... 17
Understanding the Keypad Buttons ....................................................................................................................................... 17
LED Indicators ...................................................................................................................................................................................... 18
Connecting the Display to a PC.......................................................................................................................................................18
Connecting To the Optional PC In the Bay On Back Of Panel.........................................................................................18
Understanding the Display and External PC Connections...............................................................................................19
Connecting the Display to an External PC ........................................................................................................................... 20
Plugging a PC Into the Display ........................................................................................................................................ 20
Connecting the Display To a PC Using Wi ..................................................................................................................21

Basic Functions ................................................................................................................................................................................... 22
Turning On the Display .............................................................................................................................................................. 22
Turning O the Display .............................................................................................................................................................. 23
Adjusting Volume Without Using the On Screen Display Menus ................................................................................. 24
Total Touch Control.............................................................................................................................................................................25
Dening Total Touch Control .................................................................................................................................................... 25
Understanding the Total Touch Control Menu Options .................................................................................................... 25
Using Total Touch Control .........................................................................................................................................................26
Working with Sources ....................................................................................................................................................................... 27
Accessing Sources Using Total Touch Control .................................................................................................................... 27
Understanding Source Touch Control Icons ................................................................................................................. 27
Selecting a Source Using Total Touch Control .............................................................................................................28
Accessing Sources Using the Remote ...................................................................................................................................29
Understanding Source Options ........................................................................................................................................ 29
Selecting a Source Using The Remote ............................................................................................................................31
Working with Total Touch Control Advanced Functions Menu ............................................................................................ 32
Understanding Total Touch Control Advanced Functions Menu ..................................................................................32
Selecting an Advanced Function Option Using Touch Control ..................................................................................... 33
Working With the On Screen Display Settings ......................................................................................................................... 34
Dening On Screen Display ...................................................................................................................................................... 34
Understanding On Screen Display Menu Selections ......................................................................................................... 34
Picture Mode Menu ............................................................................................................................................................. 34
Sound Mode Menu ............................................................................................................................................................... 36
Settings Mode Menu ........................................................................................................................................................... 37
Selecting an On Screen Display Menu...................................................................................................................................38
Adjusting Display Picture, Using the On Screen Display Menu .................................................................................... 40
Adjusting the Sound Mode Using the On Screen Display Menu ....................................................................................41
Adjusting Display Settings Using the On Screen Display Menu ................................................................................... 43
Working with Android Settings ..................................................................................................................................................... 44
Android Setting Overview ......................................................................................................................................................... 44
Device .............................................................................................................................................................................................. 44
Preferences .................................................................................................................................................................................... 46
Personal ...........................................................................................................................................................................................47
Troubleshooting .................................................................................................................................................................................. 48
Limited Warranty ................................................................................................................................................................................ 51

DECLARATION OF CONFORMITY
Manufacturer: InFocus Corporation, 13190 SW 68th Parkway, Suite 200, Portland, Oregon 97223-8368 USA
Trademarks
Apple, Mac and Facetime are trademarks or registered trademarks of Apple, Inc. Microsoft, Windows, PowerPoint, Excel and Word
are trademarks or registered trademarks of Microsoft Corporation. Adobe and Acrobat are trademarks or registered trademarks of
Adobe Systems Incorporated. HDMI logo and “High Denition Multimedia Interface” are registered trademarks of HDMI Licensing
LLC. Manufactured under license from Dolby Laboratories. Dolby and the double-D symbol are trademarks of Dolby Laboratories. SRS
TruSurround HD and SRS TruVolume are trademarks of SRS Labs, Inc. TruSurround HD and TruVolume technologies are incorporated
under license from SRS Labs, Inc. InFocus, In Focus, INFOCUS (stylized), MondoCenter, Mondopad, BigTouch, JTouch, and ShareView are
either registered trademarks or trademarks of InFocus Corporation in the United States and other countries. All other trademarks are
the property of their respective owners. Any other trademarks, service marks, personal names or product names are assumed to be the
property of their respective owners and are used only for reference. There is no implied sponsorship, aliation, certication, approval or
endorsement if we use one of these terms.
FCC Warning
This equipment has been tested and found to comply with the limits for a Class A digital device, pursuant to part 15 of the FCC
Rules. These limits are designed to provide reasonable protection against harmful interference when the equipment is operated in
a commercial environment. This equipment generates, uses and can radiate radio frequency energy and, if not installed and used in
accordance with the instruction manual, may cause harmful interference to radio communications.
Operation of the equipment in a residential area is likely to cause harmful interference in which case the user will be required to correct
the interference at his own expense. Changes or modications not expressly approved by InFocus Corporation may void authority to
operate the equipment.
This device complies with part 15 of the FCC Rules. Operation is subject to the following two conditions: (1) This device may not cause
harmful interference and (2) this device must accept any interference received, including interference that may cause undesired
operation.
The manufacturer is not responsible for any radio or TV interference caused by unauthorized modications to this equipment. Such
modications could void the user's authority to operate the equipment.
Canada
This Class A digital apparatus complies with Canadian ICES-003.
Cet appareil numérique de la classe A est conforme à la norme NMB-003 du Canada.
EU/EEC
Warning: This is a class A product. In a domestic environment this product may cause radio interference in which case the user may be
required to take adequate measures.
Agency Approvals
See product certication label.
This document applies to regulatory model: D104
Input ratings: AC 100-240V AC, 4.5A, 50-60Hz
InFocus reserves the right to alter product oerings and specications at any time without notice.
INF8630eAG / INF8630AG Hardware Guide
Page 3

SAFETY CONSIDERATIONS
Please read and follow all safety instructions provided below and on the display before connecting the display to a power
source. Failure to comply with safety instructions may result in re, electrical shock, or personal injury and may damage or
impair protection provided by the equipment. Please save all safety instructions.
General
• Refer to this guide for proper startup and shutdown procedures.
• Follow all warnings and cautions in this manual and on the display.
• Turn o display and unplug power, if there is a power outage, unstable voltage, thunder or lighting storm, abnormal sound or smell,
damaged power cord, or product damaged caused by impact, fall, or strike.
Moving this Display
• Move and install this display with two individuals, as it is very heavy. Do not attempt to move or install the display by yourself,
otherwise injury and/or damage may occur.
• Hold the display rmly using the handles and side or bottom bezels, when you move it. Do not hold the top bezel.
• Hold the four corners and bottom side of the display. To not exert pressure on the front of the display.
• Do not tilt or invert the carton, when you move the display or carton. Always keep display and carton in an upright orientation.
• Disconnect all accessories and cables before moving or repositioning the display.
Installation and Location
WARNING: Securely attach this display to the oor/wall per installation instructions. Tipping, shaking, or rocking the machine may
cause injury or death.
• Use only properly rated wall and stand mounting hardware, which meets this product’s specications and follow the manufacturer
installation instructions. The warranty does not cover any damage caused by use of improperly rated mounting hardware or from
improper installation.
• Use only metric 8 (12 mm) screws, when you mount the display to a wall. In addition, the mounting interface should comply with
the UL1678 standard in North America. The mounting means should be strong enough to bear the weight of the display.
• Do not install or use the display or speakers near any heat sources such as radiators, heat registers, stoves, or other devices
(including ampliers) that produce heat.
• Do not place the display in direct sunlight, humid, greasy or dusty places or in places where the display may come into contact with
rain, smoke, steam, ammable or explosive substances, combustible or corrosive gasses.
• Do not use any components of the display, including the speakers, near water.
• Make sure no naked ame source, such as lighted candles, are placed on the display.
• Do not install the display in places subject to mechanical vibration.
• Do not place the display on an unstable surface, which could result in serious personal injuries and display damage. When
mounting the display to a stand, be sure to following the manufacturer’s instructions. Use only the mounting hardware
recommended by the manufacturer.
Page 4

Ventilation
• Maintain a distance of at least 1.98” (5 cm) between the display and the wall to provide adequate ventilation, if the display is
installed against the wall.
• Locate the display at least 4’ (1.2 m) away from heating and cooling vents.
• Do not block ventilation openings. Locate the display in a well-ventilated area without obstructions to intake or exhaust vents.
• Maintain 1 1/2" (30 cm) above, 1/2" (10 cm) on each side, and 1/2" (10 cm) below display to provide adequate ventilation.
Power Source, Power Cord, Plugs
• Make sure the power outlet used to power this display is readily accessible for fast disconnection, in case
of emergency.
• Do not use an outlet that has been damaged or has a non-standard power supply.
• Use the power cord provided.
• Ensure a good connection as you connect the power cord to a receptacle with a protective safety (earth) ground terminal.
• Ground Class 1 display.
• Use a surge-protected power strip. Do not overload wall outlets.
• Do not use the display with the power cord near water: for instance, near a bathtub, washbowl, kitchen sink or swimming pool, etc.
• Do not place any heavy objects on the power cord.
• Protect the power cord from being walked on or pinched particularly at plugs, convenience receptacles and the point where they
exit from the display.
• Unplug the display if you are not going to use it for an extensive period of time.
• Hold the plug, not the cord, when you disconnect the system.
• Keep power plug free of dusk and metal attachments.
• Unplug the display if you need to clean it with the included micro-ber cleaning cloth. The screen may be wiped with the cleaning
cloth when the power is o. Never use alcohol, solvents or ammonia-based liquids on this display.
• Do not touch the power cord with wet hands.
Medical Concerns
• Rinse skin for 15 minutes, in the event that the LCD screen breaks and leeks onto skin.
• Use the display with adequate light. Insucient light or continuous use may damage vision.
INF8630eAG / INF8630AG Hardware Guide
Page 5

Treatment of Display and Remote
WARNING: Do not expose this equipment or any component of this equipment to rain or moisture, because re or
electric shock may result.
WARNING: Do not allow children to climb on display.
WARNING: Do not insert any sharp objects, metal, or liquid into the unit. Do not allow such objects to contact ventilation holes or
signal connectors. Short circuiting of the product, damage, or electrical shock may result.
WARNING: Do not remove the cover or back or service your display, yourself; doing so can be dangerous and will void your warranty.
Refer all service to qualied service personnel.
WARNING: Unplug Panel before a lighting/ thunder storm. Damage to product or electrical overload could result if power surge is
allowed to overload system.
• Use only replacement parts, specied by InFocus. Unauthorized substitutions may result in re, electrical shock, or injury and may
void the warranty.
• Do not drop the display.
• Do not spill liquid on the display. Spilled liquid may damage the display.
• Wash hands after handling the cables supplied with this display.
• Do not use hard objects or press forcibly on the display screen.
• Do not twist the display.
• Do not use harsh chemicals to clean display.
• Do not allow any image, text or icon to display indenitely on the screen. Ghosting of an image may occur and is not covered by
warranty.
• Allow display to adjust to new temperature slowly, upon change of location. Do not use it immediately.
• Make sure the polarity (+/-) of the remote control's batteries is correctly aligned. Dispose of used batteries in accordance with local
disposal laws. Batteries are not included.
Cleaning the Display
Clean the display with a soft cloth and a cleaner, made for cleaning high tech screens. Spray a soft cloth with minimal cleaner and rub
carefully to remove smudges and nger oils.
Note: Most common window cleaners will not hurt the display; use them limitedly and carefully.
WARNING: Never spill liquids or use excessive cleaning products on the screen or any part of the display.
WARNING: Follow these instructions to help ensure personal safety and image quality over the life of the
display. Failure to follow these instructions may aect the warranty.
Page 6

WHAT’S INCLUDED
47.28" x 78.35" x 4.57"
1201mm x 1990mm x 116.1mm
POWER SCREENSHOT MUTE
ABC DEF GHI
3
1
2
JKL MNO PQR
654
STU VWX YZ-
9
8
7
F1
CHLIST
FREEZE
0
HOME MENU
OK
VOL
CH
SOURCE
AUDIO INFO ZOOM
IMAGE SYS STEREO
PLAY PAUSE STOP ROTATE
PREV NEXT BACK SPEED
Remote Control
Quick Start
(Batteries Optional)
INF8630eAG / INF8630AG Hardware Guide
009-1740-XX
Guide
Power Cord ( Varies by Country)
009-1724-XX
Combo Guide:
HDMI
Warranty
Safety
Certicate of
Conformity
USB Cable
A to B
Styli
Page 7

SETUP
Mounting
This product does not ship with mounting accessories. Only use commercially manufactured mounting accessories which meet this
product's specications and follow the manufacturer installation instructions.
WARNING: This display must be securely attached to the oor/wall per installation instructions. Tipping, shaking, or rocking the
machine may cause injury or death.
Mounting Location
• Install the display near an easily accessible AC power outlet.
• Mount display to solid wall or stable horizontal surface.
• Do not install the display in places subject to mechanical vibration.
• Do not place the display on an unstable surface, which could result in serious personal injuries and display damage. When you
mount the display to a stand, be sure to follow the manufacturer’s instructions. Use only the mounting hardware recommended by
the manufacturer.
• Do not install or use the display near any heat sources such as radiators, heat registers, stoves, or other devices (including
ampliers) that produce heat.
• Do not place the display in direct sunlight, humid, greasy or dusty places or in places where the display may come into contact with
rain, smoke or steam.
• Protect display from environmental hazards; that is: heavy dust, insects, condensation, other moisture, and strong electromagnetic
elds.
Mounting Technique
• Use a professional technician to properly install display.
• Use only properly rated wall and stand mounting hardware that meet this product’s specications and follow the manufacturer
installation instructions. The warranty does not cover any damage caused by use of improperly rated mounting hardware or from
improper installation.
• Place your display front face-down on a clean, cushioned surface, to prevent damage to the screen surface.
• Use metric 8 (12 mm) screws, when you mount the display to a wall. Use spring washers to prevent the screws from coming loose.
In addition, the mounting interface should comply with the UL1678 standard in North America. The mounting means should be
strong enough to bear the weight of the display.
• Maintain a distance of at least 1.98” (5 cm) between the display and the wall, if the display is installed against the wall; this
distance provides adequate ventilation.
Page 8

Panel Front, Under, and Side
AV-OUT Y Pb Pr AV-IN L-IN R-IN USB3.0 USB3.0 USB2.0
SPDIF TOUCH-USB1 TOUCH-USB2 TOUCH-USB3 TOUCH-USB4 OPS PC-USB RS232-IN RS232-OUT
HDMI1 HDMI2 HDMI3 HDMI-OUT LAN HDMI4(MHL) VGA PC-AUDIO
Optional PC Ports
Side Panel Ports
Light and Sensor
Under Panel Ports
PC USB MEDIA USB
Front Panel Ports Front Panel Buttons
TOUCH USB HDMI
Panel Back and Side
Trapezoid Plug In On/O Switch
INF8630eAG / INF8630AG Hardware Guide
Page 9
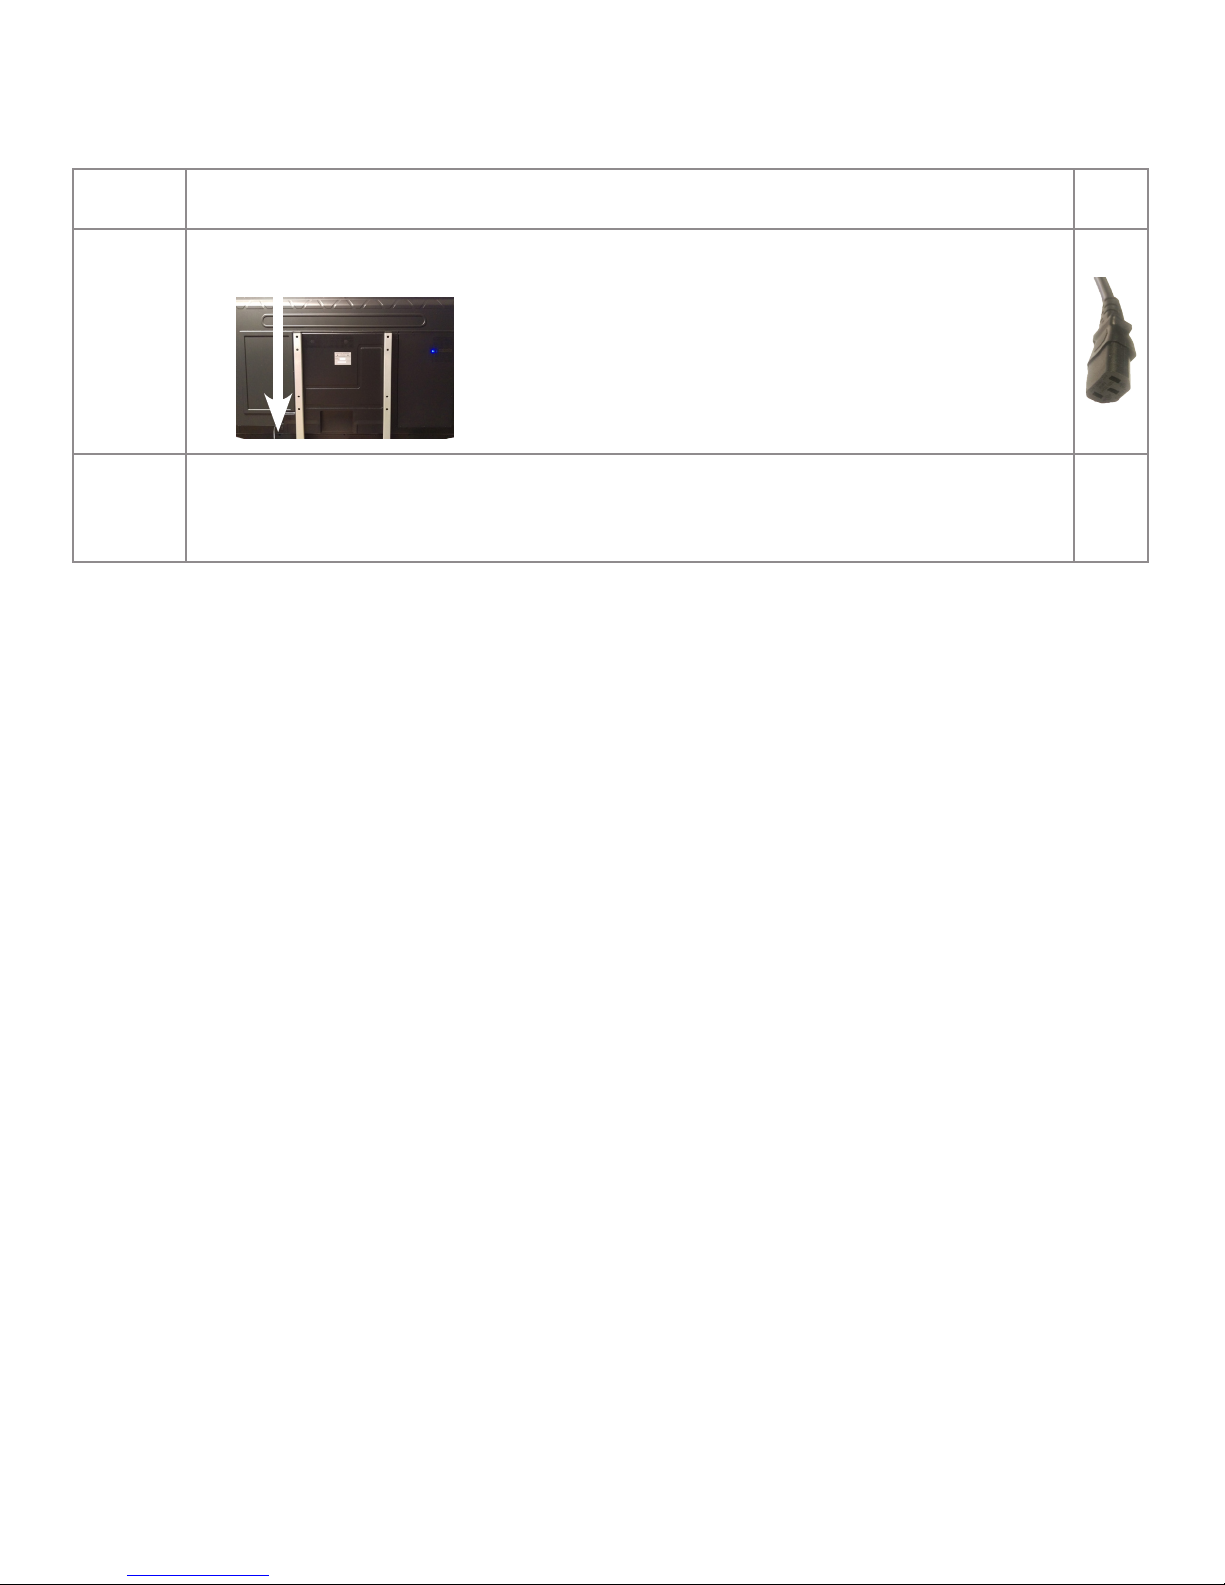
CONNECTING AC POWER
Step Action
Connect the trapezoid plug end of the AC power cord to the AC In jack on the back of the display.
1
Connect the other end of the AC power cord to an AC outlet.
2
Note: Depending on your country, you may need to check the proper voltage of the outlet and product
requirements.
Plug
End
CAUTION:
• Operate the display from the power source indicated on the label.
• Unplug the AC power cord from the power outlet when you are not using your display for an extended period of time, before you
move it, or when you are connecting other devices.
Page 10
CONNECTING TO OTHER DEVICES
Connection ports are located on the side in the back, and under the display which can be connected to a full range of digital input
devices, and output devices including: accessories, source devices, PCs, tablets, daisy-chain displays, etc.
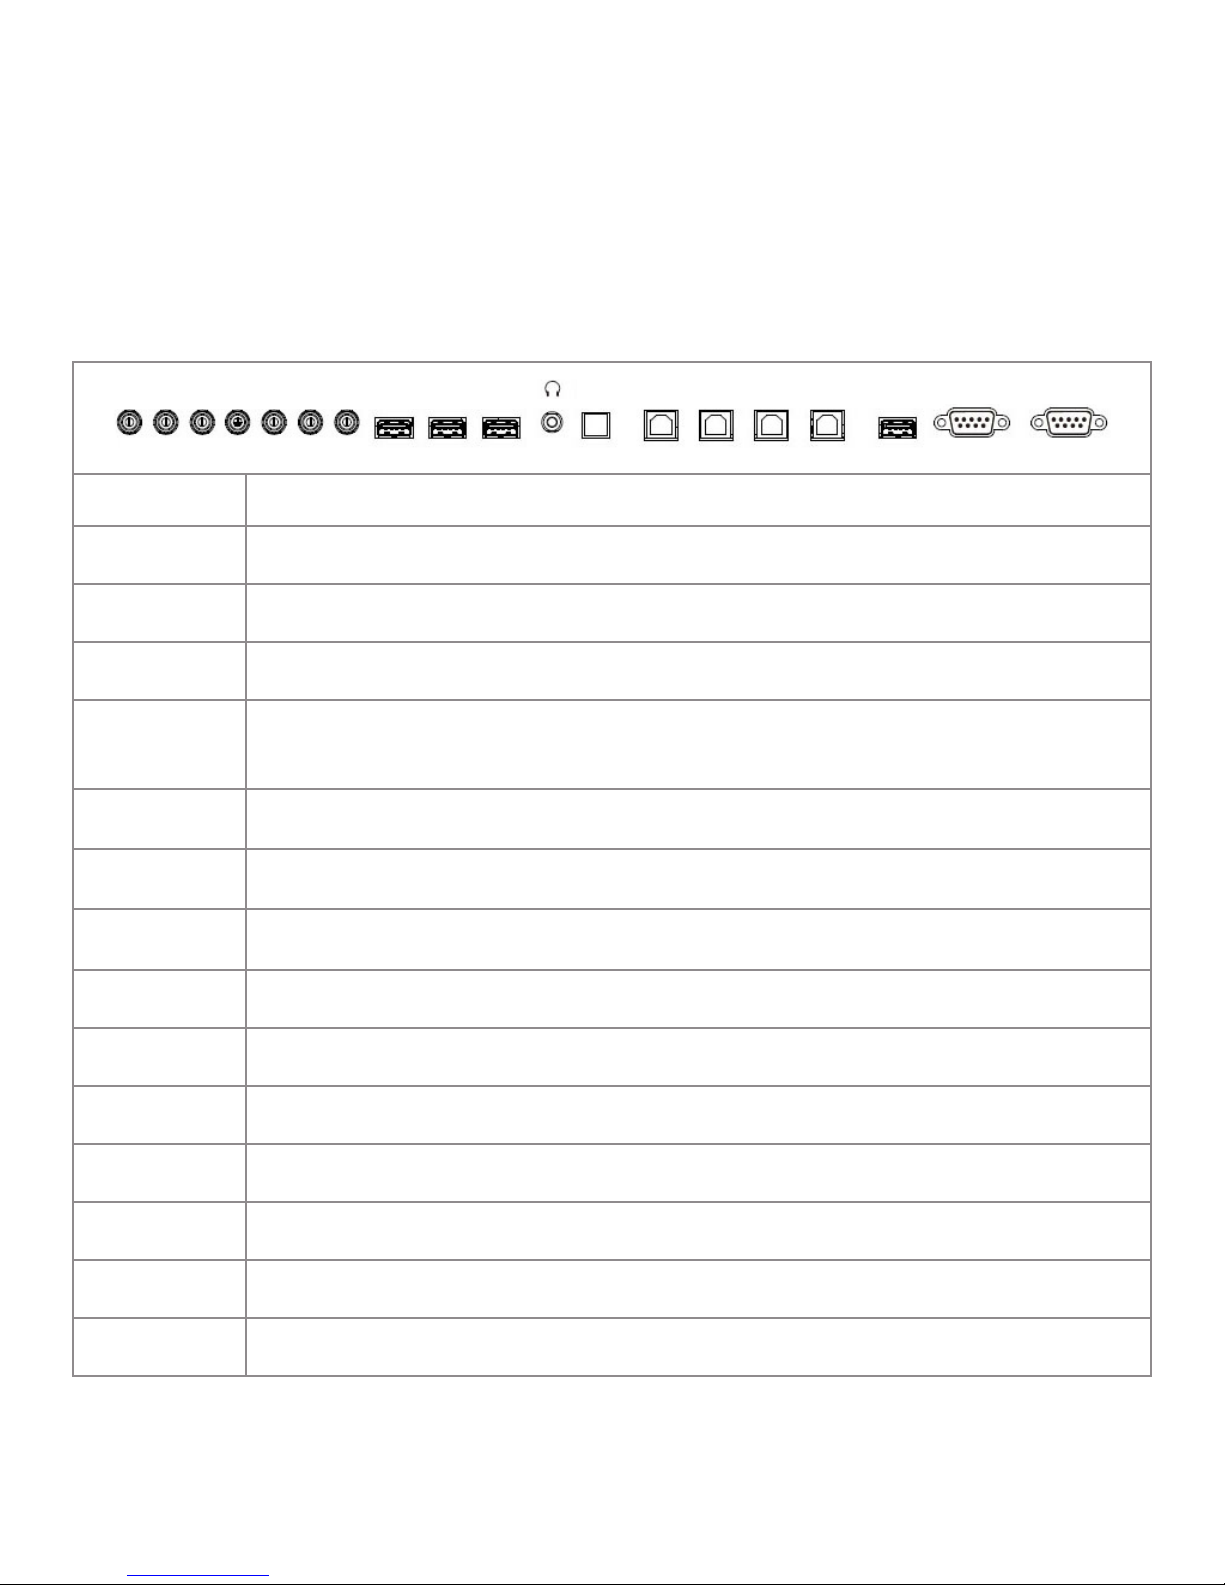
Side Panel Ports
The side panel ports are located on the left side of the back of the display. This table shows how to connect them.
AV-OUT Y Pb Pr AV-IN L-IN R-IN USB3.0 USB3.0 USB2.0
Port Connection Instructions
RS232 IN Connect to RS232 control device for remote control applications.
RS232 OUT Connect to RS232 control device for remote control applications.
OPS PC USB Connect a USB 2.0 device to the OPS module.
Connect a A-B cable between this type B port and your computer to get touch control.
Touch USB 4
Touch USB 3
Touch USB 2
Touch USB 1
Touch USB port 4 should be used with HDMI port 4, or any of the other video imputes
(VGA, component, composite).
Connect a A-B cable between this type B port and your computer to get touch control.
Touch USB port 3 should be used with HDMI port 3.
Connect a A-B cable between this type B port and your computer to get touch control.
Touch USB port 2 should be used with HDMI port 2.
Connect a A-B cable between this type B port and your computer to get touch control.
Touch USB port 1 should be used with HDMI port 1.
SPDIF TOUCH-USB1 TOUCH-USB2 TOUCH-USB3 TOUCH-USB4 OPS PC-USB RS232-IN RS232-OUT
SPDIF Connect a SPDIF cable to Output audio.
Headset Connect a 3.5 mm headset to output audio. This will mute the internal speakers.
USB 2.0 Connect a USB 2.0 device to the internal Android PC.
USB 3.0 Connect a USB 2.0/3.0 device to the internal Android PC.
USB 3.0 Connect a USB 2.0/3.0 device to the internal Android PC.
R-IN Connect an RCA L/R audio cable to an external device, provides audio in for the AV- IN source.
L-IN Connect an RCA L/R audio cable to an external device, provides audio in for the AV- IN source.
INF8630eAG / INF8630AG Hardware Guide
Page 11
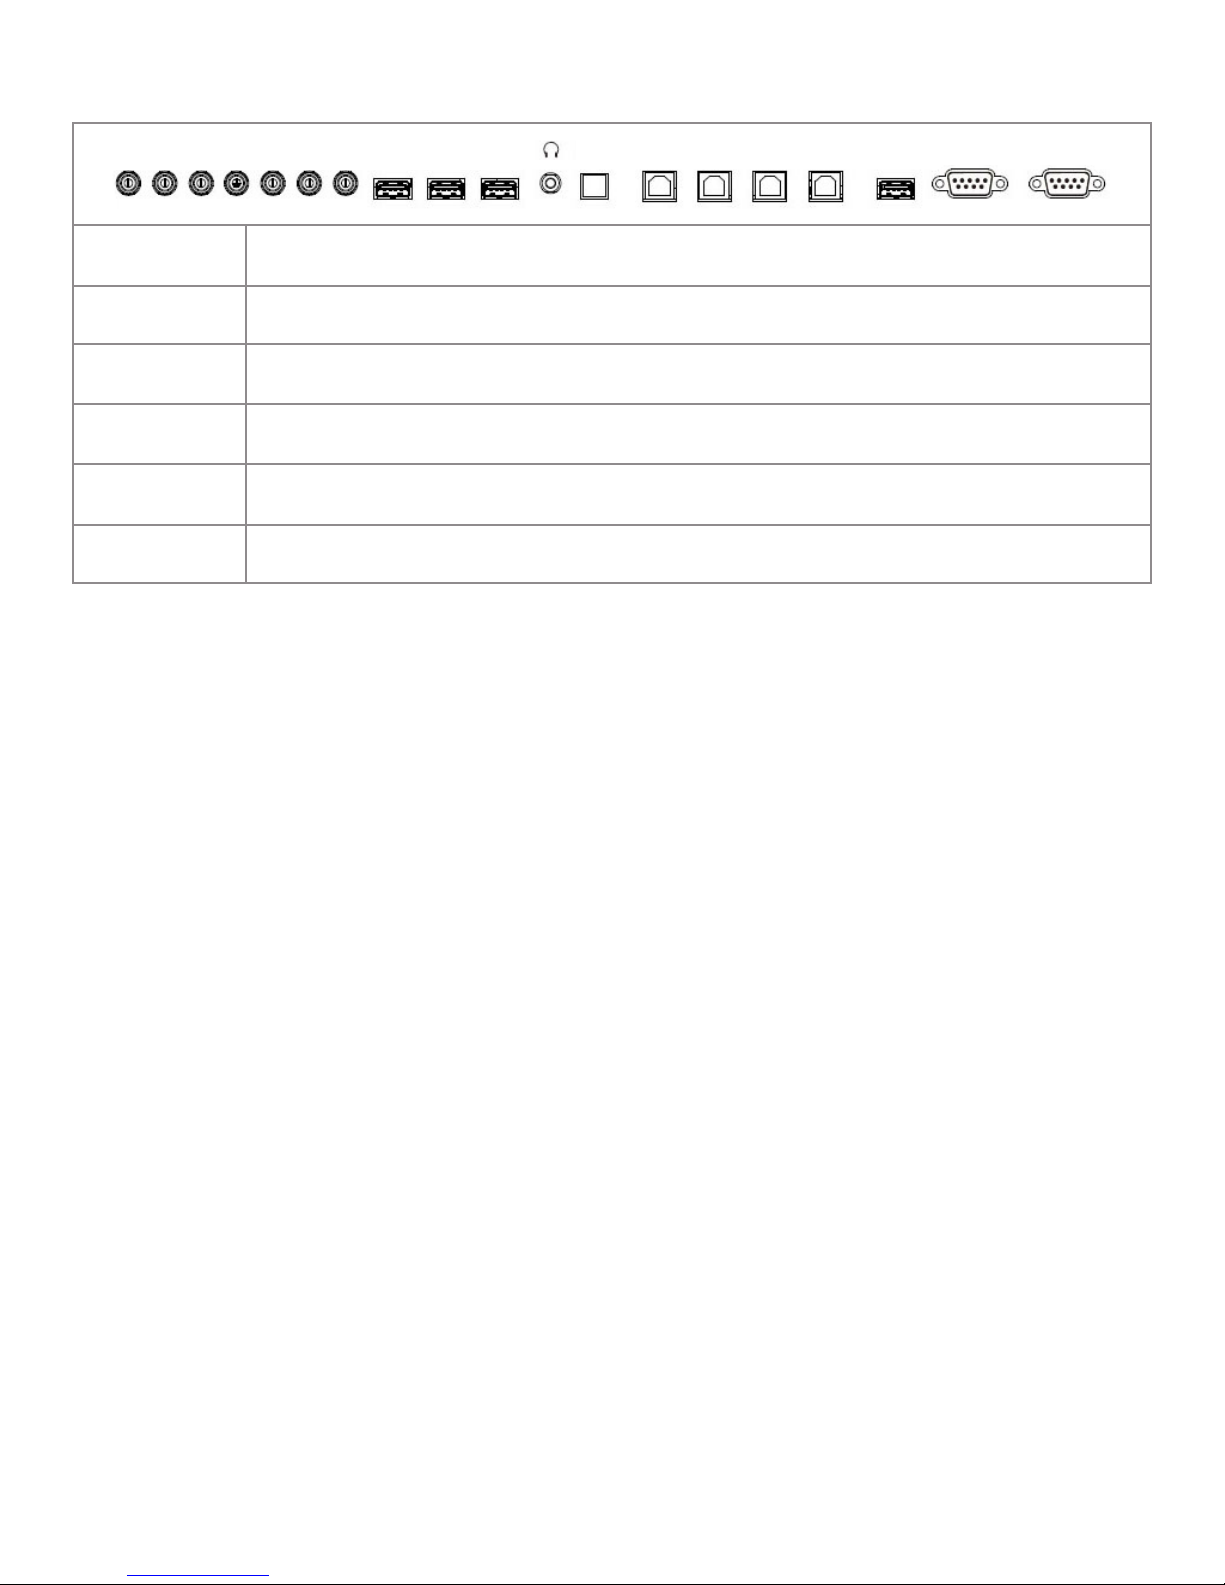
AV-OUT Y Pb Pr AV-IN L-IN R-IN USB3.0 USB3.0 USB2.0
SPDIF TOUCH-USB1 TOUCH-USB2 TOUCH-USB3 TOUCH-USB4 OPS PC-USB RS232-IN RS232-OUT
Port Connection Instructions
AV-IN Connect a composite video cable from the display to an external device (such as VCR or DVD player).
Pr
Pb
Y
Connect Red component RCA video cable from the display to an external device
(such as a DVD player, HD device, or Laser Disc player) Pr signal.
Connect Blue component RCA video cable from the display to an external device
(such as a DVD player, HD device, or Laser Disc player) Pb signal.
Connect Red component RCA video cable from the display to an external device
(such as a DVD player, HD device, or Laser Disc player) Y signal.
AV-Out Connect a composite video cable to display the Output from AV-IN.
Page 12
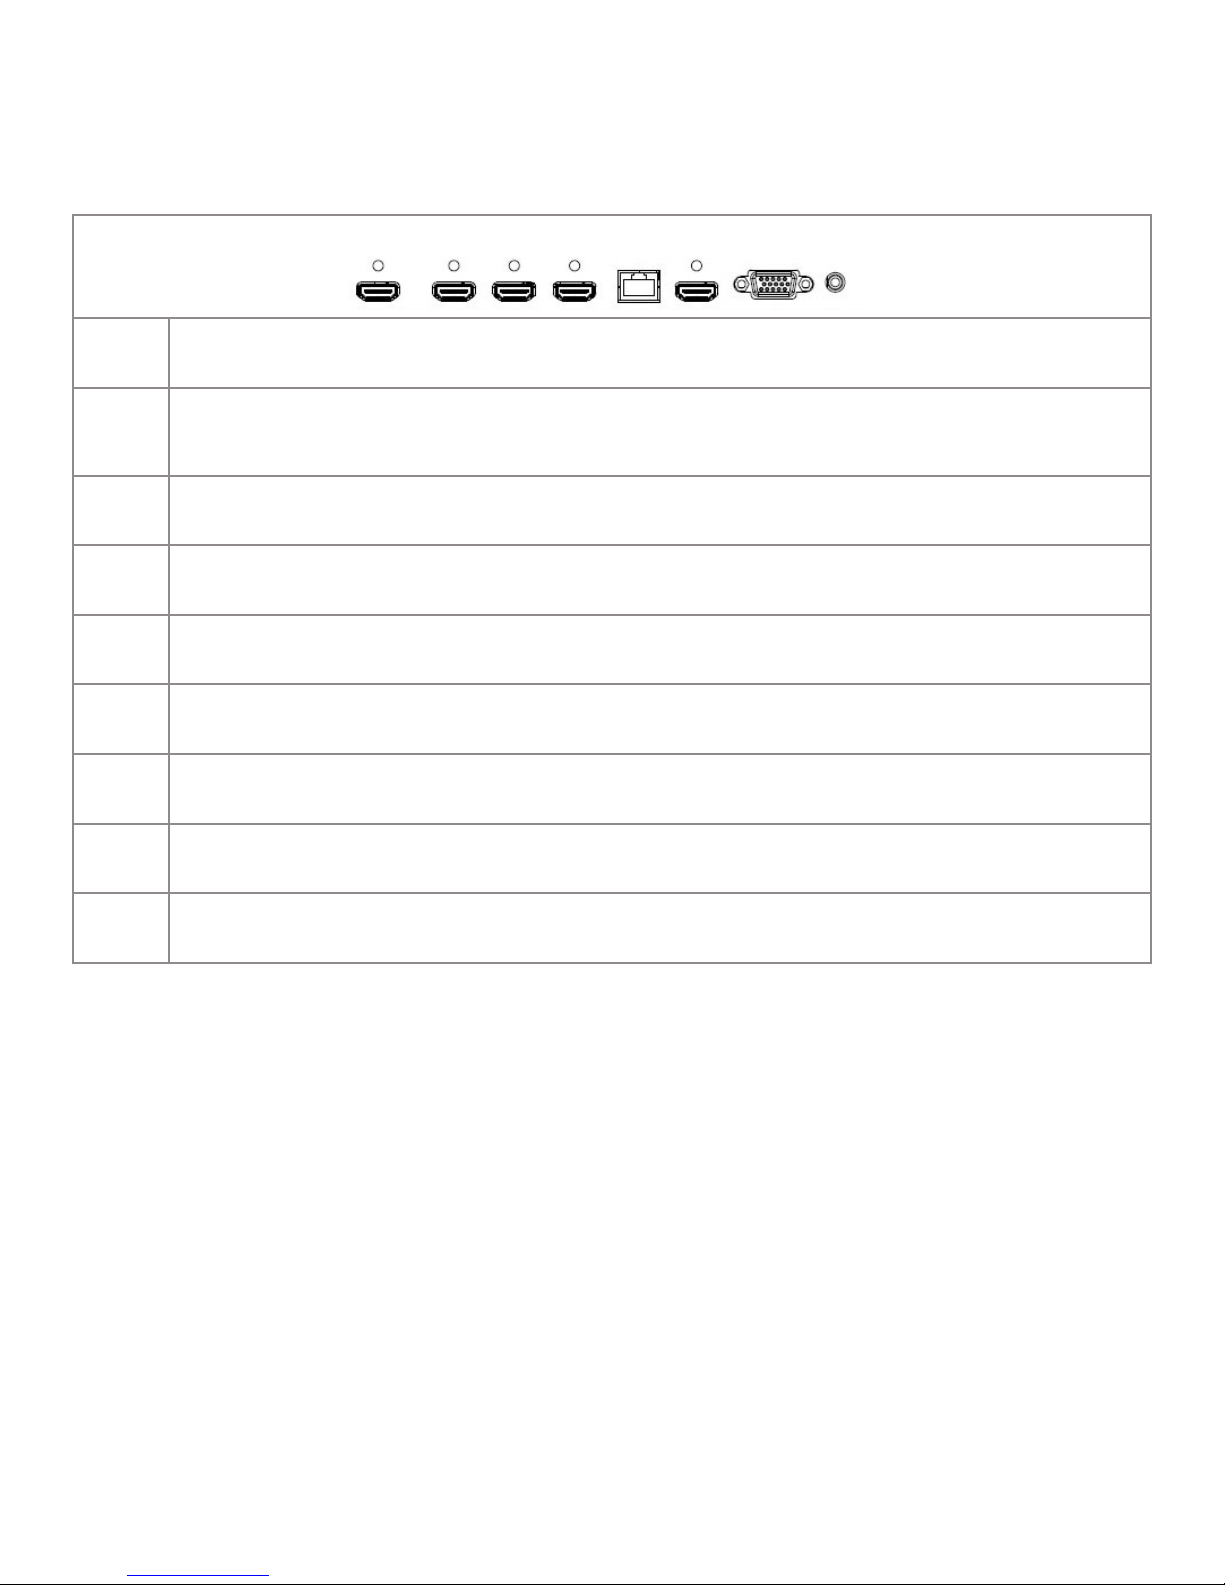
Under Panel Ports
The under panel ports are located on the left side of the bottom of the display. This table shows how to connect them.
HDMI1 HDMI2 HDMI3 HDMI-OUT LAN HDMI4(MHL) VGA PC-AUDIO
Port
Name
Connection Instructions
HDMI 1 Connect a HDMI cable from the display to a HDMI external device.
HDMI 2 Connect a HDMI cable from the display to a HDMI external device.
HDMI 3 Connect a HDMI cable from the display to a HDMI external device.
HDMIOut
Connect an HDMI cable from this port to an HDMI Input port on another display.
This will mirror the content of this display to the 2nd display. Only works with HDMI inputs 1-3.
LAN Connect RJ45 cable to provide network connections for Internal Android.
HDMI 4
(MHL)
Connect a HDMI cable from the display to a HDMI external device, such as your computer.
Supports HDMI 2.0/HDCP 2.2 and MHL standards.
VGA Connect a VGA computer cable from the monitor to an external computer.
PC
Audio
Connect a 3.5 mm audio cable to your computer for audio when displaying VGA input.
INF8630eAG / INF8630AG Hardware Guide
Page 13

Front Panel Ports
The front panel ports are located on the left side of the bottom front of the display. This table shows how to connect them.
PC USB MEDIA USB
Port
Name
Headset Connect a 3.5 mm headset to output audio. This will mute the internal speakers.
Mic Connect a 3.5 mm microphone or cable for audio input. Overrides audio from all other sources when connected.
PC USB Connect a USB 2.0 device to the OPS module.
Media
USB
Connection Instructions
Connect a USB 2.0 device to the Internal Android.
TOUCH USB HDMI
Touch
USB
HDMI Connect an HDMI cable from the display to an HDMI external device, such as a computer.
Connect a USB A-B cable between this type B port and your computer to get touch control.
This works with front HDMI port.
Page 14
WORKING WITH THE REMOTE
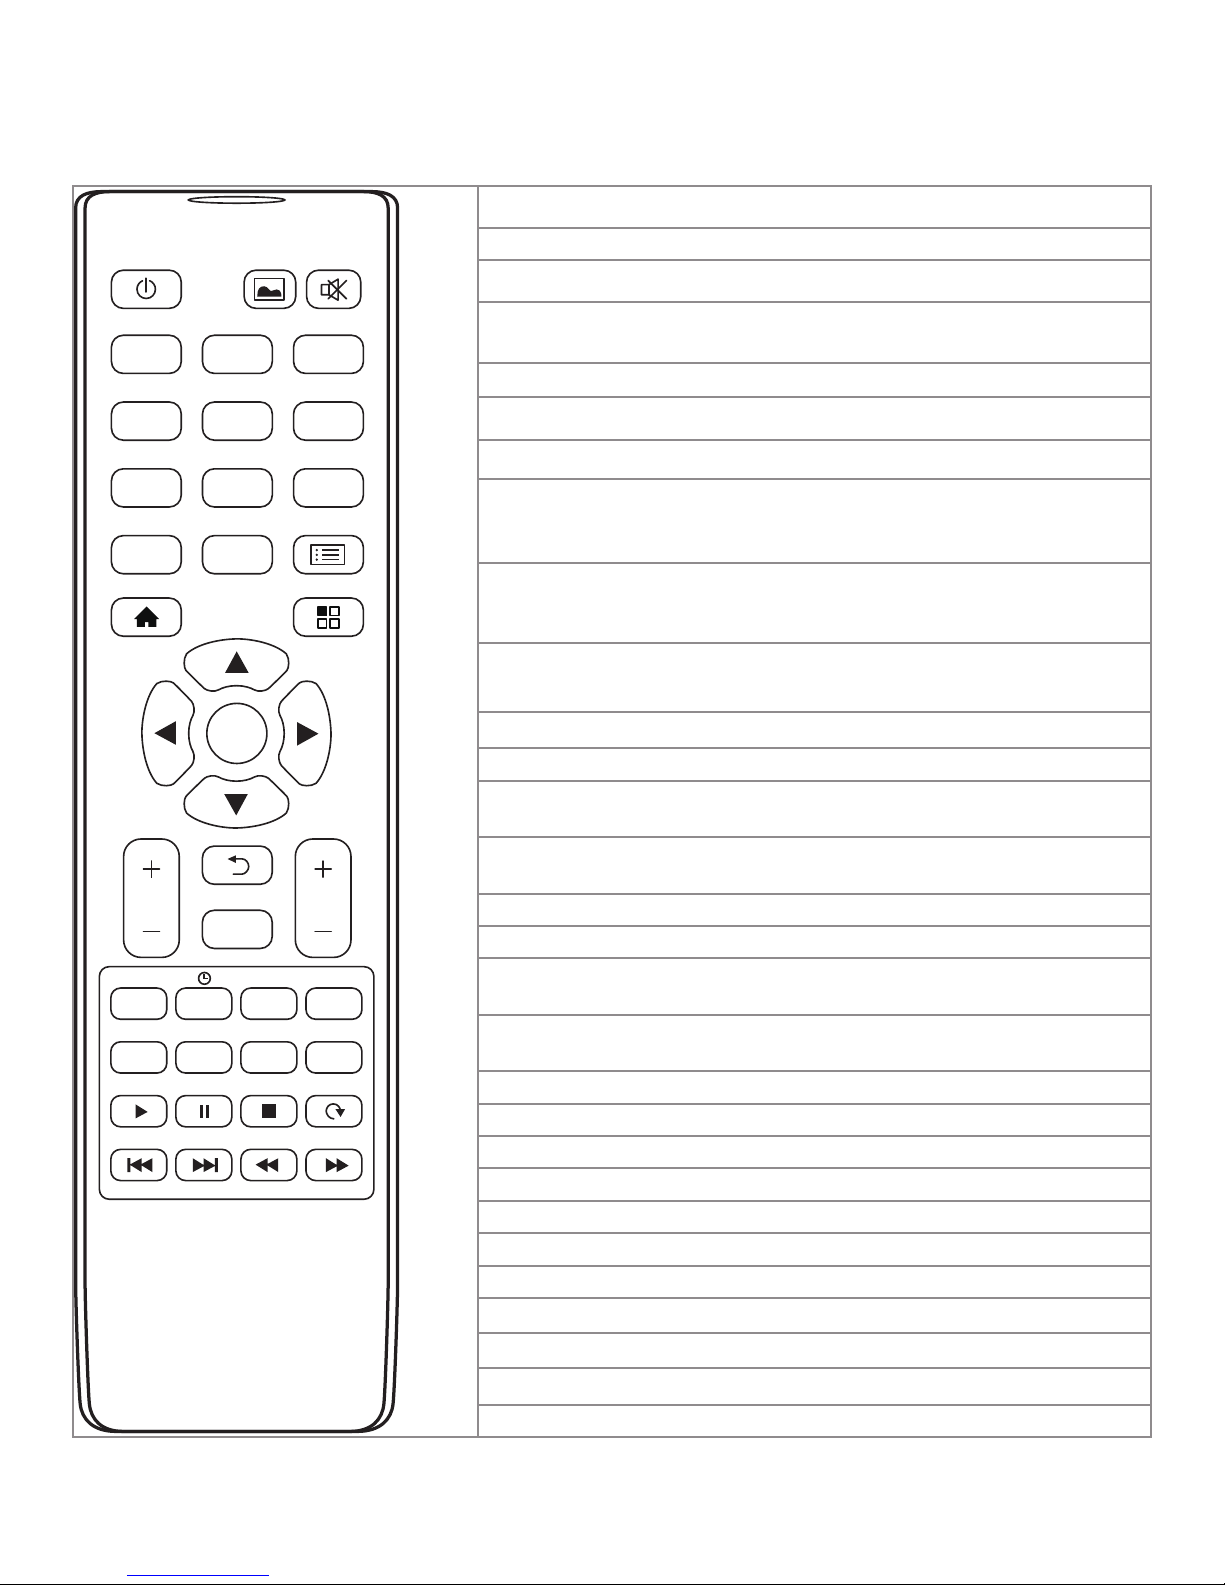
Understanding the Remote Buttons
Power: Switches the power on or puts the display into Standby.
POWER SCREENSHOT MUTE
ABC DEF GHI
1
JKL MNO PQR
4
STU VWX YZ-
7
0
HOME MENU
2
5
8
F1
FREEZE
OK
VOL
SOURCE
AUDIO INFO ZOOM
IMAGE SYS STEREO
PLAY PAUSE STOP ROTATE
PREV NEXT BACK SPEED
3
6
9
CHLIST
CH
Screen Shot: Takes a screen shot.
Mute: Switches the audio on or o.
Numbered Keys: Inputs any letter or number.
Note: When you begin entering numbers, the on screen keyboard appears.
F1 3D (Freeze): When enabled, freezes the image which is currently displayed.
CH List: Reserved for future use.
Home: Displays the Home Screen.
Menu: Displays small On Screen Display Menus Mode when accessed from a
screen, other than the Home Screen.
Note: Menu key has no function in the Home Screen.
Cursor Keys (Left, Right, Up, Down Arrows): Use these buttons to navigate
through and make changes to the On-screen Menu features.
OK: Conrms the operation (Enter).
Volume Up: Increases the audio volume.
Volume Down: Decreases the audio volume.
Back: Returns the user to the previous menu.
Source: Displays the Source Selection Menu on the bottom of the display.
CH Up: Reserved for future use.
CH Down: Reserved for future use.
Audio (Sound Mode): Accesses On Screen Display Sound Mode Menu:
Movie Sports, User, Standard, Music settings.
Sleep mode: Allows you set a "sleep time" for the display.
OSD: Reserved for future use.
Zoom: Accesses ODS Menu Mode for Panorama, PC Mode, Just Scan, Auto, Default
settings.
Image (Picture Mode): Accesses On Screen Display Picture Mode Menu:
User, Standard, Lightness, Soft, PC settings.
Blank: Reserved for future use.
SYS: Reserved for future use.
Stereo: Reserved for future use.
Play: For online video - Plays media.
Pause: For online video - Pauses media play.
Stop: For online video - Stops media play.
Rotate: For online video - Rotates picture.
Previous: For online video - Skips to previous scene.
INF8630eAG / INF8630AG Hardware Guide
Next: For online video - Skips to next scene.
Back (Fast Reverse): For online video - Shows media backwards quickly.
Speed (Fast Forward): For online video - Shows media forwards quickly.
Page 15
 Loading...