

Page 1

HARDWARE GUIDE
JTOUCH INF7001A
009-1531-00
Page 2

Page 3

CONTENTS
Declaration of Conformity ...................................................................................................................................................3
Safety Considerations .........................................................................................................................................................4
What’s Included ..................................................................................................................................................................6
Setup ...................................................................................................................................................................................7
Mounting ......................................................................................................................................................................7
Connecting to Other Devices ........................................................................................................................................8
Connecting AC Power ...................................................................................................................................................9
External PC Touchscreen Control Setup ......................................................................................................................9
Turning the Monitor On/Off .................................................................................................................................................9
Using the Remote ..............................................................................................................................................................10
Using the Keypad ..............................................................................................................................................................12
OSD (On-Screen Display) Menu System ...........................................................................................................................13
Picture Menu ...............................................................................................................................................................14
Screen Menu ...............................................................................................................................................................15
Audio menu .................................................................................................................................................................16
PIP menu .....................................................................................................................................................................17
Configuration 1 ............................................................................................................................................................18
Configuration 2 ............................................................................................................................................................19
Advanced Option ........................................................................................................................................................20
Troubleshooting ................................................................................................................................................................21
Specifications ....................................................................................................................................................................24
Limited Warranty ...............................................................................................................................................................25
Appendix ...........................................................................................................................................................................30
Calibration Tool ...........................................................................................................................................................30
Calibration Troubleshooting Tool ................................................................................................................................32
安全注意事項 ...............................................................................................................................................................34
JTouch 70”顯示器I/O port 介紹前/後面板 ...................................................................................................................35
Page 4

Page 5

DECLARATION OF CONFORMITY
Manufacturer: InFocus Corporation, 13190 SW 68th Parkway, Portland, Oregon 97223-8368 USA
Trademarks
Apple, Mac and Facetime are trademarks or registered trademarks of Apple, Inc. Microsoft, Windows, PowerPoint, Excel and Word
are trademarks or registered trademarks of Microsoft Corporation. Adobe and Acrobat are trademarks or registered trademarks of
Adobe Systems Incorporated. HDMI logo and “High Definition Multimedia Interface” are registered trademarks of HDMI Licensing
LLC. Manufactured under license from Dolby Laboratories. Dolby and the double-D symbol are trademarks of Dolby Laboratories.
SRS TruSurround HD and SRS TruVolume are trademarks of SRS Labs, Inc. TruSurround HD and TruVolume technologies are
incorporated under license from SRS Labs, Inc. InFocus, In Focus, INFOCUS (stylized), MondoCenter, Mondopad, JTouch, and
JTouch are either registered trademarks or trademarks of InFocus Corporation in the United States and other countries. All other
trademarks are the property of their respective owners. Any other trademarks, service marks, personal names or product names are
assumed to be the property of their respective owners and are used only for reference. There is no implied sponsorship, affiliation,
certification, approval or endorsement if we use one of these terms.
FCC Warning
This equipment has been tested and found to comply with the limits for a Class A digital device, pursuant to part 15 of the FCC
Rules. These limits are designed to provide reasonable protection against harmful interference when the equipment is operated in a
commercial environment. This equipment generates, uses and can radiate radio frequency energy and, if not installed and used in
accordance with the instruction manual, may cause harmful interference to radio communications.
Operation of the equipment in a residential area is likely to cause harmful interference in which case the user will be required to correct
the interference at his own expense. Changes or modifications not expressly approved by InFocus Corporation may void authority to
operate the equipment.
This device complies with part 15 of the FCC Rules. Operation is subject to the following two conditions: (1) This device may not
cause harmful interference and (2) this device must accept any interference received, including interference that may cause
undesired operation.
Canada
This Class A digital apparatus complies with Canadian ICES-003.
Cet appareil numérique de la classe A est conforme à la norme NMB-003 du Canada.
This device complies with part 15 of the FCC Rules / RSS-210. Operation is subject to the following two conditions: (1) This device
may not cause harmful interference and (2) this device must accept any interference received, including interference that may cause
undesired operation.
Cet appareil est conforme à l’article 15 des réglementations de la FCC / CNR-210. Le fonctionnement est subordonné aux deux
conditions suivantes : (1) ce appareil ne doit pas provoquer d’interférences nuisibles, et (2) ce appareil doit accepter toute interférence
reçue, y compris des interférences qui peuvent provoquer un fonctionnemnent non désiré.
이 기기는 업무용으로 전자파적합등록을 한 기기이오니 판매자 또는 사용자는 이 점을 주의하시기 바라며 만약 잘못 판매 또는
구입하였을 때에는 가정용으로 교환하시기 바랍니다.
申明:
此为A级产品,在生活环境中,该产品可能会造成无线电干扰。在这种情况下,可能需要用户对其干扰采取切实可行的措施。
警告使用者。
這是甲類的通訊產品, 在居住的環境中使用時, 可能會造成射頻干擾, 在這種情況下, 使用者會被要求採取某些適當的對策。
This document applies to regulatory model: INF7021c
Input ratings: 100-240V~, 50-60Hz, 5A
Output ratings: 100-240V~, 50-60Hz, 1A
InFocus reserves the right to alter product offerings and specifications at any time without notice.
Page 3INF7001a Hardware Guide
Page 6

SAFETY CONSIDERATIONS
Please read and follow all safety instructions provided below and on the monitor before connecting the monitor to a
power source. Failure to comply with safety instructions may result in fire, electrical shock, or personal injury and may
damage or impair protection provided by the equipment. Please save all safety instructions.
• This monitor is very heavy and should be moved and installed by at least two individuals. Do not attempt to move or
install the monitor yourself, otherwise injury and/or damage may occur.
• When moving the monitor, always hold the monitor firmly using the handles and side or bottom bezels. Do not hold
the top bezel.
• When moving the monitor carton, do not tilt or invert the carton. Always keep it in an upright orientation.
• Disconnect all accessories and cables before moving the monitor.
• If the monitor is installed against the wall, maintain a distance of at least 1.98” (5cm) between the monitor and the
wall to provide adequate ventilation.
• Refer to this guide for proper startup and shutdown procedures.
• Follow all warnings and cautions in this manual and on the monitor.
• Locate the monitor at least 4’ (1.2m) away from heating and cooling vents.
• Do not block ventilation openings. Locate the monitor in a well-ventilated area without obstructions to intake or
exhaust vents.
• Do not install or use the monitor or speakers near any heat sources such as radiators, heat registers, stoves, or other
devices (including amplifiers) that produce heat.
• Do not place the monitor in direct sunlight, humid, greasy or dusty places or in places where the monitor may come
into contact with rain, smoke or steam.
• The monitor should not be used with the power cord near water, for instance, near a bathtub, washbowl, kitchen sink
or swimming pool, etc.
• Do not use any components of the monitor, including the speakers, near water. Warning: To reduce the risk of fire or
electric shock, do not expose this equipment or any component of this equipment to rain or moisture.
• Do not drop the monitor.
• Do not spill liquid on the monitor. Spilled liquid may damage the monitor.
• WARNING: This monitor must be securely attached to the floor/wall per installation instructions. Tipping, shaking, or
rocking the machine may cause injury or death.
• The power outlet used to power this monitor should be readliy accessible for fast disconnection in case
of emergency.
• No naked flame source, such as lighted candles, should be placed on the monitor.
• Use the power cord provided. Connect the power cord to a receptacle with a protective safety (earth) ground
terminal. A surge-protected power strip is recommended. Do not overload wall outlets.
• It is recommended that the Class 1 monitor be grounded.
• Do not install the monitor in places subject to mechanical vibration.
• Do not place the monitor on an unstable surface, which could result in serious personal injuries and monitor damage.
When mounting the monitor to a stand, be sure to following the manufacturer’s instructions. Use only the mounting
hardware recommended by the manufacturer.
• When disconnecting the power cord, hold the plug, not the cord.
Page 4
Page 7

• Protect the power cord from being walked on or pinched particularly at plugs, convenience receptacles and the point
where they exit from the monitor.
• Unplug the monitor if you are not going to use it for an extensive period of time.
• Unplug the monitor if you need to clean it with the included microfiber cleaning cloth. The screen may be wiped with
the cleaning cloth when the power is off. Never use alcohol, solvents or ammonia-based liquids on this monitor.
• Wash hands after handling the cables supplied with this monitor.
• The monitor remote control uses batteries (not included). Make sure the batteries’ polarity (+/-) is aligned correctly.
Dispose of used batteries in accordance with local disposal laws.
• Only use properly rated wall and stand mounting hardware that meet this product’s specifications and follow the
manufacturer installation instructions. The warranty does not cover any damage caused by use of improperly rated
mounting hardware or from improper installation.
• Refer all service to qualified service personnel. Do not remove the cover or back. Servicing your own monitor can be
dangerous to you and will void the warranty.
• Only use replacement parts specified by InFocus. Unauthorized substitutions may result in fire, electrical shock or
injury and may void the warranty.
• When mounting the monitor to a wall, metric 8 (12mm) screws must be used. In addition, the mounting interface
should comply with the UL1678 standard in North America. The mounting means should be strong enough to bear
the weight of the monitor (approximately 176.37 lbs / 80 kg without the stand).
• Follow these instructions to help ensure image quality over the life of the monitor. Failure to follow these instructions
may affect the warranty.
Page 5INF7001a Hardware Guide
Page 8
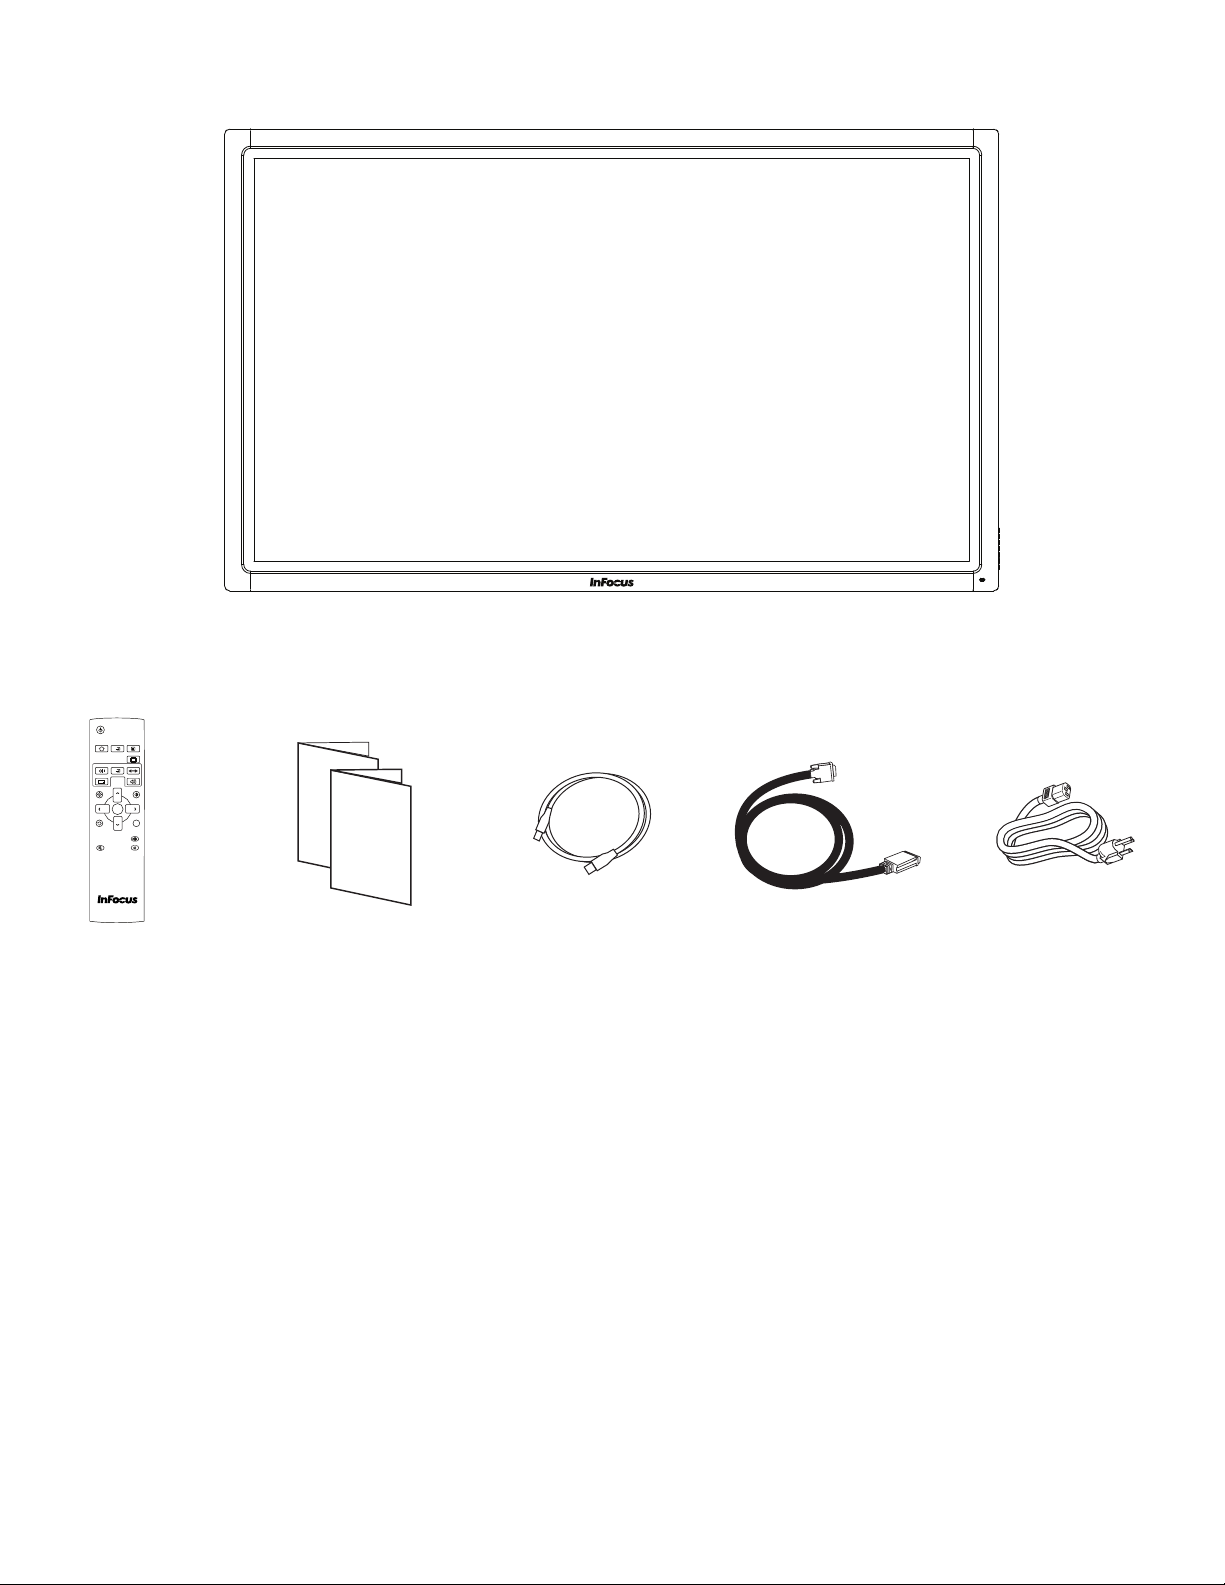
WHAT’S INCLUDED
1920 x 1080 monitor
POWER
HOME
INPUT MENU
RESIZE
PIP
INPUT
SWAP
ON/OFF
AUDIOPOSITION
CONTRASTBRIGHTNESS
OK
INFO
BACK
i
VOL UP
MUTE
VOL DOWN
Warranty
Quick Start
Guide
Documentation
USB cableRemote control
VGA cable
(batteries not included)
For additional accessory options, such as stands, feet, carts and wall mounts, see the InFocus website
(www.infocus.com/store) or your local dealer.
Power cord
(varies per country)
Page 6
Page 9

SETUP
Mounting
This product does not ship with mounting accessories. Only use commercially manufactured mounting accessories
which meet this product's specifications and follow the manufacturer installation instructions.
• Only use properly rated wall and stand mounting hardware that meet this product’s specifications and follow the
manufacturer installation instructions. The warranty does not cover any damage caused by use of improperly rated
mounting hardware or from improper installation.
• To prevent damage to the screen surface, carefully place your monitor face-down on a clean, cushioned surface.
• When mounting the monitor to a wall, metric 8 (12mm) screws must be used. Use spring washers to prevent the
screws from coming loose. In addition, the mounting interface should comply with the UL1678 standard in North
America. The mounting means should be strong enough to bear the weight of the monitor (approximately 176.37 lbs /
80 kg without the stand).
• Do not install the monitor in places subject to mechanical vibration.
• Do not place the monitor on an unstable surface, which could result in serious personal injuries and monitor damage.
When mounting the monitor to a stand, be sure to following the manufacturer’s instructions. Use only the mounting
hardware recommended by the manufacturer.
• WARNING: This monitor must be securely attached to the floor/wall per installation instructions. Tipping, shaking, or
rocking the machine may cause injury or death.
• If the monitor is installed against the wall, maintain a distance of at least 1.98” (5cm) between the monitor and the
wall to provide adequate ventilation.
• Do not install or use the monitor near any heat sources such as radiators, heat registers, stoves, or other devices
(including amplifiers) that produce heat.
• Do not place the monitor in direct sunlight, humid, greasy or dusty places or in places where the monitor may come
into contact with rain, smoke or steam.
Page 7INF7001a Hardware Guide
Page 10
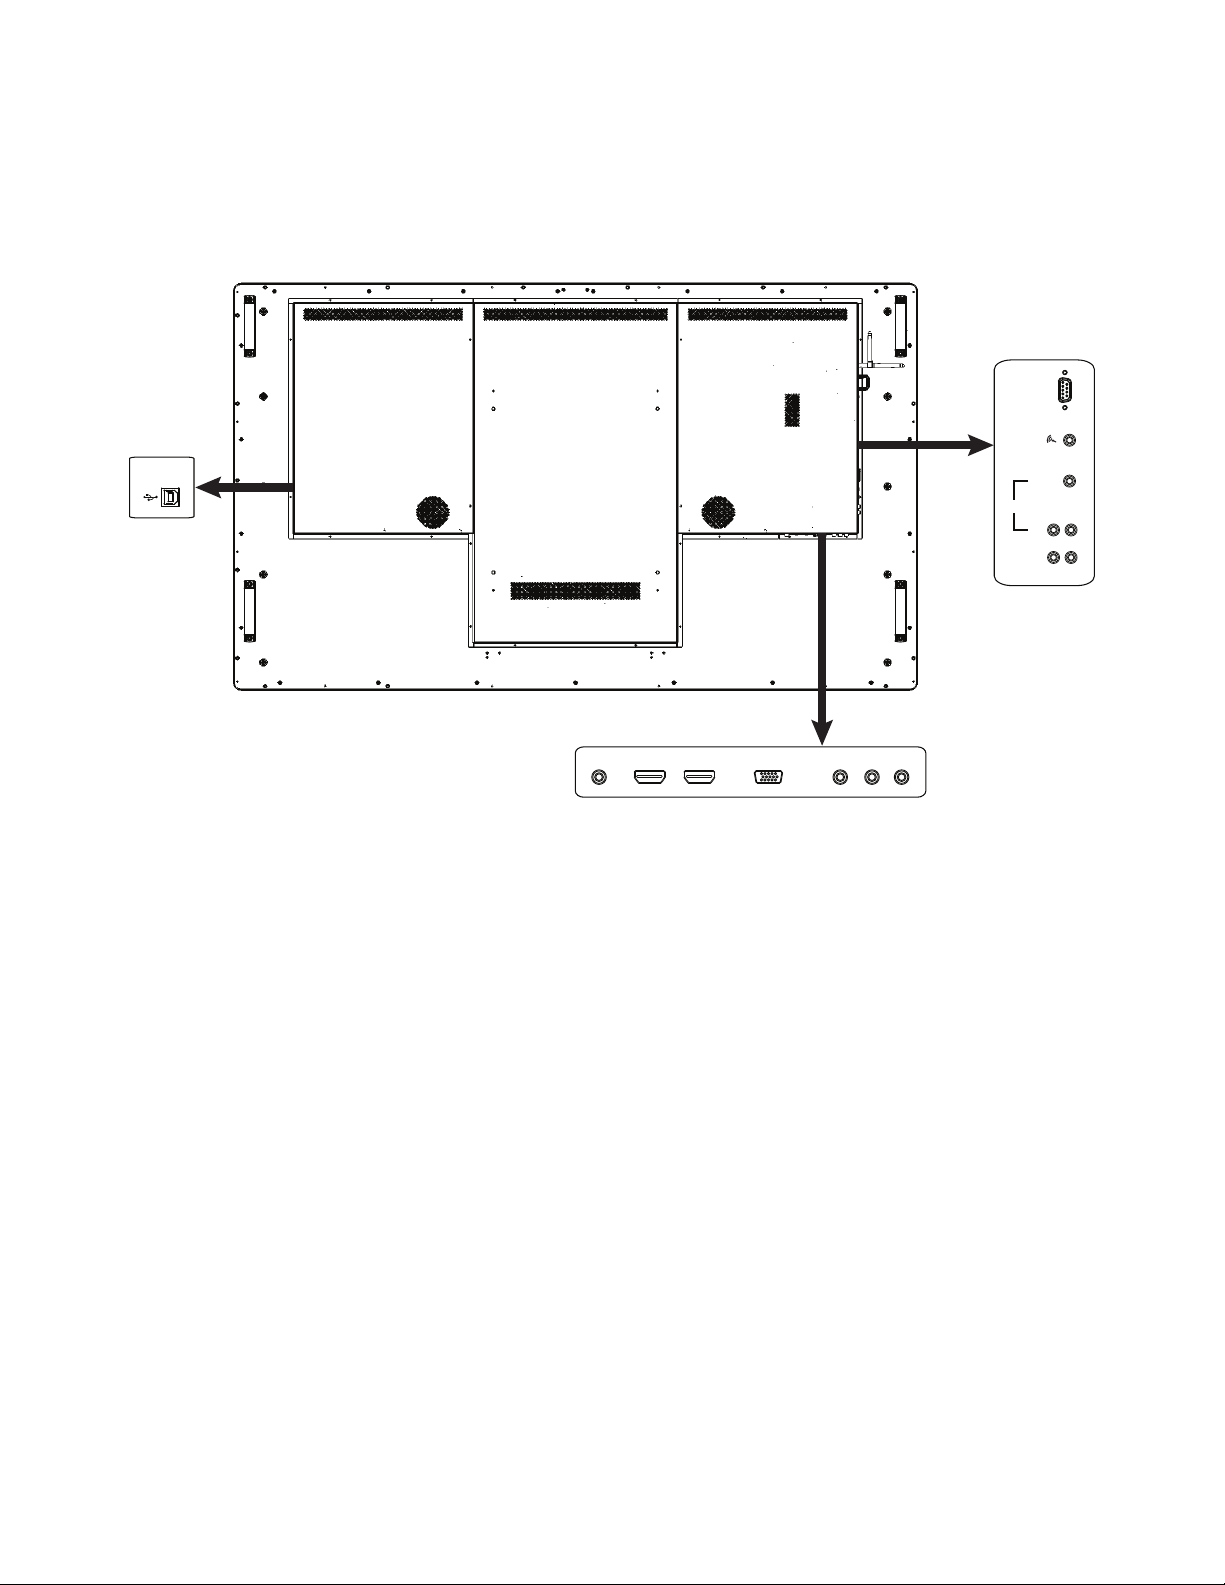
Connecting to Other Devices
A full range of digital and analog video inputs and audio source devices can be connected to the connection panels on
the back and side of the monitor. Available jacks include: HDMI In (2), PC In (1), Composite Video (1), Component RCA
(1), RS232 (1), Audio In 3.5mm (1), Audio In RCA (1-R/L), Microphone In (1), USB-B for touch control (1), and Audio Out
RCA (1-R/L).
RS232
TOUCH
CONTROL
Audio
Audio OUT
IN 1
IN 2
L R
HDMI1HDMI2 COMPONENTVIDEO PC IN
Page 8
Page 11

Connecting AC Power
1) Connect one end of the AC power cord to the AC In jack on the back of the monitor.
2) Connect the other end of the AC power cord to an AC outlet.
3) Press the power switch. (The LED on the front of the monitor turns on.)
NOTES:
• Your monitor should only be operated from the power source indicated on the label.
• Always unplug the AC power cord from the power outlet when you are not using your monitor for an extended period
of time.
External PC Touchscreen Control Setup
1) A Windows driver must be installed to enable full multi-point touch support. Download and install the driver from
www.infocus.com/support.
2) Connect an external computer to the monitor using a DVI, HDMI, or VGA cable.
3) Connect the Type A to Type B USB cable to the USB Type A jack on the computer and to the USB Type B jack on
the side of the monitor.
4) The computer can now be controlled by using touchscreen gestures on the monitor.
TURNING THE MONITOR ON/OFF
1) Verify that the power cord is connected to a power outlet and that the power switch is ON.
2) Press the Power button on the remote or the right side of the monitor. (The LED on the front of the monitor
turns off.)
NOTES:
• If the monitor does not respond to normal power down procedures, press and hold the PC box Power button
(located on the back of the monitor) for 7-8 seconds.
Page 9INF7001a Hardware Guide
Page 12
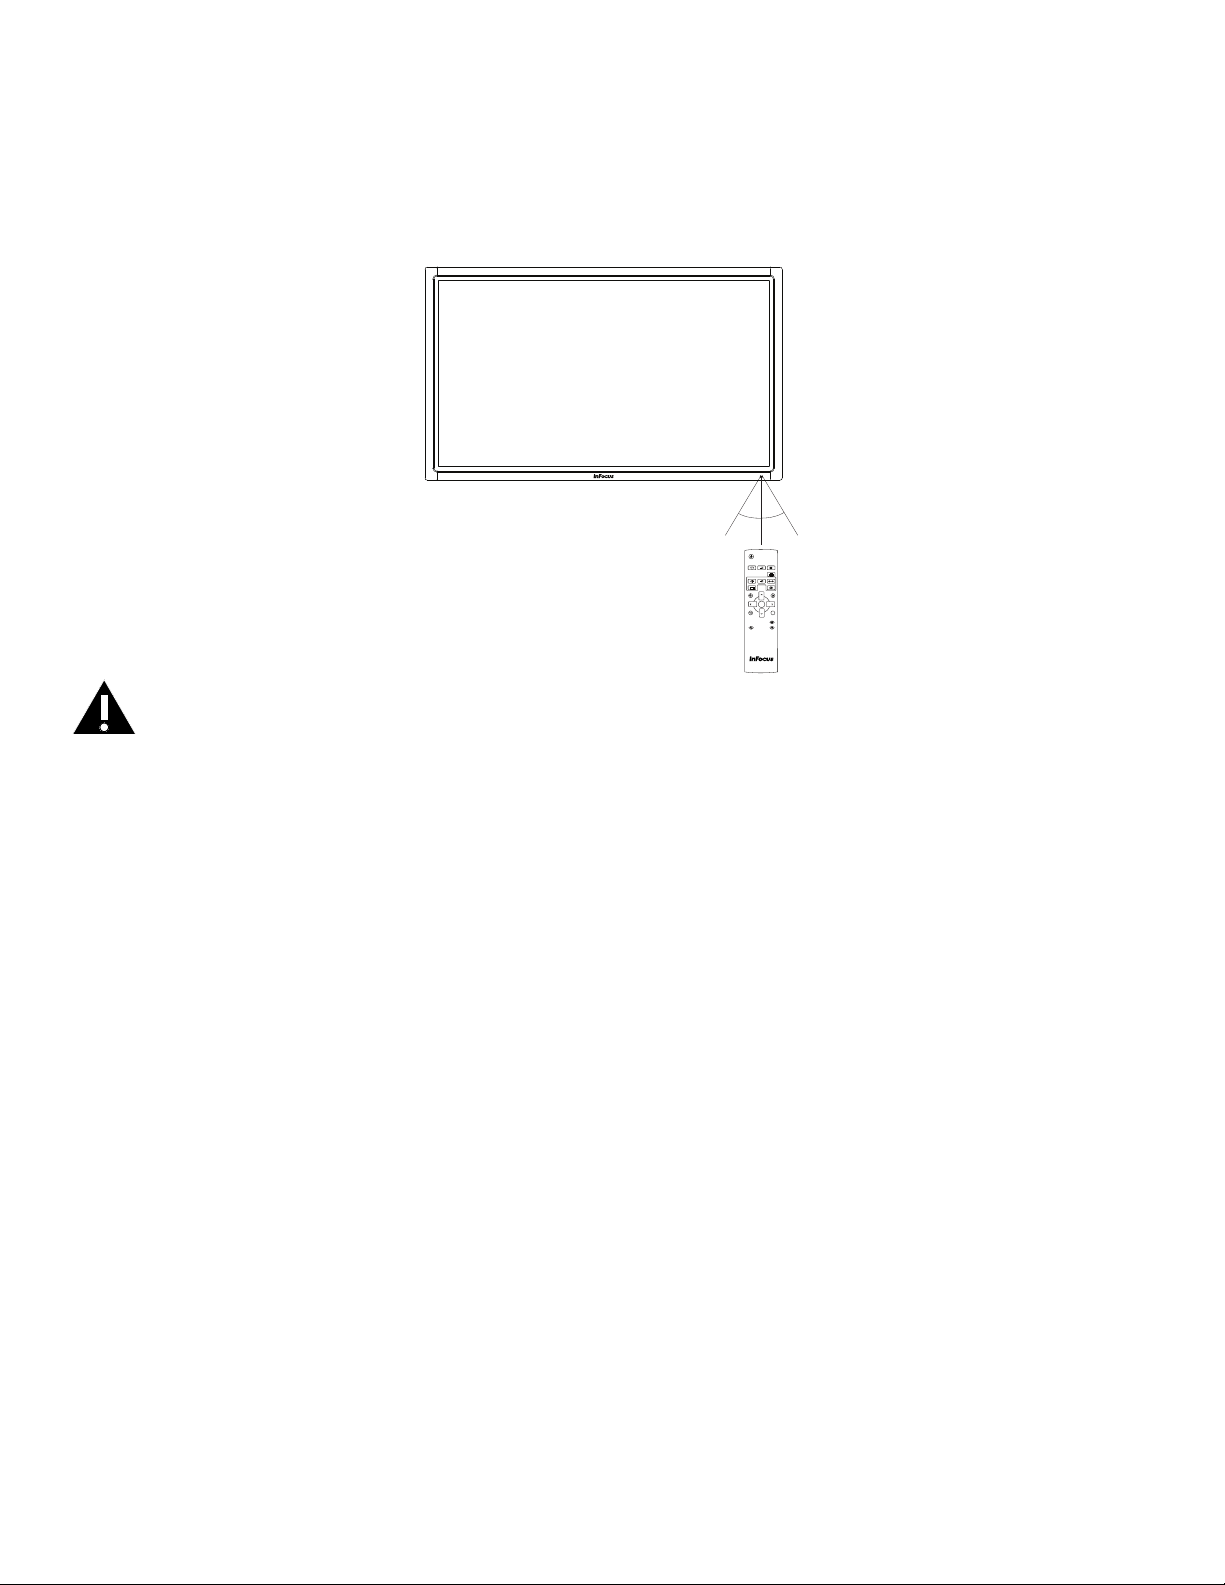
USING THE REMOTE
The remote uses two (2) AAA batteries (not included). Install the batteries by removing the cover from the remote’s back,
aligning the + and – ends of the batteries, sliding them in place and replacing the cover.
To operate, point the remote at the monitor sensor at the bottom right-hand corner of the monitor. The range of
optimum operation is about 26’ (8m) and within a horizontal and vertical angle of 30 degrees.
30˚ 30˚
POWER
INPUT MENU
HOME
RESIZE
PIP
ON/OFF
INPUT
SWAP
AUDIOPOSITION
CONTRASTBRIGHTNESS
OK
BACK
INFO
i
VOL UP
MUTE
VOL DOWN
CAUTION:
• When disposing of the batteries, be sure to do so in an environmentally proper manner.
• If the remote control gets wet, wipe it dry immediately.
• Avoid excessive heat and humidity.
• Ensure the batteries’ polarity (+/-) is properly aligned.
• Do not mix new and old batteries or different types of batteries together.
• Replace the batteries as soon as they run out.
• Remove batteries from the remote control when storing or not in use for a prolonged period.
Page 10
Page 13

Remote buttons
POWER
OK
POWER
HOME
ON/OFF
BACK
MUTE
INPUT MENU
RESIZE
PIP
INPUT
SWAP
AUDIOPOSITION
CONTRASTBRIGHTNESS
OK
VOL UP
VOL DOWN
INFO
Power: Switches the power on or puts the monitor into Standby.
HOME
INPUT
Home: Changes the active source back to the embedded PC.
Input: Toggles the Input Source menu on and off, which allows the user to
change sources. Options include: HDMI1, HDMI2, PC, and VGA.
MENU
RESIZE
PIP
ON/OFF
i
Menu: Turns the OSD menu on and off.
Resize: Switches between screen modes. Modes vary based on the source.
PiP On/Off: Turns the PiP function on and off and changes the PiP
configuration between two active PiP sources. Options include corner and
side-by-side configurations (50%-resized, 25%-resized and 50%-fullscreen),
depending on source types.
PIP
INPUT
PiP Input: Switches the PiP window source. Options include HDMI1, HDMI2,
PC, VGA, Component, S-video and Video. Note: The PiP window is not visible
when a secondary source has not been selected.
PIP
SWAP
PiP Swap: Switches the position of the main and secondary sources.
PIP
POSITION
PIP
AUDIO
BRIGHTNESS
CONTRAST
BACK
INFO
i
VOL UP
VOL DOWN
MUTE
PiP Position: Moves the PiP window position from corner to corner (upper
left, upper right, lower left, lower right).
PiP Audio: Turns the PiP audio mix on and off.
Brightness: Opens the Brightness OSD menu. Use the right and left arrow
buttons to adjust.
Contrast: Opens the Contrast OSD menu. Use the right and left arrow buttons
to adjust.
Back: Returns the user to the previous menu.
Left, Right, Up, Down Arrows and OK: Use these buttons to navigate
through and make changes to the Onscreen Menu features.
Info: Displays source information.
Vol up: Increases the audio volume of the following sources: HDMI 1, HDMI
2, Audio In L/R, Audio In 3.5mm and Audio Out L/R. The microphone volume
level is controlled by the PC volume controls.
Vol down: Decreases the audio volume of the following sources: HDMI 1,
HDMI 2, Audio In L/R, Audio In 3.5mm and Audio Out L/R. The microphone
volume level is controlled by the PC volume controls.
Mute: Switches the audio on or off for the following sources: HDMI 1, HDMI 2,
Audio In L/R, Audio In 3.5mm and Audio Out L/R.
Page 11INF7001a Hardware Guide
Page 14

USING THE KEYPAD
The keypad, located on the side of the monitor, has the following buttons:
Power button: Switches the power on or puts the monitor into Standby.
Input button: Turns the Source menu on allowing the user to change sources. Saves
changes/selections if the OSD menu is on.
INPUT
MENU
CH ^
CH
VOL ^
VOL
Menu button: Turns the OSD menu on and off.
CH ^ button: Moves the highlight bar up when the OSD or Source menu is on.
CH v button: Moves the highlight bar down when the OSD or Source menu is on.
VOL ^ button: When the OSD menu is on, this button increases the value of selected
^
^
OSD items.
When the OSD menu is off, this button increases the audio volume of the following
sources: HDMI 1, HDMI 2, Audio In L/R, Audio In 3.5mm and Audio Out L/R. The
microphone volume level is controlled by the PC volume controls.
VOL v button: When the OSD menu is on, this button decreases the value of selected
OSD items.
When the OSD menu is off, this button decreases the audio volume of the following
sources: HDMI 1, HDMI 2, Audio In L/R, Audio In 3.5mm and Audio Out L/R. The
microphone volume level is controlled by the PC volume controls.
Page 12
Page 15

OSD (ON-SCREEN DISPLAY) MENU SYSTEM
The OSD provides the user the ability to control the monitor display.
To access the OSD, press the Menu button on the remote or the keypad located on the right-hand side of the monitor.
Use the up and down arrows on the remote or keypad to scroll through the menu options and press OK to enter the
highlighted menu. Use the up and down arrows and OK button to select the item you would like to adjust. Left and right
arrow buttons are used to make adjustments.
When your adjustments are complete, press the Back button to go to a different menu or press the Menu button to exit
the OSD menu entirely.
The following pages describe each of the OSD menus in detail.
PICTURE
BRIGHTNESS
CONTRAST
SHARPNESS
COLOR TEMPERATURE
COLOR CONTROL
PICTURE MODE
PICTURE RESET
<
<
Sel Adjust Enter Back Quit
< >
PIP
PIP SIZE
PIP AUDIO
PIP RESET
<
<
Sel Adjust Enter Back Quit
< >
RED
BLUE
GREEN
NATIVE
STANDARD
NO
SMALL
MAIN
NO
70
50
50
100
100
100
SCREEN
H POSITION
V POSITION
CLOCK
CLOCK PHASE
ASPECT RATIO
SCREEN RESET
<
<
Sel Adjust Enter Back Quit
< >
CONFIGURATION 1
LANGUAGE
AUTO SOURCE
OPERATION MODE
CONFIGURATION RESET
FACTORY RESET
<
<
Sel Adjust Enter Back Quit
< >
WIDE
NO
ENGLISH
YES
AIO
NO
NO
50
50
50
50
AUDIO
SPEAKER
AUDIO SOURCE
AUDIO RESET
<
<
Sel Adjust Enter Back Quit
< >
CONFIGURATION 2
OSD TURN OFF
OSD H POSITION
OSD V POSITION
MONITOR INFORMATION
<
<
Sel Adjust Enter Back Quit
< >
INTERNAL
MONDOPAD
NO
10
50
50
ADVANCED OPTION
INPUT RESOLUTION
GAMMA SELECTION
OVER SCAN
SCAN CONVERSION
IR CONTROL
KEYBOARD CONTROL
MONITOR ID
DDC/CI
ADVANCED OPTION RESET
<
<
Sel Adjust Enter Back Quit
< >
MODE1
ON
NORMAL
UNLOCK
ON
NO
Page 13INF7001a Hardware Guide
Page 16

Picture Menu
PICTURE
BRIGHTNESS
CONTRAST
SHARPNESS
COLOR TEMPERATURE
COLOR CONTROL
PICTURE MODE
PICTURE RESET
<
<
Sel Adjust Enter Back Quit
< >
RED
BLUE
GREEN
NATIVE
STANDARD
NO
Brightness: changes the intensity of the image. Range: 0-100. (Default 70.)
Contrast: controls the degree of difference between the lightest and darkest parts of the picture and changes the
amount of black and white in the image. Range: 0-100. (Default 50.)
70
50
50
100
100
100
Sharpness: changes the clarity of the edges of a video image. Range: 0-100. (Default 50.)
Color Temperature: changes the intensity of the colors. Options include: Native (default), User, 6500K, and 9300K.
Color Control: allows the user to finely adjust individual red, green and blue colors. Color Temperature must be set to
User to access this feature. Range: 0-255 for each color.
Picture Mode: provides different preset picture modes to choose from. Options include: Standard (default), HighBright,
and Soft.
Picture Reset: resets all Picture menu items to factory default settings. Options: Yes and No.
Page 14
Page 17

Screen Menu
SCREEN
H POSITION
V POSITION
CLOCK
CLOCK PHASE
ASPECT RATIO
SCREEN RESET
<
<
Sel Adjust Enter Back Quit
< >
H Position: adjusts the horizontal position of the image. Range: 0-100. (Default 50.)
V Position: adjusts the vertical position of the image. Range: 0-100. (Default 50.)
Clock: adjusts the width of the image (For VGA input only). Range: 0-100.
WIDE
NO
50
50
50
50
Clock Phase: adjusts the focus, clarity and stability of the image (For VGA input only). Range: 0-100.
Aspect Ratio: adjusts the ratio of the image width to image height. Options: Auto, Native, 4:3, Wide, and Custom.
Screen Reset: resets all Screen menu items to factory default settings. Options: Yes and No.
Page 15INF7001a Hardware Guide
Page 18

Audio menu
AUDIO
SPEAKER
AUDIO SOURCE
AUDIO RESET
<
<
Sel Adjust Enter Back Quit
< >
Speaker: controls whether both the internal and external speakers (sound bar, etc.) or just external speakers are used.
Options include: Internal (both internal and external speakers operate) and External (only external speakers operate).
Default Internal.
Audio Source: selects the audio input source. Options include: Mondopad, PC Speaker (default), HDMI 1, HDMI 2,
Audio1, and Audio2.
INTERNAL
MONDOPAD
NO
Audio Reset: resets all Audio menu items to factory default settings. Options: Yes and No.
Page 16
Page 19

PIP menu
PIP
PIP SIZE
PIP AUDIO
PIP RESET
<
<
Sel Adjust Enter Back Quit
< >
PIP Size: changes the size of the PiP window used in the Corner-to-Corner configuration. Options include: Small
(default), Middle and Large.
PIP Audio: switches the audio source from the main source to the PiP source. Options include: Main (default) and Sub.
SMALL
MAIN
NO
PIP Reset: resets all PIP menu items to factory default settings. Options: Yes and No.
The PiP feature allows the user to display two distinct sources simultaneously on the monitor. These are the supported
combinations and configurations:
Input HDMI1 HDMI2 PC VGA Component Composite
HDMI1
HDMI2
PC
VGA
Component
Composite
Page 17INF7001a Hardware Guide
Page 20

Configuration 1
CONFIGURATION 1
LANGUAGE
AUTO SOURCE
OPERATION MODE
CONFIGURATION RESET
FACTORY RESET
<
<
Sel Adjust Enter Back Quit
< >
Language: switches the OSD menu language.
Auto Source: When enabled, automatically searches for an active source. Options: On (default) and Off.
Operation Mode: When Monitor is enabled, the monitor acts like a simple monitor and only displays external source
devices. AIO (All-in-One) should only be enabled when the monitor is being upgraded to include a Mondopad embedded
PC. Options: Monitor (default) and AIO.
ENGLISH
YES
AIO
NO
NO
Configuration Reset: resets all Configuration 1 and Configuration 2 menu items to factory default settings. Options: Yes
and No.
Factory Reset: resets all menu items to factory default settings. Options: Yes and No.
Page 18
Page 21

Configuration 2
CONFIGURATION 2
OSD TURN OFF
OSD H POSITION
OSD V POSITION
MONITOR INFORMATION
<
<
Sel Adjust Enter Back Quit
< >
OSD Turn Off: controls how many seconds the OSD menu remains on the screen Range: 5-120 (seconds). (Default: 45)
OSD H Position: adjusts the horizontal position of the OSD menu. Range: 0-100. (Default: 50)
OSD V Position: adjusts the vertical position of the OSD menu. Range: 0-100. (Default: 50)
10
50
50
Monitor Information: This read-only submenu displays the model name, serial number, firmware version and amount of
time the monitor has been powered on (hours/minutes).
Page 19INF7001a Hardware Guide
Page 22

Advanced Option
ADVANCED OPTION
INPUT RESOLUTION
GAMMA SELECTION
OVER SCAN
SCAN CONVERSION
IR CONTROL
KEYBOARD CONTROL
MONITOR ID
DDC/CI
ADVANCED OPTION RESET
<
<
Sel Adjust Enter Back Quit
< >
Input Resolution: sets the resolution of the VGA input. This is only required when the monitor is unable to detect the
VGA input resolution correctly. Options include: 1024 x 768, 1280 x 768, 1360 x 768, 1366 x 768, 640 x 480, 720 x 480,
852 x 480, 800 x 600, 1064 x 600, 720 x 576, 1400 x1050, 1680 x 1050, 720 x 400, 640 x 400, 1440 x 900, 1600 x 900
and Auto.
MODE1
ON
NORMAL
UNLOCK
ON
NO
Gamma Selection: adjusts the gamma value of the image and optimizes image brightness and contrast. Options
include: Mode 1, Mode 2, Mode 3.
Over scan: removes noise around the edges of a video image. Options include: On and Off (default).
Scan Conversion: adjusts the conversion of source images. Options include: Interlace and Progressive (recommended).
IR Control: disables and enables the IR sensor on the monitor. Options include: Normal (default; IR is enabled) and Lock
(IR is disabled).
Keypad Control: disables and enables the keypad on the right-hand side of the monitor. Options include: Lock (keypad
is disabled) and Unlock (default; keypad is enabled).
Monitor ID: set the identification number of the monitor via the RS232C connection. Each monitor must have a unique
identification number when multiple monitors are connected. Range: 1-26. (Default; 1)
DDC/CI: enables and disables DDC/CI communication. Options include: On (default) and Off.
Advanced Option Reset: resets all Advanced Option menu items to factory default settings. Options: Yes and No.
Page 20
Page 23

TROUBLESHOOTING
SYMPTOM POSSIBLE SOLUTIONS
No power • Verify the power cord is properly connected to the power outlet and to
the monitor.
• Verify the power switch is ON and that the Power button on the remote or
keypad has been turned on (the front LED should be white).
• Plug another electrical device to the power outlet to verify that the outlet is
supplying the proper voltage.
The monitor shuts down suddenly • Check the Sleep Timer setting in the Configuration 2 OSD menu. Disable the
Sleep Timer.
• Verify that a source is active.
• The monitor may have overheated. Remove any objects blocking the vents.
• Review the Windows power settings of the monitor.
No image • If attempting to display an external source, see “No image from external
source” below.
• Verify that the monitor is turned on (the front LED should be white).
No image from external source • Verify that the source is correct by reviewing the Settings>Input Source menu.
• Verify that connections between the source and the monitor have been
made correctly.
• Verify that the cables are in good condition.
• Verify the correct input source is selected and that the input signal is
compatible with the monitor.
The colors on the monitor do not
look right
No touchpad activity with
external computer
Touchpad functions are not
functioning consistently
Remote is not working • Make sure the batteries are installed in the proper orientation and are not dead.
• Adjust the color settings in the Picture menu.
• Reset the picture settings.
• Verify that connections between the source and the monitor have been made
correctly.
• Verify that the cables are in good condition.
• Verify that the USB B to USB type A cable is plugged from the laptop into the
monitor correctly.
• Verify that the laptop’s operating system is Windows® 7 or 8. (The monitor
touchpad does not support any other operating systems.)
• Remove all objects placed on the lip of the monitor and/or within 2” of the
touchpad screen.
• Disable the PiP feature.
• Power the device off and back on after a few seconds. Re-booting the device
helps the touchpad to re-synchronize.
• Run the Calibration Tool (See "Calibration Tool" on page 30).
• Verify the remote is turned on (the button is on the bottom of the remote).
• Verify you are pointing the remote at the table and are within 26’ (8m) and 30
degrees (horz/vert) of the sensor.
• Verify that the IR Control setting in the Advanced Option OSD menu is set
to Normal.
Page 21INF7001a Hardware Guide
Page 24

Audio noise • If using external speakers, verify that "Analog Audio Out" within the
Audio>Advanced Audio submenu, is set to Variable.
• If using external speakers, verify that "TV speaker" within the Audio menu, is
set to Off.
• Noise can occur when infrared communication equipment (for example,
infrared cordless headphones) is used near the monitor. Move the infrared
communication equipment away from the monitor to eliminate the noise.
No sound • If using the external speakers, verify that the speakers are connected properly
and that the speaker's power switch is turned on.
• If external speakers or an external sound system is not being used, verify that
the Speaker setting in the OSD Audio menu is set to Internal.
• If using an external source, such as component, verify that an audio cable is
correctly installed between the device and the monitor.
• Using the remote, verify the volume is turned up enough and not muted.
• If playing a video, verify the playback has not been paused and that the video’s
audio has not been muted.
• An HDMI® 1.3 (or higher) source and source device is required to hear audio
via the HDMI cable.
Page 22
Page 25

LED Indicators
FRONT LED
(near IR sensor)
Off • The monitor is powered off. Press the Power button on the remote or keypad. If that does
Off • The monitor is in standby mode. Press the Power button on the remote or keypad.
White • The monitor is powered on.
Orange • Contact InFocus Support at www.infocus.com/support.
For additional troubleshooting support, please contact:
InFocus Corporation - Technical Support
6am-5pm PST
877-388-8385
www.infocus.com/support
SOLUTION
not work: 1) verify the power cord is properly connected to the power outlet and to the
monitor; 2)verify that the power switch on the back of the unit is turned on; 3) plug another
electrical device to the power outlet to verify that the outlet is supplying the proper voltage.
Page 23INF7001a Hardware Guide
Page 26

SPECIFICATIONS
To read the latest product specifications, be sure to visit our support website at www.infocus.com/support, as
specifications are subject to change.
Size (viewable) 69.51” (176.56cm) diagonal
Dimensions (without stand) 65.3" W x 39.5 H x 4.1" D (165.86 x 100.33 x 10.41cm)
Weight (without stand) 176.37lbs (80 kg)
Monitor Type TFT-LCD
Refresh Rate 120 Hz
Maximum Resolution 1920 x 1080
Pixel Pitch 0.802mm x 0.802mm
Dynamic Contrast Ratio 4000:1
Response Time 6ms
Brightness 350 nits
Viewing Angle 1760 (H)/1760 (V)
Inputs HDMI In (2), PC In (1), Composite Video (1), Component RCA (1),
RS232 (1), Audio In 3.5mm (1), Audio In RCA (1-R/L), Microphone In
(1), and USB-B for touch control (1).
Outputs Audio Out RCA (1 – R/L)
Wireless Network 802.11n
OSD Language English, Spanish, French
Ambient Light Sensor Yes
Certifications FCC Class A
Input Ratings 100-240V~, 50-60Hz, 5A
Output Ratings 100-240V~, 50-60Hz, 1A
Page 24
Page 27

LIMITED WARRANTY
InFocus Limited Warranty For InFocus Branded Hardware Products Only
LIMITED WARRANTY. InFocus’s warranty obligations for the hardware products are limited to the terms set forth
herein. InFocus warrants the InFocus-branded hardware products against defects in materials and workmanship under
normal use for a period outlined in the Limited Warranty Periods section below from the date of retail purchase by the
original end-user purchaser (“Warranty Period”). The Warranty Period starts on the date of purchase. Your dated sales
or delivery receipt, showing the date of purchase of the product, is your proof of the purchase date. You may be required
to provide proof of purchase and proof that the product was purchased new as a condition of receiving warranty
service. If a hardware defect arises and a valid claim is received within the Warranty Period, at its option and to the
extent permitted by law, InFocus will either (1) repair the hardware defect at no charge, using new parts or refurbished
parts that are equivalent to new in performance and reliability, (2) exchange the product with a product that is new or
refurbished that is equivalent to new in performance and reliability and is at least functionally equivalent to the original
product, or (3) refund the purchase price of the product. InFocus may request that you replace defective parts with
customer-installable new or refurbished parts that InFocus provides in fulfillment of its warranty obligation (“Customer
Self Repair”). A replacement product or part, including a Customer Self Repair part that has been installed in accordance
with instructions provided by InFocus, assumes the remaining warranty of the original product or ninety (90) days from
the date of replacement or repair, whichever provides longer coverage. When a product or part is exchanged, any
replacement item becomes your property and the replaced item becomes InFocus’s property. Parts provided by InFocus
in fulfillment of its warranty obligation must be used in products for which warranty service is claimed. When a refund is
given, the product for which the refund is provided must be returned to InFocus and becomes InFocus’s property. This is
your exclusive remedy for defective products.
Limited Warranty Periods are as follows:
• LCD monitor and remote: one (1) year from date of purchase.
• Accessory products: ninety (90) days from date of purchase.
The Accessory Product Limited Warranty covers the accessory items only and excludes normal wear and tear.
Remanufactured Products and Software Products are exempt from the foregoing Limited Warranty. Please refer to the
appropriate Remanufactured Product Limited Warranty or Software Product Limited Warranty for applicable
Warranty information.
EXCLUSIONS AND LIMITATIONS. This Limited Warranty applies only to the hardware products manufactured by or
for InFocus, and sold by InFocus, its worldwide subsidiaries, authorized resellers or country distributors, that can be
identified by the “InFocus” trademark, trade name, or logo affixed to it, and to required firmware. The Limited Warranty
does not apply to any non-InFocus hardware products or peripherals external to the InFocus-branded hardware
products (including but not limited to external storage subsystems, displays, printers, speakers or other peripherals), or
to any software applications or programs, even if packaged or sold with the InFocus hardware. Manufacturers, suppliers,
or publishers of products, software or peripherals, other than InFocus, may provide their own warranties to the end
user purchaser, but InFocus, in so far as permitted by law, provides their products “AS IS” without the InFocus Limited
Warranty. Software distributed by InFocus with or without the InFocus brand name (including, but not limited to system
software) is not covered under this Limited Warranty. Refer to the licensing agreement accompanying the software for
details of your rights with respect to its use.
InFocus does not warrant that the operation of the products will be uninterrupted or error-free. InFocus is not
responsible for damage arising from failure to follow instructions relating to the products’ use.
INFOCUS IS NOT RESPONSIBLE FOR DAMAGE TO OR LOSS OF ANY PROGRAMS, DATA, OR REMOVABLE
STORAGE MEDIA. INFOCUS IS NOT RESPONSIBLE FOR THE RESTORATION OR REINSTALLATION OF
Page 25INF7001a Hardware Guide
Page 28

ANY PROGRAMS OR DATA OTHER THAN SOFTWARE INSTALLED BY INFOCUS WHEN THE PRODUCT IS
MANUFACTURED.
To enable InFocus to provide the best possible support and service during the Limited Warranty Period, you will be
required to:
• Maintain a proper and adequate environment, and use the InFocus hardware products in accordance with the
instructions furnished.
• Verify configurations, load most recent firmware, install software patches, run InFocus diagnostics and utilities, and
implement temporary procedures or workarounds provided by InFocus while InFocus works on permanent solutions.
• Allow InFocus to keep resident on your systems or sites certain system and network diagnosis and maintenance
tools to facilitate the performance of warranty support (collectively referred to as “Proprietary Service Tools”);
Proprietary Service Tools are and remain the sole and exclusive property of InFocus.
Additional Limitations:
• Products external to the system processor (CPU) box, such as external storage subsystems, printers and other
peripherals, are covered by the applicable warranty for those products or options.
• An effective repair does not necessarily require the replacement of a defective part. For example, cleaning the heads
of a floppy drive or updating revision levels of ROM BIOS on a PCA board are activities that in many instances deliver
an effective repair.
• BIOS/Firmware upgrades are not covered under the Limited Warranty. Firmware that is an integral part of the option
hardware board is not automatically upgraded when new versions of firmware are released.
• It is the responsibility of the customer to ensure that their software is compatible with the latest
BIOS/firmware revision.
This Limited Warranty does not apply: (a) to consumable or expendable parts, such as batteries, or protective coatings
designed to diminish over time unless failure has occurred due to a defect in materials or workmanship; (b) to cartons,
carrying cases, shipping cases, external cabinets, accessories used in connection with the product; (c) to cosmetic
damage, including but not limited to scratches, dents, and broken plastic on ports; (d) to damage caused by use with
non-InFocus products; (e) to damage caused by accident, abuse, misuse, improper ventilation, smoke exposure,
contamination, improper or inadequate maintenance, cleaning or calibration, liquid contact, unusual physical or electrical
stress and/or power surges, virus infection, fire, earthquake, disaster, lightning or other external causes; (f) to damage
caused by operating the product outside the permitted or intended uses or usage parameters described by InFocus
(including burned monitor screens and incorrect input voltage); (g) to damage caused by service (including upgrades
and expansions) performed by anyone other than a representative of InFocus or an InFocus Authorized Service Provider
(“ASP”) or your own installation of customer-installable parts as instructed by InFocus; (h) to a product or part that
has been modified to alter functionality or capability without the written permission of InFocus (including use of an
unauthorized mount); (i) to defects caused by normal wear and tear or otherwise due to the normal aging of the product;
(j) to failure to follow maintenance procedures as outlined in the product user documentation including where a schedule
is specified for regular cleaning of certain parts (based on usage and environment); (k) to loss or damage in transit;
or (l) if the product is not used under normal operating conditions which are defined as use not in excess of 16 hours
continuously per day with a minimum 8 hour period of continuous rest in the powered off state; or (m) if any InFocus
serial number has been removed or defaced. In addition, LCD burn-in as a result of excessive display of static images on
the product is not covered under the terms of this Limited Warranty.
Important: Do not open the hardware products unless otherwise directed by InFocus for the purposes of a Customer
Self Repair (CSR). Opening the hardware products may cause damage that is not covered by this Limited Warranty. Only
InFocus or an ASP should perform service on the hardware products.
Page 26
Page 29

TO THE EXTENT PERMITTED BY LAW, THIS WARRANTY AND THE REMEDIES SET FORTH ABOVE ARE EXCLUSIVE
AND IN LIEU OF ALL OTHER WARRANTIES, REMEDIES AND CONDITIONS, WHETHER ORAL, WRITTEN, STATUTORY,
EXPRESS OR IMPLIED. AS PERMITTED BY APPLICABLE LAW, INFOCUS SPECIFICALLY DISCLAIMS ANY AND ALL
STATUTORY OR IMPLIED WARRANTIES, INCLUDING, WITHOUT LIMITATION, WARRANTIES OF MERCHANTABILITY
AND FITNESS FOR A PARTICULAR PURPOSE AND WARRANTIES AGAINST HIDDEN OR LATENT DEFECTS.
IF INFOCUS CANNOT LAWFULLY DISCLAIM STATUTORY OR IMPLIED WARRANTIES THEN TO THE EXTENT
PERMITTED BY LAW, ALL SUCH WARRANTIES SHALL BE LIMITED IN DURATION TO THE DURATION OF THE
EXPRESS WARRANTY AND TO THE REPAIR OR REPLACEMENT SERVICE AS DETERMINED BY INFOCUS IN ITS
SOLE DISCRETION. No InFocus reseller, agent, or employee is authorized to make any modification, extension, or
addition to this warranty. If any term is held to be illegal or unenforceable, the legality or enforceability of the remaining
terms shall not be affected or impaired.
EXCEPT AS PROVIDED IN THIS WARRANTY AND TO THE MAXIMUM EXTENT PERMITTED BY LAW, INFOCUS IS
NOT RESPONSIBLE FOR DIRECT, SPECIAL, INCIDENTAL OR CONSEQUENTIAL DAMAGES RESULTING FROM ANY
BREACH OF WARRANTY OR CONDITION, OR UNDER ANY OTHER LEGAL THEORY, INCLUDING BUT NOT LIMITED
TO LOSS OF USE; LOSS OF REVENUE; LOSS OF ACTUAL OR ANTICIPATED PROFITS (INCLUDING LOSS OF
PROFITS ON CONTRACTS); LOSS OF THE USE OF MONEY; LOSS OF ANTICIPATED SAVINGS; LOSS OF BUSINESS;
LOSS OF OPPORTUNITY; LOSS OF GOODWILL; LOSS OF REPUTATION; LOSS OF, DAMAGE TO, COMPROMISE
OR CORRUPTION OF DATA; OR ANY INDIRECT OR CONSEQUENTIAL LOSS OR DAMAGE HOWSOEVER CAUSED
INCLUDING THE REPLACEMENT OF EQUIPMENT AND PROPERTY, ANY COSTS OF RECOVERING, PROGRAMMING
OR REPRODUCING ANY PROGRAM OR DATA STORED IN OR USED WITH THE INFOCUS PRODUCT AND ANY
FAILURE TO MAINTAIN THE CONFIDENTIALITY OF DATA STORED ON THE PRODUCT. THE FOREGOING LIMITATION
SHALL NOT APPLY TO DEATH OR PERSONAL INJURY CLAIMS, OR ANY STATUTORY LIABILITY FOR INTENTIONAL
AND GROSS NEGLIGENT ACTS AND/OR OMISSIONS. INFOCUS DISCLAIMS ANY REPRESENTATION THAT IT WILL
BE ABLE TO REPAIR ANY PRODUCT UNDER THIS WARRANTY OR MAKE A PRODUCT EXCHANGE WITHOUT RISK
TO OR LOSS OF PROGRAMS OR DATA.
Limitation on Bringing Action: No action, regardless of form, arising out of the agreement to purchase the Product
may be brought by purchaser more than one year after the cause of action has accrued. Governing Law: Any action,
regardless of form, arising out of the agreement to purchase the Product is governed by the laws of the State of Oregon,
U.S.A. Mandatory Arbitration – Any action, regardless of form, arising out of the agreement to purchase the Product is
subject to mandatory arbitration.
ADDITIONAL RIGHTS. FOR CUSTOMERS, WHO ARE COVERED BY CONSUMER PROTECTION LAWS OR
REGULATIONS IN THEIR COUNTRY OF PURCHASE OR, IF DIFFERENT, THEIR COUNTRY OF RESIDENCE, THE
BENEFITS CONFERRED BY THIS WARRANTY ARE IN ADDITION TO ALL RIGHTS AND REMEDIES PROVIDED BY
SUCH CONSUMER PROTECTION LAWS AND REGULATIONS. THIS WARRANTY DOES NOT EXCLUDE, LIMIT OR
SUSPEND ANY RIGHTS OF CONSUMERS ARISING OUT OF NONCONFORMITY WITH A SALES CONTRACT. SOME
COUNTRIES, STATES AND PROVINCES DO NOT ALLOW THE EXCLUSION OR LIMITATION OF INCIDENTAL OR
CONSEQUENTIAL DAMAGES OR ALLOW LIMITATIONS ON HOW LONG AN IMPLIED WARRANTY OR CONDITION
MAY LAST, SO THE LIMITATIONS OR EXCLUSIONS DESCRIBED BELOW MAY NOT APPLY TO YOU. THIS
WARRANTY GIVES YOU SPECIFIC LEGAL RIGHTS, AND YOU MAY ALSO HAVE OTHER RIGHTS THAT VARY BY
COUNTRY, STATE OR PROVINCE. INFOCUS, THE WARRANTOR UNDER THIS LIMITED WARRANTY, IS IDENTIFIED
AT THE END OF THIS DOCUMENT.
EXTENDED WARRANTIES. InFocus extended product warranties are available for an additional charge. For further
information on InFocus extended product warranties, please contact InFocus or your product reseller.
OBTAINING WARRANTY SERVICE. Please access and review the online help resources located at www.infocus.
com/support before seeking warranty service. If the product is still not functioning properly after making use of these
resources, please contact InFocus Technical Support or, if applicable, an ASP using the information provided below.
When contacting InFocus via telephone, other charges may apply depending on your location. When calling, InFocus
Page 27INF7001a Hardware Guide
Page 30

Technical Support or an ASP will help determine whether your product requires service and, if it does, will inform you
how InFocus will provide it. You must assist in diagnosing issues with your product and follow InFocus’s warranty
processes. InFocus may restrict service to the country where InFocus or its Authorized Distributors originally sold the
hardware product. InFocus will provide warranty service either (i) at an ASP location, where service is performed at the
location, or the ASP may send the product to an InFocus repair service location for service, (ii) by sending you prepaid
way bills (and if you no longer have the original packaging, InFocus may send you packaging material at your cost) to
enable you to ship the product to an InFocus repair service location, or (iii) by sending you customer-installable new or
refurbished replacement parts to enable you to conduct Customer Self Repair, or (iv) by exchanging the product for a
new or refurbished replacement.
Customer Self Repair
InFocus products are designed with many Customer Self Repair (CSR) parts to minimize repair time and allow for greater
flexibility in performing defective parts replacement. If during the diagnosis period, InFocus identifies that the repair can
be accomplished by the use of a CSR part, InFocus will ship that part directly to you for replacement. There are two
categories of CSR parts:
• Parts for which customer self repair is mandatory. If you request InFocus to replace these parts, you will be charged
for the travel and labor costs of this service.
• Parts for which customer self repair is optional. These parts are also designed for customer self repair. If, however,
you require that InFocus replace them for you, this may be done at no additional charge under the type of warranty
service designated for your product.
Based on availability and where geography permits, InFocus will attempt to ship CSR parts out the next business day.
Customer receipt will vary based upon the actual part, customer location and shipping method. Next day, same-day
or four-hour delivery may be offered at an additional charge where geography permits. If assistance is required, you
can call the InFocus Technical Support Center and a technician will help you over the phone. InFocus specifies in the
materials shipped with a replacement CSR part whether a defective part must be returned to InFocus. In cases where
it is required to return the defective part to InFocus, you must ship the defective part back to InFocus within a defined
period of time, normally five (5) business days, and clearly display the Return Material Authorization (RMA#) on the
outside of the shipping carton or a similar package affording an equal degree of protection. The defective part must be
returned with the associated documentation in the provided shipping material. Failure to return the defective part may
result in InFocus charging you for the replacement. With a Customer Self Repair, InFocus will pay all shipping and part
return costs and determine the courier/carrier to be used.
InFocus may utilize a doorstep swap process, which involves an InFocus delivery person delivering the replacement
product or CSR part to the Customer and picking up the defective product or part at the time of delivery for return to
InFocus. Upon receipt of the replacement product or part, the original product or part becomes the property of InFocus
and you agree to follow instructions, including arranging the return of original product or part to InFocus in a timely
manner. When providing a product exchange or Customer Self Repair (CSR) part requiring the return of the original
product or part, InFocus may require a credit card authorization as security for the retail price of the replacement product
or part and applicable shipping costs. When returning product to InFocus, a Return Material Authorization Number
(RMA #) is required and must be clearly displayed on the outside of the shipping carton or a similar package affording
an equal degree of protection. Service options, parts availability and response times may vary according to the country
in which service is requested. Service options are subject to change at any time. You may be responsible for shipping
and handling charges if the product cannot be serviced in the country in which service is requested. If you seek service
in a country that is not the country of original purchase, you will comply with all applicable import and export laws and
regulations and be responsible for all custom duties, V.A.T. and other associated taxes and charges. Where international
service is available, InFocus may repair or exchange defective products and parts with comparable products and parts
that comply with local standards. In accordance with applicable law, InFocus may require that you furnish proof of
purchase details and/or comply with registration requirements before receiving warranty service. Resources with more
details on this and other matters on obtaining warranty service are described below.
Page 28
Page 31

PRIVACY. InFocus will maintain and use customer information in accordance with the InFocus Privacy Policy available
at www.Infocus.com/privacy and InFocus’s applicable legal obligations.
BACKUP. If your product is capable of storing software programs, data and other information, you should protect
its contents against possible operational failures. Before you deliver your product for warranty service it is your
responsibility to keep a separate backup copy of the contents, remove all personal information and data that you want
to protect and disable any security passwords. THE CONTENTS OF YOUR PRODUCT WILL BE DELETED AND THE
STORAGE MEDIA REFORMATTED IN THE COURSE OF WARRANTY SERVICE. Your product or a replacement product
will be returned to you as your product was configured when originally purchased, subject to applicable updates.
InFocus may install system software updates as part of warranty service that will prevent the hardware from reverting
to an earlier version of the system software. Third party applications installed on the hardware may not be compatible
or work with the hardware as a result of the system software update. You will be responsible for reinstalling all other
software programs, data and passwords. Recovery and reinstallation of software programs and user data are not
covered under this Limited Warranty.
RESOURCES. Support and service information including Authorized Distributor and Authorized Service Provider
locations is available at: www.infocus.com/support.
InFocus Corporation, 13190 SW 68th Parkway, Suite 200, Portland, OR 97223-8368 USA
© 2011-2014 InFocus Corp. All rights reserved. InFocus and the InFocus logo are trademarks of InFocus Corp.,
registered in the U.S. and other countries.
Page 29INF7001a Hardware Guide
Page 32

APPENDIX
Calibration Tool
1) From your Start menu, navigate to All Programs>PQLabs Software>MultiTouch Platform, and
double-click MultiTouchPlatform.
2) The MultiTouch Platform window displays.
3) Using a mouse and keyboard, click Calibrate. The Reset Touchscreen Data window displays.
Page 30
Page 33

4) Do not touch the screen until the white cross and the message Touch + for more than 1 second" displays.
5) Using a stylus (or your finger), touch and hold the white cross until the cross turns green and the message Please
release your finger displays.
6) Repeat steps 4 and 5 until calibration is complete.
7) Click OK, or to start the calibration process again, click Reset Calibration.
Page 31INF7001a Hardware Guide
Page 34
Calibration Troubleshooting Tool
1) From your Start menu, navigate to All Programs>PQLabs Software>MultiTouch Platform, and
double-click MultiTouchPlatform.
2) The MultiTouch Platform window displays.
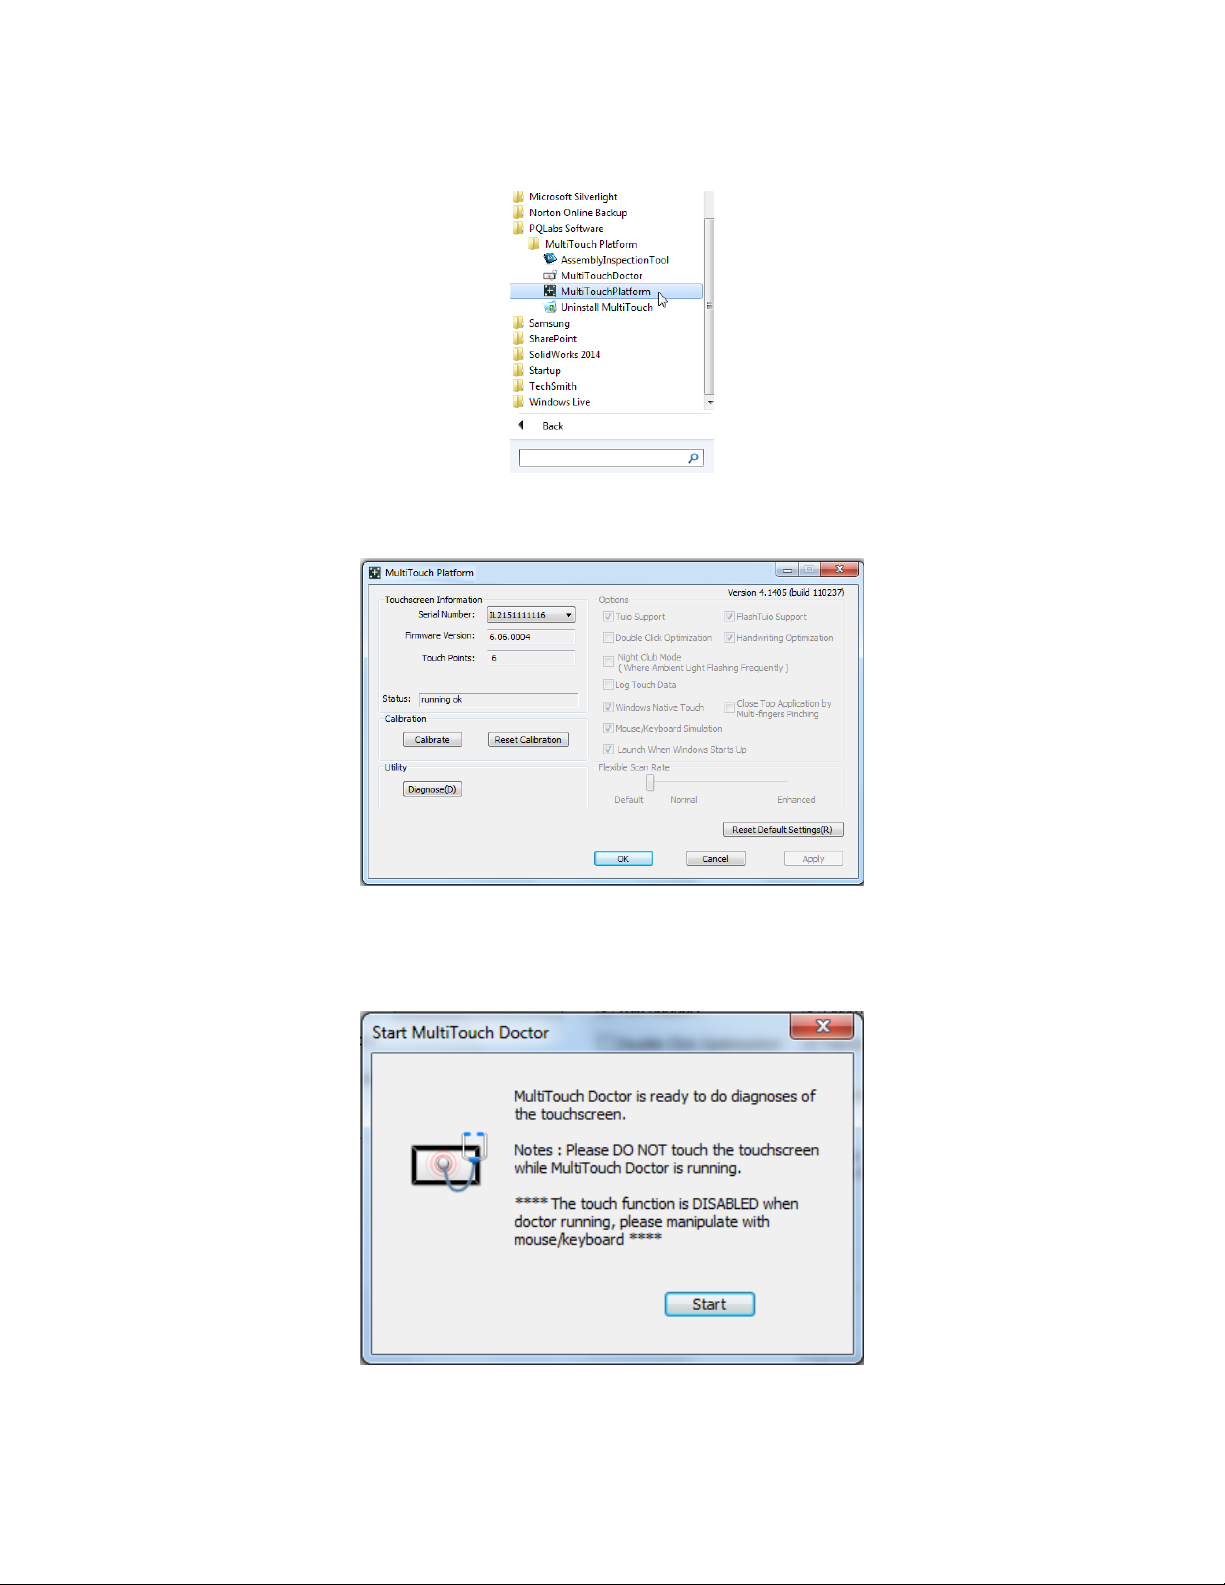
3) Click Diagnose. The Start MultiTouch Doctor window displays.
4) Click Start.
Page 32
Page 35

5) If a check mark appears, the panel has passed that test. If a red X appears, the panel has failed. In that case, follow
the instructions in the Details box.
6) If instructed to send a report to the PQ Labs team, click Send report, type your information, and click Send.
7) Close the application.
Page 33INF7001a Hardware Guide
Page 36

安全注意事項
在將顯示器連接到電源之前,請仔細閱讀並遵守顯示器上提供的下述安全說明。如不遵守安全說明則可能導致火災、觸電或
人身傷害,並可能損壞或 損害對設備所提供的保護。 請妥善保存所有安全說明。
• 這種顯示器是非常沉重的,應由至少兩個人進行搬動和安裝。不要試圖自行搬動或安裝顯示器,否則可能造成傷害和/
或損害。
• 搬動顯示器時,利用手柄和側板或底板始終牢固地把持住顯示器。不要把持頂板。
• 在搬動顯示器紙箱時,不要傾斜或倒置紙箱。始終將其保持在豎直方向。
• 在移動顯示器前,請斷開所有配件和電纜。
• 如果顯示器安裝在牆上,顯示器與牆壁之間的距離至少保持為 1.98 英寸(5釐米),以提供足夠的通風。
• 請參閱正確的開機和關機程式方面的指南。
• 遵循本手冊和顯示器上的所有警告和注意事項。
• 顯示器的安放位置遠離加熱和冷卻通風孔至少 4 英尺(1.2米)。
• 請勿堵塞通風口。顯示器放在通風良好且不阻礙進氣口和排氣口的地方。
• 不要在諸如散熱器、熱記錄器、火爐或其他發熱設備(包括放大器)等熱源附近安裝或使用顯示器或揚聲器。
• 不要將顯示器放置在陽光直射、潮濕、油膩或灰塵較多的地方,或顯示器可能接觸到雨水、煙霧或蒸汽的地方。
• 顯示器使用的電源線不應該靠近水,例如靠近浴缸、洗臉盆、廚房水槽、游泳池等。
• 不要在靠近水的地方使用顯示器的任何元件,包括揚聲器。警告:為減少火災或觸電的危險,請勿將本設備和該設備的
任何元件淋雨或受潮。
• 請勿摔落顯示器。
• 不要將液體灑在顯示器上。濺落的液體可能損壞顯示器。
• 警告:翻倒、搖晃或搖擺機器可能會造成人身傷害或死亡。警告:翻倒、搖晃或搖擺機器可能會造成人身傷害或死亡。
• 用於驅動該顯示器的電源插座在緊急情況下應當能夠順暢地接觸和操控,以便能夠快速地斷開連接。
• 不應將明火火源如點燃的蠟燭等放在顯示器上。
• 使用所提供的電源線。將電源線連接到有安全保護(接地)接地端子的插座上。建議使用電湧保護電源排插。
• 建議將第 1 級顯示器接地。
• 不要將顯示器安裝在承受機械振動的地方。
• 不要將顯示器安置在不穩定的表面上,否則可能導致嚴重的人身傷害和顯示器損壞。將顯示器安裝到支架上時,一定要
遵守製造商的說明。僅使用制 造商推薦的安裝硬體。
• 在斷開電源線時,請握住插頭而非電線。
• 保護電源線使其免於踩踏或擠壓,尤其是插頭、電源插座處以及它們從顯示器退出的部位。
• 如果您不打算較長時間使用顯示器,則應拔下顯示器的電源線。
• 在需要使用附帶的超細纖維清潔布清潔顯示器時,應拔下顯示器的電源線。螢幕的擦拭工作應當在電源關閉時使用清潔
布進行。切勿在顯示器上使用 酒精、溶劑或腐蝕性的液體。
• 處理此顯示器隨附的線纜後請洗手。
• 顯示器遙控器、滑鼠和鍵盤使用電池。顯示器遙控器、滑鼠和鍵盤使用電池。確保電池的極性(+/-)正確對齊。根據
當地處理法規處理廢舊電池。
• 只使用符合本產品規格的適當規格的牆面和支架安裝硬體,並遵照製造商的安裝說明。保修範圍不包括因使用不當規格
安裝硬體或安裝不當而造成的 任何損壞。
• 應向合格的維修人員諮詢所有服務資訊。不要取下蓋子或背板。自行維修顯示器是危險的做法,將導致保修失效。
• 只使用富可視公司指定的更換零部件。未經認可的代用品可能會導致火災、觸電或人身傷害,並可能導致保修失效。
• 在將顯示器安裝到牆上時,必須使用 M8 (12 毫米) 規格的螺栓。此外,安裝介面應符合北美 UL1678 標準。安裝方
式應牢固到足以承受顯示器的重量(無底座重量約為176.37 磅/80斤)。
• 請遵照以下說明,以確保顯示器使用壽命期間的圖像品質。不遵守這些說明可能會影響保修。
Page 34
Page 37

JTouch 70”顯示器I/O port 介紹前/後面板
A
TOUCH
CONTROL
C
Audio
Audio OUT
RS232
IN 1
IN 2
L R
A
B
VIDEO
HDMI2
TOUCH
CONTROL
TOUCH
CONTROL
HDMI1HDMI2 COMPONENTVIDEO PC IN
B
HDMI1HDMI2 COMPONENTVIDEO PC IN
將USB纜線從顯示器連接至外部電腦,以便使用觸控模組。
接受來自外部裝置(例如VCR或DVD播放器)的VIDEO信號。
接收外部裝置的HDMI信號。
HDMI1
PC IN
COMPONENT
接收外部裝置的HDMI信號。
接收來自外部裝置(例如電腦)的類比RGB訊號。
接收來自外部裝置(例如DVD播放器,HDTV裝置或雷射光碟播放器)的色差視訊
(YPbpr)訊號。
Page 35INF7001a Hardware Guide
Page 38

C
RS232
連接外部數據機。
RS232
IN 1
Audio
IN 2
Audio OUT
L R
INPUT
MIC
連接至麥克風。
AUDIO IN1
接收來自外部裝置(例如iPod播放器)所發出的音頻訊號。
AUDIO IN2
接收來自外部裝置(例如DVD播放器)所發出的音頻訊號。
AUDIO OUT
連接到外接式立體聲喇叭。
開啟或關閉顯示器。
選取/確認屏幕顯示(OSD) 功能表中的選項。
MENU
CH ^
CH
VOL ^
VOL
開啟或關閉OSD 功能表。
在OSD 功能表中向上捲動瀏覽各個設定和選項。
^
在OSD 功能表中向下捲動瀏覽各個設定和選項。
音量增加鍵,在OSD 功能表中向左捲動瀏覽各個設定和選項。
^
音量減小鍵,在OSD 功能表中向右捲動瀏覽各個設定和選項。
Page 36
 Loading...