


USER GUIDE
INF6502WB
009-1609-01


CONTENTS
Declaration of Conformity ...................................................................................................................................................3
Safety Considerations .........................................................................................................................................................4
安全資訊 ..............................................................................................................................................................................5
What’s Included ..................................................................................................................................................................7
Setup ...................................................................................................................................................................................8
Mounting ......................................................................................................................................................................8
Connecting to other devices .........................................................................................................................................9
Connecting AC power .................................................................................................................................................11
External PC touchscreen control setup ......................................................................................................................11
Turning the Monitor On/Off ...............................................................................................................................................11
Using the Remote ..............................................................................................................................................................12
Using the Keypad ..............................................................................................................................................................14
Whiteboard ........................................................................................................................................................................15
Create a drawing object ..............................................................................................................................................15
Import an image ..........................................................................................................................................................16
Modify whiteboard canvas objects .............................................................................................................................18
Save the whiteboard canvas .......................................................................................................................................19
Save the whiteboard canvas to a USB thumb drive ...................................................................................................20
Open a new whiteboard canvas ..................................................................................................................................20
Open a whiteboard file ................................................................................................................................................21
Open a whiteboard file from a USB thumb drive ........................................................................................................22
Navigation ...................................................................................................................................................................22
Whiteboard Tools ..............................................................................................................................................................23
Update Firmware ...............................................................................................................................................................26
OSD (On-Screen Display) Menu System ...........................................................................................................................27
Picture .........................................................................................................................................................................28
Screen .........................................................................................................................................................................29
Audio ...........................................................................................................................................................................30
PIP ...............................................................................................................................................................................31
Configuration 1 ............................................................................................................................................................32
Configuration 2 ............................................................................................................................................................33
Advanced option .........................................................................................................................................................34
Troubleshooting ................................................................................................................................................................35
Limited Warranty ...............................................................................................................................................................37
安全注意事項 ...............................................................................................................................................................42
JTouch 65”顯示器I/O port 介紹前/後面板 ...................................................................................................................44


DECLARATION OF CONFORMITY
Manufacturer: InFocus Corporation, 13190 SW 68th Parkway, Suite 200, Portland, Oregon 97223-8368 USA
Trademarks
Apple, Mac and Facetime are trademarks or registered trademarks of Apple, Inc. Microsoft, Windows, PowerPoint, Excel and Word are trademarks
or registered trademarks of Microsoft Corporation. Adobe and Acrobat are trademarks or registered trademarks of Adobe Systems Incorporated.
HDMI logo and “High Definition Multimedia Interface” are registered trademarks of HDMI Licensing LLC. Manufactured under license from Dolby
Laboratories. Dolby and the double-D symbol are trademarks of Dolby Laboratories. SRS TruSurround HD and SRS TruVolume are trademarks
of SRS Labs, Inc. TruSurround HD and TruVolume technologies are incorporated under license from SRS Labs, Inc. InFocus, In Focus, INFOCUS
(stylized), MondoCenter, Mondopad, BigTouch, and JTouch are either registered trademarks or trademarks of InFocus Corporation in the United
States and other countries. All other trademarks are the property of their respective owners. Any other trademarks, service marks, personal names or
product names are assumed to be the property of their respective owners and are used only for reference. There is no implied sponsorship, affiliation,
certification, approval or endorsement if we use one of these terms.
FCC Warning
This equipment has been tested and found to comply with the limits for a Class A digital device, pursuant to part 15 of the FCC Rules. These limits are
designed to provide reasonable protection against harmful interference when the equipment is operated in a commercial environment. This equipment
generates, uses and can radiate radio frequency energy and, if not installed and used in accordance with the instruction manual, may cause harmful
interference to radio communications.
Operation of the equipment in a residential area is likely to cause harmful interference in which case the user will be required to correct the interference
at his own expense. Changes or modifications not expressly approved by InFocus Corporation may void authority to operate the equipment.
This device complies with part 15 of the FCC Rules. Operation is subject to the following two conditions: (1) This device may not cause harmful
interference and (2) this device must accept any interference received, including interference that may cause undesired operation.
The manufacturer is not responsible for any radio or TV interference caused by unauthorized modifications to this equipment. Such modifications could
void the user's authority to operate the equipment.
Radiation Exposure Statement
FCC/IC Identification (ID number: 146INF6502/8150B-INF6502) is only applicable when the product is under working mode as Easel, no any accessory
and peripheral connected to I/O ports. Detailed introduction for Easel mode, please refer to pages 12 - 30. The device and its antenna used for this
transmitter must be installed to provide a separation distance of at least 20cm from all persons and much not be co-located or operating in conjunction
with any other antenna or transmitter. To comply with FCC/IC RF exposure compliance requirements, this grant is applicable to only Mobile-Easel
Configurations.
Canada
This Class A digital apparatus complies with Canadian ICES-003.
Cet appareil numérique de la classe A est conforme à la norme NMB-003 du Canada.
This device complies with part 15 of the FCC Rules / RSS-247. Operation is subject to the following two conditions: (1) This device may not cause
harmful interference and (2) this device must accept any interference received, including interference that may cause undesired operation.
Cet appareil est conforme à l’article 15 des réglementations de la FCC / CNR-247. Le fonctionnement est subordonné aux deux conditions suivantes :
(1) ce appareil ne doit pas provoquer d’interférences nuisibles, et (2) ce appareil doit accepter toute interférence reçue, y compris des interférences qui
peuvent provoquer un fonctionnemnent non désiré.
The device for operation in the band 5150-5250 MHz is only for indoor use to reduce the potential for harmful interference to co-channel mobile
satellite systems; Users should also be advised that high-power radars are allocated as primary users of the bands 5250-5350 MHz and 5650-5850
MHz and that these radars could cause interference and/or damage to LE-LAN devices.
Cet appareil utilisant la fréquence 5150-5250 MHz est réservé à une utilisation en intérieur afin de réduire le risque d'interférences avecles systèmes
mobiles par satellites à canaux partagés. Les utilisateurs doivent également savoir que les radars haute puissance sont alloués comme utilisateurs
principaux (ou utilisateurs prioritaires) des fréquences 5250-5350 MHz et 5650-5850 MHz et que ces radars pourraient occasionner des interférences
et éventuellement endommager les appareils LE-LAN.
이 기기는 업무용으로 전자파적합등록을 한 기기이오니 판매자 또는 사용자는 이 점을 주의하시기 바라며 만약 잘못 판매 또는 구입하였을 때에는
가정용으로 교환하시기 바랍니다.
申明: 此为A级产品,在生活环境中,该产品可能会造成无线电干扰。在这种情况下,可能需要用户对其干扰采取切实可行的措施。
警告使用者: 此為甲類資訊技術設備,於居住環境中使用時,可能會造成射頻擾動, 在此種情況下,使用者會被要求採取某些適當的對策。
Agency Approvals
See product certification label.
Page 3INF6502WB User Guide

This document applies to regulatory model: INF6502
Input ratings: AC 100-240V AC, 4.5A, 50-60Hz
InFocus reserves the right to alter product offerings and specifications at any time without notice.
SAFETY CONSIDERATIONS
Please read and follow all safety instructions provided below and on the monitor before connecting the monitor to a
power source. Failure to comply with safety instructions may result in fire, electrical shock, or personal injury and may
damage or impair protection provided by the equipment. Please save all safety instructions.
• This monitor is very heavy and should be moved and installed by at least two individuals. Do not attempt to move or
install the monitor yourself, otherwise injury and/or damage may occur.
• When moving the monitor, always hold the monitor firmly using the handles and side or bottom bezels. Do not hold
the top bezel.
• When moving the monitor carton, do not tilt or invert the carton. Always keep it in an upright orientation.
• Disconnect all accessories and cables before moving the monitor.
• If the monitor is installed against the wall, maintain a distance of at least 1.98” (5cm) between the monitor and the
wall to provide adequate ventilation.
• Refer to this guide for proper startup and shutdown procedures.
• Follow all warnings and cautions in this manual and on the monitor.
• Locate the monitor at least 4’ (1.2m) away from heating and cooling vents.
• Do not block ventilation openings. Locate the monitor in a well-ventilated area without obstructions to intake or
exhaust vents.
• Do not install or use the monitor or speakers near any heat sources such as radiators, heat registers, stoves, or other
devices (including amplifiers) that produce heat.
• Do not place the monitor in direct sunlight, humid, greasy or dusty places or in places where the monitor may come
into contact with rain, smoke or steam.
• The monitor should not be used with the power cord near water, for instance, near a bathtub, washbowl, kitchen sink
or swimming pool, etc.
• Do not use any components of the monitor, including the speakers, near water. Warning: To reduce the risk of fire or
electric shock, do not expose this equipment or any component of this equipment to rain or moisture.
• Do not drop the monitor.
• Do not spill liquid on the monitor. Spilled liquid may damage the monitor.
• WARNING: This monitor must be securely attached to the floor/wall per installation instructions. Tipping, shaking, or
rocking the machine may cause injury or death.
• The power outlet used to power this monitor should be readliy accessible for fast disconnection in case
of emergency.
• No naked flame source, such as lighted candles, should be placed on the monitor.
• Use the power cord provided. Connect the power cord to a receptacle with a protective safety (earth) ground
terminal. A surge-protected power strip is recommended. Do not overload wall outlets.
Page 4

• It is recommended that the Class 1 monitor be grounded.
• Do not install the monitor in places subject to mechanical vibration.
• Do not place the monitor on an unstable surface, which could result in serious personal injuries and monitor damage.
When mounting the monitor to a stand, be sure to following the manufacturer’s instructions. Use only the mounting
hardware recommended by the manufacturer.
• When disconnecting the power cord, hold the plug, not the cord.
• Protect the power cord from being walked on or pinched particularly at plugs, convenience receptacles and the point
where they exit from the monitor.
• Unplug the monitor if you are not going to use it for an extensive period of time.
• Unplug the monitor if you need to clean it with the included microfiber cleaning cloth. The screen may be wiped with
the cleaning cloth when the power is off. Never use alcohol, solvents or ammonia-based liquids on this monitor.
• Wash hands after handling the cables supplied with this monitor.
• The monitor remote control uses batteries (not included). Make sure the batteries’ polarity (+/-) is aligned correctly.
Dispose of used batteries in accordance with local disposal laws.
• Only use properly rated wall and stand mounting hardware that meet this product’s specifications and follow the
manufacturer installation instructions. The warranty does not cover any damage caused by use of improperly rated
mounting hardware or from improper installation.
• Refer all service to qualified service personnel. Do not remove the cover or back. Servicing your own monitor can be
dangerous to you and will void the warranty.
• Only use replacement parts specified by InFocus. Unauthorized substitutions may result in fire, electrical shock or
injury and may void the warranty.
• When mounting the monitor to a wall, metric 8 (12mm) screws must be used. In addition, the mounting interface
should comply with the UL1678 standard in North America. The mounting means should be strong enough to bear
the weight of the monitor.
• Follow these instructions to help ensure image quality over the life of the monitor. Failure to follow these instructions
may affect the warranty.
安全資訊
在將本產品連接到電源前,請仔細閱讀並遵守以下列出以及產品上的所有安全指示。未遵守安全指示可能會導致火災、電擊
或人身傷害,並可 能破壞或損壞設備所提供的保護。請保存所有安全指示。
• 此顯示器非常重,至少需要兩個人移動並完成安裝。請勿自己嘗試移動或安裝顯示器,否則會造成傷害和/或損壞。
• 移動顯示器時,請務必使用手柄和側外框或底部外框牢牢托住顯示器。請勿抓握頂部外框。
• 移動顯示器包裝箱時,請勿傾斜或倒置包裝箱。始終保持直立。
• 移動顯示器前,請斷開所有配件和線纜。
• 如果將顯示器裝在牆上,請在顯示器和牆壁之間保留最少 1.98 英寸(5 釐米)的距離,以保持足夠通風。
• 有關正確開機和關機流程,請參閱本指南。
• 請遵循本手冊中以及顯示器上的所有警告和注意事項。
• 顯示器的擺放位置應與加熱和冷卻通風孔保留至少 4 英尺(1.2 米)的距離。
• 請勿堵塞通風口。將顯示器置於通風良好的區域,且進氣口或排氣口無阻塞。
• 請勿在散熱器、電熱器、火爐或其他產生熱量的設備(包括放大器)等熱源附近安裝或使用顯示器或條形音箱。
Page 5INF6502WB User Guide

• 請勿將顯示器放在陽光直射、潮濕、油膩或積塵,或顯示幕可能接觸到雨水、煙霧或蒸汽的區域。
• 請勿在電源線靠近浴缸、洗臉盆、廚房水槽、游泳池附近等有水的區域使用顯示器。
• 請勿在靠近水的區域使用顯示器的任何元件,包括條形音箱。警告:要降低火災或電擊風險,請勿使本設備或其元件淋
雨或受潮。
• 請勿拋擲顯示器。
• 請勿將液體濺灑在顯示器上。濺落的液體可能會損壞顯示器。
• 警告:必須按照安裝指示將本顯示器牢固地固定在地板/牆面上。傾斜、搖晃或搖動機器可能會造成人身傷害或致死。
• 用於為此顯示器提供電力的電源插座應置於便於觸及的地方,以便在出現緊急情況時快速斷開連接。
• 請勿將點燃的蠟燭等明火火源放在顯示器上。
• 請使用附帶的電源線。將電源線連接到附帶防護安全(接地)接地端子的插座。建議使用具有電湧保護功能的電源板。
請勿超負荷使用壁式插座。
• 建議將 1 類顯示器接地。
• 請勿將顯示器安裝到易受機械振動影響的地方。
• 請勿將顯示器置於不平整的表面,這可能會造成嚴重的人身傷害並會損壞顯示器。要將顯示器安裝在支架上,請務必遵
守下列製造商指示。僅使用制 造商推薦的安裝硬體。
• 斷開電源線時,請握住插頭,切勿拉扯電線。
• 防止踩踏或擠壓電源線,尤其是電源插頭、插座以及在顯示幕上的出入點。
• 如果您長時間不打算使用顯示器,請拔掉顯示器插頭。
• 如果您需要使用附帶的超細纖維清潔布進行清潔,請拔掉顯示器插頭。電源關閉時,可使用清潔布擦拭螢幕。切勿在顯
示器上使用酒精、溶劑或含氨 液體。
• 操作顯示器附帶的線纜後需要洗手。
• 顯示器遙控器利用電池工作。一些型號在發運時還附有採用電池工作的滑鼠和鍵盤。請確保電池極性 (+/-) 正確對齊。按
照當地廢棄物品處理法規處理 廢舊電池。
• 僅使用符合此產品規格的適當耐火等級牆和支架安裝硬體,並遵守製造商的安裝指示。由額定安裝硬體使用不當或安裝
不當造成的任何損壞均不在保 修範圍內。
• 請向專業維修人員諮詢所有維修資訊。請勿卸下封蓋或封底。自行維修顯示器不僅會對您造成傷害,而且也會使保修失
效。
• 僅使用 InFocus 指定的更換零件。未經授權進行更換可能會造成火災、電擊或人身傷害,並可能使保修失效。
• 將顯示器安裝到牆上時,必須使用 8 枚公制(12 毫米)螺絲。此外,安裝介面應符合北美地區的 UL1678 標準。安裝方
法應結實牢固,足以承受顯 示器的重量(參見產品技術規格)。
• 遵守這些指示有助於確保使用壽命內顯示器的圖像品質。不遵守這些指示可能會影響保修。
Page 6

WHAT’S INCLUDED
1920 x 1080 monitor
USB cable
Remote control
VGA cable
Warranty
Quick Start
Guide
Documentation
Power cord
(varies per country)
(batteries not included)
For additional accessory options, such as stands, feet, carts and wall mounts, see the InFocus website
(www.infocus.com/store) or your local dealer.
Page 7INF6502WB User Guide

SETUP
Mounting
This product does not ship with mounting accessories. Only use commercially manufactured mounting accessories
which meet this product's specifications and follow the manufacturer installation instructions.
• Only use properly rated wall and stand mounting hardware that meet this product’s specifications and follow the
manufacturer installation instructions. The warranty does not cover any damage caused by use of improperly rated
mounting hardware or from improper installation.
• To prevent damage to the screen surface, carefully place your monitor face-down on a clean, cushioned surface.
• When mounting the monitor to a wall, metric 8 (12mm) screws must be used. Use spring washers to prevent the
screws from coming loose. In addition, the mounting interface should comply with the UL1678 standard in North
America. The mounting means should be strong enough to bear the weight of the monitor.
• Do not install the monitor in places subject to mechanical vibration.
• Do not place the monitor on an unstable surface, which could result in serious personal injuries and monitor damage.
When mounting the monitor to a stand, be sure to following the manufacturer’s instructions. Use only the mounting
hardware recommended by the manufacturer.
• WARNING: This monitor must be securely attached to the floor/wall per installation instructions. Tipping, shaking, or
rocking the machine may cause injury or death.
• If the monitor is installed against the wall, maintain a distance of at least 1.98” (5cm) between the monitor and the
wall to provide adequate ventilation.
• Do not install or use the monitor near any heat sources such as radiators, heat registers, stoves, or other devices
(including amplifiers) that produce heat.
• Do not place the monitor in direct sunlight, humid, greasy or dusty places or in places where the monitor may come
into contact with rain, smoke or steam.
Page 8

Connecting to other devices
A full range of digital and analog video inputs and audio source devices can be connected to the connection panels on
the back and side of the monitor. Available jacks include: HDMI In (4), PC In (1), Composite Video (1), Component RCA
(1), RS232 (1), Audio In 3.5mm (1), Audio In RCA (1-R/L), USB-B for touch control (1), USB 2.0-A (4), and Audio Out RCA
(1-R/L).
A
TOUCH
CONTROL
USB
RS232
C
IN 1
Audio
IN 2
Audio OUT
L R
B
RJ45
HDMI3HDMI4
HDMI1HDMI2 COMPONENTVIDEO PC IN
A
TOUCH
CONTROL
USB
TOUCH
CONTROL
USB 1-4
Connect a Type A to Type B USB cable from the monitor to an external
computer in order to use the touchscreen gestures on the monitor.
Connect a wireless mouse, USB thumb drive or other USB device to this
USB Type A 2.0 connector.
Page 9INF6502WB User Guide

B
RJ45
HDMI3HDMI4 HDMI1HDMI2 COMPONENTVIDEO PC IN
RJ45 Not functional on this model.
Connect a USB thumb drive to this USB Type A 2.0 connector. Used for
USB
firmware upgrades, saving whiteboard files, and importing images onto
the whiteboard.
Connect a USB thumb drive to this USB Type A 2.0 connector. Used for
USB
firmware upgrades, saving whiteboard files, and importing images onto
the whiteboard.
VIDEO
HDMI4
HDMI3
HDMI2
HDMI1
PC IN
COMPONENT
C
Connect a composite video cable from the monitor to an external device
(such as a VCR or DVD player).
Connect an HDMI cable from the monitor to an HDMI external device
(such as a VCR or DVD player).
Connect an HDMI cable from the monitor to an HDMI external device
(such as a VCR or DVD player).
Connect an HDMI cable from the monitor to an HDMI external device
(such as a VCR or DVD player).
Connect an HDMI cable from the monitor to an HDMI external device
(such as a VCR or DVD player).
Connect a VGA computer cable from the monitor to an external
computer.
Connect a component RCA video cable from the monitor to an external
device (such as a DVD player, HDTV device, or Laser Disc player)
(YPbPr) signals.
RS232 Connect to an RS232 control device for remote control applications.
Audio OUT
Page 10
Audio
RS232
IN 1
IN 2
AUDIO IN1 Connect a 3.5mm audio cable to an external device (e.g., iPod player).
AUDIO IN2 Connect an RCA L/R audio cable to an external device.
AUDIO OUT Connect an RCA L/R audio cable to external stereo speakers.
L R

Connecting AC power
1) Connect one end of the AC power cord to the AC In jack on the back of the monitor.
2) Connect the other end of the AC power cord to an AC outlet.
3) Toggle the power switch to the ON position.
4) Press the power switch. (The LED on the front of the monitor turns on.)
NOTES:
• Your monitor should only be operated from the power source indicated on the label.
• Always unplug the AC power cord from the power outlet when you are not using your monitor for an extended period
of time.
External PC touchscreen control setup
1) Connect an external computer to the monitor using a DVI, HDMI, or VGA cable.
2) Connect the Type A to Type B USB cable to the USB Type A jack on the computer and to the USB Type B jack on
the side of the monitor.
3) The computer can now be controlled by using touchscreen gestures on the monitor.
TURNING THE MONITOR ON/OFF
1) Verify that the power cord is connected to a power outlet and that the power switch is ON.
2) Press the Power button on the remote or the right side of the monitor.
NOTE: By default, the monitor goes into system standby after 30 minutes of inactivity. To change this behavior, use the
Power Save Mode feature in the menu system.
Page 11INF6502WB User Guide
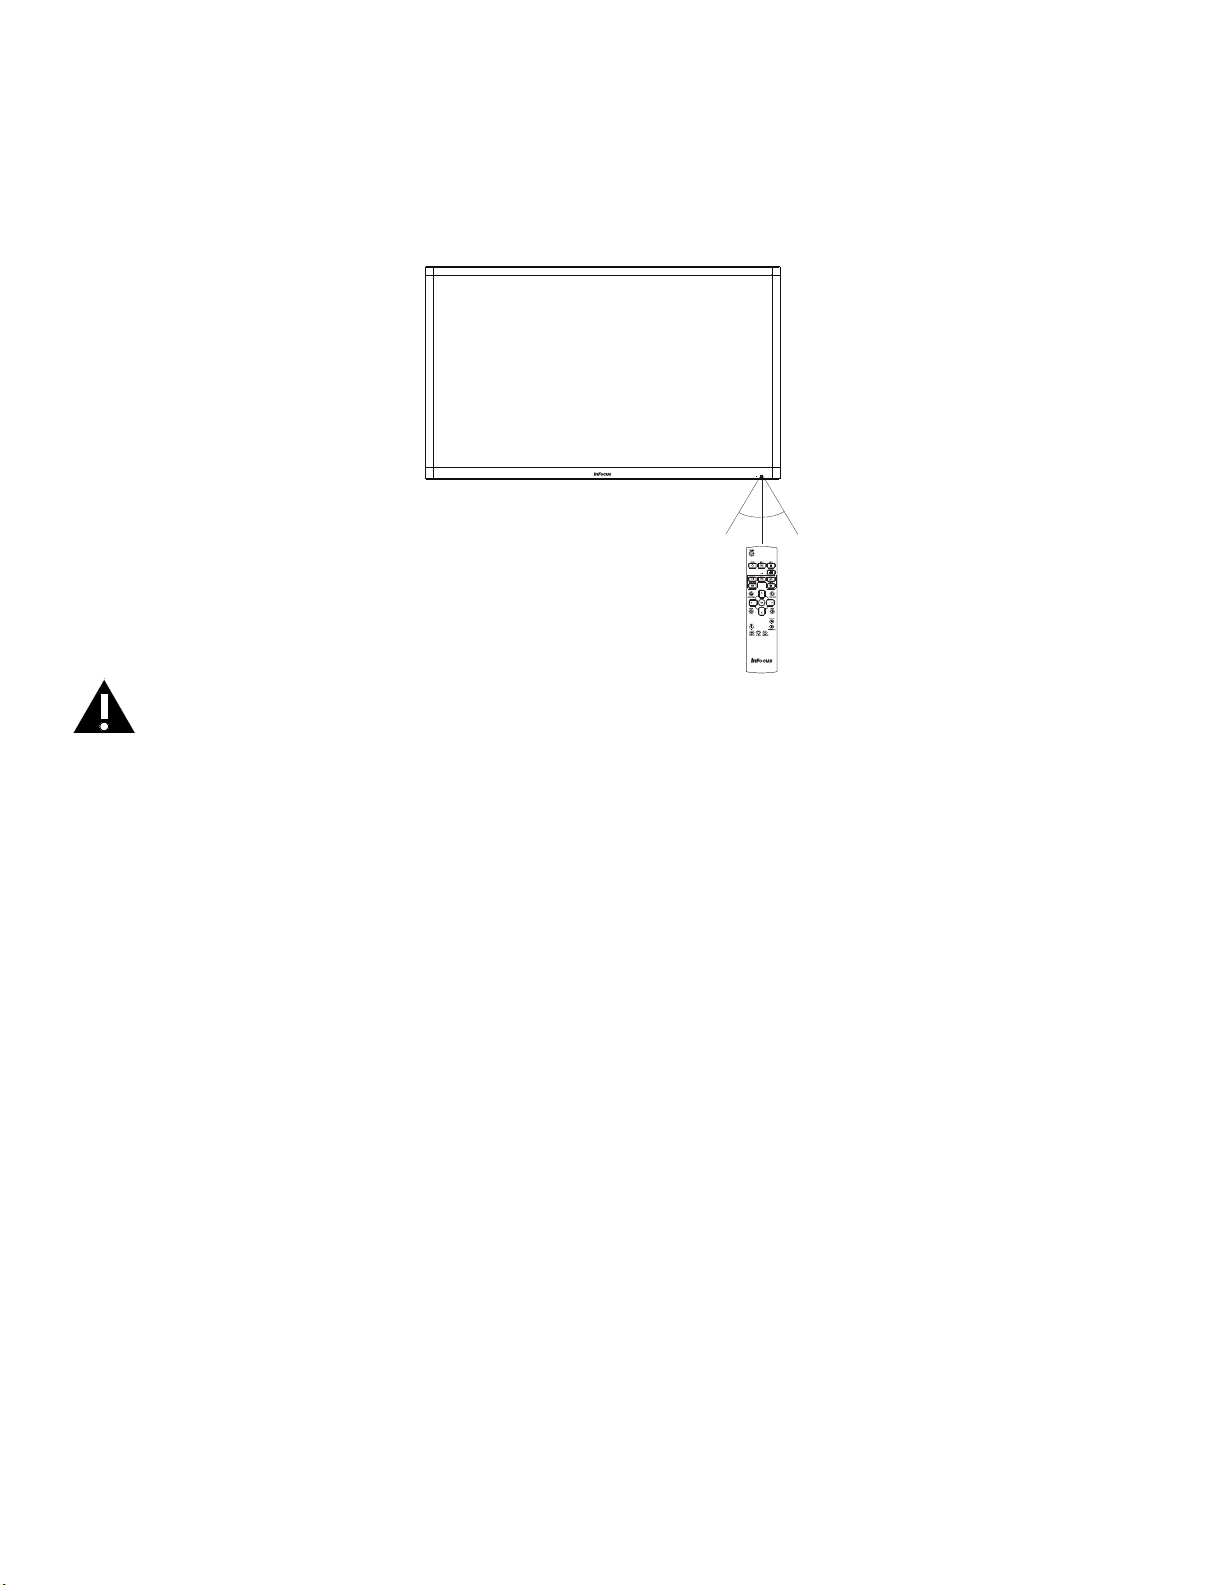
USING THE REMOTE
The remote uses two (2) AAA batteries (not included). Install the batteries by removing the cover from the remote’s back,
aligning the + and – ends of the batteries, sliding them in place and replacing the cover.
To operate, point the remote at the monitor sensor at the bottom right-hand corner of the monitor. The range of optimum
operation is about 26’ (8m) and within a horizontal and vertical angle of 30 degrees.
30˚ 30˚
CAUTION:
• When disposing of the batteries, be sure to do so in an environmentally proper manner.
• If the remote control gets wet, wipe it dry immediately.
• Avoid excessive heat and humidity.
• Ensure the batteries’ polarity (+/-) is properly aligned.
• Do not mix new and old batteries or different types of batteries together.
• Replace the batteries as soon as they run out.
• Remove batteries from the remote control when storing or not in use for a prolonged period.
Page 12
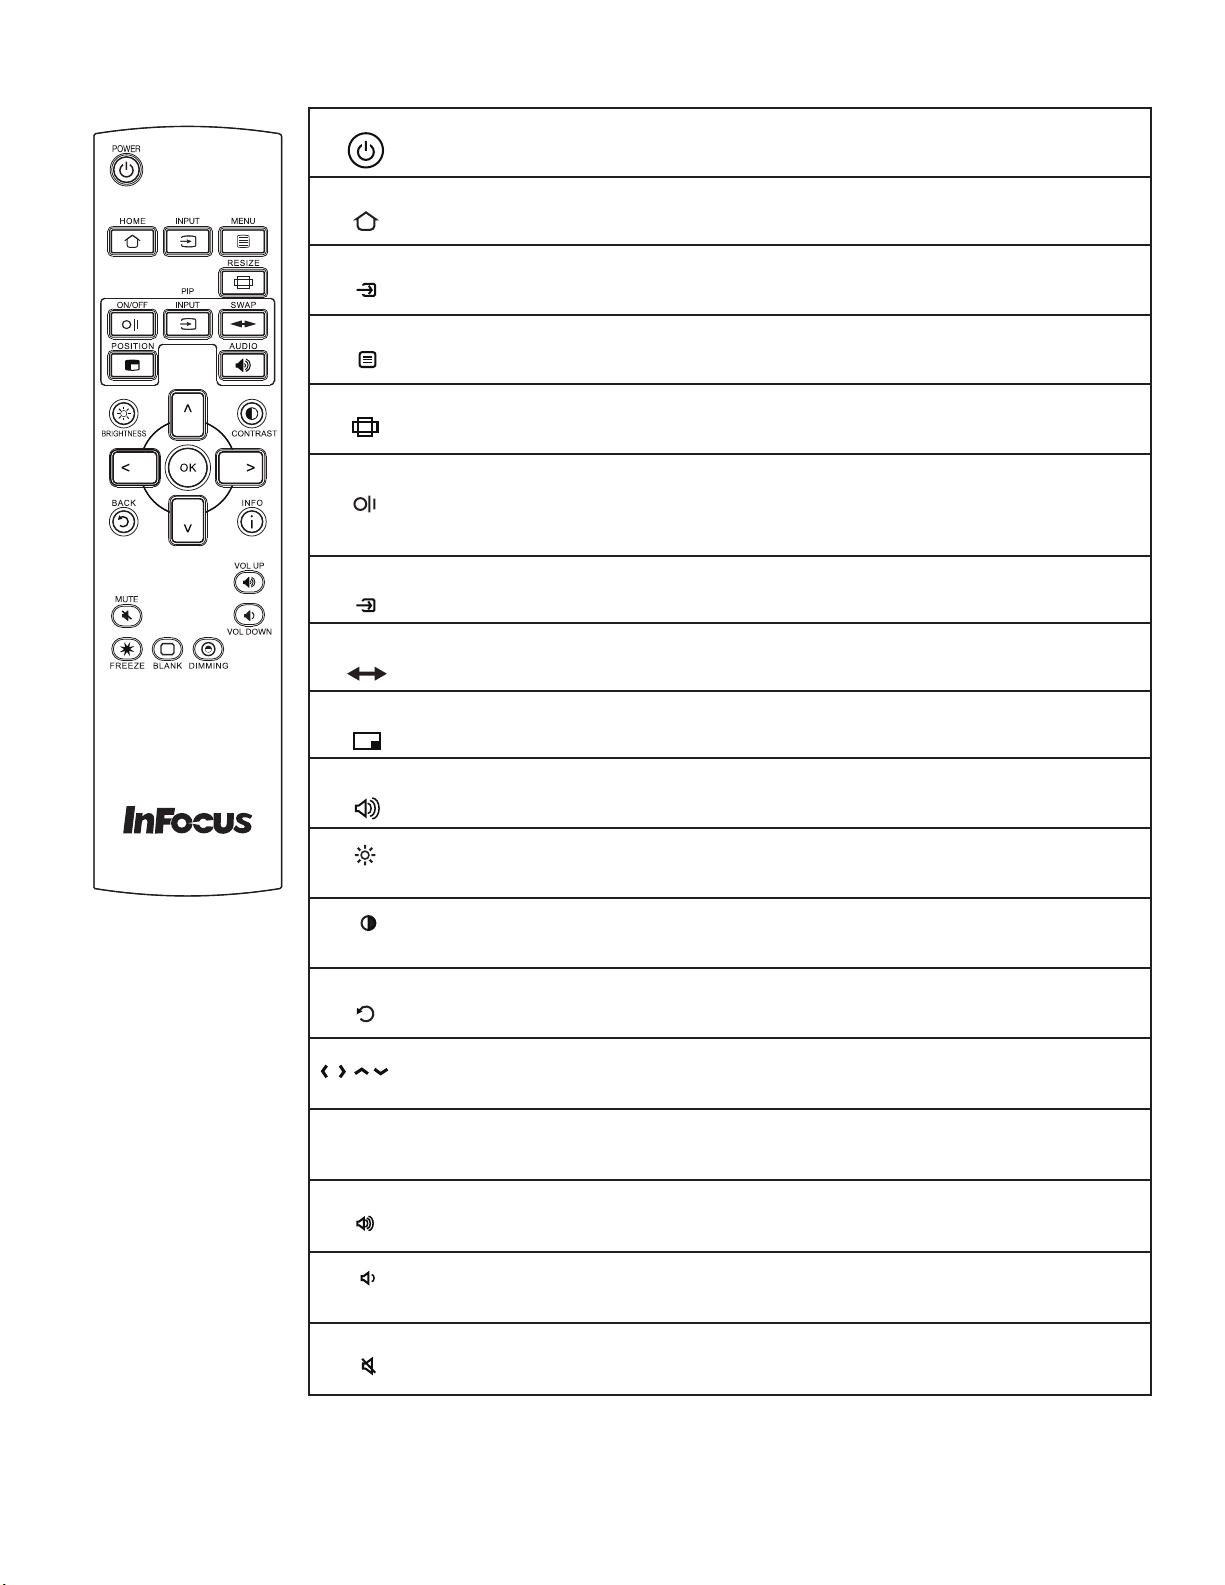
Remote buttons
PIP
OK
POWER
Power: Switches the power on or puts the monitor into Standby.
HOME
INPUT
MENU
RESIZE
PIP
ON/OFF
PIP
INPUT
PIP
SWAP
PIP
POSITION
Home: Changes the active source back to the embedded PC.
Input: Toggles the Input Source menu on and off, which allows the user to
change sources.
Menu: Turns the OSD menu on and off.
Resize: Switches between screen modes. Modes vary based on the source.
PiP On/Off: Turns the PiP function on and off and changes the PiP
configuration between two active PiP sources. Options include corner and
side-by-side configurations (50%-resized, 25%-resized and 50%-fullscreen),
depending on source types.
PiP Input: Switches the PiP window source. Note: The PiP window is not
visible when a secondary source has not been selected.
PiP Swap: Switches the position of the main and secondary sources.
PiP Position: Moves the PiP window position from corner to corner (upper left,
upper right, lower left, lower right).
AUDIO
BRIGHTNESS
CONTRAST
BACK
INFO
i
VOL UP
VOL DOWN
MUTE
PiP Audio: Turns the PiP audio mix on and off.
Brightness: Opens the Brightness OSD menu. Use the right and left arrow
buttons to adjust.
Contrast: Opens the Contrast OSD menu. Use the right and left arrow buttons
to adjust.
Back: Returns the user to the previous menu.
Left, Right, Up, Down Arrows and OK: Use these buttons to navigate through
and make changes to the Onscreen Menu features.
Info: Displays source information.
Vol up: Increases the audio volume.
Vol down: Decreases the audio volume.
Mute: Switches the audio on or off.
Page 13INF6502WB User Guide
 Loading...