

Page 1

LIGHTCAST
Software Guide for projectors
009-1683-00
Page 2

CONTENTS
Introduction ........................................................................................................................................................................................................................................ 3
Registration when using a LightCast Key ................................................................................................................................................................................. 4
Basic Navigation ............................................................................................................................................................................................................................... 7
Using the remote and projector keypad ............................................................................................................................................................................7
Using the on screen keyboard ..............................................................................................................................................................................................7
Using a mouse and keyboard ............................................................................................................................................................................................... 7
Document Viewer .............................................................................................................................................................................................................................8
Supported document types ...................................................................................................................................................................................................8
Open document les ..............................................................................................................................................................................................................10
Document Viewer tools ........................................................................................................................................................................................................ 10
Annotate the le ..................................................................................................................................................................................................................... 12
Annotation tools ..................................................................................................................................................................................................................... 13
Save the le .............................................................................................................................................................................................................................. 14
Share the le ............................................................................................................................................................................................................................15
Copy a le or folder ............................................................................................................................................................................................................... 16
Create a new folder ............................................................................................................................................................................................................... 17
Delete les and folders ......................................................................................................................................................................................................... 18
Cast (Wireless display) .................................................................................................................................................................................................................. 19
LightCast ................................................................................................................................................................................................................................... 19
AirPlay ...................................................................................................................................................................................................................................... 20
Miracast .....................................................................................................................................................................................................................................21
Whiteboard ...................................................................................................................................................................................................................................... 22
Navigation ...............................................................................................................................................................................................................................22
Create a drawing object ...................................................................................................................................................................................................... 22
Add text.................................................................................................................................................................................................................................... 23
Whiteboard tools ................................................................................................................................................................................................................... 23
Save the whiteboard canvas .............................................................................................................................................................................................. 26
Save the whiteboard canvas to a USB thumb drive ....................................................................................................................................................27
Share the le ...........................................................................................................................................................................................................................28
Open a new whiteboard canvas ........................................................................................................................................................................................28
Open a whiteboard le.........................................................................................................................................................................................................28
Open a whiteboard le from a USB thumb drive ........................................................................................................................................................ 29
Browser ............................................................................................................................................................................................................................................30
Navigation controls ...............................................................................................................................................................................................................30
Tools submenu......................................................................................................................................................................................................................... 31
Save the le ............................................................................................................................................................................................................................. 33
Share the le ........................................................................................................................................................................................................................... 33
Page 3

Settings ..............................................................................................................................................................................................................................................34
Network Settings ....................................................................................................................................................................................................................34
Device ....................................................................................................................................................................................................................................... 35
System and Security ............................................................................................................................................................................................................ 36
Accounts ...................................................................................................................................................................................................................................37
Browser Preferences ............................................................................................................................................................................................................ 38
Appendix .......................................................................................................................................................................................................................................... 39
Access Point Setup ............................................................................................................................................................................................................... 39
Port Requirements for AirPlay, Miracast, and LightCast Sender App ................................................................................................................... 40
Page 4

INTRODUCTION
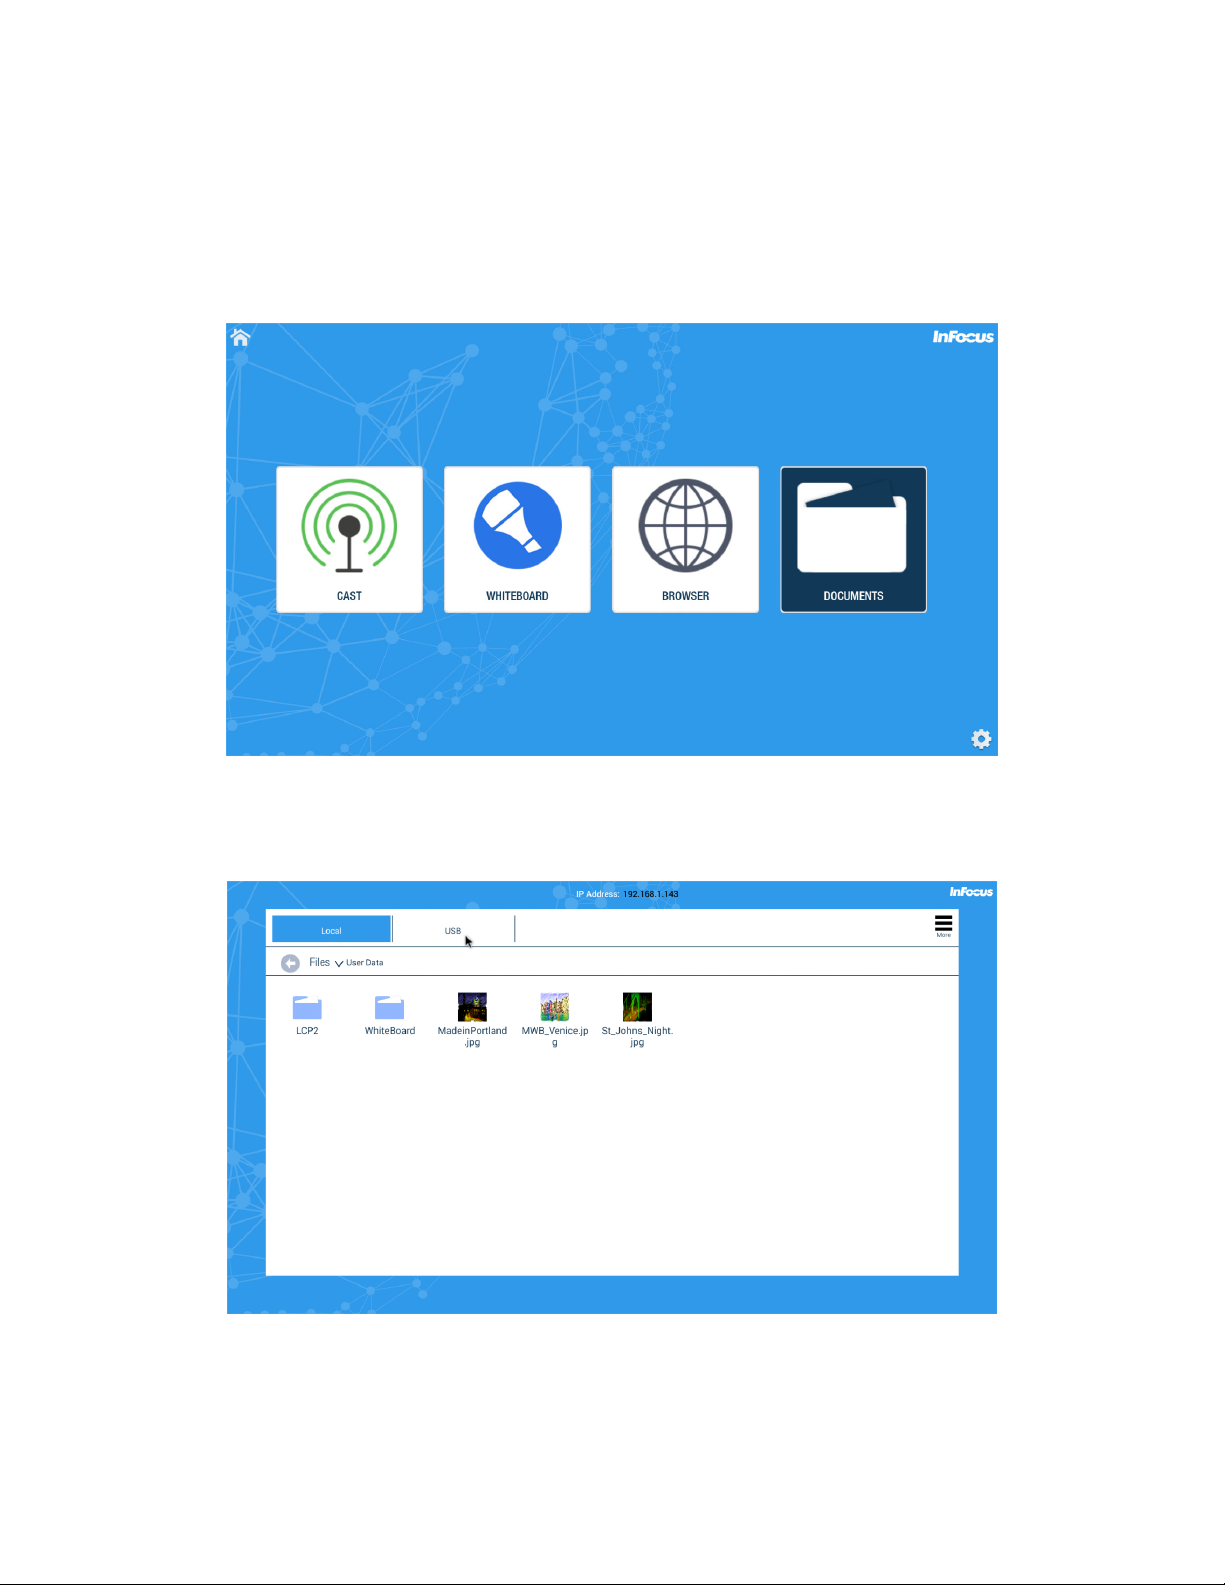
LightCast is an easy to use set of applications designed to maximize the connectivity and interactivity of your InFocus projector.
There are two levels of LightCast support for InFocus Projectors: with or without the optional LightCast key.
FEATURES AVAILABLE IN A LIGHTCAST READY PROJECTOR INCLUDE:
Document reader
• Documents (doc, docx, ppt, pptx, pdf, txt, xls, xlsx)
• Pictures (bmp, jpg, jpeg, png)
• Videos (avi, v, mkv, mov, mpg, mp4, ts, wmv, 3gp)
Network control (if projector is equipped with a wired network connector)
USB-A connectors which can be used for:
• LightCast key
• USB storage device (such as a thumb drive, camera, or external hard drive)
• Touch device (such as a touchpad)
• Wireless USB keyboard/mouse
Current limit on both connectors is 1A.
ADDITIONAL FEATURES ENABLED WITH A LIGHTCAST KEY INCLUDE:
• Wireless display (AirPlay, LightCast, Miracast)
• Whiteboard
• Internet browser
Page 3LightCast User Guide for projectors
Page 5
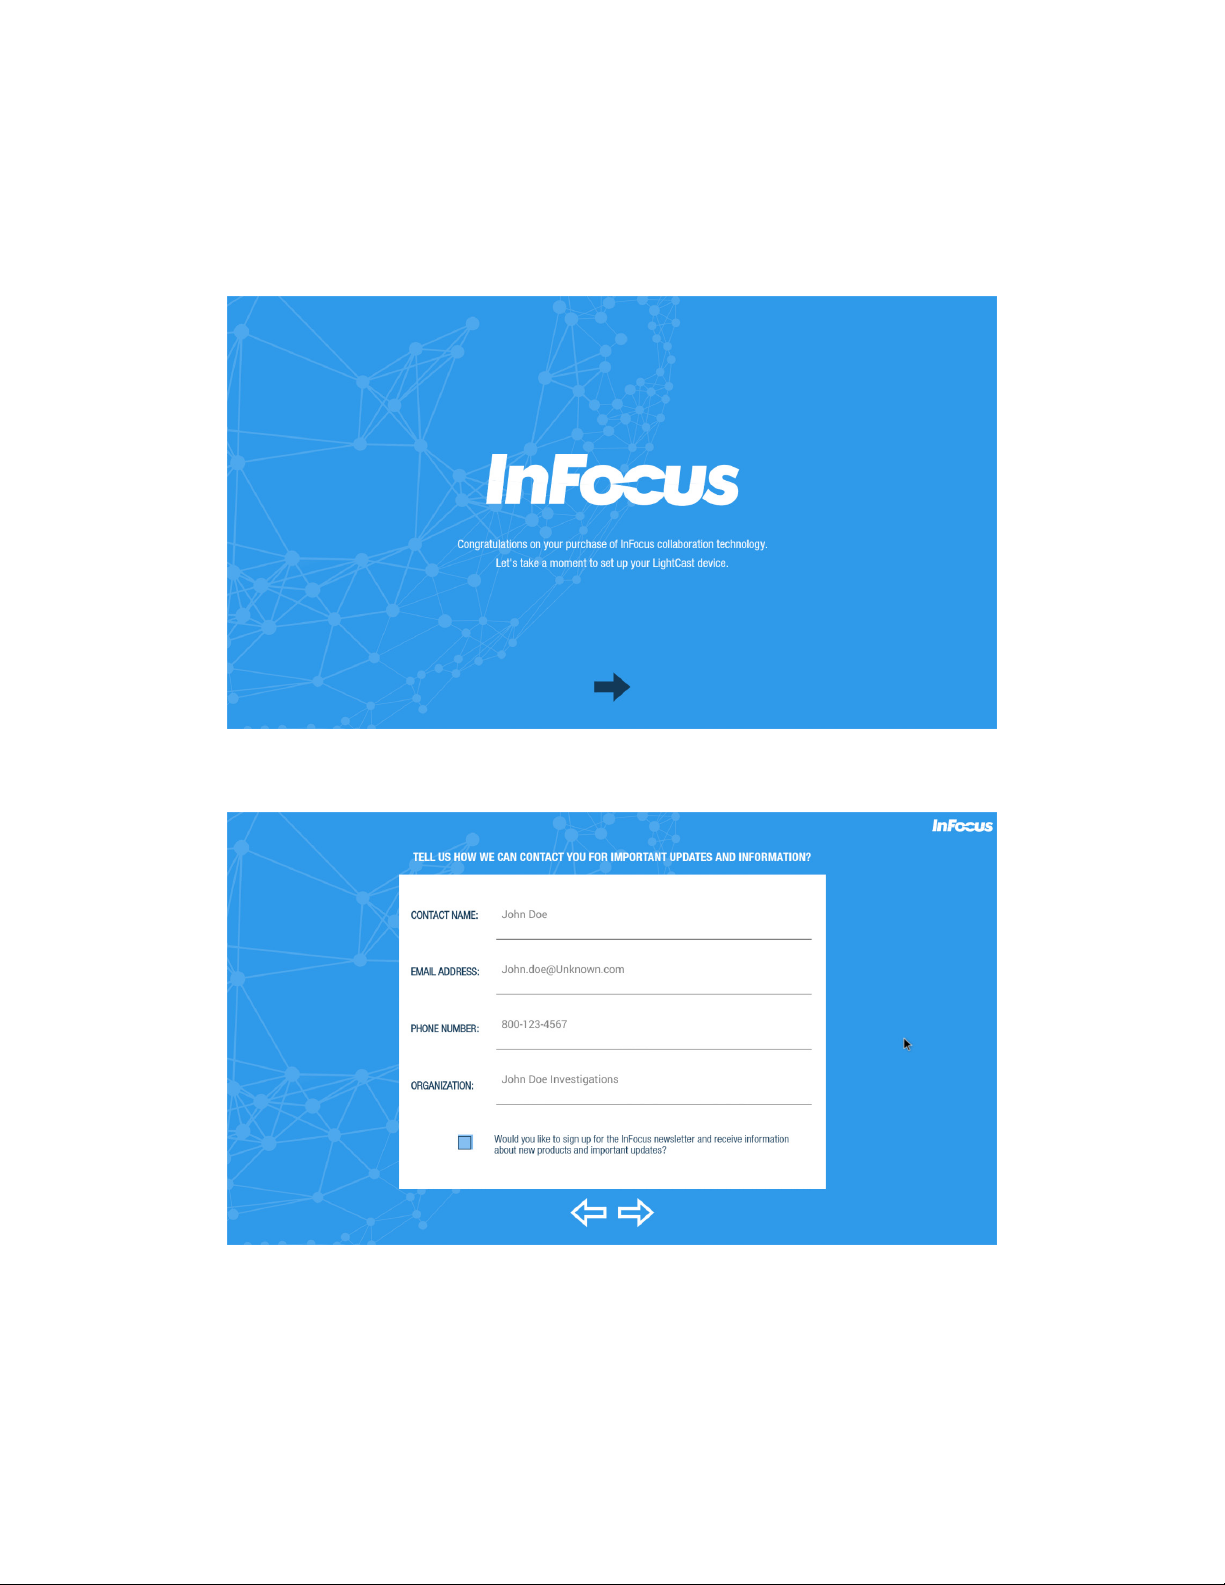
REGISTRATION WHEN USING A LIGHTCAST KEY
1) Insert the LightCast key into an available USB-A port and then turn on the projector.
2) Press the Source button on the remote or projector keypad.
3) Navigate to LightCast.
4) Press the Enter/Select button on the remote or projector keypad. The LightCast registration welcome page displays.
5) Click the arrow.
Page 4
Page 6
6) Enter the information for registration using either a wireless keyboard/mouse (not included) or the on screen keyboard and
remote. Click the right facing arrow.
7) Use a keyboard/mouse or on screen keyboard and remote to rename the device. This is useful to dierentiate between dierent
projectors that have LightCast enabled.
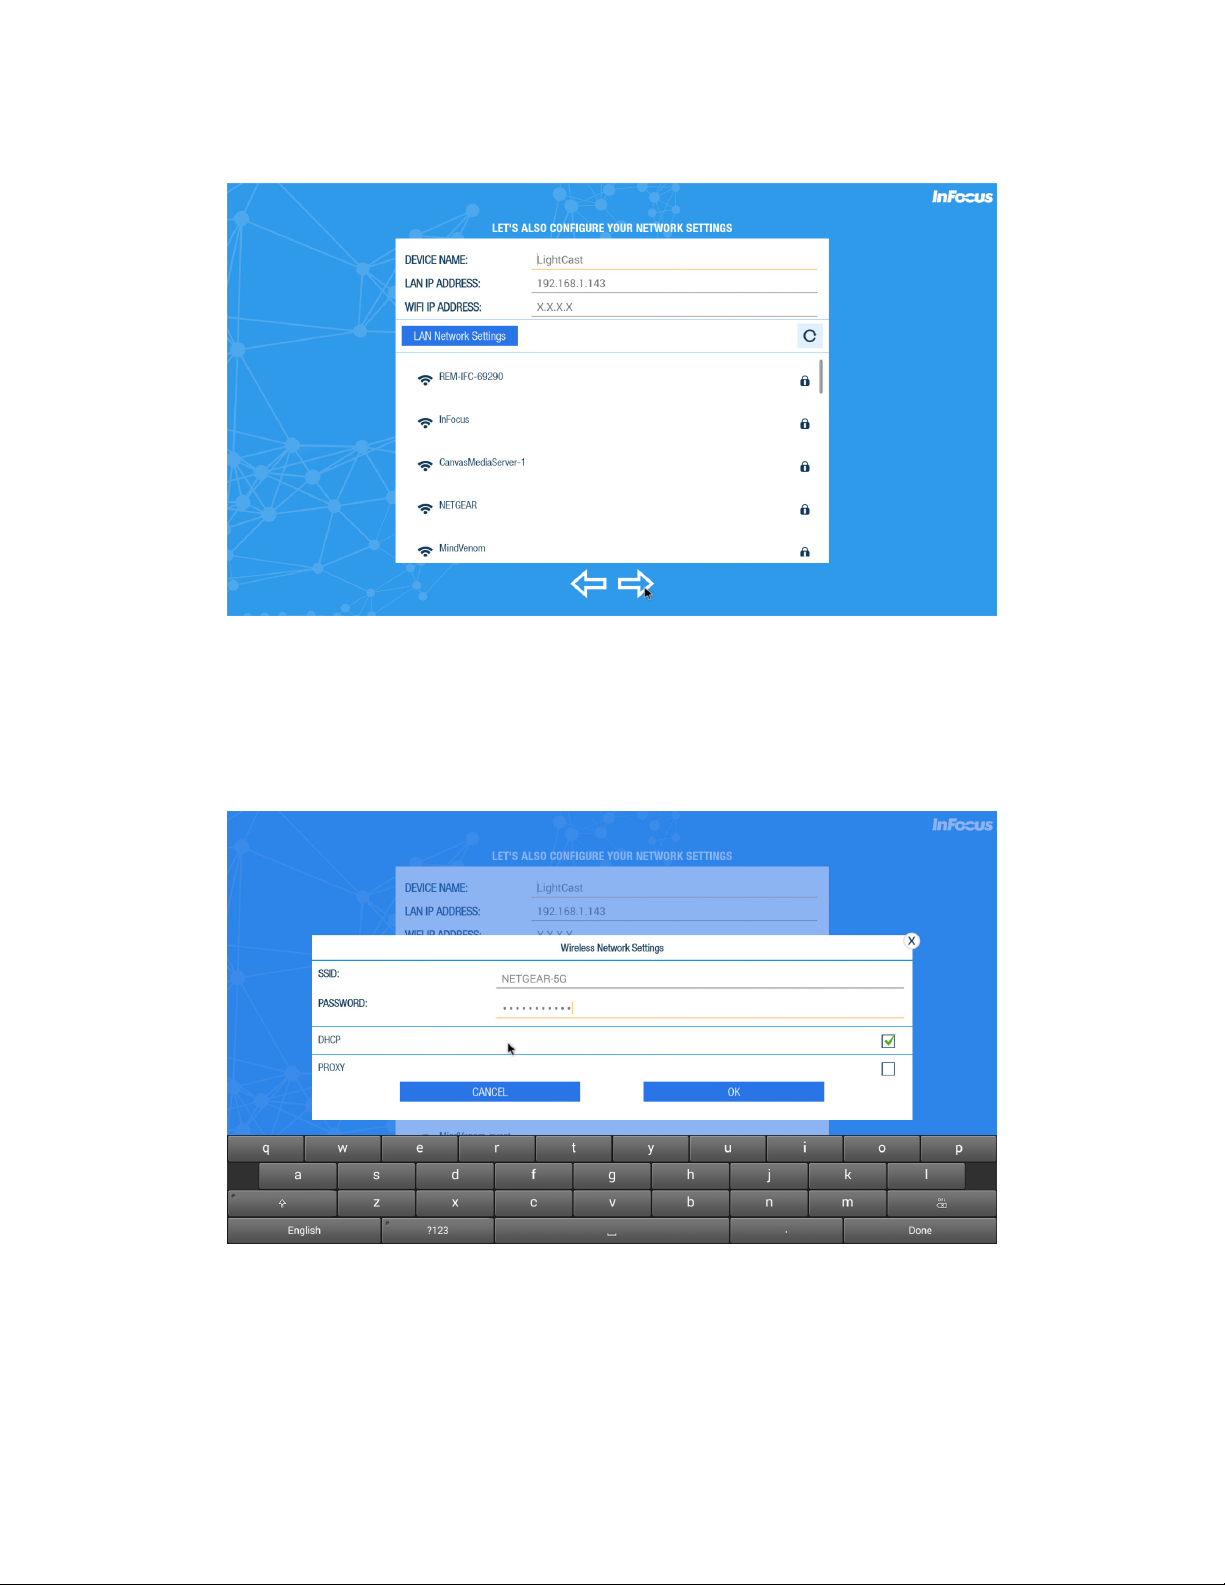
8) If equipped, the Wired LAN IP address is displayed.
9) After the local SSIDs are displayed, log onto a wireless network:
10) Highlight an SSID.
11) Press Select/Enter.
12) If the SSID is encrypted, enter the password.
Page 5LightCast User Guide for projectors
Page 7
13) The word “Connected” displays below the SSID when the connection is made. A green checkmark displays next to saved SSIDs.
14) If a software update is available, an update window displays. Click Update and follow the prompts to complete the update
process.
15) When registration is complete, the LightCast home page displays.
Page 6
Page 8

BASIC NAVIGATION
Using the remote and projector keypad
1) Use the arrow keys to highlight items in LightCast.
2) Press the Select button on the remote or the Enter button on the projector to select the highlighted item.
3) Press the Esc button on the remote to back out of the currently running item.
4) Press the Auto Image button on the remote or Auto button on the projector to return to the LightCast home screen.
Using the on screen keyboard
1) In the desired eld, highlight and click Select using the projector keypad or remote.
2) The on screen keyboard is displayed.
3) Use the arrow keys to highlight characters.
4) Click Select when the correct character is highlighted.
5) After each eld is completed, highlight and click Done to go to the next eld.
Using a mouse and keyboard
1) Plug a mouse and keyboard into an available USB-A connectors on the projector.
2) Use the mouse and keyboard as you normally would.
Page 7LightCast User Guide for projectors
Page 9
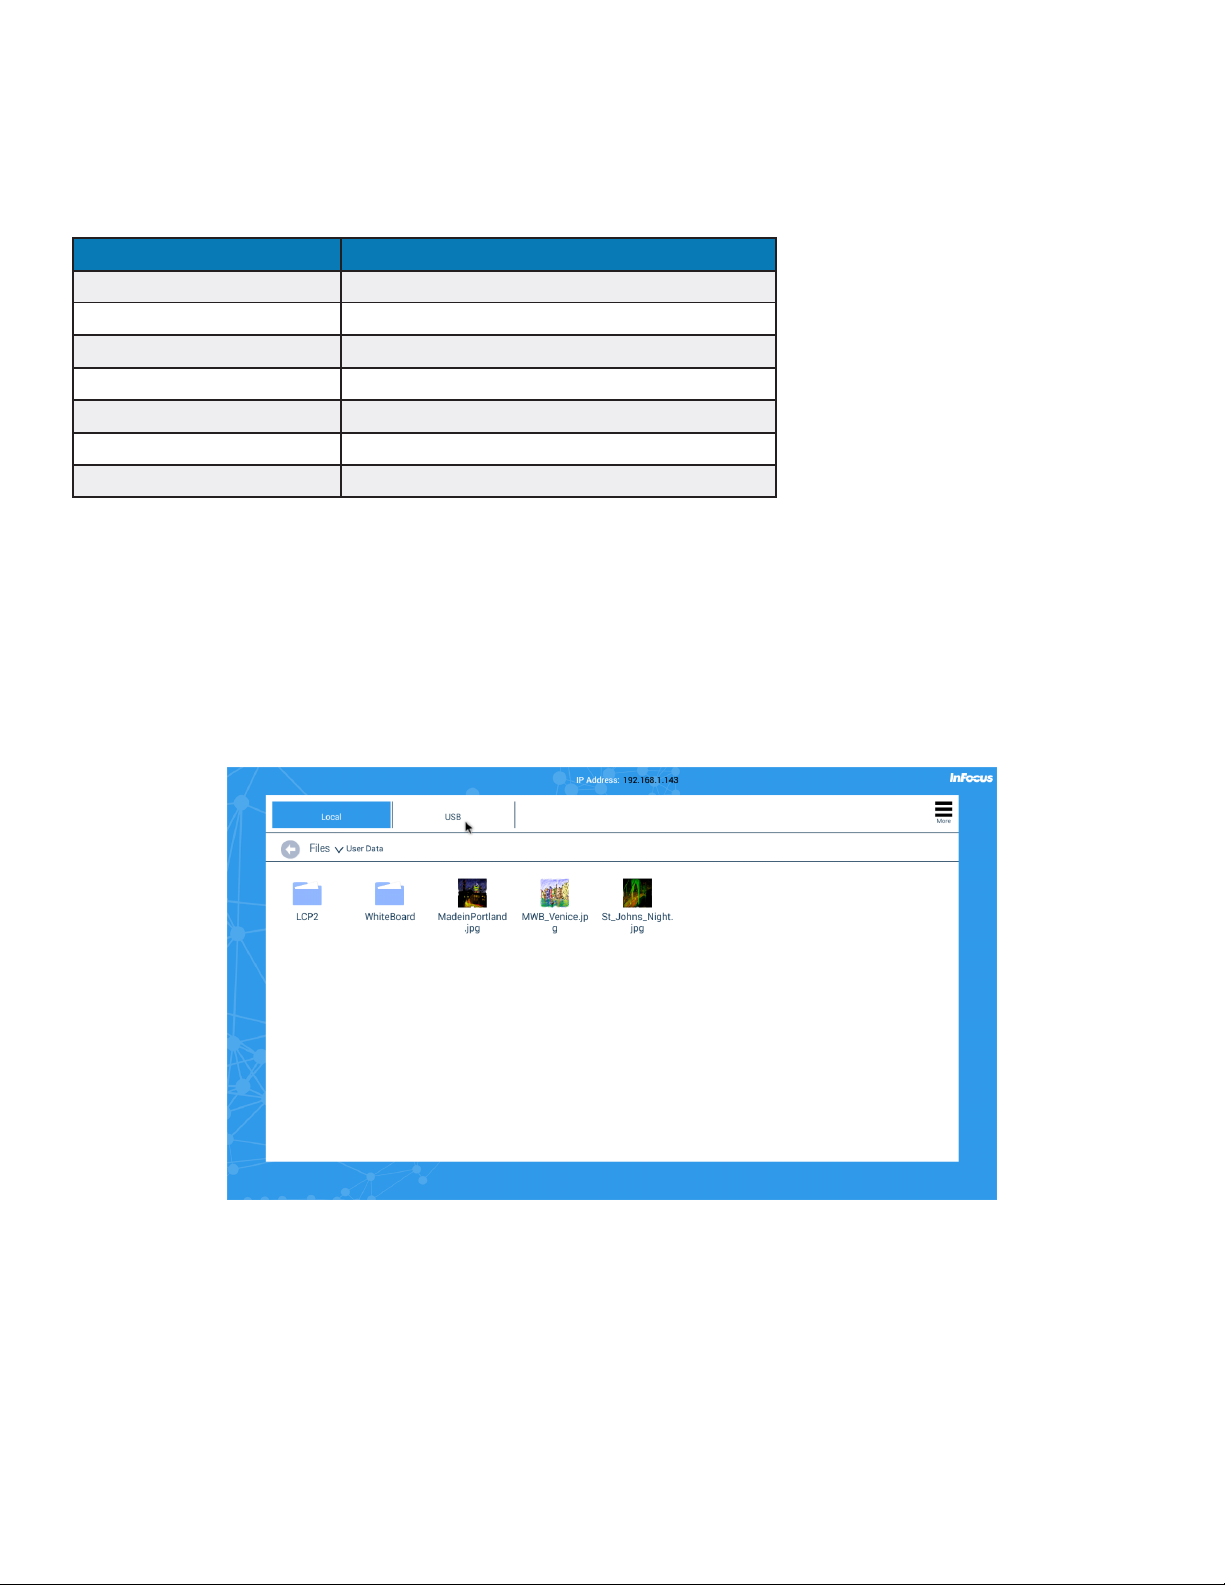
DOCUMENT VIEWER
The Document Viewer allows you to display images, les, and videos from your projector's internal memory or from a USB thumb drive.
Supported document types
Supported File Types File Extensions
Images .jpg, .jpeg, .bmp, .png
PowerPoint .ppt, .pptx
Excel .xls, .xlsx
Word .doc, .docx
Adobe PDF .pdf
Video les .avi, .v, .mkv, .mov, .mpg, .mp4, .ts, .wmv, .3gp
Other les .txt
To access the Document Viewer without the LightCast key (sold separately), follow the instructions below:
1) Turn on the projector.
2) Press the Source button on the remote or projector keypad.
3) Navigate to LightCast.
4) Press the Enter/Select button on the remote or projector keypad. The Document Viewer displays.
Page 8
Page 10
To access the Document Viewer using the LightCast key, follow the instructions below:
1) Insert the LightCast key into an available USB port on the back of the projector.
2) Turn on the projector.
3) Press the Source button on the remote or projector keypad.
4) Navigate to LightCast.
5) Press the Enter/Select button on the remote or projector keypad. The LightCast home page displays.
6) Navigate to Documents.
7) Press the Enter/Select button on the remote or projector keypad. The Document Viewer displays.
Page 9LightCast User Guide for projectors
Page 11
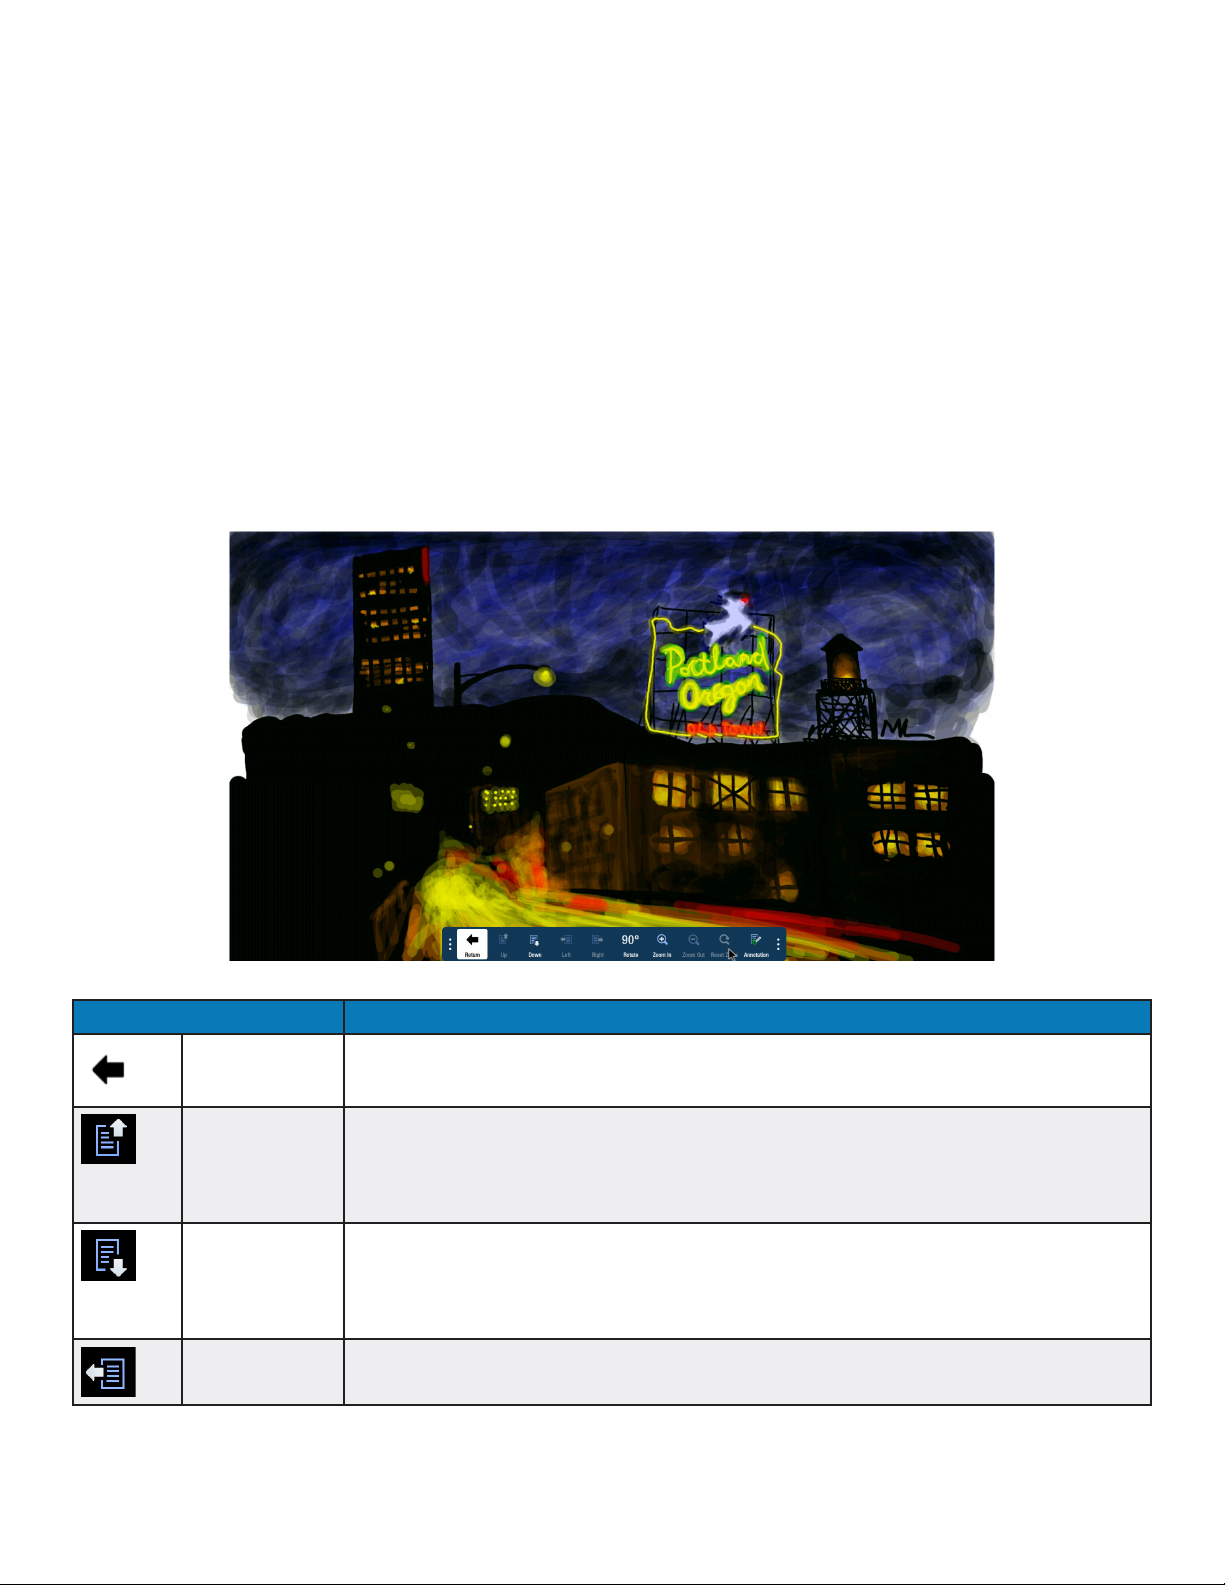
Open document les
1) Navigate to the desired le and either click the le with an attached mouse, or press the Select/Enter button on the remote or
projector keypad. NOTE: Files can be opened from the local folder or a USB thumb drive.
2) Use the menu options to navigate through the le. NOTE: File-level tools vary depending on the le type.
3) To move the tool bar position, use a mouse to click the vertical dots and drag the tool bar to one of four positions. Or use the
remote or projector keypad to highlight the vertical dots and press the Select/Enter button. Then use the up or down arrow
buttons to move the tool bar and press the Select/Enter button when done.
4) When nished with the document le, click the Return button to return to the document folder.
5) To return to the LightCast home page, click the Home button.
Document Viewer tools
NOTE: Document tools vary based on le type.
Button Description
Return Exits the document view and returns to the folder view.
Up When displaying an Excel, Word, or PDF document, selecting up scans up the open document.
When displaying a PowerPoint document, selecting up goes to the previous slide in the slideshow.
When an image is shown in full screen, selecting Up displays the previous image in the same
folder. When the document is zoomed in, selecting Up scans up the open document.
Down When displaying an Excel, Word, or PDF document, selecting down scans down the open
document. When displaying a PowerPoint document, selecting down goes to the next slide in the
slideshow. When an image is shown in full screen, selecting Down displays the next image in the
same folder. When the document is zoomed in, selecting Down scans down the open document.
Left When the document is zoomed in, selecting Left scans the open document to the left.
Page 10
Page 12
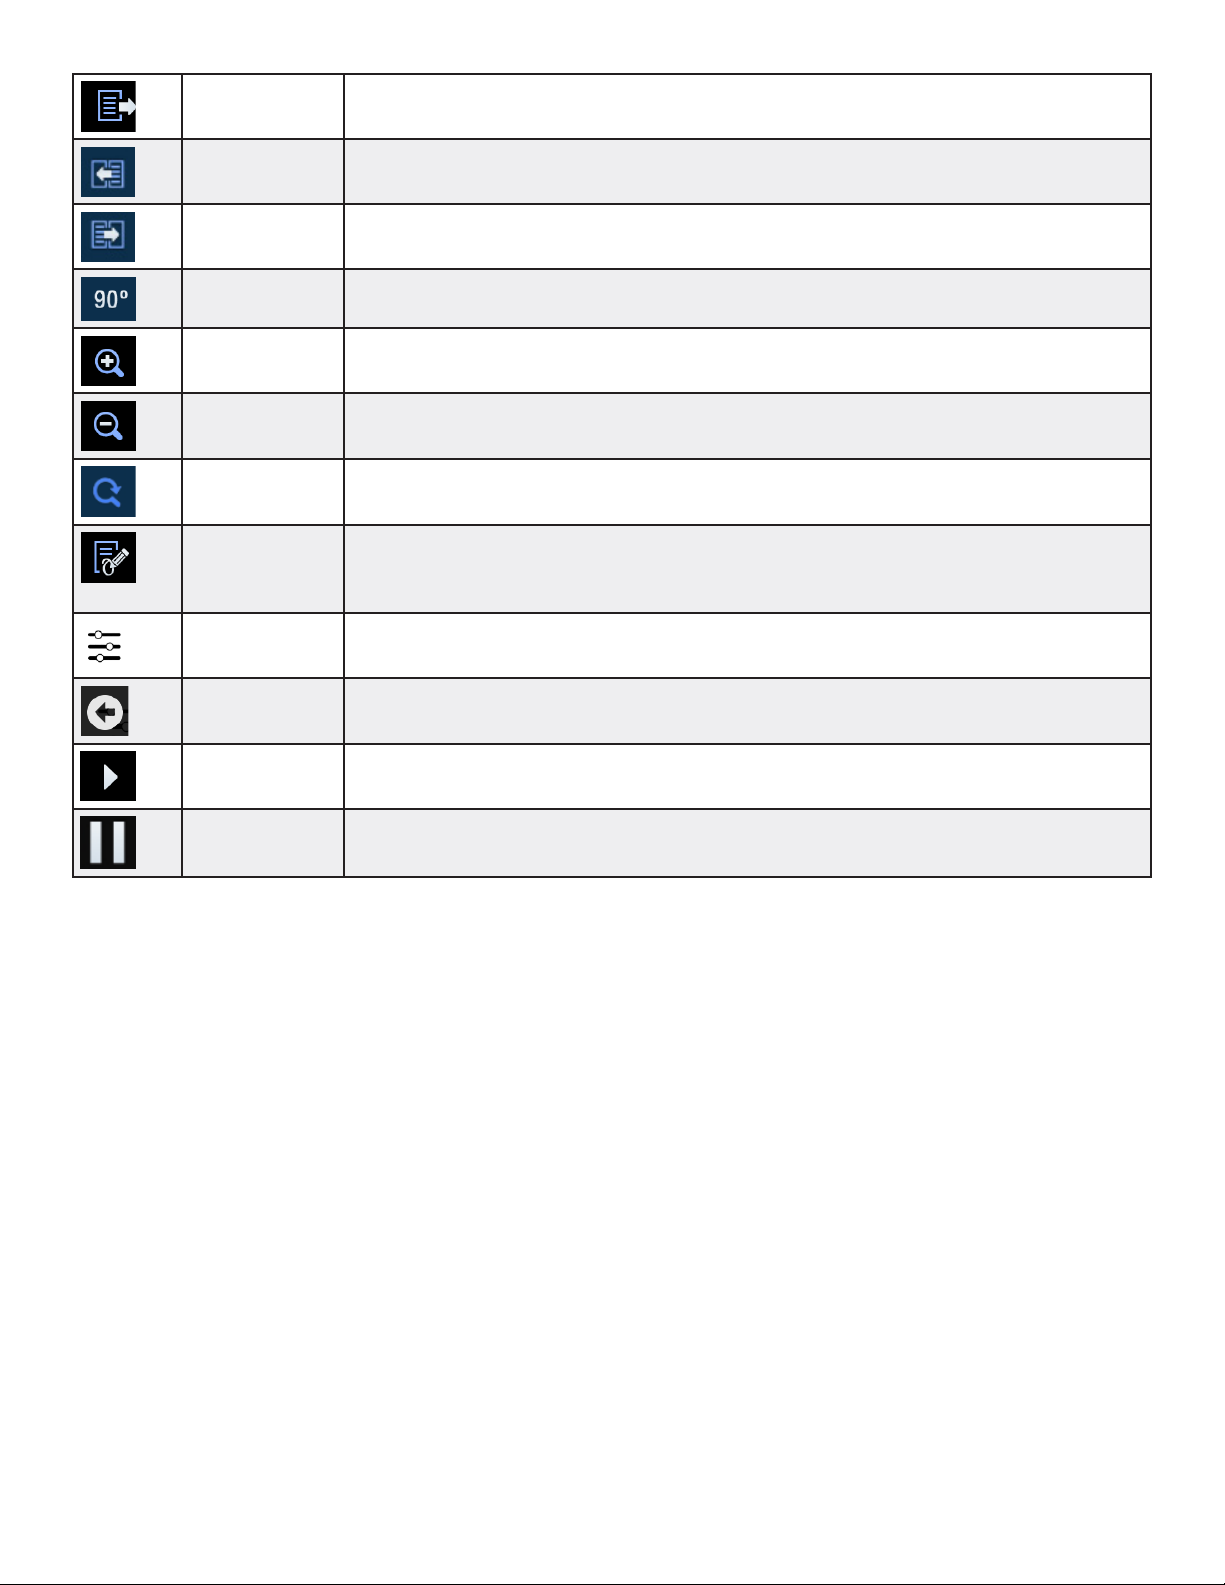
Right When the document is zoomed in, selecting Right scans the open document to the right.
Previous For Excel documents only: Selects the previous tab in the le.
Next For Excel documents only: Selects the next tab in the le.
Rotate Rotates the document ninety degrees clockwise
Zoom In Magnies the document view
Zoom Out Reduces the document view
Reset Zoom Returns the document back to its original document width
Annotation When selected, allows the user to annotate the document. See "Annotate the le" on page 12 for
more information. NOTE: Annotation is only available when a mouse (or touch device) is connected
to one of the USB-A connectors.
Video menu For video les only: Click to open the video controls.
Return For video les only: Click to close the video le and return to the folder view.
Play For video les only: Click to play the video le.
Pause For video les only: Click to pause the video le.
Page 11LightCast User Guide for projectors
Page 13
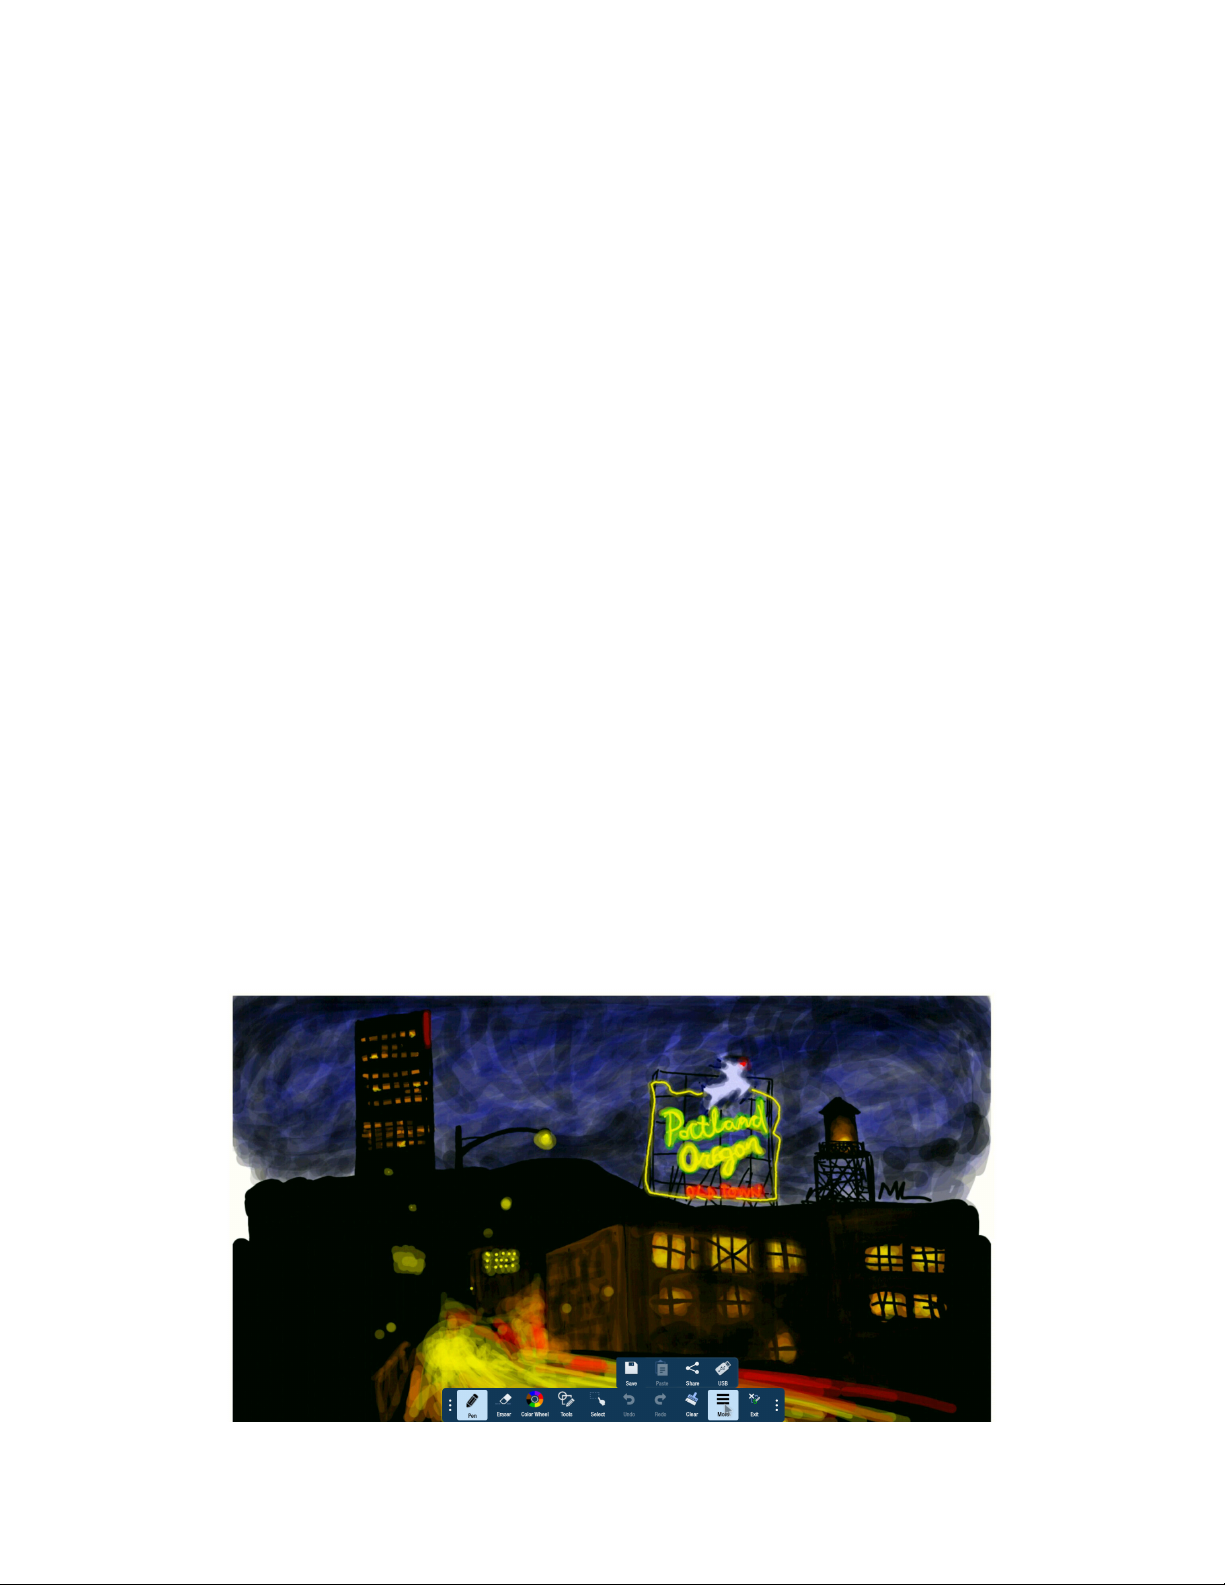
Annotate the le
Document les can be annotated and saved us using the Annotation submenu.
NOTE: You must attach a mouse (or touch device) to use the annotation feature. If a mouse (or touch device) is not detected, a warning
displays.
CREATE A DRAWING
1) Open a le from the document viewer.
2) Click Annotation.
3) Click Tools and select a drawing tool.
4) Click Color Wheel to adjust the color, size, and opacity of the selected drawing tool.
5) Draw on the page using the mouse (or touch device).
6) Use Eraser, Select, Undo, Re-do, and Clear to modify the drawing. See "Annotation tools" on page 13 for more information.
ADD TEXT
NOTE: Text boxes overlay the open document and do not aect the text within the displayed document.
1) Open a le from the document viewer.
2) Click Annotation.
3) Click Tools.
4) Click Text.
5) Click the screen where you want the text box to be. A text box opens.
6) Adjust the font family, size, color, and text attributes, as desired.
7) Using either a keyboard or the on-screen keyboard, type your text.
8) Click OK when nished.
Page 12
Page 14

Annotation tools
Button Description
Current tool Click to use the current tool.
Eraser Click Eraser, and then click and drag across the drawing object to erase the portion you touched.
Only drawing objects are aected.
Color Wheel
submenu
Color wheel Click to choose a color using a color ramp. The current selected color displays in the middle of the
Click to access the color submenu.
color wheel.
Segmented color
wheel
Size Click and drag the thumbnail button along the slider path to adjust the size of the pen/line width.
Opacity Click and drag the thumbnail button along the slider path to adjust the size of the highlighter/
Tools submenu
Pen
Highlighter Click to use a highlighter.
Rectangle Click to draw a rectangle.
Circle Click to draw a circle.
Click to choose a color from the segmented color wheel. The current selected color displays in the
middle of the color wheel.
shape opacity.
Click to select an annotation tool. NOTE: Each object has its own color, pen width, and pen
transparency setting.
Click to use a pen. NOTE: Opacity control is not available for the pen object.
Line Click to draw a line.
Text Click to add a text box. Adjust the font size, color, and type attributes as desired. Type your text
and click OK.
Laser Click to highlight something temporarily. The mark disappears when a new mark is made. Laser
marks cannot be saved.
Page 13LightCast User Guide for projectors
Page 15

Select Click Select. Click and drag the selection box around the drawing objects which you want to move,
cut, copy, paste, or delete.
Once selected:
• Click and drag to move the selection.
• Click Copy to copy the selection, and then click Paste to create a duplicate object set.
• Click Delete to delete the selection.
Undo Click to delete the last annotation.
Redo Click to display the last deleted annotation.
Clear Click to delete all annotations from the le.
More submenu Click to access additional menu features.
Save Click to save the le as a JPG image or PDF le.
Paste Click to paste the clipboard onto the image.
Share Only available when the projector is connected to a network. Click to send the annotated image as
a JPG image by email.
USB Click to save the annotated picture to a USB device as a JPG image or PDF le.
Exit Click to exit the annotation submenu.
Save the le
1) From the annotation submenu, click More.
2) Click Save.
3) Type the le name in the Name eld.
4) Select the desired File Type ( JPG or PDF).
5) Select Current View to save the displayed page or Whole View to save the entire le.
6) Browse to the Location you would like to save the le to or accept the default location.
7) Click Save.
Page 14
Page 16

Share the le
1) From the annotation submenu, click More.
2) Click Share.
3) Type the recipient email address in the To: eld.
4) Type information about the le in the Description eld, if desired.
5) Click Send (envelope icon).
Page 15LightCast User Guide for projectors
Page 17

Copy a le or folder
1) Navigate to the desired le or folder location.
2) Navigate to More.
3) Click Select/Enter on the remote or projector keypad.
4) Navigate to Copy.
5) Click Select/Enter on the remote or projector keypad.
6) Navigate to the desired le or folder.
7) Click Select/Enter on the remote or projector keypad. A green checkmark displays.
8) Repeat until all desired les or folders are selected.
9) Navigate to the location where you would like to paste the copied les.
Page 16
Page 18

10) Navigate to Paste.
11) Click Select/Enter on the remote or projector keypad.
12) Click Done.
Create a new folder
1) Browse to the desired folder location.
2) Navigate to More.
3) Click Select/Enter on the remote or projector keypad.
4) Click New Folder.
Page 17LightCast User Guide for projectors
Page 19

5) Using an attached keyboard or the virtual keyboard, enter the desired folder name. NOTE: If using the virtual keyboard, use the
arrows and Select/Enter button on the remote or keypad to select the letters. Select Done when the folder name is complete.
6) Click OK.
Delete les and folders
1) Navigate to the desired le or folder location.
2) Navigate to More.
3) Click Select/Enter on the remote or projector keypad.
4) Navigate to Delete.
5) Click Select/Enter on the remote or projector keypad.
6) Navigate to the desired le or folder.
7) Click Select/Enter on the remote or projector keypad. A green checkmark displays.
8) Repeat until all desired les or folders are selected.
9) Navigate to the Delete icon.
10) Click Select/Enter on the remote or projector keypad.
11) Click Done.
Page 18
Page 20

CAST (WIRELESS DISPLAY)
NOTE: This feature is only available when a LightCast key is attached to one of the USB-A inputs on the projector.
From the LightCast home page, select Cast. From the Cast screen, select which service to use. To protect the display, you can enable an
eight digit PIN. See "Network Settings" on page 34 for more information.
LightCast
To send video and audio wirelessly using the Chrome browser on Windows, Chrome OS, and OS X computers, download and install the
LightCast Sender application from the Chrome web store.
1) With Chrome open, click the LightCast icon in the toolbar.
2) Select the Current Tab with the audio in order to pass audio to the projection device. Otherwise no audio will pass through. Select
the projector from the list.
Page 19LightCast User Guide for projectors
Page 21

AirPlay
Display using an iPhone, iPad, iPod Touch, or stream audio and video from a Macintosh computer. Your device and LightCast must be
connected to the same wireless network.
TO DISPLAY FROM A MAC COMPUTER
1) Click the AirPlay icon in the menu bar, then choose the name of the LightCast device under "Connect To AirPlay Display." The icon
turns blue when your Mac is using an AirPlay display.
2) From the same AirPlay menu, choose either Extended Desktop or one of the mirroring options under "Use AirPlay Display To."
TO DISPLAY FROM AN IOS DEVICE
1) Swipe up from the bottom of your screen to open Control Center.
2) Click AirPlay.
3) Click the name of the device you want to stream content to. You'll see (TV) or (speaker) next to each device, so you know what
type of content you can stream.
COMPATIBILITY
• iPhone 4 or later. iPhone 4s or later for AirPlay Mirroring.
• iPad, iPad mini. iPad 2 or later for AirPlay Mirroring.
• iPod touch (4th generation) or later. iPod touch (5th generation) or later for AirPlay Mirroring.
For mirroring your display or extending your desktop, any of the following Mac computers with OS X Mountain Lion v10.8 or later:
• iMac (Mid 2011 or later)
• Mac mini (Mid 2011 or later)
• MacBook (Early 2015 or later)
• MacBook Air (Mid 2011 or later)
• MacBook Pro (Early 2011 or later)
• Mac Pro (Late 2013 or later)
Page 20
Page 22

Miracast
Your device and LightCast should be connected to the same wireless network for best performance.
USING AN ANDROID TABLET OR PHONE
1) Launch the Miracast application (See device instructions).
2) Select the LightCast device.
USING A WINDOWS 8.1 OR 10 PC
1) Open the Charms menu on the right side of the desktop.
2) Select Devices.
3) Select Project.
4) Select Add a Wireless Device.
5) Select the LightCast device.
Page 21LightCast User Guide for projectors
Page 23

WHITEBOARD
NOTE: This feature is only available when both a LightCast key and a mouse (or touch device) are attached to the projector.
Use the whiteboard feature to brainstorm ideas, create graphs and workows, or whatever you desire. The blank slate lets you
collaborate, share, and save your ideas.
Navigation
1) From the LightCast home page, select Whiteboard.
2) Click Next to add or go to the next page. Note: The whiteboard feature supports up to 3 pages total.
3) Click Previous to add or go to the previous page. Note: The whiteboard feature supports up to 3 pages total.
4) To return to the LightCast home page, click the Home button.
Create a drawing object
1) Click Tools and select a drawing tool.
2) Click Color Wheel to adjust the color, size, and opacity of the selected drawing tool.
3) Draw on the whiteboard canvas with the mouse (or touch device).
4) Use Eraser, Select, Undo, Re-do, and Clear to modify the drawing. See "Whiteboard tools" on page 23 for more information.
Page 22
Page 24

Add text
NOTE: Text boxes overlay the open document and do not aect the text within the displayed document.
1) Click Tools.
2) Click Tex t .
3) Click the screen where you want the text box to be. A text box opens.
4) Adjust the font family, size, color, and text attributes, as desired.
5) Using either a keyboard or the on-screen keyboard, type your text.
6) Click OK when nished.
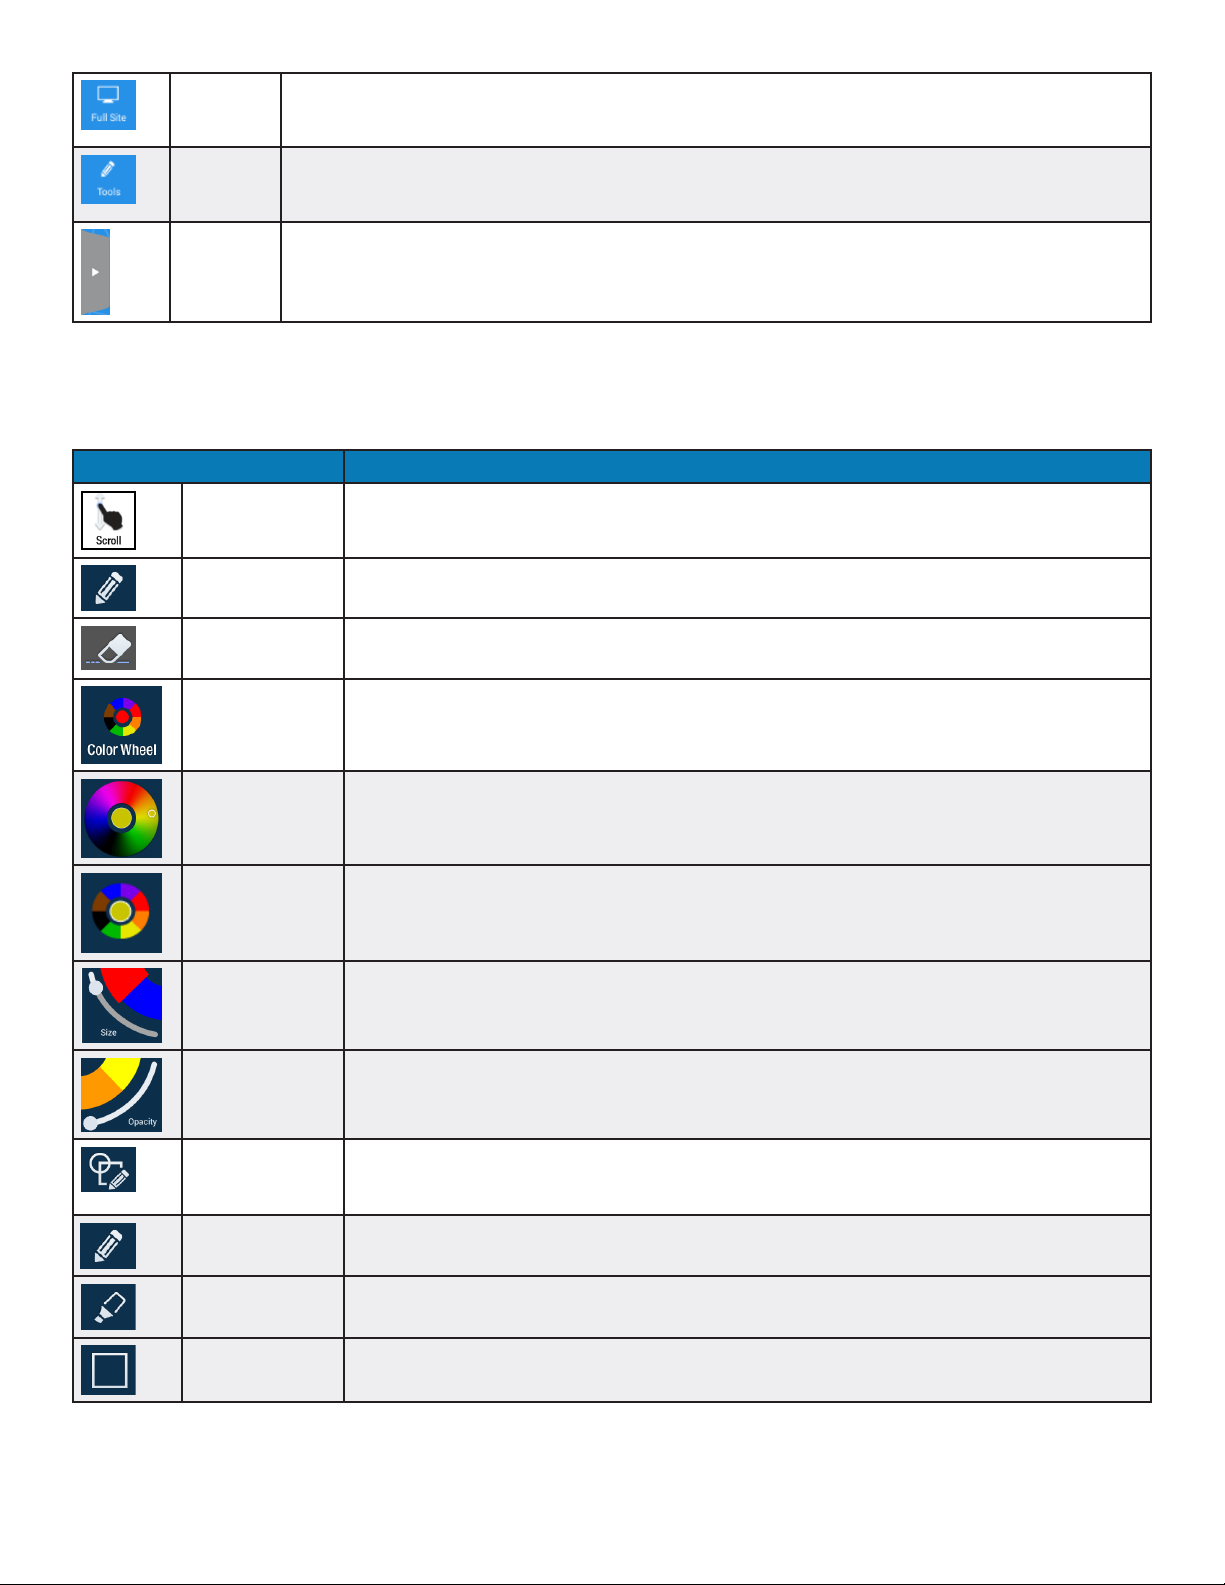
Whiteboard tools
Icon Tool Name Description
Previous Click to go to the previous page.
Current tool Click to use the current tool.
Eraser Click Eraser, and then click and drag across the drawing object to erase the portion you
touched.
Color Wheel
submenu
Color wheel Click to choose a color using a color ramp. The current selected color displays in the middle
Segmented
color wheel
Size Click and drag the thumbnail button along the slider path to adjust the size of the pen/line
Click to access the color submenu.
of the color wheel.
Click to choose a color from the segmented color wheel. The current selected color displays
in the middle of the color wheel.
width.
Opacity Click and drag the thumbnail button along the slider path to adjust the size of the
highlighter/shape opacity.
Tools
submenu
Click to select a drawing object. NOTE: Each object has its own color, pen width, and pen
transparency setting.
Page 23LightCast User Guide for projectors
Page 25

Pen
Click to use a pen. NOTE: Opacity control is not available for the pen object.
Highlighter Click to use a highlighter.
Rectangle Click to draw a rectangle.
Circle Click to draw a circle.
Line Click to draw a line.
Text Click to add a text box. Adjust the placement, font size, color, and type attributes as desired.
Type your text and click OK.
Laser Click to highlight something temporarily. The red laser mark disappears when a new mark is
made. Laser marks cannot be saved.
Select Click Select. Click and drag the selection box around the drawing objects which you want to
move, cut, copy, paste, or delete.
Once selected:
• Click and drag to move the selection.
• Click Copy to copy the selection, and then click Paste to create a duplicate object set.
• Click Delete to delete the selection.
Cut Click to cut the selected object(s).
Copy Click to copy the selected object(s).
Paste Click to paste the last copied or cut object(s) onto the whiteboard canvas.
Delete Click to delete the selected object(s).
Cancel Click to remove the selection box.
Undo Click to reverse the last executed command.
Redo Click to reverse the last Undo command.
Page 24
Clear Click to clear the drawing objects from the whiteboard canvas.
More
Click to access additional menu features.
submenu
Canvas Click to view thumbnails of all the edited pages. Click a thumbnail to navigate to that page.
Page 26

New Click to open a new whiteboard canvas.
Open Click to open a saved le.
Save Click to save the annotated pages as a DigiEasel whiteboard le (.mwbx), JPG image, or PDF
le.
Paste Click to paste the last copied or cut object(s) on the whiteboard canvas.
Import Click to import an image onto the whiteboard canvas. To remove an imported image, click
the red X in the top right-hand corner of the image.
Share Only available when the projector is connected to a network. Click to send the annotated
image as a JPG image by email.
USB Click to save or open les from an external USB thumb drive.
Next Click to go to the next page.
Page 25LightCast User Guide for projectors
Page 27

Save the whiteboard canvas
1) Click More.
2) Click Save.
3) Type a le name in the Name text box.
4) Select the le type:
File Type Option Choose this le type if you want to...
DigiEasel Saves the whiteboard le (.mwbx) for future editing.
JPG Creates an image le.
PDF Creates a printable document for others to view.
5) For JPG and PDF le types, click Current view to save the visible portion of the canvas or click Whole view to save the entire
canvas. Note: Whole view creates multiple pages and requires extra time to complete.
6) Browse to the desired le location or accept the default location.
7) Click Save.
Page 26
Page 28

Save the whiteboard canvas to a USB thumb drive
1) Click More.
2) Click USB.
3) Click Save, if not already highlighted.
4) Type a le name in the Name text box.
5) Select the le type:
File Type Option Choose this le type if you want to...
DigiEasel Saves the whiteboard le (.mwbx) for future editing.
JPG Creates an image le.
PDF Creates a printable document for others to view.
6) For JPG and PDF le types, click Current view to save the visible portion of the canvas or click Whole view to save the entire
canvas. NOTE: Whole view creates multiple pages and requires extra time to complete.
7) Click Save.
Page 27LightCast User Guide for projectors
Page 29

Share the le
1) Click More.
2) Click Share.
3) Type the recipient email address in the To: eld.
4) Type information about the le in the Description eld, if desired.
5) Click Send (envelope icon).
Open a new whiteboard canvas
1) Click More.
2) Click New.
3) Select Save to save the existing canvas or Don't save to delete the existing canvas and open a new one. Cancel returns the user
to the current canvas.
Open a whiteboard le
1) Click More.
2) Click Open.
3) If the whiteboard canvas contains objects, you are prompted to save the existing canvas. Select Save to save the existing canvas
or select Don't save to delete the existing canvas and open a new one. (Cancel returns the user to the current canvas.)
4) By default, the Open Files window displays whiteboard les saved internally on the projector. To open a saved le from a USB
thumb drive, click the USB icon at the top of the Open Files window, and navigate to the desired USB thumb drive.
5) Browse to the desired folder and click the whiteboard le you wish to open.
Page 28
Page 30

Open a whiteboard le from a USB thumb drive
1) Click More.
2) Click USB.
3) Click Open.
4) Browse to the desired folder and click the whiteboard le you wish to open.
Page 29LightCast User Guide for projectors
Page 31

BROWSER
NOTE: This feature is only available when a LightCast key is attached to one of the USB-A inputs on the projector.
Use the Browser to access the internet, save links to favorite web pages, and annotate images of web pages.
1) From the LightCast home page, select Browser.
2) To return to the LightCast home page, click the Home button.
Navigation controls
Button Description
Home Click to return to the LightCast home page.
Close Click to close the current browser tab.
Add Click to open another browser tab.
Back Click to return to the previous web page.
Forward Click to go to the next web page.
Refresh Click to refresh the browser window.
Favorite Click to add the current URL to your Favorites list.
Go Click to go to the URL address listed in the browser address bar.
Page 30
Page 32
Full Site/
Touch Site
Tools/
Exit Tools
Favorites
bar
Select Full Site to go to a non-touch site. Select Touch Site to return.
Select Tools to annotate and save an image of the browser site (see the Tools submenu section below).
Select Exit Tools to exit out of annotation mode.
Click to expand or minimize the Favorites bar.
Tools submenu
Use the Tools submenu to annotate the browser image.
Button Description
Scroll Click to scroll up or down the web page.
Current tool Click to use the current tool.
Eraser Click Eraser, and then click and drag across the drawing object to erase the portion you touched.
The picture is not aected.
Color Wheel
submenu
Click to access the color submenu.
Color wheel Click to choose a color using a color ramp. The current selected color displays in the middle of the
color wheel.
Segmented color
wheel
Size Click and drag the thumbnail button along the slider path to adjust the size of the pen/line width.
Opacity Click and drag the thumbnail button along the slider path to adjust the size of the highlighter/
Tools submenu
Pen
Highlighter Click to use a highlighter.
Rectangle Click to draw a rectangle.
Click to choose a color from the segmented color wheel. The current selected color displays in the
middle of the color wheel.
shape opacity.
Click to select an annotation tool. NOTE: Each object has its own color, pen width, and pen
transparency setting.
Click to use a pen. NOTE: Opacity control is not available for the pen object.
Page 31LightCast User Guide for projectors
Page 33

Circle Click to draw a circle.
Line Click to draw a line.
Text Click to add a text box. Adjust the placement, font size, color, and type attributes as desired. Type
your text and click OK.
Laser Click to highlight something temporarily. The mark disappears when a new mark is made. Laser
marks cannot be saved.
Select Click Select. Click and drag the selection box around the drawing objects which you want to move,
cut, copy, paste, or delete.
Once selected:
• Click and drag to move the selection.
• Click Copy to copy the selection, and then click Paste to create a duplicate object set.
• Click Delete to delete the selection.
Undo Deletes the last annotation.
Redo Displays the last deleted annotation.
Clear Deletes all annotations from the le.
More submenu Accesses additional menu features.
Save Saves the le as a JPG image or PDF le.
Paste Pastes the clipboard onto the image.
Share Only available when the projector is connected to a network. Sends the annotated image as a JPG
image by email.
USB Saves the annotated picture to a USB device as a JPG image or PDF le.
Page 32
Page 34

Save the le
1) From the Tools submenu, click More.
2) Click Save.
3) Type the le name in the Name eld.
4) Select the desired File Type ( JPG or PDF).
5) Select Current View to save the displayed page or Whole View to save the entire le.
6) Browse to the Location you would like to save the le to or accept the default location.
7) Click Save.
Share the le
1) From the Tools submenu, click More.
2) Click Share.
3) Type the recipient email address in the To: eld.
4) Type information about the le in the Description eld, if desired.
5) Click Send (envelope icon).
Page 33LightCast User Guide for projectors
Page 35

SETTINGS
NOTE: This feature is only available when a LightCast key is attached to one of the USB-A inputs on the projector.
To access setting options, click the Settings gear icon in the lower right corner of the LightCast home page.
Network Settings
WiFi - WiFi Settings allows you to turn WiFi on and o, and to select and connect to visible SSIDs.
Access Point allows you to congure the projector as a WiFi access point. The internet connection is passed down from the wired
connection. This is also useful for casting video using LightCast or AirPlay when another network is not available. (See "Access Point
Setup" on page 39 for additional information.)
LAN Network Settings allows you to set up a wired network connection between the projector (if this feature is available) and the wired
network. The wired network connection can be congured as xed or non-xed IP or go through a proxy.
Require PIN for Casting allows you to enable or disable a security PIN for casting onto the projector. When enabled, the user must
enter a random eight digit PIN to connect. The PIN displays in the top center of the screen.
Page 34
Page 36

Device
Use this submenu to dene the projector name, determine how much local storage on the projector is available, and when the projector
should go to sleep.
Device Name displays the current device name. Click the name to edit it. This helps dierentiate between dierent projectors that have
LightCast enabled.
Device Storage Availability and Capacity displays the current ash memory usage.
Device Timeout puts the LightCast projector to sleep but does not shut o the projector immediately. If no other video sources are
active or if Auto Source is disabled, the projector shuts o based on the Sleep Timer setting in the projector menu (20 minutes by
default).
Page 35LightCast User Guide for projectors
Page 37

System and Security
Use this submenu to review LightCast information, update the LightCast rmware, reset registration, and reboot the rmware.
About LightCast displays the LightCast revision, projector serial number and the MAC addresses for WiFi and LAN (if present on the
projector).
Firmware Update allows you to dene the update method:
• Online Update searches for a newer version of LightCast rmware on the internet automatically. This requires a valid internet
connection. Follow the prompts to complete the update.
• SD Card/USB Update allows you to update the LightCast rmware from a USB storage device. Visit
www.infocus.com/support to download the latest version of LightCast rmware. Select the correct .zip le from the list to continue.
• Factory reset completely erases all personal data in memory, including registration information, and return all settings to default.
Registration Reset erases the registration information but not personal data in memory.
Reboot restarts LightCast while the projector continues to run. LightCast displays when the reboot is complete.
Page 36
Page 38

Accounts
Use this submenu to dene the registered email address.
Email settings displays the email address initially dened during the registration process. To change the address associated with this
device, click the current email address and enter the new email address.
Page 37LightCast User Guide for projectors
Page 39

Browser Preferences
Use this submenu to dene the browser default home page, default search engine, and the request desktop site.
Set default home page allows you to dene the home page that displays when the browser is opened. Click the existing home page to
change the address.
Set default search engine allows you to dene the default search engine when the browser is opened. Click the down arrow to choose
from the options.
Request desktop site allows you to change the web page type from a Touch Site (default) to a Full Site (non-touch page). Enabling the
feature displays the page as a Full Site.
Page 38
Page 40

APPENDIX
Access Point Setup
1) From the home page, click the Settings icon.
2) Navigate to the Network Settings tab.
3) Click the Access Point On/O button, so that On is selected. This disconnects the current WiFi connection.
4) Click the right arrow to open the Access Point submenu.
5) By default, the SSID is LightCastAP. If other LightCast equipment is being used nearby, change the SSID to a unique name using a
mouse and keyboard, or the remote and on screen keyboard.
6) Enter a password (min. 8 characters) and click OK.
Page 39LightCast User Guide for projectors
Page 41

Port Requirements for AirPlay, Miracast, and LightCast Sender App
AIRPLAY
Port Number Type Protocol RFC Used by
80 TCP HTTP 2616 AirPlay
443 TCP HTTPS AirPlay
554 UDP/TCP RTSP 2326 AirPlay
3689 TCP DAAP iTunes Music Sharing/AirPlay
5297 TCP Bonjour
5289 UDP/TCP Bonjour
5353 UDP MDNS Bonjour/AirPlay
49159 UDP MDNS (Windows) Bonjour/AirPlay
49163 UDP MDNS (Windows) Bonjour/AirPlay
MIRACAST
Miracast uses the network dierently than AirPlay and the LightCast Sender App. Miracast connects directly using WiFi protocol
between your sending device and the LightCast (receiving) device. Your sending device (PC or mobile device) must be Miracast
compatible in order for communication to occur. No router or internet connection is needed.
LIGHTCAST SENDER APP
The three server addresses listed below must be entered into the rewall allowing them through on UDP port 443 outbound. UDP
ports 5000-65534 are required for internal network communication only and should not be opened outside of the rewall, or blocked
internally.
Application Port
M360.api.splashtop.com 443
Turn.relay.splashtop.com 443
Wbs.relay.splashtop.com 443
Page 40
 Loading...